
National Industrial Security Program Authorization Office
Version 1.1
18 December 2019
National Industrial Security Program
Enterprise Mission Assurance Support
Service Industry Operation Guide

I
Page | i
TABLE OF CONTENTS
1 INTRODUCTION ............................................................................................................ 1
1.1 BACKGROUND ............................................................................................................................. 1
1.2 RESOURCES .................................................................................................................................. 1
2 ENTERPRISE MISSION ASSURANCE SUPPORT SERVICE .................................................. 1
2.1 OVERVIEW ................................................................................................................................... 1
2.2 APPROVAL CHAINS ...................................................................................................................... 2
3 ACCOUNT MANAGEMENT ............................................................................................ 2
3.1 REQUESTING MODIFICATIONS TO AN EXISTING USER ACCOUNT ............................................... 2
3.2 USER INACTIVITY .......................................................................................................................... 3
3.3 ADDING NEW CREDENTIALS TO AN EXISTING USER ACCOUNT .................................................. 3
3.4 DEACTIVATE USER ACCOUNT ...................................................................................................... 4
4 SYSTEM REGISTRATION ................................................................................................ 4
4.1 STEP 1 – SYSTEM INFORMATION ................................................................................................. 6
4.2 STEP 2 – AUTHORIZATION INFORMATION .................................................................................. 8
4.3 STEP 3 – ROLES .......................................................................................................................... 10
4.4 STEP 4 – REVIEW AND SUBMIT .................................................................................................. 10
5 SYSTEM INFORMATION .............................................................................................. 11
5.1 SYSTEM – DETAILS ..................................................................................................................... 11
5.1.1 SYSTEM INFORMATION ............................................................................................................. 12
5.1.2 AUTHORIZATION INFORMATION ............................................................................................... 14
5.1.3 FEDERAL INFORMATION SECURITY MANAGEMENT ACT (FISMA)............................................. 14
5.1.4 BUSINESS ................................................................................................................................... 14
5.1.5 EXTERNAL SECURITY SERVICES .................................................................................................. 15
5.2 CATEGORIZATION ...................................................................................................................... 15
5.2.1 CONTROL SECTION .................................................................................................................... 16
5.2.2 OVERLAYS .................................................................................................................................. 17
5.2.3 SECURITY TECHNICAL IMPLEMENTATION GUIDES .................................................................... 17
5.2.4 MANAGE SECURITY CONTROLS ................................................................................................. 17
5.3 CONTROLS ................................................................................................................................. 18
5.3.1 LISTING ...................................................................................................................................... 18
5.3.2 IMPORT/EXPORT ....................................................................................................................... 20
5.3.3 IMPLEMENTATION PLAN ........................................................................................................... 31
5.3.4 RISK ASSESSMENT ...................................................................................................................... 32
5.4 PLAN OF ACTION AND MILESTONES (POA&M) ......................................................................... 34
5.5 ARTIFACTS .................................................................................................................................. 34
5.6 SUBMIT FOR REVIEW ................................................................................................................. 35
6 PACKAGE APPROVAL CHAIN WORKFLOWS ................................................................. 38
6.1 PACKAGE TYPES ......................................................................................................................... 38
6.2 PACKAGE WORKFLOW MANAGEMENT ..................................................................................... 40
7 DECOMMISSIONED SYSTEMS ..................................................................................... 42
8 MANAGEMENT (INHERITANCE) .................................................................................. 48
8.1 COMMON CONTROL PROVIDER PACKAGE ................................................................................ 48


Page | 1
1 INTRODUCTION
1.1 BACKGROUND
The National Industrial Security Program (NISP) Enterprise Mission Assurance Support Service (eMASS)
Operation Guide was designed to assist NISP eMASS users in navigating eMASS processes. The Defense
Information Systems Agency (DISA) eMASS User Guide is an essential document and MUST be referenced
throughout the process. The DISA eMASS User Guide can be accessed by selecting the “Help” tab at the
top of the eMASS screen. Select the “RMF User Guide” link.
1.2 RESOURCES
In addition to this operation guide, key resources include:
DoD 5220.22-M Change-2, National Industrial Security Program Operating Manual (NISPOM);
DISA eMASS User Guide;
DISA eMASS User Guide for System Administrators;
DCSA Assessment and Authorization Process Manual (DAAPM);
NISP eMASS Account; and
Role Based Access as IAM
2 ENTERPRISE MISSION ASSURANCE SUPPORT SERVICE
2.1 OVERVIEW
The eMASS is a government-owned, web-based application with a broad range of services for
comprehensive fully integrated cybersecurity management. Features include dashboard reporting,
controls scorecard measurement, and generation of a system security authorization package.
The DISA manages eMASS’s core functionality, and established an instance for Industry. The Industry
eMASS instance is referred to as the NISP eMASS instance. The DCSA Assessment and Authorization
Processing Manual (DAAPM) System Security Plan (SSP) templates will no longer be submitted via the
ODAA Business Management System (OBMS) when requesting assessment and authorization (A&A) of a
classified system. The SSP is created in eMASS. All system security authorization packages must be
submitted via the NISP eMASS instance at: https://emass.nisp.apps.mil/. Reference the NISP eMASS
Information and Resource Center located on the DCSA webpage.
The NISP eMASS instance is not approved for storing classified information. If system artifacts, information,
or vulnerabilities are classified per the Security Classification Guide (SCG), do not enter this data into
eMASS. Follow guidance provided in this operation guide and contact the assigned Information System
Security Professional (ISSP).
Page | 2
2.2 APPROVAL CHAINS
An approval chain is a series of users or user groups who must approve content before the deliverable
can be finalized. When the last person in the chain approves the content, the deliverable is complete.
The approval chain replicates the Risk Management Framework (RMF) process. The figure below
provides an overview of the NISP eMASS approval chain from system record creation through
authorization decision.
eMASS Approval Chain
Control Approval Chain (CAC): The primary vehicle through which the system security controls are
approved and validated. The eMASS privileges align with the system roles. As a standard, Industry users
are assigned to the CAC – 1 Role. ISSPs are assigned to the CAC – 2 Role. Industry users have the
following roles available in the CAC: IAM, Artifact Manager, and View Only. To register a system and edit
security controls, Industry users must have the IAM role.
Package Approval Chain (PAC): The primary vehicle through which the system is assessed and authorized.
DCSA users [e.g., ISSPs, Team Leads, and Authorizing Officials (AO)] are assigned to the PAC.
3 ACCOUNT MANAGEMENT
To request a NISP eMASS user account, Industry must complete the following:
1. DISA eMASS Computer Based Training (CBT);
2. DISA Cyber Awareness Challenge (CAC) Training;
3. DCSA (pre-populated) DD Form 2875, System Authorization Access Request (SAAR);
4. Submit all artifacts (above) to DCSA NISP Authorization Office (NAO) eMASS mailbox:
5. Access NISP eMASS instance and register user profile.
Detailed instructions, training links, and required forms are located at the NISP eMASS Information and
Resource Center.
3.1 REQUESTING MODIFICATIONS TO AN EXISTING USER ACCOUNT
Requests to modify an existing NISP eMASS user account are processed via the DCSA NAO eMASS team.
If an additional eMASS role and/or Cage Code access is required, Industry must submit an updated DCSA
SAAR to the DCSA NAO eMASS mailbox: [email protected]. The SAAR (Block 13)
must contain the updated role and/or Cage Code information. In addition, the Facility Security Officer

Page | 3
(FSO) or a cleared Key Management Personnel (KMP) member from each Cage Code must sign the DCSA
SAAR. The SAAR (Box 27) has space in for additional signatures.
Note: Ensure the e-mail subject line states the following: “Modification to an Existing eMASS User
Account.”
3.2 USER INACTIVITY
The eMASS user accounts are automatically deactivated after 30 days of inactivity (no log-in). Ten days
prior to deactivation and three days prior to deactivation, eMASS will send the user a reminder
notification e-mail. After 30 days of inactivity (no log-in), eMASS will automatically deactivate the account
and send an e-mail notifying the user of the account deactivation.
Inactive users will receive a warning message (as shown below) when accessing eMASS after account
deactivation. When inactive users select [Click Here], an account reactivation request is sent to eMASS
system administrators. When a deactivated user account is reactivated by an administrator, that user will
receive an e-mail notifying them of the account reactivation.
If an eMASS user’s last login date is greater than 90 days, the user must submit a new DSCA SAAR and the
required training certificates (eMASS Computer Based Training (CBT) and DISA Cyber Awareness
Challenge (CAC) Training) to the DCSA NAO eMASS Mailbox: [email protected].
Note: Training certificate completion dates cannot be greater than one year of the reactivation request.
3.3 ADDING NEW CREDENTIALS TO AN EXISTING USER ACCOUNT
If a user has an existing eMASS account but needs to add a new DoD Public Key Infrastructure (PKI)
certificate, the user must enter the e-mail address that matches the one associated with their new
certificate and click [Save].

Page | 4
A confirmation message appears and eMASS sends the user a confirmation e-mail. Upon receiving the
automatically generated confirmation e-mail, a user should click the verification link embedded within the
e-mail body. After verification by the user, the eMASS system administrators will receive a workload task
alerting them of a new PKI certificate request awaiting approval.
Once the eMASS system administrators approve the new certificate request, the user will receive a
confirmation e-mail. The new certificates will be added and displayed under Current Certificates on the
User Details screen.
3.4 DEACTIVATE USER ACCOUNT
If the employment status of an employee changes (i.e., termination, retirement, etc.), the FSO or member
of the KMP is responsible for requesting deactivation of the user’s account by submitting a DCSA SAAR to
of the SAAR, “Deactivate” must be selected.
4 SYSTEM REGISTRATION
The new system registration process consists of the following four major steps in eMASS:
1. Step 1 – System Information;
2. Step 2 – Authorization Information;
3. Step 3 – Roles; and
4. Step 4 – Review and Submit.
Conduct the following actions:
1. Log in to NISP-eMASS: https://nisp.emass.apps.mil/;
2. Locate the Authorization Module Dashboard on NISP-eMASS Home screen;
3. Click the [New System Registration] to open the System Registration Module;

Page | 5
4. Select the RMF Policy option; and
5. Click [Next] in the lower right-hand corner to begin registering a new RMF system record.
Reference the DISA eMASS User Guide (New System Registration Section).
Note: Systems with an ACTIVE Authorization to Operate (ATO) in the OBMS are only required to complete
New System Registration.

Page | 6
4.1 STEP 1 – SYSTEM INFORMATION
Registration Type: Select [Assess and Authorize].
System Name: Enter the System Name.
The DCSA guidance for NISP eMASS system naming is as follows:
1. Enter the assigned Cage Code;
2. Enter the System Type by using ONE of the following options:
SUSA – Single-User Standalone
MUSA – Multi-User Standalone
P2P – Peer-To-Peer
C/S LAN – Client Server Local Area Network (LAN)
C2G – Contractor to Government Interconnected System
C2C – Contractor to Contractor Interconnected System
CCP – Common Control Provider
UWAN – Unified WAN (Wide Area Network)
eWAN – Enterprise WAN
3. Enter a unique value for System Name; and
4. If applicable, enter the interconnected Government System Name (e.g., Secure Internet Protocol
Router Network (SIPRNet), Missile Defense Agency Classified Network (MDACNet), Secure Defense
Research Engineering Network (SDREN), Joint Interoperability Test Command (JITC, etc.).
(CAGE Code)-(System Type)-(System Name)-(Interconnected Network)
Example 1 – 12345-C2G-INFINITY STONE-SIPR
Example 2 – 12345-SUSA-GAUNTLET
System Acronym: Enter the System Acronym.
The DCSA guidance for NISP eMASS System Acronyms is as follows:
1. Enter the assigned Cage Code;
2. If applicable, enter the interconnected Government System Name (e.g., SIPRNet, MDACNet,
SDREN, JTIC, etc.); and
3. Enter a System Name. Note: The facility can choose how to best uniquely identify the system. It
can be a unique name or number.
(CAGE Code)-(Interconnected Network)-(System Name)
Example 1 – 12345-SIPR-00001
Example 2 – 12345-00001

Page | 7
Information System Owner: Select the applicable Cage Code/Field Office from the drop-down menu. If
the applicable Cage Code/Field Office does not appear, inform the NAO eMASS mailbox at:
Version/Release Number: Enter the System Version/Release Number specific to the facility’s version or
system control conventions.
System Type: Select IS Enclave. Note: The DCSA specific system types are not available options in eMASS.
Thus, Industry must select [IS Enclave] to select the applicable baselines/overlays when creating the system
record.
Acquisition Category: Select N/A.
System Life Cycle/Acquisition Phase: Select [Post-Full Rate Production/Deployment Decision (Operations
& Support)].
National Security System: Check National Security System.
Financial Management System: Uncheck Financial Management System.
Reciprocity System: Uncheck Reciprocity System.
Reciprocity Exemption Justification: Enter N/A.
System Description: Provide a narrative description of the system, its function, and uses. Enter
program/contract information, including contract vehicle's expiration date. The following details must
also be included:
1. System Type (i.e., SUSA, MUSA, P2P, C/S LAN, , C2C, C2G, CCP, UWAN, and eWAN);
2. Classification;
3. Categorization;
4. Formal Access Approvals;
5. CAVEATs;
6. Location (i.e., Closed Area, Restricted Area);
7. Type Authorization – List number of systems Type Authorized and include all System Acronyms;
8. eWAN (if applicable) – Annotate all nodes. (Note: The eWAN ISSM will provide the list of systems
migrating into the eWAN to the DCSA eWAN Program Manager. When the eWAN migration is
complete, the migrated systems will be removed from eMASS.)
9. Protected Distribution System (if applicable);
10. Operating System(s);
11. Mobility (if applicable);
12. Interconnections (if applicable); and
13. Command Communications Service Designator (CCSD) (if applicable).
DITPR ID: Enter N/A.

Page | 8
DoD IT Registration Number: Not a required field – Leave blank.
Click SAVE to proceed to the next step.
4.2 STEP 2 – AUTHORIZATION INFORMATION
Security Plan Approval Status: Users will select the system’s authorization status and corresponding A&A
dates. Users also can indicate if the system has been approved outside of eMASS. If the user indicates
the system has been previously approved, the “Security Plan Approval Status Date” field is required. If
the system is registered with an “Authorization Status” of anything other than “Not Yet Authorized,” then
the “Authorization Date” and the “Assessment Date” fields are conditionally required fields.
The drop-down options are the following:
1. Not Yet Approved (Initial System Registration/New System without authorization in
OBMS/eMASS):
Authorization Status: Select [Not Yet Authorized].
Need Date: Enter the Need Date. These dates are based on contractually driven time
frames, time needed to respond to Broad Agency Announcements (BAA), Requests for
Proposals (RFP), Requests for Information (RFI), Rough Orders of Magnitude (ROM),
white papers, and other solicitations.
RMF Activity: Choice is based upon where the system is within the RMF Process. The
RMF Activity must be updated when the activity changes. The following are the options
from the drop-down menu:
o Initiate and plan cybersecurity Assessment Authorization [Note: This should be
selected for an initial registration/system without a valid Authorization to Operate
(ATO)];
o Implement and validate assigned security controls;
o Make assessment determination and authorization decision;
o Maintain ATO and conduct reviews; and
o Decommission.
Terms/Conditions for Authorization: Provide a description of any specific limitations or
restrictions placed on the information system’s operation or inherited controls that the
system owner or common control provider must follow.
2. Approved (Valid ATO in OBMS/eMASS):
Security Plan Approval Status: Enter authorization date.
Authorization Status: Select the applicable Authorization Status (Available Options: ATO,
ATO w/ Conditions, Decommissioned, Denial of Authorization to Operate (DATO), Interim
Authorization to Test (IATT), and Not Yet Authorized).
Assessment Completion Date: Enter date assessment completed. (Note: This date is
located on the Security Assessment Report (SAR). If user is unable to locate this date,
authorization date can be used.)

Page | 9
Authorization Termination Date (ATD): Enter ATD.
RMF Activity: Choice is based upon where the system is within the RMF Process. The
RMF Activity must be updated when the activity changes. Below are the options from the
drop-down menu:
o Initiate and plan cybersecurity assessment authorization.
o Implement and validate assigned security controls.
o Make assessment determination and authorization decision.
o Maintain ATO and conduct reviews (Note: This should be selected for a system
with a valid ATO.).
o Decommission.
Terms/Conditions for Authorization: Provide a description of any specific limitations or
restrictions placed on the information system’s operation or inherited controls that the
system owner or common control provider must follow.
3. Denied (Valid DATO in OBMS/eMASS):
Security Plan Approval Status: Enter authorization date.
Authorization Status: Select the applicable [Authorization Status] (Available Options:
ATO, ATO w/ Conditions, Decommissioned, DATO, Interim Authorization to Test (IATT),
and Not Yet Authorized).
Assessment Completion Date: Enter date assessment completed. (Note: This date is
located on the SAR. If the user cannot locate this date, the authorization date can be
used.)
Authorization Termination Date (ATD): Enter ATD.
RMF Activity: Choice is based upon where the system is within the RMF Process. The
RMF Activity must be updated when the activity changes. Below are options from the
drop-down menu:
o Initiate and plan cybersecurity assessment authorization.
o Implement and validate assigned security controls.
o Make assessment determination and authorization decision.
o Maintain ATO and conduct reviews.
o Decommission.
Terms/Conditions for Authorization: Provide a description of any specific limitations or
restrictions placed on the information system’s operation or inherited controls that the
system owner or common control provider must follow.
Click SAVE to proceed to the next step.
Note: Once the Authorization Information is entered and saved, it cannot be changed. The “RMF Activity”
field is the single exception and can be modified by assigned IAM users by clicking [Edit]. It is critical that
Industry update the RMF activity when the activity changes (Example: Industry initially selected “Maintain
ATO and conduct reviews”. However, Industry is now seeking reauthorization due to a security relevant
change. Industry will update the RMF Activity and select “Initiate and plan cybersecurity Assessment
Authorization”.)

Page | 10
4.3 STEP 3 – ROLES
Users will assign specific personnel to each role of the PAC and CAC. To assign a user to a specific role,
drag the user’s name from the Available Users list box to the Assigned Users list box or double-click on
the user’s name in the Available Users list box. Multiple personnel can be selected for each step. At this
point in time, Industry must know their assigned DCSA Field Office. DCSA Field Offices can be found on
the DCSA Web site.
Package Approval Chain: Personnel assigned to a role in the PAC are responsible for moving the system’s
RMF package through the A&A. Conduct the following actions to assign users to the PAC:
1. SCA: Select the applicable DCSA Field Office in the SCA Available Users column and drag to the
Assigned Users list box or double-click.
2. Team Lead: Select the applicable DCSA Field Office in the Team Lead Available Users column and
drag to the Assigned Users list box or double-click.
3. Regional AO: Select the applicable DCSA Region in the Regional AO Available Users column and
drag to the Assigned Users list box or double-click.
4. IAM: The IAM Assigned Users list box will be prepopulated with the Industry eMASS user
registering the system.
Control Approval Chain: Personnel assigned to a role in the CAC are responsible for assessing and
validating security controls, adding and managing the system’s Plan of Action and Milestones (POA&M),
and adding artifacts and scans. Conduct the following actions to assign users to the CAC:
1. IAM: Select the applicable users in the IAM Available Users column and drag to the Assigned
Users list box or double-click. Note: To allow other users within the container to view/edit the
system package, add them here.
2. SCA: Select the applicable DCSA Field Office in the SCA Available Users column and drag to the
Assigned Users list box or double-click.
Click SAVE to proceed to the next step.
4.4 STEP 4 – REVIEW AND SUBMIT
The final step in the process allows the user to review the data and submit the system registration. This
screen displays system information, authorization information, and roles. If corrections are needed, click
on the system registration navigation menu on the left to return to the step.
Click [Submit System] to complete the registration. The newly created system will now be displayed in
the list of available systems.
Note: Systems with an ACTIVE ATO in the OBMS are only required to complete New System Registration. In
addition to completing New System Registration, attach the following documents: ATO, SAR, and POA&M.
The documents will be added in the Artifacts section of eMASS. The next steps are for systems seeking
authorization or re-authorization.

Page | 11
5 SYSTEM INFORMATION
The System module enables the user to manage and update system information. At the top of the
system screen is a series of links to take the user to specific modules for the system.
System – Dashboard: Overview of high-level system information.
System – Details: Update system information populating the RMF Security Plan report.
System – Categorization: Manage overlays and manually tailor-in security controls and a system’s
categorization.
Controls – Listing: Access the Assigned Security Controls, Control Information Import/Export, Test
Result Import/Export, and Bulk Control Processing modules.
Controls – Implementation Plan: Create a plan concerning the implementation of system’s
security controls and System-Level Continuous Monitoring (SLCM) Plan.
Controls – Risk Assessment: Update information surrounding the risk of individual security
controls along with recommendations for remediation/mitigation.
POA&M: Add, modify, and delete POA&M items. Access POA&M Import/Export module.
Artifacts: Add, modify, and delete system- and control- level artifacts.
Package: Initiate the authorization workflow approval process; comment in the collaboration
boards; and view comments and system snapshots from past reviews within the Historical
Package Listing.
Management: Access to ATC (certain eMASS instances only), Personnel, Associations
(Inheritance), System Migration, Workload Tasks, and Administration functions.
RMF/DIACAP Policy Toggle: Toggle to view information associated with the RMF and DIACAP
policy views.
Reference the DISA eMASS User Guide (System Information Section).
5.1 SYSTEM – DETAILS
Once the system is registered, the package creator (IAM) will build the system package. Under the
System tab, select [Details]. The following subsections will display:
System Information;
Authorization Information;
Federal Information Security Management Act (FISMA);
Business; and
External Security Services.
Some of the data will be prepopulated based on information entered during System Registration. To
enter all system information, select the [Details Sub-navigational] tab within the system module. To add
information to a particular section, click [Edit].

Page | 12
Note: All required fields (red stars) must be completed. If all required fields are not complete, the package
cannot be successfully submitted.
Reference the DISA eMASS User Guide (Details Section).
5.1.1 SYSTEM INFORMATION
Select [System Information] on the left-hand side menu. Click [Edit]. The following information must be
completed in the System Information subsection:
Registration Type: Prepopulated from System Registration.
System Name: Prepopulated from System Registration.
System Acronym: Prepopulated from System Registration.
Information System Owner: Prepopulated from System Registration.
Version/Release Number: Prepopulated from System Registration.
System Type: Prepopulated from System Registration.
National Security System: Prepopulated from System Registration (Checked).
Financial Management System: Prepopulated from System Registration (Unchecked).
Reciprocity System: Prepopulated from System Registration (Checked).
Reciprocity Exemption Justification: Prepopulated from System Registration (N/A).
Public Facing Component/Presence: Select No.
Cyber Operational Attribute Management System (COAMS) System Affiliation: If not applicable, leave
blank.
System Description: Prepopulated from System Registration.
Department of Defense Information Technology Portfolio Repository (DITPR) ID: Prepopulated from
System Registration (N/A).
DoD IT Registration Number: Prepopulated from System Registration (Blank).
Defense Information System Network (DISN) Video Service (DVS) Site ID: If not applicable, leave blank.
System User Categories: Select applicable categories for the type of system users. The categories
available are the following: Contractors, Coalition Partners, DoD Personnel, Fed/State/Local, Foreign
Nationals, General Public, and Organization. More than one category can be selected. After checking the
applicable user categories, enter relevant information.
Page | 13
Ports, Protocols, and Services Management (PPSM) Registry Number: If applicable, enter PPSM Registry
number. If not applicable, enter N/A.
System Authorization Boundary: Provide a description of the System Authorization Boundary and attach
supporting artifacts. Note: Only one artifact can be added here. If additional artifacts need to be
uploaded, use the Artifacts section.
Hardware/Software/Firmware: Provide details and attach supporting artifacts (e.g., hardware baseline,
software baseline, etc.). Note: Only one artifact can be added here. If additional artifacts need to be
uploaded, use the Artifacts section.
System Enterprise and Information Security Architecture: Describe system architecture and attach
supporting artifacts. Note: Only one artifact can be added here. If additional artifacts need to be
uploaded, use the Artifacts section.
Information Flow/Paths: Describe information flow/paths and attach supporting artifacts. Note: Only one
artifact can be added here. If additional artifacts need to be uploaded, use the Artifacts section.
Network Connection Rules: Describe Network Connection Rules. If not applicable, enter N/A.
Interconnected Information Systems and Identifiers: Enter Interconnected Information Systems and
Identifiers. If not applicable, enter N/A.
Encryption Techniques: Enter Encryption Techniques used for information processing, transmission, and
storage.
Cryptographic Key Management Information: Enter Cryptographic Key Management Information.
System Location: Select applicable location type (Single or Multiple).
Type Authorization: Select applicable choice [Yes or No]. Industry users will select [Yes] if they are using
this system to Type Authorize identical copies of the system. If Industry users are type authorizing
identical systems, the following procedures must be followed:
1. Select the system being used to type authorize;
2. In the Artifacts section, upload the following for the system being type authorized:
Test Result Import/Export;
Hardware and Software Baselines;
Facility/System Layout;
Record of Controlled Area (if applicable); and
Artifacts requested by the ISSP/AO.
3. In the System Description section (System>Details>System Information), update the Type
Authorization information to include the number of systems Type Authorized and all System
Acronyms.
Deployment Locations: Select applicable deployment location (Options: (1) Cleared Contractor Facility –
Mobility Plan must be attached; (2) Government Site – Mobility Plan must be attached; (3) Both Cleared

Page | 14
Contractor Facility and Government Site – Mobility Plan must be attached; and (4) Not Applicable –
System and/or components are not mobile);
Baseline Location: If the user assigns only one deployment location to the system, then [Baseline
Location] is NOT a required field; and
Physical Location: Enter installation name and physical location information.
Click [SAVE] to complete.
5.1.2 AUTHORIZATION INFORMATION
Select Authorization Information on left-hand side menu. This data will be prepopulated based on
information entered during System Registration. Validate Authorization Information.
Note: Once the Authorization Information is entered and saved, it cannot be changed.
5.1.3 FEDERAL INFORMATION SECURITY MANAGEMENT ACT (FISMA)
Select FISMA on left-hand side menu. Click [Edit]. This section is not applicable. However, user must
select [No] for all drop-down menu options.
Click [SAVE] to complete.
5.1.4 BUSINESS
Select [Business] on left-hand side menu. Click [Edit]. The following information must be completed in
the Business subsection:
Mission Criticality: Choose applicable mission criticality. Verify criticality via Information Owner (IO)
documentation/guidance;
Governing Mission Area: Choose applicable Governing Mission Area. Verify mission area with IO;
DoD Component: Office of the Secretary of Defense (OSD) is prepopulated;
Acquisition Category: Prepopulated from System Registration (N/A);
System Life Cycle/Acquisition Phase: Prepopulated from System Registration. (Note: Industry must select
Post-Full Rate Production/Deployment Decision (Operations & Support) during System Registration.);
Software Category: Enter applicable Software Category;
System Ownership/Controlled: Select the applicable option;
Other Information: If applicable, enter additional information. If not applicable, leave blank; and
Cybersecurity Service Provider: If applicable, select appropriate Cybersecurity Service Provider. If not
applicable, leave blank.

Page | 15
Click [SAVE] to complete.
5.1.5 EXTERNAL SECURITY SERVICES
Select External Security Services on left-hand side menu. Click [Edit]. The following information must be
completed in the External Security Services subsection:
External Security Services: Provide the security service name and identify the provider. These are security
services provided by external sources (e.g., through contracts, interagency agreements, lines of business
arrangements, licensing agreements, Cyber Security Service Provider (CSSP), and/or supply chain
arrangements.) If not applicable, enter N/A.
Services Description: List all of the security services provided by external providers, include specific
source (e.g., through contracts, interagency agreements, lines of business arrangements, licensing
agreements, CSSP, and/or supply chain arrangements). If not applicable, enter N/A.
Security Requirements Description: Describe how the external services are protected in accordance with
the security requirements of the organization. If not applicable, enter N/A.
Risk Determination: Document that the necessary assurances have been obtained stating the risk to
organizational operations and assets, individuals, other organizations, and the nation arising from the use
of the external services is accessible. Is the external provider compliant with Federal laws, or is the
external service provider under contract to provide a security level commensurate with the system's
security categorization? If not applicable, enter N/A.
Click [SAVE] to complete.
5.2 CATEGORIZATION
Until the system’s Categorization is completed with the identified appropriate Control Attributes, the
system will not have security controls. The following subsections must be completed:
1. Control Selection;
2. Overlays; and
3. Manage Security Controls.
To manage the system’s Control Set, navigate to the Categorization sub-navigational tab within the
system module.
Note: All required fields (red stars) must be completed. If all required fields are not complete, the package
cannot be submitted.
Reference the DISA eMASS User Guide (Categorization Section).
Page | 16
5.2.1 CONTROL SECTION
In the Control Selection module, the user can search for and associate National Institute of Standards and
Technology (NIST) SP 800-60 Information Types with the system record to receive an overall
recommended system security categorization. The following information must be completed in the
Control Selection subsection:
Applied Information Types: Select [Edit Information Types]. From the Information Types page, users can
search for Information Types by using the drop-down or text field in the top left section. Once the user
has entered in search data, click [Search]. Information Types may be searched by “Information Type
Category,” or “Information Type Name.” All applicable Information Types will be listed in the Search
Results section. Add individual Information Types by clicking the green [+] button to the right of the
result. Additionally, the user can click [Add Visible] to select all search results;
Selected Information Types: The Selected Information Types will be shown. Use the drop-down menus
to select the applicable Confidentiality, Integrity, and Availability (C-I-A) for each Information Type. (Note:
eMASS will automatically populate the recommended C-I-A levels for some of the Information Type as
established by NIST SP 800-60 Vol. 2. However, the C-I-A must be based on the risk assessment results.)
Click [Save] to complete.
Primary Security Control Set: Select [Edit Control Selection]. Select latest version of NIST SP 800-53 from
the drop-down menu.
1. Control Attributes: Enter C-I-A and Impact (Recommended: Moderate);
2. Information Type Evidence: Upload evidence on how categorization of the system was
determined (e.g., RAR);
3. Rationale for Categorization: Enter NISP if the system has been categorized at the Moderate-
Low-Low (M-L-L) level. Justification needs to be provided for anything other than
M-L-L;
4. Additional Authorization Requirements: Identify any additional authorization requirements
beyond the A&A process (e.g., privacy, special access requirements, cross security domain
solutions, Non-classified Internet Protocol (IP) Router Network (NIPRNet), SIPRNet, or Global
Information Grid (GIG) Connection Approval Process (CAP) identifier, ports, protocols, and
services management.);
5. Additional Control Sets: Not applicable;
6. Rebaseline Controls: Check [Save Control Set Information]. Resaving the control sets will
rebaseline all controls.
7. Click [Save]. The Confirm Control Changes screen will appear.
8. Review the security controls and scroll down to the bottom of the page.
Click [SAVE] to complete.

Page | 17
5.2.2 OVERLAYS
Select [Overlays] on left-hand side menu. In the Overlays section, the user can apply overlays to a
system’s baseline control set to address unique security requirements. The following overlays are
available for application within eMASS:
1. DCSA Baseline (M-L-L);
2. SUSA (M-L-L);
3. MUSA (M-L-L);
4. ISOL-P2P (M-L-L); and
5. Classified Information (Note: This Overlay will ONLY be selected if the Categorization is above
M-L-L).
To apply the SUSA, MUSA, or ISOL-P2P Overlay, users must also apply the DCSA baseline (M-L-L) Overlay.
Once an overlay is applied, eMASS will retain the control information. If an overlay is applied in error, users
cannot go back and rebaseline the controls. The user will need to delete the system and start again.
To apply an available overlay to a system’s baseline security controls, conduct the following actions:
1. Select the hyperlinked (Overlay Name) within the Overlays section in Categorization.
2. Within the Overlay pop-up window, complete the questionnaire to determine if the overlay will
be applied to the system.
3. Click [SAVE].
4. If an overlay is successfully applied to the system, the [Status] column will state “Applied”.
5.2.3 SECURITY TECHNICAL IMPLEMENTATION GUIDES
The eMASS allows users to identify applicable DISA Security Technical Implementation Guides (STIG)
based on the technologies present within the system’s authorization boundary.
THIS SECTION
5.2.4 MANAGE SECURITY CONTROLS
Select [Manage Security Controls] on left-hand side menu. The controls listed in the Manage Security
Controls page will be directly associated with the selections the user made in the Control Selection page.
The Manage Security Controls page allows users to add additional (i.e., tailor in) controls to the system’s
baseline security controls. Click [Add Additional Controls] to open the “Add Additional Controls” screen.
Conduct the following actions:
1. Select [Controls] search for the desired control to add to the system record’s baseline security
control set by clicking [Search].
2. Select the [+] button next to each control that will be added to the system’s baseline control set.
3. Provide justification for adding the security controls.
4. Click [Apply]. The selected controls will now be displayed.

Page | 18
5. Review the controls that will be included in the system’s baseline security control set.
6. Click [SAVE].
5.3 CONTROLS
The Control Details within the “Controls” view displays all the security controls assigned to the system.
Each control lists the “Acronym,” “Status,” “Name,” “Properties,” and “Residual Risk Level”. By default, all
the controls are grouped by control family, but each control family can be collapsed or expanded by
clicking [expand all] or [expand] to display associated security controls. Control – Listing will default to
display the last custom filters the user applied per system record.
Reference the DISA eMASS User Guide (Controls Section).
5.3.1 LISTING
Select [Controls] on the top menu. To filter controls for a registered system, select one or many options
in the [Control Filters] listing. Filter options include Non-Compliant (NC) and Not Applicable (NA) controls,
missing POA&M item, exclude Inherited and Shared Controls, Residual Risk Level, Control Status, Control
Family, Control Property, and Control Criticality Rating. Users can reset the selected filters by clicking
[Reset Filter].
Control Actions: Users can apply a variety of actions against the security controls assigned to their
systems at either an individual level or in bulk.
1. Import/Export Test Results: Test Result Import/Export is a feature of eMASS which allows users
to export/import a system’s Assessment Procedures (AP)/Control Correlation Identifiers (CCIs)
and latest test results simultaneously utilizing a defined template. Test Result Import/Export
provides flexibility to practitioners in situations where security control assessment activities may
have already been performed outside of eMASS.
2. Import/Export Control Information: Control Import/Export is a feature of eMASS which allows
users to import/export a system’s Implementation Plan, SLCM strategy, and Risk Assessment
information for selected security controls using a defined Microsoft Excel template.
3. Bulk Processing: Bulk processing is a feature of eMASS which enables the user to assess or
validate multiple controls simultaneously. Bulk processing may be appropriate in situations
where an ATO already exists under a different authorization scheme (e.g., OBMS), a RMF package
was done manually outside of eMASS, or the system has been imported into eMASS. Bulk
processing does not eliminate the need to test and validate each applicable RMF control. Bulk
processing provides flexibility to practitioners in situations where authorization activities may
have already been performed outside of eMASS and to track future control assessments within
eMASS.
4. Individual Test Results: Users can add individual test result to an Assessment Procedure (AP) by
navigating to the [Assessment Procedures Details] screen.
From the [Control Details[ page on the [System Main – Controls] view, click the [+] sign
next to the desired control and the view will expand to show all the APs for the control;
Click on the desired AP to display the [Assessment Procedures Details] screen;

Page | 19
At the top and bottom of the page are navigation tabs that allow the user to move to the
previous or next AP. The drop-down menu in the center allows the user to move to other
APs within the same control;
The left side of the display provides information on how to test the AP and what the
result of the test should be (derived from the RMF Knowledge Service);
Within the Artifact and POA&M items table, users can view existing and add new AP-level
artifacts and POA&M items; and
The section on the right side of the screen is where test results are recorded.
5. Multiple Test Results: Users can add test results to all APs of a particular control from a single
view by navigating to the Control Details view.
From Control Details on the System Main screen, click the desired [Control Acronym] to
navigate to the Control Details view. Each security control AP is displayed within the
Assessment Procedure List;
Users have the option to [Enter Test Results] for an individual AP or click [Expand All APs]
to enter multiple test results simultaneously; and
The four required fields appear for each AP. Once all the fields have been completed,
click [Save].
Test Results: Test results consist of the following required fields.
1. Status: “Compliant,” “Not Applicable,” or “Non-Compliant.”
2. Test Date: The default date is today’s date, but can be changed to any date in the past.
3. Tested By: The default value is the person entering the AP test results, but the value can be
edited to enter a different name. This is useful if the actual test was conducted by someone
other than the person entering the data. Note: The controls must be tested by an authorized
individual (i.e., ISSM, ISSO, System Administrator, etc.).
4. Test Results: The test results are required and used to document Industry’s self-assessment of
the security controls and provide confirmation that the security controls are applied and meet
the security requirements for the system.
If annotating the non-compliance status of a security control is determined to be classified per the SCG,
mark the security control as “Not Applicable”.
“Not Applicable” Security Control: If it is deemed that a baseline security control is Not Applicable, the
user can set the control as “Not Applicable” from the Control Information and Actions section on the
[Control Details] page. If “Not Applicable” is selected from the dropdown menu, a comment box appears.
The “Comments” text field is mandatory and is used to provide justification for this status. Enter
comments and click [Save]. Note: When tailoring out a security control, the user will set the control as
“Not Applicable”.
If system vulnerabilities are determined to be classified, the control will be set as “Not Applicable”. In the
“Comments” field, indicate that details will be maintained on-site. Ensure ongoing communication is
conducted with the assigned ISSP regarding the authorization package.
Page | 20
Organizational Values from Control Details: In order to view the organizational specific assignment values
for security controls set by DCSA, navigate to the “Control Details” view. Conduct the following actions:
1. From Control Details on the System Main screen, click the desired [Control Acronym] to navigate
to the Control Details view.
2. Select the [Assignment Value] hyperlink to view Assignment Values that were set for each specific
parameter within the Security Control text.
3. The Assignment Values Information tooltip will appear. Select [Assignment Values] assigned from
NISP to view within the Security Control text.
4. The NISP Assignment Value will now be displayed within the Security Control text.
Note: Users are required to reference the DAAPM Appendix A for Security Control implementation
requirements, organizational values, supplemental guidance, as well as DCSA specific guidelines.
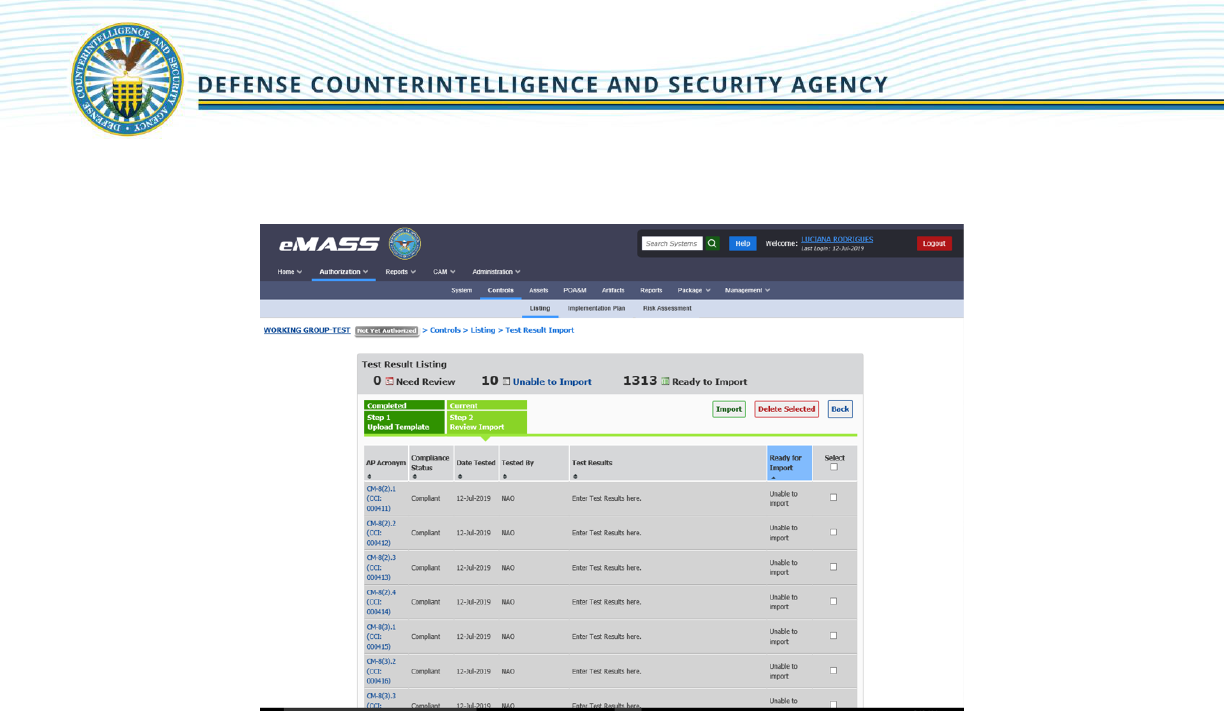
5.3.2 IMPORT/EXPORT
DCSA strongly recommends utilizing the Test Result Import/Export and Control Import/Export. Rather than
addressing the test results, implementation plan, SLCM strategy, and risk assessment for each control
individually, the Test Result Import/Export and Control Import/Export feature allows users to address all
system requirements within the eMASS generated templates.
Note: Only eMASS generated templates can be imported.
Test Result Import/Export
1. To begin the process, click [Import/Export] under [Control Actions] on [Controls – Listing] view.

Page | 21
2. From the Import/Export home page, click [Custom Export]. The [Test Result Export] tab allows
users to export to a defined custom template.

Page | 22
3. Place a checkmark in the checkbox of the security controls that will be exported. Ensure that
controls marked Not Applicable Official (NAO), due to application of an overlay, are NOT selected.
Select [Export Selected] from the drop down.

Page | 23
4. An eMASS template will generate. Complete all sections highlighted in blue. The test results are
required and used to provide confirmation that the security controls are applied and meet the
security requirements for the system. Industry is documenting the results of their self-assessment
and determining if all aspects of the control, including the CCIs, are compliant, non-compliant, or
not applicable. DCSA requires CCIs be addressed for each control. As always, Industry must work
with their assigned ISSP. If an overall statement adequately demonstrates to the ISSP how
Industry completed the assessment and how/why the control compliance status was determined,
it can be entered in each of the CCI required fields. However, it must satisfy the assessment
requirements of the ISSP. The template includes instructions and examples.

Page | 24
5. When the template is complete, return to the Import/Export home page. Click [Browse] to
upload the completed eMASS-generated Test Result Export template. Click [Upload].
Page | 25
6. The user will be taken to Step 2 – Review Import to verify that the imported test result
information is correct.
Test results are indicated by green, red, or grey highlight:
Green Highlight - Ready to be imported and does not require updates.
Red Highlight - There are errors and the controls are not ready to import.
Grey Highlight - Unable to be imported into the system.
Users may apply the following options to imported test results:
Edit Results - Edit test results by clicking on the hyperlinked cell or row.
Delete Results - Delete test results by placing a checkmark in a checkbox for a test result
and clicking [Delete Selected].
Update Results - Update test results by clicking on a hyperlinked row with errors.
Note: If there are any test results with errors, eMASS will prompt the user to review those entries before
proceeding to the next step.

Page | 26
7. After confirming all of the test results are ready for import, click [Import]. Review the summary
information and click [Finish Import].
The newly imported test results will be added to the Test Result History table for the associated
APs. The Control/AP compliance status will be updated automatically based upon the imported
test results.
Control Import/Export
1. To begin the process, click [Import/Export] under [Control Actions on Controls – Listing] view.

Page | 27
2. Control Export allows users to select security controls to export to a defined custom template.
From the Import/Export home page, click [Custom Export].
3. Place a checkmark in the checkbox of the security controls that will be exported. Ensure that
controls marked NAO, due to application of an overlay, are NOT selected. Select [Export Selected]
from the drop down.

Page | 28
4. An eMASS template for an Implementation Plan, SLCM strategy, and Risk Assessment will
generate. Complete all required fields in the Implementation Plan section. Use the “Comments”
section to provide information regarding the implementation strategy and functional description of
security control Implementation (including planned inputs, expected behavior, and expected
outputs). This section will include any additional information necessary to describe how the
security capability is achieved. Users can also use this section to provide any needed
explanation/justification. When referencing an artifact to support the implementation of a
security control, provide the following: Artifact name, description, type, template (if applicable),
category (e.g., Implementation Guidance, Evidence, and Other), expiration date, last reviewed
date, page number, and artifact owner (if applicable).
5. Complete all required fields in the SLCM section.

Page | 29
6. For all NC security controls, users must complete the fields in the Risk Assessment section.
7. When the template is complete, return to the Import/Export home page. Click [Browse] to
upload the completed eMASS-generated Control Export template. Click [Upload]. From the
“Import Type” drop down, users may select to import “Implementation Plan” information, “Risk
Assessment” information, or “Implementation Plan & Risk Assessment” information. Click
[Upload].
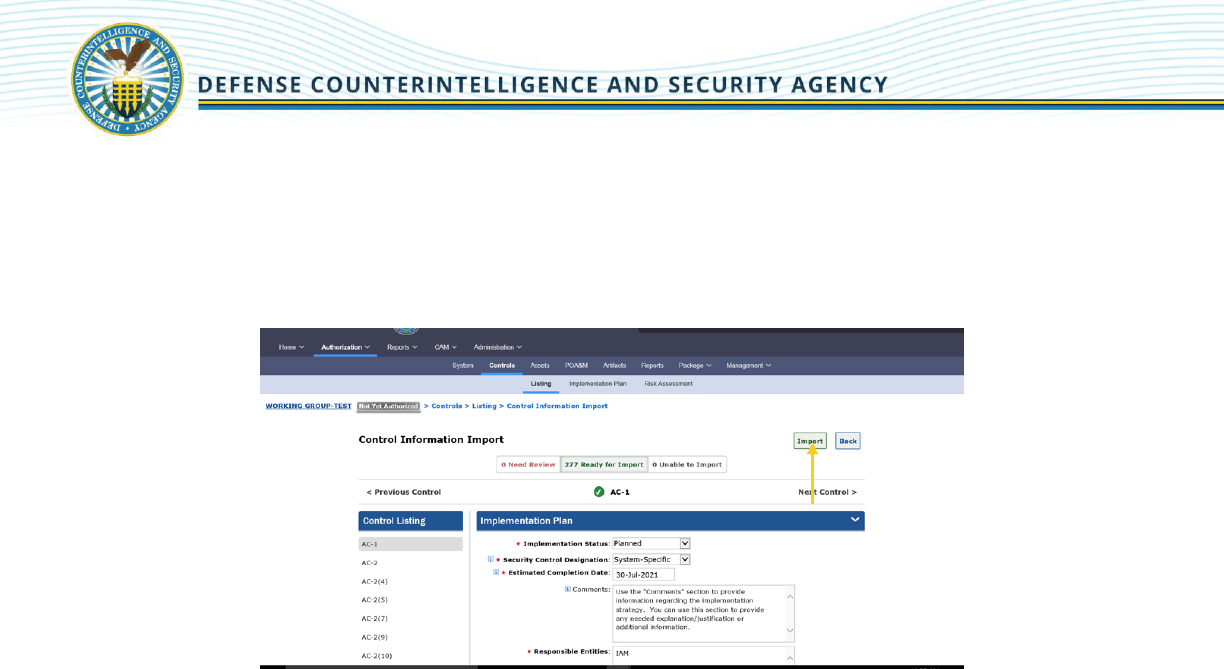
Page | 30
8. The user will be taken to the second step of Control Import to verify that the imported
information is correct. Control information that is ready to be imported and does not require
updates will be located within the green [# Ready to Import] section. Control information that is
not ready to import will be located in the red [# Need Review] section. Control information that
is unable to be imported will be located in the grey [# Unable to Import] section.
Users have the following options for imported Security Controls:
Edit Security Control information by clicking on the control within the “Need Review”
and/or “Ready for Import” sections of the Import. If any information is modified, the
user must click [Save Control] to ensure the changes are recorded before proceeding.
[Save Control] will only appear once all required fields have been completed.
Users can completely remove imported information per security control by clicking
[Delete Control] within the “Need Review” and/or “Ready for Import” sections of the
Import.

Page | 31
5.3.3 IMPLEMENTATION PLAN
Select [Implementation Plan] on the top menu. The Implementation Plan sub-navigational tab displays
assigned security controls and lists the following information: Control Acronym, Implementation Status,
Security Control Designation, Responsible Entities, and Estimated Completion Date. The information here
populates the Implementation Plan and SLCM Strategy.
Note: The instructions below are for adding Implementation Plan information individually. If the user has
used the Control Import/Export feature to import Implementation Information, this information will be
prepopulated.
To edit the “Implementation Plan”, conduct the following actions:
1. Select the control(s) to edit in the “Select Visible” column and click [Edit Selected].
2. To edit the implementation plan for all controls, place a check in the checkbox located in the
“Select Visible” column header and click [Edit Selected]. Once the user clicks [Edit Selected], the
Edit Implementation Plan screen will display.
The following information must be completed:
Implementation Plan
1. Implementation Status: Select Applicable Option;
2. Security Control Designation: Select Applicable Option;
3. Estimated Completion Date: Enter projected completion; and
4. Responsible Entities: Personnel responsible for implementing each control.
System-Level Continuous Monitoring (SLCM) Strategy (a/k/a Continuous Monitoring Strategy)
1. Criticality: Indicate the criticality of monitoring the Control as Red, Yellow, or White. (Note: The
DoD Continual Reauthorization Working Group (CRWG) Criticality Ratings (Red, Yellow, and
White) are associated with security controls (NIST SP 800-53 Priority 1 = Red, NIST SP 800-53
Priority 2 = Yellow, and NIST SP 800-53 Priority 3 = White). Control Criticality Rating is annotated
for each control on the Control Listing page. Security controls identified with a Red or Yellow
Criticality icon contain rationale surrounding the actions that need to be taken when assessed
and validated as NC. Reference the Control Statuses Section of the DISA eMASS User Guide.
2. Frequency: Indicate the frequency with which the control is monitored.
3. Method: Indicate the method of monitoring the control.
4. Reporting: Provide a short narrative explaining who reports what to whom by when;
5. Tracking: Provide a short narrative explaining how security controls found to be non-compliant
or ineffective will be tracked.
6. SLCM Comments: Provide a short narrative further explaining any other details not appropriate
for the other fields.
Reference the DISA eMASS User Guide (Implementation Section).
Page | 32
Note: Implementation Plan information must be completed.
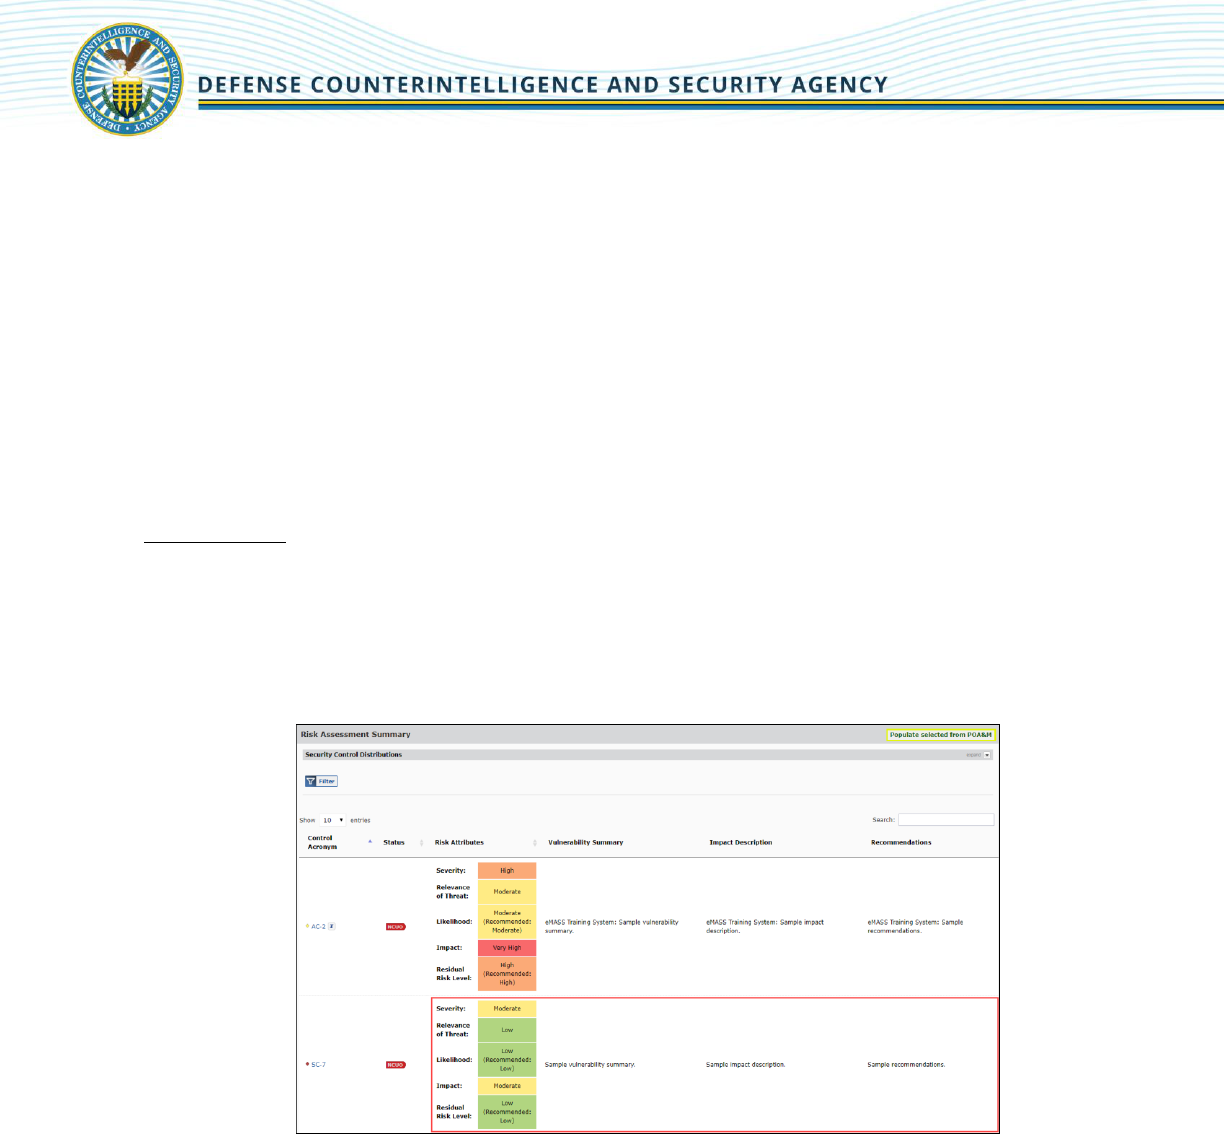
5.3.4 RISK ASSESSMENT
The Risk Assessment tab displays the Risk Assessment Summary and the Security Control Distributions.
Industry is required to complete the Risk Assessment for all NC security controls.
The Risk Assessment Summary allows users to document the assessed risk for the system’s security
controls. The Security Control Distributions section displays risk assessment information surrounding the
number of NC controls per Residual Risk Level and number of NC controls per severity.
Users can enter/edit risk assessment information from the Risk Assessment Summary or Control Details
page.
Risk Assessment:
1. Under the “Control” tab, select [Risk Assessment].
2. Click on the row for the applicable security control. Note: Clicking on the control acronym will
display information about the control and will not allow the user to edit the risk assessment
information.
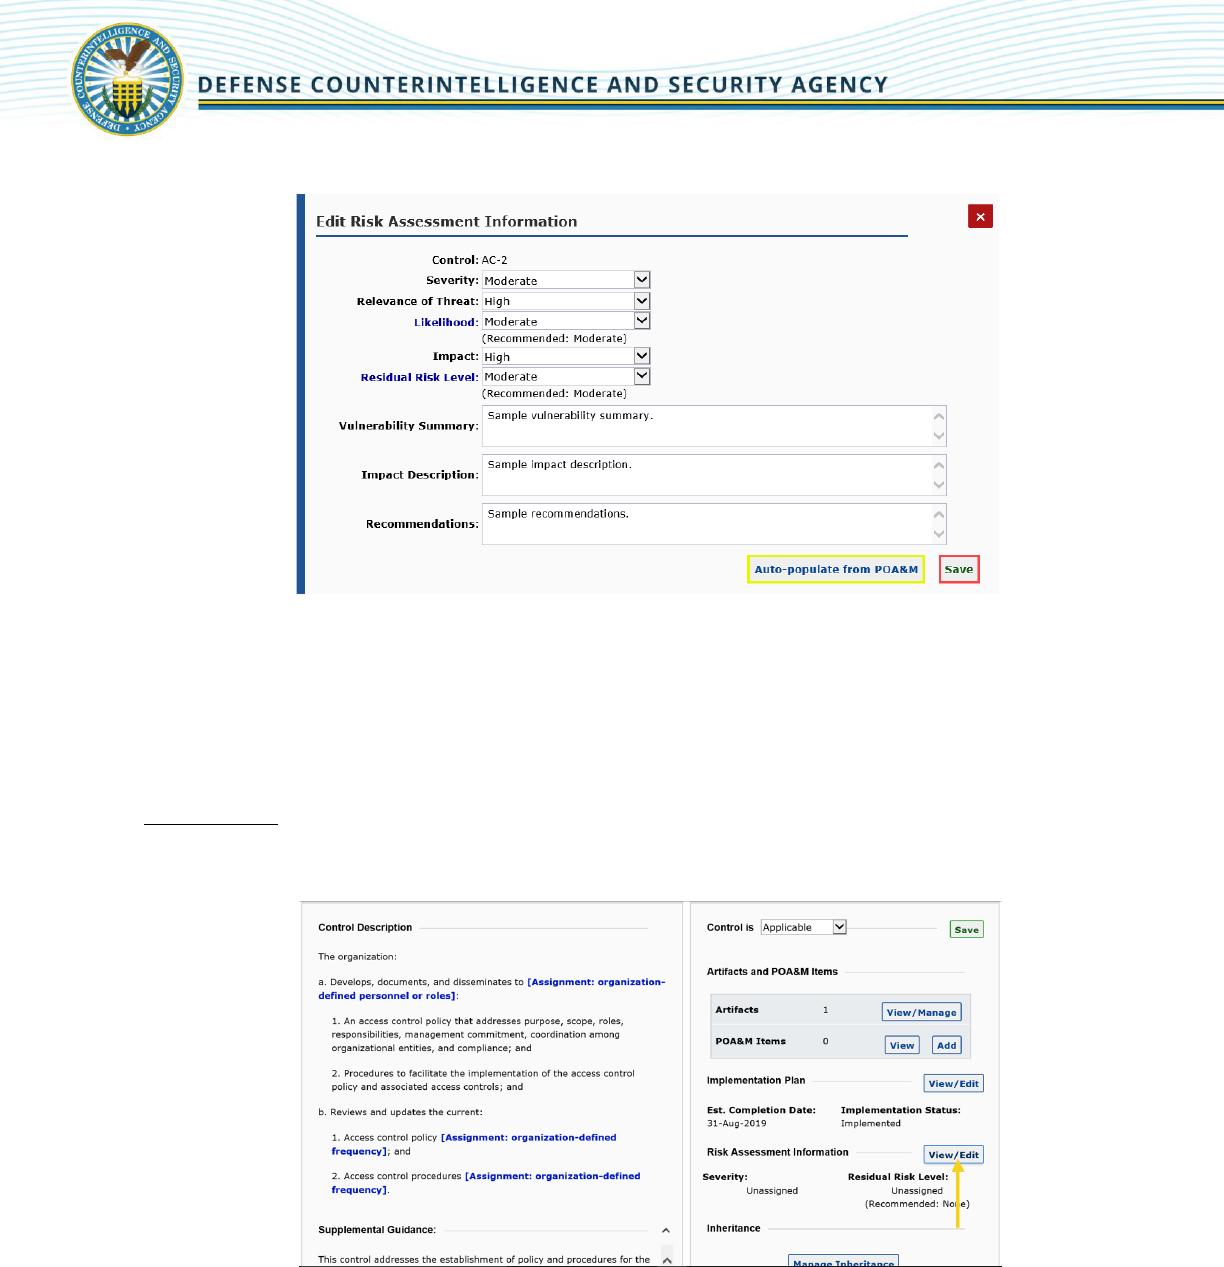
Page | 33
3. The Edit Risk Assessment Information pop-up displays.
4. Enter information and click [Save]. If the security control was already identified and documented
in the POA&M, users can pull over information by using the Auto-populate from the POA&M
button.
Note: Severity, Relevance of Threat, Likelihood, Impact, and Residual Risk Levels are determined following
the charts in NIST SP 800-30.
Control Details:
1. On Control Details, click [View/Edit].
2. The Edit Risk Assessment Information pop-up displays.
3. Users can populate/edit the same control risk fields as the Risk Assessment Summary (adjusting a
value in one location will automatically be reflected in the other.) As such, the same auto-

Page | 34
calculations and recommended value displays for the “Likelihood” and “Residual Risk Level” fields
are applied to the Edit Risk Assessment Information pop-up.
4. Enter information and click [Save].
Reference the DISA eMASS User Guide (Risk Assessment Section).
Note: Risk Assessment information must be completed for NC controls.
5.4 PLAN OF ACTION AND MILESTONES (POA&M)
The eMASS allows users to create and edit POA&M items, add additional milestones, review and modify
the POA&M, provide the AO with risk assessments, and ensure transparency to corrective actions and
mitigation efforts. The eMASS requires a POA&M for NC controls. If annotating a system vulnerability is
determined to be classified as per the SCG, indicate in eMASS that details will be maintained on site.
While a package is being processed in the PAC, all POA&M items (both control-level and system-level)
existing at package creation will be locked. Users can view details of locked POA&M items, but can only
edit the risk analysis fields.
Users are responsible for updating a POA&M “Completion Status” based on actions taken against a
control (e.g., control status change). The eMASS users can choose to view the POA&M items in a “Table
View” or “Card View” format.
Reference the DISA eMASS User Guide (Plan of Action and Milestones Section).
Note: A POA&M Template is available in the “Help” section of eMASS.
5.5 ARTIFACTS
The user can upload artifacts into eMASS to support authorization activities. Artifacts can be documents,
diagrams, Visio charts, spreadsheets, etc. These artifacts may be associated at the system level or the
control and/or AP level.
To add artifacts, conduct the following actions:
1. Select [Artifacts] on the top menu.
2. Click [Artifacts] to open the Artifacts screen.
3. Click [Add Artifact] and the Add Artifact screen opens.
4. Search for the desired control and/or AP associated with the artifact by clicking [Search]. Security
controls may be searched by “Control Family,” “Control Acronym/Control Name,” and “Include
APs.” If a user does not select “Include APs,” only controls will be returned in the search results;
5. A list of controls and/or APs will be displayed based on the search criteria. Select the [+] button
to associate an individual security control and/or AP to the artifact.
6. Complete all required artifact information. The “Artifact Owner” field will only appear if the
system has established a manual inheritance relationship. The optional “Artifact Expiration Date”
allows for tracking of any artifact that requires periodic reviews and updates.

Page | 35
7. Enter the artifact information. The “Category” drop-down menu has the following choices:
Implementation Guidance: Specific guidance for implementation of the system.
Evidence: Artifacts that are related to the system, but not specifically guidance for that
system’s implementation.
Other: Digitally signed reports from packages.
Click [Browse] to select the location of the artifact to upload.
Click [Save] to complete the process of adding the artifact and to return to the Control
Details screen.
Reference the DISA eMASS User Guide (Artifacts Section).
Note: The maximum file size for downloading artifacts is 100 MB.
5.6 SUBMIT FOR REVIEW
Prior to submitting for review, Industry must ensure the following is complete:
1. Test Results for all security controls.
2. Implementation Plan for all security controls.
3. SLCM for all security controls.
4. Risk Assessment for all NC controls.
Note: Security controls must contain acceptable responses for Test Results, Implementation Plan, SLCM,
and Risk Assessment (if applicable). If the responses are not acceptable and the documentation is
insufficient, the system package review will take additional time and the ISSP may recommend a DATO.
Industry/CAC – 1 Actions: Once all the information listed above is complete, the security controls are
ready to move to the next stage of the CAC (CAC – 2/ISSP). Industry users are not required to initiate a
workflow to submit. The ISSP will complete the control validation/assessment. When the validation
process is complete, the ISSP will initiate the Package Approval Chain workflow.
Use the Bulk Processing feature in eMASS to submit controls to the ISSP in the CAC – 2 role for validation.
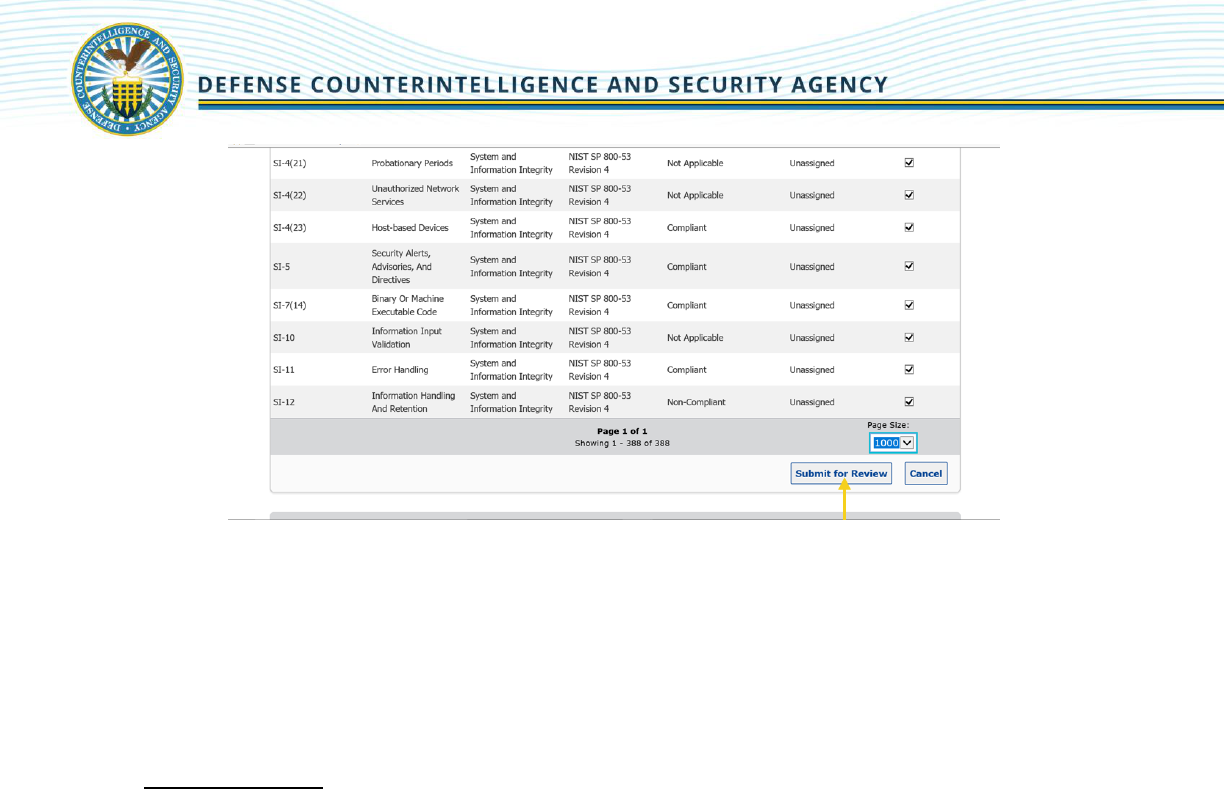
1. Select [Bulk Processing] on the Controls – Listing screen.

Page | 36
2. Bulk Processing has the following options: "Add Test Results," "Set as Not Applicable," "Submit
for Review," "Validate," or "Skip Validation. Select [Submit for Review].
3. Place a check in the [Select Visible] checkbox next to all the security controls. Note: Scroll down
to the bottom of the page and expand page size to 1000 to view/select all.
4. Select [Submit for Review].
Page | 37
A Workload Task notification will be generated for the second role in the CAC (CAC – 2/ISSP).
5. To check the security controls status in the CAC, IAM users that either registered the system or
have an assigned IAM role for a system package can run a CAC History Report. This report allows
users to see the system’s package status within the CAC.
Reports > CAC History Report > Select the System Acronym from the drop-down menu >
Generate Report.
ISSP/CAC – 2 Actions: The assigned ISSP will log in to eMASS and go to the Control Details screen for the
control requiring validation. The CAC – 2 role will be highlighted in blue and an [Approve/Return] button
will be listed. The ISSP has two options:
1. Add a test result before approving the Control. If the ISSP adds a test result before approving the
control, the control’s status will change from Compliant Unofficial (CUO), Non-Compliant
Unofficial (NCUO), or Not Applicable Unofficial (NAUO) to Compliant Validated (CV), Non-
Compliant Validated (NCV), or Not Applicable Validated (NAV). This feature allows the validator
to retest and verify a submitted test result.
2. Continue the approval process. The ISSP will click [Approve/Return]. This action will reveal the
Approve/Return screen. The ISSP has two options: “Approve” or “Return for Rework.” “Return
for Rework” returns the control back to the CAC – 1/Industry. Both options require the ISSP to
complete the “Comments” text field. Once saved, the control receives a final validation status of
Compliant Official (CO), Non-Compliant Unofficial (NCO), or Not Applicable Official (NAO).
Reference the DISA eMASS User Guide (Security Control Testing and Validation Section).

Page | 38
6 PACKAGE APPROVAL CHAIN WORKFLOWS
DCSA will submit packages through the PAC for review and approval. The only exception is the
Decommission Workflow. Industry will initiate the Decommission Workflow. Each package type will be
captured and tracked historically within the Historical Package Listing for a system record.
6.1 PACKAGE TYPES
The package types available for submission into the PAC are listed below. All package types share
common functionality concerning initiation, submission, and approvals.
1. Assess and Authorize: This is selected when all required A&A activities are completed, and the
system is ready to be submitted and reviewed through the PAC for an authorization decision. At
the final step of the workflow, the AO has the ability to render an authorization decision. The AO
also has the optional ability to set the System’s Security Plan approval status and associated date.
Upon completion of the workflow, the system’s authorization status will be set to the selected
authorization decision.
The package is a static snapshot in time. If the live system data is changed while the package is
being reviewed, the package will not be updated. Information contained in the package cannot
be edited or changed, with the exception of the following:
All POA&M items contained in the package, except for the risk analysis fields, are
completely locked during the review process until an authorization decision is applied by
the AO. Changes to the risk analysis fields in the package POA&M items will be reflected
in the live system.
The Risk Assessment Summary contained in the package can be updated during the
review process until it is finalized by the SCA. Changes to the Risk Assessment Summary
in the package Risk Assessment will be reflected in the live system.
An A&A decision applied to the package will be reflected in the live data.
The following business rules are enforced for an Assess and Authorize package type:
All NC controls must have at least one associated “Ongoing” or “Risk Accepted” POA&M
item mapped to either the control-level or AP-level.
“Severity” values must be assigned to all POA&M items to proceed past the SCA role.
The AO will be prohibited from granting a full ATO if an RMF package has at least one NC
control with a control Residual Risk Level of “High” or “Very High”.
If an RMF system with at least one control Residual Risk Level of "High" or "Very High"
still requires operation, the authorization conditions should specify a review period that
is within six months of the authorization date. The POA&M supporting this authorization
must document the identified risk and specify the necessary corrective actions to be
completed before the review.

Page | 39
2. Extension: Selected when an extension is requested for an authorization. Mimics the Assess and
Authorize package type process. The Assess and Authorize package business rules are also
enforced for an Extension package type.
3. Denial of Authorization to Operate (DATO): Selected for an expedited DATO decision. The DATO
workflow type does not create a static snapshot upon initiation. At the final step of the PAC, the
AO will issue the DATO decision. PAC users also have the ability to specify the system’s Security
Plan approval status and associated date, terms and conditions, and executive risk summary.
4. Decommission: Selected when requesting a formal decommissioned decision as part of a system
decommissioning strategy. The Decommission workflow type does not create a static snapshot
upon initiation. [This is the only workflow initiated by the IAM (Industry)]. A Decommission Plan
should be uploaded as an artifact. The system will be checked for inheritance relationships and
package reviewers will be notified of any remaining active control inheritance.
5. POA&M Approval: Selected for the review and approval of one or many POA&M items within a
system. Once approved, the review status for all included POA&M items will update to
“Approved”.
The package is a static snapshot in time. The following information is available for review in a
POA&M Approval package, although it is limited to information related to the POA&M items
included in the package:
Package Overview
Risk Assessment
POA&M
Categorization
Artifacts
Reports
The following business rules are enforced for a POA&M Approval package type:
All POA&M items contained in the package are locked during the review process except
for the risk analysis fields, which can only be edited when the package resides at the
user’s role in the PAC. Changes to the risk analysis fields in the package POA&M will be
reflected in the live system.
Any role can upload artifacts.
Any role can update the package Risk Assessment information.
Note: Industry completes the package in the CAC. The actions below are conducted by DCSA.

Page | 40
6.2 PACKAGE WORKFLOW MANAGEMENT
The Package module focuses on processing packages through various workflows. The NISP eMASS
instance has defined workflows for each package type. For the main package types (Assess and
Authorize, Extension, DATO, and POA&M Approval), the ISSP/SCA will "initiate" the workflow. The IAM
(Industry) can only initiate the Decommission Workflow. Within the workflow, collaboration boards
facilitate communication between system personnel.
Workflow Initiation: Users will conduct the actions below to initiate a workflow.
1. Navigate to the Package Status tab located within the package main tab.
2. Choose the workflow type that will be submitted into the PAC.
3. On the Create New page, enter the “System Name” and enter optional “Comments.” Click
[Initiate Workflow] to initiate the workflow;
4. A confirmation message will appear stating that the workflow was successfully initiated.
5. PAC users can now use the collaboration boards to comment/collaborate and upload artifacts as
the package is processed through the workflow.
Cancel Workflow: From the Package Status page, users may review the initiated workflow. To cancel the
workflow initiation, select [Cancel] from the “Action” dropdown, provide information in the “Comments”
section, and click [Cancel]. A confirmation message will appear stating that the workflow was successfully
cancelled.
Package Submission: From the Package Status page, the user with the 1
st
PAC role in the workflow will
submit the initiated package. The active role is highlighted in dark blue in the PAC bar and a user with
that highlighted role will have the ability to act on the workflow. Select [Approve] from the “Action”
dropdown, enter in required “Comments” and click [Approve] to submit the package to the next role.
Package Review: PAC users reviewing a package can “Approve,” “Disapprove and Move Forward,” or
“Return for Rework.”
Updates to System: PAC users reviewing a package can view updates made to the live system since the
package was submitted into the PAC.
1. Click [Updates to System] from the Package Status screen.
2. The “Updates to Current System” pop-up window will display a count of POA&M items (grouped
by completion status) that have been added to the live system since the package was created.
3. To view any changes to control compliance status since package creation, click the [Updated
Controls] tab.
Package Status: The “Package Status” sub-tab of an active workflow displays the following information
and notifications:
1. Package Progress Bar shows the location of the package in the approval chain and the elapsed
time spent at the current and each previous package reviewing role.

Page | 41
2. The “Assessment Recommendations” section shows any special artifacts and comments added by
package reviewers.
3. The “Collaboration Board” displays all actions performed by package reviewers and the date the
action occurred. Additionally, it shows all user posts and replies since the workflow initiation.
4. Package notifications will potentially display on the “Package Status” sub-tab depending on the
information contained within the package or certain events in the live system. Package
notifications can appear as yellow warnings (informational) or red warnings (package cannot
proceed forward until the issue has been addressed).
Package Overview: Package Overview mimics the Controls – Listing page and displays information on the
compliance status of security controls and allows the reviewer to drill down to view specific information
on each security control. The Package Control Summary view can be expanded or collapsed
simultaneously or by an individual control family.
Package Risk Assessment: Risk Assessment allows the reviewer to view and edit the package Risk
Assessment Summary. Any changes made to the risk information in the package will be reflected in the
live System Risk Assessment.
Package POA&M: Package POA&M allows the reviewer to view and to edit the package POA&M (risk
analysis fields only). Any changes made here will be reflected in the live System POA&M. To add or
modify a package POA&M item’s risk analysis fields, click the hyperlinked “Vulnerability Description” and
then [Edit].
Package Categorization: The system’s security categorization can be viewed in package Categorization.
The package Categorization displays the overall categorization (Confidentiality, Integrity, and Availability
values), applied Information Types, rationale for categorization, and any additional authorization
requirements.
Package Artifacts: Artifacts attached to the package can be viewed in package “Artifacts”.
Package Reports: Reports associated with the active package can be viewed and downloaded in “Package
Reports”.
Return for Rework: Throughout the review and approval process, the PAC user has the option to return a
package for rework.
1. “Return for Rework” option is selected from the “Select Action” drop-down menu.
2. Select the appropriate role in the drop-down menu.
3. Provide comments and click [Return for Rework].
Applying an Assessment Decision: For authorization package types, the DCSA roles can assess the
submitted package and provide the AO with authorization recommendations. When assessing the
package, these roles can document an Executive Summary describing the overall system cybersecurity
risk and recommend an ATD. After applying the assessment decision to the active package, the DCSA PAC
roles will automatically be taken to the Package Reports view to apply a digital signature to the SAR.
Applying an Authorization Decision: For authorization package types, the AO will be prompted to select
the appropriate authorization decision for the system.

Page | 42
1. Once an “Authorization Determination” for the package is selected, the “Authorization Date,”
“Terms/Conditions for Authorization,” “Authorization Termination Date,” and “ADD
Classification” fields appear;
2. The “ATD” field will display a list of preset dates based on the “Authorization Status” the user
selected;
3. The AO will enter information for all required fields and select [Authorize]; and
4. After applying the authorization decision to the active package, the AO will be automatically
redirected to the package Reports view to apply a digital signature to the Security Plan Report
and Authorization Decision Document.
Reference the DISA eMASS User Guide (Package Section).
7 DECOMMISSIONED SYSTEMS
According to the RMF, the last phase of a system’s life cycle is the decommission phase. The eMASS has
several rules governing decommissioned systems:
1. Decommissioned systems remain in the eMASS instance repository but no longer appear on any
reports, metrics, or general system searches;
2. New inheritance relationships cannot be requested with systems that have an “Authorization
Status” of “Decommissioned”;
3. Setting an “Authorization Status” as ‘Decommissioned’ will automatically update the “RMF
Activity” field to “Decommissioned”;
4. Setting the “RMF Activity” field to “Decommissioned” will automatically update the
“Authorization Status” to “Decommissioned”; and
5. Systems of any registration type can be set to “Decommissioned.”

Page | 43
Workflow Initiation: The Decommission Workflow is initiated by the IAM (Industry). The IAM (Industry) will
conduct the actions below to initiate the workflow.
1. Navigate to the “Package Status” tab located within the package main tab. Click the
[Decommission] box.
2. On the “Create New” page, enter the “Package Name” and enter optional “Comments.” The
“Package Name” will be the System Name. Click [Initiate Workflow] to initiate the workflow.

Page | 44
Package Submission: From the “Package Status” page, the IAM (Industry) will submit the initiated
package. The active role is highlighted in dark blue in the PAC bar, and the user with that highlighted role
will have the ability to act on the workflow. Industry will also have the option to add the Decommission
Plan. Select [Approve] from the “Action” dropdown, enter in required “Comments” and click [Approve] to
submit the package to the next role.
Package Review: PAC users reviewing a package can perform the following actions: “Approve,”
“Disapprove and Move Forward,” or “Return for Rework.”
ISSP Actions
1. The ISSP will assess the package and select the applicable action.

Page | 45
2. If the ISSP concurs, he or she will act on the workflow and submit the package to the next role.
Select [Approve] from the “Action” dropdown, enter in required “Comments” and click [Approve]
to submit the package to the Team Lead.
Team Lead Actions
1. The Team Lead will assess the package and select the applicable action.

Page | 46
2. If the Team Lead concurs, he or she will act on the workflow and submit the package to the next
role. Select [Approve] from the “Action” dropdown, enter in required “Comments” and click
[Approve] to submit the package to the AO.

Page | 47
AO Actions
1. The AO will be prompted to select the appropriate authorization decision for the system. In the
Decommission Workflow, “Decommissioned” is the only available authorization decision. The AO
also has the optional ability to specify the System’s Security Plan approval status and associated
date, terms and conditions, and executive risk summary.
2. Enter information for all required fields and select [Authorization Determination].
Reference the DISA eMASS User Guide (Decommissioned Systems Section).

Page | 48
8 MANAGEMENT (INHERITANCE)
Inheritance identifies authorization boundaries and creates relationships (i.e., Parent/Child, Provider, or
Co-System) between interconnected systems registered in eMASS, allowing for an establishment of
system hierarchy or information management.
Users can establish an inheritance relationship wherein an individual security control/AP is provided from
one or multiple systems. When full inheritance is established, a receiving system will have visibility into
all the test results, POA&M items, and artifacts from the originating system(s). When hybrid inheritance
is established, a receiving system will have visibility into the latest test results, POA&M items, and
artifacts from the providing system(s) but must still enter local assessments to that control/AP. Users can
manage any common control provider relationships and system associations within the Associations
Summary.
Reference the DISA eMASS User Guide (Management Section).
8.1 COMMON CONTROL PROVIDER PACKAGE
An authorized Common Control Provider (CCP) plan will enable organizations to document enterprise
processes to ensure consistency and streamline A&A processes. The CCP package will include the
organization's approach to enable standardized RMF implementation across multiple NISP programs. The
CCP package will be used to identify the common controls and all the associated procedures and artifacts.
In addition, it will specify if the common controls provide the required protection fully (with nothing
further needed from the system) or in hybrid fashion (partially by the alternative, with the remainder
provided by the system).
Once the CCP plan is developed, the organization will submit the package and request authorization to
allow systems to inherit these controls. The CCP will require re-authorization when common controls are
modified or added. These controls cannot be inherited on any authorized system until authorization is
granted by the AO.
8.2 NISP CLASSIFIED CONFIGURATION TOOLKIT
The NISP Classified Configuration (NCC) Toolkit is designed to assist Industry with hardening a Windows
7/10 standalone to a number of technical baseline compliance standards required by NAO for the NISP
and its participants. The toolkit is based upon recommended guidance found in the DISA STIGs and the
NIST special publications. Industry is ultimately responsible for the proper configuration and testing of
the system. Additional security settings may still require configuration or tailoring in accordance with the
system security authorization package and/or applicable policies. Ultimately, the NCC Toolkit is intended
to strengthen system security controls, ease the configuration process, assist with continuous monitoring,
and expedite security reviews.

Page | 49
The NCC Toolkit is now available for download via eMASS. In order to download the NCC Toolkit, Industry
must have a registered system in eMASS. Conduct the following actions:
1. Access a registered system within eMASS. The eMASS displays the system’s default landing page.
Click [Associations (Inheritance)] from within the Management dropdown menu.
2. Click [Manage Common Control Providers] on the Associations Summary page.

Page | 50
3. Within the resulting CCP Relationships page, type “NISP” in the Search box and click [Search].
4. Locate “NISP-NCC-SCAP” within the search results and click [View/Add].
5. The Accept Default Controls window displays, click [Save].

Page | 51
6. “NISP-NCC-SCAP” will appear under “Selected CCPs”. Click [Save].
7. Once DCSA has approved the request, return to the Associations Summary page and select the
link titled “NISP-NCC-SCAP” (Common Control Provider)”. Note: DCSA takes approximately 1-3
business days to approve requests.

Page | 52
8. The Receiving System Details page will appear. Scroll to the bottom of the page and click [Save].
9. Navigate to the Controls – Listing page. Click on the CM-2.
10. Within the CM-2 Control Details, click [View/Manage] in Artifacts and POA&M items.

Page | 53
11. The “Manage Artifacts” window appears. Click the [Filename] to download the NCC Toolkit.
9 REPORTS
Reports can be accessed from the eMASS tool bar or from the eMASS Home screen. The user can
generate system and package reports from the Reports and Package tab respectively on the System Main
screen.
Reference the DISA eMASS User Guide (Reports Section).
