
8=:7*58/A+.:;.,=:2<A-=,*<287$.;.*:,1*7-#:*,<2,.8=:7*58/A+.:;.,=:2<A-=,*<287$.;.*:,1*7-#:*,<2,.
(85=6. !=6+.: :<2,5.
",<8+.:
7/:*;<:=,<=:.*;8-./8:A+.:;.,=:2<A&:*272707/:*;<:=,<=:.*;8-./8:A+.:;.,=:2<A&:*27270
$=2#27<8
*,=5<A8/7027..:2708/<1.'72>.:;2<A8/#8:<8
:=2927<818<6*25,86
$85*7-8 *:<27;
*,=5<A8/%,2.7,.;8/<1.'72>.:;2<A8/#8:<8
:6*:<27;/,=99<
*:58;!8>8
*,=5<A8/7027..:2708/<1.'72>.:;2<A8/#8:<8
,*:58;78>8/.=99<
8558?<12;*7-*--2<287*5?8:4;*<1<<9;-202<*5,86687;4.77.;*?.-=3,.:9
#*:<8/<1.7/8:6*<287%.,=:2<A86687; *7*0.6.7<7/8:6*<287%A;<.6;86687;*7-<1.
&.,178580A*7-778>*<28786687;
$.,866.7-.-2<*<287$.,866.7-.-2<*<287
#27<8$=2 *:<27;$85*7-8*7-!8>8*:58;7/:*;<:=,<=:.*;8-./8:A+.:;.,=:2<A&:*27270
8=:7*58/A+.:;.,=:2<A-=,*<287$.;.*:,1*7-#:*,<2,.
(85!8:<2,5.
"1<<9;-828:0
>*25*+5.*<1<<9;-202<*5,86687;4.77.;*?.-=3,.:9>852;;
&12;:<2,5.2;+:8=01<<8A8=/8:/:..*7-89.7*,,.;;+A<1.,<2>.8=:7*5;*<202<*586687;.77.;*?%<*<.
'72>.:;2<A<1*;+..7*,,.9<.-/8:27,5=;287278=:7*58/A+.:;.,=:2<A-=,*<287$.;.*:,1*7-#:*,<2,.+A*7
*=<18:2B.-.-2<8:8/202<*586687;.77.;*?%<*<.'72>.:;2<A8:68:.27/8:6*<28795.*;.,87<*,<
-202<*5,86687;4.77.;*?.-=

7/:*;<:=,<=:.*;8-./8:A+.:;.,=:2<A&:*272707/:*;<:=,<=:.*;8-./8:A+.:;.,=:2<A&:*27270
+;<:*,<+;<:*,<
78:0*72B*<287;27/:*;<:=,<=:.:.;<;=987<1.9:.62;.<1*<,A+.:;.,=:2<A9:8/.;;287*5;1*>.;9.,2C,
478?5.-0.27*-6272;<:*<270*7-9:8<.,<2702<*0*27;<8=<;2-.<1:.*<;)2<18=<<12;.@9.:<2;.;.7;2<2>.
27/8:6*<287,8=5-+.5.*4.-<86*52,28=;*,<8:;*7-,*=;.-*6*0.<8,:2<2,*5;A;<.6;&1.;.*<<*,4;
<.7-<8+.,86.27,:.*;2705A;9.,2*52B.-6.*7270,A+.:;.,=:2<A9:8/.;;287*5;6=;<.7;=:.9:8C,2.7,A27
;9.,2C,*:.*;!*<=:*55A:.,866.7-*<287;27,5=-.,:.*<270*->*7,.-9:*,<2,*5<:*27270;,.7*:28;
,87;2-.:270:.*52;<2,;2<=*<287;<81.59<:*27..;0*27-.<*25.-478?5.-0.8?.>.:<1.,*>.*<;8/1201
,8;<27/:*;<:=,<=:.*7--2D,=5<2.;27<1.-.958A6.7<9:8,.;;8/<12;427-8/;A;<.69:26*:25A-=.<8<1.
6*7=*59:8,.;;8/9:.,87C0=:270;8/<?*:.7..-.-/8:<1.<:*27270*7-:.5A27087*;.<8/;<*<2,(2:<=*5
*,127.;6*A<*4.6=,1?8:4<8,2:,=6>.7<
78:-.:<8/*,252<*<.<12;9:8,.;;8=:?8:4*--:.;;.;<1.=;.8/7/:*;<:=,<=:.*;8-.**7-.>"9;
<8*=<86*<.<1.-.958A6.7<8/,A+.::*70.;7*99:8*,1,58;.5A:.5*<.-<8>2:<=*52B*<287*7-
,87<*27.:2B*<287*;<1.,8-.;=7-.:5A27027/:*;<:=,<=:.1.59;5*A-8?7<12;+=:-.7!8<*+5A95*,270
.691*;2;87=;270*<885;524.7;2+5..*;.;<1.9:8,.;;8/,87C0=:*<2876*7*0.6.7<*7-
9:8>2;2872708/*7.<?8:4&1.:./8:.?.;<*:<+A/8,=;27087=7-.:;<*7-270?1*<<1.%<*<.8/<1.:<
9.:;9.,<2>.;5*,4*7-;18?,*;270<1.+.7.C<;8/<12;7.??8:42708=<5884*;<5A?..@958:.;.>.:*5=9
<8-*<.>=57.:*+252<2.;<1*<*:.,87;<*7<5A6.;;270?2<1<1.52>.;8/27-2>2-=*5;*7-8:0*72B*<287;68;<
:.5*<.-<8#:2>25.0.;,*5*<287$.68<.8-.@.,=<287*<<*,4;*7-7,2-.7<8:.7;2,;*558?270<1.
269:8>.6.7<8/;4255;,87,.:7270$.-<.*6*7-5=.<.*6;,.7*:28;&1.*7*5A;2;8/<1.*<<*,4;*7-
.@9582<*<2878/;=,1>=57.:*+252<2.;*:.,*::2.-8=<;*/.5A-=.<8*;*7-+8@.7>2:876.7<
&1..@9.,<.-:.;=5<;:.>85>.*:8=7-=;270*<8-.958A*;.<8/9=:98;.5A-.;207.-,A+.::*70.;?2<1
;9.,2C,,1*55.70.;&1.6*278+3.,<2>.2;<80=*:*7<..*,8695.@2<A8/;,.7*:28;;2625*:<8?1*<?.,*7
8+;.:>.27.7<.:9:2;.5.>.57.<?8:4;&1=;<12;.7<*25;1*>270*;.<8/95*A+884;<1*<,*7+.:=727*
6*,127.8:5*+8:*<8:A*;;=:270<1.C7*5;<*<.8/<1.7.<?8:42;,87;2;<.7<)..@9.,<<12;-.958A6.7<
;<:*<.0A<8+.,8;<.//.,<2>.*558?270<1.<:*27..<80.<-..927;201<27<8*?2-.:*70.8/;2<=*<287;
!8?*-*A;.>"9;;85=<287;?8:4*;*;25>.:+=55.<*0*27;<<1.2;;=.;-.:2>.-/:8685-,*;.-:2>.7
*99:8*,1.;/8:;.<<270=9;,.7*:28;7;18:<87.8/<1.4.A<*4.*?*A;8/<12;?8:42;,87<:2+=<270<8
+.<<.:9:.9*:.;9.,2*52;<;27.7;=:270<1*<<1.9:27,295.;8/<1.!*<287*57;<2<=<.8/%<*7-*:-;*7-
&.,178580A!%&A+.:;.,=:2<A:*6.?8:4185-7*6.5A9:.>.7<-.<.,<62<20*<.*7-:.,8>.:
.A?8:-;.A?8:-;
7/:*;<:=,<=:.*;8-..>"9;A+.:$*70.A+.:;.,=:2<A(2:<=*52B*<287
&12;*:<2,5.2;*>*25*+5.278=:7*58/A+.:;.,=:2<A-=,*<287$.;.*:,1*7-#:*,<2,.
1<<9;-202<*5,86687;4.77.;*?.-=3,.:9>852;;
Infrastructure as Code for Cybersecurity Training
Rui Pinto
University of Porto
Porto, Portugal
https://orcid.org/0009-0003-5362-7819
Rolando Martins
University of Porto
Porto, Portugal
https://orcid.org/0000-0002-1838-1417
Carlos Novo
University of Porto
Porto, Portugal
carlos.nov[email protected]
https://orcid.org/0009-0003-0094-5565
Abstract—An organization’s infrastructure rests upon the
premise that cybersecurity professionals have specific knowledge
in administrating and protecting it against outside threats.
Without this expertise, sensitive information could be leaked to
malicious actors and cause damage to critical systems.
In order to facilitate this process, the presented work addresses
the use of Infrastructure as Code (IaC) and DevOps to automate
the deployment of cyber ranges. An approach closely related
to virtualization and containerization as the code’s underlying
infrastructure helps lay down this burden. Notably, placing
emphasis on using IaC tools like Ansible eases the process of
configuration management and provisioning of a network. Lastly,
several up-to-date vulnerabilities that are constantly messing
with the lives of individuals and organizations are explored,
most related to Privilege Escalation, Remote Code Execution
attacks, and Incident Forensics, allowing the improvement of
skills concerning Red team and Blue team scenarios. In short, one
of the key takeaways of this work is contributing to better prepare
specialists in ensuring that the principles of the National Institute
of Standards and Technology (NIST) Cybersecurity Framework
hold, namely: prevent, detect, mitigate, and recover.
Index Terms—Infrastructure as Code, DevOps, Cyber Range,
Cybersecurity, Virtualization
I. INTRODUCTION
Preparing cybersecurity professionals to better respond to
incidents using cyber ranges is costly due to the infrastruc-
ture complexity these setups may require and because the
development of new scenarios is mostly a manual process.
With paper and pencil training, it is possible to go over a
vulnerable scenario, but details on how systems respond to
incidents are often lost to the trainee. Moreover, many cyber
range deployments are based on old case-driven methodologies
that rely on hardware [7] and preconfigured virtualization
through Virtual Machines (VMs) [13], [4], [8]. Containeriza-
tion is starting to emerge [12], [11] as a more lightweight
approach, but configuration management and deployment of
these containers is often very specific to each implementation,
turning the solution unscalable. For this reason, expanding the
current cyber range platforms to diversify scenarios continues
to be an issue.
Another possible development regarding cyber ranges is
building networks that include containers and VMs [5]. This
allows exploration of both generic and kernel vulnerabilities
as, contrary to what happens with containers, VMs do not
share the kernel with the host system.
II. MOTIVATION
With all the above situations in mind, the presented work
focuses on developing and deploying a cyber range framework
and exploring the creation of complex scenarios that the
cybersecurity workforce will find helpful in refining their
skills. There is a clear need to evolve this type of research
so that the development costs are significantly reduced by
taking advantage of virtualization techniques. Lastly, there
is a tremendous need to familiarize ourselves with current
attack scenarios, such as Log4j and Ransomware, and even old
events like the Shellshock vulnerability so that the mistakes
that happened in the past do not get repeated in the future.
III. GOAL
This work addresses the deployment automation of the
software used for cybersecurity training using an approach
based on Infrastructure as Code and DevOps for networking
and the relying infrastructure used by these scenarios. Several
vulnerabilities will be explored related to Remote Code Exe-
cution, web applications, Privilege Escalation, and forensics,
which are associated with the daily threats companies face.
The ultimate goal is to build a set of playbooks that will
automatically deploy, configure and provision container-based
environments in a reasonable amount of time and use fewer
resources in terms of funds and infrastructure so that the
deployment process happens more efficiently.
Besides, running an entire enterprise-level network in a
single computer or in the cloud is possible due to the scenarios’
containerized nature. Notions regarding the safety of the train-
ing system are taken into account to ensure that no actual harm
reaches the host computer but the sandboxed environment.
IV. RELATED WORK
A. Hardware-based Cyber Ranges
According to Ferguson et al. [7], the National Cyber Range
(NCR), closely tied to the American Department of De-
fense, provides a “unique environment for cybersecurity testing
throughout the program development life cycle using unique
methods to assess resiliency to advanced cyberspace security
threats.” The NCR works as an Internet-like environment
supported by a multitude of VMs and physical hardware.
Scenarios are deployed to perform tests that should not occur
on open operational networks due to potentially catastrophic
consequences caused by the execution of malicious payloads.
1
Pinto et al.: Infrastructure as Code for Cybersecurity Training
Published by DigitalCommons@Kennesaw State University, 2023

It features traffic generation techniques, several types of vul-
nerability scanning, exploitation, and data capturing tools. As
expected, the main focus of this project is purely military,
meaning there are few details on the internals of the cyber
range.
Fig. 1: NCR Core Capabilities [7].
As depicted in Fig. 1, a firewall is placed between the
“Isolated Testbeds” and the “Range Management Enclave.”
The latter consists of encapsulation tools and an automation
tool kit that provisions resources from a “Common Resource
Pool.” Physical Layer 1 switching ensures isolation concerning
the low-level communication protocol stack.
The sequence of actions required to execute tests starts with
assigning hardware and software resources from the “Common
Resource Pool.” Afterward, the provisioning process includes
using the Layer 1 switch to isolate the selected resources from
all the other NCR assets. At this point, the systems under test
are installed, and the final network state is matched against the
initial expectations. Then, tests are performed, and results are
collected. Lastly, hardware is sanitized, ensuring no remnants
related to the test, and made available back in the “Common
Resource Pool.”
Gustafsson et al. [9] proposes CRATE, a cyber range heavily
relying on a dedicated hardware platform and virtualization.
The high-level architecture of this system is featured with a set
of virtualization servers that house the emulated environments,
a control plane used for management tasks, and the event plane
for systems where training sessions are executed. Inside each
virtualization server, a customized Linux-based operating sys-
tem called CrateOS was placed. Among many other features,
it contains a system service named NodeAgent that handles
communication between the Core Application Programming
Interface (API), which connects to the Application Layer,
the Database layer, and the VMs. It automates the deploy-
ment and configuration activities of the cyber range. The
network in the event plane uses Software Defined Networking
(SDN) to facilitate automated configuration and emulation of
the networks. Besides, virtual network segments, VXLANs,
are used to support many emulated networks. Furthermore,
CRATE Exercise Control (CEC) is a tool used to set up and
manage training sessions. SVED (Scanning, Vulnerabilities,
Exploits, and Detection) is used to automate experiments
and training scenarios. It consists of several modules: one
linked to vulnerability data and automatic scans performed
with OpenVAS, and others related to designing attack graphs,
executing them, and generating reports. CRATE allows con-
necting any hardware device in the emulated environments to
conduct experiments with hardware-based security solutions.
It is featured with traffic generation tools and data collection
tools, using tcpdump and Snort.
B. VM-based Cyber Ranges
Most current state-of-the-art focuses on cyber ranges based
on VMs. Pham et al. [13] proposes a system, CyRIS (Cyber
Range Instantiation), that automatically prepares and manages
cyber ranges for cybersecurity training based on custom speci-
fications. CyRIS is part of CyTrONE [4], a training framework
that facilitates training activities, providing an open-source set
of tools that automate the training content generation. It also
integrates with a Learning Management System, Moodle.
CyRIS is a module that takes a configuration input file
following the Yet Another Markup Language (YAML) format
and a base image under the format used for Kernel-based
Virtual Machine (KVM) virtualization, creating the desired
environment according to the provided description. This base
image contains a set of pre-installed operating systems and
several basic system configurations (hostname, SSH keys, IP
addresses). Later on, a master node running the CyRIS service
processes the description file and allocates VMs that will be
assigned to other hosts of the same LAN network, as observed
in Fig. 2.
Fig. 2: CyRIS’s Architecture [13].
CyRIS comprises five key features that play important roles
in its architecture:
• System Configuration, which not only involves basic
system configuration but also managing user accounts and
modifying firewall rules.
2
Journal of Cybersecurity Education, Research and Practice, Vol. 2024, No. 1 [2023], Art. 5
https://digitalcommons.kennesaw.edu/jcerp/vol2024/iss1/5
DOI: 10.32727/8.2023.30
• Tool Installation, which is essential for the penetration
testing work.
• Incident Emulation, as per the ability to launch actual
incidents. It consists of attack emulation, traffic capture,
and malware emulation.
• Content Management consisting of copying content into
the cyber range, executing scripts, and generating logs.
• Clone Management, which considers the defined network
topology for the VMs and the inherent isolation between
them.
Beuran et al. [4] presents CyTrONE that follows the archi-
tecture presented in Fig. 3, where CyRIS is also represented.
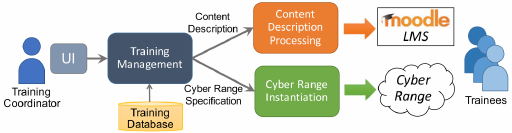
Fig. 3: CyTrONE’s Architecture [4].
The Training Management module is based on user inputs
and the training database, which includes training scenarios
(VM base images), security incidents, and vulnerability infor-
mation. This module is responsible for creating the input files
related to content description and a cyber range description
defining the training’s content and activity. The Content De-
scription Processing module converts the content description
to a format named SCORM, which is widely used in the e-
learning industry and, therefore, understandable by Moodle.
The adoption of Moodle is related to educational purposes
and follows a Q&A approach, as questions related to the posed
challenge will be presented on this platform.
Jiang et al. [10] mentions a particularly interesting VM-
based type of cyber range, Pandora, which is intentionally
incompatible with enterprise systems to reduce the risk of
attack propagation into the infrastructure. It proposes a system
suitable for automated testing of exploits and result collection,
keeping security concerns related to the sandboxed envi-
ronment in mind by considering vulnerabilities on VMware
Fusion (CVE-2015-2337) and Venom (CVE-2015-3456) that
allowed VM escape, thereby causing damage to host systems.
Pandora’s architecture runs under a VM with an operating
system that introduces some incompatibility with the “Generic
Operating System” to, as mentioned before, introduce an
intentional inconsistency with regards to damage propagation
outside the testing environment. The “Vulnerable Binary Man-
ager” is used to execute vulnerable binaries within the secure
environment, use exploits against the vulnerable binary and
record the effect of such exploitations. A “Vulnerable Binary”
is a file containing a set of defined vulnerabilities that auto-
mated tools will exploit. Notice that this binary should only be
able to be executed within the “Secure OS.” The “Vulnerability
Manager” is an API that handles communication with the
cyber range by sending exploits and receiving responses from
the “Vulnerable Binary Manager.” The “Automated Cyberse-
curity Tool(s)” generates exploits against vulnerable binaries
and is not present in the secure operating system to assure
simplification. Examples include fuzzing tools, such as Fuzzer
and American Fuzzy Lop, to generate crash strings for simple
binary files vulnerable to buffer overflows. Later on, rex, an
automated exploit engine, exploits the target binary using
the above-mentioned crash string obtained from the fuzzing
tool, generating a Proof of Vulnerability (POV) that is later
on sent to the “Vulnerability Manager” and received by the
“Vulnerability Binary Manager” inside the cyber range VM.
C. Container-based Cyber Ranges
Container-based cyber ranges are frequently linked to re-
duced resource consumption compared to VM-based scenar-
ios, mainly because the container’s resources are shared with
the host, causing a lower overhead. This same overhead is even
lower compared to scenarios full of virtual instances since the
CPU and memory usage compared to VM-based scenarios is
much lower. This section intends to elaborate on container-
based cyber ranges and their specific details.
Perrone et al. [12] brings forward the Docker Security
Playground, a microservices-based approach to building com-
plex network infrastructures tailored to study network security.
These microservices are based on Docker. Likewise, it offers
an API enabling further development on the lab scenarios.
This project uses Docker-compose to manage scenarios’ start
and stop procedures. It uses a Docker Image Wrapper which
defines a standard notation for Docker labels to provide custom
configurations for the base Docker image of each scenario.
The Docker images used within the project are placed at
DockerRegistry Hub.
Related to the Docker Security Playground, Caturano et al.
[5] designed another container-based cyber range built upon
the Docker Security Playground. This project tackles the fact
that several vulnerabilities related to the kernel cannot be
explored in Docker-based environments because containers
share the Linux kernel with the Docker host. To overcome
this problem, Capturano et al. explores scenarios based on
containers and VMs, providing a hybrid environment where
cybersecurity exercises are deployed. For this, it makes use of
“macvlan” interface drivers to create a bridge between Docker
containers and VMs. Similarly, Acheampong et al. [1] mixes
the concept of cloud deployments based on VMs with Docker
containers hosting packaged applications.
Closely related to the education side, Thompson et al. [15]
refers to another training framework, Labtainers, which relies
on Docker containers featured with an automatic assessment
of students, as lab data is collected and automatically sent
to an instructor upon completion via email or a Learning
Management System, creating the possibility of analyzing the
experiential learning efficacy of the exercise. Specific proper-
ties of the laboratory activities are randomized so that each stu-
dent works on a different scenario in terms of configurations.
This randomization is achieved by defining symbols within the
source code and data files part of the lab, which are replaced
with student-specific values upon lab startup, for instance,
3
Pinto et al.: Infrastructure as Code for Cybersecurity Training
Published by DigitalCommons@Kennesaw State University, 2023

the buffer size related to a buffer overflow vulnerability. This
concept is further explored in the next section.
D. Randomization
Developing a scenario for a cyber range is mainly a manual
process. An example that corroborates this statement is SEED
Labs [6], where many of Labtainers’ laboratories are based
[15], where several scenarios based on software security, web
security, system security, mobile security, network security,
cryptography, and blockchain are made available to trainees
using both VMs and containers. More than 80 universities use
SEED Labs, which expresses close bounds to education.
Consequently, there is a need to address some randomization
of the developed scenarios as they essentially turn out to be
static once created. As so, this section elaborates more on the
cyber ranges, both VM-based and container-based, that take
into account randomization.
Starting with Schreuders et al. [14] that proposes a VM-
based cyber range, SecGen, developed in Ruby that introduces
randomization. It is suited for both educational lab usage and
Capture The Flag (CTF) challenges. One of the main concerns
is addressing the sluggish pace associated with the manual
configuration of hacking scenarios, which is not practical
at scale. This cyber range focuses on a CTF-style type of
challenge, where solving the proposed challenge results in
discovering a secret flag. The introduced randomization is
characterized as follows:
• Selection: randomized selection of the operating system,
network configurations, services, system configurations,
and vulnerabilities to be used.
• Parameterisation: that entails system elements should be
configurable, for instance, the strength of a user account
password.
• Nesting: data generation should be combined/nested ran-
domly.
The description of the system greatly depends on the
eXtensible Markup Language (XML) specification language,
which states the details related to the configuration of the
network, available vulnerabilities, services, users, and content
and applies logic for randomizing the scenario. It uses Puppet
and Vagrant to provision the VMs. A critical takeaway idea of
this project is its highly modular structure and the use of vul-
nerabilities and associated exploits provided by the Metasploit
Framework. The SecGen running process is composed of two
stages:
• First Stage: is where all the scenario Ruby modules are
read, randomization steps are applied, and the Puppet
modules are deployed. At last, a Vagrant file is created,
which describes the entire scene, according to the steps
mentioned.
• Second Stage: leverages Vagrant to generate and provi-
sion the VMs.
Currently, SecGen counts over 100 modules: data generation
modules, encoder modules, providing various encryption and
encoding methods, service modules, providing a wide range of
secure services, utility modules, allowing various system con-
figurations, and vulnerability modules, concerning vulnerable
services.
Consequently, Nakata et al. [11] proposes a Directed
Acyclic Graph (DAG) based cyber range, CyExec, with ran-
domization techniques in mind, using Docker containers. This
article claims CyExec outperforms the SecGen VM-based
scenario [14] generator, consuming 1/3 memory, having 1/4
CPU load, and 1/10 of storage usage, primarily since it uses
containers instead of VMs.
The concept of randomization here takes the form of a
graph, being each milestone a vertex and each scenario an
edge, meaning an attack consists of different types of vul-
nerabilities that achieve the same outcome. As a result, the
trainee experiences several distinct situations. Since the attack
is directed towards the final target and there is no going back
to a previous milestone or looping back to the same vertex,
this graph is considered a DAG.
Fig. 4 shows the structure followed by CyExec. With several
Docker-compose files, randomization is assured because it
allows switching between which Dockerfiles are used when
setting up a scenario. A Dockerfile works as just another
“edge” to reach a “vertex,” leading us to the fact that different
vulnerabilities are introduced into the system according to the
selected Dockerfile.
Fig. 4: CyExec structure [11].
For example, consider a scenario where Metasploitable2,
a purposely vulnerable system, is available in the CyExec
testbed. Several vulnerable applications can be found in this
machine, such as vsftpd, PHP, Samba, and PostgreSQL, among
others. Scenarios can be swapped and selected randomly if
different vulnerabilities or attack techniques are considered.
E. Summary
As mentioned, current cyber range problems are related to
high-cost infrastructure relying too much on VMs, and details
of these kinds of open-source scenarios rarely reference up-to-
date vulnerabilities and attacks. Container-based solutions are
starting to appear, but they heavily rely on custom cyber range
description files, using the YAML, XML, or, sometimes, even
the JavaScript Object Notation (JSON) format. There are cases
where IaC tools are not being used, hampering scalability
concerns. In such cases, a custom tool was typically designed
to parse and take action on the aforementioned customized
scenario description files. Randomization is clearly lacking in
some cyber range scenarios, which is understandable given
that developing these testing environments is a slow manual
process.
4
Journal of Cybersecurity Education, Research and Practice, Vol. 2024, No. 1 [2023], Art. 5
https://digitalcommons.kennesaw.edu/jcerp/vol2024/iss1/5
DOI: 10.32727/8.2023.30
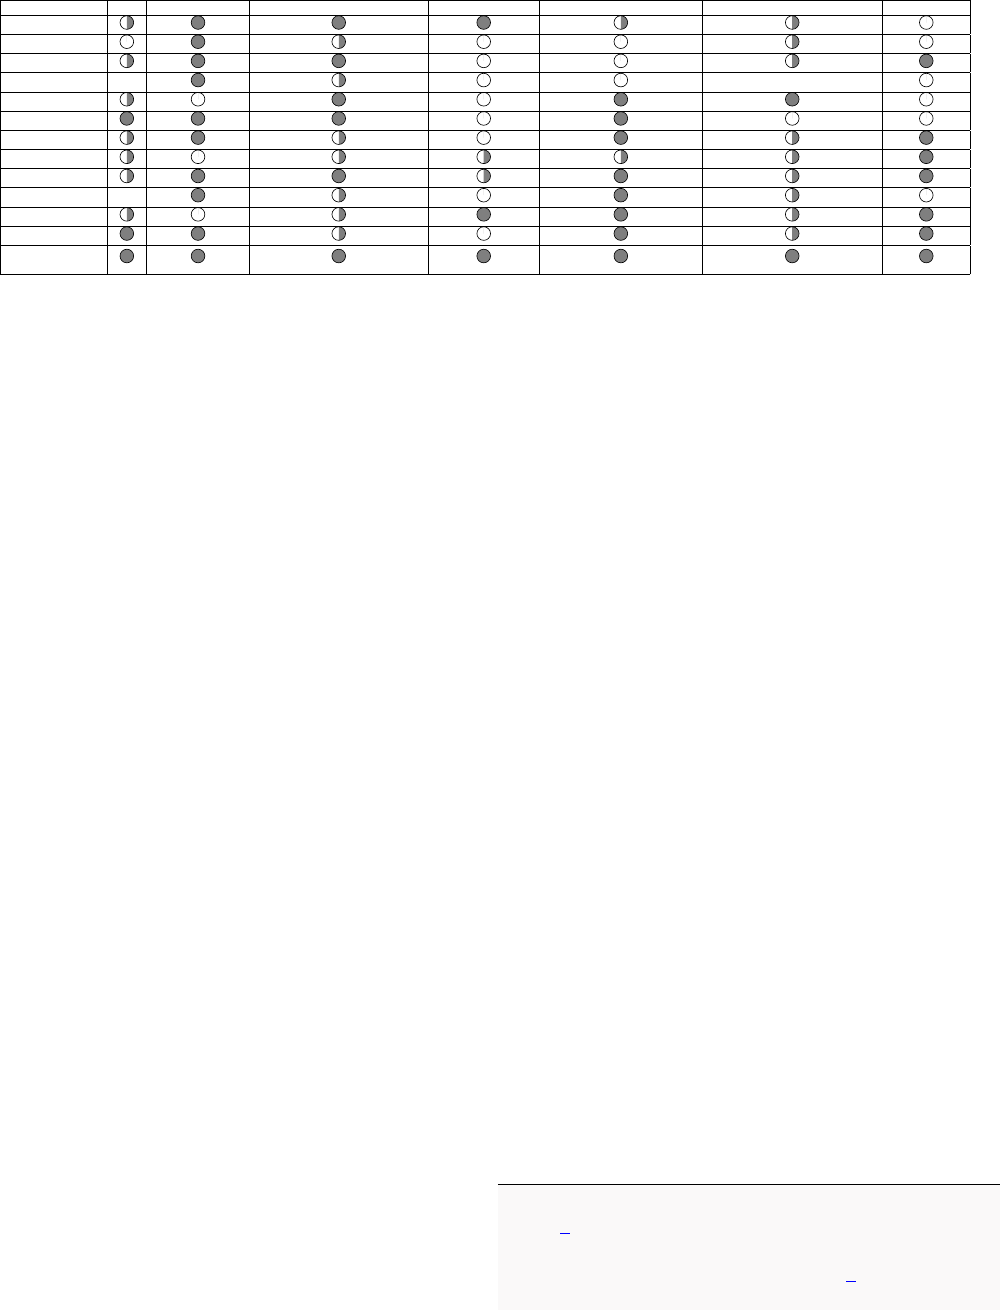
TABLE I: Comparison of Cyber Ranges.
IaC Randomization Local & Cloud Deployments Containerization Enterprise-level Scenarios Linux & Windows Scenarios Open-source
CyExec
Pandora
CyRIS/CyTrONE
NCR - -
SmallWorld
Leaf
CRACK
SEED Labs
Labtainers
CRATE -
DSP
SecGen
Proposed
Solution
Table I presents a high-level overview of the main features
supported by some of the most relevant cyber ranges, finishing
with the proposed solution’s aim. Several marks were given
according to each cyber range. As a way to demystify some
classifications, for the IaC column, half a circle considers ap-
proaches that used customized descriptions to deploy scenarios
or solutions only relying on Docker or Docker-compose with-
out a standard tool. For the Randomization column, tools that
provided some randomization of traffic generation, network,
system, and accounts’ configurations or vulnerabilities present
in the scenario were considered a full circle. Regarding the
Local & Cloud Deployments and Linux & Windows Scenarios,
half a circle was considered for cases where only one of the
features was present. About the Containerization column, half
a circle was considered for scenarios that combined containers
and VMs in separate scenarios. Concerning the Enterprise-
level Scenarios column, full circles were considered for net-
works with a wide variety of services ranging from firewalls,
internal networks, Intrusion Detection Systems (IDS), and
mail servers, among others. At the same time, half-circles
were intermediate representations of enterprise-level networks.
Finally, the Open-source column considers scenarios available
to the general public.
This framework addresses every column of Table I, which
is not achieved by any other framework. Even in cyber range
frameworks such as CyExec, which is complete in terms of
the mentioned features, a possible idea would be to extend
the development. Unfortunately, not all frameworks are open-
source, and some lack community support. Instead, a new
framework with custom functionalities was created using the
technology stack of the development team’s choice.
V. DEVELOPED WORK
A. Architecture
The scenario construction process using Docker containers
targeted enterprise-level networks. As such, corporate environ-
ments normally subdivide networks into three different main
sections:
• External Network refers to the public internet where
machines are not controlled by the organization. As such,
risk modeling activities should be taken into account in
order to evaluate the risk and the probability specific
threats and attack scenarios pose to the internals of the
organization. With this, according to the organization’s
budget, decisions on which security measures to place in
the company’s network are considered and may include
systems like IDS, Intrusion Prevention Systems (IPS),
Firewalls, Antivirus, among others.
• Internal Network which contains the protected machines
of an organization, such as internal databases and services
only available to the company’s employees and not to the
general public.
• Demilitarized Zone (DMZ), which is a network that
protects the company’s internal network and is targeted
with untrustworthy traffic. It includes services available
to the public and sits between the External Network and
the Internal Network. It generally includes web servers,
Domain Name System (DNS) servers, among others.
This project focuses on these three distinct types of net-
works and considers several network services that people
would typically see on enterprise networks.
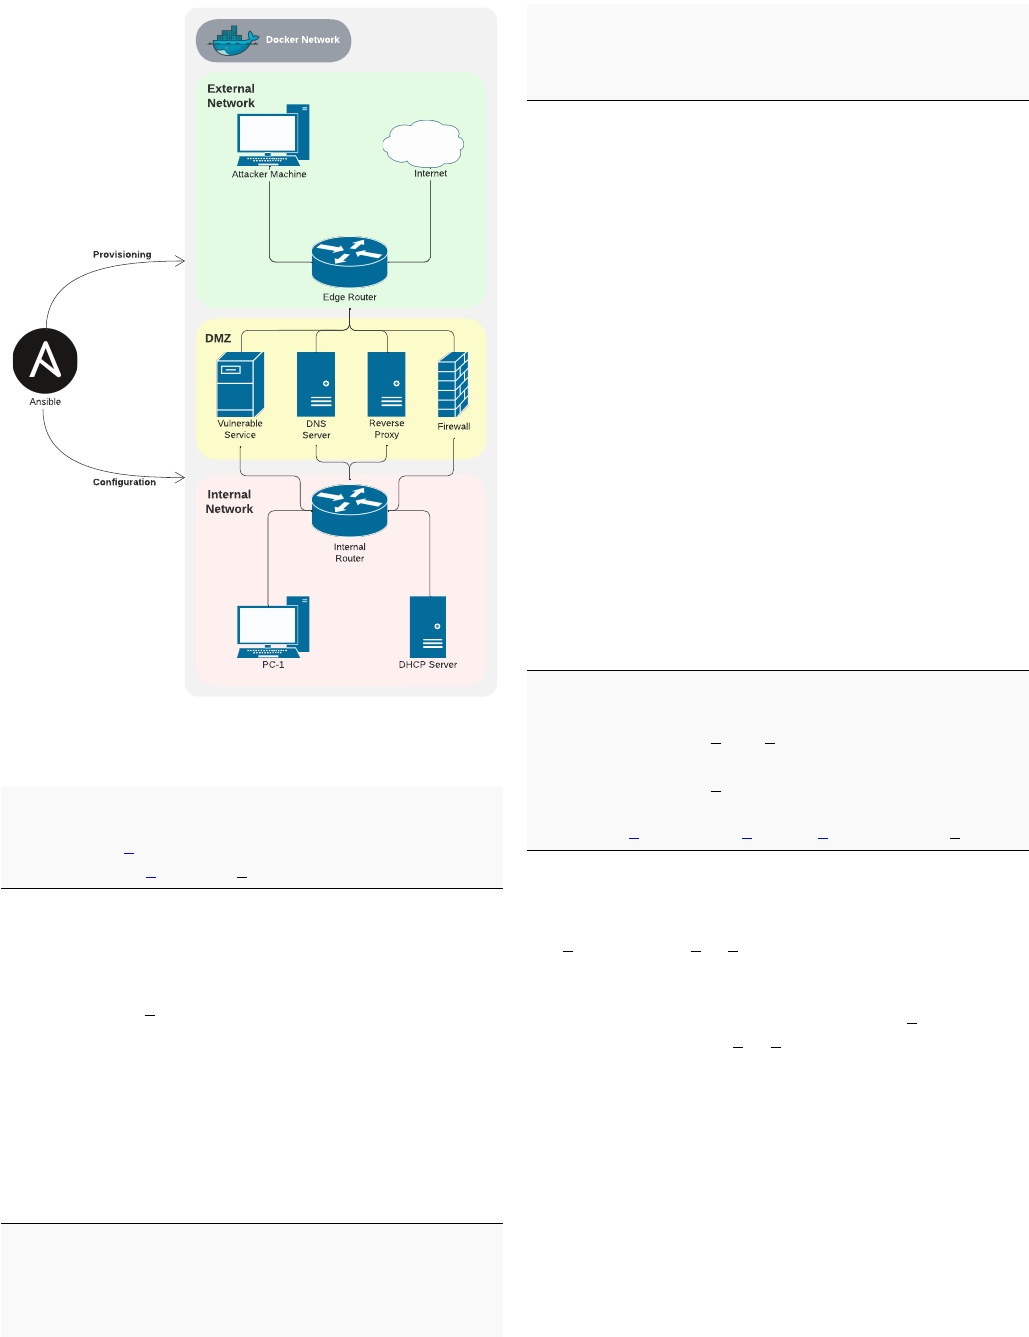
The network architecture presented in Fig. 5 shows the ser-
vices available on every Linux scenario, except for Windows-
based scenarios, which slightly differ from this schema. As
shown, Ansible appears as the tool responsible for configuring
and provisioning the entire network.
B. Ansible Architecture
Three different playbooks include all the developed sce-
narios. The first is explicitly used in Linux-based scenarios,
representing most designed challenges. The second is used
for the Windows Ransomware scenario, and the last for the
Windows Active Directory (AD) scenario. On each playbook,
the first step is to delete stale Docker containers from previous
running scenario executions, as shown in Listing 1.
− h o s t s : l o c a l h o s t
p r e t a s k s :
- name: Remove S t a l e C o n t a i n e r s
a n s i b l e . b u i l t i n . i n c l u d e t a s k s :
t e ardo w n . yml
5
Pinto et al.: Infrastructure as Code for Cybersecurity Training
Published by DigitalCommons@Kennesaw State University, 2023
Text
Internal
Network
Ansible
DMZ
Firewall
Edge Router
Attacker Machine
Vulnerable
Service
Internet
Internal
Router
DNS
Server
PC-1 DHCP Server
External
Network
Docker Network
Provisioning
Configuration
Reverse
Proxy
Fig. 5: Template Network Architecture.
l o o p : "{{ machines + vulnerables.
machines }}"
l o o p c o n t r o l :
l o o p v a r : p c i n f o
Listing 1: Removal of Stale Containers.
Essentially, for every machine object passed, the contents
of the teardown.yml file are run. This uses the commu-
nity.docker.docker container module that is built-in in Ansible
and removes the container under a given name.
C. Ansible Groups and Inventory
Every machine belongs to a group, by default in Ansible, the
all group. Nonetheless, other groups and respective members
were defined in the so-called Ansible Inventory, as presented
in Listing 2.
[routers]
[firewalls]
[external]
[internal]
→ [pcs]
→ [dhcp_servers]
[dmz]
→ [dns_servers]
→ [custom_machines] # Scenario’s vulnerable
machines.
→ [reverse_proxies]
Listing 2: High-level View of Ansible Inventory.
Each word represents a group of one or more machines.
Each group may have several child groups defined by their
name, as it happens above, or by machines, represented by
their Fully Qualified Domain Name or IP address. Groups
themselves are very useful when restricting specific tasks per
group. Then, some groups contain child groups, as happens
with the internal and dmz groups. In the case of Windows-
based scenarios, another group called machine is used and
refers to the Docker container containing the Windows Vagrant
box. Listing 2 is a very high-level view of how groups are
organized within the project. A custom Python inventory script
was created to allow the specification of custom variables
across each group.
D. Generic Scenario Variables
For each playbook, a set of variables is always defined
and corresponds to the generic structure of the network, as
presented in Fig. 5. We start with the Docker images used
across the workflow, their path, and the default image name
in case none is specified.
g e n e r a l :
im ag es :
- name: k a l i t e s t i m g
p a t h : . / a t t a c k e r
- name: b a s e im a g e
p a t h : .
d e f a u l t c o n t a i n e r i m a g e n a m e : b a s e im ag e
Listing 3: Ansible Variables - Docker Images.
As shown in Listing 3, two Docker images are used:
base image and kali test img. The former is an image derived
from node:lts-alpine with some extra packages installed. The
Alpine distribution was chosen due to its smaller size com-
pared to other images. As a result, the base image size is
around 230MB. The kali test img is an image derived from
the official kalilinux/kali-rolling Docker image. This image
was extended to include the Xfce desktop environment, charac-
terized by its low resource consumption and user-friendliness,
as well as the Virtual Network Computing (VNC) package,
which allows screen sharing and remote control from another
device, meaning the computer screen, keyboard, and mouse
are mapped from an external device to the device installed
with VNC. Accessing port 6080 on the target machine makes
it possible to obtain remote control over it, which will be later
used in the scenarios. This Kali Linux image is especially
suited for offensive tasks, and here the only concern was
providing the trainee with a broad range of tools he could
6
Journal of Cybersecurity Education, Research and Practice, Vol. 2024, No. 1 [2023], Art. 5
https://digitalcommons.kennesaw.edu/jcerp/vol2024/iss1/5
DOI: 10.32727/8.2023.30

use in a scenario. Therefore, the image’s size is much larger
(around 11GB) compared to the base image used for common
network services.
The second category of Ansible variables for machines be-
longing to the all group concerns Docker networks, according
to the structure mentioned in Section V-A. The range of each
network is defined, as well as the gateway address which
points to the host machine. This is mandatory by Docker,
as the host machine should always take part in each created
virtual Docker network to forward packets from and to it.
At last, the random byte attribute points to a random byte
that changes across each scenario execution and confers some
degree of randomization, as for each new scenario execution,
the networks’ IP addresses will change.
Several attributes are specified for a machine’s variables
according to the logic of a Docker container. Starting with
its name, the Docker image it uses, possible volumes (anony-
mous, named, or bind mounts), the groups the container be-
longs to, and published ports, meaning ports mapped between
the Docker container and the host machine. Then, the container
is assigned to one or more networks. Lastly, the DNS server
location is specified. In this case, as the attacker machine is
located in the external network, DNS queries are redirected
to the edge router’s network interface sitting in the external
network so that these queries are later forwarded to the DNS
server in the DMZ. This is achieved using iptables rules. For
machines located inside the corporate network, DNS queries
are sent directly to the DNS server sitting in the DMZ network
without the need for any type of forwarding by the edge
router. It is also important to mention other attributes that
are also possible to be specified, namely the devices and
privilege attributes, all having the same meaning as understood
by Docker.
E. Custom Scenario Variables
After presenting how the standard setup for each scenario
is organized, Listing 4 shows the structure of the scenario’s
custom variables, starting with an example of a DNS config-
uration.
dns :
- domain: example − domain . u i . com
i n t e r n a l :
mac h ine: v u l n s e r v i c e
n e t w o r k: dmz net
e x t e r n a l :
mac h ine: e d g e r o u t e r
n e t w o r k: e x t e r n a l n e t
Listing 4: Ansible Variables - DNS.
Here, a domain named example-domain.ui.com is presented
along with internal and external specifications of it. This is
related to two distinct DNS views that are defined. “Internal
view” refers to devices in the internal or DMZ networks;
otherwise, they belong to the “external view.” So, in the listing
mentioned above, the example-domain.ui.com domain points
to the vuln service container located in the DMZ whenever
devices in the “internal view” look for this domain. Devices
in the “external view” point to the external network interface
of the edge router. This means resolved DNS requests made
by external machines will go through the edge router and are
forwarded to the respective machine.
Furthermore, the set of variables concerning custom ma-
chines’ Docker images has a similar format to the one pre-
sented in Listing 3. Still, the representation is a bit more flex-
ible, allowing the specification of the name of the Dockerfile
and arguments to be read in the Docker image creation process.
Then, in the vulnerable machines section, the situation is
quite the same as presented for the generic machines. The
only exception is the inclusion of an attribute that allows the
specification of variables for each machine.
p o r t f o r w a r d i n g :
- d e s t i n a t i o n p o r t : 443
t o m a c h i n e : r e v e r s e p r o x y 1
t o n e t w o r k : dmz n e t
t o p o r t : 443
Listing 5: Ansible Variables - Port Forwarding.
Then, Listing 5 references the port forwarding section
especially relevant for external machines and how they can
communicate with DMZ machines. The attributes meaning are
as follows:
• destination port: the incoming port on the edge router
where packets will later be redirected.
• to machine: the target machine to which packets reaching
the destination port will be forwarded to.
• to network: the network where the target machine is
placed.
• to port: the destination port in the target machine where
the edge router will redirect packets.
Some names may be misleading, such as destination port
and to port. Still, they obey the convention used by iptables.
s e t u p :
m a c h i ne s :
- name: l o c a l h o s t
s e t u p : "{{ playbook_dir }}/
scenarios/chessrs/setup/"
- name: a t t a c k e r m a c h i n e
s e t u p : "{{ playbook_dir }}/
scenarios/chessrs/
attacker_machine_setup/
*
.j2"
Listing 6: Ansible Variables - Setup Section.
7
Pinto et al.: Infrastructure as Code for Cybersecurity Training
Published by DigitalCommons@Kennesaw State University, 2023
Lastly, we have Listing 6, which provides information on
where to find the setup instructions for the localhost and
attacker’s machines.
F. Ansible Roles & Network Services
The structure followed by Ansible uses a feature called
“roles”. A different role is used for every milestone in
the network configuration. Ansible allows defining specific
variables and tasks for each role, making grouping an entire
workflow into separate roles straightforward to reuse in
the development cycle. In the folder structure, a directory
represents a single role. Inside it, specific tasks are defined.
The following sections detail the tasks present for each role.
1) Base Role: The base role is responsible for the sce-
nario’s initial tasks:
• Start the Docker service.
• Building the scenario’s Docker images, as presented in
Listing 3.
• Create the Docker networks.
• Create generic scenario’s Docker containers.
• Assign each created container to one or more Ansible
groups.
2) DHCP Role: The DHCP role configures the DHCP
servers. At first, the dhcp package is installed. Then a
template configuration file is created using Jinja2 templates.
At last, the dhcp service daemon is started.
Essentially, the DHCP lease is responsible for assigning an
internal IP address with the last byte ranging from 64 to 127,
pinpointing the router of the internal network as the gateway
router, and updating the DNS server with the one placed in
the DMZ network.
3) Internal PCs Role: The internal PCs role handles the
behavior of machines inside the internal network. As such, it
runs the following tasks:
• Install the DHCP client package.
• Ask for a DHCP lease to the DHCP server.
• Removes the automatically assigned IP address by
Docker so that its only IP address is the one stated by
the DHCP server.
4) Internal Role: The internal role is destined for the
internal machines and the DHCP server. It simply configures
each device’s default route as the internal router’s interface in
the internal network. Every time a default gateway or static
route is configured across the Ansible setup, the iproute2
package, installed on each Docker image by default, is used.
The iproute2 package allows controlling and monitoring
various aspects of networking in the Linux kernel, namely
routing, tunnels, network interfaces, and traffic control, among
others.
5) DNS Role: The DNS role is somewhat of a more
complex role and is destined for DNS servers. It is responsible
for running the following actions:
• Install the bind DNS server package.
• Copy the necessary template DNS configuration files to
the DNS server container.
• Start the named DNS service.
Two Access Control Lists (ACLs) are created regarding
the DNS configuration files. The internal deals with which
machines stand in the internal and DMZ networks, and the
external points to every other machine that is not part of the
internal ACL, meaning external machines only. Afterward, a
distinction on the IP addresses retrieved by resolved domains
for internal and external machines is made, according to what
was presented in Listing 4.
Essentially, an ACL named “exclude” is created and refers
to the IP address of the edge router because it performs
Network Address Translation (NAT) over specific packets
coming from outside the organization’s network. Then, the
“internal” and “external” views are created, as mentioned
above, which direct requests to different DNS zones according
to the mapped domain. If the DNS query does not match
any internal domain, the request will be forwarded to the
8.8.8.8 Google’s public DNS server.
6) Router Role: The next role leads us to the router’s
configuration steps. Here, the steps vary according to the
internal or edge router configuration steps.
The internal router takes a single action to configure its
default gateway with the edge router’s DMZ network interface,
as this is the gateway that provides internet access to the
network.
The edge router’s task is to provide NAT to packets
whose source matches the internal or DMZ networks. This
is accomplished using the MASQUERADE jump of iptables.
Lastly, a static route is added, specifying that packets destined
for the internal network should be directed to the DMZ
interface of the internal router.
7) Custom Machines Role: The custom machines role is
quite similar to the base role except that it performs Docker
image and container creation on the set of specific machines
required by a scenario instead of the generic ones. Although
both roles slightly differ, using just one role with some small
conditionals would be possible. Still, the adopted approach
allows more accessible future updates.
8) DMZ Role: The DMZ role is also quite simple. It
targets DNS servers, custom machines, and reverse proxies
sitting in the DMZ network. Two tasks are associated with
this role: the static configuration route to the internal network,
which directs packets to the internal router’s interface on the
DMZ network, and the configuration of the default gateway
to access the internet, which points to the edge router’s DMZ
network interface.
8
Journal of Cybersecurity Education, Research and Practice, Vol. 2024, No. 1 [2023], Art. 5
https://digitalcommons.kennesaw.edu/jcerp/vol2024/iss1/5
DOI: 10.32727/8.2023.30
9) Reverse Proxies Role: The reverse proxies role, as the
name suggests, targets the reverse proxies present in the
network. These services sit in front of the scenario’s custom
machines and forward client requests to those machines.
Essentially, they allow establishing HTTPS connections with
the client device, handling all the Secure Sockets Layer (SSL)
certificate-related tasks from the Transport Layer Security
(TLS) connection, and talking with the destination machine
in the back of the reverse proxy using an HTTP connection.
In simple words, it works as a middle agent.
The variables defined for the reverse proxy include a domain
and information on the target machine. The current setup
allows the configuration of several domains specified using
Jinja2 templates. The reverse proxy continuously listens for
connections at port 443, and according to the selected domain,
it forwards the traffic to the appropriate target. If requests are
made to port 80, they are redirected to port 443, meaning the
HTTP connection gets upgraded to HTTPS.
Then, SSL certificates need to be taken into consideration.
For this, a Certificate Authority (CA) was first created by
defining an openssl.cnf file and the necessary folder
structure, as well as generating the public and private keys
associated with the CA.
The reverse proxies role generates a Certificate Signing
Request (CSR), a specially formatted encrypted message sent
from an SSL digital certificate applicant to a CA. The CA then
takes the CSR and generates a public-key certificate signed by
itself. Then, it removes the password from the private key
associated with the newly issued public-key certificate and
copies both files to the reverse proxy container. At last, it
starts the NGINX service with the loaded configuration.
One crucial aspect of this configuration is the signing of
public-key certificates by the CA. This entails that the created
root CA has to be trusted by machines that will eventually
access the domain linked to the digital certificate, in this
case, the attacker machine. To achieve such setup, the CA’s
public-key certificate is loaded as trusted in the attacker
machine both system-wide and in Firefox, as it will be later
explained.
10) Firewalls Role: The firewall role focuses on the two
existing routers which incorporate a firewall. During this
explanation, the internal router’s firewall will be referred to
as the internal firewall, and the edge router’s firewall as the
external firewall.
Starting with the internal firewall, the role performs the
following iptables actions:
• Set the forward chain’s default policy to drop, meaning
the internal router does not forward traffic by default.
• Already established connections or connections previ-
ously associated with existing ones to the internal net-
work are accepted.
• New, previously established, or related connections from
the internal network are also accepted.
Concerning the external firewall, this role performs the
following iptables actions:
• Generic Rules:
– Set the forward chain’s default policy to drop, mean-
ing the external router does not forward traffic by
default.
– Established connections or connections previously
associated with existing ones to the internal or DMZ
networks are accepted.
– Packets from the internal or DMZ networks are also
accepted in the forward chain.
• DNS Rules:
– Set a “prerouting” chain rule in which TCP and UDP
traffic reaching the edge router’s port 53 will have its
destination changed (DNAT) to the real DNS server
sitting in the DMZ network and destination port 53.
– Forwarding traffic to the DNS server is accepted.
– A “postrouting” NAT rule is added to traffic whose
destination is the DNS server.
• Port Forwarding Rules:
– Allow TCP and UDP forwarding according to the
information provided in the example of Listing 5.
The target machine and the target port number are
considered in this regard.
– Accept TCP and UDP traffic in the “prerouting”
chain according to the information provided in the
example of Listing 5. The target machine and the
destination port number are considered in this regard.
– A “postrouting” NAT rule for the traffic reaching the
target machines, as in the example of Listing 5.
With both the internal and external firewalls, the allowed
traffic is restricted from the devices externally placed
with respect to the organization’s network. Only certain
services in the DMZ should be allowed external access,
never devices from the internal network. On the other hand,
connections from inside the corporate network are allowed.
This configuration uses iptables to create a realistic firewall
setup. Therefore, rules are not based on highly-complex logic
like which domains an internal device tries to access and
if they should be blocked, according to a blocklist of IP
addresses and domains.
11) Entry point Role: The entry point role performs the
necessary tasks to configure a particular machine, as defined
at Listing 6. It creates the environment needed to run the
setup scripts, which may include copying template files to the
Docker container and then executing the entry point script.
This role distinguishes when being conducted by the localhost
machine or a different machine. For the localhost, the entry
point script is run without any previous configuration. In the
case of the other machines, the Jinja2 template setup files are
first copied to the target container, and then the entry point
script is run.
12) Mesh Role: The mesh role handles devices that need to
join the Tailscale network, called tailnet. This network allows
communication between each device that belongs to it. This is
9
Pinto et al.: Infrastructure as Code for Cybersecurity Training
Published by DigitalCommons@Kennesaw State University, 2023
useful when focusing on cloud deployments if, for instance, a
connection is established on port 6080 in the attacker machine
to be able to control it remotely and, as further detailed, in
Windows-based scenarios to access the Windows Vagrant box
using Remote Desktop.
This role’s actions start by installing Tailscale and starting
the tailscaled service. After this, the container is instructed to
join a specific Tailscale network using an authentication key
and by specifying a hostname for the machine. An authenti-
cation key allows the addition of new nodes to the Tailscale
network without needing to sign in to the network. A reusable
authentication key was created to connect multiple nodes to
the network. Each time a new node joins the Tailscale network
using this authentication key, it enters the group of Tailscale
ephemeral nodes, which essentially refer to short-lived devices
that are automatically removed from the network after a short
period of inactivity and are immediately removed from the
network in case they are instructed to do so. Also, the usage of
the same hostname for a particular machine allows accessing it
using a Tailscale feature called “MagicDNS” which essentially
registers all the DNS names for the network’s devices using
the following schema: [Device Hostname].[Network
DNS Name] The device’s hostname was already mentioned
above. By default, the network’s DNS name is chosen by
Tailscale upon the first usage but can be modified afterward.
The “MagicDNS” configuration provides easy access to ma-
chines when they are not under the host’s control. This will
be useful in Section X.
VI. CUSTOM SCENARIOS
The set of custom scenarios involves three distinct cyber
ranges:
• A Linux scenario that explores the Apache Log4j vulner-
ability (CVE-2021-44228).
• A Windows-based scenario that explores a Ransomware
malware executable that encrypts a set of files.
• A Windows-based scenario that exposes a vulnerable
Active Directory Domain Controller that provides a vast
attack surface where the trainee can experiment with
several attacks.
For each challenge, details on how to solve them will be
revealed. Some of the intended solutions to get the secret flag
are presented and, when available, unintended solutions.
A. Log4j Scenario
The Apache Log4j vulnerability started haunting the
world during the last month of 2021. It was based on the
Java-based logging package Apache Log4j and essentially
allowed an attacker to execute code on a remote server, the
so-called Remote Code Execution. The scope of machines
this vulnerability targeted was enormous, and some put it on
the same level as the most severe vulnerability along with
Heartbleed and Shellshock. CVE-2021-44228 details which
Log4j versions were affected and gives a brief insight into
what the vulnerability is about. In simple words, an attacker
that can control log messages may run arbitrary code by
means of a process called message lookup substitution.
1) Scenario Construction: This scenario is based on the
Tier 2 Unified Hack The Box challenge and in the Sprock-
etSecurity blog post [2], essentially reproducing a vulnerable
version of the Ubiquiti UniFi network application dashboard.
This works as an interface manager for all the hardware
devices belonging to Ubiquiti’s mesh network allowing the
changing of several network-related configurations. To repli-
cate the scenario, the Goofball222’s GitHub UniFi Docker
container repository version 6.4.54 was used with some
tweaks in the Dockerfile suited for Alpine-based distribu-
tions by installing the python3 package and removing the
JVM_EXTRA_OPTS=-Dlog4j2.formatMsgNoLookups
=true environment variable that turns off variable lookups,
which was turning the network application to be not vulnerable
to the Log4j exploit. It’s also important to refer that this
configuration uses a MongoDB database that supports the
UniFi Network Application, where users are saved.
At first, an HTTPS connection with UniFi’s dashboard could
not be achieved as the default CA certificate was generated by
an untrusted CA. Therefore, it was time to create a Certificate
Authority responsible for issuing the signed public-key digital
certificates associated with a predefined domain name. Turning
the created CA into trusted in the target device made it possible
to achieve an HTTPS connection.
The steps to load the certificates into the Docker container
were as follows:
1) Map the certificates folder path to the
/usr/lib/unifi/cert volume exposed by
the container.
2) Insert in the certificates folder the PEM format SSL pri-
vate key file corresponding to the server’s SSL certificate
under the name of privkey.pem.
3) Insert in the certificates folder the PEM format SSL
certificate with the full certificate chain under the name
of fullchain.pem.
The private key file is associated with UniFi’s dash-
board domain. The full chain file is simply a concate-
nation of the public-key certificates of the CA and the
example-domain.ui.com server’s domain.
Furthermore, Docker entry point scripts were changed to
always reload SSL certificates inside UniFi’s Docker container
upon new executions. This was not the default behavior, as the
Docker image was previously configured to issue a file with
the hashes of the certificates and check for its existence. In
such cases, SSL certificates were not reloaded.
After the above-mentioned SSL certificates are issued, the
newly created root CA’s public-key certificate is needed in the
attacker machine to be considered trustworthy. This way, when
the trainee visits the UniFi dashboard, the website appears with
a legitimate HTTPS connection.
Every template file is within the scenario’s setup folder.
At first, the root CA’s public-key certificate was copied
into a special ca-certificates folder and run the
update-ca-certificates command, which turns the
10
Journal of Cybersecurity Education, Research and Practice, Vol. 2024, No. 1 [2023], Art. 5
https://digitalcommons.kennesaw.edu/jcerp/vol2024/iss1/5
DOI: 10.32727/8.2023.30

newly placed root CA certificate into system-wide trusted.
So, every digital certificate signed by this new root CA will
be deemed safe. After this, the Firefox browser needed to
consider this CA safe. So, the policies.json file was
copied into a special folder.
{
"policies": {
"Certificates": {
"ImportEnterpriseRoots": true,
"Install": [
"ca.crt",
"/setup/ca.crt"
]
}
}
}
Listing 7: Firefox’s Policies File.
Listing 7 presents the policies file, which is read on every
Firefox’s new execution.
After loading the SSL certificates, the desired effect was
obtained, an HTTPS connection when loading UniFi’s dash-
board. Still, there is a slight problem. When hitting the
dashboard’s web page for the first time, the initial wizard
setup was shown. This was overcome by creating a Selenium
script for this effect using Firefox’s WebDriver to instruct the
browser’s behavior remotely. The tasks performed by Selenium
can be summarized in:
• Visiting UniFi’s web dashboard page.
• Setting administrator credentials for accessing UniFi’s
web page. These were specified in the YAML format
as custom variables of the vulnerable service in the
scenario’s specific variables.
• Clicking several wizard setup buttons to move onto more
advanced setup stages.
With these configurations set, it is time to move into the
exploitation phase.
2) Exploit: The goal of the Log4j exploit on UniFi’s
software is to obtain a reverse shell, get the secret flag, and
even leverage access to get the administrative credentials on
the UniFi MongoDB instance as part of the post-exploitation
process.
Initially, a little reconnaissance can be done by checking
which ports are open by default in the victim machine using
nmap. Indeed, port 8443 is open, which is where UniFi’s
interface is.
Then, the https://example-domain.ui.com:8443
domain is accessed, and the login page from Fig. 6 is obtained.
Fig. 6: UniFi’s Initial Dashboard.
As mentioned earlier, the field to target needs to be logged
by Apache Log4j using a malicious Java Naming and Direc-
tory Interface (JNDI) query. In this case, it is the remember
field of the POST request.
Then, it is time to test if the web application is vulnerable
to the Log4j attack. Firstly, the listening for connections on
port 9999 using netcat with nc -lnvp 9999 was done.
From the POST request issued when submitting the login
form, there is only the need to change the remember field
to ${jndi:ldap://172.152.0.2:9999/whatever}
and issue the modified POST request. Notice 172.152.0.2
is the attacker machine’s IP address.
As a connection is established on port 9999 from the
vulnerable Log4j container, the web application is indeed
susceptible to the exploit. The next step is to use the Rogue-
JNDI GitHub tool to obtain a reverse shell on the target.
Essentially, this tool sets up a malicious Lightweight Directory
Access Protocol (LDAP) and HTTP server for JNDI injection
attacks. When the tool first receives a connection from the
vulnerable client to connect to the local LDAP server, it
responds with a malicious entry containing a payload that
will be useful to achieve a Remote Code Execution. The steps
to build upon this foundation are to stage an LDAP Referral
Server that will redirect the initial client request of the victim
to an HTTP server where a secondary payload is hosted that
will eventually run code on the target.
The procedures to set up the exploit include first using
netcat to listen for inbound connections on port 4444 with the
command nc -lnvp 4444 and then following the steps:
1) Clone the Rogue JNDI tool and build the project into a
JAR file using Maven.
2) Generate the Base64 payload that will run in the victim’s
server. It connects to the attacker machine on port 4444,
redirecting both the standard input and standard output
to the remote machine so the attacker can have complete
control over the victim.
3) Running the Rogue JNDI tool to create malicious LDAP
and HTTP servers with the command that will trigger a
reverse shell.
4) Issue a cURL command with the malicious JNDI query
and run the exploit.
11
Pinto et al.: Infrastructure as Code for Cybersecurity Training
Published by DigitalCommons@Kennesaw State University, 2023

As a result, a reverse shell is obtained in the initial
netcat listener, meaning access was granted to the target
server under the unifi user. Running a simple ls -la
command, it is possible to see there is a weird file with
the name “...” (3 dots). By opening it, the challenge flag
flag{l3ts_un1f1_every0ne_l0g4j} is shown.
B. Ransomware Scenario
The Ransomware scenario is the first Windows-based sce-
nario, opening the door to this new dissertation scope. The
initial idea was to combine both Linux scenarios and Windows
scenarios. There was a willingness to continue using containers
to maintain consistency in the overall project. Still, since
the development was based on a Linux host machine, and
the underlying operating system resources and drivers used
were also Linux-based, there was no way to create Windows
containers. This happens because Docker is an OS-Level
Virtualization, and the Docker daemon provides each container
with the necessary kernel-level properties for it to be able to
run. Due to this, Linux applications run on a Linux machine,
and Windows applications run on a Windows platform. Still,
there are exceptions in Windows due to the existence of
Linux Subsystem, making it possible for a Linux container
to run on Windows. With this in mind, the solution was to
use Linux containers with KVM installed to run a Windows
Vagrant box that would allow remote control. In the case of
the Ransomware scenario, the malicious payload comes in the
form of an executable (.exe) file, and having a Windows
machine to run this script was the ideal situation.
This challenge distinguishes itself from the other scenarios
because it is not attack-oriented. As such, there is no attacker
machine and, therefore, no external network. Still, the final
goal stays the same, which is to get the secret flag. This
scenario is forensics-oriented in the sense that the trainee
has to use a set of tools to debug the executable file,
understand the consequences of executing the payload, and
develop the reverse engineering skills necessary to get the flag.
1) Windows Vagrant Box Inside Linux Docker Container:
As mentioned, one cannot run Linux and Windows containers
simultaneously using the same Docker daemon. The solution
to overcome this problem was to install a Windows Virtual
Machine inside a Linux container. From the Docker daemon’s
perspective, all containers are Linux-based. Nonetheless, some
of those containers run a hypervisor, on top of which there is a
Windows Vagrant box. Ultimately, the goal is to configure and
access the Windows machine through Remote Desktop (RDP).
One may ask: Why install a VM inside a container? This
may seem strange to many since installing the VM directly
on the base OS is always possible without needing an extra
container layer. However, running a VM inside a container has
advantages in spinning up multiple identical Windows VMs,
saving tremendous resources, mainly in terms of disk space.
When comparing a scenario where only a single VM runs
directly on the base OS versus a scenario where the VM is
containerized, both situations consume similar resources. For
instance, a VM that takes 30GB of disk space will take 35GB
on a containerized setup. If six copies of a VM are run, the
occupied disk space increases to 180GB, as each copy takes
the exact amount of disk space. The situation slightly differs
in the case of six copies of containerized VMs. In Docker,
there are two distinct concepts: images and containers. Images
turn out to be read-only and are the core of containers that are
created from a read-only layer, the image. On top of this read-
only layer, they add their own read-write layer, which differs
between containers. Considering the example above, where the
Docker image size is 35GB when creating six containerized
VMs, each container will only vary in its read-write layer
interacting with the read-only image. Assuming this read-write
layer has a size of 10GB, all six containers have a combined
size of 60GB on top of the 35GB Docker image, making a
total of 95GB. To take this even further, one could consider
using linked clones in Vagrant VMs in which new VMs only
differing in disk images are created using the parent disk image
belonging to a master VM.
RDP access was a desirable feature in these setups, but
contrary to what happens in Linux, Windows containers cannot
have a Desktop Environment. Instead, they are designed to
run services and applications accessible using the PowerShell
command line interface. Unlike Linux containers, where the
Desktop Environment is an installable component, Microsoft
ships Windows containers in a bundle directly with the OS.
Microsoft published a set of known base images that form
any Windows container’s base. For them, there is no instal-
lable Desktop Environment component, meaning even if using
Windows containers, the issue of not having the possibility of
remotely controlling the UI would be present.
The architecture of the Vagrant box can be seen in Fig. 7.
Base OS
Docker Daemon
Ubuntu Linux Container
KVM-QEMU Hypervisor
Windows 10 Vagrant Box
With RDP Access
Fig. 7: Architecture Of Windows Vagrant Box Inside Docker
Container.
This setup enabled a fully running Windows OS accessible
through RDP and containerized and managed by Docker
daemon. Five different technologies are worth mentioning:
12
Journal of Cybersecurity Education, Research and Practice, Vol. 2024, No. 1 [2023], Art. 5
https://digitalcommons.kennesaw.edu/jcerp/vol2024/iss1/5
DOI: 10.32727/8.2023.30

• Base Operating System, that will be the main hosting
platform.
• Docker Daemon, which will handle the final Docker
image (Ubuntu 18.04 Linux) out of which a container
will be spawned. The Docker image’s main function is
to run a hypervisor on which the Windows VM will run.
• Hypervisor on the Docker Image (KVM-QEMU), which
enables the installation and management of the Windows
VM.
• Windows VM, the machine, a pre-packaged Windows
10 Enterprise Evaluation Vagrant box, that is available
through RDP.
The first step is to build the Docker image with the
hypervisor installed. For this, virtualization (VT-x) must be
enabled in the BIOS settings to launch the VM. Then, in a
Ubuntu 18.04 Linux image, firstly, the QEMU-KVM hypervisor
package and Libvirt, an API library that manages KVM, are
installed. Afterward, the /dev/kvm and /dev/net/tun
devices in the host OS are mapped to the container, as
well as the /sys/fs/cgroup directory, ensuring read-write
permissions on it. Also, the container should run in privileged
mode, meaning it can access almost all resources the host OS
can. Another vital topic worth mentioning is the installation of
Vagrant, which is necessary to run the Windows VM. At last,
the respective Vagrantfile, which contains instructions on how
to build the Vagrant box, is downloaded. The final Vagrant
box size should be about 8.3GB.
Setting up the right iptables rules was a challenge. This
is extremely important to ensure access to the RDP port on
the Vagrant box from out of the container. By default, the
Vagrant box configures firewall rules to allow access only from
within the hypervisor container, meaning machines external to
the hypervisor container do not have access to the Windows
Vagrant box. As such, rules that redirect traffic from the base
OS to the Vagrant box on RDP are needed. The logic followed
is depicted in Fig. 8.
Base OS
Container
iptables rules
Vagrant Box
docker0
172.17.0.1
eth0
172.17.0.2:3389 192.168.121.1 192.168.121.68:3389
virbr1
Fig. 8: Schema of Vagrant iptables Rules.
The inserted iptables rules on the hypervisor container
concerning NAT and port forwarding from the host OS to the
container were:
• Forward new TCP connections on ports 3389 (RDP),
5985 (PSRP HTTP), and 5986 (PSRP HTTPS) destined
to the Windows VM.
• Add a “prerouting” rule that changes the destination
packet address to the Windows VM on connections
reaching ports 3389, 5985, and 5986.
• Add a “postrouting” rule that changes the source packet
address to the hypervisor container on connections reach-
ing ports 3389, 5985, and 5986.
• Forward established and related connections from and to
the Windows VM.
• Reject every other traffic from and to the Windows
machine. Notice the previous rules take precedence over
this rule.
These rules are sufficient for establishing RDP and PSRP
(PowerShell Remoting Protocol) connections. The former is
a protocol for remote desktop access, while the latter is
a protocol that runs over Windows Remote Management
(WinRM). This remote management protocol uses a Simple
Object Access Protocol (SOAP) based API for communication
between the client and the server. Essentially, PSRP establishes
remote sessions with the Windows machine, runs PowerShell
commands and scripts on it, and receives the results back.
The PSRP traffic redirection rules denote how to forward
traffic from Ansible instructions destined for Windows ma-
chines. After the creation of the Windows VM, there is the
need to configure it, so the logic followed was the same
as before, meaning using Ansible to configure the Vagrant
box remotely. This way, commands issued from the base OS
go through the Linux hypervisor container using the above-
mentioned iptables rules and are redirected using NAT to reach
the final target, the Windows VM box. This is possible using
an SSH connection from the Ansible host machine to the
hypervisor container, which will then redirect the traffic. Still,
there are incompatibilities with these different remote access
protocols between Linux and Windows: SSH and PSRP or
WinRM.
A PSRP Ansible connector that connects to Windows-
based machines using the PSRP protocol. A WinRM Ansible
connector could as well be an option here. Still, PSRP offers
the possibility to use a SOCKS5 proxy, which is suited
for handling connections of Windows hosts sitting behind a
bastion, in this case, the hypervisor machine. So, the current
setup uses two different Ansible connectors: the Docker one
that connects to the Linux containers and the PSRP one that
connects to the Windows VM.
In the above paragraph, it was mentioned that the SOCKS5
proxy, which routes traffic back and forth between two distinct
actors, acting as a middleman between the two. Packets going
through this proxy are not modified nor encrypted, only in
cases where traffic is encrypted through an SSH connection, as
it currently happens, from the Ansible host to the bastion host.
This SOCKS5 proxy is needed to forward WinRM commands
to the bastion host. As mentioned, SSH creates incompatibility
issues as it is only suited for remote access commands on
Unix-like systems.
Fig. 9 shows a basic outline of the current configuration.
13
Pinto et al.: Infrastructure as Code for Cybersecurity Training
Published by DigitalCommons@Kennesaw State University, 2023

Docker Network
Vagrant Private Network
Local Network
Ansible Host
(Base OS)
Ansible
SOCKS Client
Listening
Port 1234
WinRM data through
SOCKS5 Proxy
SSH Client
Internal Data
Bastion Host
(Hypervisor
Container)
SSH/SOCKS
Server
SSH Channel
Port 22
Windows Machine
(Windows Vagrant Box)
WinRM Server
(HTTP/HTTPS)
Ports 5985/5986
iptables
NAT & Forward
Fig. 9: Ansible Host, Hypervisor Container and Vagrant Box
Architecture [16].
The network boundaries included in this setup include the
following:
• Ansible Host to the SOCKS Listener:
– The Ansible host forwards data using the WinRM
payload encapsulated in a SOCKS packet.
– A SOCKS5 proxy is set up in the Ansible host.
• SOCKS Listener to the SSH client:
– Data from the SOCKS5 proxy is sent using an
internal SSH channel.
• SSH Channel:
– All data is encrypted using the SSH protocol.
• SSH Server to the WinRM Listener:
– The bastion host, the hypervisor container, acts as
the Ansible controller and sends the WinRM traffic
to the Windows VM using port 5985 or 5986.
– The WinRM service in the Windows VM sees the
bastion host as the source of the communication and
has no idea of the SSH and SOCKS implementation
behind it.
Configuring the SSH proxy that exposes the SOCKS5 proxy
to channel the WinRM requests through the bastion host is
rather simple. The way to go is using SSH multiplexing with
ControlMaster:
ssh -o "ControlMaster=auto" -o "
ControlPersist=no" -o "ControlPath=˜/.
ssh/cp/ssh-%r@%h:%p" -CfNq -D
127.0.0.1:1234 kvm
Listing 8: SSH Proxy Exposing SOCKS5 Proxy.
The command in Listing 8 enables SSH multiplexing,
which allows reusing an existing SSH connection to establish
multiple sessions without needing to re-authenticate every
time, saving resources. Without this, whenever a command is
executed, the SSH client would need to establish a new TCP
connection and a new SSH session with the remote host. A
SOCKS5 proxy is also configured on port 1234. It creates a
channel with the kvm host, an alias in the SSH configuration
file for the hypervisor container, meaning the bastion host.
After this is set up, the variables associated with the hypervisor
container in the Ansible environment must be configured, as
shown in Listing 9.
"ansible_user": "administrator" ,
"ansible_password": "vagrant" ,
"ansible_connection": "psrp" ,
"ansible_psrp_protocol": "http" ,
"ansible_psrp_proxy": "socks5h://localhost
:1234"
Listing 9: Ansible Variables - Hypervisor Container.
In Ansible terms, the host machine issues commands
to the Windows VM as if there is no bastion host in
the middle. Here, the ansible_psrp_proxy variable
pointing to the SOCKS5 proxy server is used, as specified
in Listing 8. Any commands sent through it will be
redirected to the Windows VM. Regarding the socks5h
scheme, it means the DNS resolution is made in the bastion
host, meaning the hypervisor container. Other variables
such as ansible_user and ansible_password
refer to the Windows VM’s credentials. Regarding the
ansible_psrp_protocol, port 5985 is used for HTTP
connections.
2) Scenario Construction: The Ransomware scenario is
based on the FireEye Flare-On Challenge of the 2016 edition
and in the materials of the Malware Analysis and Incident
Forensics course of the Sapienza Universit
`
a di Roma. A
Ransomware attack employs encryption to hold a victim’s in-
formation at ransom. The target user or organization’s critical
data, which includes files, databases, or entire applications, are
encrypted, and a ransom is demanded to provide access.
The Ansible construction of the scenario includes all the
configurations presented in Section VI-B1 and some little
extras:
• Copy of scenario files.
• Tool Installation:
– IDA Free Version - Popular tool that allows users
to debug, disassemble and decompile binary files.
– x64dbg - Debugger and disassembler similar to IDA
but designed mostly for Windows executables.
– Process Explorer - Provides detailed information on
processes, modules, handles, and threads running in
Windows.
– Process Monitor - Used for monitoring and captur-
ing real-time system activity on Windows, including
file system, registry, process, and network-related
events.
– PeStudio - Software analysis tool designed for exam-
ining files in the Windows PE (Portable Executable)
format.
– Resource Hacker - Tool that analyzes, modifies, and
extracts resources in Windows executable files.
14
Journal of Cybersecurity Education, Research and Practice, Vol. 2024, No. 1 [2023], Art. 5
https://digitalcommons.kennesaw.edu/jcerp/vol2024/iss1/5
DOI: 10.32727/8.2023.30
All these tools are installed by default in the Windows VM
and are accessible to the trainee. As mentioned earlier, the
VM is accessible through Remote Desktop, and the credentials
for accessing it are vagrant:vagrant or administrator:vagrant.
3) Reverse Engineering: The process of obtaining a solu-
tion to the challenge requires going through the reverse engi-
neering process. The following descriptions include figures of
low-level Assembly code, which should also be the trainee’s
focus. At first, a basic static analysis will be performed.
Afterward, code snippets will be explored.
Starting with some information PeStudio gives us. The
binary is not packed, meaning the program is not obfuscated
and compressed, making the analysis process more straight-
forward. This can be checked by the fact that the binary’s
sections have very low entropy. With a deeper inspection, a
“Resource Section” is spotted, which shows an image using
Resource Hacker. Using PeStudio, many API imports related
to Microsoft’s Crypto API can be observed, as well as other
interesting imports associated with system parameters, loading
resources, and locating files.
Moving on to the IDA analysis section, the challenge
consists of two files: the malware executable and an encrypted
file inside a folder named briefcase. The first block of code
after the main function builds the “briefcase” Unicode string.
The next system call is SHGetFolderPathW and is identified
by the CSIDL parameter pointing to the desktop directory.
Then, the binary checks if the length of the desktop directory
path is smaller than 248. If it does, the execution moves
forward, concatenating the “briefcase” string with the desktop
path and storing it in a variable. This variable is then fed to
the CreateFileW call, checking for the existence of a directory
named “briefcase” in the Desktop. If not, execution terminates.
This malware sample contains a debugger trap because
due to the fact that a dynamic analysis activity may end up
closing a non-existent file handle and the debugging process
immediately stops.
The next step is a GetVolumeInformationA call fetching
volume C’s serial number. This value is compared against
0x7DAB1D35h, meaning the malware targets a concrete
machine that most likely does not match ours. If so, the
execution terminates.
To move forward in the analysis, there is the need to
patch the binary but keep the result of the subroutine with
0x7DAB1D35h, as this value will be later used in the exe-
cution. After the serial number check, the malware decodes
a global variable using the above-mentioned serial number
as a multi-byte XOR key. The final result string is “those-
filesreallytiedthefoldertogether.” The next phase is related to
starting the cryptography activities using Microsoft’s Crypto
API for file encryption. Firstly, the malware hashes the above-
mentioned long string using SHA-1, deriving an AES-256
symmetric key. Later, it recursively enumerates every file in
the “briefcase” directory and encrypts them. It uses Cipher
Block Chaining (CBC) mode, being the Initialization Vector,
the MD5 of the lower-cased name and the extension of each
file. After this value is set, two handles to the file are obtained:
one for reading and one for writing. The read content goes
through the CryptEncrypt function and is written back to the
file in 16KB blocks.
If there is no file to be encrypted in the “briefcase” folder,
the binary loads a resource, an image asking for a ransom,
and sets it as the Desktop’s Wallpaper.
Ultimately, the trainee must decrypt a previously encrypted
file inside the briefcase folder to find the secret flag.
Given that the malware uses AES symmetric encryption,
one can take advantage of the fact that the key used for
encrypting files is the same as the one used for decrypting
them. So, one possibility that is not so straightforward for
solving the challenge is to patch the binary by replacing
the CryptEncrypt call for CryptDecrypt by modifying
the sample’s Import Address Table (IAT) statically or at
runtime using a debugger. The other possible solution
that is publicly available in the project’s open-source
repository is a Python script that computes the decryption
key of the AES algorithm being the SHA-1 hash of the
string “thosefilesreallytiedthefoldertogether,” taking into
consideration Microsoft’s CryptDeriveKey inner workings,
plus the MD5 hash of the lowercase of the filename and
extension as the Initialization Vector. The decrypted file
content is then unpadded. By applying such operations over
the initially encrypted file inside the “briefcase” folder, it is
possible to obtain the secret flag.
C. Active Directory Scenario
The last custom-made challenge is Windows-based and
goes through the Microsoft Active Directory (AD) technology.
AD complies with a database (or directory) and a set of
services that connect users to the network resources they need.
1) Scenario Construction: The process of constructing this
scenario is very similar to the structure presented in Section
VI-B1. The main difference is the use of a Windows Server
2022 Evaluation box instead of a Windows 10 Enterprise
Vagrant box. This change was added because the scenario fo-
cuses on building a vulnerable AD Domain Controller, which
needs an underlying Windows Server. The other difference
between the ransomware scenario and the AD one is the
fact that now the attacker machine is sitting in the DMZ
network, which simulates an attacker inside the organization’s
network. As with the ransomware scenario, there is no external
network. The last added change concerned iptables rules from
the bastion host to the Windows Server VM. Previously,
only NAT and forwarding operations were performed with
respect to the RDP and WinRM/PSRP connection, as the
main goal was to access the remote VM using RDP and
issue commands to it using the PSRP protocol. Now, as
the challenge’s focus is again attack-oriented, every type of
traffic from the attacker machine to the bastion host should
be redirected to the Windows Server VM. The only exception
is SSH traffic because incoming connections to the bastion
15
Pinto et al.: Infrastructure as Code for Cybersecurity Training
Published by DigitalCommons@Kennesaw State University, 2023
host should not be redirected to the Windows Server VM, as
they are destined to the hypervisor container and not to the
Windows Server VM. With this configuration set, the trainee
can issue attacks from the attacker machine to the Windows
Server VM, knowing the traffic going through the bastion
container will be correctly forwarded.
The development of a vulnerable AD Domain Controller
was based on John Hammond’s Active Directory Youtube
series and currently existing GitHub sources.
The first configurations steps on the Windows Server VM
are:
1) Change the Domain Controller’s hostname to DC01.
2) Install Active Directory Services and create a domain
named xyz.com.
3) Configure the DNS server as the Windows Server VM
itself and create a reverse DNS zone.
4) Create a private network share controlled by Domain
Administrators. Move the secret flag into it.
5) Allow Remote Desktop sessions to ordinary Domain
users, as this is not enabled by default.
6) Change the administrator accounts default passwords.
7) Generate a vulnerable AD schema with a set of Do-
main users and the Domain groups they belong to,
including information on the Domain Controller’s local
administrators. This schema is randomized on every new
scenario execution.
8) Configure the Domain Controller with several kinds of
vulnerabilities the trainee can explore using the previ-
ously generated vulnerable AD schema.
The vulnerable configuration steps include the following:
• Weaken the Domain Accounts password policy to allow
weak passwords linked to user accounts.
• Create the AD Groups and Users and add them to the
respective AD Group.
• Generate a vulnerable configuration to enable Kerberoast-
ing attacks. Essentially, a service account with a weak
password is created and it is specified that future ticket
requests to this service account should use the easily
crackable “RC4” Kerberos Encryption type.
• Configuration suitable for AS-REP Roasting attacks. A
maximum of three user accounts is configured not to
require Kerberos pre-authentication, enabling this kind of
attack.
• Set a maximum of three AD user accounts as DNS
Administrators.
• Set a maximum of three AD user accounts vulnerable to
DCSync attacks.
• Disable SMB Signing which enables the existence of
man-in-the-middle (MiTM) attacks on the SMB Server.
The SMB protocol is typically used for sharing access
to files, printers, and other resources across the network.
2) Exploits: This section intends to explore attacks on the
Active Directory scenario. During the attack phase, we will
use the following tools:
• CrackMapExec, a post-exploitation tool that helps au-
tomate assessing the security of large Active Directory
domains. It supports several types of attacks, including
various protocols such as SMB, LDAP, WinRM, and
Kerberos.
• Impacket, a collection of Python modules for working
with network protocols that are extremely useful for
attacking Active Directory networks.
• Bloodhound, an Active Directory reconnaissance and
attack management tool that depicts the AD network
graphically and uses graph theory to identify hidden
relationships, sessions, user permissions, and attack paths
in a domain.
• Mimikatz, a tool that can exploit Microsoft’s Authen-
tication systems. It can perform attacks such as: Pass
the Hash, Pass the Ticket, Kerberoast Golden and Silver
Tickets, DCSync attacks, among others.
As in the Log4j scenario, the exploitation phase starts by
doing some reconnaissance using, for instance, nmap. Indeed,
port 22 of the hypervisor container, the machine responsible
for redirecting traffic to the target Windows Server machine,
is open.
The next step is to grab a set of commonly used Active
Directory users and a subset of the rockyou.txt password dic-
tionary to test if some AD user accounts are found. At first, the
hypervisor container should be registered as the attacker ma-
chine’s DNS server. Then, one can attempt to get some users
using CME with: crackmapexec ldap 172.100.0.40
-u users.txt -p ’’ -k, where 172.100.0.40 is the
bastion host, and the users file contains some of the commonly
used AD usernames. The retrieved output tells us existing AD
users, as well as information on the Domain Controller, for
instance, the hostname (DC01) and the domain currently being
targeted (xyz.com). With this information in mind, an entry in
the /etc/hosts file of the dc01.xyz.com domain can
be mapped to the 172.100.0.40 IP address.
Moreover, a brute-force attack using both the
users and passwords dictionary can be performed,
again, using CME with crackmapexec ldap
dc01.xyz.com -u users.txt -p passwords.txt
--continue-on-success | grep ’[+]’. With
some luck, a match between the AD users and their
respective passwords is obtained. Then, it is time to test
the login in the Domain Controller using the credentials
of a match with: crackmapexec smb dc01.xyz.com
-u USERNAME -p PASSWORD. The command mentioned
above plus an extra --pass-pol flag can be used to
view the AD password policy. Other flags can be provided,
such as the --users flag to view the currently existing
users, a --groups flag to view the existing groups, or a
--computers flag to view the devices that are part of the
AD domain. All this information is helpful to perform similar
brute-force attacks, given the gathered information on the
used password policy, as well as the information on which
AD users exist. Notice that with the credentials of an AD
user, it is possible to have a Remote Desktop session linking
16
Journal of Cybersecurity Education, Research and Practice, Vol. 2024, No. 1 [2023], Art. 5
https://digitalcommons.kennesaw.edu/jcerp/vol2024/iss1/5
DOI: 10.32727/8.2023.30
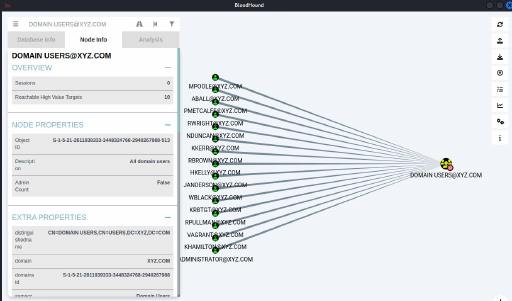
to the remote controller.
The next step is to use Bloodhound to view information
on existing AD users and their groups. At first, one should
configure Bloodhound and then use the bloodhound-python
module, along with the previously fetched credentials of
an AD user, and collect information on the Active Direc-
tory domain, using bloodhound-python -u USERNAME
-p PASSWORD -dc dc01.xyz.com -d xyz.com -c
all. This will generate a set of JSON files which should then
be imported into Bloodhound.
Bloodhound provides a realistic view of several AD objects.
Fig. 10 lists the Domain Users. Each of their attributes can
be selected, providing crucial information about the groups
they belong to, their unique identifiers, and other relevant
information.
Fig. 10: Bloodhound Active Directory Users.
As a next step, one can gather information on the Domain
Controller’s administrators, which combine local and Domain
Administrators, where a randomly selected account is given
local administrator privileges for which the trainee can attempt
to get the plaintext password using brute-forcing techniques.
Bloodhound also allows fetching AD user accounts vulner-
able to Kerberoasting, AS-REP Roasting, and DCSync attacks.
Finding dangerous permissions on Domain Users and Groups
or legacy OS versions on computers belonging to the AD
domain is also possible. Each may lead an attacker to a new
attack path to obtain Domain Administrator privileges. At
last, it allows the user to forge custom queries on the AD
domain data, which turns this tool into one of the favorites
for penetration testers.
Moreover, the trainee can use Impacket WMIExec
module to perform lateral movement. This module allows
executing commands on a remote system and establishing
a semi-interactive shell on the remote host. As the current
setup uses a bastion host, the connection is not directed
to the Domain Controller, meaning there is the need
to perform a tiny tweak on some module files. After
all this, the trainee can run impacket-wmiexec
xyz.com/USERNAME:[email protected]
to obtain a remote shell if using the local administrator
account. It can then check the privileges of the current user
session with whoami /priv or try the same command with
impacket-psexec. In this case, no remote shell is obtained
because Windows flags this as a malicious operation. This
attack works if the Domain Controller’s Windows Defender
is turned off. Simultaneously, the trainee can also check
for RDP Desktop access using impacket-rdp_check
xyz.com/USERNAME:[email protected].
Impacket also provides an SMB Client module to
list the available network shares. With this tool, it is
possible to observe the SYSVOL Domain Controller
share listed, and also an INTERNAL share, on which
only Domain Administrators have read access. To test
this, the trainee can run impacket-smbclient
xyz.com/USERNAME:[email protected].
This share is where the secret flag is located.
Going more profound in the AS-REP Roasting theme, the
Kerbrute tool that, similarly to CrackMapExec performs brute-
force attacks on specific users, can be used. Furthermore, it
identifies which accounts have pre-authentication disabled,
meaning they are vulnerable to this attack. If a match
between a user and password is found, it saves the
Ticket Granting Ticket (TGT) ticket for each match
found, which opens the door for Pass the Ticket attacks.
To perform the AS-REP Roasting attack, the trainee
can run crackmapexec ldap dc01.xyz.com -u
users.txt -p ’’ --asreproast out.txt, where
the users’ file contains the AD user with pre-authentication
disabled found using Kerbrute. This command captures the
AS-REP response. Then, one can use hashcat to crack it
and obtain the plaintext password with hashcat -m18200
out.txt passwords.txt.
It is time to enter the Kerberoasting world. The target here
is service accounts, so each one must be enumerated. For this,
the trainee should first brute-force the RID, the unique value
representing an AD object. Then it can issue the command
crackmapexec smb dc01.xyz.com -u USERNAME
-p PASSWORD -d xyz.com --rid-brute. Then, it
should create a file with the service account names and
use the GetUserSPNs Impacket script with the credentials
of an AD user account to get the Ticket Granting Service
(TGS) tickets of the vulnerable service account. The
command is as follows python getUserSPNs.py
xyz.com/USERNAME:PASSWORD -usersfile users
.txt -output file hashes.kerberoast,
and finally, it is possible to crack the tickets using
hashcat with hashcat -m13100 --force -a 0
hashes.kerberoast passwords.txt.
The next attack is Pass the Ticket, where the only premise
is the fact that access is granted to the local administrator
account in the Domain Controller and use Impacket to
dump the NTLM hashes of the administrator account
using impacket-secretsdump -just-dc-ntlm
xyz.com/USERNAME:[email protected]. The
next technique is called Overpass the Hash because it
uses an NT hash to obtain a Kerberos ticket that will be
later used to impersonate a user. Then, to grab the TGT
17
Pinto et al.: Infrastructure as Code for Cybersecurity Training
Published by DigitalCommons@Kennesaw State University, 2023

ticket using the Impacket GetTGT module, the command
impacket-getTGT xyz.com/Administrator -has
hes LMHASH:NTHASH is used. Lastly, there is the need
to export the KRB5CCNAME environment variable with the
path of the TGT ticket and use Impacket’s WMIExec module
to get an Administrator shell on the Domain Controller using
the Pass the Ticket attack. The trainee can also use Impacket’s
SMBClient module to access the internal network share and
grab the secret flag. This is the intended solution for solving
the challenge.
The unintended solution uses PsExec to perform Local Priv-
ilege Escalation, which allows a non-admin process to escalate
to SYSTEM if running PsExec with .\PsExec64.exe
-accept eula \\dc01 -s cmd using the local adminis-
trator account on a Remote Desktop session. Lastly, the trainee
should change the directory into the internal network share
folder and print out the flag.
To perform the Golden Ticket attack, the trainee
first grabs the NT hashes using Impacket’s Secrets
Dump module, as before, and the domain SID with
crackmapexec ldap dc01.xyz.com -u USERNAME
-p PASSWORD --get-sid. Then it can get a re-
mote session using the local administrator account in
the Domain Controller and, using Mimikatz in the re-
mote machine, dump the KRBTGT account hashes by
performing a DCSync attack with lsadump::dcsync
/domain:xyz.com /user:krbtgt. Then, to craft the
Golden Ticket, it needs the obtained Domain SID and the
KRBTGT NT hash. With not just a Domain Controller but
also workstations, the trainee should be able to run the attack
and get administrator privileges in the Domain Controller.
Lastly, a DLL injection attack can be performed using a
vulnerable AD account belonging to the DNSAdmins group.
Essentially, this DLL is a reverse shell that connects to the
attacker machine, and the threat actor should be able to obtain
SYSTEM privileges on the Domain Controller machine.
The Domain Controller is vulnerable to a wide range of
attacks. Some of them were presented above, but many others
can be used to target the domain. As mentioned before, this
scenario reveals itself as extremely useful as a way to provide
the trainee with hands-on experiments for all the possible
attacks.
VII. IMPORTED SCENARIOS
By now, the inner workings of the scenario construction
process should be clear. The most complex scenarios were
detailed in Section VI, but the project supports the addition of
already existing scenarios. To keep the same logic followed so
far was taken into consideration. As such, the final decision
was to pick scenarios that were already based in Docker.
Through profound research using platforms like CTFtime, sev-
eral scenarios from the 2023 DiceCTF competition available
on GitHub were chosen. A total of 23 challenges from the
2023 DiceCTF edition were imported. To enable this, a Python
script was created to convert the scenarios from the format
they were published on GitHub to the one the framework
understands.
Every imported DiceCTF scenario typically has a YAML
file that is core to understanding the challenge. There, one
can find information on the challenge’s name, author, a
short description, where to find the secret flag, the files
that should be provided to the trainee so he can have a
deeper understanding of the presented code, and the ports
that the scenario’s containers should expose to the exterior.
With all this information in place, it was time to organize
the folder structure for each scenario. The Python script first
pulls the DiceCTF’s GitHub repository and recursively looks
for the challenges that use Docker. The ones that do not
use it are, therefore, excluded. Other specific checks are also
performed in this sense, for instance, challenges pinpointed
to be excluded because their Docker setup is incompatible
with the framework’s setup, simply because they use Docker
images that do not support the installation of python3 and
iproute2 packages. Both these packages are required. The
former is to be able to run Ansible playbooks and the latter
to configure static routes between containers. Then, the script
goes through the challenge mentioned above’s YAML file and
starts creating the scenario’s variables file. As before, each sce-
nario’s vulnerable container is exposed via a domain, and the
format followed by DiceCTF is CHALLENGE_NAME.mc.ax.
In the variable’s file, the necessary configurations in the DNS
server are created, reverse proxy, and the edge router’s port
forwarding. As each scenario is attack-oriented, one must
include the attacker machine in the external network of the
setup. This will be the machine in control of the trainee.
The following tasks involve setting up the custom scenario’s
structure, which is very similar for each scenario. The only
things that change are the created containers and the domain of
the exposed service. If the scenario has two or more containers,
the container’s names are mapped via the DNS server, as
usually happens in Docker. For instance, if a scenario deploys
containers app and mongo, the app container may attempt
to access the database using the mongo domain. As such, the
mongo string must be mapped to the mongo container’s IP
address.
VIII. SCENARIO EXTENSIBILITY
This topic intends to address the scenario extensibility
theme. This topic is essential because it ensures the project’s
continuity regarding future updates. Scenario extensibility is
closely related to what was presented in Section V-E. For
this framework to support new scenarios, developers must
understand the project’s inner workings. This encompasses
variable declarations for each scenario, namely DNS con-
figurations for new domains, port forwarding issues, entry
point setup, and representation of custom machines. Given
the knowledge obtained so far, adding new scenarios to the
current configuration should be relatively straightforward.
A new folder inside the scenarios folder should be cre-
ated for each scenario. Then, a file named challenge
vars.yml
should store the custom variables of the scenario. The rest
18
Journal of Cybersecurity Education, Research and Practice, Vol. 2024, No. 1 [2023], Art. 5
https://digitalcommons.kennesaw.edu/jcerp/vol2024/iss1/5
DOI: 10.32727/8.2023.30

of the folder structure is dedicated to scenario’s files. Every
configuration should be specified on the challenge vars.yml
file.
Firstly, the DNS configuration, where information on each
domain should be specified. This includes selecting the ma-
chines to which internal and external DNS requests should be
mapped. Afterward, it is important to determine the Docker
images that will be linked to the custom Docker containers of
the scenario. This includes the Docker images’ name, the path
to reach the Dockerfile, and, optionally, possible arguments
to the Docker image construction process. While explaining
how the framework works, the idea of having a domain
associated with the vulnerable machine was always taken into
consideration because it is easier for the trainee to reach the
vulnerable machine by a domain than by an IP address. While
expanding the project’s scenarios, the same line of logic was
followed. As such, adding a reverse proxy to redirect each
request to the appropriate Docker container is mandatory.
With this in mind, Docker image configuration for the
proxy should also be included. The next step is to configure
the Docker containers of the custom machines by specifying
their name, the Docker image they are associated with, the
groups they belong to, the Docker networks and assigned
IP address, possible Docker volumes, information on where
to find the DNS server, environment variables, and optional
variables. The mandatory Docker containers include, again,
the reverse proxy and the DNS server. An important note is
that the reverse proxy configuration should consist of a set of
variables later used in the NGINX configuration, as explained
in Section V-F9. This includes specifying the domains to be
mapped by the reverse proxy and the machines and ports the
requests should be redirected. Notice that this setup allows
load balancing configurations as several machines can be
specified to the same domain.
The next topic concerns port forwarding configurations on
the edge router. The goal of this configuration is to redirect
requests from the attacker’s machine located in the external
network to the vulnerable service. But since there is a reverse
proxy in between, requests are first redirected to it, which
then forwards the packets to the final vulnerable service. This
configuration allows us to configure the edge router’s inbound
port and configure the target machine and port to which
packets should be redirected. In situations where the target
machine is the reverse proxy, its destination port should be
443 (HTTPS), as specified in Section V-F9. In scenarios like
Log4j, the connection between the attacker machine and the
vulnerable service is not handled by a reverse proxy, meaning
it can map packets directly to the vulnerable service.
Lastly, it is crucial to pay attention to the entry point
scripting section. For configurations in Docker containers,
there is a need to include a folder with a set of Jinja2
templating files that support the inclusion of variables specified
in the YAML files. There is no need to use Jinja2 templates
for configurations in the local machine. With each of these
configurations, an entrypoint.sh.j2 or an entrypoint.sh file
should be created, as it will be the script that Ansible’s actions
will trigger. Concerning the setup of the attacker machine,
including the setup of the previously mentioned root CA, is
needed so that the digital certificates are considered trusted
across scenarios.
Regarding Windows-based scenarios, the only change is cre-
ating a hypervisor container that will host the Windows VM.
To configure and provision the Windows VM, the developer
may create a new set of Ansible playbooks that handle the
configuration according to his will.
Having these considerations in mind and following the logic
of the already presented scenarios, it is simple to expand the
project to new scenarios.
IX. USER INTERFACE PANEL
For users that like to handle the scenario launching with the
touch of a button, a user interface was created. It presents a
listing of every scenario, as shown in Fig. 11.
Fig. 11: User Interface Panel.
The UI panel consists of two primary tabs, one for all the
available scenarios and one for the solved scenarios. Two side-
bar filters are presented for the categories of the challenges
and their difficulty. For each scenario, details associated with
it, namely the name, author, category, difficulty, a short
description, and the domains of the services to be targeted
within the scenario, are visible to the user. Furthermore, there
is a bottom panel where the user receives real-time feedback
on the scenario’s execution steps provided by Ansible via a
WebSocket.
X. CLOUD DEPLOYMENT
One of the project’s key aspects was the ability to run
complex scenarios with the effort of a click or a command
in the local machine. A UI panel was created to broaden the
accessibility to users that want to keep it simple. However, the
project focused on supporting remote deployments, namely,
cloud deployments.
During the development, Microsoft Azure was the selected
cloud provider. Two types of Azure VMs were created: a
Standard D2ads v5 and a Standard E2bs v5, featured with
2 vCPUs, 8GB and 16GB of RAM, respectively, and 128GB
disk space due to the amount of memory the current cyber
ranges take. The OS used was Ubuntu 22.04. Notice the
selected VMs need to have KVM virtualization enabled;
19
Pinto et al.: Infrastructure as Code for Cybersecurity Training
Published by DigitalCommons@Kennesaw State University, 2023
otherwise, the setup of Windows-based scenarios will not
work.
For every scenario deployment, the last steps include
the installation of Tailscale in the attacker machine
(attackermachine) and/or in the hypervisor container
(kvmcontainer). After the installation of this tool, these
machines are added to a Tailscale network as ephemeral
nodes with a previously generated authentication key that one
can use to sign in to the network. Even the Azure VM, where
the project was later deployed, had Tailscale installed and
joined the network using the same authentication key. With
such a configuration set, accessing every machine belonging
to the Tailscale mesh network was easy using MagicDNS.
Through the host machine, which is also part of the Tailscale
network, one can access the attacker machine using the
domain attackermachine.rhino-duck.ts.net,
the hypervisor container using
kvmcontainer.rhino-duck.ts.net, and the remote
machine using local.rhino-duck.ts.net. Notice
rhino-duck.ts.net is Tailscale’s network domain.
With the remote deployment set in place, the trainee can
use these domains to access every remote container without
needing any port forwarding or firewall configurations set.
This means it can access the attacker machine using VNC,
Remote Desktop into the Windows VM, and even access
the UI panel hosted in the remote machine. Notice that on
every new scenario execution, either via the UI panel or
the command line, the first step is attempting to remove
possible attacker or hypervisor machines from the Tailscale
network so that when new scenarios are deployed and other
machines attempt to join the Tailscale network, there is
no collision between domain names. Doing so ensures the
correct machines are always targeted when accessing any of
the domains mentioned above.
CONCLUSION
The current thesis touches on a multitude of topics and
approaches. In this section, we go over each of these.
The literature review process revealed many cyber ranges
built using old-case-driven approaches. To improve this pro-
cess, a DevOps approach relying on Infrastructure as Code
with Ansible to configure and provision cyber range scenarios
based on Docker containers was used. Moreover, an enterprise-
level network template was developed, considering various
attack paths, enabling the trainee to solve a scenario in
many ways. Randomization was addressed by changing the
IP address of each container on every new scenario execution.
Using Ansible, the created framework is capable of integrating
a wide range of Docker-based scenarios supported by an
enterprise-level network in a cost-effective manner. Creating
custom scenarios with new environments related to world-
known vulnerabilities, namely, Log4j, which haunted several
companies across the end of the year 2021, meant a huge
knowledge improvement. Furthermore, not only Linux operat-
ing system scenarios were visited. But with the aid of Vagrant,
the project was expanded to Windows-based scenarios, which
introduced another degree of complexity. Among the devel-
oped scenarios, a Ransomware sample was used, replicating
a threat that still haunts individuals and companies nowadays.
A purposely vulnerable Active Directory Domain Controller
was developed where trainees can test every sort of attack
path. The journey of custom scenario creation does not finish
here, as the framework was designed to allow the integration
of new scenarios. To make the framework easy to manage, a
UI panel was created. It works in sort of a CTF-like platform,
where a user can launch scenarios, exploit them and submit
the correct secret flag to mark them as solved. Finally, to make
the framework flexible, the scenarios were deployed not only
locally but to a remote machine and joined containers that
needed to be accessible from the exterior to a Tailscale mesh
network.
In conclusion, a straightforward open-source cyber range
framework [3] that addresses the knowledge gaps the cyber-
security force needs to build upon was developed.
FUTURE WORK
The final outcome of the developed framework is quite
interesting. However, many things can be considered for
future work, namely:
Scenarios
Pursue further efforts in creating scenarios that use a
wider range of network services, for instance, Mail servers,
Intrusion Detection, and Prevention Systems. The possibility
of using real hardware in some scenarios could also add value
to the project. The ability to generate traffic from hypothetical
users sitting in the network and logging the activities carried
by an attacker to try to exploit a vulnerable service could
also be meaningful from the trainee’s point of view.
Scenarios Supporting Multiple Trainees
The current framework is suited for a single trainee only.
A possible future improvement could be enabling scenario
deployments to multiple remote machines so that numerous
trainees can improve their skills in a style similar to a CTF
competition.
Randomization
Several possible avenues of research were identified during
the Literature Review (cf. Section IV), which were not
fully explored. Regarding randomization, it was mentioned
that every time a scenario is launched, the IP address
of each container varies. The ability to experiment with
several attack paths in certain scenarios was also taken into
consideration. However, further developments can consider
the randomization of user accounts, credentials, operating
systems, other network configurations, and services. Even if
considering the above-mentioned traffic generation, several
types of traffic could be generated.
Docker Escape Concerns
20
Journal of Cybersecurity Education, Research and Practice, Vol. 2024, No. 1 [2023], Art. 5
https://digitalcommons.kennesaw.edu/jcerp/vol2024/iss1/5
DOI: 10.32727/8.2023.30

This framework is tailored for running in controlled
environments. Even in cloud deployments, access to
externally accessible machines is guaranteed only if the
machine trying to access them is part of the Tailscale
network. The traffic exchanged between the mesh network
is encrypted, and any device sitting outside it cannot access
any machine or decrypt any traffic. Still, if by any means the
trainee feels inspired to perform Docker escape attacks, it
would be helpful to explore some countermeasures to prevent
the trainee from accessing the host system.
ACKNOWLEDGMENT
This study was made possible in part with support from
the Faculty of Engineering of the University of Porto, from
Rolando Martins, partially funded by POCI-01-0247-FEDER-
047264 (Theia) financed by Fundo Europeu de Desenvolvi-
mento Regional (FEDER), through COMPETE 2020 and Por-
tugal 2020 and from Carlos Novo, funded by FCT, Fundac¸
˜
ao
para Ci
ˆ
encia e Tecnologia, through the individual research
grant 2021.08532.BD.
REFERENCES
[1] Rebecca Acheampong et al. “Security Scenarios Automation and
Deployment in Virtual Environment using Ansible”. In: 2022 14th
International Conference on Communications (COMM). 2022, pp.
1–7. DOI: 10.1109/COMM54429.2022.9817150. URL: https://doi.org/
10.1109/COMM54429.2022.9817150.
[2] Another Log4j on the fire: UniFi. Available at https://www.
sprocketsecurity.com/resources/another-log4j-on-the-fire-unifi. Last ac-
cessed in May 2023.
[3] Cyber Range Framework: GitHub. Available at https://github.com/
2dukes/Cyber-Range-Framework. Last accessed in August 2023.
[4] Razvan Beuran et al. “Integrated framework for hands-on cy-
bersecurity training: CyTrONE”. In: Computers & Security 78
(2018), pp. 43–59. ISSN: 0167-4048. DOI: https://doi.org/10.1016/j.
cose.2018.06.001. URL: https://www.sciencedirect.com/science/article/
pii/S0167404818306527.
[5] Francesco Caturano, Gaetano Perrone, and Simon Pietro Romano.
“Capturing flags in a dynamically deployed microservices-based het-
erogeneous environment”. In: 2020 Principles, Systems and Applica-
tions of IP Telecommunications (IPTComm). 2020, pp. 1–7. DOI:
10.1109/IPTComm50535.2020.9261519. URL: https://doi.org/10.1109/
IPTComm50535.2020.9261519.
[6] Wenliang Du. “SEED: Hands-On Lab Exercises for Computer Security
Education”. In: IEEE Security & Privacy 9.5 (2011), pp. 70–73. DOI:
10.1109/MSP.2011.139. URL: https://doi.org/10.1109/MSP.2011.139.
[7] Bernard Ferguson, Anne Tall, and Denise Olsen. “National Cyber Range
Overview”. In: 2014 IEEE Military Communications Conference. 2014,
pp. 123–128. DOI: 10.1109/MILCOM.2014.27. URL: https://doi.org/10.
1109/MILCOM.2014.27.
[8] Massimo Ficco and Francesco Palmieri. “Leaf: An open-source cyber-
security training platform for realistic edge-IoT scenarios”. In: Journal
of Systems Architecture 97 (2019), pp. 107–129. ISSN: 1383-7621.
DOI: https://doi.org/10.1016/j.sysarc.2019.04.004. URL: https://www.
sciencedirect.com/science/article/pii/S1383762118304442.
[9] Tommy Gustafsson and Jonas Almroth. “Cyber Range Automation
Overview with a Case Study of CRATE”. In: Secure IT Systems: 25th
Nordic Conference, Nord-Sec 2020, Virtual Event, November 23–24,
2020, Proceedings. Berlin, Heidelberg: Springer-Verlag, 2020, pp.
192–209. ISBN: 978-3-030-70851-1. DOI: 10.1007/978-3-030-70852-
8
12. URL: https://doi.org/10.1007/978-3-030-70852-8 12.
[10] Hetong Jiang, Taejun Choi, and Ryan K. L. Ko. “Pandora: A Cyber
Range Environment for the Safe Testing and Deployment of Au-
tonomous Cyber Attack Tools”. In: Security in Computing and Commu-
nications. Ed. by Sabu M. Thampi et al. Singapore: Springer Singapore,
2021, pp. 1–20. ISBN: 978-981-16-0422-5. DOI: 10.1007/978-981-16-
0422-5 1. URL: https://doi.org/10.1007/978-981-16-0422-5 1.
[11] Ryotaro Nakata and Akira Otsuka. “CyExec*: A High-
Performance Container-Based Cyber Range With Scenario
Randomization”. In: IEEE Access 9 (2021), pp. 109095–109114.
DOI: 10.1109/ACCESS.2021.3101245. URL: https://doi.org/10.1109/
ACCESS.2021.3101245.
[12] G. Perrone and S. P. Romano. “The Docker Security Playground: A
hands-on approach to the study of network security”. In: 2017 Principles,
Systems and Applications of IP Telecommunications (IPTComm). 2017,
pp. 1–8. DOI: 10.1109/IPTCOMM.2017.8169747. URL: https://doi.org/
10.1109/IPTCOMM.2017.8169747.
[13] Cuong Pham et al. “CyRIS: A Cyber Range Instantiation System for
Facilitating Security Training”. In: Proceedings of the 7th Symposium
on Information and Communication Technology. SoICT ’16. Ho Chi
Minh City, Vietnam: Association for Computing Machinery, 2016,
pp. 251–258. ISBN: 9781450348157. DOI: 10.1145/3011077.3011087.
URL: https://doi.org/10.1145/3011077.3011087.
[14] Z. Cliffe Schreuders et al. “Security Scenario Generator (SecGen): A
Framework for Generating Randomly Vulnerable Rich-scenario VMs
for Learning Computer Security and Hosting CTF Events”. In: ASE @
USENIX Security Symposium. 2017.
[15] Michael Thompson and Cynthia Irvine. “Labtainers Cyber Exercises:
Building and Deploying Fully Provisioned Cyber Labs That Run on
a Laptop”. In: Proceedings of the 52nd ACM Technical Sympo-
sium on Computer Science Education. SIGCSE ’21. Virtual Event,
USA: Association for Computing Machinery, 2021, p. 1353. ISBN:
9781450380621. DOI: 10.1145/3408877.3432490. URL: https://doi.org/
10.1145/3408877.3432490.
[16] Windows Host Through SSH Bastion on Ansible. Avail-
able at https://www.bloggingforlogging.com/2018/10/14/
windows-host-through-ssh-bastion-on-ansible/. Last accessed in
May 2023.
21
Pinto et al.: Infrastructure as Code for Cybersecurity Training
Published by DigitalCommons@Kennesaw State University, 2023
