


v
Contents at a Glance
About the Author ...................................................................................................xvii
About the Technical Reviewer ................................................................................xix
Acknowledgments ..................................................................................................xxi
■Chapter 1: Getting Started with Vagrant ............................................................... 1
■Chapter 2: Four Web Frameworks in Four Minutes ............................................. 21
■Chapter 3: The States of VM ................................................................................ 41
■Chapter 4: Default Configuration and Security Settings of the Guest VM ............. 65
■Chapter 5: Your First Box ..................................................................................... 85
■Chapter 6: Provisioning ....................................................................................... 99
■Chapter 7: Creating Boxes from Scratch ........................................................... 127
■Chapter 8: Configuring Vir tual Machines .......................................................... 157
■Chapter 9: One True Workflow ........................................................................... 187
■Chapter 10: Going Pro ....................................................................................... 205
Index ..................................................................................................................... 225
www.allitebooks.com

1
CHAPTER 1
Getting Started with Vagrant
This chapter introduces Vagrant, the tool you want to master. We start with a short description of Vagrant: its
role and why you should learn it in the first place. To fully appreciate its benefits, we will analyze the current
approaches to set up a development environment for a web application. After summarizing the problems
with traditional methods, we will discuss how virtualization can help resolve various issues. With a clear
image of the virtual approach, we will demonstrate the simplicity offered by Vagrant. Then we will proceed
with the installation of the software; finally, you will take a look at the built-in manual and the Vagrant
documentation. The pros of using Vagrant that you will learn here should convince you to give Vagrant a try.
What Is Vagrant?
Vagrant is a tool that simplifies the workflow and reduces the workload necessary to run and operate virtual
machines (VMs) on your computer. It also does the following:
• Offers a very simple command-line interface to manage VMs
• Supports all major virtual solutions: VirtualBox, VMWare, and Hyper-V
• Supports most popular software configuration tools, including Ansible, Chef,
Puppet, and Salt
• Facilitates procedures to distribute and share virtual environments
Vagrant shines when it is used for web applications but is not restricted to this particular task. It
should be considered a general-purpose tool to work with VMs. If you have any previous experience with
virtualization, you will be amazed by the simplified workflow offered by Vagrant. If virtual solutions are
something that you have not tried yet, you will be surprised by the opportunities Vagrant offers.
Vagrant provides a simple and uniform command-line interface. You can think of it as the way to
standardize the workflow when using VMs. No matter which virtualization solution you use or how intricate
your virtual environment might be, Vagrant will boot your VM (or VMs) with just one command:
$ vagrant up
This single command is the most fundamental and important feature of Vagrant and it is all your
team members need to know to proceed with their work. You might be working with VirtualBox,
VMWare, Hyper-V, or any other virtual platform. Your application can be written in arbitrary languages
and frameworks, such as Ruby/Ruby on Rails, Python/Django or PHP/Symfony. You might use arbitrary
operating systems (OSs) to deploy your application: Linux, FreeBSD, or Windows. All these details are of no
www.allitebooks.com

CHAPTER 1 ■ GETTING STARTED WITH VAGRANT
2
importance because (thanks to Vagrant) the complete virtual environment can be brought to life with just
one command:
$ vagrant up
If you were to run the virtual development environment manually — without Vagrant’s help, that
is — you would have to follow these steps:
1. Download the VM image.
2. Start the VM.
3. Configure the VM’s shared directories and network interfaces.
4. Maybe install some software within the VM.
With Vagrant, all these tasks (and many more) are automated. The command $ vagrant up can do the
following (depending on the configuration file):
• Automatically download and install a VM, if necessary
• Boot the VM
• Configure various resources: RAM, CPUs, network connections, and shared folders
• Install additional software within the VM by using tools such as Puppet, Chef,
Ansible, and Salt
■ Note Vagrant is a tool that provides a simple and unified command-line interface to work with VMs
managed by well-known virtualization solutions such as VirtualBox, VMWare, and Hyper-V.
Although Vagrant is a general-purpose tool and can be used in many different ways, the easiest way to
learn about its features is to adopt it for web development (because of the nature of web applications, which
have front ends and back ends).
The next three sections discuss the background knowledge you need about the following:
• The nature of web applications and the problems that accompany setting up a
development environment for a web application
• Traditional methods for setting up development environments for web applications
• Virtualization
Client/Server Paradigm and its Aftermath
The dual nature of web applications imposes difficulties that can turn the task of setting up a development
environment into a chore. Web applications work on the basis of the client/server paradigm, using the HTTP
protocol for communication purposes. When you run the application, it consists of two communicating
parties: the client, which is the process that sends requests; and the server, which is the process responsible
for responding.
The very nature of the application is to enable the client and server to be run on different machines,
usually equipped with different hardware and OSs. The client is the process that is being executed on your
laptop, and the server is the process that runs on a remote machine accessible through the network. This
setting is depicted in Figure
1-1.
www.allitebooks.com

CHAPTER 1 ■ GETTING STARTED WITH VAGRANT
3
Figure1-1 shows two different computers using two different OSs: Windows and Linux. The client is the
Firefox web browser running on Windows; the server is the Apache daemon executed on the Linux machine.
The consequence of the client/server paradigm is that the application consists of two different pieces of
code: the code that runs on the client and the code that runs on the server. A developer who works on the
application needs (at least sometimes) to run and access the client-side code as well as the server-side code.
■ Note The two ingredients of a web application are commonly referred to as the front end and back end.
The front end is executed within a web browser on the client side; the back end runs on the server side.
Traditional Approach to Setting up a Developer Environment
There are two ways to set up a development environment. In the first, both the client and server processes
are run on the same machine; in the second, the client and server run on different computers.
The first solution is shown in Figure1-2. The developer installs all the software on the workstation, and
the front and back ends run locally. The source code of the application is stored on the developer machine’s
hard drive.
...
...
...
...
...
...
OS : Windows
The Client
FF Web Browser
Computer A
Developer’s Workstation
Computer B
the Server
The Server
Apache Daemon
OS: Linux
Response
Request
The Network
Figure 1-1. A web application in action
www.allitebooks.com
CHAPTER 1 ■ GETTING STARTED WITH VAGRANT
4
The second approach, the one in which the client and the server run on different machines, imitates
the way the deployed application is executed by end users. The client-side software runs on the developer’s
workstation, and the server-side software runs on a remote machine. The source code of the application is
stored on remote machine and, depending on preferences, the developer can do the following:
• Synchronize the files from within the integrated development environment (IDE),
as shown in Figure
1-3.
...
...
...
The Network
OS: Windows
The Client
FF Web Browser
The Server
Apache Daemon
Response
Request
Developer’s Workstation
Figure 1-2. Development environment: the client and the server run on the same machine as the processes of
the same OSs
www.allitebooks.com

CHAPTER 1 ■ GETTING STARTED WITH VAGRANT
5
• Access the source with the terminal (e.g., SSH/vi), as shown in Figure1-4.
...
...
...
...
...
...
OS: Windows
The Client
FF Web Browser
Computer A
Developer’s Workstation
Computer B
the Server
The Server
Apache Daemon
OS: Linux
Response
Request
The Network
IDE
Application’s
Source Code
Sync
Figure 1-3. Development environment: the client and the server run on different machines; the application’s
source code is synchronized within the IDE
OS: Windows
The Client
FF Web Browser
Computer A
Developer’s Workstation
Computer A
the Server
The Server
Apache Daemon
OS: Linux
...
...
...
...
...
...
Application’s
Source Code
Application’s
Source Code
Response
SSH/vi
Request
The Network
Figure 1-4. Development environment: the client and the server run on different machines; the source code is
accessed via a terminal session SSH/vi
www.allitebooks.com

CHAPTER 1 ■ GETTING STARTED WITH VAGRANT
6
• Emulate local access with drive mapping (see Figure1-5)
The most evident shortcomings of the first solution shown in Figure1-2 are the following:
• The installation and updates of the server-side software (for example, an HTTP
server or SQL Server) have to be done manually by every developer. From the
company’s point of view, this can be an enormous waste of developers’ time.
• When all developers use their favorite OS, it can be difficult to set up the identical
environment on all platforms. Some developers might be unable to reproduce the
complete environment on their machines.
• Because the installation is done by hand, environments used by developers might
differ, which can lead to “it works on my machine” problems.
• New members of the team have to spend time setting up their environment. On a
global scale, this onboarding is an unnecessary waste of time and resources.
• If the OS of the server is different from the one installed on the developer’s machine
(which happens very often), the development environment always differs from
production because it runs software compiled for the different platform.
• All members of the team need specialized knowledge about the software necessary
for the application to run. Even if they are responsible only for the design of the
application and don’t take part in development, they still have to know how to install
and configure everything. So it can be difficult for designers to install all packages
required by the back end.
OS: Windows
The Client
FF Web Browser
Computer A
Developer’s Workstation
Computer A
the Server
The Server
Apache Daemon
OS: Linux
...
...
...
...
...
...
Application’s
Source Code
Application’s
Source Code
S:\
Response
Drive or Directory
Mapping
Request
The Network
Figure 1-5. Development environment: the client and the server run on different machines; the source code is
accessed through a mapped drive or directory
www.allitebooks.com
CHAPTER 1 ■ GETTING STARTED WITH VAGRANT
7
• Developers who work on multiple projects at the same time can have problems
because one development environment is shared by different projects. For example,
one project might be designed to work under settings (e.g., PHP 5.3) different from
other project (e.g., PHP 5.5). The projects are not separated from each other: they
share compilers, interpreters, and tools installed on the host system.
• With multiple projects, the procedures to start or shut down necessary daemons and
services are usually project-dependent. For every project, you might need to run
different commands or start different services to run the application.
The scenarios shown in Figures
1-3, 1-4, and 1-5 have the following disadvantages:
• They all require a network connection to work on an application; the performance of
the server-side software influences the work of every developer. When the network
is down, all the developers are idle.
• Some companies can apply restrictive security policies and forbid access to the
servers from the outside world. Thus, development environments can’t be accessed
by collaborators working remotely;
Now that you understand the possible drawbacks that accompany the traditional approach, let’s look at
some virtual solutions.
Virtualization to the Rescue
Virtualization helps to exploit the best features of both previous solutions while eliminating drawbacks at the
same time. When working with VMs, we install both front end and back end components of the application
on the same machine: the developer’s computer. The client’s processes are managed exactly as before: as
regular processes in the native OS of the developer’s workstation. The server-side software, however, runs
within a VM. Both the front and back ends run at the same machine, but the solution closely imitates the
production settings, thanks to virtualization (see Figure
1-6).
www.allitebooks.com

CHAPTER 1 ■ GETTING STARTED WITH VAGRANT
8
When you work in the system shown in Figure1-6, you are dealing with two (usually different) OSs
labelled as host and guest. The original OS of the developer’s machine will hereafter be referred to as host OS
and the VM’s OS will be called the guest OS. In Figure1-6, the host OS is Windows and the guest OS is Linux.
■ Note The host OS is the system that boots when you power on your computer. If you work on Mac OS X,
your host OS is OS X. When you work on a laptop running Windows 7, your host OS is Windows 7. It should also
be obvious that there is only one host OS.
The guest OS is the system used by the VM. Because you can boot many VMs at the same time, you can have
more than one guest at the same time.
...
...
...
Developer’s Workstation
Host OS: Windows
Guest OS: Linux
The Server
Apache Daemon
Application’s Source code:
The Files are Shared by both OSs
The Client
FF Web Browser
Response
Request
The Network
VM
Figure 1-6. Development environment using a VM
CHAPTER 1 ■ GETTING STARTED WITH VAGRANT
9
To be sure, the settings shown in Figure1-6 can be achieved with various virtualization platforms:
VirtualBox, VMWare, and Hyper-V, to name the most popular. But the procedure to install, distribute, start,
stop, and configure VMs is manual, so it differs depending on the solution you use. This is where Vagrant can
help; it provides a very simple and uniform interface to manage VMs, regardless of the virtualization solution
you use.
Enter the Vagrant
Vagrant is open source software distributed under an MIT license. It was originally authored by Mitchell
Hashimoto, and as of February 2015, almost 500 programmers have contributed to it. The source code of
Vagrant is available at
https://github.com/mitchellh/vagrant.
Vagrant sits on top of existing and well-known virtualization solutions such as VirtualBox, VMWare
Workstation, VMWare Fusion, and Hyper-V; and provides a unified and simple command-line interface to
manage VMs. This architecture is shown in Figure1-7.
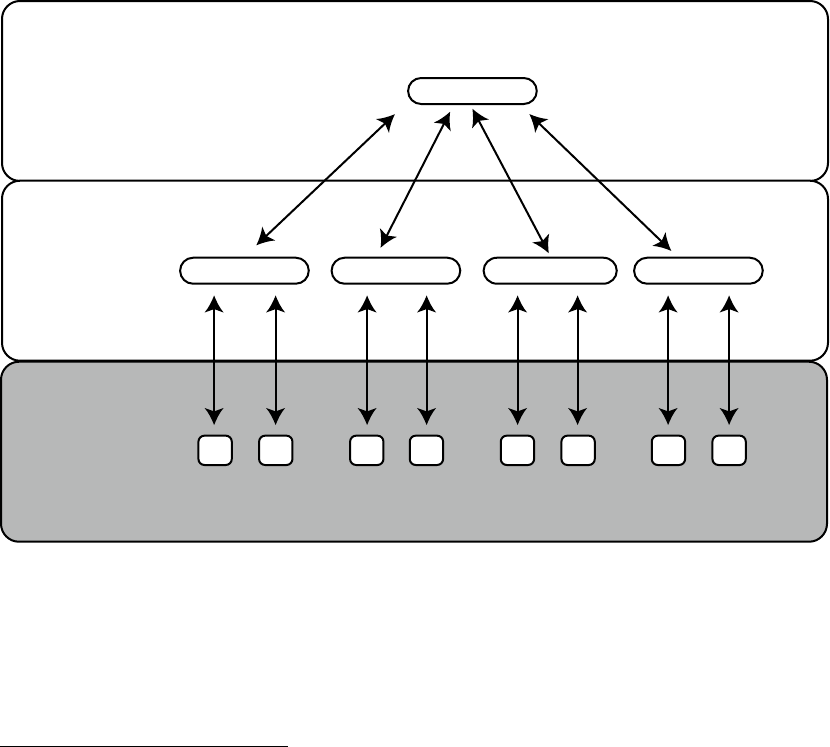
Vagrant
VirtualBox Hyper-VVMWare WorkstationVMWare Fusion
VM VM VM VM VM VM VM VM
VIRTUAL
MACHINES
PROVIDERS
Figure 1-7. Layered architecture of Vagrant using providers
To quote its home page, Vagrant is a tool that helps to “create and configure lightweight, reproducible,
and portable development environments.”
1
1
The quote comes from the Vagrant home page:
http://vagrantup.com.

CHAPTER 1 ■ GETTING STARTED WITH VAGRANT
10
In Vagrant’s terminology, the underlying virtualization solutions are called providers. To work with
Vagrant, you have to install at least one provider. The official list of providers includes the following:
• VirtualBox
• VMWare (Fusion and Workstation)
• Docker
• Hyper-V
■ Note In Vagrant terminology, a provider is a software virtualization solution such as VirtualBox, VMWare
Fusion, or VMWare Workstation.
Although it is technically possible to work with virtual development environments without using
Vagrant, doing so requires a fair share of manual labor. Vagrant automates lots of things and exposes the
magic $ vagrant up command to developers. In many cases, this single command is all developers need to
boot the application, no matter how complicated the server-side settings are.
■ Note Vagrant sits on top of providers and exposes a very simple, consistent, and powerful command-line
interface to all of them. This interface consists of commands such as $ vagrant up, $ vagrant halt, and
$ vagrant destroy.
Vagrant Rulez!
How does Vagrant outclass traditional approaches? The first and most eye-catching feature of Vagrant is that
the complete development environment is created with a single command: $ vagrant up. You don’t need
to know the internals of the server-side ingredients. The command boots the VM or VMs, and sets all the
properties: RAM size, shared directories, networking, and so on.
The developer is no longer responsible for the installation of the server-side software; although it is
executed on the developer’s machine, there is no struggle with the installation. The burden of preparing
and configuring server-side software is moved from developers to system engineers. The developers use
a prefabricated VM they may treat as a black box that can be turned on and off with Vagrant commands.
In general, it takes a minute or two to get the development environment up and ready for development,
although that can depend on many factors.
As you look deeper into the internals of Vagrant operation, note that every project runs within its own
VM. Thus, all the projects are separated, and each can use whatever software stack is appropriate.
One project can use a Linux/Apache/MySQL/PHP (LAMP) stack; the other can use Ruby on Rails with
Nginx and PostgreSQL (Postgres), all running on FreeBSD. At the same time, even though VMs are truly
isolated, you still use only one and the same interface to control (to boot or shut down) the environment.
This process simplifies the workflow enormously, and the workflow is no longer project-dependent.
Project isolation can be seen as breaking the ties between your workstation and the project. When
working with Vagrant, you can replace your computer or its OS without worrying about the software
necessary to run the project. Once you install the provider and Vagrant, the project should run exactly as it
did before the changes took place. You don’t have to search for and install all the libraries used in any of the
projects on which you are collaborating.
CHAPTER 1 ■ GETTING STARTED WITH VAGRANT
11
Yet another aspect of using virtualization is that developers do not have to install software that expose
resources, such as network ports, to the outside world. With Vagrant, you are using a sandboxed solution
that by default is not accessible by the outside world. You can ease those restrictions, of course, but it is done
explicitly and in a consistent way for all the resources. And, of course, the configuration of exposed resources
is done by your sysadmin — the person who can be relied on when it comes to security. Thus, the overall
security of your workstation is improved.
From a company perspective, problems with different versions of server-side software used by different
developers will vanish. Everyone in the organization uses exactly the same virtual environment prepared
by a system engineer. This not only leaves no place for “works on my machine” issues but also facilitates the
creation of development environments that are identical to production settings — the system engineer can
use the same recipes to prepare the development and production configuration. Moreover, the procedure
of updating the server-side software on all the machines used by developers is also painless — all that has
to be done is to distribute a new boxed VM. (In fact, it is the main reason I loved Vagrant right from the
very moment I learned how to use it.) More on this in the following “Vagrant for Trainers, Instructors, and
Teachers” section.
When you combine all the features discussed above with the fact that Vagrant is an open source, free
software that works seamlessly across many platforms (including Windows, Linux, and OS X), you will see
that the advantages of Vagrant over the traditional approach are overwhelming.
To summarize, let’s enumerate Vagrant’s most important features:
• Vagrant has an easy workflow: one command ($ vagrant up) gets the development
environment ready.
• The time needed to bring the development environment to life, even though it
depends on many factors, is only a minute or two.
• The developer can change the workstation or replace the OS without having to install
software. There are only two packages to be reinstalled: a provider (e.g., VirtualBox)
and Vagrant.
• The developer is no longer responsible for installing server-side software.
• The VMs used by all developers are prepared by system engineers.
• Everyone uses exactly the same server-side software.
• Every developer can create, destroy, and re-create virtual environments within a
couple of minutes.
• Vagrant facilitates easy updates of server-side software on developers’ machines.
• Access to all the resources, such as network ports, is restricted by default.
• The explicit rules that expose a workstation’s resources are defined by a sysadmin
who is responsible for preparing the sandboxed VM. Thus, the security of all the
machines used by developers can be managed globally in a consistent way.
• You can quite easily get 1:1 (or nearly 1:1) mapping across development, testing, and
production environments.
• Virtual development environments are created on a per-project basis (all the projects
run in isolated cocoons).
• Every project can use arbitrary packages (e.g., one project can use Linux/PHP 5.3;
another can use CentOS/Rails).
• One workflow is used for all projects, no matter what virtualization platform, guest
OS, language, framework, or server-side software is used.

CHAPTER 1 ■ GETTING STARTED WITH VAGRANT
12
• Developers don’t need a network connection to proceed with their work.
• Vagrant works on all major platforms, including Windows, Linux, and Mac OS X.
• Vagrant is open source and free.
• Vagrant has detailed, well-organized, and clear documentation.
• If you find it necessary, you can extend Vagrant’s features with plug-ins.
• The popularity of Vagrant is growing exponentially; it is quickly becoming the tool of
choice in many companies.
Disadvantages of Vagrant
The most important disadvantage of using Vagrant is efficiency; the workstations used by developers have
to be powerful enough to work with the chosen provider. Moreover, the workstation used by the sysadmin
to prepare boxed VMs needs to be even more superior; otherwise, the process of preparing and testing the
boxed VMs will be nerve-wracking. When I started preparing boxed VMs, I had to upgrade my laptop to Mac
Book Pro.
These constraints don’t constitute the complete list. Some combinations of host OSs and providers are
known to yield ineffective outcomes. For example, the access time to the shared directory of VMs created
with the VirtualBox provider is quite slow. When your host OS is Linux or Mac OS X, you can bypass this
issue using a network file system (NFS), but there is no universal solution if you use Windows. Although a
workaround is to avoid using shared folders and to use deployment procedures to access the storage in VM
instead, it requires additional effort from developers.
Vagrant for Trainers, Instructors, and Teachers
I have loved Vagrant from the very first day I learned how to use it during my classes. It has really changed
the way I work. I am the only one who bears the responsibility for creating development environments, so I
am the only one who has to deal with installing software, updating system libraries, and so on. I don’t have
to explain how to install the software any more. Last year, when I introduced Vagrant on a mass scale (for all
my classes), I finally stopped spending hours dealing with the installation of all the server-side stuff.
Right now, no matter what platform is used in the computer laboratory or what OS is installed on
students’ laptops, all I have to do is distribute boxed VMs and tell the students how to use them, which can
take as little as five minutes. And, of course, the procedure doesn’t change when we change language or
framework; once learned, it can’t be forgotten.
Exactly the same arguments apply for the training I provide for commercial companies. To proceed with
training without any hassle, I need a boxed solution available on the desktop computer of every participant.
When that is done and verified, everything goes smoothly. Before Vagrant, there were always problems that
could be classified as “doesn’t work on my machine” issues.
I also find Vagrant indispensable when I want to take a look at applications or solutions. Gerrit, Gitlab,
or Jenkins — you don’t have to mess with your desktop any more just to try them. (This is exactly what I
suggest to my readers in my book Git Recipes.)
2
To recompile git or experiment with gitolite, you can use
VM managed by Vagrant/VirtualBox. Working this way, I can provide a single tutorial to be followed by all
readers, no matter what platform they work on. Were the readers to install the software on their computers,
the instructions would be OS-specific, and it would be much more time-consuming to uninstall everything
because the process would be manual.
2
Gajda, Włodzimierz. Git Recipes: A Problem-Solution Approach. Apress, 2013.

CHAPTER 1 ■ GETTING STARTED WITH VAGRANT
13
Installing the Software
During this course you will need three packages (all are free and open source):
• Git
• VirtualBox
• Vagrant
Git
Git is a distributed version control system that has gained enormous popularity since its birth ten years ago
and is the de facto standard for open source projects. You have probably already had some experience with
git; if not, don’t worry — I will provide you with all git-related information you may need.
To install git, visit
http://git-scm.com and download the release for your platform. During the
installation, leave all the available options with their default values. Then run the command line and type
this command, which should output the version of git:
$ git --version
■ Note If you work on Windows, don’t use the standard Windows command line shipped with the system.
Run the git bash shell instead. Working this way, you can use the commands exactly as they appear in the
book without any modifications.
VirtualBox
The home page of VirtualBox is https://www.virtualbox.org. Go to the Downloads section and fetch the
latest version available for your platform. (During the writing of this book, I used VirtualBox 4.3.22, but that
is not mandatory.) Proceed with the typical procedure you use to install software on your platform. The main
screen of the installation program on OS X is shown in Figure
1-8.

CHAPTER 1 ■ GETTING STARTED WITH VAGRANT
14
Recent VirtualBox distributions are known to be quite easy to install, but in case of any problems, the
VirtualBox manual can come in handy: www.virtualbox.org/manual/ch02.html.
If you have an older version of VirtualBox on your workstation, remove it prior to installing a newer
version. And because VirtualBox installs low-level drivers, you might have to restart the system after the
installation or removal of VirtualBox (at least on Windows).
Vagrant
To install Vagrant go to
www.vagrantup.com/downloads.html and download the distribution for your system.
Then proceed with the installation of the downloaded package. The main window of the Vagrant installator
is shown in Figure1-9.
Figure 1-8. Main screen of VirtualBox installator on OS X

CHAPTER 1 ■ GETTING STARTED WITH VAGRANT
15
Check the Installation
How do you verify that Vagrant is ready to work? Just open your command line
3
and execute one of the
commands shown here:
$ vagrant --version
$ vagrant -v
The command should produce output similar to the following:
Vagrant 1.7.2
I used Vagrant 1.7.2 during the work on this book. I usually prefer to work with the latest software
version and suggest that you to do the same (although it isn’t obligatory).
■ Caution If you work on Windows and your account contains non-Latin letters with diacritical marks, such
as óąśż, Vagrant doesn’t work. You have to create and use a new account that consists only of Latin characters.
Figure 1-9. Main screen of the Vagrant installator
3
If you work on Windows. I strongly advise you to use the git bash prompt that is shipped with git.

CHAPTER 1 ■ GETTING STARTED WITH VAGRANT
16
Basic Vagrant Configuration
By default, Vagrant stores boxed VMs in a current user’s home directory in the ~/.vagrant.d/ folder.
Because boxed VMs are images of the complete guest OS, they are quite large. It is not uncommon to have
a box consuming 1 – 2 GB. And because the boxes are used only as templates, they can be shared by all
users who work on the given computer without any negative consequences. By sharing installed Vagrant
boxes, users save hard disk drive (HDD) space and gain immediate access to all boxes without having to
download them again. This can be important when workstations are used by many people, as in a computer
laboratory, for example.
The location of the Vagrant home directory can be redefined with the VAGRANT_HOME environment
variable. You can change its value by executing the following command in bash:
$ export VAGRANT_HOME=/some/shared/directory
When working on Windows, you can set a new environment variable using System/Properties/
Advanced System Settings/Environment Variables dialog box.
■ Note The list of other environment variables used by Vagrant can be found at
https://docs.vagrantup.com/v2/other/environmental-variables.html.
Documentation
Sooner or later, you’ll need other sources of information. You can use the Vagrant built-in manual, which
comes very handy, indeed. Access it with the following commands:
$ vagrant
$ vagrant -h
$ vagrant --help
When you run one of them, the output is similar to the one shown in Figure
1-10.

CHAPTER 1 ■ GETTING STARTED WITH VAGRANT
17
The Vagrant interface consists of commands such as these:
$ vagrant box
$ vagrant package
$ vagrant up
During the course, we will discuss all these commands. Some of them have subcommands such as the
following:
$ vagrant box add
$ vagrant box list
$ vagrant box remove
These subcommands will also be explained in the following chapters. Right now, remember that to
print the syntax of any of the commands and subcommands, you have to use the --help or -h switch, as
shown in these examples:
$ vagrant box -h
$ vagrant box --help
$ vagrant box add -h
$ vagrant box add --help
Figure 1-10. The output of the $ vagrant command describes basic usage and lists all the subcommands
www.allitebooks.com

CHAPTER 1 ■ GETTING STARTED WITH VAGRANT
18
When the manual is not enough, you can access Vagrant documentation online:
https://docs.vagrantup.com/v2/getting-started/. The documentation is very clear and includes
in-depth descriptions of all Vagrant features.
Summary
In this chapter, I wanted to give you a clear picture of the advantages that Vagrant offers. When working with
Vagrant, you move the responsibility for setting development environment from developers to one central
point — a sysadmin, for example. Developers run both client-side and server-side software of the application
on their workstations. Server-side services such as a database server or HTTP server are executed within a
virtual system that can mimic the system used on a production server. The VM can be seen by developers
as a black box. All developers need to know about server-side software is reduced to a couple of commands
that turn the environment on and off, such as the following:
$ vagrant up
$ vagrant halt
Moreover, all projects that developers might be working on are separated, and each can use arbitrary
server-side solutions. The projects do not overlap nor do they collide with each other.
The Vagrant’s workflow not only facilitates easier onboarding of new developers but also simplifies
the task of updating the environment used by all developers. This is especially attractive for training and
teaching purposes.
Because Vagrant really changed the way I work, I sincerely recommend it and promote it to everyone.
In the Next Chapter, You’ll Learn . . .
There’s nothing better than hands-on experience. All the discussions from this chapter will be more
understandable after you run the examples awaiting you in Chapter 2. In just a few minutes, you will run
four web applications, each written in different language:
• JavaScript/AngularJS
• Python/Django
• Ruby/Ruby on Rails
• PHP/Symfony
Even without any knowledge of these languages and frameworks, with Vagrant you can still run them all
on your computer.
Reading List
If you’re interested in reading more about Vagrant, the first source of information should be its
documentation:
https://docs.vagrantup.com/v2/getting-started/.
For a more detailed, extensive, and thorough introduction, I strongly recommend Vagrant: Up and
Running, by Mitchell Hashimoto.
4
Hashimoto is Vagrant’s author and project leader, and his book is an
excellent source of information for novices and advanced Vagrant users alike.
4
Hashimoto, Mitchell. Vagrant: Up and Running. O’Reilly, 2013.
CHAPTER 1 ■ GETTING STARTED WITH VAGRANT
19
You might also need more information about your provider. For VirtualBox,
see www.virtualbox.org/manual/.
For Vagrant’s untypical behavior, the list of current issues can be helpful: https://github.com/
mitchellh/vagrant/issues.
For basic introduction to web applications and the client/server model, see the following Wikipedia
entries:
•
http://en.wikipedia.org/wiki/Web_application
• http://en.wikipedia.org/wiki/Client-server_model
Test Yourself
1. What is Vagrant? Define it in one sentence.
2. What is the most important Vagrant command?
3. What is the URL of the Vagrant home page?
4. What difficulties are caused by the client/server paradigm for developers?
5. What traditional approaches to setting development environments do you know?
6. Explain the Vagrant approach to setting up the development environment.
7. Define the terms host and guest.
8. Define the term provider.
9. Name the providers supported by Vagrant.
10. What is the command to print the Vagrant version?
11. What is the command to print the Vagrant built-in manual?
12. How do you list Vagrant commands?
13. How do you print the manual for one of the subcommands?
14. Where does Vagrant store boxes? Why should you want to change this location?
How can you do it?

21
CHAPTER 2
Four Web Frameworks in
Four Minutes
Chapter 1 discussed some of the amazing advantages of Vagrant: how it can change the workflow of a company
and how every member of the team can benefit from using it. I specifically underlined the advantages of
running a web application in a virtualized environment with just one command: $ vagrant up.
Because the best way to understand Vagrant is to see it in action, this chapter will act as a guided tour to
running four simple web applications written in four popular web frameworks:
• AngularJS (JavaScript)
• Django (Python)
• Rails (Ruby)
• Symfony (PHP)
Of course, this discussion can’t be a complete tour of AngularJS, Django, Ruby on Rails, or Symfony.
I will not dive into details concerning any of the frameworks because that is not the purpose of this book.
I aim to prove to you that even if you are new to these frameworks and languages (and even if you don’t
have Python, Ruby, or PHP on your laptop), you can still run the examples with just one command. And the
procedure to run each of them is almost identical.
Each of the four projects presents exactly the same web pages; each is set up and brought to life in
a couple of minutes (maybe not exactly at the speed of an example per minute, as promised in the title,
but much faster than can be done manually). And most importantly, the booting of the applications is
completely automated. It leaves no place for mistyped commands, misconfigured services, incorrect
configuration settings, and similar typos and other human errors.
Just one more notice before we proceed. Every example uses one TCP port on your host computer:
• AngularJS project: port 8800
• Django project: port 8000
• Ruby on Rails project: port 3000
• Symfony project: port 8880
If any of these ports is not available on your computer, the project will not run. (This problem will be
addressed and solved in the next chapter.) Right now, let’s assume that at least some of the listed ports are
available. And if security is a concern, you might want to postpone the practical exercises described in this
chapter until you have fully understood the implications of running the $ vagrant up command. This topic
is described in great detail in Chapter
4.

CHAPTER 2 ■ FOUR WEB FRAMEWORKS IN FOUR MINUTES
22
■ Tip The source code for all the projects discussed in this chapter and in the entire book is stored on GitHub
at http://github.com/pro-vagrant.
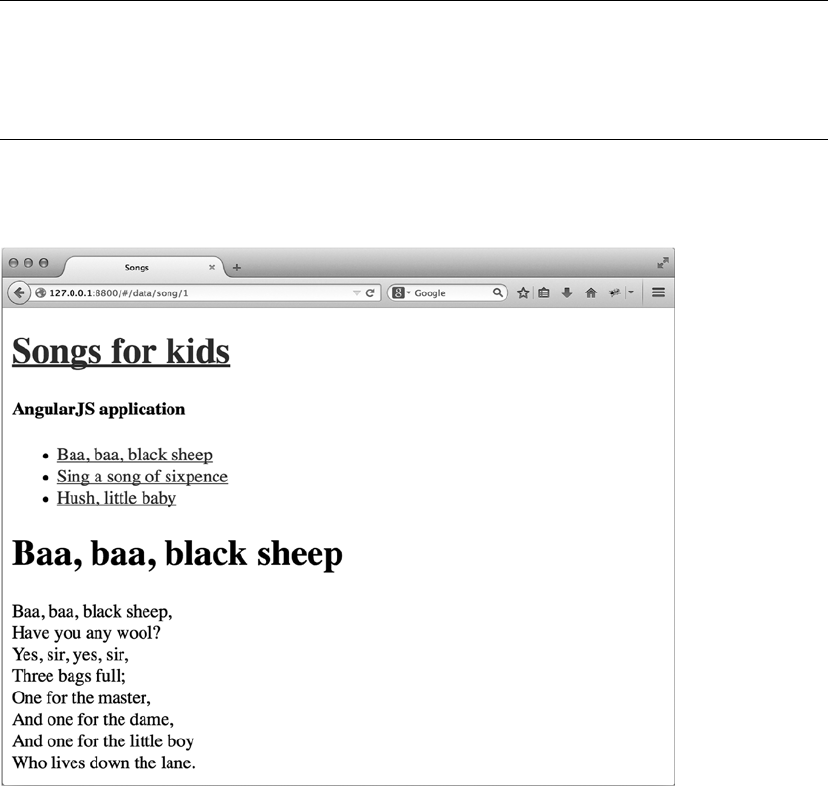
Project 1: “Songs for kids” Written in AngularJS
The first project is the application titled “Songs for kids,” which is written in AngularJS framework. It consists
of three web pages, each of which displays the text of one song for kids. To run the project, execute the
commands shown in Listing 2-1.
Listing 2-1. Commands to Run “Songs for kids” in AngularJS
$ cd folder/with/examples
$ git clone https://github.com/pro-vagrant/songs-app-angularjs.git
$ cd songs-app-angularjs
$ vagrant up
# Run webbrowser and visit http://localhost:8800/
■ Note AngularJS is a web framework written in JavaScript. Its home page is https://angularjs.org/.
Depending on your connection, the complete procedure to get this first example running can take up to
several minutes. My timing was about 2 minutes and 10 seconds.
Here is the explanation for the commands in Listing 2-1. Start by entering a directory in which you want
to keep the examples:
$ cd folder/with/examples
You might have to create this folder, of course. It can be located anywhere on your hard drive (it really
doesn’t matter where).
The source code of the AngularJS “Songs for kids” project is available at https://github.com/
pro-vagrant/songs-app-angularjs.git. To copy the sources from the GitHub server to the hard drive,
use the $ git clone command:
$ git clone
https://github.com/pro-vagrant/songs-app-angularjs.git
You now have the complete source code of the application inside the songs-app-angularjs/ directory.
Enter the project’s folder:
$ cd songs-app-angularjs
You can boot the VM required to run the application with this command:
$ vagrant up
CHAPTER 2 ■ FOUR WEB FRAMEWORKS IN FOUR MINUTES
23
Although this command prints a lot of output, at this point I want to skip it. I prefer to postpone the
in-depth discussion concerning the messages printed by Vagrant during booting until Chapter 3. Right now,
I intend to convince you how simple Vagrant really is. With that goal in mind, wait until the command has
finished running and proceed with the next step of this example.
■ Note An in-depth analysis of the internals behind vagrant commands such as $ vagrant up, $ vagrant
ssh
, and $ vagrant destroy is in Chapter
3. Chapter 2 is meant to be the bait that gets you hooked; no matter
what the server-side solution is, you can get the project running in a couple of minutes without any specific
knowledge about the back end.
Start your web browser and visit http://localhost:8800/. The web page that displays is shown in
Figure2-1.
Figure 2-1. “Songs for kids” application written in Angular JS
At this point your computer runs two OSs:
• Host: primary OS
• Guest: virtual OS started by $ vagrant up

CHAPTER 2 ■ FOUR WEB FRAMEWORKS IN FOUR MINUTES
24
To verify, start VirtualBox and take a look at its main window. It should contain a VM with a name that
starts with songs-app-angularjs_default. The state of this VM should be denoted as Running (see Figure2-2).
You can also list all the VMs started by Vagrant with the following command:
$ vagrant global-status
Right now, it should output just one item:
id name provider state directory
-------------------------------------------------------------------
17b0c01 default virtualbox running /examples/songs-app-angularjs
The application shown in Figure
2-2 is being served by an HTTP server running inside the guest OS:
Ubuntu 14.04.
The application consists of:
• The front end which runs in a web browser executed in the host OS.
• The back end which runs in Ubuntu 14.04 guest OS (see Figure2-3).
Figure 2-2. VM started for the project written in Angular JS

CHAPTER 2 ■ FOUR WEB FRAMEWORKS IN FOUR MINUTES
25
Before proceeding with another example, let’s modify one of the pages, which will clarify the notion of
file sharing between host and guest OSs. The source code of the application is available in both the host OS
and VM. Moreover, the changes you make to files in one OS are instantly reflected in the other OS.
Open the file songs-app-angularjs/web/data/song/1.json with any text editor (vi is used here):
$ vi songs-angularjs-app/web/data/song/1.json
Change the title of the song. The third line of the file looks like this:
"title": "Baa, baa, black sheep",
Change it into this:
"title": "ABC... ",
Note that this is an ordinary file available in your host OS. Even though it is being served by an HTTP
daemon that runs within the guest VM, you can still access it with your favorite text editor (running on the
host OS).
After you change and save the file, refresh the page displayed in the browser:
http://localhost:8800/
You will see the page containing the title "ABC" instead of "Baa, baa black sheep". The source code of
the application is available on the host OS, which is very convenient.
The first example is running, so let’s move forward to the second project.
Host OS
VM
Guest OS: Ubuntu
The Client
FF Web Browser
The Server
Apache Daemon
Response
Request
Figure 2-3. Communication between the web browser and HTTP Apache daemon

CHAPTER 2 ■ FOUR WEB FRAMEWORKS IN FOUR MINUTES
26
Project 2: “Songs for kids” Written in Django
The second example is written in the Django framework. The application generates web pages that look
exactly as they did in the first project, except for a small comment to identify the framework. Listing 2-2
shows the commands you need to run this example.
Listing 2-2. Commands to Run “Songs for kids” written in Django
$ cd folder/with/examples
$ git clone
https://github.com/pro-vagrant/songs-app-django.git
$ cd songs-app-django
$ vagrant up
# Run webbrowser and visit http://localhost:8000/
■ Note Django is a web framework written in Python. Its home page is https://www.djangoproject.com/.
For me, the time necessary for the command $ vagrant up to finish was 1 minute and 40 seconds.
Yours, depending on many factors, might be much longer (it can take as long as 10 minutes).
Start the procedure by entering the directory created for the projects. The purpose of the $ git clone
command stays the same: it is the way to download the source code of the example to the hard drive. Enter
the folder with the sources and bring VM to life:
$ cd songs-app-django
$ vagrant up
Wait until the command finishes and use your browser to visit http://localhost:8000/. You should
see the web page shown in Figure
2-4.

CHAPTER 2 ■ FOUR WEB FRAMEWORKS IN FOUR MINUTES
27
Now your computer runs three OSs:
• Host OS
• First VM for the first project
• Second VM for the second project
To verify this, go to the VirtualBox main window. It should contain two VMs, which are shown in
Figure
2-5.
Figure 2-4. “Songs for kids” application written in Django

CHAPTER 2 ■ FOUR WEB FRAMEWORKS IN FOUR MINUTES
28
The following command:
$ vagrant global-status
now produces two items:
id name provider state directory
-------------------------------------------------------------------
17b0c01 default virtualbox running /examples/songs-app-angularjs
82dcf84 default virtualbox running /examples/songs-app-django
This time, the overall picture of your system is more complicated as shown in Figure
2-6. Your host
contains two guest VMs: one for the AngularJS application and the other for the example written in Django.
Both guests run Ubuntu 14.04.
Figure 2-5. Two VMs started in examples written in AngularJS and Django
www.allitebooks.com

CHAPTER 2 ■ FOUR WEB FRAMEWORKS IN FOUR MINUTES
29
Let’s change one of the pages. Use vi to open the first baa.html file:
$ vi songs-app-django/songs/songs/templates/baa.html
The file contains the block named content that begins with the following code:
{% block content %}
<h2>Baa, baa, black sheep</h2>
<p>
Change the preceding lines to these:
{% block content %}
<h2>ABC </h2>
<p>
Refresh the page shown in Figure
2-5. You should see the new title "ABC" in your browser.
Host OS
Guest OS: Ubuntu
Guest OS: Ubuntu
The Client
FF Web Browser
AngularJS App Back End
Django App Back End
VM
VM
Figure 2-6. Host OS with two guest VMs

CHAPTER 2 ■ FOUR WEB FRAMEWORKS IN FOUR MINUTES
30
Project 3: “Songs for kids” Written in Ruby on Rails
The third application is written in Ruby on Rails. Again, it contains the same three web pages. The procedure
to run this project is shown in Listing 2-3.
Listing 2-3. Commands to Run “Songs for kids” in Ruby on Rails
$ cd folder/with/examples
$ git clone
https://github.com/pro-vagrant/songs-app-rails.git
$ cd songs-app-rails
$ vagrant up
# Run webbrowser and visit http://localhost:3000/
■ Note Ruby on Rails is a web framework written in Ruby. Its home page is http://rubyonrails.org/.
After running the commands shown in Listing 2-3, start the web browser and visit
http://localhost:3000/. The browser will display the page shown in Figure2-7.
Figure 2-7. “Songs for kids” application written in Ruby on Rails

CHAPTER 2 ■ FOUR WEB FRAMEWORKS IN FOUR MINUTES
31
The purpose of each command is almost identical to the previous projects. The following command
creates a local copy of the project’s source on the hard drive:
$ git clone
https://github.com/pro-vagrant/songs-app-rails.git
Enter the project’s directory with this:
$ cd songs-app-rails
Finally, the virtual system is brought up:
$ vagrant up
Right now, the host is running three VMs:
• VM for AngularJS example
• VM for Django example
• VM for Rails example
This situation is depicted on Figure2-8.
Guest OS: Ubuntu
Host OS
VM
VM
VM
Guest OS: Ubuntu
Guest OS: Ubuntu
Rails App Back End
AngularJS App Back End
The Client
FF Web Browser
Django App Back End
Figure 2-8. Host OS with three guest VMs

CHAPTER 2 ■ FOUR WEB FRAMEWORKS IN FOUR MINUTES
32
All three guests are displayed in the VirtualBox main window, as shown in Figure2-9.
The output of $ vagrant global-status now looks like this:
id name provider state directory
---------------------------------------------------------------------
17b0c01 default virtualbox running /examples/songs-app-angularjs
82dcf84 default virtualbox running /examples/songs-app-django
68d0c57 default virtualbox running /examples/songs-app-rails
To change the title of the first song, open this file:
$ vi songs-app-rails/app/views/lyrics/baa.html.erb
Replace this line:
<h2>Baa, baa, black sheep</h2>
with this one:
<h2>ABC</h2>
Go to the web page shown in Figure
2-7 and refresh it. The browser should display the new title "ABC".
Figure 2-9. Three running guest VMs displayed by VirtualBox

CHAPTER 2 ■ FOUR WEB FRAMEWORKS IN FOUR MINUTES
33
Project 4: “Songs for kids” Written in Symfony
I have created the final project in PHP using the Symfony framework. To run it, execute the commands
shown in Listing 2-4.
Listing 2-4. Commands to Run “Songs for kids” in Symfony
$ cd folder/with/examples
$ git clone
https://github.com/pro-vagrant/songs-app-symfony.git
$ cd songs-app-symfony
$ vagrant up
# Run webbrowser and visit http://localhost:8880/
■ Note Symfony is a web framework written in PHP. Its home page is http://symfony.com/.
Again, do the following:
• Clone the source code with $ git clone.
• Enter the projects directory with $ cd.
• Boot the VM with $ vagrant up.
When these commands finish, you can visit the web page of the project by running the web browser and
visiting http://localhost:8880/. You should see the web page shown in Figure
2-10.
Figure 2-10. “Songs for kids” application written in Symfony

CHAPTER 2 ■ FOUR WEB FRAMEWORKS IN FOUR MINUTES
34
As you can guess, the VirtualBox will now display four VMs running, as shown in Figure2-11.
The same four VMs are included in the output of the $ vagrant global-status command:
id name provider state directory
--------------------------------------------------------------------
17b0c01 default virtualbox running /examples/songs-app-angularjs
82dcf84 default virtualbox running /examples/songs-app-django
68d0c57 default virtualbox running /examples/songs-app-rails
913bbce default virtualbox running /examples/songs-app-symfony
Your computer now runs five OSs:
• Host OS of your machine
• Four guest VMs
Your web browser sends requests to four back ends (see Figure
2-12).
Figure 2-11. VirtualBox with four VMs running: one VM for each example project

CHAPTER 2 ■ FOUR WEB FRAMEWORKS IN FOUR MINUTES
35
To modify one of the pages, open this file:
$ vi songs-app-symfony/src/AppBundle/Resources/views/Default/baa.html.twig
Change the block body. Replace these lines:
{% block body %}
<h2>Baa, baa, black sheep</h2>
<p>
with the following contents:
{% block body %}
<h2>ABC</h2>
<p>
To display the new contents in a browser, visit http://localhost:8880/app_dev.php/.
■ Note The Symfony framework doesn’t refresh cached templates when you use http://localhost:8880
URL. The easiest way to force template reloading is to use the app_dev.php front controller. That’s why the URL
to use is http://localhost:8880/app_dev.php.
AngularJS App Back End
VM
VM
VM
Django App Back End
Rails App Back End
Guest OS: Ubuntu
Guest OS: Ubuntu
Guest OS: UbuntuGuest OS: Ubuntu
Symfony App Back End
The Client
FF Web Browser
Host OS
VM
Figure 2-12. Communication within the host running four examples
CHAPTER 2 ■ FOUR WEB FRAMEWORKS IN FOUR MINUTES
36
What Have You Achieved?
To run the first example within your host OS without referring to virtualization, you would have to install and
configure the Apache web server in your host OS. Although it is not a very complicated task, it requires some
amount of manual work, and the procedure is system-dependent. It is slightly different for Windows, Linux,
and OS X hosts.
To run the other three example projects, you would have to install the following:
• Project 2: Python
• Project 3: Ruby and NodeJS
• Project 4: PHP
Again, it is not a difficult task, but it is manual and system-dependent. By using Vagrant, you can reduce
the procedure to start any application to this:
$ cd folder/with/examples
$ git clone APPLICATION
$ cd APPLICATION
$ vagrant up
Refer to Listings 2-1 through 2-4. Besides cloning and changing the current directory with cd, they all
contain just one command: $ vagrant up. The procedure to run the applications is very simple; there is
nothing manual and it is exactly the same, no matter what the OS is and which guest OS is used for the back
end. All the examples are also completely isolated from each other; each can use arbitrary software, and
there is no interference between them. Finally, the TCP ports opened by the following are not accessible to
anyone but you; they cannot be accessed remotely:
• AngularJS application: http://localhost:8800
• Django application: http://localhost:8000
• Rails application: http://localhost:3000
• Symfony application: http://localhost:8880
I hope that the pros of using Vagrant have become clearer to you. As for the cons, well, the time
necessary to run each example is definitely much longer than one minute. In the sequel, you will learn
how to minimize the time necessary to boot a VM, but I can’t promise that you’ll get below the one-minute
threshold.
Shared Folders
The instructions to modify the title of a song aim to convince you of the simplicity offered by Vagrant. Even
though the application is being served by the guest OS, the source code is available in your host OS.
You can edit the files with your favorite IDE. By default, the directory in which you run the $ vagrant
up command is available inside the guest OS. The two OSs, host and guest, share the project’s directory.

CHAPTER 2 ■ FOUR WEB FRAMEWORKS IN FOUR MINUTES
37
Stopping VMs
As you already know, the following command displays information about all VMs started by Vagrant:
$vagrant global-status
Its output is similar to the one shown in Listing 2-5.
Listing 2-5. Output of $ vagrant global-status
id name provider state directory
-------------------------------------------------------------------
17b0c01 default virtualbox running /examples/songs-app-angularjs
82dcf84 default virtualbox running /examples/songs-app-django
68d0c57 default virtualbox running /examples/songs-app-rails
913bbce default virtualbox running /examples/songs-app-symfony
To stop each of the applications, go to its directory and run the $ vagrant destroy command. Here is
the procedure to stop AngularJS:
$ cd folder/with/examples
$ cd songs-app-angularjs
$ vagrant destroy
If you now visit http://localhost:8800/, you can see the message about the unavailable web page.
And, of course, the VM will vanish from the VirtualBox main window. Now the command $ vagrant
global-status should print information about the three VMs still running.
You can also stop VMs without changing the current directory. The ID displayed in the first column in
Listing 2-5 can be passed to the $ vagrant destroy command. The following command stops the third VM
visible in Listing 2-5, no matter what the current directory is:
$ vagrant destroy 68d0c57
You can also stop the VM by doing the following on the VirtualBox main menu:
1. First, use Machine/Close/Power Off for a selected machine.
2. Then use Machine/Remove/Delete All Files for the same machine.
■ Caution If you turn off your computer without destroying the VMs with $ vagrant destroy, the output
of $ vagrant global-status might contain stale entries. To remove them, run $ vagrant global-status
--prune
.

CHAPTER 2 ■ FOUR WEB FRAMEWORKS IN FOUR MINUTES
38
Summary
Now that you have seen Vagrant in action, its features should become more understandable. I have
purposefully provided you with four projects written in different languages and frameworks. If you were able
to run the examples with the commands displayed in Listings 2-1 through 2-4, it proves that your fluency
in PHP, Ruby, Python, and JavaScript is of no importance at all. Even if you have no experience with a given
language, say PHP/Symfony2, you can still run the application with a couple of commands: $ vagrant up
being the most important.
The advantages of Vagrant are these:
• To run each of the examples you need to run $ vagrant up.
• Exactly the same command is used no matter which
• host OS you work on
• guest OS is used
• language and framework used for the application
• You don’t need any specialized knowledge of how to install software because
everything is baked into the guest VM.
• All the examples run in isolation and don’t interfere with each other or with your
host OS.
• Every example can closely imitate the production settings.
• All the resources allocated for guest VMs (such as TCP ports 8800, 8000, 3000, and
8880) are available only to your host OS; they are not accessible remotely.
• The source code of every example is available in the host OS; you can change the files
(e.g., song titles) with your favorite editor running on the host OS.
The most obvious disadvantage of using Vagrant is its time inefficiency. The procedures shown in
Listings 2-1 through 2-4 can last for many minutes. Don’t let this discourage you, however; the whole
process of running applications is automatic, and that’s what really matters. Once you know how Vagrant
works, you can keep the time necessary to boot and reboot the applications at a reasonable level.
■ Tip As a teacher and instructor, I just couldn’t believe that a course of developing a web application in any
language could be started without any hassle. In less than five minutes, every student can get the examples
running on their laptops, no matter which host OS is used. And, what is extremely appealing, students can take
the working solution home with them. For me, that was a complete revelation!
In the Next Chapter, You’ll Learn . . .
When misused, Vagrant can quickly cause confusion and dissatisfaction. The way to avoid this is to learn
the actions performed in the background when you run $ vagrant up. The analysis of the various stages
of booting provide a detailed characterization of all the states that VM can possibly enter. I will specifically
focus attention on timing, which will act as the basis of the search of the most effective workflow.
www.allitebooks.com
CHAPTER 2 ■ FOUR WEB FRAMEWORKS IN FOUR MINUTES
39
Reading List
For more information about the four frameworks from this chapter, see their documentation:
• AngularJS:
https://angularjs.org/
• Django: https://www.djangoproject.com/
• Ruby on Rails: http://rubyonrails.org/
• Symfony2: http://symfony.com/
The Vagrant command $ vagrant global-status is documented at https://docs.vagrantup.com/
v2/cli/global-status.html
To learn about its syntax, use its build-in manual: $ vagrant global-status --help
Test Yourself
1. How do you boot a VM in one of the example applications?
2. What software do you need to install to run Projects 1 through 4?
3. How do you stop a VM using the command line?
4. How do you stop a VM using the VirtualBox main window?
5. How can you list all guest VMs started by Vagrant using the command line?
6. How can you check all guest VMs using the VirtualBox main window?
7. What are the advantages of using virtual development environments for Projects
1 through 4?
8. What does it mean that the projects are isolated and do not interfere with each
other?
9. What does it mean that the Vagrant workflow is not project-dependent?
10. Can you explain a scenario in which one or all of the projects would not run?
11. What are the exact commands to run the first example?
12. What does the term file sharing mean?
Exercises
1. Run the first project written in AngularJS and change the title of “Sing a song of
sixpence” to “Second song.” Verify the new title in your web browser.
2. Run the second project written in Django and change the title of “Sing a song of
sixpence” to “Second song.” Verify the new title in your web browser.
3. Run the third project written in Ruby on Rails and change the title of “Sing a song
of sixpence” to “Second song.” Verify the new title in your web browser.
CHAPTER 2 ■ FOUR WEB FRAMEWORKS IN FOUR MINUTES
40
4. Run the fourth project written in Symfony and change the title of “Sing a song of
sixpence” to “Second song.” Verify the new title in your web browser.
5. Add one new song to the application “Songs for kids” written in AngularJS.
6. Add one new song to the application “Songs for kids” written in Django.
7. Add one new song to the application “Songs for kids” written in Ruby on Rails.
8. Add one new song to the application “Songs for kids” written in Symfony.

41
CHAPTER 3
The States of VM
Now that you know how to run applications within a Vagrant-controlled environment, it’s time to learn more
about Vagrant internals and get acquainted with the operations behind the $ vagrant up command. In this
chapter, you will learn about the following:
• Vagrantfile
• Versioning strategy for the Vagrantfile format
• Base boxes (where they come from and how, and when they get installed on
your computer)
• Starting and stopping a VM
• States that a VM can enter
• Vagrant commands to manage a VM state
• Resolving the problem of colliding ports
To simplify this analysis of $ vagrant up, Vagrant’s actions will be divided into three stages. I will draw
your attention to various files and directories that are involved during booting as well as the timing of the
three stages. It will help you understand how Vagrant can be used in the most efficient way.
Then I will analyze the five different states that the guest OS can enter. This part of the chapter, together
with explanation of all Vagrant commands to change states, will ultimately provide you with precise
descriptions for all the methods to do the following:
• Boot the guest OS
• Shut down the guest OS
The example used in this chapter is quite similar to the ones used in Chapter 2. This time, the
application “Songs for kids” will be written in the Sinatra web framework. Similar to the examples presented
in the previous chapter, you don’t need any knowledge of Sinatra to run the application. But in order to get
a deeper insight into the way various resources such as files and processes are handled by VM, you will start
the HTTP server manually within the guest VM.
CHAPTER 3 ■ THE STATES OF VM
42
Before You Begin
Let’s start by making sure there are no VMs running on our hosts. Run this command:
$ vagrant global-status
If the list of VMs is not empty, use the following command to destroy the VM:
$ vagrant destroy ID
The ID parameter stands for the ID displayed by $ vagrant global-status. You might have to run
this command:
$ vagrant global-status --prune
The previous command removes stale VMs. The $ vagrant global-status command caches the data
about VMs and it could print outdated results. This problem can be resolved with the --prune option, which
clears the cache used by the $ vagrant global-status command.
When there are no VMs running on your host, you are ready to go.
Getting the Source Code of the Example Application
To work with the project, you have to download its source code. For this chapter, I prepared the example
project “Songs for kids” written in Sinatra. It is hosted on GitHub at
https://github.com/pro-vagrant/
songs-app-sinatra/. The following command will clone the project from GitHub to your local drive:
$ cd folder/with/examples
$ git clone
https://github.com/pro-vagrant/songs-app-sinatra.git
Enter the newly created project’s directory:
$ cd songs-app-sinatra
Vagrantfile
The configuration of a VM used within a project is stored on a per-project basis inside the Vagrantfile file.
Every project has its own Vagrantfile that governs the properties of the VM used. This file is written in the
Ruby language and contains the name of the so-called base box for the guest OS (among other things).
The Vagrantfile is supposed to be shared by all developers, so it should go into the version control. If all
the developers have the same Vagrantfile, they will have identical development environments.
Although Vagrant is pretty stable right now, it is still being actively developed, so its format might
change. The strategy used by Vagrant’s author to denote the version of the Vagrantfile format relies on stable
releases, which have the second number equal to 0. Thus, the following facts are true:
• Vagrant 1.0.* was the first stable release (published on March 6, 2012).
• Vagrant 2.0.* will be the second stable release.
• Vagrant 3.0.* will most probably be the third stable release, and so on.

CHAPTER 3 ■ THE STATES OF VM
43
The Vagrantfile format for the first stable release was denoted as format number 1. It was developed
in Vagrant from 0.1.0 up to 1.0.0, and fixed in Vagrant up to 1.0.7. Since version 1.0.0, this format has been
frozen — it won’t change any more. Because Vagrant guarantees backward-compatibility, you can use this
format safely in all future versions of Vagrant.
The next format, the one denoted as version 2, is being developed in versions up to 2.0.0. Once the
Vagrant reaches version 2.0.0, format 2 will become stable and it won’t change (except for some bug fixes in
versions 2.0.*). Because Vagrant has not reached the 2.0.0 release yet, this format is still under development
(so it still might change).
■ Note All the examples in the book use Vagrantfile format 2, even though there is a slight risk of publishing
outdated information.
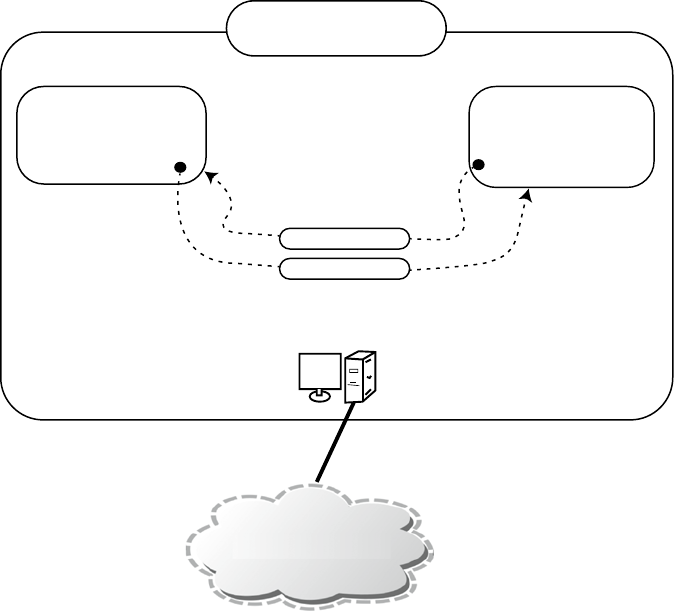
The Vagrantfile for the project “Songs for kids” written in Sinatra is shown in Listing 3-1.
Listing 3-1. Vagrantfile for “Songs for kids” written in Sinatra
Vagrant.configure(2) do |config|
config.vm.box = "http://boxes.gajdaw.pl/sinatra/sinatra-v1.0.0.box"
config.vm.network :forwarded_port, guest: 4567, host: 45670, host_ip: "127.0.0.1"
end
As shown in Listing 3-1, this Vagrantfile uses version 2, which can also be done with the variable
VAGRANTFILE_API_VERSION:
VAGRANTFILE_API_VERSION = "2"
passed ass a parameter to Vagrant.configure():
Vagrant.configure(VAGRANTFILE_API_VERSION) do |config|
...
end
The VM used in this project is configured with two instructions:
config.vm.box = "
http://boxes.gajdaw.pl/sinatra/sinatra-v1.0.0.box"
config.vm.network :forwarded_port, guest: 4567, host: 45670, host_ip: "127.0.0.1"
The first instruction sets the base box used in the project to the one available at http://boxes.gajdaw.pl/
sinatra/sinatra-v1.0.0.box; the second defines port forwarding. Requests sent to port 45670 on the host
OS will be forwarded to port 4567 in the guest OS. Thanks to the host_ip parameter, the guest OS will accept
only connections originating at the host with the IP address set to 127.0.0.1 (this is the host, of course).
This is the way to restrict remote access to a VM.

CHAPTER 3 ■ THE STATES OF VM
44
Where Does the VM Image Come From?
The complete VM used by Vagrant to create and run the guest OS is stored in a single file. This file, often
referred to as a box file or an image file, is usually quite large: from a few hundred megabytes to a few gigabytes.
That’s not surprising because the file contains a complete preinstalled OS such as Linux, CentOS, or FreeBSD,
for example. The extension used by Vagrant for the base boxes is usually .box, but it is not mandatory.
■ Tip To avoid inadvertent commits of .box files, consider adding this rule to your global gitignore file: *.box.
The file that I prepared for this example is named sinatra-v1.0.0.box, which consumes 700 MB of hard
drive space. The time necessary to download this file depends on the bandwidth of your Internet connection.
It usually takes a couple of minutes to download the base box, but it might take much longer. The file is
uploaded onto my server and is available at
http://boxes.gajdaw.pl/sinatra/sinatra-v1.0.0.box.
To run the example, you have to download this file and install it into your system. Vagrant is smart
enough to perform these operations during the execution of $ vagrant up, which is why this command
takes so much time when you run it for the first time.
■ Note Of course, you can set the config.vm.box to an arbitrary URL; for example, config.vm.box =
"
http://example.net/some/other.box"
. You can also use the Vagrant Cloud service to use names such as
gajdaw/sinatra or ubuntu/precise32. Vagrant Cloud services will be discussed in Chapter 10.
Booting the VM
When you run the command $ vagrant for the first time, you will see output similar to the one shown in
Listing 3-2.
Listing 3-2. Output of $ vagrant up Run for the First Time
❶Bringing machine 'default' up with 'virtualbox' provider...
❶==> default: Box '
http://boxes.gajdaw.pl/sinatra/sinatra-v1.0.0.box' could not be found.
Attempting to find and install...
❶ default: Box Provider: virtualbox
❶ default: Box Version: >= 0
❶==> default: Adding box '
http://boxes.gajdaw.pl/sinatra/sinatra-v1.0.0.box' (v0) for
provider: virtualbox
❶ default: Downloading: http://boxes.gajdaw.pl/sinatra/sinatra-v1.0.0.box
❶==> default: Box download is resuming from prior download progress
❶==> default: Successfully added box '
http://boxes.gajdaw.pl/sinatra/sinatra-v1.0.0.box'
(v0) for 'virtualbox'!
❷==> default: Importing base box 'http://boxes.gajdaw.pl/sinatra/sinatra-v1.0.0.box'...
❸==> default: Matching MAC address for NAT networking...
❸==> default: Setting the name of the VM: songs-app-sinatra_default_1425397277271_42545
❸==> default: Clearing any previously set network interfaces...
❸==> default: Preparing network interfaces based on configuration...
❸ default: Adapter 1: nat
❸==> default: Forwarding ports...

CHAPTER 3 ■ THE STATES OF VM
45
❸ default: 4567 => 45670 (adapter 1)
❸ default: 22 => 2222 (adapter 1)
❸==> default: Booting VM...
❸==> default: Waiting for machine to boot. This may take a few minutes...
❸ default: SSH address: 127.0.0.1:2222
❸ default: SSH username: vagrant
❸ default: SSH auth method: private key
❸ default: Warning: Connection timeout. Retrying...
❸ default:
❸ default: Vagrant insecure key detected. Vagrant will automatically replace
❸ default: this with a newly generated keypair for better security.
❸ default:
❸ default: Inserting generated public key within guest...
❸ default: Removing insecure key from the guest if its present...
❸ default: Key inserted! Disconnecting and reconnecting using new SSH key...
❸==> default: Machine booted and ready!
❸==> default: Checking for guest additions in VM...
❸==> default: Mounting shared folders...
❸ default: /vagrant => /examples/songs-app-sinatra
❸==> default: Running provisioner: shell...
❸ default: Running: inline script
❸==> default: stdin: is not a tty
The process of booting the machine consists of three main stages:
• Stage I: downloading and installing the box in the system (denoted in Listing 3-2 with ❶)
• Stage II: importing the base box into the project (denoted in Listing 3-2 with ❷)
• Stage III: booting the system (denoted in Listing 3-2 with ❸)
Before the analysis of the above three states, take a look at the timing shown in Table
3-1 and the space
consumption summarized in Table3-2. Although the data I present are taken from my system and will
probably be different in your situation, the tables will give you the basic understanding of the time and space
necessary to work with a VM created by Vagrant.
Table 3-1. Timing of the Initial $ vagrant up Command
Stage Time
Stage I: Download and install the box 3 minutes
Stage II: Import the box 15 seconds
Stage III: Boot the system 20 seconds
Total 3 minutes, 35 seconds
Table 3-2. Space Occupied After the First Two Stages
Stage Directory Space
Stage I: Download and install the base box ~/.vagrant.d/boxes/ 800 MB
Stage II: Import the box ~/VirtualBox VMs/ 2.2 GB
Total (after Stages I and II) 2.8 GB

CHAPTER 3 ■ THE STATES OF VM
46
Stage I: Downloading and Installing the Box in the System
In Listing 3-2, the first stage starts with this message:
❶==> default: Box 'http://boxes.gajdaw.pl/sinatra/sinatra-v1.0.0.box' could not be found.
Attempting to find and install...
It ends with this message:
❶==> default: Successfully added box 'http://boxes.gajdaw.pl/sinatra/sinatra-v1.0.0.box'
(v0) for 'virtualbox'!
During this Stage I, Vagrant checks to see whether the box is available on your computer. If not, which
is the case during the first run, Vagrant downloads the box and installs it in the system. Because the file
consumes about 800 MB, the operation can last a couple of minutes. In my case, it took about 3 minutes.
(This process is one of the most time-consuming parts of booting the VM.) But, as you will see in Chapter 6
on provisioning, not necessarily the longest one.
Once downloaded, the box is installed in your home directory; you’ll find it inside ~/.vagrant.d/boxes/.
If you have changed the VAGRANT_HOME environment variable, you’ll find it in the
$VAGRANT_HOME/.vagrant.d/boxes/
directory. To verify, run one of these commands:
$ ls -l ~/.vagrant.d/boxes/
$ ls -l $VAGRANT_HOME/.vagrant.d/boxes/
The name of the directory in which Vagrant stores the downloaded VM is the same as the URL, but
each slash (/) is replaced with -VAGRANTSLASH-. The image downloaded from
http://boxes.gajdaw.pl/
sinatra/sinatra-v1.0.0.box will be stored in this folder: http:-VAGRANTSLASH--VAGRANTSLASH-boxes.
gajdaw.pl-VAGRANTSLASH-sinatra-VAGRANTSLASH-sinatra-v1.0.0.box.
Note that the boxes stored in the .vagrant.d/boxes/ directory are used as templates by your projects.
No matter how many projects using a particular base box you have on your computer, you need only one
entry for this box inside the .vagrant.d/boxes/ directory.
■ Note Downloading and installing the box can be done manually (see Chapter 5).
Stage II: Importing the Base Box into the Project
The second stage, importing the base box into the project, is shown in Listing 3-2 with just one line:
❷==> default: Importing base box 'http://boxes.gajdaw.pl/sinatra/sinatra-v1.0.0.box'...
During this stage, the template box stored in the .vagrant.d/boxes/ directory is copied into the Virtual
Box directory: ~/VirtualBox VMs/. You can verify it with the following command:
$ ls -l ~/VirtualBox\ VMs/
CHAPTER 3 ■ THE STATES OF VM
47
Think of this step as creating the VM instance in ~/VirtualBox VMs/ using the template from
.vagrant.d/boxes/. The name of the directory for this instance is the name of your project’s directory with a
timestamp, similar to this: ~/VirtualBox\ VMs/songs-app-sinatra-123456-9876/.
Note that the box stored in .vagrant.d/boxes/ is compressed and consumes about 800 MB. However,
the imported box, the one stored within the ~/VirtualBox VMs/ directory, is decompressed and thus much
larger. (In the case of a VM for Sinatra, it is about 2.2 GB.)
This operation is a local one, so it usually takes much less time than downloading. In my case, it took
about 15 seconds.
Stage III: Booting the System
The third stage, the actual process of booting the guest OS, starts right after the import and lasts until the
end. In Listing 3-2, this stage is denoted with ❸:
❸==> default: Matching MAC address for NAT networking...
...
❸ default: /vagrant => /examples/songs-app-sinatra
In this stage, Vagrant boots the guest OS — the one stored as a subdirectory of ~/VirtualBox\ VMs/ —
and sets the configuration for networking and shared hosts.
The networking that is defined in Vagrantfile with the following directive:
config.vm.network :forwarded_port, guest: 4567, host: 45670, host_ip: "127.0.0.1"
results in the following message (refer to Listing 3-2):
❸==> default: Forwarding ports...
❸ default: 4567 => 45670 (adapter 1)
When the booting is finished, you might be surprised that nothing happens. Well, not exactly nothing.
Vagrant brought up the guest OS that you can work with. The system works in headless mode, which means
that it has no GUI interface. You can verify it with the following command:
$ vagrant status
This command prints the information about the status of the guest OS in the current project. After a
successful $ vagrant up operation, the guest OS is running in the background and its state is denoted as
follows:
default running (virtualbox)
The main window of VirtualBox now contains a VM labeled Running (see Figure
3-1).
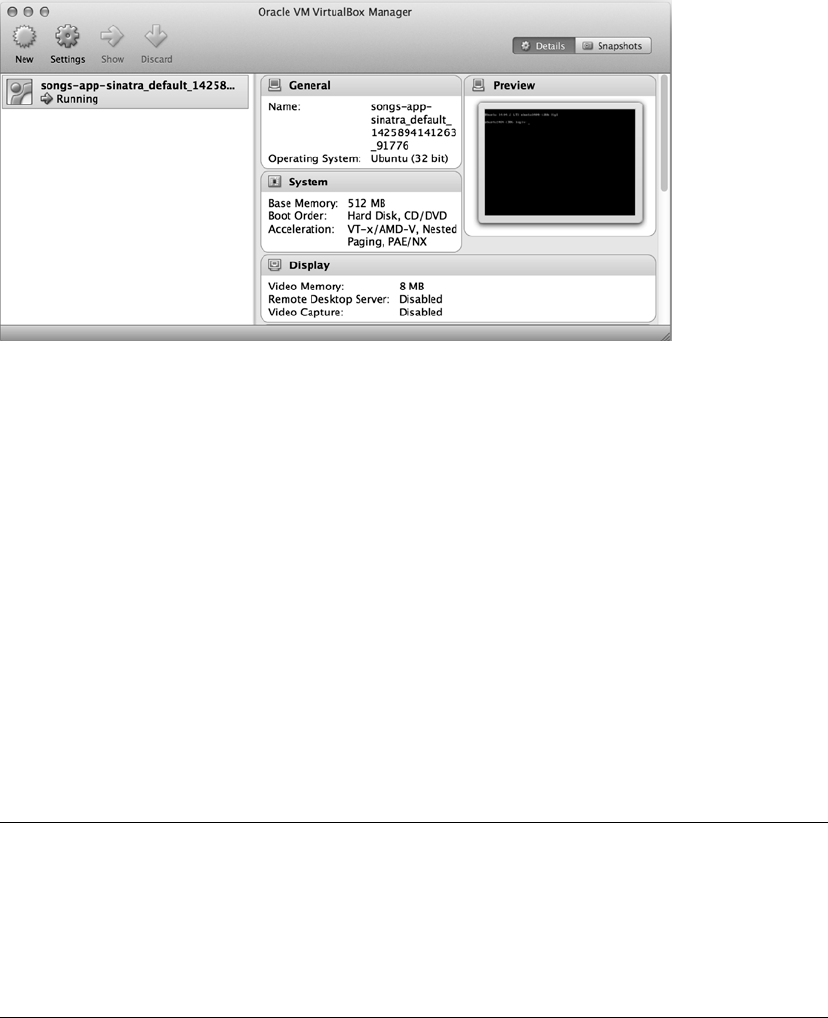
CHAPTER 3 ■ THE STATES OF VM
48
If you list the contents of the project’s directory with $ ls -la, you’ll see this item among others:
drwxr-xr-x 3 gajdaw staff 102 12 lis 08:18 .vagrant
This directory is the place in which Vagrant stores the ID and some other information about the guest
OS. The size of this directory might be neglected; it is only a couple of kilobytes. The following command
prints the output of approximately 20 KB:
$ du -hs .vagrant/
This directory should not be shared with other developers. What’s more, it also can’t be copied. It is designed
to be created and destroyed only by Vagrant commands such as $ vagrant up and $ vagrant destroy.
To avoid sharing .vagrant/ directory, remember to add the following entry to your .gitignore file:
/.vagrant/
You can also add this entry to your global .gitignore configuration.
■ Warning What happens if you inadvertently remove the .vagrant/ directory in a project? You’ll lose the
information about the VM, but if the machine was already started before the removal, it won’t be automatically
stopped. To stop or remove the machine, use the VirtualBox main window shown in Figure 3-1. After selecting
the VM, use Machine/Close option/Power off. You can also use the $ vagrant global-status command.
In general, you should avoid performing any filesystem operations on Vagrant directories, such as .vagrant/ or
.vagrant.d/; rely on Vagrant commands instead.
Figure 3-1. The main window of VirtualBox with songs-app-sinatra running
www.allitebooks.com

CHAPTER 3 ■ THE STATES OF VM
49
Files and Directories: Summary
Figure3-2 presents a summary of files and directories that are relevant to $ vagrant up. It will help you
better understand the process of bringing up a new guest OS to life.
■ Note From now on, I’ll refer to the directories shown in Figure 3-2 as the project’s directory as A, the VM
template directory as B, and the VM instance directory as C.
The directory labelled A is where the source code of the project resides (for an existing project, this
directory is created with the $ git clone command). This is the place where you should run all Vagrant
commands such as $ vagrant up or $ vagrant status. Inside this directory, you can find the Vagrantfile
file and the directory .vagrant/.
■ Notice To start the work on a new project from scratch, you need the $ vagrant init command, which
will be discussed in Chapter 4.
Please note that right after the $ git clone command, the project’s directory A does not contain
.vagrant/ subdirectory; it is created only after the $ vagrant up command. Keep in mind the following:
• Vagrantfile should always go into the version control.
• .vagrant/ should always be ignored by the version control. You can’t copy this
directory to some other location on your hard drive.
Now let’s dive into the actions performed by Vagrant during each of the three stages of $ vagrant up.
Server:
http://boxes.gajdaw.pl
File:
/sinatra/sinatra-v1.0.0.box
about 800 MBtt
Project’s directory
VM Template directory
VM Instance directory
Directory songs-app-sinatra/containing:
Vagrantfile - file: it goes to VCS
.vagrant/ - dir: it doesn’t go to VCS
Directory: Directory:
~/.vagrant.d/boxes/http:-VAGRANTSLASH-...gajdaw...box
about 800 MB
~/VirtualBox VMs/songs-app-sinatra-XXX/
about 2.2 GB
A
B
C
D
Your hard drive
Figure 3-2. Files and directories relevant to the $ vagrant up command
CHAPTER 3 ■ THE STATES OF VM
50
Files and Directories in Stage I
During Stage I, Vagrant downloads the box file (about 800 MB) from the server and installs the box in the
system inside the VM template directory denoted as B in Figure3-2. This template can be reused by many
projects. In other words, the directory denoted as B is created (if it does not already exist) during Stage I of
$ vagrant up.
The directory ~/vagrant.d/boxes/http:-VAGRANTSLASH-...gajdaw...boxsinatra consumes about as
much as the file downloaded from the server — about 800 MB. You can verify it with this:
$ du -hs ~/.vagrant.d/boxes/http:-VAGRANTSLASH--VAGRANTSLASH-boxes.gajdaw.pl*
Because this file is not user- or project-dependent, it is a very reasonable solution to install it on your
system only once for all users. You can do this with the VAGRANT_HOME environment settings (refer to Chapter 1):
$ export VAGRANT_HOME=/some/shared/directory
Files and Directories in Stage II
During this stage, the VM template stored in directory B is copied and uncompressed into directory C. This
is the guest OS that will be used only by this particular project. Every project that you run uses its own VM
instance.
At this stage, the VM instance directory shown in Figure
3-2 as C is created. The subdirectory C contains
uncompressed version of the VM, so it can consume much more space. In the case of my sinatra-v0.2.0
box, it is about 2.2 GB, as you can verify with the following command:
$ du -hs ~/VirtualBox\ VMs/songs-app-sinatra*
Files and Directories in Stage III
During this step, the guest OS is started. This step is the most complicated one. It will be discussed in more
detail in following chapters. Now, I want to focus on the VM state and the directories and files that take part
during$ vagrant up.
At this stage, the .vagrant/ directory is created inside the project’s folder and consumes only a couple
of kilobytes. You’ll find only some text files that identify the VM instance to be used inside this directory.
You have to remember to ignore it from VCS (Version Control System).
Guest OS States
The guest OS is up and running. To verify this, you can use the $ vagrant status command, which prints
the information about the state of the VM.
In all, there are five different states that your machine can enter. They are denoted by $ vagrant status
as follows:
• running
• poweroff
• saved
• not created
• aborted

CHAPTER 3 ■ THE STATES OF VM
51
running State
When the command $ vagrant status prints:
Current machine states:
default running (virtualbox)
the guest OS is running, and you can access it using ssh and other protocols (such as HTTP) that were made
available in the VM and Vagrantfile configuration.
When you access the guest OS with ssh, you can create files and directories inside virtual filesystems,
and you can start processes. These files, directories, and processes remain in the system as long as the
system is working (i.e., as long as you do not halt, reboot, or destroy it).
For the project in this state, your hard drive contains both directories B and C shown in Figure3-2.
VirtualBox uses the Running label to denote this VM state (refer to Figure
3-1).
poweroff State
If the output of the $ vagrant status is the following, the guest OS was halted:
Current machine states:
default poweroff (virtualbox)
You cannot access the VM with ssh any more, of course. When the VM enters this step, it halts all the
processes that were running. As a consequence, when you bring the machine back to life, some of the
processes might not be available. But the files that you have created inside the guest VM are not removed. If
you reboot the system, it will contain the files created during the previous run.
In this state, your hard drive contains both directories B and C shown in Figure
3-2. When a VM enters
this state, the VirtualBox main window labels the state as Powered Off (see Figure3-3).
Figure 3-3. Virtual machine in poweroff state

CHAPTER 3 ■ THE STATES OF VM
52
saved State
The next state is described as follows by the $ vagrant status command:
Current machine states:
default saved (virtualbox)
In this state, the VM is frozen. The exact state of the guest OS, with all the processes still running with
the contents of RAM and so on, is saved into directory C. This means that when you resume the system,
you’ll getall the files, processes, and RAM back.
In this state, the C directory can consume much more space than in the other states because the VM
RAM is dumped to a file. VirtualBox uses the Saved label, as shown in Figure
3-4.
not created State
The fourth state is described as follows:
Current machine states:
default not created (virtualbox)
The VM is in this state in these two situations:
• Before the first run of $ vagrant up (directories B and C don’t exist)
• After $ vagrant destroy (directory B exists; directory C doesn’t exist)
There is a slight difference between these two cases. In the first one, the box file hasn’t been
downloaded yet, so directory B doesn’t exist. In the second case, directory B exists. In both cases, directory C
doesn’t exist.
Figure 3-4. VM in a saved state

CHAPTER 3 ■ THE STATES OF VM
53
When the VM is in this state, the main window of VirtualBox is empty — the state is not listed at all by
VirtualBox because the VM doesn’t exist.
aborted State
The last state is described by $ vagrant status as follows:
default aborted (virtualbox)
The VM can enter this state in these two situations:
• Your host OS goes to sleep
• You interrupt $ vagrant up by pressing Control+C
The VirtualBox main window with a guest OS in this state is shown in Figure
3-5.
Figure 3-5. VM in the aborted state
Vagrant Commands
Vagrant offers a number of commands that deal with a machine’s state:
$ vagrant status
$ vagrant global-status
$ vagrant up
$ vagrant halt
$ vagrant suspend
$ vagrant destroy
$ vagrant reload
CHAPTER 3 ■ THE STATES OF VM
54
The first command reports the state of a machine in the current directory. When you try to run it
outside the project’s directory, as follows:
$ cd ~
$ vagrant status
you’ll see only the following notice:
A Vagrant environment or target machine is required to run this
command. Run `vagrant init` to create a new Vagrant environment. Or,
get an ID of a target machine from `vagrant global-status` to run
this command on. A final option is to change to a directory with a
Vagrantfile and to try again.
The second command, $ vagrant global-status, prints a system-wide report that informs you about
all VMs controlled by Vagrant.
For other commands that manage the VM state, see Figure
3-6. The commands to manage the VM state
differ with two aspects:
• Time necessary to boot the VM
• Space occupied on your hard drive
As you might expect, the larger the space occupied on a drive, the shorter the time necessary to bring
the VM to life.

CHAPTER 3 ■ THE STATES OF VM
55
$ vagrant up Command
When you run the $ vagrant up command, the actual actions performed by Vagrant can include the following:
• Stage I, if necessary (the box was not downloaded and installed; in other words, when
the VM template directory B shown in Figure
3-2 does not exist, it will be created)
• Stage II, if necessary (if the VM instance directory C shown in Figure
3-2 does not
exist, it will be created)
• Stage III, depending on the state, it boots or resumes the VM
No matter what the previous state was, you always end in the running state, in which the directories for
VM template (B) and for VM instance (C) always exist.
poweroff
$ vagrant up
saved
$ vagrant suspend
$ vagrant up
$ vagrant resume
running
$ vagrant halt
$ vagrant up
$ vagrant destroy
not created
without VM template B
without VM instance C
with VM template B
without VM instance C
$ vagrant box remove
$ git clone
$ vagrant init
Figure 3-6. How Vagrant commands modify the state of the guest VM
CHAPTER 3 ■ THE STATES OF VM
56
Stage I is executed only during the initial $ vagrant up (or if you manually remove the box with
$ vagrant box remove command).
Stage II is executed only during the initial $ vagrant up (or if you used $ vagrant destroy to stop the VM).
If you use $ vagrant halt or $ vagrant suspend, both Stage I and Stage II are skipped during the next
$ vagrant up run, which reduces the time necessary to reboot the guest VM.
$ vagrant halt Command
The $ vagrant halt command stops the VM. It should be executed in a running state and it always leaves
the machine in a poweroff state with both VM template (B) and VM instance (C) directories. This operation:
• Preserves all the files within the VM filesystem
• Doesn’t preserve any processes running in the VM
• Doesn’t preserve the VM’s RAM
To boot the VM when it was stopped with $ vagrant halt, you’ll have to run the $ vagrant up
command. Only Stage III is executed in this case. Stages I and II are skipped because template directory B
and instance directory C already exist.
The space consumed by the various resources on your hard drive can be described as follows:
• B directory (for a sinatra box, about 800 MB)
• C directory (for songs-app-sinatra, about 2.2 GB)
The time necessary to boot the VM that was stopped with $ vagrant halt is about 30 seconds on
my system.
$ vagrant suspend Command
The $ vagrant suspend command saves a snapshot of the VM on your hard drive. It is executed in the
running state, and it leaves the machine in the saved state with both B and C directories. This operation will
preserve the following:
• All the files within the virtual filesystem
• All processes running in the virtual system
• RAM of the virtual system
A VM in a suspended state can consume much more space on your hard drive (about 2.2 GB for
songs-app-sinatra). The time necessary to resume the VM from the saved state is the shortest; no other
method brings a VM to life more quickly. On my system, it takes about 20 seconds.
$ vagrant destroy Command
The $ vagrant destroy command stops the guest OS and removes the VM instance from the drive.
It removes the VM instance directory C shown in Figure
3-2. Keep in mind that the directory labelled as
template directory B is not removed, so after the following two commands, you’ll still have the box installed
during $ vagrant up in your system:
$ vagrant up
$ vagrant destroy

CHAPTER 3 ■ THE STATES OF VM
57
$ vagrant reload Command
The $ vagrant reload command restarts the VM. It is equivalent to the following:
$ vagrant halt
$ vagrant up
You can use this command to reload changes in Vagrantfile, such as port forwarding or shared folder
configuration.
How to Start and Stop a VM
The three aspects of starting and stopping VM are these:
• Time necessary to boot the system (during $ vagrant up or $ vagrant resume)
• Space on the hard drive necessary for storage (after $ vagrant halt, $ vagrant
suspend, or $ vagrant destroy)
• Which resources — such as files, processes, or RAM contents — are preserved in the
guest OS and which are lost
To start the guest OS, you need only one command: $ vagrant up. It brings the VM to life, no matter
what the current state of your project is. The time necessary to complete this operation depends on your
previous actions.
When you run $ vagrant up for the first time for a given box, it will take quite a while to complete.
Depending on your hardware and the bandwidth of the network, it can be a nerve-wracking operation,
so make sure that it is executed only once.
When the guest OS is running on your machine, things will work much better. If you need to stop the
machine, use either $ vagrant halt or $ vagrant suspend. Then, the next time you boot the machine with
$ vagrant up, the operation will be finished quite quickly. Of course, when you stop the system, the guest
doesn’t consume the RAM or processor of your host machine. A stopped or suspended guest consumes only
your hard drive space.
The summary of starting and stopping VMs is shown in Tables
3-3 and 3-4.
Table 3-3. Timing of Starting VMs from Different States
Boot VM from
the State
Stage I
Download
Stage II
Import
Stage III
Boot/Resume
Total Time
not created
(after $ vagrant init,
when the box is not installed)
3 minutes 15 seconds boot: 20 seconds 3 minutes,
35 seconds
poweroff
(after $ vagrant halt)
- - boot: 20 seconds 20 seconds
saved
(after $ vagrant suspend)
- - resume: 10 seconds 10 seconds
not created
(after $ vagrant destroy)
- 15 seconds boot: 20 seconds 35 seconds

CHAPTER 3 ■ THE STATES OF VM
58
■ Warning Timing and space estimates are for my computer and for songs-app-sinatra using the box
version v1.0.0. They are not universal; you will probably get other results.
Running “Songs for kids” in Sinatra
Let’s take a look at Vagrant commands and VM states in practice by using the example application. If you
have not already completed the execution of $ vagrant up, do it right now:
$ vagrant up
When the command finishes, the guest system should be in the running state. To verify it, use this command:
$ vagrant status
To access the application through your browser, start the HTTP server with the following commands:
$ vagrant ssh
$ ruby app.rb -o 0.0.0.0 &
$ logout
The ruby command starts the process to serve the application over the HTTP protocol. Using the
IP 0.0.0.0 enables connections to the guest OS from an arbitrary IP, which is how you allow the connections
incoming from the host OS. When this process is running, you can visit the application using the web
browser running on your host OS. If you use your browser to visit http://127.0.0.1:45670, you’ll see a web
page identical to the one shown in Figure3-7.
Table 3-4. Properties of Three Different Methods of Shutting Down VMs
VM Processes
and RAM
VM Filesystem VM Template in
~/.vagrant.d/boxes/
VM Instance in
~/VirtualBox VMs/
Space
$ vagrant
destroy
not preserved not preserved preserved — 700 MB not preserved 700 MB
$ vagrant
halt
not preserved preserved preserved — 700 MB preserved — 2.1 GB 2.8 GB
$ vagrant
suspend
preserved preserved preserved — 700 MB preserved — 2.2 GB 2.9 GB
www.allitebooks.com

CHAPTER 3 ■ THE STATES OF VM
59
Killing and Preserving Processes in a Guest OS During Shutdown
Suppose that you have finished coding for today and you want to finish dealing with the application. You can
use the halt subcommand to stop the guest machine:
$ vagrant halt
The guest OS is no longer present in your computer’s RAM. It has just entered the poweroff state.
When you are eager to start coding again, first bring the guest OS to life by using this command:
$ vagrant up
This time, the command should be completed in much shorter time because it consists only of Stage III.
As I have already mentioned, it takes about 30 seconds, which I consider to be reasonable. Wait for the
command to finish and try to use your web browser to visit http://127.0.0.1:45670.
The page is not available because all processes running in the guest OS are killed during
$ vagrant halt. When you reboot the VM, the system runs only the processes that are started up at boot time.
Figure 3-7. “Songs for kids” written in Sinatra
CHAPTER 3 ■ THE STATES OF VM
60
To visit http://127.0.0.1:45670, you have to start the process again using the following commands:
$ vagrant ssh
$ ruby app.rb -o 0.0.0.0 &
$ logout
Again, the process to serve the pages is running, and the URL http://127.0.0.1:45670 works just fine
in your browser. Now, try to stop the system using the $ vagrant suspend command:
$ vagrant suspend
At this point, the VM is in the saved state; it doesn’t consume the host’s RAM or CPU. Of course, the URL
http://127.0.0.1:45670 is inaccessible.
To wake the system up, you can now use either of two commands:
$ vagrant up
$ vagrant resume
Whichever command you choose, Vagrant will resume the suspended VM. When one of these two
commands is executed, the system will run again; this time, you can access http://127.0.0.1:45670 at
once with your browser. The process to serve the application (the one started before $ vagrant suspend) is
present in the guest OS:
$ ruby app.rb -o 0.0.0.0 &
As you can see, the $ vagrant suspend command preserves the processes within the guest OS.
You can also try to stop the VM with the $ vagrant destroy command and wake the VM again with
$ vagrant up. But when you stop the guest OS with $ vagrant destroy, all its processes are killed, so when
you reboot the VM with $ vagrant up, you have to start the HTTP server by hand.
Here’s a summary to remember:
• $ vagrant suspend followed by $ vagrant up: The HTTP server started by hand is
preserved
• $ vagrant halt followed by $ vagrant up: The HTTP server started by hand is
killed and has to be started again manually
• $ vagrant destroy followed by $ vagrant up: The HTTP server started by hand is
killed and needs to be started again manually
Preserving and Losing Files in a Guest OS During Shutdown
Finally, I want to discuss what happens to files when the guest VM is rebooted. The answer is quite simple:
• When you use $ vagrant destroy followed by $ vagrant up, all the files that you
may have created within the guest OS are removed.
• When you use $ vagrant halt followed by $ vagrant up, the files within the guest
OS are preserved.
The files within the project’s directory are always preserved. Even if you stop the guest VM with
$ vagrant destroy, all the files within a project’s directory will be preserved.

CHAPTER 3 ■ THE STATES OF VM
61
Colliding Ports
If port 45670 on your host system is already in use, the command $ vagrant up will fail. You can resolve this
issue in two ways:
• Close the application that allocated the port 45670
• Change the port defined in the Vagrantfile
To change the port used in Listing 3-1 from 45670 to 9090, open the Vagrantfile and change the fourth
line to this:
config.vm.network :forwarded_port, guest: 4567, host: 9090, host_ip: "127.0.0.1"
Reboot the system with this:
$ vagrant reload
Start the web server:
$ vagrant ssh
$ ruby app.rb -o 0.0.0.0 &
$ logout
Use your web browser to access http://127.0.0.1:9090. You should see the web page shown in Figure
3-8.
Figure 3-8. “Songs for kids” running on port 9090
CHAPTER 3 ■ THE STATES OF VM
62
Removing the Box
To list the boxes installed during the $ vagrant up command, use this command:
$ vagrant box list
The output of the command contains the names of all installed boxes. Every box can be removed from
the system with this command:
$ vagrant box remove NAME
The NAME has to be replaced with the name of the box that you want to remove. The command removes
the VM template directory for the box (this directory is labeled B in Figure
3-3). If you remove the box the
next $ vagrant up command will download the box again.
Summary
Although the contents of this chapter might seem too complicated at first glance (at least for beginners),
they serve a very important purpose. If you want to avoid the pitfall of spending endless minutes waiting for
Vagrant to boot your development environment, you need to master all the different methods to start and
stop VMs. I was struggling with Vagrant for quite a long time, and it was not until I learned the three ways of
stopping the guest OS that I made progress in reducing the time necessary for each boot. That’s not all that
you need to know to work with Vagrant efficiently, but it’s a sound starting point.
This chapter gave you introductory information about the following:
• Vagrantfile and the configuration of the guest OS
• How to set the base box for a VM within Vagrantfile using the config.vm.box
instructions
The most important part of the chapter concerned the different states that a VM can enter. Specifically,
you learned the following:
• Which files and directories on your hard drive are affected by Vagrant
• Which files should be version controlled
• Which files can’t be version controlled
• Different states that a VM can enter
• Three stages behind $ vagrant up
• All the commands to modify the VM state
The practical aspect of this chapter is in-depth knowledge about starting and stopping VM. You should
be able to explain all the ways to start and stop the development environment, giving precise analysis of
the following:
• Time necessary to run
• Space consumption
You should also be able to explain the influence of the method with regard to the resources inside a
guest OS.
CHAPTER 3 ■ THE STATES OF VM
63
In the Next Chapter You Will Learn . . .
Chapter 4 is devoted to security. You will get a thorough explanation of all the risks that accompany using
Vagrant and VMs.
Reading List
The most important source for information about Vagrant commands is (not surprisingly) the manual.
Access
https://docs.vagrantup.com/v2/cli/index.html to get detailed documentation for all Vagrant
commands, including the ones discussed in this chapter.
Test Yourself
1. What is the versioning strategy for the Vagrantfile format?
2. What Vagrantfile entries do you use to define the base box to be used?
3. What are the three stages behind $ vagrant up executed for the first time for a
given box?
4. What happens during Stage I: downloading and installing the base box? How
long does the stage take? What directories and files are affected?
5. What happens during Stage II: importing the base box? How long does the stage
take? What directories and files are affected?
6. What happens during Stage III: booting? How long does the stage take? What
directories and files are affected?
7. Which files and directories on your hard drive are affected by Vagrant?
8. Where does Vagrant store base boxes (i.e., templates to run a guest OS)?
9. When should you change Vagrant’s configuration concerning the directory in
which the base boxes (templates) are stored? How can you do it?
10. Where does Vagrant store running/halted/suspended guest OSs? Can you
change the location? How?
11. Which Vagrant-related directories and files should always be committed into
version control?
12. Which Vagrant-related directories and files should never be version controlled?
13. How does $ vagrant destroy affect processes and files of VMs?
14. How does $ vagrant destroy affect the directories on your host’s hard drive?
15. How does $ vagrant halt affect processes and files of VMs?
16. How does $ vagrant halt affect the directories on your host’s hard drive?
17. How does $ vagrant suspend affect processes and files of VMs?
18. How does $ vagrant suspend affect the directories on your host’s hard drive?
CHAPTER 3 ■ THE STATES OF VM
64
19. What is the purpose of $ vagrant reload? How does it affect files and
directories inside a VM? How does it affect processes inside a VM?
20. Can you run $ vagrant status in an arbitrary directory? Why would you do so?
21. Can you run $ vagrant global-status in an arbitrary directory? Why would
you do so?
22. Suppose that you have inadvertently removed .vagrant/ directory for a
currently running VM. What can you do?
Exercises
1. Run the first example from Chapter 2 (“Songs for kids” written in AngularJS)
using port 7878.
2. Run the second example from Chapter 2 (“Songs for kids” written in Django)
using port 9100.
3. Remove the box installed for the “Songs for kids” written in Sinatra from your host.
4. Measure the time required for the up, halt, suspend, reload, and destroy
commands for the “Songs for kids” Sinatra example.

65
CHAPTER 4
Default Configuration and
Security Settings of the Guest VM
In Chapter 2, you had the opportunity to take a look at Vagrant in action; and thanks to Chapter 3, you
now understand the actions performed by Vagrant when you boot or halt the guest OS. Now it’s time to get
acquainted with the default configuration of a VM.
In this chapter, you will find the answers to the following questions:
• How does the guest OS communicate with the outside world?
• What aspects of communication can be defined?
• What default settings are used by Vagrant?
• How can these settings be changed?
In particular, the chapter will cover the following:
• Port forwarding
• Directory sharing between the host and guest OS
• Working with SSH
All these topics are crucial because they give you insight into the security of your workstation. With the
knowledge gained from this chapter, you will be aware of the most common security pitfalls and know how
to avoid them.
■ Note To proceed with the examples, stop all VMs that may be running on your host. You don’t have to
destroy them; you can just halt or suspend them.
Atlas
To start a new project that will use a guest OS, you need an image of the preinstalled OS. This image, which is
called a base box in Vagrant terminology, can be either created from scratch (using installation CD ROM, for
example) or downloaded from the network.

CHAPTER 4 ■ DEFAULT CONFIGURATION AND SECURITY SETTINGS OF THE GUEST VM
66
■ Note The topic of creating base boxes from scratch isn’t covered here because it will be discussed
thoroughly in Chapter 7. This chapter will use a base box that comes from the network, as in the previous
two chapters.
The Vagrantfile included in all the examples in Chapters 2 and 3 contains a line similar to the one
shown here:
config.vm.box = "http://boxes.gajdaw.pl/sinatra/sinatra-v1.0.0.box"
When you boot the VM, Vagrant downloads the file using the URL assigned to config.vm.box. Starting
with version 1.6, Vagrant can also use a cloud service named Atlas to download base boxes. This service,
which is available at
https://atlas.hashicorp.com, acts as a huge catalog of boxes. Each box is identified
by a name that consists of two parts: the vendor’s name and the name of the box.
For example, the name hashicorp/precise64 refers to the box authored by Hashicorp and named
precise64. It is an Ubuntu release with the code name Precise built for 64-bit hardware. The details about
this box are available at
https://atlas.hashicorp.com/hashicorp/boxes/precise64. To search for other
boxes, visit https://atlas.hashicorp.com/boxes/search and type the name of the system or framework
that you are interested in.
Among the huge collection of boxes, the most important, in my opinion, are the ones produced by
well-known companies such as Hashicorp, Puppet, Chef, and Ubuntu (to name a few). Their boxes are
available here:
• Hashicorp
• https://atlas.hashicorp.com/hashicorp
• Puppetlabs
•
https://atlas.hashicorp.com/puppetlabs
• http://puppet-vagrant-boxes.puppetlabs.com/
• https://github.com/puppetlabs/puppet-vagrant-boxes
• Chef
•
https://atlas.hashicorp.com/chef
• http://chef.github.io/bento/
• https://github.com/chef/bento
• Ubuntu
•
https://atlas.hashicorp.com/ubuntu
• https://cloud-images.ubuntu.com/vagrant/
Although there are lots of OSs, I will stick to the 32-bit Ubuntu 14.04 box published by Ubuntu. This box
is available in Atlas under the name ubuntu/trusty32.
To create a development environment that imitates your production settings, use the box with the same
OS as is used by the server in which you deploy your application. For example, if your production server is
CentOS 7.0, this box might be useful: puppetlabs/centos-7.0-64-nocm. And if you deploy your applications
on a machine running Fedora 21, this box might be appropriate: chef/fedora-21.
The complete procedure to deploy one of the examples will be discussed in Chapter
10.

CHAPTER 4 ■ DEFAULT CONFIGURATION AND SECURITY SETTINGS OF THE GUEST VM
67
■ Tip I prefer to use 32-bit versions of base boxes because they can be run on a large assortment of
hardware. If you’re sure that your hardware supports a 64-bit OS, you can try ubuntu/trusty64.
Initializing a New Project
The Vagrant command to start a new project is $ vagrant init. To create a new project using the
ubuntu/trusty32 box, run the commands shown in Listing 4-1.
Listing 4-1. Starting a Project Using the ubuntu/trusty32 Base Box
$ cd folder/with/examples
$ mkdir new-project-chapter-04
$ cd new-project-chapter-04
$ vagrant init -m ubuntu/trusty32
The sole purpose of the $ vagrant init command is to create a configuration file named Vagrantfile.
The file created by the following command is shown in Listing 4-2:
$ vagrant init -m ubuntu/trusty32
Listing 4-2. Vagrantfile Created with $ vagrant init -m ubuntu/trusty32
Vagrant.configure(2) do |config|
config.vm.box = "ubuntu/trusty32"
end
As you already know, the file is written in the Ruby language. The file shown in Listing 4-2 is equivalent
to the following:
VAGRANTFILE_API_VERSION = "2"
Vagrant.configure(VAGRANTFILE_API_VERSION) do |config|
config.vm.box = "ubuntu/trusty32"
end
At this point, you should understand that the Vagrantfile shown in Listing 4-2 is written using version 2
for Vagrantfile syntax, and the VM will use a box named ubuntu/trusty32 that comes from the Atlas service.
The parameter you pass to $ vagrant init is used as the value for the config.vm.box configuration entry.
The -m flag used in Listing 4-1 forces Vagrant to create a minimal Vagrantfile. If you skip this flag, you
will get a Vagrantfile with a lot of comments explaining diverse configuration options. I will stick with a
minimal Vagrantfile, but you can experiment with $ vagrant init without an -m flag.
Another $ vagrant init flag of that you will find useful is -f. By default, $ vagrant init will not
create a new Vagrantfile if one is already present in the current directory. Using the -f flag can force Vagrant
to overwrite an existing Vagrantfile with new contents.
Keep in mind that the sole purpose of $ vagrant init is to create a Vagrantfile. If you prefer, you can
create a Vagrantfile by hand using your favorite text editor and skip using $ vagrant init at all.
At this point, I assume that your new-project-chapter-04/ directory contains the Vagrantfile shown in
Listing 4-1.

CHAPTER 4 ■ DEFAULT CONFIGURATION AND SECURITY SETTINGS OF THE GUEST VM
68
Security Concern #1
Using a base box downloaded from the network is the first potential security risk. Using a base box means
downloading a packed file that contains a complete OS and then booting this system on a laptop. When you
run $ vagrant up, you actually boot up the guest OS prepared by someone else. Of course, a guest OS can
contain malicious software, just like any other binary executable. Before you bring a VM up, you have to ask
yourself whether the author of the base box can be trusted.
That’s where the security begins. If you download and boot the system that has been created with bad
intentions or has been tampered with by attackers, you might compromise the security of your machine or
even your network.
I recommend several VMs available on Vagrant Cloud, including the following:
• hashicorp/precise64
• ubuntu/trusty32
• chef/centos-6.5
More generally speaking, I have confidence in all the boxes available from Hashicorp, Ubuntu, or Chef,
but I don’t use boxes by vendors that I am not familiar with.
All the boxes that I have prepared for this book are open source. The source code is hosted at GitHub,
and the binary versions are hosted at
http://boxes.gajdaw.pl. You can download the source code and
build the boxes yourself, which will require some additional work (but you’ll avoid running binaries that
come from external sources). You can also run the examples with a simple $ vagrant up, but it will entail
downloading and using my binary boxes. The choice is yours. I’ll give you the complete and in-depth
explanation of how to build my boxes and run the examples using your binaries in Chapter 9.
■ Warning Running $ vagrant up for a base box that you know nothing about can be compared to running
a binary application that comes from an unknown source. It can compromise your workstation or even the
whole network.
Booting the Guest OS
If you have used the ubuntu/trusty32 box in some of your projects, please remove the box from your
system. You can use this command to do so:
$ vagrant box remove ubuntu/trusty32
You can verify that the box is not present in your system with these commands:
$ vagrant box list
$ vagrant box list | grep ubuntu
Now that the Vagrantfile is ready, and the ubuntu/trusty32 box is not present in your system, you can
boot the guest OS with this:
$ vagrant up
www.allitebooks.com
CHAPTER 4 ■ DEFAULT CONFIGURATION AND SECURITY SETTINGS OF THE GUEST VM
69
The output produced by this command is shown in Listing 4-3. This time, you’ll concentrate on the
code marked with
❶
,
❷
, and
❸
.
Listing 4-3. Output of $ vagrant up Executed for the First Time for the Vagrantfile Shown in Listing 4-2
new-project-chapter-04$ vagrant up
Bringing machine 'default' up with 'virtualbox' provider...
❶
==> default: Box 'ubuntu/trusty32' could not be found. Attempting to find and install...
❶
default: Box Provider: virtualbox
❶
default: Box Version: >= 0
❶
==> default: Loading metadata for box 'ubuntu/trusty32'
❶
default: URL:
https://atlas.hashicorp.com/ubuntu/trusty32
❶
==> default: Adding box 'ubuntu/trusty32' (v14.04) for provider: virtualbox
❶
default: Downloading:
https://atlas.hashicorp.com/ubuntu/boxes/trusty32/
versions/14.04/providers/virtualbox.box
❶
==> default: Successfully added box 'ubuntu/trusty32' (v14.04) for 'virtualbox'!
==> default: Importing base box 'ubuntu/trusty32'...
==> default: Matching MAC address for NAT networking...
==> default: Checking if box 'ubuntu/trusty32' is up to date...
==> default: Setting the name of the VM: new-project-chapter-04_default_1425979386605_81311
==> default: Clearing any previously set forwarded ports...
==> default: Clearing any previously set network interfaces...
==> default: Preparing network interfaces based on configuration...
default: Adapter 1: nat
❷
==> default: Forwarding ports...
default: 22 => 2222 (adapter 1)
==> default: Booting VM...
==> default: Waiting for machine to boot. This may take a few minutes...
default: SSH address: 127.0.0.1:2222
default: SSH username: vagrant
default: SSH auth method: private key
default: Warning: Connection timeout. Retrying...
default: Warning: Remote connection disconnect. Retrying...
default:
default: Vagrant insecure key detected. Vagrant will automatically replace
default: this with a newly generated keypair for better security.
default:
default: Inserting generated public key within guest...
default: Removing insecure key from the guest if its present...
default: Key inserted! Disconnecting and reconnecting using new SSH key...
==> default: Machine booted and ready!
==> default: Checking for guest additions in VM...
❸
==> default: Mounting shared folders...
default: /vagrant => /examples/new-project-chapter-04
Downloading the ubuntu/trusty32 Base Box from Atlas
The parts marked in Listing 4-3 with
❶
concern downloading and installing the base box. As you know, this
is the first stage of $ vagrant up. The box name ubuntu/trusty32 is searched for in the Atlas service:
❶
default: URL:
https://atlas.hashicorp.com/ubuntu/trusty32

CHAPTER 4 ■ DEFAULT CONFIGURATION AND SECURITY SETTINGS OF THE GUEST VM
70
Atlas expands the name ubuntu/trusty32 into the URL:
❶ default: Downloading:
https://atlas.hashicorp.com/ubuntu/boxes/trusty32/
versions/14.04/providers/virtualbox.box
If you try to download the previous URL with the curl command-line tool like this:
$ curl
https://atlas.hashicorp.com/ubuntu/boxes/trusty32/versions/14.04/providers/
virtualbox.box
you will receive this response:
<html>
<body>
You are being <a href="http://cloud-images.ubuntu.com/vagrant/trusty/current/trusty-
server-cloudimg-i386-vagrant-disk1.box">redirected</a>.
</body>
</html>
Atlas redirects requests for ubuntu/trusty32 to
http://cloud-images.ubuntu.com/vagrant/trusty/
current/trusty-server-cloudimg-i386-vagrant-disk1.box.
The preceding file served by cloud-images.ubuntu.com is downloaded to your computer and installed
as a base box.
■ Note You can also download base boxes manually by using curl or wget:
$ curl [URL] -o [FILENAME]
$ wget -O [FILENAME] [URL]
Here are the commands to download one of my boxes:
$ curl http://boxes.gajdaw.pl/apache/apache-v1.0.0.box -o apache-v1.0.0.box
$ wget -O apache-v1.0.0.box http://boxes.gajdaw.pl/apache/apache-v1.0.0.box
And here are the commands to download the ubuntu/trusty32 base box:
$ curl http://cloud-images.ubuntu.com/vagrant/trusty/current/trusty-server-cloudimg-
i386-vagrant-disk1.box -o trusty-server-cloudimg-i386-vagrant-disk1.box
$ wget -O trusty-server-cloudimg-i386-vagrant-disk1.box http://cloud-images.ubuntu.com/
vagrant/trusty/current/trusty-server-cloudimg-i386-vagrant-disk1.box
Default Configuration of a VM
The default configuration of a VM consists of the following:
• One forwarded port: Host port 2222 is forwarded to guest port 22.
• One shared folder: The folder that contains the Vagrantfile is shared by the host and
guest OS.

CHAPTER 4 ■ DEFAULT CONFIGURATION AND SECURITY SETTINGS OF THE GUEST VM
71
Forwarding Port 2222 on the Host to Port 22 on the Guest
The exposed port is announced in Listing 4-3 by the output denoted here:
❷==> default: Forwarding ports...
default: 22 => 2222 (adapter 1)
When you access port number 2222 on the host system, you are redirected to port number 22 inside the
guest system. This configuration is necessary; without it, you could not to access the guest OS using SSH.
But Vagrant takes the precaution to restrict the access to this port to only requests coming from IP address
127.0.0.1, which prevents access to the guest OS through the network. By default, the SSH session to the
guest OS can be opened only from the host machine.
You can verify this by inspecting forwarded ports properties for VM with the VirtualBox application. The
procedure to do this is shown in Figures
4-1, 4-2, and 4-3. Open the VirtualBox main window and follow the
buttons shown with arrows A, B, C, and D.
Figure 4-1. VirtualBox main window with the VM from new-project-chapter-04/ running

CHAPTER 4 ■ DEFAULT CONFIGURATION AND SECURITY SETTINGS OF THE GUEST VM
72
Figure 4-2. Network properties of the VM from Figure4-1
Figure 4-3. Forwarded ports of the VM from Figure4-1
CHAPTER 4 ■ DEFAULT CONFIGURATION AND SECURITY SETTINGS OF THE GUEST VM
73
The Host IP value shown in Figure4-3 is responsible for restricting the machines that can access the
forwarded port. This setting can be achieved with the following Vagrantfile entry:
config.vm.network :forwarded_port, guest: 22, host: 2222, host_ip: "127.0.0.1"
Whenever you use forwarded ports to access services of a guest OS, ensure that you expose the ports
only to the host machine unless you know exactly what you are doing.
Security Concern #2
By default, Vagrant exposes only one port of a guest OS. No matter which daemons are running inside a
guest OS, the only daemon that can be accessed is sshd. What’s more, the sshd running on a guest machine
can be accessed only by sessions originating from a host machine.
When dealing with forwarded ports, you should mimic this behavior. Your guest OS should not expose
any services to the outside world. One way to do this is to use the host_ip parameter for :forwarded_port
rules:
config.vm.network :forwarded_port, guest: 80, host: 8888, host_ip: "127.0.0.1"
Sharing a Project Directory
When you run $ vagrant up, Vagrant turns on sharing of a project directory by default. This is announced in
Listing 4-3 with the following:
❸==> default: Mounting shared folders...
default: /vagrant => /examples/new-project-chapter-04
The project directory in the host OS is now available in the guest OS. In my case, I executed $ vagrant
up inside the /examples/new-project-chapter-04/ directory, which became available in the guest OS as
the /vagrant folder. In other words, the following two directories have exactly the same contents and are
synchronized in the background:
Host directory Guest directory
/examples/new-project-chapter-04/ <===> /vagrant
The changes you make in the host OS are immediately visible in the guest OS. And the changes made in
the guest are immediately visible in the host. You can verify this by running the following commands, which
will create a file named abc.txt in the host OS:
### Here you are in Host OS
$ cd new-project-chapter-04/
$ echo abc > abc.txt

CHAPTER 4 ■ DEFAULT CONFIGURATION AND SECURITY SETTINGS OF THE GUEST VM
74
The echo command creates a file named abc.txt that contains the text "abc". Open the SSH session to
the guest, list the contents of the /vagrant directory, and print the contents of the /vagrant/abc.txt file on
the terminal:
### Here you are in Host OS
$ vagrant ssh
### Now you are in Guest OS
$ ls /vagrant
$ cat /vagrant/abc.txt
$ logout
### After logout you are in Host OS again
The output of $ ls /vagrant will include the abc.txt file, and $ cat /vagrant/abc.txt will print the
string "abc".
Thus, the changes you made in the host system inside the /examples/new-project-chapter-04/
directory are visible in the guest OS in the /vagrant directory. It proves the synchronization from host to
guest.
Now test the synchronization in the other direction: from guest to host. Run the following commands
that change the contents of the abc.txt file inside the guest OS:
### Here you are in Host OS
$ vagrant ssh
### Now you are inside Guest OS
$ echo xyz > /vagrant/abc.txt
$ logout
### After logging out you are in Host OS again
Take a look at the new-project-chapter-04/ directory. If you list the contents of the abc.txt file in the
host OS with the following, you will see the output "xyz":
### You are in Host OS
$ cd new-project-chapter-04
$ cat abc.txt
Thus, the changes made inside the guest OS are available in the host OS.
You can inspect the properties of a shared folder by using VirtualBox (see Figure
4-4). Run VirtualBox
and then click the buttons in Figure
4-4 denoted by the A, B, C, and D arrows.
■ Note Some commands, like for example $ ls, can be executed in both the host and the guest systems.
To avoid confusion, I add comments such as these:
### Here you are in Host OS
$ ls
$ vagrant ssh
### Now you are in Guest OS
$ ls
$ logout
### After logout you are in Host OS again

CHAPTER 4 ■ DEFAULT CONFIGURATION AND SECURITY SETTINGS OF THE GUEST VM
75
Sharing a project directory is defined in Vagrant with the following configuration settings:
config.vm.synced_folder [HOST-PATH], [GUEST-PATH]
Here’s the example for Windows:
config.vm.synced_folder "c:\\dir\\on\\host\\windows", "/dir/on/guest/ubuntu"
And here’s one for Mac or Linux:
config.vm.synced_folder "/dir/on/host/Mac/or/Linux", "/dir/on/guest/ubuntu"
■ Note There are some very interesting options for the config.vm.synced_folder setting (turning on NFS,
for example). But because this requires using private networks, I will postpone the discussion until Chapter 8.
Figure 4-4. Inspecting a shared folder’s properties
CHAPTER 4 ■ DEFAULT CONFIGURATION AND SECURITY SETTINGS OF THE GUEST VM
76
Communication with the Outside World
The communication of a guest OS with the outside world is defined by the following:
• Shared directories
• Exposed network resources (for example, forwarded ports)
The new-project-chapter-04/ project has the following:
• One shared directory: The project’s directory is available in the guest under the name
/vagrant.
• One forwarded port: Port 2222 on the host is forwarded to port 22 on the guest.
With this knowledge, you should now understand how the examples discussed in Chapter
2 work.
Analysis of “Songs for kids” in AngularJS
Let’s analyze the example “Songs for kids” written in AngularJS. The project directory contains the following
files:
└── songs-angularjs-app
├── README.md
├── Vagrantfile
└── web
├── css
├── data
├── index.html
├── js
├── lib
└── partials
Because a project directory is shared between the host and guest, the files inside the directory
(for example, web/index.html) can be edited on the host workstation. You can use an arbitrary editor to
change the contents of the file.
The contents of a project’s directory are mounted in the guest OS under the name /vagrant. Thus the
files available in the host under the web/ directory are present in the guest inside the /vagrant/web/ folder.
Next, port number 8800 on the host is mapped to port number 80 in the guest, thanks to the following
line in Vagrantfile:
config.vm.network :forwarded_port, guest: 80, host: 8800, host_ip: "127.0.0.1"
So when you access http://127.0.0.1:8800 on the host, the request is sent to port number 80 in the
guest VM.

CHAPTER 4 ■ DEFAULT CONFIGURATION AND SECURITY SETTINGS OF THE GUEST VM
77
The box used in this example, apache-v0.3.3, contains an Apache daemon running in the guest OS.
The Apache starts at boot time and serves the contents of /vagrant/web directory over HTTP port 80.
When you run $ vagrant up in this example, you can use your browser to access
http://127.0.0.1:8800, which presents the contents of the project’s web/ directory.
When you change the contents of a file (for example, web/index.html on the host machine), these
changes are at once reflected inside the guest (thanks to host-guest synchronization). When you refresh the
page that is displayed, you will see the new contents.
Working with SSH
Secure Shell (SSH) is a mechanism that opens a remote terminal session to a computer running a u*ix-like
system. By default, the guest VM is configured so that its ssh daemon is available on the host on port
number 2222. This information is included in the output of the $ vagrant up command:
❷==> default: Forwarding ports...
default: 22 => 2222 (adapter 1)
The usual way to use SSH is to run the ssh command from a command prompt. Use something like the
following, where johnny is your username on the example.net server:
$ ssh [email protected]
When you boot the guest OS, you can start the SSH session with the much-simplified $ vagrant ssh
command. This process is the simplest way to do it because it takes into account various settings. The
configuration of SSH sessions opened by Vagrant can be checked with this command:
$ vagrant ssh-config
One advantage of using $ vagrant ssh is that Vagrant will take care of port conflicts. If you start more
than one guest OS (for example, if you run all the examples from Chapter
2 at the same time), only one guest
can use default port mapping: 2222 => 22 for the ssh daemon. Every other guest will have to use a different
setting (for example, 2200 => 22) to avoid conflicts with ports that have already been allocated on the guest.
Vagrant takes care of such conflicts when you use $ vagrant ssh to open an SSH session.
■ Note In case of conflicts, you can verify the port mapping for every VM using the output of $ vagrant up:
==> default: Forwarding ports...
default: 22 => 2222 (adapter 1)
You can also use the VirtualBox dialog box shown in Figure 4-3.
CHAPTER 4 ■ DEFAULT CONFIGURATION AND SECURITY SETTINGS OF THE GUEST VM
78
You can also use a traditional approach, which is also worth trying because it exposes another
important aspect of guest security. The following command opens the SSH session to the guest OS:
$ ssh -p2222 [email protected]
To log in, you have to use the following credentials:
username: vagrant
password: vagrant
After typing the password, you will be granted SSH access to the guest. All the standard base boxes
contain the "vagrant" account that is protected by the "vagrant" password.
Working with Multiple Guests
When you work with multiple guests, it is very useful to embed a script that prints the precise information
about the box in the guest. I will tell you how to do it in Chapter
6, but for now remember that when you
open an SSH session to one of the boxes prepared for the example projects (such as the apache-v1.0.0 box
used in the “Songs for kids” project in Chapter 2), you can run this command:
### You should open SSH session to guest
### the command should be executed in guest vm
$ guestvm
You will see output similar to this:
============================================================
gajdaw
/some/path/on/your/host/os/songs-app-angularjs
apache
1.0.0
============================================================
The output contains the following:
• Vendor: gajdaw
• Box name: apache
• Box version: 0.3.3
• Path on the host OS: /some/path/on/your/host/os/songs-app-angularjs

CHAPTER 4 ■ DEFAULT CONFIGURATION AND SECURITY SETTINGS OF THE GUEST VM
79
Security Concern #3
As you may guess a well known built-in account is yet another thing that can be considered a security
concern. The guest OS contains the following account:
username: vagrant
password: vagrant
The account is allowed to use the sudo command, so the Vagrant user has full administrative access to
the guest OS. The only restriction that protects the guest OS from remote access is the host_ip requirement
set to "127.0.0.1".
So you must remember that you can’t make your guest’s sshd daemon publicly available until you
disable the Vagrant account. The following configuration setting would allow everyone who knows your IP to
access the guest OS:
config.vm.network :forwarded_port, guest: 22, host: 9999
The command to open SSH session to VM configured with the above config entry is the following,
where 1.2.3.4 is the IP address:
$ ssh -p9999 [email protected]
You can resolve these problems by changing the password for the Vagrant account. To do so, open the
SSH session:
$ vagrant ssh
Then use this command:
$ passwd
■ Note When you destroy the VM with $ vagrant destroy and boot it again with $ vagrant up, the
guest OS will use the settings from the original base box. For ubuntu/trusty32, it is username=vagrant,
password=vagrant. To make the change permanent, you need to repackage the base box (this will be
discussed in Chapter 5).
Using the authorized_keys File for SSH Authorization
The SSH protocol allows two different methods of authorization: username/password and public/private
cryptographic keys. This command from the previous section uses the first method:
$ ssh –p222 [email protected]
Access is granted if you provide a valid password to the Vagrant account.

CHAPTER 4 ■ DEFAULT CONFIGURATION AND SECURITY SETTINGS OF THE GUEST VM
80
The second method relies on two RSA keys: a private key and a public key, stored in separate files. By
default, the keys are stored here:
~/.ssh/id_rsa - private key
~/.ssh/id_rsa.pub - public key
When you try to open the SSH session to the account [email protected], the access can be granted
without having to type the password under one condition: the public key has to be included in the list stored
in johnny’s authorized_keys file. The file should be saved at the host example.net in johnny’s home
directory under the name ~/.ssh/authorized_keys. When it is done, the SSH session is opened.
This is the way to avoid having to retype your password for SSH sessions, scp commands, and git
push/fetch commands.
And this is the method applied by Vagrant. When you run the following command, the SSH session is
authorized with RSA keys:
$ vagrant ssh
The two keys are stored as follows:
• The private key is stored in the host OS in ~/.vagrant.d/insecure_private_key
• The public key is stored in the guest OS inside /home/vagrant/.ssh/authorized_keys
■ Tip You can check the path to the host’s private key with the $ vagrant ssh-config command.
To change the RSA key pair used by the guest, generate a new pair of keys. The following generates two
files: johnny and johnny.pub:
# Host
$ ssh-keygen -t rsa -C [email protected] -f johhny
This is a pair of RSA keys. The first of them contains the private key; the second contains the public key.
Once the keys are generated, append the public key to the authorized_keys file for the Vagrant
account in the guest OS by using these commands:
# Host
$ cp johnny.pub new-project-chapter-04/
$ vagrant ssh
# Guest
$ cat /vagrant/johnny.pub > ~/.ssh/authorized_keys
$ logout
Finally, instruct Vagrant to use the private key from the file named johnny. Inside the Vagrantfile of
the project, add the following line:
config.ssh.private_key_path = "/path/to/the/key/johnny"

CHAPTER 4 ■ DEFAULT CONFIGURATION AND SECURITY SETTINGS OF THE GUEST VM
81
When you reload the guest system with the following, Vagrant will use the new RSA keys to authorize
access, and the default pair of keys will no longer work:
$ vagrant reload
Security Concern #4
Publicly available boxes (for example, ubuntu/trusty32) use so-called insecure and publicly known
SSH keys. (The insecure private key can be found in the ~/.vagrant.d/insecure_private_key file.) The
insecure public key is added to the authorized_keys file for a Vagrant account inside a box (for example,
ubuntu/trusty32), which is why you can log in as admin and install software within the guest OS. Be aware
that everyone has access to this pair of keys and can use them. For security, use a new pair of RSA keys to
authorize access to the guest OS.
The latest versions of Vagrant minimize the risk of using a publicly known key pair. If Vagrant recognizes
insecure keys, it replaces them on the fly with a new and randomly generated pair, which is announced
during $ vagrant up by the following message shown in Listing 4-3:
default: Vagrant insecure key detected. Vagrant will automatically replace
default: this with a newly generated keypair for better security.
default:
default: Inserting generated public key within guest...
default: Removing insecure key from the guest if its present...
default: Key inserted! Disconnecting and reconnecting using new SSH key...
■ Note When publishing a box, you have to use insecure keys; otherwise, no one can use the box. So you
need to turn on SSH key substitution with config.ssh.insert_key = false. You will use this option in
Chapters 5 and 7.
Reloading the Guest OS
You might need to change the configuration stored in the Vagrantfile. To apply new changes made in the
configuration stored within Vagrantfile, use this:
$ vagrant reload
This command stops the guest OS and boots it again using the settings read from Vagrantfile. This is
the command to use if you want to change port forwarding settings or shared folder configurations.
You can change the configuration in the “Songs for kids” AngularJS example so that the application is
available at port 9876. To do this, edit the Vagrantfile by introducing the following change:
config.vm.network :forwarded_port, guest: 80, host: 9876, host_ip: "127.0.0.1"
Then reload the system with the $ vagrant reload command. When the command finishes rebooting
the guest OS, the example application will be available at http://127.0.0.1:9876.
You now know how to resolve the problem of colliding ports. If port 8800 is already used on your host,
and you can’t start the “Songs for kids” AngularJS example, change the project’s configuration in Vagrantfile
and reload the guest OS.
CHAPTER 4 ■ DEFAULT CONFIGURATION AND SECURITY SETTINGS OF THE GUEST VM
82
Summary
This chapter discussed the potential risks of using Vagrant, with emphasis on the following issues:
• Downloading and running unknown boxes (they can contain malicious software)
• Exposing resources, such as network ports, to the outside world
• Base boxes that contain the Vagrant account with sudo privileges protected by a
well-known password
• Base boxes that use a well-known RSA key pair
When you introduce Vagrant in your company, consider doing the following:
• Change the user account used to access the SSH session (or at least change the
password to the Vagrant account)
• Change the private/public key pair used for SSH authorization within your box
This chapter also discussed the following:
• Atlas
• Default VM configuration
• SSH
You should know that the name "ubuntu/trusty32" is resolved by the Vagrant service into an arbitrary
URL that may point to an arbitrary server (for ubuntu/* boxes, it is http://cloud-images.ubuntu.com).
You should also be able to download boxes manually by using wget or curl.
Default VM configuration concerns include these:
• Port forwarding
• Directory sharing
If the Vagrantfile contains no entries other than the box name (as in Listing 4-2), host-guest
communication is reduced to the following:
• One shared folder (the host’s folder with Vagrantfile is available in the guest as
/vagrant)
• One host port (2222 by default) mapped to the guest’s 22 port with host_ip restricted
to 127.0.0.1
Remember that changes you make to the configuration file Vagrantfile can be applied with the
$ vagrant reload command.
If you get lost when working with multiple VMs, use the following command:
$ guestvm
It is available in my boxes; in Chapter
6, I will explain to you how you can embed similar commands
inside your boxes.
CHAPTER 4 ■ DEFAULT CONFIGURATION AND SECURITY SETTINGS OF THE GUEST VM
83
In the Next Chapter, You Will Learn . . .
The guest OS created in this chapter was not very interesting because it was a bare Ubuntu without any
daemons installed. In Chapter
5, you will learn how to customize the box with the software you might need
for your next project. You will learn how to install software inside the guest and how to package the obtained
system into an image file to be used by others. Using this knowledge, you will be able to make permanent
changes within a guest OS.
Reading List
For more information about SSH, visit Wikipedia:
http://en.wikipedia.org/wiki/Secure_Shell and
check the SSH manual:
$ man ssh
Test Yourself
1. What are the potential risks of using Vagrant?
2. How do you open a SSH session to the guest OS by using Vagrant commands?
3. How do you check SSH settings for a current project?
4. How do you open an SSH session to the guest OS in a traditional way?
5. How do you initialize a new project using Vagrant?
6. What flags of $ vagrant init do you know? What are their roles?
7. What is the sole purpose of the $ vagrant init command?
8. How do you define port forwarding from port 1234 on the host to the service
running inside the guest using port 9876?
9. How does the $ vagrant up command inform the forwarding port host’s port
55555 about the service running in the guest VM on port 80?
10. How do you restrict access to the forwarded port to only sessions originating
from the host machine?
11. How do you generate a new pair of RSA keys?
12. How do you use a new pair of RSA keys to authorize access to the guest OS?
13. How do you apply any changes done in Vagrantfile?
Exercises
1. Start a new project using the puppetlabs/debian-7.8-64-puppet base box.
2. Start a new project using chef/fedora-21.
3. Boot two VMs: “Songs for kids” in AngularJS and “Songs for kids” in Django.
Open the SSH session to each guest and run the $ guestvm command.

85
CHAPTER 5
Your First Box
The time has come to create your first box. In this chapter, you will adopt a manual procedure: initialize a
new base box using the pristine Ubuntu 14.04 and then install the software by hand, running appropriate
commands. Once the guest contains the necessary packages and tools, you will export it to a file. This is a
basic solution to generate a new base box. Even though it can be a tedious process, the possibilities it offers
are just great. With your box at hand, you can introduce Vagrant in your workflow. I will show you how to do
this by creating an imaginary project called “Corporate Blog.”
The Task at Hand
Suppose that you are responsible for setting up the development environment for the next project your
company wants to launch: a blog coauthored by all the staff. The blogging platform will be Jekyll, which is a
tool that works offline to process a set of text files written in MarkDown language with some templates and
configuration files into a complete set of HTML static files that can be served to clients.
You are responsible for setting up the development environment so that it does the following:
• Contains all the tools necessary to process source files into the HTML to be served
• Enables you to inspect how the blog looks at any given moment with a web browser
at http://localhost:8080
The exercise in this chapter will involve two activities carried out in two different folders:
• ~/first-box-factory/
• ~/corporate-blog/
In the introductory step, you will work in the ~/first-box-factory/ directory to produce a boxed VM.
This work will be carried out by system engineers.
In the second stage, you will work in ~/corporate-blog/ to create a blog using the box prepared in the
first step. This part of the work is assigned to a developer.
■ Note To avoid confusion, turn off all guest VMs that may be already running on your host.
CHAPTER 5 ■ YOUR FIRST BOX
86
Choosing a Base Box and Initializing a New Project
Suppose that you are a system engineer and your role is to set up the development environment. The result
of your work should be a single box file that developers will use to work on a project.
When you need to produce a new box, the easiest solution is to extend one of the existing base boxes.
If you want to prepare a development environment running Ubuntu, you can choose one of the boxes
supported by Ubuntu:
• ubuntu/trusty64
• ubuntu/trusty32
• ubuntu/precise32
• ubuntu/precise64
If you prefer CentOS, Debian, Fedora, or FreeBSD, you can use boxes supported by Chef Software, Inc.:
• chef/centos-6.5
• chef/debian-7.4
• chef/fedora-20
• chef/freebsd-9.2
More boxes can be found on the atlas.hashicorp.com site. I will stick with 32-bit version of
Ubuntu 14.04, but the approach to the task is exactly the same, no matter what your platform is. The only
difference is the way you install the software in the guest OS.
When you decide which base box you want to use, go to your home directory and create a new folder
named first-box-factory/:
# Host
$ cd
$ mkdir first-box-factory
$ cd first-box-factory
Initialize a new project using Vagrant:
# Host
$ vagrant init -m ubuntu/trusty32
Bring up the VM:
# Host
$ vagrant up
CHAPTER 5 ■ YOUR FIRST BOX
87
Installing the Necessary Software
When the guest OS is ready, you can start the SSH session and install the necessary software. Because Jekyll
relies on the Ruby and JavaScript runtime, you have to install the following:
• NodeJS
• Ruby
• Jekyll
You will also install Lynx, which is a web browser that runs in a terminal. Lynx is a useful tool to test web
sites served by a guest OS within an SSH session. And because you are using Ubuntu, the first thing you have
to do is update the system.
The complete set of commands you need to run is presented in Listing 5-1.
Listing 5-1. Commands to Install Jekyll and Lynx on Ubuntu 14.04
# Host
$ vagrant ssh
# Guest
$ sudo apt-get update -y
$ sudo apt-get install nodejs -y
$ sudo apt-get install lynx-cur -y
$ sudo apt-get install ruby1.9.1-dev -y
$ sudo gem install jekyll
Let’s run the commands from Listing 5-1, and I will explain the role of each command as we go. Because
the VM was already started, you can open the SSH session as follows:
# Host
$ vagrant ssh
Once in the guest OS, update the system and install the NodeJS and Lynx packages:
# Guest
$ sudo apt-get update -y
$ sudo apt-get install nodejs -y
$ sudo apt-get install lynx-cur -y
Install the latest version of Ruby header files for compiling extension modules:
# Guest
$ sudo apt-get install ruby1.9.1-dev -y
CHAPTER 5 ■ YOUR FIRST BOX
88
The last thing to do is to install Jekyll like this:
# Guest
$ sudo gem install jekyll
When the installation is finished, you can verify that Jekyll is available on your guest system:
# Guest
$ jekyll --version
You can close the SSH session. VM is now ready to be boxed.
Generating a Box
Now you have the guest OS running, which includes all the necessary software. It is time to create the box
that will result in exactly the same guest machine when booted. To do so, run this command:
# Host
$ vagrant package --output first-box-jekyll.box
Vagrant offers the $ vagrant package subcommand for boxing. It should be executed in a directory
containing the guest OS (i.e., in a directory that contains a Vagrantfile).
The $ vagrant package command can be used for a VM that is running or halted. If the VM is running,
it will be gracefully shut down. The command then produces a file that contains the boxed VM.
When run without any parameters, the command creates a file named package.box:
# Host
$ vagrant package
With the --output parameter, you can change the name and location of the file.
As soon as $ vagrant package has finished working, you can run $ ls to verify that the file named
first-box-jekyll.box has been successfully created. The boxed development environment is ready.
The box file is ready, and your work as a system engineer is finished.
Listing, Installing, and Removing Boxes
Now you will start to work as a developer. As you already know, boxes have to be installed in your system
before they can be used by Vagrant. Box management is achieved with the following subcommands:
# Host
$ vagrant box list
$ vagrant box add
$ vagrant box remove
Unlike $ vagrant up and $ vagrant package, these subcommands can be executed in an arbitrary
directory because they affect a global Vagrant installation, not the particular VM instance.

CHAPTER 5 ■ YOUR FIRST BOX
89
The first command lists the boxes that have already been installed in your system. Depending on your
previous actions, the following command:
# Host
$ vagrant box list
may produce the following results:
gajdaw/rails (virtualbox, 0.3.3)
gajdaw/sinatra (virtualbox, 0.1.2)
ubuntu/trusty32 (virtualbox, 14.04)
The listing contains the following:
• Box name (e.g., gajdaw/rails)
• Provider name (e.g., virtualbox)
• Box version (e.g., 14.04)
The boxes listed in the output of $ vagrant box list come from the directory discussed in Chapter
3:
either ~/.vagrant.d/boxes/ or $VAGRANT_HOME/.vagrant.d/boxes/, depending on the configuration. The
listing of one of these directories should resemble (to some extent) the output of $ vagrant box list:
# Host
$ ls -la ~/.vagrant.d/boxes/
$ ls -la $VAGRANT_HOME/.vagrant.d/boxes/
To add a new box to your .vagrant.d/boxes/ directory, you need to use the $ vagrant box add
command. It takes two parameters: box name and box URL, as follows:
# Host
$ vagrant box add [NAME] [ADDRESS]
The NAME is the label that you want to assign to the newly installed box; ADDRESS points to the file that
contains the box (usually with the *.box extension). The ADDRESS can take one of these forms:
• Vendor/Name
• http:// . . .
• file:/// . . .
• A local filename
■ Tip When the NAME has the form Vendor/Name, the box comes from the cloud service atlas.hashicorp.com.
To add your box stored in the first-box-jekyll.box file under the name first-box-jekyll, use this
command:
# Host
$ vagrant box add first-box-jekyll first-box-jekyll.box

CHAPTER 5 ■ YOUR FIRST BOX
90
When $ vagrant box add finishes, you can run the following again:
# Host
$ vagrant box list
The output should contain this:
first-box-jekyll (virtualbox, 0)
And, of course, the.vagrant.d/boxes/ directory should now contain another item: the subdirectory
first-box-jekyll/.
To remove a box, you can use this command:
# Host
$ vagrant box remove NAME
The NAME parameter passed to this command is the name of the box as printed by $ vagrant box list.
Because Vagrant supports multiple providers and box versioning, this command can also take two more
optional parameters:
# Host
$ vagrant box remove NAME --provider PROVIDER --box-version VERSION
These parameters set the provider and version of the box to be removed. For example, the following
command removes version 1.2.3 of the box labelled as abc:
# Host
$ vagrant box remove abc --box-version 1.2.3
But versioning works only for boxes that are hosted remotely, either in an Atlas or HTTP server with
specially created versioning information.
To remove the box that you created in the previous section, use this:
# Host
$ vagrant box remove first-box-jekyll
If you use it, remember to add it again because you need the box to proceed with the task:
# Host
$ vagrant box add first-box-jekyll first-box-jekyll.box
■ Note The mysterious lack of symmetry between the $ vagrant up and $ vagrant destroy commands
that was discussed in Chapter 3 is thus solved. When executed, $ vagrant up invokes $ vagrant box add
if the box is not installed already. The $ vagrant destroy command does not run $ vagrant box remove.
Thus, when you run the two commands $ vagrant up and $ vagrant destroy, your system will remain in the
state as it would be after using $ vagrant box add. The box that was installed during $ vagrant up was not
removed by $ vagrant destroy; it is still present in the system. You can verify it with $ vagrant box list.

CHAPTER 5 ■ YOUR FIRST BOX
91
Using the Box
If you proceeded with the example up to this point, you should have the box installed in the system and
ready to be used. The following command:
# Host
$ vagrant box list | grep jekyll
should produce the single line:
first-box-jekyll (virtualbox, 0)
Go to your home directory and create another folder in which the corporate blog project will be stored:
# Host
$ cd
$ mkdir corporate-blog
$ cd corporate-blog
This project should use the box named first-box-jekyll. To achieve this result, run this command:
# Host
$ vagrant init -m first-box-jekyll
You can now boot the VM and open the SSH session:
# Host
$ vagrant up
$ vagrant ssh
Once in the guest OS, go to the shared directory:
# Guest
$ cd /vagrant
Generate the first version of the corporate blog:
# Guest
$ jekyll new -f .
■ Note The command to generate a new blog contains a dot after the -f parameter. This dot stands for
current directory.
The previous command generates the source code of the blog in Jekyll internal format. To build the
HTML version, run this:
# Guest
$ jekyll build

CHAPTER 5 ■ YOUR FIRST BOX
92
The command to build the site with Jekyll should be run in the directory that contains the Jekyll source
files. In this case, it is the /vagrant folder (in the guest OS, of course). The HTML files built on the basis of
configuration, MarkDown, and templates are stored under the _site/ directory. You can serve the HTML
files from the _site/ directory using Jekyll’s built-in HTTP server by running the following:
# Guest
$ jekyll serve -H 0.0.0.0 --detach
Among other things, the output of the command informs you how to access the site and how to stop
the server:
Server address: http://0.0.0.0:4000/
Server detached with pid '2159'. Run 'kill -9 2159' to stop the server.
By default, Jekyll’s HTTP server listens on port 4000. To visit the generated site inside your guest OS,
run this:
# Guest
$ lynx 127.0.0.1:4000
You will see a page like the one shown in Figure
5-1.
Figure 5-1. Corporate blog displayed by Lynx in the guest

CHAPTER 5 ■ YOUR FIRST BOX
93
Now you can proceed with the last step that will allow to access the blog from the host OS. Not
surprisingly, you need to forward ports.
■ Note The -H parameter of the $ jekyll serve -H 0.0.0.0 command defines the IP addresses that are
allowed to connect to the HTTP server. The 0.0.0.0 value allows connections that originate at any host. But
the HTTP server runs in guest and, by default, no connections are allowed from the outside world to the guest’s
daemons. So you should not be afraid to use -H 0.0.0.0. We will filter the incoming request using the host_ip
restriction for the forwarded port.
Forwarding Ports
To reconfigure port forwarding, you need to edit the Vagrantfile like this:
# Host
$ vi ~/corporate-blog/Vagrantfile
■ Tip If you are comfortable with vi, you can also edit the Vagrantfile within a guest system with the
$ vi /vagrant/Vagrantfile command.
Change its contents by adding port forwarding. Host port 8080 should be forwarded to guest port 4000.
This is the purpose of the config.vm.network entry shown in Listing 5-2.
Listing 5-2. Vagrantfile for Corporate Blog Project with Forwarded Ports
Vagrant.configure(2) do |config|
config.vm.box = "first-box-jekyll"
config.vm.network :forwarded_port, guest: 4000, host: 8080, host_ip: "127.0.0.1"
end
To apply the new changes, you have to reload the guest OS with this:
# Host
$ vagrant reload
After rebooting the system, you have to start the built-in Jekyll server again:
# Host
$ vagrant ssh
# Guest
$ cd /vagrant
$ jekyll serve -H 0.0.0.0 --detach

CHAPTER 5 ■ YOUR FIRST BOX
94
Now, if you run the web browser on your host and access http://localhost:8080, you will be
forwarded to the guest’s port number 4000. The page displayed by your browser will look like Figure5-2.
Advantages of Boxing
You are already aware of the most important aspect of boxing, which was the purpose of the examples
presented in Chapter 2. The development environment can be reproduced with a single command:
$ vagrant up. No special knowledge is required to do this, no matter how difficult and time-consuming the
process of preparing the boxed VM might have been.
But that’s not the end of boxing advantages. It speeds up your work tremendously, especially when you
want to start afresh using a given development environment. Two possible scenarios I have in mind
are these:
• You made some changes to your guest OS and don’t know how to revert them
• You want to create another Jekyll–driven web site in the ~/my-personal-blog/
directory
In the first scenario, all you have to do is to run this:
# Host
$ cd ~/corporate-blog
$ vagrant destroy
$ vagrant up
Figure 5-2. Corporate blog displayed by Firefox running in the host

CHAPTER 5 ■ YOUR FIRST BOX
95
In the second case, you can use these commands:
# Host
$ cd
$ mkdir my-personal-blog
$ cd my-personal-blog
$ vagrant init -m create-your-first-box
$ vagrant up
Because the box is already installed in the system, in both cases the $ vagrant up command will skip
the longest stage: the downloading of the box.
From a practical point of view, I consider boxing much more important than automatic provisioning,
which will be discussed in Chapter 6. Do not misunderstand me: I do not advise you to abandon or
underestimate provisioning. Definitely not. What I mean is that boxing and manual software installation
provide a workflow that can be satisfactorily used in practice, even when used without automated
provisioning.
It was not until I introduced boxed solutions that using Vagrant for my classes and courses became
possible. Two key tricks are using boxed solutions and sharing installed boxes by setting
VAGRANT_HOME, as explained in Chapter
1.
Serving Boxes over the Network
The box you created is just one large first-box-jekyll.box file. You can distribute it any way you like, for
example using shared directories, FTP servers, CD-ROMs, DVDs, and so on. Your collaborators can copy the
file using the $ cp command and arbitrary media.
But with these solutions, you have to instruct your colleagues what to do with the file (i.e., how to add
the box to Vagrant). And regardless of how easy the process is, it will always cause some trouble, questions,
and inconvenience. (And, of course, we would not say that the development environment is built with a
single $ vagrant up command anymore.)
The best approach to distribute the box is to use the network and internal Vagrant feature to
automatically download and install the box if it is missing. All you need is an HTTP server or shared network
drive. Assuming that you have read/write access to
http://example.net server, upload the box so that it is
available under http://example.net/first-box-jekyll.box.
Change the name of the box inside ~/corporate-blog/Vagrantfile to this:
config.vm.box = "
http://example.net/first-box-jekyll.box"
Now, if anyone runs $ vagrant up in this project, the command automatically downloads and installs
the box without any interaction from the user. It relieves the burden of instructing your colleagues
about boxes.
You can also use shared and mapped drives to achieve the same purpose, as with the following:
config.vm.box = "/net/drive/mounted/first-box-jekyll.box"
■ Tip Boxes hosted over HTTP can be downloaded with the help of curl or wget. The command to download
the file with curl looks like this:
$ curl
http://example.net/first-box-jekyll.box > first-box-jekyll.box

CHAPTER 5 ■ YOUR FIRST BOX
96
Securing Your Boxes
Yes, you should apply the security considerations discussed in Chapter 4 into practice. You should do the
following:
• Change the Vagrant user’s password
• Change the SSH key used to authenticate in guest
All these changes should be done in guest before you run the $ vagrant package command, of course.
To change the Vagrant user’s password, run this command:
# Guest
$ passwd
■ Tip Refer to Chapter 4 to see the procedure to replace SSH keys.
Repackaging Boxes
Your system now contains the first-box-jekyll.box box twice, which is stored in the first-box-jekyll.box
file and installed in the .vagrant.d/boxes/ directory.
The boxes that you installed in your system can be deleted from your hard drive:
$ rm first-box-jekyll.box
In case you need the boxes again, you can always create a *.box file from the box installed in
.vagrant.d/boxes/ with this:
$ vagrant box repackage NAME PROVIDER VERSION
To re-create the first-box-jekyll box, run this command:
$ vagrant box repackage first-box-jekyll
The command will save the box in file named package.box.
Summary
In Chapter
2, you learned how to use the box that has already been prepared. This is the approach applied by
developers in your company. They want to work on a given project (i.e., to write some code) and they need a
working development environment.
In this chapter, you learned about Vagrant from the perspective of a system engineer. Vagrant involves
the cooperation of both developers and system engineers. It all begins with the work done by system
engineers, who are responsible for preparing the box. When the box is ready, developers start to work on a
project using the box at hand.
CHAPTER 5 ■ YOUR FIRST BOX
97
You learned the most basic method to prepare the box, which consists of four steps:
1. Choose the appropriate base box (Ubuntu, Fedora, Debian, FreeBSD, and so on).
2. Boot the base box.
3. Install the software within the guest OS (e.g., $ sudo apt-get install and $
sudo yum install).
4. Package the box with the $ vagrant package command.
This is a natural and simple solution that you can apply immediately.
To distribute the box, the best approach is to upload it to the HTTP server and update the config.vm.box
configuration entry in your project’s Vagrantfile. Vagrant will take care of downloading and installing the
box on your workstation. (In fact, this is the method used in Chapter
2.)
The following Vagrant commands that you learned to use in this chapter will help you manage
the boxes:
$ vagrant box list
$ vagrant box add
$ vagrant box remove
$ vagrant box repackage
$ vagrant package
In the Next Chapter, You Will Learn . . .
Chapter
6 will get rid of the tedious and error-prone manual installation phase and replaces the necessity of
issuing commands to install the software within a guest OS with automatic scripts. The procedure of creating
a box will become semiautomatic; the only steps done by humans will be booting and boxing.
Reading List
Jekyll is a tool that belongs to Static Site Generators (SSGs). The comprehensive list of SSGs can be found at
https://staticsitegenerators.net/.
The Jekyll documentation is available at http://jekyllrb.com/
You can always access the syntax of $ vagrant box and $ vagrant package with the following:
$ vagrant box help
$ vagrant package help
Test Yourself
1. What are two advantages of using boxes?
2. How do you package a guest OS into a my-new-box.box file?
3. How do you list the boxes installed on your workstation?
4. Where are the boxes internally stored by Vagrant?
5. How do you manually install a new box stored in the abc.box file?
6. How do you remove a box named xyz that is installed on your system?
CHAPTER 5 ■ YOUR FIRST BOX
98
7. Are the commands $ vagrant up and $ vagrant destroy symmetrical? Do they
perform exactly the same actions in reverse order?
8. How do you create a *.box file for one of the boxes already installed on your
system?
9. Where can you find base boxes for various OSs?
10. How can you distribute the boxed development environment among those who
work on the project?
Exercises
1. Create a new Ubuntu 14.04 box containing the apache daemon. Follow the
manual approach described in Chapter 5.
2. Create a new CentOS 7 box containing the nginx daemon. Follow the manual
approach described in Chapter 5.
3. Create a new Fedora 21 box containing Python and Django. Follow the manual
approach described in Chapter 5.
4. Create a new Debian box containing Ruby and Ruby on Rails. Follow the manual
approach described in Chapter 5.

99
CHAPTER 6
Provisioning
Whenever you want to prepare a new development environment, the first approach is probably a manual
one. By running the commands in the pristine guest OS, you should find all the steps you need to install
required packages. (That’s the approach used in Chapter 5.) To find out the exact procedure of setting up the
desired development environment we booted the clean Ubuntu and ran various commands to install Jekyll.
After you know all the necessary commands and steps that tune the new system for the next project,
you don’t have to run them by hand. You can automate this process by using configuration management
software (CMS), which is what you will learn about in this chapter.
It can be helpful, at least for beginners, to think about creating boxes in terms of two separate stages:
• Manual
• Automatic
First, you will start a new project in a new directory and proceed with a manual procedure, which will
resemble what you did in previous chapters. When the manual phase is finished, which means that you
know all the commands necessary to set up a guest VM, you will create another project in a new directory.
It is a completely new project and does not depend on the first one. This time you will save the commands
in special scripts that will be automatically executed during $ vagrant up. This automatic process is called
provisioning.
Vagrant has built-in support for many popular configuration management tools. In this chapter, you will
learn how to automate the task of setting up the VM with the following:
• Shell scripts
• Puppet
• Ansible
• Chef
To give each of them a try, you will create four projects:
• vagrant-jekyll-shell
• vagrant-jekyll-puppet
• vagrant-jekyll-ansible
• vagrant-jekyll-chef
Every one of these projects will be responsible for creating an identical development environment that
was used for the corporate Jekyll-powered blog in Chapter
5.

CHAPTER 6 ■ PROVISIONING
100
Working with provisioners opens new possibilities. Not only it does lead to a procedure that is
repeatable and free of manually introduced errors but it also facilitates versioning. This chapter shows you
how to version your environment with git.
Provisioners
In Vagrant’s terminology, the process of automatic installation and configuration of software within the
guest OS during $ vagrant up is called provisioning and the tools to perform this operation are called
provisioners. A provisioner can execute arbitrary commands; it can, for example,
1
install Apache like so:
$ sudo apt-get install apache2
It can also start the service:
$ sudo service apache2 restart
It can also download the Ruby source code:
$ curl ftp://ftp.ruby-lang.org/pub/ruby/2.2/ruby-2.2.0.tar.gz > ruby.tar.gz
And it can also recompile and install Ruby:
$ make
$ make install
There are no restrictions; all the commands that you usually run within an SSH session to reconfigure
your system can be performed by provisioners.
There are many different approaches to provision VMs. You can provision the guest OS by writing
shell scripts or using more sophisticated tools such as Puppet, Ansible, and Chef. Out-of-the-box Vagrant
supports the following provisioners:
• File
• Shell scripts
• Ansible
• CFEngine
• Chef
• Docker
• Puppet
• Salt
As of now, Puppet, Chef, and Ansible are generally considered the most popular open – source
configuration management solutions available on the market. Although I decided to include them all in
this book, you can confine yourself to just the one you need, or you might want to try them all and then
choose the one that most appeals to you. Vagrant offers the perfect environment for getting acquainted with
configuration-management software.
1
The following examples are for the Ubuntu system.

CHAPTER 6 ■ PROVISIONING
101
■ Note Provisioning is the process of automatic software installation and configuration during $ vagrant up.
Configuring Provisioning
Provisioning configuration is stored in a Vagrantfile. Here is the general syntax to configure provisioning:
Vagrant.configure(2) do |config|
...
config.vm.provision "THE-NAME-OF-THE-PROVISIONER" ...
end
The first parameter of config.vm.provision is the name of the provisioner you want to use. Replace
"THE-NAME-OF-THE-PROVISIONER" with one of the built-in provisioners, such as the following:
• shell
• puppet
• ansible
• chef-solo
Other parameters of config.vm.provision depend on the provisioner you have chosen. Each takes
different parameters, and some provisioners (Puppet, for example) don’t have any obligatory parameters
because all the options have reasonable default values. To use Puppet, you can simply write the following:
Vagrant.configure(2) do |config|
...
config.vm.provision "puppet"
end
Other provisioners, such as shell, need at least one additional parameter. For the shell provisioner, you
have to define the shell script to be executed:
Vagrant.configure(2) do |config|
...
config.vm.provision "shell", path: "script.sh"
end
Because provisioners do not share any common options except the first parameter, they will be
discussed separately.
CHAPTER 6 ■ PROVISIONING
102
Multiple Provisioners
Remember that a single project can use more than one provisioner. You can use shell and Puppet and
Ansible in one project like this:
Vagrant.configure(2) do |config|
...
config.vm.provision "shell", path: "script.sh"
config.vm.provision "puppet"
config.vm.provision "ansible", playbook: "playbook.yml"
end
Provisioners are executed in the order in which they are defined in the Vagrantfile. Mixing different
provisioners proves to be very useful. You will learn why in Chapter
9, which will dissect real-life examples.
When Does Provisioning Happen?
By default, provisioning is executed only during the first run of $ vagrant up. When you run $ vagrant up
for the very first time after $ vagrant init or $ vagrant destroy, the system is in a pristine state — it does
not contain the packages installed by provisioners. Thus, Vagrant boots the system and runs the provisioners
defined in the Vagrantfile.
If you halt the system using $ vagrant halt or $ vagrant suspend, the next run of $ vagrant up
will skip the provisioners. Vagrant assumes that provisioners were already executed and all the necessary
packages are already installed.
You can change the default behavior in a number of ways. First, you can enable and disable provisioning
during $ vagrant up by using the --provision and --no-provision flags:
$ vagrant up --provision
$ vagrant up --no-provision
The first command, $ vagrant up --provision, boots the system and runs provisioners, even if they
were already applied. The second command, $ vagrant up --no-provision, turns off provisioners even if
it is the first time $ vagrant up is being executed.
You can also enable provisioners by type. The following command enables only provisioners x, y, and z,
disabling all the others:
$ vagrant up --provision-with x, y, z
To boot the system with shell provisioners only, you can use $ vagrant up like this:
$ vagrant up --provision-with shell
Another way to run provisioners is to run the $ vagrant provision command, which is especially
useful when you work on provisioning scripts and want to try many different settings. The command is
supposed to be run for the guest OS that has already been booted. Instead of booting and provisioning the
system with $ vagrant up, you can, for example, boot the system without running provisioners:
$ vagrant up --no-provision
CHAPTER 6 ■ PROVISIONING
103
and then run the provisioners:
$ vagrant provision
The $ vagrant provision command can be invoked with the --provision-with x,y,z option to
enable only some provisioners. To run modified provisioning scripts, you don’t have to reboot the system;
you can run provisioners again and again with $ vagrant provision.
The last command that can be executed with or without running provisioners is $ vagrant reload,
which can be run with the --provision, --no-provision and --provision-with x, y, z parameters:
$ vagrant reload --provision
$ vagrant reload --no-provision
$ vagrant reload --provision-with shell
Versioning Boxes with git
Working with provisioners to automate the system configuration process boils down to writing various
scripts. No matter which provisioners you eventually choose, you will end up creating text files. Over a
period of time, your scripts will surely evolve: you will add new components, change settings, and probably
remove obsolete items. At some point, you will get a satisfactory solution that needs to be assigned a unique
tag. Looking forward to this scenario, the best approach is to put the VM configuration under version
control, which will lead you to workflows in which you can version the infrastructure build with Vagrant the
same way you version the code.
For this purpose, git will be used. To proceed with the examples in this chapter, you will have to issue
some basic git commands. But don’t worry; I will give you all the necessary explanations about how to do it
and the exact role of every command used. Working with git, you will be able to do the following:
• Version the development environments
• Tag various versions
To start using git for versioning your VMs, you have to do the following:
• Install the git distribution appropriate for your system
• Set up the basic configuration options
The installation was already explained in Chapter
1. To commit your changes using git, you have to set
up your name and e-mail address with the following commands:
$ git config --global user.name "Włodzimierz Gajda"
$ git config --global user.email [email protected]
Of course, you have to substitute your name and your e-mail for "Włodzimierz Gajda" and gajdaw@
gajdaw.pl. And please remember to use quotation marks around your first name and surname. After you
have done this, the following commands should print your data:
$ git config --global user.name
$ git config --global user.email

CHAPTER 6 ■ PROVISIONING
104
■ Tip Git stores users’ global configuration in the ~/gitconfig file. You can edit this file using any text
editor you like.
Jekyll Box with the Shell Provisioner
Let’s start the first project: a Vagrant box for Jekyll–driven web sites configured with a shell provisioner. (All
the commands necessary to build this box were already discussed in Chapter 5 and shown in Listing 5-1.)
The task at hand is to automate the process of running these commands with a shell provisioner. The goal is
to define the VM configuration so that after a single $ vagrant up command, you will have a guest OS with
Ruby and Jekyll already installed. Then you will create the box file.
■ Note The work in this section is to be done by system engineers. Developers are not involved.
Box Source Code
Create the empty directory for this project:
# Host OS
$ cd folder/with/examples
$ mkdir vagrant-jekyll-shell
Inside this directory, create two files: the Vagrantfile and script.sh. They are shown in Listings 6-1
and 6-2.
Listing 6-1. Vagrantfile for a Jekyll Box with Shell Provisioning
Vagrant.configure(2) do |config|
config.vm.box = "ubuntu/trusty32"
config.vm.provision "shell", path: "script.sh"
end
Listing 6-2. Bash Script script.sh for a VM with Shell Provisioning
#!/usr/bin/env bash
echo "Installing: nodejs, lynx, ruby and jekyll..."
apt-get update -y >>/tmp/provision-script.log 2>&1
apt-get install nodejs -y >>/tmp/provision-script.log 2>&1
apt-get install lynx-cur -y >>/tmp/provision-script.log 2>&1
apt-get install ruby1.9.1-dev -y >>/tmp/provision-script.log 2>&1
gem install jekyll >>/tmp/provision-script.log 2>&1
CHAPTER 6 ■ PROVISIONING
105
The Vagrantfile sets the name of the base box to be ubuntu/trusty32 and enables automatic
provisioning with a shell script named script.sh. The following line instructs Vagrant to provision the box
running the shell script named script.sh:
config.vm.provision "shell", path: "script.sh"
In other words, when you boot the system with $ vagrant up, Vagrant will run the script.
The filename can be arbitrary, and the path to the file is a path in your host system. It is relative with
regard to the directory that contains the Vagrantfile.
Let’s dissect the bash script named script.sh. It starts with a portable shebang for bash:
#!/usr/bin/env bash
Next, it uses the echo command to print a message that will be visible in the Vagrant output:
"Installing: nodejs, lynx, ruby and jekyll..."
The commands that follow install NodeJS, Lynx, Runy and Jekyll. This time, you don’t need to
prepend sudo before each command because provisioning scripts are executed with root’s privileges.
The second modification is to redirect all the output produced by the commands to a file named
/tmp/privision-script.log with the following appended to every command:
>>/tmp/provision-script.log 2>&1
The two >> characters redirect the output of the command to a file. The 2>&1 part is responsible
for redirecting errors (file descriptor 2) to the same file as the standard output (&1). If the file
/tmp/provision-script.log doesn’t exist, it will be created by the first of the commands.
The two files shown in Listings 6-1 and 6-2 can be seen as the source code for the box you are to create.
First Run of the Shell Provisioner
When you have created the two files shown in Listings 6-1 and 6-2, you can test the box. Enter the directory
that contains these files:
# Host OS
$ cd vagrant-jekyll-shell
and run the command:
# Host OS
$ vagrant up
The provisioning script shown in Listing 6-2 downloads Jekyll and various gems and recompiles them
(among other processes). It might take more than 10 minutes, so you have to be patient.

CHAPTER 6 ■ PROVISIONING
106
■ Warning Using provisioner scripts such as the one shown in Listing 6-2 within your projects will only make
your collaborators furious. Would you like to wait 30 minutes to run each of the example projects that I showed
you in Chapter 2? Probably not. Provisioning scripts should be run by system engineers when they build the box.
Developers should work with a box that contains all the necessary software baked inside. (Best practices will be
discussed in Chapter 9.)
You will see the old Vagrant output with two new elements at the very end. One of them will be the
message ❶ about running the shell provisioner; the other is the message ❷ about installing NodeJS, Lynx,
Ruby, and Jekyll:
Bringing machine 'default' up with 'virtualbox' provider...
==> default: Importing base box 'ubuntu/trusty32'...
...
❶==> default: Running provisioner: shell...
==> default: stdin: is not a tty
❷==> default: Installing: nodejs, lynx, ruby and jekyll...
■ Note The output contains one red warning: "stdin: is not a tty". This is a completely minor issue and
you can safely ignore it. It will be discussed after you complete the vagrant-jekyll-shell project.
Now your guest OS is running, which you can verify with the following command:
# Host OS
$ vagrant status
Open the SSH session to the guest OS with this:
# Host OS
$ vagrant ssh
You can verify that Jekyll is installed and ready with the following:
# Guest OS
$ jekyll --version
You don’t have to run any commands to install Ruby or Jekyll; it was already done by the script.sh
shell script. You can destroy the system with this:
# Host OS
$ vagrant destroy
And bring it back to life with this:
# Host OS
$ vagrant up

CHAPTER 6 ■ PROVISIONING
107
The operation of booting the system and installing the software is automatic, but the installation takes
place every time you destroy and boot the system again. You can reboot a guest OS, but the time necessary to
get it running again is annoyingly long—usually about 30 minutes.
There are two important aspects of provisioning to be aware of. The first is that the installation of the
software within the guest OS was done automatically. The second is that the whole process of booting the
guest OS lasts much longer than anything in Chapters
2 or 3. Depending on the software that you want to
provision, it can last for hours.
The first feature of this approach, automatization, is an obvious advantage. The second, the slowness of
the process, is a severe disadvantage. Although there is nothing you can do when you boot the project for the
very first time—the software has to be downloaded and installed anyway—you can speed up each following
$ vagrant up by generating a box that contains all the software baked inside. That’s where you are heading,
but you first have to enable version control for your first project.
■ Note Keep in mind the two most important aspects of provisioning: it runs automatically, but it usually
takes a lot of time to provision the pristine system.
Versioning the Box Source Code
When your environment is ready, which means that the system boots and is provisioned without any errors,
you can put the configuration under the control of git, which will help you track changes.
Enter the directory in which you created the project:
# Host OS
$ cd vagrant-jekyll-shell
Initialize a new git repository:
# Host OS
$ git init
As discussed in earlier chapters, when you boot the guest OS, Vagrant creates a special directory named
.vagrant, which should be excluded from version control. Create a file named .gitignore that contains a
single line:
.vagrant
It will force git to ignore the .vagrant directory. Use the following command:
# Host OS
$ echo .vagrant > .gitignore
To avoid inadvertent box commits, ignore all the files with the *.box extension. Run the following
command, which will append the line "*.box" to the .gitignore file:
# Host OS
$ echo "*.box" >> .gitignore
CHAPTER 6 ■ PROVISIONING
108
Now you can commit your changes with these two commands:
# Host OS
$ git add -A
$ git commit -m "Initial version"
The first of the preceding commands selects all the files in the project and prepares them for the next
commit. In git terminology, this process is called staging changes. The $ git add -A command stages three
new files: the Vagrantfile, script.sh, and .gitignore. The .vagrant directory is excluded, so it will not be
staged.
The second command creates the revision titled "Initial version", which will include the three new
files that were just staged: the Vagrantfile, script.sh, and .gitignore.
Finally, you can assign a name to this version of the environment. Semantic versioning strategy suggests
that the initial version of a new project should have the number 0.1.0. To assign this version to the first
commit, use the following git command:
# Host OS
$ git tag -a v0.1.0 -m "Release 0.1.0"
It creates a v0.1.0 tag with the caption "Release 0.1.0". Once it is done, you can check available
versions with this:
$ git tag
To print the complete history of the project with the tag list, use this command:
# Host OS
$ git log --oneline --decorate
Now the git repository is in a clean state, which means that all the files were checked in and saved in the
git database. To verify it, use one of these commands:
# Host OS
$ git status
$ git status -sb
Generating a Box
The manual procedure to generate a box consists of two basic steps (refer to Chapter
5):
• Booting the guest OS
• Running the $ vagrant package command
Here are the commands to produce a box for the vagrant-jekyll-shell project (remember that $
vagrant up can take more than 30 minutes):
# Host OS
$ cd vagrant-jekyll-shell
$ vagrant up
$ vagrant package --output vagrant-jekyll-shell-v0.1.0.box

CHAPTER 6 ■ PROVISIONING
109
When the vagrant-jekyll-shell-v0.1.0.box file is ready, you can use it as you used the box
generated in Chapter 5. It can be seen as the compiled version of the source code. And, of course, this
procedure is done only by system engineers; developers just use vagrant-jekyll-shell-v0.1.0.box.
It is very convenient to append the tag, for example v0.1.0, to the filename used for the box. It helps to
avoid confusion and allows you to host various versions of the same box.
■ Note The box source code consists of the Vagrantfile and script.sh. The vagrant-jekyll-shell-
v0.1.0.box
file can be seen as the binary version of the box.
Using the Shell-Provisioned Box
The box is ready, so you can change the role; now you will perform the developer’s work. First, you have to
install the box in the system with the following command:
# Host OS
$ vagrant box add vagrant-jekyll-shell-v0.1.0 vagrant-jekyll-shell-v0.1.0.box
You have to execute this command in the folder that contains the vagrant-jekyll-shell-v0.1.0.box
file generated in the previous section. Alternatively, you can prepend the path to the file:
# Host OS
$ vagrant box add vagrant-jekyll-shell-v0.1.0 /some/path/vagrant-jekyll-shell-v0.1.0.box
The output of this command should now contain the vagrant-jekyll-shell entry:
# Host OS
$ vagrant box list
So far, so good. Let’s create a new project named flowers-vagrant-jekyll-shell, which will be a
Jekyll–driven web site titled Flowers:
# Host OS
$ cd folder/with/examples
$ mkdir flowers-vagrant-jekyll-shell
$ vagrant init -m vagrant-jekyll-shell-v0.1.0
Notice that the name of the box that was installed with the $ vagrant box add command is passed to
the $ vagrant init command. Now edit the Vagrantfile and add a directive to configure port forwarding.
The complete Vagrantfile for the flowers-vagrant-jekyll-shell project is shown in Listing 6-3.
Listing 6-3. Vagrantfile for the flowers-vagrant-jekyll-shell Project
Vagrant.configure(2) do |config|
config.vm.box = "vagrant-jekyll-shell-v0.1.0"
config.vm.network :forwarded_port, guest: 4000, host: 8100, host_ip: "127.0.0.1"
end
CHAPTER 6 ■ PROVISIONING
110
When the Vagrantfile is ready, you can boot the VM with this:
# Host OS
$ vagrant up
This time, the procedure to boot the system will be reasonably short: about one minute. You don’t have
to run the provisioners; it was done by a system engineer when the box file was created. Ruby and Jekyll are
baked inside the box, and the developer doesn’t have to download, recompile, or install them.
The development environment is ready. You can create a new project and serve it over the
forwarded port:
# Guest
$ cd /vagrant
$ jekyll new -f .
$ jekyll build
$ jekyll serve -H 0.0.0.0 --detach
$ logout
Thanks to directory sharing, the flowers-vagrant-jekyll-shell/ host directory now contains the
source code of the flowers site. And because of the forwarded_port entry in Listing 6-3, you can use your
browser to access http://127.0.0.1:8100/. You will see the same page as the one shown in Figure 5-2.
Now the flowers-vagrant-jekyll-shell project is configured so that you have to run $ jekyll serve
-H 0.0.0.0 --detach every time you boot the VM. You can avoid it with the shell provisioner. Modify the
Vagrantfile by introducing the changes shown in Listing 6-4.
Listing 6-4. Shell Provisioner to Start the HTTP Server at Boot
Vagrant.configure(2) do |config|
config.vm.box = "vagrant-jekyll-shell-v0.1.0"
config.vm.network :forwarded_port, guest: 4000, host: 8100, host_ip: "127.0.0.1"
$script = <<SCRIPT
cd /vagrant
jekyll serve -H 0.0.0.0 --detach
SCRIPT
config.vm.provision "shell", inline: $script, run: "always"
end
The Vagrantfile shown in Listing 6-4 contains a variable named $script. The part between <<SCRIPT
and SCRIPT is a text assigned to the $script variable, which is, of course, the code of the shell script that
consists of two commands: cd /vagrant and jekyll serve. Thanks to config.vm.provision, this script
will be automatically executed when you boot the guest VM.

CHAPTER 6 ■ PROVISIONING
111
Now destroy the guest VM and boot it again:
# Host OS
$ vagrant destroy
$ vagrant up
This time, the URL http://127.0.0.1:8100 is available right after $ vagrant up. You don’t have to
open the SSH session and start the HTTP server by hand.
SYSTEM ENGINEER’S ROLE VS. DEVELOPER’S ROLE
The following comparison can help you get started with Vagrant in the most efficient manner:
• Different roles
• System engineer creates a box file
• Developer uses a box file
• Different timings
• Booting the guest OS can last for hours when you run provisioners that install
software
• Booting the guest OS without installing anything takes about one minute
• Differences in configuration
• System engineer’s Vagrantfile (refer to Listing 6-1) doesn’t contain port forwarding,
but contains provisioners that install software
• Developer’s Vagrantfile (refer to Listing 6-3) contains port forwarding, but doesn’t
contain provisioners that install software; it may contain provisioners that
perform some fast actions, such as starting and stopping the HTTP server (refer to
Listing 6-4)
• Re-creating (i.e., $ vagrant destroy -f && vagrant up)
• To re-create the guest VM, system engineer needs a lot of time (half an hour, an
hour, or even more)
• Developer can re-create the guest VM in a minute or so
• Reconfiguring
• To change the Vagrantfile (for example, forwarded ports) and reload the guest VM,
system engineer might need an hour
• Developer can modify the Vagrantfile and apply the changes in a minute
Of course, there are many different scenarios for using Vagrant, and I don’t know them all. There are
probably cases in which the preceding rules won’t apply directly, so don’t take them literally. But if you
start your adventure with Vagrant, they can help you avoid disappointment.
CHAPTER 6 ■ PROVISIONING
112
Annoying “not a tty” Problem
Shell provisioners that run on some boxes, for example ubuntu/trusty32, print this red message:
==> default: stdin: is not a tty
This message is displayed by the following command, which is included in the /root/.profile script in
the ubuntu/trusty32 box:
mesg n
The role of the mesg n command is to disable messages sent by other users with the $ write and $
wall commands. Because the guest system won’t be used by others (there are no user accounts), you can
safely remove mesg n from the /root/.profile script, and the red message will vanish. (That’s what you will
do in Chapter
9.)
To verify what I told you above create a new project called verify-tty-problem:
# Host OS
$ mkdir verify-tty-problem
$ cd verify-tty-problem
$ vagrant init -m ubuntu/trusty32
Edit the Vagrantfile by adding three inline shell provisioners:
Vagrant.configure(2) do |config|
config.vm.box = "ubuntu/trusty32"
config.vm.provision "shell", inline: "echo abc"
config.vm.provision "shell", inline: "echo def"
config.vm.provision "shell", inline: "echo ghi"
end
Boot the guest with this:
# Host OS
$ vagrant up
You will see the red message displayed three times, once for every run of the shell provisioner:
==> default: Running provisioner: shell...
default: Running: inline script
==> default: stdin: is not a tty
==> default: abc
==> default: Running provisioner: shell...
default: Running: inline script
==> default: stdin: is not a tty
==> default: def
==> default: Running provisioner: shell...
default: Running: inline script
==> default: stdin: is not a tty
==> default: ghi
CHAPTER 6 ■ PROVISIONING
113
To run the provisioners again, use this command:
# Guest OS
$ vagrant provision
The red messages will be printed each time you run the $ vagrant provision command.
Now log in to the guest:
# Host OS
$ vagrant ssh
Display the /root/.profile file:
# Guest OS
$ sudo cat /root/.profile
You should see mesg n at the very end of the output. Remove the mesg n command from the
/root/.profile file with this:
# Guest OS
$ sudo sed -i "/mesg n/d" /root/.profile
You can verify that the /root/.profile file no longer contains the mesg n with the command:
# Guest OS
$ sudo cat /root/.profile
To find out the final effect of removal, close the SSH session:
# Guest OS
$ logout
Run the provisioners:
# Host OS
$ vagrant provision
The output is free of the annoying "not tty" warnings. When you create your own boxes, just remove
the mesg n command from /root/.profile and you will be just fine.
Diving into this issue will give you a pretext to do the following:
• Use multiple shell provisioners
• Learn about inline shell provisioners
• See the $ vagrant provision command in action
I always prefer a practical approach; there’s nothing better than to get your hands dirty. That’s why you
should proceed with this experiment.
CHAPTER 6 ■ PROVISIONING
114
Jekyll Box with the Puppet Provisioner
This second example presents the Puppet provisioner in action. Again, you now enter the realm of the
system engineer.
Box Source Code
Start with an empty directory:
# Host OS
$ cd folder/with/examples
$ mkdir vagrant-jekyll-puppet
Create two files (the Vagrantfile and manifests/default.pp) with the contents shown in Listings 6-5
and 6-6. Note that default.pp is to be stored inside a directory named manifests/. The Vagrantfile doesn’t
contain a directive to define port forwarding.
Listing 6-5. Vagrantfile for Jekyll Box with Puppet Provisioning
Vagrant.configure(2) do |config|
config.vm.box = "ubuntu/trusty32"
config.vm.provision "puppet"
end
Listing 6-6. Puppet Script default.pp to Provision a VM
exec { 'apt-get update':
command => '/usr/bin/apt-get update -y'
}
package { 'nodejs':
require => Exec['apt-get update']
}
package { 'lynx-cur':
require => Exec['apt-get update']
}
package { 'ruby1.9.1-dev':
require => Exec['apt-get update']
}
exec { 'Install Jekyll':
command => '/usr/bin/gem install jekyll',
require => Package['ruby1.9.1-dev']
}
Apart from the following line to set up provisioning, there is nothing new in the Vagrantfile:
config.vm.provision "puppet"
CHAPTER 6 ■ PROVISIONING
115
With the default configuration, Puppet looks for a file named manifests/default.pp and executes it.
Puppet manifests consist of resources such as exec or package:
exec {
}
package {
}
Manifests can contain an arbitrary number of resources, and resources can be processed by Puppet
in an arbitrary order—not necessarily in the order in which they are declared. The first string that appears
inside the braces is a unique label that identifies the resource.
The following resource has the label 'apt-get update':
exec { 'apt-get update':
command => '/usr/bin/apt-get update -y'
}
When applied, this resource executes a command to update the system. The next resource installs the
nodejs package:
package { 'nodejs':
require => Exec['apt-get update']
}
For package resources, the label identifies the package to be installed. This resource should be applied
after the first resource that updated the system. Resource ordering is achieved with the required entry.
The following key forces Puppet to apply the package{'nodejs': } resource after the exec{ 'apt-get
update': } resource:
require => Exec['apt-get update']
The following two resources will be applied after the system has been updated:
package { 'nodejs':
require => Exec['apt-get update']
}
package { 'lynx-cur':
require => Exec['apt-get update']
}
The order in which nodejs and lynx-cur are installed is not defined, so you can’t assume that nodejs
will be installed before lynx-cur.
The last two resources are responsible for installing Ruby dev package and Jekyll. The require keys set
the following ordering of the resources:
• First to be applied: exec { 'apt-update': }
• Second to be applied: package { 'ruby1.9.1-dev': }
• Last to be applied: exec { 'Install Jekyll': }

CHAPTER 6 ■ PROVISIONING
116
First Run of the Puppet Provisioner
The commands to run the environment are exactly the same as they were for the shell provisioner. The
following commands might require half an hour or more to finish:
# Host OS
$ cd folder/with/examples
$ cd vagrant-jekyll-puppet
$ vagrant up
This time, the output will contain the Puppet’s messages, denoted with ❶. They will be printed once in
a while:
Bringing machine 'default' up with 'virtualbox' provider...
==> default: Importing base box 'ubuntu/trusty32'...
...
❶==> default: Running provisioner: puppet...
❶==> default: Running Puppet with default.pp...
❶==> default: stdin: is not a tty
❶==> default: Notice: Compiled catalog for vagrant-ubuntu-trusty-32 in environment
production in 0.10 seconds
❶==> default: Notice: /Stage[main]/Main/Exec[apt-get update]/returns: executed successfully
❶==> default: Notice: /Stage[main]/Main/Package[lynx-cur]/ensure: ensure changed 'purged'
to 'present'
❶==> default: Notice: /Stage[main]/Main/Package[nodejs]/ensure: ensure changed 'purged' to
'present'
❶==> default: Notice: /Stage[main]/Main/Package[ruby1.9.1-dev]/ensure: ensure changed
'purged' to 'present'
❶==> default: Notice: /Stage[main]/Main/Exec[Install Jekyll]/returns: executed successfully
❶==> default: Notice: Finished catalog run in 174.26 seconds
As you can see, Puppet prints a notice about every resource, and every message contains the label of
the resource. The provisioning lasted for 174.26 seconds, which is quite long when compared with the time
necessary to boot a guest VM.
The 174-second timing was achieved on a Mac Book Pro i7/8GB RAM/SSD. Windows running
i5/4 GB RAM/SATA reported 260.77 seconds. But network transfer has some impact on these results, so your
benchmarks can differ.
■ Note When you use the Puppet provisioner, you might encounter the following red warning:
warning: could not retrieve fact fqdn
It means that there is a problem with getting a fully qualified domain name (FQDN) for your machine. You will
encounter this message, for example, when you boot the guest machine that uses the Puppet provisioner on a
computer that isn’t connected to the Internet. By default, Puppet tries to set the hostname of a guest VM using
an FQDN. You can resolve this issue with the following entry in the Vagrantfile:
config.vm.hostname = "abc.example.net"
It sets the guest’s hostname; Puppet will not try to resolve the FQDN anymore.

CHAPTER 6 ■ PROVISIONING
117
Versioning the Box Source Code
The procedure to version the box is the same, no matter which provisioner you use:
1. Change the current directory.
2. Initialize the new repository with git init.
3. Create the .gitignore file.
4. Commit all the files.
5. Tag the initial version with the v0.1.0 annotated tag.
Here are the commands:
# Host OS
$ cd vagrant-jekyll-puppet
$ git init
$ echo .vagrant > .gitignore
$ echo "*.box" >> .gitignore
$ git add -A
$ git commit -m "Initial version"
$ git tag -a v0.1.0 -m "Release 0.1.0"
The initial version of the source code of the box is ready.
Generating a Box
Generate the box named vagrant-jekyll-puppet-v0.1.0.box with the following commands:
# Host OS
$ cd vagrant-jekyll-puppet
$ vagrant up
$ vagrant package --output vagrant-jekyll-puppet-v0.1.0.box
Using a Puppet-Provisioned Box
■ Note Again, you switch the role. Here you work as a developer.
The procedure to use the vagrant-jekyll-puppet-v0.1.0.box is exactly the same as the procedure
described for the shell-provisioned box. The only difference is when you install the box:
# Host OS
$ vagrant box add vagrant-jekyll-puppet-v0.1.0 vagrant-jekyll-puppet-v0.1.0.box
And when you initialize a project:
# Host OS
$ vagrant init -m vagrant-jekyll-puppet-v0.1.0

CHAPTER 6 ■ PROVISIONING
118
Apart from these two diversions, both procedures are exactly the same. You should be able to proceed
with the flowers-vagrant-jekyll-puppet exercise on your own.
Jekyll Box with the Chef Provisioner
■ Note Here you work as a system engineer.
The third example presents the Chef provisioner in action. To proceed with this example, you need to
install Chef on your host. You will find the necessary packages for your host at https://downloads.chef.io.
Box Source Code
Create the new directory:
# Host OS
$ cd folder/with/examples
$ mkdir vagrant-jekyll-chef
Populate it with two files: the Vagrantfile and cookbooks/jekyll/recipes/default.rb (see Listings 6-7
and 6-8). Ensure that you store the default.rb file in the appropriate directory: cookbooks/jekyll/recipes.
(You have to create the cookbooks/jekyll/recipes directory).
Listing 6-7. Vagrantfile for a Jekyll Box with Chef Solo Provisioning
Vagrant.configure(2) do |config|
config.vm.box = "ubuntu/trusty32"
config.vm.provision "chef_solo" do |chef|
chef.add_recipe "jekyll"
end
end
Listing 6-8. Chef Script default.pp to Provision a VM
execute 'apt-get update'
package 'nodejs'
package 'lynx-cur'
package 'ruby1.9.1-dev'
execute 'gem install jekyll'
This project uses the chef_solo provisioner with one recipe named "jekyll":
config.vm.provision "chef_solo" do |chef|
chef.add_recipe "jekyll"
end
CHAPTER 6 ■ PROVISIONING
119
The name of the recipe sets the name of the directory in which the Ruby default.rb. script is stored. By
default, all recipes should reside in the cookbooks/ directory. Then goes the name of the recipe: jekyll/ in
this case. Inside the recipe directory, another folder named recipes is needed. Thus the complete path to
default.rb is this:
cookbooks/jekyll/recipes/default.rb
The default.rb script consists of a list of instructions that are executed in the same order in which they
appear in the file. The instructions from Listing 6-8 either execute a command or install a package.
First Run of the Chef Provisioner
As you already know, it takes some time to install Ruby and Jekyll. Chef requires as much time as the shell
and Puppet provisioners. But don’t expect miracles; Chef requires as much time as the shell and Puppet
provisioners.
To start the VM, run these commands:
# Host OS
$ cd vagrant-jekyll-chef
$ vagrant up
This time, the output will contain Chef messages, which are denoted with ❶:
Bringing machine 'default' up with 'virtualbox' provider...
==> default: Importing base box 'ubuntu/trusty32'...
...
❶==> default: Running provisioner: chef_solo...
❶Generating chef JSON and uploading...
❶==> default: Running chef-solo...
❶==> default: stdin: is not a tty
❶==> default: [2015-04-18T07:52:35+00:00] INFO: Forking chef instance to converge...
❶==> default: [2015-04-18T07:52:35+00:00] INFO: *** Chef 12.2.1 ***
❶==> default: [2015-04-18T07:52:35+00:00] INFO: Chef-client pid: 2421
❶==> default: [2015-04-18T07:52:42+00:00] INFO: Setting the run_list to ["recipe[jekyll]"]
from CLI options
❶==> default: [2015-04-18T07:52:42+00:00] INFO: Run List is [recipe[jekyll]]
❶==> default: [2015-04-18T07:52:42+00:00] INFO: Run List expands to [jekyll]
❶==> default: [2015-04-18T07:52:42+00:00] INFO: Starting Chef Run for vagrant-ubuntu-trusty-32
❶==> default: [2015-04-18T07:52:42+00:00] INFO: Running start handlers
❶==> default: [2015-04-18T07:52:42+00:00] INFO: Start handlers complete.
❶==> default: [2015-04-18T07:52:52+00:00] INFO: execute[apt-get update] ran successfully
❶==> default: [2015-04-18T07:53:01+00:00] INFO: apt_package[nodejs] installed nodejs at
0.10.25~dfsg2-2ubuntu1
❶==> default: [2015-04-18T07:53:07+00:00] INFO: apt_package[lynx-cur] installed lynx-cur
at 2.8.8pre4-1
❶==> default: [2015-04-18T07:53:14+00:00] INFO: apt_package[ruby1.9.1-dev] installed
ruby1.9.1-dev at 1.9.3.484-2ubuntu1.2
❶==> default: [2015-04-18T07:55:34+00:00] INFO: execute[gem install jekyll] ran successfully
❶==> default: [2015-04-18T07:55:34+00:00] INFO: Chef Run complete in 171.99255357 seconds
❶==> default: [2015-04-18T07:55:34+00:00] INFO: Skipping removal of unused files from the cache
❶==> default: [2015-04-18T07:55:34+00:00] INFO: Running report handlers
❶==> default: [2015-04-18T07:55:34+00:00] INFO: Report handlers complete

CHAPTER 6 ■ PROVISIONING
120
For every entry in the default.rb file, Chef prints a notice with the information about whether the
command succeeded. The whole process of provisioning with Chef took 171.99 seconds for me.
Versioning the Box Source Code
As before, version the source code using git:
# Host OS
$ cd vagrant-jekyll-chef
$ git init
$ echo .vagrant > .gitignore
$ echo "*.box" >> .gitignore
$ git add -A
$ git commit -m "Initial version"
$ git tag -a v0.1.0 -m "Release 0.1.0"
The repository is ready.
Generating a Box
To generate the box named vagrant-jekyll-chef-v0.1.0.box, run these commands:
$ cd vagrant-jekyll-chef
$ vagrant up
$ vagrant package --output vagrant-jekyll-chef-v0.1.0.box
Jekyll Box with the Ansible Provisioner
The last example presents the basic use of the Ansible provisioner. Before you can use Ansible, you have to
install it.
On OS X, run this:
$ brew update
$ brew install ansible
If you work on Ubuntu, use these commands:
$ sudo apt-get install software-properties-common
$ sudo apt-add-repository ppa:ansible/ansible
$ sudo apt-get update
$ sudo apt-get install ansible
For other platforms, refer to the Ansible documentation at
http://docs.ansible.com/intro_
installation.html.
■ Note As of now, there is no Ansible installer for Windows platform.
CHAPTER 6 ■ PROVISIONING
121
Box Source Code
Start with the empty directory:
# Host OS
$ cd folder/with/examples
$ mkdir vagrant-jekyll-ansible
Create the two files shown in Listings 6-9 and 6-10: the Vagrantfile and playbook.yml.
Listing 6-9. Vagrantfile for a Jekyll Box with Ansible Provisioning
Vagrant.configure(2) do |config|
config.vm.box = "ubuntu/trusty32"
config.vm.provision "ansible", playbook: "playbook.yml"
end
Listing 6-10. Ansible playbook.yml to Provision a VM
- hosts: all
sudo: true
tasks:
— name: Update apt
apt: update_cache=yes
— name: Install nodejs
apt: name=nodejs state=present
— name: Install lynx
apt: name=lynx-cur state=present
- name: Install ruby1.9.1-dev
apt: name=ruby1.9.1-dev state=present
- name: Install Jekyll
shell: 'gem install jekyll'
To activate the Ansible provisioner, the Vagrantfile contains the following:
config.vm.provision "ansible", playbook: "playbook.yml"
This entry sets the name of the file with the configuration to playbook.yml. The file, which is written
in YAML format, contains a list of tasks to be run that are stored under a tasks key. Each task consists of
a name and one more key that defines the action. In the playbook shown in Listing 6-10, three different
actions are used:
• apt is responsible for running the apt-get commands
• command is responsible for running arbitrary commands
• shell is responsible for running arbitrary commands in a shell environment
CHAPTER 6 ■ PROVISIONING
122
First Run of the Ansible Provisioner
To start the VM, run these commands (they will need some time, maybe even half an hour, to finish):
# Host OS
$ cd vagrant-jekyll-ansible
$ vagrant up
The output produced by Ansible is denoted with ❶:
Bringing machine 'default' up with 'virtualbox' provider...
==> default: Importing base box 'ubuntu/trusty32'...
...
❶==> default: Running provisioner: ansible...
...
❶PLAY [all] ********************************************************************
❶GATHERING FACTS ***************************************************************
ok: [default]
❶TASK: [Update apt] ************************************************************
ok: [default]
❶TASK: [Install nodejs] ********************************************************
changed: [default]
❶TASK: [Install lynx] **********************************************************
changed: [default]
❶TASK: [Install ruby1.9.1-dev] *************************************************
changed: [default]
❶TASK: [Install Jekyll] ********************************************************
changed: [default]
❶PLAY RECAP ********************************************************************
default : ok=6 changed=4 unreachable=0 failed=0
The notices produced by Ansible contain the name of each task.
Versioning the Box Source Code
To store the project with Ansible provisioner in git, use the following:
# Host OS
$ cd vagrant-jekyll-ansible
$ git init
$ echo .vagrant > .gitignore
$ echo "*.box" >> .gitignore
$ git add -A
$ git commit -m "Initial version"
$ git tag -a v0.1.0 -m "Release 0.1.0"
CHAPTER 6 ■ PROVISIONING
123
Generating a Box
Finally, vagrant-jekyll-ansible-v0.1.0.box can be generated with this:
$ cd vagrant-jekyll-ansible
$ vagrant up
$ vagrant package --output vagrant-jekyll-ansible-v0.1.0.box
Workflow
Remember from now on that the workflow for creating and using Vagrant boxes splits into two diverse
procedures:
• The procedure to create the box is carried out by system engineers.
• The procedure to use the box is carried out by developers.
This chapter updated the workflow used by system engineers to create the box. Now the code of the
box is versioned, and booting of the box is automatic. The procedure to build the box is repeatable, and new
versions of the box can be released in the same way as software.
There is only one final step that still requires manual interaction. Right now, to produce a box, you have
to run two commands manually: $ vagrant up and $ vagrant package. (This topic will be discussed in
Chapter
9.)
From the system administrator’s perspective, the cost of using this workflow is the following:
1. The admin has to boot the VM with provisioning (it has to be done only once).
2. The admin has to package the VM into the box file.
3. The box file has to be uploaded to globally accessible storage.
All three of these steps have to be executed for every new release of the box.
From the developers’ perspective, each new release will force them to do the following:
• Download the box file from globally accessible storage to their laptops.
• Destroy and boot the VM again (using the updated box).
And no matter how many projects use the new release of the box, the procedure to update the box
needs to be run just once. Because the procedure to update the box can be done semiautomatically, this
workflow is extremely convenient and efficient.
Summary
Automatic installation and configuration of software within a guest OS is called provisioning in Vagrant
terminology. It is a huge step forward because VMs can be developed as if they were the code.
You were introduced to four different provisioners: shell scripts, Puppet, Chef, and Ansible. As of now,
these are the most popular and frequently used software configuration solutions on the market. Ansible
currently has a lot of attention because it has been described as the easiest-to-learn SCM tool yet invented.
To be sure, this chapter was only an introduction, and you will have to refer to documentation for a
more in-depth discussion. But you should understand the overall view of provisioners: what purposes they
serve, how to include them in Vagrantfiles, and how to use them for some simple tasks. As you can see,
Vagrant-controlled VMs act as a perfect sandbox to play with Puppet, Chef, or Ansible.
CHAPTER 6 ■ PROVISIONING
124
When you have a basic grasp of one of the provisioners, take care to use a version control system (VCS)
for your boxes. I personally prefer to use git, but there are others (for example, Bazaar and Mercurial) that
you can choose from.
Using a VCS system for boxes help you keep track of box releases. The approach that I use is to tag a
version that can be automatically booted without any human interaction and to store the box in a file using a
filename that contains the version number. It is a very simple trick, yet it helps to avoid confusion when you
update your boxes.
Keep in mind that if developers use a box that contains all the software inside (as in vagrant-jekyll-
shell-v0.1.0.box), they can reboot and destroy the box without any penalty. The process of destroying
and booting a completely new VM-based box that contains all the software inside and does not need to run
provisioners in order to download, compile, and install packages is not time-consuming. Although there is
an upfront cost to produce the box, you can then re-create the environment in a fraction of the time required
to perform a complete provisioning.
In the Next Chapter, You Will Learn . . .
In this chapter, you modified the ubuntu/trusty32 box. But how can you start from scratch? How was the
ubuntu/trusty32 box created? Is it an updated and reconfigured version of some other box? How can you
create a new box without falling back on any box? These are the main topics of Chapter
7.
Reading List
Vagrant documentation contains an extended chapter that explains the whole purpose of provisioning and
gives various examples of how to use it:
https://docs.vagrantup.com/v2/provisioning/index.html. The
documentation contains a complete reference of options for each provisioner.
To learn more about each provisioner, Ansible, Chef and Puppet, refer to their documentation on
Wikipedia:
• Ansible
• http://en.wikipedia.org/wiki/Ansible_%28software%29
• www.ansible.com/home
• www.ansible.com/get-started
• Chef
•
http://en.wikipedia.org/wiki/Chef_%28software%29
• www.chef.io/
• https://learn.chef.io/
• Puppet
•
http://en.wikipedia.org/wiki/Puppet_%28software%29
• http://puppetlabs.com/
• http://puppetlabs.com/download-learning-vm
Wikipedia shows a comprehensive comparison of open source SCM tools at http://en.wikipedia.org/
wiki/Comparison_of_open-source:configuration_management_software.
CHAPTER 6 ■ PROVISIONING
125
Shebang and portable shebang are described at http://en.wikipedia.org/wiki/
Shebang_%28Unix%29.
For the mesg command, see
http://en.wikipedia.org/wiki/Mesg. The "not a tty" “thing” is
explained in issue 1673 of the Vagrant GitHub repository: https://github.com/mitchellh/vagrant/
issues/1673.
For resources on git, refer to http://git-scm.com/. You will see, among many other resources, the most
famous Pro Git book:
http://git-scm.com/book/en/v2.
Semantic versioning is specified in the document at http://semver.org. The note about starting your
project at 0.1.0 can be found in the FAQs (this is the first entry).
Finally, for the specification of the YAML format, visit
http://www.yaml.org.
Test Yourself
1. What is the purpose of provisioning?
2. Can you name at least four provisioners supported by Vagrant?
3. What is the Vagrantfile configuration entry to configure provisioning with a shell
script saved in a separate file?
4. What is the Vagrantfile configuration entry to configure provisioning with an
inline shell script?
5. What is the Vagrantfile configuration entry to configure provisioning with
Puppet?
6. What is the Vagrantfile configuration entry to configure provisioning with Chef?
7. What is the Vagrantfile configuration entry to configure provisioning with
Ansible?
8. What is shebang?
9. Can you write a shell script that updates the system and installs an arbitrary
package (e.g., git, lynx, mc)?
10. Can you write a Puppet manifest that updates the system and installs an arbitrary
package (e.g., git, lynx, mc)?
11. Can you write a Chef recipe that updates the system and installs an arbitrary
package (e.g. git, lynx, mc)?
12. Can you write an Ansible playbook that updates the system and installs an
arbitrary package (e.g., git, lynx, mc)?
13. Can you define the terms “source code of the box” and “binary version of a box”?
14. How can you use git to version control the source code of the box?
15. How do you build a binary version of a box?
16. What is the advantage of using binary boxes with all the software baked in
instead of running provisioners to install the software each time you boot the
guest VM?
CHAPTER 6 ■ PROVISIONING
126
Exercises
1. Create the flowers-vagrant-jekyll-puppet project, which should use the
vagrant-jekyll-puppet box. For instructions on how to do it, refer to the “Using
the Shell-Provisioned Box” section. When you finish this exercise, your web
browser should display a page like the one shown in Figure 5-2. The box used by
the project should be generated with the Puppet provisioner.
2. Create the flowers-vagrant-jekyll-chef project, which should use the
vagrant-jekyll-chef box. For instructions on how to do it, refer to the “Using
Shell-Provisioned Box” section. When you finish this exercise, your web browser
should display a page like the one shown in Figure 5-2. The box used by the
project should be generated with the Chef provisioner.
3. Create the flowers-vagrant-jekyll-ansible project, which should use the
vagrant-jekyll-ansible box. For instructions on how to do it, refer to the
“Using Shell-Provisioned Box” section. When you finish this exercise, your web
browser should display a page like the one shown in Figure 5-2. The box used by
the project should be generated with the Ansible provisioner.

127
CHAPTER 7
Creating Boxes from Scratch
By now, it should be completely clear to you that Vagrant boxes are preinstalled OSs stored in files with
a *.box extension, and you can easily download and start them using Vagrant. To perform automated
downloads and booting of VMs, you need to create a Vagrantfile containing a config.vm.box entry like the
following and then run the $ vagrant up command:
config.vm.box = "ubuntu/trusty32"
config.vm.box = "puppetlabs/centos-6.6-64-puppet"
To download the box manually, you can use curl or wget like this:
$ curl
http://cloud-images.ubuntu.com/vagrant/trusty/current/trusty-server-cloudimg-i386-
vagrant-disk1.box -o trusty-server-cloudimg-i386-vagrant-disk1.box
$ wget -O trusty-server-cloudimg-i386-vagrant-disk1.box
http://cloud-images.ubuntu.com/
vagrant/trusty/current/trusty-server-cloudimg-i386-vagrant-disk1.box
In Chapters 5 and 6, you learned how to build your own customized solution based on one of the existing
boxes, for example ubuntu/trusty32. The procedure is quite simple: boot the predefined box, change its
configuration, and export it to a new file with a *.box extension using the $ vagrant package command.
But how were these public boxes, such as ubuntu/trusty32, created? What can you do if you need to
run an atypical guest OS and can’t find any base box for it?
This chapter will get to the very bottom of this problem. You’ll create boxes by installing OSs using ISO
CD-ROM and DVD images distributed by producers. And the whole process will be completely automatic.
Packer
Packer is a command-line tool produced by HashiCorp, which is the company behind Vagrant. The main
purpose of Packer is to automate the creation of preinstalled VMs for various operating systems and
providers. You will use it to generate Vagrant boxes.
How does Packer work? It starts by downloading the ISO CD or DVD image of the OS you want to install.
Then it runs the installation program and applies the default configuration. When that finishes, Packer uses
provisioners (shell, Chef, Puppet, or Ansible) to customize the system. Finally, it exports the system and
converts it into a single box file. The whole process can be described in five steps:
1. Download the ISO image for the OS.
2. Install the system using preconfigured options read from configuration files.
3. Run provisioners to customize the system.
CHAPTER 7 ■ CREATING BOXES FROM SCRATCH
128
4. Export the system.
5. Pack the exported OS into a single *.box file.
This procedure can be used for the following purposes:
• To produce arbitrary systems—for example, Ubuntu, CentOS, FreeBSD,
Windows 7
• To create a box for arbitrary providers—for example, VirtualBox, VMware, Parallel
Before you dive deeper into the details of how Packer works, you can start by building your first box.
Installing Packer
Packer distributions are available for download at
https://www.packer.io/downloads.html. Just download
a package appropriate for your platform and unzip it. The files you unzip can reside anywhere on your drive,
but the directory that contains the Packer binary should be available in the path.
If you work on OS X, you can also use brew to install Packer. Here are the commands to use:
$ brew tap homebrew/binary
$ brew install packer
In case of a problem, refer to Packer’s documentation here:
https://www.packer.io/docs/
installation.html.
When the installation is finished, you can verify that Packer is ready by running this command:
$ packer version
Before you start using Packer, it is worthwhile to change some settings. By default, Packer caches
downloaded files on a per-project basis, and cached files are stored in a subdirectory named packer_cache.
It is very convenient to reconfigure Packer to work with the global packer_cache directory, which will allow
you to share downloaded ISO files between different projects instead of downloading them again.
You can change Packer’s behaviour concering the cache with the following environment variable:
PACKER_CACHE_DIR
To change the location of cached files run the command:
$ PACKER_CACHE_DIR=/some/dir/packer_cache
$ export PACKER_CACHE_DIR
If you want to run them during every shell session, you can put them in your shell configuration
file—for example, in ~/.profile.
Building Boxes Using the chef/bento Project
The most popular project with Packer definitions is chef/bento, which is available on GitHub here:
https://github.com/chef/bento. It contains boxes published by Chef Software, Inc. here:
https://atlas.hashicorp.com/chef. And you can also find them here: http://chef.github.io/bento/.

CHAPTER 7 ■ CREATING BOXES FROM SCRATCH
129
To use those definitions, simply clone the chef/bento project:
# Host OS
$ cd folder/with/examples
$ git clone
https://github.com/chef/bento.git
Enter the packer/ subdirectory inside the cloned project:
$ cd bento
$ cd packer
You are done. The current directory contains a lot of JavaScript Object Notation (JSON) files. To verify it,
run this command:
$ ls
Each JSON file contains definitions of how to build a given OS for many different providers. By using
Packer and the JSON files, you can build many different base boxes: Ubuntu, Debian, Fedora, and FreeBSD,
among others.
■ Note Building a box with Packer consists of many stages, one of which is an unintended installation of an
OS. As you might expect, it takes a lot of time—longer than any operations you have performed so far. You need
a lot of patience; the command to build Ubuntu 14.04 runs for almost an hour.
To build the Ubuntu 14.04 box for the VirtualBox provider, run this:
$ packer build -only=virtualbox-iso ubuntu-14.04-i386.json
■ Note When you run the preceding command, observe the windows that appear on your screen: you will see
an unintended installation of Ubuntu. One of the windows will, at some point, contain the boot command shown
in Listing 7-5. The window will act as if someone were typing the command for you.
When it finally finishes, you should be able to find the following file on your system:
bento/builds/virtualbox/opscode_ubuntu-14.04-i386_chef-provisionerless.box
This is an Ubuntu 14.04 box that was built without any preexisting box; it was installed using an ISO
image downloaded from the Ubuntu distribution site.
Using a different JSON file as the last parameter for the Packer command, you can build boxes for other
OSs and other providers:
$ packer build -only=vmware-iso fedora-21-i386.json
The boxes produced by chef/bento definitions are bare; they do not contain anything that is not
necessary for the system to run. They are stripped of various programs and tools, and they don’t even
contain provisioning tools such as Puppet or Chef. This makes them a perfect starting point for personalized
customizations.
CHAPTER 7 ■ CREATING BOXES FROM SCRATCH
130
Using the Box Generated with chef/bento
Once you have created a box you can use it. The box for Ubuntu 14.04 is stored in:
bento/builds/virtualbox/opscode_ubuntu-14.04-i386_chef-provisionerless.box
The procedure to generate this box is very time-consuming and nerve-straining experience. But when
the box is ready, you need only a minute or two to give it a try.
First, you have to install the box in your system. It can be done with the $ vagrant box add command,
preceded by the appropriate $ cd commands:
# Host OS
$ cd folder/with/examples
$ cd bento
$ cd builds/virtualbox
$ vagrant box add bento-ubuntu opscode_ubuntu-14.04-i386_chef-provisionerless.box
Note that the first parameter of the $ vagrant box add command can be just an arbitrary string. I used
bento-ubuntu. Now the list printed by the following command should include, among other things, the
bento-ubuntu box:
$ vagrant box list
Go to the directory with your examples and create a new project:
# Host OS
$ cd folder/with/examples
$ mkdir using-bento-ubuntu-box
$ cd using-bento-ubuntu-box
$ vagrant init -m bento-ubuntu
Finally, you can boot the VM with this:
# Host OS
$ vagrant up
The procedure to build the box lasted for half an hour, but booting consumes only about a minute.
Now open the SSH session:
# Host OS
$ vagrant ssh
Print the contents of one file:
# Guest OS
$ cat /home/vagrant/.vbox_version
You will see the version of VirtualBox that you used to generate the box, which is very handy.

CHAPTER 7 ■ CREATING BOXES FROM SCRATCH
131
When you finish, close the SSH session and destroy the box to avoid complications:
# Guest OS
$ logout
# Host OS
$ vagrant destroy
Building Boxes Using the boxcutter Project
Another interesting initiative for building base boxes with Packer is the boxcutter project available at
https://github.com/boxcutter. You will find many subprojects there, each one for a different OS.
Boxcutter builds boxes that are equipped with the Puppet, Chef, and Salt provisioners. The build is governed
by the GNU make program.
INSTALLATION OF MAKE ON WINDOWS
If you work on Windows, you have to install the make program. Go to http://cygwin.com/install.html
and run setup-x86.exe. Follow the instructions; when you are asked about packages to install, select
Development Tools and Make. When the installation finishes, you will find the C:\cygwin directory that
contains the make program. To run the program in git bash, use this command:
$ /c/cygwin/bin/make.exe
If you add the /c/cygwin/bin directory to your path, you can use the make command like this:
$ make
The prefix /c/cygwin/bin is necessary only if your path doesn’t contain the /c/cygwing/bin folder.
To build an Ubuntu 14.04 box equipped with the latest version of Puppet, clone this project:
# Host OS
$ cd folder/with/examples
$ git clone
https://github.com/pro-vagrant/ubuntu.git
The previous command creates a directory named folder/with/examples/ubuntu. Enter this directory:
$ cd ubuntu
Create a new file named Makefile.local with the following contents:
CM := puppet
UPDATE := true

CHAPTER 7 ■ CREATING BOXES FROM SCRATCH
132
You can do this by running these two commands:
$ echo "CM := puppet" > Makefile.local
$ echo "UPDATE := true" >> Makefile.local
You can also use your favorite text editor. When the Makefile.local file is ready, run this command
(be patient; the command will run for an hour):
$ make virtualbox/ubuntu1404-i386
■ Note If you work on Windows, you might need to use this command:
$ /c/cygwin/bin/make.exe virtualbox/ubuntu1404-i386
It will run for about half an hour and should create the file named box/virtualbox/ubuntu1410-i386-
puppetlatest-1.0.16.box. The version of the file, which in my case is 1.0.16, may be different.
The boxes built with boxcutter configuration files contain one provisioner that you can choose using
the Makefile.local file. The CM configuration variable stands for Configuration Manager and can take the
following values: puppet, chef, salt, and nocm. The following line:
CM := puppet
can be replaced with this:
CM := chef
or this:
CM := salt
As of now, there is no support for Ansible, though.
■ Note To list the boxes that can be built with Boxcutter/Ubuntu, run the following:
$ make list
Or run this:
$ /c/ygwin/bin/make.exe list
By using other repositories available in
https://github.com/boxcutter, such as the following, you can
build boxes for other systems:
•
https://github.com/boxcutter/centos
• https://github.com/boxcutter/fedora
CHAPTER 7 ■ CREATING BOXES FROM SCRATCH
133
Using the Box Generated with the boxcutter Project
The procedure to use the box should be straightforward. The box is stored in:
box/virtualbox/ubuntu1410-i386-puppetlatest-1.0.16.box
Install the box in your system:
# Host OS
$ cd folder/with/examples
$ cd ubuntu
$ cd box/virtualbox
$ vagrant box add boxcutter-ubuntu ubuntu1410-i386-puppetlatest-1.0.16.box
Verify that the box named boxcutter-ubuntu is available:
$ vagrant box list
Go to the directory with your examples and create a new project:
# Host OS
$ cd folder/with/examples
$ mkdir using-boxcutter-ubuntu-box
$ cd using-boxcutter-ubuntu-box
$ vagrant init -m boxcutter-ubuntu
Boot the VM:
# Host OS
$ vagrant up
Booting should last for a minute or so. Finally, close the SSH session and destroy the box:
# Guest OS
$ logout
# Host OS
$ vagrant destroy
How Does Packer Work?
Just like Vagrant, Packer knows a couple of subcommands that perform certain actions. The subcommand
you used to build a box was build, which takes the mandatory argument TEMPLATE:
$ packer build TEMPLATE
TEMPLATE is the name of a JSON file that defines precisely how to build a box. The basic structure of a
template file is shown in Listing 7-1.

CHAPTER 7 ■ CREATING BOXES FROM SCRATCH
134
A ONE-MINUTE INTRODUCTION TO JSON
JSON files are text files that contain hashes, tables, and scalar values. To define a hash with two keys,
the following syntax is used:
{
"name": "John",
"surname": "Doe"
}
JSON for an array with two strings looks like this:
[
"First string",
"Second string"
]
You can nest both structures in an arbitrary number of levels:
{
"persons": [
{ "name": "John", "surname": "Doe" },
{ "name": "Ann", "surname": "Moo" }
],
"cities": [
"London", "New York", "Berlin"
]
}
Listing 7-1. Basic Structure of a Packer Template File
{
"variables": {
"mirror": "
http://releases.ubuntu.com",
...
},
"builders": [
{
"type": "virtualbox-iso",
...
},
{
"type": "vmware-iso",
...
},
{
"type": "parallels-iso",
}
],

CHAPTER 7 ■ CREATING BOXES FROM SCRATCH
135
"provisioners": [
{
"scripts": [
"scripts/ubuntu/update.sh",
"scripts/common/sshd.sh",
"scripts/ubuntu/networking.sh",
...
],
"type": "shell"
}
],
"post-processors": [
{
"type": "vagrant",
...
}
]
}
■ Note The template file is in JSON format, which means that the entries can be reordered. The following
order was used here: variables, builders, provisioners, post-processors. It reflects the order of processing.
The template contains a list of the following:
• Variables
• Builders
• Provisioners
• Post-processors
Variables define some global settings—for example, URLs for OS distribution. Builders are the most
complicated part of the configuration: they define the procedure to boot VMs and perform unattended
installation. Provisioners allow you to install additional packages and customize running VMs. And post-
processors shut the VM down and transform it into a box file.
Every builder has a mandatory key type. In Listing 7-1, you can see three types: virtualbox-iso,
vmware-iso, and parallels-iso. Each section with type defines one box. When you run $ packer build
command, feeding it with just the name of the template, as follows, you ask Packer to build all the builders:
$ packer build ubuntu-14.04-i386.json
For the template shown in Listing 7-1, Packer would run three builders:
• virtualbox-iso
• vmware-iso
• parallel-iso
The algorithm to process the template file is just an iteration that for every builder X runs four steps:
variables, a particular builder X, all the provisioners, and post-processors. And because the VM for every
build is completely independent, all the boxes can be produced in parallel.
CHAPTER 7 ■ CREATING BOXES FROM SCRATCH
136
The -only=virtualbox-iso parameter that you used to produce the Ubuntu box filters the builders:
$ packer build -only=virtualbox-iso ubuntu-14.04-i386.json
The previous command will run only the virtualbox-iso builder.
The most interesting part of processing happens in the builder. Crucial parts of the VirtualBox builder
for Ubuntu 14.04 are shown in Listing 7-2. The excerpts shown in Listing 7-2 come from the chef/bento file
packer/ubuntu-14-04-i386.json, but they are reordered for clarity.
Listing 7-2. VirtualBox Builder for Ubuntu 14.04
{
"type": "virtualbox-iso",
"iso_checksum": "976044842804eafc18390505508958b559c131211160ecae5e60694bdf171f78",
"iso_checksum_type": "sha256",
"iso_url": "{{user `mirror`}}/14.04.1/ubuntu-14.04.1-server-i386.iso",
"disk_size": 40960,
"vboxmanage": [
[
"modifyvm",
"{{.Name}}",
"--memory",
"384"
],
[
"modifyvm",
"{{.Name}}",
"--cpus",
"1"
]
],
"boot_wait": "10s",
"http_directory": "http",
"boot_command": [
"<esc><wait>",
"<esc><wait>",
"<enter><wait>",
"/install/vmlinuz<wait>",
" auto<wait>",
" console-setup/ask_detect=false<wait>",
" console-setup/layoutcode=us<wait>",
" console-setup/modelcode=pc105<wait>",
" debconf/frontend=noninteractive<wait>",
" debian-installer=en_US<wait>",
" fb=false<wait>",
" initrd=/install/initrd.gz<wait>",
CHAPTER 7 ■ CREATING BOXES FROM SCRATCH
137
" kbd-chooser/method=us<wait>",
" keyboard-configuration/layout=USA<wait>",
" keyboard-configuration/variant=USA<wait>",
" locale=en_US<wait>",
" netcfg/get_domain=vm<wait>",
" netcfg/get_hostname=vagrant<wait>",
" noapic<wait>",
" preseed/url=http://{{ .HTTPIP }}:{{ .HTTPPort }}/ubuntu-14.04/preseed.cfg<wait>",
" -- <wait>",
"<enter><wait>"
],
"virtualbox_version_file": ".vbox_version",
"guest_additions_path": "VBoxGuestAdditions_{{.Version}}.iso",
"ssh_password": "vagrant",
"ssh_port": 22,
"ssh_username": "vagrant",
"ssh_wait_timeout": "10000s",
"shutdown_command": "echo 'vagrant'|sudo -S shutdown -P now",
"output_directory": "packer-ubuntu-14.04-i386-virtualbox",
}
The processing starts with downloading two files: VirtualBox Guest Additions and the Ubuntu
installation ISO file. The following entry is expanded with the mirror variable defined in the variables
section of Listing 7-1:
"iso_url": "{{user `mirror`}}/14.04.1/ubuntu-14.04.1-server-i386.iso",
It produces this URL:
http://releases.ubuntu.com/14.04.1/ubuntu-14.04.1-server-i386.iso.
If the file cannot be found in PACKER_CACHE_DIR, it is downloaded from the network. Two additional
keys are relevant to this operation: iso_checksum and iso_checksum_type. They define the checksum of the
file, which is used to verify the file’s integrity.
When the ISO installation file is ready, Packer starts the VM using this file as an image. Two modifyvm
entries under the vboxmanage key modify the memory and CPU of the VM that is started. Disk size for this
VM is defined with the disk_size key. Then Packer waits the amount of time defined with the boot_wait
parameter.
In the meantime, Packer starts the HTTP server that allows access to the directory defined with the
http_directory entry. The subdirectory http/ contains a preseed.cfg file that is necessary to automate the
install. This HTTP server is a one-way communication channel from host machine to guest VM that is used
to transfer this file.
When the amount of time defined with boot_wait has expired, Packer types the command defined with
boot_command into the VM. The command contains special sequences such as <esc>, <enter>, and <wait>.
The sequences <esc> and <enter> send the ESC and ENTER key codes to the VM. The <wait> sequence waits
for a couple of seconds. Thus, the boot command acts as if it did the following:
1. Pressed ESC and waited
2. Pressed ESC and waited

CHAPTER 7 ■ CREATING BOXES FROM SCRATCH
138
3. Typed the long command waiting from time to time
4. Finally pressed Enter
The command contains some basic parameters for Ubuntu installation, such as keyboard layout and
hostname. But no matter which parameters are defined here, the installation procedure asks a couple
of questions. To skip all the questions, use the preseed.cfg file stored in the http/ directory. This file
contains answers to questions that are asked by the installation program. The following fragment of the boot
command forces the installation program to fetch the preseed.cfg file via HTTP:
" preseed/url=http://{{ .HTTPIP }}:{{ .HTTPPort }}/ubuntu-14.04/preseed.cfg<wait>",
■ Note Packer replaces the variables .HTTPIP and .HTTPPort with the actual values for the HTTP server
instance that was started.
You will wait a long time while the system is being installed. When it finishes, Packer logs in to the guest
OS using the following credentials:
"ssh_password": "vagrant",
"ssh_port": 22,
"ssh_username": "vagrant",
"ssh_wait_timeout": "10000s",
The user account vagrant with the password vagrant was created by the keystrokes stored in the
preseed.cfg file. After a successful login, Packer uploads VirtualBoxGuestAdditions to the guest machine
and creates a special text file that contains the version of VirtualBox. These two operations are governed by
the following:
"virtualbox_version_file": ".vbox_version",
"guest_additions_path": "VBoxGuestAdditions_{{.Version}}.iso",
The system is ready to be provisioned, so Packer runs all the provisioners defined by entries under the
key "provisioners": [ ] shown in Listing 7-1.
Finally, Packer does the following:
1. Halts the system using the command defined with shutdown_command
2. Exports the VM to a directory defined with output_directory
3. Runs the post-processor defined in Listing 7-1 with "post-processors": [ ]
The output produced by Packer when generating the VirtualBox Ubuntu 14.04 box is presented in
Listing 7-3. You should be able to correlate most of the messages with the appropriate fragments of either
Listing 7-1 or Listing 7-2.
Listing 7-3. Output Produced by Packer During Ubuntu Box Production
==> virtualbox-iso: Downloading or copying Guest additions
virtualbox-iso: Downloading or copying: file:///.../VBoxGuestAdditions.iso
==> virtualbox-iso: Downloading or copying ISO
virtualbox-iso: Downloading or copying:
http://releases.ubuntu.com/14.04.1/ubuntu-14.04.1-server-i386.iso
CHAPTER 7 ■ CREATING BOXES FROM SCRATCH
139
==> virtualbox-iso: Starting HTTP server on port 8134
==> virtualbox-iso: Creating virtual machine...
==> virtualbox-iso: Creating hard drive...
==> virtualbox-iso: Creating forwarded port mapping for SSH (host port 4229)
==> virtualbox-iso: Executing custom VBoxManage commands...
virtualbox-iso: Executing: modifyvm packer-ubuntu-14.04-i386 --memory 384
virtualbox-iso: Executing: modifyvm packer-ubuntu-14.04-i386 --cpus 1
==> virtualbox-iso: Starting the virtual machine...
==> virtualbox-iso: Waiting 10s for boot...
==> virtualbox-iso: Typing the boot command...
==> virtualbox-iso: Waiting for SSH to become available...
==> virtualbox-iso: Connected to SSH!
==> virtualbox-iso: Uploading VirtualBox version info (4.3.18)
==> virtualbox-iso: Uploading VirtualBox guest additions ISO...
==> virtualbox-iso: Provisioning with shell script: scripts/ubuntu/update.sh
...
==> virtualbox-iso: Provisioning with shell script: scripts/common/minimize.sh
==> virtualbox-iso: Gracefully halting virtual machine...
==> virtualbox-iso: Preparing to export machine...
virtualbox-iso: Deleting forwarded port mapping for SSH (host port 4229)
==> virtualbox-iso: Exporting virtual machine...
virtualbox-iso: Executing: export packer-ubuntu-14.04-i386 ...
==> virtualbox-iso: Unregistering and deleting virtual machine...
==> virtualbox-iso: Running post-processor: vagrant
==> virtualbox-iso (vagrant): Creating Vagrant box for 'virtualbox' provider
Build 'virtualbox-iso' finished.
Customizing Boxes Generated with chef/bento
If you want to produce a modified version of any of the boxes included in the chef/bento project, the
simplest procedure is to add one more provisioning script.
In this section, you again work in the chef/bento project. To avoid confusion, change the current
directory to your clone of the chef/bento project:
# Host OS
$ cd folder/with/examples
$ cd bento
To customize Ubuntu builds, create a packer/scripts/ubuntu/customize.sh file with the following
contents:
#!/bin/bash -eux
apt-get install git
apt-get install mc
CHAPTER 7 ■ CREATING BOXES FROM SCRATCH
140
As you may guess, the preceding instructions install git and mc tools. Then add to the provisioners’
section shown in Listing 7-1 the name of the newly created script ❶:
"provisioners": [
{
...
"scripts": [
"scripts/ubuntu/update.sh",
"scripts/common/sshd.sh",
"scripts/ubuntu/networking.sh",
"scripts/ubuntu/sudoers.sh",
"scripts/common/vagrant.sh",
"scripts/common/vmtools.sh",
"scripts/common/chef.sh",
❶ "scripts/ubuntu/customize.sh",
"scripts/ubuntu/cleanup.sh",
"scripts/common/minimize.sh"
],
"type": "shell"
}
],
The next time you build an Ubuntu 14.04 box, it will include git and mc.
By modifying existing configuration files and scripts, you can also change all other settings for the generated
box. For example, you can modify the SSH key used for authorization and username/password credentials. The
user account is created in the pressed.cfg file. Here are the code lines responsible for this operation:
d-i passwd/user-fullname string vagrant
d-i passwd/user-uid string 900
d-i passwd/user-password password vagrant
d-i passwd/user-password-again password vagrant
d-i passwd/username string vagrant
By changing these lines in the preseed.cfg file into the following, you create a default user account
called johnny with the password THISISSECRET:
d-i passwd/user-fullname string johnny
d-i passwd/user-uid string 900
d-i passwd/user-password password THISISSECRET
d-i passwd/user-password-again password THISISSECRET
d-i passwd/username string johnny
VirtualBox Guest Additions
If you work a with VirtualBox provider, you might have encountered the message about a mismatched
version of VirtualBox Guest Additions. Vagrant displays this message when you boot the guest OS that was
built with a version of VirtualBox different from the one you are using. Listing 7-4 presents the warning
printed by Vagrant.
CHAPTER 7 ■ CREATING BOXES FROM SCRATCH
141
Listing 7-4. Warning About Mismatched VirtualBox Guest Additions
default: The guest additions on this VM do not match the installed version of
default: VirtualBox! In most cases this is fine, but in rare cases it can
default: prevent things such as shared folders from working properly. If you see
default: shared folder errors, please make sure the guest additions within the
default: virtual machine match the version of VirtualBox you have installed on
default: your host and reload your VM.
default:
default: Guest Additions Version: 4.1.12
default: VirtualBox Version: 4.3
Mismatched VirtualBox Guest Additions can sometimes result in severe problems (for example, the
inability to mount shared folders). How can you avoid this kind of issue? The first step is to make certain that
your host and guest use the same version of Guest Additions.
One of the benefits of building boxes with Packer is that the resulting box contains the Guest Additions
copied from the VirtualBox installation directory. Thus, the Guest Additions version in a generated box
always matches the version of VirtualBox that you have installed on your computer. The boxes generated
with chef/bento definitions also include a file named /home/vagrant/.vbox_version, which contains the
VirtualBox version used to generate the box. So when you open the SSH session to the guest using one of the
boxes generated with chef/bento, you can check the version of VirtualBox with this:
# Guest OS generated with chef/bento project
# This is the instruction that we run in
# "Using the box generated with bento project"
# section.
$ cat /home/vagrant/.vbox_version
The name of the .vbox_version file is defined with the following configuration entry shown in Listing 7-2:
"virtualbox_version_file": ".vbox_version",
Creating a Box Manually
If you really want to take a closer look at the commands and actions executed by Packer, you can follow the
procedure by hand. Even though this is not a method that you will use in practice, I still advise you to try it
at least once up to the point shown in Figure
7-9 because it is helpful for understanding the box-generation
procedure.
Downloading ISO Images
Where do the CD/DVD ISO images come from? They are published and distributed by OS producers.
Here are websites to download Ubuntu, CentOS, Debian and Fedora ISO images:
Ubuntu:
http://releases.ubuntu.com/
http://releases.ubuntu.com/14.04/ubuntu-14.04.1-server-i386.iso

CHAPTER 7 ■ CREATING BOXES FROM SCRATCH
142
CentOS:
http://mirrors.kernel.org/centos/
http://mirrors.kernel.org/centos/7.0.1406/isos/x86_64/CentOS-7.0-1406-x86_64-Minimal.iso
Debian:
http://cdimage.debian.org/cdimage/archive/
http://cdimage.debian.org/cdimage/archive/6.0.10/i386/iso-cd/debian-6.0.10-i386-CD-1.iso
Fedora:
http://download.fedoraproject.org/pub/fedora/linux
http://download.fedoraproject.org/pub/fedora/linux/releases/21/Server/i386/iso/Fedora-
Server-DVD-i386-21.iso
■ Note You will find more URLs in the chef/bento project.
To copy a file available at http://releases.ubuntu.com/14.04/ubuntu-14.04.1-server-i386.iso
onto your drive, use the curl command:
# Host OS
$ cd folder/with/examples
$ mkdir manually-downloaded-boxes
$ cd manually-downloaded-bxes
$ curl
http://releases.ubuntu.com/14.04/ubuntu-14.04.1-server-i386.iso -o ubuntu-14.04.1-
server-i386.iso
After some minutes, you should see a file named ubuntu-14.04.1-server-i386.iso in your manually
downloaded files. This is the file that you will use in the dialog box shown in Figure
7-8.
If you proceeded with the previous Packer examples, you should find a file with a name that begins with
the following characters in the packer_cache directory:
90a2489db0fb9bf8...
This is the ubuntu-14.04.1-server-i386.iso cached file. The filename used by Packer is a SHA256 hash
of the URL used to download the file. You can verify it by running the following command:
# Host OS
$ echo -n "
http://releases.ubuntu.com/14.04/ubuntu-14.04.1-server-i386.iso" | openssl dgst
-sha256
This command should print the hash that starts with this:
90a2489db0fb9bf8e4062a05cd...
The first step performed by Packer is to download the ISO DVD image and store it under this funny
name in the cache directory.

CHAPTER 7 ■ CREATING BOXES FROM SCRATCH
143
Booting ISO Images
The second step performed by Packer is to start the VM using the downloaded ISO DVD image file. The
process for doing it manually is described in the Figures 7-1 through 7-8.
Start VirtualBox and press the New button available in the main toolbar. You can also choose Machine/New
from the main menu. You should see the dialog box shown in Figure7-1. Type the name manual-ubuntu and
choose Linux/Ubuntu 32 OS.
Figure 7-1. Setting the name of the VM in the VirtualBox dialog box
When you finish with the first dialog box, press the Continue button. You will be forwarded to a second
dialog box, which is responsible for setting the RAM of the VM. It is equivalent to the entries in Listing 7-2:
[
"modifyvm",
"{{.Name}}",
"--memory",
"384"
]
Thus, you can set the amount of RAM to 384 MB (see Figure7-2).

CHAPTER 7 ■ CREATING BOXES FROM SCRATCH
144
In the next step, you will create the virtual drive used by the VM. The dialog boxes shown in
Figures7-2, 7-3, 7-4, and 7-5 create a virtual drive with the following properties:
• Hard drive file type: VMDK
• Dynamically allocated
• File location and size: manual-ubuntu, 40 GB
Figure 7-2. Setting the amount of RAM to be allocated by a VM

CHAPTER 7 ■ CREATING BOXES FROM SCRATCH
145
Figure 7-3. Creating a virtual hard drive
Figure 7-4. Setting the hard drive file type to VMDK
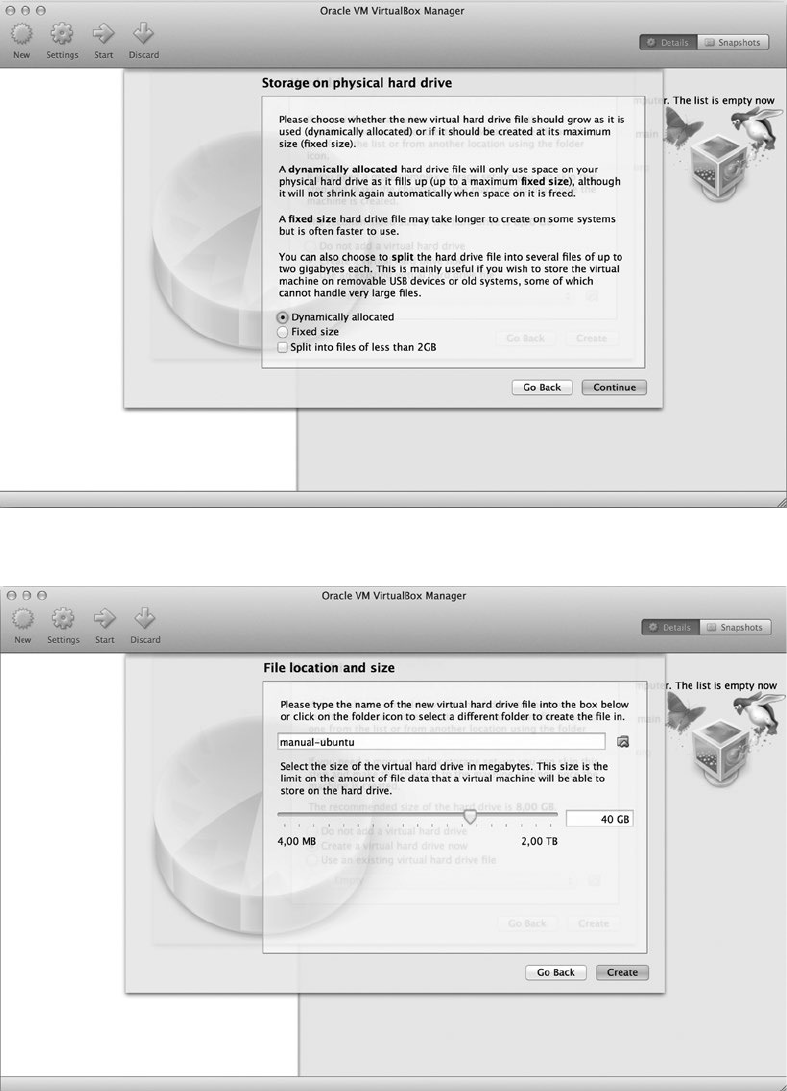
CHAPTER 7 ■ CREATING BOXES FROM SCRATCH
146
Figure 7-5. Chosing a dynamically allocated virtual hard drive
Figure 7-6. Setting the name and size of the virtual hard drive

CHAPTER 7 ■ CREATING BOXES FROM SCRATCH
147
In the template file shown in Listing 7-2, the file size is defined with this:
"disk_size": 40960,
Press the Create button to close the last dialog box; you will be redirected to the VirtualBox main
window shown in Figure
7-7. As you can see, the VM configuration was successfully created.
At this point, you can customize VM properties. For example, you might want to disable audio drivers
because they probably won’t be necessary.
■ Note The VirtualBox main window can contain many other VMs, depending on your previous actions.
Before creating Figure 7-7, I destroyed all VMs with the $ vagrant destroy command, which is why the
window is so empty.
To boot the VM, double-click its name or select it with single click and run Machine/Start. When you
do this for the first time, you will be asked to select the ISO file (see Figure7-8). Choose the file that you
manually downloaded with the curl command in the “Downloading ISO Images” section. The filename,
which is ubuntu-14.04.1-server-i386.iso, should be available in the manually-downloaded-boxes
directory.
Figure 7-7. Newly created VM appears in the VirtualBox main window

CHAPTER 7 ■ CREATING BOXES FROM SCRATCH
148
■ Note You can also use files cached by Packer. The ubuntu-14.04.1-server-i386.iso file is available in
the Packer cache directory under the name that starts with 90a2489db0fb9bf8....
Press the Start button to begin the procedure of booting the system. If you chose the Ubuntu 14.04 ISO
file, you should see a window like the one shown in Figure7-9.
Figure 7-8. Selecting an ISO image to boot inside a VM

CHAPTER 7 ■ CREATING BOXES FROM SCRATCH
149
You can now manually install Ubuntu 14.04. Although the installation is not necessary to complete,
I wanted to show you how it can be done. You can stop this exercise at this point by going to the VirtualBox
main window and using the Machine/Close/Power Off menu option.
Remember that if you want to create a box to be used by Vagrant, you have to do the following:
• Enable NAT Networking for the first adapter (these are default settings; you can
check them using Machine/Settings/Network for the VM displayed in Figure
7-7)
• Manually install VirtualBox Guest Additions inside the guest VM
• Create vagrant user with the vagrant password
• Use the Vagrant insecure private key for the authorization SSH
All these operations are fully automated with Packer and chef/bento definitions.
Figure 7-9. First step of installating Ubuntu 14.04

CHAPTER 7 ■ CREATING BOXES FROM SCRATCH
150
■ Note If you ever finish the manual installation procedure and want to export it into a box file, remember
that you need to use the --base parameter of the $ vagrant package command. This parameter sets the
name of the VM you want to package. You should use the name you entered in the dialog box in Figure 7-1
(manual-ubuntu). The command to package this VM should look like this:
$ vagrant package --base manual-ubuntu
Using the Boot Command and preseed.cfg
When you reach the point shown in Figure7-9, you can proceed with the unattended install of Ubuntu using
the appropriate boot command and the preseed.cfg file. To try it, you have to start up the HTTP server that
will serve the preseed.cfg file. It can easily be done with the help of PHP or Python, whichever you prefer.
Enter the directory that contains the preseed.cfg file for the OS you have chosen. For Ubuntu 14.04, it
is the following:
# Host OS
$ cd bento/packer/http/ubuntu-14.04
Start the HTTP server in this directory. Run one of the following commands:
# Host OS
$ php -S 0.0.0.0:8080 &
$ python -m SimpleHTTPServer 8080 &
The preceding commands start a HTTP server running in the background. Please note the process ID
for future reference.
If you use your web browser to visit http://localhost:8080/preseed.cfg, it should trigger a binary
file transfer.
■ Note When you finish, you can stop the HTTP server started with PHP or Python by running the $ kill NNN
command, where NNN is the ID of the process started with one of these commands:
$ php -S 0.0.0.0:8080 &
$ python -m SimpleHTTPServer 8080 &
Next, use the ifconfig command to find out your IP address:
$ ifconfig
Assuming that your IP is 10.20.30.40, and the HTTP server is running, go to VirtualBox and restart the
system shown in Figure
7-9. When you are in the window shown in Figure7-9, press the ESC key on your
keyboard twice. You will see the message shown in Figure7-10.
CHAPTER 7 ■ CREATING BOXES FROM SCRATCH
151
When you close the dialog box shown in Figure7-10 by pressing the OK button, you will see the text
mode interface presented in Figure7-11.
Figure 7-10. Warning about entering the text mode interface during Ubuntu 14.04 installation

CHAPTER 7 ■ CREATING BOXES FROM SCRATCH
152
You can proceed with the unattended install. Type the command shown in Listing 7-5 inside the
window depicted in Figure
7-11. (While you do it, skip all newline characters.) Instead of pressing Enter, use
spaces to separate the lines displayed in the listing. Press Enter only once—when you have reached the very
end of the command (two dashes --). The commands are written on separate lines for readability. Please
note that the commands contain the IP address 10.20.30.40, so you have to replace it with your IP address.
Listing 7-5. Command to Perform the Unattended Install of Ubuntu 14.04
/install/vmlinuz
auto
console-setup/ask_detect=false
console-setup/layoutcode=us
console-setup/modelcode=pc105
debconf/frontend=noninteractive
debian-installer=en_US
fb=false
initrd=/install/initrd.gz
kbd-chooser/method=us
keyboard-configuration/layout=USA
keyboard-configuration/variant=USA
locale=en_US
netcfg/get_domain=vm
netcfg/get_hostname=vagrant
noapic
preseed/url=http://10.20.30.40/preseed.cfg
--
Figure 7-11. Text mode interface of Ubuntu 14.04

CHAPTER 7 ■ CREATING BOXES FROM SCRATCH
153
After you have typed the command shown in Listing 7-5, the window should look like Figure7-12. Press
Enter and enjoy the unattended install of Ubuntu 14.04.
Figure 7-12. Unattended installation of Ubuntu 14.04
You can interrupt or stop this activity at any point. I just wanted to provide you with a complete
description of how an OS can be installed from scratch in a completely unattended manner.
■ Note You can now repeat the automatic generation of the Ubuntu box procedure with bento definitions.
Run the following command and take a closer look at the VM window:
$ packer build -only=virtualbox-iso ubuntu-14.04-i386.json
You will see that to perform an unattended install, Packer types the command shown in Listing 7-5 within the
VM window.
Timing
Generating freshly built boxes with Packer takes a lot of time; it is the longest operation you have
encountered so far. First, you need to download the ISO CD/DVD image, which might last a couple of
minutes, depending on your Internet connection. Then you have to perform an unattended install, which
usually lasts for half an hour.

CHAPTER 7 ■ CREATING BOXES FROM SCRATCH
154
The freshly built system will then be configured and provisioned, which consumes another 10 (or even more)
minutes. Finally, the provisioned system will be exported and post-processed into a box file. This operation, as
you may remember from the previous chapter, takes another couple of minutes.
The timing periods I estimated on my Mac are shown in Table7-1. Although your results will be
different, comparing the contents of the Table
7-1 with the contents of Tables 3-1, 3-2, and 3-3 in Chapter 3
will give you an overall picture of the most time-consuming parts of working with Vagrant.
Table 7-1. Timing of the $ packer build -only=virtualbox-iso ubuntu-14.04-i386.json Command
Stage Time
Downloading ISO CD 6 minutes
Unattended install 10 minutes
Provisioning and configuration 6 minutes
Exporting a box file 1 minute
Total 23 minutes
Working with the Open Virtualization Format (OVF)
Packer can also be used to work with existing VMs. After the initial $ vagrant up run for a given box
(for example, ubuntu/trusty32), Vagrant downloads the box file from the network, unzips it, and stores
the unzipped contents in the ~/.vagrant.d/boxes/ directory. List the contents of a directory created for
ubuntu/trusty32 box with the following:
# Host OS
$ ls .vagrant.d/boxes/ubuntu-VAGRANTSLASH-trusty32/14.04/virtualbox
You will see the following output:
Vagrantfile
box-disk1.vmdk
box.ovf
metadata.json
The box.ovf file can be used as the entry point of Packer instead of ISO CD/DVD images. The complete
example template file is shown in Listing 7-6.
Listing 7-6. Template File to Work with Existing Boxes in OVF Format
{
"builders": [{
"name": "vagrant-jekyll-packer-ovf-shell",
"type": "virtualbox-ovf",
"source:path": "/Users/gajdaw/.vagrant.d/boxes/ubuntu-VAGRANTSLASH-trusty32/14.04/
virtualbox/box.ovf",
"ssh_username": "vagrant",
"ssh_password": "vagrant",
"ssh_wait_timeout": "30s",
"shutdown_command": "echo 'packer' | sudo -S shutdown -P now"
}],
CHAPTER 7 ■ CREATING BOXES FROM SCRATCH
155
"provisioners": [{
"type": "shell",
"script": "script.sh"
}],
"post-processors": [{
"type": "vagrant"
}]
}
Working with the OVF format is similar to the procedure that you applied in Chapter 6. It is the way to
modify one of the existing boxes.
Summary
This chapter gave you basic knowledge about practical methods you can use to create Vagrant boxes from
scratch. The quickest path to achieve satisfactory results is to use Packer and the chef/bento or boxcutter
templates. Because I wanted to explain actions performed by Packer, I showed you how to create boxes
manually in VirtualBox without the need to refer to either Packer or any templates. This is not a practical
approach, however; you should stick with Packer and the chef/bento and boxcutter templates, customizing
them when necessary.
In this chapter, VirtualBox Guest Additions were discussed for the first time. This software contains
drivers that have to be installed in a guest OS. The important thing to know is that Guest Additions are
published for every version of VirtualBox. If you work with VirtualBox 4.3.18 on your host, you will get the
best VirtualBox experience if your Vagrant boxes contain Guest Additions v4.3.18. The simplest way to
achieve it is to generate Vagrant boxes from scratch using Packer. Other solution is to use vbguest plugin
mentioned in Chapter 10.
Finally, you learned how to apply Packer to use existing base boxes (stored on your system in OVF format)
as a starting point for Packer. You can use Packer to extend boxes the way you did manually in Chapter
6.
In the Next Chapter, You Will Learn . . .
Your knowledge of Vagrant is now very broad. Chapter
7 will discuss various configuration options that you
can include in the Vagrantfile.
Reading List
Documentation available at http://www.packer.io is the best source of knowledge concerning Packer. For
a quick remainder about commands and their syntax, use the built-in manual:
$ packer
$ packer build --help
Packer is quite a new product: its first commit was dated March 22, 2013. Another project named
Veewee performs similar operations, and because it was started on November 9, 2010, it can be seen as a
predecessor of Packer.
The source code of both Packer and Veewee are available on GitHub:
https://github.com/mitchellh/packer
https://github.com/jedi4ever/veewee
CHAPTER 7 ■ CREATING BOXES FROM SCRATCH
156
Packer is written in Go; Veewee is written in Ruby.
The JSON file format is specified at http://json.org/. If you are new to JSON, you might be interested
in the Wikipedia entry about this format: http://en.wikipedia.org/wiki/JSON.
For more information about Virtual Box Guest Additions, see the VirtualBox documentation at
https://www.virtualbox.org/manual/ch04.html.
Test Yourself
1. What is the purpose of using Packer?
2. In which situations is this tool indispensable?
3. What is the name of the most popular GitHub project that contains a large
collection of Packer templates of many different OSs for various providers?
4. What is the command to produce an Ubuntu 14.04 box using Packer and bento
definitions?
5. Where does Packer store downloaded ISO images by default?
6. How do you change the location of the Packer cache?
7. Why does the Packer cache folder contain files with strange names that consist of
hexadecimal numbers?
8. How to calculate SHA 256 hash of an arbitrary string?
9. Create an example JSON file that contains a list of five persons, with each person
having two attributes: name and surname?
10. What are the four top-level keys used in the Packer template JSON file?
11. How does Packer perform an unattended install of Ubuntu 14.04 using the ISO
CD/DVD distribution downloaded from the Ubuntu web site?
12. How can you manually download an ISO image from the Ubuntu web site?
13. What are the necessary steps to create, from scratch, a complete box that can be
used by Vagrant?
Exercises
1. Build a box for a FreeBSD 10.1 (32-bit) system using the chef/bento project. Use
the freebsd-10.1-i386.json file.
2. Build a box for a Fedora 21 (32-bit) system using the chef/bento project. Use the
fedora-21-i386.json file.
3. List all the boxes that can be generated with boxcutter/ubuntu templates.
4. Build a box for an Ubuntu 12.04 (32-bit) system using the boxcutter/ubuntu
project. The box should contain Puppet SCM tool.
5. List all the boxes that can be generated with boxcutter/centos templates.
6. Build a box for CentOS 6.5 (32-bit) system using the boxcutter/centos project.
The box should contain the Chef SCM tool.

157
CHAPTER 8
Configuring Vir tual Machines
This chapter will analyze and classify the most important configuration settings that can be used within the
Vagrantfile. In particular, you will learn about the following:
• VirtualBox-related configuration
• VM name
• GUI mode
• Physical properties, such as RAM and number of CPUs
• General VM settings
• Hostname
• Post-up message
• Booting and halting timeouts
• SSH settings
• X11 forwarding
• Box-related configuration
• Networking
• Port forwarding
• Private networks
• Public networks
• Sync folders
• Performance
• Types: VirtualBox, NFS, rsync, SMB
• Defining platform-specific configuration
CHAPTER 8 ■ CONFIGURING VIR TUAL MACHINES
158
Vir tualBox-Related Configuration
VirtualBox allows you to redefine the following configuration settings:
• VM name
• Graphical user interface (GUI) mode
• Physical properties of a VM
VM Name
To set the VM name to my-fantastic-project, use the code shown in Listing 8-1. In other words, the v.name
variable allows you to interact with the name defined in Figure 7-1 in Chapter
7.
Listing 8-1. Setting the VM Name to my-fantastic-project
Vagrant.configure(2) do |config|
config.vm.box = "ubuntu/trusty32"
config.vm.provider "virtualbox" do |v|
v.name = "my-fantastic-project"
end
end
When you boot the machine using the Vagrantfile from Listing 8-1 with $ vagrant up, the output will
include the following message:
==> default: Setting the name of the VM: my-fantastic-project
What happens if you use the same name in two different projects? Nothing interesting. You will see this
error message:
A VirtualBox machine with the name 'my-fantastic-project' already exists.
Please use another name or delete the machine with the existing name, and try again.
The name of the machine is displayed inside VirtualBox, as shown in Figure8-1.

CHAPTER 8 ■ CONFIGURING VIR TUAL MACHINES
159
The name of the machine is very important in one situation: when you want to package a box,
as described in Chapter 7 in the section “Booting ISO Images.” Boot the VM using this command:
$ vagrant up
You can package the box with this:
$ vagrant package
Vagrant is clever enough to find the VM that was started in the current directory.
But if the VM is started without the $ vagrant up command (for example, using ISO images distributed
by Ubuntu.com), you have to pass the name of the box to the $ vagrant package command:
$ vagrant package --base my-fantastic-project
GUI Mode
By default, VirtualBox starts the machines in headless mode, which means that there is no interface to access
the guest OS. The only way to do it is to use SSH. You can change this behavior using the gui configuration
variable, as shown in Listing 8-2.
Figure 8-1. VM name within VirtualBox

CHAPTER 8 ■ CONFIGURING VIR TUAL MACHINES
160
Listing 8-2. Using GUI
Vagrant.configure(2) do |config|
config.vm.box = "ubuntu/trusty32"
config.vm.provider "virtualbox" do |v|
v.gui = true
end
end
When you boot the machine using the configuration shown in Listing 8-2, VirtualBox will start the
console shown in Figure
8-2. Although it is a typical terminal that doesn’t offer any advantages over the SSH
console, it can be useful when something goes wrong. The messages shown in the GUI console may help you
to pin the problem down.
Figure 8-2. GUI mode
■ Note In case of problems with booting the VM you can also use the debug flag:
$ vagrant up --debug

CHAPTER 8 ■ CONFIGURING VIR TUAL MACHINES
161
RAM
The amount of RAM assigned to a VM can be defined with the memory variable. The guest using the
configuration from Listing 8-3 has 4 GB of RAM.
Listing 8-3. Setting the Amount of RAM to 4 GB
Vagrant.configure(2) do |config|
config.vm.box = "ubuntu/trusty32"
config.vm.provider "virtualbox" do |v|
v.memory = 4096
end
end
When you boot the machine configured with Listing 8-3, you can verify the amount of RAM within the
guest with the following commands:
# Guest OS
$ free m
$ cat /proc/meminfo
$ sudo lshw
VirtualBox displays the amount of RAM assigned for the VM inside the Settings/System/Motherboard
dialog box, as shown in Figure
8-3 (the screenshot was generated for a machine configured with the
v.memory = 4096 value).
Figure 8-3. Amount of RAM assigned to the VM

CHAPTER 8 ■ CONFIGURING VIR TUAL MACHINES
162
By default, Vagrant allocates 512 MB for each VM. So if you skip the memory variable, it is equivalent to this:
v.memory = 512
How much RAM should you assign to your VM? You need to take a few factors into consideration:
• How much physical RAM your machine has
• How much RAM the tools you use consume
Of course, you have to leave enough memory for your host to run smoothly. You will get the best
performance when your system doesn’t have to use the swap file, and can fit all the applications and
processes within the physical memory limit. When I boot my Mac OS system, the activity window displays
the information that the processes consume about 3.7 GB of physical memory. Starting the web browser,
integrated development environment (IDE), and some tools increases this amount to more than 4 GB. So I
prefer to reserve 5 GB for my host. Having 8 GB of RAM, it leaves 3 GB for guests, so I don’t exceed the limit
of 3 GB assigned to guests. It helps keep my swap file size at 0.
Another problem is the amount of RAM needed by the guest OS, which depends on the software you
want to use within a VM. For running just a basic HTTP server, as you did in Chapter
2, the default amount
of 512 MB of RAM is more than enough. But some applications might need more RAM. For example, if you
want to use composer (a dependency manager for PHP projects), you will have to increase the amount of
RAM to 1 GB. In practice, I usually use 1 GB for VMs.
EATMEMORY PROGRAM
To test the behavior of a guest OS under memory constraints, you can use the eatmemory program,
which is available at https://github.com/julman99/eatmemory.
You can copy the eatmemory.c file to your computer using this:
# Host OS
$ git clone http://github.com/julman99/eatmemory.git
$ cd eatmemory
After compiling the eatmemory.c program with the following:
# Guest OS
$ gcc eatmemory.c -o eatmemory
you can use it to allocate a given amount of RAM; for example, 380 MB or 1 GB:
# Guest OS
$ eatmemory 380M
$ eatmemory 1G
Then you can verify the amount of available memory with this:
# Guest OS
$ free m

CHAPTER 8 ■ CONFIGURING VIR TUAL MACHINES
163
GUEST’S VIRTUAL MEMORY
By default, the ubuntu/trusty32 guest OS does not use swap files for virtual memory. Thus, the various
processes that you run within the guest can allocate the amount of memory only up to the limit defined
with the v.memory setting. You can enable virtual memory within a guest running Linux using the
following commands:
# Guest OS
$ /bin/dd if=/dev/zero of=/var/swap.1 bs=1M count=1024
$ /sbin/mkswap /var/swap.1
$ /sbin/swapon /var/swap.1
These instructions come from the Composer documentation:
https://getcomposer.org/doc/
articles/troubleshooting.md
.
Number of CPUs
If you work on a multiprocessor machine, you can restrict the number of CPUs to be used by the guest
system with the configuration shown in Listing 8-4.
Listing 8-4. Setting RAM and Number of CPUs
Vagrant.configure(2) do |config|
config.vm.box = "ubuntu/trusty32"
config.vm.provider "virtualbox" do |v|
v.cpus = 2
end
end
With the configuration shown in Listing 8-4, VirtualBox will use only two processors to run this
particular VM, even if your machine has four of them. In most cases, you should use all the CPUs. And, of
course, using the value that is greater than the number of CPUs installed on your computer won’t do any
good because VirtualBox will decrease it.
■ Note Try to use VirtualBox/Settings/System dialog box shown in Figure 8-3. Go to the Processor tab and
use the slider titled Processors. As you can see, VirtualBox doesn’t allow you to set the value greater than
the actual number of processors installed on your computer.
Other Physical Properties
There are some other low-level properties of a guest OS that you may find useful. (For a full list, see the
VirtualBox documentation at www.virtualbox.org/manual/ch08.html#vboxmanage-modifyvm.)
Vagrant allows you to set those low-level properties with the following syntax:
v.customize ["modifyvm", :id, "NAME", "VALUE"]

CHAPTER 8 ■ CONFIGURING VIR TUAL MACHINES
164
For example, to set the value of parameter named --cpuexecutioncap to 50, use the code shown in
Listing 8-5.
Listing 8-5. Setting --cpuexecutioncap parameter to 50
Vagrant.configure(2) do |config|
config.vm.box = "ubuntu/trusty32"
config.vm.provider "virtualbox" do |v|
v.customize ["modifyvm", :id, "--cpuexecutioncap", "50"]
end
end
For the VM created with the Vagrantfile shown in Listing 8-5, VirtualBox will constrain the processors’
execution time to 50 percent.
■ Note The following configuration:
v.memory = 758
v.cpus = 4
is a shorthand for the following:
v.customize ["modifyvm", :id, "--memory", "758"]
v.customize ["modifyvm", :id, "--cpus", "4"]
General Settings
This is the general configuration of a VM:
• Hostname
• Post-up message
• Booting and halting timeouts
• SSH configuration
• Base box settings
Hostname
To set the name of your host to abc.example.lh, use the code shown in Listing 8-6.
Listing 8-6. Setting the Hostname
Vagrant.configure(2) do |config|
config.vm.box = "ubuntu/trusty32"
config.vm.hostname = "abc.example.lh"
end

CHAPTER 8 ■ CONFIGURING VIR TUAL MACHINES
165
If the Vagrantfile contains the config.vm.hostname variable, $ vagrant up will output the
following message:
==> default: Setting hostname...
As you may remember from the Puppet section in Chapter
6, an undefined hostname might result in
warning about an unresolved fully qualified domain name:
warning: could not retrieve fact fqdn
Suppose that you define a name for your host as abc.example.lh:
config.vm.hostname = "abc.example.lh"
Within the guest OS, the following command:
# Guest OS
$ hostname -f
will produce this output:
abc.example.lh
The name abc.example.lh is available in the guest, but not in the host. To enable it in the host, you
have to modify the /etc/hosts file. By appending the following line to your /etc/hosts file, you can make
the name abc.example.lh available in your host:
127.0.0.1 abc.example.lh
The application available in the guest will be available under http://abc.example.lh.
■ Note If you work on Windows, your hosts file is located under C:\windows\system32\drivers\etc\hosts.
To edit the file, you have to run the editor with administrator privileges.
Post-up Messages
The config.vm.post_up_message variable can be used to display a message when booting is finished. This is
a perfect place to show your users how to access the application. The example usage is shown in Listing 8-7.
Listing 8-7. Setting the Hostname
Vagrant.configure(2) do |config|
config.vm.box = "ubuntu/trusty32"
config.vm.post_up_message = "The application is available at
http://abc.example.lh:8765"
end
When you boot the VM using Listing 8-7, Vagrant will display this message:
CHAPTER 8 ■ CONFIGURING VIR TUAL MACHINES
166
==> default: Machine 'default' has a post `vagrant up` message. This is a message
==> default: from the creator of the Vagrantfile, and not from Vagrant itself:
==> default:
==> default: The application is available at
http://abc.example.lh:8765
Booting and Halting Timeouts
Two variables shown in Listing 8-8 set the timeout for booting and halting the guest VM. Both values are in
seconds, and the defaults are 300 and 60:
config.vm.boot_timeout = 300
config.vm. graceful_halt_timeout = 60
Listing 8-8. Booting and Halting Timeouts
Vagrant.configure(2) do |config|
config.vm.box = "ubuntu/trusty32"
config.vm.boot_timeout = 1
config.vm. graceful_halt_timeout = 5
end
If the system can’t boot within the period defined by boot_timeout, you will see the following message
(this is just an excerpt, not a complete message):
Timed out while waiting for the machine to boot. This means that
Vagrant was unable to communicate with the guest machine within
the configured ("config.vm.boot_timeout" value) time period.
The graceful_halt_timeout value is the number of seconds Vagrant waits after issuing a halt signal
before shutting the guest down.
SSH
Basic properties of SSH sessions opened by the $ vagrant ssh command are governed by the following
settings:
config.ssh.username
config.ssh.password
config.ssh.host
config.ssh.port
config.ssh.private_key_path
They define username, password, host, port, and private key. With those options, you can avoid using
predefined and publicly known credentials.
One more important option is this:
config.ssh.insert_key

CHAPTER 8 ■ CONFIGURING VIR TUAL MACHINES
167
It is a Boolean value that, when set to true, will instruct Vagrant to replace publicly known SSH keys
with a new, randomly generated pair. The operation of inserting a new randomly generated pair is shown
with the following comment displayed during $ vagrant up:
default: Vagrant insecure key detected. Vagrant will automatically replace
default: this with a newly generated keypair for better security.
default:
default: Inserting generated public key within guest...
default: Removing insecure key from the guest if its present...
default: Key inserted! Disconnecting and reconnecting using new SSH key...
It makes using publicly known keys much more secure. But remember that you have to turn it off when
you package a new box. Otherwise, you will generate a box that can’t be accessed with well-known SSH keys.
To turn off the operation that inserts new random SSH keys, use the configuration shown in Listing 8-9.
Listing 8-9. Turning Off Random SSH Keys Insertion
Vagrant.configure(2) do |config|
config.vm.box = "ubuntu/trusty32"
config.ssh.insert_key = false
end
X11 Forwarding
Turning on the feature of X11 forwarding allows you to run X11 applications within a guest system with
windows displayed by the host system. To try this, you need to install the X11 server:
• On OS X, use XQuartz:
https://support.apple.com/en-us/HT201341
• On Windows, use Xming: http://sourceforge.net/projects/xming/
On OS X, the X11 server will start automatically. Windows users have to start Xming/XLaunch manually.
Once you start XLaunch, its icon will be displayed in the system tray (systray) in the right-bottom corner of
your Windows main screen (see Figure
8-4).
Figure 8-4. On Windows, the XMing icon is displayed in the systray

CHAPTER 8 ■ CONFIGURING VIR TUAL MACHINES
168
Create the Vagrantfile shown in Listing 8-10. When it is ready, boot the guest VM with $ vagrant up.
Listing 8-10. Forwarding X11
Vagrant.configure(2) do |config|
config.vm.box = "ubuntu/trusty32"
config.vm.network "private_network", ip: "192.168.50.4"
config.ssh.forward_x11 = true
end
When the guest VM is ready, open the SSH session:
# Host OS
vagrant ssh
Install X11 applications and run the xeyes program:
# Guest OS
$ sudo apt-get update -y
$ sudo apt-get install x11-apps -y
$ xeyes
The xeyes application will be displayed by your host OS. In the same way, you can run the Firefox
browser within the guest OS:
# Guest OS
$ sudo apt-get install firefox -y
$ firefox
■ Note If you work on Windows, you need to set the DISPLAY environment variable:
# Guest OS
$ export DISPLAY="192.168.0.100:0.0"
$ xeyes
You have to replace the IP address 192.168.0.100 with the value that you will find in Xming/View Log (the View
Log option is displayed in Figure
8-4). The IP is contained within the line that looks like this:
XdmcpRegisterConnection: newAddress 192.168.0.100
The Vagrant file in Listing 8-10 contains a private network. Network configuration is explained in the
“Networking” section, later in this chapter.
CHAPTER 8 ■ CONFIGURING VIR TUAL MACHINES
169
Base Box
There are two important variables that configure the base box:
config.vm.box
config.vm.box_url
The first one defines the name of the box. The value assigned to config.vm.box can take one of
three forms:
• The vendor/name (for example, ubuntu/trusty32); this name is resolved into an
URL by atlas.hashicorp.com
• The valid URL; for example,
http://boxes.gajdaw.pl/apache/apache-v1.0.0.box
• The name, such as rails-my-shop; the name of the box already installed in the system
These three cases are illustrated in Listings 8-11, 8-12, and 8-13.
Listing 8-11. The Name ubuntu/trusty32 Resolved by atlas.hashicorp.com
Vagrant.configure(2) do |config|
config.vm.box = "ubuntu/trusty32"
end
Listing 8-12. Using a URL as a Box Name
Vagrant.configure(2) do |config|
config.vm.box = "
http://boxes.gajdaw.pl/apache/apache-v1.0.0.box"
end
Listing 8-13. Using the Box That Is Already Installed
Vagrant.configure(2) do |config|
config.vm.box = "apache-v1.0.0"
end
If you boot the VM defined in Listing 8-11 or Listing 8-12 for the first time, Vagrant will install the given
box in the system. In case of ubuntu/trusty32, the URL to download the box file will be resolved by the Atlas
service. You will be notified by the message displayed during $ vagrant up:
==> default: Loading metadata for box 'ubuntu/trusty32'
default: URL:
https://atlas.hashicorp.com/ubuntu/trusty32
==> default: Adding box ‘ubuntu/trusty32’ (v14.04) for provider: virtualbox
default: Downloading:
https://atlas.hashicorp.com/ubuntu/boxes/trusty32/versions/14.04/
providers/virtualbox.box
For Listing 8-12, the box will be installed in the system under the name identical to the URL, which
is usually very long and not easy to type. You can change this behavior with the box_url parameter. Using
both box and box_url, instruct Vagrant to install the box under the given name. During the booting of the
machine shown in Listing 8-14, Vagrant would at some point issue this command:
$ vagrant box add apache-v1.0.0
http://boxes.gajdaw.pl/apache/apache-v1.0.0.box

CHAPTER 8 ■ CONFIGURING VIR TUAL MACHINES
170
The box would be installed under the name apache-v1.0.0.
Listing 8-14. Using the box and box_url Variables
Vagrant.configure(2) do |config|
config.vm.box = "apache-v1.0.0"
config.vm.box_url = "
http://boxes.gajdaw.pl/apache/apache-v1.0.0.box"
end
Remember that to boot the machine from Listing 8-13, the box named apache-v1.0.0 has to be already
installed on your host system; otherwise, $ vagrant up will fail.
Using Checksums for Boxes
Two additional variables can be used to validate boxes using checksums:
config.vm.box_download_checksum
config.vm.box_download_checksum_type
The example configuration is shown in Listing 8-15. (Of course, the 01234567890 value shown in
Listing 8-15 is not a real SHA-256 checksum of the apache-v1.0.0.box file.)
Listing 8-15. Validating the Box with Checksums
Vagrant.configure(2) do |config|
config.vm.box_download_checksum_type = "sha256"
config.vm.box_download_checksum = "01234567890"
config.vm.box = "
http://boxes.gajdaw.pl/apache/apache-v1.0.0.box"
end
During the booting of the VM shown in Listing 8-15, Vagrant downloads the apache-v1.0.0.box file,
calculates the SHA-256 checksum of the downloaded file, and compares the calculated value with the value
given as downloaded_checksum. If the values differ (as is the case for the data in Listing 8-15), Vagrant fails
and prints this message:
The checksum of the downloaded box did not match the expected
value. Please verify that you have the proper URL setup and that
you're downloading the proper file.
Expected: 019238457
Received: 091eb90af1bce5dd1dc936ed9db9ef65631e7428c29e60b395025a2d21cdc463
■ Note To calculate SHA-256 checksums, you can use the following commands:
# OS X
$ shasum -a 256 filename.box
# On Windows
$ openssl dgst -sha256 filename.box

CHAPTER 8 ■ CONFIGURING VIR TUAL MACHINES
171
Some distributions of Vagrant contain a bug, and a comparison of checksums is skipped. I could produce the
message “The checksum of the downloaded box did not match” only when I used this command:
# Host OS
$ vagrant box add \
apache-v1.0.0 \
--checksum-type sha256 \
--checksum 019238457 \
http://boxes.gajdaw.pl/apache/apache-v1.0.0.box
Vagrant also supports box versioning. You learn more about versioning boxes in Chapter
10.
Networking
There are three ways to communicate with your guest VM using the network:
• Port forwarding
• Private networks
• Public networks
Port Forwarding
This is the simplest approach to set up host-guest communication. It has two advantages over other
methods: Vagrant doesn’t ask any questions during booting, and you don’t need administrator privileges to
boot the machine. (That’s why I prefer to use this solution for the examples that accompany this book.) But it
also has some drawbacks:
• You have to define each forwarded port manually.
• It is a communication channel that originates on the host side; you cannot use it for
NFS or X11 because port forwarding doesn’t allow the guest to communicate with
services running on the host.
The example shown in Listing 8-16 shows how to forward the requests sent to the host’s port 8800 to the
guest’s port 80. The configuration shown in Listing 8-16 changes the behavior of VirtualBox, and all traffic
coming to the port 8800 on the host is routed to the service running on port 80 in the guest.
Listing 8-16. Requests Sent to the Host’s Port 8800 Are Handled by Guest’s Daemon Running on Port 80
Vagrant.configure(2) do |config|
config.vm.box = "ubuntu/trusty32 "
config.vm.network :forwarded_port, guest: 80, host: 8800
end
When you boot the VM, Vagrant informs you about the forwarded ports:
==> default: Forwarding ports...
default: 80 => 8800 (adapter 1)
default: 22 => 2222 (adapter 1)

CHAPTER 8 ■ CONFIGURING VIR TUAL MACHINES
172
As discussed in Chapter 4, to allow SSH connections to the guest, Vagrant configures the forwarding
host’s port 2222 to the guest’s port 22 by default.
The following syntax means that the requests sent to the host’s port 456 will be serviced by the daemon
running in the guest on port 123:
default: 123 => 456 (adapter 1)
Forwarding can be further customized with the following five parameters:
guest
guest_ip
host
host_ip
protocol
The guest and host parameters define the port numbers. For host, you should use a number greater
than 1024, unless Vagrant runs with administrator privileges. guest_ip and host_ip can be used to restrict
IP addresses. Use the following to forbid remote access to the forwarded port:
host_ip: "127.0.0.1"
■ Note Remember that the configuration shown in Listing 8-16 allows everyone who knows your IP address
to access the web server. Suppose that your IP is 10.20.30.40; the web server would then be available at
http://10.20.30.40:8800.
The last parameter, protocol, can be used to restrict forwarded protocols to either TCP or UDP.
How many ports can you forward? Well, as many as you like. The following configuration:
config.vm.network :forwarded_port, guest: 80, host: 8800
config.vm.network :forwarded_port, guest: 81, host: 8801
config.vm.network :forwarded_port, guest: 82, host: 8802
config.vm.network :forwarded_port, guest: 83, host: 8803
config.vm.network :forwarded_port, guest: 84, host: 8804
config.vm.network :forwarded_port, guest: 85, host: 8805
...
results in the following messages:
default: 80 => 8800 (adapter 1)
default: 81 => 8801 (adapter 1)
default: 82 => 8802 (adapter 1)
default: 83 => 8803 (adapter 1)
default: 84 => 8804 (adapter 1)
default: 85 => 8805 (adapter 1)
...
CHAPTER 8 ■ CONFIGURING VIR TUAL MACHINES
173
Port Collision
One port on your host can be assigned to only one service. If the port number 8000 is already in use, you
can’t use it again. If you try to boot the machine defined in Listing 8-16 twice (you have to copy the same
Vagrantfile to two different folders and use $ vagrant up in both folders), the second attempt will fail with
this message:
Vagrant cannot forward the specified ports on this VM, since they
would collide with some other application that is already listening
on these ports. The forwarded port to 8800 is already in use
on the host machine.
To fix this, modify your current projects Vagrantfile to use another
port. Example, where '1234' would be replaced by a unique host port:
config.vm.network :forwarded_port, guest: 80, host: 1234
Sometimes, Vagrant will attempt to auto-correct this for you. In this
case, Vagrant was unable to. This is usually because the guest machine
is in a state which doesn’t allow modifying port forwarding.
To boot the second machine, you have to use a different port on your host.
Vagrant can automatically avoid the conflict, which is done with the auto_correct option set to true
(see Listing 8-17).
Listing 8-17. Autocorrecting Port Collisions
Vagrant.configure(2) do |config|
config.vm.box = "ubuntu/trusty32 "
config.vm.network :forwarded_port, guest: 80, host: 8800, auto_correct: true
end
Booting two VMs, the one shown in Listing 8-16 and the second shown in Listing 8-17, results in the
following messages:
==> default: Fixed port collision for 80 => 8800. Now on port 2200.
==> default: Fixed port collision for 22 => 2222. Now on port 2201.
...
==> default: Forwarding ports...
default: 80 => 2200 (adapter 1)
default: 22 => 2201 (adapter 1)
During bootup, Vagrant tries to allocate the host’s port number 8800. But the port is already occupied.
Thanks to auto_correct: true, Vagrant avoids the collision; instead of 8800, it allocates the host’s port
number 2200. So the service running in guest on port 80 can be accessed from the host using port 2200.
Vagrant can successfully boot the system, and you won’t see any error message.
As you may guess, Vagrant performs autocorrection for the SSH service. By default, the SSH session uses
the host’s port 2200. But if this port is already allocated (i.e., another VM is running), Vagrant resolves the
conflict automatically. If you use the $ vagrant ssh command to start the SSH session, it won’t bother you.
But if you use some other SSH client (e.g., putty), you will have to adjust the client configuration.
The range of ports used for autocorrection is defined with config.vm.usable_port_range. It defaults to
2200..2250.
CHAPTER 8 ■ CONFIGURING VIR TUAL MACHINES
174
Private Networks
By using private networks, you can do the following:
• Avoid typing the configuration of each forwarded port separately
• Avoid using port numbers such as 8800 for well-known services
• Use the same port numbers in different projects
• Communicate between multiple guests
• Use NFS for shared directories
These are the main advantages. The most important disadvantage is that depending on your host OS
and its configuration, you might have to answer some questions during booting, which may be an issue
for you.
Private networks can be configured manually or with the VirtualBox built-in DHCP server. The
example shown in Listing 8-18 shows how to configure private network manually; Listing 8-19 shows
the way to configure private networking with DHCP. Remember that when you provide the IP address
manually, you have to use the address from the private space: http://en.wikipedia.org/wiki/Private_
network#Private_IPv4_address_spaces.
Listing 8-18. Manual Configuration of Private Networking
Vagrant.configure(2) do |config|
config.vm.box = "ubuntu/trusty32"
config.vm.network "private_network", ip: "10.20.30.40"
end
Listing 8-19. Private Networking Configured with DHCP
Vagrant.configure(2) do |config|
config.vm.box = "ubuntu/trusty32 "
config.vm.network "private_network", type: "dhcp"
end
Before dissecting the internals, let’s take a more detailed look at the advantages of private networks.
First, although Listings 8-18 and 8-19 do not contain any forwarded_port options, all the ports in the guest
are available in the host — no matter how many you want to use. For forwarding, you have to add one
forwarding rule per each service (one for HTTP, one for MySQL, one for FTP, and so on).
The second advantage is that with private networks, every project can use default port numbers. For
HTTP, every project can use port 80. If the guest runs an HTTP server at default port 80, you can access this
port with your browser using this URL: http://10.20.30.40.
If you have multiple projects, you can run them all at the same time. The projects will be accessible
under different IPs:
http://10.20.30.40
http://192.168.0.123
For private networks configured with DHCP, you may need to find out the IPs assigned to guests.
With private networking, all the guest machines running on your host can communicate with each
other because they share the IP address space. And because the IPs are private, you don’t have to worry
about security: the traffic from the remote machines is not routed to or from the guests.
CHAPTER 8 ■ CONFIGURING VIR TUAL MACHINES
175
Now that you know the advantages of private networks, you can dive into the internals. When you boot the
machine configured with private networks, Vagrant creates a new network interface in the host’s configuration.
With each new VM and IP address, the list of network interfaces on the host system will be expanded.
After booting the machine shown in Listing 8-18, the output of the ifconfig command on the host:
# Host OS
$ ifconfig
will include the interface named vboxnet0:
vboxnet0: flags=8843<UP,BROADCAST,RUNNING,SIMPLEX,MULTICAST> mtu 1500
ether 0a:00:27:00:00:00
inet 10.20.30.1 netmask 0xffffff00 broadcast 10.20.30.255
The IP address 10.20.30.1 indicates that this is the interface for the private network 10.20.30/255
defined in Listing 8-18.
Now open the SSH session to the guest system and list the guest’s interfaces:
# Guest OS
$ ifconfig
You will see, among other things, the following interface within the guest system:
eth1 Link encap:Ethernet HWaddr 08:00:27:a6:7e:b9
inet addr:10.20.30.40 Bcast:10.20.30.255 Mask:255.255.255.0
inet6 addr: fe80::a00:27ff:fea6:7eb9/64 Scope:Link
UP BROADCAST RUNNING MULTICAST MTU:1500 Metric:1
RX packets:0 errors:0 dropped:0 overruns:0 frame:0
TX packets:8 errors:0 dropped:0 overruns:0 carrier:0
collisions:0 txqueuelen:1000
RX bytes:0 (0.0 B) TX bytes:648 (648.0 B)
The IP address 10.20.30.40 indicates that this interface is created by the configuration
from Listing 8-18.
If you booted the following two new VMs configured with two different IPs:
172.29.253.190
192.168.77.88
the list of interfaces on your host would include three interfaces: vboxnet0, vboxnet1 and vboxnet2. The
output of the following:
# Host OS
$ ifconfig
would include vboxnet0, vboxnet1 and vboxnet2:
vboxnet0: flags=8843<UP,BROADCAST,RUNNING,SIMPLEX,MULTICAST> mtu 1500
ether 0a:00:27:00:00:00
inet 10.20.30.1 netmask 0xffffff00 broadcast 10.20.30.255
vboxnet1: flags=8843<UP,BROADCAST,RUNNING,SIMPLEX,MULTICAST> mtu 1500
ether 0a:00:27:00:00:01

CHAPTER 8 ■ CONFIGURING VIR TUAL MACHINES
176
inet 172.29.253.1 netmask 0xffffff00 broadcast 172.29.253.255
vboxnet2: flags=8843<UP,BROADCAST,RUNNING,SIMPLEX,MULTICAST> mtu 1500
ether 0a:00:27:00:00:02
inet 192.168.77.1 netmask 0xffffff00 broadcast 192.168.77.255
Your host has three interfaces assigned to the following IPs:
vboxnet0 - 10.20.30.1 (Guest's IP 10.20.30.40)
vboxnet1 - 172.29.253.1 (Guest's IP 172.29.253.190)
vboxnet2 - 192.168.77.1 (Guest's IP 192.168.77.88)
It might be surprising, but these interfaces are not removed, even if you shut down the VMs. If you
use the $ vagrant destroy command to remove all three guests, it won’t affect the interfaces vboxnet0,
vboxnet1, and vboxnet2. To remove the interfaces from the host, use the following commands:
# Host OS
$ VBoxManage hostonlyif remove vboxnet0
$ VBoxManage hostonlyif remove vboxnet1
$ VBoxManage hostonlyif remove vboxnet2
■ Note On Windows, VBoxManage.exe is not in the path, so you need to prepend the full path. Here is
an example:
# Host OS
$ /c/Program\ Files/Oracle/VirtualBox/VBoxManage.exe hostonlyif remove vboxnet0
How does the DHCP configuration work? When you use DHCP to configure private networks, be aware
that the DHCP server is managed by VirtualBox; it is not the server available on your network. Even if your
host is configured with the DHCP server on your network, guests are configured only with the DHCP server
managed by VirtualBox. When you boot the machine defined in Listing 8-19, Vagrant starts a new DHCP
server managed by VirtualBox. You can verify it with:
# Host OS
$ VBoxManage list dhcpservers
The output of the preceding command should include at least one DHCP server:
NetworkName: HostInterfaceNetworking-vboxnet0
IP: 172.28.128.2
NetworkMask: 255.255.255.0
lowerIPAddress: 172.28.128.3
upperIPAddress: 172.28.128.254
Enabled: Yes
CHAPTER 8 ■ CONFIGURING VIR TUAL MACHINES
177
The DHCP server can be identified by HostInterfaceNetworking-vboxnet0. Its IP is 172.28.128.2,
and it assigns IPs starting at 172.28.128.3. When the DHCP server is running, Vagrant uses it to create and
configure a new interface. When the booting is finished, the output of the following command:
# Host OS
$ ifconfig
will include the interface bound to the network IP 172.28.128.1 (depending on your previous actions, the
interface may be named vboxnet5, vboxnet8, and so on):
vboxnet0: flags=8843<UP,BROADCAST,RUNNING,SIMPLEX,MULTICAST> mtu 1500
ether 0a:00:27:00:00:00
inet 172.28.128.1 netmask 0xffffff00 broadcast 172.28.128.255
If you now open the SSH session to your guest and run the following:
# Guest OS
$ ifconfig
you will see that your guest is assigned the lowest IP address offered by DHCP, which is 172.28.128.3:
eth1 Link encap:Ethernet HWaddr 08:00:27:22:75:88
inet addr:172.28.128.3 Bcast:172.28.128.255 Mask:255.255.255.0
inet6 addr: fe80::a00:27ff:fe22:7588/64 Scope:Link
UP BROADCAST RUNNING MULTICAST MTU:1500 Metric:1
RX packets:8 errors:0 dropped:0 overruns:0 frame:0
TX packets:10 errors:0 dropped:0 overruns:0 carrier:0
collisions:0 txqueuelen:1000
RX bytes:1732 (1.7 KB) TX bytes:1332 (1.3 KB)
Similar to vboxnet interfaces, the DHCP server managed by VirtualBox is not removed when you destroy
the guest. From time to time, it can result in strange behavior in which Vagrant announces that the DHCP
server is already in use. When that happens, you can manually remove the stale DHCP server with this:
# Host OS
$ VBoxManage dhcpserver remove --netname HostInterfaceNetworking-vboxnet0
Everything should work just fine.
Public Networks
If you configure your guest with public networks, it becomes available for remote access. Before doing this,
make sure that you understand the security risks explained in Chapter
4.
To configure a public network, use the Vagrantfile shown in Listing 8-20.
Listing 8-20. Public Network
Vagrant.configure(2) do |config|
config.vm.box = "ubuntu/trusty32"
config.vm.network "public_network"
end
CHAPTER 8 ■ CONFIGURING VIR TUAL MACHINES
178
The configuration shown in Listing 8-20 starts a VM and uses the DHCP server on your network to
set up networking. If your host contains multiple interfaces, you have to choose one of them. For public
networks, Vagrant doesn’t create any new interfaces; it uses an existing one (it does not start a DHCP
network managed by VirtualBox).
To avoid questions about which interface to use, you can use the bridge parameter like this:
config.vm.network "public_network", bridge: 'en1: Wi-Fi (AirPort)'
And if you don’t want to use DHCP, you can provide an IP:
config.vm.network "public_network", ip: "192.168.0.17"
Running the $ ifconfig command inside the guest will prove that the IP assigned to one of the
interfaces was retrieved from the DHCP server on your network.
Synced Folders
Vagrant synchronizes the host’s directory containing the Vagrantfile with the guest’s /vagrant directory,
which is a default Vagrant behavior that doesn’t require any Vagrantfile entries. If you want, you may be
more verbose using the code shown in Listing 8-21.
Listing 8-21. Public Network
Vagrant.configure(2) do |config|
config.vm.box = "ubuntu/trusty32"
config.vm.synced_folder ".", "/vagrant"
end
When the system is brought up, Vagrant informs you about synchronized folders with this message:
==> default: Mounting shared folders...
default: /vagrant => /some/path/on/host
The first path passed to synced_folder is the host’s path, which can be absolute or relative to the
project’s root directory. The second path, which is the guest’s path, it is absolute (it can’t be relative). The
guest path is always created if it does not exist. Although the host’s path is not created by default, this
behavior can be changed with the create parameter.
When using an absolute path as a first parameter, remember the differences between platforms.
Depending on your host OS, you have to use one of these solutions:
# Host OS: Windows
config.vm.synced_folder "c:\\some\\path", "/vagrant"
# Host OS: u*ix
config.vm.synced_folder "/some/path", "/vagrant"
One Vagrantfile may contain an arbitrary number of synced_folder entries, like in Listing 8-22.
CHAPTER 8 ■ CONFIGURING VIR TUAL MACHINES
179
Listing 8-22. Synchronizing Multiple Folders
Vagrant.configure(2) do |config|
config.vm.box = "ubuntu/trusty32"
config.vm.synced_folder "./some/dir/first", "/first", create: true
config.vm.synced_folder "./some/dir/second", "/second", create: true
end
The sync_folder has the following parameters:
• create: If the host’s directory doesn’t exist it will be created (defaults to false)
• disabled: Should the synchronization be turned on? (defaults to true)
• group: Group of the guest’s directory (defaults to ssh user)
• owner: Owner of the guest’s directory (defaults to ssh user)
• type and mount_options: Define the method of synchronization
Synchronization Types
Vagrant offers four types of synchronization:
• Default synchronization supported by the provider (bidirectional, slowest
performance)
• NFS (bidirectional, best performance)
• rsync (one-way host-to-guest)
• SMB (bidirectional, performance comparable with NFS)
Before you start using the various synchronization types, let’s first measure the performance of disk
operations within the guest OS.
Benchmarking Disk Operations
To measure the efficiency of filesystem I/O operations in the guest, you will use the Linux dd command.
It copies some amount of data from one place to another and asserts the speed of this operation. The
parameters if and of set the name of input and output files. The amount of data to be copied is defined with
bs and count: bs sets the block size, and count sets the number of blocks. The total number of bytes to be
copied is equal to this:
bs * count
You can use dd to test both read and write efficiency.
The command shown in Listing 8-23 copies 10,000 blocks, each block of 1 K bytes from /dev/zero to /
vagrant/abc. Thus, this command benchmarks writing to a shared directory.
Listing 8-23. Efficiency of Writing to a Shared Directory
# Guest OS - shared dir write benchmark
$ dd if=/dev/zero of=/vagrant/abc bs=1k count=10k

CHAPTER 8 ■ CONFIGURING VIR TUAL MACHINES
180
Another command to test efficiency is shown in Listing 8-24. It copies the contents of /vagrant/abc to /
tmp/def. Thus, it benchmarks reading from a shared directory.
Listing 8-24. Efficiency of Reading /vagrant/abc file
# Guest OS - shared dir read benchmark
$ dd if=/vagrant/abc of=/tmp/def bs=1k count=10k
To measure native I/O operations within the guest, you can use the commands shown in
Listings 8-25 and 8-26.
Listing 8-25. Efficiency of Writing to a Native Filesystem
# Guest OS - native filesystem write benchmark
$ dd if=/dev/zero of=/tmp/native-abc bs=1k count=10k
Listing 8-26. Efficiency of Reading from a Native Filesystem
# Guest OS - native filesystem read benchmark
$ dd if=/tmp/native-abc of=/tmp/native-def bs=1k count=10k
Boot the machine shown in Listing 8-21 and run the test shown in Listing 8-23 (writing to the shared
directory). Repeat the command a couple of times and record the best results (I got about 11 MB/s):
10240+0 records in
10240+0 records out
10485760 bytes (10 MB) copied, 0.945521 s, 11.1 MB/s
Next, run the test shown in Listing 8-24 (reading from the shared directory). My results were these:
10240+0 records in
10240+0 records out
10485760 bytes (10 MB) copied, 0.970321 s, 10.8 MB/s
■ Note Read/write operations on a shared drive run at about 11 MB/s.
Now use the tests shown in Listings 8-25 and 8-26 to assert the efficiency of the native filesystem in the
guest. You will get much better results. Mine were the following:
10240+0 records in
10240+0 records out
10485760 bytes (10 MB) copied, 0.0244637 s, 429 MB/s
■ Note Read/write operations on a guest’s native filesystem run at about 400 MB/s.
Remember that there is an enormous discrepancy in performance between the shared folder and the
guest’s native filesystem. It can be summarized as follows:
Shared folder: 10 MB/s vs. Native filesystem: 400 GB/s

CHAPTER 8 ■ CONFIGURING VIR TUAL MACHINES
181
The shared directory is about 40 times slower than native I/O operations in the guest OS.
■ Note The results you achieve depend on many different factors, such as amount of data and block size.
The following commands produce different results:
$ dd if=/dev/zero of=/tmp/native-abc bs=100k count=1k
$ dd if=/dev/zero of=/tmp/native-abc bs=1k count=100k
The main purpose of the tests is to show you the differences between the efficiency of various solutions.
VirtualBox Shared Folders
CHARACTERISTICS: BIDIRECTIONAL; READ: 10 MB/s; WRITE: 10 MB/s
If you don’t provide any value for this parameter, Vagrant will use the default solutions supported by the
provider you use. Thus, when working with VirtualBox, the Vagrantfile shown in Listing 8-27 implies using
the native VirtualBox synchronization method.
Listing 8-27. Default Synchronization
Vagrant.configure(2) do |config|
config.vm.box = "ubuntu/trusty32"
end
This is very easy to use, but offers the worst efficiency.
■ Note Keep in mind that if a project’s directory resides somewhere different from the hard drive, the
performance will be below any reasonable level. Do not run your Vagrant–driven virtual environments residing
on removable USB memory or network-mapped drives.
NFS
CHARACTERISTICS: BIDIRECTIONAL; WRITE: 20 MB/s; READ: 400 MB/s
The configuration for using NFS shared folders is shown in Listing 8-28.
Listing 8-28. Using NFS for Synchronization
Vagrant.configure(2) do |config|
config.vm.box = "ubuntu/trusty32"
config.vm.network "private_network", type: "dhcp"
config.vm.synced_folder ".", "/vagrant", type: "nfs"
end
You will get unbelievable speedup when you use NFS. Notice that for NFS to work, you need private
networking. Also, NFS is not available by default on Windows. On hosts running Windows, Vagrant ignores
type: nfs. You can circumvent this restriction by using the
https://github.com/GM-Alex/vagrant-
winnfsd plug-in (discussed in Chapter 10).

CHAPTER 8 ■ CONFIGURING VIR TUAL MACHINES
182
■ Note If your host runs Linux, you might have to install NFS.
■ Tip When you boot the VM configured with NFS, Vagrant will ask for the root’s password at some point.
You can avoid it by following the “Root Privilege Requirement” hint in Vagrant’s documentation:
https://docs.vagrantup.com/v2/synced-folders/nfs.html.
rsync
CHARACTERISTICS: ONE-TIME, ONE-WAY HOST-TO-GUEST
The rsync type performs one-way synchronization from host to guest and is purposed mainly for situations
in which both the default mechanism and NFS fail. An example configuration for rsync synchronization is
shown in Listing 8-29.
Listing 8-29. rsync Synchronization
Vagrant.configure(2) do |config|
config.vm.box = "ubuntu/trusty32"
config.vm.synced_folder ".", "/vagrant", type: "rsync",
rsync__exclude: ".git/"
end
Keep in mind that rsync synchronization is performed only once: during $ vagrant up. When you
boot the VM, Vagrant copies the contents of the synchronized folder from host to guest using the rsync
utility. Vagrant does not monitor the folder on the host for any changes. To change this behavior, use the
rsync_auto parameter set to true.
Remember that this is a one-way communication only. If you change the files in your guest, those
changes are not reflected in your host.
What’s the purpose of this strange method of synchronization? It allows you to take advantage of the
native filesystem efficiency of your guest. Imagine the following workflow:
1. You work with your code in the project’s root directly with your tools running
on host.
2. The HTTP server serves the application saved in the native filesystem (for
example, in the /app folder in the guest).
3. To run the application, you synchronize the files: the contents of the project’s
root is sent to the /app folder in the guest.
4. You visit the application with your browser; the HTTP server serves the
application using only the native filesystem.
The advantage of this workflow is that you can use the full speed of the native filesystem; the
disadvantage is that it can be more difficult to set up.

CHAPTER 8 ■ CONFIGURING VIR TUAL MACHINES
183
USING GIT FOR HOST => GUEST SYNCHRONIZATION
Yet another solution for a host->guest one-way synchronization is to use git with a post-update hook.
To perform a push operation, git needs SSH. But Vagrant configures the SSH that you can use to access
your host. So if you have a git repository somewhere on the host and somewhere on the guest, you can
easily perform a push from host to guest. The workflow and the advantages are exactly the same as in
case of rsync.
■ Tip To use the rsync type, you need the rsync application in your path. On Windows hosts, you can install
rsync.exe the same way you installed make.exe in Chapter 7.
Server Message Block (SMB)
CHARACTERISTICS: BIDIRECTIONAL
The SMB shared folder is available on Windows hosts. It is purposed to replace native VirtualBox
synchronization to achieve better efficiency. The example configuration is shown in Listing 8-30.
Listing 8-30. SMB Synchronization
Vagrant.configure(2) do |config|
config.vm.box = "ubuntu/trusty32"
config.vm.synced_folder ".", "/vagrant", type: "smb"
end
To use this SMB type, you need administrator privileges.
Platform-Related Configuration
You might need to use a different configuration, depending on your host OS. To do so, use the ffi library
and if instruction, as shown in Listing 8-31.
Listing 8-31. Host-Dependent Configuration
Vagrant.configure(VAGRANTFILE_API_VERSION) do |config|
config.vm.box = "ubuntu/trusty32 "
require 'ffi'
if FFI::Platform::IS_WINDOWS
print "\n\n ===> win\n\n"
config.vm.synced_folder ".", "/vagrant", :nfs => false
config.vm.network :forwarded_port, guest: 80, host: 8880
else
print "\n\n ===> not win\n\n"
config.vm.network :private_network, ip: "192.168.0.100"
config.vm.synced_folder ".", "/vagrant", :nfs => true
end
end
CHAPTER 8 ■ CONFIGURING VIR TUAL MACHINES
184
Summary
This chapter acted as a comprehensive compendium of various configuration options. Instead of
memorizing the syntax of all the configuration options, I advise you to concentrate on these essentials:
• When can setting the VM name or guest hostname be important?
• How can you pin down the problems with $ vagrant up?
• How much memory and how many processors should you allocate for a VM?
• What are the basic characteristics of the three approaches to networking: forwarded
ports, private networks, and public networks?
• What are the basic characteristics of the four ways to set up shared directories: the
default VirtualBox shared filesystem, NFS, rsync, and SMB?
One thing is certain: before proceeding to the next chapters, you have to understand the way
networking works and how Vagrant handles shared folders. As to the rest, you can return here if necessary.
In this chapter, you used some commands that are not strictly related to Vagrant. It often happens that
you have to use additional tools to find out the more subtle aspects of various options. The investigation
concerning memory relied on the commands to inspect the guest’s RAM; eatmemory program; and to turn
on swap: dd, mkswap, and swapon:
# Guest OS
$ free m
$ cat /proc/meminfo
$ sudo lshw
The analysis of the network-related aspects of using Vagrant was possible thanks to the hostname and
ifconfig commands, together with the VBoxManage utility, which is shipped with VirtualBox. And the
performance of filesystem was measured with dd.
In the Next Chapter, You Will Learn . . .
Well, you are done. You know all the basic facts about Vagrant, and it is time to use them. In the next chapter,
I will share my experience of using Vagrant in practice.
Reading List
The most important resources for Vagrant configuration are, of course, the documentation:
•
http://docs.vagrantup.com/v2/vagrantfile/machine_settings.html
• http://docs.vagrantup.com/v2/vagrantfile/ssh_settings.html
• http://docs.vagrantup.com/v2/networking/index.html
• http://docs.vagrantup.com/v2/synced-folders/index.html
The list of low-level configuration options offered by VirtualBox is available here:
•
www.virtualbox.org/manual/ch08.html#vboxmanage-modifyvm
CHAPTER 8 ■ CONFIGURING VIR TUAL MACHINES
185
For a guide to private networks, refer to Wikipedia:
•
http://en.wikipedia.org/wiki/Private_network#Private_IPv4_address_spaces
I found a solution to deal with stale DHCP among Vagrant issues here:
•
https://github.com/mitchellh/vagrant/issues/3083
The dd command to benchmark I/O operations is described at askubuntu.com:
•
http://askubuntu.com/questions/87035/how-to-check-hard-disk-performance
The commands to turn on swapping come from getcomposer.org:
•
https://getcomposer.org/doc/articles/troubleshooting.md
For a general introduction to virtual memory, read these Wikipedia articles:
•
http://en.wikipedia.org/wiki/Virtual_memory
• http://en.wikipedia.org/wiki/Paging
Finally, to resolve the problems I met during the configuration of X11 forwarding, I found the following
article helpful:
•
https://coderwall.com/p/ozhfva/run-graphical-programs-within-vagrantboxes
Test Yourself
1. How do you set the VM name?
2. When do you have to use the VM name?
3. Why would you need to use the GUI console?
4. How do you debug the problems that cause $ vagrant up to hang?
5. How much RAM should you allocate to your VM?
6. How can you find out the amount of RAM and the size of the swap file in
Ubuntu Linux?
7. How and why would you configure the guest hostname?
8. What is the purpose of defining the post-up message? How do you do it?
9. What SSH properties can you define within the Vagrantfile?
10. How do you run an X11 application inside a VM with the window displayed on
the host?
11. Which values can be assigned to the config.vm.box configuration variable?
12. What is the purpose of using checksums for boxes?
13. What are the basic characteristics of port forwarding?
14. What are the basic characteristics of private networks?
15. What are the basic characteristics of public networks?
CHAPTER 8 ■ CONFIGURING VIR TUAL MACHINES
186
16. What are the similarities and differences between forwarded ports, private
networks, and public networks?
17. What are the similarities and differences between all types of shared folders?
18. Is it possible to define some options within the Vagrantfile to be applied only if
the host runs one specific OS (Windows, for example)? How do you do it?
Exercises
1. Boot the machine configured with the code shown in each of the listings
included in this chapter. Watch the output of $ vagrant up to find the message
produced by the config options included in a given example.

187
CHAPTER 9
One True Workflow
There is no such thing as the one true workflow that all Vagrant users can apply. Your requirements and
settings may be completely different from mine, and solutions that work for me may be unsuitable for you.
This chapter focuses on the importance of the workflow. To get satisfactory results when working with
Vagrant, you should follow certain procedures; otherwise, you will end up wasting lots of precious time.
Here are the most crucial tips for using Vagrant most efficiently:
• Use git and semantic versioning for your boxes.
• Keep your application code and your box in separate repositories.
• Generate base boxes with Packer (don’t ever do it manually).
• Generate your customized boxes with Packer or a build.sh script.
• Use modularized definitions for provisioning.
• Store every submodule in a new repository; it can be Puppet module, Chef
cookbook, or Ansible playbook.
• Use git and semantic versioning for submodules.
• Bake everything that developers may need inside the box.
Most Common Antipattern
When I started my adventure with Vagrant in 2012, I made the error of misusing provisioners. Do you remember
how you proceeded in Chapter 6? There were two roles: the system engineer’s role and the developer’s role.
The key point is that time-consuming provisioners (such as compilation of Ruby, for example) should be applied
only when you work as an engineer (when you prepare the base box for developers).
To help you understand the problem, I prepared a new version of the “Songs for kids” application
written in Ruby. It is available at https://github.com/pro-vagrant/songs-app-rails-antipattern.git.
Open the command line and run the example:
# Host OS
$ cd folder/with/examples
$ git clone
https://github.com/pro-vagrant/songs-app-rails-antipattern.git
$ cd songs-app-rails-antipattern
$ vagrant up
CHAPTER 9 ■ ONE TRUE WORKFLOW
188
In this example, the $ vagrant up command might need more than 30 minutes to finish. The Vagrantfile
configuration for this antipattern is shown in Listing 9-1.
Listing 9-1. Antipattern: Developer’s Vagrantfile with Time-Consuming Provisioners
Vagrant.configure(2) do |config|
config.vm.box = "ubuntu/trusty32"
config.vm.network :forwarded_port, guest: 3000, host: 3333, host_ip: "127.0.0.1"
config.vm.provision "shell", path: "install-puppet-modules.sh"
config.vm.provision :puppet do |puppet|
puppet.manifests_path = "puppet/manifests"
puppet.manifest_file = "default.pp"
puppet.options = ['--verbose']
end
$script = <<SCRIPT
cd /vagrant
rails server -b 0.0.0.0 -d
SCRIPT
config.vm.provision "shell", inline: $script, run: "always"
config.vm.post_up_message = "The application is available at http://127.0.0.1:3333"
end
The VM created by the configuration shown in Listing 9-1 will be exactly the same as the configuration
in the “Songs for kids” example discussed in Chapter
2, in which you used a base box that contained all the
software baked inside the guest. The guest used by the antipattern example, on the other hand, downloads
the source code of Ruby and Ruby on Rails and then recompiles them. This compilation is a time-consuming
process; developers just waste their time. Usually, there is no rational justification for using this approach;
certainly not during training or classes.
Puppet provisioners perform downloading and compiling. First use the shell provisioner to install the
Puppet modules:
config.vm.provision "shell", path: "install-puppet-modules.sh"
then run the Puppet manifest to download, compile, and install Ruby and Ruby on Rails:
config.vm.provision :puppet do |puppet|
puppet.manifests_path = "puppet/manifests"
puppet.manifest_file = "default.pp"
puppet.options = ['--verbose']
end

CHAPTER 9 ■ ONE TRUE WORKFLOW
189
Is it an Antipattern?
Is the solution shown in Listing 9-1 really useless? As I mentioned, during training this approach is a pure
waste of clients’ time, but it might be unavoidable or even appealing in some situations. Why? Because it
relies on a well-known base box produced by Ubuntu. It has benefits for both the person who published
(me, of course) and the person who downloaded (you, of course) the
https://github.com/pro-vagrant/
songs-app-rails-antipattern.git example.
The solution shown in Listing 9-1 might be appealing because of the following reasons:
• You don’t have to host a binary box. They are large; what will happen if a few
thousand people try to run the examples at the same time? Nothing funny, for sure.
• You’re not responsible for the contents of the box (you won’t be blamed if the box
causes any trouble).
If you want to run the application shown in Listing 9-1, you might be less reluctant to run the binary
box produced by Ubuntu than by someone else. And because ubuntu/trusty32 is just a bare-bones Ubuntu,
you can use your own homemade version of Ubuntu.
As you can see, the solution labeled as an antipattern can be useful in some scenarios. In fact, I used
this very solution once when I was applying for a job. I solved the examination assignment and created a
Vagrant-driven environment that relied on a bare Ubuntu base box.
To summarize:
• If you prepare the application that is supposed to be used by someone else, you may
find the approach shown in Listing 9-1 interesting.
• If you prepare a box for your coworkers or students, you should bake everything
inside the box.
■ Note While I was working on this book, I was undecided about whether I should rely on bare–bones base
boxes such as ubuntu/trusty32 or prepare my own boxes. If I worked with the ubuntu/trusty32 base box,
I wouldn’t have to worry about hosting boxes or be responsible for the boxes. Users would be much more at
ease using well-known boxes (such as ubuntu/trusty32).
But the time needed to run the examples in Chapter 2 would be much longer. Because I consider Chapter 2
the most essential and important part of the book, I decided to use my own boxes. To increase security, I used
checksums to validate the contents of the downloaded boxes. And for those who are still reluctant to try my
boxes, I prepared instructions to generate the underlying boxes. This may also turn out useful if the number of
downloads of my boxes exceeds a reasonable level.
Generating Base Boxes
I described the antipattern only to convince you that developers in your company should not work with
bare–bones base boxes that waste their time. Instead, you should generate the boxes to contain all the
necessary software within them. In my opinion, the best ways to do this are as follows (and described in the
following sections):
• Generate bare–bones base boxes with Packer
• Customize bare–bones boxes with provisioners
CHAPTER 9 ■ ONE TRUE WORKFLOW
190
Generating Base Boxes with Packer
The sooner you start generating your own boxes with Packer, the better. Here are the most obvious advantages
of using Packer:
• You don’t have to use binary boxes downloaded from the network. As you remember
from Chapter
4, that may be an important security concern.
• With Packer, you can generate base boxes automatically.
• When you generate the box, the version of guest additions will be updated.
• When you generate the box, the software installed in your base box is also updated.
What are the alternatives to using Packer? You can rely on publicly available base boxes, such as
ubuntu/trusty32, or you can generate a base box manually using the procedure described in Chapter
7.
Both solutions are much worse than using Packer.
When I work with Packer definitions, I don’t embed everything that I might need into the base box;
I prefer to get them lean. The only component that I include in base boxes is the latest version of the Puppet
provisioner. Depending on your requirements, you may find it useful to install some additional software
packages, or change the default user and well-known SSH keys.
I use the boxcutter templates available at
https://github.com/boxcutter. The procedure to generate
the Ubuntu 14.04 base box is shown in Listing 9-2.
Listing 9-2. Generating the Ubuntu 14.04 Base Box with Puppet
# Host OS
$ cd folder/with/examples
$ git clone
https://github.com/pro-vagrant/ubuntu.git
$ cd ubuntu
$ echo "CM := puppet" > Makefile.local
$ echo "UPDATE := true" >> Makefile.local
$ make virtualbox/ubuntu1404-i386
If you finish running the commands shown in Listing 9-2, the box will be created in the file:
box/virtualbox/ubuntu1404-i386-puppetlatest-1.0.16.box
Of course, the numbers in the filename might be different:
1.0.16
This is the version number and it evolves in time. To use this box, you need to install it in your system by
using the following:
$ Host OS
$ cd box/virtualbox/ubuntu
$ vagrant box add ubuntu1404-i386-puppetlatest-1.0.16 ubuntu1404-i386-puppetlatest-1.0.16.box
When it is finished, the box is ready to be used. You can verify it with this:
$ Host OS
$ vagrant box list | grep ubuntu1404

CHAPTER 9 ■ ONE TRUE WORKFLOW
191
The preceding command should print the complete name of the box:
ubuntu1404-i386-puppetlatest-1.0.16
The base box that you have generated is ready to be used, so you can proceed with customization.
Generating Customized Boxes
■ Note Before proceeding with the commands presented in this section, you have to install the base box
ubuntu-1404-i386-puppetlatest-1.0.16.box, as described in the previous section.
When the bare–bones Ubuntu base box is ready, you can generate the customized boxes that I
used in Chapter 2. The box for the “Songs for kids” application written in AngularJS is available at
https://github.com/pro-vagrant/vagrant-box-factory-apache.
To build the box, run these commands:
# Host OS
$ cd folder/with/examples
$ git clone
https://github.com/pro-vagrant/vagrant-box-factory-apache.git
$ cd vagrant-box-factory-apache
$ ./build.sh
The./build.sh script generates the box file by running two commands:
$ vagrant up
$ vagrant package --vagrantfile VagrantfileToInclude --output "${name}-${version}.box"
The first command boots the VM; the second generates a box file using two variables: name and
version. After running the ./build.sh script, you should find a file similar to the following in the current
directory (the numbers 5.6.7 will be replaced by the latest version):
apache-v5.6.7.box
There are two important things to note from the vagrant-box-factory-apache example:
• File provisioner
• Two levels of Vagrantfile configuration
Let’s first take a look at the Vagrantfile used in the vagrant-box-factory-apache example, which is
shown in Listing 9-3.
Listing 9-3. Vagrantfile in the vagrant-box-factory-apache Example
Vagrant.configure(2) do |config|
config.vm.box = "ubuntu1404-i386-puppetlatest-1.0.16"
config.ssh.insert_key = false
CHAPTER 9 ■ ONE TRUE WORKFLOW
192
# Copy all box-*.txt files into /home/vagrant/ in Guest OS
config.vm.provision "file", source: "box-version.txt", destination: "box-version.txt"
config.vm.provision "file", source: "box-name.txt", destination: "box-name.txt"
config.vm.provision "file", source: "box-author.txt", destination: "box-author.txt"
config.vm.provision "file", source: "box-date.txt", destination: "box-date.txt"
# Create /usr/bin/guestvm script in Guest OS
config.vm.provision "file", source: "guestvm", destination: "/home/vagrant/guestvm"
config.vm.provision "shell", inline: "mv /home/vagrant/guestvm /usr/bin && chmod 755
/usr/bin/guestvm"
config.vm.provision "shell", path: "install-puppet-modules.sh"
config.vm.provision "puppet"
end
The configuration shown in Listing 9-3 starts with the name of the base box:
config.vm.box = "ubuntu1404-i386-puppetlatest-1.0.16"
The box named ubuntu14-04-i386-puppetlatest-1.0.16 is generated in the section titled “Generating
Base Boxes with Puppet”. Thanks to the following, the generated box will use well-known SSH keys:
config.ssh.insert_key = false
Then comes the new part that makes use of file provisioners:
config.vm.provision "file", source: "box-version.txt", destination: "box-version.txt"
The file provisioner is useful if you want to copy the file from host to guest. The preceding instruction
copies the file named box-version.txt from project’s root directory on the host into the guest. The newly
created file will be stored as /home/vagrant/box-version.txt.
In the same manner, copy three other files named box-name.txt, box-author.txt and box-date.txt:
config.vm.provision "file", source: "box-name.txt", destination: "box-name.txt"
config.vm.provision "file", source: "box-author.txt", destination: "box-author.txt"
config.vm.provision "file", source: "box-date.txt", destination: "box-date.txt"
All these files are used in the guest to find additional information about the VM, which is useful if you
run multiple guests at the same time or release different versions of the box. Thanks to these files, you can
easily print some information about the box within the guest OS by using this:
# Guest OS
$ guestvm
The guestvm command is a bash script that you copy into the guest and then move to the /usr/bin
directory with the file provisioner and inline shell provisioner:
config.vm.provision "file", source: "guestvm", destination: "/home/vagrant/guestvm"
config.vm.provision "shell", inline: "mv /home/vagrant/guestvm /usr/bin && chmod 755
/usr/bin/guestvm"
CHAPTER 9 ■ ONE TRUE WORKFLOW
193
Finally we install Puppet modules:
config.vm.provision "shell", path: "install-puppet-modules.sh"
and run Puppet provisioners:
config.vm.provision "puppet"
The command to package the box uses a new parameter: --vagrantfile:
$ vagrant package --vagrantfile VagrantfileToInclude --output "${name}-${version}.box"
This parameter sets the name of the Vagrantfile that should be packed within the box. The name
VagrantfileToInclude is the name of the file in the project’s root directory. Its contents are shown in
Listing 9-4.
Listing 9-4. VagrantfileToInclude Configuration File
Vagrant.configure(2) do |config|
currentDirectory = Dir.pwd.strip
config.vm.provision "shell", inline: "echo -n #{currentDirectory} > box-directory.txt"
end
The code in Listing 9-4 creates a new file within the /home/vagrant/box-directory.txt guest OS.
This file contains the full path leading to the project on the host system. The script creates a variable named
currentDirectory with the following Ruby code:
currentDirectory = Dir.pwd.strip
Then the script prints the value of this variable to the /home/vagrant/box-directory.txt file using the
inline shell provisioner:
config.vm.provision "shell", inline: "echo -n #{currentDirectory} > box-directory.txt"
I use this embedded Vagrantfile configuration that is baked into the box for the purpose of the guestvm
script. If you use any of my boxes, you can run the following command within the guest OS:
# Guest VM
$ guestvm
It will provide you with the basic information about the guest VM, such as the following:
• Box name
• Box version
• Date when the box was generated
• Guest Additions version
• Project root directory (most important)

CHAPTER 9 ■ ONE TRUE WORKFLOW
194
All this facts are very handy when you work with multiple projects and many guest versions. Please
remember that you can embed the following types of configuration into the VagrantfileToInclude file:
• Network configuration
• Shared directory configuration
• Provisioners
• Other options discussed in Chapter
8
■ Note Customized boxes can be created using three different approaches:
• You can use packer and chef/bento or boxcutter projects, as described in Chapter 7
• You can use Packer with OVF files, as described in Chapter 7
• You can use a bash script similar to build.sh discussed in this example
The results are similar: to create a box, you need to run a single command on your host. Because you can’t
create a guest OS within the guest OS, this command has to be run on your host.
One final note about the vagrant-box-factory-apache example: the box configuration is stored in a git
repository. You can display the project history with this:
# Host OS
$ cd folder/with/examples
$ cd vagrant-box-factory-apache
$ git log --oneline --decorate
The output of this command contains tags such as v0.4.3, v0.4.2, and so on:
06173d1 (HEAD, tag: v0.4.3, origin/master, master) Version 0.4.3
91d3ff3 Move Puppet manifest to manifests/
c7d4ff3 (tag: v0.4.2) Version 0.4.2
5090d2e Verbose explanation for file provisioners and guestvm
37de9c5 Simplify puppet provisioners
2aeeb56 Fix CS
2e65fea Fix CS
2cc9798 (tag: v0.4.1) Version 0.4.1
To generate the version of the box, for example v0.4.3, use the following commands:
# Host OS
$ cd folder/with/examples
$ cd vagrant-box-factory-apache
$ git checkout v0.4.3
$ ./build.sh
$ checkout master
CHAPTER 9 ■ ONE TRUE WORKFLOW
195
You have the following advantages when you use git:
• All box versions are located in one repository.
• Each version is easily accessible (you need only the $ git checkout command).
• If you use semantic versioning, the project moves forward in a predictable manner.
I strongly advise you to do the following:
• Use git to manage the customized box
• Tag releases by using git tags
• Use semantic versioning strategy
To find out the latest version of the project, you can use this:
# Host OS
$ cd folder/with/examples
$ cd vagrant-box-factory-apache
$ git checkout master
$ git describe
The $ git describe command prints the unique name of the latest revision that you can use as the box
filename, which is exactly what I did in the ./build.sh script. The following variable:
version=`git describe`
is used within the command:
$ vagrant package --vagrantfile VagrantfileToInclude --output "${name}-${version}.box"
Modularize Boxes with Provisioner Modules
When you’re comfortable with the provisioning basics, consider using modularized definitions. No matter
which provisioner you prefer, each supports modularization.
With Puppet, you work with modules; in Chef terminology, they are called cookbooks; and Ansible uses
the term playbook. You will find more information here:
• Puppet modules:
https://forge.puppetlabs.com
• Chef cookbooks: https://supermarket.chef.io
• Ansible playbooks: https://galaxy.ansible.com
I chose Puppet, but you can use any solution. The key point is that for each task that you need to
perform in your boxes, such as configuring Apache virtual hosts, you should use modules (either existing
ones or your own implementations).
Take a look at Listing 9-3. First, Puppet modules are installed with the shell provisioner:
config.vm.provision "shell", path: "install-puppet-modules.sh"

CHAPTER 9 ■ ONE TRUE WORKFLOW
196
The Puppet manifest that will use the modules runs as follows:
config.vm.provision "puppet"
The install-puppet-modules.sh script is shown in Listing 9-5, which is a bash script that installs the
modules needed for this box. The first three modules are produced by Puppetlabs, and the other three are
my own creations.
Listing 9-5. Script install-puppet-modules.sh from vagrant-box-factory-apache
#!/usr/bin/env bash
echo "Install Puppet modules..."
sudo puppet module install puppetlabs-apache --version 1.4.0 --force
sudo puppet module install puppetlabs-concat --version 1.2.0 --force
sudo puppet module install puppetlabs-stdlib --version 4.6.0 --force
sudo puppet module install gajdaw-ubuntu --version 0.1.13 --force
sudo puppet module install gajdaw-diverse_functions --version 0.1.1 --force
sudo puppet module install gajdaw-environment --version 0.1.4 --force
The following command installs version 1.4.0 of the puppetlabs-apache module:
sudo puppet module install puppetlabs-apache --version 1.4.0 --force
You can find the documentation for this module at
https://forge.puppetlabs.com/puppetlabs/apache.
The puppetlabs/apache module simplifies the tasks of installing and configuring the Apache web
server. The two other modules by Puppetlabs contain various functions used by Apache module:
sudo puppet module install puppetlabs-concat --version 1.2.0 --force
sudo puppet module install puppetlabs-stdlib --version 4.6.0 --force
The following three modules are available at
https://forge.puppetlabs.com/gajdaw:
gajdaw-ubuntu
gajdaw-environment
gajdaw-diverse_function
• The first module, gajdaw-ubuntu, updates Ubuntu:
$ sudo apt-get update
• The second module, gajdaw-environment, installs packages such as git, mc, lynx,
and apache2-utils. It also removes the mesg n command from the /root/.profile
file
1
and adds cd /vagrant to the /home/vagrant/.profile file.
• The last module, gajdaw-diverse_functions, contains some utility functions used
within the modules.
1
That’s how I get rid of stdin: is not a tty message (discussed in Chapter
6).
CHAPTER 9 ■ ONE TRUE WORKFLOW
197
The point of modularization is that the same actions performed by one of the modules, for example the
actions done by gajdaw-environment module, can be easily repeated in every box that you generate.
The manifest to apply modules installed with install-puppet-modules.sh is shown in Listing 9-6.
Listing 9-6. Script manifests/default.pp from vagrant-box-factory-apache
include stdlib
include environment
class { ubuntu: stage => setup }
class {
'apache': default_vhost => false;
}
apache::vhost { 'app.lh':
port => '80',
docroot => '/vagrant/web',
docroot_owner => 'vagrant',
docroot_group => 'vagrant',
}
First we include two modules: stdlib and environment (their full names are puppetlabs-stdlib and
gajdaw-environment):
include stdlib
include environment
Next there are instructions to include the ubuntu module (full name gajdaw-ubuntu) with the stage
parameter set to setup:
class { ubuntu: stage => setup }
Then we use the apache module (full name puppetlabs-apache) with default_vhost set to false:
class {
'apache': default_vhost => false;
}
Finally, we use the apache::vhost–defined resource that is shipped with the apache module to create a
virtual host:
apache::vhost { 'app.lh':
port => '80',
docroot => '/vagrant/web',
docroot_owner => 'vagrant',
docroot_group => 'vagrant',
}
Of course, this is not a complete course on writing Puppet modules; you have to consult other sources
for an introduction to Puppet or other provisioning solutions. But I want you to be aware of gains when
working with modularized provisioning scripts. Using the apache Puppet module, you don’t have to struggle

CHAPTER 9 ■ ONE TRUE WORKFLOW
198
with httpd.conf files, directives, and so on. The apache module and its configuration are governed by
simple entries that rely on the puppetlabs-apache module. It makes the whole task of defining virtual hosts
much simpler.
For Puppet, exactly the same manifest can be applied on arbitrary platforms. You can use it on Ubuntu,
CentOS, and FreeBSD, to name a few. For your own modules, the gain is that you have a single place in which
you define given behavior, and the same behavior can be applied in many different boxes. For example, I used
the gajdaw-environment module in each of the box examples in Chapter
2.
Embedding Submodules
Remember that submodules live on their own; each submodule becomes a new project. To avoid confusion,
use git and the semantic versioning strategy for each submodule. This leads to another problem, however:
how can you embed a submodule in a box?
Puppet has two approaches:
• git submodules
• shell provisioner with the $ puppet module install command
I prefer to use the second approach, which is exactly what I did in Listing 9-5. The advantage of this
solution is that Puppet modules are stored in just one place: in their own repo; they are not embedded in
every project that uses them. For example, the files of the gajdaw-environment module are included only in
the
https://github.com/puppet-by-examples/puppet-environment repository.
You can’t find them inside vagrant-box-factory-apache/ directory, even though this project uses the
module. How does it happen? The following command is executed inside the guest VM:
$ sudo puppet module install gajdaw-environment --version 0.1.4 --force
The module gets installed inside the guest within the /etc/puppet/modules/environment directory.
I prefer it this way to avoid problems with submodule synchronization. It comes at a price, however:
each time you build the box, the module gets downloaded from the Internet. It could be an antipattern (the
following sidebar discusses this in more detail).
EFFICIENCY OF GIT SUBMODULES
Using git submodules is more efficient than installing Puppet submodules with $ puppet module
install
because you don’t have to download submodules when building the box; they are on the
hard drive within the project’s directory. Depending on your settings, this may be important. If you
often build the box, and it downloads tens and hundreds of submodules, there is no point in using the
shell provisioner and $ puppet module install command. In that case, you can even call using $
puppet module install
with shell provisioners an antipattern. There is no doubt that git submodules
are a much more efficient solution. I have chosen the shell provisioner with $ puppet module apply
because I strongly prefer to have just one place in which I work on my modules. If you work with git
submodules, remember that your module is stored in many different places.
Another problem is the version of the submodule. With Puppet, you have two choices:
• $ sudo puppet module install gajdaw-environment --version 0.1.4 --force
• $ sudo puppet module install gajdaw-environment
CHAPTER 9 ■ ONE TRUE WORKFLOW
199
The first command installs version 0.1.4 of the gajdaw-environment submodule (just this module and
nothing else). The second command installs the latest version of the submodule with all the dependent
modules. I prefer to stick with a hard-coded version such as the following because it is more predictable:
$ sudo puppet module install gajdaw-ubuntu --version 0.1.13 --force
When you give the concrete version number, such as 0.1.13, you are guaranteed that Puppet will use this
version. In case the newer version is not backward-compatible, doing so helps to avoid errors. Remember that
when you use hard-coded version numbers, you have to explicitly include all the dependent submodules.
That’s the reason why Listing 9-5 contains the following:
sudo puppet module install puppetlabs-concat --version 1.2.0 --force
sudo puppet module install puppetlabs-stdlib --version 4.6.0 --force
If you used the $ puppet module install command without a hard-coded version for Apache, Puppet
would install the latest version of the apache module together with the latest versions of all dependent
modules, such as puppetlabs-concat and puppetlabs-stdlib.
Although the code presented in Listing 9-5 is Puppet-related, you should be aware of the strategy:
• Using external submodules
• Using git and semantic versioning for submodules
• Using hard-coded versions for submodules
This strategy will help you manage dependencies between different functionalities in your modules.
And hard-coded versioning will provide predictable results.
If you use git submodules to work with Puppet modules, you will find puppet.module_path useful
(it is used to point to the directory that contains the Puppet modules):
Vagrant.configure("2") do |config|
config.vm.provision "puppet" do |puppet|
puppet.module_path = "modules"
end
end
If you want to see the git submodules in action, try to build the box available at
https://github.com/
pro-vagrant/vagrant-box-factory-apache-git-submodules.git.
Here are the commands that you need to execute:
# Host OS
$ cd folder/with/examples
$ git clone --recursive
https://github.com/pro-vagrant/vagrant-box-factory-apache-git-
submodules.git
$ cd vagrant-box-factory-apache-git-submodules
$ ./build.sh
The --recursive parameter that is used in the $ git clone command turns on the recursive mode,
in which git clones the main repo together with all the submodules.
CHAPTER 9 ■ ONE TRUE WORKFLOW
200
Puppet Submodule Antipattern
Thanks to the following, you can use Puppet modules as a part of your project:
Vagrant.configure("2") do |config|
config.vm.provision "puppet" do |puppet|
puppet.module_path = "modules"
end
end
Putting your Puppet modules inside modules without referring to git submodules is a common pitfall.
Working this way the Puppet submodule is not versioned on its own, so it is very difficult to share among
the boxes. If you work with just one box that uses this particular module, you will be fine. But when you
start using the submodule in different boxes, you will encounter severe difficulties. So remember that if a
submodule is to be used by two or more boxes, it should be stored in a separate git repository with its own
versioning and tagging strategy.
Bake Everything in the Customized Box
After the discussion and analysis included in the section titled “Most Common Antipattern,” the concept of
baking everything inside the box should be clear now. I just want to underline a more subtle aspect of it. When
you work with an application that uses a package manager (for example, a project written in Ruby on Rails),
you may want to include the dependencies inside the box. That’s what was done in the rails-vX.Y.Z. box
used in the “Songs for kids” applications discussed in Chapter
2.
The box available at
https://github.com/pro-vagrant/vagrant-box-factory-rails uses the
gajdaw-bundle_install module:
class { 'bundle_install':
repo => '
https://github.com/pro-vagrant/songs-app-rails.git',
require => Class['ruby', 'rails', 'nodejs']
}
The box is generated with the following command:
$ ./build.sh
During this process, the code of the gajdaw-bundle_install module runs the following command for
the project “Songs for kids”:
$ bundle install
Thanks to this trick, when you use the box for the “Songs for kids” application, you don’t have to run
bundle install. I use this trick for boxes prepared for Ruby on Rails applications as well as for boxes for
PHP Symfony applications, which helps me to minimize the time necessary to run the application. This is
very important during classes and trainings. With all the components embedded in the box, and the box
already downloaded and installed in the system, the new project can be started in a minute. I do not waste
the time during classes nor during trainings.
CHAPTER 9 ■ ONE TRUE WORKFLOW
201
Summary
To avoid problems, I recommend following these practices:
• Use git and semantic versioning for your boxes.
• Use two levels of boxing: bare-bones boxes (such as ubuntu1404-i386-
puppetlatest-X.Y.Z) and customized boxes (such as apache-vX.Y.Z).
• For bare-bone boxes, use Packer and JSON definitions. You can use the chef/bento
or boxcutter project for them. (I consider doing this manually a complete disaster,
not just an antipattern.)
• Build your customized boxes on the basis of bare-bone boxes (i.e., apache-vX.Y.Z is
built on the basis of ubuntu1404-i386-puppetlatest-X.Y.Z).
• Create build scripts for customized boxes (such as build.sh) or use Packer
definitions and the OVF format of bare-bones boxes.
• Use the provisioner to customize your boxes (e.g., for apache-vX.Y.Z , you can use
the Puppet provisioner).
• Use modularized provisioners (e.g., for apache-vX.Y.Z, use the puppetlabs-apache
and gajdaw-environment modules, among others; the same modules can be used in
many boxes).
• Every submodule should be stored as a new independent project.
• Use git and semantic versioning for your submodules (e.g., module gajdaw-environment
is a new git project with its own history and versioning strategy).
• Use git submodules or shell provisioners with the $ puppet module install
command to embed your module in your project (e.g., in apache-vX.Y.Z you use the
shell provisioner with the $ puppet module install command).
• Use hard-coded versions of your submodules (e.g., in the apache-vX.Y.Z box
configuration, use gajdaw-environment vX.Y.Z).
• Bake everything inside the boxes (e.g., in the rails-vX.Y.Z box, you run bundle
install to include the gems that are used by the example application).
Remember the following:
• If you prepare the application to be used by people you don’t know (such as an
open-source project available for everyone), you may want to rely on some
well-known and publicly trusted base boxes, such as ubuntu/trusty32.
• If you work on a closed project available only to your colleagues and coworkers, you
will get the best Vagrant experience by creating a new binary box that includes all the
software; you will be responsible for hosting and distributing the box.
In the Next Chapter, You Will Learn . . .
The basic course of Vagrant is now finished. In the next chapter, I will show you more-advanced concepts of
using Vagrant.
CHAPTER 9 ■ ONE TRUE WORKFLOW
202
Reading List
Modularization is a very important aspect of using SCM tools. Every provisioner uses a slightly different
approach and terminology, but they all serve the same purpose: to extract the pieces that can be reused.
For a list of available modules that can be used with Puppet, Chef, and Ansible, see the following web sites:
• Puppet modules:
https://forge.puppetlabs.com
• Chef cookbooks: https://supermarket.chef.io
• Ansible playbooks: https://galaxy.ansible.com
Git submodules are explained at http://git-scm.com/book/be/v2/Git-Tools-Submodules.
Test Yourself
1. How can you configure the box to maximize the time necessary to run the
application? Discuss it using the “Songs for kids” application written in
Ruby on Rails.
2. How can you configure the box to minimize the time necessary to run the
application? Discuss it using the “Songs for kids” application written in
Ruby on Rails.
3. Why is it useful to run the application using the bare–bones base box and
provisioners? Discuss it using the songs-app-rails-antipattern.git example.
4. What are the advantages of modularized provisioning scripts?
5. What are the three ways to generate customized boxes?
Exercises
1. Run the application
https://github.com/pro-vagrant/songs-app-rails-
antipattern
.
2. Generate the base box named ubuntu1404-i386-puppetlatest-X.Y.Z.box.
Use the commands shown in Listing 9-2.
3. Install the ubuntu1404-i386-puppetlatest-X.Y.Z box in your system.
4. Generate the box named apache-vX.Y.Z. Use the
https://github.com/
pro-vagrant/vagrant-box-factory-apache
repository and the base box that
you generated and installed in Exercises 2 and 3.
5. Install the apache-vX.Y.Z box in your system under the name my-apache.
6. Run the https://github.com/pro-vagrant/songs-app-angularjs application
using the my-apache box that you installed in your system in Exercise 5.
7. Generate the box named django-vX.Y.Z. Use the
https://github.com/
pro-vagrant/vagrant-box-factory-django repository and the base box that
you generated and installed in Exercises 2 and 3.
8. Install the django-vX.Y.Z box in your system under the name my-django.
CHAPTER 9 ■ ONE TRUE WORKFLOW
203
9. Run the application https://github.com/pro-vagrant/songs-app-django
using the my-django box that you installed in your system in Exercise 8.
10. Generate the box named rails-vX.Y.Z. Use the
https://github.com/
pro-vagrant/vagrant-box-factory-rails repository and the base box that
you generated and installed in Exercises 2 and 3.
11. Install the rails-vX.Y.Z box in your system under the name my-rails.
12. Run the https://github.com/pro-vagrant/songs-app-rails application using
the my-rails box that you installed in your system in Exercise 11.
13. Generate the box named symfony-vX.Y.Z. Use the
https://github.com/
pro-vagrant/vagrant-box-factory-symfony repository and the base box that
you generated and installed in Exercises 2 and 3.
14. Install the symfony-vX.Y.Z box in your system under the name my-symfony.
15. Run the application
https://github.com/pro-vagrant/songs-app-symfony
using the my-symfony box that you installed in your system in Exercise 14.
16. Generate the box that uses git submodules:
https://github.com/pro-vagrant/
vagrant-box-factory-apache-git-submodules
.

205
CHAPTER 10
Going Pro
Now that you have mastered the contents of the first nine chapters, you should be ready to use
Vagrant–driven development environments created by other system engineers effectively and with ease.
I hope that I have convinced you that it is a simple process and that there is nothing to worry about. You
should also be able to create your own base boxes.
But to advance your knowledge to the next level (the pro level), you have to practice introducing
Vagrant-driven workflows for others. I prefer to associate the pro adjective with real-life achievements. In
other words, you need a challenge: for example, the task of preparing the box and the workflow for the next
web application produced by your company.
For me, the challenge was to reorganize the way I taught various web development–related courses,
which was the playground that provided the necessary feedback to evaluate Vagrant in real-life settings. And
the result is astonishing. I can truly say that Vagrant has changed the way I work.
In this chapter, I will help you plan your strategy of going pro with Vagrant. I will also discuss some
Vagrant features that weren’t discussed in previous chapters:
• Using multimachine settings
• Debugging
• Using Vagrant plug-ins
• Using Atlas
• Versioning boxes
• Sharing the development environment
The Challenge
Find a project with which you can use Vagrant in practice. If you work alone, it might be the next web site
that you build. If you are one of the team, try to persuade your colleagues or boss to give Vagrant a try (it
won’t be too easy, but it might work). Remember that to convince anybody about Vagrant’s virtues, you have
to demonstrate its best features. So far, I haven’t found any better solutions than the four “Songs for kids”
examples from Chapter
2. Four frameworks in four minutes. (And in my case, it means literally four minutes
because I have all the boxes installed and ready at hand).
Your colleagues might be more demanding, however. If so, you can do the following:
• Create a much more elaborate example than “Songs for kids.”
• Use Vagrant-driven VMs to demonstrate existing web applications such as GitLab or
Redmine.
• Create the examples and VMs that run in different operating systems.

CHAPTER 10 ■ GOING PRO
206
To avoid disappointment, at least try to build all the boxes discussed in this book. You should also run
the “Songs for kids” examples on all kinds of platforms and hardware used by your colleagues. You will
experience how time-consuming and difficult boxing can be and how efficient (or inefficient, for that matter)
the virtualized development environment can be. It is good to know it right from the beginning. You will also
need an HTTP server capable of serving large files. Using your local infrastructure to distribute base boxes
can drastically reduce the download time and improve the overall Vagrant experience.
SCM Tools
As discussed in Chapter
6, software installation within the guest is done with SCM tools. (If you don’t know
any of them, this should be the next topic for you to master, especially if you will be responsible for creating
base boxes used by others).
As of now, the most popular solutions are these:
• Puppet (project started in 2005)
• Chef (project started in 2009)
• Salt (project started in 2011)
• Ansible (project started in 2012)
I chose Puppet, but you may prefer something else. Instead of advising you which SCM is the one and
only, I prefer to emphasize the role of modularization. No matter which SCM you use or plan to master, you
should know how to use modules authored by others and how to write your own modules.
For example, if you need to install Apache, start by investigating these:
• Puppet modules:
https://forge.puppetlabs.com/puppetlabs/apache
• Chef cookbooks: https://supermarket.chef.io/cookbooks/apache2
• Ansible roles: https://galaxy.ansible.com/list#/roles/428
■ Note Remember that learning SCM can be another stumbling block. Mastering Puppet, Chef, or Ansible is a
task of its own, and you may need some extra time to do so.
Keep in mind that having a basic knowledge of bash scripting and Ruby is handy when working with
advanced Vagrantfiles and script provisioners.
Development /Production Mapping
How do you create 1:1 production-development mapping? One solution is to use the same SCM modules
that are used to configure the production server to create base boxes for developers. If your organization
already uses SCM to configure production servers, your task is really easy: all you have to do is create a base
box for the OS used by the production servers and use the existing SCM solutions to configure the VM.
If your organization doesn’t use SCM solutions, you have to adopt one of them, master it, and create
modules that will be used by the production and development environments.
CHAPTER 10 ■ GOING PRO
207
Multimachine Settings
If the infrastructure required to run your application is more complicated and runs different services on
different machines, you might be interested in multimachine settings. Vagrant supports multimachine
configurations, and Listing 10-1 shows how to configure two virtual machines: one for a web server and one
for a database server within a single Vagrantfile.
Listing 10-1. Vagrantfile for a Two-Machine Environment
Vagrant.configure(2) do |config|
config.vm.define "web" do |web|
web.vm.box = "chef/centos-6.5-i386"
end
config.vm.define "db" do |db|
db.vm.box = "ubuntu/trusty32"
end
end
When you run $ vagrant up for the configuration shown in Listing 10-1, the output will include the
following messages:
Bringing machine 'web' up with 'virtualbox' provider...
Bringing machine 'db' up with 'virtualbox' provider...
==> web: Importing base box 'chef/centos-6.5-i386'...
==> web: Matching MAC address for NAT networking...
...
==> web: Mounting shared folders...
==> db: Importing base box 'ubuntu/trusty32'...
==> db: Matching MAC address for NAT networking...
...
==> db: Mounting shared folders...
The machine configured with config.vm.define "web" do |web| is labeled as ==>web, like this:
==> web: Importing base box 'chef/centos-6.5-i386'...
==> web: Matching MAC address for NAT networking...
...
The second machine, the one configured with config.vm.define "db" do |db|, is announced with
messages that begin with ==>db:
==> db: Importing base box 'ubuntu/trusty32'...
==> db: Matching MAC address for NAT networking...

CHAPTER 10 ■ GOING PRO
208
■ Note If the Vagrantfile configures only one machine, it is labeled as ==> default. (You can find this level in
Listing 3-2 in Chapter 3, for example).
Each machine can use an arbitrary base box. For the web machine, I used CentOS:
web.vm.box = "chef/centos-6.5-i386"
The db machine runs a bare-bones Ubuntu:
db.vm.box = "ubuntu/trusty32"
For each machine, you can use all the configuration options discussed in Chapter
8. The following code
snippet explains how to use the ssh.insert_key and memory options for a web VM:
config.vm.define "web" do |web|
web.vm.box = "chef/centos-6.5-i386"
web.ssh.insert_key = false
web.vm.provider "virtualbox" do |v|
v.memory = 1024
end
end
When you boot a multimachine environment, labels assigned to VMs (web and db in the previous
examples) are used to identify the machines. The $ vagrant status command reports the status like this:
Current machine states:
web running (virtualbox)
db running (virtualbox)
The web and db machines can be managed independently. To open the SSH session, you should use
$ vagrant ssh db. In a similar manner, you can use other commands, such as these:
$ vagrant halt web
$ vagrant destroy web
$ vagrant up web
If you don’t provide a name, the command will be executed for every machine or for the primary
machine only:
$ vagrant halt
$ vagrant destroy
$ vagrant up
To set the primary machine, use the :primary parameter in the Vagrantfile:
config.vm.define "web", primary: true do |web|
...
end
CHAPTER 10 ■ GOING PRO
209
Debugging
When you encounter problems during booting, and the guest system hangs on, the --debug flag may
help you to resolve the issue. The $ vagrant up -debug command produces verbose output with precise
information about executed commands. Together with the GUI window (for details, refer to Listing 8-2 in
Chapter
8), the flag can help to diagnose the problem.
Using Vagrant Plug-ins
The Wiki page available at
https://github.com/mitchellh/vagrant/wiki/Available-Vagrant-Plugins
contains an official collection of Vagrant plug-ins that enhance Vagrant’s functionality. The following
sections describe some plug-ins that you may find useful. For precise instructions on how to use them, see
their individual documentation.
Vagrant-cachier Plug-in
This plug-in, which is available at
http://fgrehm.viewdocs.io/vagrant-cachier, manages the cache
folder of various applications (such as apt, gem, npm, and composer) on a per–base box basis. The cache is not
stored within a guest; it is moved to the host and accessed through a shared directory. So if you run multiple
VMs that use the same base box, or boot and destroy the same VM many times (each time provisioning it),
commands such as the following download the packages from the network and store them locally in the
host:
# Guest OS
$ sudo apt-get install
$ bundle install
$ composer install
In other words, the cache is shared by all the base box instances. Each package is downloaded just once
per base box and reused in every VM that uses the same base box. This process can radically reduce the time
necessary to run the $ vagrant up command.
For example, if you use this plug-in and run the following command in one of the VMs, the packages
downloaded by apt-get are stored within the host:
# Guest OS
$ sudo apt-get update
If you switch to another VM and run the following, the packages updated in the second VM are not
downloaded from the network; they come from cache that is stored on the host:
# Guest OS
$ apt-get update
Vagrant-winnfsd Plug-in
This plug-in, which is available at
https://github.com/GM-Alex/vagrant-winnfsd, turns on the NFS type
for shared folders on hosts running Windows. As you remember, this process can improve the efficiency of
HDD read/write operations.
CHAPTER 10 ■ GOING PRO
210
Vagrant-puppet-install Plug-in
This plug-in, which is available at https://github.com/petems/vagrant-puppet-install, installs the
Puppet provisioner in the guest OS. If you embed Puppet in the base box build with Packer (as with the
boxcutter project in Chapter 7), this plug-in not necessary. But if you use bare bones boxes devoid of SCM,
you may find it useful.
Vagrant-omnibus Plug-in
This plug-in, which is available at
https://github.com/chef/vagrant-omnibus, installs the Chef
provisioner in the guest OS. It is handy if you work with bare base boxes and need to install Chef.
Vagrant-hostupdater Plug-in
This plug-in, which is available at https://github.com/cogitatio/vagrant-hostsupdater, helps manage
the hosts file on the host.
Vagrant-vbguest Plug-in
This plug-in, which is available at https://github.com/dotless-de/vagrant-vbguest, updates VirtualBox
Guest Additions within the guest to match the VirtualBox version installed on the host.
Working with Atlas.Hashicorp.com
The Atlas service, available at https://atlas.hashicorp.com, was originally intended to be a hosting
platform and catalog for Vagrant boxes. It can serve also as the following:
• A platform to build boxes with Packer
• The solution to deploy the application
• The platform to share the development environment with others
To try it, visit
https://atlas.hashicorp.com, register, and then log in. I will guide you how to use Atlas
for your own box that is served by your own HTTP server. I assume that the box is saved in the file named
lorem-v0.4.3.box and is already uploaded to the HTTP server and available under
http://example.net/
lorem/lorem-v0.4.3.box.
If you host the *.box files on your own HTTP server, you can use Atlas free of charge. For boxes hosted
in the Atlas, you will be charged for transfers that your boxes generate.
After logging in to your Atlas account, you will see the dashboard, which will resemble Figure
10-1. To
create the first box, press the Begin button that corresponds with the Create a Vagrant Box option.

CHAPTER 10 ■ GOING PRO
211
The procedure starts with a dialog box to fill in some basic information about the new box. The most
important thing is the name. Type the name lorem and press the Create Box button, as shown in Figure10-2.
Figure 10-1. Atlas user’s main window
Figure 10-2. Setting up the box name

CHAPTER 10 ■ GOING PRO
212
On the next screen (see Figure10-3), you have to assign a version number to your box. Type
version 0.4.3 and press the Create Version button.
Figure 10-3. Creating the box version
The first stage is finished, and the box is created. Now, you have to create a new provider for the box.
Press the Create New Provider button, as shown in Figure
10-4.

CHAPTER 10 ■ GOING PRO
213
Now you are in the next dialog box, shown in Figure10-5. Type the name of the provider: virtualbox.
Figure 10-4. Creating a new box provider
Figure 10-5. Creating a new self-hosted box provider

CHAPTER 10 ■ GOING PRO
214
Select the URL radio button and type the URL (you can use an arbitrary URL, even the one that is not
correct; there is no URL validation here): http://example.net/lorem/lorem-v0.4.3.box.
When this is done, press the Create Provider button.
When this phase is finished, there is just one more thing to do: you have to release the box. To do so,
press the Edit button, as shown in Figure
10-6.
Figure 10-6. Releasing a box by pressing the Edit button
Finalize your actions by pressing the Release Version button (see Figure
10-7).
CHAPTER 10 ■ GOING PRO
215
The box is available in the panel displayed on the left side of the window. Figure10-8 shows where to
find the box you created.
Figure 10-7. Releasing a box

CHAPTER 10 ■ GOING PRO
216
If your Atlas service username is johnny, the box you created will be available as johnny/lorem. Use this
name in the Vagrantfile:
Vagrant.configure(2) do |config|
config.vm.box = "johny/lorem"
end
Boot the VM. Vagrant will resolve the name johnny/lorem into the URL you provided in the dialog box
shown in Figure10-5 and download the box from the server.
To verify the way the box named vendor/box is resolved into the URL, create the Vagrantfile shown in
Listing 10-2.
Listing 10-2. Vagrantfile for ubuntu/precise32
Vagrant.configure(2) do |config|
config.vm.box = "ubuntu/precise32 "
end
The $ vagrant up command executed for the VM shown in Listing 10-2 will produce the output that
begins with the messages shown in Listing 10-3.
Listing 10-3. Output of $ vagrant up for the VM in Listing 10-2
Bringing machine 'default' up with 'virtualbox' provider...
==> default: Box 'ubuntu/precise32' could not be found. Attempting to find and
install...
default: Box Provider: virtualbox
Figure 10-8. Newly created box is available in the left panel

CHAPTER 10 ■ GOING PRO
217
default: Box Version: >= 0
==> default: Loading metadata for box 'ubuntu/precise32'
default: URL:
https://atlas.hashicorp.com/ubuntu/precise32
==> default: Adding box 'ubuntu/precise32' (v12.04.4) for provider: virtualbox
default: Downloading: https://atlas.hashicorp.com/ubuntu/boxes/precise32/
versions/12.04.4/providers/virtualbox.box
This is a single machine configuration, so the machine is labeled as ==> default.
Take a look at the URLs included in the output:
https://atlas.hashicorp.com/ubuntu/precise32
https://atlas.hashicorp.com/ubuntu/boxes/precise32/versions/12.04.4/providers/virtualbox.box
When you use the ubuntu/precise32 name, Vagrant resolves it into https://atlas.hashicorp.com/
ubuntu/precise32. This URL serves as a gate for all providers and for all versions.
You use VirtualBox and the default version 12.04.4, which is reflected in the next URL:
https://atlas.hashicorp.com/ubuntu/boxes/precise32/versions/12.04.4/providers/virtualbox.box
Finally, if you use curl, as follows:
# Host OS
$ curl
https://atlas.hashicorp.com/ubuntu/boxes/precise32/versions/12.04.4/providers/
virtualbox.box
you will see that the following is just a redirect to
https://cloud-images.ubuntu.com/vagrant/precise/
current/precise-server-cloudimg-i386-vagrant-disk1.box:
<html>
<body>
You are being
<a href="
https://cloud-images.ubuntu.com/vagrant/precise/current/precise-server-
cloudimg-i386-vagrant-disk1.box">redirected</a>.
</body>
</html>
The procedure of resolving the URL to download the box using the name is depicted in Figure
10-9.
Figure 10-9. Resolving the URL using the name
CHAPTER 10 ■ GOING PRO
218
Versioning Boxes
The concept of versioning boxes loosens the ties that bind developers (who use boxes) and system engineers
(who create boxes). System engineers can upload new versions of boxes without influencing developers in
any way. Developers update the boxes they use when they consider it appropriate.
For example, consider the scenario in which a system engineer working at the example.net company
publishes version 1.0.0 of the box named rails:
example-net/rails (virtualbox, 1.0.0)
Developers start using this box. Then a system engineer uploads a new version:
example-net/rails (virtualbox, 2.0.0)
Developers may continue to use version 1.0.0 or can upgrade to version 2.0.0. They make the decision and
perform the update when they consider it appropriate. Nothing is imposed on them.
Here is how it is done in practice. Each box available through the vendor/box name in the Atlas catalog,
such as ubuntu/precise32, is versioned. The dialog box shown in Figure
10-3 requires you to type the
version of the box. You can’t skip or avoid denoting the version in Atlas. For each name, you can upload any
number of versions.
When you use vendor/box name, one of the first things that Vagrant does during $ vagrant up is to
check whether the version you have installed in your system is up to date. It is announced with this:
==> default: Checking if box 'ubuntu/precise32' is up to date...
If your box is stale, you will see a message about it.
When you run the $ vagrant box list command, the output contains the name of each box, together
with the name of the provider and box version:
apache-v0.3.3 (virtualbox, 0)
apache-v0.4.0 (virtualbox, 0)
apache-v0.4.3 (virtualbox, 0)
django-v0.2.4 (virtualbox, 0)
gajdaw/apache (virtualbox, 0.1.0)
gajdaw/apache (virtualbox, 0.3.2)
ubuntu/precise32 (virtualbox, 12.04.4)
ubuntu/trusty32 (virtualbox, 14.04)
ubuntu/trusty64 (virtualbox, 14.04)
The following line means that the box named apache-v0.3.3 is not handled by Atlas:
apache-v0.3.3 (virtualbox, 0)
Its name doesn’t have the form of vendor/boxname. It was either installed with $ vagrant box add or
during $ vagrant up for a box configured like this:
Vagrant.configure(2) do |config|
config.vm.box = "apache-v0.3.3"
config.vm.box_url = "
http://boxes.gajdaw.pl/apache/apache-v0.3.3.box"
end
CHAPTER 10 ■ GOING PRO
219
The apache-v0.3.3 box has just one version, denoted as 0.
The following line informs you about the box named ubuntu/precise32:
ubuntu/precise32 (virtualbox, 12.04.4)
The name of the box comes from the Atlas catalog. The version of the box is 12.04.4.
And the following two lines mean that you have installed two versions of the gajdaw/apache box on
your system:
gajdaw/apache (virtualbox, 0.1.0)
gajdaw/apache (virtualbox, 0.3.2)
One of the lines is denoted as 0.1.0; the second as 0.3.2. Because the name of the box matches
vendor/boxname pattern, you know that the name is resolved through the Atlas.
If you want to update the box used in your project to the latest version, run the $ vagrant box update
command. If there is nothing to update, you will see this message:
==> default: Checking for updates to 'ubuntu/precise32'
default: Latest installed version: 12.04.4
default: Version constraints:
default: Provider: virtualbox
==> default: Box 'ubuntu/precise32' (v12.04.4) is running the latest version.
Otherwise, your box will be updated.
Vagrant allows you to ask for a specific version of the box with the vm.box_version configuration entry,
as shown in Listing 10-4.
Listing 10-4. VM Running a Concrete Version of a Box
Vagrant.configure(2) do |config|
config.vm.box = "gajdaw/apache "
config.vm.box_version = "1.2.3"
end
The value you assign to vm.box_version can use multiple constraints separated with commas, as
follows:
config.vm.box_version = ">0.1,<0.3"
config.vm.box_version = "<2.0,>=1.0"
When you ask for a version that does not exist, as in Listing
10-4, $ vagrant up fails with this message:
The box you're attempting to add has no available version that
matches the constraints you requested. Please double-check your
settings. Also verify that if you specified version constraints,
that the provider you wish to use is available for these constraints.
Box: gajdaw/apache
Address: https://atlas.hashicorp.com/gajdaw/apache
Constraints: 1.2.3
Available versions: 0.1.0, 0.3.1, 0.3.2

CHAPTER 10 ■ GOING PRO
220
The final part of the message informs you about the available versions:
Available versions: 0.1.0, 0.3.1, 0.3.2
If the version you ask for with vm.box_version exists and is not installed on your system, Vagrant
will install it. When you have multiple versions of a box, some Vagrant commands may need additional
parameters. To remove version 0.3.2 of the gajdaw/apache, box, use $ vagrant box remove gajdaw/apache
--box-version 0.3.2.
During my classes and training, I prefer to use the exact box version numbers of my boxes, such as 0.1.2.
You can achieve this effect by using this configuration:
Vagrant.configure(2) do |config|
config.vm.box = "apache-v0.3.3"
config.vm.box_url = "
http://boxes.gajdaw.pl/apache/apache-v0.3.3.box"
end
You can also use this configuration:
Vagrant.configure(2) do |config|
config.vm.box = "gajdaw/apache"
config.vm.box_version = "0.3.3"
end
If you work this way, you don’t have to remind anyone about updates.
Sharing Your Environment
The Atlas service allows you to share the development environment running on your machine with your
colleagues. Anyone can gain remote access to your application. The first step of using shares is to register
with the Atlas service.
HTTP Shares
The HTTP share allows others to access the web application running within your VM with a web browser.
To allow others to visit your app, go to the directory with one of the examples (it might be “Songs for kids”
written in AngularJS)
1
:
$ cd folder/with/examples
$ cd songs-app-angularjs
Boot the application with $ vagrant up and then run $ vagrant login. You will be asked to type your
Atlas credentials. When this is done, you can start sharing your application by running $ vagrant share.
You will see output containing the following:
==> default: Your Vagrant Share is running! Name: exquisite-hare-7519
==> default: URL:
http://exquisite-hare-7519.vagrantshare.com
==> default:
1
This example was discussed in Chapter
2.
CHAPTER 10 ■ GOING PRO
221
==> default: You're sharing your Vagrant machine in "restricted" mode. This
==> default: means that only the ports listed above will be accessible by
==> default: other users (either via the web URL or using 'vagrant connect').
Your application is available to anyone through
http://exquisite-hare-7519.vagrantshare.com.
And because everyone who knows this URL can access your application, you have to be careful not to
reveal any sensitive data. Notice that the persons who use the preceding URL do not need to install Vagrant
on their machines.
To stop the share, press Ctrl+C on your keyboard; to log out from Atlas, run $ vagrant login –logout.
SSH Shares
Use SSH shares if you want to allow other developers to SSH into your VM. First, go to one of your projects
and boot the VM:
$ cd folder/with/examples
$ cd songs-app-django
$ vagrant up
Log in to your Atlas account with $ vagrant login and start the share with $ vagrant share –ssh.
You will be asked to invent a new password that will protect your share:
==> default: Generating new SSH key...
default: Please enter a password to encrypt the key:
default: Repeat the password to confirm:
After typing the new password twice, Vagrant will start the share and print the following message:
==> default: Your Vagrant Share is running! Name: fast-boar-5405
==> default: URL:
http://fast-boar-5405.vagrantshare.com
==> default:
==> default: You're sharing your Vagrant machine in "restricted" mode. This
==> default: means that only the ports listed above will be accessible by
==> default: other users (either via the web URL or using 'vagrant connect').
==> default:
==> default: You're sharing with SSH access. This means that another user
==> default: simply has to run 'vagrant connect --ssh fast-boar-5405'
==> default: to SSH to your Vagrant machine.
==> default:
==> default: Because you encrypted your SSH private key with a password,
==> default: the other user will be prompted for this password when they
==> default: run 'vagrant connect --ssh'. Please share this password with them
==> default: in some secure way.
Your application now has the HTTP share accessible through
http://fast-boar-5405.vagrantshare.com.
The SSH share that can be used to open SSH session to your guest is $ vagrant connect --ssh
fast-boar-5405.
When you run the $ vagrant connect command, Vagrant will ask for the password that you typed and
retyped previously.
CHAPTER 10 ■ GOING PRO
222
To stop the SSH share, do the following:
1. Press Ctrl+C.
2. Log out with $ vagrant login –logout.
3. Destroy the VM with $ vagrant destroy –f.
If you want to start the SSH share without running the HTTP share at the same time, use the --disable-
http flag: $ vagrant share --ssh --disable-http.
Summary
The details described in this chapter made your journey complete. You began with an introduction that may
help you to get your Vagrant-related competencies to a Pro level. Then a number of technical details were
discussed that will become useful at some point:
• Using multimachine settings
• Debugging
• Using Vagrant plug-ins
• Using Atlas
• Versioning boxes
• Sharing the development environment
Reading List
For documentation concerning Atlas, go to https://atlas.hashicorp.com/help. Keep in mind that this
is a new project that is evolving. The section titled “Current and future integrations” at https://atlas.
hashicorp.com should give you a hint about the huge plans that Mr. Mitchell Hashimoto and his company
have. It looks like a final solution that will help you to integrate all aspects of your workflow.
To learn more about Vagrant plug-ins (especially about developing them), refer to the documentation at
https://docs.vagrantup.com/v2/plugins/index.html.
If you are interested in versioning self-hosted boxes without using Atlas, refer to the “Tutorial about
versioning self-hosted boxes” at https://github.com/hollodotme/Helpers/blob/master/Tutorials/
vagrant/self-hosted-vagrant-boxes-with-versioning.md.
Test Yourself
1. How do you configure a multimachine development environment?
2. How do you boot and halt different guests when working with multimachine
settings?
3. How can you debug the $ vagrant up command?
4. Which Vagrant plug-ins are you familiar with? What is their purpose?
CHAPTER 10 ■ GOING PRO
223
5. Why would you want to use Atlas?
6. What is the concept of Vagrant box versioning?
7. How can you define a required version of a base box within the Vagrantfile?
8. How can you update the box used in a project?
9. How can you install an arbitrary version of a box on your system?
10. How can you uninstall an arbitrary version of a box on your system?
Exercises
1. Create a Vagrantfile for a multimachine development environment. Boot the
environment and analyze the messages produced by Vagrant. Finally, destroy all
the guest VMs.
2. Register and log in to the Atlas.hashicorp.com service.
3. Generate a box shown in this book (the box discussed in Chapter
9, for example)
and publish it on Atlas.
4. Find out which versions of gajdaw/apache are available?
5. Install the gajdaw/apache version 0.1.0 box on your system.
6. Install the gajdaw/apache version 0.3.3 box on your system.
7. Update the gajdaw/apache box to the latest version.
8. Remove all versions of the gajdaw/apache box from your system.
9. Boot one of the examples from Chapter
2 and start the HTTP share for it.
10. Boot one of the examples from Chapter
2 and start both the SSH and HTTP
shares for it.
11. Boot one of the examples from Chapter
2 and start only the SSH share for it, not
the HTTP share.

225
A
AngularJS framework
command execution,
22
$ git clone command, 22
host OS, 24
OSs, 23
songs-app-angularjs/directory, 22
songs for kids, 76–77
Ubuntu 14.04 guest OS, 24
VM, 24
web browser and HTTP Apache daemon, 25
Ansible playbooks, 195
Ansible provisioner
execution,
122
git, 122
playbook.yml., 121
Ubuntu, 120
Vagrantle, 121
vagrant-jekyll-ansible-v0.1.0.box, 123
Antipattern, 187
base boxes
advantages, git,
195
AngularJS, 191
box-name.txt, box-author.txt and
box-date.txt,
192
build.sh script, 191
gajdaw-bundle_install module, 200
$ git describe command, 195
guest OS, 192–193
guest VM, 193
guestvm command, 192
packer, 190
puppet modules, 193
puppet provisioners, 193
SSH keys, 192
vagrant-box-factory-apache, 191–192, 194
VagrantleToInclude
Conguration File,
193–194
puppet modules, 188
time-consuming provisioners, 188
Ubuntu base box, 189
$ vagrant up command, 188
Apache module, 196–197
Arbitrary operating systems (OSs), 1
Atlas
base box,
65
box name setting up, 211
chef, 66
create new provider button, 212–213
create version button, 212
edit button, 214–215
hashicorp, 66
HTTP server, 210
puppetlabs, 66
Ubuntu, 66
self-hosted box provider, 213
Ubuntu/trusty32, 69–70, 216
URLs, 217
user’s main window, 211
$ vagrant up command, 216–217
B
Base box, 65
booting, 68
downloading, 69
-f ag, 67
-m ag, 67
Ubuntu/trusty32 box, 67
vagrant cloud, 68
$ vagrant init command, 67
Boxcutter templates, 190
Boxing
add command,
89
advantages, 94
Apache, 77
box command, 91
Chef, 86
execution, 88
rst-box-factory, 86
forwarding ports, 93
Index
■ INDEX
226
installation
jekyll,
88
NodeJS, 87
Ruby Version Manager (RVM), 87
jekyll, 85, 91
list command, 89
remove command, 90
repackaging, 96
security, 96
servers, 95
Ubuntu, 86
C
Checksums, 170–171
Chef/bento project
box customization,
139–140
denitions, 128
JSON le, 129
new project creation, 130
SSH session, 130–131
Ubuntu distribution site, 129
$ vagrant box add command, 130
VirtualBox Guest Additions, 140–141
Chef cookbooks, 195
Chef provisioner
default.rb script,
118–119
execution, 119
source code, 120
vagrantle, 118
vagrant-jekyll-chef-v0.1.0.box, 120
Colliding ports, 61
CPUs, 163
D
Default VM conguration, 70
directory sharing
conguration settings,
75
echo command, 74
guest OS, 73
host OS, 73
synchronization, 74
forwarding port
Host IP value,
72
network properties, 72
VirtualBox application, 71
Django framework
baa.html le,
29
$ git clone command, 26
Host OS, 29
OSs, 27
$ vagrant up, 26
VMs, 28
E
Each command, 31
F
Fully qualied domain name (FQDN), 116
G
Gajdaw-environment submodule, 199
Git, 13
$ git clone command, 22, 26, 49, 199
Git submodules, 198
Guest OS
aborted state,
53
communications, 76
not created state, 52
powero state, 51
running state, 51
saved state, 52
$ vagrant status command, 50
Guestvm command, 192
GUI Mode, 159
H
Halt subcommand, 59
Hard disk drive (HDD) space, 16
HTTP shares, 220
I
ifcong command, 175, 178
Integrated development environment (IDE), 4, 162
J, K, L
Jekyll box, 85
Ansible provisioner, 120
Chef provisioner, 118
puppet provisioner (see Puppet provisioner)
shell provisioner (see Shell provisioner)
M
Multimachine settings
ssh.insert_key and memory options,
208
$ vagrant ssh db, 208
$ vagrant status command, 208
$ vagrant up, 207
$ vagrant status command, 208
N
Network le system (NFS), 181
Boxing (cont.)
■ INDEX
227
O
Open Virtualization Format (OVF), 154–155
P, Q
Packer
boot command,
137
boxcutter project
conguration les,
132
installation, 133
Makele.local le, 131–132
new project creation, 133
puppet version, 131
SSH session, 133
chef/bento project
box customization,
139
denitions, 128
JSON le, 129
new project creation, 130
SSH session, 130–131
Ubuntu distribution site, 129
$ vagrant box add command, 130
VirtualBox Guest
Additions,
140–141
downloading, 127, 137
http_directory entry, 137
installation, 128
ISO images
downloading,
141–142
properties, 144
RAM, 143–144
selection le, 147–148
Ubuntu 14.04 (see Ubuntu 14.04)
VirtualBox dialog box,
143
VirtualBox main window, 147
virtual hard drive, 144–146
VMDK, 145
JSON les, 134
operations, 138
output, 138–139
OVF, 154–155
preseed.cfg le, 138
template le, 133–134
timing, 153–154
Ubuntu 14.04, 136–137
$ vagrant up command, 127
variables, 135
Port collision, 173
Private networks
advantages,
175
DHCP server, 174, 176–177
guest system, 175
ifcong command, 175
IPs, 175
manual conguration of, 174
SSH session, 177
vboxnet0, vboxnet1 and vboxnet2, 175–176
Provisioners
Ansible provisioner,
120
Chef provisioner, 118
conguration management software, 99
gitbox, 103
Jekyll box (see Jekyll box)
multiple,
102
provisioning, 99–100
conguration, 101
execution, 102
puppet provisioner (see Puppet provisioner)
shell provisioner (see Shell provisioner)
workow, 123
Public network, 177
Puppet modules, 195, 200
$ Puppet module install command, 199
Puppet provisioner
apt-get update command,
115
box versioning, 117
execution, 116
manifests/default.pp, 114–115
nodejs package command, 115
vagrant-jekyll-puppet-v0.1.0.box, 117–118
Vagrantle, 114
R
Rails(Ruby)
each command,
31
procedure, 30
$ vagrant global-status command, 32
VirtualBox, 32
VMs, 31
RAM, 161
rsync, 182
S
SCM tools, 206
Scratch. See Packer
Secure Shell (SSH)
built-in account, 79
denition, 77
insecure public key, 81
with multiple guests, 78
public/private cryptographic keys, 79
RSA keys
private key,
80
public key, 80
shares, 221
sudo command, 79
traditional approach, 78
■ INDEX
228
$ vagrant reload command, 81
$ vagrant ssh command, 77
Server Message Block (SMB), 183
Shell provisioner
boot HTTP Server,
110
box generation, 108
owers-vagrant-jekyll-shell project, 109–110
gitignore le, 107
# Host OS, 105
Jekyll Box with Shell Provisioning, 104
mesg n command, 112
script.sh., 105
staging changes, 108
system engineer’s vs. developer’s role, 111
vagrantle, 105
vagrant-jekyll-shell-v0.1.0.box le, 109
$ vagrant up, 105
verify-tty-problem, 112
VM with Shell Provisioning, 104
Sinatra
guest OS
$ vagrant halt command, 60
$ vagrant destroy command, 60
$ vagrant suspend command, 60
halt subcommand, 59
HTTP server, 58
$ vagrant up command, 58
Submodule
approaches,
198
gajdaw-environment, 199
git, 198
$ git clone command, 199
$ puppet module install command, 199
puppet.module_path, 199
strategy, 199
Symfony framework
command execution,
33
Host OS, 35
OSs, 34
$ vagrant global-status command, 34
VMs, 34
Synced folders
benchmarking disk operations,
179–181
NFS, 181
parameters, 179
Public Network, 178
rsync, 182
SMB, 183
synchronization types, 179
VirtualBox, 181
T
TCP port, 21
U
Ubuntu 14.04
ifcong command,
150
installation, 148–149
preseed.cfg le, 150
text mode interface, 151–152
unattended installation, 152–153
Ubuntu/trusty32, 68
V, W, X, Y, Z
Vagrant
client/server paradigm,
2–3
conguration, 16
development environment
IDE,
4
setting up, 3
SSH/vi, 5
VM, 8
disadvantage, 7, 12
documentation, 16
features, 11
installation, 14–15
Git, 13
VirtualBox, 13
LAMP stack, 10
layered architecture of, 9
providers list, 10
sandboxed solution, 11
shared folders, 36
trainers, instructors, and teachers, 12
$ vagrant up command, 10
virtualization, 7, 9
VM, 1
$ Vagrant box list command, 218
$ Vagrant box update command, 219
Vagrant-cachier Plug-in, 209
Vagrant commands, 53
projects directory, 54
$ vagrant destroy command, 56
$ vagrant halt command, 56
$ vagrant reload command, 57
$ vagrant suspend command, 56
$ vagrant up command, 55
VM state, 54–55
$ Vagrant connect command, 221
$ Vagrant destroy command, 37, 48, 56, 60
Vagrantle, 42
VAGRANTFILE_API_VERSION variable, 43
$ Vagrant global-status command, 32, 34, 37, 42
$ Vagrant halt command, 56, 60
VAGRANT_HOME environment variable, 46
Vagrant-hostupdater Plug-in, 210
Vagrant-omnibus Plug-in, 210
Secure Shell (SSH) (cont.)
■ INDEX
229
Vagrant-puppet-install Plug-in, 210
$ Vagrant reload command, 57
$ Vagrant ssh command, 166
$ Vagrant status command, 208
$ Vagrant suspend command, 56, 60
$ Vagrant up command, 2, 10, 26, 36, 55, 61, 62,
104, 159, 188, 209, 216–218
$ Vagrant up-debug command, 209
Vagrant-vbguest Plug-in, 210
Vagrant-winnfsd Plug-in, 209
Versioning boxes
gajdaw/apache box,
219
$ vagrant box list command, 218
$ vagrant box update command, 219
$ vagrant up, 218
vm.box_version conguration, 219–220
VirtualBox, 13
GUI Mode, 159
physical properties
CPUs,
163–164
RAM, 161
VM name, 158
Virtual machines (VMs), 1, 8, 37
booting, 166
$ vagrant up command, 44–45
base box importing, 46–47
downloading and installation, 46
guest OS, 47
process of stages, 45
checksums, 170–171
cong.vm.box, 169
cong.vm.box_url, 169
les and directories
$ vagrant up command,
49
box le, 50
guest OS, 50
halting timeouts, 166
hostname, 164–165
platform-related conguration, 183
port collision, 173
port forwarding
drawbacks,
171
Host’s Port 8800, 171
parameters, 172
TCP/UDP, 172
post-up message variable, 165
private networks (see Private networks)
public network,
177
start and stop
aspects of,
57
properties of, 58
$ vagrant up, 57
SSH sessions, 166
X11 server, 167–168

Pro Vagrant
Włodzimierz Gajda
Pro Vagrant
Copyright © 2015 by Włodzimierz Gajda
This work is subject to copyright. All rights are reserved by the Publisher, whether the whole or part of the
material is concerned, specifically the rights of translation, reprinting, reuse of illustrations, recitation,
broadcasting, reproduction on microfilms or in any other physical way, and transmission or information
storage and retrieval, electronic adaptation, computer software, or by similar or dissimilar methodology now
known or hereafter developed. Exempted from this legal reservation are brief excerpts in connection with
reviews or scholarly analysis or material supplied specifically for the purpose of being entered and executed
on a computer system, for exclusive use by the purchaser of the work. Duplication of this publication or
parts thereof is permitted only under the provisions of the Copyright Law of the Publisher’s location, in its
current version, and permission for use must always be obtained from Springer. Permissions for use may be
obtained through RightsLink at the Copyright Clearance Center. Violations are liable to prosecution under
the respective Copyright Law.
ISBN-13 (pbk): 978-1-4842-0074-2
ISBN-13 (electronic): 978-1-4842-0073-5
Trademarked names, logos, and images may appear in this book. Rather than use a trademark symbol
with every occurrence of a trademarked name, logo, or image we use the names, logos, and images only
in an editorial fashion and to the benefit of the trademark owner, with no intention of infringement of the
trademark.
The use in this publication of trade names, trademarks, service marks, and similar terms, even if they are
not identified as such, is not to be taken as an expression of opinion as to whether or not they are subject to
proprietary rights.
While the advice and information in this book are believed to be true and accurate at the date of publication,
neither the authors nor the editors nor the publisher can accept any legal responsibility for any errors or
omissions that may be made. The publisher makes no warranty, express or implied, with respect to the
material contained herein.
Managing Director: Welmoed Spahr
Lead Editor: Louise Corrigan
Technical Reviewer: Tyler Merry
Editorial Board: Steve Anglin, Mark Beckner, Gary Cornell, Louise Corrigan, Jim DeWolf,
Jonathan Gennick, Robert Hutchinson, Michelle Lowman, James Markham, Susan McDermott,
Matthew Moodie, Jeffrey Pepper, Douglas Pundick, Ben Renow-Clarke, Gwenan Spearing,
Matt Wade, Steve Weis
Coordinating Editor: Christine Ricketts
Copy Editor: Nancy Sixsmith
Compositor: SPi Global
Indexer: SPi Globa
Artist: SPi Global
Distributed to the book trade worldwide by Springer Science+Business Media New York,
233 Spring Street, 6th Floor, New York, NY 10013. Phone 1-800-SPRINGER, fax (201) 348-4505, e-mail
and the sole member (owner) is Springer Science + Business Media Finance Inc (SSBM Finance Inc).
SSBM Finance Inc is a Delaware corporation.
For information on translations, please e-mail
Apress and friends of ED books may be purchased in bulk for academic, corporate, or promotional use.
eBook versions and licenses are also available for most titles. For more information, reference our Special
Bulk Sales–eBook Licensing web page at
www.apress.com/bulk-sales.
Any source code or other supplementary material referenced by the author in this text is available to
readers at www.apress.com. For detailed information about how to locate your book’s source code,
go to
www.apress.com/source-code/.
For Beata

vii
Contents
About the Author ...................................................................................................xvii
About the Technical Reviewer ................................................................................xix
Acknowledgments ..................................................................................................xxi
■Chapter 1: Getting Started with Vagrant ............................................................... 1
What Is Vagrant? .............................................................................................................. 1
Client/Server Paradigm and its Aftermath ........................................................................ 2
Traditional Approach to Setting up a Developer Environment .......................................... 3
Virtualization to the Rescue.............................................................................................. 7
Enter the Vagrant .............................................................................................................. 9
Vagrant Rulez! ................................................................................................................ 10
Disadvantages of Vagrant ............................................................................................... 12
Vagrant for Trainers, Instructors, and Teachers .............................................................. 12
Installing the Software ................................................................................................... 13
Git .........................................................................................................................................................13
VirtualBox .............................................................................................................................................13
Vagrant .................................................................................................................................................14
Basic Vagrant Configuration ........................................................................................... 16
Documentation ............................................................................................................... 16
Summary ........................................................................................................................ 18
In the Next Chapter, You’ll Learn . . . ............................................................................... 18
Reading List ................................................................................................................... 18
Test Yourself ................................................................................................................... 19
viii
■ CONTENTS
■Chapter 2: Four Web Frameworks in Four Minutes ............................................. 21
Project 1: “Songs for kids” Written in AngularJS............................................................ 22
Project 2: “Songs for kids” Written in Django ................................................................. 26
Project 3: “Songs for kids” Written in Ruby on Rails ...................................................... 30
Project 4: “Songs for kids” Written in Symfony .............................................................. 33
What Have You Achieved? .............................................................................................. 36
Shared Folders ............................................................................................................... 36
Stopping VMs ................................................................................................................. 37
Summary ........................................................................................................................ 38
In the Next Chapter, You’ll Learn . . . ............................................................................... 38
Reading List ................................................................................................................... 39
Test Yourself ................................................................................................................... 39
Exercises ........................................................................................................................ 39
■Chapter 3: The States of VM ................................................................................ 41
Before You Begin ............................................................................................................ 42
Getting the Source Code of the Example Application ..................................................... 42
Vagrantfile ...................................................................................................................... 42
Where Does the VM Image Come From? ........................................................................ 44
Booting the VM ............................................................................................................... 44
Stage I: Downloading and Installing the Box in the System .................................................................46
Stage II: Importing the Base Box into the Project .................................................................................46
Stage III: Booting the System ................................................................................................................47
Files and Directories: Summary ..................................................................................... 49
Guest OS States .............................................................................................................. 50
running State ........................................................................................................................................ 51
poweroff State ...................................................................................................................................... 51
saved State ...........................................................................................................................................52
not created State .................................................................................................................................. 52
aborted State ........................................................................................................................................53
ix
■ CONTENTS
Vagrant Commands ........................................................................................................
53
$ vagrant up Command ........................................................................................................................55
$ vagrant halt Command ......................................................................................................................56
$ vagrant suspend Command ...............................................................................................................56
$ vagrant destroy Command ................................................................................................................56
$ vagrant reload Command ..................................................................................................................57
How to Start and Stop a VM ........................................................................................... 57
Running “Songs for kids” in Sinatra ............................................................................... 58
Killing and Preserving Processes in a Guest OS During Shutdown ...................................................... 59
Preserving and Losing Files in a Guest OS During Shutdown .............................................................. 60
Colliding Ports ................................................................................................................ 61
Removing the Box .......................................................................................................... 62
Summary ........................................................................................................................ 62
In the Next Chapter You Will Learn . . . ........................................................................... 63
Reading List ................................................................................................................... 63
Test Yourself ................................................................................................................... 63
Exercises ........................................................................................................................ 64
■Chapter 4: Default Configuration and Security Settings of the Guest VM ............. 65
Atlas ............................................................................................................................... 65
Initializing a New Project ................................................................................................ 67
Security Concern #1 ....................................................................................................... 68
Booting the Guest OS ..................................................................................................... 68
Downloading the ubuntu/trusty32 Base Box from Atlas ................................................. 69
Default Configuration of a VM......................................................................................... 70
Forwarding Port 2222 on the Host to Port 22 on the Guest .................................................................. 71
Security Concern #2 ....................................................................................................... 73
Sharing a Project Directory................................................................................................................... 73
Communication with the Outside World ......................................................................... 76
Analysis of “Songs for kids” in AngularJS ..................................................................... 76
x
■ CONTENTS
Working with SSH ...........................................................................................................
77
Working with Multiple Guests ........................................................................................ 78
Security Concern #3 ....................................................................................................... 79
Using the authorized_keys File for SSH Authorization ................................................... 79
Security Concern #4 ....................................................................................................... 81
Reloading the Guest OS .................................................................................................. 81
Summary ........................................................................................................................ 82
In the Next Chapter, You Will Learn . . . ........................................................................... 83
Reading List ................................................................................................................... 83
Test Yourself ................................................................................................................... 83
Exercises ........................................................................................................................ 83
■Chapter 5: Your First Box ..................................................................................... 85
The Task at Hand ............................................................................................................ 85
Choosing a Base Box and Initializing a New Project ...................................................... 86
Installing the Necessary Software ................................................................................. 87
Generating a Box ............................................................................................................ 88
Listing, Installing, and Removing Boxes ......................................................................... 88
Using the Box ................................................................................................................. 91
Forwarding Ports ............................................................................................................ 93
Advantages of Boxing ..................................................................................................... 94
Serving Boxes over the Network .................................................................................... 95
Securing Your Boxes....................................................................................................... 96
Repackaging Boxes ........................................................................................................ 96
Summary ........................................................................................................................ 96
In the Next Chapter, You Will Learn . . . ...........................................................................
97
Reading List ................................................................................................................... 97
Test Yourself ................................................................................................................... 97
Exercises ........................................................................................................................ 98
xi
■ CONTENTS
■Chapter 6: Provisioning ....................................................................................... 99
Provisioners .................................................................................................................. 100
Configuring Provisioning .............................................................................................. 101
Multiple Provisioners .................................................................................................... 102
When Does Provisioning Happen? ................................................................................ 102
Versioning Boxes with git ............................................................................................. 103
Jekyll Box with the Shell Provisioner ........................................................................... 104
Box Source Code ................................................................................................................................104
First Run of the Shell Provisioner .......................................................................................................105
Versioning the Box Source Code .........................................................................................................107
Generating a Box ................................................................................................................................108
Using the Shell-Provisioned Box .................................................................................. 109
Annoying “not a tty” Problem ....................................................................................... 112
Jekyll Box with the Puppet Provisioner ........................................................................ 114
Box Source Code ................................................................................................................................114
First Run of the Puppet Provisioner .................................................................................................... 116
Versioning the Box Source Code ........................................................................................................117
Generating a Box ................................................................................................................................117
Using a Puppet-Provisioned Box .................................................................................. 117
Jekyll Box with the Chef Provisioner ............................................................................ 118
Box Source Code ................................................................................................................................118
First Run of the Chef Provisioner ........................................................................................................119
Versioning the Box Source Code ........................................................................................................120
Generating a Box ................................................................................................................................120
Jekyll Box with the Ansible Provisioner........................................................................ 120
Box Source Code ................................................................................................................................121
First Run of the Ansible Provisioner ....................................................................................................122
Versioning the Box Source Code ........................................................................................................122
Generating a Box ................................................................................................................................123
xii
■ CONTENTS
Workflow ......................................................................................................................
123
Summary ...................................................................................................................... 123
In the Next Chapter, You Will Learn . . . ......................................................................... 124
Reading List ................................................................................................................. 124
Test Yourself ................................................................................................................. 125
Exercises ...................................................................................................................... 126
■Chapter 7: Creating Boxes from Scratch ........................................................... 127
Packer .......................................................................................................................... 127
Installing Packer ........................................................................................................... 128
Building Boxes Using the chef/bento Project ............................................................... 128
Using the Box Generated with chef/bento .................................................................... 130
Building Boxes Using the boxcutter Project ................................................................. 131
Using the Box Generated with the boxcutter Project.................................................... 133
How Does Packer Work? .............................................................................................. 133
Customizing Boxes Generated with chef/bento ........................................................... 139
VirtualBox Guest Additions ........................................................................................... 140
Creating a Box Manually .............................................................................................. 141
Downloading ISO Images ....................................................................................................................141
Booting ISO Images ............................................................................................................................143
Using the Boot Command and preseed.cfg ........................................................................................150
Timing .......................................................................................................................... 153
Working with the Open Virtualization Format (OVF) ..................................................... 154
Summary ...................................................................................................................... 155
In the Next Chapter, You Will Learn . . . ......................................................................... 155
Reading List ................................................................................................................. 155
Test Yourself ................................................................................................................. 156
Exercises ...................................................................................................................... 156
xiii
■ CONTENTS
■Chapter 8: Configuring Vir tual Machines .......................................................... 157
Vir tualBox-Related Configuration ................................................................................. 158
VM Name ............................................................................................................................................158
GUI Mode ............................................................................................................................................159
RAM .................................................................................................................................................... 161
Number of CPUs .................................................................................................................................163
Other Physical Properties ...................................................................................................................163
General Settings ........................................................................................................... 164
Hostname ...........................................................................................................................................164
Post-up Messages .............................................................................................................................. 165
Booting and Halting Timeouts .............................................................................................................166
SSH .....................................................................................................................................................166
X11 Forwarding ..................................................................................................................................167
Base Box .............................................................................................................................................169
Using Checksums for Boxes ............................................................................................................... 170
Networking ................................................................................................................... 171
Port Forwarding .................................................................................................................................. 171
Port Collision .......................................................................................................................................173
Private Networks ................................................................................................................................174
Public Networks .................................................................................................................................177
Synced Folders ............................................................................................................. 178
Synchronization Types ........................................................................................................................ 179
Benchmarking Disk Operations ..........................................................................................................179
VirtualBox Shared Folders ..................................................................................................................181
NFS ..................................................................................................................................................... 181
rsync ...................................................................................................................................................182
Server Message Block (SMB) ............................................................................................................. 183
Platform-Related Configuration .................................................................................... 183
Summary ...................................................................................................................... 184
xiv
■ CONTENTS
In the Next Chapter, You Will Learn . . . .........................................................................
184
Reading List ................................................................................................................. 184
Test Yourself ................................................................................................................. 185
Exercises ...................................................................................................................... 186
■Chapter 9: One True Workflow ........................................................................... 187
Most Common Antipattern ............................................................................................ 187
Is it an Antipattern? ...................................................................................................... 189
Generating Base Boxes ................................................................................................ 189
Generating Base Boxes with Packer ...................................................................................................190
Generating Customized Boxes ............................................................................................................191
Modularize Boxes with Provisioner Modules................................................................ 195
Embedding Submodules .............................................................................................. 198
Puppet Submodule Antipattern .................................................................................... 200
Bake Everything in the Customized Box ....................................................................... 200
Summary ...................................................................................................................... 201
In the Next Chapter, You Will Learn . . . ......................................................................... 201
Reading List ................................................................................................................. 202
Test Yourself ................................................................................................................. 202
Exercises ...................................................................................................................... 202
■Chapter 10: Going Pro ....................................................................................... 205
The Challenge ............................................................................................................... 205
SCM Tools ..................................................................................................................... 206
Development /Production Mapping ............................................................................... 206
Multimachine Settings ................................................................................................. 207
Debugging .................................................................................................................... 209
Using Vagrant Plug-ins ................................................................................................. 209
Vagrant-cachier Plug-in ......................................................................................................................209
Vagrant-winnfsd Plug-in .....................................................................................................................209
xv
■ CONTENTS
Vagrant-puppet-install Plug-in ...........................................................................................................
210
Vagrant-omnibus Plug-in ....................................................................................................................210
Vagrant-hostupdater Plug-in ..............................................................................................................210
Vagrant-vbguest Plug-in .....................................................................................................................210
Working with Atlas.Hashicorp.com ............................................................................... 210
Versioning Boxes .......................................................................................................... 218
Sharing Your Environment ............................................................................................ 220
HTTP Shares .......................................................................................................................................220
SSH Shares .........................................................................................................................................221
Summary ...................................................................................................................... 222
Reading List ................................................................................................................. 222
Test Yourself ................................................................................................................. 222
Exercises ...................................................................................................................... 223
Index ..................................................................................................................... 225

xvii
About the Author
Włodzimierz Gajda is an experienced trainer and a highly passionate
teacher. During the last 20 years, he has conducted numerous courses
on various subjects, ranging from programming in C language and
TCP/IP networking to building LEGO robots and developing web
applications with PHP. Włodzimierz is currently employed at the Institute
of Mathematics and Computer Science, John Paul II Catholic University of
Lublin. His preferred leisure activities are trekking in the Tatra Mountains
and playing the blues (
http://www.youtube.com/user/gajdaw). He lives
with his wife and three children in Lublin, Poland.
Włodzimierz provides training all over Europe on various topics,
including Vagrant, git, PHP, Symfony, TDD, and BDD. You can contact him
by e-mail at:

xix
About the Technical Reviewer
Tyler Merry is a UX Technologist for Universal Mind, where his focus is on bridging the gap between idea
and implementation. Tyler approaches all problems through the filter of experimentation. He believes
that the fastest and most accurate solution is working provocatively through multiple experiments and
informal testing.
Through past work experiences with Coke, Sony, Pfizer, P&G, Ford, and Vail Resorts, Tyler has learned
the value of accuracy and communication. His work with early startups helped to reinforce the value of
iteration, speed, and efficiency.
When not keeping uptodate with web and UX trends, Tyler spends his time on his
fewer-than-four-wheeled-vehicles (bicycle, motorcycle, unicycle) or learning whatever skill catches his
fancy for the day: knitting, photography, or juggling, for example.

xxi
Acknowledgments
First and foremost, I want to thank all the authors of the software this book describes. My sincere thanks go
to Mr. Mitchell Hashimoto and all the contributors at Vagrant and Packer. I am also very indebted to Oracle
for its VM VirtualBox product; and to Puppet Labs, Chef Software, and Ansible for their provisioners.
Thanks to Ubuntu, Chef Software, and HashiCorp for their boxes available at atlas.hashicorp.com;
and to Chef Software, Mischa Taylor, and Anna Moujan for their chef/bento and boxcutter/ubuntu
products.
Because git plays an important role in the way I handle my boxes, I also want to express my gratitude to
git authors Linus Torvalds and Junio Hamano, and to the whole git community.
The staff of Apress has done an outstanding job during the production of this book. I want to thank
• Michelle Lowman and James Markham for their confidence
• Christine Ricketts for her constant support and patience
• Louise Corrigan for handing the initial stage of the project
• Nancy Sixsmith for copy editing
• And Kumar Dhaneesh for his work on my manuscript
My special thanks go to technical reviewer Tyler Merry who helped me get the book into its final shape.
Thanks, Tyler!
—Włodzimierz Gajda
Lublin, Poland
April 28, 2015
