
Mini-Photobook
©2015 DNP IMAGINGCOMM AMERICA COROPRATION PN: DOC-U-MPB-V10-R01
A
LL RIGHTS RESERVED REV: 01.15.2014
User Guide
License Agreements
SOFTWARE END USER LICENSE AGREEMENT (EULA). PLEASE READ THE FOLLOWING TERMS AND CONDITIONS CAREFULLY BEFORE
USING THIS SOFTWARE. USING THIS SOFTWARE INDICATES YOUR ACCEPTANCE OF THESE TERMS AND CONDITIONS. IF YOU DO NOT
AGREE WITH THESE TERMS AND CONDITIONS, DO NOT DOWNLOAD OR USE THIS SOFTWARE. This Software License Agreement (the “Software
License Agreement”) is an agreement entered into by and between you (hereinafter referred to as “You” or Your”) and DNP Imagingcomm America
Corporation (DNP IAM) (the “Licensor”) for any and all software and documentation provided by the Licensor (the “Software”). The Software includes
items available either by Internet download, contained in a CD/DVD or contained within a 3
rd
party software installer. By using the Software, You agree to
the terms of this Software License Agreement. The Licensor grants You a non-exclusive, non-transferable license to use one copy of the Software in
object code only.
OWNERSHIP RETAINED BY LICENSOR. The Licensor owns all title and copyrights in and to the Software and the Licensor has the full right and
authority to grant the license granted herein. Your license does not give You any title or ownership in the Software, nor is it a sale of any rights in the
Software. The only right granted to You is the right to use the Software in accordance with the terms of this Software License Agreement. All rights not
specifically granted to You under this Software License Agreement are reserved by the Licensor. You may make only a single copy of the Software as a
backup copy, provided that it includes all notices and markings, including copyright, trademark and other proprietary notices as on the original. Such
backup copy of the Software may not be in use at any time unless the original Software is damaged beyond use, and both the original and the copy must
remain in Your possession and control. You may not copy the software onto any public network. You may not, and You may not allow others to modify,
disassemble, decompile, translate, reverse engineer, reproduce, make derivative works of or enhance the Software. You may not, and You may not allow
others to rent, lease, sell, sub license, export or otherwise transfer the Software to any other person. In addition to any other rights it may have, the
Licensor may terminate this Software License Agreement if You fail to comply with the terms and conditions hereof. In such event, You must cease all use
of the Software and destroy all copies of the Software and all of its component parts. At the Licensor’s sole discretion, the Licensor may from time to time
provide You with updates to the Software. Any such updates shall become part of the Software licensed to You hereunder and subject to all of the terms
and conditions of this Software License Agreement.
DISCLAIMER OF WARRANTIES. The Licensor expressly disclaims any and all warranties relative to the Software. THE SOFTWARE IS PROVIDED “AS
IS,” WITHOUT WARRANTY OF ANY KIND, EXPRESS OR IMPLIED, INCLUDING, WITHOUT LIMITATION, THE IMPLIED WARRANTIES OF
MERCHANTABILITY AND FITNESS FOR A PARTICULAR PURPOSE, NON-INFRINGEMENT, COURSE OF DEALING AND USAGE OF TRADE. YOU
HEREBY ASSUME THE ENTIRE RISK AS TO THE QUALITY AND PERFORMANCE OF THE SOFTWARE.
LIMITATION OF LIABILITY. In no event shall the Licensor be liable for any direct, special, incidental, indirect or consequential damages whatsoever to
You (including, without limitation, damages for loss of profits, sales or data or for business interruption) arising out of the use of or inability to use the
Software, even if the Licensor has been advised of the possibility of such damages. In any event, the Licensor’s entire liability under any provision shall be
limited to the amount actually paid by You for the Software. Because some states and jurisdictions do not allow the exclusion or limitation of liability, the
above limitation may not apply to You. If any provision of the Software License Agreement is declared by a court of competent jurisdiction to be invalid for
any reason, such invalidity shall not affect the remaining provisions hereof.
GOVERNING LAW. This Software License Agreement shall be governed by the laws of the State of North Carolina without regard to conflict of laws
principles. You and the Licensor hereby consent to the exclusive venue and jurisdiction of the state and federal courts located in Mecklenburg County,
North Carolina.
TAXES. You are responsible for all taxes or charges imposed by any government or regulatory authority with respect to the delivery and use of the
Software, but exclusive of any taxes based upon the Licensor’s net income.
TERM. This License Agreement is effective until terminated. You may terminate this License Agreement by ceasing to use the Software and, if applicable,
returning the Software to the Licensor. Licensor may terminate this License Agreement if You breach any of the terms and conditions. Upon termination of
this License Agreement for any reason, You shall cease using the Software and, if applicable, return the Software to the Licens
or. All provisions of this
Agreement relating to disclaimers of warranties, limitation of liability, remedies, or damages, and Licensor’s proprietary rights shall survive termination.
ACKNOWLEDGMENTS. The ICC profiles provided by DNP Imagingcomm America Coropration are prepared using the technology of X-Rite,
Incorporated. YOU ACKNOWLEDGE YOU HAVE READ AND UNDERSTAND THIS AGREEMENT AND AGREE TO BE BOUND BY ITS TERMS. YOU
FURTHER AGREE THAT THIS AGREEMENT IS THE COMPLETE AND EXCLUSIVE STATEMENT OF THE AGREEMENT BETWEEN YOU AND
LICENSOR, AND SUPERSEDES ANY PROPOSAL OR PRIOR AGREEMENT, ORAL OR WRITTEN, AND ANY OTHER COMMUNICATIONS
RELATING TO THE SOFTWARE ADDRESSED IN THIS AGREEMENT.
The information contained in this document represents the current view of DNP Imagingcomm America Coropration on the issues discussed as of the
date of publication. Because DNP Imagingcomm America Coropration must respond to changing market conditions, it should not be interpreted to be a
commitment on the part of DNP Imagingcomm America Coropration, and DNP Imagingcomm America Coropration cannot guarantee the accuracy of any
information presented after the date of publication. This document is for informational purposes only. DNP Imagingcomm America Coropration MAKES
NO WARRANTIES, EXPRESSED OR IMPLIED, AS TO THE INFORMATION IN THIS DOCUMENT.
Complying with all applicable copyright laws is the responsibility of the user. Without limiting the rights under copyright, no part of this document may be
reproduced, stored in or introduced into a retrieval system, or transmitted in any form or by any means (electronic, mechanical, photocopying, recording,
or otherwise), or for any purpose, without the express written permission of DNP Imagingcomm America Coropration
DNP Imagingcomm America Coropration may have patents, patent applications, trademarks, copyrights, or other intellectual property rights covering
subject matter in this document. Except as expressly provided in any written license agreement from DNP Imagingcomm America Coropration, the
furnishing of this document does not give you any license to these patents, trademarks, copyrights, or other intellectual property.
Tomo™, Hot Folder Print™, PrintCenter™, DS-Series Printers™, and PrintTurbine™ are trademarks and Nexlab® is a registered trademark of DNP
Imagingcomm America Coropration PrintRush® and Party Print® are registered trademarks of Dai Nippon Printing Company LTD. The names of actual
companies and products mentioned herein may be the trademarks of their respective owners.
DNP Imagingcomm America Coropration * 4524 Enterprise Dr NW * Concord, NC 28027 * USA
© 2000-2015 DNP Imagingcomm America Coropration All rights reserved.

DNP Imagingcomm America Coropration 3
CONTENTS
1. Before You Begin
Documentation Conventions . . . . . . . . . . . . . . . . . . . . . . . . . . . . . . . . . . . . . . . . . . . . . . . . . . . . . . . . . . . . . 5
Text Elements. . . . . . . . . . . . . . . . . . . . . . . . . . . . . . . . . . . . . . . . . . . . . . . . . . . . . . . . . . . . . . . . . . . . . . . . . . . . . . . . . . . . . . . . 5
Text Treatments. . . . . . . . . . . . . . . . . . . . . . . . . . . . . . . . . . . . . . . . . . . . . . . . . . . . . . . . . . . . . . . . . . . . . . . . . . . . . . . . . . . . . . 5
Important Safety Instructions . . . . . . . . . . . . . . . . . . . . . . . . . . . . . . . . . . . . . . . . . . . . . . . . . . . . . . . . . . . 5
General Safety Precautions . . . . . . . . . . . . . . . . . . . . . . . . . . . . . . . . . . . . . . . . . . . . . . . . . . . . . . . . . . . . . . 6
2. Installing the Mini-Photobook Application
Minimum System Requirements: . . . . . . . . . . . . . . . . . . . . . . . . . . . . . . . . . . . . . . . . . . . . . . . . . . . . . . . . . 7
Installing the Mini-Photobook Software . . . . . . . . . . . . . . . . . . . . . . . . . . . . . . . . . . . . . . . . . . . . . . . . . . . 7
3. Overview
General Workflow . . . . . . . . . . . . . . . . . . . . . . . . . . . . . . . . . . . . . . . . . . . . . . . . . . . . . . . . . . . . . . . . . . . . 11
Touring the Mini-Photobook Interface . . . . . . . . . . . . . . . . . . . . . . . . . . . . . . . . . . . . . . . . . . . . . . . . . . . 12
Mini-Photobook Toolbar . . . . . . . . . . . . . . . . . . . . . . . . . . . . . . . . . . . . . . . . . . . . . . . . . . . . . . . . . . . . . . . . . . . . . . . . . . . . . 12
Product Category Screen . . . . . . . . . . . . . . . . . . . . . . . . . . . . . . . . . . . . . . . . . . . . . . . . . . . . . . . . . . . . . . . . . . . . . . . . . . . . . 12
Image Selection Screen . . . . . . . . . . . . . . . . . . . . . . . . . . . . . . . . . . . . . . . . . . . . . . . . . . . . . . . . . . . . . . . . . . . . . . . . . . . . . . . 13
Page Layout Screen . . . . . . . . . . . . . . . . . . . . . . . . . . . . . . . . . . . . . . . . . . . . . . . . . . . . . . . . . . . . . . . . . . . . . . . . . . . . . . . . . . 13
Edit Screen . . . . . . . . . . . . . . . . . . . . . . . . . . . . . . . . . . . . . . . . . . . . . . . . . . . . . . . . . . . . . . . . . . . . . . . . . . . . . . . . . . . . . . . . . 14
4. Using the Mini-Photobook Application
Selecting a Product . . . . . . . . . . . . . . . . . . . . . . . . . . . . . . . . . . . . . . . . . . . . . . . . . . . . . . . . . . . . . . . . . . . 15
Importing Images . . . . . . . . . . . . . . . . . . . . . . . . . . . . . . . . . . . . . . . . . . . . . . . . . . . . . . . . . . . . . . . . . . . . . 16
Saving a Photobook Template . . . . . . . . . . . . . . . . . . . . . . . . . . . . . . . . . . . . . . . . . . . . . . . . . . . . . . . . . . 18
Loading a Photobook Template . . . . . . . . . . . . . . . . . . . . . . . . . . . . . . . . . . . . . . . . . . . . . . . . . . . . . . . . . 18
Saving a Completed Photobook . . . . . . . . . . . . . . . . . . . . . . . . . . . . . . . . . . . . . . . . . . . . . . . . . . . . . . . . . 20
Loading a Completed Photobook Template . . . . . . . . . . . . . . . . . . . . . . . . . . . . . . . . . . . . . . . . . . . . . . . 21
Printing a Photobook . . . . . . . . . . . . . . . . . . . . . . . . . . . . . . . . . . . . . . . . . . . . . . . . . . . . . . . . . . . . . . . . . . 21
5. Making Page Layout Changes
Opening the Layout Tools Screen . . . . . . . . . . . . . . . . . . . . . . . . . . . . . . . . . . . . . . . . . . . . . . . . . . . . . . . 23

4 DNP Imagingcomm America Coropration.
Mini-Photobook User Guide
Touring the Layout Tools Screen . . . . . . . . . . . . . . . . . . . . . . . . . . . . . . . . . . . . . . . . . . . . . . . . . . . . . . . . 23
Using the Image Zoom Feature . . . . . . . . . . . . . . . . . . . . . . . . . . . . . . . . . . . . . . . . . . . . . . . . . . . . . . . . . 24
Moving the Images Within the Page Layout . . . . . . . . . . . . . . . . . . . . . . . . . . . . . . . . . . . . . . . . . . . . . . . 25
Changing the Image Orientation . . . . . . . . . . . . . . . . . . . . . . . . . . . . . . . . . . . . . . . . . . . . . . . . . . . . . . . . 26
Editing the Page Layout . . . . . . . . . . . . . . . . . . . . . . . . . . . . . . . . . . . . . . . . . . . . . . . . . . . . . . . . . . . . . . . 27
Adding Text to the Photobook . . . . . . . . . . . . . . . . . . . . . . . . . . . . . . . . . . . . . . . . . . . . . . . . . . . . . . . . . . 28
6. Making Image Edits
Cropping Images . . . . . . . . . . . . . . . . . . . . . . . . . . . . . . . . . . . . . . . . . . . . . . . . . . . . . . . . . . . . . . . . . . . . . 29
Rotating Images . . . . . . . . . . . . . . . . . . . . . . . . . . . . . . . . . . . . . . . . . . . . . . . . . . . . . . . . . . . . . . . . . . . . . . 31
DNP Imagingcomm America Coropration 5
1
Before You Begin
Use the information in this chapter to better understand this document and any standard procedures or warnings that may
come with your product.
Documentation Conventions
When using this document, several text elements and treatments are repeated throughout. The following is an explanation
of these symbols and headings:
Text Elements
Attention
This denotes important information concerning safety when working with the equipment. Failure to comply with
an Attention statement can cause you injury or harm or cause damage to the system.
Note
This signifies convenient or useful instructions.
Used to denote a procedure that requires two people to lift a heavy item.
Warns of a time-sensitive step. Be sure to read the surrounding instructions completely before performing this operation.
Signifies an item that needs to be entered on the specified form.
Text Treatments
Bold Text – Indicates items you can select, such as buttons and menu entries.
Italic Text – Indicates variable text or placeholders for information, such as user names and directory paths. When entering
directory paths and so forth, the word in italics should not be typed, but should be replaced by the appropriate text. Italic
text also introduces new words and is occasionally used for emphasis in text.
Monospace– Distinguishes information that is displayed on the screen, as well as the text that you should enter.
Important Safety Instructions
Safety is paramount when installing and operating the system. These safety instructions are to protect you and the
customer and the overall public. The following bullet points apply to the safety instructions in this manual:
Read all of these instructions before setting up, installing, and operating your system.
Follow all warnings, safety precautions, and notices for all procedures in this manual.

6 DNP IMS America, Corp.
General Safety Precautions Mini-Photobook User Guide
When in doubt, stop what you are doing and reassess the safety of the situation or procedure. Never continue with a
step or procedure when there is the slightest doubt regarding safety.
Save these instructions for future reference.
General Safety Precautions
Never install or setup the system near water.
Never place the system on an unstable platform.
Never place the system near a heat source, such as a heater or furnace.
Never perform any of these steps while wearing jewelry (rings, loose necklaces, bracelets, etc.), neckties, or other
clothing that could get caught in the equipment. These items can get caught in the equipment or may conduct
electricity and cause injury.
Never insert any foreign object into the system unit without powering the system OFF first.
Never block ventilation ports; allow plenty of room around the system for ventilation.
Never use water or liquid to extinguish a fire on the system unit.
Always protect the power cord from accidental kinks, cuts, and foot traffic.
Always operate this system from the correct type of grounded power source.
Always clean and maintain the system in the prescribed manner as instructed in this manual.
Always use this equipment in the specified manner as recommended by the manufacturer.
Failure to observe safety precautions voids your warranty and may cause damage to the unit and could result in
personal injury or death.
Contact DNP Imagingcomm America Coropration immediately if:
The system is damaged due to fire or flood; or is otherwise unsafe to operate.
Any part of the system is dropped, cracked, or is not operating properly after performing cleaning and maintenance.
You have any questions not answered in this manual.

DNP Imagingcomm America Coropration 7
2
Installing the Mini-Photobook Application
Attention
If you have not already, unpack and install the DNP DS80-DX printer.
Minimum System Requirements:
Available Disk Space: 1GB or more
Operating System: Windows 7 or 8
Other Software: Hot Folder Print v2.1
Installing the Mini-Photobook Software
1. Make sure the DS80-DX is set up and connected to your PC.
2. If you have not already, install the DNP IAM Hot Folder Print v2.1 software.
3. Start the Hot Folder Print software and then minimize the application.
4. From the installation CD, locate the application Mini-Photobook setup file.
5. Double-click on the Mini-Photobook setup file.
8 DNP Imagingcomm America Coropration.
Installing the Mini-Photobook Software Mini-Photobook User Guide
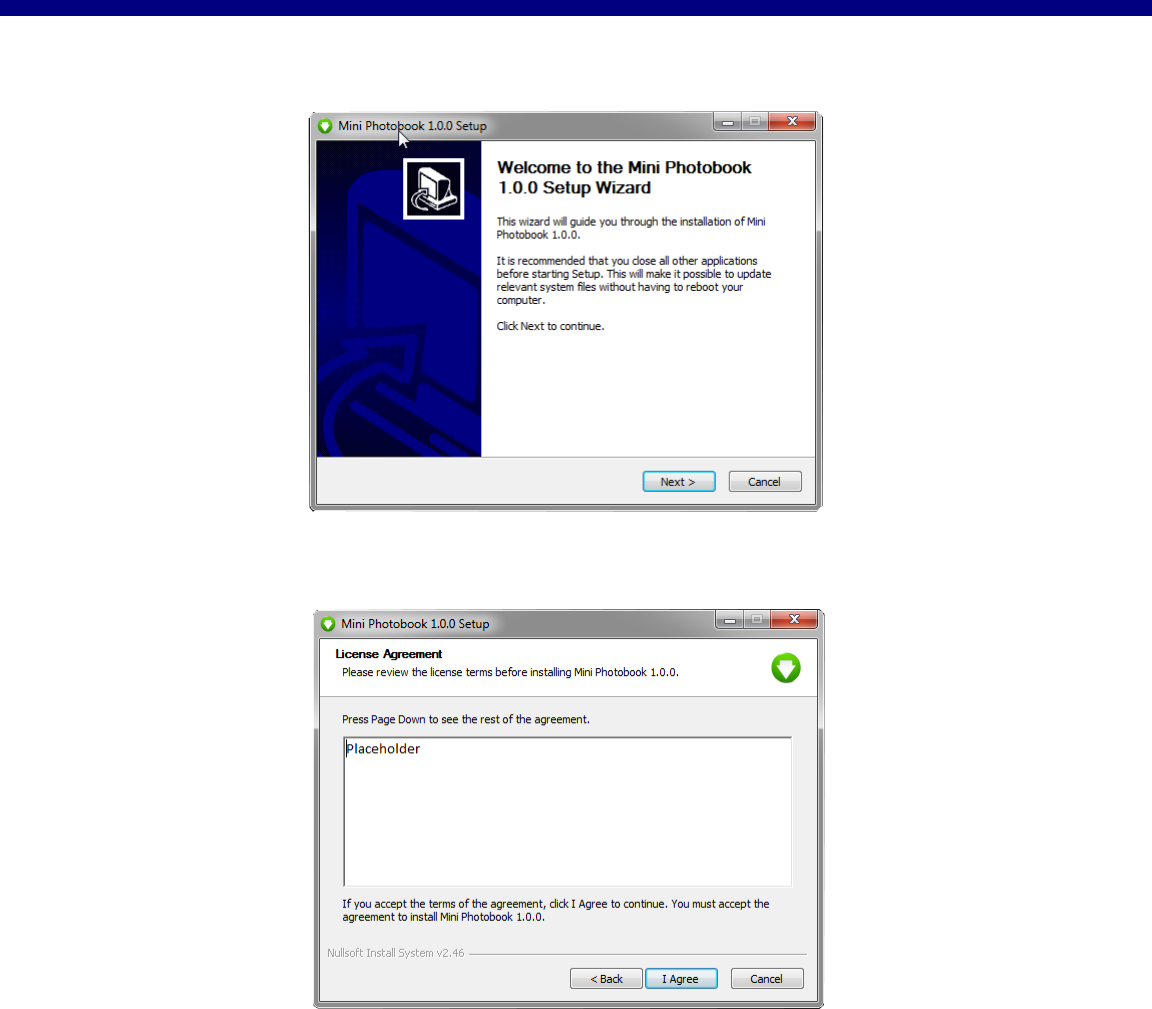
6. When the installation wizard appears, select the Install button.
-
7. On the license agreement screen, click I Agree to accept the licensing terms and continue with the software
installation.
8. The software installation begins automatically.

DNP Imagingcomm America Coropration 9
Installing the Mini-Photobook Software Mini-Photobook User Guide
9. When the installation is complete, press the Finish button to close the installation wizard.
10. There is now an icon on your system desktop for the Mini-Photobook application.

10 DNP Imagingcomm America Coropration.
Installing the Mini-Photobook Software Mini-Photobook User Guide

DNP Imagingcomm America Coropration 11
3
Overview
The Mini-Photobook application was created to use in conjunction with DNP Imagingcomm America Coropration’s Hot
Folder Print v2.1 software and the DS80-DX duplex printer. This application offers a fast and easy solution for printing
photobooks during trade shows or other events. The software offers printing of the images of your choice, or through the
use of pre-determined templates with photo spaces (similar to a bordered print).
This document explains the basic operation of the software application as well as how to install the application.
General Workflow
This is the general workflow when using Mini-Photobook.
1. Launch the Mini-Photobook application.
2. Select a template.
3. Load your images.
4. Select your images.
5. Apply effects.
6. Preview your book.
7. Print your images.

12 DNP Imagingcomm America Coropration.
Touring the Mini-Photobook Interface Mini-Photobook User Guide
Touring the Mini-Photobook Interface
The Mini-Photobook software is easy to use and navigate! Use this section to familiarize yourself with the software.
Mini-Photobook Toolbar
The toolbar at the top of the Mini-Photobook screen can be used throughout the software to perform the following actions:
Start Over: Restarts the photobook session. Any changes you have not saved are lost.
Language: Switch between any of the offered languages.
Load More: Load more images into the photobook session.
Help: Access the help files for more information on how to use the software.
Hide: Minimize the Mini-Photobook software to the system taskbar.
Close: Closes the Mini-Photobook software. Any unsaved changes are lost.
Product Category Screen
Select from any of the offered products, saved templates, or completed books. See “Selecting a Product”.

DNP Imagingcomm America Coropration 13
Image Selection Screen Mini-Photobook User Guide
Image Selection Screen
Select your images for the current photobook session. See “Importing Images”.
Page Layout Screen
Make changes to the page layouts, such as moving images, deleting images, adding text, or adding image boxes for use in
templates. See “Making Page Layout Changes”.


DNP Imagingcomm America Coropration 15
4
Using the Mini-Photobook Application
Selecting a Product
1. Select your product or template from the main screen.
2. On the next screen, select how many pages you want in your photobook.

16 DNP Imagingcomm America Coropration.
Importing Images Mini-Photobook User Guide
Note
Mini-Photobook comes with pre-defined templates for standard mini-photobook sizes. However,
you can create your own templates for any standard photobook size. See “Saving a Photobook
Template”.
Importing Images
Once you have selected your product type and number of pages, you are prompted to load your images.
Note
At any point during the product selection process, you can insert your media drive.
1. After you have selected your product type and page numbers, if you have not already done so, insert your media
drive.
2. Select your media drive from the available options.
3. Use the onscreen options to select where your images are stored on your media drive.

DNP Imagingcomm America Coropration 17
Importing Images Mini-Photobook User Guide
4. Use the Thumbnail Selection screen to select which images you want to load. A green checkmark appears on
selected images.
5. To deselect an image, click the image again.
6. Press the Show Selected button to view only the images you've selected. Press the Show All button to view all
images in your current directory.
Note
If you select fewer images than there are pages in your photobook, the images are repeated
throughout the photobook.
7. When you are finished, press the Done button. The images are loaded, and the Preview screen appears.
You have now chosen your product and loaded your images. Use the following chapters to make changes to the photobook
layout and images within the photobook.

18 DNP Imagingcomm America Coropration.
Saving a Photobook Template Mini-Photobook User Guide
Saving a Photobook Template
If you are using Mini-Photobook for trade shows or other events, you may want to save photobook templates to use to
advertise your business or event where only a few customer images are inserted in each book. Saving a photobook as a
template allows you to do this.
1. Create your photobook template by selecting the product and number of pages.
2. Load your static images. Static images are images you do not want to change when creating photobooks from a
template. Some common examples of static images are advertisements for you business, information about the
event or trade show, coupons for your business, book cover pages, or contact information. Create the static images
using your preferred image manipulation software and save the static images in the correct size and aspect ratio for
the book template.
3. Make any edits necessary to your static pages.
4. Once have created your template, go to the Layout Tools screen and press the Save Work button.
5. When prompted, select the My Templates location.
6. The template is now saved in the My Templates category on the Product Selection screen (the main screen when
you open the Mini-Photobook software). You can access the template when needed.
Note
You cannot save over a current template. You must use a new name for each template you save.
Loading a Photobook Template
If you are using Mini-Photobook for trade shows or other events, you may want to save templates to use to advertise your
business or event where only a few customer images are inserted in each book. Saving a photobook as a template allows
you to do this. When you are ready to use the photobook template, simply load the template and your customer images into
a session to create a custom photobook with a personalized touch.
1. If you haven’t already, create your photobook template. See “Saving a Photobook Template”.
2. Start a new Mini-Photobook session.
3. From the main product selection page, select the My Templates option.

DNP Imagingcomm America Coropration 19
Loading a Photobook Template Mini-Photobook User Guide
4. Select your saved photobook template.
5. Load your customer images.
6. Press Import Images to continue.
7. The customer images you selected are automatically imported into the empty image boxes in the photobook
template.

20 DNP Imagingcomm America Coropration.
Saving a Completed Photobook Mini-Photobook User Guide
8. Press the Preview button at the bottom of the page to see the entire photobook layout. You can also use the Next
Page and Previous Page buttons on the Preview or Layout screens to browse through the pages and view where
the customer images were inserted.
9. Make any edits that are needed to the customer images.
10. Once you are done, you can either Save the photobook as a completed photobook or Print the book for your
customer.
Saving a Completed Photobook
You can save a photobook for future printing.
1. Once you are at a stopping point, go to the Layout Tools screen and press the Save Work button.
2. When prompted, select the Completed Work location.
3. The photobook is now saved in the Completed Books category on the Product Selection screen (the main screen
when you open the Mini-Photobook software). You can access the book when needed for reprinting or editing.

DNP Imagingcomm America Coropration 21
Loading a Completed Photobook Template Mini-Photobook User Guide
Note
You cannot save over a current photobook. You must use a new name for each photobook you
save.
Loading a Completed Photobook Template
Load completed photobooks to reprint orders as needed.
1. Start a new Mini-Photobook session.
2. From the main product selection page, select the Completed Books option.
3. Select your saved photobook.
4. Press the Preview button at the bottom of the page to see the entire photobook layout. You can also use the Next
Page and Previous Page buttons on the Preview or Layout screens to browse through the pages and view where
the customer images were inserted.
5. Make any edits that are needed to the completed photobook images.
6. Once you are done, you can either Save the photobook as another completed photobook or Print the book for your
customer.
Printing a Photobook
1. Once you have made any needed changes, simply press the Print button from either the Effects or Photo screens.

22 DNP Imagingcomm America Coropration.
Printing a Photobook Mini-Photobook User Guide

DNP Imagingcomm America Coropration 23
5
Making Page Layout Changes
Opening the Layout Tools Screen
1. From the Preview screen, select the Layout Tools button.
Touring the Layout Tools Screen
Use the Layout Tools screen to make changes to pages within your photobook. The Layout Tools screen also accesses the
Edit Tools screens.
The following are some of the modifications you can make from the Layout Tools screen:
Make the selected image larger or smaller on the page (zoom).
Move the image on the page.
Change the image orientation from portrait to landscape.
Remove the image and the image box from the page.

24 DNP Imagingcomm America Coropration.
Using the Image Zoom Feature Mini-Photobook User Guide
Remove only the image and keep the image box on the page. (Used for creating book templates.)
Swap the selected image.
Add text to the page.
Save the current photobook as a template for future use.
Print the photobook.
Using the Image Zoom Feature
1. Use the image zoom icons to make the selected image larger (+) or smaller (–) within the page.
Note
You can expand the image beyond the boundaries of the page using the zoom in and zoom out
buttons. Portions of the image that are shaded a darker gray will not be printed.
2. If you want to share the selected image across both pages (used for interior pages within the photobook), press the
Expand button. The image will automatically enlarge to fit the page(s) shown.
Note
Want to expand your image across both pages in the layout? This can only be done on interior
photobook pages that are consecutive within the book. Covers will only expand to the one page.
3. For dual page layouts, the image on the right page is always shown on top, or in front, of the left page image. The
image on the left page is shown under, or behind, the right page image.
4. Press the Undo button to remove any changes you have made to the selected image. This action removes crop
changes as well.

DNP Imagingcomm America Coropration 25
Moving the Images Within the Page Layout Mini-Photobook User Guide
Moving the Images Within the Page Layout
1. To move an image, click to select that image. A red box appears around a selected image.
2. Simply click and drag the image to the position you want within the page layout. You can click and drag anywhere
within the image or use the corner controls to move the image.
Note
You can move the image beyond the boundaries of the page. Portions of the image that are
shaded a darker gray will not be printed.

26 DNP Imagingcomm America Coropration.
Changing the Image Orientation Mini-Photobook User Guide
Changing the Image Orientation
1. To change the image between the portrait and landscape orientations, select the image.
2. Press the Change Orientation button to change the image orientation. Changing the image orientation may remove
any crop changes you made to your image.
Note
Do you want to rotate your image? The Change Orientation button only changes the image
between portrait and landscape orientations. Use the rotate options on the Edit Tools screen to
rotate your image clockwise or counterclockwise.

DNP Imagingcomm America Coropration 27
Editing the Page Layout Mini-Photobook User Guide
Editing the Page Layout
1. Use the edit options to edit the image or text you have selected. All edit functions work for images and the delete edit
function works for text as well.
2. Press the Delete button to remove the selected image (and image box) from the page layout.
Note
The image box is the placeholder for where images are allowed within the photobook. By
removing an image box, an image is no longer needed to complete the photobook. Leaving an
empty image box saves that area as a placeholder for future images. This is helpful when creating
templates to use, such as for trade shows or other events.
3. If you have removed the image box from the page, an Insert Image button appears. Use this button to add an image
to the page.
4. Press the Remove Image button to remove only the image, and keep the image box on the page. When you are
creating photobook templates for use multiple times, this is a helpful tool to set up where you want the customer
images inserted.
5. Press the Change Image button to change the selected image with any other image you imported during the
photobook session.

28 DNP Imagingcomm America Coropration.
Adding Text to the Photobook Mini-Photobook User Guide
Adding Text to the Photobook
1. Press the Add Text button to open a keyboard and the text edit screen.
2. You can add text to any page layout. You can also add multiple text boxes.
3. Use the text edit screen to change the font, text size, text color, add a drop shadow, or further format the selected text
box.

DNP Imagingcomm America Coropration 29
6
Making Image Edits
Cropping Images
1. From the Layout screen, select your image. A red box surrounds the selected image.

30 DNP Imagingcomm America Coropration.
Cropping Images Mini-Photobook User Guide
2. Select the Edit Image button. The Crop Tools screen appears.
3. Your image is shown in the original aspect ratio. A red dotted line outlines the printable area of the image. Any portion
of the image that will not be printed is shaded with gray.
4. Move the crop box on the photo by clicking and dragging the center box.
5. Resize the crop box on the image by clicking and dragging any of the corner boxes.
6. Press the Done button when you have finished making changes.

DNP Imagingcomm America Coropration 31
Rotating Images Mini-Photobook User Guide
7. If at any time you want to remove the crop changes you have made, press the Reset Crop button on the Crop Tools
screen.
Note
If you are unhappy with crop changes once you are on the Page Layout screen, press the Undo
button to remove those changes. However, any other move or crop changes you have made to
your image will also be removed.
Rotating Images
1. From the layout page, select your image. A red box surrounds the selected image.
2. Select the Edit Image button. The Crop Tools screen appears.
3. Your image is shown in the original aspect ratio. A red dotted line outlines the printable area of the image. Any portion
of the image that will not be printed is shaded with gray.

32 DNP Imagingcomm America Coropration.
Rotating Images Mini-Photobook User Guide
4. Press the Rotate Photo Right or Rotate Photo Left buttons to rotate your image.
5. Press the Done button when you have finished making changes.

DNP Imagingcomm America Coropration
4524 Enterprise Drive NW
Concord, NC 28027
www.dnpimagingcomm.com
www.dnpphoto.com
