
Teddy Ruxpin Rebuild
Created by Erin St Blaine
https://learn.adafruit.com/teddy-ruxpin-rebuild
Last updated on 2024-06-03 03:54:10 PM EDT
©Adafruit Industries Page 1 of 18

3
4
11
13
14
17
Table of Contents
Overview
• Parts Needed
Creature Build
Creating Audio Files
• What Files Do I Need?
• Creating Content
• Converting Audio Files
Building a new story file
• Rhubarb json files
Mouth Movement
• Songs & Music Files
• Create the Mouth Movement File
• Modifying Mouth Movement Files
Story Files
• Troubleshooting
©Adafruit Industries Page 2 of 18

Overview
Come Dream with Me Tonight...
Teddy Ruxpin is a very cool animatronic talking teddy bear toy, originally from the
1980s and re-released in 2017. Kids absolutely love this guy -- he tells stories, sings
songs, and captivates kids' attention for hours.
These days, Teddy Ruxpin toys are available on eBay for a fraction of their original
cost. The animatronics work great, and there's no other source we've found for a
complete animatronic system for such an affordable price.
The amazing engineers at Adafruit have figured out how to unpack Teddy's code and
upload our own voice files and eye graphics. And since he's such a standard size for a
stuffy, his skin is changeable too. I've put my Teddy Ruxpin's insides into a Figment
the Dragon stuffy, and he fits almost perfectly.
I have two baby nieces who love dragons, so I got their grandparents to record audio
files for this toy, so they can hear a story read by Grandma or Grandpa whenever they
wish.
Parts Needed
A Teddy Ruxpin from 2017(https://adafru.it/18VE) -- these are easy to find on
eBay
A 10" stuffy with a similar shape to Teddy: I used Figment the Dragon(https://
adafru.it/18VF)
A USB micro cable
Scissors, a thread ripper, and a needle & thread
•
•
•
•
©Adafruit Industries Page 3 of 18

Accessories to cover any scars
Creature Build
Find or make a stuffy that's about the same size as Teddy. I used this Figment the
Dragon(https://adafru.it/18VF) stuffy. He's also 10" tall, and his mouth lines up almost
perfectly with Teddy's mouth.
Take Teddy's vest off and cut the zip tie
that holds his shirt in place.
•
©Adafruit Industries Page 4 of 18


Turn Teddy's paws inside out and use a
thread ripper to remove the switch. Also
remove the piece of muslin fabric that's
sewn to the inside of his paw to hold the
switch in place. We'll use this same bit of
fabric to install the switch into Figment's
paws.
Open Figment in the same way, starting at
the back of the neck. You'll need to
remove a fair amount of stuffing. Set it
aside for now, we'll tuck some of it back in
so he stays nice and huggable.
I made a small hole at first and widened it
bit by bit, to minimize the amount of
sewing I needed to do at the end.
©Adafruit Industries Page 6 of 18

Turn Figment's paws inside out and hand-
stitch the muslin pieces you pulled out of
Teddy's paws onto the front side
Figment's paws. Slip the switches inside
and sew them in place, making sure the
button presses from the front of the paws
when they're turned right-side out again.
Use a utility knife to carefully cut Figment's
pupils out. I stayed just inside the black
section, to keep the fabric from unraveling
and to give him a bit of "eyeliner".
I colored the inside of his eyes with a
sharpie to cover up any white threads that
were showing.
©Adafruit Industries Page 7 of 18

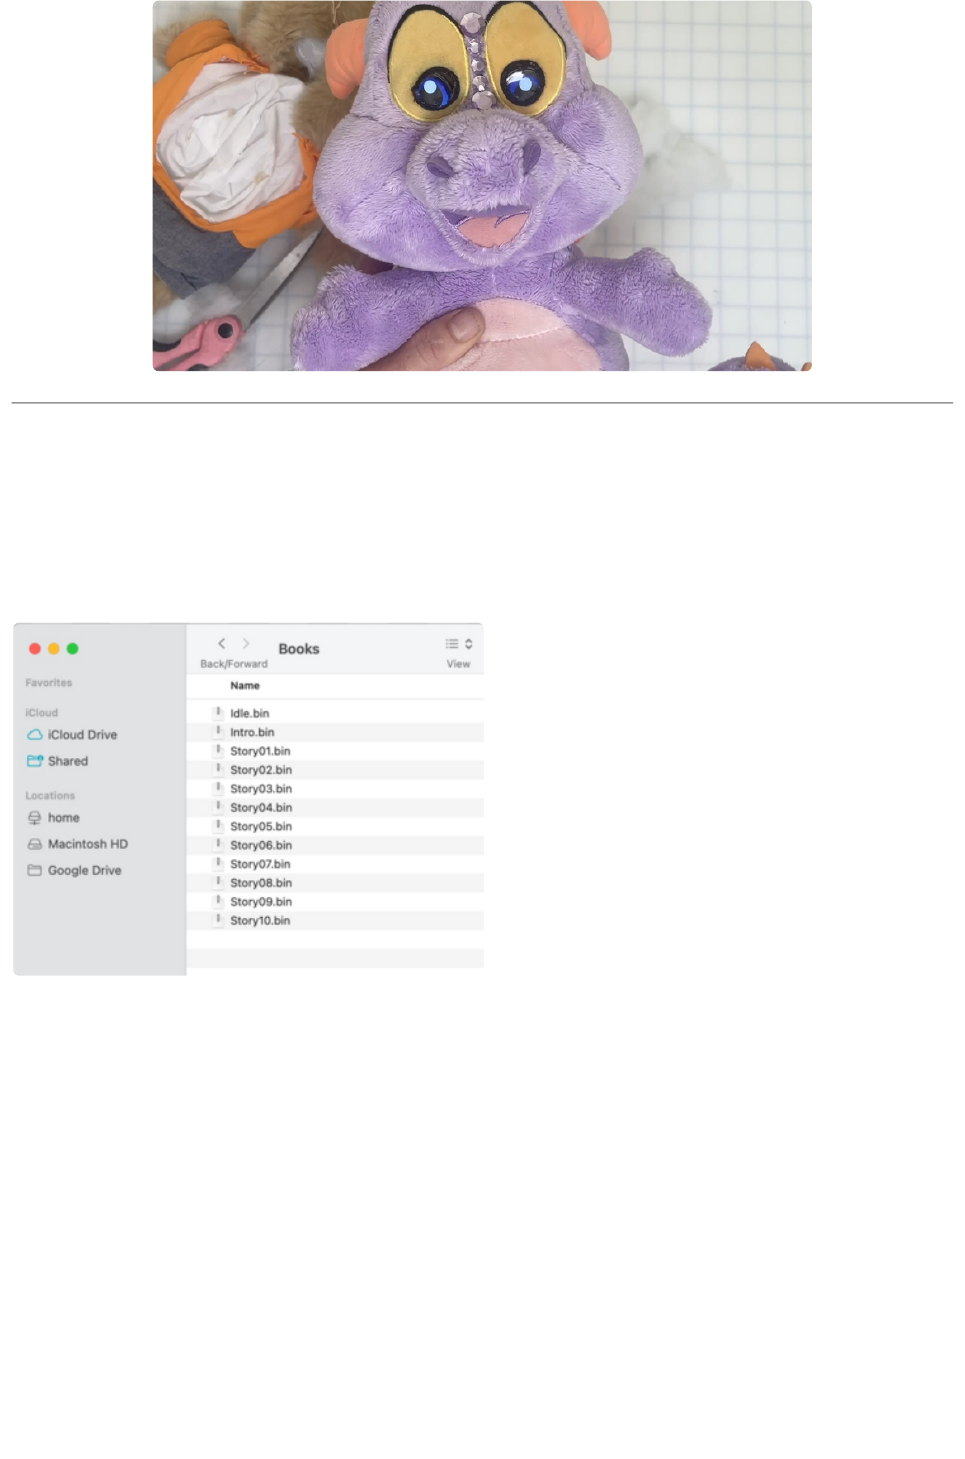
Make sure all the stuffing is out of
Figment's face and slide the animatronic
body into Figment's skin. Once it's inside,
plug the JST connectors from the hands
back in and adjust the face so that Teddy's
mouth aligns with Figment's mouth.
Stuff Figment's stuffing back inside his
head around the back, so his head skin fits
tightly around the animatronics and the
stuffing presses the mouth tightly against
the front of Figment's face.
©Adafruit Industries Page 8 of 18

Sew Figment back up, starting with the
back seam and finishing with the neck. He
doesn't close fully around the
animatronics, but that's fine - we need to
leave the back open so we can reach the
on/off switch and change the batteries.
Just stitch him up as best as you can.
©Adafruit Industries Page 9 of 18

Figment's eyes are slightly closer together
than Teddy's and I couldn't quite get them
to line up. I fixed this by cutting a slit with
my utility knife in between his eyes. I later
covered this up by gluing on some purple
jewels. Now he feels fancy, and his eyes
line up perfectly with Teddy's.
Finally, I added a few stitches around the
corners of his mouth to tighten up the fit
around Teddy's mouth. This gave him a bit
of a "facelift" and made the animatronic
movement look a lot better.
©Adafruit Industries Page 10 of 18
Creating Audio Files
What Files Do I Need?
Plug Teddy into your computer with a USB
cable and a drive wil appear called
NO_NAME. On that drive is a folder called
Books, and in that folder are all the story
files, in .bin format.
intro.bin is the file that plays when Teddy
starts up. It's the one where he sings
"Come Dream with Me Tonight.." I
replaced mine with a short recording that
says "Hi Billie and Daisy! Would you like to
hear a story?"
There are 10 story files, but stories 4-10 are "locked" -- the manufacturers added these
as a paid in-app purchase. Worlds of Wonder has long since gone out of business, so
we couldn't figure out any way to unlock these stories. But we can access and replace
the first three, which were included with the original purchase.
So, we have three spaces for stories: Story01.bin, Story02.bin, and Story03.bin. Each
of these stories can be pretty long -- the original stories are close to 20 minutes in
length so there's plenty of space. I kept mine to about 5 minutes.
©Adafruit Industries Page 11 of 18

Creating Content
For the audio recordings for this project, I wanted to use voices that my baby nieces
will recognize and love. I got their grandparents to send me recordings of about 5
minutes long, reading stories and nursery rhymes the kids will love.
My mom has an iPhone, so I asked her to make her recording using the Voice Memos
app. After recording she clicked the "share" button in the app, and emailed me the
audio file she created.
Their Australian Grandpa couldn't think of what to read, so I used ChatGPT(https://
adafru.it/18Wb) to write a personalized story using my nieces' names, and telling all
about the animals in Australia. Here's the prompt I used:
Please write me a rhyming 800 word story in the style of Mother Goose about
Australian animals who become friends with little girls named Daisy and Billie.
ChatGPT did not let me down! Here are the first two paragraphs of this delightful tale:
In a land Down Under, where kangaroos hop,
And kookaburras laugh atop a gum tree's top,
Lived creatures unique, full of life and zest,
In a tale of friendship, we're about to invest.
Daisy and Billie were two little mates,
With hearts full of joy, they'd frolic in fates,
Through the bushland they wandered, their spirits so free,
Meeting critters and creatures, as happy as could be.
Converting Audio Files
This project requires the audio files to be in 16 bit WAV file format. I used
Audacity(https://adafru.it/18Wc), a free audio editing program, to convert the files.
Here's a complete guide on how to get the files into the correct format: Convert
Sound Files in Audacity(https://adafru.it/BvU)
I still had some trouble getting all the correct boxes checked - my audio files were just
not working for some reason. So as a workaround, I stared with a known good 16-bit
audio WAV file project, and opened my voice recording directly into that project. Then
when I exported, the project already had the correct settings.
©Adafruit Industries Page 12 of 18

Here's a working .wav file to use as a starting point.
intro-16bit.wav
https://adafru.it/18We
Save your files as Intro.wav, Story01.wav, etc - this will make it easier to keep
everything straight in the next few steps.
Building a new story file
You'll need some software for this:
Rhubarb Lip Sync(https://adafru.it/18IB) (version 1.13.0 was used while creating
this guide)
The modified g722.1 encoder, available from pypi(https://adafru.it/18IC) and
github(https://adafru.it/18ID) for Windows, Linux and Mac with pip3 install
g722-1-mod
The Python scripts for creating a new .bin file, currently at https://github.com/
adafruit/snxrom(https://adafru.it/18IE)
A program for re-sampling audio files. If you don't already have a program for
doing this, one open source option is Audacity(https://adafru.it/18IF). There's a
dedicated guide for sample rate conversion in Audacity(https://adafru.it/BvU),
but for this project you will be converting to 16kHz or 32kHz.
Grab the file Intro.bin from your Teddy Ruxpin's original files and save it as
orig_Intro.bin. It is used as the basis for the modified (patched) story file.
Record your new story in the audio format of your choice. Then, create a
downsampled version in wav format at 16kHz or 32kHz sample rate and mono (one
channel) audio. If you don't already have a program for doing this, one open source
option is Audacity(https://adafru.it/18IF).There's a dedicated guide for sample rate
conversion in Audacity(https://adafru.it/BvU), just remember that the supported
sample rates for this project are 16kHz (16000 Hz) or 32kHz (32000 Hz)
The text below will refer to the original audio file as story.wav and the downsampled
version as story32k.wav.
Create the mouth position json file with rhubarb using a commandline like:
rhubarb -f json -o mouth.json story.wav
•
•
•
•
©Adafruit Industries Page 13 of 18

Now, you have all the files needed to run earpatch from snxrom.git.
python3 earpatch.py --wav story32k.wav --rhubarb-json
mouth.json orig_Intro.bin new_Intro.bin
Copy new_Intro.bin back to the Books folder as Intro.bin (the name must match
exactly), eject/safely remove the USB device, then turn Teddy's power off and back
on. Teddy will begin with your story, the mouth movements detected by Rhubarb, and
eye animations occurring on average once every 30 seconds.
Rhubarb json files
The file produced by rhubarb looks something like the following:
{
"metadata": {
"soundFile": "story.wav",
"duration": 23.64
},
"mouthCues": [
{ "start": 0.00, "end": 0.34, "value": "A" },
{ "start": 0.34, "end": 1.12, "value": "B" },
{ "start": 1.12, "end": 1.68, "value": "D" },
{ "start": 1.68, "end": 1.82, "value": "C" },
{ "start": 1.82, "end": 2.17, "value": "B" },
Within the mouthCues section, you can add or delete lines, adjust start or end
times, or change the mouth shape, called value .
While doing so, you need to make sure that:
json syntax is respected
the start times are in ascending order
each end time is no later than the next "start" time
the value is one of the following 9 uppercase letters: A, B, C, D, E, F, G, H, X
The letters A, F, and X correspond to a closed mouth; B, C, G, and H to a partially
open mouth, and D and E to a fully open mouth.
Mouth Movement
We're using earpatch.py to automatically create mouth movements from our .wav
files. It does a fairly good job. It's not quite perfect, but it's possible to modify the file it
creates to improve synching of the words and mouth.
•
•
•
•
©Adafruit Industries Page 14 of 18

On my Mac, I created a Rhubarb folder in
my home directory, since Python on Mac
requires a typing full file path, I got a bit
tired of typing seven nested folder names.
You can install all your software into this
folder so it can work together.
Save your 16-bit .wav audio files into this
folder as well.
Songs & Music Files
I wanted to play a song for my nieces as Story03.bin, but this posed a tricky problem:
the earpatch.py script can't tell the difference between music and speech, so it
continues to move the mouth during instrumental sections. It is also really coded for
speech, not song, and it seems to get lost during singing where a vowel is held longer
than it would be when speaking.
To get around this, I created two different .wav files: one with my song, and then
another where I clearly spoke the lyrics in time with the song. I created the
mouth.json file using the spoken .wav file, and then created the final .bin file using the
singing-and-playing .wav file.
Create the Mouth Movement File
Open a terminal window and create the mouth file using a command like:
/Users/erin/Rhubarb/rhubarb -f json -o mouth_intro.json intro.wav
where the file path points to your Rhubarb folder, and intro.wav is the audio file you're
converting. The script will create a file called mouth_intro.json, which we'll use when
we create the .bin file on the next page of the guide.
Modifying Mouth Movement Files
Open up mouth_intro.json using a text editor and take a look at it. It should look
something like this:
{
"metadata": {
©Adafruit Industries Page 15 of 18

"soundFile": "/Users/erin/Rhubarb/intro.wav",
"duration": 6.09
},
"mouthCues": [
{ "start": 0.00, "end": 1.23, "value": "X" },
{ "start": 1.23, "end": 1.29, "value": "C" },
{ "start": 1.29, "end": 1.48, "value": "E" },
{ "start": 1.48, "end": 1.58, "value": "A" },
{ "start": 1.58, "end": 2.28, "value": "B" },
{ "start": 2.28, "end": 2.40, "value": "A" },
{ "start": 2.40, "end": 2.51, "value": "D" },
{ "start": 2.51, "end": 2.72, "value": "B" },
{ "start": 2.72, "end": 2.86, "value": "C" },
{ "start": 2.86, "end": 3.21, "value": "B" },
{ "start": 3.21, "end": 3.83, "value": "X" },
{ "start": 3.83, "end": 4.06, "value": "F" },
{ "start": 4.06, "end": 4.13, "value": "C" },
{ "start": 4.13, "end": 4.27, "value": "F" },
{ "start": 4.27, "end": 4.62, "value": "B" },
{ "start": 4.62, "end": 4.76, "value": "E" },
{ "start": 4.76, "end": 4.97, "value": "B" },
{ "start": 4.97, "end": 6.09, "value": "X" }
]
}
Within the mouthCues section, you can add or delete lines,
adjust start or end times, or change the mouth shape, called value .
While doing so, you need to make sure that:
json syntax is respected
the start times are in ascending order
each end time is no later than the next "start" time
the value is one of the following 9 uppercase letters: A, B, C, D, E, F, G, H, X
The letters A, F, and X correspond to a closed mouth; B, C, G, and H to a partially
open mouth, and D and E to a fully open mouth. With Teddy's animatronics, we don't
really need this many options -- A, F, and X all do the same thing: close the mouth. I
found it easier to understand and edit this file by using just one letter from each
category:
X = closed mouth
B = partially open
E = fully open
I opened my .wav file in Audacity to see the time points of each section, so I could
find the corresponding lines in the code and modify the movements as needed.
•
•
•
•
•
•
•
©Adafruit Industries Page 16 of 18

I spent a lot of time on my intro.wav mouth file since that's the first thing kids will see,
and it will get watched a lot. I didn't worry too much about the longer story files since
it can get really tricky to figure out which lines need to be edited.
It helps to play the .wav file in Audacity at the same time Teddy is speaking to find the
time points that need editing.
Story Files
Grab the fileIntro.binfrom your Teddy Ruxpin's original files and save it
asorig_Intro.bin. It is used as the basis for the modified (patched) story file.
Now, you have all the files needed to run earpatch from snxrom.git.
Back in your terminal window, type a command like:
python3 earpatch.py --wav Intro.wav --rhubarb-json mouth_intro.json orig_Intro.bin
new_Intro.bin
A file called new_Intro.bin will be created. Rename this to Intro.bin and copy to your
Teddy's NO_NAME/Books drive, replacing the existing Intro.bin file.
Eject Teddy and turn him off with the switch on his back. Unplug the USB cable and
turn him on again. Your new Intro file will play in place of the original intro.
©Adafruit Industries Page 17 of 18

Do the same with Story01.bin, Story02.bin and Story03.bin. If the mouth movements
don't quite match up to your liking, head back to the Mouth Movement page of this
guide for instructions on how to edit the mouth.json files, then create another .bin file
using the edited .json file.
Troubleshooting
One error I got a few times looked like this:
File "/Users/erin/Rhubarb/earpatch.py", line 109, in earpatch
assert wav_params.framerate in (16000, 32000)
AssertionError
This is telling me that my .wav file is formatted incorrectly. The script needs a 16-bit
WAV file and my framerate is too high. Try again using our sample Audacity project on
the previous page of this guide. If that one works, try opening your audio file into the
same Audacity project and export it using the existing settings.
Be sure you've named your new files to be exactly the same as Teddy's original files.
Intro.bin is not the same as intro.bin -- make sure the name and case match exactly.
©Adafruit Industries Page 18 of 18
