
SOFTWARE MANUAL
EASTWEST SOUNDS
PLAY 6PLAY 6
1.0.3

P L A Y 6 SO FT WARE MANUAL
The information in this document is subject to change without notice and does not rep-
resent a commitment on the part of East West Sounds, Inc. The software and sounds
described in this document are subject to License Agreements and may not be copied
to other media. No part of this publication may be copied, reproduced or otherwise
transmitted or recorded, for any purpose, without prior written permission by East West
Sounds, Inc. All product and company names are ™ or ® trademarks of their respective
owners.
Solid State Logic (SSL) Channel Strip, Transient Shaper, and Stereo Compressor li-
censed from Solid State Logic. SSL and Solid State Logic are registered trademarks of
Red Lion 49 Ltd.
© East West Sounds, Inc., 2020. All rights reserved.
East West Sounds, Inc.
6000 Sunset Blvd.
Hollywood, CA 90028
USA
1-323-957-6969 voice
1-323-957-6966 fax
For questions about licensing of products: [email protected]
For more general information about products: [email protected]
For technical support for products: http://www.soundsonline.com/Support

P L A Y 6 SO FT WARE MANUAL
CREDITS
Project Management
Doug Rogers and Rhys Moody
Software Development
Doug Rogers, Nick Phoenix, Wolfgang Kundrus, Klaus Lebkücher,
Stefan Holek, Eike Jonas, Helen Evans, Nuno Fonseca, Gerrit Haasler
User Manual
Jason Coffman
In Memoriam
In Loving Memory of Rhys Moody

P L A Y 6 SO FT WARE MANUAL
CONTENTS
Chapter 1: Welcome
2 Welcome to Play 6
3 About EastWest
3 About Doug Rogers
4 About Nick Phoenix
4 About EastWest Studios
7 What’s Included
7 System Requirements
8 Sequencer Compatibility
9 Support and Documentation
Chapter 2: Getting Started
11 Creating an EastWest Account
11 How Content Is Delivered
12 How to Install a Play Library
17 Managing Play Library Licenses
18 Initial Setup in Stand-Alone Mode
22 Play Libraries Are Now NKS-Ready
23 How To Optimize Playback and Performance
26 All About MIDI
Chapter 3: Play 6 User Interface
31 Navigating the User Interface
32 Main Controls and Library-Specific Controls
33 The Player View
38 The Browser View
42 Instruments Panel
43 Instruments Selector
44 The Mixer View
64 Multi-channel Audio Output
65 Main Menu
66 Settings Menu

P L A Y 6 SO FT WARE MANUAL
Chapter 4: Play Libraries Overview
70 Inside the Main Library Folder
70 Instruments
71 Articulations
71 Keyswitches
73 Master and Elements
73 Samples
73 Instrument and Sample Updates
74 Space Requirements for Play Libraries
Chapter 5: Using Play as a Plug-in
78 Opening Play in a Sequencer
78 Using Play in Logic Pro
80 Using Play in Pro Tools
81 Using Play in Cubase
82 Using Play in Ableton Live
82 Using Play in Sonar
83 Using Play in Digital Performer
84 Using Play in Garageband
85 Using Play in Studio One
86 Automation


P L A Y 6 SO FT WARE MANUAL
Chapter 1: Welcome
2
CONTENTS
<
Welcome to Play 6
Play 6 is an advanced sample engine that powers EastWest’s vast virtual instrument col-
lection, called Play Libraries. They are the winner of over 100 industry awards, making
EastWest the industry leader of highly detailed sampled instruments.
Each Play Library has a custom user interface with a set of controls designed to accomo-
date the unique needs of that library. Altogether, they make up an expansive collection
of sampled instruments that range from orchestral to rock to ethnic to electronic and
beyond.
A number of new features, improvements and fixes are included in this latest version,
including the following:
• Instrument Database allows you to search instruments directly with key words, or by
selecting attribute tags to narrow search results across a variety of categories.
• User Inteface (UI) has been redesigned to get around Play 6 easier than ever.
• Instruments Panel allows access to instruments and advanced instrument properties
• NKS-Ready compatibility is now available for Native Instruments’ Komplete Kontrol
and Maschine hardware and software, including parameter mapping, sound pre-
views and library browsing.
• Convolution Engine has been improved for better performance with reverb and amp.

P L A Y 6 SO FT WARE MANUAL
Chapter 1: Welcome
3
CONTENTS
<
About EastWest
EastWest (www.soundsonline.com) has been dedicated to perpetual innovation and un-
compromising quality, setting the industry standard as the most critically acclaimed
producer of Sample CDs and Virtual Instruments software. Founder and producer Doug
Rogers has over 35 years experience in the audio industry. His uncompromising ap-
proach to quality, and innovative ideas have enabled EastWest to lead the sound-ware
business for nearly 30 years.
In 1997, Rogers partnered with composer and producer Nick Phoenix to establish the
Quantum Leap imprint, a subsidiary of EastWest, to produce high-quality, no-compro-
mise virtual instruments. Mostly produced by Nick Phoenix, some of the larger produc-
tions, such as Symphonic Orchestra, Symphonic Choirs, Pianos, and Hollywood Strings
are co-produced by Doug Rogers and Nick Phoenix. For over 20 years, the two have pro-
duced sample libraries that are considered the best available by the industries top talent.
In 2006, EastWest purchased the legendary Cello Studios (formerly United Western Re-
corders) on Sunset Boulevard in Hollywood, re-naming it EastWest Studios. The 21,000
sq. ft. facility, since remodelled by master designer Philippe Starck, houses five record-
ing studios and is the world headquarters for EastWest.
About Doug Rogers
With over 35 years experience in the audio industry, founder and producer Doug Rogers
is the recipient of over 100 industry awards, more than any other sound developer. His
uncompromising approach to quality, and innovative ideas have enabled EastWest to
lead the sound-ware business for nearly 30 years. “The
Art of Digital Music” named him one of “56 Visionary
Artists & Insiders” in the book of the same name.
He released the very first commercial Drum Samples CD
in 1988, and followed it with the multiple award-winning
“Bob Clearmountain Drums” sample collection which he
co-produced. In the years that followed he practically re-
invented the sound-ware industry. EastWest introduced
loop sample libraries to the market in the early nineties,
followed closely by the first midi driven loops collection
(Dance/Industrial). He released the first library to include
multiple dynamics, followed by the first sample library to stream from hard disk, an in-
novation that led to the detailed collections users expect today.
His recent productions are Symphonic Orchestra (awarded a Keyboard Magazine “Key
Buy Award,” EQ Magazine “Exceptional Quality Award,” Computer Music Magazine “Per-
formance Award,” “Sound On Sound Readers Award” (twice), and G.A.N.G. [Game Audio
Network Guild] “Best Sound Library Award”); and Symphonic Choirs (awarded Electronic
Musician “Editor’s Choice Award,” G.A.N.G. “Best Sound Library Award,” and Keyboard
Magazine “Key Buy Award”). Most recently, his productions include Quantum Leap Pia-
nos, the most detailed virtual piano collection ever produced; Fab Four, inspired by the
sounds of the Beatles; The Dark Side (Fab Four and The Dark Side were both M.I.P.A.

P L A Y 6 SO FT WARE MANUAL
Chapter 1: Welcome
4
CONTENTS
<
Award winners, judged by 100 music magazines); Hollywood Strings, Hollywood Brass,
Hollywood Orchestral Woodwinds, Hollywood Orchestral Percussion; ProDrummer 1, co-
produced with Mark “Spike” Stent; ProDrummer 2, co-produced with Joe Chiccarelli;
and Ghostwriter, co-produced with Steven Wilson.
About Nick Phoenix
Since composer and producer Nick Phoenix began scoring film trailers in 1994, and
since founding “Two Steps From Hell” with Thomas Bergersen in 2006, Nick has scored
or licensed music for the ad campaigns of over 1000 major motion pictures.
Some of these works include: “Godzilla”, “Ender’s
Game”, “Skyfall”, “World War Z”, “Rush”, “The Hob-
bit”, “Avengers”, “Star Trek 2”, “Inception”, “Harry Pot-
ter and the Deathly Hallows”, “Tomb Raider 2”, “Termi-
nator 3”, “Lord of the Rings Return of the King”, “Harry
Potter 2”, “Star Wars Episode 2”, “Spiderman 3”, “Pi-
rates of the Caribbean 3”, “Blood Diamond”, “Night at
the Museum”, and “The Da Vinci Code”.
The journey as a composer has inspired Nick to record
and program his own sounds and samples. For over 20
years, a partnership with Doug Rogers and EastWest un-
der the Quantum Leap imprint, has yielded award winning software titles such as the
Hollywood Series, Stormdrum 1, 2 and 3, Symphonic Orchestra, Symphonic Choirs, Silk,
RA, Voices Of Passion, Ministry Of Rock 2, Gypsy, Pianos, Goliath, and many others.
About EastWest Studios
EastWest Studios (formerly United Western Recorders) is the world’s premiere studio.
The book Temples of Sound Here is quoted from page 33: “United Western Recorders
has been the scene of more hit records—from the 1950’s to right now—than any other
studio. No other studio has won more technical excellence awards, and no other studio
has garnered as many Best Engineered Grammys as this complex of studios on Sunset
Boulevard.” One thing everyone agrees on: The acoustics and the vibe in the recording
rooms of 6000 Sunset Boulevard are unmatched.
EastWest Studios has hosted the who’s who of the music industry for over 45 years. In the
beginning, artists like Bing Crosby, Frank Sinatra, Dean Martin, Sammy Davis, Nat King
Cole, Johnny Mercer and Ray Charles were recording the hits of the day. Ray Charles’
classic, “I Can’t Stop Loving You” was recorded here as well as Sinatra’s, “Strangers In
The Night” and “That’s Life,” and the legendary Beach Boys “Pet Sounds” album, which
was the inspiration for The Beatles’ “Sgt. Peppers” album, was recorded here also.
The Mamas and Papas “California Dreamin,” “Monday Monday,” and Scott McKenzie’s
“San Francisco” were recorded here. Elvis Presley recorded his 1968 Christmas special
in Studio 1. Famous themes for film and television were recorded here including the
“M*A*S*H” theme,“Mission Impossible” theme, “Hawaii Five-O” theme, “Beverly Hill-
billies” theme, “Godfather” theme, plus much of the “Monkees” and “Partridge Family”
television series.

P L A Y 6 SO FT WARE MANUAL
Chapter 1: Welcome
5
CONTENTS
<
It would be impossible to name all the musical royalty who have worked at EastWest
Studios, but here are some of them (in alphabetical order) Christina Aguilera, Herb Al-
bert, America, Paul Anka, Fiona Apple, Audioslave, Franky Avalon, Barenaked Ladies,
Better Than Ezra, Blondie, Buffalo Springfield, Burt Bacharach, Beach Boys, Blink 182,
Glen Campbell, Canned Heat, Vickie Carr, Carpenters, Johnny Cash, David Cassidy, Ray
Charles, Chicago, Petula Clarke, Ry Cooder, Elvis Costello, Count Basie & Orchestra, Eric
Clapton, Nat King Cole, Natalie Cole, Ornette Coleman, Duane Eddy, Jan & Dean, John
Coltrane, Petula Clark, Joe Cocker, Sam Cooke, Bing Crosby, Bobby Darin, Sammy Davis,
Jr., Jackie DeShannon, Duke Ellington, Neil Diamond, Fifth Dimension, Bob Dylan, Ellla
Fitzgerald, Benny Goodman Big Band, Grateful Dead, Grass Roots, Green Day, Guess
Who, Lani Hall, Herbie Hancock, Don Ho, Whitney Houston, Howlin’ Wolf, Janis Ian,
Ike & Tina Turner, Incubus, Isley Brothers, Michael Jackson, Elton John, Stan Keaton,
Carole King, Kris Kristofferson, Franky Laine, K.D. Lang, Avril Laverne, Michel LeGrand,
Peggy Lee, Little Feat, Trini Lopez, Madonna, Mamas & the Papas, Dean Martin, Johnny
Mathis, Meatloaf, Sergio Mendez & Brazil 66, Metallica, Johnny Mercer, Paul McCart-
ney, Barry Manilow, Scott McKenzie, Natalie Merchant, Bette Midler, Monkees, Alanis
Morrissette, Motley Crue, Muse, Rick Nelson, Willie Nelson, Wayne Newton, Harry Nils-
son, Nitty Gritty Dirt Band, Ozzy Osborne, Partridge Family, Paul Revere and the Raiders,
Tom Petty and the Heartbreakers, Pointer Sisters, Iggy Pop, Elvis Presley, Lisa Marie
Presley, Billy Preston, Rage Against the Machine, Red Hot Chilli Peppers, Kenny Rog-
ers, Rolling Stones, Ronnie & the Ronettes, Bonnie Raitt, Helen Reddy, R.E.M., Nelson
Riddle, Righteous Brothers, Johnny Rivers, Ronnie & the Ronnettes, Dianna Ross, San-
tana, Jimmy Smith, Sonny & Cher, Phil Spector, Tom Scott, Carly Simon, Frank Sinatra,
Nancy Sinatra, Bruce Springsteen, Steppenwolf, Rod Stewart, Mathew Sweet, Stone
Temple Pilots, Barbra Streisand, System of a Down, Temptations, The Animals, The
Association, The Four Tops, The GoGos, The Kingston Trio, The O’Jays, The Vines, The
Who, Mel Torme, U2, Richie Valens, Stevie Wonder, Tool, Turtles, Sarah Vaughn, Jimmy
Webb, Weezer, Andy Williams, Nancy Wilson, Young Rascals, Frank Zappa.

P L A Y 6 SO FT WARE MANUAL
Chapter 1: Welcome
6
CONTENTS
<
What’s now called EastWest Studios was founded by Bill Putnam in 1961. Considered
to be the “Father of modern recording,” he is acknowledged to be the first person to use
artificial reverberation for commercial recording. He also developed the first multi-band
equalizers and, with his company Universal Audio, was responsible for the develop-
ment of classic equipment like the Urei 1176LN and Urei Time Align Monitors. He was
involved in the early development of stereophonic recording and founded studios in
Chicago, Hollywood, and San Francisco. He was responsible for a number of innovations
including: the first use of tape echo and echo chambers, the first vocal booth, the first
multiple voice recording, the first use of 8-track recording, half-speed disc mastering.
In 1957, he started United Recording Corp. in a building at 6050 Sunset and started
new construction on new studios. Stereo was taking off and Putnam was determined
to incorporate as many technological innovations into the new complex as possible. In
1961, Western Recorders (now EastWest Studios) at 6000 Sunset was acquired, re-
modeled, and incorporated into the complex with the facilities being known as United
Western Recorders. After Bill Putnam passed away in 1989, the studio was acquired by
Allen Sides and renamed Oceanway recording. In 1999 Rick Adams acquired the studios
and renamed it Cello, and in January 2006 it was acquired by Doug Rogers of EastWest
Sounds, the #1 sounds producer in the world, with over 50 international awards.
Looking for a designer to take on the task of refurbishing the exterior and non-technical
interior areas, while preserving the historic studios, Rogers contacted renowned designer
Philippe Starck, whose trend-setting work is known the world over for its sheer brilliance
and beauty. Starck jumped at the opportunity and headed to Hollywood. He insisted on
restoring all historic elements inside and out, adding new designs to the interior and cre-
ating a new exterior look that incorporated elements of the current one. Rogers strongly
supported this. Plans are also afoot by Rogers to add historic names and records to the
sidewalk on Sunset Boulevard, giving the illustrious studio its own walk-of-fame. Another
highlight of the restoration has included Rogers’ purchase of other analog studio equip-
ment to be used for recording the classic way and not just digital (including two EMI
mixing boards that the Beatles used to record their hits). His plans for reactivating the
studios are a model for historic and cultural preservation as well as providing EastWest
with the finest recording environment in the world. In addition to EastWest’s own use of
the facilities, the five studio complex will be open to a limited number of outside clients
after the Starck restoration.

P L A Y 6 SO FT WARE MANUAL
Chapter 1: Welcome
7
CONTENTS
<
What’s Included
The EastWest Play 6 system Includes:
• Play 6 stand-alone application (MacOS and Windows)
• Play 6 plug-in (VST, AU, AAX)
• Play 6 User Manual (PDF)
• The EastWest Installation Center application to install software and documentation
System Requirements
Below are the minimum and recommended hardware specifications for using Play Librar-
ies on your computer.
Minimum Specification
• Intel dual-core i5 (or equivalent) processor, running at 2.7 GHz (or above)
• 8 GB of RAM or more
• Mac OSX 10.7 (or later); Windows 7 (or later) with ASIO sound drivers
• 7200 RPM or faster (non energy saving) hard drive for sample streaming
Recommended Specification
• Intel Xeon E5 (or equivalent) running at a minimum of 2.7 GHz (or above)
• 16 GB of RAM or more
• Mac OSX 10.7 (or later); Windows 7 (or later) with ASIO sound drivers
• a 64-bit operating system; and a 64-bit host when running Play as a plug-in.
• SSD (Solid State Drive) for sample streaming
!
32-bit operating systems and DAWs are not supported (no 32-bit
plugin components will be installed).
An iLok account is required for a machine-based (electronic) license
to be placed on your computer. This license can also be activated on
an optional iLok key. This process requires an internet connection to
complete a one-time product activation.
!
P L A Y 6 SO FT WARE MANUAL
Chapter 1: Welcome
8
CONTENTS
<
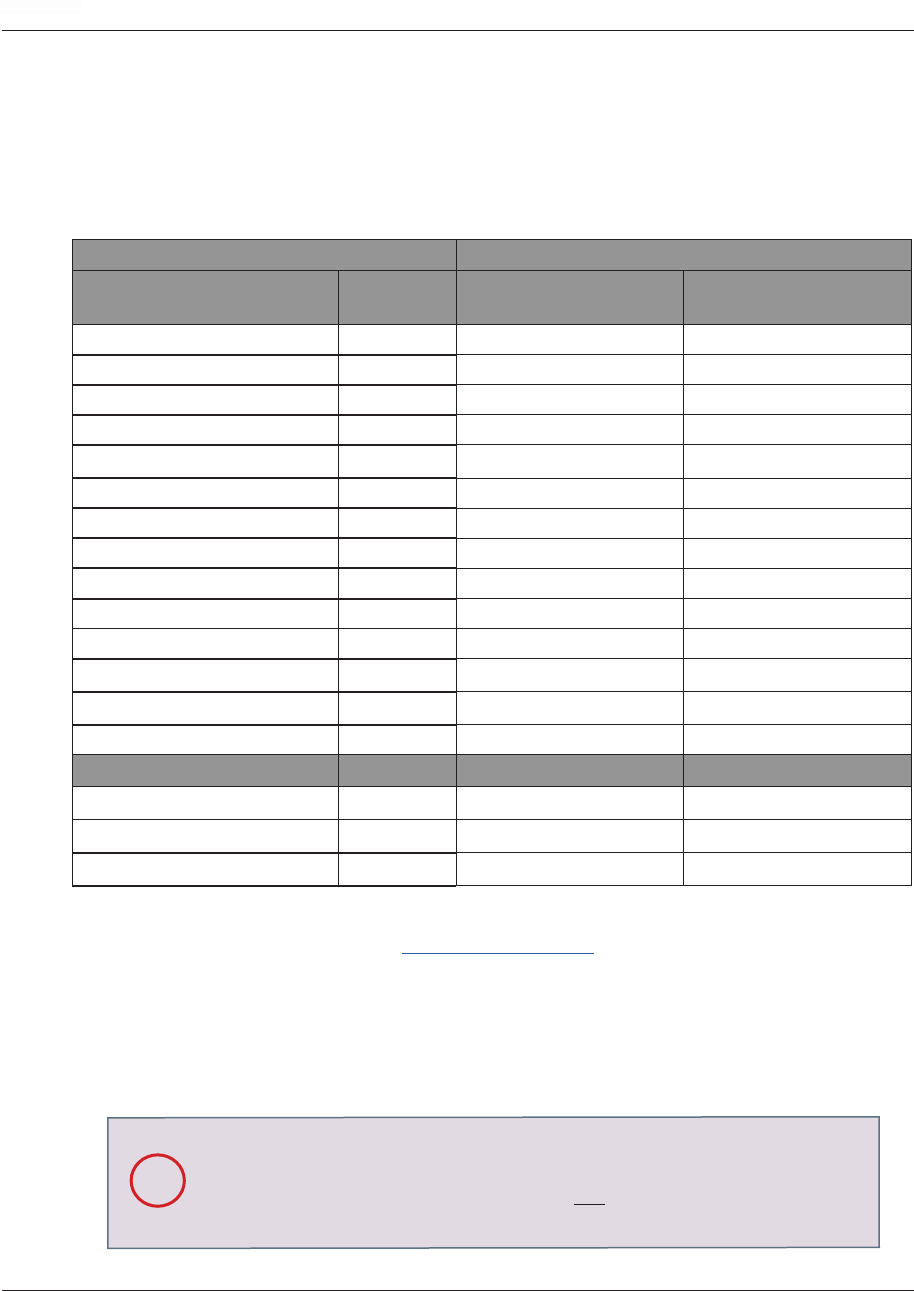
Sequencer Compatibility
The chart below outlines the MacOS and Windows 64-bit operating systems and sequenc-
ers that are officially supported (fully tested) with the latest version of Play 6. Please
contact support for questions related to compatibility with earlier versions of Play, and
please note that while 64-bit sequencers (DAWs) that use VST, VST3, AU and AAX plug-
in formats may work fine, only those listed in the chart below are officially supported.
DAWs (64-bit) Operating Systems (64-bit)
Sequecer Software
version
MacOS
(1)
(10.8 - 10.14)
Windows
(2)
(7, 8 and 10)
EW Play 6 Stand-Alone 6.0 +
√ √
Ableton Live 9.0 +
√ √
Apple Logic Pro 9.0 +
√ -
Apple Garageband 3.0 +
√ -
Avid Pro Tools 11.0 +
√
(3)
√
Bitwig Studio 2.5 +
√ √
Cakewalk Sonar 6.2 +
- √
Cockos Reaper 4.0 +
√ √
Image-Line FL Studio 12 +
√ √
Motu Digital Performer 8.0 +
√ √
Steinberg Cubase 7.5 +
√ √
Steinberg Nuendo 6.0 +
√ √
Presonus Studio One 3.0 +
√ √
VSL Vienna Ensemble Pro 5.0 +
√ √
Notation Software
version
Avid Sibelius 7.0 +
√
(4)
√
(4)
MakeMusic Finale 25.0 +
√
(4)
√
(4)
Steinberg Dorico 2.2 +
√
(4)
√
(4)
1
MacOS 64-bit Operating Systems 10.8 through 10.14 are officially supported. Please follow this link for the
latest compatibility information regarding MacOS 10.15 (Catalina).
2
Windows 7 support is officially being ended by Microsoft on January 14th, 2020.
3
Pro Tools 10 users require Play version 4 (32-bit). Please contact support for details.
4
Sibelius / Finale / Dorico notation programs work with Play 6, but do not support the full feature set of some
Play Libraries, such as those that use WordBuilder. Please contact support for details.
32-bit Sequencers and Operating Systems are only supported by Play
4, the last version of Play that was released with a 32-bit installer.
Play Libraries released on Play 6 are not compatible with older ver-
sions of Play. Please contact support for more information.
!

P L A Y 6 SO FT WARE MANUAL
Chapter 1: Welcome
9
CONTENTS
<
Support and Documentation
All documentation for Play and individual Play Libraries is provided as a collection of
PDFs. An advantage of reading this PDF on an electronic device is the ability to jump
directly to a referenced page using links. You can find these in the contents section, at
the beginning of each chapter, and within to expand on and / or connect topics.
The Bookmarks pane along the left edge of the PDF allows you to jump to a particular
chapter or specific section by clicking on the links. You can also use Page Thumbnails to
quickly scan the contents of the PDF and jump to the desired page with a click.
User Manuals and Guides
Visit the EastWest Manuals section of the online Support Center to access the latest User
Manuals and Guides for EastWest products.
• Play 6 User Manual describes how to use the Play 6 sample engine, and aspects
that are common to all Play Libraries.
• Play Library User Manuals describe aspects that are specific to each Play Library,
including instruments and unique features of each user interface.
• Spaces II User Manual describes how to use the Space II plugin, and provides a glos-
sary of impulse presets.
• Master Navigation Document (MND) is a one-page PDF that allows easy navigation
between the Play 6 User Manual and the Play Library Manuals using links. Links
to the MND can be found at the bottom of each chapter in both the Play 6 User
Manual and Play Library Manuals.
• Getting Started Guide contains only the most essential information, intended to get
you started quickly.
In addition to online availability, user manuals are installed locally into the main library
folder of each Play Library, as well as the directory below:
• (Mac) Mac HD / Applications / East West / Documentation
• (Win) C:// Program Files / East West / Documentation
EastWest Support Center
Visit the EastWest online Support Center to:
• submit a support ticket
• read FAQs on a variety of commonly asked questions
• view video tutorials, quick start guides, user manuals and more
EastWest Soundsonline Forums
Visit the EastWest Soundsonline Forums to:
• read comments and questions from other users of EastWest products
• find helpful information on both technical and musical aspects of the software
• receive support by posting to the Support section of the forum

P L A Y 6 SO FT WARE MANUAL
CONTENTS MASTER NAVIGATION DOCUMENT
Chapter 2: Getting Started
11 Creating an EastWest Account
11 How Content Is Delivered
12 How to Install a Play Library
17 Managing Play Library Licenses
18 Initial Setup in Stand-Alone Mode
22 Play Libraries Are Now NKS-Ready
23 How To Optimize Playback and Performance
26 All About MIDI

P L A Y 6 SO FT WARE MANUAL
Chapter 2: Getting Started
11
CONTENTS
<
Creating an EastWest Account
In order to purchase a product through Soundsonline.com, you must create an EastWest
account. In that account, an existing iLok Account must also be entered, or one will be
created for you based on your EastWest Account username.
Once you create an account and
place your order, a confirmation
email with steps to proceed will be
sent, and a license for the product
will be deposited directly into the
iLok account associated with your
EastWest account.
Please note! If the wrong iLok account was entered at the time of purchase, or you al-
ready had an iLok account but we accidently created one for you, please contact licens-
[email protected]. The licensing department does their best to answer every case
within a 24 hour timeframe, except on the weekends.
How Content Is Delivered
Most customers will be able to take care of their entire installation and activation setup
with the Installation Center, but in some cases a Sound Data Hard Drive is neccessary.
Boxed DVD products are also still in circulation at retailors, and require special install
instructions outlined in the following chapter.
The Installation Center makes installation activation and download of Play products
straight forward and fast. A download link to the Installation Center is provided in the
email confirming your purchase, and is also available to those that did not purchase
directly through Soundonline.com at the online Support Center.
The Sound Data HD is available for large Diamond and Platinum edition Play Libraries
that are too large to download. They also help eliminate the frustration of a slow internet
connection, and serve as a backup solution for Play Libraries.
The setup instructions are similar to those outlined in this chapter, except that instead
of downloading Play Libraries from the Installation Center, they are transferred from the
Sound Data Hard Drive to the preferred destination.
Please note! When using the Sound Data HD for sound playback, be aware of the limi-
tations of streaming all Play Libraries from a single, external USB 3.0 drive. For more
information, please see the section related to Hard Drive Specifications.
Boxed DVD Products may still be available through retailers. you purchased an East-
West product through a retailer, you may have received a Boxed DVD Product. Please
note, several installation procedures have changed since the time these products were
manufactered. Pay close attention to the installation and activation instructions outlined
below.

P L A Y 6 SO FT WARE MANUAL
Chapter 2: Getting Started
12
CONTENTS
<
How to Install a Play Library
This walkthrough will show you how to download, install and activate a Play Library.
Step 1: Install the Installation Center
Download the Installation Center package from the
email confirming your purchase, or download it directly
from the Support Center. After opening and installing
the package, you’ll find the Installation Center in one of
the following directories:
• (Mac) Mac HD / Applications / East West / EW Installation Center.
• (Win) C: / Program Files / East West / EW Installation Center
Open the Installation Center and sign in with your East-
West account. It may take a moment to load while it
gathers data.
Step 2: Install the latest Play Software
At the top of the Installation Center you will see the latest Play software update availalbe
for download. Press the download button, and once it’s completed the Play software
installer will automatically open. The Play software update is also available to download
at the EastWest Support Center.
Please note! The software components neccessary to run all Play Libraries will be in-
stalled automatically (although you will only have access those you have a license for).
Simply procede through the dialog windows when prompted.
Installing Play 6 (Win)
Make sure all programs are closed before beginning and be aware that ‘Windows User
Access Control’ may ask your permission to launch the installer.
After a welcome window, the License Agreement screen will appear. When asked to agree
to the terms of the EastWest End User License Agreement, select ‘I accept the agree-
ment’ and then click ‘Next’. If you do not agree, then you will not be able to install the
Play software.

P L A Y 6 SO FT WARE MANUAL
Chapter 2: Getting Started
13
CONTENTS
<
The next dialog will ask you to Select Components. Unless you do not want to install the
AAX plugin, and/or the VST 64-bit plugin, simply proceed to the next dialog by clicking
‘Next’. De-select those options if you do not want to install them.
Please note! The Play software installer will read
the registry to determine the installation path for
the Play VST plugin.
Next, a Ready To Install dialog will display a sum-
mary of installation. Click ‘Next’ to begin the
installation process. Now a window will appear
displaying a progress bar of the installation pro-
cess. When it’s done, another window will ap-
pear allowing you to click ‘Finish’ to complete
the installation.
If the latest Pace iLok drivers have not been installed, you will also be led through a
series of prompts to install it. You will be asked to restart your computer to complete
the installation.
Installing Play 6 (Mac)
Make sure all programs are closed before beginning and be aware MacOS security prefer-
ences may block the installers of unindentified developers. To disable this, click on the
Apple icon in the top-left corner, and go to ‘System Preferences’. In the lower-left of the
‘Security & Privacy’ window, click the lock and enter the administrator password. Now,
under ‘Allow apps downloaded from...’ header, select ‘Anywhere’. You can change this
back after installing Play.
Click ‘Continue’ in the Introduction dialog to proceed to the License dialog. Click ‘Con-
tinue’, then click ‘Agree’ to accept the terms of the EastWest End User License Agree-
ment. If you do not agree, you will not be able to install the Play software.
The Installation Type dialog will perform a Standard
Installation by default. Click ‘Install’ to perform a
Standard Installation (recommended).If you wish to
modify the Standard Installation, click the ‘Custom-
ize’ button instead. In this dialog window you can
(de)select the various Play plugin types, as well as
the Pace iLok drivers. When ready, click the ‘Install’
button.
MacOS will require the administrators password to proceed with the installation. Please
enter the password and click, ‘Install Software’.
The Installation window will appear displaying a progress bar of the installation process.
When it’s done, the Summary window will report that the installation was successful and
allow you to click ‘Close’ to complete the installation.

P L A Y 6 SO FT WARE MANUAL
Chapter 2: Getting Started
14
CONTENTS
<
Step 3: Activate the Product License
When you purchase a product through Soundsonline.com, a license for the product you
purchased will be deposited directly into the iLok account associated with your EastWest
account. Use the Installation Center to Activate a product license.
At the top of the Installation Center, click
the “Activate” button to open the Activation
Assistant window, which will lead you
through the activation process.
Click ‘Next’ to proceed past the Introduction
tab, then select the license(s) you want to ac-
tivate in the License tab and click ‘Next’.
If you have an iLok account but you have not
connected it to your Soundsonline account, the Activation Assistant will help you link
the two accounts. This only need to be done one time.
The Location window will give you the option to acti-
vate your license on your computer (a machine-based
license) or to a registered iLok security key. Make sure
your iLok key is plugged in if that’s your preferred option.
How to Activate the Authorization Code for Boxed DVD Products
At the time the Boxed DVD Products were released, they came with an Authorization
Code which was entered into the now defunct Authorization Wizard. That code is still
valid, but now you have to enter into the Installation Center.
To activate a Play product that came
with a legacy Authorization Code, go
to the Main Menu in the top-right cor-
ner of the Installation Center and click on the “Register Au-
thorization Code…” option.
Type in the 20-digit au-
thorization code that came with your product and
click “submit”. A prompt should appear letting you
know the authorization was a success and that the
license is ready to activate.
Click “Refresh Product List” from the Main Menu
(top-right) of the Installation Center to update your account with the new license, and
activate that license by with these instructions: Step 3: Activate the Product License.

P L A Y 6 SO FT WARE MANUAL
Chapter 2: Getting Started
15
CONTENTS
<
Step 4: Download the Play Library
Before you begin, you may want to review the Hard Drive Specifications section to deter-
mine the best hard drive configuration to store and stream Play Libraries.
If you’re unsure whether you have enough free disk space check the Space Requirements
for Play Libraries section to view the size of each Play Library in gigabytes (GB).
Play Libraries can also be installed to multiple hard drive locations. You can find these
instructions in the EastWest FAQ, found in the Support Center.
Download Play Libraries from the Installation Center
Before you begin downloading, create a new folder at the desired hard drive location and
name it ‘Play Libraries’.
Once created, go to the Installation Center and click the download icon (downward ar-
row) in the product panel of the Play Library you wish to download.
A browser window will
where you can navigate to the ‘Play Libraries’ folder you just
created in the step above. Click ‘Remember’ in the dialog that appears if you wish to
save
this location for future downloads.
The download process will now begin, with a blue bar displaying the download progress. Hit
the small “X” button in the lower-right corner of the product panel to pause the download
process, and click “Resume” to continue the download where you left off. The remaining
time left to complete the download process is found at the very bottom of the Installation
Center window.

P L A Y 6 SO FT WARE MANUAL
Chapter 2: Getting Started
16
CONTENTS
<
Transferring Play Libraries from a Sound Data Hard Drive
At this point, decide wether you’d like to use the Play Libraries on the supplied hard drive,
or would rather transfer them to another drive.
To transfer the Play Libraries to another drive, simply drag the Play Libraries folder from the
supplied hard drive and drop it into the preferred location on the other hard drive and wait
for the files to copy over.
Then click on the Main Menu in the Installation Center, and select the ‘Library Directories’
option from the list. In the bottom-left corner of that window, click the ‘Add’ button and
navigate to the ‘Play Libraries’ folder that you just transferred (or the one on the supplied
hard drive). Now click the ‘Play Libraries’ folder to select it, then click the ‘Open’ button to
add it to the Library Directories list.
Closing the Library Directories window should begin the process of adding each Play Library
directory into the Browser view in Play, where all installed Play Libraries appear.You can
also manually initiate the process by selecting ‘Reconnect Libraries’ in the Main Menu after
adding it to the Library Directories list.
Installing a Play Library from a Boxed DVD Products (Windows)
Do not install the Play software from the DVDs (it is outdated). Instead, follow the in-
structions ____. These instructions below only refer to installing the
Play
Library itself.
1. Before inserting the DVD, decide where you would like to install the library content
and create a folder called “Play Libraries” at that location.
2. Now, insert Disc One into your DVD Drive (do not run the installer from the DVD).
3. Locate the library folder (it contains the product’s Instruments and Samples folder).
4. Drag this library folder from the DVD and drop it into the Play Libraries folder you
created in step 1.
5. Once the transfer is complete proceed to Disc Two and repeat the drag and drop pro-
cess with the remaining DVDs, grabbing the library folder and dropping it into the same
location and allowing windows to merge your samples into the library folder.
Installing a Play Library from a Boxed DVD Products (MacOS)
Do not install the
Play
software from the DVDs (they are out-of-date). These instructions
only refer to installing the
Play
Library itself.
1. Before inserting the DVD, decide where you would like to install the library content
and create a folder called Play Libraries at that location.
2. Now insert Disc One into your DVD Drive.
3. Locate the library folder (it contains the product’s Instruments and Samples folder).
Drag this folder from the DVD and into the Play Libraries folder you created in step 1.

P L A Y 6 SO FT WARE MANUAL
Chapter 2: Getting Started
17
CONTENTS
<
4. Once the transfer is complete, proceed to Disc Two.
5. On Disc Two, open the “_Data” folder, then double-click on library installer. When
presented with the welcome screen, press “continue”.
6. The next prompt will ask you to select a destination. Choose the hard drive where the
product’s library folder is installed to, then click the “choose folder” button.
7. A window will appear. Navigate to the product’s library folder within the Play Libraries
folder and click “choose”. Now, press “continue” to proceed.
8. Next, click “install” to begin. You may need to enter the administrator password.
9. Repeat steps 5 through 8 for each subsequent disc until all library content has been
installed. You’re now ready for the next phase of the installation process.
Step 5: Update the Play Library
When an update becomes available for a Play Library, it will appear in the Installation
Center with the downard arrow icon above the word ‘Update’. Click the ‘Update’ icon to
download the latest Play Library update. The installer will run automatically once the
download is complete. Proceed through the prompts to install the updates to either the
Instruments or Samples folder, or both.
Managing Play Library Licenses
EastWest uses the Pace iLok system for license management. Licenses for EastWest
products can be activated directly on your computer (called a machine-based license),
or activated to an optional iLok key.
The iLok Key is a hardware device made available by Pace Anti-Piracy, Inc., that holds
licenses for a variety of software developers. The advantage of an iLok key is portability.
If you have installed a
Play
Library on two separate computers, you can
move the iLok between those computers at any given time to authorize
them for use.
The iLok system is well integrated into the Installation Center, but in case you need more
options to manage your licenses, download the iLOK License Manager. While a physical
iLok key is optional, an iLok account must be entered into your
EastWest account details. Please see the iLok.com website for
more detailed information on license management.

P L A Y 6 SO FT WARE MANUAL
Chapter 2: Getting Started
18
CONTENTS
<
Initial Setup in Stand-Alone Mode
These steps cover the basics of how to use Play 6 in stand-alone mode, including how to
load and view instruments, hear audio playback, and add effects.
Step 1: Launch Play 6
Launch Play 6 in stand-alone mode from one of the directories below:
• (Mac) Mac HD / Applications / East West / Play
• (Win) C:// Program Files / East West / Play
When Play 6 is launched, the Player view will show the Play Library that is selected in
the Default Interface menu. To change this se-
lection, go to the Settings Menu, click on the
Other tab, and select the desired Play Library
from the drop-down menu in Misc section, at
the bottom half of the window. Click ‘Apply’,
then quit and re-launch Play 6 to apply the changes.
See The Player View to learn more.

P L A Y 6 SO FT WARE MANUAL
Chapter 2: Getting Started
19
CONTENTS
<
Step 2: Load an Instrument from the Browser
To load an instrument, click on the Browser button located in the top-left area of the Naviga-
tion Bar that opens to the default Libraries mode.
Select one of the installed Play Libraries that populate the left column, then browse its
contents using the columns on the right to find an instrument to load.
Click on an instrument from the column on the right to select it, then click either the Add
or Replace button to load it. Use the Replace button to load a new instrument in place of the
existing one, or use the Add button to load multiple instruments.
When multiple instruments are loaded, pressing the Replace button will bring up the dialog
box pictured above, allowing you to replace the current instrument selection, or Replace All
instruments.
The shortcut to load an instrument is to simply double-click on an instrument file. Hold the
[shift] key while double-clicking on an instrument to add additional instruments. To replace
an instrument, select it in the Instrument Panel (see the next step on how to do this), then
double-click on a new instrument file.
See The Browser View to learn more.

P L A Y 6 SO FT WARE MANUAL
Chapter 2: Getting Started
20
CONTENTS
<
Step 3: Open the Instruments Panel
To view all currently loaded instruments, click on the Instruments button located in the top-
right area of the Navigation Bar.
To select an instrument, click on the gray area where the instrument
name appears. Once an instrument is selected, there are several op-
tions available.
The selected instrument can be replaced with a new one, as ex-
plained in the step above, its instrument set-
tings can be changed in the Advanced Instru-
ment Properties (left) window that appears in
the bottom half of the panel, or the instru-
ment can be removed by clicking the Delete
button.
Alternatively, the Instrument Selector is a quick way to change the selected instrument with-
out having to open the Instruments Panel, freeing up screen space.
Click in the field where the currently selected instrument appears to reveal a drop-down
menu showing all loaded instruments and their respective MIDI channel assignments in
parenthesis.
A check-mark indicates the current instrument selection, and clicking on another in-
strument will make it the current selection. The Player view will change, reflecting the
custom user interface associated with the selected instrument.
Step 4: Play a Note to Hear Audio Playback
To hear a sound, select an instrument, then click inside the highlighted range of notes that
appears on the Virtual Keyboard. If you don’t hear a sound, click on the Settings button in
the left corner of the Navigation Bar to access the Settings Menu.
See Instruments Panel to learn more.

P L A Y 6 SO FT WARE MANUAL
Chapter 2: Getting Started
21
CONTENTS
<
In the Audio Settings tab, ensure the desired audio device has been selected in the Device
Type and Output Device drop down menus.
In the MIDI Settings tab, ensure the preferred controller has a check-mark next to it, indicat-
ing it is enabled for use.
In the Other Settings tab, 2 MIDI Channel
Assignment modes are available. ‘Auto-In-
crement’ will assign each new instrument to
the subsequent MIDI channel (1, 2, 3, etc),
and ‘OMNI’ will set instruments to receive
MIDI on all channels (1-16).
Some other options in the Main Menu and Settings Menu include Sample Purge, and as-
signing Round Robin Reset controllers.
Step 5: Add Effects in the Mixer
Click the Mixer button in the top-left area of the Navigation Bar to access the Mixer.
A channel strip for each loaded instrument will appear, with basic controls like volume, pan,
mute, solo, and output.
If an instrument has multiple microphone positions, a
yellow Sub-Mixer button will appear. Click the button to
access each microphone sub-channel that makes up the
main instrument channel.
To enter the FX Rack and use a suite of effects to process
an instrument, click the light blue FX button. Effects in-
clude EastWest’s Amp Simulator,
Convolution Reverb, EP-1 Delay,
and ADT, as well as a suite of SSL
audio processing tools that includes
an EQ, Compressor, Gate/Expander,
Transient Shaper and Stereo Bus
Compressor.
See The Mixer View to learn more.
See Main Menu and Settings Menu to learn more.

P L A Y 6 SO FT WARE MANUAL
Chapter 2: Getting Started
22
CONTENTS
<
Play Libraries Are Now NKS-Ready
EastWest’s award-winning collection of virtual instruments are now fully compatible with
NKS, including the ability to browse instruments, preview sounds, and immediately ac-
cess pre-mapped instrument parameters all within Native Instruments’ Komplete Kon-
trol and Maschine hardware and software. Follow the steps below to make all installed
Play Libraries NKS-ready.
Step 1: Download the NKS Support Installer
To visit the Software & Product Updates page of the EastWest Support Center, please
click the following link: http://www.soundsonline.com/Support
Scroll down to find the ‘NKS Support Installer’ section, then
click on either the Mac or Windows icons to download the in-
staller per your operating system. The download size is approxi-
mately 790 mb.
Step 2: Run the NKS Support Installer
Once the NKS Support installer has downloaded, close all programs, then double-click
on the installer to launch it and proceed through
the prompts to complete the installation.
Please note! The NKS Support Installer can be run
anytime after installing additional EastWest Play
Libraries to make them NKS-Ready.
Step 3: Launch Native Instruments Software to Update Libraries
Now launch either the Komplete Kontrol or Maschine software to begin the ‘Updating
Library’ scan of all installed Play Libraries, making them NKS-ready for use with Native
Instruments Komplete Kontrol and Maschine software and hardware.
See Native Instruments - This is NKS to learn more.

P L A Y 6 SO FT WARE MANUAL
Chapter 2: Getting Started
23
CONTENTS
<
How To Optimize Playback and Performance
The Sample Cache settings optimize the streaming settings based on your computer
specifications. The right settings can improve the streaming performance of Play 6.
Adjusting the Streaming Cache
To access the Streaming Cache, click on the Settings Menu button (the gear icon located
in the top-left corner) in the Navigation Bar, then click the Streaming tab.
Please note! As a general rule, find the lowest setting that also results in smooth play-
back. If dropped voices or CPU spikes occur, simply raise the ‘Cache Level’.
The lowest recommended ‘Cache Level’ setting depends on:
• the speed of the computer’s processor (CPU)
• the amount of installed memory (RAM)
• the drive type and connection
• the demands of a project
Adjusting the ‘Cache Level’ affects the following:
• the loading time of your project
• the amount of memory usage
• the playback performance
Outlined below are recommended ‘Cache Level’ settings based on your computer speci-
fications, but please be aware that the demands of a given project are also a factor in
determining the best ‘Cache Level’ setting. For example, with the same computer speci-
fications, a large Hollywood Orchestra template will require a higher setting than a proj-
ect with a few small instruments from Fab Four. That’s because raising the ‘Cache Level’
results in more of each sample being loaded into memory (RAM), reducing the reliance
on disk streaming, which allows larger and/or more instruments to playback smoothly at
a given time.
In the ‘Settings’ menu under the ‘Streaming’ tab is a list of available drives that appear
under ‘Disk Volume’ with their respective ‘Cache Level’ settings to the right. Use the up
and down arrows to adjust this level for each drive.
• A ‘Cache Level’ between 0 - 1: results in the fastest load times and smallest memory
(RAM) usage, but requires a fast, multi-core processor (CPU) and Solid State Drives
(SSD) with a fast connection type to achieve smooth playback
• A ‘Cache Level’ between 2 - 3: results in less demands on the processor (CPU) but re-
quires more memory (RAM) usage. These settings are best for a computer with an
average CPU, but still plenty of RAM and SSDs with a fast connection type
• A ‘Cache Level’ between 4 - 5: results in the most memory (RAM) usage, but makes less
demands on the processor (CPU) and hard drive. These settings are recommended
for computers with an aging CPU and/or traditional 3.5” HDD

P L A Y 6 SO FT WARE MANUAL
Chapter 2: Getting Started
24
CONTENTS
<
Hard Drive Specifications
There are several factors that determine what kind of performance you can expect when
streaming large sample libraries from a hard drive. Those outlined below include details
on the speed of the drive itself, the speed of the connection type, and other options for
increasing data transfer speed.
• Solid State Drive (SSD) is the best drive option, giving you seek and retrieval times that
are nearly instantaneous, allowing for smooth performance at low latencies even
when working with larger projects. To take full advantage of the speed offered by
SSDs, they must be installed internally to a SATA III connection, or externally via a
USB 3.0 or Thunderbolt port. Connection types like SATA II, USB 2.0 and Firewire
400 / 800 do not offer speeds that take full advantage of SSDs.
• Hard Disk Drive (HDD) running at 7200 rpm (non-energy saving) is the minimum hard
drive specification that will achieve adequate performance. It’s best to install this
internally to either a SATA II or SATA III connection, or externally via eSATA or USB
3.0. Slower connection types like USB 2.0 or Firewire 400 / 800 will offer less per-
formance, and may not be fast enough for instruments with heavy sample loads that
playback many simultaneous voices.
• Raid 0 Configuration is an option for professional users to achieve high performance
when using streaming drives. There are many resources available online that provide
instructions, or you can consult a computer specialist.
• Mac Pro Retrofit is a way to optimize older Mac Pro towers that have previous generation
ports like USB 2.0, and the internal hard drive bays use SATA II connections. Neither
take full advantage of the speed offered by SSDs. A way around this is to install an
expansion card into a PCI-e slot (x2 or larger). The biggest boost in performance is
provided by SATA III interface cards that connects up to two 2.5” SSDs. When used
in a RAID 0 setup, speeds of up to 800 mb/s can be achieved. This is much greater
than the 300 mb/s offered by SATA 2 interface.
Hard Drive Considerations
Some less obvious considerations include only filling your drive up to 70% capacity,
spreading libraries across multiple drives, and dedicating drives only to stream libraries.
• Dedicated Streaming Drives can achieve better performance because they are dedicated
to streaming and do not share the connection’s throughput with other tasks like run-
ning an operating system or loading projects files.
• Managing Drive Space (HDD only) is important to maintain the speed at which data can be
read from a drive. Try to keep around 30% of each streaming drive empty to avoid
reduced performance, which can drop by half when the drive is up to or greater than
90% filled.
• Using Multiple Streaming Drives is recommended when using large sample libraries like the
Diamond edition of Hollywood Orchestra. For instance, because Hollywood Strings
and Hollywood Brass are both large libraries, putting them on separate drives will
help avoid performance issues when playing back large projects that have high voice
counts.
P L A Y 6 SO FT WARE MANUAL
Chapter 2: Getting Started
25
CONTENTS
<
Library Considerations
Another way to improve performance when streaming large libraries is to use libraries
that have smaller CPU footprint, like the Gold edition libraries that use 16-bit samples
as opposed to 24-bit samples, or ‘Lite’ instrument versions designed with fewer samples.
• ‘Lite’ Instrument (LT) are available for many Play Libraries that are programmed with few
samples, lowering voice counts. This can help relieve computer resources that are
being taxed as the instrument count rises.
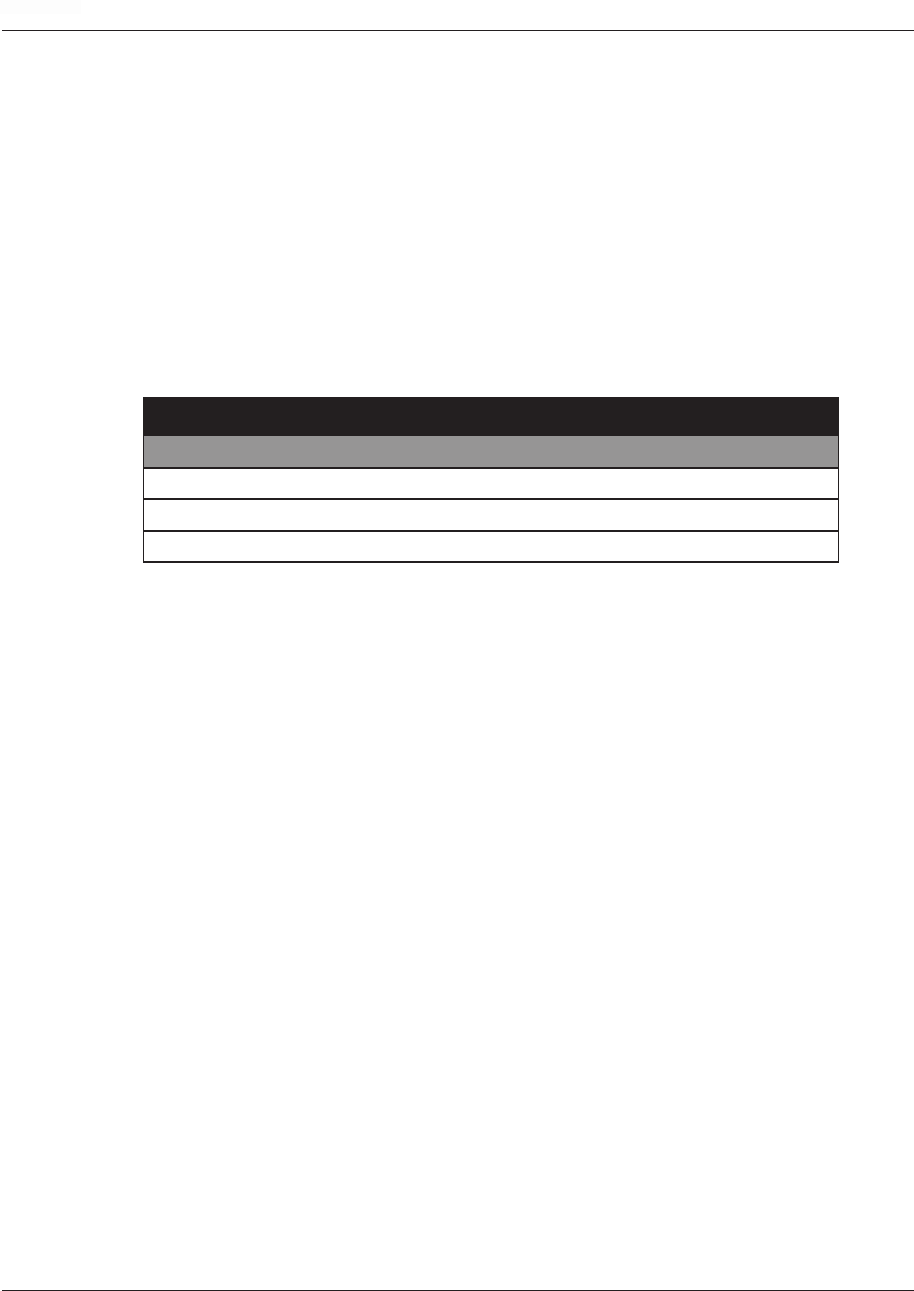
• Using Smaller Library Editions require less computer resources by using a lower bit depth
(16-bit versus the standard 24-bit) and fewer microphone positions. This enables
those with less capable systems access to the same basic soundset. Below is a table
showing the differences between the different editions.
COMPARISON OF EDITIONS
Silver
Gold Gold X Platinum Diamond
Instruments Selection All All All All
Bit Depth 16-bit 16-bit 16-bit 24-bit 24-bit
Mic Positions 1 1 2 3 5

P L A Y 6 SO FT WARE MANUAL
Chapter 2: Getting Started
26
CONTENTS
<
All About MIDI
MIDI is a digital data specification by which one musical device can communicate with
another to describe a musical performance. A “musical device” can be an electronic
instrument as well as a computer running MIDI-aware programs. (The term MIDI is an
acronym for the name, “Musical Instrument Digital Interface.” The specification is main-
tained and published by the MIDI Manufacturers Association.)
MIDI data describes much more than what notes are to be played and when. It includes
information describing dynamics, tempo, expression, and much more. (See the table
below.) One thing that MIDI cannot specify, though, is the sound of each note. The exact
same MIDI data can be sent to sound generators that imitate a flute and a ukulele, with
very different results. While this independence of MIDI data from the audio can some-
times cause problems, it can be used to great advantage with sound libraries like those
from EastWest.
This spec has become the standard means for conveying musical data in several very
different types of environments:
• MIDI can be used in real time. A musician plays a keyboard—or other instrument that
can generate MIDI—and the data is sent via a cable to a sound generator that under-
stands the codes. The keyboard makes no musical sound itself, relying on the device
at the other end of the MIDI cable to do so.
• MIDI can be stored in a program for later playback. Such a program is called a se-
quencer. A musical piece stored in a sequencer can consist of any number of concur-
rent musical lines, from one to an entire orchestra—and more.
• MIDI can be used to share musical data between computer programs. A typical use
of this capability is the export of data from a sequencer (good at creating audio files)
and its import into a notation program (good at creating printed scores). Or vice versa.
• A file containing MIDI data can be sent from one computer to another as a way of
sharing a musical piece. Because there is no audio data in the file, a “MIDI song”
is typically much smaller than even a compressed audio file, such as an MP3. The
downside is that the instrumentation and sound of the file on the receiver’s computer
are entirely dependent on the local setup, especially the sound card (if the piece can
be played at all). While the notes and rhythm will be preserved, there’s no guarantee
the sounds of the instruments will be the same. Ways around this problem are out of
scope in this manual.
Play, like many other MIDI-based programs, calls the 16 MIDI channels 1 to 16. Some
other software, including some host programs, may number the MIDI channels 0 to 15
(which is still 16 separate numbers). If you set matching values in Play and the host
sequencer, but the expected instrument does not sound, try adding one to the channel
number in Play or subtracting one in the sequencer (but not both). If the instrument now
sounds correctly, you have found such a mismatch.

P L A Y 6 SO FT WARE MANUAL
Chapter 2: Getting Started
27
CONTENTS
<
Using MIDI to Shape a Performance
The sound of a performance by a live musician differs from that of a cheap music box in
all the ways that the musician interprets the music: through tempo adjustments, expres-
sive dynamics, accents, timbre changes, decisions about which articulation to use for
each note, and so on.
But a MIDI stream is only digital data; it’s the job of the musician—whether playing in
real time or adding data to a sequencer project—to use MIDI to convey his or her musical
intentions. The MIDI standard was designed to convey all these interpretive elements.
And the Play Libraries were designed to respond appropriately to expressive cues.
Please note! Initialize the Mod Wheel (CC1) and Expression (CC11) values after loading
an instrument to ensure they sound as intended. The easiest way to do this is to assign
the MIDI Continuous Controllers (CCs) to the assignable knobs or sliders of your MIDI
controller, then jog them after loading an instrument. You can also input a starting value
into the MIDI Continuous Controller (CC) lanes inside your preferred DAW.
• MIDI CC 1 (Mod Wheel): Mod Wheel data is added to the MIDI stream each time
the position of the wheel changes. There are 128 positions from Off (value = 0)
to Full (value = 127). How the sound generator responds to Mod Wheel values is
implementation-specific. It might adjust the distortion on an electric guitar, affect
the loudness in a Dynamic Cross-Fade patch (DXF), or change the amount of an LFO
filter on the patch. Really, almost anything is possible.
Some of the Play Libraries include articulation files called Dynamic Cross Fades, also
called “DXF files.” As the name indicates, the Mod Wheel is used to fade between
two or more sets of samples that differ in loudness—and usually, therefore, timbre as
well. A typical articulation file contains several layers of samples, each layer recorded
with the instrument being played at a specific loudness: such as pp, mp, mf, or ff.
And typically, it is the Velocity parameter of the note that determines which layer is
played back. In a DXF file, it is the position of the Mod Wheel that determines the
layer. That difference means that which sample is played can be modified mid-note,
instead of having to wait for the next Note-On event.
• MIDI CC 7 (Volume): Both CC7 and CC11 affect dynamics. In Play Libraries, Vol-
ume data is designed to be relatively static, perhaps even to be set once near the
beginning and left unchanged thereafter. The recommendation is to use Volume to
adjust the relative loudness of each track; if it’s discovered during a final mix session
that the lead guitar needs to be boosted throughout the piece—or in certain large
sections —adjust the Volume where appropriate. Expression is designed more for
continuous dynamics; see below.
• MIDI CC 10 (Panning): Sound generators, including Play Libraries, respond to Pan-
ning codes by adjusting the relative loudness of the sound in the two stereo chan-
nels, giving the listener an impression of the instrument being left or right of the
center line, and by how much, if any. Some libraries may have the instrument already
positioned correctly in the sound space, such as instruments in a symphony orches-
tra being recorded where they normally sit in a concert hall. Listen to the sounds in
your specific library to see whether that’s the case.

P L A Y 6 SO FT WARE MANUAL
Chapter 2: Getting Started
28
CONTENTS
<
• MIDI CC 11 (Expression): As mentioned above, Expression and Volume are two
different codes associated with dynamics. CC11 is intended to be used to add the
moment-by-moment dynamics that mimic the way live musicians are constantly ad-
justing the force of the breath or the pre sure of the bow on the strings to achieve
musicality. These changes produce the dynamic arc of a melody or even swells in
individual notes.
• Other Common MIDI CCs: In addition to data about notes, tempo, meter, the pub-
lished spec for MIDI defines continuous controllers so that various aspects of a
performance can be conveyed along with the basic note data. There are potentially
up to 128 possible continuous controllers, but not all numbers from 0 to 127 are
neccessarily defined. Below are some of the most commonly used MIDI continuous
controllers (CCs).
MOST COMMON MIDI CONTINUOUS CONTROLLERS (CC)
0 Bank Select 64 Hold Pedal (on/off)
1 Modulation Wheel * 65 Portamento (on/off)
2 Breath Controller 66 Sustenuto Pedal (on/off)
4 Foot Pedal 67 Soft Pedal (on/off)
5 Portamento Time 68 Legato Pedal (on/off)
6 Data Entry 69 Hold 2 Pedal (on/off)
7 Volume * 120 All Sound Off
8 Balance 121 All Controllers Off
10 Pan Position * 123 All Notes Off
11 Expression * 124 Omni Mode Off
12 Effect Control 1 125 Omni Mode On
13 Effect Control 2 126 Mono Operation
127 Poly Operation
This information is included here for the benefit of those users who might choose to use
these MIDI continuous controllers (CCs) to control a performance in ways beyond the
scope of this manual. Here, we will discuss only four of the CCs: 1, 7, 10, and 11, as
indicated by the asterisks in the table.
Using the Round Robin Reset
This control is found in the ‘Other’ tab of the Settings menu. It allows you to specify
either a MIDI note or MIDI continuous controller (CC) to reset the round-robin cycle. The
numeric value in the spin box specifies which note number (middle C = 60) or which
continuous controller (CC) will be interpreted as a reset. Once set, all the round robin in-
struments in any given MIDI channel will be reset when that note or CC value is received.

P L A Y 6 SO FT WARE MANUAL
Chapter 2: Getting Started
29
CONTENTS
<
MIDI Learn Functionality
Many controls in Play can be connected to MIDI Continuous Controllers (CCs) using the
MIDI Learn feature. To engage this feature, right-click on a control in the Play interface
and click on “Midi Learn…”. Then move a knob or slider (CCs) on an attached MIDI
controller. The control in the Play interface on which you right-clicked will receive the in-
coming MIDI continuous controller (CC) data, and assign that CC number to the control.
To disconnect a control from the learned CC, right-click and select “Detach From Midi”.
In this way you can adjust instrument parameters in real time. It can be done either from
a MIDI keyboard or other control surface during a live performance, or by capturing the
MIDI continuous controller (CC) data in a sequence and playing it back every time the
sequence is run.
Different MIDI Modes
Two additional MIDI Modes, Multi and MPE, have been added to the MIDI channel
dropdown menu in Play. These two new modes are in addition to the option of assigning
each instrument to its own MIDI channel (1-16), or assigning an instrument to receive
MIDI on all channels (OMNI). Like OMNI mode, these new modes receive MIDI on all
channels, but differ in the way they handle Mod Wheel (CC1), Expression (CC11) and
Pitch Bend messages, which in most cases can be applied on a per-note basis. Global
MIDI messages, like Sustain Pedal (CC64), are still treated globally and will affect all
notes, regardless of channel.
• OMNI Mode will set an instrument to receive MIDI on all channels (1-16), with Mod
Wheel (CC1), Expression (CC11) and Pitch Bend modulation applied to notes on all
MIDI channels. This is useful when layering sounds intended to be played together,
like when stacking separate string sections together to create a full string patch.
• MULTI Mode is useful to MIDI guitar controllers by allowing per-note control of Mod
Wheel (CC1), Expression (CC11) and Pitch Bend by sending those MIDI messages
only to the voices on the same MIDI channel as the controller event.
• MPE Mode stands for “Multi-Dimensional Polyphonic Expression” and is a MIDI
standard developed by the MIDI Manufacturer Association to accommodate a new
class of MIDI controllers like the Roli Keyboard, the Linnstrument, and the Eigen-
Harp. In this mode, each note is sent to its own MIDI channel, cycling through an
allocated block of channels that enables MIDI messages (restricted to Note On, Note
Off, Channel Pressure, Pitch Bend and CC74) to be sent per-note, while global MIDI
messages like CC7 (Volume) and CC64 (Sustain) are applied to all voices, regardless
of the MIDI channel they were sent over.

P L A Y 6 SO FT WARE MANUAL
CONTENTS MASTER NAVIGATION DOCUMENT
Chapter 3: Play 6 User Interface
31 Navigating the User Interface
32 Main Controls and Library-Specific Controls
33 The Player View
38 The Browser View
42 Instruments Panel
43 Instruments Selector
44 The Mixer View
64 Multi-channel Audio Output
65 Main Menu
66 Settings Menu

P L A Y 6 SO FT WARE MANUAL
Chapter 3: Play 6 User Interface
31
CONTENTS
<
Navigating the User Interface
Play 6 is the latest version of EastWest’s software that powers all EastWest’s Virtual
Instruments collections, called Play Libraries. The Play software is designed around 3
main areas; the Player, Browser and Mixer views.
Use the buttons in the Navigation Bar located at the top of the user interface to access
all main areas, described briefly below as they appear from left to right.
• Main Menu open and save instruments, access sample purge, and more.
• Settings Menu access audio/midi setup, streaming settings, and more.
• Browser find instruments in Database mode, or browse for them in Libraries mode
• Mixer features channel strips, sub-mixes, and FX for loaded instruments.
• Player displays custom controls and a unique user interface for each Play Library.
• Instrument Selector use the drop down menu to select between loaded instruments.
• Instruments Panel access instruments and their Advanced Instrument Properties.
In PLAYER view, the main window displays the custom user interface for Hollywood Pop Brass.
P L A Y 6 SO FT WARE MANUAL
Chapter 3: Play 6 User Interface
32
CONTENTS
<
Main Controls and Library-Specific Controls
While they may vary in appearance, basic controls like envelopes, effects, MIDI param-
eters, and status indicators have the same function in all Play Libraries.
Information about controls that only appear in certain Play Libraries (like performance
scripts, microphone positions, or the articulation pane) can be found in the individual
Play Library User Manuals.
There are five distinct types of controls in the Player view. Some controls can accept data
from both the keyboard and the mouse; others can have their values changed with the
mouse only. The exact appearance of control may vary from one Play Library to the next,
but they behave the same.
• On/Off Buttons have two states: On and Off. The On position is indicated when its
light is illuminated. The only way to toggle a button between its On and Off states is
by clicking the button with the mouse cursor. Some
knobs and other controls are inactive unless their
button is turned on.
• Action Buttons performs an action when clicked with
the mouse. Examples include: opening an instru-
ment, moving between the Player and Browser views,
and adding a new folder to your list of favorites.
• Knobs are used to modify a numeric value over a definite range. Rotate the knob
until the desired value appears in text adjacent to the knob. Most knobs will jump
to specific, preset values in the permissible range, so it may not be possible to set
the value to a specific arbitrary number. Select the number that most closely ap-
proximates the effect you want to achieve.
To modify a knob’s value, always start by clicking on the knob with the mouse
cursor. To increase the value, drag the mouse cursor upward with the mouse’s left
button held down. To decrease the value, drag the mouse cursor downward with the
same button held down. To set the knob to the center, “12 o’clock” position, dou-
ble-click on it. Holding down control-command while
dragging with the mouse allows for finer adjustment.
• Drop-Down Lists can select from a selection of text
strings. Click on the control to display the list of op-
tions, and with the mouse, scroll through the list (if
necessary) and then click on the choice.
• Spinners allow the user to change a value incrementally by clicking on the little
arrows, or by clicking on the number itself to highlight it, then typing a new value.
See Support and Documentation to learn more.

P L A Y 6 SO FT WARE MANUAL
Chapter 3: Play 6 User Interface
33
CONTENTS
<
Envelope contains control knobs
for a 5-stage envelope: Attack,
Hold, Decay, Sustain, and Re-
lease (AHDSR).
Performance contains scripts
that change sample playback
behavior of instruments.
System & Sensitivity change
instrument settings like Tempo
Sync and Scaling options.
The Virtual Keyboard is color coded: White keys represent the instrument range, Tan keys indicate no samples are
loaded, and Blue keys are “keyswitches” that switch between multiple articulations within a single instrument.
System Usage (from left to right) tracks CPU, Disk, Voices and RAM usage.
Reverb features
convolution reverb,
and a large selec-
tion of impulses.
Stereo Double con-
trols the width of
stereo spread (‘ste-
reo’ must be selected
as channel source).
Master Instrument Channel ( right) con-
trols source, tune, pan, volume and solo /
mute for the selected instrument.
Mixes (left)
controls the
microphone po-
sition volume,
pan, mute / solo
and load state.
Hollywood Pop Brass
features 10 main areas briefly
outlined here.
Articulation Pane displays an
instrument’s articulation set.
Each articulation corresponds
to a Blue “keyswitch” that
can be used to switch between
them in real-time.
The Player View
Below is an example of the Player view of the Hollywood Pop Brass user interface, which
features 10 main areas. The areas that share common elements with all Play Libraries
(like Master Instrument Channel and Envelope) are covered in the following pages, while
others can be found in the individual Play Library user manuals.
See Support and Documentation to learn more.

P L A Y 6 SO FT WARE MANUAL
Chapter 3: Play 6 User Interface
34
CONTENTS
<
The Master Instrument Channel
Along the right side of the Hollywood Pop Brass user interface is the Master Instrument
Channel of the selected instrument.
Click in the Channel Source field to reveal a drop-down list with
options to configure the output.
• Stereo outputs the original stereo channels as they were
recorded.
• Mono sums the left and right channels into a dual mono
channel.
• Mono From Left outputs the left channel to a dual mono
output, discarding the right channel.
• Mono From Right outputs the right channel to a dual mono
output, discarding the left channel.
• Swap Left and Right outputs a reverse stereo image of the
original audio (swapping the left and right channels).
The Tune knob includes coarse and fine tuning modes. Coarse
tuning adjusts the pitch up or down in semitone increments,
while fine tuning moves the pitch up or down in increments
of 1/100
th
of a semitone (called “cents”). Change the tuning
value by clicking on the arrows inside the spinboxes above the
coarse and fine tuning buttons, or use the Tune knob with a
selected tuning mode. The spinboxes display the tuning values
for both the coarse and fine tuning modes.
The Pan knob adjusts the volume of the left and right audio sig-
nal to change the perceived position of the sound source, while
preserving the relative panning of the individual microphones
in each of the 3 Microphone Mixes. Use the Pan knob to define
the position in the stereo image, or for special effect.
The Master Fader adjusts the volume of the instrument’s mas-
ter output, without affecting the relative mix of the microphone
sub-mixer channels. Two audio meters display the signal of the
stereo output in real-time.
The Stereo Outputs default to ‘Main L/R’ in the Output Channel
field. To assign an instrument to a stereo output other than the
default, click in the field and select 1 of 9 stereo outputs. This
option allows you to send the stereo outputs of each loaded in-
strument to separate audio tracks in your system’s sound card
(in stand alone mode) or in your host sequencer (as a plug-in).
When enabled, the Mute (M) button silences the audio output
for the selected instrument. When enabled, the Solo (S) button silences the audio outputs
for all instruments that are not currently soloed.

P L A Y 6 SO FT WARE MANUAL
Chapter 3: Play 6 User Interface
35
CONTENTS
<
Envelope
The Envelope controls the volume of a sound over time across 5 stages. Each knob con-
trols the length or loudness of one or more stages of the envelope. All Play Library instru-
ments are programmed with default Envelope values to achieve a natural sound. Please
be aware that changing these default settings may result in less than natural results.
The Attack, Hold, and Decay stages of the envelope determine how long it takes for the
sound to go from the initial attack to the beginning of the sustain stage. Typically, a
sound begins to drop in volume immediately after reaching its loudest point, but using
the Hold value maintains the volume at its loudest point until reaching the decay stage.
• Attack is measured in milliseconds (ms), this stage starts at the beginning of the note
until it reaches its highest volume.
• Hold is the stage that maintains the loudest volume of the attack for the number of
milliseconds (ms) specified.
• Decay is the time in milliseconds (ms) it
takes to drop from the highest point of the
attack or hold stage, to the sustain stage
that follows.
• Sustain specifies the loudness of the sound
in decibels (db) after the initial attack, and
until the note is released.
• Release determines how long the sound re-
mains audible, in milliseconds (ms) after a
note is released
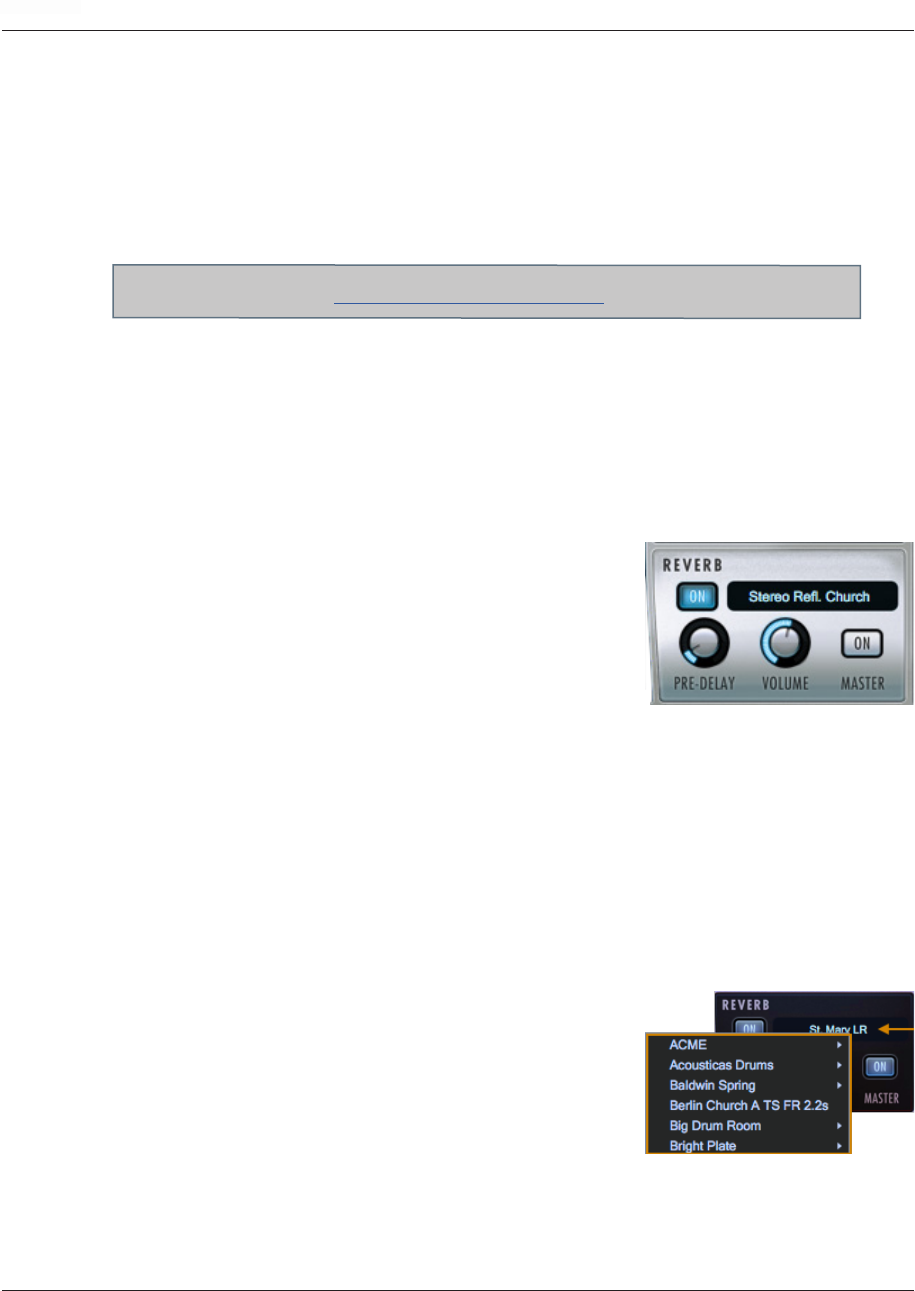
Reverb
Play uses a special type of reverb called Convolution that uses short impulses to excite a
space, like a studio or cathedral, and capture the resulting “impulse response” (IR). That
IR contains the characteristics of that space, which can then be applied, or convolved,
with the input signal to simulate that sound playing in that given space.
Please note! A default reverb setting is applied to all instruments, but can be modified,
changed, or disabled for a more dry sound.
• On Button: Click the ‘On’ button to toggle
the on/off state of the Reverb. When en-
abled, the Reverb ‘On’ button becomes
illuminated.
• Preset List: Click in the field containing
the name of the currently selected IR to
reveal a drop-down list of all available
IRs, with a check-mark indicating the
current selection. Click on the desired IR to select it.
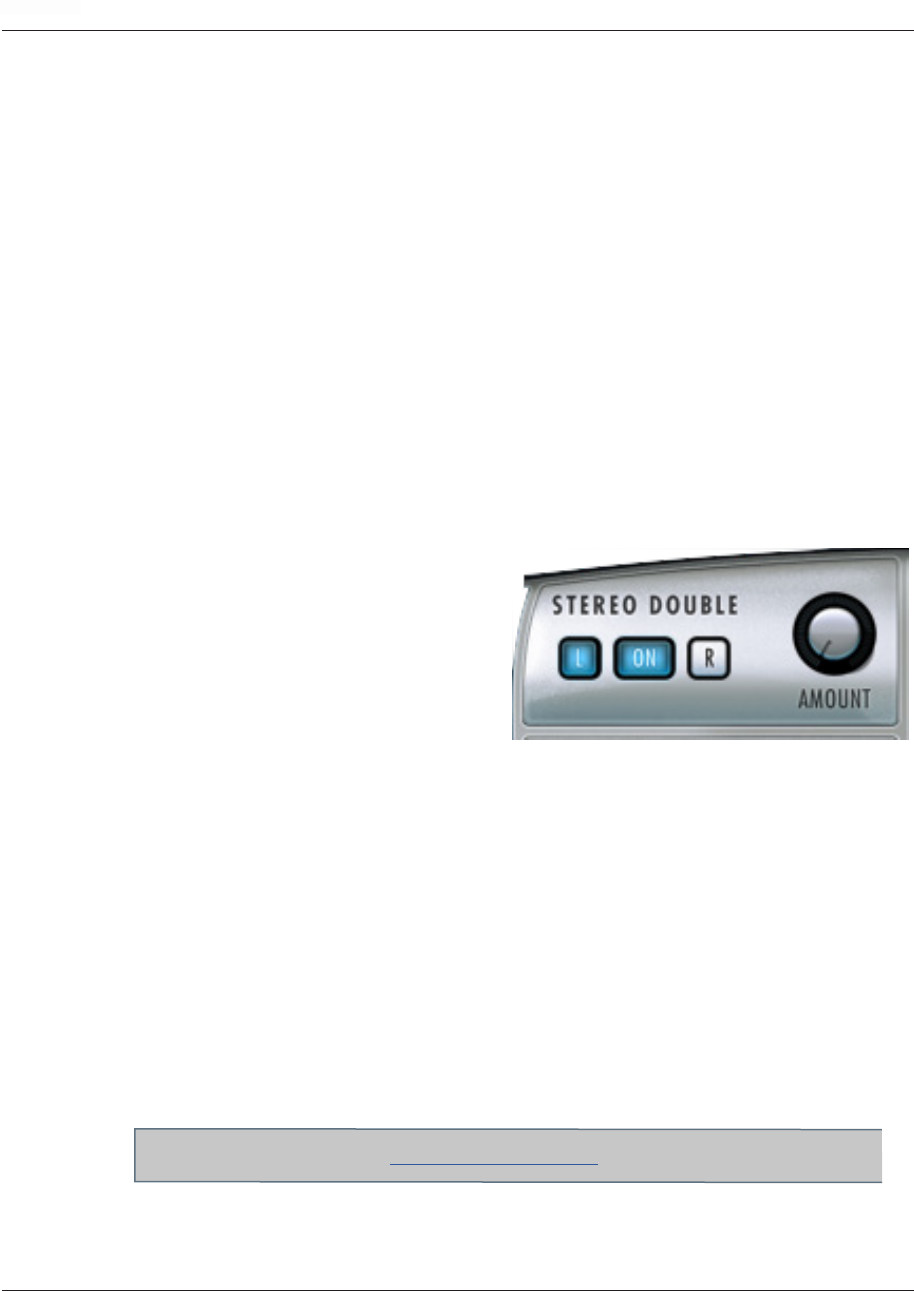
P L A Y 6 SO FT WARE MANUAL
Chapter 3: Play 6 User Interface
36
CONTENTS
<
• Pre-Delay: Adjust this value to change the onset time (in milliseconds) of the con-
volved audio output.
• Volume Knob: Adjust this value to specify the amount of reverb to apply to the signal.
• Master Button: Click on this button to toggle the on/off state of the Master Reverb
control. When enabled the Reverb ‘On’ button becomes illuminated and reverb is
applied to all instruments within a given instance of Play. The Master Reverb control
saves CPU resources by applying the selected IR to all loaded instruments within a
single instance of Play, including Play Libraries that do not include a Master Reverb
button themselves.
Stereo Double
The Stereo Double controls allow you to set the width of the stereo spread. This only
works when ‘Stereo’ is selected in the Channel Source of the Master Channel (which is
the default setting).
Select between the Left (L) and Right (R) signal with the buttons on either side of the
On button, then use the ‘Amount’ knob to
dial in the desired depth.
Turning the ‘Amount’ knob all the way to
the left results in no effect, the equivalent
of disabling the effect entirely. Turning the
‘Amount’ knob all the way to the right re-
sults in the maximum stereo spread.
System and Sensitivity
This area contains several settings, some of which can also be found in the Instruments
Panel under Advanced Instrument Properties
• MIDI Port defines which available MIDI devices are enabled (stand-alone only).
• Channel allows you to assign an instrument to receive MIDI in a variety of different
ways. A specific MIDI channel can be selected so that an instrument receives MIDI
information only on the specified channel (from 1 to 16), or the MIDI channel can
be assigned to OMNI, which allows the instrument to receive MIDI on all channels
(1 through 16). Two additional MIDI modes are are also available for special appli-
cations: Multi mode and MPE mode.
• Transpose raises or lowers the incoming MIDI note by increments of +/- 1 semitone.
See Different MIDI Modes to learn more.

P L A Y 6 SO FT WARE MANUAL
Chapter 3: Play 6 User Interface
37
CONTENTS
<
• Velocity Min and Max specify the minumum velocity and maximum velocity range
for a given instrument. Values below the minimum or above the maximum velocity
are respectively remapped to the lowest and highest values.
• Voice Limit specifies the maximum number of voices that an instrument can play-
back. If an instrument receives more voices than the voice limit value, it will cut
off voices that began playing first. Keep in
mind that there are instruments that play
more than one sample when sounding a
note (such as instruments that use cross-
fading, have release trails and/or multiple
microphone positions).
• Sensitivity determines what part of the
dynamic range the instrument is most
sensitive to, ranging in values between
-100 and +100.
Status Indicators
The Status Bar tracks system usage for CPU, Disk, Voices, and RAM usage. Monitor the
usage and if neccessary adjust the ‘Sample Cache’ settings located in the Settings Menu
under Streaming tab to improve performance.
• CPU the percentage of the total processor capacity Play is consuming.
• Disk the number of megabytes per second (MB/s) data is being streamed from disk
• Memory the number of megabytes (MB) of RAM being used by loaded samples.
• Voices the number of samples, not just notes, currently being played.
See How To Optimize Playback and Performance to learn more.

P L A Y 6 SO FT WARE MANUAL
Chapter 3: Play 6 User Interface
38
CONTENTS
<
The Browser View
Search for instruments by selecting between 1 of 2 modes: Libraries mode displays all
installed Play Libraries, allowing you to browse for Instruments by title, and Database
mode can search for instruments by entering key words into a search bar, or by selecting
attribute tags across a range of categories to narrow down results.
Libraries Mode
Select an installed Play Library from the list that populates in the left column to view the
contents of its Instruments folder. Columns to the right display the sub folders within,
eventually leading to the instruments themselves (see red text below).
The Instrument Panel highlighted above contains information related to the selected in-
strument. On the left half of the panel the Instrument name is displayed, along with the
Play Library it originates from, and a description of that library. On the right half of the
panel, abbreviations used in instruments are decoded in the Description field, and users
can type notes into the Comments field.
Tag an instrument as a Favorite by clicking the star icon in the center of the panel. It is
highlighted in blue above, meaning the instrument is already tagged.
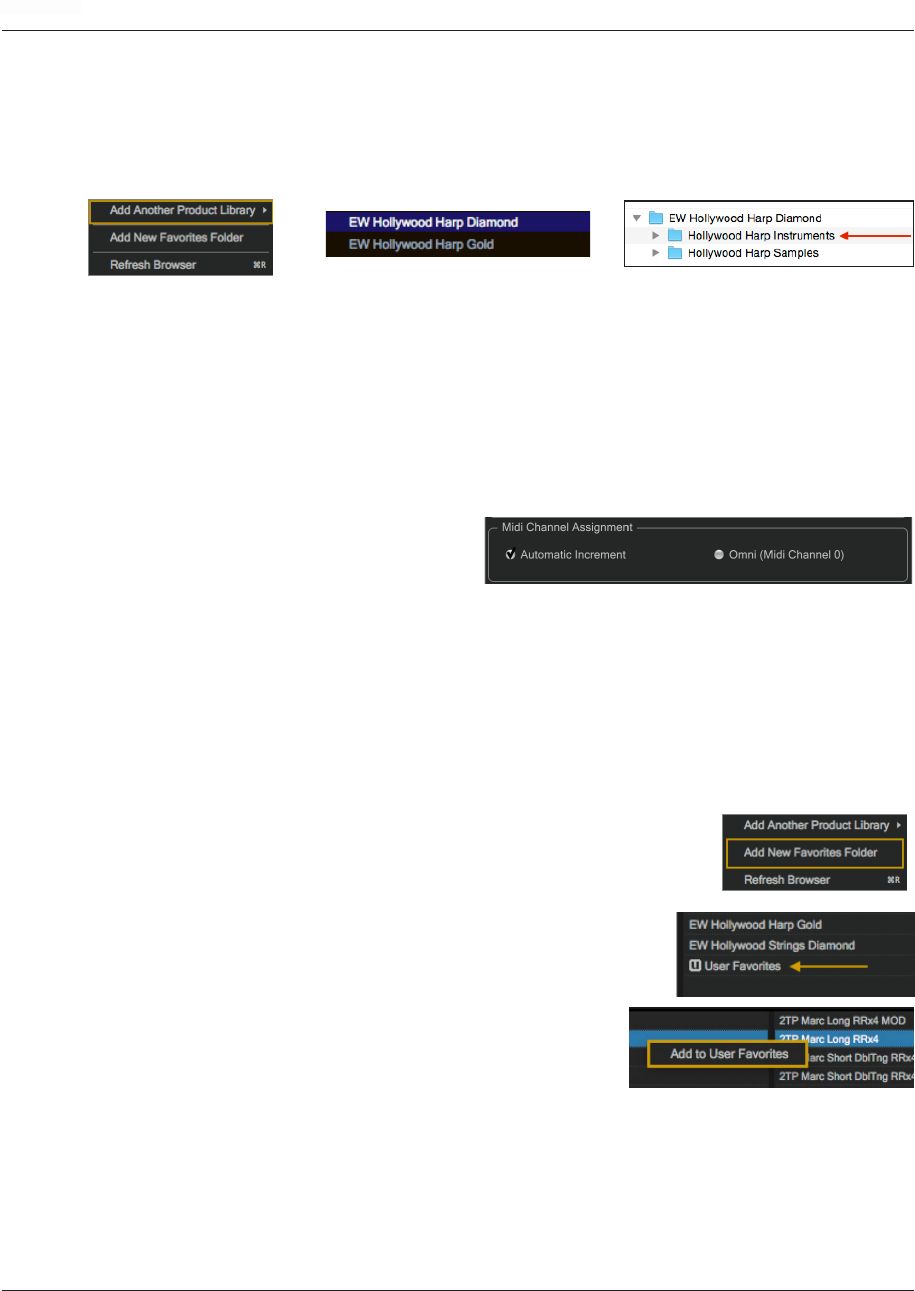
P L A Y 6 SO FT WARE MANUAL
Chapter 3: Play 6 User Interface
39
CONTENTS
<
In case a Play Library does not appear in the Browser view where all Play Libraries popu-
late, right-click in an empty space in the left column of the Libraries browser and choose
‘Add Another Product Library’ from the pop-up window. Selecting a Play Library from the
menu will bring up a search window. Locate the Instruments folder for that Play Library,
then highlight it and click ‘okay’ to set the library path.
If a Play Library has been moved from it’s a original location, it will appear grayed out
in the Libraries browser. Click on the library name in the left column and use the search
window to find the Instruments folder of that Play Library. Highlight it and click ‘okay’
to set the library path.
The MIDI Channel Assignment section can be found in the Settings Menu under the Other
tab. Here you can choose the way in which MIDI channels are assigned to instruments.
• OMNI mode assigns an instrument
to MIDI Channel 0, which means it
will receive MIDI on all channels.
• Automatic Increment assigns each new instrument to the subsequent MIDI channel,
starting on 1, 2, 3, etc.
To create a User Favorites Folder in a new location to store all your favorite instruments,
right-click in the left column of the Libraries browser and select ‘Add New Favorites
Folder’ from the menu.
Enter a name for the folder (in this example, “User Favorites”)
and click ‘okay’ to create it.
To add an instrument to this location, right-click on an in-
strument name in the right column and choose the option
‘Add to [folder name]’.

P L A Y 6 SO FT WARE MANUAL
Chapter 3: Play 6 User Interface
40
CONTENTS
<
Database Mode
Instruments can be found by either entering key words into the Search Field located near
the top-right corner, or by narrowing down the instrument selection by choosing between
desired attributes in several categories.
Those categories, from left to right, default to: Category, Type, Style and Timbre. The
Results List displays the number of instruments that match the selected criteria at the
top, and populates those instruments in a list below.
Additional Attribute Categories are available, including Articulation, Library and Size, To
access them, click on any category name to reveal a drop-down menu, then click on the
desired category to place a check-mark indicating its the current
selection.
At the bottom of the Results List column are a set of Filters that
allow you to further narrow the results to only show those tagged
as a Favorite, or only
those Installed and/or
Licensed (available) on the computer.
To tag an instrument as a Favorite, click on the star icon to the right of the Instrument
name in the Results List. The star icon
will light up to indicate it has been tagged.

P L A Y 6 SO FT WARE MANUAL
Chapter 3: Play 6 User Interface
41
CONTENTS
<
The highest level in the Database Hierarchy is simply called Category. It contains broad
attribute tags such as instrument groups like ‘Ethnic Strings’ and special categories like
‘Loops & Kits’. Selecting a tag in this column will affect all other columns, narrowing
down the visible results in each.
The Type column has the second highest level of hierarchy in the database. It contains at-
tribute tags that are a subset of Category, including instrument types like ‘Dulcimer’ and
special category types like ‘Drum Loops’. Selecting a tag in this column will affect all
other columns (except Category) by graying out the visible results in each. This behavior
allows you to always see the narrowed results in all other columns based on the main
Category selection, even as you further define the search in the Type category.
The remaining categories represent the third tier of hierarchy in the database. Style tags
pertain to musical style (genre) and production style (w/FX), Timbre tags describe the
quality or tone of a sound, Articulation tags define the performance technique(s) used,
and Size tags are related to the loading size of an instrument: small, medium, large and
x-large. Libraries tags can be used in conjunction with other search categories to find
“all the guitars in Fab Four”, for example. This differs from the search function in the
Libraries area, where instruments are located by browsing the Instruments folder of a
given Play Library.
To Reset Tag Selections, click the ‘Any’ tag at the top of the Category column will reset
existing tag selections across all categories. Clicking the ‘Any’ tag at the top of every
other category will reset everything but the Category column.
There are a few Tag Selection Rules to keep in mind as you select attributes. The Category
and Type categories allow one tag to be selected at a given time, while all other catego-
ries allow multiple tag selections by holding down ‘command’ (macOS) or ‘alt’ (Win) keys
while adding tags.
When selecting multiple tags in the Style, Timbre, Articulation, Library and Size catego-
ries, please note that only instruments containing all selected attributes will appear in
the results list, not just one or the other. This allows you to find, for example, drums that
are both fat and punchy.

P L A Y 6 SO FT WARE MANUAL
Chapter 3: Play 6 User Interface
42
CONTENTS
<
Instruments Panel
Click the Instruments button on the right side of the Navigation Bar to open the panel
that displays all loaded instruments along with their MIDI channel, audio output and
volume controls that populate from the top down.
The Advanced Instrument Properties of the selected instrument ap-
pear at the bottom of the Instruments panel. Options include:
• Transpose raises or lowers the incoming MIDI note by incre-
ments of +/- 1 semitone.
• Tune changes the pitch of the audio signal during playback.
Note that sound quality decreases as the tuning interval grows
larger.
• Micro Tuning is available for select Play Libraries only. By de-
fault, the 12 notes within an octave are tuned to the tradi-
tional Western scale. The other micro tuning scales adjust the
tuning of the 11 non-root notes to produce the characteristic
sound of the given scale.
• Root allows the selection of the lowest note in the scale, or the
“root note”. The intervals of all other notes in a given scale are
relative to the root.
• Key Range specifies the range of notes to which the instru-
ment will respond, effectively muting notes you don’t want to
hear, or giving you the ability to split the keyboard between
multiple instruments on a single MIDI channel.
• Velocity Range specifies the minimum velocity and maxi-
mum velocity range for a given instrument. Values below the
minimum or above the maximum velocity are respectively re-
mapped to the lowest and highest values.
• Sensitivity determines what part of the dynamic range the instrument is most sensi-
tive to, ranging in values between -100 (left) and +100 (right). The Sensitivity Curve
Graph included in the Player view of some Play Libraries will reflect changes made
here.
• Keyswitch sets the selected instrument’s default keyswitch note, which specifies the
articulation in the keyswitch file that plays when no keyswitch note has been played
in its MIDI channel in the current session. Please note, the instrument must be
saved to the file system with an [.ewi] extension and reopened from that [.ewi] file
for the new default value to take effect.
• PItch Bend specifies the range of the Pitch Bend Wheel in semitones. The value can
be set between -12 semitones and +12 semitones. Negative values reverse the direc-
tion of the Pitch Bend Wheel, so pushing it up lowers the pitch.
• Voice Limit specifies the maximum number of voices that an instrument can play-
back, up to a limit of 999. If an instrument receives more voices than the voice limit
value, it will cut off voices that began playing first.

P L A Y 6 SO FT WARE MANUAL
Chapter 3: Play 6 User Interface
43
CONTENTS
<
Instruments Selector
All instruments currently loaded in an instance of Play are listed in the Instrument Selec-
tor, with a check-mark denoting the currently selected instrument, with its MIDI channel
assignment in parenthesis.
Click on the drop-down menu to open the list and click on an instrument to select it.
Selecting an instrument means:
• The controls in the Player view now display the values for that instrument.
• The graphics in the Player views is dictated by this current instrument.
• The virtual keyboard plays notes from this instrument.
• Any actions that apply to the current instrument, such as Remove Instrument, affect
the one you select from this menu.

P L A Y 6 SO FT WARE MANUAL
Chapter 3: Play 6 User Interface
44
CONTENTS
<
The Mixer View
The Mixer view displays a channel strip for each loaded instrument with controls for vol-
ume, panning, mute, solo, on/off load state, output channel, as well as the FX button and
Sub-Mixer button explained below.
Sub-Mixer Channels
The Sub-Mixer button will appear when Instruments that contain multiple microphone
mixes are loaded. Click on the Sub-Mixer button to reveal a
channel strip for each available microphone position.
Please note! Instruments that do not contain multiple micro-
phone mixes will not display this button.
Click on the buttons containing the microphone names to load and unload them, which
will illuminate or become grayed out respectively.

P L A Y 6 SO FT WARE MANUAL
Chapter 3: Play 6 User Interface
45
CONTENTS
<
The FX Rack
The FX Rack contains the EastWest Amp Simulator, EP-1 Delay, ADT (Automatic Double
Tracking) Effect and Convolution Reverb, as well as the Ohm Force Ohmicide distortion
plugin, and an suite of SSL audio processing tools that includes a Filter, EQ, Compressor,
Gate/Expander, Transient Shaper and Stereo Buss Compressor.
To save an FX Rack Preset for later recall, click inside the ‘Preset’ field then click ‘Save
Preset’ from the drop-down menu to bring up a dialog box where you can ‘Enter New
Preset Name’.
Once saved, presets can be loaded from the ‘User-Defined Presets’ location, which popu-
lates just above the ‘Save Preset’ option in the drop-down menu of the ‘Preset’ field.

P L A Y 6 SO FT WARE MANUAL
Chapter 3: Play 6 User Interface
46
CONTENTS
<
SSL Channel Strip
This plug-in can be used on both the Instrument (Main) and Microphone (Sub) channel
strips. The signal is passed through 5 separate sections, as described below.
Input Section and Output Section
Turn the Gain knob in the Input Section to control the level of the incoming audio signal.
The post-gain signal level is shown in lights to its left. As a rough guide, the ‘-6’ yellow
indicator should occasionally comes on but the red ‘0’ indicator should remain off.
Press the Ø button to invert the phase of the input signal.
The Output Section is the last step in the processing. The Gain knob controls the audio
level of the output signal. Adjust this level last to achieve the loudness of the signal that
you want. The same rules for the yellow and red indicator lights apply here as in the
Input Section.
The S/C Listen button directs the Dynamics Side Chain to the channel output.
Filter Section
The Filter controls provide access to two separate kinds of filters. The black knob controls
an 18dB/Octave high-pass filter (20Hz to 500Hz). Use it to remove lower frequencies
from the audio. The purple knob controls a 12dB/Octave low-pass
filter (3kHz to 22kHz). Use it to remove higher frequencies.
Turn either knob fully left (marked OUT) to turn that filter off. Turn
either one (or both) clockwise to move the filter frequency in from
its extremity.
You have a choice where to insert the Filters in the audio stream. To place the Filters im-
mediately following the Input control, press the Input button. To switch the Filters into
the Dynamics Side Chain, press the Dyn SC button. Note that when the Syn SC button
is engaged the Input button has no effect.
Equalizer Section
To use the EQ, switch it into circuit by pressing the EQ In button, which is near the top
in the center of the interface for this section.

P L A Y 6 SO FT WARE MANUAL
Chapter 3: Play 6 User Interface
47
CONTENTS
<
The EQ section has four bands, each with its own knob color. All bands have gain and
frequency control. The low (LF) and high (HF) bands are shelved by default but can be
switched to a bell shape (parametric) by pressing the Bell button; the Bell option gives
you more control over the exact shape of the EQ curve. The low-mid (LMF) and high-mid
(HMF) bands have Q controls (to adjust the sharpness of the modified curve) in addition
to what the others have.
Listed in the table below are the ranges for the knobs in each section.
Band LF LMF HMF HF
Frequency range
40Hz – 600Hz 200Hz – 2kHz 600Hz – 7kHz 1.5kHz – 22kHz
Gain range
±16.5dB ±20dB ±20dB ±20dB
Q range
— 0.5 – 2.5 0.5 – 2.5 —
The E button in the center toggles the EQ emulation between the G Series and E Series
consoles. The difference between them is described in the following table.
G Series
E Series
The bell curve has a more rounded shape at low
gains, and the shelf curve overshoots zero slightly
at the base of the curve.
The bell curve is slightly more pointed, and there is
no overshoot on the shelf curve.
G Series EQ is more subtle and is generally more
suited to instruments and vocals.
E Series EQ is more aggressive and is therefore bet-
ter for removing problem frequencies. It is generally
more suited to drums.
Note: At full boost or full cut, the E and G Series curves are identical.
To switch the EQ into the Dynamics Side Chain, press Dyn SC.
Dynamics Section
This section consists of both Compressor controls and Noise Gate/Expander controls.
Both sections work independently but can be operational at the same time, providing
sophisticated control of signal levels. The example image of the interface is shown below,
after the description of the Compressor.
There are two buttons at the top. The Dyn In button turns on the whole section. The Pre
EQ button moves this section before the Equalizer; otherwise, this processing is per-
formed after the Equalizer.
The Compressor is controlled by 3 blue knobs: Threshold, Release, and Ratio. To activate
the Compressor/Limiter, turn the Ratio knob so that its ratio is no longer set at 1:1.

P L A Y 6 SO FT WARE MANUAL
Chapter 3: Play 6 User Interface
48
CONTENTS
<
To turn the compressor into a ∞:1 limiter, turn the knob fully to the right.
There is no gain makeup control because the T/HOLD (threshold) knob controls both
the level at which gain reduction is introduced and the gain make-up, thus keeping the
output level steady regardless of the compression.
The Release knob controls how quickly the level returns to normal after the input level
has dropped below the threshold (measured in seconds). The attack time is adjusted
automatically to match the audio. To choose a consistently fast attack time, press the
Fast Att button.
Turn on the PK button to switch from RMS to Peak signal detection. In normal RMS
mode, the compressor reacts to the average signal level and has a soft knee characteris-
tic. When switched to Peak mode, it responds to peak signal level and introduces a hard
knee characteristic, resulting in more dramatic compression.
The level of compression being introduced is shown in the left-hand of the two meters in
the centre of the Dynamics section.
To activate the Noise Gate/Expander, turn the Range knob so that its range is no longer
zero. The green indicators in the right-hand of the two meters in the centre of the Dynam-
ics section show the amount of gain reduction being introduced.
By default, the Noise Gate/Expander section functions as a Gate. To switch to the Ex-
pander, press the Exp switch.
The Threshold function uses different levels to open the gate to audio and to close it
again: the level at which the expander opens is higher than the level at which it closes
again. In other words, when the expander is opened, it stays open until the signal level
crosses the quieter Close threshold. This is known as hysteresis and is very useful as it
allows instruments to decay more naturally. The word “Threshold” normally refers to the
Open threshold.
The Hold knob controls the delay before the signal level starts reducing again. The
Release knob controls how quickly the level then reduces. Note that the Release knob
interacts with the Range knob, which determines the depth of gain reduction.
The Attack Time (the time taken for the Expander/Gate to ‘recover’ once the signal level
is above the ‘deactivate’ threshold) is normally set to 1.5ms per 40dB. Press the Fast Att
button to introduce a faster attack time of 100μs per 40dB. This is useful when gating
signals with a steep rising edge, such as drums.

P L A Y 6 SO FT WARE MANUAL
Chapter 3: Play 6 User Interface
49
CONTENTS
<
Processing Order
The graphic at the right shows the 8 possible orderings for the 3 processing stages, with
and without a Side Chain. The original audio signal starts at the left and the processed
signal exits at the right of each diagram. The lower (straight) line is the standard audio
path. When the EQ and/or Filter is in the upper path, then that component is in the Side
Chain (as described below). The one of these 8 diagrams
currently in effect appears in the upper-right corner of the
drawer.
The default order is Filter >> EQ >> Dynamics, with nothing
in the Side Chain, as shown in the 5th diagram in the image.
To place the Filter section after the EQ section, deactivate
the Input button in the Filter section so that its light is off.
To place the Dynamics before the EQ, press the Pre EQ but-
ton in the Dynamics section, so that its light is on.
When the Input and Pre EQ switch are active simultaneously, the processing order be-
comes Filter >> Dynamics >> EQ.
The Side Chain
The Side Chain is a path for the audio signal that is used to control the Dynamics section
when it acts on the main audio signal. The Side Chain is not normally audible, but can
highlight aspects of the audible signal that need processing.
The EQ and Filter sections can be assigned to the Dynamics Side Chain, allowing for
advanced processes like de-essing, as described below. This is done using the Dyn S/C
switches in the respective sections.
Both EQ and Filter sections can be assigned to the Side Chain together, in which case
the EQ precedes the Filter.
Here’s an example of using the Side Chain to remove the hissing sound of the letter S
when it’s too prominent. First, the audio is split into 2 signals. EQ is applied to the signal
in the Side Chain to make the hisses louder, so that the compressor can use the louder
S sounds as a clue that the main signal needs to be compressed (made softer) at those
moments more than at other moments. In the main signal, the S sounds are made softer.
To listen to the signal feeding the Side Chain, press the S/C Listen button in the Output
section to route the Side Chain signal to the channel output. It is important to remem-
ber to cancel the S/C Listen button once you have finished auditioning the Side Chain!

P L A Y 6 SO FT WARE MANUAL
Chapter 3: Play 6 User Interface
50
CONTENTS
<
SSL Transient Shaper
The Transient Shaper plug-in can be used on both the Instrument (Main) and Micro-
phone (Sub) channel strips. It allows you to augment the attack at the start of a drum hit
(or any note) by increasing the amplitude of the attack portion of the signal while leaving
the decay and held note unchanged. In the image at the right, the right hand waveform
is a processed version of the one on the left. It has been passed through the Transient
Shaper where the amplitude of the attack portion has been increased.
Switch the Shaper on by clicking on the Power button in its top left-hand corner. The
lights at the right give visual feedback on how much attack is being added using the Gain
and Amount controls. If the top red light illuminates, reduce the effect.
• Gain knob controls the detection level of the controller signal, and should be set so
that only the transients you want to shape are detected. If this is set too low then
the Shaper will do nothing; if it is set too high then the Shaper will detect too many
transients, resulting in an exaggerated process, and the attack appearing too long.
The default setting of 0dB should be a good starting point. Note that the Gain setting
here does not directly affect the output signal’s gain.
• Amount controls the amount of the processed signal added to the unprocessed signal.
This process can increase the peak level of a signal significantly, so watch the output
meter carefully.
• Speed controls the length of time the added attack takes to fall back down to the
normal signal level once it has reached the top of the attack phase. Turn the knob
clockwise for a slower speed, and longer transients.
• Inv button inverts the processed signal so that it is subtracted from the unprocessed
signal. This has the effect of softening the attack, resulting in more body in the drum
sound.
• Audition button to listen to the processed signal to assist in the setup process. Note
that when the Inv and Audition buttons are both pressed, the signal is not inverted.
SSL Stereo Bus Compressor
This plug-in can only be used on the Instrument (Main) channel strips. This SSL com-
pressor has become legendary in the music industry for its unique sound, so you may
want to see how it can improve the sound of your mix.
This is a stereo version of the cen-
ter section stereo bus compressor
found on the XL 9000 K Series
console. It provides high quality
stereo compression, giving you
critical control over the dynamic
range of audio signals.

P L A Y 6 SO FT WARE MANUAL
Chapter 3: Play 6 User Interface
51
CONTENTS
<
The compressor UI consists of 1 meter, 5 knobs, and 1
button, as in the image above.
• Compression meter shows the real-time gain reduc-
tion in decibels (dB).
• Threshold knob controls the level at which gain re-
duction is introduced. The value is continuously
variable: –20 dB to +20 dB.
• Attack knob controls response time when the Threshold is crossed. Choose among
the following times: 0.1, 0.3, 1, 3, 10 and 30 ms.
• Make-Up knob selects the level of compensation to offset the compressor’s action. It
is continuously variable over the range: –5 dB to +15 dB.
• Release control sets how quickly the level returns to normal. Choose between 0.1,
0.3, 0.6, or 1.2 seconds, or you can select Auto. In the case of Auto, the release time
is dependent upon the duration of the signal peak.
• Ratio knob controls the degree of compression. Choose among the ratios of: 2:1, 4:1,
and 20:1.
• Comp In button switches the compressor in and out of the signal path. Use this but-
ton to do a quick comparison between the compressed and uncompressed signal to
judge the effect of the current settings.
EastWest Convolution Reverb
This Convolution Reverb is an extension of the one in the Player view. It adds some fea-
tures that are not part of the Player view Reverb, including the ability to load true stereo
reverbs, high-pass and low-pass filters, mono functionality, and new reverb presets.
To include a reverb effect on an instrument, turn
it on by clicking on the button in the upper left
corner. Or you can also turn it on from the Re-
verb controls on the Player view. When the but-
ton is illuminated, the plug-in is turned on.
This plug-in can be used on the Instrument
(Main) channel strips. To add reverb on a specific mic channel, turn up the Reverb Send
at the top of that mic’s channel strip. That mic’s signal is then directed into the reverb
in the instrument channel.
• Filter controls the frequencies affected by the filter. Use the two circular handles on
the graph to drag the handles to adjust the setting.
• Pre-Delay controls the amount of time (if any) that the Reverb effect is delayed after
the attack of each note. Postponing the start of the effect allows the attack to sound

P L A Y 6 SO FT WARE MANUAL
Chapter 3: Play 6 User Interface
52
CONTENTS
<
without processing and to have the reverb affect only the sound of the note as it is
held and/or decays. Use your ear to determine how long of a pre-delay works for each
instrument. The Pre-Delay can be changed with the knob on the Player view.
• Reverb preset list displays all available reverb presets.
• Mono button collapses the separate left and right channels of the IR
• Amount knob controls how much of the effect to include in the output. Drag down-
ward with the mouse to create a more subtle reverb, or drag up to increase the effect.
The Amount can be changed with the knob on the Player view.
EastWest Amp Simulator
This effects processor provides distortion and re-amping characteristics. There are
about eighty options in the Preset drop-down list included with these libraries. Each
of these options can be tweaked and manipulated using the Amp Simulator’s param-
eters as described below.
This effects processor is turned on or off by clicking in the button in the upper-left
corner. In the image it’s illuminated yellow, meaning that it’s turned on.
Clicking on the Preset Menu control at the left displays a drop-down menu display-
ing the Amp Simulator’s presets, which you can then customize to fit your needs. A
check-mark in the list indicates which item is the current selection.
To select an item, click on its name. Each name in the list is the name of an amp
followed by the name of a mic it’s paired with. For example, selecting “Marshall EV
RE-20” gives you a simulation of an Electrovoice RE20 microphone run through a
Marshall amp.
Once you’ve selected an amp and mic combination, you can use the other controls here
to customize the audio output. They’re described below.
• Drive knob controls how much signal is sent into the Amp Simulator’s virtual
circuit. Turning the Drive knob increases or decreases the amount of distortion
and saturation to create either a more or a less intense effect.
Please note! Overdriving the Amp Simulator can result in reduced dynamic range and
reduced punch of the drum’s sound. Use the SSL Channel Strip’s Transient Shaper
to compensate for this side effect, if necessary.

P L A Y 6 SO FT WARE MANUAL
Chapter 3: Play 6 User Interface
53
CONTENTS
<
• Bass, Middle and Treble knobs boosts or cuts the range of frequencies named in
the button’s title, and always after the distortion is applied. Together they act as
a rough equalizer of the distortion output.
• Pre/Post switch effects where the Amp Simulator sits in the chain of effects.
When Pre is selected, then it is the first effect in the chain. When Post is se-
lected, it comes after the SSL Channel Strip.
• Dry/Wet knob adjusts how much of dry incoming signal is mixed back into the
output from this effects processor. When this knob is set to 100% Wet, only
the processed signal is heard. When set to 0%, none of the Amp Simulator’s
processing is heard.
• Master knob controls the volume of the signal coming out of the Amp Simulator.
This differs from the Drive knob in that the Master knob controls the volume
post-processing, while the Drive knob controls the loudness of the signal coming
into the effect. On all these knobs, hover over the knob with the mouse to see the
current numerical value in a small tool tip window, as shown at the left.
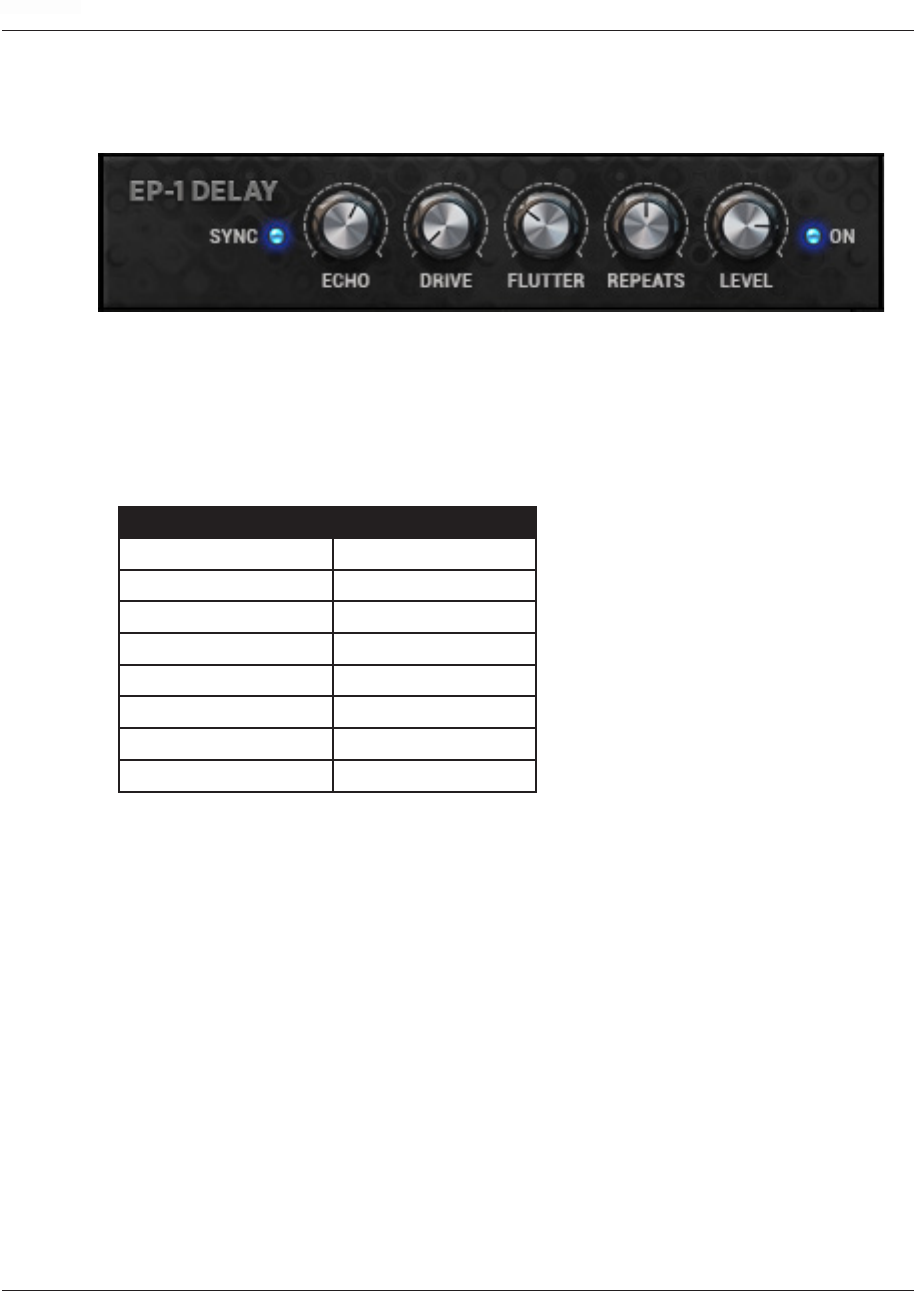
P L A Y 6 SO FT WARE MANUAL
Chapter 3: Play 6 User Interface
54
CONTENTS
<
EP-1 Delay
This effect models the Echoplex Delay designed in 1959, which uses magnetic tape to
create it’s highly prized vacuum tube delay sound.
• Echo controls the amount of the time between echoes. The time values span be-
tween 20 m/s (milliseconds) and 2.0 seconds when the Sync button is disabled.
When the Sync button is enabled (lit up blue) the Play plug-in will sync to the DAW’s
host tempo, and use time (note) values spanning between a 1/32nd note and 2 bars.
Triplet and Dotted note values are abbreviated ‘T’ and ‘D’. See table below.
Echo Sub-Divisions
1/32 1/8 D
1/16 T 1/4
1/32 D 1/2 T
1/16 1/4 D
1/8 T 1/2
1/16 D 1/2 D
1/8 1 bar
1/4 T 2 bars
• Drive controls the intensity of harmonic distortion added to the delay line, with a
range of values between 0 (none) and 10 (maximum).
• Flutter emulates the pitch wobble created by variations in tape speed in the original
Echoplex Delay. The knob controls the intensity of flutter, which with a range of
values between 0 (none) and 10 (maximum).
• Repeats controls the decay time of the delay line between a range of 0% and 100%.
The lower the percentage, the more quickly the repeats decay.
• Level controls the overall loudness of the repeats (between -60 db and +6 db) rela-
tive to loudness of the original signal. A value of 0 db means the audio signals are
of equal loudness levels.
• On will glow blue when enabled, and becomes grayed out when disabled. Click the
button to enable and disable the EP-1 Delay effect.

P L A Y 6 SO FT WARE MANUAL
Chapter 3: Play 6 User Interface
55
CONTENTS
<
ADT Effect
This effect emulates the technique made famous by the Beatles when recording at Abbey
Road Studios, which was achieved by combining an audio signal on one tape machine,
with an identical, delayed copy of that same audio signal on another tape machine.
• On will glow yellow/orange when enabled, and becomes grayed out when disabled.
Click the button to enable and disable the ADT effect.
• Delay controls the delay time between the original audio signal and the secondary
audio signal between a range of 0.1 milliseconds and 50 milliseconds. A delay time
of 40 ms is a good place to start.
• Depth controls the amount of modulation affecting the delay time.
• Speed controls the rate at which the modulation affects the delay time between a
range of 0 and 1 hertz.
• Level controls the loudness of the secondary audio signal (between -60 db and +6
db) relative to the original audio signal. At a setting of 0 db the effect is most promi-
nant, while higher and lower decibel values favor one signal over the other.

P L A Y 6 SO FT WARE MANUAL
Chapter 3: Play 6 User Interface
56
CONTENTS
<
Ohm Force Ohmicide
Ohmicide is an advanced multiband dynamics and distortion effects processor. Each
of the four bands has an array of distortion, saturation, width, gate, and feedback
controls. There are also over eighty different types of distortions. Ohmicide can
produce a wide variety of different distortion effects from slight tape saturation, to
ruckus overdrive. Its creator, Ohmforce, calls it an “audio-mangling tool.”
When the EastWest FX drawer is first opened, the Ohmicide window is closed. It appears
as a narrow strip across the drawer, as seen in the image below.
Click on the Edit button to open the full window. Note that any parameters you’ve set
in the window are still in effect when the window is closed. Once opened, this effects
processor appears as in the image below.
Please note! If you click the Edit button to open the Ohmicide interface, you’re turning
it on. But when you close the interface it stays on even when the it is hidden. If you want
to turn off the Ohmicide processing, you need to use the power button that can be seen
to the left of the Ohmicide logo.
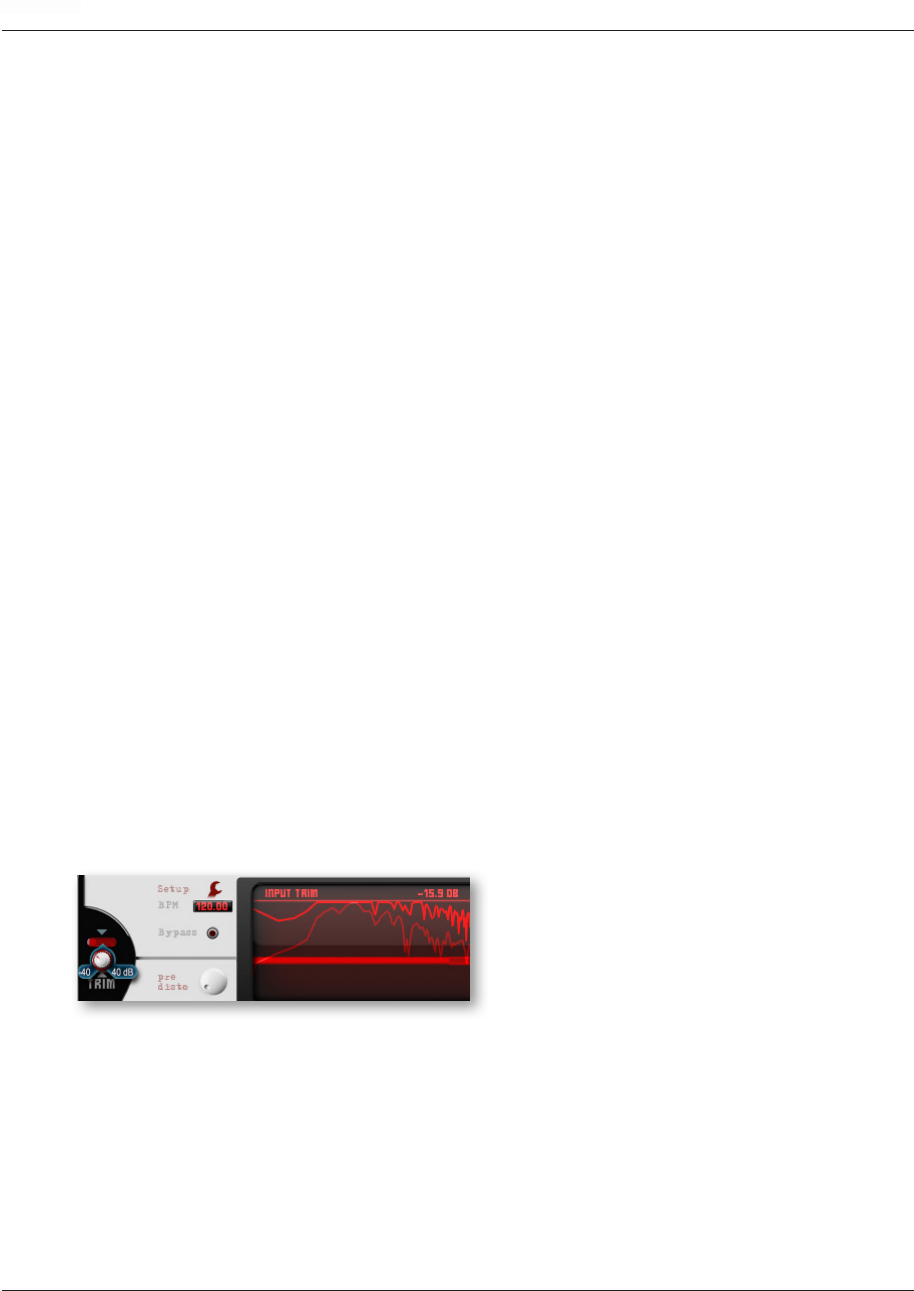
P L A Y 6 SO FT WARE MANUAL
Chapter 3: Play 6 User Interface
57
CONTENTS
<
First of all, for users familiar with the Ohmicide plug-in in other contexts, please note
that preset morphing using the Melohman feature is not available in this version. This
difference also affects some of the items in the Setup menu, namely Load, Save + Au-
toload settings, all MIDI settings, Program Change Assignation, and Melohman Settings.
Setting up Oversampling
One Setup feature that you might find most useful is Oversampling, found in the Setup
menu, which you can open by clicking on the wrench symbol in the upper-left corner
of the interface. It is an optional Ohmicide feature that reduces unwanted aliasing
artifacts produced by the distortion process. Turn on Oversampling by selecting the
High Quality mode near the bottom of the Setup menu. Be aware that turning on
this feature asks your computer to do extra processing and, therefore, might cause
problems with other software running on a less capable computer.
Setting Up Input Signal Trim
Ohmicide’s developers introduced input signal trimming to attenuate the incoming sig-
nal before it gets to the main stages of Ohmicide in order to tame its wild nature. You
need to ensure that the trimming of the input signal is calibrated correctly for the song
you’re working on. Once you accomplish that, you’re able to adjust the distortion without
having to make drastic changes to the band gains, thus allowing you to shape your sound
faster and in a more intuitive way.
This means that the overall perceived volume, when changing parameters, ends up closer
to the level of the input signal (unless you change the main output gain). That way,
presets sound more like their designers’ original intentions, with morphing that is more
consistent in their overall loudness.
Immediately above the Trim knob is a red indicator that shows 3 small red lights
inside. To calibrate any given input, adjust the Trim knob so that the left light is
on constantly in response to the incoming sounds, the center light flickers, and the
right-most light does not flicker at all. The image at the left shows the Trim knob
(near the left edge) set to a value of -15.9 dB, as shown in the value at the top
of the large red readout (far to the right
and above the graph). If you look closely in
the image, you can see that the left of the
three lights directly above the Trim knob is
lit (is a brighter red).
If the lights behave as described above, the signal is roughly calibrated, and that may be
all you need to do. However, you might want to run a simple test to see whether you need
to fine-tune the Trim. To do this, while still playing the audio, right click on a Distortion
Gain knob, and raise it to the 3 o’clock position. If the overall volume remains constant
as the gain increases, you’re set to go! If the overall volume rises, then increase the Trim,
and conversely, if the overall volume lessens, then decrease the Trim. That’s it! You’re
now in the optimal operation range for Ohmicide.
Double-click on the Trim knob to set it back to 0.0 dB.

P L A Y 6 SO FT WARE MANUAL
Chapter 3: Play 6 User Interface
58
CONTENTS
<
Setting Up the Output Stage
As a result of the calibration process above, the input and output signals are now
matched in volume. You might need to change the main output to suit your needs.
The Output knob is at the right edge of the interface. In the image at the right, you
can see that the output has been raised
by 5.9 dB, as shown at the top of the red
screen.
Below the Out knob is the smaller Mix
knob, which allows you to adjust the wet/
dry mix of the output signal.
Double-clicking the Out knob resets it to 0.0 dB. And double-clicking the Mix knob
resets it to 100% wet.
The Ohmicide Controls
The image at the right shows 2 controls to the left of the central display in Ohmicide:
the Pre-distortion knob and the Stereo Link button. As with all knobs in this plug-in, the
current value as you turn a knob is shown at the top of the large red display in the center.
Also, as you turn a knob, a ring appears around it showing the values at the left, center,
and right of the knob’s range.
• Pre-distortion knob (abbreviated “Pre disto” in the interface) allows you to add
some color and distortion to the audio signal without affect-
ing its original dynamic quality and prior to the signal reach-
ing the main effect stages.
• Stereo Link button affects the way the signal levels are detect-
ed to help control aspects of Ohmicide that are respond to
signal level. When this button is active, the two stereo signals are merged prior
to level detection, so that both channels behave the same dynamically. When
inactive, the level detection is done separately on each channel. In both cases,
the signal processing remains in stereo. The Stereo Link creates a more faithful
stereo image in the Dynamics section, the left and right channels are synchronized
in the Gate section, and the feedback both channels behave the same.
Per-Band Processing
One of the main features of Ohmicide is that you can split your audio into frequency
bands and apply the main effects sections to each band separately. For example,
assume you have a drum loop playing and you want to apply distortion to everything
except the kick drum. By setting up two bands, you can get a drum loop that sounds
as though it’s just gone through an overdriven blender in the higher frequencies and
yet still retain a clean and powerful kick. Each band also has dynamic and feedback
sections, which means that the possibilities are endless. If you want to set a param-
eter on the four bands at once, right-click on the controls instead of left-clicking.

P L A Y 6 SO FT WARE MANUAL
Chapter 3: Play 6 User Interface
59
CONTENTS
<
Setting the Frequency Range of Each Band
You can have up to four active bands, which are stacked on top of each other in such
a way that the ceiling cutoff frequency of one band acts as the floor cutoff frequency
of the next band (hence the need for only three frequency cutoff knobs).
The floor of Band One is fixed at 20hz, and the ceiling of Band Four at 20khz. The
three frequencies that divide the bands are set with the three shown knobs in the
image above. As you turn the knobs, the exact setting is shown at the top of the red
display, as is always the case with knobs.
Note that if your sample rate is less than 42106 Hz then your range is smaller than
20 Hz to 20 kHz. The maximum range is, in any case, 0.475 times the sample fre-
quency.
Also, any band that has its floor set to any value between 20000 and 20480 Hz
(the upper limit of the operating range) is effectively disabled, which means that if
all knobs are set to 20khz (far right), then only Band One is active and processing
audio.
Finally, to maintain the frequency band design of Ohmicide, the frequency knobs
may move automatically in order to insure that the value in every knob is less than
or equal to the value in all knobs to the right of it.
The filters that do the dividing into band, as with any filters, may introduce frequency-
dependent phase shifts. These shifts are cancelled out by the reconstructing filters post-
band.
The per-band processing are the same for each of Ohmicide’s 4 bands and are divided
into six parts: Mid/Side, Gate, Dynamics, Distortion, Gain and Stereo Field and Feed-
back.These controls
Mid/Side Button
One exciting feature of Ohmicide is its ability to process a band in Mid/Side mode, which
you activate by clicking the Side button in the band’s Stereo Control section. The image
at the left shows this button in the context of other controls
near the bottom of the plug-in.
This feature works as follows: Instead of processing nor-
mal stereo left/right channels, the stereo image is split up
into middle and side channels, with the mid signal sent to
the left channel for processing and the side signals sent to the right channel.
Switching to and from Mid/Side mode produces an audible click in the audio. You
should take caution when changing this parameter.

P L A Y 6 SO FT WARE MANUAL
Chapter 3: Play 6 User Interface
60
CONTENTS
<
Gate Controls
Traditionally, Noise Gates are used to remove unwanted sound in an audio track.
They work by allowing audio to pass through only when it exceeds a user-defined
decibel threshold. A gate can also be used creatively, such as when a guitarist uses
a gate before a distortion pedal to get sharp and well defined chords.
More advanced gates, such as what are in Ohmicide, have two inputs, one to pro-
cess the audio, and one, known as a side-chain, to trigger the gate by comparing its
signal to the threshold. Generally, the audio to be processed is also the side-chain,
but you can come up with useful results that use a different audio signal to trigger
the gate, such as a kick drum on a bass guitar track to tighten up both instruments.
In Ohmicide the side chain is the main, pre-split signal. Which means that each
band’s gate threshold comparison is made using the same signal, and if they have
the same threshold value, then they’ll open and close at the same time. But control-
ling the parameters of the side chain independently, as described below, gives more
creative results.
Before describing the Gate controls, here’s an image that shows the controls for
Bands 1 and 2. For Band 1, the names of the four small knobs on the far left are
spelled out. For the other three bands, the
names are abbreviated: T A R A. In the im-
age, in Band 2, you see the typical green
value bubbles that appear whenever you’re
setting a knob with the mouse.
The gate can add snap to a sound, such
as making shorter drum hits. Or by invert-
ing the gate on a band you can have one
band’s gate open while the other’s closes.The gate works best with sounds having a
lot of dynamic movement. A pad won’t gate so well because it has very slow Attack
and Decay envelopes. You control the gate by using the following knobs:
• Threshold knob defines the decibel level needed to open the gate. There’s a fixed
hysteresis on the gate, which means that the close-gate threshold is lower than
the gate-open threshold; that way, the gate does not chatter while the signal
level is near the threshold setting.
• Attack and Release Time knobs control how fast the gate opens and closes.
• Amount knob sets how much the gate closes. It closes all the way when set to
100%, and barely closes when set to 0%. With a negative setting, the gate shape
is inverted, which means it opens below the threshold, and closes above it.

P L A Y 6 SO FT WARE MANUAL
Chapter 3: Play 6 User Interface
61
CONTENTS
<
Dynamics: Shape and Body Knobs
The Shape parameter determines how the audio dynamics are changed. In the neutral
position (center), the audio is unmodified. In the Phat zone, the audio is compressed, that
is, dynamics are reduced, but the overall sound is perceived to be louder and sustained
longer. This is not a compressor in the traditional sense, as it usually just increases low
volume levels, leaving higher levels untouched. In the Sharp zone (right), the audio is ex-
panded, that is, dynamics are increased and attacks emphasized, producing percussive
and generally faster-decaying sounds.
Use the Body parameter to adjust the amount that the Shape
parameter affects the audio. In addition, Body also progres-
sively adds a limiter to the end of the band processing, so
that even if Shape is set to the central, neutral position, Body
may have an affect on the audio.The red VU-meter to the right
uses its white line to give you visual feedback on how much
the section affects the audio gain. It also lights up in red
when the limiter kicks in.
Distortion Controls
After the Dynamics stage, described above, the band signal can be optionally distorted
by adjusting the Type, Gain, Bias and Mode parameters.
Ohmicide provides 28 distortion algo-
rithms with three variants (Standard, Xxx,
and Odd) for a total of 84 distortion types.
To select a distortion algorithm click on the
lighter red up and down arrows at the right side of the small red display labeled Type to
cycle through the patch names, with each name abbreviated at the bottom of the small
red display and also in full at the top of the large red display near the top of the win-
dow. Or click on the center of the small red display and move your mouse up or down
(just as you would do on a knob) to change the distortion without repeated clicking. In
the image above, the names inside the red display are Crest, Vacuum, and Porridge.
At the top of those small red displays are icons for the three variants, from left to right:
a circle for Standard, an X for Xxx, and a star for Odd. Click one to select it.
Alternatively, click in the small red Type display and choose a type from a pop-up menu,
as shown partially in the following image. Select the variant first, which opens a menu of
all 28 distortion algorithms for that variant. In the image, the XXX variant menu is open,
as indicated by the blue highlight.
The Gain knob (above the small red display) is adjustable in a range from −20 dB to
+60 dB. The higher the gain, the more distortion is applied to the sound. However,
the overall perceived volume should not deviate by too much (though this is some-
what dependent on the level you’re listening at), and provided the Trim has been
correctly set.

P L A Y 6 SO FT WARE MANUAL
Chapter 3: Play 6 User Interface
62
CONTENTS
<
Refer to the Setting Up Input Signal Trim section for more information on balancing
the input level.
The two controls Bias and Alteration can be used to further color the chosen distor-
tion type, though bear in mind that for some algorithms the controls are irrelevant
and are grayed out.
The horizontal Bias slider (below the small red display) emulates malfunctioning
hardware circuitry and adds a DC offset before the distortion is applied. The control
is very sensitive, so even very small changes can make dramatic changes to the
sound. To break up the sound completely, move the slider all the way to the right.
The Alteration knob further changes the color of the distortion. This change depends
greatly on the Distortion type, so you should audition various levels to see whether
any setting works in your song.
Gain and Stereo Controls
The output volume of each band can be set by moving its fader near the bottom of
the band controls. It has a range of −∞ dB to +20 dB.
The Gain stage is before the limiter and you can see on the band’s dynamic VU meter
that increasing the band’s Volume fader (as seen in the image at the right) activates
the limiter. Directly above the Volume fader is the Pan control, which can be used
in conjunction with the other bands’ pans to create wider
sounds. In the image, the green value markers indicate the
3 values of Left, Center, and Right because the knob has
just been turned with the mouse.
When the Mid/Side mode is active, the Pan control behaves
differently: turning the Pan knob to the left attenuates the
side channel, and turning it to the right attenuates the mid
channel.
The remaining controls in this section are the Wet/Dry knob (labeled Mix in the in-
terface) and the Mute and Solo buttons. The Solo button takes precedence over the
Mute control, which means that a soloed band is heard regardless of its mute state.
The Solo state is ignored if the band is turned off using the Band Split knobs.
Feedback Controls
The Feedback section simulates a microphone recording the signal coming out of
loudspeakers and then amplified back into the signal chain. For Ohmicide, turning
on feedback takes the wet signal, after the signal reconstruction, and loops it back,
with a slight delay, into the signal path before the Gate section.
The Feedback behavior works on each band independently, so that you can use a
different configuration of the parameters on each band. Note, however, that the
feedback frequency content can exceed the boundaries of the current band and,
therefore, can leak into the other bands!

P L A Y 6 SO FT WARE MANUAL
Chapter 3: Play 6 User Interface
63
CONTENTS
<
• Amount knob (the control at the top of the section) determines the simulated
microphone sensitivity. To turn off all feedback on this band, turn this knob all
the way to zero.
• Frequency sets the Feedback frequency, in a range from 16 Hz to 1024 Hz, and
simulates the distance separating the microphone from the loudspeaker. The
further away the microphone, the lower is the resulting pitch. The fact that you
can set this parameter per band goes beyond reality, and does not reflect a real
world phenomenon. It is, however, sonically interesting and that’s what matters!
• Spread control changes the stereo field of the feedback. At mid position, the
feedback is mono, while on the right, the feedback is stereo. When turned left
of center, the feedback crosses channels (left channel feeds the right channel
and vice versa).
Overall Tone Setting
After the per-band processing, the signals are mixed together and a low pass filter can
optionally be applied to attenuate any hyper-bright frequencies. The two controls are
located to the right of the large red display.
• PP Shape knob determines the color of the filter. Turned to the far left, the filter
is disabled. Raising it to the mid position increases the slope, effectively mak-
ing it a 48 dB/octave low pass filter. Turning further right adds some resonance.
• PP Frequency knob has a range from 2 KHz to 8 KHz and it determines the cutoff
frequency of the filter.

P L A Y 6 SO FT WARE MANUAL
Chapter 3: Play 6 User Interface
64
CONTENTS
<
Multi-channel Audio Output
It is often the case that a composer wants different parts of the audio
output to go to different channels so that mixing can be done either in
the host or in an external mixing board in the studio. In many Play librar-
ies, that selection of output channels can be performed in the Player
view.
In the Mixer View
Along the bottom of the Mixer view, just below the buttons that turn on or
off an instrument or a mic, is a row of Output controls. At the far left of
the image at the left is the strip for the instrument. Note that when the
instrument was assigned to output channels 5 and 6 in the Browser view,
that same selection appeared here, as well. The other three strips in the
image are individual mic positions. When a value of Default is selected,
then Play uses the output assigned to the whole instrument, in this case
channels 5 and 6.
If a different output pair is selected, such as the 3 and 4 being selected
for the Snare Top mic in the image, then that selection overrides the
selection for the whole instrument. In this example, the Kick Drum mic
will be output on channels 5 and 6 (because Default is selected) and the
Snare Top mic will be output on channels 3 and 4.

P L A Y 6 SO FT WARE MANUAL
Chapter 3: Play 6 User Interface
65
CONTENTS
<
Main Menu
The Main Menu appears as three horizontal bars located in the top-left corner of the Play
interface. Click on it for quick access to the options detailed below.
• About Play: Displays pertinent information about the product, including version num-
ber, copyright, and information about the Play Library the currently selected instru-
ment comes from.
• Check for Updates: Use an internet connection to check for
a new version of the Play software (if available).
• Open: Load an instrument file with the extension [.ewi] from
its current location.
• Open Recent: The last 9 previously opened instruments ap-
pear in this list. Click on an instrument’s file name to re-
open it.
• Save: Any changes you made with controls in the Player
view can be saved to an existing instrument [.ewi] and re-
opened.
• Save As: Performs the same operation as the Save option
(above), except that the instrument name and save location
can be changed, without overwriting the original instrument
[.ewi]
• Remove Instrument: Removes the currently selected instrument from this instance
of Play.
• Show Player, Browser, Mixer: Use these shortcuts as an alternative to switching be-
tween the 3 main views in the Navigation Bar at the top of the Play user interface.
• Refresh Browser: Use this option if changes to Play Libraries file system were made
while Play is open. This option will force Play to rescan and update the file directory.
• Stream From Disk: This option is enabled by default upon loading an instrument. It
loads the beginning portion of each sample into RAM and streams the rest from the
hard drive.When the item is not checked, the entire instrument is loaded into RAM.
This setting only applies to the currently selected instrument.
• Sample Purge: contains a set of options that allow you to free up system resources in
large projects by removing unused samples from memory. This can be done across all
instruments, or on a per-instrument basis.
To begin, click the ‘Reset’ button to clear the
memory of previous playback information. Next,
playback the sequence in your DAW. Any notes
not played since the last reset will be removed by
clicking the ‘Purge’ button. To bring back purged
samples, click the ‘Reload’ button.
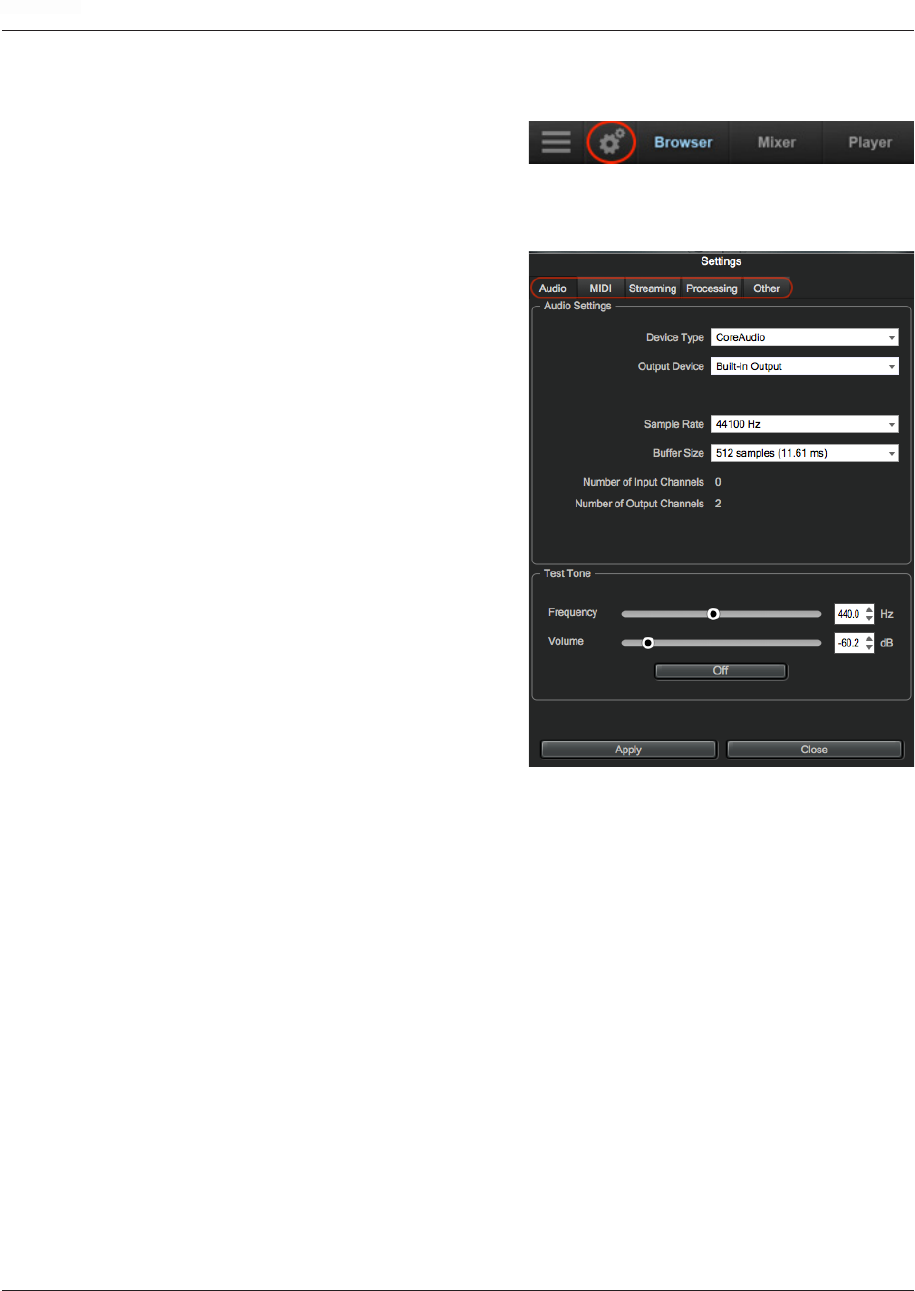
P L A Y 6 SO FT WARE MANUAL
Chapter 3: Play 6 User Interface
66
CONTENTS
<
Settings Menu
The Settings Menu appears as a gear icon located in the top-left corner of the Play inter-
face, to the right of the Main Menu. Click on it
for quick access to the 5 categories of options
detailed below.
Audio Settings
These options enable you to configure audio
connections when running Play in stand-
alone. When running as a plug-in, the DAW
will handle the audio connections and Play’s
Audio Settings tab will be disabled.
• Device Type: Select an audio driver from
the drop-down menu to handle the audio
input and output.
• Output Device: Select an audio interface
from the drop-down menu, or choose
built-in audio if you do not have an audio
interface
• Sample Rate: Select a sample rate from
the drop-down menu. The options that
appear here will depend on the supported
sample rates of your audio interface
• Buffer Size: Select from a range of buffer
sizes available from your audio interface.
Lower buffer settings result in less latency
(delay), but require more computer resources.
• Input / Output Channels: These readouts gives the number of audio channel inputs and
outputs available on your audio interface.
• ASIO Settings: A shortcut is available to Windows users that allows you to open the
ASIO audio driver to set Sample Rate and Audio Buffer Size.
• Test Tone: Use these controls to verify that audio being generated by Play is correctly
routed to your speakers, headphones, or any other destination. Use the two sliders
to set the frequency and volume, then click on the button to start or stop the tone.
MIDI Settings
These settings allow you to specify which MIDI devices can send MIDI data to Play. The
types of devices that will be listed here include MIDI keyboards, control surfaces, and
the MIDI I/O from an audio interface. Click to leave a check-mark next to the MIDI device
to enable it, and click again to remove the check-mark and disable it.

P L A Y 6 SO FT WARE MANUAL
Chapter 3: Play 6 User Interface
67
CONTENTS
<
Streaming Settings
features streaming technology that stores a small portion of the beginning of each sam-
ple into RAM (called “pre-buffer”) and streaming the rest from a drive in real-time. This
combination allows for immediate playback without using vast amounts of RAM.
• Free System Memory: reports the amount of memory (RAM) the computer has avail-
able after the operating system and programs have taken their cut.
• Engine Memory: reports the amount of memory (RAM) being used by Play to pre-
buffer samples. This value is affected by the Maximum Voices selection.
• Maximum Voices: the number of maximum voices that can be played back simultane-
ously within a project (all Play instances).
• Reset Engine: can be used to kill all notes being played and to return the audio engine
to its initial state. Use this button when experiencing a so-called “stuck note”, which
is a note that continues to play beyond its indicated length.
• Samples Loaded: reports the number of samples currently pre-buffered in memory
(RAM). Use this value to determine whether enough RAM is allocated for playback. If
this number is too large, use the Purge feature described in the Main Menu section.
• Active Streaming Voices: reports the total number of voices being played back in all
instances of Play. This is different than the Voices value reported in the Player view,
which only applies to that particular instance of Play.
• Sample Cache is the most important feature in this menu. As a general rule, find the
lowest setting that also results in smooth playback. If dropped voices or CPU spikes
occur, simply raise the ‘Cache Level’.
Processing Settings
These options allow you to specify how much of your computer’s processing power is
available to Play. Check the ‘Enabled’ box to turn Overload Protection on and use the
spin control to specify the percentage of the computer’s processor that the Play 6 soft-
ware will use.
Other Settings
These options contain a variety of useful options and settings for Play.
• Round Robin Reset is a technique that cycles through two or more samples of the
same note, each with inherent variation, providing a realistic performance of note
repetitions and avoiding the so-called “machine gun effect”.
To ensure this cycle repeats in the same order each time, use a Round Robin Reset
to reset the cycle back to the beginning, allowing for consistent playback each time
Select either a MIDI note or a MIDI Continuous Controller (CC) as the source, then
specify which MIDI note (Middle C=Note 60) or MIDI CC will trigger the reset by
inputting a numeric value in the spin box.
See How To Optimize Playback and Performance to learn more.

P L A Y 6 SO FT WARE MANUAL
Chapter 3: Play 6 User Interface
68
CONTENTS
<
• MIDI Channel Assignment consists of two modes that determine how MIDI channels
are assigned to an instrument when it’s loaded.
Automatic Increment assigns each new instrument to the next available MIDI chan-
nel (1, 2, 3, etc) in the order they are loaded.
Omni assigns each new instrument to MIDI channel 0, which receives MIDI on all
channels (1–16).
• Controls allows you modify how controls behave.
Accelerating Spin Boxes allows you to change values faster the longer you hold down
the mouse on an up or down arrow.
Enable Mouse Wheel enables you to change the value in Spin Boxes with the scroll
wheel of your mouse.
• Miscellaneous contains a variety of options.
Use XML File Format enables you to work with projects using older versions of Play.
Use program changes for key-switching enables Play to accept MIDI Program Change
messages to change keyswitches. Program 0 is the first keyswitch, Program 1 is
the second keyswitch, etc.
Write log file for technical support will create a log file to help technical support ad-
dress technical issues. The log file is written to the following locations:
(Mac) Mac HD / Library / Application Support / East West / Log
(Win) C:// Program Data / East West / Log
Show global progress bar during session load allows you to enable or disable the global
progress bar that appears when loading a project. This allows users to work on
other tasks while projects are loading, without the progress bar in the foreground.
Show product interface after loading a patch will change the Play interface based on
the instrument you just loaded. If left unchecked, Play will continue to use the
existing interface until a new instrument is explicitly selected.
Default Interface displays a list of all the currently installed Play Libraries. Select
the Play Library whose custom interface you want to display when opening Play.
Once you open any specific instrument, the custom interface will appear regard-
less of the default interface.

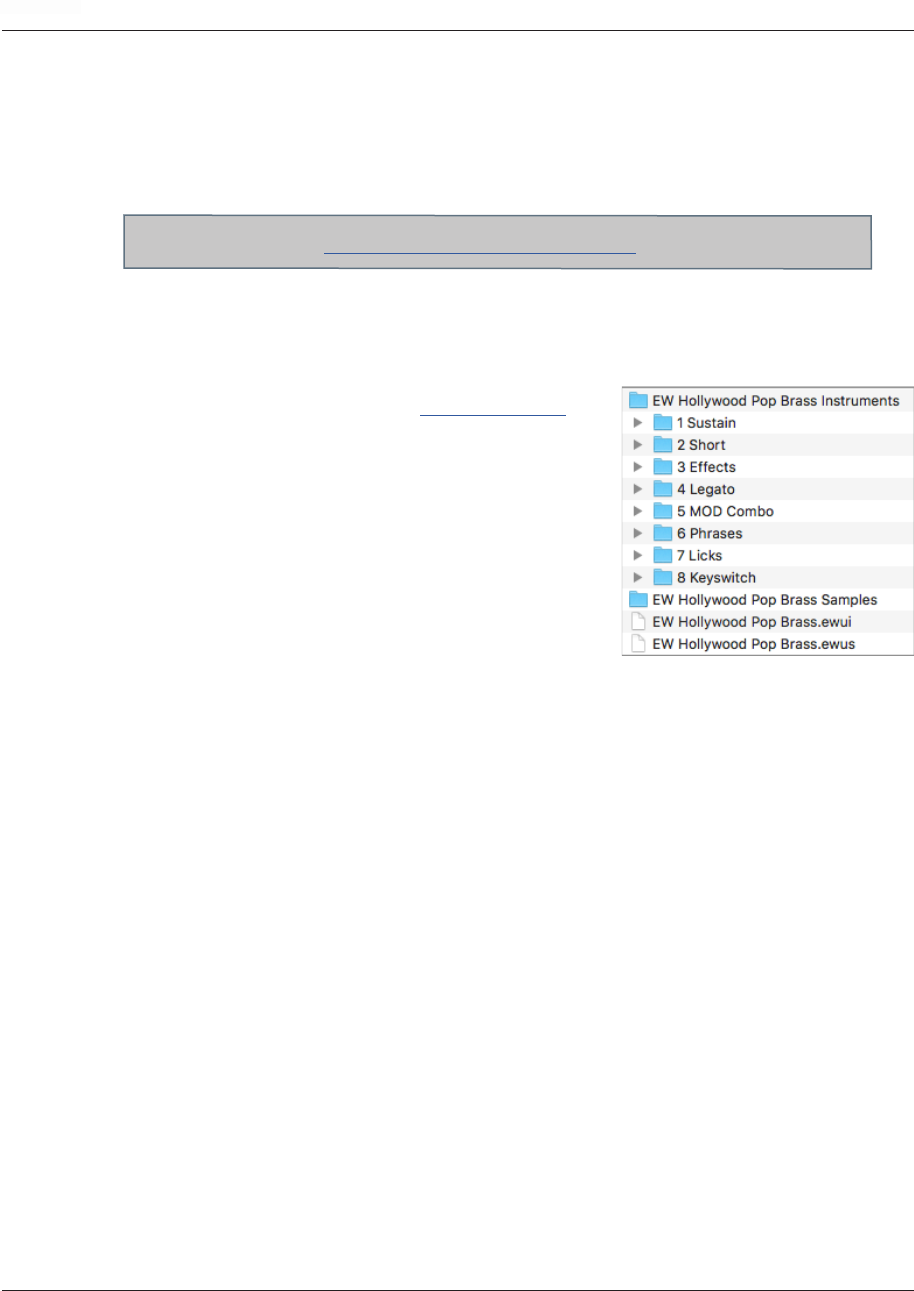
P L A Y 6 SO FT WARE MANUAL
Chapter 4: Play Libraries Overview
70
CONTENTS
<
Inside the Main Library Folder
Inside the Main Play Library folder for each product (EW Hollywood Pop Brass in the ex-
ample below) is an Instrument folder, a Samples folder, Documentation, and [.ewui] and
[.ewus] files that allow the EW Installation Center to track the version of the Play Library
contents and notify you if updates are available.
Within the Instruments folder are sub-folders of categories that eventually lead to Instru-
ments with the extension [.ewi]. Likewise, within the Samples folder are sub-folders of
categories that eventually lead to Samples with the extension [.ews].
This library folder is linked to the Libraries Mode in
Play’s Browser view, where Instruments can be viewed
and loaded from their original file heirarchy.
When loading an instrument, Play will load the associ-
ated samples, which contains encrypted content that
is only accessible in Play with the respective product
license and activation. Samples cannot be loaded or
accessed directly.
Instruments
Instruments are what users will interact with the most inside of Play. They instruct Play
what samples to load, what effects are enabled by default, and contain parameter set-
tings that shape the sound.
There are various types of instruments throughout Play Libraries, including Master and
Elements instruments, Keyswitch instruments, and Single-Articulation instruments.
Most articulations are programmed into more than one instrument type to meet the vari-
ous needs of a composer. In Hollywood Solo Violin, for instance, the Spiccato RRx4
articulation is available as both a Single-Articulation instrument and within a keyswitch
instrument of short articulations.
All MIDI channel assignments are made at the instrument level. With this approach, using
a keyswitch instrument is ideal for a phrase that needs multiple articulations within a
single MIDI channel. If instead you need to layer the Staccato articulations of each string
section on separate MIDI channels, the Single-Articulation instruments are ideal.
This flexibility enables a composer to build an instrument template in their host se-
quencer in an intuitive way that best suits the needs of a project.
See Instrument and Sample Updates to learn more.

P L A Y 6 SO FT WARE MANUAL
Chapter 4: Play Libraries Overview
71
CONTENTS
<
In order to save changes made to an instrument, you can:
• Click on the Main Menu and choose Save. This saves all the open instruments into
a single [.ewi] file, along with any parameter settings. You can save it anywhere you
like, but be careful not to overwrite the original instrument file in case you need to
start with the default values at a later time.
• To save a single instrument, modify and save it when only one instrument is open.
• If you’re running Play as a plug-in to a host, save the host project to the hard drive.
All supported plug-in parameters are saved with the project file. Please note, this
option does not allow you to load the modified instrument into another project.
Articulations
Most instruments can be played in a variety of different ways. The resulting sound of an
instrument based on the performance technique employed is called an articulation.
Play Libraries handle articulations in a few different ways. Sometimes instruments con-
tain only a single articulation, usually specified in the instrument name. Other times
instruments are programmed with keyswitches, enabling the user to switch between ar-
ticulations within a single line of music. A keyswitch instructs Play to use the specified
articulation until a new keyswitch note changes it.
Each articulation is made up of its own set of samples, and each note of an articulation
is sampled within the range of that instrument, usually at several dynamic levels (pp,
mp, mf, or ff).
The Articulations Pane appears in the Player view and contains all articulations within
an instrument. The location of the Articulation Pane is different depending on the Play
Library, so please refer to the library-specific manual if you have trouble locating it. Use
the scroll bar if there are too many articulations to view at once.
Each row in the list displays the articulation name, the note number of the keyswitch that
selects the use of that articulation, an active and loaded checkbox, and a volume control.
The checkbox labeled “active” allows the user to turn on and off the playback of a given
articulation. It’s like a Mute button, but at the level of an individual articulation.
The checkbox labeled “loaded” allows the user to load or unload the samples of that
articulation from the computer’s memory (RAM). This is helpful to free up resources.
The volume control allows you to adjust the loudness of any specific articulation relative
to others in the same instrument.
Keyswitches
A keyswitch instrument allows you to switch between articulations on the fly using MIDI
notes. Each articulation is assigned to a particular MIDI note number, and playing that
note will switch to that articulation.

P L A Y 6 SO FT WARE MANUAL
Chapter 4: Play Libraries Overview
72
CONTENTS
<
MIDI notes that are keyswitches appear on Play’s virtual keyboard as blue keys. When a
keyswitch is selected, the key changes to a darker shade of blue.
MIDI notes used as keyswitches are always outside the playable range of the instrument
(white keys). Most are between MIDI notes C0 and C1, but there are a small number of
instruments with very low ranges that require their keyswitches to be above their playable
range of notes. Please see library-specific manuals for details.
A MIDI note-on message for the keyswitch that is assigned to a given articulation must
be received by Play before that articulation is active (playable). In other words, you must
first trigger the keyswitch, allowing Play to switch articulations, before it’s playable.
Troubleshooting: Once a keyswitch note is sent to Play, its articulation remains in effect
until another keyswitch note is sent. This behavior can have unwanted side effects when
moving back to an earlier position in the piece to replay it. As an example, suppose you
place four keyswitch notes in a track at the given measures:
• D# measure 5
• E measure 12
• F# measure 17
• E measure 23
Problem 1: You play the piece through to the end. You then play it over again.The first
time you play it, the beginning is played with the default articulation (keyswitch note
C). The second time you play it, the beginning is played with the articulation controlled
by note E. That’s the state the instrument was left in at the end of the piece and there’s
nothing to reset it. Solution 1: Put an explicit keyswitch before the first audible note in
the track. Do not rely on the default unless there will be no keyswitches in the entire
track.
Problem 2: You stop at measure 19, move back to measure 14, and start playback from
there. The first time, measures 14, 15, and 16 play the articulation on note E. The sec-
ond time, those measure use the articulation on note F#. That’s the state the instrument
was left in when the piece was stopped. Solution 2: Have predetermined places to restart
and position keyswitches at each one. Any solution here would require more keyswitch
notes and would be more intrusive. It’s nice to have the freedom to stop and start a piece
at any point. At least be aware of this problem and decide whether to live with it or take
steps to avoid it.
Special Cases: Occasionally an instrument will contain an articulation that plays regard-
less of the currently selected keyswitch. These articulations will show up in the Articu-
lation list with checkboxes for active and loaded states, as well as volume controls. A
prime candidate for this type of programming is the key-clicks of a woodwind instrument,
which are considered optional.

P L A Y 6 SO FT WARE MANUAL
Chapter 4: Play Libraries Overview
73
CONTENTS
<
Master and Elements
Some Play Libraries contain Element and Master instruments. They appear with similar
instrument names in the Browser view except that one has “Master” and the other has
“Elements” at the end of their names. The two instruments are similar except that only
the Master patch uses a keyswitch to select among the included articulations.
Master Instruments have all articulations active when first opened and use a keyswitch
to select articulations. Unload any articulations you don’t need to remove their samples
from memory.
Elements instruments open with only the default articulation active. All others articula-
tions are inactive and not loaded into memory (RAM). Use the Active and Loaded check-
boxes to setup different configurations, including a single articulation, or the layering
of two or more articulations together. You can also load the same Elements instrument
multiple times and set each one to a unique articulation and MIDI channel. This is a nice
alternative to a keyswitch instrument, as each articulation is given its own MIDI channel.
Samples
Samples are the individual recordings of each articulation, note, and dynamic level pos-
sible by a given instrument. Samples are not directly accessible in Play, but are instead
loaded into Play when an Instrument file is opened.
Play knows which samples to playback based on MIDI data, including the selected key-
switch articulation, the MIDI velocity of the incoming note, and in some cases, whether
to use a legato sample in the case where the end of a MIDI note is close enough to note
ahead of it.
Samples are what make up the bulk of what gets written to the hard drive during the
download and installation process.
Instrument and Sample Updates
To ensure Instruments and Samples are updated with the latest fixes, launch the Installa-
tion Center and scroll through the product panels until you locate the ‘Updates’ section.
Any Play Libraries that have updates available will appear here. Click the ‘Update’ button
to download and install that product’s Instrument and/or Sample updates.
In addition to being able to update products when they appear in the ‘Updates’ product
category, the option to ‘Update Instruments’ is also available in the Tool Menu. Hover the
mouse pointer inside a product panel to reveal the gear icon (shown below), then click
on the gear icon to display the Tool Menu options

P L A Y 6 SO FT WARE MANUAL
Chapter 4: Play Libraries Overview
74
CONTENTS
<
Space Requirements for Play Libraries
This section covers the amount of disk space required for each PLAY Library, rounded
to the nearest gigabytes (GB). The numbers here represent an approximation. File size
values vary depending on the operating system and/or hard drive format. Also, we recom-
mend the standard practice of leaving a certain percentage of disk space free (covered
above).
Multi-Edition Play Libraries
These PLAY Libraries are the largest in EastWest’s catalog. They are deeply sampled,
feature multiple microphone positions, and contain a wide range of instruments and
articulations. Please see above for details regarding the differences between editions.
DISK SPACE REQUIREMENTS
SILVER (GB)
GOLD (GB) DIAMOND / PLATINUM (GB)
HOLLYWOOD ORCHESTRA SERIES 39 95 709
Hollywood Strings 12 47 336
Hollywood Brass 10 20 159
Hollywood Orchestra Woodwinds 12 18 144
Hollywood Orchestra Percussion 5 10 70
HOLLYWOOD SOLO INSTRUMENTS - 18 91
Hollywood Harp - 2 15
Hollywood Solo Cello - 8 38
Hollywood Solo Violin - 8 38
PIANOS 26 50 282
Bechstein 6 12 73
Bosendorfer 8 18 87
Steinway 7 11 58
Yamaha 5 10 46
SYMPHONIC ORCHESTRA 11 33 124 PlatinumPlus (194)
Strings 4 14 51 (85)
Brass 3 11 37 (62)
Woodwinds 3 7 25 (42)
Percussion 3 5 12 (21)
CHOIRS - 9 41
Hollywood Choirs - 8 59
Symphonic Choirs - 9 39
Symphonic Choirs Expansion - - 2

P L A Y 6 SO FT WARE MANUAL
Chapter 4: Play Libraries Overview
75
CONTENTS
<
Single-Edition Play Libraries
These Play Libraries were released as single editions. They come standard with 24-bit
samples, and encompass a large amount of instruments and articulations. While most of
these Play Libraries do not come with multiple microphone positions, the ProDrummer
Series is an exception.
DISK SPACE REQUIREMENTS (GB)
Hollywood Backup Singers 9
Hollywood Pop Brass 23
Stormdrum 2 14
Stormdrum 2 Pro Expansion 4
Stormdrum 3 84
Silk 25
Ra 14
Gypsy 12
Voices of Passion 8
Voices of the Empire 14
Solo Violin 5
Ghostwriter 56
Goliath 41
Ministry of Rock 1 20
Ministry of Rock 2 58
The Dark Side 38
Fab Four 13
ProDrummer Vol.1 Spike Stent 55
ProDrummer Vol.2 Joe Chiccarelli 33
25th Anniversary Collection
This collection of re-issued titles include many award winning sample libraries that have
withstood the test of time. They are available for individual purchase and many are in-
cluded in ComposerCloud.
DISK SPACE REQUIREMENTS (GB)
25 ANNIVERSARY COLLECTION 36
‘56 Strat 2.2
Adrenaline 1.4
BT Breakz 0.7
BT Twisted Textures 1.3
Bob Clearmountain Drums 1 0.6
continued

P L A Y 6 SO FT WARE MANUAL
Chapter 4: Play Libraries Overview
76
CONTENTS
<
Bob Clearmountain Drums 2 0.4
Bob Clearmountain Perc and Bass 0.4
Bosendorfer 290 3.2
Brass 1.8
Dance Industrial 1 0.3
Dance Industrial 2 0.8
Drum n Bass 0.8
Electronica 0.5
Funky Ass Loops 0.5
Guitar and Bass 0.5
Hypnotica 0.6
Ill Jointz 1.0
Joey Kramer Drums 2.9
Percussive Adventures 1 1.4
Percussive Adventures 2 3.0
Phat n Phunky 0.8
Public Enemy 1.1
Scoring Tools 0.4
Smoov Grooves 0.7
Steinway B 1.6
Steve Stevens Guitar 0.5
Stormdrum 1 Loops 3.5
Stormdrum 1 MultiSamples 2.6
Symphonic Adventures 0.6
Ultimate Strings 0.5
The MIDI Guitar Instruments Series
A wide ranging collection of instruments optimized for guitar players by the EastWest
production team, working closely with Fishman’s software developers for their TriplePlay
MIDI guitar controller.
DISK SPACE REQUIREMENTS (GB)
MIDI Guitar Series Vol 1: Orchestra 18
MIDI Guitar Series Vol 2: Ethnic & Voices 17
MIDI Guitar Series Vol 3: Soundscapes 11
MIDI Guitar Series Vol 4: Guitar & Bass 38
MIDI Guitar Series Vol 5: Keys & Percussion 23

P L A Y 6 SO FT WARE MANUAL
CONTENTS MASTER NAVIGATION DOCUMENT
Chapter 5: Using Play as a Plug-in
78 Opening Play in a Sequencer
78 Using Play in Logic Pro
80 Using Play in Pro Tools
81 Using Play in Cubase
82 Using Play in Ableton Live
82 Using Play in Sonar
83 Using Play in Digital Performer
84 Using Play in Garageband
85 Using Play in Studio One
86 Automation

P L A Y 6 SO FT WARE MANUAL
Chapter 5: Using Play as a Plug-in
78
CONTENTS
<
Opening Play in a Sequencer
Most software sequencers permit software written by other companies to run within the
sequencer. All the plug-in’s input and output (I/O) is managed by the sequencer host.
And several plug-ins—from the same or different manufacturers—can run concurrently,
each contributing its part to the audio output. Some virtual instrument plug-ins, such
as Play, are sound generators that respond to MIDI data. Other plug-ins might provide
effects, such as signal compression, EQ filtering, or echo simulation.
The details of how to open Play in several popular sequencers are covered in the follow-
ing sections. In each case, you need to first open the sequencer host. Then follow the
directions below. If you are familiar with inserting other sample players and synthesizer
plug-ins, the procedure for Play will be the same.
The sequencer hosts mentioned here are the most commonly used with plug-ins like
Play; many others can also be used and the instructions for how to open the plug-in will
likely be similar. Also, because information can change on short notice, it’s best to check
the online Support Center at Soundsonline.com to read the most recent information.
Using Play in Logic Pro
1. Once Logic Pro has opened, a window will appear asking you to create a track of your
choosing. Click on ‘Software Instrument’ in the top-left, then select Play in the ‘Instru-
ment’ drop-down menu, then click ‘Create’.
2. If instead you chose ‘Empty Channel Strip’
(the default) in the ‘Instrument’ drop-down menu,
you can manually add Play to a channel strip by
clicking in the ‘Instrument’ menu and navigating
to the Play plugin. Once loaded, it will appear
in the channel strip. Click on the Play plug-in to
show / hide the Play interface.
You’re now ready to load your first instrument and begin composing!

P L A Y 6 SO FT WARE MANUAL
Chapter 5: Using Play as a Plug-in
79
CONTENTS
<
Multi-Timbral Setup in Logic Pro
1. Once Logic Pro has opened, a window will appear
asking you to create a track of your choosing. Click
on ‘Software Instrument’ in the top-left, select Play
from the ‘Instrument’ drop-down menu, then click the
‘Multi-Timbral’ check-mark box and define the number
of parts (up to 16 midi channels are available per midi
port). Next, make sure that ‘Open Library’ is not se-
lected, then click ‘Create’.
2. You will now see (x) number of instrument tracks appear,
where x equals the number of parts you chose to create. Each
instrument track is assigned to its own MIDI channel (1, 2, 3,
etc). These will correspond to the MIDI channels assigned to
instruments loaded in Play.
3. If instead you chose ‘Empty Channel Strip’ (the default) in the ‘Instrument’ drop-
down menu, you can manually add Play to a channel strip by clicking in the ‘Instrument’
menu and navigating to the Play plugin (see screen shots in Step 2 of Using Play as a
plug-in with Logic Pro, above). Once loaded, it will appear in the channel strip as Play.
Click on this button to show / hide the Play interface.
4. Click on the Settings menu near the top of the Play
interface and then navigate to the Other tab. Here, under
MIDI Channel Assignment, select Auto Increment. This
will assign each new instrument loaded in Play to the next
MIDI channel (1, 2, 3, etc), corresponding to the assign-
ments in Logic Pro X’s multi-timbral instrument setup.
5. Now begin loading instruments into Play. Selecting ‘Add’ will load multiple instru-
ments into Play.
6. You can see what you currently have loaded by looking in Play’s Instrument Selector.
The MIDI channel assignment is in parenthesis next to the instrument name.
7. Now, each instrument you have loaded into Play will correspond with the midi chan-
nels in Logic Pro. You can now record enable the specified track in Logic Pro and and
play the corresponding instrument loaded into Play.

P L A Y 6 SO FT WARE MANUAL
Chapter 5: Using Play as a Plug-in
80
CONTENTS
<
Using Play in Pro Tools
1. Once Pro Tools is open, navigate to Track in
the top menu bar, then down to New Track.
2. Create a new stereo instrument track.
3. Now click inside the Inserts bar of the instrument
track, go to multi-channel plug-in, then find Play
AAX (stereo) from the list in the Instrument category.
You’re now ready to load your first instrument and
begin composing!
Multi-Timbral Setup in Pro Tools
1. Go to Play’s Settings menu (top-left corner in Play), then click on the Other tab and
choose Auto-Increment from the menu options. This
will assign each new instrument you load into Play to
the next MIDI channel assignment (1, 2, 3 , etc).
2. In Pro Tools, go to the Track menu and down to New
Track. This time, create (x) number of MIDI tracks,
where x equals the number of instruments you want to load into Play. The MIDI Standard
allows up to 16 MIDI Channels per MIDI Port.
3. On the MIDI track, click inside the MIDI output and choose Play 1, then the channel
assignment. Do this for each MIDI track you created
until everything is assigned to its own MIDI channel
(channel-1, channel-2, and so on).
4. Now begin loading instruments into Play,
click ‘Add’ each time your prompted. If you
set the Auto-Increment in Step 5 (above),
each Instrument will be assigned to its own
MIDI channel and will correspond to the
MIDI channel assignments in Pro Tools. In
Play, the MIDI channel assignment is in pa-
renthesis next to the Instrument name as
seen below.
Record enable the MIDI track in Pro Tools to
begin composing!

P L A Y 6 SO FT WARE MANUAL
Chapter 5: Using Play as a Plug-in
81
CONTENTS
<
Using Play in Cubase
1. Open Cubase and go to Project > Add Track > Instrument.
2. An ‘Add Instrument
Track’ window will appear.
Click in the drop down
menu and select Play from
the plugin list.
3. Click ‘Add Track’ to create the Play
plugin track.
You’re now ready to load your first instru-
ment and begin composing!
Multi-Timbral Setup in Cubase
1. Open Cubase and go to Devices > VST Instruments.
2. In the VST Instrument window, click in
the Rack Instrument menu and select Play.
You should see a Rack Instrument created
inside the VST Instruments window.
3. When asked to create a MIDI
track assigned to the Play plugin choose ‘Create’.
4. Cubase will create a Rack
Instrument and associated MIDI track assigned to Play.
5. Create up to 16 individual MIDI tracks by right-clicking
in the empty track space and choosing to ‘Add MIDI Track’.
In Cubase’s Inspector window, you can check the MIDI Channel as-
signments of each MIDI track highlighted below.
6. In Play, go to the Settings menu, and click on the Other tab. Under
MIDI channel assignment, select Auto-Increment. This will ensure
every instrument you load into Play will
advance to the next MIDI channel as-
signment (1, 2, 3, etc) and correspond to the MIDI channel
assignments in Cubase. You can begin loading instruments
in Play now.

P L A Y 6 SO FT WARE MANUAL
Chapter 5: Using Play as a Plug-in
82
CONTENTS
<
Using Play in Ableton Live
1. Open Live, go to the Browser window and click on ‘Plug-ins’
in the left column under the ‘Categories’ heading to find the East
West Folder.
2. Double-click on the Play plug-in to load it
into an Instrument track. To show and hide the
Play interface, click on the Gear icon (Ableton’s
plug-in edit button).
You’re now ready to load your first instrument and begin composing!
Multi-Timbral Setup in Ableton Live
1. After loading Play as a plugin (see above), open the
Play interface and click on the Settings menu (top-left
corner in Play), then click on the Other tab and check-
mark the box next to Auto-Increment under the MIDI
Channel Assignment heading. Click ‘Apply’ then close.
2. Begin loading instruments. Each new instrument you load
into Play is assigned to the next MIDI channel (1, 2, 3... ), up
to 16 MIDI Channels per MIDI Port. You can see your currently
loaded instruments and their MIDI Channel assignments in the
Instrument List.
3. In Live, create the same number of MIDI tracks as there are instruments loaded into
Play. Now, click in the first field under Live’s “MIDI To” menu and assign it to Play. In the
second field below that, assign the specific MIDI channel.
Each MIDI track will correspond to an Instrument in Play
on that same MIDI channel.
Using Play in Sonar
In Cakewalk’s Sonar, you can load Play from either the Insert
menu or the Synth Rack. Whether loaded from the one or the
other, every instance running in Sonar appears in the Synth Rack.
The picture on the next page shows the Synth Rack with two in-
stances of Play running concurrently.
If the Synth Rack is not visible, you can open it from the View
Menu, as shown at the right, or by clicking on the button with the
same small icon in the toolbar.

P L A Y 6 SO FT WARE MANUAL
Chapter 5: Using Play as a Plug-in
83
CONTENTS
<
From the Insert Menu
Open this menu to reveal an option labeled “Soft Synths.” Moving the mouse over that
item opens a cascading menu that lists all the installed plug-ins that Sonar has learned
about on this computer.
Note that some of the plug-ins, including Play, may be grouped in submenus; for ex-
ample, all the VST plug-ins are likely to be found by opening the “vstplugins” submenu.
Click on the Play VST to insert it.
From the Synth Rack
Click on the “Add” button (in the upper-left corner, outlined in yellow in the picture be-
low) to open the same menu described in the two paragraphs immediately above.
Please Note! Sonar calls all these plug-ins “Soft Synths,” short for “software synthesiz-
ers,” even though Play is not literally a synthesizer. The term “synth” is often used infor-
mally to indicate any electronic sound generator, including a sample player such as PLAY.
In a not-yet-used MIDI track in Sonar’s Track View
window, assign Play as the track’s plug-in, as shown
in the image at the right. Create up to 16 tracks per
instance of the Play plug-in. The MIDI channel se-
lected in the “CH” drop-down, also shown in this
same image determines which instrument in Play
will respond to MIDI notes in the track. Assign the
corresponding MIDI channel in PLAY.
Using Play in Digital Performer
1. Go to Project > Add Track > Instrument Track > East West >
Play [stereo]. This will load a new instance of Play.
2. Now create a MIDI track by going to Project > Add Track >
MIDI Track
3. On this new MIDI track...
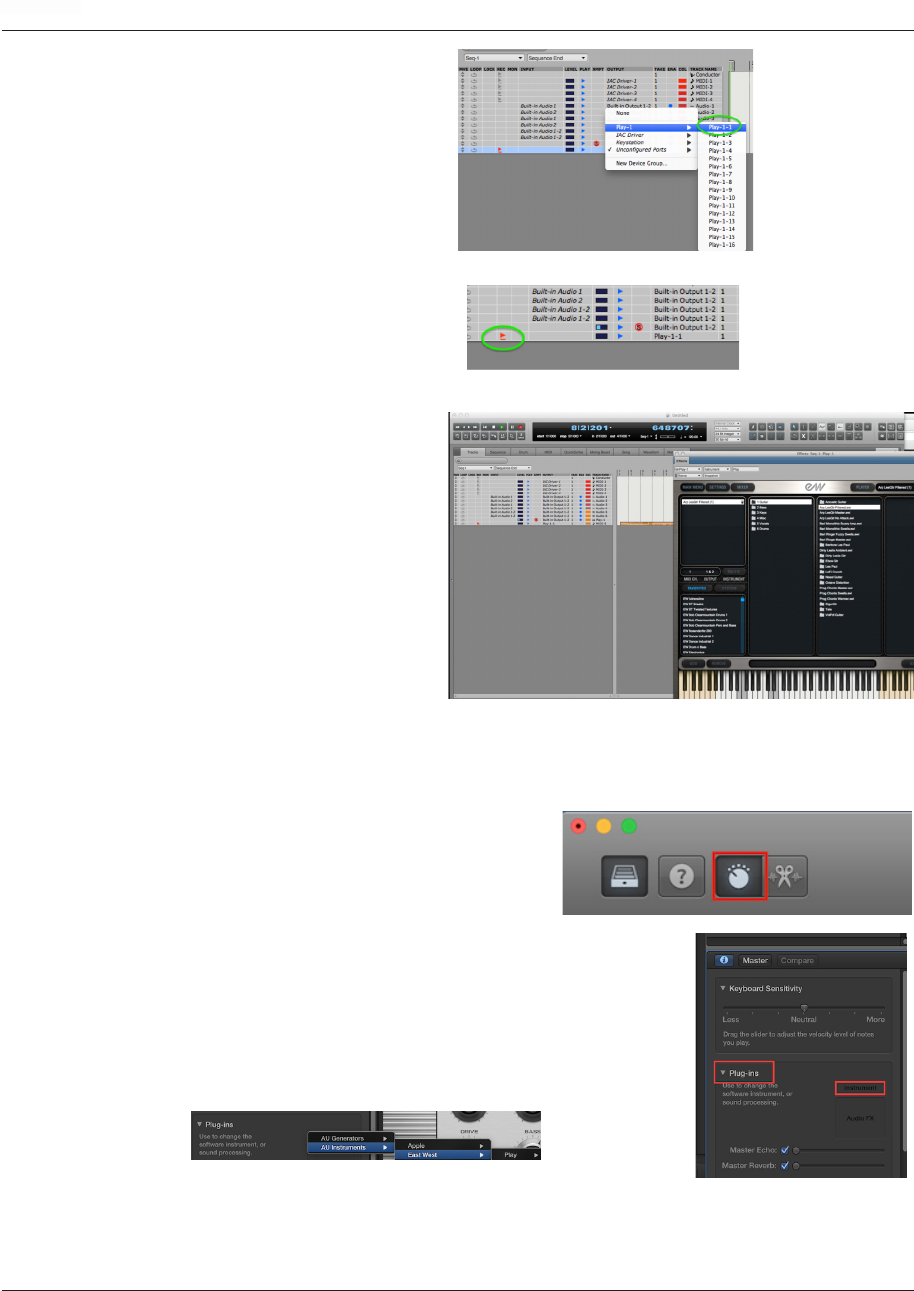
P L A Y 6 SO FT WARE MANUAL
Chapter 5: Using Play as a Plug-in
84
CONTENTS
<
... set the output to Play 1-1
4. Now, record-enable the Play track
5. Click on Play’s Browser button.
In the Favorites window (lower-left)
select the desired library from the
list, then navigate to the instrument
you wish to load.
6. Double-click on the instrument
file (.ewi) to load it. Now, highlight
the corresponding PLAY 1-1 track
in Digital Performer 9 and you’re
ready to start composing!
Using Play in Garageband
1. Once Garageband has opened, click on the
Smart Tools icon in the top-left.
2. In the window that appears, click on the “i” Info Icon in
the top-left corner to reveal the plugins button.
3. Click in the Instrument menu and navigate to Play Stereo
by going through the following sub-menus: AU Instruments /
East West / Play
You’re now ready to load an instrument and begin composing!

P L A Y 6 SO FT WARE MANUAL
Chapter 5: Using Play as a Plug-in
85
CONTENTS
<
Using Play in Studio One
1. Open Studio One and drag Play from the Instruments
list and drop it onto the timeline, or on the panel on the
left-hand side of the project window.
2. Assign the instrument track
to Play, on a specified MIDI
channel.
3. Open Play, load an instru-
ment and specify the MIDI
channel assignment to cor-
respond to the one created in
Studio One.
4. For each instrument you
load into Play, create another Instrument track in Studio One,
assign it to Play and specify the MIDI channel assignment.
Multi-Timbral Setup with Studio One
1. To add multiple tracks at once using Studio One, right-
click (or control-click) in the panel on the left-hand side
of the project window and choose ‘Add Tracks’.
2. In the ‘Add Tracks’ window enter a name, select In-
strument under ‘Type’, choose the number of tracks (up
to 16) under ‘Count’, and check the ‘Pack Folder’ box.
3. Under ‘Output’, click ‘New Instrument’, select Play
from the drop-down list, and click ‘Ok’.
An instance of Play will
open with the number of
tracks specified in the
‘Count’ field, all collected into one folder.
4. Open Play and click on the Settings menu (top-left
corner), then click on the Other tab and check-mark the
box next to Auto-Increment under the MIDI Channel As-
signment heading. Click ‘Apply’ then close.
Each new instrument you load into Play will now be as-
signed to the next MIDI channel (1, 2, 3... ), up to 16
MIDI Channels per MIDI Port. You can see your currently
loaded instruments and their MIDI Channel assignments
in the Instrument List.

P L A Y 6 SO FT WARE MANUAL
Chapter 5: Using Play as a Plug-in
86
CONTENTS
<
Automation
The term “Automation” refers to a facility for manipulating knobs, sliders, and other con-
trols with an external process and being able to repeat the same movements automati-
cally on subsequent playback. This feature is available in many modern sequencers. The
details of the implementation vary from one software product to the next, but the goals
are similar. Read the sequencer’s documentation to find out how to set up automation
that can affect the controls in the Player view within Play.
For example, suppose you want to have an instrument jump back and forth between the
left and right speakers and then seem to move slowly from right to left across the “sound
stage” of the resulting audio track. It’s possible to manipulate Play’s Pan control to ac-
complish this effect, and to automatically do it the same way each time the sequencer’s
project is played back.
The two most common ways to achieve such an effect are as follows:
• Record the movements of a physical knob—or slider—on MIDI hardware known as a
control surface. To do this, map a specific hardware control to Play’s Pan knob and
then turn on automation recording for that mapping. While the project is playing in
the sequencer, move the hardware control as needed. At the end turn off automation
recording. The next time you play back the project, the Pan knob will move the same
way without having to move it yourself.
• Draw the automation in what’s called an “envelope.” To do this, set up a mapping so
that the sequencer knows which of Play’s controls to manipulate. Then create an en-
velope for that control in the appropriate track of the sequencer. Then use the tools
provided to draw in the movement of the knob. The following image shows such an
envelope for the panning example described above.
Specific details on how to do both of these tasks with your sequencer can be found in
its documentation.
In this image, the short, horizontal blue segments are MIDI notes played on a guitar. The
continuous green line indicates graphically the position of the Pan knob: 90% left, 90%
right, left, right, and then moving slowly to the left.
