
OpenLab CDS ChemStation Edition
Workstation Installation Guide
Workstation Installation Guide

Workstation Installation Guide
Notices
Document Information
Part No: M8301-90092 Rev. D
EDITION 05/2020
Copyright
© Agilent Technologies, Inc. 2010-2020
No part of this manual may be repro-
duced in any form or by any means
(including electronic storage and retrieval
or translation into a foreign language)
without prior agreement and written con-
sent from Agilent Technologies, Inc. as
governed by United States and interna-
tional copyright laws.
Agilent Technologies
Hewlett-Packard-Strasse 8
76337 Waldbronn
Warranty
The material contained in this document
is provided “as is,” and is subject to being
changed, without notice, in future edi-
tions. Further, to the maximum extent
permitted by applicable law, Agilent dis-
claims all warranties, either express or
implied, with regard to this manual and
any information contained herein, includ-
ing but not limited to the implied warran-
ties of merchantability and fitness for a
particular purpose. Agilent shall not be lia-
ble for errors or for incidental or conse-
quential damages in connection with the
furnishing, use, or performance of this
document or of any information con-
tained herein. Should Agilent and the user
have a separate written agreement with
warranty terms covering the material in
this document that conflict with these
terms, the warranty terms in the separate
agreement shall control.
Technology Licenses
The hardware and/or software described
in this document are furnished under a
license and may be used or copied only in
accordance with the terms of such
license.
Restricted Rights Legend
U.S. Government Restricted Rights. Soft-
ware and technical data rights granted to
the federal government include only
those rights customarily provided to end
user customers. Agilent provides this
customary commercial license in Soft-
ware and technical data pursuant to FAR
12.211 (Technical Data) and 12.212
(Computer Software) and, for the Depart-
ment of Defense, DFARS 252.227-7015
(Technical Data - Commercial Items) and
DFARS 227.7202-3 (Rights in Commer-
cial Computer Software or Computer
Software Documentation).
Safety Notices
CAUTI ON
A CAUTION notice denotes a
hazard. It calls attention to an
operating procedure, practice, or
the like that, if not correctly per-
formed or adhered to, could result
in damage to the product or loss
of important data. Do not proceed
beyond a
CAUTION notice until
the indicated conditions are fully
understood and met.
WARNING
A WARNING notice denotes a
hazard. It calls attention to an
operating procedure, practice, or
the like that, if not correctly per-
formed or adhered to, could
result in personal injury or death.
Do not proceed beyond a WARN-
ING notice until the indicated
conditions are fully understood
and met.
Software Revision
This guide is valid for revision C.01.10
of OpenLab CDS ChemStation Edition.

Workstation Installation Guide 3
In this Guide ...
This installation guide provides instructions to install Agilent OpenLab CDS
ChemStation Edition workstations.
Table 1 Terms and abbreviations used in this document
Term Description
AIC Agilent's Analytical Instrument Controller
CDS Chromatography Data System
ChemStation OpenLab CDS ChemStation Edition
Control Panel OpenLab Control Panel
Microsoft Control Panel Part of the Microsoft Windows operating system
Secure Workstation Secure Workstation for OpenLab CDS ChemSta-
tion Edition
Workstation Installation Guide 4
1 Prepare your PC
This chapter describes how to configure a non-Agilent-delivered PC.
Agilent-delivered PC Bundle systems are delivered with the supported pre-installed
Windows operating system and are configured for optimum performance.
Non-Agilent PCs require some manual configuration changes in order to provide
optimum performance.
2 Install OpenLab CDS ChemStation Edition
The installation is automated by the OpenLab CDS ChemStation Edition Installer.
This tool installs all the components needed.
3 Post Installation Tasks
This chapter describes tasks that are relevant after finishing the installation.
4 Optional Procedures
This chapter contains information on the Additional Drivers and Software wizard,
on the Software Verification Tool, and other helpful procedures.
5 Licensing
This chapter contains information on how to obtain and install a license.
6 Upgrade ChemStation Edition to C.01.10
This chapter describes the upgrade from ChemStation C.01.07 SR3 or higher. If
you upgrade from an older ChemStation revision, upgrade to C.01.07 SR3 first. For
information on upgrading from ChemStation A.0x or B.0x, please refer to the
migration guide (CDS_CS-data-Migration.pdf).
7 Uninstall the Software
This chapter contains information on the uninstallation by using the OpenLab
Uninstallation Wizard. It also describes post uninstallation tasks that are essential
if you plan to reinstall ChemStation on the same computer.
8 Troubleshooting
The chapter contains some troubleshooting hints.
Workstation Installation Guide 5
Contents
1 Prepare your PC 7
Install and Update Windows 8
Run the Site Preparation Tool 10
Install and Configure Third Party Tools 11
Configure a Printer 16
Before You Begin the Installation of OpenLab CDS ChemStation
Edition 18
Configure the Operating System 20
2 Install OpenLab CDS ChemStation Edition 31
Prepare for Installation 32
Run the Installation Wizard 33
What to do Next 36
Scripted Installation 37
3 Post Installation Tasks 43
Allow ChemMain Through Firewall 44
Configure the Antivirus Program 45
4 Optional Procedures 47
Install Additional Software and Drivers 48
Run a Software Verification after Software Installation 49
Transform a Workstation to a Networked Workstation 50
Improve Performance on Offline Machines 51
Protect ChemStation Folders with Secure File I/O 52
Change the PC Name 53
Copy Installation files to a Centralized Folder for Installation 54
Add Shortcut to Public Folder 55
Workstation Installation Guide 6
5 Licensing 56
About OpenLab Licensing 57
Get a License 58
Install Your License 62
6 Upgrade ChemStation Edition to C.01.10 63
Planning the Upgrade 64
Convert Classic Instrument Drivers to RC.NET 67
License Upgrade 70
Upgrade the Workstation 72
7 Uninstall the Software 74
About Uninstallation 75
Run the OpenLab CDS Uninstallation Wizard 76
8 Troubleshooting 77
Reconfigure Instruments Using Classic Drivers After Upgrade to
ChemStation C.01.08 or Higher 78
9 Appendix 81
Sales and Support Assistance 82

Workstation Installation Guide 7
1 Prepare your PC
Install and Update Windows 8
Run the Site Preparation Tool 10
Install and Configure Third Party Tools 11
Install and Configure Adobe Acrobat Reader 11
Install the .NET Framework 14
Install Keysight IO Libraries Suite 15
Configure a Printer 16
Add a Network Printer as a Local Printer 17
Before You Begin the Installation of OpenLab CDS ChemStation Edition 18
Configure the Operating System 20
Windows Configuration Checker for OpenLab CDS ChemStation Edition 20
Manual Configuration Steps 21
Editing the Security Settings for LC/MS and CE/MS Systems 29
This chapter describes how to configure a non-Agilent-delivered PC.
Agilent-delivered PC Bundle systems are delivered with the supported
pre-installed Windows operating system and are configured for optimum
performance. Non-Agilent PCs require some manual configuration changes in
order to provide optimum performance.

Workstation Installation Guide 8
1 Prepare your PC
Install and Update Windows
Install and Update Windows
1 Install the Windows operating system from the Microsoft installation media
or qualified PC image media provided by your IT department. During the
setup, provide the computer name, administrator password and network
settings. Choose to either join an existing domain or set up the system in a
workgroup mode.
2 For Windows 10 Pro users: Update to the latest Windows 10 edition in
accordance to the guidelines of your local IT department.
3 To secure your system against viruses please install an antivirus program. Be
sure to open the firewall ports listed in the Firewall Settings in the OpenLab
CDS ChemStation Edition Hardware and Software Requirements guide
(CDS_CS_HW-SW-Requirements.pdf).
4 In the Microsoft Control Panel under System> Windows activation, click
Change product key. Enter a valid value to activate Windows.
5 Under Windows Update, click Check for updates to check for updates and apply
all critical security patches. Make sure that all Windows updates have been
performed before installing ChemStation (update settings may be configured
centrally by your IT department).
6 Disable or defer Windows updates (update settings may be configured
centrally by your IT department):
• Windows 7:
a In the Microsoft Control Panel, select Windows Update.
b Select Change settings.
NOTE
Running antivirus programs might influence the behavior and performance of
your computer. Some virus scanners might cause issues when used with
OpenLab CDS. The application is tested with Symantec Endpoint Protection 14.0
MP2 and with Microsoft Security Essentials.
NOTE
This setting is important to avoid data loss due to system reboot during data
acquisition.

Workstation Installation Guide 9
1 Prepare your PC
Install and Update Windows
c In the Important updates section, select Never check for updates. Clear
the other update options.
d Restart the computer after update.
• Windows 10:
a Under Settings> Update & Security, select Advanced options.
b Enter the number of days by which the update should be deferred.
7 Windows 10 and Windows 7 only: To configure remote settings: In the
Microsoft Control Panel navigate to System> Remote settings. On the Remote
tab:
• In the Remote Assistance section, clear the check box Allow Remote
Assistance connections to this computer.
• In the Remote Desktop section, select Don't allow connections to this
computer.
8 In the Microsoft Control Panel under Date and Time: Choose the time zone of
your regional location.
9 In the Microsoft Control Panel under Region (Region and Language for
Windows 7):
a Regional format options should be set to English (United States) from the
drop-down list.
b If regional format other than English (United States) is used, the following
settings are mandatory. The settings can be defined by clicking on the
Additional settings... button:
• Decimal symbol = . (point)
• Digit grouping symbol = , (comma)
• List separator =, (comma)
10 In the Microsoft Control Panel under Region (Region and Language for
Windows 7), on the Administrative tab:
a In the Language for non-Unicode program section, click Change system
locale....
b From the drop down list, select English (United States).
NOTE
Do not change the system locale if you are using an English, Japanese or
Chinese Operating System.

Workstation Installation Guide 10
1 Prepare your PC
Run the Site Preparation Tool
Run the Site Preparation Tool
1 Run the installer from the USB medium or from a centralized folder. From the
Planning screen, select System Configuration Checker.
2 The Site Preparation Tool opens. Select OpenLab CDS ChemStation Edition
C.01.XX from the drop-down list.
3 Select OK.
4 Complete page 1 of the Contact Information—System details by typing in the
fields provided.
• System Location fields
• System Information fields
• Configuration fields
5 Review the system details and make any necessary entries. The system will
follow the paths specified.
6 Select the green check mark icon in the top left corner of the screen to begin
the software check. A summary report is displayed showing the results for
each check category. Results are expressed as Pass, Warning, Critical Warning,
or Fail.
Fail results must be corrected before continuing with the installation. Agilent
recommends investigating and correcting any Critical Warnings and Warnings
whenever possible before proceeding.
7 To view details of the report, select the appropriate link: System Hardware
Details, Operating System and Software Details, or Manual Verification Required.
8 To save the report, select the Save icon at the top left of the screen.
9 E-mail the saved report to your Agilent Service Representative for evaluation,
and for validation of your personal computer for Agilent Software Systems
Installs.
NOTE
If the firewall is controlled by security software, the Site Preparation Tool cannot
read the firewall settings because of security limitations and will display Status
"Fail" for the firewall settings.
In this case, make sure the firewall is disabled and enter the status in the Site
Preparation Tool report manually.

Workstation Installation Guide 11
1 Prepare your PC
Install and Configure Third Party Tools
Install and Configure Third Party Tools
Certain third party tools must be installed and configured on your PC. Some of
these tools can be installed directly from the Installation screen if you run the
OpenLab CDS ChemStation Edition Installer.
Install and Configure Adobe Acrobat Reader
Check if an existing Acrobat Reader version must be uninstalled
1 If Acrobat Reader is already installed, check its version number.
a Open Acrobat Reader.
b Select Help> About Adobe Acrobat Reader.
2 The version number has several ranges. The Continuous or Classic track is
indicated by the first two digits of the third range.
20 = Continuous track
30 = Classic track
NOTE
If an older version of Acrobat Reader (2016 or lower, XI or lower) or a Reader
version from the Continuous track (even with Acrobat Reader 2017) is installed
on your system, you must uninstall it first. Otherwise, the installation below
would result in an Acrobat Reader version that pushes automatic updates.
Workstation Installation Guide 12
1 Prepare your PC
Install and Configure Third Party Tools
Install Adobe Acrobat Reader 2017 (Classic Track):
1 Under Third Party Tools, select Adobe PDF Reader.
2 The Acrobat Reader setup screen appears. Click Install to continue.
3 If Acrobat Reader was successfully installed, click Finish to exist the setup
screen.
Alternatively, you can install Acrobat Reader from the ChemStation
installation medium. It is available under Disk1/Tools/Adobe Reader.
Run AcroRdr_MUI.bat and follow the instructions of the Adobe Reader Setup
wizard.
4 Open the newly installed Adobe Acrobat Reader to confirm the Adobe Reader
license agreement. You will be asked only this one time.
Configure Adobe Acrobat Reader in Windows:
1 Set Adobe Acrobat Reader as your default PDF viewer.
a Windows 7: In the Microsoft Control Panel, navigate to Default Programs>
Set default programs, select Adobe Acrobat Reader from the list, and click
Set this program as default.
OR
Windows 10: Navigate to Settings> Apps> Default Apps, select Choose
default apps by file type. In the list, navigate to .pdf and select Adobe
Acrobat Reader as default.
b Select Adobe Acrobat Reader as default PDF viewer.
2 Disable the Adobe Update Service.
a In the Windows Start menu, search for Services. In the results, click
services.msc.
b Stop the Adobe Acrobat Update Service.
c In the service properties, set the startup type to Manual.
Workstation Installation Guide 13
1 Prepare your PC
Install and Configure Third Party Tools
Ensure correct Adobe Acrobat Reader settings:
1 Click Edit> Preferences in Acrobat Reader.
2 Select the General category.
a Ensure that the Open documents as new tabs in the same window check box
is cleared. If it is selected, Acrobat Reader may interfere with the
ChemStation Report Viewer feature.
b Clear the Show me messages when I launch Adobe Acrobat Reader check
box. If it is selected, Adobe messages may interfere with the ChemStation
software.
3 Select the Security (Enhanced) category.
a Ensure that the Enable Protected Mode at startup check box is selected.
b Ensure that the Enable Enhanced Security check box is selected.
4 Select the Tracker category.
Ensure that the Show notification icon in system tray check box is cleared.
Update Acrobat Reader regularly
1 Update Adobe Acrobat Reader on a regular basis to avoid push notifications
from Adobe.
We recommend to include Acrobat Reader updates in a regular update
schedule. Acrobat Reader updates usually come on a quarterly basis.
2 To update, open Acrobat Reader, and click Help> Check for Updates....
3 After an update, ensure that the Adobe Acrobat Update Service is still stopped.

Workstation Installation Guide 14
1 Prepare your PC
Install and Configure Third Party Tools
Install the .NET Framework
Install .NET 3.5
If .NET 3.5 is not installed on your system, its installation will automatically be
triggered by the installation wizard. Follow the procedure below to install it in
advance.
1 Go to the Microsoft Control Panel.
In the Windows Start menu, enter "Control Panel" in the Search programs and
files field (alternatively, press [Win+R] and enter "Control panel"). To view all
items in the Control Panel view, select Small icons in the View by field.
2 Go to Programs and Features.
3 Enable .NET 3.5 as follows:
This requires an internet connection.
• For Windows 10: Expand the .NET Framework 3.5 (includes .NET 2.0 and
3.0) node,
• For Windows 7: Expand the Microsoft .NET Framework 3.5.1 node,
in both cases select the Windows Communication Foundation Non-HTTP
Activation check box.
Figure 1 Enable .NET 3.5 (Win 10)
NOTE
If this does not work as expected, or the computer has no internet access, install
.NET 3.5 from the Windows installation media. For Windows 10, see details 10
under https://support.microsoft.com/en-us/kb/2734782.
If you do not have installation media, create them as described under
https://www.microsoft.com/en-us/software-download/windows10.
Workstation Installation Guide 15
1 Prepare your PC
Install and Configure Third Party Tools
Install .NET 4.7
If .NET 4.7.2 is not installed on your system, its installation will automatically be
triggered by the installation wizard. When manually installing .NET 4.7.2,
Windows requires write access to the installation files. Direct installation from
USB media is therefore not possible.
1 Copy the folder Disk1\Tools\DotNet4.7 to a local disk.
2 Run dotNetFx_Full_x86_x64.bat.
3 Follow the installation wizard.
4 Restart the computer.
Install Keysight IO Libraries Suite
IO Libraries are required only for LC/MS and CE/MS instruments.
To install IO Libraries:
1 From the installer, select Installation.
2 Under Third Party Tools, select Keysight IO libraries.The Keysight IO libraries
setup screen opens.
3 Click Install to continue.
4 When Keysight IO libraries have been successfully installed, click Finish to exit
the setup screen.
Workstation Installation Guide 16
1 Prepare your PC
Configure a Printer
Configure a Printer
Physical Default Printer
Make sure that a default printer is configured in Windows. Every Windows user
who runs ChemStation needs a default printer configured in the user profile. The
printer driver must be for a physical printer, even if the printer is not connected.
Configuring a to-file printer such as a PDF or XPS writer is not sufficient.
This is done via the Microsoft Control Panel. If no default printer is configured the
following problems may occur:
• Printing of a report preview will fail
• the Copy To Clipboard menu will have an error
• the Custom Report View will have problems with new templates
PDF XChange printer
During the installation of ChemStation C.01.10, a PDF XChange 6 printer driver is
installed (revision 6.0.317.1).
Print Limitations
The maximum number of pages for one print job is 1500; for example, a
sequence summary report is one print job.
When printing Multi-Page chromatograms (specified in the Specify Reports dialog
box), the maximum number of pages that can be printed properly depends on the
resolution of the printer. 300 dpi allows ten pages per chromatogram, 600 dpi
allows up to six pages per chromatogram.

Workstation Installation Guide 17
1 Prepare your PC
Configure a Printer
Add a Network Printer as a Local Printer
Use physical printers to ensure correct function. Follow the steps below to add a
network printer as a local printer. In OpenLab CDS ChemStation Edition, you will
be able to choose this printer as a default printer when configuring instruments.
1 In the Microsoft Control Panel, navigate to Devices and Printers.
2 Click Add a Printer.
3 Click The printer I want isn't listed, then select Add a local printer and click Next.
4 Select Create a new port, then select Local Port for the port type and click Next.
5 For Port Name, enter the network path to the printer. The network path
consists of two slashes, the computer name or local IP address of the PC
sharing the printer, and the share name of the printer. For example, \\
PTPRINT\PG5-B or \\192.168.1.100\hpprinter.
6 Select the appropriate printer driver and click Next. If the exact model is not
listed, try the closest model number or a generic printer.
7 Follow the rest of the wizard.
NOTE
The print quality of graphics and pictures depends on the printer hardware,
maintenance state, configuration, printing options, and paper quality. Resizing
pictures and graphics during the print process may lead to a reduced print
quality. Choose paper format and page margins that are suitable for your printer.

Workstation Installation Guide 18
1 Prepare your PC
Before You Begin the Installation of OpenLab CDS ChemStation Edition
Before You Begin the Installation of OpenLab
CDS ChemStation Edition
Before you begin installing the OpenLab CDS ChemStation Edition, make sure
that the following steps have been performed. With these configuration options
you ensure that the PC is well prepared before you start with the specific
configuration and installation.
1 Decide on a computer name.
The computer name will be reflected in the instrument configuration. To avoid
considerable effort, it is recommend to keep the computer name unchanged
after installing OpenLab CDS ChemStation Edition.
2 Make sure that you use only the following characters for user names:
3 For installing OpenLab CDS, you need to have administrator privileges for all
servers and clients. Power user privileges are not sufficient (the installation
does not start).
4 Decide on a directory location to store all files related to the data system
software, including data, methods, sequences, and configurations. The
directory must always be accessible to the PC running the software.
5 If you will be using OpenLab ECM with your system, obtain the ECM server
name.
NOTE
To make sure that a DNS server can resolve the computer name, follow the
internet standard for protocols(RFC952) and use only the following characters:
• Letters (a-z, A-Z)
• Digits (0-9)
• Hyphen (-)
Do not use an underscore.
A-Z, a-z, 0-9, _ (underscore), - (hyphen)
NOTE
Make sure you have administrator privileges for both ECM and OpenLab CDS
ChemStation Edition.
Workstation Installation Guide 19
1 Prepare your PC
Before You Begin the Installation of OpenLab CDS ChemStation Edition
6 Decide on the software delivery approach you want to use:
• Install directly from the USB medium — Insert the USB medium directly at
the workstation computer. (Recommended)
• Copy installation files to a centralized location — You can use the utility to
copy the installation files, for example, to a network share folder, and run
the installation from that location. However, some networks may interfere
with installation (see “Copy Installation files to a Centralized Folder for
Installation” on page 54).
7 Before you install the software, check that your computer meets all
requirements. You can access the OpenLab CDS ChemStation Edition
Requirements guide (CDS_CS_HW-SW-Requirements.pdf) from the
Documentation and Learning platform.
a On the installation media, go to Disk1\DOCS\ and open welcome.html to
access Documentation and Learning.
b Select your language.
c On the Welcome page, navigate to Site Preparation> Site Preparation and
Requirements, and select CDS ChemStation Edition Hardware and Software
Requirements.
Use this PDF to check that your settings comply with the network
requirements, and to determine whether your hardware and software will
support the system.
8 Install all required hardware, including any A/D connections, interfaces,
instrument detectors, and communication cables.
9 Ensure that the latest graphic card driver is installed. Install the latest
vendor-specific driver. Do not use any generic driver.
10 Disable hardware acceleration. Ensure that the following registry key is
present and correctly set:
[HKEY_CURRENT_USER\SOFTWARE\Microsoft\Avalon.Graphics]
"DisableHWAcceleration"=dword:00000001
11 Make sure .NET 3.5 and .NET 4.7 are activated as Windows features.
For installation instructions, see “Install .NET 3.5” on page 14 and “Install .NET
4.7” on page 15.
12 Check the Agilent Service Notes for software updates for your installation
package and software products. Service Notes are available from your Agilent
support representative.

Workstation Installation Guide 20
1 Prepare your PC
Configure the Operating System
Configure the Operating System
Windows Configuration Checker for OpenLab CDS
ChemStation Edition
The OpenLab CDS ChemStation Edition configuration check tool helps to prepare
or troubleshoot the Operating System configuration and to prevent computer
problems.
This tool offers two types of configuration checks:
• Mandatory: It checks and repairs all mandatory settings which should be
applied before installing OpenLab ChemStation Edition.
• Optional: It checks the settings for performance and usability. The
configuration settings are user-specific and must be set separately for each
user.
The tool comes as .diagcab file, which is a file format used with the Microsoft
Windows Troubleshooting Platform (WTP) program. The Microsoft Windows
Troubleshooting Platform (WTP) is a platform to locate and fix hardware and
software settings in Windows. It is used specifically for diagnosing and repairing
computer settings.
In general, .diagcab files are useful for deploying troubleshooting packs because
they are self-contained and require no installation. The .diagcab file name
extension is a registered file name extension that can be executed by WTP.
Depending on whether it is a configuration check for mandatory or optional
settings, different .diagcab files must be executed:
• To perform the configuration check for mandatory settings, you must use the
file Agilent.Wtp.ChemStation.WindowsConfiguration.diagcab. This file is
located in Disk1\Tools\Windows Configuration Tools\Mandatory Settings.
• To perform the configuration check for optional settings, you must use the file
Agilent.Wtp.ChemStation.WindowsConfiguration.diagcab. This file is located in
Disk1\Tools\Windows Configuration Tools\Optional Settings.
NOTE
If User Account Control (UAC) is switched on, some configuration steps will
require active confirmation to continue.

Workstation Installation Guide 21
1 Prepare your PC
Configure the Operating System
1 Before starting the configuration check, copy the .diagcab files to a local disk.
2 Run the tool as administrator to ensure all settings will be applied: On the start
page, select Advanced, then click Run as administrator.
After the settings have been applied, you can generate a report to see which
settings have been changed.
3 To create the report:
a On the Troubleshooting Complete page, click View details.
b Click on the print button to generate the report.
4 Reboot the PC after running the configuration tool.
Manual Configuration Steps
Some Windows changes within this document are mandatory for OpenLab CDS
ChemStation Edition to work properly on a Windows system. Some changes will
optimize application performance. Other changes will have an impact on
usability.
The configuration settings are grouped according to their relevance for the
Windows system in the Mandatory, Performance, and Usability categories.
Depending on your operating system, some special configuration steps may be
required.
The following sections describe the configuration steps for each category
separately. Configure your Windows system accordingly. Alternatively, run the
OpenLab CDS configuration check tool (see “Windows Configuration Checker for
OpenLab CDS ChemStation Edition” on page 20).
NOTE
While using the Configuration Checker:
• Ensure that this computer is not turned off by another user.
• Win 7: Ensure that the menu bar is enabled (click Organize> Layout, and select
Menu bar).
• It is very important that you reboot the PC after running the configuration tool.
NOTE
The following Windows 10 descriptions apply to Windows 10 Build 1809. The
settings for other builds may differ slightly.

Workstation Installation Guide 22
1 Prepare your PC
Configure the Operating System
Mandatory Configuration Steps
About Mandatory Configuration Steps
The following procedures of this section contain all the configuration steps
required for installation and necessary to ensure proper installation and avoid
data loss.
Configure Mandatory Settings
In the Microsoft Control Panel:
In the Windows Start menu, enter "Control Panel" in the Search programs and files
field (alternatively, press [Win+R] and enter "Control panel"). To view all items in
the Control Panel view, select Small icons in the View by field.
1 Administrative Tools: Configure security options:
a Double-click Local Security Policy.
b Navigate to Security Settings> Local Policies> Security Options.
c Double-click the following policy listed in the right hand panel: Network
Access: Sharing and security model for local accounts.
d In the displayed dialog select the following item from the drop-down list:
Classic - local users authenticate as themselves.
2 Network and Sharing Center:
a Select Change adapter settings. Right-click your Ethernet Adapter, then
select Properties. On the General tab, click Configure.
b On the Power Management tab, clear all check boxes.
3 Power Options:
a As preferred plan select High performance.
b Click Change Plan settings.
c Set the option Put the computer to sleep to Never.
d Click Change advanced power settings.
NOTE
For Windows 7 users:
Ensure that Windows hotfix KB2999226 (Update for Universal C Runtime in
Windows) is installed on your system before installing ChemStation. See
https://support.microsoft.com/en-us/help/2999226/update-for-universal-c-ru
ntime-in-windows.
Workstation Installation Guide 23
1 Prepare your PC
Configure the Operating System
e Open the nodes for Hard disk> Turn off hard disk after.
f Set the Minutes to 0 (=Never).
4 Programs and Features:
a Click Turn Windows features on or off.
b Select the Telnet Client check box.
c Select the TFTP Client check box.
d Reboot the PC if necessary.
5 Windows 7 only:
Administrative Tools: Disable Services.
• Double-click Services.
• For the following services, set the startup type to Disabled:
• Application Experience
• Desktop Window Manager Session Manager
Other Windows settings:
1 To configure Windows logon options, right-click Start, select Run from the
context menu, then type gpedit.msc in the Run field.
a Navigate to Local Computer Policy> Computer Configuration> Administrative
Templates> System> Logon.
b Set Hide entry points for Fast User Switching and Always use classic logon to
Enabled.
2 Windows 10 only: Start> Settings> Update & Security> Windows Security:
a Under App & browser control:
Turn off SmartScreen under Check apps and files, SmartScreen for
Microsoft Edge, and SmartScreen for Windows Store apps.
b Under Virus & threat protection:
Ensure that a protection tool is turned on.
If you want to use Windows Defender: Enable and configure it in the
Windows Control Panel under Windows Defender Firewall> Advanced
Settings.
Workstation Installation Guide 24
1 Prepare your PC
Configure the Operating System
3 Windows 10 only: Start> Settings> Devices> Printers & scanners: Choose
default printer.
a Turn off Let Windows manage my default printer.
b Click the printer that you want to set as default, then click Manage.
c In the printer settings, click Set as default.
4 Windows 10 version 1903 only:
If the Net.TCP Port Sharing Service is disabled, enable it by running the
PowerShell command:
Enable-WindowsOptionalFeature -online -All -FeatureName
WCF-TCP-Activation45
Performance Configuration Steps
About Performance Configuration Steps
The following procedures of this section contain all the configuration steps that
improve system performance. These settings are optional.
Configure Settings to Improve Performance
In the Microsoft Control Panel:
1 System: Change system properties:
a Click Advanced system settings.
b On the Advanced tab under Performance, click Settings.
• Advanced tab > Virtual Memory: For optimum performance use the
Change button to adjust the paging file size to a value of 2 to 3 times of
the physical RAM on the PC. If possible locate the paging file on a drive
different from the system installation drive.
• Data Execution Prevention tab: Select Turn on DEP for essential Windows
programs and services only.
Click OK to close the Performance Options dialog.
c For Windows 10 and Windows 7 only: On the System Protection tab:
Make sure that Protection is turned off. If required, click Configure and
select Disable system protection.
2 Windows 10 and Windows 7 only: Indexing Options: Disable indexing.
Click the Modify button. Select Show all locations, and clear all drives and
locations.
Workstation Installation Guide 25
1 Prepare your PC
Configure the Operating System
Other Windows settings:
1 Windows 10 only: Start> Settings> Personalization> Colors: Turn Transparency
effects off.
Usability Configuration Steps
About Usability Configuration Steps
The following procedures of this section contain all the configuration steps that
improve the usability of the Windows application. These settings are optional.
Configure Settings to Improve Usability
In the Microsoft Control Panel:
1 File Explorer Options (Folder Options for Windows 7): In the View tab:
• Select Always show menus.
• Select Display the full path in the title bar.
• Clear Hide extensions for known file types.
• Clear Use Sharing Wizard.
2 System: Change system properties:
a Click Advanced system settings.
b On the Advanced tab under Startup and Recovery, click Settings.
• In the System startup section:
Change both Time to display ... fields from 30 to 3 sec.
• For Windows 10 and Windows 7 only: In the System failure section:
a Select Automatically restart.
b In the Write debugging information subsection, select Kernel memory
dump from the drop-down list.
Click OK to close the Startup and Recovery dialog.
Workstation Installation Guide 26
1 Prepare your PC
Configure the Operating System
c On the Advanced tab under Performance, click Settings. On the Visual
Effects tab:
• Select Adjust for best performance, then click Apply.
Select Custom, then select the following check boxes for better
usability:
• Show shadows under mouse pointer
• Show shadows under windows
• Smooth edges of screen fonts
Click OK to close the Performance Options dialog.
Other Windows settings:
1 Enable the navigation pane:
• Windows 10: Open Windows Explorer, then select View> Navigation pane
from the ribbon and make sure that Navigation pane is selected.
• Windows 7: Open Windows Explorer, then select Organize> Details> Layout
and make sure that Navigation pane is selected.
2 Windows 7 only: Configure general layout of the Start Menu: (right-click Start>
Properties)
a Start Menu Tab: In the Privacy section select both items
b Start Menu Tab > Customize button: In Customize Start Menu dialog:
• Clear the following option:
• Favorites menu
• Select the following options:
• Computer Display as a link
• Connect To
• Control Panel: Display as a menu
• Default Programs
• Devices and Printers
• Documents: Display as a link
• Enable context menus and dragging and dropping
• Games: Don't display this item
• Help
• Highlight newly installed programs
• Music: Don't display this item
Workstation Installation Guide 27
1 Prepare your PC
Configure the Operating System
• Network
• Open submenus when I pause on them with the mouse pointer
• Personal folder: Display as a link
• Pictures: Display as a link
• Run command
• Search other files and libraries Search with public folders
• Search programs and Control Panel
• Sort All Programs menu by name
• System administrative tools: Display on the All Programs menu and in
the Start menu
• Use large icons
3 Windows 10 and Windows 7 only: Configure Windows logon options:
Right-click Start, select Run from the context menu, then type gpedit.msc in
the Run field.
a Navigate to Local Computer Policy> Computer Configuration> Administrative
Templates> System> Logon.
b Set Don't display the Getting Started welcome screen at logon to Enabled.
4 Recycle Bin Properties: (right-click on desktop icon Recycle Bin, then select
Properties) Select the following options:
• Custom size: Select a size corresponding to approximately 10% of the
complete disk space for the drive.
• Select Display delete confirmation dialog.
Repeat these steps for all drives of your computer.
5 Select Internet Explorer as default Web browser:
• Windows 10 only:
a Under Start> Settings> Apps> Default Apps, select the Internet Explorer
as default Web browser.
• Windows 7 only:
a In the Microsoft Control Panel under Default Programs> Set your default
programs, select Internet Explorer from the list.
b Click Set this program as default.
6 Windows 10 only: Start> Settings> System> Tablet Mode:
a For When I sign in, select Use desktop mode.
b For When this device automatically switches tablet on or off, select Don't ask
me and don't switch.
Workstation Installation Guide 28
1 Prepare your PC
Configure the Operating System
7 Windows 10 only: Start> Settings> Apps> Offline Maps: Turn Metered
connections and Map updates off.
8 Windows 10 only: Start> Settings> Privacy:
a On the General page, turn off the following:
• Let apps use advertising ID to make ads more interesting to you based on
your app usage (turning this off will reset your ID)
• Let website provide locally relevant content by assessing my language list
• Let Windows track app launches to improve Start and search results
b On the Location page, make sure Location for this device is off. If not, click
Change to turn it off.
9 Windows 10 only: Start> Settings> Personalization: Disable advertising info:
a On the Lock screen page:
• Under Background, select Picture or Slideshow.
• Turn off Get fun facts, tips, tricks, and more on your lock screen.
• Turn off Show lock screen background picture on the sign-in screen.
b On the Start page:
Turn off Occasionally show suggestions in Start.
10 Windows 10 only: Start> Settings> Personalization: In the Taskbar tab, under
Taskbar buttons select Combine when taskbar is full.
This will simplify switching between open CDS instances.
Workstation Installation Guide 29
1 Prepare your PC
Configure the Operating System
Editing the Security Settings for LC/MS and CE/MS
Systems
The following sections summarize all security settings required for LC/MS and
CE/MS. All other security settings are set automatically by the OpenLab CDS
ChemStation Edition Installer.
OpenLab CDS ChemStation Edition needs to be installed using an operating
system Administrator user account. To run the system with the configured
options outlined in this document, all users and power users should use the
same settings.
Firewall
On PCs controlling LC/MS or CE/MS systems, it is recommended that you turn
off the firewall.
Advanced Network Settings
The communication with the MS is sensitive to the order NICs in the Adapters and
Bindings dialog.
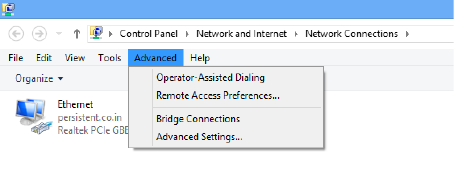
1 Go to Start> Control Panel.
Go to Network and Sharing Center
1
.
2 Click Change adapter settings.
3 Press ALT to bring up the menu.
1
View the items by icon to see a list of all items.
Workstation Installation Guide 30
1 Prepare your PC
Configure the Operating System
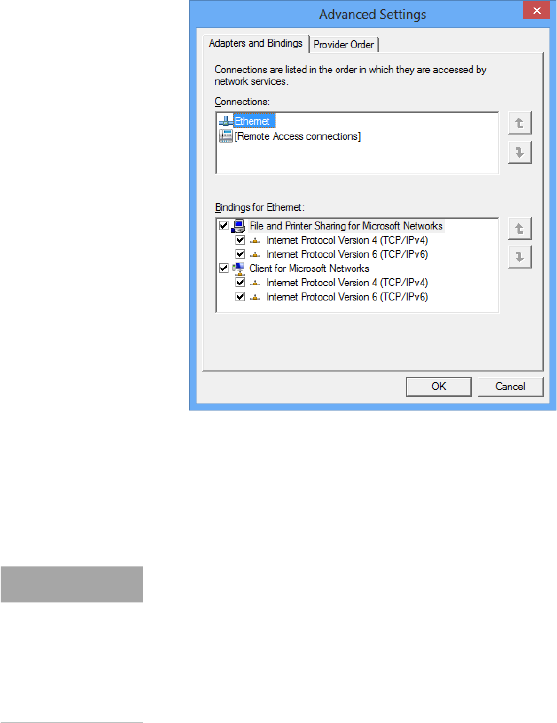
4 Select Advanced Settings....
Figure 2 Advanced Settings dialog, Adapters and Bindings tab
5 In the Adapters and Bindings tab (see Figure 2 on page 30):
a Make sure that the Local Area Connection pertaining to the LC/MS or
CE/MS NIC is the first item in the list of connections
NOTE
The names of your LAN cards may differ from those shown in the example. You
can tell which LAN card is the Instrument LAN by comparing the IP addresses
assigned to the LAN cards.
The LAN pertaining to the company intranet > internet will typically have an IP
address assigned by organizations Static IP policy or by a DHCP server. Check
with your network administrator.

Workstation Installation Guide 31
2 Install OpenLab CDS ChemStation Edition
Prepare for Installation 32
Run the Installation Wizard 33
License Agreement Screen 33
Installation Folder Screen 33
Installation Type Screens 34
Summary Screen 35
What to do Next 36
Scripted Installation 37
About Scripted Installation 37
Export as XML 37
Parameters and Return Codes 38
Installation, Upgrade, or Repair 41
Uninstallation 42
Logging and Tracing 42
The installation is automated by the OpenLab CDS ChemStation Edition Installer.
This tool installs all the components needed.
Workstation Installation Guide 32
2 Install OpenLab CDS ChemStation Edition
Prepare for Installation
Prepare for Installation
1 Make sure that the antivirus software is disabled during the installation.
2 Do not run the Windows Update Service during installation. Make sure that no
Windows updates are performed during the installation of ChemStation.
3 Make sure that no system reboot is pending.
Pending reboots are indicated both in the Configuration Checker (see
“Windows Configuration Checker for OpenLab CDS ChemStation Edition” on
page 20) and in the Site Preparation Tool (see “Run the Site Preparation
Tool” on page 10).
4 To begin installation, navigate to \Disk1\Setup.bat. Right-click the file and run
it as administrator to proceed to the Planning screen.

Workstation Installation Guide 33
2 Install OpenLab CDS ChemStation Edition
Run the Installation Wizard
Run the Installation Wizard
License Agreement Screen
1 From the OpenLab CDS ChemStation Edition Installer, select Installation.
2 Select OpenLab CDS ChemStation.
3 The OpenLab CDS Installation Wizard opens. Read the terms of the License
Agreement. The installer provides a printable PDF of the license agreement
under the Resources option of the main menu.
4 Select I agree with the terms and conditions. You cannot proceed with
installation unless you agree to these terms.
5 Select Next to proceed to the Installation Folder screen.
Installation Folder Screen
1 Type the folder name or browse to the directory where you want to store the
application components (typically this is in the programs folder). Folders
must have English names.
2 To install e-familiarization documents during installation, select Include
e-familiarization. This will extend the installation time considerably.
3 To run an installation verification as part of this installation, select Run
Software Verification. The Software Verification Tool provides documentary
evidence that your system has been built and installed correctly, and that all
design specifications have been met. You can run the Software Verification
Tool at a later time if you prefer (see “Run a Software Verification after
Software Installation” on page 49).
4 Select Next to proceed to the Installation type screens.
NOTE
Installations into the root of a drive may cause problems during operation and
are not supported.

Workstation Installation Guide 34
2 Install OpenLab CDS ChemStation Edition
Run the Installation Wizard
Installation Type Screens
1 Under Installation type, select Standalone Workstation.
2 Under OpenLab CDS ChemStation Edition, provide the following folder paths:
• Installation folder: directory where you want to store the ChemStation
application components. Typically this is in the programs folder. Folder
names must be entered without spaces.
• Instrument data folder: Instrument specific data such as methods,
sequences, and results. The default data path is the public documents
folder. If you plan to activate the Secure File I/O feature, this folder must
not be shared at a later point in time. If your PC is equipped with a second
disk drive, it is recommended to change the default data path to this
alternative drive. Using a second disk drive increases the performance.
3 Select Next to proceed to the Additional items screen.
4 If you want to use OpenLab ECM 3.4, 3.5 or 3.6 with your data system:
a Select ECM 3.x Server. Type in a server name and press the Test
Connection... button.
b The system will perform a connectivity check to verify access to a
functional OpenLab ECM server. If the connectivity check is successful,
the message Connection succeeded appears. Click OK to continue. If the
connectivity test fails, you will be returned to the Additional items screen.
From here you can select Next to run the test again. If the test is still
unsuccessful:
• Enter a new OpenLab ECM server and try another test.
• Call internal support for assistance if you cannot connect to an
OpenLab ECM server.
• You can uncheck the box and run the installation without OpenLab
ECM at this time. You will be able to add it to your data system at a later
time, when a server is determined.
5 Select Next to proceed to the Summary screen.
NOTE
The storage type OpenLab Server/OpenLab ECM XT Server is only available for a
Networked Workstation or a Distributed System.

Workstation Installation Guide 35
2 Install OpenLab CDS ChemStation Edition
Run the Installation Wizard
Summary Screen
1 Review the installation settings that you have selected in the preceding steps.
Select Back as necessary to change installation settings, or Cancel to cancel
the installation.
2 Before starting or canceling the installation, you can save an XML file with
your installation settings. This XML can then be used for a scripted
installation (see “About Scripted Installation” on page 37).
To save the XML file, click the file symbol in the Summary screen.
3 Select Start to begin installation.
4 The system performs an automated system check before it proceeds with the
listed activities.
If a system check passed message appears, installation continues.
If a system check failed message appears, you can either:
• Decline to view the system report, and continue installation.
• Decline to view the system report and postpone installation.
• View the system report, and decide to continue installation.
• View the system report and postpone installation until the problem is fixed.
5 If an installation verification was completed as part of this installation, review
the Software Verification Report. If the report indicates failure, verify the
computer requirements and reinstall the data system. Do not use the system
until the Software Verification Report gives a ‘pass’ result.
6 Click Next to proceed to the Installed Features screen.
7 Click Finish to close the installation wizard.
NOTE
To view the system report as PDF file, Adobe PDF Reader must be installed (see
“Install and Configure Adobe Acrobat Reader” on page 11).
Workstation Installation Guide 36
2 Install OpenLab CDS ChemStation Edition
What to do Next
What to do Next
The basic installation of the data system software is complete.
There is a 60-day Startup License for this system, and the expiration period starts
with the installation.
To request and download your final software license and add the license file to
your system, see the Licensing chapter in this guide.
After you have acquired and installed your final software license, you will continue
to prepare your data system for operation by end users by configuring users and
instruments. This is accomplished through the OpenLab Control Panel, see the
OpenLab CDS ChemStation Edition Configuration Guide (CDS_CS_configure.pdf).

Workstation Installation Guide 37
2 Install OpenLab CDS ChemStation Edition
Scripted Installation
Scripted Installation
About Scripted Installation
The OpenLab CDS ChemStation Edition Installer supports a command line mode
for installation, the scripted installation. This mode supports installation, upgrade,
repair, and uninstallation. You can execute scripted installations either manually
or as part of software management systems such as LANDesk or HP CM. With
the corresponding parameter (-q), the scripted installation completes
unattended.
Export as XML
The installer supports a feature to export the installation parameters into an XML
file which you can then use for the scripted installation.
This feature is also supported for upgrade and repair. However, for these cases
the exported installation XML file is not appropriate. For scripted repair and
upgrade, you must prepare specific XML files using the respective installer
wizards.
1 Launch the OpenLab CDS ChemStation Installation Wizard.
2 Follow the installation instructions.
3 When you have reached the Summary screen, click the icon on the top right
corner to export the installation parameters to XML. Save the file on a physical
drive.
You can now use the XML file for the scripted installation.
NOTE
Installation file and XML file must not be in the same file path.

Workstation Installation Guide 38
2 Install OpenLab CDS ChemStation Edition
Scripted Installation
Parameters and Return Codes
Parameters
You can call Agilent.OpenLab.CDSInstaller.exe in command line mode with the
following parameters:
• -i
Install or upgrade
• -r
Repair
• -u
Uninstallation
• -q
Silent mode — no installation or uninstallation wizard will be shown.
• -reboot
Reboot automatically after successful installation, repair, upgrade, or
uninstallation. The system will reboot if the return code is either 0 or 17.
A warning message will be shown in the command prompt 10 min before the
system is rebooted. In addition, a Windows dialog opens 2 min before reboot.
• KeepComponents
Optional parameter for the uninstallation process, which can contain one or
more shared components that should stay on your system. Without this
parameter, all OpenLab CDS components will be removed from your system.
To keep certain shared components, list the corresponding IDs from the table
below in double quotes and separated by comma.
Component Name Id
Software Verification Tool IQT
Microsoft SQL Server SQLServer
IO Library IOLibraries

Workstation Installation Guide 39
2 Install OpenLab CDS ChemStation Edition
Scripted Installation
• ConfigurationXML="<ConfigurationXMLFilePath>"
The XML file contains all required inputs of the installer to install, upgrade, or
repair a certain topology (see “Export as XML” on page 37). Replace
<ConfigurationXMLFilePath> with the correct file path and XML file name.
Return Codes
After installation, uninstallation, upgrade, or repair in the command line mode, the
system will return a number code which is explained below.
NOTE
Do not enter a blank before or after the equals (=) sign. The scripted installation
and uninstallation mode will not work as expected.
Table 2 Return codes
Error/Return Code Return value
Unknown (default) -1
Success 0
CoreComponentFailure 1
NonCoreComponentFailure 2
TestConnectivityFailure 3
ExpectedWindowsInstallerNotInstalled (WI 4.5 missing) 4
ParameterMismatchError 5
CannotProceedWithFreshInstallation 6
CannotProceedWithUpgrade 7
CannotProceedWithUninstallation 8
CannotProceedWithRepair 9
CannotProceedWithReRegistration 10
ReRegistrationNotSupported 11
IncompleteTopologyFound 12
InvalidUNCPath 13
MissingInstallable 14
NotAStrongPassword 15
DowngradeNotSupported 16
RestartRequired 17

Workstation Installation Guide 40
2 Install OpenLab CDS ChemStation Edition
Scripted Installation
RegistryCleanupError 18
InvalidInputXML 19
InvalidMode 20
SitePrepFailure 21
DatabaseConnectionFailed 22
DotNetFramework4NotInstalled 23
OLSSConnectionFailed 24
PDFReaderNotInstalled 25
AllComponentsInstallationFailed 26
SomeComponentsInstallationFailed 27
Failed 28
AddOnListEmpty 29
EULANotAccepted 30
ScriptedNotSupported 31
Table 2 Return codes
Error/Return Code Return value
Workstation Installation Guide 41
2 Install OpenLab CDS ChemStation Edition
Scripted Installation
Installation, Upgrade, or Repair
In installation mode, the installer checks if .Net Framework is present on your
system. If not, it will automatically be installed. Select Accept to agree with the
license agreement.
The installer evaluates the products already installed on your system. Depending
on the installed components, the installer will offer one of the following options:
• Start a fresh installation
• Upgrade
• Repair
If a required installable is missing, the installer will create an entry in a log file,
and, depending on the component type, will continue or rollback the installation.
A corresponding error code will be returned in such scenarios.
1 Right-click the executable of the command prompt or Power shell prompt,
and run it as administrator.
You will get a return code for the scripted installation only if you start it as
administrator.
2 Navigate to the location where you have saved the installation files.
For example: C:\CDS
3 To start the installation, call Agilent.OpenLab.CDSInstaller.exe with the
following syntax:
Agilent.OpenLab.CDSInstaller.exe -i ConfigurationXML="<path to xml file>" -q
-reboot
For example:
Agilent.OpenLab.CDSInstaller.exe -i ConfigurationXML="c:\settings\
ConfigurationXML.xml" -q -reboot
With this command, you start the installation wizard without a user interface,
and automatically reboot the system.
Preparations
You must have copied all installation files to a centralized folder (see “Copy Installation files to a Cen-
tralized Folder for Installation” on page 54). This step is mandatory for scripted installation.
Workstation Installation Guide 42
2 Install OpenLab CDS ChemStation Edition
Scripted Installation
Uninstallation
1 Right-click the executable of the command prompt or Power shell prompt,
and run it as administrator.
You will get a return code for the scripted uninstallation only if you start it as
administrator.
2 Navigate to the location where you have saved the installation files.
For example: C:\CDS
3 To start the uninstallation, call Agilent.OpenLab.CDSInstaller.exe with the
following syntax:
Agilent.OpenLab.CDSInstaller.exe -u KeepComponents="<list of components>"
-q -reboot
For Example:
Agilent.OpenLab.CDSInstaller.exe -u KeepComponents="IQT,IOLibraries" -q
-reboot
With the KeepComponents parameter, you can specify a list of shared
components that you want to keep on the system (see “Parameters” on
page 38). With the command given in the example, the OpenLab CDS
components Software Verification Tool (IQT) and IO Library (IOLibraries) will
be kept.
Logging and Tracing
All exceptions, errors and information messages are logged in the following
locations:
• During installation, upgrade, or repair: under <BaseInstallDirectory>\Logs
• During uninstallation: under <User's Temp>\<Company Name>\Logs\<Log
folder>\<Wizard Name>.txt

Workstation Installation Guide 44
3 Post Installation Tasks
Allow ChemMain Through Firewall
Allow ChemMain Through Firewall
Carry out the following procedure to prevent ChemStation from functioning
incorrectly due to firewall restrictions. Consider using a second network card to
isolate the instrument's data traffic, and carry out the following procedure for that
second network card only.
Alternatively, ensure that all required firewall ports are open. For details, refer to
the OpenLab CDS ChemStation Edition Hardware and Software Requirements
guide (CDS_CS_HW-SW-Requirements.pdf).
1 In the Microsoft Control Panel, click Windows Defender Firewall
1
.
2 Click Allow an app or feature through Windows Defender Firewall.
3 Click Change settings.
The Allow another app... button becomes active.
4 Click Allow another app....
5 Click Browse... and navigate to C:\Program Files (x86)\Agilent Technologies\
ChemStation\CORE.
6 Select ChemMain.exe and click Open.
7 Click Add.
8 In the list of allowed apps and features, find ChemStation ChemMain, and
select the check boxes for all three network types.
9 Confirm your changes.
10 Repeat the procedure for ChemMainAcq.exe.
1
View the items by icon to see a list of all items

Workstation Installation Guide 45
3 Post Installation Tasks
Configure the Antivirus Program
Configure the Antivirus Program
Be sure to open the firewall ports listed in the Firewall Settings in the OpenLab
CDS ChemStation Edition Hardware and Software Requirements guide
(CDS_CS_HW-SW-Requirements.pdf).
In order for the OpenLab software to function correctly, you should configure any
antivirus real time protection software with the following folder exclusions. They
should only be scanned while the instruments are idle and no data acquisition
takes place. Refer to your specific antivirus software documentation on how to
configure folder exclusions.
NOTE
Running antivirus programs might influence the behavior and performance of
your computer. Some virus scanners might cause issues when used with
OpenLab CDS ChemStation Edition. The application is tested with Symantec
Endpoint Protection 14.0 MP2 and with Microsoft Security Essentials.
Process Directory File name
Data acquisition %public%\Documents\Chem-
Station
(or the corresponding folder for
instrument data that you pro-
vided during installation)
Data, methods, sequences, reports etc.
ECM upload/download
(if applicable)
%temp% for Windows users
(=Users' temp directory)
*.ssizip
Standard reports %temp% for Windows users
(=Users' temp directory)
~p3d*.tmp
~job*.tmp
Hpspl00.que
CDS intelligent reports %LOCALAPPDATA%
%APPDATA%
%PROGRAMDATA%
Files on:
• Agilent
• Agilent Technologies
• Agilent_Technologies,_Inc
• IsolatedStorage
• Temp
e.g.:
C:\Users\xxxxx\AppData\Local\ Agilent
Technologies\Intelligent Reporting\Raw-
DataFileCache

Workstation Installation Guide 46
3 Post Installation Tasks
Configure the Antivirus Program
If your antivirus software includes program or executable deny execution
settings, ensure that the following program files are not denied execution. You
can use the windows search feature to find the specific folder each program file
is located in.
• agilentiolibrariesservice.exe
• chemmain.exe
• chemmainacq.exe
• apg_top.exe
• iprocsvr.exe
• iproc8491.exe
• msinsctl.exe
• httpdmsd.exe
• epcsetup.exe
• AcroRd32.exe
• Acrobat.exe
NOTE
Depending on your specific configuration, some of the listed folders or files may
not exist on your system.

Workstation Installation Guide 47
4 Optional Procedures
Install Additional Software and Drivers 48
Run a Software Verification after Software Installation 49
Transform a Workstation to a Networked Workstation 50
Improve Performance on Offline Machines 51
Protect ChemStation Folders with Secure File I/O 52
Change the PC Name 53
Copy Installation files to a Centralized Folder for Installation 54
Add Shortcut to Public Folder 55
This chapter contains information on the Additional Drivers and Software wizard,
on the Software Verification Tool, and other helpful procedures.
Workstation Installation Guide 48
4 Optional Procedures
Install Additional Software and Drivers
Install Additional Software and Drivers
OpenLab CDS ChemStation Edition offers a wizard to help you installing
additional software, such as the ADFExport Plug-in, or drivers for third-party
instruments. To open the wizard, go to Start> All programs> Agilent Technologies>
OpenLab Additional Software and Drivers. Follow the wizard to install the required
software.
Prepare Network Drives
If the additional software is located on a network drive, you must prepare the
network drive to make it accessible by the wizard. Without this preparation,
Windows security prevents the wizard from accessing those drives.
1 Map the drive to a letter.
For example, map the drive as Z: using the shared path "\\<machine-name>\
OpenLabCDS".
This maps the drive for the logged-in user.
2 Open the command prompt in elevated mode (run as administrator), and map
the drive using the net use command.
For example,
net use Z: "\\<machine-name>\OpenLabCDS"
This maps the drive for the local administrator account. The mapped drive is
now visible to both logged-in user and administrator, and can be selected in
the wizard.
Workstation Installation Guide 49
4 Optional Procedures
Run a Software Verification after Software Installation
Run a Software Verification after Software
Installation
The Software Verification Tool (SVT) provides documentary evidence that your
system has been built and installed correctly, and that all design specifications
have been met. You do not need to run the software verification again if it has run
successfully at the end of the installation.
1 Using your Windows operating system, go to Start> All Programs> Agilent
Technologies> Software Verification Tool.
2 Select the components to qualify.
3 Select Qualify.
The system will run the application and generate a Software Verification
Report.
4 If the report indicates failure, verify the computer requirements and reinstall
the data system.
Do not use the system until the Software Verification Report gives a ‘pass’
result.

Workstation Installation Guide 50
4 Optional Procedures
Transform a Workstation to a Networked Workstation
Transform a Workstation to a Networked
Workstation
With Networked Workstations, you use a separate server to control the system.
You can access all information provided by the Shared Services component from
any Networked Workstation. For example, you can see on each workstation
which instruments are available and which status (Online, Offline, Error, In Run,
Not Ready, etc.) the instruments currently have. Also licenses and user accounts
are managed centrally on the Shared Services server.
1 Before starting the transformation: Copy the data, methods, and sequences
from the instruments to a local backup folder. Then delete the instrument on
the Workstation.
2 From the OpenLab CDS ChemStation Edition Installer, select Maintenance.
3 Select Transformation of an OpenLab Standalone Workstation into a Networked
Workstation.
4 Enter the server name and the authentication service used by the server.
If the server requires authentication, you will be asked for the credentials of an
OpenLab Shared Services administrator.
5 Start the transformation.
6 After the transformation, configure a new instrument, and copy back the data
from the local folder.
NOTE
• You must already have installed one of the following:
• OpenLab CDS Shared Services Server (see OpenLab CDS ChemStation
Edition Networked and Distributed System Installation,
CDS_CS_Install_NwWS-DS.pdf on disk 1), or
• A Content Management system (OpenLab Server, OpenLab ECM XT,
OpenLab ECM 3.x).
• Make sure that the Shared Services versions on the workstation and the
server are identical. If not, upgrade your system before doing the
transformation. See “Planning the Upgrade” on page 64.
For more information on temporary support of mixed version systems during
an upgrade phase, refer to the OpenLab CDS ChemStation Edition System
Topologies and Architectural Concepts (CDS_CS_Topologies.pdf).

Workstation Installation Guide 51
4 Optional Procedures
Improve Performance on Offline Machines
Improve Performance on Offline Machines
Computers running OpenLab CDS ChemStation Edition may exhibit slow
performance when they are not connected to the Internet.
The windows operating system has routines built into its operation that causes it
to continuously search for an online connection in order to update to all the latest
Windows security certificates when using secure software.
Use the following system settings on all workstations, clients, AICs, and servers
to remedy this problem.
1 Open Internet Explorer and select Tools> Internet Options. In the Advanced tab,
clear the following check boxes:
• Security> Check for publisher's certificate revocation
• Security> Check for server certificate revocation
2 Change the following registry keys:
• [HKEY_LOCAL_MACHINE\SOFTWARE\Policies\Microsoft\
SystemCertificates\AuthRoot]
"DisableRootAutoUpdate"=dword:00000001
• [HKEY_LOCAL_MACHINE\SOFTWARE\Wow6432Node\Policies\
Microsoft\SystemCertificates\AuthRoot]
"DisableRootAutoUpdate"=dword:00000001
3 Document that you turned off the Root Certificates, as this can prevent users
from installing other applications.
NOTE
If you connect the computer to the internet again, you must remove the registry
keys.
Workstation Installation Guide 52
4 Optional Procedures
Protect ChemStation Folders with Secure File I/O
Protect ChemStation Folders with Secure File
I/O
ChemStation files such as data, methods, or sequences are stored in various
local folders. To ensure data integrity, ChemStation offers the Secure File I/O
function. If you enable this function, all folders will be protected against
modifications from outside ChemStation or in Open or Save As dialogs.
For more information, refer to the Folder Protection with Secure File I/O chapter in
the OpenLab CDS ChemStation Edition Configuration Guide
(CDS_CS_configure.pdf).

Workstation Installation Guide 53
4 Optional Procedures
Change the PC Name
Change the PC Name
A change of the PC name may be scheduled to avoid duplicate names in a
network or can be due to a policy change. Internally, the software components
use localhost for the Workstation, so no additional action is required to continue
running the software. However, if you need to change a PC name after
installation, the license file for the PC will be no longer valid.
Instruments are licensed by installing files that are specifically created for a given
configuration. The text of the license files contains references to the computer
name and the hardware address of the network card. If one of the parameters is
changed, the license no longer applies.
You will need to generate and install a license file with the new PC name (host
name).

Workstation Installation Guide 54
4 Optional Procedures
Copy Installation files to a Centralized Folder for Installation
Copy Installation files to a Centralized Folder for
Installation
Completing this step will enable you to run an installation from a network share.
1 From the installer Planning screen, select Installation from the sidebar menu.
2 Select Preparation of an Installation from Network Share.
3 At the Network Share screen, browse to a directory and create a destination
folder as follows:
a Select the button with the three dots.
b Navigate to the directory where you want to create the folder.
c Select Make New Folder.
d Type in the folder name.
e Select OK. The system will return you to the Network Share screen, with the
path displayed.
f Select Start.
4 When processing is complete, copy the files to the local drive or map the
location to a network drive.
5 Close the application and navigate to the directory and folder you created.
Open the folder.
6 Select the Disk 1 folder, then execute Setup.bat to run the application.
The system will display the installer Planning screen.
NOTE
Installations into the root of a drive may cause problems during operations and
are not supported.

Workstation Installation Guide 55
4 Optional Procedures
Add Shortcut to Public Folder
Add Shortcut to Public Folder
By default, user data such as master methods, sequence templates, report
templates, raw data etc. is located in the public documents folder C:\Users\
Public\Documents\ChemStation. You define this folder during the installation.
The system creates a shortcut to the defined folder under Instrument Data in the
Windows Start menu.
In Windows 7, a shortcut to public documents is automatically available in the
Windows Explorer.
In Windows 10, the Windows Explorer is organized differently. To provide easy
access to that folder, we recommend that you pin the Instrument Data folder to
the Start menu.
Figure 3 Windows Start menu in Windows 10
1 Navigate to the Instrument Data shortcut in the Start menu.
2 Right-click the icon, then select Pin to Start.

Workstation Installation Guide 57
5 Licensing
About OpenLab Licensing
About OpenLab Licensing
License Types
The license file is a collection of Product, Instruments and Add-on licenses (or
activation keys), and is installed to your OpenLab CDS System.
The licenses or activation keys in the license file can either be Shared or Counted:
• Shared licenses — system computers and other components can have
shared, or add-on, licenses — because they share a core license.
• Counted licenses — these licenses are part of the OpenLab CDS ChemStation
Edition floating licensing strategy. They are not permanently assigned to any
one component. Instead they are automatically assigned to components,
such as AICs and instruments, while the components are starting up. The
licenses are automatically returned when the component is closed. The
license management program controls license issuance and retrieval.
In this case, the only requirement is that a component is licensed while
running. You only need enough licenses for all components running
concurrently, rather than for each installed component.
A startup license for the system allows you to run OpenLab CDS for 60 days after
the installation. In order to run the data system software after the 60-day period,
you must install your license file.
License File
A license file will contain your software license. This file is installed on the
workstation. The license file is bound to this computer, and cannot be moved to
another workstation without regenerating the license in SubscribeNet.
Information in the license file defines the number of instruments and other
options that may be used concurrently with your system.
The most efficient way to manage and maintain your licensing is through the
Internet.

Workstation Installation Guide 58
5 Licensing
Get a License
Get a License
Obtain a License with SubscribeNet
Use the following procedure to generate and download your license. In case you
do not have internet access, skip to the section “Other Ways to Obtain a
License” on page 60.
If you are a new user who has not registered with SubscribeNet, continue with the
section New Users.
If you have registered with SubscribeNet, skip to the section Users registered with
SubscribeNet.
Prerequisites To generate, download, and install a final license for your product, you will need:
• The authorization code label provided in the lavender envelope containing
your Software Entitlement Certificate.
If you have not received a lavender envelope for your product, contact your
vendor or internal support.
• The URL for SubscribeNet from the Software Entitlement Certificate.
• The host name of the computer where the Control Panel is running.
• The MAC address.
To retrieve your MAC address from a computer where OpenLab CDS
ChemStation Edition is already installed, open the Control Panel and browse
to the Administration> Licenses section. Use the Copy MAC Address or Save
MAC Address function to obtain the MAC address for license generation.
During this process you will have to enter the MAC address of your license
server. For workstations, this is the local computer. For client/server systems,
this is the server.
NOTE
If any changes are made to the computer name or domain reference after the
license is installed, remove the license. A new license will need to be created in
SubscribeNet, downloaded, and installed.
NOTE
If the network adapter that provides the MAC address used during license
creation is removed from the machine, your license will no longer be valid. A new
license will need to be generated with a currently available MAC on the license
server.
Workstation Installation Guide 59
5 Licensing
Get a License
New Users
1 Go to https://agilent.subscribenet.com/control/agil/AgilRegisterToAccount
to register the product with SubscribeNet.
2 On the registration page, enter the authorization code from the label and
complete the profile information (required fields are marked with an asterisk
*).
The email address you enter will become your login ID.
3 Click Submit. The system will generate and display an account name for you.
SubscribeNet will send a welcome email with your login ID and password.
4 Log in to SubscribeNet using your login ID and password.
Once you log in, you can use the online user manual link for help with any
questions you have.
5 Select Generate or View licenses from the left navigation bar.
6 Follow the prompts to generate your new license.
You will be prompted for the HOST NAME of the computer. The host name
you enter must match with the network name of the computer where the
Control Panel is running. Do not include any DNS suffix (domain.com)
references in the entered machine name.
7 When the system generated the license, view its details, then click Download
License File. Save the license file to your computer and to a backup location
(such as a portable storage device).
Use your login ID and password when you revisit the Agilent SubscribeNet site
to regenerate a license file, add new authorization codes, or further configure
the license for your system.
Workstation Installation Guide 60
5 Licensing
Get a License
Users registered with SubscribeNet
1 If you already have a SubscribeNet account, use
https://agilent.subscribenet.com/.
Lost your SubscribeNet password? Use
https://agilent.subscribenet.com/control/agil/password to have it emailed
to you.
2 Select the SubscribeNet account associated with this authorization code, if
you have more than one account.
3 From the SubscribeNet navigation pane, select Register Authorization Code.
This will allow you to enter your new authorization code and make available
the new license entitlements.
4 Follow steps 5 through 7 in the previous procedure, New Users, to generate or
view your new licenses.
Other Ways to Obtain a License
If you are unable to generate a license, contact your nearest Agilent technical
support office. A representative will tell you how to submit an OpenLab CDS
License Generation Form in your location.
Offline Licensing
If an internet connection is not available in your laboratory:
You or your local on-site service engineer will collect the necessary information
from you to allow Agilent to create a license account on your behalf. For phone
support in your region, call the sales and service number for your region. See the
Appendix for contact information.
Workstation Installation Guide 61
5 Licensing
Get a License
Required Customer Information for Agilent License Support:
The following information must be provided to Agilent in order to enable us to
create a licensing account on your behalf.
1 Collect Account Information:
Your account name will be your company name and Lab name separated by a
comma. Employee information provided here will be used to define the first
administrator of your account for future access to the system as required.
Please prepare the following pieces of information prior to contacting your
local Agilent sales and service center in order to expedite service:
• Company Name
• Lab/Department Name
• First Name
• Last Name
• E-mail address
• Job Title
• Phone #
• Address, City, State/Province, Postal Code, Country
2 Collect Authorization Code(s):
The authorization code is an alpha-numeric code provided on a label which is
enclosed in a lavender envelope. If you have received more than one code you
must provide all codes to ensure that all ordered licenses are granted to your
account.
3 Receiving your license:
Once the above information is provided Agilent will then work on your behalf
to generate a license file through SubscribeNet. The license file will either be
sent to your shipping address (on a CD), or your local FSE will deliver it in
person (usually on USB media). Once your license is received follow the below
section on “Install your License” to finish installing your license on your CDS
system(s).

Workstation Installation Guide 62
5 Licensing
Install Your License
Install Your License
The license must be added to your system using the Control Panel.
1 Start the Control Panel shortcut on the desktop or go to Start> All Programs>
Agilent Technologies> OpenLab Shared Services> Control Panel.
2 Navigate to Administration> Licenses.
3 In the ribbon, click Add License .
4 Choose to install the license by:
• Using the license file option to browse to and open the license file (.lic)
saved from the license generation process in SubscribeNet.
• Selecting the License Text option and copying the license text from a text
file received into the provided field.
5 Click OK.
The Administration interface in the Control Panel will now display the status of
installed licenses.

Workstation Installation Guide 63
6 Upgrade ChemStation Edition to C.01.10
Planning the Upgrade 64
Convert Classic Instrument Drivers to RC.NET 67
License Upgrade 70
Get Upgraded License File 70
Add Upgraded License File to the System 71
Upgrade the Workstation 72
This chapter describes the upgrade from ChemStation C.01.07 SR3 or higher. If
you upgrade from an older ChemStation revision, upgrade to C.01.07 SR3 first.
For information on upgrading from ChemStation A.0x or B.0x, please refer to the
migration guide (CDS_CS-data-Migration.pdf).

Workstation Installation Guide 64
6 Upgrade ChemStation Edition to C.01.10
Planning the Upgrade
Planning the Upgrade
A direct upgrade, using the Upgrade Wizard, is supported from ChemStation
C.01.07 SR3 or higher. Older ChemStation revisions or OpenLab Control Panel
components must first be upgraded to C.01.07 SR3 or higher in a separate step.
If you upgrade from C.01.07 SR3, ensure that you are using the OpenLab Control
Panel component rev. 2.1, which was the version included with ChemStation
C.01.07 SR3. You use the correct Control Panel version if it looks like this:
Figure 4 Control Panel rev. 2.1 layout
Note that C.01.10 is supported on Windows 7 SP1 64 bit or Windows 10 only. An
in-place upgrade from Windows 7 or 8.1 to Windows 10 on an existing
ChemStation Workstation is not supported. Before upgrading a system, make
sure that the Windows configuration meets all requirements. See “Prepare your
PC” on page 7.
OpenLab CDS ChemStation Edition no longer controls the Agilent 5890 GC
instrument. Do not upgrade to rev. C.01.10 if using the 5890 GC.
Note that the M8370AA OpenLab Data Analysis Add-On is no longer supported. It
must be uninstalled manually.
The functions related to ADF Export will be available as an Add-On for
ChemStation starting from revision C.01.10. To use the latest version, install the
ADFExport Add-On separately (see “Install Additional Software and Drivers” on
page 48). ADF Export functions have been included in ChemStation C.01.09.
Therefore, if you upgrade ChemStation from C.01.09, always install the latest
ADFExport Add-On onChemStation revision C.01.10 in order to upgrade the
outdated ADF Export functions.
If you protect ChemStation files with Secure File I/O, you must temporarily
disable Secure File I/O.

Workstation Installation Guide 65
6 Upgrade ChemStation Edition to C.01.10
Planning the Upgrade
The upgrade procedure depends on the revision of your currently installed
ChemStation Edition:
• C.01.07 SR3 or SR4 with outdated OpenLab Control Panel
Your OpenLab Control Panel may still look as shown below. In this case,
update the Control Panel separately. Afterwards continue as described for
upgrading from C.01.07 SR3.
Figure 5 Outdated OpenLab Control Panel
To upgrade the Control Panel: Run the installation wizard. On the Maintenance
tab, click OpenLab Control Panel Upgrade. Follow the wizard.
• C.01.07 up to SR2, C.01.06, C.01.05
If the M8370AA OpenLab CDS Data Analysis Add-On is present, uninstall it
using the Microsoft Control Panel.
Run the C.01.07 SR3 upgrade wizard. For details, please refer to the C.01.07
SR3 installation guide.
If your system is configured to use one of the following ELSD drivers (G7102A,
G4261A/B or G4260A/B), refer to the latest ReleaseNotes for
ELSD_RC.NETDriver for upgrade instructions. A current version is supplied in
the folder Disk3\Docs\en\Manuals on the install media.
Workstation Installation Guide 66
6 Upgrade ChemStation Edition to C.01.10
Planning the Upgrade
• C.01.04–C.01.01
a Uninstall the old ChemStation.
b Uninstall specific drivers or Add-Ons.
If your system is configured to use one of the following drivers or Add-Ons,
uninstall them using the Microsoft Control Panel:
• ELSD (G7102A, G4261A/B or G4260A/B).
ELSD drivers will be supplied with a separate installer.
• Agilent Cirrus GPC software for ChemStation (G7818A), versions earlier
than 3.4.2; uninstall Cirrus Operational Qualification first, then uninstall
Cirrus.
Version 3.4.2 of the Cirrus Add-On is required for ChemStation C.01.08.
• M8370AA OpenLab CDS Data Analysis Add-On.
c Install C.01.10
• A.0x or B.0x
For information on upgrading ChemStation A.0x or B.0x, please refer to the
migration guide (CDS_CS-data-Migration.pdf).
Classic instrument drivers, with exception of LC/MS instrument drivers, are no
longer supported. It is recommended that you convert the corresponding
instruments and methods to RC.NET driver prior to the upgrade (see “Convert
Classic Instrument Drivers to RC.NET” on page 67).

Workstation Installation Guide 67
6 Upgrade ChemStation Edition to C.01.10
Convert Classic Instrument Drivers to RC.NET
Convert Classic Instrument Drivers to RC.NET
With C.01.10, only RC.NET drivers are available (with exception of MSD
instrument drivers). Instruments using the classic driver must be reconfigured to
use the RC.net driver. Agilent recommends to do this before upgrading to
C.01.10.
To determine which instruments are using the classic driver, go to the OpenLab
Control Panel and select the instrument. Select Configure Instrument in the
ribbon. The instrument is using the classic driver if the Use classic drivers check
box is selected. Perform the following steps to reconfigure the instrument to use
RC.NET.
1 Record the IP address for each classic driver instrument.
2 Verify there is a backup of the methods and data to another location.
3 For your reference: Print the classic driver method settings or save the
method listing to disk.
4 To reconfigure the instrument, select the instrument in the OpenLab Control
Panel.
5 In the ribbon, click Configure Instrument.
6 In the configuration dialog, clear the Use classic drivers check box.
The instrument is moved from the Selected Modules panel to the Configurable
Modules panel.

Workstation Installation Guide 68
6 Upgrade ChemStation Edition to C.01.10
Convert Classic Instrument Drivers to RC.NET
7 Select the instrument in the Configurable Modules panel, then click the arrow
to add the instrument to the Selected Modules panel again.
8 Double-click the instrument under Selected Modules, and configure the
previously recorded IP address. Click Get Serial Number and Firmware to get
the corresponding entries.
Figure 6 Example for 35900 configuration
9 Launch the newly configured instrument.
NOTE
• If a current RC.NET driver is not yet available, you must install it manually
before upgrading OpenLab CDS ChemStation.
• For example, follow these steps to install the 35900E ADC RC.NET driver:
a Run the installer.
b Go to Installation and open OpenLab Additional Software and Drivers.
c When asked for the Add-on software, browse to Disk3 of the installation
media, and to the Agilent 35900E RCNet folder to find the Agilent OpenLab
CDS ChemStation 35900 AtoD Drivers.msi file. The corresponding
software will then be listed in the installer.
d Select the software in the list, and continue to install. The installation
verification will automatically follow and should complete without errors.

Workstation Installation Guide 69
6 Upgrade ChemStation Edition to C.01.10
Convert Classic Instrument Drivers to RC.NET
10 To convert a method to RC.NET driver, load the method. If a dialog like the
following opens, click OK.
Review the method, and if no updates are needed, add a comment such as
"Updated to RC.NET" to the method when saving it.
Methods are converted to RC.NET when loaded. After saving to disk,
converted methods have an additional Agilent folder and
RapidControl.InstrumentConfig file.
Only with RC.NET driver methods
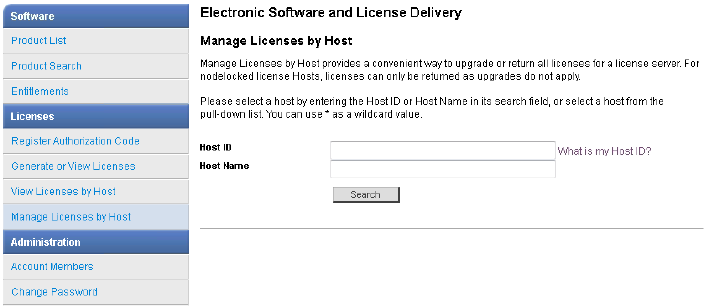
Workstation Installation Guide 70
6 Upgrade ChemStation Edition to C.01.10
License Upgrade
License Upgrade
Get Upgraded License File
You will need to upgrade your licenses in SubscribeNet prior to upgrading to the
next version of OpenLab CDS ChemStation Edition. We strongly recommend
upgrading your workstation licenses before upgrading the core software.
Standalone workstations which are upgraded to the new core software version,
without a new workstation license, will not work until the new workstation
licenses are added to the OpenLab Control Panel.
If you are under SMA subscription, proceed as follows to upgrade your licenses:
1 During the following process, you will be prompted in SubscribeNet for the
host name or MAC address of the workstation where OpenLab CDS
ChemStation Edition is already installed.
To retrieve this hostname and MAC address, open the Control Panel and
browse to the Administration> Licenses section. Note down the host name
and use the Copy MAC Address or Save MAC Address function to obtain the
MAC address.
2 Log into the Agilent Electronic Software and License Delivery
(https://agilent.subscribenet.com/).
3 Navigate to Manage Licenses by Host. In the Host ID field, enter the previously
noted MAC address, and click Search.

Workstation Installation Guide 71
6 Upgrade ChemStation Edition to C.01.10
License Upgrade
If the relevant host name does not appear, you may be managing your
licenses in multiple SubscribeNet accounts. You will need to log into those
accounts to upgrade those workstation licenses.
4 If your license(s) are eligible for an upgrade, you will see the Upgrade All
button. Otherwise you will need to contact your Agilent Sales Representative
to renew your Software Maintenance Agreement (see “Sales and Support
Assistance” on page 82). To proceed with generating your upgrade license,
click the button.
5 On the Upgrade All Licenses for License Host page, review the data, and
confirm by clicking Upgrade All.
This upgrades the license file to the most current version. SubscribeNet will
send you an email with a new license file.
6 Put the new license file on your system (see “Add Upgraded License File to the
System” on page 71.
If you have multiple standalone Workstations, repeat this step for each
individual workstation.
Note that each workstation's MAC address is the file name. This helps identify
the correct license file to import into the workstation's Control Panel.
Add Upgraded License File to the System
If you have purchased new options, such as additional instrument controls or
client license and regenerated your license in SubscribeNet, the upgraded license
file must be re-applied to the system.
1 Start the Control Panel from any machine connected to the system you want
to install the license for.
2 Navigate to Administration> Licenses.
3 In the ribbon, click Remove License .
4 In the ribbon, click Add License .
5 Browse to and open the license file saved from the license generation process
in SubscribeNet.
6 Restart the following Windows services:
• Agilent OpenLab License Server
• Agilent OpenLab Licensing Support
Workstation Installation Guide 72
6 Upgrade ChemStation Edition to C.01.10
Upgrade the Workstation
Upgrade the Workstation
Prerequisites You are using OpenLab CDS ChemStation Edition rev. C.01.07 SR3 or higher.
Older revisions must first be upgraded to C.01.07 SR3 in a separate step.
For AICs and Networked Workstations: To preserve the instrument's column
table during the upgrade, go into each of the existing instrument folders (C:\
ProgramData\Agilent Technologies\ChemStation\1\, C:\ProgramData\Agilent
Technologies\ChemStation\2\, ...) and rename the file Config.reg into Config.bak.
This step is not required if you use LC column tags to store the LC column
information, or if GC column injection counts are irrelevant.
1 If you protect your folders with Secure File I/O: disable Secure File I/O during
the upgrade.
a Shut down all ChemStation sessions.
b Click Start> All Programs> Agilent Technologies> ChemStation
Administration Tool to open the ChemStation Administration Tool.
c In the ChemStation Administration Tool, clear the enable secure file IO
check box.
2 Run the installer from the same media type (for example, USB or network
share) as you used to install the current version.
3 From the installer Planning screen, switch to the Installation screen.
4 Select OpenLab CDS ChemStation.
If OpenLab CDS ChemStation Edition is already installed, this automatically
opens the upgrade wizard.
5 The workstation license must be upgraded, see “Get Upgraded License
File” on page 70.
Acknowledge that the license has been upgraded and click Next to continue.
6 Select I agree with the terms and conditions. You cannot proceed with the
upgrade unless you agree to these terms. Click Next.
7 If an Authentication Provider has been configured: Enter the username and
password of a user with system administration privileges in the OpenLab
Shared Services Settings for Registration screen. Click Next.
8 In the Summary screen of the Upgrade Wizard, the components for the
upgrade are listed. Click Start to proceed with the upgrade.
If an error occurs during the upgrade, an error message appears.

Workstation Installation Guide 73
6 Upgrade ChemStation Edition to C.01.10
Upgrade the Workstation
9 Select Finish to close the upgrade wizard.
10 After the upgrade, check if the settings in the ChemStation Administration Tool
still match your original system settings before the upgrade.
11 If you disabled it before, enable Secure File I/O again after the upgrade is
finished.
a Click Start> All Programs> Agilent Technologies> ChemStation
Administration Tool to open the ChemStation Administration Tool.
b In the ChemStation Administration Tool, select the enable secure file IO
check box.
As of rev. C.01.08, the Control Panel layout is upgraded for all installations. The
new user interface is shown in the following figure:
Figure 7 Control Panel user interface
Existing instrument configuration can remain unchanged after the upgrade.
NOTE
The classic drivers are not supported with ChemStation C.01.08 and later. Please
check section “Convert Classic Instrument Drivers to RC.NET” on page 67 for
details.

Workstation Installation Guide 74
7 Uninstall the Software
About Uninstallation 75
Run the OpenLab CDS Uninstallation Wizard 76
This chapter contains information on the uninstallation by using the OpenLab
Uninstallation Wizard. It also describes post uninstallation tasks that are
essential if you plan to reinstall ChemStation on the same computer.

Workstation Installation Guide 75
7 Uninstall the Software
About Uninstallation
About Uninstallation
Like the installation, the uninstallation of OpenLab CDS ChemStation Edition is
automated by the OpenLab CDS ChemStation Edition Installer.
For your convenience, the installer uses the same user interfaces for the
software uninstallation of all ChemStation configurations (standalone or
networked workstation). The OpenLab Uninstallation Wizard is found under the
Maintenance section of the installer. It guides you through the uninstallation
steps.
NOTE
If the installer was not used for installation, any manually installed additional
software such as Headspace, PAL, or third party drivers must be uninstalled
using the Windows Control Panel before OpenLab CDS ChemStation Edition can
be uninstalled.
NOTE
Do not use the Windows uninstallation tool for uninstalling OpenLab CDS
ChemStation Edition.
Workstation Installation Guide 76
7 Uninstall the Software
Run the OpenLab CDS Uninstallation Wizard
Run the OpenLab CDS Uninstallation Wizard
1 Select Start> All Programs> Agilent Technologies> Uninstall OpenLab CDS.
The OpenLab Uninstallation Wizard opens.
2 In the Shared Components screen, select the Uninstall Software Verification
and Uninstall PostgreSQL check box.
Note: Software Verification Tool needs to be uninstalled if you wish to
re-install OpenLab CDS ChemStation Edition at a later time.
3 In the Summary screen under Uninstallation of OpenLab CDS ChemStation
Components, there is a list of the components you want to uninstall.
4 Select Start to start the uninstallation.
If you want to abort the uninstallation, select Cancel. If you want to change
any settings, select Back.
All listed components are automatically uninstalled, one after another.
5 When the uninstallation has finished, click Finish to close the uninstallation
wizard.


Workstation Installation Guide 78
8 Troubleshooting
Reconfigure Instruments Using Classic Drivers After Upgrade to ChemStation
C.01.08 or Higher
Reconfigure Instruments Using Classic Drivers
After Upgrade to ChemStation C.01.08 or Higher
If you missed the recommendations from the driver preparation described in the
OpenLab CDS ChemStation Edition Upgrade Guide (CDS_CS-Upgrade.pdf),
ChemStation will start up, but instruments with the Classic driver will no longer
be available. You will receive a notice that you need to reconfigure your
instrument.
The classic driver instruments and methods are not updated to RC.NET
automatically. To adjust them, perform the following steps.
To check if a classic method is used, go to Windows Explorer and view the
contents of the corresponding method folder. The classic method will not have
the Agilent folder listed.
1 Record the IP address for each classic driver instrument.
2 Verify there is a backup of the methods and data to another location.
3 To reconfigure the instrument, select the instrument in the OpenLab Control
Panel.
4 In the ribbon, click Configure Instrument.
A message is displayed, requesting you to reconfigure your instrument.
Only with RC.NET driver methods

Workstation Installation Guide 79
8 Troubleshooting
Reconfigure Instruments Using Classic Drivers After Upgrade to ChemStation
C.01.08 or Higher
5 Click OK.
The Configure Instrument panel opens. The Use classic drivers check box is no
longer shown.
6 To update the instrument to use the RC.net driver, select the instrument in the
Configurable Modules panel, then click the arrow to add it to the Selected
Modules panel.
7 Enter the IP Address. Only for 35900E A/D instrument: Click Get Serial Number
and Firmware to get the corresponding entries. For the example below the
serial number and firmware version are updated upon successful connection
to the 35900E A/D instrument.
This completes the setup of the instrument.
8 Click OK to load the instrument configuration.
9 Specify the Method Load on Startup option and select one of the following
options:
a Always ask the user to choose an option
b Download method to instrument on start up (select this option to match the
behavior of the classic driver)
c Upload method from instrument
d New method from instrument
10 Click OK to complete.
11 Launch the newly configured instrument.

Workstation Installation Guide 80
8 Troubleshooting
Reconfigure Instruments Using Classic Drivers After Upgrade to ChemStation
C.01.08 or Higher
12 To convert a method to RC.NET driver, load the method. If a dialog like the
following opens, click OK.
Review the method, and if no updates are needed, add a comment such as
"Updated to RC.NET" to the method when saving it.
Methods are converted to RC.NET when loaded. After saving to disk,
converted methods have an additional Agilent folder and
RapidControl.InstrumentConfig file.
Only with RC.NET driver methods

Workstation Installation Guide 82
9 Appendix
Sales and Support Assistance
Sales and Support Assistance
Please check the following web site for your local sales and support contact:
http://www.agilent.com/en-us/contact-us/page

www.agilent.com
Agilent Technologies Inc. 2010-2020
Published in Germany
05/2020
M8301-90092*
Part No: M8301-90092 Rev. D
In This Book
This installation guide provides instructions
to install the Agilent OpenLab CDS
ChemStation Edition workstations.
