
Inteset Secure Lockdown™
ver. 2.0
Multi Application Edition
for
Windows
User Guide

Contents
Welcome 4
System Requirements 6
Use with Tablets and Touch Devices 7
Installation 7
Product Activation 7
Deactivate the Secure Lockdown License 8
Managing Licenses 8
Managing Devices 9
Secure Lockdown™ v2 Usage 9
Password Tab 9
System Lockdown Tab 11
App Launcher 15
Browser Lockdown 17
IE Lockdown Tab 18
General Options 18
Layout Options 19
Browser Reset 20
Allowed Sites 20
Chrome Lockdown Tab 21
General Options 22
Layout Options 23
Browser Reset 23
Allowed Sites 24
Secure Lockdown Browser Helper - Chrome Extension 25
Background Apps Tab 26
Help Tab 27
About 27
Export / Import 28
Deactivate License 28
Secure Lockdown™ v2 – Multi Application Edition - User Guide Page 2


Welcome
Thank you for purchasing Inteset Secure Lockdown™ v2 – Multi Application Edition for Windows. This
simple, but powerful program will enable you to run programs of your choice from a user-friendly
application launching utility or the new Windows 8 Modern UI Start screen while locking out Windows
Desktop functionality and unwanted keystrokes. Perfect for training kiosks, schools, libraries, internet
cafes, hotels, museums, military institutions, correctional facilities, and a host of other areas that require
systems with restricted use of select applications. Secure Lockdown™ will run in the background
ensuring that only the apps you want can be run.
Inteset Secure Lockdown™ v2 – Multi Application Edition includes the following features:
Windows Lockdown Features
● Creates a “virtual embedded,” focus purposed operating environment
● Secure Lockdown runs as a hidden background application and removes access to undesired
Windows features
● Removes the Windows Taskbar and Start button (optional)
● Removes Desktop actions and features such as:
o Desktop right-click menu
o Task Manager access
o CTRL-ALT-Delete functions
o System shutdown or logoff
o Windows Ease of Access
o Windows Help and Support
● Disables numerous keystrokes including:
o Alt-tab
o Alt-F4
o Alt-Esc
o Alt-Space
o Alt -Shift-Esc
o CTRL-Esc
o CTRL-Shift-Esc
o Windows Keys
o F1 (Windows Help) F3 (Windows Search)
● Allows for independent Windows user accounts that use or do not use Secure Lockdown on one
computer
● Off-line trial and product activation (Internet connection not needed)
● Command-line and unattended installation and enable/disable handling
● Remotely manage systems running Secure Lockdown
Secure Lockdown™ v2 – Multi Application Edition - User Guide Page 4
Circle Dock Start Menu Features
● With Windows locked down, users have access to an elegant, easy-to-use menu utility (Circle
Dock), instead of the standard Windows Start menu, configured
to run applications of your choice.
● Circle Dock (included) is a popular, free, flexible yet simple,
customizable, utility which you can configure to launch only the
applications you need.
● Can configure applications to launch only a single instance. For
example, you can set it up so that only one instance of Word can
run. If the application is minimized, selecting it from Circle Dock
again brings it back to the foreground and does not start a new instance.
Windows 10 Start Menu Features
● Launch only desired apps with the Standard Windows 10 Start menu
● Locks down the Windows Start Menu
● Locks down the Windows Taskbar
● Can view and launch Taskbar notifications
Microsoft Edge Lockdown Features
● Runs Microsoft Edge locked down
● Allows for many customizations not available through
the Edge interface.
o Ability to remove individual menu bars and
menu options
o Prevent printing, Open dialog, files
downloads, and new browser windows
o Reset the browser upon close
o Restrict access to only certain websites
o More…
Chrome Lockdown Features
● Runs Google Chrome locked down
● Allows for several customizations not available
through the Chrome interface.
o Ability to permanently remove individual
menu bars and menu options
o Prevent printing, open dialog, downloads, etc
o Reset the browser after an inactive interval
o Restrict access to only certain websites
o More…
Page 5 Secure Lockdown™ v2 – Multi Application Edition - User
Guide

Administrators of the locked down system, can easily and quickly manage the Secure Lockdown™
settings with just a few button presses.
It is recommended that you read the following sections of this guide to ensure that you have a complete
understanding of the capabilities of Secure Lockdown™ v2 - Multi Application Edition.
System Requirements
The list below describes the system requirements of Secure Lockdown™.
● Runs with any version of Windows 7 or 10
● .Net 4.5.2 or higher
● Google Chrome or Microsoft Edge version 75 or higher (Note that both browsers follow the same
versioning as they are based on the Chromium browser - an open-source browser project that
aims to build a safer, faster, and more stable way for all Internet users to experience the web.
● Secure Lockdown™ must run under an administrator account (the logged in user must have
administrator privileges). Secure Lockdown cannot “Run as administrator” under a Standard
User account.
Note: Secure Lockdown, when enabled, effectively converts the administrator account into a highly
restricted Standard User account. In addition, it adds many security enhancements and access limitations
both fixed and customizable.
● An Internet connection on the system in which the software is installed is recommended for
simple product activation (off-line activation is available).
● Windows User Account Control (UAC) should be disabled. If it is not disabled while Secure
Lockdown is enabled, upon logging into the locked down account, users can answer “no” to the
UAC prompt, then bypass many of the lockdown features Secure Lockdown employs.
● Antivirus software should be either configured to allow Secure Lockdown to run uninhibited or
disabled entirely as Secure Lockdown needs to write to the HKLM portion of the Windows
Registry and some antivirus software prevents this. Antivirus software can also prevent the
Alt-Shift-S Secure Lockdown configuration tool from launching. This could prevent the ability to
disable Secure Lockdown if it has been enabled. Note that if Windows Defender is used, an
exception should be created for the “C:\Program Files (x86)\Inteset\Secure Lockdown” folder.
● It is highly recommended that a second, password protected local administrative account be set
up on the system as a security and recovery measure.
Use with Tablets and Touch Devices
Secure Lockdown supports tablets and other Windows touch devices that do not use physical keyboards.
However, certain precautions need to be taken particularly during the Secure Lockdown testing phase.
During the testing phase, it is recommended that a physical keyboard such as a USB or blue-tooth
keyboard be configured before enabling Secure Lockdown. This will ensure that you have access to the
Alt-Shift-S hotkey that invokes the Secure Lockdown configuration utility and allows you to disable Secure
Lockdown. In addition, you may need to set up a virtual keyboard (on-screen keyboard) that starts when
Secure Lockdown™ v2 – Multi Application Edition - User Guide Page 6

Windows starts (see the On-screen Keyboard Helper topic later in this guide.) The default Windows
on-screen keyboard does not include an “Alt'' key that is needed for the Alt-Shift-S key sequence. Thus, if
Secure Lockdown senses that no physical keyboard is available, it will automatically set the default virtual
keyboard to “Compatibility Mode” which will convert it to a full keyboard.
Installation
Installing Secure Lockdown™ v2 is simple and quick. It is the same installation process as required by
many standard Windows applications. The only requirements of the installation are that you must be
logged in as an administrator of the system. Assuming that you have the proper privileges and that you
have downloaded the Secure Lockdown™ v2 installation file, you can begin the installation procedure by
double-clicking on the “IntesetSecureLockdown_v2_MA.exe” file and following the instructions displayed
by the installation application. Once the installation is complete, you can launch Secure Lockdown™ by
selecting the Windows Start button, then All Programs, Inteset, Secure Lockdown, then Inteset Secure
Lockdown v2.
Product Activation
The Inteset Secure Lockdown™ software has a trial period of 30 days whereby you can use it without
purchasing it. This is ample time to determine if it is right for your needs. Just select the Run Trial button
to run the full featured trial.
Note: The trial activation process requires that the computer has a connection to the Internet. If it does not, you
will be prompted to use an off-line method of activating the trial version of Secure Lockdown.
If you wish to activate the product, you should purchase it from the http://www.intesetsystems.com
store and obtain a Product Key which will be emailed to you. Upon starting Secure Lockdown™, you will
notice the following splash screen that allows you to enter the product key you’ve purchased.
Paste the product key from the email in the Product Key field, then press the Activate button.
Page 7 Secure Lockdown™ v2 – Multi Application Edition - User
Guide

Note: This process requires that the computer has a connection to the Internet. If it does not, you will be prompted
to use an off-line method of activating Secure Lockdown. In addition, for high volume license purchases, Inteset
provides Off-line Licensing (where no internet connection is ever used on the system.) Please contact Inteset sales
to learn more about this type of licensing.
The software will be activated and the splash screen will close. At this point, Secure Lockdown™ will be
running in the background and there is no visible indication that it is running. To display the Secure
Lockdown™ configuration screen, press the Alt-Shift-S keyboard sequence.
Deactivate the Secure Lockdown License
If you purchase Secure Lockdown and activate the license on a computer, and decide later that you want
to move the license to another computer, you must deactivate the license on the initial computer first.
Do not uninstall the application before deactivating it. You can deactivate a license by going to the Help >
About tab in the Secure Lockdown configuration utility, then press the Deactivate button. Note that the
Deactivate button will only appear if the Secure Lockdown license has been activated on the computer.
Managing Licenses
If you purchase more than one license, you can view the status and manage your licenses on our
website. This is useful if you need to:
● View how many licenses are activated for a particular purchase/order
● View the Secure Lockdown machine ID’s of each activation
● Determine which computers are activated under which product key
● Merge a product key (and its associated licenses) into a previous product key
To access these features, go to http://services.inteset.com and log into your account. Choose the My
Account menu option, then select the Manage Licenses option. You can learn more about Secure
Lockdown licensing at https://www.inteset.com/secure-lockdown-licensing-explained.
Managing Devices
Inteset offers Remote Management Services (RMS) which allows you to manage your Secure Lockdown
devices remotely. Many features are free including viewing the system information and status of each
device, viewing a screenshot of current activity, and updating the system to the latest release of Secure
Lockdown. Other features include:
● change the Secure Lockdown settings (beta)
● modify settings in batch (beta)
● change the Secure Lockdown password (beta)
● restart the system (beta)
● enable and disable Secure Lockdown (beta)
● send email alerts when Secure Lockdown is not running (beta)
To enable this feature, register Secure Lockdown with the service as described under the “Help Tab >
Remote Management” section of this guide.
Secure Lockdown™ v2 – Multi Application Edition - User Guide Page 8

Secure Lockdown™ v2 Usage
Once Secure Lockdown is installed, from the Windows Start button, All Programs, Inteset menu,
double-click on Secure Lockdown v2. From here, Secure Lockdown will be running in the background. The
configuration screen can be invoked by pressing the Alt-Shift-S keyboard key sequence.
Password Tab
Once Secure Lockdown™ is running in the background, press the Alt-Shift-S keyboard key sequence to
display the configuration screen (as shown below). From here, you will need to enter a password into the
Password field before using it. For first time use, there is no password required and full access to the
configuration utility is available. A password can be created later which will restrict access to the
configuration screen.
If you’ve previously entered a password, enter the password, then press the password Unlock button to
reveal the features of the application. The following screen will be displayed.
Set – this button (visible once the utility is unlocked) allows you to set the password for accessing Secure
Lockdown. Press the Set button to reveal the following password entry fields.
Page 9 Secure Lockdown™ v2 – Multi Application Edition - User
Guide

New Password – To add a password requirement to access the Secure Lockdown configuration
utility, enter a password in the New Password field. A password can be any alphanumeric and
special key combination. Passwords are not case sensitive.
Confirm Password – Enter the same password in the Confirm Password field.
Windows Password – If you need to seamlessly access network shares or mapped network
drives, enter the Windows sign in password of the current account into the Windows Password
field.
Note: Network shares are still accessible without the Windows sign in setting, however, they will require
the user to enter access credentials. In addition, the System Lockdown > Local Level > No Network Shares
option must be disabled for this password entry to be relevant.
Set - Press the Set button to apply the passwords.
VERY IMPORTANT: Be sure to remember the Secure Lockdown password as you will not be able
to access the application in the future without it. And, if Secure Lockdown is enabled, the system
will be locked and you will not be able to unlock it without the password.
Enable Secure Lockdown – Check the Enable Secure Lockdown checkbox to put Windows in a locked
down state. Before doing this, you should review and edit the many lockdown options available, then
press the Apply button. You will need to restart the system in order to fully enable Secure Lockdown.
Note that you cannot exit Secure Lockdown when it’s enabled. While enabled, it will run in the
background and can be invoked by pressing the Alt-Shift-S keyboard key sequence.
Once Secure Lockdown is enabled, you can disable it by pressing the Alt-Shift-S keyboard key sequence.
The Secure Lockdown application will appear. Enter the password (if one exists), then press the password
Apply button. Uncheck the Enable Secure Lockdown checkbox, then select the Apply button. You will
need to restart the system in order to fully disable Secure Lockdown.
System Lockdown Tab
Under the System Lockdown tab (shown below), you can adjust various local and machine level options
related to locking down Windows, configuring the application launch utility, and locking down Internet
Explorer.
Secure Lockdown™ v2 – Multi Application Edition - User Guide Page 10

Browser
The Browser section of the System Lockdown tab allows you to choose which browser, if any, Google
Chrome or Microsoft Edge, you’d like to lock down and configure for use. Note that only one browser can
be locked down. Be sure that the desired browser is installed on the operating system prior to locking
down the system. If the browser is not installed, the Browser checkbox will be diasabled.
Google Chrome - When enabled, the Chrome Lockdown tab will appear allowing the lockdown
configuration of Google Chrome.
Microsoft Edge - When enabled, the Edge Lockdown tab will appear allowing the lockdown configuration
of Microsoft Edge.
App Launcher
Under the App Launcher section, two menu systems are available to launch your applications. These
include either Circle Dock or the standard Windows Start Menu.
Circle Dock – Choosing the “Circle Dock…” radio button, then the “Configure…” button will display the
included Circle Dock application launcher utility as shown below.
Page 11 Secure Lockdown™ v2 – Multi Application Edition - User
Guide

Note: For Windows 8.1 installations, when Circle Dock is chosen as the app launcher, Modern UI apps are not
available. Only Windows Desktop apps are allowed. Choose the Modern UI app launcher option instead if you
intend to run Modern UI and Windows Desktop applications.
Note: Circle Dock is a free product not created by Inteset, thus it is not supported by Inteset. It has been bundled
with Secure Lockdown – Multi Application Edition for your convenience.
Some of the features of the Circle Dock utility include:
● Elegant, easy-to-use menu utility configured to run applications of your choice.
● To configure, simply drag and drop files, folders, and shortcuts onto a circular dock/menu
● Rotate the dock with either the mouse wheel or the keyboard arrow keys
● Change the appearance of the dock to match your company appearance, or use many of the
included icons and skins
● Change the icon and title shown for your programs
● Toggle the visibility of the dock by pressing a hotkey (default is F9), the middle mouse button, or
by moving your mouse to any edge of the screen
● Multi-language capable. 50+ Languages currently available
● Change the images used for the dock icons by setting the configuration in "Icon Replacement
Mode" Change all the icon images by just dragging and dropping new PNG images onto them
● Ensure only one instance of an application can be run (see “Run as single instance” option in the
Circle Dock “Item Settings” screen.
You can customize the applications that appear in the menu (dock) simply by dragging an application’s
shortcut or exe file onto the dock, or by right-clicking on the dock menu and choosing the “Add/Blank
Icon” option. You can also add folders and individual files to the dock in the same manner. Removing an
item from the dock is as simple as right-clicking on its icon and selecting the “Remove” option in the
right-click popup menu. If you add a folder to the menu, be sure that it is not one that is restricted when
Secure Lockdown is enabled. For example, any folder on the “C:\” drive will be restricted.
Note: Under Windows 64 bit operating systems, some Windows programs (ie: Write, MS Paint, etc) must be run
from the “C:\Windows\SysWow64\” folder and not the “System32” folder. If you create a shortcut on Circle Dock to
the wrong location, the program will not run when Secure Lockdown is enabled.
Secure Lockdown™ v2 – Multi Application Edition - User Guide Page 12

You can further customize the appearance, animation, and other features of the utility by right-clicking
on the center button and selecting “Settings” from the right-click popup menu. As shown below:
Hide and show the menu by pressing the F9 button (default can be changed). Move the menu by
dragging it with your mouse. Press the center button to hide it.
For a more detailed explanation of Circle Dock and its capabilities, please select the Help option under
the above Configuration menu.
Note: When Secure Lockdown is enabled, the preconfigured Circle Dock application launch menu will appear upon
booting the computer. When Secure Lockdown is enabled, you will not be able to edit or modify the application
launcher in any way.
Win Start Menu – For Windows XP, Vista, or Windows 7 only, choose this radio button option if you wish
to use the standard Windows Start menu instead of Circle Dock as the application launching mechanism.
Note that the Windows Start menu will only display shortcut icons that are “Pinned” to the Start Menu.
You can “Pin” shortcuts to the Start menu by right-clicking on the icon and choosing the “Pin to Start
Menu” option.
Modern UI (Start Screen) – For Windows 8.1 systems only, choose this radio button option if you wish to
use the Modern UI Start screen as the application launching mechanism for both Modern UI and
Windows Desktop applications. If you want to configure individual options of the Modern UI features of
Windows, select the Configure… button which will display the following screen.
Page 13 Secure Lockdown™ v2 – Multi Application Edition - User
Guide

Note: Only Modern UI applications that are installed for Current Users will be available in the Modern UI Start
screen when Secure Lockdown is enabled.
No Start Button – For Windows 8.1 systems only, choose this option to remove the Windows Start
button.
No Hot Corners – For Windows 8.1 systems only, choose this option to remove the Windows Hot corner
that appears in the top left corner of the screen.
No Charms Bar – For Windows 8.1 systems only, choose this option to remove the Windows Charms Bar
from appearing on the right side of the screen.
Desktop First – For Windows 8.1 systems only, choose this option to have Windows go to the Desktop
instead of the Windows Start screen when logging in.
No Drag Close – For Windows 8.1 systems only, prevents the drag close feature in the Windows Desktop
screen. This feature currently works with non-touch screen devices only.
Local Level Options
Local Level settings allow you to disable various local user account options of Windows. These settings
do not affect other user accounts of the system. Each option is listed below.
No Logoff – When enabled, Secure Lockdown prevents access to all logoff/sign out features of Windows.
Users will not be able to log out of their account.
No Local Drives – When enabled, Secure Lockdown blocks access to the A, B, and C drives when
attempting to access the file system from an application’s Open, Save, or other file access dialog. A user
can, however access drives beyond the C drive if the No Local Drives option is unchecked. This will allow
access to removable drives and devices beyond the operating system drive. Check this option if you do
not want to allow access to any local drives or devices through Open, Save, or other file access dialogs.
Note: this feature does not block an applications access to the file system, it only blocks direct user access. Also, by
default the Windows Library folders point to locations on the “C:\” drive (ie: “C:\users\<user name>”). Many
Windows programs will use the Library locations as their default and the user will be directed to those folders
when prompted with the application’s Open and Save dialogs. Secure Lockdown will not block this access. Thus, it is
important to move the Library folders to a drive other than “C:\”. Refer to the “Windows System Modifications to
Consider > Create a Separate Hard Drive Partition” section later in this guide for instructions on how to move
Windows Library folders.
No Auto Play – When enabled, Secure Lockdown prevents the Windows Auto Play feature. The Auto Play
dialog appears when external media such as a USB flash drive is inserted.
Secure Lockdown™ v2 – Multi Application Edition - User Guide Page 14

No System Keys – “System Keys” include the following keyboard keys and key sequences: Windows Key,
Alt-Tab, Alt-Shift-Tab, Alt-Esc, Alt-Shift-Esc, Ctrl-Alt-Esc, Ctrl-Esc, Alt-F4, F1, and F3. These keys can be
enabled or disable independently by selecting the associated ellipse button (…) next to the option. The
F1 key is used to invoke Windows Help and help features in other applications which could lead to
security risks if there are links to external applications or web sites within the help screens. Similarly, the
F3 key invokes the Windows Search feature. The ALT-F4 key can close the active program. Alt-Tab, Alt-Esc,
Ctrl-Esc key sequences can disrupt the active window (Master Application). If you do not want to provide
these abilities, check this option.
No Desktop – Check this option to remove the Windows Desktop and run Secure Lockdown as the
Windows Shell. No features of the Windows Desktop will be available. Windows Embedded
environments frequently do not use the Windows Desktop - "No Desktop" creates a similar environment.
Should your application require some features of the Windows Desktop, do not check this feature.
Note: This feature is disabled in Window 8.1 when using the Modern UI as the App Launcher.
Note: If this option is selected, no applications or services defined in the Windows HKCU “Run” or “RunOnce”
Registry settings will run upon account login as this Windows feature requires the Windows Shell. If a particular
app or service is required to run, consider using the Secure Lockdown – Background Apps feature or the Windows
Task Scheduler instead.
No Action Center – Check this option to remove the Notifications and Action Center from the Taskbar
and prevent, in Windows 10, the right-to-left sweep touch gesture from revealing the Action Center
feature.
Note: This feature is not available if the “No Desktop” option is enabled.
No Desktop Icons – Check this option to remove icons (files, folders, shortcuts, etc) from the Windows
Desktop.
Note: This feature is not available if the “No Desktop” option is enabled. Also, only icons (shortcuts) created by the
current user will be available when Secure Lockdown is enabled.
No Taskbar – Check this option to remove the Windows Taskbar and System Tray from the Windows
Desktop. The Windows Start button is not available.
Note: This feature is not available if the “No Desktop” option is enabled.
No Win 10 Shell – Check this option to disable the Windows 10 Shell experience which includes the Start
Menus, Action Center, Available Networks, and other Windows 10 UI elements.
Page 15 Secure Lockdown™ v2 – Multi Application Edition - User
Guide

Note: This feature is not available if the “No Desktop” option is enabled. This feature also enables the “No Action
Center”.
No Network Shares – Check this option to disable the ability to access network shares (connections to
network folders.) If disabled, access to shared drives is available to applications, however mapped drives
will not be visible in Windows Open and Save dialogs.
Note: To view and access network shared folders, the Secure Lockdown password must match the Windows sign-in
password.
Machine Level Options
Machine Level options (shown below) allow you to disable various machine level Windows features.
Machine level features are those that apply to all users of the computer. Enabling machine level options
will affect all local computer users even if Secure Lockdown is not running under that account. All of the
following options are machine level settings.
No User Switching – Fast user switching provides a quick way for users to switch from one account to
another without logging off. This option can be accessed by pressing the CTRL-ALT-DELETE key sequence.
If you do not want to provide this ability, check this option.
No Shutdown – Select this checkbox if you do not want to allow the user to shut down or restart the
system. When Secure Lockdown is enabled, the user can press the CTRL-ALT-DELETE keys. They will no
longer have the option to logoff or shutdown the computer from this screen or the Windows Start menu
if that feature is activated.
No Ease of Access – The Windows Ease of Access feature provides many features including access to
various features of Windows via voice commands. This could pose a security risk. This option can be
accessed by pressing the CTRL-ALT-DELETE key sequence. If you do not want to provide this ability, check
this option.
No Help and Support – Windows Help and Support provides help for Windows features, but can lead to
security risks if there are links to external applications or web sites within the help screens. If you do not
want to provide this ability, check this option.
No App Install – When enabled, the Windows Installer will be disabled. Users will not be able to install
applications when this option is checked.
Secure Lockdown™ v2 – Multi Application Edition - User Guide Page 16

No Ctrl+Alt+Del – When enabled, users will not be able to use the Windows Ctrl+Alt+Del key sequence
to display the Ctrl+Alt+Del screen. Enabling this option disables the Delete key while Secure Lockdown is
enabled.
Note: Be cautious when enabling the “No Ctrl+Alt+Del” option. Users will not be able to access the Ctrl+Alt+Del
screen where they can switch users, log in and off, or shut down the system. In addition, if the system is Windows 7
or previous and on a domain network, users will not be able to press the Ctrl+Alt+Del key sequence to log into
Windows. It is recommended that systems under these conditions use the Windows Auto Login capability and
should be set up before enabling the Secure Lockdown “No Ctrl+Alt+Del” option.
No Removable USB Drives – When enabled, the system will no longer allow access to removable USB
storage devices such as USB hard drives and flash drives.
No New USB Devices – When enabled, the system will no longer allow newly plugged in USB devices to
register with the operating system. USB devices already connected will continue to work on the USB port
to which they are attached. The same device will not connect to other ports unless it was previously
connected while secure Lockdown was disabled.
Note: If a USB device is installed and the drivers for that device are loaded on a particular USB port before Secure
Lockdown is enabled, that device will be available when Secure Lockdown is enabled. No new USB devices will be
installable when Secure Lockdown is enabled.
No Library Access – When enabled, users will not be able to access the Windows Library folders in any
Explorer, Open, and Save dialogs. The Library folders will not be visible in the Navigation pane.
No Network UI (available in Windows 8 and higher) – When enabled, the network UI found within the
Ctrl+Alt+Delete screen and Windows Login screen will not be available.
No Safe Mode (not available in Windows 8 or 10) – When enabled, the Windows (F8) boot option to enter
Windows “Safe Mode” is disabled. Users will not be able to boot the computer into Safe Mode.
No Windows Updates – When Secure Lockdown is enabled, it disallows Windows Updates from
automatically installing. It is recommended to enable this setting.
Log off / Restart
The Log off / Restart feature (shown below) allows you to specify times when you want the computer to
either log off, or restart. This option is ideal if you need to run a login script periodically, or if you want to
incorporate system restore tools such as Toolwiz - Time Freeze, or Horizon Datasys - Reboot Restore RX
into your Secure Lockdown implementation. You can set the computer to restart either at a specific time
of the day, or when the computer has been inactive for a defined amount of time or both.
Page 17 Secure Lockdown™ v2 – Multi Application Edition - User
Guide

Log off after x inactivity minutes - When enabled, the computer will log off the current account when
the computer has not been active for the specified number of minutes.
Restart at – When enabled, the computer will restart at the specified time each day.
Restart after x inactive minutes – When enabled, the computer will restart when the computer has not
been active for the specified number of minutes.
Chrome Lockdown Tab
Under the Chrome Lockdown tab (shown below), you can modify the layout and lockdown various
features of Google Chrome version 28 and above.
Note: The Chrome browser offers many customizations on its own. These options are available by accessing the top
right Customizations button in the Chrome browser. If needed, these customizations should be performed before
any Secure Lockdown customizations are done.
General Options
The General Options section allows you to choose various elements in Chrome to restrict. In addition,
this section allows you to reset Chrome to its initial state before use.
Secure Lockdown™ v2 – Multi Application Edition - User Guide Page 18
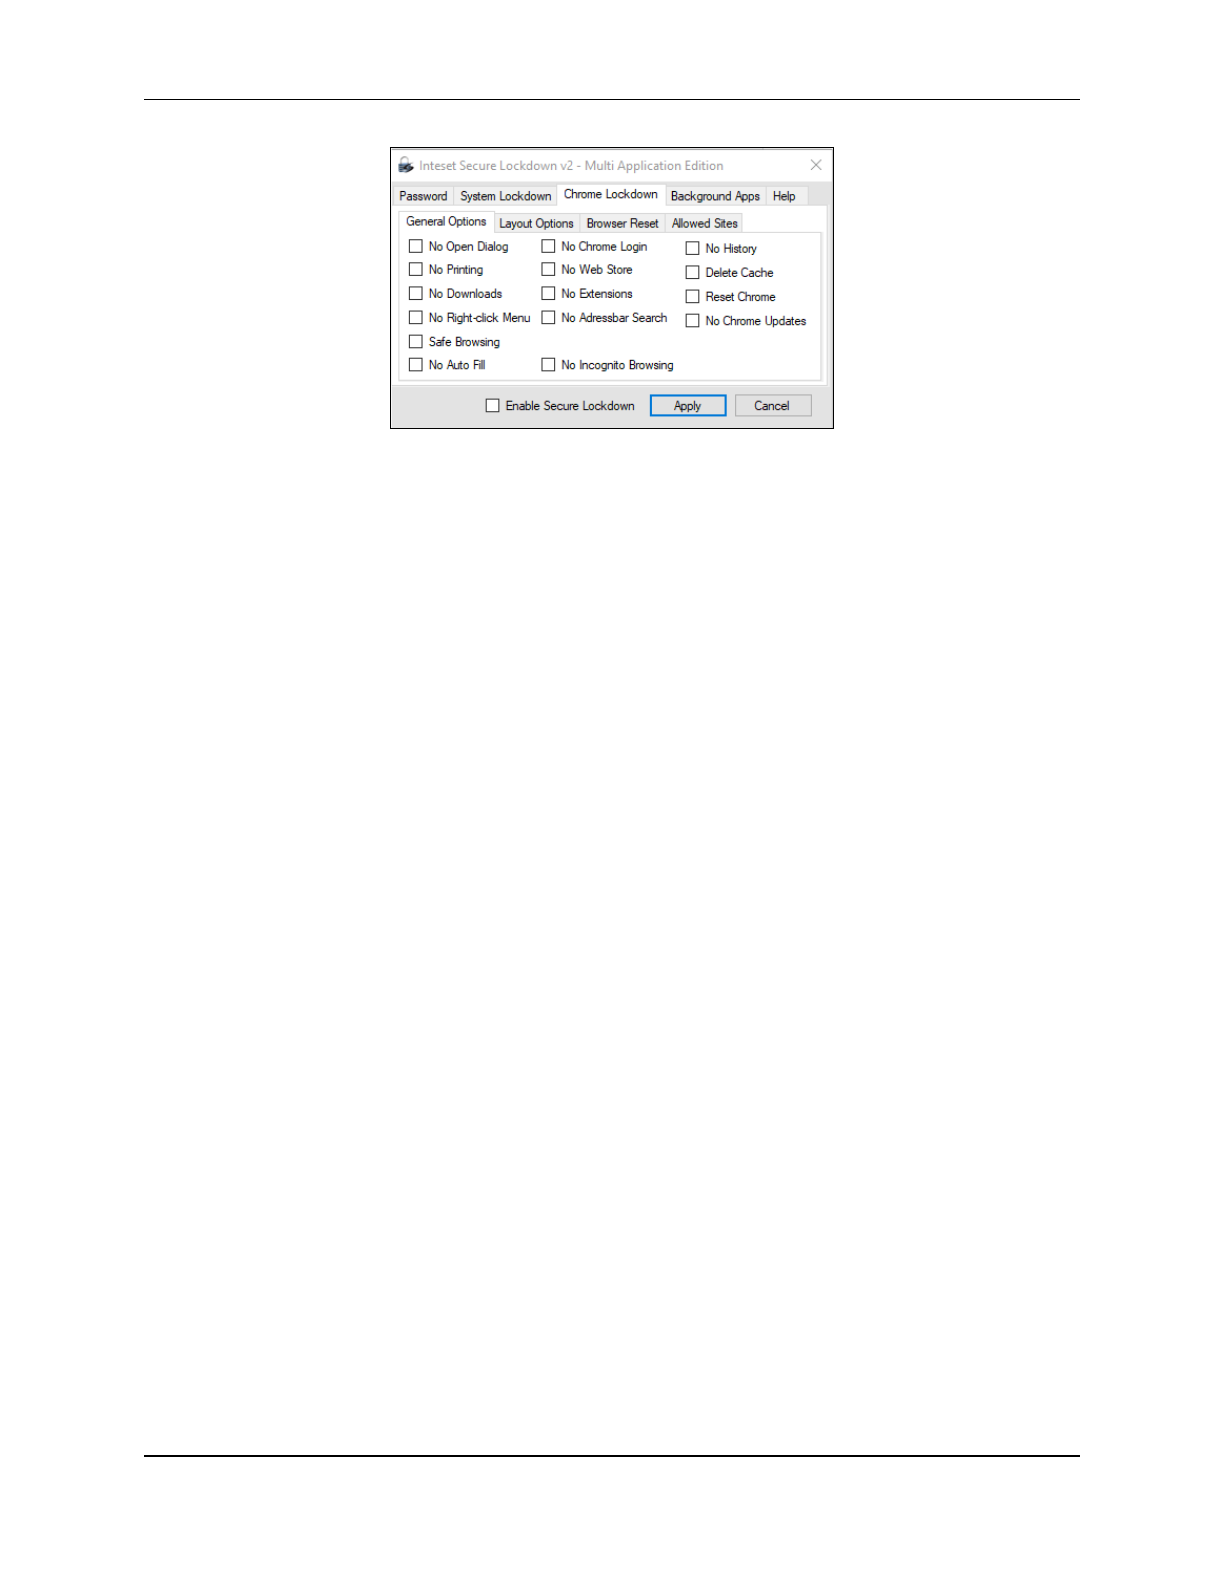
No Open Dialog (ctrl-o) – Prevents the ability to open the “Open” dialog that allows running files, etc.
The ctrl-o keyboard key sequence is disabled.
No Printing (ctrl-p) – Prevents the ability to print the current web page by using the ctrl-p keyboard key
sequence or from the File menu option.
No Downloads – Prevents the ability to download files onto the computer.
No Right-click Menu – This option removes the ability to display the browser right-click menu that
appears when the user right-clicks on a web page, menu, or title bar.
Safe Browsing – This option sets the Chrome browser to Safe Browsing mode. Safe Browsing mode helps
protect against the three most common threats on the web: phishing, drive-by malware, and harmful
downloads. Check this option to enable Safe Browsing.
No Auto Fill – Enable this feature to prevent the Chrome Auto Fill capability from functioning. Auto Fill
information is generally private/personal information that should not be available on a public system.
No Chrome Login – Enable this feature to prevent users from signing into their Chrome account.
No Web Store – Enable this option to restrict users from accessing the Chrome Web Store via integrated
the buttons available on the browser (ie: the “Apps” and “Web Store” button.)
No Extensions – Choose this option to disallow installing or uninstalling Chrome extensions.
No Addressbar Search – Enable this feature to remove the ability to perform Google searches and other
lookup information within the addressbar.
No Incognito Browsing (ctrl-shift-n) – Disable the “Incognito” browsing capability. When this option is
checked, no incognito mode is allowed.
No History – Select this option to automatically remove all browser history upon closing the browser.
Delete Cache – Select this option to automatically delete all file and memory based cookies, cached web
pages and images, and all other browser cached files upon closing the browser.
Page 19 Secure Lockdown™ v2 – Multi Application Edition - User
Guide

Reset Chrome – Upon closing the browser Chrome will be reset to its installed default. Note that any
pages defined in the browser’s On startup and Homepage settings will be cleared.
No Chrome Updates – Choose this option to prevent Chrome from installing updates. Note that when
Secure Lockdown is not enabled, Chrome will be able to install updates.
Layout Options
The Layout Options section allows you to hide various layout elements in Chrome such as bookmarks,
home button, and Chrome menus.
No Fullscreen – Enable this checkbox to disallow users to put Chrome into Fullscreen mode. Fullscreen
mode does not contain any navigation buttons or menus, or the Bookmark bar. It is applied by pressing
the F11 key and disabled again by pressing the F11 key. This feature is disabled if Kiosk Mode is enabled.
No Bookmark Bar – Enable this checkbox to remove the Bookmark bar. This feature is disabled if Kiosk
Mode is enabled.
No Edit Bookmark – Enable this option to disallow editing, adding or removing a bookmark entry on the
Bookmark bar. This option requires that the “No Bookmark Bar” option be unchecked. This feature is
disabled if Kiosk Mode is enabled.
No Home Button – When enabled, this option removes the home button found to the left of the Address
bar. This feature is disabled if Kiosk Mode is enabled.
No Chrome Menus – Select this option to remove access to the Customizations button found at the top
right corner of the Chrome window. If enabled, this will also disallow access to other Chrome menus
such as the right-click menu. This feature is disabled if Kiosk Mode is enabled.
No Zoom – Select this option to disable the keyboard-based Chrome zoom functionality (CTRL+Plus sign,
CTRL+Minus sign). Note that this option does not disable the Chrome touch-based pinch to zoom
capability.
Browser Reset
Under this section, various settings allow resetting Chrome to its originally started state after a specified
increment of no user activity (no keyboard, mouse, or touch activity.)
Secure Lockdown™ v2 – Multi Application Edition - User Guide Page 20

Inactive Minutes - Set this option to the number of minutes of user inactivity whereby Secure Lockdown
will reset the browser. Note: playing a video or music is not considered activity. If playing a video and no
interaction occurs, the browser will be reset in the specified period even if the video is still playing. In
this case, as a solution, you could set the inactivity period equal to or greater than the time length of the
video.
Close Chrome – Select this option to close all instances of Chrome at the specified “Inactivity”
increment. Note that this option clears memory based user sessions, but not file-based cookies. Choose
the “Delete History” option in combination with the “Close Chrome” option to remove all memory-based
user sessions and file-based cookies.
Return Home – Select this option to return to the defined Chrome homepage at the specified
“Inactivity” increment. This will only occur if Chrome is the foreground application.
Allowed Sites
If you need to restrict access to only certain sites and/or pages, use the Allowed Sites feature. Sometimes
described as white listing, you can prevent users from going to undesired sites.
Site – To add an allowed site URL enter it in the Site textbox, then press the Add button. Include the URL
Scheme prefix in the link (ie: HTTP, FTP, File, HTTPS, etc). Malformed URLs are not allowed. To define
properly formatted URL patterns, see the following web page:
https://www.chromium.org/administrators/url-blocklist-filter-format
Note: If a Chrome Extension is being used, you will need to add the extension’s URL to the Allowed Sites list. For
example, you would add its extension ID to the “chrome-extension://” protocol prefix such as:
Page 21 Secure Lockdown™ v2 – Multi Application Edition - User
Guide

“chrome-extension://gighmmpiobklfepjocnamgkkbiglidom”. Within Chrome, you can determine the extension ID
by going to Settings > Extensions > Developer Mode.
Remove – To remove a link from the list, select it, then press the “Remove” button.
Edit – To edit a link in the list, select it, then press the Edit button. The URL will appear in the Allowed
Sites textbox for editing.
Enable – If this check box is checked, Chrome will only allow access to the sites in the Allowed Sites list.
Disable this option if all websites are allowed. Note that Enable works only when Secure Lockdown is
enabled.
Edge Lockdown Tab
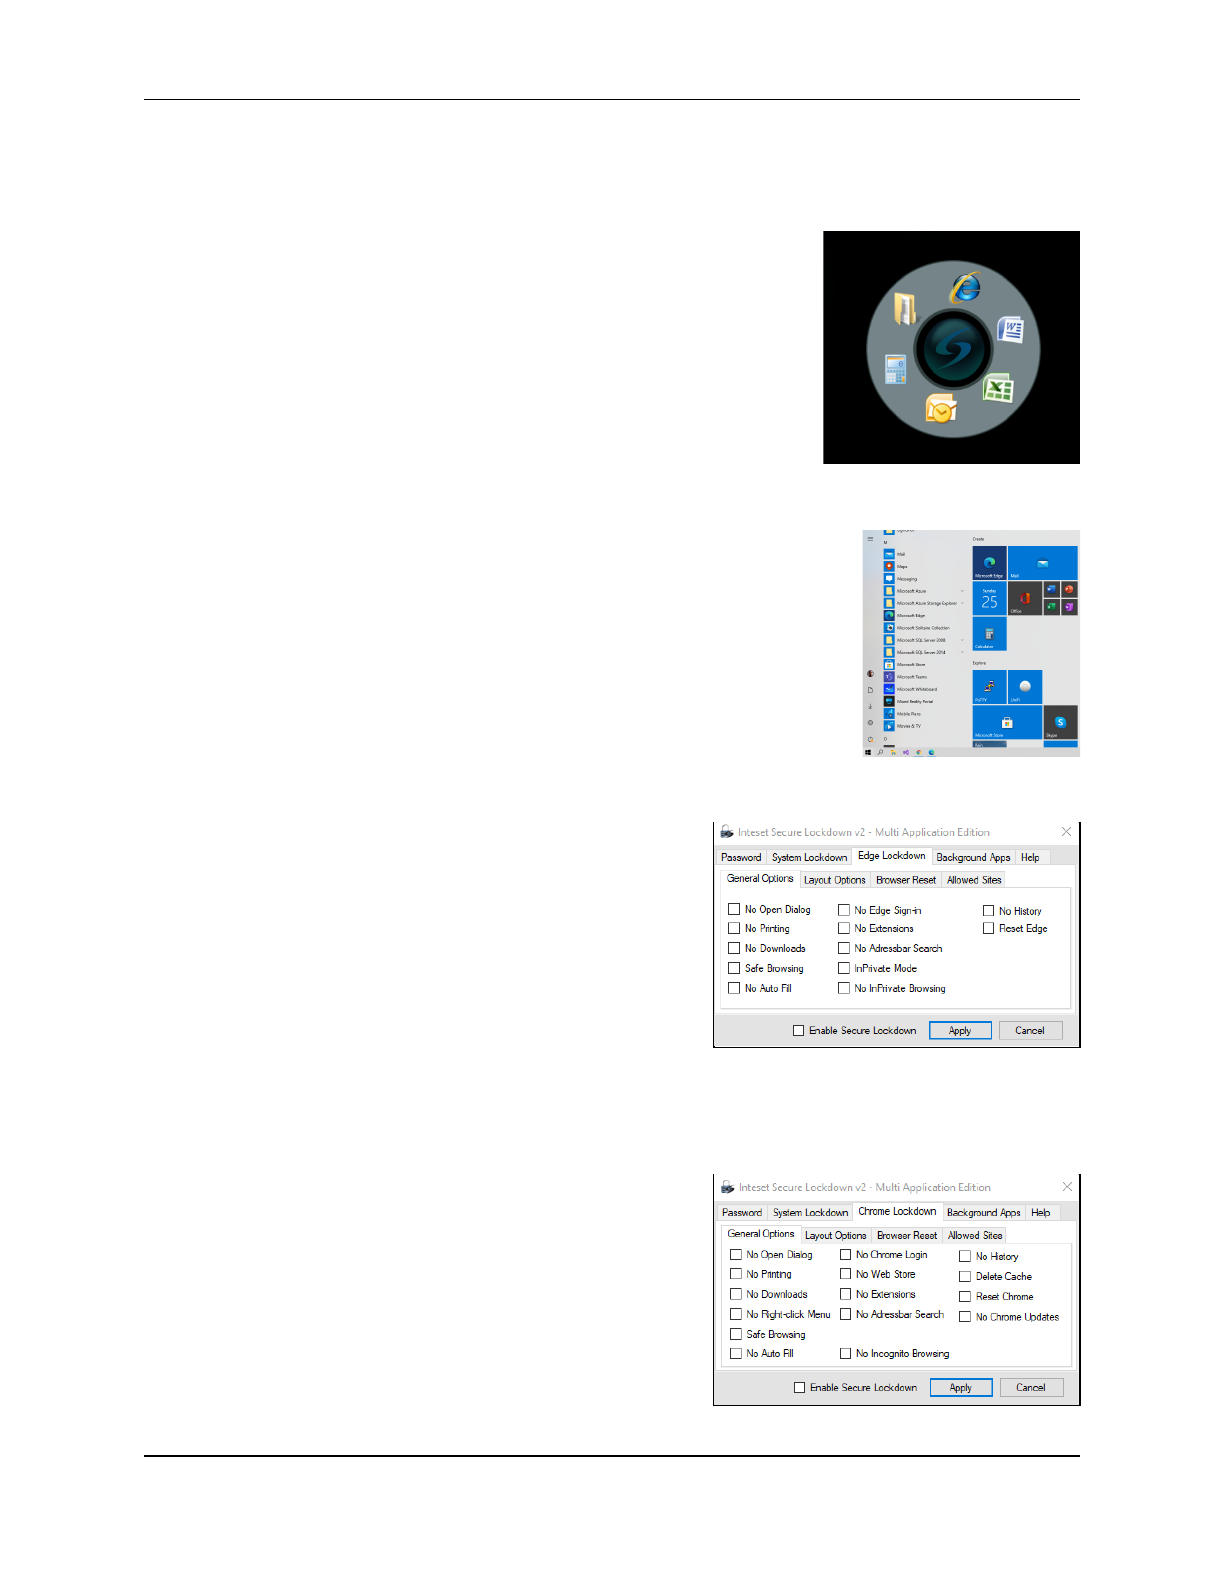
Under the Edge Lockdown tab (shown below), you can modify the layout and lockdown various features
of the Microsoft Edge browser.
General Options
The General Options section allows you to choose various elements in Edge to restrict. In addition, this
section allows you to reset Edge to its initial state before use.
No Open Dialog (ctrl-o) – Prevents the ability to open the “Open” dialog that allows running files, etc.
The ctrl-o keyboard key sequence is disabled.
No Printing (ctrl-p) – Prevents the ability to print the current web page by using the ctrl-p keyboard key
sequence or from the File menu option.
Secure Lockdown™ v2 – Multi Application Edition - User Guide Page 22

No Downloads – Prevents the ability to download files onto the computer.
Safe Browsing – This option sets the Edge browser to Safe Browsing mode. Safe Browsing mode helps
protect against the three most common threats on the web: phishing, drive-by malware, and harmful
downloads. Check this option to enable Safe Browsing.
No Auto Fill – Enable this feature to prevent the Edge Auto Fill capability from functioning. Auto Fill
information is generally private/personal information that should not be available on a public system.
No Edge Sign-in – Enable this feature to prevent users from signing into their Microsoft Edge account.
No Extensions – Choose this option to disallow installing or uninstalling Edge extensions.
No Addressbar Search – Enable this feature to remove the ability to perform Bing or Google searches
and other lookup information within the Addressbar.
No InPrivate Browsing (ctrl-shift-n) – Disables the “InPrivate” browsing capability. When this option is
checked, InPrivate mode is disallowed.
No History – Select this option to automatically remove all browser history upon closing the browser.
Reset Edge – Upon closing the browser Edge will be reset to its installed default. Note that any pages
defined in the browser’s Startup pages and Home settings will be cleared.
Layout Options
The Layout Options section allows you to hide various layout elements in Edge such as favorites, home
button, and Edge menus.
No Fullscreen – Enable this checkbox to disallow users to set Edge to Fullscreen mode. Fullscreen mode
does not contain any navigation buttons or menus, or the favorites bar. It is applied by pressing the F11
key and disabled again by pressing the F11 key.
No Favorites Bar – Enable this checkbox to remove the favorites bar.
No Edit Favorites – Enable this option to disallow editing, adding or removing a favorite entry on the
Favorite bar. This option requires that the “No Favorite Bar” option be unchecked.
Page 23 Secure Lockdown™ v2 – Multi Application Edition - User
Guide

No Home Button – When enabled, this option removes the home button found to the left of the Address
bar.
No Right-click Menu – This option removes the ability to display the browser right-click menu that
appears when the user right-clicks on a web page, menu, or title bar.
Browser Reset
Under this section, various settings allow resetting Edge to its originally started state after a specified
increment of no user activity (no keyboard, mouse, or touch activity.)
Inactive Minutes - Set this option to the number of minutes of user inactivity whereby Secure Lockdown
will reset the browser. Note: playing a video or music within the browser is not considered activity. If
playing a video and no interaction occurs (ie:mouse movement), the browser will be reset in the
specified period even if the video is still playing. In this case, as a solution, you could set the inactivity
period equal to or greater than the time length of the video.
Close Edge – Select this option to close all instances of Edge at the specified “Inactivity” increment. Note
that this option clears memory based user sessions, but not file-based cookies. Choose the General
Options > Reset Edge or the Layout Options > Kiosk Mode > Public Browsing option in combination with
the Restart Edge option to remove all memory-based user sessions and file-based cookies.
Note: This setting will not restart Edge if it was already restarted and the inactivity period has elapsed.
Return Home – Select this option to return to the defined Edge homepage at the specified “Inactivity”
increment. This will only occur if the browser is the foreground application.
Allowed Sites
If you need to restrict access to only certain sites and/or pages, use the Allowed Sites feature. Sometimes
described as white listing, you can prevent users from going to undesired sites.
Secure Lockdown™ v2 – Multi Application Edition - User Guide Page 24

Site – To add an allowed site URL enter it in the Site textbox, then press the Add button. Include the URL
Scheme prefix in the link (ie: HTTP, FTP, File, HTTPS, etc). Malformed URLs are not allowed. To define
properly formatted URL patterns, see the following web page:
https://www.chromium.org/administrators/url-blocklist-filter-format
Remove – To remove a link from the list, select it, then press the “Remove” button.
Edit – To edit a link in the list, select it, then press the Edit button. The URL will appear in the Allowed
Sites textbox for editing.
Enable – If this check box is checked, Edge will only allow access to the sites in the Allowed Sites list.
Disable this option if all websites are allowed. Note that Enable works only when Secure Lockdown is
enabled.
Background Apps Tab
Under the Background Apps tab (shown below), you can run any number of background applications
that may be necessary to support your applications. An example of a background app is an on-screen
keyboard. For security purposes, when Secure Lockdown is enabled, programs that normally run on
Windows login are disabled by Secure Lockdown (these are programs that run based on settings in the
Windows Registry under the following Registry key:
“HKEY_CURRENT_USER\Software\Microsoft\Windows\CurrentVersion\Run”). To substitute this
functionality, Secure Lockdown allows you to define the specific background apps you’d like to start
when Secure Lockdown is enabled. These applications will start upon user login and immediately after
your master application is launched. They are launched with administrative privileges.
Page 25 Secure Lockdown™ v2 – Multi Application Edition - User
Guide

Path - Select the Path ellipse button to choose the location of the background application executable.
Arguments (optional) - Enter any desired arguments that are accepted by the executable in the Arguments
field.
Start in (optional) – With some applications, a startup directory (working directory) needs to be specified.
Enter the working directory path in the Start in field. Note that system variables can be used (ie:
“%PROGRAMFILES%”, “%HOMEDRIVE%”, “%HOMEPATH%”, “ %WINDIR%”, etc)
Add – Once an executable path is defined, press the Add button to add the path to the background apps
list.
Remove – To remove a background app from the background apps list, first select the app to remove in
the list, then press the Remove button.
Edit – To edit a background app in the background apps list, first select the app to edit in the list, then
press the Edit button. The information will be moved to the Path, Arguments, and Start in fields where
they can be edited, then added back to the list.
Enable – Select the Enable checkbox to run the background apps upon user login when Secure Lockdown
is enabled.
Help Tab
Under the Help tab, you will be able to get pertinent support information about your Secure Lockdown
software and license, communicate with the user community and Inteset support technicians, export
and import Secure Lockdown settings, and deactivate the Secure Lockdown license.
About
Under the About section (shown below), you can get information regarding the version and build
number of Secure Lockdown as well as the system serial number and machine ID of the computer. This is
important information for Inteset Systems technical support should they ask for it. Note that the
machine ID can be highlighted and copied to the clipboard (ctrl+c) for easy pasting into emails. You can
also easily access the Inteset support forum for quick answers to common questions and responses from
the community and Inteset’s support team.
Secure Lockdown™ v2 – Multi Application Edition - User Guide Page 26

Shutdown – Press the Shutdown button to shut down the computer. This button is only available when
Secure Lockdown is enabled and the password has been entered to access Secure Lockdown settings.
Note: shutting down the computer with this button will not disable Secure Lockdown.
Logoff – Press the Logoff button to log out of the current Windows user session. This button is only
available when Secure Lockdown is enabled and the password has been entered to access Secure
Lockdown settings. Note that logging off with this button will not disable Secure Lockdown.
Export / Import
Under this section, you can export the Secure Lockdown settings into a single file (.bac). This file can
serve as a backup, and/or to import into other Secure Lockdown systems using the Import Settings
feature.
Export Settings – Press the Export Settings button to export the Secure Lockdown settings into a single
“.bac” file in a location of your choosing.
Import Settings – Press the Import Settings button to import the Secure Lockdown settings into Secure
Lockdown. After pressing the Import Settings button, you will need to locate a “.bac” export file
previously created.
Note: these functions can also be performed from a command line (See the “Using the Command Line” section
later in this guide.)
Page 27 Secure Lockdown™ v2 – Multi Application Edition - User
Guide

Deactivate License
Under this section, you will be able to deactivate the Secure Lockdown license in order to move it to a
different computer.
Deactivate License – If you purchase Secure Lockdown and activate the license on a computer, and
decide later that you want to move the license to another computer, you must deactivate the license on
the initial computer first. Do not uninstall the application before deactivating it. You can deactivate a
license by pressing the Deactivate button. Note that the Deactivate button will be enabled if the Secure
Lockdown license has been activated on the computer.
Remote Management
Under this section, you can set up and enable the Secure Lockdown Remote Management Service. The
Secure Lockdown Remote Management Service allows you to perform many tasks via the Inteset website
Remote Management console. In the console, you can:
● update Secure lockdown to the latest build
● view a screenshot of the current activity
● view system and Secure Lockdown configuration information
● view the status if Secure Lockdown is enabled and running
● change the Secure Lockdown settings (beta)
● modify settings in batch (beta)
● change the Secure Lockdown password (beta)
● restart the system (beta)
● enable and disable Secure Lockdown (beta)
● send email alerts when Secure Lockdown is not running (beta)
After you enable the service via the screen below, go to the http://www.inteset.com/ website, then sign
in and select the My Account > Manage Devices menu option to manage your device.
Secure Lockdown™ v2 – Multi Application Edition - User Guide Page 28

Enable Remote Management Service… – Press the Enable Remote Management Service button to
reveal the registration entry form required to enable the remote management service. The following
screen will appear.
Enter the description and location information requested and then check the Enable Remote
Management Service checkbox. Press “OK” to start the process.
Status – The Status information will indicate if the Secure Lockdown system agent is running in the
background. If the Remote Management feature is enabled, the status should always indicate that the
agent is running.
OS Image Installations and Remote Management
Secure Lockdown has built-in handling of product activation (auto/unattended activation) and
automated password assignment. These tools along with using Secure Lockdown command-line
capabilities can be very useful for bulk implementation scripts, unattended installations, OS Image
creation, and remote management. In addition, Secure Lockdown has several “hidden” features that
allow administrators to fine-tune its functionality to suit their needs. Please see the accompanying
Secure Lockdown – Administrator’s Guide if you’re interested in these capabilities.
Windows System Modifications to Consider
When preparing the system for use with Secure Lockdown™, it makes sense to customize and optimize
the operating system for that purpose. Some recommendations include:
● Create a Separate Hard Drive Partition – Create a separate drive letter (ie: “M:\”) and move all
user libraries (ie: Documents, Downloads, Pictures, Videos, Music, etc) to that new drive. By
default, Secure Lockdown does not allow access to the “C:\” drive where these libraries originally
Page 29 Secure Lockdown™ v2 – Multi Application Edition - User
Guide

reside when using the standard Windows Open and Save dialogs. If your application requires
access to these folders, move them to the new partition (drive letter) for uninhibited access.
Note: Do not move these libraries to removable media such as a USB drive. Also, if the System Lockdown >
Local Level > No Local Drives option is selected, no local drives including the new drive letter created will
be accessible.
● Change UAC settings to “Never notify” – This will prevent potential unwanted UAC dialogs from
appearing.
● Disable Windows AutoPlay – This will prevent a popup or the start of media playing
automatically if the media or device is inserted into a system port.
● Remove the Windows username and password login requirement, or enable automated login –
This will allow a seamless system start into the master application.
● Remove unneeded Windows services and applications – This will ensure a fast system boot-up
and best performance of the master application.
● Disable Windows Updates – This will ensure the system does not perform any unexpected
restarts due to the Windows Update process. It will also ensure nothing undesired is installed on
the system.
● Disable Windows Aero – This will enable a slight improvement on screen redraw speeds.
● Modify the Windows Welcome (logon) screen image – This will give the system a custom look
during the boot process.
The detailed steps to accomplish the above recommendations are beyond the scope of this
document. For a deeper dive into preparing Windows 10 for special purpose operation, see the
following article:
https://www.inteset.com/how-to-strip-down-windows-10-for-kiosks-digital-signage-and-other-speci
al-purpose-systems
Support
Support for Secure Lockdown™ v2 is available through the http://www.intesetsystems.com Forum
pages. Here, you can ask questions to the community and to Inteset technicians. If the question is
directed toward an Inteset technician, you can expect a response in 24 hours or less.
Secure Lockdown™ v2 – Multi Application Edition - User Guide Page 30
