
Design Patterns for Building
Multi-Tenant Applications
on Snowflake

Contents
Introduction 2
Part One: Comparing Multi-Tenant Design Patterns 2
Multi-tenant table (MTT) 2
Object per tenant (OPT) 3
Account per tenant (APT) 3
Summarizing the three patterns 4
Part Two: Exploring Each Design Pattern 6
MTT design notes 6
Maintaining the entitlement table 9
Authenticating to Snowflake 11
Isolating working databases if needed 13
Isolating workloads as needed or pooling to save costs 14
Routing users to warehouses 15
OPT design notes 17
Using automation to create new tenants 17
OPT authentication and authorization considerations 18
Isolating ingestion/transformation databases in the OPT model 19
Incorporating OPT to facilitate multi-region data sharing 20
APT design notes 22
APT authentication considerations 23
APT ingestion/transformation considerations 24
Part Three: Evaluating Tenancy Models 25
Storage and security considerations 25
Encryption, isolation, and data protection considerations 26
Billing, resource utilization, and network policy considerations 27
Page 1

Introduction
Multi-tenant Snowflake applications typically conform to one of three design patterns:
● Multi-Tenant Table (MTT) : MTT consolidates tenants within a shared table or warehouse.
Centralizing tenants in single, shared objects enables tenants to share compute and other
resources efficiently.
● Object Per Tenant (OPT): OPT isolates tenants into separate tables, schemas, databases,
and warehouses. Although this approach allocates individual objects to tenants, the
application still operates within a single Snowflake account.
● Account Per Tenant (APT): APT isolates tenants into separate Snowflake accounts. Unlike
OPT, each tenant within the application has its own dedicated Snowflake account.
Tenancy models have different advantages regarding security, storage, compute, and connectivity,
and a hybrid approach may be needed to properly address these considerations. Hybrids between
tenancy models are common. For example, a design might use a multi-tenant table to consolidate
storage but allocate dedicated compute resources to each tenant, thereby forming an MTT/OPT
hybrid design.
This white paper has three parts:
● Part One helps data application builders understand the pros-and-cons and
costs-and-benefits of the various patterns
● Part Two describes each pattern in greater detail and offers guidance on the Snowflake
features required for proper implementation
● Part Three provides additional information to help you evaluate tenancy models based on
security, storage, and compute requirements
Part One: Comparing Multi-Tenant
Design Patterns
This section compares and contrasts the three patterns and describes the requirements that tend
to favor one design approach over the others.
Multi-tenant table (MTT)
MTT's chief characteristics are scalability and architectural simplicity .
● MTT is the most scalable design pattern in terms of the number of tenants an application
can support. This approach supports apps with millions of tenants.
Page 2

● It has a simpler architecture within Snowflake. Simplicity matters because object
proliferation makes managing myriad objects increasingly difficult over time. With MTT,
adding tenants does not cause the number of objects to grow, but adding tenants to OPT
and APT can result in hundreds or thousands of objects being created within Snowflake.
From a cost standpoint, MTT is usually more cost-efficient because multiple customers utilize
shared compute and other resources more efficiently.
But MTT has a somewhat rigid requirement: To use MTT, an app's data model has to have the same
general shape across all tenants. Application builders can achieve slight variances using custom
columns that only apply to certain types of tenants, but this approach introduces sparsity into the
data.
Object per tenant (OPT)
OPT is a great fit if each tenant has a different data model. Unlike MTT, the tenant data shape can
be unique for each tenant. OPT does not scale as easily as MTT, however. OPT typically scales well
from tens to hundreds of tenants, but starts to become unwieldy when it includes thousands of
tenant databases.
Security can factor into the decision to use an OPT design pattern. Some customers prefer the
OPT model because they don't want to manage an entitlement table, secure views, or row-level
security with strong processes behind it. They are, however, comfortable using RBAC to control
who has specific access to a database.
Some apps that use the OPT model give customers their own dedicated compute resources to
satisfy contractual, security, or regulatory requirements.
Account per tenant (APT)
APT isolates tenants at the account level. Typically, customers have a strong security reason for
choosing this approach. For example, organizations bound by strict regulatory mandates may
choose this option if:
● They need to implement a dedicated connection string per tenant
● They require security measures such as Bring Your Own Tool (BYOT)
● They want to use per-tenant IP restrictions at the account level
APT requires the customer to also implement OPT, which can support a huge variety of tenant
data shapes. In addition, APT introduces more scaling limitations—tenant counts in the tens to low
hundreds are typical, however, customers with higher tenant numbers exist. APT can become
unwieldy when managing thousands of tenant accounts.
Page 3

Summarizing the three patterns
Table 1 summarizes the similarities and differences among the three design patterns.
Page 4
Table 1: Design pattern similarities and differences
MTT
OPT
APT
Data model
characteristics
● Tenant data needs to
follow the same general
shape.
● Data is stamped with a
tenant_id , so within a
row it's easy to tell what
tenant the data belongs
to.
● Tenant data shape can
be unique to each tenant
or similar across multiple
tenants.
● Tenant data shape can
be unique to each
tenant or similar
across multiple
tenants.
Scalability
● Scales from tens to
millions of tenants and
beyond, although upper
scale limits are
unknown.
● Scales from tens to
hundreds of tenants in
typical deployments.
● Scales from tens to
low hundreds of
tenants in typical
deployments.
Security
concerns
● Requires developers to
manage security, such as
an entitlement table,
secure views, or
row-level security
settings.
● Requires application
owner to be proficient in
RBAC and row-level
security.
● Enables customers who
are comfortable using
RBAC to isolate tenants
without requiring them
to manage entitlement
tables with strong
processes.
● Isolates tenants,
thereby reducing the
risk of mismanaging
security.
● Allows for strict
security measures
(encryption keys, IP
allow lists,
better-than-RBAC
controls) by isolating
tenants by account.
● Allows for strict
network measures,
such as BYOT,
Snowflake UI login,
and dedicated
connection string per
tenant.

Table 2 lists notes and drawbacks to consider when evaluating design patterns.
Page 5
Table 2: Design pattern notes and drawbacks
MTT
OPT
APT
Notes
● Pooling customers on
shared, scalable compute
saves money and is
simpler to operationalize.
● Compute can be pooled or
isolated per tenant based
on customer goals. Pooled
compute frequently saves
money but increases the
possibility of contention
between tenants.
● Using this design
feels familiar for
customers who are
re-platforming from
a legacy database
platform.
Drawbacks
● Multi-region data sharing
can be a challenge, but
see Incorporating OPT to
facilitate multi-region data
sharing .
● To improve performance
you might need to shard
large tables .
● MERGE , UPDATE , and
auto-clustering
operations can be a
challenge on very large
tables.
● It's hard to determine
per-tenant storage costs
in a multi-tenant table.
● Creating objects within
Snowflake is easy, but
maintaining a consistent
state across many similar
objects is hard. As
numbers increase, keeping
objects in sync becomes
difficult.
● Compute per tenant can
increase costs because
you lose the ability to
pool compute across
tenants.
● Increased automation is
required to maintain and
version objects.
● Creating an account
within Snowflake is
easy, but
maintaining a
consistent state
across accounts is
hard.
● Compute per tenant
can increase costs
because you lose
the ability to pool
compute across
tenants.
● Increased
automation is
required to create
and manage
accounts and
objects.

Part Two: Exploring Each Design Pattern
MTT design notes
The logical diagram depicted in Figure 1 represents a fairly common application setup:
● Application users access tenant data via secure views in a serving database (highlighted in
red)
● An entitlements table controls which Snowflake users or roles have access to which tenants
● Secure views ensure application users only see their tenant rows
● All tables are clustered by a tenant_id type column
To enforce that users can see only their tenant rows, tenants query through secure views, which
JOIN base tables to the entitlements table on tenant_id . Common tables, where everybody
gets to see all the rows, use regular views pointed to the base tables.
Figure 1: A serving database with secure views ensures application users see only their tenant rows.
Page 6
Note : Many of the concepts covered in this section apply to the OPT and APT models as well.

Snowflake recommends creating a hierarchy of roles based on privilege and functional access,
with a role and user defined per tenant. Set the privileges for dedicated tenant roles by following
role-based hierarchy best practices.
Figure 2 depicts application setup at the schema level. Secure views occupy one schema, and base
tables and the entitlements table occupy a second schema to separate the privileges that
determine who can access what data. Secure tables and common tables help segregate developer
users and application users. There may also be instances where you want to create sandbox areas
for individual customers to do more sophisticated things, and you can use a schema per customer
to separate that as well. Users can be given default namespaces ( database.schema ) to further
direct access.
Figure 2: Schema-level view of database objects based on RBAC
Secure views use the current_role() parameter to filter the base table using a JOIN to the
entitlements table where the value of current_role() matches one or more rows in the
entitlements table.
Page 7

In a data application you can implement secure views by user or by role.
Secure views based on CURRENT_USER (see Figure 3) make sense if you have one database user
per tenant and you don't need fine-grained control of different users within the tenant.
Figure 3: Secure views based on CURRENT_USER()
Secure views based on CURRENT_ROLE (see Figure 4) allow fine-grained entitlements between
application users. You can have multiple sets of privileges within a given tenant and selectively
assign privileges to tenant users, for example users who can write data into the sandbox versus
users who cannot.
Page 8

Figure 4: Secure views based on CURRENT_ROLE()
Maintaining the entitlement table
Application data security depends on the entitlements table working correctly, so managing the
entitlement table is a major priority for data application builders. Snowflake recommends starting
with the following best practices.
Regarding security:
● Lock down entitlement tables with restrictive permissions.
● Manage the entitlement table with a systematic process. Avoid poor practices such as
adding new customers by running single INSERT/UPDATE statements against the
entitlement tables.
● Eliminate human error by wrapping processing in procedures that are automated and have
controls in place. Procedures can execute either inside or outside of Snowflake.
● To find issues, run regular regression tests after entitlement table updates to test secure
view results against expected outcomes.
Regarding optimization:
● Tenants should have a unique numeric identifier (that is, a tenant_id ).
Page 9

● Cluster all transaction tables by tenant_id and a meaningful date field, at minimum.
(The reverse, date then tenant_id , is also fine.)
● Sort load dimension tables representing tenants initially, and use incrementing identifiers
for tenants.
● Despite the small size, cluster the entitlement table if there are a lot of users or roles per
tenant; otherwise sort load.
Table clustering is common in a multi-tenant model because each tenant typically can access only
its own slice of the data. The type of table and the data model (such as star schema or highly
denormalized) also play a role in determining which tables you need to cluster.
Sometimes you can do simple sort ordering when the table loads to make the data easy to access
and to help with partition pruning. But be aware that auto-clustering runs as a background service
and is not instantaneous. Depending on how frequently the data is updated and loaded within the
application, auto-clustering may not be enough and may require additional workarounds, such as
changing how data pipelines are structured.
Page 10

Figure 5: Cluster tables by tenant_id and DATE
Authenticating to Snowflake
The way application users connect to Snowflake is a little different from most other Snowflake
users. Because application users come through an application tier, users are typically unaware that
Snowflake exists, as shown in Figure 6.
Page 11

Figure 6: Users authenticate to Snowflake through the application tier.
Applications need to handle authentication to Snowflake on behalf of the user. There are multiple
ways to do authentication, but the following principles generally apply:
● Application users authenticate to the application as they normally would.
● There is typically a secrets manager at the application-tier level that stores credentials for
the corresponding Snowflake user. The application is programmed to obtain a Snowflake
session using one of several supported authentication methods.
● Users are only authorized to query secure views and are only authorized to see their
tenant based on the user/role link to tenant_id .
Figure 7 shows an application that establishes a Snowflake session based on a secrets manager
lookup. Note that the application manages the key-pair user authentication flow and stores the
Snowflake user and session access token. Network policies control access to Snowflake from the
application tier over Private Link, which is optional. And, finally, role-based access controls (RBAC)
route users to default warehouses and databases, and allow users to access only the data that they
are permitted to see within the application.
Page 12

Figure 7: Obtaining and storing a user session via key-pair authentication
Isolating working databases if needed
Isolating working databases is optional. Some application builders directly load data into the
serving database and Snowflake points to the initial landing tables. But other builders need to run
transformations in Snowflake before serving data, in which case a best practice is to separate the
serving database from the working databases used for transformation or ingestion from outside
sources. The application can be configured to write data to both the serving database or the
working databases as appropriate for the application functionality.
Snowflake recommends separating databases to simplify application administration. For example,
it's easier to configure RBAC to control "what should be done where " and "who has access to
what " if databases are separate.
Regarding workload processing, you can do some of these processes offline if that makes sense for
the application, and then apply them to the serving database as appropriate.
Page 13

Figure 8: Separate the working databases used for transformation or ingestion from the service
database as needed for your application.
Isolating workloads as needed or pooling to save costs
Similar to database separation being a general best practice, workload separation based on the
type of workload is a good idea. Specific recommendations include:
● Give developers their own warehouse for development work
● Pool application users on a common multi-cluster warehouse or isolate them onto
dedicated warehouses based on application requirements
● Use different warehouses for different application purposes
● Isolate other workloads to their own warehouses
When it comes to tenants, app builders need to make decisions around whether to give tenants a
dedicated warehouse, versus pooling them on common warehouses or multi-cluster warehouses.
Cost will be a factor. You can pool dashboard queries more easily than ad hoc queries because
they're predictable. Ad hoc usage can introduce unexpected and unplanned expenses. Strict COGS
per tenant calculations are a reason to separate tenants into dedicated warehouses because
pooled heuristics are less precise. Some applications pool users by default but offer the option to
pay extra to get a dedicated warehouse.
Page 14

Figure 9: Separating workloads based on the type of workload is a best practice.
Routing users to warehouses
To make application management easier, it's essential to configure RBAC and default warehouses
in Snowflake to route users to the correct warehouses. Proper planning and up front configuration
will ensure that user lookups within the secrets manager and the application tier will
automatically route the user to the right database and the right warehouse.
The following guidance applies to routing users:
● You can grant roles the privilege to operate (modify) or use (run queries against) a given
warehouse
● Users can be configured to use a specific warehouse by default, but roles cannot
● Users with access to multiple warehouses can choose to use a warehouse upon
establishing a session or before query execution
Page 15

Figure 10: Configuring RBAC and default warehouses in Snowflake makes managing the application
tier easier.
Page 16

OPT design notes
OPT enables you to isolate tenant data by database, schema, and table, and use RBAC to control
which user or role can see or query an object. Separating customers into their own databases is
the most common practice (see Figure 11), because it is the easiest, cleanest isolation level, but
some app builders separate customers into dedicated tables, for example, in embedded analytics
use cases in which data applications create a report table per tenant.
Which objects to use for isolation depends on factors such as your data pipeline design, your
software development life cycle process, the consistency of your data shape, and more. How many
total tenants do you expect to have? How many tables will you use? Think through the features
you plan to use, such as replication and zero-copy cloning. (Replication can only be done at the
database level. And, while zero-copy cloning can take place at all three levels, it's cleaner to clone a
database.) All of these factors and more come into play when you implement OPT.
Figure 11: Isolating customers into their own databases is the most common OPT pattern.
Using automation to create new tenants
If you implement the OPT or APT pattern, use automation to create new tenants (see Figure 12).
Automation can be written inside or outside of Snowflake to create new tenants based on a
template. Your template should cover databases, schemas, tables, compute, security, and anything
else new tenants require. Automation is necessary because when you start to get into the
Page 17

hundreds and thousands of objects, tenant creation and ongoing enhancements become too
unwieldy to manage any other way.
Third-party products, such as Flyway and others, can help synchronize template updates with
existing tenants.
Figure 12: Use automation to create and synchronize tenants when implementing either OPT or
APT.
Authenticating and authorizing
OPT authentication and authorization is similar to MTT (see Authenticating to Snowflake ), but with
OPT, routing users to the right databases becomes even more important.
The routing process is similar to what is described in Routing users to warehouses (see Figure 13),
but users are routed to different objects because the context changes relative to MTT. When done
properly, user lookup within the secrets manager and application tier automatically routes the
user to the right database and the right warehouse.
Page 18

Figure 13: OPT authentication is unchanged from MTT, but routing users to the right databases
becomes even more important.
Isolating ingestion/transformation databases in the OPT model
When planning how to isolate your serving database from your working
(ingestion/transformation) database, consider how your data will fan out to and fan in from tenant
databases for common processing. Frequently, running separate workloads on a separate,
per-tenant basis will cost more than consolidating the workloads into a single instance. For
example, if you settle on multiple tables per tenant and each has its own pipeline, the cost will
likely be higher than if you manage a single transformation process in a common data store that
application users cannot access. If necessary, after transformation you can distribute data into
multiple tenant-specific objects or store data in a single, shared, serving database.
To optimize efficiency and cost, consider hybrid models, such as the hybrid OPT/MPT model
described above.
Page 19

Figure 14: Tenant data can be ingested and transformed through one working database and fanned
out to tenant serving databases.
Incorporating OPT to facilitate multi-region data sharing
As noted previously, multi-region data sharing can be a challenge for the MTT model. If you need
to share data in cloud/region pairs other than your primary one, and you do not want to replicate
all tenant data to all cloud/region pairs, consider incorporating OPT into your MTT design.
Because Snowflake supports replication at the entire database level, it's not possible to send only
certain tenant slices from a multi-tenant database somewhere else. While it's possible to replicate
an entire multi-tenant table to all clouds and regions where it's required, over time this design will
become unmanageable as data sizes and the number of tenants grow. For example, Figure 15
shows a multi-tenant, multi-CSP app design. Customer D shares data on GCP, but it does not make
sense to replicate Customer D's data on Azure if no one accesses it there.
Page 20
Note : If you have a data sharing use case, consider using Snowflake Data Marketplace to take
advantage of the latest features.

Figure 15: If you do not want to replicate all tenant data to all cloud/region pairs, consider
incorporating OPT into your MTT design.
Page 21

APT design notes
With the APT model, there is typically one Snowflake account, one warehouse, and one database
per tenant.
There can be exceptions. For example:
● Multiple tenants can share an account to form a hybrid of APT and MTT (see Figure 16).
● There might be an additional administrative warehouse for data loading or administrative
activities, depending on whether the data is going out to the account through data sharing,
or if some form of ETL or ELT is used to do additional processing within the tenant account.
For example, some applications load the data and don't need to do anything further in the
tenant account because it's done elsewhere.
● Many APT designs can rely on single-cluster warehouses. A heavily used application may
require many clusters, including multi-cluster warehouses.
Figure 16: Multiple tenants can share an account to form a hybrid of APT and MTT.
Page 22

Authenticating
With APT, authenticating via the application tier largely works the same as with MTT and OPT.
The key difference is that the account URL changes per tenant. It's also possible for users to log in
to their Snowflake account directly, either through the UI or a BYOT solution.
Figure 17: Sometimes data application builders decide not to authenticate users in the application
tier and instead require users to log in to their Snowflake accounts directly, either through the UI or a
BYOT solution.
Page 23

Ingesting and transforming data
As mentioned previously, applications typically use a central account to manage the working
databases used for ingestion from outside sources or transformation.
You can share tenant data with tenant accounts using Snowflake Secure Data Sharing. This can
also be done with an MTT or OPT approach.
You could also use ELT or Snowflake replication to materialize data in the tenant accounts.
Figure 18: Data can pass to the account through an ETL/ELT process, or through Secure Data
Sharing in which the data is directly loaded into the accounts.
Page 24
Part Three: Evaluating Tenancy Models
You should evaluate all three tenancy models, but Snowflake recommends starting with the MTT
pattern. It's generally instructive to first evaluate if the MTT pattern will work—and, if not, why.
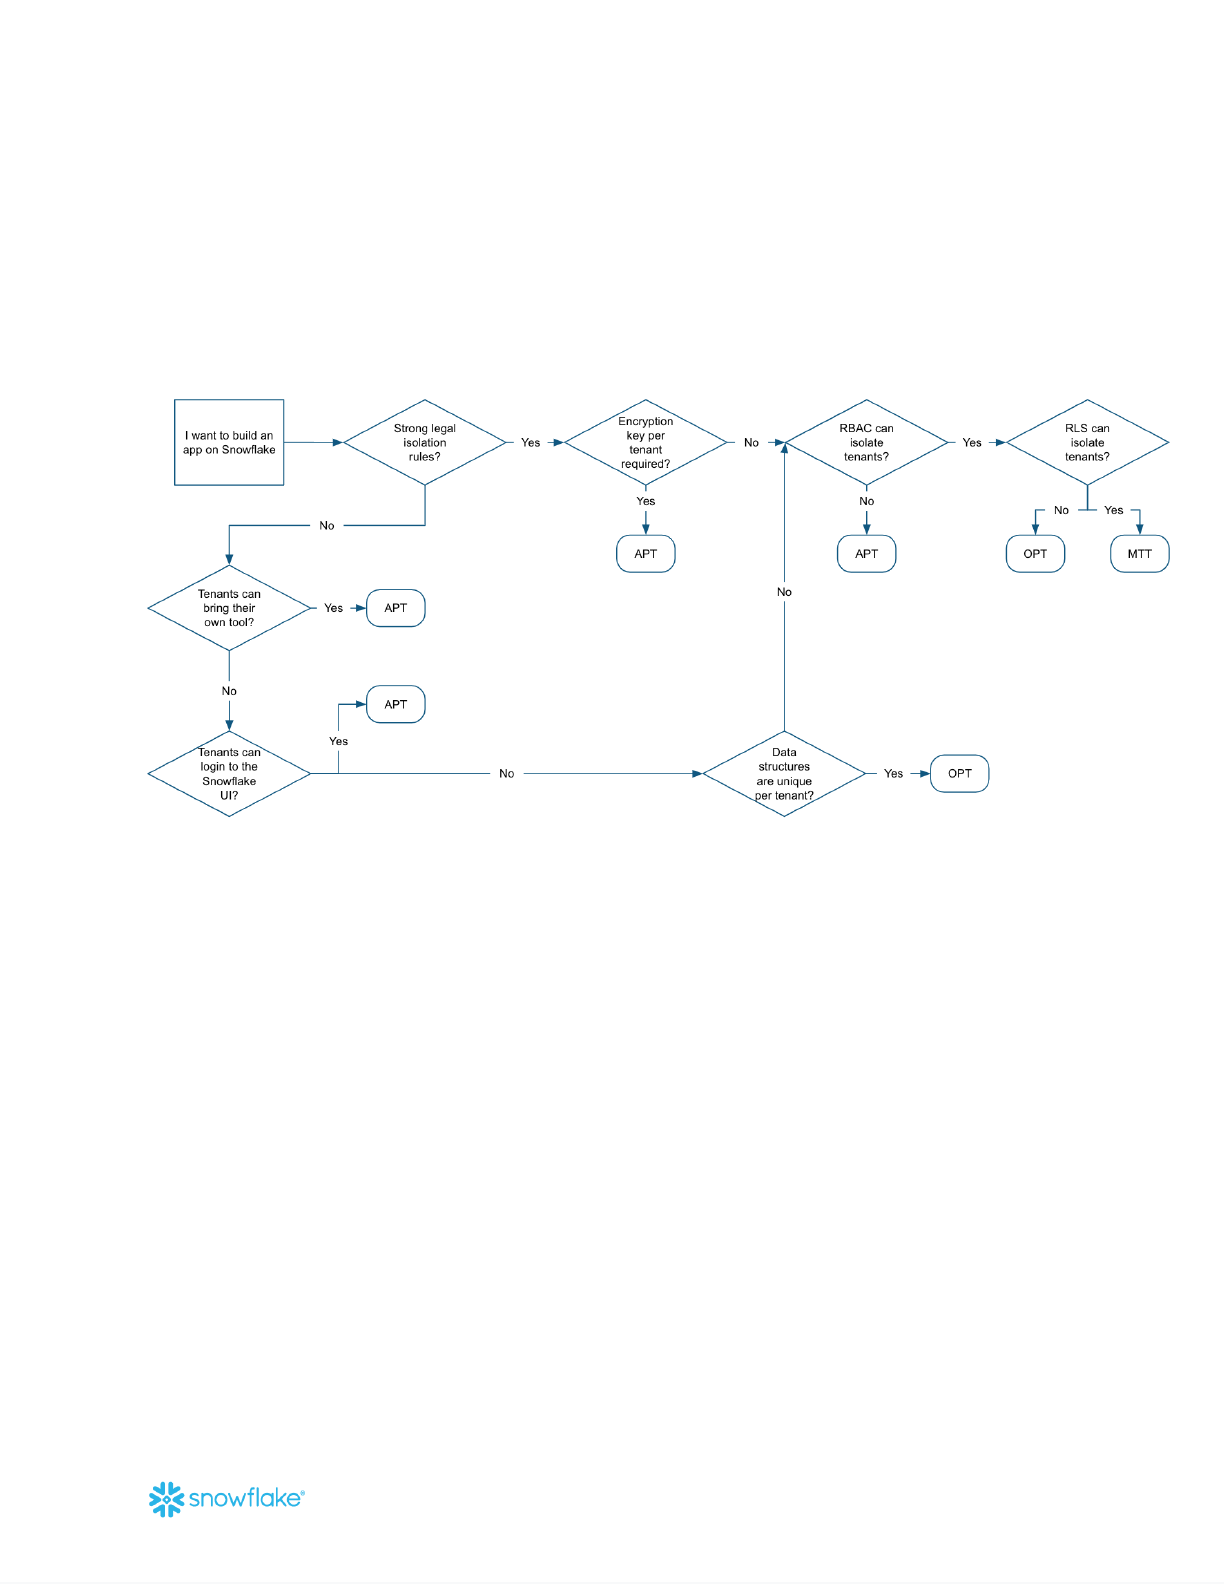
Storage and security considerations
Figure 19: Flowchart for evaluating storage and security requirements. OPT here refers to
databases, schemas, and tables (not virtual warehouses and compute).
Decisions hinge on:
● Contractual obligations that dictate how data should be stored and encrypted
● Regulatory obligations that dictate how data should be stored and encrypted
● InfoSec standards on how data should be stored and encrypted
● Application owner's perspective on the enforcement of database RBAC
● Application owner's perspective on the enforcement of row-level security through
entitlement tables and views
● How customers access the application:
○ Through an application UI?
○ Through the Snowflake UI?
○ Through a BYOT solution?
● How consistent data shapes (data models) are across customers
Page 25

Encryption, isolation, and data protection considerations
● Tri-secret Secure (Bring Your Own Key) is available at only the account level in Snowflake.
● Snowflake uses a hierarchy of encryption keys at the account, table, and file level to
encrypt data-at-rest and prevent data from being accessed between accounts (except data
sharing).
● Snowflake is a multi-tenant service, and the cloud object store is a multi-tenant service, so
data is not truly isolated at the public cloud level, but encryption creates the isolation.
● Databases and schemas are largely logical constructs; they don’t physically separate data.
Figure 20: Flowchart for evaluating compute and security requirements. OPT means one virtual
warehouse per tenant where MTT refers to tenants on a pooled virtual warehouse.
Decisions hinge on:
● Contractual obligations that dictate how tenants should be isolated on raw compute.
● Regulatory obligations that dictate how tenants should be isolated on raw compute.
● InfoSec standards on how tenants should be isolated on raw compute.
● Network policy requirements. Will user-based network policies work? Or do you have
more complex requirements that require account-based policies?
● If virtual warehouse cache constitutes data that must be isolated.
● How COGS are managed per tenant or billed back to the customer.
(Calculating COGS per tenant is more straightforward when each tenant has its own
compute resources. If tenants share compute resources, you can use a heuristic to
Page 26

calculate COGS per tenant, but it's not as precise. Some apps need the precision, and some
are fine with a reasonable approximation.)
● How customers access the application:
○ Through an application UI?
○ Through the Snowflake UI?
○ Through a BYOT solution?
● How many tenants could use a single virtual warehouse concurrently.
Billing, resource utilization, and network policy considerations
● Snowflake network policies (IP allow lists) can be applied only at the account or user level.
● Snowflake virtual warehouses cache data from object stores temporarily for whole or
partial reuse in subsequent queries. RBAC and secure view rules still apply.
● Snowflake compute billing is done at the virtual warehouse level. Calculating per-query,
per-user, or per-tenant costs can be inexact if tenants share compute.
● Snowflake virtual warehouses do not allow for resource limits per user or per tenant.
About Snowflake
Snowflake delivers the Data Cloud—a global network where thousands of organizations mobilize
data with near-unlimited scale, concurrency, and performance. Inside the Data Cloud,
organizations unite their siloed data, easily discover and securely share governed data, and
execute diverse analytic workloads. Wherever data or users live, Snowflake delivers a single and
seamless experience across multiple public clouds. Snowflake’s platform is the engine that powers
and provides access to the Data Cloud, creating a solution for data warehousing, data lakes, data
engineering, data science, data application development, and data sharing. Join Snowflake
customers, partners, and data providers already taking their businesses to new frontiers in the
Data Cloud. Snowflake.com.
Page 27
