
USER GUIDE
Welcome to WD Discovery
Important:
An active Internet connection with ports 80 and 443 available are required for software
and firmware update notifications to occur
Western Digital does not provide instructions on how to modify the DNS settings for
third party routers. Please consult the router's user manual or contact the router's
manufacturer for support
If the router was supplied by an Internet Service Provider (ISP), please contact them
for support
Welcome to WD Discovery
WD Discovery is a new application from WD that enables you to:
Manage your connected WD devices like My Passport, My Book, and My Cloud Home drives
Make complex things easy, like securing a drive with a password or managing drive settings
Download, install and stay up-to-date with software offered by WD and WD partners
Register your devices and receive important software updates
Manage your My Cloud Home device
Features:
It allows connected WD devices like WD My Passport and other supported drives to be managed
under one application
It simplifies complex tasks like securing the drive with a password or managing drive settings
It allows for device registration in order to receive important software updates and notifications
It displays device status such as capacity, free space available, drive security and so on
Notifications about devices not yet registered with a link to a registration form within WD
Discovery itself
Notifications about software updates

It allows for importation of data from a cloud storage (Dropbox, Google Drive, and OneDrive) or
social media accounts (Facebook and Instagram) to a supported drive
A list of installed applications from WD that can be launched and updated from WD Discovery
A list of additional applications available from WD and WD partners

Preferences such as having WD Discovery automatically start on system startup
Links to WD websites such as product documentation

A setting to keep WD Discovery pinned to the system menu or have it as a floating window
Support for 18 languages

Comes with the My Cloud Home Desktop App preinstalled

How to Install and Launch on a Mac
WD Discovery is a light weight desktop application for Mac and Windows that provides a cloud based
method of delivering software, updates and notifications for external USB drives. WD Discovery can be
manually installed on computers that do not have an internet connection like any other software
application
Important:
An active internet connection with ports 80 and 443 available are required for
software and firmware update notifications to occur
WD Discovery will install or Update existing versions of WD Drive Utilities to the
version included with WD Discovery
Existing installations of WD Software supported by WD Discovery will prompt the
user that a new version is available through the WD Discovery environment
Installing WD Discovery on a Mac
1. Go to the WD Discovery Download Site and download the software

2. Once finished, run the software
3. Click on Install Now

4. Enter the Mac user's password , click OK and wait for the installer to complete the installation

5. From Apple menu bar, click on the WD icon to open WD Discovery

How to Install and Launch on a Windows
WD Discovery is a light weight desktop application for Mac and Windows that provide a cloud based
method of delivering software, updates and notifications for external USB drives. WD Discovery can be
manually installed on computers that do not have an internet connection like any other software
application
Important:
An active internet connection with ports 80 and 443 available are required for
software and firmware update notifications to occur
WD Discovery will install or Update existing versions of WD Drive Utilities to the
version included with WD Discovery
Existing installations of WD Software supported by WD Discovery will prompt the
user that a new version is available through the WD Discovery environment
Installing WD Discovery on Windows
1. Go to the WD Discovery Download Site and download the software

2. Right Click and extract the installer from the .zip file
3. Right Click the Installer and select Run as Administrator. Select Yes when prompt
4. Click Install Now

5. Wait while WD Discovery is installing

6. Locate the WD icon in the lower right hand corner of the PC system tray
7. Click to launch WD Discovery
Note:
Attached WD external drives will be automatically recognized by WD Discovery due to the
installed of WD Drive Utilities. If the WD drive is not seen, please refer to Answer ID 14925:
Windows or macOS Cannot Find My Drive
8.

9.
10. System Restart

Important:
A reboot is required if previous versions of WD Backup, WD SmartWare, WD Drive
Utilities or WD Security are already installed
If the computer is not rebooted, WD Discovery cannot Update WD software to the
latest available version
WD Discovery has been successfully installed on a Windows PC
How to Access Files on the Device
Access drive content in Windows
1. Locate the WD icon in the lower right hand corner of the PC system tray or select and start WD
Discovery from the Start Menu
2. Click to launch WD Discovery

3. Click the drive to access the content

Access drive content on a Mac
1. Click the WD icon in the upper right hand corner of the Mac's menu bar and double click on the
drive to access the content

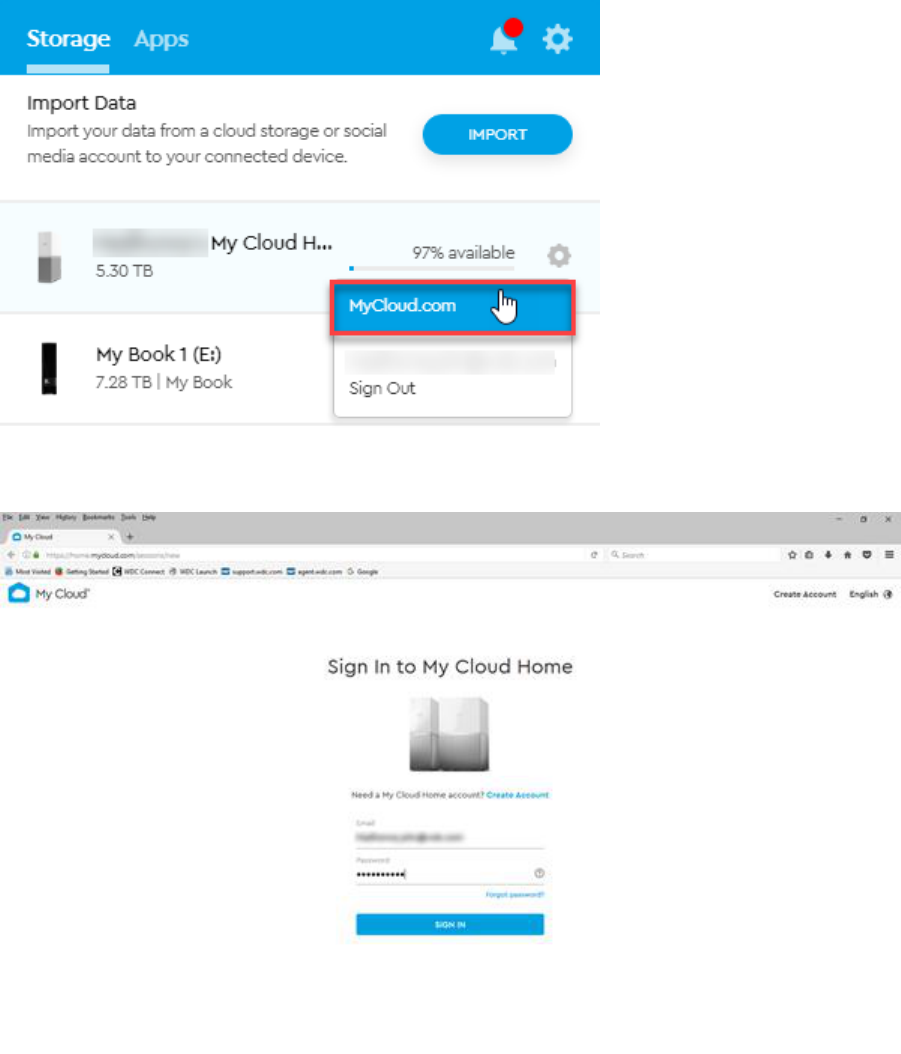
The My Cloud Home Desktop App comes preinstalled with the WD Discovery software.
Basic instructions for setting up and accessing your My Cloud Home are as follows:
1. If there are no other WD devices connected to the computer, the following page should be
displayed under the Storage tab. Click Sign In
2. Enter your My Cloud Home credentials. If you do not have a My Cloud Home account, go to
MyCloud.com and create one

3. Click the My Cloud Home icon or go to MyCloud.com to access your data


How to Configure RAID Mode (Direct Attached Drive)
1. Click on Settings icon and choose RAID Settings
2. Choose RAID Type, Volume name, and Format and click Configure

3. Wait for the RAID to be configured

4. Check RAID Settings to confirm current configuration

How to Set a Password and Unlock a Supported WD Drive
1. Click on Settings icon and choose Set Password
2. Type the Password , Verify Password , Password Hint (optional), and Click Set Password

3. Eject the drive and disconnect and reconnect the cable

4. Click on Unlock
5. Type the Password and click Unlock Device
6. The drive is now unlocked

How to Eject and Turn LED On or Off
How to Eject
1. Click on Settings icon and choose Eject
2. Disconnect the drive once it disappears from Discovery window

How to Turn LED On or Off
1. Click on Settings icon and choose LED

2. Set the LED switch to ON or OFF
How to Install WD Apps
Important:
Existing installations of WD Software supported by WD Discovery will prompt
the user that a new version is available through the WD Discovery environment
An active internet connection and ports 80 and 443 are required to install apps
using WD Discovery
WD App Installation
1. Open the WD Discovery and go to Apps

2. WD Apps are displayed at the top under the app banner. Scroll down to view 3rd party apps.

3. Click Install under the WD App that you wish to install on your computer
4. The WD App is downloaded and installed automatically by WD Discovery
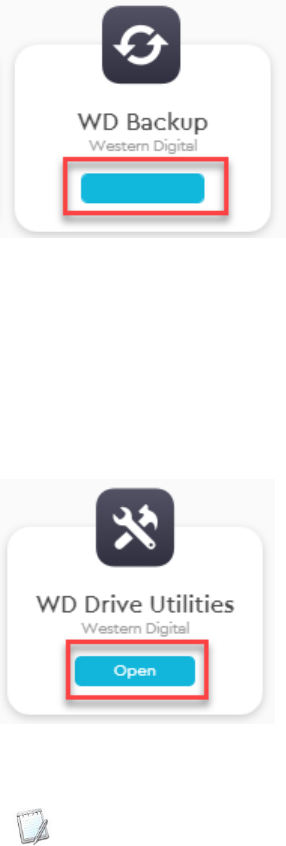
5. Click Yes when prompted to install the app
6. After the app installation has completed, the newly installed app is available and can be opened.
Note:
App launch speed can depend of the state of the computer. Wait a few seconds to allow the
App to start when there are many applications and or program open and in use
7. click Open to launch an installed app

8. Repeat the steps above to install other AVAILABLE APPS
How to Open WD Apps
1. Open WD Discovery and go to the Apps tab
2. Click Open to launch an installed WD App

Note:
App launch speed can depend of the state of the computer. Wait a few seconds to allow the
App to start when there are many applications and or program open and in use
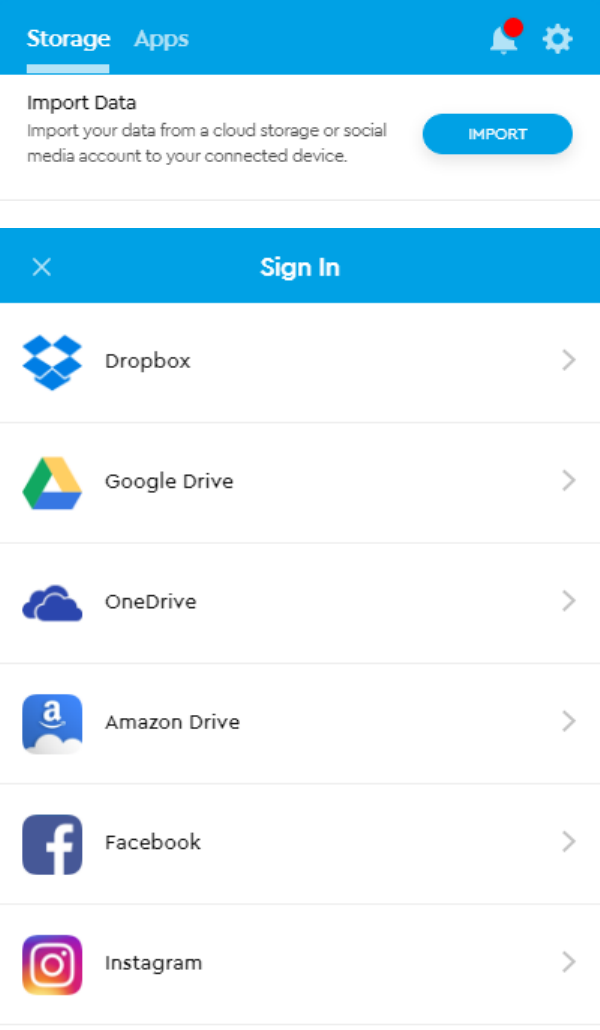
How To Import Content from Cloud Storage or Social Media Account with WD Discovery
Answer ID 18050
Before using the Cloud and Social media apps within WD Discovery, please create a Cloud or
Social media account through the vendors web portal.
Click Here to create a Dropbox account
Click Here to create a Google Drive account
Click here to create a OneDrive acconnt
Click here to create a Facebook account
Click here to create a Instagram account
Click here to create a Amazon Drive account
How to Import Social Media or Cloud Storage Data
Topic
Instructions
Dropbox
Click here for Instructions
Google Drive
Click here for Instructions
OneDrive
Click here for Instructions

Facebook
Click here for Instructions
Instagram
Click here for Instructions
Amazon Drive
Click here for Instructions
Access Token Expiry Times
An Import failed message can occur when importing large amounts of data and the access token expires.
The access token expiry times are set and controlled by the Cloud and Social Media
application provider.
These settings cannot be controlled or changed by the end user or WD Technical Support.
Sloution for Access Token Expiry Time
Start a new Import if the process failed due to the access token expiring.
The new import will only download files that were not previously imported.
The table below can be used to estimate import time limits by application
App Name
Access Token Expire Time
Access Token Refresh Amounts
Import Time Limit
DropBox
N/A
N/A
N/A
Google Drive
1 hour
50 Times
50 hours
One Drive
1 hour
3 days
72 hours
Facebook
60 days
N/A
60 days
Instagram
sometime in the future
undefined
Undefined
Box
1 Hour
N/A
60 days

Important:
It should take 1 hour to sync down 1 GB of content.
How to Update WD Apps
Important:
Existing installations of WD Software supported by WD Discovery will prompt
the user that a new version is available through the WD Discovery environment
An active internet connection and ports 80 and 443 are required to install apps
using WD Discovery
1. Open WD Discovery and go to Apps tab to view the WD Apps that have an updated version
available
2. Apps that have an update will have an Update button under the Open button.

3. Click Update
o The WD App is downloaded and installed automatically by WD Discovery
4. Click Open to launch the WD App
Note:
App launch speed can depend of the state of the computer. Wait a few seconds to allow the
App to start when there are many applications and or program open and in use

5. Repeat the steps above to Update other apps
How to Update WD Discovery
WD Discovery can be manually installed on computers that do not have an internet connection like any
other software application
Update with internet connection
1. Updates for WD Discovery and My Cloud Home Desktop App will appear in the notification
window. Click UPDATE NOW to start the update process.

2. WD Discovery will update and restart automatically

3. A reboot may be required before or after an update to WD Discovery to complete the process.
Select Restart Now at the prompt after the update process
Update without internet connection
WD Discovery can be updated by downloading the most recent release
1. Download WD Discovery from our website or from the drive which includes the application

2. Right Click and extract the installer from the .zip file
3. Right Click the Installer and select Run as Administrator. Select Yes when prompted
Note:
The following message will appear if the newer version of WD Discovery is already installed.
Click Close to exit

How to Update Device Firmware
Western Digital recommends that best practice is to keep a backup of your important data before updating
the device firmware. Maintaining a valid backup protects against: computer virus, data corruption,
hardware issues, or environmental hazards
Important: Always remember that "backup" means that you have your data stored in at
least two (2) locations. Moving data from your system drive to an external hard drive is
not a backup, unless there is already a duplicate of the file on a different drive
1. Open WD Discovery and check under NOTIFICATIONS to see if there is a new firmware
available
2. If there is an update available, click on here to launch WD Firmware Updater

3. Click Continue

4. Read the Western Digital End User License Agreement and click on Accept
5.
Important: Disconnect all other attached USB drives prior to updating the firmware
6.

7. Click on Update Firmware
8. Click Exit once the firmware has been successfully updated
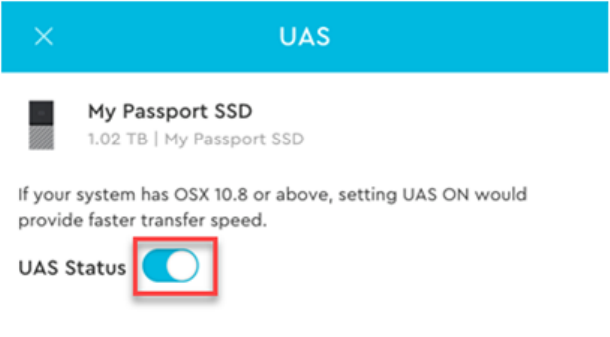
How to Turn on UAS (USB Attached SCSI) on My Passport SSD
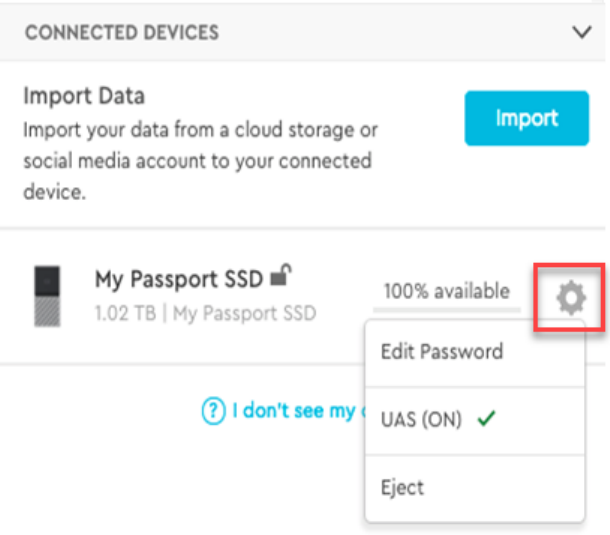
USB Attached SCSI (UAS or UASP) is a protocol that uses SCSI commands over USB. If macOS
version is 10.8 or above and Windows version 8 or above, setting UAS to on will provide faster transfer
speeds. UAS is currently supported on My Passport SSD (Firmware 1.007).
1. Click the Settings icon next to My Passport SSD
2. Set the UAS Status to ON
How to Install Paragon Driver on Windows and macOS
Paragon driver is an application that allows for full read-write access to drives formatted NTFS (read-only
on macOS) and HFS+ (no read / write on Windows) on Windows and macOS without having to reformat
the drive to exFAT.
Supported Drives:
My Passport (New Model)
My Book (New Model)
1. Click on Install Driver
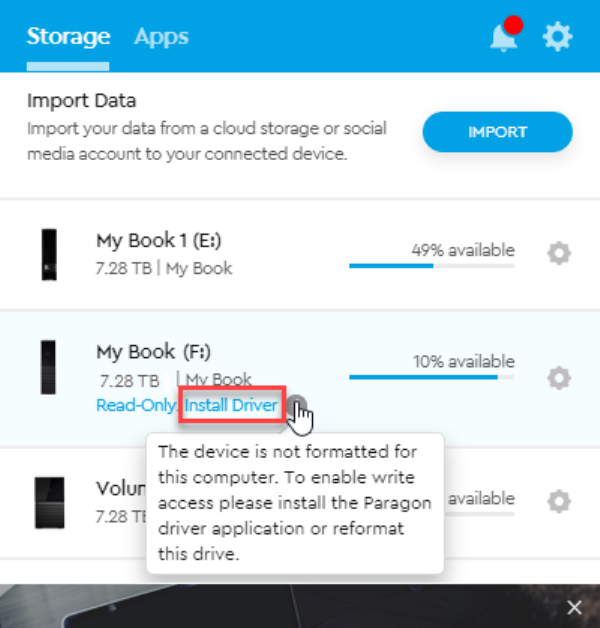
2. Click Install

3. Restart the system
How to Uninstall WD Apps

Mac
1. From Apple menu bar, click on Go and open Applications
2. Go to the WD App Uninstaller (WD Security Uninstaller, etc.) and run the uninstaller

3. Check the box and click Unistall

4. Enter the Mac user's password and click OK and wait for the uninstaller to complete
5. Click Finish once the app has been successfully uninstalled

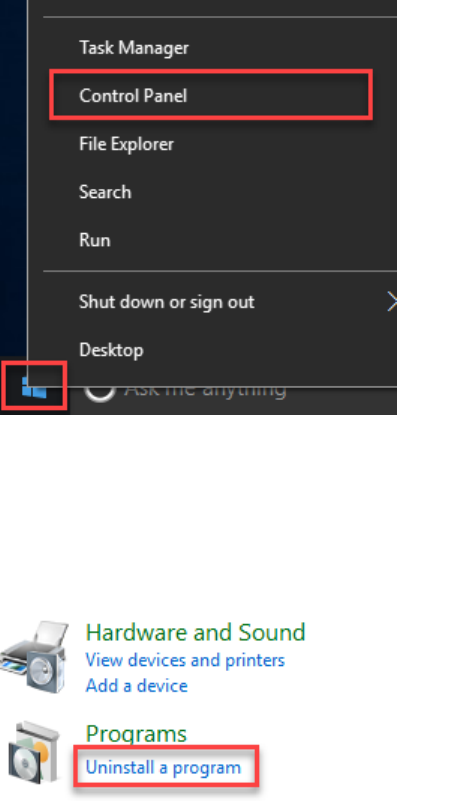
2. From the Programs choose Uninstall a program
3. Right click on WD app from installed programs and choose Uninstall

4. Check the box and click the Uninstall button

How to Turn Off Notifications, Start on System Startup, and Unpin from Windows System Tray
and Apple Menu Bar
1. Open WD Discovery and go to Settings

2. Uncheck the box for Show OS notifications

3. To clear all notifications, click on Clear All

4. To stop WD Discovery from automatically starting during computer start up uncheck the box
next to Start on system startup

5. To move the WD Discovery window around, click the Unpin

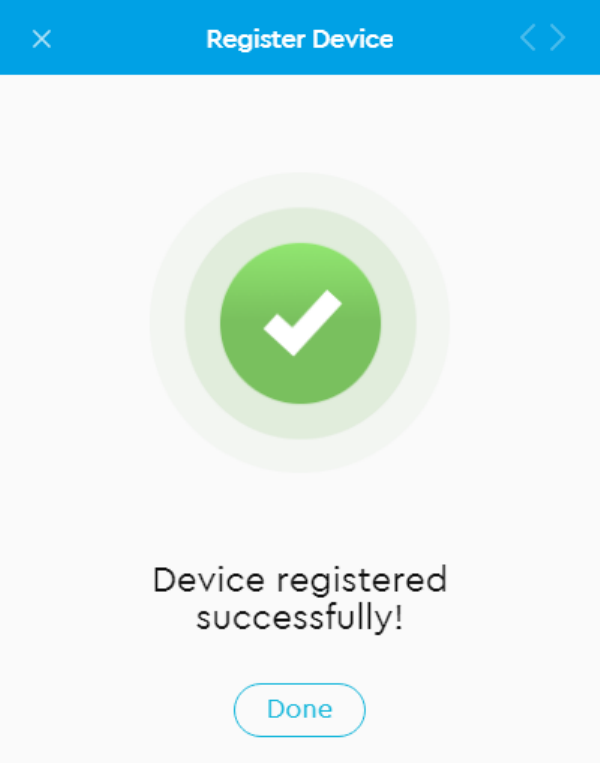
How to Register a Drive
1. Open WD Discovery and Go to the Storage tab and at the bottom of the page click on Register
device

2. Enter First Name, Last Name, Email, select the Country from the dropdown menu and click
Register device

3. Click Done once the device has been successfully registered
How to Provide WD Discovery Feedback
1. Open WD Discovery and go to Settings tab

2. Click on Have Feedback

3. Enter your Email and Comments and click Submit

WD Discovery Icon States
The WD Discovery icon is visible in the system tray:
The icon can be visible by default:
Or visible once opening the arrow:

Windows and macOS have the following four states:
1. Default State.
2. Selected State - When the system tray icon is clicked.
3.Activity In Progress - e.g. downloading software.
4. Critical Notification - An error within WD Discovery.
Supported WD Apps, File Systems, Operating Systems, and Languages
Supported WD Apps
WD Discovery supports the following WD apps
Windows
WD Backup
(External Drive, and Dropbox backup)
Windows and MacOS
WD Drive Utilities
(Installs with WD Discovery)
WD Security
Universal Firmware Updater
(Launched by WD Discovery)
Supported File Systems
WD Discovery supports the following file systems
NTFS
exFAT
FAT32
FAT
HFS+
Supported Operating Systems
WD Discovery can be installed and is supported on the following Operating Systems
Windows
Windows 10
Windows 8.1 / 8.0
32-bit and 64-bit
Windows 7 SP1
32-bit and 64-bit

Note:
WD Discovery requires .NET 4.0 on Windows 7 and is installed with WD Discovery
Mac OS
macOS 10.12
(Sierra)
macOS 10.11
(El Capitan)
macOS 10.10
(Yosemite)
macOS 10.9
(Mavericks)
Supported Languages
WD Discovery is supported in the following languages
English
French
Italian
German
Spanish
Simplified Chinese
Traditional Chinese
Korean
Japanese
Russian
Portuguese
Czech
Dutch
Hungarian

Norwegian
Polish
Swedish
Turkish
How to Uninstall and Remove on Windows
Important:
Uninstalling WD Discovery uninstalls WD Drive Utilities
WD Drive Utilities cannot be uninstalled by itself when WD Discovery is
installed
Other WD Apps are not uninstalled with WD Discovery and may require a
standalone installation of WD Drive Utilities
Use of Third-Party Software or Websites
We may recommend use of software, information, products, or websites that are owned
or operated by other companies. We offer or facilitate this recommendation by
hyperlinks or other methods to aid your access to the third-party resource. While we
endeavor to direct you to helpful, trustworthy resources, We cannot endorse, approve,
or guarantee software, information, products, or services provided by or at a third-party
resource or track changes in the resource. Thus, we are not responsible for the content
or accuracy of any third-party resource or for any loss or damage of any sort resulting
from the use of, or for any failure of, products or services provided at or from a third
party resource. WD recommends these resources on an “as is” basis. When you use a
third party resource, you will be subject to its terms and licenses and no longer be
protected by our privacy policy or security practices, which may differ from the third
policy or practices or other terms. You should familiarize yourself with any license or
use terms of, and the privacy policy and security practices of, the third party resource,
which will govern your use of that resource.
A third party utility may be used to uninstall WD Discovery in the event that Windows
is unable to uninstall it. Please see Wise uninstaller

Uninstall WD Discovery
Important:
Please make sure show hidden files and folder is enabled. For more information please
refer to Microsoft Article 14201: Show hidden files
For more information on how to access the Control Panel please refer to Microsoft
Article 13764: Where is Control Panel?
1. Start by opening Control Panel and go to the Programs screen
2. Locate and select WD Discovery
3. Select Uninstall/Change or right click and select Uninstall/Change

4. Select Uninstall

5. Click the X in the upper right hand corner to exit the unstill splash screen
Directory Removal
Manually delete the remaining files and directories after uninstalling WD Discovery Software
Note:
C:\Users\$HOME\AppData is a hidden directory and will not be seen in Windows Explorer
unless the "View Hidden Files" option is enabled on the PC
1. Go to C:\Users\USERNAME in Windows Explorer
2. Delete the .wdc folder

3. Type \AppData after the USERNAME in the location bar and press Enter
4. Go into the AppData/Local/Temp directory and delete all WD Discovery files in the Temp
directory. DO NOT delete the Temp directory itself
C:\Users\USERNAME\AppData\Local\Temp
5. Delete the following WD Discovery folders
C:\Users\USERNAME\AppData]\Local\Western Digital\WD Discovery
C:\Users\USERNAME\AppData]\Roaming\Western Digital\WD Discovery
WD Discovery has been completely uninstalled and removed
We recommend rebooting the computer
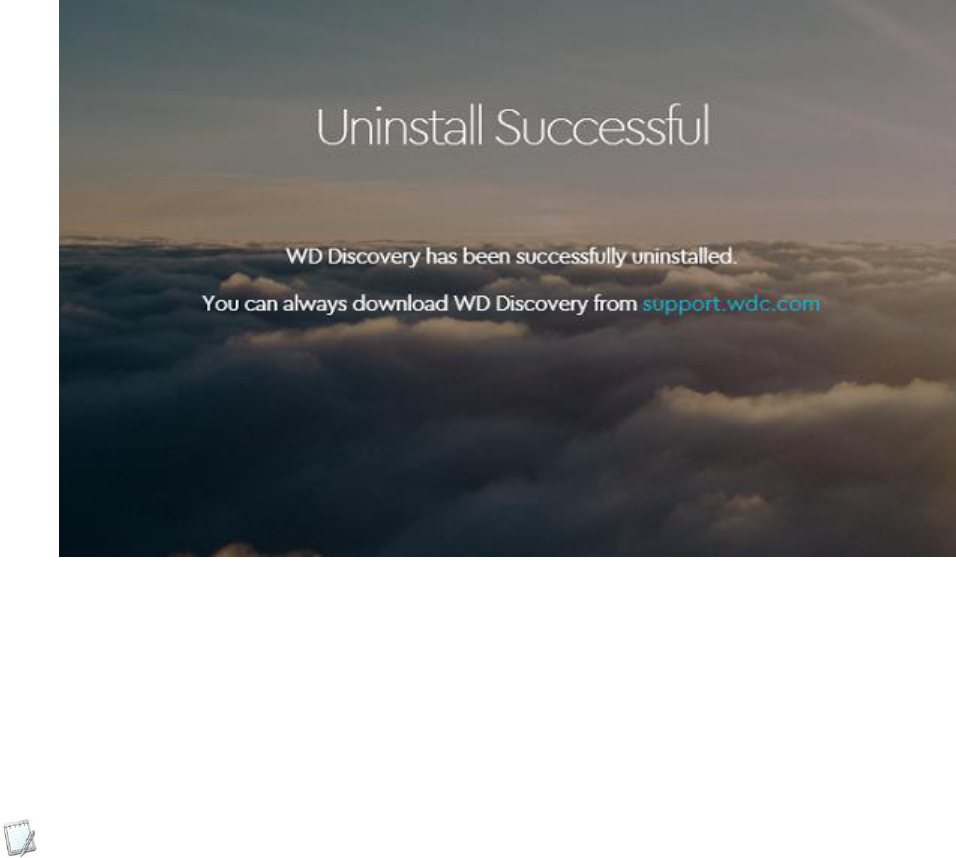
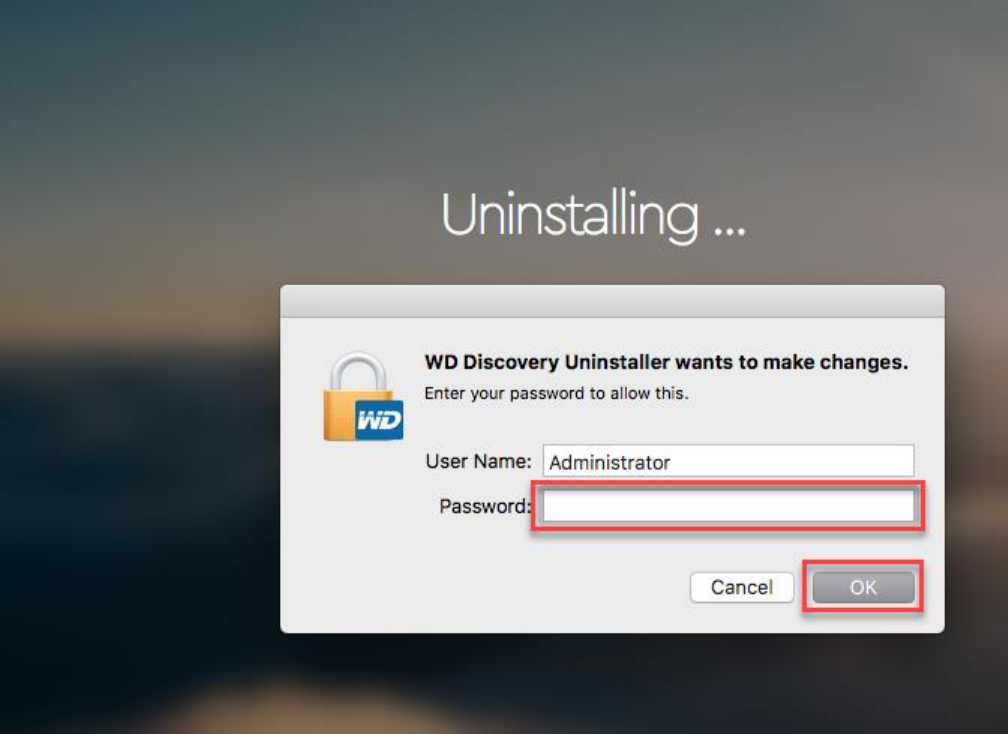
How to Uninstall and Remove on macOS

1. From Apple menu bar, click on Go and open Applications
2. Go to WD Discovery , More WD Apps , Uninstallers and double click Uninstall WD
Discovery

3. Click on Uninstall
4. Enter the Mac user's password and click OK and wait for the uninstaller to complete
5. Click the X once the WD Discovery has been successfully uninstalled

6. Check the following folders:
o /Applications/WD Discovery, remove it if it still exists
o ~/.wdc , remove if it still exists
o ~/Library/Application Support/WD Discovery, remove if it still exists
o /Library/LaunchAgents, remove everything which starts with com.wdc (for 1.x)
7. Reboot the Mac
WD Discovery Solutions and Troubleshooting
WD Discovery Solutions and Troubleshooting

Subject
Answer ID
Title
Information
17596
How to Collect WD Discovery Software Logs
Information
18199
How To Increase WD Discovery Log Levels
Information
18345
Error Codes and WD Discovery Messages
Information
24785
Download and Install WD Discovery Without or Restricted Internet Connection
Solution
21258
No Apps or USB Drives Detected After Download, Install and Update of WD Discovery
Solution
18553
WD Discovery Failed to Install
Solution
23126
WD Discovery No Internet Connection Message
Solution
24785
Download and Install WD Discovery Without Internet Connection
Solution
23053
WD Discovery Will Be Back Shortly Message
Solution
24591
WD Discovery Prompts for Admin User on non Admin Account
Solution
18545
WD Software will not install on Microsoft Windows 10 S
Solution
18197
WD Software Update Check Does Not Report New Version Available
Solution
17354
WD Discovery does not display capacity, free space available, or open the drive
Solution
14925
Windows or macOS cannot find my drive
Solution
18567
WD Discovery Social Media or Cloud Import Failed Message "No Permission to Create Folders"
Solution
18236
WD Discovery Cloud Apps Do Not Import All Files and Folders
Solution
18233
WD Discovery Cloud Apps Login Screen Different or Blurred
Solution
18243
WD Discovery OneDrive App Cannot Create a Onedrive Account
Solution
18213
WD Discovery Google Drive App Cannot Create a Google Account
Solution
18216
WD Discovery Social Media or Cloud Import Failed Message
Solution
18231
WD Discovery Social Media or Cloud Slow Import Count
Solution
18239
WD Discovery Facebook App Imports Remove the Trailing . (dot) of the Album Name
Solution
18238
WD Discovery Facebook App Imports Albums Into The Same Folder

Solution
18211
WD Discovery Instagram App All Photos and Videos Not are Imported
Solution
19521
WD Discovery can not be uninstalled or reinstalled on a Mac
Solution
20393
WD Discovery shows the attached drive as a read-only
Solution
20434
WD Discovery Dropbox Import fails to complete
Solution
20435
Unable to install WD Discovery 1.x after installing Drive Utilities 2.x
Solution
20470
WD Drive Utilities Can Not be Uninstalled
Solution
20537
My Cloud Home Desktop App Fails to Update
Solution
21026
WD Smartware 2.4.20.48 No Longer Launches With WD Discovery 2.2 and Higher Installed
Solution
20706
WD Discovery Unsigned Driver Pop Up Message on Windows 7
Solution
23053
WD Discovery Will Be Back Shortly Message
Solution
23126
WD Discovery No Internet Connection Message
Solution
24435
WD Drive Utilities Installer for Mac Quit unexpectedly
Solution
24592
WD Discovery Wants to Use Your Confidential Information Alert
