
ADDITIONAL GUIDES | Customer
1908 | 2019-07-31
SAP Enable Now Customization
Customer
© 20 19 S A P SE o r an SAP aff il i at e co m pa ny. A l l ri gh ts rese rv ed.
SAP Enable Now Customization
Introduction
CUSTOMER
2
Table of Contents
1 Introduction ...................................................................................................................................................... 4
1.1 Workarea Resources ............................................................................................................................................... 4
1.2 Customization Editors ............................................................................................................................................. 5
1.3 Using Customized Resources in Different Workareas ......................................................................................... 5
2 Customizing Colors .......................................................................................................................................... 6
2.1 Color Palette............................................................................................................................................................. 6
2.1.1 Customizing a Color Palette ................................................................................................................... 7
2.2 Color Selection Dialog Box ...................................................................................................................................... 7
3 Customizing Styles ........................................................................................................................................... 9
3.1 Structure and Functions ......................................................................................................................................... 9
3.2 Creating a New Style ............................................................................................................................................. 10
3.3 Style Attributes ...................................................................................................................................................... 10
3.4 trainer Style (including library and book reader) ................................................................................................. 11
3.4.1 Attributes of the trainer Style .............................................................................................................. 12
3.4.2 Explanation Icons .................................................................................................................................. 14
3.4.3 Activating the trainer Style ................................................................................................................... 15
3.5 Desktop Assistant Style ........................................................................................................................................ 15
3.5.1 Attributes of the Desktop Assistant Style ........................................................................................... 15
3.5.2 Activating the Desktop Assistant Style ............................................................................................... 16
3.6 Book Page Style ..................................................................................................................................................... 17
3.6.1 Attributes of the Book Style ................................................................................................................. 18
3.7 Bubble Styles ......................................................................................................................................................... 18
3.7.1 Attributes of the Bubble Styles ............................................................................................................ 22
3.8 Border Styles ......................................................................................................................................................... 22
3.8.1 Attributes of Border Styles ..................................................................................................................24
3.9 Manager Style ........................................................................................................................................................ 25
3.9.1 Attributes of the Manager Style ........................................................................................................... 25
3.9.2 Implementing the Manager Style (SQL Option) .................................................................................26
3.9.3 Implementing the Manager Style (HANA / Cloud) ............................................................................ 27
3.10 Desktop Assistant: Mini Icons ..............................................................................................................................28
3.10.1 Attributes of the Mini Icons ..................................................................................................................28
3.11 Avatars ....................................................................................................................................................................29
3.11.1 Attributes of the Avatars ...................................................................................................................... 31
4 Customizing Text Styles ................................................................................................................................. 32
4.1 Structure and Functions ....................................................................................................................................... 32
4.2 Text Style Categories ............................................................................................................................................ 33
4.3 Editing a Text Style ................................................................................................................................................ 33
4.4 Creating a Text Style .............................................................................................................................................34
5 Customizing Dictionaries ............................................................................................................................... 36
5.1 Structure and Functions .......................................................................................................................................36
5.2 Setting up a Dictionary .......................................................................................................................................... 37
SAP Enable Now Customization
Introduction
CUSTOMER
3
5.3 Editing an Entry ...................................................................................................................................................... 37
5.4 Creating a New Entry .............................................................................................................................................38
5.5 Creating a New Language .....................................................................................................................................39
5.6 Activating a Dictionary ..........................................................................................................................................39
6 Customizing Documentation Templates and Settings .................................................................................... 41
6.1 Documentation Templates ................................................................................................................................... 41
6.1.1 Managing Templates ............................................................................................................................42
6.1.2 Editing a Microsoft Word Template .....................................................................................................42
6.1.3 Editing a Microsoft PowerPoint Template ..........................................................................................43
6.1.4 Explanation Icons ................................................................................................................................. 44
6.2 Documentation Settings ....................................................................................................................................... 45
6.2.1 Basic Settings ....................................................................................................................................... 46
6.2.2 Fragments .............................................................................................................................................. 47
6.2.3 Settings of the Subcategories ............................................................................................................. 48
6.2.4 Subcategory: Quiz ................................................................................................................................ 48
6.2.5 Subcategory: Action Table .................................................................................................................. 49
6.2.6 Compound Document Settings .......................................................................................................... 50
6.2.7 Customizing Documentation Naming ................................................................................................. 51
6.2.8 Documentation for Right-to-Left Languages ..................................................................................... 52
7 Templates for Content Objects ...................................................................................................................... 54
7.1 Customizing Simulation Pages ............................................................................................................................. 55
7.2 Templates for Book Pages .................................................................................................................................... 55
7.2.1 Creating a Book Page Template .......................................................................................................... 56
7.2.2 Defining a Book Page Template ........................................................................................................... 57
7.2.3 Using a Book Page Template ............................................................................................................... 57
7.3 Templates for Text Units and Projects ................................................................................................................ 58
7.4 Quiz Templates ..................................................................................................................................................... 60
7.4.1 Customizing a Quiz Template ............................................................................................................. 60
7.4.2 Elements of a Quiz Template ............................................................................................................... 61
7.4.3 Adapting the Quiz Item Template ........................................................................................................63
7.4.4 Selecting a Quiz Template ................................................................................................................... 64
8 Technical Support .......................................................................................................................................... 65
9 Important Disclaimers on Legal Aspects ........................................................................................................ 66
SAP Enable Now Customization
Introduction
CUSTOMER
4
1 Introduction
The document gives you an overview about the customization possibilities of the SAP Enable Now. This includes
how to adapt the style, text and documentation resources in your workarea.
The instructions allow you to adapt the styles based on templates for own requirements or your corporate identity
as well as different use cases for your learning content.
1.1 Workarea Resources
The resources are part of the workarea and contain the styles, text modules and configurations for the creation and
playback of learning content. The resources are located in the resource structure of the project explorer.
Further information about the resources can be found in the Producer manual.
Adaptable Resources
The adaptable resources are part of the workarea resource tree and are located on top of the resource structure.
They contain customizable resources like styles and templates. The following chapters describe how to adapt these
style and templates resources.
The general style and template resources are:
• trainer Styles
• Desktop Assistant Style
• Text Style
• Documentation Style
• Bubble Styles
• Border Styles
• Book Style
• Desktop Assistant: Mini Icons
Dictionary Resources
The dictionary resources contain the texts of the content languages used for the project bubbles, documentation
and playback functionalities. The available dictionary types are:
• Playback Dictionary
• Recording Dictionary
Further information on the dictionary resources is available in the chapter Dictionary Editor.
SAP Enable Now Customization
Introduction
CUSTOMER
5
1.2 Customization Editors
The Producer provides different editors to enable you to easily customize styles and texts in the required resources.
The customization editors of the Producer are:
• Style Editor
Allows you to customize style resources for the content and playback functionalities.
You can open the editor with the Tools -> Customization -> Edit Style Resources... menu.
See the chapter Customizing Styles.
• Text Style Editor
Allows you to customize text style resources for content creation in the HTML editor.
You can open the editor with the Tools -> Customization -> Edit Text Styles... menu.
See the chapter Customizing Text Styles.
• Dictionary Editor
Allows you to customize dictionary resources for the content and playback functionalities.
You can open the editor with the Open Dictionary button in the object editor, when selecting a dictionary
resource.
See the chapter Customizing Dictionaries.
• Color Palette Editor
Allows you to customize color palette resources for the content creation.
You can open the editor with the Tools -> Customization -> Edit Color Palettes... menu.
See the chapter Customizing Colors.
Further information about the editors is available in the linked chapters.
1.3 Using Customized Resources in Different Workareas
Customized resources are located in the workarea where you adapt them. You can also use them in different
workareas and you do not need to re-edit the texts each time. The customized resources can be outputted as an
archive and imported into the required workarea. Read the sections on exporting and importing an archive in the
Producer manual.
If there is a connection to a Manager, the resources can be saved to the central workarea and downloaded to each
local workarea afterwards.

SAP Enable Now Customization
Customizing Colors
CUSTOMER
6
2 Customizing Colors
To specify a set of colors you can use the Color Palette resource. The colors of the resource can be selected from
the Color Selection Dialog Box.
Recommendation
You can use the color palette for customizing styles. Create the color palette as preparation for the customizing.
2.1 Color Palette
The color palette allows you to predefine a set of colors used for content creation. For example, you can specify the
colors of your corporate design. This helps the author to use the colors in the content consistently.
The color palette is a resource type of the Adaptable Resources.
Note
The color palette is not a default resource of the workarea. The resource is added after you specify and save colors
in the color palette editor.
Color palette editor
The editor can be opened with the Tools -> Customization -> Edit Color Palettes... menu.
The editor is structured as follows:
○ Toolbar:
Contains functions for editing colors.
○ New Color:
Allows you to create a new color for the resource.
○ Edit Name and Description:
Allows you to edit the name and description of a color.
○ Reset Color:
Resets the color and discards the last changes.
○ Move Color Up / Move Color Down:
Changes the order of the color in the list.
○ Delete Color:
Deletes a selected color from the resource.
Color list:
Show the colors of the resource with preview, name and description.
Color selection controls:
Contains controls for specifying a color. See also Color Selection Dialog Box.

SAP Enable Now Customization
Customizing Colors
CUSTOMER
7
2.1.1 Customizing a Color Palette
You can create a new color specification or you can change an available color.
Creating a new color
To create a new color, proceed as follows:
1. Select New to create a new color. Select Edit to edit an available color.
2. A dialog box is opened.
1. Color preview:
The field shows a preview of the current color and the Hex value.
2. Color Name:
Allows you to enter a name for the color.
3. Description:
Allows you to enter a description for the color. The description can contain a use case or limitations for
the color.
3. Select OK.
The new color is created and selected in the list.
4. Specify the color by using the color wheel or enter a color value.
Changing an available color
To change an available color, proceed as follows:
1. Select a color in the list.
2. To edit the name and description select Edit in the toolbar or double-click the color.
1. A dialog box is opened. Change the values.
2. Select OK.
3. Specify the color by using the color wheel or enter a color value.
2.2 Color Selection Dialog Box
The color selection dialog box allows you to select the colors of a color palette. The dialog box can be opened by
selecting Font Color... or by selecting a color preview of a color parameter.
Note
The dialog box is only available, if the workarea has a Color Palette resource.
See also Color Palette.
• Recently Used:
This fields display the last 7 colors that have been previously selected.

SAP Enable Now Customization
Customizing Colors
CUSTOMER
8
• Standard Palette:
This fields display the colors of the Color Palette.
You can display the colors or the colors and the descriptions. Select a button in the top of the dialog box to
change the view.
○ Show List View
○ Show Swatch View
• Custom Colors...:
The control opens the custom color dialog box to specify a custom color.

SAP Enable Now Customization
Customizing Styles
CUSTOMER
9
3 Customizing Styles
The style editor is the component for editing style resources in the Producer. The editor allows an individual
adaptation of interfaces for the playback functionalities, contents and bubbles based on style templates.
The dialog can be opened with the Tools -> Customization -> Edit Style Resources... menu.
The customizable style types for the style editor are:
• trainer Style
Includes trainer bar, library, popup window, task window, book reader bar and quiz.
• Desktop Assistant Style
Includes windows of the Desktop Assistant and guided tour.
• Book Styles
Adaptation of background, buttons and pop-up window.
• Bubble Styles
Adaptation of bubbles based on different bubble styles.
• Border Styles
Adaptation of borders based on different border styles.
• Manager Style
User interface of the Manager – the style has to be implemented in the Manager after creation.
• Desktop Assistant: Mini Icons
Adaptation of icons used for mini bubbles of a context help.
In the style editor, adapted styles are stored in the Adaptable Resources section of the project explorer’s
resource tree. Bubbles are also stored in the Bubble Styles section and book styles are also stored in the Book
Styles section.
The created styles are always used for the current workarea. To use the styles in other workareas, export the
resources as an archive file.
3.1 Structure and Functions
The basic parts of the style editor are:
• Style list
The style list on the top left shows the created styles.
• Settings page
The settings page on the bottom left shows the settings for the selected style.
• Preview
The preview on the right shows the selected style and the executed changes.

SAP Enable Now Customization
Customizing Styles
CUSTOMER
10
The style editor includes several functions for style management:
• New…:
Creates a new style based on a template.
• Delete:
Deletes a style from the style list and the resources.
• Update Preview:
Updates the style preview to make changed style attributes visible.
• Save:
Saves the changes of the currently opened style.
• Close:
Closes the style editor.
Style preview
The preview of the style editor shows the selected style in the final status. It allows you to see executed changes
directly in the style components. After changing a style attribute, you need to update the preview to make the
changes visible in the view.
3.2 Creating a New Style
Before you adapt a style, you first need to create a new style in the style editor. This can be done as follows:
1. Click on the New… button. A dialog box opens with the following settings:
○ Template:
The setting shows the available style templates of the Producer.
○ Name:
The setting defines the name of the style.
○ Style ID:
The Style ID is used internally and cannot be changed afterwards.
2. Confirm your settings with OK.
Once you have created a new style, a style resource will be created in the Adaptable Resources section of the
resources. The style editor shows the style in the preview and in the style list.
3.3 Style Attributes
Style editing in the style editor is based on the structured attributes and behaviors that allow resources to be
adapted quickly and easily. The attributes are located under Style Definition.
Note
It is not possible to change the size of a complete style or for parts of a style. This is to avoid functional errors.

SAP Enable Now Customization
Customizing Styles
CUSTOMER
11
Colors
The basic adaptable attributes for styles are colors. The colors can be specified as hexadecimal values or using the
Color Selection dialog box. This dialog box can be opened by selecting the color preview o a parameter.
Connected colors
The color attributes with a star ( * ) are set and changed automatically, when a higher-ranking color is changed. For
this behavior, do not specify the attribute. The green button is set to inactive.
This practice allows you to create a well-balanced color style and to reduce the effort for adaptations. Therefore it is
recommended that you only change the colors without a star.
This means each color of a default style only needs to be changed once and this change is applied to all other color
instances. Other color instances can also be changed but this makes editing much more complex.
Images
In some cases, images are used (mostly for logos). To change an image, you need to consider the size of the original
image. The new image should have the same size to fit in the layout. The used image size appears after the attribute
name.
The typical file formats for images are GIF, JPG, PNG, BMP. The default images are in PNG format.
Layout types
The settings area has two layout types: Standard Layout and Advanced Layout. You can change the layout by
activating or deactivating the Advanced Layout option.
The standard layout shows the higher-ranking colors of the style. It is sufficient to only change these colors to get a
complete defined style.
In the advanced layout, there are a lot more colors visible that allow you to specify the used colors in greater detail.
Note
After adapting the settings, press the Update Preview button to see the changes.
3.4 trainer Style (including library and book reader)
The trainer is the playback component for simulations. The trainer style includes the following components:
• trainer bar
• library window
• popup window
• task window
• book reader bar
• quiz style
• start, stop, load and error page

SAP Enable Now Customization
Customizing Styles
CUSTOMER
12
trainer style templates
The templates for trainer Style in style editor:
• trainer Style (small)
• trainer Style (medium)
• trainer Style (big)
3.4.1 Attributes of the trainer Style
This chapter describes the basic settings and sections for adapting the trainer style.
• Name:
The setting defines the name of the style.
• Logo:
Specifies the logo for the library, control bars and dialog boxes. The size of the logo depends on the selected
template.
Select Replace Image to change the logo.
Recommendation
You can hide the logo for the playback in the Playback Settings. The Show Logo setting is available for the control
bar of each playback component.
The first settings are the basic color settings for the trainer style. When you change these colors, the gradation of
the other colors changes automatically.
• Fill color:
The setting defines the basic fill color. The gradients are set automatically.
• Active / Selection:
The setting defines the basic color for active and selected controls and texts.
• Background color (Advanced layout):
The setting defines the background color of the library, book reader, and trainer.
Recommendation
We recommend that you change the basic color settings first, because the settings influence all of the style's other
colors. All other settings can be changed afterwards, to adapt the details.
Standard layout
The standard settings sections lets you specify the colors for the style's basic components.
• Application Icon section:
These settings define the colors of the trainer's application icon. The application icon is used as favicon.
• Dialog windows section:
These settings define the colors of the dialog boxes.
• Text colors section:
These settings define the colors for the texts and the different statuses.

SAP Enable Now Customization
Customizing Styles
CUSTOMER
13
• Tree / list section:
These settings define the color of the content tree in the library.
• Buttons icons / text section:
These settings define the color of the icons and the different statuses.
• Buttons section:
These settings define the color of the buttons and the different statuses.
Recommendation
The Next button of an Explanation bubble also uses these button configurations. You can change the button in the
Playback Settings -> General. In the parameter Explanation Link (Forward) you can enter a text or a link to an image
in your workarea. For example: <img src="group!GR_3B86D0D06A9D5EAB:next.png" border=0 >
• Navigation path buttons section:
These settings define the color of the breadcrumbs in the library.
• Start buttons section:
These settings define the color of the start buttons for the modes or a book in the library.
○ Multi-color icons:
With this setting, you can deactivate the use of the default mode icons. Instead, icons with the same
color as the text are used.
○ Use custom icons:
With this setting, you can specify custom images for the mode and book icons. The size of the icon
depends on the selected template.
Choose Replace Image to change a specific icon.
Recommendation
Insert the PNG image file with black icon and transparent background:
The icon is colorized with the same color as that of the Text parameter.
Advanced layout – additional sections
The advanced layout sections and settings let you define parts of the style in detail.
• library section:
These settings define the colors in the area under the library's top bar.
• Dialog splitter section:
These settings define the color of the splitter between the tree and content view in the library.
• trainer bar section:
These settings define the color of the library's and book reader's top and bottom lines.
• Progress indicator section:
These settings define the color of the progress indicator for the trainer and book reader bar.
In addition to the advanced layout sections, there additional settings are available in the standard layout sections.

SAP Enable Now Customization
Customizing Styles
CUSTOMER
14
Color overview
The color overview is an HTML page that includes all options with the corresponding colors in a table. This provides
you with an overview for proof of design standards.
To use the color overview, go to the style folder and open the colors.html file.
3.4.2 Explanation Icons
The explanation icons are used for explanation macro types in a simulation. To customize images, replace the
default images with your own images.
The images have the size 32x32 pixels and are in GIF format.
You can adapt the explanation icons of the documentation in the Documentation Style additionally.
Type
Icon
Info
Remark
Tip
Warning
Replacing an image
This is necessary to assign the correct image file to the active explanation type.
To replace an explanation image in a workarea, proceed as follows:
1. Select the icon file in the trainer Style resource of the Explorer.
2. Click on the Replace file... button in the object editor.
3. This opens the file selection dialog box. Select the required file.
4. Click on Open.
The icon is now integrated into the trainer Style and can be used for simulations.
SAP Enable Now Customization
Customizing Styles
CUSTOMER
15
3.4.3 Activating the trainer Style
The trainer uses the standard style of the workarea. A different style can be activated by using the Playback Settings
in the Producer:
1. Open the central configuration dialog using the Tools -> Settings menu.
2. Select the section Playback Settings -> trainer - Global -> Visual properties.
3. In the Style setting, select the created style resource.
4. Confirm the dialog with OK.
The trainer - Global section activates the style for the whole trainer. It is also possible to select an individual style for
the book reader, library or a simulation mode on the relevant settings page.
3.5 Desktop Assistant Style
The Desktop Assistant style is used for the playback of Desktop Assistant content. The style includes the image
files and colors for the Desktop Assistant windows and the guided tour windows as well as for the sidebar.
3.5.1 Attributes of the Desktop Assistant Style
This chapter describes the basic settings and sections for adapting the Desktop Assistant style.
• Name:
Specifies the name of the style.
The first settings are the basic color settings for the Desktop Assistant style. When these colors change, the
gradation of the other colors changes automatically.
• Main Color:
The setting defines the basic fill color. The gradients are set automatically.
• Text Color:
The setting defines the basic color of the window texts.
• Active / Selection:
The setting defines the basic color of active and selected controls and entries.
• Text (Selected):
The setting defines the color of selected text.
Standard layout
The standard settings let you define the components of the windows and sidebar.
• Sidebar section:
These settings define the size and the color of the status bar.
There are three sizes: Small, Medium (default) and Big
• Sidebar Buttons section:
These settings define the colors of the sidebar's buttons.

SAP Enable Now Customization
Customizing Styles
CUSTOMER
16
• External Search Icon section:
In this setting, you can exchange the default icon of the external search with another icon. The icon size is 24 x
24 pixels.
It is recommended that you use a PNG file with a transparent background.
• Window section:
These settings define the colors of the windows and window icons.
• Tabs section:
These settings define the tab colors.
• Content section:
The settings define the colors of the content areas.
• List section:
These settings define the colors of the object and step lists.
With the Inside Borders setting you can show or hide the borders between the objects and steps.
• Footer section:
These settings define the color of the footer and footer buttons.
• Start Button section:
These settings define the colors of the button for starting content.
• Systray Info Popup section:
These settings define the colors of the system tray's info popup.
Advanced layout – additional sections
The advanced layout sections and settings let you define further style parts in more detail.
• Sidebar Grip section:
These settings define the colors of the sidebar's grip.
• Checkbox section:
These settings define the checkbox colors.
• Scroll Bar section:
These settings define the scroll bar's colors.
In addition to the advanced layout sections, additional settings are available in the standard layout sections.
3.5.2 Activating the Desktop Assistant Style
The Desktop Assistant uses the workarea's standard style. A different style can be activated as follows:
Desktop Assistant
1. Open the Settings dialog box using the Tools -> Settings... menu.
2. Select the section Desktop Assistant: Playback Settings -> Desktop Assistant -> Desktop Assistant - Style and
Windows.
3. In the Style setting select the created style resource.
4. Choose OK to confirm the dialog box.

SAP Enable Now Customization
Customizing Styles
CUSTOMER
17
Guided Tour
1. Open the guided tour project.
2. Select the Guided Tour Style macro in the first step.
3. Open the Guided Tour Window subcategory in the macro editor.
4. Select the style resource in the Window Style option.
If the setting is deactivated, click on the green button.
5. Save the project.
You can define the style as a default of the Guided Tour Style macro for each new guided tour project.
1. Open the Settings dialog box using the Tools -> Settings... menu.
2. Choose Desktop Assistant: Authoring Settings -> Macro Initialization -> Guided Tour Style.
3. In the Style setting select the created style resource.
4. Choose OK to confirm the dialog box.
3.6 Book Page Style
You can define specific book page styles to customize books. This can reflect the topic of the content or can have a
company design.
The book style can be selected for a book page in the Style parameter in the book page editor.
The following components are included in the style:
• background
• buttons
• pop-up window
Book style templates
The templates for books in style editor:
• Standard
• Flat
Book style resource
A book style is divided into two resource types:
• Adaptable Resources:
Contains the files used for the customizing of the book style.
• Book Styles:
Contains the files used for the playback of content.

SAP Enable Now Customization
Customizing Styles
CUSTOMER
18
Note
When exporting an archive with the book style, make sure to export both resources.
3.6.1 Attributes of the Book Style
This chapter describes the basic settings and sections for adapting the book style.
• Name:
Specifies the name of the style.
The first settings are the basic color settings for the book style. When these colors are changed, the other colors will
be changed automatically in their gradation.
• Button border:
The setting defines the basic color for the borders of the buttons.
• Button fill:
The setting define the fill color of the buttons.
• Multi-color icons:
The setting defines the colors of the icons of the buttons. In general the icons are multi-color icons.
With deactivated setting further parameters are available to define icons with a single color.
The setting areas allow you to define the components of the book page.
• Page background:
These settings define the image of the book page background.
• Text pop-up - Window:
These settings define the colors of the window for the text pop-up.
• Text pop-up - Button:
These settings define the colors of the buttons for the text pop-up.
3.7 Bubble Styles
You can define specific bubble styles for the individual customization of simulation or Desktop Assistant content as
well as book pages.
The general structure of bubbles is a text field with a spike and header bar for the feedback bubble.

SAP Enable Now Customization
Customizing Styles
CUSTOMER
19
Bubble templates
The templates for bubbles in the style editor:
Bubble
Preview
Notes
Edge Bar
The template is used for the Blue
Sunset bubble style.
Gloss Effect
Rounded Corners
The template is used for the Blue
Ocean and White Island bubble
styles.

SAP Enable Now Customization
Customizing Styles
CUSTOMER
20
Bubble
Preview
Notes
Shadow
Gray
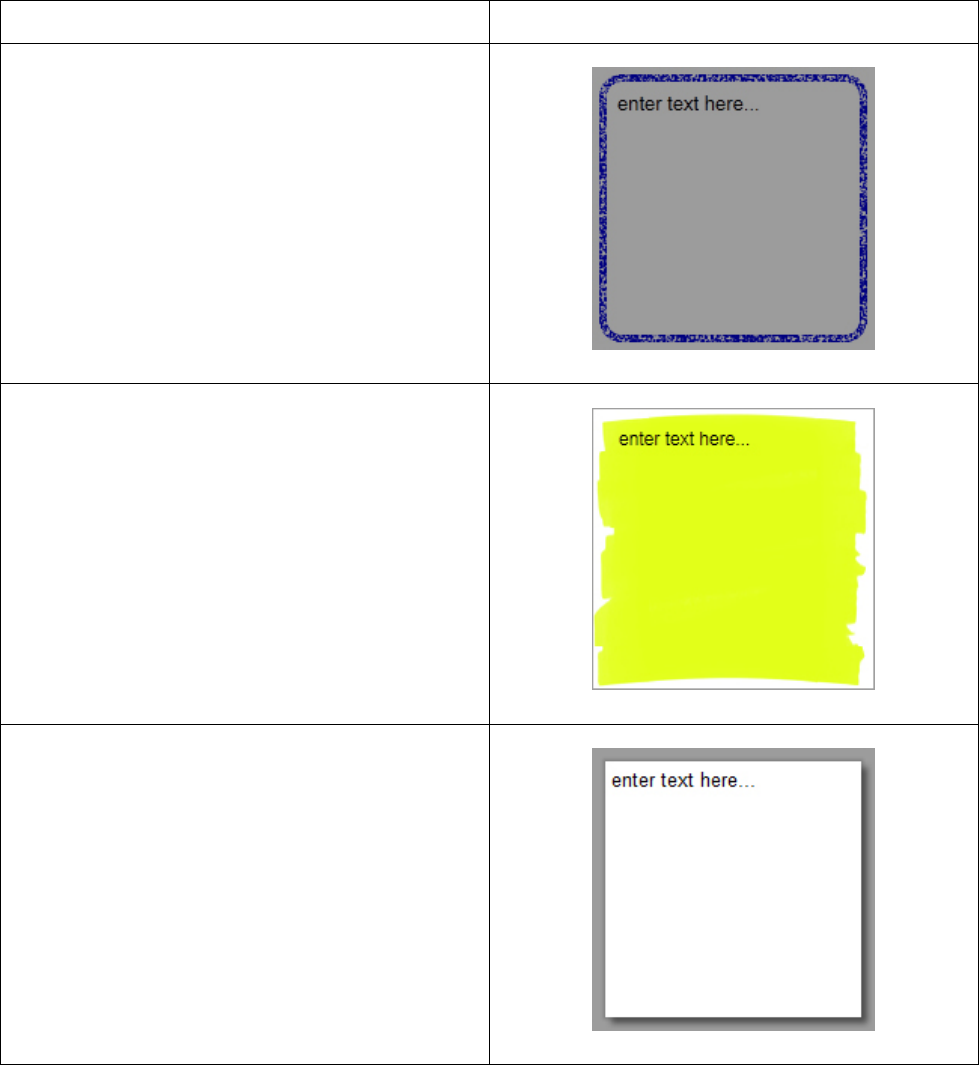
Sticky Note
The template is used for the Yellow
Note bubble style.

SAP Enable Now Customization
Customizing Styles
CUSTOMER
21
Bubble
Preview
Notes
Thick Border
Big Title Bar
The template is used for the Black
Forest bubble style.
Rectangular
The template is used for the White
Island bubble style.
Bubble resource
A bubble style is divided into two resource types:
• Adaptable Resources:
Contains the files used for the customizing of the bubble style and for the content editing.
• Bubble Styles:
Contains the files used for the playback of content.

SAP Enable Now Customization
Customizing Styles
CUSTOMER
22
Note
When exporting an archive with a bubble style, make sure to export both resources.
3.7.1 Attributes of the Bubble Styles
The available bubble settings depend on the bubble style and characteristics.
Typical bubble style attributes for defining the main characteristics:
• Name:
This setting specifies the name of the style.
• Border:
This setting defines the color of the bubble’s border.
• Content fill:
This setting defines the color of the bubble including the content part.
• Header fill:
This setting defines the color of the bubble’s header.
Advanced layout – additional sections
The advanced layout sections and settings allow you to define parts of the style in detail.
• Title text section:
The settings define the text style for the text in the bubbles title bar.
• Content text section:
The settings define the text style for the text of the bubble content.
3.8 Border Styles
You can define specific border styles for the objects Text Box, Placeholders and Active Area on book pages, in order
to highlight content or to use the boxes as design elements.
The border styles can be selected individually for each object by using the Border Style parameter.
SAP Enable Now Customization
Customizing Styles
CUSTOMER
23
Border style templates
The templates for border styles in the style editor:
Border Style
Preview
Decor 1
Highlighter
Text Box Shadow

SAP Enable Now Customization
Customizing Styles
CUSTOMER
24
Border Style
Preview
Warning
3.8.1 Attributes of Border Styles
The available border settings depend on the border style and characteristics.
Typical border style attributes for defining the main characteristics:
• Name:
This setting specifies the name of the style.
• Background color:
This setting specifies the color of the text box.
• Fill background:
This setting activates the specified Background color of the text box.
Decor
The style includes the following further parameters:
• Line color:
This setting specifies the color of the text box border.
Highlighter
The style includes the following further parameters:
• Color:
This setting specifies the color of the highlighter.
Text Box Shadow
The style includes the following further parameters:
• Shadow:
These settings specify the shadow of the text box and allow you to change the characteristic.
• Shadow color:
This setting specifies the color of the defined Shadow.
SAP Enable Now Customization
Customizing Styles
CUSTOMER
25
• Add Effects (Advanced Layout):
These settings activate and specify the color effects in the text box.
Warning
The style includes the following further parameters:
• Border:
This setting specifies the color of the outer border (2px).
• Inner border:
This setting specifies the color of the inner border (1px).
• Stripe color 1:
This setting specifies the first color of the stripes in the top and bottom bar.
• Stripe color 2:
This setting specifies the second color of the stripes in the top and bottom bar.
• Content fill:
This setting specifies the color of the text area.
3.9 Manager Style
You can define a specific Manager style (based on your company design, for example) to customize the Manager
interface.
The Manager style must be copied manually into the Manager installation.
3.9.1 Attributes of the Manager Style
This chapter describes the basic settings and sections for adapting the Manager style.
• Name:
This setting specifies the name of the style.
• Logo:
This setting specifies the logo image that will be used in the header of the Manager. (300 x 47 Pixel)
• Content Background:
The setting defines the background color of the application screen.
• Screen Title:
The setting defines the text color of the title of the application screen.
• Active / Selection:
The setting defines the basic color for active and selected controls and texts.
• Marked Text:
The setting defines the text color for a selected control, list entry or tree entry.
SAP Enable Now Customization
Customizing Styles
CUSTOMER
26
Standard layout
The standard settings sections allow you to specify the colors for basic components of the Manager style.
• Application Icon section:
These settings define the color of the Manager icon.
• Header section:
These settings define the color of the background and texts for the header.
• Menu bar section:
These settings define the color of the buttons and texts of the menu bar with different statuses.
• Submenu dropdown section:
These settings define the color of the menu and texts of the dropdown for the submenu.
• Buttons section:
These settings define the color of the buttons and the different statuses.
• Links and Tabs section:
These settings define the color of the links and tabs and the different statuses.
Advanced layout – additional sections
The advanced layout sections and settings allow you to define parts of the Manger style in detail.
• Tree selection:
These settings define the color for the status of the tree entries.
• Table selection:
These settings define the color for the status of the table entries.
• Dialog windows:
These settings define the color of the bars and texts for the dialog boxes.
Color overview
The color overview is HTML page that includes all options with the corresponding colors in a table. This provides
you with an overview for proof of design standards.
To use the color overview, go to the style folder and open the colors.html file.
3.9.2 Implementing the Manager Style (SQL Option)
The Manager styles that you create are stored in the Explorer under Resources -> Adaptable Resources. To include
the style in a Manager installation, proceed as follows:
1. Right-click on your Manager Style resource.
2. In the context menu, select Open Folder.
3. Open the version-'number' folder of the resource.
4. Open the Manager files in the webapps folder of your Tomcat installation, for example:
…\Apache Software Foundation\Tomcat6.0\webapps\Manager_Installation

SAP Enable Now Customization
Customizing Styles
CUSTOMER
27
5. Copy the files from the resource folder into the folder of your Manager installation, replacing the existing files.
Keep the other files in the installation folder untouched.
The files and folders are: images, release, unprotected, webclient and index.htm
3.9.3 Implementing the Manager Style (HANA / Cloud)
Using a Manager HANA or Cloud instance you can upload and change your style to the running instance without
redeployment or server downtime.
Requirement
To implement the Manager style you need:
• Role Master Author or higher
• Workarea permission Edit Workarea for default workarea System (_system)
Procedure
The Manager styles that you create are stored in the Explorer under Resources -> Adaptable Resources. To include
the style in your Manager instance, proceed as follows:
1) Right-click the resource object ui and select Export… .
2) Save the dkp file somewhere on your PC.
3) Open the Manager interface in your browser.
4) Go to Workareas > System.
5) Expand the workarea tree to Workarea > Resources > Adaptable Resources.
6) Select the resource item ui.
7) Click Start Editing in the upper right corner.
8) Click Import Archive and select the exported dkp file.
9) Click Upload.
10) Check that the resource is checked in the Import Archive dialog and click OK.
11) Click Publish to apply the modified style to the Manager.
Note
Changes are only applied if the resource is published. To switch back to default style you can unpublish the
resource.
Alternative procedure
Using Manager HANA / Cloud you can connect the Producer directly to the System workarea (HANA) or use the
Cloud Producer (click Open Producer in the System workarea) to create / modify your individual Manager style.

SAP Enable Now Customization
Customizing Styles
CUSTOMER
28
3.10 Desktop Assistant: Mini Icons
You can define a set of icons used for the mini bubbles of the object bubbles for Desktop Assistant projects. The
icons can be selected individually for each action macro by using the Mini Icon Type parameter.
The style contains the following icon types:
• Help
• Info
• Warning
• Maintenance
• Update
• New
• Training
• Attachment
• Link
• Tip
• Note
• Compliance
Mini icon templates
The templates for bubbles in the style editor:
• Desktop Assistant: Mini Icons
• Desktop Assistant: Mini Icons (Big)
3.10.1 Attributes of the Mini Icons
This chapter describes the basic settings and sections for adapting the Mini Icons style.
• Name:
Specifies the name of the style.
• Background color:
This setting specifies the background color of the preview.
Master colors 1 and 2
The master colors define the initial colors for the icons. There are two master color sections to define two different
icon types.
The master colors have the following parameters:

SAP Enable Now Customization
Customizing Styles
CUSTOMER
29
• Symbol:
Defines the color of the symbol.
• Background:
Defines the background color of the icon.
• Symbol (mouse over):
Defines the color of the symbol in mouse over status.
• Background (mouse over):
Defines the color of the background in mouse over status.
• Symbol (pressed):
Defines the color of the symbol in pressed status.
• Background (pressed):
Defines the color of the background in pressed status.
Icons types
The settings define the shape and the color of the icons.
Each icon has the following parameters:
• Background Shape:
Defines the shape of the icon. The following shapes are available:
○ Square
○ Circle
○ Diamond
○ Triangle
○ Note
○ Explanation
○ Symbol with Border
○ Plain Symbol
• Colors:
You can adapt the symbol and background colors for each icon individually. Each icon uses a definition of the
master colors by default.
3.11 Avatars
You can create avatars for the use in your content. An avatar has different gestures and poses and is stored as style
resource in Adaptable Resources.
Adding avatars to the content provides different possibilities to enhance the learning experience. They can be used
to present content, to guide through a story, pose questions or to speak directly to the learner.
Avatar templates
The templates for avatars in the style editor:
Avatar
Preview

SAP Enable Now Customization
Customizing Styles
CUSTOMER
30
Avatar
Preview
Comic Man
Comic Woman
Using an avatar
To select an avatar in your content, proceed as follows:
1. Insert an Image object or open the HTML editor.
2. Select Insert image from workarea.
A dialog box opens.
3. Open the workarea tree Resources -> Adaptable Resources -> Comic Man / Comic Woman in the dialog box.

SAP Enable Now Customization
Customizing Styles
CUSTOMER
31
4. Select the required image of the avatar.
5. Select OK to insert the image.
Recommendation
To show the resources in the selection dialog box, select Filter Tree -> Show Resources.
3.11.1 Attributes of the Avatars
The available settings depend on the avatar and characteristics.
Typical avatar attributes for defining the main characteristics:
• Name:
Specifies the name of the style.
• Hair / Hat:
Specifies the type of head or hair. Select a type from the dropdown box.
• Skin
• Hair
• Eyes
• Mouth
• Clothes attributes
• Shoes
You can change the colors of the settings to customize your avatar.
Logo / Details
The settings in the subcategory Logo / Details allow you to add images on the clothes of the avatar. For examples:
logo of a company.
• Add Logo / Images:
Activate the setting, to display further image parameters.
• Front:
Specifies the front image of the avatar. (60 x 60 pixel)
• Back:
Specifies the back image of the avatar. (60 x 60 pixel)
• More Images:
For the avatars which are looking left or right you can add further images. This is helpful to use an image with
the correct perspective of the avatar.
The recommended image rotation is 4 degree.

SAP Enable Now Customization
Customizing Text Styles
CUSTOMER
32
4 Customizing Text Styles
The text style editor is the component for editing text resources in the Producer. The editor allows you to customize
texts for consistent use in the content.
In the text style editor, adapted styles are stored in the Adaptable Resources section of the project explorer’s
resource tree. The created styles can be used in the HTML editor during content creation.
Opening the text style editor
The text style editor can be opened with the Tools -> Customization -> Edit Text Styles... menu. The editor is
opened with the current default text style.
To edit a specific text style, choose the resource in the Adaptable Resources and select Edit Text Styles... in the
object editor.
Note
The created text styles are always used for the current workarea. To use the styles in other workareas, export the
resources as an archive file.
Duplicating text styles
You are able to use more than one text style for different uses cases, for example, to create an optimized text style
for documentation.
Duplicate a resource as follows:
1. Select a resource in resource tree.
2. Open the context menu.
3. Select Duplicate... .
4. A dialog box opens
Enter a Name and change the ID, if required.
5. Select OK.
4.1 Structure and Functions
The basic parts of the text style editor are:
• Preview
The preview on the left of the screen shows the available styles and the executed changes.
• Settings page
The settings page on the right of the screen shows the settings for the selected style.
SAP Enable Now Customization
Customizing Text Styles
CUSTOMER
33
The style editor includes several functions for managing styles:
• New…:
Creates a new style based on an available style.
• Duplicate:
The function duplicates the selected style. The duplicated style and the source style use the same base style.
A default style cannot be duplicated.
• Inherit:
Inherits the selected style. The inherited style uses the source style as base style.
• Delete:
Deletes a style from the style list and the resources.
• Save:
Saves the changes of the currently opened style.
• Close:
Closes the text style editor.
4.2 Text Style Categories
The text style editor has the following style categories in the preview view. Each section includes default styles and
can contain created or duplicated styles.
• Default Style:
Includes the default text style for all style definitions. The default text style only includes the Font Family and
Font Size.
• Paragraph Styles:
Includes the paragraph and heading styles.
• List Styles:
Includes styles for lists and list level.
• Character Styles:
Includes styles for formatting a text inside a paragraph.
• Block Styles:
Includes styles for specifing text boxes and the formatting of the text.
• Table Styles:
Includes styles for speciging tables, the table headers and the formatting of the text.
• Link Styles:
Includes styles for linked text.
4.3 Editing a Text Style
To edit a text style, proceed as follows:
1. Select the style that you want to change.
To open a style category, click on the category name.

SAP Enable Now Customization
Customizing Text Styles
CUSTOMER
34
2. Edit the settings in the settings page.
Each text style includes style relevant parameters that can be adapted. The main sections are:
○ Text - general parameters
○ Paragraph
○ Margin
○ Padding
○ Border
○ List Level
3. Select Save to save your changes.
Recommendation
In some cases it is necessary to have a fallback font type, if the specified font cannot be displayed.
You can add a fallback font type to your specified font, separated by a comma. For Example: Standard
Font,Fallback Font
4.4 Creating a Text Style
Before you can adapt a text style, you first need to create a new text style in the text style editor. This can be done
as follows:
1. Select New…
The New Text Style dialog box is opened.
2. Adapt the following settings:
○ Style Type:
Shows the available style types. Select the type that you want to use as a template.
○ Display Name:
Enter a name for the style.
○ CSS Class Name:
Contains the name of the style that is used in the CSS of the HTML text. The CSS Class Name is
generated from the Display Name. You can change the name, if required.
3. Select OK.
The new text style is added to the preview in the corresponding style category.
Duplicate or inherit a style
Alternatively, you can also duplicate or inherit an existing style in a style section.
• Duplicate:
Use this function if you want the duplicated style and the source style to use the same base style.
Note that a default style cannot be duplicated.
• Inherit:
Use this function if you want the inherited style to use the source style as the base style.
SAP Enable Now Customization
Customizing Text Styles
CUSTOMER
35
The functions can be used as follows:
1. Select the source style in the preview.
2. Select Duplicate or Inherit.
The New Text Style dialog box is opened.
3. Adapt the following settings:
○ Display Name:
Enter a name for the style.
○ CSS Class Name:
Contains the name of the style that is used in the CSS of the HTML text. The CSS Class Name is
generated from the Display Name. You can change the name, if required.
4. Select OK.
The new text style is added to the preview under the source style.

SAP Enable Now Customization
Customizing Dictionaries
CUSTOMER
36
5 Customizing Dictionaries
You can customize predefined bubble text modules and the texts used in the trainer; the Producer allows you
opportunity to edit these text files individually. That means that you can use terminology or sentences specific to
your own texts, which conform to your company's corporate language, or you can set up an additional project
language, which is not included as standard in the Producer.
The Edit Dictionary dialog box is available to you for editing the texts. That means that direct access to the text files
is not necessary.
You can use the dialog box to edit the following texts:
• Playback texts
These are the texts for the user interface of the trainer bar, the book reader bar and the library as well as for
the Desktop Assistant.
Resource: Playback Dictionaries
• Recording texts
These are the content languages for the texts of the projects and documentation.
Resource: Recording Dictionaries
Open dialog
You can open the Edit Dictionary dialog box using the resources in the project explorer and thereby access the
required text files directly. To do this, select the corresponding dictionary and then click on the Open Dictionary
button in the object editor.
Once the dialog box has been opened, the texts are automatically loaded from the relevant text file. By default, the
dialog box is opened with the dictionary in the active Producer language.
5.1 Structure and Functions
The basic parts of the dictionary editor are:
• Toolbar
The toolbar includes the functions for editing the dictionary texts.
• Text list
The text list displays the dictionary texts with IDs, states and values.
The dictionary editor includes several functions for managing texts:
• New:
Creates a new dictionary entry.
• Save:
Saves the changes of an edited dictionary.
• Import as Excel File:
Imports an Excel file of the texts into the dictionary.

SAP Enable Now Customization
Customizing Dictionaries
CUSTOMER
37
• Export as Excel File:
Exports the texts of a dictionary into an Excel file for external translation. All languages are exported.
• Cut, Copy, Paste:
With these functions, you can edit the texts of a dictionary.
• Undo, Redo:
With these functions, you can switch between editing states.
• Search:
With this function, you can search for an entry in the dictionary.
Selecting the button opens a dialog box where you can enter a search value and search criteria.
• Filter:
With the function, you can filter the entries of a dictionary.
Selecting the button opens a dialog box where you can enter filter values and criteria.
To display the complete list again, remove the entries in the filter dialog box.
• New Language:
Creates a new dictionary language.
• Language List:
With the language list, you can switch between the languages of a dictionary. The selected language is shown
in the text list.
5.2 Setting up a Dictionary
To edit the texts, first create a new dictionary. This involves copying the standard dictionary, which you use as a
template for editing the texts and IDs.
Note
You cannot change the texts in the standard dictionaries of the workarea. Always set up a new dictionary.
1. Select the appropriate dictionary group in the Explorer resources.
2. Select New Dictionary in the object editor.
3. Enter a name in the dialog box. Select OK.
The Standard dictionary will now be copied.
5.3 Editing an Entry
To customize the texts, open your dictionary in the Edit Dictionary dialog box. You can edit the text in the dialog as
follows:

SAP Enable Now Customization
Customizing Dictionaries
CUSTOMER
38
Note
The text IDs cannot be changed as they are used to assign the texts in the content or user interface.
Caution
Do not change any variables or scripts contained in texts. These are used for allocating or formatting applicable
content. Changes can cause implementation errors.
Placeholders for assigning object names and object images can be found in square brackets [] in the text modules.
The variables are indicated by an @ sign or in curly brackets {...}. HTML / CSS scripts have diamond brackets <...>.
1. Double-click on the line of the text you want to edit.
2. The editing dialog box opens and contains the following areas:
○ Language of translation template:
The upper field displays the original text.
You can view this text in another language by clicking on the Other... button.
○ Target language (Value):
Enter your text in the Target language field.
○ State:
Specify the State of your text. This allows you to manage texts for editing and translation.
The following statuses are possible: new, needs-translation, translated, needs-review, needs-fix, final
The standard texts have the status final.
○ Comment:
Enter a comment needed for editing a particular text.
3. Select Close.
The text is replaced in the dictionary.
5.4 Creating a New Entry
In addition to using existing texts, you can also add further IDs for new texts, thus enlarging the recording
dictionary. These entries allow you to insert the texts using placeholders in your content. For further information,
refer to the chapter Inserting a placeholder in the Producer manual.
Set up new IDs as follows:
1. Select New in the toolbar.
The Edit dialog box is opened.
2. Enter a name in the ID field. You can only enter an ID that does not already exist.
3. Use the setting Add to all languages to specify whether you want to add the new entry only in the chosen
content language or in all content languages to the dictionaries.
To ensure consistency between content languages, the setting should be retained.
4. Select OK.
Once the dialog box has been closed, the editing dialog box for the text opens. Now enter your text. Read the
section on editing texts.

SAP Enable Now Customization
Customizing Dictionaries
CUSTOMER
39
For the IDs, you can then enter the texts in the other content languages you are using. To do so, select the language
you want from the drop-down list.
5.5 Creating a New Language
If you would like to add an additional language to those provided by the Producer, you can do so using the New
Language function.
Creating a new language
1. Select New Language in the toolbar.
The New Language dialog box is opened.
2. Enter the following values:
○ Language:
Select the new language you would like to set up from the list. In this list you will find an overview of
different languages with their associated flags.
○ Copy from:
Select which project language you want to use as a template for your new language. This is required to
assign the texts to the corresponding IDs.
3. Select OK.
A text file in the Dictionary for the new language is created.
Translating a new language
You can now amend the texts or export them as an Excel file to have them translated into the corresponding
language by a translator. Once the Excel file has been translated, you can reimport it. The Export Excel and Import
Excel functions in the toolbar to allow you to do this.
5.6 Activating a Dictionary
The dictionary resources for simulation and books can be activated as follows:
Activating the Playback Dictionary
The created Playback Dictionary can be activated using the Playback Settings in the Producer.
1. Open Tools -> Settings... menu.
2. Select the section Playback Settings -> trainer - Global -> Visual properties.
3. Select your created dictionary in the Playback Dictionary setting.
4. Select OK.
The trainer - Global section activates the dictionary for the whole trainer. It is also possible to select an individual
dictionary for the book reader, library or a simulation mode on the relevant settings page.
SAP Enable Now Customization
Customizing Dictionaries
CUSTOMER
40
Activating the Recording Dictionary
The created Recording Dictionary can be activated using the Playback Settings in the Producer.
1. Select the dictionary resource in the resource tree of the Explorer.
2. Select Set as Default in the object editor.
The resource name is now displayed in bold.

SAP Enable Now Customization
Customizing Documentation Templates and Settings
CUSTOMER
41
6 Customizing Documentation Templates and
Settings
For the generation of documentation there are the following resource types which can be customized:
• Documentation Style
Containing the document templates.
• Documentation Settings
Containing the settings for the content and the structure of the documents.
6.1 Documentation Templates
Documentation templates are used to generate Microsoft Word, PDF and Microsoft PowerPoint documents. The
templates are stored in the Documentation Style resource in the Adaptable Resources section of the Explorer.
The resource Documentation Style (Right-to-Left) contains the same templates with support for right-to-left
languages.
The following file formats are supported:
• .dot (default) and .dotx for Microsoft Word and PDF documents
• .pot (default) and .potx for Microsoft PowerPoint documents
• .html for HTML documents
A workarea includes the following standard templates:
File Format
Document Name
Microsoft Word / PDF
Single Document
Single Document with Title
Master Document
BPP Document
A&C Document
Microsoft PowerPoint
Power Point (4:3)
Power Point (16:9)
HTML
HTML Document
Responsive HTML Document (Hands-On Guide only)

SAP Enable Now Customization
Customizing Documentation Templates and Settings
CUSTOMER
42
6.1.1 Managing Templates
Selecting a documentation template
• Single document, Compound document
The templates can be individually set for every documentation type on the relevant settings page.
To select the documentation templates, proceed as follows:
1. Select the Edit Link... button next to the Template setting.
A dialog appears that shows the workarea structure.
2. Select a template from the Documentation Style resource.
3. Select OK.
• Master document
You can configure the template for a master document in the settings dialog box when generating a master
document.
Integrating a template
To insert a documentation template into a workarea, proceed as follows:
1. Select the Documentation Style resource in the Explorer.
2. Select Insert File... in the object editor.
The file selection dialog box is opened.
3. Select the required file.
4. Select Open.
The template will now be integrated in the Documentation Style and can be used for generating documentation.
Copying a template
If you want to create your own template, it is recommended that you use an existing standard template as a preset.
To do so, proceed as follows:
1. Open the context menu of a Documentation Style resource.
2. Select Open Folder to open the docstyle folder.
3. Open the dot folder.
4. Copy the needed template to a separate folder and rename it.
Once you have adapted a template, import the file by using the Insert File... function in Explorer.
Note
Do not paste the file directly into the dot folder, because the file will not be recognized by the resource structure.
6.1.2 Editing a Microsoft Word Template
For Microsoft Word templates you can edit the layout and the text styles.
Go in to the folder of your copied .dotx file. Open the template in Word by right-clicking the file and clicking Open
in the context menu.
SAP Enable Now Customization
Customizing Documentation Templates and Settings
CUSTOMER
43
Note that changes in the page setup could affect the complete layout. We recommend that you test templates after
creating them.
Edit background
The background of a template is defined using the Header & Footer view. Double click the header or footer area to
change the view. You can then change the images and texts of the header and footer area.
Edit text styles
Text styles of the content use the same style defined in the text style editor. In the document templates, we
recommend that you only adapt the template-specific styles, for example, header and footer texts.
Note
For the headings there are parameter, which are used from the template: numbering of heading, page break of
heading 1.
You are able to change this in the template.
The used default text styles are:
• Numberings of headings
• _Cover_Subtitle
• _Cover_Title
• _Title_Header
• Footer
Recommendation
If you want to adapt a Word template for a document type, it is recommended that you adapt all templates to have
a consistent design in all documentation.
6.1.3 Editing a Microsoft PowerPoint Template
PowerPoint templates are generally used to create documentation for simulations. When a document is generated,
the content is inserted with the project title on the top, the bubble texts on one side and the screenshot on the other
side of a slide.
Customizing a template
Open your template in Microsoft PowerPoint. A PowerPoint template can be adapted in the Slide Master view.
Select the view in the View tab.
You can customize the following parts of the template:
• design slide master
• layout pages

SAP Enable Now Customization
Customizing Documentation Templates and Settings
CUSTOMER
44
Note
The layouts in the template are supported with version 9.5 of the Producer. If you are using a customized template
of an older version, replace it with a newer template.
Design slide master
The design slide master contains the basic design of the template used for all layouts. It is the first page in the
structure.
You can adapt:
•
Background
•
Footer
Layout pages
The layouts contain different placeholders, which define the position and the size of the included content as well as
the formatting of the text. They are subpages of the design slide master.
You can adapt:
•
Cover page background:
You can change the position and formatting of the title as well as the background.
•
Position and size of placeholders:
You can change the position and formatting of the placeholders for title, text and image.
To change a text formatting highlight the texts in the text field. You can then change the Font settings in the Home
tab.
Note
Do not delete a layout or placeholders of a layout to insert the content correctly.
6.1.4 Explanation Icons
The explanation icons are used for explanation macro types in a simulation. To customize images, replace the
default images with your own images.
The images have the size 80x80 pixels and are in BMP format.
You can adapt the explanation icons of the simulation playback in the trainer Style additionally.
Type
Icon
Info
Remark

SAP Enable Now Customization
Customizing Documentation Templates and Settings
CUSTOMER
45
Type
Icon
Tip
Warning
Replacing an image
This is necessary to assign the correct image file to the active explanation type.
To replace an explanation image in a workarea, proceed as follows:
1. Select the icon file in the Documentation Style resource of the Explorer.
2. Select the Replace File... button in the object editor.
3. This opens the file selection dialog box. Select the required file.
4. Select on Open.
The icon is now integrated into the Documentation Style and can be used for generating documentation.
6.2 Documentation Settings
The structure of a document follows a predefined model. To individually customize a document, you can define the
structure and content to be inserted. There are numerous configuration parameters that influence the appearance
of documents specific for each type and format (based on fragments).
Managing documentation settings
The documentation settings are a resource type. This means you can manage individual settings and use them in
different workareas.
The documentation settings are summarized in the area Documentation Settings of the Settings dialog box.
Alternatively, the settings can be configured by choosing Resources -> Documentation Settings in the Explorer
menu.
In addition to the standard settings, you can create further settings by duplicating an existing setting and using it as
a base type:
1. Open the Documentation Settings section of the resource tree.
2. Select a documentation type to be used as a base type. For example: - Standard Document.
3. Select Duplicate... in the object editor.
A settings dialog box opens.
4. Enter a name for the setting.
5. Select OK to create the new setting.

SAP Enable Now Customization
Customizing Documentation Templates and Settings
CUSTOMER
46
Note
The Standard Documentation setting cannot be deleted because it is the basic setting resource of the Producer.
6.2.1 Basic Settings
The main settings for documentation are:
• Base Type:
Specifies the base type for the selected settings. This is defined when the documentation is created and
cannot be changed afterwards.
• Name:
Specifies the name of the selected settings.
• Template:
Specifies the documentation template used to generate the document. Choose Edit Link... to select a
template from the Documentation Style resource.
• HTML Template:
Specifies the documentation template used to generate the HTML document. Choose Edit Link... to select
a template from the Documentation Style resource.
The setting is only available for the hands-on guide.
Recommendation
To show the resources in the selection dialog box, select Filter Tree -> Show Resources.
• Style:
Specifies the documentation style used to generate the document. Select a style resource from the list.
• Text Style:
Specifies the text style used to generate the document. Select a style resource from the list.
Recommendation
The workarea contains one default text style for all content types. You can duplicate the default text style and
optimize the style configurations for the documentation. Afterwards, activate the text style in the Text Style
setting.
See also Text Style Editor.
Note
Text styles are not supported for Microsoft PowerPoint documents. The text can be formatted in the template.
See also Editing a PowerPoint Template.

SAP Enable Now Customization
Customizing Documentation Templates and Settings
CUSTOMER
47
6.2.2 Fragments
The fragments specify the basic structure of the document. There are different fragments for single documents and
compound document:
• Title (Single Document):
Inserts the title of the project.
○ Show Cover Page (PowerPoint):
Inserts a cover page with the title of the project.
• Description (Single Document):
Inserts the description of the project.
• Short Description (Single Document):
Inserts the short description of the project.
• Process Flow (Single Document):
Inserts the process flow for the project.
• Table of Contents:
Inserts a table of content. A drop-down list appears here where you can specify the depth of the table of
contents.
• Content
○ Project Content (Single Document):
This fragment inserts the content of the project.
○ Content (Compound Document):
This fragment inserts the content of the selected structure.
• Book Page:
This function inserts a book page in the documentation. Choose Edit Link... to select a book page.
• Text Unit:
This function inserts a text unit in the documentation. Choose Edit Link... to select a text unit.
• Revision History (Single Document):
This selection defines where the content from the Revision Entry macro is placed. The relevant macro has to
be inserted into the project beforehand.
• Input Values (Single Document):
This selection defines where the content from the Input Values macro is placed. The relevant macro has to be
inserted into the project beforehand.
• Blank Line & Break:
This fragment makes it possible to separate fragments using spacing and thus provide considerably more
structure.
○ Page Break
○ Small Blank Line
○ Medium Blank Line
○ Large Blank Line
• Glossary:
This fragment inserts a table of glossary descriptions of all used glossary entries of the content.
For creating glossaries, see the chapter Glossary of Terms.

SAP Enable Now Customization
Customizing Documentation Templates and Settings
CUSTOMER
48
• None:
Defines an empty fragment.
Note
For Microsoft PowerPoint only the fragments Description, Title, Project Content, Book Page and Text Unit can be
inserted.
6.2.3 Settings of the Subcategories
Settings for specifying the selected content can be made in the various areas. Not all areas are available for all
documentation types.
• Action Table:
Includes settings for the structure of the action table. See the relevant chapter.
Only BPP Document, Audit & Compliance Document
• Screenshots:
Includes settings for the size, style and quality of screenshots.
• Markers:
Includes settings for the style of highlights and arrows.
• Numbering:
Includes settings for the structure and style of numberings.
• Project Content:
Includes settings for specifying project content.
• Included Objects:
Includes settings for specifying content included as fragments.
• Quiz:
Includes settings for the display of quiz items.
Only Standard Document, Training, Document, Work Document
• Revision History:
Includes settings for specifying Revision Entry macros as revision history.
• Input Values:
Includes display settings for input values of interactions.
6.2.4 Subcategory: Quiz
The quiz settings are available for the documentation types Standard Document, Training Document and Work
Document.
• Show Quiz:
The setting specifies if quiz items are displayed in a documentation.
• Include Solutions:
This setting allows you to generate the solutions for the quiz items. This means you can differentiate between

SAP Enable Now Customization
Customizing Documentation Templates and Settings
CUSTOMER
49
a document intended for the examiner with all the correct answers and a document for the person being
examined without any of the answers.
6.2.5 Subcategory: Action Table
Specific settings can be defined for the documentation types BPP and Audit & Compliance document. There is an
additional subcategory called Action Table available with the relevant settings.
Defining the action table
The structure and content of the table can be defined to insert the explanations of the actions. A total of 5 columns
can be defined as follows:
• Hide Screenshots:
The Hide Screenshots option allows you to set up the screenshots display in the Screen macros.
If the option is activated you are provided with a screenshot and a table below containing all available actions
of the step.
If the option is deactivated, a serial table containing the actions is displayed. The single steps are numbered
consecutively.
• Action Table:
This option specifies whether the actions are displayed as a table or as text only using a step by step
approach.
• Table Width:
Defines the width of the action table in pixels.
• Column 1 - 5: Content:
Defines the column for the information extracted from the macro and displayed in the documentation. When a
table is generated, the column name will be displayed in the relevant project language based on the content
dictionary.
The column can also have a title allocated to it, which can be entered manually in the document.
Content
Explanation
Hide Column
Hides the column.
Numbering
Creates sequential numbering for the actions.
Text from Demo Bubble / Practice Bubble
Texts from the Demo or Practice bubbles of the actions
Object name
Contains the object names of the actions.
Value
Contains the entered value from the macros
.
ROC
Contains the ROC value defined for the entry macros.
Description
Contains the description defined for the entry macros.
Result, OK, Comment, Reference
Empty columns for manual creation of contents.
SAP Enable Now Customization
Customizing Documentation Templates and Settings
CUSTOMER
50
• Column 1 - 5: Width (%):
Defines the width of the column as a percentage of the total width of the table.
6.2.6 Compound Document Settings
For the compound document, you can specify the content types that have to be considered for the document
generation. There are the following settings:
Groups
• Include Groups:
Specifies that the group content is displayed in the document.
• Show Description:
Specifies that the group descriptions are displayed in the document.
Text Units
• Include Text Units:
Specifies that the text unit content is displayed in the document.
• Show Title:
Specifies that the group titles are displayed in the document.
Projects
• Include Projects:
Specifies that the project content is displayed in the document.
• Documentation Type:
Specifies the documentation type used. The content and structure for single documents corresponds to the
specified Documentation Settings for a document type.
Books
• Include Books:
Specifies that the book content is displayed in the document.
• Show Book Description:
Specifies that the book descriptions are displayed in the document.
Book Pages
• Include Book Pages:
Specifies that the book page content is displayed in the document.
• Show Book Page Description:
Specifies that the book page descriptions are displayed in the document.
• Book Page Format:
Specifies the format for displaying the book pages:
○ Book Page as Image:
Includes the images of the book pages in the document.

SAP Enable Now Customization
Customizing Documentation Templates and Settings
CUSTOMER
51
○ Book Page as Text:
Includes the texts of the book pages in the document.
• Maximum Image Width:
Specifies the maximum width of the images if the book pages are included as images. By default, the images
are scaled to the width of the template layout.
• Links:
Specifies that links of book page objects are inserted into the document.
• Background Image:
Specifies that the background images of book page objects are displayed on the book page image.
• Refresh Preview Images:
Specifies that the book page images are refreshed before including the images in the document. This is
helpful for displaying the latest changes of the book pages in the images.
Output Options
• Include Hidden Objects:
When this option is enabled, hidden documents are added to the compound document. When this option is
disabled, hidden documents are ignored and do not appear in the documentation.
• Show Short Description:
Shows the short description for groups, books, book pages, and text units. For projects, the short description
is activated in the documentation settings of a document type.
6.2.7 Customizing Documentation Naming
The object names of generated documents are by default the names of the relevant document types. Duplicated
documentation settings use the defined name of the resource and do not have different content languages.
You can change document naming and add different languages. This can be done in the entity file of a
documentation setting resource. The entity file is an xml file that is available for each object in the workarea folder
structure. It contains general attributes for object administration.
Adapting the entity.xml
Proceed as follows to adapt the file:
Note
To customize naming in the entity.xml, you should have basic knowledge of editing XML files.
1. Open the Documentation Settings tree in the Resources -> Adaptable Resources in the Explorer.
2. Select the required resources or duplicated resources; click the right mouse button to open the context menu.
3. Click on the menu entry Open Folder .
4. Open entity.xml in an editing program, for example notepad.
5. Edit the file and enter your new naming.
6. Save and close the file.
7. Restart the Producer.

SAP Enable Now Customization
Customizing Documentation Templates and Settings
CUSTOMER
52
Now you can generate your documents with the new naming.
XML structure
Example of the XML structure:
Note
Only change the attributes mentioned here; otherwise errors may occur in resource administration.
Syntax
<?xml version="1.0" encoding="UTF-8"?>
<doc_settings created_by="author_name" creation_time="date_time" caption="work_doc"
version="resource_version" sub_type="document_type"
cwa_recommended_sync_mode="synchronization">
<Language name="1031">
<Text name="work_doc">Arbeitsdokument</Text>
</Language>
<Language name="1033">
<Text name="work_doc">Work Document</Text>
</Language>
...
</doc_setting>
For each language, insert these attributes:
<Language name="language code">
<Text name="caption name">Document name</Text>
</Language>
An overview of the content languages and required language codes is available in the chapter Content Languages
Overview.
6.2.8 Documentation for Right-to-Left Languages
An additional Documentation Style (Right-to-Left) resource is available for creating documentation for content with
right-to-left languages. The resource is similar to the standard Documentation Style but includes right-to-left
adaptations in the templates. Further adaptations to templates can be performed individually. The resource is
located in the Adaptable Resources tree of the Explorer.
The following documentation formats are supported for right-to-left languages:
• Microsoft Word
• PDF
• Microsoft PowerPoint
• HTML

SAP Enable Now Customization
Customizing Documentation Templates and Settings
CUSTOMER
53
Requirements
To edit documentation in Microsoft Word / PowerPoint, you need to activate a right-to-left language under Editing
Language and Keyboard Layout in Microsoft Office.
Note that in some situations, the activated right-to-left editing language can influence the direction of the table of
contents. If this is the case, you need to change the table of contents manually. Alternatively, remove the right-to-
left editing language and generate the documentation again.
Activation
The resource Documentation Style (Right-to-Left) can be set individually for each document in the Documentation
Settings. The documentation settings are available in the Documentation Settings area of the Settings dialog box
and in the Resources -> Documentation Settings area of the Explorer. Further information is available in the
chapter Managing Templates.
SAP Enable Now Customization
Templates for Content Objects
CUSTOMER
54
7 Templates for Content Objects
Templates can be made for objects that are created for workareas in the project explorer. The templates are useful
for saving time as well as for ensuring uniformity for newly created objects when more than one author is working
on a project.
Creating a template
To create a template, proceed as follows:
1. Create a new object by clicking on New Project, New Book Page etc. from the toolbar in the project editor.
2. A dialog box will appear.
Enter a name for the template. Set further required attributes.
Confirm by clicking on Ok.
3. Configure your object as desired.
4. Save the object.
Managing templates
It is recommended to create a group for your templates and to collect all required templates in the group. The
authors can choose a template for the content creation.
Set the group to hidden by using the Hide option in the object editor. Thus the templates are not displayed during
content playback.
Choosing a template
If a template has already been created, you can use it to create a new object or it can be defined as a general
template for creating new objects, which will then serve as the default settings for the new objects.
To use an existing template, proceed as follows:
• For an individual object
Create a new object. Select your template from the New Object dialog box under Template about the Change…
button. All the objects will then appear in the opened dialog box. Select your template and click on OK.
• As a general template
If you would like to use a template for all the objects, open the central configuration dialog from the menu
Tools -> Settings in the area Application -> Templates. Select the desired template to be used and click on OK.

SAP Enable Now Customization
Templates for Content Objects
CUSTOMER
55
Note
The settings cannot be saved into a resource and have to be set by the authors individually.
7.1 Customizing Simulation Pages
You can design the pages in your simulations any way you want. This can be useful if the screenshots of the
recording do not take up the entire screen area or if you are using imported pages. The pages design is based on the
book page design so that you can use the book page styles available in your workarea.
You can find the respective settings under Playback Settings -> General -> Page Style in the Settings dialog box.
You can create the design as the default design for your workarea or for a specific project. A specific project can be
used as template for other projects.
Settings
• Style:
Specifies the page design. You can select a book style from the dropdown box.
The setting also affects the book page objects inserted in a simulation.
• Center Background Image:
Centers the background image or the simulation screenshot. If the option is deactivated, the image is
positioned in the upper left-hand corner.
• Page Color:
Specifies the color of the page. Select the color preview to open the Color Selection dialog box. If you do not
want to use any color, select Transparent .
• Background Color:
Specifies the color of the background. Select the color preview to open the Color Selection dialog box. If you do
not want to use any color, select Transparent .
• Border:
Specifies the thickness of the page border in pixels. If no border is to be displayed, set the value to 0 (zero).
• Border Color:
Specifies the color of the page border. Select the color preview to open the Color Selection dialog box.
• Border Style:
Specifies the style of the page border that you can select from the dropdown box.
7.2 Templates for Book Pages
Book page templates are special types of book pages, which define a layout and general objects for creating book
page content. Templates are useful for saving time and for ensuring uniformity for newly created objects in a
complex book and to support the content creation of many authors.

SAP Enable Now Customization
Templates for Content Objects
CUSTOMER
56
7.2.1 Creating a Book Page Template
You should create a template before creating a book. This ensures consistency and avoids the need to make
changes afterwards. For further information, see the chapter Creating a Content Object.
To create a book page template, proceed as follows:
1. Select your template group in the workarea structure to insert the book page template.
2. Select New Object in the toolbar.
An overview of all objects opens.
3. Select Book Page .
The New Book Page dialog box opens.
4. Adapt the following settings:
1. Name:
Enter an object name.
The default name is the object type with an ID.
2. Language:
Select a language from the dropdown box.
5. Select OK to create the object.
The book page is opened in the book editor.
6. Select a Book Style in the Style parameter.
7. Create your standard elements of the template.
8. Select Save and close the book page.
9. Open the Explorer.
10. Select Book Page Template as Subtype for the created book page.
The icon of the object changes and displays the template type.
Note
An existing template cannot be used to create a new template. Always create a template without using other
templates.
Tips for creating templates
• Create a group for your templates. Set the group to hidden, in order to hide it during content playback.
• Lock the position of your objects, if you want to prevent objects from being changed accidentally.
• Use guides to create a layout grid.
• Define Text Styles for the content, to ensure consistency and straightforward adaptation.
• Insert the layout and design relevant objects.

SAP Enable Now Customization
Templates for Content Objects
CUSTOMER
57
7.2.2 Defining a Book Page Template
You can use a book page template to create your book page content. There are different ways to activate a
template for a book page:
• Define a default template for creating new book pages
• Select a template when creating a new book page
• Set a template in an existing book page
Select a default template
You can select a default template, which is always used for creating new book pages. This can be done as follows:
1. Open the area Producer -> Templates in the Settings dialog box.
2. In the Book Page parameter, select Edit Link...
The object selection dialog box opens.
3. Select the Book Page Template and select OK.
4. Confirm your changes in the Settings dialog box with Apply.
5. Select OK to close the dialog box.
When creating a new book page, the template is set by default. Further information is available in the chapter
Templates for Content Objects.
Select a template for a new book page
When creating a book page, you can set a template in the New Book Page dialog box. If a template has been defined
as standard, you can select an alternative template for an individual page. For further information, see the chapter
Creating a Book Page.
Set a template in a book page
The Page object of a book page contains the setting Template, which displays the activated template. If you want to
use another template, select the book page from the dropdown box. The property only displays book pages with the
subtype Book Page Template.
7.2.3 Using a Book Page Template
The objects of an active book page template have the following characteristics:
• they are inherited from the template
• they use the properties as default (green button deactivated)
• they are highlighted in blue in the objects list
• they are positioned on the layers behind the objects of the created book page
• they cannot be deleted - the objects are hidden automatically
SAP Enable Now Customization
Templates for Content Objects
CUSTOMER
58
Changing and resetting objects
The template objects use the defined properties by default, if the template is used for a general book page. You can
change the template objects for your content as required.
To change an object, you have to select the specific property by activating the green control in front of the property
name.
If you have changed objects, you can reset your changes by choosing the Reset Template Objects in the Edit menu.
Once reset, the parameters are unspecified (green control deactivated) and the default template is used.
Note
Changed objects keep their status even when objects are changed in the template. Click on Reset Template
Objects to change the objects in the book page to the current status of the template.
Tips for using templates
• If you do not need an object on a book page, hide the object by using the Hide property in the object editor.
• We recommend that you keep the template objects when the template is used as a book page because the
objects define a layout.
7.3 Templates for Text Units and Projects
You can insert the content of objects into a book page template, in order to use text units and projects in books.
This supports a separation between content and design. During playback, the properties of the text units or
projects with modes are inserted automatically by the book reader. Each object is displayed as a single book page,
which shows the defined content.
Creating a template
Proceed as follows to insert text units or projects into a book page:
1. Create a book using the New Book toolbar entry.
2. Insert the text units or projects into the book with the required structure. You can also use both types in a
book.
3. Create a book page using the New Book Page toolbar entry. To use it as a template, we recommend that
you save the book page in a separate template group in the workarea structure.
4. Open the book page in the book page editor.
5. Insert empty text boxes as placeholders for the content properties of the objects. The property displayed by
each text box must be defined in the Name parameter of the text box.
6. For projects, you can also insert a Mode Link in the template to use a specific project mode by default.
Insert the Mode Link for the required mode and define the use of the mode in the Name parameter of the
object.
7. Save the book page.
8. Open the Settings dialog box in the section Playback Settings -> book reader. Specify the settings and
confirm with OK.

SAP Enable Now Customization
Templates for Content Objects
CUSTOMER
59
Playback settings
Setting
Description
Text Units
Show text unit properties
Activate this setting to display text units in the book
reader.
Template for text units
Select your created book page template for the text
units.
Projects
Show project properties
Activate this setting to display projects in the book
reader.
Template for project pages
Select your created book page template for the projects.
Name entries
Value
Description
Example
caption
Name
shortdesc
Short Description
description
Description
demo_link
Demo Mode
uebung_link
Practice Mode
test_link
Test Mode
praxis_link
Concurrent Mode

SAP Enable Now Customization
Templates for Content Objects
CUSTOMER
60
7.4 Quiz Templates
Quiz templates are a special type of book page, which define a layout and general objects for creating quiz content.
Templates are useful for saving time and for ensuring consistency when creating objects. Furthermore, they
provide flexibility when creating a quiz layout.
7.4.1 Customizing a Quiz Template
The Info Center of SAP Enable Now provides templates that you can use for your content. You also can use the
templates to customize your own templates. For more information, see the Content Templates -> Quiz Templates
section.
To customize a template, proceed as follows:
1. Download the template from the Info Center.
2. Import the DKP file in your Producer.
3. Open Quiz Template book page in the book page editor.
4. Page
The Page uses the default Book Style of the workarea. You can select another style in the Style setting.
The default page size is 1024x672.
5. Objects
Customize the available objects that are used for the structure and the design of the template. It is
recommended that you change the following:
• The position of the objects
• The text formatting of the objects
• The design of the objects
6. Quiz Item Template
Customize the Quiz Item Template object. The settings of the object influence the design of the quiz item.
See also Adapting the Quiz Item Template.
7. Save the book page.
Note
Do not change the object names. If you change a name, the quiz cannot be played back correctly. The object
names are used to assign functionality to an object.
See also Elements of a Quiz Template.
Images
The images used for the objects are added as assets to the book page. You can replace the images. Make sure that
you adapt the assets in the controls afterwards.
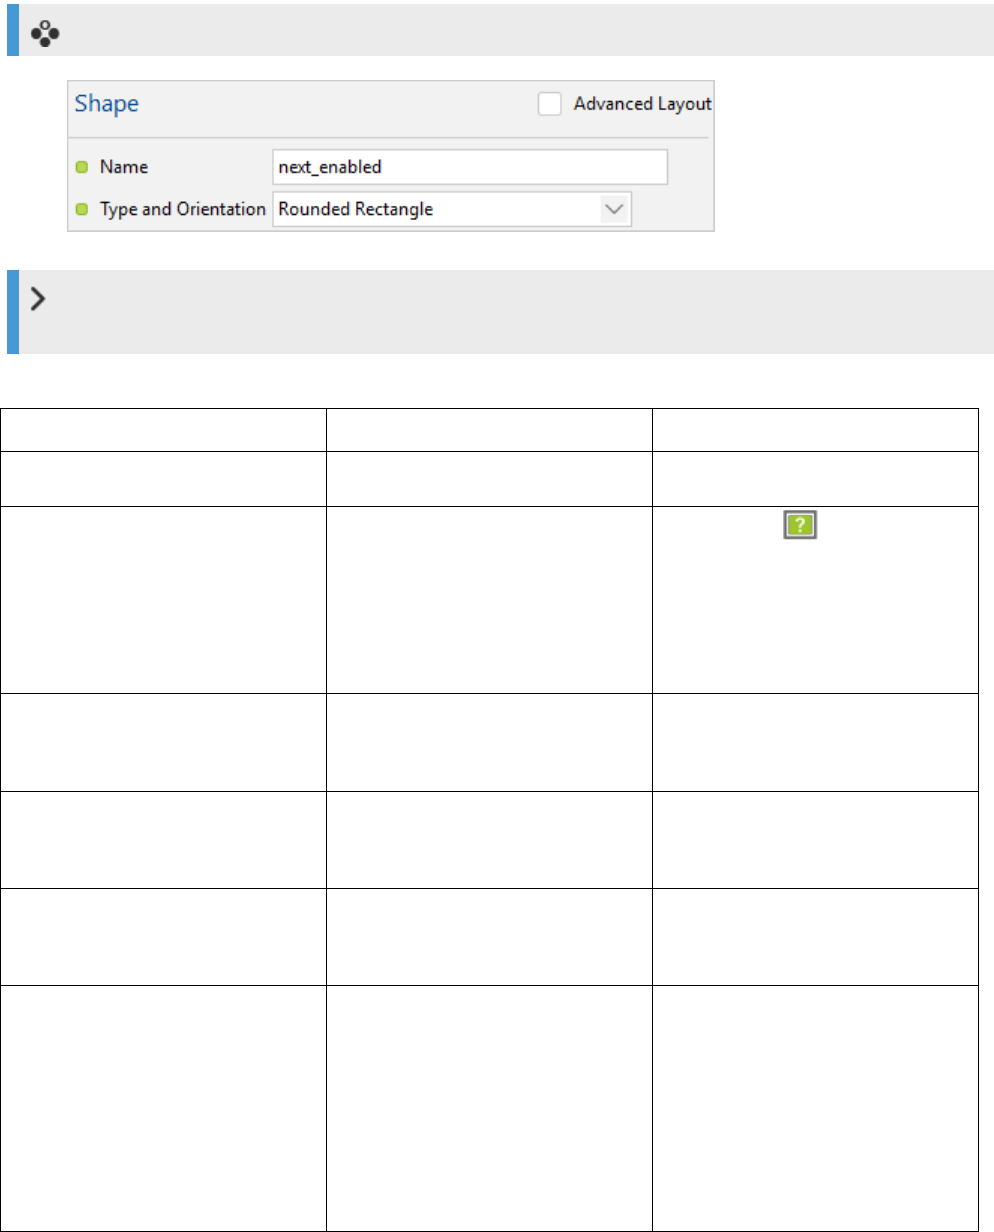
SAP Enable Now Customization
Templates for Content Objects
CUSTOMER
61
7.4.2 Elements of a Quiz Template
To create a quiz template you have to assign a specific quiz function (for example: task, next quiz, time limit) to a
book page object. To assign a quiz function to a book page enter the function's name into the name field of the book
page object.
Example
Recommendation
We recommend to use the following basic objects for your quiz templates: Text, Image, and Shape.
The following functions and name values can be used for a quiz template:
Type
Function / Name Value
Description
General
Quiz Item Template
quiz_element
Is used for the Quiz Item
Template object and is a placeholder
for the quiz content.
Specifies the design of the quiz
items.
Title
title
Contains the title text of the quiz.
Task
task
Contains the task text of the quiz.
Next control: disabled
next_disabled
Disabled button for showing the next
quiz or feedback.
Next control: enabled
next_enabled
Enabled button for showing the next
quiz or feedback.
The button shows a Next tooltip. This
text is taken from the playback
dictionary Standard and will be
displayed in the current project
language.

SAP Enable Now Customization
Templates for Content Objects
CUSTOMER
62
Type
Function / Name Value
Description
Quiz Evaluation
quiz_evaluation
Contains the evaluation of a quiz.
Note
The object is a placeholder for the
position and size of the evaluation.
The evaluation style cannot be
changed in the template, as it uses
the default trainer configurations.
Feedback
For quizzes there are two feedback
types:
• Feedback displayed on page
• Feedback displayed as popup
Feedback on page:
Feedback text: correct
feedback_correct
Contains the feedback text for a
correct answer.
Feedback text: wrong
feedback_wrong
Contains the feedback text for a
wrong answer.
Feedback text: timeout
feedback_timeout
Contains the feedback text displayed
if the time limit is exceeded.
Feedback icon: correct
feedback_passed_icon
Specifies an icon for displaying
feedback for a correct answer.
Feedback icon: wrong
feedback_failed_icon
Specifies an icon for displaying
feedback for a correct answer or a
time out.
Feedback as popup:
Feedback popup: correct
feedback_correct_popup
Contains the feedback text for a
correct answer (popup).
Feedback popup: wrong
feedback_wrong_popup
Contains the feedback text for a
wrong answer (popup).
Feedback popup: timeout
Contains the feedback text if the
time limit is exceeded (popup).

SAP Enable Now Customization
Templates for Content Objects
CUSTOMER
63
Type
Function / Name Value
Description
feedback_timeout_popup
Feedback icon: correct
feedback_correct_icon
Specifies an icon for displaying
feedback for a correct answer.
Feedback icon: wrong
feedback_wrong_icon
Specifies an icon for displaying
feedback for a correct answer or a
time out.
Media
Media popup
media
Contains the media file of the quiz.
Media control: show
media_open
Specifies a button for showing the
media popup.
Media control: hide
media_close
Specifies a button for hiding the
media popup.
Media preview
media_preview
Specifies an image as preview for the
media file.
Status
Points
points
Shows the points of the quiz.
Number
number
Shows the number of the quiz.
Time limit
countdown
Shows the time limit for the current
quiz item.
Global time limit
countdown_global
Shows the time limit for the current
quiz items.
7.4.3 Adapting the Quiz Item Template
The Quiz Item Template is a book page object, which is used as placeholder for the quiz items in a quiz template. In
the object, you can define the design of the quiz item controls.

SAP Enable Now Customization
Templates for Content Objects
CUSTOMER
64
The object contains the following setting subsections:
• Design Controls:
Contains general settings for the controls of the quiz items.
• The following subcategories contain additional settings specific for a quiz item.
○ Design Multiple Choice:
○ Design Fill in the Blanks:
○ Design Fill in the Fields:
○ Design Matching:
○ Design Connection:
○ Design Sorting:
○ Design Slide Control:
○ Design Grid:
• Design:
Contains settings for the text and the general design of the object (for example background color).
Recommendation
Test your changes using an example quiz to see the settings. Create an example quiz with all required quiz items.
7.4.4 Selecting a Quiz Template
A quiz item can be selected as follows:
• In settings dialog box
1. Open the settings dialog box using the Tools -> Settings menu.
2. Select the section Playback Settings -> General -> Quiz.
3. Go to the Template setting and select the customized Quiz Template.
4. Confirm the dialog box with OK.
• For each quiz item
1. Open a project with a quiz.
2. Select a quiz item.
3. Open the macro editor.
4. Go to the Template setting and select the customized quiz template.
SAP Enable Now Customization
Technical Support
CUSTOMER
65
8 Technical Support
Please use the SAP Incident Wizard on the SAP Support Portal to submit your incidents on the following
components:
• KM-WPB // Enable Now
• KM-WPB-PRO // Enable Now – Producer
• KM-WPB-IPR // Enable Now – Instant Producer
• KM-WPB-MGR // Enable Now – Manager
• KM-WPB-NAV // Enable Now – Desktop Assistant
• KM-WPB-CXH // Enable Now – Context Sensitive Help
• KM-WPB-APR // Enable Now – Application Profiles
• KM-WPB-SMI // Enable Now – Solution Manager Integration
Using the SAP Support Portal
If you are not familiar with the SAP Support Portal, read the following information:
• To access the SAP Support Portal you need an S-user ID and password. You can request access data from
your SAP Super Administrator or register online on the SAP Support Portal page under Registration.
• With this user, you have read-access to all the contents of the SAP Support Portal, you can use the SAP
Community Network and SAP Help Portal, and you can also book courses under SAP Education.
• If you want to work with the support applications (Incident Wizard, license key request, system data
maintenance, manage remote connections, software download and so on), you need the corresponding
authorizations, which your SAP Super Administrator can give you.
• You can find information for new users and about support applications on the Support Portal Homepage
under Learn More. There you can also register for a personal overview demonstration of the SAP Support
Portal.
• In case of problems with SAP Support Portal contact your local Customer Interaction Center.
An online web form is available on http://support.sap.com/contactus. This web form should be used for all
written communication with your local customer interaction center. More Details about Incident Processing,
Support Addresses and Hotline Numbers can be found here:
http://service.sap.com/sap/support/notes/560499
• Are you interested in a tour through the SAP Support Portal? Register for an online demo.
Diagnosis function in Producer
The Producer diagnosis function can also be used to check the technical data of the installation on your computer
(version, operating system, browser, etc.). Open Producer and select Diagnosis… by using the Help menu. The
Producer transmits the required information automatically and lists this in a corresponding dialog box. This
information can also be saved as a text file and sent as an E-mail attachment to the SAP support staff.
SAP Enable Now Customization
Important Disclaimers on Legal Aspects
CUSTOMER
66
9 Important Disclaimers on Legal Aspects
This document is for informational purposes only. Its content is subject to change without notice, and SAP does not
warrant that it is error-free. SAP MAKES NO WARRANTIES, EXPRESS OR IMPLIED, OR OF MERCHANTABILITY, OR
FITNESS FOR A PARTICULAR PURPOSE.
Coding Samples
Any software coding and/or code lines / strings ("Code") included in this documentation are only examples and are
not intended to be used in a productive system environment. The Code is only intended to better explain and
visualize the syntax and phrasing rules of certain coding. SAP does not warrant the correctness and completeness
of the Code given herein, and SAP shall not be liable for errors or damages caused by the usage of the Code, unless
damages were caused by SAP intentionally or by SAP's gross negligence.
Accessibility
The information contained in the SAP documentation represents SAP's current view of accessibility criteria as of
the date of publication; it is in no way intended to be a binding guideline on how to ensure accessibility of software
products. SAP specifically disclaims any liability with respect to this document and no contractual obligations or
commitments are formed either directly or indirectly by this document.
Gender-Neutral Language
As far as possible, SAP documentation is gender neutral. Depending on the context, the reader is addressed
directly with "you", or a gender-neutral noun (such as "sales person" or "working days") is used. If when referring to
members of both sexes, however, the third-person singular cannot be avoided or a gender-neutral noun does not
exist, SAP reserves the right to use the masculine form of the noun and pronoun. This is to ensure that the
documentation remains comprehensible.
Internet Hyperlinks
The SAP documentation may contain hyperlinks to the Internet. These hyperlinks are intended to serve as a hint
about where to find related information. SAP does not warrant the availability and correctness of this related
information or the ability of this information to serve a particular purpose. SAP shall not be liable for any damages
caused by the use of related information unless damages have been caused by SAP's gross negligence or willful
misconduct. Regarding link classification, see: http://help.sap.com/disclaimer.

www.sap.com/contactsap
© 2019 SAP SE or an SAP affiliate company. All rights reserved.
No part of this publication may be reproduced or transmitted in any form
or for any purpose without the express permission of SAP SE or an SAP
affiliate company.
The information contained herein may be changed without prior notice.
Some software products marketed by SAP SE and its distributors contain
proprietary software components of other software vendors. National
product specifications may vary.
These materials are provided by SAP SE or an SAP affiliate company for
informational purposes only, without representation or warranty of any
kind, and SAP or its affiliated companies shall not be liable for errors or
omissions with respect to the materials. The only warranties for SAP or
SAP affiliate company products and services are those that are set forth in
the express warranty statements accompanying such products and
services, if any. Nothing herein should be construed as constituting an
additional warranty.
In particular, SAP SE or its affiliated companies have no obligation to
pursue any course of business outlined in this document or any related
presentation, or to develop or release any functionality mentioned therein.
This document, or any related presentation, and SAP SE’s or its affiliated
companies’ strategy and possible future developments, products, and/or
platforms, directions, and functionality are all subject to change and may
be changed by SAP SE or its affiliated companies at any time for any
reason without notice. The information in this document is not a
commitment, promise, or legal obligation to deliver any material, code, or
functionality. All forward-looking statements are subject to various risks
and uncertainties that could cause actual results to differ materially from
expectations. Readers are cautioned not to place undue reliance on these
forward-looking statements, and they should not be relied upon in making
purchasing decisions.
SAP and other SAP products and services mentioned herein as well as
their respective logos are trademarks or registered trademarks of SAP SE
(o r an SAP affiliate company) in Germany and other countries. All other
product and service names mentioned are the trademarks of their
respective companies.
Please see http://www.sap.com/corporate-en/legal/copyright/index.epx
for additional trademark information and notices.
