"MAYARIS 2" REXING FORMULA WHEEL - QUICK GUIDE
1
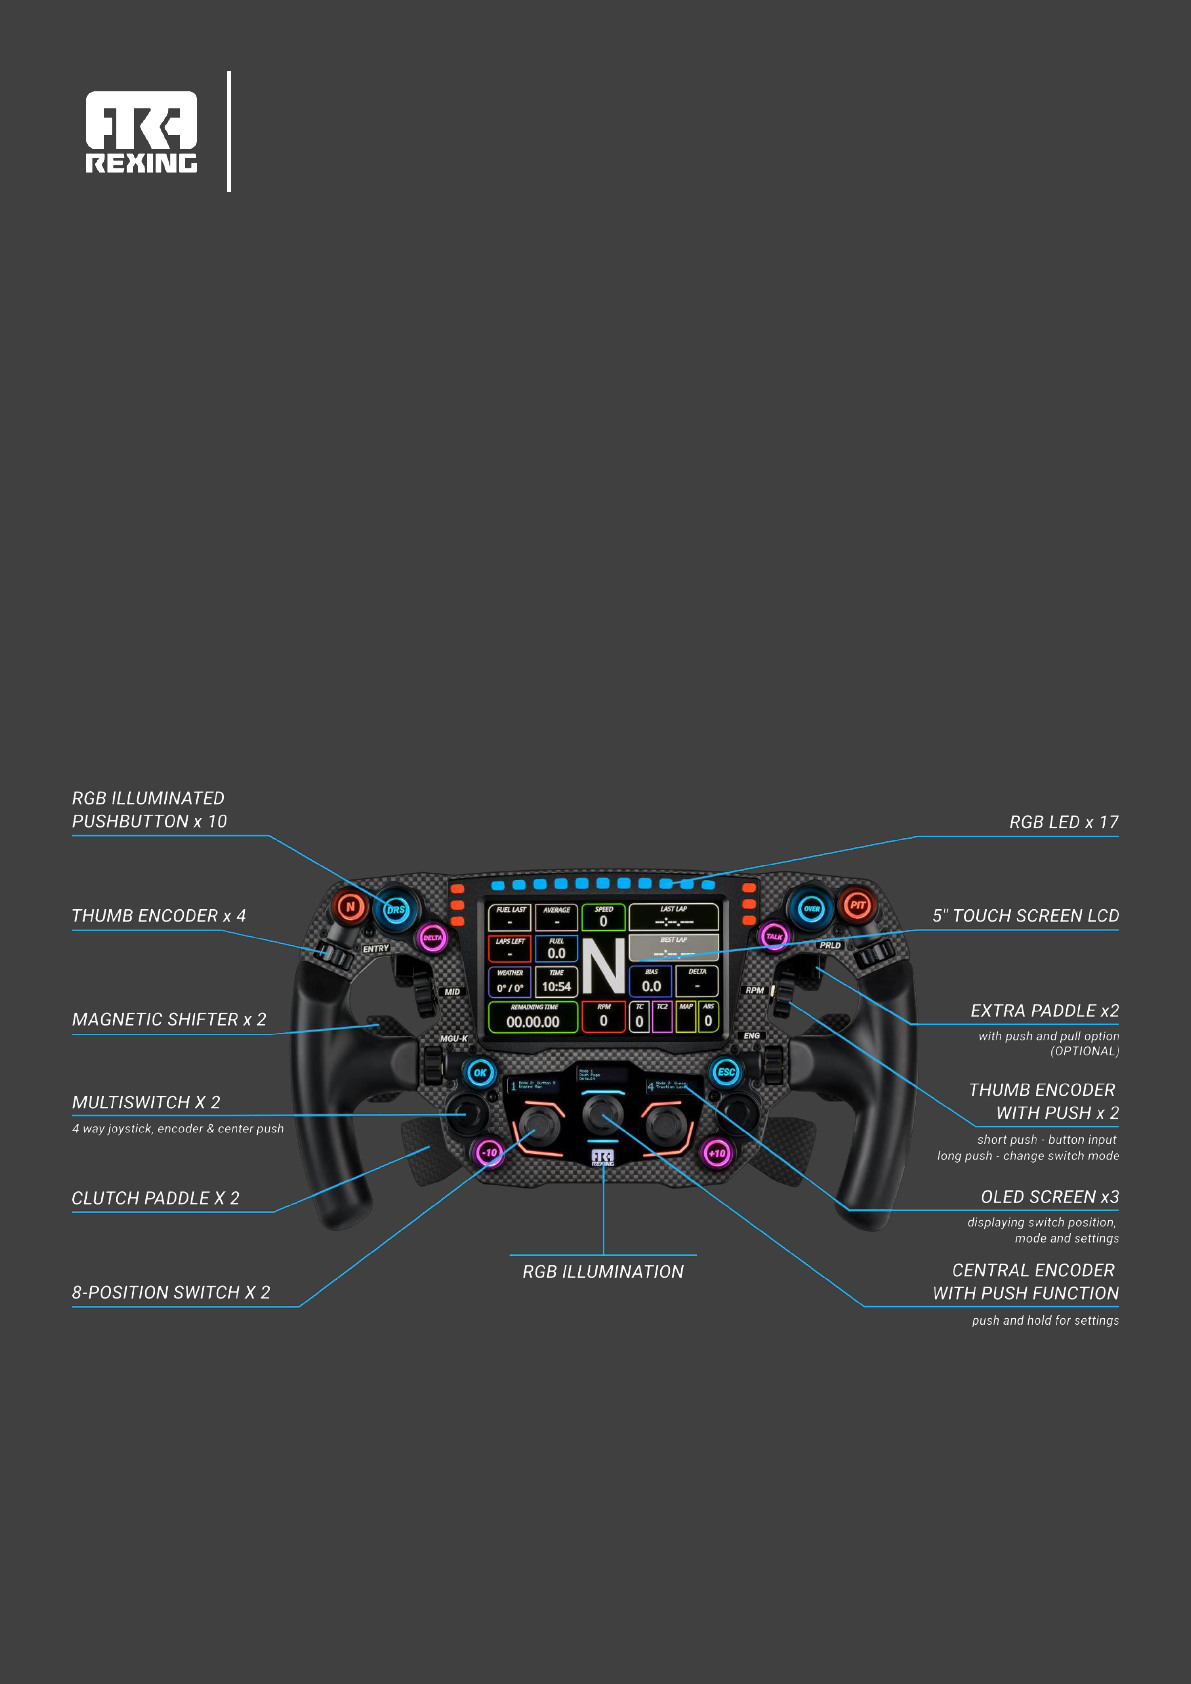
REXING FORMULA WHEEL
"MAYARIS 2"
QUICK GUIDE
Firmware version 1.03F or higher

"MAYARIS 2" REXING FORMULA WHEEL - QUICK GUIDE
2
1. GENERAL
Keep the steering wheel away from water and humidity.
Avoid long exposure to direct sunlight to prevent degradation of carbon fiber finish.
Do not try to open your steering wheel.
Do not try to remove the hub from the back of the steering wheel.
Make sure the coiled cable is loose rather than very tight, to ensure the cable lasts longer and
doesn’t get damaged.
All measures are expressed in metric units. You will need metric tools for nuts and bolts.
Rexing Formula Steering Wheel Mayaris 2 will need to be connected to a powered USB hub
in order to use highest brightness levels. If you’re using an extension cable to connect your
Rexing wheel to your PC, we recommend a higher quality cable of up to 2 meters long.
Avoid touching the screen with your fingers when holding or carrying the wheel:
2. ATTACHING THE WHEEL TO THE BASE OR QUICK RELEASE

"MAYARIS 2" REXING FORMULA WHEEL - QUICK GUIDE
3
Illustration 1: attaching the steering wheel hub to bases or
quick releases that have threads
Use M5 x 10 mm bolts for bases or quick
releases that have threads, for example:
Simucube, Fanatec Podium Hub, NRG or
similar. We recommend to use the supplied
washers.
Necessary tools: 8 mm wrench key
Illustration 2: attaching the steering wheel hub to formula
type bases or quick releases
Use M5 x 16 mm bolts and M5 nuts for bases
or quick releases such as Asetek or Q1R and
most formula-type quick releases (Lifeline, Go-
Race, Sparco etc.). We recommend to use the
supplied washers both for bolt and for the nut.
Necessary tools: two 8 mm wrench keys OR
one 8 mm wrench key and one 8 mm socket
wrench key.
For quick releases that have 6 holes, it is enough to use only 3 holes.
For Fanatec Podium Hub it is enough to use 3 holes, either on 50,8 or on 70 mm diameter.
The best way to secure the screws is to start them with your fingers, and then tighten them with a
wrench key.
Tip: To avoid damaging the surface and components under and near the hub, we recommend
covering it with some masking tape or soft cloth while inserting and securing the bolts.
IMPORTANT: Please check on Rexing website (https://rexing.eu/rexing-formula-wheel-mayaris-
2/#tab-2-5) if your wheel’s firmware version is up to date. If not, follow the procedure described on
the link in order to update it. To see your current firmware version, enter Settings and scroll the
central encoder until the Firmware version entry is displayed.

"MAYARIS 2" REXING FORMULA WHEEL - QUICK GUIDE
4
3. INSTALLATION TO PC
Rexing Formula Steering Wheel Mayaris 2 can work without powered USB hub, but if you experience
any issue with shutting down, a powered USB hub will solve it. This may depend on the quality and
length of your USB cable, and on the LED brightness level you use. For highest brightness levels
powered USB hub IS required.
Plug the supplied coiled USB cable into the wheel on the one end and a powered hub/extension USB
cable on the other end. The powered USB hub should be plugged directly into your PC’s back USB
connector.
4. FUNCTIONALITY
4.1. Switch modes and center encoder modes
4.1.1. Left 8-position switch
The left 8-position switch has 3 modes. Modes are cycled by pushing and holding for at least half a
second (“long press”) the left middle thumb encoder. Short press of the left thumb encoder works
as a button which can be used in games.
Mode change will be indicated on the OLED screen directly above the corresponding switch. For
information on how to insert your custom text in the OLED screens, see Chapter 5.2.
1
Mode 1: 8-pos.
Here comes
Custom text
Mode number / description
Switch position
Custom text, two lines,
can be edited in Simhub
“Long press” - left
middle thumb encoder
Left 8-pos. switch

"MAYARIS 2" REXING FORMULA WHEEL - QUICK GUIDE
5
Mode 1: 8-pos.:
In this mode each position of the switch will make a momentary push input, like
pressing a pushbutton. 1-8 positions of the switch correspond to inputs 46-53. Useful
for assigning different engine modes, TC levels etc.
Mode 2: Button 6:
In this mode the switch works together with button 6. Input is only activated when the
button is pressed. In this mode button 6 will not be recognized as its default input,
instead, depending of the switch position, it will be inputs 100-107.
Mode 3: Encoder:
Works together with right bottom thumb encoder. Each of 8 positions of the switch
will change function of the encoder. Normal inputs (20-21) of the encoder will be
disabled and new input pairs will be assigned depending on the switch position:
1:108-109
2: 110-111
3: 112-113
4: 114-115
5: 116-117
6: 118-119
7: 120-121
8: 122-123
Button 6
Right bottom
thumb encoder

"MAYARIS 2" REXING FORMULA WHEEL - QUICK GUIDE
6
4.1.2. Right 8-position switch
The right 8 position switch has 3 modes. Modes are cycled by pushing and holding for at least half a
second (“long press”) the right middle thumb encoder. Short press of the right thumb encoder works
as a button which can be used in games.
All 3 modes work as a regular 8 position switch where each position of the switch sends short button
press. Same as Mode 1 on the left 8 position switch.
Mode 1 inputs 54-61,
Mode 2 inputs 84-91,
Mode 3 inputs 92-99.
4.1.3. Central encoder
Central encoder can have 1 to 4 modes. Modes operate as normal encoders, but each mode is a
different pair of inputs.
Modes are changed by pressing down on the encoder. Mode change will be indicated on the OLED
display above the encoder. Number of modes can be changed from 1 to 4 using the Center Modes
within Settings > Advanced settings. If only 1 mode is set, then short press of the encoder
will work as additional button input instead of changing the modes.
Central encoder
“Long press“- right
middle thumb encoder
Right 8-pos. switch

"MAYARIS 2" REXING FORMULA WHEEL - QUICK GUIDE
7
Mode 1 inputs 28-29 (center push input 127),
Mode 2 30-31,
Mode 3 32-33,
Mode 4 34-35.
In case of using 2 or more modes, it is possible to make the encoder always return to a preferred
mode five seconds after the last usage of this encoder. To select the preferred mode that the
encoder will autoreturn to, go to Settings > Advanced settings > AutoRtn. Center.
For example, if Mode 1 is an often used game command, and you change to some different mode
for some minor adjustments, setting this to “Mode 1” will make sure it comes back to Mode 1 on
its own. Available options are: Mode 1, Mode 2, Mode 3, Mode 4 or OFF.
4.1.4. Text editing
The two bottom lines of each OLED screen can be edited with custom text. Each mode and switch
position can be separately edited. For example, they can be named “Engine mode”, “TC level”
etc. Editing is done in Simhub software (see Chapter 5.2).
4.2. Settings
Settings are entered with a long press of the central encoder. Navigation is done by rotating the
central encoder. To enter a particular setting, push the encoder. Confirm the chosen setting by
pushing the encoder again.
Bitepoint
To set the bitepoint of the clutch paddles, press and hold the central encoder to enter
Settings. Once you enter Settings, Bitepoint is the first item. Push the central encoder
to enter Bitepoint. The layout of the OLED screen will show the following:
Set bite point x
<60,00%>
Bite point preset
number (1-6)
Bitepoint percentage
Mode number
Mode 1
Here comes
Custom text
Custom text, two lines,
can be edited in Simhub

"MAYARIS 2" REXING FORMULA WHEEL - QUICK GUIDE
8
Use the pushbuttons marked below to choose the preset number (6 different bitepoint
presets can be saved on the wheel). Use the encoders marked below to change values.
The bitepoint value setting effect is immediate.
Max Brightness
Here you can individually change the brightness of shiftlights, buttons and center
switches.
NOTE: This setting adjusts maximum brightness level. If switches brightness is set to
50% in this setting, that will be its maximum brightness level in Simhub (100%).
NOTE 2: Changing brightness settings while Simhub is running will usually take effect
after a couple of seconds.
Bitepoint preset 1
Bitepoint preset 2
Bitepoint preset 3
Bitepoint preset 6
Bitepoint preset 5
Bitepoint preset 4
Rotate central encoder -
Increment value by 10%
Rotate right thumb encoder -
Increment value by 1%
Rotate left thumb encoder -
Increment value by 0,1%

"MAYARIS 2" REXING FORMULA WHEEL - QUICK GUIDE
9
3
rd
Paddles Multiple Presses (only on wheels with 6 paddles)
Here it's possible to set multiple button presses for each paddle position (left pull, left
push, right pull and right push), choosing from 2 to 20 presses. Action type can be set
as Standard or Modifier. Cycle through paddle action, action type and number of
presses with center push.
STANDARD: Pushing or pulling the paddle set to standard will repeatedly press that
paddle for the set amount of times.
MODIFIER: This will set the paddle action to work as a modifier for other buttons and
encoders. For example, if left pull is set to 5 and as a modifier, pulling the
left paddle and holding it while pressing a button, will press that button 5
times. This will NOT interfere with the primary function of the paddle set
in games. For example, you can map paddle pull as wiper in game and use
it as a modifier at the same time. The wheel will recognize if the paddle
was pulled alone or in pair with another button to work as a modifier.
NOTE: Setting the number of presses to “x1” will mean that multiple presses function
will not be used.
Clutch Mode
Choose between “Autopriority” or “Fixed” mode for the clutch paddles.
Autopriority (default): Fully pull both clutch paddles. Release one clutch. The one that
remains pulled becomes the secondary clutch and is set to the predefined
bitepoint.
Fixed: The right clutch is always going from 0 to 100%, while the left clutch goes from
0 to predefined bitepoint.
Pressing both clutch paddles at once will activate all three OLED screens. The left
screen will show left clutch value. The right screen will show the right clutch value.
Central screen will show clutch bite value and preset number.
< Left Pull >
Standard
x1

"MAYARIS 2" REXING FORMULA WHEEL - QUICK GUIDE
10
Advanced Settings
o LED Color
Change the idle color scheme of the wheel.
It’s possible to choose the “LED off” option which will make the LEDs and OLEDs turn
off when Simhub is not running. It’s useful if your PC always sends power to USB ports,
and you don’t want the LEDs to be on when the PC is not working. If your PC is on, but
Simhub isn’t, you will still be able to enter settings by a long press of the central
encoder.
PLEASE NOTE: When Simhub is running, the color scheme will not work.
o OLED Night Mode
Choose between 2 brightness modes for the OLED screens.
o Font Setting
Auto (default): This option allows you to use both large and small font for OLED
text. Adding /*/ before text you want to be displayed in Simhub will display that
text as large. Example: /*/Engine - this will make "Engine" display in large font.
Small – text is displayed in small font.
Large - text will be displayed with the font twice as large, but only in one line
(second line from Simhub won't be displayed).
o Center Modes
Set how many modes you want on the central encoder, between one and four. If only
1 mode is set, then short press of the encoder will work as additional button input
instead of changing the modes.
o AutoRtn. Center
In case of using 2 or more modes, it is possible to make the encoder always return to
a preferred mode five seconds after the last usage of this encoder. For example, if
Mode 1 is an often used game command, and you change to some different mode for
some minor adjustments, setting it to “Mode 1” will make sure it comes back to Mode
1 on its own. Available options are: Mode 1 (default), Mode 2, Mode 3, Mode 4 or OFF.
o AutoRtn. Left
Autoreturn function for the left switch. Choose the mode you wish the left switch to
return to after not being used for 10 seconds. Available options are: Mode 1, Mode 2,
Mode 3 or OFF (default).

"MAYARIS 2" REXING FORMULA WHEEL - QUICK GUIDE
11
o AutoRtn. Right
Autoreturn function for the right switch. Choose the mode you wish the right switch
to return to after not being used for 10 seconds. Available options are: Mode 1, Mode
2, Mode 3 or OFF (default).
Hardware settings
o Clutch calibrate
Follow the on-screen instructions on the OLED. The steering wheel will come pre-
calibrated and this should only be used if calibration is not correct.
o Shifter calibrate
Follow the on-screen instructions on the OLED. The steering wheel will come pre-
calibrated and this should only be used if calibration is not correct.
o Third calibrate (only on wheels with 6 paddles)
Follow the on-screen instructions on the OLED. The steering wheel will come pre-
calibrated and this should only be used if calibration is not correct.
o Diagnostic Analog paddles
Raw values of each paddle sensor can be seen here. This is only needed for
troubleshooting in case of a paddle not working correctly.
Firmware version
Entering this setting and choosing “Yes” will set the wheel in firmware update mode.
Firmware update procedure:
Once you press “Yes”, a new window will pop up on your computer. If the
window does not pop up by itself, find it in “This PC” named “RPI-RP2”.
simply drag and drop the new firmware file in that window
the wheel will update by itself and will restart. If it doesn’t restart, restart it
manually by unplugging the wheel from the USB.
NOTE: If you enter firmware update by accident, just unplug the wheel from the USB
and plug it back in. There will be no consequences.
User Manual QR code
Zoom in on your phone camera to scan and follow the QR code link.

"MAYARIS 2" REXING FORMULA WHEEL - QUICK GUIDE
12
4.3. Third pair of paddles – latching function
Apart from the standard 4 inputs you get with the pair of push/pull paddles, there are additional 2
inputs which work as a latching switch. Latching switch means that, once pressed, the button stays
pressed all the time until you press it again.
One latch function is activated by pushing both paddles at the same time. On the central OLED “Push
toggle ON” will be displayed. Input 123 will be pressed. It will remain pressed until you push both
paddles again. Then the message “Push toggle OFF” will be displayed on the central OLED.
The second latch function is activated by pulling both paddles at the same time. On the central OLED
“Pull toggle ON” will be displayed. Input 122 will be pressed. It will remain pressed until you
pull both paddles again. Then the message “Pull toggle OFF” will be displayed on the central
OLED.
Push and pull latch/toggle will also be indicated on the central OLED in the top right corner by small
icons:
Use case could be a radio button, so you don't have to hold it pressed all the time, or as a
shift/modifier to use in combination with other buttons.
NOTE: Pushing or pulling both paddles at the same time will not interfere with normal paddle
function.
Mode 1
Custom text
goes here
Indicators of the latch
switch function being ON

"MAYARIS 2" REXING FORMULA WHEEL - QUICK GUIDE
13
5. SIMHUB INSTALLATION
Download and install Simhub software from this link: https://www.simhubdash.com/download-2/
During installation make sure to check the option to install LCD drivers:
Once installed, open the app and choose "Devices" from the menu on the left. Then click on "Add
new device" and choose "Rexing Mayaris 2".
NOTE: Mayaris 2 default settings are enough to get you started. Further settings and options in
Simhub are beyond the scope of this Manual. For deeper customization we recommend to
experiment by yourself or use Simhub documentation and online video tutorials.
In the following text you’ll find a few examples of some basic settings.

"MAYARIS 2" REXING FORMULA WHEEL - QUICK GUIDE
14
5.1. Changing default LED colors of buttons and switches
Choose the LEDs tab and click on “Edit default colors”.
A new window will open showing buttons and central switch LEDs. Click on the one you want to
change.

"MAYARIS 2" REXING FORMULA WHEEL - QUICK GUIDE
15
5.2. OLED screens custom text
On the LEDs tab, under Misc click on “Edit encoders OLED labels”.
Click on the OLED box you want to write in and insert your text. Confirm with OK button at the
bottom of the window. There are 4 different screens for central encoder modes, and there are 3 x
8 screens for left and right switches. Each mode has 8 screens for 8 switch positions.
If Font Setting option is set to Auto (default), it allows you to use both large and small font for
OLED text. Adding /*/ before text you want to be displayed will display that text as large. Example:
/*/Engine - this will make "Engine" display in large font.

"MAYARIS 2" REXING FORMULA WHEEL - QUICK GUIDE
16
Kompozit d.o.o.
Croatia
contact@rexing.eu
