
ZAC User Guide
Install
To install ZAC, open an internet browser and enter the system’s IP address provided by IDeACOM ECSI in
the search bar at the top of the browser. Click on the ZAC icon under the applicaons for Users column
(Figure 1.1)
Figure 1.1
On the next page click the buon and follow the prompts to
download and install the applicaon.

Note for MAC Users: aer downloading the ZAC Applicaon drag the applicaon into the computer’s
Applicaons folders to launch it from this point.
Login
• To log into ZAC, launch the applicaon.
• Each user will have a unique username provided by IDeACOM ECSI.
• The default password is 159753 (Please change passwords to a secure 6 + digit password aer
logging in).
• The host/URL is the same URL used to download the applicaon.
• Windows credenals can be used as well to log into the applicaon by checking the relevant box.
• Users who are part of one or more call groups will be prompted to login to their respecve
groups.

Figure 1.2
Figure 1.3
These sengs can be saved for future logins.
Applicaon Overview
The default screen for the applicaon is the buddies screen. On the le side of the applicaon is the
various tabs and navigaon for the applicaon.

The buon toggles between a compact and expanded mode . Expanded mode provides more
space to work with but most acons can be done in either mode.
Recents is call and message history for each user.
Buddies is a customizable speed dial for each user.
Dial is the dial pad where number can be entered.
Groups contains all internal message groups the user has created or is a part of.
Voicemail contains all voicemails and recorded calls for the individual user.
Contacts contain different address books that can be sorted and searched.
Fax allows users that have a fax line connected to the system to send, receive and view their faxes.
Conference allows conference call mes to be set for those with the conference bridge feature Park lists
all calls placed on a universal hold system all users can access.
Agent Roles allow users who are part of call groups see and manage their agent role sengs. Some
sengs are also accessed using the Buon at the top right of the screen
The sengs buon accesses general sengs, informaon, and logout opons
Presence: The user’s name and a status that can be shared with others is at the top center of the screen.
Figure 1.4
Bind: Binding is the process of connecng a phone or headset required to use the ZAC program.
Bind Recent: This will list devices connected to the specific user, not those connected system wide.

Bind by Device ID: If set up by the technician or IT department the MAC address (idenfying product
number) can be set up to bind with this idenfying number
Bind an external Phone: A device such as a cell phone can be connected as the device used with the ZAC
program. Note: If using the mobile app, do not bind the same cell phone device to the ZAC program as
this will cause problems with calls connecng and roung properly.
Bind by call from device: Using a device programmed to work on the system (a desk phone) a prompt
will be given to make a call using the desired device to connect in order to connect the device.
Bind Sophone: is used when a headset, without a desk phone is used as the user’s phone.
Making and Receiving Calls
Making calls
To make a call to someone who is not a contact, click on the dial pad and type the recipient’s number
and press the call buon to iniate the call. Calls can also be used from the contacts or Buddy
secons by clicking on the corresponding green call icon.
Receiving Calls
Calls can be answered by picking up the physical phone, or by using the ZAC applicaon. Incoming call
noficaons will appear in a pop up window with call handling opons, see figures 2.1 and 2.2.
Figure 2.1
Figure 2.2
The caller ID is displayed on the top of the call window. To answer the call, tap the answer buon.
To reject the call, click the drop-down arrow and click End Call to disconnect the call.
To send a caller to voicemail without first answering the call click the drop-down arrow in the decline
column and click Send to Voicemail. The caller will be sent to the voicemail assigned to the user’s phone.
Depending on the version of ZAC being used decline will silence the ringer and the caller will be sent to
voicemail. In this version the end call and send to voicemail opons will not be available.

Managing Phone Calls
Call handling features for acve calls will be available via the Dial Pad. Depending on whether the
applicaon is in minimized or maximized mode the placement of call handling features will be slightly
different, (See figures 2.4 and 2.5).
Figure 2.5
Minimized
In Minimized Mode Conference, internal messaging, record and end call will be opons on the blue
banner. Mute, Keypad, add call, transfer, hold and park will be displayed below the blue bar. (Figure 2.5)
Maximized
In Maximized Mode all features will be available in the blue banners. (Blue banners indicate an acve
call. Grey banners indicate callers who are on hold, See Figure 2.6). The same features are available in
each mode and which one to used is simply up to user preference.

Figure 2.6
In Maximized Mode part of the call opons (record and conference will appear over a contact
or buddy list. In Minimized Mode only one tab can be displayed on the screen at one me. The record
icon will only be available if the system is using call recording licenses.
Parking calls
Parking a call puts a caller in a numbered park zone where any user on the system can pick the call up. If
a caller is placed on hold only the user who put the caller on hold can take the caller off of hold.
To place an acve caller on park, press the park icon.
Navigate to the park tab to see the park zone the caller has been placed in.
Call and inform the intended recipient which park zone the caller is in (See Figure 2.7).
Picking up a parked Call
Hover the cursor over the desired caller and a green pickup buon will appear. Click on the green pick-up
buon to pick up the call (See Figure 2.7) If there is more than one caller on park each party will be listed
with their corresponding informaon in the park tab.
Figure 2.7
Transferring Calls

Blind Transfer
When on an acve call click and hold on the blue call banner and drag it over the Contacts or Buddies
tab unl it opens. Hover over the desired contact unl a grey outline
covers the user. Let go of the mouse buon and the call will
be transferred.
To transfer using the dial pad, press transfer and enter the extension or phone number (calls can be
transferred offsite) of the desired recipient then click the transfer buon again to complete the transfer.
Aended Transfer
Aended transfers allow the intended recipient to be contacted before the caller is transferred to them.
Press hold to put the caller on hold. Call the intended recipient. If the recipient will take the call drag the
grey bar of the caller on hold over the acve caller’s blue call banner and let go to transfer the call. (see
Figure 2.6)
Transfer to voicemail
If a recipient does not want to receive the call but would like the caller to be transferred to their
voicemail, press the transfer buon and type *86 and the extension or phone number of the desired
recipient and press the transfer buon again. The recipient’s phone will not ring and their caller will go
straight to their voicemail.
Transferring from desk phone to Mobile app
Calls can be transferred from the desk phone or ZAC to the user’s Zultys Mobile app so conversaons can
connue on the go. Complete a blind transfer using the user’s extension number and answer the call on
the mobile app (transfer-100-transfer to move the call from ZAC on ext 100 to the mobile app at ext 100.
Note: As calls on the mobile app use wi-fi, mobile data or cell carrier data make sure the sengs you will
be using for the duraon of the call are turned on when taking the call. (If you start a call on wi-fi and will
need to change to mobile data when leaving the building turn off wi-fi and answer the call on mobile
data as the call will drop if the wi-fi connecon is lost when leaving the building. Calls will only use one
communicaon method and cannot switch automacally mid-call).
Ad Hoc (impromptu Conference Calls)
While on an acve call click the buon on the side of the call banner and select conference to start
a conference. The acve call banner will then say MX conference.
Click add call and get the third party on the phone.
Drag and drop the third party onto the conference banner and all pares will be connected.
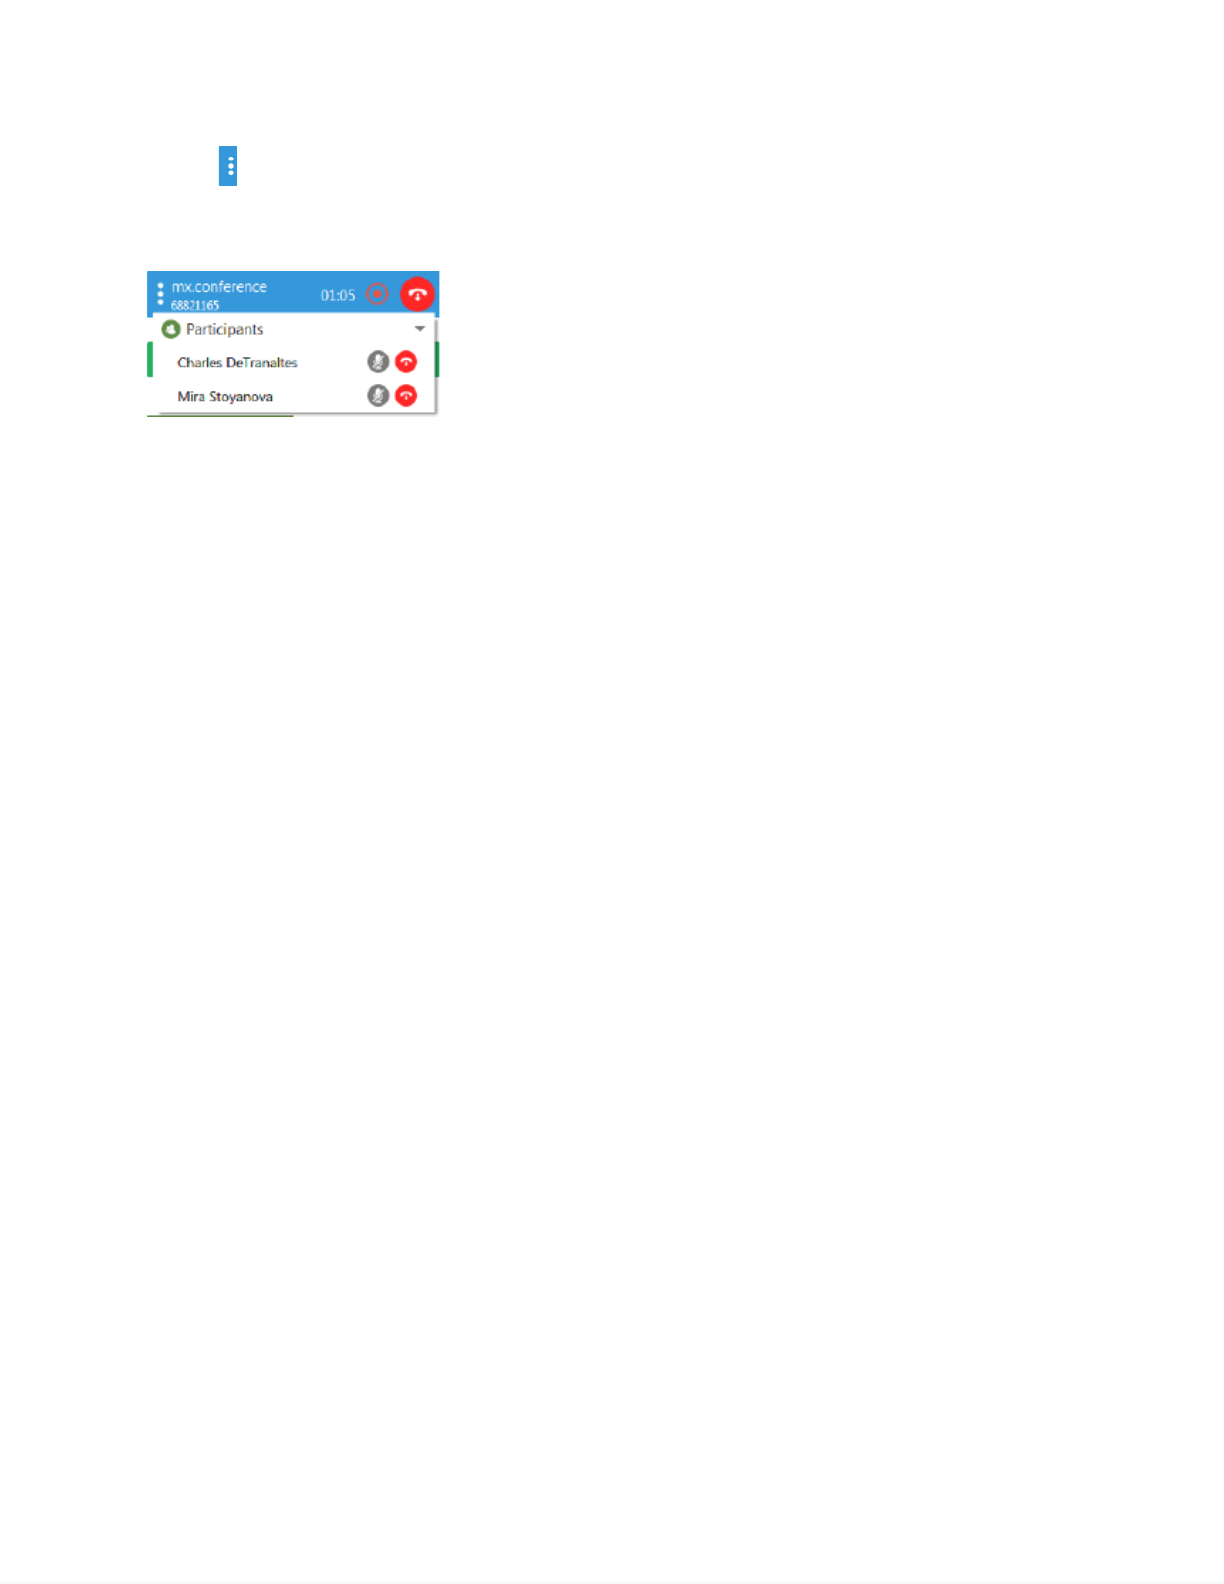
Click on the conference banner for more opons. Individual callers can be muted or disconnected
from the call without ending the conference call. (see Figure 2.7). If the user who started the call presses
the red call buon by their name the whole conference will be ended.
Figure 2.7
Paging
Type *4 and the page zone (usually 01) and press send. Aer hearing a tone make the paging
announcement. All phones will play the announcement over their speaker phone.
Addional Features
Recents
This tab is call and message history for each individual user. Recents is split into All acvity, Calls, and
Messages for easy sorng.
Phones with an arrow poinng out indicate outgoing calls.
Phones with an arrow poinng in, indicates an incoming call.
Phone with an x indicates a missed call.
The voicemail sign indicates a missed call that went to voicemail.
A fax icon indicates fax traffic and it will indicate on the fax whether it was incoming or outgoing.
The paper airplane indicates internal messages (See figure 3.1)

Figure 3.1
Contacts
The contacts tab is made up of three different groups: MX is all users on the phone system, Local is the
users personalized contact directory, imported contacts are contacts that can be imported from an
exchange account if desired.
Click the new contact buon and fill out the fields to add a new contact to a directory.
Hover over a contact for addional opons
The star when solidly filled in will place this contact on the buddies list, which works like a favorite’s
list. To remove a Buddy click on the star and it will be displayed as an outline. This contact will no longer
be on the Buddies list.
Press the paper airplane buon to send an internal message to another user. The internal message
system is set up like the text screen on most cellular phones with the input field on the boom and the
history listed above.
Press the buon to call the contact.
Right click on the contact to see more informaon about the contact.
Buddies
The Buddies tab is a Favorites list each user can customize. Like the contacts tab, calls and internal
messages can be sent by selecng a user from this tab using the same methods used in the contacts tab.
Presence

At the top of each tab the user's name and presence are indicated. Click on the green circle beneath the
user name and select a status that will display on the screens of all other ZAC and Mobile App users.
A note may be typed to further specify a user's status. To save a note press enter. See figure 3.2
Figure 3.2
Groups
The groups tab is used to create Private or public groups to send instant messages to, similar to text
groups on a cell phone.
Click the buon to create a new group and select public or private. Anyone on the phone system can
join a public group but when a group is made private, only the creator of the group can add or remove
members from this group.
Instant messaging can only be sent to other users on the phone system.
Conference
The conference tab is used to schedule conference calls and web conferences if a web conference license
has been purchased.
Click schedule and fill out the informaon provided in the prompts such as me and date and press save.
This informaon can be emailed to parcipants to let them know of the me of the conference call.
Press the play buon to start the conference call. A maximum of three parcipants can be on a
conference call at one me.
Voicemail
voicemail can be accessed for both group and personal mail boxes for any users who are part of a call
group.
Click on a voicemail to listen to it and the voicemail control will appear. (see figure 3.3)

Figure 3.3
Press the play buon to play messages
Press the red delete buon to send a message to the deleted folder. Only messages delete from the
deleted folder will be completely removed from the system.
Press the Call buon to call the message's sender.
Press the Forward buon to forward the message to another user on the phone system. A note or
preamble can be wrien or recorded to accompany the message. Select the lock symbol to mark the
message as private or the exclamaon mark buon to mark the message important. These same opons
are available when replying to message.
press the check mark to mark the message as read or unread.
Press reply to record a message and send it straight to the user's voicemail. A message may be typed or
recorded to go along with the voicemail message.
Play via bound phone will allow the user to listen to messages on their phone instead of the computer's
default sound sengs. This will be useful when messages contain confidenal informaon that should
not be played over the computer’s speakers or the speaker phone.
Press the download buon to download and save and audio file of the message to the computer or
network.
Voicemail Sengs
Click the icon to open the voicemail sengs.
select a greeng and press play to listen to the recorded greeng.
Press the record buon on the selected greeng to record a new/replacement greeng.
To save the message press the upload buon and save the message.
Select the box by the greeng to set it as the acve greeng.
Note: Auto Aendants are best set up through admin so there is no need to use this secon.
Fax
If a fax line has been set up with the system the fax tab is where most of the controls for faxing will be
found. To send a fax, open the selected document to send and press print. Select the Zultys print driver

and press print. The fax tab in ZAC will then be opened prompng the user to fill out informaon to send
the fax (See Figure 3.4).
Figure 3.4
Using the fax driver will allow PDF files to be uploaded as faxes. In the example above a fax has been
started without the fax driver in ZAC. This will work as long as the document is an image that is not a
PDF.
Enter the recipient’s number in the To Field.
Use the fax driver or search for a document to aach.
Select the paper size and orientaon
Click send to send the fax or click the Schedule box to schedule a specific me for a fax to be sent.
To view received faxes select from the down arrow by My faxes to select the respecve fax locaon.
Faxing has the inbox, Sent and deleted folders like voicemail.
Hover over the message and click, the eye icon to view the message.
Click the more opons buon, to open the forward, mark as read, delete and save as opons.
Agent Roles
This tab displays the status/availability of users who are part of call groups.
By pressing Not Available in agent roles the user will not receive calls as part of the call group unl their
status is set back to available. This only applies to the agent role status.
Screen Sharing

Screen sharing can be used either internally or externally. Screen sharing can be used one on one or in a
group. To use screen sharing ZAC must be in expanded mode.
Start screen sharing with a user or a group by selecng the user or group to open addional opons.
Click the green computer buon to start screen sharing. The default or primary monitor will be the
screen that is shared if the system is using mulple screens. Once the screen share has started each
parcipant will need to accept the screen share invitaon which will pop up as a noficaon in their ZAC
program.
Click the stop buon to end the screen share.
An outside party can be added to the group chat by clicking on the blue i buon for more opons.
Click invite to chat by link to create and save a link.
Copy the link into an email and send it to the recipient so they can use the link to be added to the group
or individual chat temporarily.
The recipient can click on the link in their inbox and enter their desired screen name to enter the chat.
To create a screen share for only an external party instead of a group, click on your user name at the top
of ZAC to access the link to be emailed to the user. Paste the link in an email and send it to the external
recipient. Once the screen share has been created it will work the same as if it were set up in a group.
Any links sent to external users will expire aer 24 hours. If the link needs to be deacvated before the
24-hour me frame the group will need to be deleted and recreated.
Sengs
Press the gear icon in the upper right corner of the Buddies screen to access the applicaon's sengs.
Note: To save any changes that are made click the apply buon at the boom of the window before
navigang away from the sengs screen or changes may not be saved.
About provides the user basic informaon about the version of the applicaon they are running as well
as a link to the Zultys website where instruconal videos can be viewed under the support tab.
Log out will log the user out of the applicaon but will not close it.
Exit will close the applicaon.
Click sengs for the main program sengs.
Applicaon
General sengs are the main seng that will be adjusted by most users. Seng the program to stay in
the system tray (task bar at the boom of the computer, whether or not the user want's ZAC to always

be the top program on a screen (stay on top) and whether or not the applicaon will launch when the
computer is turned on (launch at start up).
Login sengs allow the user to automacally login to the applicaon and user roles. The user may also
change their password as long as they remember their current password.
Integraon will allow the user to connect their Microso exchange contacts if the user's email has been
programmed into the phone system. This secon also allows the user to set up a screen dial short cut so
numbers in documents and websites can be highlighted and called instantly without navigang to the
ZAC applicaon.
Audio devices will allow headset users (primarily sophone users) to set up their headset as the audio
for different features instead of the desk phone. Call and message history duraon can be set to start
deleng this history aer a set amount of me.
Alerts allow the user to customize which noficaons they would like an audio alert for. Pop up Alerts
allow the user to change the locaon and duraon of the pop up alerts for incoming calls and instant
messages.
Call Handling
Call handling allow the user to set call rules for their specific user. Press the plus buon to start creang
a new rule. Events specify when a rule takes effect, Condions further specify different mes or
circumstances when this will happen. Acon will specify the desired outcome of the change being made.
One example is seng a rule that all calls to the user's extension will be forwarded to another extension.
This can be used when one user will be out of the office for an extended period of me to ensure all of
their calls are handled by a representave. (See figure 4.1)

Figure 4.1
Voicemail Noficaons, If the company has set up voicemail to email this will be set up by a technician.
Sophone sengs are only for users who are using the computer and a headset as their phone without
a physical phone. No other users will need to use these sengs.
