
Oracle® Cloud
Using the Oracle Database Adapter with
Oracle Integration Generation 2
E85496-32
June 2024
Oracle Cloud Using the Oracle Database Adapter with Oracle Integration Generation 2,
E85496-32
Copyright © 2017, 2024, Oracle and/or its affiliates.
Primary Author: Oracle Corporation
This software and related documentation are provided under a license agreement containing restrictions on use and
disclosure and are protected by intellectual property laws. Except as expressly permitted in your license agreement or
allowed by law, you may not use, copy, reproduce, translate, broadcast, modify, license, transmit, distribute, exhibit,
perform, publish, or display any part, in any form, or by any means. Reverse engineering, disassembly, or decompilation
of this software, unless required by law for interoperability, is prohibited.
The information contained herein is subject to change without notice and is not warranted to be error-free. If you find
any errors, please report them to us in writing.
If this is software, software documentation, data (as defined in the Federal Acquisition Regulation), or related
documentation that is delivered to the U.S. Government or anyone licensing it on behalf of the U.S. Government, then
the following notice is applicable:
U.S. GOVERNMENT END USERS: Oracle programs (including any operating system, integrated software, any
programs embedded, installed, or activated on delivered hardware, and modifications of such programs) and Oracle
computer documentation or other Oracle data delivered to or accessed by U.S. Government end users are "commercial
computer software," "commercial computer software documentation," or "limited rights data" pursuant to the applicable
Federal Acquisition Regulation and agency-specific supplemental regulations. As such, the use, reproduction,
duplication, release, display, disclosure, modification, preparation of derivative works, and/or adaptation of i) Oracle
programs (including any operating system, integrated software, any programs embedded, installed, or activated on
delivered hardware, and modifications of such programs), ii) Oracle computer documentation and/or iii) other Oracle
data, is subject to the rights and limitations specified in the license contained in the applicable contract. The terms
governing the U.S. Government's use of Oracle cloud services are defined by the applicable contract for such services.
No other rights are granted to the U.S. Government.
This software or hardware is developed for general use in a variety of information management applications. It is not
developed or intended for use in any inherently dangerous applications, including applications that may create a risk of
personal injury. If you use this software or hardware in dangerous applications, then you shall be responsible to take all
appropriate fail-safe, backup, redundancy, and other measures to ensure its safe use. Oracle Corporation and its
affiliates disclaim any liability for any damages caused by use of this software or hardware in dangerous applications.
Oracle®, Java, MySQL, and NetSuite are registered trademarks of Oracle and/or its affiliates. Other names may be
trademarks of their respective owners.
Intel and Intel Inside are trademarks or registered trademarks of Intel Corporation. All SPARC trademarks are used
under license and are trademarks or registered trademarks of SPARC International, Inc. AMD, Epyc, and the AMD logo
are trademarks or registered trademarks of Advanced Micro Devices. UNIX is a registered trademark of The Open
Group.
This software or hardware and documentation may provide access to or information about content, products, and
services from third parties. Oracle Corporation and its affiliates are not responsible for and expressly disclaim all
warranties of any kind with respect to third-party content, products, and services unless otherwise set forth in an
applicable agreement between you and Oracle. Oracle Corporation and its affiliates will not be responsible for any loss,
costs, or damages incurred due to your access to or use of third-party content, products, or services, except as set forth
in an applicable agreement between you and Oracle.

Contents
Preface
Audience v
Documentation Accessibility v
Diversity and Inclusion v
Related Resources vi
Conventions vi
1
Understand the Oracle Database Adapter
Oracle Database Adapter Capabilities 1-1
Oracle Database Adapter Restrictions 1-2
What Application Version Is Supported? 1-3
Workflow to Create and Add an Oracle Database Adapter Connection to an Integration 1-3
2
Create an Oracle Database Adapter Connection
Prerequisites for Creating a Connection 2-1
Create a Connection 2-1
Configuring Connection Properties 2-2
Configuring Connection Security 2-2
Configure an Agent Group 2-3
Test the Connection 2-3
3
Add the Oracle Database Adapter Connection to an Integration
Basic Information Page 3-1
Trigger Polling Page 3-2
Polling Page 3-2
Manage Tables Page 3-3
Relations Page 3-4
Polling Strategy and Options Page 3-4
Invoke Stored Procedure Page 3-4
Invoke SQL Statement Page 3-6
Table Operation Page 3-7
iii

Import Tables Page 3-7
Relationships Page 3-8
Create Relationship Page 3-8
Attribute Filtering Page 3-8
Advanced Options Page 3-8
Operations on Table Page 3-9
Summary Page 3-12
4
Implement Common Patterns Using the Oracle Database Adapter
Migrate an On-Premises Oracle Database Instance to an Oracle Autonomous Transaction
Processing or Oracle Autonomous Data Warehouse Database Instance 4-1
Define Fault Mapping in Orchestrated Integrations 4-2
Define a Select Operation on Database Tables 4-5
5
Troubleshoot the Oracle Database Adapter
Set Null to Collections 5-1
Resolve Error ORA-04068: existing state of packages has been discarded 5-1
Unable to Execute Stored Procedures with a PL/SQL Table When the Table Uses a Different
Schema 5-1
Wrappers Require Regeneration After Objects Change 5-2
Special Characters are Not Supported in Schema Names 5-2
Resolve Message Time Out Errors 5-2
Recover from a CLOUD-0005: Unable to Establish Connection Error 5-3
iv

Preface
This guide describes how to configure this adapter as a connection in an integration in Oracle
Integration.
Note:
The use of this adapter may differ depending on the features you have, or whether
your instance was provisioned using Standard or Enterprise edition. These
differences are noted throughout this guide.
Topics:
• Audience
• Documentation Accessibility
• Diversity and Inclusion
• Related Resources
• Conventions
Audience
This guide is intended for developers who want to use this adapter in integrations in Oracle
Integration.
Documentation Accessibility
For information about Oracle's commitment to accessibility, visit the Oracle Accessibility
Program website at
http://www.oracle.com/pls/topic/lookup?ctx=acc&id=docacc
.
Access to Oracle Support
Oracle customers that have purchased support have access to electronic support through My
Oracle Support. For information, visit
http://www.oracle.com/pls/topic/lookup?
ctx=acc&id=info
or visit
http://www.oracle.com/pls/topic/lookup?ctx=acc&id=trs
if you
are hearing impaired.
Diversity and Inclusion
Oracle is fully committed to diversity and inclusion. Oracle respects and values having a
diverse workforce that increases thought leadership and innovation. As part of our initiative to
build a more inclusive culture that positively impacts our employees, customers, and partners,
we are working to remove insensitive terms from our products and documentation. We are also
v

mindful of the necessity to maintain compatibility with our customers' existing technologies and
the need to ensure continuity of service as Oracle's offerings and industry standards evolve.
Because of these technical constraints, our effort to remove insensitive terms is ongoing and
will take time and external cooperation.
Related Resources
See these Oracle resources:
• Oracle Cloud
http://cloud.oracle.com
• Using Integrations in Oracle Integration Generation 2
• Using the Oracle Mapper with Oracle Integration Generation 2
Conventions
The following text conventions are used in this document:
Convention Meaning
boldface
Boldface type indicates graphical user interface elements associated with an
action, or terms defined in text or the glossary.
italic Italic type indicates book titles, emphasis, or placeholder variables for which
you supply particular values.
monospace
Monospace type indicates commands within a paragraph, URLs, code in
examples, text that appears on the screen, or text that you enter.
Preface
vi

1
Understand the Oracle Database Adapter
Review the following conceptual topics to learn about the Oracle Database Adapter and how to
use it as a connection in integrations in Oracle Integration. A typical workflow of adapter and
integration tasks is also provided.
Topics:
• Oracle Database Adapter Capabilities
• Oracle Database Adapter Restrictions
• What Application Version Is Supported?
• Workflow to Create and Add an Oracle Database Adapter Connection to an Integration
Oracle Database Adapter Capabilities
The Oracle Database Adapter enables you to integrate the Oracle database residing behind
the firewall of your on-premises environment with Oracle Integration through use of the on-
premises connectivity agent. Use the Oracle Database Adapter to poll for new and updated
records for processing in Oracle Integration. For example, any new record added to the
Employee
table in your Oracle database can be synchronized with Oracle HCM Cloud using
Oracle Integration. In addition, use the Oracle Database Adapter to execute SQL queries or
stored procedures in the Oracle database. For example, quotes in Oracle CPQ Cloud can be
created as
Orders
in the on-premises Oracle database by sending SQL statements or stored
procedures using the Oracle Database Adapter.
The Oracle Database Adapter provides the following capabilities:
• Support for invocation of stored procedures in the Oracle database.
• Support for non-JDBC (PL/SQL boolean, PL/SQL record, and PL/SQL table) datatypes in
outbound invocations of stored procedures.
• Support for execution of DML statements and SQL queries:
Select
,
Insert
,
Update
, and
Delete
.
Select the Run a SQL Statement option on the Basic Info page of the Adapter Endpoint
Configuration Wizard to execute simple SQL queries. For complex SQL queries, use
stored procedures by selecting the Invoke a Stored Procedure option on the Basic Info
page of the Adapter Endpoint Configuration Wizard. Stored procedures can reduce the
complexity of a SQL query.
• Support for generating XSD from PureSQL. This feature generates an XSD from a
PureSQL statement provided by dynamically querying the table.
• Support for polling new and updated records for processing in the Oracle database. The
Oracle Database Adapter supports distributed polling and multithreading. Distributed
polling helps eliminate duplicate polling of the same records while multithreading provides
optimum performance.
• Support for updating or inserting multiple records in a single request.
• Support for a logical delete polling strategy. This strategy involves updating a special field
on each row once it is processed.
1-1

• Support for performing a
SELECT
operation against database tables.
• Support for database fault mapping. See Define Fault Mapping in Orchestrated
Integrations.
• Support for processing message payloads up to 10 MB in size. In the case of polling, you
must set the Rejected Value property to REJECTED on the Polling Strategy and Options
page. If the incoming message is greater than the 10 MB threshold size, that particular
record is updated to REJECTED instead of READ. If the outbound operation returns a
response greater than the 10 MB threshold size, the response message is ignored and a
fault response is sent to the calling client.
Note:
In Java, Unicode characters are represented as 2 bytes.
• Support for integrating an Oracle Database with a private endpoint. Integration is achieved
with a wallet-based connection that uses the connectivity agent. See Configuring
Connection Security.
The Oracle Database Adapter is one of many predefined adapters included with Oracle
Integration. You can configure the Oracle Database Adapter as a connection in an integration
in Oracle Integration.
Oracle Database Adapter Restrictions
Note the following Oracle Database Adapter restrictions in Oracle Integration.
• Using the Oracle Database Adapter to access the Oracle E-Business Suite Database is
not recommended. Instead, use the Oracle E-Business Suite Adapter to access the Oracle
E-Business Suite Database.
• The Oracle Database Adapter can only be used with the on-premises connectivity agent.
• Overloaded procedures are not supported.
• Wrappers are not generated for releases 18c and later of the database. Any integrations
created on prior releases of the database that contain wrappers require a manual migration
of the wrapper procedures. A re-edit of such invokes is not supported and goes through a
non-wrapper route by selecting the original procedure.
• Automatic metadata refresh is not supported. Any modifications to stored procedures or
tables used in the invoke or trigger connection require a re-import or redo in the Adapter
Endpoint Configuration Wizard for the changes to be reflected.
• The database password length cannot exceed 20 characters.
• Database schema names with hyphens (
-
) are not supported.
• All integrations that include stored procedure, PureSQL, or operation on table database
operations must finish within 240 seconds. Otherwise, the query times out and a
Limit
Exceeded
error occurs.
• The Oracle Database Adapter uses JDBC drivers to interact with the database and is
restricted by JDBC driver constraints. Therefore, nested PL/SQL types ( for example,
RECORD
types inside a
TABLE
type) are not supported as IN/OUT parameters in a stored
procedure. However, you can define
OBJECT
types inside the
TABLE
type.
• When using the Oracle Database Adapter with a PureSQL statement operation, carriage
returns are not supported in the SQL statement.
Chapter 1
Oracle Database Adapter Restrictions
1-2

• If stored procedures contain arguments of PL/SQL boolean, PL/SQL record, and PL/SQL
table types, wrappers are generated. Otherwise, you must generate your own wrappers.
• Cross schema stored procedures are not allowed in cases where Oracle Integration must
generate the wrappers.
• The Oracle Database Adapter does not support polling when the logical delete column is in
lower case.
• No order is maintained while polling records.
Note:
There are overall service limits with Oracle Integration. A service limit is the quota or
allowance set on a resource. See Service Limits.
What Application Version Is Supported?
For information about which application version is supported by this adapter, see the
Connectivity Certification Matrix.
See Connectivity Certification Matrix.
Workflow to Create and Add an Oracle Database Adapter
Connection to an Integration
You follow a very simple workflow to create a connection with an adapter and include the
connection in an integration.
Step Description More Information
1 Create the adapter connections for
the applications you want to
integrate. The connections can be
reused in multiple integrations and
are typically created by the
administrator.
Create an Oracle Database Adapter Connection
2 Create the integration. When you do
this, you add trigger and invoke
connections to the integration.
Create Integrations and Add the Oracle Database Adapter
Connection to an Integration
3 Map data between the trigger
connection data structure and the
invoke connection data structure.
Map Data in Using Integrations in Oracle Integration
Generation 2
4 (Optional) Create lookups that map
the different values used by those
applications to identify the same
type of object (such as gender
codes or country codes).
Manage Lookups in Using Integrations in Oracle Integration
Generation 2
5 Activate the integration. Manage Integrations in Using Integrations in Oracle
Integration Generation 2
6 Monitor the integration on the
dashboard.
Monitor Integrations in Using Integrations in Oracle
Integration Generation 2
Chapter 1
What Application Version Is Supported?
1-3

Step Description More Information
7 Track payload fields in messages
during runtime.
Assign Business Identifiers for Tracking Fields in Messages
and Manage Business Identifiers for Tracking Fields in
Messages in Using Integrations in Oracle Integration
Generation 2
8 Manage errors at the integration
level, connection level, or specific
integration instance level.
Manage Errors in Using Integrations in Oracle Integration
Generation 2
Chapter 1
Workflow to Create and Add an Oracle Database Adapter Connection to an Integration
1-4

2
Create an Oracle Database Adapter
Connection
A connection is based on an adapter. You define connections to the specific cloud applications
that you want to integrate.
Topics:
• Prerequisites for Creating a Connection
• Create a Connection
Prerequisites for Creating a Connection
You must satisfy the following prerequisites for creating a connection with Oracle Integration.
1. Ensure that you have write permissions to the database.
2. Ensure that you have the required permissions to run stored procedures and SQL
statements.
3. Know the database URL, including the hostname or IP address and the port number.
4. Know the database system ID and service name.
5. Know the username and password for connecting to the database.
6. Oracle Integration can connect to Oracle Real Application Clusters (RAC) databases with
the on-premises connectivity agent using Single Client Access Name (SCAN) as the
hostname while configuring the connection. SCAN provides a single name for clients to
access any Oracle Database running in a cluster.
Create a Connection
Before you can build an integration, you have to create the connections to the applications with
which you want to share data.
To create a connection in Oracle Integration:
1. In the left navigation pane, click Home > Integrations > Connections.
2. Click Create.
Note:
You can also create a connection in the integration canvas of:
• An orchestrated integration (See Define Inbound Triggers and Outbound
Invokes.)
• A basic routing integration (See Add a Trigger (Source) Connection.)
2-1

3. In the Create Connection — Select Adapter dialog, select the adapter to use for this
connection. To find the adapter, scroll through the list, or enter a partial or full name in the
Search field and click
Search.
4. In the Create Connection dialog, enter the information that describes this connection.
a. Enter a meaningful name to help others find your connection when they begin to
create their own integrations. The name you enter is automatically added in capital
letters to the Identifier field. If you modify the identifier name, don't include blank
spaces (for example,
SALES OPPORTUNITY
).
b. Enter optional keywords (tags). You can search on the connection keywords on the
Connections page.
c. Select the role (direction) in which to use this connection (trigger, invoke, or both). Only
the roles supported by the adapter are displayed for selection. When you select a role,
only the connection properties and security policies appropriate to that role are
displayed on the Connections page. If you select an adapter that supports both invoke
and trigger, but select only one of those roles, you'll get an error when you try to drag
the adapter into the section you didn't select. For example, let's say you configure a
connection for the Oracle Service Cloud (RightNow) Adapter as only an invoke.
Dragging the adapter to a trigger section in the integration produces an error.
d. Enter an optional description of the connection.
5. Click Create.
Your connection is created. You're now ready to configure the connection details, such as
connection properties, security policies, connection login credentials, and (for certain
connections) agent group.
Configuring Connection Properties
Enter connection information so your application can process requests.
1. Go to the Connection Properties section.
The Connection Properties dialog is displayed.
2. Enter the host name or IP address of the database server.
3. Enter the database server port number.
4. Enter the system or site ID.
5. Enter the database service name.
Configuring Connection Security
Configure security for your database connection by selecting the security policy and setting
login credentials.
1. Go to the Security section.
2. If you select Username Password Token:
a. Enter the database username and password to connect to the Oracle Database.
b. Reenter the password a second time.
3. If you select Oracle Wallet:
Chapter 2
Create a Connection
2-2

Note:
The Oracle Database Adapter can connect through the connectivity agent when
using the wallet. It can be used as a trigger connection only if the connectivity
agent is used in the connection. However, all operations that you select on the
Basic Info page such as Run a SQL Statement, Invoke a Stored Procedure,
and Perform an Operation On a table are supported when configuring the
adapter to use direct connectivity (without the connectivity agent).
a. In the Wallet field, select the check box, then click Upload to upload the wallet file.
b. Enter the wallet password, then re-enter it a second time to confirm.
c. Enter the database username and password to connect to the Oracle Database.
d. Enter the database password a second time to confirm.
Configure an Agent Group
Configure an agent group for accessing the service hosted on your premises behind the fire
wall.
1. Click Configure Agents.
The Select an Agent Group page appears.
2. Click the name of the agent group.
3. Click Use.
To configure an agent group, you must download and install the on-premises connectivity
agent. See Download and Run the Connectivity Agent Installer and About Connectivity Agents
and Integrations Between On-Premises Applications and Oracle Integration in Using
Integrations in Oracle Integration Generation 2.
Test the Connection
Test your connection to ensure that it's configured successfully.
1. In the page title bar, click Test. What happens next depends on whether your adapter
connection uses a Web Services Description Language (WSDL) file. Only some adapter
connections use WSDLs.
If Your Connection... Then...
Doesn't use a WSDL The test starts automatically and validates the inputs you provided for the
connection.
Uses a WSDL A dialog prompts you to select the type of connection testing to perform:
• Validate and Test: Performs a full validation of the WSDL, including
processing of the imported schemas and WSDLs. Complete
validation can take several minutes depending on the number of
imported schemas and WSDLs. No requests are sent to the
operations exposed in the WSDL.
• Test: Connects to the WSDL URL and performs a syntax check on
the WSDL. No requests are sent to the operations exposed in the
WSDL.
2. Wait for a message about the results of the connection test.
Chapter 2
Create a Connection
2-3

• If the test was successful, then the connection is configured properly.
• If the test failed, then edit the configuration details you entered. Check for typos, verify
URLs and credentials, and download the diagnostic logs for additional details.
Continue to test until the connection is successful.
3. When complete, click Save.
Chapter 2
Create a Connection
2-4

3
Add the Oracle Database Adapter Connection
to an Integration
When you drag the Oracle Database Adapter into an integration, the Adapter Endpoint
Configuration Wizard appears. This wizard guides you through configuration of Oracle
Database Adapter endpoint properties.
The following sections describe the wizard pages that guide you through configuration of the
Oracle Database Adapter as a trigger and an invoke in an integration.
Topics:
• Basic Information Page
• Trigger Polling Page
• Invoke Stored Procedure Page
• Invoke SQL Statement Page
• Table Operation Page
• Operations on Table Page
• Summary Page
See Oracle Database Adapter Capabilities.
Note:
The Oracle Database Adapter does not support the regeneration of WSDL artifacts.
See Regenerating a WSDL File for Integrations (in Using Integrations in Oracle
Integration Generation 2).
Basic Information Page
Specify a name, description, and operation type on the Basic Info page of each trigger and
invoke connection in your integration.
Element Description
What do you want to call your
endpoint?
Identifies the connection with a meaningful name that defines
the purpose of connection. For example,
CreateEmployeeInDB
for a database connection that adds
new employee data. The name can include English alphabetic
characters, numbers, underscores, and dashes. The name
cannot include:
• Blank spaces (for example,
My DB Connection
)
• Special characters (for example,
#;83&
or
righ(t)now4
)
• Multibyte characters
3-1

Element Description
What operation do you want to
perform?
•
Invoke a Stored Procedure — Select to run a stored
procedure on the database.
•
Run a SQL Statement — Select to run a SQL query on
the database.
•
Perform an Operation On a Table — Select to perform
one of the following operations on a table. You can
update or insert multiple records in a single request.
– Insert
– Update
– Insert or Update (Merge)
– Select
Notes
• When operations in a SQL statement such as Update,
Concat, and Merge accept values for the inbound
invocation of an integration, they do not work. For
example, the following query does not work:
select concat(empname, 'ss') from DB_AQ
where empno=#empno
select empno from DB_AQ where
empname=concat(#empname, 'YY')
As a workaround, handle these scenarios during payload
mapping. For example, perform a concatenation during
mapping of the payload. The final output can then be
passed as input to the SQL query.
•
IN
/
BETWEEN
operators are not supported with bind
parameters. Use greater than (
>
) and less than (
<
)
operators instead.
Trigger Polling Page
Select the root database table for the service query.
Topics
• Polling Page
• Manage Tables Page
• Relations Page
• Polling Strategy and Options Page
Polling Page
The following table describes the key information on the Polling page.
Element
Description
Import Tables
Imports tables and the root database table for the service
query.
Chapter 3
Trigger Polling Page
3-2

Element Description
Remove Tables
Removes the selected table from the service query tables list.
Review and Manage relationships
reachable from the root database
table.
Appears after importing tables. Select Edit to open the
Relations page where you can view, create, and remove
relationships between tables.
Review and verify the attributes
created from the imported tables and
relationships.
Appears after importing tables. Select Edit to open the
Attributes Filtering page where you can review, verify, select
or deselect the attributes in the object model created from the
imported tables and the defined relationships.
Polling Strategy and Options Appears after importing tables. Select Edit to open the Polling
Strategy and Options page where you can define the polling
strategy and specify polling options.
Manage Tables Page
The following table describes the key information on the Manage Tables page. The Manage
Tables page appears when you select Import Tables on the Polling page.
Element Description
Schema
Select the schema for the tables and views you are importing.
Special characters (for example,
#
) are not supported in
schema names. See Special Characters are Not Supported in
Schema Names.
Table Type
The type of the table to which the schema or view is applied.
The list allows these selections:
• All — selects all available tables and views.
• Materialized View — selects materialized views.
• Materialized View Log — selects materialized view logs.
• Synonym — selects the alias for the schema object.
• Table — selects tables.
• View — selects views.
Table Name
Specify the table name. Table names are case sensitive.
Search
Click to search for the specified table.
Available Tables
Lists the tables that meet the selection criteria.
Selected Tables
Lists your table selection.
Primary Keys
Appears when you select tables without a primary key
defined. Selects the virtual primary key for the table.
Note: Having the primary key at the database level is the best
practice.
Chapter 3
Trigger Polling Page
3-3

Relations Page
The following table describes the key information on the Relations page. The Relations page
appears when you select Edit for the Review and Manage relationships reachable from the
root database table option on the Polling page.
Element Description
Create New
Opens the Create Relation page with these options:
• Parent Table — selects the parent table for the
relationship between tables.
• Child Table — selects the child table for the relationship
between tables.
• Relationship — defines the relationship between the
parent and child tables.
• Attribute Name — Applies attributes to the table
relationship.
• Mapping — Displays the mapping for the table
relationship.
Detach
Opens the Relationships list in a new window.
Polling Strategy and Options Page
The following table describes the key information on the Polling Strategy and Options page.
The Polling Strategy and Options page appears when you select Edit for Polling Strategy and
Options on the Polling page.
Element Description
Logical Delete Field
Selects a field in the root database table. To allow the
selection, polling must be enabled in the Status column.
Read Value
Identifies the value that is used to indicate a row has been
read. For example, PROCESSED. Surrounding quotes are not
required.
Unread Value
Indicates the rows to process. Only rows with Logical Delete
Field and column values that match the Unread Value are
read.
Rejected Value Set to REJECTED. If the incoming message is greater than
the 10 MB threshold size, that particular record is updated to
REJECTED instead of READ. If the outbound operation
returns a response greater than the 10 MB threshold size, the
response message is ignored and a fault response is sent to
the calling client.
Polling Frequency (Sec)
Specifies the polling frequency (in seconds) for new records
or events.
Invoke Stored Procedure Page
Enter the invoke stored procedure values. The Invoke a Stored Procedure page appears when
you select Invoke a Stored Procedure as the operation to perform on the Basic Info page.
You can specify the following values on the Invoke a Stored Procedure page.
Chapter 3
Invoke Stored Procedure Page
3-4

• Select the database schema that includes the data you want to query (for example, you
want to query details about an employee based on their employee ID).
• Select a stored procedure or package from the list that is displayed after you select the
database schema.
Note:
• Stored procedures return binary large objects (for example, BLOB database data
types) as base64Binary types in XML. Depending upon the use cases, these can
be decoded during transformation using inbuilt functions such as decodeBase64
or can be passed as-is for downstream processing.
• Adapter input/output parameters are defined based on the stored procedure
IN/OUT parameters. The IN parameter corresponds to the request and the OUT
parameter is translated as the response. Procedures without parameters are not
listed in the Adapter Endpoint Configuration Wizard for database versions 18c
and above. You can pass a dummy parameter or create a wrapper procedure
with a dummy parameter to list it in the wizard.
Element Description
Select Schema
Select a database schema from the list. This action refreshes
the page to display fields for selecting a package or procedure
to invoke. Special characters (for example,
#
) are not
supported in schema names. See Special Characters are Not
Supported in Schema Names.
Select Package
Select the database package. This action refreshes the page
to display the procedures available for the package.
When importing a predefined integration package containing
PLS or SQL stored procedures, the wrapper package is not
recreated in the target database. To add the wrapper
package, confirm JPublisher is installed on the target
database and define the original stored procedure. After
confirming JPublisher is installed and the stored procedure is
defined, open the PL/SQL Wrapper utility and execute the add
scripts command to add the scripts included in the exported
inventory archives (IAR) file.
Select Procedure
Displays the in (inbound), out (outbound), and in/out (inbound/
outbound) parameters for the selected package.
Arguments
Display the in, out, and in/out parameters that are passed with
this procedure.
Chapter 3
Invoke Stored Procedure Page
3-5

Invoke SQL Statement Page
Enter the SQL statement values. The Run a SQL Statement page appears when Run a SQL
Statement is selected as the operation to perform on the Basic Info page. You can specify the
following values on the Run a SQL Statement page.
Note:
• Do not use schema/database names in SQL queries. Configure the details in the
connection. For example:
Update HR.employee set HR.employee.first_name = 'Name' where
HR.employee.employee_id='1'
can be changed to a simple query, such as:
Update employee set first_name = 'Name' where employee_id='1'
where
HR
is used in the connection details. This restricts a user with specific
privileges to a particular schema/database.
• When configuring the adapter as an invoke connection, ensure that proper
spaces are provided between key words for a pure SQL statement. For example,
the following statement fails during integration activation because there is no
blank space between
VALUES
and
(#
.
INSERT INTO table_name VALUES(#EMPNO, #EMPNAME)
Add a blank space between VALUES and (#, and the statement is successfully
processed.
INSERT INTO table_name VALUES (#EMPNO, #EMPNAME)
• When configuring the adapter as an invoke connection, define all bind
parameters in the same order and define the parameters that takes absolute
values at the end.
INSERT INTO table_name (EMPNO, EMPNAME, EMPUUID, EMPPHONE,
EMPHIREDATE) VALUES (#EMPNO,
#EMPNAME, Sys_guid(), NULL, SYSDATE)
Element Description
SQL Query
Identifies the SQL query.
Validate SQL Query
Validates the SQL query syntax.
Status
Displays the SQL query syntax validation status. When syntax
validation is successful, the message
Success!
appears.
Chapter 3
Invoke SQL Statement Page
3-6

Table Operation Page
You can update or insert multiple records in a single request.
Note:
When you change the structure of a table (for example, you add or delete a column),
you must re-import the table by doing a re-edit in the Adapter Endpoint Configuration
Wizard. Go to the Import Tables page and re-import the same table, then click OK >
Next > Done to complete the wizard. Only then are the table changes reflected in the
integration.
Topics:
• Import Tables Page
• Relationships Page
• Create Relationship Page
• Attribute Filtering Page
• Advanced Options Page
• Operations on Table Page
Import Tables Page
Filter and select the tables to import based on the selected schema. These tables are used to
generate a SQL statement based on the operation selected.
You can import the following number of tables:
• A maximum of three tables for insert, update, and insert or update actions
• A maximum of five tables for the select - operation on table feature
• A maximum of five tables for the polling feature
Element Description
Schema
Select the schema to use. The page is refreshed to display
the tables available for selection.
Name Filter
Filter the display of tables.
Available
Select the tables on which to insert or update records.
Selected
Displays the selected tables.
Chapter 3
Table Operation Page
3-7

Relationships Page
Review the relationships between the selected tables and optionally create, remove, or rename
relationships. These relationships are used in the insert or update SQL statements.
Element Description
Relationships Table
Displays the relationships defined on the root database table
and any related tables (one-to-one or one-to-many).
Create
Click to create new relationships.
Remove
Click to remove a selected relationship.
Rename
Click to rename a selected relationship.
Create Relationship Page
Specify the parent and child relationships to use in the SQL statement.
Element Description
Parent Table
Select the parent table.
Child Table
Select the child table.
Mapping Type
Select the mapping type (one-to-many, one-to-one, or one-to-
one with the foreign key on the child table). For example, if
you selected Employees as the parent table and
Departments as the child table, the following options are
displayed:
•
Employees has a 1:1 Relationship with Departments
•
Employees has a 1:1 Relationship with Departments
(Foreign Key on Child table)
•
Employees has a 1:M Relationship with Departments
Parent and Child Table
Associate the foreign key fields to the primary key fields.
Relationship Name
Optionally name the relationship (a default name is
generated).
Attribute Filtering Page
Filter out the attributes to exclude.
Element Description
Attributes Tree
Deselect any attributes to exclude from the database query.
You cannot exclude primary key attributes.
Advanced Options Page
Provide additional advanced options such as sequencing. This is only valid for the insert and
merge operations.
Element
Description
Table
Displays the selected table.
Chapter 3
Table Operation Page
3-8

Element Description
Sequence
Specify that the primary key is assigned from a sequence on
any insert. Click Search and select a sequence from the list.
Only the sequences of the user who owns the adapter on the
Connections page are listed.
The adapter generates sequence numbers in a batch of 50.
Configure sequences in increments of 50. This issue only
applies to the Oracle Database Adapter.
Operations on Table Page
Select the database tables. To use the bulk extract feature, you must choose the SELECT
operation from the Perform an Operation On a Table list on the Basic Info page.
Operations on Table Page
Element Description
Schema
Select the database schema that includes the tables to
process.
Table Name
Enter a filter with which to search the schema (for example,
%TAB
to search for tables with
TAB
in the name).
Table Type
Specify the table type filter to get a subset of the appropriate
database objects, then click Search.
•
ALL
•
MATERIALIZED VIEW
•
MATERIALIZED VIEW LOG
•
SYNONYM
•
TABLE
•
VIEW
Filter By
Enter the initial letters to filter the display of table names.
Table Names
Select the tables to import.
Note: It is recommended that you to import the tables
together for the adapter to automatically recognize the
relationship. If you import the tables separately, you must
explicitly create the table relationship.
Import Tables
Click to import the tables. The page is refreshed for you to
select the parent database table.
Select the parent database table
Select the parent (root) table from the list. If using multiple
related tables, this is the top-level parent table in the
relationship. After making your selection, the page is
refreshed for you to view and edit the table relationships.
Add || Remove Tables
Click to add more tables or remove tables no longer in use.
Review and manage parent database
table relationships
Click Edit to view and edit the table relationships. The
relationships automatically identified by the adapter are
displayed. See Review and manage parent database table
relationships Option.
Review and filter columns from
selected database tables
Click Edit to view and edit the table attributes. You can
deselect any attributes to exclude from the database queries.
Primary key attributes cannot be excluded. See Review and
filter columns from selected database tables Option.
Chapter 3
Operations on Table Page
3-9

Element Description
Review and edit SQL query Click Edit to view and edit the default SQL query. See Review
and edit SQL query Option.
Note: This field is available for a
Select
operation on the
table.
Review and manage parent database table relationships Option
Table 3-1 - Review and manage parent database table relationships Option
Element Description
Create New
Click to create a new relationship.
Relations
View the existing parent and child table relations
automatically created by the adapter.
Review and filter columns from selected database tables Option
Table 3-2 - Review and filter columns from selected database tables Option
Element Description
Attributes Tree
View and deselect attributes automatically created
by the adapter.
Review and edit SQL query Option
Note:
This is only applicable for a
Select
operation on a table.
Table 3-3 - Review and edit SQL query Option
Element Description
SQL Edit Click to manually edit the query in the SQL Query
field.
Chapter 3
Operations on Table Page
3-10

Table 3-3 (Cont.) - Review and edit SQL query Option
Element Description
Edit using Expression Builder
Click to edit the query in the Expression Builder.
•
Add New: Click to add new criteria to the SQL
query.
1. Click Add New.
2. In the First Argument field, click Edit,
and select the argument to add (for
example, deptno).
3. In the Operator field, select the operator
to use for the comparison from the
dropdown list (for example, =).
4. In the Second Argument field, select the
option to use:
–
Literal: Click to specify a value. If
selected, you are prompted to select
the data type (for example, integer)
and specify the value.
–
Parameter: Click to specify a bind
parameter.
–
Query Key: Click to run the
comparison against another column
in the table.
New criteria is appended to the SQL query
with a WHERE clause. If you add subsequent
SQL queries, they are appended to the SQL
query with an AND clause
•
Add Nested: Click to add nested criteria to the
SQL query.
•
Edit: Click the edit the SQL criteria you
specified.
•
Remove: Click the edit the SQL criteria you
specified.
Click to edit the query with the Expression Builder.
Maximum Number of Records to be fetched
Select the number of records to fetch with this SQL
query.
Chapter 3
Operations on Table Page
3-11

Summary Page
You can review the specified adapter configuration values on the Summary page.
Element Description
Summary
Displays a summary of the configuration values you defined on previous
pages of the wizard.
The information that is displayed can vary by adapter. For some
adapters, the selected business objects and operation name are
displayed. For adapters for which a generated XSD file is provided, click
the XSD link to view a read-only version of the file.
To return to a previous page to update any values, click the appropriate
tab in the left panel or click Back.
To cancel your configuration details, click Cancel.
Chapter 3
Summary Page
3-12

4
Implement Common Patterns Using the Oracle
Database Adapter
You can use the Oracle Database Adapter to implement the following common patterns.
Topics:
• Migrate an On-Premises Oracle Database Instance to an Oracle Autonomous Transaction
Processing or Oracle Autonomous Data Warehouse Database Instance
• Define Fault Mapping in Orchestrated Integrations
• Define a Select Operation on Database Tables
Migrate an On-Premises Oracle Database Instance to an Oracle
Autonomous Transaction Processing or Oracle Autonomous
Data Warehouse Database Instance
Perform the following steps if you want to migrate from an on-premises Oracle Database
instance to an Oracle Autonomous Transaction Processing or Oracle Autonomous Data
Warehouse database instance.
1. Migrate all the required database objects, stored procedures, wrapper procedures, and
tables to the destination Oracle Autonomous Transaction Processing or Oracle
Autonomous Data Warehouse database instance.
Note:
When migrating integrations that include stored procedures with PL/SQL types,
you must migrate the wrappers created by the integration along with the
database objects before reactivating the integrations. If there are any
modifications to the stored procedures performed after the migration, you must
re-edit the Adapter Endpoint Configuration Wizard and reselect the stored
procedure for the changes to be enabled. This re-edit does not create any
wrappers and uses the actual stored procedures instead.
2. Change the Oracle Database Adapter connection details to point to an Oracle Autonomous
Transaction Processing or Oracle Autonomous Data Warehouse database instance.
a. Go to the Connection page for the Oracle Database Adapter.
b. Go to the Connection Properties section.
c. Specify the new host name.
d. Specify the new service name and click OK.
e. Go to the Security section.
4-1

f. Select Oracle Wallet from the Security Policy list.
g. In the Wallet field, click the Upload icon to upload the wallet file.
h. Specify the wallet password and reconfirm it.
i. Specify the database service username.
j. Specify the database service password, reconfirm it, and click OK.
k. Configure an agent group.
Note:
When migrating an on-premises Oracle Database instance to Oracle
Autonomous Transaction Processing or Oracle Autonomous Data
Warehouse, it is mandatory to use the connectivity agent in the connection.
3. Test the connection.
4. Once the test is successful, click Save to save the connection details.
5. Reactivate the integrations.
Define Fault Mapping in Orchestrated Integrations
You can define fault mappings in integrations. This mapping transforms a Database Adapter
fault when used as a target into the source format defined in its WSDL. You add the Database
Adapter to a scope action in an orchestrated integration and select this fault in the Fault
Handler part of the scope action.
A
serviceInvocationError
fault mapping is defined in the WSDL
In the mapper, the elements of
serviceInvocationError
provide details about the runtime
fault:
•
type
: The type of fault.
•
title
: The title of the fault.
•
detail
: Information about the fault cause.
•
errorCode
: Information about the fault code.
•
remedialAction
: How to fix the fault.
This fault structure is populated during runtime when any exception occurs in an outbound
invocation (for example, a primary key violation).
If using the adapter in a map data integration, only
reason
,
detail
, and
errorCode
are
available in the mapper.
Assume an exception (for example,
NumberFormatException
) occurs in an invoke (outbound)
adapter. Exceptions are mapped in fault mappings and returned to the source format as
defined in its WSDL contract. In this use case, a stored procedure is used that accepts only an
integer type. If you invoke the adapter by passing a noninteger value, Oracle Integration
reports the fault back to you.
To define fault mapping:
1. Create connections for the SOAP Adapter and the Database adapter.
Chapter 4
Define Fault Mapping in Orchestrated Integrations
4-2

2. Create an orchestrated integration.
3. Drag the SOAP Adapter into the integration canvas as a trigger.
The Adapter Endpoint Configuration wizard is displayed.
4. Configure the SOAP Adapter (for this example, named s1).
5. From the Actions palette, drag a Scope action below the SOAP Adapter.
6. From the Invokes palette, drag the Database Adapter inside the scope.
The Adapter Endpoint Configuration wizard is displayed.
7. Select an operation to invoke any stored procedure that accepts only an integer as the
input parameter (for this example, the adapter is named db1).
8. Define mappings for the Database Adapter.
9. In the integration canvas, click Reposition and move the s1 map inside the scope.
10. Define mappings for s1.
Chapter 4
Define Fault Mapping in Orchestrated Integrations
4-3
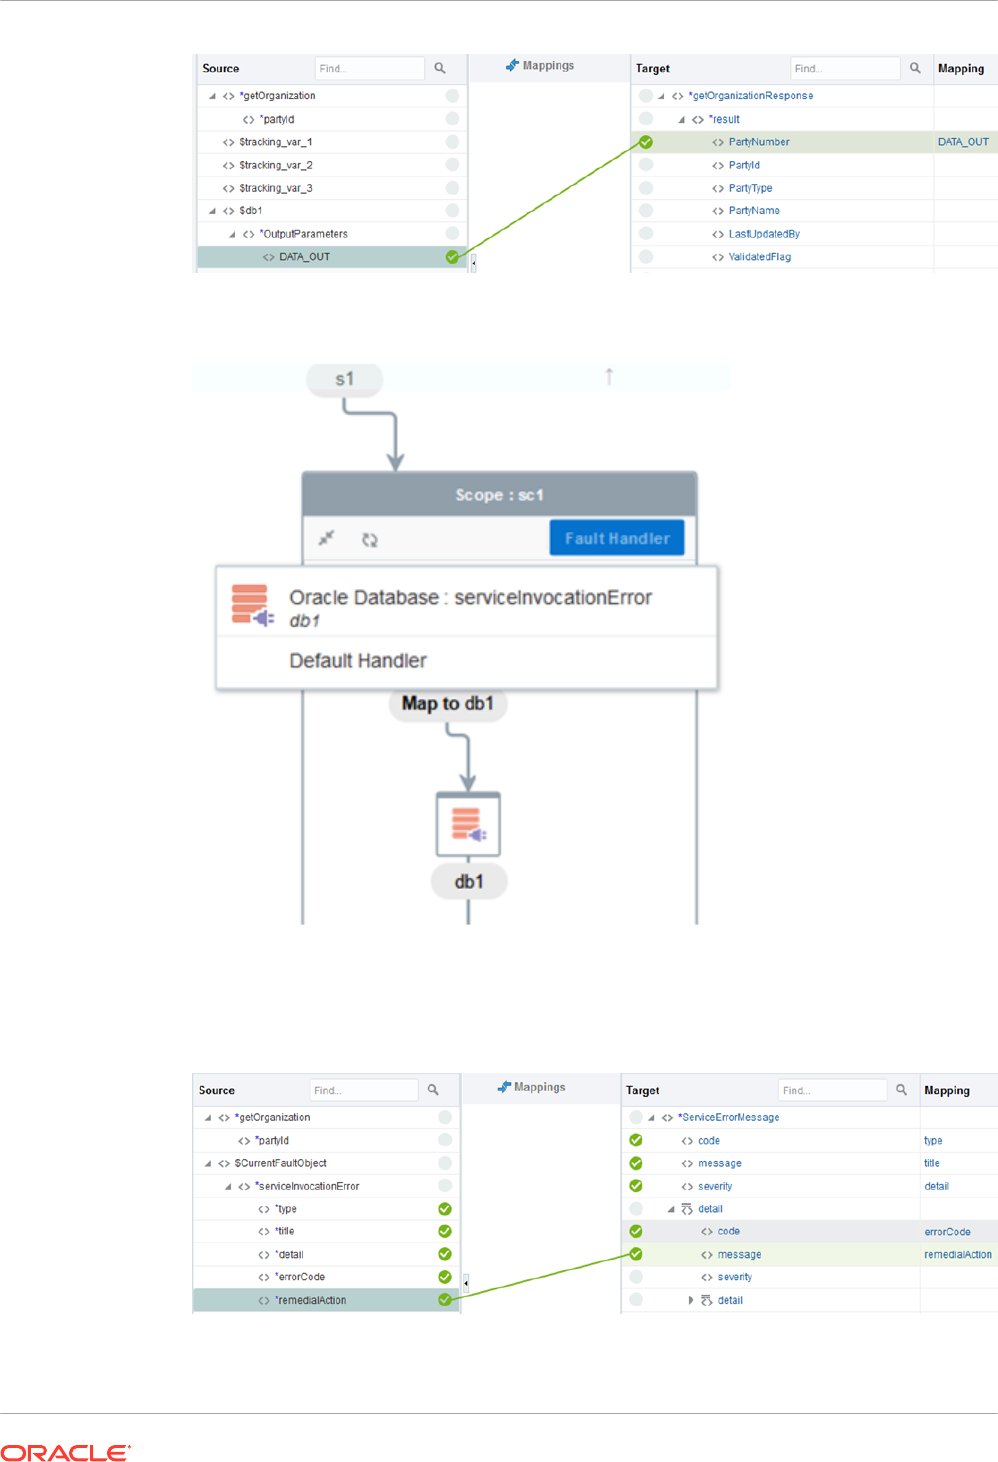
11. Click the Fault Handler part and select Oracle Database : serviceInvocationError db1.
12. From the Actions palette, drag a Fault Return action inside the Fault Handler part.
13. Define fault mappings.
Chapter 4
Define Fault Mapping in Orchestrated Integrations
4-4

The root element for the fault is
serviceInvocationError
. The fault includes other
elements that carry the fault details:
type
,
title
,
detail
,
errorCode
, and
remedialAction
.
The
detail
element carries information about the fault cause. The
remedialAction
element suggests the action to fix the fault.
14. From the menu, select Tracking and define the tracking field.
15. Activate and invoke the integration by passing a string value (that is, a noninteger value)
from the SOAP UI.
<typ:getOrganization>
<typ:partyId>test</typ:partyId>
</typ:getOrganization>
The fault response returns information similar to the following:
<nstrgmpr:code>XSD object conversion error</nstrgmpr:code>
<nstrgmpr:message>An error occurred while parsing XML representing a
Java object.</nstrgmpr:message>
<nstrgmpr:severity>Unable to convert the XSD element DATA_IN whose SQL
type is INTEGER and JDBC type is INTEGER. Cause:
java.lang.NumberFormatException: For input string: "test"</
nstrgmpr:severity>
<nstrgmpr:detail>
<nstrgmpr:code>serviceInvocationError</nstrgmpr:code>
<nstrgmpr:message>Check to ensure that the XML data describing the object
matches the definition of the element in the XSD.</nstrgmpr:message>
<nstrgmpr:detail>
<nstrgmpr:code/>
<nstrgmpr:message/>
<nstrgmpr:severity/>
<nstrgmpr:detail/>
</nstrgmpr:detail>
<nstrgmpr:detail xsi:type="nstrgmpr:ServiceErrorMessage" xmlns:xsi="http://
www.w3.org/2001/XMLSchema-instance"/>
</nstrgmpr:detail>
</nstrgmpr:ServiceErrorMessage>
</detail>
Define a Select Operation on Database Tables
You can define a
SELECT
operation to perform against database tables. This section provides a
high level overview of creating an integration in which an Oracle Database Adapter is
configured as an invoke connection to retrieve table records from the Oracle Database.
To define a
SELECT
operation on database tables:
1. Configure SOAP Adapter and Oracle Database Adapter connections.
2. Select App Driven Orchestration in the Create Integration - Select a Style dialog.
3. Add and configure the SOAP Adapter as a trigger connection in the integration.
The SOAP Adapter is configured to accept an input and return the response received from
the invoke connection.
4. Add the Oracle Database Adapter as an invoke connection in the integration.
Chapter 4
Define a Select Operation on Database Tables
4-5

This invokes the Adapter Endpoint Configuration Wizard.
5. On the Basic Info page, select Perform an Operation On a Table as the type of operation
to perform and Select as the operation to perform on the table.
6. On the Operate On Table page, specify the schema and tables to import, and click Import
Tables. For this example, the following values are specified.
• Schema: HR
• Table Type: TABLE
• Table Name:
%TAB
• Selected Tables: EMPLOYEE_TAB and DEPARTMENT_TAB. The tables are
imported together for the Oracle Database Adapter to recognize the relation between
the tables.
The page is refreshed for you to select the parent (root) database table.
7. Select the parent table (for this example, DEPARTMENT_TAB is selected).
This page enables you to:
• View the automatically created table relationships and create new ones.
• View and deselect attributes.
• View and edit the automatically created SQL query.
Chapter 4
Define a Select Operation on Database Tables
4-6

8. If you want to edit the automatically created SQL query, click Edit to the right of Review
and edit SQL Query.
a. Click Edit using Expression Builder. You can also manually edit the SQL query by
clicking SQL Edit.
b. Click Add New to add new criteria to the SQL query. The automatically created SQL
query is displayed below the link.
c. Specify values for the following fields, and click OK.
• First Argument
• Operator
• Second Argument
For example:
Chapter 4
Define a Select Operation on Database Tables
4-7

The criteria you specify are appended to the existing SQL query as part of a WHERE
clause. Any additional SQL query criteria you specify are appended as part of an AND
clause. For example:
d. Click OK.
9. Click Next.
10. View your selections on the Summary page. Links to the tables you selected to import and
SQL query you specified are provided.
11. Click Done to exit the Adapter Endpoint Configuration Wizard.
12. Complete the integration by performing mapping and tracking tasks.
13. Activate the integration.
14. Copy the link to invoke the integration from under the How to Run link.
15. Invoke the integration from a tool such as the SOAP UI.
16. Review the values returned by the Oracle Database Adapter.
Chapter 4
Define a Select Operation on Database Tables
4-8

5
Troubleshoot the Oracle Database Adapter
Review the following topics to learn about troubleshooting issues with the Oracle Database
Adapter.
Topics:
• Set Null to Collections
• Resolve Error ORA-04068: existing state of packages has been discarded
• Unable to Execute Stored Procedures with a PL/SQL Table When the Table Uses a
Different Schema
• Wrappers Require Regeneration After Objects Change
• Special Characters are Not Supported in Schema Names
• Resolve Message Time Out Errors
• Recover from a CLOUD-0005: Unable to Establish Connection Error
Additional integration troubleshooting information is provided. See Troubleshoot Oracle
Integration in Using Integrations in Oracle Integration Generation 2 and the Oracle Integration
Troubleshooting page on the Oracle Help Center.
Set Null to Collections
You may sometimes want to pass null to the adapter while mapping collections. If you do not
map those collections, an
ORA-06550 pl/sql statement ignored
error can occur. To avoid
this error, map the collections using the mapping component
attribute name='xsi:nil'
. This
action ensures that a null collection is propagated to the adapter.
Resolve Error ORA-04068: existing state of packages has been
discarded
If you receive a
java.sql.SQLException: ORA-04068: existing state of packages has
been discarded
error, then perform the following tasks.
1. Ensure that the stored procedure is stateless.
2. Avoid using global variables.
Unable to Execute Stored Procedures with a PL/SQL Table
When the Table Uses a Different Schema
You receive the following error when you attempt to use a stored procedure that contains a
PL/SQL record, PL/SQL table, or boolean data type and the stored procedure is not defined in
the schema used to create the connection. This is deliberately restricted because PL/SQL
5-1

record, PL/SQL table, or boolean data types require wrappers to be generated that may fail
when you do not have the required permissions on the selected schema.
Please select procedure from the same schema based on the username that was
used to create connection. This procedure contains PL/SQL RECORD, PL/SQL
TABLE, or BOOLEAN data type and hence wrapper generation can fails due to
privilege problems.
As a workaround, move the stored procedure to the schema used to create the connection. If
you cannot change the schema, then define a wrapper stored procedure in the schema that
does not reply on PL/SQL record, PL/SQL table, or boolean data types. Instead, you can use
SQL object types.
Wrappers Require Regeneration After Objects Change
The adapter automatically generates the wrapper packages and objects for stored procedures
used in an integration when PL/SQL boolean, table, and record types are involved. If the
underlying objects (that is, the IN/OUT parameters) are changed, the wrappers must be
regenerated after you delete the existing wrapper’s packages and objects. During design time
or activation, the wrappers are regenerated automatically with the latest object definitions
available in the database.
Special Characters are Not Supported in Schema Names
If you use schema names with special characters such as
#
, integration activation fails. For
stored procedures, the schema derives the names of the types in the XSD. If the type name
contains
#
, the XSD has problems with the name. Use a schema name that does not contain
any special characters.
Resolve Message Time Out Errors
The following errors can occur during both design time (in both the inbound and outbound
directions) and runtime.
•
Message not received within X seconds of wait interval
There can be multiple reasons for a time out occurring, such as connectivity issues
between Oracle Integration and the connectivity agent or the connectivity agent being
disabled. Ensure that the connectivity agent is up and running if you see this error. Check
the status of the agent under Dashboards > Agents in Oracle Integration.
Note:
When using the Oracle Database Adapter to connect to an Oracle E-Business
Suite Database instance, you may notice this error occurring continuously. It is
recommended that you use the Oracle E-Business Suite Adapter instead of the
Oracle Database Adapter to access the Oracle E-Business Suite Database
instance.
Chapter 5
Wrappers Require Regeneration After Objects Change
5-2

•
SQLState: 08006 errorCode: 17002 message: IO Error: Connection timed out
This error can occur when database sessions are terminated by a network firewall or some
other reason. The adapter automatically recovers during this state and new connections
are created. However, a few requests using old connections may time out. Ensure that the
firewall is not terminating idle connections.
• Timeouts can also occur due to design problems. Avoid certain antipatterns. For example,
do not explicitly update the same table as an invoke operation when the same table is
getting polled on the trigger side.
Recover from a CLOUD-0005: Unable to Establish Connection
Error
If you receive the following error:
CLOUD-0005: Unable to establish connection.
Please check connection parameters · IO Error: Invalid connection string
format, a
valid format is: "host:port:sid" and the Service Name contains HYPHEN "-"
Perform the following steps:
1. Check if the service name can be modified to remove the hyphen (
-
).
2. If you cannot remove the hyphen, prefix the host name in the database connection with
//
(for example,
//host.test.com
).
Chapter 5
Recover from a CLOUD-0005: Unable to Establish Connection Error
5-3
