

docs.smarttech.com/kb/171798 2
Learn more
This guide and other resources for SMART Remote Management are available in
the Support section of the SMARTwebsite (smarttech.com/support). Scan this
QRcode to view these resources on your mobile device.
Trademark notice
SMARTBoard, SMARTNotebook, SMART Meeting Pro, SMARTInk, smarttech, the SMART logo and all SMART taglines are trademarks or registered trademarks of
SMARTTechnologiesULC in the US and/or other countries. Apple, iOS, and macOS are trademarks of Apple Inc., registered in the US and other countries. Google, Android,
Chrome OS, and Google Play are trademarks of Google Inc. Windows is either a registered trademark or trademark of Microsoft Corporation in the United States and/or
other countries. The Bluetooth word mark is owned by the Bluetooth SIG, Inc. and any use of such marks by SMART Technologies ULC is under license. All other third-party
product and company names may be trademarks of their respective owners.
Copyright notice
© 2021–2024SMARTTechnologiesULC. All rights reserved. No part of this publication may be reproduced, transmitted, transcribed, stored in a retrieval system or translated
into any language in any form by any means without the prior written consent of SMARTTechnologiesULC. Information in this manual is subject to change without notice and
does not represent a commitment on the part of SMART.
This product and/or use thereof is covered by one or more of the following US patents:
www.smarttech.com/patents
August 29, 2024

docs.smarttech.com/kb/171798 3
Contents
Chapter 1 Welcome 5
About SMART Remote Management 5
About this guide 6
More information 8
Chapter 2 Managing devices 9
Monitoring devices 10
Using tags and groups 21
Remotely viewing and controlling devices 27
Connecting to devices using the Terminal feature 29
Removing devices 30
Viewing total connected devices 31
Chapter 3 Installing and managing apps on devices 32
Installing apps 32
Enabling, disabling, and stopping apps 39
Clearing app data 44
Uninstalling apps 45
Installing and uninstalling apps on iOS and macOS devices using VPP 47
Viewing app usage data 50
Preventing users from installing apps 54
Chapter 4 Deploying policies and managing settings 58
About policies and settings 58
Deploying policies 59
Deploying kiosk policies 64
Managing settings 66
Returning devices to factory settings and resettingtheir authentication tokens 72
Chapter 5 Running other commands on devices 75
Sending custom commands and scripts to devices 76
Sending files to devices 85
Sending messages and sounding the siren 88
Locking and unlocking devices 96
Restarting, shutting down, and waking devices 99
Changing devices’ agent passwords 106
Running device-type-specific commands 107

docs.smarttech.com/kb/171798 5
Chapter 1 Welcome
About SMART Remote Management 5
About this guide 6
More information 8
About SMART Remote Management
SMART Remote Management is a cloud-based device-management tool you can use to remotely
maintain, support, control, and secure devices in your organization. You can manage SMART Board
®
interactive displays and Android
™
, iOS, macOS, Windows
®
, and Chrome OS
™
devices all from a central
location.
When you create a SMART Remote Management domain account for your organization and register for
the first time, you receive a free 30-day trial automatically. To continue using SMART Remote
Management after the trial period, activate the domain account by redeeming credits. You can obtain
credits in one of two ways:
l
Purchase the credits from a SMART reseller.
l
Use the subscription to SMART Remote Management included in your purchase of a SMART Board
interactive display.
After you create the domain account for your organization, you can create users and enroll your SMART
Board interactive displays and other devices. You and other SMART Remote Management users can
then perform a variety of actions with enrolled devices:
l
Monitor and locate devices
l
Use tags and groups to manage devices
l
Remotely view and control devices
l
Remove devices from SMART Remote Management
l
Install and manage apps on devices
l
Deploy policies to devices
l
Manage device settings
l
Send remote execution commands to devices

Chapter 1 Welcome
docs.smarttech.com/kb/171798 6
l
Send files to devices
l
Send messages and sound the siren
l
Lock and unlock devices
l
Restart, shut down, and wake devices
l
Return devices to factory settings
See also
SMART Remote Management quick tour
(docs.smarttech.com/kb/171797)
About this guide
This guide explains how to manage enrolled SMART Board interactive displays and other devices in
SMART Remote Management. It also explains how to troubleshoot common issues with SMART Remote
Management.
This guide assumes you have created and activated a domain account, created users, and enrolled your
organization’s devices.
See
SMART Remote Management setup guide
(docs.smarttech.com/kb/171333)

Chapter 1 Welcome
docs.smarttech.com/kb/171798 7
Note
Some SMART Remote Management features are available on only certain devices. The
documentation for each feature in this guide includes a table that shows which devices the feature
supports. The header rows in these tables represent devices with the following icons:
Icon Description
SMART Board interactive displays with iQ 4
SMART Board interactive displays with iQ 3
SMART Board GX series interactive displays
Android devices
iOS devices
macOS devices
Windows devices
Chrome OS devices
See also
SMART Remote Management feature compatibility
(docs.smarttech.com/kb/171722)

Chapter 1 Welcome
docs.smarttech.com/kb/171798 8
More information
This guide is part of a set of documentation for SMART Remote Management.
Other documentation for SMART Remote Management includes:
Document Link
Quick tour docs.smarttech.com/kb/171797
Setup guide docs.smarttech.com/kb/171333
Feature compatibility docs.smarttech.com/kb/171722
Scan the QR code on the inside front cover of this guide to view links to this documentation and other
SMART Remote Management support resources.

docs.smarttech.com/kb/171798 9
Chapter 2 Managing devices
Monitoring devices 10
Showing and hiding columns 11
Finding devices 12
Using filters 13
Renaming devices 15
Identifying which devices are online 16
Viewing device details 16
Locating devices 20
Exporting device details to CSV files 21
Using tags and groups 21
Using tags 21
Using groups 25
Remotely viewing and controlling devices 27
Connecting to devices using the Terminal feature 29
Removing devices 30
Viewing total connected devices 31

Chapter 2 Managing devices
docs.smarttech.com/kb/171798 10
Monitoring devices
The
Devices
view displays information about the devices enrolled in SMART Remote Management to
which you have access. The
Devices
view is the main view in SMART Remote Management for
monitoring and managing devices.
To open the
Devices
view from anywhere in SMART Remote Management, click Devices in the menu.
In the
Devices
view, you can:
l
Show and hide columns
l
Filter devices
l
Identify which devices are online
l
View device details
l
Locate devices
l
Export device details to CSV files

Chapter 2 Managing devices
docs.smarttech.com/kb/171798 11
Important
If a warning icon appears next to a device’s ID, you need to reset the device’s authentication token.
Click the icon to learn more and reset the device’s authentication token.
Showing and hiding columns
You can choose the columns that appear in the
Devices
view by clicking Columns . Enable columns
you want to show, and disable columns you want to hide:
These are the columns you’d typically want to display for SMART Board interactive displays with iQ:
Column Description
Notes
OS
An icon representing the device’s type
(operating system)
For SMART Board interactive displays
with iQ, the icon is .
Hardware ID
A unique identifier assigned by the
device’s manufacturer
For SMART Board interactive displays
with iQ, the unique identifier is the same
as the display’s serial number.
Name A name you give the device to identify
it in SMART Remote Management
See
Renaming devices
on page15
Last seen The date and time the device was last
active
N/A
Policy-Kiosk The policies applied to the device
See
Deploying policies
on page59
Tags The tags applied to the device
See
Using tags
on page21
Chapter 2 Managing devices
docs.smarttech.com/kb/171798 12
Column Description
Notes
SMART Build
Number
The build number of iQ software
running on the SMART Board
interactive display
For devices other than SMART Board
interactive displays with iQ, this column is
blank.
Tips
l
You can sort devices by clicking the Last Seen column header.
l
You can change the order of columns by dragging a column’s header to its new position.
l
You can filter the list of devices based on values in some columns.
See
Finding devices
below
Finding devices
To find a specific device or devices quickly, filter the devices in the
Devices
view in one of the following
ways:
l
Use the
Search
bar at the top of the
Devices
view

Chapter 2 Managing devices
docs.smarttech.com/kb/171798 13
l
Use column filtering.
Notes
o
Column filtering is available for the
OS
,
Policy-Kiosk
, and
Tags
columns.
o
For the OS column, selecting Android displays all SMART Board interactive display and
Android devices, not just Android devices.
l
Use filters
See
Using filters
below
l
Use groups
See
Using groups
on page25
Using filters
You can use filters to filter devices in the
Devices
view and run commands on all devices that meet filter
criteria. You can create and save a filter for future use, or you can create a one-time quick filter.
Tip
Filters are useful for applying policies to a group of devices. Because policies are created for specific
operating systems, create a filter for devices that have the same operating system.
See
Deploying policies
on page59

Chapter 2 Managing devices
docs.smarttech.com/kb/171798 14
To create and save a filter
1.
Click Filters in the
Search
bar.
2. Create the conditions for the filter.
Note
Click ADD CONDITION to add multiple conditions as needed.
Example
3.
Click SAVE FILTER.
The
Save filter
window appears.
4. Type a name in the
Filter name
box.
5.
OptionalSelect the following options for the filter:
Option Description
Set as private Make this filter available only to you.
Select color Assign a color to the filter’s icon.
Select icon Assign an icon to the filter.
6.
Click SAVE.
Tip
You can edit the filter by selecting it in the list, modifying its conditions, and clicking EDIT FILTER.
Chapter 2 Managing devices
docs.smarttech.com/kb/171798 15
To filter devices using filters
1.
Click Filters in the
Search
bar.
2. Select the saved filter you want to use.
OR
Create the conditions for a one-time quick filter and click QUICK SEARCH.
Note
Click ADD CONDITION to add multiple conditions as needed.
Example
3. Click outside the filter drop-down menu.
The devices that meet the filter’s criteria appear in the
Devices
view.
To run a command on all devices that meet a saved filter’s criteria
1.
Click Filters in the
Search
bar.
2.
Click Actions next to a saved filter and select the command you want to run on the devices that
meet the filter’s criteria.
Tip
You can pin a frequently used command to the top of the menu by hovering over it and clicking
Pin to favorites .
Renaming devices
You might need to change a device’s name if its current name doesn’t accurately describe its status or
purpose. You can rename devices from the
Devices
view.

Chapter 2 Managing devices
docs.smarttech.com/kb/171798 16
To rename a device
1.
Click Edit device name beside the device’s name.
2.
Type a new name for the device and click save changes .
Tips
o
To revert to the existing name, click cancel .
o
You can also rename a device from the device dashboard by clicking Manage and then
RENAME.
See
Viewing device details
below
Identifying which devices are online
You can quickly identify which devices are online by clicking Who is online? in the
Devices
view. The
OS
icon for online devices turns blue ( ).
Viewing device details
When you click a device’s row in the
Devices
view, a device dashboard similar to this appears:
From this dashboard, you can view general information about the device, a list of apps installed on the
device, and device usage. The device dashboard also offers management tools, such as starting a
remote session, applying settings and policies, and more.

Chapter 2 Managing devices
docs.smarttech.com/kb/171798 17
The general details section on the dashboard’s left side shows the device’s current state (
Connected
or
Disconnected
) and device information, such as memory, storage, resolution, battery life, and more.
Tip
The device state refreshes automatically every 3 seconds. You can refresh it manually by clicking
Refresh .
Click the other tabs to see additional information for the device:
Icon Tab Description
Info
More details about
the device, such as
Wi-Fi, IP address,
Bluetooth
availability, model
number, operating
system version,
MAC address,
permissions, CPU,
serial number, and
time zone
Properties
Properties for the
device
File system
Contents of the
device’s file system

Chapter 2 Managing devices
docs.smarttech.com/kb/171798 18
Icon Tab Description
Storage stats
Storage statistics
for the device
Network
Network
information, such
as Wi-Fi state, Wi-Fi
SSID, Wi-Fi allowed
protocols, IP
address, subnet
mask, network
related events
(traceroute), and
more
Smartboard
Basic information
about the SMART
Board interactive
display with iQ,
such as information
about the touch
controller and
scaler firmware
version, display
build number, and
display name
Note
If a user changes
the name of a
SMART Board
interactive
display with iQ
from the
display’s settings,
it can take up to
24 hours before
the new name
appears in
SMART Remote
Management.
Bios
Information about
the device’s BIOS
Processor
Information about
the device’s CPU

Chapter 2 Managing devices
docs.smarttech.com/kb/171798 19
Icon Tab Description
Manufacture
model
Information about
the device’s model
Hot fixes
Information about
Windows hot fixes
applied to the
device
OS
Information about
the device’s
operating system
Disks
Information about
the device’s hard
drive
Logged on
users
Information about
users currently
logged on to the
device
Browsing
the device’s
browsing history
Chapter 2 Managing devices
docs.smarttech.com/kb/171798 20
Tip
In the
Properties
,
File system
,
Storage stats
, and
Browsing
tabs, you can do the following:
l
Search for specific information using the
Search
box.
l
Export information to a CSV file by clicking Export to CSV .
l
Display the information in the tab in an expanded view by clicking Expand .
Locating devices
You can see a device’s current location from the
Devices
view. This is particularly useful for finding
mobile devices.
Notes
l
Before SMART Remote Management can locate a device, you must set up the network.
See
SMART Remote Management setup guide
(docs.smarttech.com/kb/171333)
l
If location services are not available, SMART Remote Management shows an approximate
location for the device based on its IP address.
To locate a device
1. Click the row of the device you want to locate.
The device’s dashboard window appears.
2.
Click Location to open the
Location
window.

Chapter 2 Managing devices
docs.smarttech.com/kb/171798 21
Exporting device details to CSV files
From the
Devices
view, you can create a CSV file that contains information from all available device
columns in SMART Remote Management or from only those columns shown in the
Devices
view.
See
Showing and hiding columns
on page11
To export a CSV file
1. Select the check boxes of the devices you want to include in the CSV file.
2.
Click More actions and select Export to CSV.
3.
Select All columns to export all device columns to the CSV file.
OR
Select Columns shown in devices table to export only those columns shown in the
Devices
view.
4.
Click CONFIRM.
Your browser downloads a CSV file from SMART Remote Management.
5. Open the CSV file in a spreadsheet application.
Using tags and groups
You can use tags and groups to organize devices in SMART Remote Management.
Using tags
Tags are a way of classifying devices enrolled in SMART Remote Management. For example, you could
use tags to identify:
l
Which devices are SMART Board interactive displays, which are computers, and which are mobile
devices
l
Where devices are located
l
The intended purposes of the devices
l
The department, team, or group that uses the devices
Tip
You can assign more than one tag to a device.
Assigning tags to devices is a prerequisite for creating groups. You can also use tags, along with groups,
to filter devices in the
Devices
view.

Chapter 2 Managing devices
docs.smarttech.com/kb/171798 22
See
Using groups
on page25
See
Finding devices
on page12
You can also assign tags to SMART Remote Management users to control which devices and other users
those users can access in SMART Remote Management.
Example
The user jperez@smarttechnologies is assigned the tag “1st Floor SMART Board” so can access only
devices and users also assigned the tag “1st Floor SMART Board”:
If you assign more than one tag to a user, the user can access only devices and users with the matching
set of tags.
Example
The user jperez@smarttechnologies is assigned the tags “1st Floor SMART Board” and “Science Lab
SMART Board” so can access only devices and users assigned both of these tags:
Typically, you assign tags to devices when you first enroll those devices in SMART Remote Management.
After enrolling devices, you can also assign tags to them in the
Devices
view.

Chapter 2 Managing devices
docs.smarttech.com/kb/171798 23
Notes
l
By default, tags are not synchronized automatically when you enroll a device. The tags that
appear in SMART Remote Management do not reflect changes you make directly to the device.
l
The enrollment wizard includes an option to make sure the tags displayed in SMART Remote
Management for a device match those defined on the device during daily synchronization. For
example:
Time Tags (as displayed in SMART
Remote Management)
Tags (as defined on the device)
Before daily
synchronization
Classroom – Math – Grade 5 Classroom – Math – Grade 5 –
Interactive – Tablet
After daily
synchronization
Classroom – Math – Grade 5 –
Interactive – Tablet
Classroom – Math – Grade 5 –
Interactive – Tablet
To add tags to a single device
1.
Click Devices to open the
Devices
view.
2. Click the row of the device to which you want to add a tag.
The device’s dashboard window appears.
3.
Click Manage, and then click TAGS.
The
Tags
window appears.

Chapter 2 Managing devices
docs.smarttech.com/kb/171798 24
4. For each tag you want to add to the device, type a name for the tag in the
Add tag, then press enter
box and press ENTER.
5.
Click CONFIRM.
You’ll see the tags added for the device in the
Tags
column.
To assign tags to multiple devices
1.
Click Devices to open the
Devices
view.
2. Select the devices’ check boxes.
3.
Click More actions and select Tags.
The
Tags
window appears.
4. For each tag you want to add to the devices, type the name for the tag in the
Add tag, then press
enter
box and press ENTER.
5.
Click CONFIRM.

Chapter 2 Managing devices
docs.smarttech.com/kb/171798 25
Using groups
Groups are a way of organizing devices enrolled in SMART Remote Management. By default, all
enrolled devices are included in the All group, and any new devices you enroll are included in the New
Devices group.
You can create additional groups using tags.
Example
If you create a group called “SMART Board” and assign it the tags “1st Floor SMART Board” and “2nd
Floor SMART Board,” the group will contain all devices with those tags:
The relationship between tags and groups is many-to-many: You can assign multiple tags to a single
group and a single tag to multiple groups. This allows you to create groups that are as simple or as
complex as your organization needs.
Most of the commands you can run for a single device or multiple devices you can also run for a group.
In addition, you can make commands persistent: if you assign a new device to a group in the future (by
adding one of the group’s tags to the device), any persistent commands for that group run on the device
automatically.
See
Making group commands persistent
on page122
You can create, edit, and delete groups from the
Devices
view. When you create a group, you assign it at
least one tag and, optionally, one or more installation packages. SMART Remote Management
automatically deploys a group’s installation packages to any devices you add to the group (by adding
one of the group’s tags to the device).
To create a group
1.
Click Devices to open the
Devices
view.
2.
Click Groups to open the
Groups
panel.

Chapter 2 Managing devices
docs.smarttech.com/kb/171798 26
3.
Click Add new group .
The
Create new group
window appears.
4. Type a name and description in the
Group name
and
Group description
boxes.
5.
Click Tags .
6. For each tag you want to add to the device, type the name for the tag in the
Add tag, then press
enter
box and press ENTER.
Note
You must assign at least one tag to the group.
7.
OptionalClick Packages , click ADD PACKAGES, select the installation packages you want to
assign to the group, and click UPDATE.
See
Installing apps
on page32
Notes
o
Installation packages you assign to the group are persistent: if you assign a new device to
the group in the future, SMART Remote Management deploys the installation packages to
the device automatically.
o
SMART Board interactive displays with iQ support persistent installation packages.
o
Other devices require version 11.5.1.1 or later of the Viso MDM agent to support persistent
installation packages.
8.
Click CONFIRM.
Tip
To edit or delete an existing group, click Actions in the group’s row and select Edit or Delete.
(You can’t delete the All or New Devices groups.)
To filter devices using groups
1.
Click Devices to open the
Devices
view.
2.
Click Groups to open the
Groups
panel.
3. Select the group you want to use.
The devices that meet the group’s criteria appear in the
Devices
view.

Chapter 2 Managing devices
docs.smarttech.com/kb/171798 27
To run commands on all devices in a group
1.
Click Devices to open the
Devices
view.
2.
Click Groups to open the
Groups
panel.
3.
Click Actions next to a group and select the command you want to run on the devices in the
group.
Tip
You can pin a frequently used command to the top of the menu by hovering over it and clicking
Pin to favorites .
Remotely viewing and controlling devices
1
You can use SMART Remote Management to start a remote view or control session with a device. You
can see and interact with a device’s screen as if you were in the room with the device. A remote view or
control session is particularly useful when you need to help a user troubleshoot an issue with a device.
Whether you can remotely control a device or only view its screen depends on the following:
l
The type of device
Type of device Level of access
SMART Board interactive displays with iQ View and control
SMART Board GX series interactive displays and Android devices View and control
Windows devices View and control
Chrome OS devices View only
l
Whether you have permission to view or control devices remotely
Note
If the
Require users permission for remote control
option is enabled as described below, the user must
grant permission before you can interact with the device.
1
Remote view only

Chapter 2 Managing devices
docs.smarttech.com/kb/171798 28
To require user permission before starting a remote view or control session
1.
Click Account settings .
The
Account settings
window appears.
2.
Click Remote control .
3.
Enable Require users permission for remote control.
4.
Click SAVE.
To start a remote view or control session
1.
Click Devices to open the
Devices
view.
2.
OptionalFilter the devices shown in the
Devices
view.
See
Finding devices
on page12
3. Click the device’s row.
The device’s dashboard window appears.

Chapter 2 Managing devices
docs.smarttech.com/kb/171798 29
4.
Click Remote.
The remote window appears, and you can view or control the device.
Tip
Use the buttons on the left side of the window to navigate the device:
To end a remote view or control session
Click the X in the top right corner of the remote window.
Connecting to devices using the Terminal feature
You can use SMART Remote Management’s Terminal feature to open direct Android Debug Bridge
(ADB) shell connections to SMART Board interactive displays and Android devices. This allows you to
remotely execute commands and pull logs in real time.

Chapter 2 Managing devices
docs.smarttech.com/kb/171798 30
Important
The Terminal feature is available only on request. Contact a SMART representative if you would like to
enable the Terminal feature for your organization.
To connect to a device
1.
Click Devices to open the
Devices
view.
2.
OptionalFilter the devices shown in the
Devices
view.
See
Finding devices
on page12
3. Click the device’s row.
The device’s dashboard window appears.
4.
Click Terminal.
The
Terminal
window appears.
5. Use the
Terminal
window to connect to the device and enter commands.
Tips
o
To run the terminal session as a system administrator, click Enable run as system .
o
To download a log file for the terminal session, click Get log , and then click the link that
appears in the
Terminal
window.
6.
Click CLOSE when you’re done.
Removing devices
You may need to remove a device from SMART Remote Management for a number of reasons:
l
You are replacing the device (as part of SMART’s RMA program or otherwise)
l
You no longer need to monitor, manage, or control the device remotely
To remove a device
1.
Click Devices to open the
Devices
view.
2.
OptionalFilter the devices shown in the
Devices
view.
See
Finding devices
on page12
3. Click the device’s row.
The device’s dashboard window appears.

Chapter 2 Managing devices
docs.smarttech.com/kb/171798 31
4.
Click Manage, and then click REMOVE.
5.
Click YES.
Viewing total connected devices
The
Connected devices
graph in the
Dashboard
view shows how many connected devices have been
active in four time intervals:
Tip
To view the specific number of active devices for a time interval, hover over the time interval’s bar in
the graph.

docs.smarttech.com/kb/171798 32
Chapter 3 Installing and managing
apps on devices
Installing apps 32
Creating installation packages 33
Deploying installation packages 36
Creating an activation command 38
Unsupported apps for SMART Board interactive displays with iQ 38
Enabling, disabling, and stopping apps 39
Enabling apps 40
Disabling apps 41
Stopping apps 43
Clearing app data 44
Uninstalling apps 45
Installing and uninstalling apps on iOS and macOS devices using VPP 47
Viewing app usage data 50
Preventing users from installing apps 54
Disabling the App Store app 55
Uninstalling the Google Play store 56
Installing apps
You can remotely install apps on devices using SMART Remote Management by completing these steps:
1. Create an installation package.
2. Deploy the installation package.
3. Create an activation command (if required).

Chapter 3 Installing and managing apps on devices
docs.smarttech.com/kb/171798 33
Important
l
For SMART Board interactive displays with iQ:
o
Review the list of unsupported apps
See
Unsupported apps for SMART Board interactive displays with iQ
on page38
o
Different SMART Board interactive displays with iQ support different Android versions:
Displays Supported
Android version
Displays with AM30 appliances 4.4
Displays with AM40 and AM50 appliances 7.1
SMART Board MX (V2), 6000S, 7000 (V2), and 7000R series interactive
displays
8
l
Install apps only from sources that you trust.
l
Take care when installing apps that change Wi-Fi settings, Ethernet settings, VPNs, and alarms.
l
Review required permissions for apps before installing them. For SMART Board interactive
displays and Android devices, visit the Android developer site
(developer.android.com/guide/topics/permissions/overview#perm-groups) for app permission
guidelines.
l
Test apps before installing them.
l
Some apps depend on other apps and will not run unless other packages are deployed first.
Creating installation packages
The first step in using SMART Remote Management to install an app is to create an installation package
for the app. The procedure for creating an installation package depends on the app’s source:
Source
Online file
File saved on your computer
Google Play
™
app
iOS enterprise app

Chapter 3 Installing and managing apps on devices
docs.smarttech.com/kb/171798 34
To create an installation package using an online file
1.
Click Repositories and select Packages.
The
Packages
window appears.
Tip
If your organization created its domain account after May 2023, the
Packages
window includes
sample installation packages that you can use as starting point for creating your own installation
packages. These sample installation packages have turquoise icons.
2.
Click ADD NEW.
3.
Select File from Url from the
Select upload method
drop-down list.
4. Type the file’s URL in the
File url
box.
5. Type a name and description in the
Repository name
and
Package description
boxes.
6.
OptionalType appropriate values in the remaining boxes.
7.
Click CONFIRM.
To create an installation package using a file saved on your computer
1.
Click Repositories and select Packages.
The
Packages
window appears.
Tip
If your organization created its domain account after May 2023, the
Packages
window includes
sample installation packages that you can use as starting point for creating your own installation
packages. These sample installation packages have turquoise icons.
2.
Click ADD NEW.
3.
Select Upload file from the
Select upload method
drop-down list.
4.
Click ADD FILE.
5.
Browse to and select the file, and click Open.
The file uploads and the
Repository name
box updates to include the file name.
6. Type a description in the
Package description
box.
7.
OptionalType appropriate values in the remaining boxes.
8.
Click CONFIRM.

Chapter 3 Installing and managing apps on devices
docs.smarttech.com/kb/171798 35
To create an installation package using a Google Play app
1.
Click Repositories and select Packages.
The
Packages
window appears.
Tip
If your organization created its domain account after May 2023, the
Packages
window includes
sample installation packages that you can use as starting point for creating your own installation
packages. These sample installation packages have turquoise icons.
2.
Click ADD NEW.
3.
Select Package from play store from the
Select upload method
drop-down list.
4.
Click Play store.
The Google Play store opens in a separate browser tab.
5. Search or browse for the app you’d like to use.
6. Copy the webpage’s URL from the address bar.
Example
The URL to the WPS Office app is
https://play.google.com/store/apps/details?id=cn.wps.moffice_eng.
7. Return to the SMART Remote Management tab and paste the URL you copied in step 4 in the
Copy
app URL from Play store
box.
8. Select the country where the devices on which you want to install the app are located in the
Select
country
drop-down list.
9. Select the type of device in the
Device type
drop-down list.
Note
For SMART Board interactive displays, select Interactive flat panel (Android).
10.
Click SYNC.
11.
OptionalModify the name and description in the
Repository name
and
Package description
boxes.
12.
OptionalModify the values in the remaining boxes.
13.
Click CONFIRM.

Chapter 3 Installing and managing apps on devices
docs.smarttech.com/kb/171798 36
To create an installation package using an iOS enterprise app
1.
Click Repositories and select Packages.
The
Packages
window appears.
Tip
If your organization created its domain account after May 2023, the
Packages
window includes
sample installation packages that you can use as starting point for creating your own installation
packages. These sample installation packages have turquoise icons.
2.
Click ADD NEW.
3.
Select iOS enterprise application from the
Select upload method
drop-down list.
4. Complete one of the following procedures (based on the file’s source):
Source Procedure
Online file
a.
Select File from Url from the second
Select upload method
drop-down
list.
b.
Type the file’s URL in the
File url
box.
c.
Type a name, description, and version in the
Repository name
,
Package
description
, and
Package version number
boxes.
d.
OptionalType appropriate values in the remaining boxes.
File saved on your
computer
a.
Select Upload file from the second
Select upload method
drop-down list.
b.
Click ADD FILE.
c.
Browse to and select the file, and click Open.
The file uploads and the
Repository name
box updates to include the file
name.
d.
Type a description and version in the
Package description
and
Package
version number
boxes.
e.
OptionalType appropriate values in the remaining boxes.
5.
Click CONFIRM.
Deploying installation packages
You can deploy an installation package to a single device, multiple devices, all devices that match a
saved filter’s criteria, or a group. Alternatively, you can:
l
Assign the installation package to a group so the package is automatically deployed to devices
added to the group
See
Using tags and groups
on page21

Chapter 3 Installing and managing apps on devices
docs.smarttech.com/kb/171798 37
l
Use a trigger to initiate the deployment of the installation package at a scheduled time or when a
specific event takes place
See
Managing schedulers and triggers
on page123
l
Include the deployment of the installation package in a workflow
See
Managing workflows
on page138
To deploy an installation package to a single device
1.
Click Devices to open the
Devices
view.
2.
OptionalFilter the devices shown in the
Devices
view.
See
Finding devices
on page12
3. Click the device’s row.
The device’s dashboard window appears.
4.
Click Repositories actions, and then click INSTALL PACKAGES.
The
Install package
window appears.
5.
Select the installation package from the list and click APPLY.
To deploy an installation package to multiple devices
1.
Click Devices to open the
Devices
view.
2.
OptionalFilter the devices shown in the
Devices
view.
See
Finding devices
on page12
3. Select the devices’ check boxes.
4.
Click Install package .
The
Install package
window appears.
5.
Select the installation package from the list and click APPLY.
To deploy an installation package to all devices that match a saved filter’s criteria
1.
Click Devices to open the
Devices
view.
2.
Click Filters in the
Search
bar.
3.
Click Actions in the saved filter’s row and select Install package.
Chapter 3 Installing and managing apps on devices
docs.smarttech.com/kb/171798 38
The
Install package
window appears.
4.
Select the installation package from the list and click APPLY.
To deploy an installation package to a group
1.
Click Devices to open the
Devices
view.
2.
Click Groups to open the
Groups
panel.
3.
Click Actions in the group’s row and select Install package.
The
Install package
window appears.
4.
Select the installation package from the list and click APPLY.
Creating an activation command
If an app requires activation and supports centralized activation, you can create a command or script in
SMART Remote Management to activate it on the device.
See
Sending remote execution commands and scripts to SMART Board interactive displays and
Android and Windows devices
on page76
Important
For SMART Notebook
®
software, provisioning email addresses is the recommended method for
activating.
SeeDetermining the best activation method
Notes
l
Not all SMART software, such as SMART Ink
®
and Product Drivers, requires activation.
l
Commands for activating SMART software are provided in the products’ system administrator or
deployment guides. Refer to the
Documents
page on support.smarttech.com.
Unsupported apps for SMART Board interactive displays with iQ
Some apps can cause issues with SMART Board interactive displays with iQ and are not supported on
these displays as a result:
Unsupported apps Issues
Launchers Launcher apps can interfere with the home screen app and cause the Input,
Screen Share, and SMART Notebook Player apps to stop working.

Chapter 3 Installing and managing apps on devices
docs.smarttech.com/kb/171798 39
Unsupported apps Issues
Web browsers Third-party web browsers allow users to download APKs and other files
from the internet. Pages that are visited are not added to the home screen
recent list.
File managers File managers can allow access to hidden system files and settings.
Keyboards Third-party keyboards can cause a wide variety of issues with the iQ
experience.
Setup wizards, system
setting tuners, and apps
that allow the system to
be rooted
These apps grant access to the operating system and can cause a wide
variety of issues.
Online music players Online music players can operate in the background. The interface is hidden
and you can't stop unintended music from playing.
Apps requiring Google
Play Services
Google
™
policies do not permit Google Play Services to be used on
interactive display products. Apps requiring Google Play Services will not run
on SMART Board interactive displays with iQ, and attempts to do so could
cause problems.
Apps with GPS Hardware limitations prevent apps from working.
Apps with NFC Hardware limitations prevent apps from working.
Apps with Bluetooth
®
LE
(low energy)
SMART Board interactive displays with iQ use Bluetooth LE, and apps that
require Bluetooth LE will cause issues.
Apps that require
portrait orientation
Apps that require portrait orientation don’t fit the landscape screen. Install
only apps that allow landscape orientation.
Enabling, disabling, and stopping apps
Three common app management activities are enabling, disabling, and stopping apps. You can
complete these activities—as well as clearing app data and uninstalling apps—for a single device from
the device’s dashboard.
See
Clearing app data
on page44
See
Uninstalling apps
on page45
You can also enable and disable apps using SMART Remote Management commands.

Chapter 3 Installing and managing apps on devices
docs.smarttech.com/kb/171798 40
Enabling apps
Apps are enabled by default. If you or another administrator disabled apps on one or more devices, you
can re-enable them from SMART Remote Management.
See
Disabling apps
on the next page
You can enable apps on a single device, multiple devices, all devices that match a saved filter’s criteria,
or a group. Alternatively, you can:
l
Use a trigger to initiate the enabling of apps at a scheduled time or when a specific event takes
place.
See
Managing schedulers and triggers
on page123
l
Include the enabling of apps in workflows.
See
Managing workflows
on page138
To enable apps on a single device
1.
Click Devices to open the
Devices
view.
2.
OptionalFilter the devices shown in the
Devices
view.
See
Finding devices
on page12
3. Click the device’s row.
The device’s dashboard window appears.
4.
For each app you want to enable, click in the app’s row and select Enable app.
To enable apps on all devices that match a saved filter’s criteria
1.
Click Devices to open the
Devices
view.
2.
Click Filters in the
Search
bar.
3.
Click Actions in the saved filter’s row and select Enable apps.
The
Enable apps
window appears.
4.
Click Add to list for each app you want to enable.
5.
Click ENABLE.

Chapter 3 Installing and managing apps on devices
docs.smarttech.com/kb/171798 41
To enable apps on multiple devices
1.
Click Devices to open the
Devices
view.
2.
OptionalFilter the devices shown in the
Devices
view.
See
Finding devices
on page12
3. Select the devices’ check boxes.
4.
Click More actions and select Enable apps.
The
Enable apps
window appears.
5.
Click Add to list for each app you want to enable.
6.
Click ENABLE.
To enable apps in a group
1.
Click Devices to open the
Devices
view.
2.
Click Groups to open the
Groups
panel.
3.
Click Actions in the group’s row and select Enable apps.
The
Enable apps
window appears.
4.
Click Add to list for each app you want to enable.
5.
Click ENABLE.
Disabling apps
If you want to prevent users from using an app but don’t want to remove the app entirely from devices,
you can disable the app from SMART Remote Management.
You can disable apps on a single device, multiple devices, all devices that match a saved filter’s criteria,
or a group. Alternatively, you can:
l
Use a trigger to initiate the disabling of apps at a scheduled time or when a specific event takes
place.
See
Managing schedulers and triggers
on page123
l
Include the disabling of apps in workflows.
See
Managing workflows
on page138

Chapter 3 Installing and managing apps on devices
docs.smarttech.com/kb/171798 42
Important
Take care when disabling an app because devices might not work correctly without the app.
To disable apps on a single device
1.
Click Devices to open the
Devices
view.
2.
OptionalFilter the devices shown in the
Devices
view.
See
Finding devices
on page12
3. Click the device’s row.
The device’s dashboard window appears.
4.
For each app you want to disable, click in the app’s row and select Disable app.
To disable apps on multiple devices
1.
Click Devices to open the
Devices
view.
2.
OptionalFilter the devices shown in the
Devices
view.
See
Finding devices
on page12
3. Select the devices’ check boxes.
4.
Click More actions and select Disable apps.
The
Disable apps
window appears.
5.
Click Add to list for each app you want to disable.
6.
Click DISABLE.
To disable apps on all devices that match a saved filter’s criteria
1.
Click Devices to open the
Devices
view.
2.
Click Filters in the
Search
bar.
3.
Click Actions in the saved filter’s row and select Disable apps.
The
Enable apps
window appears.
4.
Click Add to list for each app you want to disable.
5.
Click DISABLE.
Chapter 3 Installing and managing apps on devices
docs.smarttech.com/kb/171798 43
To disable apps in a group
1.
Click Devices to open the
Devices
view.
2.
Click Groups to open the
Groups
panel.
3.
Click Actions in the group’s row and select Disable apps.
The
Disable apps
window appears.
4.
Click Add to list for each app you want to disable.
5.
Click DISABLE.
Stopping apps
You can stop any apps currently running on a device from SMART Remote Management. This is
particularly useful when you are working with users to troubleshoot issues with their devices.
Important
Take care when stopping an app because devices might not work correctly without the app.
To stop apps
1.
Click Devices to open the
Devices
view.
2.
OptionalFilter the devices shown in the
Devices
view.
See
Finding devices
on page12
3. Click the device’s row.
The device’s dashboard window appears.
4.
For each app you want to stop, click in the app’s row and select Stop app.

Chapter 3 Installing and managing apps on devices
docs.smarttech.com/kb/171798 44
Clearing app data
You can clear app data using SMART Remote Management. This is particularly useful when you are
working with users to troubleshoot issues with their devices.
Important
Take care when clearing app data because apps might not work as expected after data is cleared.
You can clear app data on a single device, multiple devices, all devices that match a saved filter’s
criteria, or a group. Alternatively, you can:
l
Use a trigger to initiate the clearing of app data at a scheduled time or when a specific event takes
place.
See
Managing schedulers and triggers
on page123
l
Include the clearing of app data in workflows.
See
Managing workflows
on page138
To clear app data on a single device
1.
Click Devices to open the
Devices
view.
2.
OptionalFilter the devices shown in the
Devices
view.
See
Finding devices
on page12
3. Click the device’s row.
The device’s dashboard window appears.
4.
For each app for which you want to clear data, click in the app’s row and select Clear app data.
To clear app data on multiple devices
1.
Click Devices to open the
Devices
view.
2.
OptionalFilter the devices shown in the
Devices
view.
See
Finding devices
on page12
3. Select the devices’ check boxes.

Chapter 3 Installing and managing apps on devices
docs.smarttech.com/kb/171798 45
4.
Click More actions and select Clear apps data.
The
Clear apps data
window appears.
5.
Click Add to list for each app for which you want to clear data.
6.
Click CLEAR.
To clear app data on all devices that match a saved filter’s criteria
1.
Click Devices to open the
Devices
view.
2.
Click Filters in the
Search
bar.
3.
Click Actions in the saved filter’s row and select Clear apps data.
The
Clear apps data
window appears.
4.
Click Add to list for each app for which you want to clear data.
5.
Click CLEAR.
To clear app data on a group
1.
Click Devices to open the
Devices
view.
2.
Click Groups to open the
Groups
panel.
3.
Click Actions in the group’s row and select Clear apps data.
The
Clear apps data
window appears.
4.
Click Add to list for each app for which you want to clear data.
5.
Click CLEAR.
Uninstalling apps
On occasion, you might need to uninstall one or more apps on a single device or multiple devices. You
can do this from SMART Remote Management.

Chapter 3 Installing and managing apps on devices
docs.smarttech.com/kb/171798 46
You can uninstall apps on a single device, multiple devices, all devices that match a saved filter’s criteria,
or a group. Alternatively, you can:
l
Use a trigger to initiate the removal of apps at a scheduled time or when a specific event takes
place.
See
Managing schedulers and triggers
on page123
l
Include the removal of apps in workflows.
See
Managing workflows
on page138
Important
Take care when uninstalling an app because devices might not work correctly without the app.
To uninstall apps on a single device
1.
Click Devices to open the
Devices
view.
2.
OptionalFilter the devices shown in the
Devices
view.
See
Finding devices
on page12
3. Click the device’s row.
The device’s dashboard window appears.
4.
For each app you want to uninstall, click in the app’s row and select Uninstall app.
To uninstall apps on multiple devices
1.
Click Devices to open the
Devices
view.
2.
OptionalFilter the devices shown in the
Devices
view.
See
Finding devices
on page12
3. Select the devices’ check boxes.
4.
Click More actions and select Uninstall packages.
The
Uninstall packages
window appears.
5.
Click Add to list for each app you want to uninstall.
6.
Click UNINSTALL.

Chapter 3 Installing and managing apps on devices
docs.smarttech.com/kb/171798 47
To uninstall apps on all devices that match a saved filter’s criteria
1.
Click Devices to open the
Devices
view.
2.
Click Filters in the
Search
bar.
3.
Click Actions in the saved filter’s row and select Uninstall package.
The
Uninstall packages
window appears.
4.
Click Add to list for each app you want to uninstall.
5.
Click UNINSTALL.
To uninstall apps on a group
1.
Click Devices to open the
Devices
view.
2.
Click Groups to open the
Groups
panel.
3.
Click Actions in the group’s row and select Uninstall packages.
The
Uninstall packages
window appears.
4.
Click Add to list for each app you want to uninstall.
5.
Click UNINSTALL.
Installing and uninstalling apps on iOS and macOS
devices using VPP
Apple School Manager and Apple Business Manager are online services that include the ability to install
and uninstall apps on your organization’s iOS and macOS devices in SMART Remote Management and
other mobile device management software.
Note
Apple School Manager and Apple Business Manager replace the Volume Purchase Program (VPP).
However, the term “VPP” is still used in SMART Remote Management and in this documentation.

Chapter 3 Installing and managing apps on devices
docs.smarttech.com/kb/171798 48
SeeGetting started using Apple Business Manager or Apple School Manager with mobile device
management
To use these Apple programs with SMART Remote Management to install or uninstall apps, follow these
three steps:
1. If you haven’t already, enroll in the appropriate program for your organization:
Program Link
Apple School Manager school.apple.com
Apple Business Manager business.apple.com
2. Add a VPP account to SMART Remote Management.
See
SMART Remote Management setup guide
(docs.smarttech.com/kb/171333)
3. Install or uninstall apps on a single device, multiple devices, or a group.
To install or uninstall apps on a single device
1.
Click Devices to open the
Devices
view.
2.
OptionalFilter the devices shown in the
Devices
view.
See
Finding devices
on page12
3.
Click Actions in the device’s row and select VPP install/uninstall.
The
VPP install
window appears.
4. Select the VPP account in the
Select VPP account
drop-down list.
5.
Select Install or Uninstall.
6. Use the remaining controls to select the apps you want to install or uninstall and set options for those
apps.
7.
Click CONFIRM.
To install or uninstall apps on multiple devices
1.
Click Devices to open the
Devices
view.
2.
OptionalFilter the devices shown in the
Devices
view.
See
Finding devices
on page12
3. Select the devices’ check boxes.

Chapter 3 Installing and managing apps on devices
docs.smarttech.com/kb/171798 49
4.
Click More actions and select VPP install/uninstall.
The
VPP install
window appears.
5. Select the VPP account in the
Select VPP account
drop-down list.
6.
Select Install or Uninstall.
7. Use the remaining controls to select the apps you want to install or uninstall and set options for those
apps.
8.
Click CONFIRM.
To install or uninstall apps on all devices that match a saved filter’s criteria
1.
Click Devices to open the
Devices
view.
2.
Click Filters in the
Search
bar.
3.
Click Actions in the saved filter’s row and select VPP install/uninstall.
The
VPP install
window appears.
4. Select the VPP account in the
Select VPP account
drop-down list.
5.
Select Install or Uninstall.
6. Use the remaining controls to select the apps you want to install or uninstall and set options for those
apps.
7.
Click CONFIRM.
To install or uninstall apps on a group
1.
Click Devices to open the
Devices
view.
2.
Click Groups to open the
Groups
panel.
3.
Click Actions in the group’s row and select VPP install/uninstall.
The
VPP install
window appears.
4. Select the VPP account in the
Select VPP account
drop-down list.
5.
Select Install or Uninstall.
6. Use the remaining controls to select the apps you want to install or uninstall and set options for those
apps.
7.
Click CONFIRM.

Chapter 3 Installing and managing apps on devices
docs.smarttech.com/kb/171798 50
Viewing app usage data
You can view apps currently running on a device and detailed app information for the device using
SMART Remote Management.
Alternatively, you can create an app usage report for a single device, multiple devices, all devices that
match a saved filter’s criteria, or a group. This report displays app usage data, including the most- and
least-used apps on the devices. Usage data is helpful for determining which apps are being used in your
organization and which aren’t and can be either disabled or uninstalled.
See
Disabling apps
on page41
See
Uninstalling apps
on page45
Chapter 3 Installing and managing apps on devices
docs.smarttech.com/kb/171798 51
To view apps currently running on a device
1.
Click Devices to open the
Devices
view.
2.
OptionalFilter the devices shown in the
Devices
view.
See
Finding devices
on page12
3. Click the device’s row.
The device’s dashboard window appears.
4.
Click Usage .
A list of all apps currently running on the device appears.
To view detailed app information for a device
1.
Click Devices to open the
Devices
view.
2.
OptionalFilter the devices shown in the
Devices
view.
See
Finding devices
on page12
3. Click the device’s row.
The device’s dashboard window appears.

Chapter 3 Installing and managing apps on devices
docs.smarttech.com/kb/171798 52
4.
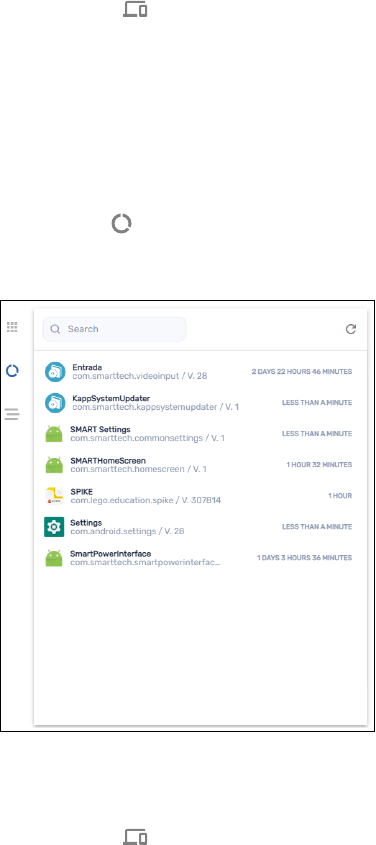
Click Advanced stats .
A table with detailed app information for the device appears.
Tip
You can do the following:
o
Search for specific information using the
Search
box.
o
Export information to a CSV file by clicking Export to CSV .
o
Display the information in the tab in an expanded view by clicking Expand .
To create an app usage report for a single device
1.
Click Devices to open the
Devices
view.
2.
OptionalFilter the devices shown in the
Devices
view.
See
Finding devices
on page12
3.
Click Actions in the device’s row and select App usage report.
The app usage report for the device appears. By default, the report displays app usage data for the
last month.

Chapter 3 Installing and managing apps on devices
docs.smarttech.com/kb/171798 53
4.
OptionalChange the report’s start and end dates using the calendar.
Tip
In the
App usage
section of the report, you can do the following:
o
Search for specific information using the
Search
box.
o
Export information to a CSV file by clicking Export to CSV .
o
Sort the list of apps by clicking Sort ascending or Sort descending .
To create an app usage report for multiple devices
1.
Click Devices to open the
Devices
view.
2.
OptionalFilter the devices shown in the
Devices
view.
See
Finding devices
on page12
3. Select the devices’ check boxes.
4.
Click More actions and select App usage report.
The app usage report for the devices appears. By default, the report displays app usage data for
the last month.
5.
OptionalChange the report’s start and end dates using the calendar.
Tip
In the
App usage
section of the report, you can do the following:
o
Search for specific information using the
Search
box.
o
Export information to a CSV file by clicking Export to CSV .
o
Sort the list of apps by clicking Sort ascending or Sort descending .
To create an app usage report for all devices that match a saved filter’s criteria
1.
Click Devices to open the
Devices
view.
2.
Click Filters in the
Search
bar.
3.
Click Actions in the saved filter’s row and select App usage report.
The app usage report for the devices appears. By default, the report displays app usage data for
the last month.

Chapter 3 Installing and managing apps on devices
docs.smarttech.com/kb/171798 54
4.
OptionalChange the report’s start and end dates using the calendar.
Tip
In the
App usage
section of the report, you can do the following:
o
Search for specific information using the
Search
box.
o
Export information to a CSV file by clicking Export to CSV .
o
Sort the list of apps by clicking Sort ascending or Sort descending .
To create an app usage report for a group
1.
Click Devices to open the
Devices
view.
2.
Click Groups to open the
Groups
panel.
3.
Click Actions in the group’s row and select App usage report.
The app usage report for the devices appears. By default, the report displays app usage data for
the last month.
4.
OptionalChange the report’s start and end dates using the calendar.
Tip
In the
App usage
section of the report, you can do the following:
o
Search for specific information using the
Search
box.
o
Export information to a CSV file by clicking Export to CSV .
o
Sort the list of apps by clicking Sort ascending or Sort descending .
Preventing users from installing apps
To prevent users from installing apps on SMART Board interactive displays and Android devices, you can
either disable the App Store app or uninstall the Google Play store from those devices.

Chapter 3 Installing and managing apps on devices
docs.smarttech.com/kb/171798 55
Disabling the App Store app
You can disable the App Store app from a single device, multiple devices, all devices that match a saved
filter’s criteria, or a group.
Note
When you disable the App Store app on a device, the App Store icon will still appear on the device, but
users will not be able to open the app.
To disable the App Store app on a single device
1.
Click Devices to open the
Devices
view.
2.
OptionalFilter the devices shown in the
Devices
view.
See
Finding devices
on page12
3.
Click in the device’s row and select Disable apps.
The
Disable apps
window appears.
4.
Click Add to list for the App Store app.
5.
Click DISABLE.
To disable the App Store app on multiple devices
1.
Click Devices to open the
Devices
view.
2.
OptionalFilter the devices shown in the
Devices
view.
See
Finding devices
on page12
3. Select the devices’ check boxes.
4.
Click More actions and select Disable apps.
The
Disable apps
window appears.
5.
Click Add to list for the App Store app.
6.
Click DISABLE.
To disable the App Store app on all devices that match a saved filter’s criteria
1.
Click Devices to open the
Devices
view.
2.
Click Filters in the
Search
bar.

Chapter 3 Installing and managing apps on devices
docs.smarttech.com/kb/171798 56
3.
Click Actions in the saved filter’s row and select Disable apps.
The
Disable apps
window appears.
4.
Click Add to list for the App Store app.
5.
Click DISABLE.
To disable the App Store app on a group
1.
Click Devices to open the
Devices
view.
2.
Click Groups to open the
Groups
panel.
3.
Click Actions in the group’s row and select Disable apps.
The
Disable apps
window appears.
4.
Click Add to list for the App Store app.
5.
Click DISABLE.
Uninstalling the Google Play store
You can uninstall the Google Play store from a single device, multiple devices, all devices that match a
saved filter’s criteria, or a group.
To uninstall the Google Play store from a single device
1.
Click Devices to open the
Devices
view.
2.
OptionalFilter the devices shown in the
Devices
view.
See
Finding devices
on page12
3.
Click in the device’s row and select Uninstall package.
The
Uninstall packages
window appears.
4.
Click Add to list for the Google Play Store.
5.
Click UNINSTALL.
To uninstall the Google Play store from multiple devices
1.
Click Devices to open the
Devices
view.
2.
OptionalFilter the devices shown in the
Devices
view.
See
Finding devices
on page12

Chapter 3 Installing and managing apps on devices
docs.smarttech.com/kb/171798 57
3. Select the devices’ check boxes.
4.
Click More actions and select Uninstall packages.
The
Uninstall packages
window appears.
5.
Click Add to list for the Google Play Store.
6.
Click UNINSTALL.
To uninstall the Google Play store from all devices that match a saved filter’s criteria
1.
Click Devices to open the
Devices
view.
2.
Click Filters in the
Search
bar.
3.
Click Actions in the saved filter’s row and select Uninstall package.
The
Uninstall packages
window appears.
4.
Click Add to list for the Google Play Store.
5.
Click UNINSTALL.
To uninstall the Google Play store from a group
1.
Click Devices to open the
Devices
view.
2.
Click Groups to open the
Groups
panel.
3.
Click Actions in the group’s row and select Uninstall packages.
The
Uninstall packages
window appears.
4.
Click Add to list for the Google Play Store.
5.
Click UNINSTALL.

docs.smarttech.com/kb/171798 58
Chapter 4 Deploying policies and
managing settings
About policies and settings 58
Deploying policies 59
Deploying kiosk policies 64
Managing settings 66
Managing settings 66
Locking settings for SMART Board interactive displays with iQ 70
Returning devices to factory settings and resettingtheir authentication tokens 72
Returning devices to factory settings 72
Resetting devices’ authentication tokens 73
About policies and settings
You can control users’ access to apps and websites on devices by deploying policies to those devices.
You can also manage device settings remotely.
SMART Remote Management includes three repository item types you use for deploying policies and
managing settings:
l
Policies
l
Kiosk
l
Device settings
This table defines the purpose of these repository item types and the device types each supports:
Repository item
type
Purpose
Policies Control what users
can and can’t do on
devices

Chapter 4 Deploying policies and managing settings
docs.smarttech.com/kb/171798 59
Repository item
type
Purpose
Kiosk Set devices as kiosks
(devices with limited
user control, such as
information terminals
in shopping malls and
other public places)
and control what users
can and can’t do on
kiosks
Device settings Manage device
settings remotely
Notes
l
For SMART Board interactive displays with iQ, you can lock settings by deploying a policy.
See
Locking settings for SMART Board interactive displays with iQ
on page70
l
For SMART Board GX series interactive displays and Android devices, you can add settings to a
policy. This allows you to deploy policies and manage settings in a single step.
See
Deploying policies
below
Deploying policies
You can deploy policies to your organization’s devices using SMART Remote Management. Policies
control what users can and can’t do using your organization’s devices.
You can deploy a policy to a single device, multiple devices, all devices that match a saved filter’s
criteria, or a group. Alternatively, you can use a trigger to deploy a policy at a scheduled time or when a
specific event takes place (for SMART Board GX series interactive displays, Android devices, and
Windows devices only).

Chapter 4 Deploying policies and managing settings
docs.smarttech.com/kb/171798 60
To create a policy
1.
Click Repositories and select Policies.
The
Policies
window appears.
Tip
If your organization created its domain account after May 2023, the
Policies
window includes
sample policies that you can use as starting point for creating your own policies. These sample
policies have turquoise icons.
2.
Click ADD NEW and select the type of device for which you want to create the policy.

Chapter 4 Deploying policies and managing settings
docs.smarttech.com/kb/171798 61
3. Type a name and description in the
Policy name
and
Policy description
boxes.
4. Enter the appropriate information in the remaining tabs:
Icon Tab Description
Restrictions
Allow or block
features of iOS
Passcode
Enable or disable
passcodes on iOS
and macOS
devices and set
requirements for
passcodes if
enabled
Content filter
Prevent access to
adult content or
allow or block
specific website
URLs
Single app
Enable single app
mode on iOS
devices and select
the app to use in
this mode
Block list
Allow or block apps
Web
Allow or block
websites
Settings
lockdown
Lock SMART Board
interactive display
with iQ settings
See
Locking
settings for SMART
Board interactive
displays with iQ
on
page70

Chapter 4 Deploying policies and managing settings
docs.smarttech.com/kb/171798 62
5.
OptionalFor SMART Board GX series interactive displays, Android devices, and Windows devices,
use a trigger to start or stop the deployment of the policy:
See
Managing schedulers and triggers
on page123
a.
Click General .
b.
Turn on Activate policy by trigger.
c.
Click SELECT TRIGGER.
The
Scheduler & triggers
window appears.
d.
Select the trigger from the list and click APPLY.
6.
OptionalFor SMART Board GX series interactive displays and Android devices, add settings to the
policy:
See
Managing settings
on page66
a.
Click General .
b.
Turn on Add settings to policy.
c.
Click SELECT SETTINGS.
The
Settings
window appears.
d.
Select the settings from the list and click APPLY.
7.
Click CONFIRM.
To deploy a policy to a device
1.
Click Devices to open the
Devices
view.
2.
OptionalFilter the devices shown in the
Devices
view.
See
Finding devices
on page12
3. Click the device’s row.
The device’s dashboard window appears.
4.
Click Repositories actions, and then click POLICIES.
The
Policies
window appears.
5.
Select a policy from the list and click APPLY.

Chapter 4 Deploying policies and managing settings
docs.smarttech.com/kb/171798 63
To deploy a policy to multiple devices
1.
Click Devices to open the
Devices
view.
2.
OptionalFilter the devices shown in the
Devices
view.
See
Finding devices
on page12
3. Select the device’s check boxes.
Note
Policies are created for specific device types, so select devices of the same type.
4.
Click Policies .
The
Policies
window appears.
5.
Select a policy from the list and click APPLY.
To deploy a policy to all devices that match a saved filter’s criteria
1.
Click Devices to open the
Devices
view.
2.
Click Filters in the
Search
bar.
3.
Click Actions in the saved filter’s row and select Policies.
The
Policies
window appears.
Note
Policies are created for specific device types, so select a filter with devices that are of the same
type.
4.
Select the policy from the list and click APPLY.
To deploy a policy to a group
1.
Click Devices to open the
Devices
view.
2.
Click Groups to open the
Groups
panel.
3.
Click Actions in the group’s row and select Policies.
The
Policies
window appears.
Note
Policies are created for specific device types, so select a group with devices that are of the same
type.
4.
Select the policy from the list and click APPLY.

Chapter 4 Deploying policies and managing settings
docs.smarttech.com/kb/171798 64
Deploying kiosk policies
A kiosk is a device with limited user control, such as information terminals in shopping malls and other
public places. You can create policies for kiosks in SMART Remote Management that do the following:
l
Set allowed apps for kiosks
l
Specify which allowed app is the launcher app (in other words, the app that appears when users
first interact with kiosks)
l
Set allowed and blocked websites for kiosks
l
Set a wallpaper (background) for kiosks
You can deploy a kiosk policy to a single device, multiple devices, all devices that match a saved filter’s
criteria, or a group. Alternatively, you can use a trigger to deploy a kiosk policy at a scheduled time or
when a specific event takes place.
To create a kiosk policy
1.
Click Repositories and select Kiosk.
The
Kiosk
window appears.
Tip
If your organization created its domain account after May 2023, the
Kiosk
window includes
sample kiosk policies that you can use as starting point for creating your own kiosk policies. These
sample kiosk policies have turquoise icons.
2.
Click ADD NEW and select the type of device for which you want to create the kiosk policy.
3. Type a name and description in the
Kiosk name
and
Kiosk description
boxes.
4. Enter the appropriate information in the remaining tabs:
Icon Tab Description
Allow list
Allow apps and select an allowed app as the launcher.
Web
Allow or block website URLs
Wallpaper
Set a wallpaper for the kiosk

Chapter 4 Deploying policies and managing settings
docs.smarttech.com/kb/171798 65
5.
OptionalUse a trigger to start or stop the deployment of the kiosk policy:
See
Managing schedulers and triggers
on page123
a.
Click General .
b.
Turn on Activate kiosk by trigger.
c.
Click SELECT TRIGGER.
The
Scheduler & triggers
window appears.
d.
Select the trigger from the list and click APPLY.
6.
Click CONFIRM.
To deploy a kiosk policy to a device
1.
Click Devices to open the
Devices
view.
2.
OptionalFilter the devices shown in the
Devices
view.
See
Finding devices
on page12
3. Click the device’s row.
The device’s dashboard window appears.
4.
Click Repositories actions, and then click KIOSK.
The
Kiosk
window appears.
5.
Select a kiosk policy from the list and click APPLY.
To deploy a kiosk policy to multiple devices
1.
Click Devices to open the
Devices
view.
2.
OptionalFilter the devices shown in the
Devices
view.
See
Finding devices
on page12
3. Select the device’s check boxes.
Note
Policies are created for specific device types, so select devices of the same type.
4.
Click More actions and select Kiosk.
The
Kiosk
window appears.
5.
Select a kiosk policy from the list and click APPLY.

Chapter 4 Deploying policies and managing settings
docs.smarttech.com/kb/171798 66
To deploy a kiosk policy to all devices that match a saved filter’s criteria
1.
Click Devices to open the
Devices
view.
2.
Click Filters in the
Search
bar.
3.
Click Actions in the saved filter’s row and select Kiosk.
The
Kiosk
window appears.
Note
Kiosk policies are created for specific device types, so select a filter with devices that are of the
same type.
4.
Select the kiosk policy from the list and click APPLY.
To deploy a policy to a group
1.
Click Devices to open the
Devices
view.
2.
Click Groups to open the
Groups
panel.
3.
Click Actions in the group’s row and select Kiosk.
The
Kiosk
window appears.
Note
Kiosk policies are created for specific device types, so select a group with devices that are of the
same type.
4.
Select the kiosk policy from the list and click APPLY.
Managing settings
You can use SMART Remote Management to manage settings for SMART Board interactive displays
and Android devices remotely. You can also lock access to settings from SMART Board interactive
displays with iQ so that users do not inadvertently change them.
Managing settings
1 2 3
1
SMART Board interactive displays with iQ 4 don’t support all settings available in SMART Remote Management.
2
SMART Board interactive displays with iQ 3 don’t support all settings available in SMART Remote Management.
3
SMART Board GX series interactive displays don’t support all settings available in SMART Remote Management.

Chapter 4 Deploying policies and managing settings
docs.smarttech.com/kb/171798 67
To manage a device’s settings remotely using SMART Remote Management, you need to first create
settings in SMART Remote Management. You can then apply the settings to an individual device,
multiple devices, all devices that match a saved filter’s criteria, or a group. Alternatively, you can:
l
Use a trigger to apply settings at a scheduled time or when a specific event takes place.
See
Managing schedulers and triggers
on page123
l
Include the application of settings in workflows.
See
Managing workflows
on page138
Note
Not all SMART Board interactive display with iQ settings can be changed from SMART Remote
Management. If there is a setting you want to be able to change from SMART Remote Management,
submit a feature request to add this setting to a future version.
To create settings
1.
Click Repositories and select Device settings.
The
Device settings
window appears.
Tip
If your organization created its domain account after May 2023, the
Device settings
window
includes sample settings that you can use as starting point for creating your own settings. These
sample settings have turquoise icons.
2.
Click ADD NEW.
3. Type a name and description in the
Name
and
Description
boxes.
4. Enter the appropriate information in the remaining tabs:

Chapter 4 Deploying policies and managing settings
docs.smarttech.com/kb/171798 68
Icon Tab Description
Wifi Enable Set device wifi to enter the device’s Wi-Fi settings.
Notes
o
SMART doesn’t recommend connecting SMART Board
interactive displays with iQ to hidden networks using SMART
Remote Management settings. If you do, you might need to
apply settings twice to connect the display to the network
successfully, particularly if the display is connected to the
internet through Ethernet (rather than Wi-Fi).
o
To make devices forget an existing Wi-Fi network, enable
Forget wifi and type the existing network’s SSID in the
Service
Set Identifier (SSID)
box.
Security
Enable security settings you want to apply to the device, such as
maximum allowed log in attempts, password settings, and so on.
General
Control various settings for the device, such as allowing users to be
added locally, volume adjustments, and so on.
Tip
Search for specific settings using the
Search
box at the top of the
tab.
APN
Turn on Access Point Name (APN)settings and enter APN details.
Wallpaper
Set a wallpaper for the device.
Certificates
Install certificates on the device. To do this
a.
Turn on Install CA Certificate.
b.
Select one of the following from the
User certificate
drop-down
list:
o
User trusted credentials
o
User wifi CA certificate
o
VPN and apps certificate
c.
If you selected User wifi CA certificate or VPN and apps
certificate in step b, type the alias for the certificate in the
Certificate
alias box.
d.
Copy the body text of the certificate and paste it into the
CA
cetificate body
box.
Smartboard
settings
Control general display settings, such as the apps visible in the
display’s apps library, whiteboard settings, and so on.
Lock screen
Set a password and message for the device’s lock screen.

Chapter 4 Deploying policies and managing settings
docs.smarttech.com/kb/171798 69
5.
Click CONFIRM.
To apply settings to a single device
1.
Click Devices to open the
Devices
view.
2.
OptionalFilter the devices shown in the
Devices
view.
See
Finding devices
on page12
3. Click the device’s row.
The device’s dashboard window appears.
4.
Click Repositories actions, and then click DEVICE SETTINGS.
The
Device settings
window appears.
5.
Select the settings from the list and click APPLY.
To apply settings to multiple devices
1.
Click Devices to open the
Devices
view.
2.
OptionalFilter the devices shown in the
Devices
view.
See
Finding devices
on page12
3. Select the devices’ check boxes.
4.
Click Device settings .
The
Device settings
window appears.
5.
Select the settings from the list and click APPLY.
To apply settings to all devices that match a saved filter’s criteria
1.
Click Devices to open the
Devices
view.
2.
Click Filters in the
Search
bar.
3.
Click Actions in the saved filter’s row and select Device settings.
The
Device settings
window appears.
4.
Select the settings from the list and click APPLY.

Chapter 4 Deploying policies and managing settings
docs.smarttech.com/kb/171798 70
To apply settings to a group
1.
Click Devices to open the
Devices
view.
2.
Click Groups to open the
Groups
panel.
3.
Click Actions in the group’s row and select Device settings.
The
Device settings
window appears.
4.
Select the settings from the list and click APPLY.
Locking settings for SMART Board interactive displays with iQ
To lock access to settings on SMART Board interactive displays with iQ, connect a USB drive to one
display and create a lockdown certificate. After you obtain the lockdown certificate, create a lockdown
policy and apply it to a display, multiple displays, all displays that match a saved filter’s criteria, or a
group.
Tip
You can use a lockdown certificate from a single display to lock settings on multiple displays. You don’t
need to create a lockdown certificate on each display for which you want to lock settings.
To create a lockdown policy
1. Connect a USB drive to a SMART Board interactive display with iQ and create a lockdown
certificate.
SeeLocking down the iQ experience Settings app
2. Connect the USB drive to your computer.
3.
Click Repositories and select Policies.
The
Policies
window appears.
Tip
If your organization created its domain account after May 2023, the
Policies
window includes
sample policies that you can use as starting point for creating your own policies. These sample
policies have turquoise icons.

Chapter 4 Deploying policies and managing settings
docs.smarttech.com/kb/171798 71
4.
Click ADD NEW and select Smartboard.
The
New custom policy
window appears.
5. Type a name and description in the
Policy name
and
Policy description
boxes.
6.
Click Settings lockdown .
7.
Click the Set key slider to enable it.
8.
Click Add key .
The
Open
window appears.
9.
Browse to and select the .key file on the USB drive, and click Open.
10.
Click CONFIRM.
To lock settings on a single display
1.
Click Devices to open the
Devices
view.
2.
OptionalFilter the devices shown in the
Devices
view.
See
Finding devices
on page12
3. Click the display’s row.
The display’s dashboard window appears.
4.
Click Repositories actions, and then click POLICIES.
The
Policies
window appears.
5.
Select the lockdown policy from the list and click APPLY.
To lock settings on multiple displays
1.
Click Devices to open the
Devices
view.
2.
OptionalFilter the devices shown in the
Devices
view.
See
Finding devices
on page12
3. Select the displays’ check boxes.
4.
Click Policies .
The
Policies
window appears.
5.
Select the lockdown policy from the list and click APPLY.

Chapter 4 Deploying policies and managing settings
docs.smarttech.com/kb/171798 72
To lock settings on all displays that match a saved filter’s criteria
1.
Click Devices to open the
Devices
view.
2.
Click Filters in the
Search
bar.
3.
Click Actions in the saved filter’s row and select Policies.
The
Policies
window appears.
Note
Select a filter that selects only SMART Board interactive displays with iQ.
4.
Select the lockdown policy from the list and click APPLY.
To lock settings on a group
1.
Click Devices to open the
Devices
view.
2.
Click Groups to open the
Groups
panel.
3.
Click Actions in the group’s row and select Policies.
The
Policies
window appears.
Note
Select a group that contains only SMART Board interactive displays with iQ.
4.
Select the lockdown policy from the list and click APPLY.
Returning devices to factory settings and
resettingtheir authentication tokens
Returning devices to factory settings
You can return a device to its factory settings (or “wipe it”) as described below. Alternatively, you can use
a trigger to initiate the wiping of a device at a scheduled time or when a specific event takes place.
See
Managing schedulers and triggers
on page123

Chapter 4 Deploying policies and managing settings
docs.smarttech.com/kb/171798 73
Important
If you return a device to factory settings, the authentication token that was generated when you first
enrolled the device will be lost. You will need to generate a new authentication token following the
instructions in
Resetting devices’ authentication tokens
below.
To return a device to factory settings
1.
Click Devices to open the
Devices
view.
2.
OptionalFilter the devices shown in the
Devices
view.
See
Finding devices
on page12
3. Click the device’s row.
The device’s dashboard window appears.
4.
Click Lock or Power, and then click WIPE.
5.
Click YES.
Resetting devices’ authentication tokens
For security reasons, the first handshake between a device and SMART Remote Management generates
an authentication token. This token is stored on SMART Remote Management and on the device.
You can generate a new authentication token for a device if the original authentication token was lost.
This is useful if you’ve performed a factory reset on the device and need to reconnect it to SMART
Remote Management.
Note
If you’ve never enrolled a device in SMART Remote Management, it should not have an authentication
token. However, in rare situations, such as when you receive a replacement SMART Board interactive
display that was previously enrolled in SMART Remote Management on another domain, a device
that you haven’t enrolled in SMART Remote Management might have an authentication token. In
these situations, contact SMART support (smarttech.com/contactsupport) to reset the device’s
authentication token.

Chapter 4 Deploying policies and managing settings
docs.smarttech.com/kb/171798 74
To reset a device’s authentication token
1.
Click Devices to open the
Devices
view.
2.
OptionalFilter the devices shown in the
Devices
view.
See
Finding devices
on page12
3. Click the device’s row.
The device’s dashboard window appears.
4.
Click Manage, and then click RESET AUTH TOKEN.
5.
Click RESET AUTH TOKEN.

docs.smarttech.com/kb/171798 75
Chapter 5 Running other commands
on devices
Sending custom commands and scripts to devices 76
Sending remote execution commands and scripts to SMART Board interactive displays and
Android and Windows devices 76
Installing certificates on SMART Board interactive displays with iQ 79
Enabling or disabling automatic OTA updates on SMART Board interactive displays with iQ 82
Sending custom MDM commands to iOS and macOS devices 83
Sending files to devices 85
Sending messages and sounding the siren 88
Sending text-only messages 89
Sending advanced messages 90
Sounding the siren 95
Locking and unlocking devices 96
Locking and unlocking SMART Board GX series interactive displays and Android, Windows, and
Chrome OS devices 97
Locking and unlocking iOS and macOS devices 98
Restarting, shutting down, and waking devices 99
Restarting devices 100
Shutting down devices 101
Waking devices 103
Changing devices’ agent passwords 106
Running device-type-specific commands 107
Removing Google accounts from Android devices 108
Deploying DEP profiles to iOS and macOS devices 110
Clearing passcodes from iOS and macOS devices 112
Retrieving the default password for Chrome OS devices 113

Chapter 5 Running other commands on devices
docs.smarttech.com/kb/171798 76
Sending custom commands and scripts to devices
Sending remote execution commands and scripts to SMART Board
interactive displays and Android and Windows devices
1 2
You can create remote execution commands and scripts in SMART Remote Management and send
them to devices for a variety of purposes, including:
l
Installing certificates on SMART Board interactive displays with iQ
l
Enabling or disabling automatic over-the-air (OTA) updates on SMART Board interactive displays
with iQ
l
Activating software, such as SMART Notebook or SMART Meeting Pro
®
, on computers
You can send remote execution commands and scripts to a single device, multiple devices, all devices
that match a saved filter’s criteria, or a group. Alternatively, you can:
l
Use a trigger to send a remote execution command at a scheduled time or when a specific event
takes place
See
Managing schedulers and triggers
on page123
l
Include the sending of remote execution commands and scripts in workflows.
See
Managing workflows
on page138
To create a remote execution command
1.
Click Repositories and select Remote execute.
The
Remote execute
window appears.
Tip
If your organization created its domain account after May 2023, the
Remote execute
window
includes sample remote execution commands that you can use as starting point for creating your
own remote execution commands. These sample remote execution commands have turquoise
icons.
1
SMART Board interactive displays with iQ 4 don’t fully support remote execution commands.
2
SMART Board interactive displays with iQ 3 don’t fully support remote execution commands.

Chapter 5 Running other commands on devices
docs.smarttech.com/kb/171798 77
2.
Click ADD NEW.
The
New remote execution
window appears.
3. Type a name in the
Name
box.
4.
Select Command line.
5. Type the command in the
Command
box.
6.
OptionalType arguments in the
Arguments
box.
Note
You cannot sent the remote execution command settings put to devices when users are
signed into those devices. Use the command smartcli settings put instead.
See also
Installing certificates on SMART Board interactive displays with iQ
on page79
See also
Enabling or disabling automatic OTA updates on SMART Board interactive displays with
iQ
on page82
7.
Click CONFIRM.
The remote execution command is added to the repository.
To create a remote execution script
1.
Click Repositories and select Remote execute.
The
Remote execute
window appears.
Tip
If your organization created its domain account after May 2023, the
Remote execute
window
includes sample remote execution scripts that you can use as starting point for creating your own
remote execution scripts. These sample remote execution scripts have turquoise icons.
2.
Click ADD NEW.
The
New remote execution
window appears.
3. Type a name in the
Name
box.
4.
Select Script.
5. Type the script in the
Script
box.
6.
Click CONFIRM.
The remote execution script is added to the repository.

Chapter 5 Running other commands on devices
docs.smarttech.com/kb/171798 78
To send a remote execution command or script to a device
1.
Click Devices to open the
Devices
view.
2.
OptionalFilter the devices shown in the
Devices
view.
See
Finding devices
on page12
3. Click the device’s row.
The device’s dashboard window appears.
4.
Click Repositories actions, and then click REMOTE EXECUTE.
The
Remote execute
window appears.
5.
Select a command or script from the list and click APPLY.
To send a remote execution command or script to multiple devices
1.
Click Devices to open the
Devices
view.
2.
OptionalFilter the devices shown in the
Devices
view.
See
Finding devices
on page12
3. Select the devices’ check boxes.
4.
Click More actions and select Remote execute.
The
Remote execute
window appears.
5.
Select a command or script from the list and click APPLY.
To send a remote execution command or script to all devices that match a saved filter’s criteria
1.
Click Devices to open the
Devices
view.
2.
Click Filters in the
Search
bar.
3.
Click Actions in the saved filter’s row and select Remote execute.
The
Remote execute
window appears.
4.
Select a command or script from the list and click APPLY.
To send a remote execution command or script to a group
1.
Click Devices to open the
Devices
view.
2.
Click Groups to open the
Groups
panel.

Chapter 5 Running other commands on devices
docs.smarttech.com/kb/171798 79
3.
Click Actions in the group’s row and select Remote execute.
The
Remote execute
window appears.
4.
Select a command or script from the list and click APPLY.
Installing certificates on SMART Board interactive displays with iQ
You can use remote execution commands to install certificates on SMART Board interactive displays with
iQ.
These are the commands for installing certificates on SMART Board interactive displays with iQ 4:
Task Command Arguments
Install CA certificate
install_ca <Certificate> [--delete_file]
[--for_all_users]
Where
l
<Certificate> is the path to the certificate (for
example, /sdcard/certs/certificate.p12 or
/sdcard/Download/certificate.p12)
l
Optional[--delete_file] specifies whether
the certificate file should be deleted (true by
default)
l
Optional[--for-all-users] specifies whether
the certificate should be installed for all signed-in
users (false by default)
Install user certificate
install_user <Certificate> [--delete_file] [--alias]
[--cert-password]
Where
l
<Certificate> is the path to the certificate (for
example, /sdcard/certs/certificate.p12 or
/sdcard/Download/certificate.p12)
l
Optional[--delete_file] specifies whether
the certificate file should be deleted (true by
default)
l
Optional[--alias] specifies the alias for the
certificate
l
Optional[--cert-password] specifies the
password for the certificate

Chapter 5 Running other commands on devices
docs.smarttech.com/kb/171798 80
Task Command Arguments
Install user certificate
for Wi-Fi
install_wifi <Certificate> [--delete_file] [--alias]
[--cert-password]
Where
l
<Certificate> is the path to the certificate (for
example, /sdcard/certs/certificate.p12 or
/sdcard/Download/certificate.p12)
l
Optional[--delete_file] specifies whether
the certificate file should be deleted (true by
default)
l
Optional[--alias] specifies the alias for the
certificate
l
Optional[--cert-password] specifies the
password for the certificate
These are the commands for installing certificates on SMART Board interactive displays with iQ 3:
Task Command Arguments
Install CA certificate
install_ca <Certificate> [--delete_file]
[--for_all_users]
Where
l
<Certificate> is the path to the certificate (for
example, /sdcard/certs/certificate.p12 or
/sdcard/Download/certificate.p12)
l
Optional[--delete_file] specifies whether
the certificate file should be deleted (true by
default)
l
Optional[--for-all-users] specifies whether
the certificate should be installed for all signed-in
users (false by default)

Chapter 5 Running other commands on devices
docs.smarttech.com/kb/171798 81
Task Command Arguments
Install user certificate
install_user <Certificate> [--delete_file] [--alias]
[--cert-password][--board_lock_type]
[password|pin][--board_lock_value]
Where
l
<Certificate> is the path to the certificate (for
example, /sdcard/certs/certificate.p12 or
/sdcard/Download/certificate.p12)
l
Optional[--delete_file] specifies whether
the certificate file should be deleted (true by
default)
l
Optional[--alias] specifies the alias for the
certificate
l
Optional[--cert-password] specifies the
password for the certificate
l
[--board_lock_type] specifies the display’s lock
type (password or pin)
l
[--board_lock_value] specifies the display’s lock
alpha-numeric password or numeric PIN
(between 4 and 17 characters).
Install user certificate
for Wi-Fi
install_wifi <Certificate> [--delete_file] [--alias]
[--cert-password][--board_lock_type]
[password|pin][--board_lock_value]
Where
l
<Certificate> is the path to the certificate (for
example, /sdcard/certs/certificate.p12 or
/sdcard/Download/certificate.p12)
l
Optional[--delete_file] specifies whether
the certificate file should be deleted (true by
default)
l
Optional[--alias] specifies the alias for the
certificate
l
Optional[--cert-password] specifies the
password for the certificate
l
[--board_lock_type] specifies the display’s lock
type (password or pin)
l
[--board_lock_value] specifies the display’s lock
alpha-numeric password or numeric PIN
(between 4 and 17 characters).

Chapter 5 Running other commands on devices
docs.smarttech.com/kb/171798 82
Enabling or disabling automatic OTA updates on SMART Board interactive displays with iQ
You can use remote execution commands to enable or disable OTA updates on SMART Board
interactive displays with iQ.
Example
This command enables automatic OTA updates on SMART Board interactive displays with iQ:
Example
This command disables automatic OTAupdates on SMART Board interactive displays with iQ:

Chapter 5 Running other commands on devices
docs.smarttech.com/kb/171798 83
Example
This command causes SMART Board interactive displays with iQ to check for OTA updates tonight:
Other schedule options:
l
none (checks for OTA updates immediately)
l
tomorrow night
l
this weekend
Note
The above examples might not work with all SMART Board interactive display models.
Sending custom MDM commands to iOS and macOS devices
The Mobile Device Management (MDM) protocol allows you to send commands to iOS and macOS
devices enrolled in SMART Remote Management.
SeeMobile Device Management protocol reference
You can create custom MDM commands to perform a variety of actions on iOSand macOS devices:
l
Inspect, install, or remove profiles
l
Remove passcodes
l
Begin secure erase

Chapter 5 Running other commands on devices
docs.smarttech.com/kb/171798 84
You can run custom MDM commands on a single device, multiple devices, all devices that match a
saved filter’s criteria, or a group.
To create a custom MDM command
1.
Click Repositories and select Apple custom command.
The
Apple custom command
window appears.
Tip
If your organization created its domain account after May 2023, the
Apple custom command
window includes sample custom MDM commands that you can use as starting point for creating
your own custom MDM commands. These sample custom MDM commands have turquoise
icons.
2.
Click ADD NEW.
3. Type a name in the
Name
box.
4. Type the command in the
Plist text
box.
5.
Click CONFIRM.
To run a custom MDM command on a single device
1.
Click Devices to open the
Devices
view.
2.
OptionalFilter the devices shown in the
Devices
view.
See
Finding devices
on page12
3. Click the device’s row.
The device’s dashboard window appears.
4.
Click Repository actions, and then click APPLE CUSTOM COMMAND.
The
Apple custom command
window appears.
5.
Select the custom MDM command from the list and click APPLY.
To run a custom Apple MDM command on multiple devices
1.
Click Devices to open the
Devices
view.
2.
OptionalFilter the devices shown in the
Devices
view.
See
Finding devices
on page12
3. Select the devices’ check boxes.

Chapter 5 Running other commands on devices
docs.smarttech.com/kb/171798 85
4.
Click More actions and select Apple custom command.
The
Apple custom command
window appears.
5.
Select the custom MDM command from the list and click APPLY.
To run a custom Apple MDM command on all devices that match a saved filter’s criteria
1.
Click Devices to open the
Devices
view.
2.
Click Filters in the
Search
bar.
3.
Click Actions in the saved filter’s row and select Apple custom command.
The
Apple custom command
window appears.
4.
Select the custom MDM command from the list and click APPLY.
To run a custom MDM command on a group
1.
Click Devices to open the
Devices
view.
2.
Click Groups to open the
Groups
panel.
3.
Click Actions in the group’s row and select Apple custom command.
The
Apple custom command
window appears.
4.
Select the custom MDM command from the list and click APPLY.
Sending files to devices
You can upload files from your computer or a URL and use SMART Remote Management to send those
files to devices in your organization. This is useful when you want all devices to have the same wallpaper
or otherwise share common files.
You can send files to a single device, multiple devices, all devices that match a saved filter’s criteria, or a
group. Alternatively, you can:
l
Use a trigger to initiate the sending of files at a scheduled time or when a specific event takes place.
See
Managing schedulers and triggers
on page123

Chapter 5 Running other commands on devices
docs.smarttech.com/kb/171798 86
l
Include the sending of files in workflows.
See
Managing workflows
on page138
To upload files from your computer
1.
Click Repositories and select Files.
The
Files
window appears.
Tip
If your organization created its domain account after May 2023, the
Files
window includes
sample saved files that you can use as starting point for creating your own saved files. These
sample saved files have turquoise icons.
2.
Click ADD NEW.
The
New file
window appears.
3.
Select Upload File in the
Select upload method
drop-down list.
4. Type a name for the files in the
Name
box.
5. Type the path where you want to send the files in the
Destination
box.
Tip
For SMART Board interactive displays with iQ:
o
Place files in /sdcard/download to have them appear in the Downloads folder.
o
Place files in /sdcard/Android/obb/SMART/shared/files to have them appear in the
Board Files folder.
SeeUsing the Files Library
6.
Click ADD FILES.
The
Open
dialog box appears.
7.
Browse to and select the first file you want to upload, and click Open.
8. Repeat steps 6 and 7 for all other files you want to upload.
9.
Click Upload all .
10.
Click CONFIRM.

Chapter 5 Running other commands on devices
docs.smarttech.com/kb/171798 87
To upload files from a URL
1.
Click Repositories and select Files.
The
Files
window appears.
Tip
If your organization created its domain account after May 2023, the
Files
window includes
sample saved files that you can use as starting point for creating your own saved files. These
sample saved files have turquoise icons.
2.
Click ADD NEW.
The
New file
window appears.
3.
Select File from Url in the
Select upload method
drop-down list.
4. Type the URL you are uploading the files from in the
File url
box.
5. Type a name for the files in the
Name
box.
6. Type the path where you want to send the files in the
Destination
box.
Tip
For SMART Board interactive displays with iQ:
o
Place files in /sdcard/download to have them appear in the Downloads folder.
o
Place files in /sdcard/Android/obb/SMART/shared/files to have them appear in the
Board Files folder.
SeeUsing the Files Library
7.
Click CONFIRM.
To send files to a single device
1.
Click Devices to open the
Devices
view.
2.
OptionalFilter the devices shown in the
Devices
view.
See
Finding devices
on page12
3. Click the device’s row.
The device’s dashboard window appears.
4.
Click Repositories actions, and then click FILES.
The
Files
window appears.
5.
Select the files from the list and click APPLY.

Chapter 5 Running other commands on devices
docs.smarttech.com/kb/171798 88
To send files to multiple devices
1.
Click Devices to open the
Devices
view.
2.
OptionalFilter the devices shown in the
Devices
view.
See
Finding devices
on page12
3. Select the devices’ check boxes.
4.
Click More actions and select Send files.
The
Files
window appears.
5.
Select the files from the list and click APPLY.
To send files to all devices that match a saved filter’s criteria
1.
Click Devices to open the
Devices
view.
2.
Click Filters in the
Search
bar.
3.
Click Actions in the saved filter’s row and select Send files.
The
Files
window appears.
4.
Select the files from the list and click APPLY.
To send files to a group
1.
Click Devices to open the
Devices
view.
2.
Click Groups to open the
Groups
panel.
3.
Click Actions in the group’s row and select Send files.
The
Files
window appears.
4.
Select the files from the list and click APPLY.
Sending messages and sounding the siren
You can send messages and sound the siren using SMART Remote Management. These features are
useful when you need to communicate information with specific users or all users across your
organization quickly.
You can send two types of messages using SMART Remote Management:
l
Text-only
l
Advanced

Chapter 5 Running other commands on devices
docs.smarttech.com/kb/171798 89
Text-only messages can be sent to all devices. You can send advanced messages to only SMART Board
interactive displays and Android devices.
Sending text-only messages
Text-only messages consist of a title and body.
You can send text-only messages to a single device, multiple devices, all devices that match a saved
filter’s criteria, or a group. Alternatively, you can:
l
Use a trigger to send a text-only message at a scheduled time or when a specific event takes place.
See
Managing schedulers and triggers
on page123
l
Include the sending of text-only messages in workflows.
See
Managing workflows
on page138
To send a text-only message to a single device
1.
Click Devices to open the
Devices
view.
2.
OptionalFilter the devices shown in the
Devices
view.
See
Finding devices
on page12
3. Click the device’s row.
The device’s dashboard window appears.
4.
Click Send message.
The
Send message
window appears.
5. Type the message title and body text in the
Message title
and
Message body
boxes.
6.
Click CONFIRM.
To send a text-only message to multiple devices
1.
Click Devices to open the
Devices
view.
2.
OptionalFilter the devices shown in the
Devices
view.
See
Finding devices
on page12
3. Select the devices’ check boxes.

Chapter 5 Running other commands on devices
docs.smarttech.com/kb/171798 90
4.
Click More actions and select Send message.
The
Send message
window appears.
5. Type the message title and body text in the
Message title
and
Message body
boxes.
6.
Click CONFIRM.
To send a text-only message to all devices that match a saved filter’s criteria
1.
Click Devices to open the
Devices
view.
2.
Click Filters in the
Search
bar.
3.
Click Actions in the saved filter’s row and select Send message.
The
Send message
window appears.
4. Type the message title and body text in the
Message title
and
Message body
boxes.
5.
Click CONFIRM.
To send a text-only message to a group
1.
Click Devices to open the
Devices
view.
2.
Click Groups to open the
Groups
panel.
3.
Click Actions in the group’s row and select Send message.
The
Send message
window appears.
4. Type the message title and body text in the
Message title
and
Message body
boxes.
5.
Click CONFIRM.
Sending advanced messages
Unlike text-only messages, advanced messages can include images, sounds, and video. You can create
three types of advanced messages:
l
Advanced messages with text, images, and sounds
l
Advanced messages with YouTube
™
videos that you can play in a loop
l
Advanced messages with embedded web pages or HTML

Chapter 5 Running other commands on devices
docs.smarttech.com/kb/171798 91
You can send advanced messages to a single device, multiple devices, all devices that match a saved
filter’s criteria, or to a group. Alternatively, you can:
l
Use a trigger to send advanced messages at a scheduled time or when a specific event takes place.
See
Managing schedulers and triggers
on page123
l
Include the sending of advanced messages in workflows.
See
Managing workflows
on page138
To create an advanced message with text, image, and sound
1.
Click Repositories and select Advanced messaging.
The
Advanced messages
window appears.
Tip
If your organization created its domain account after May 2023, the
Advanced messages
window
includes sample advanced messages that you can use as starting point for creating your own
advanced messages. These sample advanced messages have turquoise icons.
2.
Click ADD NEW.
3. Type a name and description in the
Name
and
Description
boxes.
4.
Click Content .
5.
Select Image/Sound in the
Advanced message type
drop-down list.

Chapter 5 Running other commands on devices
docs.smarttech.com/kb/171798 92
6. Provide text, image, and sound for the advanced message:
Component Procedure
Text
a.
Type text in the
Text to display
box.
b.
Click and select a color for the text.
Image
a.
Click ADD IMAGE ASSET.
The
Assets
window appears.
Note
If the image you want to include in the advanced message isn’t
already available in SMART Remote Management, click ADD NEW and
follow the on-screen instructions to upload the image.
b.
Select the image and click APPLY.
c.
OptionalSelect Stretch on screen to stretch the image to fill the screen.
d.
OptionalSelect Horizontal or Vertical to keep the width or height of the
image proportional.
Sound
a.
Click ADD AUDIO ASSET.
The
Assets
window appears.
Note
If the sound you want to include in the advanced message isn’t already
available in SMART Remote Management, click ADD NEW and follow
the on-screen instructions to upload the sound.
b.
Select the sound and click APPLY.
c.
OptionalSelect Loop audio to replay the sound while the message is
visible on the device.
7.
Click CONFIRM.
To create an advanced message with a YouTube video
1.
Click Repositories and select Advanced messaging.
The
Advanced messages
window appears.
Tip
If your organization created its domain account after May 2023, the
Advanced messages
window
includes sample advanced messages that you can use as starting point for creating your own
advanced messages. These sample advanced messages have turquoise icons.
2.
Click ADD NEW.
3. Type a name and description in the
Name
and
Description
boxes.

Chapter 5 Running other commands on devices
docs.smarttech.com/kb/171798 93
4.
Click Content .
5.
Select YouTube URL in the
Advanced message type
drop-down list.
6. Type the URL for the YouTube video in the
YouTube URL
box.
7.
OptionalSelect Loop to play the YouTube video in a loop.
8.
Click CONFIRM.
To create an advanced message with an embedded web page or HTML
1.
Click Repositories and select Advanced messaging.
The
Advanced messages
window appears.
Tip
If your organization created its domain account after May 2023, the
Advanced messages
window
includes sample advanced messages that you can use as starting point for creating your own
advanced messages. These sample advanced messages have turquoise icons.
2.
Click ADD NEW.
3. Type a name and description in the
Name
and
Description
boxes.
4.
Click Content .
5.
Select Embed URL/HTML in the
Advanced message type
drop-down list.
6. Embed a web page or HTML:
Option Procedure
Embed a web
page
a.
Select URL in the
Type
drop-down list.
b.
Type the web page’s URL in the
URL
box.
Embed HTML
a.
Select HTML in the
Type
drop-down list.
b.
Type or copy and paste the HTML in the text box.
7.
Click CONFIRM.
To send an advanced message to a single device
1.
Click Devices to open the
Devices
view.
2.
OptionalFilter the devices shown in the
Devices
view.
See
Finding devices
on page12

Chapter 5 Running other commands on devices
docs.smarttech.com/kb/171798 94
3. Click the device’s row.
The device’s dashboard window appears.
4.
Click Repository actions, and then click ADVANCED MESSAGING.
The
Advanced messaging
window appears.
5.
Select the advanced message from the list and click APPLY.
To send an advanced message to multiple devices
1.
Click Devices to open the
Devices
view.
2.
OptionalFilter the devices shown in the
Devices
view.
See
Finding devices
on page12
3. Select the devices’ check boxes.
4.
Click Advanced message .
The
Advanced messaging
window appears.
5.
Select the advanced message from the list and click APPLY.
To send an advanced message to all devices that match a saved filter’s criteria
1.
Click Devices to open the
Devices
view.
2.
Click Filters in the
Search
bar.
3.
Click Actions in the saved filter’s row and select Advanced messaging.
The
Advanced messaging
window appears.
4.
Select the advanced message from the list and click APPLY.
To send an advanced message to a group
1.
Click Devices to open the
Devices
view.
2.
Click Groups to open the
Groups
panel.
3.
Click Actions in the group’s row and select Advanced messaging.
The
Advanced messaging
window appears.
4.
Select the advanced message from the list and click APPLY.

Chapter 5 Running other commands on devices
docs.smarttech.com/kb/171798 95
Sounding the siren
To inform device users of an emergency, you can sound the siren on a single device, multiple devices, all
devices that match a saved filter’s criteria, or a group. Alternatively, you can:
l
Use a trigger to sound the siren at a scheduled time or when a specific event takes place.
See
Managing schedulers and triggers
on page123
l
Include the sounding of the siren in workflows.
See
Managing workflows
on page138
Warning
The siren causes devices’ screens to flash at approximately 7 Hz. If any users are sensitive to rapidly
flashing screens, consider sending messages instead.
To sound the siren on a single device
1.
Click Devices to open the
Devices
view.
2.
OptionalFilter the devices shown in the
Devices
view.
See
Finding devices
on page12
3. Click the device’s row.
The device’s dashboard window appears.
4.
Click Lock, and then click SIREN.
A message appears, asking if you want to sound the siren.
5.
Click CONFIRM.
To sound the siren on multiple devices
1.
Click Devices to open the
Devices
view.
2.
OptionalFilter the devices shown in the
Devices
view.
See
Finding devices
on page12
3. Select the devices’ check boxes.

Chapter 5 Running other commands on devices
docs.smarttech.com/kb/171798 96
4.
Click More actions and select Sound siren.
A message appears, asking if you want to sound the siren.
5.
Click CONFIRM.
To sound the siren on all devices that match a saved filter’s criteria
1.
Click Devices to open the
Devices
view.
2.
Click Filters in the
Search
bar.
3.
Click Actions in the saved filter’s row and select Sound siren.
A message appears, asking if you want to sound the siren.
4.
Click CONFIRM.
To sound the siren on a group
1.
Click Devices to open the
Devices
view.
2.
Click Groups to open the
Groups
panel.
3.
Click Actions in the group’s row and select Sound siren.
A message appears, asking if you want to sound the siren.
4.
Click CONFIRM.
Locking and unlocking devices
If a device is lost or stolen, you can lock it from SMART Remote Management to secure it, provided the
device still has wireless connectivity.
You can lock and unlock devices as described below. Alternatively, you can lock and unlock devices at a
scheduled time or when a specific event takes place.
See
Managing schedulers and triggers
on page123

Chapter 5 Running other commands on devices
docs.smarttech.com/kb/171798 97
Locking and unlocking SMART Board GX series interactive displays and
Android, Windows, and Chrome OS devices
To lock a device
1.
Click Devices to open the
Devices
view.
2.
OptionalFilter the devices shown in the
Devices
view.
See
Finding devices
on page12
3. Click the device’s row.
The device’s dashboard window appears.
4.
Click Lock, and then click LOCK.
5. For an iOS and macOS device, type a message and phone number in the appropriate boxes to
display on the screen of the device.
6.
Click CONFIRM.
To unlock a device
1.
Click Devices to open the
Devices
view.
2.
OptionalFilter the devices shown in the
Devices
view.
See
Finding devices
on page12
3. Click the device’s row.
The device’s dashboard window appears.
4.
Click Lock, and then click UNLOCK.
5.
Click CONFIRM.
To retrieve the password from a locked device
1.
Click Devices to open the
Devices
view.
2.
OptionalFilter the devices shown in the
Devices
view.
See
Finding devices
on page12
3. Click the device’s row.
The device’s dashboard window appears.

Chapter 5 Running other commands on devices
docs.smarttech.com/kb/171798 98
4.
Click Lock, and then click GET PASSWORD.
5.
Click PRESS TO RETRIEVE PASSWORD.
Locking and unlocking iOS and macOS devices
To enable Lost Mode
1.
Click Devices to open the
Devices
view.
2.
OptionalFilter the devices shown in the
Devices
view.
See
Finding devices
on page12
3. Click the device’s row.
The device’s dashboard window appears.
4.
Click Lost mode, and then click ENABLE LOST MODE.
5. Type a message, phone number, and footnote in the appropriate boxes to display on the screen of
the device when it is locked.
6.
Click CONFIRM.
To disable Lost Mode
1.
Click Devices to open the
Devices
view.
2.
OptionalFilter the devices shown in the
Devices
view.
See
Finding devices
on page12
3. Click the device’s row.
The device’s dashboard window appears.
4.
Click Lost mode, and then click DISABLE LOST MODE.
5.
Click YES.
To lock a device
1.
Click Devices to open the
Devices
view.
2.
OptionalFilter the devices shown in the
Devices
view.
See
Finding devices
on page12

Chapter 5 Running other commands on devices
docs.smarttech.com/kb/171798 99
3. Click the device’s row.
The device’s dashboard window appears.
4.
Click Lost mode, and then click LOCK.
5. Type a message and phone number in the appropriate boxes to display on the screen of the device.
6.
Click CONFIRM.
To unlock a device
1.
Click Devices to open the
Devices
view.
2.
OptionalFilter the devices shown in the
Devices
view.
See
Finding devices
on page12
3. Click the device’s row.
The device’s dashboard window appears.
4.
Click Lost mode, and then click UNLOCK.
5.
Click CONFIRM.
To sound the siren on a device with Lost Mode enabled
1.
Click Devices to open the
Devices
view.
2.
OptionalFilter the devices shown in the
Devices
view.
See
Finding devices
on page12
3. Click the device’s row.
The device’s dashboard window appears.
4.
Click Lost mode, and then click PLAY LOST MODE SOUND.
5.
Click CONFIRM.
Restarting, shutting down, and waking devices
You can restart, shut down, and wake devices from SMART Remote Management. This is useful when
you are troubleshooting issues with device users and when you are installing apps on devices and need
to wake and restart (or shut down) those devices as part of the installation.

Chapter 5 Running other commands on devices
docs.smarttech.com/kb/171798 100
Restarting devices
You can restart a single device, multiple devices, all devices that match a saved filter’s criteria, or a
group. Alternatively, you can:
l
Use a trigger to initiate the restarting of devices at a scheduled time or when a specific event takes
place.
See
Managing schedulers and triggers
on page123
l
Include the restarting of devices in workflows.
See
Managing workflows
on page138
To restart a single device
1.
Click Devices to open the
Devices
view.
2.
OptionalFilter the devices shown in the
Devices
view.
See
Finding devices
on page12
3. Click the device’s row.
The device’s dashboard window appears.
4.
Click Power, and then click RESTART.
5.
Click YES.
To restart multiple devices
1.
Click Devices to open the
Devices
view.
2.
OptionalFilter the devices shown in the
Devices
view.
See
Finding devices
on page12
3. Select the devices’ check boxes.
4.
Click More actions and select Restart.
5.
Click YES.

Chapter 5 Running other commands on devices
docs.smarttech.com/kb/171798 101
To restart all devices that match a saved filter’s criteria
1.
Click Devices to open the
Devices
view.
2.
Click Filters in the
Search
bar.
3.
Click Actions in the saved filter’s row and select Restart.
4.
Click YES.
To restart a group
1.
Click Devices to open the
Devices
view.
2.
Click Groups to open the
Groups
panel.
3.
Click Actions in the group’s row and select Restart.
4.
Click YES.
Shutting down devices
3
You can shut down a single device, multiple devices, all devices that match a saved filter’s criteria, or a
group. Alternatively, you can:
l
Use a trigger to initiate the shutdown of devices at a scheduled time or when a specific event takes
place.
See
Managing schedulers and triggers
on page123
l
Include the shutdown of devices in workflows.
See
Managing workflows
on page138
To shut down a single device
1.
Click Devices to open the
Devices
view.
2.
OptionalFilter the devices shown in the
Devices
view.
See
Finding devices
on page12
3
Use this command to shut down SMART Board GX (V2 and V3) series interactive displays. Use a remote execution command to
shut down earlier SMART Board GX series displays.

Chapter 5 Running other commands on devices
docs.smarttech.com/kb/171798 102
3. Click the device’s row.
The device’s dashboard window appears.
4.
Click Power, and then click SHUTDOWN.
5.
Click YES.
To shut down multiple devices
1.
Click Devices to open the
Devices
view.
2.
OptionalFilter the devices shown in the
Devices
view.
See
Finding devices
on page12
3. Select the devices’ check boxes.
4.
Click More actions and select Shutdown.
5.
Click YES.
To shut down all devices that match a saved filter’s criteria
1.
Click Devices to open the
Devices
view.
2.
Click Filters in the
Search
bar.
3.
Click Actions in the saved filter’s row and select Shutdown.
4.
Click YES.
To shut down a group
1.
Click Devices to open the
Devices
view.
2.
Click Groups to open the
Groups
panel.
3.
Click Actions in the group’s row and select Shutdown.
4.
Click YES.

Chapter 5 Running other commands on devices
docs.smarttech.com/kb/171798 103
Waking devices
Using SMART Remote Management, you can make a source device wake target devices if those target
devices support Wake on LAN (WOL):
You can choose a single source device, multiple source devices, all source devices that match a saved
filter’s criteria, or a group. If you choose multiple source devices or a group, SMART Remote
Management determines which source device to send the WOL command from based on criteria such
as availability, performance, and priority.
Tip
It’s better to choose multiple source devices or a group than choose a single source device because
the single source device might not be awake when you send the WOL command.
The WOL command that SMART Remote Management sends to the source device includes the target
devices’ MAC addresses. The source device generates and sends a magic packet for each target device.
A magic packet is a special signal that contains the MAC address of the target device and is sent as a
broadcast frame over the network, meaning it reaches all the devices on the network. Only the device
with the matching MAC address in the magic packet responds and wakes up.
Notes
l
Make sure target devices support WOL before completing the following procedures.
l
The source device that sends the magic packets must be awake and on the same network as the
target devices you’re waking.
l
You can view WOL commands in the
Commands
view to determine if they have succeeded, are
pending, or failed.
See
Viewing command details
on page120

Chapter 5 Running other commands on devices
docs.smarttech.com/kb/171798 104
In addition to waking target devices on demand, you can:
l
Use a trigger to wake target devices at a scheduled time or when a specific event takes place.
See
Managing schedulers and triggers
on page123
l
Include the waking of target devices in workflows.
See
Managing workflows
on page138
To choose a single source device
1.
Click Devices to open the
Devices
view.
2.
OptionalFilter the devices shown in the
Devices
view.
See
Finding devices
on page12
3. Click the source device’s row.
The source device’s dashboard window appears.
4.
Click Power, and then click WAKE ON LAN.
The
Wake on lan
window appears.
5.
To wake the target devices that match a filter’s or group’s criteria, select Filter or Group and select
a filter or group from the drop-down list.
See
Finding devices
on page12
OR
To wake a single target device, select Device and type a target device’s ID in the
Device ID
box.
6.
OptionalTurn on Advanced wake-on-lan settings and specify the broadcast address and port
for execution if your network requires this information.
7.
Click CONFIRM.
To choose multiple source devices
1.
Click Devices to open the
Devices
view.
2.
OptionalFilter the devices shown in the
Devices
view.
See
Finding devices
on page12
3. Select the source devices’ check boxes.
4.
Click More actions and select Wake on lan.
The
Wake on lan
window appears.

Chapter 5 Running other commands on devices
docs.smarttech.com/kb/171798 105
5.
To wake the target devices that match a filter’s or group’s criteria, select Filter or Group and select
a filter or group from the drop-down list.
See
Finding devices
on page12
OR
To wake a single target device, select Device and type a target device’s ID in the
Device ID
box.
6.
OptionalTurn on Advanced wake-on-lan settings and specify the broadcast address and port
for execution if your network requires this information.
7.
Click CONFIRM.
To choose multiple source devices that match a saved filter’s criteria
1.
Click Devices to open the
Devices
view.
2.
Click Filters in the
Search
bar.
3.
Click Actions in the saved filter’s row and select Wake on lan.
4.
To wake the target devices that match a filter’s or group’s criteria, select Filter or Group and select
a filter or group from the drop-down list.
See
Finding devices
on page12
OR
To wake a single target device, select Device and type a target device’s ID in the
Device ID
box.
5.
OptionalTurn on Advanced wake-on-lan settings and specify the broadcast address and port
for execution if your network requires this information.
6.
Click CONFIRM.
To choose a group
1.
Click Devices to open the
Devices
view.
2.
Click Groups to open the
Groups
panel.
3.
Click Actions in the group’s row and select Wake on lan.
The
Wake on lan
window appears.
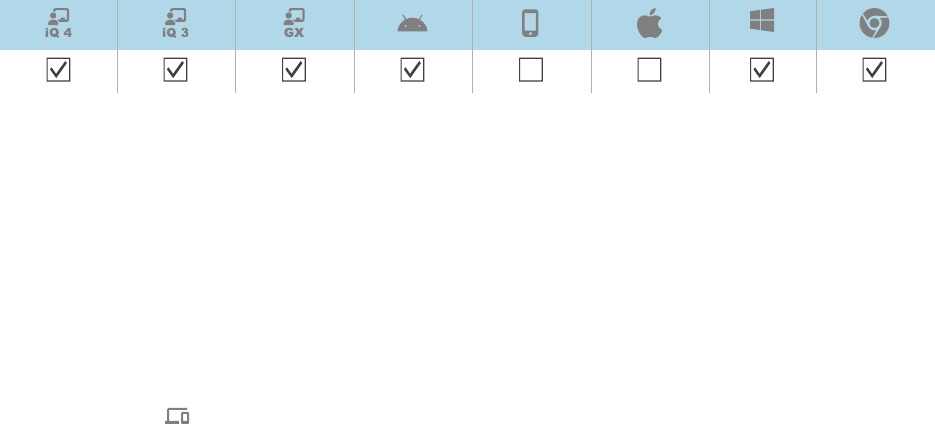
Chapter 5 Running other commands on devices
docs.smarttech.com/kb/171798 106
4.
To wake the target devices that match a filter’s or group’s criteria, select Filter or Group and select
a filter or group from the drop-down list.
See
Finding devices
on page12
OR
To wake a single target device, select Device and type a target device’s ID in the
Device ID
box.
5.
OptionalTurn on Advanced wake-on-lan settings and specify the broadcast address and port
for execution if your network requires this information.
6.
Click CONFIRM.
Changing devices’ agent passwords
Agent passwords are used to lock SMART Remote Management settings on devices.
You can change the agent password on a single device, multiple devices, all devices that match a saved
filter’s criteria, or a group as described below. Alternatively, you can use a trigger to initiate the change
of the agent password when a specific event takes place.
See
Managing schedulers and triggers
on page123
To change the agent password on a single device
1.
Click Devices to open the
Devices
view.
2.
OptionalFilter the devices shown in the
Devices
view.
See
Finding devices
on page12
3. Click the device’s row.
The device’s dashboard window appears.
4.
Click Manage, and then click CHANGE AGENT PASSWORD.
The
Change agent password
window appears.
5. Type the new agent password in the
Password
and
Confirm password
boxes.
6.
Click CONFIRM.

Chapter 5 Running other commands on devices
docs.smarttech.com/kb/171798 107
To change the agent password on multiple devices
1.
Click Devices to open the
Devices
view.
2.
OptionalFilter the devices shown in the
Devices
view.
See
Finding devices
on page12
3. Select the devices’ check boxes.
4.
Click More actions and select Change agent password.
The
Change agent password
window appears.
5. Type the new agent password in the
Password
and
Confirm password
boxes.
6.
Click CONFIRM.
To change the agent password on all devices that match a saved filter’s criteria
1.
Click Devices to open the
Devices
view.
2.
Click Filters in the
Search
bar.
3.
Click Actions in the saved filter’s row and select Change agent password.
The
Change agent password
window appears.
4. Type the new agent password in the
Password
and
Confirm password
boxes.
5.
Click CONFIRM.
To change the agent password on a group
1.
Click Devices to open the
Devices
view.
2.
Click Groups to open the
Groups
panel.
3.
Click Actions in the group’s row and select Change agent password.
The
Change agent password
window appears.
4. Type the new agent password in the
Password
and
Confirm password
boxes.
5.
Click CONFIRM.
Running device-type-specific commands
Although most commands in SMART Remote Management can be run on multiple types of devices,
some commands are specific to certain device types.

Chapter 5 Running other commands on devices
docs.smarttech.com/kb/171798 108
Removing Google accounts from Android devices
You can use SMART Remote Management to remove all Google accounts (except those you explicitly
choose not to remove) from your organizations’ Android devices.
You can remove Google accounts on a single device, multiple devices, all devices that match a saved
filter’s criteria, or a group. Alternatively, you can:
l
Use a trigger to initiate the removal of Google accounts when a specific event takes place.
See
Managing schedulers and triggers
on page123
l
Include the removal of Google accounts in workflows.
See
Managing workflows
on page138
To remove Google accounts from a single device
1.
Click Devices to open the
Devices
view.
2.
OptionalFilter the devices shown in the
Devices
view.
See
Finding devices
on page12
3. Click the device’s row.
The device’s dashboard window appears.
4.
Click Manage, and then click REMOVE GOOGLE ACCOUNTS.
The
Remove accounts
window appears.
5.
Select Remove all accounts to remove all Google accounts.
OR
Select Keep one account to retain one Google account and type that account’s email address in the
Email account
box.
6.
Click CONFIRM.

Chapter 5 Running other commands on devices
docs.smarttech.com/kb/171798 109
To remove Google accounts from multiple devices
1.
Click Devices to open the
Devices
view.
2.
OptionalFilter the devices shown in the
Devices
view.
See
Finding devices
on page12
3. Select the devices’ check boxes.
4.
Click More actions and select Remove Google accounts from device.
The
Remove accounts
window appears.
5.
Select Remove all accounts to remove all Google accounts.
OR
Select Keep one account to retain one Google account and type that account’s email address in the
Email account
box.
6.
Click CONFIRM.
To remove Google accounts from all devices that match a saved filter’s criteria
1.
Click Devices to open the
Devices
view.
2.
Click Filters in the
Search
bar.
3.
Click Actions in the saved filter’s row and select Remove Google accounts from device.
The
Remove accounts
window appears.
4.
Select Remove all accounts to remove all Google accounts.
OR
Select Keep one account to retain one Google account and type that account’s email address in the
Email account
box.
5.
Click CONFIRM.
To remove Google accounts from a group
1.
Click Devices to open the
Devices
view.
2.
Click Groups to open the
Groups
panel.
3.
Click Actions in the group’s row and select Remove Google accounts from device.
The
Remove accounts
window appears.

Chapter 5 Running other commands on devices
docs.smarttech.com/kb/171798 110
4.
Select Remove all accounts to remove all Google accounts.
OR
Select Keep one account to retain one Google account and type that account’s email address in the
Email account
box.
5.
Click CONFIRM.
Deploying DEP profiles to iOS and macOS devices
Apple School Manager and Apple Business Manager are online services that include the ability to
automate the enrollment and configuration of your organization’s iOS and macOS devices in SMART
Remote Management and other mobile device management software.
Note
Apple School Manager and Apple Business Manager replace the Device Enrollment Program (DEP).
However, the term “DEP” is still used in SMART Remote Management and in this documentation.
SeeGetting started using Apple Business Manager or Apple School Manager with mobile device
management
To use these Apple programs with SMART Remote Management to enroll and configure devices, follow
these four steps:
1. If you haven’t already, enroll in the appropriate program for your organization:
Program Link
Apple School Manager school.apple.com
Apple Business Manager business.apple.com
2.
See
SMART Remote Management setup guide
(docs.smarttech.com/kb/171333)
3. Create DEP profiles.
4. Deploy DEPprofiles to a single device, multiple devices, all devices that match a saved filter’s
criteria, or a group.

Chapter 5 Running other commands on devices
docs.smarttech.com/kb/171798 111
To add a DEP server account to SMART Remote Management
See
SMART Remote Management setup guide
(docs.smarttech.com/kb/171333)
To create a DEP profile
1.
Click Repositories and select Dep Apple profile.
The
DEP Apple profile
window appears.
Tip
If your organization created its domain account after May 2023, the
DEP Apple profile
window
includes sample DEP profiles that you can use as starting point for creating your own DEP
profiles. These sample DEP profiles have turquoise icons.
2.
Click ADD NEW.
3. Type a name and description in the
Name
and
Description
boxes.
4. Select a DEP server account in the
DEP server account
drop-down list.
5. Enter the appropriate information in the remaining tabs:
Icon Tab Description
General
Enable and disable general settings for the DEP profile.
Support info
Enter support contact information for the DEP profile.
Setup assistant
Enable and disable setup assistant features for the DEP profile.
6.
Click CONFIRM.
To deploy a DEP profile to a single device
1.
Click Devices to open the
Devices
view.
2.
OptionalFilter the devices shown in the
Devices
view.
See
Finding devices
on page12
3. Click the device’s row.
The device’s dashboard window appears.
4.
Click Repository actions, and then click DEP APPLE PROFILE.
The
Dep Apple profile
window appears.
5.
Select the DEP profile from the list and click APPLY.

Chapter 5 Running other commands on devices
docs.smarttech.com/kb/171798 112
To deploy a DEP profile to multiple devices
1.
Click Devices to open the
Devices
view.
2.
OptionalFilter the devices shown in the
Devices
view.
See
Finding devices
on page12
3. Select the devices’ check boxes.
4.
Click More actions and select Dep Apple profile.
The
Dep Apple profile
window appears.
5.
Select the DEP profile from the list and click APPLY.
To deploy a DEP profile to all devices that match a saved filter’s criteria
1.
Click Devices to open the
Devices
view.
2.
Click Filters in the
Search
bar.
3.
Click Actions in the saved filter’s row and select Dep Apple profile.
The
Dep Apple profile
window appears.
4.
Select the DEP profile from the list and click APPLY.
To deploy a DEP profile to a group
1.
Click Devices to open the
Devices
view.
2.
Click Groups to open the
Groups
panel.
3.
Click Actions in the group’s row and select Dep Apple profile.
The
Dep Apple profile
window appears.
4.
Select the DEP profile from the list and click APPLY.
Clearing passcodes from iOS and macOS devices
Using SMART Remote Management, you can clear the passcode and the restrictions passcode from an
iOS or macOS device.

Chapter 5 Running other commands on devices
docs.smarttech.com/kb/171798 113
To clear a passcode from a device
1.
Click Devices to open the
Devices
view.
2.
OptionalFilter the devices shown in the
Devices
view.
See
Finding devices
on page12
3. Click the device’s row.
The device’s dashboard window appears.
4.
Click Power, and then click CLEAR PASSCODE.
5.
Click YES.
To clear a restrictions passcode from a device
1.
Click Devices to open the
Devices
view.
2.
OptionalFilter the devices shown in the
Devices
view.
See
Finding devices
on page12
3. Click the device’s row.
The device’s dashboard window appears.
4.
Click Power, and then click CLEAR RESTRICTIONS PASSCODE.
5.
Click YES.
Retrieving the default password for Chrome OS devices
Using SMART Remote Management, you can retrieve the default password for a Chrome OS device.
To retrieve the default password for a device
1.
Click Devices to open the
Devices
view.
2.
OptionalFilter the devices shown in the
Devices
view.
See
Finding devices
on page12
3. Click the device’s row.
The device’s dashboard window appears.
Chapter 5 Running other commands on devices
docs.smarttech.com/kb/171798 114
4.
Click Manage, and then click GET DEFAULT PASSWORD.
5.
Click PRESS TO RETRIEVE PASSWORD.

docs.smarttech.com/kb/171798 115
Chapter 6 Running ad-hoc sessions
On occasion, you might want to manage a device that is on a different account or domain. For these
occasions, you can run an ad-hoc session.
Running an ad-hoc session involves two steps:
1. Starting the ad-hoc session on the device
2. Connecting to the ad-hoc session from SMART Remote Management
You can end an ad-hoc session from SMART Remote Management, or the device’s user can end it from
the device.
Note
The steps for starting an ad-hoc session on a SMART Board interactive display with iQ depend on
whether iQ 3 or iQ 4 is installed. (One way to differentiate iQ 3 from iQ 4 is the appearance of the
Home screen.)
Tip
If you are working with SMART support to troubleshoot an issue with a SMART Board display with iQ,
you can start an-hoc session on the display following the procedure below, then provide the token ID
to the SMART support agent. The SMART support agent will then be able to connect to the display to
diagnose the issue.
To start an ad-hoc session on a SMART Board interactive display with iQ 4
1.
Open the apps menu and tap the SMART Remote Management app.
The remote management settings window appears.
2.
Tap in the top-right corner of the screen and select Start Ad-Hoc session.
The
Session Token
screen appears, displaying a session token ID.

Chapter 6 Running ad-hoc sessions
docs.smarttech.com/kb/171798 116
To start an ad-hoc session on a SMART Board interactive display with iQ 3
1.
Open the display’s settings and browse to System Remote Management Launch Remote
Management Settings.
Note
For information about opening the display’s settings, see the display’s documentation.
The remote management settings window appears.
2.
Tap in the top-right corner of the screen and select Start Ad-Hoc session.
The
Session Token
screen appears, displaying a session token ID.
To start an ad-hoc session on an Android device
1. If the Viso MDM agent is not already installed on the device, download and install it from
radix-int.com/radix-viso-mdm-download-links.
2. Open the Viso MDM agent on the device.
3.
Tap in the top-right corner of the screen and select Start Ad-Hoc session.
The
Session Token
screen appears, displaying a session token ID.
To connect to an ad-hoc session from SMART Remote Management
1.
Click Devices to open the
Devices
view.
2.
Click Ad-hoc session to open the
Ad-hoc session
window.
3. In the
Token ID
box, type the session token ID generated by the user in the previous procedures and
click START.
The ad-hoc session window appears. You can manage the device like you do enrolled devices:
o
Chapter 2 Managing devices
on page9
o
Chapter 3 Installing and managing apps on devices
on page32
o
Chapter 5 Running other commands on devices
on page75
To end an ad-hoc session
Click Stop session in the ad-hoc session window.

docs.smarttech.com/kb/171798 117
Chapter 7 Managing commands,
schedulers, triggers, and workflows
Managing commands 118
Showing and hiding columns 119
Finding commands 120
Viewing command details 120
Stopping, restarting, and editing commands 121
Resending commands 122
Exporting command logs to CSV files 122
Making group commands persistent 122
Managing schedulers and triggers 123
Creating schedulers and triggers 124
Initiating commands using schedulers and triggers 127
Managing workflows 138

Chapter 7 Managing commands, schedulers, triggers, and workflows
docs.smarttech.com/kb/171798 118
Managing commands
The
Commands
view provides a centralized list of all the commands currently running, previously run,
and set to run by trigger on devices for which you have access.
Note
The color of each command’s icon indicates its status:
Icon
color
Command status
Applies to a single device or multiple devices
Applies to a group but is not persistent
Applies to a group and is persistent
For more information about groups and persistent commands, see
Making group commands
persistent
on page122.
From this view, you can:

Chapter 7 Managing commands, schedulers, triggers, and workflows
docs.smarttech.com/kb/171798 119
l
Filter commands
l
View command details
l
Stop, restart, and edit currently running or trigger commands
l
Resend commands to all devices for which the commands apply or only to those devices for which
the commands previously failed
l
Export command logs to CSV files
l
Make group commands persistent
To open the
Commands
view from anywhere in SMART Remote Management, click Commands in
the menu.
Showing and hiding columns
You can choose which columns appear in the
Commands
view by clicking Columns . Enable columns
you want to show, and disable columns you want to hide:
Tips
l
You can sort commands by clicking beside the column headers.
l
You can change the order of columns by dragging a column’s header to its new position.

Chapter 7 Managing commands, schedulers, triggers, and workflows
docs.smarttech.com/kb/171798 120
Finding commands
1. Select one of the following columns in the
Search by
drop-down list:
o
Description
o
Device ID
o
Command type
o
Trigger name
2. In the
Search
box, type the text you want to search for in the selected column.
3.
Click Search .
Viewing command details
1. Click the command’s row.
The command’s status window appears.
Successful commands appear in green.
Pending commands appear in purple.

Chapter 7 Managing commands, schedulers, triggers, and workflows
docs.smarttech.com/kb/171798 121
Failed commands appear in red.
Tip
Click More info in a command’s row to see why it failed.
Stopping, restarting, and editing commands
You can stop, restart, and edit currently running, scheduled, or trigger commands from the
Commands
view.
To stop a command
1.
Click Actions in the command’s row and select Stop command.
2.
Click YES.
To restart a command
1.
Click Actions in the command’s row and select Start command.
2.
Click YES.
To edit a command
1.
Click Actions in the command’s row and select Edit command.
The
Scheduler & trigger commands
window appears.
2. Make any desired changes to the command.
3.
Click CONFIRM.

Chapter 7 Managing commands, schedulers, triggers, and workflows
docs.smarttech.com/kb/171798 122
Resending commands
You can resend previously run commands from the
Commands
view. You can resend the commands to
all devices for which it applies or only to devices for which it previously failed.
To resend a command to all devices for which it applies
1.
Click Actions in the command’s row and select Resend command.
2.
Click YES.
To resend a command to only devices for which it previously failed
1.
Click Actions in the command’s row and select Resend command to failed devices.
2.
Click YES.
Exporting command logs to CSV files
From the
Commands
view, you can export a command log to a CSV file for a single command, multiple
commands, or all commands. SMART Remote Management sends the CSV file to the email address
linked to your user account.
To export a command log
1.
OptionalSelect the check boxes of the commands you want to include in the command log.
2.
Click Export to CSV .
A notification appears in the bottom-right corner of the browser window, and you receive an email
from SMART Remote Management with the CSV file attached.
Making group commands persistent
You can make group commands persistent from the
Commands
view. If you assign a new device to a
group in the future (by adding one of the group’s tags to the device), the persistent commands for that
group automatically run on the device.
See
Using groups
on page25
Notes
l
SMART Board interactive displays with iQ support persistent commands.
l
Other devices require version 11.5.1.1 or later of the Viso MDM agent to support persistent
commands.
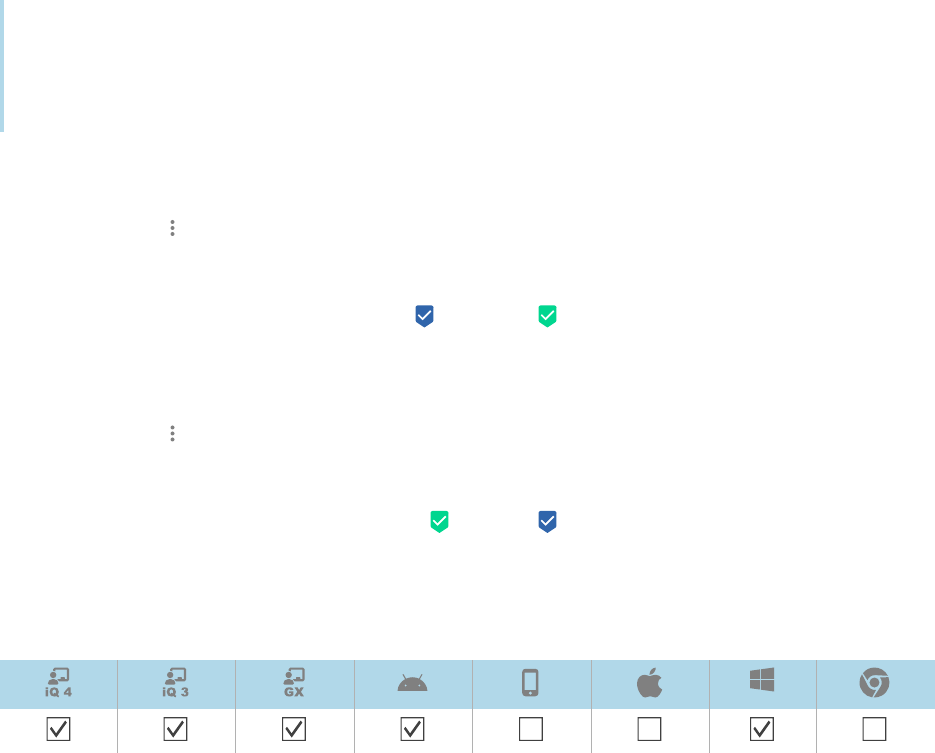
Chapter 7 Managing commands, schedulers, triggers, and workflows
docs.smarttech.com/kb/171798 123
Tip
If you want to run a command, such as deploying an installation package, on each new device you
enroll in SMART Remote Management, run the command on the New Devices group and make it
persistent.
To make a group command persistent
1.
Click Actions in the command’s row and select Persist.
2.
Click YES.
The command’s icon changes from blue ( ) to green ( ).
To stop a group command’s persistence
1.
Click Actions in the command’s row and select Stop persistence.
2.
Click YES.
The command’s icon changes from green ( ) to blue ( ).
Managing schedulers and triggers
Although you can run commands whenever you want on demand, you might prefer to initiate them at a
scheduled time or in response to a specific event. Schedulers and triggers allow you to do this for all
types of commands, including workflows.
See
Managing workflows
on page138

Chapter 7 Managing commands, schedulers, triggers, and workflows
docs.smarttech.com/kb/171798 124
Example
If you need to update software on devices every week, you can create a scheduler that deploys the
appropriate software installation package during off-hours.
Creating schedulers and triggers
You can create three types of schedulers and triggers:
Type Description
Scheduler (also known as
“timing trigger”)
Run a command at a scheduled time once or at regular intervals
Geofencing trigger Run a command when a device enters or leaves a specified area
Wi-Fi trigger Run a command when a device joins or leaves a Wi-Fi network
Tip
Use geofencing and Wi-Fi triggers with mobile devices that you want to maintain in a specific area or
on a specific Wi-Fi network.

Chapter 7 Managing commands, schedulers, triggers, and workflows
docs.smarttech.com/kb/171798 125
To create a scheduler
1.
Click Repositories and select Scheduler & triggers.
The
Scheduler & triggers
window appears.
Tip
If your organization created its domain account after May 2023, the
Scheduler & triggers
window
includes sample schedulers that you can use as starting point for creating your own schedulers.
These sample schedulers have turquoise icons.
2.
Click ADD NEW.
3. Type a name and description for the scheduler in the
Name
and
Description
boxes.
4.
Click Add trigger .
5.
Select Timing in the
Select trigger
drop-down list.
6. Complete one of the procedures below (depending on when you’d like the command to run):
Option Procedure
Run the
command once
a.
Select Once in the
Timing type
drop-down list.
b.
Select the date you want to run the command in the
Start date
drop-
down list.
c.
Select the time you want to run the command in the
Execution time
drop-
down list.
Run the
command
regularly for a
specific length of
time
a.
Select From/To date in the
Timing type
drop-down list.
b.
Select the date you want to first run the command in the
Start date
drop-
down list.
c.
Select the time you want to run the command in the
Execution time
drop-
down list.
d.
Select the date you want to last run the command in the
End date
drop-
down list.
e.
Select an interval type in the
Range type
drop-down list and use the
resulting drop-down list to specify the interval.
Run the
command
regularly
indefinitely
a.
Select Forever in the
Timing type
drop-down list.
b.
Select the date you want to first run the command in the
Start date
drop-
down list.
c.
Select the time you want to run the command in the
Execution time
drop-
down list.
d.
Select an interval type in the
Range type
drop-down list and use the
resulting drop-down list to specify the interval.

Chapter 7 Managing commands, schedulers, triggers, and workflows
docs.smarttech.com/kb/171798 126
7.
OptionalEnable Time to live and type the maximum time in seconds for the command to go live
in the
Time to live (seconds)
box.
8.
Click CONFIRM.
To create a geofencing trigger
1.
Click Repositories and select Scheduler & triggers.
The
Scheduler & triggers
window appears.
Tip
If your organization created its domain account after May 2023, the
Scheduler & triggers
window
includes sample triggers that you can use as starting point for creating your own triggers. These
sample triggers have turquoise icons.
2.
Click ADD NEW.
3. Type a name and description for the trigger in the
Name
and
Description
boxes.
4.
Click Add trigger .
5.
Select Geofencing in the
Select trigger
drop-down list.
6. Using the map, zoom in to the area you want to use for the trigger.
7.
Click Draw a circle and draw a circle around the area.
Note
The area must be at least 40 m in diameter.
8. Specify what happens when the device enters the area by selecting the appropriate option under
On enter
:
o
Select Start to start running the command when the device enters the area.
o
Select End to stop running the command when the device enters the area.
o
Select Nothing to do nothing when the device enters the area.
9. Specify what happens when the device leaves the area by selecting the appropriate option under
On exit
:
o
Select Start to start running the command when the device leaves the area.
o
Select End to stop running the command when the device leaves the area.
o
Select Nothing to do nothing when the device leaves the area.
10.
Click CONFIRM.

Chapter 7 Managing commands, schedulers, triggers, and workflows
docs.smarttech.com/kb/171798 127
To create a Wi-Fi trigger
1.
Click Repositories and select Scheduler & triggers.
The
Scheduler & triggers
window appears.
Tip
If your organization created its domain account after May 2023, the
Scheduler & triggers
window
includes sample triggers that you can use as starting point for creating your own triggers. These
sample triggers have turquoise icons.
2.
Click ADD NEW.
3. Type a name and description for the trigger in the
Name
and
Description
boxes.
4.
Click Add trigger .
5.
Select Wifi in the
Select trigger
drop-down list.
6. Type the Wi-Fi network’s SSID in the
SSID
box.
7. Specify what happens when the device joins the Wi-Fi network by selecting the appropriate option
under
On enter
:
o
Select Start to start running the command when the device joins the Wi-Fi network.
o
Select End to stop running the command when the device joins the Wi-Fi network.
o
Select Nothing to do nothing when the device joins the Wi-Fi network.
8. Specify what happens when the device leaves the Wi-Fi network by selecting the appropriate
option under
On exit
:
o
Select Start to start running the command when the device leaves the Wi-Fi network.
o
Select End to stop running the command when the device leaves the Wi-Fi network.
o
Select Nothing to do nothing when the device leaves the Wi-Fi network.
9.
Click CONFIRM.
Initiating commands using schedulers and triggers
After you have created schedulers and triggers, you can use them to initiate commands on a single
device, multiple devices, all devices that match a saved filter’s criteria, or a group.

Chapter 7 Managing commands, schedulers, triggers, and workflows
docs.smarttech.com/kb/171798 128
To initiate commands on a single device using a scheduler or trigger
1.
Click Devices to open the
Devices
view.
2.
OptionalFilter the devices shown in the
Devices
view.
See
Finding devices
on page12
3. Click the device’s row.
The device’s dashboard window appears.
4.
Click Schedule & trigger command.
The
Schedule & trigger command
window appears.
5. Type a name for the scheduler- or trigger-based commands in the
Command name
box.
6.
Click SELECT TRIGGER.
The
Scheduler & triggers
window appears.
7.
Select a scheduler or trigger from the list and click ADD.
8.
Click SELECT COMMAND and select from the following options:
Option Subsequent steps
Advanced
messaging
a.
Select an advanced message.
b.
Click ADD.
AFW
install/uninstall
a.
Select Install or Uninstall.
b.
Select the apps you want to install or uninstall.
c.
Click CONFIRM.
Note
You need to enroll in Android for Work to use this option (see Android
for Word (AFW)—Google EMM enrollment).
Change agent
password
a.
Type the new agent password in the
Password
and
Confirm password
boxes.
b.
Click CONFIRM.
Clear apps data
a.
Click Add to list for each app for which you want to clear data.
b.
Click CONFIRM.

Chapter 7 Managing commands, schedulers, triggers, and workflows
docs.smarttech.com/kb/171798 129
Option Subsequent steps
Device alert
a.
For each email address to which you want to send the alert, type the
email address in the
Add email, then press Enter
box and press ENTER.
Tips
o
Your SMART Remote Management user account’s email address
is included by default.
o
You can delete an email address by clicking its button.
b.
Type the alert message in the
Message
box.
c.
Click CONFIRM.
Device settings
a.
Select settings.
b.
Click ADD.
Disable apps
a.
Click Add to list for each app you want to disable.
b.
Click CONFIRM.
Enable apps
a.
Click Add to list for each app you want to enable.
b.
Click CONFIRM.
Install package
a.
Select an installation package.
b.
Click ADD.
Lock
N/A
Remote execute
a.
Select a remote execution command.
b.
Click ADD.
Remove Google
accounts from
device
a.
Select Remove all accounts to remove all Google accounts.
OR
Select Keep one account to retain one Google account and type that
account’s email address in the
Email account
box.
b.
Click CONFIRM.
Restart
N/A
Send files
a.
Select files.
b.
Click ADD.
Send message
a.
Type the message title and body text in the
Message Title
and
Message
Body
boxes.
b.
Click CONFIRM.
Shutdown
N/A

Chapter 7 Managing commands, schedulers, triggers, and workflows
docs.smarttech.com/kb/171798 130
Option Subsequent steps
Sound siren
N/A
Uninstall
packages
a.
Click Add To List for each app you want to uninstall.
b.
Click UNINSTALL SELECTED.
Wake on lan
a.
To wake the target devices that match a filter’s or group’s criteria, select
Filter or Group and select a filter or group from the drop-down list.
See
Finding devices
on page12
OR
To wake a single target device, select Device and type a target device’s
ID in the
Device ID
box.
b.
OptionalTurn on Advanced wake-on-lan settings and specify the
broadcast address and port for execution if your network requires this
information.
c.
Click CONFIRM.
Wipe
N/A
Workflow
a.
Select a workflow.
b.
Click ADD.
9.
Click CONFIRM
To initiate commands on multiple devices using a scheduler or trigger
1.
Click Devices to open the
Devices
view.
2.
OptionalFilter the devices shown in the
Devices
view.
See
Finding devices
on page12
3. Select the devices’ check boxes.
4.
Click More actions and select Scheduler & triggers command.
The
Scheduler & triggers command
window appears.
5. Type a name for the scheduler- or trigger-based commands in the
Command name
box.
6.
Click SELECT TRIGGER.
The
Scheduler & triggers
window appears.

Chapter 7 Managing commands, schedulers, triggers, and workflows
docs.smarttech.com/kb/171798 131
7.
Select a scheduler or trigger from the list and click ADD.
8.
Click SELECT COMMAND and select from the following options:
Option Subsequent steps
Advanced
messaging
a.
Select an advanced message.
b.
Click ADD.
AFW
install/uninstall
a.
Select Install or Uninstall.
b.
Select the apps you want to install or uninstall.
c.
Click CONFIRM.
Note
You need to enroll in Android for Work to use this option (see Android
for Word (AFW)—Google EMM enrollment).
Change agent
password
a.
Type the new agent password in the
Password
and
Confirm password
boxes.
b.
Click CONFIRM.
Clear apps data
a.
Click Add to list for each app for which you want to clear data.
b.
Click CONFIRM.
Device alert
a.
For each email address to which you want to send the alert, type the
email address in the
Add email, then press Enter
box and press ENTER.
Tips
o
Your SMART Remote Management user account’s email address
is included by default.
o
You can delete an email address by clicking its button.
b.
Type the alert message in the
Message
box.
c.
Click CONFIRM.
Device settings
a.
Select settings.
b.
Click ADD.
Disable apps
a.
Click Add to list for each app you want to disable.
b.
Click CONFIRM.
Enable apps
a.
Click Add to list for each app you want to enable.
b.
Click CONFIRM.
Install package
a.
Select an installation package.
b.
Click ADD.

Chapter 7 Managing commands, schedulers, triggers, and workflows
docs.smarttech.com/kb/171798 132
Option Subsequent steps
Lock
N/A
Remote execute
a.
Select a remote execution command.
b.
Click ADD.
Remove Google
accounts from
device
a.
Select Remove all accounts to remove all Google accounts.
OR
Select Keep one account to retain one Google account and type that
account’s email address in the
Email account
box.
b.
Click CONFIRM.
Restart
N/A
Send files
a.
Select files.
b.
Click ADD.
Send message
a.
Type the message title and body text in the
Message Title
and
Message
Body
boxes.
b.
Click CONFIRM.
Shutdown
N/A
Sound siren
N/A
Uninstall
packages
a.
Click Add To List for each app you want to uninstall.
b.
Click UNINSTALL SELECTED.
Wake on lan
a.
To wake the target devices that match a filter’s or group’s criteria, select
Filter or Group and select a filter or group from the drop-down list.
See
Finding devices
on page12
OR
To wake a single target device, select Device and type a target device’s
ID in the
Device ID
box.
b.
OptionalTurn on Advanced wake-on-lan settings and specify the
broadcast address and port for execution if your network requires this
information.
c.
Click CONFIRM.
Wipe
N/A
Workflow
a.
Select a workflow.
b.
Click ADD.
9.
Click CONFIRM

Chapter 7 Managing commands, schedulers, triggers, and workflows
docs.smarttech.com/kb/171798 133
To initiate commands on all devices that match a saved filter’s criteria using a scheduler or trigger
1.
Click Devices to open the
Devices
view.
2.
Click Filters in the
Search
bar.
3.
Click Actions in the saved filter’s row and select Scheduler & triggers command.
The
Scheduler & triggers command
window appears.
4. Type a name for the scheduler- or trigger-based commands in the
Command name
box.
5.
Click SELECT TRIGGER.
The
Scheduler & triggers
window appears.
6.
Select a scheduler or trigger from the list and click ADD.
7.
Click SELECT COMMAND and select from the following options:
Option Subsequent steps
Advanced
messaging
a.
Select an advanced message.
b.
Click ADD.
AFW
install/uninstall
a.
Select Install or Uninstall.
b.
Select the apps you want to install or uninstall.
c.
Click CONFIRM.
Note
You need to enroll in Android for Work to use this option (see Android
for Word (AFW)—Google EMM enrollment).
Change agent
password
a.
Type the new agent password in the
Password
and
Confirm password
boxes.
b.
Click CONFIRM.
Clear apps data
a.
Click Add to list for each app for which you want to clear data.
b.
Click CONFIRM.

Chapter 7 Managing commands, schedulers, triggers, and workflows
docs.smarttech.com/kb/171798 134
Option Subsequent steps
Device alert
a.
For each email address to which you want to send the alert, type the
email address in the
Add email, then press Enter
box and press ENTER.
Tips
o
Your SMART Remote Management user account’s email address
is included by default.
o
You can delete an email address by clicking its button.
b.
Type the alert message in the
Message
box.
c.
Click CONFIRM.
Device settings
a.
Select settings.
b.
Click ADD.
Disable apps
a.
Click Add to list for each app you want to disable.
b.
Click CONFIRM.
Enable apps
a.
Click Add to list for each app you want to enable.
b.
Click CONFIRM.
Install package
a.
Select an installation package.
b.
Click ADD.
Lock
N/A
Remote execute
a.
Select a remote execution command.
b.
Click ADD.
Remove Google
accounts from
device
a.
Select Remove all accounts to remove all Google accounts.
OR
Select Keep one account to retain one Google account and type that
account’s email address in the
Email account
box.
b.
Click CONFIRM.
Restart
N/A
Send files
a.
Select files.
b.
Click ADD.
Send message
a.
Type the message title and body text in the
Message Title
and
Message
Body
boxes.
b.
Click CONFIRM.
Shutdown
N/A

Chapter 7 Managing commands, schedulers, triggers, and workflows
docs.smarttech.com/kb/171798 135
Option Subsequent steps
Sound siren
N/A
Uninstall
packages
a.
Click Add To List for each app you want to uninstall.
b.
Click UNINSTALL SELECTED.
Wake on lan
a.
To wake the target devices that match a filter’s or group’s criteria, select
Filter or Group and select a filter or group from the drop-down list.
See
Finding devices
on page12
OR
To wake a single target device, select Device and type a target device’s
ID in the
Device ID
box.
b.
OptionalTurn on Advanced wake-on-lan settings and specify the
broadcast address and port for execution if your network requires this
information.
c.
Click CONFIRM.
Wipe
N/A
Workflow
a.
Select a workflow.
b.
Click ADD.
8.
Click CONFIRM.
To initiate commands on a group using a scheduler or trigger
1.
Click Devices to open the
Devices
view.
2.
Click Groups to open the
Groups
panel.
3.
Click Actions in the group’s row and select Scheduler & triggers command.
The
Scheduler & triggers command
window appears.
4. Type a name for the scheduler- or trigger-based commands in the
Command name
box.
5.
Click SELECT TRIGGER.
The
Scheduler & triggers
window appears.

Chapter 7 Managing commands, schedulers, triggers, and workflows
docs.smarttech.com/kb/171798 136
6.
Select a scheduler or trigger from the list and click ADD.
7.
Click SELECT COMMAND and select from the following options:
Option Subsequent steps
Advanced
messaging
a.
Select an advanced message.
b.
Click ADD.
AFW
install/uninstall
a.
Select Install or Uninstall.
b.
Select the apps you want to install or uninstall.
c.
Click CONFIRM.
Note
You need to enroll in Android for Work to use this option (see Android
for Word (AFW)—Google EMM enrollment).
Change agent
password
a.
Type the new agent password in the
Password
and
Confirm password
boxes.
b.
Click CONFIRM.
Clear apps data
a.
Click Add to list for each app for which you want to clear data.
b.
Click CONFIRM.
Device alert
a.
For each email address to which you want to send the alert, type the
email address in the
Add email, then press Enter
box and press ENTER.
Tips
o
Your SMART Remote Management user account’s email address
is included by default.
o
You can delete an email address by clicking its button.
b.
Type the alert message in the
Message
box.
c.
Click CONFIRM.
Device settings
a.
Select settings.
b.
Click ADD.
Disable apps
a.
Click Add to list for each app you want to disable.
b.
Click CONFIRM.
Enable apps
a.
Click Add to list for each app you want to enable.
b.
Click CONFIRM.
Install package
a.
Select an installation package.
b.
Click ADD.

Chapter 7 Managing commands, schedulers, triggers, and workflows
docs.smarttech.com/kb/171798 137
Option Subsequent steps
Lock
N/A
Remote execute
a.
Select a remote execution command.
b.
Click ADD.
Remove Google
accounts from
device
a.
Select Remove all accounts to remove all Google accounts.
OR
Select Keep one account to retain one Google account and type that
account’s email address in the
Email account
box.
b.
Click CONFIRM.
Restart
N/A
Send files
a.
Select files.
b.
Click ADD.
Send message
a.
Type the message title and body text in the
Message Title
and
Message
Body
boxes.
b.
Click CONFIRM.
Shutdown
N/A
Sound siren
N/A
Uninstall
packages
a.
Click Add To List for each app you want to uninstall.
b.
Click UNINSTALL SELECTED.
Wake on lan
a.
To wake the target devices that match a filter’s or group’s criteria, select
Filter or Group and select a filter or group from the drop-down list.
See
Finding devices
on page12
OR
To wake a single target device, select Device and type a target device’s
ID in the
Device ID
box.
b.
OptionalTurn on Advanced wake-on-lan settings and specify the
broadcast address and port for execution if your network requires this
information.
c.
Click CONFIRM.
Wipe
N/A
Workflow
a.
Select a workflow.
b.
Click ADD.

Chapter 7 Managing commands, schedulers, triggers, and workflows
docs.smarttech.com/kb/171798 138
8.
Click CONFIRM.
Tip
If you want to initiate the command on any new devices added to the group, see
Making group
commands persistent
on page122.
Managing workflows
A workflow allows you to run a series of commands on one or more devices in a single step. Workflows
are particularly useful when you need to run commands in sequence.
Example
If you need to update software on devices then restart the devices to complete the installation, you can
create a workflow that first deploys the appropriate software installation package then restarts the
devices.
You can then run the workflow on appropriate devices enrolled in SMART Remote Management.
You can run a workflow on a single device, multiple devices, all devices that match a saved filter’s
criteria, or a group. Alternatively, you can use a trigger to initiate a workflow at a scheduled time or when
a specific event takes place.
See
Managing schedulers and triggers
on page123

Chapter 7 Managing commands, schedulers, triggers, and workflows
docs.smarttech.com/kb/171798 139
To create a workflow
1.
Click Repositories and select Workflow.
The
Workflow
window appears.
Tip
If your organization created its domain account after May 2023, the
Workflow
window includes
sample workflows that you can use as starting point for creating your own workflows. These
sample workflows have turquoise icons.
2.
Click ADD NEW.
3. Type a name and description for the workflow in the
Workflow name
and
Workflow description
boxes.
4.
Click Commands .
5.
Click ADD COMMAND and select from the following options:
Option Subsequent steps
Advanced
messaging
a.
Select an advanced message.
b.
Click ADD.
Clear apps data
a.
Click Add to list for each app for which you want to clear data.
b.
Click CONFIRM.
Device alert
a.
For each email address to which you want to send the alert, type the
email address in the
Add email, then press Enter
box and press ENTER.
Tips
o
Your SMART Remote Management user account’s email address
is included by default.
o
You can delete an email address by clicking its button.
b.
Type the alert message in the
Message
box.
c.
Click CONFIRM.
Device settings
a.
Select settings.
b.
Click ADD.
Disable apps
a.
Click Add to list for each app you want to disable.
b.
Click CONFIRM.
Enable apps
a.
Click Add to list for each app you want to enable.
b.
Click CONFIRM.

Chapter 7 Managing commands, schedulers, triggers, and workflows
docs.smarttech.com/kb/171798 140
Option Subsequent steps
Install package
a.
Select an installation package.
b.
Click ADD.
Remote execute
a.
Select a remote execution command.
b.
Click ADD.
Remove Google
accounts from
device
a.
Select Remove all accounts to remove all Google accounts.
OR
Select Keep one account to retain one Google account and type that
account’s email address in the
Email account
box.
b.
Click CONFIRM.
Restart
N/A
Send files
a.
Select files.
b.
Click ADD.
Send message
a.
Type the message title and body text in the
Message Title
and
Message
Body
boxes.
b.
Click CONFIRM.
Shutdown
N/A
Sound siren
N/A
Time out
a.
Type the time in minutes and seconds before devices should time out.
b.
Click CONFIRM.
Uninstall
packages
a.
Click Add To List for each app you want to uninstall.
b.
Click UNINSTALL SELECTED.
Wake on lan
a.
To wake the target devices that match a filter’s or group’s criteria, select
Filter or Group and select a filter or group from the drop-down list.
See
Finding devices
on page12
OR
To wake a single target device, select Device and type a target device’s
ID in the
Device ID
box.
b.
OptionalTurn on Advanced wake-on-lan settings and specify the
broadcast address and port for execution if your network requires this
information.
c.
Click CONFIRM.

Chapter 7 Managing commands, schedulers, triggers, and workflows
docs.smarttech.com/kb/171798 141
6. For each command you added in step 4:
o
Select Stop on failure to stop the workflow if the command fails.
o
Select Wait until done to allow the command to finish running before the workflow continues to
the next command.
Tip
To move a command higher or lower in the order of execution, click Press to drag and drag
the command up or down.
7.
Click CONFIRM.
To run a workflow on a single device
1.
Click Devices to open the
Devices
view.
2.
OptionalFilter the devices shown in the
Devices
view.
See
Finding devices
on page12
3. Click the device’s row.
The device’s dashboard window appears.
4.
Click Repository actions, and then click WORKFLOW.
The
Workflow
window appears.
5.
Select the workflow from the list and click APPLY.
To run a workflow on multiple devices
1.
Click Devices to open the
Devices
view.
2.
OptionalFilter the devices shown in the
Devices
view.
See
Finding devices
on page12
3. Select the devices’ check boxes.
4.
Click Workflow .
The
Workflow
window appears.
5.
Select the workflow from the list and click APPLY.
To run a workflow on all devices that match a saved filter’s criteria
1.
Click Devices to open the
Devices
view.
2.
Click Filters in the
Search
bar.

Chapter 7 Managing commands, schedulers, triggers, and workflows
docs.smarttech.com/kb/171798 142
3.
Click Actions in the saved filter’s row and select Workflow.
The
Workflow
window appears.
4.
Select the workflow from the list and click APPLY
To run a workflow on a group
1.
Click Devices to open the
Devices
view.
2.
Click Groups to open the
Groups
panel.
3.
Click Actions in the group’s row and select Workflow.
The
Workflow
window appears.
4.
Select the workflow from the list and click APPLY
Tip
To run the workflow on any new devices added to the group, see
Making group commands
persistent
on page122.


