
1
sales@rts-solutions.com (865) 212-9703 www.rts-solutions.com
READY THEATRE SYSTEMS
getting started guide
READY THEATRE SYSTEMS LLC
2019-1

2
sales@rts-solutions.com (865) 212-9703 www.rts-solutions.com
Welcome to the RTS Getting Started Guide
This guide will cover the basics of RTS procedures and features. For additional information on
how to operate RTS, please see our wiki page. Information on features can be found on our
website. Also, please feel free to contact our sales, media and support team at any time to
implement features or ask questions regarding RTS.
SALES MEDIA SUPPORT
WIKI
http://wiki.readyticket.net/mw/index.php/Main_Page
WEBSITE
www.rts-solutions.com
PHONE
(865) 212-9703

3
sales@rts-solutions.com (865) 212-9703 www.rts-solutions.com
CONTENT
Installing RTS
4
Open and Close Procedures
10
Adding Films
15
Scheduling Films
21
Concession Items
25
Concession Layouts
30
Inventory
33
Station Items
36
Tickets
39
Auditoriums
42
Passwords
47
Timeclock and Payroll
59
Gift Cards
63
Loyalty pages
69
Internet Ticketing
76
Automatic Reporting
82

4
sales@rts-solutions.com (865) 212-9703 www.rts-solutions.com
INSTALLING RTS
This section will explain how to add RTS on to a workstation or office computer.
This section is divided into FOUR parts:
- Downloading the Software
- Connecting RTS to your server when inside the network
- Connecting RTS to your server when outside the network
- Manually connecting RTS to your serve
Downloading the Software
RTS Can be downloaded using the following Link or using the following instructions. Note: Please contact
our technical support team at anytime for assistance.
http://www.readyticket.net/download/net/stubinstaller.exe
1) If not using the link, navigate to
www.rts-solutions.com
2) Select the Customer Tab
3) Click on the link to start the download
4) The RTS stub installer will begin to download. Depending on your internet browser, the setup file will
appear in the bottom of the browser or the top right corner.
5) Run the stubinstaller.exe file, this will download the Setup.exe file for RTS to your desktop
6) Right click on the RTS Setup.exe file and select Run as Administrator
7) RTS will continue to run through the download. A message will prompt if you would like to install a
sample demo configuration, select No.
8) RTS will now begin to download. Depending on your browser, the setup link will appear in the bottom
of the browser, or in the right-hand corner.
9) Click on stub installer for the install to run.

5
sales@rts-solutions.com (865) 212-9703 www.rts-solutions.com
10) After the installer has downloaded, you will see a prompt that it has downloaded to the desktop.
Right click on the icon and select “Run as administrator.”
11) The install will now begin
12) After the setup has been downloaded to the desktop you will see the following prompt. If you are
ready to run the setup, select Yes.
13) RTS will continue to run through the download. A message will prompt if you would like to install a
sample demo configuration. Select No.
14) The next window will ask what type of unit RTS is being downloaded on. For instance, is it an office
computer? A PT 6515? SP 5514? Other? Select as needed. Note: This is an important step as RTS will
load settings specific to the type of computer, such as printer and power settings.
15) After selecting the computer type, RTS will continue with the installation. The next steps depend if
you are inside the server’s network or not.
6
sales@rts-solutions.com (865) 212-9703 www.rts-solutions.com
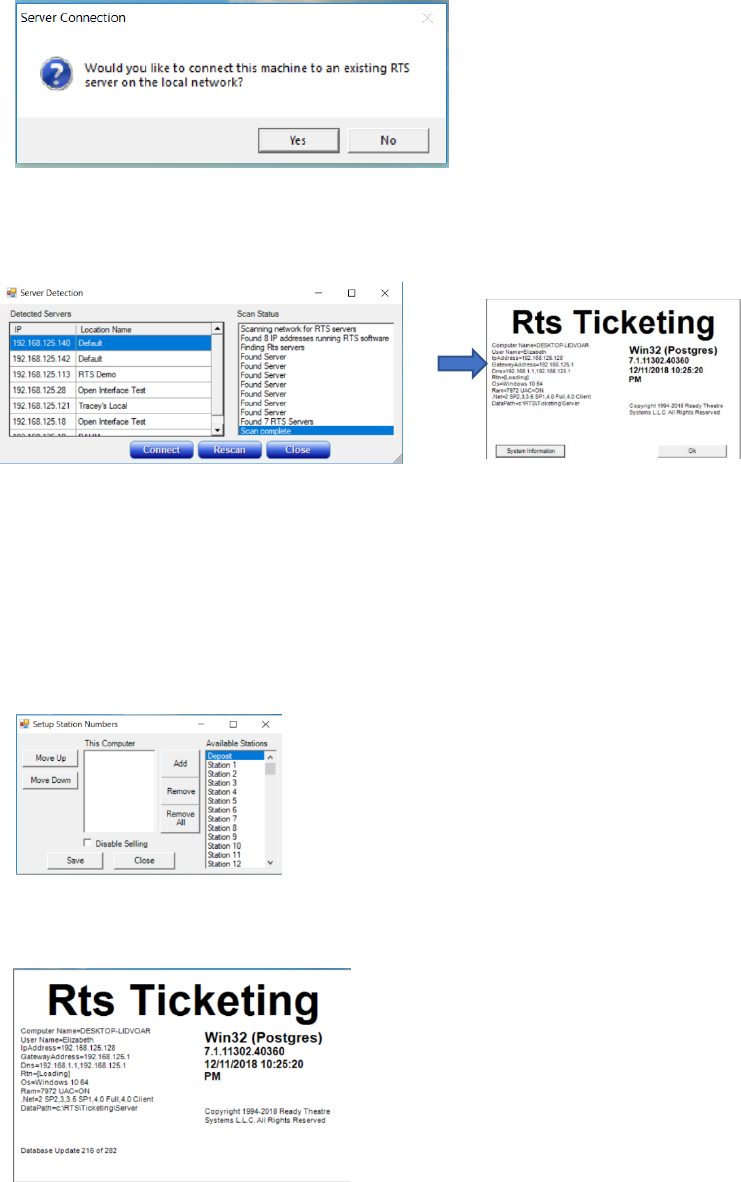
Connecting RTS to your Server when Inside the Network
1) RTS will ask if you would like to connect to a local server. When inside the theatre’s network, select
YES when prompted.
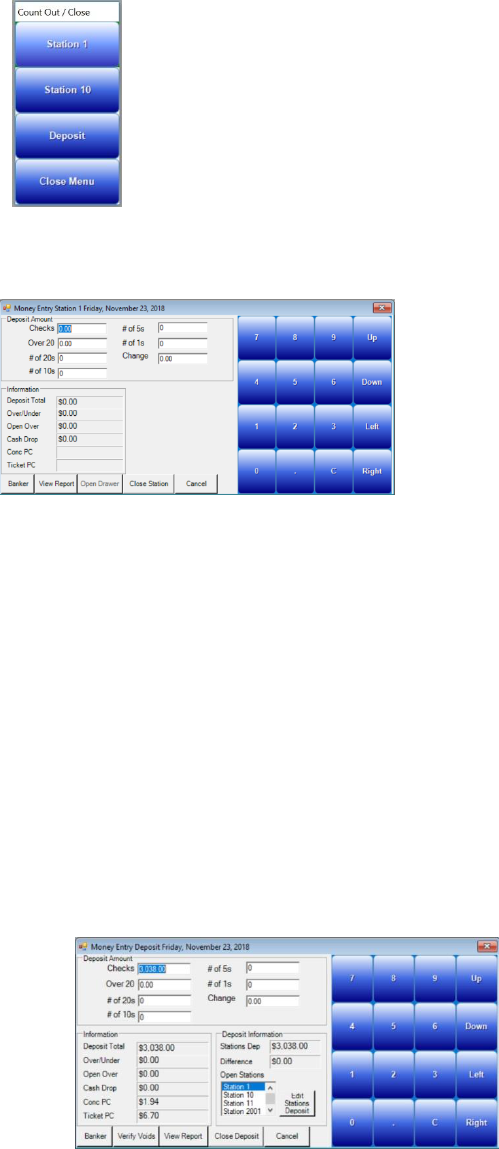
2) Select your server’s IP address from the detected Server list. Note: You may verify your server’s IP
address by navigating on your server to Help – About and viewing the credentials for the IP address.
3) Once your server’s IP address has been verified, select Connect. Your workstation will now be
connected to the server. If you do not see your server in the list, select Rescan. Note: If it does not
appear, select Close. The settings can be manually entered using the steps under Connecting a
Workstation outside the Network.
4) After connecting to the server, you may designate a station number(s) for the terminal. Select the
station number and click add. Repeat the steps as needed. If you do not wish to add station numbers
during the installation, select Close and proceed with the installation.
5) The final steps of the installation will now commence. You should see this window appear, similar to
the Help – About Window.

7
sales@rts-solutions.com (865) 212-9703 www.rts-solutions.com
6) If the setup is successful, the RTS login screen will appear. Please login using your password.
Connecting RTS to your Server when Outside the Network
1) If you are connecting to RTS when outside the network, select No when prompted to connect to a
local server. This situation is frequently used when setting up a home or corporate office computer.
Note: RTS does not require an additional license for office use.
2) After electing not to connect to the server, you may designate a station number(s) for the terminal.
Select the station number and click add. Repeat the steps as needed. If you do not wish to add station
numbers during the installation, select Close and proceed with the installation.
3) The final steps of the installation will now commence. You should see this window appear, similar to
the Help – About Window.
4) Since your RTS is not connected to the server, a blank RTS will appear. Please login using the
password boxoffice. If the wrong password is used, a prompt will appear explaining the correct
password.

8
sales@rts-solutions.com (865) 212-9703 www.rts-solutions.com
5) After logging in, navigate to File – Other – Network Connection.
6) Select Edit Network Servers. The Network Location Setup window will appear.
7) Check off Enable Multiple Servers, found in the bottom right corner.
8) To connect to RTS outside of the network, you will need your RTN number. This can be found under
Help – About on your server’s computer or it can be provided by our RTS team.
9) Click the Add button
10) In the field, name your connection. RTS suggests using your theatre name followed by Away
11) Type in your RTN number in the Server field. Then click the +formovietickets.com field. This will
automatically add the needed information.

9
sales@rts-solutions.com (865) 212-9703 www.rts-solutions.com
12) To verify the connection, select Test. If the connection is active, a Working message will appear. Our
technical support team is available if you experience any technical difficulties. Please repeat the steps as
needed if you have multiple locations. Note: Your computer may also have connections for inside the
local network as well. Please see the following notes for adding a local connection manually.
Manually Connecting RTS to your Server
1) Navigate to File – Other – Network Connection. Select Edit Network Servers. The Network Location
Setup window will appear.
2) Verify that Enable Multiple Servers in the bottom right corner is checked off.
3) Click the Add Button. RTS suggests naming the connection your theatre name followed by “local” or
something similar to designate this connection will be used when at the theatre.
4) The new connection will now be added to the Connection List. Please enter your Server’s IP address.
This can be found by navigating on your Server to Help – About and viewing your server’s IP address
credentials.
5) Once all local connections have been added, select Save. When restarting your server, please select
the connection you would like to use.

10
sales@rts-solutions.com (865) 212-9703 www.rts-solutions.com
RTS OPENING AND CLOSING PROCEDURES
This section discusses the opening and closing procedures for RTS. These
functions are performed daily by RTS users.
This section is divided into four parts:
- Opening Procedures
- Closing Procedures
- Inventory
- Reporting
Opening Procedure
Ticket and Concession Selling Stations
Each RTS selling station can begin each day with a customized starting cash drawer amount. To
configure, navigate to Setup – Banks and enter the starting money for each station and select the
checkbox for Cash Drawer Station. Change the station by selecting the drop-down menu.
NOTE: When using a configured bank amount, the starting drawer amount will need to be included when
closing out your stations, but not included when closing out the deposit.
Closing Procedure
Each day, all selling stations must be closed prior to closing the deposit. It is important that each station
is closed, followed by closing the deposit, each day.
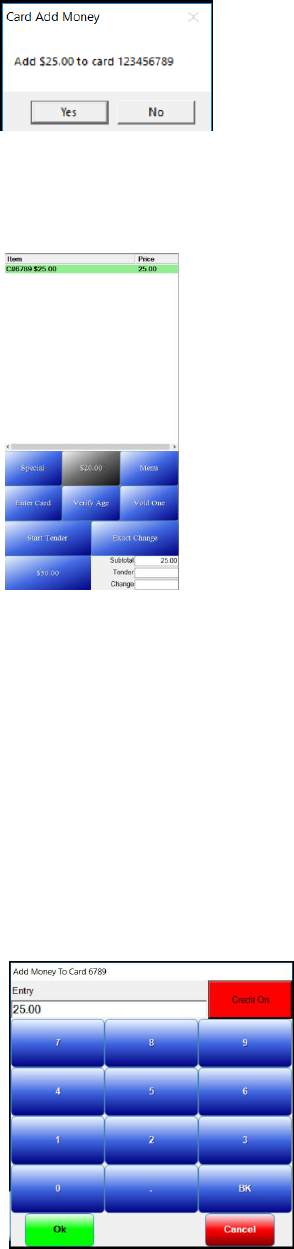
Closing Station(s)
1) Select the Close Station Icon
11
sales@rts-solutions.com (865) 212-9703 www.rts-solutions.com
2) Choose the station you would like to close. If you do not see it in the list, navigate to Setup –
Station Numbers and add the station to the list.
3) RTS will prompt a close station window that will have an amount that should be in your drawer. This
will be in the Over/Under Section.
4) Verify your over/under by entering your station drawer amount (if you are using the RTS
configured banks, this will include your starting drawer amount). You may enter this by entering the
amount in checks, or you can enter the amount of 20s, 10s, etc.
5) If the amount is what RTS expects, the drawer will be even. If not and you verify the over/under,
select Close Station.
6) Repeat for all Stations. DO NOT move on to the Close Deposit steps until all stations have closed.
Closing Deposit
The closing deposit function will close out all stations, batch out credit cards and close out tickets that
will report to Rentrak/Swift, if so enabled.
1) Choose the Close Station Icon and select Deposit. If it is not in the list, you may add it by
navigating to Setup – Station Numbers and adding Deposit.
2) This window is similar to Close Station, however, please note the Open Station Box. If there are
any stations open, the stations will be listed here.

12
sales@rts-solutions.com (865) 212-9703 www.rts-solutions.com
3) Please enter the total deposit amount minus the starting money amount.
4) You may view a prior to close deposit report by select View Report.
5) Verify the Over/Under is acceptable.
6) Select Close Station
7) Enter your RTS password
8) If you are not using secure card readers for chip card processing, you will be prompted to enter
your secure username and password.
9) If the system prompts you to close out your tickets, select yes. If so enabled, your tickets will
then be sent to Rentrak and Swift.
10) You may then print and desired reports as needed. (Suggested report: Reports – Deposit –
Total).
INVENTORY
Receiving Inventory
1) Select Actions – Stock Inventory – Receive or Return
2) Search for the item you would like to stock
3) With the item highlighted, enter the order or memo number, designate the stockroom, the
amount entering in (if one case of 50, enter 50) and the total cost (this is optional).

13
sales@rts-solutions.com (865) 212-9703 www.rts-solutions.com
4) When the order is ready to be added, select Add to List.
5) The order will not be finalized and added into the stockroom until you select FINISH.
Listed Reports: While adding in stock, you may reference the following reports from the receive or
return window. Station Inventory will not update until after you close out the Deposit for the day.
Station Inventory: Inventory report, including inventory corrections and receive or returns.
Count Sheet: Lists current details with boxes next to it to use as a guide for completing end of night
counts. Updates in real time.
Current Details: Current inventory details. Updates in real time.
Correct Inventory
1) Select Actions – Stock/Inventory – Correct Inventory
2) Choose the stockroom or station you would like to correct. If the stockroom is not in the list,
navigate to Setup – Station Numbers and add the stock room.
3) Enter the correct inventory amounts. Note: RTS will automatically adjust your numbers as you
sell. If you are routinely making large adjustments to particular items, please contact our tech
support team to verify your configuration settings.
4) When the items are adjusted, select Ok.
14
sales@rts-solutions.com (865) 212-9703 www.rts-solutions.com
REPORTING
During Day
Ticket Sales Monitor: Reports – Sales Monitor – Ticket Monitor
Ticket Log: Reports – Tickets - Log
Current Sales: Reports – Stations – Open
View Sales Transaction Details: Reports – Deposit Sales Log
End of Night
Deposit Total Report (Shows sales and money received): Reports – Deposit Total
Daily Ticket Report (Displays Ticket sales that started dusting a day): Reports – Tickets – Daily
End of Week
Boxoffice Report: Reports – Tickets – Boxoffice
Weekly Report Tickets: Reports – Tickets – Weekly

15
sales@rts-solutions.com (865) 212-9703 www.rts-solutions.com
ADDING FILMS
This section will explain how to add films to RTS. Before films can be scheduled,
they must first be added to your database. For efficiency and to utilize all
available features, please use the Internet Film List when adding your films.
This section is divided into two parts:
- How to Add Films
- Explaining Each Tab
How to Add Films
The film list can be accessed by Navigating in RTS through Setup – Films. Films can also be added directly
through the Show Scheduler, accessed by Actions – Schedule – Showtimes New Scheduler and selecting
the Films button.
1) From the Film List, select Add, or from the Scheduler click the Films button and select Add.
2) The Film Information window will prompt

16
sales@rts-solutions.com (865) 212-9703 www.rts-solutions.com
3) To add a film, select Internet Film List. This is an RTS compromised database of past, current,
and future films with information pertaining to film information, synopsis, and Digital Signage
Content. See HERE for information on Digital Signage.
4) Select the film you would like to add from the list. You may search for the film using the search
bar. The film list will shorten as you type.
5) Once you have your film selected, click Ok.
6) The Internet Film List will now populate some of the information in the fields.
7) Please enter the length in minutes and the ratings. This will sometimes be available depending
on if the rating was public when the movie was entered into the database.
8) If you are utilizing a feature that requires a film code, press Generate or Find.
Tabs Explained
General Tab
Title: Title of the Film
Display Title: Title that will display online, reports and selling screen, if not using graphic film buttons
Length in Minutes: Length of performance. This will not be included when using the internet film list.
Website: Can provide link to film’s official website, etc.

17
sales@rts-solutions.com (865) 212-9703 www.rts-solutions.com
Film Codes - RTS: Film codes generated for anyone that pulls the RTS schedule.
Film Codes - MT.com: Film codes for MovieTickets.com
Film Codes - CS: Film codes for Webedia.
Story Code:
Start Date:
Ending Date:
Display MovieTickets.com: Display the film on MovieTickets.com.
Sell MovieTickets.com: Allow sales on MovieTickets.com.
Display on Kiosk: Film will be available for kiosk sales.
RTN Website: Will display and sell on the RTS provided website, known as the RTN.
RTN Sell: Sell on RTS provided website, known as the RTN page
Rentrak Transfer: Report to Rentrak
Showtime Display: Show on Digital Signage boards.
Settings Tab
The Settings Tab enables settings for the film that will apply to all performances unless specifically noted
on the performance. If you are scheduling a 3D film, the internet film list should automatically check the
3D box. NOTE: The settings tab is where you will set ADA requirements available for the performance.
Distributor Tab

18
sales@rts-solutions.com (865) 212-9703 www.rts-solutions.com
The Distributor Tab associates a film to a studio for reporting purposes.
1) Highlight the film in the list.
2) This list populates from your Address Book. If you do not see the desired studio, select Add.
3) This will prompt your address book to add the Distributor.
Synopsis Tab
RTS will populate information for the movie on your selling screen and the kiosk when information is
provided under the synopsis tab. When using the Internet Film List, this information will import
automatically.
Content Tab
19
sales@rts-solutions.com (865) 212-9703 www.rts-solutions.com
The content tab populates graphics for your selling screen and also digital signage content. When using
the internet film list, no additional action needs to happen here. If for some reason content does not
download the first time, or it needs to be changed, you can download here.
1) Select Internet Film List
2) Choose your film using the search bar
3) The content available to download will appear in the window
4) Select download all. The content will begin downloading.

20
sales@rts-solutions.com (865) 212-9703 www.rts-solutions.com
SCHEDULING FILMS
This section will explain how to schedule films in RTS using the New Film
Scheduler. From here you may also add films and edit show attributes.
This section is divided into five sections:
- How to schedule.
- Additional schedule features
- Showtimes New Scheduler Explained
- Showtime Colors Explained
- Editing a Showtime
How to Schedule Films
1) Access the show scheduler by selecting Actions – Schedule – Showtimes New Scheduler. From
this window, you can schedule your films or modify existing showtimes and films.
2) To schedule a film, highlight a film from the film column. Hover your mouse to the desired time
and auditorium. After you click in the space, select the auditorium you would like the film to be
scheduled in (if you have only one auditorium type you will not see this prompt. For auditorium
directions, please see the Auditorium Wiki Page HERE).
3) To open the film for sales, right click and select Open for Sales. To open shows for the entire
day, select Open Days at the top of the window. It will prompt to choose a date range. Select
the desired date range and click Ok.

21
sales@rts-solutions.com (865) 212-9703 www.rts-solutions.com
Additional Features
1) You may drag the film block within the auditorium to change the time
2) The film block may be dragged between auditoriums to change the schedule location
3) Right click on the film to delete the performance
4) If the window is expanded large enough, the auditorium will display the seat count on the right
column
5) Add films directly from the Scheduler using the Film button. Select the button and click Add.
Learn how to Add Films from the Add films Wiki HERE.
Showtimes New Scheduler Explained
Calendar: Select the desired date for creating your show schedule
Films/Clean List Buttons
Sort: Choose to sort films alphabetically or by date added to your database.
Add: Adds a film to your database. This is the same function as navigating to Setup – Films.
Edit: Edits the highlighted film in the film list. Changes made here affect all shows. To edit a specific
performance of a film, right click on the film and select edit. See more details below on Editing a
Showtime.
Hide: Hides the film from the film list.
Cancel: Closes the Films Button menu
Show Hidden: Displays films previously hidden using the Hide function. You may enable films again from
this window.
Clean List:

22
sales@rts-solutions.com (865) 212-9703 www.rts-solutions.com
The Clean List button will prompt a window that explains it will hide old films from the Pick List. All films
added before the selected movie in the drop-down will be hidden. NOTE: The films will not be purged
from the system and can be added back by right-clicking on the film list.
Top Buttons
New Ticket Type Rule: To default which ticket type rule to use for a set of scheduled films, select the
ticket type rule using the drop-down menu. This will prevent having to right-click on individual films and
editing the showtime. For further information on how to edit showtimes, please see Edit a Showtime.
Ticket type rules can be added by navigating to Setup – Ticketing – Class Rules.
Exact Time: If checked, allows to schedule film for the exact time, instead of increments of five.
Zoom In: Increases the size of the Calendar.
Zoom Out: Decreases the size of the Calendar.
Copy: Copies the schedule for a designated date range.
Open: Opens the schedule for sales for a designated date range. The films will change from green to
yellow when available for sales.
Print: Prompts to print the schedule in various formats, designated by date range.
Close Window: Closes the film scheduler.
Showtime Colors Explained
Green: Scheduled by not available for sales.
Yellow: Scheduled and available for sales.
Red: Scheduled, available for sales and tickets sold to the performance.

23
sales@rts-solutions.com (865) 212-9703 www.rts-solutions.com
Editing a Scheduled Showtime
Right click on the scheduled film in the scheduler and select Edit.
Title: Title of the film
Location: Location of the auditorium. Can change the location by selecting auditorium from the drop-
down menu
Price: Edits the price category using the drop-down menu. Will Change the tickets listed in the box of
tickets.
Ticket Class Rule: Determine which tickets are available for purchase. This will change which tickets are
checked off in the box if you change the class rule using the drop-down. If you manually click on ticket
types, the class rule will change to Custom. NOTE: If you are frequently customizing this section, please
contact our tech support team so we can modify your class rules.
Save: Saves changes made
Cancel: Closes the window without saving changes made.

24
sales@rts-solutions.com (865) 212-9703 www.rts-solutions.com
Showtime Amenities
Configure settings for an individual showtime, such as if the film should display online, be allowed to sell
online, if the performance is closed captioned, etc.
To change a setting, double click in the True/False area. The setting will change accordingly.

25
sales@rts-solutions.com (865) 212-9703 www.rts-solutions.com
CONCESSIONS
This section explains how to add and edit concession items. Whenever adding
items, it is best to clone items, instead of adding items from the concession list.
When cloning, the item will then copy settings such as stock and the subtotal.
This section is divided into three parts:
- Concession Item List
- Adding a Concession Item
- Concession Items Explained
Concession Item List
To see your current concession list, navigate in RTS to Setup – Concessions – Items. This will display all
your items currently in your database. Note: If an item was deleted and you would like to add it back into
the system, navigate to Setup – Concessions – Restore and restore the item.
From the concession item list, you may use the search bar to search for an item, edit, add and remove.
As previously noted, please do not add items from this window. Please see the following steps for adding
concession items.

26
sales@rts-solutions.com (865) 212-9703 www.rts-solutions.com
Adding a Concession Item
1) Navigate to Setup - Concessions - Clone Item
2) Choose an item in the drop-down menu to base your new item from. Select "Create New Item"
3) Enter the name of your item. RTS recommends capitalizing your item. Select "Okay"
4) The window provided below will prompt after creating your item. From this screen, you may
designate price, functions of the item, subtotal, picture and sales tax. Functionality of this window is
explained in Concession Item Configuration
5) Designate the price of your item. Click the subtotal tab and select the category you wish your item to
be filtered with for subtotal reports.
6) Modify how you wish your item to appear on your selling screen by selecting the picture tab. If an
image of the item is not available within the database, you can designate a font color and background
color.
7) RTS recommends including your tax within your item price to avoid pennies in the drawer. However, if
you choose to utilize the sales tax feature, designate the appropriate sales tax using the sales tax tab. If
your state's tax does not appear in the provided list, please contact technical support for configuration,
or see Sales Tax in the help file.

27
sales@rts-solutions.com (865) 212-9703 www.rts-solutions.com
8) After your item is configured, save your settings. Please keep in mind that this only creates the item
within your database. If you cloned the item with similar settings, the item will already by added into the
appropriate stations and stockroom. If this is not the case, please see Station Items to configure how
your stations are calculated for inventory purposes.
Concession Items Explained
GENERAL TAB
Item Name
Name the item. The name is limited to 15 characters.
Price
Designates the price of the item.
Use to calculate percap
Set this option if you want this item’s sales to be included in the per capita calculation. This setting is
checked whenever a report is displayed. The per capita setting is not stored in the historical data base
records.
Show on cash out report
Forces the remaining amount of this item to print on the cashout report when the station is closed. This
is usually enabled for gift certificates that are returned with the station's cash drawer.
Increase stockroom amounts
Increase the stockroom amount when this item is stocked from the stockroom. This option is set when
the item is a sequentially numbered gift certificate. The stockroom amount is set to the current gift
certificate serial number so when a certificate is removed from the stockroom the software will track to
next certificate number.
Discount with a movie card
This enables discounts if this item is purchased with a discount movie card.
Display on fill order station
This causes this item's sales to appear on a remote display for pickup. Also when this item is sold a
receipt is printed automatically with the Pickup number. You must have a receipt printer configure for
the receipt to print.

28
sales@rts-solutions.com (865) 212-9703 www.rts-solutions.com
Enable Employee Discount
This enables employee discounts for this item.
Amount Entry Item
Set this option to force an amount entry field on the selling screen for this item.
Password Protected
Set this option to password protect the amount entry item.
Earn Points
Set this option if you want this item to earn concession points through the bonus point program.
Currently $1= 1point.
SUBTOTAL TAB
This configures which subtotal the items sales will be included in. This setting is checked and recalculated
whenever reports are displayed. The setting is not stored in the sales database.
None
Select this button to set up the subtotal to nothing. Subtotal reports will display "No Subtotal Found" for
this item's sales.
Edit Subtotals
This button will display the subtotal configuration window.
PICTURE TAB
This tab allows configuration of the concession item that is displayed on the touch screen-selling screen.

29
sales@rts-solutions.com (865) 212-9703 www.rts-solutions.com
Item Graphics
To display a graphical picture of the concession item, click load and select the items picture.
Text Display
If there is no picture available, select the text color and background color of the text button. The size
adjust will increase and decrease the text size on the selling screen.
DISCOUNT TAB
These are different discount amounts that can be configured. The amounts entered should be the
amount to deduct from the selling price.
SALES TAX TAB
This configures the sales tax for the concession item.
1) Select the sales tax from the drop-down lists.
2) If your sales tax is not available, please contact technical support and we will add your tax rate to the
software.

30
sales@rts-solutions.com (865) 212-9703 www.rts-solutions.com
CONCESSION LAYOUT
This section explains how to configure the concession layout.
The section is divided into three parts:
- Configuring the concession layout
- Adding screen layout names
- Troubleshooting
Configuring the Concession Layout
Navigate to Setup - Concessions - Touch Screen Layout - Employee Station. The Concession Layout
window sets the display order for concession item when using a touch screen station.
Adding an item
1) Select the station you wish to add the item to in the station box.
2) Select the item from the item list. If the item you wish to add is missing from the item list, close
the layout window and add the item to the concession sheet for this station. Note: You may use
the search box for faster configuration
3) Left click in on the concession grid located on the right side of the screen. The item will now be
placed in the grid.
4) If you would like for a shortcut page to be added to the layout, scroll to the bottom of the
concession list. There will be options for Screens. Select the screen you would like to add. Note:
Please see below to edit the screens.

31
sales@rts-solutions.com (865) 212-9703 www.rts-solutions.com
Deleting an item
1) Select the station you wish to remove the item from in the station box.
2) Make sure that the Delete item button is selected.
3) On the concession grid located on the right side of the screen, left click in on the concession
item that you wish to remove. The item will now remove. Note: Items will continue to remove
until the delete button has been selected again.
Copy a layout to another station
1) Select the station you wish to copy from in the station box.
2) The stations current settings will be displayed on the screen.
3) Click the save as button and check off the station(s) you would like the configuration to save for.
Configure Multiple Screens within Stations
RTS allows for stations to have multiple screens to better organize your screen and to add more items.
1) Select the screen you would like to edit from the drop down
2) This will bring a new page to configure
3) Please keep in mind to utilize arrow icons and screens for ease of use
Editing Screen Names
1) Navigate in RTS to Setup – Concessions – Touch Screen Names
32
sales@rts-solutions.com (865) 212-9703 www.rts-solutions.com
2) From this window, add a name for the touchscreen
3) You may choose to add an image for the button or add text and background color with a size
adjustment.
Trouble Shooting
1) If the concession item name is displayed but the concession graphic is blank, there is no graphic
associated with the item. Select Setup - Concession Items to associate the graphic.
2) If your item does not appear in the list to add to a station, it's most likely not configured for that
station. Add it to that selling station by navigating to Setup – Concessions – Station Items and check that
your item is in the main item list on the left.

33
sales@rts-solutions.com (865) 212-9703 www.rts-solutions.com
INVENTORY
RTS will track and update stock counts automatically if items are received into
stock. Using various RTS reports, you may then reference reports to verify stock
levels and modify stock levels as needed.
This section is divided into four parts
- Receiving Inventory
- Correcting Inventory
- Transfer within Building
- Reporting
Receiving Inventory
6) Select Actions – Stock Inventory – Receive or Return
7) Search for the item you would like to stock
8) With the item highlighted, enter the order or memo number, designate the stockroom, the
amount entering in (if one case of 50, enter 50) and the total cost (this is optional).

34
sales@rts-solutions.com (865) 212-9703 www.rts-solutions.com
9) When the order is ready to be added, select Add to List.
10) The order will not be finalized and added into the stockroom until you select FINISH.
Listed Reports: While adding in stock, you may reference the following reports from the receive or
return window. Station Inventory will not update until after you close out the Deposit for the day.
Station Inventory: Inventory report, including inventory corrections and receive or returns.
Count Sheet: Lists current details with boxes next to it to use as a guide for completing the end of
night counts. Updates in real time.
Current Details: Current inventory details. Updates in real time.
Correct Inventory
5) Select Actions – Stock/Inventory – Correct Inventory
6) Choose the stockroom or station you would like to correct. If the stockroom is not in the list,
navigate to Setup – Station Numbers and add the stock room.
7) Enter the correct inventory amounts. Note: RTS will automatically adjust your numbers as you
sell. If you are routinely making large adjustments to particular items, please contact our tech
support team to verify your configuration settings.
8) When the items are adjusted, select Ok.

35
sales@rts-solutions.com (865) 212-9703 www.rts-solutions.com
Transfer within Building
1) Select Actions – Stock/Inventory -Transfer Within Building
2) First, choose the Station or Stockroom the item currently resides in that you would like to
transfer
3) Next, select the Station or Stockroom from the dropdown the item will be transferred into from
the To Station.
4) Select the Item that will be transferred, followed by the Amount.
5) When the transfer is set how you would like it, select Transfer.
Reports
RTS has multiple reports available for tracking inventory.
Reports – Inventory – Count Sheet: Displays current details with a space to indicate current levels in
stock.
Reports – Inventory – Concession Sales vs Inventory: Displays inventory information by deposit. This
information will update after the deposit is closed.
Reports – Inventory – Cost: RTS will calculate the cost of items if the information is entered when
receiving items into stock.
Reports – Inventory – Current Details: Live count of stock as day progresses. The deposit does not have
to close for this report to update.
Reports – Inventory – Inventory Remaining: Displays how many of each item is remaining in the
location’s inventory and how many days the current inventory should last. The number of days
remaining is calculated using sales for the past 35 days.

36
sales@rts-solutions.com (865) 212-9703 www.rts-solutions.com
STATION ITEMS
This section discusses how to determine which items will be available in which
selling stations, and how they will behave in the stockrooms.
The section is divided into two parts:
- Adding items into a station/stockroom
- Station Items Explained
Adding Station Items
To determine which items will be available in certain stations and stockrooms and to designate which
station/stockroom an item will stock from, navigate to Setup - Concessions - Station Items
1) From this window, you will have your concession items listed in the Main Item List. Your concession
items will not be available in your station until you move the items from your main list to your station
list. To move all items, select All with the arrow pointing left. Note: Removing items utilizes the same
concept using the right arrow.
2) To add an item into a station, highlight the item in the Main Item List, then select the left arrow. This
will then prompt you on the item's setting. Select whether the item will act as a selling item, inventory,
entry, or custom. Select Selling.

37
sales@rts-solutions.com (865) 212-9703 www.rts-solutions.com
3) The next window will prompt you to select a stockroom. If its a stock able, item, select Stockroom 1. If
the item is available for sale but you are not tracking inventory, such as a combo or theatre rental item,
choose Create.
4) Repeat the above steps as needed. To save your configuration for multiple stations, select Save As,
and select the stations accordingly.
5) Configuring Stockrooms follows the same format. Select your stockroom in the drop-down menu.
Move your items from the Main List into the Station Item List. This time the item will be set to Inventory
and Create. Repeat as needed.

38
sales@rts-solutions.com (865) 212-9703 www.rts-solutions.com
Setup – Concessions – Station Items Explained
The concession sheet determines which items are included in each station. It also instructs the system
how each item operates. By configuring each station’s items independently, you have total control over
your inventory system.
Main Item List
This is a list of all available concession items. Items can be dragged from this list to the station item list to
add the item to the station.
Station Items
This is a list of the items in the currently selected station.
Item Settings
The item settings configure how the current selected item in the station item list works.
Disable Open / Close
Setting this option removes the item from the count in and the count out concession sheets.
Disable Stock In
Setting this option removes this item from the order stock concession entry.
Disable Waste
Setting this option disables waste for this item.
Disable Discount
Setting this option disables employee discount for this item.
Close Out – Normal
Setting this option causes the close amount to be transferred to the close amount after the station is
closed. This setting is used for most inventory items.
Close Out - Zero Close
Setting this option causes the concession calculation to compute sales as if the close entry is zero. Also,
the close number is not transferred to the close amount after the station is closed.
Close Out - Zero Prior
Setting this option causes the close number to be set to zero after station closing. This setting is usually
used when an amount is entered into the closed concession sheet when the station is closed, but the
entry should not carry inventory into the next station report, for instance, a coupon redemption that is
entered at station close.
Stock From Location
This is the inventory location where the item will be removed from when it is ordered using an order
stock entry or it is tendered in the cash register.

39
sales@rts-solutions.com (865) 212-9703 www.rts-solutions.com
TICKETS
Tickets can be added and edited into RTS using the ticket price category module.
This will not determine when tickets are available. Please contact our technical
support team for ticket availability changes.
This section is divided into two parts:
- Adding Tickets
- Setup – Tickets Explained
Adding Tickets
1) Navigate to Setup - Tickets - Price.
2) Highlight General and select "Edit." Note: RTS recommends utilizing only one price category.
However, you can add a new price category by selecting "Add." If you would like to create a new
category with the same time tickets, select clone. This will clone the settings of an existing
category.
3) After selecting Edit, the Setup Ticket window will populate.

40
sales@rts-solutions.com (865) 212-9703 www.rts-solutions.com
2) When editing a ticket category, select Add Ticket and designate the name of your item accordingly.
3) Enter your price (without tax). If you would like to add tax (which will be included in the price on the
selling screen), enter in the Tax 1 and Tax 2 fields accordingly.
4) Modify your ticket names if needed. Note: The RTS Selling screen allows for 7 characters. If your name
is longer than 7 letters, consider shortening your name for the Employee Screen and the Ticket Print
Screen. For example, change Senior to Sr
5) Repeat steps as needed, and choose Save and Close.
Setup Tickets Explained
Ticket
Lists the tickets in your database. If you are configuring tickets for the first time, this field will remain
blank until tickets are added.
Show Disabled Tickets
If checked, tickets that were previously deleted will appear in the list
Move Up
RTS determines the ticket order on the selling screen based on how they are listed in the Ticket Window.
If you would like for a ticket to appear higher on your list, highlight the ticket and select Move Up
Move Down
Moves your ticket down in the list. This list determines the order of appearance on the selling screen.
Ticket Names
Database
Determines your ticket name in the database
Employee Screen
Designates the ticket name that will appear on your selling screen. The ticket should be modified to less
than 7 characters to fit on the selling screen.
Ticket Print Name
Displays how the ticket will print on the tickets. Characters are also limited to the ticket, so modify your
ticket name accordingly if needed.
Internet Name
Display name for online ticket sales.
Kiosk Name
Ticket name displayed on the kiosk
Kiosk Description
Name that appears on the kiosk

41
sales@rts-solutions.com (865) 212-9703 www.rts-solutions.com
Price (no tax)
Price of ticket before tax.
Tax 1
First tax to be calculated. Will appear as a combined amount with your Price amount.
Tax 2
An additional field for tax
Enabled Employee
If checked, the ticket will display on the Employee Selling Screen
Enabled Kiosk
Determines if ticket will appear on the kiosk
Enabled Internet
Designates if the ticket will be available for purchases made online. For example, a Pass would be
enabled for Employee usage, but not for sales made online.
Reward Points
Designates how many points will be earned for the loyalty program.
Enabled Web API
This determines if the ticket type will be available for sales for third-party sites that use the API, such as
movie pass. If this is checked, all sites that you use on the API will be available for you to determine if the
ticket is available for sale on that website.
Link Item Options
Links a concession item with a ticket. This can be used to have an item associated with the ticket or
discount a price of a ticket while still reporting to the boxoffice correctly.
Item
Choose the item that will be linked to your ticket.
Item Amount
Choose how many concession items will be linked.
Item Price
Designates the price of the ticket.

42
sales@rts-solutions.com (865) 212-9703 www.rts-solutions.com
AUDITORIUMS
This section will explain how to set auditorium levels, determine default ticket
pricing and settings.
The section is divided into two parts:
- Adding Auditoriums
- Setup - Auditoriums Explained
Adding Auditoriums
1) Navigate to Setup - Auditoriums in RTS. From this window, you can add auditoriums, change seat
levels, or edit default pricing structures.
2) To add an Auditorium, select Add in the bottom left corner. You will see a prompt to name your
Schedule Location. Set the location name. An example is shown below.

43
sales@rts-solutions.com (865) 212-9703 www.rts-solutions.com
3) For the next prompt, select the desired Ticket Price Category. This will enable which ticket price
category defaults for a selected auditorium when scheduling your movies.
3) The next prompt will populate with a number corresponding to your Schedule Location Name. Using 2
GENERAL for an example, the next window will display the number 2. Select okay.
4) Now that your Schedule Location has been created, you can add Auditorium Information. In the
middle section of the window under the general tab, select Add. This will prompt to add your general
Auditorium Name. RTS Suggests calling it Auditorium (#) with the appropriate corresponding number.
For example, Auditorium 2.

44
sales@rts-solutions.com (865) 212-9703 www.rts-solutions.com
5) After adding the Auditorium Name, another box will appear with the number corresponding to your
auditorium already populated. Select okay.
6) You may now edit Total Seats and various warning levels. This section designates when RTS will alert
your employees that a show is down to single seats or sold out.
7) Select the Settings Tab. From this tab you can select the Auditoriums features such as 3D Capable. If
you determine your 3D pricing through your Class Rules (See Setup - Tickets - Class Rules for more
information) you must check off that the auditorium is 3D capable.

45
sales@rts-solutions.com (865) 212-9703 www.rts-solutions.com
9) For Physical Auditoriums, select Add. Choose your auditorium accordingly.
10) To have your auditoriums appear in the Physical Auditoriums List, select the Physical Locations tab in
the top left corner. Add as many auditoriums as needed by clicking Add.
Setup - Auditoriums Explained
Schedule Locations
List of your auditoriums. Highlight the auditorium you wish to edit from this list to determine seat counts
and features.
Delete
Deletes the highlighted auditorium. You may see previously delete auditoriums by selecting "Show
Deleted."
Ticket Price
When scheduling films in RTS, your show will default to a particular price category based off of this
setting. Highlight the price category you use most often for efficiency and employee accuracy when
scheduling films.
Employee Name
Displays on employee selling screen. An example of how it displays on your selling screen is provided
below.

46
sales@rts-solutions.com (865) 212-9703 www.rts-solutions.com
Settings
Total Seats
This is the total number of seats in the auditorium. Once these seats have tickets issued, the ticketing
software will refuse to sell any more tickets.
Single Seats
When the number of seats remaining is less than the single seat level, the ticket selling screen will
display the single seat warning.
Sold Out
When the number of seats remaining is less than the sold-out seat level, the ticket selling screen will
display the sold-out warning. The sold-out warning is only a visual display, ticket sales can continue until
there are no seats remaining.
Ticket Description
This is an optional message that is printed on the ticket after the advertising line.
47
sales@rts-solutions.com (865) 212-9703 www.rts-solutions.com
PASSWORDS
This section discusses how to add employees in RTS, and the varying password
levels. The Password screen is accessed by selecting Setup – Passwords. This is an
important step that should be done as soon as possible.
The section is divided into five parts:
- RTS Preconfigured Groups
- How to add Custom Groups
- Adding Users
- Setup Password Features
- Explaining Different Tabs
RTS Preconfigured Groups
The RTS password module screen is loaded with password groups available to assign to your employees.
These groups include
1) Cashier – Only allowed to sell and clock in and out
2) Disabled – Zero Level, used when the employee is no longer working at the theatre
3) General Manager – Highest level under owner. Can access all reports beside web reporting and most
editing functions in RTS.
4) Manager – Lower level to General Manager with less clearance.
5) Owner – Highest clearance in RTS with full access.
6) Shift Manager – 7000 level, less access than manager level
7) Timeclock Only – Can only clock in and out. Not able to sell.
Note: These settings are not able to change unless a group is first selected, and then changed to Custom
in the drop-down. If you would like to create your own password settings, please see the following steps.

48
sales@rts-solutions.com (865) 212-9703 www.rts-solutions.com
Creating Custom Groups
The RTS password module screen is loaded with password groups available to assign to your employees.
These groups include
1) Navigate in RTS to Setup – Password Group
2) To add a group, RTS recommends using the clone feature. To clone, choose the password group you
would like to base the new group. Select Clone.
3) A window will prompt verifying if you would like to create a new group based on the selected
password group. Select Yes to continue and enter the new group name.
4) A new group will appear in the drop-down with the varying options now available to be marked as
true or false. Configure the group accordingly and select Save when done. Please repeat these steps as
needed or your Password Groups. Please see below for an explanation on the different password
categories.

49
sales@rts-solutions.com (865) 212-9703 www.rts-solutions.com
Adding New Users
After your groups are ready, you may add employees into your system.
1) Navigate in RTS to Setup – Passwords
2) Select Add User.
3) Enter the First Name followed by the Last Name
4) Enter a password then verify the password
5) RTS will ask if you would like to associate the employee number using a social security number or use
a randomly generated number. Select No.
6) Choose a password group for the employee. Using the steps above, select either a RTS preconfigured
group or a custom group using Setup – Password Group.

50
sales@rts-solutions.com (865) 212-9703 www.rts-solutions.com
7) After selecting the password group, RTS will ask if you would like to create the new user. If you are
satisfied with the settings, select Yes or No to repeat the steps. Once complete, the new user will appear
in the password window.
Setup – Password Features
Changing Passwords:
If you are changing the password for a different user:
1) Select Change Password under Selected User and have the employee name selected. It will not
prompt for the old password and only the new password. You must have the appropriate password level
to complete this step.
If you are changing the password for yourself
1) Select Change Password under Current User. It will prompt to enter in the old password first, and
then enter in the new password.
Add Fingerprint:
You may add a fingerprint to login in addition to a standard password.
If you are adding a fingerprint for a different user:
1) Select Add Fingerprint under Selected User and have the employee name selected.
2) A window will prompt to add a fingerprint four times.
3) When done, the user can now log in using their fingerprint.
If you are adding a fingerprint for yourself
1) Select Add Fingerprint under Current User.
2) A window will prompt to add a fingerprint four times.

51
sales@rts-solutions.com (865) 212-9703 www.rts-solutions.com
3) When done, the user can now log in using their fingerprint.
Edit User
1) Select the user you would like to edit
2) Choose Edit User.
3) A window will prompt to edit the name or edit employee number. Please edit the desired settings
accordingly.
Delete User
1) This feature will delete the highlighted employee. Instead of deleting the user, you may also set the
user to be a disabled setting.
Setup – Password Tabs Explained
Cards Settings
This section controls settings for credit cards and Mag cards.
Register Mag Card
Allows user to register a mag card with the customers name and address.
Lookup Registered Cards
Allows user to search for registered mag cards.
Credit Card Setup
Allows user to configure Credit Card Service Providers.
Clear Mag Cards
Allows user to remove all information from a mag card.
Enter New Mag Card
Allows user to add new mag cards to the system.
Manual Card Entry
Allows user to process mag cards without using a card reader.
Manual Credit Card Entry
Allows user to process credit cards without using a card reader.
Manual Credit Card Amounts
Allows user to process credit card sales and refunds for user specified amounts.
Edit registered cards
Allows user to edit a mag card’s registered user information.
Issue Monthly Pass
52
sales@rts-solutions.com (865) 212-9703 www.rts-solutions.com
Allows user to issue a monthly pass.
Transfer Cards
Allows user to transfer data from one card to another.
Manual Add Points
Manually add points to gift cards.
Void Credit Credits
Execute void transactions via credit card purchase on the selling screen
Marketing Creator
Access to Online Gift Purchase Logs
View Full Mag Card in Log
When viewing mag card report, user can see full card number instead of last four digits.
Bulk Card Functions
Access to Setup – Mag Cards – Bulk Card Functions. This screen is for configuring gift card options and
generating gift card numbers.
Close Settings
This section controls the access to closing stations and making cash drops.
Access Deposit
Allows user to access the deposit station.
Close Station
Allows user to close stations.
Mid Shift Cash Drop
Allows user to use the cash drop function.
Database Settings
This section controls access to functions that can alter the database, edit reports, backup and restore the
entire database, edit deposit sales and more.
Backup
Allows user to backup of database records.
Restore
Allows user to restore database records from backup files.
Edit Deposit
Allows user to edit the total deposit amount after the deposit has been closed using the Edit Deposit
Window.
Delete Data
Allows user to delete database records.
Export Deposit
Allows user to export the deposit and ticket database to ASCII or accounting software.
Edit Deposit Sales
Allows the user to edit non-inventory items in the reporting database.
Edit Closed Stations Deposit
Allows the user to edit the individual stations deposit amounts before the deposit station is closed.
SQL Query
Permits user to run SQL Queries
53
sales@rts-solutions.com (865) 212-9703 www.rts-solutions.com
Discount Settings
This section controls the discounts settings.
Sell Discount
Allows user to sell an employee discount concession item.
Receive Discount
Allows user to buy employee discount concession items.
Manual Discount
Allows user to enter non-calculated discount amounts.
Discount Setup
Allows user to configure the employee discount settings using the setup concession employee discount
window.
Override Discount Restrictions
Allows user to override discount restrictions.
Pickup Tab Password Settings
This tab controls the ability to view and access the Pickup Viewer.
Pickup Settings
This section controls the ability to view and access the Pickup Viewer.
Access pickup viewer
User can access the pickup viewer
Configure pickup viewer
User can configure the pickup viewer
Selling Settings
This section controls the access to the selling and voiding functions in RTS.
Sell Tickets
Allows user to sell tickets
Void Tickets
Allows user to void tickets. If the tickets have not been printed, a user without this setting may void
them from the register.
Ticket Previous
Allows user to sell and void tickets for a show time before the best calculated show time.
Can Sell Passes
Allows user to sell zero priced tickets.
Void Concession
Allows user to void concession items. If the transaction has not been tendered, any user may void from
the register.
Ticket Code
Allows user to enter a new ticket code. This is only used in keyboard selling mode.
Advance Tickets
Allows user to sell advance tickets. Advance tickets are tickets for a selling date in touch screen mode or
any future show time after the next show time within 6 hours in keyboard mode.
54
sales@rts-solutions.com (865) 212-9703 www.rts-solutions.com
Open Cash Drawer
Allows user to open the cash drawer without completing a transaction.
Over Sell Auditorium
Allows user to sell more tickets for a show time then there are seats in the auditorium.
Issues passes
Allows user to issue passes.
Issue Custom Gift Certificate
Allows user to issue gift certificates.
Protected Concession Item Sale
Allows user to sell a protected concession item sale.
Credit Card Refund
Refund Credit Card transactions
Print Pickup Tickets
Print advanced tickets purchased online
Swap Seats
Change seats using the reserved seating feature.
Kiosk Single Seat Overide
Override the single seat warning in kiosk mode
Hold Reserved Seats
Hold seats for reserved seating
Sell Companion Seats
Sell companion seats for reserved seating
Sell Wheelchair Seats
Sell wheelchair seats for reserved seatig
Stock Settings
This section controls the access to inventory correction, stocking in and out and transferring inventory.
Stock In
Allows user to stock item in to the system using the stock in / out window.
Stock Out
Allows user to stock item out of the system using the stock in / out window.
Stock Transfer
Allows user to transfer stock between stations using the stock transfer window.
Access Inventory Correction
Allows user to access the inventory correction window.
Waste
Allows user to waste inventory items.
Transfer Settings
This section controls the access to data transfers and Rentrak or Hollywood software.
Data Transfer
Allows user to user the communications functions to send and receive database records using the
Remote Data Connections Window.
Setup Data Transfer and Remote Control
Allows user to setup data transfers and the remote-control function
55
sales@rts-solutions.com (865) 212-9703 www.rts-solutions.com
Rentrak and Hollywood Software
Allows user to send gross information to Rentrak or Hollywood Software.
Timeclock Settings
This section controls the time clock settings.
Enable Time Clock Punch
Allows user to punch in and out using the time clock.
View Time Clock Punches
Allows user to view and print time clock reports.
Edit Time Clock Punch
Allows user to manually edit time clock entries.
Schedule Employees
Allows user access to the employee schedule.
Setup Time Clock
Allows user to configure time clock options.
Override Schedule Time (All)
Allows user to override schedule lockouts when using the time clock and override lockouts for other
employees.
Override Schedule (Myself)
Allows user to override schedule lockouts for their own password when using the time clock.
Enable Scheduling
Allows user to be scheduled
Prompt to Punch In
Prompts user to punch in
Setup Payroll
Allows user to setup payroll reporting
Payroll Reports
Allows user to view the payroll reports
View Tab Password Settings
This tab controls the access to many of the reports, over and under totals and stockrooms.
Reports Section
This section controls access to reports.
General Reports
Allows user access to daily reports not over 3 days old. See Old Reports
Old Reports
Allows user access to all reports except summary reports.
Summary Reports
Allows user access to summary reports
Show Sales Before Deposit
Allows user to view sales and inventory levels before the deposit is closed.
View Over / Under Total
Allows user to view the over / under total amount when closing a station.
View Over / Under Open
Allows user to view the total over / under when closing a station.

56
sales@rts-solutions.com (865) 212-9703 www.rts-solutions.com
Access Stockrooms
Allows user to access stockroom stations
Multiple Locations
Allows user to access non-local theatres reports and settings that are included in the local networks
database. This option is used to control manager access to information when the local theatre is a
remote data location for other locations.
Access Web Reporting
View reports form any outside browser, tablet or mobile device. See our wiki page for instructions on
how to configure. Web Reporting
Setup Settings
This section controls the access to most of the setup menu.
Show Times
Allows user to setup and modify show times using the show schedule window. Also allows the user to
setup and modify film titles using the Setup Film Window.
Passwords
Allows user to add new passwords and change their password using the setup password window. This
also allows access to the setup password group window.
Local Computer
Allows user to modify the local computer configuration using the Setup Local Computer Window.
Prices
Allows user to modify all prices in the system. This setting enables access to Setup Items, Setup Ticket
Price, and expiration of old super savers.
Conc Setup
Allows user access to the Setup Concession Menu Items.
Keyboard
Allows user access to the setup keyboard window.
Ad Line
Allows user to modify the Advertising Line printed on the ticket.
Screen Information
Allows user to modify the auditorium configuration using the Setup Auditorium Window.
Theatre Name
Allows user access to changing the local theatre database name using the setup theatre name window.
Addresses
Allows user access to the address list window.
Accounting
Allows user access to the setup accounts window and the setup account allocation window.
Rentrak, Hollywood Software and EDI
Allows user to configure Rentrak or Hollywood automated gross reporting.
Currency
Allows user to configure currency configuration
Register Layout
Allows user to access the register layout screen
Custom Gift Certificates
Allows user to setup gift certificates
57
sales@rts-solutions.com (865) 212-9703 www.rts-solutions.com
Other Settings
This section controls the access to misc settings in RTS.
Shell
Allows user access to the windows shell.
Utilities
Allows user access to Actions / Close Tickets and other miscellaneous menus.
Exit Rts System
Allows exiting the ticketing software.
Scan Documents
Allows user to scan and attach documents to the deposit.
Send Faxes and Email
This is currently not implemented in the windows version.
Access Email
This setting is not used in the windows version.
Schedule Departments
Allows user access to the employee schedule department list.
Schedule Employees
Allows user access to the schedule employee’s window.
Ad Display Setup
Allows user to configure the ad display
Internet Settings
This section controls access to web, email and posting showtimes to RTN.
Post Show Times to Web
Allows user to update the website using the current show schedule.
Access Web Site Passwords
Allows user to edit the current passwords for the show time web site.
Web Browser
Allows user to access the web browser
Setup Web Restrictions
Allows user to configure web restrictions. Allow websites to be viewed etc.
Access default email Client
Allows user to access the default email client.
Kitchen Pickup Viewer Settings
This section provides settings for the pickup viewer
Access
User with this setting will have access to the pickup viewer
Configure
User can configure the pickup viewer
58
sales@rts-solutions.com (865) 212-9703 www.rts-solutions.com
Tabs Settings
This section refers to tab settings for quick service and the restaurant interface.
View all Open Tabs
View all open tabs.
Finish Cash Tabs
Complete tabs via cash
Allow Tab Management
Manager setting to manage tabs across multiple users.
Info Settings
This section controls access to web, email and posting showtimes to RTN.
Email Address
Enter your Email Adress for the web reporting
Password Level
Password level needs to be set at 10001 for web reporting
Brunswick Settings
This section controls settings for the Brunswick configuration.
Setup
Allows user to setup Brunswick.
HVAC Settings
This section controls settings for HVAC.
Setup
Allows user to setup HVAC.
Override
Allows user to override HVAC.

59
sales@rts-solutions.com (865) 212-9703 www.rts-solutions.com
TIMECLOCK AND PAYROLL
RTS can track employee’s timeclock hours and their payroll. Employees will need
to be added to a department and the department is assigned a pay rate.
This section is divided into four parts
- Time Clock Departments
- Assigning Time Clock Departments
- Time Clock Options
- Pay Rates
- Reports
Time Clock Departments
First, Time Clock Departments need to be added into RTS.
1) Navigate in RTS to Setup – Time Clock Options. Select the Departments Tab.
2) Click Edit.
3) A window will prompt to add or remove departments.
4) To add a department, click Add. Type in the name and click Ok. The Department will now be added to
the list.

60
sales@rts-solutions.com (865) 212-9703 www.rts-solutions.com
5) Please repeat these steps as needed. If the department can complete transactions, please mark the
box Finish Cash Transactions.
Assign Time Clock Departments
Each Employee will now be assigned to a Time Clock Department. Note: Employees can be assigned to
multiple time clock groups. When the employee clocks in, they will be prompted to log in to their job for
the shift.
1) Select in RTS Setup – Time Clock – Employees in Department
2) Check off the department the employee is assigned. Repeat the steps as needed. Save when
complete.
Assign Pay Rates
RTS can also calculate pay rates. This will be assigned per the employee’s department.
1) Navigate to Setup – Time Clock – Payroll
2) Designate if the employee is hourly or salary
3) Enter their pay rate by double-clicking in the pay rate for the designated department. Repeat this step
as needed and select Save when done.

61
sales@rts-solutions.com (865) 212-9703 www.rts-solutions.com
Reports
Time Clock and Payroll reports can be accessed in RTS by selecting Reports – Time Clock.
Current Status:
Displays the current status of all Time Clock users in RTS.
Daily:
View Time Clock hours broken down by day per the designated date range.
Details:
View Time Clock Details by the designated date range.

62
sales@rts-solutions.com (865) 212-9703 www.rts-solutions.com
Employee:
View timeclock details broken down by employee by the designated date range.
Labor Cost:
View Labor Cost details by date range. Modify the report using the True/False parameters.
Payroll
View payroll information for a given date range. Can be broken down by hour-minute or decimal. Can
also show total only and employee numbers.
Payroll Cost
Displays payroll cost for the specified date range.

63
sales@rts-solutions.com (865) 212-9703 www.rts-solutions.com
GIFT CARDS
This section discusses gift card functionality in RTS, ranging
from how to order cards, sell cards and how to redeem.
Note: RTS can also sell gift cards online. Please see our wiki for
more information. Online Gift Cards
The section is divided into eight parts:
- Gift Card Ordering
- Adding Money to Cards
- Removing Money from Cards
- Adding Passes to Gift Cards
- Adding Concession Items to Gift Cards
- Transferring Gift Card Information
- Completing Transactions with Gift Cards
- Reports
Ordering Cards
RTS suggests ordering cards from Plastic Printers. When cards are ordered, Plastic Printers will request
cards numbers from RTS so we can generate the card numbers directly within your database. This way
you will not have to manually enter the card numbers. Contact information is provided below.
Ashley Otte
Ashley.Otte@PlasticPrinters.com
651.319.4758 Direct
741 Spiral Blvd. • Hastings, MN 55033
http://www.plasticprinters.com
When using a different card company:
1) Email support@rts-solutions.com including the locations' information and the number of card
numbers needing to be generated.
2) Our card numbers are provided in the following format
a) Track 1, human-readable CR-LF
b) Cards need to be encoded on ABA Track 1 only, nothing on Track 2 or 3. Cards can be lo-co or
hi-co (lo-co is preferred and usually more cost effective). Note: It is strongly recommended that
the card number be printed on the cards due to normal wear of the magnetic strip.
* Above information is for the manufacturer.

64
sales@rts-solutions.com (865) 212-9703 www.rts-solutions.com
Adding Money to Cards
1) At the selling screen, select Menu – Add Money
2) Swipe or manually enter the card number you wish to add money to.
3) The next prompt will ask to add money to the card. Enter the amount of money you wish to add to
the card. Select OK.
65
sales@rts-solutions.com (865) 212-9703 www.rts-solutions.com
4) After selecting Ok, RTS will ask to confirm the amount being added to the card. If the amount is
correct, select Yes, or No, to begin the process again.
5) Once confirmed, the card now moves to the tender window. Money will not be added to the card
until the transaction completes. Please finish the transaction using the appropriate transaction method.
6) Money will be added to the card instantly and can be used directly after the transaction finalizes.
Removing Money from Card
The following steps are for removing money from a card and crediting the money back to a customer.
1) On the selling screen, select Menu – Void On. The tender will turn red indicating a void is taking place.
2) Select Menu – Add Money, the same steps as you would be adding money to a card.
3) Enter the card number.
4) Enter the money you would like to remove from the card, however, select CREDIT OFF. When the
button is selected, it will turn red and the verbiage change to Credit On.
66
sales@rts-solutions.com (865) 212-9703 www.rts-solutions.com
5) After selecting Ok, two prompts will appear. First, select yes that you are removing money from the
card. Then you must verify that you wish to remove money from the card.
6) To verify the amount being removed from the card, repeat the above steps by entering the amount
and select CREDIT OFF. Press Ok when done.
7) The credit off transaction will now move to the tender window. Complete the transaction as needed
that will credit the credit card or expect money to be taken out of the drawer.
Adding Concession Items to Gift Cards
1) In RTS, navigate to Setup – Mag Cards – Add Concession.
2) Enter a password with the appropriate permissions.
3) Select an item listed under Concession Bonus and enter the amount of concession items that should
be added to the card(s).
4) If needed, set an expiration date or leave as never.
5) If this item will be added to a series of cards, enter the number of cards or leave at 1.
6) Select Add Credits, swipe the card(s) and select Close when done.
67
sales@rts-solutions.com (865) 212-9703 www.rts-solutions.com
Transferring Gift Cards
If a customer needs a replacement card, the card data can be transferred to a different card.
1) Navigate to Setup – Mag Cards – Transfer Cards.
2) Enter a password with the appropriate permission level.
3) Enter the old card number
4) Enter the new card number
5) The data is now transferred to the new data
Using Mag Cards to Complete Transactions
Once a card has money on it, the card can be used to complete transactions.
1) On the selling screen, either select Enter Card on the register layout or Menu – Enter Card. Note: The
register layout can be customized by navigating to Setup – Register Layout. Make sure to save as for all
stations.
2) Once the card is entered, the card will be associated with the transaction and display their current
balance. If the card is also a loyalty card, their information and point value will appear in the tender as
well. Please see the next section on the Loyalty Program for more information.
3) After the transaction is ready to be finalized, please select Exact Change.
4) The money will now be removed from the card and money will not be expected out of your drawer. If
you were to swipe the card again, the balance would now reflect the deduction from the recent
transaction.
Gift Card Reports
RTS offers a wide range reports specifically for mag cards. These reports will be located under Reports –
Mag Cards.
Individual Log:
See all transactions for a specific card. Please swipe or enter the card number when prompted.

68
sales@rts-solutions.com (865) 212-9703 www.rts-solutions.com
Gift Card Detail:
This report will display all cards and current balances, or cards before the specified date. You may view
the report or choose to export via CSV.
Daily Log:
This log will show varying information based on the items selected for the given date range.
System Total:
System total will display your total amount of cards, debit total, valid supers, expired supers, valid ticket
credits and expired ticket credits. This information may be printed.
Mag Card Expire Summary:
View cards that have expired based on the specified date.

69
sales@rts-solutions.com (865) 212-9703 www.rts-solutions.com
CONFIGURING THE RTS LOYALTY PROGRAM
This section discusses the RTS loyalty program, how to
configure and loyalty features.
The section is divided into four parts:
- Configuring Points
- Registering Loyalty Members
- Redeeming Rewards
- Additional Loyalty Features
Enabling Concession Item to Earn Points
1) Navigate to Setup – Concessions - Items
2) Highlight an item and click Edit.
3) Check the box labeled Earn Points and select Save.
4) Repeat for every concession item that can earn points.
NOTE: Concession items earn ONE point per $1 spent. This cannot be modified at this time.
Enabling Tickets Types to Earn Points
1) Navigate to Setup – Tickets – Price

70
sales@rts-solutions.com (865) 212-9703 www.rts-solutions.com
2) Highlight the desired price category and click Edit
3) Highlight the ticket type you would like to earn points.
4) In the box labeled Reward Points (located towards the center under the enable checkboxes),
designate how many points the ticket should earn. This is a customized amount.
5) Repeat for all ticket types that can earn rewards.
To Add Concession Rewards
1) Navigate to Setup – Mag Cards – Bonus Points
2) Select the “Reward” Tab
3) Click the Add button
4) A window will prompt for the level to earn the reward
5) Select Concession. This will prompt immediately after entering your amount of rewards.
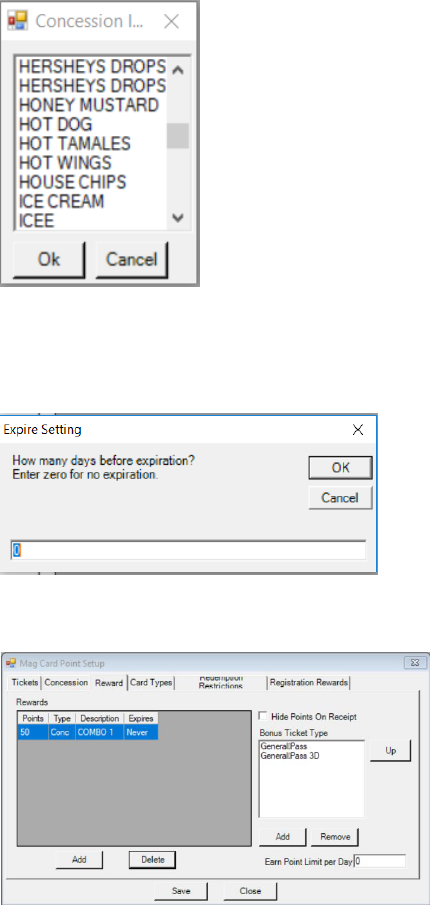
71
sales@rts-solutions.com (865) 212-9703 www.rts-solutions.com
6) Choose the concession item you would like to reward from your concession item list. This will
prompt after choosing the reward type.
7) If you would like for the reward to expire after a designated number of days, set the number
here. This will prompt after choosing the concession item. NOTE: 0 indicates the reward will
never expire.
8) After selecting OK the item is now added to your rewards.
Adding Ticket Rewards
1) Navigate to Seutp – Mag Cards – Bonus Points
2) Select the “Reward” Tab
3) Click the Add tab
4) A window will prompt for the level to earn the reward

72
sales@rts-solutions.com (865) 212-9703 www.rts-solutions.com
5) Select Tickets. This will prompt immediately after entering your amount of rewards.
6) If you would like for the reward to expire after a designated number of days, set the number
here. This will prompt after choosing the concession item. NOTE: 0 indicates the reward will
never expire.
7) After choosing the expiration, a free ticket will be added to your reward list. This will reward any
zero priced item listed under your bonus ticket type.

73
sales@rts-solutions.com (865) 212-9703 www.rts-solutions.com
Adding Bonus Ticket Types
1) Click Add
2) A window will prompt to select a category. Choose your ticket type category that you would like your
reward ticket to be available from.
3) Select the ticket available for the reward. This will prompt after selecting the ticket price category.
Registering Loyalty Members
1) From the selling screen, select Menu – Register Card. Note: Verify registering cards are enabled
by navigating to Setup – Mag Cards options and checking the box next to Enable Registered
Cards.

74
sales@rts-solutions.com (865) 212-9703 www.rts-solutions.com
2) The next window will be a Register Mag Card field. Any mag card can earn points as long as it
has some information associated with it. NOTE: To expedite the process, you may scan or swipe
a driver’s license. However, this is dependent on the state’s driver’s license.
3) When the desired information is entered, select Register Card. The card will now be ready to
accumulate points.
NOTE: Cards can also be registered under Setup – Mag Cards – Register Card, or online. Please email
[email protected]m for more information.
Redeeming Rewards
1) When completing transactions, the employee will associate the loyalty card with the transaction
by selecting on the RTS selling screen Enter Card. This is the same procedure as entering a gift
card.
2) When the card is added to the tended window, their available points will display along with their
lifetime points (EXAMPLE: 50/150)
3) If they have a reward available to redeem, the reward will display in the window.
4) The employee then can select the item to redeem from the selling screen as they would
normally sell the item.
5) A dialogue box will prompt asking the employee signaling they have a reward available and if
they would like to redeem.
6) If they choose yes, the reward will then be removed from the card and money will not be
expected from the drawer.
7) If they are not ringing up any additional items, select exact change, or continue the transaction
as needed.
75
sales@rts-solutions.com (865) 212-9703 www.rts-solutions.com
Additional Loyalty Features
Online Features
Loyalty features can apply to online ticketing sales as well, such as waiving the online ticketing fee or
doubling ticketing points. NOTE: These features are available only when using the hosted checkout
platform/secure processing (taking chip cards at the theatre instead of the standard swiping).
1) To enable, navigate to Setup – Ready Ticket Network – Options. Mark the feature as True by
double-clicking in the field.
Allow E2E Gift: Customers can enter their loyalty card information when buying tickets online.
Online Ticket Point Multiplier: When using their loyalty card online, their points will multiply.
Waive Internet Fee for Loyalty: Internet fee will be waived when using their loyalty card online.
Allow Ticket Credit Redemption: Ticket reward can be redeemed online.
REPORTS: Setup – Mag Cards – Member Information will pull information based on data inputted at
registration, filtered by designated date range.
Adding Points Manually:
1) Navigate in RTS to Setup – Mag Cards – Add Concession.
2) Enter a password with the appropriate permissions.
3) Select the Points tab
4) Enter the points to add, a reason and select Add Points.

76
sales@rts-solutions.com (865) 212-9703 www.rts-solutions.com
INTERNET TICKETING
RTS provides multiple options for internet ticketing. This document details the
different avenues for providing advanced ticket sales to your patrons, and
implementation procedures.
This section is divided into seven parts:
- Internet Ticketing Options
- Pages of the RTN
- Editing the RTN
- Third Party Sites
- Online Gift Cards
- Redeeming Online Tickets
- Useful Reports
Internet Ticketing Options
1) RTS provided site called the RTN page. This page can be stand-alone or linked to your existing
website.
2) Showtimes XML to pull your schedule to your existing website.
3) Open Interface API that will integrate your showtimes to your website – No additional licensing fees
4) Third Party Ticketing Platforms – No additional licensing fees
Open Interface API
Utilize our open source API for your web developer to enhance your current website with a direct RTS
showtime integration. API LINK: http://www.readyticket.net/download/rts_purchase_interface.pdf
Options for displaying your RTN Page
1) Direct link from website to RTN page within same window
2) Direct link from website to RTN in a new tab or browser
3) Within your navigation using i-frame
Note: Framed area will Not show a secure lock in the browser when choosing this option. Options
available in RTS to have a secure checkout page appear in a new secure browser

77
sales@rts-solutions.com (865) 212-9703 www.rts-solutions.com
RTN Link
Your website link is your RTN number followed by formovietickets.com:2235.
To locate your RTN number, navigate in RTS to Help – About. The number will be listed next to “RTN”.
The number is also listed at the top of your window next to “R:{}”
Provide this link to your web developer to link your page to your existing website.
Pages of the RTN Site
Showtime Page
The first page customers will visit on the RTN platform is the showtimes page. Patrons may select the
showtime date, their performance, and the showtime for their designated date.
Like all RTN pages, theatres may add text, a logo, and change color/fonts.
Pick Ticket Page
After selecting their performance, customers will then be directed to the pick tickets page. Based on
your settings, patrons will determine their amount of tickets using a drop-down format.
Note: not all tickets available at the boxoffice have to be sold online – certain ticket types can be disabled
for online sales.

78
sales@rts-solutions.com (865) 212-9703 www.rts-solutions.com
If you are a reserved seating location, customers will first reserve their seat. This will be the same layout
that is available at the boxoffice.
Purchase Confirmation
Before completing the transaction, patrons will confirm their order. If the theatre is utilizing secure
credit card processing (taking chip cards), the site will function as a shopping cart.
On the purchase confirmation page, theatre customers can enter their loyalty card or pay with a gift
card. A disclaimer can also be added.
Once confirmed, the patron can check out, clear cart or continue shopping.

79
sales@rts-solutions.com (865) 212-9703 www.rts-solutions.com
Editing RTN Page
The steps for editing the RTN are on our Wiki Page. Our support team can also assist with customizing
your RTN page.
Internet Ticket Fees
Theatres may charge an optional internet ticketing fee, either by ticket or per transaction. Note: This fee
is 100% retained by the theatre.
Third Party Sites
RTS integrates with all major third-party ticketing sites using our API. Please contact our sales
department for boarding information.
RTS Sales
(865) 212-9703
sales@rts-solutions.com
Online Gift Cards
In addition to selling tickets online, physical and virtual cards may be sold on the RTS provided online
ticketing platform. Information may be found HERE on our wiki page.
Redeeming Tickets Purchased Online
Tickets purchased online will need to be redeemed at an RTS terminal.
1) On the selling screen select Pickup Tickets or Menu – Pickup Tickets. Note: To configure how
your register layout is configured, navigate in RTS to Setup – Register Layout. You may choose
which shortcut buttons are available such as
2. After selecting Pickup Tickets, a window will prompt to redeem the ticket purchased online.

80
sales@rts-solutions.com (865) 212-9703 www.rts-solutions.com
2) From here, scan the barcode from the confirmation page either printed out or on the phone, or
enter the receipt number.
3) If the patron does not have either of the information from their order, please select Advanced
Pickup Search
4) This window will display all advance ticket sales along with their email. Using the keyboard, the
user may search for the ticket by their email or card number.
5) To narrow the search, select More Options
6) This will display a search by parameters along with a filter by title and performance
7) From this window, you will also be able to Export Sales and Copy Emails from tickets purchased
online.
8) When the search parameters are done, select Load Data. The Back button will take the user
back to the original menu.

81
sales@rts-solutions.com (865) 212-9703 www.rts-solutions.com
Reporting
To view advance ticketing sales vs matured sales, navigate in RTS to Reports – Deposit – Advance
Ticketing Details. Note: advance tickets will also appear on reports such as the Ticketing Log
When selling advanced tickets, you may receive notice from your patrons that a purchase did not
complete. RTS provides a report to determine why the transaction failed.
1) Navigate in RTS to Reports – System Log – Internet Ticketing Credit Cards
2) This window will display all internet ticket transactions. If the charge failed, the reason will
display in the grid. For example, if the user did not properly enter their Zip Code or Address, the
fail reason will be an AVS fail. This report will help explain to your customers why their
transactions are not processing. Note: RTS requires that the user only correctly enters one of the
fields.
For additional information, or if you have any questions regarding RTS internet ticketing, please
contact the RTS Team.
Ready Theatre Systems
(865) 212-9703
sales@rts-solutions.com
support@rts-solutions.com

82
sales@rts-solutions.com (865) 212-9703 www.rts-solutions.com
Automatic Reporting
This section will explain how to configure automatic reporting to Rentrak, Swift
and how to send reports to emails within your company.
This section is divided into two parts:
- Configure Rentrak/Swift
- Configure automatic nightly reporting emails
Configure Rentrak and Swift Reporting
Send reports automatically to Rentrak/Comscore and Swift through RTS.
1) Navigate in RTS to Setup – Communications – Rentrak.
2) To enable, check off Enable Reporting. To send automatically, check Auto Send When Tickets
Closed.
3) You may also enable Send Hourlies and Send Net Only.
4) To send your reports, the Theatre ID, Username and Password will need to be entered into the
fields. The credentials will need to be provided by Rentrak.
5) For EBOR, select the EBOR tab and check off Enable Reporting and Auto Send When Tickets
Closed.
6) Additional options include Hide Auditoriums and Consolidate Showtimes.

83
sales@rts-solutions.com (865) 212-9703 www.rts-solutions.com
Configure Automatic Report Emails
To send Deposit and Boxoffice reports automatically after closing the deposit via email to a designated
address, navigate in RTS to File – Options and select the Communications tab.
1) Enter the address you would like the reports to be sent to at the night end of the night. If
multiple addresses, please separate by a comma.

84
sales@rts-solutions.com (865) 212-9703 www.rts-solutions.com
READY THEATRE SYSTEMS
getting started guide
Please contact our technical support team with any questions regarding the
guide. We are available 24/7/365
Also, please check out our wiki for additional information
http://wiki.readyticket.net/mw/index.php/Main_Page
(865) 212-9703
