
HOW TO PRINT FREE
VARIANCE REPORTS
A walk-though guide for finding and downloading your variance report for free.

INDEX
Page(s) 4-9: How to create a single variance report and download report files.
Page(s) 10-12: How to create a variance report for a portion of a parcel using
GeoView.
Page(s) 13-14: How to convert your CSV file and print labels from GeoView.
Page(s) 15-16: How to create a multi-subject variance report.
2

INTRODUCTION
Before walking you through the steps of how to print a variance report, you should
first understand what a variance report is and how this tool works.
The Variance Report is a tool that creates the documents required to notify property
owners when changes are being made to how a property is used. Each county
jurisdiction has rules regarding the kinds of allowable changes as well as the affected
area that requires notification. This tool selects parcels based on the requirements of
each jurisdiction and creates a map showing the affected parcels, a listing of owners,
and a PDF file of addresses designed for Avery 5161 mailing labels.
It is important to understand that a variance does not change the allowable use of the
property, building, or structures, or change procedural requirements or definitions.
For more information about Unincorporated Lee County variance reports see the
following link: https://
www.leegov.com/dcd/zoning/var
For information concerning all other jurisdictions please contact their Planning
Departments.
3

STEP 1: VISIT OUR WEBSITE
The first step to finding your property‘s
variance report is to visit the Lee County
Property Appraiser’s website.
This can be found by searching for Lee County
Property Appraiser online (see image) and
clicking on the first website, OR by using the
provided link to our website.
((https://www.leepa.org/
)
4

STEP 2: DATABASE SEARCH
After clicking the link, you will be taken
to our homepage. From here you have
access to a wide range of tools and
information which can help you learn
about deeds, exemptions, and much
more.
On the left side of the page, you will find
a column with titles such as “Welcome”
and “Database Search”. Please click on
the words “Database Search”.
5

STEP 3: ENTER PROPERTY DETAILS
After clicking on “Database Search” you will be
navigated to the page titled “Real Property
Search”. From this page you can use one of the
methods listed below to locate your property.
1. Enter your Parcel (STRAP) Number
2. Enter your Folio ID
3. Enter your Address
After entering your information click “Search”
6

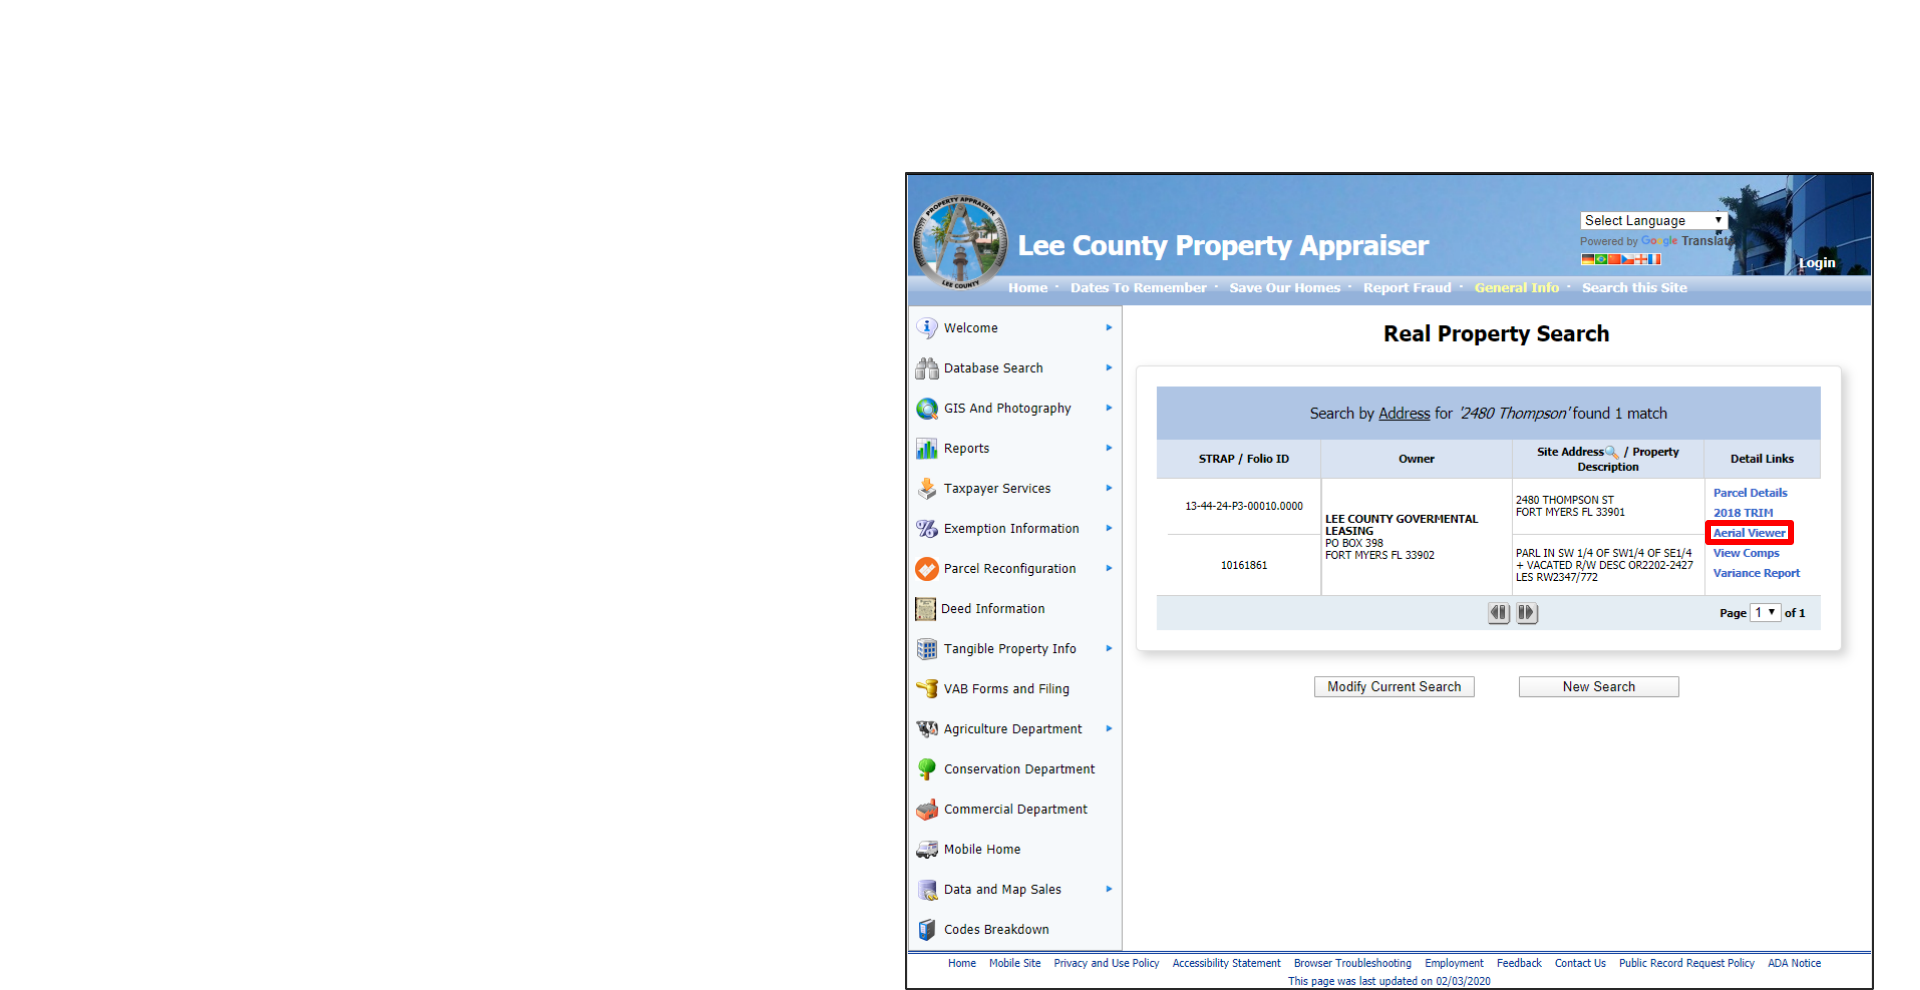
STEP 4: SELECT VARIANCE REPORT
After clicking search, you will either be directed to the next
page listing properties matching your search criteria or an
error message will appear in red stating the following
message.
“No matches found for given criteria or search result is exempt
from public disclosure per Florida Statute §119.071.”
If this message appears then you will need to check and make
sure you entered your information correctly.
If your information is correct, then it may also mean that
the property you are searching for is statutorily exempt
from public disclosure. See information for this on our
homepage under “Taxpayer Services” and its sub
category “Exempt from Public Records” or using the
following link:
https://
www.leepa.org/DisclosureExemption/DisclosureE
xemptionInfo.aspx
If this message does not appear then you will be navigated
to the next page showing a list of properties as shown on
the right. Please click the words “Variance Report”.
7

IMPORTANT INFORMATION: BUFFER DISTANCE
PLEASE NOTE. Every municipality/jurisdiction has
their own default buffer distance for variance
reports.
*For any buffer distance over 2,500 ft. please contact the Lee County
Property Appraiser’s office.
Buffer values:
Upon selecting your property, the appropriate
buffer is applied automatically. If the report fails to
find 10 or more unique owners within that set buffer
area it will automatically increase the buffer to 750
ft. Please bear in mind the buffer can be modified
and the report rerun. (See image.)
PLEASE NOTE. Parcels Exempt from Disclosure per
Florida Statute 119.071 will be excluded from
variance reports.
Village of Estero – 500 ft
Town of Fort Myers Beach – 500 ft
Unincorporated Lee County– 500 ft
City of Fort Myers – 300 ft
City of Sanibel – 300 ft
City of Cape Coral – 300 ft
Bonita Springs – 375 ft, 500 ft, & 1000 ft
8

STEP 5: VERIFY AND DOWNLOAD
For this final step, simply verify that
the highlighted parcel (shown in the
image) is the one you are looking for.
Then, click the blue hyperlink
(outlined on the right) to download
and save the map image, mailing
labels (Avery 5161), and CSV
formatted information.
Now that you have these files, you
can print from home or businesses
like Staples or Fed-Ex should be able
to print your labels for you. For label
type/size use Avery 5161 or its
equivalent generic brand.
* A secondary method is to print directly by right clicking on the screen
and selecting print as shown in the image above.
9
GENERATING A REPORT FOR PORTION OF A PARCEL
Please follow the guided instructions on pages 4-6
to navigate our webpage and locate your property
on the Real Property Search page before
continuing.
Step 1: Using the Real Property Search Page
You should now be on the Real Property Search
page. Click search to see a matching result
based on the property data you entered. If you
are not on this page, please go to the start of
this guide and follow the instructions on pages
4-6 before continuing.
Step 2: Click Aerial Viewer to open GeoView
After opening GeoView a popup may appear.
Please read this information if you are
unfamiliar with how to use GeoView.
This window can be re-opened by clicking the
search icon in the bottom left corner of
GeoView and selecting the “?” icon that
appears on the bottom left side of your screen.
10

GENERATING A REPORT FOR A PORTION OF A PARCEL
Step 3: Open the Toolbox and select both the
Binoculars and Pencil icons.
The tool box is located in the upper left corner of
GeoView.
Step 4: Use the menu option “Find Parcels by
Buffer Shape” and the Graphics Tool(s) to create
a shape and buffer.
Click the drop-down menu in the Find Parcels tool
and change the menu option to Buffer Shape.
Enter a buffer distance and use the line or polygon
graphics tool to outline a portion of the parcel(s).
Double-click to finish drawing.
If the Graphics Tools menu isn’t visible, select the
pencil icon. If you are unsure what each tool is, you
can hover your cursor over each tool to view its short
description.
* If you need to select multiple parcels, skip to
page 15
*The image above used the line tool to outline a
portion of county land and shows a 500ft buffer.*
11

GENERATING A REPORT FOR A PORTION OF A PARCEL
Step 5: Select your graphic and click Run
Buffer.
After you have outlined the portion of land
you need, click Run Buffer and then select
your line or polygon. Parcels within your
buffer will be selected and grouped at the
bottom of your page.
Step 6: Click any of the “i” icons and then
“Save this table to CSV”.
All parcels within your buffer will be saved
in the downloaded file.
Please keep in mind that this file contains
more parcel information than necessary for
a variance report. When using the mail
merge step on the last page you will be able
to select the specific fields needed to
create your labels.
12

CONVERTING FILES FROM GEOVIEW FOR LABEL PRINTING
Step 7: Convert file from CSV (.csv)
to Excel (.xls)
When you open the saved file in
Excel there may be a warning
about a potential loss of data. To
prevent this please do the
following:
1. Click File.
2. Click Save As.
3. Change file type from CSV
(Comma delimited) (*.csv)
to Excel Workbook (*.xlsx)
4. Click Save.
13

CREATE, FORMAT, AND PRINT LABELS FROM GEOVIEW
Step 8: Use Microsoft Word Mail Merge to create and print labels
Open a new Word document, select Mailings Start Mail Merge Labels
Set Avery US Letter as Label Vendor
Set Product number as 5161 Address Labels Click OK
From the Mailings tab click Select Recipients
Use an Existing List
Find your saved Excel file, then click Open
From the Mailings tab, click Insert Merge Field and select the fields for your labels.
Column K contains Owner Name
Columns L-R contain current owner information: Address1 (Owner mailing address), City, State, Country, and Zip
Columns F-J contain site address information: Street Number, Street Name, Site Unit, Site City, Site Zip
Format these fields to your personal specifications and then click Preview Results to see how your labels will look when
printed.
It is recommended that you use the Check for Errors function (located next to the preview function) to ensure that there are
no errors with your merge before printing.
Print labels by clicking Finish & Merge and follow the steps to print your labels.
14

CREATING A MULTI-SUBJECT VARIANCE REPORT
Please follow the guided instructions on pages 4-6 to
navigate our webpage and locate your property on the
Real Property Search page before continuing.
*Important Note: Only parcels which are adjacent or in
close proximity of each other are allowed.
Multi-Parcel Steps:
Step 1: Use the Real Property Search Page
You should now be on the Real Property Search page.
Click search to see a matching result based on the
property data you entered. If you are not on this page,
please go to the start of this guide and follow the
instructions on pages 4-6 before continuing.
Step 2: Select “Aerial Viewer” to navigate to the
GeoView webpage and view your parcel.
Step 3: Open the Toolbox (upper left corner) and
select both the Binoculars and Pencil icons.
This will open the Find Parcels tool and Graphics Tools.
(See upper-right corner of image)
* The Line tool is used in the image above with one line per parcel.
15

MULTI-SUBJECT REPORT CONTINUED
Step 4: Use Find Parcels by Location and to select your
parcels.
Change the Find parcel(s) by: menu to show “Find parcel(s) by:
location” and then use the line tool to draw a line through
each parcel you wish to include in the report.
When you have finished placing your lines, double-click your
left mouse button to close the tool.
Step 5: Create Variance Report for the selected parcels.
Your parcels are now selected and a table should have
appeared at the bottom of your page. (See image)
Click “i” and then “variance report” for any one of the parcels
in the table that is now visible at the bottom of your screen.
Step 6: Verify Buffer and save data.
You will now be on the report page. Adjust the buffer distance
(if necessary), and click Rerun if any adjustment are made.
For this final step, simply verify that the highlighted parcel is
the one you are looking for. Then, click the blue hyperlink to
download and save the map image, mailing labels (Avery
5161), and CSV formatted information.
* Selected parcel(s) are outlined in blue and shown in bottom
table.
16
