
How to Upgrade macOS
Using erase-install and Jamf Pro
Rev20230913
Contents
Preface .......................................................................................................................................... 3
Methodology ................................................................................................................................. 4
Section 1: macOS Upgrade Preparation ........................................................................................ 5
Section 2: Creating Smart Computer Groups............................................................................... 10
Section 3: Creating Policies ......................................................................................................... 15
Section 4: Upgrade to macOS Ventura ........................................................................................ 30
Addendum .................................................................................................................................. 34

3
How to Upgrade macOS Using erase-install and Jamf Pro
Preface
What is erase-install?
Written by the very talented Graham Pugh, erase-install is a script to reinstall macOS directly from
the system volume using startosinstall, a resource binary which has been built into macOS installer
applications since version 10.12.4. The --eraseinstall option was added with macOS 10.13.4 for
computers with an APFS system volume. The script has many options to suit a large variety of
workows, management tools and user experiences. You can see all of the options in the addendum
section of this guide.
Latest version or legacy version?
Latest Version Requirements:
• The script must run as root or sudo.
• macOS 11 or newer is required.
• The le system must be APFS.
The latest version, at the time of writing, is 30.2. This version requires mist-cli and swiftDialog, which
are included in the installer package.
mist-cli is a Mac command line utility that automatically downloads macOS installers and rmware.
It is created by Nindi Gill. More on mist-cli here:
https://github.com/ninxsoft/mist-cli
swiftDialog is used to create user notications. It is created by Bart Reardon and requires macOS 11
or later. More on swiftDialog here:
https://github.com/bartreardon/swiftDialog
Legacy Version Requirements:
• The script must run as root or sudo.
• macOS 10.12.4 or greater is required for the reinstall workows.
• macOS 10.13.4 is required for the erase-and-reinstall workow.
• The le system must be APFS.
• Installers can only be obtained for macOS 10.13 and greater.
Version 27.3 is the most recent legacy version of erase-install which, instead of mist-cli, uses
installinstallmacos.py, a python script which is included in the package installer along with a python
framework to run it. It can use jamfHelper or DEPNotify, rather than swiftDialog. It is still useful on
computers for upgrading computers currently running macOS 10.15 or older. If you want to use the
legacy version of the erase-install script (version 27.3), get it here:
https://github.com/grahampugh/erase-install/releases/tag/v27.3
What’s covered in this guide?
There are myriad ways to congure erase-install. The script, as of version 30.2, has 3385 lines of
code and over 50 options. We will not cover all the options but will include a list in the addendum
section of the guide. This guide will focus on using a locally cached macOS Ventura installer to
upgrade macOS on a Mac computer running macOS Big Sur or later. We will not cover legacy
macOS upgrades requiring version 27.3 of erase-install.
The following items were used to create this guide:
• erase-install version 30.2
• macOS Ventura 13.5.1
• Jamf Pro Server version 10.49 with administrative credentials

4
How to Upgrade macOS Using erase-install and Jamf Pro
Methodology
Erase-install can be used to download the macOS installer, as well as for running it to upgrade a Mac.
You can choose to cache it directly on the client, or download a single copy for upload to Jamf Pro.
Here we will present these two options.
Method 1: use erase-install to cache the installer directly on the client
The advantage of this method is that you do not need to manually download each version of the
macOS installer and upload them to Jamf Pro. The disadvantage is that you cannot test that the
downloaded installer is working prior to uploading it to Jamf.
Method 2: download the installer and upload it to Jamf Pro
This allows you to download the installer as a package on your own machine, which you then upload
to Jamf Pro.

Section 1 Page 5
How to Upgrade macOS Using erase-install and Jamf Pro
Section 1: macOS Upgrade Preparation
What You’ll Need
Learn what hardware, software, and information you’ll need to complete the tutorials in this section.
Hardware and Software
Requirements for following along with this section:
• erase-install version 30.2 or later. This guide will use 30.2
• macOS Ventura installer (for Method 2 only). This guide will use version 13.5.1
• Administrative access to your Jamf Pro server.
1. Download erase-install here:
https://github.com/grahampugh/erase-install/releases/latest
• For Method 1, go to Step 2.
• For Method 2, you also need to download the latest version of macOS Ventura. We can use
erase-install to do this, which connects directly to Apple's software catalogs.
To use erase-install, install the downloaded erase-install-30.2.pkg package on your Mac. Then,
run the following command in Terminal to download the package:
sudo /Library/Management/erase-install/erase-install.sh --pkg
To move the downloaded package into your Downloads folder, open the folder /Library/
Management/erase-install in Finder and drag the InstallAssistant.pkg to the Downloads folder.
Alternatively, you can obtain the installer packages via the web from https://mrmacintosh.com/
macos-ventura-13-full-installer-database-download-directly-from-apple/ as soon as that website
has been updated.
NOTE: The macOS Ventura download is close to 12GB and may take 15 minutes or more to
complete based on your download speed. Once downloaded, it will be named InstallAssistant.
pkg. To better identify the macOS installer once uploaded to Jamf Pro, we recommend
renaming it to:
Install_macOS_Ventura13.5.1.pkg
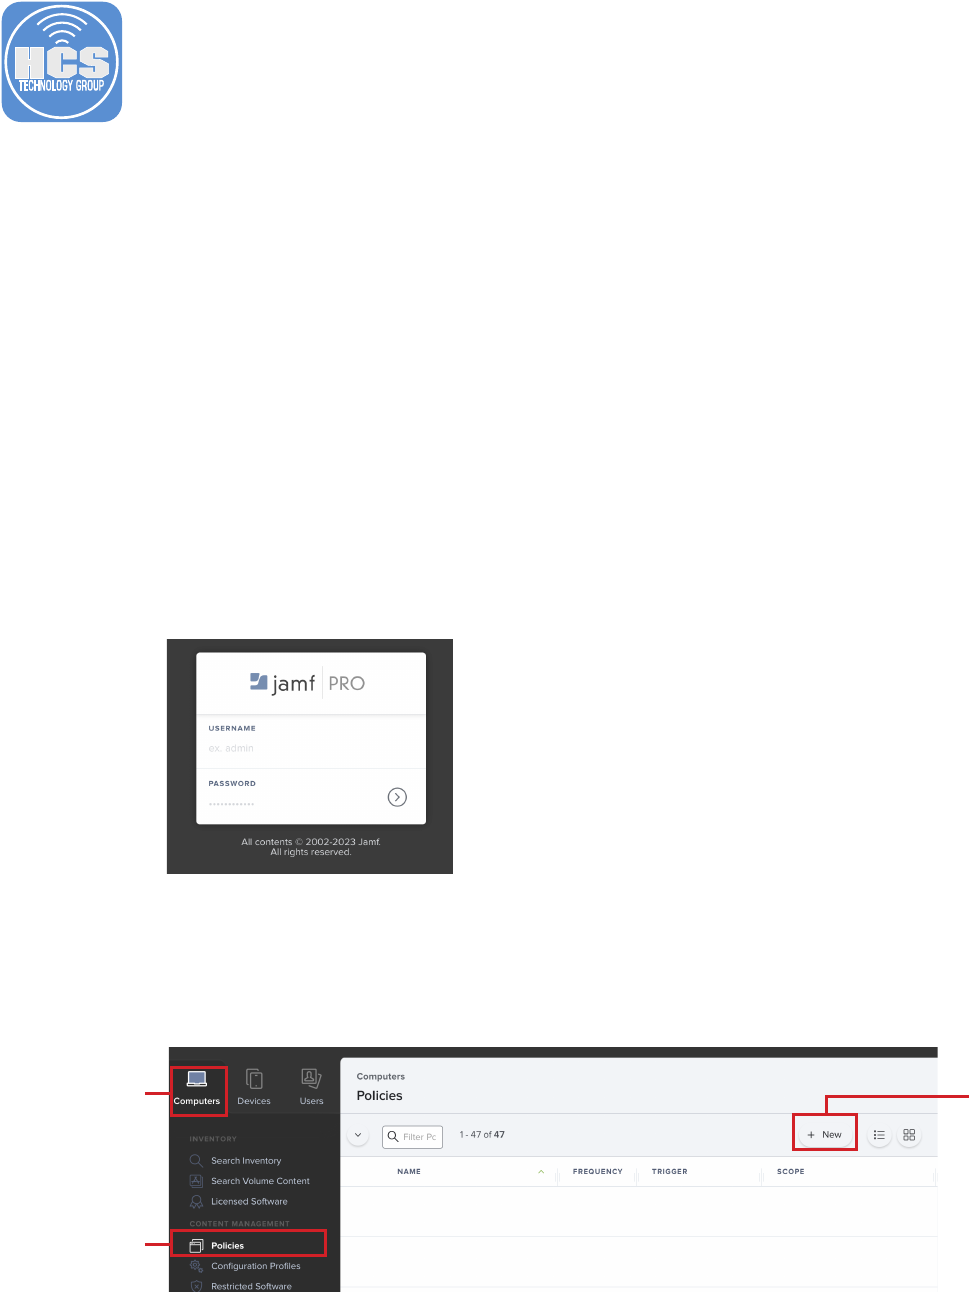
2. Log into your Jamf Pro Server with administrator credentials.

Section 1 Page 6
How to Upgrade macOS Using erase-install and Jamf Pro
3. Switch back to your Jamf Pro Server instance. On the top-right corner, click Settings ().
4. Click Computer management.
5. Click Packages.
3
5
4
7. Congure the following:
A. Category: This guide will use macOS Upgrades
B. Click Choose File
6. Click New.
A
B

Section 1 Page 7
How to Upgrade macOS Using erase-install and Jamf Pro
8. Perform the following:
A. Navigate to your Downloads folder
B. Select erase-install-30.2.pkg
C. Click Upload
C
B
A
9. Conrm the Display Name auto-populates with the name erase-install-30.2.pkg. Click Save to
begin the upload.
10. After the upload has completed, click Packages.
For Method 1, skip to Section 2.
For Method 2, continue with steps 10-15 to upload the macOS installer package.

Section 1 Page 8
How to Upgrade macOS Using erase-install and Jamf Pro
12. Congure the following:
A. Category: This guide will use macOS Upgrades
B. Click Choose File
11. Click New.
A
B
13. Perform the following:
A. Navigate to your Downloads folder
B. Select Install_macOS_Ventura13.5.1.pkg
C. Click Upload
C
B
A

Section 1 Page 9
How to Upgrade macOS Using erase-install and Jamf Pro
14. Conrm the Display Name auto-populates with the name Install_macOS_Ventura13.5.1.pkg.
Click Save to begin the upload.
15. The upload is complete.
Section 2 Page 10
How to Upgrade the macOS Using erase-install and Jamf Pro
Section 2: Creating Smart Computer Groups
What You’ll Need
Learn what hardware, software, and information you’ll need to complete the tutorials in this section.
Hardware and Software
Requirements for following along with this section:
• Administrative access to your Jamf Pro server.
• Completion of section one of this guide.
In this section we will create the following:
• A smart computer group to provide us with all Mac computers that can run macOS Ventura
but are not running macOS Ventura 13.5.1
• A smart computer group to provide us with all Mac computers that have macOS Ventura
13.5.1 cached locally
We are creating these smart computer groups so we can use them for scoping our policies which
will be covered in section 3 of this guide.
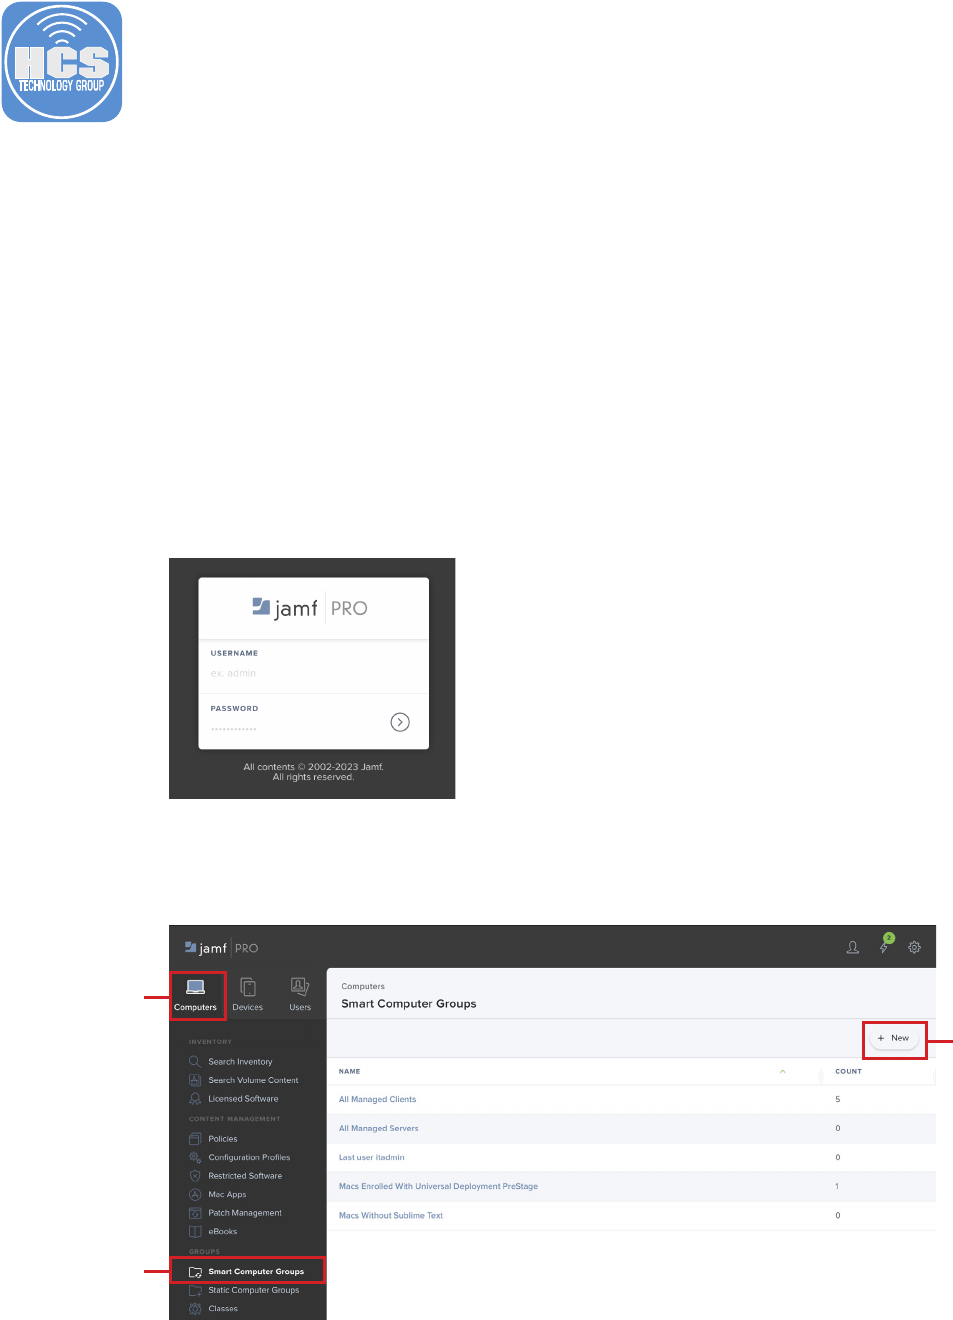
1. If necessary, Log into your Jamf Pro Server
2. Click Computers
3. Click Smart Computer Groups.
4. Click New.
4
2
3
Section 2 Page 11
How to Upgrade the macOS Using erase-install and Jamf Pro
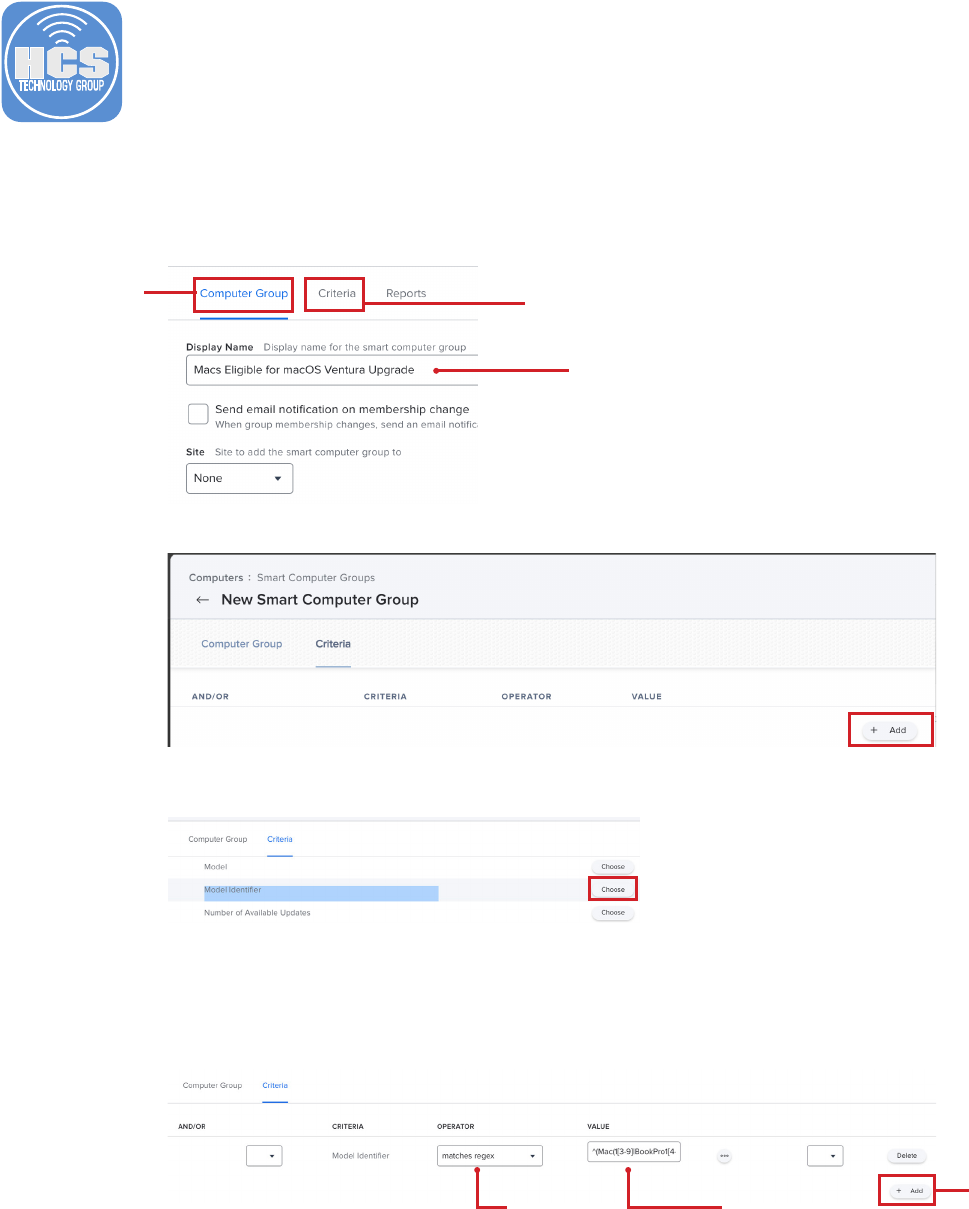
5. Perform the following:
A. Click Computer Group
B. Enter the Display Name: Macs Eligible for macOS Ventura Upgrade
C. Click Criteria
6. Click Add.
7. Locate Model Identier, click Choose.
8. Congure the following for the Criteria:
A. Operator: matches regex
B. Value:
^(Mac(1[3-9]|BookPro1[4-8]|BookAir([89]|10)|Pro[7-9]|Book\d{2,})|iMac(Pro\d+|(1[89]|[2-9]\d))|Macmini[89]),\d+$
C. Click Add
B
A
C
B
A
C
The regex was written by the very talented Bill Smith AKA Talking Moose. Here are links for
macOS Ventura and macOS Sonoma: This guide will use the regex for macOS Ventura.
macOS Ventura Regex:
https://gist.github.com/talkingmoose/3100dab934baa13a799ba29be62ca357
macOS Sonoma Regex:
https://gist.github.com/talkingmoose/1b852e5d4fc8e76b4400ca2e4b3f3ad0
Section 2 Page 12
How to Upgrade the macOS Using erase-install and Jamf Pro
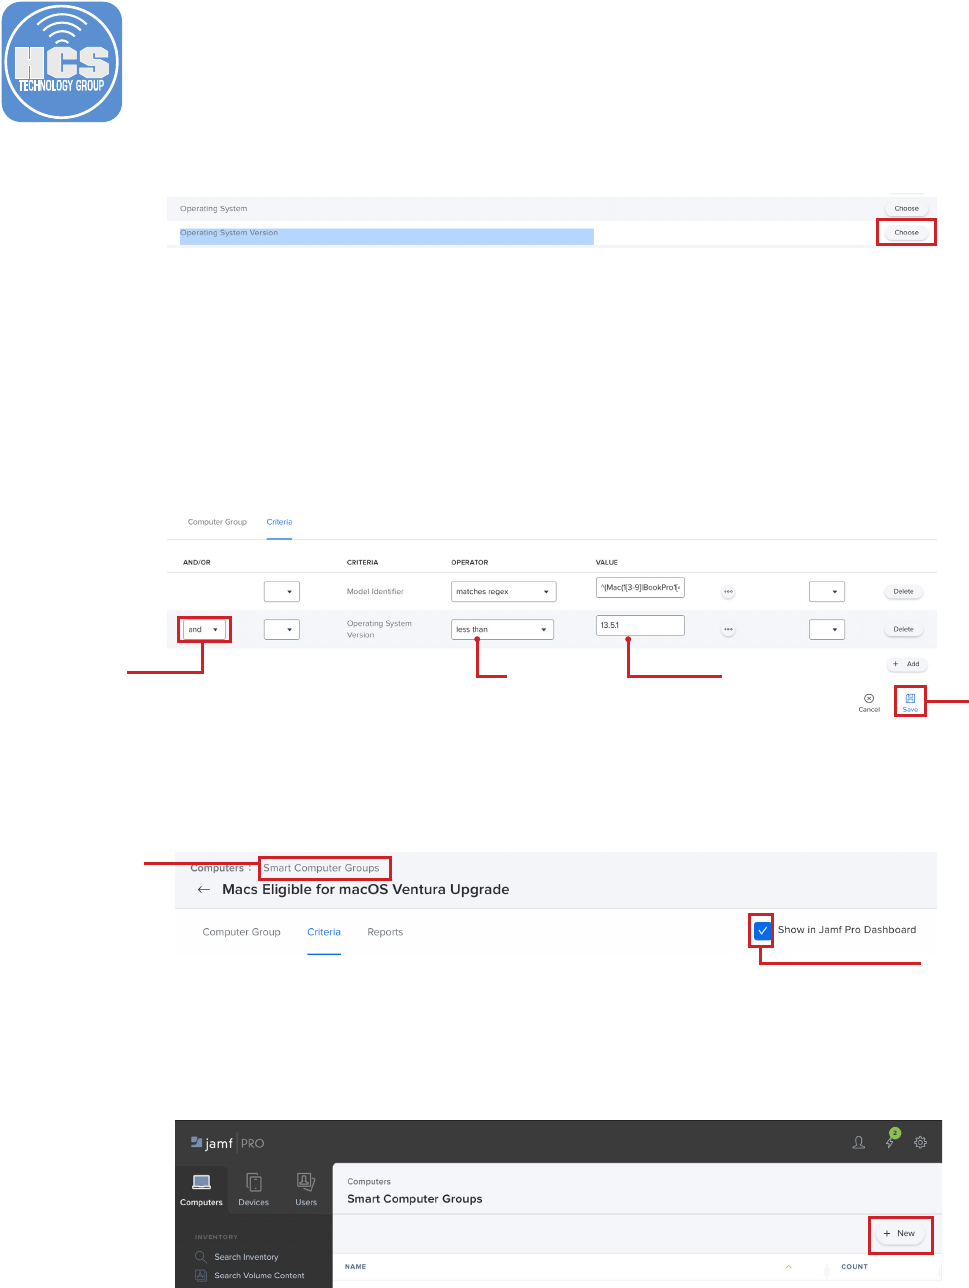
10. Congure the following for the Criteria as shown below:
A. And/Or: and
B. Operator: less than
C. Value: 13.5.1
D. Click Save
This will nd all Mac computers that are compatible with macOS Ventura that are
not running version 13.5.1.
A
C
B
D
9. Locate Operating System Version, click Choose.
11. Select the checkbox for Show in Jamf Pro Dashboard.
12. Click Smart Computer Groups.
13. Click New.
12
11

Section 2 Page 13
How to Upgrade the macOS Using erase-install and Jamf Pro
16. For Method 1, locate Application Title, click Choose.
17. Congure the following for the Criteria:
A. Operator: is
B. Value:
Install macOS Ventura.app
C. Click Save
B
A
14. Perform the following:
A. Click Computer Group
B. Enter the Display Name: Macs with macOS Ventura Cached
C. Click Criteria
15. Click Add. The criteria used depend on whether you are using Method 1 or 2.
• For Method 1, continue with Steps 16 to 17.
• For Method 2, skip to Step 18.
B
A
C
C
This will nd all Mac computers that have the Install macOS Ventura application cached locally.
NOTE: If using method 1, skip to step 20.
Section 2 Page 14
How to Upgrade the macOS Using erase-install and Jamf Pro
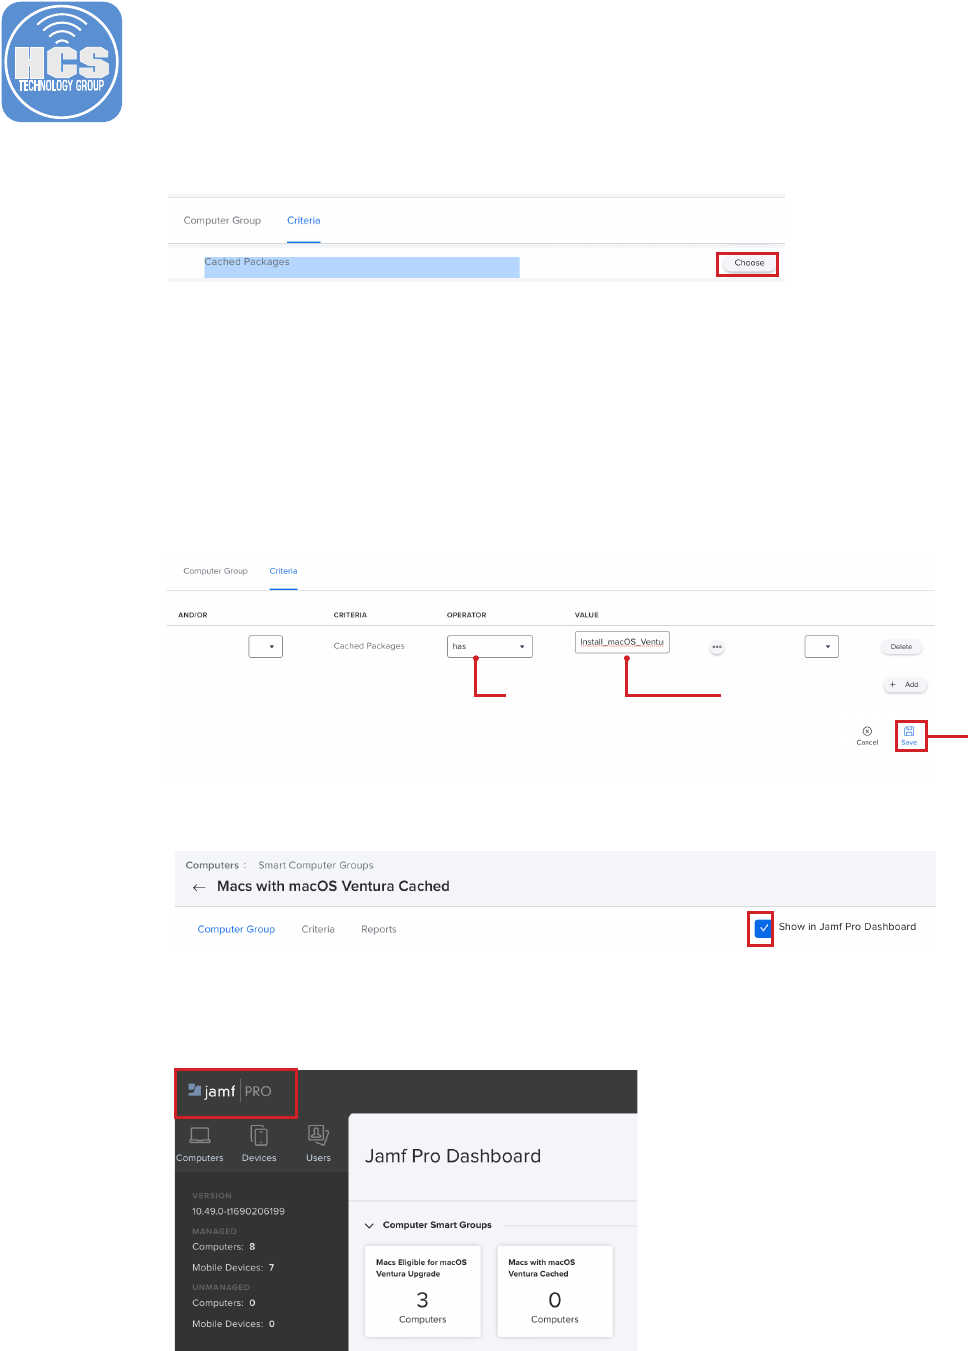
20. Select the checkbox for Show in Jamf Pro Dashboard.
21. In the upper-left corner, click the Jamf Pro logo. This will bring us to the Dashboard where we
will see the Smart Computer Groups we just created.
This completes this section.
19. Congure the following for the Criteria:
A. Operator: has
B. Value:
Install_macOS_Ventura13.5.1.pkg
C. Click Save
B
A
C
18. For Method 2, locate Cached Packages, click Choose.
This will nd all Mac computers that have the macOS Ventura13.5.1 installer package cached
locally.
Note that for Method 2, whenever a new package is uploaded to Jamf Pro, you will need
to change the criteria to the name of the newly uploaded package. This is not necessary for
Method 1.
Section 3 Page 15
How to Upgrade macOS Using erase-install and Jamf Pro
Section 3: Creating Policies
What You’ll Need
Learn what hardware, software, and information you’ll need to complete the tutorials in this section.
Hardware and Software
Requirements for following along with this section:
• Administrative access to your Jamf Pro server.
• Completion of sections one and two of this guide.
In this section we will create the following:
• A policy that caches the macOS Ventura 13.5.1 installer to all eligible Mac computers
• A policy that installs erase-install, macOS Ventura 13.5.1, and sends a command to the erase-
install script
• A policy that runs an inventory update when a Mac computers starts up
Caching the macOS installer on the client will speed up the time it takes for a Mac computer to run
the upgrade, as the user will not have to wait for the 12 GB installer to be downloaded.
Note that as this is a Once-per-Computer policy, whenever a new macOS version is released, and
(for Method 2) after you upload a new package to the policy, you will need to Flush the policy on all
clients.
1. If necessary, Log into your Jamf Pro Server
2. Click Computers.
3. Click Policies.
4. Click New.
4
2
3

Section 3 Page 16
How to Upgrade macOS Using erase-install and Jamf Pro
5. Perform the following in the General Payload:
A. Display Name: macOS Ventura Cached Installer
B. Category: This guide will use macOS Upgrades
C. Trigger: Recurring Check-in
D. Execution Frequency: Once per computer
E. Automatically re-run policy on failure: Enabled
F. Retry Event: On next recurring check-in
G. Retry Attempts: 3
6. Click the Packages payload.
7. Click Congure.
Steps 6-10 are required for Method 2. For Method 1, skip to step 11.
A
B
C
D
E
F
G
6
7

Section 3 Page 17
How to Upgrade macOS Using erase-install and Jamf Pro
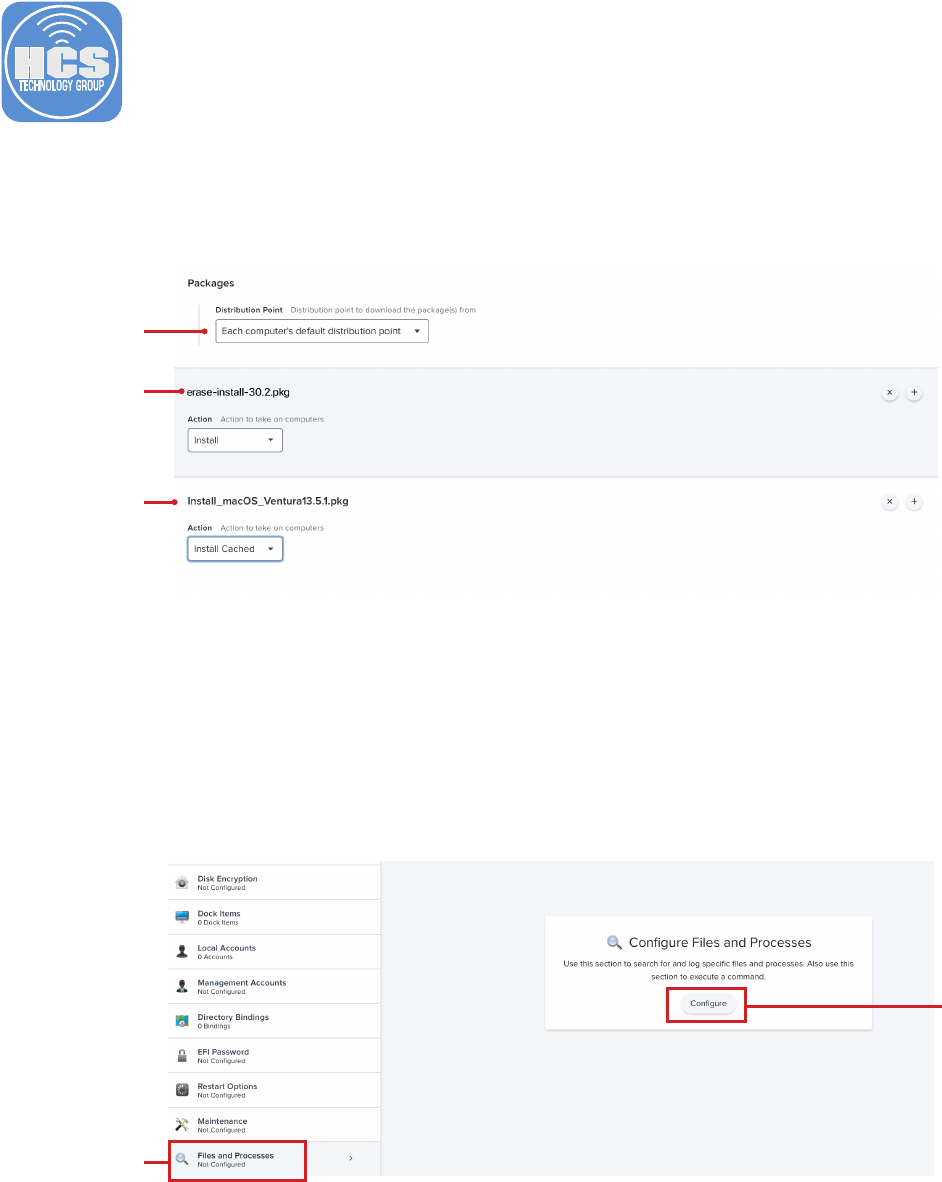
8. Locate Install_macOS_Ventura13.5.1.pkg.
9. Click Add.
11. Click the Files and Processes payload.
12. Click Congure.
13. Enter the following into the Execute Command eld:
/Library/Management/erase-install/erase-install.sh --os=13 --update
10. Congure the following:
A. Packages: Select the distribution point the works best for you. This guide will use the default.
B. Action: Select Cache from the menu.
A
B
Steps 11-13 are required for Method 1. For Method 2, skip to step 14.
11
12

Section 3 Page 18
How to Upgrade macOS Using erase-install and Jamf Pro
14. Click the Maintenance Payload.
15. Click Congure.
16. Make sure Update Inventory is selected. This will force an inventory update once the macOS
installer is cached.
14
15
17. Click Scope and congure the following:
A. Click Targets
B. Target Computers: Specic Computers
C. Click Add
A
B
C

Section 3 Page 19
How to Upgrade macOS Using erase-install and Jamf Pro
18. Select Computer Groups and congure the following:
A. In the search eld enter Macs Eligible.
B. Click Add for Macs Eligible for macOS Ventura Upgrade.
C. Click Done.
D. Click Save.
19. Click Policies.
20. Click New.
20
19
A
B
C
D

Section 3 Page 20
How to Upgrade macOS Using erase-install and Jamf Pro
21. Perform the following in the General Payload:
A. Display Name: macOS Ventura Upgrade
B. Category: This guide will use macOS Upgrades
C. Trigger: Recurring Check-in
D. Execution Frequency: Once per computer
22. Click the Packages payload.
23. Click Congure.
24. Locate erase-install-30.2.pkg.
25. Click Add.
22
23
A
B
C
D

Section 3 Page 21
How to Upgrade macOS Using erase-install and Jamf Pro
26. Congure the following:
A. Packages: Select the distribution point the works best for you. This guide will use the default.
B. Action: Select Install from the menu.
C. Click Add (+).
27. Locate Install_macOS_Ventura13.5.1.pkg.
28. Click Add.
29. From the menu, Action, select Install Cached.
A
B
C
The following steps 27- 30 apply only to Method 2. For Method 1, skip to step 31.
Section 3 Page 22
How to Upgrade macOS Using erase-install and Jamf Pro
31. Click the Files and Processes payload.
32. Click Congure.
30. Conrm the following to match the graphic below:
A. Packages: Select the distribution point the works best for you. This guide will use the default.
B. erase-install-30.2.pkg: Action: Install.
C. Install_macOS_Ventura13.5.1.pkg: Action: Install Cached.
31
32
A
C
B

Section 3 Page 23
How to Upgrade macOS Using erase-install and Jamf Pro
33. In the Execute Command eld, enter the following:
/Library/Management/erase-install/erase-install.sh --os=13 --reinstall --check-power --no-timeout
Breakdown what this command is doing:
/Library/Management/erase-install/erase-install.sh
(This is where the erase-install script is located and will be called from)
/Library/Management/erase-install/erase-install.sh --os=13 --reinstall --check-power
--no-timeout
--os=13 This tells erase-install what major version of macOS to use
--reinstall This tells erase-install to reinstall the macOS without erasing the hard drive
--check-power This tells erase-install to make sure a power cable is plugged in
--no-timeout This tells erase-install not to timeout after 1 hour and will extend timeout for one day.
Helpful if your network is very slow
There are many different options you can provide in this command. It really depends on your needs.
The above command is suitable for most upgrades. Check the addendum section of this guide for a
listing of all the options.
NOTE: Mac computers with Apple Silicon require a user that is a volume owner and will prompt that
user for their credentials before running the macOS Ventura upgrade. There is a new feature in erase-
install version 30 or later that will allow you to provide a set of user credentials to run the upgrade
without being prompted. Please note the password is sent in PLAIN TEXT which is very insecure. Use
this at your own risk. The user credentials must be the same on all Macs that run it, for example, local
admin credentials for an admin user that logged into the Mac at least once. The credentials must be
base64 encoded which can be done using the Terminal.app. See the example below:
Example:
printf "%s:%s" "userhcs" "pass1234" | iconv -t ISO-8859-1 | base64 -i -
This is the output of the above command. It combines the user name and password in base64.
dXNlcmhjczpwYXNzMTIzNA==
This is what you would need to enter in the Execute Command eld in Jamf Pro.
/Library/Management/erase-install/erase-install.sh --os=13 --reinstall --check-power
--no-timeout --very-insecure-mode --credentials dXNlcmhjczpwYXNzMTIzNA==
For more on this, read the release notes for version 30 here:
https://github.com/grahampugh/erase-install/releases/tag/v30.0
Section 3 Page 24
How to Upgrade macOS Using erase-install and Jamf Pro
34. Click Scope and congure the following:
A. Click Targets
B. Target Computers: Specic Computers
C. Click Add
35. Select Computer Groups and congure the following:
A. In the search eld enter cached.
B. Click Add for Macs with macOS Ventura Cached
C. Click Done.
D. Click User Interaction.
A
B
C
A
B
C
D
Section 3 Page 25
How to Upgrade macOS Using erase-install and Jamf Pro
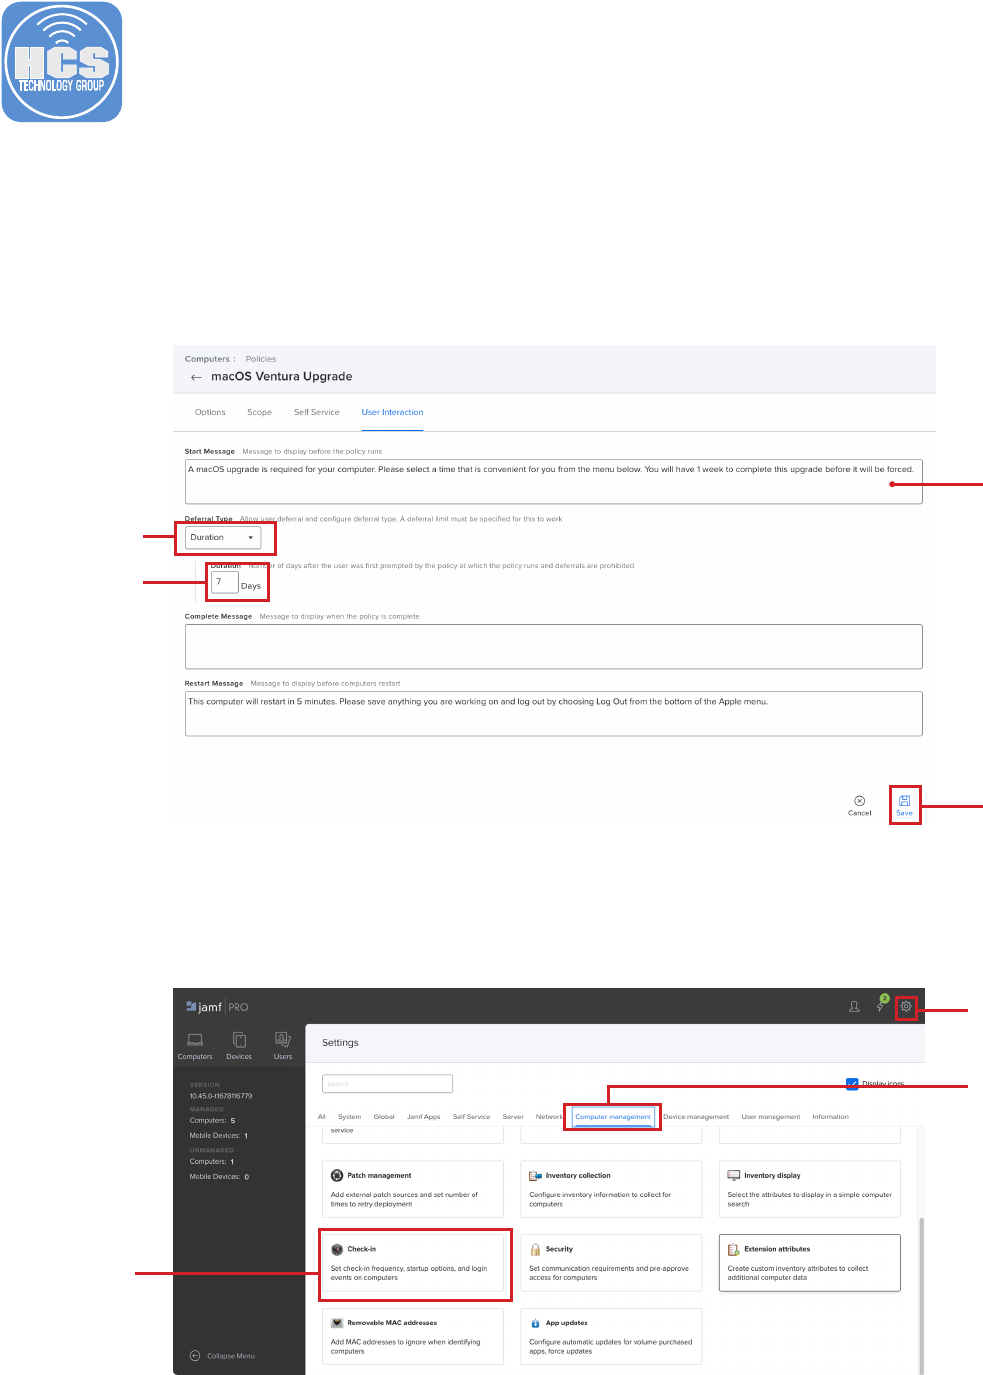
36. Congure the following:
A. Start Message:
A macOS upgrade is required for your computer. Please select a time that is convenient for
you from the menu below. You will have 1 week to complete this upgrade before it will be
forced.
B. Deferral Type: Duration
C. Enter 7 for Days.
D. Click Save.
37. We need to make sure the Jamf Pro server is congured to make a launch daemon that
executes on a computer at startup. This is required to run policies that trigger at startup.
On the top-right corner, click Settings ().
38. Click Computer management.
39. Click Check-in.
37
39
38
A
B
C
D

Section 3 Page 26
How to Upgrade macOS Using erase-install and Jamf Pro
40. Congure the following:
A. Create startup script: Enabled
B. Check for policies triggered by startup: Enabled
C. Click Save.
41. Click Computers.
42. Click Policies.
43. Click New.
43
42
41
A
B
C
Section 3 Page 27
How to Upgrade macOS Using erase-install and Jamf Pro
44. Congure the following in the General payload:
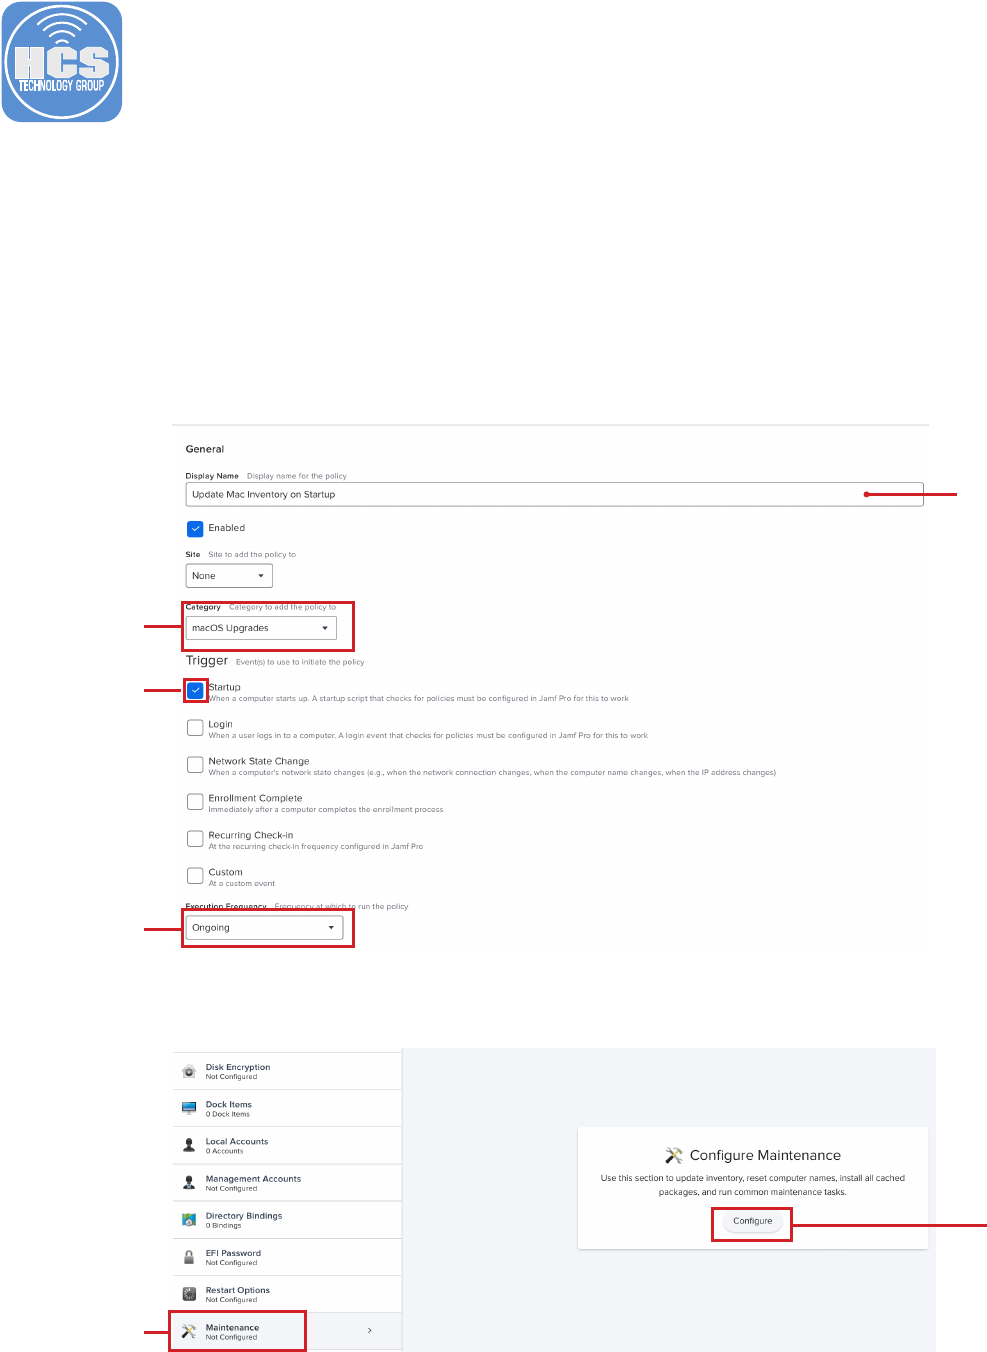
A. Display Name: Update Mac Inventory on Startup
B. Category: Select one of your choosing. This guide will use macOS Upgrades.
C. Trigger: Startup
E. Execution Frequency: Ongoing
NOTE: We are creating this policy because Jamf Pro would never know when erase-install
is nished as it reboots the Mac and never runs an inventory update. This will ensure an
inventory update is ran once the Mac computer is rebooted. This is required to remove the
Mac computers that have successfully upgraded from the smart computer groups we created in
section 2 of this guide.
45. Click the Maintenance payload
46. Click Congure.
45
46
A
B
C
D

Section 3 Page 28
How to Upgrade macOS Using erase-install and Jamf Pro
48. Click Scope and congure the following:
A. Select Targets
B. Target Computers: All Computers
C. Click Save
D. Click Policies
NOTE: This guide is selecting All Computers for simplicity. If you don’t want to run an inventory
update each time a Mac computer starts up, then scope to your needs.
47. Conrm the checkbox for Update Inventory is selected
A
D
B
C
Section 3 Page 29
How to Upgrade macOS Using erase-install and Jamf Pro
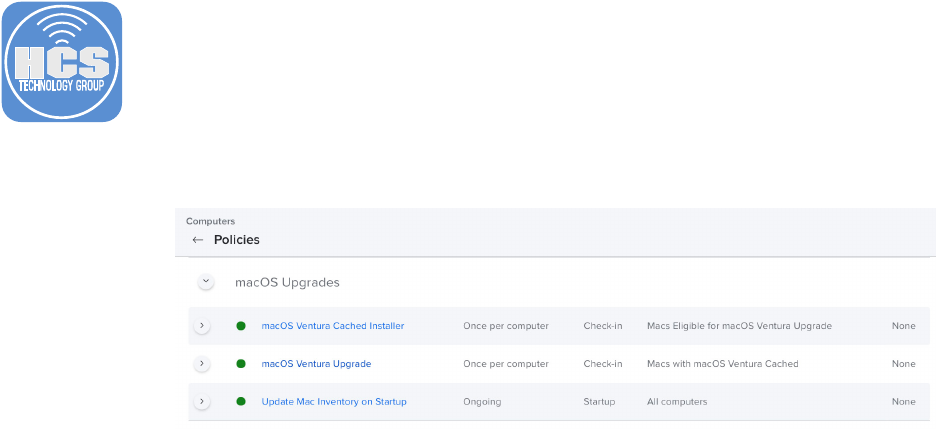
49. Conrm that you see all three policies that we created with the correct triggers and scope.
This completes this section.

Section 2 Page 30
How to Upgrade macOS Using erase-install and Jamf Pro
Section 4: Upgrade to macOS Ventura
What You’ll Need
Learn what hardware, software, and information you’ll need to complete the tutorials in this section.
Hardware and Software
Requirements for following along with this section:
• A Mac computer enrolled in your Jamf Pro server that is NOT running macOS Ventura 13.5.1
• Administrative access to your Jamf Pro server.
In this section we will upgrade a Mac computer to macOS Ventura 13.5.1.
Please use a NON production Mac computer when
testing the steps in this guide. Depending on your
network speed, it can take up to 45 minutes to cache
the macOS Ventura installer to your local Mac. You
cannot follow the steps in this section until the macOS
Ventura installer is cached to your local Mac. To nd
out if your Mac computer has macOS Ventura cached,
log into your Jamf Pro server and look at the Macs with
macOS Ventura Cached smart computer group on the
dashboard. If your Mac computer shows up in the list,
you are good to proceed with the steps in this section.
1. Log into a non production Mac computer that is enrolled in jamf and NOT running macOS
Ventura 13.5.1
2. You will be presented with the screen below the next time your Mac computer checks in with
your Jamf Pro server. You will only see this message if your Mac computer has the macOS
installer cached locally.

Section 2 Page 31
How to Upgrade macOS Using erase-install and Jamf Pro
3. You have a few options in the menu. You can defer this policy from running, up to 7 days
(1 Week). After the 7th day, it will be a forced upgrade. Select Start now and click Submit
4. If you’re using a Mac computer with Apple Silicon, you will be presented with the screen below.
Enter your password and click Continue.
NOTE: If you’re running a Mac Computer with an Intel processor, you will not see this message.
You can pass credentials in base64 format to avoid seeing this message on Macs with Apple
Silicon. The password is sent in clear text so be careful when using this method. See section 3
step 22 of this guide for more details on passing in the credentials.
5. The upgrade process will take over the entire screen. It can take 30 minutes or more to complete
depending on your network speed.

Section 2 Page 32
How to Upgrade macOS Using erase-install and Jamf Pro
6. A progress bar will show the percentage completed. Once done, your Mac computer will reboot
and continue processing the upgrade.
7. Once the computer has returned to the login window, log in.
8. Log into your Mac Computer.
9. Click the Apple menu () in the top-left corner, select About This Mac.
10. Conrm your Mac computer is running macOS Ventura 13.5.1

Section 2 Page 33
How to Upgrade macOS Using erase-install and Jamf Pro
11. Log into your Jamf Pro server. Conrm your Mac computer no longer shows up in the smart
computer groups we created in section 2 of this guide. The pictures below show the smart
computer groups before and after the macOS Ventura Upgrade.
This completes the guide.

Addendum Page 34
How to Upgrade macOS Using erase-install and Jamf Pro
Addendum
Install Locations
• erase-install is located in: /Library/Management/erase-install
• mist-cli is located at: /usr/local/bin/mist
• swiftDialog is located in: /usr/local/bin/dialog and /Library/Application\Support/Dialog/Dialog.app
erase-install Log Location
The erase-install log le is located in: /Library/Management/erase-install/log
Helper Scripts
erase-install-launch-script-example.sh
https://github.com/grahampugh/erase-install/blob/main/erase-install-launch-script-example.sh
This script is an example of how you can launch erase-install from another script when deploying
the standard macOS package of erase-install from within Jamf Pro. You can simply add this script to
the "Scripts" section of a Jamf Pro policy, which will in turn launch erase-install.sh with all supplied
parameters and return its output and return code back to Jamf Pro. The command in the script can
be exactly the same as what was added in Section 3, Point 32 of this guide. The advantage of using a
launch script over an Execute Command is that if the script fails, this will be reported back to Jamf Pro
as a failed policy, whereas Execute Commands always exit as if the command was successful.
set-credentials.sh
https://github.com/grahampugh/erase-install/blob/main/set-credentials.sh
This script can be used to generate the base64-encoded credentials for use with Apple Silicon Mac
computers. You can alternatively use the following shell command to get the same result as the set-
credentials.sh script:
printf "%s:%s" "<USERNAME>" "<PASSWORD>" | iconv -t ISO-8859-1 | base64 -i -
Example: printf "%s:%s" "hcs" "hcs1234" | iconv -t ISO-8859-1 | base64 -i -
Available options for erase-install
Standard options for list, download, reinstall and erase
--list
List available updates only. It does not download anything
[no ags]
Finds the latest compatible production version of macOS, downloads
it.
--reinstall
After download, reinstalls macOS without erasing the current system.
--erase
After download, erases the current system and reinstalls macOS.
--conrm
Displays a conrmation dialog prior to erasing or reinstalling macOS.
--check-power
Checks for AC power if set.
--power-wait-limit NN
Maximum seconds to wait for detection of AC power, if --check-
power is set. Default is 60.
--check-fmm
Prompt the user to disable Find My Mac before proceeding, when
using --erase
--fmm-wait-limit NN
Maximum seconds to wait for removal of Find My Mac, if --check-
fmm is set. Default is 300.
--rebootdelay NN
Delays the reboot after preparation has nished by NN seconds (max
300) (--reinstall option only). If set to greater than 10 seconds, the
normal fullscreen dialog during the preparation phase is replaced
with a smaller dialog, so the user can continue to work. The user is
given a countdown once preparation is complete and the reboot
delay has begun.

Addendum Page 35
How to Upgrade macOS Using erase-install and Jamf Pro
Options for ltering which installer to download/use
--os X.Y
Finds a specic inputted OS version of macOS if available and
downloads it if so. Will choose the latest matching build.
--version X.Y.Z
Finds a specic inputted minor version of macOS if available and
downloads it if so. Will choose the latest matching build.
--build XYZ
Finds a specic inputted build of macOS if available and downloads
it if so.
--sameos
Finds the version of macOS that matches the existing system version,
downloads it. Most useful with --erase.
--samebuild
Finds the build of macOS that matches the existing system version,
downloads it. Most useful with --erase.
--update
Checks that an existing installer on the system is still the most current
compatible build, and if not, it will delete it and download the
current installer, within the limits set by --os or --version.
--replace-invalid
Checks that an existing installer on the system is still valid i.e. would
successfully build on this system. If not, deletes it and downloads the
current installer, within the limits set by --os or --version.
--overwrite
Delete any existing macOS installer found in /Applications and
download the current installer within the limits set by --os or
--version.
--clear-cache-only
When used in conjunction with --overwrite, --update or --replace-
invalid, the existing installer is removed but not replaced. This is
useful for running the script after an upgrade to clear the working
les.
--cleanup-after-use
Creates a LaunchDaemon to delete /Library/Management/erase-
install after use. Mainly useful in conjunction with the --reinstall
option.
Extra packages
--eraseinstall can install packages after the new installation. By default, erase-install.sh will look
for packages in /Library/Management/erase-install/extras.
--extras /path/to
Overrides the path to search for extra packages
Parameters for use with Apple Silicon Mac
Note that startosinstall requires user authentication on AS Mac. The user must have a Secure
Token. This script checks for the Secure Token of the supplied user. A dialog is used to supply
the password, so this script cannot be run at the login window or from remote terminal.
--max-password-attempts NN | innite
Overrides the default of 5 attempts to ask for
the user's password. Using 'innite' will disable
the Cancel button and keep asking until the
password is successfully veried.

Addendum Page 36
How to Upgrade macOS Using erase-install and Jamf Pro
Advanced options
-newvolumename
If using the --erase option, lets you customize the name of
the clean volume. Default is ‘Macintosh HD’.
--preinstall-command ‘some
arbitrary command’
Supply a shell command to run immediately prior to
startosinstall running. An example might be ‘jamf recon
-department Spare’. Ensure that the command is in quotes.
--postinstall-command ‘some
arbitrary command’
Supply a shell command to run immediately after
startosinstall completes preparation, but before reboot. An
example might be ‘jamf recon -department Spare’. Ensure
that the command is in quotes.
--catalog NN
Override the default catalog with one from a different OS
(overrides --seed/--seedprogram).
--catalogurl https://...
Select a non-standard catalog URL (overrides --seed/--
seedprogram).
--caching-server https://...
Set mist-cli to use a Caching Server, specifying the URL to
the server.
--pkg
Creates a package from the installer. Ignored if --move,
--erase or --reinstall is selected. Note that mist takes a long
time to build the package from the complete installer, so
this method is not recommended for normal workows.
--move
Extracts the installer to /Applications from a cached macOS
installer package.
--keep-pkg
Retains a cached package if --move is used to extract an
installer from it.
--fs
Uses full-screen windows for all stages, not just the
preparation phase.
--no-fs
Replaces the full-screen dialog window during the
preparation phase with a smaller dialog, so you can still
access the desktop while the script runs.
--beta
Include beta versions in the search. Works with the no-ag
(i.e. automatic), --os and --version arguments.
--path /path/to
Overrides the destination of --move to a specied directory
--min-drive-space
Override the default minimum space required for
startosinstall to run (45 GB).
--no-curl
Prevents the download of swiftDialog or mist in case your
security team don’t like it.
--no-timeout
The script will normally timeout if the installer has not
successfully prepared after 1 hour. This extends that time
limit to 1 day.

Addendum Page 37
How to Upgrade macOS Using erase-install and Jamf Pro
Experimental features
--fetch-full-installer |
--i | -f
Obtain the installer using ‘softwareupdate --fetch-full-installer’
method instead of using mist.
--list
List installers using ‘softwareupdate --list-full-installers’ when
called with --fetch-full-installer
--seed ...
Select a non-standard seed program. This is only used with
--fetch-full-installer options. Note: as this relies on ‘seedutil’, it
no longer works with macOS 13.4 and above.
--kc
Keychain containing a user password (do not use the login
keychain!!)
--kc-pass
Password to open the keychain.Note that this is still insecure
since it’s not possible to separate access between the keychain
and the password.
--kc-service
The name of the key containing the account and password
--credentials
A base64 credential set. Only works in conjunction with --very-
insecure-mode
--very-insecure-mode
Sends the credential password in plain text. This is very
insecure. Use at your own risk.
--silent
Silent mode. No dialogs. Requires use of keychain for Apple
Silicon to provide a password, or the --credentials mode.
--quiet
Remove output from mist during installer download. Note that
no progress is shown.
--preservecontainer
Preserves other volumes in your APFS container when using
--erase
--set-securebootlevel
Resets Secure Boot Level to High when using --erase
--clear-rmware
Clears the rmware NVRAM variables when using --erase
Parameters useful in testing this script
--test-run
Run through the script right to the end, but do not actually run
the ‘startosinstall’ command. The command that would be run
is shown in stdout.
--workdir /path/to
Supply an alternative working directory. The default is the
same directory in which erase-install.sh is saved.
--cache-downloads
Caches mist downloads in a temporary directory in /private/
tmp/com.ninxsoft.mist Useful when running repeated tests.
