
CoSoSys Confidential. Copyright © 2004 – 2023 CoSoSys SRL and its licensors. All rights reserved.
JAMF
Deployment Guide
Version 4.0
Date 05.05.2023

CoSoSys Confidential. Copyright © 2004 – 2023 CoSoSys SRL and its licensors. All rights reserved.
Table of Contents
Document Changelog 3
1. Introduction 4
2. Creating the Configuration Profile 5
2.1. General settings 5
2.2. Certificate settings 6
2.3. Privacy Preferences Policy Control settings 9
2.4. Allow EppNotifier settings 10
2.5. EasyLock Enforced Encryption settings 11
2.6. System Extension settings 12
2.6.1. Allow System Extension 12
2.6.2. Removable System Extensions 13
2.6.3. Managed Login Items 13
2.7. VPN settings 14
2.8. Notifications settings 16
2.9. Scope 17
3. Uploading the Script and Package 18
4. Creating the Policy 20
5. Disclaimer 23

CoSoSys Confidential. Copyright © 2004 – 2023 CoSoSys SRL and its licensors. All rights reserved.
Document Changelog
Version
Date
Notes
1.0
2019
The document was created.
2.0
16.02.2022
The document was updated.
3.0
11.11.2022
Updated the VPN settings section, added the Document
Changelog section and applied the current template.
4.0
05.05.2023

CoSoSys Confidential. Copyright © 2004 – 2023 CoSoSys SRL and its licensors. All rights reserved.
1. Introduction
Since the release of macOS 11.0 (Big Sur), significant changes have been made regarding
system extensions that now allow deploying endpoint security solutions without kernel-level
access.
This affects the deployment of the Endpoint Protector Client on all Macs that are using 11.0
operating systems or later. Companies can use third-party deployment tools such as JAMF as
well as other alternatives.
This user manual aims to explain how to use JAMF in order to deploy Endpoint Protector on
multiple endpoints.

CoSoSys Confidential. Copyright © 2004 – 2023 CoSoSys SRL and its licensors. All rights reserved.
2. Creating the Configuration Profile
In order to use JAMF, first, you need to create a new configuration profile.
To do so, follow these steps:
1. Open the JAMF Pro account and log in using your credentials;
2. In your JAMF account, from the main navigation bar click Computer, and then from the
left sidebar menu, select Configuration Profiles;
3. To create a new configuration profile, in the upper right, above the table with available
configuration profiles, click +New.
On the New macOS Configuration Profile section, you can manage profile settings and select
the devices and users to which you want to deploy the profile.
Note: Click Save only once you have managed all settings and the profile scope.
2.1. General settings
On the default General section, enter the following information:

CoSoSys Confidential. Copyright © 2004 – 2023 CoSoSys SRL and its licensors. All rights reserved.
● Name – enter a name to use for this configuration profile
● Description (optional) – add a description that details the purpose of the configuration
profile
You can continue with the default settings for the category, level, and distribution method
fields.
2.2. Certificate settings
You will add the Client CA Certificate in .cer format on the Certificate settings section.
Note: This step is not required if you are not using Deep Package Inspection. To continue the
process, go to the Privacy Preferences Policy Control section.

CoSoSys Confidential. Copyright © 2004 – 2023 CoSoSys SRL and its licensors. All rights reserved.
1. Log in to Endpoint Protector Server, go to the System Configuration section, and then
select System Settings;
2. On the Default System Settings section, enable Deep Packet Inspection Certificate
and then download Client CA Certificate – the downloaded .zip file contains the .cer and
.crt client certifications.
CoSoSys Confidential. Copyright © 2004 – 2023 CoSoSys SRL and its licensors. All rights reserved.
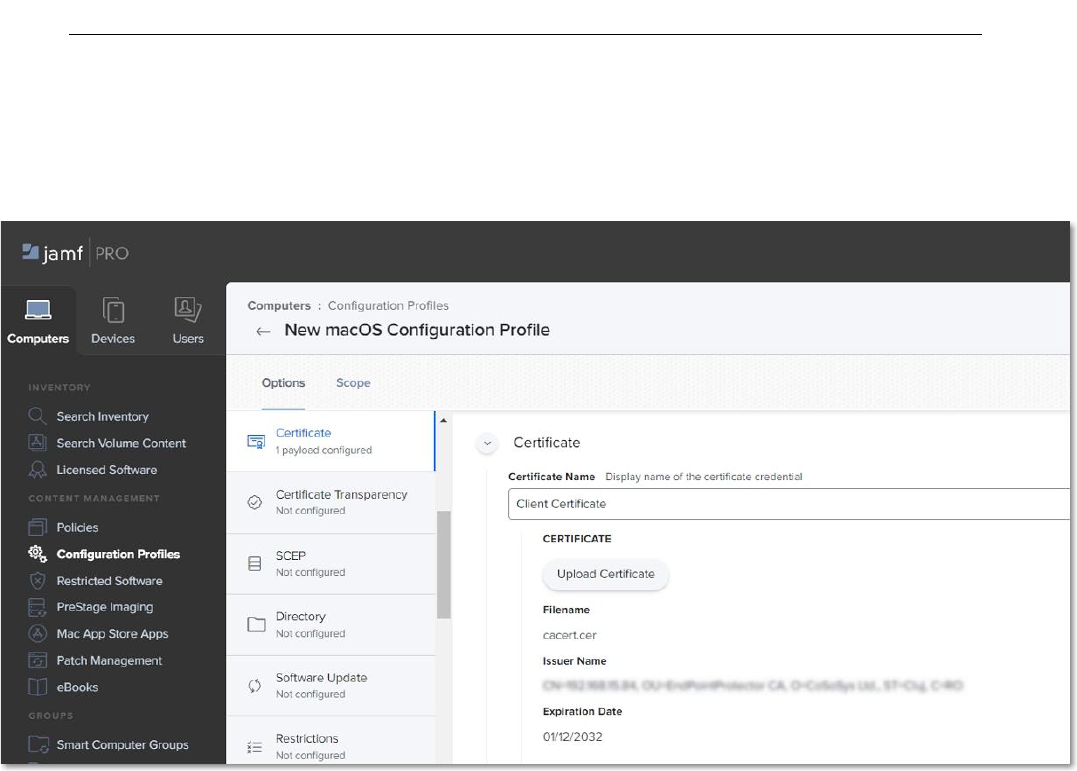
3. Go to JAMF, the Certificate section, and click Configure;
4. Enter a Certificate name and then select and upload the downloaded Client CA
Certificate in .cer format.

CoSoSys Confidential. Copyright © 2004 – 2023 CoSoSys SRL and its licensors. All rights reserved.
2.3. Privacy Preferences Policy Control settings
On the Privacy Preferences Policy Control section, click Configure and then enter the
following information:
● Identifier - com.cososys.eppclient
● Identifier Type – go with the default Bundle ID type
● Code Requirement
anchor apple generic and certificate 1[field.1.2.840.113635.100.6.2.6] /* exists */
and certificate leaf[field.1.2.840.113635.100.6.1.13] /* exists */ and certificate
leaf[subject.OU] = TV3T7A76P4
Note: Use the Terminal Editor to verify there are no formatting alterations before executing
this command line.
● Select the Validate the Static Code Requirement checkbox
● Click Add and Save to allow access to SystemPolicyAllFiles and Accessibility services.

CoSoSys Confidential. Copyright © 2004 – 2023 CoSoSys SRL and its licensors. All rights reserved.
2.4. Allow EppNotifier settings
On the Privacy Preferences Policy Control section, click the + icon to add a new policy and
then enter the following information:
● Identifier - com.cososys.eppclient.notifier
● Identifier Type – go with the default Bundle ID type
● Code Requirement
anchor apple generic and certificate 1[field.1.2.840.113635.100.6.2.6] /* exists */ and
certificate leaf[field.1.2.840.113635.100.6.1.13] /* exists */ and certificate
leaf[subject.OU] = TV3T7A76P4
Note: Use the Terminal Editor to verify there are no formatting alterations before executing
this command line.
● Select the Validate the Static Code Requirement checkbox
● Click Add and then Save to allow access to Accessibility services.
CoSoSys Confidential. Copyright © 2004 – 2023 CoSoSys SRL and its licensors. All rights reserved.
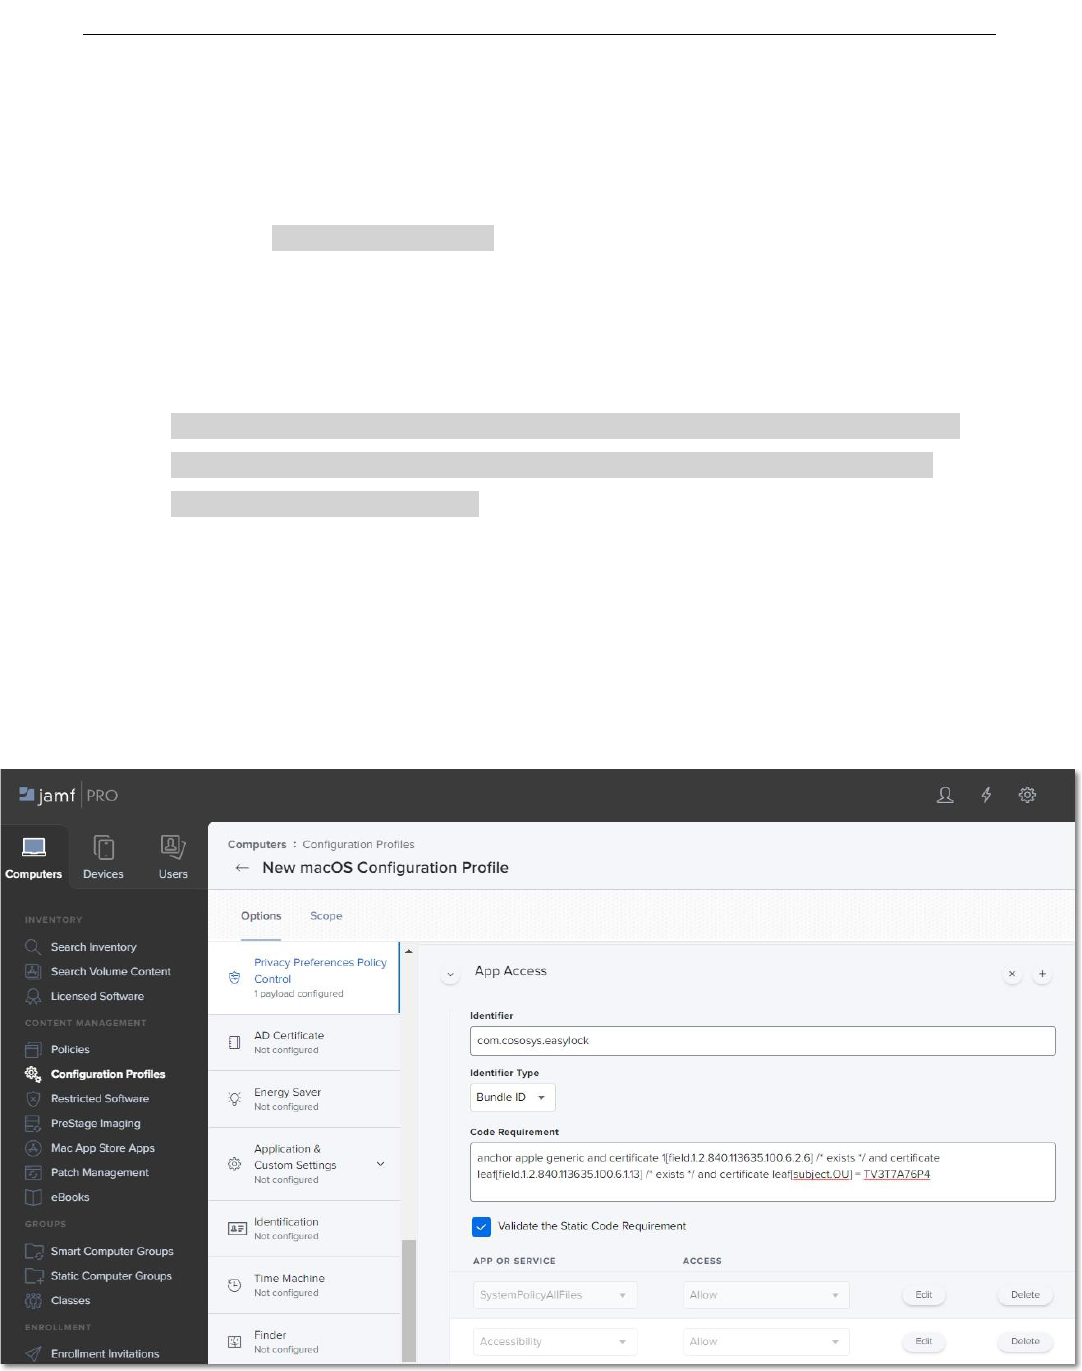
2.5. EasyLock Enforced Encryption settings
On the Privacy Preferences Policy Control section, click the + icon to add a new policy and
then enter the following information:
● Identifier – com.cososys.easylock
● Identifier Type – go with the default Bundle ID type
● Code Requirement
anchor apple generic and certificate 1[field.1.2.840.113635.100.6.2.6] /* exists */
and certificate leaf[field.1.2.840.113635.100.6.1.13] /* exists */ and certificate
leaf[subject.OU] = TV3T7A76P4
Note: Use the Terminal Editor to verify there are no formatting alterations before executing
this command line.
● Select the Validate the Static Code Requirement checkbox
● Click Add and then Save to allow access to SystemPolicyAllFiles and Accessibility
services
CoSoSys Confidential. Copyright © 2004 – 2023 CoSoSys SRL and its licensors. All rights reserved.
2.6. System Extension settings
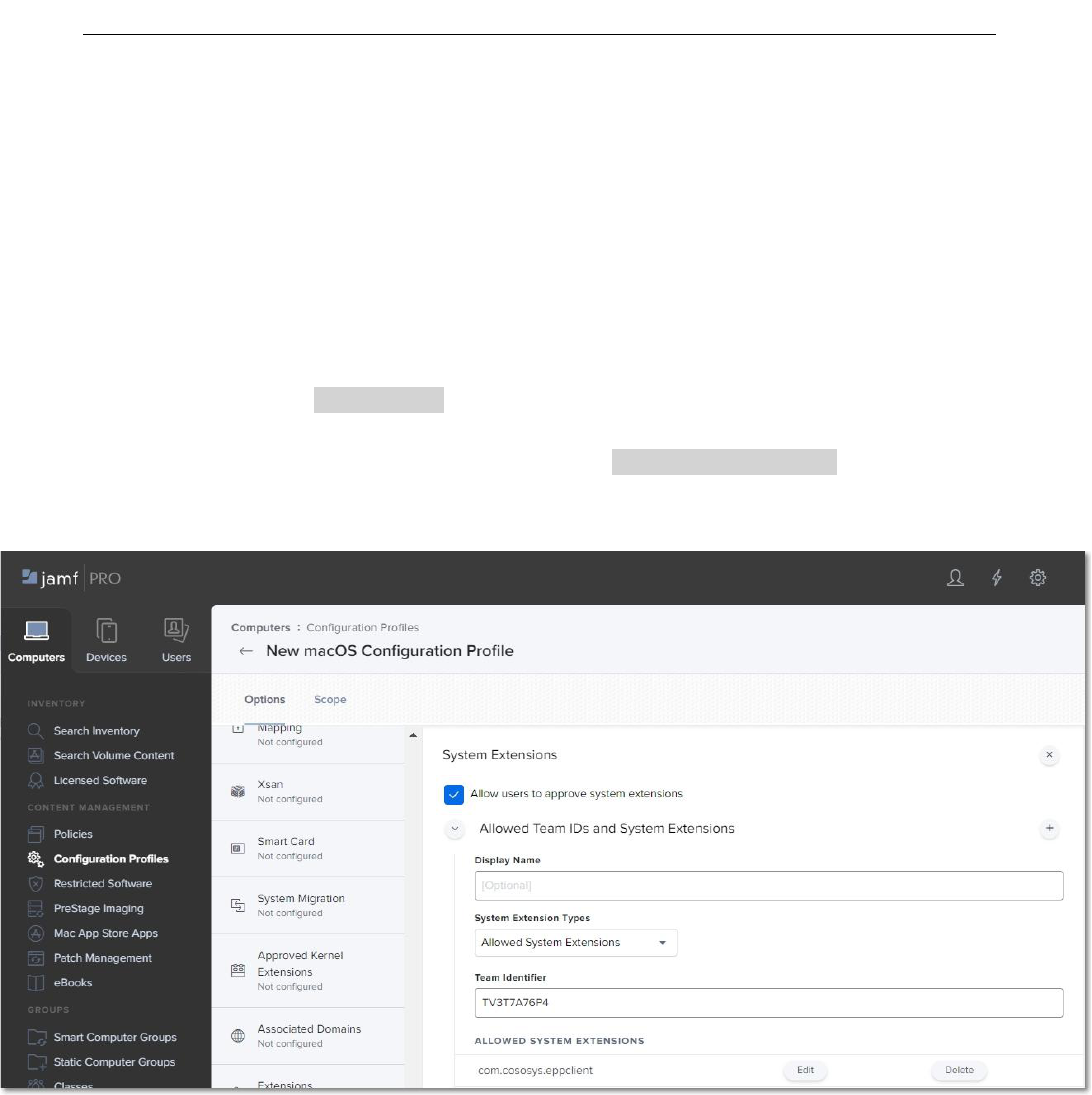
2.6.1. Allow System Extension
On the System Extension section, click Configure and then enter the following information:
● Display Name (optional) - enter a name to use for this configuration
● System Extension Type - select Allow System Extension type
● Team Identifier - TV3T7A76P4
● Allowed System Extensions – click Add, enter com.cososys.eppclient, and then Save
the changes
Note: For operating systems lower than macOS 11 (Big Sur), manage settings from the
Approved Kernel Extensions section instead of System Extensions. Define the Team ID (enter
TV3T7A76P4) and proceed to the next step.

CoSoSys Confidential. Copyright © 2004 – 2023 CoSoSys SRL and its licensors. All rights reserved.
2.6.2. Removable System Extensions
On the System Extension section, click the + icon to add a new policy that will allow removing
system extensions without a pop-up, and then enter the following information:
● Display Name (optional) - enter a name to use for this configuration
● System Extension Type - select Removable System Extensions type
● Team Identifier - TV3T7A76P4
● Allowed System Extensions – click Add, enter com.cososys.eppclient, and then Save
the changes
Note: This setting will be applied starting with MacOS 12 version (Monterey).
2.6.3. Managed Login Items
Administrators can quickly disable Endpoint Protector Items in JAMF Configuration Profiles
with Ventura's (macOS 13) new capability. This can be accomplished by taking the following
steps:
1. Log in to your JAMF account.
2. Click "Computer" from the main navigation bar.
3. Select "Configuration Profiles" from the sidebar menu on the left.
4. Click "New" in the upper right-hand corner.
5. On the left, under the "Options" box, select "Managed Logged In Items."

CoSoSys Confidential. Copyright © 2004 – 2023 CoSoSys SRL and its licensors. All rights reserved.
Endpoint Protector Items can be simply disabled in your JAMF Configuration Profiles from
here. Simply uncheck the box next to the Endpoint Protector Item(s) you want to disable, and
then click "Save" to save your changes.
Note: Disabling Endpoint Protector Items may have an impact on the security of your system.
Only disable these items if you are positive it is essential and you have taken every
precaution necessary to keep your system secure.
2.7. VPN settings
Note: This step is not required if you are not using VPN services. To continue the process, go
to the Scope section.
On the VPN section, click Configure and then enter the following information:
● Connection Name – enter a connection name that will be displayed on the device
● VPN Type – select Per-App VPN type
● Per-App VPN Connection Type – select Custom SSL connection type
● Identifier – com.cososys.eppclient.daemon
● Server – localhost
● Provider Bundle Identifier – com.cososys.eppclient.daemon
● Provider Type – select App-proxy type
● Select the Include All Networks checkbox
● Provider Designated Requirement
anchor apple generic and certificate 1[field.1.2.840.113635.100.6.2.6] /* exists */ and
certificate leaf[field.1.2.840.113635.100.6.1.13] /* exists */ and certificate
leaf[subject.OU] = TV3T7A76P4
Note: Use the Terminal Editor to verify there are no formatting alterations before executing
this command line.
● Select the Prohibit users from disabling on-demand VPN settings checkbox

CoSoSys Confidential. Copyright © 2004 – 2023 CoSoSys SRL and its licensors. All rights reserved.

CoSoSys Confidential. Copyright © 2004 – 2023 CoSoSys SRL and its licensors. All rights reserved.
2.8. Notifications settings
Note: This step is optional. To continue the process, go to the Scope section.
On the Notifications section, click Configure and then enter the following information:
● App Name - EppNotifier
● Bundle ID - com.cososys.eppclient.notifier
● Toggle the switch to include the settings type and then disable/enable to manage each
notification option

CoSoSys Confidential. Copyright © 2004 – 2023 CoSoSys SRL and its licensors. All rights reserved.
2.9. Scope
Once you manage all settings, go to the Scope tab and select the devices and users to deploy
the new profile.
Click Save to apply all settings to the new configuration profile.
Note: To confirm that the new configuration profile is saved successfully, reboot your
computer at this point.

CoSoSys Confidential. Copyright © 2004 – 2023 CoSoSys SRL and its licensors. All rights reserved.
3. Uploading the Script and
Package
To deploy the Endpoint Protector Client, you need to upload the EndpointProtector.pkg
package and epp_change_ip.sh script.
Important: You need to request the script at [email protected].
To upload the script and package, follow these steps:
1. In your JAMF account, from the main navigation bar, click Computer, and then from the
left sidebar menu, select Management Settings;
2. From the Computer Management section, select Scripts and then, in the upper right,
click + New;
3. On the General section, add a name for the profile, and then select the Script tab and
add the epp_change_ip.sh script;
4. Add your Server IP to the EPP_SERVER_ADDRESS field;
Note: You can edit the EPP_DEPARTMET CODE and EPP_SERVER_PORT fields to deploy the
Endpoint Protector Client on specific departments or custom ports.

CoSoSys Confidential. Copyright © 2004 – 2023 CoSoSys SRL and its licensors. All rights reserved.
5. From the Computer Management section, select Package and then, in the upper right,
click + New;
6. On the General tab, add a name and then upload the package EndpointProtector.pkg.

CoSoSys Confidential. Copyright © 2004 – 2023 CoSoSys SRL and its licensors. All rights reserved.
4. Creating the Policy
Once the script and package are successfully uploaded, you need to create a new JAMF policy.
To create the new policy, follow these steps:
1. In your JAMF account, from the main navigation bar, click Computer, from the left sidebar
menu, select Policies, and then click + New;
2. On the default General section, enter the following information:
● Display Name – enter the name to use for this policy
● Select the Recurring Check-in checkbox

CoSoSys Confidential. Copyright © 2004 – 2023 CoSoSys SRL and its licensors. All rights reserved.
3. On the Scripts section, click Configure and then enter the following information:
● Add the epp_change_ip.sh script
● Priority – set priority to Before, as the script needs to be installed before the next
step
4. On the Packages section, click Configure and then add the package
EndpointProtector.pkg;

CoSoSys Confidential. Copyright © 2004 – 2023 CoSoSys SRL and its licensors. All rights reserved.
5. Go to the Scope tab and add the devices and users to apply the new policy;
6. Click Save to apply all settings to the new policy.
To confirm that the Endpoint Protector Client has been successfully deployed and the Server-
Client communication and policies work as expected, you can view the endpoint in the List of
Computers from the Endpoint Protector UI, and the Endpoint Protector Client is displayed in
the menu bar.

CoSoSys Confidential. Copyright © 2004 – 2023 CoSoSys SRL and its licensors. All rights reserved.
5. Disclaimer
The information in this document is provided on an “AS IS” basis. To the maximum extent
permitted by law, CoSoSys disclaims all liability, as well as any and all representations and
warranties, whether express or implied, including but not limited to fitness for a particular
purpose, title, non-infringement, merchantability, interoperability, and performance, in relation
to this document. Nothing herein shall be deemed to constitute any warranty, representation,
or commitment in addition to those expressly provided in the terms and conditions that apply
to the customer’s use of Endpoint Protector.
Each Endpoint Protector Server has the default SSH Protocol (22) open for Support
Interventions, and there is one (1) System Account enabled (epproot) protected with a
password. The SSH Service can be disabled at customers’ request.
Security safeguards, by their nature, are capable of circumvention. CoSoSys cannot, and does
not, guarantee that data or devices will not be accessed by unauthorized persons, and
CoSoSys disclaims any warranties to that effect to the fullest extent permitted by law.
Copyright © 2004 – 2023 CoSoSys SRL and its licensors. Endpoint Protector is a trademark of CoSoSys
SRL. All rights reserved. Macintosh, Mac OS X, macOS are trademarks of Apple Corporation. All other
names and trademarks are the property of their respective owners.

CoSoSys Confidential. Copyright © 2004 – 2023 CoSoSys SRL and its licensors. All rights reserved.
Confidential. © CoSoSys 2023.
Not to be shared without the express
written permission of CoSoSys
