
How to Deploy
Cisco AnyConnect with Jamf Pro
Contents
Section 1: Creating an XML Choice Installation File .....................................................................................4
Section 2: Creating a custom Cisco AnyConnect Installer Package ............................................................7
Section 3: Deploying Cisco AnyConnect with Jamf Pro ............................................................................15
Section 4: Deploying Cisco AnyConnect to a Mac Computer ...................................................................25

3
How to Deploy Cisco AnyConnect with Jamf
The purpose of this guide is to congure all the required items for a silent installation of Cisco
AnyConnect using Jamf Pro. A custom installer package and conguration prole will be used to
silence prompts for System Extensions, Socket Filter messages, and Notications. This will allow
for an installation without prompting users to accept or allow any messages during and after the
installation of Cisco AnyConnect.
We will also cover creating a xml le that can be used to choose what apps get installed as part of the
Cisco AnyConnect bundle as well as providing a custom conguration le so users can get up and
running without having to add any additional server information when connecting to the VPN.
To follow along with this guide you will need the following:
• Cisco AnyConnect installer. This guide will use version 4.10
• Jamf Composer for creating packages.
• A Mac computer running macOS Monterey enrolled in Jamf Pro. This guide will use version
macOS Monterey 12.3.1 and Jamf Pro 10.37.2
• Administrative access to a Jamf Pro server.
• Sample les for this guide can be downloaded here:
https://hcsonline.com/HCSles/AnyConnect_Sample_Files.zip
• Once downloaded, unzip the le and place the contents on your Desktop.

4
How to Deploy Cisco AnyConnect with Jamf
This section is optional and is meant to explain how XML choice les work. If you are already familiar
with creating and working with XML choice installation les you can move on to the next section. If
you downloaded the sample les for this guide, there is a pre formatted XML le named anyconnect_
choices.xml ready for use with this guide. We recommend using the sample le and editing it to your
needs.
To follow along with this section, you need a copy of your Cisco AnyConnect installation le. This guide
will use version 4.10 which downloads as a DMG le. Once downloaded, place the DMG on your
Desktop as we will use the Desktop in some le paths throughout this section.
1. Double click the anyconnect-macos.dmg le to mount it.
2. You are presented with the window below. Do NOT install AnyConnect. Leave this window open
as we will need it in a later step.
Section 1: Creating an XML Choice Installation File

5
How to Deploy Cisco AnyConnect with Jamf
3. This purpose of this step is to show you what choices are available when installing Cisco
AnyConnect from the GUI. This is an informational step and nothing needs to be done for this
step when following this guide. The Cisco AnyConnect installer package contains a myriad of
applications that can either be installed or excluded from the install based on your needs. When
installing via the GUI, you’re presented with a window where you can select and deselect the
apps that you want to install shown below.
4. Open Terminal located in /Applications/Utilities.
What if you wanted to automate the installation of Cisco AnyConnect and exclude some apps
using the command line? How can that be achieved?
macOS includes a binary located in /usr/sbin called installer. The installer command supports a
ag called -applyChoiceChangesXML. This will allow you to create an XML le with the items that
you want to include when installing Cisco AnyConnect from the command line. For example, if
you only wanted to install the VPN app, you could congure your XML le to only include the
VPN app. In order to nd out what choices are supported by Cisco AnyConnect, the installer
command has another ag called -showChoicesXML.

6
How to Deploy Cisco AnyConnect with Jamf
5. If you run the command below, it will output all the XML key value pairs that are supported by
Cisco AnyConnect to your Desktop.
NOTE: The section of the command below that is in red is a drag and drop of the AnyConnect.
pkg le from the AnyConnect dmg that we mounted on the Desktop in step 2 of this guide. Your
version number may vary.
/usr/sbin/installer -showChoicesXML -pkg /Volumes/AnyConnect\ 4.10.04065/
AnyConnect.pkg -target / > ~/Desktop/anyconnect_choices.xml
6. Open the anyconnect_choices.xml le to examine the key value pairs.
7. As we examine the le, you will notice keys named childitems that contain an additional key
named choiceDescription. Each app is identied by its choiceIdentier key and its installation
status is identied by the choiceIsSelected key. If you look at the choiceIdentier key, which is
in blue text, you will see the choice is for the VPN app, which is in red text. If you look at the
choiceIsSelected key, which is in blue, you will see an integer of 0 which means the VPN app will
NOT be installed. If the integer was set to 1, then the VPN app would be installed. The integer is
what decides if an app will be installed. 0 means don’t install and 1 means install.
Close this le when you’re done examining it.
In the next section, we will go over creating a custom Cisco AnyConnect installer package that will
apply the anyconnect_choices.xml le and a anyconnect_prole.xml settings le that will include
the VPN server information.

7
How to Deploy Cisco AnyConnect with Jamf
Section 2: Creating a custom Cisco AnyConnect Installer Package
To follow along with this section, you will need download the sample les using the link in the
beginning of this guide, Jamf Composer, and your Cisco AnyConnect installation le.
1. Open Composer located in the /Applications/Jamf Pro folder.
2. Click Cancel at the screen below.
3. Double click the anyconnect DMG le.
NOTE: If you did not skip the rst section of this guide, this dmg may already be mounted on
your Desktop.

8
How to Deploy Cisco AnyConnect with Jamf
4. Drag the AnyConnect.pkg le to your Desktop.
5. Conrm the le is on the Desktop. We will use it later in the guide.
6. Navigate back to the Finder, click the Go menu and select Go to Folder.

9
How to Deploy Cisco AnyConnect with Jamf
7. Enter /tmp in the eld, then double-click the private > tmp link.
8. Move the tmp folder to the left side of your desktop. Open the AnyConnect Sample Files folder
on your Desktop and move it to the right of the tmp folder so they are side by side. Drag the
anyconnect_choices.xml and anyconnect_prole.xml les from the AnyConnect Sample Files
folder into the tmp folder.
NOTE: The sample anyconnect_prole.xml le should be edited to your needs before creating
the package. This le contains information related to your organization. For example, you can
include the hostname of the VPN server for your organization so it pre populates when the
AnyConnect VPN software is open. There are a few ways to create this le:
A. If you’re comfortable with xml, you can edit the sample le to your needs.
B. If you already have a Mac computer that is congured with all the required AnyConnect
settings, you can copy the xml settings le located in /opt/cisco/anyconnect/prole/
C. If you have a Windows PC, Cisco has an AnyConnect Prole Editor Application that you can
use to create a prole. More on that here:
https://www.cisco.com/c/en/us/td/docs/security/vpn_client/anyconnect/anyconnect40/
administration/guide/b_AnyConnect_Administrator_Guide_4-0/anyconnect-prole-editor.html
Make sure you have your settings les congured to your needs before continuing to step 9.
9. Conrm the anyconnect_choices.xml and anyconnect_prole.xml les are in the tmp folder.
10
How to Deploy Cisco AnyConnect with Jamf
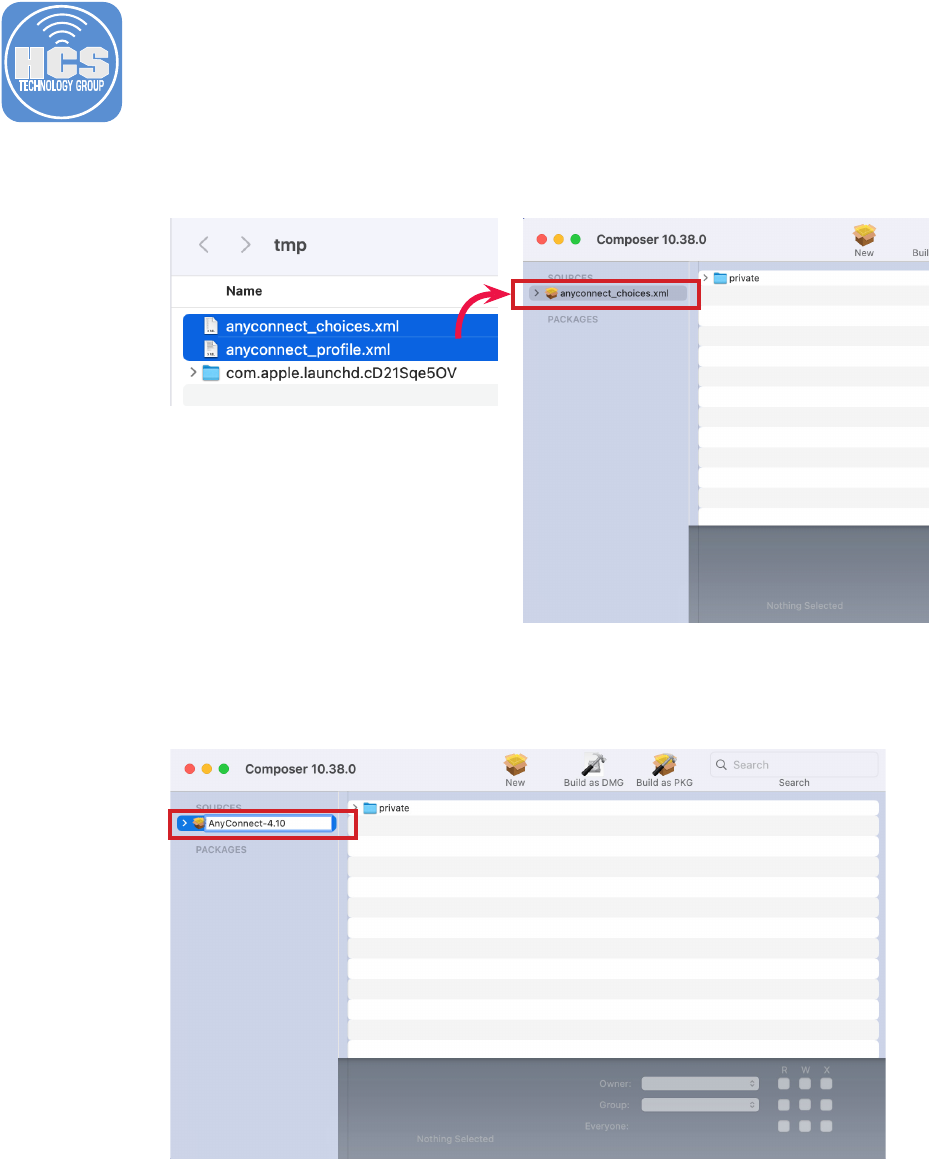
10. Drag the anyconnect_choices.xml and anyconnect_prole.xml les from the tmp folder to the
SOURCES section of Composer.
11. In the SOURCES section of Composer select the anyconnect_choices.xml le and rename it to
AnyConnect-4.10 or whatever version you are using.

11
How to Deploy Cisco AnyConnect with Jamf
12. Expand the private folder then expand the tmp folder. You will see the the two xml les named
anyconnect_choices.xml and anyconnect_prole.xml.
13. Drag the AnyConnect.pkg le from your Desktop to the tmp folder in Composer. Conrm you have
three les in the tmp folder in Composer as shown below.

12
How to Deploy Cisco AnyConnect with Jamf
14. Select the tmp folder, then select the permissions icon on the bottom right corner (circle with 3
dots). Select Apply Permissions to tmp and All Enclosed Items.
15. In the left-hand column, expand AnyConnect-4.10 then select the Scripts folder.
16. Right-click the scripts folder and select Add Shell Script. Select postinstall.

13
How to Deploy Cisco AnyConnect with Jamf
17. Delete the sample postinstall script. We will replace this in the next step.
18. Open the AnyConnect Sample Files folder on the Desktop. Open the PostinstallCiscoAnyConnect.
sh script. Copy the contents of the script.
19. Paste in the script you copied in the previous step. Press the Command and S key on your
keyboard to save the script. This is required by Composer.
Let’s break down the postinstall script:
• The rst item in the script will run the installer command and apply the XML choice
installation le with the apps that we want to be installed. We covered the XML choice
installation le in section 1 of this guide.
• The next item in the script will move a pre congured anyconnect settings le to the
required location which is /opt/cisco/anyconnect/prole/. This le should be edited to
include your required information as discussed in the note before step 9 of this section.
• The last few lines are doing some clean up after the install. It will remove all the les that
were placed in the /tmp folder.
Delete
this content
Paste content
in place

14
How to Deploy Cisco AnyConnect with Jamf
20. Select AnyConnect-4.10 then select Build as PKG.
21. Save the package to your Desktop. Click Save.
22. The new package is now on your Desktop.
In the next section, we will go over conguring Jamf Pro with a policy and conguration proles to
stop all the messages that a user is prompted with when installing Cisco AnyConnect.

15
How to Deploy Cisco AnyConnect with Jamf
Section 3: Deploying Cisco AnyConnect with Jamf Pro
To follow along with this section, you will need the custom package that was created in section 2 of
this guide, administrative access to your Jamf Pro server, and a Mac computer enrolled in your Jamf
Pro server.
1. Log into your Jamf Pro server
2. On the top right-hand, click Settings (looks like a gear.)
3. Click Computer Management
4. Click Packages.
3
2
4

16
How to Deploy Cisco AnyConnect with Jamf
5. Click New.
6. Select a Category.
7. Click Choose File.
8. Navigate to the AnyConnect-4.10.pkg then click Upload.
6
7

17
How to Deploy Cisco AnyConnect with Jamf
9. Click Save.
10. Click Computers.
11. Click Policies.
12. Click New
13. Enter the following:
A. Display Name: Install Cisco AnyConnect
B. Category: Set the category to your needs
C. Trigger: Set the trigger to your needs
D. Click Packages
10
11
D
12
A
B
C

18
How to Deploy Cisco AnyConnect with Jamf
14. Click Congure.
15. Find the AnyConnect-4.10.pkg and click Add.
16. Set the Distribution Point your needs.
17. Set the Action to Install.
18. Click Scope and scope to your needs.
17
16

19
How to Deploy Cisco AnyConnect with Jamf
19. Click Save.
20. Click Computers.
21. Click Conguration Proles.
22. Click New
23. Select General, then enter the following:
A. Name: Cisco AnyConnect
B. Category: Set the category to your needs
C. Leave other items at the default settings.
20
21
22
A
B

20
How to Deploy Cisco AnyConnect with Jamf
24. Select the Notications Payload, then click Add.
25. Enter the following:
A. App Name: Cisco AnyConnect
B. Bundle ID: com.cisco.anyconnect.notication
C. Congure the Critical Alerts and Notications to your needs.
26. The Notications payload will prevent the user from having to allow or deny the message below.
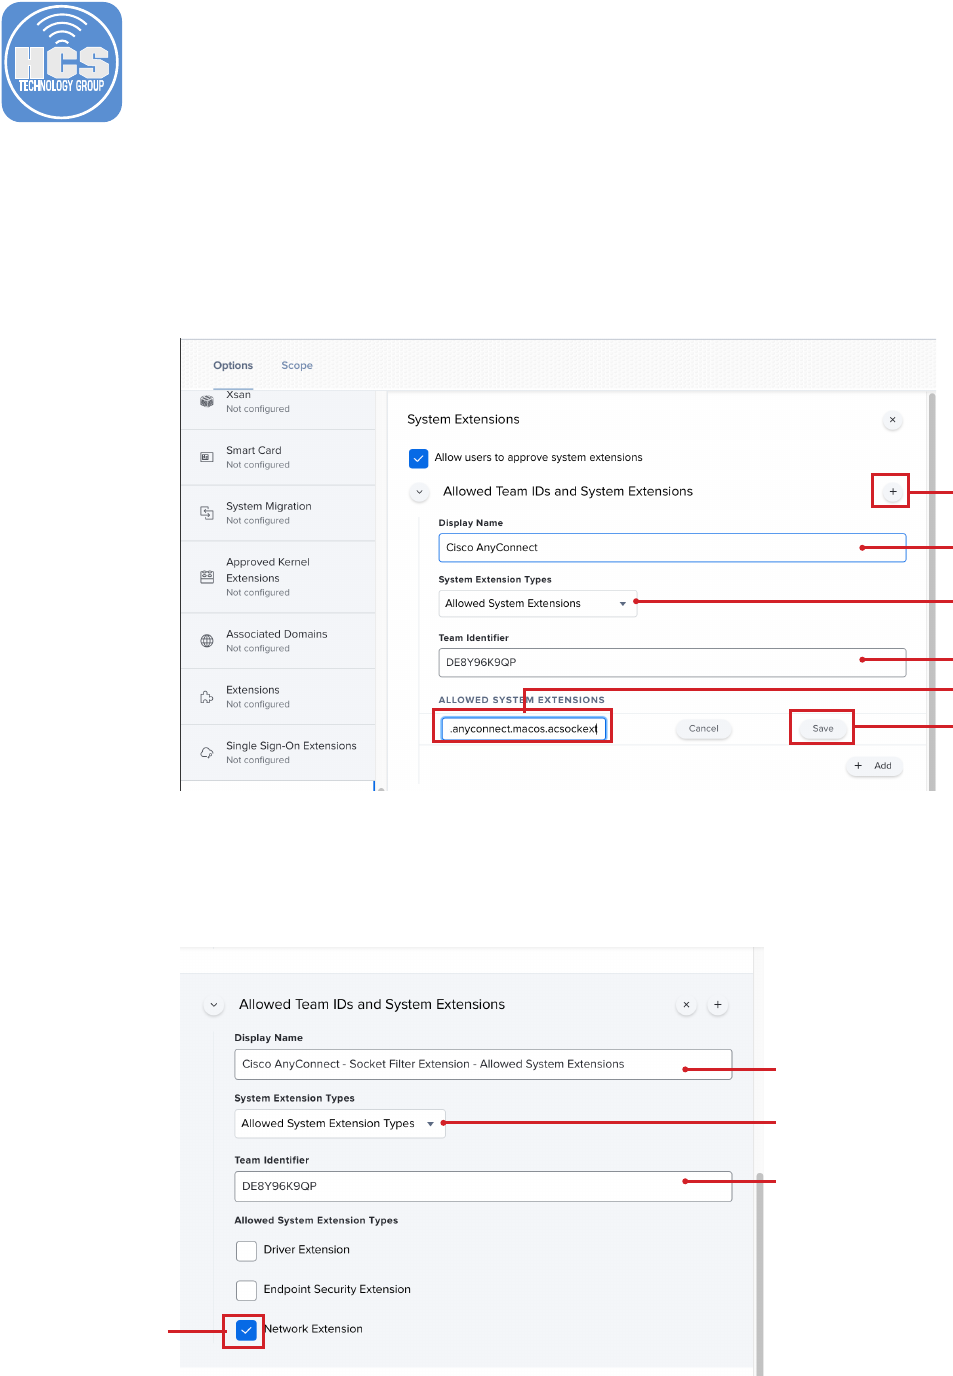
27. Select the System Extensions Payload, then click Congure.
A
B
C
21
How to Deploy Cisco AnyConnect with Jamf
28. Enter the following:
A. Display Name - Cisco AnyConnect - Socket Filter Extension - Removable System Extensions
B. System Extension Types: Allowed System Extensions
C. Team Identier: DE8Y96K9QP
D. Allowed System Extensions - Click Add (+) then enter this:
com.cisco.anyconnect.macos.acsockext
E. Click Save.
F. Click Add (+) in the upper-right corner to add another System Extension.
29. Enter the following:
A. Display Name - Cisco AnyConnect - Socket Filter Extension - Allowed System Extensions
B. System Extension Types: Allowed System Extension Types
C. Team Identier: DE8Y96K9QP
D. Allowed System Extension Types - select the checkbox next to Network
D
D
E
F
A
C
B
A
C
B

22
How to Deploy Cisco AnyConnect with Jamf
30. The System Extensions payload will prevent the user from seeing the message below.
31. Select the Content Filter Payload. NOTE: This is a very long payload. Only the sections shown
below should be congured. Leave all other items at their defaults.
Enter the following:
A. Filter Name: Cisco AnyConnect Content Filter
B. Identier: com.cisco.anyconnect.macos.acsock
C. Scroll down to the Socket Filter section.
32. In the Socket Filter section, enter the following:
A. Socket Filter Bundle Identier: com.cisco.anyconnect.macos.acsockext
B. Socket Filter Designated Requirement (Copy and paste the info below):
anchor apple generic and identier "com.cisco.anyconnect.macos.acsockext" and (certicate
leaf[eld.1.2.840.113635.100.6.1.9] /* exists */ or certicate 1[eld.1.2.840.113635.100.6.2.6]
/* exists */ and certicate leaf[eld.1.2.840.113635.100.6.1.13] /* exists */ and certicate
leaf[subject.OU] = DE8Y96K9QP)
C. Scroll down to the Custom Data section.
A
A
B
B

23
How to Deploy Cisco AnyConnect with Jamf
33. Click the Add (+) ve times to add ve Key/Value elds:
34. Enter the information shown in the picture below in the ve elds. Enter exactly as shown. This is
case sensitive.
Key Value
FilterGrade rewall
FilterPackets false
FilterSockets true
FilterBrowsers false
AutoFilterEnabled false
35. Click Scope and scope to your needs.

24
How to Deploy Cisco AnyConnect with Jamf
36. Click Save.
37. The Content Filter payload will prevent the user from having to choose Allow or
Don’t Allow at the message below.
25
How to Deploy Cisco AnyConnect with Jamf
To follow along with this section, you will need a Mac computer enrolled in your Jamf Pro server and
scoped to the policy and conguration prole we created in section 3 of this guide.
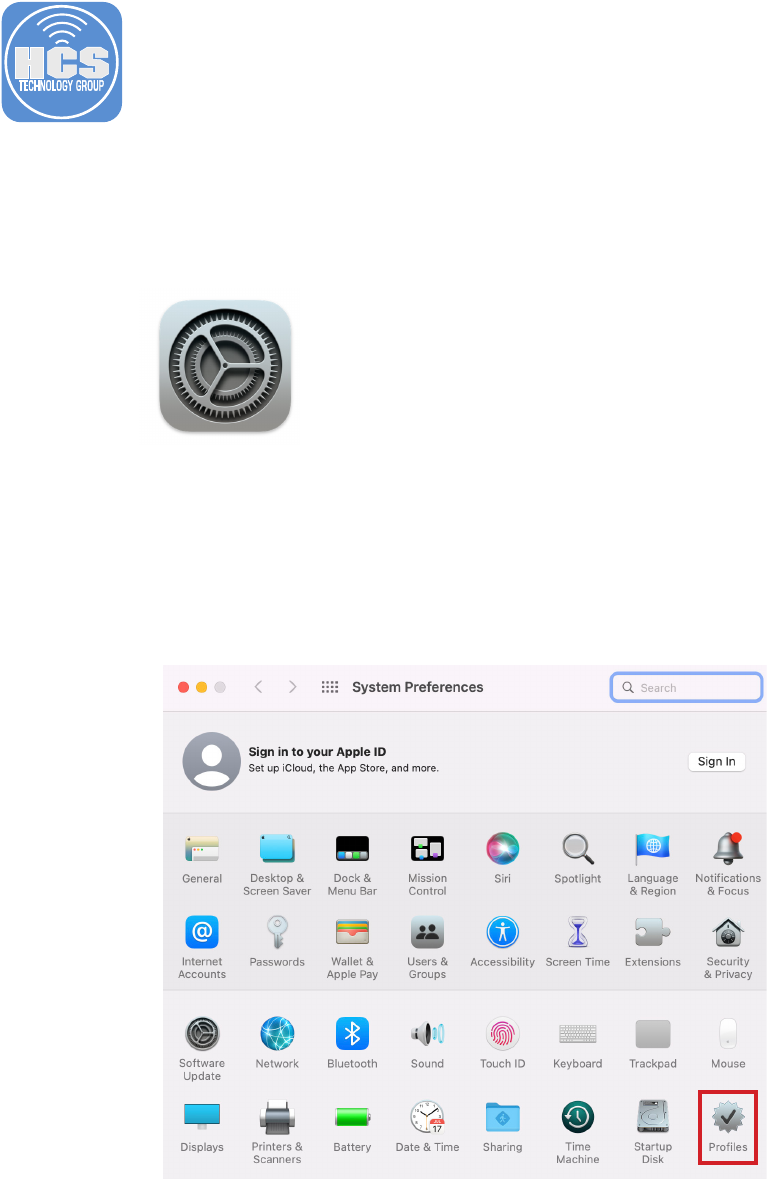
1. Login to the Mac Computer, then open System Preferences
2. Click Proles.
Section 4: Deploying Cisco AnyConnect to a Mac Computer

26
How to Deploy Cisco AnyConnect with Jamf
3. Conrm the Cisco AnyConnect prole is installed then quit System Preferences. It’s very
important that the prole is installed before Cisco AnyConnect gets installed on the Mac
computer. If not, the user will get all the messages and prompts that we are trying to silence.
4. Open Terminal located in /Applications/Utilities.
5. Enter this command to run the Install Cisco AnyConnect policy:
sudo jamf policy -event InstallAnyConnect
If all goes well, you should NOT get any prompts to approve System Extensions, Proxy, or
Notication messages. Cisco AnyConnect should install silently.
This guide used a custom trigger to call the Install Cisco AnyConnect policy. If you used a
different installation trigger when setting up your policy to install Cisco AnyConnect, you can
skip step 4.

27
How to Deploy Cisco AnyConnect with Jamf
6. Conrm the installation of Cisco AnyConnect. Go to /Applications/Cisco. Open the Cisco
AnyConnect Secure Mobility Client.
7. You will be presented with ONLY the AnyConnect VPN client. No other Cisco applications should
be installed. The anyconnect_choices.xml le that we added to the custom package we created
in section 2 of this guide instructed the installer to only install the VPN app.
8. Conrm the pre congured server settings show up in the dropdown menu. These settings were
populated from the anyconnect_prole.xml that we added to the custom package created in
section 2 of this guide.
This completes the guide.
