
1
Billing/Invoicing
with Office Timesheets Time Billing Edition
2
Table of Contents
Billing/Invoicing Configuration .................................................................................................................... 4
Setting Client, Project and Phase Levels ................................................................................................. 4
Setting up Billing Rates ........................................................................................................................... 5
Client, Project and Phase/Milestone Invoice Settings ............................................................................. 5
Adding Client Contacts ........................................................................................................................ 6
Adding your Company Name and Address Info for Invoices ................................................................... 8
Working with Invoice Templates ................................................................................................................ 8
Using the Invoice Template Designer...................................................................................................... 8
Previewing an Invoice Template ............................................................................................................. 9
Editing an Invoice Template .................................................................................................................. 10
Uploading a Custom Invoice Template ................................................................................................. 13
Formatting Your Custom Invoice’s Email Summary .......................................................................... 13
Adding a New Invoice Template ........................................................................................................... 15
Creating and Managing Invoices ............................................................................................................... 16
Creating an Invoice ............................................................................................................................... 16
Invoice Batches ......................................................................................................................................... 17
Creating a Batch of Invoices .................................................................................................................. 17
Finalizing a Batch of Invoices ................................................................................................................ 18
Emailing a Batch of Invoices .................................................................................................................. 19
Deleting an Invoice Batch ..................................................................................................................... 19
The Invoice Grid ........................................................................................................................................ 19
Invoice Actions .......................................................................................................................................... 20
Invoicing Stages .................................................................................................................................... 20
Finalizing and Unfinalizing Invoices ....................................................................................................... 21
Editing an Invoice .................................................................................................................................. 21
Previewing an Invoice ........................................................................................................................... 22
Setting an Invoice as Exported or Unexported ...................................................................................... 22
Sending an Invoice ................................................................................................................................ 23
Viewing an Invoice’s Email History .................................................................................................... 24
Deleting an Invoice ............................................................................................................................... 24
Payments .................................................................................................................................................. 24
3
Adding Payments .................................................................................................................................. 24
Managing Adjustments ............................................................................................................................. 25
Entering Balance Adjustments .............................................................................................................. 25
Entering Refunds................................................................................................................................... 26
History ...................................................................................................................................................... 26
Statements................................................................................................................................................ 27
Billing/Invoicing Reports ........................................................................................................................... 28
Exporting Invoices ..................................................................................................................................... 30
Available Invoice Export Fields .............................................................................................................. 31
4
Billing/Invoicing Configuration
Office Timesheets Time Billing Edition includes all the features found in Office Timesheets’ Core Edition
along with a fully-integrated and comprehensive time billing and professional invoice layout engine.
Invoices can be generated using time entries, expense entries and flat-fee services.
Setting Client, Project and Phase Levels
Office Timesheets Time Billing Edition allows for three (3) levels of accounting isolation:
• Client (Required) – combines accounting for all projects and phases for a specified client.
• Project (Required) – separates accounts for each project for a specified client.
• Phase/Milestone (Not Required) – separates accounts for each phase/milestone for a specified
project for a specified client.
Because Office Timesheets allows users to define and configure up to ten (10) element tracking levels,
the Time Billing Edition requires that you define the Client, Project and Phase/Milestone (not required –
only setup if needed) levels before you can configure/setup other parts of the billing eco-system and
generate invoices.
To define the client, project and/or phase/milestone levels, navigate to the Billing/Invoicing tab and
click on the Setup icon in the Configuration ribbon group. Locate the Client Billing Level and Project
Tracking Level; click on their dropdown list; and select the appropriate corresponding element tracking
level. If you do not plan to use phase/milestone accounting isolation then simply leave the
Phase/Milestone Level dropdown set to the {No Selection}. If you are unsure of how you should
setup/configure your isolation tracking levels please contact the Office Timesheets team at Lookout
Software for advice.

5
Setting up Billing Rates
Office Timesheets allows users to enter many different rate types (Employee Rates, Task Rates and Entry
Rates, and Conditional Billing Rates. Before generating your first invoice that will include time entries,
you’ll want to setup your billing rates in Office Timesheets.
If you use default rates based on employees then you’ll want to set one of Office Timesheets’ 6
definable employee rates as your billing rate default (System Configuration -> Miscellaneous -> Time
entry rate default). It’s important to note that in Office Timesheets the term entry rate is synonymous
with the term billing rate.
If you require more specialized billing rates then you’ll want to setup conditional billing rates and billing
rate rules, which is located in the Billing/Invoicing tab in the Billing Rates ribbon group. Here, you can
setup unlimited conditional billing rates so Office Timesheets will always know the correct billing rate to
apply based on the work that is being performed.
Client, Project and Phase/Milestone Invoice Settings
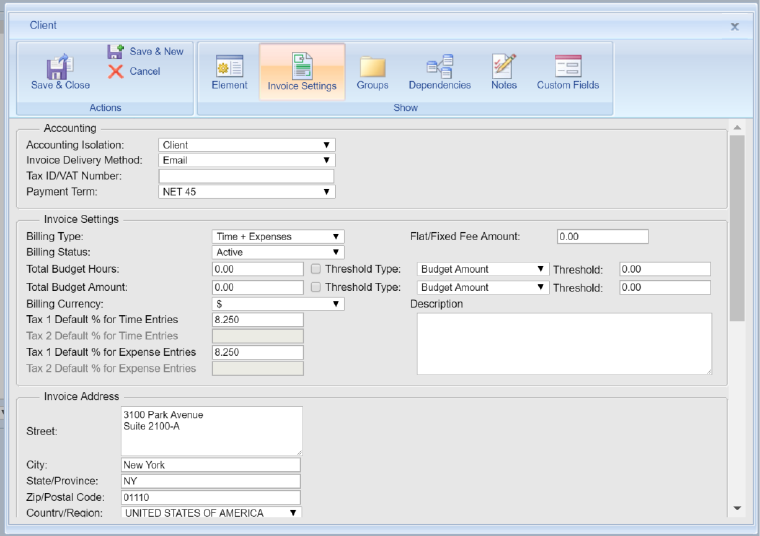
You’ll need to configure appropriate Invoice Settings for each Client, Project and/or Phase for which you
wish to generate invoices. To configure Invoice Settings, navigate o the Process Management tab; and
then click Edit -> Element Items (Client, Project, Phase/Milestone). Next, open a Client, Project and/or
Phase; and then click on the Invoice Settings icon. The following fields require setup at each billing
isolation level.
• Accounting Isolation – the level (Client, Project, or Phase) in which you’ll isolate accounting for
the specified client.
6
• Invoice Delivery Method - here you’ll choose if you wish to deliver the invoice for the specified
client, project or phase via traditional mail or email.
• Payment Terms - the number of days in which payment is expected.
• Billing Status – by default, each client, project and/or phase you add to Office Timesheets will
inherit the Planning Billing Status. However, you must set the Billing Status to Active in order to
generate an invoice for the Client, Project and/or Phase.
• Billing Currency – the currency symbol that will appear on invoices for the specified Client,
Project and/or Phase.
• Invoice Address – the billing address for the specified Client, Project and/or Phase.
• Client Contacts – contacts that will receive invoices for the specified Client, Project and/or
Phase.
Adding Client Contacts
To add client contacts to Office Timesheets, navigate to the Billing/Invoicing tab; and click the Contacts
icon in the Contacts ribbon group…

7
Next, click the Add New link at the bottom of the contact grid…
Finally, fill in all the appropriate details for the contact. If you plan to email invoices to the specified
client then you must fill in a valid email address for the specified contact…

8
Adding your Company Name and Address Info for Invoices
One final item you’ll want to setup before generating invoices is your Company Info details (Company
Name and Address). To do this, navigate to the System Configuration tab and click Company Info.
Working with Invoice Templates
Invoice templates are used in creating a single invoice or a batch of invoices. The invoice template will
determine the design/layout of the invoice as well as the content displayed on the invoice(s). Each
installation of Office Timesheets Time Billing Edition can contain an unlimited number of invoice
templates. This allows Office Timesheets users to create one set of invoices with a specific design and
layout, and other customer invoices with a different invoice layout and design.
You can create templates using Office Timesheets’ built-in Invoice Template Designer; or you can order
one or more custom invoice template(s) from Lookout Software, created to your exact specification.
Using the Invoice Template Designer
Each Office Timesheets Time Billing Edition nstallation currently contains four (4) pre-made template
designs to use and/or edit:
• Time and Expense template – this template contains a detailed breakdown of each time and
expense entry for specified Clients and Projects; and includes each entry’s notes. Sub-Totals for
time and expenses are included along with a grand total for the invoice.
• Time template – this template is exactly the same as the Time and Expense template; but
excludes Expense entries.
• Flat Fee with Expenses template – this template contains a flat fee amount and itemized
expenses for your specified client and/or project.
• Flat Fee template – this template is exactly the same as the Flat Fee with Expenses template,
but excludes Expense entries.

9
Previewing an Invoice Template
Invoices that are created using Time Billing Edition’s Invoice Template Designer can be previewed with a
customer’s and/or project’s live time and/or expense data; or flat fee data. This allows the user to fine-
tune the design of the template while making additions/modifications to the template.
Before you can preview an invoice template, you’ll need to ensure that your database contains
appropriate data (time entries, expense entries and/or flat fee data) for at least one or more clients,
projects and/or phases.
To preview an invoice template, click on the Billing/Invoicing tab; and then click the Templates icon;
and select a template name and click the Preview button…
Next, choose the appropriate Client, Project and/or Phase along with a date range for entries and/or
expenses; and click the Preview button…

10
The invoice preview will appear on the screen…
Editing an Invoice Template
If you are still in the invoice preview window; click the Back to Edit button…

11
Or; if you have returned to the Invoice Template list, simply highlight the template name and click the
Edit button…
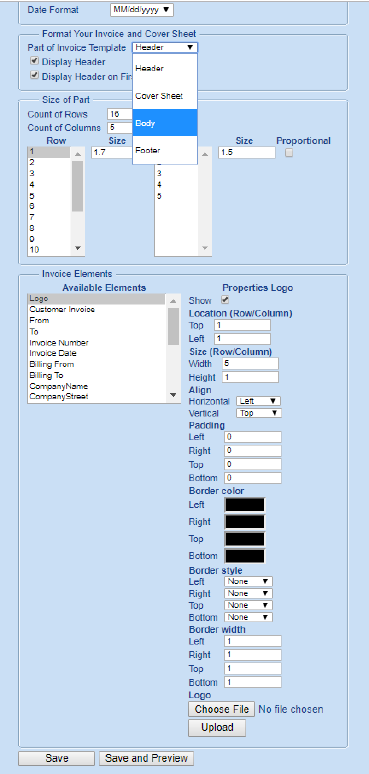
In this example, we wish to remove the default Lookout Software logo and add our own company logo.
To do this we’ll scroll down the Invoice Template Designer screen to the Invoice Elements area; highlight
the Logo element in the Available Elements list; click the Choose File button under the Properties Logo
section; select the company logo image you wish to use; and click the Upload button; then click the Save
and Preview button…

12
Next, select a Client, Project and/or Phase in which to preview on the invoice along with a date range of
entries you wish to view within the invoice template; and click the Preview button…
To see how your invoice template will appear when printed or opened as an email attachment click on
the disk dropdown icon and choose the PDF option…your invoice preview will be saved to PDF file.

13
Uploading a Custom Invoice Template
Many Office Timesheets customers require highly unique and very specific invoice templates that meet
the contractual requirements between them and their customers. Most of these types of invoices can’t
be created in commercially available time billing and/or accounting applications. However, the Office
Timesheets team provides an affordable service with quick turnaround for creating custom invoices
designed to each customer’s exact specification using a special invoice code editor.
When your order for one or more custom invoice templates is complete, you’ll receive one or more
invoice template files to upload into your invoice template list. To upload your custom invoice template,
simply save the file to your computer; log into Office Timesheets and click on the Billing/Invoicing tab
and then click on the Templates icon. Them, from the Invoice Template List and click the Upload
Template button…the Upload Template dialog will appear…
Give your template an appropriate name; click on the Choose File button; select the template file
supplied to you from the Office Timesheets team; and click Save & Close.
Formatting your custom invoice’s email summary
Office Timesheets allows two types of delivery options for your invoice: mail or email. When you email
your invoices to one or more customer contacts, they will receive a pre-formatted email (Invoice Email
Summary) and a copy of the email attached in Adobe Acrobat PDF file format. To format your custom
invoice’s email summary simply select your custom invoice in the Invoice Template List and click Edit…

14
The Invoice Template Designer window for your custom invoice template will open…
Construct your Email Subject and Email Body using a combination of text and Token variables; then
select the Date Format you wish to appear on this selected invoice’s output; and click Save.

15
Adding a new invoice template
To add a new invoice template, click on the Billing/Invoicing tab; and then click on the Templates icon.
From the Invoice Template List screen click the Add button…the Invoice Template Designer will appear…
Start by naming your invoice template – type a name in the Name field…
Next, format your invoice template’s Invoice Email Summary…
Next, format your invoice’s regional preferences…
Finally, format your invoice and optional invoice cover sheet…
16
Finally, click Save or Save and Preview to save your new invoice template settings.
Creating and Managing Invoices
From the Billing/Invoicing tab in Office Timesheets’ Time Billing Edition you can create one-off invoices
or invoice batches; view and mange invoices; enter and manage invoice payments and adjustments;
view invoice history; and generate statements. Each of these areas/functions are covered in the sub-
topics below.
Creating an Invoice
To create a single invoice, click on the Add Invoice icon in Invoices area. Next, choose the appropriate
Invoice Info, Filter, and Discount Options.
• Client, Project (if needed) and/or Phase (if needed) – the client, project and/or phase for which
you are generating and invoice.

17
• Invoice Date – the date in which you issue the invoice. This date triggers the payment terms. For
example, if your invoice date is March 1, 2019 and your payment terms are NET 15, then the
invoice due date will be March 16, 2019 (15 days from March 1
st
).
• Payment Terms – number of days, from the selected Invoice Date, when the payment is
expected.
• Template – the invoice template you wish to use to create the invoice.
• From and To Date – the start and end date for time and expense entries used to create the
invoice.
• Filters – filters allow you to exclude specified time and expense entries from your invoices using
entry and task-based status fields in Office Timesheets.
• Discount – this allows you to include a discount on your invoice. You can specify what the
discount will apply to on the invoice (Time Entries, Expense Entries or Flat Fee items); and you
can specify how you wish to apply the discount (as a fixed amount or as a percentage).
Next, make a notation about the invoice in the Notes field; and then click Save.
Invoice Batches
Office Timesheets includes a batch invoice creation functions to allow Billing Administrators the ability
to create two (2) or more invoices at a time.
Creating a Batch of Invoices
To generate a batch of invoices, navigate to the Billing/Invoice tab, and click on the Add Batch icon …
the Billing Invoice Batches screen will appear. Complete the Batch Invoice Info form and then click the
Search Batches button … Office Timesheets will search for all possible invoices based on the Batch
Invoice Info details you’ve entered.

18
NOTE: Each isolation level requires a separate batch of invoices (they can’t be combined into a single
batch).
Select the invoices you wish to create in your batch using each invoice row’s checkbox (in the first
column); and click on the Create Batches button.
Finalizing a Batch of Invoices
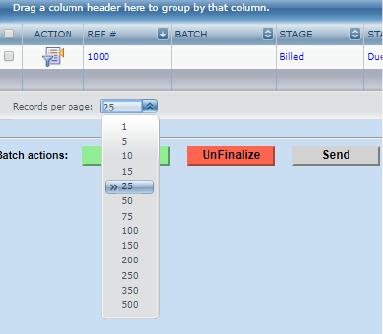
Once your invoice batch is created, return to the Invoices Grid by clicking on the Invoices icon. You’ll
notice that each invoice that is created from your batch will display the batch’s name in the BATCH
column …
Select the invoices from the batch that you wish to Finalize using each invoice row’s checkbox (in the
first column); and click on the Finalize button.

19
Emailing a Batch of Invoices
To email an entire batch of invoices or selection of invoices simply select the invoices from the Invoices
Grid that you wish to email using each invoice row’s checkbox (in the first column); and click on the Send
button.
Deleting an Invoice Batch
To delete an entire batch of invoices, select one invoice from the specified batch; click the Action icon;
and then click the Delete Invoice Batch option from the Invoice Actions dialog as shown below …
The Invoice Grid
The invoice grid is the primary area in which you’ll be managing your invoices. The invoice grid is highly
20
inter-active and provides several easy-to-use tools that allow you to view invoice and invoice data
practically any way you wish. By default, twenty-five (25) invoice records are visible on each page of the
invoice grid. However, you can view up to five hundred (500) invoices on single page within the grid
control using the Records per page drop down list…
The invoice grid also allows you to sort and/or group your invoice grid by column. Simply click on the
ascending/descending sorting arrow next to the column heading name to sort a specified column. To
group the invoice grid by one or more column, simply drag the column header to the blue bar just above
the column header row.
Invoice Actions
Once you generate an invoice there are several actions available such as editing, previewing, finalizing,
unfinalizing and more. Below we’ll discuss the two (2) stages of invoices and each available action
allowed for invoices you’ve created.
Invoicing Stages
Once you create a single invoice or a batch of invoices the invoice will be in the “Pre-Bill” stage. The Pre-
Bill stage allows your organization to review an invoice before it is sent to appropriate customer
contacts. Once your internal review of an invoice is completed, you’ll use the Finalize action to finalize
the invoice, which moves it to the “Billed” stage.

21
Finalizing and Unfinalizing Invoices
To finalize one or more invoices in the Pre-Bill Stage simply check the box in the first column of invoice
row, and then click the green Finalize button. You’ll now notice that the STAGE of the invoice is changed
to “Billed”.
If you’ve finalized an invoice, but later notice a mistake and need to edit the invoice, you’ll need to
Unfinalize the invoice. To Unfinalize the invoice simply check the box in the first column of the
appropriate invoice row, and then click the red UnFinalize button. You’ll now notice that the STAGE of
the invoice is changed to “Pre-Bill”.
Editing an Invoice
To edit an invoice, click on the Action icon in the row of the invoice you wish to edit; and click Edit
Invoice.

22
Make the changes/modifications you desire for the selected invoice in the Billing Invoice Details screen;
and click Save to complete your changes to the selected invoice.
Previewing an Invoice
To preview an invoice, click on the Action icon in the row of the invoice you wish to edit; and click
Preview Invoice. The invoice will appear in the Preview window, which also allows you save the invoice
to Excel, PDF and/or Word file formats.
Setting an Invoice as Exported or Unexported
Office Timesheets’ Time Billing Edition includes a special flag for each invoice to indicate if the invoice
has been exported or not. The Exported flag is both visible and actionable from the Invoices Grid. To
change the Exported flag of a specified invoice to Exported or Unexported check the box in the first
column of the invoice row, and then click the Set as Exported or Set as Unexported button.

23
Sending an Invoice
There are two ways to send invoices to your specified client contacts: traditional mail and/or email.
The traditional mail approach requires that you preview the invoice (as described above); save the
invoice to Excel, Word, or PDF (recommended for best print results) file format; print the invoice; and
then enclose the invoice in an addressed envelope.
The other option is to email your invoice to the customer’s linked contacts. Invoices can be emailed one
at a time or in multi-selected batches (sending two or more invoices at a time). Keep in mind, while your
invoice template can contain a cover page, each invoice template can also contain an Invoice Email
Summary mail template, personalized with variables specific to the client and/or the client’s specified
projects and more. Thus, while not as feature rich, the invoice template’s Invoice Email Summary acts in
a similar manner to the invoice’s cover sheet. To edit an invoice, click on the Action icon in the row of
the invoice you wish to edit; and click Send Invoice. Once this action is completed, Office Timesheets
will send an email to each of the linked contacts for the customer, with the invoice attached in PDF file
format.

24
Viewing an Invoice’s Email History
Each invoice that is emailed from Office Timesheets’ Time Billing Edition is logged, contains a status,
and, if appropriate, error message details. To view an invoice’s email history, click on the Action icon in
the appropriate row of the invoice; and click Email History.
Deleting an Invoice
Sometimes you may wish to completely delete an invoice and start all over again. To delete an invoice or
invoice batch, click on the Action icon in the row of the invoice; and click Delete Invoice.
Payments
Payments are viewed and managed from the Payments grid. To access the Payments grid click on the
Payments icon in the Invoices ribbon group. You can perform similar functions in the Payment grid as in
the Invoices grid like column sorting, column grouping, settings the number of payment records visible
in a single grid page, and filter by column.
Adding Payments
To add a payment, click on the Invoices icon, and then click on the Add Payment icon (only visible when
the Payments icon is selected) …

25
Managing Adjustments
There are two types of adjustments that can be made from the Adjustments area: balance adjustments
and refunds.
Balance adjustments are credit and/or debit adjustments applied to a customer, customer project
and/or customer phase. A refund is a refund that can be applied to any payments that have not been
applied to a specified invoice.
Entering Balance Adjustments
To enter a balance adjustment, click on the Adjustments icons, and then click on the Add Credit/Debit
icon (only visible from the Adjustments grid); enter the appropriate Adjustment Info; and click Save.

26
Entering Refunds
To enter a refund, click on the Adjustments icons, and then click on the Add Refund icon (only visible
from the Adjustments grid); enter the appropriate Refund Info; and click Save.
History
The History Grid contains all invoice transactions that justify the balance for a given range of invoices. It

27
helps you to quickly identify and review a detailed list of all activities pertaining to one or more invoices
including all payments, credit/debit memos, and refunds.
From the History Grid you can perform the following actions:
• View Invoice
• Preview Invoice
• Delete Invoice
• Edit Payment
• Delete Payment
• Edit Adjustment
• Delete Adjustment
• Edit Refund
• Delete Refund
Statements
The Statements Grid list each isolated Client, Project and Phase and their associated balance.

28
You can generate a statement for each isolated Client, Project and/or Phase by clicking on the Action
icon for the specified Client’s/Project’s/Phase’s grid row, and clicking View Client/View Project or View
Phase. The statement will appear in the Billing Statement Preview window.
Billing/Invoicing Reports
Office Timesheets Time Billing Edition contains several useful Billing/Invoicing Detail Report templates.
To access the Billing/Invoicing Detail Report templates navigate to the Reports tab; click the Detail
Reports icon; and select Billing/Invoicing from the Category dropdown list …

29
Select the report you wish to view; and click the Load button. Next, click on the View Criteria icon and
enter the From and To date for the report, and click OK …
Next, click the Recalculate icon to generate the report with your specified criteria …

30
From the Report Viewer you can Print the report or Save the report to Excel, Word and/or PDF file
format.
***NOTES ABOUT EMPLOYEE COMMISSION REPORTS***
You must create an Employee Custom field, in the #10 field, and then enter each employee’s
commission value (example: 10 = 10%).
Exporting Invoices
You can export invoice data from Office Timesheets Import/Export tab. To learn more about basic

31
Import/Export functions please refer to the main Office Timesheets User’s Guide. To access the (Export)
Invoice Mapping Template Editor click on the Template button in the Generic Text Import / Export
screen …
***IMPORTANT NOTE ABOUT EXPORTING INVOICES***
When you export invoices out of Office Timesheets Time Billing Edition, the invoice records for all
invoices contained in the export file will be updated to “Exported”. Also, if an invoice’s record contains
the “Exported” flag, it will be excluded from any subsequent invoice exports. If you wish to export an
invoice that has already been exported, you’ll need to navigate to the Invoice Grid, select the specified
invoice, and mark it “Unexported”.
Available Invoice Export Fields
• SKIP – this field will add a blank column to your export file.
• NUMBER – the invoice number.
• BATCH_NAME – if the invoice was created as part of a batch, this field contains the batch’s name.
• STAGE – the billing stage in which the invoice is in at the time of the export.
• CLIENT_EX_ID – the external ID number for the client.
• CLIENT_NAME – the name of the client.
32
• CLIENT_ABBR – the abbreviation of the client.
• PROJECT_EX_ID - the external ID number for the project.
• PROJECT_NAME - the external ID number for the project.
• PROJECT_ABBR - the external ID number for the project.
• PROJECT_ALL – this is flag to indicate if the invoice was created for all of the client’s projects or only
1 project or no projects. If the invoice was created for all projects then the value will be 1; if the
invoice was created for 1 project or no projects then the value will be 0.
• PHASE_ENABLED – this is a flag to indicate if the Phase/Milestone billing is enabled for the invoice.
If it is enabled, the value will be 1; if not, the value will be 0.
• PHASE_EX_ID - the external ID number for the phase.
• PHASE_NAME - the name of the phase.
• PHASE_ABBR – the abbreviation of the phase.
• PHASE_ALL – this is flag to indicate if the invoice was created for all of the client’s
phases/milestones or only 1 phase/milestone or no phases/milestones. If the invoice was created
for all phases then the value will be 1; if the invoice was created for 1 phase or no phase then the
value will be 0.
• DATE – the date of the invoice.
• START_DATE – the date in which time and expense entries start for the creation of the invoice.
• END_DATE - the date in which time and expense entries end for the creation of the invoice.
• CREATION_DATE – the creation date of the invoice.
• BILLING_TYPE – indicates the billing type for the invoice (Time = 1, Time & Expenses = 2, Flat Fee =
3, and Flat Fee + Expenses = 4).
• TIMEENTRY_AMOUNT – the time entry value amount, excluding taxes and discounts.
• TIMEENTRY_AMOUNT_TAX1 – the amount of taxes for tax type 1 for the time entries on the
invoice.
• TIMEENTRY_AMOUNT_TAX2 - the amount of taxes for tax type 2 for the time entries on the
invoice.
• TIMEENTRY_AMOUNT_WITHTAX - the time entry value amount, including taxes, but excluding
discounts.
• EXPENSEENTRY_AMOUNT - the expense entry value amount, excluding taxes and discounts.
• EXPENSEENTRY _AMOUNT_TAX1 - the amount of taxes for tax type 1 for the expense entries on the
invoice.
• EXPENSEENTRY _AMOUNT_TAX2 - the amount of taxes for tax type 2 for the expense entries on the
invoice.
• EXPENSEENTRY _AMOUNT_WITHTAX - the expense entry value amount, including taxes, but
excluding discounts.
• FLATFEE_AMOUNT - the flat fee value amount, excluding taxes and discounts.
• FLATFEE _AMOUNT_TAX1 - the amount of taxes for tax type 1 for the flat fee value on the invoice.
• FLATFEE _AMOUNT_TAX2 - the amount of taxes for tax type 2 for the flat fee value on the invoice.
• FLATFEE _AMOUNT_WITHTAX - the flat fee value amount, including taxes, but excluding discounts.
• DISCOUNT – the discount amount on the invoice.
• AMOUNT – the grand total amount of the invoice, inclusive of all taxes and discounts.
• TERM_NAME – the name of the invoice terms for the invoice (example: NET 30).
