
1
Microsoft
Publisher Basics
Revised January 2021
Microsoft Publisher is a powerful desktop publishing program that can create posters, flyers, brochures,
business cards, newsletters, greeting cards, certificates, letterhead, and more. Publisher can be used to design
dynamic documents for marketing a business or communicating with family and friends. This class covers the
essentials of using Publisher, including getting started, working with text and pictures, connecting text boxes,
saving, and printing your publication.
Getting Started
1. Click the start button in the task bar at the bottom of the screen
2. Choose Publisher
Publisher Start Screen & Templates
When Publisher opens, it displays the Start Screen which shows all of the template options and open other
publication.
• Click Open Other Publications to open a previous Publisher document.
• More templates can be download off Office.com, search the available templates by typing in the Search
for Online Templates box.
To get started with a new Publication:
1. Click Blank 8.5 x 11”
2. The Publisher screen will open.

2
The Publisher Screen
Ribbon
Starting with Microsoft Office 2007, Microsoft Office programs like Publisher have used the Ribbon system. The
Ribbon is the large graphic user interface (GUI) that appears at the top of the PowerPoint screen. The ribbon
is divided into Tabs, Groups, and Commands
Each tab opens with different groups of commands. The Publisher Ribbon allows users to
quickly access all of the program's features and commands with a minimal number of mouse
clicks.
The Page Navigation Bar, which runs down the left side of the screen, displays thumbnails of
all the pages in the document. The Page Navigation bar can be collapsed to make the
thumbnails smaller and provide more space for the document itself.
Text Options
Publisher offers the same basic text options found in
Word. Using the icons in the Home tab → Font group,
select the font, change the size of the text, or create
bold, italic, or underlined words. Use the Paragraph
group to align the text (left, center, right, or justified).
Group
Tab
Commands
Ribbon
3
Adding New Objects
Whether working from a template or starting with a blank document, you may want to add elements to the page,
including text boxes and graphics.
To add a new text box:
1. Go to the Insert tab → Text group → Draw Text
Box command.
2. The cursor turns into a plus sign; click and drag to
draw the text box in the document.
3. Release the mouse button; the text box appears.
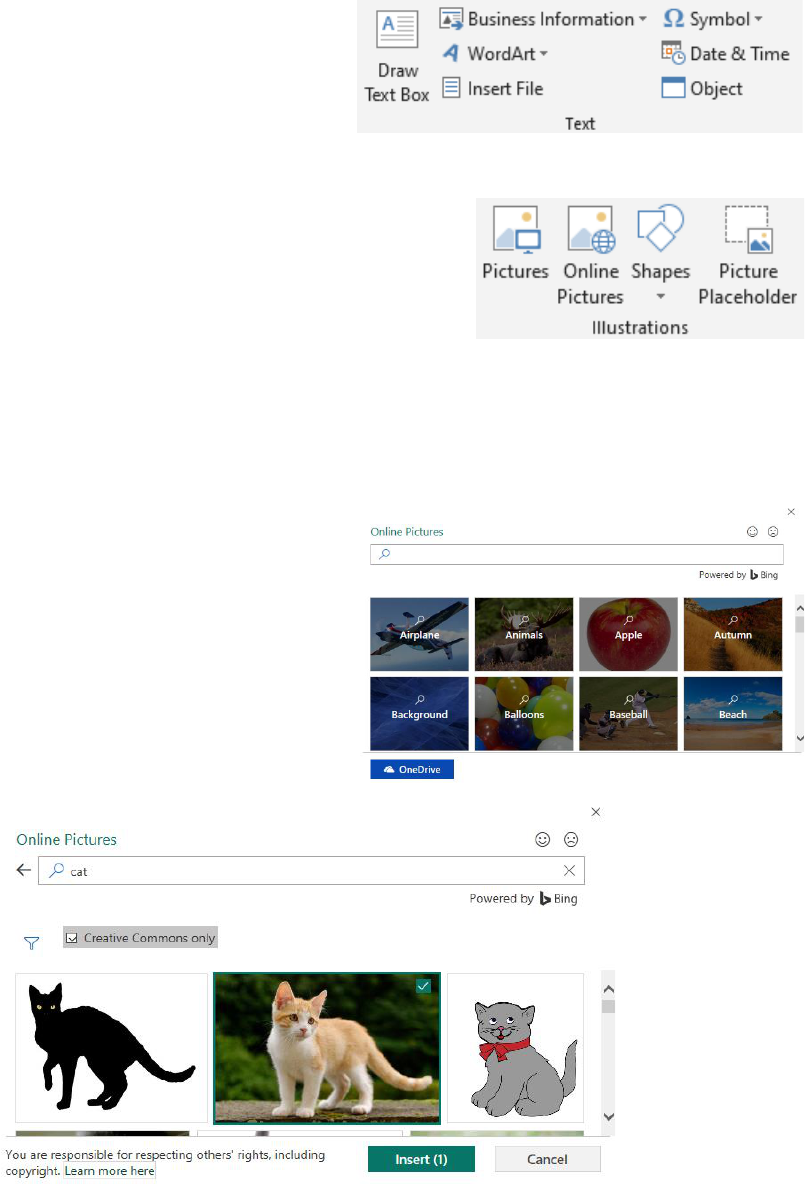
There are several types of graphic elements that can be added to a document:
• Pictures (images saved to a computer or flash drive).
• Online Pictures (contains Bing image search.)
• Shapes
• Picture Placeholder
Adding Objects in Publisher
Online Pictures
Online Pictures replaces Clip Art in Publisher. This option allows you to use Bing Image Search to find free
images without leaving Publisher.
1. Go to the Insert tab → Illustrations group →
Online Pictures command.
2. The Online Pictures dialog box opens.
3. Type keyword(s) for the image into the Search
Bing box (e.g. cat).
4. Press Enter on the keyboard; images matching the
keyword(s) appear within the dialog box.
5. Scroll through the images and click on one to insert
it into the document.
6. Click on Insert to add the image to the document.
4
Inserting Images from a Computer
Publisher also allows you to search for a saved image on the computer (or flash drive).
1. Go to the Insert tab → Illustrations group → Pictures command
2. A dialog box appears.
3. Navigate to the picture’s location on the computer or flash
drive.
4. Click on the image to select it.
5. Click Insert to add it to the publication.
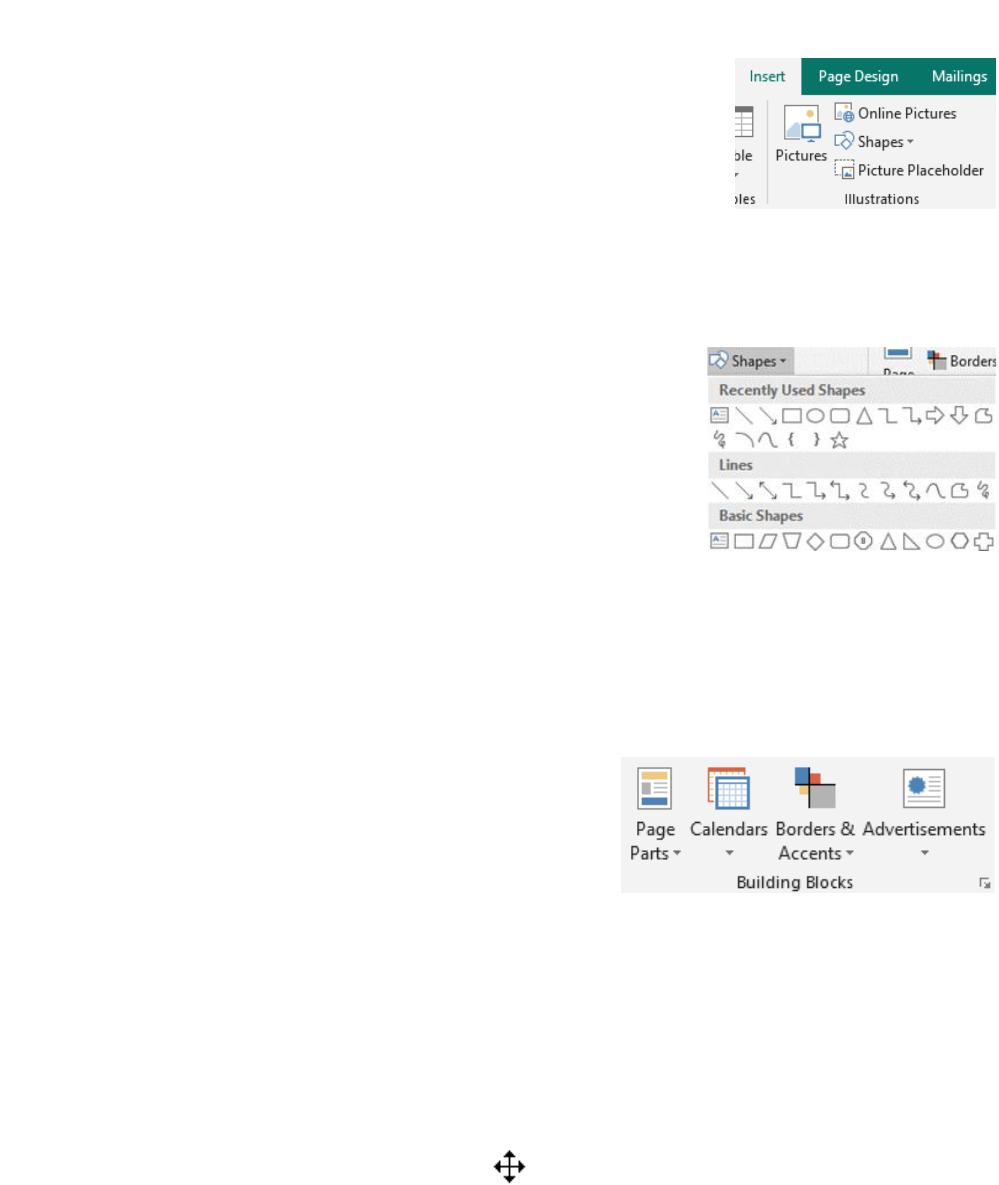
Adding Shapes
Publisher also has options for drawing objects using the options in the Shapes command.
1. Go to the Insert tab → Illustrations group → Shapes command.
2. Click on the shape to be inserted into the document.
3. The cursor turns into a plus sign; hold down the mouse button and
drag to draw the shape.
4. Release the mouse button; the shape appears.
The object can be resized, rotated, or formatted just like any image.
Building Blocks
Publisher’s Building Blocks group offers more specialized graphic objects, such as coupons, calendars, forms,
and borders.
To access Building Blocks:
1. Go to the Insert tab → Building Blocks group.
2. Click on any of the categories in the Building Blocks group
(Page Parts, Calendars, Borders & Accents and
Advertisements) to see the available options.
3. To add an object to your document, click on it.
4. Page Parts can be moved and resized to suit your
document.
To extend the border across the entire page, click on a resizing handle and drag.
Moving, Resizing, and Deleting Objects
Moving Objects
To move an image:
1. Move the mouse inside the image.
2. When the cursor changes to a 4-headed arrow , click and hold down the left mouse button.
3. Drag the image to the desired location
4. Release the mouse button.

5
Resizing Objects
To resize an image:
1. Move the mouse over a resize handle.
2. When the mouse cursor changes to a two-headed arrow, click and hold down
the left mouse button.
3. Drag diagonally inward to make the image smaller.
Drag outward to make the image larger.
NOTE: Use a corner resize handle to maintain the image’s original proportions. Using one of the side resize
handles stretches the image either horizontally or vertically.
Deleting Objects
To delete a shape, image, or textbox:
1. Click on the object
2. Press the Delete or Backspace key on the keyboard.
Undo
To undo an action:
1. Click on the undo arrow in the Quick Action Toolbar OR use the keyboard shortcut Control + Z.
Working with Images in Publisher
Publisher 2013 offers several other features that are helpful when working with images.
Scratch Area
Publisher features a scratch area along the sides of a
document, this where you can temporarily put images while
you are moving things around on the document. Things in the
scratch area will not show when printed, but they can be
saved.
To put an image in the scratch area:
1. Click on an image or other object and drag it over to
the scratch area.
2. Click and drag an image from the scratch area back to the document.
Swapping Pictures
Another new feature in Publisher 2013 and that is the ability to easily swap out images. It is possible to swap out
one image for another without affecting the layout or formatting for the rest of the document. Pictures can be
swapped out from within the document OR from the scratch area.
To swap a picture:
1. Add at least 2 images to the document by going to the Insert tab → Illustrations group → Pictures or
Online Pictures
2. Click on an image
Scratch Area
Document

6
3. Hover the cursor over the middle to bring up the photo swap icon.
4. Click and drag the image over to the image you wish to replace.
Arranging Objects
Layering
Layering allows one element to be placed on top of another (for example, a text box on top of an image). Each
new object is automatically layered on top of previously-added objects, but layering can be controlled manually
in order to move objects in front of or behind one another.
To layer and group objects:
1. Select the object.
2. Go to the Home tab → Arrange group and select an option under either Bring Forward or Send
Backward.
• Bring to Front puts the selected object in the top-most layer.
• Send to Back puts it in the bottom-most layer, behind any
other objects on the page.
• Bring Forward and Send Backward move the object forward
or backward one layer in the publication, respectively.
Grouping
Publisher also allows objects to be grouped together, which combines several layers into one object so that
they can be moved or edited as a bundle rather than individually.
To group objects:
1. Click on the first object.
2. Hold down the Ctrl key on the keyboard and select the other(s) by clicking on
each one with the mouse when a small plus sign is visible next to the cursor.
3. Go to the Home tab or one of the contextual tabs at the end of the Ribbon.
4. Go to the Arrange group → Group command.
NOTE: When working with different types of
objects, such as a shape and a text box, more
than one contextual tab may be visible (for
example, Drawing Tools and Text Box
Tools). The Group command can be found
under either contextual tab as well as the
Home tab.
Ungrouped Objects
Grouped Objects

7
To separate objects again:
1. Select the grouping.
2. Go to the Arrange group → Ungroup command on one of the contextual tabs.
Aligning Objects
Aligning objects arranges text boxes, pictures, AutoShapes, and drawing objects so that they line up with margin
guides, ruler guides, and grid guides. You can also distribute objects relative to each other or relative to the
margin guides.
To align an object:
1. Click on the object to be aligned. To select multiple objects, hold down the Control key.
2. Go to the Home tab → Arrange group → Align command.
3. Select an option from the resulting drop-down menu. If all options are grayed out, click on Relative to
Margin.
Text Wrapping
If a document includes both text and graphical elements, it must be determined how the
text will wrap around images.
When changing the text wrapping of an image:
1. Click on the picture.
2. Go to Picture Tools contextual tab → Arrange group → Wrap Text command
3. Select an option from the drop-down menu
OR
1. Right-click on the image.
2. Choose a Wrap Text option from the drop-down menu.
Connect Text Boxes
If creating a story or a list of names for a program that won’t fit into a single text box, it is possible to connect text
boxes. When text boxes are connected, the text that won’t fit into the first text box flows into the next text box. A
chain of connected text boxes can span multiple pages.
1. Add a new text box by going to Home tab → Object group → Draw
Text Box command.
2. Draw a small text box.
3. Begin typing text into the text box.
4. When there is too much text to fit in one textbox, the resizing handles
turn red and an overflow icon appears (three dots in a row).
5. Click on the three-dot overflow icon.
6. The cursor will become a pitcher.
7. Click elsewhere on the page.
8. A text box appears. The second box is now connected to the first box and any text in the overflow
appears in the second box.
9. Repeat as needed.

8
Text boxes can also be linked before adding text:
1. Add a new text box by going to Home tab → Object group → Draw Text Box command.
2. Click and drag to draw the text box.
3. Repeat steps 1 and 2 to draw another text box.
4. Click in the text box that will hold the first part of the text.
5. Go to Text Box Tools tab → Linking group → Create Link the cursor changes to a pitcher.
6. Click in the text box that will contain the next part of the story.
7. To connect more text boxes to the story, repeat the steps above.
Adding Pages
To add additional pages to a publication:
1. Go to the Insert tab → Pages group → Page command.
2. Choose Blank Page, Duplicate Page, or Insert Page for more options.
When Insert Page is selected, the Insert Page dialog box appears, with options
regarding:
• How many pages to insert.
• Whether the pages should appear before or after the current page.
• Whether the new page(s) should be blank or should duplicate elements
from an existing page.
Once the selections have been made, click OK.
To rename or delete a page:
1. Right-click on the thumbnail in the Page Navigation bar
2. Choose Rename or Delete from the resulting menu.
Two-Page Spread View
Publisher offers a unique document view option called Two-Page Spread, which displays the layout of the
document as it would look when printed. For example, if printing a brochure or booklet, two-page spread view
displays the pages side-by-side.
To view the document in the two-page spread format:
1. Go to the View tab → Layout group → Two-Page Spread
OR
2. Right-click on a thumbnail and select View Two-Page Spread from the menu.
In the example below, pages two and three are shown facing each other in two-page spread format. Page one,
which is the cover of the booklet, is still viewed separately. Click on the thumbnails to switch back and forth
between pages.

9
NOTE: Two-Page Spread is only useful when a document contains at least three pages.
Saving
It’s important to save your document on a regular basis to avoid losing your hard work!
To save a file for the first time in Publisher:
1. Click on the Save icon in the Quick Access toolbar (a floppy disk) or go to the File tab →
Save As.
2. If working with a new document that has not yet been saved, the Save As dialog box appears, asking
for a name and location for the saved file.
3. Choose a location on the computer and enter a title in the File name box.
4. Click Save or press Enter on the keyboard.
NOTE: Unlike the other Office programs (Word, Excel, PowerPoint), Publisher still saves files in the standard file
format (.pub).
As you continue to work on a document, save your changes by:
• Click on the Save icon in the Quick Access Toolbar.
• Using the keyboard shortcut Control + S.
• Going to File → Save.

10
Printing
Previewing a document before printing is always important—particularly so in Publisher. Previewing displays
how the document will look when printed, i.e. without dotted lines around text boxes, blue lines indicating margin
boundaries, and other formatting guides.
To view a document’s Print Preview:
1. Go to the File tab → Print
2. The Print Preview appears on the right along with various print options on the left, including:
• The number of copies
• The printer to be used
• The pages to be printed
• The number of pages per sheet
• The paper size
• Printing on one side or two sides of the page
3. To print the document, click the Print command.
4. To return to the document to make changes, click the back arrow or press Escape on the keyboard.
