Snap! Computer Programming Tutorial 2: Input/Output and If/Then Statements
By: Matthew Jourden
Brighton High School
Brighton, MI
Objective: The objective this tutorial is to demonstrate how to use input/output statements, variables and comparison
statements
Input: User enters data based on a questioned asked. Snap! Command is located in the Sensing Menu > ask command.
The answer the user types in will be linked to the answer block found in Sensing Menu
Output: Any data that the Sprite says, thinks or asks. Provides opportunity for the programmer to communicate to the
user.
Variable: is an element that stores data input. Maybe an integer (whole number), real number (number with decimal
point, character or string.
If/Then Statement: is a comparison statement that when true will carry out specific lines of code; if the condition is
false the code linked with the condition will be ignored
1. Open Google Chrome > Open App Bird Brain Robot Server > Pop Menu will Appear > Choose Level 4: Regular Snap! >
Select Open Snap!
Note: The screen will say No Finch Connected. This is ok for now since we will not be communicating to the Finch
Robot. When writing a program that you want to talk to the Finch then it should say Finch connected.
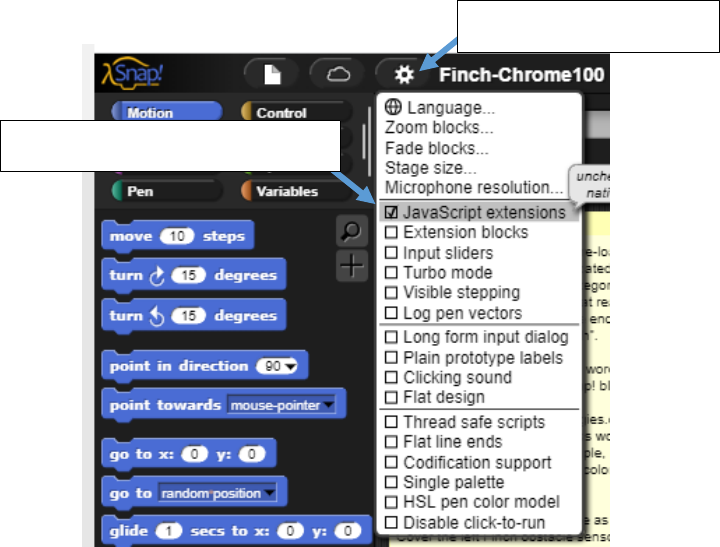
1. Setup Java Script Extension: Script allows user to input/output text and graphic images
a. Select Settings Gear at the Top Left Of Screen > Select Check Mark next to Java Script Extentions
1, Select Settings Gear
2. Select JavaScript Extension

2. Starting Program
a. Select Control Menu
b. Drag and Drop when “space” key pressed into workspace
3. Input
a. Select Sensing Menu
b. Drag and Drop Ask Command connected to When “Space” Key Pressed Command > Change the Question to
“What is your Name?”
c. Sensing Menu > Check the box next to the Answer Command
NOTE: this will allow the user/programmer see what answer is equal to on the stage without using an output
command
d.
e. Test the Code > Type in your name in the textbox located at the bottom of the stage > Press Enter
Note: See Answer gets set to your name
Check Box
Variable Answer is
set to Mr Jourden

f. Saving the User Input
A new variable will need to be created in order to transfer what Answer Block is equal to and be saved.
i. Select Variables Command > Select Make a Variable > Variable Name: Name > Press Ok
NOTE: When naming variables make the variable name obvious to what data is stored in the variable
(i.e. if asking how old someone is; create a variable called age)
ii. Assign Variable Name to Answer
1. Variables Menu > Drag and Drop set “ “ to 0 below ask command
2. Select Drop Down arrow on the set command > Select name
3. Select Sensing Menu > Drag and Drop Answer Block > Drop in the space currently marked
0 in the Set name to 0 Block
Note: think of the to part of the set “ : to 0 as an = sign
Select Variable Command
Select make a variable
Variable: Name
Place Set Command > Select
name from drop down menu
From the Sensing Menu > Drag
and Drop Answer Block in the
0 space

iii. Output Persons Name joined with a friendly message
1. Select Looks Menu > Drag and Drop Say Block
Note: this block can only say 1 thing at a time on its own, but there is a way to combine multiple
features together
2. Select Operators Menu > Drag and Drop Join “ “ >
a. Select Left arrow to make a 3
rd
Box
b. Type the following message in the first box of the Join Command
c. Select Variables Menu > Drag and Drop variable Name into the second box of the Join
Command
d. Test the Code
g. Adding 2 Numbers
i. Select Variable Menu
ii. Create 3 Variables called
1. Num1
2. Num2
3. Sum
iii. Use the Ask Command to have the user input Number 1 and Number 2 > Store the answer to the
respected variable after variable
Place Say Block Below Set “ “
> Place Join Block in Space
Select Right Arrow to
add 3
rd
Box

iv. Select Variables Menu
1. Drag and Drop Set Command > Select Down arrow > select Sum
2. Select Operators > Drag and Drop Addition Command > Place in set to spot in the Set Command
3. Place num1 + num2 variables in the addition space
4. Output the Answer
4. If/Then Statements
If/Then Statement: is a comparison statement that when true will carry out specific lines of code; if the
condition is false the code linked with the condition will be ignored
There is 2 options for creating an if statement
- I : Allows the user to place a comparison statement (<,>, or =) into the space next to if > if the comparison is
true it will run the code placed in the space below the if; if false the code will be not run
- : If/Else 1 of 2 things will happen
o User will 1
st
place a comparison statement into the space provided
o if the comparison statement is true then it will run the code in the space provided below the if and
ignore the code placed in the else
o if the comparison is false then the code below the if will be ignored and the code placed with the else
will be run.
NOTE: with Comparisons there is only < and > symbols, not <= or >=. So when setting a comparison
always add or subtract your comparison value by 1.
For Example if I want to see if sum less than or equal to 60 my code would be sum < 61

a. Select the if/else from the Command Menu
i. Comparison Statement: Select Operators > Drag and Drop < comparison > Place in the if
statement
b. Place the following code in the if/else
NOTE: it is common practice when setting up a comparison statement to place the users variable 1
st
and what it is
being compared to second
For Example
GOOD: sum < 100
BAD: 100 > sum
c. Test the Code

d. If statements for Range of values
2 Options: If the user wants to see if multiple conditions are true at one time an AND/OR Command will be
needed.. For example in creating a number line 60 < sum < 100 would be a mathematical way of looking for a
number between those two values. While programming the processor can only compare one value to one value
at a time.
- And Statement: : In an AND command both sides need to be true in order to carry out code. Used
for when trying to find a value with in a range.
Example: will look for a number between 60 and 100
- Or Statement: : In an OR Command only 1 side needs to be true in order to carry out the code
attached with it. Good use for when looking for something that is outside of specific range or if seeing if one button is
pressed out of multiple options (i.e. emergency fire pull stations within a building)
Example: Out of Range: Looking for a number that is either less than 60 or Greater than 100

i. Add the following embedded Code
e. Test the Code Running the Program 3 Different times with values below to test the various conditions
i. For Example
1
st
Time Running the Program Set
Num1=5
Num2=5
2
nd
Time Running the Program Set
Num1: 60
Num2: 70
3
rd
Time Running the Program Set
Num1=100
Num2=100
Save the program
Click on this Icon > Save > Select Computer > Change Name as needed > the .xml code will download to the
computer into the Downloads Folder > right mouse button on the file name or navigate to the Downloads Folder > Copy
and Paste Code to a secure location (i.e. student directory, flash drive, etc.)
See Reference Video on Class Website or Google Classroom for video demonstration
Submission: Save Project > Change File name to Snap Tutorial 2 Input_Output “Student Last Name > Email .xml file to
jourdem@brightonk12.com for grading
This If Statement is known as an
embedded If. Meaning it is only
looked at if the else part of the
If/Else Statement is true. If the
Initial If Statement from the If/Else
is true then this If statement would
be ignored because the Else would
be false
Initialize Sprite Location
and Clear Screen
Move Sprite if sum is
between 59-101
