
User Manual
v1.81.4
By Chris Burton

Table of Contents
Introduction 8
Chapter I: The Basics 10
1. Setting up 11
1.1. Installation 12
1.2. Running the demo games 14
1.3. The New Game Wizard 15
1.3.1. Templates 16
1.4. The Game Editor window 18
1.4.1. The Scene Manager 19
1.4.2. The Settings Manager 26
1.4.3. The Actions Manager 28
1.4.4. The Variables Manager 29
1.4.5. The Inventory Manager 30
1.4.6. The Speech Manager 32
1.4.7. The Cursor Manager 33
1.4.8. The Menu Manager 34
1.5. Preparing a 3D scene 35
1.5.1. Adding a PlayerStart 36
1.5.2. Adding visuals 37
1.5.3. Adding colliders and/or a NavMesh 38
1.5.4. Adding cameras 39
1.5.5. Adding interactivity 40
1.6. Preparing a 2D scene 41
1.6.1. Adding a 2D PlayerStart 43
1.6.2. Adding visuals 44
1.6.3. Adding a 2D NavMesh 45
1.6.4. Adding a Sorting Map 46
1.6.5. Adding 2D cameras 49
1.6.6. Adding interactivity 50
1.7. Preparing a 2.5D scene 51
1.7.1. Adding a PlayerStart 52
1.7.2. Adding backgrounds and cameras 53
1.7.3. Adding colliders and/or a NavMesh 55
1.7.4. Adding scene sprites 57
1.7.5. Adding interactivity 58
1.8. Updating Adventure Creator 59
1.9. Project settings 60
2. Input and navigation 61
2.1. Input and navigation overview 62
2

2.2. Movement methods 63
2.2.1. Point-and-click movement 64
2.2.2. Direct movement 65
2.2.3. First-person movement 66
2.2.4. Drag movement 68
2.2.5. Straight-to-cursor movement 69
2.3. Input methods 70
2.3.1. Mouse and keyboard input 71
2.3.2. Keyboard or controller input 72
2.3.3. Touch-screen input 73
2.4. Pathfinding methods 75
2.4.1. Unity Navigation pathfinding 76
2.4.2. Mesh Collider pathfinding 77
2.4.3. Polygon Collider pathfinding 79
2.4.4. A* 2D pathfinding 82
2.4.5. Custom pathfinding 85
2.5. Cursor locking 86
2.6. Active inputs 87
2.7. Input descriptions 89
2.8. Remapping inputs 93
3. Characters 95
3.1. Creating characters 96
3.1.1. The Character wizard 100
3.1.2. Players 101
3.1.3. Player switching 102
3.1.4. NPCs 103
3.2. Character tracking 104
3.3. Character movement 105
3.3.1. Retro movement 107
3.3.2. Precision movement 108
3.3.3. Custom motion controllers 109
3.4. Character animation 111
3.4.1. Character animation (Mecanim) 112
3.4.2. Character animation (Sprites Unity) 116
3.4.3. Character animation (Sprites Unity Complex) 118
3.4.4. Character animation (Legacy) 121
3.4.5. Custom animation engines 123
3.5. Head animation 124
3.6. Footstep sounds 126
3.7. Character scripting 128
4. Camera perspectives 130
4.1. Cameras overview 131
4.2. Camera types 132
3

4.2.1. GameCamera 133
4.2.2. GameCamera Animated 135
4.2.3. GameCamera Third-person 136
4.2.4. SimpleCamera 137
4.2.5. GameCamera 2.5D 138
4.2.6. GameCamera 2D 140
4.2.7. GameCamera 2D Drag 142
4.3. Adding custom cameras 143
4.4. Working with VR 144
4.5. Working with Cinemachine 145
4.6. Overriding perspective 147
4.7. Camera e!ects 148
4.8. Disabling the MainCamera 150
4.9. Camera scripting 151
5. Interactions 152
5.1. Interaction methods 153
5.1.1. Context sensitive mode 154
5.1.2. Choose Interaction Then Hotspot 156
5.1.3. Choose Hotspot Then Interaction 159
5.1.4. Custom interaction systems 163
5.2. Actions and ActionLists 167
5.2.1. Standard Actions 169
5.2.2. Custom Actions 200
5.2.3. The ActionList Editor 202
5.2.4. Generating ActionLists through script 205
5.3. Hotspots 207
5.4. Hotspot detection 210
5.4.1. Mouse-over detection 211
5.4.2. Player-vicinity detection 212
5.5. Cutscenes 213
5.6. Skipping cutscenes 215
5.7. Background logic 217
5.8. Triggers 218
5.9. Conversations 220
5.10. ActionList assets 223
5.11. Arrow prompts 226
5.12. Sounds 227
5.13. Music 229
5.14. Ambience tracks 230
5.15. Containers 231
5.16. ActionList parameters 232
5.17. Draggable objects 235
5.17.1. Drag tracks 237
5.18. PickUp objects 240
5.19. Custom cursors 242
4

5.19.1. Unity UI Cursor rendering 244
5.20. Quick-time events 245
5.21. Interaction scripting 246
6. Inventory 249
6.1. Inventory items overview 250
6.2. Inventory interactions 253
6.3. Managing inventory at runtime 257
6.4. Crafting 258
6.5. Inventory properties 259
6.6. Scene items 261
6.7. Exporting inventory data 262
6.8. Documents 264
6.9. Objectives 266
6.9.1. Sub-objectives 268
6.10. Inventory scripting 270
7. Variables 273
7.1. Variables overview 274
7.2. Managing variables at runtime 277
7.3. Variable linking 278
7.3.1. Linking with Playmaker Variables 279
7.3.2. Linking with custom scripts 280
7.4. Variable presets 281
7.5. Timers 282
7.6. Exporting variables 283
7.7. Scene attributes 284
7.8. Variable scripting 285
8. Miscellaneous components 286
8.1. Highlight 287
8.2. Shapeable 289
8.3. Moveable 290
8.4. Parallax 2D 291
8.5. Limit Visibility 292
8.6. Align To Camera 293
8.7. Particle Switch 294
8.8. Light Switch 295
8.9. Sprite Fader 296
8.10. Tint maps 297
8.11. ActionList Starter 298
8.12. Set Interaction Parameters 299
8.13. Set Inventory Interaction Parameters 300
8.14. Set Trigger Parameters 301
8.15. Set Drag Parameters 302
5

8.16. Auto Correct UI Dimensions 303
8.17. Link Variable To Animator 304
8.18. Survive Scene Changes 305
Chapter II: Advanced Features 306
9. Saving and loading 307
9.1. Saving and loading overview 308
9.1.1. Saving scene objects 311
9.1.2. Saving asset references 316
9.1.3. Saving example: The 3D Demo 318
9.2. Autosaving 319
9.3. Options data 320
9.4. Loading screens 321
9.5. Importing saves from other games 322
9.6. Save profiles 323
9.7. Custom save labels 325
9.8. Custom save data 326
9.9. Custom save formats and handling 327
9.10. Save-game file management 329
9.11. Save scripting 330
10. Speech and text 333
10.1. Gathering game text 334
10.2. Speech audio 336
10.3. Displaying subtitles 340
10.4. Script sheets 341
10.5. Translations 343
10.5.1. Custom translatables 346
10.5.2.Localization integration 347
10.6. Text tokens 348
10.6.1. Speech event tokens 351
10.6.2. Text event tokens 353
10.7. Lip syncing 355
10.8. Facial expressions 360
10.9. External dialogue tools 361
10.10. Speech scripting 362
11. Menus 364
11.1. Menus overview 365
11.1.1. Adventure Creator menus 370
11.1.2. Unity UI menus 373
11.2. Menu elements 377
11.3. The default interface 402
11.4. Navigating menus directly 418
11.5. Menu scripting 419
6

12. Working with Timeline 421
12.1. Timeline integration overview 422
12.2. Timeline playback 423
12.3. AC Timeline tracks 424
12.3.1. Main Camera tracks 425
12.3.2.Camera Fade tracks 426
12.3.3. Speech tracks 427
12.3.4. Character Animation 2D tracks 429
12.3.5. Character Animation 3D tracks 430
12.3.6. Head Turn tracks 431
12.3.7. Shapeable tracks 432
12.4. Timeline scripting 433
Chapter III: Extending functionality 434
13. Integrating new code 435
13.1. Integrations 436
13.2. Custom scripting 439
13.3. Custom events 441
13.4. Integrating other gameplay 443
14. Further considerations 445
14.1. Game debugging 446
14.2. Performance and optimisation 447
14.3. Version control and collaboration 451
7
Introduction
Adventure Creator, or “AC”, is a toolkit for Unity that can be used to make 2D, 2.5D and
3D adventure games. Navigation, inventory, characters, conversations, cutscenes, saving
and loading and more are all possible - and without coding.
AC also caters to those who are more comfortable writing code, as well as those just
looking to extend the base functionality with some add-on scripts. The full API is
available in the online
scripting guide, and user-made scripts are shared on the wiki.
If you're new to Unity, you should get to grips with the basics of the Unity interface first,
since Adventure Creator is tightly integrated into it. Tutorials that teach Unity’s interface
can be found on the o"cial site, while more can be found at unity3d.com/learn.
AC has three demo games available for you to try out: the 2D Demo, the 3D Demo and
the Physics Demo. The source files for the 2D and 3D games come included with AC
itself, while those for Physics game can be downloaded. To run the demo games from
within the Unity Editor, see
Running the demo games.
AC has two types of tutorials:
•
Text tutorials, which focus on individual aspects and features, and are the quickest way
to get up and running.
•
Video tutorials, which focus on the main aspects using practical examples, and are
best for getting a good overview of how AC works.
The video tutorials available are described below:
Making a 2D game
This covers the steps in making a simple point-and-click 2D
game. Since many of the topics are applicable to all games, it
is recommended for all those are getting started.
Recreating Unity's adventure game
Unity made their own adventure game available as a Sample
Project. Here, we take those assets and remake the game
using AC, so this is a good choice if you already know Unity.
Making a 3D game
Here we make a more complex 3D game with direct-control,
Mecanim-driven animation, close-ups and cutscenes. Assets
required to follow along are available on the Downloads page.
8

Making a 2.5D game
A guide to creating 2.5D games with pre-made backgrounds.
While this tutorial is more focused on a particular game style,
it also covers translations, UI and Navigation.
First-person primer
Here we cover the essentials when it comes to a first-person
puzzle game. This tutorial covers Timeline cutscenes,
interaction logic, scene-switching, and the physics system.
9

Chapter I: The Basics#
10

1. Setting up#
11

1.1. Installation
Once purchased, Adventure Creator is installed by importing it from its page on the Unity
Asset Store
.
The full package includes both the 2D and 3D Demos. If you prefer to have a “blank”
project without these demos, you can uncheck the Demo and 2D Demo folders when the
Import dialog appears inside Unity.
Once imported, AC will check for the presence of a few inputs and layers that must be
defined in order for it to work. It will then prompt you to auto-create these:
If you would prefer to do this manually, the following Layers must be defined in Unity’s
“Tags and Layers” settings:
•
NavMesh
•
BackgroundImage
•
DistantHotspot
The following Input must also be defined in Unity’s Input settings:
•
Menu
12

Once installed, you should see Adventure Creator appear as a menu item in the top
toolbar:
If it does not, check the Console window for compilation errors, which may occur if not all
scripts are imported, or if another asset is creating a conflict.
A successful install will also show the About window. This will open when Unity is
launched, but this behaviour can be disabled.
With AC installed, you are now ready to
run the demo games, go through tutorial videos,
or open the Game Editor window to start working.
PROTIP: Depending on your chosen play-style, more inputs may need defining. AC
will inform you of any missing inputs that it needs while the game is running in the
Console window, and a list of available inputs can be found in the Settings Manager.
NOTE: Be sure to also read the guide to Updating Adventure Creator.
PROTIP: By default, AC will be imported into a directory inside the project's Assets
folder named AdventureCreator. It can be moved elsewhere (e.g. to a Package), so
long as its location is updated in the Adventure Creator section of Unity's Project
settings.
13

1.2. Running the demo games
AC comes included with two demo games – a 3D game and a 2D game – that show o! the
basic workflow involved.
To run either of them, choose Adventure Creator → Getting started from the top
toolbar, and then choose the game you wish you run:
Each game made with AC requires its own set of Managers, which are explained in the
next section. While a demo scene is opened, its Managers are temporarily loaded into the
AC Game Editor window. Closing the scene will cause your own Managers to be reappear.
Both demos are played with point-and-click movement, but the 3D Demo is equipped to
also work with
Direct and First-person movement. You can pick them apart and modify
them to see how they’re made, and also use the characters to test with in your own game.
You can’t, however, use them in anything you publicly release.#
14

1.3. The New Game Wizard
The first step of any new project is to create your own set of Managers. This can be done
using the New Game Wizard, found in the top toolbar:
In the window that then appears, click Begin and then New game to get started. You will
then be presented with a series of choices - such as camera perspective and movement
style - that will be used to configure your starting assets.
Based on your choices, the wizard may then present you with a series of optional
Templates to install as well.
On the last page, you will be given a chance to review these details before creation:
Click Create, and your game’s files will be created in a new subfolder in your Project
window. If you opted to also install a sample scene, that will be opened as well.
To begin creating your game, open a new scene and use the Scene Manager to initialise it.#
PROTIP: The choices made in the wizard are mainly there to help you get started: your
Managers can be edited further as needed afterwards.
15

1.3.1. Templates
To help get you up and running more quickly, AC includes a number of Templates that
can extend your game with additional features or behaviour. These can be accessed from
the
New Game Wizard, and are filtered based on your earlier choices:
The following Templates are available:
2D sample Player
A sample Player character for 2D games. This uses the
Sprites Unity animation engine,
and are equipped with a Hotspot Detector for optional Player-vicinity detection. When
installed, they will be assigned as the default Player in your Settings Manager.
3D sample Player
A sample Player character for 3D games. This uses the Mecanim animation engine, and
are equipped with a Hotspot Detector for optional
Player-vicinity detection. When
installed, they will be assigned as the default Player in your Settings Manager.
First-person Player
A sample Player character for First-person games. This uses a custom animation set for
camera motion, and also includes a crouching ability that can be invoked with the Crouch
input button. When installed, they will be assigned as the default Player in your
Settings
Manager.
PROTIP: After creating your Managers, you can return to the New Game Wizard and
choose Modify existing to access all Templates without filtering.
16

2D sample scene
A small sample 2D scene, that demonstrates Cutscenes, Polygon Collider pathfinding,
Sorting Maps, 2D GameCameras, Hotspots, Triggers, Conversations and Variables. These
features are commented on in the Console as you play - keep the window open to learn
more about them. When installed, this scene will be opened automatically.
3D sample scene
A small sample 3D scene, that demonstrates
Cutscenes, Unity Navigation pathfinding,
GameCameras, Hotspots, Triggers, Conversations and Variables. These features are
commented on in the Console as you play - keep the window open to learn more about
them. When installed, this scene will be opened automatically.
Nine Verbs interface
Replaces part of the default menus to provide a classic 'Nine verbs' interface, in the style
of LucasArts adventure games in the 90s. Because of the extra space needed at the
bottom of the screen, you may wish to lower your GameCamera's vertical o!set to better
see the Player.
Graphic options
Provides a 'Graphic options' menu, that can be used to configure the game's resolution,
quality preset and more. Optionally, it can also provide a button to access this inside
your existing
Options menu.
Mobile joystick
Provides an on-screen joystick that can be used to control the Player and camera on
mobile devices. Its appearance can be tweaked, and additional buttons added, by editing
the JoystickUI prefab it generates.
TextMesh Pro menus
Converts all Unity UI-based Menus currently in the
Menu Manager to use TextMesh Pro
instead. This involves replacing Text components with their TextMesh Pro - Text (UI)
counterpart. TextMesh Pro will need to already be imported into the project via Unity's
Package Manager.
Animated cursor
Renders the cursor using Unity UI, allowing for playback of some simple animations when
hovering over Hotspots, or selecting Inventory items.
17

1.4. The Game Editor window
All games made with AC have eight “Managers” - asset files that each control a di!erent
aspect of the project. For example, the Inventory Manager holds all inventory items the
player can pick up:
•
Scene Manager
•
Settings Manager
•
Actions Manager
•
Variables Manager
•
Inventory Manager
•
Speech Manager
•
Cursor Manager
•
Menu Manager
These Managers are modified via AC’s Game Editor window, which can be accessed from
the top toolbar under Adventure Creator → Editors → Game editor:
At the top of this window are eight tabs - one for each Manager. The currently-selected
Manager, as well as its associated asset file, is listed beneath these tabs:
If you keep this window open when loading either of the demo games, you’ll see that
each demo has its own set of Managers. You can create your own using the
New Game
Wizard.#
18

1.4.1. The Scene Manager
The Scene Manager exposes settings unique to the open scene, and allows for the
handling and creation of AC objects in your Hierarchy. It is this Manager that is used to
convert a “regular” Unity scene into an “AC” one.
A Unity scene is considered to be an “AC” one by the presence of an AC GameEngine in
the Hierarchy. If there is none, the Scene Manager will invite you to organise your scene
objects. This can be done either with a set of folders (empty GameObjects to aid
structure) or without:
Once either is chosen, a GameEngine will be added and the rest of the Scene Manager will
be revealed in the form of five sub-sections:
Scene settings
This is where the scene’s pathfinding method is chosen, as well as where the default
objects such as your starting camera and starting player position are assigned. The
Create button to the right of these fields can be clicked to automatically create and
assign a new prefab.
Scene cutscenes
These are where the scene’s three “automatic”
cutscenes are defined. On start will run
whenever the scene begins through natural gameplay, while On load will run whenever
the scene is switched to after loading a save game or
player-switching. For more on
Actions, see
Actions and ActionLists.
19

Scene attributes
Scene attributes allow you to create a list of properties about your scenes, and give each
scene di!erent values of those properties. For more, see Scene attributes.
Visibility
A typical scene will consist of Triggers, Hotspots, Markers and other AC objects. This
panel allows you to control their visibility within the Scene window, provided Gizmos are
enabled.
Scene prefabs
This provides a list of objects that you can add to your scene, including cameras,
cutscenes and Hotspots. When an object type is selected, existing objects of that type are
listed above together with a description of what that type does. Double-clicking an icon
creates a new object in the scene.
PROTIP: ActionLists can also be started when a scene begins or loads with the
ActionList Starter component.
PROTIP: Each sub-section within a Manager is collapsable by clicking its header. This
is useful when you want to focus only on certain parts.
PROTIP: If the Unity Editor is currently in “Prefab Mode”, objects will be added to the
prefab's hierarchy, not the scene.
20

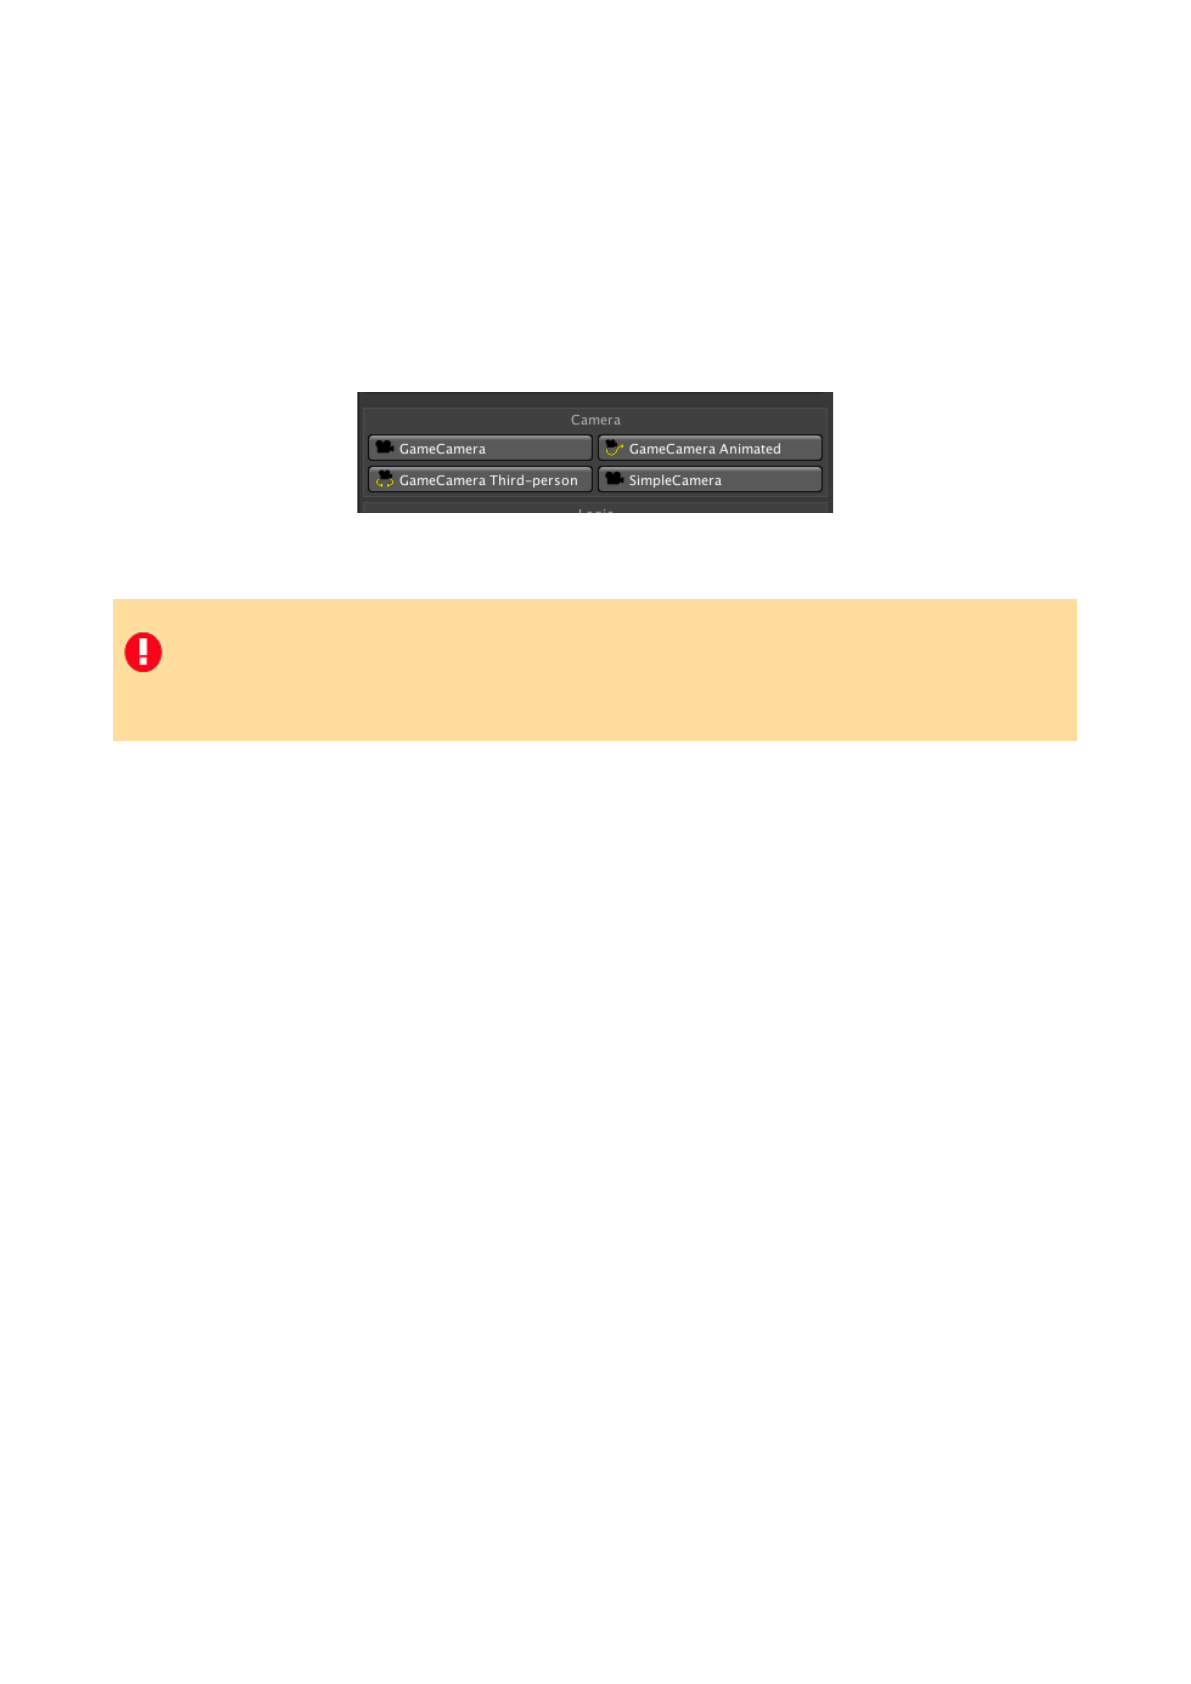
Exactly which prefabs are listed will depending on what Camera perspective your game
uses. The following is a brief run-down of what each prefab type is for:
Camera
GameCamera
The standard camera type for 3D games, which can track a moving target.
GameCamera Animated
A camera that either plays an animation when made active, or positions itself
along a timeline as a target moves along a path.
GameCamera Third-person
A camera that follows a target by keeping the same distance from it at all times,
with the ability to rotate.
SimpleCamera
A camera that has no controls and doesn't move by itself, but can be attached to
a custom camera script to make it compatible with AC.
GameCamera 2D
The standard camera type for 2D games, which can track a moving target. A
“grid-snapping” option causes the camera to move only in discrete steps, which
can be useful when making pixel-art games.
GameCamera 2D Drag
A camera that can be dragged around using the mouse.
TintMap
A texture that covers the scene which is used to tint sprites as they move around.
GameCamera 2.5D
The standard camera type for 2.5D games, which allows for background images
to be placed behind 3D objects.
Background Image
A texture used as a background by
2.5D cameras.
Scene sprite
A sprite used to mask 3D objects in 2.5D games.#
21

Logic
Arrow prompt
A set of on-screen arrows that the user can interact with to trigger Cutscenes.
Conversation
A selection of dialogue options that the player can make when talking to an NPC.
Container
A collection of inventory items that the player can take from and place into.
Cutscenes
A series of Actions that form a cutscene or logic process.
Dialogue Option
A series of Actions that run when a
Conversation’s dialogue option is chosen.
Hotspot
A volume of the screen that the player can interact with in 3D or 2.5D games.
Hotspot 2D
An area of the screen that the player can interact with in 2D games.
Interaction
A series of Actions that run when a Hotspot is interacted with.
Interactive boundary
If assigned to a Hotspot, Draggable or PickUp, a volume in the scene that the
Player must be inside for the Hotspot to be interactive. The Player must have a
Rigidbody and Collider.
Sound
A source of sound e!ects linked to AC’s sound system.
Trigger
A volume of a 2.5D or 3D scene that runs a series of Actions when some object
passes through it.
Trigger 2D
An area of a 2D screen that runs a series of Actions when some object passes
through it.
Variables
A collection of Variables, which can be used to keep track of logic and progress.
22

Moveable
Draggable
A 3D physics object that can be dragged around by the cursor either freely or
locked to a track.
PickUp
A 3D physics object that can be picked up, rotated and thrown by the cursor.
Straight Track
A track that locks Draggables to move only along straight lines.
Curved Track
A track that locks Draggables to move only in arcs.
Hinge Track
A track that locks Draggables to only rotate along one axis.
23

Navigation
Collision Cube
A cube that blocks 3D physics objects or raycasts from passing through it.
Collision Cylinder
A cylinder that blocks 3D physics objects or raycasts from passing through it.
Collision Cube 2D
A box that blocks 2D physics objects or raycasts from passing through it.
Marker
An arrow used to reference a position that a 3D
character should have.
Marker 2D
An arrow used to reference a position that a 2D
character should have.
PlayerStart
An arrow used to reference the Player’s starting position in 3D games.
PlayerStart 2D
An arrow used to reference the Player’s starting position in 2D games.
Random Marker
A Marker that describes a volume - using either a Box or Sphere Collider - of
which a point will be chosen at random when referenced by the
Character: Move
to point Action.
Random Marker 2D
A Marker that describes an area - using either a Box 2D or Polygon Collider - of
which a point will be chosen at random when referenced by the
Character: Move
to point Action.
SortingMap
A way of controlling the scale and ordering of sprites as they move around a
scene.
Path
A pre-determined path that
character can move along.
NavMesh
A custom mesh that defines the area that character can use when pathfinding in
3D scenes.
24


1.4.2. The Settings Manager
The Settings Manager is where the bulk of your game’s project-wide settings are defined
- for example, whether it is 2D or 3D, and how is controlled.
The fields within are interdependent - some may only show if some other combination of
settings are made. This means that only the settings you see are the ones relevant to
your game. Settings can be changed at any time - even during gameplay.
The Settings Manager consists of 15 sub-sections:
Save game settings
Relates to the number and naming of
save game files, as well as the ability to
automatically add save components to your scene objects.
Cutscene settings
Allows you define an ActionList asset that runs when the game begins. This is useful if
you want to initialise
Variables or some other data regardless of the starting scene.
Character settings
Allows you to define one or more Player prefabs that can be controlled. If Player
switching is allowed, then the Player prefab can be changed during gameplay. This can
be left empty if you don’t need a Player to be visible on-screen.
Interface settings
Relates to how the game is controlled, including the
Input method, Movement method
and Interaction method.
Inventory settings
Relates to how inventory items are handled. To define which inventory items can be used
in your game, use the Inventory Manager.
Available inputs
Lists any inputs that your game can make use of, depending on the settings chosen.
Checking Assume inputs are defined? will boost performance, but errors will occur if
any inputs listed are not defined in Unity’s Input settings.
PROTIP: Any Manager field can be changed at runtime through custom scripting. To
modify a field, right-click on the field’s label and choose Copy script variable - you
will then be able to paste a link to the field in your own script or custom Action.
26

Movement settings
Relates to pathfinding and - in the case of point-and-click movement - NavMesh
searching.
Touch-screen settings
If the Input method is set to Touch Screen, then this section will show a number of
options related to how the game plays on a mobile device. For more, see
Touch-screen
input.
Camera settings
Allows you to set the game’s perspective, and enforce an aspect ratio. For more, see
Cameras.
Hotspot settings
Relates to the way in which Hotspots are selected and displayed - also see Hotspot
detection
.
Audio settings
Allows you to choose whether your game plays audio via standard Audio Sources, or
makes use of Audio Mixer Groups. For more, see Sounds.
Raycast settings
Allows you to define which layers objects are placed on when made active and inactive, as
well as the lengths of Raycasts used to detect Hotspots and other interactive objects.
Scene loading
Relates to the way in which scenes are loaded, and whether or not to use a loading screen
between them. For more, see
Loading screens.
Options data
Allows you to set the values of options, such as speech volume and the current language,
without going to the Options Menu in-game - see
Options data.
Debug settings
Provides a number of tools for debugging, including the ability to list all active ActionLists
in the Game window, as well as output Action comments to the Console.
27

1.4.3. The Actions Manager
Actions are the building blocks of AC’s visual scripting system. Each Action performs a
di!erent task, and complex cutscenes and logic can be formed when Actions are chained
together.
The Actions Manager lists all Actions that are available to your project. This includes the
default set that come included with AC, as well as any
custom Actions you may have
installed.
It consists of five sub-sections:
ActionList editing settings
This provides a number of control options when working with the ActionList Editor.
Custom Action scripts
This allows you to point to a directory where any custom Actions you may have are
installed. When set, any such Actions found are automatically installed.
Action categories
Lists all available Actions, by category. Clicking on a category reveals all Actions within
that category via the Category sub-section that then appears:
Category
Lists all Actions available in the category selected above. Clicking on an Action displays
the final sub-section with more details about that Action.
Action
Displays information and options about the selected Action. Here, you can set the node
colour of all Actions of this type within the
ActionList Editor, disable it, make it the default
(either globally, or for that category), find instances of this Action type in your project.
For a description of each Action included with AC, see Actions and ActionLists.#
PROTIP: Disabling an Action type will prevent it from being available in the selector
field at the top of all Actions, but will not remove existing instances of that type. If a
disabled Action type is found within an ActionList, it will run as normal but cannot be
changed to another.
28

1.4.4. The Variables Manager
Variables are used to implement logic in a game, by allowing you to keep track of
progress or choices made by the player. A game can have two sets of Variables:
•
Global, which exist outside of any scene and can be accessed at any time
•
Local, which exist in a single scene and cannot be accessed outside of it
For more, see Variables.
The Variables Manager is used to define such Variables and keep track of them during
gameplay. The top of it allows you to choose between viewing Global and Local Variables,
and the following sub-sections appear beneath:
Editor settings
Allows you to see the realtime values of listed Variables during gameplay, as well as filter
lists by name.
Preset configurations
Allows you to manage presets, which allow you to bulk-assign Variable values. For more,
see
Variable presets.
Global/Local variables
Shows a list of existing Variables, and allows you create more. Clicking a Variable shows
its properties below.
Global/Local variable properties
Shows the selected Variable’s properties, including label, type and initial value. If preset
configurations exist, preset values can be set here.#
29

1.4.5. The Inventory Manager
Inventory items are items that can be picked up by the player, and used either on each
other or Hotspots in the scene. For more, see Inventory items.
The Inventory Manager is used to create items, as well as define categories, crafting
recipe and properties. It consists of four tabs:
Items
The Items tab is where the Inventory items are defined, and may be the only tab needed if
your game doesn’t have a complex inventory system. It has three sub-sections:
Global unhandled events
Unhandled events are “fallback” interactions that will run if there is no defined response
when an item is used on something. Each item can have their own set of unhandled
events, but these ones can be used for all items. For more, see
Inventory interactions.
Inventory items
Shows a list of existing items, and allows you to create more. When an item is clicked, its
properties are shown below:
Inventory item settings
When an item is selected above, its properties are listed here. Here you can name an
item, choose its graphic, as well as define interactions that run when it is manipulated.
Categories
This tab allows you to create categories, which are a way of grouping Inventory items,
Documents, or Objectives together. Once two or more categories exist, each item can be
assigned one via its properties box.
Crafting
Simple interactions between two items can be defined in the Items tab. However, more
complex interactions can be made in the form of crafting - where multiple items can be
combined on a grid to create another. This tab allows you to manage all recipes that a
Crafting Menu will accept. For more, see Crafting.
30


1.4.6. The Speech Manager
The Speech Manager is used to control how speech is displayed and heard, as well as
manage translations and script sheets. It consists of five sub-sections:
Subtitles
Relates to how subtitles behave when displayed on-screen. They can be made to scroll,
respond to user clicks, and play audio. The Display time factor field is an important
one: if text does not scroll, it will be used to determine the total display duration of the
subtitle. If text scrolls, or the speech has audio associated with it, then it is used to
determine the display duration after the scrolling/audio.
Speech audio
Relates to the playback of speech files and the way in which they are matches with their
associated speech line. For more, see
Audio files.
Lip syncing
Provides a number of options related to automated lip-syncing. For more, see Lip
syncing.
Languages
Allows you to manage the translations that players can choose from while playing. Each
translation can be imported from, and exported to, CSV files for editing. For more, see
Managing translations.
Game text
Lists all of text in your game which can be translated, as well as speech lines that can
make use of speech audio or lip-sync files. The Gather text button is used to search
your project for relevant text - see
Gathering game text.#
32

1.4.7. The Cursor Manager
The Cursor Manager is used to define what graphics the cursor can have, as well as which
icons are available when interacting with Hotspots, NPCs and inventory items. It consists
of seven sub-sections:
Global cursor settings
This provides you with the option to switch between cursor rendering modes, as well as
game-wide cursor behaviour.
Main cursor settings
This is where you choose when a cursor is shown, and what the default cursor looks like.
Walk cursor
This is where you can provide an optional cursor shown when the Player is in “walk
mode”.
Hotspot cursor
This is where you can provide an optional cursor shown when hovering over Hotspots.
This can be overridden by using inventory icons, so that the cursor changes depending on
what interactions are available for a given Hotspot.
Inventory cursor
This provides you with options related to how the cursor changes when dealing with
inventory items.
Interaction icons
This is where
interaction icons are defined. An interaction icon can be used as a cursor -
but also placed in Interaction Menus and made to form a Hotspot label (e.g. the “Pick up”
in “Pick up stick”). This works by associating each Hotspot interaction with a given
interaction icon. For more, see
Hotspots.
Cutscene cursor
This is where you can provide an optional cursor shown when a cutscene is playing, to
indicate that the player cannot interact with the scene.
33

1.4.8. The Menu Manager
The Menu Manager is where your game’s user-interface is constructed. The interface
consists of a series of Menus, which can be rendered using either AC’s own system, or
with Unity UI. The default interface, as created by the New Game Wizard, provides you
with a series of Menus that can handle inventory, conversations, options, as well as saving
and loading.
For more on creating your own interface, see
Menus. The Menu Manager has five sub-
sections:
Global menu settings
Here you can set global settings such as an Event system prefab (if using Unity UI to
render) and the ability to preview the selected Menu in the Game window (if using AC to
render).
Menus
Lists all Menus used by the game. Here you can select Menus to edit them, and create
new ones.
Menu properties
Shows the properties of the currently-selected Menu. Here you can choose the conditions
for when it is shown, change its appearance, and define ActionLists that run whenever it
is turned on or o!.
Menu elements
Lists all Elements present in the currently-selected Menu. Here you can select Elements
to edit them, and create new ones.
Menu element properties
Shows the properties of the currently-selected Element Here you can can change its
appearance and behaviour when the Player interacts with it.
#
PROTIP: Each of the default Menus created by the New Game Wizard work with both
Adventure Creator and Unity UI drawing modes, and you can switch back and forth at
will. It’s recommended that you use AC for prototyping, and then UI for refinement.
34

1.5. Preparing a 3D scene
After creating your Managers with the New Game Wizard, you are ready to begin creating
your scenes. The Game Editor window is best docked in a tall vertical pane when
working.
To begin working in 3D, make sure that your Camera perspective is set to 3D in the
Settings Manager:
You can now change to the
Scene Manager, from where you can create the GameObjects
needed for an adventure game.
Creating a scene for a 3D game typically consists of five steps:
•
Adding a PlayerStart
•
Adding visuals
•
Adding colliders and/or a NavMesh
•
Adding cameras
•
Adding interactivity
The sections below cover each step. For a practical guide to follow along with, see the
Making a 3D game video tutorial.
35

1.5.1. Adding a PlayerStart
With a new scene, the top of the Scene Manager will have two Organise scene objects
buttons: With folders and Without folders:
Both of these buttons will set up your scene to be useable by Adventure Creator – the only
di!erence is whether or not “helper” folders (empty GameObjects) will also be created to
help keep things organised. As you use the Scene Manager to create Hotspots,
Conversations and other prefabs, it will place them into the relevant folders automatically.
AC makes use of its own MainCamera object for rendering - see
Cameras. If it detects
that another camera is present, then it will ask you if you would like to replace it
completely, or convert it into a camera that AC can use.
Once the scene is converted, a blue arrow will be placed at the centre of the scene:
This is a PlayerStart, which is used to give the player a starting position and rotation
when the scene begins. You can see that the Scene Manager has automatically assigned
this as the Default PlayerStart within its Scene Settings panel:
PROTIP: A scene can have multiple PlayerStarts, with each one setting the Player’s
starting position when entering from another scene. The di!erence with the Default
PlayerStart is that this will be used if the game begins from this scene, or if no more
suitable PlayerStart is found.
36

1.5.2. Adding visuals
We can now dress the scene with geometry and lights, and move the PlayerStart into an
appropriate spot. If you are using scene folders, the _SetGeometry folder is provided for
your scene’s visuals.
You can do this before the previous step, if you prefer.
NOTE: Be careful when placing your geometry’s colliders on the Default layer, as this is
the layer used by interactive objects that the cursor “discovers” by hovering over them.
If another collider on this layer is in between the camera and a Hotspot, it will block
the Raycast - though this can be useful if you want walls to hide interactive objects.
37

1.5.3. Adding colliders and/or a NavMesh
We can now work on allowing our characters to move around. We’ll start with the floor,
which all 3D characters require (unless una!ected by gravity). We can make one either by
using Unity’s own colliders, or the CollisionCube prefab that is listed in the Scene
Manager:
Double-click this prefab type, and a blue cube will be created in the scene. Manipulate its
transforms so that the top face covers the whole ground. This cube won’t be visible
during gameplay - it’s used purely as a “barrier” to prevent characters from falling.
If the
Player character uses anything other than point-and-click control to move during
gameplay, colliders will also need to be created for the walls to prevent him from clipping
through the set.
Now we will want a Navigation Mesh, or NavMesh, which marks the area in a scene over
which our characters can move around through pathfinding. In 3D scenes, we can use
either provide a
custom mesh or bake one with Unity's own navigation tools. If you
choose to use a custom mesh, be sure to assign it as the Default NavMesh in the Scene
settings.#
PROTIP: The 3D Demo game has wall colliders even though it uses point-and-click
movement. This is so that you can experiment with di!erent movement types in the
scene to see which one suits your own game.
38
1.5.4. Adding cameras
Next come cameras. We can have as many cameras as we choose, but only one default -
which we can automatically create and assign under Scene settings in the Scene
Manager. The standard camera type for 3D games is the GameCamera, which has
controls for moving and turning as it follows a target - which by default is the Player. 3D
games can make use of four camera types, as listed in the prefabs panel:
A description of what each prefab type is can be found in
The Scene Manager.
To switch camera at runtime, use the Camera: Switch Action (see Actions and ActionLists).
If multiple PlayerStarts are in a scene, each can be associated with a specific camera from
their Inspector.#
NOTE: A scene can have multiple GameCameras, but only one MainCamera. All
rendering is done through the MainCamera, while the GameCameras are used only for
reference: a MainCamera will copy the transform and camera values of whatever
GameCamera is currently “active”.
39

1.5.5. Adding interactivity
We can create an opening cutscene by assigning an On Start cutscene, under Scene
cutscenes in the Scene Manager. A cutscene is a collection of Actions that chain together
to form a sequence of events. For more, see Actions and ActionLists.
To make the scene interactive, you can populate it with logic objects, such as Hotspots
and Triggers, listed under the “Logic” pane of the Scene prefabs in the Scene Manager:
For more on Hotspots and other types of interactivity available, see Interactions.
We can now give the scene some life by adding characters, including our Player. This is
covered in Creating characters.
PROTIP: OnStart cutscenes will play whenever a scene opens through gameplay (i.e. if
the game begins from this scene, or the player enters it from another scene). OnLoad
cutscenes will play whenever a scene opens due to loading a save game or
switching
Player character. If you want to run a set of Actions regardless of why the scene is
opened, place them in a separate Cutscene and have it shared by both OnStart and
OnLoad.
PROTIP: The 3D Demo’s player prefab, Tin Pot, is designed to work with a variety of
play styles and is useful when testing a scene if you don’t yet have a Player of your
own. Just drop him into the scene and run it - he’ll override whatever prefab you have
assigned in your Settings Manager.
40

1.6. Preparing a 2D scene
After creating your Managers with the New Game Wizard, you are ready to begin creating
your scenes. The Game Editor window is best docked in a tall vertical pane when
working.
You may encounter problems if your NavMesh's scale is too small, which may be the case
if you are using a low-resolution (e.g. 320x240) art style. You can tell if your scale is
wrong by looking at the white squares that break up a Character's path when pathfinding
– they should be tiny (but visible) dots in the Scene window compared with the rest of the
scene.
To begin working in 2D, make sure that your Camera perspective is set to 2D in the
Settings Manager:
The Moving and turning field beneath it is an important one, as it will a!ect the way
your entire game is created. It determines how the cameras, sprites, Hotspots and
Navigation Meshes relate to one another. It is recommended that you use the default
value of Unity 2D, but the three available options are described below:
Unity 2D
The game is played in Unity's own “2D” view. Characters move purely in the X/Y plane,
and are scaled to create a depth e!ect. The game use 2D components, and Polygon
Collider pathfinding.
Top Down
This mode is now deprecated.
World Space
The game is played with perspective cameras, with the main “background sprite” behind
all Characters. Characters move in 3D space and rely on 3D collider and physics
components, with no need for “cheating” a depth e!ect.
NOTE: An important consideration when making a 2D game with pathfinding is that of
your sprite scales, which you can adjust by modifying the Pixels Per Unit setting in
your sprite Inspectors. The game's scale should have 1 unit roughly equal 1 metre.
The 2D Demo's graphics are built to an appropriate scale - you can compare your own
sprites with those in the 2D Demo/Graphics/Sprites folder to see if they need
adjusting.
41

Screen Space
The game is played with perspective cameras, with the main “background sprite” behind
all Characters. Characters move in 3D space and rely on 3D collider and physics
components, with no need for “cheating” a depth e!ect. Unlike World Space, however,
characters move and turn according to perceived object positioning, rather than true
positioning. For example, if a Hotspot appears above the Player, then it will be
considered behind them instead. This is a convenience as it means that interactive
objects can still be placed on the 2D plane - only the NavMesh need be in 3D.
You can now change to the
Scene Manager, from where you can create the GameObjects
needed for an adventure game.
Creating a scene for a 2D game typically consists of six steps:
•
Adding a 2D PlayerStart
•
Adding visuals
•
Adding a 2D NavMesh
•
Adding a Sorting Map
•
Adding 2D cameras
•
Adding interactivity
The sections below cover each step. For a practical guide to follow along with, see the
Making a 2D game video tutorial.
PROTIP: Not sure which option to pick? Just go with Unity 2D - the others were made
before Unity’s 2D tools were introduced.
NOTE: Looking to have 3D characters in your 2D scene? The 2.5D option allows for
that, but it involves working in 3D space. If you want to work completely in 2D space,
you can still use 3D characters in a 2D scene, provided that:
1) They have no collider or Rigidbody components.
2) They have custom shaders that allow them to render correctly alongside sprites,
when their "sorting order" values are changed by a Follow Sorting Map.
Alternatively, they are each rendered by separate camera (see
this wiki page).
42

1.6.1. Adding a 2D PlayerStart
With a new scene, the top of the Scene Manager will have two Organise scene objects
buttons: With folders and Without folders:
Both of these buttons will set up your scene to be useable by Adventure Creator – the only
di!erence is whether or not “helper” folders (empty GameObjects) will also be created to
help keep things organised. As you use the Scene Manager to create Hotspots,
Conversations and other AC prefabs, it will place them into the relevant folders
automatically.
AC makes use of its own MainCamera object for rendering - see
Cameras. If it detects
that another camera is present, then it will ask you if you would like to replace it
completely, or convert it into a camera that AC can use. Once complete, a blue arrow will
be placed at the centre of the scene:
This is a PlayerStart, which is used to give the player a starting position and rotation
when the scene begins. You can see that the Scene Manager has automatically assigned
this as the Default PlayerStart within its Scene Settings panel:
PROTIP: A scene can have multiple PlayerStarts, with each one setting the Player’s
starting position when entering from a di!erent scene. The di!erence with the Default
PlayerStart is that this will be used if the game begins from this scene, or if a no more
suitable PlayerStart is found.
43

1.6.2. Adding visuals
We can now dress the scene with set sprites, and move the PlayerStart into an appropriate
spot. If you are using scene folders, the _SetGeometry folder is provided for your scene’s
visuals.
When importing your scene's graphics into Unity, be sure to set their Texture type to
Sprite, so that they can be placed in the scene.
Special attention should be paid to sprites that characters will be able to walk behind and
in front of: Sorting Maps work by altering the sorting order of character sprites, you will
need to separate your scene sprites’ Order in Layer far apart enough for values in-
between to exist.
PROTIP: Aren’t sure what Order in Layer values to give your set sprites? You can
normally get by with just spacing them 5 units apart, e.g.:
•
Background: -10
•
Ground: -5
•
Mid-foreground: 5
•
Foreground: 10
See that this allows for sprites with an order zero (such as characters by default) to be
above the ground.
44

1.6.3. Adding a 2D NavMesh
Now we will want a 2D Navigation Mesh, or NavMesh 2D, which marks the area in a scene
over which our characters can move around through pathfinding. In 2D scenes, we can
make use of Unity's Polygon Collider 2D to “draw" this NavMesh in our scene - see
Polygon Collider pathfinding for more.
Once you’ve made a 2D NavMesh, be sure to set it as the Default NavMesh in the Scene
settings.
45

1.6.4. Adding a Sorting Map
Because Unity 2D games are built on a 2D plane, characters will all have the same
distance from the camera as they move around. To get around this, we use a Sorting
Map. A Sorting Map can scale characters and optionally a!ect their sprite orders as they
move around, faking a depth e!ect. We can auto-create a Default Sorting Map in the
Scene settings, and its Inspector looks like this:
The Sorting Map works vertically, so position it at the top-most point of the scene's
walkable region, and and click Add area in its Inspector. This will create a new mark
beneath - position this one at the bottom-most point:
We can use this Sorting Map to a!ect a character’s scale as they move down it - click
A"ect Character scale?. This will expose Scale % fields that we can use to set character
scales at each end-point. The scales in between will be set automatically, and changing
these values will update its appearance in the Scene window:#
46

In order for a character to be a!ected by a Sorting Map, its sprite must have the Follow
Sorting Map component attached. This is added automatically when using the Character
wizard. Note that this should not be on the root of the character, i.e. the one with the
NPC or Player component.
We can also use a Sorting Map to change a character sprite's Order in Layer value when
inside each area - this allows them to be rendered on top of scene objects when “in front"
of them, and underneath when “behind”.
In this case, we have a tree placed on the ground. We will need an area above it, and an
area beneath it. Click Add area to create a new area, and re-adjust their positions
accordingly.
PROTIP: Scaling by use of areas is linear. For more natural scaling, change the
Character scaling mode to Animation Curve. This allows you to more precisely
control scaling using a curve.
47

To automatically recalculate the scale values of all areas in between the top and bottom,
click Interpolate in-between scales.
Now we must set correct Order values. You can see these in the centre of each area when
the Sorting Map is selected:
These are the Order in Layer values that character sprites will have when inside each
area. They can be adjusted in the Inspector, and should account for the orders of your
background sprites. For example, if your ground is -5, and the tree is 5, then the top and
bottom areas could have values of 0 and 10 respectively.
Since 2D games involve faking perspective, you may wish for your characters to move
vertically more slowly than horizontally. You can adjust the Vertical movement factor
slider to do just this, either globally in the
Settings Manager, or per-scene in the Scene
Manager.
PROTIP: The Follow Sorting Map can either a!ect Sprite Renderer's Order In Layer
value directly, or - if attached to the character - a Sorting Group component instead.
The latter is more useful if a character is made up of multiple sprites.
PROTIP: A Sorting Map does not necessarily need to a!ect sprite sorting. If A"ect
Character sorting? is unchecked, then sorting will be based on the Transparency
Sort Axis defined the Graphics section of Unity's Project Settings.
NOTE: If two or more Follow Sorting Map components occupy the same Sorting Map
region, their relative positions along the Y-axis will adjusted slightly to ensure they are
rendered in the correct order. The amount by which they are adjusted can be set on
the GameEngine object, via the Scene Settings component's Shared Layer Separation
Distance value. If such sprites do not render in the correct order, try increasing this
value until they do.
48

1.6.5. Adding 2D cameras
Next come cameras. We can have as many cameras as we choose, but only one default -
which we can automatically create and assign under Scene settings in the Scene
Manager. The standard camera type for 2D games is the GameCamera 2D, which has
controls for moving and turning as it follows a target - which by default is the Player. 2D
games can make use of two camera types, as listed in the prefabs panel:
A description of what each prefab type is can be found in
The Scene Manager.
To switch camera during gameplay, use the Camera: Switch Action (see Actions and
ActionLists). If we have multiple PlayerStarts in our scene, we can associate each one with
a specific camera from their Inspectors.#
NOTE: A scene can have multiple GameCameras, but only one MainCamera. All
rendering is done through the MainCamera, while the GameCameras are used only for
reference: a MainCamera will copy the transform and camera values of whatever
GameCamera is currently “active”.
49

1.6.6. Adding interactivity
We can create an opening cutscene by assigning an On Start cutscene, under Scene
cutscenes in the Scene Manager. A cutscene is a collection of Actions that chain together
to form a sequence of events. For more, see Actions and ActionLists.
To make the scene interactive, you can populate it with logic objects, such as Hotspots
and Triggers, listed under the “Logic” pane of the Scene prefabs in the Scene Manager:
For more on Hotspots and other types of interactivity available, see Interactions.
We can now give the scene some life by adding characters, including our Player. This is
covered in
Creating characters.
PROTIP: OnStart cutscenes will play whenever a scene opens through gameplay (i.e. if
the game begins from this scene, or the player enters it from another scene). OnLoad
cutscenes will play whenever a scene opens due to loading a save game or
switching
Player character. If you want to run a set of Actions regardless of how the scene is
opened, place them in a separate Cutscene and have it shared by both OnStart and
OnLoad.
PROTIP: The 2D Demo’s player prefab, Brain2D, is designed to work with a variety of
play styles and is useful when testing a scene if you don’t yet have a Player of your
own. Just drop him into the scene and run it - he’ll override whatever prefab you have
assigned in your Settings Manager.
50

1.7. Preparing a 2.5D scene
After creating your Managers with the New Game Wizard, you are ready to begin creating
your scenes. The Game Editor window is best docked in a tall vertical pane when
working.
AC’s 2.5D mode is used for games that make use of 3D characters and pre-rendered) or
photographic) backgrounds. To begin working in this mode, make sure that your
Camera perspective is set to 2.5D in the Settings Manager:
If your game makes use of pre-rendered backgrounds, it is also recommended to set
Aspect ratio to Fixed.
You can now change to the
Scene Manager, from where you can create the GameObjects
needed for an adventure game.
Creating a scene for a 2.5D game typically consists of five steps:
•
Adding a PlayerStart
•
Adding backgrounds and cameras
•
Adding colliders and/or a NavMesh
•
Adding scene sprites
•
Adding interactivity
The sections below cover each step. For a practical guide to follow along with, see the
Making a 2.5D game video tutorial.
NOTE: This implementation involves placing characters in 3D space, so that
perspective is correct. The alternative approach is to place characters in 2D space, and
use sprites for backgrounds - see Preparing a 2D scene.
NOTE: Using URP? Unity’s Universal Render Pipeline uses its own technique to overlay
cameras, so you'll need this wiki script to have it work with AC’s 2.5D cameras.
51

1.7.1. Adding a PlayerStart
With a new scene, the top of the Scene Manager will have two Organise scene objects
buttons: With folders and Without folders:
Both of these buttons will set up your scene to be useable by Adventure Creator – the only
di!erence is whether or not “helper” folders (empty GameObjects) will also be created to
help keep things organised. As you use the Scene Manager to create Hotspots,
Conversations and other prefabs, it will place them into the relevant folders automatically.
Adventure Creator makes use of its own MainCamera object for rendering - see
Cameras.
If it detects that another camera is present, then it will ask you if you would like to
replace it completely, or convert it into a camera that Adventure Creator can use.
Once the scene is converted, a blue arrow will be placed at the centre of the scene:
This is a PlayerStart, which is used to give the player a starting position and rotation
when the scene begins. You can see that the Scene Manager has automatically assigned
this as the Default PlayerStart within its Scene Settings panel:
PROTIP: A scene can have multiple PlayerStarts, with each one setting the Player’s
starting position when entering from another scene. The di!erence with the Default
PlayerStart is that this will be used if the game begins from this scene, or if no more
suitable PlayerStart is found.
52

1.7.2. Adding backgrounds and cameras
2.5D games typically involve pre-rendered backgrounds and static cameras, with each
camera used for a specific background.
AC makes the development of 2.5D scenes easier by having the background graphics
drawn only at runtime, so that you don’t have to spend time placing graphics in the scene
and getting them to line up properly.
We can have as many cameras as we choose, but only one default - which we can
automatically create and assign under Scene settings in the Scene Manager. The
standard camera type for 2.5D games is the GameCamera 2.5D, which can’t move but
allows you to assign a Background Image to it. Both these prefab types are listed in the
prefabs panel:
A description of what each prefab type is can be found in
The Scene Manager.
In your new camera’s Inspector, you’ll see a field for the Background image prefab:
Click Create to automatically create and assign a new BackgroundImage object. This is
where the background image texture is assigned - see
GameCamera 2.5D.
We can see this image in the Game window while editing by going back to the camera’s
Inspector and clicking Set as active. When a camera is active, its background will be
drawn underneath any visible objects in its view:
We must now adjust the camera so that it matches the position and rotation of the
image’s perspective. A Perspective o"set can also be applied via the GameCamera’s
Inspector. This may take some trial-and-error, and is often easier to do in conjunction
with creating a NavMesh.
NOTE: Working with Unity’s URP? A script to overlay the scene and background
together can be found on the AC wiki here.
53

To switch camera during gameplay, use the Camera: Switch Action (see Actions and
ActionLists). If we have multiple PlayerStarts in our scene, we can associate each one with
a specific camera from their Inspectors.
NOTE: If your background is pre-rendered in a 3D modelling package, you can usually
extract the camera data used to render it and transfer it into Unity. Take a note of its
position, rotation and field of view, and copy these values into your Unity camera’s
Inspector - though sometimes the axes ordering may be di!erent. If you are instead
using photographic backgrounds, take plenty of measurements when shooting!
PROTIP: A tutorial on adding shadows to 2.5D scenes can be found here.
PROTIP: Though the 2.5D camera can’t move, you can still have scrolling cameras in
your 2.5D scene. That camera type is really just for convenience, and you can just
drop in a GameCamera2D prefab if you want to have a moving one instead. For more
on scrolling in 2.5D games, see
this tutorial.
54

1.7.3. Adding colliders and/or a NavMesh
We can now work on allowing our characters to move around. We’ll start with the floor,
which all 3D characters require (unless una!ected by gravity). We can make one either by
using Unity’s own colliders, or the CollisionCube prefab that is listed in the Scene
Manager:
Double-click this prefab type, and a blue cube will be created in the scene. Manipulate its
transforms so that the top face covers the whole ground. This cube won’t be visible
during gameplay - it’s used purely as a “barrier” to prevent characters from falling.
Be sure to check how this looks with the background (see
Adding backgrounds and
cameras) - the orientation of the background camera should match the scene objects:
55

If the Player character uses anything other than point-and-click control to move during
gameplay, colliders will also need to be created for the walls to prevent him from clipping
through the set.
Now we will want a Navigation Mesh, or NavMesh, which marks the area in a scene over
which our characters can move around through pathfinding. In 3D scenes, we can use
either provide a
custom mesh or bake one with Unity's own navigation tools. If you
choose to use a custom mesh, be sure to assign it as the Default NavMesh in the Scene
settings.#
PROTIP: The 3D Demo game has wall colliders even though it uses point-and-click
movement. This is so that you can experiment with di!erent movement types in the
scene to see which one suits your own game.
56

1.7.4. Adding scene sprites
Scene sprites can be used whenever we want to overlay some of the background over our
characters (when behind a wall, for example), or when we want to animate a portion of
the screen.
Any such sprites in our scene will di!er from normal 2D images because they need to be
aligned to the camera, and only visible when a given camera is active. AC’s Scene sprite
prefab allows us to make these easily:
This prefab type contains a standard Sprite Renderer, and the
Align To Camera and Limit
Visibility components, which we can use to meet the requirements above.#
57

1.7.5. Adding interactivity
We can create an opening cutscene by assigning an On Start cutscene, under Scene
cutscenes in the Scene Manager. A cutscene is a collection of Actions that chain together
to form a sequence of events. For more, see Actions and ActionLists.
To make the scene interactive, you can populate it with logic objects, such as Hotspots
and Triggers, listed under the “Logic” pane of the Scene prefabs in the Scene Manager:
For more on Hotspots and other types of interactivity available, see Interactions.
We can now give the scene some life by adding characters, including our Player. This is
covered in Creating characters.
PROTIP: OnStart cutscenes will play whenever a scene opens through gameplay (i.e. if
the game begins from this scene, or the player enters it from another scene). OnLoad
cutscenes will play whenever a scene opens due to loading a save game or
switching
Player character. If you want to run a set of Actions regardless of how the scene is
opened, place them in a separate Cutscene and have it shared by both OnStart and
OnLoad.
PROTIP: The 3D Demo’s player prefab, Tin Pot, is designed to work with a variety of
play styles and is useful when testing a scene if you don’t yet have a Player of your
own. Just drop him into the scene and run it - he’ll override whatever prefab you have
assigned in your Settings Manager.
58

1.8. Updating Adventure Creator
Adventure Creator is frequently updated with new features, and it's a good idea to
download the latest update when it becomes available.
AC can detect updates for you by choosing Adventure Creator → Check for updates in
the top toolbar.
You can update Adventure Creator from your Unity Asset Store account. Choose
Windows → Package Manager from the top toolbar, then opt to view “My Assets” from
the top left.
The contents of each update are listed within the changelog file within the root
AdventureCreator asset folder. At the top of each version's release notes is the Upgrade
notes section, which describes any change made that may a!ect your game or you need
to be aware of. You should read these notes thoroughly after updating.
NOTE: Please read the “Upgrade notes” section after updating - this details any
changes made to AC that you may need to be aware of to retain your game’s earlier
behaviour.
59

1.9. Project settings
When using Unity 2019.2 or later, AC has its own entry in Unity’s Project settings
window. This can be accessed by choosing Edit -> Project Settings… from the top
toolbar.
Here, it is possible to fine-tune some of the Editor settings such as gizmo colours, and
Hierarchy icon placement.#
60

2. Input and navigation#
61

2.1. Input and navigation overview
Choosing how an AC game plays generally comes down to three key areas:
Movement
How the Player (if there is one) is moved around during gameplay
Input
The input device used to play the game
Interaction
How Hotspots, NPCs and Inventory items are used
Each of these can be changed at any time within the Settings Manager, under Interface
settings:
Some settings will lead to more options becoming available - the Settings Manager will
only show fields that are relevant to your game’s play style. You make need to define
additional inputs, too - you can see a list of what inputs your game can make use of
under the Available inputs section of the Settings Manager.
The various interaction modes are discussed later - see
Interactions. The rest of this
section is dedicated to input and navigation.
PROTIP: What you choose for these options will a!ect not only the way your game
plays, but also the way it is built. Playing around with the demo games is a good way
to experiment: you can change the values and see what e!ect they have instantly.
62

2.2. Movement methods
A game's movement method refers to how Player characters are controlled during
gameplay. It has the following options:
Point-and-click
The Player is controlled by clicking where you want him to go via pathfinding.
Direct
The Player is controlled by moving him directly with keyboard keys / gamepad buttons.
First person
The Player moves and looks in first-person.
Drag
The Player is controlled by dragging the cursor in the direction you want him to move.
Straight-to-cursor
The Player will move directly to the cursor whenever a click is held.
None
The Player will not move unless instructed through
ActionLists.
The Movement method is chosen in the Settings Manager, under Interface settings:
NOTE: This setting can be changed at any time with the Engine: Manage systems
Action. However, as this a!ects the asset file itself, changes made to it will not be
reverted when the game ends. If you do this, be sure to set the default value as part of
your game's ActionList on start game, as set in the Settings Manager.
63

2.2.1. Point-and-click movement
Point-and-click control is the most common way of moving in adventure games, with
titles such as Monkey Island and The Longest Journey controlled in this way. If you left-
click your cursor in the scene but not over an interactive object, the Player will make their
way there. The e!ect of double-clicking can be modified in the
Settings Manager, but is
set to make the player run by default. On mobiles, this equates to single- and double-
tapping.
You can also map control to the InteractionA input button, which is necessary if your
game is played with a gamepad. If you wish to remove the default mouse behaviour,
uncheck Left and right mouse clicks have default functionality? in the
Settings
Manager.
As this style makes heavy use of pathfinding to move the player around the scene, you
will need to define a NavMesh for every scene – see Pathfinding methods.
If you are making a 3D game that involves gravity, you will also need to create at least
one collider in every scene to act as a floor - see Adding colliders.
There are several options under Movement settings in the Settings Manager that relate
to how the player's destination is determined. The NavMesh search % setting allows you
to choose how far from the cursor the game will search for a NavMesh, if one was not
clicked on directly. If this is greater than zero, you can use the NavMesh search
direction to determine if the search is conducted radially outward from the cursor, or
straight down.
The Destination accuracy slider determines "how close is close enough” when checking
if the Player has reached their target. This may need to be reduced if your characters
have a small scale.
If you have NPCs moving around as well, or some other dynamic element, you will need to
set a non-zero Pathfinding update time, so that pathfinding can be recalculated mid-
movement.
You can optionally supply a Click marker prefab, which appears in the scene when you
click, at the player character's intended destination. A sample click marker can be found
in Assets/AdventureCreator/Prefabs/Navigation/ClickMarker.
PROTIP: The NavMesh object to click on must be on the NavMesh layer, but objects on
other layers (except Ignore Raycast) will block clicks by default to prevent clicking
through e.g. walls to inaccessible rooms. The layers involved in the process can be
configured with the LayerMask field in the GameEngine object’s PlayerMovement
component.
64

2.2.2. Direct movement
Direct movement allows you to control the player's movement directly, with either the
keyboard, a controller, or on-screen buttons. Telltale's The Walking Dead series employs
this movement method.
When used on a touch-screen, this mode behaves like Drag movement. Otherwise,
Horizontal and Vertical input axes are required. Run, ToggleRun and Jump are also
valid, though Jump is only available for 3D Characters. For a description of these axes,
see
Input descriptions.
If you want the intensity of the Horizontal and Vertical axes to a!ect the player's speed,
check the Input magnitude a"ects speed? setting under Movement settings in the
Settings Manager. Checking Account for player's position on screen? will cause
pressing “down” (for example) to result in the player walking towards the camera, rather
than just away from the camera's point of view.
If the camera cuts to a di!erent angle, his will continue his direction until the user
changes the input – this prevents the player moving in an unintended direction if the
angle changes sharply. Note that the ActionList that performs this camera cut must be a
background process. The angle threshold used by this process is set by the Max camera
lock angle slide.
When input is released, the Player will continue moving towards the direction that the
input was last indicating. This e!ect can be disabled by checking the Stop turning when
release input? option.
The Direct-movement type setting allows you to instead enable Tank controls, in which
the Horizontal axis rotates the Player on the spot.
NOTE: When under Direct control, the Player’s movement is blocked by Colliders. In
2D scenes, you can optionally check the Player’s Auto stick to NavMesh? option to
have them be constrained to the confines of the NavMesh. In 3D scenes, such
constraint requires a NavMesh Agent component - see
Unity Navigation pathfinding.
65

2.2.3. First-person movement
First-Person control lets you navigate your game from the player character's point of
view, with the ability to look around freely.
When used on a touch-screen, it works by dragging one or two fingers (based on options
chosen). Otherwise, Horizontal and Vertical axes are required for movement, and
CursorHorizontal and CursorVertical axes are required for aiming.
To aim with the mouse, map those last two axes to the X and Y axes respectively.
Run, ToggleRun and Jump are also valid. For a description of these axes, see Input
descriptions
.
To control a Player prefab in first-person, you must update the prefab by giving him a
new child GameObject and attaching both the Camera and First Person Camera
components. The Camera component itself should be disabled:
Position this GameObject such that the camera appears where the Player’s head should
be. The 3D Demo game’s Player prefab, is equipped with such a camera:
PROTIP: A pre-made first-person Player prefab is available online.
66

The First Person Camera component provides various free-aiming options, while aiming
smoothness and the maximum free-aim speed being controlled under Movement
settings in the Settings Manager.
To be able to free-aim during gameplay, the cursor must be locked (see Cursor locking).
You can also use the
Player: Constrain Action to enforce free-aiming at all times.
During normal gameplay, the first-person camera will automatically be used regardless of
the Default camera field in the Scene Manager. You can still switch camera during
cutscenes with Actions. To allow for camera-switching during Conversations, uncheck
Run Conversations in first-person?, also under Interface settings.
PROTIP: A first-person Player prefab doesn’t need any graphics attached - you can get
by with just a Player base object with a First-person child camera.
NOTE: Is your first-person Player only moving forward? Make sure their Animator’s
Apply root motion option is unchecked, as this can cause movement issues.
PROTIP: You can also switch to another movement method at any time by using the
Engine: Manage systems Action. This is useful if you want to have “close-up”
sequences where you want to be able to interact with certain objects from a fixed
perspective camera. Just be sure to use this Action in your game’s ActionList on start
game (defined in the
Settings Manager) so that it begins with the correct value.
67

2.2.4. Drag movement
In this mode, the player can navigate a scene by clicking and dragging the left mouse
button, or by pressing an input button named InteractionA. The Settings Manager
provides options for how the "drag distance" is visualised on-screen.
NOTE: Similar to Direct movement, the Player does not take notice of the NavMesh -
they are instead blocked by Colliders, which act as invisible walls to prevent them from
clipping through the set.
PROTIP: The drag direction is shown as a simple line by default, but this can be
disabled in favour of your own UI through custom events. An example script that
displays an on-screen joystick (as common with mobile games) can be found in the AC
wiki here:
adventure-creator.wikia.com/wiki/Mobile_joystick_example
68

2.2.5. Straight-to-cursor movement
Straight-to-cursor control causes the Player to move towards the cursor whenever the
mouse button (or tap, for Touch Screens) is held down. The InteractionA input button
can be used as well.
If a non-zero Pathfinding update time is set in the Settings Manager, then the player will
pathfind to the cursor by this frequency. Otherwise, no pathfinding will occur, and the
player will move directly towards the cursor every frame.
The Run threshold determines how far away the Player must be to start running, and how
closely the Player will follow the cursor - use higher values if the Player starts circling the
cursor continuously.
With the Single-clicking also moves Player? option, you can also determine whether or
not a single-click will cause the Player to move – much like regular
Point-and-click
movement. The Click/hold separation slider determines how long a click must be held
before it is recognised as a “hold” and the Player will stop moving when released.
If your Player does not move via pathfinding, they will only ever move in a straight line.
Therefore, unless you want pathfinding in Cutscenes or for NPCs, you do not need to set
up a
Pathfinding method for your scenes. You simply need a Collider that is able to
"receive" the cursor clicks on the floor. A Box Collider or Collision Cube, that marks out
the floor and placed on the Default layer, will su"ce.#
69

2.3. Input methods
Adventure Creator provides three methods of input:
Mouse and keyboard
Which allows for mouse control, with optional keyboard control for movement.
Keyboard or controller
Which allows for strict keyboard or gamepad control, with no mouse.
Touch-screen
Which allows for control on mobile devices.
The Input method is chosen in the
Settings Manager, under Interface settings:
A list of available inputs can also be found in the Settings Manager. For details on what
each input is used for, see Input descriptions.
It is not generally necessary to change this value during gameplay, but - like any Manager
field - it can be changed through code - see
Custom scripting.
NOTE: Inputs don’t necessarily need to be mapped to Unity’s Input Manager - they can
also be simulated via Menu Button clicks, and through script. Scripting can also be
used to remap inputs at any time - see Remapping inputs.
70

2.3.1. Mouse and keyboard input
This is the most common input type for traditional adventure games on PC.
A game with this input can be completely mouse-driven, or share input duties with the
keyboard. For example, a Direct movement game can rely on the mouse for interacting,
and the keyboard for movement.
With this type, interaction is automatically mapped to the mouse buttons - with the left
mouse button used to interact with
Hotspots and Inventory items, begin point-and-click
movement, and click Menu buttons. When using Context sensitive interactions, the right
mouse button is used to examine.
Double-clicking can be used to run to Hotspots or instantly run their interactions. To
tweak the speed that clicks register, locate the scene’s GameEngine object and adjust the
PlayerInput component's Click Delay and Double Click Delay values:
Click behaviour can also be achieved by invoking Input buttons named InteractionA and
InteractionB respectively. You can rely on this instead of the default mouse behaviour by
unchecking Mouse clicks have default functionality? in the Settings Manager.#
71

2.3.2. Keyboard or controller input
This input type is necessary if you want to do without a mouse, and rely solely on either a
keyboard or a gamepad for input.
With this type, interaction is handled via Input buttons named InteractionA and
InteractionB. InteractionA is used to interact with Hotspots and Inventory items, begin
point-and-click movement, and click Menu buttons. When using Context sensitive
interactions, InteractionB is used to examine.
Just because this input type does not use the mouse, you can still control a simulated
cursor (provided that it is unlocked, see Cursor locking). To move the cursor, use Input
axes named CursorHorizontal and CursorVertical. The speed of the cursor can be
adjusted by the
Settings Manager’s Simulated cursor speed field.
Options are provided at the top of the Menu Manager to let you dictate how Menus are
navigated when the game is paused or a Conversation is active. By default, they are
navigated with the Horizontal and Vertical inputs, as opposed to the cursor:
If you wish to navigate Menus directly during normal gameplay, use the Engine: Manage
systems Action to unlock this ability - otherwise, a cursor will be necessary. For more,
see Navigating menus directly.
NOTE: Enabling direct Menu navigation during gameplay doesn’t disable Player
movement automatically. This should generally be done in conjunction with the Player:
Constrain
Action so that you only control either Menus or the Player at any one time.
72

2.3.3. Touch-screen input
This input method is used to enable AC-made games to work on iOS and Android.
Choosing touch-screen input will adapt your game’s Movement method if necessary.
Direct movement will now work by dragging a finger across the screen. First Person
movement can work a number of ways – for example, one touch moves while two touches
turns. If one is required, a drag line can be drawn to indicate the direction and size of the
drag, using the fields in Movement settings in the
Settings Manager:
Further touch-screen-related options can be found under the Touch Screen settings:
In Context sensitive mode, objects are examined by placing a second finger down on the
screen while the first finger is still touching. You can simulate this e!ect in the Unity
Editor by right-clicking on a Hotspot while the left mouse button is held down.
In
Choose Hotspot Then Interaction mode, a game can make use of an Interaction menu
that appears once a Hotspot is selected, which contains a list of Interaction icons. By
default, selecting a Hotspot and then an Interaction icon requires two separate taps, but
this can be reduced to a tap, hold, and release by checking Trigger interactions by
releasing tap?.
The Moving touch drags cursor? option causes cursor to be dragged, as opposed to
being at the position of the touch at all times.
PROTIP: A ready-made mobile joystick template can be found in the “UI Template:
Mobile Joystick” package on the Downloads page.
NOTE: By default, Hotspots are activated with two taps - one to highlight them, and
another to interact. This is so that the player doesn’t use a Hotspot by mistake. You
can change this behaviour to have Hotspots react to a touch-down, or a touch-up, via
the Hotspot input mode field.
73

If your game is in First Person, an additional First-person movement field will show -
allowing you to choose how movement on a touch-screen is conducted. If set to Custom
Input, then movement will be controlled by overriding (or simulating) the Horizontal and
Vertical axes, and free-aiming by overriding the FreeAimDelegate. For more, see
Remapping inputs.
Similarly, if your game uses Direct movement, an additional Direct movement field will
show. By default, this is set to Drag Based, which means the Player is moved by dragging
across the screen. However, if set to Custom Input, then movement will be controlled by
overriding (or simulating) the Horizontal and Vertical axes. For more, see
Remapping
inputs.
PROTIP: By default, AC will limit its display area to the mobile device's "safe area".
This prevents UI or gameplay elements from being obscured by e.g. a phone's notches,
if present. This can be disabled, however, by unchecking Limit display to 'safe area'?
in the Settings Manager.
74

2.4. Pathfinding methods
Point-and-click movement relies on pathfinding to navigate the Player. Pathfinding is
also used whenever a character - NPC or Player - is instructed to move during a cutscene.
Adventure Creator provides three methods of pathfinding:
Unity Navigation
Which uses Unity’s NavMesh baking tools. This is the default for 3D games.
Mesh Collider
Which relies on a custom mesh collider for the NavMesh’s shape.
Polygon Collider
Which uses Unity's Polygon Collider 2D component, and is used for 2D games.
A* 2D
An implementation of the A* algorithm, and is also used for 2D games.
Additionally, a custom pathfinding algorithm can be implemented through scripting - see
Custom pathfinding.
The pathfinding method is set on a per-scene basis within the Scene Manager:
Be mindful of your game’s scale - the default settings work best when using a scale of 1
Unity unit = 1 meter. If your scale is very di!erent, you may have to adjust the
Destination accuracy slider in the Settings Manager. Larger art should have a lower
value, and smaller art should have a higher one. More more on accurate pathfinding, see
Precision movement.
By default, characters will make one path calculation before moving to a set point in the
scene. However, the Settings Manager's Pathfinding update time (s) value can be used
to enforce regular recalculations as they move. This may necessary if your game features
NPCs moving around, so that the Player can avoid them dynamically.#
75

2.4.1. Unity Navigation pathfinding
Unity Navigation-based pathfinding relies on Unity's built-in Navigation tools. It requires
that you bake a NavMesh using Unity’s provided tools.
Once a NavMesh is baked, characters will rely on it when pathfinding. However, Point-
and-click movement requires an additional step: the floor collider must be on the
NavMesh layer.
NOTE: The workflow for baking a NavMesh varies with Unity version. If you’re using
2022.2 or later, you’ll need Unity’s AI Navigation package from the Package Manager,
and adding a NavMesh Surface component to the scene. Otherwise, it's a case of
using the AI -> Navigation window in the top toolbar. A tutorial that covers both of
these methods can be found here.
PROTIP: Characters have their own motion system, but you can use NavMeshAgent
components if you prefer. To do this, simply add the component together with the
Nav Mesh Agent Integration script. This script can be duplicated and amended to
suit your own needs. When using these components, a Player’s position is bound to
the NavMesh even when using
Direct movement.
76

2.4.2. Mesh Collider pathfinding
Mesh Collider-based pathfinding is the default pathfinding method, and involves creating
custom 3D meshes to mark out the area over which characters can walk. Such a mesh
can be created in an external modelling tool such as Blender:
Because of the need for mesh creation, it can take more time to set up than Unity
Navigation, but is dynamic – di!erent NavMeshes can be swapped out when the layout of
the scene changes.
Once the Pathfinding method field in the Scene Manager has been set to Mesh Collider,
the Navigation panel will allow you to create a NavMesh prefab:
This prefab type features a Mesh Collider component. Assign your custom mesh as this
component’s Mesh field:
The mesh will now show up in green in the scene. Position the object so that it marks out
the floor, and assign it in the Scene Manager’s Default NavMesh field. This places the
NavMesh on the correct layer during gameplay.#
77

You can use the Scene: Change setting Action to change the active NavMesh at runtime.
The
3D Demo game does this when the barrel is tipped over. Click on each object, with
the Mesh Collider component open, to see the di!erence between the two.
Navigation Meshes can be made visible when not selected via the Scene Manager's
Visibility panel. Provided your scene has an active NavMesh with a Mesh Renderer
component, it can be shown and hidden using the On and O! buttons.#
NOTE: This method does not allow for other objects to dynamically a!ect pathfinding.
If the NavMesh connects two rooms, but the door between them is closed, characters
will attempt to walk through the door. You can get around this by swapping your
NavMesh for another when your scene layout changes.
78

2.4.3. Polygon Collider pathfinding
Polygon Collider-based pathfinding is only a valid option when making a 2D game. It
involves using the shape of Unity's Polygon Collider component as a NavMesh, and can be
modified during gameplay.
Once the Pathfinding method field in the Scene Manager has been set to Polygon
Collider, the Navigation panel will allow you to create a NavMesh2D prefab:
It will appear in your scene as a pentagon. You can use its
Polygon Collider component to
reshape it to fit the scene’s walkable area:
One adjusted, assign it in the Scene Manager’s Default NavMesh field. This places it on
the correct layer during gameplay.
Holes in your NavMesh can be created with other Polygon Colliders. Attach a Polygon
Collider 2D to an empty GameObject, shape it as a hole, and then add it to the
Navigation Mesh component after increasing the Number of holes value by 1. When the
game begins, the hole will be incorporated into the NavMesh:
NOTE: Keep the number of points to its bare minimum, as the speed of the algorithm
is dependent on how complex the shape is.
79
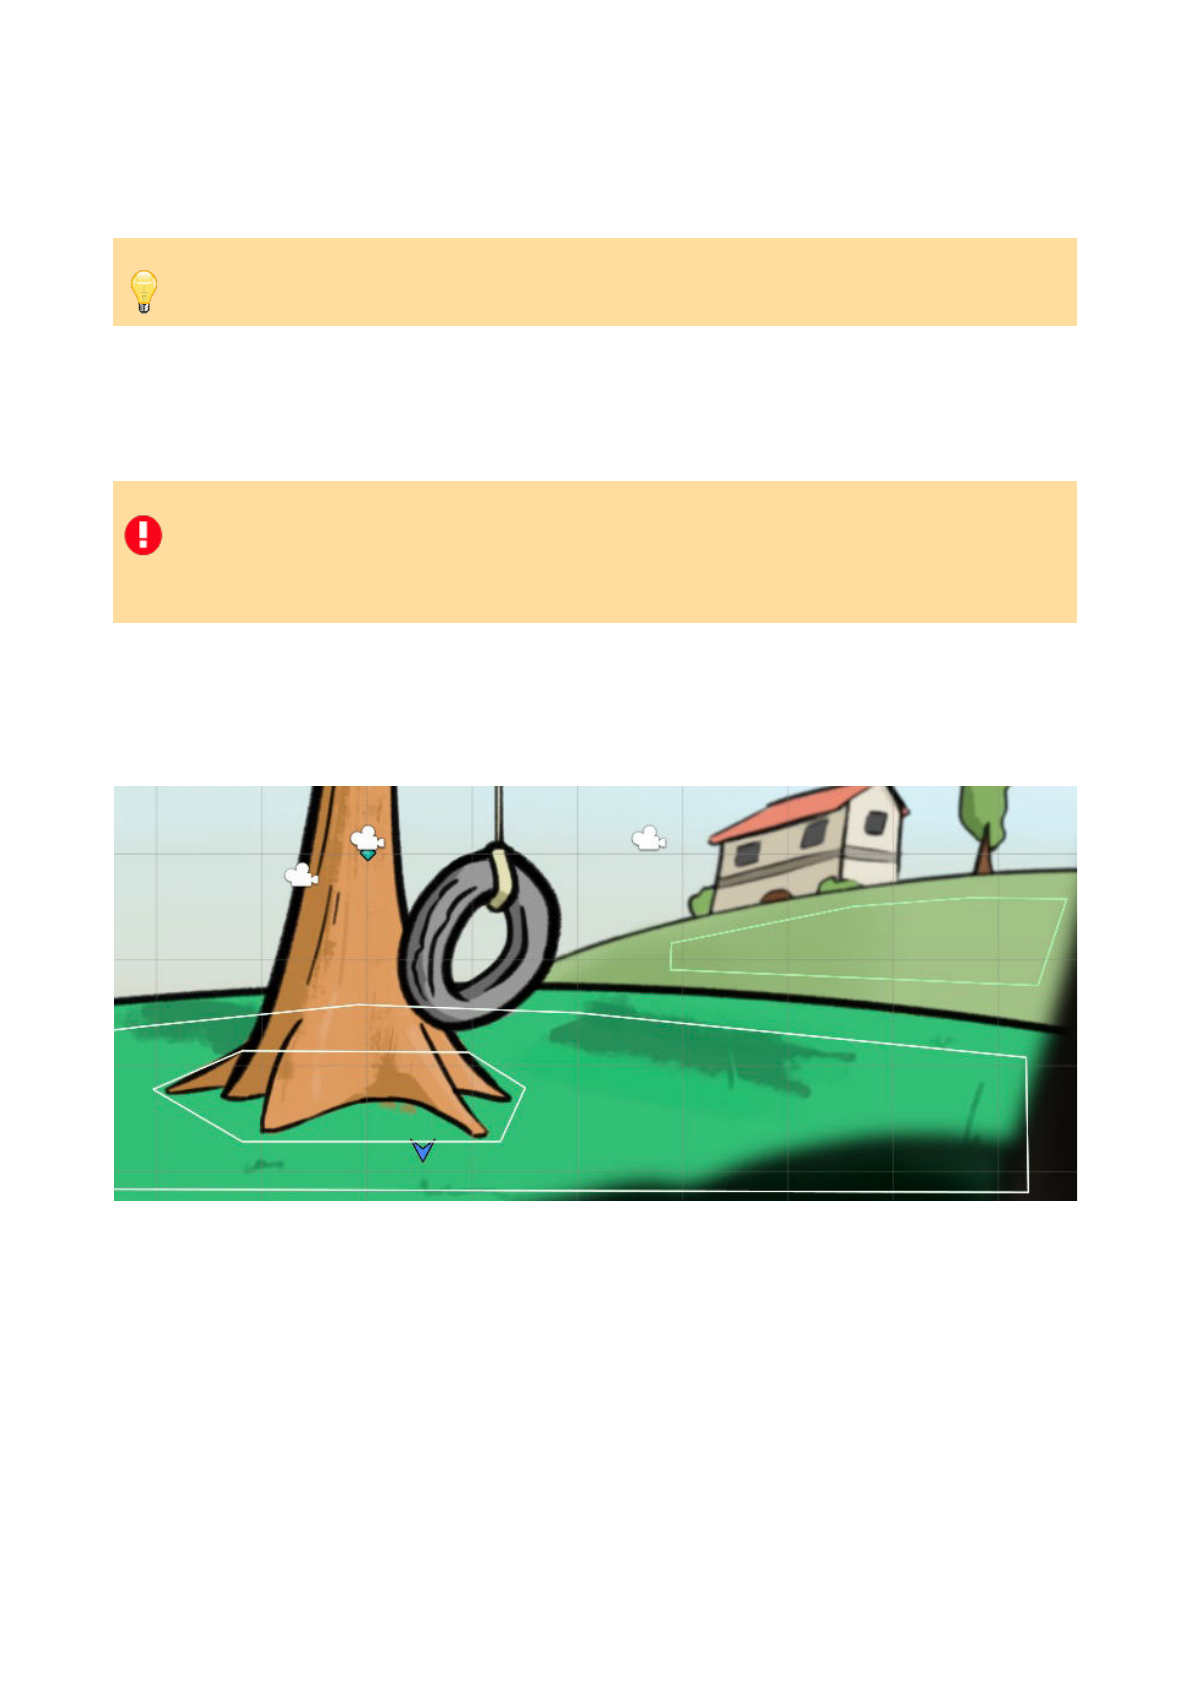
This method can also be used to add walkable areas together – if the “hole” Polygon
Collider overlaps the boundary of the original NavMesh, then it will be added onto the
NavMesh instead – rather than being subtracted.
The active NavMesh, and the number of holes it has, can be changed during gameplay
with the
Scene: Change setting Action. This can be used to e.g. allow the player to walk
where a removed object was once placed in the scene.
You can also add additional Polygon Collider 2D components onto the same NavMesh
GameObject to create separate regions that cannot be accessed directly. This is useful if
you want to have NPCs walking around, without the player being able to move to them:
These additional colliders must have Is Trigger checked, and be kept separate from one
another. Note that character evasion and NavMesh hole features will only apply to the
first collider on the NavMesh.#
PROTIP: To improve scene startup time, NavMesh holes can be “baked” into the
NavMesh. Just click “Bake" in the NavMesh’s Inspector, then disable the hole objects.
NOTE: This method does not allow for other objects to dynamically a!ect pathfinding.
If the NavMesh connects two rooms, but the door between them is closed, characters
will attempt to walk through the door. You can get around this by changing the
NavMesh when your scene layout changes.
80

Be aware that you may encounter problems if your NavMesh's scale is too small, which
may be the case if you are using a low-resolution (e.g. 320x240) art style. You can tell if
your scale is wrong by either comparing your graphics to that of the included 2D Demo,
or by looking at the white squares that break up a Character's path when pathfinding –
they should be tiny dots in the Scene window compared with the rest of the scene:
If they are overly large, your scene is likely too small and you will have to scale up your
geometry. You can scale up your scene sprites by reducing the Pixels Per Unit value in
sprites’ Texture import settings.
The Navigation Mesh component features a number of options related to character-
evasion. Two methods of evasion are available, each with their own benefits: Carve
involves cutting holes around characters the NavMesh, which favors accuracy over
performance, while Push involves pushing characters as they get too close, which favors
performance over accuracy. In either case, for a character be evaded, they must have a
Circle Collider 2D component at their feet on their root object
NOTE: For completely dynamic pathfinding around moving characters when set to
Carve, be sure to set a non-zero Pathfind update time value in the Settings Manager.
This will force a recalculation of a character’s path while on the the move, so that they
can account for any changes in the scene.
PROTIP: For a performance boost, you can lower the Accuracy slider. The optimal
value of this slider will depend on your game's scale, NavMesh size, and target
platform, but should generally only be set below 1 if you experience slowdown when
pathfinding. For more performance tricks, see Performance and optimisation.
81

2.4.4. A* 2D pathfinding
A* 2D pathfinding is an alternative to the Polygon Collider option when navigating a 2D
scene. It too involves using the shape of Unity's Polygon Collider component as a
NavMesh, and can be modified during gameplay.
Once the Pathfinding method field in the Scene Manager has been set to A Star 2D, the
Navigation panel will allow you to create a NavMesh2D prefab:
It will appear in your scene as a pentagon. You can use its
Polygon Collider component to
reshape it to fit the scene’s walkable area:
The A* algorithm works by dividing this NavMesh into a grid - you can adjust the
accuracy by increasing the Cell size Inspector field - try to keep it the largest value it can
be while still accurately describing the shape of the collider.
One adjusted, assign it in the Scene Manager’s Default NavMesh field. This places it on
the correct layer during gameplay.
Holes in your NavMesh can be created with other Polygon Colliders. Attach a Polygon
Collider 2D to an empty GameObject, shape it as a hole, and then add it to the
Navigation Mesh component after increasing the Number of holes value by 1. When the
game begins, the hole will be incorporated into the NavMesh:
PROTIP: Which is best for a 2D game? Polygon Collider can sometimes give slightly
more natural movement when complex paths are involved, but A* is considerably
faster. If your NavMesh is large, go with A*.
PROTIP: You’re not limited to using a Polygon Collider - this mode can make use of
any 2D Collider - including a Tilemap Collider.
82

This method can also be used to add walkable areas together – if the “hole” Polygon
Collider overlaps the boundary of the original NavMesh, then it will be added onto the
NavMesh instead – rather than being subtracted.
The active NavMesh, and the number of holes it has, can be changed during gameplay
with the
Scene: Change setting Action. This can be used to e.g. allow the player to walk
where a removed object was once placed in the scene.
You can also add additional Polygon Collider 2D components onto the same NavMesh
GameObject to create separate regions that cannot be accessed directly. This is useful if
you want to have NPCs walking around, without the player being able to move to them:
These additional colliders must have Is Trigger checked, and be kept separate from one
another. Note that character evasion and NavMesh hole features will only apply to the
first collider on the NavMesh.#
83
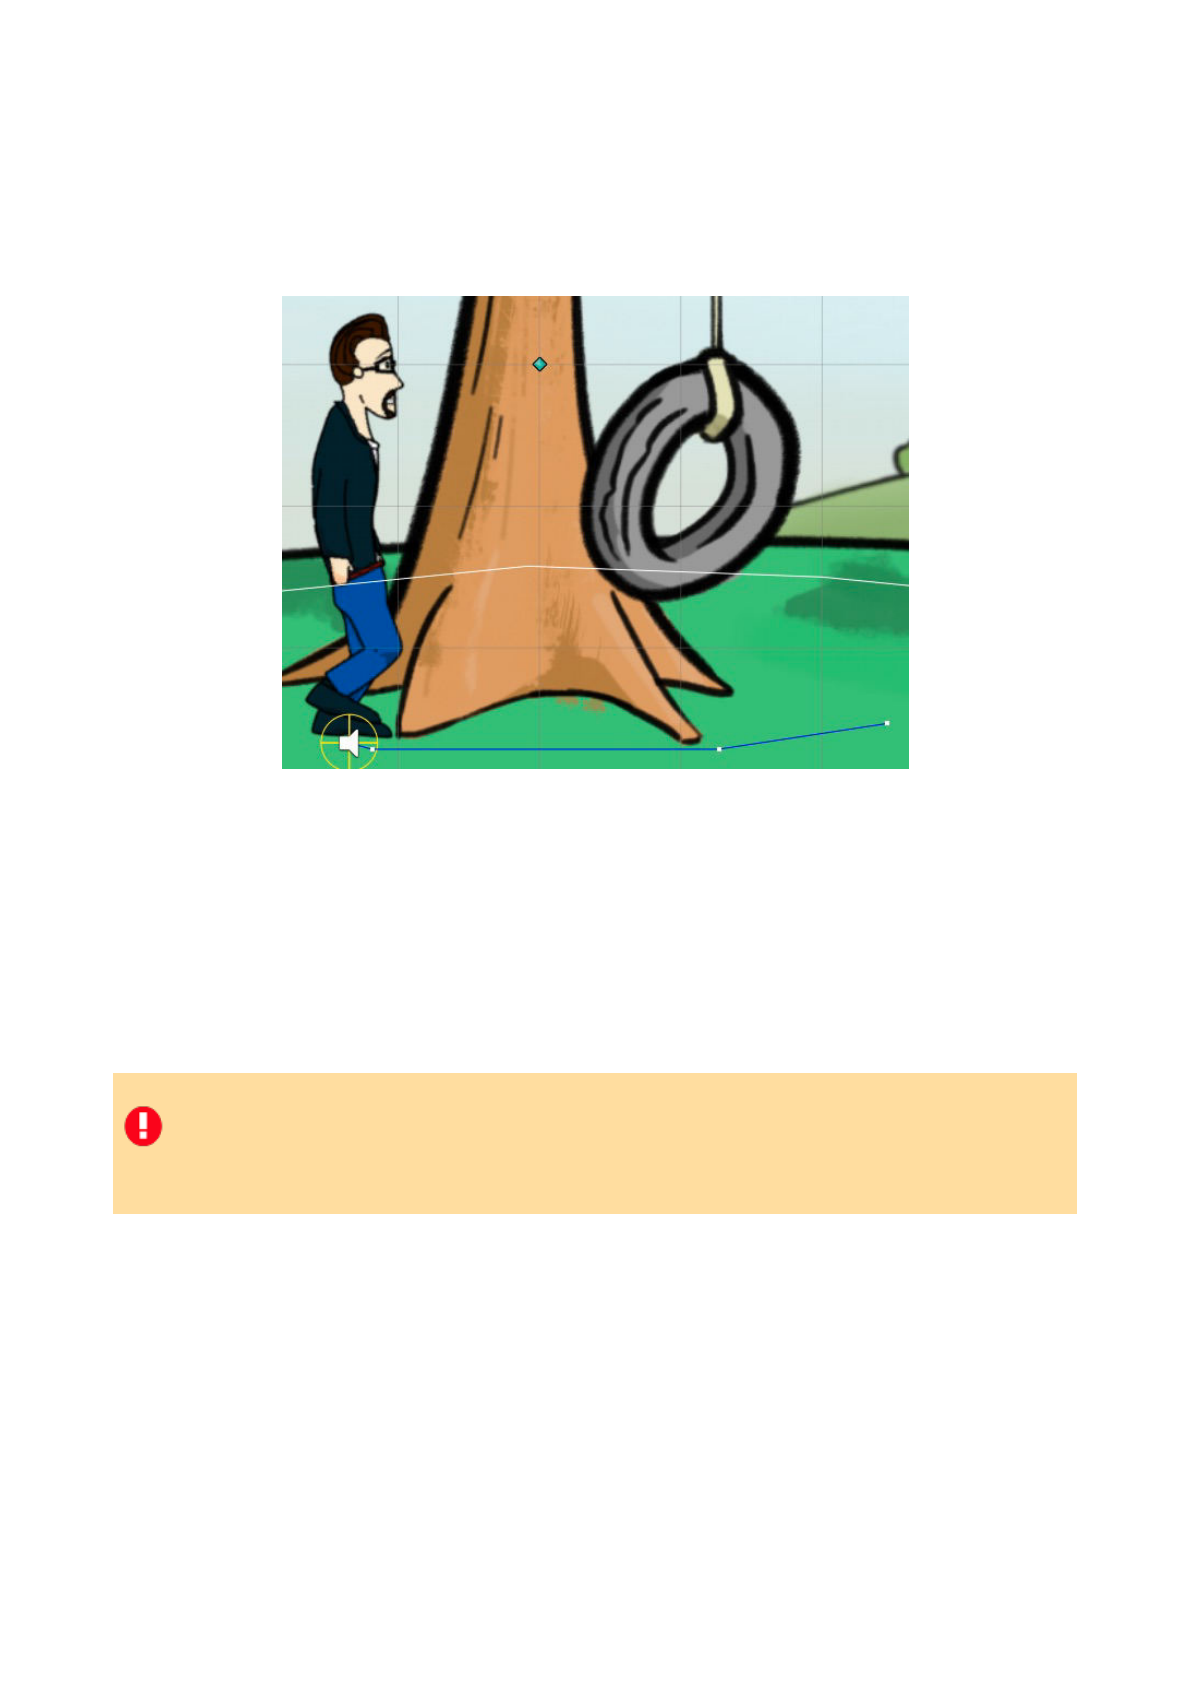
Be aware that you may encounter problems if your NavMesh's scale is too small, which
may be the case if you are using a low-resolution (e.g. 320x240) art style. You can tell if
your scale is wrong by either comparing your graphics to that of the included 2D Demo,
or by looking at the white squares that break up a Character's path when pathfinding –
they should be tiny dots in the Scene window compared with the rest of the scene:
If they are overly large, your scene is likely too small and you will have to scale up your
geometry. You can scale up your scene sprites by reducing the Pixels Per Unit value in
sprites’ Texture import settings.
The Navigation Mesh component features a number of options related to character-
evasion. For performance reasons, this defaults to Only Stationary Characters - but can
be made to a!ect all characters if desired. In order for a character be evaded, they must
have a Circle Collider 2D component at their feet on their root object
NOTE: For completely dynamic pathfinding around moving characters, be sure to set a
non-zero Pathfind update time value in the Settings Manager. This will force a
recalculation of a character’s path while on the the move, so that they can account for
any changes in the scene.
84
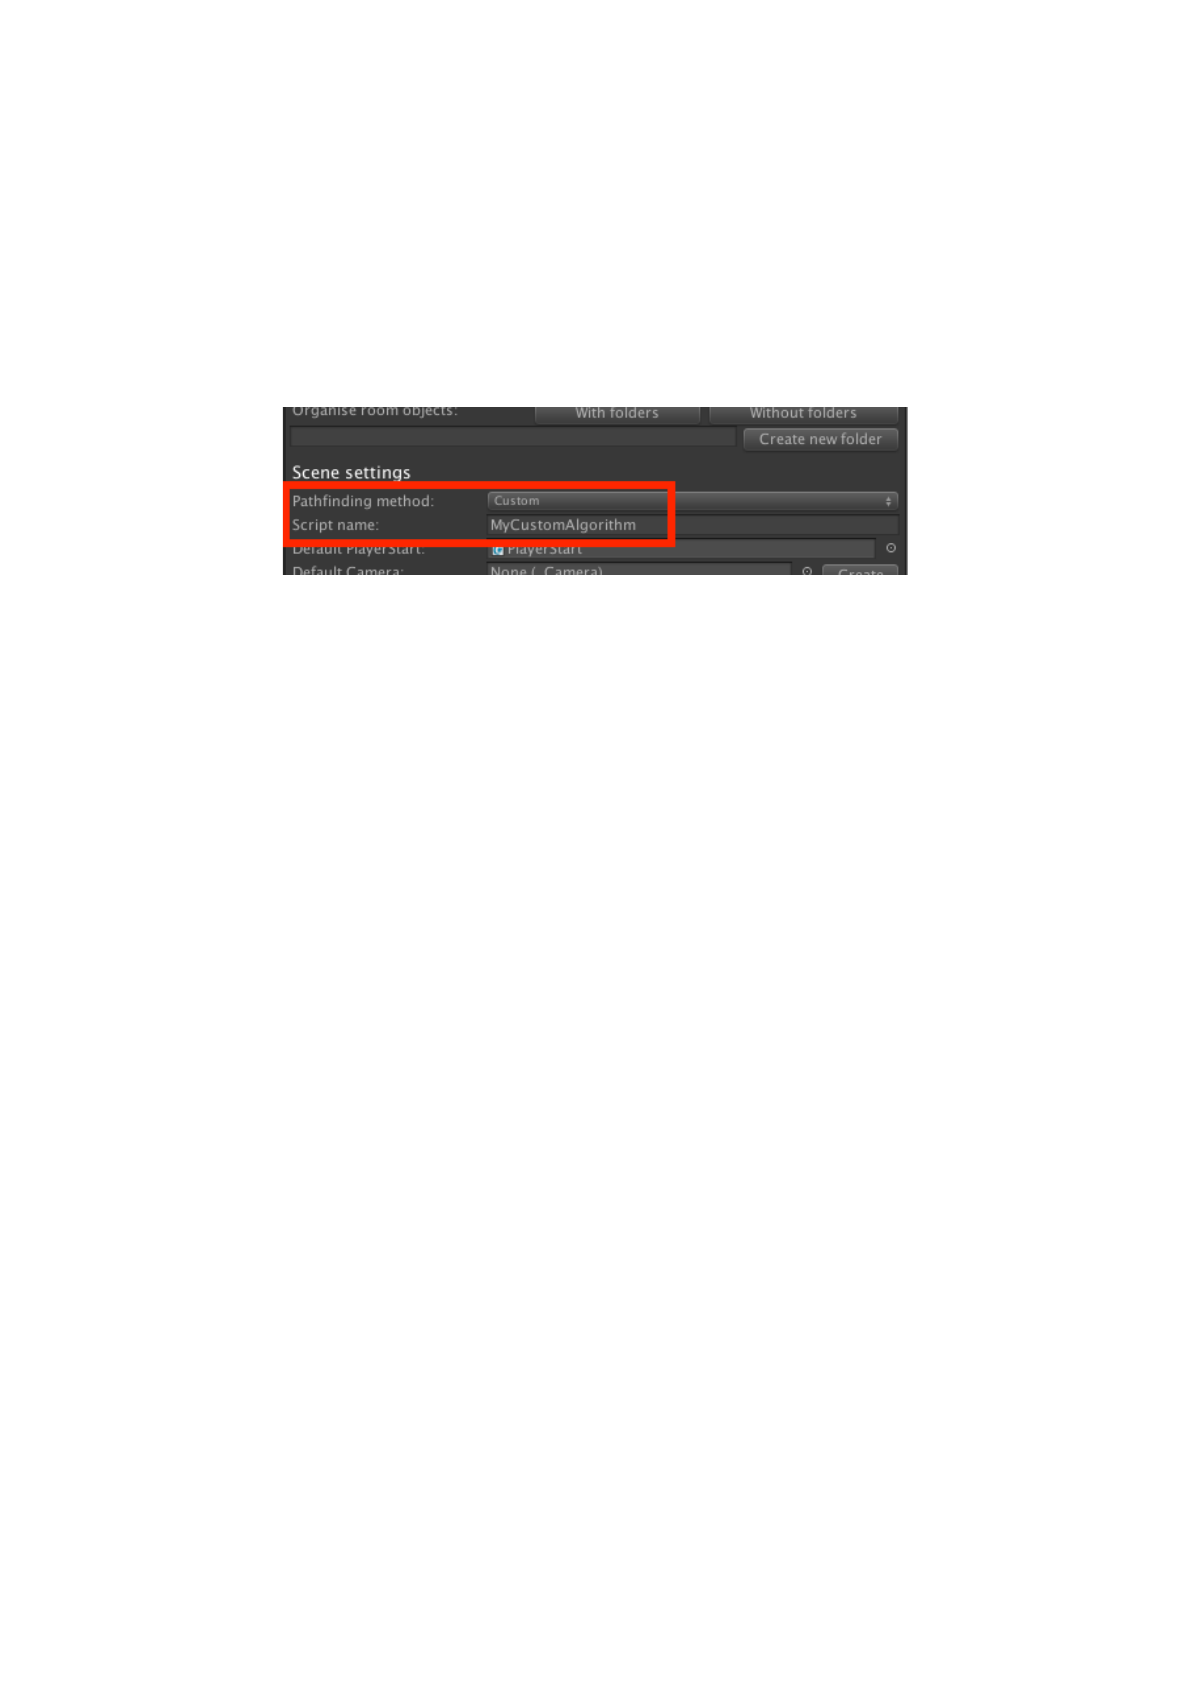
2.4.5. Custom pathfinding
Each pathfinding method is written in a separate script, which are all subclasses of the
NavigationEngine ScriptableObject class. Which script is used in a scene is determined by
the Pathfinding method option in the Scene Manager.
To integrate a new pathfinding script, set the Pathfinding method to Custom, and then
enter the name of your NavigationEngine subclass into the box that appears beneath:
Writing a new pathfinding method involves overriding the functions within
NavigationEngine with your own.
The only essential function is GetPointsArray, which takes two Vector3s as inputs and
returns a Vector3 array that describes the path. Other functions, such as SetVisibility
and SceneSettingsGUI can be used to better integrate the method into your workflow,
but are not necessary.
For the script to be useable when working with Unity's 2D view (i.e. make use of
Physics2D raycasts), the
is2D boolean must be set to True. This can be done within the
OnReset function, which is called when the scene begins.#
85

2.5. Cursor locking
While most games rely on a cursor (mouse-driven or otherwise), you can prevent it from
moving by locking it. Locking the cursor allows you to give total input control to e.g. a
gamepad, and is necessary for aiming in first-person movement.
The default locked state of the cursor can be set under Interface settings in the Settings
Manager, with Lock cursor in screen's centre when game begins?. You can optionally
choose to hide the cursor and prevent interactions when it is locked.
The player can unlock the cursor at any time by invoking an input button named
ToggleCursor. This allows you to create two distinct gameplay modes - one for
movement, and another for interactivity.
Alternatively, the state of the cursor can be enforced using the
Player: Constrain Action.
If mouse and keyboard input is enabled, the cursor is automatically unlocked when a
Menu pauses the game. If you wish to rely on a completely cursor-free input, switch to
Keyboard Or Controller input instead. Disabling free-aiming while in first-person will
also unlock the cursor.
PROTIP: A practical example of how cursor locking can be used is given when creating
a custom inventory interface in the Making a first-person game video tutorial.
PROTIP: It is also possible to limit the software cursor’s range of movement to the
boundary of a Menu. This can be done by setting the PlayerCursor script's
LimitCursorToMenu property through script.
86

2.6. Active inputs
Active Inputs are a series of pre-defined Input buttons that trigger ActionList assets when
pressed. Typical examples of their use include:
•
Opening either a “title” or a “pause” Menu, depending on the current scene
•
Backing out of a close-up of a set of interactive objects
To access the Active Inputs Editor window, choose Adventure Creator -> Editors ->
Active Inputs from the top toolbar:
Each Active Input requires an Input button or axis name, an ActionList asset to run, and
the conditions that it runs under. These conditions can be any of four values:
Normal
The state during normal gameplay
Cutscene
The state while the game is in a gameplay-blocking cutscene
Paused
The state while the game is paused
DialogOptions
The state while a Conversation is active, and dialogue options are displayed on-screen
If an active input references an axis, then an Axis threshold value must be set. If this is
positive, then the ActionList will run only when the input exceeds this value. If negative,
then the same will be true but in the negative direction.
If you wish for an Active Input to work during multiple game states (i.e. during both
gameplay and cutscenes) you must define two separate Inputs - one for each state.
Multiple Active Inputs can share the same ActionList asset, however.
Active Inputs can be enabled and disabled at runtime using the
Input: Toggle active
Action.
NOTE: The Input button field must match the name of the input as listed in Unity’s
Input Manager, not the button itself.
87

NOTE: Active Inputs are stored within the Settings Manager asset. If you change your
Settings Manager, any Active Inputs previously defined will no longer be present.
88

2.7. Input descriptions
Adventure Creator makes use of a number of di!erent inputs that need to be defined in
Unity's Input Manager (Edit -> Project settings -> Input). What inputs will be used,
however, depends on how your game is played, and what settings you've chosen.
A full list of inputs available to your game can use can be found within the Settings
Manager. The following is a list of each possible input, and what it is used for:
Horizontal (Axis)
Moves the player when using
Direct or First-person movement, as well as navigate menus
with a keyboard/controller.
Vertical (Axis)
Moves the player when using Direct or First-person movement, as well as navigate menus
with a keyboard/controller.
InteractionA (Button)
Acts in the same way as a left-click. It is used to interact with on
Hotspots, Menus and
NavMeshes.
InteractionB (Button)
Acts in the same way as a right-click. It is used to examine Hotspots when in Context
sensitive
mode.
CursorHorizontal (Axis)
Moves the cursor along the screen's X-axis when using First-person movement or
Keyboard or controller input.
CursorVertical (Axis)
Moves the cursor along the screen's Y-axis when using First-person movement or
Keyboard or controller input.
ToggleCursor (Button)
Toggles the cursor's "locked" state on and o! during gameplay. When the cursor is
locked, it is placed in the centre of the screen and cannot be moved. When used in a
First-person game, locking the cursor allows the player to free-aim. For more, see
Cursor locking.
Run (Button/Axis)
When held down during
Direct or First-person movement, causes the player to run when
moving.
89

ToggleRun (Button)
When pressed during Direct or First-person movement, toggles the player’s ability to run.
Jump (Button)
Causes a 3D Player to jump, if used with Direct or First-person movement. The Player
must have either a Rigidbody or Character Controller attached.
Mouse ScrollWheel (Axis)
Zooms a First-person camera in and out.
CycleHotspots (Axis)
Cycles the highlighted Hotspot when the Hotspot detection method is set to
Player
Vicinity.
CycleHotspotsLeft (Button)
Cycles the highlighted Hotspot left when the Hotspot detection method is set to Player
Vicinity.
CycleHotspotsRight (Button)
Cycles the highlighted Hotspot right when the Hotspot detection method is set to
Player
Vicinity.
CycleInteractions (Axis)
Cycles the highlighted Interaction when the Interaction method is Choose Hotspot Then
Interaction.
CycleInteractionsLeft (Button)
Cycles the highlighted Interaction left when the Interaction method is
Choose Hotspot
Then Interaction.
CycleInteractionsRight (Button)
Cycles the highlighted Interaction right when the Interaction method is Choose Hotspot
Then Interaction.
CycleCursors (Button)
Cycles through the next available cursor type when the game allows for it. This is either
when the Interaction method is
Choose Interaction Then Hotspot, or when it's Choose
Hotspot Then Interaction and Select interactions by is set to Cycling Cursor And
Clicking Hotspot.
CycleCursorsBack (Button)
90

Cycles through the previous available cursor type when the Interaction method is
Choose Interaction Then Hotspot, or when it’s Choose Hotspot Then Interaction and
Select interactions by is set to Cycling Cursor And Clicking Hotspot.
DefaultInteraction
If the Interaction method is
Choose Interaction Then Hotspot, invokes the active Hotspot
or Inventory item’s first-enabled interaction. Note that either Set first ‘Use’ Hotspot
interaction as default? or Set first ‘Standard’ Inventory integration as default? must
be checked in the Settings Manager - the latter of which is only displayed if Inventory
interactions is set to Multiple.
FlashHotspots (Button)
Briefly flashes all
Hotspots in the scene, provided that they have a Highlight component
correctly assigned. This can be used to make the player aware of all interactive objects in
a scene.
SkipSpeech (Button)
Skips the current speech or subtitle. Depending on the choices made in the
Speech
Manager, this can instead advance a scrolling-subtitle to the end first.
EndCutscene (Button)
Skips the current set of gameplay-blocking ActionLists - see Skipping cutscenes.
EndConversation (Button)
Ends the current Conversation. Note that this will not result in any "exiting" sequence,
such as the player saying goodbye.
DialogueOption[1-9] (Button)
Chooses a dialogue option, when a
Conversation is active. Each option is mapped to a
separate input: DialogueOption1, DialogueOption2, etc.
ThrowMoveable (Button)
Throws the current PickUp object, if it allows for it. Holding down this button will
increase the throwing force when released.
RotateMoveable (Button)
Rotates the current
PickUp object, if it allows for it. Rotation will be possible while this
button is held down.
RotateMoveableToggle (Button)
Rotates the current PickUp object, if it allows for it. This button will toggle the ability to
rotate on and o!.
91

ZoomMoveable (Axis)
Zooms the current PickUp object towards or away from the camera, if it allows for it.
The list of available inputs will also include any
Active inputs, and inputs mapped to
Menus with an Appear type of On Input Key.
NOTE: Inputs don’t necessarily need to be mapped to Unity’s Input Manager - they can
also be simulated via Menu Button clicks, and through script. Scripting can also be
used to remap inputs at any time - see Remapping inputs.
92

2.8. Remapping inputs
The GameEngine’s PlayerInput script uses custom functions to detect input, which are
called throughout AC in place of Unity's standard functions, such as
Input.GetButtonDown.
These functions can also be overridden using delegates, meaning your game's control
scheme can be changed on the fly, or integrated with a third-party input manager asset.
The following table shows the available functions that can be overridden using delegates:
PROTIP: A tutorial on using these delegates in practice can be found online. The
World Space Cursor Example component uses them to override the cursor position.
Unity function
PlayerInput function
Delegate override
bool Input.GetButtonDown
(string name)
bool InputGetButtonDown
(string name)
bool
InputGetButtonDownDelegate
(string name)
bool Input.GetButtonUp
(string name)
bool InputGetButtonUp
(string name)
bool
InputGetButtonUpDelegate
(string name)
bool Input.GetButton (string
name)
bool InputGetButton (string
name)
bool InputGetButtonDelegate
(string name)
float Input.GetAxis (string
name)
float InputGetAxis (string
name)
float InputGetAxisDelegate
(string name)
Vector2 Input.mousePosition
Vector2 InputMousePosition
(bool cursorIsLocked)
Vector2
InputMousePositionDelegate
(bool cursorIsLocked)
Vector2 Input.GetTouch (int
index).position
Vector2 InputTouchPosition
(int index)
Vector2
InputTouchPositionDelegate
(int index)
Vector2 Input.GetTouch (int
index).deltaPosition
Vector2
InputTouchDeltaPosition (int
index)
Vector2
InputTouchDeltaPositionDeleg
ate (int index)
TouchPhase Input.GetTouch
(int index).phase
TouchPhase InputTouchPhase
(int index)
TouchPhase
InputGetTouchPhaseDelegate
(int index)
bool
Input.GetMouseButtonDown
(int button)
bool InputGetMouseButtonDown
(int button)
bool
InputGetMouseButtonDownDeleg
ate (int button)
bool Input.GetMouseButton
(int button)
bool InputGetMouseButton
(int button)
bool InputGetMouseButton
(int button)
Vector2 (Input.GetAxis
("CursorHorizontal"),
Input.GetAxis
(“CursorVertical"))
Vector2 InputGetFreeAim
(bool cursorIsLocked)
Vector2
InputGetFreeAimDelegate
(bool cursorIsLocked)
93

When moving in First person, the free-aim vector is normally calculated by combining
both the CursorHorizontal and CursorVertical axis values into a 2D vector. However, this
too can be overridden with the InputGetFreeAimDelegate override.
Delegates are mapped to function within your own script to override them. For example,
the cursor position can be overridden with:
void Start ()
{
AC.KickStarter.playerInput.InputMousePositionDelegate =
CustomMousePosition;
}
Vector2 CustomMousePosition (bool cursorIsLocked)
{
return Input.mousePosition;
}
NOTE: Delegates are assigned per-scene. Such code must be run in each scene you
wish to override input in. The OnAfterChangeScene custom event can be used for this.
94

3. Characters#
95

3.1. Creating characters
A game can feature two types of characters: Players and NPCs.
The steps involved to create either type is largely similar, and the di!erences are detailed
in the sections linked above. This section will cover the elements that all characters have.
The quickest way to get characters into your game is to use the Character wizard, which
adds the necessary scripts and components onto a model or sprite.
NPCs require the NPC script, while Players require the Player script - each attached to its
root GameObject.
The inspectors for both the Player and NPC scripts are identical, and have fields grouped
into sub-panels:
Animation settings
The first field you should set for any new character is its
Animation engine. The Motion
control setting allows you to disable AC's own movement code in favour of a
custom
motion controller. The Animation engine chosen will determine the contents of the
panel beneath. For more information about this panel, refer to the section on your
chosen engine.
PROTIP: A character’s type cannot be changed at runtime, but can be converted
between an NPC and Player while in Edit mode via the Inspector’s cog menu.
NOTE: In the case of 2D characters, the main sprite must be a child in their hierarchy,
with the Player/NPC component on the root object. The sprite must then be assigned
as the Sprite child inside this component. This is automatic when using the wizard.
96

Movement settings
This panel stores motion options and speed values.
Physics settings
This panel stores physics and Rigidbody options, provided one is attached. The Move
with Rigidbody? option allows you to decide if a character is moved by applying forces to
their Rigidbody, or have their transform set directly. If a character is found to be sliding
on slopes, the Freeze Rigidbody when Idle? checkbox can help prevent this.
PROTIP: If you are making a low-resolution 2D game and want pixel-perfect
pathfinding, consider
Retro movement.
NOTE: If a character relies on a Rigidbody (3D or 2D) for movement, their rotation will
automatically frozen at all times. If Freeze Rigidbody when Idle? is checked, then
their position will also be frozen when standing still. Otherwise, you are free to freeze
individual position axes - though this is not recommended for characters who rely on
pathfinding.
NOTE: Characters can still move without a Rigidbody, which can be processor-
intensive if your game features many of them. Consider removing them from NPCs,
and Players that do not need to pass through Triggers, or move vertically in the scene.
You can also use a
Character Controller in place of a Rigidbody and Capsule Collider,
giving you the ability to limit a Player's slope limit, for example.
2D characters in 2D games work with a Rigidbody2D component instead - but this too
is optional depending on your requirements. If your character relies on Point and click
control, best performance is achieved by setting the Body Type field to Kinematic. If
instead you are using Direct control, unchecking Turn root object in 3D? will reduce
jittering.
97

Audio clips
This panel allows you to quickly assign walk and run sounds the character, provided that
they have an SFX Sound child (just a child GameObject with the Sound component). If no
Speech AudioSource is defined, the AudioSource on the root object will be used for
speech.
PROTIP: For greater control over a character’s movement sounds, unset the Walk
sound / Run sound fields and make use of the Footstep sounds component instead.
98

Dialogue settings
This panel allows you to configure the appearance of Subtitle Menus, provided that they
are set up to make use of them - for example, a Portrait graphic will only be shown if
the Subtitles Menu has a Graphic element that's set to display character portraits.
In addition to the Player/NPC components, characters also require:
Audio Source
For speech audio. No audio clip is required, as this is added dynamically
Collider
A Capsule Collider works best for 3D, and a Circle Collider 2D for 2D. The Circle Collider
2D should be placed at the character’s feet, with Is Trigger? checked.
Rigidbody / Rigidbody 2D
For enabling collisions and, in the case of 3D characters, gravity e!ects. If Move with
Rigidbody? is set, Interpolation should be enabled for smooth movement.
Paths
For pathfinding. If not present, it will be added automatically at runtime.#
99

3.1.1. The Character wizard
The Character wizard is used to automatically assign the key components to a model or
sprite to allow it to become a character. It can be opened from the top toolbar, under
Adventure Creator → Editors → Character wizard.
The first page asks you if you are making a Player or an NPC, and to supply a base
GameObject. This should be your character’s model if working in 3D, or sprite if working
in 2D. This object must be in the scene’s Hierarchy to be accepted.
You will then need to decide on an animation engine to rely on - see
Character animation.
Once complete, the wizard will add the necessary scripts and components onto your
supplied GameObject, and tag it if required.
PROTIP: Graphics are not strictly required to be on the supplied base GameObject - an
empty one will still work, which may be all you need if making a first-person game.
NOTE: The added components will still require tweaking - for example, the size of the
collider, or the position of a first-person camera. The Character wizard is more
focused on preparing your character with the correct components over fine-tuning.
100

3.1.2. Players
A Player is necessary if you want your game to have an on-screen avatar. If you don’t
need one, you can set your
Movement method to None and skip this step.
To create a Player, either use the Character wizard or add the Player component to a
GameObject and follow the steps outlined in Creating characters.
A Player can be used in a scene by one of two ways:
1. By assigning his prefab under Character settings in the Settings Manager, so that
he is automatically added to the scene at runtime. This is the usual method.
2. By having him saved within the scene file itself. This can be useful if you need to
attach scripts that refer to local objects.
If you have a Player saved in the scene, and a prefab assigned in the Settings Manager,
then the one in the scene will override the prefab for that scene only.
A game can have one Player, or make use of multiple - see Player switching.
3D Players that move under Direct or First-person control can also jump when the Jump
input button is pressed - see Input descriptions. Jumping requires that a Player has a
Rigidbody and Collider, or a Character Controller. If using a Collider, ensure that this is
not placed on the same layer as the Ground-check layer(s) defined in the Player
Inspector.#
PROTIP: Players are normally non-interactive, in that you can't click on them directly.
You can add interactivity, however, by adding a Hotspot component and trigger-
Collider onto him, and placing it on the Default layer, as you can with an NPC. If your
Player is a prefab added at runtime, be sure to set the Hotspot’s Actions source field
to Asset File, so that his interactions can run in any scene.
101

3.1.3. Player switching
Though AC only supports single-player games, you can switch between multiple Players
at any time. This can be enabled in the Settings Manager by setting the Player switching
field to Allow:
You can then assign as many Player character prefabs as you like. To choose which Player
is the game's default, click the cog icon beside them and choose Set as default.
To set the starting position of your non-default Players, choose Edit start data… from
this same icon. This will bring up the Player start data window, from where you can
define that character’s starting scene and position.
To switch Player at runtime, use the
Player: Switch Action. The previously-active Player
will remain in the scene - all inactive Players are saved and loaded in by AC automatically.
Inactive Players will behave like NPCs, meaning they can be made to move, talk, or follow
other characters. To teleport an inactive Player to a new scene, use the Player: Teleport
inactive
Action. Other Actions that have Is Player? fields in them will also be updated to
let you choose specifically which Player it e!ects.
NOTE: The use of local Players (i.e. those saved in the scene file) are disallowed when
player-switching is enabled. If you need to rely on di!erent Player objects throughout
your game, use one one method or the other.
PROTIP: If your Player prefab has a Hotspot component in their Hierarchy, the Auto-
sync Hotspot state? option can be used to enable it only when the Player is inactive -
preventing the Player from being clickable while being controlled.
102

3.1.4. NPCs
NPCs are characters that are only controlled by issuing commands to them via Actions or
scripting, and can be interacted with by the player. They can move, speak, and animate
just as a Player can.
To create an NPC, either use the
Character wizard or add the NPC component to a
GameObject and follow the steps outlined in Creating characters.
It is a good idea to make your NPC a prefab, so that it can be re-used in other scenes.
If you intend to make them interactive, you'll need to add the Hotspot component, as well
as a Collider component.
For more on Hotspot and interactions, see Hotspots.
You can use Actions to give the NPCs instructions during gameplay. To have your NPC
perform a task when the scene begins, place such Actions in your OnStart cutscene - see
The Scene Manager.
When a scene features NPCs – particularly ones that move around – the player may
occasionally find themselves stuck because an NPC is in their way. To prevent this, NPCs
can be made to keep away from the player if they get too close. In the NPC inspector,
check Keep out of Player's way?, and set the minimum distance that they should keep
between themselves and the player. If you are using
Polygon Collider pathfinding, you
can also make use of character-evasion.#
NOTE: If your NPC is sprite-based, these components should be placed on the sprite
itself and check Is Trigger on the collider. If your NPC is a 3D model, they should
instead be placed on the root object. In both cases, it is necessary to place the
Hotspot object onto the Default layer.
103

3.2. Character tracking
AC features a robust Player-switching system, in which any Player character defined in the
Settings Manager has their position and scene tracked as they move around a game. Such
characters are automatically spawned into, and removed from a scene as necessary.
However, because inactive Players behave like NPCs, this system can also be used to keep
track of characters that are never actually controlled by the Player. So long as a character
has a Player - not an NPC - component, they can be listed in the Settings Manager and
have their position data automatically saved.
This is particularly useful if you have characters - playable or not - that appear in
di!erent scenes throughout the course of the game. To move an inactive character to a
di!erent scene, use the
Player: Teleport inactive Action.
PROTIP: Such characters do not require a Remember NPC component in order to be
saved - such data is handled automatically.
104

3.3. Character movement
Actions can be used to move a character, and in the case of the Player - restrict
movement.
Characters can both walk and run. The Minimum run distance on a Player / NPC
Inspector controls the minimum distance between the character and its target required
for running to be possible.
Characters can move in two ways:
1. By dynamically pathfinding their way between two points
2. By following a pre-determined route designed in the Scene view.
For pathfinding to work, a scene must contain an active NavMesh - see
Pathfinding
methods. A character can then be made to pathfind (i.e. move dynamically to a location)
with the
Character: Move to point Action. If a character wants to pathfind but no
NavMesh is set, they will simply move in a straight line directly to their destination.
To make a character move along a pre-set path, you first need to create that path as a
separate object. From the Scene Manager, click Path under the Navigation prefabs panel.
You should see a blue circle appear, which represents the starting point of your path.
The Paths Inspector can be used to create path nodes, which can be repositioned in the
Scene window:
Note that the the elevation of a path's nodes are unimportant unless you check the
Override gravity? box in the Inspector. Doing so will cause the character to move to
each node's point on the Y-axis, as well as the X and Z. This is useful if you want a
character to fly, for example.
You can also make the character walking along this path wait for a time at each node, by
supplying a Wait time (s). For greater control, you can also run a
Cutscene or ActionList
105

asset when a character reaches each node. The character involved can be sent as a
parameter to this ActionList if it contains a GameObject parameter - see ActionList
parameters. Once you have set up your pre-determined path, you can use the Character:
Move along path
Action to move a character along it.
Because object scaling varies from game to game, you may need to adjust the
Destination accuracy slider in the Settings Manager. This slider determines how “close
is close enough” when it comes to determining if a Character has reached their
destination. This is visualised as a yellow sphere gizmo by the Character's feet in the
Scene window.
PROTIP: Pre-determined paths can also be used to restrict player movement during
gameplay. You can use the Player: Constrain Action to assign a Paths object to the
Player, which will mean they can only move along that path. Note that this feature only
works with the Direct and First-person movement.
PROTIP: If you are making a low-resolution 2D game and want pixel-perfect
pathfinding, consider using Retro movement.
106

3.3.1. Retro movement
"Retro movement" is a special mode that emulates the pixel-perfect character motion of
classic 2D adventure games such as Monkey Island and Thimbleweed Park. It works best
when making low-resolution 2D games, but will also work for 3D games. Note that this
movement only changes pathfinding motion - not when a
Player character is under e.g.
Direct control.
The mode is enabled by checking Retro-style movement? under a character's
Movement settings:
When enabled, characters will then move by the following rules:
•
Deceleration values are ignored, they will move at a constant speed and will reach
their intended destination precisely.
•
Rigidbodies are not used, but 2D NavMesh evasion settings are still accounted for.
•
Turning while walking is instantaneous.
•
They will turn before walking, and will turn to face the camera when turning more
than 180 degrees (Unity 2D only).
For a further retro-e!ect with 2D characters, there is also the Only move when sprite
changes? option.#
107

3.3.2. Precision movement
When characters in Adventure Creator move along a path, they'll determine whether their
destination is reached or not according to their distance from it. If they are within a pre-
set threshold, then they'll be considered "close enough" and will stop moving. This is
typical of 3D game engines, where it is often impossible to attain an “absolute zero”
di!erence between the character and their intended destination.
You can amend this threshold via the Destination accuracy slider in the Settings
Manager, under Movement settings. Lower values will allow characters to stop farther
from their targets, and higher values will require them to be closer. The larger your
game's scale is (compared to Unity's base scale), the lower you'll generally want this value
to be. You may need to experiment a little to get the right value, but the default of 0.8 is
generally fine if 1 Unity unit is close to 1 metre.
If you require more precise in your movement, you will need to raise this value. Be aware,
however, that this may bring about "overshooting" if this is too high - especially if your
character's deceleration value is too low (meaning they take too long to slow down).
If you ramp this value all the way up to 1, however, you can enable the Attempt to be
super-accurate? setting. This will force characters to land on the exact point they are
supposed to, but will come with a "sliding" e!ect that may be obvious under certain
circumstances. The list below outlines some steps you can try to reduce this e!ect and
attain more natural, precise movement:
•
If you are using
Root Motion, then use a Blend Tree to scale movement speed with
animation speed. This will allow the character to slow down more naturally as they
approach their target.
•
If a character overshoots when running, increase their Minimum run distance value.
If a character is running this far from their target, they'll slow to a walk.
•
The Deceleration value a!ects at what point a character begins to slow down -
lower values will cause them to slow down sooner. If you find that the character
slows down so prematurely that they can't reach their destination, try raising this
value. A value of zero will cause it to copy the Acceleration value.
•
Enabling a character's Retro-style movement? option will make characters reach
their targets precisely, but this option is best suited to 2D - see
Retro movement.#
108

3.3.3. Custom motion controllers
By default, a character's motion is handled automatically. However, you can also set their
Motion control field to Just Turning or Manual:
When set to either, AC will leave the character’s positioning to a separate motion
controller. When set to Just Turning, the character will be rotated by AC when idle. In
either case, Adventure Creator will still calculate what the character’s position and
rotation “should” be - which custom animation controllers can make use of.
The intended position and rotation of a character can then be read at any time by
accessing the public functions and methods in the Player or NPC component:
bool isRunning
bool isTalking
Vector3 GetTargetPosition ()
Quaternion GetTargetRotation ()
float GetTargetSpeed ()
Additionally, the messages OnTeleport and OnSnapRotate are called on the character’s
GameObject when AC moves a character instantly - this is useful when initialising a
character after e.g. a scene change or loading a save game file.
This feature is made use of by the included NavMeshAgent Integration script, which is
an example of how an AC character can move using a NavMeshAgent component instead.
A tutorial on writing a “bridge script” to another motion control system can be found
online. An example script that links AC with Unity’s Third Person Controller can also be
found in the AC wiki.
When it comes to using custom controllers (e.g. a dedicated platform controller) with
Player characters, it is generally much easier to have control duties shared by AC and the
custom script depending on the game's current state. For example, a custom controller
can control the player's motion during gameplay, while AC can control it during
cutscenes.
This can be achieved by manipulating the Motion control field through script, based on
the value of the StateHandler script's IsInGameplay() method, i.e.:
PROTIP: A full list of the variables and functions available in NPC and Player scripts can
also be found online.
109

if (AC.KickStarter.stateHandler.IsInGameplay ())
{
AC.KickStarter.player.motionControl = AC.MotionControl.Manual;
// Also allow custom script to take control
}
else
{
AC.KickStarter.player.motionControl = AC.MotionControl.Automatic;
// Also prevent custom script from taking control
}
Such a check should be made every frame in an Update method. Alternatively, the
OnEnterGameState
custom event can be used to make necessary changes only when the
state of the game is changed - see Interaction scripting.#
110

3.4. Character animation
Characters have the following animation engine options:
Mecanim
Unity’s standard animation engine, and the one recommended for 3D characters.
Sprites Unity
A simplified engine for 2D characters that plays animations automatically.
Sprites Unity Complex
A more complex engine for 2D characters that need layered animation.
Legacy
Unity’s old animation system for 3D characters.
Sprites 2D Toolkit
An engine that integrates with 2D Toolkit.
Custom
Allows for other systems to be integrated through script.
A character's animation engine is chosen at the top of their Player/NPC Inspector:
Characters are not limited by the game's perspective - 3D games can feature 2D Sprites
Unity characters, for example.#
111

3.4.1. Character animation (Mecanim)
The Mecanim engine is intended for designers who wish for greater control over their
animation than that which Legacy provides. While Legacy animation allows designers to
simply assign animations to a list of fields and have them play automatically, Mecanim
leaves the handling of animations up to the designer, while giving up control over certain
parameters in the Controller.
Mecanim is required if you want more refined animation, such as turning while walking,
use of
Root Motion, and multiple layers.
Characters that use this engine must have an Animator component. This should
generally be placed on the root GameObject, but it can be assigned to a child object if
necessary. When selected, two new panels will appear in their Inspectors:
Mecanim parameters
This panel is where you define the names of your
Animation parameters that AC can
control. AC will control any named parameters at all times:
Move speed float
The current horizontal speed. Will become the Walk speed scale when walking, and the
Run speed scale when running.
Turn float
This is set to -1 when turning left, 0 when not turning, and +1 when turning right
Talk bool
This is set to True when talking
Phoneme integer
The current phoneme index, when using with
Lip syncing.
PROTIP: The 3D Demo’s player prefab, Tin Pot, uses this engine - so you can refer to
him as a practical example. He can be found in AdventureCreator/Demo/Resources.
112

Normalised phoneme float
The current phoneme index, as a factor of the total number of phonemes, when using
with Lip syncing.
Head yaw float
The yaw angle of the head, when looking around
Head pitch float
The pitch angle of the head, when looking around
Vertical movement float
The current vertical speed, allowing for falling and landing animations.
Jump bool
Set to True in the one frame that a jump is initiated (
Players only)
‘Is grounded’ bool
Set to True if the character is currently touching the ground.
It is up to you to decide how these parameters should be used by your Controller - you
could make use of Blend Trees, for example, or have simple Transitions between various
states.
Mecanim settings
This panel is where the Animator component is assigned (if not on the root GameObject),
and where other Mecanim-related options are set. Head and mouth layers can be
provided if you choose to play facial animations by name with the
Dialogue: Play speech
Action. If your character is a Humanoid, IK head-turning? will automatically rely on IK
when head-turning instead of supplying angle parameters.
NOTE: For IK head-turning to work, two additional steps are necessary:
1. The Animator's Base layer must have IK Pass enabled in its properties.
2. The character must have a Neck bone assigned in their Inspector, or a Capsule
Collider must be placed on their root.
113

For added realism when moving, Slow movement near walls? will have the character
slow down as they approach a scene's walls. This is most suited for Direct-controlled
Players.
PROTIP: AC will auto-detect the state of your Animator's Apply Root Motion field.
When set, AC will no longer move the character - which will then be dependent on the
animation itself to move. You can choose how much control AC has over turning:
when the Root motion turning slider is set to one, then all turning will be expected to
be performed by the controller.
114

Bone transforms
This panel is where bones are assigned so that they can head-turn and hold things with
the Character: Hold object Action. By default, the first two Attachments points refer to
the left- and right-hands respectively, but a character can have any number of additional
points.
During gameplay, the
Character: Animate Action can be used by such characters to
change the value of any parameter in their Controller. It can also be used to change
expected parameter names, making it possible to “redirect” the Controller to play
di!erent “standard” animations, such as Walking and Talking.
This engine also supports numerous methods for facial animation - see Lip syncing.#
115

3.4.2. Character animation (Sprites Unity)
The Sprites Unity engine is a convenient way of working with 2D characters because it
plays animations according to a naming convention, as opposed to transitions or
parameters. If you have a character that can animate in all eight directions, this can be
very time-consuming.
When selected, a new panel will appear in the Inspector:
Standard 2D animations
You will first need to ensure that the character’s sprite is a child in their Hierarchy (with
their NPC/Player component on their root), and that this is assigned as the Sprite child.
An Animator is also required, which should be placed on either the sprite or the root.
The standard animations (idle, walk, run and talk) are all played automatically, based on
the animation type followed by a directional su"x. For example, the character above will
play Walk_D when walking downward, and Idle_R when idle while facing right. The
following su"xes are understood:
•
_R → Right
•
_L → Left
•
_U → Up
•
_D → Down
•
_UR → Up-right
•
_UL → Up-left
•
_DR → Down-right
•
_DL → Down-left
PROTIP: The 2D Demo’s player prefab, Brain2D, uses this engine - so you can refer to
him as a practical example. He can be found in AdventureCreator/2D Demo/
Resources.
116

If Head on separate layer? is checked, then an additional Head layer index field will
appear and head animations (idle and talk) can be moved to a separate layer in the
Animator component. The head sprite must also be separated from the body as a child
component, but this allows for a character to talk while moving, and look at objects
without turning their body. For more, see
Head turning.
Characters will face up to eight directions, depending on the Facing directions field. If
set to Four, then the character can face up, down, left and right. If set to Eight, they can
also face diagonally. If set to Custom, you can select exactly which directions they can
face. If set to None, the directional su"x will be ignored completely. Clicking List
expected animations will reveal a list of all the animations that a character’s Animator is
expected to have.
These animations need to be placed in the character's
Animator Controller. As AC refers
to these by state name, you do not need to incorporate transitions between them.
If your left- and right-facing sprites are merely mirror images of each other, you only
need supply one or the other. Set the Frame flipping value to Left Mirrors Right to only
rely on right-facing animations, or Right Mirrors Left for the opposite. By default, this
option will only a!ect standard animations, such as Idle, Walk and Run – to make it a!ect
custom animations as well, check Flip custom animations?.
If your animation clips rely on sprite transforms, rather than swapping out frames, you
can use the Crossfade animations? checkbox to smooth transitions.
If you are going for a retro e!ect, you can use the Only move when sprite changes?
checkbox so that the character's movement is less smooth – which can be useful when
working with low-resolution sprites. This is equivalent to
Adventure Game Studio's “Anti-
glide mode”. Note that this feature ignores collisions - so should not be used for
Players under
Direct control.
The Character: Animation Action can be used to change standard animation names, or
play custom clips temporarily. Note that when playing non-standard animations, you
may need to add Transitions to your Controller to control how the animation finishes
playing.
The
Dialogue: Play speech Action is given additional animation options, allowing playback
of animations on varying layers.
To handle collision, add a Circle Collider 2D at the base of the character's root object
(covering the feet), and unchecking Is Trigger. If you are making an interactive NPC, add
a second collider, a Box Collider 2D, onto the sprite child, as well as the
Hotspot script.#
NOTE: A 2D character's animations should all pivot around their feet.
117
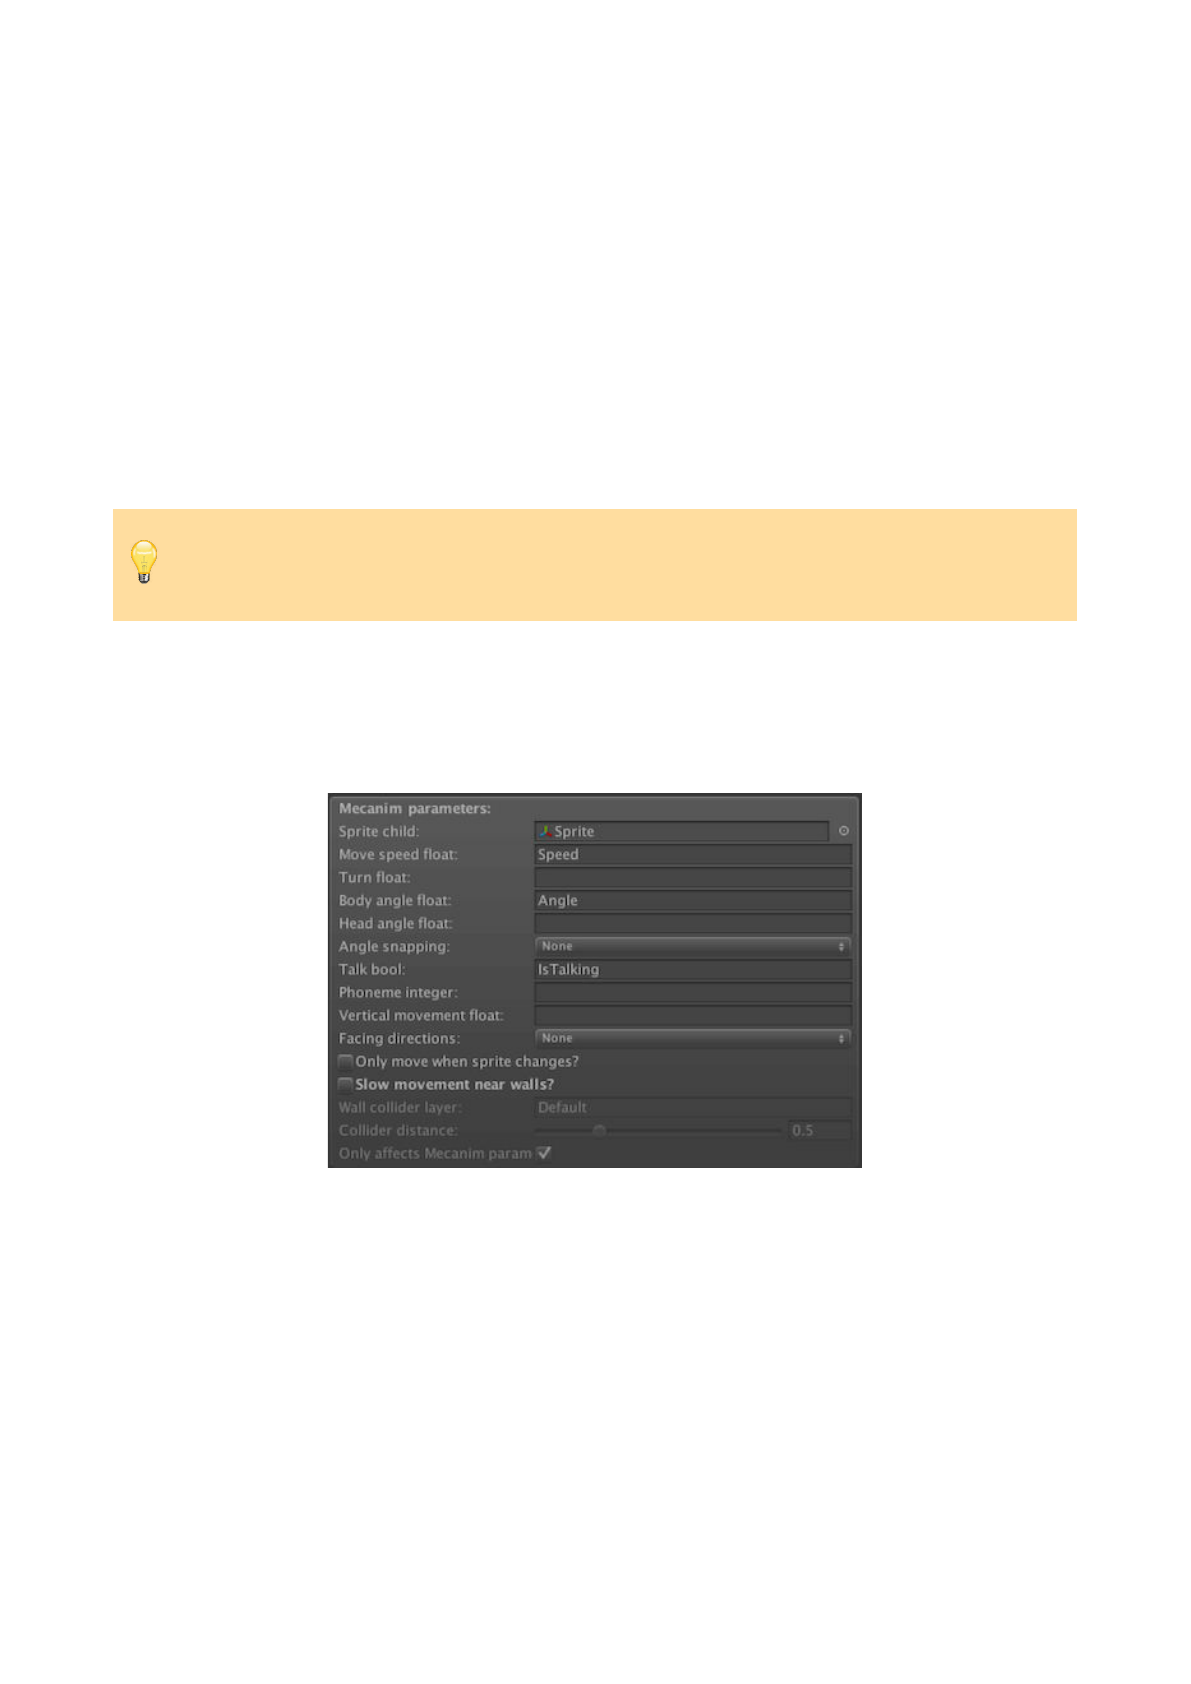
3.4.3. Character animation (Sprites Unity Complex)
The Sprites Unity Complex engine allows for more control over how 2D animations are
played back than Sprites Unity. While it can take more e!ort to fine-tune, it allows for
smooth transitions between animations – such as Broken Sword-style animated
transitions while changing direction while walking.
Rather than requiring the names of animation clips for Adventure Creator to automatically
call upon, Sprites Unity Complex works by giving AC control over certain parameters in
the character’s Animator Controller – this allows the designer to make use of them
however they like.
When selected, a new panel will appear in the Inspector:
Mecanim parameters
You will first need to ensure that the character’s sprite is a child in their Hierarchy (with
their NPC/Player component on their root), and that this is assigned as the Sprite child.
An Animator is also required, which should be placed on either the sprite or the root.
This panel is where you define the names of your
Animation parameters that AC can
control. AC will control any named parameters at all times:
Move speed float
The current speed. Will become the Walk speed scale when walking, and the Run speed
scale when running.#
PROTIP: A variant of the 2D Demo’s player, Brain2D_SpritesUnityComplex, uses this
engine - so you can refer to him as a practical example. He can be found in
AdventureCreator/2D Demo/Resources.
118

Turn float
Set to -1 when turning left, +1 when turning right, and 0 when not turning or moving.
Direction integer
The current facing direction, as a whole number. Note that diagonal directions are only
used if Diagonal sprites? is checked:
0 –> Down
1 –> Left
2 -> Right
3 –> Up
4 –> Down-left
5 –> Down-right
6 –> Up-left
7 –> Up-right
Body angle float
The current facing direction, as an angle in degrees. This is zero when the character
faces down, and increases to 360 (non-inclusive) as the Character rotates clockwise.
Head angle float
The head’s facing direction, as an angle in degrees. This uses the same angle system as
Body angle float, above. See
Head turning.
Angle snapping
This field allows you to snap the Body angle float and Head angle float parameters to
the nearest 45 or 90 degrees. This is useful if using these parameters in
Blend Trees, and
you wish to remove interpolated blend e!ects.
Talk bool
Set to True when talking
Phoneme integer
The current phoneme index, when using talking with Lip syncing.
Vertical movement float
The current vertical speed, allowing for falling and landing animations.
It is up to you to decide how these parameters should be used by your Controller - you
could make use of
Blend Trees, for example, or have simple Transitions between various
states.
119

For added realism when moving, Slow movement near walls? will have the character
slow down as they approach a scene's walls. This is most suited for Direct-controlled
Players.
If you are going for a retro e!ect, you can use the Only move when sprite changes?
checkbox so that the character's movement is less smooth – which can be useful when
working with low-resolution sprites. This is equivalent to
Adventure Game Studio's “Anti-
glide mode”.#
NOTE: This engine does not have a Frame-flipping option like Sprites Unity. If you
want to flip the sprite so that left-facing animations can be recycled for right (or vice-
versa), you can make use of a simple script. A sample is provided in the AC wiki.
NOTE: A 2D character's animations should all pivot around their feet.
120

3.4.4. Character animation (Legacy)
The Legacy engine is a much more simple way of animating 3D characters than Mecanim,
as it involves supplying the required animations directly within the Inspector, so that AC
can play them automatically. It is referred to as Legacy because it uses Unity’s old
animation tools that pre-date the Mecanim / Animator tools.
Characters that use this engine must have an Animation component on the root
GameObject, but it can be assigned to a child object if necessary.
When selected, two new panels will appear in the character's Inspector:
Standard 3D animations
This panel is where standard animations such as walking and talking are assigned. These
will be played automatically when appropriate - they do not need to be assigned in the
Animation component.
When Talk animation style is set to Custom Face, facial animation clips are assigned
directly within each
Dialogue: Play speech Action as opposed to a singular talking
animation.
PROTIP: The 3D Demo’s NPC character, Brain, uses this engine - so you can refer to
him as a practical example. He can be found in AdventureCreator/Demo/NPCs.
NOTE: In order to play back an animation, make sure it is marked as Legacy in its
import Inspector.
121

Bone transforms
This panel is where a few of the character’s rig bones are assigned. This is necessary so
that AC knows which bones to isolate when e.g. animating the head while the character is
looking around.
Custom animations can be played in-game with the
Character: Animate Action. When
doing so, you define an animation layer for it to be played on, from the Base layer at the
bottom, to the Mouth layer at the top. By keeping your animations on separate layers,
you can mix them together to create new animations.
The demo provides a good example of this when Brain talks to the player while in his
chair. He is playing his idle animation on the Base layer, turning his head left on the Neck
layer, bobbing his head on the Head layer, changing his expression on the Face layer, and
moving his lips on the Mouth layer. It's generally a good idea to only play one animation
per layer at any one time.
You can also choose if that animation is blended with or added on top of existing
animations. If you are having trouble getting an additive animation to play properly,
make sure that all keyframed bones in that animation start from their rest position.
The
Character: Animate Action can also stop animations, change the standard animations,
and reset a character to idle.
The Dialogue: Play speech Action also allows for two more animations: Head and Mouth.
These fields act as shortcuts to play custom animations in the correct way. The Head
animation is used to vary a character's head motion as they say a line, for example a nod
if they are agreeing with something. This is an Additive animation played once on the
Head layer. The Mouth animation is used to let the character animate their lips as they
talk. You can either supply a generic “talking” animation, or a line-specific lip-sync
animation. This is a Blend animation played once on the Mouth layer.
Adventure Creator also features a number of ways to animate your
lip-syncing, including
making use of FaceFX.
To animate expressions on characters by using blend shapes, attach a Shapeable
component to your Skinned Mesh Renderer and use it to define your expression shapes.
You can then use either the
Object: Blend shape Action to control which shape is active,
or define Expressions in the character Inspector so that the [expression:name] tag can be
used - see
Text tokens.
122

3.4.5. Custom animation engines
Each of the provided animation engines are self-contained scripts in the
AdventureCreator/Scripts/Animation folder.
To implement a custom animation engine, create a C# subclass of the AnimEngine
ScriptableObject. Then within your character's Inspector, set the Animation engine field
to Custom, and supply the name of your new C# script as the Script name:
Animation engines work by overriding functions within the
AnimEngine class whenever a
character must be animated. For example, when a character walks, the script’s PlayWalk
function is called every frame.
The functions below can be overridden in a custom animation script. Its character
variable can be used to access the character’s NPC/Player script properties.
The following are called every frame, depending on what the character is doing:
PlayIdle ()
PlayWalk ()
PlayRun ()
PlayTalk ()
PlayJump ()
PlayTurnLeft ()
PlayTurnRight ()
The following can also be overridden:
CharSettingsGUI ()
Used to display any additional GUI settings the character’s Inspector may require
ActionCharAnimGUI (ActionCharAnim action)
Used to display the “Character: Animate” Action’s GUI
ActionCharAnimRun (ActionCharAnim action)
Called when the “Character: Animate” Action is run
ActionCharAnimSkip (ActionCharAnim action)
Called when the “Character: Animate” Action is skipped
PROTIP: A full list of the variables and functions available in NPC and Player scripts can
be found
online.
123

3.5. Head animation
With a little configuration, characters can turn their heads to specific objects - rather than
turning their entire bodies. Sprite-based characters can also separate their head and
body animations, so that they can talk while moving without the need for full-body
“talking and walking” animations.
A character can face an object by using the
Character: Face object Action, and setting
Face with to Head. A character will continue to face the object until the Action is run
again with Stop looking? checked.
The Player can also be made to face the active Hotspot - from the Settings Manager,
check Player turns head to active? underneath Hotspot settings. This can be disabled
mid-game using the
Player: Constrain Action. The Player will face the Hotpot’s centre,
unless a Centre point (override) is assigned for it.
The method of configuring a character to allow for this depends on their animation
engine:
Mecanim
If a character has a Humanoid rig, then you can make use of automatic IK head turning –
just check IK head-turning? within the character's Inspector. If the character has a
Capsule Collider or
Character Controller, it will be used to estimate their height - but
you can set this explicitly by defining a Neck bone transform.
Otherwise, you will need to supply four animation clips for full rotation - one each for
looking up, down, left, and right. You can update your Animator Controller with two float
parameters that determine the head's yaw (left-and-right) and pitch (up-and-down).
Enter these parameter names into the character’s Inspector, and their values will update
during gameplay. Ideally, these are used to control a 2D Blend Tree.
PROTIP: Example prefabs that demonstrate sprite-based characters with independent
head animation are available on AC's Downloads page.
PROTIP: The 3D Demo’s Player prefab, Tin Pot, can turn his head this way. If you want
to see how he works, find him in /Assets/AdventureCreator/Demo/Resources.
Example Player prefabs for 2D games can be downloaded from the
AC website.
124

Legacy
Head-turning animation clips can be assigned directly in the character's Inspector. They
should all only animate the head, start in the base position and finish in the extreme
position. A Neck bone should also be supplied.
Sprites Unity Complex
A 2D character can only move their head sideways - not up and down.
If defined, the Head angle float parameter will take the angle of the direction that the
head should be facing. When the head is not facing an object, this will be the same value
as the Body angle float parameter. This parameter will be a!ected by the Angle
snapping value.
Head animations that rely on this parameter will need to be placed in a sub-layer so that
they can be controlled independently of those placed on the Base layer.
Sprites Unity
A 2D character can only move their head sideways - not up and down.
Head turning with this engine is only available if Head on separate layer? is checked in
their Inspector. When checked, a separate Head layer field is then exposed, and
additional animation names will appear in the List expected animations? foldout. This
lists expected animation names, as well as the layer index they must appear on.
This method works by playing idle and talk animations on the head, isolated from the
body. Therefore, the character's head should be both a separate sprite, and a separate
GameObject - a child of the main body sprite GameObject. The head animations will
need to be placed in a sub-layer so that they can be controlled independently of those
placed on the Base layer.
An additional "HiddenHead" animation is also listed - this should be a single-frame
animation in which the head is removed from view, typically by replacing it with an
invisible sprite. This is a convenient way of returning to a single-sprite system when a
special full-body animation is required, and will be played automatically when using the
Character: Animate Action and Hide head? is checked.
NOTE: When head-turning in 2D games, the object a character faces is assumed to be
on the ground, i.e. at the same level as the characters feet. If a character faces a
Hotspot that is tall, you may need to define a Look-at override for that Hotspot, and
place the override on the ground to get the intended e!ect.
125

3.6. Footstep sounds
Footstep sounds that play when a character moves are a subtle but e!ective way of
enhancing the immersion of a scene. The Footstep Sounds component allows you to
control their playback.
The various sounds that can be played are defined in Surfaces. To begin editing them,
click the Surfaces window button to bring up the Surfaces editor:
126

For each surface, multiple walk and run sounds can be assigned - one will be chosen at
runtime when played.
Back inside the Footstep Sounds component, the additional fields let you map the sounds
to a specific Character, and a Sounds component to play them from.
You can choose if they are played via Animation Events, or Automatically according to
user-defined separation times. If using Animation Events, you must call the component’s
PlayFootstep function to trigger the audio.
Changing the component’s active Surface can be done in a number of ways:
1. Using the component’s Auto-detect Surface? option to fire a raycast at the
character’s feet. This will search for floor colliders that have a
PhysicMaterial asset
whose name ends with “_”, followed by the name of the intended Surface.
2. Using the Sound: Change footsteps Action.
3. Altering the component’s CurrentSurface property through custom script. This is
best set inside a hook to the OnRequestFootstepSounds custom event, which is fired
just before a sound is to be played.#
127

3.1. Character scripting
Characters make use of either the Player or NPC script components. Both are subclasses
of the Char script.
The current Player can be retrieved with:
KickStarter.player;
The available Players in a game that allows Player-switching can be retrieved with:
KickStarter.settingsManager.players;
A character can be made to move or turn with:
myCharacter.MoveToPoint (Vector3 destination);
myCharacter.SetLookDirection (Vector2 lookDirection, bool isInstant);
myCharacter.EndPath ();
myCharacter.Halt ();
Character scripts output their intended destination, rotation, and other parameters.
These are useful when building custom motion controllers:
myCharacter.GetTargetSpeed ();
myCharacter.GetTargetNode ();
myCharacter.GetTargetDistance ();
myCharacter.GetTargetPosition ();
myCharacter.GetTargetRotation ();
myCharacter.GetAngleDifference ();
myCharacter.IsTurning ();
myCharacter.IsMovingAlongPath ();
The character system has the following events:
OnSetPlayer (Player player)
OnPlayerSpawn (Player player)
OnPlayerRemove (Player player)
OnPlayerJump (Player player)
OnSetHeadTurnTarget (Char character, Transform headTurnTarget, Vector3
targetOffset, bool isInstant)
OnClearHeadTurnTarget (Char character, bool isInstant)
OnCharacterSetPath (Char character, Paths path)
OnCharacterEndPath (Char character, Paths path)
OnCharacterReachNode (Char character, Paths path, int nodeIndex)
OnCharacterSetExpression (Char character, Expression expression)
OnSetLookDirection (Char character, Vector3 direction, bool isInstant)
OnOccupyPlayerStart (Player player, PlayerStart playerStart)
OnCharacterTeleport (Char character, Vector3 position, Quaternion
rotation)
OnPlayFootstepSound (Char character, FootstepSounds footstepSounds,
AudioSource audioSource, AudioClip audioClip)
128

OnCharacterRecalculatePathfind (Char character, ref Vector3
destination)
OnCharacterHoldObject (Char character, GameObject object, int
attachmentPointID);
OnCharacterDropObject (Char character, GameObject object, int
attachmentPointID);
OnRequestFootstepSounds (FootstepSounds footstepSounds);!
129

4. Camera perspectives#
130

4.1. Cameras overview
As you create your game, you will place many cameras in your scene. Most of these will
be GameCameras, which are never used directly to view your game from, but rather are
used as “reference points” for the MainCamera. The MainCamera attaches itself to
whichever GameCamera is currently active, and copies its position, rotation, field of view,
orthographic type and other camera properties.
The active camera can be changed in-game by using the
Camera: Switch, Camera:
Crossfade and Camera: Split-screen Actions. In the Editor, you can also switch camera via
the component’s cog menu during runtime.
You can add new GameCameras to your scene from the Camera prefabs section of the
Scene Manager. What camera types are available based on your Settings Manager's
Camera perspective setting.
You can still use any type of GameCamera in your game, regardless of the perspective
setting you've chosen – just drag them manually from AdventureCreator → Prefabs →
Cameras into your scene hierarchy.
AC also provides widescreen and letterboxing support. The Aspect ratio setting allows
you to enforce either a fixed or an enforced minimum/maximum aspect ratio, regardless
of the resolution.
NOTE: Since GameCameras are merely used for the MainCamera's reference, and do no
rendering themselves, any image e!ect scripts you want to make use of must be
added to the MainCamera GameObject in your scene. For more, see
Camera e!ects.
PROTIP: The Camera perspective setting will be the default setting for your game, but
this can be overridden on a per-scene basis - see Overriding perspective.
131
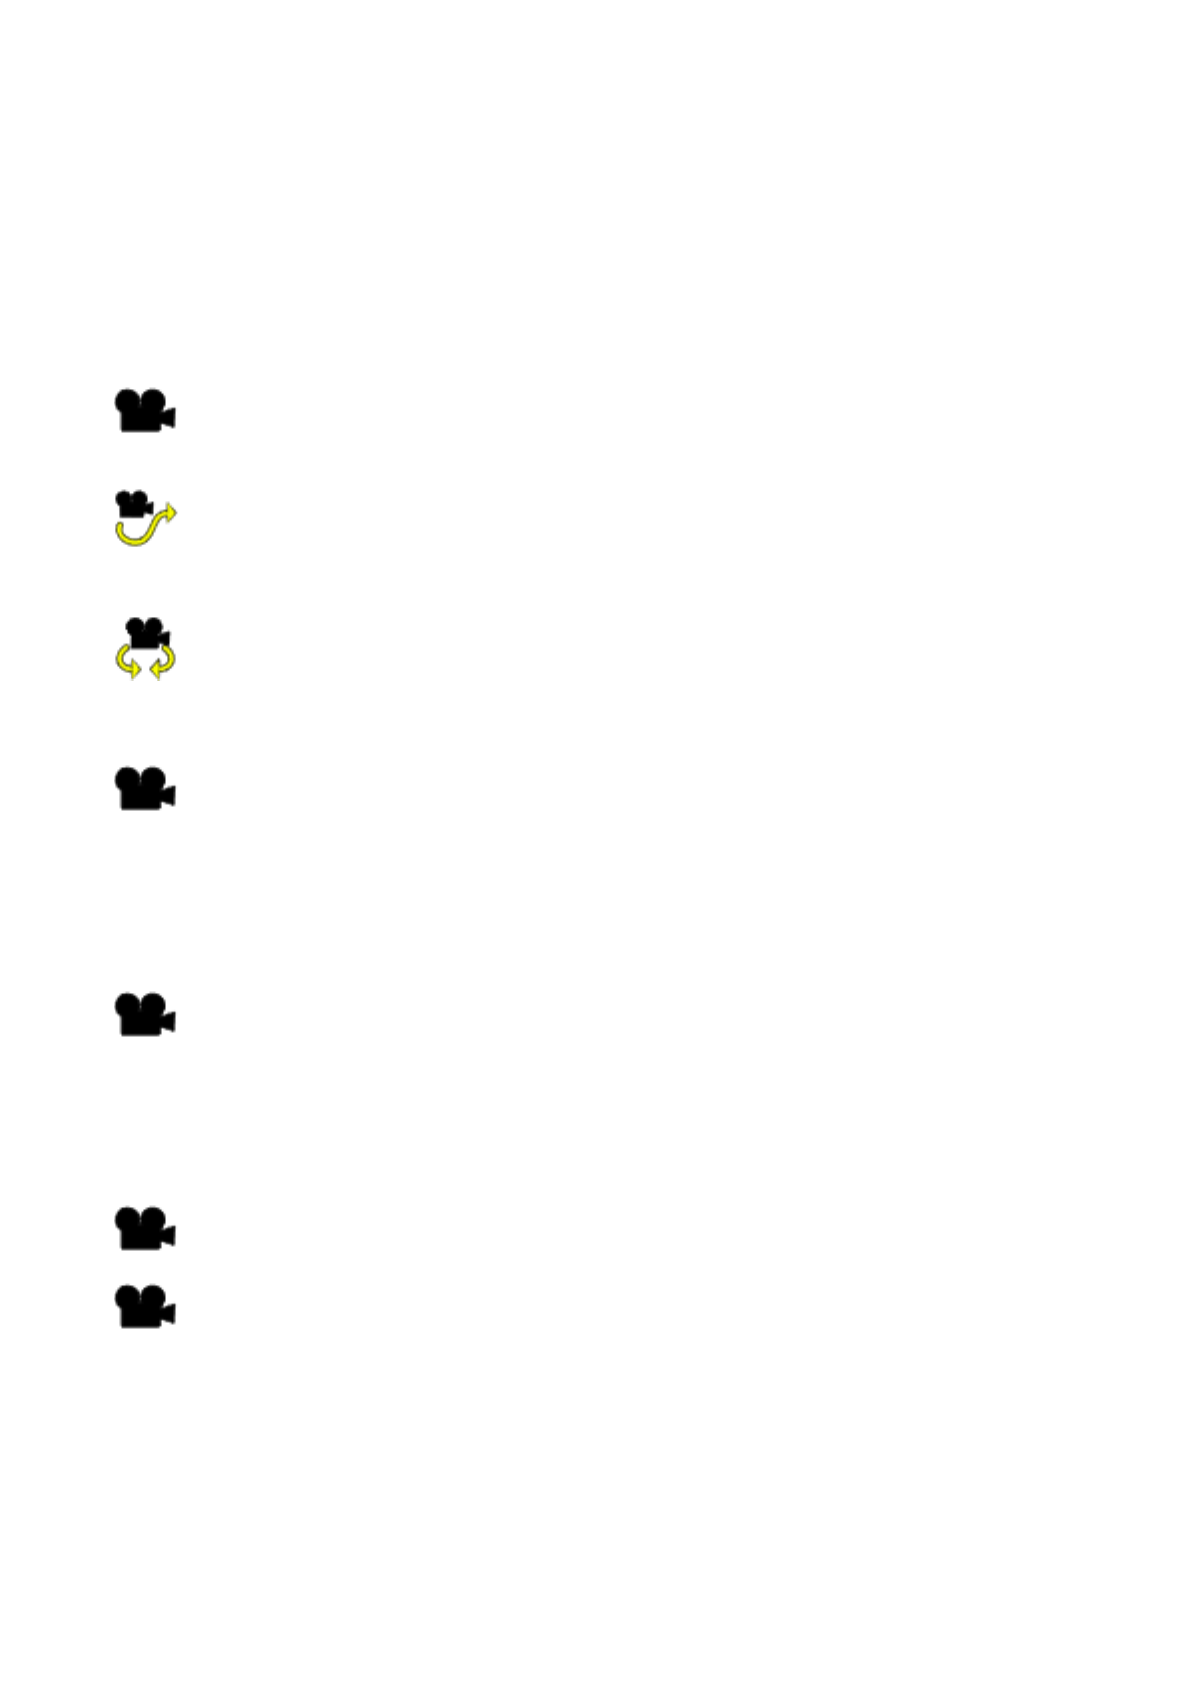
4.2. Camera types
The following camera types are listed in the Scene Manager, depending on the Camera
perspective setting:
3D
GameCamera
The standard camera type for 3D games, which can track a moving target.
GameCamera Animated
A camera that either plays an animation when made active, or positions itself
along a timeline as a target moves along a path.
GameCamera Third-person
A camera that follows a target by keeping the same distance from it at all times,
with the ability to rotate.
SimpleCamera
A camera that has no controls and doesn't move by itself, but can be attached to
a custom camera script to make it compatible with AC.
2.5D
GameCamera 2.5D
The standard camera type for 2.5D games, which allows for background images
to be placed behind 3D objects.
2D
GameCamera 2D
The standard camera type for 2D games, which can track a moving target.
GameCamera 2D Drag
A camera that can be dragged around using the mouse.
132

4.2.1. GameCamera
The GameGamera is the default camera type when working in 3D. Position, spin, pitch
and field of view can all be controlled independently by unchecking the Lock? toggle
beside each:
When at least one axis is unlocked, a panel to a!ect the camera's target appears. By
default, this is the
Player, but other GameObjects can be used instead if the Target is
player? checkbox is unchecked. The speed at which the camera follows its target can
also be controlled.
When an axis becomes unlocked, the method by which that axis is a!ected can be set.
For example, the X-axis movement can be based on the target's X-axis position, Z-axis
position, position across the viewport or position away from it. The way in which this
“input” results in the axis' final position depends on the Influence and O"set values, and
limits can be set using the Constrain panel.
The Side Scrolling option allows the camera to behave like a more traditional 2D
adventure game camera, in which the camera only moves when the player nears the edge
of the screen.
133

The Spin rotation panel has an additional option: Look At Target, which is a simple way
of ensuring the camera is always centred on the target:
The Cursor influence panel allows the camera to appear to subtly “follow” the cursor as it
moves around the screen.
To determine the best values for a GameCamera’s Inspector, it is often easier to tweak
them while the game is running, copy their values (via the cog icon to the top-right of the
inspector), and paste them back in once the game has been stopped:
Though their default projection is Perspective, GameCameras can also be set to
Orthographic. It is important, however, that the scene's Navigation Mesh is always
visible to the camera if you are making a point-and-click game – if you are making one
with Orthographic camera, be sure to rotate them downward so that the NavMesh is in
view.
GameCameras have a Depth of field setting that you can call upon in such post-
processing scripts. The focal distance can either be set manually, or tied to the camera's
target object. When the MainCamera is attached to a GameCamera, it can return the
current focal distance with this command:
AC.Kickstarter.mainCamera.GetFocalDistance ();!
134
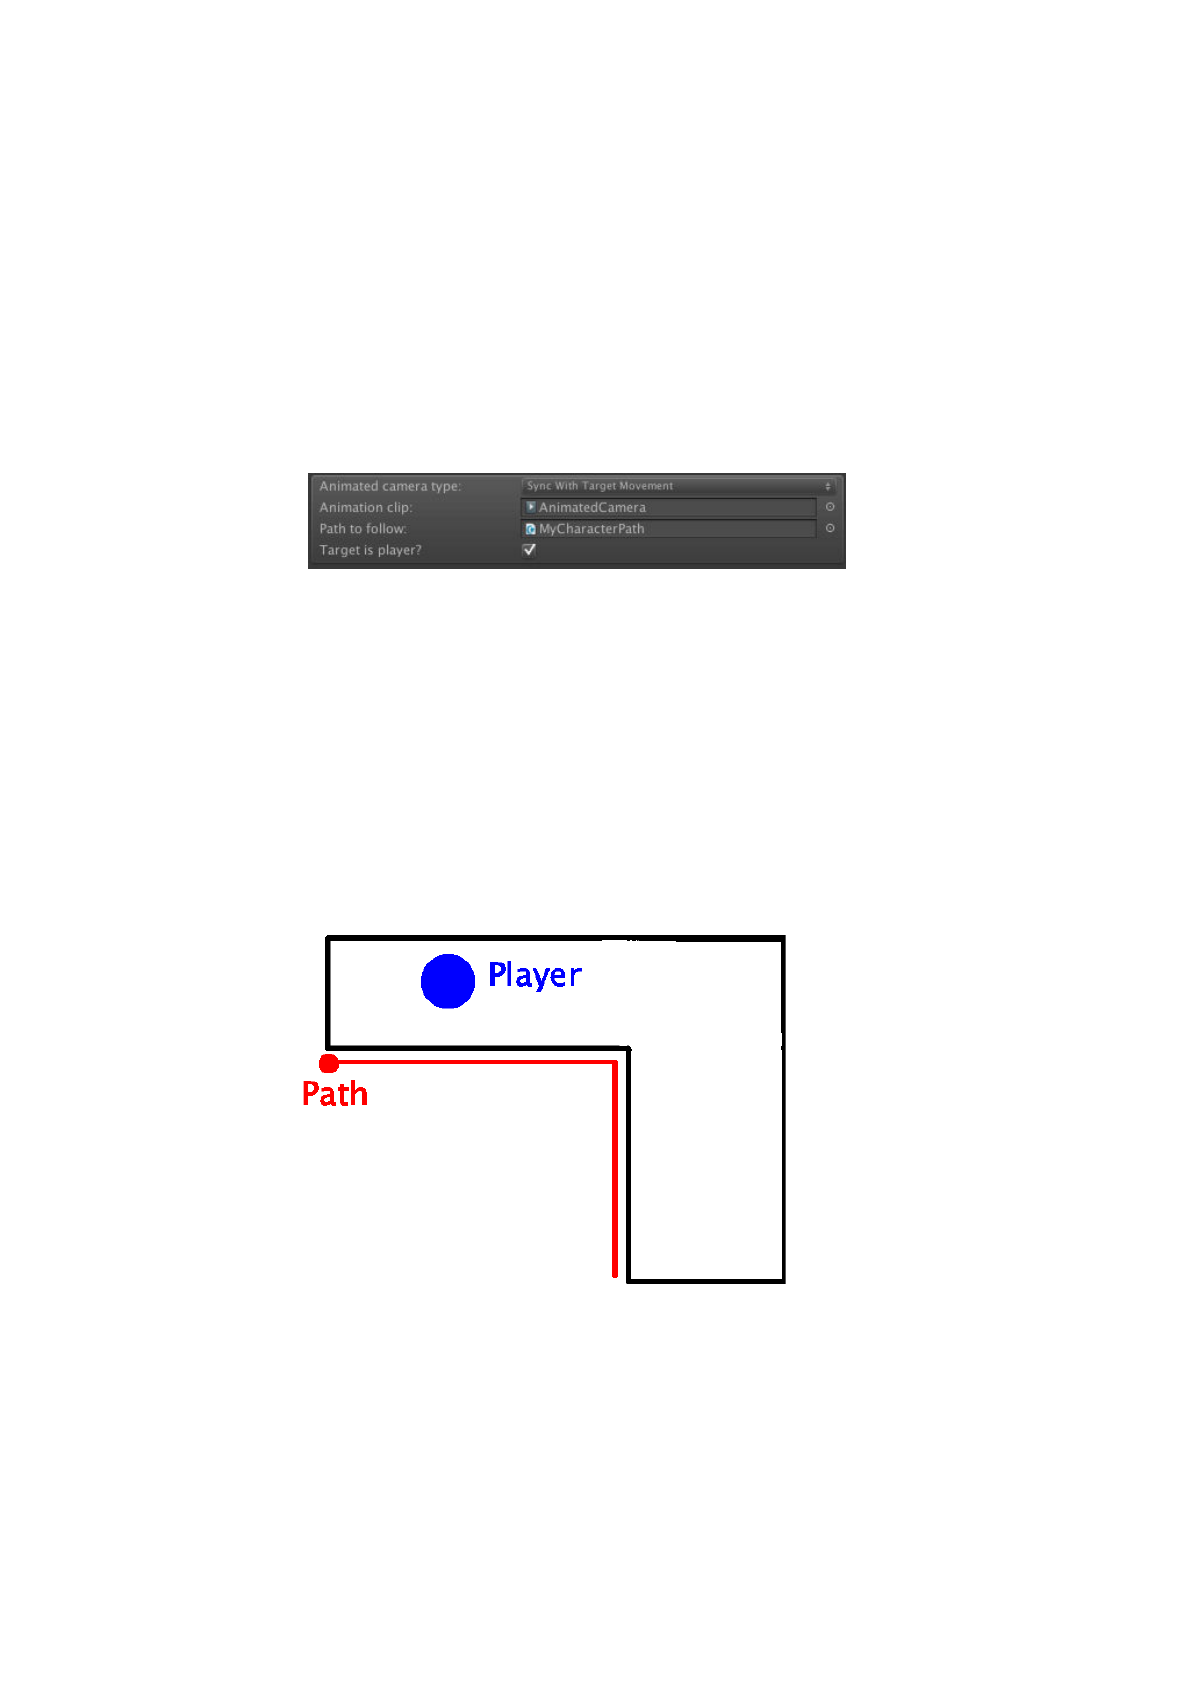
4.2.2. GameCamera Animated
The GameCamera Animated prefab can play back a Unity-made animation when made
active. This allows for more dynamic and interesting camerawork during Cutscenes, for
example. As this works with the Animation component, any animations involved must be
marked as Legacy.
However, the real use of this camera type is that it be made to play a fixed frame from an
animation based on its target's point along a Path, which is possible when the Animated
camera type is set to Sync With Target Movement:
A Path is a prefab that describes a series of nodes - see
Character movement. When the
camera's target is at the start of the assigned Path, the camera will play the first frame of
the animation. When the target is at the end of the Path, the Camera will play the last
frame. In-between frames will be interpolated. This allows for more controlled
camerawork as the Player moves along a specific section of the scene.
Do be aware, however, that such Paths must be kept to one side of the target at all times,
and the nodes must be positioned such that the reflex angles (> 180 degrees) between
them must face the Target. If the Path were to be used for a corner, for example, the
bird's eye view should look like this:
135

4.2.3. GameCamera Third-person
The GameCamera Third-person camera type allows for more traditional, over-the-
shoulder, behaviour when following the player.
This camera type can be rotated horizontally (Spin) and vertically (Pitch), with each axis
having independent settings and limits. When pitch rotation is enabled, the camera's
position can be defined by Top, Middle and Bottom regions. Each region has Distance
and Height o"set values, allowing you to adjust the camera's position as the Player
controls the pitch angle.
It is also possible to have the camera adjust its rotation and distance according to the
movement of its Target (by default, the Player). This makes it possible to have the
camera smoothly follow a Player in all directions without having the user having to control
it directly.
Because the camera can be moved freely, enabling Do collisions? is often necessary as
this prevents the camera from being able to travel through colliders placed on a specified
layer.
Zooming can also be enabled: either with an input button controlling FOV when pressed,
or with an input axis controlling distance to the target.
The Initial direction field determines how the camera's orientation is first set. If Set
initial direction when active? is checked, then this direction will be set whenever the
camera is made active (e.g. via the
Camera: Switch) Action.
You can also set the rotation by using the Camera: Rotate third-person Action. This
allows you to turn the camera manually as part of a cutscene, it you want to focus the
player's attention on something.
Like
GameCameras, this type has a Depth of field setting that you can call upon in such
post-processing scripts. The focal distance can either be set manually, or tied to the
camera's target object. When the MainCamera is attached this camera type, it can return
the current focal distance with this command:
AC.Kickstarter.mainCamera.GetFocalDistance ();!
PROTIP: This camera type can be found in the 3D Demo, though it is not activated by
default. To activate it, load the 3D Demo game and go into the Variables Manager. In
the list of Local variables, set the value of Third person camera to True.
PROTIP: Getting jittery movement when the Player moves? Try adjusting the camera's
Update mode field.
136


4.2.5. GameCamera 2.5D
The GameCamera 25D camera type facilitates the development of games that use a
mixture of pre-rendered (or photographic) backgrounds and 3D characters.
This camera type cannot move, but this limitation allows each one to be associated with a
particular background image. This background image is displayed underneath the rest of
the scene's geometry, and is not a physical object in the scene itself. This means that a
scene can have many cameras and backgrounds without it becoming unmanageable.
Each background image must be stored within its own Background Image prefab. This
can be created from the Scene Manager, or from the camera itself:
A BackgroundCamera prefab must also be present in the scene - but this will be added
automatically when
creating a 2.5D scene. This prefab's Culling Mask needs to be set to
the BackgroundImage layer, and the MainCamera's Culling Mask needs to omit this - but
this should be automatic.
The BackgroundImage is where the background image Texture is assigned:
The assigned texture can either be a single Texture, or a VideoClip asset file, which will
play on a loop when the background is made active. When the Background type is set to
Video Clip, both Texture and VideoClip fields will be made available. The assigned
NOTE: If you require scrolling, you can still use the GameCamera 2D camera type in
combination with sprite-based backgrounds. The GameCamera2D prefab can be
found in /AdventureCreator/Prefabs/Camera. A tutorial can be found online.
NOTE: Using URP? Unity’s Universal Render Pipeline uses its own technique to overlay
cameras, so you'll need this wiki script to have it work with AC’s 2.5D cameras.
138

Texture is treated as a placeholder while the VideoClip is loaded into memory, or when
previewing its associated camera in the Editor.
Once a GameCamera25D has been assigned a BackgroundImage prefab, a button labelled
Set as active appears in its inspector. Clicking this allows you to preview its view, plus
the background image, in the Game Window when the scene is not running:
For more on 2.5D games, see
Preparing a 2.5D scene.#
PROTIP: It is strongly recommended to set the Aspect ratio option in the Settings
Manager to Fixed when working with background images, as this will ensure that they
are proportionally correct. Also be sure to have your Game Window's perspective set
to match your chosen aspect ratio.
139

4.2.6. GameCamera 2D
This camera type emulates the behaviour of traditional 2D adventure game cameras, and
can move horizontally and vertically as it follows a target. While this camera type only
moves along the X and Y axes, it can still be used in 3D scenes provided that it looks
down the Z axis.
A GameCamera 2D can move horizontally and vertically, or be locked in either direction.
When at least one axis is unlocked, options to control the camera's target will appear:
The Track freedom variable determines how far, in Unity co-ordinates, the target must
move from the camera's screen-centre before the camera begins to follow. A freedom of
zero will keep the target in the centre of the screen at all times.
The Target direction factor allows you to influence the camera’s position based on the
target’s facing direction - so that if the target faces left, the camera pans further left.
The Cursor influence panel allows the camera to appear to subtly “follow” the cursor as it
moves around the screen.
NOTE: GameCamera 2Ds do not physically move, but instead just change their
projection matrices to give a scrolling e!ect. This is also the case when the camera's
Projection is set to Perspective - meaning you'll get a Ken Burns e!ect even in 3D.
140
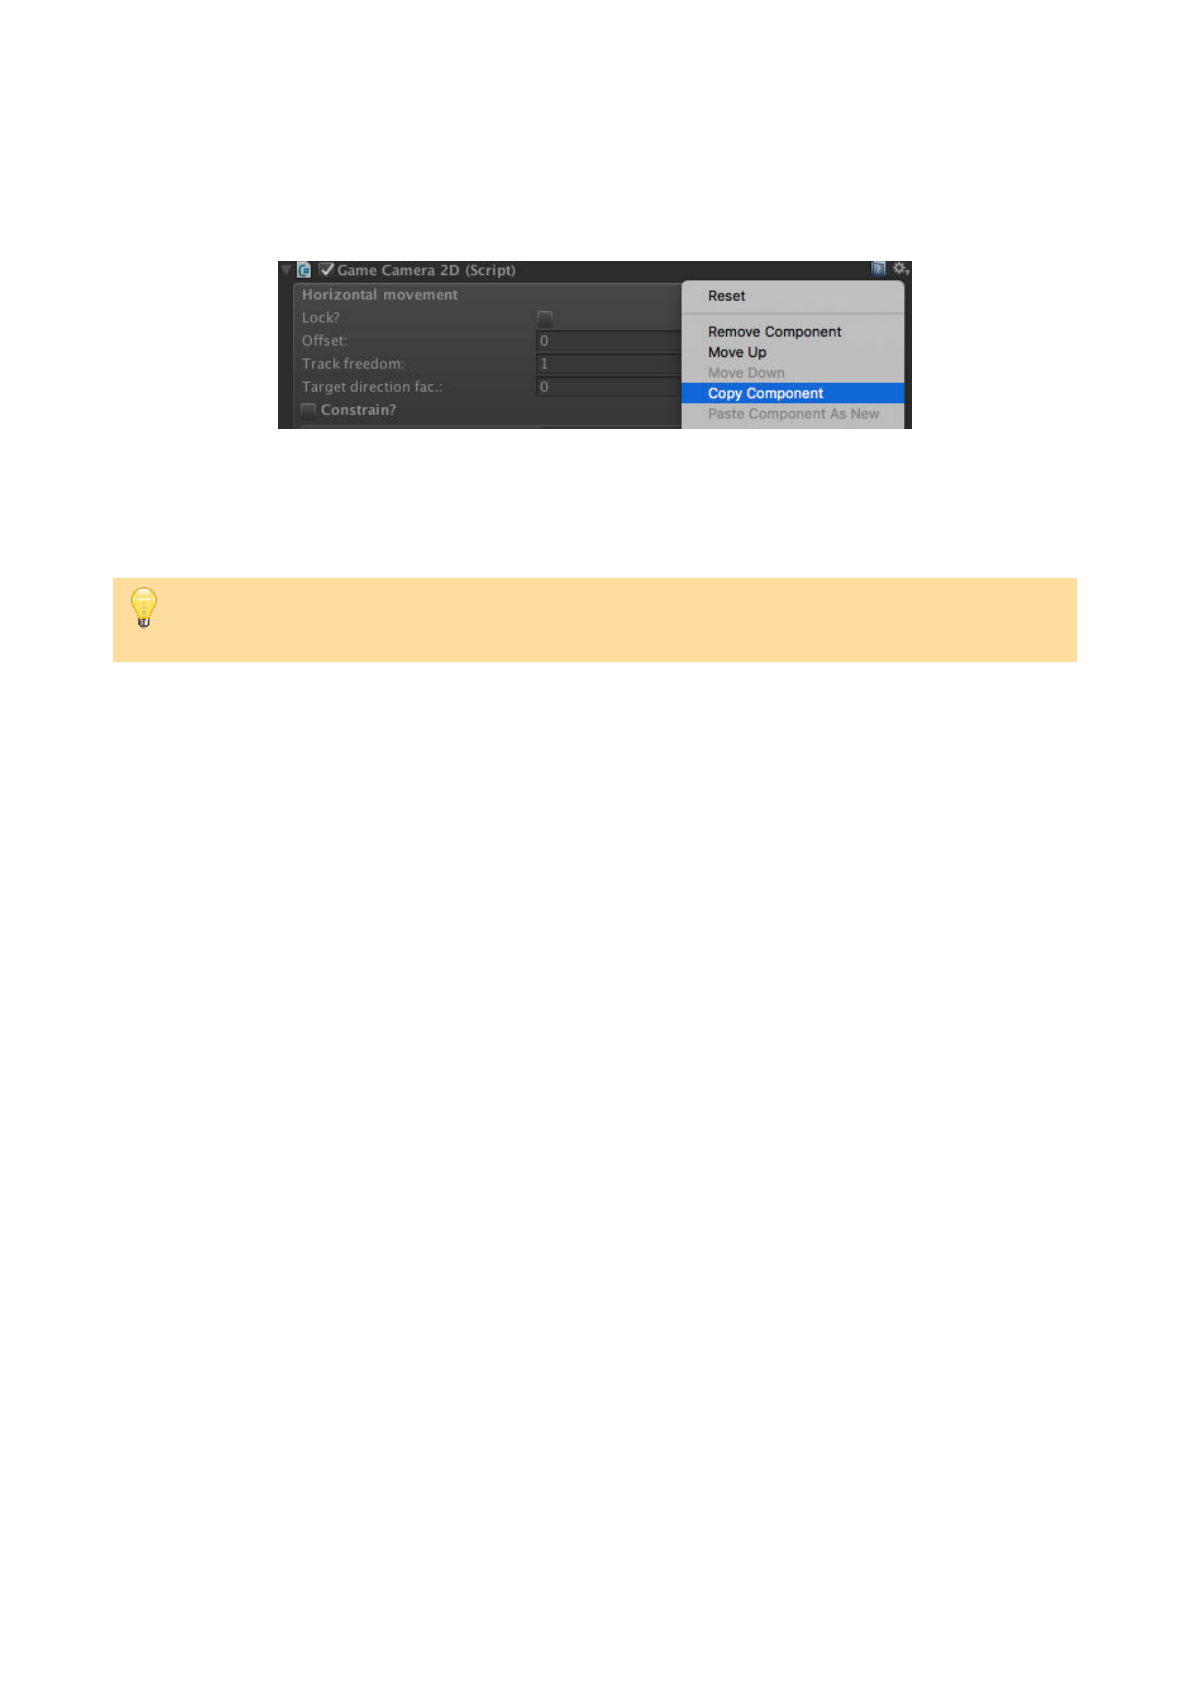
As with the GameCamera, the movement in either direction can be constrained and o!set.
To determine the best values for a GameCamera 2D’s Inspector, it is often easier to tweak
them while the game is running, copy their values (via the cog icon to the top-right of the
inspector), and paste them back in once the game has been stopped:
It is possible to make other objects scroll as the camera does - though at di!erent speeds
- to achieve a depth e!ect. To do this, attach a Parallax2D script to any other
GameObject you want to scroll. For more, see
Parallax 2D.
PROTIP: A cursor graphic to make use of while dragging this camera type can be
assigned in the Cursor Manager.
141

4.2.7. GameCamera 2D Drag
This 2D camera has no “target”, but is instead panned horizontally or vertically by
dragging with a mouse (or finger on a touch-screen). Movement in the X and Y directions
can be controlled independently:
As clicks will still be used to initiate player movement, this camera type is recommended
for games that do not make use of
point-and-click movement.
142

4.3. Adding custom cameras
Although a variety of camera types are provided, it may be that you require or prefer to
use other types - whether it be another camera asset from Unity’s Asset Store, or your
own script.
To make such a camera visible to AC’s camera system, simply add the Adventure Creator
-> Cameras -> Basic Camera component from the Inspector’s Add Component menu:
Adding this component will mean that it can be used in AC’s various
Camera Actions and
be made the Default camera in the
Scene Manager.
If the camera is for a 2D game, check the box in its Inspector:
Like GameCameras, this type has a Depth of field setting that you can call upon in such
post-processing scripts. The focal distance can either be set manually, or tied to the
camera's target object. When the MainCamera is attached this camera type, it can return
the current focal distance with this command:
AC.Kickstarter.mainCamera.GetFocalDistance ();
NOTE: As explained in Cameras overview, the only active Camera in your scene should
be the MainCamera – and this is true even when custom cameras are involved. Be sure
to disable your custom camera's Camera component – Adventure Creator will still read
its values, but there won't be a conflict in rendering.
143

4.4. Working with VR
While Adventure Creator isn't geared towards VR experiences, its still possible to allow a
scene to be viewed in VR.
Replace the scene's MainCamera with the MainCameraVR prefab found in
AdventureCreator/Prefabs/Camera. This will allow for VR movement while also being
able to use AC's camera system.
When Virtual Reality Supported is enabled in Unity’s Player Settings, the Main Camera
Inspector will display an option to restore its Transform when loading save games.
Leaving this as unchecked may help compatibility when working with VR projects.
It is common for VR games to incorporate a 3D cursor into your game, as opposed to an
icon-based one. You can do this by overriding the mouse position with an
InputMousePositionDelegate - see
Remapping inputs.
If you wish to make a VR game that can be played completely with the camera (i.e. with no
cursor clicks), you can use
custom events to detect when the mouse is over Hotspots and
Menus, and interact with them through script if it remains over them for a set time.
PROTIP: Certain operations in AC, such as Direct-controlling the Player relative to the
camera, rely on knowing which direction the camera is facing. This is typically the
same direction as that of the MainCamera - but in the case of the MainCameraVR
prefab, these two components are on separate GameObjects. The MainCamera
Inspector’s Facing direction field can be set to either have such operations refer to
the MainCamera, or the Camera.
PROTIP: An example 3D cursor script is already included – add a mesh GameObject to
the scene, and add the World Space Cursor Example component. It is fully
documented and can be modified to suit the needs of your own game.
PROTIP: Such a script is also included – add a new GameObject to the scene, and add
the Click By Hovering Cursor Example component. This can be used in conjunction
with the World Space Cursor Example mentioned above.
NOTE: When loading a save-game file in VR, you may wish for the MainCamera to not
restore its position depending on how you've set your game up. If Virtual Reality
Supported is checked in Unity's Player Settings, this is made optional within the
MainCamera Inspector.
144

4.5. Working with Cinemachine
Cinemachine is a free Unity asset that allows for dynamic camera movement and
cinematic shot composition. It can be downloaded from the Unity Asset Store.
Adventure Creator and Cinemachine both share the concept of using multiple cameras as
references, with only one main camera that performs the rendering. AC's MainCamera
and GameCamera are comparable to Cinemachine's CinemachineBrain and
VirtualCamera.
Cinemachine can be integrated with AC in two ways, depending on whether or not you
want to also make use of AC GameCameras.
Using Cinemachine exclusively
If you want to rely solely on Cinemachine, attach the Cinemachine Brain component to
AC's existing MainCamera, and rely on Cinemachine VirtualCameras instead of AC
GameCameras. The integration package mentioned above includes a Camera:
Cinemachine Action that can be used to control the active VirtualCamera, as well as a
Remember Cinemachine Virtual Camera component that can be used to save its data.
Mixing AC and Cinemachine cameras
If you instead wish to be able to switch between Cinemachine VirtualCameras and AC
GameCameras, keep AC's Main Camera and Cinemachine's Cinemachine Brain
components on separate GameObjects - each with their own Camera component. On the
Cinemachine Brain object, remove the AudioSource and attach AC's Basic Camera
component (see
Adding custom cameras):
PROTIP: An integration package, containing helper scripts and example scenes to link
Cinemachine with AC can be found on the AC website’s Downloads page.
145

The Cinemachine Brain will then be available when assigning the Scene Manager's Default
Camera field, as well as the various Camera Actions. When the MainCamera is attached
to the Cinemachine Brain, you can then switch VirtualCamera as you would in any other
Cinemachine project - as well as continue to use AC’s own cameras when desired.
NOTE: Since the above technique requires the MainCamera to copy the
CinemachineBrain's camera values each frames, AC will need to update after
Cinemachine. To do this, set AC’s StateHandler script’s Execution Order to a value
larger than the CinemachineBrain script.
146

4.6. Overriding perspective
While the game's regular Camera perspective is defined in the Settings Manager (see
Cameras overview), scenes can be made to override this on a per-scene basis. This is
useful if you want isolated sections of your game to make use of di!erent gameplay - for
example, a 2D map screen in an otherwise 3D game.
Before a scene's objects have been organised, you have the option to Override the
default camera perspective?.
Checking this box brings up further options to choose what kind of camera perspective
the scene will have. Once the Organise scene objects process has run, these options will
disappear.
If the scene overrides the default camera perspective, then you must ensure that your
Player is equipped to work in it. Both 2D and 3D players are able to work in 2D and 3D
scenes if they have no Collider or Rigidbody components, but this is not always ideal. In
most cases, it is recommended to rely on player-switching (see
Players) so that scenes
that override the camera perspective rely on their own Players.
NOTE: This feature is not available for First Person games.
NOTE: A few components and Actions (such as Player: Constrain) vary slightly based
on the current camera perspective. If a scene that overrides the global setting is open,
such fields will update to reflect the overriding scene. Therefore, you should only have
such scenes open when you are specifically working on them, and not unrelated
objects.
147

4.7. Camera e!ects
As explained in Cameras overview, only the MainCamera is normally rendered at runtime
- other cameras are used merely as reference points for the MainCamera to make use of.
Because of this, special considerations must be made with it comes to camera e!ects, as
they will only work when placed on the MainCamera object.
While most e!ects are necessary to be shown at all times, some e!ects may only need
showing when particular cameras are active. For example, a "VHS video" e!ect may be
necessary when switching to a POV shot of a security camera.
We can achieve this by enabling the e!ect only when the MainCamera is attached to the
security camera. To do this, we can use the
OnSwitchCamera event, which is called
whenever the MainCamera attaches itself to a new camera, and includes information
about the change.
The following code registers its own OnSwitchCamera function to the EventManager and
changes the state of an example "CustomE!ect" script on the MainCamera according to
the name of the new camera.
private void OnEnable ()
{
EventManager.OnSwitchCamera += SwitchCamera;
}
private void OnDisable ()
{
EventManager.OnSwitchCamera -= SwitchCamera;
}
private void SwitchCamera (_Camera oldCam, _Camera newCam, float time)
{
bool isSecurityCam = (newCam.gameObject.name == “SecurityCamera");
Camera.main.GetComponent <CustomEffect>().enabled = isSecurityCam;
}
The event function also includes a transition time, if the camera switch is not instant and
the e!ect needs to be changed over time.
NOTE: Custom events are a powerful way of injecting custom code into common AC
functions. For more information, see Custom events.
148

A common camera e!ect is one that provides a Depth of field e!ect. Such an e!ect often
requires a Focal length value to work. AC's GameCamera and GameCamera Third-person
camera types can set this value from within their Inspectors:
A custom script can read the focal length at any time with:
KickStarter.mainCamera.GetFocalDistance ();
This can be incorporated into a custom event, or called in an Update function, and sent to
the Depth of field e!ect's script component.
PROTIP: A script that synchronises Unity’s Post Processing Stack depth-of-field with
AC’s camera values can be found in the AC wiki.
149

4.8. Disabling the MainCamera
As explained in Camera overview, AC's MainCamera is the only one that does any
rendering in a typical AC scene - while GameCameras are used only for reference.
Also, Custom cameras covers how to make use of custom camera scripts in conjunction
with AC.
This will cover you for most cases of camera customisation. However, it may be
necessary to temporarily disable the MainCamera while some other asset or script runs.
For example, while playing a Director Timeline, or using a third-party transition e!ect
script.
In these cases, the MainCamera can be disabled with the following code:
AC.KickStarter.mainCamera.Disable ();
And subsequently re-enabled with:
AC.KickStarter.mainCamera.Enable ();
NOTE: The MainCamera should never be disabled during gameplay - only as part of a
cutscene - because AC relies on the MainCamera for things like interaction and
movement raycasting. The state of the MainCamera will also not be stored in save
game files, so you should always make sure that the MainCamera is re-enabled
whenever the player can save.
150

4.9. Camera scripting
The MainCamera can be retrieved with:
KickStarter.mainCamera;
And the camera that the MainCamera is attached to can be retrieved with:
KickStarter.mainCamera.attachedCamera;
The current focal distance, based on the settings of the attached camera, can be read
with:
KickStarter.mainCamera.GetFocalDistance ();
To disable, and then re-enable, the MainCamera at runtime, use:
KickStarter.mainCamera.Disable ();
KickStarter.mainCamera.Enable ();
If the MainCamera component’s Draw fade? option is unchecked, then it is down to a
custom script to render any full-screen fade e!ects. The intensity and texture that the
MainCamera would otherwise use can be read with:
KickStarter.mainCamera.GetFadeAlpha ();
KickStarter.mainCamera.GetFadeTexture ();
The camera system has the following events:
OnSwitchCamera (_Camera fromCamera, _Camera toCamera, float
transitionTime);
OnShakeCamera (float intensity, float duration);
OnCameraSplitScreenStart (_C
amera camera, CameraSplitOrientation
splitOrientation, float splitAmountMain, float splitAmountOther,
bool isTopLeftSplit);
OnCameraSplitScreenStop (_Camera camera);
151

5. Interactions#
152

5.1. Interaction methods
At their core, adventure games are played by clicking on interactive objects and getting
responses back. Interactive objects in AC are called Hotspots, and can apply to both
objects and NPCs in the scene. The response that a Hotspot can have is called an
Interaction.
A Hotspot can have many Interactions, and how which Interaction is decided when
clicking a Hotspot is dependent on the game's Interaction method. The Interaction
method is a critical setting of the game, as it a!ects not only how the game is played, but
also how it is built.
The Interaction method is set within the
Settings Manager's Interface settings:
It can have one of four values:
Context Sensitive
Allows the player to run simple "use" and "examine" interactions with a single mouse
clicks.
Choose Interaction Then Hotspot
Allows the player to select from a range of interaction icons, and then click on a Hotspot.
Choose Hotspot Then Interaction
Allows the player to click on a Hotspot, and then select from a range of interaction icons.
Custom Script
Allows the designer to create their own interaction system with custom scripting.
Changing this value will alter the Inspectors of Hotspots, and may require you to build an
Interaction Menu. Therefore, you should choose a value early in your game's
development rather than decide later on.
PROTIP: The 3D Demo uses Context Sensitive mode, while the 2D Demo uses Choose
Hotspot Then Interaction. For an example of Choose Interaction Then Hotspot, see the
Nine verbs UI template available on the website's Downloads page.
153

5.1.1. Context sensitive mode
In this mode, each Hotspot has a single "Use" interaction, and (optionally) a single
"Examine" interaction.
•
When using Mouse And Keyboard input, "Use" is mapped to the left mouse button
and the InteractionA input button, while "Examine" is mapped to the right mouse
button and the InteractionB input button.
•
When using Keyboard Or Controller input, "Use" is mapped to the InteractionA input
button, while "Examine" is mapped to the InteractionB input button.
•
When using Touch Screen input, "Use" is mapped to single-finger touches, while
"Examine" is mapped to two-finger touches.
Interactions are defined in a Hotspot's Inspector:
Hotspots can have multiple "Use" interactions defined, but only the first enabled one can
be triggered. The
Hotspot: Change interaction Action can be used to disable and enable
interactions during gameplay.
For more on Hotspots and interactions, see Hotspots.
Each "Use" interaction is assigned an icon defined in the Cursor Manager, which can be
used to inform the player of the type of interaction clicking a Hotspot will perform. For
example, hovering the mouse over an NPC might reveal the words "Talk to" along with a
speech bubble icon. How the UI reacts when hovering over a Hotspot is set within the
Cursor Manager, in the Interaction icons panel:
PROTIP: The 3D Demo uses this interaction method - see Running the demo games.
154

All Hotspot "Examine" interactions share the same icon, which set at the bottom of the
Interaction icons panel:
This panel is also used to decide the behaviour of the UI when a Hotspot features both a
"Use" and "Examine" interaction.
Each icon has a name and a texture. The texture can be a simple graphic, or animated if
it consists of multiple frames.
Inventory items are handled in a similar way - the Inventory Manager will allow you to
define a single “Use” and ”Examine” ActionList asset for each item. An item's "Use"
ActionList asset will override the default behaviour of selecting the item when clicked -
though you can still incorporate that with the Inventory: Select Action.
When an inventory item is selected, it can be used on other items or on Hotspots by
clicking on them.#
PROTIP: Take care to not get confused between “Look at”, and “Examine”. “Look at” is
one of the default cursor icons, and can be mapped to any “Use” interaction in the
Hotspot. To create an interaction that responds to right-clicks, define an “Examine"
interaction underneath instead,
155

5.1.2. Choose Interaction Then Hotspot
This mode allows for classic adventure-game interfaces used by the old LucasArts and
Sierra games, in which the cursor icon (or "verb") is chosen by the player before choosing
a Hotspot to interact with:
In this mode, a Hotspot can have as many "Use" interactions as you wish:
Each interaction is associated with a di!erent icon defined in the Cursor Manager's
Interaction icons section. While Context Sensitive mode leaves this association as purely
visual, here an icon is used to determine which interaction will run. For example, a
Hotspot's "Look at" interaction will only be run if it is clicked while the "Look at" icon is
selected.
The
Hotspot: Change interaction Action can be used to disable and enable interactions
during gameplay.
PROTIP: If Set first ‘Use’ Hotspot interaction as default? is checked in the Settings
Manager, invoking the DefaultInteraction input will cause the active Hotspot’s first-
enabled "Use" interaction to be run regardless of the active icon. This allows for the
“right-click secondary mode” seen in the classic SCUMM games. The same feature is
also available for inventory items via the Set first ‘Standard’ Inventory interaction as
default? option.
156

Icons can be selected in three ways:
•
By pressing either the right-mouse button or an input button named CycleCursors
to cycle through the available icons. (The last-selected
Inventory item can also
optionally be included). Backward-cycling can be performed by pressing an input
button named CycleCursorsBack.
•
By pressing an input button mapped to the icon directly, provided that Set
Interaction with specific inputs? is checked in the Cursor Manager. Each icon’s
associated input will then be listed beneath.
•
By clicking on an Interaction menu element associated with that icon.
The first and third methods combined allow for the same interface used by Kings Quest V
and Sam & Max Hit The Road, while the second and third allow for the same interface
used by Monkey Island 1 and 2 (classic editions).
You can enable the right-mouse button cycling of cursor icons in the Cursor Manager:
The Leave out of Cursor cycle? option for each icon allows you to have individual icons
ignored when cycling.
To represent a “Walk to” cursor inside Interaction elements and menus, a separate
Interaction icon can be defined and referenced via the Sync with interaction? field.
Additionally, each icon has an associated Input button name that, when clicked, will
cause it to be selected:
PROTIP: This mode can be demonstrated within the 2D Demo by changing the
Interaction method to Choose Interaction Then Hotspot. A classic "nine-verb"
interface example is available on AC's Downloads page.
157

To associate an icon with an Interaction menu element, change the element's Cursor field
in its list of properties:
Because it is possible to select icons that a Hotspot does not have an associated
interaction for, this mode introduces Unhandled interactions, which are "fallback"
interactions that run when no other more specific one can be found. Each icon has its
own unhandled interaction slot, which again is defined in the Cursor Manager:
You can choose if Inventory items are used the same way as Hotspots via the Inventory
interactions field in the Settings Manager's Inventory settings panel:
Choosing Multiple will allow you to create multiple interactions for items as well, while
Single will cause them to have "one-click behaviour" as seen in
Context Sensitive mode.
For more on this option, see Inventory interactions.
NOTE: You can revert back to Context Sensitive mode on a per-Hotspot basis with a
Hotspot's Single 'Use' interaction? checkbox. When checked, that Hotspot will behave
like all do in Context Sensitive mode, causing it to run the same interaction regardless
of the current cursor mode. This is useful if you want to create "room exit" Hotspots
that only ever need to be used in a single way.
158

5.1.3. Choose Hotspot Then Interaction
This mode is the most complex of the three, but has the most room for customisation. In
this mode, a Hotspot can have as many "Use" interactions, however the interaction that
gets run is chosen after the Hotspot. The advantage is that the player only has to see a
list of interactions that are relevant to each Hotspot - those that don't make sense can be
omitted.
A Hotspot can have as many "Use" interactions as you like:
Each interaction is associated with a di!erent icon defined in the
Cursor Manager's
Interaction icons section. While Context Sensitive mode leaves this association as purely
visual, here an icon is used to determine which interaction will run.
The Hotspot: Change interaction Action can be used to disable and enable interactions
during gameplay.
PROTIP: The 2D Demo uses this interaction method - see Running the demo games.
159

The Select Interactions by field under Interface settings in the Settings Manager
determines how the interaction to run is chosen once a Hotspot is clicked:
It has the following options:
Clicking Menu
Which involves clicking an icon from a Menu that pops up
Cycling Menu And Clicking Hotspot
Which involves using input buttons to cycle through icons in a Menu that pops up
Cycling Cursor And Clicking Hotspot
Which involves using input buttons to change the cursor's icon
Clicking Menu
In this mode, an Interaction Menu appears when a Hotspot is clicked on - and the user
clicks on an icon inside it. An Interaction Menu is one with an Appear type of On
Interaction, and contains a selection of Interaction menu elements - each one associated
with a particular Cursor icon:
Further options in the Settings Manager allow you to choose when this Menu is turned on
and o!, as well include inventory items in it:
For inventory items to show, the Interaction Menu must also have an InventoryBox
element with an Inventory box type of Hotspot Based.
160

Cycling Menu And Clicking Hotspot
This mode is similar to the previous, only the player presses Input buttons to select and
trigger an icon inside an Interaction Menu.
The buttons CycleInteractionsLeft and CycleInteractionRight (or an axis named
CycleInteractions), are used to change the selected icon, while the left-mouse /
InteractionA button is used to run the interaction.
Cycling Cursor And Clicking Hotspot
This option removes the need for a Menu, and simply changes the cursor icon to
represent the selected interaction. The right-mouse-button, or CycleCursors input
button, can be used to cycle through the various interactions (and CycleCursorsBack will
cycle in reverse). Optionally, the cursor can be cycled automatically once an Interaction is
run. The interaction itself is run be pressing either the left-mouse button or a button
named InteractionA.
You can choose if Inventory items are used the same way as Hotspots via the Inventory
interactions field in the Settings Manager's Inventory settings panel:
Choosing Multiple will allow you to create multiple interactions for items as well, while
Single will cause them to have "one-click behaviour" as seen in
Context Sensitive mode.
For more on this option, see Inventory interactions.
PROTIP: The default interface provided by the New Game Wizard, as well as the demo
game's Menu Managers, include an Interaction Menu that's already set to work with the
default cursor icons "Use", "Look at" and "Talk to".
NOTE: As the interaction icons are not clicked directly in the Menu, the Menu should
be set to Ignore cursor clicks? to avoid conflict.
PROTIP: If interactions are displayed in an Interaction Menu, only those that are
relevant to the active Hotspot will be shown by default. This can be amended by
unchecking Auto-hide Interaction icons based on Hotspot? in the
Settings Manager.
If unchecked, “Unhandled” interactions for each cursor icon can then be set in the
Cursor Manager - similar Choose Interaction Then Hotspot mode.
161

NOTE: You can revert back to Context Sensitive mode on a per-Hotspot basis with a
Hotspot's Single 'Use' interaction? checkbox. When checked, that Hotspot will behave
like all do in Context Sensitive mode, causing it to run the same interaction regardless
of the current cursor mode. This is useful if you want to create "room exit" Hotspots
that only ever need to be used in a single way.
162

5.1.4. Custom interaction systems
While Adventure Creator has a range of options that can be used to recreate many
popular adventure game interfaces, it's possible to create a completely custom one
through scripting. If your Settings Manager's Interaction method is set to Custom
Script, then
Hotspots will only be selectable by calling script functions.
The Hotspot script component contains the following functions, that can be used to
trigger its various interactions:
RunUseInteraction (int iconID = -1)
Runs the Hotspot's 'Use' interaction. If no icon ID is supplied (as defined in the Cursor
Manager), then the first-available use interaction will be run.
RunExamineInteraction ()
Runs the Hotspot's 'Examine' interaction.
RunInventoryInteraction (InvItem invItem = null)
Runs the Hotspot's 'Use with inventory' interaction. If no inventory item is supplied, then
the currently-selected inventory item will be run.
RunInteraction (Button button)
Runs the interaction associated with the supplied Button - see below.
ShowInteractionMenus ()
Shows any Interaction menus (i.e. with an Appear type of On Interaction), connected to
the Hotspot.
ShowInteractionMenu (Menu menu, bool includeInventoryItems)
Shows a specific Interaction menus, connected to the Hotspot. This menu need not have
an Appear type of On Interaction.
It also contains functions to retrieve a use and inventory interaction based on the
interaction’s ID and inventory item ID respectively. They both return a
Button class, which
contains the interaction data:
GetUseButton (int iconID)
GetInvButton (int invID)
The currently-active Hotspot can be read with:
AC.KickStarter.playerInteraction.GetActiveHotspot ();
PROTIP: Included with AC is the Custom Interaction System Example script, which
demonstrates how Hotspots and inventory items can be selected and interacted with
from a GUI, bypassing AC's internal interface.
163

Even with a custom interaction system, Hotspots are still detected according to the
Hotspot detection method. Therefore, if you wish to control how Hotspots are first
selected, this must be set to Custom Script as well. You can then select any Hotspot
(updating the "Hotspot label" and highlighting it in the scene) with:
AC.KickStarter.playerInteraction.SetActiveHotspot (Hotspot hotspot);
Note that a Hotspot does not need to be selected or highlighted in order to have its
interactions triggered through script.
When it comes to inventory interactions, the above settings do not a!ect the way
InventoryBox elements behave - you can still use, select and combine items as normal. In
order to change the way an InventoryBox menu element works, you can set its Inventory
box type setting to Custom Script to disable regular behaviour, and then use the
OnMenuElementClick custom event to run your own code as appropriate.
A typical event reads as:
private void MyElementClick (Menu _menu, MenuElement _element, int
_slot, int _buttonPressed)
{
Debug.Log ("Menu: " + _menu.title + ", Element: " + _element +
", Slot: " + _slot + ", MouseState: " + _buttonPressed);
}
For more, see Custom events.
Either by using custom events or otherwise, Inventory items (InvItem class) can have their
interactions triggered in a manner similar to that of Hotspots:
RunUseInteraction (int iconID = -1)
Runs the Inventory item's 'Use' interaction. An icon ID (as defined in the Cursor Manager)
can be supplied if the Settings Manager's Inventory interactions field is set to Multiple.
RunExamineInteraction ()
Runs the Inventory item's 'Examine' interaction, if the Settings Manager's Inventory
interactions field is set to Single.
CombineWithItem (InvItem otherInvItem)
Combines the Inventory item with another
Select ()
Selects the inventory item, but does not use it
ShowInteractionMenus ()
Shows any Interaction menus (i.e. with an Appear type of On Interaction), connected to
the item.
164

ShowInteractionMenu (Menu menu, bool includeInventoryItems)
Shows a specific Interaction menus, connected to the item. This menu need not have an
Appear type of On Interaction.
A List of all inventory items defined by your game can be found with:
AC.KickStarter.inventoryManager.items
A List of all inventory items carried by the player can be found with:
AC.KickStarter.runtimeInventory.localItems!
165

The currently-selected inventory item can be read with:
AC.KickStarter.runtimeInventory.SelectedItem;
And can be deselected with:
AC.KickStarter.runtimeInventory.SetNull ();
Finally, if your interaction system involves mouse-clicks on the screen, you may need to
“reset” the mouse click afterwards in order to prevent any of AC's other systems (such as
point-and-click pathfinding) from making use of it. Do to that, just call:
AC.KickStarter.playerInput.ResetMouseClick ();!
NOTE: Entries in this List can be null - therefore you should always do a null check
when reading entries in this List.
166

5.2. Actions and ActionLists
At the core of AC's visual-scripting system is the Action. An Action is a code block that
performs a specific task. Actions come in two types:
An instruction
For example, adding an item to the player's Inventory.
A query
For example, checking the value of a
Variable.
Actions are chained together to form ActionLists, which can be used to create cutscenes,
process logic, and more. There are five types of ActionList:
Cutscene
A component, run when the scene begins or when called by another ActionList.
Interaction
A component, run when the player clicks on a Hotspot. See Interaction methods.
Trigger
A component, run when the player or some other object passes through a volume in the
scene.
DialogOption
A component, run when the player chooses an option from a Conversation.
ActionList asset
An asset file, and run whenever something scene-independent is needed - for example,
when examining an inventory item.
ActionLists can be run from logic objects (such as
Hotspots), when a scene starts via the
Scene Manager, when the game begins via the Settings Manager’s ActionList on start
game field. They can also be run from custom scripts, by invoking their Interact method
- this is true for both scene-based lists and asset files.
PROTIP: Custom Actions are a powerful way of extending functionality, as they allow
you to run your own code within any ActionList. A series of tutorials on writing them
can be found online.
NOTE: Actions cannot exist in prefabs. If you want an ActionList to exist outside of a
scene, use an ActionList asset.
167

Each ActionList type has its own set of properties, which can be viewed and set at the top
of their Inspector:
An ActionList's Actions can be edited by clicking Edit Actions underneath. This will bring
up the
ActionList Editor, where Actions can be added, removed, and modified.
“Instruction” Actions have an After running field. With this, you can choose what
happens after an Action has been performed. You can stop the ActionList, skip to
another Action within that ActionList, or run a di!erent Cutscene. “Query" Actions allow
you to perform a di!erent task depending on its outcome - allowing you to create
branching gameplay and puzzle logic.
To aid testing, ActionLists can be run at any time while the game is running – just click
Run now in its Inspector. Actions can also be set to pause the Unity Editor just before
they are run – allowing you to debug any problems more easily. This is done via the
Toggle breakpoint option in an Action's context menu.#
NOTE: If the Actions source field is changed to Asset File, then the Actions will be
pulled from an ActionList asset. This is useful when collaborating in team projects, so
that Actions can be modified outside of scene files. It is also recommended to do this
when working with prefabs, since Actions themselves cannot exist in prefabs.
PROTIP: To have an ActionList call another and wait until it has finished running, use
the ActionList: Run Action. To run multiple Actions and ActionLists in parallel, use the
ActionList: Run in parallel Action.
168

5.2.1. Standard Actions
AC comes included with over 100 Actions, and more can be added by writing custom
Actions or downloading them from the AC wiki.
Actions are sorted into the following categories:
•
ActionList
•
Camera
•
Character
•
Container
•
Dialogue
•
Document
•
Engine
•
Hotspot
•
Input
•
Inventory
•
Menu
•
Moveable
•
Object
•
Objective
•
Physics
•
Player
•
Save
•
Scene
•
Sound
•
ThirdParty
•
Variable
All Actions available to use are listed in the Actions Manager. The following are present
in all AC games:#
169

ActionList
These Actions deal with the playback and management of ActionLists.
Check running
Queries whether or not a supplied ActionList is currently running. By looping the If
condition is not met field back onto itself, this will e!ectively “wait” until the supplied
ActionList has completed before continuing. Can also query if the ActionList this is
placed in is currently being skipped - see
Skipping cutscenes.
Check parameter
Queries the value of a parameter sent to either the parent ActionList, or a supplied one,
by the ActionList: Run and ActionList: Set parameter Actions. For more, see ActionList
parameters.
Comment
Stores text for editor display only, which is useful for keeping track of complex lists. The
comment text can optionally be sent to the Console window when the Action is run, either
as a log, warning, or error message.
Kill
Instantly stops a scene or asset-based ActionList from running.
Pause or resume
Pauses or resumes an ActionList. When instructed to pause, any currently-running
Actions will first be completed.
PROTIP: Any Action can be assigned a comment when using the ActionList Editor
window - and printed in the Console via the Settings Manager's Print Action
comments in Console? option.
NOTE: Killing an ActionList will stop Actions from running, but will not stop the e!ects
that Actions have already made on them. For example, if a character is mid-speech
due to the
Dialogue: Play speech Action, killing the list will not stop them from
speaking. This must be done separately with e.g. the Dialogue: Stop speech Action.
PROTIP: The triggering of Actions is what pauses - not the Actions themselves.
Actions that are running mid at the time of the call to pause will first be completed.
However these Actions can optionally be re-run when the ActionList is resumed.
170

Run
Runs any ActionList, either from the beginning or from a particular Action. If the new
ActionList to be run has parameters (see ActionList parameters), then their values can be
set within this Action - and without actually running the ActionList, if desired.
Run in parallel
Runs up to ten subsequent Actions (whether in the same list or in a new one)
simultaneously. This is useful when making complex cutscenes that require timing to be
exact.
Set parameter
Sets the value of a single parameter of an ActionList. The new value can be set manually,
copy from another parameter, or by copying the value of a
Global Variable. Integer,
boolean, and float parameters can also be given random values. To set the value of all
parameters at once, use the ActionList: Run Action. For more, see ActionList parameters.
Wait for preceding
Triggers its After running command only when all Actions that can run it have done so.
This allows for multiple chains of Actions created by the ActionList: Run in parallel
Action to wait for one another before continuing - and is useful if the duration of each
chain is dynamic or unknown.#
NOTE: To save the pause-state of a scene-based ActionList, you must add a Constant
ID component - see Saving scene objects. To save the pause-state of an ActionList
asset, you must give it a unique name and place it in a Resources folder - see Saving
asset references
.
PROTIP: By setting a parameter's value, and running Actions that use it, multiple times
in a sequence, it can behave similar to an array of values.
PROTIP: This Action can be used to set an Inventory Item parameter's value from a
Global Integer variable that references its ID, or a Global String variable that references
its name.
171

Camera
These Actions deal with the camera system - see Cameras overview for more.
Check active
Use to determine if a specific camera is currently active.
Crossfade
Crossfades to a new camera, over a specified time.
Fade
Fades the camera in or out. The fade speed can be adjusted, as can the overlay texture.
Rotate third-person
Rotates the
GameCamera Third Person to a fixed angle – either in World Space or relative
to its target.
Shake
Causes the camera to shake, giving an earthquake screen e!ect. The camera can
translate, rotate, or both.
Split-screen
Displays two cameras on the screen at once, arranged either horizontally, vertically, or
with one overlaid on top of the other. When arranged side by side, you can choose which
camera responds to mouse clicks. When one is overlaid atop the other, only the former
will respond to clicks.
Switch
Switches to a specified camera - either instantly or over time.#
172

Character
These Actions deal with modifying or instructing Players and NPCs.
Animate
Can play or stop a custom animation, change a standard animation (idle, walk, run or
talk), change a footstep sound, or revert the character to idle. The exact functionality of
this Action depends on the character's
Animation engine.
Change rendering
Overrides a character's scale, sorting order, sprite direction, or
Sorting Map. It can also
be used to redefine which directions a character can face. This is primarily intended for
2D games.
Face direction
Makes a character turn, either instantly or over time, to face a direction relative to either
the camera or themselves – i.e. up, down, left or right.
Face object
Makes a character turn, either instantly or over time, to another object or copy an object's
rotation. A character can turn with their body, or look with their head - see
Head turning.
If a
First-person Player is being a!ected, the camera can optionally be tilted as well.
Hold object
Places an object in a character's attachment point (i.e. hand) - either by parenting the
object to the character’s hand transform (as set in their Inspector), or by using IK to move
the character’s hand itself. If the GameObject is a prefab, and not present in the scene at
runtime, it will first be instantiated. This Action also allows a held object to be dropped -
with the option to remove it from the scene. The dropped object can be assigned to a
GameObject parameter if one is defined - see
ActionList parameters.
Move along path
Moves the character along a pre-determined Path - see Character movement. Will adhere
to the speed setting selected in the relevant Paths object. Can also be used to stop a
character from moving, or resume moving along a path if it was previously stopped.#
NOTE: In order to record a change in a character's footstep sounds, you must instead
rely on the
Sound: Change footsteps Action.
NOTE: If the object is a Scene Item, you can record the holding of objects on the Player
character by attaching the Remember Scene Item component.
173

Move to point
Moves a character to a given Marker - Pathfinding methods. If Wait until finish is
checked, then a time limit can be applied. If the time taken to move exceeds this limit,
then the character can be made to either teleport or stop moving.
NPC follow
Makes an NPC follow another NPC or the Player. If they exceed a maximum distance from
their target, they will run towards them. Optionally, they can be made to move to random
points around the character they are following, as opposed to simply getting close. If the
NPC is an inactive Player (see
Player switching), they have the option of following the
active Player across scenes.
Rename
Changes the display name of a character when subtitles are used.
Switch portrait
Changes the “speaking” graphic used by characters. To display this graphic in a Menu,
place a Graphic element of type Dialogue Portrait in a Menu with an Appear type of
When Speech Plays.
PROTIP: If the walk-to point is set by a GameObject parameter, and the GameObject is
a
Hotspot, then the character will move to that Hotspot's Walk-to Marker.
NOTE: Making an NPC move with another Action will stop them from following anyone.
NOTE: To save a character’s change in portrait graphic, you must attach the
Remember Portrait component - available on the AC wiki.
174

Container
These Actions deal with reading and changing the contents of Containers.
Add or remove
Adds or removes inventory items from a Container, and optionally transferring it to the
Player’s Inventory or another Container.
Check
Checks if a container is carrying a given inventory item, or if it is carrying a given number
of items.
Open
Opens a Container, causing any Menu with an Appear type of On Container to open. To
close the Container, close the Menu with the
Menu: Change state Action.
Alternatively, a Container can be mapped to a specific InventoryBox element inside a
Menu, allowing multiple Containers to be open simultaneously.#
175
Dialogue
These Actions deal with the playback of character speech and Conversations.
Play speech
Makes a character speak. If no character is specified, the speech line will be considered
to be narration. A “thinking” e!ect can be produced by opting to not play any animation.
For speech to be shown, an appropriate
Subtitles Menu with an Appear type of When
Speech Plays must be present in the
Menu Manager. If Run in background? is checked,
the Action will not wait for the line to finish and the ActionList will continue instantly. If
the Wait time o!set is greater than zero, then the ActionList will wait for that amount of
time once the speech has finished. To insert dynamic elements in speech text, see Text
tokens
. Text can also make use of Unity’s Rich Text tags.
Rename option
Renames a conversation's dialogue option label.
Start conversation
Runs a conversation, and displays its available dialogue options via a Conversation Menu.
This will be automatic for any
Menu with an Appear Type of During Conversation and a
DialogList element. Alternatively, it can be set to display in a specific Menu.
Stop speech
Ends any currently-playing speech instantly, whether it be background, blocking, or both.
Can be limited to stop speech spoken by specific characters, as well as narration.
Wait for speech
Waits until a particular character has finished speaking. This is most useful when the line
in question has been set to play in the background.
PROTIP: Even with a Subtitles Menu, speech will only be shown if the Subtitles option
is enabled. To set the default state of the Subtitles option, click Reset Options data in
the Setting Manager and check/uncheck the Show subtitles? box.
NOTE: If the ActionList that runs this Action has a When running value of Run In
Background, then the speech line will be considered background regardless of its own
Run in background? setting. Background and blocking speech can be displayed in
separate Subtitle menus by altering the Menu’s For speech of type field.
NOTE: By default, this Action ceases its ActionList and a conversation's DialogOptions
run when an option is chosen. Checking Override options?, however, allows you to
keep the resulting Actions all within the same ActionList. For an example of this, see
the PlayIntroConv Cutscene in the 3D Demo scene, “Basement”.
176

Toggle option
Sets the display of a Conversation’s dialogue option. If an option is locked, it cannot be
shown again until it is unlocked.#
177

Document
These Actions deal with the manipulation of Documents.
Add or remove
Adds, removes, or clears all Documents held by the Player. A list of all held Documents
can be displayed with an
InventoryBox element.
Check
Queries whether or not a particular Document is being held by the Player.
Open
Activates a Document for viewing via a
Menu with an Appear type of On View
Document. When such a Menu is closed, the Document is considered closed.#
178
Engine
These Actions deal with game-wide and scene-independent behaviours.
Change timescale
Changes the playback speed of gameplay to a value between 0 and 1. This allows for
slow-motion e!ects. Unity’s “Time.fixedTimeScale” can also be optionally adjusted, in
case the physics system needs to work in slow motion as well.
Check platform
Queries the platform that the game is running on or being built for, which is useful when
creating platform-specific content.
Control Timeline
Controls the playback of Timelines used by Playable Director components, by allowing the
user to play and stop them at runtime. The Timeline asset can be changed, and the track
bindings can also be modified to allow di!erent GameObjects each each track.
The MainCamera can be optionally disabled while it runs, to allow the Timeline to have
camera control. Note that this is only for Unity 2017 or later.
End game
Ends the current game, either by loading an autosave, resetting the scene, resetting all
data, restarting the game, or quitting the game executable. If restarting, a new scene to
switch to must be specified.
Manage systems
Enables and disables individual systems within Adventure Creator, such as Interactions.
Disabling systems allows other assets to take over control. Can also be used to change
the
Movement method, as set in the Settings Manager., but note that this change will not
be recorded in save games.
Wait
Waits a set time before continuing. If a negative time, the Action will wait for one frame.
NOTE: To record the playback state of a Playable Director in save games, attach the
Remember Timeline script to it.
NOTE: If the Movement method is changed, the Settings Manager asset file will by
modified - so you should set the game's default value in your Settings Manager's
ActionList on start game. This change will not be stored in save game data either,
and you should use Variables to keep track instead.
179

Play movie clip
Controls playback of a Video Player component. The loaded video clip asset can
optionally be changed. On WebGL, this is done by supplying a url to download the video
from.
PROTIP: If the ActionList's When running field is set to Run In Background, this will
act as a background timer - otherwise, it will pause the game.
NOTE: To record the playback state of a a Video Player component in save games,
attach the Remember Video Player script to it.
180
Hotspot
These Actions deal with the reading and modification of Hotspots.
Change interaction
Enables and disables specific Interactions on a Hotspot.
Check interaction enabled
Checks if a specific Interaction on a Hotspot is currently enabled.
Check selected
Checks if a specific Hotspots is currently selected. If a GameObject
parameter is defined,
it can optionally be set to the active Hotspot.
Enable or disable
Turns a Hotspot on or o!.
Rename
Renames a Hotspot, or an NPC with a Hotspot component.
Run interaction
Runs a given Hotspot Interaction manually, without requiring input from the player. The
Interaction’s “Player action” field can optionally be ignored.#
NOTE: To record the enabled state of a Hotspot in save games, attach the Remember
Hotspot script to it.
181

Input
These Actions deal with the reading of inputs.
Check
Checks to see if the player is pressing a mouse key, touching the screen, or pushing a
button/axis as defined in Unity's Input Manager at the time it is run.
QTE
Initiates a
Quick-time event for a set duration. The QTE type can either be a single key-
press, holding a button down, or button-mashing. The Input button must be defined in
Unity's Input Manager.
Simulate
Simulates the pressing of an input button or axis. The input name must be one
recognized by AC in order to take e!ect - see Input descriptions for a list of available
inputs. Note that the input’s recognition is still dependent on the game’s current state -
so gameplay inputs (e.g. FlashHotspots) will need to be simulated from background logic
in order to take e!ect.
Toggle active
Enables or disables an
Active Input.#
NOTE: If you need to check continuously for an input, use Active inputs instead of
looping this on itself.
PROTIP: When relying on Touch-screen input, leaving the Input button name field will
allow touches anywhere on the screen to be valid.
182

Inventory
These Actions deal with the reading and manipulation of the player's Inventory items.
Add or remove
Adds or removes an item from the player's inventory. Items are defined in the
Inventory
Manager. If the player can carry multiple amounts of the item, the exact number added
or removed can be set. If the game supports player-switching, the inventory of inactive
players can also be modified.
Change interaction
Enables and disables specific Interactions on an Inventory item. If Multiple
Inventory
interactions are enabled, this includes Standard as well as Combine Interactions.
Otherwise, only Combine Interactions can be a!ected.
Check
Queries whether or not the player is carrying an item, or how many items in total they
currently hold. If categories are defined, the query can also be limited to a specific
category.
Check selected
Queries whether or not the chosen item, or no item, is currently selected. Note that when
used in a gameplay-blocking ActionList, the active item is automatically deselected.
Therefore, this Action also allows you to query the last-selected item. If
Inventory
categories are defined, this Action can also be used to query which category the
currently-selected item is in.
Crafting
Either clears the current arrangement of crafting ingredients, or evaluates them to create
an appropriate result (if this is not done automatically by the recipe itself). The e!ects
can either be applied to all Crafting elements, or a specific one. See
Crafting.
Property to Variable
Converts an item’s
property value to a Variable, or vice-versa. The item in question can
either be a specific one, or the one currently selected by the Player. If converting a
property to a Variable, you have the option to read the “live” values of the item if the
Player is carrying it - as opposed to the default values supplied in the Inventory Manager.
This is because the property values of items held by the Player can be modified through
script.
NOTE: Interactions can only be changed for items that are currently held by the Player.
If the Player is carrying multiple instances of the specified item, all will be a!ected.
183

Scene item
Transfers an Inventory item into the scene, or vice-versa, by referencing its Linked
prefab. See Scene items. If the ActionList has a GameObject parameter defined, that
parameter's value can optionally be set to the spawned object.
Select
Selects a chosen inventory item, as though the player clicked on it in the Inventory menu.
Will optionally add the specified item to the inventory if it is not currently held.#
184

Menu
These Actions deal with the reading and manipulation of Menus.
Change state
Provides various options to show and hide both menus and menu elements. Menus can
also be locked, which will prevent them from opening even if their Appear type matches
the current conditions. Can also add or remove a Journal element's pages.
Check num slots
Queries the number of slots that a given menu element has. This can be used on an
InventoryBox element, for example, to determine how many Inventory items the player is
carrying.
Check state
Queries the visibility of menu elements, and the enabled or locked state of menus.
Update content
Alters the an element’s label text, the background graphic of Adventure Creator
elements, or the texture shown by Graphic elements. The new content can be overridden
with an Inventory item or Document
parameter.
Select element
Selects either a supplied element, or the first-available, within a given menu. Note that
this only works if the menu can be directly-controlled - see Navigating menus directly.
This works best when placed as the first Action in the menu’s ActionList when turn on
asset.
Regardless of the menu’s control style, this Action can also be used to simulate the
clicking of the specified element.
Set Journal page
Changes a Journal’s selected page to a specific index.#
PROTIP: Some elements have multiple slots - for example, the DialogList element has
a di!erent slot for each displayed
Conversation option. Individual slots cannot be
hidden, since they are controlled by the system they are linked to. To show or hide
individual slots, instead manipulate the linked data. For example, Conversation
options are shown and hidden using the Dialogue: Toggle option Action.
NOTE: To record new pages added to a Journal in save games, they must be added to
the Speech Manager - see Gathering game text.
185

Moveable
These Actions deal with the reading and manipulation of Draggable and PickUp objects.
Check held by player
Queries whether or not a Draggable or PickUp object is currently being manipulated.
Check track position
Queries how far a Draggable object is along its track.
Set track position
Moves a Draggable object along its track automatically to a specific point, provided that
its Drag Mode is set to Lock To Track. The e!ect will be disabled once the object
reaches the intended point, or the Action is run again with the speed value set as a
negative number. It is also possible to use this Action to change which track it is
attached to.
Toggle Track region
A
Drag track can be assigned regions, that mark areas along it that can be detected or
snapped towards. This Action disables and enables them.#
186

Object
These Actions deal with scene objects and miscellaneous scripts.
Add or remove
Instantiates or deletes GameObjects within the current scene. If the ActionList has a
GameObject
parameter defined, that parameter's value can optionally be set to the
instantiated object.
Animate
Causes a GameObject to play or stop an animation, or modify a Blend Shape. The
available options will di!er depending on the chosen animation engine.
Blend shape
Animates a Skinned Mesh Renderer's blend shape by a chosen amount. If the Shapeable
component attached to the renderer has grouped multiple shapes into a group, all other
shapes in that group will be deactivated.
Call event
Invokes a public function present on another GameObject.
Change material
Changes the material on any scene-based mesh object.
Change Tint map
Changes which Tint map a Follow Tint Map component uses, and the intensity of the
e!ect. For more, see
Tint maps.
Check presence
PROTIP: If the project uses Addressables, you can optionally reference the object to
spawn by their Addressable name.
NOTE: To record the state of added GameObjects in save games, follow the steps
outlined in Saving asset references.
NOTE: This Action cannot pass parameters to its target function. To pass an integer
parameter, use the Object: Send message Action.
NOTE: To record modified materials in save games, place both the new and the
original materials in a Resources asset folder, and give the a!ected GameObject the
Remember Material component - see Saving asset references.
187

Use to determine if a particular GameObject or prefab is present in the current scene.
Check tag
Use to determine if a GameObject or prefab has a particular tag.
Check visibility
Use to determine if a particular Renderer is visible, either at all in the current scene, or
within the view of the currently-active camera. If the GameObject has a
Sprite Fader
component attached, then this will also be accounted for. UI Canvas Group components
can also be checked.
Fade sprite
Fades a sprite in out out over a set time. The sprite in question must have the Sprite
Fader component attached to it.
Highlight
Gives a glow or continuous pulse e!ect to any mesh object with a Highlight component.
Can also be used to make Inventory items glow, making it useful for tutorial sections.
Record transform
Allows the position, rotation, or scale of a GameObject to be recorded in a Vector3
Variable, both in World and Local space.
Send message
Sends a given message to a GameObject. Can be either a message commonly-used by
Adventure Creator (Interact, TurnOn, etc) or a custom one, with an integer argument.
Set parent
Parent one GameObject to another. Can also set the child's local position and rotation.
NOTE: If the visibility within the view of the camera is being checked, the condition will
be met if it is also visible with the Scene window.
NOTE: To record the state of a sprite's fade in save games, attach the Remember
Visibility component.
PROTIP: Many of AC’s logic components respond to the common messages provided.
A Trigger can be disabled, for example, by passing the Turn O! message.
188
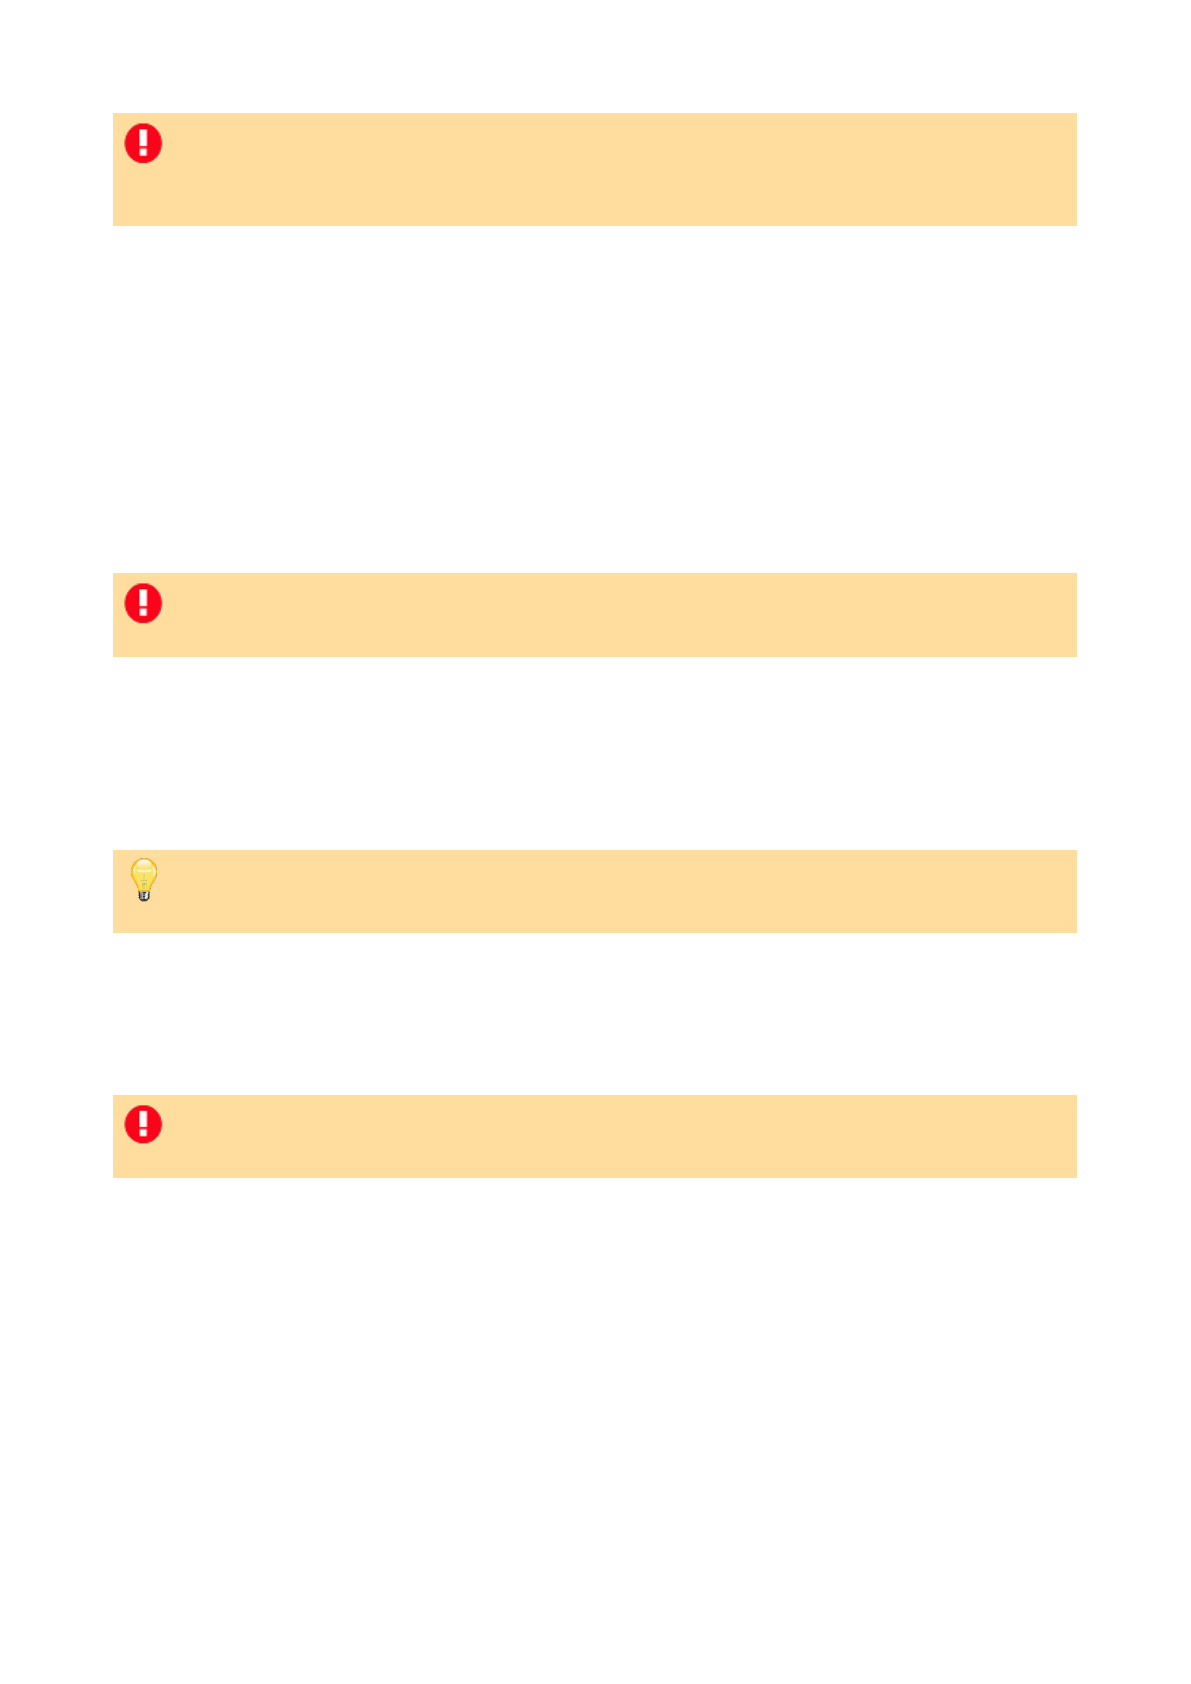
Teleport
Moves a GameObject to a Marker instantly. Can also copy the Marker's rotation. The final
position can optionally be made relative to the active camera, the player, a Vector3, or
any GameObject in the scene. For example, if the Marker's position is (0, 0, 1) and
Position relative to is set to Relative To Active Camera, then the object will be
teleported in front of the camera.
If no Marker is set, but a relative Vector3 value is supplied, the GameObject will move by
that amount instead.
Transform
Moves, rotates or scales a GameObject over time, or copies the Transform of a Marker in
the scene. The GameObject must have a
Moveable component attached. Position and
rotation changes can be made in either local or world space.
Visibility
Hides or shows a GameObject. Can optionally a!ect the GameObject's children. Can also
be used to enable or disable UI Canvas and Canvas Group components.
NOTE: To record an object's parentage in save games, attach the Remember
Transform component and check Save change in Parent? - see Saving asset
references. All possible parent objects must also have a Constant ID component.
NOTE: To record an object's position in save games, attach the Remember Transform
component.
PROTIP: For finer control over the way an object moves, it is often better to attach an
Animator, create animations, and play them with the Object: Animate Action.
NOTE: To record an object's visibility in save games, attach the Remember Visibility
component.
189

Objective
These Actions deal with the querying and manipulation of Objectives.
Set state
Updates an Objective's current state. The updated Objective can optionally be "selected"
for display by Label and Graphic elements.
Check state
Queries an Objective's current state.
Check state type
Queries whether an Objective's current state is Active, Completed, or Failed.#
190

Physics
These Actions make use of Unity’s provided physics system.
Raycast
Fires a Raycast (or a SphereCast if the radius is non-zero), either in a given direction, or
between two points. Two outputs are provided - the top being used if the ray hit an
object in the supplied LayerMask. If the ActionList has GameObject and Vector3
parameters defined, they can optionally be mapped to the hit GameObject and hit
position respectively.#
191

Player
These Actions deal with reading and manipulating the current Player.
Check
Queries which Player prefab is currently being controlled. This only applies to games for
which Player switching has been set to Allow in the Settings Manager.
Constrain
Locks and unlocks various aspects of Player control, such as what direction he can move
in, or his ability to run.
Lock to Path
When using
Direct or First-person movement, this can be used to restrict the Player’s
motion to a specific Path during gameplay. This is useful for controlled gameplay
sequences where you only want the Player to move in a certain direction. Additional
options allow you to choose which node along the Path to start at, and whether or not the
Player can move in both directions along the Path.
Switch
Swaps out the Player prefab mid-game - see
Player switching. If the new Player is in a
di!erent scene, that scene will be loaded automatically - and its OnLoad cutscene will be
triggered, if defined.
Teleport inactive
When multiple Players are defined - see
Player switching - this Action can be used to
teleport one of the currently-unused Players to a new scene. They can be set to appear at
a specific PlayerStart, the scene’s default, or a PlayerStart based on which scene they were
previously in.#
192

Save
These Actions relate to the reading and manipulation of save game files - see Saving and
loading overview
.
Check
Queries whether or not saving is currently possible (to aid in the display of a “Save” Menu
Button, for example), whether or not a particular save slot is filled, whether a particular
Save profile exists (by name or index), or how many profiles or save game files have been
created (to aid in the display of a “Continue game” Button, for example).
Manage profiles
Creates, renames, deletes and switches Save profiles, if enabled. If the ActionList that
contains this Action has an Integer parameter, then it can be set when called from a
Button or ProfilesList menu element.
Manage saves
Renames and deletes save game files, as referenced by the slot index number of a
SavesList menu element. If the ActionList that contains this Action has an
Integer
parameter, then it can be set when called from a Button or SavesList menu element.
Save or load
Allows you to load, continue the last-recorded, or save a save-game file. Note that
saving will not be permitted if any gameplay-blocking ActionList other than the one that
contains this Action is running, or if a Conversation is active. The Save: Check Action can
be used to determine if a save will succeed beforehand. This Action can also be used to
optionally load a game selectively, i.e. only certain elements, such as inventory or
variables.
Set Option
Allows you to set the state of any default
Options data, i.e.: the active language, subtitle
display, and audio volumes. These values are normally changed by the user in the default
Options menu
, but with this you can set them directly. To set the value of Options-linked
Variables, use the Variable: Set Action.#
193

Scene
These Actions deal with manipulating the currently-open scene(s).
Add or remove
Adds or removes a scene without a!ecting any other currently-open scenes. If a scene is
added, it will be added as a sub-scene and the “active” scene will be unchanged. This is
designed to provide the possibility of open-world adventures, and thus the new scene's
PlayerStarts will be ignored when it is loaded. If this Action is used to remove the “active”
scene, then the first-available sub-scene will become the new active scene.
Any scene added in this way should be configured using the Scene Manager. If not, you
will need to attach a SubScene component to an object in it, and configure its Inspector.
This will ensure that such changes are recorded in save-game files.
Change setting
Changes any of the following scene parameters: NavMesh, Default PlayerStart, Sorting
Map, Tint Map, Cutscene On Load, or Cutscene On Start. When the NavMesh is a
Polygon
Collider, this Action can also be used to add or remove holes from it.
Check
Queries either the current scene, or the last one visited. This is useful if you want to run
a cutscene that is a continuation of one in a previous scene. If
Player switching is
enabled, you can query the scene visited by a specific Player.
Check attribute
Queries the value of any of the pre-defined attributes in the main scene that's open. See
Scene attributes.
Switch
Switches to a new scene, bringing the active Player along with it. The scene must be
listed in Unity's Build Settings. If asynchronous loading is enabled (see Loading screens),
this Action can also be used to preload a scene only, so that loading time is reduced when
it is next opened.
NOTE: This Action is not compatible with scenes that use local Players (i.e. Player
objects that are stored within the scene file), nor those that override default camera
perspective - see
Overriding perspective.
NOTE: When saving, the active Camera can only be recorded if it is in the “active” (or
main) scene. To save a Camera within a sub-scene, the active scene must be removed
so that the sub-scene becomes the new active one.
194

Switch previous
Switches (or preloads) to the previous scene. If Player switching is enabled, you can
choose between the Player’s previous scene, or whichever was last loaded.#
PROTIP: A crossfade transition between scenes can be achieved by checking Overlay
current scene during switch? and fading in with the Camera: Fade Action in the new
scene's OnStart cutscene.
195

Sound
These Actions deal with the playback of Sounds and Music.
Change footsteps
Changes which Surface is referenced by a character's
Footstep Sounds component.
Change volume
Alters the 'relative volume' of any Sound object. Be sure to add the RememberSound
component to any Sound object whose volume changes you wish to be saved.
Play
Triggers a Sound object to start playing. Can be used to fade sounds in or out.
Play ambience
Handles the playback of an ambience track listed in the Ambience Storage window. See
Ambience tracks.
Play music
Handles the playback of a music track listed in the Music Storage window. See Music.
Play one-shot
Plays an AudioClip once, and without the need for a Sound object or AudioSource
component. The sound will be treated as SFX. Sounds triggered with this Action will not
be able to fade or be interrupted.
Set Mixer snapshot
Transitions to a single or multiple Audio Mixer snapshots.#
NOTE: To record changes to a Sound component in save games, attach the Remember
Sound
component.
196

ThirdParty
These Actions deal with integrations with third-party assets.
PlayMaker
Calls a specified Event within a
Playmaker FSM. Note that PlayMaker is a separate Unity
Asset, and the PlayMakerIsPresent preprocessor must be defined for this to work.
NOTE: Due to the way Playmaker behaves, the call will be ignored if the FSM in
question is already in mid-execution at the time that the Action is run.
197

Variable
These Actions deal with the reading and manipulation of Variables.
Assign preset
Bulk-assigns all Global or Local Variables to pre-determined values - see
Variable
presets. Optionally, Variables linked to Options Data can be ignored.
Check
Queries the value of both Global and Local Variables declared in the Variables Manager.
Variables can be compared with a fixed value, or with the values of other Variables.
Check random number
Picks a number at random between zero and a specified integer – the value of which
determines which subsequent Action is run next. Optionally, the last-picked number can
be prevented from being chosen - but in order to store this in save games, the Action
must be linked to a Global or Local integer Variable.
Copy
Copies the value of one Variable to another. This can be between Global and Local
Variables, and AC will attempt to convert the value in question if the two Variables are of
di!erent types (e.g. Integer to a Float).
Pop Up switch
Uses the value of a Pop Up Variable to determine which Action is run next. An option for
each possible value the Variable can take will be displayed, allowing for di!erent
subsequent Actions to run.
Run sequence
Runs a di!erent subsequent Action each time it is run. In order to save the current order
in the sequence, it must be linked to a Global or Local integer Variable - however this is
not a requirement.
Set
Sets the value of both Global and Local Variables. Integers can be set to absolute,
incremented or assigned a random value. Strings can also be set to the value of an Input
menu element, while Integers, Booleans and Floats can also be set to the value of a
Mecanim (Animator) parameter. When setting Integers and Floats, you can also opt to
type in a formula (e.g. 2 + 3 *4), which can also include tokens of the form [var:ID] and
[localVar:ID] to denote the value of a Variable - see
Speech tokens.
PROTIP: This Action is useful when giving the Player di!erent responses each time he
examines a Hotspot.
198


5.2.2. Custom Actions
As well as the Standard Actions included with AC, it is possible to write custom ones and
include them in ActionLists.
Each Action is a self-contained script file. They are added to via the Custom Action
scripts panel in the Actions Manager. Once a folder is pointed to via the folder icon, a
new field will appear - allowing for multiple folders to be chosen:
Each Action is a subclass of the
Action base class, and is a self-contained script that
contains both its UI and its functionality.
To be properly visible inside the Actions Manager, a new Action must have overrides set
for its Title text property and Category enum property. The number of output sockets an
Action has is set by its NumSockets integer property.
To display its own UI, it requires an override of the ShowGUI function. Public variables
declared in the script can be exposed here using Unity's standard
EditorGUILayout
functions so that they can be edited by the user.
For an Action to run, it requires an override of the Run function. This function returns a
float which - if positive - is the time that its parent ActionList will wait before running it
again. An Action will only be considered complete when:
•
Its internal isRunning boolean is set to False
•
Its Run function returns zero
If an ActionList is skipped (see
Skipping cutscenes), then each Action within that list will
have its Skip function (if overridden) invoked. This should command the Action to
perform its task instantly - or do nothing at all, if the function is overridden but left
blank.
If no such function is used, then Run will be called instead. By default, this will only be
called once, so that the skipping process occurs over a single frame. If this Action must
be run over multiple frames even when skipping, set the Action’s RunNormallyWhenSkip
property to True.
NOTE: Each selected folder is assumed to only contain Action scripts. No other script
or asset type should be contained in them.
200

To assist in the creation of new Actions, annotated "blank" Action script are provided:
ActionTemplate.cs, ActionCheckTemplate.cs, and ActionCheckMultipleTemplate.cs.
ActionCheckTemplate demonstrates how "check" Actions (i.e. those that have two output
sockets) can be created, while ActionCheckMultipleTemplate allows for any number of
output sockets.
These scripts can be found in Assets → AdventureCreator → Scripts → ActionList.
PROTIP: A series of step-by-step tutorial on writing custom Actions can be found
online.
201

5.2.3. The ActionList Editor
The ActionList Editor is the main window that ActionLists are edited from. It provides a
node-based workflow that makes the flow of lists easy to understand..
It can be opened in any of the following ways:
•
By clicking the Edit Actions Button from an ActionList's Inspector
•
By clicking the node icon next to a scene-based ActionList in the Hierarchy
•
By double-clicking an ActionList asset file
•
From the top toolbar, under Adventure Creator → Editors → ActionList Editor
This window is designed to help make ActionLists easier to follow: Actions appear as
nodes, which you can re-arrange and re-connect to one another by dragging “wires” from
output sockets on the right:
Actions can be collapsed and expanded by clicking their top-left icon:
You can move around the canvas either by panning, using the scrollbars, or by pressing
the Page Up / Page Down keys. The Home key will reset the view back to the first Action.#
202
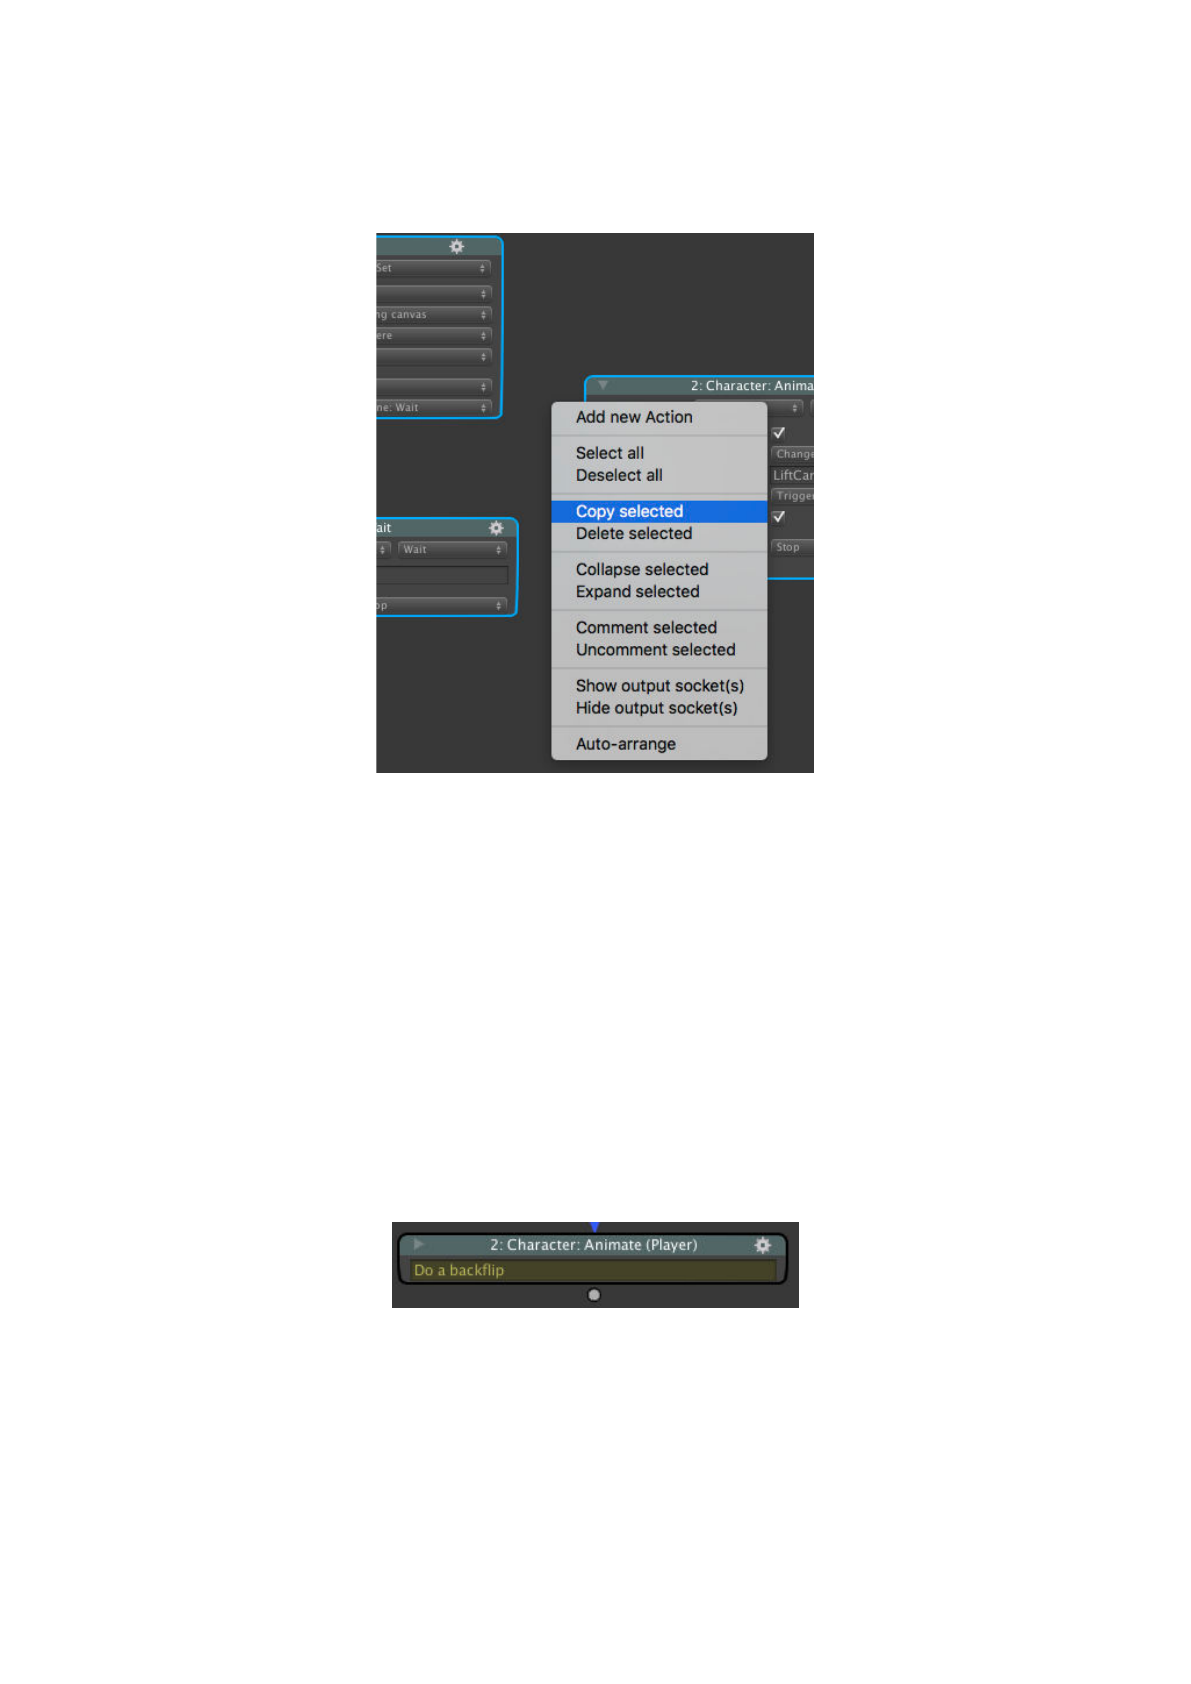
You can marquee-select multiple Actions at a time by dragging a box around them.
Holding the Shift key while doing so retains the previous selection. Selected Actions can
be manipulated in bulk by right-clicking an empty space to bring up a context menu:
The Grouping options allow you to group multiple Actions together. This is useful if they
serve a common task, such as updating a series of variables. Like Actions, groups can be
moved by dragging them around the window. Right-clicking their header also allows
them to be named.
The Auto-arrange and Align options allow you to arrange Actions more neatly.
Individual Actions can also be assigned a colour, to help di!erentiate them.
Clicking an Action's cog icon brings up its own context menu, from where you can toggle
breakpoints and comments. Comments will be visible even if the Action itself is
collapsed, allowing you to get an overview of what an ActionList does even if all the
Actions are collapsed:
Comment boxes support both variable and parameter tokens - see
Speech tokens.
Actions can also be favourited via this menu. Up to 10 Actions can be marked as a
favourite via the cog icon menu, and then pasted at any time by right-clicking in empty
space.
203

The top of the Actions Manager features a number of editing options when using the
ActionList Editor, including the ability to open multiple instances:
The ActionList Editor also can be locked to a particular ActionList. Click the yellow
padlock icon to the lower-left of the window, and it will lock itself to the ActionList it is
currently viewing:
In the lower-right corner of the window are three further buttons:
View all / Reset view
Toggles between viewing all Actions and resetting the viewport.
Ping object
Pings the ActionList being edited in the Hierarchy or Project window, depending on
whether it is an asset file or not.
Show properties
Toggles the properties of the ActionList, which are also displayed at the top of its
Inspector.#
204

5.2.4. Generating ActionLists through script
ActionLists are the core of AC's interaction and cutscene system, and are used to trigger
dialogue, make characters move, make changes to the inventory, and more.
While any command that an Action performs can be done so in a separate script, one
major benefit of them is that they can be queued up and only run when those before it
have finished. For example, an ActionList can command an NPC to move to a Marker, and
say something once they've reached it.
As well as using the Inspector or
ActionList Editor, ActionLists can also be created
through script. Some of the benefits of doing this include:
•
Pre-populate an ActionList with a standard set of Actions to further work on
•
Dynamically generate ActionLists at runtime
•
Reduce filesizes and memory usage, since runtime-created ActionLists are not
saved in a project
In order to create Actions, we first need to reference an ActionList component in which to
store them, i.e.:
ActionList actionList = gameObject.GetComponent <ActionList>();
if (actionList == null)
{
actionList = gameObject.AddComponent <ActionList>();
}
The above code, placed in a MonoBehaviour script, will add such a component to the
GameObject (if not already present) and create a reference to it.
To create a new instance of an Action, we need to know the name of its class. This can be
done by looking it up in the
Actions Manager. Looking up the Dialogue: Play speech
Action, for example, reveals that its filename is ActionSpeech.cs:
The class name is just the filename without the '.cs' at the end.
205

To create a new instance of the Action, invoke its CreateNew static function. This
function's parameters are used to set up the data within it, and it returns an instance of
the class. For example:
ActionSpeech myNewSpeechAction = ActionSpeech.CreateNew (myCharacter,
"My speech text”);
What parameters are available will depend on the Action. Some Actions which serve
multiple purposes have di!erent CreateNew functions - but each is documented in the
source code.
The returned
Action class can then be placed within the ActionList's actions List:
actionList.actions = new List<Action> { myNewSpeechAction };
Actions can also be created and placed in a single command:
actionList.actions = new List<Action>
{
ActionSpeech.CreateNew (myCharacter, "My speech text");
ActionPause.CreateNew (1f);
ActionCharPathFind.CreateNew (myCharacter, myMarker),
}
The above will make a character (stored in the “myCharacter" Char variable, speak, wait
for 1s second, and then walk to a marker (stored in the “myMarker” Marker variable).
Once populated with Actions, an ActionList can be run by simply calling:
actionList.Interact ();
NOTE: Only AC's Standard Actions have CreateNew functions - Custom Actions need
their own written.
PROTIP: If an Action's CreateNew function includes a GameObject or component
parameter, and a prefab is assigned, then the Action will rely on the instance of the
prefab in the scene - provided it has an associated Constant ID component.
PROTIP: The Scripted Action List Example component demonstrates two sample lists
generated at runtime. The script itself is commented with instructions and
explanations.
206

5.3. Hotspots
Hotspots are used to create ways for the player to interact with the scene. They are
placed over geometry and NPCs, and assigned Interactions run when clicked on.
To create a Hotspot, open the
Scene Manager and click Hotspot under the Logic panel,
followed by Add new. A yellow cube will appear at the scene origin, marking the region
that the mouse cursor must hover over in order to select it. Reposition it over an object
you want to make interactive.
If a scene mesh or sprite is selected when creating a new Hotspot, the option Position
over selected mesh? will appear in the Prefabs panel.
The name of the Hotspot is what will appear as the label when selected, but you can
override this with the Label (if not name) field in the Hotspot inspector:
NOTE: A Hotspot is 'on' when on the Default layer, and 'o!' when on Ignore Raycast
layer. These can be changed in the Settings Manager's Raycast settings.
PROTIP: The Hotspot prefab is just a convenience tool - any object can be made
interactive by attaching the Hotspot component and a collider.
207

You can make an object glow when the Hotspot is selected by adding a Highlight
component to it, and then referring to it from the Hotspot's Object to highlight field in
its Inspector.
The bottom half of the Hotspot's inspector is where you define its associated interactions.
Which interaction types are available will be based on your chosen
Interaction method.
Click the + icon to create a new interaction slot:
Inside each slot, the Interaction field is a reference to the Interaction ActionList that will
run when the player triggers it through gameplay. You can create an Interaction object
from the Scene Manager, but it is easier to click Auto-create to the right of the
Interaction field. Doing so will create, rename, and link a new Interaction object within
the scene, which you can then select and modify to define what happens when the
Interaction runs - see
The ActionList Editor.
When creating Use interactions, the Cursor / Icon field lets you associate the interaction
with an interaction icon:
Interaction icons are defined in the Cursor Manager. How this icon is used will be
dependent on your game's
Interaction method.
The Player action field dictates what the Player character does before the interaction is
run. They can do nothing, turn to face the Hotspot, or move towards it. They can also be
made to move towards a Marker, provided a Walk-to Marker has been assigned at the
top of the Inspector.
If in Context-sensitive mode, you can also define an Examine interaction, which runs
when the player right-clicks. You can also have multiple Inventory interactions, with each
Inventory interaction handling the use of one type of item on the object:
208

For more, see Inventory interactions.
If you want to create a default response (i.e. “I can't use that there!”) to using an inventory
item on a hotspot without creating the same interaction multiple times, you can define an
Unhandled Use on Hotspot event in the Inventory Manager.
Hotspots can be turned on and o! using the Hotspot: Enable or disable Action, and
individual interactions with
Hotspot: Change interaction.
You can limit a Hotspot's interactivity by assigning a GameCamera in the Inspector's Limit
to camera field. When assigned, the Hotspot will only be active if the chosen camera is
also active.
If you are creating a game of very large scale, you may find that you need to increase the
size of the Hotspot ray length, which you can adjust inside the Settings Manager.
By default, scene-based Interaction prefabs are used to handle what happens when a
Hotspot is clicked on, but there are alternatives. Setting the Hotspot's Interaction source
to Asset File allows you to call ActionList assets instead. This is useful for building game
logic when you don't have access to the scene, for example when building a game as part
of a team.
This can also be set to Custom Script, to allow you to send a message to a GameObject
of your choice. This is useful if you wish to hard-code your interactions instead of relying
on Actions.
If the Interaction’s ActionList makes use of a
GameObject parameter, then that parameter
can automatically be set to the Hotspot when run. For control over all of an Interaction's
parameter values, use the Set Interaction Parameters component.#
PROTIP: To set the Hotspot's starting state, attach the Remember Hotspot component
and set the Hotspot state on start to O". This component also records changes
made to it in save games.
PROTIP: If an Inventory interaction calls a script function that has a single integer
parameter, that parameter will be set to the item’s ID number. This is also the case for
Unhandled inventory interactions.
209

5.4. Hotspot detection
The way in which Hotspots are detected can be modified via the Hotspot detection
method, under Hotspot settings in the Settings Manager:
This field has three options:
Mouse Over
In which Hotspots are selected by the cursor pointing at them.
Player Vicinity
In which Hotspots are selected according to how close they are to the Player.
Custom Script
In which Hotspots are selected by only calling custom script functions.
Hotspots can also be assigned an Interactive boundary within their Inspectors. This
represents an optional bounding volume that the Player must be within before the
Hotspot becomes interactive. This volume is marked by a Box Collider by default, but this
can be replaced with any collider component.
NOTE: Since the Interactive boundary makes use of Collider triggers, the Player must
have both a Rigidbody and a Collider of their own.
210

5.4.1. Mouse-over detection
Mouse-over detection causes Hotspots to become selected when the cursor points at
them - with only one being selectable at a time. It is the most common option when
using mouse and keyboard input. It is simple to set up because it involves no other
settings or additions to the Player prefab.
When using
keyboard or controller input, the cursor is not controlled by the mouse - but
instead with input axes named CursorHorizontal and CursorVertical. These can be
mapped to either mouse axes, keyboard buttons, or joystick axes in Unity's Input
Manager.
When using touch screen input, the cursor is normally wherever the user presses on the
touch-screen. However, the Moving touch drags cursor? option allows you to drag the
cursor without it needing to be in the same place.
NOTE: When two Hotspots share the same screen-space, the cursor will - by default -
detect the one closest to the camera. In 2D, you can optionally elect to instead select
the GameObject with the lower Y-position by checking Detect lowest overlapping
Hotspot?.
211

5.4.2. Player-vicinity detection
Player-vicinity detection causes Hotspots to be highlighted when they enter a Trigger
volume attached to the Player. With this mode, it is possible to make a game with similar
controls to Grim Fandango.
When used with Direct or First-person movement, an additional field named Hotspots in
vicinity will also be available:
When this is set to Cycle Multiple, the player can press input buttons mapped to
CycleHotspotsLeft and CycleHotspotsRight (or alternatively an axis mapped to
CycleHotspots) to cycle through available Hotspots near to the Player.
For a Player prefab to be able to detect Hotspots, they must be equipped with a Hotspot
Detector. To make one, add an empty GameObject to your Player prefab as a child object
(and also a child of the sprite if in 2D). Leave it untagged and move it to the Ignore
Raycast layer.
Then add a collider (in 3D games, this will usually be a Sphere Collider; in 2D games,
this will be a Circle Collider 2D), with Is Trigger? checked. Then add a Detect Hotspot
component, and position it such that its centre is slightly in front of the player, with the
radius extending a few feet outward.
Finally go back to your Player's Inspector and assign this new GameObject as the
Hotspot detector child.
NOTE: If your Player does not have a Rigidbody or Rigidbody 2D component on their
base, you will need to add one to the Hotspot Detector.
NOTE: If your game has this detection mode enabled, Players created with the
Character wizard will automatically be assigned a Hotspot Detector. The 3D Demo
game's Player, Tin Pot, is equipped with one - and can be dropped in your own game
to experiment with. He can be found in AdventureCreator/Demo/Resources.
212
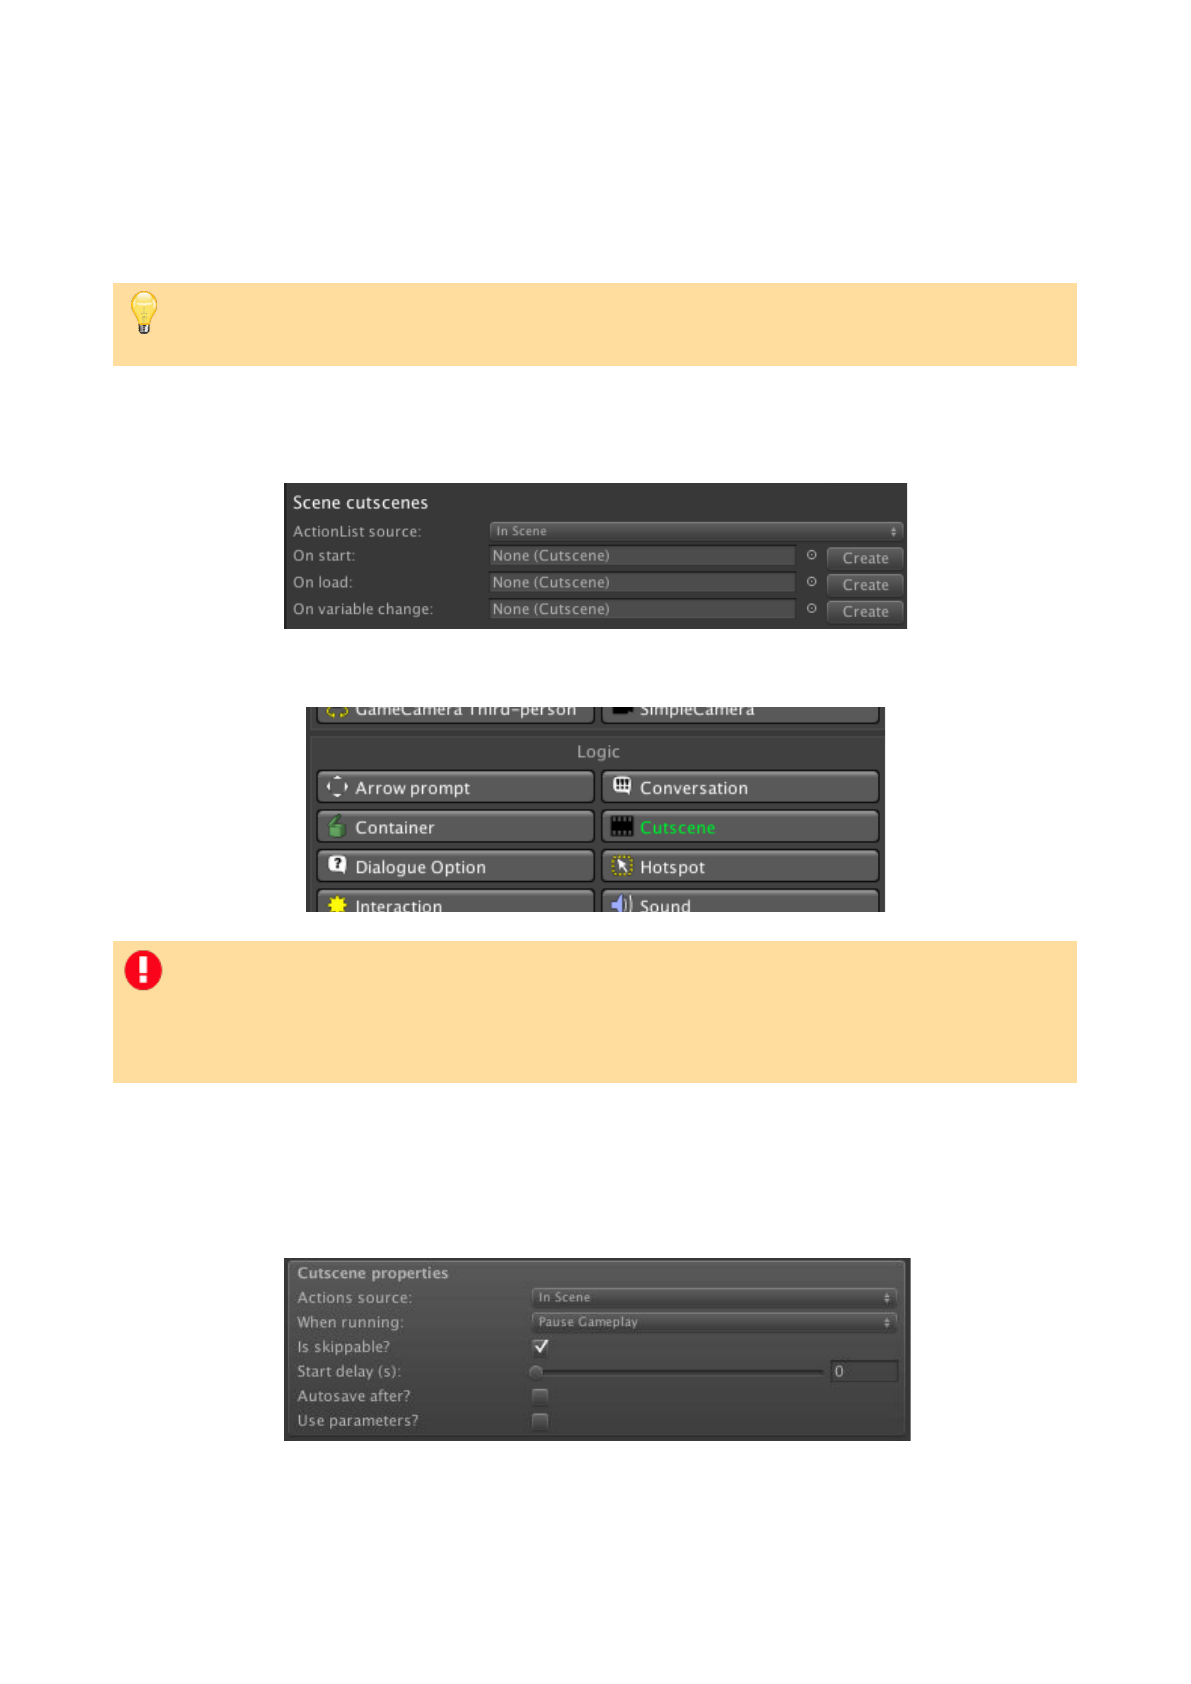
5.5. Cutscenes
A Cutscene is an ActionList that can be run automatically when a scene begins, as well as
by any other Action or ActionList.
Cutscenes are created in the
Scene Manager. They can either by created by clicking
Create beside each of the three Scene cutscene types:
Or by double-clicking the Cutscene prefab button under the Logic panel:
Cutscene objects are invisible and cannot be interacted with directly by the player – their
position is unimportant.
The top of the Cutscene's Inspector features the following properties:
The Actions Source field allows you to use the Actions from an
ActionList asset, which is
useful when collaborating as it keeps the Actions out of the scene file.
PROTIP: Don't let the name confuse you: a Cutscene can be used to create background
processes, process logic and more - not just gameplay-blocking sequences.
NOTE: On start vs On load? On start refers to the scene beginning through natural
gameplay - whether it be due to the player entering it from another, or it being the
first scene in the game. On load refers to a scene beginning due to a save game file
being loaded.
213

The When running field allows you to choose if it blocks gameplay, or runs in the
background - see Background logic.
The Is skippable? checkbox allows you to make it skip to the end instantly when the
player presses the EndCutscene button - see Skipping cutscenes.
A non-zero Start delay causes the Cutscene to wait for a set time before running. If a
Kill command is sent to it during this time (using the
Object: Send message Action), it will
not run afterwards. This can be a useful way of creating timed sequences, as a delayed
Cutscene can play the "fail state" which gets cancelled if the player succeeds in time.
The Auto-save after? checkbox will record an autosave once it has completed, provided
that no other gameplay-blocking ActionLists are running. For more, see Autosaving.
The Use parameters? checkbox allows you to dynamically alter its Actions fields at
runtime - see ActionList parameters.
Cutscenes can be converted to ActionList assets, and vice-versa, via the cog icon to the
top-right of the Inspector.#
214

5.6. Skipping cutscenes
If an ActionList type has an Is skippable? checkbox available in the properties, then
checking it means it can be skipped by the player while it is running:
To skip an ActionList, the player invokes the EndCutscene input button - this can either
be an input listed in Unity's Input Manager, or a Button menu element that simulates it.
Skipping an ActionList still causes it to end instantly, with all Actions within it completed
in one go - regardless of the point at which it is skipped. All game logic within it will
execute: Variables will still be changed, Inventory items will still be added or removed,
and objects will still be moved to their expected “end” position.
Animation Actions, however, may require additional work for the e!ect to be complete.
Because some animations may be intended to continue playing once the Action finishes –
or continue to another FSM state in Mecanim, they must still be played when an ActionList
is skipped.
Therefore, it is necessary to end your ActionList with Actions that place your objects
and characters in their correct animation state.
For instance, if the Player waves their hand during a cutscene, you should end your
ActionList with an additional
Character: Animate Action that specifically returns the Player
to their Idle animation, even if this happens naturally when the ActionList plays normally.
Additionally, if your ActionList invokes Mecanim Trigger parameters, Unity may run them
inadvertently afterwards. Therefore, this is made optional when skipping the Character:
Animate and Object: Animate Actions.
If you ever want to bypass certain Actions when skipping an ActionList, the
ActionList:
Check running Action has the ability to check if the ActionList it is placed in is currently
skipping.
PROTIP: The 2D Demo's Park scene contains examples of this necessity: the Intro2
Cutscene ends by playing the BirdHide animation on the Bird NPC, even though this
animation is played by the FSM when the Cutscene plays uninterrupted. Further
explanation is given in the Skipping Cutscenes chapter of the
Making a 3D game
tutorial.
215


5.7. Background logic
By default, an ActionList will prevent regular gameplay while it runs - allowing you to
build complex cutscenes and interaction responses.
However, any ActionList can instead run alongside gameplay by setting its When running
property to Run In Background:
PROTIP: When placed in a "background" ActionList, the Engine: Wait Action will act as a
simple timer, allowing you to time exactly when background processes occur.
NOTE: Running an ActionList in the background will not enforce gameplay: if another
ActionList set to Block Gameplay is running at the same time, gameplay will still be
blocked.
217
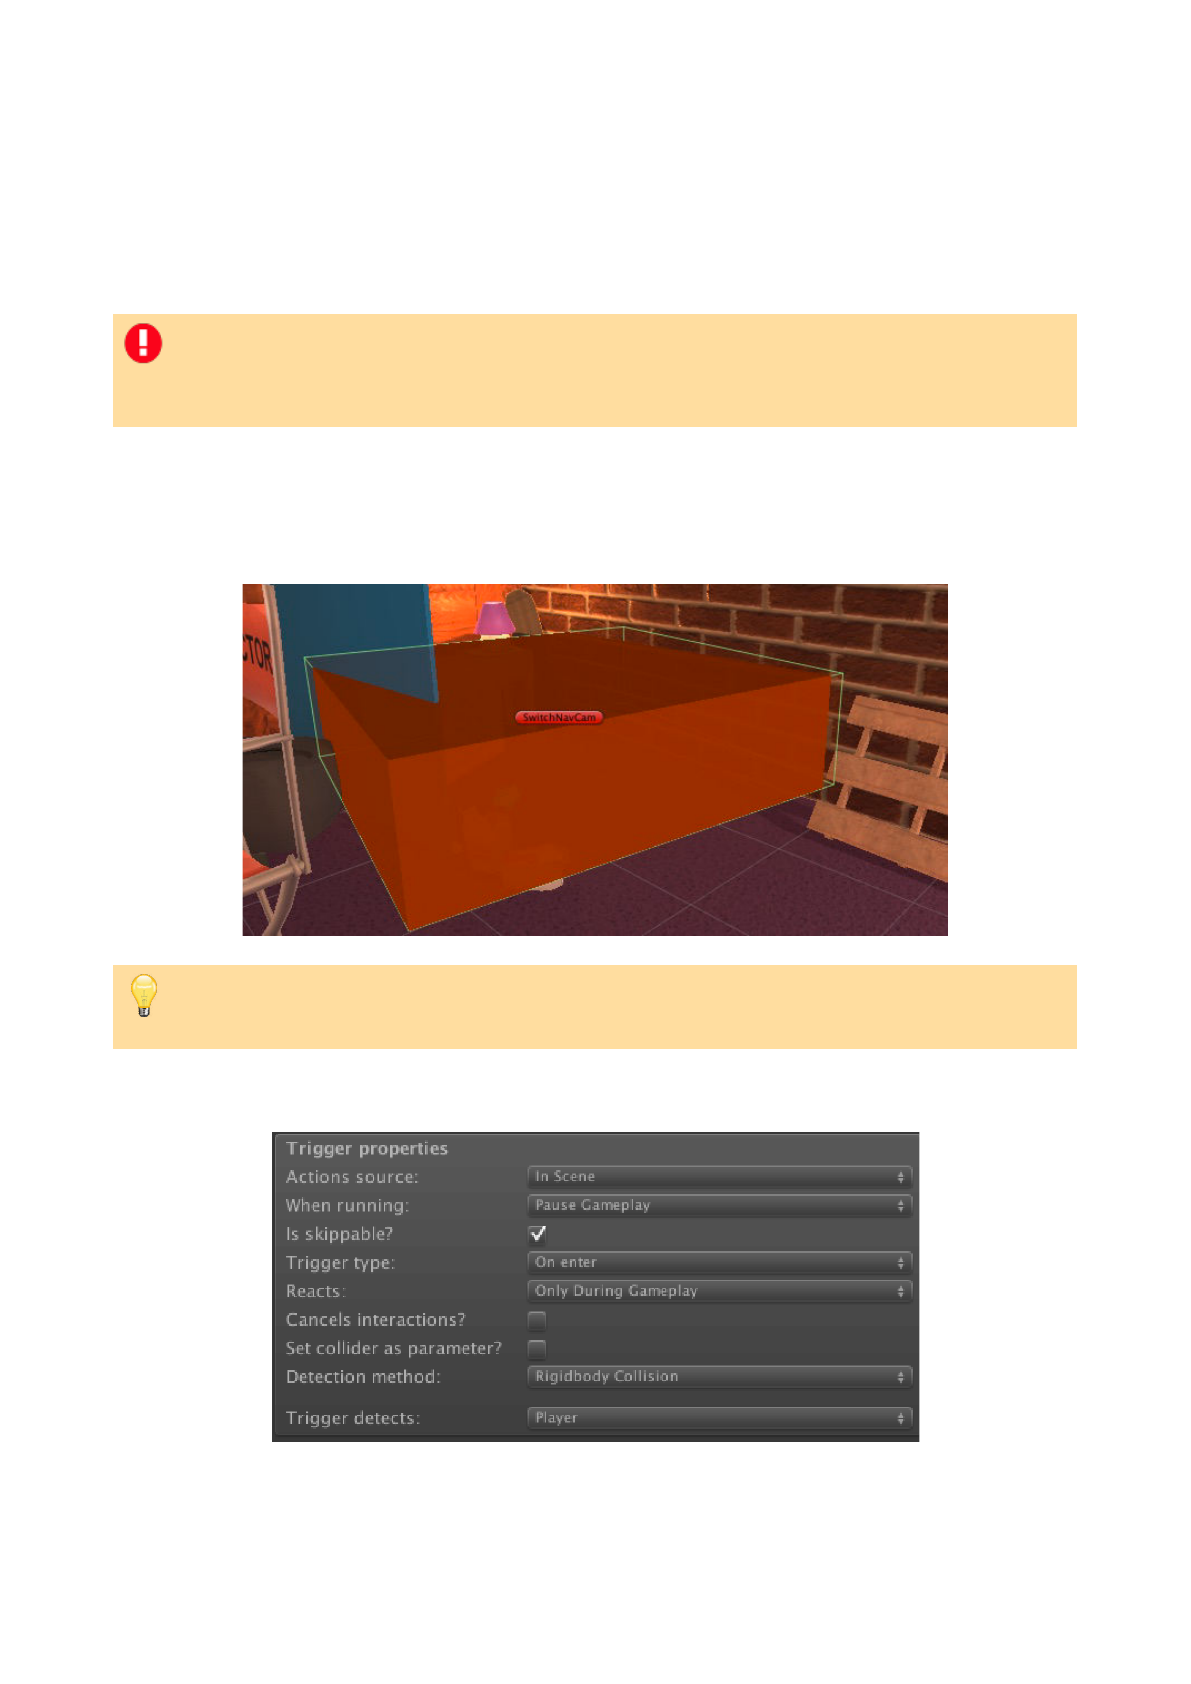
5.8. Triggers
A Trigger is an ActionList that runs when an object passes through it. It can be set to
react to the player, or some other object. It is invisible to the player, but can cause events
to run as they move around the scene.
To create one, open the
Scene Manager and click Trigger under the Logic panel, followed
by Add new. A red cube will appear at the scene origin, marking the region that an
object must enter for it to react. Reposition it to the area you want to make interactive.
The top of the Trigger's Inspector features the following properties:
The Actions source field allows you to use the Actions from an
ActionList asset, which is
useful when collaborating as it keeps the Actions out of the scene file.
NOTE: If a Trigger’s Detection method is set to Rigidbody Collision, then the object
it is set to detect must have a Rigidbody component (or Rigidbody 2D, for 2D
games).
PROTIP: The Trigger prefab is just a convenience tool - any object can be made into
one by attaching the AC_Trigger component and a Collider with Is Trigger checked.
218

The When running field allows you to choose if it blocks gameplay, or runs in the
background.
The Is skippable? checkbox allows you to make it skip to the end instantly when the
player presses the EndCutscene button - see Skipping cutscenes.
The Trigger type field allows you to choose if the trigger runs when an object enters it,
leaves it, or continuously while inside it. Note that the Continuous option is the most
processor-intensive of the three.
The Reacts field allows you to choose when the Trigger reacts. You will normally want to
leave this on the default setting of Only During Gameplay, so that it does not interfere
with cutscenes.
The Cancels interactions? checkbox allows you to interrupt an interaction, if the Player
moves through it as the result of moving towards a clicked
Hotspot.
The Set collider as parameter? checkbox allows you to dynamically insert the detected
object as a GameObject parameter into the Trigger's Actions. This is useful if you want to
manipulate the detected object in some way, but don't know what the object will be. For
more, see ActionList parameters.
The Detection method field allows you to choose how incoming objects are detected.
When set to Rigidbody Collision, then it will react when an object’s Collider touches its
own Collider. When set to Transform Position, then it will react according to the object’s
actual position relative to the Trigger’s Collider. This latter option is more useful for 2D
games, where precision is needed.
Triggers can be turned on and o! using the
Object: Send message Action. A Trigger is
considered o! if its Collider component is disabled.
Triggers can be converted to
ActionList assets via the cog icon to the top-right of the
Inspector.#
PROTIP: A Trigger can have multiple AC_Trigger components attached, with each
given a di!erent Trigger type field. The 3D Demo scene uses this trick to have the
camera change when both entering and leaving the SwitchNavCam Trigger.
PROTIP: If the Detection method is set to Transform Position, then objects it is set
to detect do not require Rigidbody or Collider components for the Trigger to detect
them.
PROTIP: To set the Triggers's starting state, attach the Remember Trigger component
and set the Trigger state on start to O". This component also records changes made
to it in save games.
219

5.9. Conversations
A Conversation is a way of presenting an array of options on-screen for the player to
choose from. They are typically used for allowing the player to choose what to say to an
NPC, but can really be used for any situation that requires the player to make a choice.
A Conversation is begun by running the Dialogue: Start conversation Action.
To create one, open the Scene Manager and click Conversation under the Logic panel,
followed by Add new. A Conversation object is never physically seen by the player, so its
position in 3D space is irrelevant.
The Conversation's Inspector provides you with the tools necessary to create and manage
its dialogue options:
Each option can be assigned a label and a texture, but bear in mind that your
Conversation Menu is what determines how they are displayed.
The Only show if carrying a specific item? checkbox allows you to limit an option's
display according to whether or not the player has something in their inventory. This is
useful if you want to create options for "asking about X item”. If the
DialogList element
used to display the Conversation has icons, this icon will automatically set to the item.
NOTE: A Conversation is shown on screen through the DialogList element, in a Menu
with an Appear type of During Conversation. The default interface provides you with
a
Conversation menu.
220

When it comes to the Actions that get run when an option is chosen, there are two
methods:
1) By running separate a DialogOption ActionList (each option's Interaction field). This
is the default method, and takes into account the option's When finished field to
determine whether or not the options should be shown again when the Actions are
complete.
2) By checking Override defaults? within the
Dialogue: Start conversation Action used
to initiate it. When checked, its various options will appear as outputs within the
Action, allowing you to run subsequent Actions for each response within the same
ActionList. To re-show the Conversation after the response, you must re-route back
to the original Action:
The top of the Conversation Inspector features the following properties:
The Interactions source field allows you to call ActionList assets instead of in-scene
DialogOptions, which is useful when collaborating as it keeps the Actions out of the scene
file.
The Auto-play lone option? checkbox allows you to have a lone option run
automatically, as opposed to having the player make an arbitrary click.
The Is timed? checkbox allows you to have the Conversation active only for a set duration
- a behaviour common to titles by TellTale Games. When checked, one of the options can
be marked as the Default to have it run when the timer expires - via the cog menu to the
right. If End if timer runs out? is checked, then the Conversation will simply end
instead.
PROTIP: The 3D Demo scene demonstrates both of these methods: BrainConv makes
use of DialogOption ActionLists, while IntroConv makes use of overrides in the
PlayIntroConv Cutscene.
221

Dialogue options can be enabled and disabled using the Dialogue: Toggle option Action,
and renamed with Dialogue: Rename option. If an option is locked, it will ignore
subsequent calls to turn on.
Particularly if your game is keyboard-controlled, you can make it easier for your player to
select options by linking them to numeric keys on your keyboard. Just check Dialogue
options can be selected with number keys? in the Settings Manager. This option also
allows you to trigger options with inputs mapped to DialogueOptionX, where 'X' is the
index number of the option to trigger - see the Settings Manager's list of available inputs.
Conversations are normally ended by choosing an option that doesn't return to the
Conversation after running. However, you can also end a Conversation manually by
pressing an input button names EndConversation.
PROTIP: The ability to re-colour already-chosen options is available in the DialogList
menu element - not in the Conversation Inspector.
NOTE: Conversations normally prevent regular player movement and interactions from
occurring, so that they can focus on the choice to make. However, this can be
changed by checking Allow regular gameplay during Conversations? in the Settings
Manager. Be mindful that this may create gameplay conflicts (such as allowing a
scene-switch to occur mid-Conversation), so it's recommended to use this option with
care. To allow only movement and not interactions during this time, use the Engine:
Manage systems Action when the Conversation menu is turned on.
222

5.10. ActionList assets
It is often necessary to run a common set of Actions no matter which scene is currently
loaded - for example, when examining an Inventory item or handling a Menu's behaviour.
When working as a team on a large game, you may also want to be able to create
ActionLists for a scene without interfering with anyone else's work.
ActionList assets are able to live as physical files in your Assets folder, outside of scenes.
They are created by right-clicking inside the Project window, and choosing Create →
Adventure Creator → ActionList:
Double-clicking this asset will open it within the
ActionList Editor.
ActionList assets can also manipulate scene objects by referring to them with Constant
ID numbers. A Constant ID number is a unique identifier held by a scene object, so that it
can be found again by the ActionList when the scene is re-opened. Assigning a scene-
based GameObject to an ActionList asset's field will cause a Constant ID number to be
automatically generated:
PROTIP: ActionList assets are mainly used for Inventory interactions, Menu functions,
and common tasks that can occur in any scene. For example, the default
Pause menu
runs the DeselectInventory ActionList when it turns on. This de-selects any active
Inventory item, making sure the main cursor is always displayed when navigating the
Pause menu.
223

This number is stored inside the Constant ID component attached to the GameObject - be
sure to save the scene after it has been added. If the scene that holds an object
referenced by the ActionList is not open, the connection is not broken - what matters is
the Constant ID field beneath it. Clicking Search scenes will search all scenes in your
game's Build settings for the referenced object.
For more on Constant IDs, see
Saving scene objects.
The top of an ActionList assets's Inspector features the following properties:
When running
Allows you to choose if it blocks gameplay, or runs in the background.
Is skippable?
Allows you to make it skip to the end instantly when the player presses the EndCutscene
button - see
Skipping cutscenes.
Unfreezes 'pause' Menus?
Allows it to revert the timescale back to non-zero if it is run while the game is paused
due to a Menu being on. This is generally only necessary if the ActionList needs to run a
scene animation while the game is otherwise paused.
Can run multiple instances?
Allows it to be run multiple times simultaneously. If unchecked, calls to run it while
already running will result in the first instance being interrupted.
Can survive scene changes?
Prevents it from being ended once a scene change occurs through natural gameplay. This
option is only available if Is skippable? is unchecked.
PROTIP: A bonus of this workflow is that an asset-based Action can refer to di!erent
objects in di!erent scenes provided that they share the same Constant ID number.
Constant IDs can also be manually assigned from within their Inspectors.
NOTE: All ActionLists will be ended upon the loading of a save game file. Therefore,
care should be taken to account for this when dealing with an ActionList that spans
multiple scenes.
224

Use parameters?
Allows you to dynamically alter its Actions fields at runtime - see ActionList parameters.
The Settings Manager has an ActionList on start game field that you can assign to have
an asset that runs before anything else. The ActionList: Run Action can also be used to
run an ActionList asset file at any time.
ActionList assets can be converted to a Cutscenes, and vice-versa, via the cog icon to the
top-right of the Inspector. As scene-based ActionLists cannot be stored as assets
directly, if you want to transfer one to another scene, then it is recommended to convert
it to an ActionList asset, and then convert it back to a scene-based ActionList in the new
scene.#
225

5.11. Arrow prompts
An Arrow Prompt is an on-screen indicator that the player can perform an action by
pushing a directional key. This is similar to the quick-time events that are employed in
Telltale's The Walking Dead series:
Arrow Prompts can be clicked on directly, or activated by pressing the Horizontal and
Vertical inputs in the corresponding direction. When relying on
touch-screen input, you
can activate them by swiping in the given direction.
Arrow Prompts are created by clicking Arrow Prompt under the Scene Manager's Logic
panel, followed by Add new. Arrow Prompt objects are invisible and their transforms are
unimportant.
You can use the Arrow Prompt inspector to provide any combination of up, down, left and
right arrows. You can modify the icon of each arrow, and supply a Cutscene that will run
when a direction is invoked. The arrows will be disabled automatically once this happens.
While a set of Arrow Prompts are on-screen, the player's regular movement control is
disabled. To make a set of Arrow Prompts appear, its TurnOn function must be triggered
- which is most easily done using the
Object: Send message Action.#
PROTIP: Arrow Prompts are used in the 3D Demo when the player uses the barrel - left
and right arrows are used to indicate the choices of pushing the barrel and leaving it
along respectively.
226

5.12. Sounds
A Sound object provides AC with the ability to control the volume and playback of Audio
Sources. The
Sound: Play Action relies on the Sound component to work.
Sound objects are created by clicking the Sound button under the Scene Manger's Logic
panel followed by Add new. You can set up your sound using the Audio Source
component as normal, but the Volume field will be overridden. Instead, you can use the
Relative volume field in the Sound inspector to adjust its sound level. This way, you can
adjust the volume relative to other sounds of the same type (e.g. music or SFX).
The Sound type pop-up lets you designate which category of sound the object will play:
This will a!ect its overall volume, since the game allows the player to choose the volume
of Music, SFX and Speech audio from the
Options menu. Choosing Other will make the
Options menu ignore the volume for this object, making it independent from the rest of
the game. As speech audio is automatically set to the correct volume without the need
for a Sound object, the “Speech” option in the pop-up is only necessary for playing other
sounds at the same volume.
The
Scene Manager has a Default Sound field, which is used by Menus to play UI sounds:
Sound objects can connect to Unity's Audio Mixer Groups. Mixer Groups can be set
within the Settings Manager, under Audio Settings:
PROTIP: To easily play an audio clip without the need for a Sound component, use the
Sound: Play one-shot Action.
227

Volume (or attenuation) parameters for each sound type will also need to entered, and
created in the Mixer Group - refer to Unity's own documentation for more on creating
these parameters. If an AudioSource has no Audio Mixer Group assigned in its Output
field, then it will be assigned automatically based on the Sound type in the Sound
component. This is also true for the AudioSource components used by characters.
The
Sound: Play Action can control Sound objects by playing, stopping and fading audio.
You can also change the sound clip that is being played, but this is not recommended for
audio that will likely be looping when the game is saved, since any change in a Sound
object's Audio Clip will not be stored in the save data.
By default, sounds do not carry over when changing scene, but you may wish to have e.g.
ambient sounds continue playing as you navigate the game. To have a Sound object
survive a scene change, check the Play across scenes? checkbox, and move the prefab
into the root of your scene's hierarchy - it cannot survive a scene load if it has a parent.
Though the Sound object can be used to play music, it is recommended to use the
dedicated
Music system for music playback.#
228
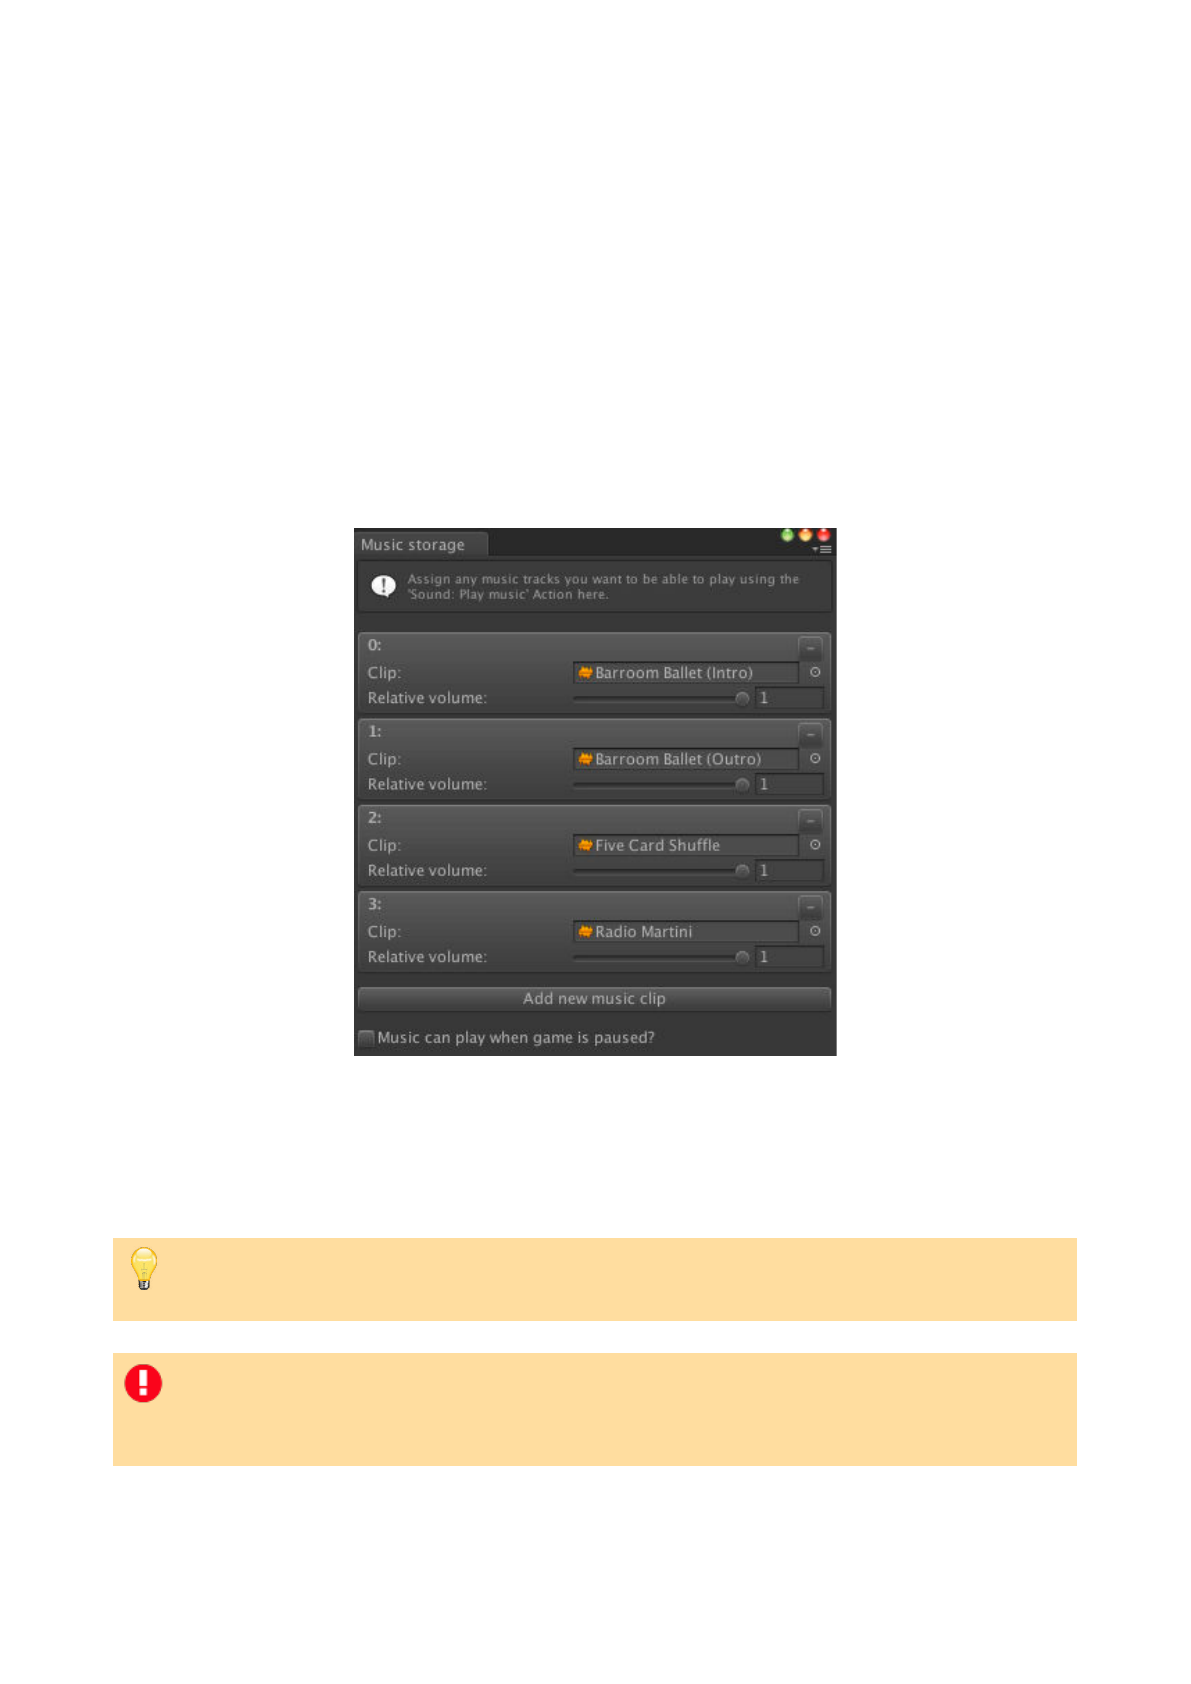
5.13. Music
Whereas sound e!ects and speech audio are generally tied to specific GameObjects in a
scene, music tracks can played independently.
By using the
Sound: Play music Action, music tracks can be played, queued, looped and
stopped at any time. The state of the music, and the queued playlist, is saved
automatically.
In order to play music using this Action, a music track must first be listed in the Music
Storage window, which is accessed within the Action itself, or via the top toolbar in
Adventure Creator -> Editors -> Soundtrack -> Music storage:
This window is used to assign AudioClips to tracks, and adjust their relative volumes -
while they’ll be globally a!ected by the
Music volume option. Music can optionally be
made to play while the game is paused. Only tracks listed in this window will be available
to use in the Action.
PROTIP: If Audio Mixer Groups are enabled (see Sounds), each track can optionally be
set their own Mixer Group to play from.
NOTE: When music tracks are assigned in this window, the associated data is stored in
the
Settings Manager. Therefore, be aware that if you change your Settings Manager
asset file, you will also have to update the Music Storage window with your tracks.
229

5.14. Ambience tracks
Ambience tracks are similar to Music, in that they are played independently of scenes and
GameObjects, and their playback states are saved automatically.
By using the Sound: Play ambience Action, ambience tracks can be played, queued,
looped and stopped at any time.
In order to play ambience using this Action, an ambience track must first be listed in the
Ambience Storage window, which is accessed within the Action itself, or via the top
toolbar in Adventure Creator -> Editors -> Soundtrack -> Ambience storage:
This window is used to assign AudioClips to tracks, and adjust their relative volumes -
while they’ll be globally a!ected by the
SFX volume option. Only tracks listed in this
window will be available to use in the Action.
PROTIP: If Audio Mixer Groups are enabled (see Sounds), each track can optionally be
set their own Mixer Group to play from.
NOTE: When ambience tracks are assigned in this window, the associated data is
stored in the
Settings Manager. Therefore, be aware that if you change your Settings
Manager asset file, you will also have to update the Ambience Storage window.
230

5.15. Containers
A Container is a scene-based list of Inventory items which the player can interact with,
separate to their own inventory. This allows for gameplay such as treasure chests that
the player can loot from, and boxes that the player can store items in for later use:
Containers are created by clicking Container under the
Scene Manager's Logic panel,
followed by Add new. Container objects are invisible and their transforms are
unimportant - any graphics associated with them will be related to the Hotspot that is
used to access them.
In a Container’s Inspector, a list of items it holds by default can be defined. If Can re-
order Items in menus? is checked in the
Settings Manager, then empty slots can be
inserted as well.
During gameplay, a Container's items can be changed either through Actions or through
Menus. To “open” a Container, use the
Container: Open Action. To add or remove
specific items manually, use the Container: Add or remove Action.
To view a Container's contents, the Menu Manager must include a Menu with an Appear
type of On Container, with an InventoryBox element of type Container. The default
interface includes a Container menu for you to re-style. Using such a Menu, the player
can transfer items between the Container and their own inventory.
PROTIP: Custom events are available when manipulating Containers - see Inventory
scripting.
NOTE: If a Container has an item that the player is already carrying, and that item's
Can carry multiple? property is unchecked, the item will not be clickable and the
OnContainerRemoveFail event will be invoked.
231

5.16. ActionList parameters
In a typical game, there'll be times we want to perform the same task multiple times on
di!erent objects. For example, whenever the player picks up an item, we'd want its
associated Hotspot to be disabled, its scene graphic to be made invisible, and the item to
be added to the inventory.
ActionList parameters allow us to alter an Action's fields at runtime - e!ectively letting us
recycle ActionLists to perform the same task in varying ways.
In the example above, parameters could be used to create a single ActionList that
disables a Hotspot, hides a GameObject, and adds an item to the inventory. Whenever
the player picks up an item, this ActionList would then be called with each of those
objects set there and then.
As the name suggests, ActionList parameters behave like function parameters.
Cutscenes, DialogueOptions, Interactions and ActionList assets have a Use parameters?
checkbox in their list of properties. Enabling this allows you to define what parameters
the ActionList can use:
Each parameter has a name, a type, and a default value. The type is important, as it
dictates which of an Action's fields it can override. The available types are:
•
Float
•
String
•
Integer
•
Boolean
•
Inventory Item
•
Global Variable
•
Local Variable (scene-based ActionLists only)
•
Game Object (e.g. Camera, NPC)
•
Unity Object (e.g. Material / AudioClip assets)
•
Vector3
•
PopUp
•
Document
•
Objective#
232

If an Action contains a field that matches a define parameter's type, you can override it
with that parameter by clicking the P icon beside it:
When the Action runs, it will then use the value of that parameter in place of that field.
Parameter values are normally set by one of the following ways:
•
By using the
ActionList: Run Action to run an ActionList with parameters to set the
values of all parameters at once
•
By using the ActionList: Set parameter Action to set an individual parameter's value
•
By using the ActionList Starter component to run an ActionList that uses parameters
•
By using the
Set Interaction Parameters component to set all of a Hotspot
Interaction's parameters at once
•
By using the
Set Inventory Interaction Parameters component to set all of an
Inventory Item Interaction’s parameters at once
•
By using the
Set Trigger Parameters component to set all of a Trigger’s parameters
at once
•
By using Events to run an ActionList automatically based on some condition
Parameter values can be read with the
ActionList: Check parameter Action, and their
values at runtime are displayed in the Inspectors of ActionLists that use them.
The [param:X] and [paramlabel:X] tokens can also be used in Action text fields - see
Text tokens for more.
Values can also be read and written to with scripting: an ActionList's parameters are
stored in its parameters List, which can be modified in a script.
Parameters can be set automatically, in special cases:
•
A
Hotspot can set itself as the GameObject parameter of any Interaction
PROTIP: When the game is running, an ActionList’s parameter values are listed in its
Inspector.
NOTE: When an ActionList's parameter values are changed, these changes will persist
until the game ends. In the case of ActionList assets, however, this is optional - values
can be reverted back to their defaults each time the asset is run.
233

•
A
Hotspot can set the item as the Inventory parameter of an Inventory Interaction
•
A Trigger can set the detected object as its own GameObject parameter
•
A Button menu element can the Integer parameter of an ActionList asset to a user-
set value
•
A SavesList menu element can set the Integer parameter of an ActionList asset to
the clicked save-slot
•
A ProfilesList menu element can set the Integer parameter of an ActionList asset to
the clicked profile-slot
When a
Cutscene sources its Actions from an ActionList asset which uses parameters, the
Cutscene will also make use of those parameters. You can choose to either use the
parameter values from the asset file (Sync parameter values?), or the scene object (Set
local parameter values?).
NOTE: Sometimes the function of Actions change based on their field settings. For
example, the Variable: Check Action checks for True or False when querying a
boolean, but a number when querying an integer. When a parameter is assigned to
such an Action, it will assume the same UI and functionality that it had before the
parameter was set.
PROTIP: A practical example of parameters is given in the Action parameters chapter
of the Making a 3D game tutorial, and a text-based tutorial is available online.
234

5.17. Draggable objects
Draggable objects are physics objects that can be manipulated by the player in a pre-
determined way: for example, a door that turns around a hinge, or a drawer that moves
along a rail. As such, they allow for gameplay with a greater sense of immersion than
simply clicking Hotspots.
To create one, open the
Scene Manager and click Draggable under the Moveable panel,
followed by Add new. Attach your mesh to it as a child object and adjust the collider - it
is a Sphere Collider by default but can be replaced with any collider you wish.
Draggables react to both mouse clicks and touch-screen touches - how close to the
screen they must be is determined by the Moveable ray length field under Raycast
settings in the
Settings Manager.
As set in its Inspector, a Draggable object has three Drag modes:
Move Along Plane
In which it can only move along the axes of a plane, or aligned to the camera.
Rotate Only
In which it can only be rotated and zoomed to and from the camera. This is similar to the
PickUp object, only it cannot be moved freely. If Allow zooming? is checked, the zoom
factor is controlled by an input axis named ZoomMoveable. In this mode, the Rigidbody
is optional.
PROTIP: The Physics Demo features cupboards, drawers and tumbler Draggables. A
practical guide to creating such a Draggable from scratch can be found in the Making a
first-person game tutorial.
235


5.17.1. Drag tracks
Tracks are pre-defined paths that Draggable objects can be made to move along. They
can also be connected together to form more complex paths - see Track regions, below.
There are three types of track, available in the Scene Manager's Moveable panel:
Straight Track
A Straight Track is used to constrain a Draggable object along a straight line. Rotation
e!ects can also be added, to make the object roll as it moves, or turn in a screw-like
motion. Typical use-cases for this type include drawers and threaded nuts.
Curved Track
A Curved Track is used to constrain a Draggable object along a circular line. If the line is
looped to form a circle, the number of possible revolutions can also be set.
Hinge Track
A Hinge Track is used to pivot a Draggable object about its centre. Its position is locked,
and can only be rotated in a circular motion. Like the Curved Track, it can also be looped.
Typical use-cases for this type include doors and levers.
NOTE: Both Straight and Curved tracks can generate colliders at their ends so that a
Draggable’s behaviour when reaching them can be set with Physics Materials. If end-
colliders are enabled, a Sphere Collider must be placed on the Draggable's root to
correctly position them - but it can be disabled if desired.
NOTE: When a Draggable object becomes attached to a track, it adopts that track's
transform - its rotation may become flipped depending on the track's orientation, for
example. This is a necessary requirement of the drag/track system, but can be
countered by checking Maintain original child transforms? in its Inspector. This will
cause any children (which is where models should be placed) of the Draggable to
retain their position and rotation after attachment.
237

When locked to a Track, ActionLists can be assigned that run when the object is moved or
let go under the player’s control. These ActionLists can be scene-based Interactions or
asset-files, and a GameObject parameter can be optionally assigned to the moved object.
When locked to a track, a Draggable can be moved either automatically via the Moveable:
Set position
Action, or manually through player input. The input style, set by a track’s
Movement input property, has two modes:
Drag Vector
In which the Draggable moves in the direction of cursor movement, provided that this
movement is aligned to the Draggable's current position along the track. This mode is
best used when tracks are viewed at an angle to the camera (i.e. with perspective).
Cursor Position
In which the Draggable will move as close as it can to the cursor position, while remaining
fixed to the track. This mode is best used when tracks are viewed head-on, so that they
take up as much screen-space as possible.
If a Draggable has a Rigidbody attached, then its settings will be relied on for speed and
acceleration. Objects with a higher Mass value, for example, will move more slowly.
Objects with a higher Drag value will take longer to accelerate and decelerate. To change
these values while the player is holding them via a custom script, hook into the
OnGrabMoveable and OnDropMoveable
custom events.
Track regions
Straight and Curved tracks can also have regions defined, which can be used to enable
snapping (i.e. have the Draggable automatically move towards their centre when close
enough), or to connect a Track to other Tracks that Draggables can move between. When
a connection is made, the connecting Track must also have regions defined - and the
connection will be made automatically to the nearest region.
The
Moveable: Check position Action to determine how far along a Draggable is along its
Track, or which snap region it is currently in.
Draggables can be turned on and o! by using the Object: Send message Action on them.
They start the scene enabled, but this can be changed with the Remember Moveable
script, which is attached to the prefab by default.
PROTIP: As Draggables rely on Unity's Physics system, they are bound by the same
settings as any other physics object. Modifying Unity's
Fixed Timestep and Solver
Iteration Count variables will a!ect the accuracy of this system.
238

Draggable objects can also be assigned an Interactive boundary within their Inspectors.
This represents an optional bounding volume that the Player must be within before the
object becomes interactive. This volume is marked by a Box Collider by default, but this
can be replaced with any collider component.
NOTE: Since the Interactive boundary makes use of Collider triggers, the Player must
have both a Rigidbody and a Collider of their own.
239

5.18. PickUp objects
PickUp objects are physics objects that can be picked up and moved freely by dragging
the cursor. They are not "picked up" in the Inventory sense - instead they are held in 3D
space so that the player can examine, move, and throw them from all angles.
To create one, open the Scene Manager and click PickUp under the Moveable panel,
followed by Add new. Attach your mesh to it as a child object and adjust the collider - it
has a Sphere Collider by default but can be replaced with any collider you wish.
PickUps react to both mouse clicks and touch-screen touches - how close to the screen
they must be is determined by the Moveable ray length field under Raycast settings in
the
Settings Manager.
The PickUp Inspector allows it to be rotated, zoomed to/from the camera, and thrown.
These are performed with the Inputs that must be named as follows:
RotateMovable (Button)
Used to rotate the PickUp while held
RotateMoveableToggle (Button)
Used to toggle between rotate and move modes
ZoomMoveable (Axis)
Used to move the PickUp towards and away from the camera
ThrowMoveable (Button)
Used to "charge up" a throw which occurs when released
PROTIP: The Physics Demo features a rock that can be picked up in this way. A
practical guide to creating such a PickUp from scratch can be found in the Making a
first-person game tutorial.
240

The Inspector also allows you to reduce the player's movement when it is being
manipulated, which is helpful when creating first-person games.
Key to the way a PickUp behaves is its Rigidbody settings. The Drag and Angular Drag
values are locked to 20 when it is held, so altering the Mass value will a!ects how quickly
it can move. A Mass of 1 gives a 1:1 relationship between the movement of the mouse or
touch and the movement of the object. Higher values will require more movement from
the player to move the object, which lower values will require less.
Triggers can be placed in the scene to determine if a PickUp object has been placed in the
correct position. A Trigger can be set to detect the PickUp object in question, or all
PickUp objects, so that a sequence of Actions will run when the object enters it.
PickUps can be turned on and o! by using the
Object: Send message Action on them.
They start the scene enabled, but this can be changed with the Remember Moveable
script, which is attached to the prefab.
PickUps can also be assigned an Interactive boundary within their Inspectors. This
represents an optional bounding volume that the Player must be within before the object
becomes interactive. This volume is marked by a Box Collider by default, but this can be
replaced with any collider component.
PROTIP: As PickUps rely on Unity's Physics system, they are bound by the same
settings as any other physics object. Modifying Unity's Fixed Timestep and Solver
Iteration Count variables will a!ect the accuracy of this system.
NOTE: Since the Interactive boundary makes use of Collider triggers, the Player must
have both a Rigidbody and a Collider of their own.
241

5.19. Custom cursors
The Cursor Manager is used to define the Interactions available in your game. You can
add, remove and set textures, animate them, as well as define the rules for which cursors
appear – such as the ability to display a dedicated “walk” cursor when hovering over a
Navigation Mesh.
The Cursor Manager can also be used to determine if cursors are rendered in Software,
Hardware or Unity UI mode. Software mode, the default, hides the system cursor and
displays the correct cursor as a texture. While it can be slower on older systems, it enjoys
wider support on more platforms.
Hardware mode, on the other hand, replaces the system's hardware cursor completely,
and can often be faster.
Unity UI mode hides the system cursor and relies on a Unity UI prefab that uses its own
script to handle the cursor’s position - see
Unity UI Cursor rendering. A default script
and CursorUI prefab is provided as part of the default interface, allowing for more control
over animations - but this can be replaced if desired.
The “click o!set” can also be set for each cursor. In Software mode, this o!set represents
how far the click point is from the cursor's centre, as a decimal of its size. In Hardware
mode, the o!set represents how far the click point is from the cursor's top-left, in exact
pixels.
Cursors defined under the Interaction icons panel can also be referenced both by
Interaction elements (see also: Choose Hotspot Then Interaction mode), as well as
Hotspots.
To have a cursor be animated, the supplied graphic must include all of the animation
frames, arranged in a grid:
PROTIP: Interaction icons also accept Render Textures, allowing you to create an
interface with 3D e!ects.
NOTE: If Hardware rendering is used to draw cursors, the cursor graphic assets must
have their Texture type fields set to Cursor in order to correctly display.
242
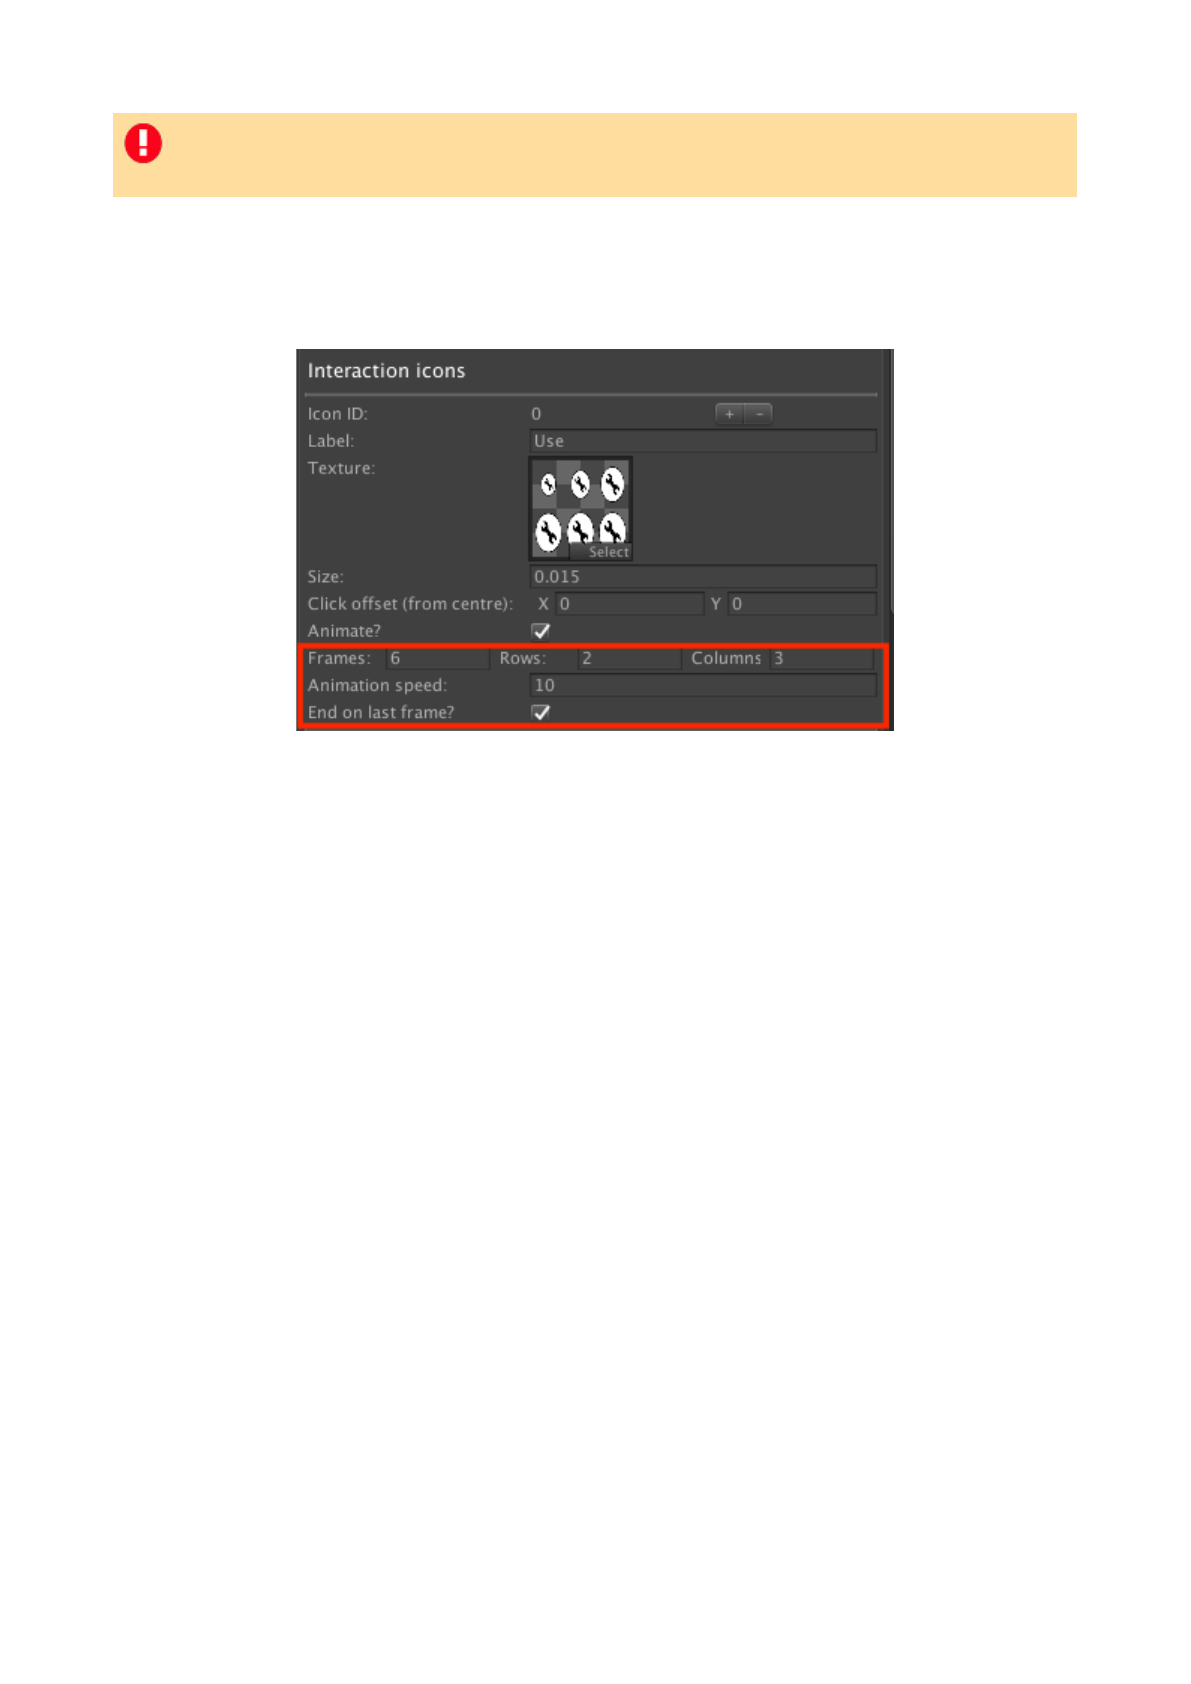
When Animate? is checked in the Cursor Manager, further fields will then appear -
allowing you to enter in the number of frames, rows and columns that the image has, as
well as the speed of the animation:
NOTE: So that the image can be separated into individual frames, the Read/Write
Enabled setting must be checked in the image’s Inspector, under Advanced.
243

5.19.1. Unity UI Cursor rendering
The Cursor Manager's Unity UI rendering option delegates cursor display to a Unity UI
Canvas prefab. This allows for easier control over its size and appearance, as well as
animated e!ects.
The default Unity UI cursor prefab, CursorUI, can be found in Assets/
AdventureCreator/UI.
The prefab's behaviour can be set from its Unity UI cursor component. The cursor's
appearance can be controlled by direct manipulation of a RawImage component, through
Animation, or both.
If the RawImage to control field is assigned, then that Image's texture will be set to the
appropriate textures defined in the
Cursor Manager, similar to other cursor rendering
modes.
If the RectTransform to position field is assigned, then that RectTransform's position
will be set to the cursor's intended on-screen position.
If the optional Animator field is assigned, then an additional list of parameter fields will
then be displayed. These allow the UI's appearance to be controlled through animation
transitions, based on the current cursor ID, selected item ID, cursor visibility and click
state. Not all of these paramaeter fields need to be set, but those that are will need to
have a matching parameter defined in the assigned Animator.
NOTE: This option should only be used alongside Unity UI menus. Adventure Creator
menus will always be drawn on top of this cursor, as they use Unity’s OnGUI system.
244

5.20. Quick-time events
Quick-time events, also known as QTEs, are isolated moments of gameplay that require
the player to press a key, or a combination of keys, within a time limit. The event is
considered "won" if the keys are pressed correctly, and "lost" otherwise. Such events can
be created with the
Input: QTE Action. When this Action is run, regular gameplay is
disabled, and the Action waits until the player has either won or lost.
QTEs can have several "win" requirements: a single button-press, an axis movement, a
button held down for a set time, a thumbstick rotated, or a button pressed repeatedly (i.e.
"button mashing"). The button name defined in the Action must correspond to an Input
button defined in Unity's Input Manager. What happens when the player wins or loses is
dictated by the Action's If condition is met and If conditions is not met fields
respectively.
A Menu name can also be supplied to the Action. So long as this Menu's Appear type is
set to Manual, then it will be displayed automatically for the duration of the QTE -
making it suitable to act as a "button prompt" to tell the player what to do.
Timer menu
elements are useful here: the Timer type can be set to either Quick Time Event
Remaining (how long longer the QTE will last) or Quick Time Event Progress (how much
progress the player has made). If such a Timer is visible when a QTE is active, then it will
represent that QTE.
If the Menu is linked to
Unity UI, then it can also be animated when the player wins, loses,
or presses a correct button. To prepare a Unity UI-linked Menu for animating, attach an
Animator component to the base Canvas component. Adventure Creator requires that
three animation states be present:
•
Win
•
Lose
•
Hold or Hit (the Action will describe which states it requires).
If not all animations are required (e.g. Win but not Lose), then empty states of the same
name can be used instead.
A series of QTE tutorials can be found
online.#
PROTIP: When relying on Touch-screen input, leaving the Input button name field will
allow touches anywhere on the screen to be valid.
NOTE: If you wish to use these values in your own scripts, you can read them with:
AC.KickStarter.playerQTE.GetProgress ();
AC.KickStarter.playerQTE.GetRemainingTimeFactor ();
245

5.21. Interaction scripting
When an ActionList whose When running field is set to Block Gameplay is run, it will be
considered a non-interactive sequence and gameplay cannot occur for that time.
To place the game in and out of Cutscene and Pause modes through script, use:
KickStarter.stateHandler.EnforceCutsceneMode
KickStarter.stateHandler.EnforcePauseMode
Scene-based ActionLists and ActionList assets can be run with:
myActionList.Interact ();
myActionList.RunFromIndex (int index);
myActionListAsset.Interact ();
myActionListAsset.RunFromIndex (int index);
And ended with:
myActionList.Kill ();
myActionListAsset.KillAllInstances ();
If an ActionList uses Parameters (each an instance of the ActionParameter class), then can
be retrieved with:
myActionList.GetParameter (int parameterID);
myActionList.GetParameter (string parameterLabel);
myActionList.GetParameters ();
Parameters can then be modified without the need to use the ActionList: Run or
ActionList: Set parameter Actions.
Gameplay-blocking ActionLists can be skipped with:
AC.KickStarter.actionListManager.EndCutscene ();
Conversations can be triggered with:
myConversation.Interact ();
And ended with:
KickStarter.playerInput.EndConversation ();
The currently-selected Hotspot can be retrieved with:
KickStarter.playerInteraction.GetActiveHotspot ();
246

Interactions involves the following events:
OnEnterGameState (GameState gameState);
OnExitGameState (GameState gameState);
OnHotspotSelect (Hotspot hotspot);
OnHotspotDeselect (Hotspot hotspot);
OnHotspotInteract (Hotspot hotspot, AC.Button button);
OnDoubleClickHotspot (Hotspot hotspot, AC.Button button);
OnHotspotReach (Hotspot hotspot, AC.Button button);
OnHotspotTurnOn (Hotspot hotspot);
OnHotspotTurnOff (Hotspot hotspot);
OnHotspotStopMovingTo (Hotspot hotspot);
OnHotspotSetInteractionState (Hotspot hotspot, AC.Button button, bool
state);
OnHotspotsFlash ();
OnRunTrigger (AC_Trigger trigger, GameObject collidingObject);
OnEnableInteractionMenus (Hotspot hotspot, InvItem invItem);
OnPointAndClick (ref Vector3[] pointArray, bool run);
OnBeginActionList (ActionList actionList, ActionListAsset
actionListAsset, int startingIndex, bool isSkipping);
OnEndActionList (ActionList actionList, ActionListAsset
actionListAsset, bool isSkipping);
OnPauseActionList (ActionList actionList);
OnResumeActionList (ActionList actionList);
OnSkipCutscene ();
OnGrabMoveable (DragBase moveable);
OnDropMoveable (DragBase moveable);
OnDraggableSnap (DragBase moveable, DragTrack track, int snapID);
OnPickUpThrow (PickUp pickUp);
OnStartConversation (Conversation conversation);
OnClickConversation (Conversation conversation, optionID);
OnPlayMusic (int trackID, bool loop, float fadeTime, int
startingSample);
OnPlayAmbience (int trackID, bool loop, float fadeTime, int
startingSample);
OnStopMusic (float fadeTime);
OnStopAmbience (float fadeTime);
OnPlaySound (Sound sound, AudioSource audioSource, AudioClip
audioClip, float fadeTime);
OnStopSound (Sound sound, AudioSource audioSource, AudioClip
audioClip, float fadeTime);
OnModifyHotspotDetectorCollection (DetectHotspot hotspotDetector,
List<Hotspot> hotspots);
OnBeforeChangeScene (string nextSceneName);
OnDelaySceneChange (SceneInfo sceneInfo, System.Action callback);
OnAfterChangeScene (LoadingGame loadingGame);
247

OnCompleteScenePreload (int preloadSceneName);
OnStartScene ();
OnChangeCursorMode (int cursorID);
OnSetHardwareCursor (Texture2D texture, Vector2 clickOffset);
OnCursorLock (bool isLocked);
OnQTEBegin (QTEType qteType, string inputName, float duration);
OnQTEWin (QTEType qteType);
OnQTELose (QTEType qteType);
OnActiveInputFire (ActiveInput activeInput);!
248

6. Inventory#
249

6.1. Inventory items overview
The inventory is a staple of many adventure games, and refers to a collection of items
that the player character can carry around with them as they explore the game world.
These items can be examined, interacted with, and combined with other items or
Hotspots. This is the foundation for many puzzles and gameplay mechanics.
What the player is carrying can be modified at runtime - see
Managing inventory in-
game.
A game's inventory is defined in the Items tab of the Inventory Manager. Here, items can
be created and modified to be used throughout the game.
When an item is selected in the Editor, further properties will be displayed:
Name
The item's internal label, and display label if Label (if not name) is left blank.
PROTIP: Inventory items don't need to be "items" in the physical sense - they can also
refer to things like spells or abilities that the player can possess.
250

Label (if not name)
The item's display label, if it should not be the the same as Name field above.
Name is pronoun?
If unchecked, the first letter of the item’s display name will be lower-cased if placed in
the middle of a sentence.
Category
Which category the item appears in, if any are defined in the Categories tab.
Carry on start?
If checked, the item will be present in the player's inventory when the game begins.
Can carry multiple?
If checked, multiple instances of the item can be carried. This is good for consumables,
e.g. currency.
Slot capacity
Appears only if Can carry multiple? is enabled. This sets the maximum number of items
that can be placed in a single slot.
Selection mode
Appears only if Can carry multiple? is enabled and Slot capacity is greater than one.
This sets the behaviour when selecting an item that has multiple instances in a single slot
- you can select all, select only one, or stack the selection with each click.
Override 'Use' syntax
When any item is selected and hovering over another item or Hotspot, the Hotspot menu
label will take the form "Use (item) on (Hotspot)" - the exact words are defined in the
Cursor Manager. Checking this box allows you to override this syntax for this particular
item - which allows for item-dependent labels such as "Spray (paint) on (Hotspot)".
Linked prefab
This field allows you to associate a prefab object with the item, which can be used to
represent the item in the scene. For details on its usage, see
Scene items.
Main graphic
The item's default texture, which can either be a 2D texture or a Render Texture. This is
used when the item is displayed in the inventory but not being interacted with.
Active graphic
The item's "active" texture, which can either be a 2D texture or a
Render Texture. This is
used when the cursor hovers over the item, or the item is selected.
251

Selected graphic
The item's "selected" texture, which can either be a 2D texture or a Render Texture. This
is used when the item is selected, provided that the Settings Manager's Selected item's
display option is set to Show Selected Graphic.
Cursor
The graphic that is used by the cursor when the item is selected. The supplied graphic
should be imported as a Cursor type in Unity's Texture import settings. If one is not
supplied, the Main graphic will be used instead.
Properties
If
Inventory properties are used, then their per-item values can be set here.
Additionally, each item can be assigned a number of Interactions that run when it is used,
examine, or combined. Which interactions are available will be based on your chosen
Interaction method - see
Inventory interactions.
The maximum number of Inventory items the Player can hold can be set at the very top.
PROTIP: A list of all Inventory items being carried by the active Player can be found in
their Inspector while the game is running.
252

6.2. Inventory interactions
How items are interacted with depends on your game's Inventory interactions field,
which appears under the Inventory settings panel of the Settings Manager:
This field has two options: Single and Multiple.
Single
In this mode, items are selected by left-clicking on them in an InventoryBox element, and
examined by right-clicking them.
Each item's Standard interactions panel in the Inventory Manager allows you to define a
“Use” and an “Examine” ActionList asset:
If an item has a “Use” interaction, then left-clicking the item will run that instead of
selecting it. If you wish to select the item as part of the ActionList, you can use the
Inventory: Select Action.
Multiple
In this mode, items behave like Hotspots - which in turn behave di!erently according to
your game's Interaction method. Items are interacted by clicking them in an InventoryBox
element.
Each items's Standard interactions panel in the
Inventory Manager allows you to define
multiple “Use” ActionList asset - with each one associated with a di!erent Interaction
icon defined in the
Cursor Manager:
NOTE: When in Context sensitive mode, this field is hidden and set to Single - see
below.
NOTE: When using Touch-screen input, this is done by single-finger and two-finger
tapping. When using Keyboard or controller input, this is done by pressing buttons
mapped to InteractionA and InteractionB.
253

The checkbox to the left of each line allows you to disable an Interaction by default.
The Select item if Interaction is unhandled? option in the Settings Manager allows you
to have an item become selected when a particular icon is used on it, provided that no
matching interaction is defined.
_____
Regardless of option: once an item is selected, the interface can be changed according to
the
Cursor Manager's When inventory selected option:
A selected item can then be used on other items, or Hotspots. Interactions between items
are defined in the Combine interactions section of an item's properties in the
Inventory
Manager:
NOTE: If you wish to instead signify an item's selection via a static icon, you can create
an InventoryBox element of the type Display Selected. This technique is covered in
the Custom inventory interface section of the First-person tutorial.
PROTIP: Clicking or tapping again will cause the item to become de-selected.
However, this can be changed to releasing the initial click or tap by checking Drag and
drop Inventory interface?, under Inventory settings in the Settings Manager.
PROTIP: To avoid having to create two sets of interactions for each item (i.e. "Use A on
B" and "Use B on A"), just check Combine interactions work in reverse? in the
254

Interactions with Hotspots are defined in the Hotspot Inspector:
Items can also have “Unhandled” interactions - which are fallback interactions that are
run if no more suitable interaction is defined. These are available per-Hotspot, per-item,
and globally at the top of the Inventory Manager.
One special case arises if your interaction system relies on Interaction menus (see Choose
Hotspot Then Interaction
mode), and Include Inventory items in Hotspot Interaction
menus? is checked in the Settings Manager. This allows you to run inventory interactions
without selecting them - as they instead appear in a Hotspot / item's Interaction menu
along with the interaction icons:
In order for them to show, the Interaction menu must include an InventoryBox element of
type Hotspot Based - though this is true of the default.
NOTE: If you are using Choose Hotspot Then Interaction or Choose Interaction Then
Hotspot mode, and items can be selected normally, above), you can distinguish
between "using" an item on an NPC and "giving" it. If the Hotspot has an NPC
component attached, an additional field will appear for each inventory interaction.
PROTIP: The 3D Demo's Prop sword item uses an unhandled interaction so that the
Player character can say "I can't cut that" when attempting to use it on Hotspots that
don't have an interaction for it.
PROTIP: The 2D Demo makes use of this feature. The worm item cannot be selected
by clicking it in the top inventory bar - instead it is used on Hotspots by clicking it in
the game’s Interaction Menu.
255

PROTIP: If your chosen Interaction method is set to either Choose Hotspot Then
Interaction or Choose Interaction Then Hotspot, Inventory interactions can be marked
as "Give" when interacting with NPCs. In a NPC's Hotspot Inspector, a Use/Give popup
box will appear beside Inventory interactions. By default, items are selected in "Use"
mode, but this can be changed with the Inventory: Select Action or through script.
256

6.3. Managing inventory at runtime
During gameplay, the Player's Inventory items are shown inside the InventoryBox menu
element. The default interface includes an Inventory menu that appears when the mouse
hovers over the top of the screen - see the default Inventory menu.
If items are categorised (see Inventory items overview), then InventoryBox elements can
also be used to limit what kind of items are shown. For example, a "regular" inventory
could be shown for items, while another could be shown for spells.
Items can be added to and removed from the Player's Inventory by using the
Inventory:
Add or remove Action. If multiple units of the same item can be carried, then this Action
will also allow you to a!ect the number of units that the player is carrying. For example,
a "gold currency" item could be reduced by 50 when the player buys something from a
shop.
The
Inventory: Check Action is used to perform di!erent Actions based on what the player
is carrying. Again, if multiple units of the same item can be carried, this Action will allow
you to make a specific query about how many units of that item the player is carrying.
Returning to our shop example, we can use this Action to determine if the player has
enough gold to buy an item, and issue a response accordingly.
PROTIP: The cog icon to the right of an item’s label in the Inventory Manager can be
used to find all references made to that item in the project.
NOTE: If you wish to access the inventory through script, you can do so with:
AC.KickStarter.runtimeInventory.localItems;
257

6.4. Crafting
Combining items together typically involves using one item on another. However, AC also
allows for "recipes", in which many items can be combined at once to create a new item.
This mechanic is known as crafting, as made popular by games such as Minecraft.
To perform crafting in game, an
InventoryBox and a Crafting element must be made
available to the player so that they can transfer items between them. Such a Menu is
already provided in the default interface - see the
default Crafting Menu.
Recipes are managed in the Crafting tab of the
Inventory Manager:
Each recipe requires a number of "ingredient" items, and a resulting item that is produced
when the ingredients are combined.
If an ingredient's Item has Can carry multiple? checked, you can also determine the
number of instances of this item required. For example, a recipe to create a working
flashlight may require one empty flashlight and two batteries.
The Crafting element has two types: Ingredients and Output. When the correct
arrangement of items are placed in a Crafting box of the Ingredient type, the resulting
item can be selected from a Crafting element of the Output type. Whether the resealing
item is displayed automatically or not depends on the
Crafting element.
PROTIP: Recipes can optionally be made to require a specific crafting pattern – that is,
each ingredient must be placed in a specific position within the Crafting element.
NOTE: The default Crafting Menu has an Appear type of Manual, meaning it will not
open unless it is told to with the
Menu: Change state Action.
258

6.5. Inventory properties
Inventory properties are a way of giving Inventory items "stats", such as weight or value.
They are similar to Variables, only they are attached to Inventory items - with each item
having its own value.
They can be managed within the Properties tab of the Inventory Manager:
A property can be one of five types:
Boolean
A simple True/False flag
Integer
A whole number
String
A piece of text
Float
A number with a decimal point
Pop Up
One of a set of pre-defined labels
Vector 3
A group of three numbers that can represent a position, scale, rotation or direction
Game Object
In the case of Global variables, this is a prefab. For Local and Component variables, this
can either be a prefab or an object in the scene.
259

Unity Object
A Unity asset or prefab available in the Project window.
Properties can also be limited to items of a specific category, should any be defined in the
Categories tab.
Property values can then be assigned to each item at the bottom of that item's Settings
panel, in the Items tab:
They can also be assigned to Documents and Objectives, provided they are both in the
same Category.
Property values can be displayed in a
Label element, and can be converted to Variables via
the Inventory: Property to Variable Action.
Through scripting, the InvItem class's GetProperty function can be used to retrieve or
modify a property, allowing you to display them in custom UI elements or perform
di!erent code depending on it.
PROTIP: To get an API reference to an item's property, right-click on the property's
label and click Copy script variable. This is true for all Manager fields.
260

6.6. Scene items
The Scene Item component allows an Inventory item to be represented by a GameObject
in the scene. This is useful for mechanics such as:
•
Inspecting items from the Inventory with a "close up" mechanic
•
Equipping items in the Player's hand, for interacting with the environment
•
Dropping items from the Inventory into the scene, while allowing them to be picked
up again later
To establish a link between a GameObject and an Inventory item, attach the Scene Item
component, make it a prefab, and assign it in the item's Linked prefab property field. If
the object is going to be present in the scene before it is moved to the Inventory, add the
Remember Scene Item component as well, and set its Default Inventory item field to
match the intended item.
Once an item has a Linked prefab assigned, the Inventory: Scene item Action can be used
to transfer it from the Inventory to the scene, and vice-versa. If this Action is used to
spawn in a linked prefab that has no Scene Item component, one will be added
automatically.
When transferring to the scene, the Remove original? option can be used to take the
item out of the Inventory - as though it were being dropped in the scene. Unchecked, the
item will remain in place, but the Scene Item will still represent it.
If the parent ActionList has a GameObject parameter defined, then the resulting Scene
Item can be mapped to this parameter's value. This means that Actions that follow can
further manipulate the spawned object - for example, by parenting it to the Player's hand
with the
Character: Hold object Action.
To save the presence of a spawned Scene Item held by the Player, attach the Remember
Scene Item component.
The advantage of using this technique, over the Object: Add or remove Action, is that the
link between Inventory item and GameObject is retained. If changes are made (through
scripting) to the Item's properties, for example, then those changes can be accessed from
the Scene Item component. The
Remember Scene Item component will also update the
item with the contents of any any other Remember component attached to it - allowing a
change made to the Scene Item to be restored upon removing it from, and then re-adding
it to, the scene.
To save the position and presence of a Scene Item in the scene, attach the
Remember
Transform component.#
261

6.7. Exporting inventory data
It is possible to export a game's inventory item data as a CSV file, so that you and other
team members can keep track of them outside of the Editor.
To export them, go to the Inventory Manager's Items tab, click on the cog icon to the
right of the Create new item button and choose Export items...:
This will bring up the Inventory item export wizard, which you can use to choose what
data is exported:
262

It is also possible to import data from the same cog icon - clicking Import items... will
bring up the Inventory item import wizard:
Only certain data can be imported, and the wizard is used to match each column with the
data to import. Note that the first column must be a list of ID numbers, with each ID
number associated with a specific item.
NOTE: The existing inventory data won't be cleared by this process, but data for items
that have matching ID numbers will be overwritten. Therefore, you should back up
your project before attempting this process.
263
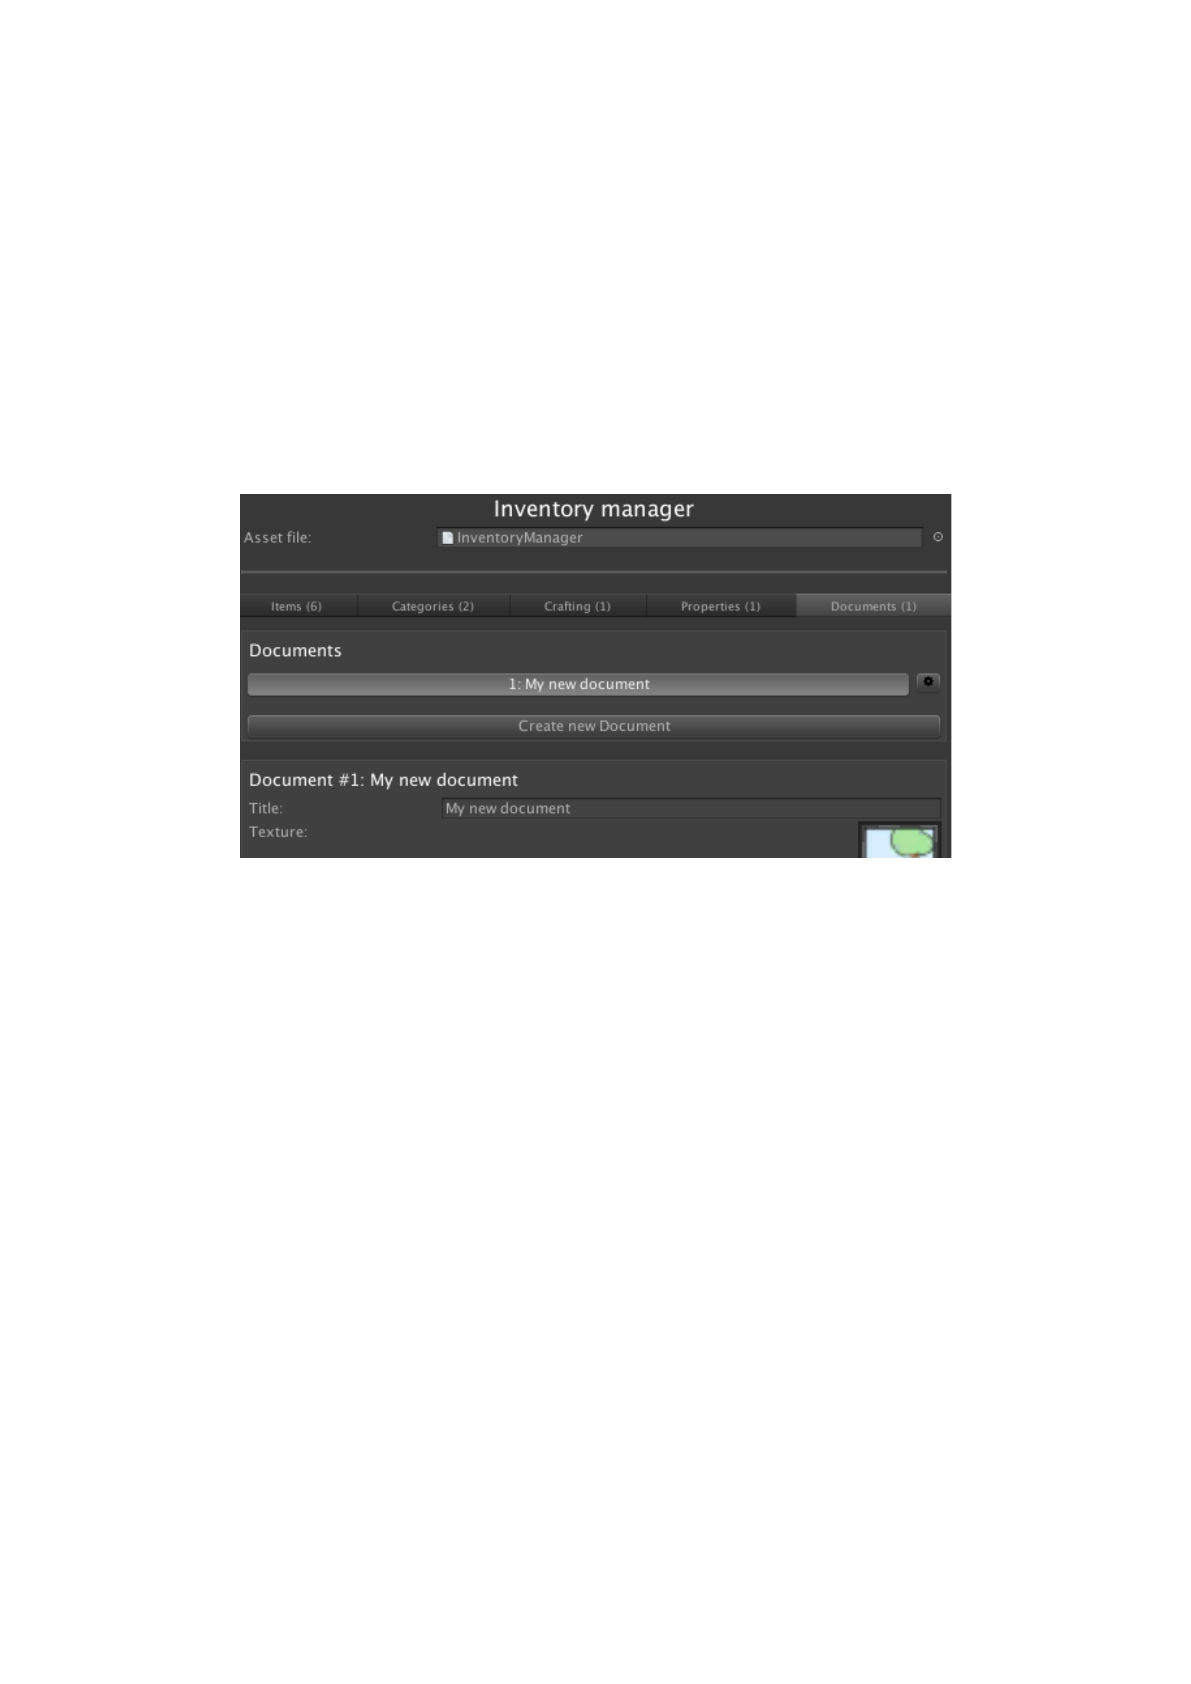
6.8. Documents
Documents allow the Player to read signs, notes and diary pages that they find as they
explore the game world, and can also be collected by the Player as they would their
regular Inventory items.
A Document consists of a title, multiple pages of text, and a graphic - and can be viewed
in a Menu with an Appear type of On View Document. Such a Menu is included in the
Default interface - see
The default Document Menu.
Documents can be defined in the
Inventory Manager, under the Documents tab:
Here, they can be given a title and a texture, as well as a series of pages that each have
their own text and texture. A category can also be assigned, if created in the Categories
tab.
A Document can optionally be carried by the Player when the game begins, and the last
page that was previously open can be remembered next time. To read and manipulate
Documents, use the
Document: Open and Document: Add or remove Actions respectively.
A list of collected Documents can be viewed via an InventoryBox element with an
Inventory box type value of Collected Documents. If inventory categories exist, then
this list can be filtered by category.
To view a Document when using the Document: Open Action, you must rely on a Menu
with an Appear type value of On View Document. To view the Document in full, the
following Elements within that Menu must be present:
•
A
Label element with a Label type of Document Title
•
A Journal element with a Journal type of Display Active Document
•
A
Graphic element with a Graphic type of Document Texture
•
A
Graphic element with a Graphic type of Page Texture (if pages have textures)
264


6.9. Objectives
Particularly in long or multi-branching games, Objectives are a way of reminding the
player on their current tasks and puzzles. These can be broken up into multiple steps -
or states. For example, the Objective "Slay the dragon" may have the states "Get the
sword", "Find the lair", and "Defeat the dragon". As the player's progresses in this task,
the Objective's state is updated accordingly.
Objectives can be defined in the
Inventory Manager, under the Objectives tab:
An Objective can be given a name, description, an associated texture, and a number of
"states". As a minimum, an Objective must have both a "Started" and "Completed" state.
Additional states, including "Fail" states, can be defined in the Editor.
For each state, an
ActionList asset can be assigned that runs when the state is entered.
A category can also be assigned, if created in the Categories tab. An InventoryBox
elements that display Objectives can be filtered by category - allowing for the separation
of e.g. “main” and “optional” Objectives.
When the game begins, all Objectives are considered to be inactive. The
Objective
Actions allow you to set and query the current state. If Player-switching is enabled, an
Objective's current state can either be unique to each Player, or shared by all.
NOTE: Objectives are purely a way of conveying a task's status to the player, and do
not have any "logic" associated with them.
266


6.9.1. Sub-objectives
If an Objective has states that include multiple steps, or has di!erent ways it can be
completed, it can help to break it down into sub-Objectives - such that completing the
sub-Objective(s) automatically a!ects the “parent” Objective.
This is useful when the player must complete multiple Objectives to complete a task - or
alternatively, complete only one from a list of Objectives.
For example, let’s say we have an Objective named “Gather intel”, which involves asking
Tom, Dick and Harry for information. We could break these down into individual sub-
Objectives (“Talk to Tom”, “Talk to Dick” etc), and then link them to "Gather intel”. We
could then have the “Gather intel” Objective auto-complete either when we talk to all
three, or only one.
Sub-Objectives are defined by grouping them into Objective
categories. In our example
above: we would go to the Inventory Manager's Categories tab, and then create a new
Category - with Available to Objectives? checked - named “Talk to townspeople”. Once
an Objective category has been defined, it can be assigned in an Objective state’s Sub-
Objectives category dropdown:
Once assigned, the automatic behaviour of these Objectives can then be set:
Auto-start sub-Objectives when enter? will cause all Objectives in the sub-Objectives
category to become active when the “parent” Objective state is entered.
Beneath that, the “parent” Objective can be made to switch its own state automatically
when the sub-Objectives meet a given condition:
•
All are completed
• Any is completed
• All are failed
• Any are failed
PROTIP: A tutorial covering this topic can be found online.
268


6.10. Inventory scripting
Inventory item data is stored in the InvItem class. At runtime, items are referenced by
InvInstance classes, which can be generated from an InvItem, its name, or its ID:
InvInstance invInstance = new InvInstance (invItem);
InvInstance invInstance = new InvInstance (itemName);
InvInstance invInstance = new InvInstance (itemID);
If you have an InvInstance class, you can get its associated item with:
invInstance.InvItem;
Items can be interacted with using functions within InvInstance:
invInstance.Select ();
invInstance.Deselect ();
invInstance.Use ();
invInstance.Use (int iconID);
invInstance.Examine ();
invInstance.Combine (InvInstance otherInvInstance);
Item textures can be accessed and modified at runtime with:
invInstance.Tex
invInstance.ActiveTex
invInstance.SelectedTex
Inventory properties can be modified per-instance at runtime, and can be accessed with:
invInstance.GetProperty (int propertyID)
If your chosen Interaction method supports it, you can access an instance’s selection
mode with:
invInstance.SelectItemMode
Properties are stored in the InvVar class.
InvInstances are stored as Lists in InvCollection classes.
The player's collection of items can be retrieved with:
KickStarter.runtimeInventory.PlayerInvCollection;
Items in a collection can be modified and accessed with:
invCollection.Add (InvInstance invInstance);
invCollection.Insert (InvInstance invInstance, int index);
invCollection.Delete (InvInstance invInstance);
invCollection.Delete (int itemID, int amount);
270

invCollection.DeleteAll ();
invCollection.DeleteAllInCategory (int categoryID);
The currently-selected item can be retrieved with:
KickStarter.runtimeInventory.SelectedItem;
And de-selected with:
KickStarter.runtimeInventory.SetNull ();
The unselected item underneath the cursor can be retrieved with:
KickStarter.runtimeInventory.HoverItem;
Numerous functions related to currently-held Documents and active Objectives can be
found within the RuntimeDocuments and RuntimeObjectives classes, which can be
accessed with:
KickStarter.runtimeDocuments
KickStarter.runtimeObjectives
The Inventory system involves the following events:
OnInventoryAdd (InvItem invItem, int value);
OnInventoryAdd_Alt (InvCollection invCollection, InvInstance
invInstance, int amount);
OnInventoryRemove (InvItem invItem, int value);
OnInventoryRemove_Alt (InvCollection invCollection, InvInstance
invInstance, int amount);
OnInventorySelect (InvItem invItem);
OnInventorySelect_Alt (InvCollection invCollection, InvInstance
invInstance);
OnInventortHover (InvCollection invCollection, InvInstance
invInstance);
OnInventoryDeselect (InvItem invItem);
OnInventoryDeselect_Alt (InvCollection invCollection, InvInstance
invInstance);
OnInventoryInteract (InvItem invItem, int iconID);
OnInventoryInteract_Alt (InvInstance invInstance, int iconID);
OnInventoryCombine (InvItem invItem1, InvItem invItem2);
OnInventoryCombine_Alt (InvInstance invInstance1, InvInstance
invInstance2;
OnInventoryHighlight (InvItem invItem, HighlightType highlightType);
OnInventoryHighlight_Alt (InvInstance invInstance, HighlightType
highlightType);
OnRequestInventoryCountText (InvInstance invInstance, bool
isSelectedCursor);
OnContainerOpen (Container container);
OnContainerClose (Container container);
OnContainerAdd (Container container, InvInstance invInstance);
OnContainerRemove (Container container, InvInstance invInstance);
271

OnContainerRemoveFail (Container container, ContainerItem
containerItem);
OnCraftingSucceed (Recipe recipe, InvInstance invInstance);
OnDocumentOpen (DocumentInstance documentInstance);
OnDocumentClose (DocumentInstance documentInstance);
OnDocumentAdd (DocumentInstance documentInstance);
OnDocumentRemove (DocumentInstance documentInstance);
OnObjectiveUpdate (Objective objective, ObjectiveState state);
OnObjectiveSelect (Objective objective, ObjectiveState state);!
272

7. Variables#
273

7.1. Variables overview
Variables are essential when implementing puzzle logic, as they allow you to keep track
of various states and decisions in your game. For example, they can be used to record a
choice made by the player, or how many times a particular interaction has been
attempted.
Variables can be defined in three places:
Global
Meaning they are scene-independent and can be accessed anywhere at any time,
including
ActionList assets.
Local
Meaning they are saved as part of a scene and cannot be accessed outside of that scene.
Component
Meaning they are saved as part of a GameObject, and can be accessed anywhere - so long
as that GameObject is active within a scene.
Global and Local variables are managed in the
Variables Manager. You can switch
between the two at the top:
Component variables are managed after adding a Variables component to a GameObject
- either via the Scene Manager's “Logic” panel, or via the Add component menu in a
GameObject's Inspector.
PROTIP: Global, Local or Component? To avoid clutter, a variable should be placed
according to where it need to be accessed. If it must be accessed across multiple
scenes, it should be Global. If it is only accessed within a single scene, it's best o! as
Local. Component variables are best relied on when they are associated with the
GameObject or Prefab they are attached to - for example, an "Is locked?" variable
placed on a treasure chest.
274

It is possible to convert a variable's location between Global and Local by clicking the cog
icon to the right of it. You should backup your project beforehand, however, as AC will
then go through your project and amend any Actions and Manager fields that refer to it.
Each Variable has a number of fields:
Label
The variable's internal name, used by Actions to reference it.
Type
The variable type, which can be one of five values:
Boolean
A simple True/False flag
Integer
A whole number
String
A piece of text
Float
A number with a decimal point
Pop Up
One of a set of pre-defined labels. These labels can either be unique to the
variable, or shared amongst several by creating a Preset.
Vector 3
A group of three numbers that can represent a position, scale, rotation or direction
Game Object
In the case of Global variables, this is a prefab. For Local and Component
variables, this can either be a prefab or an object in the scene.
NOTE: When converting a variable from Global to Local, be mindful that ActionList
assets cannot reference Local variables. If AC detects that an Action refers to this
variable, it will not amend it - but instead display a warning message in the Console.
275

Unity Object
A Unity asset or prefab available in the Project window.
Replacement token
This is a unique piece of text that, when used as dialogue speech or places in a Label
element, will be replaced at runtime by the variable's current value. This is useful when
you want to display the variable's value on-screen. For more, see
Text tokens.
Initial value
The variable's value when the game begins.
Link to (Global and Component only)
In the case of a Global variable, this allows you to synchronise its value to Options data, a
Playmaker global variable, or a custom script. In the case of a Component variable, this
also you to synchronise its value to a Playmaker local variable, or a custom script. For
more, see
Variable linking.
Internal description
An Editor-only description to aid designers on its use.
Once defined, Variables can be read and manipulated using the Variable Actions.
As variable values can be set by the user, they can also aid in testing. For example, a
"Skip opening cutscene" boolean could be used in your OnStart cutscene to bypass an
opening cinematic when set to True by the user.
PROTIP: Placing forward-slashes in a variable's name will cause the slash to turn into a
divider when listed in Actions. For example, the label "Options/IsFullScreen" will place
it in an "Options" hierarchy. This makes it much easier when referencing them.
NOTE: Using the Variables Manager to change a variable's value while the game is
running will not a!ect the game's current instance of those variables. For debugging,
the realtime values of Variables can be seen during gameplay by checking Show
runtime values? at the top of the Manager. Checking this option also allows you to
modify Variable values directly in the Editor at runtime.
276

7.2. Managing variables at runtime
Variables are primarily read and modified at runtime with the various Variable Actions. It
is recommended that you do so inside the ActionList Editor so that the logic flow is more
easily readable.
Variable values can also be used in dialogue speech - see
Text tokens.
Variable values can also be both read and written to through scripting - see Variable
scripting. They can also be automatically synced with other values or assets - see
Variable linking.#
PROTIP: The Variable: Copy Action can be used to transfer a Variable's value between a
Local one and a Global one.
PROTIP: The cog icon to the right of an variable’s label in the Variables Manager can
be used to find all references made to that variable in the project.
277

7.3. Variable linking
Variables are normally independent, with their values stored in save game files and
updated when a save file is loaded.
However, both Global and Component variables can be linked to other sources, so that
their values becomes synchronised with another value. This allows for AC variables to
integrate more easily with third-party assets and custom options data.
To do so, select the Variable you wish to link, and amend its Link to field:
It can be set to the following values:
None
The variable is not linked to anything and its value is independent with the rest of the
project
Playmaker Variable
This variable is linked to a Playmaker variable, allowing Playmaker variable values to be
saved.
Options Data
The variable’s value is stored in PlayerPrefs as “options data”, and is independent of save
games. This setting is only valid for Global variables.
Custom Script
The variable is synchronised with a separate script or third-party asset by hooking into
custom events.#
278

7.3.1. Linking with Playmaker Variables
If you have the popular Playmaker asset, which is a separate Unity asset to Adventure
Creator, you can synchronise AC's variables with Playmaker's.
Upon setting a variable's Link to value to Playmaker Variable, you will be prompted to
add the PlayMakerIsPresent scripting define symbol to your game's Player Settings. You
can find this field from Edit → Project Settings → Player.
You can then enter the name of the Playmaker Variable you wish to link to. AC Global
variables can only link to Playmaker global variables, and AC Component variables can
only link to Playmaker variables defined within a GameObject FSM. Bear in mind that the
two variables must match type: if you are linking a Playmaker float, you must do so with
an Adventure Creator float as well.
You can also choose whether or not Playmaker determines the initial value of the AC
variable. Generally, the link should be kept one-way - that is, one asset a!ects it, while
the other reads it. When a Playmaker variable is changed, its value is “downloaded” to AC
when it requested – i.e. when the
Variable: Check Action is used to determine its value.
Using this method, you can save the value of Playmaker Variables automatically.
NOTE: An AC PopUp variable should be linked with a PM Integer variable.
NOTE: By default, Playmaker takes control over the mouse cursor via the
PlayMakerGUI object's Control Mouse Cursor option. This can create a conflict with
AC, since both assets are trying to control the cursor. To solve this, just uncheck this
field.
279

7.3.2. Linking with custom scripts
By using custom events, AC global variables can be connected to other variables present
in your own scripts or third-party assets.
Upon setting a variable's Link to value to Custom Script, events will be called whenever it
is read or modified:
OnVariableUpload (GVar variable)
This event will be triggered after AC amends the variable’s value. Therefore, a custom
event can use this to update the custom script’s variable accordingly.
OnVariableDownload (GVar variable)
This event will be triggered before AC reads the variable’s value, when requested through
e.g. the Variable: Check Action. Therefore, a custom event can use this to transfer the
value of the custom script’s variable to AC.
Reading and modifying a variable involves accessing the GVar class. The provided
Variable Linking Example script demonstrates how an custom integer can be
synchronised with an AC global variable. Its usage is described within the comments of
the file.#
280

7.4. Variable presets
Variable presets allow you to assign the values all Global or Local variables at once. This
is particularly useful when testing, since you can use them to quickly assign your
variables to states appropriate to specific points in your game.
Presets are listed and defined in the Preset configurations panel of the Variables
Manager
:
You can assign each Variable's preset values, or prevent it from being included, within the
its Properties panel:
When the game is running, a preset can be assigned by selecting it in the Variables
Manager and clicking Bulk-assign. Presets can also be assigned by using the
Variable:
Assign preset Action, which can be useful if you need to ensure all players have the exact
same variable values at some point during gameplay.#
281

7.5. Timers
Timers are special variables that automatically change by a fixed amount over time. They
can be used to keep track of timed sequences, or aid with mechanics such as an oxygen
meter if the Player is underwater.
Timers are defined in the Timers Editor, which can be accessed from Adventure Creator
-> Editors -> Timers Editor in the top toolbar.
Each Timer has its own properties related to its minimum and maximum values, how
frequently it updates, and more. ActionLists can optionally be assigned when it is
updated, or reaches its limit. Timers can also be linked to Integer, Float and PopUp
Global variables.
To control a Timer, use the Variable: Set Timer Action, which can start, stop and resume
Timers. A Timer's state is saved automatically in save-game files.
A Timer's value can be presented in
Timer elements.
282

7.6. Exporting variables
It is possible to export all of a game's variables as a CSV file, so that you and other team
members can keep track of them outside of the Editor.
To export them, navigate to the type of Variables you want to export (e.g. Global), click
on the cog icon to the right of the "Create new" button and choose Export variables…:
This will bring up the Variable export wizard, which you can use to specify what data is
exported:
When you click Export CSV and choose a save location, AC will then go through all scenes
added to your Build settings and extract any local variables you've defined. Therefore,
you should save the current scene before attempting this process.
PROTIP: Forward slashes (/) in a Variable's Label can be used to organise them into
categories. To aid with importing data into third-party script-writing software, these
characters can optionally be replaced with a full-stop (.) instead.
283

7.7. Scene attributes
Scene attributes are a special set of variables that exist in all scenes, but can't be written
to. They allow you to set properties about a scene that can later be read using the Scene:
Check attribute Action.
An ActionList asset that's called when a scene begins, for example, can be used to
initialise a scene or run some common task depending on the attributes of that scene.
Scene attributes are created within the
Scene Manager, under the Scene attributes
header:
Attributes are created by clicking Manage attributes, and using the window that opens to
define the attributes available to your game:
The values for each scene's set of attributes can then be set back in the Scene Manager:#
284

7.8. Variable scripting
Variables can be referenced both by name, or by ID number. This number is displayed to
the left of it when listed in the Variables Manager, or the Variables component.
A Global Variable can be retrieved with:
GVar myVar = GlobalVariables.GetVariable (int id);
GVar myVar = GlobalVariables.GetVariable (string name);
Similarly, a Local Variable can be retrieved with:
GVar myVar = LocalVariables.GetVariable (int id);
GVar myVar = LocalVariables.GetVariable (string name);
To access Component Variables, a reference to the Variables class is needed:
GVar myVar = myVariables.GetVariable (int variableID);
GVar myVar = myVariables.GetVariable (string variableName);
Each Variable is an instance of the GVar class. Its value can be read and set by script:
myVar.IntegerValue = 2;
myVar.BooleanValue = true;
myVar.FloatValue = 3.5f;
myVar.TextValue = "Hello";
myVar.Vector3Value = new Vector3 (1f, 2f, 3f);
You can also get the Variable’s display value in a string-format:
myVar.GetValue ();
The variable system has the following events:
OnVariableChange (GVar variable)
OnDownloadVariable (GVar variable, Variables variables)
OnUploadVariable (GVar variable, Variables variables)!
285

8. Miscellaneous components#
286

8.1. Highlight
The Highlight component is used to control visual e!ects for Hotspots. A Hotspot can be
associated with a Highlight component via its Object to highlight field:
The Highlight component can be used to brighten a Hotspot's associated MeshRenderer
when selected by the player, when the
FlashHotspots input button is invoked, or by using
the
Object: Highlight Action. However, it can also be used to assist with custom visual
e!ects.
It has the following Inspector fields:
Enable when associated Hotspot is selected?
When checked, the Highlight e!ect will be enabled when its associated Hotspot is
selected. This can be disabled in favour of manually invoking its HighlightOn() and
HighlightO"() methods through script.
Auto-brighten materials when enabled?
When checked, the component will brighten any attached Renderer component when the
e!ect is enabled. Note that this works by shifting the "_Color" property of the Renderer's
materials - so it may not have any e!ect if certain shaders are used. In this case, or if a
di!erent e!ect is desired, either events (below) or the reading of the component's
GetHighlightIntensity() method through script can be used to manually alter the
Renderer.
Also a"ect child Renderer components?
When checked, then child Renderer components will be a!ected as well as any on the
same GameObject.
PROTIP: This component is also necessary if you want Hotspots to have icons show
when a Hotspot is selected, which can be enabled via the Settings Manager's Display
Hotspot icons field.
NOTE: The default brightening e!ect is performed by modifying a Material's “_Color”
property, which is available when using Unity's Standard shader, or “_BaseColor”
property if present. The property to a!ect can be overridden via the Highlight
material override field - either per-component or globally in the
Settings Manager.
287

Intensity curve
An animation curve that defines the intensity of the e!ect over time, where a y-axis value
of 1 means “default brightness”. This does not a!ect the transition time of the e!ect -
for that, use the field below.
Transition time (s)
A slider to control how long it takes for the highlight e!ect to become fully enabled.
Flash hold time (s)
A slider to control how long the highlight e!ect is enabled when the
FlashHotspots input
button is invoked.
Call custom events
When checked, event boxes will allow events to be called whenever the highlight e!ect is
enabled or disabled. Note that these events will be called regardless of whether or not
Auto-brighten materials when enabled? is checked, allowing for custom e!ects.
288

8.2. Shapeable
If a Skinned Mesh Renderer references a model that has blendshapes, their weights can
be controlled independently at runtime.
However, it is often the case that some shapes won't be used together - and as one set is
made active, another must be made inactive. This is often the case when using
blendshapes for expressions or mouth phonemes.
The Shapeable component allows you to group blendshapes together so that their
weights can be controlled in bulk, by only allowing for one key within a group to be the
"active" at a time.
Attach the Shapeable component to a Skinned Mesh Renderer, and you will be able to
define as many shape groups as you like. A group can contain any number of shape keys,
which each correspond to a di!erent set blendshapes:
Once configured, it can then be manipulated with the
Object: Blend shape Action. This
Action can be used to make one key in a group the “active” one – all others will be
disabled. This can be performed over time, however, for smooth transitions.
This component is also when animating the mouths of 3D characters - see
Lip syncing.#
PROTIP: The 3D Demo game's Brain NPC uses this technique to group his
ExpressionHappy and ExpressionSad blendshapes together.
289

8.3. Moveable
In order to manipulate a GameObject's Transform component with the Object: Transform
Action, the Moveable component must be attached. Simply attach it to the GameObject,
and its Transform can be manipulated.
If the Moveable has a Rigidbody component, it can optionally be used to predict if
movement commands given to it will result in a collision - and cancel the command if so.
NOTE: In order to save a GameObject’s Transform, attach the Remember Transform
component - see
Saving scene objects.
290

8.4. Parallax 2D
When running 2D scenes, the camera does not physically move. When the view pans
across the scene, the perspective remains fixed - regardless of the camera's Projection
setting.
As this happens, all objects in the scene will move across the game window at the same
rate, regardless of their distance from the camera.
To combat this, the Parallax 2D component is be used to achieve a depth a!ect by
causing objects to move relative to the camera's panning. It can also be made to react to
the mouse cursor’s position instead.
Attach the Parallax 2D component to a background sprite, choose whether it Reacts to
the Camera (recommended), the Cursor, or a specific Transform. Then assign a Depth
value, and enable a scrolling direction:
The more positive the Depth, the further the sprite will appear to be relative to the
"regular" graphics. The more negative, the closer it will appear to be. The value should
stay within -1 to +1 in general.
For more advanced e!ects, it is also possible to limit the parallax movement to within
pre-set boundaries in both the X and Y directions. Just check Constrain? within each
directional box to set upper and lower bounds.
PROTIP: This technique is used in the 2D Demo scene to give a 3D e!ect. The
component is attached to the ParkForeground1, ParkBackground and ParkCloud
GameObjects.
NOTE: Do not attach this to the parts of your scene that the player can navigate or
interact with - it is not intended to work with gameplay elements, and should be used
for background e!ects only.
291

8.5. Limit Visibility
Particularly in 2.5D scenes, you may wish for an object to be visible only when a particular
camera is the active one. Attach the Limit Visibility to camera script, and you can limit
its visibility to certain cameras – and optionally its children, too.
The e!ect can also be negated - so that it is not visible to certain cameras.
PROTIP: This component also works with Video Player components, and works by
setting the Alpha value of the video to either 1 or 0, based on the active camera.
292
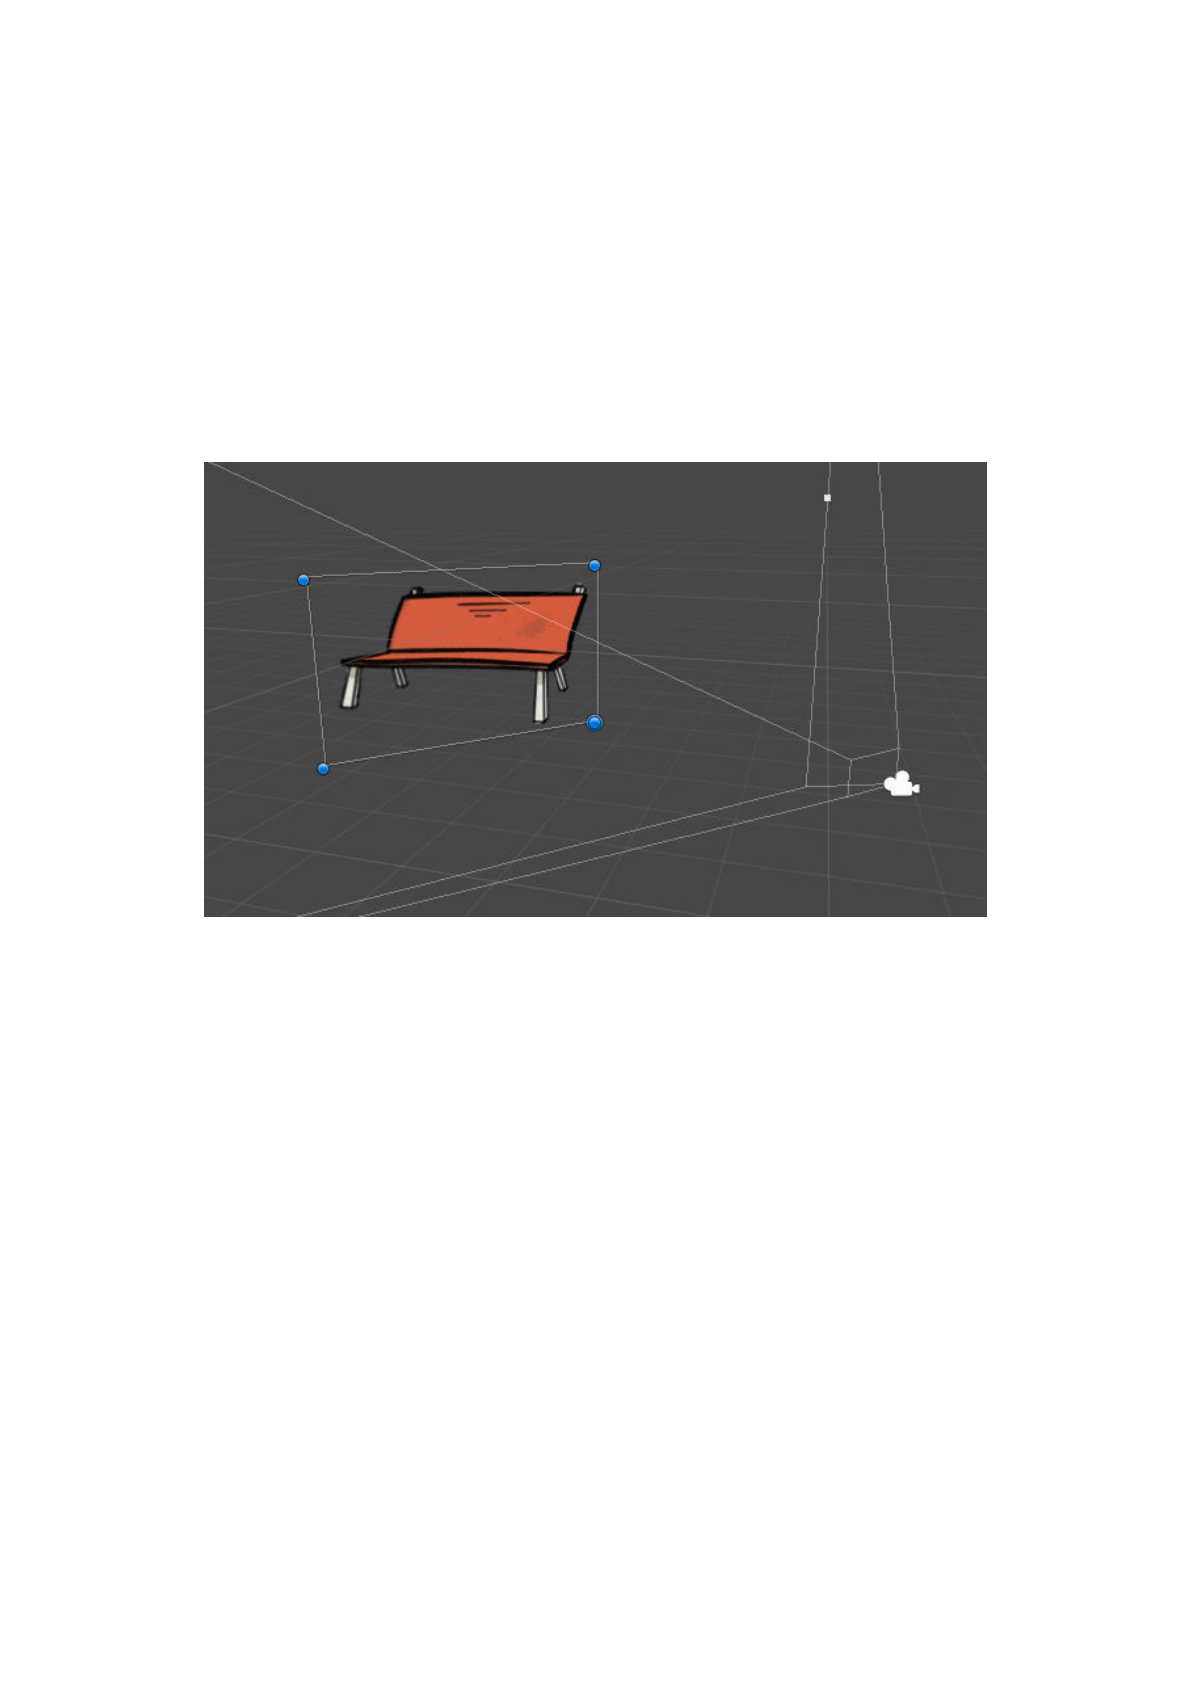
8.6. Align To Camera
The Align to Camera component is used to assist the placement of sprites when building
2.5D games.
When working in 2.5D, scene sprites are used for interactive graphics and to mask
characters behind the background when moving behind certain areas - and should be
facing the camera at all times. As 2.5D cameras are positioned in 3D space and rarely
aligned down the Z-axis, the sprites too must be rotated to face them.
By attaching the Align to Camera component, you can have a sprite automatically face a
given camera. Once aligned, its distance from this camera can be controlled with the
Depth property.
Optionally, you can lock the sprite's perceived scale when the Depth is adjusted: this will
cause the sprite to get larger as it moves further away, causing it to appear the same size
when viewed through the camera.
293

8.7. Particle Switch
When you create a Unity Particle System, you may wish to turn it on at some point during
gameplay, rather than play it continually. For example, a fireplace would only need to
produce smoke when it's lit.
The Particle Switch component is used to turn the Particle System on and o! easily with
the
Object: Send message Action. When attached to a Particle System, the Turn On and
Turn O" messages will perform as expected, and the Interact message will cause it to
emit all of its particles once.#
294

8.8. Light Switch
When you create a Unity Light, you may wish to turn it on at some point during gameplay,
rather than play it continually. For example, a lamp would only emit light if the player has
plugged it into a wall socket.
The Light Switch component is used to turn the Light on and o! easily with the Object:
Send message
Action. When attached to a Light, the Turn On and Turn O" messages
will perform as expected.
NOTE: To save the on/o! state of a Light, follow the steps outlined in the online
Saving custom scene data tutorial.
PROTIP: The intensity of a Light can also be animated, and controlled with the Object:
Animate Action.
295

8.9. Sprite Fader
In order to manipulate a Sprite's transparency with the Object: Fade sprite Action, the
Sprite Fader component must be attached to it. This component can also optionally the
transparency of its children in the Hierarchy.
NOTE: In order to save a Sprite’s transparency, attach the Remember Visibility
component - see Saving scene objects.
PROTIP: Sprite transparency can also be animated, and controlled with the Object:
Animate Action.
296

8.10. Tint maps
Tint maps are a way of faking lighting e!ects in 2D scenes. They work by altering the
colour of sprites based on their position. This allows you to easily create dynamic
lighting e!ects, such as having your Player get darker when they enter a shaded portion
of the background.
When making a 2D game, tint maps can be found under the Camera section of the
Scene
Manager’s list of prefabs:
The active Tint map must be assigned as the Default Tint map, under the Scene settings
panel.
When created, it will appear 10 units in the Z-axis, but its Z-position is not actually
important, as it can be hidden when the game begins. What is important is its scale in
the X and Y directions - after creating it, stretch it out so that it covers the same area as
your background graphic.
You can then supply a "tint" texture to its Inspector. This texture will tint any sprites that
"follow" it - but pure white will not have an e!ect. Such sprites will be tinted according to
their position over the Tint map. A colour modifier can also be applied to the final e!ect,
and this can be controlled through animation for dynamic lighting e!ects.
To make a sprite follow a Tint map, simply add the Follow Tint Map component to it.
This component will normally follow the scene's Default Tint map, but you can also
supply a separate Tint map if you prefer.
You can also adjust the intensity of the tinting e!ect. These values can also be changed
mid-game by using the
Object: Change Tint map Action - allowing you to change the Tint
e!ect dynamically, e.g. when the player turns on on a light switch.
NOTE: The texture you supply must be readable by Unity. This is a simple but crucial
step: within its properties Inspector, check Read/Write Enabled. If you are using
older versions of Unity, you may also have to set its Texture Type to Advance.
PROTIP: A tutorial on working with Tint maps can be found online.
297

8.11. ActionList Starter
This component allows you to run ActionLists when the scene starts through natural
gameplay, or is opened as the result of loading a save game file.
Though the same can be achieved in the Scene Manager, which provides Cutscene on
start and Cutscene on load fields, this method allows you to store such functionality in a
prefab. This is useful if multiple instances of the same prefab, which each have their own
“starting logic”, need to run their own ActionList when the scene begins.
If
Player-switching is enabled, you can also use this to run an ActionList when the scene
is loaded due to a change in Player character.
The linked ActionList can optionally be made to run instantly, as opposed to naturally
over time. This is similar to
Cutscene skipping, when all Actions are run at once over a
single frame.
If the ActionList it runs makes use of parameters, then its parameter values can be set
within this component’s Inspector. If the ActionList is an asset file that has Can run
multiple instances? checked, then multiple instances of the ActionList can be run
simultaneously - each with its own set of parameter values.#
PROTIP: The linked ActionList can also be run by invoking this component's
RunActionList() method.
298

8.12. Set Interaction Parameters
The Set Interaction Parameters component allows you to set values for all parameters
defined on a Hotspot's Interaction.
If an Interaction has a GameObject parameter defined, then the Hotspot component
optionally allows you to set that parameter to itself when run. However, this component
allows you to set the values for all parameters when the Interaction is triggered.#
299


8.14. Set Trigger Parameters
The Set Trigger Parameters component allows you to set values for all parameters
defined in an Trigger's asset file, provided that the Trigger's Actions source field is set to
Asset File.
PROTIP: If this is attached to a GameObject with multiple Triggers, then this will refer
to the first one. However, all Triggers that share the same number of parameters will
be a!ected as well.
301


8.16. Auto Correct UI Dimensions
The Auto Correct UI Dimensions component is used to re-position and re-size a Unity
UI-based Menu, if the "playable" area is not the same as game screen. This can be the
case if an aspect ratio is enforced, or if running on a mobile device with notched features.
Each of the
default UI prefabs make use of this component to ensure they look correct
with di!erent playable areas.
To use it, attach it to the UI prefab’s root, and assign the Transform to control to the
RectTransform that it should reposition. Typically this should be the Menu’s Rect
transform boundary, an immediate child of the Canvas that describes the boundary of all
other UI components - so that manipulating it a!ects the whole UI's display.
In it's Inspector, you then set the minimum and maximum anchor points as decimals
relative to the screen. For example, the default values of (0.5, 0.5) for each will place the
UI in the centre of the screen.#
303

8.17. Link Variable To Animator
This component can synchronise a Global or Component variable's value to that of an
Animator parameter, provided that both share the same type and name. This is useful
when you want an object's appearance to reflect an associated variable - for example, an
"Is Locked" bool used for a door. Rather than having to update both the variable and the
Animator parameter, you can use this component to only update the variable.
To use it, have either a Global Variables, or a Variables component (with either a Bool, Int,
PopUp or Float variable defined), as well as an Animator component with a parameter of
the same type and name defined. Then attach the Link Variable To Animator
component, and fill in the fields in its Inspector.
A two-way link can be established by then selecting the Variable, and setting its Link to
field to Custom Script.
If instead left as None, then the link will be one-way only - changing the Variable’s value
will a!ect the Animator parameter, but not the other way around.
This script relies on the technique covered in
Linking with custom scripts chapter.#
304

8.18. Survive Scene Changes
Attaching this component to a GameObject will cause it to be moved to the
DontDestroyOnLoad section of the Hierarchy while in Play mode, preventing it from not
being destroyed when the active scene is changed.
This is useful for creating objects and logic that should be persistent or accessible at all
times, but which cannot be kept outside of the scene as an asset or prefab. For example,
a series of Containers that holds separate equipment items.
To avoid duplicates of such objects being created when re-entering their original scene,
the Settings Manager’s ActionList when start game asset can be used to run an Object:
Add or remove Action that spawns in objects that should be persistent.
Remember components attached to such objects will work, but will be saved as “global
data”, independent of any scene data.
305

Chapter II: Advanced Features
306

9. Saving and loading#
307

9.1. Saving and loading overview
AC provides a robust save system that can be used with minimal e!ort on the developer's
part. However, as it is not completely automatic, it is important to understand how it
works before it can be used e!ectively.
Save game files can be read and written to in one of three ways:
Menus
The
SavesList element displays all existing save files and, when clicked, can be made to
either overwrite or restore them. The default interfaces provide both Save and Load
Menus accessible from the Pause Menu.
Actions
The included Save Actions can be used to save and load files from ActionLists.
Scripting
The
SaveSystem class includes numerous static functions that can be used to save and
load files from code.
When recording a save file, AC stores three types of data:
Main data
This includes the values of
Variables, the Inventory, the current scene, the music, which
Menus are open, and the Player’s position. Basically, anything that AC knows must always
be saved - and as such, is automatic.
Scene data
This includes anything in a particular scene that has been flagged up for being saved.
This is done simply by attaching appropriate components to it - see
Saving scene objects.
NOTE: Loading can occur at any time after a scene has initialised, but saving is only
possible under the following conditions:
1. No Conversation is currently active (unless regular gameplay is allowed, and its
options are not overridden in the Dialogue: Start conversation Action).
2. No gameplay-blocking ActionList (both scene-based and asset-based) is running
other than the one that contains the Save: Save or load Action (if being used to save).
3. The
Engine: Manage systems Action is not currently locking the save system o!.
The Save: Check Action can be used to determine if saving is currently possible.
308

Asset reference data
This includes any changes made to asset references by a scene object or the Player. For
example, a character's walk sounds, or an object's material - see Saving asset references.
When a save file is recorded or read, it's location is shown in the Console window. A set
of game-wide options regarding the recording of save-game files can be found in the
Settings Manager:
Save filename
The name to assign save files when either recording to disk, or as PlayerPrefs keys.
Use '_Editor' prefix for Editor save files?
If checked, then saves recorded while testing in the Unity Editor will rely on a di!erent set
of files to those used in builds.
Enable save game profiles?
If checked, allows multiple profiles to be made use of, each with their own Options and
save files. For more, see Save profiles.
Save screenshots
Allows screenshots to be recorded at the moment the game is saved.
Save screenshot texture
If save screenshots are enabled (above), a Render Texture can optionally be assigned
here, to use as its basis. Otherwise, a default full-screen screenshot will be taken
instead.
Save using separate thread?
If checked, the saving process will be handled by a separate CPU thread, which is useful
when autosaving as it allows regular gameplay to continue alongside the process.
Save asset references with Addressables?
If checked, then assets referenced by save game files will be based on their Addressable
name, as opposed to being in a Resources folder. For more, see
Saving asset references.
NOTE: For screenshots to display, a SavesList element's Display type field must be set
to allow for them. An example package can be found online.
309

Reference scenes by
Allows you to choose whether - inside save files - scenes are referred to by filename or
build index number. If scenes are added to the game dynamically via Addressables or
Asset Bundles, set this to Name - as such scenes do not have valid index values.
Auto-add Save components to GameObjects
Automatically searches the project and attempts to attach save components as
appropriate. For more, see Saving scene objects.
Manage save-game files
Brings up the Save File Manager, in which you can view all stored save game files and
Options data currently found on disk.
When reading a save file, AC reads this data and returns the player to the correct scene
automatically. When switching scene through gameplay, scene data will also be loaded
automatically.
Sometimes, however, more work is necessary to ready a scene after loading. For
example, we may need to return a character to their "Idle" animation if they were in the
middle of a complex tree of animations beforehand. For this, we can use the On load
Cutscene, as defined in the
Scene Manager's Scene cutscenes panel:
This Cutscene is run after a save file is opened and the game continues from this scene.
Actions inside it will run only once all save data has been successfully loaded.
NOTE: In order for scene data to correctly save and load when switching scenes, you
must use either the Scene: Switch Action or by calling the following method
beforehand:
AC.KickStarter.sceneChanger.PrepareSceneForExit ();
PROTIP: It is possible to save custom global data by storing them in Global Variables.
A tutorial for doing so can be found online.
310

9.1.1. Saving scene objects
A typical scene will feature GameObjects that require saving beyond the Player, who is
saved automatically. This might be a sprite's visibility, a Conversation’s enabled options,
or which camera is currently active.
In AC, this is done by adding components to these GameObjects that inform the save
system about what kind of data needs saving.
These components can be added automatically to your scenes from the Save game
settings section of the
Settings Manager:
When a GameObject has such a component, a disk icon appears beside it in the Hierarchy
window:
The most basic save component is Constant ID, which is used to generate a unique
number for any GameObject it is attached to:
This number is used as an identifier, and is necessary whenever we want to save a
reference to a particular object, rather than anything about it. The most common
example for this is the scene's active camera: AC needs to know which camera is currently
active, but doesn't need to know anything about the camera itself.
NOTE: You should back up your project before running this operation, but this will
work for most games that don't rely on
custom save data. However, you should still be
aware of the procedure to prepare objects manually should your game have particular
save requirements.
311

Constant IDs are also used by ActionList assets to reference scene objects.
The other save components are the Remember scripts, which each save a particular set of
data about the GameObject they are attached to. For example, the Remember
Transform script instructs the save system to record its position, rotation, and scale.
The following Remember scripts are available:
Remember ActionList Parameters
When attached to a scene-based
ActionList, it will save its current parameter values. The
parameter values of ActionList assets cannot be saved directly, but instances of them can
be by setting a Cutscene’s Actions source field to Asset File, referencing the asset,
unchecking Sync parameter values?, and checking Sync local parameter values?.
Remember Animator
When attached to an Animator, it will save its current-playing animation, parameter
values and layer weights. If an animation is in mid-transition when saving occurs, only
the “transition-to” animation will be saved.
The active Animator Controller can also be optionally saved (though changing the
Controller at runtime requires a custom script). To restore a change in the Controller, it
must be placed in a Resources subfolder and given a unique name (see
Saving asset
references).
It is also possible to set the Animator Controller’s default parameter values - which is
useful if a Controller is shared by more than one Animator, since the default parameter
values are set per-Animator.
Remember Collider
When attached to a Collider, it will save its enabled state. It also allows you to have the
Collider disabled by default.
Remember Container
When attached to a
Container, it will save the items stored within. This is included on the
Container prefab by default.
PROTIP: Pay attention to the Console window when saving - it will inform you of any
object that does not have the required Constant ID component.
PROTIP: It is possible to have the Console list how a GameObject is used in ActionLists
by choosing Find local / global references from the save component's "cog" menu.
312

Remember Conversation
When attached to a Conversation, it will save the state of each of its options. This is
included on the Conversation prefab by default.
Remember Footstep Sounds
When attached to a Footstep Sounds component, it will save the sound clips it references.
Such sounds can be changed with the
Sound: Change footsteps Action. Note that the
AudioClip assets involved must be stored properly - see Saving asset references.
Remember GameCamera 2D Drag
Saves the position of a GameCamera 2D Drag camera type.
Remember Hotspot
When attached to a Hotspot, it will save its enabled state, changes made to its name, and
the enabled states of each of its Interactions. It also allows you to have the Hotspot
disabled by default.
Remember Material
When attached to a Renderer, it will save the Materials that it uses. Note that the Material
assets involved must be stored properly - see
Saving asset references.
Remember Moveable
When attached to a Draggable or PickUp object, it will record its position and rotation. It
also allows you to have the object disabled by default. To save a change in a Draggable
object’s track, all associated tracks will need a Constant ID.
Remember Name
When attached to a GameObject, it will save its name.
Remember NavMesh2D
When attached to a
Polygon Collider NavMesh, it will record any changes made to its hole
structure using the
Scene: Change setting Action.
Remember NPC
When attached to an NPC, it will save its name, various movement and graphical variables
as well as the enabled state of any attached Hotspot component - which can be disabled
by default. Note that in order to also save their position along a Path object, the Path
must have a Constant ID. Changes in portrait graphic, and walk and run sounds (if set
within the NPC component) can also be saved - but the Texture and AudioClip assets
involved must be stored properly - see
Saving asset references.
Remember Particle System
When attached to a Particle System, it will save its playback state.
313

Remember Scene Item
Saves the state of a Scene Item component. A default Inventory item to be associated
with must be defined. This component will save the object's presence in the scene - a
task normally reserved for the Remember Transform component. However, the latter
component should still be used to record the object's position and parentage.
Remember Shapable
When attached to a
Shapeable, it will save the active blendshape and its weight.
Remember Sound
When attached to a Sound, it will save its playback state and optionally the change in
audio clip. To do so, the AudioClip assets involved must be stored properly - see Saving
asset references
.
Remember Transform
When attached to a GameObject, its position, rotation and scale will be recorded. It can
optionally save its parentage, but its direct parents must have a Constant ID.
The Relative load order can be used to set the order in which it is loaded, relative to
other Remember Transforms. This is useful if you have many such components parented
to one another, and you need to restore data in order of their Hierarchy.
It can also save the object's presence in the scene, as changed with the Object: Add or
remove
Action, provided that it is a prefab asset that is stored properly - see Saving asset
references. If multiple instances of the object are spawned at runtime, assign its own
Constant ID number as the Linked prefab ConstantID.
Remember Timeline
When attached to a Playable Director, the playback state of its linked Timeline will be
recorded. In order to save track bindings, each track’s bound GameObject requires a
Constant ID component. In order to save the Timeline asset, both the original and any
new assets must be stored properly - see
Saving asset references. If the Timeline was not
playing when it was saved, the frame it was stopped at can optionally be evaluated - so
that the e!ects of it are then felt.
Remember Track
When attached to a
Drag track, saves the enabled state of its defined regions.
Remember Trigger
When attached to a Trigger, it will save its enabled state. It also allows you to have the
Trigger disabled by default.
314

Remember Variables
When attached to a Variables component, the states of its defined Variables will be saved.
This is attached by default to the Variables prefab type in the Scene Manager.
Remember Video Player
When attached to a Video Player, it will save its playback state. The Video Player is only
available in Unity 5.6 or later. The loaded video clip asset can optionally be saved, but
both the original and any new assets must be stored properly - see
Saving asset
references.
Remember Visibility
When attached to a Renderer (Sprite or Mesh), Sprite Fader or Follow Tint Map
component, it will save its visibility - and optionally its children as well. It also allows you
to have the Renderer invisible by default. It can also save the enabled state of a Canvas.
An object can have multiple save scripts, and Remember scripts also generate Constant
IDs. If set automatically, all save components on a single GameObject will share the same
ID number.
Scene data is stored and retrieved automatically - both when traversing them through
natural gameplay, or when loading save files. Scene data is also limited to the scene that
they are in - so if multiple scenes are open (through use of the
Scene: Add or remove
Action), then each one's data is handled independently.
If Remember components are placed on scene-surviving objects (i.e. those that are
flagged with
DontDestroyOnLoad), then those too are saved. However, their data is only
retrieved when loading a save file - not when changing scene through gameplay. In this
way, “global” elements can be added to the game - for example, a Conversation flagged
with DontDestroyOnLoad can be updated and accessed from any scene.#
PROTIP: It is possible to save custom data about scene objects by writing your own
Remember script. A tutorial for doing so can be found
online.
NOTE: Save file sizes are proportional to the number of such components present in
your game - so it's generally best to only add them when necessary.
315
9.1.2. Saving asset references
Certain Actions can be used to change which assets are referenced by the scene. For
example, the Object: Change material Action changes which Material asset a Renderer
uses, the Sound: Change footsteps Action changes which AudioClip assets a character
plays when walking, and the
Object: Add or remove Action can spawn a Prefab at runtime.
Remember components are used to record such changes. However, in order to
successfully restore these changes when loading a save-game file, these assets need to
be identifiable.
There are two ways of doing this:
1. Resources folders
This is the default method, and is easiest to set up - though is the less performant of the
two.
To make an asset identifiable, it must be stored in the following way:
•
Given a filename unique to the project
•
Placed in an Assets subfolder named Resources
2. Addressable name
This method is a little more involved, but more performant than the use of Resources.
This method makes use of Unity's
Addressables Asset System, which is an optional
package that provides a way to reference assets by “address". Refer to Unity's own
documentation for more on this system.
To enable this method, go to the "Save game settings" panel in the
Settings Manager, and
check Save asset references with Addressables?.
To make an asset identifiable, it must then be stored in the following way:
•
Given a filename unique to the project
NOTE: This must be done for both the original asset and the new one.
PROTIP: Searching Resources folder(s) for asset files can be an intensive process. If
you have many such files, it is recommended to rely on SaveableData subfolders - see
Performance and optimisation for more.
316

•
Given an Addressable name that matches its filename
•
Placed outside of any Assets subfolder names Resources
NOTE: This must be done for both the original asset and the new one.
317

9.1.3. Saving example: The 3D Demo
The 3D demo game, while simple, demonstrates a fully-functioning save and load
system.
The first step to creating such a system is to be aware of the conditions under which
saving is possible. While loading is possible at any time, a game can only be saved during
normal gameplay (that is, not during cutscenes or conversations). For that reason, the
player cannot save progress in the demo until the introduction cinematic has played, and
we can use this knowledge to make assumptions about the state of the scene when the
game loads.
We know that during normal gameplay, the
NPC Brain will be sat in the chair, and the
canvas will be tipped over. Therefore, the
Scene Manager's On load Cutscene sets the
correct Idle state for Brain. This is necessary because Brain uses the Legacy animation
engine, which cannot be saved with the Remember Animator component.
The rest of the save system is set up by careful placement of ConstantID and Remember
scripts:
•
ConstantID placed on the NavCam1 and NavCam2 GameCameras ensures the
reference to the active camera is stored. Only these cameras require this script,
since the game can only be saved during normal gameplay.
•
RememberNPC placed on Brain ensures his transformation is stored
•
RememberAnimator placed on the Barrel, Canvas and Chair SetGeometry objects,
as well as the
Player prefab, Tin Pot (since these objects use Animators for their
animation playback).
•
RememberConversation placed on the
Conversation BrainConv ensures the
enabled state of each option is stored
•
RememberHotspot placed on the Sword
Hotspot saves its enabled state, as it is
turned o! as the player picks it up.
•
RememberTransform placed on the Sword mesh (inside the _SetGeometry folder)
ensures its transformation is stored. Since it’s parentage changes when the Player
holds it in the Sword: Take Interaction, its original parent Transform, _SetGeometry,
also has a ConstantID.
Additionally, the demo game makes use of a
Local Variable called Played intro, which is
read by the On start Cutscene to either play the opening cutscene or skip it. This is
purely a debug Variable - as is useful when testing the scene during development.#
318

9.2. Autosaving
Autosaving is a way of saving the player's progress for them automatically.
Save slot "0" is reserved for Autosaves, and appear in Save and Load menus with the label
"Autosave". Only one Autosave file can exist per profile - subsequent Autosaves will
overwrite the previous.
Autosaving can be achieved by three ways:
1) The
Save: Save or load Action
This Action allows you to save or load the game without the use of Menus.
2) Completing Cutscenes
At the top of a Cutscene's inspector, tick the Autosave after running? box to save the
game automatically once the Cutscene has run. Be aware that this will only occur if the
Cutscene does not “branch o!” onto another Cutscene object: gameplay must be set to
resume once the Cutscene has finished.
3) Custom scripting
The following code will save and load the Autosave file respectively:
AC.SaveSystem.SaveAutoSave ();
AC.SaveSystem.LoadAutoSave ();
NOTE: As with regular saving, Autosaving is only possible under the following
conditions:
1. No Conversation is currently active.
2. No gameplay-blocking
ActionList (both scene-based and asset-based) is running
other than the one that contains the Save: Save or load Action (if being used to save).
3. The Engine: Manage systems Action is not currently locking the save system o!.
319

9.3. Options data
Options data is independent from save data, allowing option values to “survive” the
loading of a save file. They are stored in Unity's PlayerPrefs, under a key that is based on
your game's name. If you make use of Profiles, then each profile has its own set of
Options data.
Options data is loaded when the game begins, and saved whenever a change is made to
any of them.
All Adventure Creator games have five options by default:
•
Whether or not subtitles are on
•
The game's active language
•
The volume levels of music, speech, and sound e!ects
At runtime, these can be changed by the player in the default
Options Menu. Their
default values are set in the “Default Options” section of the Settings Manager:
It is possible to create custom options in your game by way of
Variables. The Link to
property of a Global Variable, as listed in the Variables Manager, can be set to Options
Data:
When this is done, the Variable's value will be stored with the other Options data, and not
in save game files. This is useful for creating your own options, such as graphics
settings. Just as with regular Variables, you can use the
Variable: Set Action, or Cycle,
Toggle and Slider elements to a!ect its value.
PROTIP: A tutorial on creating custom options can be found online.
320

9.4. Loading screens
If your game features complex scenes, or it is played on older hardware, it may take a few
seconds to transition between scenes. In this case, you may wish to create a loading
screen, that appears during this pause to alert the player that the game is loading.
You can do this by creating a dedicated "loading" scene, which is displayed during
transitions. This does not need to be an Adventure Creator scene (i.e. one with a
GameEngine prefab) - it can merely be a camera with a sprite texture in front of it.
Create a scene you wish to act at the loading screen, and add it to your game's list of
Scenes in build from the Build Settings. Then, check the Use loading screen? box in
the
Settings Manager, and supply the scene's build index number or name:
You can also opt to make use of asynchronous loading. This feature allows you to load
scenes in the background, allowing animation to continue for a short time while the next
scene loads. By checking Load scenes asynchronously?, you can then provide a delay
time before and after the load process – which is useful if you want some nice loading
e!ects.
A tutorial on creating a Loading menu, complete with progress bar, can be found
online.
With asynchronous loading, it is also possible to delay the switching to a newly-loaded
scene until a script function is called. This is useful if, for example, you want to prompt
the user to “press a key to continue”. To do this, check Scene loading requires manual
activation?. Once a scene has loaded, it will then wait until a script calls the following:
AC.KickStarter.sceneChanger.ActivateLoadedScene ();
A “Complete Loading Example" script that demonstrates this can be found on the AC wiki.
It is also possible to delay the process of loading a scene until a callback is invoked, so
that e.g. any necessary files can be downloaded beforehand. This can be achieved by
hooking a custom script into the OnDelayChangeScene
custom event.#
PROTIP: When using asynchronous loading, you can use the Scene: Switch Action to
preload scenes in advance so that they can be switched to more quickly when needed.
321

9.5. Importing saves from other games
If you are making an episodic game that spans multiple projects, you can have the player
import save game files from one to another so that their progress is transferred. This
works by transferring the Global Variable values, and ignoring all other data.
This is done by adding a SavesList menu element that is set to import files instead of load
them. When importing, only the file's Global Variables (and thus the player's choices) into
the current game.
When a SavesList's List type field is set to Import, you must supply an Import product
name (as set in the other project's
Player Settings window), and Import save filename (as
set in the other project's Settings Manager):
NOTE: This feature has three requirements:
•
The other project's Company name (as set in the Player Settings window) must be
identical to the current project.
•
The two projects must share exactly the same Global Variables – it is recommended to
copy the VariablesManager asset and use it in both projects.
•
Due to Unity’s security measures, this feature only works on standalone platforms (PC,
Mac and Linux).
PROTIP: It is possible to limit the available files to those in which a particular boolean
Variable has been set to true. This is useful if you only want players to be able to
import a save if they have reached the end of the previous game.
322

9.6. Save profiles
Profiles allow you to separate save game files and options settings by the player who
created them. This is useful because it means that one player cannot accidentally
overwrite another player's save files, and also allows options such as the language to be
unique to the person playing.
Profiles can be enabled under Save game settings in the
Settings Manager:
You can now use the ProfilesList element to list all profiles created by your game's players
- and when one is clicked, it will be selected. To display the current profile non-
interactively, a Label can be created with a Label type of Active Save Profile.
Profiles are not created in the same way as save games - they are instead created
exclusively through the
Save: Manage profiles Action, which can create, delete, load and
rename profiles.
When a new profile is created or renamed, its name can be set by the value of a String
Global Variable. You can have the player enter a name of their choice by using an Input
menu element, and using the Variable: Set Action to store the Input box's contents in the
String Global Variable. When a profile is deleted, any associated save game files will also
be deleted, so you may want to have a confirmation box appear before performing this.
To provide the ability to rename or delete profiles in the form of
Button Menu Elements
beside your list of profiles, it is recommended to make use of ActionList parameters to
condense the number of ActionLists you need to make. If a Button Menu Element is set to
run an ActionList that has an Integer parameter, then the parameter can be set within the
Button's properties. If you set this parameter to match the slot index number of the
profile list beside it (indices start from zero), you can use just one
Save: Manage profiles
Action to handle the deletion of any profile.
PROTIP: All profiles found on the system can be viewed in the Save-game Manager.
PROTIP: A tutorial that uses this technique to create custom save game labels can be
found online.
323


9.7. Custom save labels
Custom save labels, and more refined saving interfaces, can be created by using the Save:
Save or load Action together with a SavesList element.
By default, the SavesList element works by instantly saving and loading upon the player
clicking a slot. When saving, a label is automatically generated based on the Time
display field in the
Settings Manager.
This default functionality can be overridden by unchecking a SavesList's Save when click
on? field in it's properties:
Doing to will disable the automatic saving or loading and will instead allow you to run an
ActionList asset when a slot is clicked. If this ActionList has an Integer parameter, that
parameter's value can be set to the slot index that was clicked, and you can use this to
set the save label dynamically.
The basic workflow is:
•
The player clicks on a save slot to save into
•
The slot index is passed to an ActionList as an Integer parameter
•
This parameter is stored in a Global Variable
•
A new Menu appears that allows the player to enter in their own label
•
Actions then save the slot with a custom label
PROTIP: A tutorial that covers these steps in detail is available online. The principles
can also be used to name Save profiles.
325

9.8. Custom save data
It is possible to write scripts that extend the save system by saving both custom scene
and global data.
Saving scene data is possible by writing custom Remember scripts. Create a new C#
subclass of Remember, overriding the SaveData and LoadData functions.
To save global data, use the OnBeforeSaving and OnAfterLoading custom events to
synchronise data with
Global Variables, which are are recorded automatically in save files.
If a script that uses these events is attached to the PersistentEngine prefab, it will persist
throughout the game.
PROTIP: A tutorial on writing custom Remember scripts can be found online.
PROTIP: A tutorial on saving custom global data can be found online.
326

9.9. Custom save formats and handling
AC makes changes to the way that saved data is both serialized and stored based on the
project's platform. For example, desktop games rely on binary serialization, while iPhone
games use XML. Most platforms store save data in the persistentDataPath, while the
WebPlayer platform stores it in
PlayerPrefs.
It is possible, however, to override the default behaviour. This makes it possible, for
example, to allow saving on platforms that AC does not o"cially support, such as the
Playstation Vita.
To override the default file format, you use the following:
SaveSystem.FileFormatHandler = new MyClassName ();
Where MyClassName is a C# class that implements the iFileFormatHandler interface.
The following classes are already provided:
FileFormatHandler_Binary
Saves data in binary
FileFormatHandler_Xml
Saves data in XML
FileFormatHandler_Json
Saves data in Json (only available for Unity 5.3 and newer)
You can save in custom formats by writing a new implementation of the
iFileFormatHandler interface and assigning it as above. The included format classes can
be used as examples.
Options data, by default, will share the same file format as save game data. You can
override this with the following:
SaveSystem.OptionsFileFormatHandler = new MyClassName ();!
NOTE: In order to have the override take e!ect before any data is loaded, assign it in
an Awake function on a component attached to the PersistentEngine prefab. This
can be found in /Assets/AdventureCreator/Resources.
327

Overriding the location of save files is done in a similar way:
SaveSystem.SaveFileHandler = new MyClassName ();
Where MyClassName is a C# class that implements the iSaveFileHandler interface. The
following classes are already provided:
SaveFileHandler_SystemFile
Saves data to the
persistentDataPath folder
SaveFileHandler_PlayerPrefs
Saves data to Unity's PlayerPrefs
You can save data to custom locations by writing a new implementation of the
iSaveFileHandler interface and assigning it as above. The included format classes can be
used as examples.
Options data, by default, is always stored in Unity's PlayerPrefs - but this, too can be
overridden:
Options.OptionsFileHandler = new MyClassName ();
Where MyClassName is a C# class that implements the iOptionsFileHandler interface.
The following classes are already provided:
OptionsFileHandler_PlayerPrefs
Saves options data to Unity's PlayerPrefs. This is the default.
OptionsFileHandler_SystemFile
Saves options data to the persistentDataPath folder - one file per profile.
You can save options data to custom locations by writing a new implementation of the
iOptionsFileHandler interface and assigning it as above.#
328

9.10. Save-game file management
Each save-game file is associated with the currently-active Save profile. It is possible to
view and manage all profiles, and their associated save files, that are currently stored on
the system. This information is accessed from within the Settings Manager, by clicking
Save-game file management in the "Manage save-game files" section:
This brings up the Save-game Manager, which has the following sections:
File and format handlers
This displays the active save and option file and format handlers, which determine the
location and format of save files. Each supported platform has its own default handlers,
but these can be altered through script - see
Custom save formats and handling.
Profiles
If
Save profiles are enabled, this displays all found profiles. Selecting one will display its
properties, and associated save-game files, beneath.
Profile properties
This displays the selected profile's name and Options data (including linked Variables). It
can be deleted, or - if Save profiles are enabled - made active.
Save game files
This displays all save-game files associated with the selected profile. Selecting one will
display its properties and data beneath. New saves and can be made at runtime -
provided that saving is currently possible.
Save game properties
This displays information bout the selected save-game file - including name, file location,
and timestamp. It can be deleted, and - at runtime, overwritten or loaded.
Save game data
This displays all data associated with the save-game file - including the state of variables,
each Player, and each scene's
Remember scripts. This is mainly intended to aid
debugging.#
329

9.11. Save scripting
The scripting guide has entries for the SaveSystem and Options classes online.
To save, load or delete the game with a specific ID, use:
SaveSystem.SaveGame (int saveID);
SaveSystem.LoadGame (int saveID);
SaveSystem.DeleteGame (int saveID);
Saves displayed in SavesList elements must have an ID value of zero or greater. However,
saves with negatives IDs can be saved and loaded using the above functions, without
having them appear in menus.
To save and load the
Autosave file, use:
SaveSystem.SaveAutoSave ();
SaveSystem.LoadAutoSave ();
To manage Save profiles, use:
Options.SwitchProfileID (int profileID)
KickStarter.options.CreateProfile (string profileName);
KickStarter.options.RenameProfileID (string newProfileName, int
profileID);
To set the current profile's Options data, use:
Options.SetLanguage (int index);
Options.SetSubtitles (bool value);
Options.SetSFXVolume (float volume);
Options.SetMusicVolume (float volume);
Options.SetSpeechVolume (float volume);
To read the current profile's Options data, use:
Options.GetLanguageName ();
Options.GetLanguage ();
Options.AreSubtitlesOn ();
NOTE: As saving-handling is a background process, the "OnFinish" events below must
be used to handle what happens afterwards.
PROTIP: Be careful when saving manually - gameplay-blocking cutscenes will not be
saved, so it is always best to save only when in normal gameplay.
330


You can also modify another profiles OptionsData class with:
Options.LoadPrefsFromID (int profileID);
Options.SavePrefsToID (int profileID, OptionsData optionsData);
A save file’s Global Variables data can be read with:
SaveFile saveFile = KickStarter.saveSystem.GetSaveFile (fileID);
SaveSystem.ExtractSaveFileVariables (saveFile,
System.Action<List<GVar>> callback);
The saving of individual Remember components can be disabled with:
GetComponent <Remember>().SavePrevented = true;
To restart the game and clear all temporary data (such as collected inventory items):
KickStarter.RestartGame (bool rebuildMenus, int newSceneIndex);
Saving, loading, and options involve the following events:
OnBeforeSaving (int saveID);
OnFinishSaving (SaveFile saveFile);
OnFailSaving (int saveID);
OnBeforeLoading (SaveFile saveFile);
OnFinishLoading (int saveID);
OnFailLoading (int saveID);
OnBeforeImporting ();
OnFinishImporting ();
OnFailImporting ();
OnSwitchProfile (int profileID);
OnRestartGame ();
OnChangeLanguage (int language);
OnChangeVolume (SoundType soundType, float volume);
OnChangeSubtitles (bool showSubtitles);!
332

10. Speech and text#
333
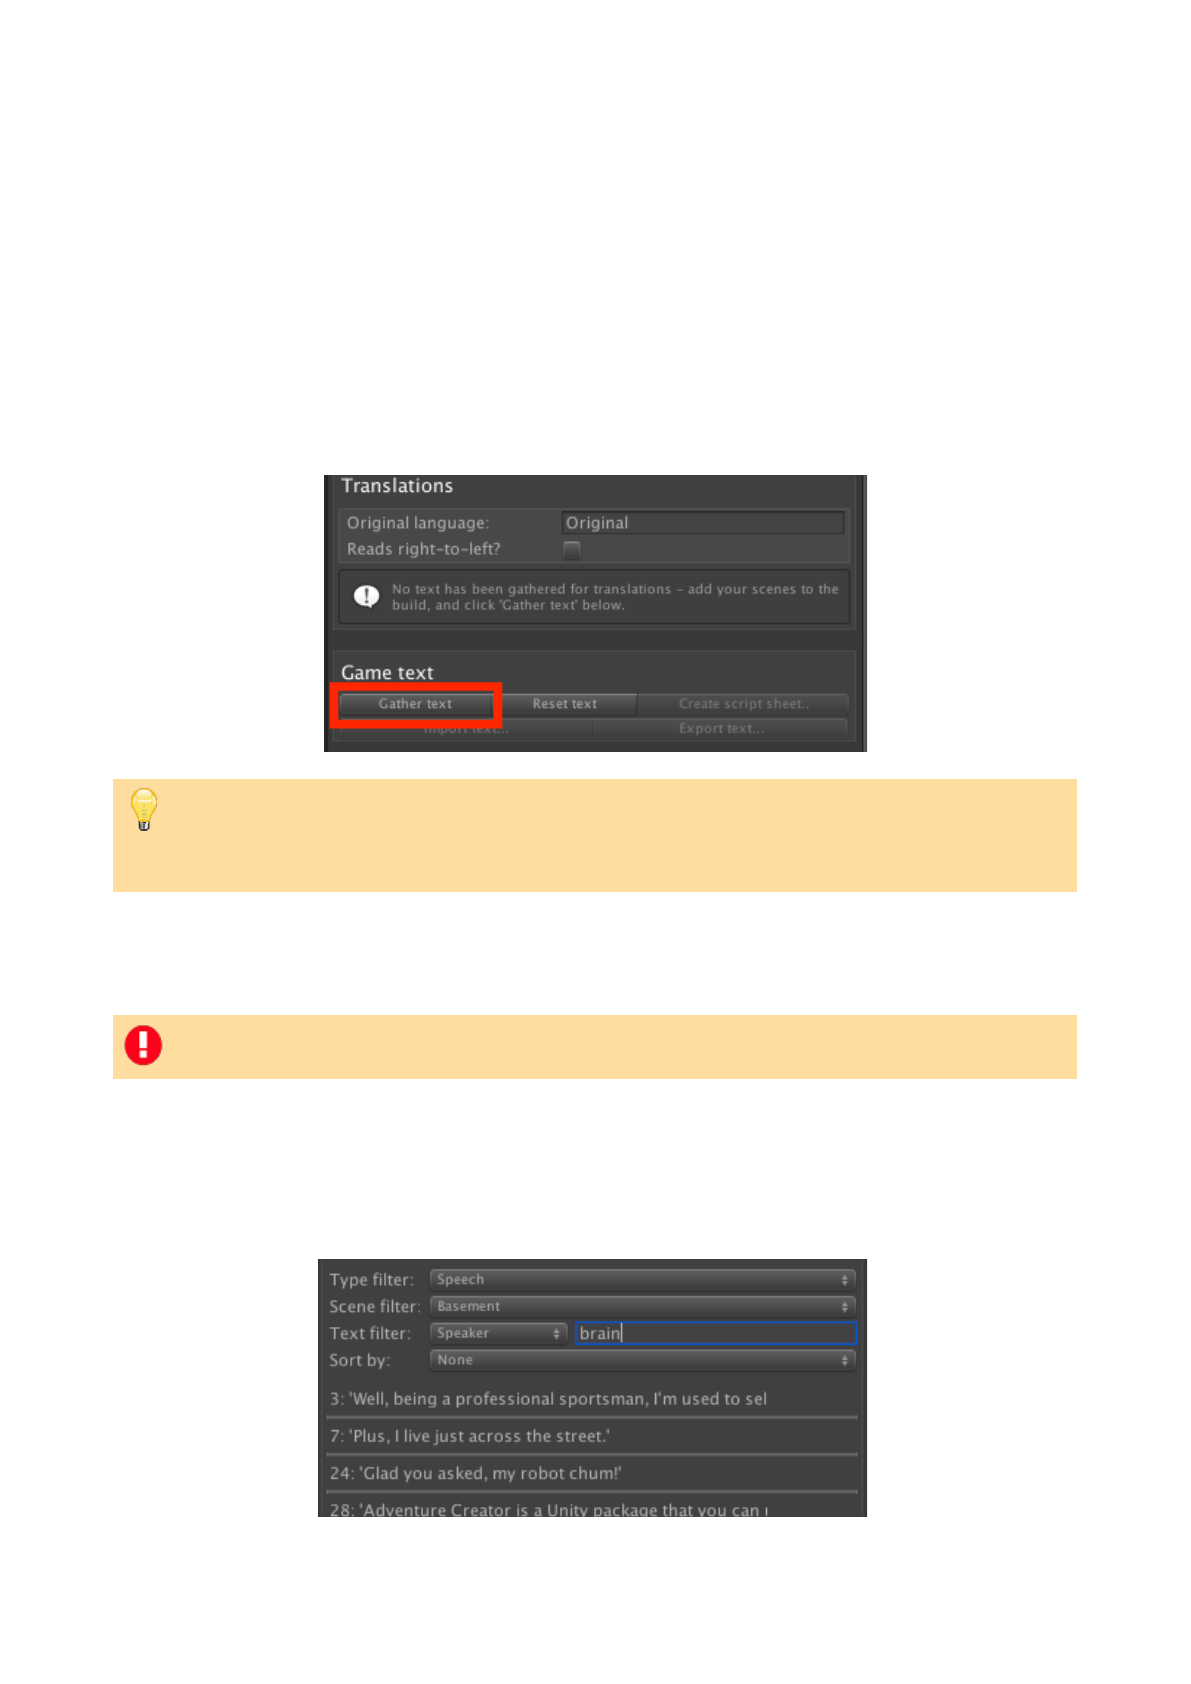
10.1. Gathering game text
AC is able to gather up all text in your game and store them in the Speech Manager. This
is necessary if you want to:
•
Manage translations
•
Play speech audio in time with a character's dialogue line
•
Export script sheets for voice actors to use
This is by clicking Gather text in the Game text panel of the Speech Manager:
When clicked, you will be prompted to back up your game as AC will then go through all
of your scenes and modify them by assigning unique ID numbers to any text it finds.
This text is then listed at the bottom of the Speech Manager, which can be filtered down
by various options:
PROTIP: By default, all display text is translated - including subtitles, Hotspot names,
and Menu labels. The Translatable text types field, however, lets you choose exactly
what gets included in this process.
NOTE: Only scenes added to Unity's Build Settings will be searched by this process.
334

Clicking on a text entry will reveal more information about it:
Each line of text is assigned a unique ID number. ID numbers will not be overwritten - if
you re-gather text after making changes, existing IDs will be retained.
NOTE: By default: once an ID number is assigned, it is never used by anything else -
even if the text that it is assigned to is later removed from the game. This behaviour
can be amended via the ID number recycling field.
NOTE: The record of game text is not "live", so if you make a change to e.g. a speech
line, it will not be reflected in the Game text panel until you re-gather it.
335

10.2. Speech audio
Once your game's text has been gathered, it can be used to playback speech audio when
characters speak.
For a speech audio file to play, it must be linked to its associated Dialogue: Play speech
Action or Speech Timeline track. This can be done in one of three ways:
1) Automatically, based on naming convention in a Resources folder
2) Automatically, based on naming convention in an Asset Bundle
3) Manually, by assigning an AudioClip file in the Speech Manager
Which method is used is based on the
Speech Manager's References speech files setting:
By Naming Convention
In this mode, speech AudioClip assets must be placed in a Resources/Speech folder, and
given a specific name. This filename is - by default - based on the character's name, the
line's ID number, and is displayed in a line's entry in the Game text panel along with the
folder it should be in:
PROTIP: If using Translations, you can have di!erent audio for each language by
checking Speech audio can be translated?. By default, the game's current language
will be used for both speech audio and display text, but these can be separated by
checking the Speech audio and display text can be di"erent languages? field that
appears beneath.
336

The Set custom button can be used to assign a custom filename, and this can also be set
by importing a CSV file via the Import text.. button.
The Place audio files in speaker subfolders? setting allows you to divide AudioClip
assets into further folders based on character name. The name of the “Speech” subfolder
can also be changed if desired, and the full filepath can be overridden completely via the
SpeechManager script’s GetAutoAssetPathAndNameOverride delegate override
function.
By Asset Bundle
This mode is similar to By Naming Convention in that files are loaded in automatically
based on their expected name. However, rather than placing them in a Resources
subfolder, they are instead placed in an
Asset Bundle.
Each language relies on its own Asset Bundle, and these are defined in the Languages
panel:
AssetBundle(s) will need rebuilding if you want to add more speech lines or audio.
Therefore, it is recommended to perform this step towards the end of your game's
development, as relying on By Naming Convention (i.e. in Resources folders) is more
convenient for testing.
NOTE: If speech audio has Translations, each translation has the same filename but is
placed in a di!erent sub-folder as shown.
NOTE: The supplied AssetBundle must be in a subfolder named StreamingAssets
within your Assets folder.
PROTIP: A tutorial on using AssetBundles for voice files can be found online.
NOTE: AssetBundles are loaded in asynchronously - meaning the game will begin
while they're still being prepared. As this operation can take a few seconds, you cans
hook into the OnLoadSpeechAssetBundle custom event so that you can determine
when these assets are ready.
337
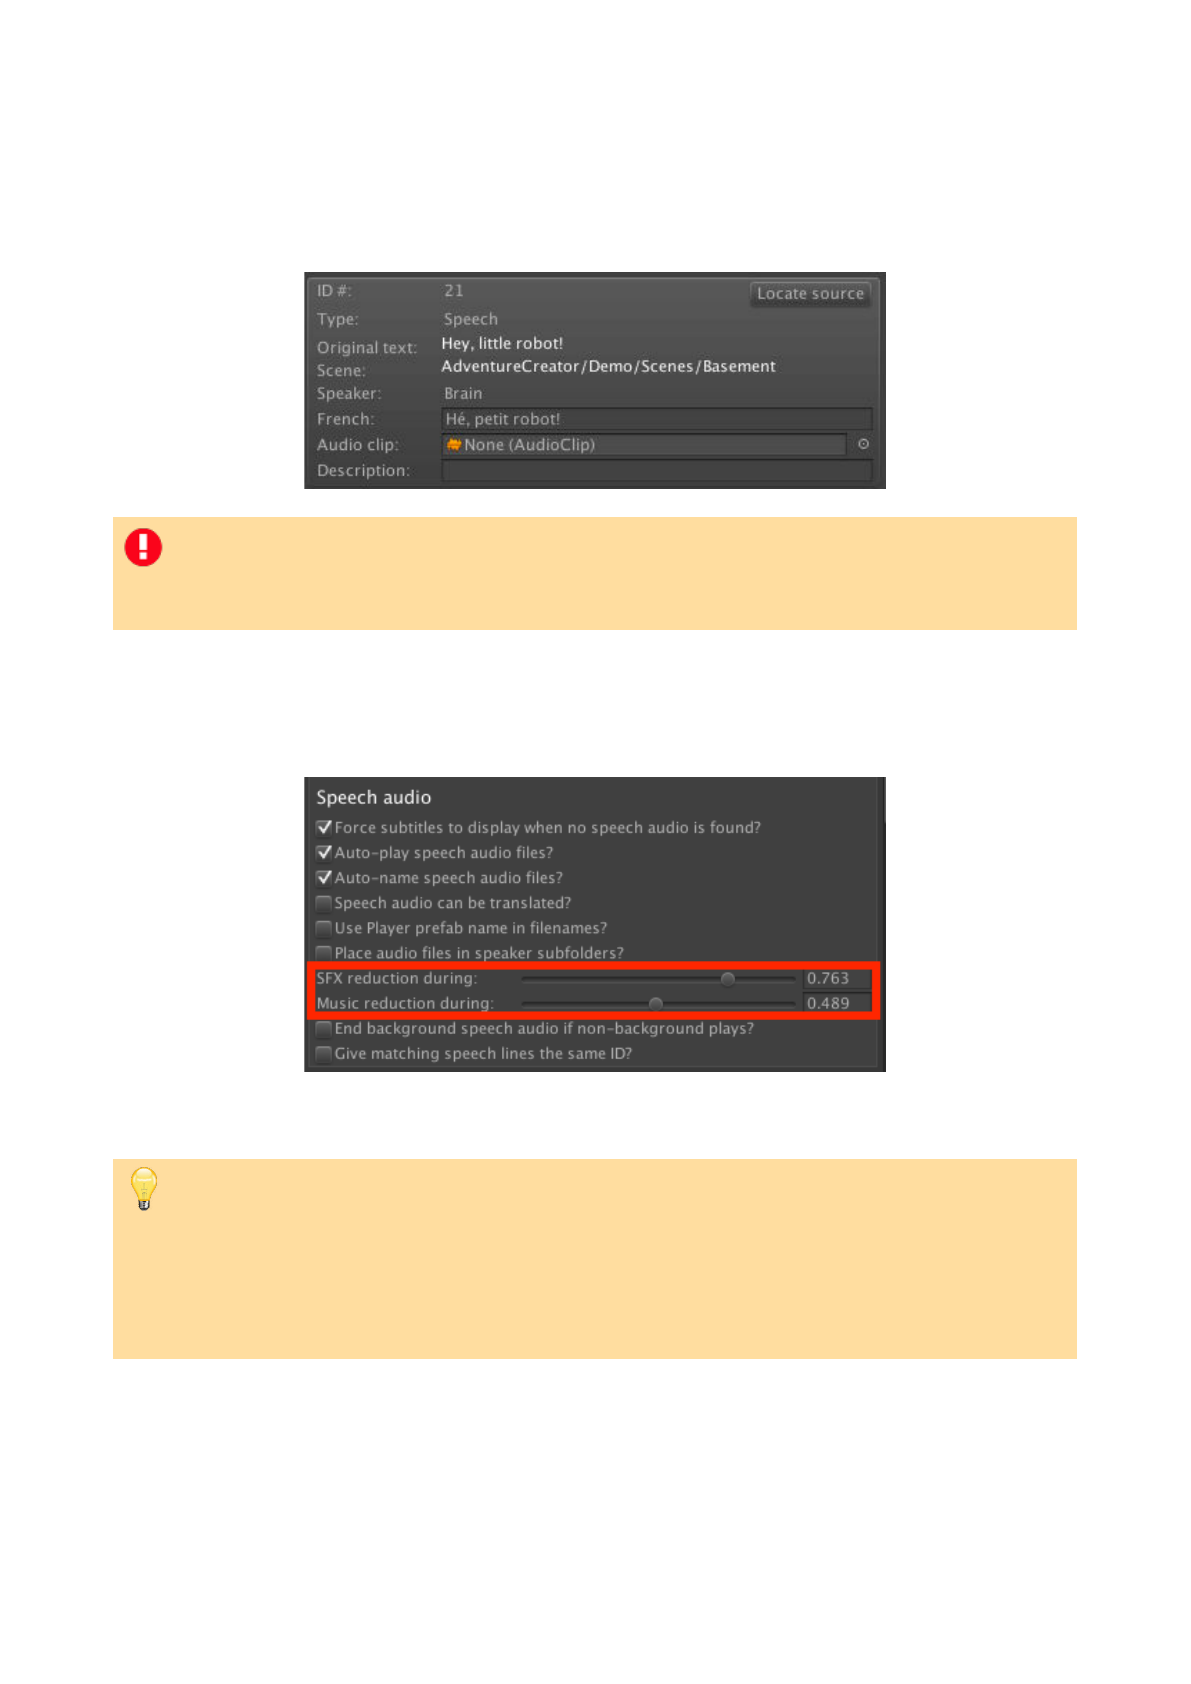
By Direct Reference
In this mode, speech AudioClip assets must be manually assigned to each speech line's
entry in the Game text panel:
AC also supports “audio ducking”: when speech audio plays, all other audio can be made
to quieten slightly so that the speech can be more easily heard. The amount by which SFX
and Music volumes are reduced are set in the Speech audio panel:
To animate characters' mouths when speaking in time with their audio, see
Lip syncing.
NOTE: If a speech line has no associated character, it is considered a narration. A
Sound prefab to use for narration audio can be assigned in the GameEngine object’s
Dialog component, but if none is assigned then one will be automatically generated.
PROTIP: If your game makes use of multiple Players, then each Player can be assigned
their own audio and lipsync files for shared speech lines - i.e. ones where the
Dialogue: Play speech Action has Player line? checked. To allow this, check 'Player'
lines have separate audio for each player?. Note that this feature is only available if
both Auto-name speech audio files? and Use Player prefab name in filenames? are
also enabled.
338
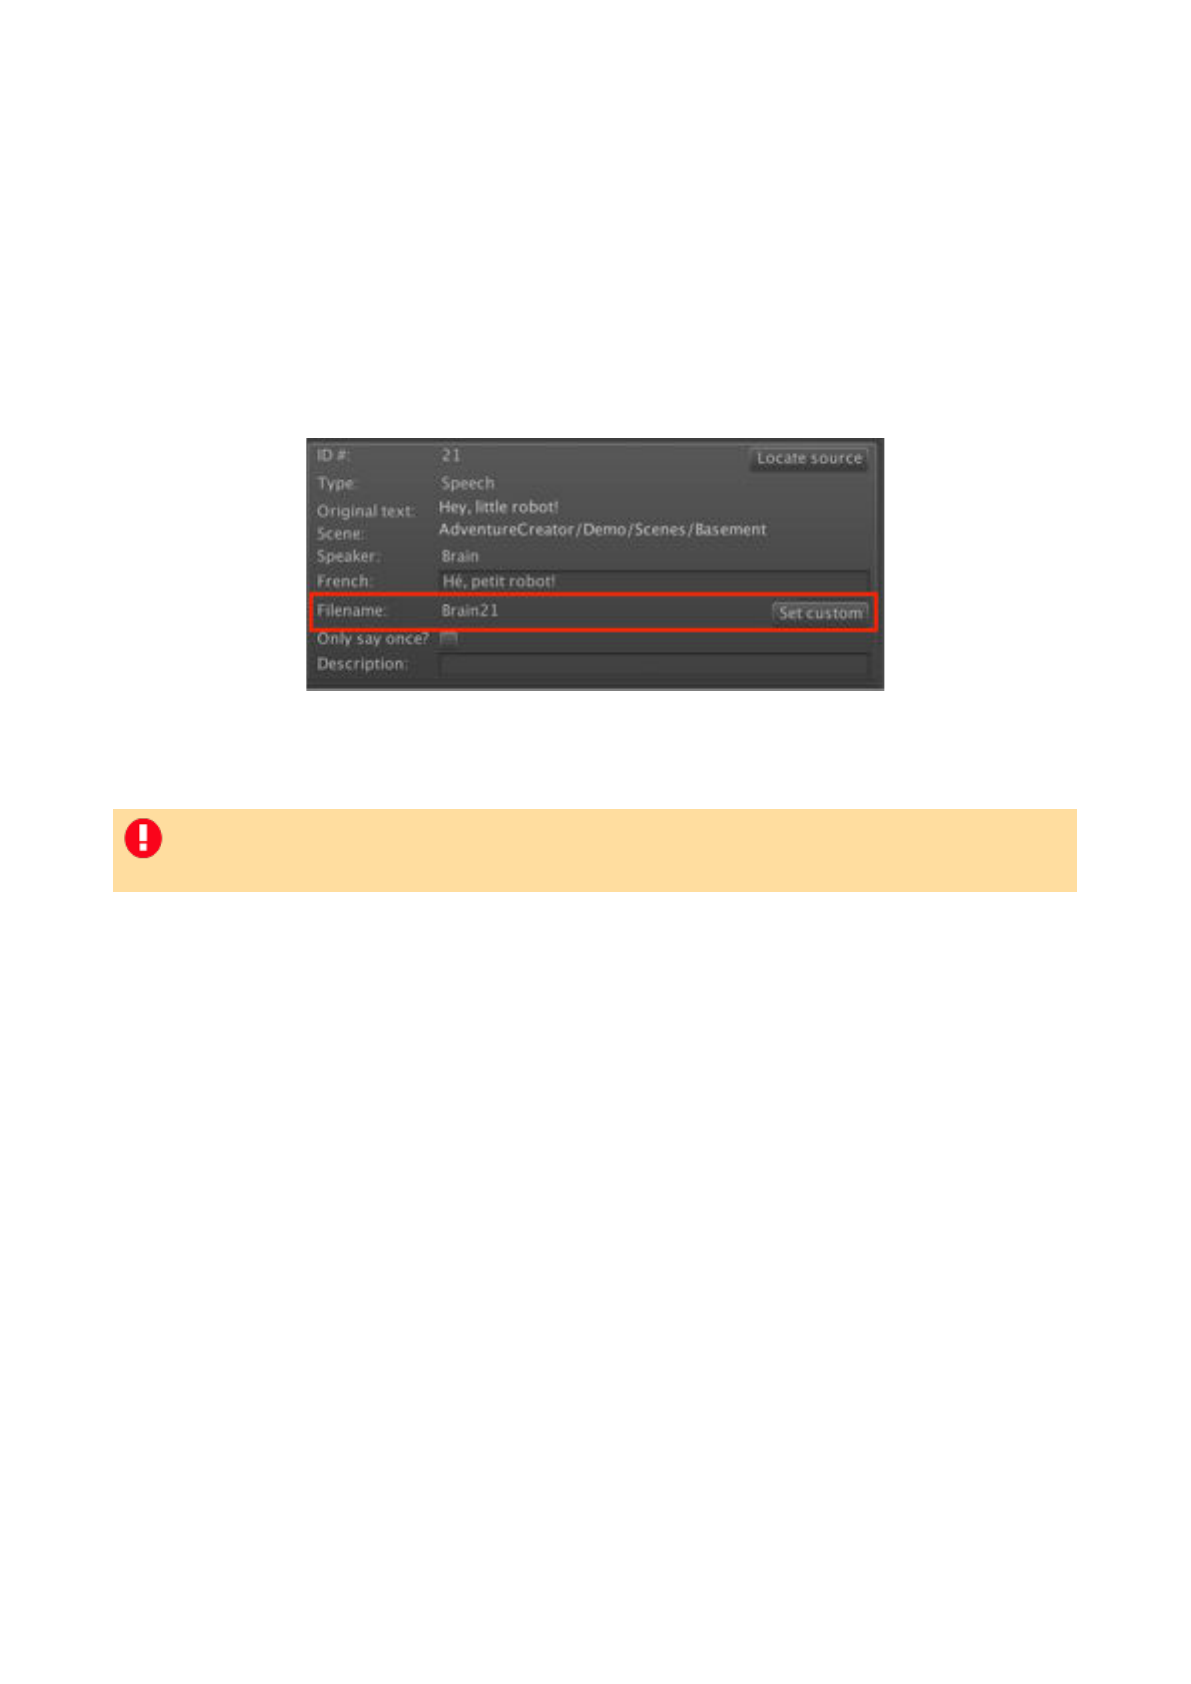
By Addressable
This mode is similar to By Naming Convention in that files are loaded in automatically
based on their expected name. However, rather than placing them in a Resources
subfolder, they are instead referenced by their Addressable name. The Addressable
system is available as a separate package using Unity’s Package Manager.
This filename is - by default - based on the character's name, the line's ID number, and is
displayed in a line's entry in the Game text panel:
The Set custom button can be used to assign a custom filename, and this can also be set
by importing a CSV file via the Import text.. button.
NOTE: Due to the way the Addressable system is designed, an error will be thrown if a
speech is played without its associated files listed as an Addressable.
339

10.3. Displaying subtitles
Speech lines are defined and played via either the Dialogue: Play speech Action, or the
Speech Timeline track.
For speech text to show, a menu equipped to display it must be defined in your Menu
Manager. This involves creating a menu with an Appear type set to When Speech Plays,
and creating within it a
Label element with a Label type of Dialogue Speech.
Such a menu is included as part of the default interface - see The default Subtitles menu.
All menus can be restyled, but this menu type features a number of unique properties
that control how and when it is displayed:
For speakers of type
This allows you to define exactly characters the menu will show (or not show) for.
For speech of type
This allows you to limit the menu's display to blocking or background speech only. The
Dialogue: Play speech Action triggers "background speech" if the ActionList that contains
it has its When running field set to Run In Background.
Duplicate for each line?
This will cause a new instance of the menu to be created for each line that it displays for,
as opposed to re-purposing the same one each time. This is useful if two characters
speak simultaneously, since this allows both character's speech text to show together.
Limit by speaker proximity
This causes the menu to only show if the speaking character is within a set distance to
either the
Player or the camera. This is useful if you don’t want subtitles to show if the
speaking character is too far away. Note that this option is only available if Duplicate for
each line? is also checked.#
NOTE: If a speech line has associated audio, then the Show subtitles? option must
also be enabled (see Options data), or the menu must have Ignore 'Subitles' option?
checked.
340

10.4. Script sheets
Once your game's text has been gathered, speech lines can be exported as an HTML
script sheet to hand out to voice actors.
In the Speech Manager's Game text panel, click Create script sheet... to bring up the
Script sheet export window:
All speech lines listed in the Speech Manager can be exported as an HTML file. This will
display each line's text, character, audio filename(s) and description. If the game features
translations, a language can be selected.
Optionally, you can limit lines by character name, language, or by speech tag. Speech
tags are labels that you can assign
ActionLists that contain Dialogue: Play speech Actions,
and are useful if your voice actors to only record lines for a specific cutscene or sequence.
They can be created by clicking Edit speech tags under the Speech Manager's Subtitles
panel:
Once tags are enabled and defined, any ActionList that contains a Dialogue: Play speech
Action can be assigned to one within its list of properties:
341

Further options allow you to remove Text tokens, and include descriptions. Descriptions
can be written either directly in the Speech Manager, or imported using the Import text
wizard - see Translations.
You can also opt to only output lines that already have an associated audio file. This is
useful when conducting multiple recording sessions, as you can set script sheets to only
show those lines that have yet to be recorded.#
NOTE: You will need to re-gather your game's text for the changes to be reflected in
the Speech Manager.
342

10.5. Translations
Once your game's text has been gathered, it can be used to handle translations.
The Speech Manager’s Gather text button collects all display text, specifically:
•
Speech lines
•
Hotspots and Dialogue Option labels
•
NPC names (if set to something other than their GameObject's name)
•
Menu text
•
Journal entries
•
Inventory Item names
•
Pop-up and String Variables
•
Cursor names and prefixes
•
Custom translatables
A game's translations can be managed from the Languages panel:
Arabic or Hebrew can make use of the Reads right-to-left? option. If checked, then
Hotspot and inventory labels (e.g. “Use sword on barrel”) will be reversed (e.g. “barrel on
sword Use”) as will
Input menu elements. Speech scrolling, enabled in the Subtitles
panel, will also be reversed.
When a new language is created, each entry in the Game text panel will be updated with
an associated field:
PROTIP: The 3D Demo game includes an example French translation.
343

New languages have no default text - instead, a Fallback language can be assigned. If
no text is found for a given language, the fallback’s equivalent will be used instead.
Each entry's translation can be modified directly in the Editor, but it is recommended to
export them so that they can be edited using a spreadsheet. To do so, click the cog icon
beside a language's name and choose Export:
This will open up the Text export wizard, which you can use to select which text is
exported and in what order:
Text is then exported either as a CSV file, which can be opened with a spreadsheet
application such as Excel or OpenO"ce, or an XML file in the SpreadsheetML format that
can be read by Excel.
Once changes have been made, you can import the CSV file back into the Speech Manager
by choosing Import from the same location. After selecting the CSV file, you will then be
presented with the Text import wizard, in which you can choose which columns get
imported as what translation. The game’s original text can also be updated this way.
344

The file's line ordering does not matter. The importer will identify text by the ID number
in the first column – not by the row in which they appear.
Translations can also be modified at runtime - see Speech scripting.#
PROTIP: It is also possible to rely only on translations, and ignore any text entered in
Actions and Editors, by checking Don't use at runtime? in the Speech Manager’s
"Original language” panel.
345

10.5.1. Custom translatables
The Speech Manager can gather up all text used within Managers, Actions, and logic
objects so that it can be translated. However, it can also gather up custom text that it
finds, by placing it in scripts that implement the ITranslatable interface.
The ITranslatable interface has functions to retrieve and assign a unique ID number for
each piece of translatable text, as well as functions to determine if such text is
appropriate for translation. When
gathering text, the Speech Manager will automatically
detect the presence of any MonoBehaviour script, or custom Action, that implements
ITranslatable. This includes prefabs referenced by the Object: Add or remove Action.
For a description of the ITranslatable interface, see the Scripting guide.
Once an implementation has been written, and translatable text has been gathered, it can
be displayed along with the rest of your game's text in the Speech Manager. This then
means it can be exported for external translation, or have translations written directly
within the manager.
Once translations have been provided, you can retrieve the translatable text in the game's
current language with:
AC.KickStarter.runtimeLanguages.GetTranslatableText (ITranslatable
translatable)
AC.KickStarter.runtimeLanguages.GetTranslation (int lineID)
When it comes to searching ActionList assets, AC will search the Managers and scenes for
references made to them. In scenes, this works by searching for components that
implement
iActionListAssetReferencer. If you have ActionList assets that are only
referenced through script, you will can implement this interface in your MonoBehaviour to
create a link that AC can use to include the assets in the Speech Manager.#
PROTIP: A sample script that demonstrates translatable text can be found in the form
of the Custom Translatable Example component.
346

10.5.2.Localization integration
Unity's Localization package allows for translations through the use of database tables
that can be updated externally with e.g. Google Sheets. Text gathered through the
Speech Manager (see Gathering game text) can optionally be synchronised with
Localization table entries.
To make use of this feature, the number and order of languages defined in AC's Speech
Manager (including the original) must match that of the Locales defined in your
Localization settings. For example, if your AC game's default language is in English, and
has French and German translations, then your Localization settings must have English,
French and German locales defined - in that order.
Once added, a new option named Auto-sync Locale with Language? will appear in the
Speech Manager. This allows AC to synchronise the active Localization Locale with AC’s
active language.
For any line of text you wish to link to Localization, select it at the bottom of the Speech
Manager and check Rely on Localization?. This then enables a Localized string field,
that can be used to create or connect an entry in your Localization tables. The text in this
table will be used, including when using the game's original language.
Additional assets associated with the line, such as speech audio or lipsync data, are still
linked to the AC line as normal.#
347
10.6. Text tokens
Tokens are snippets of text that, when inserted into game text (normally a character's line
of dialogue), are replaced or have a dynamic e!ect. The following tokens are recognised:
[var:ID]
Replaces the token with the value of a Global Variable, where “ID” is the ID number of the
referenced Variable. The replacement token of any Variable is listed in its properties in
the
Variables Manager. This token also works in Label elements, Journal elements, and
Conversation options.
[localvar:ID]
Replaces the token with the value of a Local Variable, where “ID” is the ID number of the
referenced Variable. The replacement token of any Variable is listed in its properties in
the
Variables Manager. This token also works in Label elements, Journal elements, and
Conversation options.
[compvar:CID:VID]
Replaces the token with the value of a
Component Variable, where “CID” is the Constant
ID number associated with the Variables component, and “VID” is the ID number of the
referenced Variable. The replacement token of any Variable is listed in its properties in
the Variables Inspector, provided that a Remember or Constant ID component is attached.
This token also works in
Label elements, Journal elements, and Conversation options.
[continue]
If the dialogue this is placed in is not running in the background, then from this point
onward it will be. This is useful if you want to cut the camera on a particular word, mid-
sentence.
[hold]
Like [continue] above, the ActionList will continue when this token is displayed on
screen. However, the speech itself will remain on the screen indefinitely, until the
Dialogue: Stop speech Action is used to end it. This is useful if you want a character's
last-spoken line to remain on the screen when the player is presented with a
Conversation option.
[expression:Name]
Changes the speaking character's expression to the one named “Name”. See
Facial
expressions.
NOTE: A tutorial on using this token in Menus can be found online.
348

[wait]
Removes the token, and only displays the speech text up to the point at which it was
placed. The character will not continue speaking until the player clicks/taps. Note that
Subtitles can be skipped? must be enabled in the Speech Manager.
[wait:X]
Removes the token, and only displays the speech text up to the point at which it was
placed. The character will wait X seconds before continuing to speak. The value of X can
be either an integer or a decimal.
[param:X]
Replaces the token with the value of an
ActionList parameter. For this to work, a
parameter with an ID of X must be present in the ActionList from which this
Dialogue:
Play speech Action is called. This token also works with Action comments.
[paramlabel:X]
Similar to the [param:X] token above, only it displays a label if the parameter is a
GameObject, Inventory Item, Global Variable or Local Variable. For example, if set to a
Global Variable, the token will display the variable’s label as opposed to value. if the
GameObject has a
Hotspot component, then the Hotspot’s label will be displayed.
Similarly if there is a Player or NPC component. If no such component is found, the
GameObject’s name will be shown. All other parameter types will show the same value as
the [param:X] token.
[paramval:X]
Similar to the [param:X] token above, only - if the parameter is linked to a Variable, then
it instead displays that Variable’s value, as opposed to that Variable’s ID number. All
other parameter types will show the same value as the [param:X] token.
[speaker]
Replaces the token with the display name of the character associated with the line of
dialogue.
[line:ID]
Replaces the token with
text gathered in the Speech Manager, set to the game’s current
language. This is useful if you want, for example, to display a Conversation’s dialogue
option label as the speech text that the player says when chosen.
[token:ID]
Replaces the token with a string assigned by calling the SetCustomToken function inside
the
RuntimeVariables script, where “ID” is the ID number of the custom token. A tutorial
PROTIP: The [param:X] token is processed before all others, so that you can use it in
place of other token values, for example [var:[param:X]] will use a parameter value in
place of the variable token’s ID number.
349


10.6.1. Speech event tokens
Speech event tokens are a special kind of token that can be used in speech lines. Rather
than being used to place text dynamically, they are instead used to trigger custom events.
This allows you to run additional code directly from your speech text. For example, the
token [anim:wave] could be used to make a character wave, or [look:John] could tell the
speaking character to look at an NPC named John.
Speech event tokens take the form:
[key:value]
Where both key and value are both strings. In order for a key to be recognised, it must
first be added to the Dialog script's internal array of accepted keys. This is done by
writing to:
KickStarter.dialog.SpeechEventTokenKeys
For example, to allow the keys "anim" and" "look" to be recognised, we can write the
following code:
KickStarter.dialog.SpeechEventTokenKeys = new string[2] { "anim",
"look" };
When tokens of the form [anim:X] and [look:Y] are placed in speech text, they will then
trigger the OnSpeechToken custom event - allowing you to run whatever code is
necessary. The following code will define the above token keys, and run an event when
read:
private void OnEnable ()
{
KickStarter.dialog.SpeechEventTokenKeys = new string[2] { "anim",
"test" };
EventManager.OnSpeechToken += OnSpeechToken;
}
private void OnDisable ()
{
EventManager.OnSpeechToken -= OnSpeechToken;
}
private void OnSpeechToken (AC.Char speakingCharacter, int lineID,
string tokenKey, string tokenValue)
{
Debug.Log (speakingCharacter + " said token [" + tokenKey + ":" +
tokenValue + "]");
}!
351

A speech token will be automatically removed when the text is displayed on-screen.
However, with the OnRequestSpeechTokenReplacement event, it is also possible to use
events to dynamically replace the token with something else. This is useful for inserting
procedural text, for example. The following code will replace the token [random:animal]
with the name a random animal every time it is used in speech text:
private void OnEnable ()
{
KickStarter.dialog.SpeechEventTokenKeys = new string[1]
{ "random" };
EventManager.OnRequestSpeechTokenReplacement +=
OnRequestSpeechTokenReplacement;
}
private void OnDisable ()
{
EventManager.OnRequestSpeechTokenReplacement -=
OnRequestSpeechTokenReplacement;
}
private string OnRequestSpeechTokenReplacement (Speech speech, string
tokenKey, string tokenValue)
{
if (tokenKey == "random" && tokenValue == "animal")
{
string[] animals = new string[5] { "Cat", "Dog", "Parrot", "Bear",
"Monkey" };
int i = Random.Range (0, animals.Length);
return animals[i];
}
return string.Empty;
}!
352

10.6.2. Text event tokens
Text event tokens are similar to Speech event tokens in that they rely on custom events to
replace text dynamically at runtime. Text tokens are used more widely than speech
tokens, and are typically valid in any text field found in Actions.
Text event tokens take the form:
[key:value]
Where both key and value are both strings. In order for a key to be recognised, it must
first be added to the RuntimeVariables script's internal array of accepted keys. This is
done by writing to:
KickStarter.runtimeVariables.TextEventTokenKeys
For example, to allow the keys "anim" and" "look" to be recognised, we can write the
following code:
KickStarter.runtimeVariables.TextEventTokenKeys = new string[2]
{ "anim", "look" };
When tokens of the form [anim:X] and [look:Y] are placed in text, they will then trigger
the OnRequestTextTokenReplacement custom event - allowing you to replace the entire
token dynamically through script. The following code will replace the token
[favourite:colour] with a random colour every time it is used in speech text:
private void Start ()
{
KickStarter.runtimeVariables.TextEventTokenKeys = new string[1]
{ "favourite" };
}
private void OnEnable ()
{
EventManager.OnRequestTextTokenReplacement +=
OnRequestTextTokenReplacement;
}
private void OnDisable ()
{
EventManager.OnRequestTextTokenReplacement -=
OnRequestTextTokenReplacement;
}
private string OnRequestTextTokenReplacement (string tokenKey, string
tokenValue)
{
if (tokenKey == "favourite" && tokenValue == "colour")
{
353

string[] colours = new string[4] { "Red", "Blue", "Yellow", "Green"
};
int i = Random.Range (0, colours.Length);
return colours[i];
}
return string.Empty;
}!
354

10.7. Lip syncing
Animating characters convincingly makes a big di!erence to a game's quality, and there
are a number of methods available. The Mecanim and Legacy animation engines, for
example, allow you define a facial animation clip within each Dialogue: Play speech
Action.
However, it's often unfeasible to keyframe an animation for every line of dialogue - so AC
provides several ways to animate lips automatically. This is known as lip syncing.
Lip syncing involves two processes:
1)
Extracting a list of phonemes (lip shapes) from a speech line
2) Using those phonemes to construct an animation#
355

Extracting phonemes
The method by which phonemes are extracted is determined by the Lip syncing option in
the Speech Manager:
It can take the following values:
From Speech Text
Phonemes are generated automatically based on the speech text. It won't always be a
totally accurate approximation, but it will give the character's animation some noticeable
variety. If a line has accompanying audio, the timing of the generated phonemes will be
scaled to the length of the audio clip.
Read Pamela File
Phonemes are generated by a Pamela file.
Pamela is a free Windows application that can
generate phonemes, and can be used to fine-tune!an animation.
Read Sapi File
Phonemes are generated by a SAPI file.
SAPI is another free Windows application, and can
be used to generate bulk files automatically.
Read Papagayo File
Phonemes are generated by a Papagayo file. Papagayo is a free, cross-platform lip-sync
tool that's easy to use.
Face FX
See
FaceFX integration.
Salsa 2D
This option will make use of the 2D lip-syncing features of SALSA With RandomEyes,
which is a separate Unity asset.
While the Salsa 3D script component can be used on 3D characters independently of
Adventure Creator, Salsa 2D cannot – because 2D characters can face multiple directions,
and therefore need di!erent sets of “talking” frames. To get around this problem, simply
choose this option, and add the Salsa 2D to your character's base object (which should
also have an AudioSource), and ignore its sprite fields. AC will instead make use of the
PROTIP: The Physics demo makes use of this option.
356

sprite animations you provided in the NPC / Player components, and use Salsa 2D to
perform the lip-syncing processing.
You will also need to add SalsaIsPresent as a scripting define symbol – see Supported
third-party assets.
Pamela, SAPI, Rogo Digital LipSync, and Papagayo files are detected by Adventure Creator
in the same way that Speech audio files are.
If they are connected to speech automatically, they must be placed in a Resources/
Lipsync folder, and be of the same filename as they're relevant audio file, only with a .txt
extension (or .asset for Rogo Digital LipSync). For example, if an audio file is “Resources/
Speech/Player2.mp3”, its accompanying phoneme file would be “Resources/Lipsync/
Player2.txt”.
Lip sync files can also work with
Translations.#
357

Constructing animations
Generated phonemes must be mapped to animation frames in order to be played back at
runtime. We can do this from the Phonemes Editor, which is available in the Lip syncing
panel of the Speech Manager:
Here, you can define how many animation frames you want, and which phonemes make
use of them. Multiple phonemes can be mapped to the same frame by separating them
with a slash “/”. The Revert to defaults button will map appropriate phonemes to your
chosen Lip-sync method, but it will likely require further tweaking.
Once mapped, you can now use them to animate your characters. The Perform lipsync
on setting chooses how: Portrait will animate a Character's portrait graphic (assuming it's
an animated texture), Portrait And Game Object will also animate the Character's
GameObject, and Game Object Texture will animate a texture on a Character's Skinned
Mesh Renderer.
The method by which Portrait And Game Object a!ects the character’s GameObject is
based on their chosen
animation engine:
•
With Sprites Unity, each lip-sync frame will correspond to a frame in the character's
talking animation. This animation is assumed to be of the same number of frames as
have been declared in the Phonemes Editor.
•
With
Sprites Unity Complex, the current lip-sync frame can be output to the
Animator controller by declaring a Phoneme integer parameter in the character's
Inspector.
•
With Legacy and Mecanim, lip-syncing works by manipulating blend shapes. Each
lip-sync frame will be mapped to a particular blend shape, as declared by the Shapeable
script. All blend shapes used to animate the mouth must be placed in the same group
(see the
Shapeable component), and the group to a!ect is then declared in the character's
inspector.
358

To use Game Object Texture mode, a Lip Sync Texture component must be attached to
the Character's root GameObject. Once attached, it will provide texture replacement
fields that correspond to each phoneme frame.
PROTIP: The Lip Sync Texture component works by updating a Material's texture
according to the current phoneme. This is normally done in an Update call, but this
can optionally be done in LateUpdate instead. This may be necessary if conflicts arise
due to controlling the same texture via an Animator.
NOTE: A series of lip sync tutorials can be found online.
359

10.8. Facial expressions
If a character uses Mecanim or Sprites Unity Complex for their animation, or makes use of
Portrait graphics, then their expression can be changed mid-speech by using the
[expression:Name] token within their speech text.
The "Name" part of this token refers to the label given to an expression defined in the
Player or NPC Inspector, underneath Dialogue settings, once Use expressions? is
checked:
Here, multiple expressions can be created and managed - each with their own portrait
graphic and ID number.
The ID number is fixed, and displayed just above the expression's "Name" field. If your
character uses Mecanim animation, then your chosen Expression ID integer parameter
(as set under the Mecanim parameters panel) will be set to this value when the
expression is triggered.
Another option is to use blendshapes. If your character uses
Mecanim or Legacy
animation, an additional Map to Shapeable? option will appear. Checking this will allow
you to link the expressions to a Shapeable group, provided one is attached to the
character’s Skinned Mesh Renderer. Note that the expression names listed in the
character Inspector must match the key labels defined in the linked Shapeable groupe.
PROTIP: The text token [expression:None] will clear the active expression.
PROTIP: A tutorial on working with character expressions can be found online.
360

10.9. External dialogue tools
There are a number of external tools for writing dialogue, including Chat Mapper and
articy:draft, which you may prefer to work with over AC's built-in tools - particularly
when working in team projects.
Dialogue System, which is a Unity asset dedicated to this aspect of game development, is
able to link such tools with Adventure Creator. It can import both Chat Mapper and
articy:draft projects, and has a number of Actions and features when working with
Adventure Creator.
Further integration can be added through
custom events. The AC wiki includes a sample
script that demonstrates how an articy:draft FlowPlayer can be used to trigger speech and
Conversations in AC.#
361

10.10. Speech scripting
Characters can be made to speak through custom scripts with either:
KickStarter.dialog.StartDialog (AC.Char speakingCharacter, string
speechText);
KickStarter.dialog.StartDialog (AC.Char speakingCharacter, int
lineID);
Where lineID refers to a speech line gathered in the Speech Manager.
These functions return a Speech class instance, which can be used to end the speech
prematurely:
KickStarter.dialog.KillDialog (mySpeech);
Or even modify the speech text at runtime:
mySpeech.ReplaceDisplayText ("My new speech text");
A log of all speech spoken since the last file load can be retrieved with:
KickStarter.runtimeVariables.GetSpeechLog ();
This returns an array of the SpeechLog class.
Translations can be modified or created at runtime by using:
KickStarter.runtimeLanguages.ImportRuntimeTranslation (TextAsset
textAsset, string languageName, int newTextColumn);
KickStarter.runtimeLanguages.UpdateRuntimeTranslation (int lineID, int
languageIndex, string translationText);
Where textAsset is a CSV file of the form used by the Speech Manager to amend
translations, languageName is the name of the language to modify, and newTextColumn
is the index number of the column that contains the new translation text.
If your game relies on AssetBundles for its voice files, you can manually enforce the
loaded AssetBundle for both audio and lipsyncing:
KickStarter.runtimeLanguages.CurrentAudioAssetBundle = value;
KickStarter.runtimeLanguages.CurrentLipsyncAssetBundle = value;
PROTIP: The above function can be used to support new languages for a game after its
release. However, you must still cater for this within your game’s initial build: whether
it by using Unity AssetBundles, or by reading a file online, your game must still be able
to “look out” for future languages even if they do not exist at the time of release.
362

The speech system has the following events:
OnStartSpeech (AC.Char speaker, string speechText, int lineID);
OnStartSpeech_Alt (Speech speech);
OnStopSpeech (AC.Char speaker);
OnStopSpeech_Alt (Speech speech);
OnStopSpeech (Speech speech, bool justCompletingScroll);
OnStartSpeechScroll (AC.Char speaker, string speechText, int lineID);
OnStartSpeechScroll_Alt (Speech speech);
OnEndSpeechScroll (AC.Char speaker, string speechText, int lineID);
OnEndSpeechScroll_Alt (Speech speech);
OnCompleteSpeechScroll (AC.Char speaker, string speechText, int
lineID);
OnCompleteSpeechScroll_Alt (Speech speech);
OnSpeechToken (AC.Char speaker, int lineID, string tokenKey, string
tokenValue);
OnSpeechToken_Alt (Speech speech, string tokenKey, string tokenValue);
string OnRequestSpeechTokenReplacement (Speech speech, string
tokenKey, string tokenValue);
string OnRequestTextTokenReplacement (string tokenKey, string
tokenValue);
OnLoadSpeechAssetBundle (int language);!
363

11. Menus#
364

11.1. Menus overview
An AC game's entire interface - save for the cursor - is built using menus.
A menu is a collection of Menu elements that make it interactive. An inventory menu, for
example, could feature an InventoryBox grid to show the player's items, and two Buttons
to scroll through them.
When using the New Game Wizard, you can opt to begin with a Default set of menus that
form a fully-functioning UI for an adventure game. These can then be modified to suit,
which is easier than starting from scratch. This UI is also used by the 3D Demo game.
Menus are listed in the
Menu Manager:
Selecting a menu allows you to view its properties, as well as a list of its elements:
365

Selecting an element allows you to view properties of its own.
Menus can be drawn by one of two modes:
Adventure Creator
Which uses OnGUI calls to render a menu without need for any other assets.
Unity UI
Which links the menu to a Unity UI Canvas prefab to give the user full stylistic control.
Which render method a menu uses is set from its Source field:
The next most important property of a menu is its Appear type:
This property determines the rule for when it is shown. It can take the following values:
Manual
The menu is never shown or hidden automatically - only by using the Menu: Change state
Action.
Mouse Over
The menu is shown when the cursor hovers over its boundary.
PROTIP: AC or Unity UI? Since AC-based menus are easier to set up quickly, but Unity
UI o!ers more style options, it is recommended to first prototype your UI using AC
menus, and then switch to Unity UI once happy with the functionality.
NOTE: Draw ordering between menus can only be set for those that use the same
drawing mode. AC menus are drawn in order of their listing in the Menu Manager,
while Unity UI menus rely on the Sort Order values in their Canvas components.
AC menus will always appear above Unity UI ones.
366

During Conversation
The menu is shown when a Conversation is active.
During Cutscene
The menu is shown whenever gameplay is blocked due to an ActionList. This can be used
to add black borders on the screen during a cutscene, or add a Skip cinematic button.
The Clickable in cutscenes? option must be set for a Menu to be interactive at this time.
On Container
The menu is shown when a
Container has been opened using the Container: Open Action.
On Input Key
The menu is shown when a particular input button has been pressed by the player. If
pressed while open, the menu will close. The supplied Toggle key input's name must
match that of an axis in Unity’s Input Manager.
On Interaction
The menu is shown when the player must choose a
Hotspot’s interactions from a menu -
see Choose Hotspot Then Interaction mode. The Settings Manager's Close interactions
with field determines how the menu is closed again.
On Hotspot
The menu is shown when a Hotspot is selected before an interaction is run - or when over
an Inventory item in a Menu. This menu can optionally be duplicated for each Hotspot or
Menu element it is displayed for.
When Speech Plays
The menu is shown when a character is speaking and subtitles are enabled - see
Options
data. Further settings with this mode allow the menu to be duplicated for each line, and
for it to be limited to only show for lines that meet certain criteria: for example, those
spoken by a specific character, or those played in the background. It can also account for
proximity, so that it only shows when the speaking character is close enough.
During Gameplay
The menu is shown during normal gameplay.
While Inventory Selected
The menu is shown while an
Inventory item is selected, ready to be used on another item
or Hotspot.
Except When Paused
The menu is shown during normal gameplay and cutscenes, but hidden whenever the
game is paused.#
367

During Gameplay And Conversations
The menu is shown during normal gameplay, and when a Conversation is active.
Other properties common to all menus include:
Name
The internal name of the menu, used to reference it in Menu Actions and scripts.
Start game locked o"?
If checked, the menu will be locked by default and must be unlocked using the Menu:
Change state
Action before it will be displayed.
Ignore cursor clicks?
If checked, then it will not react to the cursor, and any interactive elements or objects
behind it will register. This should be used for Hotspot menus, and Interaction menus
that rely on Choose Hotspot Then Interaction mode's Cycling Cursor And Clicking
Hotspot option.
ActionList when turn on/o"
ActionList assets that can be run whenever the menu is shown or hidden. These can be
used to initialise the menu correctly or disable certain systems using the Engine: Manage
systems Action. Such ActionLists should generally have their When running field set to
Run In Background so that they do not interfere with gameplay.
Enabled on start? (Manual only)
If checked, then the menu will be shown by default.
Pauses game?
If checked, then the menu will pause the game when it is shown. This option is only
available for certain Appear types.
Clickable in cutscenes?
If checked, then the menu will be interactive while gameplay-blocking cutscenes are
running. This option is only available for certain Appear types.
PROTIP: When a menu is locked, it won't be shown even if the current conditions
match its Appear type. A menu's locked state can be controlled with the Menu:
Change state Action.
PROTIP: The Default Pause menu makes use of this to deselect the active Inventory
item when it turns on.
368


11.1.1. Adventure Creator menus
Adventure Creator menus are simple to set up as they can be made completely within the
Menu Manager - without the for any other assets or scene objects.
They can be previewed while editing by checking Preview in Game window? at the top of
the Menu Manager:
To draw a menu using AC, set the Source property is set to Adventure Creator - this is
the default setting:
This menu type is styled by tweaking its properties:
Position
How the menu's position is chosen. It has the following options:
Centred
Places the menu in the centre of the screen.
Aligned
Aligns the menu to a corner of edge of the screen.
Manual
Allows you to position the menu exactly.
PROTIP: Elements can be quickly selected for editing by clicking on them in the Game
window.
PROTIP: Both demo games rely on AC menus for their interfaces.
370

Follow Cursor
Moves the menu with the cursor, o!set by some determine amount.
Appear At Cursor Then Freeze
Positions itself over the cursor when turned on, and then made stationary.
On Hotspot
Positions itself over the selected Hotspot, o!set by some determine amount.
Above Speaking Character
Positions itself over the currently-speaking character. If the Appear type is When
Speech Plays and One menu per speech? is checked, the Menu can optionally
remain stationary once it appears regardless of the character’s motion.
Above Player
Positions itself above the
Player.
Size
How the menu's size is chosen. It can be set manually, or automatically based on the
Elements it contains.
Resize every frame?
If checked, then the menu's size will be updated every frame. As this is an expensive
operation, it should be left unchecked for menus that are not expected to change size.
Background texture
A texture that can be drawn across the menu. Its
Elements will be drawn above it.
Element spacing
The spacing amount between Elements that have a Position type of Aligned.
Element orientation
The orientation of Elements that have a Position type of Aligned.
Transition type
The e!ect by which the menu turns on and o!. Available options are the ability to zoom,
pan, and fade.
PROTIP: When a Menu is set to appear above a character, AC will attempt to
determine where that character's head is. However, you can specify exactly
where to place the Menu by defining a Speech menu placement child for that
character.
371

Transition time (s)
The duration of the transition e!ect when turning on and o!, if it has one.
Transition animation
How the transition e!ect changes over time, when turning on and o!. An animation
curve can optionally be supplied.
Update when fading out?
If checked, then changes to the menu and Elements within will be seen even when
transitioning out.
Similar styling properties are also available for each
Elements an Adventure Creator menu
contains.#
PROTIP: When two AC menus overlap, their drawing order is based on their order in
the Menu Manager: the bottom-most menu in the list will be drawn above all others.
372

11.1.2. Unity UI menus
Unity UI menus allow you to make use of Unity’s UI system and styling options while
letting AC handle clicks and visibility.
The link works by assigning a UI canvas to the menu, and a UI component to each of the
menu's Elements. AC will then override click functionality, labels, etc with the properties
in the
Menu Manager.
To have an AC menu connect to Unity UI, change its Source field to either Unity Ui Prefab
or Unity Ui In Scene:
Unity Ui Prefab
Links the menu to a Unity UI canvas prefab, which is instantiated by AC automatically
when the game begins.
Unity Ui In Scene
Links the menu to a Unity UI canvas in the scene, if one exists.
The steps to connect a menu to a UI canvas are as follows:
1) Create the menu in the Menu Manager along with any Elements it needs.
2) Set the menu's Source field to either Unity Ui Prefab or Unity Ui In Scene
3) Separately create your Unity UI canvas
4) Assign the UI canvas into the menu's Linked Canvas field. This should either be a
prefab or a scene object, depending on the Source type.
PROTIP: Each of the menus in The default Interface can be switched to Unity Ui
Prefab, as can those in the 3D Demo game.
PROTIP: Prefab or in-scene? Unity Ui Prefab is the standard option, with Unity Ui In
Scene being best for 3D menus that need to be in a specific position in a specific
scene. Note that in order to control an “In Scene” menu, the Canvas must be manually
placed in each scene.
NOTE: All UI canvases linked to the Menu Manager should be independent of one
another in the Hierarchy. AC turns o! such menus by disabling them - so having
one Canvas the child of another can cause it to be inadvertently turned o!.
373

5) Assign the UI's "bounding box" into the menu's RectTransform boundary field.
This can be an invisible RectTransform object if need be. This is so that AC can
reposition it (if necessary) and determine it the cursor is over it.
6) Place the UI canvas in the scene (if a prefab) and assign each UI component (Text,
Button, etc) into its associated menu Element's Linked UI field. Elements with
multiple slots (such as
InventoryBoxes) will need one object per slot. The canvas
must be in the scene because Unity does not allow for expanded hierarchies in the
Project window.
7) Update the prefab (if appropriate) by clicking Apply at the top of its Inspector. This
is because linking UI components to Elements generates Constant ID components.
8) Remove the UI canvas from the scene (if a prefab).
Unity UI-linked menus have the following properties:
Position type
How the menu's position is chosen, provided a RectTransform boundary has been
assigned. It has the following options:
Above Player
Positions itself above the
Player.
Above Speaking Character
Positions itself over the currently-speaking character.
Appear At Cursor Then Freeze
Positions itself over the cursor when turned on, and then made stationary.
Follow Cursor
Moves the menu with the cursor, o!set by some determine amount.
NOTE: Do not assign the Canvas itself as the RectTransform boundary. A child
RectTransform must instead be assigned.
PROTIP: A tutorial on linking the default Inventory menu to Unity UI can be found
online.
PROTIP: When a Menu is set to appear above a character, AC will attempt to
determine where that character's head is. However, you can specify exactly
where to place the Menu by defining a Speech menu placement child for that
character.
374

Manual
Does not move by AC, and can only be moved with custom scripting.
On Hotspot
Positions itself over the selected
Hotspot, o!set by some determine amount.
Always fit within screen?
If True, then the menu will be kept within the screen's border, if Aspect ratio is set in the
Settings Manager's Camera settings panel.
Transition type
The e!ect by which the menu turns on and o!. The available options are:
Canvas Group Fade
The menu will fade by a!ecting the Alpha value of the Canvas Group component
that must be attached to the UI's root GameObject.
Custom Animation States
The menu will play animations from the UI's root Animator component. Four states
must be present on the Animator: On, O", OnInstant and O"Instant - though
they can be empty if not necessary. Note that to ensure it works correctly when
pausing is involved, set the Animator’s Update Mode to Unscaled Time.
Custom Animation Blend
The menu will control the Animator component on the UI’s root. The Animator
must have an OnAmount float parameter defined - this will be set to the amount
by which the Menu is “on”, with 0 being fully o!, and 1 being fully on. Note that to
ensure it works correctly when pausing is involved, set the Animator’s Update
Mode to Unscaled Time.
None
The menu will be turned on and o! instantly.
Update when fading out?
If checked, then changes to the menu and
Elements within will be seen even when
transitioning out.
Use TMPro components?
If TextMesh Pro is present, this causes Elements to rely on TMPro components instead of
regular Text components - if found. For details, see
Integrations.
PROTIP: To position a Manual menu relative to the screen’s playable area, attach
the Auto Correct UI Dimensions component to the RectTransform boundary.
375

Linked Canvas
The UI canvas that is linked to the menu. This should either be a prefab, or a scene-
based GameObject, depending on the chosen Source.
RectTransform boundary
A RectTransform child of the UI canvas that marks the menu's boundary. This is
necessary for AC to know where the menu lies, and how to re-position it if necessary.
Auto-select first visible Element?
If checked, then the first visible element listed in the
Menu Manager will be automatically
highlighted when the menu is turned on. This is useful if the menu is keyboard-
controlled, but which elements will be active is unknown.
First selected Element
The name of the element to automatically highlight when the menu is turned on. This is
useful if the menu is keyboard-controlled, as an element must be selected before it can
be controlled with a keyboard or gamepad.
Because Unity UI canvases requires an
Event System to work, AC will automatically
generate one if a scene has none. You can have it spawn your own one, however, by
making it a prefab and assigning it at the top of the Menu Manager.
NOTE: When using Keyboard or controller input, options appear at the top of the Menu
Manager regarding when menus can be controlled without using a cursor.
For gamepad/keyboard control during gameplay, you must enable it using the Engine:
Manage systems Action to enable it BEFORE the Menu is turned on, or in the menu's
ActionList when turn on asset.
Also be aware that the game must be in normal gameplay at the time that the menu is
turned on: if an
ActionList is used to turn it on, set its When running field to Run In
Background.
PROTIP: By default, Menus will rely on Unity UI Text components for text display.
However, you can alternatively opt to rely on on Text Mesh Pro - see Supported third-
party assets.
376

11.2. Menu elements
A menu's elements are what make it interactive. When a menu is selected in the Menu
Manager, its elements are listed beneath:
New elements can be created by choosing a type and clicking Add new. The following
types are available:
Label
A simple text box.
Button
A button that can be clicked.
DialogList
Displays the options of the active Conversation.
Interaction
Displays Icons defined in the Cursor Manager.
InventoryBox
Displays Inventory items carried by the player.
Crafting
Provides a grid for placing down crafting ingredients - see Recipes.
SavesList
Displays save files to load or overwrite - see Saving and loading.
ProfilesList
Displays user profiles to switch to - see Save profiles.
Journal
A multi-page document.
377

Input
A text box that the user can edit.
Toggle
A button that toggles between On and O! states.
Cycle
A button that cycles through an array of labels when clicked.
Slider
A slider that represents a numerical value.
Timer
A timer that represents a timed numerical value.
Drag
An area that can be mouse-dragged within a boundary.
Graphic
A static or animated image.
Each element type has its own unique properties, but the following are available for all
types:
Element name
The internal name of the element, used to reference it in
Menu Actions and scripts.
Is visible?
If checked, the element will be shown by default. Elements can be shown and hidden at
runtime by using the Menu: Change state Action.
Hover / click sound
AudioClips that play when the element is hovered over by the cursor, or clicked. To play,
a Default Sound must be defined in the
Scene Manager's Scene Settings.
Element-specific properties are listed in the next section.#
378

Label elements
Labels are used to display text non-interactively. They are primarily used for headings,
subtitles, and interaction display. They have the following properties:
Label type
What type of text is shown. The available options are:
Normal
Shows the contents of the Label text box. Can make use of variable tokens - see
Text tokens.
Hotspot
Shows the name of the currently-selected Hotpot or Inventory item, together with
the active Interaction if enabled in the Cursor Manager.
Dialogue Line
Shows the speech text being currently spoken by a character. If Text Mesh Pro is
being used (see
Supported third-party assets), and subtitle scrolling is enabled, an
additional option to make use of TMPro’s Typewriter e!ect will be made available.
Dialogue Speaker
Shows the name of the currently-speaking character.
Global Variable
Shows the value of a Global Variable. This is deprecated by the Normal type's
ability to use tokens.
Active Save Profile
Shows the name of the active
Save profile.
Inventory Property
Shows the value of a Inventory property.
Document Title
Shows the title of the active Document.
Selected Objective
Shows text related to the currently-selected Objective - it’s Title, Description, State
Description, State Label, or State Type.
Label text
If the Label type is Normal, the actual contents of the label.
379


Button elements
Buttons are the most common form of UI interactivity.
They are used primarily for accessing other menus and running ActionLists. They have
the following properties:
Click type
What happens when it is clicked. The available options are:
Turn O" Menu
Turns o! its parent menu.
Crossfade
Simultaneously turns o! its parent menu and turns on another.
O"set Element Slot
Shifts the slots of an element that relies on multiple slots -
InventoryBox,
DialogList, SavesList, ProfilesList - by some amount. This can be used to create,
for example, scrolling inventories.
Run Action List
Runs an ActionList asset. It the asset has an Integer parameter, then its value can
optionally be set here.
Custom Script
Does nothing by itself, but the OnMenuElementClick
custom event can be used to
run code when clicked.
O"set Journal
Shifts the pages of a Journal element.
Simulate Input
Simulates the invoking on an input listed in Unity's Input Manager. This can be
used to create, for example, an on-screen joystick or a "Skip cutscene" button -
see
Input descriptions.
Button text
The display text. If it features textures, can be left blank.
Hotspot label override
If text is entered, then the
Hotspot menu will display this text when the mouse hovers
over it.
381

Alternative input button
When given the name of an input defined in the Input Manager, pressing that input will be
the equivalent of clicking the element.
Change when cursor over?
If checked, the cursor can have its icon changed when over it to one defined in the Cursor
Manager
.
Additional properties for styling will be shown if used in an
Adventure Creator menu.
PROTIP: When using Unity UI, they can be linked to UI Button components.
382

DialogList elements
DialogLists display a Conversation's options.
When clicked, the associated option will be triggered. They have the following properties:
Map to
How to map a Conversation’s dialogue options to the element. List allows all options to
be displayed, as a list, in the one element. Fixed Slot Index will show only one option -
determined by the index of available options, so that the “nth” option always appears in
the same place. Fixed Option ID will only show one option - determined by that option's
ID number, so that it always shows the same option.
Maximum number of slots
The maximum number of slots, if Fixed option number? is unchecked. If there are more
options than slots, they can be shifted using a Button with a Click type of O"set Element
Slot.
Display type
Whether options are represented by text, icons, or both.
Mark options already used?
If checked, then options already triggered once can be tinted di!erently.
Prefix with index numbers?
If checked, then option labels will begin with their order in the list.
Change when cursor over?
If checked, the cursor can have its icon changed when over it to one defined in the
Cursor
Manager
.
Additional properties for styling will be shown if used in an Adventure Creator menu.
PROTIP: When using Unity UI, they can be linked to UI Button components.
383

Interaction elements
Interaction elements displays Interaction icons defined in the Cursor Manager.
They are used by Choose Hotspot Then Interaction and Choose Interaction Then Hotspot
modes to select an interaction. They have the following properties:
For fixed icon?
If checked, then this element will be used to represent a single icon - so that clicking it
will always result in the same interaction type. If unchecked, then this element will
represent multiple icons using as many slots as you define. If there are more icons than
can be shown, the element can be scrolled through using a
Button element with a Button
type set to O"set Element Slot.
Display type
Whether icons are represented by text, image, or both. Note that For fixed icon? is
checked,
Unity UI-based Interaction elements do not rely on the icons set within the
Cursor Manager. Instead, the graphics are assigned manually within the UI Image
component.
Cursor
The Interaction icon, defined in the Cursor Manager, it is mapped to. Only available
when For fixed icon? is checked.
Override icon texture?
If checked, an alternative graphic can be used in place of the icon's default. Only
available when For fixed icon? is checked.
Alternative input button
When given the name of an input defined in the Input Manager, pressing that input will be
the equivalent of clicking the element. Only available when For fixed icon? is checked.
Additional properties for styling will be shown if used in an
Adventure Creator menu.
PROTIP: When using Unity UI, they can be linked to UI Button components. Icon
graphics can work with both Image and Raw Image components on the Button.
384

InventoryBox elements
InventoryBoxes are used to list Inventory items.
They are mainly used to show the player's current inventory, but can also be used to show
items in a Container, or those available to the selected Hotspot. They have the following
properties:
Inventory box type
What items are shown, and how they behave. The available options are:
Default
Shows the player's full inventory, and items react to clicks as normal.
Hotspot Based
Shows the items associated with a given Hotspot. This is only used when building
Interaction Menus for Choose Hotspot Then Interaction mode, and Include
Inventory items in Interaction Menus? is enabled in the Settings Manager.
Custom Script
Shows the player's full inventory. Does nothing by itself, but the
OnMenuElementClick
custom event can be used to run code when clicked.
Display Selected
Shows the currently-selected item for visual purposes only.
Display Last Selected
Shows the previously-selected item, allowing it to be re-selected by the player.
Container
Shows the active Container's items. Clicking them places them in the player's
inventory.
Objectives
Shows a list of
Objectives.
PROTIP: The element can be connected to a specific Container by writing to its
OverrideContainer variable through script:
(AC.PlayerMenus.GetElementWithName ("MyMenu",
"MyInventoryBox") as
AC.MenuInventoryBox).OverrideContainer
Note that the Menu’s Appear type should not be set to On Container, as this will
interfere with the active Container.
385

Sub Objectives
Shows a list of sub-Objectives. By default, this will display sub-Objectives for the
“selected Objective”, which is set by clicking inside an “Objectives” InventoryBox.
However, this can be overridden with the element’s OverrideMainObjective
property through
scripting.
Display type
Whether items are represented by text, icons, or both.
Maximum number of slots
The maximum number of slots, if Fixed option number? is unchecked. If there are more
items than slots, they can be shifted using a Button with a Click type of O"set Element
Slot.
Prevent interactions?
Prevents the running of Inventory interactions, and display of Interaction menus - so that
interactivity is limited to the selection and re-arrangement of items only. This is useful
when working with
Container or Crafting menus.
Prevent selection?
Prevents the selection of Inventory items. Used in conjunction with the
OnMenuElementClick event, this is useful when creating custom inventory behaviour.
Additional properties for styling will be shown if used in an Adventure Creator menu.
PROTIP: The element can be connected to a specific “main" Objective by writing
to its OverrideMainObjective variable through script:
(AC.PlayerMenus.GetElementWithName ("MyMenu",
"MySubObjectivesList") as
AC.MenuInventoryBox).OverrideMainObjective
PROTIP: When using Unity UI, they can be linked to UI Button components. Item
graphics can work with both Image and Raw Image components on the Button.
386

Crafting elements
Crafting elements allow for items to be crafted from others - see Recipes. They have the
following properties:
Crafting element type
What kind of items are shown, and how they behave. The available options are:
Ingredients
Shows the items used as ingredients in the current recipe. The player can move
items to and from their own inventory - see
InventoryBox elements.
Output
Shows the item that results from a successful recipe.
Result is automatic?
For Output types only. If checked, then resulting Recipe items will appear automatically
when the correct ingredients have been placed. Otherwise, the Inventory: Crafting Action
must run to create the recipe.
Display type
Whether items are represented by text, icons, or both.
Number of slots
How many items can be shown at once, if the Crafting element type is Ingredients. If
there are more items than slots, they can be shifted using a
Button with a Click type of
O"set Element Slot.
Additional properties for styling will be shown if used in an Adventure Creator menu.
PROTIP: When using Unity UI, they can be linked to UI Button components.
387

SavesList elements
SavesLists display save game files.
They are used for saving and loading the game - see Saving and loading. They have the
following properties:
List type
What kind of save files are listed, and how they react when clicked. The available options
are:
Save
Shows the game's save files, which can be overwritten when clicked.
Load
Shows the game's save files, which can be loaded when clicked.
Import
Shows another game's save files, which can be imported - see Importing saves
from other games.
Display type
Whether save files are represented by text, screenshot, or both. Save screenshots can be
enabled in the
Settings Manager.
Fixed Save ID only?
If checked, then only one save file will be shown. This is useful if you want to arrange
your files non-linearly.
Maximum number of slots?
The maximum number of slots, if Fixed Save ID? is unchecked. If there are more saves
than slots, they can be shifted using a
Button with a Click type of O"set Element Slot.
Allow empty slots?
If checked, then save slots will be visible even when empty. For example, if slots 1 and 3
are filled, an empty slot 2 will be available.
Show 'New save' option?
If the List type is Save, checking this provides an option to create a new save. Otherwise,
new saves can be made with the
Save: Save or load Action.
Save/load when click on?
If checked, then saving and loading will be handled automatically.
388

ActionList after saving/loading
The ActionList asset that can be run after a successful save or load, if Save/load when
click on? is checked. This can be used to update the UI as required.
ActionList when click
The ActionList asset that can be run when clicked, if Save/load when click on? is
unchecked. This can be used in conjunction with the
Save: Save or load Action to create
more dynamic save menus - see Custom save labels. If the asset has an Integer
parameter, it can optionally be set to the save that was clicked on.
Additional properties for styling will be shown if used in an Adventure Creator menu.
PROTIP: When using Unity UI, they can be linked to UI Button components.
389

ProfilesList elements
Profiles display a list of Save profiles.
They can be used to select a profile for switching, deleting, or renaming. They have the
following properties:
Fixed Profile ID only?
If checked, then only one profile will be shown. This is useful if you want to arrange your
files non-linearly.
Include active?
If unchecked, the active profile will not be displayed. The name of the active profile can
also be displayed in
Label elements.
Maximum number of slots?
The maximum number of slots, if Fixed Profile ID? is unchecked. If there are more
profiles than slots, they can be shifted using a Button with a Click type of O"set Element
Slot.
Switch profile when click on?
If checked, then clicking a profile will result in it being made active.
ActionList when click
The
ActionList asset that can be run after a switch, if Switch profile when click on? is
checked. This can be used to update the UI as required.
ActionList after selecting
The ActionList asset that can be run when clicked, if Switch profile when click on? is
unchecked. This can be used in conjunction with the
Save: Manage profiles Action to
rename and delete profiles. If the asset has an Integer parameter, it can optionally be set
to the profile that was clicked on.
Additional properties for styling will be shown if used in an Adventure Creator menu.
PROTIP: When using Unity UI, they can be linked to UI Button components.
390

Journal elements
Journals display text from a number of pages. Such text can either be tied to the
element, or managed separately in Documents.
The open page can be changed by using a Button element with a Click type set to O"set
Journal, or with the Menu: Set journal page Action. Pages can be added or removed with
the Menu: change state Action.
Journal elements have the following properties:
Journal type
Where pages are sourced from. The available options are:
New Journal
It is a new journal and has its own pages.
Display Existing Journal
It shares pages with another Journal element on the same Menu. Since a Journal
element can only display one page at a time, this allows you to show two side-by-
side by having a second one share pages from the first.
Display Active Document
It shows the page text of the currently-active
Document, which is defined
separately in the Inventory Manager and opened using the Document: Open Action.
Page text
When Journal type is New Journal, this is where pages are created.
Page o"set #
When Journal type is Display Existing Journal, this allows you to o!set the open page
compared with the journal it shares with.
Additional properties for styling will be shown if used in an
Adventure Creator menu.
PROTIP: A tutorial on using Journals to create a diary system can be found online.
PROTIP: When using Unity UI, they can be linked to UI Text components.
NOTE: In order for any in-game changes made to a journal to be recorded in save
game files, all pages must be listed in the
Speech Manager - see Gathering game text.
391

Input elements
Input elements provide a text box that the player can write into.
They can be used for things like password puzzles and name-entry. Their values can be
converted to Global string Variables by using the Variable: Set Action.
When using Adventure Creator menus, they have the following properties:
Default text
The box's text when the menu is turned on.
Input type
What type of input is allowed. It has the following options:
Alpha Numeric
Only letters and numbers can be entered.
Numeric Only
Only numbers can be entered.
Allow Special Characters
Any character type can be entered.
Character limit
The maximum number of characters that can be entered.
'Enter' key's linked Button
When given the name of a
Button element in the same menu, pressed Enter/Return inside
the Input will have the same e!ect as clicking the Button.
PROTIP: When using Unity UI, they can be linked to UI InputField components.
392

Toggle elements
Toggles are a special type of button that can be toggled between On and O! states.
They can be used to toggle subtitles, or a Global boolean Variables. They have the
following properties:
Label text
The label that is shown at all times.
Append state to label?
If checked, the state of the Toggle will be added to the label, e.g. "Subtitles: On".
Toggle type
What the toggle state is linked to. The available options are:
Custom Script
Toggles between on and o! and nothing else. The OnMenuElementClick
custom
event can be used to run code when clicked.
Subtitles
Toggles the visibility of subtitles - see Options data.
Variable
Represents the state of a Global boolean Variables.
Global boolean var
If the Toggle type is Variable, the ID of the
Global boolean Variables to link to.
ActionList on click
If the Toggle type is either Custom Script or Variable, the ActionList asset to run when it
is clicked. This asset's When running field should be set to Run In Background to avoid
interference.
Alternative input button
When given the name of an input defined in the Input Manager, pressing that input will be
the equivalent of clicking the element.
Change when cursor over?
If checked, the cursor can have its icon changed when over it to one defined in the
Cursor
Manager
.
Additional properties for styling will be shown if used in an Adventure Creator menu.
393


Cycle elements
Cycles are a special type of button that cycle their label through a set of texts when
clicked. They can be used to change the language, or a Global Variable. They have the
following properties:
Cycle type
What texts are cycled through when clicked, and what this a!ects. The available options
are:
Language
Cycles through the game's available languages - see
Translations. The game's
active language is linked to the element. If voice audio and display text languages
are separated, you can choose which language type this a!ects.
Custom Script
Cycles through user-defined texts and nothing else. The OnMenuElementClick
custom event can be used to run code when clicked.
Variable
Links the current label's index to a Global Integer or Popup Variable. If linked to a
a Popup, then labels will match those defined by the variable.
Choices
If the Cycle type is either Custom Script or Variable, the available texts that can be
cycled through are defined here.
Global Variable ID
If the Cycle type is Variable, the ID of the
Global integer Variable to link to.
ActionList on click
If the Cycle type is either Custom Script or Variable, the ActionList asset to run when it
is clicked. This asset's When running field should be set to
Run In Background to avoid
interference.
Alternative input button
When given the name of an input defined in the Input Manager, pressing that input will be
the equivalent of clicking the element.
Change when cursor over?
If checked, the cursor can have its icon changed when over it to one defined in the
Cursor
Manager.
Additional properties for styling will be shown if used in an Adventure Creator menu.
395


Slider elements
Sliders are bars whose length represents a value. They can be used to change volumes,
or a Global float variable. They have the following properties:
Slider a"ects
What information the slider is linked to, and what it a!ects. The available options are:
Custom Script
Changes its own value and nothing else. The OnMenuElementClick custom event
can be used to run code when clicked.
Float Variable
Links to the value of a Global float variable.
Music
Links to the current music volume - see Options data.
SFX
Links to the current SFX volume - see Options data.
Speech
Links to the current speech volume - see Options data.
Global Float var
If the Slider a"ects is Float Variable, the
Global float variable to link to.
Min/max value
If the Slider a!ects is Custom Script or Float Variable, the minimum and maximum
values it can take.
ActionList on click
If the Slider e"ects is Custom Script or Float Variable, the ActionList asset to run when
its value is changed. This asset's When running field should be set to Run In
Background to avoid interference.
User can change value
If checked, the user can control the slider by interacting with it. Otherwise, it is read-only
- this is useful if you want to represent player stats like health as a metered bar.
Change when cursor over?
If checked, the cursor can have its icon changed when over it to one defined in the
Cursor
Manager
.
397


Timer elements
Timers are a special type of slider that automatically animates their value when linked to
gameplay.
They can be used to represent the time left in a Conversation, Quick-time event, or in a
scene load. They have the following properties:
Timer type
What kind of value the timer represents. The available options are:
Conversation
Shows the time left of a timed
Conversation. The Conversation must have Is
timed? checked in its own Inspector.
Loading Progress
Shows the time left of a current scene-load. Load scenes asynchronously? must
be checked in the Settings Manager - see Loading screens.
Quick Time Event Progress
Shows the progress the player has made in the current
Quick-time event.
Quick Time Event Remaining
Shows how much time remains in the current Quick-time event.
Timer
Shows the current value of a Timer, relative to its minimum and maximum values.
Invert value?
If checked, the appeared value will be the inversion of the true value - that is, it will go
upward when the time goes down.
Value smoothing
If non-zero, enables smoothing. Higher values will result in more smoothing, so the
timer will react more slowly to value changes.
Additional properties for styling will be shown if used in an
Adventure Creator menu.
PROTIP: When using Unity UI, they can be linked to UI Slider components.
399

Drag elements
Drag elements allow for drag e!ects in a menu.
They can be used to drag entire menu or a single element within a pre-defined boundary.
This also works on elements that are larger than the menu they're contained in, making it
useful for displaying documents that are larger than the screen. They have the following
properties:
Label
The label to display.
Drag type
What e!ect dragging has. The available options are:
Entire Menu
The parent menu can be dragged.
Single Element
A single element can be dragged.
Element name
If the Drag type is Single Element, the name of the element to drag.
Drag boundary
The boundary limits in which dragging can occur.
Change when cursor over?
If checked, the cursor can have its icon changed when over it to one defined in the
Cursor
Manager.
PROTIP: This Element type is not necessary in Unity UI menus, as it can be recreated
using ScrollBar and ScrollRect components. A tutorial on using this for
Adventure
Creator menus can be found online.
400

Graphic elements
Graphic elements allow for textures to be drawn.
They can be used to either display a texture, or a character's portrait graphic. They have
the following properties:
Graphic type
What kind of graphic to draw. The available options are:
Dialogue Portrait
Shows the currently-speaking character's portrait graphic, as defined in the Player
or
NPC Inspector.
Normal
Shows a specific texture.
Document Texture
Shows the associated texture of the currently-active Document.
Page Texture
Shows the associated texture of the currently-active Document page.
Objective Texture
Shows the associated texture of the currently-selected Objective.
Texture
The texture to draw. This can optionally be animated if it consists of an animation
sequence.
Additional properties for styling will be shown if used in an
Adventure Creator menu.
PROTIP: When using Unity UI, they can be linked to both UI Image and Raw Image
components.
401

11.3. The default interface
The default interface is created when using the New Game Wizard to create your
Managers. While you can choose to use Unity UI or Adventure Creator as the basis, you
can switch back and forth between these drawing modes via each menu's Source field at
any time.
The default set of menus are designed to provide you with the key menus needed to
create an adventure game, and is accessible directly via the Default_MenuManager
Menu
Manager asset file. They include:
•
Pause
•
Options
•
Save
•
Load
•
Profiles
•
Inventory
•
InGame
•
Conversation
•
Interaction
•
Subtitles
•
Container
•
Crafting
•
Document
•
Objectives
•
Hotspot#
402

The default Pause menu
The Pause menu pauses the game and allows access to the Options, Save and Load
menus:
It is turned on when the player presses an input key named "Menu" (which is the Escape
key by default), or clicks on the
InGame menu.
If Save profiles are enabled, you can allow access to the Profiles menu by un-hiding the
ProfilesButton element.
The Save button is automatically hidden
NOTE: The Save button is automatically hidden when the menu is opened while in a
gameplay-blocking cutscene, since saving is prevented at this time. If you open this
menu with the Menu: Change state Action, be sure to set the ActionList's When
running field to Run In Background so that gameplay is not interrupted.
403

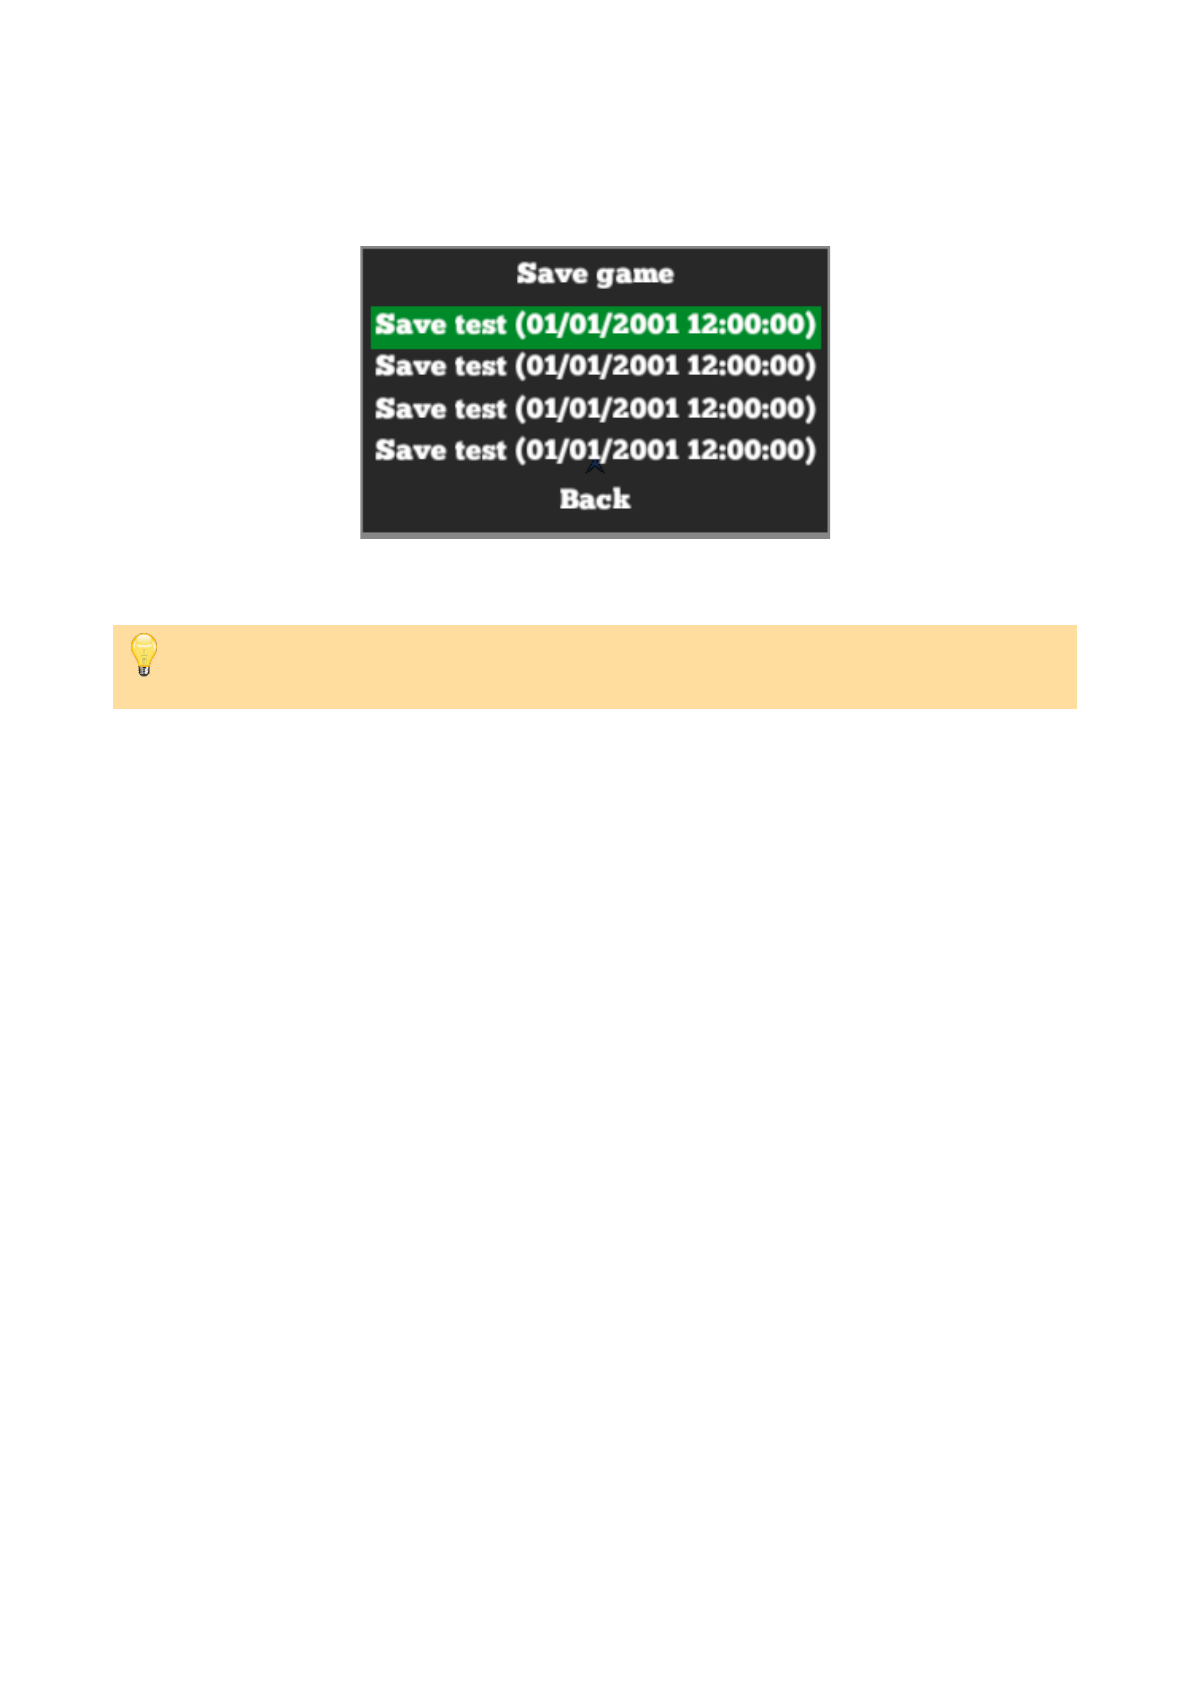


The default Inventory menu
The Inventory menu displays all Inventory items currently held by the player:
It is accessed by hovering the mouse over the top of the screen during normal gameplay.
If the player is carrying more items than can fit in the InventoryBox, the ShiftLeft and
ShiftRight Buttons allow you to scroll through them.#
408

The default InGame menu
The InGame menu shows a single button to open the Pause menu:
This allows the Pause menu to be opened without the need for invoking the "Menu" input
axis, and is useful when playing on mobile devices. It is visible in the lower-left corner of
the screen during gameplay.
PROTIP: See this menu flashing at runtime? As this menu's Appear type is set to
During Gameplay, it will be turned o! anytime gameplay is blocked - even if only for
a split-second. To prevent a momentary ActionList from interrupting gameplay, set its
When running field to Run In Background.
409

The default Conversation menu
The Conversation menu shows the active Conversation's dialogue options:
It also includes a Timer that shows how the duration left if the Conversation is timed. It is
only visible when a Conversation is active.
PROTIP: When rendered Unity UI, the available options can be scrolled through using
the mouse-wheel. This is made possible by the Mousewheel Scroll UI component
attached to its Canvas root. This component can be attached elsewhere to support
scrolling through other element types.
410

The default Interaction menu
The Interaction menu shows the available interactions when in Choose Hotspot Then
Interaction mode:
This is a special-case menu in that it is used only when using this particular interface
type. If Include Inventory items in Interaction menus? is checked in the Settings
Manager
, then it will also include Inventory items that can be used on the clicked
Hotspot/item.
The Unity UI counterpart of this menu embeds the icon graphics directly within its Image
components - they are not pulled from the Cursor Manager icon graphics.
PROTIP: When creating new Interaction icons in the Cursor Manager, this menu must
be updated with new
Interaction elements in order for them to show. Normally, icons
that are not appropriate for the active Hotspot will not be shown - but this can be
changed by unchecking Auto-hide Interaction icons based on Hotspot? in the
Settings Manager.
411

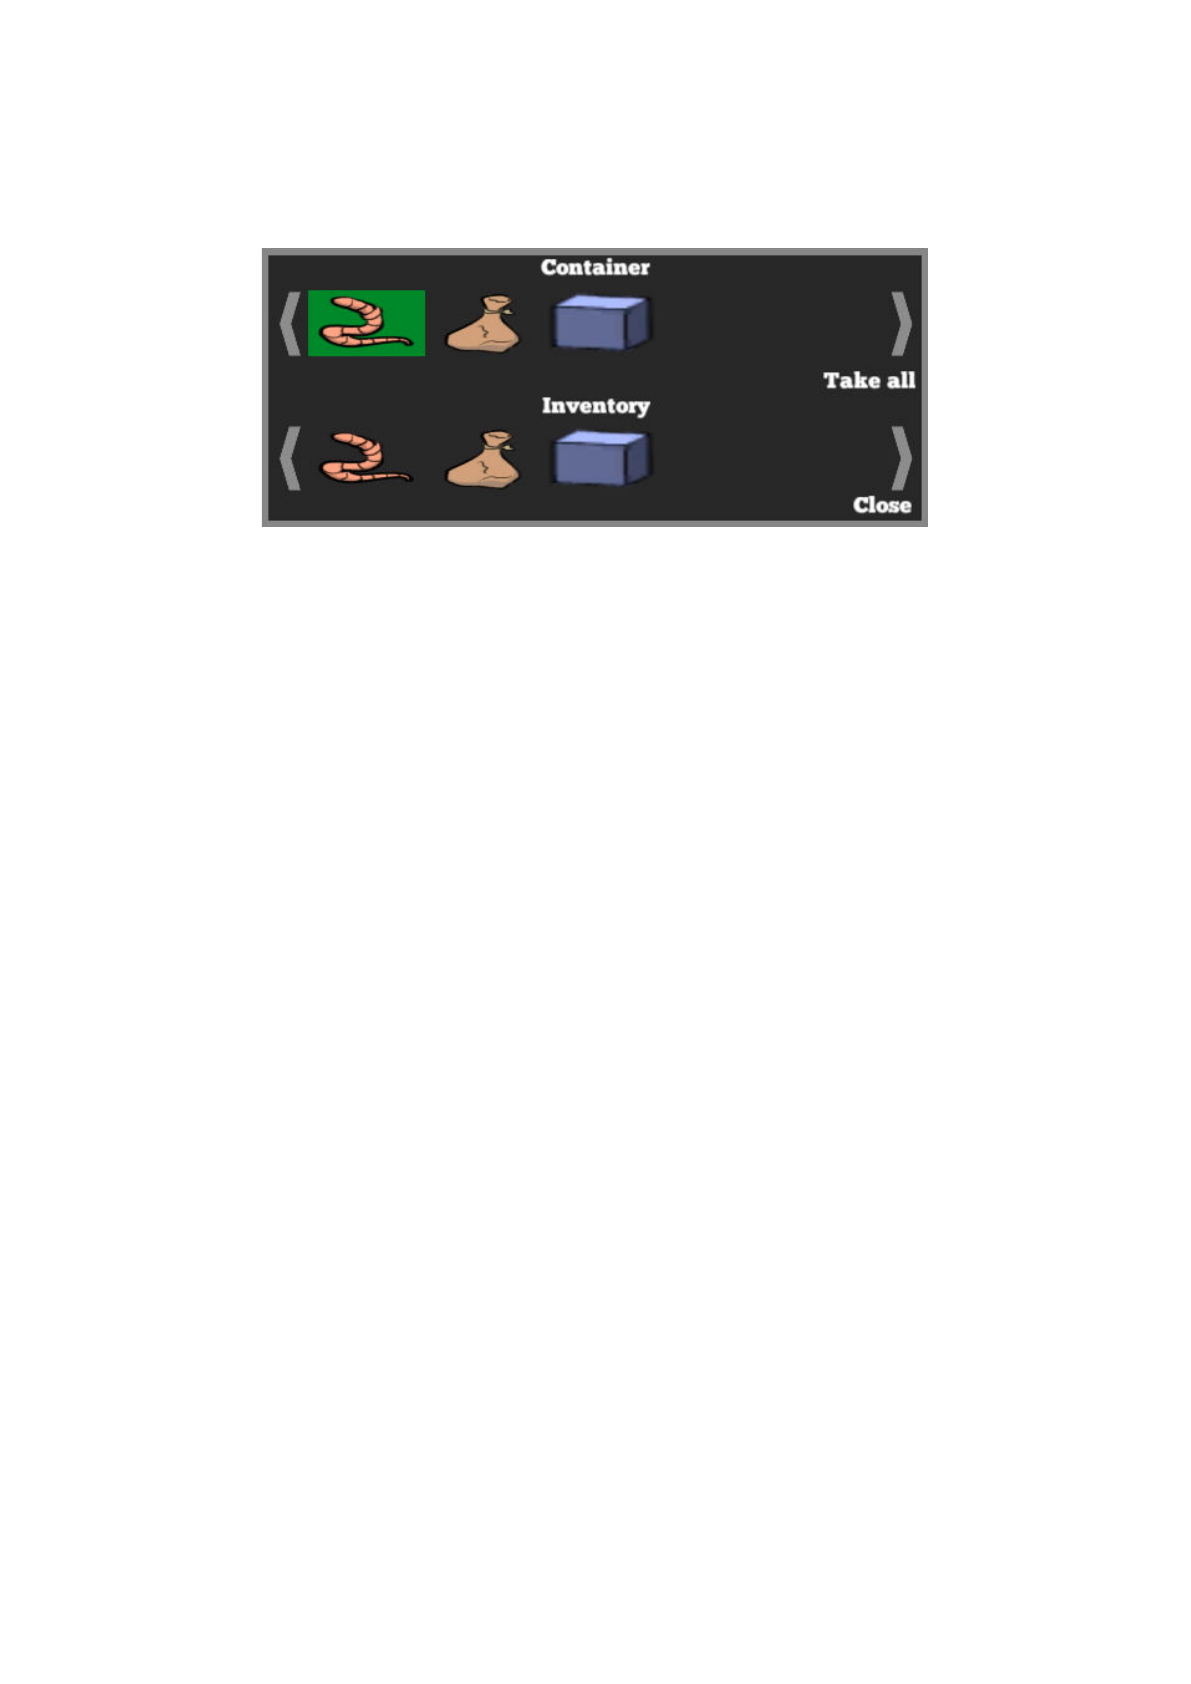
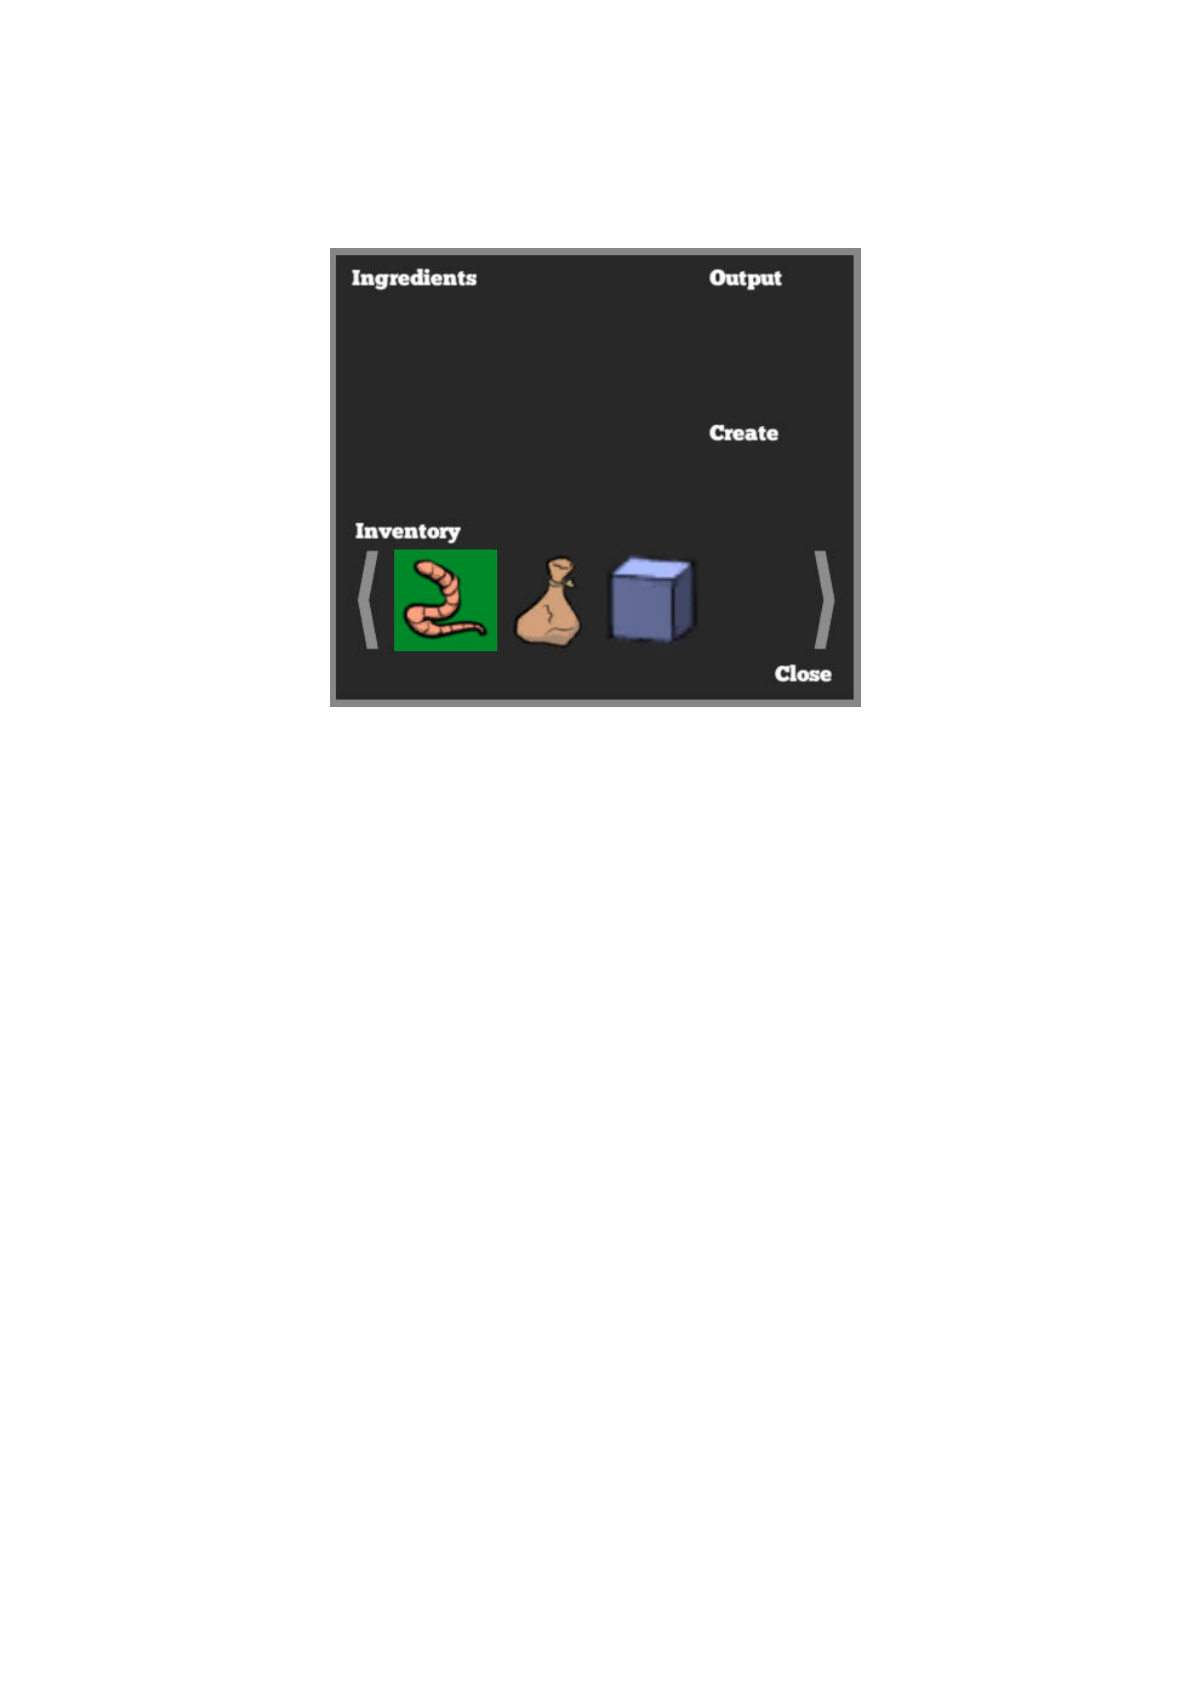


The default Hotspot menu
Displays the name of the active Hotspot or Inventory item:
The text also includes the current Interaction name if set within the Cursor Manager. It is
only visible during normal gameplay.
Some menu element types also have a Hotspot label override property that can be used
to set the Hotspot text. This can also be set dynamically by hooking into the
OnRequestMenuElementHotspotLabel
custom event.
PROTIP: This menu is at the bottom of the menu stack because it depends on the ones
above it for its display. When hovering over the Inventory menu, for example, the label
will show the names of Inventory items. As menus are updated in the order in which
they are listed, those that depend on others must be placed further down.
417
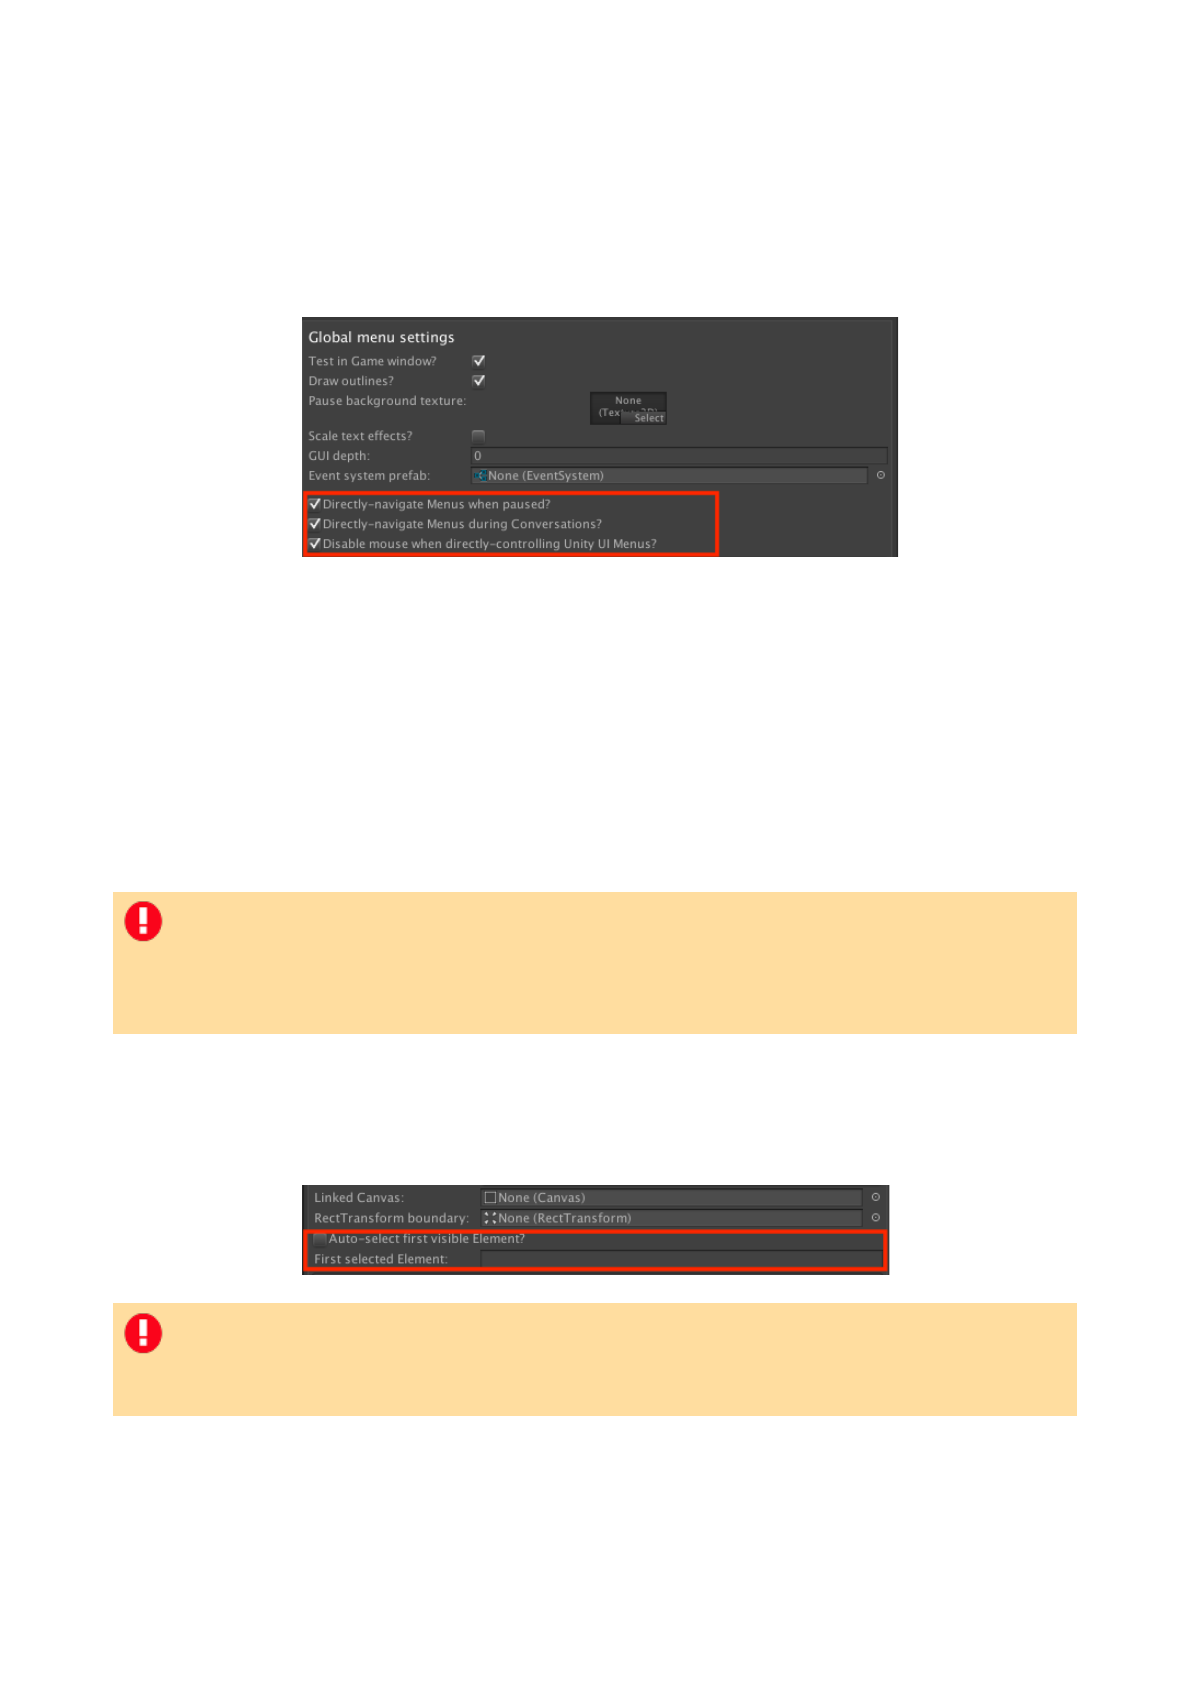
11.4. Navigating menus directly
Menus can be navigated with the mouse (by hovering over each element with the pointer),
or directly (by using a keyboard or controller to move between elements in turn). Options
are available at the top of the Menu Manager to allow for direct-navigation:
These options can be used to directly-navigate menus when the game is paused, or when
a Conversation is active. To allow for this behaviour during gameplay, the
Engine:
Manage systems Action must be used to allow it. Note that enabling this will not
automatically disable player movement, which can be done using the
Player: Constrain
Action.
Menus can then be navigated with the Horizontal and Vertical input axes. For Adventure
Creator menus, elements can then be selected with the InteractionA input button. For
Unity UI menus, they can be selected with the Submit input button.
Unity UI menus can only be directly-controlled if an element is designated to become
selected when the menu is turned on. This can be done either with the
Menu: Select
element Action, or at the bottom of the menu’s properties:
The selected element can be manually-set using the Menu: Select element Action.#
NOTE: When a gameplay Menu is set to be directly-controlled, it is important that the
game is not in a cutscene when it is turned on. If the Menu is turned on using the
Menu: Change state Action, ensure that its ActionList's When running field is set to
Run In Background, so that it does not interrupt gameplay at this moment.
NOTE: The order of Menus as they appear in the Menu Manager determines their
selection priority. If two or more Menus are enabled at the same time, then the one
furthest down the list will be made direct-controllable.
418

11.5. Menu scripting
The scripting guide has entries for the Menu and MenuElement classes online.
To retrieve a List of all Menus at runtime, use:
PlayerMenus.GetMenus ();
To get a specific Menu or MenuElement by name, use:
PlayerMenus.GetMenuWithName (string menuName);
PlayerMenus.GetElementWithName (string menuName, string
menuElementName);
A Menu can be turned on and o! through script with:
myMenu.TurnOn ();
myMenu.TurnOff ();
Note that if it’s Appear type condition will still control the Menu’s visibility. If it is set to
e.g. During Gameplay, it can be prevented from showing by locking it:
myMenu.isLocked = true;
To reposition a Menu with an Appear type of Manual, use:
myMenu.SetCentre (Vector2 newPosition);
All element types are subclasses of the MenuElement class. To get the true class instance
from a MenuElement variable, simply cast it:
MenuButton myButton = PlayerMenus.GetElementWithName ("MyMenuName",
“MyButtonName") as MenuButton;
MenuElements can also be used to retrieve information about Unity UI linked to them, for
example:
MenuInventoryBox myInventoryBox = PlayerMenus.GetElementWithName
("MyMenuName", “MyInventoryBoxName”) as MenuInventoryBox;
UnityEngine.UI.Button uiButton = myInventoryBox.GetUIButtonWithItem
(inventoryItemID);
To simulate the clicking of a MenuElement, use:
PlayerMenus.SimulateClick (string menuName, string menuElementName,
int slot);!
419

If you have modified a Menu's appearance, you may need to recalculate it in order to
update its display. To do this call:
KickStarter.playerMenus.RecalculateAll ();
You can also rebuild the runtime interface by referencing another Menu Manager:
KickStarter.playerMenus.RebuildMenus (MenuManager menuManager);
Additional instances of Menus can also be created by creating a new instance and copying
its data:
Menu myMenu = ScriptableObject.CreateInstance <Menu>();
myMenu.CreateDuplicate (menuToCopy);
It can then be registered with the PlayerMenus component to have it’s display and
interaction handling updated automatically:
KickStarter.playerMenus.RegisterCustomMenu (myMenu);
And unregistered with:
KickStarter.playerMenus.UnregisterCustomMenu (myMenu);
If a Menu drawn using Unity UI, then AC will generate an EventSystem to control it (unless
one is manually assigned in the Menu Manager). This EventSystem can be read with:
KickStarter.playerMenus.EventSystem;
Menus have the following custom events:
OnGenerateMenus ();
OnMenuTurnOn (Menu menu, bool isInstant);
OnMenuTurnOff (Menu menu, bool isInstant);
OnMouseOverMenu (Menu menu, MenuElement menuElement, int slot)
OnMenuElementClick (Menu menu, MenuElement menuElement, int slot, int
buttonPressed);
OnMenuElementShow (MenuElement menuElement);
OnMenuElementHide (MenuElement menuElement);
OnHideSelectedElement (Menu menu, MenuElement menuElement, int slot);
OnMenuElementShift (MenuElement menuElement, AC_ShiftInventory
shiftType);
string OnRequestMenuElementHotspotLabel (Menu menu, MenuElement, int
slot, int language);!
420

12. Working with Timeline#
421

12.1. Timeline integration overview
Adventure Creator has a number of ways in which it integrates with Unity's Timeline
feature:
•
The Engine: Control Timeline Action, which can be used to control the playback of
Directors.
•
The Remember Timeline Action, which stores the current playback state of a Timeline
in save game files.
•
The following custom tracks:
•
Main Camera, which allows for the editing of MainCamera shots on a Timeline
•
Camera Fade, which allows for camera fading in and out
•
Speech, which allows for the triggering of speech on a Timeline
•
Character Animation 2D, which animates 2D characters based on their motion
•
Head Turn, which controls a 3D character’s head direction
PROTIP: From Unity 2018.3 and onward, the 3D Demo relies on Timeline for its
opening and closing cutscenes.
NOTE: If Timeline is removed using Unity's Package Manager, then ACIgnoreTimeline
must be defined as a Scripting Define Symbol in order for AC to compile.
422

12.2. Timeline playback
The Engine: Control Timeline Action can be used to play, pause, resume and stop Playable
Director components:
If you wish for your Timeline to be dynamic, or if the objects it animates are spawned in
at runtime (like the Player), you can re-bind GameObjects to the various tracks. Checking
Remap bindings? will bring up a selector field for each of the tracks found, allowing you
to re-assign fields as necessary. These fields support
ActionList parameters.
NOTE: Particularly If you are using a custom motion controller to move your character,
you may find that it is necessary to disable certain components, or alter their state,
while they are a!ected by a Timeline. This can be done by hooking into custom
events.
423

12.3. AC Timeline tracks
AC provides the following custom tracks:
•
Main Camera, which allows for the editing of MainCamera shots on a Timeline
•
Camera Fade, which allows for camera fading in and out
•
Speech, which allows for the triggering of speech on a Timeline
•
Character Animation 2D, which animates 2D characters based on their motion
•
Character Animation 3D, which animates 3D characters based on their motion
•
Head Turn, which controls a 3D character’s head direction
•
Shapeable, which controls a Shapeable component
424

12.3.1. Main Camera tracks
The Main Camera track allows you to edit the MainCamera's position when a Timeline is
running. It is available under AC -> Main Camera Track when creating a new track:
The MainCamera works by snapping itself to the various camera types you define in your
scene - usually with the Camera: Switch Action. With this track, you can override this
default behaviour and have it snap to cameras in the Timeline. Both snap-cutting and
transitioning are supported.
When a clip is created in the track, you can assign which camera the MainCamera attaches
itself to via the Game Camera field in its Inspector:
Alternatively, you can create a clip already mapped to a camera by right-clicking in the
track and choosing Add From Camera from the context menu.
The clip’s Inspector also allows you to set an optional Shake intensity, which will shake
the MainCamera during that clip. This e!ect will only run at runtime - not in Edit mode.
When the Timeline ends, or when there is no shot at the current point in time, the
MainCamera will revert back to its usual behaviour - unless Sets camera after running?
is checked in one of the track Inspectors.
NOTE: Only one track of this type should exist in a given Timeline, and only one track
of this type should run at any one time.
PROTIP: Set in the track's Inspector, this track type can optionally call the
OnSwitchCamera custom event.
425
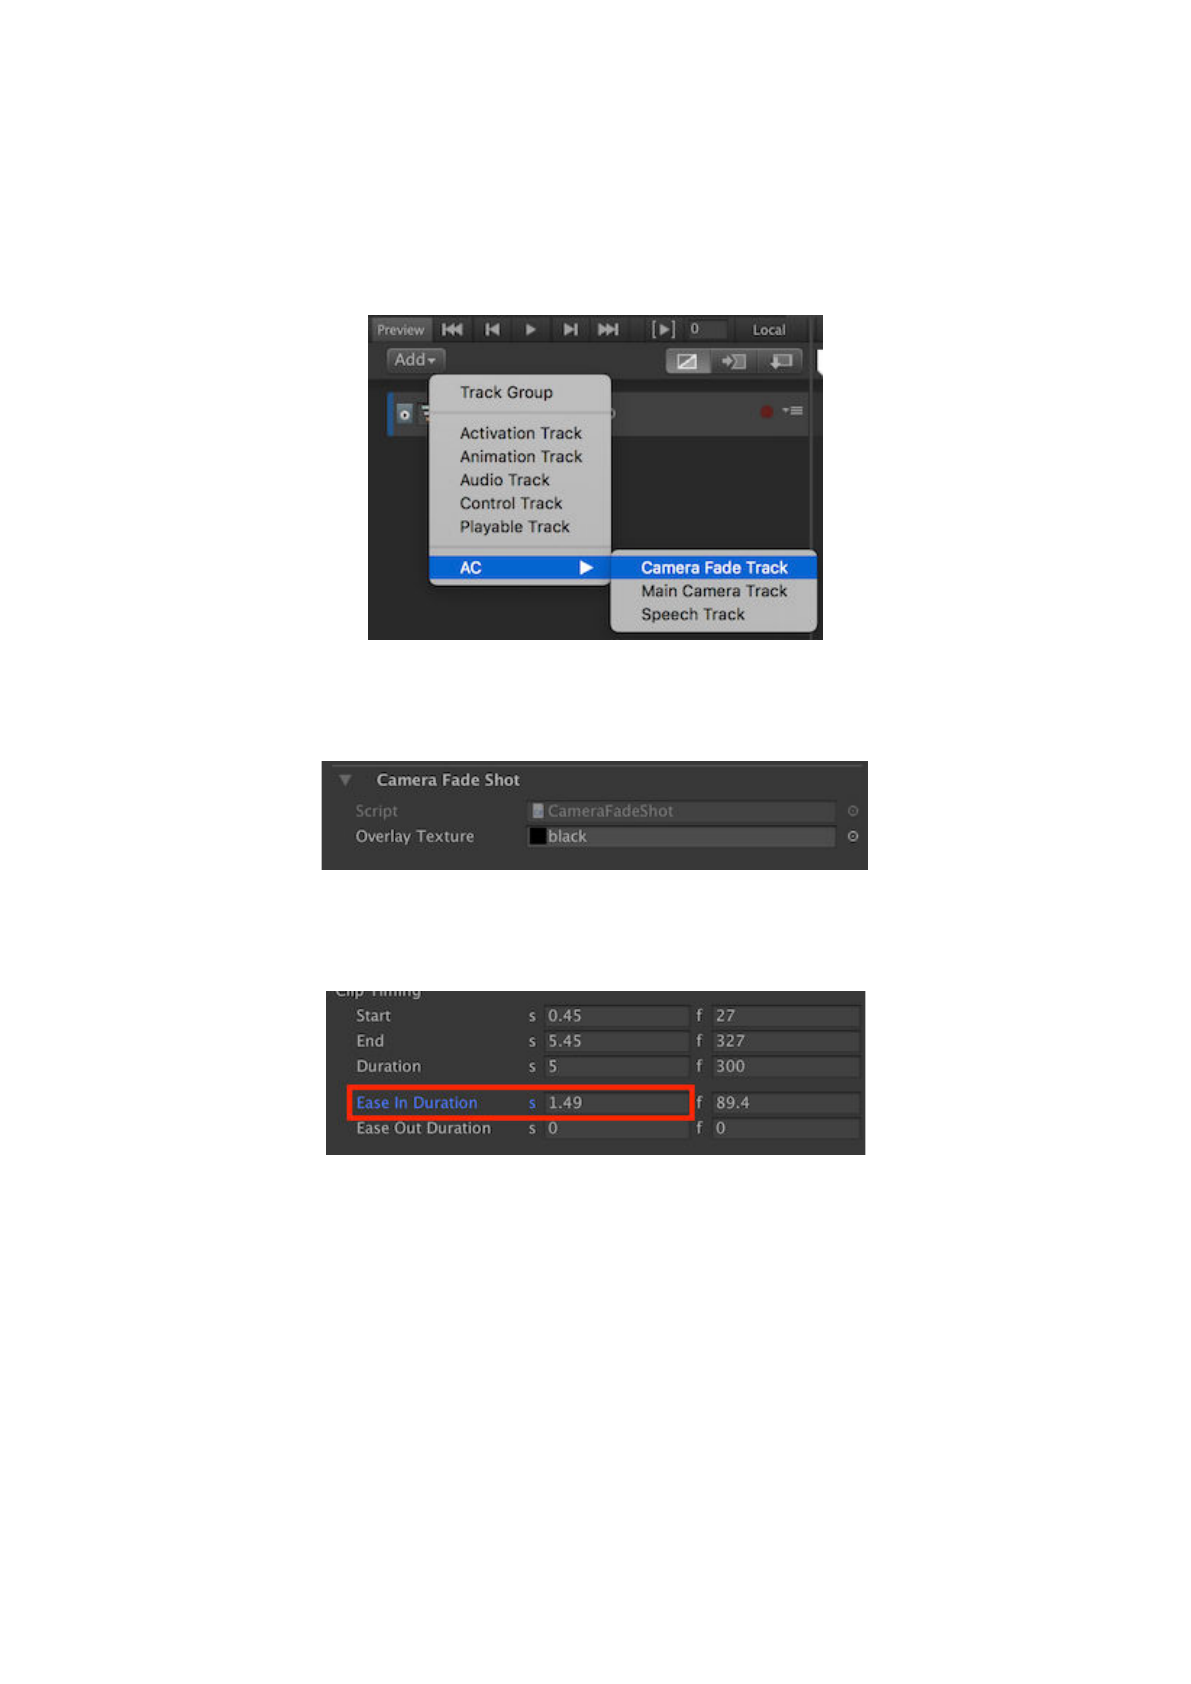
12.3.2.Camera Fade tracks
The Main Camera track allows you to fade the camera in and out when a Timeline is
running. It is available under AC -> Camera Fade Track when creating a new track in
the Timeline window:
Each clip on this track requires an Overlay texture - this should be a pure black texture
for a black fade. The texture is assigned in the clip’s Inspector:
This texture will be overlaid on top of the game view when the clip is active. To create
the fade in e!ect, set the clip’s Ease In Duration value:
Similarly, to fade out, set the clip’s Ease Out Duration value.#
426

12.3.3. Speech tracks
The Speech track allows you to trigger character (and narrator) dialogue when a Timeline
is running. It is available under AC -> Speech Track when creating a new track in the
Timeline window:
All clips within a single track will be spoken by the same character. The character that
speaks its lines is set within the track's Inspector:
Unless the speaking character is the default Player, you must assign them as a prefab into
the Speaker prefab field. This allows the Timeline be run from any scene without having
to rebind it - since the speaking character will rely on the prefab's Constant ID value
identify them in the current scene. For more on Constant IDs, see
Saving scene objects.
When a clip is created in the track, you can enter in the speech line's text in its Inspector:
This text will be included for translation when gathering game text, so long as it is
referenced by a Playable Director or
Engine: Control Timeline Action. Speech audio will
also play automatically.
427

The Speech track has two playback modes, set in the track's Inspector:
Natural
In this mode, speech lines will last for as long as they would if played via the
Dialogue:
Play speech Action. Clip length will have no bearing on playback - only the clip start
point will. Subtitle scrolling and display options in the Speech Manager will a!ect its
duration.
Clip Duration
In this mode, speech lines will last for the duration of their associated clip. This gives you
precise control over when a line is displayed in relation to other elements in the Timeline.
Speech tracks can be previewed in the Game window when the game is not running. To
do this, you must first make sure that a Menu that can display subtitles exists in your
Menu Manager. The default Subtitles Menu is one such Menu.
Next, enter the name of this Menu into the
Speech Manager's Subtitle preview menu
field:
This menu will then be used to preview speech tracks while in Edit mode.
NOTE: Only one track per character should be defined in any given Timeline.
NOTE: Speech skipping is prevented when played from a Timeline.
PROTIP: Only Adventure Creator menus can preview speech tracks. If the supplied
preview menu uses Unity UI, it will temporarily switch Source to Adventure Creator.
428

12.3.4. Character Animation 2D tracks
When controlling 3D characters in Timeline, Unity's Root Motion feature allows their
positions to be updated automatically based on their animation. For example, when
playing a walking animation, they'll automatically move forward.
Since Root Motion is not available for 2D, however, this is not an option for sprite-based
characters. As an alternative, the Character Animation 2D track o!ers the opposite
approach: when characters move, their animations will update to match their changing
position.
It is available under AC -> Character Animation 2D Track when creating a new track in
the Timeline window:
Assign the character by binding them to the track:
While a clip from this track is active, it will cause the character's walk or run animation to
play as they move around the scene. By default, they will turn to face the direction of the
motion, but this can be overridden by the Face fixed direction? option. This option can
also be used to turn stationary characters.
NOTE: For this to be able to control a character, they must have Turn root object in
3D? unchecked in their Inspector. Also note that if the character is moved using an
Animation track, the character’s root object must be moved - not the sprite child.
NOTE: This track type does not support previewing.
429

12.3.5. Character Animation 3D tracks
When controlling 3D characters in Timeline, Unity's Root Motion feature allows their
positions to be updated automatically based on their animation. For example, when
playing a walking animation, they'll automatically move forward.
If a character does not use Root Motion for their animations, however, this track can be
used to play back their idle, walking and turning animations automatically based on their
position changes.
It is available under AC -> Character Animation 3D Track when creating a new track in
the Timeline window:
Assign the character by binding them to the track:
While a clip from this track is active, it will cause the character's walk, run or turn
animation to play as they move around the scene. This should typically be used in
conjunction with an Animation track that is used to control that character's root position
and rotation at the same time.
NOTE: This track type does not support previewing.
430

12.3.6. Head Turn tracks
This track type allows you to assign a Transform that a 3D character faces turns their
head towards. The character must be animated with Mecanim and support IK head-
turning. A o!set vector, in the Transform’s co-ordinate space, can optionally be applied
as well.
To support IK head-turning, the character needs to have Use IK for head-turning?
checked in their Inspector, and have
IK Pass enabled in their Animator’s base layer.
This track is assigned per-character, and each clip requires a Transform to be assigned.
When the clip is played, the character’s head will turn to that Transform with an influence
equal to that clip’s weight.
NOTE: This track type does not support previewing.
431

12.3.7. Shapeable tracks
This track type allows you to control the value of a Blendshape in a Skinned Mesh
Renderer, by setting the active key of a Shapeable component.
Shapeable components allow the grouping of a model’s Blendshapes, so that changing
the value of a particular shape will inversely a!ect others in the same group. This is
particularly useful when using Blendshapes to animate a character’s expressions, since
other expression shapes can be disabled automatically when one is animated.
This track type is bound to a Shapeable component. In each track’s Inspector, you can
define the Group and Key you wish to a!ect, as well as its intensity. Multiple tracks can
be blended together, provided they a!ect the same Shape Group.
NOTE: This track type does not support previewing.
432


Chapter III: Extending functionality
434

13. Integrating new code
435

13.1. Integrations
AC works with a number of third-party assets. They are available in a few places, so their
installation process will vary.
Built-in, AC has integrations for the following:
•
Addressables
•
Localization
•
Playmaker
•
SALSA With RandomEyes
•
TextMesh Pro
Details of these integrations can be found below.
Online, AC’s
Downloads page has o"cial integrations for:
•
AI Tree
•
Articy:draft
•
Cinemachine
•
Kinematic Character Controller
•
Input System
•
UCC
The AC
Wiki also has a number of uno"cial integrations, including:
•
A* Pathfinding Project
•
Anima 2D
•
Animal Controller
•
Bolt
•
Cinema Director
•
Easy Performant Outline
•
Face FX
•
Final IK
•
Motion Matching
•
Rewired
•
Simple Touch Controller
•
SLATE
•
Spine
•
Third Person Motion Controller
•
Unity First Person Controller
•
Unity Third Person Controller
436

Addressables
AC supports Unity’s Addressables package in a number of areas. Addressables can be
used to reference speech files, scene files, Player prefabs, Menu prefabs and save data.
By default, relevant options are exposed automatically when Addressables is imported
into a project. If you have removed the included AC.asmdef file, you can manually
expose these options by defining the AddressableIsPresent scripting define symbol.
Localization
Unity’s
Localization package can be used in tandem with AC’s Speech Manager for
translation data. See Localization integration for details.
By default, relevant options are exposed automatically when Localization is imported into
a project. If you have removed the included AC.asmdef file, you can manually expose
these options by defining the LocalizationIsPresent scripting define symbol.
Playmaker
Playmaker is a popular visual scripting system for Unity. Adventure Creator can call
Playmaker Events with the ThirdParty: PlayMaker Action. Global Variables can also be
linked to Playmaker's Variables – see Linking with Playmaker Variables.
To expose relevant options and Actions, define PlayMakerIsPresent as a scripting define
symbol
.
SALSA With RandomEyes
SALSA With RandomEyes is a 2D and 3D lip-syncing Unity asset. While 3D characters
made in Adventure Creator can make use of Salsa's 3D component without conflict, 2D
characters require special set up – see
Lip syncing.
To enable this integration, define SalsaIsPresent as a
scripting define symbol.
Text Mesh Pro
Description
AC support’s Unity’s
TextMesh Pro package for crisper text rendering. To have a Menu
rely on TextMeshProUGUI component instead of the standard Text component, check Use
NOTE: By default, Playmaker’s PlaymakerGUI object will override AC’s control over the
cursor. To prevent this, disable its Control Mouse Cursor option.
437

TMPro components? in its Properties panel. If such components are not found, the Menu
will default back to Text.
By default, this option is exposed automatically when Text Mesh Pro is imported into a
project. If you have removed the included AC.asmdef file, you can manually expose
these options by defining the TextMeshProIsPresent scripting define symbol.#
438

13.2. Custom scripting
Custom scripting in AC games can either involve calling non-AC scripts from within AC,
or by calling AC functions and variables from non-AC scripts.
To call non-AC scripts from within AC, you can use the Object: Send message and Object:
Call event Actions. Both of these Actions can be used to invoke functions in scene
scripts. Note that function parameters cannot be set when using the
Object: Call event
Action - this is a limitation of Unity's Editor tools.
You can also write your own Actions that plug into the ActionList system - see Custom
Actions.
Custom code can also be called when AC performs common tasks - see Custom events.
All of AC's scripts use the AC namespace. To reference them, you will need to include
this in your script. This can be done by beginning your script with:
using AC;
A reference for AC's entire API is available in the online Scripting Guide. This guide gives
descriptions for all classes, and public functions and variables.
GameEngine and PersistentEngine components can be accessed via static variables in
KickStarter. For example:
KickStarter.playerInput
KickStarter.stateHandler
Similar variables also exist for the MainCamera and Player objects:
KickStarter.mainCamera
KickStarter.player
And also for Managers:
KickStarter.settingsManager
KickStarter.variablesManager
PROTIP: A community-led scripting resource for AC can be found at the AC wiki.
PROTIP: The reference page for each component can be easily accessed by clicking the
"Help" icon in the upper-right corner of its Inspector.
PROTIP: An API reference to any Manager field can be shown by right-clicking the
field's label.
439

To determine if the game is in regular gameplay, cutscene, or paused, read:
KickStarter.stateHandler.IsInGameplay ();
KickStarter.stateHandler.IsInCutscene ();
KickStarter.stateHandler.IsPaused ();
AC’s startup processes include the following events:
OnInitialiseScene ();
OnAddSubScene (SubScene subScene);
OnManuallyTurnOnAC ();
OnManuallyTurnOffAC ();
When a log is made to the Console, it can be read or modified with the event:
object OnDebugLog (object message, DebugLogType debugLogType, Object
context, bool isDisplayed);
System-specific coding help is given at the end of each section:
•
Character scripting
•
Camera scripting
•
Interaction scripting
•
Inventory scripting
•
Variable scripting
•
Save scripting
•
Speech scripting
•
Menu scripting#
NOTE: As Managers are asset files, changes to them through code will survive game
restarts. Therefore, separate code that runs when the game begins to set any such
fields to their default values.
NOTE: To force the game into Cutscene or Pause mode, Interaction scripting.
440

13.3. Custom events
AC has a number of events that will run when common tasks are performed - for
example, whenever a character speaks, or the mouse hovers over a Menu element.
Such events can be listened out for, so that additional logic can be run at the same time.
For example, a sound can be played whenever a "Score" variable's value is increased.
AC provides two ways to subscribe to events:
1. By defining them in the Events Editor or Event Runner component
2. By accessing them through custom script
Events Editor / Event Runner component
Using AC's Editor tools, it is possible to listen out for a number of events, and run
ActionList asset files when they are fired.
Such events can be declared either globally, or per-object. To declare global events,
choose Adventure Creator -> Editors -> Events Editor from the top toolbar. Here, you
can create new events based on an initial condition, assign a label, and an ActionList to
run.
Some events can be given additional conditions. For example, the Menu / Turn on event
can optionally be set to only run when a specific Menu is turned on - as opposed to all.
Once an ActionList asset is assigned, the event's parameters can optionally be assigned to
it. Such parameters are dynamic, and will depend on the event. For example, the
Inventory / Add event can pass the added item to an ActionList's Inventory Item
parameter. If the ActionList is automatically created and assigned (by clicking the ‘+’
icon beside it), such parameters will be automatically generated and assigned.
Global events will be fired at any time during runtime. To create events that only fire at
specific times, the Event Runner component can be used.
When attached to a GameObject in the scene, the Event Runner allows events to be
declared much in the same way as global events. However, they will only be fired while
the component is present and enabled in the scene.
Some events also benefit from additional conditions when run from an Event Runner. For
example, the Hotspot / Interact event can optionally be set to only run when a specific
Hotspot is interacted with.
441

Custom script events
Custom scripts o!er more event types than the Editor, and are more flexible when it
comes to the number of parameters passed to them.
Custom scripts can access AC's events from the EventManager class. These events are
static, and should be subscribed to in OnEnable, and unsubscribed in OnDisable. For
example, this code properly subscribes to the OnEnterGameState event, which is called
whenever the "game state" (i.e. normal gameplay, cutscene mode, etc) is changed:
void OnEnable () { EventManager.OnEnterGameState +=
My_OnEnterGameState; }
void OnDisable () { EventManager.OnEnterGameState -=
My_OnEnterGameState; }
void My_OnEnterGameState (GameState newGameState)
{
Debug.Log ("The new gamestate is " + newGameState);
}
Each event has its own set of parameters that must be declared in the listener. A list of
relevant events is provided at the end of each of the following chapters:
•
Character scripting
•
Camera scripting
•
Interaction scripting
•
Inventory scripting
•
Variable scripting
•
Save scripting
•
Speech scripting
•
Menu scripting
•
Timeline scripting
All events, together with descriptions, can also be found in the Scripting guide.
PROTIP: A tutorial on working with custom events can be found online, and another
example can be found in Camera e!ects.
442

13.3. Integrating other gameplay
While Adventure Creator is intended primarily for traditional adventure games, other
gameplay mechanics (such as combat, driving, etc) can be added on through careful
integration of other assets or custom scripts. However, as each such game is unique, the
procedure to do so is also unique - so it is important to understand how AC is designed
before doing so.
First, it is strongly recommended to have a solid understanding of how AC works when
used by itself. The multi-hour
tutorial videos can provide this, and watching all of them
will give you a good all-round knowledge of AC's workflow regardless of the perspective
or gameplay your game will ultimately have.
AC will only operate in any Unity scene that contains an instance of its GameEngine
prefab - which keeps track of settings about the scene. This is generated automatically
when you use the Scene Manager.
When the first such scene is run, the GameEngine will spawn an instance of AC's
PersistentEngine prefab - which keeps track of your player's progress and any game-
wide settings. If you then switch to a "non-AC" scene (i.e. one without a GameEngine) the
PersistentEngine will go to sleep, and will only reawaken when you enter an AC scene
again.
Therefore, if you want to keep your adventure game elements and non-adventure (e.g.
combat) elements in separate scenes, then it is generally quite simple to make a game
that shares the two.
It is also possible to send AC to sleep at any point - even in an AC scene - by calling the
KickStarter script’s static TurnO"AC function:
AC.KickStarter.TurnOffAC ();
This will cause all of AC's Update, LateUpdate, OnGUI and FixedUpdate calls to cease until
the script's TurnOnAC function is called:
AC.KickStarter.TurnOnAC ();
This approach would be suitable if you wanted to disable AC entirely midway through a
scene, and re-enable it later on.
If, however, you want a more closely-merged integration - for example, replace AC
gameplay with combat but retain AC's Menu system - you can use the
Engine: Manage
systems Action to selectively disable any of AC's systems. To prevent movement and
interactions, for example, you would use this Action to disable the Movement and
Interaction systems, and re-enable them at a later time.
443

Disabling individual systems will prevent them from being updated - so if a character is
in the middle of walking, for example, then will only stop if you command them to with
the Character: Move along path Action. The same goes for ActionList, which can be
halted at anytime using the
ActionList: Kill Action.
PROTIP: AC's scene-loading and data-restoration operations are called from Start
functions. If you have custom code that depends on this in a Start function as well,
you'll need to give its script's Script Execution Order a negative value to ensure that it
runs first. Alternatively, you can hook into the OnInitialiseScene custom event.
444

14. Further considerations#
445

14.1. Game debugging
Adventure Creator has a few features that aid in debugging:
A status box that displays the current Player, camera, running ActionLists and game state
can be made to appear in the Game window. This can be enabled via the Show ‘AC
Status’ box field under Debug settings in the Settings Manager.
Actions can be marked as breakpoints, causing the Unity Editor to pause just before they
are run – allowing the user to check the state of a scene at that point in time. Actions can
be toggled as breakpoints via their context menu to the top-right of their node - see
The
ActionList Editor.
Actions can also be commented from within the ActionList Editor window, by clicking the
cog in their top-right corner. These comments can be printed in the Unity Console via
the Action comment logging option, also in the Settings Manager.
When dealing with general gameplay and player issues, a good first step is to temporarily
rely on assets from one the two provided
demo games (depending on your game's chosen
perspective). For example, the following sequence of tests can help determine the source
of an issue with a player character:
•
Try dropping the demo game's player prefab into your scene file and run it. If they
run correctly, then the issue is likely with your character, and you can compare this
prefab with your own to find the key di!erence.
•
If not, try loading the demo game, drop your own player prefab into the demo
scene, and run it. If it then runs correctly (missing cutscene animations
notwithstanding), then the issue is likely with your scene.
•
If not, Manager asset files can be swapped with demo counterparts in the
Game
Editor window. These can be changed individually (the main being the Settings
Manager
) or all at once. This may help to identify an issue with one of your
Managers.
When dealing with issues with save-game files, it’s possible to read all data associated
with a given file - see Save-game file management.#
NOTE: Always be sure to re-assign your game's own Managers after testing. They can
be re-assigned in bulk by double-clicking the ManagerPackage asset file that the New
Game Wizard creates in your game's subfolder.
446

14.2. Performance and optimisation
AC is designed with performance in mind. Depending on your game type, however, there
are some tricks you can employ to further boost performance:
Stream music and ambience tracks
Music and ambience tracks are loaded when an AC game begins, so the amount of such
data present will have a big impact on initial loading time. For all such such tracks, it is
therefore recommended to check Load In Background and enable Streaming in their
AudioClip Inspectors.
Speech audio AssetBundles
If your game relies on speech audio, it is recommended to rely on AssetBundles to store
audio and lipsync files. For more, see
Speech audio in AssetBundles.
Scene asset bundles
If you make use of Unity's Asset Bundles feature, AC can open scenes that have been
loaded from an Asset Bundle rather than added to Unity's Build Settings. Provided that
you have a means to load your Asset Bundles before AC requires them, this feature allows
you to pack chunks of your game into bundles, so that they do not contribute to the
game's initial loading times. To allow for this, set the Settings Manager's Reference
scenes by field to Name, and then refer to your scenes in Actions and PlayerStarts by
scene filename, rather than build index number.
If necessary, you can delay the loading of a scene until the correct bundle is loaded by
writing a custom script that hooks into the OnDelaySceneChange custom event.
Scene addressables
As an alternative to placing scenes in Asset Bundles (above), scenes can also be opened
directly if they are marked as Addressable. This, too, allows scenes to be omitted from
Unity's Build Settings. To allow for this, set the Settings Manager's Reference scenes by
field to Name, check Load scenes asynchronously?, and then check Load scenes from
Addressables?. Once Unity's Addressables package is installed via Unity's Package
Manager, you can then refer to a scene by its Addressable name in Actions and
PlayerStarts.
Use SimpleCamera types
When creating cameras in 3D games, the
SimpleCamera o!ers the best performance. Use
this type whenever a camera does not need to move.
Auto-create the PersistentEngine
The PersistentEngine is a scene-independent object that is required for an AC game to
run. By default, this is generated by spawning an instance of the PersistentEngine
prefab - which is located in Adventure Creator's Resources directory. If you have no
447

need to attach your own scripts to this prefab, you can have AC instead generate this
object from scratch, removing the need to search Resources upon startup. To do this,
uncheck Spawn PersistentEngine prefab from Resources? in the Settings Manager.
Cache Camera.main
Unity’s Camera.main property is called often with AC, but is an expensive operation if a
scene has many cameras. If Cache ‘Camera.main’? is checked in the
Settings Manager,
this property will be cached. However, this cache may need updating if the main camera
is not AC’s, and/or it is changed at runtime. This can be done by setting the value of:
AC.KickStarter.CameraMain
Define all Input axes
The Settings Manager will list your game's available Input Axes based on the settings
chosen. By default, AC will perform try/catch statements to avoid errors if these inputs
are not define. If the Assume inputs are defined? option beneath this list is checked,
these statements will be ignored. The Inputs will be need to be present in Unity's Input
Manager, but performance to the game will be increased.
Use Addressables for asset references
When loading save game files, AC will - by default - search your game's Resources folder
for asset files that may be referenced by your save data. However, it is more performant
to rely on Unity’s Addressables system instead – see
Saving asset references.
Use Addressables for menus
Unity UI prefab Menus can also be loaded in via Unity’s Addressable system. Checking
Use Addressables for UI prefab references? at the top of the Menu Manager will replace
all Linked Canvas prefab fields with Canvas asset key fields, where the name of the
prefab’s Addressable key should be entered.
Use Addressables for Players
Player prefabs assigned in the Settings Manager can referenced by Addressable.
Checking Reference Player prefabs with Addressables? will replace all Player prefab
fields with Asset References. For this option to be available, Unity’s Addressables
package will need to be installed via Unity's Package Manager.
Use Resources subfolders
If you are not using Addressables for asset references (see above), then assets must be
instead placed in Resources folders. Normally, this is performed by searching for all
such assets with a Resources.LoadAll() function call. This is an intensive operation, and
can be an issue particularly on mobiles, if you have many such assets in a Resources
folder.
To get around this, you can place such assets in specially-named subfolders within your
Resources folder. If such subfolders are found, then AC will only search them – which can
448

lower the memory usage considerably if you have many files to search. This can be done
by placing your Resources assets in the following folders:
•
SaveableData/Textures – for Texture2D assets
•
SaveableData/Audio – for AudioClip assets (this excludes speech audio)
•
SaveableData/Animations – for AnimationClip assets
•
SaveableData/Animators – for AnimatorController assets
•
SaveableData/Materials – for Material assets
•
SaveableData/ActionLists – for ActionList assets
•
SaveableData/Prefabs – for GameObject prefabs (asset with a Transform component)
•
SaveableData/VideoClips - for Video Clip assets (Unity 5.6 and later)
•
SaveableData/Timelines - for Timeline assets (Unity 2017.1 and later)
For full optimisation, you should create subfolders with these names even if you have no
relevant assets to place in them, and place a “dummy” asset inside of each – for example,
a single AudioClip inside “SaveableData/Audio”. Note that once these subfolders exist,
however, all such assets must be placed in them correctly for AC to be able to find them.
Disable auto-unloading of assets
Unless Addressables are used for asset references (see above), AC will call Unity’s
Resources.UnloadUnusedAssets function automatically after scene changes and loading
save-game files, in order to free up memory. This automation can be prevented, in
favour of being called manually, by unchecking Auto-call
Resources.UnloadUnusedAssets? in the Settings Manager.
Disable OnGUI
Menus that have their Source property set to Adventure Creator are drawn with Unity's
OnGUI calls. If your game relies on Unity UI-sourced Menus, or no Menus at all, then
removing the OnGUI call can give a performance boost - particularly on mobile. The
OnGUI call can be removed by entering ACIgnoreOnGUI as a
Scripting Define Symbol.
Be aware, however, that OnGUI is also used by AC for drawing camera e!ects and
Software cursors - though the latter can be corrected by changing your Cursor rendering
to Hardware in the Cursor Manager. If the OnGUI code required only some of the time, it
can be run manually by calling the StateHandler script's _OnGUI() function:
AC.KickStarter.stateHandler._OnGUI ();
Disable Character evasion
If your game is in 2D, then the Navigation Mesh Inspector, which is used by 2D
NavMeshes, has a number of options that can aid performance. Setting Character
evasion to None will reduce the number of pathfinding calls, and the Accuracy slider can
be reduced. As the latter will a!ect the accuracy of pathfinding, it is best to experiment
while the game is running to find the optimum value.
449

Disable Console logs
AC will output log messages to the Console when necessary – this may be frequent if
there is something wrong with your game. Such messages can impact performance.
While you should always check the Console for AC's messages, these logs can be disabled
completely by switching Show logs in Console? to Never in the Settings Manager.
Use Timeline for cutscene animation
Rely on Unity’s own
Timeline feature to handle character animation during cutscenes
when possible, particularly if your characters rely on the Sprites Unity animation engine.
Animator controllers that hold many animations can increase load times, so removing
“one o!” animations that play at controlled moments and playing them via Timeline
assets can boost performance. Timeline tracks can be played via the
Engine: Control
Timeline Action.
Remove the border camera
If Aspect ratio is enabled in the Settings Manager, then a second “Border camera” will be
used to render letterboxing/pillarboxing bars. This can lower framerates - particularly
when using HDRP - but is there to safeguard against glitch artefacts. This may not
always be necessary, however, and can be disabled by unchecking Render border
camera? further down.
Initialise in Update’s first frame
By default, AC’s startup processes (e.g. running a scene’s OnStart/OnLoad cutscenes)
occur in Unity’s Start function. This is considered the “last 10%” of Unity’s scene-loading
process - therefore, if these processes involve e.g. the instant spawning of prefabs, it
may impact the scene’s loading time. On a per-scene basis, it is possible to defer this
process to the first loop of Unity’s Update function - via the Multi Scene Checker
component of the scene’s GameEngine object.#
450

14.3. Version control and collaboration
When collaborating, rely on ActionList assets over scene-based ActionLists (such as
Cutscenes) whenever possible. Hotspots, Conversations and other components that
reference Actions each have an Actions source field. Setting this to Asset File allows
you to make use of an ActionList asset instead of a scene-based Action.
Also, be mindful when merging branches that each modify collections of items, menus,
variables and other entities within the Inventory and Variables Managers. Such entities
rely on unique ID numbers to reference them within a project. If two branches both
define a new Inventory item with an ID of 6, for example, then one must be modified -
causing references made to that item to be broken.
AC makes it possible to modify the ID numbers for Inventory items, Documents,
Objectives and Global Variables via the “cog” menu beside them and choosing Change ID
from the menu. This operation will search a project for existing references and update
them to reflect the updated ID - and should be done before merging branches that
feature separate entities that share the same ID.
451
