
DoD Admin
2019 Issue
SOCIAL MEDIA PROTECTION
A Handbook for Privacy & Security Settings

i
ABSTRACT
Cyber-enabled financial fraud is a sophisticated scam often targeting unwitting individuals who do
not have a good understanding of the military construct, benefits, or rank structure. Because of this
lack of knowledge, threat actors use the digital identities of U.S. service members to carry out their
scam. Threat actors conduct Open Source Intelligence (OSINT) operations on Social Media
Networks and the Internet to harvest photographs and biographies of the individuals who they are
going to impersonate. The best way to combat these threat actors is to strengthen the security and
privacy settings of the top social media networks. This handbook is a step-by-step guide covering
good cyber-hygiene practices and the steps you need to take to strengthen the security and privacy
settings for Facebook, Instagram, Twitter, and LinkedIn.

ii
CONTENTS
Abstract .............................................................................................................................................................. i
Cyber Security Safe Practices ......................................................................................................................... 1
Passwords and Passphrases ........................................................................................................................ 2
Two-Factor Authentication: ................................................................................................................... 2
Account Security Questions: .................................................................................................................. 3
Virtual Private Networking (VPN) ........................................................................................................ 3
Stealth or Incognito Mode ...................................................................................................................... 3
Device Protection When Traveling ....................................................................................................... 3
Social Networking Safety Tips ................................................................................................................... 4
Assumptions ............................................................................................................................................. 4
Recommendations ................................................................................................................................... 4
Confidence Based/Romance Relationship ........................................................................................... 5
Sales Scheme ............................................................................................................................................. 5
Advance Fee Scheme ............................................................................................................................... 6
Facebook ........................................................................................................................................................... 7
Settings .......................................................................................................................................................... 7
General Account Settings ........................................................................................................................... 7
Name ......................................................................................................................................................... 8
Email .......................................................................................................................................................... 9
Delete an Existing Email ...................................................................................................................... 10
Manage Account ........................................................................................................................................ 11
Steps to designate a friend to Manage your Account. ....................................................................... 11
How To Request your Account be deleted after your Death. ......................................................... 13
How to Deactivate Your Account ....................................................................................................... 14
How to Delete your Account ............................................................................................................... 14
Security and Login ..................................................................................................................................... 15
Where You’re Logged In ...................................................................................................................... 15
Passwords ................................................................................................................................................ 16
How to Change Your Password .......................................................................................................... 17
How to Set Up Two-Factor Authentication ...................................................................................... 18

iii
Security Login Alerts ............................................................................................................................. 19
How to Set Up Extra Security .............................................................................................................. 20
Privacy Settings and Tools ........................................................................................................................ 21
Your Activity .......................................................................................................................................... 21
How To Configure Your Activity Settings ......................................................................................... 22
Limit Past Posts ......................................................................................................................................... 23
How To Limit Past Posts ...................................................................................................................... 23
How People can Find you & Contact You ........................................................................................ 23
Who Can Send You Friend Requests? ................................................................................................ 23
Who Can See Your Friends List? ......................................................................................................... 24
Who Can Look You Up Using Your Email Address? ...................................................................... 24
Who Can Look You Up Using Your Phone Number? .................................................................... 25
Do You Want Search Engines to Link to Your Facebook Account? ............................................ 26
Timeline and Tagging Settings ................................................................................................................. 26
How to change Timeline settings ........................................................................................................ 26
Who can see what others post on your timeline. ............................................................................... 27
Allow others to share your posts to their stories. .............................................................................. 27
Hide comments containing certain words from your timeline. ....................................................... 28
Tagging ........................................................................................................................................................ 29
How to change Tagging settings .......................................................................................................... 29
When you're tagged in a post, who do you want to add to the audience of the post if they can’t
already see it? .......................................................................................................................................... 29
Who sees tag suggestions when photos that look like you are uploaded. ...................................... 30
Review ......................................................................................................................................................... 31
Review posts you’re tagged in before the post appears on your timeline. ..................................... 31
Review tags people add to your posts before the tags appear on Facebook. ................................ 33
Location Settings ........................................................................................................................................ 34
Face Recognition ....................................................................................................................................... 35
Who Can Follow Me ................................................................................................................................. 37
Public Post Comments .............................................................................................................................. 37
Public Post Notifications ...................................................................................................................... 37
Public Profile Info ................................................................................................................................. 38

iv
Photos.......................................................................................................................................................... 38
How to Change the Audience of your Photos ................................................................................... 39
How to Remove a Tag from a Photo .................................................................................................. 40
Instagram ........................................................................................................................................................ 41
Advantages .............................................................................................................................................. 41
Disadvantages ......................................................................................................................................... 42
How to Set Your Instagram Account to Private ................................................................................... 42
Set your account to private from the Instagram app on your Android or iOS device ................. 42
Set your account to private on your computer or mobile browser ................................................. 42
How to turn off activity status on Instagram ..................................................................................... 42
How to stop sharing your story on Instagram ................................................................................... 43
How to establish Two-Factor Authentication ................................................................................... 44
How Do I Remove a Follower ............................................................................................................ 44
Twitter ............................................................................................................................................................. 45
How to Set Your Twitter Account to Private ........................................................................................ 45
Profile visibility settings......................................................................................................................... 45
Visibility options .................................................................................................................................... 45
How does Twitter use my birth date? ................................................................................................. 45
How to Protect and Unprotect your Tweets ......................................................................................... 46
Apple iOS Instructions.......................................................................................................................... 46
Android Instructions ............................................................................................................................. 46
Desktop instructions ............................................................................................................................. 47
Location Services ................................................................................................................................... 47
How to unprotect your Tweets ............................................................................................................ 47
Desktop Instructions ............................................................................................................................. 47
iOS and Android .................................................................................................................................... 47
LinkedIn .......................................................................................................................................................... 48
Two-Step Verification: .......................................................................................................................... 48
Profile Privacy ........................................................................................................................................ 51
Countering Online Imposters ...................................................................................................................... 56
Protect Yourself ............................................................................................................................................. 56
Phishing ....................................................................................................................................................... 57

v
Identifying Imposter Accounts ................................................................................................................ 58
Google: .................................................................................................................................................... 58
Image Search Examples ........................................................................................................................ 60
Firefox ..................................................................................................................................................... 61
Removing Fake Social Media Pages ........................................................................................................ 61
Facebook ................................................................................................................................................. 61
Skype ........................................................................................................................................................ 62
Twitter ..................................................................................................................................................... 62
LinkedIn: ................................................................................................................................................. 62
Pinterest ................................................................................................................................................... 62
Myspace ................................................................................................................................................... 63
Instagram ................................................................................................................................................. 63
DeviantArt .............................................................................................................................................. 63
Other Sites .............................................................................................................................................. 64
Links to Terms of Service ............................................................................................................................ 64
Reporting Identity Theft or Online Impersonation .................................................................................. 65
Notes__________________________________________ ................................................................ 65

1
SOCIAL MEDIA
PROTECTION
A HANDBOOK FOR PRIVACY &
SECURITY SETTINGS
CYBER SECURITY SAFE PRACTICES
Your digital identity is comprised of your true name, usernames,
online search activities, electronic transactions, date of birth and
purchasing history or behavior. Every time you connect to the
Internet, or use your mobile phone, or digital device, you leave a
trail that can be tracked. Intentionally shared personal data, such
as social media postings, blog pages, e-mail, cell and Skype calls,
media applications (YouTube) and online purchases all
represent your active digital footprint. Online data is collected
on you every time you access the Internet. A cell phone can
store geographical locations that pinpoint routes you travel,
your home or hotel, among places. Practicing good cyber
hygiene and security is no easy task. You have to be conscious
of the risks that are out there and what steps you can take to
mitigate and minimize your digital footprint. This handbook is
going to cover general cyber hygiene practices that you should
keep up with. Everything in this handbook is designed to lean
more to the hypervigilance of security and privacy. As the user,
you have the choice to make the changes outlined in this
handbook that will align with your comfort level. A key take
away with the Internet or social media, everything comes with a
level of Assumed Risk.
DISCLAIMER
The security and privacy
settings information
contained in this
handbook are comprised
of the best information at
the time of publication
and does not guarantee
100% safety or privacy.
Cybersecurity practices
and Social Networking
Security configurations
are continuously evolving
in response to adversarial
tactical changes in cyber
space and as Social Media
Networks update their
user interfaces.

2
Passwords and Passphrases
First and foremost, this is a topic that everyone needs to tighten up on. You first need to ask
yourself these two very important questions, “how often do you change your password?” and “are
you using the same password for multiple accounts?” Let’s face it, everyone has used the same
password for multiple accounts and very rarely do they change their passwords. Changing
passwords is inconvenient and remembering new passwords can be difficult. Whether you are at
home or at work, security is critical to protecting highly personal accounts. One of the first things
everyone needs to do is ensure that their passwords or passphrases are lengthy, unique and safely
stored. It is essential to fortify accounts by adopting strong authentication or if the option is
available, use two-factor authentication, which adds another layer of protection. Passphrases are the
keys to your personal digital identity, whether at work or in the home, and you need to do
everything possible to keep people from learning your passphrase.
Passphrases can be inconvenient, but if you want to keep your information safe, this is an important
step to your personal security. Here are some steps:
1. Make your passphrase a sentence: A strong passphrase is a sentence that is at least 12
characters long. Focus on positive sentences or phrases that you like to think about and are
easy to remember (e.g. “B3@rs eat fish!”)
2. Unique account, unique passphrases: Having separate passphrases for every account helps to
thwart cybercriminals. At a minimum, separate your work and personal accounts and make
sure that your critical accounts have the strongest passphrase.
3. Write it down and keep it safe: Everyone forgets their passwords. By keeping your
passphrases written down and secured in a safe place, like a safe, will prevent you from
locking yourself out of your account. Alternatively, you can use a password or passphrase
manager to keep track of your passwords.
TWO-FACTOR AUTHENTICATION:
Two-Factor Authentication provides an extra layer of security beyond your username and
password/passphrase to protect against account hijacking. When it comes to user authentication in
computer security there are three factors for authentication: something you know (like a password),
something you have (like your cell phone), and something you are (your fingerprint). Two-factor
means using two of these options. For example, you can use two-factor authentication with USAA.
When you log in, you are prompted to provide a password (something you know) then you will
receive a text message to your cell phone (something you have) that will have a special pin/access
code that you would have to enter before you can access the account.

3
ACCOUNT SECURITY QUESTIONS:
Account security questions are a common staple with any account you create; however, the problem
is much like your passwords. You probably use the same answers for your security questions. This
is a bad habit to develop and you need to really think outside of the box. A social engineer can piece
together answers to your security question by monitoring the conversations within your social
network. They will look for postings or commentary on things like; your pet’s name was, when
someone wishes you a happy birthday or anniversary, what your likes and hobbies are, what you like
to eat, the schools you attended, etc. Don’t feel bad, most accounts give the user the same security
questions and for convenience, most every user will provide the same answers. Now a really radical
and outside of the box thinking is to “
Provide Knowingly False Answers”
to your security
questions. For example, if the question is: What is your favorite food? You can answer with “trash
or garbage.” This is probably something that you would never post on your social media account.
VIRTUAL PRIVATE NETWORKING (VPN)
A Virtual Private Network gives you online privacy and anonymity by creating a private network
from a public internet connection. VPNs mask your Internet protocol (IP) address so your online
actions are virtually untraceable. Most important, VPN services establish secure and encrypted
connections to provide greater privacy than even a secured Wi-Fi hotspot. Virtual Private Networks
are often used by corporations to protect sensitive data.
STEALTH OR INCOGNITO MODE
Internet browsers offer private browsing options to avoid being tracked, some of the more privacy
and security conscious people use privacy tools such as the Tor browser to browse incognito;
however, there is no need to go to that extreme, especially if you value good browsing speeds. The
most obvious change you’ll notice after a privacy browsing session is that it doesn’t show up under
the History tab in your browser. But you may also notice less tracking from advertisers. You can use
Google Chrome Incognito, Firefox In-Private Browser, Microsoft Edge In-Private Browser, and
Safari.
DEVICE PROTECTION WHEN TRAVELING
Most people do not think about this when they are traveling. There are many ways that nefarious
actors can steal data from your devices, whether you are in a hotel room, at Starbucks, renting a
vehicle, or just charging your device. Here are a few tips that you can use:
1. Turn off your Wi-Fi and Bluetooth.
2. Do not connect to the media center in any rental car. Meaning do not link your phone via
Bluetooth to the car radio.
3. Do not connect to any free Wi-Fi or hotspot.
4. If you need to charge your device, use the power outlet. Avoid any USB ports in a car, hotel,
and airport.

4
5. Do not access banking information while you are traveling outside the United States.
Basically, if you don’t own it, don’t plug into it!
Social Networking Safety Tips
Social networking sites allow people to interact with others and find people with similar interests or
backgrounds. Social networking sites enjoy worldwide popularity, underscoring the need to
understand potential risks associated with the use of these sites. A person’s online activities may
inadvertently expose excessive information about their identity, location, relationships, and
affiliations, creating an increased risk of identity theft, stalking, or targeted violence. A safer social
networking experience is available by accepting some basic assumptions and following a few
recommendations.
ASSUMPTIONS
1. Once something is posted on a social networking site, it can quickly spread. No amount of
effort will erase it – the Internet does not forget.
2. You are not anonymous on the Internet.
3. There are people on the Internet who are not who they purport to be and will take
advantage of you if afforded the opportunity.
4. Participating in more social networking sites increases your attack surface and overall risk.
5. Everyone on the Internet can see what you post, from where you post it, who your friends
and associates are, the comments your friends make and your “witty” replies.
6. An embarrassing comment or image will come back to haunt you… one day…when you
least expect it…at the least opportune time.
7. There is a complete record of your online activity...somewhere.
8. Do not post anything you would be embarrassed to see on the evening news.
9. Do not accept friend/follower requests from anyone you do not know; independently verify
identities.
10. Avoid using third-party applications; if needed, do not allow them to access your social
networking accounts, friends list or address books.
RECOMMENDATIONS
1. Do not post personally identifiable information.
2. Be cautious about the images you post. What is in them may be more revealing than who is
in them. Images posted over time may form a complete mosaic of you and your family.
3. Do not allow others to tag you in images they post. Doing so makes you easier to locate and
accurately construct your network of friends, relatives and associates.
4. Securely configure your social networking accounts to minimize who can see your
information.

5
5. Do not use check-ins. If check-ins are enabled, disable them. Do not post your specific
location.
6. Be cautious when accessing online accounts from public Wi-Fi connections. Someone might
have installed software capable of capturing your login credentials and other sensitive
information.
7. Do not use the save password, remember me or keep me logged in options from public
or shared computers.
8. Limit social networking to personal use. If you have a professional/business page, do not
cross your personal life and business life between the two accounts.
9. Do not use the same password for all of your accounts. Make sure the passwords for your
financial sites are not permutations of your other passwords.
10. Do not use your social networking site to log in to other sites. Create another user account
on the new site instead.
11. Use strong, unique passwords. Consider passphrases for an additional level of safety.
12. Keep anti-virus software current.
13. Do not arrange meetings with people you meet online.
Social media is the preferred online resource for scammers to steal photographs and implement
online impersonations, which can take three forms, Confidence Based/Romance Relationship, Sales
Scheme, and Advance Fee Scheme.
CONFIDENCE BASED/ROMANCE RELATIONSHIP
Scammers defraud victims by pretending to be Service Members seeking romance or who are in
need of emotional support and companionship. In these scams, cybercriminals often derive
information for their fictionalized military personas from official military websites and social
networking websites where military families post information about their loved ones. Scammers
gather enough detailed personal information, including pictures, to concoct believable stories
tailored to appeal to a victim’s emotions and then lure unsuspecting victims (most often women)
into sending money to help them with transportation costs, marriage processing expenses, medical
fees, communication fees such as laptops and satellite telephones. They typically promise to repay
the victim when they finally meet; however, once the victim stops sending money, the scammer is
not heard from again.
SALES SCHEME
Most frequently carried out on sites that facilitate sales of various products, scammers lure victims
by offering goods well below market price. Most scams involve vehicle sales, house rentals or
similar big-ticket items. The scammer advertises an item for sale, at a too-good-to-be-true price, and
describes it in the broadest of terms. A person showing interest is soon contacted by the “seller”
who claims to be a Service Member with a military unit that is being deployed abroad. The scammer

6
uses the pending deployment to explain the need for a quick sale and, hence, the below market sales
price. The scammer insists that money changes hands quickly using some untraceable and
irrevocable means such as Western Union, MoneyGram or gift cards. Unsurprisingly, the
merchandise is never received and the scammer is not heard from again.
ADVANCE FEE SCHEME
These schemes defraud potential victims by promising big profits in exchange for help in moving
large sums of money (or gold, oil, or some other commodity or contraband). Claiming to be high-
ranking or well-placed government/military officials or the surviving spouse of former government
leaders, the perpetrators offer to transfer significant amounts of money into the victim’s bank
account in exchange for a small fee. Some use photographs and biographical information of high-
profile American military officials obtained from the Internet. Scammers that receive payment are
never heard from again.

7
FACEBOOK
Facebook, Inc. is the top rated online social media and social networking service company based in
Menlo Park, California. Its website was launched on February 4, 2004, by Mark Zuckerberg, along
with fellow Harvard College students and roommates Eduardo Saverin, Andrew McCollum, Dustin
Moskovitz and Chris Hughes. There are approximately 2.6 billion Facebook users worldwide.
Facebook is the predominant social media platform that social engineers will use to conduct
research on their targets.
Configuring Facebook for a more secure social networking experience.
This step by step guide is designed to provide the most privacy configurations for Facebook.
Settings
To access your Settings at the top of your Facebook page, select the upside down Arrow.
General Account Settings
General Account Settings are used to configure your basic information within your Facebook
profile. There are more advanced features to your information that will be covered in this
handbook.
To access General account settings:
1. Click at the top right of any Facebook page.
2. Click Settings.
3. Click General.
8
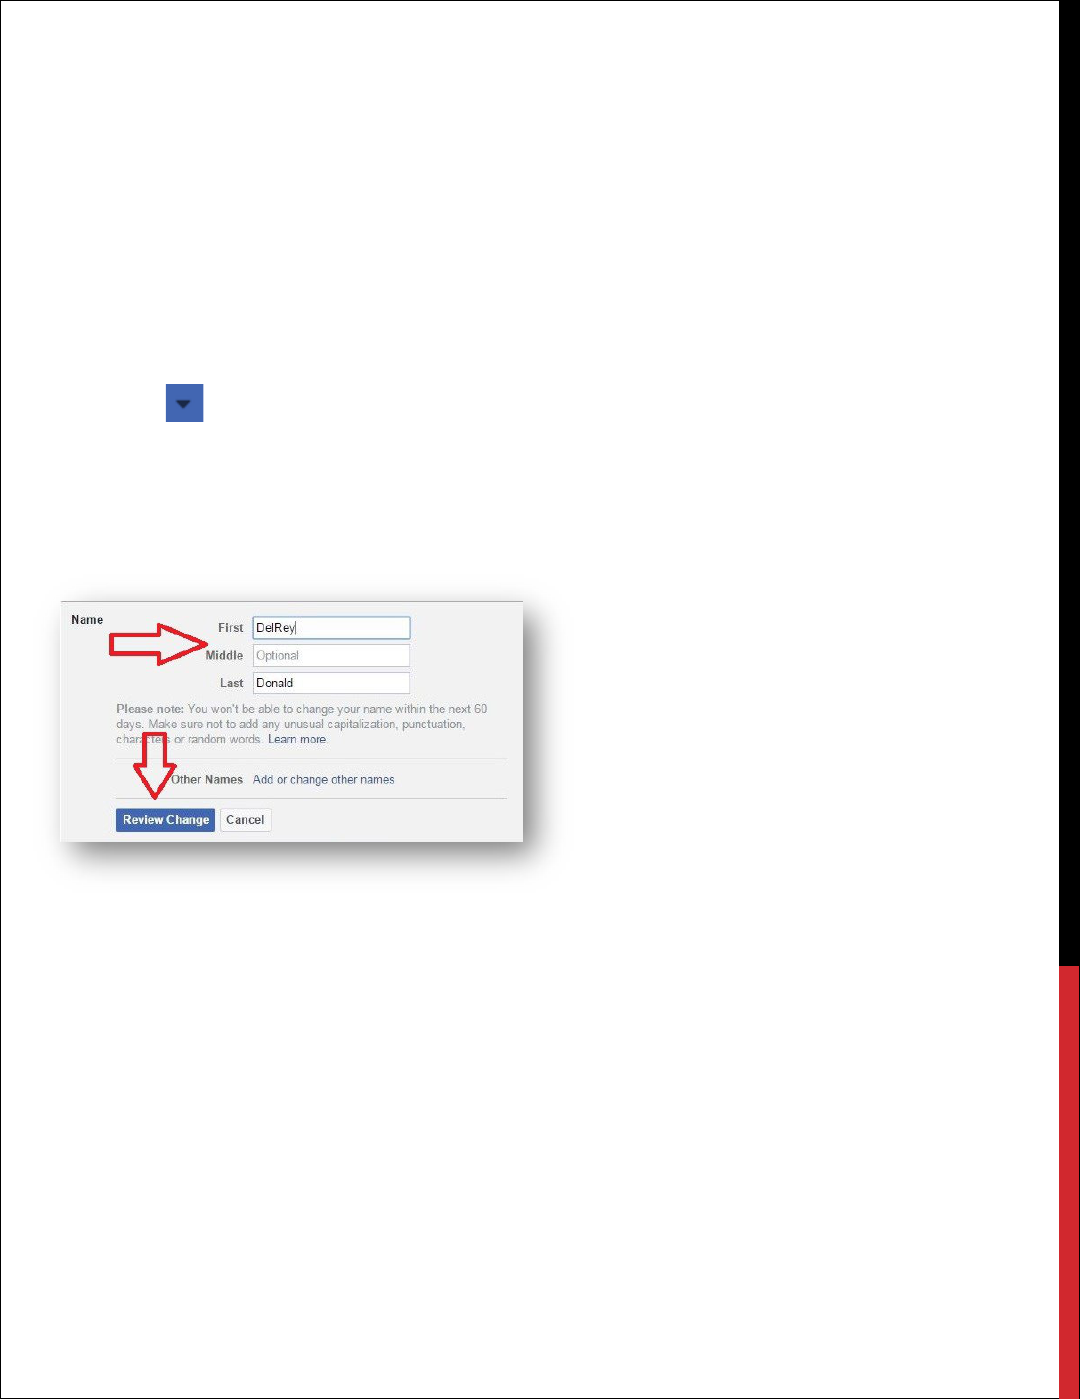
NAME
You can change the name of your Facebook account to just about anything; however, Facebook’s
rules require that the name be your actual name. In Facebook’s own words, “Facebook is a
community where everyone uses the name they go by in everyday life. This makes it so that you
always know who you’re connecting with and helps keep our community safe.” Facebook, and
likely every other social networking site, does not make a serious effort to verify anyone’s identity.
The alternate name feature can be used for an unmarried name so friends can locate you (e.g., Susan
Smith (Jones) or a nickname or diminutive of your given name). Once a name change is made, you
are required to wait a period of time before another name change can be made.
1. Click at the top right of any Facebook page.
2. Click Settings.
3. Click General.
4. Select Name.
5. Make changes as necessary and click Review Change.
6. Facebook presents a preview of how your name change will appear on your timeline.
7. Check an acceptable variant, enter your password, and click Save Changes.

9
EMAIL
When you created your Facebook account, your registration was verified through email or text
message. That means that Facebook sent an email message to the email address you provided. That
email message had a web link you had to click to verify your email address. This is also where you
change your email address if the address you registered with Facebook is disabled or retired for any
reason or if you want to receive emails in a different mailbox.
To change your email, from the General Account Settings menu:
1. Click at the top right of your Facebook page.
2. Click Settings.
3. Click General.
4. Click Contact.
5. Click Add another email or mobile number.

10
6. Enter a new email address in the box.
Click Add.
7. Enter your password and click
Submit.
8. Facebook will send an email to the
new email address confirming the change
and a notification of the change to the
email address of record. It will look like
this. Click Confirm.
9. Return to the General Settings area. If
you see this message, the changes were successful.
DELETE AN EXISTING EMAIL
Facebook will not allow the removal of an email if it is the primary email or it is the only email. If
you do not have a secondary email, you must add one. Follow the instructions in the section
immediately above to add a secondary email address. Then, to delete an email address, from the
General Settings menu:
1. Click at the top right of your
Facebook page.
2. Click Settings.
3. Click General.
4. Click Contact.
5. Click Remove next to the address you want to remove.

11
6. Click Save Changes. If you
have chosen to remove an
email address and save
changes, you will receive an
email at the removed email
address notifying you of the
change.
Manage Account
Under the Manage Account Settings you can choose to deactivate your account, delete your account
after your death, or assign someone to look after your account in the event you passed away. The
designated person can:
1. Manage who can see or post tribute to you.
2. Delete tribute posts.
3. Change who can see tribute posts that you are tagged in.
4. Remove tags of you that someone else has posted
5. Pin a tribute post to your profile.
6. Respond to new friend requests.
7. Update your profile picture and cover photo.
8. Most importantly they will not be able to pretend to be you or see your messages.
STEPS TO DESIGNATE A FRIEND TO MANAGE YOUR ACCOUNT.
1. Click at the top right of your Facebook page.
2. Click Settings.
3. Click General.
4. Select Manage Account.
5. Type in the name of your friend.
6. Click Add.

12
7. A window will appear that will send the message to your friend that you have designated
them to manage your account after your
death.
8. Read the Message and Click Send.

13
HOW TO REQUEST YOUR ACCOUNT BE DELETED AFTER YOUR DEATH.
1. Click at the top right of any Facebook page.
2. Click Settings.
3. Click General.
4. Select Manage Account and
Request account deletion.
5. A dialog box will appear.
6. Select Delete After Death.
If you change your mind at any point, you can go back into the settings and select Keep Your
Facebook Account.

14
HOW TO DEACTIVATE YOUR ACCOUNT
1. Click at the top right of any
Facebook page.
2. Click Settings.
3. Click General.
4. Select Manage Account.
5. Click Deactivate Your Account.
Note: Deactivating your account will
only disable your account and prevent
your name and photo from being
searchable. It will not delete your
account or content.
6. You will be prompted to enter your
password to deactivate your account.
7. Click Continue.
HOW TO DELETE YOUR ACCOUNT
Before deleting your account, you may want to log in and download a copy of your information
(like your photos and posts) from Facebook. After your account has been deleted, you won't be
able to retrieve anything you've added.
To permanently delete your account:
1. Click at the top right of any Facebook page.
2. Click Settings.
3. Select Your Facebook Information.
4. Select Delete Your Account and Information, then click Delete My Account.
5. You will be given three options:
• To Keep Messenger, Deactivate Instead

15
• Download Your Information
• Edit Page Admin Settings
6. Enter your password, click Continue and
then click Delete Account.
Facebook has implemented an option of Identity Confirmation under the General Account
Settings. It is recommended that you DO NOT enable this feature. Facebook is requesting a copy
of your driver’s license, birth certificate, passport, medical bill, green card, etc., as a means to verify
the validity of your account in the happenstance that you’re locked out or if your account is hacked.
The security risk associated with doing this is the reliance that Facebook will keep your information
secure.
Security and Login
Under this setting you have the option to select 3 to 5 friends as your Trusted Contacts to help you
if you get locked out of your account, see what devices have been used to login to your account,
change your password, implement Two-Factor Authentication (highly recommended), and establish
extra security. Your Trusted Contacts can also assist with advanced options such as receiving
encrypted email notification from Facebook, recover external accounts, and see a history of emails
from Facebook. This handbook is going to focus on Where You’re Logged In, Password
Management, and Two-Factor Authentication.
WHERE YOU’RE LOGGED IN
This is a very useful feature that will show you what type of devices have logged into your Facebook
account, the type of browser that was used, and the time, date and location of the activity. This is
also a very useful feature to identify if there are devices that you do not recognize that have logged
into your account.

16
It is highly recommended that you review this section quite frequently and log out each session on
each device. If you choose to do so, you can use this section to log out of all sessions by selecting
Log Out Of All Sessions.
A dialog box will appear requesting confirmation. Select Log Out.
PASSWORDS
Passwords, secret elements of authentication, are on the front line of defense preventing people and
automated tools from illegally accessing your online accounts. Therefore, your choice of password
and the frequency with which you change it are important security considerations. A password,
however, need not be limited to a word. It can be a passphrase. A passphrase is a string of
characters that form a phrase. An example might be, "The song remains the same" or "I’ll see you
on the dark side of the moon". Passphrases are generally easier to remember than complex
passwords and more likely to survive a dictionary attack than is a password. Guidelines for
passwords to avoid, especially if you are a public figure or in a situation where much of your
personal information is in the public domain, include:
1. Your name or any permutation of your name

17
2. Your user ID or any part of your user ID
3. Common names
4. The name of any relative, child, or pet
5. Your telephone number, social security number, date of birth, or any combinations or
permutations of those
6. Vehicle license plate numbers, makes, or models
7. The school you attended
8. Work affiliation
9. The word "password" or permutations including "password" prefixed or suffixed with
numbers or symbols
10. Common words from dictionaries, including foreign languages
11. Common dictionary word permutations
12. Names or types of favorite objects
13. All the same digits or all the same letters or letter sequences found on keyboards (e.g.,
QWERTY)
HOW TO CHANGE YOUR PASSWORD
1. Click at the top right of
any Facebook page.
2. Click Settings.
3. Click Security and Login.
4. Select Change Password.

18
5. Enter your current password.
6. Enter your new password or
passphrase.
7. Re-enter your new password or
passphrase for verification.
8. Click Save Changes.
HOW TO SET UP TWO-FACTOR AUTHENTICATION
1. Click at the top right of
any Facebook page.
2. Click Settings.
3. Click Security and
Login in the left column.
4. Click Edit in the use two-
factor authentication.
5. Select Get Started.

19
6. Enter your password.
Note: If you are doing this from a device
that Facebook does not recognize it will
prompt you to verify your account. The
easiest method is to choose images of your
friends.
7. Choose Your Security Method and click
Next. It is recommended that you use your
phone number to receive a text message.
SECURITY LOGIN ALERTS
This is an effective means to identify attempted compromises to your Facebook profile. When
accessing your profile, after correctly entering the username/password combination, Facebook
checks for the presence of a cookie on your computer. That cookie identifies the browser as one
from which you have accessed Facebook before. If the cookie is found, the login proceeds without
further interaction. If the cookie is absent or incorrect, Facebook will ask the user if information
about the browser should be saved AND sends a text message or email to the addresses of record
indicating a login from an unknown browser. If you elect to use text messages, you will be required
to provide Facebook with the number of your mobile device.
If this browser is unrecognized, you will encounter a Facebook challenge asking if you want to
Remember Browser. Do not save that browser information unless you are using a computer you
have control over and will use again. If by chance you mistakenly opt to save the browser or there is
a browser you have previously saved but know you will not use again in the future, you can delete
that browser by following the instructions in the section Recognized Devices.
Login Alerts is not double authentication. If the correct username/password combination is
entered, the user will be allowed access to the profile. The defensive benefit of Login Alerts is the
email or text message notifying you of the access. If you receive a login alert and did not log in, you
should immediately change your password and take immediate steps as outlined in the sections
Login Alerts will not work if your browser is configured to refuse cookies or if your browser clears
its cache when it closes. If your browser is set to refuse cookies or clear cache when exiting, it is
best to leave these settings as they are and not use the Login Alerts feature.

20
HOW TO SET UP EXTRA SECURITY
1. Click at the top right of any Facebook page.
2. Click Settings.
3. Click Security and Login.
4. Select Setting up Extra Security.
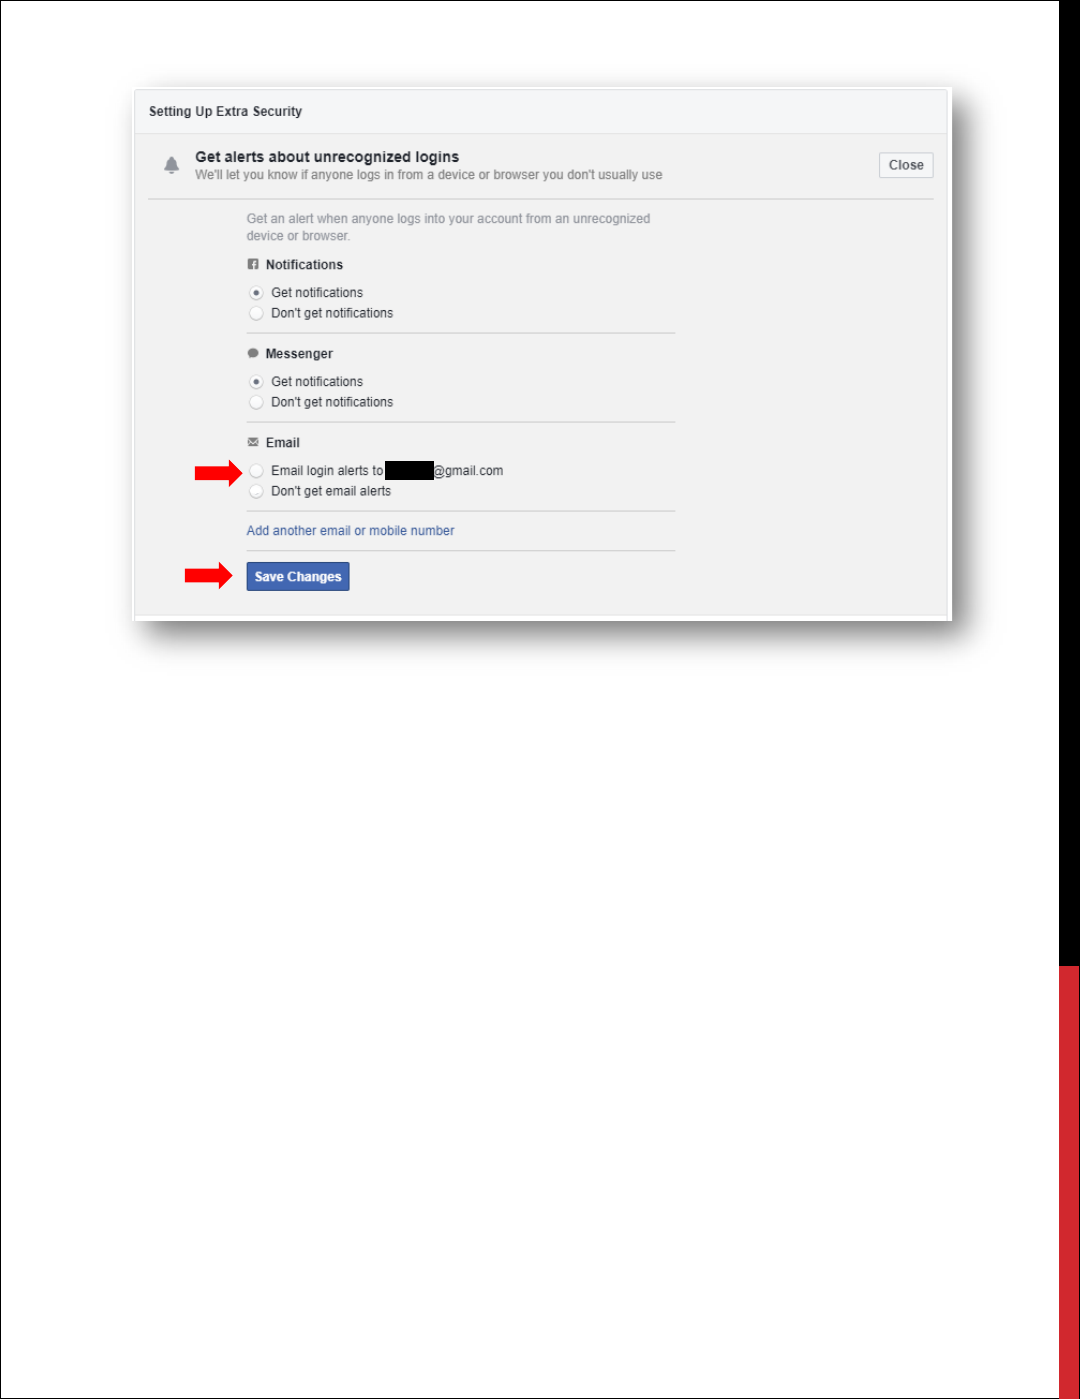
21
5. Under Setting Up Extra Security, select Get Alerts About Unrecognized Login
6. Select Get notifications. Here you will have three options:
• Facebook Notifications
• Facebook Messenger Notifications
• Email Notification.
7. Select Email and click Save Changes.
8. Email notices will be sent to your email on file with Facebook.
Privacy Settings and Tools
This option is where you will maximize your privacy settings. In this section you can limit who can
see your Activity and how people can Find You and Contact You. The following steps will
maximize your privacy on Facebook.
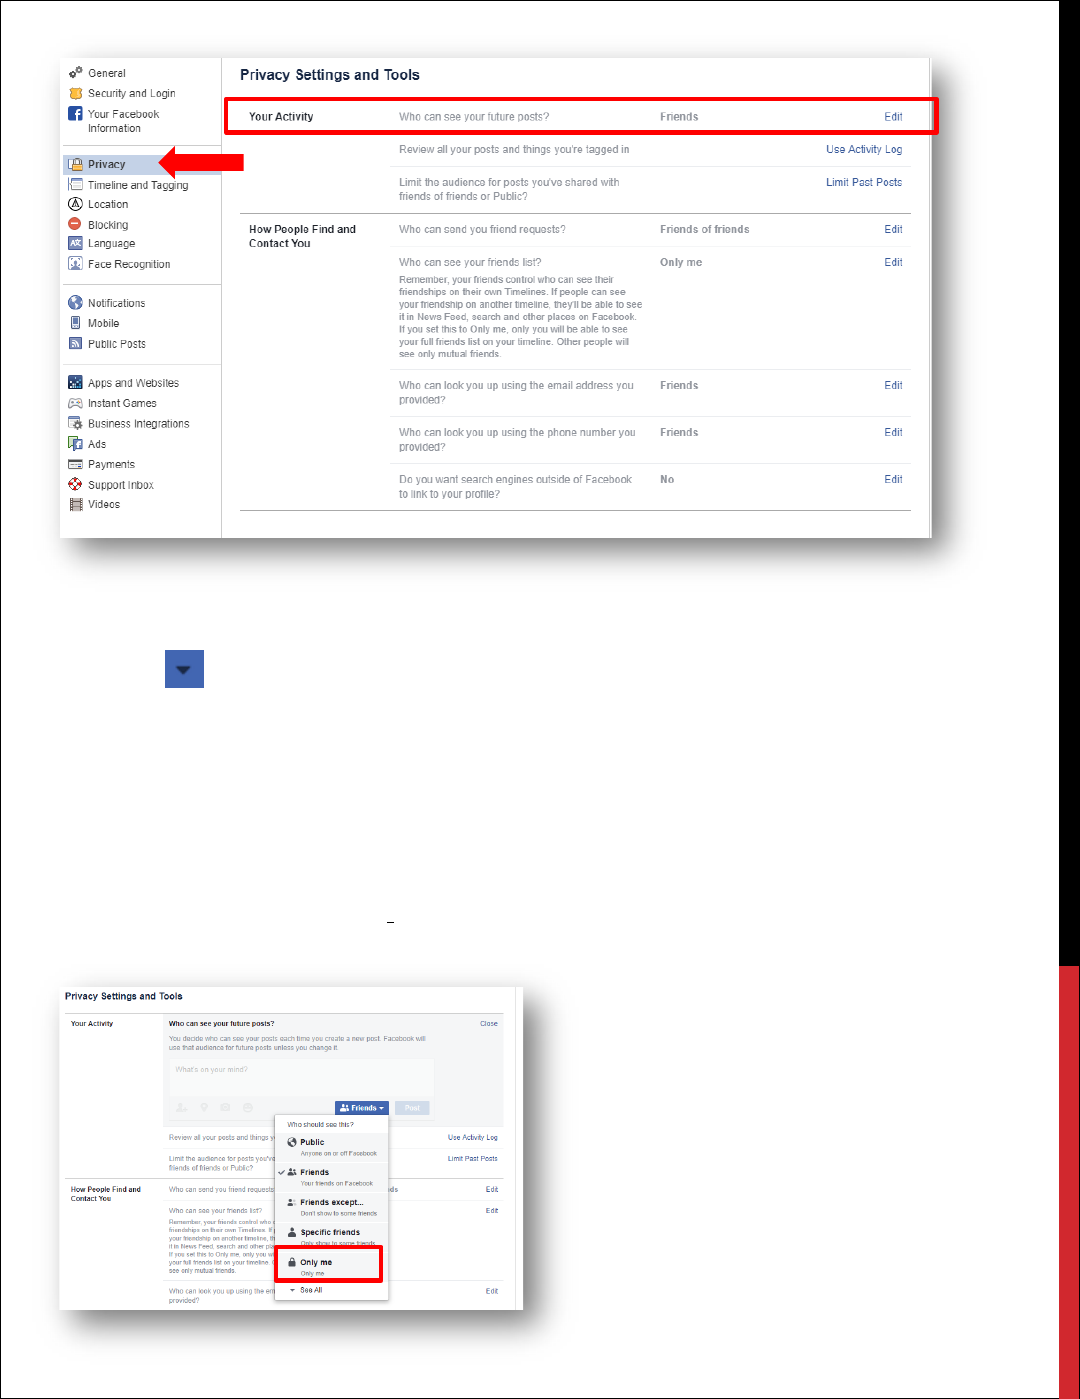
YOUR ACTIVITY
In the Your Activity section you will want to edit Who Can See Your Future Posts and Limit
the audience for posts you’ve shared with friends of friends or Public.
22
HOW TO CONFIGURE YOUR ACTIVITY SETTINGS
1. Click at the top right of any Facebook page.
2. Click Settings.
3. Click Privacy.
4. Under the Activity Section, select Who Can See Your Future Posts.
5. Click on the Friends box.
From here you will select your audience. It is recommended that a minimum, you select Friends.
For maximum privacy, select Only Me. It is important to note that if you select Only_Me, no one
will see your posts.

23
Limit Past Posts
You may want to limit your past posts. If your timeline is accessible to the public, social engineers
will scour your entire timeline to garner any valuable information on you, such as birthday wishes,
anniversary wishes, places you have visited, etc. You will learn how to secure your timeline in the
Timeline and Tagging Section.
HOW TO LIMIT PAST POSTS
1. Click at the top right of any Facebook page.
2. Click Settings.
3. Click Privacy.
4. Under Your Activity, click
on the Limit Past Posts.
5. A dialog box will open,
select Limit Past Posts.
HOW PEOPLE CAN FIND
YOU & CONTACT YOU
Under this setting you control who can send friend requests, who can see your friends list, who can
search for you using your email address registered with Facebook, who can search for you using
your phone number registered with Facebook, and if you want to let search engines outside of
Facebook link to your Facebook account. Depending on the level of privacy and security you wish,
the below steps are configured to maximize your privacy.
WHO CAN SEND YOU FRIEND REQUESTS?
1. Click at the top right of any Facebook page.
2. Click Settings.
3. Click Privacy.
4. Under How People Find and Contact You, select Who can send you friend requests.

24
5. Click on the Audience Button and choose Friends of Friends.
WHO CAN SEE YOUR FRIENDS LIST?
1. Click at the top right of any Facebook page.
2. Click Settings.
3. Click Privacy.
4. Under How People Find and Contact You, select Who can see your friends list.
5. Click on the Audience Button.
6. Select Only Me. This will prevent your friends list from being seen by the public.
WHO CAN LOOK YOU UP USING YOUR EMAIL ADDRESS?
1. Click at the top right of any Facebook page.
2. Click Settings.
3. Click Privacy.
4. Under the How People Find and Contact You, select Who can look you up using your
email address.
5. Click on the Audience Button and select Friends.

25
WHO CAN LOOK YOU UP USING YOUR PHONE NUMBER?
1. Click at the top right of any Facebook page.
2. Click Settings.
3. Click Privacy.
4. Under the How People Find and Contact You, select Who can look you up using your
phone number.
5. Click on the Audience Button and select Friends.

26
DO YOU WANT SEARCH ENGINES TO LINK TO YOUR FACEBOOK ACCOUNT?
1. Click at the top right of
any Facebook page.
2. Click Settings.
3. Click Privacy.
4. Under the How People Find
and Contact You, in the Do
you want search engines
outside of Facebook to link
to your profile section, make
sure the box Allow Search
Engines Outside of
Facebook to Link to Your
Profile is not enabled.
Timeline and Tagging Settings
Limiting the visibility of past and future posts to just friends is the best way to limit access to items
on your timeline to people with whom you have a trust relationship. This assumes that people on
your friends list are in fact the people they purport to be. Social engineering is a reality and
Facebook does not make a serious effort to verify the identity of new subscribers.
HOW TO CHANGE TIMELINE SETTINGS
1. Click at the top right of any Facebook page.
2. Click Settings.
3. In the Timeline and Tagging Settings section, under Timeline, select Who can post on
your timeline.

27
4. Click on the Audience
Button and select
Friends.
For maximum privacy select
Only Me.
WHO CAN SEE WHAT OTHERS POST ON YOUR TIMELINE.
It is important to note that friends of friends can see what is posted on your timeline. To change
this feature, follow these steps.
1. Click at the top right of
any Facebook page.
2. Click Settings.
3. Click Timeline and Tagging.
4. Under Timeline, select Who
can see what others post
on your timeline.
5. Select the Audience Button,
and choose Friends or Only
Me.
ALLOW OTHERS TO SHARE YOUR POSTS TO THEIR STORIES.
This is another social networking feature that allows your friends to share your posts on their
timeline. Much like other features, if your friends are able to share your story, then their friends and
friends of their friends can do the same. This is a valuable tool that social engineers rely on to
harvest information about you. By default, Facebook enables this feature. To change this setting,
follow these steps:
1. Click at the top right of any Facebook page.
2. Click Settings.
3. Click Timeline and Tagging.

28
4. Under Timeline, select Allow
others to share your posts to
their stories.
5. Select the Audience Button,
and choose Disabled.
HIDE COMMENTS CONTAINING CERTAIN WORDS FROM YOUR TIMELINE.
This is a great feature to enable in order to prevent certain content that you do not want to see on
your timeline. For example, if you have a friend that is constantly posting sexually explicit or vulgar
language with their posts, you can create a “banned word” or “emoji” list which will scan all posts
to your timeline. If a banned word or emoji is identified, the post will not appear on your timeline.
You do not have to enable this feature but if you have concerns, this is worth the time to build a
list.
29
Tagging
Originally, tagging could only be done with photos. However, now users are able to tag any type of
Facebook post. Tagging basically involves attaching a friend's name to one of your posts. When
someone is tagged in a post, a “special kind of link” is created that will link to your Facebook
account. The privacy problem is that once you are tagged in a photo or a post and the user's privacy
settings are set to public, the post will show up on your timeline and in the news feed of your
friends and their friends.
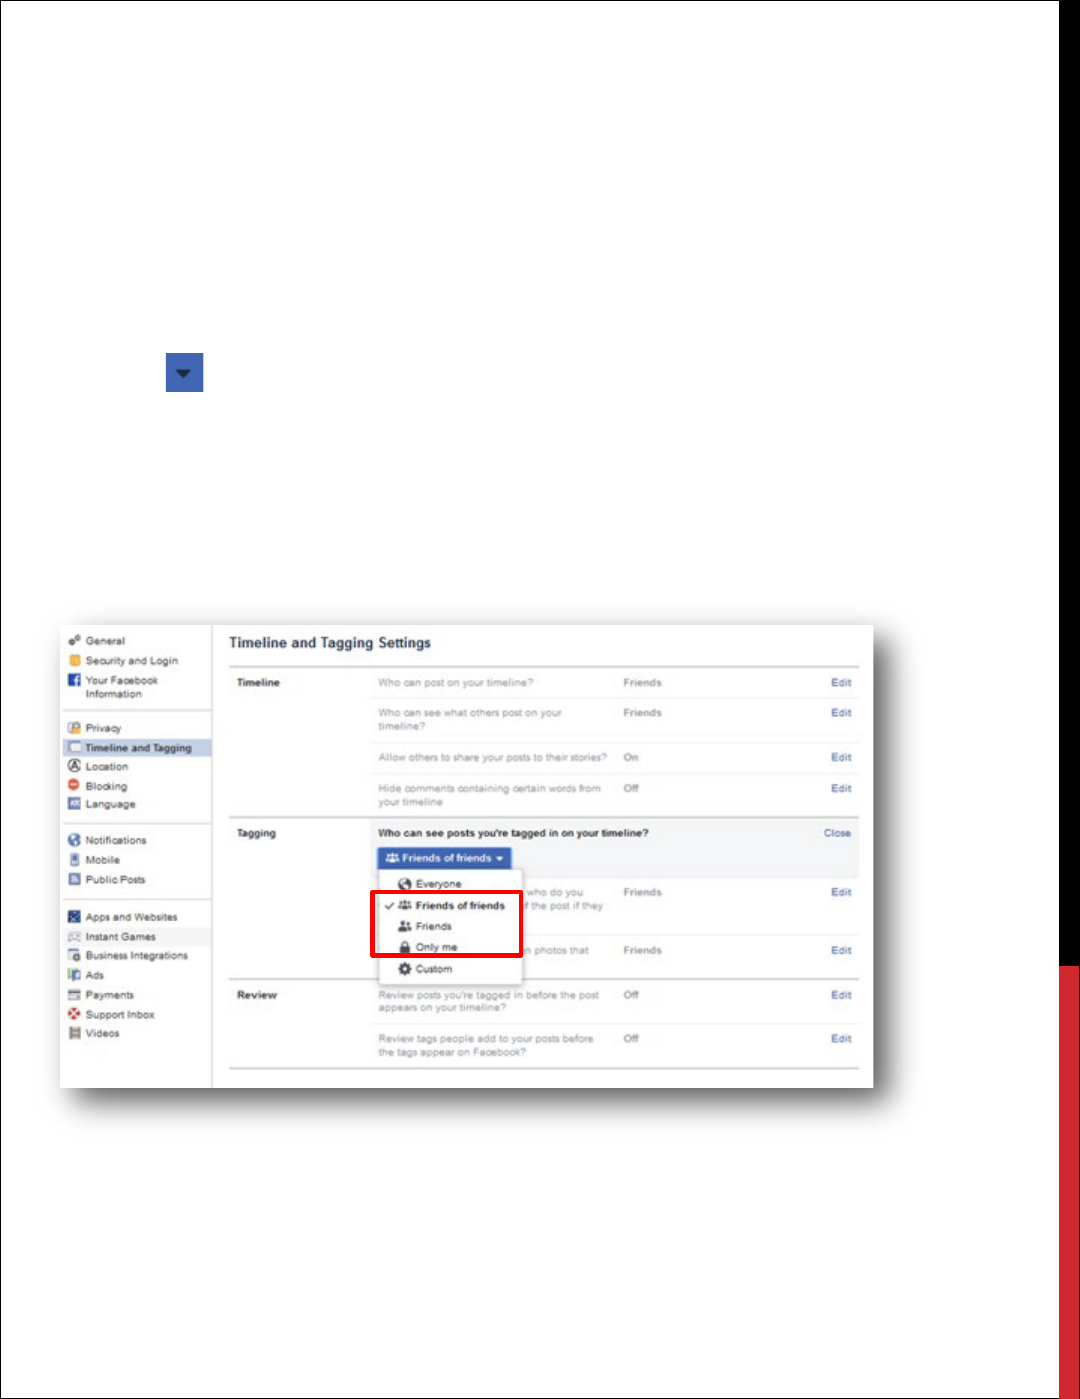
HOW TO CHANGE TAGGING SETTINGS
1. Click at the top right of any Facebook page.
2. Click Settings.
3. Under Tagging, select Who can see posts you’re tagged in on your timeline.
4. Select the Audience Button, and choose Friends of Friends, Friends, or Only Me.
Note: This is a privacy choice you have to make. It is recommended that at minimum, you
should select Friends
WHEN YOU'RE TAGGED IN A POST, WHO DO YOU WANT TO ADD TO THE
AUDIENCE OF THE POST IF THEY CAN’T ALREADY SEE IT?
People who are tagged will be able to see the post, but other people who aren't tagged won't
necessarily see it. If you'd like all your friends or a custom friends group to be able to see other
friends' posts you're tagged in even though they haven't been tagged in them, you can set this up
with this option.

30
1. Click at the top right of any Facebook page.
2. Click Settings.
3. Click Timeline and Tagging.
4. Under Tagging, select When you're tagged in a post, who do you want to add to the
audience of the post if they can’t already see it?
5. Select the Audience Button, and choose Friends or Only Me.
WHO SEES TAG SUGGESTIONS WHEN PHOTOS THAT LOOK LIKE YOU ARE
UPLOADED.
Facebook created this optional feature where Facebook will suggest adding a tag to an uploaded
photograph. In essence, the Facebook algorithm will make the suggestion of who they think the
name of person is in the photograph. Facebook advertises this as tool to help you save time. It is
recommended that you do not tag people in your photographs. The suggestion will appear and you
have the option to ignore the suggestion but best practice would be to set this feature to Only Me.

31
1. Click at the top right of any Facebook page.
2. Click Settings.
3. Click Timeline and Tagging.
4. Under Tagging, select Who sees tag suggestions when photos that look like you are
uploaded.
5. Select the Audience Button, and choose No One.
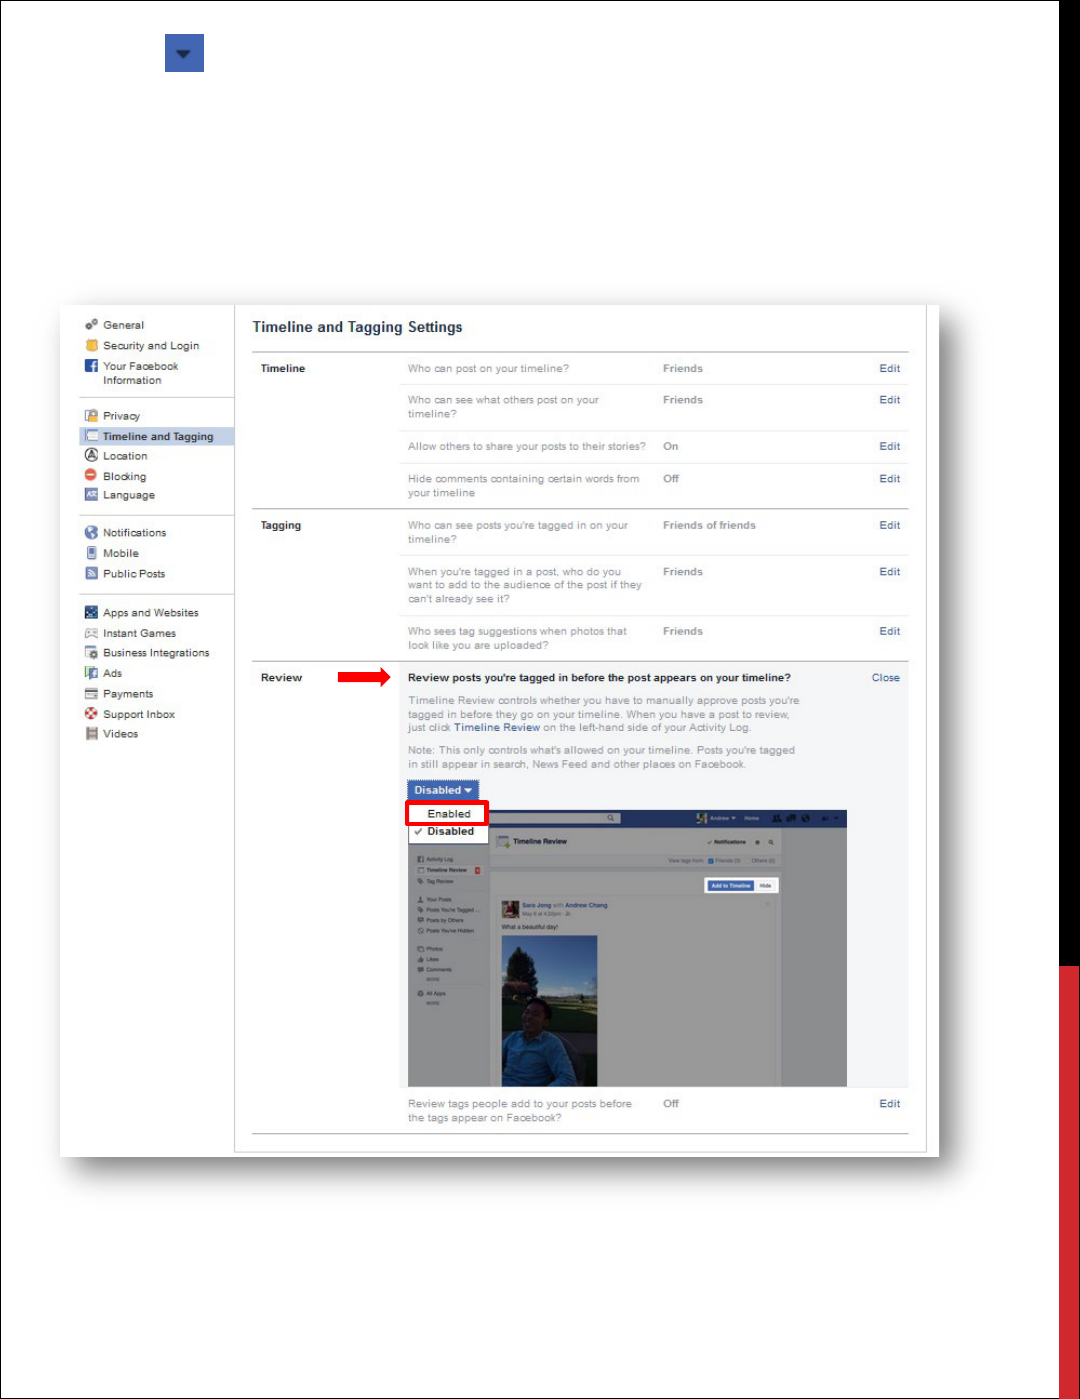
Review
This is a feature everyone should take advantage of. Facebook has given you the ability to review
any post that you are tagged in, before allowing it to appear on your timeline.
REVIEW POSTS YOU’RE TAGGED IN BEFORE THE POST APPEARS ON YOUR
TIMELINE.
Enable this feature if you don’t want photos you've been tagged in to go on your own timeline
before you approve each of them. You can reject the tag if you don’t want to be tagged. This can be
a useful feature for avoiding unflattering photos from suddenly showing up on your profile for all
your friends to see.
32
1. Click at the top right of any Facebook page.
2. Click Settings.
3. Click Timeline and Tagging.
4. Under Review, select Review posts you’re tagged in before the post appears on your
timeline.
5. Select the Audience Button, and choose Enabled.

33
REVIEW TAGS PEOPLE ADD TO YOUR POSTS BEFORE THE TAGS APPEAR ON
FACEBOOK.
Your friends can tag themselves or you in your photos. If you want to be able to approve or reject
those tags before they go live and appear on your timeline and on your friend’s timeline, you just
have to enable this feature.
1. Click at the top right of any Facebook page.
2. Click Settings.
3. Click Timeline and Tagging.
4. Under Review, select Review tags people add to your posts before the tags appear on
Facebook.
5. Select the Audience button, and choose Enabled.

34
Location Settings
Location History is a setting that allows Facebook to build a history of precise locations received
through Location Services on your device. When Location History is on, Facebook will periodically
add your current precise location to your Location History, even if you leave the app.
You can turn off Location History at any time in your Location Settings on the Mobile Phone app
(See How to Turn Off Location Services in the Mobile Phone section of this handbook).
When Location History is turned off, Facebook will stop adding new information to your Location
History. You can view the saved locations in your mobile phone’s Location Settings. You can also
delete your previously recorded location from your Location History. If you have allowed Facebook
Mobile Phone app to access your location services you can delete your history in the following
steps:
1. Click at the top
right of any Facebook
page.
2. Click Settings.
3. Click Location.
4. Select View your
Location History.
5. Enter your password.
6. If you see your history,
you can delete the record.

35
Face Recognition
Facebook recently created an additional feature to their security and privacy settings that is designed
to analyze your photos and videos that they think you may be in. In order for this algorithm to
work, you first have to authorize Facebook to create a unique number or “template” of you. In
tech terms, this “template” is a mapping of your unique facial features (facial contures) that is later
used to find photos and videos you may be in. If you choose to use this feature, Facebook will send
you a notification that you may have appeared in a photo or video that a friend has posted on their
timeline or vice versa. Additionally, Facebook claims that this algorithm will aide in the detection of
impersonation and identity misuse. Unfortunately there is not enough information to determine if
this algorithm is being used for other purposes other than providing a suggestion or notification
that your image has shown up in another person’s timeline.
NOTE: This feature is completely the choice of the user. If you are not comfortable with
activating this feature, then skip to the next section.
If you choose to turn on this feature, you can turn it off at any time. Facebook stated that they will
delete your template when you deactivate this feature.
1. Click at the top right of any Facebook page.
2. Click Settings.
3. Click on Face Recognition.
4. Select Edit.
5. A dialogue box will appear. This dialogue box will explain what Facebook will do, should
you choose to activate this feature. If you decide to activate this feature, select Continue.

36
6. Another dialogue box will appear. Again, Facebook will inform you of how the feature will
work. If you choose to continue, select Turn On. Remember, that you can turn this feature
off at any time.
37
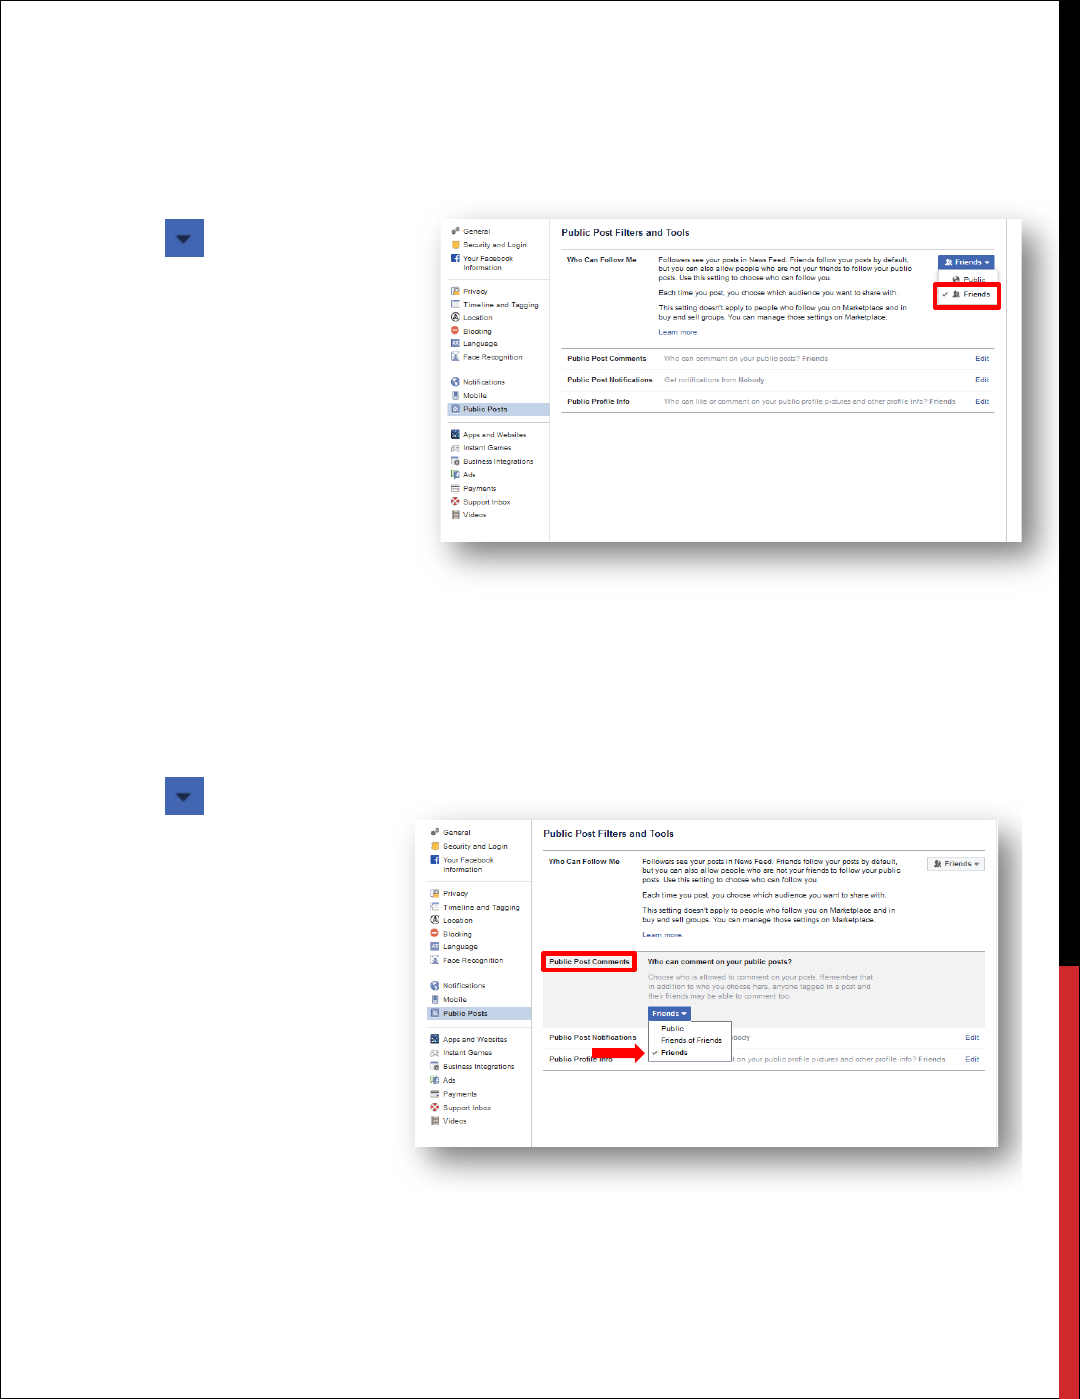
Who Can Follow Me
If you are an avid poster on Facebook, by default, your posts are made Public. If you leave your
posts public, people who follow you will be able to see your posts. For maximum privacy it is
recommended that you change this setting to Friends only.
1. Click at the top right of
any Facebook page.
2. Click Settings.
3. Click Public Posts.
4. In the Who Can Follow
Me section, select the
Audience Button and
choose Friends.
Public Post Comments
This feature allows you to control who can comment on your public posts. Remember, comments
someone makes to your Facebook timeline will also appear on the timeline of the person who
commented.
1. Click at the top
right of any Facebook
page.
2. Click Settings.
3. Click Public Posts.
4. Select Public Post
Comments.
5. Select the Audience
Button and choose
Friends.
PUBLIC POST
NOTIFICATIONS
You can get notifications when people who aren't your friends start following you and share, like or
comment on your public posts. To maximize your privacy, it is recommended to select nobody.
This will prevent anyone who isn’t your friend liking or commenting on your public posts.

38
1. Click at the top right
of any Facebook page.
2. Click Settings.
3. Click Public Posts.
4. Select Public Post
Notifications.
5. Select the Audience
Button and choose
Friends of Friends.
PUBLIC PROFILE INFO
This section allows you to manage who can like or comment on your profile information that is
always public. This includes your profile pictures, profile videos, cover photos, featured photos and
updates to your short bio. For privacy purposes, it is recommended that you set this to friends only.
1. Click at the top right of
any Facebook page.
2. Click Settings.
3. Click Public Posts.
4. Select Public Profile Info.
5. Select the Audience
Button and choose Friends.
Photos
The default setting for your profile and cover photograph is set to public. You cannot change this
setting. For the rest of your photographs in your albums, you have the ability to change the
audience of the photos. This can be a painstaking process because you have to go into every
photograph and change the settings. Photographs provide valuable information for social engineers.
It will allow them to associate family members, close friends, and specific events of your life. Even
if your timeline is not open to the public, but your photographs are, social engineers can look at

39
who has liked or commented on your photographs. Each photograph provides a date of when it
was uploaded into Facebook.
This section is going to cover how to change the audience for each photograph and how to remove
and previously tagged photographs that were shared on your timeline.
HOW TO CHANGE THE AUDIENCE OF YOUR PHOTOS
1. Go to top bar of your Facebook page.
2. Click on your name. This is located at the top of the page in the blue bar.
3. Click on Photos. (This is located at the top of the page.)
4. Under Photos, select Your Photos.
5. Click on any picture.
6. On the top right corner of the photograph, directly located under your name, there is an
Audience Button. Click on the Audience button.
7. Choose who you want to see your photograph. It is recommended that you select Friends
or for maximum privacy, select Only Me.

40
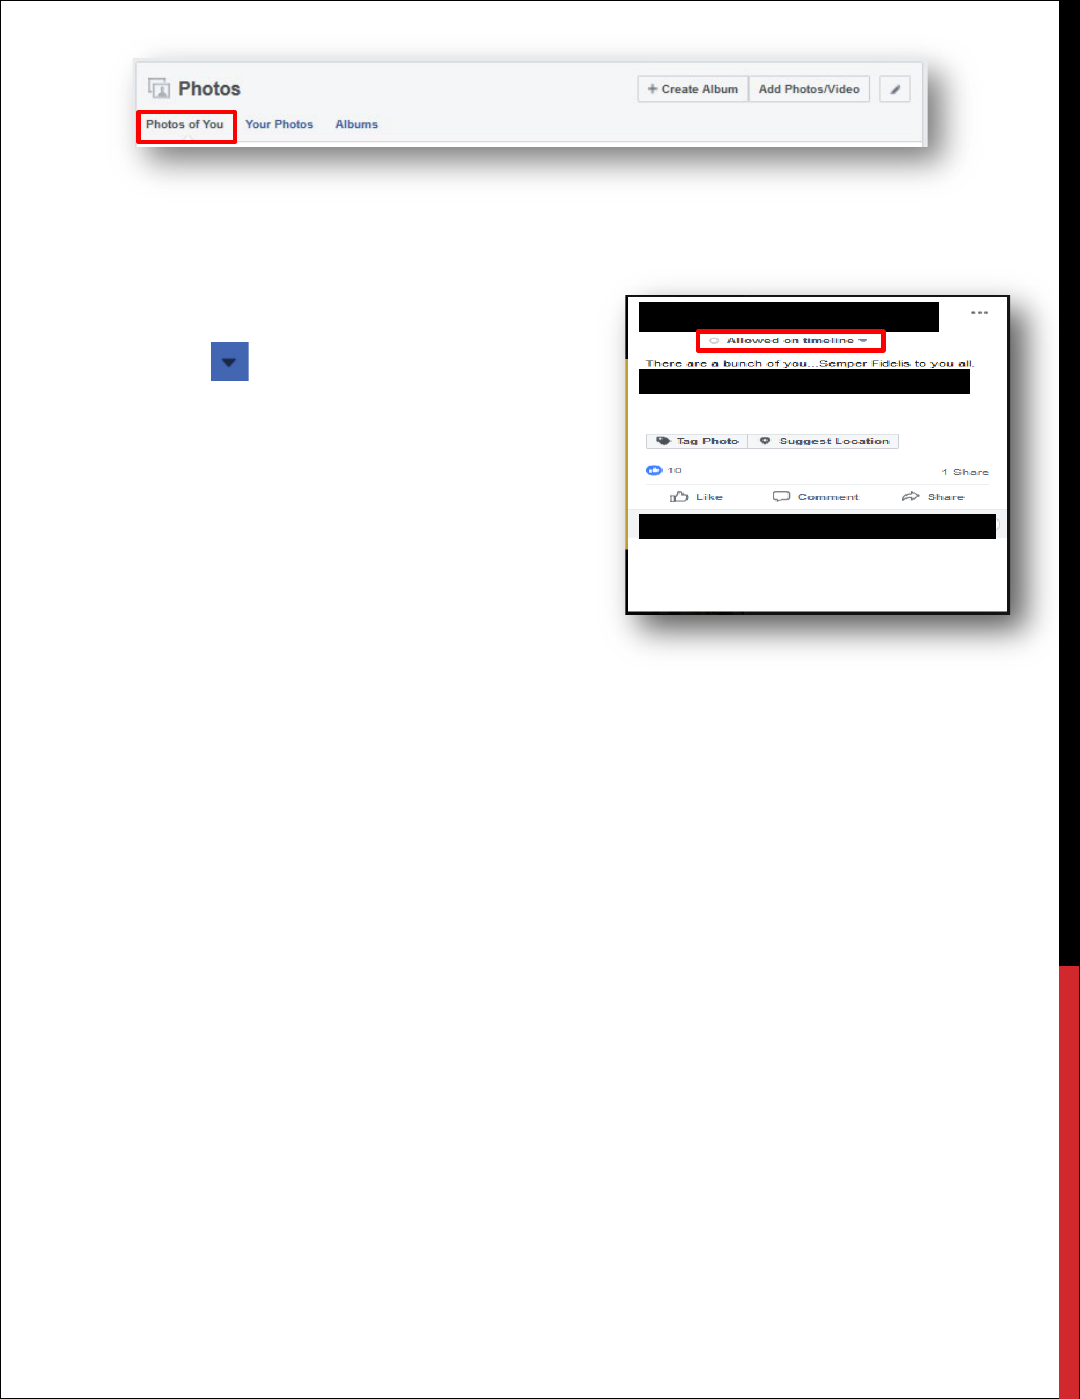
HOW TO REMOVE A TAG FROM A PHOTO
Your friends love to take photos and may tag you in them. If your timeline settings are set to
private, this is not much of an issue because people who do not know you will not be able to see
your timeline. However, if you want to hide a photo from your timeline, follow these steps.
1. Go to top bar of your Facebook page.
2. Click on your Name. This is located at the top of the page in the blue bar.
3. Click on Photos. (This is located at the top of the page.)
41
4. Under Photos, select Photos of You.
5.
6. Click on any picture and look for Allowed on
Timeline.
7. Select the next to Allowed on Timeline.
8. Choose Hidden from Timeline.
INSTAGRAM
With over 200 million active users, Instagram is the fastest growing social media network. There are
over 30 billion shared photos, with 70 million photos on average uploaded daily, and there are 25
billion likes on content per day. Thus far, Instagram has the most engaged users compared to other
social media platforms. Instagram users are 15 times more engaged than Facebook users, and 20
times more engaged than Twitter users. Instagram is solely based on fast and easy photo-sharing, so
you have to be careful of what you post and who your audience is. Below are the pros and cons of
using Instagram:
ADVANTAGES
• Privacy Settings: One of the greatest features of Instagram is its privacy settings. This
ensures that outside users--people who are not following you--have to request your
permission to see your photos. This helps ward off strangers and potential offenders who
could possibly cause harm through their comments.
• Free: Like many other social networks, Instagram is free to sign up for and use.
• Edit / Filters: Instagram provides a variety of filters. These filters help in enhancing the
images and add more character to them. Now there is no need for a separate editing App for
basic editing and touch ups.

42
• Sharing Options: Instagram lets you share photos and videos that you create on, or import
from, your mobile device. You can post them on other social networks, share them with
people who follow your activity on Instagram, or send them privately to only a few specific
people.
DISADVANTAGES
• Portable: Instagram is a service that is designed to be used with mobile devices, such as
tablet computers or smart phones. It has very limited functionality on desktop computers.
• Search Users: It only searches for the Instagram user names and not the real names of the
users.
• Edit Privacy: You can’t edit the privacy of each photo. They are all either public or private.
The Cons may seem to be more of a Pro if you are very conscious of your privacy and security. The
following information will help guide you through the process of maximizing your privacy on
Instagram.
How to Set Your Instagram Account to Private
By default, anyone can see your profile and posts on Instagram. You can make your account private
so that only followers you approve of can see what you share. If your account is set to private, only
your approved followers will see your photos, videos, hashtags or location pages.
SET YOUR ACCOUNT TO PRIVATE FROM THE INSTAGRAM APP ON YOUR
ANDROID OR IOS DEVICE
1. Go to your profile, then tap .
2. Tap Settings.
3. Tap Privacy and Security.
4. Tap Account Privacy then tap to toggle Private Account on.
SET YOUR ACCOUNT TO PRIVATE ON YOUR COMPUTER OR MOBILE
BROWSER
1. Go to instagram.com on your computer or mobile browser.
2. Click , then click .
3. Click Privacy and Security.
4. Below Account Privacy, click to check the box next to Private Account.
HOW TO TURN OFF ACTIVITY STATUS ON INSTAGRAM
People you follow or have direct conversations with can see when you were last active on
Instagram. You can change the visibility of your activity status at any time.

43
To change the visibility of your activity status on Android or iOS Instagram app:
1. Go to your profile and tap .
2. Tap Settings > Privacy and Security > Activity Status.
3. Tap next to Show Activity Status to turn off your activity status.
To change the visibility of your activity status on a computer:
1. Click , then click .
2. Click Privacy and Security.
3. Below Account Privacy, click to check the box next to Activity Status.
Keep in mind that when you turn off your activity status, you won't be able to see anyone else's.
HOW TO STOP SHARING YOUR STORY ON INSTAGRAM
To make changes on the Android or iOS Instagram app:
1. Go to your profile and tap .
2. Tap Settings > Privacy and Security > Story Sharing.
3. Tap next to Story Sharing to turn off your sharing status.
To make changes on your computer:
1. Click , then click .
Did you know?
Worldwide, there were over 2.38 billion monthly active users as of
March 31, 2019
In Europe, over 307 million people are on Facebook.
Age 25 to 34, at 29.7% of users, is the most common age
demographic.
Five new profiles are created every second.
There are 83 million fake profiles.

44
2. Click Privacy and Security.
3. Below story sharing, click to check the box next to Allow Sharing.
HOW TO ESTABLISH TWO-FACTOR AUTHENTICATION
To make changes on the Android or iOS Instagram app:
1. Go to your profile and tap .
2. Tap Settings > Privacy and Security > Two-Factor Authentication.
3. Tap next to Two-Factor Authentication to turn off your activity status.
To make changes on your computer:
1. Click , then click .
2. Click Privacy and Security.
3. Below Two-Factor Authentication, click on Edit Two-Factor Authentication setting.
4. Click on the box for Use Text Message
5. Enter in your phone number and select Next.
6. You will receive a text message with a confirmation code. Enter the confirmation code and
click Done.
HOW DO I REMOVE A FOLLOWER
If your account is set to private, you can remove people from your followers list:
1. Go to your profile
2. Tap Followers at the top of the screen
3. Tap (iPhone) or (Android) to the right of the follower you'd like to remove, then
select Remove
When you remove a follower, they aren't notified that you've removed them. You can also block
someone to get them to stop following you. People aren't notified when you block them.
Fun Facts!
•
34% of Instagram users are millennials.
• 22% of all Instagram users log in at least once a day.
• 38% of users check Instagram multiple times a day.
• 25% of smartphone owners use Instagram.

45
TWITTER
Twitter is an American online news and social networking service on which users post and interact
with messages known as “tweets.” Tweets were originally restricted to 140 characters, but on
November 7, 2017, this limit was doubled for all languages except Chinese, Japanese, and Korean.
There are 335 million users.
How to Set Your Twitter Account to Private
PROFILE VISIBILITY SETTINGS
Below you'll find information about your profile visibility settings, and how Twitter uses your birth
date when added to your profile
.
VISIBILITY OPTIONS
Most of the profile information you provide Twitter is always public, like your biography, location,
website, and picture. For certain profile information fields Twitter provides you with visibility
settings to select who on Twitter can see this information in your Twitter profile. If you provide us
with profile information and you don’t see a visibility setting, that information is public.
Below are the visibility settings that are available for your birth date. Your settings allow you to
separately control who on Twitter can see your birth year and who can see your birth day and
month in your Twitter profile. Please note that the date of birth entered must be of the person
operating the account.
HOW DOES TWITTER USE MY BIRTH DATE?
If you choose to add your birth date to your profile, it will be displayed to the audience that you’ve
chosen. Your birth date lets Twitter know that you’re old enough to use our services. It will also be
used to customize your Twitter experience. For example, Twitter will use your birth date to show
you more relevant content, including ads.

46
Public: This information will be part of your public profile,
meaning it may be viewed by anyone all around the world
instantly.
My followers: Only people who follow you can view this
information on your profile.
People I follow: Only people whom you follow can view
this information on your profile.
We follow each other: Only people who follow you and
whom you follow can view this information on your
profile.
Only me: This means only you can view this information on your profile. This is the option we
recommend you choose, in order to best secure your private information.
Note: If you are under 18, your visibility setting for birth year will be set to Only you.
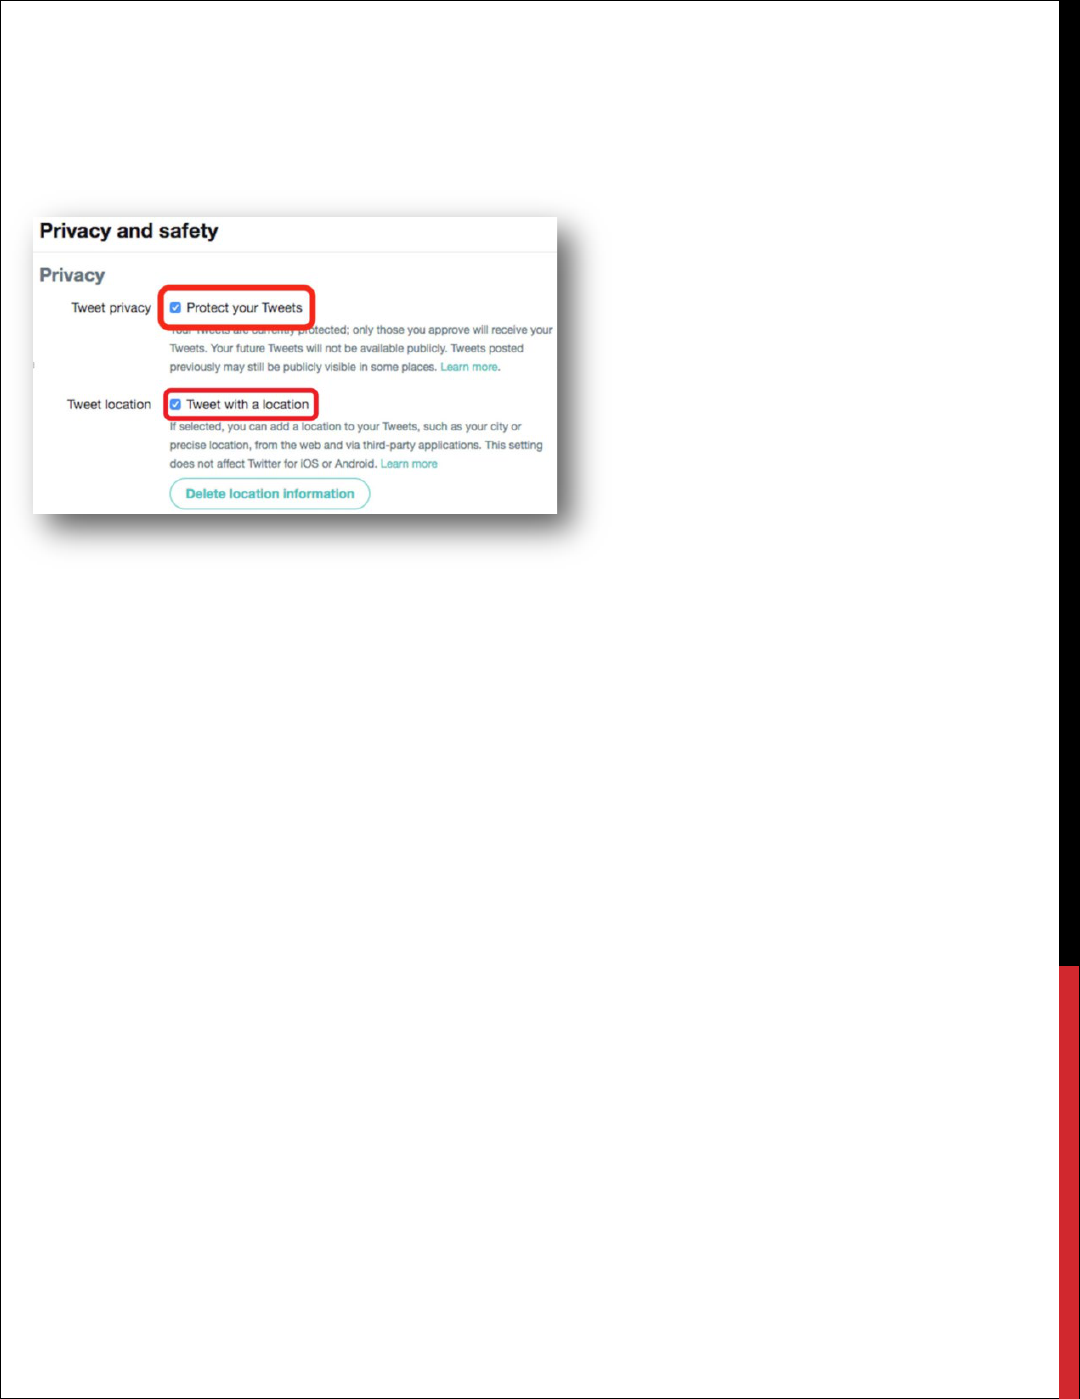
How to Protect and Unprotect your Tweets
When you sign up for Twitter, you can choose to keep
your tweets public or protect your tweets. Read more
about the difference between public and protected
tweets.
APPLE IOS INSTRUCTIONS
1. In the top menu, tap your profile icon.
2. Tap Privacy and safety.
3. Under Tweets, and next to Protect your Tweets,
drag the slider to turn on.
ANDROID INSTRUCTIONS
1. In the top menu, you will either see a navigation
menu icon or your profile icon. Tap whichever icon
you have and select Settings and privacy.
2. Tap Privacy and safety.
3. Under Tweets, and next to Protect your Tweets,
check the box.
47
DESKTOP INSTRUCTIONS
1. Go to your Privacy and safety settings.
2. In the Tweet privacy section, check the box next to Protect your Tweets.
3. Click the Save button at the bottom of the page. You will be prompted to enter your
password to confirm the change.
LOCATION SERVICES
This feature is off by default and you will need to opt in to use it. Best practice is not to enable
location services with any of your tweets.
HOW TO UNPROTECT YOUR TWEETS
DESKTOP INSTRUCTIONS
1. Uncheck the box next to Protect my Tweets.
IOS AND ANDROID
1. Uncheck the slider or box next to Protect your Tweets.
Be sure to review your pending follower requests before making your tweets public. Any requests
left pending will not be accepted automatically. If left pending, those accounts will need to follow
you again. Please note that unprotecting your tweets will cause any previously protected tweets to
be made public.

48
LINKEDIN
LinkedIn is a business-focused social networking site that launched in 2003. Its main purpose is to
help people network professionally. The site lets you find other business associates, clients, and
colleagues whom you already know. You “connect” with them through the site, and they then
become part of your network. This is a great networking tool for professional development and
searching for future employment. Configuring LinkedIn for maximum safety is challenging. Users
must decide how to balance privacy, security and safety against the value of building a successful
business network. If your profile is not being used for active networking, it is recommended that
the account is not searchable.
TWO-STEP VERIFICATION:
Enabling two step verification in LinkedIn provides a second layer of protection for your account.
In order to review your privacy and security settings, click Me on the menu ribbon:
Then, under ACCOUNT, click on Settings & Privacy:
From the next page, you can select among
Account, Privacy, Ads and Communications
options. Under Account, the Login and security
tab provides access to the more important account
configuration settings, from a security standpoint.

49
On this tab, you can configure e-mail addresses and phone numbers for your account, change
passwords, review details for where your account has been logged in, and configure/review two-
step verification. In order to configure two-step verification, click on the ••• option.

50
If you have not yet associated a phone number with your LinkedIn account, you will be required to
do so at this point:
Once you have entered a phone number to verify your LinkedIn account, return to the two-step
verification page and click Turn on.
You may be prompted to enter your
password to confirm your change.
Once the change is made, return to
the two step verification tab to verify
success.

51
PROFILE PRIVACY
From the Settings Menu, if you click on the Privacy tab, you will be given options to
increase/decrease the privacy of your LinkedIn Profile:
Click on Edit your Public Profile to manage options related to what will be publicly shown from
your profile information.

52
If you feel compelled to keep your profile visible to everyone,
consider restricting information to the greatest extent possible
by turning off information that could increase your risk for
identity theft and phishing.
Click on Who can
see your e-mail
address to view
settings related to the
visibility of your email
address on the
LinkedIn platform.
Click on Choose who can see your list of connections to configure the visibility of your own
LinkedIn connections. You can choose between Your connections and Only you. You should
choose the option that best balances safety with your needs on LinkedIn, we recommend setting
this option to Only you.

53
Click on Profile visibility off LinkedIn and set to no. The risks posed by leaving the set to yes
outweigh any benefits provided by leaving it enabled.
If you click on the How others see your LinkedIn activity tab, and click Profile viewing
options, you can configure what other’s see about you, after you have reviewed their profile.
Review the options, and consider which is most appropriate for your situation, it is recommended
to use Private Mode:

54
If you click on the How LinkedIn uses your data tab, and click Manage who can discover your
profile from your e-mail address or Manage who can discover your profile from your phone
number you can configure the ability for others to find your profile from either of theses contact
methods. Review the options, and consider which is most appropriate for your situation:

55
If you click on the Blocking and hiding tab, and click Followers you will see options related to
who can follow your profile and see your public updates. For a personal LinkedIn account, we
recommend limiting your connections to control the audience for your posts:
Did You Know?
LinkedIn has over 575 million users and 70% of those users reside outside the
U.S.
LinkedIn is more popular with men, which comprise 57% of LinkedIn users.
50% of college students in the U.S. are LinkedIn users.

56
COUNTERING ONLINE IMPOSTERS
Recent years have been marked by an increase in online scams involving cybercriminals looking to
exploit the public’s confidence in the U.S. Armed Services. The U.S. Army had seen an explosion of
cases in which Internet scammers adopt identities of Soldiers at all levels.
Fraudulent online activities involve a variety of schemes. Cybercriminals impersonate service
members, including senior officers, using actual and fictitious information. Criminals create
impersonation accounts to look just like the real account of a Service Member, using very similarly
spelled names and replacing characters with dashes, spaces, and/or homoglyph characters. For
example, a scammer might use a zero instead of an “O” or a number one instead of an “I.”
Criminals will highjack one or more of the photographs found on the Soldiers official and personal
social media page and will have a similar or identical biography. Criminals assume the identities of
Soldiers to exploit the known integrity and ethical credibility of Soldiers and the recognizable honor
of the uniform.
The United States Army Criminal Investigation Command (USACIDC), Major Cybercrime Unit
(MCU) has documented hundreds of instances involving the online impersonation of Army
personnel, including more than 100 in which perpetrators assumed the identities of general officers,
senior civilian officials and senior non-commissioned officers. The increased public exposure of
senior government official’s online use of social media and the amount of basic information and
photographs of senior officials found online, greatly increases the susceptibility of nefarious actors
impersonating officials online. This epidemic is not exclusive to senior officials but to everyone who
wears the uniform.
PROTECT YOURSELF
There are steps you can take to reduce your attack surface. Expediency is paramount. The
USACIDC - MCU has found that the longer an imposter account is active, the greater the
likelihood of misleading others.
A good Internet practice is to conduct Internet searches on yourself and your family members. If
fake profiles are identified, take immediate steps to have them removed. Effectively searching for
yourself requires creativity. Imposters often misspell names and other identifying information,
whether on purpose (to disguise their activities) or because they do not have a command of the
English language.
Generally, imposter accounts violate the terms of service of the social media platform on which
they are created and sometimes violate federal codes (18 USC §912 and others). However,

57
investigations are time consuming and often involve international legal complexities underscoring
the importance of proactive mitigation efforts. Imposter accounts can be reported directly to the
social media site’s officials via their in-platform tools. If you see an imposter account, report it to
the social media network immediately.
Many social media sites’ terms of service permit the creation of fan or parody sites. Generally, these
sites must be clearly marked as “fake,” “parody,” “community,” “fan” or something similar. If there
is any doubt about the legitimacy of a profile, read the terms of service (links to the terms of service
for many sites are provided at the end of this document) and if there is still doubt, report the profile
to the site.
Phishing
Phishing is a social engineering tactic that will attempt to trick you into revealing critical personal
information, like your username and password. It can take many forms, so it is important to learn
how to spot suspicious emails and websites. For example, a social engineer might create a fake login
page that looks legitimate, such as “likedin.com” not “linkedin.com”, and once your password is
revealed, the social engineer could access your account or infect your machine.
To avoid getting phished:
1. Never click on questionable links.
2. Always double-check the URL before you click that link and always make sure you’re
entering your data into a legitimate website or app.
3. Watch out for impersonators.
4. If someone you know emails you but the message seems odd, their account may have been
hacked. Don’t reply to the message or click any links unless you can confirm the email is
legitimate. Look out for things for like urgent requests for money, the person claiming to be
stranded in another country, the person saying their phone was stolen and cannot be called.
5. Be wary of requests for personal information.
6. Don’t reply to suspicious emails, instant messages, or pop-up windows that ask for personal
information, like passwords, bank account or credit card numbers, or even your birthday.
Even if the message comes from a site you trust, like your bank, never click on the link or
send a reply message. It is better to go directly to their website or app to log in to your
account. Remember, legitimate sites and services will not send messages requesting that you
send passwords or financial information over email.
7. Beware of email scams, fake prizes, and gifts.
8. Messages from strangers are always suspect, especially if they seem too good to be true – like
declaring you have won something, offering prizes for completing a survey, or promoting

58
quick ways to make money. Never click suspicious links and never enter personal
information into questionable forms or surveys.
9. Double-check files before downloading.
10. Some sophisticated phishing attacks can occur through infected documents and PDF
attachments. If you come across a suspicious attachment, use Chrome or Google Drive to
open it and reduce the risk of infecting your device. If Chrome detects a virus, you will see a
warning.
11. Have secure connections before accessing sensitive sites.
12. When you are browsing the web – and especially if you plan to enter sensitive information
like a password or credit card number – make sure the connection to the sites you visit is
secure. If it is a secure URL, the Chrome browser will show a gray, fully locked icon in the
URL field. HTTPS helps keep your browsing safe by securely connecting your browser or
app with the websites you visit. Before submitting any information, make sure the site’s URL
begins with “https.” Look for the locked padlock
Identifying Imposter Accounts
Typically, fake profile accounts have few friends or followers (or whatever they are called on a given
site) and most of those friends appear to be women. Their posts are infrequent, poorly worded and
often out of step with Army culture and customs. It is not uncommon for the comments and
pictures to disagree; the imposter will claim to hold a rank inconsistent with the rank insignia of the
soldier in the photographs and there have been instances where the name the imposter uses is not
the name on the uniform name tape. Imposters lift images from different sources and often the
images are outdated.
Some finer points of search engine syntax can help locate fake profiles faster. These techniques and
operators will help you focus efforts and reduce the number of false hits. These techniques work
with Google but this is not an endorsement of the Google search site. Some of these techniques
will work on other Internet search sites. Experimentation is recommended.
First and foremost, log out of the search engine. Search engines track searches and the results of
every search are tailored to your specific interests based upon prior searches. Various search
operators and combinations refine search results. A good tip? Start your exploration with simple
search terms and add complexity.
GOOGLE:
String Search Examples

59
Without the quotes, the results of searching bradley bradson will include any web page that has
bradley AND bradson anywhere in the document. The words need not be together or even in the
order specified. Wrapping the words in quotes creates a phrase and search results will include only
web pages where the phrase bradley bradson is present.
The search operator AROUND(10) (all caps) creates a search for the string bradley bradson and the
word marriage where they occur within ten words of each other. The number of words, in this
example 10, is flexible depending upon specific needs.
The site operator limits results to the website specified, in this case Facebook.com, where the
phrase bradley bradson and marriage occur. Do not chain the site operator (e.g., site:facebook.com
site:twitter.com).
The -site operator excludes matches from the specified website. Chaining multiple websites and
using wildcards help to refine your searches. This syntax searches for websites, other than
Facebook, where the phrase bradley bradson and marriage appear.
Chaining search operators can be an effective means to refine your searches and limit the number
of false hits. For instance, the result of this combination of search terms and operators will include
only those where marriage appears within 10 words of the phrase bradley bradson but not on the
Facebook website or any government site.
Restricting the time frame of the search is an effective way
to reduce results to a manageable level if you regularly check
for fake social media profiles.
For example, you checked last April and took steps to
remove fake social profiles you found. Now it’s October and
time to check again. By limiting the date range, you won’t be
inundated with the same hits that you dealt with six months
ago. You will see only the web pages that were indexed in the past six months. However, if those
web pages have changed, even slightly, since you last searched for fake social media profiles, they

60
will appear in your results. For instance, correcting a spelling error or correcting the double space
after a period to a single space is sufficient.
Most search engines search concepts. For instance,
marriage will return married even though married was
not in the search string. This feature can muddy your
search results. You can instruct Google to return only
those results that contain marriage by setting it to
verbatim.
IMAGE SEARCH EXAMPLES
The reverse image search option in Google Images helps users quickly discover related images from
around the web. Search results may include similar images, sites that include the image or other
sizes of the image searched for.
Reverse image searches work with the following browsers: Internet Explorer 9+, Chrome 5+,
Firefox 4+, and Safari 5+. Multiple options are available when searching for images, but not all of
the browsers have the same capability.
Upload an image (All Browsers)
1. Navigate to https://images.google.com/.
2. Click on the camera icon to open the Search by Image dialog box.
3. Click the Upload and image tab.
4. Click Browse.
5. Select the image from the File Upload window.
6. Click Open to start the images search.
Search using an image URL (All browsers)
1. On any website, right-click an image and select Copy Image URL or Copy Image Location.
2. Navigate to https://images.google.com/.
3. Paste the URL you copied into the Google search box.
4. Click the search icon.
Drag & drop an image into the search box (Chrome or Firefox)

61
1. Navigate to https://images.google.com/.
2. Using Windows file explorer, drag and drop the image you want to search for into the search
box.
3. The search begins automatically. `
Right-click an image on a site (Chrome)
1. Right-click any image you see on a website or in search results results.
2. Click Search Google for this image.
3. A new browser tab will open with the results.
FIREFOX
1. Download the Search by Image extension.
2. Right-click any image you see on a website or in search results.
3. Click Search Image on Google.
4. A new tab will open with your results.
Removing Fake Social Media Pages
There are so many social media sites, it is impossible for OSMD to provide guidance on even most
of them. Highlighted here are some major social media sites. For other sites, users must navigate the
sometimes confusing menus and options to find the steps required to remove an imposter profile.
FACEBOOK
If you are a designated representative of a general officer or an SES, contact OSMD directly so
OSMD can add you to Facebook’s Partner Portal. Once you have been added, you will have access
to an expedited Facebook reporting process reserved for, among others, high ranking government
officials.
As a designated representative, once you’ve located an imposter profile:
1. Log in to Facebook using your profile that has been added to Facebook’s Partner Portal.
2. Navigate to the imposter profile.
3. Copy the Unform Resource Locator (URL).
4. Navigate to https://www.facebook.com/help/294708857296204
5. Follow the on-screen instructions.
If you are not a designated representative and you have located a profile of someone pretending to
be you:
1. Log in to Facebook.
2. Go to the imposter profile.
3. Click on the ellipsis (…) in the lower right corner of the cover photo.
4. Click Report and follow the onscreen on-screen instructions.

62
Alternatively, you can navigate to https://www.facebook.com/help/contact/295309487309948 and
follow the instructions to report an imposter profile. Follow the on-screen instructions.
SKYPE
1. Navigate to the imposter’s Skype profile.
2. Right-click on the upper part of the right side of the Skype window and choose View Profile
to find the Skype user name. Please note that there is no space in a Skype user name (i.e.
gen.bernard.champoux). Email abuse@microsoft.com
and provide the Skype user name.
TWITTER:
1. Log in to your Twitter account.
2. Navigate to https://help.twitter.com/forms/impersonation.
3. Select An account is pretending to be me or someone I know or An account is
pretending to be or represent my company, brand, or organization as appropriate.
4. Follow the on-screen instructions.
LINKEDIN:
If you represent a general officer or SES, submit the names, emails and phone numbers of your
social media representatives to OSMD. OSMD will list those names and the represented Army
senior leaders to the LinkedIn government liaison and provide a direct email to the liaison to report
fake profiles.
If you do not represent, or are not, a general officer or SES:
1. Log in to your LinkedIn account
2. Navigate to the imposter account
3. Click the down arrow next to Send a Message.
4. Select Block or report.
5. Select the box next to Report.
6. Select the reason for reporting the account from the drop-down “Flag profile as” menu.
7. Select misrepresentation.
8. Include a detailed justification about why you believe the account is a misrepresentation.
9. Click Continue and follow the on-screen instructions.
An alternate method that requires your declaration, under penalty of perjury, that the allegations of
impersonation are true and correct:
1. Log in to your LinkedIn account.
2. Navigate to https://help.linkedin.com/app/ask/path/TS-NFPI
.
3. Follow the on-screen instructions.
PINTEREST
1. Log in to your Pinterest account.

63
2. Navigate to https://help.pinterest.com/en/login-request.
3. Select Continue without logging in.
4. Select Report Something.
5. Select Impersonation.
6. Follow the on-screen instructions.
MYSPACE
With a myspace account:
1. Log in to your myspace account.
2. Navigate to the imposter account.
3. Hover your mouse over the connect icon (two intertwined circles) and select Report on the
drop down menu.
4. Select This is me! > This profile is pretending to be me.
5. Follow the on-screen instructions.
Without a myspace account:
1. Send an email to support@myspace.com
with as much information about the fake profile as
you can collect using screen shots and be certain to include the offending profile’s URL.
Myspace will likely request additional information before action is takenFlickr
1. Navigate to https://www.flickr.com/abuse.
2. From the What would you like to report drop down, select Other Concerns.
3. Complete the form with as much detail as possible.
4. Click Send.
INSTAGRAM
Like Pinterest, you cannot search Instagram without an Instagram account. You can, however,
report a fake Instagram account without actually having an Instagram account.
1. Navigate to https://www.facebook.com/help/instagram/contact/636276399721841
.
2. Choose the best option from the available options under Which of the following best
describes your situation.
3. Follow the on-screen instructions.
DEVIANTART
1. Navigate to https://help.deviantart.com/contact/
.
2. Complete the contact form with as much detail as possible.
3. Select Abuse Report from the category drop down menu.
4. Include the link to the imposter profile by right clicking on the profile name, selecting copy
link address and pasting the information into the comment section.

64
5. Click Finish.
OTHER SITES
For sites other than those listed here, report fake profiles directly to the host site. If you receive a
report from someone who has been contacted by an imposter, gather as much information from
this person as possible: URLs, email addresses, times and dates of impersonator contact, copies of
any messages, victim identification in case follow-up is warranted. Send that information to the
emails listed below. Encourage the person to report the impersonations to the Internet Crime
Complaint Center (IC3) (www.ic3.gov
). IC3 is not an investigative agency and does not have law
enforcement authorities but they will forward complaints to appropriate law enforcement agencies.
As an alternative, refer the person to the Federal Trade Commission (FTC) Complaint Assistant
(www.ftccomplaintassistant.gov/
) and follow instructions to report an incident of someone falsely
claiming to be a government employee. The FTC cannot resolve individual complaints, but they can
provide information about what steps to take.
If you believe you are the victim of a crime or believe that a crime has been committed, document
all contacts submit the information to the CID crime tips system by visiting,
https://www.cid.army.mil/
. In addition to the web interface, a mobile crime tips submission app is
available for free download from the Apple Store and Google Play at
http://www.p3tips.com/app.aspx?ID=325.
LINKS TO TERMS OF SERVICE
Facebook: https://www.facebook.com/policies/
Skype: https://www.microsoft.com/en-US/servicesagreement/
Twitter: https://twitter.com/tos?lang=en
LinkedIn: https://www.linkedin.com/legal/user-agreement
Pinterest: https://about.pinterest.com/en/terms-service
MySpace: https://myspace.com/pages/terms
Flickr: https://www.flickr.com/services/api/tos/
Instagram: https://help.instagram.com/478745558852511
DeviantArt: https://about.deviantart.com/policy/service/#skins

65
REPORTING IDENTITY THEFT OR ONLINE IMPERSONATION
If you have been a victim of identity theft or online impersonation, below is general guidance
from CID and the Army Public Affairs Online Social Media Division.
• Report the identity theft or impersonation to the Internet Crime Complaint Center (IC3)
• Report Nigerian Scam related frauds to the Federal Trade Commission.
• If you are a victim of fraud (not impersonation), report the fraud to your local law enforcement
agencies or to:
(1) Federal Bureau of Investigation
(2) United States Secret Service
(3) United States Postal Inspection Service
For further information, advice or assistance, please contact the Major Cybercrime Unit, Digital
Persona Protection Program (DP3) at usarmy.belvoir.usacidc.mbx.dp3@mail.mil
.
NOTES__________________________________________

66
