
Salesforce CLI Setup Guide
Version 61.0, Summer ’24
Last updated: August 2, 2024
©
Copyright 2000–2024 Salesforce, Inc. All rights reserved. Salesforce is a registered trademark of Salesforce, Inc., as are other
names and marks. Other marks appearing herein may be trademarks of their respective owners.

CONTENTS
Chapter 1: Before You Begin . . . . . . . . . . . . . . . . . . . . . . . . . . . . . . . . . . . . . . . . . . . . 1
Chapter 2: Release Notes . . . . . . . . . . . . . . . . . . . . . . . . . . . . . . . . . . . . . . . . . . . . . . 3
Chapter 3: Move from sfdx (v7) to sf (v2) . . . . . . . . . . . . . . . . . . . . . . . . . . . . . . . . . . . 4
Chapter 4: Install Salesforce CLI . . . . . . . . . . . . . . . . . . . . . . . . . . . . . . . . . . . . . . . . . 9
Install the CLI on macOS . . . . . . . . . . . . . . . . . . . . . . . . . . . . . . . . . . . . . . . . . . . . . . . . . 10
Install the CLI on Windows . . . . . . . . . . . . . . . . . . . . . . . . . . . . . . . . . . . . . . . . . . . . . . . 10
Install the CLI with a TAR File . . . . . . . . . . . . . . . . . . . . . . . . . . . . . . . . . . . . . . . . . . . . . . 10
Install the CLI with npm . . . . . . . . . . . . . . . . . . . . . . . . . . . . . . . . . . . . . . . . . . . . . . . . . 12
Install Older Versions of Salesforce CLI . . . . . . . . . . . . . . . . . . . . . . . . . . . . . . . . . . . . . . . 12
Verify Your Installation And Get Version Information . . . . . . . . . . . . . . . . . . . . . . . . . . . . . . 15
Chapter 5: Update Salesforce CLI . . . . . . . . . . . . . . . . . . . . . . . . . . . . . . . . . . . . . . . 17
Update to the CLI Release Candidate or Nightly . . . . . . . . . . . . . . . . . . . . . . . . . . . . . . . . . 19
Disable Automatic Update of the CLI . . . . . . . . . . . . . . . . . . . . . . . . . . . . . . . . . . . . . . . . 20
Chapter 6: Salesforce CLI Configuration and Tips . . . . . . . . . . . . . . . . . . . . . . . . . . . . 21
Autocomplete Salesforce CLI Commands and Flags . . . . . . . . . . . . . . . . . . . . . . . . . . . . . . 22
Use Salesforce CLI from Behind a Company Firewall or Web Proxy . . . . . . . . . . . . . . . . . . . . 24
Windows Performance Suggestions . . . . . . . . . . . . . . . . . . . . . . . . . . . . . . . . . . . . . . . . 25
Configuration Variables . . . . . . . . . . . . . . . . . . . . . . . . . . . . . . . . . . . . . . . . . . . . . . . . 26
Salesforce CLI Environment Variables . . . . . . . . . . . . . . . . . . . . . . . . . . . . . . . . . . . . . . . 29
How API Version and Source API Version Work in Salesforce CLI . . . . . . . . . . . . . . . . . . . . . 37
CLI Parameter Resolution Order . . . . . . . . . . . . . . . . . . . . . . . . . . . . . . . . . . . . . . . . . . . 40
Support for JSON Responses . . . . . . . . . . . . . . . . . . . . . . . . . . . . . . . . . . . . . . . . . . . . . 41
Specify Topics and Commands in Any Order . . . . . . . . . . . . . . . . . . . . . . . . . . . . . . . . . . 43
Customize the Colors in Help Output . . . . . . . . . . . . . . . . . . . . . . . . . . . . . . . . . . . . . . . . 44
Log Messages and Log Levels . . . . . . . . . . . . . . . . . . . . . . . . . . . . . . . . . . . . . . . . . . . . 45
Enable 256-Bit Encryption of Authorization Files . . . . . . . . . . . . . . . . . . . . . . . . . . . . . . . . . 46
Prerequisites . . . . . . . . . . . . . . . . . . . . . . . . . . . . . . . . . . . . . . . . . . . . . . . . . . . . 46
Enable 256-Bit Encryption (v2 Crypto) . . . . . . . . . . . . . . . . . . . . . . . . . . . . . . . . . . . . 47
Go Back to 128-Bit Encryption (v1 Crypto) . . . . . . . . . . . . . . . . . . . . . . . . . . . . . . . . . . 48
Disable Salesforce CLI Data Collection and Metrics . . . . . . . . . . . . . . . . . . . . . . . . . . . . . . 48
Chapter 7: Uninstall Salesforce CLI or Plugins . . . . . . . . . . . . . . . . . . . . . . . . . . . . . . 49
Chapter 8: Run Salesforce CLI Using a Docker Image . . . . . . . . . . . . . . . . . . . . . . . . . 51
Chapter 9: Salesforce CLI Plugins . . . . . . . . . . . . . . . . . . . . . . . . . . . . . . . . . . . . . . . 53
Install a CLI Plugin . . . . . . . . . . . . . . . . . . . . . . . . . . . . . . . . . . . . . . . . . . . . . . . . . . . . 56
Install Other Versions of Salesforce CLI Plugins . . . . . . . . . . . . . . . . . . . . . . . . . . . . . . . . . 56
Install Trusted Unsigned Plugins Automatically . . . . . . . . . . . . . . . . . . . . . . . . . . . . . . . . . 57
Discover Salesforce Plugins . . . . . . . . . . . . . . . . . . . . . . . . . . . . . . . . . . . . . . . . . . . . . . 57
Quickly Uninstall All Non-Core Plugins . . . . . . . . . . . . . . . . . . . . . . . . . . . . . . . . . . . . . . . 58
Chapter 10: Troubleshoot Salesforce CLI . . . . . . . . . . . . . . . . . . . . . . . . . . . . . . . . . . 59
Check Our GitHub Repository for Issues and Discussions . . . . . . . . . . . . . . . . . . . . . . . . . . 60
Use the Doctor to Troubleshoot Problems . . . . . . . . . . . . . . . . . . . . . . . . . . . . . . . . . . . . 60
Debug Errors When Deploying or Retrieving Source . . . . . . . . . . . . . . . . . . . . . . . . . . . . . 63
Error: Bad CPU Type . . . . . . . . . . . . . . . . . . . . . . . . . . . . . . . . . . . . . . . . . . . . . . . . . . . 64
Where is Salesforce CLI Installed? . . . . . . . . . . . . . . . . . . . . . . . . . . . . . . . . . . . . . . . . . . 64
Error: Command Failed with ENOENT . . . . . . . . . . . . . . . . . . . . . . . . . . . . . . . . . . . . . . . . 65
Error After Installing Salesforce CLI on PowerShell Using npm . . . . . . . . . . . . . . . . . . . . . . . 65
Error Installing on Windows About the PATH Not Updated . . . . . . . . . . . . . . . . . . . . . . . . . 66
Chapter 11: CLI Deprecation Policy . . . . . . . . . . . . . . . . . . . . . . . . . . . . . . . . . . . . . . . 67
Chapter 12: Next Steps . . . . . . . . . . . . . . . . . . . . . . . . . . . . . . . . . . . . . . . . . . . . . . . 68
Contents

CHAPTER 1 Before You Begin
Salesforce CLI is a command-line interface that simplifies development and build automation when
working with your Salesforce org. Use it to create and manage orgs, synchronize source to and from
orgs, create and install packages, and more.
Important: Are you still using sfdx (v7)? See Move from sfdx (v7) to sf (v2) if so.
Salesforce CLI is based on oclif, an open-source framework for building command-line interfaces in
Node.js. You run it on your local machine or continuous integration (CI) system. It supports the installation
of custom plugins.
We release new versions of the CLI and plugins weekly. Read the weekly release notes to learn about
recent and upcoming changes.
System Requirements
Before you begin, review these system requirements to get the most out of Salesforce CLI and developer
tools.
Operating Systems
Salesforce CLI supports the following operating systems.
•
Windows—Windows 8.1 and Windows Server 2012 (64-bit and 32-bit) or later
•
Mac—macOS 10.11 or later (Intel and M1)
•
Linux—Ubuntu 20.04
Code Editor or IDE
You can use any code editor. We recommend that you use Visual Studio Code (VS Code) and install
the Salesforce Extensions for VS Code that are designed for development on Salesforce Platform.
Note: If you’re using Salesforce Extensions for VS Code, keep in mind that some CLI commands
are unavailable in the command palette. If you can’t find a command in VS Code, run it in the
integrated terminal.
Enable API System Permission
Salesforce CLI requires the API Enabled system permission, which provides programmatic access to
your org's information. If you’re unable to run CLI commands, ask your Salesforce admin to enable
this permission.
Version Control System
You can use any version control system (VCS). We recommend that you use GitHub to take advantage
of the samples in our GitHub repository.
1

Node.js
We bundle Node.js in each operating system-specific Salesforce CLI installer. We include the version
of Node.js with Active LTS status and update it in tandem with the Node.js release schedule.
If you prefer to install Salesforce CLI using npm, we recommend you also use the Active LTS version
of Node.js.
Salesforce CLI Version Support
Salesforce supports only the most current version of Salesforce CLI. See the Salesforce CLI Release Notes
for the latest version information.
SEE ALSO:
Salesforce Extensions for Visual Studio Code
Salesforce DX Developer Guide
Salesforce CLI Command Reference
oclif: The Open CLI Framework
2
Before You Begin

CHAPTER 2 Salesforce CLI Release Notes
Use the Release Notes to learn about the most recent updates and changes to Salesforce CLI.
We release new versions of Salesforce CLI weekly. Read the weekly release notes to learn about new
features, changes, and bug fixes in both the current release and the release candidate.
3

CHAPTER 3 Move from sfdx (v7) to sf (v2)
If you’re currently using sfdx (v7), we highly recommend that you move to sf (v2). The move is easy:
you first uninstall sfdx (v7) and then install sf (v2). After you move, the CLI commands that you’ve
been running in a terminal or continuous integration (CI) scripts continue to work as before.
Important: You must uninstall sfdx (v7) before you install sf (v2), or you can get an installation
error. This requirement applies to all installation methods: npm, OS-specific installers, and TAR
files.
To determine if sfdx (v7) is installed on your computer, run this command in a terminal (macOS
and Linux) or command prompt (Windows):
sfdx version
sfdx-cli/7.208.10 darwin-arm64 node-v18.16.0
If the displayed version starts with sfdx-cli/7, as shown, then sfdx (v7) is installed on your
computer.
The sections in this document show how to move to sf (v2) for the three installation methods: npm,
macOS or Windows installers, and TAR files. Pick the section that applies to your environment. If you’re
not sure how you originally installed sfdx (v7), read this document. Are you using Docker? Read our
updated Docker instructions to see how to get the sf (v2) image.
npm
1. Open a terminal (macOS and Linux) or command prompt (Windows).
2. Uninstall sfdx (v7) with this command:
npm uninstall sfdx-cli --global
3. Verify that you've uninstalled sfdx (v7) by running the sfdx version command. If you
uninstalled correctly, the command fails. For example, on macOS:
sfdx version
-bash: sfdx: command not found
4. Install sf (v2) with this command.
npm install @salesforce/cli --global
If you already had sf (v1) installed, this command updates it to v2.
4

5. Verify that you've installed sf (v2) by running this command:
sf version
@salesforce/cli/2.0.1 darwin-arm64 node-v18.16.0
The version starts with @salesforce/cli/2. The following command also returns the same
version because sfdx is now aliased to sf:
sfdx version
@salesforce/cli/2.0.1 darwin-arm64 node-v18.16.0
Congrats, you successfully moved to sf (v2)!
macOS or Windows Installers
Installers refer to the Windows .exe or macOS .pkg installer files.
1. Uninstall your current sfdx (v7) installation.
As of October 2021, if you originally installed Salesforce CLI using the OS-specific installers, you
actually got two interoperable CLIs (AKA executables) bundled together: sfdx (v7) and sf (v1).
When you uninstall Salesforce CLI, it removes both executables.
2. Open a terminal (macOS) or command prompt (Windows).
3. Verify that you've uninstalled sfdx (v7) by running the sfdx version command. If you
uninstalled correctly, the command fails. For example, on macOS:
sfdx version
-bash: sfdx: command not found
4. Install sf (v2) using these installer links:
•
macOS
–
Apple Silicon
–
Intel CPU
•
Windows
–
x64
–
x86
5. Verify that you've installed sf (v2) by running this command:
sf version
@salesforce/cli/2.0.1 darwin-arm64 node-v18.16.0
The version starts with @salesforce/cli/2. The following command also returns the same
version because sfdx is now aliased to sf:
sfdx version
@salesforce/cli/2.0.1 darwin-arm64 node-v18.16.0
Congrats, you successfully moved to sf (v2)!
5
Move from sfdx (v7) to sf (v2)

TAR Files
Salesforce CLI distributes TAR files that you can install on all supported operating systems.
1. Uninstall your current sfdx (v7) installation.
As of October 2021, if you originally installed Salesforce CLI using TAR files, you actually got two
interoperable CLIs (AKA executables) bundled together: sfdx (v7) and sf (v1). When you uninstall
Salesforce CLI, it removes both executables.
2. Open a terminal (macOS and Linux) or command prompt (Windows).
3. Verify that you've uninstalled sfdx (v7) by running the sfdx version command. If you
uninstalled correctly, the command fails. For example, on macOS:
sfdx version
-bash: sfdx: command not found
4. Install sf (v2).
5. Verify that you've installed sf (v2) by running this command:
sf version
@salesforce/cli/2.0.1 darwin-arm64 node-v18.16.0
The version starts with @salesforce/cli/2. The following command also returns the same
version because sfdx is now aliased to sf:
sfdx version
@salesforce/cli/2.0.1 darwin-arm64 node-v18.16.0
Congrats, you successfully moved to sf (v2)!
Update Your Continuous Integration (CI) Scripts
If you use Salesforce CLI in a continuous integration (CI) system, update your scripts to use sf (v2).
npm
If your CI scripts install Salesforce CLI with npm, update them to use this command to install sf
(v2):
npm install @salesforce/cli --global
Warning: When updating your CI script, if it includes this command to install sfdx (v7),
you must remove it:
npm install sfdx-cli --global
If you keep both commands, the command to install sf (v2) returns an error and your script
fails.
6
Move from sfdx (v7) to sf (v2)

TAR Files
If your CI scripts install Salesforce CLI with TAR files, update the download URLs to point to the sf
(v2) downloads. For example, change this URL:
https://developer.salesforce.com/media/salesforce-cli/sfdx/channels/stable/sfdx-linux-x64.tar.gz
To this URL:
https://developer.salesforce.com/media/salesforce-cli/sf/channels/stable/sf-linux-x64.tar.gz
See Install the CLI with a TAR File for the URLs for all operating systems.
After You Move to sf (v2)
Here are a few things to be aware of after you make the move.
•
Regenerate your autocomplete cache by running this command in a terminal (macOS and Linux)
or command prompt (Windows).
sf autocomplete --refresh-cache
Open a new terminal for the change to take effect. Autocomplete doesn’t work correctly until you
regenerate its cache.
•
Every CLI command execution, VS Code invocation of Salesforce CLI, and CI script works the same
in both sfdx (v7) and sf (v2). If you find a difference, open a GitHub issue.
•
You can run commands with either sfdx or sf; they’re now the same. For example, these two
command executions are the same.
sf project deploy start
sfdx project deploy start
Everything that was in sfdx is available in sf, with the same names and flags.
Why Should You Move?
sf (v2) became generally available on July 12, 2023. At that time we stopped publishing updates to
sfdx (v7) and sf (v1). To get new Salesforce CLI features and bug fixes, you must use sf (v2).
Also, sfdx (v7) is twice the size of sf (v2) because it also includes sf (v1). To reduce the size of your
Salesforce CLI installation and downloads, we recommend you move to sf (v2).
Troubleshoot npm Error: code EEXIST
If you try to install sf (v2) using npm without first uninstalling sfdx (v7), you get this error:
npm ERR! code EEXIST
npm ERR! path /Users/user/.nvm/versions/node/v18.16.0/bin/sfdx
npm ERR! EEXIST: file already exists
npm ERR! File exists: /Users/user/.nvm/versions/node/v18.16.0/bin/sfdx
npm ERR! Remove the existing file and try again, or run npm
npm ERR! with --force to overwrite files recklessly.
7
Move from sfdx (v7) to sf (v2)

npm ERR! A complete log of this run can be found in:
npm ERR!
/Users/user/.npm/_logs/2023-06-28T22_16_15_181Z-debug-0.log
You can also encounter this error in your continuous integration (CI) system when sf (v2) becomes
generally available. If your CI scripts already use npm to install both sfdx (v7) and sf (v1), and you
don’t update the script, the error can start happening automatically as of July 12, 2023.
To fix the problem, remove this command from your script.
npm install sfdx-cli --global
Keep this command, which installs sf (v2).
npm install @salesforce/cli --global
Return to sfdx (v7)
We don’t anticipate any reason for you to move back to sfdx (v7). However, if you must return, follow
these steps.
1. Uninstall sf (v2).
2. Install sfdx (v7).
For npm, run this command in a terminal (macOS and Linux) or command prompt (Windows).
npm install sfdx-cli --global
For the installers and TAR files, refer to the sfdx (v7) JSON files that list the recent download URLs
for each supported operating system. See this topic on page 14 for details.
Note: As of July 12, 2023, the web page to download Salesforce CLI has been updated to
download only sf (v2).
3. In your CI scripts, go back to the npm commands or TAR download URLs you were using before.
SEE ALSO:
Salesforce CLI Command Reference: Migrate sfdx-Style Commands to the New sf-Style
8
Move from sfdx (v7) to sf (v2)

CHAPTER 4 Install Salesforce CLI
Install Salesforce CLI on your computer using operating system-specific artifacts, such as .pkg on
macOS, TAR files, or with npm.
In this chapter ...
• Install the CLI on
macOS
Choose one method to install on your computer. For example, don’t install on macOs with both a .pkg
file and npm. Installing it both ways can lead to confusing path issues on your computer, sometimes
without an explicit error and thus difficult to diagnose.
• Install the CLI on
Windows
• Install the CLI with a
TAR File
• Install the CLI with
npm
• Install Older Versions
of Salesforce CLI
• Verify Your
Installation And Get
Version Information
9

Install the CLI on macOS
Install Salesforce CLI on macOS with a .pkg file.
1. Download the .pkg file.
2. Run the .pkg file, such as double-clicking it from Finder, and answer all the prompts.
3. After the installation completes, restart your Terminal windows or IDEs to make sure Salesforce CLI is available.
SEE ALSO:
Verify Your Installation And Get Version Information
Disable Automatic Update of the CLI
Install the CLI on Windows
Install Salesforce CLI on Windows with an .exe file.
1. Download the .exe file.
2. Run the .exe file, such as double-clicking it from Windows Explorer, and answer all the prompts.
(Optional) In the Choose Components window, if you want Microsoft Defender Antivirus to exclude the installed Salesforce CLI files
when it scans, select Add %LOCALAPPDATA%\sf to Windows Defender exclusions.
This option is initially deselected because we want the default Windows installation to be more secure. But excluding the CLI files
from the antivirus scans improves the performance of Salesforce CLI, which is why we give you the option. Use with care.
3. After the installation completes, restart your command prompts, PowerShell windows, or IDE to make sure Salesforce CLI is available.
Warning: Salesforce CLI works best within the native Windows command prompt (cmd.exe) and the Microsoft Windows
PowerShell. We don’t recommend using Salesforce CLI with a Linux terminal emulator, such as Windows 10 Subsystem for Linux,
cygwin, or MinGW, because support for bugs is limited.
SEE ALSO:
Verify Your Installation And Get Version Information
Disable Automatic Update of the CLI
Install the CLI with a TAR File
Salesforce CLI distributes TAR files that you can install on all supported operating systems.
Use this table to find the unversioned URLs for the TAR file (.tar.gz or .tar.xz ) for your operating system. When we release a
new version of Salesforce CLI every week, we also update these URLs so they point to the most up-to-date version. Unversioned URLs
are especially useful for CI use cases. The table also includes manifest URLs that show the versioned URL for each file.
ManifestTar FilesOperating System
Linux
•
sf-linux-x64-buildmanifest
•
sf-linux-x64.tar.gz
•
sf-linux-x64.tar.xz
•
sf-linux-arm-buildmanifest
••
sf-linux-arm.tar.gz sf-linux-arm64-buildmanifest
10
Install the CLI on macOSInstall Salesforce CLI

ManifestTar FilesOperating System
•
sf-linux-arm.tar.xz
•
sf-linux-arm64.tar.gz
•
sf-linux-arm64.tar.xz
macOS
•
sf-darwin-x64-buildmanifest (Intel CPU)
•
sf-darwin-x64.tar.gz (Intel CPU)
•
sf-darwin-x64.tar.xz (Intel CPU)
•
sf-darwin-arm64-buildmanifest (Apple
Silicon)
•
sf-darwin-arm64.tar.gz (Apple Silicon)
•
sf-darwin-arm64.tar.xz (Apple Silicon)
Windows
•
sf-win32-x64-buildmanifest
•
sf-win32-x64.tar.gz
•
sf-win32-x64.tar.xz
•
sf-win32-x86-buildmanifest
•
sf-win32-x86.tar.gz
•
sf-win32-x86.tar.xz
Important: We highly recommended that you use the installers or npm to install Salesforce CLI on Windows. If, however, you
decide to use the Windows TAR files, you must first install a separate program, such as 7Zip, to extract the file contents.
In these examples it’s assumed that you’re installing Salesforce CLI on Linux and in the cli/sf subdirectory of your home directory.
1. Open a terminal window.
2. Download one of these TAR files. Alternatively, run wget in the terminal to get a TAR file.
wget
https://developer.salesforce.com/media/salesforce-cli/sf/channels/stable/sf-linux-x64.tar.xz
3. Create the directory where you want to install Salesforce CLI.
mkdir -p ~/cli/sf
4. Unpack the contents for your TAR file:
tar xJf sf-linux-x64.tar.xz -C ~/cli/sf --strip-components 1
-C unpacks the contents in the ~/cli/sf directory, while --strip-components 1 removes the root path component.
Note: This example shows just one possible set of flags for the tar command on Linux. For other options on your operating
system, refer to the tar documentation.
5. Update your PATH environment variable to include the Salesforce CLI bin directory. For example, to set it for your current terminal
session:
export PATH=~/cli/sf/bin:$PATH
11
Install the CLI with a TAR FileInstall Salesforce CLI

To update your PATH permanently, add the appropriate entry to your shell’s configuration file. For example, if you use the Bash shell,
add this line to your ~/.bashrc or ~/.bash_profile file:
PATH=~/cli/sf/bin:$PATH
SEE ALSO:
Verify Your Installation And Get Version Information
Disable Automatic Update of the CLI
Install the CLI with npm
If you've installed Node.js on your computer, you can use npm to install Salesforce CLI. This method lets you install Salesforce CLI
from the command line and can be especially useful for continuous integration (CI) use cases.
This installation method is a good option if you don’t have administrator permissions on your workstation, or if group policy blocks CLI
installation and updates. Installing Salesforce CLI with npm doesn’t require root permissions.
1. Open a terminal (macOS and Linux) or command prompt (Windows).
2. Ensure that the long-term support (Active LTS) version of Node.js is installed on your computer. To install the LTS version, go to
https://nodejs.org/en/download/. To check your version number, run this command from the terminal or command prompt:
node --version
3. To install Salesforce CLI, run this command.
npm install @salesforce/cli --global
If you receive a permission error when installing Salesforce CLI using npm macOS or Linux, we don’t recommend using sudo. See
Fixing npm permissions.
SEE ALSO:
Verify Your Installation And Get Version Information
npm Documentation
Install Older Versions of Salesforce CLI
We recommend that you always use the latest version or release candidate of Salesforce CLI. However, we also understand that sometimes
you want an older version of the CLI.
Installers
If you installed Salesforce CLI with the installers, update to an older version with the --version flag. For example, to update to version
2.0.1, run this command in a terminal (macOS and Linux) or command prompt (Windows).
sf update --version 2.0.1
12
Install the CLI with npmInstall Salesforce CLI

Use the --available flag to list all available older versions to which you can update. The output also shows whether you already
have a local copy or if it must be downloaded.
sf update --available
Use --interactive to choose a version interactively.
Use this command to return to the current version.
sf update stable
npm
To update to an older version of Salesforce CLI using npm, specify the version using @<version> after the @salesforce/cli
package name. For example, to update to version 2.0.1, run this command in a terminal (macOS and Linux) or command prompt
(Windows).
npm install @salesforce/[email protected] --global
To return to the current version, run this command.
npm install @salesforce/cli --global
See the Salesforce CLI npmjs.com page for a list of all versions. We keep all old versions of the @salesforce/cli and sfdx-cli (deprecated)
npm packages.
TAR Files
We publish JSON files that list the download URLs for recent versions of the installers and TAR files for each supported operating system.
We continually add new versions to the lists; versions remain on the list for 20 weeks. We keep the TAR and installer files themselves for
40 weeks minimum.
sf (v2)
Link to JSON FileTAR Compression
Type
File TypeOperating
System
sf-linux-arm-tar-gz.jsongzTARLinux ARM
sf-linux-arm-tar-xz.jsonxzTARLinux ARM
sf-linux-x64-tar-gz.jsongzTARLinux 64
sf-linux-x64-tar-xz.jsonxzTARLinux 64
sf-win32-x64-tar-gz.jsongzTARWindows 64
sf-win32-x64-tar-xz.jsonxzTARWindows 64
sf-win32-x86-tar-gz.jsongzTARWindows x86
sf-win32-x86-tar-xz.jsonxzTARWindows x86
sf-darwin-x64-tar-gz.jsongzTARmacOS (Intel CPU)
sf-darwin-x64-tar-xz.jsonxzTARmacOS (Intel CPU)
13
Install Older Versions of Salesforce CLIInstall Salesforce CLI

Link to JSON FileTAR Compression
Type
File TypeOperating
System
sf-darwin-arm64-tar-gz.jsongzTARmacOS (Apple
Silicon)
sf-darwin-arm64-tar-xz.jsonxzTARmacOS (Apple
Silicon)
sf-x64-exe.jsonInstallerWindows 64
sf-x86-exe.jsonInstallerWindows x86
sf-x64-pkg.jsonInstallermacOS (Intel CPU)
sf-arm64-pkg.jsonInstallermacOS (Apple
Silicon)
sfdx (v7) - Deprecated
Note: As of July 12, 2023, we no longer update sfdx (v7). We keep these old versions for historical reasons only.
Link to JSON FileTAR Compression
Type
File TypeOperating
System
sfdx-linux-arm-tar-gz.jsongzTARLinux ARM
sfdx-linux-arm-tar-xz.jsonxzTARLinux ARM
sfdx-linux-x64-tar-gz.jsongzTARLinux 64
sfdx-linux-x64-tar-xz.jsonxzTARLinux 64
sfdx-win32-x64-tar-gz.jsongzTARWindows 64
sfdx-win32-x64-tar-xz.jsonxzTARWindows 64
sfdx-win32-x86-tar-gz.jsongzTARWindows x86
sfdx-win32-x86-tar-xz.jsonxzTARWindows x86
sfdx-darwin-x64-tar-gz.jsongzTARmacOS (Intel CPU)
sfdx-darwin-x64-tar-xz.jsonxzTARmacOS (Intel CPU)
sfdx-darwin-arm64-tar-gz.jsongzTARmacOS (Apple
Silicon)
sfdx-darwin-arm64-tar-xz.jsonxzTARmacOS (Apple
Silicon)
sfdx-x64-exe.jsonInstallerWindows 64
sfdx-x86-exe.jsonInstallerWindows x86
sfdx-x64-pkg.jsonInstallermacOS (Intel CPU)
14
Install Older Versions of Salesforce CLIInstall Salesforce CLI

Link to JSON FileTAR Compression
Type
File TypeOperating
System
sfdx-arm64-pkg.jsonInstallermacOS (Apple
Silicon)
Verify Your Installation And Get Version Information
To ensure that you’ve installed Salesforce CLI correctly, run these commands to view the version and list of available commands.
To view the Salesforce CLI version that you’ve installed, run this command in a terminal (macOS and Linux) or command prompt
(Windows).
sf --version
The command returns details about the version, such as this example output.
@salesforce/cli/2.17.10 darwin-x64 node-v20.9.0
To view the installed core plugins and their versions, run this command.
sf plugins --core
The command displays information such as this sample output.
@oclif/plugin-autocomplete 3.0.1 (core)
@oclif/plugin-commands 3.0.6 (core)
@oclif/plugin-help 6.0.5 (core)
@oclif/plugin-not-found 3.0.3 (core)
@oclif/plugin-plugins 4.1.0 (core)
@oclif/plugin-search 1.0.6 (core)
@oclif/plugin-update 4.1.3 (core)
@oclif/plugin-version 2.0.6 (core)
@oclif/plugin-warn-if-update-available 3.0.2 (core)
@oclif/plugin-which 3.0.8 (core)
@salesforce/cli 2.17.10 (core)
apex 2.3.20 (core)
auth 2.8.26 (core)
data 2.6.3 (core)
deploy-retrieve 1.20.0 (core)
info 3.0.1 (core)
limits 3.0.1 (core)
login 2.0.1 (core)
marketplace 1.0.2 (core)
org 2.11.8 (core)
schema 3.0.1 (core)
settings 2.0.2 (core)
sobject 0.2.15 (core)
source 2.11.0 (core)
telemetry 3.1.0 (core)
templates 55.5.18 (core)
trust 3.0.1 (core)
user 2.3.42 (core)
15
Verify Your Installation And Get Version InformationInstall Salesforce CLI

Uninstalled JIT Plugins:
community 2.4.9
custom-metadata 2.2.12
dev 1.3.2
devops-center 1.2.4
env 3.0.1
functions 1.22.9
packaging 1.27.1
signups 1.5.6
@salesforce/sfdx-plugin-lwc-test 1.1.1
@salesforce/sfdx-scanner 3.18.0
To view all available Salesforce CLI commands, run this command.
sf commands
The list of commands includes aliased commands, such as force:apex:execute, the sfdx-style command that’s aliased to
apex run.
To display the release notes for the version of Salesforce CLI that’s currently installed on your computer, run this command.
sf whatsnew
SEE ALSO:
Salesforce CLI Plugins
16
Verify Your Installation And Get Version InformationInstall Salesforce CLI

CHAPTER 5 Update Salesforce CLI
If you want to ensure that you’re running the latest version of Salesforce CLI, you can manually update
it.
In this chapter ...
• Update to the CLI
Release Candidate or
Nightly
Determine How You Installed Salesforce CLI
Because the method to update or uninstall Salesforce CLI differs depending on whether you used the
installers or npm, you must know how you installed before you can update or uninstall. In case you
forgot, here are some tips.
• Disable Automatic
Update of the CLI
•
Run sf update in a terminal (macOS and Linux) or command prompt (Windows). If Salesforce
CLI successfully updates, then you installed with the installers. If the command returns this or similar
warning, then you installed with npm:
sf update
› Warning: Use "npm update --global @salesforce/cli" to update
npm-based installations.
@salesforce/cli: Updating CLI... not updatable
If you get an error similar to this one, then you’re probably still using sf (v1), which was bundled
with sfdx (v7):
Running "sf update" has no effect because you're using a version
of sf that was installed by sfdx.
Both sf (v1) and sfdx (v7) are deprecated, so see Move from sfdx (v7) to sf (v2) for information
on how to move to the latest supported version of Salesforce CLI, which is sf (v2).
•
Run npm list -g --depth 0. If you got valid output, and the displayed list includes the
entry @salesforce/cli@<version>, then you installed Salesforce CLI with npm.
If You Installed Salesforce CLI Using the Installer
To install the latest Salesforce CLI and plugin versions, run this command in a terminal (macOS) or
command prompt (Windows):
sf update
By default, the CLI periodically checks for and installs updates. To disable auto-update, set the
SF_AUTOUPDATE_DISABLE environment variable to true.
When you update Salesforce CLI, we automatically display the release notes for the version you're
updating to so you can learn about the new, changed, and fixed features. To silence the display, set the
17

SF_HIDE_RELEASE_NOTES and SF_HIDE_RELEASE_NOTES_FOOTER environment variables
to true.
If You Installed Salesforce CLI Using npm
The auto-update option isn’t available. When a new version of the CLI is available, run this command in
a terminal (macOS and Linux) or command prompt (Windows):
npm install --global @salesforce/cli
18
Update Salesforce CLI

Update to the CLI Release Candidate or Nightly
We release a new version of the CLI weekly. At the same time we also publish a release candidate of the CLI that contains changes that
we plan to include in the next weekly release. Think of the release candidate as the CLI-version of the Salesforce sandbox preview. You
can update to a release candidate if you want to check out upcoming features. Or stay on the current and official release. Or go back
and forth. It’s up to you!
We also release nightly builds every day. Nightly builds include the latest versions of all our libraries and plugins. If you want to try out
a fix that was merged just a day ago, try installing a nightly build. Similar to the release candidate, the nightly builds help improve the
stability of Salesforce CLI by catching issues before they make it to the stable release.
While the latest (stable) release is the most reliable, we encourage users to also test the release candidates and nightly builds and report
issues to our GitHub issues repository. We recommend you run your continuous integration (CI) jobs against both the current release
and the release candidate to identify potential breaking changes before they happen.
To display the version of your installed Salesforce CLI, run this command from a terminal (macOS and Linux) or command prompt
(Windows). The version doesn’t indicate if it’s a release candidate or nightly build, so check the release notes for the current version
numbers.
sf version
Update Using Installers
Installers use the tags stable for the current release, stable-rc for the release candidate, and nightly for the nightly builds.
If you’ve already installed Salesforce CLI and are using the current release, run this command in a terminal (macOS and Linux) or command
prompt (Windows) to switch to the release candidate.
sf update stable-rc
Similarly, run this command to install the nightly build.
sf update nightly
To uninstall the release candidate or nightly build and return to the current version, run this command.
sf update stable
Install Using npm
Npm installs use the tags latest for the current release, latest-rc for the release candidate, and nightly for the nightly
builds.
To install the release candidate using npm, run this command in a terminal (macOS and Linux) or command prompt (Windows).
npm install --global @salesforce/cli@latest-rc
Similarly, run this command to install the nightly build.
npm install --global @salesforce/cli@nightly
To uninstall the release candidate or nightly build and return to the current version, run this command.
npm install --global @salesforce/cli@latest
19
Update to the CLI Release Candidate or NightlyUpdate Salesforce CLI

To view the Salesforce CLI versions that are currently associated with the npm tags, run this command.
npm view @salesforce/cli dist-tags --json
Install from a TAR File
Salesforce CLI distributes TAR files for the release candidate and nightly builds that you can install on all supported operating systems.
The download URLs are similar to the URLs for installing the current release, but use the stable-rc or nightly channel rather
than the stable channel.
For example, to wget the Linux TAR file for the release candidate, run this command in a terminal (macOS and Linux) or command
prompt (Windows), which downloads from the stable-rc channel.
wget
https://developer.salesforce.com/media/salesforce-cli/sf/channels/stable-rc/sf-linux-x64.tar.xz
This command downloads a nightly build.
wget
https://developer.salesforce.com/media/salesforce-cli/sf/channels/nightly/sf-linux-x64.tar.xz
Other than using a different channel, the instructions for installing the release candidate or nightly build from a TAR file are the same as
the instructions for installing the current release.
SEE ALSO:
Trailhead: Get Early Access with the Sandbox Preview
Disable Automatic Update of the CLI
When you run a command, Salesforce CLI checks to see if you have the latest version. If not, the CLI automatically updates itself. You
can disable this automatic update with an environment variable.
To remain on the current version of the CLI and disable automatic updates, set the SF_AUTOUPDATE_DISABLE environment
variable to true. How you set an environment variable is different for different operating systems. See the operating system vendor’s
help for instructions on how to set environment variables.
20
Disable Automatic Update of the CLIUpdate Salesforce CLI

CHAPTER 6 Salesforce CLI Configuration and Tips
Use Salesforce CLI for most development and testing tasks. These tasks include authorizing a Dev Hub
org, creating a scratch org, synchronizing source code between your scratch orgs and VCS, and running
tests.
In this chapter ...
• Autocomplete
Salesforce CLI
You can start using Salesforce CLI right after you install it.
Commands and
Flags
The CLI commands are grouped into top-level topics. For example, the org top-level topic contains
commands to create and manage orgs, such as org list, org create sandbox, and org
• Use Salesforce CLI
from Behind a
generate password. The config top-level topic contains commands for managing configuration
variables.
Company Firewall or
Web Proxy
Run --help at each level to get more information.
sf --help // lists all top-level topics
sf org --help // lists all the topics and commands
• Windows
Performance
Suggestions
under "org"
• Configuration
Variables
sf org create --help // lists all the commands in the
subtopic "org create"
• Salesforce CLI
Environment
Variables
sf org create sandbox --help // detailed info about the "org create
sandbox" command
sf org create sandbox -h // quick and short info about the "org
create sandbox" command
• How API Version and
Source API Version
Run this command to view all available Salesforce CLI commands:
sf commands
Work in Salesforce
CLI
• CLI Parameter
Resolution Order
To see all commands with their flags, run the command with the --json flag:
sf commands --json
• Support for JSON
Responses
• Specify Topics and
Commands in Any
Order
• Customize the Colors
in Help Output
• Log Messages and
Log Levels
• Enable 256-Bit
Encryption of
Authorization Files
• Disable Salesforce
CLI Data Collection
and Metrics
21

Autocomplete Salesforce CLI Commands and Flags
Use autocomplete to quickly find the exact Salesforce CLI command and flag you want to execute.
You must set up the autocomplete feature before you can use it. Autocomplete supports these shells:
•
Bash: macOS and Linux
•
Z shell (zsh): macOS and Linux
•
PowerShell: Typically used on Microsoft Windows, although you can also install PowerShell on macOS and Linux.
Configure Autocomplete
The CLI command to configure autocomplete is the same on all shells. But the output of the command, which provides the next steps,
differs depending on the shell you’re on.
1. Open a terminal window (macOS and Linux) or Powershell command window (Windows).
2. Run this command, which builds the autocomplete cache on your computer:
sf autocomplete
3. Follow the displayed instructions, which reflect the shell you’re currently using.
If autocomplete doesn’t work immediately after configuration, open a new terminal or command window and try again.
After you update Salesforce CLI to a new version, run sf autocomplete --refresh-cache to ensure that autocomplete
works correctly on any new commands.
Use Autocomplete
Partially type a Salesforce CLI command and then press the tab key (<TAB>) to autocomplete it. The autocomplete feature also works
on Salesforce CLI flags and their values. Depending on the shell you're using, you might have to type <TAB> twice to get completion
suggestions; keep tabbing until you see something.
Let’s look at some examples using Z shell (zsh). In a terminal or command window, type sf, a space, and then <TAB> until you see
the full list of top-level topics and commands with their summaries.
22
Autocomplete Salesforce CLI Commands and FlagsSalesforce CLI Configuration and Tips

Let’s say you want to deploy metadata from your Salesforce DX project; the project topic looks promising! To see the list of sub-topics
under project, type the letters pr and then <TAB>.
The output includes a deploy sub-topic; we’re getting there! To drill down, type the letters dep and <TAB>, and the commands
in the deploy sub-topic are displayed. Keep typing and tabbing this way until you get to the full command to deploy metadata, which
is project deploy start.
Now that you found the correct command, you probably now want to see the available flags. Simply type - (hyphen) and <TAB> to
see the full list of flags, with their short and long names and summaries:
23
Use AutocompleteSalesforce CLI Configuration and Tips

Type the first letter of a flag, then <TAB> until you’ve autocompleted the flag name.
You can also use autocomplete to specify a value for some flags. For example, if your current directory is a Salesforce DX project and you
want to specify a manifest file for the --manifest flag, press <TAB> after the flag to see a list of files. Then enter the first letter and
<TAB> until you complete the name of the file, such as package.xml.
SEE ALSO:
PowerShell Documentation
Use Salesforce CLI from Behind a Company Firewall or Web Proxy
If you install or update Salesforce CLI on a computer that’s behind a company firewall or web proxy, you sometimes receive error messages.
In this case, you must further configure your system.
24
Use Salesforce CLI from Behind a Company Firewall or Web
Proxy
Salesforce CLI Configuration and Tips

You get this type of error when you run a command after installing Salesforce CLI behind a firewall or web proxy. This error is from a
Linux computer, but Windows and macOS users sometimes see a similar error.
@salesforce/cli: Updating CLI... !
'ECONNRESET': tunneling socket could not be established, cause=connect EHOSTUNREACH
0.0.23.221:8080 - Local (10.126.148.39:53107)
To address this issue, run these commands from your terminal or Windows command prompt, replacing username:pwd with your
web proxy username and password. If your proxy doesn’t require these values, omit them. Also replace proxy.company.com:8080
with the URL and port of your company proxy.
npm config set https-proxy https://username:[email protected]:8080
npm config set proxy https://username:[email protected]:8080
Then set the HTTP_PROXY or HTTPS_PROXY environment variable to the full URL of the proxy. For example, on UNIX:
export HTTP_PROXY=https://username:[email protected]:8080
export HTTPS_PROXY=https://username:[email protected]:8080
On a Windows machine:
set HTTP_PROXY=https://username:[email protected]:8080
set HTTPS_PROXY=https://username:[email protected]:8080
If You Still See an Error
Your Proxy Requires an Extra Certificate Authority
If you set the proxy environment variable, and you still see error messages, it’s possible that your proxy requires an extra certificate
authority (CA). Ask your IT department where to find or download the certificates.
Set this environment variable to point to the CA file: NODE_EXTRA_CA_CERTS.
Your Corporate Network Is Blocking Salesforce Hosts
It’s possible that your corporate network is blocking the Salesforce hosts for updating or installing Salesforce CLI. Contact your IT
department add these URLs to your allowlist:
•
https://developer.salesforce.com/media/salesforce-cli
•
https://registry.npmjs.org
Windows Performance Suggestions
Follow these suggestions to improve the performance of Salesforce CLI on Windows.
Warning: We recommend that you consult your security administrator before making any of these suggested configuration
changes.
Use a local file system for your Salesforce DX project rather than a cloud-based one.
Salesforce CLI performs better when your Salesforce DX project and associated files are on a local file system. Cloud-based file systems,
such as OneDrive, Google Drive, and Dropbox, constantly watch all the files and directories in the file system. As a result, if you create
your Salesforce DX project in one of these file systems, it can limit the performance of the Salesforce CLI. To avoid this issue, move
your project directory away from these systems.
25
Windows Performance SuggestionsSalesforce CLI Configuration and Tips

Install Salesforce CLI with the official installer and exclude the sf executable from Windows Defender.
•
Windows Defender continually rescans executables for potential threats. This scanning can have a noticeable performance
impact on slower machines.
•
To exclude Salesforce CLI, use the sf executable installed from developer.salesforce.com and follow these steps:
1. Add an exclusion to Windows Security.
2. When prompted to select a folder, select C:\Program Files\Salesforce CLI.
Exclude the project folder from Windows Defender.
It’s also possible that Windows Defender keeps rescanning your project folder, causing negative performance. To exclude your
project folder, follow these steps.
Exclude the sf executable from other security software.
Some companies use more extensive security software than Windows Defender, and this security software can cause Salesforce CLI
to perform slowly. Work with your internal IT department to exclude the sf executable from all security software.
Close memory intensive programs.
Salesforce CLI can be performing slowly because other programs such as Google Chrome or VS Code are using too much memory.
Try restarting these programs to free up memory.
Configuration Variables
You can set configuration (config) variables for your current project or for all projects. You can set two kinds of config variables: global
and local. Global config variables apply to all projects on your computer. Local config variables apply to a specific project. Local config
variables override global ones when commands are run from within a Salesforce DX project directory.
To set a config variable for the current project:
sf config set name <value>
For local config variables, you must issue the command from within the Salesforce DX project directory.
To set the config variable for all your projects:
sf config set name <value> --global
You can issue global commands anywhere or within any Salesforce DX project, yet they apply to all the Salesforce CLI commands you
run.
View the local and global config variables that you have set with the config list command. The output lists the local variables
for the project directory from which you’re running the command and all global variables.
sf config list
List Config
==========================================================
| Name Value Location
| ─────────────────── ─────────────────────────── ────────
| org-instance-url https://test.salesforce.com Local
| org-max-query-limit 20000 Local
| target-dev-hub DevHub Local
26
Configuration VariablesSalesforce CLI Configuration and Tips

To return one or more previously set config variables, use config get. It’s often useful to specify JSON output for this command for
easier parsing in a continuous integration (CI) environment. For example, to return the value of target-org and target-dev-hub:
sf config get target-org target-dev-hub --json
To unset a config variable, run the config unset command. For example, to unset the org-instance-url config variable:
sf config unset org-instance-url
Note: Alternately, you can set all CLI config variables as environment variables. Environment variables override config variables.
List of Configuration Variables
These are the Salesforce CLI configuration variables.
org-api-version
The API version for a specific project or all projects. Normally, Salesforce CLI assumes that you’re using the same version of the CLI as the
Dev Hub org.
This example sets the API version for all projects (globally) to 57.0.
sf config set org-api-version 57.0 --global
Be sure not to confuse this config variable with the sourceApiVersion project option, which has a similar name. See How API
Version and Source API Version Work in Salesforce CLI for more information.
Environment variable: SF_ORG_API_VERSION
SF_ORG_API_VERSION=57.0
org-capitalize-record-types
Specifies whether Salesforce CLI capitalizes the first letter of a default record type when it creates a scratch org. Valid values are true
or false. The default value is true.
Default record types are defined in the objectSettings option of a scratch org definition file, as described in Scratch Org Definition
File Options. The setting is required before installing a package that creates record types.
sf config set org-capitalize-record-types false --global
Environment variable: SF_CAPITALIZE_RECORD_TYPES
org-custom-metadata-templates
Specifies either a local directory or a cloned GitHub repository that contains the default custom code templates used by the project
generate command. The GitHub URL points to either the root directory that contains your templates or to a subdirectory on a branch
in the repo that contains your templates. For example:
sf config set org-custom-metadata-templates
https://github.com/mygithubacct/salesforcedx-templates
Environment variable: SF_ORG_CUSTOM_METADATA_TEMPLATES
SF_ORG_CUSTOM_METADATA_TEMPLATES=https://github.com/mygithubacct/salesforcedx-templates
27
List of Configuration VariablesSalesforce CLI Configuration and Tips

target-org
The username or alias for an org that all commands run against by default.
sf config set target-org [email protected]
Environment variable: SF_TARGET_ORG
target-dev-hub
The username or alias for your default Dev Hub org.
sf config set target-dev-hub [email protected]
Environment variable: SF_TARGET_DEV_HUB
target-devops-center (DevOps Center commands only)
The username or alias for the org in which DevOps Center is installed.
sf config set target-devops-center [email protected]
disable-telemetry
By default, Salesforce CLI collects usage information, user environment information, and crash reports. This option allows you to opt out.
sf config set disable-telemetry true
Environment variable: SF_DISABLE_TELEMETRY
org-instance-url
The URL of the Salesforce instance that’s hosting your org. Default value is https://login.salesforce.com. We recommend
that you set this config variable to the My Domain login URL for your org. You can find the My Domain login URL on the My Domain
page in Setup.
sf config set org-instance-url https://yoda.my.salesforce.com
Environment variable: SF_ORG_INSTANCE_URL
SF_ORG_INSTANCE_URL=https://yoda.my.salesforce.com
org-max-query-limit
The maximum number of Salesforce records returned by a Salesforce CLI command. Default value is 10,000.
28
List of Configuration VariablesSalesforce CLI Configuration and Tips
For example, let’s say you run sf org list metadata -m Role on a Salesforce org that has 15,000 roles. By default the
command displays only 10,000 roles. A message warns you that the command retrieved only some of the roles. To see all of them, set
this config variable to a larger number.
sf config set org-max-query-limit 20000
Environment variable: SF_ORG_MAX_QUERY_LIMIT
SF_ORG_MAX_QUERY_LIMIT=200000
org-metadata-rest-deploy
If true, Salesforce CLI uses Metadata REST API for deployments. By default, Salesforce CLI uses SOAP. Deployments using REST aren’t
bound by the 39-MB.zip file size limit that applies to SOAP deployments.
sf config set org-metadata-rest-deploy true
Environment variable: SF_ORG_METADATA_REST_DEPLOY
SEE ALSO:
Disable Salesforce CLI Data Collection and Metrics
CLI Parameter Resolution Order
Salesforce DX Developer Guide: Salesforce DX Usernames and Orgs
Salesforce DX Developer Guide: Authorization
Salesforce CLI Environment Variables
You can set environment variables to configure certain values that Salesforce CLI uses.
Environment variables override Configuration Variables. To set an environment variable for only the command you’re running, append
the variable:
SF_ORG_API_VERSION=57.0 sf org create scratch -<options>
FORCE_OPEN_URL
Specifies the web page that opens in your browser when you run org open. For example, to open Lightning Experience, set to
lightning.
Equivalent to the --path flag of org open.
FORCE_SHOW_SPINNER
Set to true to show a spinner animation on the command line when running asynchronous CLI commands. Default is false.
FORCE_SPINNER_DELAY
Specifies the speed of the spinner in milliseconds. The default value is 60.
29
Salesforce CLI Environment VariablesSalesforce CLI Configuration and Tips

SF_ACCESS_TOKEN
Specifies an access token when using the org login access-token command. If you don’t set this environment variable, the
command prompts you for the access token. Useful for continuous integration (CI) scripts.
SF_APPLY_REPLACEMENTS_ON_CONVERT
Set to true to test string replacement without actually deploying files to the org. Instead, run project convert source to
convert the files to metadata format and then inspect the files to see what will be deployed.
See Replace Strings in Code Before Deploying for details.
SF_AUDIENCE_URL
Overrides the aud (audience) field used for JWT authentication so that it matches the expected value of the authorization server URL
for the org you’re logging into. For example, https://MyDomainName.my.salesforce.com or
https://login.salesforce.com for a production org, and
https://MyDomainName--SandboxName.sandbox.my.salesforce.com or https://test.salesforce.com
for a sandbox.
Example:
SF_AUDIENCE_URL=https://MyDomainName.my.salesforce.com
SF_CAPITALIZE_RECORD_TYPES
Specifies whether Salesforce CLI capitalizes the first letter of a default record type when it creates a scratch org. Valid values are true
or false. The default value is true.
Default record types are defined in the objectSettings option of a scratch org definition file, as described in Scratch Org Definition
File Options. The setting is required before installing a package that creates record types.
Example:
SF_CAPITALIZE_RECORD_TYPES=false
SF_CONTAINER_MODE
When set to true, commands that usually open the org in a browser, such as org open or org login web, output the org’s
URL instead and don’t open a browser. When set to false (the default value), the commands open the org in a browser.
This environment variable is useful in headless environments, such as Docker or continuous integration.
SF_CONTENT_TYPE
When set to JSON, specifies that all CLI commands output results in JSON format. If you set the environment variable to any other value,
or unset it, the CLI commands output their results as specified by the flags.
Example:
SF_CONTENT_TYPE=JSON
30
Salesforce CLI Environment VariablesSalesforce CLI Configuration and Tips

SF_CRYPTO_V2
Used to enable 256-bit encryption of internal Salesforce CLI files, such as the authorization (auth) files associated with the orgs you’ve
logged into. Salesforce CLI uses 128-bit encryption by default.
For more information, see Enable 256-Bit Encryption of Authorization Files.
SF_CUSTOM_ORG_METADATA_TEMPLATES
Specifies either a local directory or a cloned GitHub repository that contains the default custom code templates used by the project
create command. The GitHub URL points to either the root directory that contains your templates or to a subdirectory on a branch
in the repo that contains your templates.
Example:
SF_CUSTOM_ORG_METADATA_TEMPLATES=https://github.com/mygithubacct/salesforcedx-templates
SF_DISABLE_AUTOUPDATE or SF_AUTOUPDATE_DISABLE (either var works)
Set to true to disable the auto-update feature of the CLI. By default, the CLI periodically checks for and installs updates.
SF_DISABLE_DNS_CHECK
Set to true to stop the Salesforce CLI commands that require an org to check whether the org is connected. For example, the org
create scratch command requires a Dev Hub org. The default value is false (always check.)
This environment variable is useful if you get this error when running certain Salesforce CLI commands.
DomainNotFound: The org cannot be found
First try setting the SF_DNS_TIMEOUT environment variable to increase the number of seconds that Salesforce CLI waits for a response.
If that doesn’t work, try disabling the check entirely with the SF_DISABLE_DNS_CHECK environment variable.
SF_DISABLE_SOURCE_MEMBER_POLLING
Set to true to disable polling of your org’s SourceMember object when you run the project deploy|retrieve commands.
The commands poll the SourceMember object to track what's changed between your local source and the org after the deploy or retrieve
completes. If you have a large metadata deployment, however, the polling can take a while, or even time out. Sometimes you don't
require source tracking at all, such as in a continuous integration (CI) job. These use cases are good candidates for setting this environment
variable.
The environment variable works with both scratch orgs and sandboxes.
Warning: When you disable SourceMember polling, the CLI’s internal tracking of what’s changed between your local source and
org metadata gets out of sync. As a result, subsequent runs of the project deploy|retrieve commands are unreliable,
and it’s up to you to synchronize your source. To reset source tracking, use the project reset tracking command.
SF_DISABLE_TELEMETRY
Set to true to disable the CLI from collecting usage information, user environment information, and crash reports.
31
Salesforce CLI Environment VariablesSalesforce CLI Configuration and Tips

SF_DNS_TIMEOUT
Specifies the number of seconds that Salesforce CLI commands that require an org wait for a response when checking whether the org
is connected. For example, the org create scratch command requires a Dev Hub org. If the commands don’t receive a response
in that time, they time out. The default value is 3.
This environment variable is useful if you get this error when running certain Salesforce CLI commands.
DomainNotFound: The org cannot be found
First try setting the SF_DNS_TIMEOUT environment variable to increase the number of seconds that Salesforce CLI waits for a response.
If that doesn’t work, try disabling the check entirely with the SF_DISABLE_DNS_CHECK environment variable.
SF_DOMAIN_RETRY
Specifies the time, in seconds, that the CLI waits for the Lightning Experience domain to resolve and become available in a newly created
scratch org.
The default value is 240 (4 minutes). Set the variable to 0 to bypass the Lightning Experience domain check entirely.
SF_HIDE_RELEASE_NOTES
Set to true to silence the automatic display of the release notes when you run sf update. The default value is false.
Example:
SF_HIDE_RELEASE_NOTES=true
SF_HIDE_RELEASE_NOTES_FOOTER
Set to true to silence the boilerplate footer about displaying the release notes when you run sf update. The default value is
false.
Example:
SF_HIDE_RELEASE_NOTES_FOOTER=true
SF_IMPROVED_CODE_COVERAGE
Scopes Apex test results to the classes entered during a test run when running apex run test and apex get test. Set to
true to improve code coverage.
SF_JSON_TO_STDOUT
Sends messages when Salesforce CLI commands fail to stdout instead of stderr. Setting this environment variable to true is
helpful for scripting use cases.
Example:
SF_JSON_TO_STDOUT=true
32
Salesforce CLI Environment VariablesSalesforce CLI Configuration and Tips

SF_LOG_LEVEL
Sets the level of messages that the CLI writes to the log file.
Example:
SF_LOG_LEVEL=debug
SF_LOG_ROTATION_PERIOD
Time period after which Salesforce CLI rotates the log file. Rotating the log file refers to making a backup copy of the file and then clearing
out the current log file to start afresh. For example, if set to 1d, Salesforce CLI rotates the log file daily at midnight.
You can set this variable to 1h (one hour) or 1m (one minute) if you want more, but smaller, log files. Any other value is treated as 1d,
which is the default value.
Example:
SF_LOG_ROTATION_PERIOD=1h
SF_MDAPI_TEMP_DIR
Directory that holds the retrieved, deployed, or converted metadata files when you run these CLI commands:
•
project retrieve start
•
project deploy start
•
project delete source
•
project convert mdapi|source
If you don’t set this environment variable, the commands automatically delete the directory after they finish executing.
Retaining these files can be useful for several reasons. You can debug problems that occur during command execution. You can use the
generated package.xml when running subsequent commands, or as a starting point for creating a manifest that includes all the
metadata you care about.
For more information, see Debug Errors When Deploying or Retrieving Source.
SF_MDAPI_TEMP_DIR=/users/myName/myDXProject/metadata
SF_NEW_VERSION_CHECK_FREQ
A number that specifies the frequency that a warning message is displayed about the availability of a new Salesforce CLI version. By
default, every CLI command execution checks whether there's a new Salesforce CLI version available, and prints out a warning message
if it finds one. Use this environment variable with SF_NEW_VERSION_CHECK_FREQ_UNIT to change the frequency that the
message is displayed. To disable the version check completely, use SF_SKIP_NEW_VERSION_CHECK.
The default value is 0, which means that the warning message is displayed each time a new version is found.
For example, to see the warning message one time a day:
SF_NEW_VERSION_CHECK_FREQ=1
SF_NEW_VERSION_CHECK_FREQ_UNIT=days
33
Salesforce CLI Environment VariablesSalesforce CLI Configuration and Tips

SF_NEW_VERSION_CHECK_FREQ_UNIT
The unit of time for the frequency that a warning message is displayed about the availability of a new Salesforce CLI version. By default,
every CLI command execution checks whether there's a new Salesforce CLI version available, and prints out a warning message if it finds
one. Use this environment variable with SF_NEW_VERSION_CHECK_FREQ to change the frequency that the message is displayed.
To disable the version check completely, use SF_SKIP_NEW_VERSION_CHECK.
Possible values are days, hours, minutes, seconds, and milliseconds. The default value is minutes.
For example, to see the warning message one time a day:
SF_NEW_VERSION_CHECK_FREQ=1
SF_NEW_VERSION_CHECK_FREQ_UNIT=days
SF_NETWORK_MUTEX_PORT
Specifies the local network server’s port when you set SF_USE_NETWORK_MUTEX to true to enable the yarn --mutex network
option when installing or updating Salesforce CLI.
This variable affects your environment only if you also set SF_USE_NETWORK_MUTEX. The default value is 31997.
SF_NPM_REGISTRY
Sets the URL to a private npm server, where all packages that you publish are private. We support only repositories that don’t require
authentication.
Example:
SF_NPM_REGISTRY=http://mypkgs.myclient.com/npm/my_npm_pkg
Verdaccio is an example of a lightweight private npm proxy registry.
SF_ORG_API_VERSION
The API version for a specific project or all projects. Normally, the Salesforce CLI assumes that you’re using the same version of the CLI
as your Dev Hub.
SF_ORG_INSTANCE_URL
The URL of the Salesforce instance that’s hosting your org. The default value is https://login.salesforce.com. We recommend
that you set this value to the My Domain login URL for your org. You can find the My Domain login URL on the My Domain page in Setup.
SF_ORG_MAX_QUERY_LIMIT
The maximum number of Salesforce records returned by a CLI command. The default value is 10,000.
Example:
SF_ORG_MAX_QUERY_LIMIT=200000
34
Salesforce CLI Environment VariablesSalesforce CLI Configuration and Tips
SF_ORG_METADATA_REST_DEPLOY
Set to true to make Salesforce CLI use the Metadata REST API for deployments. By default, Salesforce CLI uses SOAP. Deployments
using REST aren’t bound by the 39-MB .zip file size limit that applies to SOAP deployments.
SF_PRECOMPILE_ENABLE
Set to true to enable Apex pre-compile before the tests are run. This variable works with the apex run test command. Default
is false.
Important: The duration of an Apex test pre-compilation can be inconsistent. As a result, runs of the same Apex tests are sometimes
quick and other times they time out. We recommend that you set this variable to true only if your Apex tests (without pre-compile)
activate multiple concurrent Apex compilations that consume many system resources.
SF_PROJECT_AUTOUPDATE_DISABLE_FOR_PACKAGE_CREATE
For package create, disables automatic updates to the sfdx-project.json file.
SF_PROJECT_AUTOUPDATE_DISABLE_FOR_PACKAGE_VERSION_CREATE
For package version create, disables automatic updates to the sfdx-project.json file.
SF_SKIP_NEW_VERSION_CHECK
Set to true to disable Salesforce CLI version checking. By default, every CLI command execution checks whether there's a new Salesforce
CLI version available, and prints out a warning message if it finds one. While this message is useful, it’s often unwanted, especially in
continuous integration (CI) environments. Default is false.
To continue checking for a new CLI version, but change the frequency of the displayed warning message, use the
SF_NEW_VERSION_CHECK_FREQ and SF_NEW_VERSION_CHECK_FREQ_UNIT environment variables.
SF_SOURCE_MEMBER_POLLING_TIMEOUT
Set to the number of seconds you want the project deploy start command to keep polling the SourceMember object before
the command times out. The project deploy start command polls the SourceMember object to track what's changed
between your local source and the org after the deploy completes. Salesforce CLI calculates a time-out for each project deploy
start command run based on the number of components it deploys. Use this environment variable to override the calculated
time-out.
For example, if the deployment times out after 3 minutes, try setting a time-out of 5 minutes (300 seconds):
SF_SOURCE_MEMBER_POLLING_TIMEOUT=300
SF_SOURCE_TRACKING_BATCH_SIZE
Sets the source-tracked file batch size during a deploy or retrieve. The default value is 8,000 (Windows) or 15,000 (Linux/macOS).
This environment variable is useful when deploying or retrieving a large project that contains many source-tracked files, and you exceed
your operating system open file limit. While the deploy or retrieve likely complete successfully, source-tracking can run into errors in this
35
Salesforce CLI Environment VariablesSalesforce CLI Configuration and Tips

case. Either increase your open file limit, such as with the ulimit -Hn <number> command (Linux/macOS), or set the
SF_SOURCE_TRACKING_BATCH_SIZE environment variable to a number significantly lower than the output of ulimit -Hn.
SF_TARGET_DEV_HUB
Specifies the username of your default Dev Hub org so you don’t have to use the --target-dev-hub flag. Overrides the value of
the target-dev-hub configuration value.
Example of setting it to an alias:
SF_TARGET_DEV_HUB=myDevHub
Example of setting it to an org username:
SF_TARGET_ORG
Specifies the username of your default org so you don’t have to use the --target-org flag. Overrides the value of the target-org
configuration variable.
Example of setting it to an alias:
SF_TARGET_ORG=myscratchorg
Example of setting it to a username:
SF_USE_GENERIC_UNIX_KEYCHAIN
(Linux and macOS only) Set to true if you want to use the generic UNIX keychain instead of the Linux libsecret library or macOS
keychain. Specify this variable when using Salesforce CLI with ssh or "headless" in a CI environment.
SF_USE_NETWORK_MUTEX
Set to true to enable the yarn --mutex network option when installing or updating Salesforce CLI. The default value is false
(which enables the --mutex file option.)
Salesforce CLI plugin installs use yarn under the hood. If you run into errors during installs or updates, try setting this environment
variable to true to open a local network to manage the concurrent yarn instances. This behavior is more reliable and can sometimes
fix install errors. The default port for this local network server is 31997. Set the SF_NETWORK_MUTEX_PORT environment variable to use
a different port.
See the yarn documentation for more information.
SF_USE_PROGRESS_BAR
For project deploy start set to false to disable the progress bar.
Examples:
SF_USE_PROGRESS_BAR=false.
36
Salesforce CLI Environment VariablesSalesforce CLI Configuration and Tips

General Environment Variables
These environment variables aren't specific to Salesforce CLI but are general variables that you might want to set.
HTTP_PROXY
If you receive an error when you install or update the Salesforce CLI on a computer that’s behind a firewall or web proxy, set this
environment variable. Use the URL and port of your company proxy, for example:
http://username:[email protected]:8080
HTTPS_PROXY
If you receive an error when you install or update the Salesforce CLI on a computer that’s behind a firewall or web proxy, set this
environment variable. Use the URL and port of your company proxy, for example:
http://username:[email protected]:8080
NODE_EXTRA_CA_CERTS
Installs your self-signed certificate. Indicate the fully qualified path to the certificate file name. Then run sf update.
See NODE_EXTRA_CA_CERTS=file for more details.
NODE_TLS_REJECT_UNAUTHORIZED
To allow Node.js to use the self-signed certificate in the certificate chain, indicate 0.
SEE ALSO:
Log Messages and Log Levels
Support for JSON Responses
How API Version and Source API Version Work in Salesforce CLI
Salesforce CLI uses both the API version and source API version when deploying or retrieving metadata to or from an org. While they
sound the same, and are often set to the same value, the two settings work differently.
For simplicity, let’s use the terms apiVersion and sourceApiVersion in this topic, and first define what each means.
apiVersion
The apiVersion value determines the shape of the HTTPS request or response.
Digging a little deeper, apiVersion refers to the core Metadata API version used to service an HTTPS request or response. When
deploying metadata source to an org, Salesforce CLI sets the apiVersion value on the Connection object and uses the URL
of the HTTPS request with either the SOAP or REST API. Because there’s currently no REST API for metadata retrievals, Salesforce CLI
uses the apiVersion value set on the Connection object to create the URL for a SOAP endpoint.
sourceApiVersion
The sourceApiVersion value determines the shape of the metadata in the HTTPS request or response.
37
General Environment VariablesSalesforce CLI Configuration and Tips
Salesforce CLI uses the sourceApiVersion value when setting the <version> element in the manifest file (package.xml).
The package.xml file is included in the HTTPS request or response when deploying or retrieving, respectively.
These examples show how the two settings work together:
•
Retrieve: Let’s say that a new field was added to a metadata type in the Summer ‘22 release, which is API version 55.0. If you set
sourceApiVersion to 54.0, and then execute the project retrieve start command, the retrieved metadata
doesn’t include this new field. However, the same retrieve with sourceApiVersion set to 55.0 does return the metadata
with the new field.
•
Deploy: Again assume that a new field was added to a metadata type in API version 55.0. If you set sourceApiVersion to
54.0 and try to deploy a local metadata file that includes this new field, the deploy fails. To successfully deploy metadata with the
new field, you must set sourceApiVersion to 55.0 or greater.
Precedence of Salesforce CLI Settings
There are multiple ways to set apiVersion and sourceApiVersion, and multiple ways Salesforce CLI determines their values
if you haven’t explicitly set them. Use the following prioritized lists to determine the value of the two settings in your environment.
Settings higher on the list take precedence over lower ones. See the examples after this section to understand how this precedence
affects metadata deploys and retrieves.
apiVersion: Order of Precedence
1. --api-version command flag.
2. SF_ORG_API_VERSION environment variable.
3. org-api-version local configuration variable.
4. org-api-version global configuration variable.
5. Highest API version supported by the target org.
sourceApiVersion: Order of Precedence
1. <version> element in the manifest file ( package.xml).
2. sourceApiVersion property in the sfdx-project.json file.
3. --api-version command flag.
4. SF_ORG_API_VERSION environment variable.
5. org-api-version local configuration variable.
6. org-api-version global configuration variable.
7. Highest API version supported by the target org.
Deploy Examples That Show Settings Precedence
These examples set up various use cases, and then show the result after you deploy.
Settings: The apiVersion is set to 55.0 using the local configuration variable (sf config set
org-api-version=55.0). The sourceApiVersion is set to 54.0 in the sfdx-project.json file.
Command: sf project deploy start --source-dir force-app
Result: Salesforce CLI sends the deploy request to an API version 55.0 endpoint. The <version> element in the manifest that’s
sent with the request has a value of 54.0, which means the metadata source being deployed is in API version 54.0 shape.
38
How API Version and Source API Version Work in Salesforce
CLI
Salesforce CLI Configuration and Tips
Settings: The apiVersion is set to 55.0 using the local configuration variable (sf config set
org-api-version=55.0). The sourceApiVersion is set to 54.0 in the sfdx-project.json file.
Command: sf project deploy start --source-dir force-app --api-version=56.0
Result: Salesforce CLI sends the deploy request to an API version 56.0 endpoint. The <version> element in the manifest that’s
sent with the request has a value of 54.0, which means the metadata source being deployed is in API version 54.0 shape.
Settings: The apiVersion is set to 55.0 using the local configuration variable (sf config set
org-api-version=55.0). The SF_ORG_API_VERSION environment variable is set to 56.0. The sourceApiVersion
isn’t defined in sfdx-project.json.
Command: sf project deploy start --source-dir force-app
Result: Salesforce CLI sends the deploy request to an API version 56.0 endpoint. The <version> element in the manifest that’s
sent with the request has a value of 56.0, which means the metadata source being deployed is in API version 56.0 shape.
Settings: The apiVersion is set to 55.0 using the local configuration variable (sf config set
org-api-version=55.0). The sourceApiVersion is set to 54.0 in the sfdx-project.json file. The <version>
element in the manifest file is set to 53.0.
Command: sf project deploy start --manifest ./package.xml
Result: Salesforce CLI sends the deploy request to an API version 55.0 endpoint. The <version> element in the manifest that’s
sent with the request has a value of 53.0, which means the metadata source being deployed is in API version 53.0 shape.
Settings: None. The maximum API version supported by the org is 56.0
Command: sf project deploy start --source-dir force-app
Result: Salesforce CLI sends the deploy request to an API version 56.0 endpoint. The <version> element in the manifest that’s
sent with the request has a value of 56.0, which means the metadata source being deployed is in API version 56.0 shape.
Retrieve Examples That Show Settings Precedence
These examples set up various use cases, and then show the result after you retrieve.
Settings: The apiVersion is set to 55.0 using the local configuration variable (sf config set
org-api-version=55.0). The sourceApiVersion is set to 54.0 in the sfdx-project.json file.
Command: sf project retrieve start --source-dir force-app
Result: Salesforce CLI sends the retrieve request to an API version 55.0 SOAP endpoint. The <version> element in the manifest
that’s sent with the request has a value of 54.0, which means the metadata source being retrieved is in API version 54.0 shape.
Settings: The apiVersion is set to 55.0 using the local configuration variable (sf config set
org-api-version=55.0). The sourceApiVersion is set to 54.0 in the sfdx-project.json file.
Command: sf project retrieve start --source-dir force-app --api-version 56.0
Result: Salesforce CLI sends the retrieve request to an API version 56.0 SOAP endpoint. The <version> element in the manifest
that’s sent with the request has a value of 54.0, which means the metadata source being retrieved is in API version 54.0 shape.
Settings: The apiVersion is set to 55.0 using the local configuration variable (sf config set
org-api-version=55.0). The SF_ORG_API_VERSION environment variable is set to 56.0. The sourceApiVersion
isn’t defined in sfdx-project.json.
Command: sf project retrieve start --source-dir force-app
Result: Salesforce CLI sends the retrieve request to an API version 56.0 SOAP endpoint. The <version> element in the manifest
that’s sent with the request has a value of 56.0, which means the metadata source being retrieved is in API version 56.0 shape.
39
How API Version and Source API Version Work in Salesforce
CLI
Salesforce CLI Configuration and Tips

Settings: The apiVersion is set to 55.0 using the local configuration variable (sf config set
org-api-version=55.0). The sourceApiVersion is set to 54.0 in the sfdx-project.json file. The <version>
element in the manifest file is set to 53.0.
Command: sf project retrieve start --manifest ./package.xml
Result: Salesforce CLI sends the retrieve request to an API version 55.0 SOAP endpoint. The <version> element in the manifest
that’s sent with the request has a value of 53.0, which means the metadata source being retrieved is in API version 53.0 shape.
Settings: None. The maximum API version supported by the org is 56.0
Command: sf project retrieve start --source-dir force-app
Result: Salesforce CLI sends the retrieve request to an API version 56.0 SOAP endpoint. The <version> element in the manifest
that’s sent with the request has a value of 56.0, which means the metadata source being retrieved is in API version 56.0 shape.
SEE ALSO:
Configuration Variables
Salesforce CLI Environment Variables
Salesforce DX Developer Guide: Salesforce DX Project Configuration
CLI Parameter Resolution Order
Because you can specify parameters for a given Salesforce CLI command in several ways, it’s important to know the order of resolution.
Salesforce CLI resolves command-line flags and arguments, definition files, environment variables, and settings in this order, which
means items at the top of the list take precedence over items lower down:
•
Command-line flags such as --target-org.
•
Options listed in a file specified at the command line. An example is a scratch org definition in a file, which you specify with the
--definition-file flag of org create scratch. If you specify a flag at the command line, such as --edition,
whose value differs from what exists in the definition file, the command-line flag takes precedence.
•
Environment variables, such as SF_TARGET_ORG.
•
Local configuration variables, such as target-org or target-dev-hub. To view the local configuration variables, run sf
config list from your project directory.
•
Global CLI configuration variables. To view the global configuration variables, run sf config list --global from any
directory.
Remember, command-line flags are at the top of the precedence list. For example, let’s say you set the SF_TARGET_ORG environment
a command, it connects to an org with the [email protected] username.
Similarly, let’s say you set the configuration variable target-org to [email protected]. If you specify --target-org
[email protected] when you run a command, you connect to an org with the
[email protected] username.
SEE ALSO:
Configuration Variables
Salesforce CLI Environment Variables
40
CLI Parameter Resolution OrderSalesforce CLI Configuration and Tips

Support for JSON Responses
Salesforce CLI commands typically display their output to the terminal or command prompt (stdout) in non-structured, human-readable
format. Messages written to the log file (stderr) are always in JSON format.
To view the console output in JSON format, specify the --json flag for a particular CLI command.
sf org display --json
Most CLI commands support JSON output. To confirm, run the command with the --help flag to view the supported flags. The
--json flag is listed under GLOBAL FLAGS.
To get JSON responses to all Salesforce CLI commands without specifying the --json flag each time, set the SF_CONTENT_TYPE
environment variable to JSON.
export SF_CONTENT_TYPE=JSON
JSON Response Change Policy
Salesforce reserves the right to change the human-readable output of a Salesforce CLI command at any time. It also reserves the right
to make non-breaking changes to the JSON response of a Salesforce CLI command at any time. Examples of non-breaking JSON changes
include:
•
Adding JSON properties.
•
Changing the values of JSON properties that are meant for human consumption, such as warning messages.
When Salesforce intends to make a breaking change to the JSON response of a CLI command, the change first goes through an official
deprecation process. Examples of breaking changes to a JSON response include:
•
Removing JSON properties.
•
Changing the type of a JSON property, such as switching an array for an object.
Before making such a change, the change is announced and released behind an environment variable. Users can test the change by
setting this environment variable. Not setting the environment variable keeps the current behavior. After the deprecation period (4
months or more), Salesforce CLI switches the behavior so that the new JSON response is outputted by default.
JSON Schema Files
Scripts, such as those for continuous integration (CI) jobs, often use the JSON response of a CLI command to get information that’s used
later when executing a different CLI command. Knowing the structure of the JSON response is therefore useful when you create these
scripts. Each Salesforce CLI command has a JSON schema file that describes the structure of the response.
For example, let’s say the CI script first runs the org list --json command to get the list of available orgs. The command’s
response is in the result JSON object, as shown in this partial example.
{
"status": 0,
"result": {
"other": [],
"scratchOrgs": [
{
"accessToken": "00DIP000000Atfx!AQfakefakeZukpHxor.XYArinSHxK0IrQGhQB0L8S",
"instanceUrl": "https://connect.scratch.my.salesforce.com",
"orgId": "00DIfakefx2AC",
41
Support for JSON ResponsesSalesforce CLI Configuration and Tips

"username": "[email protected]",
"loginUrl": "https://connect.scratch.my.salesforce.com",
"clientId": "PlatformCLI",
"isDevHub": false,
"devHubUsername": "[email protected]",
"created": "1715292658000",
"expirationDate": "2024-05-16",
"createdOrgInstance": "USA198S",
"isScratch": true,
"isSandbox": false,
"instanceApiVersion": "61.0",
"instanceApiVersionLastRetrieved": "5/9/2024, 3:11:22 PM",
"tracksSource": true,
"alias": "myscratch",
"isDefaultDevHubUsername": false,
"isDefaultUsername": false,
"lastUsed": "2024-05-09T22:11:24.935Z",
"signupUsername": "[email protected]",
"createdBy": "[email protected]",
"createdDate": "2024-05-09T22:10:58.000+0000",
"devHubOrgId": "00DB0000000c7jiMAA",
"devHubId": "00DB0000000c7jiMAA",
"attributes": {
"type": "ScratchOrgInfo",
"url": "/services/data/v61.0/sobjects/ScratchOrgInfo/2SR1QavjWAC"
},
"orgName": "Dreamhouse",
"edition": "Developer",
"status": "Active",
"isExpired": false,
"namespace": null
}
],
...<more information about other orgs>
"warnings": []
}
The CI script then parses this JSON response to find an org to deploy to with the project deploy start command.
Find the JSON Schema File for a Command
The JSON schema file for a Salesforce CLI command is stored in the associated plugin’s GitHub repository.
1. Run the which command, which returns the npm name of the plug-in that contains the CLI command.
This example shows that the org list command is in the @salesforce/plugin-org plugin.
$ sf which org list
=== org list
plugin: @salesforce/plugin-org
2. Go to the Salesforce CLI Status page and find the npm plugin name in the Package column. Click the left Repository link, which
takes you to the GitHub repository that stores the plugin’s source code.
In our example, the GitHub repository for the @salesforce/plugin-org plugin is https://github.com/salesforcecli/plugin-org.
42
Find the JSON Schema File for a CommandSalesforce CLI Configuration and Tips

3. In the GitHub repository, search the top-level schemas directory for the command’s JSON schema file. The name of the file is the
same as the command name, with hyphens instead of spaces.
In our example, the schema file for the org list command is called org-list.json and is
https://github.com/salesforcecli/plugin-org/blob/main/schemas/org-list.json.
The definitions object in the JSON schema file describes the response when you run a CLI command with the --json flag.
Here’s a snippet of the JSON schema file for the org list command.
{
"$schema": "http://json-schema.org/draft-07/schema#",
"$ref": "#/definitions/OrgListResult",
"definitions": {
"OrgListResult": {
"type": "object",
"properties": {
"scratchOrgs": {
"type": "array",
"items": {
"$ref": "#/definitions/FullyPopulatedScratchOrgFields"
}
},
<lotsa stuff>
"FullyPopulatedScratchOrgFields": {
"type": "object",
"additionalProperties": false,
"properties": {
"isExpired": {
"type": "boolean"
},
"expirationDate": {
"type": "string"
},
"devHubUsername": {
"type": "string"
},
<more stuff>
The schema snippet shows, for example, that the isExpired key is a Boolean value in a scratchOrgs object.
SEE ALSO:
CLI Deprecation Policy
Specify Topics and Commands in Any Order
When you type a command at a terminal or command prompt, you can enter the topics and commands in any order. Salesforce CLI
determines which command you mean and automatically runs it without errors.
For example, let's say you want to log into an org using JWT but you forgot the exact command. All of these commands work without
returning a Command not found error:
sf login org jwt <flags>
sf org login jwt <flags>
sf jwt org login <flags>
43
Specify Topics and Commands in Any OrderSalesforce CLI Configuration and Tips

If you remember only parts of a command, run the partial command anyway to see a list of all the commands that contain the parts.
Use arrows to highlight the one you want, then press return to choose it.
For example, when you type sf list, you see this dialogue where you can choose the command you want:
sf list
? Which of these commands do you mean (Use arrow keys)
community list template Retrieve the list of templates available in your org.
env list List the environments you’ve created or logged into.
env logdrain list List log drains connected to a specified environment.
env var list List your environment's config vars in a table.
org list shape List all org shapes you’ve created.
org list snapshot List scratch org snapshots.
package installed list List the org’s installed packages.
To narrow down a long list of possible commands, provide a flag. For example, if you run sf list --all, it displays only the env
list and org list commands because they’re the only ones that have the --all flag.
Each command still has a canonical signature, which we use in the --help examples and to organize the Salesforce CLI Command
Reference.
SEE ALSO:
Salesforce CLI Command Reference
Customize the Colors in Help Output
When you run a command with the --help or -h flag, the help output uses colors to highlight certain parts, such as command and
flag descriptions, executable name, and more. If you don’t like the default colors, you can customize them.
1. Create a file called theme.json using your favorite editor.
2. Add key-value pairs to the theme.json file where the key specifies the help section you want to colorize and the value is a color.
You can use chalk-style colors (such as greenBright), hex code (#FF0000), or RGB (rgb(255,255,255)). See the default
theme.json file on page 45 for an example.
Here's the list of available JSON keys and what they colorize:
•
alias: The aliases that are listed in the ALIASES section.
•
bin: The sf executable name.
•
command: The command's name.
•
commandSummary: The command's summary.
•
dollarSign: The $ character printed before examples and command usage.
•
flag: The long and short flag names.
•
flagDefaultValue: The text [default: X] that is displayed for flags that have a default value.
•
flagOptions: The valid options for a flag.
•
flagRequired: The text (required) that is displayed for required flags.
•
flagSeparator: The , character (comma) that separates the short and long flag names.
•
sectionDescription: The text inside the sections, such as all the text in the DESCRIPTION section.
•
sectionHeader: The section header, such as DESCRIPTION.
•
topic: The topics listed in the TOPICS section.
44
Customize the Colors in Help OutputSalesforce CLI Configuration and Tips

•
version: The VERSION section that’s displayed when you run sf --help.
To configure a section’s color back to the default black, set the associated JSON key to none.
3. Save the theme.json file in the appropriate directory
The directory where you save the file depends on your operating system.
•
Linux and macOS: $HOME/.config/sf
•
Windows: Depending on your Salesforce CLI configuration,
either C:\Users\<username>\.config\sf or %LOCALAPPDATA%\sf
When you next run a command with the --help or -h flag, the help output uses your customized colors.
Example: As an example, here’s the internal theme.json file that Salesforce CLI uses to configure the default help output
colors.
{
"aliases": "none",
"bin": "blueBright",
"command": "blueBright",
"commandSummary": "none",
"dollarSign": "green",
"flag": "green",
"flagDefaultValue": "blueBright",
"flagOptions": "blueBright",
"flagRequired": "red",
"flagSeparator": "none",
"sectionDescription": "none",
"sectionHeader": "blue",
"topic": "blueBright",
"version": "none"
}
Log Messages and Log Levels
Salesforce CLI writes all log messages to a rotating file in the user’s home directory whose name is based on the day. For example, the
logs for August 8, 2024 are written to the file USER_HOME_DIR/.sf/sf-2024-08-07.log. Salesforce CLI command invocations
append log messages to this running log file. Only errors are output to the terminal or command window from which you run the CLI.
Important: The files in the USER_HOME_DIR/.sf directory are used internally by Salesforce CLI. Don’t remove or edit them.
The default level of log messages is warn. You can set the log level to one of the following, listed in order of least to most information.
The level is cumulative: for the debug level, the log file also includes messages at the info, warn, and error levels.
•
error
•
warn
•
info
•
debug
•
trace
•
fatal
45
Log Messages and Log LevelsSalesforce CLI Configuration and Tips

Globally set the log level for all CLI commands with the SF_LOG_LEVEL environment variable. For example, on UNIX:
export SF_LOG_LEVEL=debug
Note: Salesforce CLI gathers diagnostic information about its use and reports it to Salesforce so that the development team can
investigate issues. The type of information includes command duration and command invocation counts.
Rotating Log Files
Salesforce CLI uses rotating log files. By default, every day at midnight Salesforce CLI makes a backup copy of the log file and then clears
out its entries to start afresh. This behavior ensures that the current log file doesn't get too large.
Salesforce CLI checks for, and then deletes, any log files that are older than seven days. If you want to keep these old log files, copy them
to a different location.
You can change how often a new log file is created by setting the SF_LOG_ROTATION_PERIOD environment variable to either 1h (one
hour) or 1m (one minute). Both of these values result in more, but smaller, log files. Any other value is treated as 1d, which is the default
value.
SEE ALSO:
Salesforce CLI Environment Variables
Enable 256-Bit Encryption of Authorization Files
Salesforce CLI uses 128-bit encryption to encrypt its internal files, such as the authorization (auth) files associated with the orgs you’ve
logged into. For increased security, you can enable 256-bit encryption.
Tip: For simplicity in this document, we call 128-bit encryption v1 crypto and 256-bit encryption v2 crypto.
Prerequisites
You must complete all these steps before you enable v2 crypto. If you don’t, your Salesforce CLI installation can be a mix of v1 crypto
and v2 crypto, which can result in errors.
1. Gather the usernames and passwords for all your existing authorized orgs, including for any scratch orgs that you want to continue
using after enabling v2 crypto.
Part of enabling v2 crypto includes reauthorizing all your existing authorized orgs.
2. Update to the latest version of Salesforce CLI; if you use Salesforce Extensions for VS Code, be sure to update to its latest version too.
For Salesforce CLI, read the update documentation. For Salesforce Extensions for VS Code, see the installation documentation.
3. Ensure that all 3rd-party plugins installed on your system are ready for v2 crypto.
a. Open a terminal (macOS and Linux) or PowerShell command-line shell (Windows).
b. Run the doctor command.
sf doctor
c. In the output, make sure that the [@salesforce/plugin-auth] CLI supports v2 crypto test is passing,
as shown in this sample output:
pass - [@salesforce/plugin-auth] CLI supports v2 crypto
46
Enable 256-Bit Encryption of Authorization FilesSalesforce CLI Configuration and Tips

If the test fails, at least one plugin in your Salesforce CLI installation is using an outdated version of the @salesforce/core
library. The v2 crypto supports only plugins that use version 6.7.0 or later of @salesforce/core. All the core plugins that
ship with the latest Salesforce CLI version use the supported version of @salesforce/core, so the problem is likely with
one of your user-installed plugins. Work with your plugin provider to request updates.
Enable 256-Bit Encryption (v2 Crypto)
To update your Salesforce CLI installation to use v2 crypto, complete these steps.
1. Did you complete all the prerequisites? They’re important, so be sure you finish all the steps.
2. Make a backup copy of up the sfdx key in your key store.
•
On Windows, your key store is a file called key.json. The file is usually in the .sfdx directory in your home directory, such
as C:\\Users\<username>\.sfdx.
•
On macOS or Linux:
–
If the SF_USE_GENERIC_UNIX_KEYCHAIN environment variable is set, your key is in the file key.json. This file is usually
in the .sfdx directory in your home directory, such as /Users/<username>/.sfdx.
–
Otherwise, on macOS, your key store is most likely in the Keychain Access app. On Linux, the key store depends on the
specific flavor of Linux you’re using; refer to your documentation.
3. Rename the Salesforce CLI .sfdx directory.
For example, open a terminal (macOS and Linux) and run this command.
mv ~/.sfdx ~/.sfdx-bak
4. Set the SF_CRYPTO_V2 environment variable to true.
export SF_CRYPTO_V2=true
5. Log in to one of your orgs using one of the org login commands.
For example, run the org login web CLI command from a terminal or command prompt, and log in to your org using the
browser that opens.
6. After successfully logging into your org, confirm that you’re using the new improved encryption (v2 crypto).
•
If you’re using key.json as your key store:
–
Run sf doctor.
–
Ensure that the output includes the message CLI using stable v2 crypto.
•
If you’re not using key.json as your key store:
–
Locate the sfdx key in your key store application.
–
Confirm that the key is 64 characters long.
7. Unset the SF_CRYPTO_V2 environment variable because you no longer need it.
unset SF_CRYPTO_V2
8. Log in to the rest of your orgs.
Your Salesforce CLI installation now uses 256-bit encryption for its internal files.
47
Enable 256-Bit Encryption (v2 Crypto)Salesforce CLI Configuration and Tips

Go Back to 128-Bit Encryption (v1 Crypto)
After you enable v2 crypto, there’s nothing more for you to do; auth files automatically start using 256-bit encryption. However, if you
must revert to using v1 crypto due to unforeseen circumstances, follow these steps.
1. If you haven’t already, unset the SF_CRYPTO_V2 environment variable.
unset SF_CRYPTO_V2
2. Move the renamed .sfdx-bak directory back to its original name (.sfdx).
For example, on macOS or Linux:
mv ~/.sfdx-bak ~/.sfdx
3. If you’re not using key.json as your key store, use the backup copy of the sfdx key and set it back to its original value in your
password manager, such as the Keychain Access app on macOS.
If you’re using key.json as your key store, you don’t have to do anything because the original value has been restored as part
of the previous step.
4. All your original org authentications are now restored. To check that they’re working correctly, run the org open command on
one of your orgs; if the browser automatically opens to the org’s UI correctly, then the recovery was successful. If the browser doesn’t
open to your org, manually log into it again.
Disable Salesforce CLI Data Collection and Metrics
Salesforce collects usage data and metrics (telemetry) to help improve Salesforce CLI. We collect anonymous information related to the
use of Salesforce CLI and plugins, such as which commands and flags were run, and performance and error data.
We use these data to improve the CLI by looking at trends in command executions and how the CLI is configured. We also research error
data to improve the CLI and to create efficiencies in our work (and yours). You’re automatically enrolled in telemetry when you use the
CLI.
If you would prefer to opt out of telemetry, set the disableTelemetry configuration variable to true.
sf config set disable-telemetry=true --global
Alternatively, you can opt out by setting the environment variable: SF_DISABLE_TELEMETRY=true.
48
Go Back to 128-Bit Encryption (v1 Crypto)Salesforce CLI Configuration and Tips

CHAPTER 7 Uninstall Salesforce CLI or Plugins
Uninstalling Salesforce CLI removes it entirely from your computer.
The method to uninstall Salesforce CLI differs depending on whether you used an operating-specific
installer or npm. You must therefore know how you installed before you can uninstall. See Determine
How You Installed Salesforce CLI for more information.
You Installed on macOS or Linux Using the Installers
or TAR Files
Enter all these commands in a terminal to remove Salesforce CLI. The commands uninstall both sfdx
(v7) and sf (v1 and v2).
sudo rm -rf /usr/local/sfdx
sudo rm -rf /usr/local/lib/sfdx
sudo rm -rf /usr/local/bin/sfdx
sudo rm -rf ~/.local/share/sfdx ~/.config/sfdx ~/.cache/sfdx
sudo rm -rf ~/Library/Caches/sfdx
sudo rm -rf /usr/local/sf
sudo rm -rf /usr/local/bin/sf
sudo rm -rf ~/.local/share/sf ~/.config/sf ~/.cache/sf
sudo rm -rf ~/Library/Caches/sf
You Installed on Windows Using the Installer
These steps uninstall both sfdx (v7) and sf (v1 and v2):
1. Select Start > Control Panel > Programs > Programs and Features.
2. Select @salesforce/cli, and click Uninstall.
3. Inside your home directory, delete these two directories:
•
.config\sfdx
•
.config\sf
If Salesforce CLI is still installed, delete these directories:
•
%LOCALAPPDATA%\sfdx
•
%LOCALAPPDATA%\sf
49

You Installed Using npm
1. To uninstall sfdx (v7), run this npm command from a terminal or command prompt:
npm uninstall sfdx-cli --global
To uninstall sf (v1 or v2), run this command:
npm uninstall @salesforce/cli --global
2. Inside your home directory, delete these two directories.
•
Library/Caches/sfdx (On Windows: Library\Caches\sfdx)
•
Library/Caches/sf (On Windows: Library\Caches\sf)
Remove Authorization and Log Files
After uninstalling Salesforce CLI, your computer still has data specific to your CLI usage, such as log files
and authorization information about the orgs you’ve logged into or created. Retaining these files is useful
if you later reinstall Salesforce CLI, because you don’t have to reauthorize these orgs and you can view
your old logs. But if you want to remove these files too, run these commands.
On macOS or Linux:
sudo rm -rf ~/.sfdx
sudo rm -rf ~/.sf
On Windows, delete these directories in your home directory:
•
.sfdx
•
.sf
Uninstall a Plugin
Use the plugins:uninstall command to uninstall a plugin you’ve previously installed.
Let’s say, for example, that you previously installed a specific version of the auth plugin, but now you
want to go back to the latest version. Uninstalling the plugin takes you back to the core version that’s
bundled with the CLI. Enter this command from a terminal or Windows command prompt:
sf plugins:uninstall auth
If the plugin is standalone and not bundled with the CLI, then uninstalling it removes it from Salesforce
CLI.
50
Uninstall Salesforce CLI or Plugins

CHAPTER 8 Run Salesforce CLI Using a Docker Image
Salesforce publishes Docker container images for Salesforce CLI on Docker Hub. We follow the same
release process as our installers and npm packages. Each week we publish a Docker container image
for that week’s release candidate (latest-rc). The following week we retag the image as latest.
You can run the latest or latest-rc CLI versions, or a specific numbered version.
For each Salesforce CLI version, we provide two flavors:
•
slim—The CLI installed on Linux with a TAR file, plus OpenJDK 11.
•
full—The CLI installed on Linux with npm on a full Node.js installation, plus OpenJDK 11 and additional
utilities such as jq.
Refer to this Web page or the following table to determine the name of the image you want to use.
Docker Hub Image NameSalesforce CLI Version Type
salesforce/cli:latest-slimSlim latest release
salesforce/cli:latest-fullFull latest release
salesforce/cli:latest-rc-slimSlim release candidate
salesforce/cli:latest-rc-fullFull release candidate
salesforce/cli:2.0.1-slimSlim specific version, such as 2.0.1
salesforce/cli:2.0.1-fullFull specific version, such as 2.0.1
For example, to pull and run the slim CLI release candidate image:
docker pull salesforce/cli:latest-rc-slim
docker run -it salesforce/cli:latest-rc-slim
Then you can run Salesforce CLI commands, such as:
sf version
To exit the Salesforce CLI Docker container:
exit
51


CHAPTER 9 Salesforce CLI Plugins
Salesforce CLI consists of an npm package called @salesforce/cli and multiple plugins—also
npm packages—that contain commands. Most of the core functionality that Salesforce CLI provides
comes from plugins.
In this chapter ...
• Install a CLI Plugin
• Install Other Versions
of Salesforce CLI
Plugins
Some plugins are automatically installed when you install Salesforce CLI. These core plugins contain
commands that support source-driven development, such as:
•
Create and manage scratch orgs and sandboxes: The plugin-org plugin contains commands such
as org create scratch and org delete sandbox
• Install Trusted
Unsigned Plugins
Automatically
•
Deploy and retrieve metadata between the org and your local project: The plugin-deploy-retrieve
plugin contains commands such as project deploy start and project retrieve
preview.
• Discover Salesforce
Plugins
•
Authorize orgs: The plugin-auth plugin contains commands such as org login web and org
logout.
• Quickly Uninstall All
Non-Core Plugins
•
Create and manage scratch org users: The plugin-user plugin contains commands such as org
create user and org generate password.
Some plugins are installed just when you need them, rather than being included automatically in a
Salesforce CLI installation. When you run a command in a "just-in-time" (JIT) plugin for the first time,
Salesforce CLI installs the latest released version of the plugin and then runs the command. The plugin
installation happens automatically, although we display a little message so you know what's going on.
From then on, run any of the commands contained in the plugin as usual. When you next update
Salesforce CLI with sf update, if the JIT plugin has released a new version, then it's also updated.
These JIT plugins contain specialized commands that aren’t typically used by most CLI users, such as:
•
Create and manage second-generation packages: The plugin-packaging plugin contains commands
such as package version create and package install.
•
Create and manage custom metadata types: The plugin-custom-metadata contains commands
such as cmdt generate object and cmdt generate records.
•
Create and manage scratch org snapshots and shapes: The plugin-signups contains commands such
as org create shape and org delete snapshot.
•
Create and manage Experience Cloud sites: The plugin-community plugin contains commands such
as community create and community publish.
To determine whether a plugin is core or JIT, check the package.json file of the aggregator
@salesforce/cli plugin:
•
Core plugins are listed in the oclif:plugins section.
•
JIT plugins are listed in the oclif:jitPlugins section.
See the Salesforce CLI Status page for the full list of core and JIT plugins, their GitHub repositories, and
their status.
53

You can also install more plugins, such as CRM Analytics, to incorporate other Salesforce features into
your development environment. You can also develop your own plugin to add your custom functionality
to Salesforce CLI. See Salesforce CLI Plugin Developer Guide.
By default, the latest versions of the core plugins are installed when you install Salesforce CLI for the first
time. Similarly, when you update the CLI to the latest version, the core plugins are also updated, as well
as any JIT plugins that were subsequently installed.
To determine the versions of the plugins currently installed in your CLI, run:
sf plugins --core
The command displays information such as this sample output.
@oclif/plugin-autocomplete 3.0.1 (core)
@oclif/plugin-commands 3.0.6 (core)
@oclif/plugin-help 6.0.5 (core)
@oclif/plugin-not-found 3.0.3 (core)
@oclif/plugin-plugins 4.1.0 (core)
@oclif/plugin-search 1.0.6 (core)
@oclif/plugin-update 4.1.3 (core)
@oclif/plugin-version 2.0.6 (core)
@oclif/plugin-warn-if-update-available 3.0.2 (core)
@oclif/plugin-which 3.0.8 (core)
@salesforce/cli 2.17.10 (core)
apex 2.3.20 (core)
auth 2.8.26 (core)
data 2.6.3 (core)
deploy-retrieve 1.20.0 (core)
info 3.0.1 (core)
limits 3.0.1 (core)
login 2.0.1 (core)
marketplace 1.0.2 (core)
org 2.11.8 (core)
packaging 1.27.1
schema 3.0.1 (core)
settings 2.0.2 (core)
sobject 0.2.15 (core)
source 2.11.0 (core)
telemetry 3.1.0 (core)
templates 55.5.18 (core)
trust 3.0.1 (core)
user 2.3.42 (core)
Uninstalled JIT Plugins:
community 2.4.9
custom-metadata 2.2.12
dev 1.3.2
devops-center 1.2.4
env 3.0.1
functions 1.22.9
signups 1.5.6
@salesforce/sfdx-plugin-lwc-test 1.1.1
@salesforce/sfdx-scanner 3.18.0
54
Salesforce CLI Plugins
As shown in the sample output, if a plugin has (core) next to its name, it’s the version bundled with
the CLI. If you install a specific version of the plugin, or it was automatically installed as a JIT plugin, its
version number or tag is displayed instead. For example, the package commands are contained in
the JIT packaging plugin and the sample output indicates that version 1.27.1 is installed.
The end of the plugins --core output also displays the available JIT plugins that haven’t yet been
installed.
SEE ALSO:
Install Other Versions of Salesforce CLI Plugins
Discover Salesforce Plugins
Salesforce CLI Plugin Developer Guide
55
Salesforce CLI Plugins

Install a CLI Plugin
You can extend the functionality of the core Salesforce CLI by installing a plugin, which is a set of CLI commands that are grouped in an
npm package. The plugin can come from a variety of providers: Salesforce, a third party, or even one that you create yourself. Salesforce
CLI plugin installs work similarly to npm installs.
An example of a non-core plugin provided by Salesforce is Code Analyzer. The examples in this topic use this plugin.
The typical way to install a plugin is to specify its long name with the plugins install command. This method installs the latest
release of the plugin. The long name is the name property in the plugin’s package.json file, such as
@salesforce/sfdx-scanner.
sf plugins install @salesforce/sfdx-scanner
To install a specific release of a plugin, specify its tag with the @ character after the long name.
sf plugins install @salesforce/[email protected]
SEE ALSO:
Salesforce Code Analyzer Documentation
npm Documentation: npm install
sf Plugin Developer Guide
Install Other Versions of Salesforce CLI Plugins
Sometimes you want to use a specific version of a plugin. For example, let’s say Salesforce fixed a bug in the apex run command.
The fix has been released in the associated plugin, but Salesforce hasn’t yet included that plugin release in the current Salesforce CLI.
But you want to test the bug fix in your local development environment. Follow these steps to install the version of the plugin that has
the fix.
1. Determine the plugin that contains the command by running the which command. This example shows that the apex run
command is in the plugin-apex plugin.
sf which apex run
=== apex run
plugin: @salesforce/plugin-apex
2. Find the plugin’s repository with the Salesforce CLI Status page. Then navigate to its GitHub repo, such as @salesforce/plugin-apex,
which lists all the releases and tags.
3. Install the version that contains the bug fix. For example, to install version 2.2.22 of the apex plugin, run this command:
sf plugins install [email protected]
The preceding example uses the plugin’s short name, which is shown in the output of sf plugins --core. You can also use
the plugin’s long name, which is the name property in the plugin’s package.json file.
sf plugins install @salesforce/[email protected]
When you now run sf plugins --core, the apex plugin entry shows the newly installed version rather than (core).
apex 2.2.21 (2.2.22)
56
Install a CLI PluginSalesforce CLI Plugins

4. When you finish testing, go back to using the current version of the plugin by uninstalling the tagged version.
sf plugins uninstall apex
Important: When you install a specific plugin version using a tag, such as 2.2.22, you stay with that tag until you explicitly
uninstall it.
Install Trusted Unsigned Plugins Automatically
When you install a plugin with the sf plugins install command, Salesforce CLI first verifies its digital signature. If the plugin
provides a valid signature, the CLI installs it. Otherwise, Salesforce CLI doesn't install it until you answer a warning prompt and acknowledge
that you understand the risks. This process works well when you install a plugin interactively at the command line, but can prevent a
batch job from completing. To automatically install a plugin without prompting, even when unsigned, create an allowlist file on your
local file system and add the plugins you trust.
Warning: After you install a plugin and run one of its commands in a terminal, the command runs with your user privileges. As
a result, the command can read encrypted data, communicate with any Salesforce org you authenticated to, or remove files in
your home directory. Install only unsigned and unverified plugins that you trust.
1. Create a file called unsignedPluginAllowList.json and put it in one of these directories:
•
(Linux and macOS): $HOME/.config/sf
•
(Windows) Depending on your Windows configuration, either C:\Users\username\.config\sf or
%LOCALAPPDATA%\sf
2. Add the names of the plugins you trust to the JSON file in a simple array of strings. For example:
[
"sfdx-templates",
"salesforce-cmdt",
...
]
Discover Salesforce Plugins
Check out these other plugins that work with specific Salesforce features. These plugins are created by Salesforce.
ISV Technical Enablement Plugin
The ISVTE plugin is an on-demand Technical Evangelist. It scans your package metadata and code, and provides targeted feedback
to help you improve and future-proof your app. The feedback includes a detailed metadata inventory, recommendations on features
or technologies to consider using, enablement resources, and installation limitations. The feedback also includes best practices,
partner alerts, guidance on improving your partner Trailblazer score, and more. While it's designed for ISV and OEM partners, anyone
developing on the platform can use it.
When you install the plugin, you're asked to confirm that it's unsigned. Answer yes. This behavior is expected.
See GitHub for documentation and more information.
CRM Analytics Plugin
CRM Analytics is a cloud-based platform for connecting data from multiple sources, creating interactive views of that data, and
sharing those views in apps.
57
Install Trusted Unsigned Plugins AutomaticallySalesforce CLI Plugins

Use the CRM Analytics CLI plugin to create scratch orgs with Analytics Studio, which you can use to develop and test source code.
The plugin includes commands that call a subset of the Analytics REST API endpoints to manage CRM Analytics assets programmatically.
Create and iteratively develop CRM Analytics templates. Update and delete apps, dashboards, lenses, and dataflows. Use history
commands to restore previous versions of dashboards and dataflows. Manage the auto-install lifecycle for embedded templated
apps.
See Develop with the Analytics Plugin for the Salesforce CLI for documentation and more information.
Salesforce Code Analyzer Plugin
The Salesforce Code Analyzer plugin is a unified tool for static analysis of source code, in multiple languages (including Apex), with
a consistent command-line interface and report output. We currently support the PMD rule engine, ESLint, and RetireJS.
The plugin creates "rule violations" when the scanner identifies issues. Developers use this information as feedback to fix their code.
Integrate this plugin into your continuous integration (CI) solution to continually enforce the rules and ensure high-quality code.
See Salesforce Code Analyzer for documentation and more information.
Quickly Uninstall All Non-Core Plugins
Sometimes you want to quickly uninstall all the non-core Salesforce CLI plugins that were installed after you first installed the CLI.
Examples of non-core plugins include:
•
Third-party plugins that you explicitly installed with the plugins install command.
•
JIT plugins that were automatically installed when you ran one of their commands.
•
Local plugins that you linked with the plugins link command.
To uninstall all non-core plugins, run this command.
sf plugins reset
After the command finishes, you’re left with only the core Salesforce CLI plugins, as if you had installed the CLI from scratch.
To uninstall, then reinstall, all non-core plugins, specify the --reinstall flag.
sf plugins reset --reinstall
To remove all package manager-related files and directories
(node_modules, package.json, yarn.lock, package-lock.json) from Salesforce CLI's internal data directory, specify
the --hard flag.
sf plugins reset --hard
58
Quickly Uninstall All Non-Core PluginsSalesforce CLI Plugins

CHAPTER 10 Troubleshoot Salesforce CLI
Here’s a list of Salesforce CLI errors and how to fix them.
In this chapter ...
• Check Our GitHub
Repository for Issues
and Discussions
• Use the Doctor to
Troubleshoot
Problems
• Debug Errors When
Deploying or
Retrieving Source
• Error: Bad CPU Type
• Where is Salesforce
CLI Installed?
• Error: Command
Failed with ENOENT
• Error After Installing
Salesforce CLI on
PowerShell Using
npm
• Error Installing on
Windows About the
PATH Not Updated
59

Check Our GitHub Repository for Issues and Discussions
Don't see your problem in this section? Then check out the issues that our customers and open-source community enter in the top-level
Salesforce CLI GitHub repository.
Click the Issues tab to find both open and closed bugs. Use the filters to search for issues that match the one you're experiencing, and
add your voice in the comments! Click the Discussions tab to read about the discussions we're having about new features. You can join
a discussion if you want, or even create a new issue or discussion. We love feedback!
We also publish the weekly release notes in this GitHub repository.
Use the Doctor to Troubleshoot Problems
Quickly gather Salesforce CLI configuration data and run diagnostic tests with the doctor command. The main use case of the
command is to easily generate information files that you can attach to GitHub issues or provide to Salesforce Customer Support. You
can also use the doctor command to troubleshoot Salesforce CLI problems by interpreting the output yourself.
Run without flags, the command first displays basic information, such as whether you're on the latest CLI version. It then writes your
configuration and a detailed diagnosis to a JSON file in the current directory. Use the --output-dir flag to specify a different
directory. The name of the file is <timestamp>-diagnosis.json, such as 1708472775780-diagnosis.json.
sf doctor --output-dir diagnostic-files
The CLI doctor is in and ready to diagnose all your problems!
Run the Doctor on a Specific Command or Plugin
Use the --command flag to run a specific command in debug mode. Encapsulate the command in double quotes. The doctor generates
two additional log files, one for the standard output (stdout) and another with debug information (stderr). The log files are called
<timestamp>-command-stdout.log and <timestamp>-command-debug.log, respectively.
sf doctor --command "org list --all"
To run diagnostic tests on a specific plugin, rather than Salesforce CLI itself, use the --plugin flag. If the plugin isn't listening to the
doctor, then you get a warning and no data.
sf doctor --plugin @salesforce/plugin-deploy-retrieve
Create a GitHub Issue
To create a GitHub issue, use the --create-issue flag, enter a title at the prompt, and a browser window automatically opens
with a partially filled GitHub issue. Enter the remaining information about your specific issue, click Submit new issue, and the Salesforce
CLI team is alerted about your issue.
60
Check Our GitHub Repository for Issues and DiscussionsTroubleshoot Salesforce CLI

Interpret the Initial Doctor Output
The doctor command first outputs basic information to the terminal about your Salesforce CLI installation in the form of diagnostic
tests and whether they passed or failed, as shown in this sample output. The command outputs more comprehensive information to a
file in the specified location.
sf doctor --output-dir diagnostic-files
=== Running all diagnostics
pass - salesforcedx plugin not installed
fail - no linked plugins
warn - [@salesforce/plugin-deploy-retrieve] sourceApiVersion matches apiVersion
pass - using latest or latest-rc CLI version
...
Note: The doctor command includes a set of diagnostic tests that always run. Plugin developers can also add custom diagnostic
tests to the doctor command. If you’ve installed additional plugins that have these customizations, then your output looks
different.
Each test that results in a fail or warn usually has a corresponding suggestion in the Suggestions section at the end of the output;
make sure that you check them out!
Let’s look at the diagnostic tests that always run, and what you can do if they fail.
•
Test Name: salesforcedx plugin not installed
What it does: Checks whether the salesforcedx plugin is installed. Having the plugin installed is an error, because the
Salesforce CLI team stopped supporting it, and then removed it from the core CLI, many years ago. But some CLI installations continue
to have it installed, which can cause problems.
If you get a fail result for this test, then your installation includes the salesforcedx plugin. You must uninstall it and update
to the latest CLI version:
sf plugins uninstall salesforcedx
sf update
•
Test Name: no linked plugins
What it does: Checks for any linked plugins in the CLI. Because the test checks for an absence of linked plugins, a pass means no
linked plugins are detected, and a fail means that the doctor command detected at least one linked plugin. Linked plugins
are plugins that you install from local files with the plugins link command.
If you get a fail for this test, see the Suggestions section at the end of the doctor output for the list of linked plugins. If you
explicitly linked these plugins, great! If, however, you see a plugin that you don’t want linked, unlink it so you use the plugin version
that’s included in Salesforce CLI. Another problem with linked plugins is that they aren’t updated when you update the CLI. Here’s
how to unlink a plugin:
sf plugins unlink my-plugin
•
Test Name: [@salesforce/plugin-deploy-retrieve] sourceApiVersion matches apiVersion
What it does: Checks whether the values of the apiVersion and sourceApiVersion variables are the same. Salesforce
CLI uses the API version and source API version when deploying and retrieving metadata to and from the org.
If you get a fail or a warn, see the Suggestions section at the end of the doctor output for an explanation of why the test
didn’t pass. For example, the values might be the same because you haven’t explicitly set them, and so they both default to the
same value. If you desire this behavior, you don’t need to do anything.
61
Interpret the Initial Doctor OutputTroubleshoot Salesforce CLI

See How API Version and Source API Version Work in Salesforce CLI for more information about how these two variables interact.
•
Test Name: using latest or latest-rc CLI version
What it does: Checks whether the Salesforce CLI version is either the latest or the release candidate.
If you get a fail, we recommend that you update to the latest release of Salesforce CLI if possible. See Update Salesforce CLI for
more information.
The doctor command also checks whether you’re using sfdx (v7) or sf (v1), both of which are deprecated. If you see this
warning, read Move from sfdx (v7) to sf (v2) for information on how to move to sf (v2).
Interpret the Diagnostic File Information
After displaying basic information in the terminal, the doctor command then creates a JSON diagnostic file in the current directory,
or the directory specified by the --output-dir flag. Let’s look at the main JSON objects and keys, and the diagnostic information
they provide.
versionDetail
Provides version information about Salesforce CLI and your computer, similar to the output of the sf version --verbose
command. The JSON key names are self-explanatory, but here’s a recap anyway.
•
cliVersion—Version of the installed Salesforce CLI.
•
nodeVersion—Version of Node.js that Salesforce CLI is using.
•
osVersion and architecture—Operating system version and architecture of your computer.
•
rootPath—Location of the Salesforce CLI binary file.
•
pluginVersions—List of core and user-installed plugins, along with their versions. User-installed plugins include the JIT plugins,
such as packaging and devops-center.
sfdxEnvVars and sfEnvVars
Lists the environment variables that are set for your Salesforce CLI installation. The list includes user environment variables that you’ve
explicitly set and internal variables that Salesforce CLI sets. See Salesforce CLI Environment Variables for list of user environment variables.
The sfdxEnvVars JSON object lists the deprecated SFDX_ environment variables. Even though they’re deprecated, they still affect
the behavior of Salesforce CLI. The sfEnvVars object lists the SF_ environment variables.
Most of the deprecated SFDX_ environment variables have an SF_ equivalent with a similar name, such as
SFDX_HIDE_RELEASE_NOTES and SF_HIDE_RELEASE_NOTES. Some environment variables had bigger name changes
between SFDX and SF, see the Environment Variables section of the Migration Guide for details. If you set these SFDX_ and SF_
equivalent pairs to different values, the SF_ environment variable takes precedence.
Note: We highly recommend that you use only the SF_ environment variables.
Check the values of the user environment variables and ensure they’re what you expect and want. If you see a value you don’t want,
determine how you’ve set the environment variable and change it as needed.
cliConfig
Lists the Salesforce CLI configuration settings, most of which are used by the underlying oclif framework, which Salesforce CLI is built
on. A few examples include:
62
Interpret the Diagnostic File InformationTroubleshoot Salesforce CLI

•
binPath—Name and location of the sf binary.
•
cacheDir—Directory that Salesforce CLI uses for internal caching.
•
configDir—Directory in which Salesforce CLI stores internal configuration data.
•
dataDir—Directory in which Salesforce CLI stores data.
•
name—The npm name of Salesforce CLI, which is @salesforce/cli.
•
theme—The default color theme for --help messages.
•
shell—Shell you’re using, such as bash or zsh. The value is oclif’s best guess, but this information is notoriously difficult to
glean, so the value can be wrong or unknown, especially on Windows computers.
See the oclif documentation for more information.
pluginSpecificData
If you ran the doctor command with either the --command or --plugin flag, and the associated plugin is listening to the
doctor, then this section contains additional diagnostic information about the plugin. If the plugin isn’t listening, then this section is
empty.
By default, the doctor runs all diagnostic tests, including all plugin-defined tests. You can target tests for a specific plugin using the
--plugin flag as a way to reduce some noise or if you're a plugin author writing new doctor tests.
Debug Errors When Deploying or Retrieving Source
When you run project deploy start or project retrieve start, Salesforce CLI creates a temporary directory with
all the metadata files, and then deletes the directory upon successful completion of the command. If you run into errors when executing
either command, retaining these files can be useful for debugging purposes.
Sometimes you want to inspect the retained files even if you don’t run into an explicit error. Let’s say, for example, that your deployment
completes successfully, but when you check your org, the deployed components look different from what you expect. You can inspect
the metadata files before Salesforce sent them to the org and possibly find the problem. Similarly, if a retrieve completes successfully,
but the source files in your package directory aren’t what you expect, or something is missing, you can inspect the metadata format files
that were initially retrieved from the org, but before they were converted to source format.
How To Retain Temporary Metadata Files
To retain all the metadata files in a directory when you run the project deploy start and project retrieve start
commands, set the SF_MDAPI_TEMP_DIR environment variable to the directory path.
This example, run from a DX project directory, shows how to set the environment variable for a single retrieve.
SF_MDAPI_TEMP_DIR=mdapiout sf project retrieve start
When the command completes, the retained files are in a subdirectory of the mdapiout directory. The subdirectory’s name consists
of the timestamp when you ran the command, and either the suffix _retrieve or _deploy, depending on whether the command
was a retrieve or a deploy.
The format and location of the retained files depends on whether you ran a retrieve or a deploy:
•
For retrieves, the retained files are in both formats and in their own directories (metadata and source). The metadata directory
includes the downloaded metadata .ZIP file, the unzipped metadata format files, and the package.xml file.
The source directory contains the converted files in source format.
63
Debug Errors When Deploying or Retrieving SourceTroubleshoot Salesforce CLI

•
For deploys, the retained files are only in metadata format in the metadata directory, along with the package.xml file. There
are no source-format files because they’re already in your package directory.
Here’s what the mdapiout directory looks like after running project retrieve start with SF_MDAPI_TEMP_DIR set.
Error: Bad CPU Type
You get the error Bad CPU type in executable when you try to install Salesforce CLI on macOS.
Answer: Make sure you download and install the correct .pkg file for your macOS computer. Our download page provides two macOS
flavors based on the computer’s processor: Apple Silicon and Intel CPU.
To determine which type of processor your computer is using, see this Apple Support document.
Where is Salesforce CLI Installed?
When troubleshooting installation problems, it's often useful to know which directories Salesforce CLI is installed in.
Run this command and search the output for the location property, which points to the global Salesforce CLI installation directory.
The command works for all types of installations: installers, npm, and TAR files.
sf plugins inspect @salesforce/cli
In this sample output, Salesforce CLI is installed in the /Users/astro/.local/share/sf/client/2.25.7-b42201f
directory.
sf plugins inspect @salesforce/cli
└─ @salesforce/cli
├─ version 2.25.7
├─ homepage https://github.com/salesforcecli/cli
├─ location /Users/astro/.local/share/sf/client/2.25.7-b42201f
├─ commands
│ ├─ cmdt:generate:field
...
└─ dependencies
├─ @inquirer/select ^1.3.1 => 1.3.1
...
64
Error: Bad CPU TypeTroubleshoot Salesforce CLI

To find the directories in which the plugins are installed, set the DEBUG environment variable to sf and run the version command.
For example:
DEBUG=sf sf version
The data property in the output contains the directory that contains the installed plugins. In this truncated sample output, plugins
are installed in the /Users/astro/.local/share/sf directory.
DEBUG=sf sf version
sf OS: +0ms
sf platform: darwin +1ms
sf architecture: x64 +0ms
sf release: 23.2.0 +0ms
sf shell: bash +0ms
sf NODE: +0ms
sf version: 20.10.0 +0ms
sf CLI: +0ms
sf version: 2.25.7 +0ms
sf channel: stable +0ms
sf bin: sf +0ms
sf data: /Users/astro/.local/share/sf +0ms
sf cache: /Users/astro/Library/Caches/sf +0ms
sf config: /Users/astro/.config/sf +0ms
sf ENV: +1ms
sf SF_BINPATH: /Users/astro/.local/share/sf/client/bin/sf +0ms
sf SF_REDIRECTED: 1 +0ms
...
Error: Command Failed with ENOENT
After recently installing Salesforce CLI, you get this error when you run a command such as project generate.
ERROR running project generate: Command failed with ENOENT: npm root -g --prefix
/Users/johndoe/Documents/sf_workspaces/.yo-repository --loglevel error
spawnSync npm ENOENT
Answer: Install Node.js.
Error After Installing Salesforce CLI on PowerShell Using npm
After installing Salesforce CLI on Windows PowerShell using npm, you get a security policy error whenever you try to execute any CLI
command. Installing with the Windows-specific installer works correctly.
The error looks something like this:
sf : File C:\Users\<username>\AppData\Roaming\npm\sf.ps1 cannot be loaded because running
scripts is disabled on this system
The problem is that you have a PowerShell execution policy configured for your computer that’s blocking Salesforce CLI from working
correctly.
To fix the error, work with your administrator to manage the policy settings on your computer to disable the one that's blocking Salesforce
CLI. For more information, see about_Execution_Policies in the Microsoft PowerShell documentation.
65
Error: Command Failed with ENOENTTroubleshoot Salesforce CLI
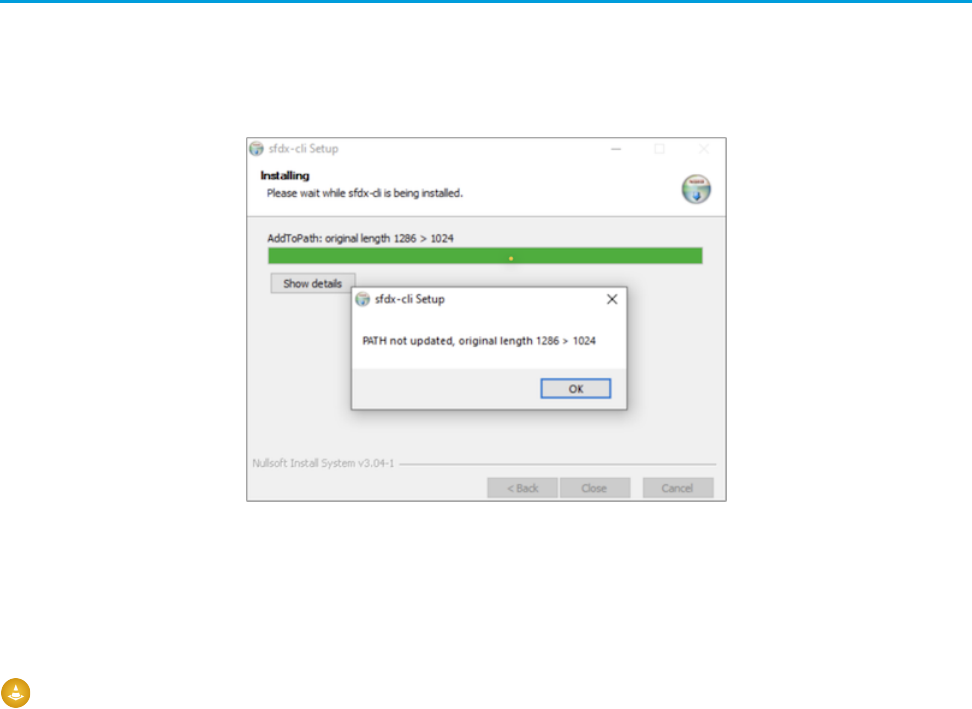
Error Installing on Windows About the PATH Not Updated
While installing Salesforce CLI on Windows using the *.exe installer executable, you get the error PATH not updated,
original length XX > 1024, where XX is a number greater than 1024.
The error looks something like this:
The problem is that your PATH environment variable has a value whose string length is greater than 1024. This limitation isn’t from
Salesforce CLI; rather, it’s a limitation of the Nullsoft Scriptable Install System (NSIS), which Salesforce CLI uses for its Windows installer.
The installer is checking for the PATH length on your computer to make sure that NSIS fails gracefully and doesn't get into a bad state.
To fix the problem, update your PATH variable to be shorter, such as removing unneeded paths. Check your Windows documentation
for details.
Warning: Be careful updating your PATH variable, especially the one in your System Variables; updating it incorrectly can cause
major headaches. Check with your admin, just to be sure.
66
Error Installing on Windows About the PATH Not UpdatedTroubleshoot Salesforce CLI

CHAPTER 11 CLI Deprecation Policy
Salesforce deprecates CLI commands and flags when, for example, the underlying API changes.
The Salesforce CLI deprecation policy is:
•
Salesforce announces new and upcoming deprecations of commands and flags in the weekly
Salesforce CLI release notes.
•
Salesforce can deprecate a command or flag at any time.
•
When you run the deprecated command, Salesforce provides a deprecation warning for a minimum
of 4 months.
•
Salesforce removes the deprecated command or flag 4 months, or more, after the deprecation
warning first appears.
•
If you use a command or flag that’s been deprecated but not yet removed, you get a warning message
in stderr in the human-readable output. If you specify JSON output, the warning is presented
as a property. The message includes the plugin version in which we plan to remove the command
or flag. The command help also includes deprecation information when appropriate.
•
When possible, Salesforce provides a functional alternative to the deprecated command or flag.
•
For our policy on changes to a Salesforce CLI command’s JSON response, see Support for JSON
Responses.
SEE ALSO:
Salesforce CLI Weekly Release Notes
67

CHAPTER 12 Next Steps
Read on to learn what to do after you’ve installed Salesforce CLI.
Check out the examples in the Sample Gallery. The gallery contains sample apps that show what you
can build on the Salesforce platform. They’re continuously updated to incorporate the latest features
and best practices.
Ramp up quickly on Salesforce CLI with the Quick Start: Salesforce DX Trailhead project. Then dive right
into development with the Build Apps Together with Package Development trail.
Looking for a more visual developer experience? We got you covered! Check out Salesforce Extensions
for VS Code, which is built on Salesforce CLI.
Read the Salesforce DX documentation:
•
Salesforce DX Developer Guide to learn how to manage and develop apps on the Salesforce Platform
across their entire lifecycle.
•
Salesforce CLI Command Reference for the complete list of CLI commands and how to use them.
•
Salesforce CLI Plugin Developer Guide to learn how to develop your own plugins for Salesforce CLI.
Development Pathways
Salesforce CLI is a powerful tool that you can use to develop applications in many different ways. Here
are some common pathways, with the required steps to get you started and suggestions on what to do
next.
Get Started: Use Scratch Orgs for Development
A scratch org is a source-driven and disposable deployment of Salesforce code and metadata. Scratch
orgs drive developer productivity and collaboration during the development process, and facilitate
automated testing and continuous integration.
1. As the Admin user, enable Dev Hub in your Developer Edition, trial, or production org (if you're
a customer), or your business org (if you're an AppExchange partner).
If you don’t have an org, sign up for a free Developer Edition org on the Salesforce Developers
website.
2. If you want your dev team to create scratch orgs, add them to your Dev Hub org.
3. (Optional) Turn on Einstein Features in your Dev Hub to eliminate the manual steps for enabling
the chatbot feature in scratch orgs.
4. Clone a sample Salesforce DX project from GitHub and try out the most common CLI commands.
Then check out the Salesforce DX Developer Guide and learn about Salesforce DX project
configuration, scratch orgs, synchronizing your code, and other developer topics.
68
Get Started: Develop Second-Generation Managed Packages
As an AppExchange partner, use second-generation managed packaging (2GP) to organize your
source, build small modular packages, integrate with your version control system, and better use
your custom Apex code.
1. As the Admin user, enable Dev Hub in your Developer Edition, trial, or production org (if you're
a customer), or your business org (if you're an AppExchange partner).
If you don’t have an org, sign up for a free Developer Edition org on the Salesforce Developers
website.
2. In the Dev Hub, enable Second-Generation Packaging.
3. If you want your dev team to create 2GP managed packages add them to your Dev Hub org.
4. Read all about 2GP managed packages and how to create them in the Salesforce DX Developer
Guide.
Get Started: Use a Sandbox
Sandboxes are copies of your Salesforce org that you can use for development, testing, and training,
without compromising the data and applications in your production org. You can turn on source
tracking in your production org so Developer and Developer Pro sandboxes automatically track
changes between the production org and your local development workspace.
1. Enable source tracking in your sandbox.
2. Learn how to use Salesforce CLI to create, manage, and develop with sandboxes by reading the
Salesforce DX Developer Guide.
SEE ALSO:
Salesforce DX Developer Guide
Salesforce CLI Command Reference
Salesforce CLI Plugin Developer Guide
69
Next Steps
