
Programmable Terminal NA-series
Replace Guide
From NS to NA
NA5-15□101□(-V1)
NA5-12□101□(-V1)
NA5-9□001□(-V1)
NA5-7□001□(-V1)
V469-E1-02
■ Introduction
This guide provides reference information for creating NA pages but no safety information.
Be sure to obtain the manuals for NA Series Programmable Terminal, read and understand the
safety points and other information required for use, and test sufficiently before actual use of the
equipment.
All rights reserved. No part of this publication may be reproduced, stored in a retrieval system, or
transmitted, in any form, or by any means, mechanical, electronic, photocopying, recording, or
otherwise, without the prior written permission of OMRON.
No patent liability is assumed with respect to the use of the information contained herein. Moreover,
because OMRON is constantly striving to improve its high-quality products, the information
contained in this manual is subject to change without notice.
Every precaution has been taken in the preparation of this manual. Should you notice any errors or
other problems, please feel free to contact us about them.
Trademarks
Sysmac and SYSMAC are trademarks or registered trademarks of OMRON Corporation in Japan
and other countries for OMRON factory automation products.
Microsoft, Windows, Visual Basic, and Excel are either registered trademarks or trademarks of
Microsoft Corporation in the United States and other countries.
ODVA, CIP, CompoNet, DeviceNet, and EtherNet/IP are trademarks of ODVA.
The SD and SDHC logos are trademarks of SD-3C, LLC.
Other company names and product names in this document are the trademarks or registered
trademarks of their respective companies.
Copyrights
・ Microsoft product screen shots used with permission from Microsoft.
The product photos and diagrams in this manual are included solely for illustrative purposes and
may differ from actual ones.

2
Terms and Conditions Agreement
Thank you for your usage of products of Omron Corporation (“Omron”). Without any special
agreements, these terms and conditions shall apply to all transactions regardless of who
sells.
⚫ Definitions of Terms
Omron product(s): Omron’s factory automation system devices, general control devices,
sensing devices, and electronic/mechanical components.
- Catalogs: Any and all catalogs (including “Best Components” and other catalogs),
specifications, instructions and manuals relating to Omron products, including
electronically provided data.
- Conditions: Use conditions, rating, performance, operating environment, handling
procedure, precautions and/or prohibited use of Omron products described in the
catalogs.
- User application(s): Application of Omron products by a customer, including but not
limited to embedding/using Omron products into customer’s components, electronic circuit
boards, devices, equipment or systems.
- Conformity: (a) conformity, (b)performance, (c) no infringement of intellectual property of
third party, (d) compliance with laws and regulations, and (e) conformity to various
standards of Omron products in user applications.
⚫ Note about Descriptions
- Rating and performance is tested separately. Combined conditions are not warranted.
- Reference data is intended to be used just for reference. Omron does NOT guarantee that
the Omron Product can work properly in the range of reference data.
- Examples are intended for reference. Omron does not warrant the conformity in usage of
the examples.
- Omron may discontinue Omron products or change specifications of them because of
improvements or other reasons.
⚫ Note about Use
Adopt and use Omron products considering the following cautions.
- Use the product in conformance to the conditions, including rating and performance.
- Check the conformity and decide whether or not Omron products are able to be adopted.
Omron makes no guarantees about the conformity.
- Make sure in advance that electricity is properly supplied to Omron products and they are
set up rightly in your system for intended use.
- When you use Omron products, ensure the followings: (i) allowance in aspect of rating
and performance, (ii) safety design which can minimize danger of the application when the
product does not work properly, (iii) systematic safety measures to notify danger to users,
and (ⅳ) periodical maintenance of Omron products and the user application.
- Omron assumes no responsibility for any direct or indirect loss, damage and expense
resulting from infection of our products, installed software, any computer devices,
computer programs, network, and databases with the followings: DDoS attack (distributed

3
DoS attack); computer virus and other technically harmful program; and unauthorized
access.
Please conduct the followings by yourself: (i) antivirus software, (ii) data input/output, (iii)
lost data recovery, (ⅳ) protections against computer virus that contaminate Omron
products or the installed software, and (ⅴ) measures to protect Omron products from
unauthorized access.
- Omron products are designed and manufactured as commodity for general industrial
products. For this reason, the usages (a) to (d) are to be unintended. Omron makes no
guarantees on Omron products, if you use Omron products for those purposes. However,
special applications that Omron expects or usages with especial agreement are excluded.
(a) Applications requiring high-level safety (e.g. nuclear control facilities, combustion
facilities, aerospace and aviation facilities, railroad facilities, elevating facilities,
amusement facilities, medical facilities, safety devices or other applications which
has possibility to influence lives or bodies)
(b) Applications requiring high reliability (e.g. gas/water/electricity supply system, 24-
hour operating system, applications handling with rights/property, such as payment
system)
(c) Applications in a harsh condition or environment (e.g. outdoor facilities, facilities with
potential of chemical contamination or electromagnetic interference, facilities with
vibration or impact, facilities on continual operation for a long period).
(d) Applications under conditions or environment which are not described in the catalogs
- Omron products in the catalogs are not intended to be used in automotive applications
(including two-wheel vehicles). Please DO NOT use Omron products in automotive
applications. Contact our sales personnel for automotive products.
⚫ Warranty
Warranty of Omron products is subject to followings.
- Warranty Period: One year after your purchase.
However, except when there is a separate statement in the catalogs.
- Coverage: Omron will provide one of the services listed below, on the basis of Omron’s
decision.
(a) Free repairing of the malfunctioning Omron products (except electronic/mechanical
components) at Omron maintenance service sites.
(b) Free replacement of the malfunctioning Omron products with the same number of
substitutes.
- Exceptions: This warranty does not cover malfunctions caused by any of the followings.
(a) Usage in the manner other than its original purpose
(b) Usage out of the conditions
(c) Usage out of Note about Use in these conditions
(d) Remodeling/repairing by anyone except Omron
(e) Software program by anyone except Omron
(f) Causes which could not be foreseen by the level of science and technology at the
time of shipment of the products.
(g) Causes outside Omron or Omron products, including force majeure such as disasters
⚫ Limitation of Liability
The warranty described in this Terms and Conditions Agreements is a whole and sole

4
liability for Omron products. There are no other warranties, expressed or implied.
Omron and its distributors are not liable for any damages arisen from or relating to Omron
products.
⚫ Export Control
Customers of Omron products shall comply with all applicable laws and regulations of other
relevant countries regarding security export control, in exporting Omron products and/or
technical documents or in providing such products and/or documents to a non-resident.
Omron products and/or technical documents may not be provided to customers if they
violate the laws and regulations.

5
Table of Contents
Terms and Conditions Agreement ..................................................................... 2
Related Manuals .................................................................................................. 9
How to Replace NS to NA5....................................................................... 10
Select NA Model ........................................................................................ 11
2-1 Communication Protocols and External Devices ................................... 11
2-2 Display Size .......................................................................................... 12
2-3 SD Card (or USB Stick Memory) ........................................................... 12
Install the NA Unit ..................................................................................... 13
3-1 Panel cutout .......................................................................................... 13
3-1-1 Differences in Front Size and Panel Cutout Dimensions ..... 13
3-1-2 Differences of Panel Cutout ................................................ 13
3-1-3 Differences of Front Size .................................................... 14
3-2 Precautions for Connecting to a Power Source ..................................... 15
3-2-1 Differences in Power Circuit ............................................... 15
3-2-2 Change in Supply Terminals ............................................... 16
Create NA HMI Project Data ..................................................................... 17
4-1 Major Differences Between NS and NA ................................................ 17
4-2 Differences in Ethernet Host Connection .............................................. 19
4-3 Host Addresses and Variables .............................................................. 19
4-3-1 How to Assign Data ............................................................ 19
4-3-2 Variable Data Type Conversion .......................................... 20
4-3-3 Processing BCD Type ........................................................ 22
4-3-4 Specify Device Address of NS ............................................ 22
4-3-5 How to Connect to CJ Series Unit ...................................... 23
4-3-6 Where to Register NS Variables ......................................... 24
4-3-7 Import CX-Programmer Variable Table to NA Device
Variables ............................................................................ 25
4-3-8 Import NS Variable Table to NA Global Variable ................ 25
4-3-9 Import NS Variable Table to NA Device Variables .............. 26
4-4 Project Settings and Functional Objects ............................................... 27
4-4-1 Appendix 1: Project Common Settings ............................... 27
4-4-2 Appendix 2: Object Common Settings ................................ 27
4-4-3 Appendix 3: Buttons ........................................................... 28
4-4-4 Appendix 4: Lamps ............................................................. 29

6
4-4-5 Appendix 5: Graphs ............................................................ 29
4-4-6 Appendix 6: Alarms ............................................................. 30
4-5 System Memory .................................................................................... 30
4-5-1 System Memory: Variable Mapping ..................................... 31
4-5-2 System Memory: Global Event ............................................ 33
4-5-3 System Memory: Supported by VB ..................................... 40
4-5-4 System Memory: Array ........................................................ 46
4-6 About Macro .......................................................................................... 51
4-6-1 Macro Execution Conditions ............................................... 51
4-6-2 Variables Used in NS Macros ............................................. 53
4-6-3 About PT Memory ............................................................... 53
4-6-4 About Host Address (Argument for READCMEM and
WRITECMEM) .................................................................... 54
4-6-5 Different Behaviors from NS Macros ................................... 54
4-6-6 Replacing NS Macro Function ............................................. 54
4-6-7 Sample Alternate Functions for NS Macro Functions .......... 58
Replacement Examples: Common Settings ........................................... 62
5-1 Project Properties .................................................................................. 62
5-1-1 Switch Label Tab ................................................................ 62
5-1-2 Macro Tab ........................................................................... 63
5-1-3 Language Selection Tab ..................................................... 65
5-2 System Setting ...................................................................................... 65
5-2-1 PT Tab ................................................................................ 65
5-2-2 Initial Tab ............................................................................ 66
5-2-3 History Tab ......................................................................... 67
5-2-4 Function Key Tab (For NS15) ............................................. 67
5-3 Variable Table ....................................................................................... 68
5-4 Alarm/ Event Settings ............................................................................ 68
5-4-1 How to Replace................................................................... 70
5-4-2 Non-replaceable Functionalities .......................................... 74
5-5 Data Log Settings .................................................................................. 75
5-5-1 How to Replace................................................................... 76
5-6 Broken-line Graph Group Settings ......................................................... 77
5-6-1 Functionality Correspondence Table ................................... 78
5-6-2 How to Replace................................................................... 78
5-7 Data Block Settings ............................................................................... 82
5-7-1 How to Replace................................................................... 82
5-8 String Table Setting ............................................................................... 84
5-8-1 Example of Indirect Reference ............................................ 84
5-9 Password .............................................................................................. 87
5-10 Unit/Scale Settings ................................................................................ 88
5-11 Dialog Setting ........................................................................................ 88
5-12 Device Data Transfer Setting ................................................................ 88

7
5-13 Troubleshooter Setting.......................................................................... 90
Replacement Examples: Functional Objects ......................................... 91
6-1 Functional Difference Between NS and NA: Common in Objects .......... 91
6-1-1 Behaviors of Overlapped Objects ....................................... 91
6-1-2 Behaviors of Hidden Objects .............................................. 91
6-1-3 Appearance of Non-Enterable Object ................................. 91
6-1-4 Where to Use Macros in Object Settings ............................ 92
6-2 Non-replaceable Functionalities: Common in Objects ........................... 93
6-3 ON/OFF Button ..................................................................................... 93
6-3-1 Button Types ...................................................................... 95
6-3-2 Non-replaceable Functionalities ......................................... 95
6-4 Word Button .......................................................................................... 96
6-4-1 Button Actions .................................................................... 96
6-4-2 Non-replaceable Functionalities ......................................... 97
6-5 Command Button .................................................................................. 98
6-5-1 Non-replaceable Functionalities ......................................... 99
6-6 Bit Lamp ............................................................................................. 100
6-6-1 Non-replaceable Functionalities ....................................... 100
6-7 Word Lamp ......................................................................................... 101
6-7-1 Non-replaceable Functionalities ....................................... 101
6-8 Multifunction ....................................................................................... 101
6-8-1 Double Pressing and ON and OFF Delay Functions ......... 103
6-8-2 Non-replaceable Functionalities ....................................... 104
6-9 Text .................................................................................................... 104
6-10 Numeral Display and Input .................................................................. 105
6-10-1 Non-replaceable Functionalities ....................................... 106
6-11 String Display and Input ...................................................................... 107
6-11-1 StartIndex and TextLength ............................................... 108
6-11-2 Non-replaceable Functionalities ....................................... 108
6-12 List Selection ...................................................................................... 109
6-12-1 Non-replaceable Functionalities ....................................... 109
6-13 Analogue Meter .................................................................................. 110
6-13-1 Non-replaceable Functionalities ....................................... 110
6-14 Level Meter ......................................................................................... 110
6-14-1 Non-replaceable Functionalities ....................................... 110
6-14-2 Realizing the Same Appearance as NS Object ................ 110
6-15 Broken-line Graph ............................................................................... 110
6-15-1 Non-replaceable Functionalities ....................................... 111
6-16 Bitmap ................................................................................................ 111
6-16-1 Non-replaceable Functionalities ....................................... 111
6-17 Alarm/Event Display ........................................................................... 111
6-18 Alarm/Event Summary and History ..................................................... 114

8
6-18-1 Non-replaceable Functionalities ........................................ 114
6-18-2 Replacing Icons ................................................................ 114
6-18-3 Setting for Distinguishing Occurrence and Cancellation of
Alarms .............................................................................. 116
6-18-4 Alternative for Page Transition When Selecting an Alarm . 117
6-19 Date and Time ..................................................................................... 117
6-20 Data Log Graph ................................................................................... 118
6-20-1 Non-replaceable Functionalities ........................................ 118
6-20-2 Replacing Icons ................................................................ 118
6-21 Data Block Table ................................................................................. 119
6-21-1 Non-replaceable Functionalities ........................................ 119
6-21-2 Replacing Icons ................................................................ 119
6-22 Frame .................................................................................................. 120
6-22-1 Functional Differences ...................................................... 120
6-22-2 Workaround When You Cannot Arrange an Object on Tab
Control Object ................................................................... 120
6-23 Table ................................................................................................... 121
6-24 Thumbwheel Switch ............................................................................ 121
6-24-1 Replace Thumbwheel Switch: Arrange Objects................. 121
6-24-2 Replace Thumbwheel Switch: Define a Structure .............. 121
6-24-3 Replace Thumbwheel Switch: Register the Structure ........ 122
6-24-4 Replace Thumbwheel Switch: Configure Global Subroutine
......................................................................................... 122
6-24-5 Replace Thumbwheel Switch: Configure Page Subroutine 123
6-24-6 Replace Thumbwheel Switch: Configure Page Switching
Event ................................................................................ 124
6-24-7 Replace Thumbwheel Switch: Configure Button Event ...... 124
6-24-8 Replace Thumbwheel Switch: Configure Data Display Object
......................................................................................... 124
6-25 Temporary Input .................................................................................. 124
6-26 Consecutive Line Drawing ................................................................... 124
6-27 Contents Display ................................................................................. 124
6-28 Video Display ...................................................................................... 124
Other Important Points ........................................................................... 125
Change Controller Program ................................................................... 127
8-1 Example of Changing Controller Program ........................................... 127
Revision History...................................................................................... 129

9
Related Manuals
The followings are the manuals and practice guides related to this document.
No.
Model
Title
W504
SYSMAC-SE2□□□
Sysmac Studio Version 1 Operation Manual
V117
NA5-15W□□□□
NA5-12W□□□□
NA5-9W□□□□
NA5-7W□□□□
NA-series Programmable Terminal Hardware
User’s Manual
V125
NA5-15W□□□□-V1
NA5-12W□□□□-V1
NA5-9W□□□□-V1
NA5-7W□□□□-V1
NA-series Programmable Terminal Hardware
(- V1) User’s Manual
V118
NA5-15W□□□□(-V1)
NA5-12W□□□□(-V1)
NA5-9W□□□□(-V1)
NA5-7W□□□□(-V1)
NA-series Programmable Terminal Software
User’s Manual
V119
NA5-15W□□□□(-V1)
NA5-12W□□□□(-V1)
NA5-9W□□□□(-V1)
NA5-7W□□□□(-V1)
NA-series Programmable Terminal Device
Connection User’s Manual
V120
NA5-15W
NA5-12W
NA5-9W
NA5-7W
NA-series Programmable Terminal Startup
Guide
V117
NS5-□Q□□(-V□)
NS8-TV□□(-V□)
NS10-TV□□(-V□)
NS12-TS□□(-V□)
NS15-TX□□(-V□)
NS-series Programmable Terminals SETUP
MANUAL
V073
NS5-□Q□□(-V□)
NS8-TV□□(-V□)
NS10-TV□□(-V□)
NS12-TS□□(-V□)
NS15-TX□□(-V□)
NS-series Programmable Terminals
PROGRAMMING MANUAL
V075
NS5-□Q□□(-V□)
NS8-TV□□(-V□)
NS10-TV□□(-V□)
NS12-TS□□(-V□)
NS15-TX□□(-V□)
NS-Series Programmable Terminals Macro
Reference

10
How to Replace NS to NA5
The following diagram illustrates the procedure for replacing an NS series unit to an NA series
unit.
NA unit
Create project data
(See Chapter 4 to 7)
Transfer HMI project
Install NA5
HMI project data
Host
Demount the existing NS
unit from the console panel
NS project data
Download the data
Install the NA Unit
(See Chapter 3)
Connect the power supply
and other units
Controller
Modify program
(See Chapter 8)
Setup NA unit
Connect to the host
Check the settings and
communications
Start running
*1, 2, 3
NA-series Programmable Terminal Hardware(-V1) User's
Manual (V125)
*2
3-4 How to Wire
Simulate HMI project
*3
Set the date and time with
reference to 4- 3 System
Menu Overview and 4- 4
System Menu Details.
*1
3-3 Installing NA Unit
Select NA model
(See Chapter 2)
Transfer controller
project

11
Select NA Model
2-1 Communication Protocols and External Devices
The table below shows communication protocols and host configurations for a NA system, which
depending on the unit model and communication protocol in your NS system.
Refer to “NA-series Programmable Terminal Device Connection User's Manual” (V119) for available
PLCs for each communication protocol.
NS Port
NS host configuration
Change in host configuration for NA
Connect to
Protocol
Protocol
What to do with host unit
Ethernet
OMR
ON
PLC
CV series
FINS
N/A
Replacement of the PLC is recommended.
CS1H/CS1G/CS1D
FINS
N/A
Connection with CS and CP series CPU Units
will be supported soon.
Please contact our sales representative for
details.
EtherNet/IP
CP1H/CP1L/CP2E
FINS
CJ1M Built-in ETN
FINS
FINS Ethernet
No change in the host configuration.
CJ1H/CJ1G/CJ1M +
CJ1W-
ETN21/CJ1W-EIP21
FINS
CJ2H/CJ2M
FINS
FINS Ethernet
EtherNet/IP
CIP Ethernet
NJ5/ NJ3/NJ1
EtherNet/IP
Ethernet
You need to change the connection to an EIP
unit to a CPU Unit with built-in port.
NX7/ NX1/NX1P
Delta Tau
Power PMAC EtherLite
Modbus/TC
P
Modbus/TCP
Replacing with OMRON CK3E or CK3M series
CPU Unit enables communications via
Modbus/TCP.
Please consider this proposal.
Serial port
A/B
OMRON PLC
Host Link
Change to the
connection via
Ethernet port
The serial connection will be supported soon.
Please contact our sales representative for
details.
The serial connection will be available only in
Host Link. If you connect more than one NS unit
through 1:N NT Link, change the protocol to the
Ethernet port connection.
1:1 NT Link
1:N NT Link
OMRON Temperature Controller
N/A
--
Other PLC
Memory Link
Modem
Barcode Reader
Controller
Link
Controller Link device
Video
input
RGB input
Video camera and other video equipment

12
2-2 Display Size
Select an NA series unit according to the display size of your NS unit.
NS series units are equipped with 4:3 displays, but NA series units are equipped with 16:10 wide-
type displays. An NA5 that has “W” in its model number is the wide display type.
NS Units to be Replaced
Recommended NA5 Units
Display Size
Resolution
(Dots)
Panel size
Resolution
(dot)
NS15
15.0 inches
1024 x 768
➡
NA5-15W□□□□-V1
15.4 W
1280 x 800
NS12
12.1”
800 x 600
➡
NA5-12W□□□□-V1
12.1 W
1280 x 800
NS10
10.4”
640 x 480
NS8
8.1”
640 x 480
➡
NA5-9W□□□□-V1
9.0 W
800 x 480
NS5
5.7”
320 x 240
➡
NA5-7W□□□□-V1
7.0 W
800 x 480
2-3 SD Card (or USB Stick Memory)
The data logging function in the NA series stores the collected log data to an SD card or USB stick
memory. Therefore, an SD card or USB stick memory must be mounted on the NA unit during the
operation.
Note that you cannot use a USB stick memory in a high-vibrational environment. Also, the NA-series
units are not equipped with a feature to fix the mounted stick memory. We recommend the SD card
to store a long-time log data.
You need to consider the room for inserting and ejecting the SD card when installing an NA unit.

13
Install the NA Unit
Refer to “3-3 Installing NA Units” in “Programmable Terminal NA Series Hardware (-V1) User’s
Manual” (V125) for details.
3-1 Panel cutout
3-1-1 Differences in Front Size and Panel Cutout Dimensions
The following is a comparison table of NS series and NA series.
(Units: mm)
NS
NA5
NS
Thick
ness
Front
dimensions
Panel cutout
NA5
Thickn
ess
Front
dimensions
Panel cutout
NS15
75.8
405 x 304
383.5 x
282.5
NA5-15W□□□□-V1
69
420 x 291
(392 + 1.0) x (268 + 1.0)
NS12
48.5
315 x 241
302 x 228
NA5-12W□□□□-V1
340 x 244
(310 + 1.0) x (221 + 1.0)
NS10
NS8
232 x 177
220.5 x
165.5
NA5-9W□□□□-V1
290 x 190
(261 + 1.0) x (166 + 1.0)
NS5
54.0
195 x 142
184 x 131
NA5-7W□□□□-V1
236 x 165
(197 + +0.5) x (141 + +0.5)
3-1-2 Differences of Panel Cutout
If the larger panel cutout size is necessary, you must enlarge the window in your control panel.
Replacement from an NS15, NS12, or NS10 unit will leave a gap in height, which requires an
adjustment plate. We do not provide dedicated plates because any replacements require widening
the panel cutout. Please prepare one for yourself.
NS15
To NA5-
15W□□□□-V1
A 14 mm gap in
height
Cut the width by 9 mm
NS12/ NS10
To NA5-
12W□□□□-V1
A 7 mm gap in
height
Cut the width by 8 mm

14
NS8
To NA5-
9W□□□□-V1
Heights are the
same
Cut the width by 41 mm
NS5
To NA5-
7W□□□□-V1
Cut the height by
10 mm
Cut the width by 13 mm
3-1-3 Differences of Front Size
Increase in the front size may cause an interference with devices around the panel.
The degree of interference depends on the cut in the panel cutout: same cuts in right/left or
top/bottom, either of right/left, or either of top/bottom.
NS
NA5
Changes in front size
Width
Height
NS15
NA5-15W□□□□-V1
+20
-14
NS12
NA5-12W□□□□-V1
+25
+3
NS10
NS8
NA5-9W□□□□-V1
+58
+13
NA5-7W□□□□-V1
+4
-12
NS5
NA5-7W□□□□-V1
+41
+23

15
3-2 Precautions for Connecting to a Power Source
3-2-1 Differences in Power Circuit
The internal power supply of the NS series units is an isolated circuit, but in the NA series units,
internal power supply is a non-isolated DC power supply.
Replacing an NS unit that is positively grounded to 24 V supply power with an NA unit as is will
cause a short circuit and damage the device, as illustrated below. Ground the negative side or add
an isolation transformer.
Also, to use a power supply that does not contain a protection circuit, supply power to the NA unit
through a fuse or other protective element.

16
3-2-2 Change in Supply Terminals
NS series units are equipped with a screwed supply terminal block, but NA series units’ supply
terminal block is a connector-type.
Change the power cable, if necessary.
Do not place heavy goods on the cable or pull the cable with force because the connector is
mounted in the joint.

17
Create NA HMI Project Data
You cannot reuse NS project data for NA series units.
Open a NS project data in CX-Designer to see your system configuration and settings of functional
object properties. Then, create an NA project data by using Sysmac Studio.
4-1 Major Differences Between NS and NA
The following table shows major differences between NS and NA that you need to know in creating
an NA project data.
Item
NS series
NA
Display resolution
4:3 display
16:9 wide-type display.
Based on the object layout in the NS unit, objects will be
arranged on the upper left of the NA screen, and a blank
space will be left on the right side.
Serial port
Two serial ports for a PLC, bar code
reader, and Memory Link device.
Serial 1 port is reserved for future expansion and not for
PLC. Use an Ethernet port for connection to the host
PLC.
Video input
The video input object can display video
inputs from a video input board attached
on the expansion I/F or RGB input board
on the user screen.
You cannot connect an I/F board usable in NS series
units. Video inputs are not available.
Project data
NS series-specific project data.
No compatibility with NA series project
data.
NA series-specific project data. No compatibility with NS
series project data.
Support tool
You can edit and transfer project data with
CX-Designer, which included in CX-One.
You can edit and transfer HMI project data with Sysmac
Studio.
Memory on a host
device
You can directly assign device addresses
of a host PLC. Also, you can use variables.
Tags are available while connecting via
EtherNet/IP.
To specify the data for an HMI object, you can use a
global variable. Also, you can specify a device address
for a device variable where the global variable is
assigned. Note that only tags are available while
connecting via CIP Ethernet, and you cannot use device
addresses.
The maximum sheets
for one screen
*A sheet is called as
background page in
NA.
10 sheets
1 sheet (page)
However, you can use a base screen, to which a sheet is
applied, as sheet in NA series units. Therefore, you can
use more than one sheet.
PT clock setting
You can set or change the internal clock
from the system menu, the date and time
objects, and the system memory.
You cannot set the clock with the DateTime object.
Use the system menu or a subroutine.
Pressing multiple points
on the touch-screen at
a time
You can press multiple points on the
touch-screen at a time except in NS15
units.
NA units do not support pressing multiple points on the
touch-screen at a time.
However, pressing a function key at the bottom of the NA
unit and a point on the touch-screen together is possible.
Also, you can press more than one Na’s function key
simultaneously.
Please consider modifying the implementation as
needed.
System ten-key
Japanese language input, including single
Kanji input, is available with a string input
ten-key pad.
The IME input function enables Hiragana and Kanji input
using Roman characters. You can input Chinese and
other languages.
User-made keypad
You can create a user keypad using
command buttons or Key Button of
Multifunction, and the pop-up function.
You can specify a keypad for each
functional object.
The custom keypad function allows you to create a user
keypad.
Keypads are determined depending on what you input:
the numeral and the hexadecimal keypads for numerical
values, and the string keypad for character strings.
The number of pop-ups
Up to 3 pop-ups at a time
Only 1 pop-up
Macro
(Called as Subroutine
in NA)
You use NS-specific scripts.
Macro set conditions are grouped by
project, screen, and functional object.
Project: Loading a project, alarm/event
occurring, alarm/event cleared, bit
changing, and value changing
Visual Basic 2008 (VB hereafter) is adopted.
There are limited or extended functions.
Subroutine descriptions in this document conform to
Visual Basic.
A subroutine is defined as either of global subroutine or
page subroutine, and unlike NS series, you cannot

18
Screen: Loading a screen and unloading a
screen
create a subroutine for each object. Set conditions for
subroutines are consolidated in Events.
Some macros for NS series can be substituted with the
Events and Actions feature of NA series.
Please consider the macro behavior in replacing.
Password
authentication for
manipulating objects
You can create a password authentication,
which requires a password for
manipulating an object.
Please consider employing the account security method,
which requires user authentication with a password on
the login page and enables you to switch access to an
object by the security level.
See the alternative VB code in Chapter 5-9 for your
reference.

19
4-2 Differences in Ethernet Host Connection
All NA series units connect to a host unit in an Ethernet port.
NS series units specifies all SYSMAC-NJ series units as “SYSMAC-NJ”, but in NA series, controllers
are set by models, such as NJ, NX, and other. Change settings for the model of the controller to
connect.
NS series
NA
Communication Settings -
Host Type
Communication
Settings - Protocol
Device References - External Device - Device
Configuration
Device
Vendor
Device Series
[Communication
Driver]
SYSMAC-CJ1
FINS
Omron
CJ
FINS Ethernet
SYSMAC-CJ2
SYSMAC-CJ2
EtherNet/IP
Omron
CJ
CIP Ethernet
SYSMAC-NJ
EtherNet/IP
Omron
NJ
Ethernet
NX7
NY
NX1P2
NX102
NX-CSG320
4-3 Host Addresses and Variables
4-3-1 How to Assign Data
For NS series units, information about the contacts and channels of a host, which is assigned to a
functional object or alarm, is specified by using a device address, variable, or tag (network
variable). Device address is referred as just “address” in CX-Designer.
Device to
Connect
Data
Data Type Assignment in NS
CJ1/CJ2
Device address
The data type will be automatically selected for a functional object using a
device address.
CJ2/NJ
Tag (Network
variable)
The data type selected for a variable will be used.
NJ
Global variable
In NA series, data are assigned to objects with NA Global Variables or System Variables in all
cases.
You need to map host addresses of connecting devices, variables, and tags (network variables) to
global variables of the NA series.
Device to
Connect
Data
Variable
mapping
Data Type Assignment in NA
Remarks
CJ1/CJ2
Device address
Required
Though device addresses do not
require data types, you need to
Select a data type according
to a functional object used in
20
select adequate data types in the
NA series.
the NS unit.
CJ2/NJ
Tag (Network
variable)
Required
The data type set for the variable
will be used.
NJ
Global variable
Required
-
Global variable
Not
required
You can map the global variables.
NA’s internal variables
-
System variable
Not
required
Use the data types given by the
system.
Precautions for Correct Use
When mapping a host address of a connecting device to an NA global variable, pay particular
attention to the size of the global variable. For instance, mapping the whole DM area to an array
may burden the data transmission and impair the NA unit’s responsiveness.
4-3-2 Variable Data Type Conversion
NS series units comply with data types of CJ series and NJ/NX series.
In NA series units, data types of global variables and device variables are VB data type and data
types depending on devices, respectively.
When you enter a device variable in AT of the Global Variables tab page and their data types are
different, the data acquired from the device will be automatically converted according to the data
type. The data that changed in the HMI will be reversibly converted. Data types other than BCD will
be converted to the same types, but named differently.
NS Data Type
NA Data Type
Data Type
Size
Data Type
Location
Device Variable
Global
variable
CJ
NJ
Boolean
1-bit
BOOL
Format for
storing
functional
object value,
variable, and
tag
BOOL
Boolean
Signed
integer
1 bytes
SINT
-
SINT
SByte
Unsigned
integer
1 bytes
BYTE
USINT
-
BYTE
USINT
Byte
Signed
integer
2-byte
INT
INT
Short
Unsigned
integer
WORD
UINT
CHANNEL
WORD
UINT
UShort
Signed
integer
4-byte
DINT
DINT
Integer
Unsigned
integer
UDINT
DWORD
UDINT
DWORD
UInteger
Floating point
REAL
REAL
Single

21
Signed
integer
8-byte
LINT
LINT
Long
Unsigned
integer
ULINT
LWORD
ULINT
LWORD
ULong
Floating point
LREAL
LREAL
Double
Character
string
Variabl
e
length
STRING
STRING
String
Date & Time
-
TIME
-
TIME
Date
DATE
-
DATE
TIME_OF_DAY
-
TIME_OF_DAY
DATE_AND_TIME
-
DATE_AND_TI
ME

22
The following shows data types of BCD variables.
Because BCD type is not available in [Global Variables], use a signed or unsigned integer type for
signed or unsigned NS data type, respectively.
NS Data Type
NA Data Type
Data Type
Size
Data Type
Location
Device Variable
Global
variable
CJ
NJ
Unsigned
BCD integer
(For CJ only)
2-byte
UINT_BCD
Variable and
tag
UINT_BCD
-
UShort
4-byte
UDINT_BCD
UDINT_BCD
-
UInteger
8-byte
ULINT_BCD
ULINT_BCD
-
ULong
Unsigned
BCD integer
4-byte
BDC2 (Unsigned 1-
WORD)
Value storing
format for
functional
objects
UINT_BCD
-
UInteger
8-byte
BDC2 (Unsigned 2-
WORD)
UDINT_BCD
-
ULong
Signed BCD
integer
4-byte
BCD1 (Signed 1-WORD,
highest-order digit is F)
Convert the data type with the PLC program
because the signed BCD integer is
unavailable in the NA series.
BCD2 (Signed 1-WORD,
upper1-bit)
8-byte
BCD1 (Signed 2-WORD,
highest-order digit is F)
BCD2 (Signed 1-WORD,
upper 1-bit)
When you use a structure or a union, pay attention to the member structure and data type
consistency of member variables.
4-3-3 Processing BCD Type
If your HMI is connected to a PLC older than the CJ series, in some cases, most of the data in the
PLC are treated as the BCD type integer values.
In NS series units, you can determine whether to handle the integers as BCD type or BIN type
integer by specifying in the property of a function or functional object. If the data in the PLC are
BCD type, they are handled as BCD integers.
On the other hand, in NA series units, only BIN integers are available in internal processing but not
BCD integers. However, if data is set to a BCD type integer, such as UINT_BCD, DINT_BCD,
LINT_BCD, in the Data Type field of the Device Variables pane and it is mapped to a global
variable, the PLC will handle the data as the BCD type integer and NA can automatically convert
BCD-BIN internally. Just after being imported, the data type of the imported device variable is
either of CHANNEL, DWORD, or LWORD. Change the data type to UINT_BCD, DINT_BCD, or
LINT_BCD, respectively.
This auto-conversion function is not available for a signed BCD integer. You must set variables in
the NA series with variable types according to the number of bytes stored, and must convert the
BCD and BIN types using a VB program on the NA or a program on the PLC.
4-3-4 Specify Device Address of NS
In the NA series, specify device addresses in the Device Variables pane. Enter a device address

23
in the AT field.
You can use a device address directly for specifying the functional object data in the NS series. On
the other hand, device address specification method in NA is an indirect way using a device
variable and global variable: you specify the with a global variable and specify a device Variables
for the AT, and a device address for the AT of the device variable. Also, the global variable and
device variable have variable types. You need to specify correct types for each variable.
Replace data specification with the initial address and the number of access points, which used for
a broken-line graph and macro in NS, with the method using an array containing the same number
of elements as the access points.
Specified device addresses in the NS series unit are registered to the CX-Designer’s variable table
with names “AutoGen + number.” Only the initial address of the contact data is registered as
BOOL, and the numeral or string data as CHANNEL, respectively. The variable table does not
include information of how to handle as other data types, such as signed or unsigned, BCD, array,
and others. Check the settings of the functional object to which the address or variable is assigned
to select a correct variable type.
4-3-5 How to Connect to CJ Series Unit
For data assignment in connecting to a CJ series PLC via CIP Ethernet, you can use tags only.
Therefore, you may need to change the data assignment method or connection method depending
on the current data assignment.
Connection in NA
Where to be
assigned in NS
FINS Ethernet
CIP Ethernet
Connection in
NS
FINS
Device address
With no change
To tags
Variable
EtherNet/IP
Device address
With no change
To tags
Variable
Tag
Tags to variables
With no change
Connection via CIP Ethernet
Replace all the variables and device addresses used for data specification with tags.
In addition, register the tags to a CJ series CPU Unit as network variables. Conduct
the following procedure.
To Tags
1. Import variables to device variables following the procedures in
“4-3-7 Import CX-Programmer Variable Table to NA Device Variables” and
“4-3-9 Import NS Variable Table to NA Device Variables.”
2. Click the header AT of the Device Variables pane in Sysmac Studio to sort
the variables by AT.
3. Select the variables whose AT fields are filled and copy them with the Ctrl +
C keys.
4. Paste them with the Ctrl + V on the Symbol Table edit pane of CX-
Programmer. The Paste Symbol dialog appears. Select the Comment
column and click the Left button to move an AT specification to the Address
column. Click OK to finalize variable pasting.

24
5. Double-click each pasted variable to display the New Symbol dialog, then
check the Net. Variable box and click OK to handle the variables as network
variables.
6. Return to the Device Variables edit pane and delete AT of the variable
whose AT is set to treat it as tag.
Connection via FINS
Ethernet
The network configuration will change following the change in communications from
Ether IP. Therefore, you need to change the FINS network configuration, such as
FINS node address and FINS routing table.
If you are using tags for data assignment, replace the tags with variables.
Tags to variables
1. First, import variables to device variables following the
procedures in “4-3-7 Import CX-Programmer Variable Table to
NA Device Variables” and “4-3-9 Import NS Variable Table to NA
Device Variables.”
2. Click the header AT of the Device Variables pane in Sysmac Studio to sort
the variables by AT. Then extract tags whose AT fields are empty.
Perform the following for the extracted tags.
3. Search for tags with the same names in the variable table edit pane of CX-
Programmer. Check the Address/Value column.
4. Set the values of Address/Value in CX-Programmer to the AT fields of the
tags in the Device Variables pane of Sysmac Studio.
Refer to “NA-series Programmable Terminal Device Connection User's Manual” (V119) for details.
4-3-6 Where to Register NS Variables
In the NS series, device address specifications, variables, and tags are registered to the variable
table of CX-Designer. Variables in the NA series are registered as shown in the table below.
NS Connecting Host
Import to
NS internal memory
(PTMEM)
Global Variables
HMI − Data − Global Variables
Serial connection
Device Variables
Configurations and Setup - Device References - External Device -
Variable
*Select the host name for External Device.
FINS connection host
Ethernet/IP connection host
Refer to Section 3 “Connecting an OMRON NJ/NX/NY-series Controller” in “NA-series
Programmable Terminal Device Connection User’s Manual” (V119) for details on importing the
variable table while connecting to an NJ series unit.
You can import the data from the CX-Designer variable table following the procedures in “4-3-8
Import NS Variable Table to NA Global Variables” and “4-3-9 Import NS Variable Table to NA
Device Variables,” though it is not an intuitive operation like the one Sysmac Studio or CX-
Programmer provides.
25
4-3-7 Import CX-Programmer Variable Table to NA Device Variables
Refer to Section 4 “Connecting an OMRON CJ-series PLC” in “NA-series Programmable Terminal
Device Connection User’s Manual” (V119) for details on importing data from the CX-Programmer
variable table while connecting to a CJ series unit.
4-3-8 Import NS Variable Table to NA Global Variable
Import the variables assigned to the internal NS memory (PTMEM) to NA’s global variables.
1. Open the Symbol (variable) Table in CX-Designer.
2. Press the All button under Host to filter hosts.
3. Select PTMEM to display PTMEM (Internal NS memory) variables only.
4. Press the Ctrl + A keys to select all and the Ctrl + C keys to copy to the buffer.
5. Paste into an empty Excel sheet.
6. Move column E (I/O comment) to column I.
7. Fill up columns E and F in all the rows with data with “FALSE.” In the same way, enter “0” and
“” in columns G and H, respectively.
8. If a string in column D, Address Type/Number, begins with “$H,” change column E to
“TRUE.”
9. Insert a column to the left of column D.
10. Delete column A (Host).
11. Select columns from A to H of the rows with data and press the Ctrl + C keys to copy.
12. Select Data - Global Variables in Sysmac Studio and paste.

26
Refer to “4-3-2 Variable Data Type” for how to replace data types.
In this example, change BOOL to Boolean and CHANNEL to Ushort, respectively.
Data in AT column are displayed as error because the letter “$” at the top is not allowed by the Na
series variable naming rules.
If a device is assigned to the system memory $SB or $SW, refer to “4-5 System Memory” to
replace with a system variable or other.
4-3-9 Import NS Variable Table to NA Device Variables
Import the variables assigned to a host device connected to the Ethernet port or serial port to NA
device variables.
If you have imported the variables of the host from the CX-Programmer’s symbol table, variables
you are going to import may have the same name and get duplicated.
Refer to the table in “4-3-2 Variable Data Type” for replacing data types.
For example, importing a variable whose type is SINT or CHANNEL results in an error. Modify
the data type to WORD or UINT according to the original data type.
13. Unusable Data Type and AT will be shown in pink. Modify them in the next step.
1. Open the Symbol (variable) Table in CX-Designer.
2. Press the All button under Host to filter hosts.
3. Press the Ctrl + A keys to select all and the Ctrl + C keys to copy.
4. Paste into an Excel sheet.
5. Delete column A.
6. Insert a column to column C.
7. Select columns from A to D of the rows with data and press the Ctrl + C keys to copy.
8. Select Device References - External Device - Variables in Sysmac Studio. Then Select
Paste from the right-click menu to import variables.
9. Unusable Data Type and AT will be shown in pink. Modify them in the next step.

27
4-4 Project Settings and Functional Objects
This section provides comparative tables of functions of NS series and NA series.
Refer to appendices for details of properties.
4-4-1 Appendix 1: Project Common Settings
NS
NA
Remarks
Item in Appendix
System Memory
System Variable
-
System Memory
Alarm/Event
HMI - User Alarms
-
Alarm
Unit/Scale
HMI - Scale Transformations
Only scale transformation is supported.
Unit transformation is not available.
Scale
Broken-line Graph
HMI - Data Group
-
Broken-line Graph
Data Block
HMI − Recipe
Resources is the corresponding function
but settings and features are quite different.
Data Block
Data Log
HMI - Data Logging
-
Data Log
Operation Log
Configurations and Setup -
Operation Log Settings
-
-
Dialog Setting
No corresponding function
-
-
String Table
HMI - Resources
Resources is the corresponding function
but settings and features are quite different.
-
→ Appendix 1: Project Common Settings
4-4-2 Appendix 2: Object Common Settings
NS
NA
Remarks
Item in Appendix
Frame
Standard Controls - Tab Control
-
Frame
Common Setting of
Object: Frame
No corresponding function
-
-
Common Setting of
Object: Flicker
No corresponding function
-
-
Common Setting of
Object: Text Attributes
Object - Properties - Appearance - Font
-
Text Attributes
Common Setting of
Object: Control Flag
Object - Properties - Behavior
Object - Animations - Enable
Object - Animations - Visibility
-
Common of Parts
Common Setting of
Object: Size/Position
Object - Properties - Layout
-
→ Appendix 2: Object Common Settings

28
4-4-3 Appendix 3: Buttons
NS
NA
Remarks
Item in Appendix
ON/OFF Button
(Momentary)
Buttons - MomentaryButton
-
ON/OFF Button
ON/OFF
Button_Shape
ON/OFF Button
(Alternate)
Buttons - ToggleButton
To group objects into a radio button, go
Standard Controls - Radio Button.
ON/OFF Button (SET)
Buttons - SetButton
-
ON/OFF Button
(RESET)
Buttons - ResetButton
-
Word Button (Set
Value)
Buttons - Button
Select SetVariable from Events and
Actions to set an input value.
Word Button
Word Button_Shape
Word Button
(Increment/Decrement)
Button - Button
Select IncreaseVariable or
DecreaseVariable from Events and
Actions, to set increase/decrease value.
Word Button (Display
Pop-up Menu)
Standard Controls -
DropDown
-
Command Button
(Switch Screen)
Buttons - Button
Select ShowPage from Events and
Actions to specify an destination screen.
Command Button
Command
Button_Function
Command Button_DB
Command Button
(Backward)
Button - Button
Select ShowPreviousPage from Events
and Actions.
Command Button (Key
Button)
-
This function cannot be substitute by a part.
A subroutine can partly perform the
function.
Command Button
(Control Pop-up
Screen - Close pup-up
screen)
Button - Button
Select ClosePage from Events and
Actions to specify the page name to close.
Multifunction
Button - Button
No dedicated part. Setting more than one
event or action in Events and Actions
enables to perform multiple functions with
one part.
Multifunction
Multifunction_Function
→ Appendix 3: Buttons

29
4-4-4 Appendix 4: Lamps
NS
NA
Remarks
Item in Appendix
Bit Lamp
Lamps - Bit Lamp
-
Bit Lamp
Bit Lamp_Shape
Word Lamp
Lamps - Data Lamp
-
Word Lamp
Word Lamp_Shape
Text
Standard Controls - Label
or
Standard Controls - TextBox
-
Text
Text
(Message Display)
Lamps - Data Lamp
Unlike NS series units, you cannot
change the font type and size for
every state. Colors of backgrounds
and texts are changeable.
-
Numeral Display &
Input/ String Display
Input (Input Enable)
Standard Controls - Data
Edit
-
Numeral Display
String Display
Numeral Display &
Input/ String Display
Input (Input Disable)
Standard Controls - Data
Display
-
List Selection
Standard Controls - ListBox
-
List
Thumbwheel Switch
No corresponding function
There is no replaceable single
object. You can create a similar
function by combining data display
parts and event/action of a button.
-
Date Object
Standard Controls -
DateTime
Displaying date and time are
performed in one setting. You can
display date only or time only by
configuring the display format.
In NA series units, the date/time
setting is not available in the form of
functional object.
DateTime
DateTime_Format
Time Object
Bitmap
Standard Controls - Image
-
BMP
→ Appendix 4: Lamps
4-4-5 Appendix 5: Graphs
NS
NA
Remarks
Item in Appendix
Level Meter
Gauges - Linear Gauge
(Horizontal/Vertical)
-
Level Meter
Analogue Meter
Gauges - Rotational Gauge
-
Analogue Meter
Broken-line Graph
HMI Controls - Broken-line
Graph
-
Broken-line Graph
Data Log Graph
HMI Controls - Trend Graph
-
Data Log
DateTime_Format
→ Appendix 5: Graphs

30
4-4-6 Appendix 6: Alarms
NS
NA
Remarks
Item in Appendix
Alarm/Event Display
No corresponding function
-
-
Alarm/Event Summary
and History
HMI Controls - User Alarms Viewer
HistoricalMode is selected
Alarm History
Data Block Table
HMI Controls - Recipe Viewer
-
Data Block
Contents Display
Lamps - Data Lamp
You cannot change the color or
font of texts for every state.
Contents Display
Video Display
No corresponding function
-
-
Temporary Input
No corresponding function
-
-
Consecutive Line
Drawing
No corresponding function
-
-
→ Appendix 6: Alarms
4-5 System Memory
NS series units has bits and integers for states of system operation in the range of $SB0 to 63 and
$SW0 to 40 in the PT Memory.
In the NA series, you can duplicate the system memory functions of the NS series with system
variables, Events and Actions function, and subroutines.
There are no system variables for the functions unavailable in NA series, e.g., Video Input.
A system variable that has a corresponding function may have different behavior or value, e.g.,
beginning with 0 or 1.
Refer to System Memory in “4-4-1 Appendix 1: Project Common Settings” for details.
For the system memories $SB54 to 58 and $SW39, regarding the password function, see “5-9
Password.”

31
4-5-1 System Memory: Variable Mapping
This section shows how to replace system memories, supported by variable mapping in the
System Memory sheet in “Appendix 1: Project Common Settings.”
The procedure depends on whether you have assigned the system memory to a connecting host
unit or used inside the NS unit.
The following provides how to replace the system memory that has been assigned to a connecting
host unit.
This is an example of the system memory $SB0 assigned to WR0.00 in the host unit.
Step 1
Step 2
The following describes how to replace the system memory that you have used inside the NS unit.
This is an example of the system memory $SB0 assigned to the display address of a Bit Lamp
Object.
Property Setting
1. Create a variable of WR0.0 in the Variables tab in Device References.
2. In the Variable Mapping tab, assign the system variable _HMI_RunSignal to the variable you
have created in Step 1.
1. Enter _HMI_RunSignal in the Expression property of the Bit Lamp Object.

32
Other system memories, which are supported by variable mapping, can be replaced in the same
manner.

33
4-5-2 System Memory: Global Event
This section shows how to replace system memories, supported by global event in the System
Memory sheet in “Appendix 1: Project Common Settings.”
The following describes how to replace the system memory that you have used inside the NS unit.
A variable name is either SB** or SW**.
If you have assigned the system memory to the connecting host unit, map the system memory to a
variable in advance.
Then, replace $SB** or $SW** with the mapped variable name.
You use Global Subroutines in this chapter.
This chapter describes the procedure using a global subroutine group SystemMemoryAction to add
subroutines. Prepare the global subroutine group SystemMemoryAction in advance.
1. Write a subroutine that will be executed when $SB** turns ON or OFF, according to the table
below.
2. In Condition of Events under Events and Actions of the global event, Enter Variable 1 in
the Expression box and any event in the Actions.
Enter Not Variable 1 in the Expression box and any event in the Actions.
This event will be executed only once when the condition is met.
34
NS System Memory
How to Reproduce in NA
Execution
Condition
Setting Up Global Events
$SB6
Brightness Adjust
(High) *1
ON
Click Actions - SetVariable, and enter a value for the
system variable _HMI_Brightness.
$SB7
Brightness Adjust
(Middle) *1
ON
Click Actions - SetVariable, and enter a value for the
system variable _HMI_Brightness.
$SB8
Brightness Adjust
(Low) *1
ON
Click Actions - SetVariable, and enter a value for the
system variable _HMI_Brightness.
$SB12
Continuous
Buzzer
ON
Click Actions - BuzzerOn, and select Continuous in
Buzzer Type.
OFF
Select BuzzerOff in Actions.
$SB13
Short Intermittent
Buzzer
ON
Click Actions - BuzzerOn, and select Intermittent
Short Pulse in Buzzer Type.

35
OFF
Select BuzzerOff in Actions.
$SB14
Long Intermittent
Buzzer
ON
Click Actions - BuzzerOn, and select Intermittent Long
Pulse in Buzzer Type.
OFF
Select BuzzerOff in Actions.
$SB19
Prohibit Input *2
ON
Check the Enable box for Actions -
EnableInputOperation.
OFF
Uncheck the Enable box for Actions -
EnableInputOperation.
$SB25
Start
Printing/Capture
Screen
ON
Select SaveScreenshot for Actions and specify the
destination in the RootFolder box.

36
$SB32
Initialize
Alarm/Event
History
ON
Substitute this with the NA function
ClearUserAlarmLog().
Copy and paste the following subroutine in the global
subroutine in advance.
Sub SB32Action
‘Initialize Alarm/Event history
ClearUserAlarmLog()
‘Automatically off SB32
SB32 = False
End Sub
Then, create an event, select CallSubroutine in Actions,
and register the subroutine.
The following is an example.
$SB33
Save Alarm/Event
History
ON
Select SaveUserAlarmLogToFile for Actions.
Since $SB33 automatically turns OFF after the
execution, add an action fpr the process of turning OFF
$SB33.
In the following settings, the log data will be saved as
UserAlarmLog.csv in the Root folder in the SD card.
$SB35
Initialize Data Log
ON
Substitute this with the NA function
ClearDataLogBuffer(DataSetName).
Copy and paste the following subroutine in the global
subroutine in advance.
Sub SB35Action
‘Initialize data log
‘Specify data set to initialize as argument
ClearDataLogBuffer("DataSetName")
'Automatically off SB35
SB35 = False
End Sub
Then, create an event, select CallSubroutine in Actions,
and register the subroutine.
The following is an example.
$SB36
Save Data Log
ON
Substitute this with the NA function
ExportDataLogBuffer(DataSetName).

37
Copy and paste the following subroutine in the global
subroutine in advance.
Sub SB36Action
‘Save data log
‘Save data set specified as argument
ExportDataLogBuffer("DataSetName")
'Automatically off SB36
SB36 = False
End Sub
Then, create an event, select CallSubroutine in Actions,
and register the subroutine.
The following is an example.
$SB37
Initialize
Operation Log
ON
Substitute this with the NA function
ClearOperationLogBuffer().
Copy and paste the following subroutine in the global
subroutine in advance.
Sub SB37Action
'Initialize operation log
ClearOperationLogBuffer()
'Automatically off SB37
SB37 = False
End Sub
Then, create an event, select CallSubroutine in Actions,
and register the subroutine.
The following is an example.
$SB38
Save Operation
Log
ON
Substitute this with the NA function
SaveOperationLogToFile(FileName).
Copy and paste the following subroutine in the global
subroutine in advance.
Sub SB38Action
‘Save operation log
‘Specify path to save as argument
SaveOperationLogToFile("¥SDCard¥OperationLog.c
sv")
‘Automatically off SB38
SB38 = False
End Sub
Then, create an event, select CallSubroutine in Actions,
and register the subroutine.
The following is an example.
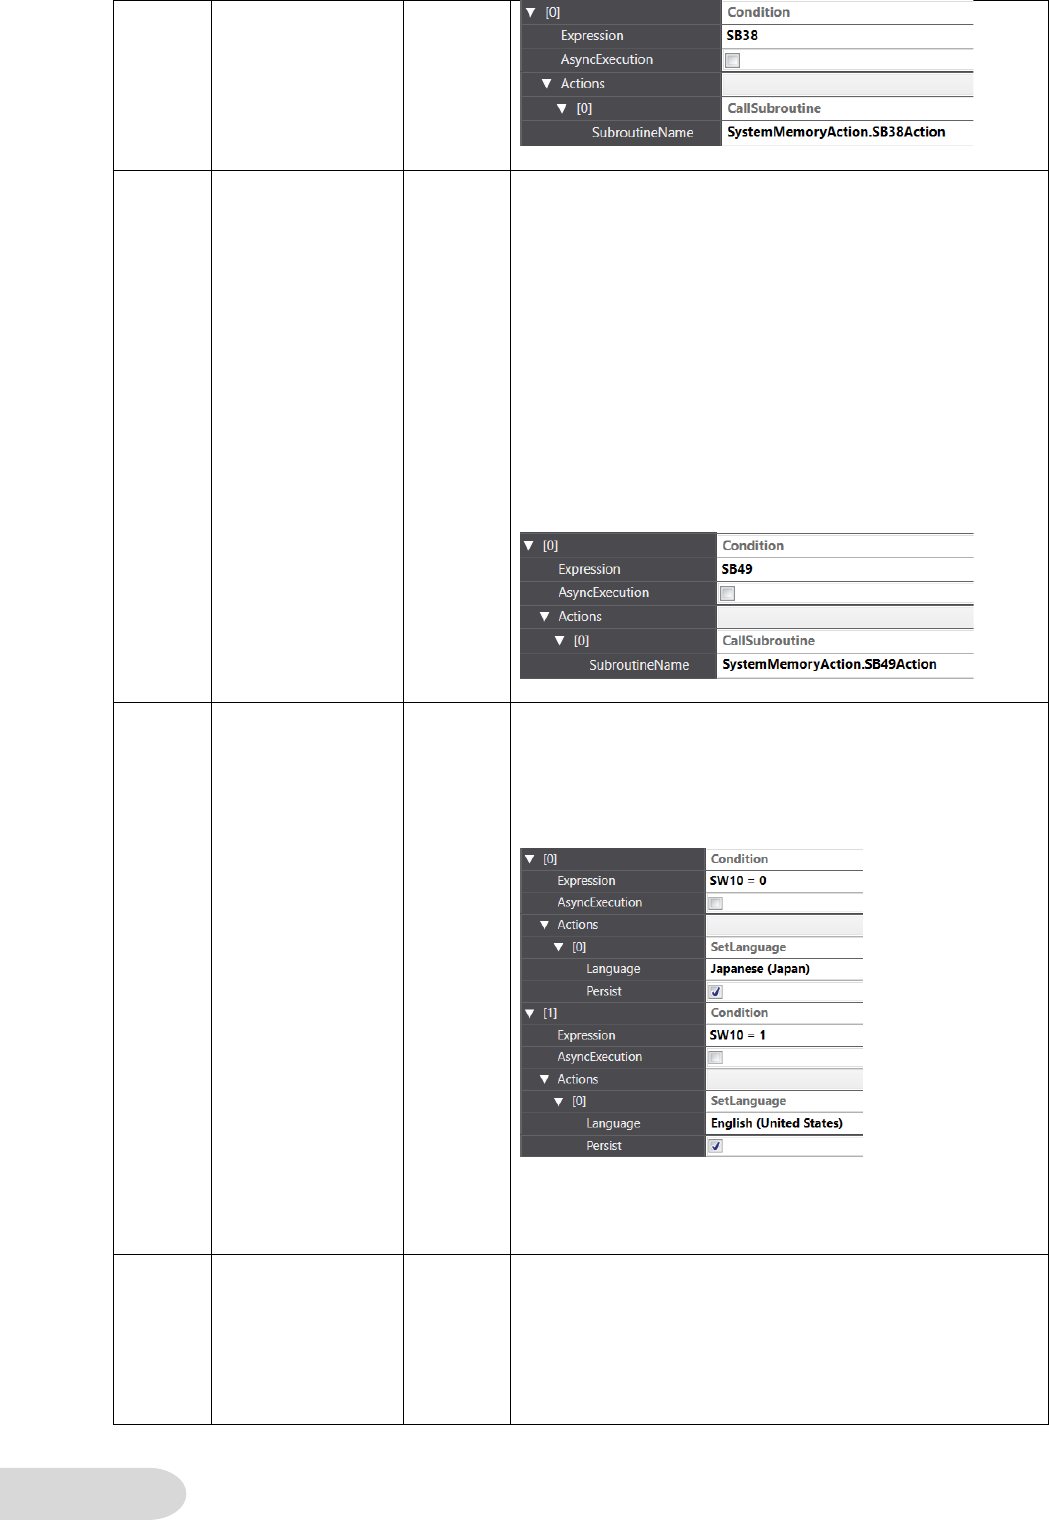
38
$SB49
Stop Memory
Card
ON
Substitute this with the NA function EjectSDMemory().
Copy and paste the following subroutine in the global
subroutine in advance.
Sub SB49Action
‘Make SD card removable
EjectSDMemory()
‘Automatically off SB49
SB49 = False
End Sub
Then, create an event, select CallSubroutine in Actions,
and register the subroutine.
The following is an example.
$SW10
Current Label No.
When
changing
value
Set SetLanguage in Actions.
Specify the value of SW10 in Expression to display the
label in the corresponding language.
In the following configuration, the label will be displayed
in Japanese when SW10 = 0, and in English when
SW10 = 1.
Checking the Persist box retains the display language
settings after turning OFF and ON the NA unit.
$SW14
to 17
Current Date and
Time
Interval
Copy and paste the following subroutine in the global
subroutine in advance.
Sub SW14_17Action
‘Convert second and minute
Dim second = _HMI_Second
Dim minite = _HMI_Minute
SW14 = ((minite << 8) Or second)

39
‘Convert date and time
Dim hour = _HMI_Hour
Dim day = _HMI_DateTime.Day
SW15 = ((day << 8) Or hour)
‘Convert year and month
Dim month = _HMI_DateTime.Month
Dim year = _HMI_DateTime.Year
year = year Mod 100
SW16 = ((year << 8) Or month)
‘Convert day of the week
SW17 = _HMI_DateTime.DayOfWeek
End Sub
Then, create an event, select CallSubroutine in Actions,
and register the subroutine.
The following is an example.
*1: In the NS series, if the backlight brightness adjustment system bits turned ON at the same time,
the higher brightness bit has the priority.
In the NA series, the brightness adjustment setting of the system bit that turned on last is
enabled.
*2: In NS series units, you are allowed to operate a dialog shown by the system, but in NA series,
all the touch-screen operations are prohibited.
If the above system memories are assigned to the connecting host unit, you can replace the
process of controlling the system memories from the connecting host unit by mapping the system
memories following the method in “4-5-1 System Memory: Variable Mapping" and assigning them
to expressions in the global event.

40
4-5-3 System Memory: Supported by VB
This section shows how to replace system memories, supported by VB in the System Memory
sheet in “Appendix 1: Project Common Settings.”
Replace the system memories $SW0 (Current screen number) and $SW1 (Current pop-up screen
number) using the procedure shown below.
In this example, $SW0 is assigned to DM0 in the connecting host unit, and $SW1 is assigned to
DM1.
If other addresses have been assigned, please read as above.
The control method of current screen numbers differs in the NS and NA series. Therefore, the
behavior cannot be duplicated perfectly.
For example, the connecting host unit can specify a pop-up page number to display on the NA unit,
but the NA unit does not notify the pop-up page number to the connecting host unit.
1. Create variables DM0 and DM1, to which the connecting host unit is assigned, in the
Variables tab in Device References.
2. Map the variables created in Step 1.

41
3. Copy and paste the following to the global subroutine.
Dim switchingPage As Boolean
‘Page number in Host to NA
Sub ConvertHostPageNoToNAPageNo
If switchingPage Then Exit Sub
switchingPage = True
BeforePageNo = DM0
_HMI_CurrentPageIndex = DM0
switchingPage = False
End Sub
‘Page number in NA to Host
Sub ConvertNAPageNoToHostPageNo
If switchingPage Then Exit Sub
switchingPage = True
BeforePageNo =CType(_HMI_CurrentPageIndex, UShort)
DM0 = CType(_HMI_CurrentPageIndex, UShort)
switchingPage = False
End Sub
‘Pop-up page number in Host to NA
‘Pop-up page number is notified from Host to NA only
Sub ConvertHostPageNoToNAPageNoPopupPage
If switchingPage Then Exit Sub
switchingPage = True
If DM1 = 0 Then
ClosePage(_HMI_CurrentPage)
BeforePopupPageNo = DM1
switchingPage = False
Exit Sub
End If
BeforePopupPageNo = DM1
_HMI_CurrentPageIndex = DM1
switchingPage = False
End Sub

42
The table provides expressions and subroutines for events described in Step 6.
You can copy and paste them for adding events.
Event No.
Expression
Subroutine
0
DM0 <> BeforePageNo
SystemMemoryAction.ConvertHostPageNoToNAPageNo
1
_HMI_CurrentPageIndex
<> BeforePageNo
SystemMemoryAction.ConvertNAPageNoToHostPageNo
2
DM1 <>
BeforePopupPageNo
SystemMemoryAction.ConvertHostPageNoToNAPageNoPopupPage
4. Rename the global subroutine group you have edit in Step 3 as SystemMemoryAction.
5. Register BeforePageNo and BeforePopupPageNo in the global variable table.
6. Add the following events in the Global Events tab page.

43
Note: Setting a screen number 10,000 or greater will cause an error in the above method.
Do not set 10,000 or greater for the screen number.
In addition, if you use the pop-up screen number currently displayed as the input condition in the
ladder diagram of the connecting host unit, the ladder diagram may not run properly.
Change the input condition of the ladder to the current screen number, or other workaround is
necessary.

44
You can duplicate $SW12, Backlight Brightness Control (32 levels), using the following procedure.
In this example, $SW12 is assigned to DM12 in the connecting host unit.
If other addresses have been assigned, please read as above.
1. Create a variable of DM12 in the Variables tab in Device References.
2. Map the variables created in Step 1.
3. Copy and paste the following to the global subroutine.
Const MaxBrightness As Integer = 200
Const MaxBrightnessLevel As Integer = 32
Const BrightnessInterval As Double = CType(MaxBrightness, Double) /
CType(MaxBrightnessLevel, Double)
Dim RequiredBrightness As Integer = MaxBrightness 'Default value
Sub ChangeBrightness
BeforeBrightness = DM12
_HMI_Brightness = TranslateBrightnessLevel(DM12)
End Sub
'1->1
'......
'32->200
Function TranslateBrightnessLevel(brightnessLevel As Integer) As Integer
If brightnessLevel < 1 Then
Return 1
Else If brightnessLevel >= MaxBrightnessLevel Then
Return MaxBrightness
End If
Return Math.Round(BrightnessInterval * brightnessLevel)
End Function

45
The table provides expressions and subroutines for events described in Step 6.
You can copy and paste them for adding events.
Event No.
Expression
Subroutine
0
DM12 <> BeforeBrightness
SystemMemoryAction.ChangeBrightness
4. Rename the global subroutine group you have edit in Step 3 as SystemMemoryAction.
5. Register BeforeBrightness in the global variable table.
6. Add the following events in the Global Events tab page.

46
4-5-4 System Memory: Array
This section shows how to replace system memories, Array in the System Memory sheet in
“Appendix 1: Project Common Settings.”
You can replace the system memories $SW27 to 36 (offset value for index I0 to I9) using the
following procedure.
You will use $SW27 to 36 for the indirect reference of address. Therefore, look up the address range
for the indirect reference in advance, using the cross reference or another method.
⚫ Example of indirect reference with ON/OFF Button Object (bit data)
This section describes the replacing method using the following setting.
Object used
ON/OFF Button Object
Address used for
Output and Display
addresses
Indirect reference
address range
D0.00 to 0.16
System memory
SW27
1. Create an array, which is assigned to DM0.00 in the connecting host unit and has 16
elements, in the Variables tab in Device References.
2. Map the variables created in Step 1.
3. Register SW27 in Global Variables.

47
4. Open the page and place a momentary button.
5. Open the Properties pane while selecting the momentary button created in Step 4. Then,
select Feedback (Button) in VisualFeedback.
6. Enter DM0_00(SW27) in FeedbackExpression.
7. Open Page Subroutines to copy and paste the following.
Sub TouchEvent
DM0_00(SW27) = True
End Sub
Sub ReleaseEvent
DM0_00(SW27) = False
End Sub

48
Note: When setting the Variable property, you cannot specify a variable as an index for an array.
Therefore, the elements of the array that turns ON/OFF are indirectly referenced in the
subroutine.
In the Expression property, you can specify variable as an index for an array.
You can specify an expression as an index to move the offset position.
8. In Events and Actions of the button, add Press and Release events. Then, assign the
subroutines created in Step 7.

49
⚫ Example of indirect reference with Numeral Display/ Input Object (word data)
This section describes the replacing method using the following setting.
Object used
Numeral Display and Input
Address used for
Address
Indirect reference
address range
D10 to 19
System Memory
SW27
1. Create an array, which is assigned to DM10 in the connecting host unit and has 10 elements,
in the Variables tab in Device References.
2. Map the variables created in Step 1.
3. Register SW27 in Global Variables.

50
4. Open the page and place a Data Display Object.
5. Open the Properties pane while selecting the Data Display Object created in Step 4. Then,
enter DM10(SW27) in Expression.
6. Open Page Subroutines to copy and paste the following.
Sub EditValue
Dim val As String = "DM10(" & SW27 & ")"
EditVariable(val, , , , , , , , , )
End Sub
7. In Events and Actions of the Data Display Object, add Press event. Then, assign the
subroutine created in Step 6.

51
4-6 About Macro
The Macro Functionality of the NS series enables you to add a new function to the basic functions by
writing a program.
Macros can be replaced with subroutines in the NA series. You can write codes with VB, but a part
of features and library functions is supported. Refer to Subroutine Reference Manual for usable
functionalities and library functions.
You can register a functionality common with screens as Global Subroutine and a functionality run
on the currently displayed screen only as Page Subroutine.
It is possible to call and execute a subroutine from a global event, object event, and button or lamp
on the screen.
If a functionality you want is prepared as an Action, you do not have to write a subroutine; you can
select the action to execute an event since executing a subroutine is one of the actions. In addition,
you can specify more than one action to an event to combine formated processing and subroutines.
Also, NA subroutines run on Visual Basic. Refer to information from Microsoft and third-party
vendors for basic knowledge like syntax, grammar, and variables of Visual Basic.
4-6-1 Macro Execution Conditions
The table below shows the relations of NS macro execution conditions and NA subroutine
execution conditions.
NS Macro Execution Condition
NA Subroutine Execution Condition
Classification
Macro Execution Condition
Location
Execution Condition
Project
When loading a project
Global event
ProjectInitialization
Alarm/Event ON
User alarm
Raised
Alarm/Event OFF
Acknowledged
Cleared
Bit change: ON/OFF
Global event
*2
Bit change: Rise
Bit change: Fall
Value change: Value
change
Value change: Value = Set
value
Condition: <Variable> = <Set value>
Value change: Value > Set
value
Condition: <Variable> > <Set value>
Value change: Value < Set
value
Condition: <Variable> < <Set value>
Screen
When loading a screen
Page
PageDisplayed
When unloading a screen
PageHidden
Part object
When pressing a display
area
Touch ON
Button,
Shape,
Image, Data
display, Text
box
Press
Touch OFF
Click
Release
When selecting a list
List box
DropDown
SelectionChanged

52
Before inputting numeral
Before inputting string
Before inputting numeral
and string
Global event
or Page
No equivalent execution condition
(*1)
Before writing numeral
Before writing string
Before writing numeral and
string
When changing numeral or
string
*2
Value change: Numerical
value = Set value
Condition: <Variable> = <Set value>
Value change: Numerical
value > Set value
Condition: <Variable> > <Set value>
Value change: Numerical
value < Set value
Condition: <Variable> < <Set value>
When changing value :
Execute when ON/OFF
Condition: <Variable> = <Set value>
When changing value :
Execute when ON
When changing value :
Execute when OFF
Alarm/Event selected
-
No equivalent execution condition
*1: Register HMI_IsDataInput_before (variable type: Boolean) to global variables. Then, detect a
change of the system variable, _HMI_IsDataInput, with the following expression in Events and
Actions - Event - Condition and Events and Actions - Action - Subroutine, in Global Events or
Page.
Event
Condition
_HMI_IsDataInput <> HMI_IsDataInput_before
Action
CallSubroutine
OnChangeDataInput
In the subroutine OnChangeDataInput:
Sub OnChangeDataInput
If _HMI_IsDataInput_before
Write to REM
Else
Start input to REM
End if
HMI_IsDataInput_before = _HMI_IsDataInput
End Sub
You can get changes in numeric or string data input. However, Macro execution conditions of the NA
series are not the same as those of the NS series: for example, before inputting and after starting
inputting, and before writing and during writing to after finishing writing.
*2: With the NS series, changes in numerical values and character strings that are mainly
monitored by each part can execute macros. However, the NA series does not have similar
execution conditions for each object, and you must configure them for a global event or page.
53
In addition, you need to prepare a variable to save the previous value separately from the
monitored variable. Compare the monitored variable with the previous value in the subroutine, and
if they do not match, detect a change of value and assign the variable value to the previous value.
You can detect a value change without preparing the previous value if it is a bit change rather than
a change in a numeral or character string. In other words, when the latest value is True, the bit is
considered raised; when the latest value is False, the bit is considered fell.
Also, you can use Standard Controls - CheckBox for an execution condition on the bit change.
The event Checked in Events and Actions of an check box object corresponds to ON (up-
differentiated), and Unchecked corresponds to OFF (down-differentiated).
4-6-2 Variables Used in NS Macros
NS-series macros use PT Memories as storage destinations for calculated values and as
arguments. Variables are not allowed.
On the contrary, only variables are available in the NA series. Replace the PT memories with
global variables or variables defined in a VB program. However, the sample functions described
later use array variables representing the virtually defined PT memories. In other words, we are
using the number of array indexes as an argument.
4-6-3 About PT Memory
For the PT memories used in the NS-series macros, define the following global variables as
arguments of sample functions that substitute macro functions, and describe them. If you do not
use a sample function, you do not have to define the global variables.
If you have used $W and $HW in the 2-word or longer data type, the following variables are not
available. Prepare new variables.
NS
NA
Variable Name
Data type
Retain Attribute
$B
NS_Memory_B
Boolean(32768)
☐
$W
NS_Memory_W
Ushort(32768)
☐
$HB
NS_Memory_HB
Boolean(8192)
☑
$HW
NS_Memory_HW
UShort(8192)
☑
■ PT Memory Size Adornment
You can specify the word size by adding the letter “W” or “L” at the end of a PT memory.
For the NA series, use variable types.
■ Access to Numerals by Bit-type PT Memory
In the NS series, by specifying the number of bits following ":" after the Bit-type PT memory in
the macro, you can handle up to 32 bits collectively as an Integer-type value in units of 4 bits.
The NA series does not have a corresponding functionality.
■ Indexed Variable
In the NS series, by adding either of "I0" to "I9" after the PT memory, you can reference the PT
memory address numbers relatively slid by the amount specified with the index registers
$SW27 to $SW36.
Though you cannot use indexed variables in the NA series, PT memories defined above can
achieve the equivalents: PT memories use array number for accessing, and adding/subtracting
an offset value to/from an array number works similarly as index specification.
54
4-6-4 About Host Address (Argument for READCMEM and WRITECMEM)
A host address can be the argument for the NS macro functions, READCMEM and WRITECMEM.
Because these macro functions are difficult to replace, a replacing method for this argument is
omitted.
4-6-5 Different Behaviors from NS Macros
■ Overflow on variable assignment
NS
Variables are assigned to the extent possible, truncating the high-order digits.
The running program will not stop and continue.
NA
An overflow exception occurs and the subroutine function terminates at the
point. The error message will appear at the bottom of the screen.
To have the same behavior as NS, enclose the assignment location with “Try”
and “End Try” to ignore the exception.
■ Assigning a decimal number to an integer
NS
Omit decimals and assign the integer part only.
NA
Round-off the decimals to assign.
For example, there are Integer-type variables A, B, and C and the original
expression is:
A = B / C
The calculated value will be rounded, so describe as the following:
A = B / C : IF A > (B / C) Then A = A – 1
You can assign the value rounding the decimals as in NS.
4-6-6 Replacing NS Macro Function
This section provides a correspondence table for replacing the NS macro functions with NA VB.
Here we use the codes shown in the table to explain arguments.
Variable Type in NS
Argument
Code
Variable Type in NA
Bit
B
Boolean
WORD
w, w1, w2
Short, UShort
DWORD
D
Long, ULong
FLOAT
f, f1, f2
Single, Double
Internal memory
M, M1, M2
Integer: Array number of the array
NS_Memory_□(m)
Object ID/ Page
number
n
String (Object name/ page name)
The table below provides the NS macro functions and their alternate VB functions and
expressions.
The grayed cells represent Math class library functions that are not mentioned in Subroutine
Reference Manual. Their operations are not guaranteed.
NS Macro Function
Argument and Return Value
NA VB Function and Expression
Numerical Operation and Value Conversion
ACOS
FLOAT ACOS(f)
Math.Acos(f)

55
ASIN
FLOAT ASIN(f)
Math.Asin(f)
ATAN
FLOAT ATAN(f)
Math.Atan(f)
ATAN2
FLOAT ATAN2(f1, f2)
Math.Atan2(f1, f2)
BCD
DWORD BCD(d)
*See sample functions
BITSET
BITSET(P, b, w)
*See sample functions
CEIL
FLOAT CEIL(f)
Math.Ceiling(f)
Function CEIL(f As Single) As Integer
Dim ret As Integer = f
If (ret < f) Then ret = ret + 1
Return ret
End Function
COS
FLOAT COS(f)
Math.Cos(s)
DEG2RAD
FLOAD DEG2RAD(f)
Math.PI / 180.0 * f
EXP
FLOAT EXP(f)
Math.Exp(s)
FADD
FLOAT FADD(f1, f2)
f1 + f2
FCOMP
WORD FCOMP(f1, f2)
Function FCOMP(f1 As Single, f2 As Single) As
Single
If (f1 < f2) Then Return -1
If (f1 > f2) Then Return 1
Return 0
End Function
FDIV
FLOAT FDIV(f1, f2)
(f1 / f2)
FSET
FLOAT FSET(d)
f = d
FSUB
FLOAD FSUB(f1, f2)
(f1 – f2)
FLOOR
FLOAT FLOOR(f)
Math.Floor(f)
Function FLOOR(f As Single) As Integer
Dim ret As Integer = f
If (ret > f) Then ret = ret - 1
Return ret
End Function
FMUL
FLOAT FMUL(f1, f2)
(f1 * f2)
LOG
FLOAT LOG(f)
Math.Log(f, Math.E)
LOG10
FLOAT LOG10(f)
Math.Log10(f)
POW
FLOAT POW(f1, f2)
Math.Pow(f1, f2)
RAD2DEG
FLOAT RAD2DEG(f)
180.0 / Math.PI * f
SIN
FLOAT SIN(f)
Math.Sin(f)
SQRT
FLOAT SQRT(f)
Math.Sqrt(f)
TAN
FLOAT TAN(f)
Math.Tan(f)
Operations of Memory, String, and Time
LOCALTIME
WORD LOCALTIME(M1,M2)
Prepare the difference between the local time and
UTC. A DateTime-type variable must include the
difference.
To use a value on a PT memory in another
processing, you need to convert the value into a
DateTime-type variable.
If the data is handled in the DateTime-type in the

56
NS unit, conversion is not necessary.
MEMCOPY
MEMCOPY(M1, M2, w)
*See sample functions
MEMSET
MEMSET(M, w1, w2)
*See sample functions
SETTIME
SETTIME(M)
SetDateTime()
You must convert the original numeric data into a
Date-type variable because a Date-type variable is
required for argument.
STRCPY
STRCPY(M1, M2)
*See sample functions
STRCPYW
STRCPYW(M1, M2)
*See sample functions
STRM2W
STRM2W(M1, M2)
Difficult to substitute.
STRW2M
STRW2M(M1, M2)
Difficult to substitute.
SWAP
*See sample functions
SWAPL
*See sample functions
Operations of Screens and Objects
CLOSEPOPW
CLOSEPOPW(PageNumber)
ClosePage(PageName)
GETNUMVAL
GETNUMVAL()
Difficult to realize.
GETPARTS
GETPARTS(n,Left,Top,Right,Bottom)
Difficult to realize.
MOVEPARTS
MOVEPARTS(n, X, Y)
Object’s properties Left and Top represent the
display coordinates of the object. Assign the
arguments to them.
MOVEPOPW
MOVEPOPW(n, X, Y)
Difficult to substitute.
MOVEPOPWDOWN
MOVEPOPWDOWN(n, Y)
Difficult to substitute.
MOVEPOPWLEFT
MOVEPOPWLEFT(n, X)
Difficult to substitute.
MOVEPOPWRIGHT
MOVEPOPWRIGHT(n, X)
Difficult to substitute.
MOVEPOPWUP
MOVEPOPWUP(n Y)
Difficult to substitute.
MSGBOX
MSGBOX(message, title, iconType)
*See sample functions
Microsoft.VisualBasic.MsgBox(message,
[ buttoNS, ], [ title, ] [ helpfile, context ] )
Note: To realize a corresponding setting to NS
series argument iconType, use the argument
“buttons” to set the button feature and displayed
icon. Button feature is the same as the NS series,
but the icon is different. The return value represents
a push button. The combination of the push button
and value is different.
RELEASEFOCUS
RELEASEFOCUS()
Moving the focus on a hidden DataEdit object will
release the focus.
RSTALARMCNT
RSTALARMCNT(sw)
Difficult to substitute.
SETFOCUS
SETFOCUS(n)
SetInputFocus()
SHOWPAGE
SHOWPAGE(n)
_HMI_CurrentPageIndex = n
SHOWPAGEBCD
SHOWPAGEBCD(n)
_HMI_CurrentPageIndex = BCD(n)
*Use the sample function for BCD(n).
External Memory and Interface
READCF
READCF(D,n,”FNAME”,Dev)
Difficult to substitute.

57
READCMEM
READCMEM(D, [a] ,w)
Difficult to substitute.
READHOSTB
READHOSTB(D,h,ch,addr,r,n)
Difficult to substitute.
READHOSTW
READHOSTW(D,h,ch,addr,r,n)
Difficult to substitute.
WRITECF
WRITECF(S,n,”FNAME”,Dev)
Difficult to substitute.
WRITEMEM
WRITECMEM([a],S,n)
Difficult to substitute.
WRITEHOSTB
WRITEHOSTB(h,ch,addr,r,S,n)
Difficult to substitute.
WRITEHOSTW
WRITEHOSTW(h,ch,addr,r,S,n)
Difficult to substitute.

58
4-6-7 Sample Alternate Functions for NS Macro Functions
Among the NS series macro functions, some can be realized by VB programs even though they
cannot be realized with existing library functions. Sample codes are shown below. The value range
check for arguments is omitted, so please add code as necessary.
NS Function
Alternate Sample Function
BCD
Function BCD(ByVal iNum As ULong) As ULong
Dim f1 As Boolean = False
If (iNum < 0) Or (99999999L < iNum)
Throw New ApplicationException("Out of range parameter on BCD()")
End If
REM Workaround for VAL function since an exception occurs in the ranges of 8000 to 9999 and
80000000 to 99999999.
If (8000L<= iNum) And (iNum <= 9999)
iNum = iNum + 10000
f1 = True
End If
If (80000000L<= iNum) And (iNum <= 99999999L)
iNum = iNum - 30000000L
f2 = True
End If
Dim ret As ULong = Microsoft.VisualBasic.Val( "&H" & iNum.ToString )
If f1 Then ret = ret - 65536
If f2 Then ret = ret + &H30000000L
Return ret
End Function
BIN
Function BIN(iNum As Integer) As Integer
If (iNum < 0) Or (&H99999999L < iNum)
Throw New ApplicationException("Out of range parameter on BIN()")
End If
Dim sNum As String = iNum.ToString("X")
If Not Microsoft.VisualBasic.IsNumeric(sNum) Then Return 0
Return Microsoft.VisualBasic.Val( sNum )
End Function
BITSET
REM The 1st argument is the offset number of $B.
Sub BITSET(m As UShort, b As UShort, w As UShort)
Dim bv As Boolean = True
If (0 = b) Then bv = False
Dim ww As UShort
For ww = 1 To w
PTMEM_B(m) = bv
m = m + 1
Next
End Sub
MEMCOPY
Sub MEMCOPY(ByVal M1 As Integer, ByVal M2 As Integer, d As Integer)
Dim n As Integer

59
For n = 1 to d
PT_Memory_W(M2) = PT_Memory_W(M1)
M1 = M1 + 1
M2 = M2 + 1
Next
End Sub
NS Function
Alternate Sample Function
MEMSET
Sub MEMCOPY(ByVal M1 As Integer, w1 As Integer, w2 As Integer)
Dim n As Integer
For n = 1 to w2
PT_Memory_W(M1) = w1
M1 = M1 + 1
Next
End Sub
MSGBOX
Sub MSGBOX
Dim msg As String
Dim title As String
Dim style As Microsoft.VisualBasic.MsgBoxStyle
Dim response As Microsoft.VisualBasic.MsgBoxResult
Dim Res1 As String
msg = "sample message"
style = Microsoft.VisualBasic.MsgBoxStyle.DefaultButton2 Or Microsoft.VisualBasic.MsgBox
Style.Critical Or Microsoft.VisualBasic.MsgBoxStyle.YesNo
title = "Title Bar"
response = Microsoft.VisualBasic.MsgBox(msg, style, title)
If response = Microsoft.VisualBasic.MsgBoxResult.Yes Then
‘Describe behavior when Yes button pressed
Res1 = "Yes_Click"
Else
‘Describe behavior when the button other than Yes pressed
Res1 = "No_Click"
End If
End Sub
Executing the above sample code displays this message box.
STRCPY
Sub STRCOPY(ByVal M1 As Integer, M2 As Integer)
Dim wd As UShort

60
Dim lp As Boolean = True
Do While lp
wd = PTMEM_W(M2)
If 0 = (wd And &HFF00)
wd = PTMEM_W(M1) And &hFF
lp = False
Else If 0 = (wd And &HFF)
wd = wd And &hFF00
lp = False
End If
PTMEM_W(M1) = wd
M1 = M1 + 1
M2 = M2 + 1
Loop
End Sub
STRCPYW
Sub STRCOPY(ByVal M1 As Integer, M2 As Integer)
While PTMEM_W(M2) <> 0
PTMEM_W(M1) = PTMEM_W(M2)
M1 = M1 + 1
M2 = M2 + 1
End While
PTMEM_W(M1) = 0
End Sub
SWAP
Sub SWAP(ByVal M As Integer, w As Integer)
Dim n As Integer
Dim wH As Integer
Dim wL As Integer
For n = 1 to w
wH = (PT_Memory_W(M) >> 8) And &hFF
wL = PT_Memory_W(M) And &HFF
PT_Memory_W(M) = (wL << 8) Or wH
M = M + 1
Next
End Sub
SWAPL
Sub SWAPL(ByVal M As Integer, w As Integer)
Dim n As Integer
Dim ww As Integer
For n = 1 to w
ww = PT_Memory_W(M)
PT_Memory_W(M) = PT_Memory_W(M+1)
PT_Memory_W(M) = ww
M = M + 2
Next
End Sub

61
NS Function
Alternate Sample Function
SETTIME
REM SetDateTime() does not work in a simulation.
Sub SETTIME(M As Integer)
Dim DateString As String
Dim wYear As UShort = 2000 + (NS_Memory_W(M+2) And &HFF )
Dim wMonth As UShort = (NS_Memory_W(M+2) >> 8) And &HFF
Dim wDay As UShort = (NS_Memory_W(M+1) >>8) And &HFF
Dim wHour As UShort = (NS_Memory_W(M+1) And &HFF )
Dim wMinute As UShort = (NS_Memory_W(M) And &HFF )
Dim wSecond As UShort = (NS_Memory_W(M) >> 8) And &HFF
DateString = wYear.ToString() & “-“ & wMonth.ToString() & "-" & wDay.ToString() _
& “ “ & wHour.ToString() & “:“ & wMinute.ToString() & “:” + wSecond.ToString()
SetDateTime( Date.Parse( DateString ) )
End Sub

62
Replacement Examples: Common
Settings
This chapter describes the examples for replacing common settings such as project properties and
system settings.
5-1 Project Properties
To show the Project Properties dialog box of an NS project, click Project Properties in Project
Workspace window. The following sections describes replacement examples for each tab on the top
of the dialog box.
5-1-1 Switch Label Tab
Select Configurations and Setup - Language Settings to setup labels.
Every click on the button increases a language. Click the button as many as languages you
use.
Project Languages corresponds to Label name in the NS series.
You can also specify the system language and default fonts for each project language.
If you display characters that are not compatible with the specified font, such as displaying Kanji
characters while specifying an English font, the display on Sysmac Studio and the display on
the NA unit will not match. Therefore, specifying default fonts in this tab is useful.

63
This table provides the recommended fonts for languages.
Language
Recommended Font Family
Japanese
Meiryo, MS Gothic
Simplified Chinese
Microsoft YaHei, SimSun
Traditional Chinese
Microsoft JhengHei, MingLiU
Korean
Malgun Gothic, Gulim, GulimChe
⚫ Toggling Display Language During the Operation
In the NS series, changing the value of the system memory $SW10 enables to toggle the
languages to display.
IN the NA series, select SetLanguage in Events and Actions to switch languages.
Or use SetLanguage function in a subroutine. In that case, you cannot specify an argument
for the subroutine that is set in Actions in Events and Actions. Therefore, create a
function without an argument and give an argument to SetLanguage function within the
prepared function.
Refer to NA-series Subroutine Reference Manual for details of SetLanguage function.
5-1-2 Macro Tab
⚫ When Loading a Project
Select HMI - Global Events. Then, select Events - ProjectInitialization, and click Actions
- CallSubroutine - SubroutineName to set the subroutine you want to run.
⚫ On timing Alarm/Event occurred/On timing Alarm/Event is canceled
For the NS series, you can set macros for all alarm occurrences and cancels, but for the
NA series, you need to configure for each alarm.

64
Click HMI - User Alarms to select an alarm which executes a subroutine. Then, select
Raised or Cleared from the options of Events. And select CallSubroutine from the
options of Actions to specify a subroutine you want to execute in SubroutineName.
⚫ When a bit changed
Click HMI - Global Events. Then select Condition from the options of Events to describe
a condition in Expression. Then, click Actions - CallSubroutine. -Specify a subroutine’s
name you want to run in SubroutineName.
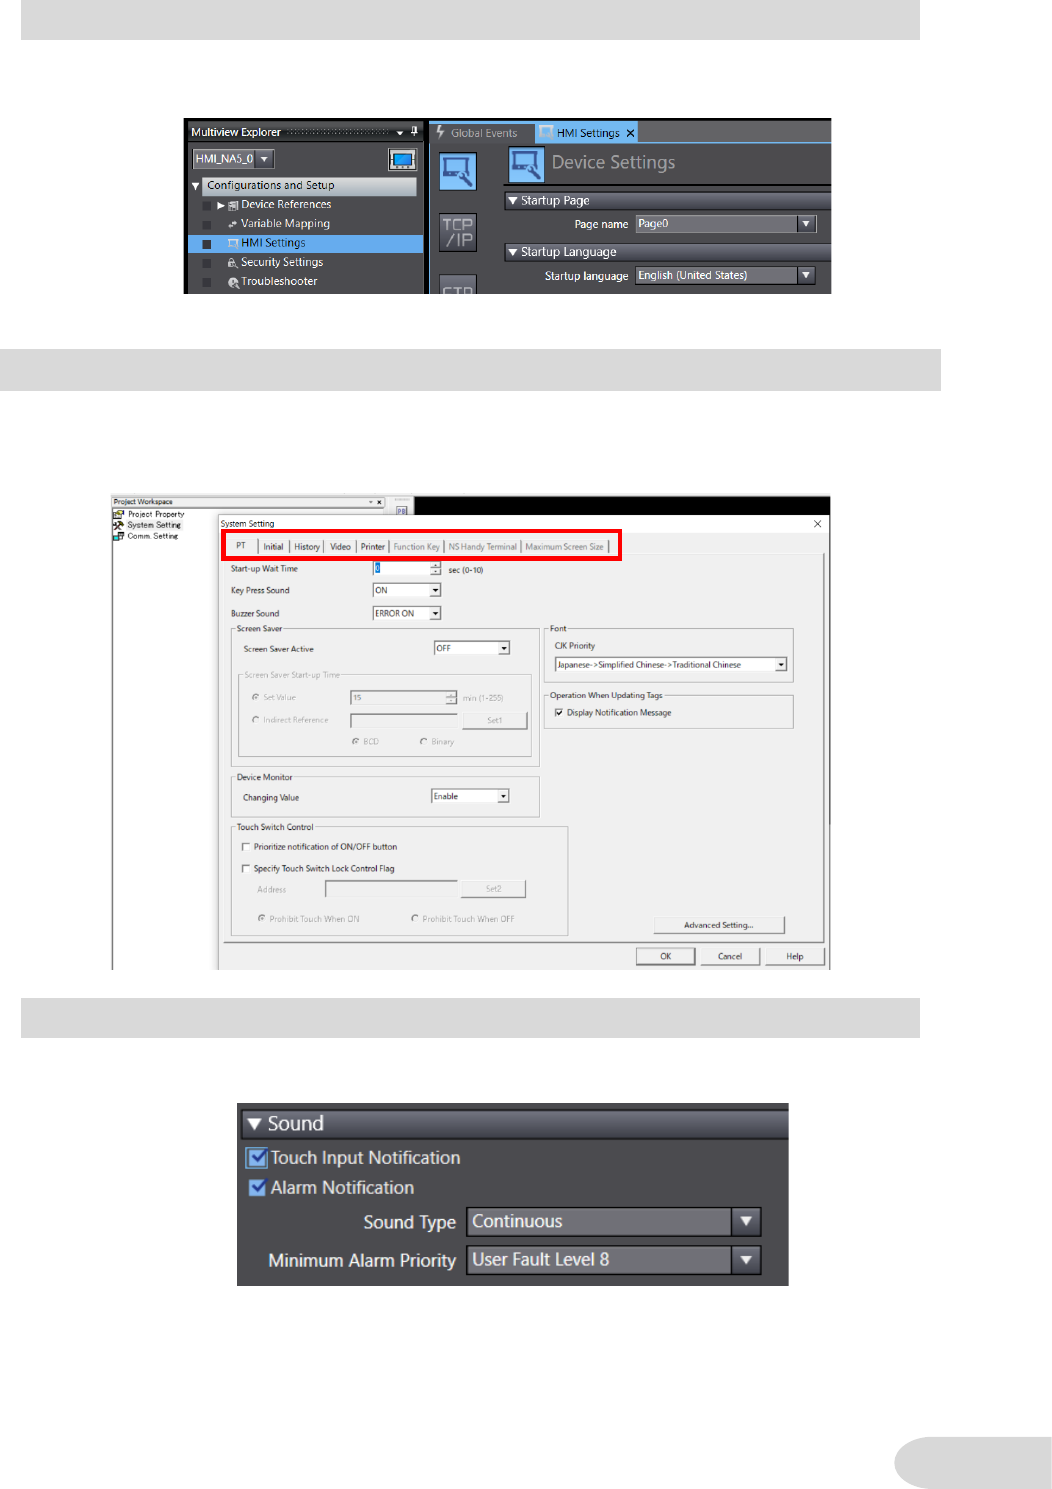
65
5-1-3 Language Selection Tab
NA system language depends on the currently running project’s language.
Set an initial project language in Configurations and Setup - Device Settings - Setup
Language.
5-2 System Setting
To show the System Setting dialog box of an NS project, click System Setting in the Project
Workspace window. The following sections describes replacement examples for each tab on the top
of the dialog box.
5-2-1 PT Tab
⚫ Key Press Sound/ Buzzer Sound
Configure the sound in Configurations and Setup - Device Settings - Sound.
⚫ Screen Saver
Configure a screen saver in Configurations and Setup - Device Settings - Screen
Saver.

66
The screen saver activates in an NS unit after 255 minutes of inactivity at the maximum,
but 60 minutes in an NA unit.
Also, NA units do not have the indirect reference of the wait time. You must specify a fixed
value.
5-2-2 Initial Tab
⚫ Initial Screen
Set the page number in Configurations and Setup - Device Settings - Startup Page.
⚫ System Memory
Add system-defined variables of the “Supported” items in the “System Memory” sheet in
“Appendix 1: Project Common Settings” to Variable Mapping, following the procedure
below.
1. Create a controller variable to be assigned to an NA system variable in the Controller side.
Select the same data type as the system-defined variable to be mapped.
2. Move to the HMI side. Click Configurations and Setup − Variable Mapping. Manually enter
a system-defined variable that is mapped to the controller variable created in the previous
step.
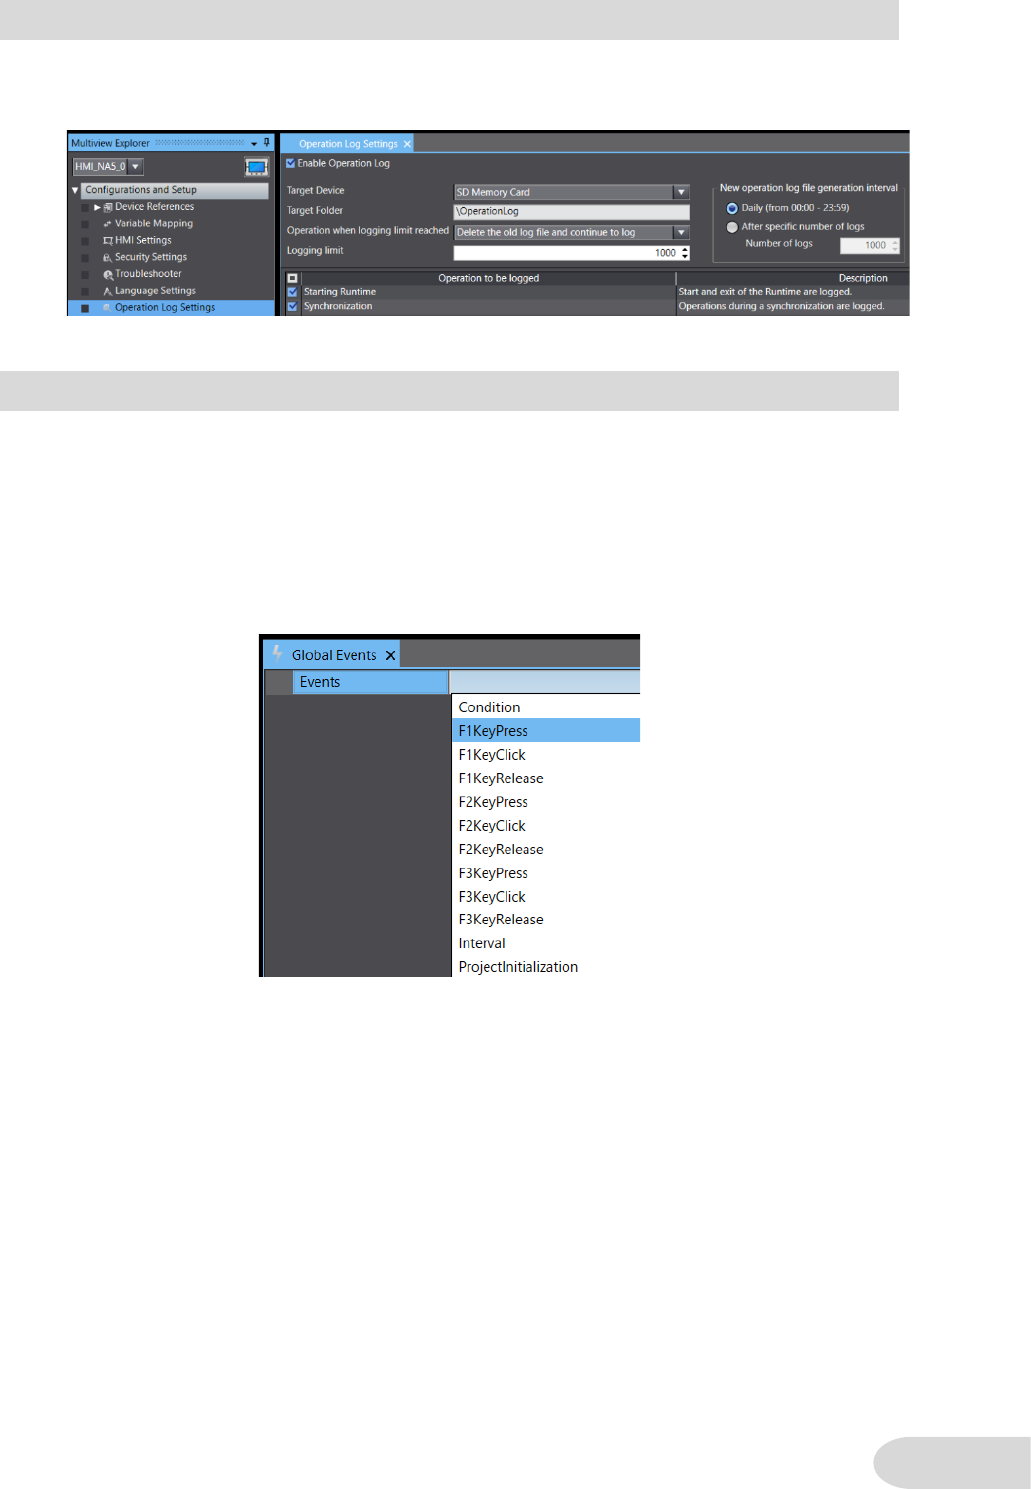
67
5-2-3 History Tab
⚫ Operation Log
Set the upper limit of logging in Configurations and Setup– Operation Log Settings.
When logs reach to the limit, a new log file will be created to continue logging.
5-2-4 Function Key Tab (For NS15)
Click HMI - Global Events. In the Global Events tab, select F1KeyPress to F3KeyRelease from
the options of Events. Then, select functionalities for each event from Actions to perform actions
related to pressing and releasing keys. In NS15, function keys can only write addresses, bur in
the NA series units, they can take screen shots and execute subroutines.
Because NA series units have fewer function keys than the NSH5, you must reassign actions to
Touch Switches.
Also, while NS15 units have function keys on the left side of the screen, in the NA series units the
function keys are located at the bottom of the screen. Therefore, if you use function keys in
association with the screen, you may have to change the screen configuration.
68
5-3 Variable Table
Import the variable table in an NS unit to the NA series variables.
Refer to “4-3-6 Specify Device Address of NS” to “4-3-9 Import NS Variable Table to NA Device
Variables” for detailed import procedure.
For device addresses or variables set as “start address + number of monitor points” in the Broken-
line Graph Group, only the start addresses will be imported. Follow the procedure in “5-6 Broken-
line Graph Group Setting” to set correct arrays.
5-4 Alarm/ Event Settings
NS series Alarm/Event Settings consists of the Alarm/Event, Alarm/Event Details, Details, and
Alarm/Event Parameter dialogs.
Alarm/Event Dialog
Alarm/Event Details Dialog
Details Dialog
Alarm/Event Parameter Dialog

69
The table below provides the relation of NS and NA Alarm/Event settings.
NS
Supported/Unsupported
in NA
Remarks
Occurred Text
Partly supported
You can select the display color in a user alarms
viewer object.
Because the object uses the same colors in all
alarms, you are not allowed to set display colors
depending on each alarm, like for the NS series.
Released Text
Partly supported
Message
Supported
Address
Supported
Both rising and falling of a bit variable are
supported.
Detection Type
Supported
Priority
Partly supported
The NS series offers 9999 levels of priority, but in
the NA series, 9 levels: User Fault Level 1 to 8
and User Information.
The NA series has the narrower setting range, so
use Alarm Code as compensation.
Display Type
Unsupported
No corresponding function
Group
Supported
The NS series registers groups by numbers 0 to
99, but the NA series group names are given by
strings.
There is the item Group in the alarm settings, but
a user alarms viewer object cannot display only a
designated group on the HMI screen.
Switch Screen
Partly supported
After selecting an alarm an performing the
operation on the dialog box that appears, the
displayed screen switches to the screen set for
the alarm. Unlike the NS series, NA screens are
not switched just after being selected on an alarm
object.
Switch Contents
Unsupported
No corresponding function
Save to History
Partly supported
You cannot have the option not to save because
the alarm and event history is mandatorily saved.
Delete when
Alarm/Event is
canceled
Partly supported
Alarms and events will be disappeared after
cancellation.
Add Info
Partly supported
You can register up to 3 additional information in
an entire project of the NS series.
In the NA series, you can register 1 additional
information for each alarm.
Icon
Partly supported
The NA series does not have dedicated icons
such as the alarm/event summary and history
object icons. Create processes corresponding to
the original icons by using buttons and other
objects.
Note that some original icons cannot be realized.
70
5-4-1 How to Replace
Item
Setting
Name
The NS series does not have this item. Leaving this field blank causes an error,
so entering a name is required. Names must be unique.
Alarm Code
If you are filtering alarms by group in NS, enter a value of the group name in this
field. This item can perform as the alternate functionality for display filtering by
group, which is not supported by the NA series.
Leave this field empty if you are not using the filtering by group.
Expression
Enter a variable name that corresponds to the original address.
When the Detection Type is “Up”, enter the variable name, and for “Down,”
enter “variable name = False.”
Priority
Select from the 9 options of User Fault Level 1 to 8 and User Information. As
mentioned before, since the setting range in the NA series is narrower than the
NS series, you need to re-asses the priority if you have set 10 levels or more for
your NS.
Message
Set a message. You can set the message here in the default language only. If
you want to set in more than one language, you need to make the setting in HMI
- Resources - Alarm Strings.
Popup
Uncheck the box.
Acknowledge
Check this box only if you need confirmation of alarm display.
Page
Enter a name of the destination page if selecting the alarm switches the
currently displayed page. If the original project does not include the page
switching action, leave this field empty.
1. Double-click Group0 under HMI − User Alarms in Multiview Explorer.
2. Click the button at the bottom of the tab page to add a new alarm row.
3. Make the settings for the added row following this table. Items not in the table are set to
defaults.

71
Variable
setting
Any unique
name
Do not
check
Check if you need
confirmation of alarm
display
72
It is possible to export the alarm setting data to an Excel file, edit the file, and import the
edited data.
The second icon from the right exports the setting data , and the rightmost icon imports.
4. Configure AdditionalInformation in the Properties tab.
Click Events in the Events and Actions tab page. You can set actions for the events,
Acknowledged, Cleared, and Raised. The following example shows the setting of
CallSubroutine.
Make settings as required.
5. Conduct these settings for all the alarms registered to the original project.

73
6. Put a user alarms viewer object on the page, then configure the displayed column in
Properties - Appearance - Column.
7. You can configure DefaultSortColumn and DefaultSortOrder in Behavior in the Property
tab.
Checking HistoricalMode displays the Alarm History data, and unchecking displays the
Currently Occurred Alarms data.

74
5-4-2 Non-replaceable Functionalities
⚫ Occurred Text/ Released Text
For the NA series, you can set text colors for each state such as occurrence or release,
and those colors are common with all the alarms shown on Alarm Objects. It is not allowed
to set different colors for each alarm in the same manner as the NS series. If you are
designating different colors for each alarm, you need to reconsider the text colors.
⚫ Priority with 10 or more levels
9999 levels are available in the alarm priority in the NS series, but 9 levels in the NA series.
If you have set 10 levels or more for your NS unit, reconsider the priority.
⚫ Display Type
The NA series does not have a corresponding setting. In addition to fewer priority levels,
the NA series does not provide a minute data classification as compared to the NS series.
To display a specific type only, classify the display data by priority, group, or alarm code,
and then, filter the data.
⚫ Additional Information (More Than One)
The NS series allows you to register up to three additional information messages, display
and record a designated address's value when an alarm rises.
However, you can set only one additional information message in the NA series. If you
have set more than one additional information message in your NS unit, you must delete
the information other than the top-priority one.

75
5-5 Data Log Settings
NS series Data Log Settings consists of the Data Log Group Setting and Data Log Address Setting
dialogs.
Data Log Group Setting Dialog
Data Log Address Setting Dialog
The table below provides the relation of NS and NA data log settings.
NS
Supported/Unsupported
in NA
Remarks
Data Log
Group
Log Timing
Partly supported
Indirect reference of sampling cycle is not
supported.
Save
Partly supported
The NA series units create a new file
automatically to continue logging when the
number of logs reach a set limit.
Memory
Card
Partly supported
You can specify a device where you save the
data but not a file name.
The file will be named automatically based on
the date and time of file creation.
Log Period
Unsupported
Data logging is not available only while an
object is being displayed.
Start/Stop
Data Log
Partly supported
ON and OFF of an address (variable) can
control starting and stopping logging, but not
clearing logs when the address is ON.
Log Points
Partly supported
The NA series units create a new file
automatically to continue logging when the
number of logs reach a set limit. Therefore, you
cannot set your NA unit to stop logging when
logs reach the specified limit.
A real logging limit is the maximum capacity of
an external memory designated as storage.
Data Log
Address
Setting
Maximum/
Minimum
Partly supported
You can set the maximum and minimum values
with fixed values only. Indirect reference is not
available.

76
5-5-1 How to Replace
Item
Setting
Target Device
Select either of the SD card or USB stick memory to save logs.
Target Folder
Specify the folder to save log files. The files will be named automatically
based on the date and time of file creation.
Update Type
Regular Interval: Logs are saved regularly.
On Condition: Logs are saved by condition with variables.
Update Rate
Logs are saved at a fixed interval configured in this field.
Indirect reference supported by the NS series is not available. You can use
fixed values only.
Expression
Logs are saved when a condition expression in this field is met.
Start New
Database File
Specifies the conditions for generating new log files.
Automatically Start
on HMI Device
Checking this box saves logs automatically when you boot up the HMI.
If you uncheck it, logs will not be saved unless you perform an action to start
saving logs.
Variable
Specify global variables to log. Data types and comments are displayed
automatically for the specified global variables.
1. Right-click HMI - Data Logging in Multiview Explorer and select Add - Data Set.
2. Double-click Dataset0, which was added to the tree.
3. Conduct the following settings.

77
Select Data - Data Set in the Properties tab and specify the data group name you have
created in the previous step for Data Set.
Then, click the button in the AnalogTraces or DigitalTraces field to open the trace setting
dialog. Enter the global variable you want to display in the Variable field.
5-6 Broken-line Graph Group Settings
NS series Broken-line Graph Settings consists of the Broken-line Graph Group Setting and Line
Setting dialogs.
Broken-line Graph Group Settings
Line Setting (Broken-line Graph Group)
In the NA series, the setting that DataSeries of DataGroup is set to Array is the corresponding
feature.
The NS series broken-line graph settings include settings related to graph drawing, e.g., line color.
However, in the NA series, the DataGroup setting has setting items for global variables and data
type only, and those for graph drawing are in Properties of a broken-line graph object.
Therefore, this section describes not only settings of a data group but broken-line graph object and
variable settings.
4. After setting the data logging, add a Trend Graph Object on the page.
5. Configure settings of line, scale, and other items for each axis.

78
5-6-1 Functionality Correspondence Table
The table below provides the relation of NS and NA Broken-line graph settings.
NS
Supported/Unsupported
in NA
Location
Remarks
Broken-
line
Graph
Group
Draw Value
Outside of the
Range
Not supported
-
Values outside of the range are
not displayed.
Read in Batch
Not supported
Always reads values in batch.
History
Not supported
You cannot save the broken-
line graph history.
Storage Type
Supported
Global
Variables
and Device
Variables
Select a correct variable type
when defining an array,
according to the storage
format.
Monitor Points
Partly supported
The NS series units can
monitor up to 1000 points, but
the NA series units can monitor
800. To monitor the 801st point
and more, modify the offset,
which determines the
beginning of monitoring, in
Data - Offset of the broken-
line graph object.
Line
Setting
Start Address
Partly supported
Set an array that has as many
as the monitor points of the
start address.
DataGroup
Add the registered array to
Data Series in DataGroup tab.
Line Setting:
Maximum/Minimum
Value
Partly supported
Broken-line
graph object
Only fixed values are available
for the maximum and minimum
values. Indirect reference is not
supported.
Line Setting: Line
Color
Partly supported
Only colors for Within
supported. You cannot use
colors out of the range.
Line Setting: Line
Style
Partly supported
The NA series supports solid
line only. Dash line and dot line
are not supported. Step display
is not supported.
Line Setting: Line
Supported
This item is not available.
You can control
displaying/hiding a line with a
subroutine.
To hide the line, use
HideTraceInGraph function,
and use ShowTraceInGraph
function to show the line.
5-6-2 How to Replace
1. Register arrays in the global and device variables, respectively, according to the setting of the
start address of the NS series Broken-line Graph Group.

79
⚫ PT Internal Memory
① Double-click Global Variables under HMI to open the Global Variables edit pane.
② Select New from the right-click menu. Enter any variable name. The variable’s data
type must correspond to the Storage Type of the NS series Broken-line Graph
Group, and the variable must have as many elements as Monitor Points.
⚫ Device Address
① Follow the same steps as 1) and 2) in “PT Internal Memory.”
② Select the added array and open the right-click menu. Then select Register To
Controller. A dialog box that allows you to associate a global variable and device
variable appears.
③ Select a device from the Device drop-down list in Controller Variable Details. Then
press the Add Global Variable button.
⚫ Variable
① Only the start address is registered as variable.
If the variable is used outside of the Broken-line Graph Group Setting, copy and
paste the variable and use the added variable in the Data Group Setting.
② Select HMI - Global Variables. Choose the target variable on the edit pane, then set
the variable’s data type to the corresponding type to the Storage Type of the NS
series Broken-line Graph Group, and the variable must have as many elements as
Monitor Points.
⚫ Tag
It is not necessary to register a variable.
2. Right-click HMI - Data Groups in the Multiview Explorer and select Add - Data Group.

80
One graph line is drawn per data series, so create as many data series as you want to display
on a single graph.
Item
Setting
Data Series
Enter any name.
Type
Select Array.
Data Type
Select the variable type corresponding to the storage type of the NS-line Graph
Group Setting.
3. Double-click DataGroup0, which was added to the tree.
4. Click the button to create a new data series.
5. Configure the following for the data series.

81
Item
Setting
Variable
Specify an array to display. The Data Type field will be
automatically filled depending on the array that was specified in the
variable setting.
DataType
Target
Dimension
Default value of 0.
Target Index
This field is used for a multidimensional array only.
Set the first index of the target.
If you use a 1D array, leave this field blank, the default.
Target Member
This field is used for a structure array only.
Enter the member names.
Enter the name of the data group you have created in DataGroup under Data in the Properties
tab.
Then, click the button in the Traces field to open the Trace Setting window. Enter the data
series name (= line to display) in Data Series.
6. Configure attributes of the data series.
7. Add the broken-line graph object on the page.
8. Configure settings of line, scale, and other items for each axis.

82
5-7 Data Block Settings
You can replace Data Blocks with Recipes.
However, settings and features are quite different.
NS
Supported/Unsupported
in NA
Remarks
Record Setting
Partly supported
You can set the number of maximum records
only.
Specify Interlock
Not supported
Input interlock with variable conditions is not
possible.
Record Label
Setting
Not supported
Character code setting is not available.
Field Name
Supported
Address
Supported
Data Format
Supported
The data types of registered variables are
automatically applied.
Record Label
Supported
Recipe Data
Supported
5-7-1 How to Replace
1. Right-click HMI - Recipes in Multiview Explorer and select Add - Recipe Template.
2. Double-click Recipe0, which was added to the tree.

83
Field Name and Address of an NS series data block are corresponding to Ingredient Name
and Variable, respectively.
These are corresponding to the fields where values are registered for each data block record.
To display all registered recipes, leave the fields DisplayedTemplate and DisplayedRecipe
blank, the default. Set these fields only when you want to select display items.
3. Click the button to add a field. Then configure the settings.
4. Click the button to register values for recipes.
5. Add a recipe viewer object on the page.
6. Configure the background color, text, and other settings.

84
5-8 String Table Setting
You can replace the String Table Setting with Resources in HMI.
While the NA series has one string table per language, the NA series has five string groups,
including General Strings, Alarm Strings, Images, and others.
Use General Strings, Alarm Strings, and Images for replacement of the NS series.
In the NS series, a string table is applied to alarm/event strings, whereas in the NA series, Alarm
Strings in Resources is applied.
In addition, the NS series manages strings by string number in the string table, whereas the NA
series manages by resource ID.
Enter the ID registered in Resources into Resource ID of the object to display the string registered
in Resources.
5-8-1 Example of Indirect Reference
You can specify Resource IDs for label and text box objects using conditional expressions. In this
way, you can achieve the similar behavior as if the string number were set to Indirect Reference
in the NS series.
1. Right-click HMI - Resources in Multiview Explorer and select Add - Group.
The group Root exits by default, but we recommend creating a new group for management
reason.

85
2. Register texts in General Strings of the newly added group.
3. After completing entering the texts, create a label or text box object. Then click the
button.

86
Enclose the part to be fixed in double quotation marks, followed by & and then a numeric-type
variable.
In the example show below, up to Group0_String is fixed, and the string can be switched
according to the value of the numeric type variable TableNum.
4. Selecting Dynamic for Resource Link Type allows you to enter in the Expression field.

87
5-9 Password
The password function of the NS series allows you to enter a password to operate a functional
object and has up to five passwords and operation levels.
For the NA series, the security function is available. This function controls whether an entry to an
object is allowed/prohibited and whether the object is shown/hidden, depending on the privilege of
the logged-in user. In the NA series, instead of entering a password at the time of operating the
object as in the NS series, the user logs in with a username and password before operating the
object.
To enter the password at the point of operating an object as in the NS series, follow this procedure.
Sub NS_checkPassword()
Dim lvl As Integer = 0
Dim pwd As String
pwd = Microsoft.VisualBasic.InputBox(“Enter the password”)
select pwd
case NS_passwrods1:
lvl = 1
case NS_passwrods2:
lvl = 2
case NS_passwrods3:
lvl = 3
case NS_passwrods4:
lvl = 4
case NS_passwrods5:
lvl = 5
End Select
If lvl > 0
NS_SW39 = lvl
NS_SB54 = True
End if
If lvl > 1 Then NS_SB55 = True
If lvl > 2 Then NS_SB56 = True
If lvl > 3 Then NS_SB57 = True
If lvl > 4 Then NS_SB58 = True
End Sub
1. Define five String type variables, NS_passwords1 to NS_passwords5, to store the password
string as global variables.
2. In addition, define Boolean type variables NS_SB54 to 58, which are substituted for the NS
system memories $SB54 to 58 and Integer type variable NS_SW39, which is substituted for
$SW39, as global variables.
3. Create a subroutine NS_checkPassword().
4. Select Press from the Events options in Events and Actions of the object. Then select
CallSubroutine from the options of Actions, and specify the subroutine NS_checkPassword()
in SubroutineName.
88
5-10 Unit/Scale Settings
Double-click Scale Transformations under HMI in Multiview Explorer to open the Scale
Transformations edit pane. Configure multiplier and offset values. Unlike in the NS series, you
cannot configure units in the NA series.
Enter the registered scale transformations in the Scaling field in Properties of a data display or data
input object.
5-11 Dialog Setting
The NA series does not have a corresponding functionality.
To realize the same behaviors as the NS series, you need to utilize pup-ups.
Since the NA series can only display one pop-up screen at a time, the following method is useful to
display additional confirmation dialog, etc. on the pop-up.
5-12 Device Data Transfer Setting
1. Place a button object the same size as the screen size at the very front of the page. Make
inputs disabled on this button object. By hiding this button object normally and making the
object visible when displaying the confirmation dialog, the currently displayed window will be
covered by this object, and all buttons there will get non-enterable.
2. Arrange objects for the confirmation dialog in front of the button object. These objects should
also be normally hidden so that they will be displayed and operated when the confirmation
dialog is displayed.

89
The NA series does not have a corresponding functionality.
The following describes how to achieve the function with a subroutine.
Sub NS_DataTraNSfer1
Dim I As Integer
DestinationVariable1 = SourceVariable1
DestinationVariable2 = SourceVariable2
DestinationVariable3 = SourceVariable3
...
For I = 0 To SourceArray4.Length – 1
DestinationArray4(i) = SourceArray4(i)
Next
For I = 0 To SourceArray5.Length – 1
DestinationArray5(i) = SourceArray5(i)
Next
...
End Sub
Trigger
Type
Event
Action
Rising Edge
Enter Variable in Condition -
Expression Specify the function
NS_DataTraansfer** in
CallSubroutine
Falling
Edge
Enter Not Variable in Condition
- Expression
Cycle
Select Interval in Interval.
1. Define transfer source address and transfer destination address of a transfer entry in Global
Variables. If the transfer entry has more than one data element, define as an array with as
many members as the elements.
2. Define the bit address of a device data transfer trigger as a Boolean variable in Global
Variables.
3. Create a function NS_DataTransfer in Global Subroutines. You need as many functions as
device data transfer triggers.
4. Register the data transfer triggers in Global Events.
Events must be the same number of triggers, and you need to specify corresponding
functions for them.

90
5-13 Troubleshooter Setting
The table below provides the relation of NS and NA troubleshooter settings.
NS
Supported/Unsupported
in NA
Remarks
Screen Setting
Partly supported
While in the NS series, you need to copy the screen
settings from Sysmac Studio or import via a CSV file, in
the NA series, you can reuse events set in the
controller, cooperating in Sysmac Studio.
However, you cannot display a screen you want to
show while pressing the Show Detail button.
Theme
Not supported
The theme to be displayed is fixed.
Language
Assignment
Supported
Configure the language assignment in the Language
Mapping area.
User
Authentication
Supported
Configure user authentications in the Security Settings
area.
Monitor Errors
Supported
Check the Launch on System Event and Launch on
User Event check boxes.
Double-click Troubleshooter under Configurations and Setup to open the Troubleshooter setting
tab page.

91
Replacement Examples: Functional
Objects
This chapter describes examples of replacing functional objects such as ON/OFF buttons and bit
lamps.
6-1 Functional Difference Between NS and NA: Common in Objects
This section provides items common in components but have different features in the NS and NA
series.
6-1-1 Behaviors of Overlapped Objects
In the NS series, objects without input function, e.g., shape, lamp, and label, do not prevent press
inputs into objects behind. You can operate a button even when those objects are front of it.
However, all objects do not allow you to operate objects behind them. For example, you cannot
press a button if you have put another shape object in front of the button.
Therefore, do not place an object in front of a button.
Or remove a button behind and set the behavior of the button in Events and Actions - Press of
the front object.
6-1-2 Behaviors of Hidden Objects
You can operate hidden objects, except Numeral Display and Input, and String Display and Input
objects in the NS series.
In the NA series, if you uncheck the IsVisible check box to hide an object, you are not allowed to
operate the object.
To create an operable invisible object, check the IsVisible and Transparent check boxes.
6-1-3 Appearance of Non-Enterable Object
The Na series objects will be forcibly grayed-out when they are in the non-enterable state.
(Left: Object in the enterable state. Right: Object in the non-enterable state)
To prohibit operations without changing the object’s appearance, overlay another shape object on
the object, not controlling inputs. Make the overlaid shape transparent. Then, show it while input is
prohibited and hide while input is allowed.

92
6-1-4 Where to Use Macros in Object Settings
The table below shows where you can set subroutines in the NA series for replacing macros
executed in the NS series object settings.
NS Functionality
NA Setting
Touch ON
Display Events and Actions of the object and select Press
from the options in Events. Then, select CallSubroutine in
Actions.
Touch OFF
Display Events and Actions of the object and select Click or
Release from the options in Events. Then, select
CallSubroutine in Actions.
Execute when ON
Display Events and Actions of the page and select
Condition from the options in Events to enter [Variable name
= True] in Expression. Then, select CallSubroutine in
Actions.
Execute when OFF
Display Events and Actions of the page and select
Condition from the options in Events to enter [Variable name
= False] in Expression. Then, select CallSubroutine in
Actions.
Execute when OFF
Execute when ON/OFF
Display Events and Actions of the page and select
Condition from the options in Events to enter [Variable name
= True] and [Variable name = False] in Expression,
respectively. Then, select CallSubroutine in Actions.
Execute when OFF
Before inputting numeral
No corresponding function
Before writing numeral
No corresponding function
When changing value
No corresponding function
When an address value changed
No corresponding function
Set Value = Address Value
Display Events and Actions of the page and select
Condition from the options in Events to enter [Variable name
= Set value] in Expression. Then, select CallSubroutine in
Actions.
Set Value != Address Value
Display Events and Actions of the page and select
Condition from the options in Events to enter [Variable name
<> Set value] in Expression. Then, select CallSubroutine in
Actions.
Set Value < Address Value
Display Events and Actions of the page and select
Condition from the options in Events to enter [Variable name
< Set value] in Expression. Then, select CallSubroutine in
Actions.
Set Value <= Address Value
Display Events and Actions of the page and select
Condition from the options in Events to enter [Variable name
<= Set value] in Expression. Then, select CallSubroutine in
Actions.
Set Value > Address Value
Display Events and Actions of the page and select
Condition from the options in Events to enter [Variable name
> Set value] in Expression. Then, select CallSubroutine in
Actions.
Set Value >= Address Value
Display Events and Actions of the page and select
Condition from the options in Events to enter [Variable name
>= Set value] in Expression. Then, select CallSubroutine in
Actions.

93
6-2 Non-replaceable Functionalities: Common in Objects
The following table shows the functionalities common in the NS series functional objects that cannot
be replaced in the NA series.
NS Functionality
Remarks
Indirect reference of color/
Indirect reference of text color
The functions change the color of objects, such as ON/OFF
buttons, bit lamps, and labels, and texts according to the value of
an address.
The NA series does not have corresponding functionalities and
use the color code of the NS series.
Three-dimensional Frame
Simple frame only. Three-dimensional frame is not available.
Frame ON/OFF Display
This functionality is not supported because three-dimensional
frame is not available.
Flicker
The NA series has the flicker functionality, but you cannot modify
the flickering point and rate.
Turn ON the specified
address when the value is
confirmed
No corresponding function.
Display Write Confirmation
Dialog
No corresponding function is available because the NA series
does not have the dialog setting function.
Record to Operation Log -
Message
The NA series cannot record messages for each object in the
operation log.
Password
You can display a password input dialog box while pressing an
object following the tangled procedure in “5-9 Password,” but the
behavior differs from the NS series.
Instead, we recommend using the NA security function and
logging in with authorized username in advance.
6-3 ON/OFF Button
In the NA series, button objects are classified into different objects: Button, Set Button, Toggle
Button, Momentary Button, and Reset Button. Lay out an object for an action you want to create.
Buttons are divided into different objects, but you can change the button type in General - Type in
the Properties tab after placing the object.
Precautions for Correct Use
There are some differences in the behavior of the momentary button between the NS and NA series.
When communication with the controller is disconnected while you are pressing the momentary
button, the NS unit checks the button state when communication is restored and writes the value to
the allocation memory if there is a difference. Still, the NA unit does not write to the memory but only
Different objects in Toolbox
Change the button type in General -
Type in the object’s Properties tab

94
reads the value of the allocated memory. Therefore, depending on the settings, the display may
differ from the operation state, so please debug it when replacing it to ensure that unexpected
behavior does not occur.

95
6-3-1 Button Types
The NS series ON/OFF button has various display statuses, e.g., write destination, display bit data,
etc.
This section describes replacement procedure for each button type.
In the NA series, you can perform settings in Behavior - VisualFeedback in the Properties tab,
which corresponds to Button type in the NS series. Some ON/PFF button types supported in the
NS series have no functionalities in the NA series.
NS Action Type
NA Setting
Remarks
Rectangle/Circle/Select
Shape (Type1)
Variable (Button)
Rectangle/Circle/Select
Shape (Type2-1)
Feedback (Button)
Enter an expression for changing the state in
FeedbackExpression.
Rectangle/Circle/Select
Shape (Type2-2)
Touch (Button) +
Feedback (Button)
Enter an expression for changing the state in
FeedbackExpression.
Rectangle/Circle/Select
Shape (Type3)
No corresponding
setting
This type does not have a functionality as a button
itself, but you can create a similar display by
overlaying buttons, lamps, and shapes.
Rectangle2Light(Type1)
Variable (Button)
+ Feedback
(Indicator)
Select Bottom or Custom for IndicatorPosition to
adjust the width, height, and position of the
indicator.
Rectangle2Light(Type2)
No corresponding
setting
Rectangle2Light(Type4)
Variable (Button)
+ Feedback
(Indicator)
I the NA series, the indicator corresponds to the 〇
in an NS series object, but its shape is rectangle.
Rectangle2Light(Type4)
No corresponding
setting
6-3-2 Non-replaceable Functionalities
NS Tab
NS Functionality
Remarks
Label
Link with the
Specified Address
ON/OFF
In the NS series, you can change the status of objects and
labels with different addresses, respectively, but in the NA
series, the status of an object and that of a label is linked.
Group
Specification
Group
Specification
No corresponding function.
You need create an action that when you press a button, it
turns all the variables assigned to other buttons in the group
OFF by using a subroutine.

96
Other
Do not allow
sound for this
object
No corresponding function.
6-4 Word Button
The NA series does not have a specific button with corresponding functionality. However, you can
realize the functionality using a simple Button object in the following way: select Press from the
Events options in Events and Actions. Then, select an appropriate action from the Actions
options.
6-4-1 Button Actions
The table below provides alternate settings in the NA series for the button action settings of NS
series word lamps.
NS Action Type
NA Action
Remarks
Set Value - Value
SetVariable
Enter a value in the Value box.
Set Value - Indirect
SetVariable
Enter a variable name for indirect reference
in the Value box.
Increment/Decrement -
Value
IncreaseVariable
DecreaseVariable
Enter a value to add or subtract in the Value
box.
Variable data type
Variable
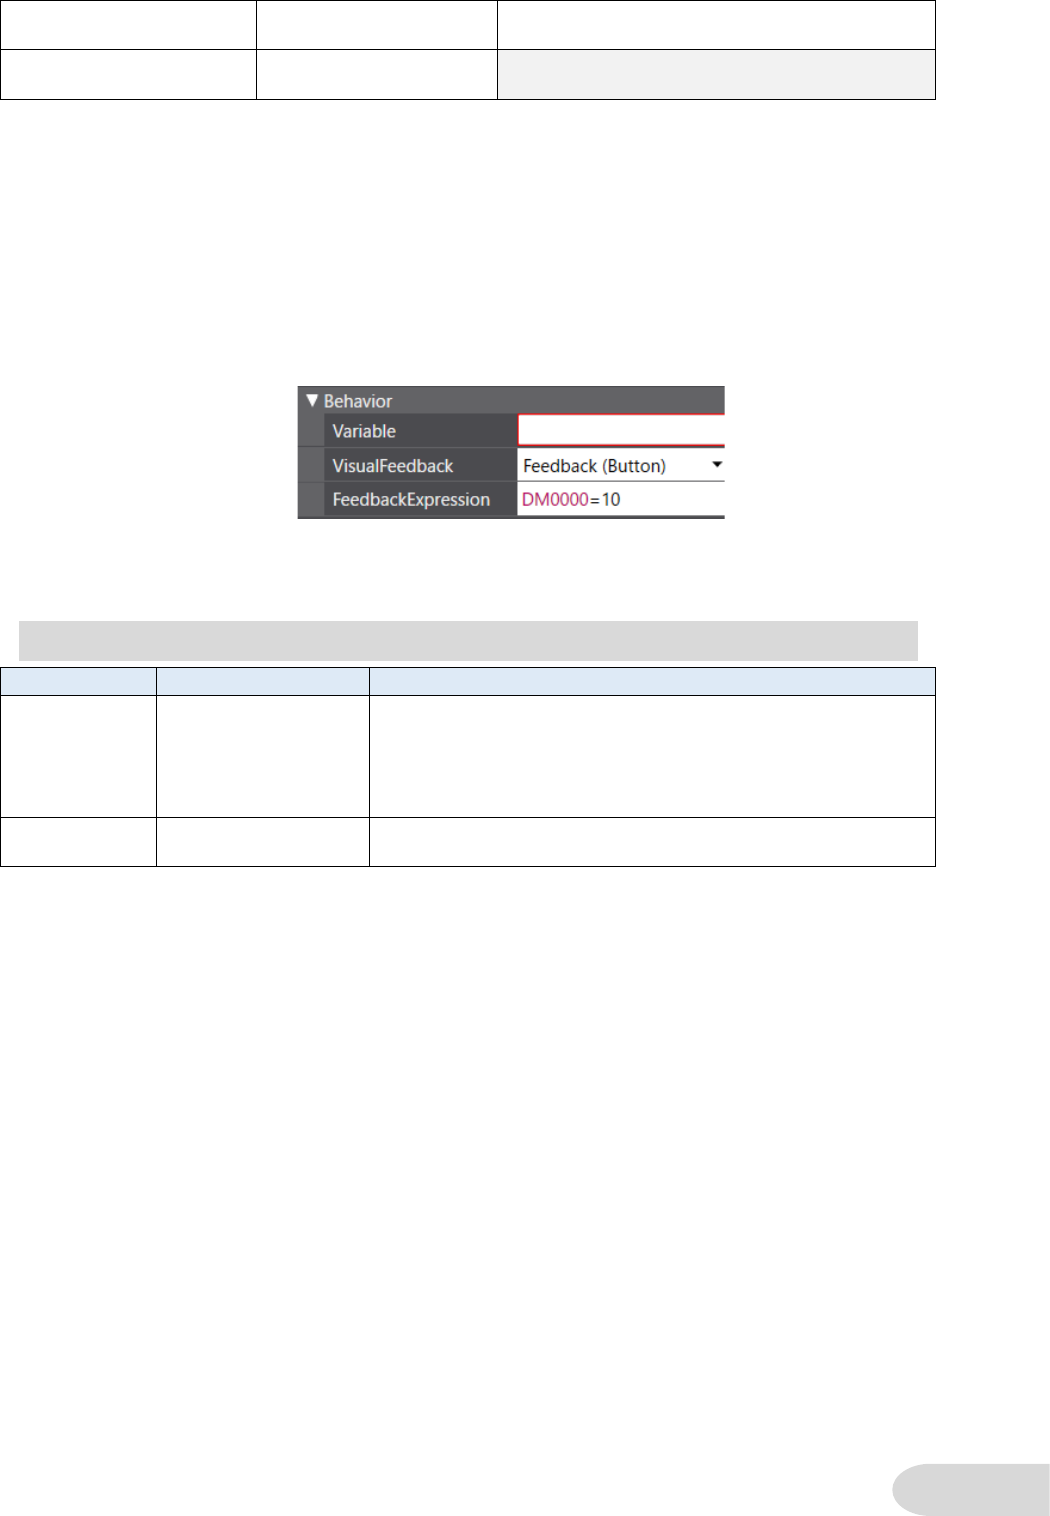
97
Increment/Decrement -
Indirect
IncreaseVariable
DecreaseVariable
Enter a variable name for indirect reference
in the Variable box.
Display Pop-up Menu
No corresponding
function
⚫ Set Value Match Color
You can select the set value match color when you choose Set Value in the Action Type
area in the NS series. In the NA series, since buttons do not have a feedback expression, it
is impossible to change a status using variables.
If you want to set the set value match color, prepare a momentary button and configure it to
change when the value comes to the set value. For this example, the state changes when
the value of the variable DM0000 comes to 10.
Leaving the Variable box blank will issue a warning at a build.
If you do not want the warning, create a dummy variable, and enter it in the Variable box.
6-4-2 Non-replaceable Functionalities
NS Tab
NS Functionality
Remarks
Max/Min
Maximum Limit/
Minimum Limit
Configure the action so that a button works within the
range of limits of inputs.
You need a subroutine to replace these settings including
the options, Return to the minimum/maximum value when
the maximum/minimum value is exceeded.
Other
Do not allow sound
for this object
No corresponding function.

98
6-5 Command Button
The NA series does not have a specific button with corresponding functionality. However, you can
realize the following settings The selected standard Button object in the following way: select Click
from the Events options in Events and Actions. Then, perform an appropriate setting in the
Actions fields. Note that some functionalities cannot be replaced.
NS Functionality
NA Action
Remarks
Switch Screen - Specified Screen
ShowPage
Enter a destination page name
in PageName.
Switch Screen - Indirect Specification of
Screen No.
SetVariable
Enter the system-defined
variable
_HMI_CurrentPageIndex in the
Variable box, and the indirect
referencing variable name in the
Value box, respectively.
Switch Screen - Selection by Pop-up
Menu
No corresponding
function
Switch Screen - Backward
ShowPreviousPage
Switch Screen - Forward
No corresponding
function
Switch Screen - Write Screen No. when
Pressing the button
SetVariable
Enter the write destination
variable name in the Variable
box, and the system-defined
variable
_HMI_CurrentPageIndex in the
Value box, respectively.
Key Button
No corresponding
function
Control Pop-up Screen - Close Local
Pop-up Screen
ClosePage
Enter the name of the page you
want to close in PageName.
Control Pop-up Screen - Close Specified
Pop-up Screen
ClosePage
Enter the name of the page you
want to close in PageName.
Control Pop-up Screen - Move Local
Pop-up Screen
No corresponding
function
Display System Menu - System menu
Top Page (Initialize Tab)
ShowSystemMenu
Display System Menu - Switch Box
Function
No corresponding
function
Display System Menu - Display Captured
Data
No corresponding
function
Stop Buzzer
BuzzerOff
None
No corresponding
function
You can realize the same action
by leaving Events settings
empty.
If another functionality, e.g., the
Touch ON macro, is registered,
configure a corresponding
functionality.
Video Control - Video Capture
No corresponding
function
Video Control - Contrast Adjustment
No corresponding
function

99
Video Control - Vision Sensor Console
Output
No corresponding
function
Data Block Control - Read data from CSV
file to PLC Data Block
No corresponding
function
Data Block Control - Write data from PLC
Data Block to CSV file
No corresponding
function
Data Block Control - Read data from CSV
file to NS PT Memory
No corresponding
function
Data Block Control - Write data from NS
Data Block to CSV file
No corresponding
function
Data Block Control - Read data from NS
PT Memory to PLC Data Block
No corresponding
function
Data Block Control - Write data from PLC
Data Block to NS PT Memory
No corresponding
function
Data Block Control - Read record label
No corresponding
function
Data Block Control - Delete record
No corresponding
function
Authentication Cancellation
Logout
6-5-1 Non-replaceable Functionalities
NS Tab
NS Functionality
Remarks
Other
Do not allow sound
for this object
No corresponding function.

100
6-6 Bit Lamp
The NS series bit lamps are replaceable with Bit Lamp Objects in the NA series.
NS Series
NA Series
General Tab
Properties
Label Tab
When you select Ellipse or Rectangle in Appearance - Design and choose a color, the upper-right
part of the object will be forcibly colored gradationally, and the appearance will differ from an NS
series bit lamp. If you want the same appearance, select Image in Appearance - Design to use an
image file for the lamp’s appearance. No gradation on the lamp. Note that you need to prepare an
image file.
Left: Rectangle in Appearance - Design, forcibly gradation colored.
Right: Image in Appearance - Design, not gradation colored.
6-6-1 Non-replaceable Functionalities
NS Tab
NS Functionality
Remarks
General
Double-line Circle
The NA series has only single-line frame.
General
Double-line
Rectangle
The NA series has only single-line frame.
Macro
Macro Execution
Condition
In the NA series, you cannot register an action to a lamp.
Set a subroutine in Events and Actions of a page or
global event.
Variable
setting

101
6-7 Word Lamp
The NS series bit lamps are replaceable with Data Lamp Objects in the NA series.
Just like bit lamps, when you select Ellipse or Rectangle in Appearance - Design and choose a
color, the upper-right part of the object will be forcibly colored gradationally.
6-7-1 Non-replaceable Functionalities
NS Tab
NS Functionality
Remarks
General
Double-line Circle
The NA series has only single-line frame.
General
Double-line
Rectangle
The NA series has only single-line frame.
Label
Switch label
according to the
address value
It is impossible to read strings from a file.
Enter a label directly in Behavior - ColorRanges in
Properties.
Macro
Macro Execution
Condition
In the NA series, you cannot register an action to a lamp.
Set a subroutine in Events and Actions of a page or
global event.
6-8 Multifunction
The NA series does not have a directly-corresponding object, but you can achieve a similar
functionality by registering multiple Events and Actions settings for a button object.
In the following example, a single object assigns a value to a variable and switches pages.
NS series
NA
102
The table below provides relations between NS functionalities by a Multifunction object and NA
actions.
Functionalities that can be replaced with a command button are omitted.
NS Functionality
NA Action
Remarks
Switch Screen - Next Page
No corresponding action
Switch Screen - Previous
Page
No corresponding action
Object Control - Contents
Control
No corresponding action
Object Control -
Alarm/Event Control - Clear
ClearUserAlarmLog
Object Control -
Alarm/Event Control - Save
SaveUserAlarmLogToFile
Object Control -
Alarm/Event Control -
Home/End
CallSubroutine
Execute ScrollAlarmViewerList. The
number of scrolling rows cannot be
greater than the maximum of history
records.
Object Control -
Alarm/Event Control -
Next/Previous
No corresponding action
Object Control -
Alarm/Event Control - From
New Date & Time
CallSubroutine
Execute SortViewer.
Object Control -
Alarm/Event Control - From
Old Date & Time
CallSubroutine
Execute SortViewer.
Object Control -
Alarm/Event Control - From
High Priority
CallSubroutine
Execute SortViewer.
Object Control -
Alarm/Event Control - From
Low Priority
CallSubroutine
Execute SortViewer.
Object Control -
Alarm/Event Control - From
High Frequency
No corresponding action
The NA series alarm does not support
frequency of occurrence.
Object Control -
Alarm/Event Control - From
Low Frequency
No corresponding action
The NA series alarm does not support
frequency of occurrence.
Object Control -
Alarm/Event Control - Check
Selected Alarm
CallSubroutine
Execute AcknowledgeUserAlarm.
Object Control -
Alarm/Event Control -
Delete Selected Alarm
No corresponding action
The NA series alarm does not have a
functionality to delete individual alarms.
Object Control -
Alarm/Event Control - Check
All Alarms
CallSubroutine
Execute AcknowledgeAllUserAlarms.
Object Control -
Alarm/Event Control -
Cancel All Alarms’ Checks
No corresponding action
You cannot cancel the confirmed
alarm.
Object Control -
Alarm/Event Control -
Change Display Type
CallSubroutine
Execute FilterByText. Configure the
target column or text filtering, as
needed.

103
NS Functionality
NA Action
Remarks
Object Control - Data Log
Control - Start
StartDataLogging
Object Control - Data Log
Control - Stop
StopDataLogging
Object Control - Data Log
Control - Log Clear
No corresponding
action
Object Control - Data Log
Control - Save to File
CallSubroutine
Execute ExportDataLogBuffer.
Object Control - Data Log
Control - Read File
No corresponding
action
Object Control - Data Log
Control - Pause
No corresponding
action
Object Control - Data Log
Control - Move the cursor
forward
CallSubroutine
Execute the function MoveTrendCursor.
Object Control - Data Log
Control - Move the cursor
backward
CallSubroutine
Execute the function MoveTrendCursor.
Object Control - Scroll Object
No corresponding
function
Special - Password Setting
No corresponding
action
Special - Confirmation Dialog
Box
No corresponding
action
Special - Macro
CallSubroutine
Describe the processing, which is
defined in Macro, in the subroutine.
Special - Initialize Operation
Log
No corresponding
action
Special - Save Operation Log
CallSubroutine
Execute the function
SaveOperationLogToFile.
6-8-1 Double Pressing and ON and OFF Delay Functions
In the NS series, Double Pressing and ON/OFF Delay functionalities are only supported by the
Multifunction Object. These functionalities are available on Momentary Button, Toggle Button,
Button, Set Button, and Reset Button in the NA series.
However, settable value range is narrower than the NS series.
NS Functionality
NS Setting Range
NA Setting Range
Double Pressing
0.5 to 30.0 s
0 to 2000 ms
On Delay
0.5 to 15.0 s
0 to 2000 ms
OFF Delay
0.5 to 15.0 s
0 to 2000 ms
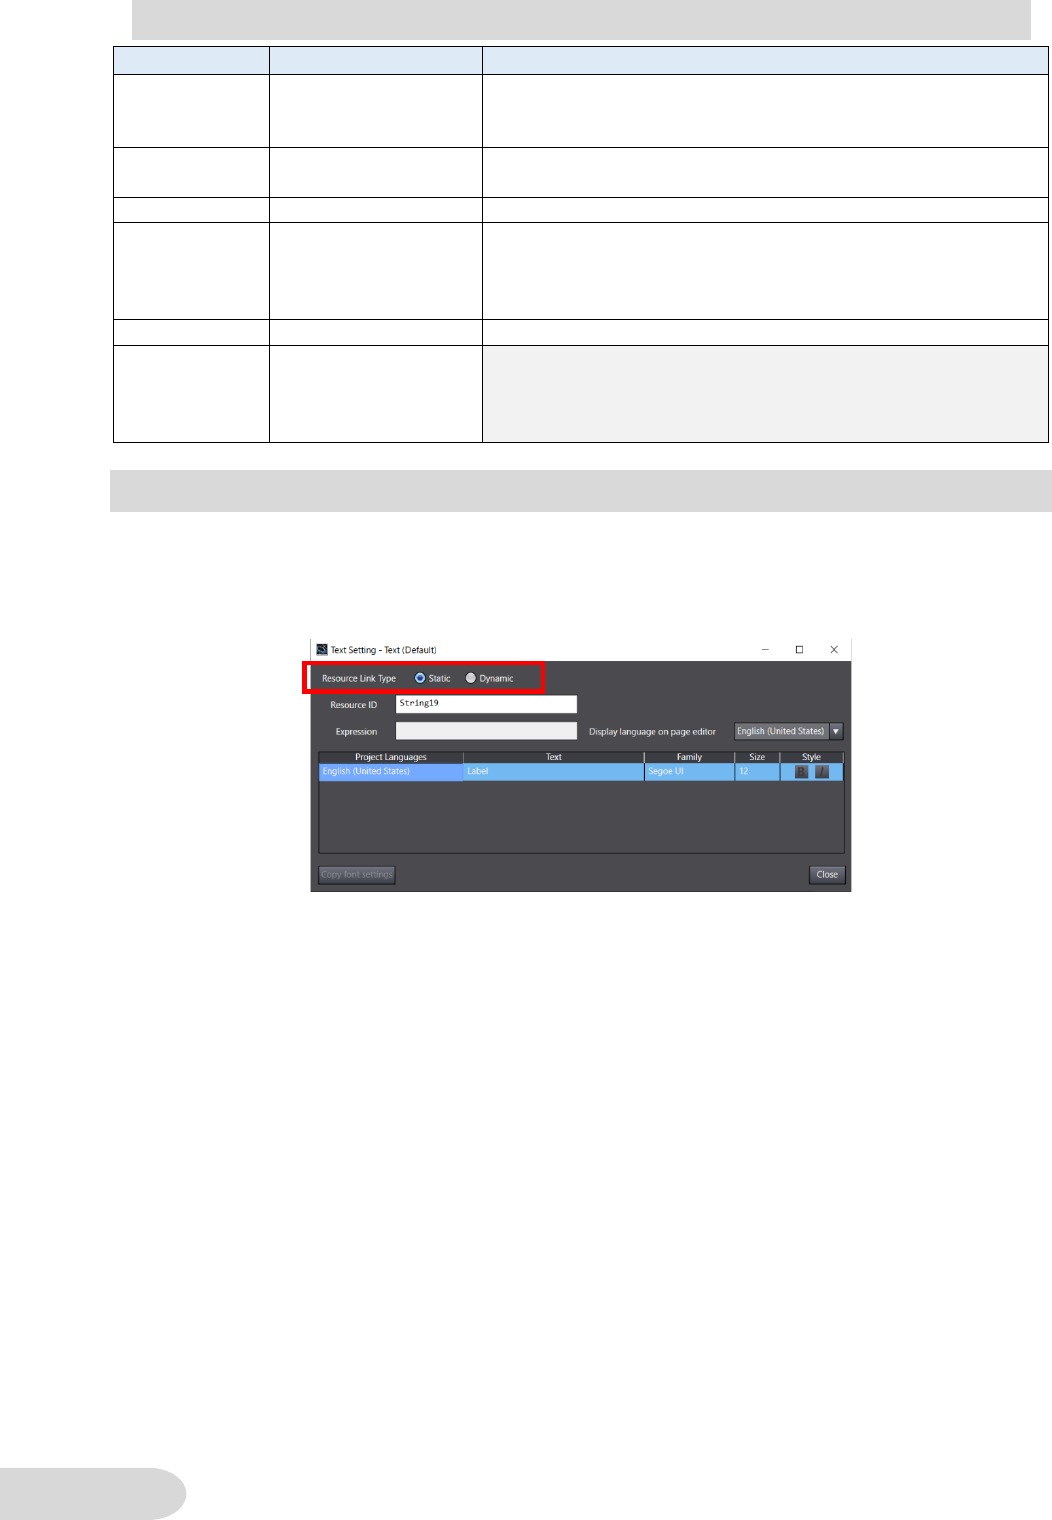
104
6-8-2 Non-replaceable Functionalities
NS Tab
NS Functionality
Remarks
General
Prohibiting
Simultaneous
Pressing
Simultaneous pressing is not supported.
Color/Shape
Double-line
Rectangle
The NA series has only single-line frame.
Color/Shape
Double-line Circle
The NA series has only single-line frame.
Color/Shape
Polygon
It is impossible to make a Button Object’s appearance
polygon.
Instead, create a Polygon Object in Shapes - Polygon,
then configure an action in Events and Actions.
Color/Shape
Sector
You cannot create a sector shape object.
Expansion
Setting
Wait for completion
of communication
(Synchronous
communication)
6-9 Text
The NS series Text Objects are replaceable with Label Objects in the NA series.
To display a fixed character string on a label object, select Static for Resource Link Type in
Behavior - Text (Default) in Properties of the object. Double-click a Label Object to display this
setting dialog.
If you have selected the option, Use as a Message Display, or indirectly referenced a string for the
NS text object, select Dynamic for Resource Link Type in Behavior - Text (Default) in Properties
of the label object. Refer to 5-8-1 How to Replace for the setting procedure.

105
6-10 Numeral Display and Input
You can replace a String Display and Input Object with a Data Display Object or a Data Input Object.
If you want only to display numerals, use a data display object, and also need to input, use a data
input object.
Put an object on the page, then select Numeric and Text in Behavior - DataType in Properties.
NS series
Numeral Display and Input
General Tab
NA series
Data Display Object Properties
Max/Min Tab
Data Input Object Properties

106
6-10-1 Non-replaceable Functionalities
NS Tab
NS Functionality
Remarks
General
Display Type - Binary
General
Display Type - Octal
General
Storage Type - All BCD
types
General
Ignore exceeded digits
General
Display input values by
*
Only a character string can hide numerals and strings
currently being entered.
Keypad
Input Method
The keypad is fixed to what you select in the Language
Settings tab page. To display a desired keypad, set a
subroutine in Events and Actions of the Data Display
Object to run the subroutine EditVariable.
Keypad
Display Position of
Keypad/Pop-up Screen
The keypad display position is automatically determined.
You cannot display it at the desired position.
Max/Min
Type of Value -
Difference from Current
Value
Max/Min
Watch Maximum Limit/
Watch Minimum Limit
You can change the colors in Animations -
ColorChange. Note that only the numeral color in data
display, and the background color in data input, are
changeable. You are not allowed to change the both
colors of numerals and background.
Control
Flag
Display/Hide (Numeral
display)
Macro
Before inputting
numeral
Macro
Before writing numeral
Macro
When changing value
Macro
Value = Set Value
Set a subroutine in Events and Actions of a page or
global event.
Macro
Value> Set Value
Macro
Value< Set Value

107
6-11 String Display and Input
You can replace a String Display and Input Object with a Data Display Object or a Data Input Object.
If you have disabled inputs, use a Data Display Object, and if not, use a Data Input Object.
Put the object on the page, then select Numeric and Text in Behavior - DataType in Properties.
You can select a character code in the String Display Type area for a String Display Object and an
String Input Objects of NS series.
You do not have to consider the character code if you use NS internal addresses to display strings.
However, if you are using CJ host addresses, selecting an appropriate character encoding scheme
in Sysmac Studio for the replacement is necessary.
The following shows the setting in Sysmac Studio. You can select a encoding scheme in the setting
Encoding for all strings.
The table below provides the character code conversions.
NS
NA
System Language
String Display Type
Character Encoding Scheme
Japanese
ASCII code (Shift-JIS)
Shift-JIS
Chinese (Simplified
and Traditional)
ASCII code (GB2312)
GB18030
English, Italian,
Spanish, German,
and French
ASCII code (Latin1)
ISO-8859-1
All Languages
Unicode (UTF-8)
UTF-8
All Languages
Unicode (UTF-16)
UTF-16

108
6-11-1 StartIndex and TextLength
StartIndex and TextLength, the data input object properties, are available only when specifying a
numerical-type array for Variable and handling the array value as ASCII.
Entering values in StartIndex and TextLength will result in an error if you have set a string type
variable in Variable. TextLength is not for setting the maximum length of input.
6-11-2 Non-replaceable Functionalities
NS Tab
NS Functionality
Remarks
General
String Display Type
The text length cannot be configured while a string type
variable is used.
General
Pop-up Menu
General
Address Information
It is not allowed to set different variables to reference for
each language.
General
Input Process
Keyboard
Input Method
The keypad is fixed to what you select in the Language
Settings tab page. To display a desired keypad, set a
subroutine in Events and Actions of the Data Display
Object to run the subroutine EditVariable.
Keyboard
Display Position of
Keypad/Pop-up
Screen
The desired position of a keypad is determined
automatically. You cannot display it at the desired position.
Keyboard
String Input
Fixed to Add to the current string.
Macro
Before inputting
string
Macro
Before writing string
Macro
When changing
string

109
6-12 List Selection
Only an action that the option Store the selected line No. in the specified address is enabled can
be replaced with a ListBox object.
6-12-1 Non-replaceable Functionalities
NS Tab
NS Functionality
Remarks
General
List Data
The NA series cannot have the list data in an internal
variable or a file.
The data is stored statically in Behavior - Items in
Properties of the ListBox object. Edit fixed strings, which
are managed by resource ID, in Resources - General
Strings.
You are not allowed to switch a displayed string
dynamically during the operation because strings in the
ListBox object are fixed.
General
Character Code
General
List Size
Selection
Show selection bar
The selection bar is always displayed. The bar color is not
changeable.
Selection
Store the selected
line No. in specified
address
A selection in the ListBox Object is to be output to a
numeral only.
Scroll Bar
The scroll bar is mandatory.
The scroll bar is displayed automatically on the object with
too many options considering its size.
External
Control
Block
External
Control
Start Line
External
Control
Update
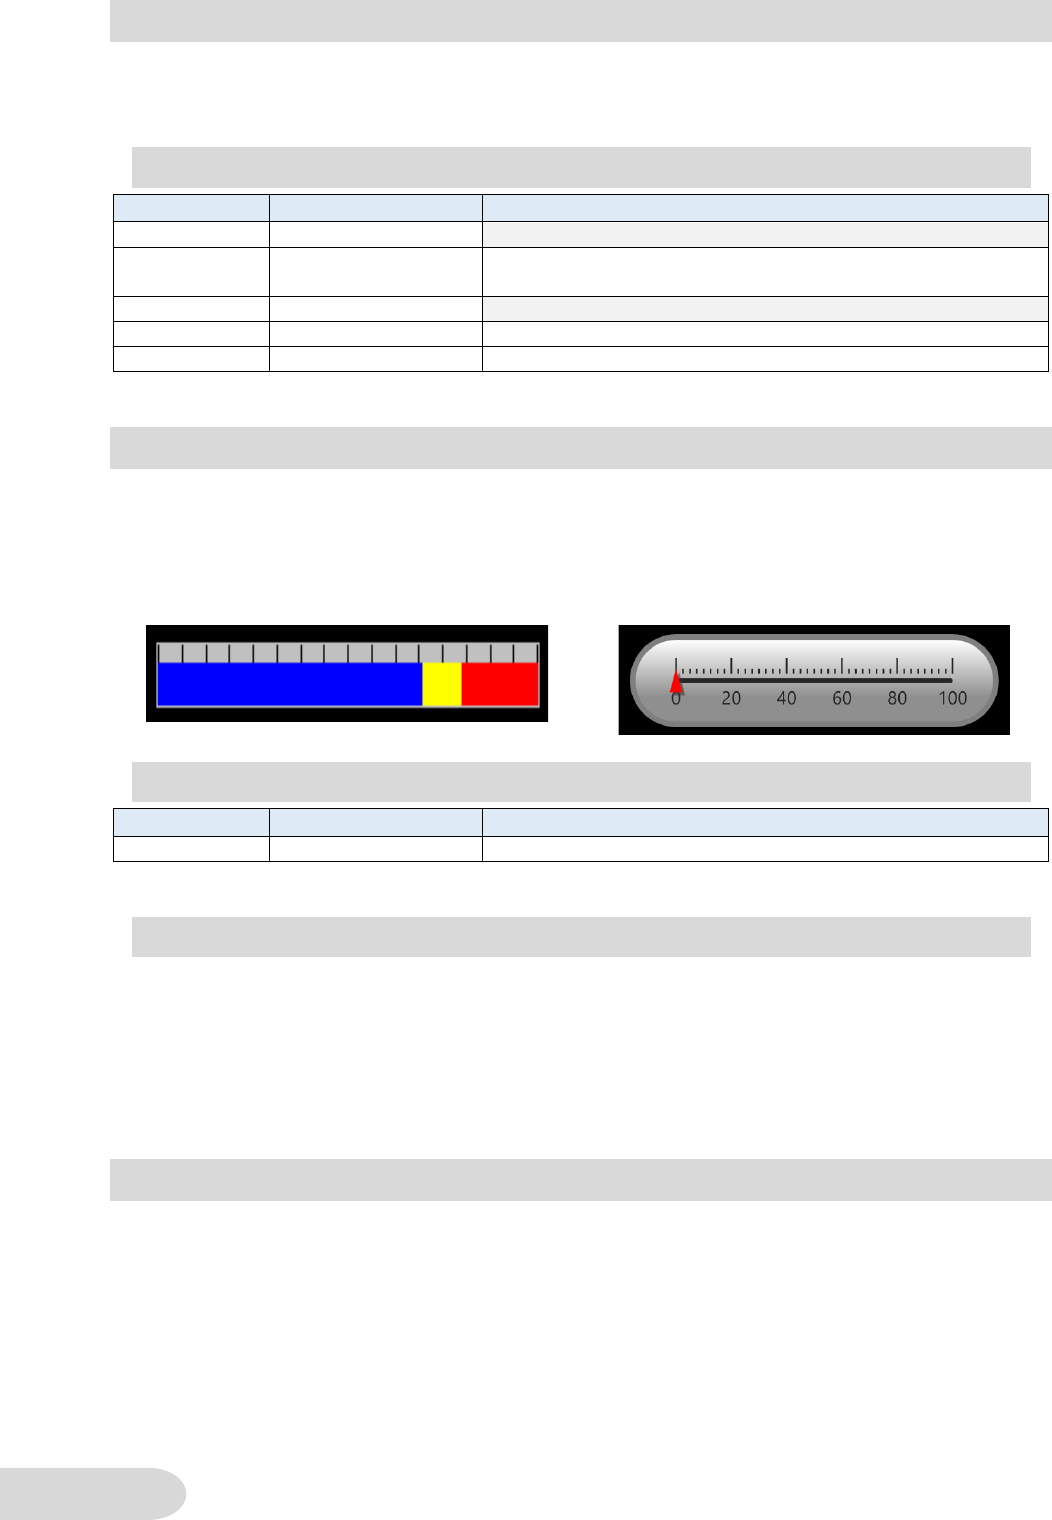
110
6-13 Analogue Meter
The NS Analogue Meter Object can be replaced with an NA Gauge Object: Full Gauge or Half
Gauge.
Only Needle is available for indication.
6-13-1 Non-replaceable Functionalities
NS Tab
NS Functionality
Remarks
General
Width Rate
General
Shape - Quarter
circle
Configure StartAngle and EndAngle in Properties -
Appearance of the object to realize a similar appearance.
General
Color inside a meter
General
Display Type
The option Fill is not supported.
Range
Indirect
Only fixed values are supported.
6-14 Level Meter
The NS Level Meter Object can be replaced with an NA Gauge Object: Vertical Gauge or Horizontal
Gauge.
However, the appearances differ significantly: the NS level meter looks like a bar chart, and in the
NA linear gauge, the marker moves to indicate a value as illustrated below.
NS Level Meter
NA Linear Gauge
6-14-1 Non-replaceable Functionalities
NS Tab
NS Functionality
Remarks
Range
Indirect
Only fixed values are supported.
6-14-2 Realizing the Same Appearance as NS Object
To get the same bar chart appearance as the NS level meter object, use a Rectangle Object from
Shapes, not a Vertical/Horizontal Linear Gauge Object. Specify a variable in Animations -
ResizeWidth for a graph whose indicator increases/decreases in the horizontal direction, and
Animations - ResizeHeight if the indicator moves vertically, to adjust the size of the rectangle.
Another object is required to create the scale. In addition, if you want different colors for levels,
multiple rectangle objects are necessary.
6-15 Broken-line Graph
The NS Broken-line Graph Object can be replaced with the NA Broken-line Graph Object.
Functionalities not supported by the NA broken-line graph object, e.g., zooming in/out the graph,
moving the cursor, can be realized with subroutines.
We offer the IAG Library for the NA series, which include basic function features.
You can get an NA IAG library from the OMRON website. Visit the following link. https://asset
s.omron.com/m/5bf56e1c1780d236/original/IAG-Software.zip
111
6-15-1 Non-replaceable Functionalities
This table shows the functionality not supported by the object settings.
NS Tab
NS Functionality
Remarks
General
Direction
Fixed to the setting corresponding to the NS setting
Right.
General
Line Style
Only the solid line is supported in both of the vertical
and horizontal directions.
General
Indirect reference of
showing scale line
Not available in both of the vertical and horizontal
directions.
General
Specify the No. of
points shown
Graph
Draw Value Outside of
the Range
If a value exceeds the upper or lower limit, it will be
displayed as the maximum or minimum value.
Scroll Bar
A scroll bar is not displayed.
-
Test Function
Broken-line graphs are displayed as fixed images on
the simulator. To test a graph display, transfer the
project to the NA unit.
The NA series has the following restrictions on the number of graphs you can put on a page:
1) One graph object, including a trend graph object, per page
2) Up to eight graph objects, including a trend graph object, per HMI project
The limits are total of broken-line graph objects and trend graph objects.
6-16 Bitmap
The NS series Bitmaps are replaceable with Image Objects in the NA series.
6-16-1 Non-replaceable Functionalities
This table shows the functionality not supported by the object settings.
NS Tab
NS Functionality
Remarks
General
Indirect Reference of
Display File
6-17 Alarm/Event Display
The NA series does not have an alternate functionality, but you can realize it following the method
below.
Sub NS_getAlarmMessage
Dim almID As String
Dim almMsg As String
Dim almDt As Date
Dim almMsg_Newest As String
Dim almDt_Newest As Date
Dim i As Integer
1. Define a String type global variable, NS_alarmMessage.
2. Name the alarm as [fixed string + serial number] in the user alarm setting. For this example,
the fixed string is “Group0_alm.”
3. Create a subroutine NS_getAlarmMessage as a global subroutine.

112
‘Repeats as many times as set alarms. In this example, 22 alarms are set.
For i = 0 To 21
almID = "Group0_alm" + i.ToString
If IsUserAlarmActive(almID)
GetAlarmInfo( almID, , , , , almMsg, , almDt, , )
If DateTime.Compare( almDt, almDt_Newest ) > 0
almDt_Newest = almDt
almMsg_Newest = almMsg
End if
End If
Next
If almMsg_Newest <> “”
NS_alarmMessage = almMsg_Newest + “ “ + almDt_Newest
Else
NS_alarmMessage = “”
End If
End Sub
When assigning a string to the variable NS_alarmMessage, you can change display contents by
adding various alarm setting information that GetAlarmInfo() acquired.
Follow this procedure to realize the flowing string.
The data display object’s Name attribute is DataDisplay0.
The value used in the IF statement depends on the width of the data display object and the
screen size.
Sub nagare()
DataDisplay0.Left = DataDisplay0.Left – 16
If DataDisplay0.Left < -200 Then DataDisplay0.Left = 800
before_Second = _HMI_Second
End Sub
The Data Display Object moves to the left by 16 dots per second.
However, the display position moves sideways regardless of the coordinates of the data display
object on Sysmac Studio. Therefore, you need to modify values for VB functions to adjust the display
position.
4. Select Interval for Events and CallSubroutine for Actions of the global event to call
NS_getAlarmMessage.
5. Put a data display object on a page where you display an alarm object. Then, select String for
Data Type in Behavior in Properties and NS_alarmMessage for Expression.
1. Add the integer type global variable, before_Second.
2. Add the subroutine nagare() in Actions - CallSubroutine of the page.
3. Select Condition from the Events options in Events and Actions of the page. Then, enter
_HMI_Second<> in Expression. And select CallSubroutine from the options of Actions and
specify nagare() in SubroutineName.
4. Arrange the data display object as much as behind because a flowing string will be displayed
without relation to other objects on the right and left sides of the display area. Then, put a
rectangle object, which cover the string, in front of the data display object.

113
For another method, edit the string to be displayed as flowing string, not hanging the position of
the data display object.
Execution condition for a subroutine is the same as mentioned above, but describe the subroutine
as the following.
Enter strAlarmMove into Expression, the Data Display Object’s property.
Dim pos As Integer
Sub nagare
Dim px As Integer = NS_alarmMessage.Length
If (px > 0)
Dim strMove As String = NS_alarmMessage + " "
px = px + 8
pos = pos - 1
If (pos > px) Or (pos < 1)
pos = px
End If
strAlarmMove = Microsoft.VisualBasic.Right(strMove, pos) _
+ " " _
+ Microsoft.VisualBasic.Left(strMove, px - pos)
Else
strAlarmMove = ""
End If
before_Second_13 = _HMI_Second
End Sub

114
6-18 Alarm/Event Summary and History
You can replace an Alarm/Event Summary and History Object with a User Alarms Viewer Object.
6-18-1 Non-replaceable Functionalities
This table shows the functionality not supported by the object settings.
NS Tab
NS Functionality
Remarks
General
Group
Specification
General
Display Type
General
Default Display
Order (Frequency)
The NA series does not have a functionality to record the
frequency.
General
Date and Time
Display Format
The date and time display format is fixed.
General
Display in the
Same Line
The NA series always displays alarm occurrence and
clearance in the same row.
General
Movement when
Alarm/Event is
Selected
Display
Line Height
Automatically tuned depending to text size.
Display
Display
Optimization
Display
Display a title
Header cannot be hidden. Setting the lowest value, 1, for the
height makes the header as if it were hidden.
Display
Message box
display
Display
Ruled Line
Display
History Display
Type
You cannot display occurrence and cancellation in the same
row.
Icon
Subroutines can substitute some functions.
Assign a corresponding functionality to a button or other
object.
Vertical
Scroll Bar
Use Scroll Bar
The scroll bar is displayed automatically on the object when
the display contents exceed the object size. It cannot be
hidden.
Horizontal
Scroll Bar
Use Scroll Bar
The scroll bar is displayed automatically on the object when
the display contents exceed the object size. It cannot be
hidden.
Macro
Pressing an icon does not start an action including macro.
6-18-2 Replacing Icons
In the NS series, you can sort and delete displayed alarms with icons.
The NA series alarm objects do not have these icons, but you can realize someicons functionalities
with subroutines.
Functionality of Icon
Alternate Subroutine
Remarks
From New Date & Time
SortViewer
If sorting targets are not in the columns,
an error occurs when you run a
subroutine.
It is possible to sort alarms by touching
the header.
Every time you touch the header, sorting
order, ascending or descending, switches.
From Old Date & Time
SortViewer
From High Priority
SortViewer
From Low Priority
SortViewer

115
From High Frequency
-
From Low Frequency
-
Delete Selected Alarm
-
Check Selected Alarm
AcknowledgeUserAlarm
Check All Alarms
AcknowledgeAllUserAlarms
Cancel All Alarms’
Check
-
Change Display Type
-
116
6-18-3 Setting for Distinguishing Occurrence and Cancellation of Alarms
User alarm viewer objects of the NA series cannot display an alarm occurrence and cancellation in
the same row. Depending on the setting, you cannot differentiate them.
The following method enables you to distinguish the information.
⚫ Coloring Messages
Check the ShowColoredMessage box in Behavior. The color of an alarm string will
change according to the color set in the RaisedUnacknowledgedColor or
RaisedAcknowledgedColor field in Appearance.
The following illustrates an alarm occurrence message shown in red and cancellation in
green.
⚫ Adding Status to Display Items
Add “Status” to the display items in Appearance - Columns.
An occurrence and a cancellation will be displayed as “Alarm Raised” and “Alarm Cleared”
in the Status column.
Messages displayed in the Status column are fixed and non-editable.
117
6-18-4 Alternative for Page Transition When Selecting an Alarm
This section describes an alternative for the functionality to go to a page after selecting a displayed
alarm.
In the NS series, selecting an alarm switches the currently displayed page to the page you set.
However, in the NA series, additional action is required after selecting an alarm for page transition.
Enter the page name where the user alarm viewer object is in PageName and the name of
the user alarm viewer object in AlarmViewerName.
This setting enables you to go to the set page when you press the object while selecting the
alarm on the user alarm object.
6-19 Date and Time
The NS series Date Object and Time Object are replaceable with a DateTime Object in the NA
series.
In the NS series, the date and time are displayed separately with a date object and time object,
respectively. In the NA series, the date and time is displayed with a single object. By changing the
display format, you can display either date or time alone.
In the NS series, you press an object to edit the date and time settings to change the system clock.
However, in the NA series, a DateTime object only displays data and does not change the system
clock setting.
Change the system clock setting from the system menu or use a subroutine.
To use the subroutine, you must combine button objects and data input objects to input date and
time data.
1. Enter destination page names in the Page field for each alarm in the User Alarm Group
setting tab page.
2. Create an object. Then select Click from Events and ShowAlarmPage from Actions in
Events and Actions.

118
6-20 Data Log Graph
The NS series Data Log Graph is replaceable with Trend Graph Object in the NA series.
Trend graph objects do not support zooming in/out of a graph and moving the cursor. You can use
subroutines to substitute these functionalities. We offer the IAG Library for the NA series, which
include subroutines used in combination with a trend graph object.. You can get an NA IAG library
from the OMRON website. Visit the following link.
https://assets.omron.com/m/5bf56e1c1780d236/original/IAG-Software.zip
6-20-1 Non-replaceable Functionalities
This table shows the functionality not supported by the object settings.
NS Tab
NS Functionality
Remarks
General
Direction
Fixed to the setting corresponding to the NS setting Right.
General
Draw Value Outside
of the Range
If a value exceeds the upper or lower limit, it will be
displayed as the maximum or minimum value.
General
Line Style
Only the solid line is supported in both of the vertical and
horizontal directions.
Time Axis
Scale
Indirect reference is not supported.
Time Axis
Use Cursor
Use of cursor is selectable, but the feature to store values
of the color or cursor position is not available.
Time Axis
Graph Display
Position
Numeral
Value Axis
Scale Settings
Only the functionality of setting the maximum and
minimum values as fixed values is supported.
Icon
Subroutines can substitute some functions.
Assign a corresponding functionality to a button or other
object.
Scroll Bar
A scroll bar is not displayed.
-
Test Function
Trend graphs are displayed as fixed images on the
simulator. To test a graph display, transfer the project to
the NA unit.
The NA series has the following restrictions on the number of graphs you can put on a page:
1) One graph object, including a broken-line graph and trend graph, per page
2) Up to eight graph objects, including a broken-line graph and trend graph, per HMI project
6-20-2 Replacing Icons
For the NS series data log graphs, you can use icons to stop or restart drawing a graph, but the NA
series trend graph objects do not have those icons. You can substitute subroutines for some
functionalities.
Functionality of
Icon
Alternate Subroutine
Remarks
Stop
StopDataLogging
StopDataLogging in Events and
Actions works in the same way.
Restart
StartDataLogging
StartDataLogging in Events and
Actions works in the same way.
Status
-
Difficult to replace
Log Clear
-
Executing ClearDataLogBuffer alone
does not delete all the data. You must
delete log files stored in the external
memory.
Pause
-
Difficult to replace
Save to File
ExportDataLogBuffer(DataSetName)
Read File
-
Difficult to replace
119
6-21 Data Block Table
Recipe Viewer is corresponding to Data Block Table in the NA series, though the feature is largely
different.
In the NA series, you use subroutines to read or write the data.
We offer the IAG Library for the NA series, which include basic function features. You can get an NA
IAG library from the OMRON website. Visit the following link.
https://assets.omron.com/m/5bf56e1c1780d236/original/IAG-Software.zip
6-21-1 Non-replaceable Functionalities
This table shows the functionality not supported by the object settings.
NS Tab
NS Functionality
Remarks
General
Display No. of rows
Background
Color of Odd Rows
You cannot set different colors for each row.
Background
Color of Even Rows
You cannot set different colors for each row.
Vertical Scroll
Bar
A scroll bar is not displayed.
Horizontal
Scroll Bar
A scroll bar is not displayed.
Macro
Pressing an icon does not start an action including macro.
6-21-2 Replacing Icons
NS Data Blocks allow you to read or write data with icons, but in NA recipes, you cannot use those
icons. You can substitute subroutines for some functionalities.
Functionality of Icon
Alternate Subroutine
Remarks
Read Data File
ImportRecipes
Write Data File
-
Use “Export_recipe” in the AN series IAG
Library.
Write to the
address
WriteRecipeToController
Read from the
address
ReadRecipeFromController
Add the record
AddRecipe
Delete the record
DeleteRecipe

120
6-22 Frame
Replaceable with Tab Control Object.
6-22-1 Functional Differences
The table below shows functional differences you should consider.
Functionality
Difference
Tab page
arrangement
NS series: Four edges of the screen
NA series: Top and bottom of the screen You cannot place a tab
page on the right and left sides.
Origins of coordinates
of an object inside the
frame
NS series: Coordinates of the upper-left corner of the frame
NA series: Coordinates of the uppe-left corner of the page
Object frame
Both of the NS series and NA series do not have the setting field for
object frame. However, frames are forcibly given on the NA series
objects. (See the illustration below)
6-22-2 Workaround When You Cannot Arrange an Object on Tab Control Object
When you attempt to arrange an object on a tab control object on the Edit Pane, sometimes you
may fail, and the object is placed on the base screen. In that case, try to manipulate the objects on
Page Explorer, where you can edit easier.
See the screen shots below. To put the object Button2 on the tab control object, select Button2 in
Page Explorer then drag and drop on a desired tab page in the tab control object.
Before editing
Drag & drop
After editing

121
6-23 Table
No functionality for direct replacement.
Replace a table with Button, Lamp, Data Display, or Data Input Object according to the type of
functional object in the pull-down menu Table Type. To copy an object and paste it tiled in the
vertical or horizontal direction, select the object and right-click to choose Create Duplicate
Objects... from the menu.
6-24 Thumbwheel Switch
There is no features for replacement.
However, combination of data display objects, objects such as buttons, and subroutines can achieve
a thumbwheel switch. This section provides the replacement procedure. Details of the procedure
depends on digits and numerical notation system. In this example, replace a thumbwheel switch of
unsigned 4-digit decimal.
6-24-1 Replace Thumbwheel Switch: Arrange Objects
In the page editor, arrange button objects and data display objects to represent a thumbwheel
switch.
6-24-2 Replace Thumbwheel Switch: Define a Structure
Select [Data] - [Data Type] to define a structure of the thumbwheel switch.
Button object
Button object
Data display object

122
6-24-3 Replace Thumbwheel Switch: Register the Structure
Register the thumbwheel switch structure as a global variable.
Basically, one structure is prepared for one thumbwheel switch. If you want to more than one
thumbwheel switches in a page, register the same number of structures as the switches.
6-24-4 Replace Thumbwheel Switch: Configure Global Subroutine
Create a subroutine that commonalizes the operations of the + and - buttons in each digits of the
thumbwheel switch as a global subroutine.
The function WheelDec_init reflect the value of variable “value”, which is the member variable of
the thumbwheel switch structure, on the elements of the member variable “digit.” You need to
initialize other member variables than “digit” in advance.
The function WheelDecSw is for the processes pressing the + and - buttons in each digit. Specify
the thumbwheel switch structure, a digit number (the rightmost digit is 0 and increments by one to
left.), and True for the + button and False for the - button, for the first, second, and third argument,
respectively.
For unsigned decimal
Dim Wheel_mulDec() As Integer = { 1, 10, 100, 1000, 10000, _
100000, 1000000, 10000000, 100000000 }
Sub WheelDec_init(tw As ThumbWheelDec)
Dim i As Integer
Dim v As Integer = tw.value
For i = 0 To 7
tw.digit(i) =v Mod 10
v = v / 10
Next
End Sub
Sub WheelDecSw(tw As ThumbWheelDec, col As Integer, up As Boolean)
Dim m As Integer = Wheel_mulDec(col)
Dim d As Integer = tw.digit(col)
Dim x As Integer = tw.value
x = x - (m * d)
If ( up )
If d >= 9 Then d = 0 Else d = d + 1
Else
If d <= 0 Then d = 9 Else d = d - 1
End If
x = x + (m * d)
If (x < tw.min) Or (x > tw.max) Then Exit Sub

123
tw.digit(col) = d
tw.value = x
End Sub
6-24-5 Replace Thumbwheel Switch: Configure Page Subroutine
For a button object, you cannot specify an argument in a function that specifies CallSubroutine for
an action of the Click event. In other words, you are not allowed to specify a function with an
argument that is defined in a global subroutine. Therefore, define the page subroutine in the code
view of the page as shown below.
The function Wheel_init14 sets initial values of members in the thumbwheel switch structure.
The functions Wheel_u1 and the followings are for the processes after pressing the + and -
buttons. In this example, the letter “u” stands for “up (+)” and “d” for “down (-)”, and numbers from 1
to 1000 stands for the ones place to the thousands place, respectively.
Sub Wheel_init14
TW14.value = 2345
TW14.max = 8765
TW14.min = 12
TW14.col = 4
WheelDec_init(TW14)
End Sub
Sub Wheel_u1()
WheelDecSw(TW14, 0, True)
End Sub
Sub Wheel_u10()
WheelDecSw(TW14, 1, True)
End Sub
Sub Wheel_u100()
WheelDecSw(TW14, 2, True)
End Sub
Sub Wheel_u1000()
WheelDecSw(TW14, 3, True)
End Sub
Sub Wheel_d1()
WheelDecSw(TW14, 0, False)
End Sub
Sub Wheel_d10()
WheelDecSw(TW14, 1, False)
End Sub

124
Sub Wheel_d100()
WheelDecSw(TW14, 2, False)
End Sub
Sub Wheel_d1000()
WheelDecSw(TW14, 3, False)
End Sub
6-24-6 Replace Thumbwheel Switch: Configure Page Switching Event
Select PageDisplayed from the [Events] under [Events and Actions] and CallSubroutine from
[Actions]. Then, enter the page subroutine Wheel_init14 in SubroutineName.
6-24-7 Replace Thumbwheel Switch: Configure Button Event
In the page editor, select Click from [Events] for the + and - buttons. Then select CallSubroutine
from [Actions] to enter the page subroutines from Wheel_u1 to Wheel_u1000, and Wheel_d1 to
Wheel_u1 in SubroutineName, respectively.
6-24-8 Replace Thumbwheel Switch: Configure Data Display Object
In the page editor, enter TW14.digit(0), TW14.digit(1) and so on, from the right, in Expression for
the data display objects of each digit. Select Decimal for [ValueFormat], and “#” for
[DisplayFormat].
6-25 Temporary Input
No corresponding function.
6-26 Consecutive Line Drawing
No corresponding function.
6-27 Contents Display
No corresponding function.
6-28 Video Display
No corresponding function.

125
Other Important Points
This chapter provides the additional information you should know to convert NS screen data to NA
screen data.
⚫ The text size differs between Sysmac Studio and an NA unit
Segoe UI, the default of the text family, is an English font. Therefore, a Japanese or
Chinese character may cause this issue.
Change the test family according to your language, following the table below.
Language
Recommended Font Family
Japanese
Meiryo, MS Gothic
Simplified Chinese
Microsoft YaHei, SimSun
Traditional Chinese
Microsoft JhengHei, MingLiU
Korean
Malgun Gothic, Gulim, GulimChe
⚫ How to specify a path to save the log file
The formats to specify a path to save the user alarm log are shown below.
A file name must include an extension.
Save to
Format
SD card
¥SDCard¥file name
USB stick memory
¥USBDisk¥file name

126
⚫ Japanese Hiragana and Katakana cannot be input through a character keypad.
To enter Japanese, you need to select Japanese for the system language of NA.
If you use Korean, Simplified Chinese, or Traditional Chinese, select a corresponding
system language.
Because the system language corresponds to a user language, changing the user
language changes the system language.
Select Events and Actions - SetLanguage then select the language you want to set in the
Language selection.
127
Change Controller Program
There are differences in system functionalities and functional objects between NA series units and
NS series units. Some of these differences can be resolved with VB programs, but some cannot be
migrated to NA units due to performance or functional issues.
In those cases, you need to change programs in the controller.
8-1 Example of Changing Controller Program
To create a screen that monitors 200 channels at a time from addresses D1000 to D2999, use the
index register, i
0
, to assign addresses to the numeric display objects as follows. The numeric display
objects and host communication processing of NS units achieve monitoring with less load. Index
register values range from 0 to 2700.
D1000i0
D1001i0
D1002i0
...
D1009i0
D1010i0
D1011i0
D1012i0
...
D1019i0
D1020i0
D1021i0
D1022i0
...
D1029i0
...
...
...
...
D1190i0
D1191i0
D1192i0
D1199i0
To achieve this using an NA unit, you need to replace an assigned address with an array variable,
and also, use VB for processing. In this example, define a numerical type variable idx, which refers
to the first channel, and an array numeric variable DD(200). Then, lay out a data display object
assigning conditional expressions to the variables in the range of DDisp(0) to Ddisp(199).
Also, define an array type network variable Dmon(2000) to monitor a value in the PLC.
Direct assigning to the data display object, like Dmon(22+idx), would ne the same manner as NS,
but it is impossible. Therefore, copy the monitoring variables to the display variables by using a VB
program.
Ddisp(0)
Ddisp(1)
Ddisp(2)
...
Ddisp(9)
Ddisp(10)
Ddisp(11)
Ddisp(12)
...
Ddisp(19)
Ddisp(20)
Ddisp(21)
Ddisp(22)
...
Ddisp(29)
...
...
...
...
Ddisp(190)
Ddisp(191)
Ddisp(192)
...
Ddisp(199)
Sub Monitor_E_Mem
Dim i as Integer
If _HMI_CurrentPageIndex <> page number of the monitor screen Then Exit Sub
For i = 0 to 199
DDisp(i) = DMon(idx + i)
Next
End Sub
Select Events - Interval - 1 Second in the global event to run this subroutine.
Because running this subroutine on screens other than the monitor screen does not make sense,
use the system variable _HMI_CurrentPageIndex, which shows a currently displayed screen index,
to prevent copying.
Now you can achieve the similar monitoring function as NS, but the subroutine has an issue: it may
issue read commands for one channel per For loop. Usually, 1 to 10read commands are required to
get all the data in one screen. In this example, there are 200 loops, so the number of read

128
commands increases by 200. Therefore, the monitoring interval will extend 20 times or more. For
instance, a screen that used to refresh every 0.2 seconds will refresh every 4 seconds.
To avoid this issue, copy the memory in the PLC, using the variables idx(DM200) and EDisp (200
channels from DM20000). It is not necessary to add VB functions and Events attributes to global
events in the NA series.
[Sample ladder diagram]

129
Revision History
Revision
History
Date
Revised Content and Page
01
August 2022
First edition
02
April 2023
Error corrections

Appendix 1: Project Common Settings
◆Models
Models
Model Name Screen size Model Name Screen size Percentage zoom
NS5-SQ0[]-V1
NS5-SQ0[]-V2
NS5-TQ0[]-V2
NS5-MQ0[]-V2
NS5-SQ1[]-V2
NS5-TQ1[]-V2
NS5-MQ1[]-V2
NS7-SV0[]
NS8-TV0[]-V1
NS8-TV0[]-V2
NS8-TV1[]-V1
NS10-TV0[]
NS10-TV0[]-V1
NS10-TV0[]-V2
NS12-TS0[]
NS12-TS0[]-V1
NS12-TS0[]-V2
NS15-TX0[]-V2 1024 x 768 NA5-15W101□-V1 1280 x 800 1
800 x 600
640 x 480
NA5-7W001□-V1
800 x 480
NA5-9W001□-V1
800 x 480
CX-Designer
Sysmac Studio
320x240
NA5-7W001□-V1
800x480
2
NA5-12W101□-V1
1280 x 800
1.3
1
1

◆Project Properties
Tab 1st Level 2nd Level Value 1st Level 2nd Level 3rd Level 4th Level Set Value
Title Project Title
Project
Properties
Comment
Switch
Label
No. of Labels Refer to the "Switch Label” sheet.
Switch No. - - - - -
Label Name - - - - -
Initial Label Label Name HMI Settings Device Settings Startup Language Startup Language
The same value
as the value of
Initial Label in NS
Macro Project
When Loading
a Project
Global Events ProjectInitialization Subroutines - Subroutine name
Alarm/Event
On timing Alarm
/Evento ccurred
- - - - -
On timing Alarm
/Event is
cancelled
- - - - -
When a bit changed - - - - -
When a value
changed
- - - - -
Select Language
See "Switch Label."
Pop-up
Menu
Pop-up Menu
Setting
Text Color Color - - - - -
Background Color2 Color - - - - -
Font Size ... - - - - -
Show Delimiter
Checked/ Unchecked
- - - - -
Macro Option MSGBOX
Recognize "\n"
in the message
as a line feed code
Checked/ Unchecked
- - - - -
Input Options
Numeral Input
Options
Clear the input field
when the input focus
has been set
- - - - -
Show the current values
when the input focus
has been set
- - - - -
Input Pad
Options
Bar-code and input pas
are both enabled.
- - - - -
Only input pad is
enabled.
- - - - -
Input Status
Color
Text Color Color - - - - -
Background Color - - - - -
Data Format
Screen/ Page Binary/ BCD - - - - -
Specifying
the File Line
Binary/ BCD - - - - -
Alarm ID No. Binary/ BCD - - - - -
Alarm/Event Info. Binary/ BCD - - - - -
Data Log Binary/ BCD - - - - -
Macro Binary/ BCD - - - - -
Consecutive
Line Drawing
Binary/ BCD - - - - -
Specifying
Contents No.
Binary/ BCD - - - - -
CX-Designer
Project Properties
Sysmac Studio
On changing of
an address value

◆System Setting
(1/2)
Tab 1st Level 2nd Level 1st Level 2nd Level 3rd Level 4th Level Value
PT
Start-up Wait Time - - - - -
Key Press Sound OFF HMI Settings Device Settings
Touch Input
Notification
Unchecked
ON HMI Settings Device Settings
Touch Input
Notification
Checked
Buzzer Sound OFF HMI Settings Device Settings Alarm Notification Unchecked
ON HMI Settings Device Settings Alarm Notification Checked
ERROR ON HMI Settings Device Settings Alarm Notification Checked
None HMI Settings Device Settings Screen Saver Screen saver type OFF
Display Erased - - - - Blank
Set Value HMI Settings Device Settings Screen Saver
Active After [ # ]
minutes of inactivity
Set the value of NS
setting
Indirect Reference Address - - - - -
Binary/ BCD - - - - -
Device Monitor Changing Value Enable/ Disable - - - - -
Prioritize notification
of ON/OFF button
Checked/
Unchecked
- - - - -
Specify Touch Switch
Lock Control Flag
... - - - - -
Font CJK Priority ... - - - - -
Operation When
Updating Tags
Display Notification
Message
Checked/
Unchecked
- - - - -
Advanced Setting
Switch screen as
high speed
Checked/
Unchecked
- - - - -
Initial
Initial Screen
HMI Settings Device Settings Startup Page Page name
Set the page name
corresponding
the startup screen of NS
setting
System Memory
$SB Allocation
Address
Address - - - - -
$SW Allocation
Address
Address - - - - -
Unchecked - - - - -
Checked - - - - -
NT30/ 620 Series - - - - -
NT31/ 631 Series - - - - -
Option
System Memory
Update Cycle
- - - - -
Intervals of RUN
signal (Pulse)
- - - - -
- - - - -
Disable - - - - -
Memory Card Free
Space Check Flag
- - - - -
System Memory
List
- - - - -
Sysmac Studio
CX-Designer
Allow System
Memory Compatibility
with NT
System Setting
Initialize System
Memory at startup
Enable
Screen Saver
Start-up Time
Screen Saver
Active
Touch Switch
Control
(2/2)
Tab 1st Level 2nd Level
1st Level 2nd Level 3rd Level 4th Level Value
History
Operation Log No. of Records
Operation Log
Settings
Logging limit
- -
Set the same value
as setting in NS.
Set 100 if the original value
is 99 and less.
Use Ring Buffer
Checked
Operation Log
Settings
Operation when
logging limit
reached
- -
Set as "Delete the old
log file and
continue to log."
Unchecked
Operation Log
Settings
Operation when
logging limit
reached
- -
Set as "Stop logging."
Character Code
for Log File
ASCII Code
- - - - -
Unicode
- - - - -
Vertical Axis: Address
/ Horizontal Axis: Time
- - - - -
Vertical Axis: Time
/ Horizontal Axis:
Address
- - - - -
Save the data with
offset time display
format
Checked/
Unchecked
- - - - -
Data Log/
Broken-line History
- - - - -
Save Destination
of history data
- - - - -
Unchecked
- - - - -
Checked
- - - - -
hour/ min/ sec Intermediate Number
- - - - -
Video
Video Board
...
- - - - -
Color which fills
blank channels
Color
- - - - -
Video Input
Method
...
- - - - -
Save in a file
if memory card
is full
...
- - - - -
Printer
Printer Type
...
- - - - -
Mode
...
- - - - -
Orientation
...
- - - - -
Key Status
Address
F1
Address
- - - - -
F2
Address
- - - - -
F3
Address
- - - - -
Function Key
(NS15 only)
Set the save cycle
for Internal
Holding Memory
Logfile Output
Format
CX-Designer
Sysmac Studio
System Setting

◆Switch Label
Language Settings
Sysmac Studio
Switch No. Label Name Project Languages System Languages
0 Type0 Language selected in CX-Designer Language selected in CX-Designer
1 Type1 Language selected in CX-Designer Language selected in CX-Designer
2 Type2 Language selected in CX-Designer Language selected in CX-Designer
3 Type3 Language selected in CX-Designer Language selected in CX-Designer
4 Type4 Language selected in CX-Designer Language selected in CX-Designer
5 Type5 Language selected in CX-Designer Language selected in CX-Designer
6 Type6 Language selected in CX-Designer Language selected in CX-Designer
7 Type7 Language selected in CX-Designer Language selected in CX-Designer
8 Type8 Language selected in CX-Designer Language selected in CX-Designer
9 Type9 Language selected in CX-Designer Language selected in CX-Designer
10 Type10 Language selected in CX-Designer Language selected in CX-Designer
11 Type11 Language selected in CX-Designer Language selected in CX-Designer
12 Type12 Language selected in CX-Designer Language selected in CX-Designer
13 Type13 Language selected in CX-Designer Language selected in CX-Designer
14 Type14 Language selected in CX-Designer Language selected in CX-Designer
15 Type15 Language selected in CX-Designer Language selected in CX-Designer
Language Selection System Language
Sysmac Studio
Japanese (Japan)
English (United States)
Italian (Italy)
Spanish (Spain)
German (Germany)
French (France)
Chinese (Simplified, PRC)
Chinese (Traditional, Taiwan)
Remarks
French
Chinese (Simplified)
Chinese (Traditional)
Switch Label
CX-Designer
Japanese
English
Italian
Spanish
German
NS label names are
user-changeable. Select
the language of the text
on the original label.
CX-Designer

◆Comm. Setting
Remarks
Comm. Time Out External Devices Device Configuration Timeout
Retry Count - - - - -
-
Comm. Auto-return - - - - -
Intervals of
Message-Comm.
- - - - -
Routing Table Setting HMI Settings FINS Settings Remote Network Table
Connect except for
a serial port where
a communication
error occurs
- - - - -
-
Ethernet - - - - -
-
Network Address HMI Settings FINS Settings FINS Address Ethernet port #1 Network
Node Address HMI Settings FINS Settings FINS Address Ethernet port #1 Node
Auto-setup only
UDP Port No. HMI Settings FINS Settings FINS/UDP FINS/UDP port no
Fixed setting
LAN Speed - - - -
Auto-identification only
IP Address HMI Settings TCP/IP Settings Ethernet Port 1 - IP Address IP Address
Sub-net Mask HMI Settings TCP/IP Settings Ethernet Port 1 - IP Address Subnet mask
Default Gateway HMI Settings TCP/IP Settings Ethernet Port 1 - IP Address Default gateway
IP Proxy Address - - - - -
-
Conversion Table - - - - -
-
Host Number - - - - -
-
Host Name External Devices Device Configuration Device Name
Host Type External Devices Device Configuration Device Vendor
See the "Comm Path” sheet
Protocol External Devices Device Configuration Connection Driver
See the "Comm Path” sheet
Network Address External Devices Communications Configuration Network Address
Node Address External Devices Communications Configuration Node Address
Use - - - - -
-
IP Address External Devices Communications Configuration IP Address
Route Path External Devices Communications Configuration Route Path
Host
Comm. Setting
CX-Designer
Sysmac Studio
Comm. - All
Ethernet
Device References: External Device, HMI Settings

◆Comm Path
Serial Port Host Type Protocol Device Vendor Device Series Comm. Driver
NT Link (1:N) - - -
NT Link (1:1) - - -
Host Link - - -
MELSEC-A Computer Link - - -
MELSEC-F Computer Link - - -
SIMATIC S7-300 3964(R) - - -
Host Link - - -
Toolbus - - -
Host Link Omron CJ FINS Ethernet
For CJ1 units, changing a connected device
to an Ethernet device enables the
replacement.
Toolbus Omron CJ FINS Ethernet
If there is not Ethernet unit in the system,
you need to add one.
Host Link - - -
Toolbus - - -
SYSMAC-CJ2
Host Link
Omron CJ FINS Ethernet
Changing a connected device to an
Ethernet device enables the replacement.
E5ZN (CompoWay/F) - - -
E5A/E/C/GN (CompoWay/F) - - -
E5A/ER (CompoWay/F) - - -
EJ1 (CompoWay/F) - - -
Memory Link - - -
Bar-Code Reader - - -
Modem for Data
Transfer
- - -
YASKAWA MP Modbus (Memobus) RTU - - -
Varispeed/VS mini Modbus (Memobus) RTU - - -
Modbus Machine
(Modicon Address Style)
Modbus (Memobus) RTU
- - -
Modbus Machine
(ISO61131 Address Style)
Modbus (Memobus) RTU
- - -
MELSEC-Q/QnA
Melsec Communication
Protocol
- - -
SLC500/MicroLogix Allen-Bradley DF1 - - -
PLC-5 Allen-Bradley DF1 - - -
ControlLogix/CompactLogix Allen-Bradley DF1 - - -
Yokogawa FA-M3/FA-M3R FA-M3 PC Link - - -
FINS Omron CJ FINS Ethernet
EtherNet/IP Omron CJ CIP Ethernet
SYSMAC-CV FINS - - -
FINS Omron CJ FINS Ethernet
EtherNet/IP Omron CJ CIP Ethernet
Trajexia FINS - - -
SYSMAC-NJ EtherNet/IP Omron NJ CIP Ethernet
Modbus Machine
(Modicon Address Style)
Modbus/TCP
- - -
Modbus Machine
(IEC61131 Address Style)
Modbus/TCP
- - -
SYSMAC-CS1/CJ1/CP1 FINS - - -
SYSMAC-CV FINS - - -
SYSMAC-CJ2 FINS - - -
SYSMAC-CV
Remarks
NA
Controller Link
Communication Path
Temperature
Controller
Generic Protocol
Ethernet
SYSMAC-CS1/CJ1/CP1
SYSMAC-CJ2
Communication
Path
Comm. Protocol
Serial Port A
Serial Port B
PLC
SYSMAC-PLC
SYSMAC-CS1
SYSMAC-CJ1/CP1

◆System Memory
(1/4)
Address Description R/W Supported by: Variable Type Variable Name Data Type Variable Represents: Description R/W
$SB0 RUN Signal (Pulse) R Variable mapping System variable _HMI_RunSignal Boolean Run Signal
Changes periodically while
the HMI is operating.
He change interval differs from NS.
R
$SB1 RUN Signal (Always ON) R Unsupported - - - - -
$SB2 Screen Switch Strobe R Variable mapping System variable _HMI_IsPageSwitching Boolean Page Switch Strobe
The value is True while a page is
switching and becomes False
after completing switching the page.
R
$SB3 Prohibit Shifting to System Menu R/W (Ext Control) Unsupported - - - - -
$SB4 Battery Low R Variable mapping System variable _HMI_IsBatteryLow Boolean Battery Low
Gives True if the battery voltage has
dropped below a specific level.
R
$SB5 Data Input Detector R Variable mapping System variable _HMI_IsDataInput Boolean Data Entry in Progress
Gives True when a data entry
object is focused.
R
$SB6 Brightness Adjust, High R/W (Ext Control) Global event System variable _HMI_Brightness Integer R/W
$SB7 Brightness Adjust, Middle R/W (Ext Control) Global event System variable _HMI_Brightness Integer R/W
$SB8 Brightness Adjust, Low R/W (Ext Control) Global event System variable _HMI_Brightness Integer R/W
$SB9
Backlight Control
(Screen Saver Start/Cancel)
R/W (Ext Control) Variable mapping System variable
_HMI_IsScreenSaver
Active
Boolean
Whether Screen Saver
is Active or not
Tells whether the screen saver is active.
True: Active, False: Not active
R/W
$SB10
Control Backlight Flashing R/W (Ext Control) VB System variable _HMI_Brightness Integer Brightness Sets the brightness of the screen.
R/W
$SB11 Backlight Status R Variable mapping System variable
_HMI_IsScreenSaver
Active
Boolean
Whether Screen Saver
is Active or not
Tells whether the screen saver is active.
True: Active, False: Not active
R/W
$SB12 Continuous Buzzer R/W (Ext Control) Global event - - - - -
$SB13 Short Intermittent Buzzer R/W (Ext Control) Global event - - - - -
$SB14 Long Intermittent Buzzer R/W (Ext Control) Global event - - - - -
$SB15 Notification/Control of Video R/W Unsupported - - - - -
$SB16
Processing Priority Registration
for PortA (NT Link 1:N)
R/W (Ext Control) Unsupported
- - - - -
$SB17
Processing Priority Registration
for PortB (NT Link 1:N)
R/W (Ext Control) Unsupported
- - - - -
$SB18
Display Keypad with
Temporary Input
R/W (Ext Control) Unsupported - - - - -
$SB19 Prohibit Input R/W (Ext Control) Global event - - - - -
$SB20 Contrast Adjust (NS5 Only) R/W (Ext Control) Unsupported - - - - -
$SB21 Contrast Adjust (NS5 Only) R/W (Ext Control) Unsupported - - - - -
$SB22 Contrast Adjust (NS5 Only) R/W (Ext Control) Unsupported - - - - -
$SB23 Contrast Adjust (NS5 Only) R/W (Ext Control) Unsupported - - - - -
$SB24 Video Captyre Trigger R/W Unsupported - - - - -
$SB25 Start Printing/Capture Screen R/W (Ext Control) Global event - - - - -
$SB26 Stop Printing R/W (Ext Control) Unsupported - - - - -
$SB27 Test Pattern Printing R/W (Ext Control) Unsupported - - - - -
$SB28 Printer Head Cleaning R/W (Ext Control) Unsupported - - - - -
$SB29 Update Printer Status R/W (Ext Control) Unsupported - - - - -
$SB30
Printer Busy Status/Capture Busy
Status
R Unsupported
- - - - -
$SB31
Notification of Printer Error/
Capture Screen Error
R Unsupported
- - - - -
$SB32 Initialize Alarm/Event History R/W Global event - - - - -
$SB33 Save Alarm/Event History R/W Unsupported - - - - -
System Memory
CX-Designer
Specifies the brightness of the screen.
Specifying 0 turns off the backlight.
Brightness
System Variables/ User Variables
Sysmac Studio
(2/4)
Address Description R/W Supported by: Variable Type Variable Name Data type Variable Represents: Description R/W
$SB34
Internal Holding Memory
($HB/$HW) Initialization
R/W Unsupported User variable
- - - -
$SB35 Initialize Data Log R/W Global event User variable - - - -
$SB36 Save Data Log R/W Global event User variable - - - -
$SB37 Initialize Operation Log R/W Global event User variable - - - -
$SB38 Save Operation Log R/W Global event User variable - - - -
$SB39
Log Functional Object Operation
and Address Operation
R/W (Ext Control) Unsupported User variable
- - - -
$SB40 Log Switch Screen Operation R/W (Ext Control) Unsupported User variable - - - -
$SB41 Log Macro Operation R/W (Ext Control) Unsupported User variable - - - -
$SB42 Initialize Error Log R/W Unsupported User variable - - - -
$SB43 Save Error Log R/W Unsupported User variable - - - -
$SB44 - - Unsupported User variable - - - -
$SB45 Macro Error Dialog Control R/W (Ext Control) Unsupported User variable - - - -
$SB46 Notification of Macro Error R Unsupported User variable - - - -
$SB47 Logging Process Error Flag R Unsupported User variable - - - -
$SB48 Memory Free Space Check R Unsupported User variable - - - -
$SB49 Stop Memory Card R/W Global event User variable - - - -
$SB50
Memory Card Removing Status
(Power OFF)
R Variable mapping System variable _HMI_CanEjectSDCard Boolean
The status flag whether
you can safely eject
SD Card
Shows whether you can safely
eject the SD card.
R
$SB51
Periodical Data Log Save
in Process Flag
R Unsupported User variable
- - - -
$SB52
Data Block Operation
Complete Flag
R Unsupported User variable
- - - -
$SB53 Prohibit Screen Saver Startup R/W Unsupported User variable - - - -
$SB54 Password Level 1 Operable Status R
$SB55 Password Level 2 Operable Status R
$SB56 Password Level 3 Operable Status R
$SB57 Password Level 4 Operable Status R
$SB58 Password Level 5 Operable Status R
$SB59 - - Unsupported User variable - - - -
$SB60 - - Unsupported User variable - - - -
$SB61 - - Unsupported User variable - - - -
$SB62 - - Unsupported User variable - - - -
$SB63 - - Unsupported User variable - - - -
$SW0
Current Screen No.
(Screen is switched when it is
changed)
R/W VB R/W
$SW1 Current Pop-up Screen 1 Number R/W VB *1 R/W
$SW2
Position of Pop-up Screen 1
(Top left X coordinate)
R/W Unsupported User variable
- - - -
$SW3
Position of Pop-up Screen 1
(Top left Y coordinate)
R/W Unsupported User variable
- - - -
$SW4
Current Pop-up Screen 2 Number R/W Unsupported User variable
- - - -
$SW5
Position of Pop-up Screen 2
(Top left X coordinate)
R/W Unsupported User variable
- - - -
*1: A modification may be required in the PLC.
System Memory
CX-Designer
System Variables/ User Variables
Sysmac Studio
String
R
VB
_HMI_CurrentPageInde
x
Integer
Current Page Index
Specifies the page number of currently
displayed page.
While a pop-up screen is displayed,
specifies the number of the pop-up.
While a pop-up is displayed, writing
the value to the memory displays a new pop-up.
If a normal page is displayed, the page switches.
If the value is the number of a non-existent page,
the memory gets the previous value.
Because NS system memory’s data size
is 1-word but NA system variable’s size
is 2-word, data size conversion is required.
System variable
System variable
The role of Current
Login User
Shows the role of user currently
logging in.
_HMI_CurrentUserRole

(3/4)
Address Description R/W Supported by: Variable Type Variable Name Data Type Variable Represents: Description R/W
$SW6
Position of Pop-up Screen 2
(Top left Y coordinate)
R/W Unsupported User variable
- - - -
$SW7 Current Pop-up Screen 3 Number R/W Unsupported User variable
- - - -
$SW8
Position of Pop-up Screen 3
(Top left X coordinate)
R/W Unsupported User variable
- - - -
$SW9
Position of Pop-up Screen 3
(Top left Y coordinate)
R/W Unsupported User variable
- - - -
$SW10 Urrent Label Number R/W
Global event User variable - - - -
$SW11
Destination
(0:Printer/1:Memory Card)
R/W (Ext Control)
Unsupported User variable - - - -
$SW12
Backlight Brightness Control
(32 levels)
R/W (Ext Control)
VB System variable _HMI_Brightness Integer Brightness Specifies the brightness of the screen. R/W
$SW13
Password Number for
Canceling Input Prohibition
R/W (Ext Control) Unsupported User variable
- - - -
$SW14 Current Date and Time
(Min, Sec)
R Global event System variable _HMI_Minute Integer System Clock
To represent minute and second, _HMI_Minute
and _HMI_Second are available, respectively.
To get the storage type of $SW14, use a
VB function.
R
$SW15 Current Date and Time
(Date, Hour)
R Global event System variable _HMI_DateTime DateTime System Clock
To represent date and hour, _HMI_DateTime.Day
and _HMI_Hour are available, respectively.
To get the storage type of $SW15, use a
VB function.
R
$SW16 Current Date and Time
(Year, Month)
R Global event System variable _HMI_DateTime DateTime System Clock
To represent year and month, _HMI_DateTime.Year
and _HMI_DateTime.Month are available, respectively.
To get the storage type of $SW16, use a VB function.
R
$SW17
Current Date and Time
(Day of the Week)
R Global event System variable _HMI_DateTime DateTime System Clock
_HMI_DateTime.DayOfWeek has
the same value as the NS.
R
$SW18 No. of Alarms/Events Occurred R Supported System variable _HMI_AlarmsRaised Integer
The alarms currently
occurring
The number of alarms currently occurring.
R
$SW19
Occurred Alarm/Event ID R Unsupported User variable - - - -
$SW20
Cancelled Alarm/Event ID R Unsupported User variable - - - -
$SW21
Alram/Event ID of Alarm/
Event Object Macro
R Unsupported User variable - - - -
$SW22
- - - User variable - - - -
$SW23
Macro Error Number R Unsupported User variable - - - -
$SW24
Screen No. Having Macro Error R Unsupported User variable - - - -
$SW25
Object ID Having Macro Error R Unsupported User variable - - - -
$SW26
Macro Timing Having Error R Unsupported User variable - - - -
$SW27
Offset for Index I0 R/W (Ext Control) Array User variable PTMEM_SW27 Integer The index of an array Specify this variable as array element. R/W
$SW28
Offset for Index I1 R/W (Ext Control) Array User variable PTMEM_SW28 Integer The index of an array Specify this variable as array element. R/W
$SW29
Offset for Index I2 R/W (Ext Control) Array User variable PTMEM_SW29 Integer The index of an array Specify this variable as array element. R/W
$SW30
Offset for Index I3 R/W (Ext Control) Array User variable PTMEM_SW30 Integer The index of an array Specify this variable as array element. R/W
$SW31
Offset for Index I4 R/W (Ext Control) Array User variable PTMEM_SW31 Integer The index of an array Specify this variable as array element. R/W
$SW32
Offset for Index I5 R/W (Ext Control) Array User variable PTMEM_SW32 Integer The index of an array Specify this variable as array element. R/W
$SW33
Offset for Index I6 R/W (Ext Control) Array User variable PTMEM_SW33 Integer The index of an array Specify this variable as array element. R/W
$SW34
Offset for Index I7 R/W (Ext Control) Array User variable PTMEM_SW34 Integer The index of an array Specify this variable as array element. R/W
$SW35
Offset for Index I8 R/W (Ext Control) Array User variable PTMEM_SW35 Integer The index of an array Specify this variable as array element. R/W
$SW36
Offset for Index I9 R/W (Ext Control) Array User variable PTMEM_SW36 Integer The index of an array Specify this variable as array element. R/W
$SW37
Data Log Group Number R/W (Ext Control) Unsupported User variable - - - -
$SW38
Data Block Error Number R Unsupported User variable - - - -
System Memory
System Variables/ User Variables
CX-Designer
Sysmac Studio

(4/4)
Address Description R/W Supported by: Variable Type Variable Name Data type Variable Represents: Description R/W
$SW39 Authentication Level R VB System variable _HMI_CurrentUserRole String
The right of a user
currently logging in.
Shows the right of a user currently logging in. R
$SW40
Range for Initializing Alarm/
Event History
R/W (Ext Control) Unsupported User variable
- - - -
How to Replace
To realize the NS system memory in NA, PLC program modification will be required in many cases.
Supported
Variable mapping
VB
Unsupported
Variable Type
User variable
The NA system variable works equally with the NS system memory without a PLC program modification.
The NA system variable works equally with the NS system memory without a PLC program modification.
CX-Designer
Sysmac Studio
Define user variables, PTMEM_SB# and PTMEM_SW#, which assigned to addresses.
Using a subroutine can perform the same function as NS.
System Memory
System Variables/ User Variables
No corresponding function is available in NA.

◆Alarm
Function 1st Level 2nd Level Set Value Category Group Property Set Value
No. of Alarm Hist. Rec.
No. of Event Hist. Rec.
Use Ring Buffer Checked/
Unchecked
- - - - -
Info1 Address
- - - - -
Info2 Address - - - - -
Info3 Address - - - - -
Icons - - - - -
- - - - -
- - - - -
- - - - -
- - - - -
- - - - -
- - - - -
- - - - -
- - - - -
- - - - -
- -
- - -
Device Settings
HMI Settings
Sysmac Studio
Specify "Bitmap displayed as
From New Date & Time" icon
Specify "Bitmap displayed as
From Old Date & Time" icon
Specify "Bitmap displayed as
From High Priority" icon
Specify "Bitmap displayed as
From Low Priority" icon
Specify "From High Frequency" icon
Specify "From Low Frequency" icon
Specify "Delete Selected Item" icon
Specify "Check Selected Item" icon
Specify "Check All Alarm" icon
Specify "Cancel All Alarm's
Checks" icon
Specify "Change Display Type" icon
The minimum value
of "No. of Alarm Hist. Rec."
plus "No. of Event Hist. Rec."
Maximum Number
of User Alarm Logs
Internal Retained
Memory Settings
Alarm/Event Settings
CX-Designer
Alarm/
Event Parameter
Alarm/
Event History
Add Alarm/
Event Info

1st Level 2nd Level 3rd Level Set Value Category Group Property Set Value
Occurred Text Color - - - - -
Released Text Color - - - - -
Message Unchecked - - - - -
Message Fixed string User Alarms Group*** Message
The original text registered as
a resource
Checked
String No. String table number User Alarms Group*** Message
The original text registered as
a resource
Address Address Address User Alarms Group*** Expression
A variable mapped to
the address
Detection Type
Raise alarm on Set (to 1)
of address/Raise alarm on
Reset (to 0) of address
- - - - -
Priority - - - - -
Display Type
High Alarm
User Alarms Group***
Priority User Fault Level 1
Middle Alarm
User Alarms Group***
Priority User Fault Level 2
Low Alarm
User Alarms Group***
Priority User Fault Level 3
Event
User Alarms Group***
Priority User Information
Group Group number User Alarms Group name
Group_[Group No.]_
[Group name]
Switch Screen
Screen Switch Screen number User Alarms Group*** Page Page name
Checked/ Unchecked
- - - - -
Switch Contents Contents number - - - - -
Checked/ Unchecked - - - - -
Checked/ Unchecked - - - - -
Checked/ Unchecked - - - - -
Checked/ Unchecked
- - - - -
Sysmac Studio
Display the document on a document
display object
Alarm/Event Settings: Alarm/Event Details
Switch screen when Alarm/Event
occurred
Contents No.
Delete when Alarm/Event is canceled
Save to History
Delete when Alarm/Event is canceled
CX-Designer
Use the String
Table
◆Broken-line Graph
Broken-line Graph: Broken-line Graph Group Setting Data Groups
Function 1st Level 2nd Level
Set Value
Category Group Property Set Value
Group Name
Group name Data Groups
Data series
name
Data Series
Data series
name
Draw Value
Outside
of the Range
Checked/ Unchecked
- - - - -
Storage Type
INT (Signed 1 word)
Data Groups Data Series Data Type Short
UINT (Unsigned 1 word)
Ushort
DINT (Signed 2 words)
Integer
UDINT (Unsigned 2 words)
Uinteger
REAL (Real Number)
Single
BDC2 (Unsigned 1 word)
-
BDC2 (Unsigned 2 words)
-
BCD1
(Signed [leftmost digit:F] 1 word)
-
BCD2
(Signed [leftmost digit:F] 2 words)
-
BCD2
(Signed [leftmost bit:1] 1 word)
-
BCD2
(Signed [leftmost bit:1] 2 words)
-
No. of vertices
in each line
Monitor Points
Fixed value
- - - - -
Batch Read Read in batch
Unchecked
- - - - -
Checked
- - - - -
Trigger Address - - - - -
Operation
Complete Flag
Address
- - - -
History
No. of Histories - - - - -
Clear history
when address
changes to ON
Unchecked Checked Address
- - - - -
CX-Designer
Sysmac Studio
Data series
name

Function 1st Level 2nd Level Set Value Category Group Property Set Value
Start Address Address Data Groups
Data series
name
Variable
A variable
mapped
to the address
Maximum Unchecked - - - - -
Fixed value - - - - -
Checked - - - - -
Address Address - - - - -
Minimum Unchecked - - - - -
Fixed value - - - - -
Checked - - - - -
Address Address - - - - -
Line Color
Within Color - - - - -
Outside Color - - - - -
Line Style
Solid line, Dotted line,
Broken line, 1-dot chain line,
or 2-dot chain line
- - - - -
Display Offset
Fixed value - - - - -
Step Display
Checked/ Unchecked - - - - -
Marker
None, □, 〇, +, or × - - - - -
Size Large, medium, or small - - - - -
Color - - - - -
Line
Display when
address
changes to ON
Unchecked or
Checked: Address
- - - - -
History Display
- - - - -
Line Color Normal Color - - - - -
Outside Color - - - - -
Display/Hide Display - - - - -
Hide - - - - -
Indirect Reference: Address - - - - -
Action When
Specifying
Indirect
Display When Address ON or
Display When Address OFF
- - - - -
Sysmac Studio
Maximum/
Minimum Value
Indirect
Reference
Indirect
Reference
Broken-line Graph: Broken-line Graph Group Settings - Line Setting
CX-Designer
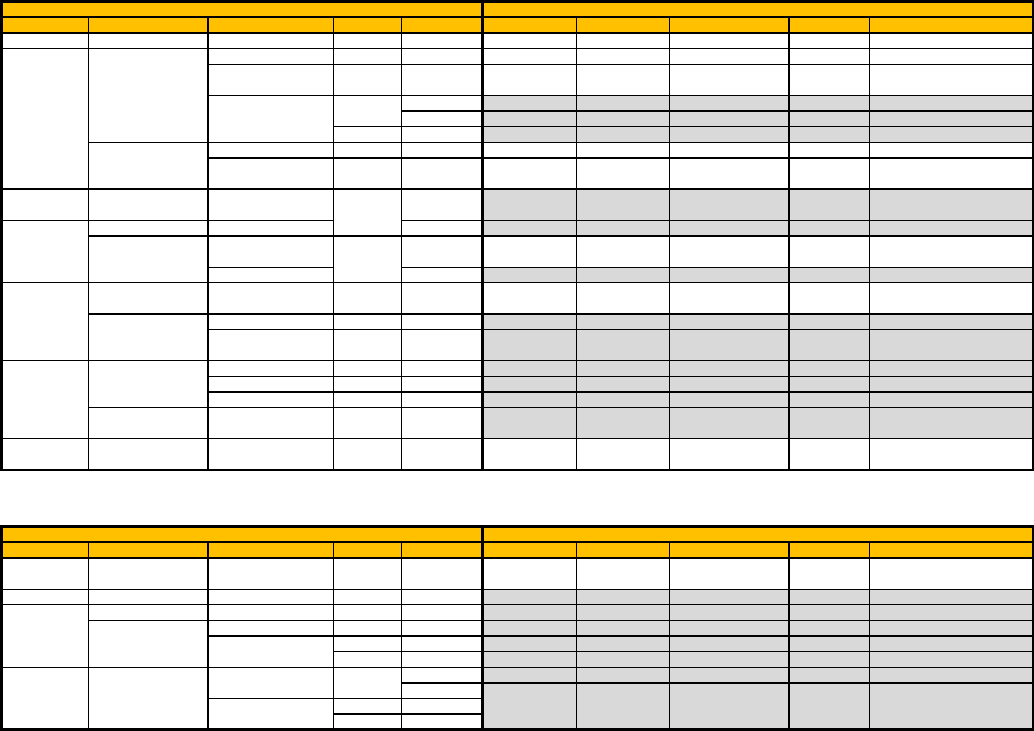
◆Data Log
1st Level 2nd Level 3rd Level 4th Level Set Value Category Data Set Property Set Value
Group Name Data Logging Data set name
Log Timing
On Sampling Cycle
Data Logging Data set name Update Type
Regular Interval
Data Logging Data set name Update Rate
A value less than the
set value on NS
Unchecked
- - - - -
Checked
- - - - -
Address
Address
- - - - -
On Event
(Address ON Timing)
Data Logging Data set name Update Type
On Condition
Address
Address Data Logging Data set name
Expression
A variable mapped
to the address
Save
Log Save Area Save with Ring Buffer
Checked/
Unchecked
- - - - -
Memory Card Output File
File name
- - - - -
Save the
data periodically
Checked
Data Logging
Data set name
Start New
Database File
After specific number of logs
Unchecked
- - - - -
Log Period Always
Data Logging
Data set name
Automatically Start
on HMI Device
Checked
- - - -
Clear when switching
screens
Checked/
Unchecked
- - - -
Unchecked
- - - -
Checked
- - - -
Address
Address
- - - -
Clear data logs when
the address is ON
Checked/
Unchecked
- - - -
Log Points
Data Logging Data set name
After specific
number of logs
The number
of logs
The original value
set in the NS
1st Level 2nd Level Set Value Category Data Set Property Set Value
Address Address Data Logging Data set name Variable
A variable mapped
to the address
Storage Type - - - - -
Maximum Indirect Reference Unchecked
- - - - -
Fixed value
Checked - - - - -
Address
Address
Minimum Indirect Reference
Unchecked
- - - - -
Fixed value
Checked
Address
Address
Data Logging: Data Set
Data Log Setting
Sysmac Studio
CX-Designer
CX-Designer
Sysmac Studio
Data Log: Data Log Address Setting
Control start/stop
data log by the
specified address
Log only when Data
Log object is shown
Data Logging
Indirect Reference of
Sampling Cycle
Start/Stop
Data Log
-
-
-
-
-
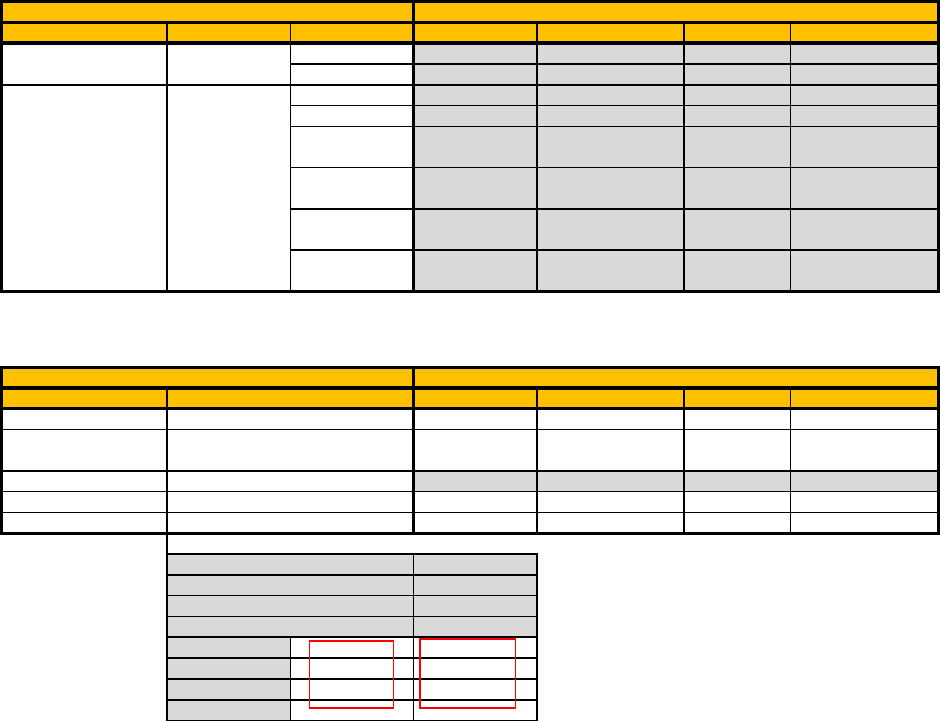
◆Data Block
Recipe
Function 1st Level Set Value Category Group Property Set Value
Parameter
ASCII code - - - -
Unicode
- - - -
Icons
Read data file
- - - -
Write data file
- - - -
Write to
the address
- - -
-
Read from
the address
- - -
-
Add
the record
- - -
-
Delete
the record
- - -
-
Recipe: Recipe Template, Recipe
Number in the Table Category Group Property Set Value
① Recipes Field Field name The original value
②
Recipes Field Variable
A variable mapped
to the address
③ - - - -
④ Recipes Recipe Recipe name The original value
⑤ Recipes Recipe Field name The original value
0
① New Field
② SERIALA:0000
③ Numeral
0
1 ④ ⑤
2
3
CX-Designer
Data Block
Sysmac Studio
Address
Data Format
CX-Designer
No.
Field Name
Function
Field Name
Address
Data Format
Record label
Recipe data
Sysmac Studio
Data Block: Field

Data Groups: Data Series
Function 1st Level Set Value Category Group Property Set Value
Data Block Name
Data Groups
Data series
name
Variable
A variable mapped
to the address
Record Setting File Name File name - - - -
The maximum number of Records - - - -
Checked - - - -
Unchecked - - - -
Interlock
Address
Address
- - - -
Record Label Setting String Length - - - -
ASCII code - - - -
Unicode - - - -
Storage
String Type
Specify Interlock
(Data updating
prohibition flag)
Data Block: Record
CX-Designer
Sysmac Studio
◆Scale
Unit & Scale Scale
CX-Designer
Function Category Group Remarks
No. Scale Name Scale[Set value]
Comment Comment [Unit][Comment]
Unit name CX-Designer identifies by No.
Scale Multiplier The original value
Offset Offset The original value
Sysmac Studio

◆Troubleshooter
Troubleshooter
(1/2)
Function Category Group Item 1 Set Value
Screen Setting PLC Setting Event Codes Controller Events User Events Event Code
The original value
for NS
Short Message - - - -
NS Setting
Troubleshooting
Screen
Controller Events User Events
Troubleshooter
Associated Page
The page name that
has been set for NS
Theme
Select a theme
Checked
- - - -
Unchecked - - - -
File name - - - -
Language
Assignment
NS Label Name Troubleshooter Language Mapping HMI Project Language
An adequate language
selected from the
language setting
PLC Setting Troubleshooter Language Mapping User Event Language
An adequate language
based on the original
language setting
Checked - - - -
Unchecked - - - -
NS Label Name - - - -
PLC Setting - - - -
User
Authentication
Checked
- - - -
Unchecked Troubleshooter Security Settings Ability to Reset Errors None
Restrict always Troubleshooter Security Settings Ability to Reset Errors Level 1
Restrict at canceling
authentication
Troubleshooter Security Settings Ability to Reset Errors Level 1
Restrict at Level 1 or lower Troubleshooter Security Settings Ability to Reset Errors Level 1
Restrict at Level 2 or lower Troubleshooter Security Settings Ability to Reset Errors Level 2
Restrict at Level 3 or lower Troubleshooter Security Settings Ability to Reset Errors Level 3
Restrict at Level 4 or lower Troubleshooter Security Settings Ability to Reset Errors Level 4
Checked - - - -
Unchecked Troubleshooter Security Settings Ability to Clear Event Logs None
Restrict always Troubleshooter Security Settings Ability to Clear Event Logs Level 1
Restrict at canceling
authentication
Troubleshooter Security Settings Ability to Clear Event Logs Level 1
Restrict at Level 1 or lower
Troubleshooter Security Settings Ability to Clear Event Logs Level 1
Restrict at Level 2 or lower
Troubleshooter Security Settings Ability to Clear Event Logs Level 2
Restrict at Level 3 or lower
Troubleshooter Security Settings Ability to Clear Event Logs Level 3
Restrict at Level 4 or lower
Troubleshooter Security Settings Ability to Clear Event Logs Level 4
Checked - - - -
Unchecked Troubleshooter Security Settings Access to Event Logs None
Restrict always Troubleshooter Security Settings Access to Event Logs Level 1
Restrict at canceling
authentication
Troubleshooter Security Settings Access to Event Logs Level 1
Restrict at Level 1 or lower
Troubleshooter Security Settings Access to Event Logs Level 1
Restrict at Level 2 or lower
Troubleshooter Security Settings Access to Event Logs Level 2
Restrict at Level 3 or lower
Troubleshooter Security Settings Access to Event Logs Level 3
Restrict at Level 4 or lower
Troubleshooter Security Settings Access to Event Logs Level 4
Sysmac Studio
Language setting
for Controller
troubles and
Controller event log
Restrict switching
into Event log
screen
Restrict log clear
Conform to the
system log
Restrict error
cancellation
Troubleshooter
CX-Designer

Troubleshooter
(2/2)
Function Category Group Item 1 Set Value
Checked
- - - -
Unchecked Troubleshooter Security Settings Ability to Print Screens None
Restrict always Troubleshooter Security Settings Ability to Print Screens Level 1
Restrict at canceling
authentication
Troubleshooter Security Settings Ability to Print Screens Level 1
Restrict at Level 1 or lower Troubleshooter Security Settings Ability to Print Screens Level 1
Restrict at Level 2 or lower Troubleshooter Security Settings Ability to Print Screens Level 2
Restrict at Level 3 or lower Troubleshooter Security Settings Ability to Print Screens Level 3
Restrict at Level 4 or lower Troubleshooter Security Settings Ability to Print Screens Level 4
Checked - - - -
Unchecked Troubleshooter Security Settings Ability to Save to CSV File None
Restrict always Troubleshooter Security Settings Ability to Save to CSV File Level 1
Restrict at canceling
authentication
Troubleshooter Security Settings Ability to Save to CSV File Level 1
Restrict at Level 1 or lower Troubleshooter Security Settings Ability to Save to CSV File Level 1
Restrict at Level 2 or lower Troubleshooter Security Settings Ability to Save to CSV File Level 2
Restrict at Level 3 or lower Troubleshooter Security Settings Ability to Save to CSV File Level 3
Restrict at Level 4 or lower Troubleshooter Security Settings Ability to Save to CSV File Level 4
Host
Troubleshooter Device - -
Monitor Target
Error
Not to monitor Troubleshooter Launch on System Event - Unchecked
Troubleshooter
Launch on User Event
Event
- Unchecked
User trouble Troubleshooter Launch on System Event - Unchecked
Troubleshooter
Launch on User Event
Event
- Checked
Controller trouble Troubleshooter Launch on System Event - Checked
Troubleshooter
Launch on User Event
Event
- Unchecked
User trouble and
Controller trouble
Troubleshooter Launch on System Event - Checked
Troubleshooter
Launch on User Event
Event
- Checked
Sysmac Studio
User
Authentication
Monitor Error
Restrict screen
capture
Restrict saving
into csv
Troubleshooter
CX-Designer

◆Password
Function 1st Level 2nd Level 3rd Level Set Value Category Group Item 1 Set Value
Password None - - - -
Level 1 - - - -
Level 2 - - - -
Level 3 - - - -
Level 4 - - - -
Level 5 - - - -
Level 1
Password
User Accounts Password The original value for NS
to Name
User_Level1, User_Level2, ...
Level 5
Role
Autority1, Authority2,…
Role/Access
Level
Autority1, Authority2,…
Level 1 Checked
Level 2 Unchecked
Level 3 Unchecked
Level 4 Unchecked
Level 5 Unchecked
Input Pad
System Keypad - - - -
Specified Pop-up
Screen
- - - -
Password - - - -
- - - -
Checked - - - -
Unchecked - - - -
Time-out time - - - -
Switch screen
when canceling the
authentication
PLC Language
Setting
Checked
- - - -
Unchecked - - - -
Switch Screen No. - - - -
Password
(with level)
Cancel authentication
if no operation is done
for a set period
Restrict
error cancellation
Password
Indirect
Reference
Function
Mode
Roles and
Access Levels
Security
Settings
Security Settings
CX-Designer
Sysmac Studio

◆String Table
String Table Resource
Function Label Category Group Item 1 Item 2 Set Value
No. Resources NS_StringTable String Name String[Setvalue]
String Type0 Resources NS_StringTable String The 1st language The string that has been set for NS
... Resources NS_StringTable String The 2nd to 15th language The string that has been set for NS
Type15 Resources NS_StringTable String The 16th language The string that has been set for NS
CX-Designer
Sysmac Studio
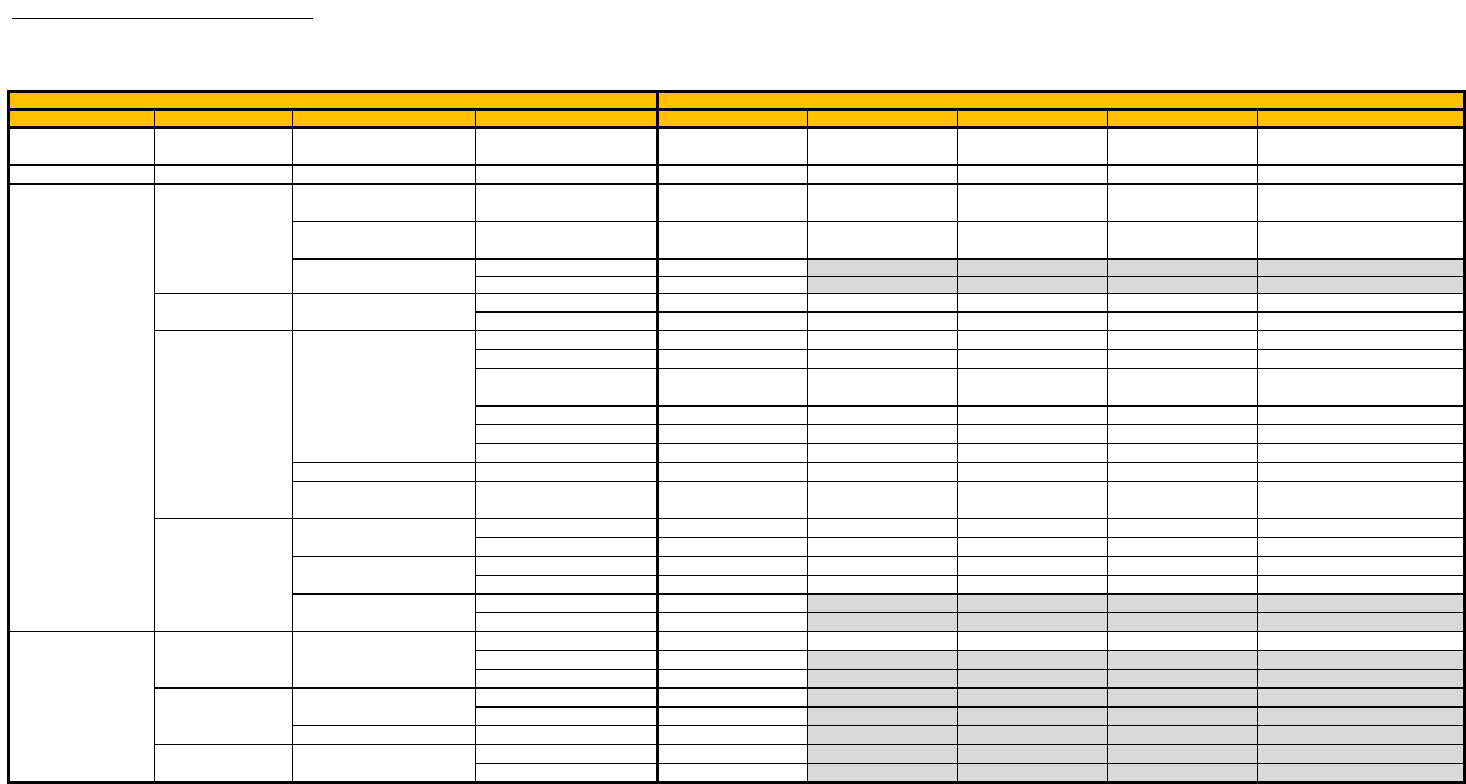
Appendix 2: Object Common Settings
◆Screen
Screen Page
(1/2)
Tab 1st Level 2nd Level Set Value Category Group Property Set Value Remarks
Screen/Sheet No. Properties General PageIndex
The original page
number for NS
Title Screen Title Properties General Name
Size/Pop-up Screen Size Width Properties Layout Width Scaled value from NS
Disabled if “Use as Pop-up
Screen” has been unchecked.
Height Properties Layout Height Scaled value from NS
Disabled if “Use as Pop-up
Screen” has been unchecked.
Checked
- - - -
Unchecked
- - - -
Checked
Properties Behavior PageType Popup
Unchecked
Properties Behavior PageType Main
Center of Screen
Properties
Layout Position
Center
Top Left of Screen
Properties
Layout Position TopLeft
Bottom Left of Screen
Properties
Layout Position BottomLeft
Top Right of Screen
Properties
Layout Position TopRight
Bottom Right of Screen
Properties
Layout Position BottomRight
Any Position
Properties
Layout Position Custom
X
Properties
Layout
Position (Left, Top) -
Left
Scaled value from NS
Y
Properties
Layout
Position (Left, Top) -
Top
Scaled value from NS
Checked
Properties Behavior
DisplayMode Modeless
Unchecked
Properties Behavior
DisplayMode Modal
Checked
Properties Behavior
CloseOnPageChange Checked
Unchecked
Properties Behavior
CloseOnPageChange Unchecked
Checked
- - - -
Unchecked
- - - -
Background/Others Background Color
Use as Default Background
Color
Properties Appearance BackgroundColor
The same color as NS
Checked
- - - -
Unchecked
- - - -
Background File Checked
- - - -
Unchecked
- - - -
Select
- - - -
Checked
- - - -
Unchecked
- - - -
No title bar
Select File Name
Compress Screen Data File
Pop-up Screen
Setting
Use as Pop-up
Screen
Pop-up Screen
Display Position
Compression
CX-Designer
Sysmac Studio
Use as Default Screen Size
Enable input on other
screens
Close when base screen
switches

Screen Page
(2/2)
Tab 1st Level 2nd Level Set Value Category Group Property Set Value Remarks
Background/Others The order of display
Display all objects at once - - - -
Display frames and fixed
objects first
- - - -
Function Key Key Status Address F1 - - - -
F2 - - - -
F3 - - - -
Macro Events and Actions Event PageDisplayed -
Events and Actions Action CallSubroutine Subroutine name
Events and Actions Event PageHidden -
Events and Actions Action CallSubroutine Subroutine name
Comm. Details
Smart Active Parts
Communication
Interval
- - - -
When loading a screen
When unloading a screen
Macro Execution
Condition
CX-Designer
Sysmac Studio

◆Frame
Tab 1st Level 2nd Level 3rd Level Set Value Category Group Property Set Value
Object ID Properties General Name The original Object ID
General Frame Page No. of Frames Properties Behavior TabPages Add as much as the frames
Page No. Edited - - -
Set Background Color Checked - - -
Unchecked - - -
Tab color Properties Appearance BackgroundColor See the table below
Properties Appearance SelectedItemBackgroundColor See the table below
Properties Behavior TabPages-[*]-BackgroundColor See the table below
Address Frame Page Ref. Properties Behavior Variable A variable mapped to the address
Frame with a Tab Attach a Tab to the Frame Checked Properties Appearance TabHeaderVisible Checked
Unchecked Unchecked
Tab Height Properties Appearance TabHeaderHeight The set value multiplied by 18
Tab position Top Properties Appearance TabHeaderPosition Top
Below Properties Appearance TabHeaderPosition Bottom
Left Properties Appearance TabHeaderPosition Top
Right Properties Appearance TabHeaderPosition Top
Category Group Property Set Value
Unchecked Unchecked
Properties Appearance BackgroundColor Transparent
Properties Appearance SelectedItemBackgroundColor Transparent
Properties Behavior TabPages-[*]-BackgroundColor Transparent
Checked Properties Appearance BackgroundColor The same color as NS
Checked Unchecked Properties Appearance SelectedItemBackgroundColor The same color as NS
Checked Properties Behavior TabPages-[*]-BackgroundColor The same color as NS
Sysmac Studio
Sysmac Studio
CX-Designer
Frame
Attach a Tab to the Frame
Set Background Color
Frame: Tab Color
CX-Designer

◆Text Attributes
Text Attributes
(1/2)
Switch Item Category Group Property Sub-property Language Set Value
OFF
Label
TextButtonUp (Default)
- **
Font Name
Font
Family See "Text_Family” sheet
Size Size See "Text_Size” sheet
Font Style Style See the table “Font Style”
Color Setting TextColor
Vertical Position VerticalAlignment See the table “Vertical Position”
Horizontal Position HorizontalAlignment See the table “Horizontal Position”
Horiz. Scale (only Scalable Gothic) - -
ON
Label
TextButtonDown (Default) -
**
Font Name
Font
Family See "Text_Family” sheet
Size Size See "Text_Size” sheet
FontStyle Style See the table “Font Style”
Color Setting TextColor
VerticalAlignment VerticalAlignment See the table “Vertical Position”
HorizontalAlignment HorizontalAlignment See the table “Horizontal Position”
Horiz. Scale (only Scalable Gothic) - -
Type1 Same as above Same as above Same as above Same as above Language selected in CX-Designer Same as above
Type2 Same as above Same as above Same as above Same as above Language selected in CX-Designer Same as above
Type3 Same as above Same as above Same as above Same as above Language selected in CX-Designer Same as above
Type4 Same as above Same as above Same as above Same as above Language selected in CX-Designer Same as above
Type5 Same as above Same as above Same as above Same as above Language selected in CX-Designer Same as above
Type6 Same as above Same as above Same as above Same as above Language selected in CX-Designer Same as above
Type7 Same as above Same as above Same as above Same as above Language selected in CX-Designer Same as above
Type8 Same as above Same as above Same as above Same as above Language selected in CX-Designer Same as above
Type9 Same as above Same as above Same as above Same as above Language selected in CX-Designer Same as above
Type10 Same as above Same as above Same as above Same as above Language selected in CX-Designer Same as above
Type11 Same as above Same as above Same as above Same as above Language selected in CX-Designer Same as above
Type12 Same as above Same as above Same as above Same as above Language selected in CX-Designer Same as above
Type13 Same as above Same as above Same as above Same as above Language selected in CX-Designer Same as above
Type14 Same as above Same as above Same as above Same as above Language selected in CX-Designer Same as above
Type15 Same as above Same as above Same as above Same as above Language selected in CX-Designer Same as above
**: Register the string of each Type# as resource texts in the default language. Then, register resources in other languages. Select the resource.
A name in [Switch] is shown in the default value. Names can be editable. The order takes preference over the name.
Sysmac Studio
CX-Designer
Properties
Appearance
Type0
Language selected in CX-Designer

Text Attributes
(2/2)
Vertical
Position
Horizontal Position
Font Style
Item 1 Item 2 Category Group Property Set Value
Italic
Properties
Appearance Italic
Bold Bold
Italic + Bold Bold Italic
CX-Designer
Sysmac Studio
Center
Center
Up
Top
Down
Bottom
CX-Designer
Sysmac Studio
Center
Center
Font Style
Left
Left
Right
Right
CX-Designer
Sysmac Studio
Font - Style

◆Common
Frame, Flicker, Control Flag, and Size/Position
Tab 1st Level 2nd Level 3rd Level Set Value Category Group Property Set Value Remarks
Frame Three-dimensional Frame Checked - - - -
Unchecked - - - -
Color (Top/Left) - - - -
Color (Bottom/Right) - - - -
Frame Size - - - -
Draw Border - - - -
Color (Border) - - - -
Link with the Specified
Address ON/OFF
- - - -
Address - - - -
Flicker Flicker No. (None) - - - -
Other than (None) - - - -
Always - - - -
When Address ON - - - -
Address - - - -
Control Flag Input Enabled Properties Behavior IsEnabled Checked
Disable Unchecked
Indirect Animations Enable
Address
Variable mapped to the
address
Display Display Properties Appearance Checked
Hide Unchecked
Indirect
Animations Visibility
Address
Variable mapped to the
address
Size/Position Size Width Properties Layout Width The same value as NS
Height Properties Layout Height The same value as NS
X
Properties Layout Left The same value as NS
Y
Properties Layout Top The same value as NS
The coordinates are to be
converted to absolute
coordinates when existing
inside a frame or table.
CX-Designer
Sysmac Studio
Flicker Timing
IsVisible
Position from the Upper Left
of Screen/Frame/Table
Frame ON/OFF Display

◆Text_Family
Type CX-Designer Sysmac Studio Type CX-Designer Sysmac Studio
Embedded Font Fine Courier New
Windows Font MingLiU_HKSCS MingLiU_HKSCS
Standard Segoe UI
MingLiU_HKSCS-ExtB MingLiU_HKSCS-ExtB
Rough Courier New
MingLiU-ExtB MingLiU-ExtB
7-segment Numeral
DF7segHMI Mongolian Baiti Mongolian Baiti
Scalable Gothic Segoe UI
MS Gothic MS Gothic
Gothic Numeral Segoe UI
MS Mincho MS Mincho
Windows Font Arial Arial
MS PGothic MS PGothic
Arial Black Arial Black
MS PMincho MS PMincho
Arial Narrow Arial Narrow
MS UI Gothic MS UI Gothic
Comic Sans MS Comic Sans MS MV Boli MV Boli
Courier New Courier New
NSimSun NSimSun
DF7segHMI DF8segHMI Nyala Nyala
Ebrima Ebrima Plantagenet Cherokee Plantagenet Cherokee
Estrangelo Edessa Estrangelo Edessa PMingLiU PMingLiU
Euphemia Euphemia PMingLiU-ExtB PMingLiU-ExtB
Gautami Gautami Raavi Raavi
Georgia Georgia Segoe UI Segoe UI
Gulim Gulim
Segoe UI Light Segoe UI Light
GulimChe GulimChe
Segoe UI Semibold Segoe UI Semibold
Impact Impact Shruti Shruti
Iskoola Pota Iskoola Pota SimSun SimSun
Kalinga Kalinga SimSun-ExtB SimSun-ExtB
Khmer UI Khmer UI Sylfaen Sylfaen
Lao UI Lao UI Symbol Symbol
Latha Latha
Tahoma Tahoma
Lucida Sans Unicode Lucida Sans Unicode Times New Roman Times New Roman
Malgun Gothic Malgun Gothic Trebuchet MS Trebuchet MS
Mangal Mangal Tunga Tunga
Meiryo Meiryo
Verdana Verdana
Meiryo UI Meiryo UI Vrinda Vrinda
Microsoft Himalaya Microsoft Himalaya Webdings Webdings
Microsoft JhengHei Microsoft JhengHei Others than above
Segoe UI
Microsoft JhengHei Microsoft JhengHei
Microsoft New Tai Lue Microsoft New Tai Lue
Microsoft PhagsPa Microsoft PhagsPa
Microsoft Sans Serif Microsoft Sans Serif
Microsoft Tai Le Microsoft Tai Le
Microsoft Uighur Microsoft Uighur
Microsoft YaHei Microsoft YaHei
Microsoft YaHei Microsoft YaHei
Microsoft Yi Baiti Microsoft Yi Baiti
MingLiU MingLiU
Text: Font Family

◆Macro
Macros for Functional Objects
CX-Designer
Macro Execution Condition Target Tab Category Events/Actions Set Value Set Value
When Display Area is Pressed Event Press - -
Action CallSubroutine Subroutine name -
Touch ON timing Event Press - -
Action CallSubroutine Subroutine name -
Touch OFF timing Event Release - -
Action CallSubroutine Subroutine name -
Execute when ON/OFF Event Condition Expression [Variable mapped to the address] = True
Action CallSubroutine Subroutine name -
Event Condition Expression [Variable mapped to the address] = False
Action CallSubroutine Subroutine name -
Execute when ON Event Condition Expression [Variable mapped to the address] = True
Action CallSubroutine Subroutine name -
Execute when OFF Event Condition Expression [Variable mapped to the address] = False
Action CallSubroutine Subroutine name -
Before inputting numeral - - - - - -
Before writing numeral - - - - - -
When changing value - - - - - -
When an address value changed - - - - - -
Value = Set Value Event Condition Expression [Variable mapped to the address] = set value
Action CallSubroutine Subroutine name -
Value != Set Value Event Condition Expression [Variable mapped to the address] != set value
Action CallSubroutine Subroutine name -
Value < Set Value Event Condition Expression [Variable mapped to the address] < set value
Action CallSubroutine Subroutine name -
Value <= Set Value Event Condition Expression [Variable mapped to the address] <= set value
Action CallSubroutine Subroutine name -
Value > Set Value Event Condition Expression [Variable mapped to the address] > set value
Action CallSubroutine Subroutine name -
Value >= Set Value Event Condition Expression [Variable mapped to the address] >= set value
Action CallSubroutine Subroutine name -
Events and Actions
Object or shape
Events and Actions
Events and Actions
Sysmac Studio
Page on which an
object exists

Appendix 3: Buttons
◆Button_Common
Buttons
Tab 1st Level 2nd Level Set Value Category Group Property Set Value
General Object Comment - - - -
Button type
Color/Shape Button type
Label OFF
Properties Appearance DefaultText (Default)
The original text set for NS
ON - - - -
OFF
ON - - - -
Indirect Reference of Text Color Checked - - - -
Unchecked Properties Behavior VisualFeedback Variable
Checked - - - -
Checked Link with the Write Address ON/OFF - - - -
Link with the Display Address ON/OFF - - - -
Link with the Specified Address ON/OFF - - - -
Address - - - -
Use the String Table Unchecked - - - -
Checked
Properties Appearance DefaultText (Default)
The original text set for NS
Write Unchecked - - - -
Checked
Checked Standard Message - - - -
Use Specified Message - - - -
Message - - - -
Unchecked Properties Security Operation Log Unchecked
Checked Properties Security Operation Log Checked
Message - - - -
Group Group Setting - - - -
Other Key Press Sound Control Do not allow sound for this object - - - -
Switch Label for Address ON/OFF
Text Attribute
Label
Display Write Confirmation Dialog
Record to Operation Log
ON/OFF Buttons: General
See the “ONOFF Button_Shape” sheet
See the “ONOFF Button_Shape” sheet
Refer to the “Text Attributes” sheet in “Appendix 2: Object Common Settings.”
CX-Designer
Sysmac Studio

◆ON/OFF Button
Tab 1st Level 2nd Level 3rd Level Set Value Category Group Property Set Value Remarks
General Action Type Momentary Properties General Behavior MomentaryButton
General Action Type Alternate Properties ToggleButton
General Action Type SET Properties SetButton
General Action Type RESET Properties ResetButton
General Address Write Address
General Address Display Address1
General Address Display Address2
Group Group Setting - - - -
See the “ONOFF Button_Shape” sheet
See the “ONOFF Button_Shape” sheet
ON/OFF Button: General
Button
CX-Designer
Sysmac Studio
See the “ONOFF Button_Shape” sheet

◆Word Button
Button
Tab 1st Level 2nd Level 3rd Level Set Value Category Group Property Set Value
General Object comment - - - -
Numeral Type - - - -
Button Shape Rectangle Properties Appearance Design Rectangle
Select Shape Properties Appearance Design Image
Action Type Set Value
Increment/Decrement
Display Pop-up Menu
Address Write Address
Max/Min Maximum Limit Value - - - -
Indirect Reference - - - -
Address - - - -
Return to the Minimum
Value when the
Maximum vale is
Exceeded
- - - -
Minimum Limit Value - - - -
Indirect Reference - - - -
Address - - - -
Return to the Maximum
Value when the Minimum
vale is Exceeded
- - - -
Word Button
CX-Designer
Sysmac Studio
See the “Word Button_Shape” sheet

◆Command Button
Tab 1st Level 2nd Level 3rd Level Set Value Category Group Property Set Value
General Function
Button Shape Rectangle Properties Appearance Design Rectangle
Circle Properties Appearance Design Ellipse
Select Shape Properties Appearance Design Image
Color/Shape
Command Button
Button
CX-Designer
Sysmac Studio
See the “Command Button_Function” sheet
See the “Command Button_Shape” sheet

◆Multifunction
Multifunction Objects
(1/2)
Tab 1st Level 2nd Level Set Value Category Group Property Set Value
General
Events and
Actions
- -
See the “Multifunction_Function”
sheet
Checked Properties Behavior IsEnabled Checked
Unchecked Properties Behavior IsEnabled Unchecked
Double Press Checked - - - -
Unchecked Properties Behavior DoubleTouchTime 0
Reception start time - - - -
Reception closing time Properties Behavior DoubleTouchTime Value converted to the time unit of ms
ON-delay Checked
Unchecked Properties Behavior OnDelayTime 0
Set Time Properties Behavior OnDelayTime Value converted to the time unit of ms
OFF-delay Checked
Unchecked Properties Behavior OffDelayTime 0
Set Time Properties Behavior OffDelayTime Value converted to the time unit of ms
Input Disable input Properties Behavior IsEnabled Unchecked
Enable input Properties Behavior IsEnabled Checked
Enable Input
When Indirect
Address ON
Animations Enable Expression
[Variable mapped to the indirect reference
address] = True
Enable Input
When Indirect
Address OFF
Animations Enable Expression
[Variable mapped to the indirect reference
address] = False
Indirect Reference - - - -
Checked - - - -
Unchecked - - - -
Record to operation log Checked Properties Security Operation Log Checked
Unchecked Properties Security Operation Log Unchecked
Message - - - -
Checked - - - -
Unchecked - - - -
Group Setting None - - - -
Group 1 - - - -
Group 2 - - - -
Group 3 - - - -
Group 4 - - - -
Group 5 - - - -
Group 6 - - - -
Group 7 - - - -
Group 8 - - - -
Group 9 - - - -
Group 10 - - - -
Group 11 - - - -
Group 12 - - - -
Group 13 - - - -
Sysmac Studio
CX-Designer
No Dedicated Objects: Assign Action and Event to a button or lamp object
Do not allow sound for
this object
Perform an action when
pressing the object
Prohibiting simultaneous
pressing

Multifunction Objects
(2/2)
Tab 1st Level 2nd Level Set Value Category Group Property Set Value
Group 14 - - - -
Group 15 - - - -
Group 16 - - - -
When a value changed Checked - - - -
Unchecked - - - -
Unchecked - - - -
Checked
Continue the
operation even
when an error occurs
Checked/
Unchecked
- - - -
Wait for completion of
communication
(Synchronous
communication)
No Dedicated Objects: Assign Action and Event to a button or lamp object
CX-Designer
Sysmac Studio
General
Group Specification
Expansion
Setting

◆ONOFF Button_Shape
(1/6)
Button Types Tab 1st Level 2nd Level Category Property Set Value
Rectangle (Type 1) Appearance Design Rectangle
Behavior
VisualFeedback Variable (Button)
General Write Address Behavior
Variable Variable
Display Address1 - - -
Display Address2 - - -
Color/Shape OFF color Color Appearance
BackgroundColorButtonUp The same color as NS
Indirect reference of
color
- - -
ON color Color Appearance
BackgroundColorButtonDown The same color as NS
Indirect reference of
color
- - -
Rectangle (Type 2-1)
Appearance Design Rectangle
Behavior VisualFeedback Feedback (Button)
General Write Address Behavior
Variable Variable
Display Address1
Behavior FeedbackExpression Variable
Display Address2 - - -
Color/Shape OFF color Color Appearance
BackgroundColorButtonUp The same color as NS
Indirect reference of
color
- - -
ON color Color Appearance
BackgroundColorButtonDown The same color as NS
Indirect reference of
color
- - -
Rectangle (Type 2-2)
Appearance Design Rectangle
Behavior VisualFeedback Touch (Button) + Feedback (Button)
General Write Address Behavior
Variable Variable
Display Address1
Behavior FeedbackExpression Variable
Display Address2 - - -
Color/Shape OFF color Color Appearance
BackgroundColorButtonUp The same color as NS
Indirect reference of
color
- - -
ON color Color Appearance
BackgroundColorButtonDown The same color as NS
Indirect reference of
color
- - -
ON/OFF Button Type Conversion Table
Sysmac Studio
CX-Designer
Button

(2/6)
Button Types Tab 1st Level 2nd Level Category Property Set Value
Rectangle (Type 3)
Appearance Design Rectangle
Behavior VisualFeedback Touch (Button) + Feedback (Button)
General Write Address
Behavior Variable Variable
Display Address1
Behavior FeedbackExpression Variable
Display Address2 - - -
Color/Shape Color Appearance
BackgroundColorButtonUp The same color as NS
Indirect reference of
color
- - -
Color Appearance
BackgroundColorButtonDown The same color as NS
Indirect reference of
color
- - -
Color
- - -
Indirect reference of
color
- - -
Color
- - -
Indirect reference of
color
- - -
Circle (Type 1)
Appearance Design Ellipse
Behavior
VisualFeedback Variable (Button)
General Write Address Behavior
Variable Variable
Display Address1 - - -
Display Address2 - - -
Color/Shape OFF color Color Appearance
BackgroundColorButtonUp The same color as NS
Indirect reference of
color
- - -
ON color Color Appearance
BackgroundColorButtonDown The same color as NS
Indirect reference of
color
- - -
Circle (Type 2-1)
Appearance Design Rectangle
Behavior VisualFeedback Feedback (Button)
General Write Address Behavior
Variable Variable
Display Address1
Behavior FeedbackExpression Variable
Display Address2 - - -
Color/Shape OFF color Color Appearance
BackgroundColorButtonUp The same color as NS
Indirect reference of
color
- - -
Display Address1 (ON)
Display Address2 (OFF)
Display Address1 (OFF)
Display Address2 (ON)
Display Address1 (ON)
Display Address2 (ON)
ON/OFF Button Type Conversion Table
Button
CX-Designer
Sysmac Studio
Display Address1 (OFF)
Display Address2 (OFF)

(3/6)
Button Types Tab 1st Level 2nd Level Category Property Set Value
Circle (Type 2-1) Color/Shape ON color Color Appearance
BackgroundColorButtonDown The same color as NS
Indirect reference of
color
- - -
Circle (Type 2-2)
Appearance Design Rectangle
Behavior VisualFeedback Touch (Button) + Feedback (Button)
General Write Address Behavior
Variable Variable
Display Address1
Behavior FeedbackExpression Variable
Display Address2 - - -
Color/Shape OFF color Color Appearance
BackgroundColorButtonUp The same color as NS
Indirect reference of
color
- - -
ON color Color Appearance
BackgroundColorButtonDown The same color as NS
Indirect reference of
color
- - -
Circle (Type 3)
Appearance Design Rectangle
Behavior VisualFeedback Touch (Button) + Feedback (Button)
General Write Address
Behavior Variable Variable
Display Address1
Behavior FeedbackExpression Variable
Display Address2 - - -
Color/Shape Color Appearance
BackgroundColorButtonUp The same color as NS
Indirect reference of
color
- - -
Color Appearance
BackgroundColorButtonDown The same color as NS
Indirect reference of
color
- - -
Color
- - -
Indirect reference of
color
- - -
Color
- - -
Indirect reference of
color
- - -
Appearance Design Rectangle
Behavior
VisualFeedback Variable (Button) + Feedback (Indicator)
Behavior IndicatorPosition Bottom
General Write Address Behavior
Variable Variable
Display Address1
Behavior FeedbackExpression Variable
Display Address2 - - -
ON/OFF Button Type Conversion Table
Button
CX-Designer
Sysmac Studio
Display Address1 (OFF)
Display Address2 (ON)
Display Address1 (ON)
Display Address2 (ON)
Rectangle 2 Light (Type1)
Display Address1 (OFF)
Display Address2 (OFF)
Display Address1 (ON)
Display Address2 (OFF)

(4/6)
Button Types Tab 1st Level 2nd Level Category Property Set Value
OFF color
Color Appearance IndicatorColorOff The same color as NS
Indirect reference of
color
- - -
ON color Color Appearance
IndicatorColorOn The same color as NS
Indirect reference of
color
- - -
OFF color Color
Behavior BackgroundColorButtonUp The same color as NS
Indirect reference of
color
- - -
ON color Color Behavior
BackgroundColorButtonDown
The same color as NS
Indirect reference of
color
- - -
Rectangle2Light(Type2)
Appearance Design Rectangle
Behavior
VisualFeedback Touch (Button)+ Feedback(Indicator)
Behavior IndicatorPosition Bottom
General Write Address Behavior
Variable Variable
Display Address1
Behavior FeedbackExpression Variable
Display Address2 - - -
Color/Shape OFF color Color Appearance
IndicatorColorOff The same color as NS
Indirect reference of
color
- - -
ON color Color Appearance
IndicatorColorOn The same color as NS
Indirect reference of
color
- - -
OFF color Color
Behavior BackgroundColorButtonUp The same color as NS
Indirect reference of
color
- - -
ON color Color Behavior
BackgroundColorButtonDown
The same color as NS
Indirect reference of
color
- - -
Rectangle 2 Light (Type3)
Appearance Design Rectangle
Behavior
VisualFeedback Variable (Button) + Feedback (Indicator)
Behavior IndicatorPosition Top Left
General Write Address Behavior
Variable Variable
Display Address1
Behavior FeedbackExpression Variable
Display Address2 - - -
Rectangle 2 Light (Type1)
Color/Shape
CX-Designer
Sysmac Studio
ON/OFF Button Type Conversion Table
Button
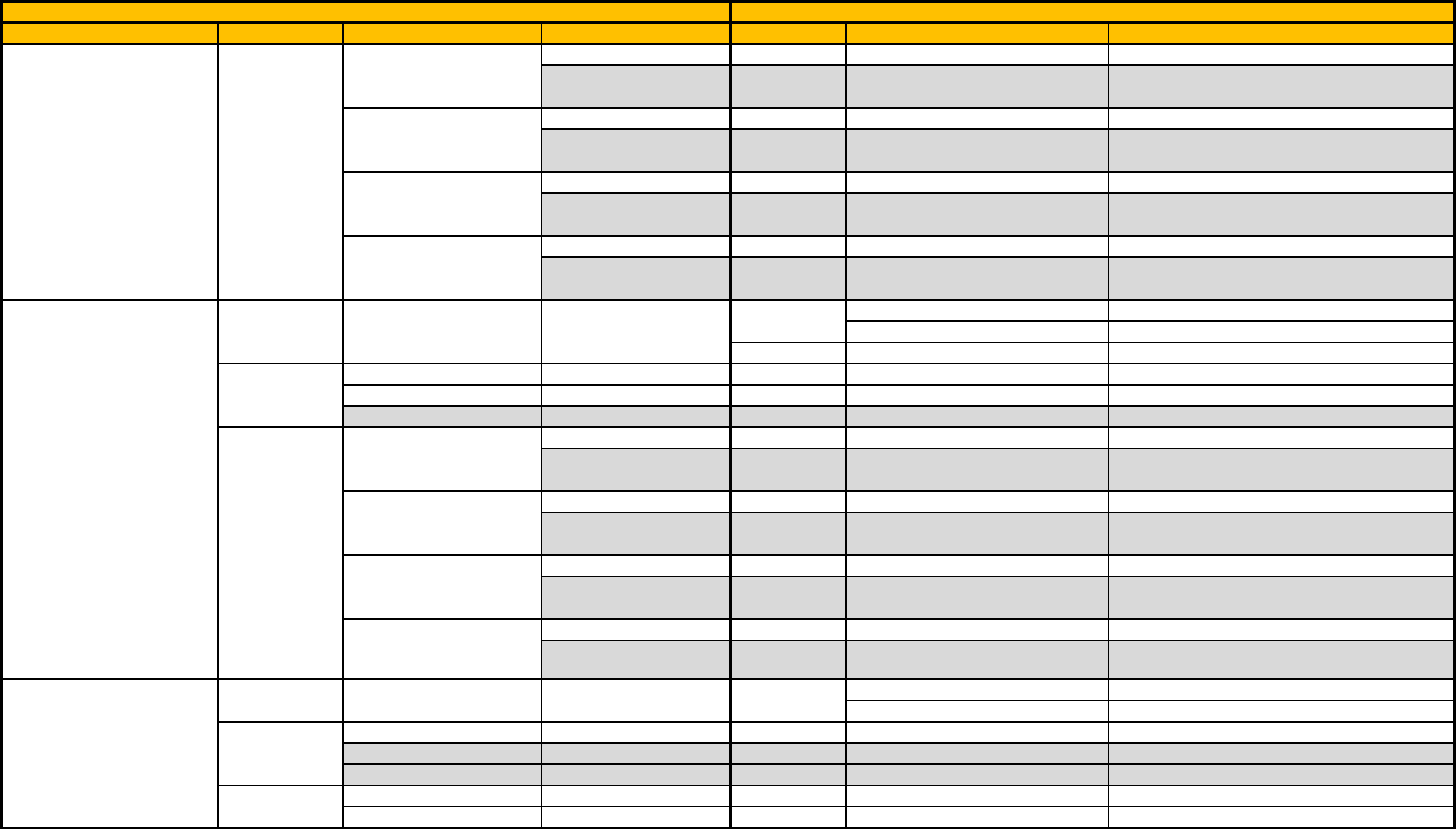
(5/6)
Button Types Tab 1st Level 2nd Level Category Property Set Value
Rectangle 2 Light (Type3) Color/Shape OFF color Color Appearance
IndicatorColorOff The same color as NS
Indirect reference of
color
- - -
ON color Color Appearance
IndicatorColorOn The same color as NS
Indirect reference of
color
- - -
OFF color Color
Behavior BackgroundColorButtonUp The same color as NS
Indirect reference of
color
- - -
ON color Color Behavior
BackgroundColorButtonDown
The same color as NS
Indirect reference of
color
- - -
Rectangle 2 Light (Type4)
Appearance Design Rectangle
Behavior
VisualFeedback Touch (Button)+ Feedback(Indicator)
Behavior IndicatorPosition Top Left
General Write Address Behavior
Variable Variable
Display Address1
Behavior FeedbackExpression Variable
Display Address2 - - -
Color/Shape OFF color Color Appearance
IndicatorColorOff The same color as NS
Indirect reference of
color
- - -
ON color Color Appearance
IndicatorColorOn The same color as NS
Indirect reference of
color
- - -
OFF color Color
Behavior BackgroundColorButtonUp The same color as NS
Indirect reference of
color
- - -
ON color Color Behavior
BackgroundColorButtonDown
The same color as NS
Indirect reference of
color
- - -
Select Shape (Type 1)
Appearance Design Image
Behavior
VisualFeedback Variable (Button)
General Write Address Behavior
Variable Variable
Display Address1 - - -
Display Address2 - - -
Color/Shape On shape Shape Shape1 Appearance
ImageFileButtonDown Image registered as resource
On shape Shape Shape2 Appearance
ImageFileButtonUp Image registered as resource
ON/OFF Button Type Conversion Table
Button
CX-Designer
Sysmac Studio

(6/6)
Button Types Tab 1st Level 2nd Level Category Property Set Value
Select Shape (Type 2-1)
Appearance Design Image
Behavior
VisualFeedback Variable (Button)
General Write Address Behavior
Variable Variable
Display Address1 - - -
Display Address2 - - -
Color/Shape On shape Shape Shape1 Appearance
ImageFileButtonDown Image registered as resource
On shape Shape Shape2 Appearance
ImageFileButtonUp Image registered as resource
Select Shape (Type 2-2)
Appearance Design Image
Behavior
VisualFeedback Touch (Button) + Feedback (Button)
General Write Address Behavior
Variable Variable
Display Address1
Behavior FeedbackExpression Variable
Display Address2 - - -
Color/Shape On shape Shape Shape1 Appearance
ImageFileButtonDown Image registered as resource
On shape Shape Shape2 Appearance
ImageFileButtonUp Image registered as resource
Select Shape (Type 3)
Appearance Design Rectangle
Behavior VisualFeedback Touch (Button) + Feedback (Button)
General Write Address
Behavior Variable Variable
Display Address1
Behavior FeedbackExpression Variable
Display Address2
- - -
Color/Shape
Display Address1 (ON)
Display Address2 (OFF)
Shape Shape1 Appearance
ImageFileButtonDown Image registered as resource
Display Address1 (OFF)
Display Address2 (OFF)
Shape Shape2 Appearance
ImageFileButtonUp Image registered as resource
Display Address1 (ON)
Display Address2 (ON)
Shape Shape3
- - -
Display Address1 (OFF)
Display Address2 (ON)
Shape Shape4
- - -
ON/OFF Button Type Conversion Table
Buttons
CX-Designer
Sysmac Studio
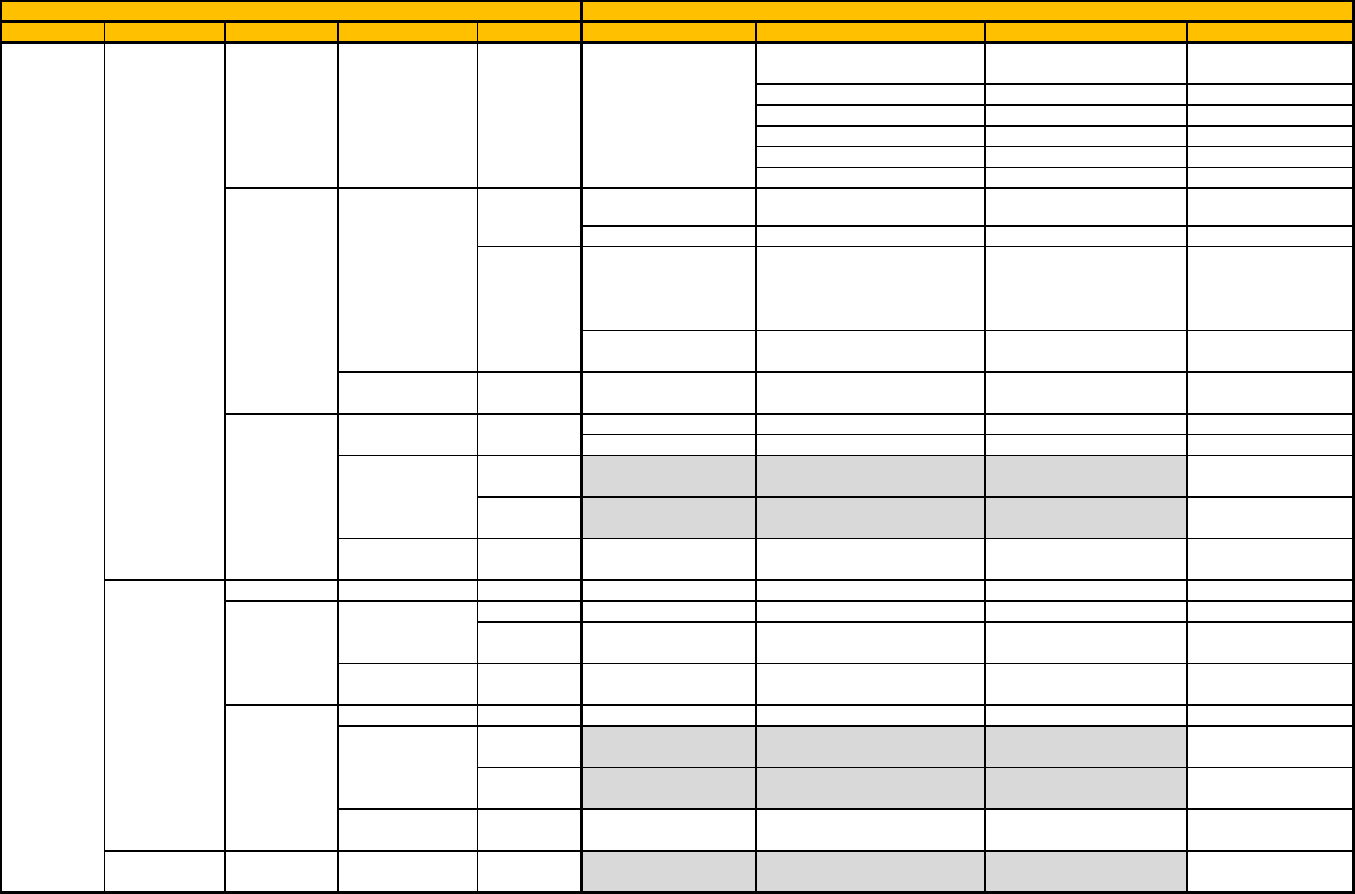
◆Word Button_Shape
(1/2)
Button Shape Action Tab 1st Level 2nd Level Category Property Set Value Remarks
Rectangle Set Value Behavior VisualFeedback
Variable (Button) +
Feedback (Indicator)
IndicatorPosition Custom
IndicatorLeft 1
IndicatorTop 1
IndicatorWidth Width - 2
IndicatorHeight Height - 2
Properties FeedbackExpression
Variable mapped to
Write Address =Set value
Events and Actions Click>SetVariable>Value The original value
Indirect Properties FeedbackExpression
Variable mapped to
Write Address =
Variable mapped to
the set address
Events and Actions Click>SetVariable>Value
Variable mapped to
the set address
Address Write
Address
Events and Actions Click>SetVariable>Variable
Variable mapped to
Write Address
Color/Shape Normal Color Appearance
BackgroundColorButtonUp The same color as NS
Behavior IndicatorColorOff
The same color as NS
Indirect
reference
of color
- - -
No corresponding
function
Address
- - -
No corresponding
function
Same as Write
Address Value
Behavior IndicatorColorOn The same color as NS
Behavior VisualFeedback Touch( Button)
General Button Actions Value Events and Actions Click>IncreaseVariable>Value The original value
Indirect Events and Actions Click>IncreaseVariable>Value
Variable mapped to
the set address
Address Write
Address
Events and Actions Click>IncreaseVariable>
Variable
Variable mapped to
Write Address
Color/Shape Normal Color Appearance
BackgroundColorButtonUp The same color as NS
Indirect
reference
of color
- - -
No corresponding
function
Address
- - -
No corresponding
function
Color when
Pressed
Appearance BackgroundColorButtonDown The same color as NS
Display
Pop-up Menu
- - -
No corresponding
function
General
Action Type
Set Value
Sysmac Studio
CX-Designer
Word Button: Shape
Button
Increment/
Decrement

(2/2)
Button Shape Button Actions Tab 1st Level 2nd Level Category Property Set Value Remarks
Select Shape Set Value Behavior VisualFeedback
Variable (Button) +
Feedback (Indicator)
IndicatorPosition Custom
IndicatorLeft 1
IndicatorTop 1
IndicatorWidth Width - 2
IndicatorHeight Height - 2
Properties FeedbackExpression
[Variable mapped
to Write Address]
= [Set value]
Events and Actions Click>SetVariable>Value The original value
Indirect Properties FeedbackExpression
Variable mapped to
Write Address =
Variable mapped to
the set address
Events and Actions Click>SetVariable>Value
Variable mapped to
the set address
Address Write
Address
Events and Actions Click>SetVariable>Variable
Variable mapped to
Write Address
Color/Shape Normal shape Appearance
ImageFileButtonUp
Image registered as
resource
Same as value - - -
Behavior VisualFeedback Touch( Button)
General
Button Actions Value Events and Actions Click>IncreaseVariable>Value The original value
Indirect Events and Actions Click>IncreaseVariable>Value
Variable mapped to
the set address
Address Write
Address
Events and Actions Click>IncreaseVariable>
Variable
Variable mapped to
Write Address
Color/Shape Normal shape Appearance ImageFileButtonUp
Image registered as
resource
Pressed Appearance ImageFileButtonDown
Image registered as
resource
Display
Pop-up Menu
- - -
No corresponding
function
Increment/
Decrement
General
Button Actions
Set Value
CX-Designer
Sysmac Studio
Word Buttons: Shape
Button

◆Command Button_Shape
Multifunction: Select Shape
(1/8)
Shape Display Method Tab 1st Level Set Value Category Group Property Set Value
Select Shape Properties
Appearance
Design Image
Normal shape Properties
Behavior
VisualFeedback Touch( Button)
Display Address1
- - - -
Display Address2
- - - -
Normal shape
Properties Appearance ImageFileButtonUp The same image file
Properties Appearance ImageFileButtonDown
When Pressed
Properties
Behavior
VisualFeedback Touch( Button)
Display Address1
- - - -
Display Address2
- - - -
Normal Shape Properties Appearance ImageFileButtonUp
Image file that has been set for NS
Shape when pressed Properties Appearance ImageFileButtonDown
Image file that has been set for NS
Bit Address Properties Behavior VisualFeedback
Feedback (Button)
Display Address1
Properties
Behavior FeedbackExpression
Variable
Display Address2
- - - -
OFF shape Properties Appearance ImageFileButtonUp
Image file that has been set for NS
ON shape Properties Appearance ImageFileButtonDown
Image file that has been set for NS
Properties Behavior VisualFeedback
Touch (Button) +
Feedback (Button)
Display Address1
Properties
Behavior FeedbackExpression
Variable
Display Address2
- - - -
OFF shape Properties Appearance ImageFileButtonUp
Image file that has been set for NS
ON shape Properties Appearance ImageFileButtonDown
Image file that has been set for NS
Same Value
Properties
Behavior
VisualFeedback Feedback (Button)
Display Address1 Properties Behavior FeedbackExpression
Enter in the Direct Reference
or Indirect Reference box.
Display Address2
- - - -
Set Value Storage Format
- - - -
Direct Reference Properties Behavior FeedbackExpression
Variable mapped
to Display Address
= Direct Reference value
Indirect Reference Properties Behavior FeedbackExpression
Variable mapped
to Display Address
= Indirect Reference value
Normal shape Properties Appearance ImageFileButtonUp Image file that has been set for NS
Same as Value Properties Appearance ImageFileButtonDown Image file that has been set for NS
Properties
Behavior
VisualFeedback Feedback (Button)
Display Address1
Properties
Behavior FeedbackExpression
Variable
Display Address2
- - - -
Display Address1 (OFF)
Display Address2 (OFF) Shape
Properties Appearance ImageFileButtonUp Image file that
has been set for NS
Display Address1 (ON)
Display Address2 (OFF) Shape
Properties Appearance ImageFileButtonDown Image file that
has been set for NS
CX-Designer
Sysmac Studio
Button
Bit Address/
When Pressed
Bit Address 1, 2
(4 shapes)

Multifunction: Select Shape
(2/8)
Shape Display Method Tab 1st Level Set Value Category Group Property Set Value
Select Shape
Bit Address 1, 2
(4 shapes)
Display Address1 (OFF)
Display Address2 (ON)
Shape
- - - -
Display Address1 (ON)
Display Address2 (ON)
Shape
- - - -
Select Shape Properties
Behavior
VisualFeedback Feedback (Button)
Display Address1
Properties
Behavior FeedbackExpression
Variable
Display Address2
- - - -
Shape1 (Value0) Properties Appearance ImageFileButtonUp
Image file that
has been set for NS
Shape2 (Value1) Properties Appearance ImageFileButtonDown
Image file that
has been set for NS
Shape3 (Value2)
- - - -
Shape4 (Value3)
- - - -
Shape5 (Value4)
- - - -
Shape6 (Value5)
- - - -
Shape7 (Value6)
- - - -
Shape8 (Value7)
- - - -
Shape9 (Value8)
- - - -
Shape10 (Value9)
- - - -
Shape11 (Value10)
- - - -
Shape12 (Value11)
- - - -
Shape13 (Value12)
- - - -
Shape14 (Value13)
- - - -
Shape15 (Value14)
- - - -
Shape16 (Value15)
- - - -
Single-lined Circle
Properties
Appearance Design Ellipse
Double-lined Circle
Sector
Single-lined Rectangle
Properties
Appearance Design Rectangle
Double-lined Rectangle
Polygon
Single-lined Circle
Normal Color Properties
Behavior
VisualFeedback Touch( Button)
Double-lined Circle Display Address1
- - - -
Single-lined Rectangle Display Address2
- - - -
Double-lined Rectangle No Tiling Checked
Properties Appearance BackgroundColorButtonUp
Transparent
Polygon
Properties Appearance BackgroundColorButtonDown
Transparent
Sector Unchecked
- - - -
Normal Color
Properties Appearance BackgroundColorButtonUp The same color as NS
Properties Appearance BackgroundColorButtonDown
Indirect reference of color
- - - -
Button
CX-Designer
Sysmac Studio
Word Address
(16 shapes)

Multifunction: Select Shape
(3/8)
Shape Display Method Tab 1st Level Set Value Category Group Property Set Value
Single-lined Circle When Pressed
Properties
Behavior
VisualFeedback Touch( Button)
Double-line Circle Display Address1
- - - -
Single-lined Rectangle Display Address2
- - - -
Double-line Rectangle No Tiling Checked
Properties Appearance BackgroundColorButtonUp
Transparent
Polygon
Properties Appearance BackgroundColorButtonDown
Transparent
Sector Unchecked
- - - -
Normal Color
Properties Appearance BackgroundColorButtonUp The same color as NS
Indirect reference of color
- - - -
Color when Pressed
Properties Appearance BackgroundColorButtonDown The same color as NS
Indirect reference of color
- - - -
Bit Address
Properties
Behavior
VisualFeedback Feedback (Button)
Display Address1
Properties
Behavior FeedbackExpression
Variable
Display Address2
- - - -
No Tiling Checked
Properties Appearance BackgroundColorButtonUp
Transparent
Properties Appearance BackgroundColorButtonDown
Transparent
Unchecked
- - - -
OFF color
Properties Appearance BackgroundColorButtonUp The same color as NS
Indirect reference of color
- - - -
ON color
Properties Appearance BackgroundColorButtonDown The same color as NS
Indirect reference of color
- - - -
Bit Address/
When Pressed
Properties Behavior VisualFeedback Touch (Button) +
Feedback (Button)
Display Address1
Properties
Behavior FeedbackExpression
Variable
Display Address2
- - - -
No Tiling Checked
Properties Appearance BackgroundColorButtonUp
Transparent
Properties Appearance BackgroundColorButtonDown
Transparent
Unchecked
- - - -
OFF color
Properties Appearance BackgroundColorButtonUp The same color as NS
Indirect reference of color
- - - -
ON color
Properties Appearance BackgroundColorButtonDown The same color as NS
Indirect reference of color
- - - -
Button
CX-Designer
Sysmac Studio

Multifunction: Select Shape
(4/8)
Shape Display Method Tab 1st Level Set Value Category Group Property Set Value
Single-lined Circle Same Value
Properties
Behavior
VisualFeedback Feedback (Button)
Double-line Circle Display Address1
Properties
Behavior FeedbackExpression
Enter in the
Direct Reference or
Indirect Reference box.
Single-lined Rectangle Display Address2
- - - -
Double-line Rectangle No Tiling Checked
Properties Appearance BackgroundColorButtonUp
Transparent
Polygon
Properties Appearance BackgroundColorButtonDown
Transparent
Sector Unchecked
- - - -
Set Value Storage Format
- - - -
Direct Reference Properties Behavior FeedbackExpression
Variable mapped to Display Address
= Direct Reference value
Indirect Reference Properties Behavior FeedbackExpression
Variable mapped to Display Address
= Indirect Reference value
Normal Color
Properties Appearance BackgroundColorButtonUp The same color as NS
Indirect reference of color
- - - -
Same as
Write Address Value
Properties Appearance BackgroundColorButtonDown The same color as NS
Indirect reference of color
- - - -
Properties
Behavior
VisualFeedback Feedback (Button)
Display Address1
Properties
Behavior FeedbackExpression
Variable
Display Address2
- - - -
No Tiling Checked
Properties Appearance BackgroundColorButtonUp
Transparent
Properties Appearance BackgroundColorButtonDown
Transparent
Unchecked
- - - -
Display Address1 (OFF)
Display Address2 (OFF) Color
Properties Appearance BackgroundColorButtonUp The same color as NS
Indirect reference of color
- - - -
Display Address1 (ON)
Display Address2 (OFF) Color
Properties Appearance BackgroundColorButtonDown The same color as NS
Indirect reference of color
- - - -
Display Address1 (OFF)
Display Address2 (ON) Color
- - - -
Indirect reference of color
- - - -
Display Address1 (ON)
Display Address2 (ON) Color
- - - -
Indirect reference of color
- - - -
Button
CX-Designer
Sysmac Studio
Bit Address 1, 2
(4 shapes)

Multifunction: Select Shape
(5/8)
Shape Display Method Tab 1st Level Set Value Category Group Property Set Value
Single-lined Circle
Properties
Behavior
VisualFeedback Feedback (Button)
Double-line Circle Display Address1
Properties
Behavior FeedbackExpression
Variable
Single-lined Rectangle Display Address2
- - - -
Double-line Rectangle No Tiling Checked
Properties Appearance BackgroundColorButtonUp
Transparent
Polygon
Properties Appearance BackgroundColorButtonDown
Transparent
Sector Unchecked
- - - -
Color1 (Value0)
Properties Appearance BackgroundColorButtonUp The same color as NS
Indirect reference of color
- - - -
Color2 (Value1)
Properties Appearance BackgroundColorButtonDown The same color as NS
Indirect reference of color
- - - -
Color3 (Value2)
- - - -
Indirect reference of color
- - - -
Color4 (Value3)
- - - -
Indirect reference of color
- - - -
Color5 (Value4)
- - - -
Indirect reference of color
- - - -
Color6 (Value5)
- - - -
Indirect reference of color
- - - -
Color7 (Value6)
- - - -
Indirect reference of color
- - - -
Color8 (Value7)
- - - -
Indirect reference of color
- - - -
Color9 (Value8)
- - - -
Indirect reference of color
- - - -
Color10 (Value9)
- - - -
Indirect reference of color
- - - -
Word Address
(16 shapes)
Button
CX-Designer
Sysmac Studio

Multifunction: Select Shape
(6/8)
Shape Display Method Tab 1st Level Set Value Category Group Property Set Value
Color11 (Value10)
- - - -
Indirect reference of color
- - - -
Color12 (Value11)
- - - -
Indirect reference of color
- - - -
Color13 (Value12)
- - - -
Indirect reference of color
- - - -
Color14 (Value13)
- - - -
Indirect reference of color
- - - -
Color15 (Value14)
- - - -
Indirect reference of color
- - - -
Color16 (Value15)
- - - -
Indirect reference of color
- - - -
Rectangle 2 Light
(Upper/Lower)
Properties Appearance Design Rectangle
Properties Behavior VisualFeedback
Touch (Button)+
Feedback(Indicator)
Properties Behavior IndicatorPosition Bottom
Display Address1
- - - -
Display Address2
- - - -
No Tiling Checked
Properties Appearance BackgroundColorButtonUp
Transparent
Properties Appearance BackgroundColorButtonDown
Transparent
Properties
Appearance
IndicatorColorOff
Transparent
Properties
Appearance
IndicatorColorOn
Transparent
Unchecked
- - - -
OFF color Color
Properties
Appearance
IndicatorColorOff The same color as NS
Indirect reference of color
- - - -
Upper ON color Color
Properties
Appearance
IndicatorColorOn The same color as NS
Indirect reference of color
- - - -
Lower OFF color Color
Properties Behavior BackgroundColorButtonUp The same color as NS
Indirect reference of color
- - - -
Word Address
(16 shapes)
Bit Address 1, 2
(Upper/Lower)
Button
CX-Designer
Sysmac Studio
Single-lined Circle
Double-lined Circle
Single-lined Rectangle
Double-lined Rectangle
Polygon
Sector

Multifunction: Select Shape
(7/8)
Shape Display Method Tab 1st Level Set Value Category Group Property Set Value
Rectangle 2 Light
(Upper/Lower)
Lower ON color Color
Properties
Behavior
BackgroundColorButtonDown
The same color as NS
Indirect reference of color
- - - -
Rectangle 2 Light
(Circle/Whole)
Properties Appearance Design Rectangle
Properties Behavior VisualFeedback
Touch (Button)+
Feedback(Indicator)
Properties Behavior IndicatorPosition Top Left
Display Address1
- - - -
Display Address2
- - - -
No Tiling Checked
Properties Appearance BackgroundColorButtonUp
Transparent
Properties Appearance BackgroundColorButtonDown
Transparent
Properties
Appearance
IndicatorColorOff
Transparent
Properties
Appearance
IndicatorColorOn
Transparent
Unchecked
- - - -
OFF color inside the circle Color
Properties
Appearance
IndicatorColorOff The same color as NS
Indirect reference of color
- - - -
ON color inside the circle Color
Properties
Appearance
IndicatorColorOn The same color as NS
Indirect reference of color
- - - -
Color
Properties Behavior BackgroundColorButtonUp The same color as NS
Indirect reference of color
- - - -
Color
Properties
Behavior
BackgroundColorButtonDown
The same color as NS
Indirect reference of color
- - - -
Select Shape
Object frame Checked - - - -
Single-lined Circle Unchecked Properties Appearance BorderThickness
0
Double-lined Circle Color (Left/Top) Properties Appearance BorderColorButtonUp
The same color as NS
Single-lined Rectangle Appearance BorderColorButtonDown
The same color as NS
Double-line Rectangle Color (Right/Bottom)
- - - -
Rectangle 2 Light
(Upper/Lower)
Draw Border Frame Size
Properties Appearance BorderThickness The same value as NS
Rectangle 2 Light
(Circle/Whole)
- - - -
Color (Border)
- - - -
Frame ON/OFF
Display
Link with the Specified
Address ON/OFF
- - - -
Address
- - - -
Bit Address 1, 2
(Upper/Lower)
Bit Address 1, 2
(Circle/Whole)
Button
CX-Designer
Sysmac Studio
OFF color for the
whole button
ON color for
the whole button
Three-dimensional
Frame

Multifunction: Select Shape
(8/8)
Shape Display Method Tab 1st Level Set Value Category Group Property Set Value
Frame Draw Border
- - - -
Color (Border)
- - - -
Polygon Line No Line
Checked - - - -
Sector Unchecked Properties Appearance BorderThickness
0
Color Properties Appearance BorderColorButtonUp
The same color as NS
Appearance BorderColorButtonDown
The same color as NS
Style Thickness
- - - -
Line Style Solid Line
- - - -
Dotted Line
- - - -
Broken Line
- - - -
DashDot
- - - -
DashDotDot
- - - -
Shade Shade Checked
- - - -
Unchecked
- - - -
Shade Color
- - - -
Depth
- - - -
Color when Pressed Direction Top Left
- - - -
Top Right
- - - -
BottomLeft - - - -
BottomRight
- - - -
Sector Angle Start Point
- - - -
End Point - - - -
Button
CX-Designer
Sysmac Studio
Select Shape
Single-lined Circle
Double-lined Circle
Single-lined Rectangle
Double-lined Rectangle
Rectangle 2 Light
(Upper/Lower)
Rectangle 2 Light
(Circle/Whole)

◆Command Button_Function
(1/2)
Function 1st Level 2nd Level 2nd Level Category Property Set Value
Switch Screen Specified Screen Events and Actions ShowPage Page name Screen title
Indirect Specification of Screen No. Events and Actions SetVariable Variable _HMI_Current_PageIndex
Address Events and Actions SetVariable Value Variable mapped to the
address
Selection by Pop-up Menu - - - -
Backward Events and Actions ShowPreviousPage - -
Forward - - - -
Write Screen No. when Pressing
the button
Checked Events and Actions SetVariable Variable Variable mapped to the
address
Unchecked - - - -
Address Events and Actions SetVariable Value _HMI_Current_PageIndex
Key Button Transmit to
Input field with focus - - - -
Specified input field - - - -
Object ID - - - -
Transmit Type Label string - - - -
Control code - - - -
Specified string - - - -
String - - - -
Indirectly specification of string - - - -
Transmit from - - - -
No. of Words - - - -
Control Pop-up Screen Action Close Local pop-up screen Events and Actions ClosePage Page name
Page where the object is
placed
Close specified pop-up screen Events and Actions ClosePage Page name
Screen No.
Move Local pop-up screen - - - -
Display System Menu
System Menu Top Page (Initialize Tab)
Events and Actions
ShowSystemMenu - -
Switch Box Function - - - -
Display Captured Data - - - -
Stop Buzzer Events and Actions BuzzerOff - -
None - - - -
Video Control - Video Capture File name
- - - -
Save in a file (If memory card is full) - - - -
Sysmac Studio
CX-Designer
Command Button: Function
Page that is to be closed

(2/2)
Function 1st Level 2nd Level 2nd Level Category Property Set Value
Video Input Adjustment Contrast
- - - -
Brightness - - - -
Depth - - - -
Tone - - - -
RGB Control Value Red - - - -
Green - - - -
Blue - - - -
Video Control - Vision Sensor
Console Output
Signal type
- - - -
Data Block Control
Authentication Cancellation Events and Actions Logout - -
See the “Command Button_DB” sheet.
Command Button: Function
CX-Designer
Sysmac Studio
Video Control - Contrast Adjustment

◆Command Button_DB
Command Button: DB Control Button
CX-Designer
Function Event Action VB Function
Read data from CSV file to PLC Data Block
WriteReicipeToController
Write data from PLC Data Block to CSV file
ReadReicipeToController
Read data from CSV file to NS PT Memory
ImportReicipes
Write data from NS PT Memory to CSV file
SaveReicipe
Read data from NS PT Memory to PLC Data Block
WriteReicipeToController
Write data from PLC Data Block to NS PT Memory
ReadReicipeToController
Read record label GetReicipeName
Delete record DeleteReicipe
The NS functions seem to be substituted by VB functions. However, since the Recipe feature of NA differs from the Data Block feature of NS, some NS functions may not be available in NA.
Sysmac Studio
Press
Subroutine

◆Multifunction_Function
(1/7)
Function 1st Level 2nd Level Category Action Option Set Value Remarks
Write Bit Write Address Properties Behavior Variable
Variable mapped to
the address
Action
Momentary
Properties General Type
MomentaryButton
Alternate ToggleButton
SET SetButton
RESET ResetButton
Write Word Write Address Events and Actions SetVariable Variable
Variable mapped to
the address
Set Value has been selected
in [Action] field.
Events and Actions IncreaseVariable Variable
Variable mapped to
the address
Increment/Decrement has
been selected in [Action] field.
Numeral Type - - - -
Action Set Value Events and Actions SetVariable - -
Increment/Decrement Events and Actions IncreaseVariable - -
Display Pop-up Menu - - - -
AND - - - -
OR - - - -
XOR - - - -
Value
Events and Actions SetVariable Value The original value
Set Value has been selected
in [Action] field.
Events and Actions IncreaseVariable Value The original value
Increment/Decrement has
been selected in [Action] field.
Indirect Events and Actions SetVariable Value
Variable mapped to
the address
Set Value has been selected
in [Action] field.
Events and Actions IncreaseVariable Value
Variable mapped to
the address
Increment/Decrement has
been selected in [Action] field.
Maximum Limit Fixed Value - - - -
Indirect - - - -
Return to the Minimum
Value when the Maximum
vale is Exceeded
- - - -
Minimum Limit Fixed Value - - - -
Indirect - - - -
Return to the Maximum
Value when the Minimum
vale is Exceeded
- - - -
Write String Write Address Events and Actions SetVariable Variable
Variable mapped to
the address
String Events and Actions SetVariable Value Value in quotes
Max. No. of
Characters
- - - -
Character Code ASCII code - - - -
Unicode (UTF-16) - - - -
Unicode (UTF-8) - - - -
Checked - - - -
Unchecked - - - -
CX-Designer
Sysmac Studio
Multifunction: Function
Events and Actions of Objects and Shapes
Swap the high-byte
and the low-byte

(2/7)
Function 1st Level 2nd Level Category Action Option Set Value Remarks
Write String Input Process Checked
- - - -
Unchecked
- - - -
Space
- - - -
NULL
- - - -
Switch Screen Specified Screen Events and Actions ShowPage Page name Screen title
Events and Actions SetVariable Variable
_HMI_Current_
PageIndex
Address Events and Actions SetVariable Value
Variable mapped to
the address
Selection by
Pop-up Menu
- - - -
Backward Events and Actions ShowPreviousPage -
Forward - - - -
Next Page - - - -
Previous Page - - - -
Checked Events and Actions SetVariable Variable
Variable mapped to
the address
Unchecked - - - -
Address Events and Actions SetVariable Value
_HMI_Current_
PageIndex
Control
Pop-up Screen
Action
Close Local
pop-up screen
Events and Actions ClosePage Page name
Page where the
object is placed
Events and Actions ClosePage Page name
Screen No.
Move Local
pop-up screen
- - - -
Display
System Menu
System Menu Top Page
(Initialize Tab)
Events and Actions ShowSystemMenu
- -
Switch Box Function - - - -
Display Captured Data - - - -
Programming Console
(CS Series)
- - - -
Programming Console
(C Series)
- - - -
Operation Log
(sort by occurrence)
Events and Actions
ShowOperation
LogViewer
- -
Operation Log
(sort by frequency)
Events and Actions
ShowOperation
LogViewer
- -
Page that is to
be closed
Close specified
pop-up screen
Write a destination
screen No.
when a screen
switches
Multifunction: Function
Events and Actions of Objects and Shapes
CX-Designer
Sysmac Studio
Fill the blank
characters with a
specified character
Indirect Specification
of Screen No.

(3/7)
Function 1st Level 2nd Level Category Action Option Set Value Remarks
Host Selection Events and Actions ShowTroubleshooter
Controller
Name
The same
value as NS
Initial Screen Display User trouble Events and Actions ShowTroubleshooter StartPage Active User Events
User-defined
Event Log
Events and Actions ShowTroubleshooter StartPage User
Event Logs
Controller error
(Function module)
Events and Actions ShowTroubleshooter StartPage
Active
Controller Events
Controller Event Log Events and Actions ShowTroubleshooter StartPage Controller
Event Logs
Key Button Transmit to
Input field with focus - - - -
- - - -
Object ID - - - -
Transmit Type
Label string - - - -
Control code - - - -
Specified string - - - -
String - - - -
- - - -
Transmit from - - - -
No. of Words - - - -
Data Block
Control
- - - -
See the “Command Button_DB”
sheet.
Contents Control
Switch to the specified
contents No.
- - - -
Contents No. - - - -
- - - -
Address - - - -
Switch to the next
contents No.
- - - -
Switch to the previous
contents No.
- - - -
Indirectly specification
of string
Switch to the indirect
reference contents No.
Specified input field
Multifunction: Function
Events and Actions of Objects and Shapes
CX-Designer
Sysmac Studio
Troubleshooter
(NJ-series)

(4/7)
Function 1st Level 2nd Level Category Action Option Set Value Remarks
Alarm/
Event Control
Clear Events and Actions
ClearUserAlarmLog - -
Save Events and Actions
SaveUserAlarmLog
ToFile
- -
- - - -
Alarm/Event Summary
and History Object ID
- - - -
- - - -
Alarm/Event Summary
and History Object ID
- - - -
- - - -
Alarm/Event Summary
and History Object ID
- - - -
- - - -
Alarm/Event Summary
and History Object ID
- - - -
- - - -
Alarm/Event Summary
and History Object ID
- - - -
- - - -
Alarm/Event Summary
and History Object ID
- - - -
- - - -
Alarm/Event Summary
and History Object ID
- - - -
- - - -
Alarm/Event Summary
and History Object ID
- - - -
- - - -
Alarm/Event Summary
and History Object ID
- - - -
- - - -
Alarm/Event Summary
and History Object ID
- - - -
- - - -
Alarm/Event Summary
and History Object ID
- - - -
From Old Date & Time
Home
End
Next
Previous
From New Date & Time
Multifunction: Function
Events and Actions of Objects and Shapes
CX-Designer
Sysmac Studio
From High Priority
From Low Priority
From High Frequency
From Low Frequency
Check Selected Alarm

(5/7)
Function 1st Level 2nd Level Category Action Option Set Value Remarks
Alarm/
Event Control
Delete Selected Alarm - - - -
Alarm/Event Summary
and History Object ID
- - - -
Check All Alarms - - - -
Alarm/Event Summary
and History Object ID
- - - -
- - - -
Alarm/Event Summary
and History Object ID
- - - -
Change Display Type - - - -
Alarm/Event Summary
and History Object ID
- - - -
Data Log Control Stop Data log group No. Events and Actions StopDataLogging DataSet
Name
Data log group No.
Start Data log group No. Events and Actions StartDataLogging DataSet
Name
Data set name
corresponding to
the data group No.
Log Clear
Data log group No. - - - -
Pause Data Log Graph
Object ID
- - - -
Save to File
Data log group No. - - - -
- - - -
Data Log Graph
Object ID
- - - -
Show the file
read data only
- - - -
Cascade the
read data to a graph
- - - -
- - - -
Data Log Graph
Object ID
- - - -
- - - -
Data Log Graph
Object ID
- - - -
Move the cursor
forward
Move the cursor backward
Read File
Multifunction: Function
Events and Actions of Objects and Shapes
CX-Designer
Sysmac Studio
Data set name
corresponding to
the data group No.
Options for showing
the read file
Cancel All Alarms’
Check

(6/7)
Function 1st Level 2nd Level Category Action Option Set Value Remarks
File name
- - - -
Update - - - -
Stop - - - -
Contrast - - - -
Brightness - - - -
Depth - - - -
Tone - - - -
Red - - - -
Green - - - -
Blue - - - -
Video Control -
Vision Sensor
Console Output
Signal type
- - - -
Scroll Object Scroll Down - - - -
Object ID - - - -
Scroll Amount 1 Page - - - -
1/2 Page - - - -
Specified No. of
Lines/Dots/Items
- - - -
Scroll Down - - - -
Object ID - - - -
Scroll Amount 1 Page - - - -
1/2 Page - - - -
Specified No. of
Lines/Dots/Items
- - - -
Scroll Down - - - -
Object ID - - - -
Scroll Amount 1 Page - - - -
1/2 Page - - - -
Specified No. of
Lines/Dots/Items
- - - -
Scroll Down - - - -
Object ID - - - -
Scroll Amount 1 Page - - - -
1/2 Page - - - -
Specified No. of
Lines/Dots/Items
- - - -
Video Control -
Contrast Adjustment
Video Control -
Video Capture
Save in a file
(If memory card is full)
Video Input
Adjustment
RGB Control Value
Multifunction: Function
Events and Actions of Objects and Shapes
CX-Designer
Sysmac Studio

(7/7)
Function 1st Level 2nd Level Category Action Option Set Value Remarks
Password Setting
None Properties Security Access
Levels
None
Level 1 Properties Security Access
Levels
Level1
Events and Actions Login - -
Level 2 Properties Security Access
Levels
Level2
Events and Actions Login - -
Level 3 Properties Security Access
Levels
Level3
Events and Actions Login - -
Level 4 Properties Security Access
Levels
Level4
Events and Actions Login - -
Level 5 Properties Security Access
Levels
Level5
Events and Actions Login - -
Authentication
Cancellation
Events and Actions Click Logout
Confirmation
Dialog
Standard Message - - - -
- - - -
Message - - - -
Buzzer Stop Buzzer Events and Actions BuzzerOff - -
Continuous Buzzer Events and Actions BuzzerOn BuzzerType Continuous
Short Intermittent
Buzzer
Events and Actions BuzzerOn BuzzerType
Intermittent
Short Pulse
Long Intermittent
Buzzer
Events and Actions BuzzerOn BuzzerType
Intermittent
Long Pulse
Initialize Operation Log - - - -
Save Operation Log - - - -
Operation
Log Control
Use Specified
Message
CX-Designer
Sysmac Studio
Multifunction: Function
Events and Actions of Objects and Shapes

Appendix 4: Lamps
◆Bit Lamp
Tab 1st Level 2nd Level 3rd Level Category Group Property Set Value Remarks
General Object Comment - - - -
Address Display Address Properties Behavior Expression
Variable mapped to the
address
Lamp Type Single-lined Circle Properties Appearance Design Ellipse See the “Bit Lamp_Shape” sheet
Single-lined Rectangle Rectangle See the “Bit Lamp_Shape” sheet
Double-line Circle Ellipse See the “Bit Lamp_Shape” sheet
Double-line Rectangle Rectangle See the “Bit Lamp_Shape” sheet
Select Shape Image See the “Bit Lamp_Shape” sheet
Color/Shape - - - - See the “Bit Lamp_Shape” sheet
Label Label
Text Attribute Text Attributes
Indirect Reference of Text Color - - - -
Link with the Write Address ON/OFF
- - - -
Link with the Display Address ON/OFF
- - - -
Link with the Specified Address ON/OFF
- - - -
Address - - - -
Use the String Table Unchecked
- - - -
Checked
Properties Appearance DefaultText (Default) The original text set for NS
Other Key Press Sound Control
Do not allow sound for this object - - - -
Switch Label for Address
ON/OFF
Bit Lamp
CX-Designer
Sysmac Studio
Refer to the “Text Attributes” sheet in “Appendix 2: Object Common
Refer to the “Text Attributes” sheet in “Appendix 2: Object Common
Bit Lamp

◆Bit Lamp_Shape
Button Shape Tab 1st Level 2nd Level Category Property Set Value
Single-lined Circle Color/Shape Color1 (OFF) Appearance BackgroundColorButtonUp The same color as NS
Double-lined Circle Indirect - - -
Single-lined Rectangle Address - - -
Double-lined Rectangle Color2 (ON) Appearance BackgroundColorButtonDown The same color as NS
Indirect - - -
Address - - -
Select Shape Color/Shape Color1 (OFF) Appearance ImageFileButtonUp Image registered as resource
Indirect - - -
Address - - -
Color2 (ON) Appearance ImageFileButtonDown Image registered as resource
Indirect - - -
Address - - -
Sysmac Studio
CX-Designer
Bit Lamp: Select Shape

◆Word Lamp
Data Lamp
Tab 1st Level 2nd Level Category Group Property Set Value
Object Comment - - - -
Numeral Type - - - -
Button Shape Rectangle Properties Appearance Design Rectangle
Select Shape Image
Button Actions Set Value
Increment/Decrement
Display Pop-up Menu
Address Write Address
Color/Shape
Label - - - -
Text Attributes
Auto resize text - - - -
Indirect Reference of Text Color - - - -
Word Lamp
Sysmac Studio
CX-Designer
Refer to the “Text Attributes” sheet in “Appendix 2:
Object Common Settings.”
See the “Word Lamp_Shape” sheet
See the “Word Lamp_Shape” sheet
See the “Word Lamp_Shape” sheet
See the “Word Lamp_Shape” sheet
See the “Word Lamp_Shape” sheet
Text Attribute
General
Label

◆Word Lamp_Shape
(1/2)
Lamp Shape Tab 1st Level 2nd Level Category Property Setting Item Set Value
Single-lined Circle Color/Shape Appearance DefaultLampColor Color specified in Color1 (Value0)
Double-lined Circle Color1 (Value0)
Behavior
ColorRanges LampColor The same color as NS
Single-lined Rectangle StartValue >= 0
Double-lined Rectangle Indirect
- - - -
Address
- - - -
Color2 (Value1)
Behavior
ColorRanges LampColor The same color as NS
StartValue >= 1
Indirect
- - - -
Address
- - - -
Color3 (Value2)
Behavior
ColorRanges LampColor The same color as NS
StartValue >= 2
Indirect
- - - -
Address
- - - -
Color4 (Value3)
Behavior
ColorRanges LampColor The same color as NS
StartValue >= 3
Indirect
- - - -
Address
- - - -
Color5 (Value4)
Behavior
ColorRanges LampColor The same color as NS
StartValue >= 4
Indirect
- - - -
Address
- - - -
Color6 (Value5)
Behavior
ColorRanges LampColor The same color as NS
StartValue >= 5
Indirect
- - - -
Address
- - - -
Color7 (Value6)
Behavior
ColorRanges LampColor The same color as NS
StartValue >= 6
Indirect
- - - -
Address
- - - -
Color8 (Value7)
Behavior
ColorRanges LampColor The same color as NS
StartValue >= 7
Indirect
- - - -
Address
- - - -
Color9 (Value8)
Behavior
ColorRanges LampColor The same color as NS
StartValue >= 8
Indirect
- - - -
Address
- - - -
Color10 (Value9)
Behavior
ColorRanges LampColor The same color as NS
StartValue >= 9
Indirect
- - - -
Address
- - - -
CX-Designer
Sysmac Studio
Word Lamp: Select Shape

(2/2)
Lamp Shape Tab 1st Level 2nd Level Category Property Setting Item Set Value
Select Shape Color/Shape
Behavior DefaultImageFile Image specified in Shape1 (Value0)
Shape1 (Value0)
Behavior
ColorRanges ImageFile Image file registered as resource
StartValue >= 0
Shape2 (Value1)
Behavior
ColorRanges ImageFile Image file registered as resource
StartValue >= 1
Shape3 (Value2)
Behavior
ColorRanges ImageFile Image file registered as resource
StartValue >= 2
Shape4 (Value3)
Behavior
ColorRanges ImageFile Image file registered as resource
StartValue >= 3
Shape5 (Value4)
Behavior
ColorRanges ImageFile Image file registered as resource
StartValue >= 4
Shape6 (Value5)
Behavior
ColorRanges ImageFile Image file registered as resource
StartValue >= 5
Shape7 (Value6)
Behavior
ColorRanges ImageFile Image file registered as resource
StartValue >= 6
Shape8 (Value7)
Behavior
ColorRanges ImageFile Image file registered as resource
StartValue >= 7
Shape9 (Value8)
Behavior
ColorRanges ImageFile Image file registered as resource
StartValue >= 8
Shape10 (Value9)
Behavior
ColorRanges ImageFile Image file registered as resource
StartValue >= 9
Word Lamp: Select Shape
CX-Designer
Sysmac Studio

◆Label
Label
Tab 1st Level 2nd Level 3rd Level Category Group Property Set Value Remarks
General
Object Comment
- - - -
Use as Message Display
- - - - *
Background
Tile Background
Unchecked Properties Appearance BackgroundColor Transparent
Checked
Color
Properties Appearance BackgroundColor The same color as NS
Indirect Reference of Color
- - - -
Address - - - -
Label
Label
String No.
Properties Appearance Resource ID Resource corresponding to the string No.
Indirect
- - - - *
Text Attribute Text Attributes
Auto resize text
- - -
No corresponding function
Indirect Reference of Text Color
- - - No corresponding function
- - - - *
File Name
- - - -
Address for Specifying File Line
- - - -
Clear display when the address
value is 0
- - - -
Use the String Table
- - - - *
Message
No. of Statuses
- - - -
Address for switching status
- - - -
Label
- - - -
String No.
- - - -
Text Attribute Text Attributes
- - - -
BackgroundColor Tile Background
Checked - - - -
Unchecked - - - -
Color - - - -
Use the String Table
- - - -
*These functions can be possible using dynamic resource linking, but modification of PLC programs are also necessary.
Indirect Reference of String
Sysmac Studio
CX-Designer
Refer to the “Text Attributes” sheet in “Appendix 2: Object Common Settings.”
Label Object
Refer to the “Text Attributes” sheet in “Appendix 2: Object Common Settings.”
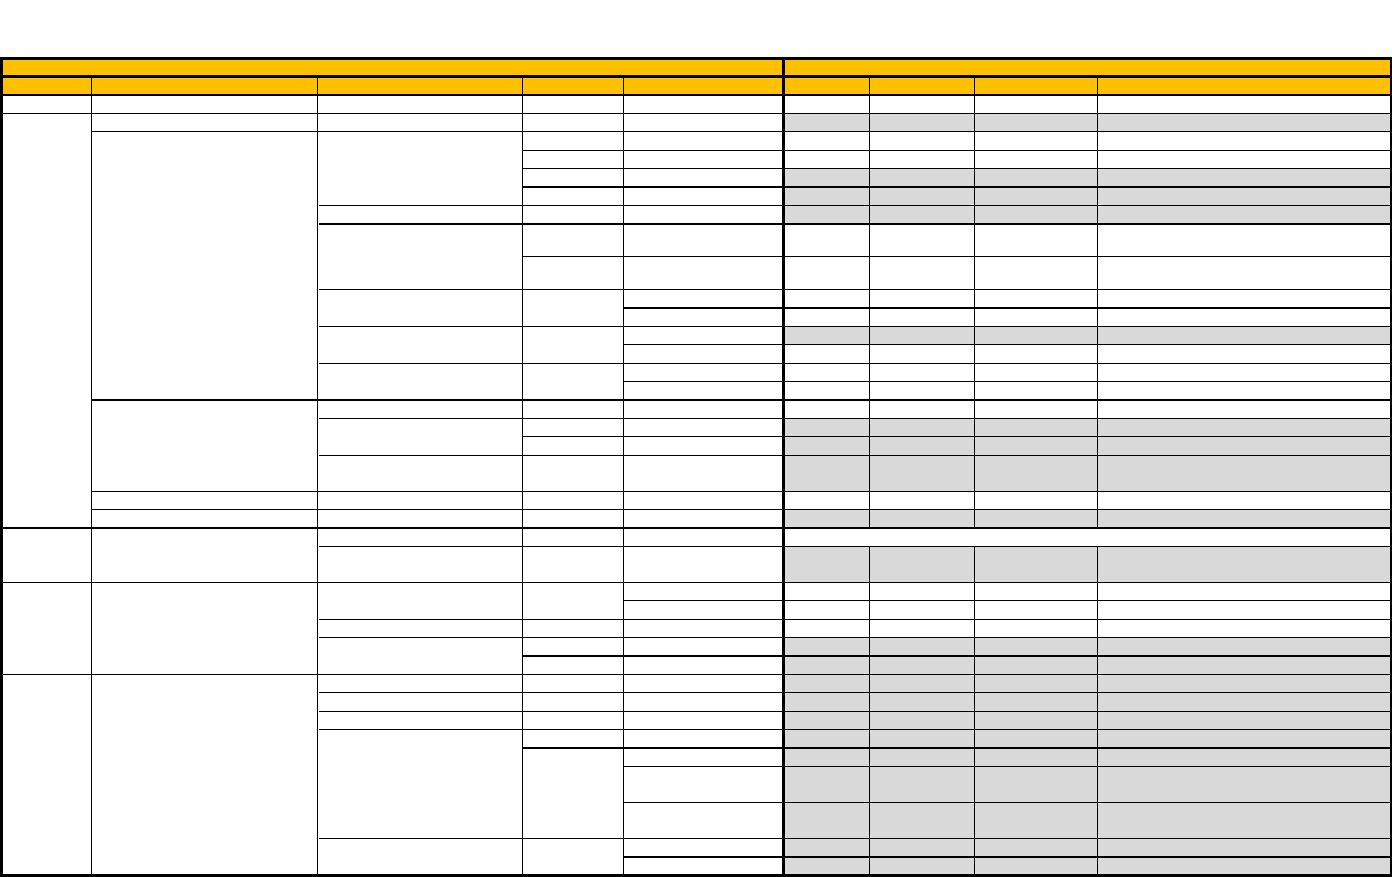
◆Numeral Display
(1/3)
Tab 1st Level 2nd Level 3rd Level Set Value Category Group Property Set Value
Properties Behavior DataType Numeric
General Object Comment - - - -
Numeral Display Type Display Type Decimal Properties Behavior ValueFormat Decimal
Hexadecimal Properties Behavior ValueFormat Hexadecimal
Binary - - - -
Octal - - - -
Storage Type - - - -
Format Integer Properties Behavior DisplayFormat
Select the format according to
the number of digits
Decimal Properties Behavior DisplayFormat
Select the format according to
the number of digits
Fill blank digits with zeros Checked Properties Behavior LeadingZeros Checked
Unchecked Properties Behavior LeadingZeros Unchecked
Ignore exceeded digits Checked - - - -
Unchecked
Display commas Checked Properties Behavior ShowSeparator Checked
Unchecked Properties Behavior ShowSeparator Unchecked
Unit and Scale Set Unit & Scale No.
Properties Behavior Scaling Scale name registered in Scaling
- - - -
Address - - - -
Perform Max/Min Limit Check
after Scale Conversion
- - - -
Address Address
Properties Behavior Variable Variable mapped to the address
Display on entry Display input values by * - - - -
Text Text Attribute Text Attributes
Indirect Reference of
Text Color
- - - -
Background Tile Background Unchecked Properties Appearance BackgroundColor Transparent
Checked
Color Properties Appearance BackgroundColor The same color as NS
Indirect Reference of Color - - - -
Address - - - -
Keypad Input Method System Keypad - - - -
Large System Keypad - - - -
Input from Pop-up Screen - - - -
Other Input Method - - - -
No Restriction - - - -
Prohibit input from
Functional Object
- - - -
Prohibit input from
Bar-Code Reader
- - - -
Use Temporary Input object Checked - - - -
Unchecked - - - -
Indirect Specification of
Unit & Scale No.
Numeral Display and Input Objects
Refer to the “Text Attributes” sheet in “Appendix 2: Object Common Settings.”
CX-Designer
Sysmac Studio
Input
Restriction

(2/3)
Tab 1st Level 2nd Level 3rd Level Set Value Category Group Property Set Value
Keypad Above this Object
- - - -
Below this Object - - - -
Top Left of Screen - - - -
Bottom Left of Screen - - - -
Top Right of Screen - - - -
Bottom Right of Screen - - - -
Center of Screen - - - -
Any Position X - - - -
Y - - - -
Input Order Properties Behavior DataInputOrder The same value as NS
Max/Min Type of Value Immediate Value - - - -
Difference from Current Value - - - -
Maximum Input Limit Checked - - - -
Unchecked Properties Behavior MaximumValue The max value of the set variable data type
Value Properties Behavior MaximumValue Value
Indirect Reference
Address Properties Behavior MaximumValue Variable mapped to the address
Minimum Input Limit Checked - - - -
Unchecked Properties Behavior MinimumValue The min value of the set variable data type
Value Properties Behavior MinimumValue Value
Indirect Reference
Address Properties Behavior MinimumValue Variable mapped to the address
Watch Maximum Limit Checked - - - -
Unchecked - - - -
Value - - - -
Indirect Reference - - - -
Address - - - -
Text Color for Exceeding Value - - - -
Background Color for
Exceeding Value
- - - -
Watch Minimum Limit Checked - - - -
Unchecked - - - -
Value - - - -
Indirect Reference - - - -
Address - - - -
Text Color for Exceeding Value - - - -
Background Color for
Exceeding Value
- - - -
Display Position of Keypad/ Pop-up
Screen
Numeral Display and Input Objects
CX-Designer
Sysmac Studio

(3/3)
Tab 1st Level 2nd Level 3rd Level Set Value Category Group Property Set Value
Write - - - -
Standard Message - - - -
User Specified Message - - - -
Message - - - -
- - - -
Address - - - -
Checked Properties Security Operation Log Checked
Unchecked Properties Security Operation Log Unchecked
Message - - - -
Control Flag
Display - - - -
Hide - - - -
Indirect - - - -
Address - - - -
Macro Macro Execution Condition
Numeral Display: Macro
Tab Category Events/Actions Event Option Set Value
- - - - -
- - - - -
- - - - -
Events and Actions*
Event Condition Expression
[Variable mapped to the address] = Set value
Action CallSubroutine - Subroutine name
Events and Actions*
Event Condition Expression
[Variable mapped to the address] > Set value
Action CallSubroutine - Subroutine name
Events and Actions*
Event Condition Expression
[Variable mapped to the address] < Set value
Action CallSubroutine - Subroutine name
Events and Actions of the page where the object is placed
Sysmac Studio
CX-Designer
Value < Set Value
Item
Before inputting numeral
Before writing numeral
When changing value
Value = Set Value
Value > Set Value
See the table below
Numeral Display and Input Objects
CX-Designer
Sysmac Studio
Display ( Numeral Display)
Turn ON the specified address when
the value is written
Display Write Confirmation Dialog
Record to operation log

◆String Display
(1/2)
Tab 1st Level 2nd Level 3rd Level Set Value Category Group Property Set Value
Properties Behavior DataType Text
General Object Comment - - - -
String Display Type TextLength - - - -
ASCII - - - -
Unicode (UTF-16) - - - -
Unicode (UTF-8) - - - -
Pop-up Menu Use Pop-up Menu Checked - - - -
Unchecked - - - -
Menu Button Width - - - -
Address Information Address Properties Behavior Variable
Address set to the default label in NS
Input Process Checked
- - - -
Unchecked
Space - - - -
NULL - - - -
Display on entry Checked Properties Behavior
MaskedDisplay
Checked
Unchecked
Text Text Attribute Text Attributes
Indirect Reference of Text Color - - - -
Background Tile Background Unchecked Properties Appearance BackgroundColor Transparent
Checked
Color Properties Appearance BackgroundColor The same color as NS
Indirect Reference of Color - - - -
Address - - - -
Keypad Input Method System Keypad - - - -
Large System Keypad - - - -
Input from Pop-up Screen - - - -
Other Input Method - - - -
Input Restriction No Restriction - - - -
Prohibit input from
Functional Object
- - - -
Prohibit input from
Bar-Code Reader
- - - -
Use Temporary Input object Checked - - - -
Unchecked - - - -
CX-Designer
Sysmac Studio
String Display and Input Objects
Refer to the “Text Attributes” sheet in “Appendix 2: Object Common Settings.”
Default
Default
Default
Fill the blank characters with a specified character
Display input characters by*

(2/2)
Tab 1st Level 2nd Level 3rd Level Set Value Category Group Property Set Value
Keypad Above this Object
- - - -
Below this Object - - - -
Top Left of Screen - - - -
Bottom Left of Screen - - - -
Top Right of Screen - - - -
Bottom Right of Screen - - - -
Center of Screen - - - -
Any Position X - - - -
Y - - - -
String Input Add to the current string.
Enter the new string. (Monitor the current string when
the input focus has been set.)
- - - -
Enter the new string. (Clear the current string when
the input focus has been set.)
- - - -
Add to the current string. (Move the cursor to
front of string when setting the input focus been set.)
- - - -
Input Order Properties Behavior DataInputOrder The same value as NS
Write
Display Write Confirmation Dialog - - - -
Standard Message - - - -
User Specified Message - - - -
Message - - - -
- - - -
Address - - - -
Record to operation log Checked Properties Security Operation Log Checked
Unchecked Properties Security Operation Log Unchecked
Message - - - -
Password Password None Properties Security Access Levels None
Level 1 Level1
Level 2 Level2
Level 3 Level3
Level 4 Level4
Level 5 Level5
Macro Before inputting string - - - -
Before writing string - - - -
When changing string - - - -
Turn ON the specified address
when the value is written
Macro Execution Condition
Default
String Display and Input Objects
CX-Designer
Sysmac Studio
Display Position of Keypad/
Pop-up Screen

◆List
(1/2)
Tab 1st Level 2nd Level 3rd Level Category Group Property Set Value
General
Object Comment - - - -
List Data Collect from $W
- - - -
Collect from a File
Properties Behavior Items Get the list from the file to assign resources
Use a File for Indirect Reference - - - -
Character Code ASCII code
- - - -
Unicode (UTF-16)
- - - -
Unicode (UTF-8)
- - - -
List Size Characters/Line
- - - -
Max Lines
- - - -
Text Text Attribute Text Attributes
Background Tile Background Unchecked
Properties Appearance BackgroundColor Transparent
Checked
Color
Properties Appearance BackgroundColor The same color as NS
Indirect Reference of Color
- - - -
Address
- - - -
Selection Show selection bar Checked
- - - -
Unchecked
- - - -
Color
- - - -
Checked
- - - -
Unchecked
- - - -
Address
Properties Behavior Variable Variable mapped to the address
Checked
- - - -
Unchecked
- - - -
Address
- - - -
Scroll Bar Use Scroll Bar Checked
- - - -
Unchecked
- - - -
Buttons for Scrolling One Line Checked
- - - -
Unchecked
Buttons for Scrolling Multiple Lines Checked
- - - -
Unchecked
Scroll Amount Lines in 1 Page
- - - -
Lines in 1/2 Page
- - - -
Specified No. of Lines
- - - -
Button Size Width
- - - -
Height
- - - -
Password Password None
Properties Security Access Levels None
Level 1
Level1
Level 2
Level2
Level 3
Level3
Level 4
Level4
Level 5
Level5
Store the selected line No.
in the specified address
Store the string of the selected line
in the specified address
List Selection Object
Refer to the “Text Attributes” sheet in “Appendix 2: Object Common Settings.”
CX-Designer
Sysmac Studio
Deafult
Default
Default

(2/2)
Tab 1st Level 2nd Level 3rd Level Category Group Property Set Value
Macro Macro Execution Condition When selecting a list
- - - -
External Control Block Max No. of Blocks
- - - -
Switching the Display Block Checked
- - - -
Unchecked
- - - -
Address for Switching the Display Block
- - - -
Start Line Switching the Display Start Line Checked
- - - -
Unchecked
- - - -
Address for Switching the Display Start Line
- - - -
Update Update a List Checked
- - - -
Unchecked
- - - -
Address for Updating a List
- - - -
List Selection Objects
CX-Designer
Sysmac Studio

◆DateTime
DateTime
Tab 1st Level 2nd Level 3rd Level Set Value Category Group Property Set Value Remarks
Properties Behavior Variable _HMI_DateTime
General Object Comment - - -
-
-
Display Format Properties Appearance Format
Value converted based on
the conversion table
See the “DateTime_Format”
sheet
Use Large Keypad Checked - - -
-
-
Unchecked - - -
-
-
Text Text Attribute
Background Tile Background Unchecked Properties Appearance BackgroundColor
Transparent
-
Checked - - -
-
-
Color Properties Appearance BackgroundColor
The same color as NS
-
Properties Appearance HeaderBackgroundColor
The same color as NS
-
- - -
-
-
Address - - -
-
-
Date Objects and Time Objects
CX-Designer
Sysmac Studio
Refer to the “Text Attributes” sheet in “Appendix 2: Object Common Settings.”
Indirect Reference of Color
◆DateTime_Format
Date and Time Format
Switch Item Category Group Property Set Value
Type1
Type2
Type3
Type4
Type5
Type6
Type7
Type8
Type9
Type10
Type11
Type12
Type13
Type14
Type15
Time Display Format
Value according to the
tables right and below
Type0
Display Format
Properties
Appearance
Format
Settings for each user
language are not available.
Format will be switched
depending on the project
language specified as
user language.
DDD.dd MMMM.yyyy
CustomFormat
dd/mm/yy
CustomFormat
DDD/mm/dd/yy
CustomFormat
(dddd) mm.dd.yyyy
CustomFormat
yyyy.mm.dd (dddd)
CustomFormat
ddd mm/dd/yyyy
CustomFormat
yyyy/mm/dd dddd
CustomFormat
-
yyyy年mm月dd日
CustomFormat
ddd.dd MMMM.yyyy
dd.mm.yy
CustomFormat
dd.mm.yy
DDD.dd.mm.yy
CustomFormat
ddd.dd.mm.yy
dd MMMM.yyyy
CustomFormat
dd MMMM.yyyy
DDD.dd MMM.yy
CustomFormat
ddd.dd MMM.yy
dd MMM.yy
CustomFormat
dd MMM.yy
dd/MM/yy
DDD/dd/mm/yyyy
CustomFormat
ddd/dd/MM/yyyy
DDD/dd/mm/yy
CustomFormat
ddd/dd/MM/yy
DDD.MMM dd.yy
CustomFormat
ddd.MMM dd.yy
MMM dd.yy
CustomFormat
MMM dd.yy
dd/mm/yyyy
CustomFormat
dd/MM/yyyy
ddd/mm/dd/yy
DDD.MMMM dd.yyyy
CustomFormat
ddd.MMMM dd.yyyy
MMMM dd.yyyy
CustomFormat
MMMM dd.yyyy
mm/dd/yyyy
CustomFormat
MM/dd/yyyy
mm/dd/yy
CustomFormat
MM/dd/yy
DDD/mm/dd/yyyy
CustomFormat
ddd/MM/dd/yyyy
CustomFormat
yy.MM.dd dddd
(dddd) MM.dd.yyyy
(dddd) mm.dd.yy
CustomFormat
(dddd) MM.dd.yy
yyyy-mm-dd
ShortDatePattern (Numeral)
-
yy.mm.dd
CustomFormat
yy.MM.dd
dddd mm.dd.yyyy
CustomFormat
dddd MM.dd.yyyy
dddd mm.dd.yy
CustomFormat
dddd MM.dd.yy
yyyy/MM/dd dddd
yy/mm/dd dddd
ddd MM/dd/yyyy
ddd mm/dd/yy
CustomFormat
ddd MM/dd/yy
(ddd) mm/dd/yyyy
CustomFormat
(ddd) MM/dd/yyyy
yy/mm/dd (dddd)
CustomFormat
yy/MM/dd (dddd)
yyyy/mm/dd
CustomFormat
yyyy/MM/dd
yy/mm/dd
CustomFormat
yy/MM/dd
yyyy年mm月dd日 (dddd)
CustomFormat
yyyy年MM月dd日 (dddd)
yy年mm月dd日 (dddd)
CustomFormat
yy年MM月dd日 (dddd)
yyyy年MM月dd日
yy年mm月dd日
CustomFormat
yy年MM月dd日
CX-Designer
Sysmac Studio
Display Format
Format
CustomFormat
yyyy年mm月dd日 dddd
CustomFormat
yyyy年MM月dd日 dddd
yy年mm月dd日 dddd
CustomFormat
yy年MM月dd日 dddd
CustomFormat
LongTimePattern
ShortTimePattern
tt hh時mm分ss秒
tt hh時mm分
hh時mm分ss秒
hh時mm分
tt hh:mm:ss
tt hh:mm
hh:mm XXXX
Sysmac Studio
Date and Time: Display Format
CustomFormat
CustomFormat
CustomFormat
hh時mm分ss秒
hh時mm分
xxxx hh:mm:ss
xxxx hh:mm
hh:mm:ss
hh:mm
CustomFormat
CustomFormat
CustomFormat
Sysmac Studio
CX-Designer
CX-Designer
hh:mm:ss tt
hh:mm tt
CustomFormat
Format
CustomFormat
Display Format
xxxx hh時mm分ss秒
xxxx hh時mm分
-
CustomFormat
yy/MM/dd dddd
yyyy/mm/dd (dddd)
CustomFormat
hh:mm:ss XXXX
yyyy/MM/dd (dddd)
yyyy.MM.dd (dddd)
yy.mm.dd (dddd)
CustomFormat
yy.MM.dd (dddd)
yyyy.mm.dd
CustomFormat
yyyy.MM.dd
(ddd) mm/dd/yy
CustomFormat
(ddd) MM/dd/yy
yyyy.mm.dd dddd
CustomFormat
yyyy.MM.dd dddd
yy.mm.dd dddd

◆BMP
Image Object
Tab 1st Level 2nd Level 3rd Level Set Value Category Group Property Set Value
General
Object Comment - - -
Display File Properties Appearance ImageFile Image registered in resources
Checked - - - -
Unchecked - - - -
Text file for referencing display image - - - -
Address for Specifying File Line - - - -
Clear the image when the value is 0 Checked - - - -
Unchecked - - - -
CX-Designer
Bitmap Object
Sysmac Studio
Indirect Reference of Display File

Appendix 5: Graphs
◆Level Meter
Vertical Gauge and Horizontal Gauge
Tab 1st Level 2nd Level Set Value Category Group Property Set Value Remarks
General Object Comment - - - -
Display Direction Up Properties Appearance IsReversed Unchecked Vertical gauge
Down Properties Appearance IsReversed Checked Vertical gauge
Right Properties Appearance IsReversed Unchecked Horizontal gauge
Left Properties Appearance IsReversed Checked Horizontal gauge
Scale Scale Checked Properties Tick Major MajorTickVisibility Checked
Unchecked Properties Tick Major MajorTickVisibility Unchecked
No. of Division Properties Appearance MajorInterval
(Max value in the range - min value in the range) /
number of divisions
Scale Color Properties Appearance TextColor The same color as NS
Horizontal Size Properties Tick Major MajorTickExtent The original value
Set 0 as the origin Checked - - - -
Unchecked - - - -
Storage Type - - - -
Address Address Properties Behavior Expression Variable mapped to the address
Range Range1
Maximum (J)
Properties
Ranges
EndValue
The original value Range1
Indirect
- - - -
Color
- - - -
Indirect
- - - -
Background Color
Properties
Ranges
BackgroundColor
The same color as NS
Indirect
- - - -
Border (L)
Properties
Ranges
StartValue
The original value
Indirect
- - - -
Range2
Border (L)
Properties
Ranges
EndValue
The original value Range2
Indirect
- - - -
Color
- - - -
Indirect
- - - -
Background Color
Properties
Ranges
BackgroundColor
The same color as NS
Indirect
- - - -
Border (N)
Properties
Ranges
StartValue
The original value
Indirect
- - - -
Range3
Border (N)
Properties
Ranges
EndValue
The original value Range1
Indirect
- - - -
Color
- - - -
Indirect
- - - -
Background Color
Properties
Ranges
BackgroundColor
The same color as NS
Indirect
- - - -
Minimum (P)
Properties
Ranges
StartValue
The original value
Indirect
- - - -
Background Color Properties
Appearance BackgroundColor
The same color as NS
Indirect Reference of Color
- - - -
CX-Designer
Sysmac Studio
Level Meter

◆Analogue Meter
Rotational Gauge and Semicircular Gauge
(1/2)
Tab 1st Level 2nd Level Set Value Category Group Property Set Value
General Object Comment
- - - -
Shape Display Direction
Increment Direction Clockwise Properties Appearance IsReversed
Unchecked
Anti-clockwise Properties Appearance IsReversed
Checked
Width Rate
- - - -
Shape
Scale Scale Checked Properties Tick Major MajorTickVisibility
Checked
Unchecked
Unchecked
No. of Division Properties Appearance MajorInterval
(Max value in the range - min value in the range) /
number of divisions
Scale Color Properties Appearance TextColor
The same color as NS
Scale Length Properties Tick Major MajorTickExtent
Length of scale / (Long side of the object / 2)
Position Properties Scale Bar ScaleBarExtent
Position / (Long side of the object / 2)
Color RimColor Properties Scale Bar ScaleBackgroundColor
Check the IsBarVisible box
Color inside a meter
- - - -
Display Type Fill
- - -
A needle indicates the current value in any settings
Needle
A needle indicates the current value in any settings
Set 0 as the origin Checked
- - - -
Unchecked
- - - -
Address Address Properties Behavior Expression
Variable mapped to the address
Storage Type
- - - -
Needle Needle Drawing Method Type1
- - - -
Type2
- - - -
Style
Type Straight Line
Properties
Needle NeedleType Rectangle
Arrow
Properties
Needle NeedleType SwordSharp
Triangular Arrow Properties Needle NeedleType TriangleSharp
Width
Properties
Needle NeedleAscent
Width / Larger value of the object size
Default value for a triangular arrow
Color
Properties
Needle
NeedleBackgroundColor
Range
Range1
Maximum (J)
Properties
Ranges
EndValue
The original value
Indirect - - - -
Color - - - -
Indirect - - - -
Background Color
Properties
Ranges
Background Color
The same color as NS
Indirect - - - -
Border (L)
Properties
Ranges
StartValue
The original value
Indirect - - - -
Add a range with the [+] button in Properties-Ranges, depending on ranges you need.
Range1
CX-Designer
Analogue Meter
Sysmac Studio
Use another object depending on the setting
Use another object depending on the setting

Rotational Gauge and Semicircular Gauge
(2/2)
Tab 1st Level 2nd Level Set Value Category Group Property Set Value
Range Range2
Border (L) Properties Ranges EndValue The original value
Indirect - - - -
Color - - - -
Indirect - - - -
Background Color Properties Ranges BackgroundColor The same color as NS
Indirect - - - -
Border (N) Properties Ranges StartValue The original value
Indirect - - - -
Range3
Border (N) Properties Ranges EndValue The original value
Indirect - - - -
Color - - - -
Indirect - - - -
Background Color Properties Ranges BackgroundColor The same color as NS
Indirect - - - -
Minimum (P) Properties Ranges StartValue The original value
Indirect - - - -
Background Color Properties Appearance BackgroundColor The same color as NS
Indirect Reference of Color
- - - -
Range2
Range3
Analogue Meter
CX-Designer
Sysmac Studio

◆Broken-line Graph
Broken-line Graph
(1/2)
Tab 1st Level 2nd Level 3rd Level Set Value Category Group Property Set Value
General Object Comment - - -
-
Display Direction - - -
-
Scale (Vertical) Scale
Checked
Properties Left Scale IsLeftAxisVisible
Check the box of the property
if the Scale option has been checked.
Unchecked
No. of Division
Properties Left Scale LeftAxisNumberOfMajorTicks
2 for the value less than 2, and 11 for
the value 12 and larger.
Scale Color Properties Appearance GridForegroundColor
*2
Size - - -
Show Scale Line Properties Left Scale LeftAxisGridMajorLinesVisible
Check the box of the property
if the Scale option has been checked.
Line Style Solid line - - -
-
Dotted line - - -
-
Broken line
-
- -
-
1-dot chain line
-
- -
-
2-dot chain line - - -
-
Indirect reference of showing scale line
-
- -
-
Scale (Horizontal)
Scale Checked
Properties
Horizontal Axis
IsHorizontalAxisVisible
Check the box of the property
if the Scale option has been checked.
Unchecked
No. of Division
Properties
Horizontal Axis
ViewportLength
No. of Division *5
Scale Color Properties Appearance
GridForegroundColor
*2
Size
-
- -
Show Scale Line
Properties
Horizontal Axis HorizontalAxisGridLinesVisible Check the box this property.
Line Style Solid line - - -
-
Dotted line
-
- - -
Broken line
- - -
-
1-dot chain line
- - -
-
2-dot chain line - - -
-
Indirect reference of showing scale line
- - -
-
Display Update Checked Properties Behavior DisplayUpdateType
Condition
Unchecked Properties Behavior DisplayUpdateType
Interval
Address Properties Behavior Expression
Variable mapped to the address
Checked
- - -
-
Unchecked - - -
-
Address - - -
-
Graph
Checked
- - -
-
Unchecked
Graph List - - -
-
Draw Value Outside of
the Range
- - -
-
Storage Type - - -
-
Group Name Properties Data Data Group
The group that has been set.
*1: Register the data of Graph List, Draw Value Outside of the Range, and Storage Type in a data group to reference.
Refore to the Broken-line Graph Group Setting Table in “Appendix 1: Project Common Settings.”
*2: Because only one color can be set for scales, the setting for the vertical scale will be used.
Broken-line Graph
Default
Default
CX-Designer
Sysmac Studio
*1
Specify Display Update Bit
Specify the No. of Points Shown
Use the graph of a
broken-line graph group

Broken-line Graph
(2/2)
Tab 1st Level 2nd Level 3rd Level Set Value Category Group Property Set Value
Graph No. of points in each line Monitor Points - - -
-
Display Points No. of Points Properties Horizontal Axis ViewportLength
The original value
Indirect Reference - - -
-
Display Start Position Position - - -
-
Indirect Reference - - -
-
Background Color Properties Appearance GridBackgroundColor
The same color as NS
Indirect Reference of Color - - -
-
Scroll Bar
Use Scroll Bar
- - -
-
Buttons for Scrolling
One Line
- - -
-
Buttons for Scrolling
Multiple Lines
- - -
-
Button Size - - -
-
Broken-line Graph
CX-Designer
Sysmac Studio
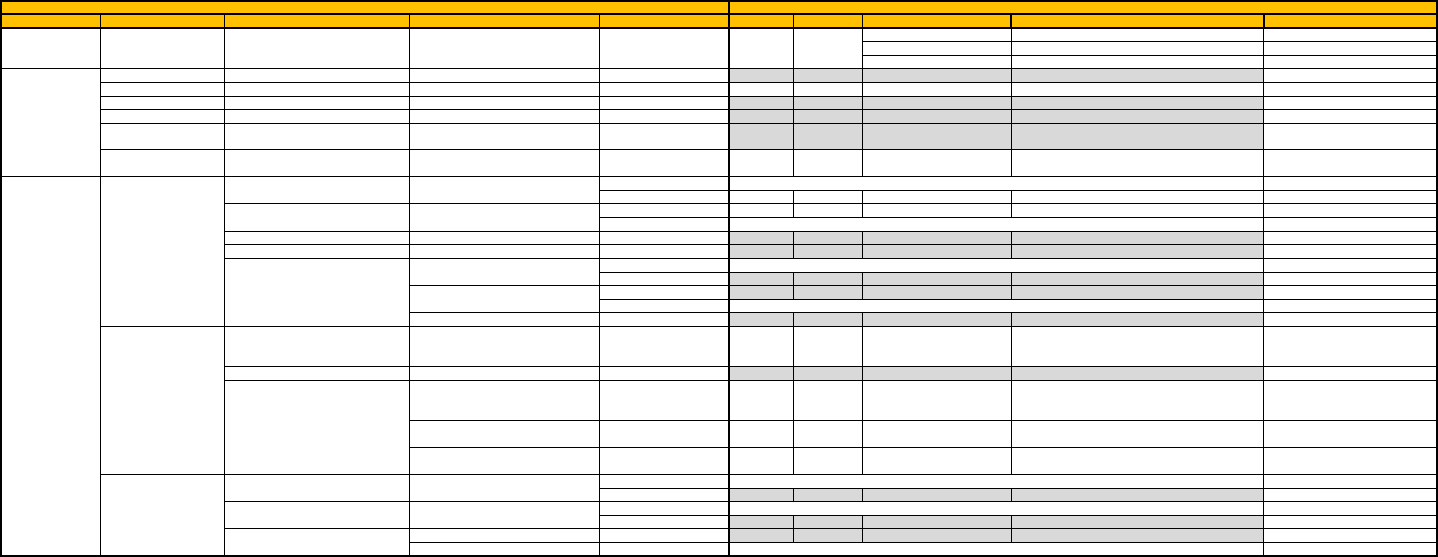
◆Data Log
Trend Graph
(1/4)
Tab 1st Level 2nd Level 3rd Level Set Value Category Group Property Set Value Remarks
Properties Right Axis IsRightAxisVisible Unchecked
RightAxisGridMinorLinesVisible Unchecked
RightAxisGridMajorLinesVisible Unchecked
General Object Comment - - - -
Group Name
Properties Data DataSet
Converted data group
Log Timing - - - -
Direction - - - -
Draw Value Outside of
the Range
- - - -
Display
Unchecked data will not be
registered in Traces
Time Axis Scale Unchecked
Checked Properties Time Scale IsTimescaleVisible Checked
Line Checked Properties Time Scale TimeScaleGridLinesVisible Checked
Unchecked
No. of Division - - - -
Scale Length - - - -
Sub-scale Unchecked
Checked
- - - -
Sub-scalre Line Checked - - - -
Unchecked
No. of Division - - - -
Scale Time Properties Time Scale ViewportLength
Set a value in the numeral field of ViewportLength.
If the value is lass than 1minute, enter 1.
If the value is 745 hours or longer, enter 31 days.
Indirect Reference - - - -
Unit Sec Properties Time Scale ViewportLength
Set a unit in the unit field of ViewportLength.
Select Minutes because the unit of
second is not available
Min Properties Time Scale ViewportLength
Set a Unit in the numeral field of
ViewportLength. Select Minutes
Hour Properties Time Scale ViewportLength
Set a unit in the unit field of
ViewportLength. Select Hour
Date & Time Display
Date ON Checked
Unchecked - - - -
Time ON Checked
Unchecked - - - -
Switch Text Color - - - - Appearance - GridForegroundColor
Text Attribute
Refer to the “DateTime_Format” sheet in “Appendix 4: Lamps.”
Refer to the “Text Attributes” sheet in “Appendix 2: Object Common Settings.”
Default
Default
Default
Default
Refer to the “DateTime_Format” sheet in “Appendix 4: Lamps.”
Sysmac Studio
Data Log Object
CX-Designer
The following settings are available only
when Scale is checked.
The following settings are available only
when Scale is checked.

Trend Graph
(2/4)
Tab 1st Level 2nd Level 3rd Level Set Value Category Group Property Set Value Remarks
Time Axis Use Cursor Unchecked Properties Behavior IsCursor1Visible Unchecked
Checked
Properties Behavior IsCursor1Visible Checked
Cursor Color - - - - The color is fixed.
Transmit Numeral Data to
- - - -
Data Enable/Disable Bit - - - -
Transfer Date & Time Checked/Unchecked - - - -
Transfer Date & Time to - - - -
Transmit the data with
offset time display format
Checked/Unchecked
- - - -
Graph Display Position
Position end of scrolling at the center
of data log graph
Checked/Unchecked
- - - -
Unchecked
Checked - - - -
Scroll Control Flag - - - -
Address for Specifying Scroll Interval - - - -
Unit Sec - - - -
Min - - - -
Hour - - - -
Numeral Value Axis
Scale Unchecked Properties Left Scale IsLeftAxisVisible Unchecked
Checked Properties Left Scale IsLeftAxisVisible Checked
Line
Checked Properties Left Scale
LeftAxisGridMajorLinesVisible
Checked
Unchecked Properties Left Scale LeftAxisGridMajorLinesVisible Unchecked
Color Properties Appearance GridForegroundColor The same color as NS
The color set for the Time Axis is
reflected in Numeral Value Axis
No. of Division - - - -
Scale Length - - - -
Sub-scale Unchecked
q
Checked
- - - -
Sub-scalre Line Checked Properties Left Scale LeftAxisGridMinorLinesVisible Checked
Unchecked Properties Left Scale LeftAxisGridMinorLinesVisible Unchecked
No. of Division - - - -
Scale Settings Unchecked
Checked
- - - -
Storage Type - - - -
Maximum Properties Left Scale LeftAxisMaximumValue The same value as NS
Indirect Reference Checked/Unchecked - - - -
Minimum Properties Left Scale LeftAxisMinimumValue The same value as NS
Indirect Reference Checked/Unchecked - - - -
Data Log Objects
CX-Designer
The following settings are available only
when Scale is checked.
The following settings are available only
when Scale is checked.
The following settings are available only
when Scale is checked.
The following settings are available only
when Scale is checked.
The following settings are available only
when Scale is checked.
Sysmac Studio
Default
Default
Set Address for Updating Display
Default
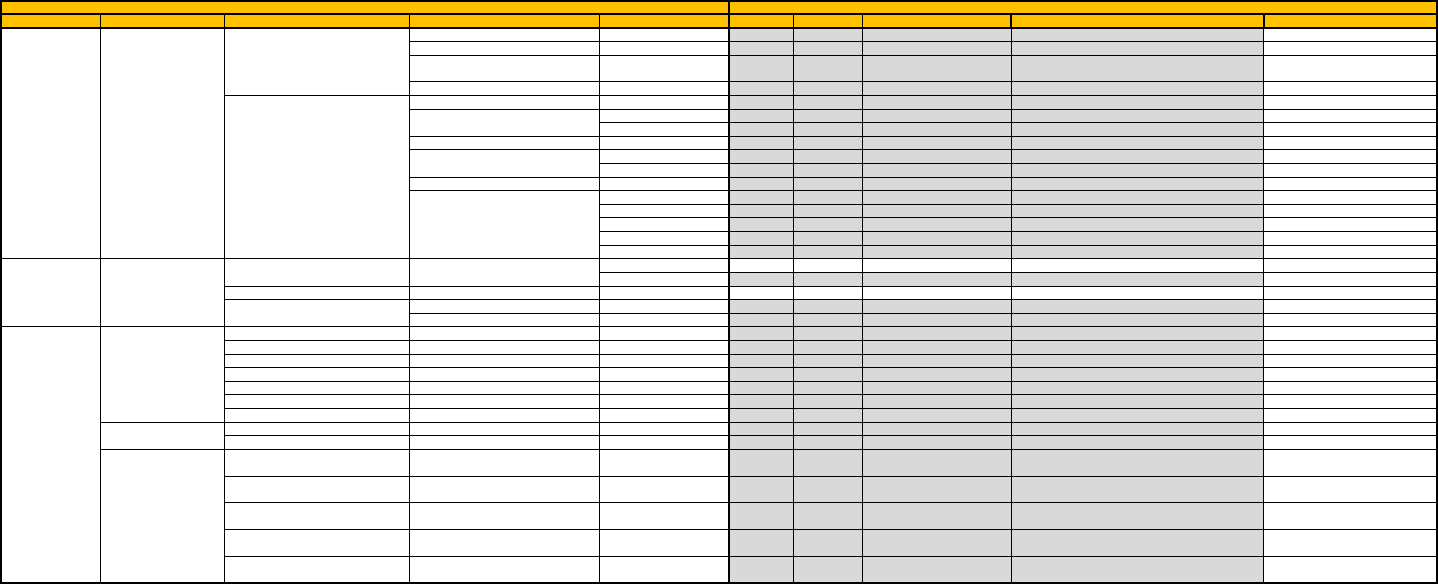
Trend Graph
(3/4)
Tab 1st Level 2nd Level 3rd Level Set Value Category Group Property Set Value Remarks
Numeral Value Axis
Scale Settings Checked/Unchecked - - - -
Format - - - -
Text Attribute
- - - -
The color set for the Time Axis is
reflected in Numeral Value Axis
Text - - - -
Appearance - GridForegroundColor
Set the threshold - - - -
Threshold H - - - -
Checked/Unchecked - - - -
Line Color - - - -
Threshold L - - - -
Checked/Unchecked - - - -
Line Color - - - -
Line Style Solid line - - - -
Dotted lilne - - - -
Broken line - - - -
Single chain line - - - -
Double chain line - - - -
Background
Unchecked
Properties Appearance GridBackgroundColor Transparent
Checked
- - - -
Color Properties Appearance GridBackgroundColor The same color as NS
Indirect Reference of Color
Checked/Unchecked - - - -
Address - - - -
Icon Icons Stop Checked/Unchecked - - - -
Restart Checked/Unchecked - - - -
Status Checked/Unchecked - - - -
Log Clear Checked/Unchecked - - - -
Pause Checked/Unchecked - - - -
Save to File Checked/Unchecked - - - -
Read File Checked/Unchecked - - - -
Icon Size Width - - - -
Height - - - -
Options
Show Confirmation Dialog when
Stopping
Checked/Unchecked
- - - -
Show Confirmation Dialog when
Restarting
Checked/Unchecked
- - - -
Show Confirmation Dialog when
Deleting Log Data
Checked/Unchecked
- - - -
Show Confirmation Dialog when
Pausing
Checked/Unchecked
- - - -
Show Confirmation Dialog when
Saving to a File
Checked/Unchecked
- - - -
Tile Background
Show values
The following settings are available only
when Scale is checked.
Data Log Objects
CX-Designer
Sysmac Studio

Trend Graph
(4/4)
Tab 1st Level 2nd Level 3rd Level Set Value Category Group Property Set Value Remarks
Icon Options
Show Confirmation Dialog when
Reading a CSV File
Checked/Unchecked
- - - -
Show the read data only
- - - -
Cascade the read data to
a graph
- - - -
Unchecked
Checked
Buttons for Scrolling One
Line
Checked/Unchecked
- - - -
Checked/Unchecked
- - - -
Lines to Scroll Lines in 1 Page - - - -
Lines in 1/2 Page - - - -
Specified Lines - - - -
Button Size Width - - - -
Height - - - -
Scroll Bar
Use Scroll Bar
Default
Use Buttons for Scrolling Multiple Lines
Buttons for Scrolling
Multiple Lines
Options for showing the read file
Data Log Objects
CX-Designer
Sysmac Studio

Appendix 6: Alarm and Others
◆Alarm History
User Alarms Viewer
(1/3)
Tab 1st Level 2nd Level 3rd Level Set Value Category Group Property Set Value
General Object Comment - - - -
Display Data Currently Occurred Alarms Properties Behavior HistoricalMode Unchecked
Alarm History Properties Behavior HistoricalMode Checked
Group Specification
Display Only the
Specified Group
Checked/ Unchecked - - - -
Date Checked/ Unchecked - - - -
Time Checked/ Unchecked - - - -
Display Type High Alarm Checked/ Unchecked - - - -
Middle Alarm Checked/ Unchecked - - - -
Low Alarm Checked/ Unchecked - - - -
Event Checked/ Unchecked - - - -
Default Display Order From New Date & Time Properties Behavior DefaultSortColumn
Date and Time The default
sort order is Descending.
From Old Date & Time Properties Behavior DefaultSortColumn
Date and Time The default
sort order is Ascending.
From High Priority Properties Behavior DefaultSortColumn
Priority The default
sort order is Descending.
From Low Priority Properties Behavior DefaultSortColumn
Priority The default
sort order is Ascending.
From High Frequency - - - -
From Low Frequency - - - -
Display in the
Same Line
Display the same alarm/event in the
same line when displaying by frequency
Checked/ Unchecked
- - - -
Checked/ Unchecked - - - -
Address - - - -
Switch Screen to the Specified Page Set
with Alarm/Event Setting
Checked/ Unchecked
- - - -
Switch to the Specified Contents
Display Set with Alarm/Event Setting
Checked/ Unchecked
- - - -
Display Selection Bar Color Properties Appearance SelectedItemColor The same color as NS
Line Height - - - -
Display Optimization Minimize column space Checked/ Unchecked - - - -
Checked/ Unchecked - - - -
Date Display Optimization Checked/ Unchecked - - - -
Checked/ Unchecked - - - -
Title Line Checked/ Unchecked - - - -
Checked/ Unchecked - - - -
Message box display
Show alarm message
Checked/ Unchecked
- - - -
Display Items Group No. Checked Properties Appearance Column Select Group.
Unchecked Properties Appearance Column Not select Group.
Display Type Checked Properties Appearance Column Select Priority.
Unchecked Properties Appearance Column Not select Priority.
Priority Checked Properties Appearance Column Select Priority.
Unchecked Properties Appearance Column Not select Priority.
CX-Designer
Sysmac Studio
Alarm/Event Summary and History Object
Write the Alarm ID to
the Specified Address
Movement when
Alarm/Event
is Selected
Date and Time
Display Format

User Alarms Viewer
(2/3)
Tab 1st Level 2nd Level 3rd Level Set Value Category Group Property Set Value
Display Display Items
Checked Time
(Date&Time)
Checked/ Unchecked - - - -
No. of Occurrences Checked/ Unchecked - - - -
Time of Occur. Checked Properties Appearance Column Select Date and Time.
Unchecked Properties Appearance Column Not select Date and Time.
Time of Cancel Checked/ Unchecked - - - -
Info1 Checked
Properties Appearance Column Select Additional Information.
Unchecked Properties Appearance Column Not select Additional Information.
Info2 Checked/ Unchecked - - - -
Info3 Checked/ Unchecked - - - -
Ruled Line Display Ruled Line Checked/ Unchecked - - - -
History Display Type
Display Time of Occurrence/
Cancellation in the Same Line
Checked/ Unchecked
- - - -
Display Time of Occurrence/
Cancellation in the Separated Line
Checked/ Unchecked
- - - -
Occurring Unchecked Properties Appearance RaisedUnacknow ledgedColor The same color as NS
Occurring Checked Properties Appearance RaisedAcknow ledgedColor The same color as NS
Cancelled Unchecked Properties Appearance ClearedUnacknow ledgedColor The same color as NS
Cancelled Checked Properties Appearance ClearedAcknow ledgedColor The same color as NS
Text Text Attribute
Use Text Color/Font of
Alarm/Event Setting
Checked/ Unchecked
- - - -
Background Tile Background Checked - - - -
Unchecked Properties Appearance BackgroundColor Transparent
Color Properties Appearance BackgroundColor The same color as NS
Properties Appearance HeaderBackgroundColor The same color as NS
Indirect Reference of Color - - - -
Address - - - -
Icon Icons From New Date & Time Checked/ Unchecked - - - -
From Old Date & Time Checked/ Unchecked - - - -
From High Priority Checked/ Unchecked - - - -
From Low Priority Checked/ Unchecked - - - -
From High Frequency Checked/ Unchecked - - - -
From Low Frequency Checked/ Unchecked - - - -
Delete Selected Alarm Checked/ Unchecked - - - -
Check Selected Alarm Checked/ Unchecked - - - -
Check All Alarms Checked/ Unchecked - - - -
Cancel All Alarms’ Check Checked/ Unchecked - - - -
Change Display Type Checked/ Unchecked - - - -
Options
Enable Deletion of
Unchecked Alarms
Checked/ Unchecked
- - - -
Enable Deletion of
Currently Occurred Alarms
Checked/ Unchecked
- - - -
Display Confirmation Dialog
When Deleting Alarms
Checked/ Unchecked
- - - -
Display Confirmation Box
When Canceling Checks
Checked/ Unchecked
- - - -
Refer to the “Text Attributes” sheet in “Appendix 2: Object Common Settings.”
CX-Designer
Sysmac Studio
Colors for
Showing Statuses
Alarm/Event Summary and History Object

User Alarms Viewer
(3/3)
Tab 1st Level 2nd Level 3rd Level Set Value Category Group Property Set Value
Icon Width - - - -
Height - - - -
Use Scroll Bar Checked/ Unchecked
- - - -
Buttons for Scrolling
One Line
Checked/ Unchecked
- - - -
Checked/ Unchecked - - - -
Lines in 1 Page - - - -
Lines in 1/2 Page - - - -
Specified Lines - - - -
Button Size Width - - - -
Height - - - -
Use Scroll Bar Checked/ Unchecked
- - - -
Buttons for Scrolling
One Row
Checked/ Unchecked
- - - -
Checked/ Unchecked - - - -
Rows in 1 Page - - - -
Rows in 1/2 Page - - - -
Specified No. of Rows - - - -
Macro
Macro Execution
Condition
When Selecting an
Alarm/Event
- - - -
Use Buttons for
Scrolling Multiple Lines
Use Buttons for
Scrolling Multiple Rows
Alarm/Event Summary and History Objects
CX-Designer
Sysmac Studio
Buttons for Scrolling
Multiple Lines
Vertical
Scroll Bar
Horizontal
Scroll Bar
Buttons for Scrolling
Multiple Rows
Icon Size
Rows to
Scroll
Lines to
Scroll

◆Data Block
Recipe
(1/2)
Tab 1st Level 2nd Level 3rd Level Set Value Category Group Property Set Value Remarks
General Object Comment - - - -
Data Block Selection Data block Properties Behavior
DisplayedTemplate Group name
Display No. of rows - - - -
Field Settings - - - -
Text Text Attribute
Indirect Reference of
Text Color
Checked/ Unchecked
- - - -
Background Color 1 Properties Appearance
IngredientsHeader
BackgroundColor
The same color as NS
Color 2
- - - -
Colors cannot be selected for
lines.
Color 3
- - - -
Odd lines and even lines
are the same color.
Color 4
- - - -
Odd lines and even lines
are the same color.
Color 5 Properties Appearance
Ingredients
BackgroundColor
The same color as NS
Icon Icons Read Data File Checked/ Unchecked - - - -
Write Data File Checked/ Unchecked - - - -
Write to the address Checked/ Unchecked - - - -
Read from the address Checked/ Unchecked - - - -
Add the record Checked/ Unchecked - - - -
Delete the record Checked/ Unchecked - - - -
Options
Display confirmation dialog box
when reading data file
Checked/ Unchecked
- - - -
Display confirmation dialog box
when writing data file
Checked/ Unchecked
- - - -
Display confirmation dialog box
when writing to the address
Checked/ Unchecked
- - - -
Display confirmation dialog box
when reading from the address
Checked/ Unchecked
- - - -
Display confirmation dialog box
when adding to the record
Checked/ Unchecked
- - - -
Display confirmation dialog box
when deleting from the record
Checked/ Unchecked
- - - -
Icon Size Width - - - -
Height - - - -
Alarm History
CX-Designer
Sysmac Studio
Refer to the “Text Attributes” sheet in “Appendix 2: Object Common Settings.”

Recipe
(2/2)
Tab 1st Level 2nd Level 3rd Level Set Value Category Group Property Set Value Remarks
Vertical Scroll Bar
Use Scroll Bar Checked/ Unchecked
- - - -
Checked/ Unchecked - - - -
Unchecked - - - -
Checked/ Unchecked - - - -
Lines in 1 Page - - - -
Lines in 1/2 Page - - - -
Specified Lines - - - -
Button Size Width - - - -
Height - - - -
Horizontal Scroll Bar
Use Scroll Bar Checked/ Unchecked
- - - -
Checked/ Unchecked - - - -
Unchecked - - - -
Checked/ Unchecked
- - - -
Rows in 1 Page - - - -
Rows in 1/2 Page - - - -
Specified No. of Rows - - - -
Address Address Animations Visibility
Variable mapped to the
address
Macro
Before inputting
numeral/string
- - -
Before writing
numeral/string
- - -
Buttons for Scrolling
One Row
Use Buttons for Scrolling Multiple
Rows
Buttons for Scrolling
Multiple Rows
Rows to Scroll
Lines to Scroll
Buttons for Scrolling
Multiple Lines
Use Buttons for Scrolling Multiple
Lines
Data Block
CX-Designer
Sysmac Studio
Buttons for Scrolling
One Line

Authorized Distributor:
Kyoto, JAPAN Contact : www.ia.omron.com
Regional Headquarters
OMRON ASIA PACIFIC PTE. LTD.
438B Alexandra Road, #08-01/02 Alexandra
Technopark, Singapore 119968
Tel: (65) 6835-3011 Fax: (65) 6835-2711
OMRON ELECTRONICS LLC
2895 Greenspoint Parkway, Suite 200
Hoffman Estates, IL 60169 U.S.A.
Tel: (1) 847-843-7900 Fax: (1) 847-843-7787
OMRON (CHINA) CO., LTD.
Room 2211, Bank of China Tower,
200 Yin Cheng Zhong Road,
PuDong New Area, Shanghai, 200120, China
Tel: (86) 21-5037-2222 Fax: (86) 21-5037-2200
OMRON EUROPE B.V.
Wegalaan 67-69, 2132 JD Hoofddorp
The Netherlands
Tel: (31) 2356-81-300 Fax: (31) 2356-81-388
Note: Do not use this document to operate the Unit.
OMRON Corporation Industrial Automation Company
Cat. No. X000-E1-01 0922 (0922)
Printed in Japan
©OMRON Corporation 2022 All Rights Reserved.
In the interest of product improvement,
specifications are subject to change without notice.
V469-E1-02
0423 (0423)
2023
(
65
)
6835-3011
(
86
)
21-6023-0333
(
86
)
21-5037-2388
