
Oracle® Database
2 Day + PHP Developer's Guide
11g Release 2 (11.2)
E10811-01
July 2009
Oracle Database 2 Day + PHP Developer's Guide, 11g Release 2 (11.2)
E10811-01
Copyright © 2009, Oracle and/or its affiliates. All rights reserved.
Primary Author: Simon Watt
Contributors: Christopher Jones, Simon Law, Glenn Stokol
This software and related documentation are provided under a license agreement containing restrictions on
use and disclosure and are protected by intellectual property laws. Except as expressly permitted in your
license agreement or allowed by law, you may not use, copy, reproduce, translate, broadcast, modify, license,
transmit, distribute, exhibit, perform, publish, or display any part, in any form, or by any means. Reverse
engineering, disassembly, or decompilation of this software, unless required by law for interoperability, is
prohibited.
The information contained herein is subject to change without notice and is not warranted to be error-free. If
you find any errors, please report them to us in writing.
If this software or related documentation is delivered to the U.S. Government or anyone licensing it on
behalf of the U.S. Government, the following notice is applicable:
U.S. GOVERNMENT RIGHTS Programs, software, databases, and related documentation and technical data
delivered to U.S. Government customers are "commercial computer software" or "commercial technical data"
pursuant to the applicable Federal Acquisition Regulation and agency-specific supplemental regulations. As
such, the use, duplication, disclosure, modification, and adaptation shall be subject to the restrictions and
license terms set forth in the applicable Government contract, and, to the extent applicable by the terms of
the Government contract, the additional rights set forth in FAR 52.227-19, Commercial Computer Software
License (December 2007). Oracle USA, Inc., 500 Oracle Parkway, Redwood City, CA 94065.
This software is developed for general use in a variety of information management applications. It is not
developed or intended for use in any inherently dangerous applications, including applications which may
create a risk of personal injury. If you use this software in dangerous applications, then you shall be
responsible to take all appropriate fail-safe, backup, redundancy, and other measures to ensure the safe use
of this software. Oracle Corporation and its affiliates disclaim any liability for any damages caused by use of
this software in dangerous applications.
Oracle is a registered trademark of Oracle Corporation and/or its affiliates. Other names may be trademarks
of their respective owners.
This software and documentation may provide access to or information on content, products, and services
from third parties. Oracle Corporation and its affiliates are not responsible for and expressly disclaim all
warranties of any kind with respect to third-party content, products, and services. Oracle Corporation and
its affiliates will not be responsible for any loss, costs, or damages incurred due to your access to or use of
third-party content, products, or services.

iii
Contents
Preface ................................................................................................................................................................. v
Audience....................................................................................................................................................... v
Documentation Accessibility..................................................................................................................... v
Related Documents ..................................................................................................................................... vi
Conventions ................................................................................................................................................. vi
1 Introducing PHP with Oracle Database
Purpose....................................................................................................................................................... 1-1
Overview of the Sample Application................................................................................................... 1-1
Resources ................................................................................................................................................... 1-3
2 Getting Started
What You Need ........................................................................................................................................ 2-1
Installing Oracle Database ..................................................................................................................... 2-1
Unlocking the HR User ..................................................................................................................... 2-2
Installing Apache HTTP Server ............................................................................................................ 2-2
Installing Apache on Windows........................................................................................................ 2-3
Starting and Stopping Apache on Windows.................................................................................. 2-3
Testing the Apache Installation on Windows................................................................................ 2-3
Installing Apache on Linux .............................................................................................................. 2-4
Starting and Stopping Apache on Linux ........................................................................................ 2-4
Testing the Apache Installation on Linux....................................................................................... 2-5
Installing PHP........................................................................................................................................... 2-6
Installing PHP on Windows............................................................................................................. 2-7
Installing PHP on Linux.................................................................................................................... 2-8
Testing the PHP Installation .................................................................................................................. 2-9
3 Getting Connected
Building the Departments Page ............................................................................................................ 3-1
Connecting to the Database.................................................................................................................... 3-4
If You Have Connection Problems .................................................................................................. 3-6
Other Ways to Connect ..................................................................................................................... 3-6
Disconnecting from the Database......................................................................................................... 3-7
iv
4 Querying Data
Centralizing the Database Application Logic..................................................................................... 4-1
Writing Queries with Bind Variables ................................................................................................... 4-5
Navigating Through Database Records............................................................................................... 4-7
ROWNUM vs ROW_NUMBER() ................................................................................................. 4-11
Extending the Basic Departments Page ............................................................................................ 4-11
5 Updating Data
Building the Basic Employees page...................................................................................................... 5-1
Extending the Basic Employees Page ................................................................................................... 5-3
Combining Departments and Employees ........................................................................................ 5-13
Adding Error Recovery......................................................................................................................... 5-17
Further Error Handling ........................................................................................................................ 5-25
6 Executing Stored Procedures and Functions
Using PL/SQL to Capture Business Logic ........................................................................................... 6-1
Using PL/SQL Ref Cursors to Return Result Sets ............................................................................. 6-4
7 Loading Images
Using BLOBs to Store and Load Employee Images........................................................................... 7-1
Resizing Images........................................................................................................................................ 7-8
8 Building Global Applications
Establishing the Environment Between Oracle and PHP ................................................................ 8-1
Manipulating Strings .............................................................................................................................. 8-2
Determining the Locale of the User...................................................................................................... 8-2
Developing Locale Awareness............................................................................................................... 8-3
Encoding HTML Pages............................................................................................................................ 8-3
Specifying the Page Encoding for HTML Pages ........................................................................... 8-4
Specifying the Page Encoding in PHP ............................................................................................ 8-4
Organizing the Content of HTML Pages for Translation ................................................................ 8-4
Strings in PHP .................................................................................................................................... 8-5
Static Files............................................................................................................................................ 8-5
Data from the Database..................................................................................................................... 8-5
Presenting Data Using Conventions Expected by the User ............................................................ 8-5
Oracle Date Formats .......................................................................................................................... 8-5
Oracle Number Formats.................................................................................................................... 8-6
Oracle Linguistic Sorts....................................................................................................................... 8-7
Oracle Error Messages....................................................................................................................... 8-8
Index

v
Preface
Oracle Database 2 Day + PHP Developer's Guide introduces developers to the use of PHP
to access Oracle Database.
This preface contains these topics:
■ Audience
■ Documentation Accessibility
■ Related Documents
■ Conventions
Audience
Oracle Database 2 Day + PHP Developer's Guide is an introduction to application
development using PHP and Oracle Database.
This document assumes that you have a cursory understanding of SQL, PL/SQL, and
PHP.
Documentation Accessibility
Our goal is to make Oracle products, services, and supporting documentation
accessible to all users, including users that are disabled. To that end, our
documentation includes features that make information available to users of assistive
technology. This documentation is available in HTML format, and contains markup to
facilitate access by the disabled community. Accessibility standards will continue to
evolve over time, and Oracle is actively engaged with other market-leading
technology vendors to address technical obstacles so that our documentation can be
accessible to all of our customers. For more information, visit the Oracle Accessibility
Program Web site at http://www.oracle.com/accessibility/.
Accessibility of Code Examples in Documentation
Screen readers may not always correctly read the code examples in this document. The
conventions for writing code require that closing braces should appear on an
otherwise empty line; however, some screen readers may not always read a line of text
that consists solely of a bracket or brace.
Accessibility of Links to External Web Sites in Documentation
This documentation may contain links to Web sites of other companies or
organizations that Oracle does not own or control. Oracle neither evaluates nor makes
any representations regarding the accessibility of these Web sites.

vi
Deaf/Hard of Hearing Access to Oracle Support Services
To reach Oracle Support Services, use a telecommunications relay service (TRS) to call
Oracle Support at 1.800.223.1711. An Oracle Support Services engineer will handle
technical issues and provide customer support according to the Oracle service request
process. Information about TRS is available at
http://www.fcc.gov/cgb/consumerfacts/trs.html, and a list of phone
numbers is available at http://www.fcc.gov/cgb/dro/trsphonebk.html.
Related Documents
For more information, see these Oracle resources:
■ Oracle Database 2 Day Developer's Guide
■ Oracle Database SQL Language Reference
■ Oracle Database PL/SQL Language Reference
■ SQL*Plus User's Guide and Reference
■ Oracle Database Globalization Support Guide
Conventions
The following text conventions are used in this document:
Convention Meaning
boldface Boldface type indicates graphical user interface elements associated
with an action, or terms defined in text.
italic Italic type indicates book titles, emphasis, or placeholder variables for
which you supply particular values.
monospace Monospace type indicates commands within a paragraph, URLs, code
in examples, text that appears on the screen, or text that you enter.

1
Introducing PHP with Oracle Database 1-1
1 Introducing PHP with Oracle Database
PHP is a popular scripting language that can be embedded in HTML, which makes it
particularly useful for Web development.
This chapter has the following topics:
■ Purpose
■ Overview of the Sample Application
■ Resources
Purpose
This document is a tutorial that shows you how to use PHP to connect to Oracle
Database, and demonstrates how to use PHP to access and modify data.
Overview of the Sample Application
This document guides you through the development of a sample Human Resources
(HR) application for a fictitious company called AnyCo Corp. For this introduction to
the PHP language no framework or abstraction layer is used. However, PHP
frameworks are becoming popular and they should be evaluated when building any
large application.
The application manages departmental and employee data stored in the
DEPARTMENTS and EMPLOYEES tables in the HR schema provided with Oracle
Database. See Oracle Database Sample Schemas for information about this schema.
The complete sample application:
■ Establishes a connection to the database using the PHP OCI8 extension
■ Queries the database for departmental and employee data
■ Displays and navigates through the data
■ Shows how to insert, update, and delete employee records
■ Handles data exceptions
■ Uploads and displays employee photographs
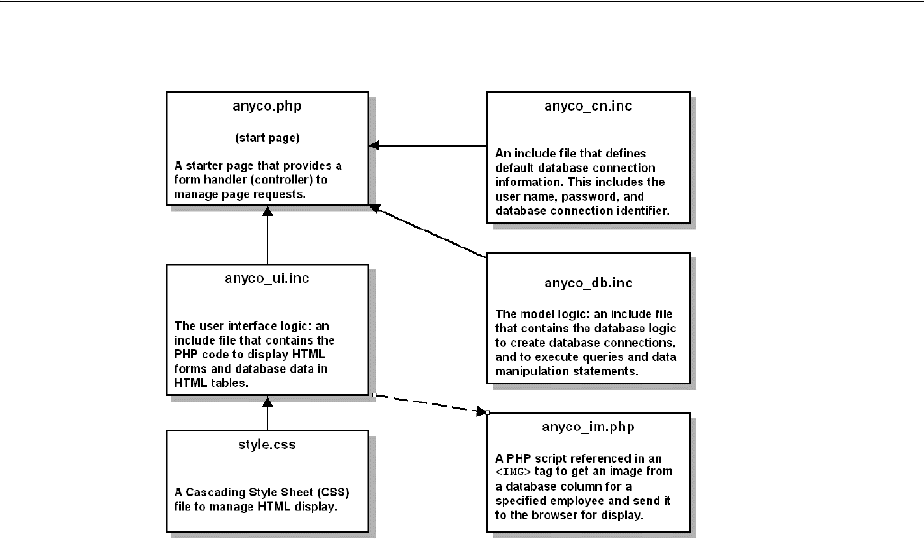
Figure 1-1 shows the relationship among the files developed for this application.
Overview of the Sample Application
1-2 Oracle Database 2 Day + PHP Developer's Guide
Figure 1–1 Components of the Sample HR Application
The sample application files are:
anyco.php This file contains the main logic for the AnyCo application. It
contains control logic that determines which page is displayed. It manages session
data for navigation. It calls functions in the include files anyco_cn.inc, anyco_
db.inc, and anyco_ui.inc.
anyco_ui.inc This file contains the functions used to present data and forms in
an HTML page.
anyco_cn.inc This file contains definitions for database connection
information, the database user name, password, and database connection
identifier.
anyco_db.inc This file contains the database logic to create database
connections, execute queries, and execute data manipulation statements.
anyco_im.php This file contains logic to retrieve an image from a database
column and send it to a Web browser for display as a JPEG image.
style.css This file contains Cascading Style Sheet (CSS) definitions for various
HTML tags generated by the application. It manages the look and feel of the
application.
Files with the suffix .inc are PHP code files included in other PHP files.
Files with the suffix .php can be loaded in a Web browser.
You can create and edit the PHP application source files in a text editor or any tool that
supports PHP development.
The code for each chapter builds on the files completed in the previous chapter.

Resources
Introducing PHP with Oracle Database 1-3
Resources
The following Oracle Technology Network Web sites provide additional information
you may find useful.
■ PHP Developer Center at
http://www.oracle.com/technology/tech/php/index.html
■ Oracle Database Documentation Library at
http://www.oracle.com/technology/documentation
■ Oracle SQL Developer center at
http://www.oracle.com/technology/products/database/sql_
developer/

Resources
1-4 Oracle Database 2 Day + PHP Developer's Guide

2
Getting Started 2-1
2 Getting Started
This chapter explains how to install and test Oracle Database and PHP environment. It
has the following topics:
■ What You Need
■ Installing Oracle Database
■ Installing Apache HTTP Server
■ Installing PHP
■ Testing the PHP Installation
What You Need
To install your Oracle Database and PHP environment, you need:
■ Oracle Database Server which includes the sample data for this tutorial
■ Oracle Database Client libraries are included with the Oracle Database software or
can be installed using Oracle Instant Client
■ Apache HTTP Server which is typically already installed on Linux computers
■ PHP - PHP Hypertext Preprocessor
■ A text editor for editing PHP code. A code editor such as Oracle JDeveloper with
the optional PHP Extension can also be used.
Installing Oracle Database
You should install Oracle Database Server on your computer. The sample data used in
this tutorial is installed by default. It is the HR component of the Sample Schemas.
Throughout this tutorial Oracle SQL Developer is the graphical user interface used to
perform Database tasks. Oracle SQL Developer is a free graphical tool for database
development.
See Also:
■ Oracle Database Sample Schemas guide for information about the HR
sample schema.
■ Oracle SQL Developer web page
http://www.oracle.com/technology/products/database/sql
_developer/

Installing Apache HTTP Server
2-2 Oracle Database 2 Day + PHP Developer's Guide
Unlocking the HR User
The PHP application connects to the database as the HR user. You may need to unlock
the HR account as a user with DBA privileges. To unlock the HR user:
1. Open SQL Developer and open a connection to your Oracle database.
2. Login to your Oracle database as system.
3. Open SQL Worksheet or SQL*Plus and run the following SQL statement:
alter user hr account unlock;
For further information about unlocking an Oracle Database account, see Chapter 6,
"Managing Users and Security," in the Oracle Database 2 Day DBA guide.
Installing Apache HTTP Server
You should install Apache before you install PHP. Apache is typically installed by
default on Linux computers. See Testing the Apache Installation on Linux before
downloading the Apache software.
Perform the following steps to obtain Apache HTTP Server for Windows or Linux:
1. Enter the following URL in your Web browser:
http://httpd.apache.org/download.cgi
2. For Windows, click the apache_2.2.12-win32-x86-no_ssl.msi. For Linux, click
httpd-2.2.12.tar.bz2.
3. Save the downloaded file in a temporary directory, such as c:\tmp on Windows
or \tmp on Linux.
See Also:
■ Oracle Database documentation
http://www.oracle.com/technology/documentation

Installing Apache HTTP Server
Getting Started 2-3
Installing Apache on Windows
This section describes how to install Apache HTTP Server on Windows.
The file name and extraction directory are based on the current version. Throughout
this procedure, ensure you use the directory name for the version you are installing.
You must be the administrator user to install Apache.
To install Apache, double-click the file and follow the wizards.
The default installation directory is likely to be C:\Program Files\Apache
Group. This is the directory that is assumed for the tutorial exercises. If you install to a
different directory, you need to note the directory so you can change the path used in
the tutorials.
Starting and Stopping Apache on Windows
You can use the Start menu option to start Apache. This opens a console window
showing any error messages. Error messages may also be written to C:\Program
Files\Apache Group\Apache2\logs\error.log.
You can also use the ApacheMonitor utility to start Apache. It will appear as an icon in
your System Tray, or navigate to the Apache bin directory and double click
ApacheMonitor.exe. In a default installation, Apache bin is located at
c:\Program Files\Apache Group\Apache2\bin.
You can also use the Windows Services to start Apache. You access Windows Services
from the Windows Start menu at Start > Control Panel > Administrative Tools >
Services. Select the Standard tab. Right click the Apache2 HTTP Server and then
select Restart
If you have errors, double check your httpd.conf and php.ini files.
Testing the Apache Installation on Windows
To test the Apache HTTP Server installation:
1. Start your Web browser on the computer on which you installed Apache.
2. Enter the following URL:
http://localhost/
Your Web browser will display a page similar to the following:

Installing Apache HTTP Server
2-4 Oracle Database 2 Day + PHP Developer's Guide
If this page does not appear check your Apache configuration. Common problems
are that Apache is not running, or that it is listening on a non-default port.
Installing Apache on Linux
This section describes how to install Apache HTTP Server on Linux.
The file name and extraction directory are based on the current version. Throughout
this procedure, ensure you use the directory name for the version you are installing.
Apache is typically already installed on Linux. If you find it is not installed after
Testing the Apache Installation on Linux, perform the following steps to install the
Apache HTTP Server:
1. Go to the directory where you downloaded the httpd-2.2.12.tar.bz2 file.
2. Log in as the root user and execute these commands:
# tar -jxvf httpd-2.2.12.tar.bz2
# cd httpd-2.2.12
# export ORACLE_HOME=/usr/lib/oracle/app/oracle/product/10.2.0/server
# ./configure \
--prefix=/usr/local/apache \
--enable-module=so \
# make
# make install
The option --enable-module=so allows PHP to be compiled as a Dynamic
Shared Object (DSO). The --prefix= option sets the Apache installation
directory used by the command make install
Starting and Stopping Apache on Linux
You use the apachectl script to start and stop Apache.
Start Apache with the apachectl script:
# /usr/local/apache/bin/apachectl start
Stop Apache with the apachectl script:
# /usr/local/apache/bin/apachectl stop

Installing Apache HTTP Server
Getting Started 2-5
When you start Apache, you must have ORACLE_HOME defined. Any other required
Oracle environment variables must be set before Apache starts too. These are the same
variables set by the $ORACLE_HOME/bin/oracle_env.sh or the
/usr/local/bin/oraenv scripts.
For convenience, you could create a script to start Apache as follows:
#!/bin/sh
ORACLE_HOME=/usr/lib/oracle/app/oracle/product/10.2.0/server
export ORACLE_HOME
echo "Oracle Home: $ORACLE_HOME"
echo Starting Apache
/usr/local/apache/bin/apachectl start
Testing the Apache Installation on Linux
To test the Apache HTTP Server installation:
1. Start your Web browser on the host on which you installed Apache, and enter the
following URL:
http://localhost/
Your Web browser will display a page similar to the following:
If this page does not appear, check your Apache configuration. Common problems
are that Apache is not running, or that it is listening on a non default port.
2. In the default Apache HTTP Server configuration file, set up a public virtual
directory as public_html for accessing your PHP files. Use your preferred editor
to open the Apache configuration file /etc/httpd/conf/httpd.conf (the
directory may be different in your installation of Linux), and remove the pound
sign (#) at the start of the following line:
UserDir public_html
In this example, your Apache httpd.conf file contains the following lines:
<IfModule mod_userdir.c>
#
# UserDir is disabled by default since it can confirm the presence

Installing PHP
2-6 Oracle Database 2 Day + PHP Developer's Guide
# of a username on the system (depending on home directory
# permissions).
#
#UserDir disable
#
# To enable requests to /~user/ to serve the user's public_html
# directory, remove the "UserDir disable" line above, and uncomment
# the following line instead:
#
UserDir public_html
</IfModule>
This enables the Web browser to make an HTTP request using a registered user on
the system and to serve files from the $HOME/public_html directory of the user.
For example:
http://localhost/~user/
3. To use the new Apache configuration file, in a command window, restart Apache
by entering the following commands:
su -
Password: <enter your su (root) password>
apachectl restart
If the Apache HTTP Server does not start, check the error log files to determine the
cause. It may be a configuration error.
4. In the command window, log in (not root) and create a
public_html subdirectory in the $HOME directory with the following command:
mkdir $HOME/public_html
Installing PHP
Perform the following steps to obtain PHP for Windows or Linux:
1. Enter the following URL in your Web browser:
http://www.php.net/downloads.php

Installing PHP
Getting Started 2-7
2.
For Windows, click the 5.2.10 zip package under Windows Binaries. For Linux,
click php-5.2.10.tar.bz2 under Complete Source Code.
3. Save the downloaded file in a temporary directory, such as c:\tmp on Windows
or \tmp on Linux.
Installing PHP on Windows
This section describes how to install PHP on Windows.
The file name and extraction directory are based on the current version. Throughout
this procedure, ensure you use the directory name for the version you are installing.
You must be the administrator user to install PHP. To install PHP, perform the
following steps:
1. In Windows Explorer, go to the directory where you downloaded the PHP 5.2.10
zip file.
2. Unzip the PHP package to a directory called C:\php-5.2.10
3. Copy php.ini-recommended to C:\Program Files\Apache
Group\Apache2\conf\php.ini
4. Edit php.ini to make the following changes:
■ Change extension_dir to C:\php-5.2.10\ext, which is the directory
containing php_oci8.dll and the other PHP extensions.
■ Remove the semicolon from the beginning of the line
extension=php oci8.dll
■ Set the PHP directive, display_errors, to On. For testing it is helpful to see
any problems in your code.
5. Edit the file httpd.conf and add the following lines. Make sure you use forward
slashes '/' and not back slashes '\':
#
# This will load the PHP module into Apache
#
LoadModule php5_module c:/php-5.2.10/php5apache2.dll
#
# This next section will call PHP for .php, .phtml, and .phps files
#
AddType application/x-httpd-php .php
AddType application/x-httpd-php .phtml
AddType application/x-httpd-php-source .phps
#
# This is the directory containing php.ini
#
PHPIniDir "C:/Program Files/Apache Group/Apache2/conf"
6. Restart the Apache Server so that you can test your PHP installation.
You can use the Start menu option to start Apache. This opens a console window
showing any error messages. Error messages may also be written to C:\Program
Files\Apache Group\Apache2\logs\error.log.
You can also use the ApacheMonitor utility to start Apache. It will appear as an
icon in your System Tray, or navigate to the Apache bin directory and double

Installing PHP
2-8 Oracle Database 2 Day + PHP Developer's Guide
click ApacheMonitor.exe. In a default installation, Apache bin is located at
c:\Program Files\Apache Group\Apache2\bin.
You can also use the Windows Services to start Apache. You access Windows
Services from the Windows Start menu at Start > Control Panel > Administrative
Tools > Services. Select the Standard tab. Right click the Apache2 HTTP Server
and then select Restart
If you have errors, double check your httpd.conf and php.ini files.
Installing PHP on Linux
This section describes how to install PHP on Linux.
The file name and extraction directory are based on the current version. Throughout
this procedure, ensure you use the directory name for the version you are installing.
Perform the following steps to install PHP:
1. Go to the directory where you downloaded the php-5.2.10.tar.bz2 file.
2. Log in as the root user and execute these commands:
# tar -jxvf php-5.2.10.tar.bz2
# cd php-5.2.10
# export ORACLE_HOME=/usr/lib/oracle/app/oracle/product/10.2.0/server
# ./configure \
--with-oci8=$ORACLE_HOME \
--with-apxs2=/usr/local/apache/bin/apxs \
--with-config-file-path=/usr/local/apache/conf \
--enable-sigchild
# make
# make install
Check the value for ORACLE_HOME to ensure it reflects your Oracle version and
installation.
If you are behind a firewall, you may need to set the environment variable http_
proxy to your proxy server before running make install. This enables PHP's
PEAR components to be installed.
3. Copy PHP's supplied initialization file:
# cp php.ini-recommended /usr/local/apache/conf/php.ini
For testing it is helpful to edit php.ini and set the PHP directive, display_
errors, to On so you can see any problems in your code.
4. Edit Apache's configuration file /usr/local/apache/conf/httpd.conf and add the
following lines:
#
# This next section will call PHP for .php, .phtml, and .phps files
#
AddType application/x-httpd-php .php
AddType application/x-httpd-php .phtml
AddType application/x-httpd-php-source .phps
#
# This is the directory containing php.ini
#
PHPIniDir "/usr/local/apache/conf"

Testing the PHP Installation
Getting Started 2-9
If a LoadModule line was not inserted by the PHP install, add it with:
LoadModule php5_module modules/libphp5.so
5. Restart the Apache Server to test your PHP installation with the following:
# /usr/local/apache/bin/apachectl start
If there are errors, they will display on your screen. They may also be written to
/usr/local/apache/logs/error_log. If you have problems, double check
your httpd.conf and php.ini files.
Testing the PHP Installation
To test the PHP installation:
1. Create a subdirectory called chap2. To create a directory for your application files,
and to change to the newly created directory, enter the following commands in a
command window:
On Windows:
mkdir "c:\program files\Apache Group\Apache2\htdocs\chap2"
cd c:\program files\Apache Group\Apache2\htdocs\chap2
On Linux:
mkdir $HOME/public_html/chap2
cd $HOME/public_html/chap2
If you create files in a different location, you must change the steps for file editing
and execution to match your working directory name and URL.
2. Create a file called hello.php that contains the following HTML text:
<?php
echo "Hello, world!";
?>
3. Open a Web browser and enter the following URL in your browser:
On Windows:
http://localhost/chap2/hello.php
On Linux:
http://localhost/~<username>/chap2/hello.php
The line "Hello, world!" appears in the browser.

Testing the PHP Installation
2-10 Oracle Database 2 Day + PHP Developer's Guide

3
Getting Connected 3-1
3 Getting Connected
In this chapter, you create HR application files that implement PHP functions to
connect and disconnect to the Oracle Database. You also develop a PHP function that
enables you to execute a query to validate that a database connection has been
successfully established.
This chapter also guides you through the creation and modification of PHP files that
call a function to produce the header and footer for the Departments page, where the
footer section of the page includes a date and time.
This chapter has the following topics:
■ Building the Departments Page
■ Connecting to the Database
■ Disconnecting from the Database
Building the Departments Page
In this section, you will create the functions and styles for the first screen of your
application.
Follow these steps to build the Departments page:
1. To create a directory for your application files, and to change to the newly created
directory, enter the following commands in a command window:
On Windows:
mkdir c:\program files\Apache Group\Apache2\htdocs\chap3
cd c:\program files\Apache Group\Apache2\htdocs\chap3
On Linux:
mkdir $HOME/public_html/chap3
Note: For simplicity, the user name and password are written into
this sample application code. For applications that will be deployed,
coding the user name and password strings directly into your
application source code is not recommended. Oracle recommends that
you use a more secure technique, such as implementing a dialog that
prompts the user for the user name and password.
See Oracle Database Security Guide and the documentation for your
development environment for details on security features and
practices.

Building the Departments Page
3-2 Oracle Database 2 Day + PHP Developer's Guide
cd $HOME/public_html/chap3
If you create files in a different location, you must change the steps for file editing
and execution to match your working directory name and URL.
2. To start developing your application user interface, use your preferred text editor
to create a file called anyco_ui.inc that contains the two functions ui_print_
header() and ui_print_footer() with their parameters to enable your
application Web pages to have consistent header and footer sections:
<?php
function ui_print_header($title)
{
$title = htmlentities($title);
echo <<<END
<!DOCTYPE HTML PUBLIC "-//W3C//DTD HTML 4.01//EN"
"http://www.w3.org/TR/html4/strict.dtd">
<html>
<head>
<meta http-equiv="Content-Type"
content="text/html; charset=ISO-8859-1">
<link rel="stylesheet" type="text/css" href="style.css">
<title>Any Co.: $title</title>
</head>
<body>
<h1>$title</h1>
END;
}
function ui_print_footer($date)
{
$date = htmlentities($date);
echo <<<END
<div class="footer">
<div class="date">$date</div>
<div class="company">Any Co.</div>
</div>
END;
}
?>
■ This application design uses PHP function definitions to enable modular
reusable code.
■ The functions in anyco_ui.inc use a PHP language construct called a "here
document." This enables you to place any amount of HTML formatted text
between the following two lines:
echo <<<END
END;
■ Do not put leading spaces in the END; line. If you do, the rest of the document
will be treated as part of the text to be printed.
■ Any PHP parameters appearing inside the body of a "here document" are
replaced with their values, for example, the $title or $date parameters.

Building the Departments Page
Getting Connected 3-3
■ The PHP function htmlentities() is used to prevent user-supplied text
from accidentally containing HTML markup and affecting the output
formatting.
3. The PHP file uses a Cascading Style Sheet (CSS) file called style.css to specify
the presentation style in HTML in the browser.
Create a style.css file in the chap3 directory with the following CSS text:
body
{ background: #CCCCFF;
color: #000000;
font-family: Arial, sans-serif; }
h1
{ border-bottom: solid #334B66 4px;
font-size: 160%; }
table
{ padding: 5px; }
td
{ border: solid #000000 1px;
text-align: left;
padding: 5px; }
th
{ text-align: left;
padding: 5px; }
.footer
{ border-top: solid #334B66 4px;
font-size: 90%; }
.company
{ padding-top: 5px;
float: right; }
.date
{ padding-top: 5px;
float: left; }
4. To call the user interface functions, create the anyco.php file with the following
text:
<?php
require('anyco_ui.inc');
ui_print_header('Departments');
ui_print_footer(date('Y-m-d H:i:s'));
?>
The require() PHP command is used to include anyco_ui.inc. The new
functions can be called to produce HTML output.
5. To test the anyco.php file, enter the following URL in your browser:
On Windows:
http://localhost/chap3/anyco.php

Connecting to the Database
3-4 Oracle Database 2 Day + PHP Developer's Guide
On Linux:
http://localhost/~<username>/chap3/anyco.php
The resulting Web page is similar to the following:
The date and time appear in the page footer section.
Connecting to the Database
In this section, you will add a database connection to your Departments screen so that
you can display Department data.
Follow these steps to add a database connection to your application.
To form a database connection, you use the oci_connect() function with three
string parameters:
$conn = oci_connect($username, $password, $db)
The first and second parameters are the database user name and password,
respectively. The third parameter is the database connection identifier. The
oci_connect() function returns a connection resource needed for other OCI8 calls;
it returns FALSE if an error occurs. The connection identifier returned is stored in a
variable called $conn.
1. Edit the anyco.php file to add a database connection with the following
parameter values:
■ Username is hr.
■ Password for this example is hr. Remember to use the actual password of
your HR user.
■ Oracle connection identifier is //localhost/orcl.
2. Edit the anyco.php file to validate that the oci_connect() call returns a usable
database connection, write a do_query() function that accepts two parameters:
the database connection identifier, obtained from the call to oci_connect(), and
a query string to select all the rows from the DEPARTMENTS table.
3. Edit the anyco.php file to prepare the query for execution, add an oci_parse()
call. The oci_parse() function has two parameters, the connection identifier
and the query string. It returns a statement identifier needed to execute the query
and fetch the resulting data rows. It returns FALSE if an error occurs.
4. Edit the anyco.php file to execute the query, add a call to the oci_execute()
function. The oci_execute() function executes the statement associated with the
statement identifier provided in its first parameter. The second parameter specifies
the execution mode. OCI_DEFAULT is used to indicate that you do not want
statements to be committed automatically. The default execution mode is OCI_
COMMIT_ON_SUCCESS. The oci_execute() function returns TRUE on success;
otherwise it returns FALSE.

Connecting to the Database
Getting Connected 3-5
5.
Edit the anyco.php file to fetch all the rows for the query executed, add a while
loop and a call to the oci_fetch_array() function. The oci_fetch_array()
function returns the next row from the result data; it returns FALSE if there are no
more rows. The second parameter of the oci_fetch_array() function, OCI_
RETURN_NULLS, indicates that NULL database fields will be returned as PHP
NULL values.
Each row of data is returned as a numeric array of column values. The code uses a
PHP foreach construct to loop through the array and print each column value in
an HTML table cell, inside a table row element. If the item value is NULL then a
nonbreaking space is printed; otherwise the item value is printed.
After the edits in Steps 1 to 5, the anyco.php file becomes:
<?php // File: anyco.php
require('anyco_ui.inc');
// Create a database connection
$conn = oci_connect('hr', 'hr', '//localhost/orcl');
ui_print_header('Departments');
do_query($conn, 'SELECT * FROM DEPARTMENTS');
ui_print_footer(date('Y-m-d H:i:s'));
// Execute query and display results
function do_query($conn, $query)
{
$stid = oci_parse($conn, $query);
$r = oci_execute($stid, OCI_DEFAULT);
print '<table border="1">';
while ($row = oci_fetch_array($stid, OCI_ASSOC+OCI_RETURN_NULLS)) {
print '<tr>';
foreach ($row as $item) {
print '<td>'.
($item!== null ? htmlentities($item) : ' ').'</td>';
}
print '</tr>';
}
print '</table>';
}
?>
6. To test the changes made to anyco.php, save the modified anyco.php file. In a
browser window, enter the following URL:
On Windows:
http://localhost/chap3/anyco.php
On Linux:
http://localhost/~<username>/chap3/anyco.php
The page returned in the browser window should resemble the following page:

Connecting to the Database
3-6 Oracle Database 2 Day + PHP Developer's Guide
If you want to query the EMPLOYEES data, you can optionally change the query
in the do_query() function call to:
do_query($conn, 'SELECT * FROM EMPLOYEES');
If You Have Connection Problems
Check that the username, password and connection string are valid. The connect string
’//localhost/orcl’ uses the Oracle Easy Connect syntax. If you are using an
Oracle Net tnsnames.ora file to specify the database you want to connect to, then
use the network alias as the third parameter to the oci_connect() function.
If you are not seeing errors, set the PHP directive display_errors to ON, and the
error_reporting directive to E_ALL|E_STRICT.
If you have a PHP code problem and are not using a debugger, you can examine
variables using the PHP var_dump() function. For example:
print '<pre>';
var_dump($r);
print '</pre>';
Other Ways to Connect
In some applications, using a persistent connection improves performance by
removing the need to reconnect each time the script is called. Depending on your
Apache configuration, this may cause a number of database connections to remain
open simultaneously. You must balance the connection performance benefits against
the overhead on the database server.
Persistent connections are made with the OCI8 oci_pconnect() function. Several
settings in the PHP initialization file enable you to control the lifetime of persistent
connections. Some settings include:
oci8.max_persistent - This controls the number of persistent connections per process.
oci8.persistent_timeout - This specifies the time (in seconds) that a process maintains
an idle persistent connection.
oci8.ping_interval - This specifies the time (in seconds) that must pass before a
persistent connection is "pinged" to check its validity.

Disconnecting from the Database
Getting Connected 3-7
For more information, see the PHP reference manual at
http://www.php.net/manual/en/ref.oci8.php
For information about connection pooling, see Connection Pooling in OCI in the Oracle
Call Interface Programmer's Guide and the Oracle Database Net Services Administrator's
Guide.
Disconnecting from the Database
The PHP engine automatically closes the database connection at the end of the script
unless a persistent connection was made. If you want to explicitly close a
non-persistent database connection, you can call the oci_close() OCI function with
the connection identifier returned by the oci_connect() call. For example:
<?php
$conn = oci_connect('hr', '<your_password>', '//localhost/orcl');
...
oci_close($conn);
...
?>
Because PHP uses a reference counting mechanism for tracking variables, the database
connection may not actually be closed until all PHP variables referencing the
connection are unset or go out of scope.

Disconnecting from the Database
3-8 Oracle Database 2 Day + PHP Developer's Guide

4
Querying Data 4-1
4 Querying Data
In this chapter, you extend the Anyco HR application from Chapter 3 by adding
information to the Departments page. You also implement the functionality to query,
insert, update, and delete employee records in a specific department.
This chapter has the following topics:
■ Centralizing the Database Application Logic
■ Writing Queries with Bind Variables
■ Navigating Through Database Records
■ Extending the Basic Departments Page
Centralizing the Database Application Logic
In this section, you will modify your application code by moving the database access
logic into separate files for inclusion in the PHP application.
1. Copy the files that you completed in Chapter 3 to a new chap4 directory, and
change to the newly created directory:
On Windows:
mkdir c:\program files\Apache Group\Apache2\htdocs\chap4
cd c:\program files\Apache Group\Apache2\htdocs\chap4
copy ..\chap3\* .
On Linux:
mkdir $HOME/public_html/chap4
cd $HOME/public_html/chap4
cp ../chap3/* .
2. Using your preferred editor, create a file called anyco_cn.inc that defines
named constants for the database connection information. This file enables you to
change connection information in one place.
<?php // File: anyco_cn.inc
define('ORA_CON_UN', 'hr'); // User name
define('ORA_CON_PW', 'hr'); // Password
define('ORA_CON_DB', '//localhost/orcl'); // Connection identifier
?>
For simplicity, the user name and password are written into this sample
application code. For applications that will be deployed, coding the user name and

Centralizing the Database Application Logic
4-2 Oracle Database 2 Day + PHP Developer's Guide
password strings directly into your application source code is not recommended.
Oracle recommends that you use a more secure technique, such as implementing a
dialog that prompts the user for the user name and password.
See Oracle Database Security Guide and the documentation for your development
environment for details on security features and practices.
3. Create a file called anyco_db.inc that declares functions for creating a database
connection, executing a query, and disconnecting from the database. Use the
following logic, which includes some error handling that is managed by calling an
additional function called db_error ():
<?php // File: anyco_db.inc
function db_connect()
{
// use constants defined in anyco_cn.inc
$conn = oci_connect(ORA_CON_UN, ORA_CON_PW, ORA_CON_DB);
if (!$conn) {
db_error(null, __FILE__, __LINE__);
}
return($conn);
}
function db_do_query($conn, $statement)
{
$stid = oci_parse($conn, $statement);
if (!$stid) {
db_error($conn, __FILE__, __LINE__);
}
$r = oci_execute($stid, OCI_DEFAULT);
if (!$r) {
db_error($stid, __FILE__, __LINE__);
}
$r = oci_fetch_all($stid, $results, null, null,
OCI_FETCHSTATEMENT_BY_ROW);
return($results);
}
// $r is the resource containing the error.
// Pass no argument or false for connection errors
function db_error($r = false, $file, $line)
{
$err = $r ? oci_error($r) : oci_error();
if (isset($err['message'])) {
$m = htmlentities($err['message']);
}
else {
$m = 'Unknown DB error';
}
echo '<p><b>Error</b>: at line '.$line.' of '.$file.'</p>';
echo '<pre>'.$m.'</pre>';
exit;
}
?>

Centralizing the Database Application Logic
Querying Data 4-3
The db_do_query() function in this example uses the oci_fetch_all() OCI8
function. The oci_fetch_all() function accepts the following five parameters:
■ $stid, the statement identifier for the statement executed
■ $results, the output array variable containing the data returned for the
query
■ The null in the third parameter for the number of initial rows to skip is
ignored.
■ The null in the fourth parameter for the maximum number of rows to fetch is
ignored. In this case, all the rows for the query are returned. For this example
where the result set is not large, it is acceptable.
■ The last parameter flag OCI_FETCHSTATEMENT_BY_ROW indicates that the
data in the $results array is organized by row, where each row contains an
array of column values. A value of OCI_FETCHSTATEMENT_BY_COLUMN
causes the results array to be organized by column, where each column
entry contains an array of column values for each row. Your choice of value for
this flag depends on how you intend to process the data in your logic.
To examine the structure of the result array, use the PHP var_dump() function
after the query has been executed. This is useful for debugging. For example:
print '<pre>';
var_dump($results);
print '</pre>';
The db_error() function accepts three arguments. The $r parameter can be false
or null for obtaining connection errors, or a connection resource or statement
resource to obtain an error for those contexts. The $file and $line values are
populated by using __FILE__ and __LINE__, respectively, as the actual
parameters to enable the error message to display the source file and line from
which the database error is reported. This enables you to easily track the possible
cause of errors.
The db_ error() function calls the oci_error() function to obtain database
error messages.
The db_error() function calls the isset() function before printing the
message. The isset() function checks if the message component of the database
error structure is set, or if the error is unknown.
4. Edit anyco_ui.inc. To format the results of a single row from the DEPARTMENTS
table query in an HTML table format, insert the following function:
function ui_print_department($dept)
{
if (!$dept) {
echo '<p>No Department found</p>';
}
else {
echo <<<END
<table>
<tr>
<th>Department<br>ID</th>
<th>Department<br>Name</th>
<th>Manager<br>Id</th>
<th>Location ID</th>
</tr>

Centralizing the Database Application Logic
4-4 Oracle Database 2 Day + PHP Developer's Guide
<tr>
END;
echo '<td>'.htmlentities($dept['DEPARTMENT_ID']).'</td>';
echo '<td>'.htmlentities($dept['DEPARTMENT_NAME']).'</td>';
echo '<td>'.htmlentities($dept['MANAGER_ID']).'</td>';
echo '<td>'.htmlentities($dept['LOCATION_ID']).'</td>';
echo <<<END
</tr>
</table>
END;
}
}
As noted in Chapter 3, do not prefix END; lines with leading spaces. If you do, the
rest of the document will be treated as part of the text to be printed.
5. Edit the anyco.php file. Include the anyco_ui.inc and anyco_db.inc files,
and call the database functions to query and display information for a department
with a department_id of 80 by using the following code. The file becomes:
<?php // File: anyco.php
require('anyco_cn.inc');
require('anyco_db.inc');
require('anyco_ui.inc');
$query =
'SELECT department_id, department_name, manager_id, location_id
FROM departments
WHERE department_id = 80';
$conn = db_connect();
$dept = db_do_query($conn, $query);
ui_print_header('Departments');
ui_print_department($dept[0]);
ui_print_footer(date('Y-m-d H:i:s'));
?>
6. To test the resulting changes to the application, enter the following URL in a
browser window:
On Windows:
http://localhost/chap4/anyco.php
On Linux:
http://localhost/~<username>/chap4/anyco.php
The page returned in the browser window should resemble the following page:

Writing Queries with Bind Variables
Querying Data 4-5
Writing Queries with Bind Variables
Using queries with values included in the WHERE clause may be useful for some
situations. However, if the conditional values in the query are likely to change it is not
appropriate to encode a value into the query. Oracle recommends that you use bind
variables.
A bind variable is a symbolic name preceded by a colon in the query that acts as a
placeholder for literal values. For example, the query string created in the anyco.php
file could be rewritten with the bind variable :did as follows:
$query =
'SELECT department_id, department_name, manager_id, location_id
FROM departments
WHERE department_id = :did';
By using bind variables to parameterize SQL statements:
■ The statement is reusable with different input values without needing to change
the code.
■ The query performance is improved through a reduction of the query parse time
in the server, because the Oracle database can reuse parse information from the
previous invocations of the identical query string.
■ There is protection against "SQL Injection" security problems.
■ There is no need to specially handle quotation marks in user input.
When a query uses a bind variable, the PHP code must associate an actual value with
each bind variable (placeholder) used in the query before it is executed. This process is
known as run-time binding.
To enable your PHP application to use bind variables in the query, perform the
following changes to your PHP application code:
1. Edit the anyco.php file. Modify the query to use a bind variable, create an array
to store the value to be associated with the bind variable, and pass the $bindargs
array to the db_do_query() function:
<?php // File: anyco.php
...
$query =
'SELECT department_id, department_name, manager_id, location_id
FROM departments
WHERE department_id = :did';
$bindargs = array();
// In the $bindargs array add an array containing
// the bind variable name used in the query, its value, a length

Writing Queries with Bind Variables
4-6 Oracle Database 2 Day + PHP Developer's Guide
array_push($bindargs, array('DID', 80, -1));
$conn = db_connect();
$dept = db_do_query($conn, $query, $bindargs);
...
?>
In this example, the bind variable, called DID, is an input argument in the
parameterized query, and it is associated with the value 80. Later, the value of the
bind variable will be dynamically determined. In addition, the length component
is passed as -1 so that the OCI8 layer can determine the length. If the bind variable
was used to return output from the database an explicit size would be required.
2. Edit the anyco_db.inc file. Modify the db_do_query() function to accept a
$bindvars array variable as a third parameter. Call the oci_bind_by_name()
OCI8 call to associate the PHP values supplied in $bindvars parameter with
bind variables in the query. The function becomes:
function db_do_query($conn, $statement, $bindvars = array())
{
$stid = oci_parse($conn, $statement);
if (!$stid) {
db_error($conn, __FILE__, __LINE__);
}
// Bind the PHP values to query bind parameters
foreach ($bindvars as $b) {
// create local variable with caller specified bind value
$$b[0] = $b[1];
// oci_bind_by_name(resource, bv_name, php_variable, length)
$r = oci_bind_by_name($stid, ":$b[0]", $$b[0], $b[2]);
if (!$r) {
db_error($stid, __FILE__, __LINE__);
}
}
$r = oci_execute($stid, OCI_DEFAULT);
if (!$r) {
db_error($stid, __FILE__, __LINE__);
}
$r = oci_fetch_all($stid, $results, null, null,
OCI_FETCHSTATEMENT_BY_ROW);
return($results);
}
The binding is performed in the foreach loop before the oci_execute() is
done.
For each entry in $bindvars array, the first element contains the query bind
variable name that is used to create a PHP variable of the same name; that is,
$$b[0] takes the value DID in $b[0] and forms a PHP variable called $DID
whose value is assigned from the second element in the entry.
The oci_bind_by_name() function accepts four parameters: the $stid as the
resource, a string representing the bind variable name in the query derived from
the first element in the array entry, the PHP variable containing the value to be
associated with the bind variable, and the length of the input value.
3. To test the results of the preceding modifications, save the anyco.php and
anyco_db.inc files and enter the following URL:

Navigating Through Database Records
Querying Data 4-7
On Windows:
http://localhost/chap4/anyco.php
On Linux:
http://localhost/~<username>/chap4/anyco.php
The page returned in the browser window should resemble the following page:
Navigating Through Database Records
Adding navigation through the database records requires several important changes to
the application logic. The modifications require the combination of:
■ Including an HTML form to provide Next and Previous navigation buttons to step
through database records.
■ Detecting if the HTTP request for the page was posted by clicking the Next or
Previous button.
■ Tracking the last row queried by using the HTTP session state. A PHP session is
started to maintain state information for a specific client between HTTP requests.
The first HTTP request will retrieve the first data row and initialize the session
state. A subsequent request, initiated with navigation buttons, combined with the
session state from a previous HTTP request, enables the application to set
variables that control the next record retrieved by the query.
■ Writing a query that returns a subset of rows based on a set of conditions whose
values are determined by the application state.
To add navigation through database rows, perform the following steps:
1. Edit the anyco_ui.inc file. Add Next and Previous navigation buttons to the
Departments page. Change the ui_print_department() function to append a
second parameter called $posturl that supplies the value for the form attribute
action. After printing the </table> tag include HTML form tags for the Next
and Previous buttons:
<?php // File: anyco_ui.inc
...
function ui_print_department($dept, $posturl)
{
...
echo <<<END
</tr>
</table>
<form method="post" action="$posturl">
<input type="submit" value="< Previous" name="prevdept">
<input type="submit" value="Next >" name="nextdept">
</form>

Navigating Through Database Records
4-8 Oracle Database 2 Day + PHP Developer's Guide
END;
}
}
?>
2. Edit the anyco.php file. To detect if the Next or Previous button was used to
invoke the page and track the session state, call the PHP function session_
start(), and create a function named construct_departments():
Move and modify the database access logic into a new
construct_departments() function, which detects if navigation has been
performed, manages the session state, defines a subquery for the database access
layer to process, and connects and calls a function db_get_page_data(). The
file becomes:
<?php // File: anyco.php
require('anyco_cn.inc');
require('anyco_db.inc');
require('anyco_ui.inc');
session_start();
construct_departments();
function construct_departments()
{
if (isset($_SESSION['currentdept']) &&
isset($_POST['prevdept']) &&
$_SESSION['currentdept'] > 1) {
$current = $_SESSION['currentdept'] - 1;
}
elseif (isset($_SESSION['currentdept']) &&
isset($_POST['nextdept'])) {
$current = $_SESSION['currentdept'] + 1;
}
elseif (isset($_POST['showdept']) &&
isset($_SESSION['currentdept'])) {
$current = $_SESSION['currentdept'];
}
else {
$current = 1;
}
$query = 'SELECT department_id, department_name,
manager_id, location_id
FROM departments
ORDER BY department_id asc';
$conn = db_connect();
$dept = db_get_page_data($conn, $query, $current, 1);
$deptid = $dept[0]['DEPARTMENT_ID'];
$_SESSION['currentdept'] = $current;
ui_print_header('Department');
ui_print_department($dept[0], $_SERVER['SCRIPT_NAME']);
ui_print_footer(date('Y-m-d H:i:s'));
}

Navigating Through Database Records
Querying Data 4-9
?>
The if and elseif construct at the start of the construct_departments()
function is used to detect if a navigation button was used with an HTTP post
request to process the page, and tracks if the currentdept number is set in the
session state. Depending on the circumstances, the variable $current is
decremented by one when the previous button is clicked, $current is
incremented by one when the Next button is clicked, otherwise $current is set to
the current department, or initialized to one for the first time through.
A query is formed to obtain all the department rows in ascending sequence of the
department_id. The ORDER BY clause is an essential part of the navigation
logic. The query is used as a subquery inside the db_get_page_data() function
to obtain a page of a number of rows, where the number of rows per page is
specified as the fourth argument to the db_get_page_data() function. After
connecting to the database, db_get_page_data() is called to retrieve the set of
rows obtained for the specified query. The db_get_page_data() function is
provided with the connection resource, the query string, a value in $current
specifying the first row in the next page of data rows required, and the number of
rows per page (in this case one row per page).
After db_get_page_data()has been called to obtain a page of rows, the value
of $current is stored in the application session state.
Between printing the page header and footer, the ui_print_department()
function is called to display the recently fetched department row. The ui_print_
department() function uses $_SERVER['SCRIPT_NAME'] to supply the
current PHP script name for the $posturl parameter. This sets the action
attribute in the HTML form, so that each Next or Previous button click calls the
anyco.php file.
3. Edit the anyco_db.inc file. Implement the db_get_page_data() function to
query a subset of rows:
// Return subset of records
function db_get_page_data($conn, $q1, $current = 1,
$rowsperpage = 1, $bindvars = array())
{
// This query wraps the supplied query, and is used
// to retrieve a subset of rows from $q1
$query = 'SELECT *
FROM (SELECT A.*, ROWNUM AS RNUM
FROM ('.$q1.') A
WHERE ROWNUM <= :LAST)
WHERE :FIRST <= RNUM';
// Set up bind variables.
array_push($bindvars, array('FIRST', $current, -1));
array_push($bindvars,
array('LAST', $current+$rowsperpage-1, -1));
$r = db_do_query($conn, $query, $bindvars);
return($r);
}
The structure of the query in the db_get_page_data() function enables
navigation through a set (or page) of database rows.
The query supplied in $q1 is nested as a subquery inside the following subquery:

Navigating Through Database Records
4-10 Oracle Database 2 Day + PHP Developer's Guide
SELECT A.*, ROWNUM AS RNUM FROM $q1 WHERE ROWNUM <= :LAST
Remember that the query supplied in $q1 retrieves an ordered set of rows, which
is filtered by its enclosing query to return all the rows from the first row to the next
page size ($rowsperpage) of rows. This is possible because the Oracle ROWNUM
function (or pseudocolumn) returns an integer number starting at 1 for each row
returned by the query in $q1.
The set of rows, returned by the subquery enclosing query $q1, is filtered a second
time by the condition in the following outermost query:
WHERE :FIRST <= RNUM
This condition ensures that rows prior to the value in :FIRST (the value in
$current) are excluded from the final set of rows. The query enables navigation
through a set rows where the first row is determined by the $current value and
the page size is determined by the $rowsperpage value.
The $current value is associated with the bind variable called :FIRST. The
expression $current+$rowsperpage-1 sets the value associated with the
:LAST bind variable.
4. To test the changes made to your application, save the changed files, and enter the
following URL in your Web browser:
On Windows:
http://localhost/chap4/anyco.php
On Linux:
http://localhost/~<username>/chap4/anyco.php
When you request the anyco.php page, the first DEPARTMENT table record, the
Administration department, is displayed:
5. To navigate to the next department record (Marketing), click Next:

Extending the Basic Departments Page
Querying Data 4-11
6.
To navigate back to the first department record (Administration), click Previous:
You may continue to test and experiment with the application by clicking Next and
Previous to navigate to other records in the DEPARTMENTS table, as desired.
ROWNUM vs ROW_NUMBER()
If you were writing a PHP function with a hard coded query, the ROW_NUMBER()
function may be a simpler alternative for limiting the number of rows returned. For
example, a query that returns the last name of all employees:
SELECT last_name FROM employees ORDER BY last_name;
could be written to select rows 51 to 100 inclusive as:
SELECT last_name FROM
SELECT last_name, ROW_NUMBER() OVER (ORDER BY last_name R FROM employees)
where R BETWEEN 51 AND 100;
Extending the Basic Departments Page
The Departments page is extended to include the following additional information:
■ The name of the manager of the department
■ The number of employees assigned to the department
■ The country name identifying the location of the department
The additional information is obtained by modifying the query to perform a join
operation between the DEPARTMENTS, EMPLOYEES, LOCATIONS, and COUNTRIES
tables.
To extend the Departments page, perform the following tasks:
1. Edit the anyco_ui.inc file. Modify the ui_print_department() function by
replacing the Manager ID and Location ID references with the Manager Name and
Location, respectively, and insert a Number of Employees field after Department
Name. Make the necessary changes in the table header and data fields. The
function becomes:
function ui_print_department($dept, $posturl)
{
if (!$dept) {
echo '<p>No Department found</p>';
Note: If you navigate past the last record in the DEPARTMENTS table,
an error will occur. Error handling is added in Adding Error Recovery
in Chapter 5.

Extending the Basic Departments Page
4-12 Oracle Database 2 Day + PHP Developer's Guide
}
else {
echo <<<END
<table>
<tr>
<th>Department<br>ID</th>
<th>Department<br>Name</th>
<th>Number of<br>Employees</th>
<th>Manager<br>Name</th>
<th>Location</th>
</tr>
<tr>
END;
echo '<td>'.htmlentities($dept['DEPARTMENT_ID']).'</td>';
echo '<td>'.htmlentities($dept['DEPARTMENT_NAME']).'</td>';
echo '<td>'.htmlentities($dept['NUMBER_OF_EMPLOYEES']).'</td>';
echo '<td>'.htmlentities($dept['MANAGER_NAME']).'</td>';
echo '<td>'.htmlentities($dept['COUNTRY_NAME']).'</td>';
echo <<<END
</tr>
</table>
<form method="post" action="$posturl">
<input type="submit" value="< Previous" name="prevdept">
<input type="submit" value="Next >" name="nextdept">
</form>
END;
}
}
2. Edit the anyco.php file. Replace the query string in construct_
departments() with:
$query =
"SELECT d.department_id, d.department_name,
substr(e.first_name,1,1)||'. '|| e.last_name as manager_name,
c.country_name, count(e2.employee_id) as number_of_employees
FROM departments d, employees e, locations l,
countries c, employees e2
WHERE d.manager_id = e.employee_id
AND d.location_id = l.location_id
AND d.department_id = e2.department_id
AND l.country_id = c.country_id
GROUP BY d.department_id, d.department_name,
substr(e.first_name,1,1)||'. '||e.last_name,
c.country_name
ORDER BY d.department_id ASC";
The query string is enclosed in double quotation marks to simplify writing this
statement, which contains SQL literal strings in single quotation marks.
3. Save the changes to your files, and test the changes by entering the following URL
in a Web browser:
On Windows:
http://localhost/chap4/anyco.php
On Linux:
http://localhost/~<username>/chap4/anyco.php
The Web page result should resemble the following output:

Extending the Basic Departments Page
Querying Data 4-13

Extending the Basic Departments Page
4-14 Oracle Database 2 Day + PHP Developer's Guide

5
Updating Data 5-1
5 Updating Data
In this chapter, you extend the Anyco HR application with forms that enable you to
insert, update, and delete an employee record.
■ Building the Basic Employees page
■ Extending the Basic Employees Page
■ Combining Departments and Employees
■ Adding Error Recovery
■ Further Error Handling
Building the Basic Employees page
In this section, you will extend your application to include a basic employees page.
To display employee records, perform the following tasks:
1. Create the chap5 directory, copy the application files from chap4, and change to
the newly created directory:
On Windows:
mkdir c:\program files\Apache Group\Apache2\htdocs\chap5
cd c:\program files\Apache Group\Apache2\htdocs\chap5
copy ..\chap4\* .
On Linux:
mkdir $HOME/public_html/chap5
cd $HOME/public_html/chap5
cp ../chap4/* .
2. Edit the anyco.php file. Add a construct_employees() function. This
function constructs the employee query, calls the db_do_query() function to
execute the query, and prints the results using the ui_print_employees()
function:
function construct_employees()
{
$query =
"SELECT employee_id,
substr(first_name,1,1) || '. '|| last_name as employee_name,
hire_date,
to_char(salary, '9999G999D99') as salary,
nvl(commission_pct,0) as commission_pct
FROM employees

Building the Basic Employees page
5-2 Oracle Database 2 Day + PHP Developer's Guide
ORDER BY employee_id asc";
$conn = db_connect();
$emp = db_do_query($conn, $query);
ui_print_header('Employees');
ui_print_employees($emp);
ui_print_footer(date('Y-m-d H:i:s'));
}
There is no need to pass a $bindargs parameter to the db_do_query() call
because this query does not use bind variables. The db_do_query() declaration
will provide a default value of an empty array automatically. PHP allows
functions to have variable numbers of parameters.
3. Edit the anyco.php file. Replace the call to construct_departments() with a
call to construct_employees():
<?php // File: anyco.php
require('anyco_cn.inc');
require('anyco_db.inc');
require('anyco_ui.inc');
session_start();
construct_employees();
...
?>
4. Edit the anyco_ui.inc file. Implement the presentation of employee data in an
HTML table by adding a ui_print_employees() function:
function ui_print_employees($employeerecords)
{
if (!$employeerecords) {
echo '<p>No Employee found</p>';
}
else {
echo <<<END
<table>
<tr>
<th>Employee<br>ID</th>
<th>Employee<br>Name</th>
<th>Hiredate</th>
<th>Salary</th>
<th>Commission<br>(%)</th>
</tr>
END;
// Write one row per employee
foreach ($employeerecords as $emp) {
echo '<tr>';
echo '<td align="right">'.
htmlentities($emp['EMPLOYEE_ID']).'</td>';
echo '<td>'.htmlentities($emp['EMPLOYEE_NAME']).'</td>';
echo '<td>'.htmlentities($emp['HIRE_DATE']).'</td>';
echo '<td align="right">'.
htmlentities($emp['SALARY']).'</td>';
echo '<td align="right">'.
htmlentities($emp['COMMISSION_PCT']).'</td>';
echo '</tr>';
}

Extending the Basic Employees Page
Updating Data 5-3
echo <<<END
</table>
END;
}
}
5. Save the changes to the anyco.php and anyco_ui.inc files. Test the result of
these changes by entering the following URL in your Web browser:
On Windows:
http://localhost/chap5/anyco.php
On Linux:
http://localhost/~<username>/chap5/anyco.php
Examine the result page, and scroll down to view all the employee records
displayed in the page:
Extending the Basic Employees Page
In this section, you will extend the basic employees page to include the ability to
manipulate employee records.
To enable employee records to be manipulated, perform the following tasks:
1. Edit the anyco.php file. Replace the construct_employees() call with the form
handler control logic to manage the requests for showing, inserting, updating, and
deleting employee records:
<?php // File: anyco.php
require('anyco_cn.inc');
require('anyco_db.inc');
require('anyco_ui.inc');
session_start();
// Start form handler code
if (isset($_POST['insertemp'])) {
construct_insert_emp();

Extending the Basic Employees Page
5-4 Oracle Database 2 Day + PHP Developer's Guide
}
elseif (isset($_POST['saveinsertemp'])) {
insert_new_emp();
}
elseif (isset($_POST['modifyemp'])) {
construct_modify_emp();
}
elseif (isset($_POST['savemodifiedemp'])) {
modify_emp();
}
elseif (isset($_POST['deleteemp'])) {
delete_emp();
}
else {
construct_employees();
}
...
2. Edit the anyco.php file. Add the construct_insert_emp() function:
function construct_insert_emp()
{
$conn = db_connect();
$query = "SELECT job_id, job_title
FROM jobs
ORDER BY job_title ASC";
$jobs = db_do_query($conn, $query,
OCI_FETCHSTATEMENT_BY_COLUMN);
$query = "SELECT sysdate FROM dual";
$date = db_do_query($conn, $query,
OCI_FETCHSTATEMENT_BY_COLUMN);
$emp = array(
'DEPARTMENT_ID' => 10, // Default to department 10
'HIRE_DATE' => $date['SYSDATE'][0],
'ALLJOBIDS' => $jobs['JOB_ID'],
'ALLJOBTITLES' => $jobs['JOB_TITLE']
);
ui_print_header('Insert New Employee');
ui_print_insert_employee($emp, $_SERVER['SCRIPT_NAME']);
// Note: The two kinds of date used:
// 1) SYSDATE for current date of the database system, and
// 2) The PHP date for display in the footer of each page
ui_print_footer(date('Y-m-d H:i:s'));
}
The construct_insert_emp() function executes two queries to obtain default
data to be used to populate the Insert New Employee form, which is displayed by
the ui_print_insert_employee() function.
The $query of the JOBS table obtains a list of all the existing job IDs and their
descriptions in order to build a list for selecting a job type in the HTML form
generated by the ui_print_insert_employee() function.
The $query using SYSDATE obtains the current database date and time for setting
the default hire date of the new employee.

Extending the Basic Employees Page
Updating Data 5-5
There are two kinds of date used in the application code, the PHP date()
function for printing the date and time in the page footer, and the Oracle SYSDATE
function to obtain the default date and time for displaying in the hire date field of
the Employees page and to ensure that text is entered in the correct database
format.
The two db_do_query() function calls provide an additional parameter value
OCI_FETCHSTATEMENT_BY_COLUMN to specify that the return type for the query
is an array of column values.
3. Edit the anyco.php file. Add the insert_new_emp() function to insert an
employee record into the EMPLOYEES table:
function insert_new_emp()
{
$newemp = $_POST;
$statement =
"INSERT INTO employees
(employee_id, first_name, last_name, email, hire_date,
job_id, salary, commission_pct, department_id)
VALUES (employees_seq.nextval, :fnm, :lnm, :eml, :hdt, :jid,
:sal, :cpt, :did)";
$conn = db_connect();
$emailid = $newemp['firstname'].$newemp['lastname'];
$bindargs = array();
array_push($bindargs, array('FNM', $newemp['firstname'], -1));
array_push($bindargs, array('LNM', $newemp['lastname'], -1));
array_push($bindargs, array('EML', $emailid, -1));
array_push($bindargs, array('HDT', $newemp['hiredate'], -1));
array_push($bindargs, array('JID', $newemp['jobid'], -1));
array_push($bindargs, array('SAL', $newemp['salary'], -1));
array_push($bindargs, array('CPT', $newemp['commpct'], -1));
array_push($bindargs, array('DID', $newemp['deptid'], -1));
$r = db_execute_statement($conn, $statement, $bindargs);
construct_employees();
}
The return value from the db_execute_statement() function is ignored and
not even assigned to a variable, because no action is performed on its result.
4. Edit the anyco.php file. Add the construct_modify_emp() function to build
the HTML form for updating an employee record.
function construct_modify_emp()
{
$empid = $_POST['emprec'];
$query =
"SELECT employee_id, first_name, last_name, email, hire_date,
salary, nvl(commission_pct,0) as commission_pct
FROM employees
WHERE employee_id = :empid";
$conn = db_connect();
$bindargs = array();
array_push($bindargs, array('EMPID', $empid, -1));
$emp = db_do_query($conn, $query, OCI_FETCHSTATEMENT_BY_ROW,
$bindargs);

Extending the Basic Employees Page
5-6 Oracle Database 2 Day + PHP Developer's Guide
ui_print_header('Modify Employee ');
ui_print_modify_employee($emp[0], $_SERVER['SCRIPT_NAME']);
ui_print_footer(date('Y-m-d H:i:s'));
}
5. Edit the anyco.php file. Add the modify_emp() function to update the
employee record in the EMPLOYEES table, using the update form field values:
function modify_emp()
{
$newemp = $_POST;
$statement =
"UPDATE employees
SET first_name = :fnm, last_name = :lnm, email = :eml,
salary = :sal, commission_pct = :cpt
WHERE employee_id = :eid";
$conn = db_connect();
$bindargs = array();
array_push($bindargs, array('EID', $newemp['empid'], -1));
array_push($bindargs, array('FNM', $newemp['firstname'], -1));
array_push($bindargs, array('LNM', $newemp['lastname'], -1));
array_push($bindargs, array('EML', $newemp['email'], -1));
array_push($bindargs, array('SAL', $newemp['salary'], -1));
array_push($bindargs, array('CPT', $newemp['commpct'], -1));
$r = db_execute_statement($conn, $statement, $bindargs);
construct_employees();
}
6. Edit the anyco.php file. Add the delete_emp() function to delete an employee
record from the EMPLOYEES table:
function delete_emp()
{
$empid = $_POST['emprec'];
$statement = "DELETE FROM employees
WHERE employee_id = :empid";
$conn = db_connect();
$bindargs = array();
array_push($bindargs, array('EMPID', $empid, 10));
$r = db_execute_statement($conn, $statement, $bindargs);
construct_employees();
}
7. Edit the anyco.php file. In the construct_employees() function, modify the
db_do_query() call to supply OCI_FETCHSTATEMENT_BY_ROW as the last
parameter, and provide $_SERVER['SCRIPT_NAME'] as second parameter in the
ui_print_employees() call. The function becomes:
function construct_employees()
{
$query =
"SELECT employee_id,
substr(first_name,1,1) || '. '|| last_name as employee_name,
hire_date,
to_char(salary, '9999G999D99') as salary,
nvl(commission_pct,0) as commission_pct

Extending the Basic Employees Page
Updating Data 5-7
FROM employees
ORDER BY employee_id asc";
$conn = db_connect();
$emp = db_do_query($conn, $query, OCI_FETCHSTATEMENT_BY_ROW);
ui_print_header('Employees');
ui_print_employees($emp, $_SERVER['SCRIPT_NAME']);
ui_print_footer(date('Y-m-d H:i:s'));
}
8. Edit the anyco_db.inc file. Add $resulttype as a third parameter to the
db_do_query() function. Replace the last parameter value, OCI_
FETCHSTATEMENT_BY_ROW, in the oci_fetch_all() call with a variable, so
that callers can choose the output type.
function db_do_query($conn, $statement, $resulttype,
$bindvars = array())
{
$stid = oci_parse($conn, $statement);
...
$r = oci_fetch_all($stid, $results, null, null, $resulttype);
return($results);
}
9. Edit the anyco_db.inc file. Inside the db_get_page_data() function, insert
OCI_FETCHSTATEMENT_BY_ROW as the third parameter value in the
db_do_query() call:
function db_get_page_data($conn, $q1, $current = 1,
$rowsperpage = 1, $bindvars = array())
{
...
$r = db_do_query($conn, $query, OCI_FETCHSTATEMENT_BY_ROW, $bindvars);
return($r);
}
10. Edit the anyco_db.inc file. Add a db_execute_statement() function to
execute data manipulation statements such as INSERT statements:
function db_execute_statement($conn, $statement, $bindvars = array())
{
$stid = oci_parse($conn, $statement);
if (!$stid) {
db_error($conn, __FILE__, __LINE__);
}
// Bind parameters
foreach ($bindvars as $b) {
// create local variable with caller specified bind value
$$b[0] = $b[1];
$r = oci_bind_by_name($stid, ":$b[0]", $$b[0], $b[2]);
if (!$r) {
db_error($stid, __FILE__, __LINE__);
}
}

Extending the Basic Employees Page
5-8 Oracle Database 2 Day + PHP Developer's Guide
$r = oci_execute($stid);
if (!$r) {
db_error($stid, __FILE__, __LINE__);
}
return($r);
}
11. Edit the anyco_ui.inc file. Change the ui_print_employees() function to
produce an HTML form containing the employee rows. The function becomes:
function ui_print_employees($employeerecords, $posturl)
{
if (!$employeerecords) {
echo '<p>No Employee found</p>';
}
else {
echo <<<END
<form method="post" action="$posturl">
<table>
<tr>
<th> </th>
<th>Employee<br>ID</th>
<th>Employee<br>Name</th>
<th>Hiredate</th>
<th>Salary</th>
<th>Commission<br>(%)</th>
</tr>
END;
// Write one row per employee
foreach ($employeerecords as $emp) {
echo '<tr>';
echo '<td><input type="radio" name="emprec" value="'.
htmlentities($emp['EMPLOYEE_ID']).'"></td>';
echo '<td align="right">'.
htmlentities($emp['EMPLOYEE_ID']).'</td>';
echo '<td>'.htmlentities($emp['EMPLOYEE_NAME']).'</td>';
echo '<td>'.htmlentities($emp['HIRE_DATE']).'</td>';
echo '<td align="right">'.
htmlentities($emp['SALARY']).'</td>';
echo '<td align="right">'.
htmlentities($emp['COMMISSION_PCT']).'</td>';
echo '</tr>';
}
echo <<<END
</table>
<input type="submit" value="Modify" name="modifyemp">
<input type="submit" value="Delete" name="deleteemp">
<input type="submit" value="Insert new employee"
name="insertemp">
</form>
END;
}
}
A radio button is displayed in the first column of each row to enable you to select
the record to be modified or deleted.
12. Edit the anyco_ui.inc file. Add the ui_print_insert_employee() function
to generate the form to input new employee data:

Extending the Basic Employees Page
Updating Data 5-9
function ui_print_insert_employee($emp, $posturl)
{
if (!$emp) {
echo "<p>No employee details found</p>";
}
else {
$deptid = htmlentities($emp['DEPARTMENT_ID']);
$hiredate = htmlentities($emp['HIRE_DATE']);
echo <<<END
<form method="post" action="$posturl">
<table>
<tr>
<td>Department ID</td>
<td><input type="text" name="deptid" value="$deptid"
size="20"></td>
</tr>
<tr>
<td>First Name</td>
<td><input type="text" name="firstname" size="20"></td>
</tr>
<tr>
<td>Last Name</td>
<td><input type="text" name="lastname" size="20"></td>
</tr>
<tr>
<td>Hiredate</td>
<td><input type="text" name="hiredate" value="$hiredate"
size="20"></td>
</tr>
<tr>
<td>Job</td>
<td><select name="jobid">
END;
// Write the list of jobs
for ($i = 0; $i < count($emp['ALLJOBIDS']); $i++)
{
echo '<option
label="'.htmlentities($emp['ALLJOBTITLES'][$i]).'"'.
' value="'.htmlentities($emp['ALLJOBIDS'][$i]).'">'.
htmlentities($emp['ALLJOBTITLES'][$i]).'</option>';
}
echo <<<END
</select>
</td>
</tr>
<tr>
<td>Salary</td>
<td><input type="text" name="salary" value="1"
size="20"></td>
</tr>
<tr>
<td>Commission (%)</td>
<td><input type="text" name="commpct" value="0"
size="20"></td>
</tr>
</table>
<input type="submit" value="Save" name="saveinsertemp">
<input type="submit" value="Cancel" name="cancel">
</form>

Extending the Basic Employees Page
5-10 Oracle Database 2 Day + PHP Developer's Guide
END;
}
}
13. Edit the anyco_ui.inc file. Add the ui_print_modify_employee() function
to generate the form to update an employee record:
function ui_print_modify_employee($empdetails, $posturl)
{
if (!$empdetails) {
echo '<p>No Employee record selected</p>';
}
else {
$fnm = htmlentities($empdetails['FIRST_NAME']);
$lnm = htmlentities($empdetails['LAST_NAME']);
$eml = htmlentities($empdetails['EMAIL']);
$sal = htmlentities($empdetails['SALARY']);
$cpt = htmlentities($empdetails['COMMISSION_PCT']);
$eid = htmlentities($empdetails['EMPLOYEE_ID']);
echo <<<END
<form method="post" action="$posturl">
<table>
<tr>
<td>Employee ID</td>
<td>$eid</td></tr>
<tr>
<td>First Name</td>
<td><input type="text" name="firstname" value="$fnm"></td>
</tr>
<tr>
<td>Last Name</td>
<td><input type="text" name="lastname" value="$lnm"></td>
</tr>
<tr>
<td>Email Address</td>
<td><input type="text" name="email" value="$eml"></td>
</tr>
<tr>
<td>Salary</td>
<td><input type="text" name="salary" value="$sal"></td>
</tr>
<tr>
<td>Commission (%)</td>
<td><input type="text" name="commpct" value="$cpt"></td>
</tr>
</table>
<input type="hidden" value="{$empdetails['EMPLOYEE_ID']}"
name="empid">
<input type="submit" value="Save" name="savemodifiedemp">
<input type="submit" value="Cancel" name="cancel">
</form>
END;
}
}
14. Save the changes to your Anyco application files, and test the changes by entering
the following URL in your Web browser:
On Windows:

Extending the Basic Employees Page
Updating Data 5-11
http://localhost/chap5/anyco.php
On Linux:
http://localhost/~<username>/chap5/anyco.php
The list of all employees is displayed with a radio button in each row.
Scroll to the bottom of the Employees page to view the Modify, Delete, and Insert
new employee buttons:
15. To insert a new employee record, click Insert new employee:
When you create or modify employee records, you will see that the database
definitions require the salary to be greater than zero, and the commission to be less
than 1. The commission will be rounded to two decimal places. In the Insert New
Employee page, the Department ID field contains 10 (the default), Hiredate
contains the current date (in default database date format), Salary contains 1, and
Commission (%) contains 0. Enter the following field values:
First Name: James

Extending the Basic Employees Page
5-12 Oracle Database 2 Day + PHP Developer's Guide
Last Name: Bond
Job: Select Programmer from the list.
Salary: replace the 1 with 7000
Click Save.
16. When the new employee record is successfully inserted, the Web page is refreshed
with the form listing all employees. Scroll the Web page to the last record and
check that the new employee record is present. The employee ID assigned to the
new record on your system may be different than the one shown in the following
example:
17. To modify the new employee record, select the radio button next to the new
employee record, and click Modify:
18. In the Modify Employee page, modify the Email Address field to JBOND, increase
the Salary to 7100, and click Save:

Combining Departments and Employees
Updating Data 5-13
19.
Successfully updating the employee record causes the Employees page to be
redisplayed. Scroll to the last employee record and confirm that the salary for
James Bond is now 7,100:
20. To remove the new employee record, select the radio button for the new employee
record, and click Delete:
On successful deletion, the deleted row does not appear in the list of employee
records redisplayed in the Employees page:
Combining Departments and Employees
In this section, you will modify your application to enable access to both Employees
and Departments pages.
To combine the Departments and Employees pages, perform the following tasks:
1. Edit the anyco.php file. Modify the query in the construct_employees()
function to include a WHERE clause to compare the department_id with a value
in a bind variable called :did. This makes the page display employees in one

Combining Departments and Employees
5-14 Oracle Database 2 Day + PHP Developer's Guide
department at a time. Get the deptid session parameter value to populate the
bind variable:
$query =
"SELECT employee_id,
substr(first_name,1,1) || '. '|| last_name as employee_name,
hire_date,
to_char(salary, '9999G999D99') as salary,
nvl(commission_pct,0) as commission_pct
FROM employees
WHERE department_id = :did
ORDER BY employee_id asc";
$deptid = $_SESSION['deptid'];
2. Edit the anyco.php file. In the construct_employees() function, update the
call to the db_do_query() function to pass the bind information:
$conn = db_connect();
$bindargs = array();
array_push($bindargs, array('DID', $deptid, -1));
$emp = db_do_query($conn, $query, OCI_FETCHSTATEMENT_BY_ROW, $bindargs);
3. Edit the anyco.php file. In the construct_departments() function, save the
department identifier in a session parameter:
$_SESSION['currentdept'] = $current;
$_SESSION['deptid'] = $deptid;
This saves the current department identifier from the Departments page as a
session parameter, which is used in the Employees page.
4. Edit the anyco.php file. Create a function get_dept_name() to query the
department name for printing in the Departments and Employees page titles:
function get_dept_name($conn, $deptid)
{
$query =
'SELECT department_name
FROM departments
WHERE department_id = :did';
$conn = db_connect();
$bindargs = array();
array_push($bindargs, array('DID', $deptid, -1));
$dn = db_do_query($conn, $query,OCI_FETCHSTATEMENT_BY_COLUMN, $bindargs);
return($dn['DEPARTMENT_NAME'][0]);
}
5. Edit the anyco.php file. Modify the construct_employees() function to print
the department name in the Employees page heading:
$deptname = get_dept_name($conn, $deptid);
ui_print_header('Employees: '.$deptname);
6. Edit the anyco.php file. Modify the construct_departments() function to
print the department name in the Departments page heading:
$deptname = get_dept_name($conn, $deptid);

Combining Departments and Employees
Updating Data 5-15
ui_print_header('Department: '.$deptname);
7. Edit the anyco.php file. Modify the construct_insert_emp() function so
that the default department is obtained from the session parameter passed in the
$emp array to the ui_print_insert_employee() function. The function
becomes:
function construct_insert_emp()
{
$deptid = $_SESSION['deptid'];
$conn = db_connect();
$query = "SELECT job_id, job_title FROM jobs ORDER BY job_title ASC";
$jobs = db_do_query($conn, $query, OCI_FETCHSTATEMENT_BY_COLUMN);
$query = "SELECT sysdate FROM dual";
$date = db_do_query($conn, $query, OCI_FETCHSTATEMENT_BY_COLUMN);
$emp = array(
'DEPARTMENT_ID' => $deptid,
'HIRE_DATE' => $date['SYSDATE'][0],
'ALLJOBIDS' => $jobs['JOB_ID'],
'ALLJOBTITLES' => $jobs['JOB_TITLE']
);
ui_print_header('Insert New Employee');
ui_print_insert_employee($emp, $_SERVER['SCRIPT_NAME']);
ui_print_footer(date('Y-m-d H:i:s'));
}
8. Edit the anyco.php file. Modify the final else statement in the HTML form
handler. The handler becomes:
// Start form handler code
if (isset($_POST['insertemp'])) {
construct_insert_emp();
}
elseif (isset($_POST['saveinsertemp'])) {
insert_new_emp();
}
elseif (isset($_POST['modifyemp'])) {
construct_modify_emp();
}
elseif (isset($_POST['savemodifiedemp'])) {
modify_emp();
}
elseif (isset($_POST['deleteemp'])) {
delete_emp();
}
elseif ( isset($_POST['showemp'])) {
construct_employees();
}
elseif ( isset($_POST['nextdept'])
|| isset($_POST['prevdept'])
|| isset($_POST['firstdept'])
|| isset($_POST['showdept'])) {
construct_departments();
}
else {
construct_departments();
}

Combining Departments and Employees
5-16 Oracle Database 2 Day + PHP Developer's Guide
9.
Edit the anyco_ui.inc file. In the ui_print_department() function, change
the HTML form to enable it to call the Employees page:
...
<form method="post" action="$posturl">
<input type="submit" value="First" name="firstdept">
<input type="submit" value="< Previous" name="prevdept">
<input type="submit" value="Next >" name="nextdept">
<input type="submit" value="Show Employees" name="showemp">
</form>
...
10. Edit the anyco_ui.inc file. In the ui_print_employees() function, change
the HTML form to enable it to call the Departments page:
...
</table>
<input type="submit" value="Modify" name="modifyemp">
<input type="submit" value="Delete" name="deleteemp">
<input type="submit" value="Insert new employee" name="insertemp">
<input type="submit" value="Return to Departments" name="showdept">
</form>
...
11. Save the changes to your PHP files. In your browser, test the changes by entering
the following URL:
On Windows:
http://localhost/chap5/anyco.php
On Linux:
http://localhost/~<username>/chap5/anyco.php
The Departments page is displayed.
To display a list of employees in the department, click the Show Employees
button.

Adding Error Recovery
Updating Data 5-17
You can return to the Departments page by clicking the Return to Departments
button. Experiment by navigating to another department and listing its employees
to show the process of switching between the Departments and Employees pages.
Adding Error Recovery
Error management is always a significant design decision. In production systems, you
might want to classify errors and handle them in different ways. Fatal errors could be
redirected to a standard "site not available" page or home page. Data errors for new
record creation might return to the appropriate form with invalid fields highlighted.
In most production systems, you would set the display_errors configuration
option in the php.ini file to off, and the log_errors configuration option to on.
You can use the PHP output buffering functionality to trap error text when a function
is executing. Using ob_start() prevents text from displaying on the screen. If an
error occurs, the ob_get_contents() function allows the previously generated
error messages to be stored in a string for later display or analysis.
Now you change the application to display error messages and database errors on a
new page using a custom error handling function. Errors are now returned from the
db* functions keeping them silent.
1. Edit the anyco_db.inc file. Change the db_error() function to return the error
information in an array structure, instead of printing and quitting. The function
becomes:
function db_error($r = false, $file, $line)
{
$err = $r ? oci_error($r) : oci_error();
if (isset($err['message'])) {
$m = htmlentities($err['message']);
$c = $err['code'];
}
else {
$m = 'Unknown DB error';
$c = null;
}
$rc = array(
'MESSAGE' => $m,
'CODE' => $c,
'FILE' => $file,
'LINE' => $line
);
return $rc;
}

Adding Error Recovery
5-18 Oracle Database 2 Day + PHP Developer's Guide
2.
Edit the anyco_db.inc file. For every call to the db_error() function,
assign the return value to a variable called $e and add a return false;
statement after each call:
if (<error test>)
{
$e = db_error(<handle>, __FILE__, __LINE__);
return false;
}
Make sure to keep the <error test> and <handle> parameters the same as
they are currently specified for each call. Remember that the __FILE__ and __
LINE__ constants help to pinpoint the location of the failure during development.
This is useful information to log for fatal errors in a production deployment of an
application.
3. Edit the anyco_db.inc file. Add a $e parameter to every function to enable the
return of error information. Use the & reference prefix to ensure that results are
returned to the calling function. Each function declaration becomes:
function db_connect(&$e) {...}
function db_get_page_data($conn, $q1, $currrownum = 1, $rowsperpage = 1,
&$e, $bindvars = array()) {...}
function db_do_query($conn, $statement, $resulttype, &$e,
$bindvars = array()) {...}
function db_execute_statement($conn, $statement, &$e,
$bindvars = array()) {...}
4. Edit the anyco_db.inc file. In the db_get_page_data() function, change the
call to the db_do_query() function to pass down the error parameter $e:
$r = db_do_query($conn, $query, OCI_FETCHSTATEMENT_BY_ROW, $e, $bindvars);
5. Edit the anyco_db.inc file. Add an @ prefix to all oci_* function calls. For
example:
@ $r = @oci_execute($stid);
The @ prefix prevents errors from displaying because each return result is tested.
Preventing errors from displaying can hide incorrect parameter usage, which may
hinder testing the changes in this section. You do not need to add @ prefixes, but it
can effect future results when errors are displayed.
6. Edit the anyco.php file. Create a function to handle the error information:
function handle_error($message, $err)
{
ui_print_header($message);
ui_print_error($err, $_SERVER['SCRIPT_NAME']);
ui_print_footer(date('Y-m-d H:i:s'));
}
7. Edit the anyco.php file. Modify all calls to db_* functions to include the
additional error parameter:
Steps 8 to 15 show the complete new functions, so the code changes in this step
can be skipped.
■ Change all db_connect() calls to db_connect($err).

Adding Error Recovery
Updating Data 5-19
■ Change all db_do_query() calls and insert a $err parameter as the fourth
parameter. For example, the call in construct_employees() becomes:
$emp = db_do_query($conn, $query,
OCI_FETCHSTATEMENT_BY_ROW, $err, $bindargs);
Change the other four db_do_query() calls in anyco.php remembering to keep
the existing parameter values of each specific call.
■ Change the db_get_page_data() call and insert a $err parameter as the
fifth parameter:
$dept = db_get_page_data($conn, $query, $current, 1, $err);
■ Change the db_execute_statement() calls and insert a $err parameter as
the third parameter, for example:
$r = db_execute_statement($conn, $statement, $err, $bindargs);
8. Edit the anyco.php file. Modify the construct_departments() function to
handle errors returned. The function becomes:
function construct_departments()
{
if (isset($_SESSION['currentdept']) && isset($_POST['prevdept']) &&
$_SESSION['currentdept'] > 1)
$current = $_SESSION['currentdept'] - 1;
elseif (isset($_SESSION['currentdept']) && isset($_POST['nextdept']))
$current = $_SESSION['currentdept'] + 1;
elseif (isset($_POST['showdept']) && isset($_SESSION['currentdept']))
$current = $_SESSION['currentdept'];
else
$current = 1;
$query =
"SELECT d.department_id, d.department_name,
substr(e.first_name,1,1)||'. '|| e.last_name as manager_name,
c.country_name, count(e2.employee_id) as number_of_employees
FROM departments d, employees e, locations l,
countries c, employees e2
WHERE d.manager_id = e.employee_id
AND d.location_id = l.location_id
AND d.department_id = e2.department_id
AND l.country_id = c.country_id
GROUP BY d.department_id, d.department_name,
substr(e.first_name,1,1)||'. '||e.last_name, c.country_name
ORDER BY d.department_id ASC";
$conn = db_connect($err);
if (!$conn) {
handle_error('Connection Error', $err);
}
else {
$dept = db_get_page_data($conn, $query, $current, 1, $err);
if ($dept === false) {
// Use === so empty array at end of fetch is not matched
handle_error('Cannot fetch Departments', $err);
} else {
if (!isset($dept[0]['DEPARTMENT_ID']) && $current > 1) {
// no more records so go back one

Adding Error Recovery
5-20 Oracle Database 2 Day + PHP Developer's Guide
$current--;
$dept = db_get_page_data($conn, $query, $current, 1, $err);
}
$deptid = $dept[0]['DEPARTMENT_ID'];
$_SESSION['deptid'] = $deptid;
$_SESSION['currentdept'] = $current;
$deptname = get_dept_name($conn, $deptid);
ui_print_header('Department: '.$deptname);
ui_print_department($dept[0], $_SERVER['SCRIPT_NAME']);
ui_print_footer(date('Y-m-d H:i:s'));
}
}
}
9. Edit the anyco.php file. Modify the construct_employees() function to
handle errors. The function becomes:
function construct_employees()
{
$query =
"SELECT employee_id,
substr(first_name,1,1) || '. '|| last_name as employee_name,
hire_date,
to_char(salary, '9999G999D99') as salary,
nvl(commission_pct,0) as commission_pct
FROM employees
WHERE department_id = :did
ORDER BY employee_id asc";
$deptid = $_SESSION['deptid'];
$conn = db_connect($err);
if (!$conn) {
handle_error('Connection Error', $err);
}
else {
$bindargs = array();
array_push($bindargs, array('DID', $deptid, -1));
$emp = db_do_query($conn, $query, OCI_FETCHSTATEMENT_BY_ROW, $err,
$bindargs);
if (!$emp) {
handle_error('Cannot fetch Employees', $err);
}
else {
$deptname = get_dept_name($conn, $deptid);
ui_print_header('Employees: '.$deptname);
ui_print_employees($emp, $_SERVER['SCRIPT_NAME']);
ui_print_footer(date('Y-m-d H:i:s'));
}
}
}
10. Edit the anyco.php file. Modify the construct_insert_emp() function to
handle errors. The function becomes:

Adding Error Recovery
Updating Data 5-21
function construct_insert_emp()
{
$deptid = $_SESSION['deptid'];
$conn = db_connect($err);
if (!$conn) {
handle_error('Connection Error', $err);
}
else {
$query = "SELECT job_id, job_title FROM jobs ORDER BY job_title ASC";
$jobs = db_do_query($conn, $query, OCI_FETCHSTATEMENT_BY_COLUMN, $err);
$query = "SELECT sysdate FROM dual";
$date = db_do_query($conn, $query, OCI_FETCHSTATEMENT_BY_COLUMN, $err);
$emp = array(
'DEPARTMENT_ID' => $deptid,
'HIRE_DATE' => $date['SYSDATE'][0],
'ALLJOBIDS' => $jobs['JOB_ID'],
'ALLJOBTITLES' => $jobs['JOB_TITLE']
);
ui_print_header('Insert New Employee');
ui_print_insert_employee($emp, $_SERVER['SCRIPT_NAME']);
ui_print_footer(date('Y-m-d H:i:s'));
}
}
11. Edit the anyco.php file. Modify the insert_new_emp() function to handle
errors. The function becomes:
function insert_new_emp()
{
$statement =
'INSERT INTO employees
(employee_id, first_name, last_name, email, hire_date,
job_id, salary, commission_pct, department_id)
VALUES (employees_seq.nextval, :fnm, :lnm, :eml, :hdt,
:jid, :sal, :cpt, :did)';
$newemp = $_POST;
$conn = db_connect($err);
if (!$conn) {
handle_error('Connect Error', $err);
}
else {
$emailid = $newemp['firstname'].$newemp['lastname'];
$bindargs = array();
array_push($bindargs, array('FNM', $newemp['firstname'], -1));
array_push($bindargs, array('LNM', $newemp['lastname'], -1));
array_push($bindargs, array('EML', $emailid, -1));
array_push($bindargs, array('HDT', $newemp['hiredate'], -1));
array_push($bindargs, array('JID', $newemp['jobid'], -1));
array_push($bindargs, array('SAL', $newemp['salary'], -1));
array_push($bindargs, array('CPT', $newemp['commpct'], -1));
array_push($bindargs, array('DID', $newemp['deptid'], -1));
$r = db_execute_statement($conn, $statement, $err, $bindargs);
if ($r) {
construct_employees();
}

Adding Error Recovery
5-22 Oracle Database 2 Day + PHP Developer's Guide
else {
handle_error('Cannot insert employee', $err);
}
}
}
12. Edit the anyco.php function. Modify the construct_modify_emp() function
to handle errors. The function becomes:
function construct_modify_emp()
{
if (!isset($_POST['emprec'])) { // User did not select a record
construct_employees();
}
else {
$empid = $_POST['emprec'];
$query =
"SELECT employee_id, first_name, last_name, email, hire_date,
salary, nvl(commission_pct,0) as commission_pct
FROM employees
WHERE employee_id = :empid";
$conn = db_connect($err);
if (!$conn) {
handle_error('Connect Error', $err);
}
else {
$bindargs = array();
array_push($bindargs, array('EMPID', $empid, -1));
$emp = db_do_query($conn, $query, OCI_FETCHSTATEMENT_BY_ROW, $err,
$bindargs);
if (!$emp) {
handle_error('Cannot find details for employee '.$empid, $err);
}
else {
ui_print_header('Modify Employee ');
ui_print_modify_employee($emp[0], $_SERVER['SCRIPT_NAME']);
ui_print_footer(date('Y-m-d H:i:s'));
}
}
}
}
13. Edit the anyco.php file. Change the modify_emp() function to handle errors.
The function becomes:
function modify_emp()
{
$newemp = $_POST;
$statement =
"UPDATE employees
SET first_name = :fnm, last_name = :lnm, email = :eml,
salary = :sal, commission_pct = :cpt
WHERE employee_id = :eid";
$conn = db_connect($err);
if (!$conn) {

Adding Error Recovery
Updating Data 5-23
handle_error('Connect Error', $err);
}
else {
$bindargs = array();
array_push($bindargs, array('EID', $newemp['empid'], -1));
array_push($bindargs, array('FNM', $newemp['firstname'], -1));
array_push($bindargs, array('LNM', $newemp['lastname'], -1));
array_push($bindargs, array('EML', $newemp['email'], -1));
array_push($bindargs, array('SAL', $newemp['salary'], -1));
array_push($bindargs, array('CPT', $newemp['commpct'], -1));
$r = db_execute_statement($conn, $statement, $err, $bindargs);
if (!$r) {
handle_error('Cannot update employee '.$newemp['empid'], $err);
}
else {
construct_employees();
}
}
}
14. Edit the anyco.php file. Modify the delete_emp() function to handle errors.
The function becomes:
function delete_emp()
{
if (!isset($_POST['emprec'])) { // User did not select a record
construct_employees();
}
else {
$empid = $_POST['emprec'];
$conn = db_connect($err);
if (!$conn) {
handle_error('Connection Error', $err);
}
else {
$statement = "DELETE FROM employees WHERE employee_id = :empid";
$bindargs = array();
array_push($bindargs, array('EMPID', $empid, -1));
$r = db_execute_statement($conn, $statement, $err, $bindargs);
if (!$r) {
handle_error("Error deleting employee $empid", $err);
}
else {
construct_employees();
}
}
}
}
15. Edit the anyco.php file. Modify the get_dept_name() function to handle
errors. The function becomes:
function get_dept_name($conn, $deptid)
{
$query =
'SELECT department_name
FROM departments

Adding Error Recovery
5-24 Oracle Database 2 Day + PHP Developer's Guide
WHERE department_id = :did';
$conn = db_connect($err);
if (!$conn) {
return ('Unknown');
}
else {
$bindargs = array();
array_push($bindargs, array('DID', $deptid, -1));
$dn = db_do_query($conn, $query, OCI_FETCHSTATEMENT_BY_COLUMN,
$err, $bindargs);
if ($dn == false)
return ('Unknown');
else
return($dn['DEPARTMENT_NAME'][0]);
}
}
16. Edit the anyco_ui.inc file. Add a new function ui_print_error():
function ui_print_error($message, $posturl)
{
if (!$message) {
echo '<p>Unknown error</p>';
}
else {
echo "<p>Error at line {$message['LINE']} of "
."{$message['FILE']}</p>"; // Uncomment for debugging
echo "<p>{$message['MESSAGE']}</p>";
}
echo <<<END
<form method="post" action="$posturl">
<input type="submit" value="Return to Departments" name="showdept">
END;
}
Remember not to put leading spaces in the END; line. Leading spaces in the END;line
cause the rest of the document to be treated as part of the text to be printed.
17. Save the changes to your application files. Test the changes by entering the
following URL in your browser:
On Windows:
http://localhost/chap5/anyco.php
On Linux:
http://localhost/~<username>/chap5/anyco.php
The Departments page is displayed:

Further Error Handling
Updating Data 5-25
18.
Click Next to navigate to the last department record, the Accounting department
with ID 110. Try to navigate past the last department record by clicking Next.
The error handling prevents navigation past the last department record.
19. If a new employee is inserted with a salary of 0, or the department ID is changed
to one that does not exist, the new error page is shown with the heading "Cannot
insert employee".
Further Error Handling
Specific Oracle errors can be handled individually. For example, if a new employee
record is created by clicking the Insert new employee button on the Employees page,
and the Department ID is changed to a department that does not exist, you can trap
this error and display a more meaningful message:
1. Edit the anyco.php file. Change the error handling in the insert_new_emp()
function:
$r = db_execute_statement($conn, $statement, $err, $bindargs);
if ($r) {
construct_employees();
}
else {
if ($err['CODE'] == 2291) { // Foreign key violated
handle_error("Department {$newemp['deptid']} does not yet exist",
$err);
}
else {
handle_error('Cannot insert employee', $err);
}
}
2. Save the changes to your application files. Test the changes by entering the
following URL:
On Windows:
http://localhost/chap5/anyco.php
On Linux:
http://localhost/~<username>/chap5/anyco.php
3. In the Departments page, click Show Employees.

Further Error Handling
5-26 Oracle Database 2 Day + PHP Developer's Guide
4.
In the Employees page, click Insert new employee.
5. In the Insert New Employee page, enter employee details as shown, setting the
Department ID to 99, and click Save.
The following error page is displayed:
You can click Return to Departments to return to the Departments page and then
click Show Employees to verify that the new employee record has not been added
to the Administration department.

6
Executing Stored Procedures and Functions 6-1
6 Executing Stored Procedures and Functions
This chapter shows you how to run stored procedures and functions using PHP and
Oracle Database. It has the following topics:
■ Using PL/SQL to Capture Business Logic
■ Using PL/SQL Ref Cursors to Return Result Sets
The Anyco application is extended with a PL/SQL function to calculate remuneration
for each employee, and is further extended with a PL/SQL procedure to return a REF
CURSOR of employee records.
Using PL/SQL to Capture Business Logic
Oracle PL/SQL procedures and functions enable you to store business logic in the
database for any client program to use. They also reduce the amount of data that must
be transferred between the database and PHP and can help improve performance.
In this section, you will create a PL/SQL stored function to calculate and display the
total remuneration for each employee.
To display the total remuneration of each employee, perform the following steps:
The PHP application connects to the database as the HR user. You may need to unlock
the HR account as a user with DBA privileges. To unlock the HR user:
1. Open SQL Developer and open a connection to your Oracle database.
2. Login to your Oracle database as system.
3. Open SQL Worksheet or SQL*Plus and run the following grant statement to
assign the create procedure privilege to the HR user:
grant create procedure to hr;

Using PL/SQL to Capture Business Logic
6-2 Oracle Database 2 Day + PHP Developer's Guide
4. Login to your HR sample schema as hr.
5. Open SQL Worksheet or SQL*Plus and enter the following text to create a
calc_remuneration() function:
create or replace function calc_remuneration(
salary IN number, commission_pct IN number) return number is
begin
return ((salary*12) + (salary * 12 * nvl(commission_pct,0)));
end;

Using PL/SQL to Capture Business Logic
Executing Stored Procedures and Functions 6-3
6.
Create the chap6 directory, copy the application files from chap5, and change to
the newly created directory:
On Windows:
mkdir c:\program files\Apache Group\Apache2\htdocs\chap6
cd c:\program files\Apache Group\Apache2\htdocs\chap6
copy ..\chap5\* .
On Linux:
mkdir $HOME/public_html/chap6
cd $HOME/public_html/chap6
cp ../chap5/* .
7. Edit the anyco.php file. Modify the query in the construct_employees()
function to call the PL/SQL function for each row returned:
$query =
"SELECT employee_id,
substr(first_name,1,1) || '. '|| last_name as employee_name,
hire_date,
to_char(salary, '9999G999D99') as salary,
nvl(commission_pct,0) as commission_pct,
to_char(calc_remuneration(salary, commission_pct),'9999G999D99')
as remuneration
FROM employees
WHERE department_id = :did
ORDER BY employee_id ASC";
8. Edit the anyco_ui.inc file. In the ui_print_employees() function, add a
Remuneration column to the table, and modify the foreach loop to display the
remuneration field for each employee:
echo <<<END
<form method="post" action="$posturl">
<table>
<tr>
<th> </th>
<th>Employee<br>ID</th>
<th>Employee<br>Name</th>
<th>Hiredate</th>
<th>Salary</th>
<th>Commission<br>(%)</th>
<th>Remuneration</th>
</tr>
END;
// Write one row per employee
foreach ($employeerecords as $emp) {
echo '<tr>';
echo '<td><input type="radio" name="emprec"
value="'.htmlentities($emp['EMPLOYEE_ID']).'"></td>';
echo '<td align="right">'.htmlentities($emp['EMPLOYEE_ID']).'</td>';
echo '<td>'.htmlentities($emp['EMPLOYEE_NAME']).'</td>';
echo '<td>'.htmlentities($emp['HIRE_DATE']).'</td>';
echo '<td align="right">'.htmlentities($emp['SALARY']).'</td>';
echo '<td align="right">'.htmlentities($emp['COMMISSION_PCT']).'</td>';
echo '<td align="right">'.htmlentities($emp['REMUNERATION']).'</td>';
echo '</tr>';
}

Using PL/SQL Ref Cursors to Return Result Sets
6-4 Oracle Database 2 Day + PHP Developer's Guide
9.
Save the changes to your application files. In a browser, enter the following URL to
test the application:
On Windows:
http://localhost/chap6/anyco.php
On Linux:
http://localhost/~<username>/chap6/anyco.php
10. In the Departments page, click Show Employees.
In the Employees page for the department, the employee remuneration is
displayed in the last column:
Using PL/SQL Ref Cursors to Return Result Sets
Query data can be returned as REF CURSORS from PL/SQL blocks and displayed in
PHP. This can be useful where the data set requires complex functionality or where
you want multiple application programs to use the same query.
A REF CURSOR in PL/SQL is a type definition that is assigned to a cursor variable. It
is common to declare a PL/SQL type inside a package specification for reuse in other
PL/SQL constructs, such as a package body.
In this section, you will use a REF CURSOR to retrieve the employees for a specific
department.
To create a PL/SQL package specification and body, with a REF CURSOR to retrieve
employees for a specific department, perform the following steps:
1. Open SQL Developer and login to your HR sample schema as hr.
2. Open SQL Worksheet or SQL*Plus and enter the following text to create the cv_
types PL/SQL package:
CREATE OR REPLACE PACKAGE cv_types AS
TYPE empinfotyp IS REF CURSOR;
PROCEDURE get_employees(deptid in number,
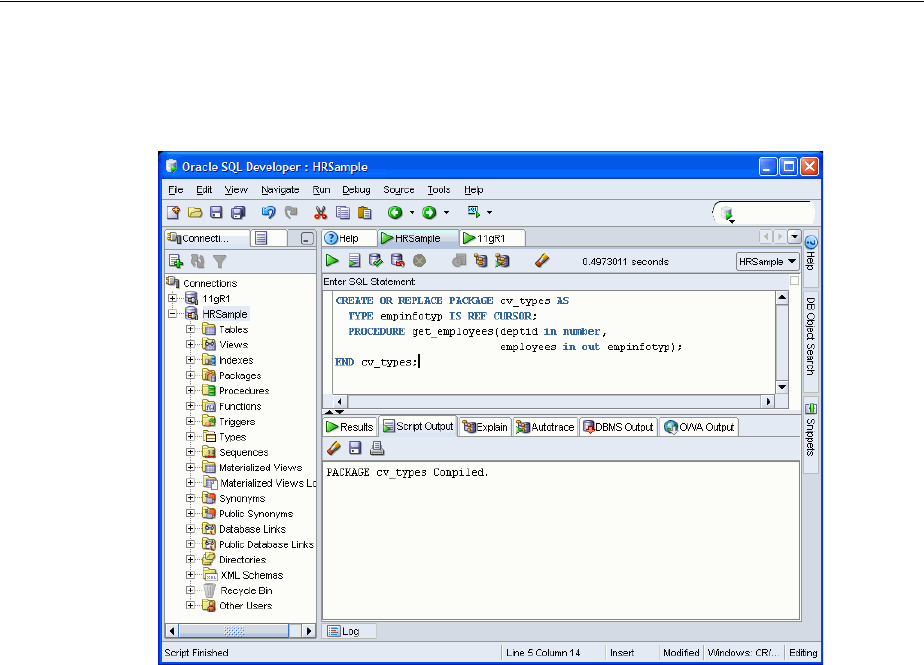
Using PL/SQL Ref Cursors to Return Result Sets
Executing Stored Procedures and Functions 6-5
employees in out empinfotyp);
END cv_types;
Click Run:
3. In SQL Worksheet enter the following text to create the cv_types PL/SQL
package body:
CREATE OR REPLACE PACKAGE BODY cv_types AS
PROCEDURE get_employees(deptid in number,
employees in out empinfotyp)
IS
BEGIN
OPEN employees FOR
SELECT employee_id,
substr(first_name,1,1) || '. '|| last_name as employee_name,
hire_date,
to_char(salary, '999G999D99') as salary,
NVL(commission_pct,0) as commission_pct,
to_char(calc_remuneration(salary, commission_pct),
'9999G999D99') as remuneration
FROM employees
WHERE department_id = deptid
ORDER BY employee_id ASC;
END get_employees;
END cv_types;
Click Run:

Using PL/SQL Ref Cursors to Return Result Sets
6-6 Oracle Database 2 Day + PHP Developer's Guide
4. Edit the anyco_db.inc file. Create a new PHP function that calls the PL/SQL
packaged procedure:
// Use ref cursor to fetch employee records
// All records are retrieved - there is no paging in this example
function db_get_employees_rc($conn, $deptid, &$e)
{
// Execute the call to the stored procedure
$stmt = "BEGIN cv_types.get_employees($deptid, :rc); END;";
$stid = @oci_parse($conn, $stmt);
if (!$stid) {
$e = db_error($conn, __FILE__, __LINE__);
return false;
}
$refcur = oci_new_cursor($conn);
if (!$stid) {
$e = db_error($conn, __FILE__, __LINE__);
return false;
}
$r = @oci_bind_by_name($stid, ':RC', $refcur, -1, OCI_B_CURSOR);
if (!$r) {
$e = db_error($stid, __FILE__, __LINE__);
return false;
}
$r = @oci_execute($stid);
if (!$r) {
$e = db_error($stid, __FILE__, __LINE__);
return false;
}
// Now treat the ref cursor as a statement resource
$r = @oci_execute($refcur, OCI_DEFAULT);
if (!$r) {
$e = db_error($refcur, __FILE__, __LINE__);
return false;
}
$r = @oci_fetch_all($refcur, $employeerecords, null, null,

Using PL/SQL Ref Cursors to Return Result Sets
Executing Stored Procedures and Functions 6-7
OCI_FETCHSTATEMENT_BY_ROW);
if (!$r) {
$e = db_error($refcur, __FILE__, __LINE__);
return false;
}
return ($employeerecords);
}
The db_get_employees_rc() function executes the following anonymous
(unnamed) PL/SQL block:
BEGIN cv_types.get_employees($deptid, :rc); END;
The PL/SQL statement inside the BEGIN END block calls the stored PL/SQL
package procedure cv_types.et_employees(). This returns an
OCI_B_CURSOR REF CURSOR bind variable in the PHP variable $refcur.
The $refcur variable is treated like a statement handle returned by oci_
parse(). It is used for execute and fetch operations just as if the SQL query had
been done in PHP.
5. Edit the anyco.php file. In the construct_employees() function, remove the
query text and the bind arguments. The function becomes:
function construct_employees()
{
$deptid = $_SESSION['deptid'];
$conn = db_connect($err);
if (!$conn) {
handle_error('Connection Error', $err);
}
else {
$emp = db_get_employees_rc($conn, $deptid, $err);
if (!$emp) {
handle_error('Cannot fetch Employees', $err);
}
else {
$deptname = get_dept_name($conn, $deptid);
ui_print_header('Employees: '.$deptname);
ui_print_employees($emp, $_SERVER['SCRIPT_NAME']);
ui_print_footer(date('Y-m-d H:i:s'));
}
}
}
6. Save the changes to your application files. In a browser, enter the following URL to
test the application:
On Windows:
http://localhost/chap6/anyco.php
On Linux:
http://localhost/~<username>/chap6/anyco.php
7. In the Departments page, click Next to navigate to the Marketing department
page.

Using PL/SQL Ref Cursors to Return Result Sets
6-8 Oracle Database 2 Day + PHP Developer's Guide
8.
In the Marketing department page, click Show Employees.
In the Employees page for the Marketing department, the employee pages
displays as previously:

7
Loading Images 7-1
7 Loading Images
This chapter shows you how to change the application to upload a JPEG image for
new employee records and display it on the Employees page. It has the following
topics:
■ Using BLOBs to Store and Load Employee Images
■ Resizing Images
Using BLOBs to Store and Load Employee Images
In this section, you will modify your application code to enable a photo to be stored in
the record of an employee.
To enable images of employees to be stored in the employee records, perform the
following tasks:
1. Create the chap7 directory, copy the application files from chap6, and change to
the newly created directory:
On Windows:
mkdir c:\program files\Apache Group\Apache2\htdocs\chap7
cd c:\program files\Apache Group\Apache2\htdocs\chap7
copy ..\chap6\* .
On Linux:
mkdir $HOME/public_html/chap7
cd $HOME/public_html/chap7
cp ../chap6/* .
2. Open SQL Developer and open a connection to your HR sample schema.
3. Login to your HR sample schema as hr.
4. Open SQL Worksheet and enter the following CREATE TABLE statement to create
a new table for storing employee images:
CREATE TABLE employee_photos(
employee_id NUMBER,
employee_thumbnail BLOB);

Using BLOBs to Store and Load Employee Images
7-2 Oracle Database 2 Day + PHP Developer's Guide
5. The HR user must have the CREATE TABLE privilege to perform this command. If
you get an "insufficient privileges" error message, then log out as the HR user, log
in as system, and execute the following GRANT command:
GRANT create table TO hr;
Then log in as HR again to execute the CREATE TABLE statement.
6. Edit the anyco_ui.inc file. Add a Photograph column to the EMPLOYEES table
in the ui_print_employees() function:
<th>Commission<br>(%)</th>
<th>Remuneration</th>
<th>Photograph</th>
The data for the Photograph column is populated with an <img> tag whose src
attribute is defined as a URL reference to a new anyco_im.php file, which will
display the image for each employee record.
7. Edit the anyco_ui.inc file. Add code in the ui_print_employees() function
to generate an <img> tag referencing the anyco_im.php file with the employee
identifier as a parameter:
echo '<td align="right">'
.htmlentities($emp['REMUNERATION']).'</td>';
echo '<td><img src="anyco_im.php?showempphoto='.$emp['EMPLOYEE_ID']
.'" alt="Employee photo"></td>';
8. Edit the anyco_ui.inc file. To enable images to be uploaded when a new
employee record is created, add an enctype attribute to the <form> tag in the
ui_print_insert_employee() function:
<form method="post" action="$posturl" enctype="multipart/form-data">
At the bottom of the form add an upload field with an input type of file:
<tr>

Using BLOBs to Store and Load Employee Images
Loading Images 7-3
<td>Commission (%)</td>
<td><input type="text" name="commpct" value="0" size="20"></td>
</tr>
<tr>
<td>Photo</td>
<td><input type="file" name="empphoto"></td>
</tr>
9. Create the anyco_im.php file. This file accepts an employee identifier as a
URL parameter, reads the image from the Photograph column for that employee
record, and returns the thumbnail image to be displayed:
<?php // anyco_im.php
require('anyco_cn.inc');
require('anyco_db.inc');
construct_image();
function construct_image()
{
if (!isset($_GET['showempphoto'])) {
return;
}
$empid = $_GET['showempphoto'];
$conn = db_connect($err);
if (!$conn) {
return;
}
$query =
'SELECT employee_thumbnail
FROM employee_photos
WHERE employee_id = :eid';
$stid = oci_parse($conn, $query);
$r = oci_bind_by_name($stid, ":eid", $empid, -1);
if (!$r) {
return;
}
$r = oci_execute($stid, OCI_DEFAULT);
if (!$r) {
return;
}
$arr = oci_fetch_row($stid);
if (!$arr) {
return; // photo not found
}
$result = $arr[0]->load();
// If any text (or whitespace!) is printed before this header is sent,
// the text is not displayed. The image also is not displayed properly.
// Comment out the "header" line to see the text and debug.
header("Content-type: image/JPEG");
echo $result;
}

Using BLOBs to Store and Load Employee Images
7-4 Oracle Database 2 Day + PHP Developer's Guide
?>
The construct_image() function uses the OCI-Lob->load() function to
retrieve the Oracle LOB data, which is the image data. The PHP header()
function sets the MIME type in the HTTP response header to ensure the browser
interprets the data as a JPEG image.
If you want to display other image types, then the Content-type needs to be
changed accordingly.
10. Edit the anyco_db.inc file. Add a new function db_insert_thumbnail()to
insert an image into the EMPLOYEE_PHOTOS table:
function db_insert_thumbnail($conn, $empid, $imgfile, &$e)
{
$lob = oci_new_descriptor($conn, OCI_D_LOB);
if (!$lob) {
$e = db_error($conn, __FILE__, __LINE__);
return false;
}
$insstmt =
'INSERT INTO employee_photos (employee_id, employee_thumbnail)
VALUES(:eid, empty_blob())
RETURNING employee_thumbnail into :etn';
$stmt = oci_parse($conn, $insstmt);
$r = oci_bind_by_name($stmt, ':etn', $lob, -1, OCI_B_BLOB);
if (!$r) {
$e = db_error($stid, __FILE__, __LINE__);
return false;
}
$r = oci_bind_by_name($stmt, ':eid', $empid, -1);
if (!$r) {
$e = db_error($stid, __FILE__, __LINE__);
return false;
}
$r = oci_execute($stmt, OCI_DEFAULT);
if (!$r) {
$e = db_error($stid, __FILE__, __LINE__);
return false;
}
if (!$lob->savefile($imgfile)) {
$e = db_error($stid, __FILE__, __LINE__);
return false;
}
$lob->free();
return true;
}
To tie the new EMPLOYEE_PHOTOS and EMPLOYEES tables together, you must use
the same employee id in both tables.
11. Edit the anyco_db.inc file. Change the $bindvars parameter in the
db_execute_statement() function to &$bindvars so that OUT bind variable
values are returned from the database. At the bottom of the function, add a loop to
set any return bind values:

Using BLOBs to Store and Load Employee Images
Loading Images 7-5
function db_execute_statement($conn, $statement, &$e, &$bindvars = array())
{
...
$r = @oci_execute($stid);
if (!$r) {
$e = db_error($stid, __FILE__, __LINE__);
return false;
}
$outbinds = array();
foreach ($bindvars as $b) {
$outbinds[$b[0]] = $$b[0];
}
$bindvars = $outbinds;
return true;
}
12. Edit the anyco.php file. Change the INSERT statement in the insert_new_
emp() function so that it returns the new employee identifier in the bind variable
:neweid. This value is inserted with the image into the new EMPLOYEE_PHOTOS
table.
$statement =
'INSERT INTO employees
(employee_id, first_name, last_name, email, hire_date,
job_id, salary, commission_pct, department_id)
VALUES (employees_seq.nextval, :fnm, :lnm, :eml, :hdt,
:jid, :sal, :cpt, :did)
RETURNING employee_id into :neweid’;
Also in the insert_new_emp() function, add a call to the array_push()
function to set a new bind variable NEWEID at the end of the list of array_
push() calls:
array_push($bindargs, array('CPT', $newemp['commpct'], -1));
array_push($bindargs, array('DID', $newemp['deptid'], -1));
array_push($bindargs, array('NEWEID', null, 10));
Because the value of NEWID is being retrieved with the RETURNING clause in the
INSERT statement, its initial value is set to NULL. The length is set to 10 to allow
enough digits in the return value.
13. Edit the anyco.php file. In the insert_new_emp() function, add a call between
the db_execute_statement() and construct_employees() calls to insert
the thumbnail image:
$r = db_execute_statement($conn, $statement, $err, $bindargs);
if ($r) {
$r = db_insert_thumbnail($conn, $bindargs['NEWEID'],
$_FILES['empphoto']['tmp_name'], $e);
construct_employees();
}
14. In a browser, enter the following application URL:
On Windows:
http://localhost/chap7/anyco.php
On Linux:
http://localhost/~<username>/chap7/anyco.php

Using BLOBs to Store and Load Employee Images
7-6 Oracle Database 2 Day + PHP Developer's Guide
15.
In the Departments page, click Show Employees to navigate to the Employees
page:
16. In the Employees page, to insert a new employee record click Insert new
employee:
17. The Insert New Employee form allows you to choose a thumbnail image on your
system to be uploaded to the database. Enter your own values in the fields or use
the values as shown. Click Browse:
18. In the File Upload window, browse for and select a JPEG image file, and click
Open:

Using BLOBs to Store and Load Employee Images
Loading Images 7-7
19. In the Insert New Employee page, click Save:
The Employees page is displayed with the new employee record, including the
image, which is displayed at its original size:

Resizing Images
7-8 Oracle Database 2 Day + PHP Developer's Guide
Resizing Images
In this section, you will further modify your application code to create a thumbnail
image from a supplied image, and store the thumbnail image in the record of an
employee.
You can use the PHP GD graphics extension to resize employee images.
1. Restart Apache. You can either use the ApacheMonitor utility, or you can use
Windows Services.
To use the ApacheMonitor utility, navigate to the Apache bin directory and
double click ApacheMonitor.exe. In a default installation, Apache bin is
located at c:\Program Files\Apache Group\Apache2\bin.
You can access Windows Services from the Windows Start menu at Start > Control
Panel > Administrative Tools > Services. Select the Standard tab. Right click the
Apache2 HTTP Server and then select Restart.
2. Edit the anyco_db.inc file. To resize the image to create a thumbnail image, add
the following code before the call to $lob->savefile($imgfile) in the
db_insert_thumbnail() function:
$r = oci_execute($stmt, OCI_DEFAULT);
if (!$r) {
$e = db_error($stid, __FILE__, __LINE__);
return false;
}
// Resize the image to a thumbnail
define('MAX_THUMBNAIL_DIMENSION', 100);
$src_img = imagecreatefromjpeg($imgfile);
list($w, $h) = getimagesize($imgfile);
if ($w > MAX_THUMBNAIL_DIMENSION || $h > MAX_THUMBNAIL_DIMENSION)
{
$scale = MAX_THUMBNAIL_DIMENSION / (($h > $w) ? $h : $w);
$nw = $w * $scale;
$nh = $h * $scale;
$dest_img = imagecreatetruecolor($nw, $nh);

Resizing Images
Loading Images 7-9
imagecopyresampled($dest_img, $src_img, 0, 0, 0, 0, $nw, $nh, $w, $h);
imagejpeg($dest_img, $imgfile); // overwrite file with new thumbnail
imagedestroy($src_img);
imagedestroy($dest_img);
}
if (!$lob->savefile($imgfile)) {
...
The imagecreatefromjpeg() function reads the JPEG file and creates an
internal representation used by subsequent GD functions. Next, new dimensions
are calculated with the longest side no larger than 100 pixels. A template image
with the new size is created using the imagecreatetruecolor() function. Data
from the original image is sampled into it with the imagecopyresampled()
function to create the thumbnail image. The thumbnail image is written back to
the original file and the internal representations of the images are freed.
The existing code in the db_insert_thumbnail() function uploads the image
file to the database as it did in the previous implementation.
3. Enter the following URL in your browser to test the changes in your application:
On Windows:
http://localhost/chap7/anyco.php
On Linux:
http://localhost/~<username>/chap7/anyco.php
4. In the Departments page, navigate to the Employees page by clicking Show
Employees:
5. In the Employees page, to insert a new employee record, click Insert new
employee:

Resizing Images
7-10 Oracle Database 2 Day + PHP Developer's Guide
6.
Enter the new employee details or use the values shown. To browse for an
employee image, click Browse:
7. Locate and select a JPEG image with a size larger than 100 pixels, and click Open:

Resizing Images
Loading Images 7-11
8. In the Insert New Image page, click Save:
The Employees page shows the new uploaded JPEG image with a reduced image
size, compared to the image loaded before including the image resize code:

Resizing Images
7-12 Oracle Database 2 Day + PHP Developer's Guide

8
Building Global Applications 8-1
8 Building Global Applications
This chapter discusses global application development in a PHP and Oracle Database
environment. It addresses the basic tasks associated with developing and deploying
global Internet applications, including developing locale awareness, constructing
HTML content in the user-preferred language, and presenting data following the
cultural conventions of the locale of the user.
Building a global Internet application that supports different locales requires good
development practices. A locale refers to a national language and the region in which
the language is spoken. The application itself must be aware of the locale preference of
the user and be able to present content following the cultural conventions expected by
the user. It is important to present data with appropriate locale characteristics, such as
the correct date and number formats. Oracle Database is fully internationalized to
provide a global platform for developing and deploying global applications.
This chapter has the following topics:
■ Establishing the Environment Between Oracle and PHP
■ Manipulating Strings
■ Determining the Locale of the User
■ Developing Locale Awareness
■ Encoding HTML Pages
■ Organizing the Content of HTML Pages for Translation
■ Presenting Data Using Conventions Expected by the User
Establishing the Environment Between Oracle and PHP
Correctly setting up the connectivity between the PHP engine and the Oracle database
is first step in building a global application, it guarantees data integrity across all tiers.
Most internet based standards support Unicode as a character encoding, in this
chapter we will focus on using Unicode as the character set for data exchange.
PHP uses the OCI8 extension, and rules that apply to OCI also apply to PHP. Oracle
locale behavior (including the client character set used in OCI applications) is defined
by the NLS_LANG environment variable. This environment variable has the form:
<language>_<territory>.<character set>
For example, for a German user in Germany running an application in Unicode, NLS_
LANG should be set to
GERMAN_GERMANY.AL32UTF8

Manipulating Strings
8-2 Oracle Database 2 Day + PHP Developer's Guide
The language and territory settings control Oracle behaviors such as the Oracle date
format, error message language, and the rules used for sort order. The character set
AL32UTF8 is the Oracle name for UTF-8.
For information on the NLS_LANG environment variable, see the Oracle Database
installation guides.
When PHP is installed on Apache, you can set NLS_LANG in /etc/profile:
export NLS_LANG GERMAN_GERMANY.AL32UTF8
If PHP is installed on Oracle HTTP Server, you must set NLS_LANG as an environment
variable in $ORACLE_HOME/opmn/conf/opmn.xml:
<ias-component id="HTTP_Server">
<process-type id="HTTP_Server" module-id="OHS">
<environment>
<variable id="PERL5LIB"
value="D:\oracle\1012J2EE\Apache\Apache\mod_perl\site\5.6.1\lib"/>
<variable id="PHPRC" value="D:\oracle\1012J2EE\Apache\Apache\conf"/>
<variable id="NLS_LANG" value="german_germany.al32utf8"/>
</environment>
<module-data>
<category id="start-parameters">
<data id="start-mode" value="ssl-disabled"/>
</category>
</module-data>
<process-set id="HTTP_Server" numprocs="1"/>
</process-type>
</ias-component>
You must restart the Web listener to implement the change.
Manipulating Strings
PHP was designed to work with the ISO-8859-1 character set. To handle other
character sets, specifically multibyte character sets, a set of "MultiByte String
Functions" is available. To enable these functions, you must enable the mbstring
extension.
Your application code should use functions such as mb_strlen() to calculate the
number of characters in strings. This may return different values than strlen(),
which returns the number of bytes in a string.
Once you have enabled the mbstring extension and restarted the Web server, several
configuration options become available. You can change the behavior of the standard
PHP string functions by setting mbstring.func_overload to one of the "Overload"
settings.
For more information, see the PHP mbstring reference manual at
http://www.php.net/mbstring
Determining the Locale of the User
In a global environment, your application should accommodate users with different
locale preferences. Once it has determined the preferred locale of the user, the
application should construct HTML content in the language of the locale and follow
the cultural conventions implied by the locale.

Encoding HTML Pages
Building Global Applications 8-3
A common method to determine the locale of a user is from the default ISO locale
setting of the browser. Usually a browser sends its locale preference setting to the
HTTP server with the Accept Language HTTP header. If the Accept Language header
is NULL, then there is no locale preference information available, and the application
should fall back to a predefined default locale.
The following PHP code retrieves the ISO locale from the Accept-Language HTTP
header through the $_SERVER Server variable.
$s = $_SERVER["HTTP_ACCEPT_LANGUAGE"]
Developing Locale Awareness
Once the locale preference of the user has been determined, the application can call
locale-sensitive functions, such as date, time, and monetary formatting to format the
HTML pages according to the cultural conventions of the locale.
When you write global applications implemented in different programming
environments, you should enable the synchronization of user locale settings between
the different environments. For example, PHP applications that call PL/SQL
procedures should map the ISO locales to the corresponding NLS_LANGUAGE and
NLS_TERRITORY values and change the parameter values to match the locale of the
user before calling the PL/SQL procedures. The PL/SQL UTL_I18N package contains
mapping functions that can map between ISO and Oracle locales.
Table 8–1 shows how some commonly used locales are defined in ISO and Oracle
environments.
Encoding HTML Pages
The encoding of an HTML page is important information for a browser and an
Internet application. You can think of the page encoding as the character set used for
Table 8–1 Locale Representations in ISO, SQL, and PL/SQL Programming Environments
Locale Locale ID NLS_LANGUAGE NLS_TERRITORY
Chinese (P.R.C.) zh-CN SIMPLIFIED CHINESE CHINA
Chinese (Taiwan) zh-TW TRADITIONAL
CHINESE
TAIWAN
English (U.S.A) en-US AMERICAN AMERICA
English (United
Kingdom)
en-GB ENGLISH UNITED KINGDOM
French (Canada) fr-CA CANADIAN FRENCH CANADA
French (France) fr-FR FRENCH FRANCE
German de GERMAN GERMANY
Italian it ITALIAN ITALY
Japanese ja JAPANESE JAPAN
Korean ko KOREAN KOREA
Portuguese (Brazil) pt-BR BRAZILIAN
PORTUGUESE
BRAZIL
Portuguese pt PORTUGUESE PORTUGAL
Spanish es SPANISH SPAIN

Organizing the Content of HTML Pages for Translation
8-4 Oracle Database 2 Day + PHP Developer's Guide
the locale that an Internet application is serving. The browser must know about the
page encoding so that it can use the correct fonts and character set mapping tables to
display the HTML pages. Internet applications must know about the HTML page
encoding so they can process input data from an HTML form.
Instead of using different native encodings for the different locales, Oracle
recommends that you use UTF-8 (Unicode encoding) for all page encodings. This
encoding not only simplifies the coding for global applications, but it also enables
multilingual content on a single page.
Specifying the Page Encoding for HTML Pages
You can specify the encoding of an HTML page either in the HTTP header, or in
HTML page header.
Specifying the Encoding in the HTTP Header
To specify HTML page encoding in the HTTP header, include the Content-Type HTTP
header in the HTTP specification. It specifies the content type and character set. The
Content-Type HTTP header has the following form:
Content-Type: text/html; charset=utf-8
The charset parameter specifies the encoding for the HTML page. The possible values
for the charset parameter are the IANA names for the character encodings that the
browser supports.
Specifying the Encoding in the HTML Page Header
Use this method primarily for static HTML pages. To specify HTML page encoding in
the HTML page header, specify the character encoding in the HTML header as follows:
<meta http-equiv="Content-Type" content="text/html;charset=utf-8">
The charset parameter specifies the encoding for the HTML page. As with the
Content-Type HTTP Header, the possible values for the charset parameter are the
IANA names for the character encodings that the browser supports.
Specifying the Page Encoding in PHP
You can specify the encoding of an HTML page in the Content-Type HTTP header by
setting the PHP configuration variable as follows:
default_charset = UTF-8
This setting does not imply any conversion of outgoing pages. Your application must
ensure that the server-generated pages are encoded in UTF-8.
Organizing the Content of HTML Pages for Translation
Making the user interface available in the local language of the user is a fundamental
task in globalizing an application. Translatable sources for the content of an HTML
page belong to the following categories:
■ Text strings included in the application code
■ Static HTML files, images files, and template files such as CSS
■ Dynamic data stored in the database

Presenting Data Using Conventions Expected by the User
Building Global Applications 8-5
Strings in PHP
You should externalize translatable strings within your PHP application logic, so that
the text is readily available for translation. These text messages can be stored in flat
files or database tables depending on the type and the volume of the data being
translated.
Static Files
Static files such as HTML and GIF files are readily translatable. When these files are
translated, they should be translated into the corresponding language with UTF-8 as
the file encoding. To differentiate the languages of the translated files, stage the static
files of different languages in different directories or with different file names.
Data from the Database
Dynamic information such as product names and product descriptions is typically
stored in the database. To differentiate various translations, the database schema
holding this information should include a column to indicate the language. To select
the desired language, you must include a WHERE clause in your query.
Presenting Data Using Conventions Expected by the User
Data in the application must be presented in a way that conforms to the expectation of
the user. Otherwise, the meaning of the data can be misinterpreted. For example, the
date '12/11/05' implies '11th December 2005' in the United States, whereas in the
United Kingdom it means '12th November 2005'. Similar confusion exists for number
and monetary formats of the users. For example, the symbol '.' is a decimal separator
in the United States; in Germany this symbol is a thousand separator.
Different languages have their own sorting rules. Some languages are collated
according to the letter sequence in the alphabet, some according to the number of
stroke counts in the letter, and some languages are ordered by the pronunciation of the
words. Presenting data not sorted in the linguistic sequence that your users are
accustomed to can make searching for information difficult and time consuming.
Depending on the application logic and the volume of data retrieved from the
database, it may be more appropriate to format the data at the database level rather
than at the application level. Oracle Database offers many features that help to refine
the presentation of data when the locale preference of the user is known. The
following sections provide examples of locale-sensitive operations in SQL.
Oracle Date Formats
The three different date presentation formats in Oracle Database are standard, short,
and long dates. The following examples illustrate the differences between the short
date and long date formats for both the United States and Germany.
SQL> alter session set nls_territory=america nls_language=american;
Session altered.
SQL> select employee_id EmpID,
2 substr(first_name,1,1)||'.'||last_name "EmpName",
3 to_char(hire_date,'DS') "Hiredate",
4 to_char(hire_date,'DL') "Long HireDate"
5 from employees

Presenting Data Using Conventions Expected by the User
8-6 Oracle Database 2 Day + PHP Developer's Guide
6* where employee_id <105;
EMPID EmpName Hiredate Long HireDate
---------- --------------------------- ---------- -----------------------------
100 S.King 06/17/1987 Wednesday, June 17, 1987
101 N.Kochhar 09/21/1989 Thursday, September 21, 1989
102 L.De Haan 01/13/1993 Wednesday, January 13, 1993
103 A.Hunold 01/03/1990 Wednesday, January 3, 1990
104 B.Ernst 05/21/1991 Tuesday, May 21, 1991
SQL> alter session set nls_territory=germany nls_language=german;
Session altered.
SQL> select employee_id EmpID,
2 substr(first_name,1,1)||'.'||last_name "EmpName",
3 to_char(hire_date,'DS') "Hiredate",
4 to_char(hire_date,'DL') "Long HireDate"
5 from employees
6* where employee_id <105;
EMPID EmpName Hiredate Long HireDate
---------- --------------------------- -------- ------------------------------
100 S.King 17.06.87 Mittwoch, 17. Juni 1987
101 N.Kochhar 21.09.89 Donnerstag, 21. September 1989
102 L.De Haan 13.01.93 Mittwoch, 13. Januar 1993
103 A.Hunold 03.01.90 Mittwoch, 3. Januar 1990
104 B.Ernst 21.05.91 Dienstag, 21. Mai 1991
Oracle Number Formats
The following examples illustrate the differences in the decimal character and group
separator between the United States and Germany.
SQL> alter session set nls_territory=america;
Session altered.
SQL> select employee_id EmpID,
2 substr(first_name,1,1)||'.'||last_name "EmpName",
3 to_char(salary, '99G999D99') "Salary"
4 from employees
5* where employee_id <105
EMPID EmpName Salary
---------- --------------------------- ----------
100 S.King 24,000.00
101 N.Kochhar 17,000.00
102 L.De Haan 17,000.00
103 A.Hunold 9,000.00
104 B.Ernst 6,000.00
SQL> alter session set nls_territory=germany;
Session altered.
SQL> select employee_id EmpID,
2 substr(first_name,1,1)||'.'||last_name "EmpName",
3 to_char(salary, '99G999D99') "Salary"

Presenting Data Using Conventions Expected by the User
Building Global Applications 8-7
4 from employees
5* where employee_id <105
EMPID EmpName Salary
---------- --------------------------- ----------
100 S.King 24.000,00
101 N.Kochhar 17.000,00
102 L.De Haan 17.000,00
103 A.Hunold 9.000,00
104 B.Ernst 6.000,00
Oracle Linguistic Sorts
Spain traditionally treats ch, ll as well as ñ as unique letters, ordered after c, l and n
respectively. The following examples illustrate the effect of using a Spanish sort
against the employee names Chen and Chung.
SQL> alter session set nls_sort=binary;
Session altered.
SQL> select employee_id EmpID,
2 last_name "Last Name"
3 from employees
4 where last_name like 'C%'
5* order by last_name
EMPID Last Name
---------- -------------------------
187 Cabrio
148 Cambrault
154 Cambrault
110 Chen
188 Chung
119 Colmenares
6 rows selected.
SQL> alter session set nls_sort=spanish_m;
Session altered.
SQL> select employee_id EmpID,
2 last_name "Last Name"
3 from employees
4 where last_name like 'C%'
5* order by last_name
EMPID Last Name
---------- -------------------------
187 Cabrio
148 Cambrault
154 Cambrault
119 Colmenares
110 Chen
188 Chung
6 rows selected.

Presenting Data Using Conventions Expected by the User
8-8 Oracle Database 2 Day + PHP Developer's Guide
Oracle Error Messages
The NLS_LANGUAGE parameter also controls the language of the database error
messages being returned from the database. Setting this parameter prior to submitting
your SQL statement ensures that the language-specific database error messages will be
returned to the application.
Consider the following server message:
ORA-00942: table or view does not exist
When the NLS_LANGUAGE parameter is set to French, the server message appears as
follows:
ORA-00942: table ou vue inexistante
For more discussion of globalization support features in Oracle Database, see
"Working in a Global Environment" in Oracle Database 2 Day Developer's Guide.

Index-1
Index
Symbols
$bindargs array, 4-5
$bindargs parameter, 5-2
$bindvars parameter, 4-6, 7-4
$conn parameter, 3-4
$current variable, 4-9
$date parameter, 3-2
$DID variable, 4-6
$e parameter, 5-18
$emp variable, 5-15
$file parameter, 4-3
$line parameter, 4-3
$posturl parameter, 4-7, 4-9
$q1 parameter, 4-9
$query parameter, 5-4
$r parameter, 4-3
$refcur variable, 6-7
$results parameter, 4-3
$resulttype parameter, 5-7
$rowsperpage parameter, 4-10
$stid parameter, 4-3, 4-6
$title parameter, 3-2
@ preventing error display, 5-18
__FILE__ variable, 4-3, 5-18
__LINE__ variable, 4-3, 5-18
A
AL32UTF8 character set, 8-2
AnyCo Corp
tutorial application, 1-1
anyco_cn.inc
creating, 4-1
description, 1-2
anyco_db.inc
calling bind variable, 4-6
calling PL/SQL packaged procedure, 6-6
changing the bind variable, 7-4
choosing output type, 5-7
creating, 4-2
creating a thumbnail image, 7-8
description, 1-2
executing data manipulation statements, 5-7
including in anyco.php, 4-4
inserting thumbnail image, 7-4
passing error parameter, 5-18
preventing error display, 5-18
return error variable, 5-18
returning errors, 5-17
returning errors from all functions, 5-18
subset query, 4-9
testing, 4-6
anyco_im.php
creating, 7-3
description, 1-2
employee image display, 7-2
anyco_ui.inc
add employee remuneration column, 6-3
adding an employee image column, 7-2
adding navigation, 4-7
creating, 3-2
description, 1-2
employee data in HTML table, 5-2
error printing, 5-24
extending, 4-11
formatting results, 4-3
functions, 3-2
generating an employee img tag, 7-2
generating employee data HTML form, 5-8
HTML form for employee data, 5-8
including, 3-3
including in anyco.php, 4-4
testing changes, 5-3
updating an employee record, 5-10
uploading employee image, 7-2
anyco.php
adding db connection, 3-4
bind variables, 4-5
building employee records, 5-5
calling a PL/SQL function, 6-3
creating, 3-3
data manipulation logic, 5-3
deleting employee records, 5-6
departments instead of employees, 5-2
description, 1-2
employees and departments pages, 5-13
employees page, 5-1
error handling, 5-18, 5-25
executing the query, 3-4
fetching all rows, 3-5
include files, 4-4

Index-2
inserting an image, 7-5
inserting employee records, 5-5
navigation, 4-8
obtaining the default department, 5-15
printing page titles, 5-14
query to execute, 3-4
replace query, 4-12
testing, 3-3, 3-5, 4-4, 4-6, 4-10, 4-12, 5-3, 5-10, 5-16,
5-24, 5-25, 6-4, 6-7, 7-5, 7-9
updating employee records, 5-6
usable database connection, 3-4
using a bind variable, 4-5
Apache
creating public_html, 2-6
httpd.conf configuration file, 2-5
public_html, 2-5
restarting, 2-6
testing installation on Linux, 2-5
testing installation on Windows, 2-3
application, 5-17
adding an employee image, 7-2
adding employee remuneration column, 6-3
building employee records, 5-5
calling departments instead of employees, 5-2
calling locale specific functions, 8-3
centralizing database logic, 4-1
choosing output type, 5-7
combining departments and employees, 5-13
connection functions, 4-2
constants for database connection, 4-1
creating employees page, 5-1
deleting employee records, 5-6
employee image display, 7-2
employee images in BLOBs, 7-1
error recovery, 5-17
executing data manipulation statements, 5-7
executing the query, 3-4
extending departments page, 4-11
extending employees page, 5-3
externalizing translatable strings, 8-5
fetching all rows, 3-5
file naming convention, 1-2
files directory, 2-9, 3-1
generating an employee img tag, 7-2
globalizing, 8-1
implementing subset query, 4-9
inserting employee records, 5-5
inserting employee thumbnail, 7-4
Next and Previous buttons, 4-7
obtaining the default department, 5-15
Oracle errors, 5-25
PL/SQL procedures and functions, 6-1
printing errors, 5-24
printing page titles, 5-14
query to execute, 3-4
report page, 3-1
return error variable, 5-18
thumbnail images, 7-8
translating HTML and GIF, 8-5
translating the user interface, 8-4
updating employee records, 5-6
uploading employee image, 7-2
user interface, 3-2
UTF-8 page encoding, 8-3
array_push() function, 7-5
B
bind variables, 4-5
anyco.php, 4-5
calling in anyco_db.inc, 4-6
DID, 4-6, 5-13
FIRST, 4-10
LAST, 4-10
modify query, 4-5
NEWEID, 7-5
OUT, 7-4
returning from database, 7-4
BLOBs
storing employee images, 7-1
C
calc_remuneration() function, 6-2
character sets
AL32UTF8, 8-2
globalization settings, 8-2
UTF-8, 8-2
charset parameter, 8-4
configuring
Apache httpd.conf, 2-5
connections
disconnecting, 3-7
Easy Connect syntax, 3-6
HR user, 2-2, 6-1
Oracle Database, 3-1
persistent, 3-6
settings, 3-6
construct_departments() function, 4-8, 4-9, 4-12, 5-2
construct_employees() function, 5-1, 5-2, 5-13, 6-3
construct_image() function, 7-4
construct_insert_emp() function, 5-4, 5-15
construct_modify_emp() function, 5-5
Content-type, 7-4
conventions
presenting data, 8-5
COUNTRIES table, 4-11
creating
anyco_ui.inc application user interface, 3-2
directory for application files, 2-9, 3-1
PHP files, 3-1
public_html, 2-6
cv_types.et_employees() procedure, 6-7
D
database
centralizing logic, 4-1
connection functions, 4-2
constants for connection, 4-1
disconnection, 3-7

Index-3
dynamic information, 8-5
Easy Connect syntax, 3-6
executing the query, 3-4
fetching all rows, 3-5
navigating records, 4-7
storing employee images, 7-1
tnsnames.ora, 3-6
validating connection, 3-4
date formats in Oracle, 8-5
date() function, 5-5
db_do_query() function, 4-3, 4-5, 4-6, 5-1, 5-2, 5-5,
5-7, 5-18
db_error () function, 4-2
db_error() function, 4-3, 5-17, 5-18
db_execute_statement() function, 5-5, 5-7, 7-4
db_get_employees_rc() function, 6-7
db_get_page_data() function, 4-8, 4-9, 5-7, 5-18
db_insert_thumbnail() function, 7-4, 7-8, 7-9
debugging, 4-3
delete_emp() function, 5-6
department_id variable, 5-13
departments page
combining with employees, 5-13
extending, 4-11
DEPARTMENTS table, 1-1, 3-4, 4-11
deptid parameter, 5-14
DID bind variable, 4-6, 5-13
directives
display_errors, 3-6
error_reporting, 3-6
disconnection, 3-7
display_errors directive, 3-6
do_query() function, 3-4
E
Easy Connect syntax, 3-6
EMPLOYEE_PHOTOS table, 7-4
employees page, 5-1
combining with departments, 5-13
creating, 5-1
extending, 5-3
EMPLOYEES table, 1-1, 3-6, 4-11, 5-5, 5-6, 7-4
enctype attribute, 7-2
environment variables
NLS_LANG, 8-1
NLS_LANGUAGE, 8-3, 8-8
NLS_TERRITORY, 8-3
error_reporting directive, 3-6
errors
assigning to variable, 5-18
handling, 5-18
NLS_LANGUAGE, 8-8
Oracle, 5-25
passing parameter, 5-18
preventing display, 5-18
recovery, 5-17
returning, 5-17
returning from all functions, 5-18
F
files
adding data manipulation logic to anyco.php, 5-3
adding db connection to anyco.php, 3-4
adding navigation to anyco.php, 4-8
anyco_cn.inc description, 1-2
anyco_db.inc description, 1-2
anyco_im.php description, 1-2
anyco_ui.inc description, 1-2
anyco.php description, 1-2
application, 2-9, 3-1
application naming convention, 1-2
creating anyco_cn.inc, 4-1
creating anyco_db.inc, 4-2
creating anyco_im.php, 7-3
creating anyco_ui.inc, 3-2
creating anyco.php, 3-3
employees and departments pages, 5-13
employees page in anyco.php, 5-1
error handling in anyco.php, 5-18, 5-25
extending anyco_ui.inc, 4-11
include file in anyco_ui.inc, 3-3
include files in anyco.php, 4-4
JPEG, 7-9
style.css description, 1-2
testing anyco_ui.inc, 5-3
testing anyco.php, 3-3, 3-5, 4-4, 4-6, 4-10, 4-12,
5-3, 5-10, 5-16, 5-24, 5-25, 6-4, 6-7, 7-5, 7-9
translating HTML and GIF, 8-5
FIRST bind variable, 4-10
format
function in anyco_ui.inc, 4-3
functions
anyco_ui.inc, 3-2
array_push(), 7-5
calc_remuneration(), 6-2
construct_departments(), 4-8, 4-9, 4-12, 5-2
construct_employees(), 5-1, 5-2, 5-13, 6-3
construct_image(, 7-4
construct_insert_emp(), 5-4, 5-15
construct_modify_emp(), 5-5
date(), 5-5
db_do_query(), 4-3, 4-5, 4-6, 5-1, 5-2, 5-5, 5-7, 5-18
db_error (), 4-2
db_error(), 4-3, 5-17, 5-18
db_execute_statement(), 5-5, 5-7, 7-4
db_get_employees_rc(), 6-7
db_get_page_data(), 4-8, 4-9, 5-7, 5-18
db_insert_thumbnail(), 7-4, 7-8, 7-9
delete_emp(), 5-6
do_query(), 3-4
get_dept_name(), 5-14
header(), 7-4
htmlentities(), 3-3
imagecopyresampled(), 7-9
imagecreatefromjpeg(), 7-9
imagecreatetruecolor(), 7-9
insert_new_emp(), 5-5, 5-25, 7-5
isset(), 4-3
modify_emp(), 5-6

Index-4
oci_bind_by_name(), 4-6
oci_close(), 3-7
oci_connect(), 3-4, 3-6, 3-7
oci_error(), 4-3
oci_execute(), 4-6
oci_fetch_all(), 4-3, 5-7
oci_fetch_array(), 3-5
oci_parse(), 3-4
OCI8 oci_pconnect(), 3-6
OCI8 oci_pconnect() function, 3-6
OCI-Lob->load(), 7-4
session_start(), 4-8
SYSDATE, 5-5
ui_print_department(), 4-7, 4-9, 4-11
ui_print_employees(), 5-1, 5-2, 5-8, 6-3, 7-2
ui_print_error(), 5-24
ui_print_footer(), 3-2
ui_print_header(), 3-2
ui_print_insert_employee(), 5-8, 5-15, 7-2
ui_print_modify_employee(), 5-10
var_dump(), 3-6, 4-3
G
GD graphicsextension, 7-8
get_dept_name() function, 5-14
globalizing
applications, 8-1
calling locale specific functions, 8-3
character sets, 8-2
date formats, 8-5
determining user locale, 8-2
dynamic information, 8-5
HTML page encoding, 8-3
linguistic sorts, 8-7
NLS_LANGUAGE, 8-8
number formats, 8-6
PHP and Oracle environment, 8-1
presenting data, 8-5
sorting data, 8-5
translating the user interface, 8-4
H
header() function, 7-4
hello.php
testing PHP installation, 2-9
HTML
cascading style sheet, 3-3
employee data output, 5-2
form containing employee data, 5-8
generating employee data form, 5-8
page encoding, 8-3, 8-4
page header, 8-4
htmlentities() function, 3-3
HTTP header
page encoding, 8-4
httpd.conf Apache configuration file, 2-5
Human Resources (HR) application, 1-1
I
imagecopyresampled() function, 7-9
imagecreatefromjpeg() function, 7-9
imagecreatetruecolor() function, 7-9
images
creating a thumbnail, 7-8
creating thumbnails, 7-8
inserting employee thumbnail, 7-4
inserting in anyco.php, 7-5
storing in BLOBs, 7-1
include files
anyco_ui.inc, 3-3
anyco.php, 4-4
in anyco.php, 4-4
insert_new_emp() function, 5-5, 5-25, 7-5
installation
Oracle Database, 2-1
PHP on Linux, 2-8
PHP on Windows, 2-3, 2-4, 2-7
isset() function, 4-3
J
JOBS table, 5-4
JPEG file, 7-9
L
LAST bind variable, 4-10
linguistic sorts, 8-7
locale, 8-2
LOCATIONS table, 4-11
M
modify_emp() function, 5-6
N
navigating database records, 4-7
NEWEID bind variable, 7-5
NLS_LANG environment variable, 8-1
NLS_LANGUAGE environment variable, 8-3, 8-8
NLS_TERRITORY environment variable, 8-3
NULL values, 3-5
number formats in Oracle, 8-6
O
obtaining
Oracle Database, 2-1
OCI_B_CURSOR ref cursor, 6-7
oci_bind_by_name() function, 4-6
oci_close() function, 3-7
OCI_COMMIT_ON_SUCCESS parameter, 3-4
oci_connect() function, 3-4, 3-6, 3-7
OCI_DEFAULT parameter, 3-4
oci_error() function, 4-3
oci_execute() function, 4-6
oci_fetch_all() function, 4-3, 5-7

Index-5
oci_fetch_array() function, 3-5
OCI_FETCHSTATEMENT_BY_COLUMN
parameter, 5-5
OCI_FETCHSTATEMENT_BY_ROW
parameter, 4-3, 5-7
oci_parse() function, 3-4
OCI_RETURN_NULLS parameter, 3-5
OCI8 oci_pconnect(), 3-6
OCI8 oci_pconnect() function, 3-6
oci8.max_persistent setting, 3-6
oci8.persistent_timeout setting, 3-6
oci8.ping_interval setting, 3-6
OCI-Lob->load() function, 7-4
Oracle
date formats, 8-5
establishing environment, 8-1
number formats, 8-6
tnsnames.ora, 3-6
Oracle Database
connecting, 3-1
installing, 2-1
obtaining and installing, 2-1
prerequisites, 2-1
OUT bind variable, 7-4
P
parameters
$bindargs, 5-2
$bindvars, 4-6, 7-4
$conn, 3-4
$date, 3-2
$e, 5-18
$file, 4-3
$line, 4-3
$posturl, 4-7, 4-9
$q1, 4-9
$query, 5-4
$r, 4-3
$results, 4-3
$resulttype, 5-7
$rowsperpage, 4-10
$stid, 4-3, 4-6
$title, 3-2
charset, 8-4
deptid, 5-14
OCI_COMMIT_ON_SUCCESS, 3-4
OCI_DEFAULT, 3-4
OCI_FETCHSTATEMENT_BY_COLUMN, 5-5
OCI_FETCHSTATEMENT_BY_ROW, 4-3, 5-7
OCI_RETURN_NULLS, 3-5
PHP
application logic, 4-1
cascading style sheet, 3-3
character sets, 8-2
creating files, 3-1
determining user locale, 8-2
display_errors directive, 3-6
error_reporting directive, 3-6
establishing environment, 8-1
externalizing translatable strings, 8-5
GD graphicsextension, 7-8
globalizing your application, 8-1
hello.php, 2-9
here document, 3-2
HTML page encoding, 8-4
installing on Linux, 2-8
installing on Windows, 2-3, 2-4, 2-7
NULL values, 3-5
oci8.max_persistent, 3-6
oci8.persistent_timeout, 3-6
oci8.ping_interval, 3-6
translating HTML and GIF files, 8-5
PHP - PHP Hypertext Preprocessor, 1-1
PHP functions
ui_print_footer(), 3-2
ui_print_header(), 3-2
PL/SQL
application procedures and functions, 6-1
calling function in anyco.php, 6-3
calling packaged procedure, 6-6
cv_types.et_employees() packaged
procedure, 6-7
UTL_I18N package, 8-3
prerequisites for Oracle Database, 2-1
public virtual directory in Apache, 2-5
public_html
Apache, 2-5
creating, 2-6
Q
queries with bind variables, 4-5
R
ref cursors
OCI_B_CURSOR, 6-7
reporting in the application, 3-1
restarting Apache, 2-6
returning errors, 5-17
returning false statements, 5-18
S
session_start() function, 4-8
sorting, 8-5, 8-7
statements, returning false, 5-18
style.css
HTML presentation, 3-3
style.css description, 1-2
SYSDATE function, 5-5
T
tables
COUNTRIES, 4-11
DEPARTMENTS, 1-1, 3-4, 4-11
EMPLOYEE_PHOTOS, 7-4
EMPLOYEES, 1-1, 3-6, 4-11, 5-5, 5-6, 7-4
JOBS, 5-4

Index-6
LOCATIONS, 4-11
testing
anyco_db.inc, 4-6
anyco_ui.inc, 5-3
Apache installation on Linux, 2-5
Apache installation on Windows, 2-3
thumbnail images, 7-8
tnsnames.ora, 3-6
tutorial AnyCo Corp, 1-1
U
ui_print_department() function, 4-7, 4-9, 4-11
ui_print_employees() function, 5-1, 5-2, 5-8, 6-3, 7-2
ui_print_error() function, 5-24
ui_print_footer() function, 3-2
ui_print_header() function, 3-2
ui_print_insert_employee() function, 5-8, 5-15, 7-2
ui_print_modify_employee() function, 5-10
unlocking HR account, 2-2, 6-1
user interface
externalizing translatable strings, 8-5
translating, 8-4
UTF-8
character set, 8-2
HTML page encoding, 8-3
UTL_I18N package, 8-3
V
var_dump() function, 3-6, 4-3
variables
$current, 4-9
$DID, 4-6
$emp, 5-15
$refcur, 6-7
__FILE__, 4-3, 5-18
__LINE__, 4-3, 5-18
department_id, 5-13
W
Web browser
testing Apache installation on Linux, 2-5
testing Apache installation on Windows, 2-3
