REPLACE CORRUPT STYLES IN MICROSOFT WORD
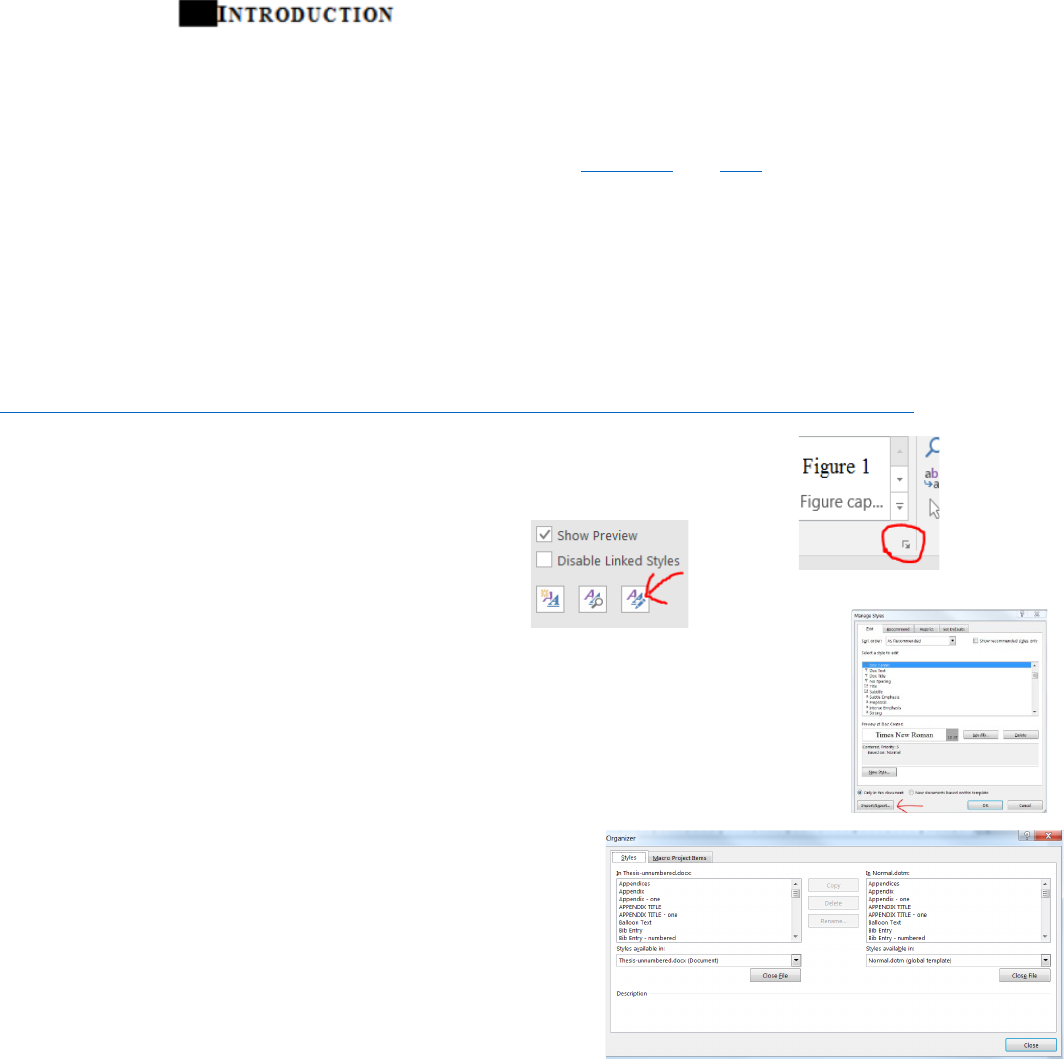
There is a “bug” in Microsoft Word’s numbering styles that may cause the style to change to a
black rectangular box. This could effect any heading and appendix style.
Example:
Also not following the instructions correctly to setup Word, could modify the styles. Following
the two step process of copying the correct styles from the original base file to the Normal.dotm
template, and then copying them from the Normal.dotm template to your corrupted document
should restore the styles. There are different instructions for Windows and Mac.
Windows
STEP 1 - OBTAINING ORIGINAL STYLES
Make sure all Word documents are closed. Download and open the original UDThesis
unnumbered or numbered document from page 8 of Microsoft Word UDThesis Style Guidelines
http://www1.udel.edu/it/research/files/publish/udthesis/msword/UDThesis-StyleGuidelines.pdf
If the styles are not showing, click the Styles dialogue icon to open the styles.
Click Manage Styles icon (bottom of styles list).
The Manage Styles dialogue window opens.
In the Manage Styles window, click Import/Export button (lower left of window).
The styles Organizer window opens.
The left panel has the original (correct) styles. The right
panel is the Normal.dotm template.
• In the left panel, select all the styles.
• Click Copy to move these styles to the Normal.dotm
template in the right panel.
• Click ‘Yes to all’ to replace styles in the Normal.dotm
template.
• Click the Close button to close the Organizer window.
Close the downloaded UDThesis unnumbered or numbered document.
STEP 2 - REPLACING STYLES IN YOUR DOCUMENT
Make sure all Word documents are closed, now open your document with the corrupted styles.
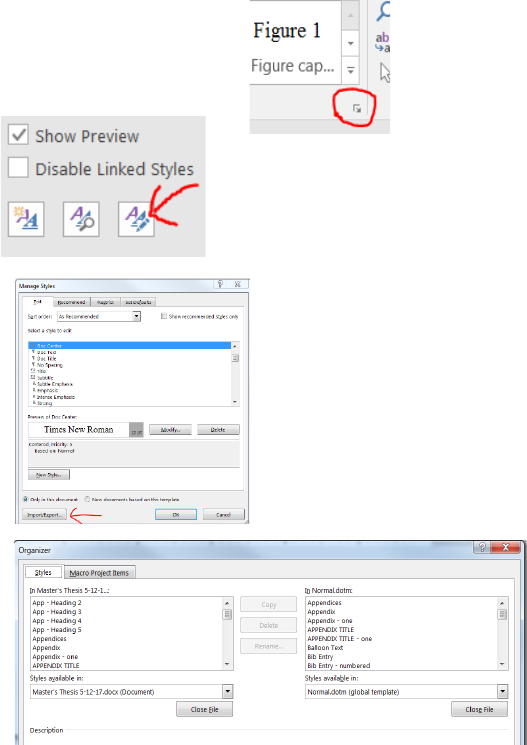
If the styles are not showing, click the Styles dialogue box to open the styles.
Click Manage Styles icon (bottom of styles panel).
The Manage Styles dialogue window opens.
Click Import/Export button (lower left of window).
The style Organizer window opens.
The left panel is the list of styles from the corrupted
document. The right panel is the Normal.dotm
template with the correct styles.
• From the right panel, Normal.dotm template, select
all styles.
• Click Copy to move the styles to the left panel.
• Click ‘Yes to all’ to replace the corrupted styles in your document with the correct styles from
Normal.dotm template.
Click the Close button to close the Organizer window.
Save your document and the corrupted styles should now work correctly.

Mac
STEP 1 - OBTAINING ORIGINAL STYLES
Make sure all Word documents are closed. Download and open the original UDThesis
unnumbered or numbered document from page 8 of Microsoft Word UDThesis Style Guidelines
http://www1.udel.edu/it/research/files/publish/udthesis/msword/UDThesis-StyleGuidelines.pdf
Choose Tools>Templates and Add-ins.
Click on the Organizer button.
The style Organizer window opens.
The left panel has original (correct) styles.
The right panel is the Normal.dotm template.
• In the left panel, select all the styles.
• Click Copy to move these styles to the Normal.dotm
template in the right panel.
• Click ‘Yes to all’ to replace styles in the Normal.dotm file.
• Click Close when done, the Organizer window closes.
Close the downloaded UDThesis unnumbered or numbered document.
STEP 2 - REPLACING STYLES IN YOUR DOCUMENT
Make sure all Word documents are closed, now open your document with the corrupted styles.
Choose Tools>Templates and Add-ins.
Click on the Organizer button.
The style Organizer window opens
The left panel is the list of styles from the corrupted document. The
right panel is the Normal.dotm template with the correct styles.
• From the right panel, Normal.dotm template, select all
styles.
• Click Copy to move the styles to the left panel.
• Click ‘Yes to all’ to replace the corrupted styles in your
document with the correct styles from Normal.dotm
template.
• Click Close when done, the Organizer window closes.
Save your document and the corrupted styles should now work correctly.
