
User manual
Boot manager Boot-US
Version 4.2.0
July/14/2024
Dr. Ulrich Straub
Copyright © 1999-2024

Table of Contents
1 Introduction...................................................................................................................................................................1
1.1 Overview.........................................................................................................................................................1
1.1.1 The package Boot-US...........................................................................................................................1
1.1.2 Central idea of Boot-US........................................................................................................................3
1.1.3 Working with Boot-US.........................................................................................................................3
1.1.4 What Boot-US cannot do......................................................................................................................4
1.2 Installation Boot-US (GUI).............................................................................................................................5
1.2.1 Setup program for Boot-US (GUI)........................................................................................................5
1.2.2 Files in the installation directory...........................................................................................................6
1.3 Update to new version....................................................................................................................................7
1.3.1 Update of configuration program Boot-US (GUI)................................................................................7
1.3.2 Update of configuration program Boot-US (command-line version)...................................................7
1.3.3 Update of boot manager........................................................................................................................7
1.4 Uninstallation..................................................................................................................................................8
1.4.1 Uninstall configuration program Boot-US (GUI).................................................................................8
1.4.2 Uninstall configuration program Boot-US (command-line version).....................................................8
1.4.3 Uninstall boot manager.........................................................................................................................8
1.5 Basic functions of Boot-US............................................................................................................................9
1.5.1 Two Windows systems on the first disk (BIOS)...................................................................................9
1.5.2 Two Windows systems on the first disk (UEFI)...................................................................................9
1.5.3 Two Windows systems on two disks (BIOS and UEFI).....................................................................10
1.5.4 Windows and Linux on the first disk (BIOS)......................................................................................10
1.5.5 Password protecting the entries in boot manager................................................................................10
1.5.6 Administrator password for Boot-US..................................................................................................10
1.5.7 Installation of boot manager on diskette or CD (BIOS)......................................................................10
1.6 Advanced function of Boot-US....................................................................................................................11
1.6.1 Installing the boot manager on USB stick (BIOS)..............................................................................11
1.6.2 Installing the boot manager on USB stick (UEFI)..............................................................................11
1.6.3 Installing the boot manager on a separate ESP partition (UEFI)........................................................11
1.6.4 Support for SSDs.................................................................................................................................11
1.6.5 Invisible start of boot manager............................................................................................................11
1.6.6 Installation of boot manager on any disk (BIOS)................................................................................11
1.6.7 One-time change of preselected entry in boot manager......................................................................12
1.6.8 Complete delete of a partition.............................................................................................................12
1.6.9 True hiding of GPT partitions.............................................................................................................12
1.6.10 Boot standard Linux installation from disk 2 (BIOS).......................................................................12
1.6.11 Change colors of boot manager.........................................................................................................12
1.7 Versions........................................................................................................................................................13
1.8 Acknowledgement........................................................................................................................................27
2 Purchase a license........................................................................................................................................................29
2.1 License..........................................................................................................................................................29
2.1.1 License agreement...............................................................................................................................29
2.1.2 Licensed functions...............................................................................................................................29
2.1.3 Testing all functions............................................................................................................................29
2.1.4 DISCLAIMER OF WARRANTY......................................................................................................30
2.1.5 Distribution..........................................................................................................................................30
2.2 Registration...................................................................................................................................................30
2.2.1 License types and prices......................................................................................................................31
2.2.2 Ordering licenses.................................................................................................................................31
User Manual Boot-US 4.2.0
i

Table of Contents
2 Purchase a license
2.3 Installing the license.....................................................................................................................................32
2.4 Contact..........................................................................................................................................................33
3 Boot manager...............................................................................................................................................................35
3.1 Overview.......................................................................................................................................................35
3.1.1 Password for partition.........................................................................................................................36
3.2 Help...............................................................................................................................................................36
3.3 Keyboard buffer............................................................................................................................................37
3.4 Change configuration....................................................................................................................................37
3.4.1 Preselected partition............................................................................................................................38
3.4.2 Start signal...........................................................................................................................................38
3.4.3 Show disk info.....................................................................................................................................39
3.4.4 Unhide all partitions............................................................................................................................39
3.4.5 Uninstall boot manager.......................................................................................................................39
4 Menu commands (GUI)..............................................................................................................................................41
4.1 All menu commands of Boot-US..................................................................................................................41
4.2 File / Login....................................................................................................................................................43
4.3 File / Exit.......................................................................................................................................................43
4.4 Boot manager / Install...................................................................................................................................44
4.4.1 Boot manager / Install / Entries (page 1 of 6).....................................................................................45
4.4.2 Boot manager / Install / Password protection (page 2 of 6)................................................................46
4.4.3 Boot manager / Install / Startup options (page 3a of 6).......................................................................47
4.4.4 Boot manager / Install / Startup options (page 3b of 6)......................................................................48
4.4.5 Boot manager / Install / Startup options (page 3c of 6).......................................................................49
4.4.6 Boot manager / Install / Hide partitions (page 4 of 6).........................................................................50
4.4.7 Boot manager / Install / Installation target (page 5 of 6).....................................................................52
4.4.8 Boot manager / Install / Installation (page 6 of 6)...............................................................................54
4.5 Boot manager / Remove................................................................................................................................55
4.6 Boot manager / Show info............................................................................................................................56
4.7 Partitions / Details.........................................................................................................................................57
4.8 Partitions / Create..........................................................................................................................................59
4.8.1 Partitions / Create / Select free space (Page 1 of 5)............................................................................59
4.8.2 Partitions / Create / Partition style (Page 2 of 5).................................................................................59
4.8.3 Partitions / Create / Size of partition (Page 3 of 5).............................................................................60
4.8.4 Partitions / Create / File system (Page 4 of 5).....................................................................................60
4.8.5 Partitions / Create / Create partition (Page 5 of 5)..............................................................................60
4.9 Partitions / Delete..........................................................................................................................................61
4.9.1 Partitions / Delete / Select partition (Page 1 of 3)...............................................................................61
4.9.2 Partitions / Delete / Method for deleting (Page 2 of 3).......................................................................61
4.9.3 Partitions / Delete / Delete partition (Page 3 of 3)..............................................................................61
4.10 Partitions / Copy.........................................................................................................................................63
4.10.1 Partitions / Copy / Select action (page 1)..........................................................................................63
4.10.2 Partitions / Copy / Select source disk or partition (page 2)...............................................................64
4.10.3 Partitions / Copy / Select source file (page 2)...................................................................................64
4.10.4 Partitions / Copy / Select target disk or partition (page 3)................................................................64
4.10.5 Partitions / Copy / Select target file (page 3)....................................................................................64
4.10.6 Partitions / Copy / Options (page 4)..................................................................................................64
4.10.7 Partitions / Copy / Show selected action (page 5).............................................................................65
User Manual Boot-US 4.2.0
ii

Table of Contents
4 Menu commands (GUI)
4.11 Partitions / Save sectors..............................................................................................................................66
4.11.1 Partitions / Save sectors / Select action (page 1)...............................................................................66
4.11.2 Partitions / Save sectors / Save partition and boot sectors (page 2 of 2)...........................................66
4.11.3 Partitions / Save sectors / Save track 0 (page 2 of 2)........................................................................67
4.12 Partitions / Restore sectors..........................................................................................................................68
4.12.1 Partitions / Restore sectors / Select action (page 1)..........................................................................68
4.12.2 Partitions / Restore sectors / Restore partition and boot sectors (page 2 of 2)..................................68
4.12.3 Partitions / Restore sectors / Restore track 0 (page 2 of 2)...............................................................68
4.13 Configuration / Basic settings.....................................................................................................................70
4.13.1 Configuration / Basic settings / Language........................................................................................70
4.13.2 Configuration / Basic settings / Password.........................................................................................70
4.13.3 Configuration / Basic settings / Boot disk.........................................................................................71
4.14 Configuration / Extended settings...............................................................................................................73
4.14.1 Configuration / Extended settings / Trace.........................................................................................73
4.14.2 Configuration / Extended settings / Startup tip.................................................................................73
4.14.3 Configuration / Extended settings / Backup......................................................................................73
4.14.4 Configuration / Extended settings / Warnings..................................................................................73
4.14.5 Configuration / Extended settings / Units.........................................................................................74
4.14.6 Configuration / Extended settings / Alignment.................................................................................74
4.14.7 Configuration / Extended settings / Disk numbers............................................................................74
4.15 UEFI / Info..................................................................................................................................................75
4.16 UEFI / Save variables.................................................................................................................................76
4.17 UEFI / Info..................................................................................................................................................77
4.18 Window / Refresh.......................................................................................................................................78
4.19 Help / Contents...........................................................................................................................................79
4.20 Help / License.............................................................................................................................................79
4.21 Help / Registration......................................................................................................................................79
4.22 Help / About Boot-US................................................................................................................................79
5 Command-line version................................................................................................................................................81
5.1 Overview.......................................................................................................................................................81
5.2 Installation.....................................................................................................................................................83
5.3 INI file bootusc.ini for command-line program............................................................................................84
5.3.1 Trace....................................................................................................................................................84
5.3.2 Backup.................................................................................................................................................84
5.3.3 Password for configuration program...................................................................................................85
5.3.4 Warnings.............................................................................................................................................85
5.3.5 Use IEC units.......................................................................................................................................85
5.3.6 Individual license texts in boot manager.............................................................................................86
5.3.7 Boot disk numbers...............................................................................................................................86
5.3.8 Language for boot manager.................................................................................................................87
5.3.9 Disk numbers.......................................................................................................................................87
5.3.10 Simple boot disk configuration.........................................................................................................87
5.4 Online help....................................................................................................................................................88
5.5 Operations on sector level.............................................................................................................................89
5.5.1 Save track 0.........................................................................................................................................89
5.5.2 Save sectors.........................................................................................................................................89
5.5.3 Save partition and boot sectors............................................................................................................90
5.5.4 Restore track 0.....................................................................................................................................90
User Manual Boot-US 4.2.0
iii

Table of Contents
5 Command-line version
5.5.5 Restore sectors.....................................................................................................................................90
5.5.6 Restore partition and boot sectors.......................................................................................................91
5.6 Operations on partition level.........................................................................................................................92
5.6.1 Hide partition.......................................................................................................................................92
5.6.2 Unhide partitions.................................................................................................................................92
5.6.3 Activate partition.................................................................................................................................93
5.6.4 Deactivate partitions............................................................................................................................93
5.7 Operations for boot manager........................................................................................................................94
5.7.1 Install boot manager............................................................................................................................94
5.7.2 Uninstall boot manager.......................................................................................................................98
5.7.3 Show status about installed boot manager..........................................................................................98
5.7.4 Update entry in boot manager.............................................................................................................99
5.7.5 Preselect other entry in boot manager...............................................................................................100
5.8 Repair MBR................................................................................................................................................101
5.9 Fix GPT table..............................................................................................................................................102
5.10 Set standard disk parameters.....................................................................................................................103
5.11 Set disk signature......................................................................................................................................104
5.12 Report about partitions..............................................................................................................................105
5.13 Encrypt passwords....................................................................................................................................106
5.14 Reboot the computer.................................................................................................................................107
5.15 Exit codes of command-line program.......................................................................................................108
6 Tips.............................................................................................................................................................................109
6.1 In which cases one might face problems ?..................................................................................................110
6.2 Recommendations for safe usage of Boot-US............................................................................................111
6.3 Uninstalling the boot manager Boot-US.....................................................................................................112
6.4 Basic questions about Boot-US..................................................................................................................113
6.5 Unhiding partitions in the boot manager....................................................................................................114
6.6 Error messages on integrity checks.............................................................................................................115
6.7 Double occupied sectors in track 0.............................................................................................................118
6.8 Limitations of different operating systems (BIOS)....................................................................................119
6.9 Check independence and completeness......................................................................................................120
6.10 Installing boot manager Boot-US on separate ESP partition (UEFI).......................................................121
6.11 Installing Windows multiple times on one disk (BIOS)...........................................................................122
6.12 Installing Windows multiple times on one disk (UEFI)...........................................................................123
6.13 Installing Windows multiple times on different disks (BIOS).................................................................124
6.14 Installing Windows multiple times on different disks (UEFI)..................................................................125
6.15 Problems with fast startup.........................................................................................................................126
6.16 Booting Linux by the boot manager of Boot-US......................................................................................127
6.17 Linux partition is recognized by Boot-US as non-bootable......................................................................128
6.18 Fast backup of partitions...........................................................................................................................128
6.19 Boot-US does not find SCSI or IDE disks under NT...............................................................................130
6.20 Support for Windows 2000/XP/2003/Vista/2008/7/8/10..........................................................................131
6.21 True partition hiding for Windows 2000/XP/2003/Vista/2008/7/8/10.....................................................132
6.22 Copying (cloning) a Windows 2000/XP/2003 installation.......................................................................133
6.23 Administrator rights under Vista and Windows 7/8/10............................................................................134
6.24 System reserved partition on Windows 7/8/10.........................................................................................135
User Manual Boot-US 4.2.0
iv

Table of Contents
7 Glossary......................................................................................................................................................................137
7.1 BIOS short overview...................................................................................................................................138
7.2 UEFI short overview...................................................................................................................................139
7.3 UEFI fallback boot mode............................................................................................................................141
7.4 Purpose of boot manager............................................................................................................................142
7.5 Partition / partition table and partition sectors / boot sector.......................................................................143
7.6 Format of MBR partition sector..................................................................................................................144
7.7 Master Boot Record (MBR) / track 0.........................................................................................................146
7.8 Primary / extended / logical partition..........................................................................................................147
7.9 GPT disk / GPT partition............................................................................................................................149
7.10 Active partition.........................................................................................................................................151
7.11 Hidden partition / true hidden partition....................................................................................................152
7.11.1 MBR partitions................................................................................................................................152
7.11.2 GPT partitions.................................................................................................................................152
7.12 Bootable partition......................................................................................................................................153
7.13 Which partition IDs are recognized ?.......................................................................................................154
7.13.1 MBR partitions................................................................................................................................154
7.13.2 GPT partitions.................................................................................................................................155
7.14 LBA and CHS format, LBA mapping......................................................................................................157
7.15 INT 13h / extended INT 13h.....................................................................................................................158
7.16 SI and IEC units........................................................................................................................................159
7.17 USB drives................................................................................................................................................160
7.18 Disk signature...........................................................................................................................................161
7.19 4Kn disk....................................................................................................................................................162
8 Tech-Info....................................................................................................................................................................163
8.1 Boot-US short overview.............................................................................................................................164
8.1.1 The package Boot-US.......................................................................................................................164
8.2 Installation and update................................................................................................................................166
8.2.1 Installation process............................................................................................................................166
8.2.2 Installed files.....................................................................................................................................166
8.2.3 Update...............................................................................................................................................167
8.3 Uninstallation..............................................................................................................................................168
8.3.1 Uninstallation of configuration program...........................................................................................168
8.3.2 Uninstallation of boot manager.........................................................................................................168
8.4 Boot manager BIOS....................................................................................................................................169
8.4.1 Overview...........................................................................................................................................169
8.4.2 Entries in boot manager.....................................................................................................................169
8.4.3 Special functions of Boot-US............................................................................................................169
8.5 Boot manager UEFI....................................................................................................................................170
8.5.1 Overview...........................................................................................................................................170
8.5.2 Entries in boot manager.....................................................................................................................170
8.5.3 Special functions of Boot-US............................................................................................................170
8.6 Partition numbers........................................................................................................................................171
User Manual Boot-US 4.2.0
v

User Manual Boot-US 4.2.0
vi

1 Introduction
1.1 Overview
1.1.1 The package Boot-US
The package Boot-US consists of a universal boot manager (fig. 1) and the accompanying configuration program
for the boot manager.
Fig. 1: Boot manager Boot-US (graphics mode)
The configuration program is supplied in two versions. The first is a Graphical User Interface (GUI) version for all
WIN32/64 variants (Windows 95 to Windows 10) (fig. 2). In the second variant the configuration program is available
also as command-line version (fig. 3) for DOS and all WIN32/64 variants.
As a result of the separation in two programs the boot manager itself can be a small and simple program. The boot
manager needs only handle the selection and booting of the desired operating system. The configuration program is
the more complex component and, among other things, it is used to configure and install the boot manager. However,
since the configuration program runs directly under Windows it offers the comfort of a graphical user interface. For
example there are wizards guiding the user through the boot manager configuration process and there is extensive
context sensitive online help.
1 Introduction 1
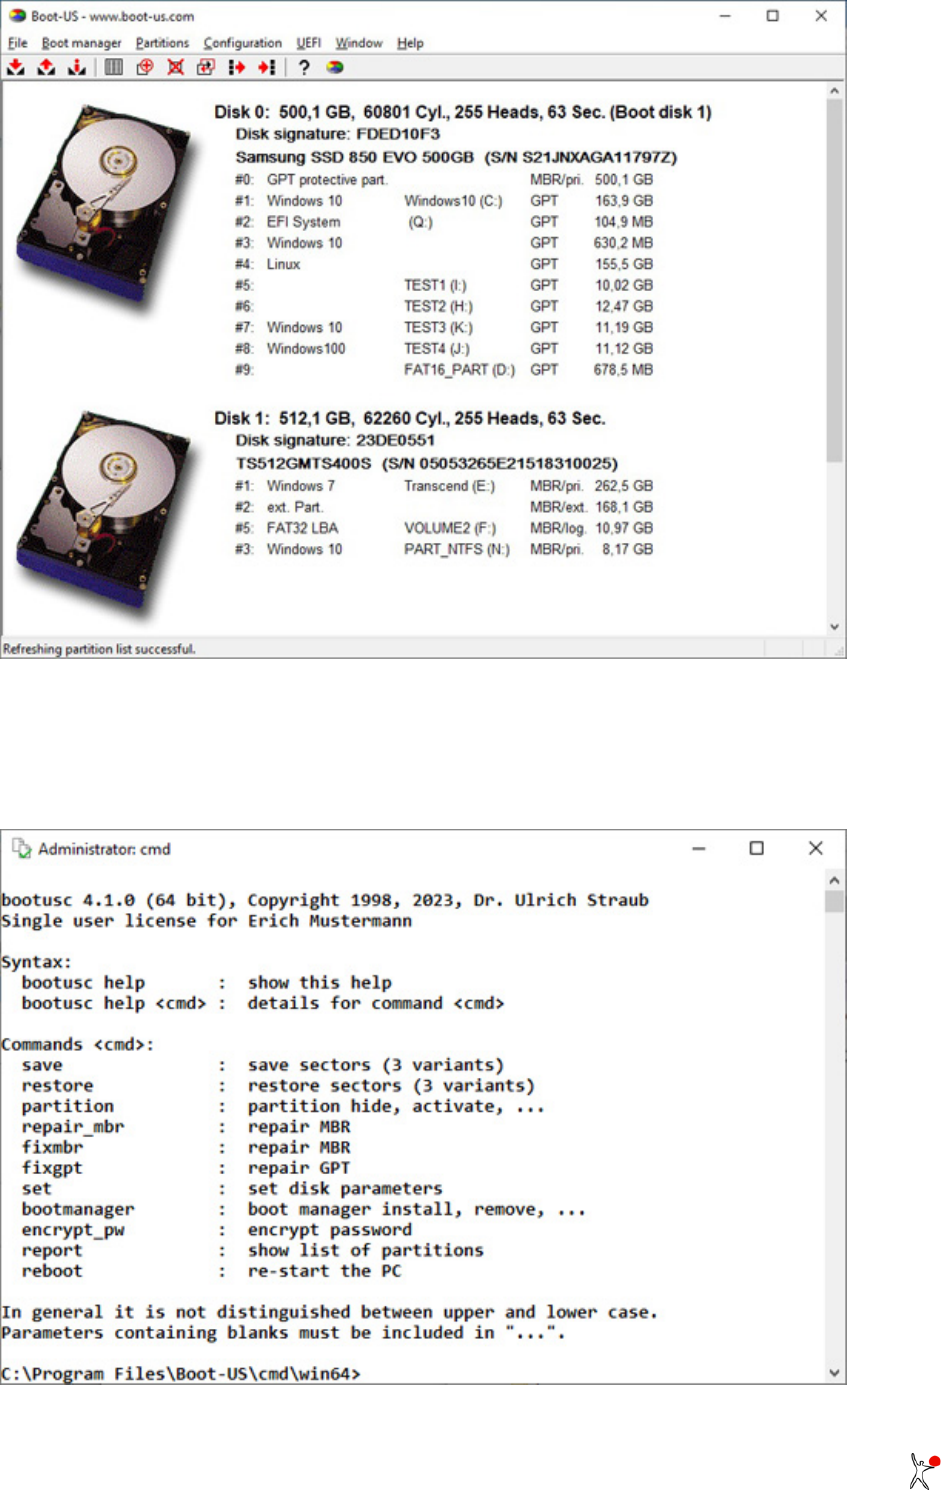
Fig. 2: Configuration program Boot-US (GUI)
The command-line version allows a script based installation of the boot manager. This is especially useful for
companies with a large number of PCs. Additionally, there is a DOS version of the command-line program that can be
installed on a DOS boot diskette. This allows configuration of the boot manager even if Windows is not running.
Fig. 3: Configuration program Boot-US (command-line version)
User Manual Boot-US 4.2.0
2 1 Introduction

For a first contact with the package Boot-US it is recommended to use the GUI version. Therefore the command-line
version is not further documented in this introductory chapter. The command-line version is fully documented in all
details in an own chapter.
It is irrelevant which configuration program (GUI or command-line) is used to configure, install or remove the boot
manager. The internal processing is the same, it is always the same boot manager which is installed. Furthermore all
configuration programs can read older versions of the boot manager. When the configuration program is updated it is
therefore not necessary to uninstall the boot manager before the update.
1.1.2 Central idea of Boot-US
Boot-US was developed to boot and run multiple operating systems completely independently of each other. By
standard methods the desired operating systems must first be installed independently, see chapter tips. The later
installation of the boot manager Boot-US can then be carried out with just a few mouse clicks. Once the boot manager
of Boot-US is installed all the operating systems can comfortably be booted independent of each other.
1.1.3 Working with Boot-US
To use the Boot-US package the configuration program Boot-US (GUI or command-line) has to be installed first. For
a first contact the Windows configuration program Boot-US is recommended. This program is a standard Windows
program with a graphical user interface (GUI) and integrated online help. It can be installed on an any Windows
partition (32 bit and 64 bit). For details please see the following chapter Installation Boot-US (GUI).
Only by the configuration program the boot manager of Boot-US is installed with the desired partitions (operating
systems) to the hard disk (or CD or diskette), see menu command Boot manager / Install.... The installation wizard
shows all bootable partitions on all local hard disk. A partition can be included in the boot manager with a simple
mouse click. All necessary information --- e.g. beginning, end, type of the partition and position of the boot sector ---
are determined and configured automatically by the configuration program. Thus the installation procedure of the boot
manager does not require detailed system knowledge. Removing the boot manager is even simpler, see menu
command Boot manager / Remove....
In addition to booting a partition from the hard disk, booting from diskette can be included in the boot manager of
Boot-US. This allows you to set boot sequence to "C:, A:" and you can boot from diskette when required.
Boot-US allows you to save all disk sectors which are modified by the boot manager installation and operation, see
menu command Partitions / Save sectors.... This includes all partition and boot sectors and the complete track 0 of all
disks. It is strongly recommended to use this feature and to store the backup file additionally on a diskette. Of course
the saved sectors can later be restored also, see menu command Partitions / Restore sectors....
Please read in any case the chapter tips for detailed instructions on a safe usage of Boot-US.
Boot-US shows all details of all partitions, see menu command Partitions / Details.... In this dialog it is also possible
to hide/unhide partitions or activate/deactivate them. The menu command Partitions / Create... allows you to create
partitions, while the menu command Partitions / Delete... allows to delete partitions.
The command-line version of Boot-US is intended mainly for companies with a large number of PCs. It allows a
batch installation of the boot manager without any user intervention. Additionally the command-line version is also
available for DOS, and thus it can be used even when no Windows is installed or when Windows cannot be accessed.
User Manual Boot-US 4.2.0
1 Introduction 3

1.1.4 What Boot-US cannot do
Boot-US cannot install or uninstall operating systems•
Boot-US cannot move or resize partitions•
Boot-US does not (fully) replace a partition manager•
Boot-US is not a disk editor•
User Manual Boot-US 4.2.0
4 1 Introduction

1.2 Installation Boot-US (GUI)
Boot-US (GUI) --- program name bootus.exe --- is a standard Windows program. Its main purpose is to configure
and install the boot manager. It is called the «configuration program» or the program «Boot-US (GUI)» or sometimes
just «Boot-US». This Windows program executes directly under any 32 bit and 64 bit Windows variant.
1.2.1 Setup program for Boot-US (GUI)
The configuration program Boot-US (GUI) is installed by a standard Windows installation program. During the
installation a few files (see below) are copied to the selected installation directory on the hard disk. The boot manager
of Boot-US is not installed at this time. The boot manager of Boot-US must be installed explicitly from the
configuration program Boot-US, see menu command Boot manager / Install.... During the installation of the
configuration program Boot-US (GUI) entries in the Windows start menu are created pointing to the installation
directory.
Under Windows NT/2000/XP/2003/Vista/2008/7/8/10/11 the configuration program Boot-US (GUI) does not require
any additional files for execution. Under Windows 95/98/ME the two DLLs disk32.dll and disk16.dll are
neccessary. These DLLs contain the functions for directly accessing the hard disk under Windows 95/98/ME. The
DLLs reside in the same directory as the configuration program Boot-US (GUI). It is not necessary that these DLLs
reside in the Windows system directory.
By default Boot-US uses only the installation directory for storing/creating files. All files and programs are searched
or created in this directory. Also the INI file bootus.ini is searched and created in this directory. Boot-US stores all
configuration settings in this INI file and not in the registry. The only exception is the password for the configuration
program which can be stored in the registry if desired. During installation no DLLs in the Windows system directory
are modified.
User Manual Boot-US 4.2.0
1 Introduction 5

1.2.2 Files in the installation directory
In the installation directory you should find the following files:
File name Comment
bootus.exe configuration program Boot-US (GUI)
disk32.dll direct disk access under Windows 95/98/ME (32-Bit part)
disk16.dll direct disk access under Windows 95/98/ME (16-Bit part)
german\bootus_ger.chm german online help for Boot-US (HTML Help format)
german\lizenz.txt license information (german)
german\bestell.txt information for ordering Boot-US (german)
german\Bestellformular.pdf pay form for ordering Boot-US (german)
english\bootus_eng.chm english online help for Boot-US (HTML Help format)
english\bootus_eng.dll english resources for Boot-US (GUI)
english\license.txt license information (english)
english\order.txt information for ordering Boot-US (english)
english\Order_form.pdf pay form for ordering Boot-US (english)
images\*.gif sample background images
bootus.lic license file (encrypted) for Boot-US
bootus.ini INI file for Boot-US (GUI)
bmgrus.ini INI file with boot manager configuration
Remark: The last three files (license file and INI files) are optional.
User Manual Boot-US 4.2.0
6 1 Introduction

1.3 Update to new version
1.3.1 Update of configuration program Boot-US (GUI)
A new version of the configuration program Boot-US (GUI) can simply be installed over an installed configuration
program Boot-US (GUI). This replaces the configuration program and the online help. The current settings and a
license file remain unchanged. It is not necessary to uninstall the configuration program first.
1.3.2 Update of configuration program Boot-US (command-line version)
A new version of the configuration program Boot-US (command-line version) can again simply be installed over an
installed configuration program Boot-US (command-line version). This replaces the configuration program and the
online help. The current settings and a license file remain unchanged. It is not necessary to uninstall the configuration
program first.
1.3.3 Update of boot manager
To install a new version of the boot manager it is necessary to first install the new version of the configuration
program (GUI or command-line version). After that you can install by the new configuration program the new version
of the boot manager. It is not necessary to uninstall the boot manager first. The new boot manager is simply installed
over an already existing boot manager.
User Manual Boot-US 4.2.0
1 Introduction 7

1.4 Uninstallation
1.4.1 Uninstall configuration program Boot-US (GUI)
The simplest way to remove the configuration program Boot-US from the hard disk is by using the accompanying
uninstaller. It removes the installation directory, the entries in the Windows Start menu and the entries in the Windows
Install/Uninstall menu in the control panel. A potential INI file and a license file will not be deleted by the
uninstallation command. Generally all files not created by the setup program remain unchanged by the uninstallation.
If necessary you can do the uninstallation also "manually". Since Boot-US has created only files in the installation
directory it is sufficient to delete this directory to remove the whole package. Also all configuration settings -- with
the potential exception of the password -- have been stored intentionally in the INI file and not in the registry. This all
together makes a potential uninstallation very easy. When you manually uninstall Boot-US please do not forget to
delete the entries in the Windows Start menu and the entry in the Install/Uninstall menu. The latter entry can be found
in the registry under the key
HKEY_LOCAL_MACHINE\Software\Microsoft\Windows\CurrentVersion\Uninstall.
The password for the configuration program is stored optionally in the registry under the key
HKEY_LOCAL_MACHINE\Software\ustraub\Boot-US
In case the boot manager is installed on the hard disk, it is not uninstalled when the configuration program Boot-US
(GUI) is removed. The boot manager must be removed explicitly by the configuration program Boot-US, see menu
command Boot manager / Remove....
1.4.2 Uninstall configuration program Boot-US (command-line version)
The configuration program Boot-US (command-line version) has been installed manually. Hence the uninstallation
has also to be done manually, i.e. the corresponding files and folders must be deleted by the user. The installation
process for the command-line version did not create any entries in the registry or the Windows Start menu, hence none
of them must be deleted by the user in the uninstallation process.
In case the boot manager is installed on the hard disk, it is not uninstalled when the configuration program Boot-US
(command-line) is removed. The boot manager must be removed explicitly by executing the command bootusc
bootmanager remove.
1.4.3 Uninstall boot manager
There are three standard ways to uninstall the boot manager:
Command "Boot manager / Remove..." of Boot-US (GUI)•
Command "bootusc bootmanager remove" of Boot-US (command-line version)•
Command "Uninstall boot manager" directly in the boot manager•
In all three cases internally the same operations are carried out. More details on the uninstallation of the boot manager
can be found in the chapter tips under Uninstalling the boot manager Boot-US.
Please note that uninstalling the boot manager does not affect the configuration program. The configuration program
(GUI or command-line) remains unchanged when the boot manager is removed.
User Manual Boot-US 4.2.0
8 1 Introduction

1.5 Basic functions of Boot-US
In this chapter we show a few simple examples for using the boot manager Boot-US. Since Boot-US is a universal
boot manager there are many more combinations of operating systems which are bootable by the boot manager
Boot-US. In this chapter we restrict ourselves on a few typical examples, and show where the boot manager Boot-US
comes in. Additional and detailed installation instructions are found in the chapter tips.
1.5.1 Two Windows systems on the first disk (BIOS)
The aim is to run both Windows systems completely independent of each other. This can be achieved as follows:
It is assumed that the first Windows system is already installed on a primary partition.•
The configuration program Boot-US (GUI) is installed on the first Windows system. A second primary
partition for the second Windows system is created, formated and set active.
•
The primary partition containing the first Windows is true hid by the Boot-US (GUI).•
The machine is rebooted and the installation of the second Window to the second partition is carried out.
Since the first Windows is true hidden, the second installation proceeds like a new installation. Importantly,
the true hidden partition remains unchanged by the second installation.
•
The second Windows is booted and the configuration program Boot-US (GUI) is installed also on the second
Windows system.
•
The boot manager Boot-US is installed. Both Windows partitions are added to the boot manager. To hide
partitions, the "automatically true hide primary partitions" option must be chosen.
•
On the next start the boot manager Boot-US appears and offers both Windows systems.•
When you boot one of the two Windows systems the corresponding partition will be made visible
automatically by the boot manager. The other Windows partition will be true hid automatically.
•
1.5.2 Two Windows systems on the first disk (UEFI)
The aim is to run both Windows systems completely independent of each other. This can be achieved as follows:
It is assumed that the first Windows system is already installed.•
It is further assumed that the installation is started from an external medium, for example an USB stick.•
The configuration program Boot-US (GUI) is installed on the first Windows system.•
The created Windows partitions and the ESP partition are true hid using the Boot-US (GUI). Starting with
Boot-US 4.1.0 the true hiding of the ESP partition additionally also changes the partition type.
•
The computer is rebooted and the installation of the second Window to the first disk is carried out. Since the
first Windows system and the ESP partition are true hidden, the second installation proceeds like a new
installation. Especially the true hidden partitions and the ESP partition remain unchanged by the second
installation.
•
The second Windows is booted and the configuration program Boot-US (GUI) is installed also on the second
Windows system.
•
An empty ESP partition is created to serve as target for the installation of the boot mananger Boot-US.•
The boot manager Boot-US is installed to the empty ESP partition. You should have two UEFI boot option
"Windows Boot Manager". Both boot option are added to the boot manager. The "individual true hding" of
partitons can be chosen. Starting with Boot-US 4.2.0 the ESP partition and the associated Windows partition
can both be true hid.
•
On the next start the boot manager Boot-US appears and offers both Windows systems.•
When you boot one of the two Windows systems the corresponding Windows partition the associated ESP
partition will be made visible by the boot manager. The other Windows partition and ESP partition will be
true hid. Only the ESP partitions containing the boot mananger Boot-US must always be visible.
•
User Manual Boot-US 4.2.0
1 Introduction 9

1.5.3 Two Windows systems on two disks (BIOS and UEFI)
Again both Windows systems should be completele independent of each other. It does not matter which Windows
system resides on which disk since Boot-US can boot all Windows versions from all disks.
It is assumed that the first Windows system is installed already on the first disk.•
The second disk must temporarily become the boot disk 1. This can be achieved by detaching the first disk
(BIOS and UEFI) or by changing the boot disk order in the BIOS.
•
The second Windows is installed on the second disk (now boot disk 1). The second installation proceeds like a
new installation since no Windows system exists on this disk.
•
The previous disk order is restored.•
The configuration program Boot-US (GUI) is installed on the first Windows system.•
The boot manager Boot-US is installed. Both Windows partitions are added to the boot manager. To hide
partitions, the option "individual true hiding of partitions" can be chosen.
•
On the next start the boot manager Boot-US appears and offers both Windows systems.•
When you boot one of the two Windows systems the corresponding partition will be made visible by the boot
manager. The other Windows partition will be true hid.
•
Starting with Boot-US 4.2.0 the ESP partition can be true hid together with the corresponding Windows
partition (UEFI). In this case the boot manager Boot-US must be installed in a separate ESP partition, which
must remain always visible.
•
1.5.4 Windows and Linux on the first disk (BIOS)
The following steps are necessary to setup this configuration:
Windows is installed in a primary partition.•
Linux is installed in another primary partition. A Linux loader must be installed into the boot sector of the
Linux partition.
•
Both systems are now bootable by setting the corresponding partition active.•
The configuration program Boot-US (GUI) is installed on the Windows partition.•
The boot manager Boot-US is installed on the disk. Both systems are added. No hiding of partition is required.•
On the next start the boot manager Boot-US appears and offers both operating systems.•
1.5.5 Password protecting the entries in boot manager
When installing the boot manager you can specify individual passwords for the entries.•
Before booting an entry the respective password must be entered.•
1.5.6 Administrator password for Boot-US
You can set an administrator password when installing the boot manager.•
The administator password must be enetered on each start of the configuration program Boot-US.•
Inside the boot manager the administator password is required only for configuration changes.•
1.5.7 Installation of boot manager on diskette or CD (BIOS)
You can easily install the boot manager on diskette.•
When installing to CD an iso file is created. This iso file can then be used to create a CD.•
When booting from diskette or CD the configured boot manager is displayed.•
User Manual Boot-US 4.2.0
10 1 Introduction

1.6 Advanced function of Boot-US
In this section some advanced functions of the package Boot-US are presented.
1.6.1 Installing the boot manager on USB stick (BIOS)
In the configuration program Boot-US (GUI) you can mark the USB stick as boot disk 1.•
Installation of the boot manager writes the boot manager always to the boot disk 1, which is the USB stick in
this case.
•
In the BIOS you need to change the boot order such that the computer boots from the USB stick. If the USB
stick is plugged in during the next startup the boot manager Boot-US will be displayed.
•
1.6.2 Installing the boot manager on USB stick (UEFI)
In the configuration program Boot-US (GUI) select "file" as installation target.•
A file called bmgrus.efi will be created.•
Copy this file to the USB stick, see UEFI fallback boot mode.•
When the computer boots the next time selected the USB stick as boot device. The boot manager Boot-US
will be displayed.
•
1.6.3 Installing the boot manager on a separate ESP partition (UEFI)
Starting with Boot-US 4.2.0 the target ESP partition for the installation of the boot manager can be selected.•
You only need to create an empty ESP partition first, then you can later install the boot manager Boot-US on
this ESP partition.
•
In addition, from version 4.2.0, the boot manager Boot-US can make true hidden ESP partitions visible
directly before booting the system in question.
•
These functions make it possible to completely separate multiple Windows installations. Each Windows
installation can be true hid together with the associated ESP partition. Only the separate ESP partition on
which the boot manager Boot-US is installed always remains visible.
•
1.6.4 Support for SSDs
To take advantage of the full speed of SSDs partitions should be aligned on 1 MiB boundaries.
Boot-US now supports partiton alignment on 1 MiB boundaries.•
The old convention of aligning partition on cylinder boundaries should not be used for SSDs.•
In the boot manager only sectors are written to disk if their contents has changed.•
You can check the current alignment of partitions easily. Just turn on the warnings by the command
"configuration/ext. settings..." and turn on and off the assumed aligment on 1 MiB.
1.6.5 Invisible start of boot manager
The boot manager can be invisible when it is started. It is active in the background.•
In the invisible mode the preselected partition is booted.•
To select another entry the boot manager has to be made visible by pressing the predefined hotkey.•
There are many key combinations defineable as hotkey.•
1.6.6 Installation of boot manager on any disk (BIOS)
The boot manager can be installed on any disk.•
User Manual Boot-US 4.2.0
1 Introduction 11

In the configuration program Boot-US (GUI) you only need to mark the respective disk as boot disk 1, and
then install the boot manager.
•
When starting the pc the specified disk must be the boot disk 1 otherwise the boot manager does not appear.•
1.6.7 One-time change of preselected entry in boot manager
For maintenance purposes it is often required to boot a certain partition just once.•
Afterwards the usual partition should be booted again.•
This one-time change of the preselected entry is available since version 3.2.0. The configuration is done by
the command-line version of Boot-US.
•
1.6.8 Complete delete of a partition
All sectors of a partition are to be deleted.•
Select the menu command "Partitions/Delete..." and the method "Complete delete".•
All sectors of the partition will be overwritten with zeroes, then the partition will be deleted from the partition
table.
•
1.6.9 True hiding of GPT partitions
The boot manager can (simple/true) hide and unhide individual GPT partitions.•
Also the Boot-US (GUI) allows to (simple/true) hide and unhide GPT partitions.•
1.6.10 Boot standard Linux installation from disk 2 (BIOS)
Linux is installed on disk 2 with GRUB residing in the MBR of disk 2.•
The boot sector of the Linux partition is empty.•
Starting with Boot-US 3.8.0 a new option "Boot MBR with GRUB from disk 2" is availabale when installing
the boot manager Boot-US.
•
Using this option the boot manager Boot-US loads GRUB from the MBR of disk 2, which loads the Linux
installation on disk 2.
•
The Linux installation remains completely unchanged.•
1.6.11 Change colors of boot manager
You can change all colors used by the boot manager. You only need to add a section [COLORS] with the desired
color values to the file bmgrus.ini (see Contents of bmgrus.ini).
User Manual Boot-US 4.2.0
12 1 Introduction

1.7 Versions
Boot-US 4.2.0: created on July/14/2024
Improvements:
- true hiding of ESP partitions in UEFI boot manager
- selection of the target ESP partition when installing the UEFI boot manager
- report extended by device name
- all UEFI boot variables are now displayed
- saving and restoring selected UEFI variables
Fixes:
- update and preselect command fixed in command-line version
Boot-US 4.1.7: created on February/10/2024 (fixed on Feb/13/2024)
Improvements:
- partitions/disks can now be saved to VHD/VHDX files
- NumLock and CapsLock can now be set in boot manager
- report extended by UEFI boot variables
Fixes:
- report fixed (Feb/13/2024)
Boot-US 4.1.5: created on September/01/2023
Improvements:
- size of dialogs can now be changed
- more reliable support for mouse and touch screen in UEFI boot manager
- optional RTC timer in BIOS boot manager
- backup of C: partition under Windows PE
Fixes:
- file check in DOS command-line version fixed
Boot-US 4.1.3: created on July/09/2023
Improvements:
- support for mouse and touch screen in UEFI boot manager
- encrypted partitions are now not modified during true hiding of partitions
- support for graphic mode PixelBltOnly in UEFI boot manager
- improved reading of serial number of NVMe drives
- DOS command-line version created additionally (July/18/2023)
Fixes:
- saving multiple partiions in *.bim file fixed
Boot-US 4.1.0: created on January/22/2023 (fixed on Jan/31/2023 and Feb/12/2023)
Improvements:
- true hiding of ESP partition simplifies multiple Windows installation on one disk
- change, save and restore UEFI variables
- better compatibility of UEFI text mode and UEFI graphic mode
Fixes:
- reading unknown UEFI values from ini file fixed
- display position of UEFI boot manager corrected (Jan/31/2023)
- initialisation of english language for boot manager fixed(Feb/12/2023)
Boot-US 4.0.3: created on July/22/2022 (fixed on Aug/18/2022)
Improvements:
- better error handling in BIOS boot manager for removable disks (e.g. card readers)
- dialog size scales now with size of start screen
User Manual Boot-US 4.2.0
1 Introduction 13

- command-line version supports now installation of UEFI boot manager
Fixes:
- improved disk recognition in UEFI boot manager
- UEFI text mode is now activated explicitly
- reading partition names from INI file fixed
- display of special characters in 32 bit version fixed (Aug/18/2022)
Boot-US 4.0.2: created on May/11/2022
Improvements:
- efi fallback files can be added to boot manager
- update of documentation for UEFI
Fixes:
- hiding of gpt partitions in BIOS mode fixed
Boot-US 4.0.1: created on March/04/2022 (second Beta version, fixed on March/08/2022)
Improvements:
- boot manager can be installed in UEFI text mode
- preview of boot manager also for text mode
Fixes:
- export of colors to ini file fixed
- help buttons did not open online help
- partition name could not be changed for GPT partitions (Mar/08/2022)
Boot-US 4.0.0: created on February/06/2022 (Beta version, fixed on Feb/17/2022)
What's new?
The most important extension is the support for booting by UEFI.
Improvements:
- support for UEFI
- simplified configuration in BIOS mode
- backup and restore of single partitions and whole disks
Fixes:
- UEFI: boot manager installation required BMP file (Feb/17/2022)
- UEFI: true hiding of gpt partitions in boot manager fixed (Feb/17/2022)
- UEFI: boot manager installation could create multiple boot options (Feb/17/2022)
- UEFI: configuration changes were not saved (Feb/17/2022)
Boot-US 3.9.6: created on November/16/2021
Improvements:
- none
Fixes:
- uninstallation of boot manager was not possible when installed in MBR
Boot-US 3.9.5: created on May/01/2021
Improvements:
- none
Fixes:
- menu command "Partitions/Copy..." was enabled too early (planned only for next version)
Boot-US 3.9.4: created on February/14/2021 (fixed on Feb/16/2021)
Improvements:
- option for reducing display size of boot manager
Fixes:
- update of background for more than 11 entries in boot manager fixed
User Manual Boot-US 4.2.0
14 1 Introduction

- warning W001 appeared for NTFS partitions with small cluster size (Feb/16/2021)
Boot-US 3.9.3: created on February/03/2021
Improvements:
- true hiding of system-reserved partition in Windows 10 possible again
- keyboard buffer in boot manager added
- partition details are displayed now similar to Windows
- 4Kn disks are recognized
Fixes:
- saving boot disk numbers with duplicate disk serial numbers fixed
Boot-US 3.9.2: created on May/02/2020
Improvements:
- small color flicker upon start and end of boot manager fixed
Fixes:
- default colors in command-line version fixed
Boot-US 3.9.1: created on April/07/2020
Improvements:
- none
Fixes:
- installation of boot manager to MBR fixed
Boot-US 3.9.0: created on April/05/2020
Improvements:
- background image for boot manager
- new chapter 'boot manager' in documentation
- boot manager colors can be changed
- partition can be overwritten and deleted with random numbers
Fixes:
- none
Boot-US 3.8.5: created on January/27/2019 (fixed on Jan/30/2019 and Feb/04/2019)
Improvements:
- improved detection whether log. partitions overlap
- check of log. partition weakened since Easeus Partition Master seems to not comply with usual standard
(Jan/30/2019)
- display of partition list failed in version 3.8.5 when boot disks were ignored (Feb/04/2019)
Fixes:
- it could happen that a new created log. partition overlaps with the next log. partition sector
- new version of true hiding is present now also in test version
Boot-US 3.8.4: created on September/30/2018
Improvements:
- display of drive letters for hidden partitions improved
- drive letters of true hidden partitions can now be removed in Boot-US (GUI)
Fixes:
- version check of preselection in command-line version was too strict
Boot-US 3.8.3: created on September/01/2018
Improvements:
- none
Fixes:
User Manual Boot-US 4.2.0
1 Introduction 15

- start problem of boot manager 3.8.2 fixed
Boot-US 3.8.2: created on August/31/2018
Improvements:
- any entry in boot manager can now be permanently preselected
- web pages changed to https protocol
Fixes:
- missing start message with invisible start fixed
- typo in english info about boot manager fixed
- last line in INI files does not require a final line wrap any more
Boot-US 3.8.1: created on April/29/2018
Improvements:
- recognize volume label of true hidden exFat partition
Fixes:
- none
Boot-US 3.8.0: created on April/22/2018
Improvements:
- boot manager now supports booting from disk 1,2,... without specifying a partition
- exFat file system is recognized now
- true hiding of exFat partitions
Fixes:
- wrong partition type could be displayed when installing the boot manger
Boot-US 3.7.2: created on February/04/2018
Improvements:
- under virtual machine the boot manager only uses standard BIOS display functions
Fixes:
- improved fix for 'access denied' problem when true hiding partitions on Windows 10
Boot-US 3.7.1: created on January/28/2018
Improvements:
- additional language available for boot manager: Polish
- support for MS Hyper-V (text mode is activated in boot manager)
- details dialog now displays file system
Fixes:
- fixed 'access denied' problem when true hiding partitions on Windows 10
- program used current directory instead of actual program directory
- retrieval of disk info by scsi commands fixed
- added missing license texts in dutch language
Boot-US 3.7.0: created on June/12/2017
Improvements:
- individual simple and true hiding of GPT partitions
- true hiding of partitions extended for Windows 10 version 1703
- support for font scaling on high resolution monitors
Fixes:
- none
Boot-US 3.6.2: created on Sept./11/2016
Improvements:
- recognition of pressed keys improved
User Manual Boot-US 4.2.0
16 1 Introduction

Fixes:
- none
Boot-US 3.6.1: created on May/30/2016 (fixed on June/10/2016 and June/18/2016)
Improvements:
- additional languages available for boot manager: Spanish, French and Dutch
- disk numbers can be configured to start with 0 (as in Windows)
Fixes:
- for cloned partitions the correct drive letter is now displayed
- crash fixed when configuring boot disk numbers (June/10/2016)
- crash fixed when reading disk info with uncommon response values (June/18/2016)
Boot-US 3.6.0: created on January/30/2016
Improvements:
- Boot-US (GUI) can be started now directly (manifest contains request for administrator rights)
- deleting and formating a partition can now be aborted without error message
Fixes:
- none
Boot-US 3.5.3: created on December/23/2015
Improvements:
- none
Fixes:
- unintented restart of Windows after true hiding a partition does not happen any more
Boot-US 3.5.2: created on October/08/2015 (fixed on Oct/13/2015 and Oct/20/2015)
Improvements:
- display of whole lines in list control while changing column width improved
- enter relative paths in bootus.ini
Fixes:
- check active partition when installing boot manager to non-active primary partition
- typo in setup program fixed
- too large font in startup tip fixed
- scrolling in list control fixed (Oct/13/2015)
- check of FAT16 partition was too strict (Oct/20/2015)
Boot-US 3.5.1: created on September/07/2015
Improvements:
- none
Fixes:
- display of serial number for Seagate disks fixed
- crash in 64 bit version with missing license fixed
- installation problem to diskette fixed
Boot-US 3.5.0: created on August/09/2015 (Beta version)
What's new?
The most important extensions are the support for Windows 10, the usage of 64-bit variables for disk and partition
sizes and the recognition of gpt partitions.
Improvements:
- support for Windows 10
- support for 64-bit LBA numbers (disk size up to 8 x 10
12
TiB)
- gpt partitions are recognized
- display of disk signature
User Manual Boot-US 4.2.0
1 Introduction 17

- new command fixmbr in command-line program
- new command fix_diskparam in command-line program
- Boot-US available as 64 bit version
- make partitions on usb sticks accessible
Fixes:
- formating of FAT32 partition with empty volume name fixed
Boot-US 3.2.2: created on April/13/2014
Improvements:
- none
Fixes:
- free space before first partition was not shown
- reading alignment from ini file did not work
Boot-US 3.2.1: created on December/26/2013
Improvements:
- license check removed for command-line functions 'bootmanager status' and 'bootmanager preselect'
Fixes:
- none
Boot-US 3.2.0: created on December/08/2013
Improvements:
- one-time boot of an entry in the boot manager
Fixes:
- none
Boot-US 3.1.0: created on January/15/2013
Improvements:
- support for Windows 8
- support for cursor keys on numpad
Fixes:
- display of volume name for duplicated partition fixed
Boot-US 3.0.2: created on February/01/2012 (fixed on Feb/12/2012)
Improvements:
- none
Fixes:
- display of 11 and more entries in boot manager fixed
- wrong colors in boot manager by command-line installation fixed
- wrong creation of image file with 8 or more entries fixed (Feb/12/2012)
Boot-US 3.0.1: created on January/09/2012 (fixed on Jan/21/2012)
Improvements:
- IEC units are now the default
- ENTER key on numpad supported again
- special characters are allowed in password entry
Fixes:
- diskette installation fixed
- booting from disk 2 fixed
- characters z and y within password were interchanged (Jan/21/2012)
Boot-US 3.0.0: created on July/10/2011 (Beta version)
What's new?
User Manual Boot-US 4.2.0
18 1 Introduction

The most important extensions are the support for SSDs, the installation of the boot manager into a non-active primary
partition and the invisible start of the boot manager (see list below).
Improvements:
- partitions may be aligned on 1 MiB boundary (support for SSDs)
- boot manager does not rewrite unmodified sectors (support for SSDs)
- installation of boot manager into non-active primary partition
- invisible start of boot manager
- installation to CD creates now ISO file
- lba access is now the default setting
- command-line version allows to change the preselected partition
- partitions size displayed in SI or IEC units
- installation to diskette may now contain twice as many sectors
- automatic hiding in boot manager restricted to configured disks
- license texts in boot manager can now be changed individually
- export of boot manager configuration in file bmgrus.ini
Fixes:
- none
Boot-US 2.1.8: created on February/20/2010 (fixed on Aug/22/2010)
Improvements:
- installation in MBR can skip a sector occupied by third-party program
Fixes:
- installation on diskette did not work under Windows Vista and 7
- failed disk access is retried in old and new variant (Aug/22/2010)
Boot-US 2.1.7: created on November/08/2009 (fixed on Nov/15/2009)
Improvements:
- boot sector is not checked any more for disk parameters
Fixes:
- setup did not run under Windows 7 (Nov/15/2009)
Boot-US 2.1.6: created on March/13/2005 (fixed on April/24/2005)
Improvements:
- none
Fixes:
- installation of boot manager in primary partition beyond 8 GB fixed: parts of the boot manager could get overwritten
some time later
- update operation of command-line version fixed (April/24/2005)
Boot-US 2.1.5: created on May/20/2004
Improvements:
- DOS command-line version now runs in protected mode
Fixes:
- writing and reading of *.sec file fixed
- formating and overwriting partition under Windows 9x/ME fixed
Boot-US 2.1.4: created on March/14/2004
Improvements:
- start signal can now be specified by all configuration programs
Fixes:
- check of FAT16 boot sector was a bit too strict
- partition name and description were not displayed in password dialog of boot manager
User Manual Boot-US 4.2.0
1 Introduction 19

Boot-US 2.1.3: created on February/17/2004
Improvements:
- none
Fixes:
- check of FAT32 boot sector was a bit too strict
- wrong exit code of command "bootusc save partsec"
Boot-US 2.1.2: created on February/08/2004
Improvements:
- when deleting a partition it is possible to erase all sectors of the partition
- when creating a partition it is possible to format it as FAT12/FAT16/FAT32
- on true hiding an encrypted partition remains unchanged
- the Boot-US (GUI) remembers the window size and position
Fixes:
- several problems on deleting or creating a partition have been fixed
- password entry in login dialog under XP displayed unusual characters
- installation problem of boot manager on diskette has been fixed
Boot-US 2.1.0: created on June/03/2003 (Beta version)
Improvements:
- boot manager can be installed in primary partition beyond the 8 GB limit
- creating and deleting partitions can now be performed in the configuration program
- boot manager does not show an error when trying to read from removable disks without medium (ZIP drive)
- user manual is provided as pdf file
- image file containing boot manager Boot-US can be created
- modernized appearance of configuration program Boot-US (GUI)
- size of dialogs and wizards depends on screen size
- integrity check does not show a warning any more for CHS cylinder number 1022
Fixes:
- none
Boot-US 2.0.6: created on December/09/2002
Improvements:
- partition ID of boot manager entry can be changed now
- better recognition of available administrator privileges of user
Fixes:
- none
Boot-US 2.0.5: created on November/27/2002
Improvements:
- none
Fixes:
- partition 0Eh was treated as a FAT32 partition (correct is FAT16)
- available support for ext. INT 13h was sometimes not recognized in DOS command-line version
Boot-US 2.0.4: created on August/29/2002 (fixed on Sept/01/2002)
Improvements:
- none
Fixes:
- booting of Windows NT/2000/XP/2003 from disk 2 failed when boot manager was installed to hard disk and the
boot manager option "select standard partition" was set
- installation of boot manager to diskette could have been incomplete when individual hiding of partitions was used
- checking duplicated entries fixed (Sept/01/2002)
User Manual Boot-US 4.2.0
20 1 Introduction

Boot-US 2.0.3: created on August/21/2002
Improvements:
- when the boot manager is installed in a primary partition the current MBR is saved within the primary partition,
therefore the track 0 remains unchanged in this case
- when the boot manager is installed in MBR the main part of the boot manager is stored near the end of the track 0
- added tooltips for buttons on page 1 of installation dialog
- informations about all hard disks can now be displayed directly in the boot manager
- command-line version extended by reboot function
Fixes:
- drive letters are displayed again
- removed the DEBUG output of the licensed command-line program
Boot-US 2.0.2: created on June/22/2002
Improvements:
- configuration program (GUI) allows to duplicate entries in boot manager
- online help is now built in modern HTML Help format
Fixes:
- only Windows NT/2000/XP/2003 are booted from disk 2, 3, ... by means of disk swapping, for all other cases (e.g.
Linux) the former method is used again
- selecting the former booted partition did not work in boot manager 2.0.1
- hiding of logical partitions did not work in the command-line version
Boot-US 2.0.1: created on April/26/2002 (Beta version)
Improvements:
- none
Fixes:
- booting of DOS and Windows 95/98 from disk 2, 3, ... did not work with the new method, hence for these cases the
previous method is used again
Boot-US 2.0.0: created on April/15/2002 (Beta version)
Improvements:
- boot manager supports booting of Windows NT/2000/XP/2003 from disk 2, 3, ...
- order of boot manager entries is unchanged in new installation
- boot manager displays precise error messages with disk and sector number
- command-line version supports uninstallation of boot manager
- command-line version supports status info about installed boot manager
- command-line version supports update of separate entries without complete re-installation
- command-line version supports installation of boot manager with simplified configuration menu (F10 key)
- configurable acoustic signal upon start of boot manager (F10 key)
Fixes:
- none
Boot-US 1.7.1: created on December/09/2001
Improvements:
- automatic hiding of pri. partitions now behaves identical to previous versions
- automatic hiding of pri. and log. partitions added as separate configuration possibility
Fixes:
- saving partition names in INI file failed if INI file was empty
Boot-US 1.7.0: created on October/14/2001 (Beta version)
Improvements:
- individual hiding of logical partitions
- warnings about invalid CHS values can be disabled
User Manual Boot-US 4.2.0
1 Introduction 21

- command-line version of Boot-US has now same functionality as GUI version
- command-line version of Boot-US is available as DOS version and as WIN32 version
Fixes:
- installation of boot manager into primary partition did not re-activate already present Boot-US partition
Boot-US 1.6.3 (GUI): created on August/21/2001
Improvements:
- none
Fixes:
- storing parameters in INI file fixed
- IDE disk model is recognized also on Windows ME
- checking of CHS values in partition table was too strict
- invalid or incomplete formated NTFS partition is now handled correctly
Boot-US 1.6.2 (GUI): created on July/22/2001 (fixed on July/23/2001)
Improvements:
- improved speed of program execution with disabled trace
- volume label of hidden NTFS partitions is recognized
- more integrity checks (LBA mapping) of partitions
Fixes:
- handling of keys 'y' and 'z' when enterings passwords in boot manager fixed
- installation program GkSetup failed when a file 'setup.exe' was present in same directory
- message about violation of cylinder boundaries for logical partitions corrected (July/23/2001)
Boot-US 1.6.1 (GUI): created on June/17/2001
Improvements:
- integrity of partitions (overlapping partitions) is verified
- NTFS version is recognized
- volume label of hidden FAT16/FAT32 partitions is recognized
Fixes:
- empty warning could appear when installing non-licensed version 1.6.0
Boot-US 1.6.0 (GUI): created on May/30/2001 (Beta version)
Improvements:
- order of boot disks can be specified within configuration program
- disturbing disks can be skipped
- configuration program recognizes disk model and serial number
- booted partition is activated (if possible) by boot manager
- timer in boot manager is stopped on first key stroke
Fixes:
- none
Boot-US 1.5.4 (GUI): created on Jan/12/2001
Improvements:
- true hiding of partitions can now be tested when boot manager is installed to diskette
Fixes:
- none
Boot-US 1.5.3 (GUI): created on Dec/10/2000
Improvements:
- improved work around for Windows NT/2000/XP/2003 problems with diskette access
Fixes:
User Manual Boot-US 4.2.0
22 1 Introduction

- none
Boot-US 1.5.2 (GUI): created on Dec/04/2000
Improvements:
- none
Fixes:
- individual true hiding did not work in the boot manager
Boot-US 1.5.1 (GUI): created on Nov/26/2000
Improvements:
- correct configuration of true hiding is checked when boot manager is installed
- work around for Windows NT/2000/XP/2003 problems with diskette access
- highest free partition table entry is used for boot manager partition
Fixes:
- none
Boot-US 1.5.0 (GUI): created on Oct/16/2000 (Beta version)
Improvements:
- true hiding of partitions (necessary especially for Windows 2000/XP/2003)
- all boot and partition sectors on all disks can be saved manually
- automatic saving of boot and partition sectors before write operations
- all partition names are stored additionally in INI file
- context menus in many dialogs
Fixes:
- administrator password for Boot-US could not be stored in boot manager due to version conflict
Boot-US 1.4.0 (GUI): created on June/29/2000
Improvements:
- new format of license file (registered license files remain valid)
Fixes:
- none
Boot-US 1.3.1 (GUI): created on June/02/2000 (fixed on June/15/2000)
Improvements:
- uninstallation now possible directly from boot manager
- contents of all sectors written is always verified now
- partition labels are obtained now directly from WIN32 functions
- before careless users ignoring warning could write empty MBR to disk
Fixes:
- problems with individual hiding of partitions fixed
- installation of boot manager to diskette fixed
- password entry for Windows program Boot-US fixed
- saving of last booted partition in boot manager fixed (June/15/2000)
Boot-US 1.3.0 (GUI): created on April/16/2000 (Beta version)
Improvements:
- individual hiding of primary and extended partitions
- configurable description for partitions in boot manager
- password protection for configuration program
- administrator password for boot manager
- drive access is repeated also under NT
- graphical design of boot manager reworked
- timer in boot manager can be deactivated completely
User Manual Boot-US 4.2.0
1 Introduction 23

- boot manager remembers last booted partition
- empty disks are ignored by the boot manager
- boot manager avoids ext. INT 13h for better compatibility
- installation on diskette may occupy up to 36 sectors
Fixes:
- for disks with > 1023 cyl. and < 255 heads the part. size was sometimes displayed wrong
Boot-US 1.2.4 (GUI): created on Jan/01/2000
Improvements:
- support for Windows 2000/XP/2003
Fixes:
- none
Boot-US 1.2.3 (GUI): created on Oct/23/1999
Improvements:
- license file is Base64 encoded to prevent corruption by email transport
- total number of sectors returned by extended INT 13h is now used
Fixes:
- installing boot manager in primary partition sometimes required to uninstall it before
Boot-US 1.2.2 (GUI): created on July/11/1999
Improvements:
- complete english online help added (Sept/13/1999)
Fixes:
- boot manager could not be installed in MBR when partition table on disk 1 was full
- unchanged passwords were corrupted at second installation of boot manager
Boot-US 1.2.1 (GUI): created on July/03/1999
Improvements:
- explicit support for booting DOS, Windows 95/98/ME from 2nd, 3rd.. hard disk
- boot manager now passes appropriate disk number (80h, 81h...) in DL register
- password protection for partitions
- by default hiding of partition is not activated
- by default boot manager is installed in primary partition
- info about target partition is shown before boot manager is installed in primary partition
- drive access is retried in case of errors
- language in Boot-US and boot manager can be changed to English
- boot manager allows manual unhiding of all partitions
Fixes:
- determination of LBA mapping from BIOS corrected
- determination of partition parameters corrected
- determination of drive letter corrected
Boot-US 1.1.4 (GUI): created on April/13/1999
Improvements:
- determination of LBA mapping selectable (from BIOS or partition table)
- boot manager in primary partition occupies full cylinder for better compatibility
- new design for toolbar (flat look)
Fixes:
- no LBA access was used for part. 0Bh, 0Ch, 0Eh, 0Fh and disk size < 8 GB
- CHS or LBA values were wrong when LBA-CHS-mapping was not correct
User Manual Boot-US 4.2.0
24 1 Introduction

Boot-US 1.1.3 (GUI): created on March/16/1999
Improvements:
- online help integrated into Boot-US
- Boot-US supports now old version of system DLL Comctl32.dll
Fixes:
- bug in VC++ list control caused problems with empty strings
- empty hard disks without partitions were not displayed correctly
Boot-US 1.1.0 (GUI): created on Jan/11/1999
Improvements:
- menu command to get info about installed boot manager
- partial editing of partition table possible
- automatic hiding of C: partitions can be disabled
Fixes:
- none
Boot-US 1.0.5 (GUI): created on Nov/29/1998
Improvements:
- boot manager can be installed in primary partition
- boot manager can automatically hide additional C: partitions
- display of license information
Fixes:
- none
Boot-US 1.0.4 (GUI): created on Nov/01/1998
Improvements:
- boot manager supports disks up to 2048 GB with extended INT 13h
- Windows 9x and NT are recognized from their boot sector
- trace output much faster than before
Fixes:
- none
Boot-US 1.0.3 (GUI): created on Oct/01/1998
Improvements:
- wizard for installation of boot manager
- complete track 0 can be saved and restored
- hidden partition (OS/2 boot manager) are recognized
- many additional partitions are recognized
- menu command for refreshing partition list
- support for trace output
Fixes:
- entries in log. partition sector were not recognized when in wrong order
Boot-US 1.0.0 (GUI): created on Sept/10/1998
- first version for general public
Boot-US 1.5.0 (cmd): created on Nov/19/2000
Improvements:
- true hidden partitions can be unhid
Fixes:
- none
User Manual Boot-US 4.2.0
1 Introduction 25

Boot-US 1.3.1 (cmd): created on June/11/2000
Improvements:
- contents of all sectors written is always verified now
- multiple sector access replaced by single sector access
- disk access avoids ext. INT 13h whenever possible
Fixes:
- program did stop sometimes
Boot-US 1.3.0 (cmd): created on April/09/2000
Improvements:
- language can be changed to english or german
- hidden extended partitions can be unhid
Fixes:
- none
Boot-US 1.2.0 (cmd): created on June/28/1999
Improvements:
- Partitions can now be made visible on all disks
Fixes:
- Only first disk could be specified
Boot-US 1.1.5 (cmd): created on May/15/1999
- first version for general public
User Manual Boot-US 4.2.0
26 1 Introduction

1.8 Acknowledgement
Users and testers:
First of all I like to thank all users who reported errors or suggested improvements or took part in the beta tests:
D. Arold, M. Bach, J. Boenisch, N. Brauer, H. Buchta, J. Cook, R. Curtis, A. Deinlein, D. Deutzer, J. Ebend, M.
Ellinger, U.-P. Egger, K.-H. Fink, O. Foellmer, L. Forsblad, K. Friedrichs, Z. Gnilka, L. Gusewski, B. Hagstrand, F.
Harbott, D. Herkner, D. Hettmann, A. Hoefler, F. Hoffmann, H. Huang, T. Huber, W. Huempfner, M. Jonas, T. Jacob,
S. Kao, W. Kasdorp, M. Kirschner, C. Klug, B. Koch, N. Krismer, H. Lampe, T. Laun, S. Lindner, A. Maier, C.
Marklund, K. R. Mathisen, S. McFee, O. Mishuris, S. Mueller, Dr. B. Niklaus, S. Nouri, G. Phieler, J. Pichler, H. F.
Piotraschke, S. Raeuber, D. Rehm, K. Reich, J. Rensmann, J. Roehrenbeck, C. Rohrbach, A. Safronov, M.
Sauerhammer, B. Scheim, J. Schieck, R. Schillmann, T. Schlegel, T. Schroeder, S. Schulte, A. Schwingenheuer, R.
Seggering, M. Seifert, F. Siebe, F. Steinkuhl, H. Tichy, Ing. H. Vogler, S. Waidele, S. Waldmann, A. Watzal, A. Weger,
S. Will, C. Wittmer, D. Zuber.
Translations:
The translations of the boot mananger were kindly provided by the following people:
Julio Montalvo (spanish)•
Helga Jakubetz (french)•
Hans Baeyens - Virgo plus (dutch)•
Adam Grubba (polish)•
Special thanks goes to Mike Wyatt for his numerous corrections of the english translation.
Windows program:
The user interface of the window program has been developed with the Visual C++ MFC library. Many interesting
details of the user interface originate from "MFC Programmer's SourceBook" (www.codeguru.com). The willingness
of all authors to allow other programmers to use their source code is gratefully acknowledged. The articles of the
following people have been especially helpful:
Brent Corkum (menu with bitmaps)•
Joerg Koenig (flat toolbars)•
Zafir Anjum (edit subitems in list control)•
Installation program:
The setup program for Boot-US has been created by the freeware tool "Inno Setup" of Jordan Russell
(www.jrsoftware.org/isinfo.php).
Background images:
The background images in the subdirectory images were downloaded from the web site https://unsplash.com/. The
images come from the following photographers:
Tolga Ahmetler, Mark Boss, Liam Briese, Boris Misevic, Paul Taton, Alex Gurung, Martin, Ryan Lum, Christine Roy,
Shayantan Ghosh, Matthew Ronder-Seid, Emily Campbell, Denis Linine, Tor Boine, Asoggetti, Sean Lee, Carl Nenzen
Loven, Jennifer Rogalla, Gayetano Gil, Rodrigo Soares.
User Manual Boot-US 4.2.0
1 Introduction 27

User Manual Boot-US 4.2.0
28 1 Introduction

2 Purchase a license
2.1 License
2.1.1 License agreement
The whole package Boot-US (GUI and command-line version) with all accompanying programs (boot manager, etc.)
may be used in the non-licensed version on private PCs for free. This allows a broad usage of the program. Public
schools may also use the non-licensed version of Boot-US for free.
Additionally, the whole package Boot-US may be tested in the non-licensed version during a trial period of one month
for free. If you want to use Boot-US after this trial period on commercially used PCs, you must purchase a license.
The license purchased entitles the licensee to use Boot-US on the corresponding number of PCs and it entitles the
licensee to use the forthcoming versions of Boot-US for free.
All future versions of Boot-US together with an old license allow to use the previously available functions. Please
note that new functions in future versions of Boot-US might not be available with an old license. The author
reserves the right to determine whether new functions in future versions are available free of charge, or are available
with an old license or require a new license.
2.1.2 Licensed functions
The following functions require a license:
Necessary license Function
Version 4.x.x True hiding of partitions in boot manager
Version 4.x.x Support for boot from second, third,... disk (BIOS)
Version 4.x.x Complete configuration of invisible start
Version 4.x.x Password protection in boot manager
Version 4.x.x Full password protection for configuration program
Version 4.x.x Support for mouse/touch screen in UEFI boot manager
Owners of a 3.x.x license can continue to use this licese also in Boot-US 4.x.x. However this old license only supports
booting by BIOS and not by UEFI. If you want to use one of the licensed functions when booting by UEFI you need a
4.x.x license.
The Windows command-line version is intended especially for larger installations. The installation and uninstallation
of the boot manager requires at least a 5-PC license. All other functions (except the report function) require at least a
single PC license. Only the report function may be used without a license.
The 100-PC license (and higher) allows to change individually the license texts displayed in the boot manager.
2.1.3 Testing all functions
It is possible to try all functions of the package Boot-US before purchasing a license. When booting by BIOS you
need to install the boot manager to diskette or CD, when booting by UEFI you need to install the boot manager in
UEFI fallback boot mode on an USB stick. Then you can try all features of Boot-US in the non-licensed version.
2 Purchase a license 29

2.1.4 DISCLAIMER OF WARRANTY
The whole package Boot-US has been developed with great care and has undergone extensive testing. But it cannot
be guaranteed that all functions of Boot-US are fully operational and work as described, and it cannot be guaranteed
that Boot-US is free of errors. You are allowed to test Boot-US freely for one month to verify whether Boot-US works
reliably and without errors in your hardware environment. At last, we would say that you are using Boot-US at your
own risk.
Please also read the legal stuff below. By using Boot-US you accept these conditions of usage. If you do not agree you
are not allowed to use Boot-US.
The installation program Boot-US allows you to perform a test installation of the boot manager to a removable media
and it allows to save the all partition and boot sectors. Both measures support a step-by-step testing of Boot-US in the
actual hardware environment. It is expected that during such a step-by-step installation of the boot manager potential
problems become quickly evident and can also be repaired completely.
If you detect problems or if you have ideas for improvements, please inform the author. It is intended to correct
problems as fast as possible (I hope within a few days). On the other hand, improvements are expected to require more
time and will therefore be implemented only in the forthcoming versions.
Legal stuff:
This software is provided on an "AS IS" basis, without warranty of any kind, including without limitation the
warranties of merchantability, fitness for a particular purpose and non-infringement. The entire risk as to the quality
and performance of the software is borne by you. Should the software prove defective, you alone assume the entire
cost of any service and repair.
SOME STATES DO NOT ALLOW EXCLUSIONS OF AN IMPLIED WARRANTY, SO THIS DISCLAIMER
MAY NOT APPLY TO YOU AND YOU MAY HAVE OTHER LEGAL RIGHTS THAT VARY FROM STATE TO
STATE OR BY JURISDICTION.
UNDER NO CIRCUMSTANCES AND UNDER NO LEGAL THEORY, TORT, CONTRACT, OR OTHERWISE,
SHALL THE PRODUCER OF THIS SOFTWARE OR ITS SUPPLIERS OR RESELLERS BE LIABLE TO YOU
OR ANY OTHER PERSON FOR ANY INDIRECT, SPECIAL, INCIDENTAL, OR CONSEQUENTIAL
DAMAGES OF ANY CHARACTER INCLUDING, WITHOUT LIMITATION, DAMAGES FOR LOSS OF
GOODWILL, WORK STOPPAGE, COMPUTER FAILURE OR MALFUNCTION, OR ANY AND ALL OTHER
COMMERCIAL DAMAGES OR LOSSES. IN NO EVENT WILL THE PRODUCER OF THIS SOFTWARE BE
LIABLE FOR ANY DAMAGES IN EXCESS OF THE LIST PRICE FOR A LICENSE TO USE BOOT-US, EVEN
IF THE PRODUCER SHALL HAVE BEEN INFORMED OF THE POSSIBILITY OF SUCH DAMAGES, OR FOR
ANY CLAIM BY ANY OTHER PARTY. THIS LIMITATION OF LIABILITY SHALL NOT APPLY TO
LIABILITY FOR DEATH OR PERSONAL INJURY TO THE EXTENT APPLICABLE LAW PROHIBITS SUCH
LIMITATION. FURTHERMORE, SOME STATES DO NOT ALLOW THE EXCLUSION OR LIMITATION OF
INCIDENTAL OR CONSEQUENTIAL DAMAGES, SO THIS LIMITATION AND EXCLUSION MAY NOT
APPLY TO YOU.
2.1.5 Distribution
If you like Boot-US, you are allowed to distribute it. The whole package Boot-US (non-licensed version) may be
copied and distributed without restriction. The licensed version of Boot-US, especially the license file bootus.lic, is
excluded from the distribution. The license file may not be distributed at all.
2.2 Registration
User Manual Boot-US 4.2.0
30 2 Purchase a license

2.2.1 License types and prices
The following license types for Boot-US version 4.x.x can be purchased:
Amount Version 4 Upgrade from V3 School license
1 24.50 EUR 10.50 EUR
5 59.50 EUR 19.50 EUR yes
20 119.50 EUR 39.50 EUR yes
100 299.50 EUR 79.50 EUR yes
These prices are final prices including tax and transportation. No further costs arise.
Owners of old V3 licenses may upgrade to a version 4 license for a reduced price (see above table).
Higher numbers or unlimited licenses are available on request.
Public schools get the multiple licenses for half the price. According to the license type purchased the package
Boot-US may be used only on the corresponding number of PCs. For example, a single PC license entitles the licensee
to use Boot-US on one PC.
2.2.2 Ordering licenses
Your license order must include the following data:
number of licenses•
name, address, country of customer•
e-mail address of customer•
name and address of invoice recipient (if different from customer)•
licensee (max. 60 characters, if different from customer)•
preferred method of payment (bank transfer or PayPal)•
Please send your order by e-mail or standard mail to the following address:
E-Mail: [email protected]
or
Postal address: Dr. Ulrich Straub
Grabenstrasse 71B
D-71116 Gärtringen
Deutschland/Germany
After your order is received the license file "bootus.lic" is sent to you by e-mail together with the invoice. No payment
in advance is required.
Processing your order takes about half a business day.
User Manual Boot-US 4.2.0
2 Purchase a license 31

2.3 Installing the license
After purchasing a license you receive a license file bootus.lic. This license file can be used both for the GUI
version and the command-line version of the configuration program Boot-US. Please copy the license file unchanged
into the installation directory of Boot-US. In this directory you will find either the executable bootus.exe or
bootusc.exe.
Remark: For the GUI version the default installation directory is c:\program files\Boot-US.
When you start the configuration program Boot-US (GUI or command-line) the next time the license file is
recognized and all encrytped data (number of licenses, licensee, etc.) is extracted from the license file. When a valid
license is recognized, the title of Boot-US (GUI) changes from "Boot-US [non-licensed version]" to "Boot-US", for
example. All data extracted from the license file can be viewed by executing the menu command Help / About
Boot-US....
When you install the boot manager the next time (or modify an existing installation of the boot manager) the extracted
license is inserted into the boot manager.
Please note that the license is not inserted automatically into an already installed boot manager. You must re-install
the boot manager. It is, however, not necessary to uninstall the boot manager. Just open the installation dialog and
click "Next" on each page. All configuration data of the installed boot manager are already preset in the appropriate
pages of the installation dialog.
The advantage of this approach is that the user controls all write access to the disk. Under no circumstance does
Boot-US automatically change any data on the disk. All data written to the disk is generally controlled by the user.
User Manual Boot-US 4.2.0
32 2 Purchase a license

2.4 Contact
In case of orders, questions, suggestions for improvements or problems contact us at the following addresses:
E-Mail: [email protected]
Postal address: Dr. Ulrich Straub
Grabenstrasse 71B
D-71116 Gärtringen
Germany
It is planned to fix errors as early as possible -- normally we expect a fixed version to be available within a few days.
Improvements are expected to require larger modifications and hence more time. Therefore improvements will be
available only in the following regular version. Questions from licensed users should be answered within a working
day. Non-licensed users can expect an answer from within a day to up to a week.
When you report errors please describe the problem as detailed as possible. If necessary include screen shots and/or a
complete trace file. Please send the files compressed.
User Manual Boot-US 4.2.0
2 Purchase a license 33

User Manual Boot-US 4.2.0
34 2 Purchase a license

3 Boot manager
3.1 Overview
In this chapter all functions of the boot manager are described and illustrated by screenshots. The installation and
configuration of the boot manager is described in the following chapters.
The following two screenshots show the start screen of the boot manager Boot-US in graphics mode with a
background image and in text mode. Apart from the background image there is not difference between graphics and
text mode.
Fig. 4a: Boot manager (graphics mode)
3 Boot manager 35

Fig. 4b: Boot manager (text mode)
All entries in the boot manager carry a short name (e.g. Windows 7) and a longer description (e.g. Games and Office
Applications). Both values can be set arbitrarily when the boot manager is installed.
The central function, booting a certain entry, is carried out by simply selecting the desired entry and pressing the
ENTER key.
When installing the boot manager you can configure which partitions should be hid when a certain entry is booted.
When selecting an entry the future state of these partitions is shown (e.g. the second partition would be true hid when
the first entry is booted). The actual hiding is however done directly before booting the selected partition.
When the boot manager is installed the preselected entry and the total time for selecting an entry is configured. These
settings can be changed also in the boot manager, see chapter 3.3.
3.1.1 Password for partition
All entries in the boot manager can be protected by individual passwords. Directly before booting the selected entry
the user is then prompted to enter the corresponding password. Of course, when no password is set no prompt occurs.
Fig. 5: Password for partition
3.2 Help
A short online help can be displayed by pressing the F1 key in the start screen of the boot manager:
User Manual Boot-US 4.2.0
36 3 Boot manager

Fig. 6: Online help in boot manager
3.3 Keyboard buffer
The keyboard buffer can be opened by pressing the F2 key in the start screen of the boot manager:
The keyboard buffer allows you to pass keystrokes to the booted operating system. For example, on Windows XP the
'Advanced Boot Options' menu can be opened by pressing the F8 key early during the boot process. Often it is
difficult to hit the right moment for pressing this key. It is much easier to put this key in the keyboard buffer and then
start Windows. When Windows starts it finds this keystroke in the keyboard buffer and thinks that the corresponding
key has been pressed.
Fig. 7: Keyboard buffer in boot manager
In the above example the keyboard buffer contains one keystroke, namely the the key F8.
The keyboard buffer can contain up to 15 keys.
3.4 Change configuration
The configuration menu opens after pressing the F10 key.
User Manual Boot-US 4.2.0
3 Boot manager 37

Fig. 8: Change configuration
The configuration menu can be protected by the administrator password of the boot manager. If an administrator
password has been set the following prompt appears:
Fig. 9: Administrator password
3.4.1 Preselected partition
The preselected partition can be changed by the user.
Fig. 10: Set preselected partition
It is possible to have a fixed entry preselected (e.g. the second entry) or to preselect the entry which was booted
before.
3.4.2 Start signal
Also the start signal can be changed by the user.
Fig. 11: Set start signal
The start signal can be activated or deactivated.
User Manual Boot-US 4.2.0
38 3 Boot manager

3.4.3 Show disk info
The command for displaying the disk info has two important functions:
First you can easily see which disks or USB drives the BIOS can access. All accessible drives are shown.•
Second you can see in which order the drives are arranged by the BIOS.•
Fig. 12: Show disk info
In the BIOS you can determine the boot drive. This drive automatically becomes the boot disk 1. If a second drive is
present this drive automatically will be the boot disk 2.
However if more than two disks are present it is unclear in which order the higher disks are arranged by the BIOS. If
you want to boot from a higher disk, or if you want to true hide a partition on a higher disk, then the knowledge of the
boot disk number is required in order that the boot manager accesses the right disk.
The actual configuration program Boot-US (GUI) runs under Windows. The disk order under Windows may be
different from the BIOS disk order. From the above disk data (size, disk signature) you can easily assign each
Windows disk the correct boot disk number in the Boot-US (GUI).
3.4.4 Unhide all partitions
This command unhides all partitions on all connected drives. The command is executed immediately without
prompting the user for confirmation.
When you boot an entry of the boot manager after all partitions were made visible a potentially configured hiding of
partitions is ignored.
3.4.5 Uninstall boot manager
This command uninstalls the boot manager. The command is executed immediately without prompting the user for
confirmation.
The uninstallation restores the previous MBR code which was present before the boot manager was installed. All
partitions on all drives are made visible, and the first primary partition on the boot disk 1 is set active. If you have
changed or deleted partitions then these changes will remain.
User Manual Boot-US 4.2.0
3 Boot manager 39

User Manual Boot-US 4.2.0
40 3 Boot manager

4 Menu commands (GUI)
4.1 All menu commands of Boot-US
The following screenshot (fig. 13) shows the configuration program Boot-US (GUI). This program runs under
Windows XP to Windows 11 (32 and 64 bit).
Fig. 13: Configuration program Boot-US (GUI)
The following summary lists all menu commands of the GUI version (fig 4) with a short description. An explicit
description is found separately with each command.
File
Login... Login into configuration program
Exit Closes the configuration program
Boot manager
Install... Installs boot manager
Remove... Removes boot manager
Show info... Shows info about installed boot manager
Partitions
Details... Shows details of all partitions
Create... Creates a new partition
Delete... Deletes a partition
Copy... Copies a partition or disk
Save sectors... Saves sectors to file
Restore sectors... Restores sectors from file
4 Menu commands (GUI) 41

Configuration
Base settings... Specify basic parameters in INI file
Extended settings... Specify extended parameters in INI file
UEFI
Info... Show UEFI boot variables
Save variables... Save UEFI variables
Restore variables... Restore UEFI variables
Window
Refresh Refreshes the display
Help
Contents... Opens the online help
License... Show license agreement in online help
Registration... Show ordering information in online help
About Boot-US... Show version and installed license
User Manual Boot-US 4.2.0
42 4 Menu commands (GUI)

4.2 File / Login...
The menu command File / Login... allows to enter the password for the configuration program Boot-US. This menu
command is only active when the password has been specified and the correct password has not yet been entered.
4.3 File / Exit
The menu command File / Exit closes the program Boot-US. This command does not modify any data and does not
write anything to disk.
User Manual Boot-US 4.2.0
4 Menu commands (GUI) 43

4.4 Boot manager / Install...
The menu command Boot manager / Install... opens a wizard to configure and install the boot manager. If the boot
manager is already installed on the hard disk the data of this installed boot manager is used to initialize the wizard.
Otherwise the wizard is initialized with standard values. The wizard consist of 6 pages to lead you through the
configuration and installation of the boot manager.
Page 1: Entries Select entries in boot manager
Page 2: Password protection Assign passwords to entries
Page 3a: Startup options Specify the startup options (part 1)
Page 3b: Startup options Specify the startup options (part 2)
Page 3c: Startup options Specify the startup options (part 3)
Page 4: Hide partitions Select method for hiding of partitions
Page 5: Install target Select installation target
Page 6: Installation Show selected configuration and start installation
When you press the Install button on the last page, the boot manager is installed with the chosen configuration. In
case of installation to the hard disk there are no further questions, and the installation begins immediately. When the
boot manager is installed to the diskette, a request to insert a diskette into drive A: is issued.
Comment:
When the boot manager is already installed on the hard disk and a second installation is done, the boot manager is
removed automatically before it is installed again. This guarantees that the boot manager is installed just once.
User Manual Boot-US 4.2.0
44 4 Menu commands (GUI)

4.4.1 Boot manager / Install / Entries (page 1 of 6)
On the first page of the installation wizard (menu command Boot manager / Install...) you can select which entries
should be included in the boot manager.
Booting by UEFI:
The boot options present in the NVRAM are shown and the fallback efi files.
The description of the entries is editable (max. 48 char.).
Booting by BIOS:
The bootable partitions are shown. Additional options are "Boot the MBR from disk 1,2,..." and "Boot from diskette".
If the MBR contains another boot manager, for example GRUB, then this second boot manager would be started. This
option is useful especially for Linux systems where GRUB is installed in the MBR of the respective disk. Such a
Linux installation can now be booted using the existing GRUB installation. An additional installation of GRUB into
the boot sector of the Linux system is not required any more.
The name by which the entries are displayed in the boot manager can be changed by the user (max. 12 char.). Also the
description of the entries is editable (max. 33 char.).
Comment:
To change an entry double click on it or press the space bar or the F2 key. Additionally the entry can be changed by
the context menu (right click).
The order of the entries in the boot manager can be changed by these buttons or by the context menu.
This button allows duplication of entries in the boot manager. By this means an entry can be booted with
different settings. For example, one option would be to hide all partitions except the selected entry, while
another option would be to make all partitions visible. Again the context menu also allows duplication of an
entry.
User Manual Boot-US 4.2.0
4 Menu commands (GUI) 45

4.4.2 Boot manager / Install / Password protection (page 2 of 6)
On the second page of the installation wizard (menu command Boot manager / Install...) you can specify the
password protection in the boot manager.
Entries in boot manager:
Here you can specify the password for all entries in the boot manager. When a password has been defined for an entry
then you need to enter the password when this entry is booted from the boot manager of Boot-US. Please remember
the password carefully. There is no way in the boot manager to escape the password entry.
Administrator password for boot manager:
Additionally you can specify an administrator password for the boot manager. This password protects the
configuration menu in the boot manager (F10 key).
To specify a password you must enter the password twice. The new password is only accepted when both entries
match. Please press the RETURN or TAB key after the password has been specified. You can abort the password
entry by the ESC key.
The maximum length of a password is 20 characters. Starting with Boot-US 3.0.1 almost all printable characters of the
7 bit ASCII characters set are allowed. To avoid potential problems with the english keyboard driver in the boot
manager you should use only the numbers '0'-'9' and letters 'a'-'x' (upper and lower case). These characters
occupy the same position on an english and german keyboard. When using special characters like '!', '#', '-',
'_', ... on a non-english keyboard the boot manager maps the pressed key to the corresponding special character.
Comment:
Setting passwords requires a license.
Comment:
When you install the boot manager without password protection on a diskette or USB stick you can boot the
corresponding entries by this emergency boot manager even if you forgot the passwords.
User Manual Boot-US 4.2.0
46 4 Menu commands (GUI)

4.4.3 Boot manager / Install / Startup options (page 3a of 6)
Startup options for the boot manager are configured on the third page of the installation wizard (menu command Boot
manager / Install...). The startup options are distributed among three pages 3a,3b,3c.
Start delay:
The start delay is set to zero seconds by default. The start of the boot manager can be delayed by up to a maximum of
10 seconds.
Available time:
The second time limit (max. 60 seconds) specifies the time available inside the boot manager to select an entry. When
this time limit expires the currently selected entry is booted automatically. Inside the boot manager you can always
stop this timer by pressing any key.
Unlimited:
You can also specify an unlimited second time limit. This would completely disable the second time limit. Please note
that the UEFI firmware has an internal time limit of 5 minutes. When the boot process takes longer the UEFI firmware
aborts the current program and tries to boot the next boot option.
Output start signal:
You can choose whether the boot manager should output a short acoustic signal upon startup or not. It is possible to
change this setting also in the configuration menu of the installed boot manager.
Preselect last booted entry:
Here you can decide whether the boot manager starts up with the standard entry (first entry) preselected or the last
booted entry. It is possible to change this setting also in the configuration menu of the installed boot manager.
User Manual Boot-US 4.2.0
4 Menu commands (GUI) 47

4.4.4 Boot manager / Install / Startup options (page 3b of 6)
Startup options for the boot manager are configured on the third page of the installation wizard (menu command Boot
manager / Install...). The startup options are distributed among three pages 3a,3b,3c.
Visibility:
You can decide whether the boot manager should be visible or invisible when it is started. When the boot manager
starts invisibly it is running in the background and the selected entry will be booted when the available time has
counted down to 0.
Hotkey:
You can choose which key or key combination should bring an invisible boot manager to the foreground. Simple press
the desired key or key combination. The following keys are allowed: <F1>-<F12>, <A>-<Z>, <0>-<9>, <ESC>,
<Enter>, <Space>, <Ins>, <Del>, <Home>, <End>, <PgUp>, <PgDown> and the cursor keys. Most of these 61
keys can be combined with <Ctrl> and <Alt> or both. All together roughly 200 key combinations are possible.
Hint (30 character):
The hint text appears as soon as the boot manager is started and running in the background. Please note that the
non-licensed version of Boot-US does not allow full control about this setting.
Show progress:
You can decide to show or disable a progress indicator displayed after the hint text. Please note that the non-licensed
version of Boot-US does not allow full control about this setting.
User Manual Boot-US 4.2.0
48 4 Menu commands (GUI)

4.4.5 Boot manager / Install / Startup options (page 3c of 6)
Startup options for the boot manager are configured on the third page of the installation wizard (menu command Boot
manager / Install...). The startup options are distributed among three pages 3a,3b,3c.
File:
When booting by BIOS you can specify a GIF file with a size of 1024 x 768 pixel as background image for the boot
manager. When booting by UEFI you can specify a BMP file as background image for the boot manager. This BMP
file must have one of the follwing sizes: 640 x 480, 800 x 600, 1024 x 768 or 1280 x 1024 pixel each with 24 bit
colors. You can either use one of images shipped with Boot-US or you can use an own image. When you use own
images you should copy them to the images subdirectory.
Display position of boot manager:
The display position of the boot manager relative to the background image is initialised to the position with the lowest
color variation. You may easily change this position, if you like. Also the transparency of the main window of the
boot manager can be turned off, if you like. Conversely all sub-windows of the boot manager are always displayed
non-transparently.
Reduce size:
The display size of the boot manager can be reduced. For certain background images the reduced size of the boot
manager together with a suitable display position significantly improves the visual appearance.
UEFI text mode:
When booting by UEFI you can configure the boot manager to run in simple UEFI text mode. This option is useful
when there are display problems with graphic modes.
Input device:
The UEFI boot manager can be configured to support a mouse or touch screen additionally to the keyboard.
Comment:
In graphics mode Boot-US uses one of two predefined color schemes for showing the boot manager texts and
windows background colors. The texts are shown in dark color for background images of light color and vice versa.
Comment:
When booting by BIOS it is not possible to use a background image and install the boot manager to the MBR. The
track 0 is too small for storing the background image additionally to the boot manager code.
User Manual Boot-US 4.2.0
4 Menu commands (GUI) 49

4.4.6 Boot manager / Install / Hide partitions (page 4 of 6)
On the fourth page of the installation wizard (menu command Boot manager / Install...) you can specify the method
for hiding partitions during the boot process.
Booting by UEFI:
The following options are available:
(1) Do not change partitions•
(2) Hide partitions individually (for experts)•
(3) TRUE hide partitions individually (for experts)•
Booting by BIOS:
The following options are available:
(1) Do not change partitions•
(2) Hide primary partitions automatically•
(3) Hide pri. and log. partitions automatically•
(4) Hide partitions individually (for experts)•
(5) TRUE hide primary partitions automatically•
(6) TRUE hide pri. and log. partitions automatically)•
(7) TRUE hide partitions individually (for experts)•
• Do not change partitions:
The default is to hide no partition. In this case all partitions remain unchanged. All visible partitions remain visible
and all hidden partitions remain hidden. When a partition is hidden it usually cannot be booted. This setting offers the
greatest safety since no data is changed during the boot process. However, the disadvantage is that potential conflicts
with the assignment of drive letters may arise. For example, when Windows is installed multiple times on a disk only
one of these partitions can get the drive letter C:. This C: partition may be booted without problems while the other
partition could cause difficulties when booted.
• Hide primary partitions automatically:
The problems with the assignment of drive letters can be solved by hiding the non-selected partitions. If you decide to
hide partitions automatically only the booted C: partition is visible, all other primary partitions working with drive
letters will be hidden after the boot process. Hiding a partition means that the partition ID in the partition table (on the
hard disk) is modified such that it becomes an unknown partition. This has no consequence for the next boot process,
i.e. the boot manager of Boot-US will boot a hidden partition without problems. In such a case the partition is made
visible before it is booted, while the other partitions become hidden. In any case the booted partition is made visible
while all other primary partitions are hidden.
• Hide pri. and log. partitions automatically:
Essentially the same as the previous method, but now all logical partition are also hidden. Only the booted partition
will be visible.
• Hide partitions individually (for experts):
This option is supplied for experienced users only. This options allows for each booted partition to define which
partitions should be hid. You can hide any partitions. The boot manager hides exactly the specified partitions and
unhides all other hideable partitions on all disks.
• TRUE hide primary partitions automatically:
• TRUE hide pri. and log. partitions automatically:
• TRUE hide partitions individually (for experts):
Essentially the same as the previous methods. The only difference is that partitions are true hid. This means the boot
sectors are additionally modified. True hiding is necessary when Windows 2000 (and higher) is involved, since the
User Manual Boot-US 4.2.0
50 4 Menu commands (GUI)

"simple" hidden partitions are still visible from Windows 2000 (and higher).
Comment:
When booting by BIOS automatic partition hiding will be performed for all hideable primary and logical partitions on
all disks referenced in the boot manager. Starting with Boot-US 3.0.0 the highest disk number referenced in the boot
manager is determined. The automatic hiding does not act any more on the disks beyond the highest one, but only on
the disks up to (and including) the highest disk.
Comment:
In case of the individual hiding the configuration program allows for any combination of partitions to be hidden.
There is no test to determine if the selected combination can be successfully booted. Your knowledge as an
experienced user is needed. For example, when Windows is installed twice, booting the "second" Windows requires
that the "first" Windows is hidden, otherwise booting will fail.
Comment:
The boot manager hides or unhides only hideable partitions. All other partitions (e.g. Linux) are considered as
non-hideable and consequently these partitions remains unchanged in the boot process.
User Manual Boot-US 4.2.0
4 Menu commands (GUI) 51

4.4.7 Boot manager / Install / Installation target (page 5 of 6)
On the fifth page of the installation wizard (menu command Boot manager / Install...) you can select the installation
target of the boot manager. The available targets depend on the boot variant.
Booting by UEFI:
• ESP and NVRAM:
This installs the boot manager Boot-US on the selected EFI System partition of the boot disk 1 and additionally
creates a boot option in the NVRAM. Upon the next start of the machine the UEFI firmware then starts this boot
option just created. The selection of the target ESP partition is possible with Boot-US 4.2.0 (and higher). If you create
a separate ESP partition beforehand, you can install the boot manager Boot-US in this ESP partition.
• Create file:
The boot manager Boot-US will be exported to the file bmgrus.efi. Afterwards this file can be copied, for example,
to an USB stick for the UEFI Fallback boot mode. When a backgound image has been selected, then this image must
be copied to the same directory. When the UEFI firmware is directed to boot from the respective USB stick the efi file
containing the boot manager Boot-US will be started.
Booting by BIOS:
• Primary partition on boot disk 1:
When the boot manager is installed on the primary partition an additional separate partition is created and the boot
manager is installed on this partition. This partition can be used only by the boot manager. It does not contain a file
system. This partition for the boot manager is created automatcially if it does not exist, otherwise an existing boot
manager partition is reused. This install option is available only if the required primaray partition can be created, i.e. a
free entry in the partition table and free space on the boot disk 1 is required. If one of these conditions is not met this
option cannot be selected. This kind of installation has the big advantage that the boot manager partition is protected
against overwriting by third-party programs. This is not the case if the boot manager is installed in the MBR.
Option permanent active:
You also need to decide if the partition for the boot manager should be permanent active or not.
In the first case the MBR remains unchanged except that an additional entry in the partition table is created and this
partition is marked as active. The code in the standard MBR searches for the active partition and starts this partition.
In this case it is our boot manager partition. which is active the whole time. The advantage of this type of installation
is that the MBR remains unchanged. The boot manager can be disabled by any partition manager simply by
deactivating the boot manager partition. This type of installation is not suitable for Windows 7 - 10.
In the second case the MBR has to be changed to start the inactive boot manager partition. The boot manager
partition remains permanently inactive. This case must be used for Windows 7 - 10. As already mentioned the code in
the MBR has to be modified. The advantage of this type of installation is that the booted partition can be set active.
Especially for Windows 7 (and higher) this is important since hibernation only works correctly if the Windows 7
partition is marked as active. Also the Windows 10 update works only if the Windows 10 partition is the active
partition. To remove the boot manager a standard MBR has be restored. The uninstallation of the boot manager is
therefore more elaborate than in the first case.
Remark: This option is automatically deactivated when no free primary partition is available for the boot manager (see
above).
• MBR on boot disk 1:
When the install target is set to MBR the boot manager will be written in the beginning of the track 0 of the first boot
disk. This also changes the boot loader code in the MBR but leaves the partition table unchanged. Thus the boot
manager will not disturb the system. The former MBR is copied completely to the second sector of the hard disk.
The advantage of this type of installation is that no entry in the partition table is consumed by the boot manager. It is
always possible to install the boot manager to the MBR.
User Manual Boot-US 4.2.0
52 4 Menu commands (GUI)

The disadvantage is that the boot loader of the MBR is changed. It may happen that some programs or operating
systems consider the MBR as corrupt and try to "repair" it. However repairing the MBR removes the boot manager.
The installation in the MBR represents a greater modification of the system than an installation in a separate primary
partition. Additionally the main part of the boot maanger is not protected against overwriting by third-party programs.
• Installation to diskette:
Installation to diskette allows a testing of the boot manager without any risk.
The advantage of this type of installation is that no data are changed on the hard disk. However, if automatic hiding
of partitions is active then partitions will be hidden during the boot process. This means data in the partition table of
the MBR need to be changed during the next boot process even if the boot manager resides on diskette. The
disadvantage is that booting from this diskette is slow and inconvenient. Additionally the boot sequence has to be
changed to something like "A: C:".
• Create image file for CD installation:
This option will create an image file with the name "bmgrus.iso" or "bmgrus.img" in the installation directory of
Boot-US. By default the image is created as a cd iso file. Burning this iso file to a cd automatically results in a
bootable cd containing the configured boot manager. This should be easily possible with any cd writer program. If
you decide to not create a cd iso image then the image file contains all sectors of a 1.44 MiB diskette with installed
boot manager Boot-US. Again this image file can be used to create a bootable cd containing the boot manager
Boot-US using appropriate cd burning tools, just a little more effort is required.
Recommendation:
For a first test the boot manager should be installed to diskette or cd. If booting from this diskette or cd works
without problems one can think to install the boot manager to hard disk. Here one should prefer an installation to a
non-active primary partition, since this type of installation could cause the least problems -- if at all. When this
partition is needed at some future time the boot manager can be easily "moved" to the MBR. All you need to do is run
through the installation wizard and change the install target to MBR. All other data are already preset according to the
installed boot manager.
User Manual Boot-US 4.2.0
4 Menu commands (GUI) 53

4.4.8 Boot manager / Install / Installation (page 6 of 6)
On the last page of the installation wizard (menu command Boot manager / Install...) a summary of all selected boot
manager settigns are displayed.
When you press the Install button on this last page, the boot manager is installed with these settings. In case of an
installation to hard disk the installation will start immediately. However when booting by BIOS and the installation
target is the diskette, a request to insert the diskette in drive A: will appear before the installation starts.
User Manual Boot-US 4.2.0
54 4 Menu commands (GUI)

4.5 Boot manager / Remove...
The menu command Boot manager / Remove... is only enabled when the boot manager is installed on the boot disk
1. When you click on this menu command a dialog is opened which allows removal of the boot manager from the hard
disk. The boot manager is only removed after clicking the Remove button.
Boot by UEFI:
The boot option with the boot manager Boot-US existing in the NVRAM will be removed. Furthermore the
corresponding boot option is removed from the BootOrder variable. All hidden partitions are made visible on all disks.
Boot by BIOS:
When the boot manager has been installed on the MBR the former boot loader code is re-written to the MBR during
the removal process. This former boot loader code is read from the saved MBR, if present. Otherwise a functional
standard boot loader is written to the MBR.
When the boot manager is installed on a primary partition this partition is deleted from the partition table on the first
boot disk.
In both cases all hidden partitions are made visible on all disks. Additionally the partition which was active before the
boot manager had been installed is made activate again. This information is also obtained from the saved MBR, if
present. If necessary the first partition is activated. When more than one partition is active all but the first are
deactivated. This guarantees that after the boot manager has been removed only one partition on the first hard disk is
marked active.
After the boot manager is removed and the PC is restarted this active partition is booted.
User Manual Boot-US 4.2.0
4 Menu commands (GUI) 55

4.6 Boot manager / Show info...
The menu command Boot manager / Show info... determines the data of an installed boot manager and displays
them. Only a boot manager installed to the boot disk 1 will be checked, a boot manager installed to another disk or
diskette is ignored.
User Manual Boot-US 4.2.0
56 4 Menu commands (GUI)

4.7 Partitions / Details...
The menu command Partitions / Details... opens a dialog which shows a list of all partitions on all hard disks. All
details like partition ID, partition type, beginning and end of partition, etc. are shown (see following table). The
displayed data can be saved in a report (see below).
--------------------------------------------------------------------------
# - partition number
Name - selectable name of partition (max. 12 char.)
Label - drive letter and volume name
Partition type - partition type (FAT16, FAT32, ...)
ID - ID of the partition (hex number)
file system - file system of partition
hidden - is the partition hidden ?
active - is the partition marked as active ?
Style - style of partition (MBR/primary, MBR/extended, MBR/logical, GPT)
bootable - is the partition bootable ?
Size - size of partition
Offset - begin of partition on disk
Start LBA - beginning of partition in LBA format
Num. Sec. - number of sectors in partition
--------------------------------------------------------------------------
This dialog also allows the user to change the following four entries:
Partition name (max. 12 char.)•
Partitions can be activated or deactivated•
Partitions can be (simple/true) hid or made visible•
Accessible partition on an USB stick•
These editable entries are displayed in another color.
All modifications will be stored until the dialog is closed by the OK button. Only then are the modfications written to
disk.
Report...
Starting with version 2.1.0 the displayed partition data can be saved to a text file. After clicking on the report button
you will be prompted to select the target file for storing the report. The format of the report is identical to the output of
the report of the command-line version.
Comment:
To change a value please double click the corresponding entry or right click it to open the context menu (fig. 14) or
press the space or F2 key.
User Manual Boot-US 4.2.0
4 Menu commands (GUI) 57

Fig. 14: Partition details with context menu
Comment:
When a partition is true hid both the partition ID and the partition's boot sector are modified.
Attention:
When a partition is activated/deactivated or made hidden/visible then the corresponding entries in the partition table
on the respective hard disk are changed. The result of these modifications become evident only at the next boot
process. Only experienced people should perform these modifications, since the system might become unbootable if
the entries are incorrectly changed.
Comment:
Starting with version 3.8.4 the context menu contains a command for removing a drive letter from a partition (fig. 14).
This command is activated only for partitions which have a drive letter and are true hidden or lie on a removable drive
(e.g. USB stick).
Comment:
The column "bootable" is shown only when booting by BIOS. This column indicates whether the boot sector of the
partition is formally valid. When booting by UEFI the boot sector is not used at all, hence this column is redundant in
this case.
User Manual Boot-US 4.2.0
58 4 Menu commands (GUI)

4.8 Partitions / Create...
The menu command Partitions / Create... opens a wizard which guides you through all steps in creating a new
partition. The wizard consists of the following pages:
Page 1: Select free space Select the free space where the partition is to be created
Page 2: Partition style Specify the style of the new partition
Page 3: Partition size Specify the size of the new partition
Page 4: File system Specify the file system for the new partition
Page 5: Create partition Show parameters of new partition and create it
4.8.1 Partitions / Create / Select free space (Page 1 of 5)
On the first page of the wizard for creating partitions (menu command Partitions / Create...) you can select the free
space where you want to create the partition.
You can also decide how the new partition should be aligned. For SSD drives the alignment of the new partition
should be set to 1 MiB boundaries.
Please note that a logical partition can be created only within an extended partition. If you want to create a logical
partition and no extended partition exists yet, you must first create the extended partition.
4.8.2 Partitions / Create / Partition style (Page 2 of 5)
On the second page of the wizard for creating partitions (menu command Partitions / Create...) you can select the
partition style .
In many cases the partition type is already determined by the position of the new partition. For example, a new
partition within an extended partition is always a logical partition. When an extended partition is already present on
the corresponding disk you cannot create another extended partition on it.
Please note that Boot-US does not support mixing of partition styles on one disk. Boot-US allows you only to create
partitions of the same style (MBR or GPT) on one disk.
MBR partition (primary/extended/logical partition):
The position of a MBR partition is specified by a 32 bit sector number. Hence MBR partitions always lie below 2 TiB.
The MBR table has space for four entries. This can be up to four primary partitions or up to three primary partitions
and one extended partition. Within an extended partition up to 24 logical partitions can be created.
GPT partition:
The position of a GPT partition is specified by a 64 bit sector number. Hence GPT partitions can be created without
problems on disks larger than 2 TiB. The GPT table has space for up to 128 GPT partitions per disk.
FDD style partition:
A partition of FDD style does not have a partition table specifying its position. Such a partition starts with the first
sector and extends over all sectors of the drive. A FDD style partition can be created only on a removable drive (e.g.
usb stick).
User Manual Boot-US 4.2.0
4 Menu commands (GUI) 59

4.8.3 Partitions / Create / Size of partition (Page 3 of 5)
On the third page of the wizard for creating partitions (menu command Partitions / Create...) you can specify the
partition size. The new partition can occupy the whole free space or you can leave some free space before and/or after
the new partition.
You can enter the desired size either directly in the edit controls or by using the range control. The cursor keys allow
changes to the size in small steps.
4.8.4 Partitions / Create / File system (Page 4 of 5)
On the fourth page of the wizard for creating partitions (menu command Partitions / Create...) you can select the file
system and the partition type of the new partition.
The main file systems and partition types are selectable from dropdown lists. For MBR partitions there is a tight
coupling between file system and partition type. For GPT partitions the coupling is not so tight.
Additionally it is possible to format FAT12/FAT16/FAT32 partitions. In this case an empty FAT is always written.
However you can choose whether the remaining sectors of the new partition are to be overwritten or not. When you
select the quick format then only an empty FAT will be created, but the other sectors of the new partition will remain
unchanged. When you do not select the quick formating then all sectors of the new partition will be changed. In this
case an empty FAT will be created and all other sectors of the new partition will be overwitten with a fixed pattern.
4.8.5 Partitions / Create / Create partition (Page 5 of 5)
On the last page of the wizard for creating partitions (menu command Partitions / Create...) the parameters of the
partition to be created are shown.
When you press the Create button and the new partition is to be formatted, then a confirmation of this operation will
be requested. During formatting the sectors of the new partition will be changed irrecoverably. Only when no
formatting is to be carried out the new partition will be created without requesting further confirmation. And only
in this case the previous state can be recovered by restoring the partition table.
When the partition is formatted a progress dialog is shown. The first step is to create an empty FAT. This task is
finished within a few seconds. When the partition is to be completely formatted the second step is to overwrite all
remaining sectors by zeros. This last step can be aborted at any time since the empty FAT has been created already.
User Manual Boot-US 4.2.0
60 4 Menu commands (GUI)

4.9 Partitions / Delete...
The menu command Partitions / Delete... opens a wizard for deleting partitions. Only single partitions can be selected
and deleted. The wizard consists of the following pages:
Page 1: Select partition Select the partition to be deleted
Page 2: Delete method Select the method for deleting the partition
Page 3: Delete partition Show selected partition and delete it
4.9.1 Partitions / Delete / Select partition (Page 1 of 3)
On the first page of the wizard for deleting partitions (menu command Partitions / Delete...) you can select the
partition to be deleted.
Only a single partition can be selected. To delete an extended partition you need to delete first all logical partitions in
the corresponding extended partition, and then the extended partition.
4.9.2 Partitions / Delete / Method for deleting (Page 2 of 3)
On the second page of the wizard for deleting partitions (menu command Partitions / Delete...) you can specify the
method for deleting the partition.
Quick delete:
In this case the partition is deleted only in the partition table. No sector within the partition is changed. As long as no
other partition is created on the deleted disk space the deleted partition can be restored completely just by restoring the
entry in the partition table.
Complete delete (overwrite with zeros):
In this case the partition is deleted in the partition table and additionally all sectors of the partition are overwritten
with zeros. When the partition has been deleted by this method the data within the partition are lost. By restoring the
deleted entry in the partition table the deleted partition re-appears in the old size, but all sectors of the partition still
contain only zeros and not the previous data.
Complete delete (overwrite with random numbers):
In this case the partition is deleted in the partition table and additionally all sectors of the partition are overwritten
with random numbers. When the partition has been deleted by this method the data within the partition are lost. By
restoring the deleted entry in the partition table the deleted partition re-appears in the old size, but all sectors of the
partition still contain only random numbers and not the previous data.
4.9.3 Partitions / Delete / Delete partition (Page 3 of 3)
On the last page of the wizard for deleting partitions (menu command Partitions / Delete...) you can finally delete the
selected partition.
When you press the Delete button a confirmation of this operation will be requested. When you have selected a
complete delete of the partition all sectors of the partition to be deleted will be unrecoverable. When you have
selected the quick delete method the partition will be deleted only from the partition table. Only in this case the
previous state can be recovered by restoring the partition table.
When you have selected the complete delete method a progress dialog is shown while the sectors of the partition are
overwritten. The overwriting can be aborted at any time since the partition has already been deleted from the partition
table in the first step. When you abort the overwriting the partition is nevertheless deleted, but of course only the
User Manual Boot-US 4.2.0
4 Menu commands (GUI) 61

corresponding part of the partition has been overwritten.
User Manual Boot-US 4.2.0
62 4 Menu commands (GUI)

4.10 Partitions / Copy...
The menu command Partitions / Copy... allows you to copy existing disks or partitions. You can either copy
disks/partitions directly or alternatively, save a disk/partition to a file and later restore a disk/partition from this file. A
wizard is opened to guide you through the task of copying the disk or partition. Depending on the selected action only
certain pages are displayed while others are skipped. The following list presents an overview over all pages of the
wizard.
Select action Select the desired action
Source disk/partition Select source disk or partition
Source file Select source file
Target disk/partition Select target disk or partition
Target file Select target file
Options Select options
Summary Show summary and start selected action
Comment:
True hidden partitions or partitions without drive letter can be selected as source or target without problems, since
Windows does not perform any read or write operations on these partitions. Boot-US recognizes the file system of true
hidden partitions, hence unoccupied sectors can be skipped.
The C: partition cannot be selected since it contains open files, whose contents can change at any time.
Other partition with drive letters can be selected. Boot-US tries to lock these partition during a backup or restore
operation, but the operation is carried out also when locking is not possible.
4.10.1 Partitions / Copy / Select action (page 1)
On the first page of the wizard for copying partitions (menu command Partitions / Copy...) you can select the type of
copy operation.
Copy disk or partition directly:
This allows you to copy a source disk or partition to a target disk or partition. When copying a disk all partitions of the
source disk are copied to the target disk. The target disk will be overwritten completely. When copying a single
partition then the target partition can be either free space on the disk or an existing partition. In the latter case the
target partition will be overwritten with the data from the source partition. On the following pages you can selected
the source disk or partition and the target disk or partition.
Save disk or partition to file:
This save the source disk or partition to the specified file. On the following pages you can selected the source disk or
partition and the target file.
Restore disk or partition from file:
This restores the target disk or partition from the data of the previously saved file. On the following pages you can
selected the source file and the target disk or partition.
The target partition can be either free space on a disk or an existing partition. In the latter case the target partition will
be overwritten with the data from the source file.
User Manual Boot-US 4.2.0
4 Menu commands (GUI) 63

4.10.2 Partitions / Copy / Select source disk or partition (page 2)
On the second page of the wizard for copying partitions (menu command Partitions / Copy...) you can select the
source.
When directly copying or saving data the source consists of a disk or partition. The page shows all existing disks and
partitions. You can select either a single disk or a single partition to copy.
Selection restrictions:
All partitions, which are not used by the current Windows system, can be selected. Typically this includes true hidden
partitions and partitions without a drive letter. The C: partition is selectable when booting a Windows PE system.
4.10.3 Partitions / Copy / Select source file (page 2)
On the second page of the wizard for copying partitions (menu command Partitions / Copy...) you can select the
source.
When restoring data the source consists of a file containing the saved data of a disk or partition. After selecting the
source file the data of the saved disk or partitions will be displayed.
4.10.4 Partitions / Copy / Select target disk or partition (page 3)
On the third page of the wizard for copying partitions (menu command Partitions / Copy...) you can select the target.
When directly copying or restoring data the target consists of a disk or a partition. The page shows all existing disks
and partitions. Depending on the source you can select either a single disk or a single partition as target.
Selection restrictions:
The target must be different from the source. When directly copying data this means that the target disk or partition
must be different from the source disk or partition, When restoring data this means the disk or partition where the
source file resides cannot be the target disk or partition. Furthermore the size of the target must be larger or equal to
the source size.
Furthermore the C: partition cannot be selected as target, because this would overwrite the Windows installation
during operation.
4.10.5 Partitions / Copy / Select target file (page 3)
On the third page of the wizard for copying partitions (menu command Partitions / Copy...) you can select the target.
When saving data the target consists of a file to store the disk or partition data.
Selection restrictions:
The target file must reside on another disk or partition than the source disk or source partition.
VHD/VHDX format:
Starting with version 4.1.7, you can select a VHD/VHDX file as the target file. This format allows you to open the file
after the backup with standard programs. This allows you to easily check that all important files are included in the
backup.
4.10.6 Partitions / Copy / Options (page 4)
On the fourth page of the wizard for copying partitions (menu command Partitions / Copy...) you can select certain
User Manual Boot-US 4.2.0
64 4 Menu commands (GUI)

options controlling the copy operation.
Copy only occupied sectors:
When this option is enabled then the program first determines which sectors are occupied, and afterwards only these
sectors will be copied. This option is only available for the following file systems: FAT16, FAT32, exFAT, NTFS,
Ext2, Ext3, Ext4. Enabling this option is especially advantageous the less occupied a partition is. For example if a
partition is occupied by one half only then this option almost doubles the effective throughput.
Save data compressed:
This option reduces the size of the target file typically by a factor 2. As a side effect the write speed to the target file is
increased. On the other hand the cpu load will also be increased. However modern processors usually have enough
power so that effectively this option increases the throughput. The reduction of the amount of data is especially
advantageous when the target file resides on a relatively slow medium.
Verify only:
This option exists mainly for testing purposes. When this option is enabled then no data on the target disk or target
partition will be changed. The program only compares the data to write with the data existing on the target disk or
target partition.
4.10.7 Partitions / Copy / Show selected action (page 5)
On the last page of the wizard for copying partitions (menu command Partitions / Copy...) a summary of the selected
action is shown.
The selected action will be started as soon as you click on the Copy button.
User Manual Boot-US 4.2.0
4 Menu commands (GUI) 65

4.11 Partitions / Save sectors...
The menu command Partitions / Save sectors... allows you to save all sectors which are modified during the
operation of the configuration program Boot-US or the boot manager of Boot-US. A wizard is opened to guide you
through the task of saving the sectors. Depending on the selected action only certain pages are displayed while others
are skipped. The following list presents an overview over all pages of the wizard.
Select action Select the desired action
Partition and boot sectors Save all partition and boot sectors
Track 0 Save the track 0
4.11.1 Partitions / Save sectors / Select action (page 1)
On the first page of the wizard for saving sectors (menu command Partitions / Save sectors...) you can select the type
of save operation.
Save partition and boot sectors:
This allows you to save all partition and boot sector from all disks to a single file. Additionally the whole track 0 of all
disks is saved.
Save track 0 of boot disk 1:
This allows you to save only track 0 of the first boot disk. Other sectors will not be saved.
4.11.2 Partitions / Save sectors / Save partition and boot sectors (page 2 of 2)
On this page of the wizard for saving sectors (menu command Partitions / Save sectors...) you can save all partition
and boot sectors from all disks to a single file. Additionally the complete track 0 of all disks is saved. This file
contains both the raw sector data and also the disk position of each saved sector. Due to the additional data you need
Boot-US to restore the sectors from this file.
Target file:
Here you can specify the file into which the partition and boot sectors will be saved.
Description (max. 80 char.):
Here you can specify a description with max. 80 characters. When restoring the sectors this description is displayed.
Comment: When the boot manager is installed the MBR and perhaps other sectors of the track 0 are modified. When
partitions are true hid the boot sector of the respective partition is changed. All sectors which could be changed by the
configuration program Boot-US or the boot manager of Boot-US are saved on this page.
When the boot manager is installed the original MBR is saved in the second sector of the track 0. In general the boot
manager can reliably be removed by the menu command Boot manager / Remove... without affecting the remaining
system.
In principle saving the partition and boot sectors to a file is therefore not necessary to remove the boot manager later.
It is "only" a precautionary measure which should be taken before the boot manager is installed to the first boot disk.
Recommendation:
You should save a copy of the file with the partiton and boot sectors to an external drive (e.g. usb stick). If the file
resides on disk it might not be accessible in case of problems.
User Manual Boot-US 4.2.0
66 4 Menu commands (GUI)

4.11.3 Partitions / Save sectors / Save track 0 (page 2 of 2)
On this page of the wizard for saving sectors (menu command Partitions / Save sectors...) you can save all sectors of
the track 0 of the first boot disk to a file. This file then contains the raw sector data without any modifications. This
file could be restored to the track 0 by Boot-US. In case of problems, track 0 could be restored from this file with a
standard disk editor or with the DOS command line tool bootusc.exe.
Target file:
Here you can specify the file into which track 0 is to be saved.
Recommendation:
You should save a copy of the file with the saved track 0 to an external drive (e.g. usb stick). If the file resides on
disk it might not be accessible in case of problems.
User Manual Boot-US 4.2.0
4 Menu commands (GUI) 67

4.12 Partitions / Restore sectors...
The menu command Partitions / Restore sectors... allows you to restore the previously saved sectors. A wizard is
opened which guides you through the task of restoring the sectors. Depending on the selected action only certain
pages are displayed whiles others are skipped. The following list presents an overview over all pages of the wizard.
Select action Select the desired action
Partition and boot sectors Restore partition and boot sectors
Track 0 Restore the track 0
4.12.1 Partitions / Restore sectors / Select action (page 1)
On the first page of the wizard for restoring sectors (menu command Partitions / Restore sectors...) you can select
the type of restore operation.
Restore partition and boot sectors:
This allows you to restore all partition and boot sector of all disks from the specified file. Additionally the whole track
0 of all disks can be restored.
Restore track 0 of boot disk 1:
This allows you to restore track 0 of the first boot disk only. Other sectors will not be restored.
4.12.2 Partitions / Restore sectors / Restore partition and boot sectors (page 2 of 2)
On this page of the wizard for restoring sectors (menu command Partitions / Restore sectors...) you can restore all
partition and boot sectors from all disks from the selected file. Additionally the complete track 0 of all disks can be
restored. The original state of the sectors will be restored. All modifications done after the partition and boot sectors
were saved will be reversed.
File:
Here you can specify the file from where the partition and boot sectors are to be restored.
When the specified file is opened the internal format of the file is checked. When the format is correct, the description
and the list of saved sectors is displayed. If the file format is not correct, the display is empty and restoration is not
possible.
If a correct file format is recognized the saved sectors are compared with current sector content on the disks. The
modified sectors are marked. Initially only the modified sectors are selected for restoration. You can extend this
selection or remove sectors from the selection. The total number of selected sectors is dispayed.
When you click on Restore the selected sectors will be restored from the specified file.
4.12.3 Partitions / Restore sectors / Restore track 0 (page 2 of 2)
On this page of the wizard for restoring sectors (menu command Partitions / Restore sectors...) you can restore all
sectors of track 0 of the first boot disk from the specified file. This file contain the raw sector data without any
modifications. When you restore track 0 the complete partition table is also restored. The sector data are completely
copied from the specified file to track 0 of the first boot disk. This restores the original state of track 0. All
modifications done after track 0 has been saved will be recovered.
Before the file is written to track 0 it is verified that the file size agrees with the size of track 0. The contents of the file
is essentially not checked. It only verifies that the partition sector signature is present in the first sector of the file.
User Manual Boot-US 4.2.0
68 4 Menu commands (GUI)

File:
Here you can specify the file containing the sectors of track 0.
User Manual Boot-US 4.2.0
4 Menu commands (GUI) 69

4.13 Configuration / Basic settings...
The menu command Configuration / Basic settings... allows to set the standard options. This comprises all options
which the user modifies during normal operation. All options are stored in the INI file bootus.ini in the installation
directory of Boot-US. The only exception is the password protection which offers additional storage locations. The
INI file is read on every start and each time the options are changed.
The following options can be set:
Language Select language
Password Password protection for configuration program
Boot disk Specify order of boot disks
4.13.1 Configuration / Basic settings / Language
On this page you can select which language should be used inside Boot-US and the boot manager.
Program
The complete program package — Windows GUI, command-line version, web site, manual and online help — is
available in the following languages:
german•
english•
Boot manager
Independent of the language of the program the boot manager can be installed in the following languages:
german•
english•
spanish•
french•
dutch•
polish•
After the language of the boot manager is changed a re-installation of the boot manager is necessary.
4.13.2 Configuration / Basic settings / Password
On this page the password for the configuration program Boot-US can be specified. When a password is set the
configuration program Boot-US can be started only after entering the correct password.
Password for Boot-US and Confirmation
These two fields allow you to enter the password and the password confimation.
To specify a password you must enter the password twice. The new password is only accepted when both entries
match. Please press the RETURN or TAB key after each password has been specified. You can abort the password
entry by the ESC key.
The maximum length of a password is 20 characters. Valid characters are almost all printable characters of the 7 bit
ASCII character set. To avoid potential problems with the english keyboard driver in the boot manager you should use
only the numbers '0'-'9' and letters 'a'-'x' (upper and lower case). These characters occupy the same position on
an english and german keyboard. When using special characters like '!', '#', '-', '_', ... on a non-english
User Manual Boot-US 4.2.0
70 4 Menu commands (GUI)

keyboard the boot manager maps the pressed key to the corresponding special character.
Store password in boot manager
You can select where the password should be stored. The safest possibility is to store the password within the boot
manager. This practically prevents any manipulation of the password. Only by deinstalling the boot manager or by
changing the password by the configuration program can the password be modified or removed. This way of storing
the password is only possible when you have purchased a license for Boot-US and when the boot manager of version
1.3 (or higher) is already installed.
Store passwort in registry
In this case the password is stored encoded in the registry under the key
HKEY_LOCAL_MACHINE\Software\ustraub\Boot-US
Please note that this key is user independent. This means a second installation of Boot-US under another user will
access the same key and thus the second installation is also password protected. This way of storing the password does
not require a license or a boot manager which is already installed. However the password protection can be easily
removed by deleting the registry key.
Store passwort in INI file
Here the password is stored encrypted in the INI file in the installation directory. This way of storing the password
offers the least security and can be overcome easily, e.g. by deleting the password in the INI file, or by deleting the
whole INI file, or by re-installing Boot-US into another directory.
Priority of storage locations
When the configuration program is started it searches for a password in the following order:
Boot manager (highest priority)•
Registry•
INI file (lowest priority)•
As soon as a non-empty password is found this password is used. It is only when no password has been found in any
location that the configuration program starts without password protection.
Overcome the password protection
It is clear that the password can be changed or removed by the configuration program. In case you have forgotten the
password and can not start the configuration program, you can overcome the password protection by the following
measure:
Manually deinstall the boot manager•
Delete the password entry in the registry•
Delete the password entry in the INI file•
Comment:
Please do not mix up the password for the configuration program with the administrator password for the boot
manager. Both passwords are completely independent. The administrator password of the boot manager is used only
inside the boot manager. The password for the configuration program is is used only to protect the start of the
configuration program.
4.13.3 Configuration / Basic settings / Boot disk
On this page the order of the hard disks upon booting is specified. This order could be different from the apparent
disk order under Windows, especially when both SSD and SATA disks are present. The relative order of SSD and
SATA disks is determined by the BIOS. However, under Windows the disks usually appear in a fixed order.
User Manual Boot-US 4.2.0
4 Menu commands (GUI) 71

Please note that it is not possible to change the physical order of the disks in this dialog. The order of the hard disks
can be modified only in the BIOS or by replugging the disk connectors.
Simple boot disk configuration selected:
When selecting this option you only need to specify the boot disk 1, i.e. from which disk the pc is started. On this disk
the boot manager will be installed. It is not required to specify the order of the higher boot disks 2, 3, etc. When
installing the boot manager all entries are additionally marked with the corresponding disk signature. Based on this
information the boot manager itself determines on which boot disk an entry resides.
This option is avlaible only when all disks have a different disk signature.
Simple boot disk configuration not selected:
In this case you need to assign the boot disk numbers to all disks. The boot manager will then use these boot disks
numbers directly for accessing the disks. The disk signature is not evaluated by the boot manager.
Comment:
In general the boot manager of Boot-US is installed on the disk specified as boot disk 1.
Comment:
Before you install the boot manager you can specify an order of the boot disks which is can be different than the
current order of the boot disks. The boot manager is then installed with these future boot disk numbers. Of course,
after the installation of the boot manager you must change the actual order of the boot disks to reflect the order used in
the installed boot manager.
User Manual Boot-US 4.2.0
72 4 Menu commands (GUI)
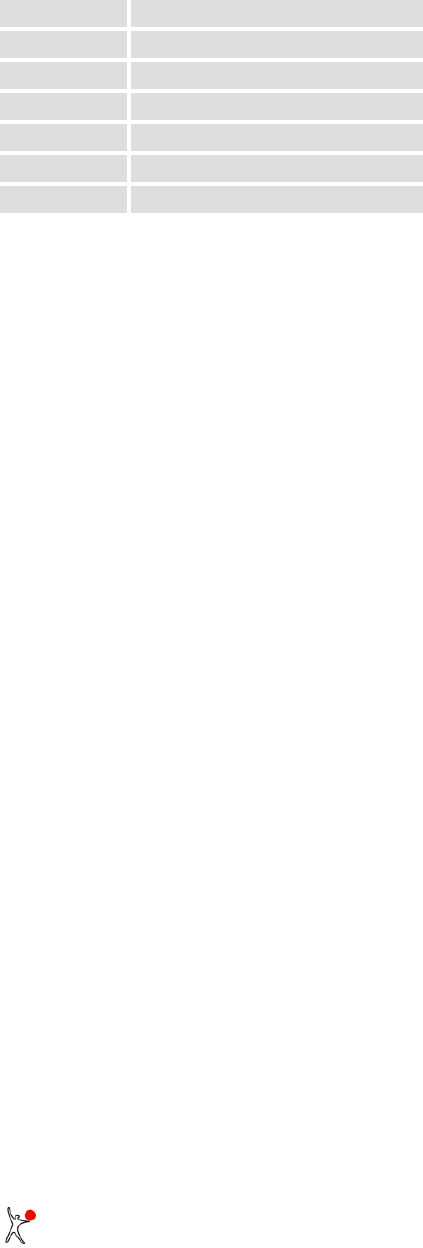
4.14 Configuration / Extended settings...
The menu command Configuration / Extended settings... allows setting of non-standard options. This comprises all
options which one never or seldom modifies during normal operations. All options are stored in the INI file
bootus.ini in the installation directory of Boot-US. The INI file is read on every start and each time the options are
changed.
The following options can be set:
Trace file Switch tracing on/off
Startup tip Enable/disable startup tip
Backup Set backup options
Warnings Enable/disable warnings
Units Select SI/IEC units
Alignment Alignment of partitions
Disk numbers Begin disk numbers with 0 or 1
4.14.1 Configuration / Extended settings / Trace
On this page tracing can be switched on or off. The trace file contains a protocol of the main function calls. For
example when Boot-US is started all partitions found with all details are written to the trace file. Please note, that
tracing should be activated only for error determination, since the program is slowed down noticeably by using
tracing.
4.14.2 Configuration / Extended settings / Startup tip
On this page the startup tip can be activated or deactivated.
4.14.3 Configuration / Extended settings / Backup
On this page the backup options can be specified. All partition and boot sectors on all disks are saved automatically
immediately before the following operations are performed::
Installing the boot manager•
Hiding/activating partitions•
Restoring sectors•
Backup directory:
Here you can specify the backup directory. This directory must exist already, it is not created here. All automatically
created backups are stored in the backup directory. The backup directory is also the initial target directory for manual
backups, however, the target directory can be changed.
Max. number of files:
The max. number of files specifies how many automatic backups should be stored (0-99). The default is 20, i.e. the
files 'auto01'...'auto20' will store the automatic backups. When the maximum number of files is reached the
oldest file is overwritten. When you specify 0 as max. number of files the automatic backup is disabled completely.
Already saved files will not be deleted by selecting 0 as max. number of files.
4.14.4 Configuration / Extended settings / Warnings
On this page potential warnings about partitions can be disabled or enabled. The partitions are not changed at all, only
the display of the warning message is suppressed.
User Manual Boot-US 4.2.0
4 Menu commands (GUI) 73

The following warnings are affected:
check of CHS values of partitions on MBR disks•
unconventional alignment of partitions•
multiple empty disk signatures•
check of backup GPT table on GPT disks (by customer request)•
4.14.5 Configuration / Extended settings / Units
Boot-US can display disk and partition sizes either in units of KB, MB, GB, TB or alternatively in units of KiB, MiB,
GiB, TiB.
The standard SI units KB, MB, GB and TB are powers of 1000, for example 1 GB = 1000
3
Byte = 10
9
Byte.
On the other hand the units KiB, MiB, GiB and TiB are specified as powers of 1024, for example 1 GiB = 1024
3
Byte
= 2
30
Byte = 1.073 GB. These units were standardized by IEC in 1999. Starting with Boot-US 3.0.1 these IEC units
are used by default.
4.14.6 Configuration / Extended settings / Alignment
On this page you can specify which convention for aligning the partition is expected by Boot-US.
Alignment on 1 MiB boundary:
This allows you to set the alignment on 1 MiB boundaries. If this option is not selected then the old alignment on
cylinder boundaries is used.
The actual alignment of already existing partitions remains unchanged by this choice. The selected alignment will be
used however when creating new partitions in Boot-US (GUI). If the display of warnings is activated then you can
easily verify whether partitions are aligned according to the new or old convention.
Techn. background:
Starting with Windows Vista and Windows 7 a new convention for aligning partitions was established, namely
aligning partitions on 1 MiB boundaries. Especially for SSD drives the new alignment allows faster access to sectors
within partitions. If partitions were aligned according to the old cylinder boundaries on SSD drives the sectors reside
on "odd" addresses and such positions cannot be accessed with the highest speed. For traditional magnetic drives
however the alignment of partitions should not have a large effect on the performance.
4.14.7 Configuration / Extended settings / Disk numbers
On this page you can select whether the displayed disk numbers should begin with the number 0 or 1.
For unknown reasons Windows displays disk numbers beginning with the number 0, and not with 1 as one would
rather expect. Starting with Boot-US 3.6.1 you can now have the same disk numbers displayed in Boot-US and
Windows.
Comment:
The boot disk numbers displayed by Boot-US begin with the number 1 as before.
User Manual Boot-US 4.2.0
74 4 Menu commands (GUI)

4.15 UEFI / Info...
The menu command UEFI / Info... opens a dialog showing all UEFI boot variables. Additionally the description of
individual boot options and their order can be changed. Also the value of BootNext can be set. This command is
available only when Windows was booted by UEFI.
BootOrder:
This variable contains the order of the UEFI boot options. The UEFI firmware first tries to start the first boot option. If
that fails the second boot option is tried. These trials continue until a working boot option is found.
BootCurrent:
This variable contains the currently started boot option.
BootNext:
This variable contains a one time boot option to be used for the next start. After the start of the specified boot option
the variable BootNext will be cleared meaning that the UEFI firmware will use again the boot order from the
BootOrder variable.
SecureBoot:
This variable contains the SecureBoot configuration: 0 = SecureBoot is disabled, 1 = SecureBoot is enabled.
Boot####:
These variables contain the individual boot options. The value #### consists of four hex digits starting with 0000.
Change variables:
You may change the description of the boot options, the order of the boot options and the value of BootNext.
Changing the order will automatically update the BootOrder variable. The changes will be saved only when you leave
the dialog by clicking on 'Store'.
User Manual Boot-US 4.2.0
4 Menu commands (GUI) 75

4.16 UEFI / Save variables...
The menu command UEFI / Save variables... opens a dialog for saving the most important UEFI boot variables. This
command is available only when Windows was booted by UEFI.
Target file:
Here you can specify the file into which the variables will be saved.
Description (max. 80 char.):
Here you can specify a description with max. 80 characters. When restoring the variables this description is displayed.
Affected variables:
Additionally the list of all variables is shown, which will be included in the backup.
User Manual Boot-US 4.2.0
76 4 Menu commands (GUI)

4.17 UEFI / Info...
The menu command UEFI / Restore variables... opens a dialog for restoring UEFI boot variables. This command is
available only when Windows was booted by UEFI.
File:
Here you can specify the file from where the UEFI variables are to be restored.
When the specified file is opened the internal format of the file is checked. When the format is correct, the description
and the list of saved variables is displayed. If the file format is not correct, the display is empty and restoration is not
possible.
If a correct file format is recognized the saved variables are compared with the current variables. The modified
variables are marked. Initially only the modified variables are selected for restoration. The total number of selected
variables is displayed.
When a boot option is modified you can choose between two actions:
Restore: the current content of the boot option will be replaced by the old value•
Add: the current boot option remains unchanged, the restored boot option is added under a new name•
The BootOrder variable is handled separately. When you select boot options for restauration the BootOrder variable is
set automatically. If you only want to restore the BootOrder variable then you must remove all boot options from the
selection.
When you click on Restore the selected variables will be restored.
User Manual Boot-US 4.2.0
4 Menu commands (GUI) 77

4.18 Window / Refresh
The menu command Window / Refresh rebuilds the complete partition list and refreshes the display. In general this is
done automatically when necessary. A manual refresh of the display is normally not required.
After a refresh of the display the information shown is the same as that immediately after a restart of Boot-US.
User Manual Boot-US 4.2.0
78 4 Menu commands (GUI)

4.19 Help / Contents...
The menu command Help / Contents... opens the online help.
Comment:
In any dialog you can obtain context-sensitive help by pressing the F1 key.
4.20 Help / License...
The menu command Help / License... opens the online help und shows the license agreement. Additionally this page
contains the disclaimer of warranty and the conditions for the redistribution of Boot-US.
4.21 Help / Registration...
The menu command Help / Registration... opens the online help and shows informations about ordering of licenses.
4.22 Help / About Boot-US...
The menu command Help / About Boot-US... shows the copyright, the version of Boot-US and the current license
type and licensee.
User Manual Boot-US 4.2.0
4 Menu commands (GUI) 79

User Manual Boot-US 4.2.0
80 4 Menu commands (GUI)

5 Command-line version
5.1 Overview
The command-line program (fig. 15) --- program name bootusc.exe --- is used to configure, install and remove the
boot manager Boot-US. Additionally the command-line program allows you to hide and activate partitions and it
allows you to save all partition and boot sectors. In short the command-line version of Boot-US supports essentially
the same set of operations as the GUI version.
Fig. 15: Configuration program Boot-US (command-line version)
The command-line program exists in three versions, a DOS version, a WIN32 and a WIN64 version. The DOS version
can be executed only under DOS (or in DOS mode), the WIN32 version can be executed in a command-line window
under any 32 bit or 64 bit Windows version, while the WIN64 version requires a 64 bit Windows system.
The language of the command-line program is fixed to either German or English. Contrary to the GUI version of
Boot-US the language of the command line program cannot be switched.
The Windows version is intended for companies with a large number of PCs. The installation and uninstallation of the
boot manager requires at least a 20-PC license. All other functions (except the report function) require at least a single
PC license. Only the report function may be used without a license.
The DOS version is intended for private usage. Furthermore the DOS version allows you to use the functions of the
package Boot-US even if Windows cannot be accessed. The DOS version is subject to the same license requirements
and restrictions as the GUI version of Boot-US. For example, the installation of the boot manager to diskette does not
require a license, while the installation to disk is available only in the licensed version.
Comment:
Creating and deleting a partition is currently only supported by the GUI version.
Comment:
It sometimes happens that users first look at the command-line version when they have their first contact with the
5 Command-line version 81

package Boot-US. In such a case it is recommended that you switch to the GUI version of the configuration program.
The functions offered by the package Boot-US are easily accessible in the GUI version. For a first contact with
Boot-US the GUI version is much more suitable than the command-line version.
User Manual Boot-US 4.2.0
82 5 Command-line version

5.2 Installation
The command-line program of Boot-US is distributed as a standard ZIP file. This ZIP file contains both the DOS and
the Windows version of the command-line program. The ZIP file can be un-zipped in any Windows shell (32 bit and
64 bit). After un-zipping you should have the following files in the unzip directory:
File name Comment
readme.txt help for command-line version
bootusc.ini example INI file for bootusc.exe
bmgrus.ini example setup data for boot manager
dos32\bootusc.exe the command-line program for DOS
win32\bootusc.exe the command-line program for WIN32
win32\disk32.dll direct disk access for Windows 95/98/ME (32-bit part)
win32\disk16.dll direct disk access for Windows 95/98/ME (16-bit part)
win64\bootusc.exe the command-line program for WIN64
The DOS and Windows version of bootusc.exe is contained in the subdirectory dos32 respectively win32 and
win64. The sample ini files for the DOS and Windows version are identical.
It is recommended that you install the DOS version of bootusc.exe to a bootable DOS diskette so that you can access
the program bootusc.exe in case of problems.
Since version 2.1.5 the DOS command-line version runs in protected mode. This is indicated by the term "DOS32".
This change means that the program can use the whole available memory. Thus the DOS version is no longer
restricted by the 640 KB barrier.
The DOS command-line version supports only booting by BIOS, it has no UEFI support.
User Manual Boot-US 4.2.0
5 Command-line version 83

5.3 INI file bootusc.ini for command-line program
The INI file for the command-line version bootusc.exe has the name bootusc.ini and must reside in the same
directory as the executable bootusc.exe. The package contains a sample INI file.
The INI file bootusc.ini uses the same key words and parameters as the INI file bootus.ini of the Boot-US (GUI).
You can rename the INI file of the Boot-US (GUI) and use it for the command-line version.
By default the command-line program does not require an INI file. The INI file is necessary only for specific tasks.
When an INI file for bootusc.exe is present it is read each time the command-line program is started.
The format of the INI file is identical to the Windows standard format of INI files, i.e. there are sections with
keywords. All section names are different and within a section all keywords are different. However the same keyword
may appear in different sections.
5.3.1 Trace
The trace function of the program bootusc.exe can be enabled in the INI file. The following example shows the
corresponding entries in the INI file:
[TRACE]
trace=1 # default: 0
tracefile=bootusc.trc # default: bootusc.trc
By default tracing is disabled.
In the example above the tracing is enabled. The trace is written to the default trace file bootusc.trc or the specified
trace file.
5.3.2 Backup
Starting with version 1.5.4 an automatic backup of partition and boot sectors can be enabled before the boot manager
is installed. This backup allows an easy restore of the previous contents of all partition and boot sectors.
The following example shows the corresponding entries in the INI file:
[BACKUP]
NumFiles=20 # Default: 0
Directory=C:\temp\backup # directory to store the backup files
LastFile=1 # do not manually edit the parameter 'LastFile'
# it is automatically incremented by bootusc.exe
By default the backup of partition and boot sectors is disabled. To enable the automatic backup the parameter
NumFiles must be set to a positive value, for example NumFiles=20. When the backup is enabled, the partition and
boot sectors from all disks are saved before the boot manager is installed. The backup file is created in the specified
directory. The file name is auto<nn>.sec, where <nn> is a number between 1 and NumFiles. The file number <nn> is
automatically incremented before each backup. It is reset to 1 when the maximum number NumFiles is exceeded. The
parameter LastFile=<nn> stores the number <nn> used in the last backup operation. The value of this parameter is
automatically incremented. The keyword LastFile should not be created or modified by the user.
User Manual Boot-US 4.2.0
84 5 Command-line version

5.3.3 Password for configuration program
Starting with version 1.5.4 the execution of the configuration program Boot-US (GUI and command-line) is protected
by a password. Both programs (GUI and command-line) are protected by the same password. When a password is
specified this password must be provided when starting the configuration program.
Typically this password would be stored within the boot manager. As long as the boot manager is installed the
password is then required to execute the configuration program (GUI and command-line). When the configuration
program is protected by a password, the default behaviour is to prompt the user to enter the password interactively.
However the command-line program allows to run most commands also in batch mode (non-interactively). In batch
mode the user should not be prompted. To achieve this behaviour when the password protection has been activated the
password can be specified in encrypted form in the INI file bootusc.ini. When the command-line program finds the
correct password in the INI file bootusc.ini the user is not prompted any more to enter the password. This feature
allows to write scripts which execute all commands without any user interaction.
The following example shows the corresponding entries in the INI file for specifying the password:
[PASSWORD]
Password=<xxx> # encrypted Boot-US password
# default: no password
The keyword Password specifies the password for the configuration program. It is necessary to specify this password
in encrypted form.
The encrypted password can be determined by the command bootusc encrypt_pw, see below.
5.3.4 Warnings
Starting with version 1.6.2 many integrity checks of the partitions are performed. As a result of these checks error and
warning messages could be created and displayed with the corresponding partition.
In general error messages indicate a severe problem. Error messages should not be ignored. Error messages canot be
suppressed.
On the other hand warning messages typically indicate "only" a violation of established standards. Usually these
warnings can be ignored. Typical examples of warning messages are the violation the convention that partitions
should start/end on cylinder boundaries or 1 MiB boundaries or non-standard CHS values in the partition table when
the partition exceeds the 8 GB limit.
The warnings can be suppressed by the following INI parameter:
[STARTUP]
ShowWarnings = 0 # default: 1
When ShowWarnings is set to 0 (null) no warnings are displayed.
5.3.5 Use IEC units
Boot-US can display disk and partition sizes either in units of KB, MB, GB, TB or alternatively in units of KiB, MiB,
GiB, TiB.
The standard SI units KB, MB, GB and TB are powers of 1000, for example 1 GB = 1000
3
Byte = 10
9
Byte.
User Manual Boot-US 4.2.0
5 Command-line version 85

On the other hand the units KiB, MiB, GiB and TiB are specified as powers of 1024, for example 1 GiB = 1024
3
Byte
= 2
30
Byte = 1.073 GB. These units were standardized by IEC in 1999. Starting with Boot-US 3.0.1 these IEC units
are used by default.
The IEC units are activated by the following INI parameter:
[STARTUP]
UseIECUnits = 1 # default: 1
5.3.6 Individual license texts in boot manager
The 100 pc license (or higher) allows you to change the license displayed in the boot manager. This is achieved by the
following setting:
[LICENSE]
Text1=my new license text1
Text2=my new license text2
Note:
You can add this section also to the INI file bootus.ini to use the changed license texts when installing the boot
manager by the Boot-US (GUI).
5.3.7 Boot disk numbers
The mapping between Windows disk numbers and boot disk numbers is configured by the following parameters:
[DISK_MAP_<nn>]
BootDisk = <ii> | ignore # defines the boot disk number
Model = <xxx> # identifies the disk (highest priority)
DiskSignature = <xxx> # identifies the disk (high priority)
SecPerTrack = <jj> # identifies the disk (medium priority)
NumHead = <kk> # identifies the disk (medium priority)
NumCyl = <ll> # identifies the disk (medium priority)
Disk = <mm> # identifies the disk (lowest priority)
For each mapping s separate section DISK_MAP_<nn> is required. It is allowed to not specifiy a mapping for certain
disks. In this case the gaps in the mapping are filled automatically.
The parameter BootDisk specifies the assigned boot disk number. The easiest and most reliable method to identify a
disk is to use the model including the serial number (parameter Model).
In many cases a disk could be uniquely identified also by the disk signature (parameter DiskSignature. If the disk
signature is empty you can use the three disk parameters SecPerTrack, NumHead and NumCyl for identifying a disk. In
this case all three parameter must be used.
The parameter Disk represents the Windows disk number. This parameter has the lowest priority for identifying a
certain disk. The reason is that this number changes dynamically when you attach or detach a usb disk/stick.
The assigment of the boot disk numbers is done in multiple runs. In each run only those disks are considered which
have not yet received a boot disk number. In the first run the boot disk number is assigend to the disks where a model
is specified. The next runs assigns the boot disk numbers based on the disk signature, then on the disk parameters and
finally based on the disk number. In the final run all potential gaps are filled automatically.
User Manual Boot-US 4.2.0
86 5 Command-line version

5.3.8 Language for boot manager
By default the boot manager is installed in the same language (german or english) as the configuration program. In
this case no special settings are required. If you want to use another language in the boot manager (german, english,
spanish, french, dutch, polish) you can achieve this by the following setting:
[LANGUAGE]
LangBmgr = de | en | es | fr | nl | pl # language in boot manager
5.3.9 Disk numbers
By default Boot-US shows disk numbers starting with the number 1, In other words, the first disk is shown as "disk
1". However, Windows uses disk numbers beginning with 0. You can now configure whether the disk numbers
displayed by Boot-US should begin with 0 (as in Windows) or 1 (as before).
[STARTUP]
DiskNumbersZeroBased = 1 # default: 0 (start with disk 1)
5.3.10 Simple boot disk configuration
When the simple boot disk configuration is active, then it is only necessary to specify the boot disk 1. Higher boot
disk number are not required any more. When not set the simple boot disk configuration is activated if possible.
[STARTUP]
SimpleBootdiskCfg = 1 # default: 1
User Manual Boot-US 4.2.0
5 Command-line version 87

5.4 Online help
The command-line program bootusc.exe contains a short online help for all supported commands. This help is
invoked by
bootusc help
You can get extended online help for a specific command <cmd> by
bootusc help <cmd>
When a command <cmd> has different variants <subcmd> you get the online help by using
bootusc help <cmd> <subcmd>
User Manual Boot-US 4.2.0
88 5 Command-line version

5.5 Operations on sector level
The following commands can be applied to single or groups of sectors:
Save track 0•
Save sector•
Save partition and boot sectors•
Restore track 0•
Restore sector•
Restore partition and boot sectors•
5.5.1 Save track 0
The command for saving the complete track 0 of boot disk 1 to a file is:
bootusc save track0 [file=<filename>]
Examples:
bootusc save track0
bootusc save track0 file=c:\temp\track0.bin
The default file name is track0.bin in the current directory. This file is used when no file name is specified.
Otherwise the track 0 is saved to the specified file <filename>.
Comment:
The above command is identical to the corresponding command of the GUI version. The created file containing the
track 0 can be restored to the boot disk 1 both by the command-line version and the GUI version of Boot-US.
5.5.2 Save sectors
The command for saving arbitrary sectors of a certain disk to a file is:
bootusc save sector {chs=c/h/s | lba=x} [num=n] [drive=d] file=<filename>
c/h/s = cylinder / head / sector number
x = LBA number
n = total number of sectors (1..127)
d = disk d (0|1..127) or diskette (A|B)
Examples:
bootusc save sector LBA=0 num=1 drive=A file=c:\temp\mbr.bin
bootusc save sector CHS=0/0/1 drive=2 file=c:\temp\mbr.bin
It is necessary to specify the sector(s) to be saved in the CHS or LBA format. Additionally the file name must be
specified where the sector data are to be stored.
By default the command for saving sectors refers only to a single sector on the first disk. If required the command can
be extended to multiple sectors by the option num. Additionally the option drive allows to access sectors on other
disks.
The file where the binary sector data are stored contains only the plain sector data. This file does not contain any
position information. In addition to using Boot-US to restore the file to disk any disk editor can be used as well.
User Manual Boot-US 4.2.0
5 Command-line version 89

5.5.3 Save partition and boot sectors
The command for saving all partition and boot sectors on all disks into a single file is:
bootusc save partsec file=<filename>
Example:
bootusc save partsec file=c:\temp\backup.sec
It is necessary to specify the file name where the sector data are to be stored. This target file contains the binary sector
data together with disk positition information for each data block. Due to the additional sector data only Boot-US can
be used for restoring the file to disk.
Comment:
The above command is identical to the corresponding command of the GUI version. The created file containing the
partition and boot sectors can be restored both by the command-line version and the GUI version of Boot-US.
5.5.4 Restore track 0
The following command restores the complete track 0 of the boot disk 1 from a file:
bootusc restore track0 [file=<filename>]
Examples:
bootusc restore track0
bootusc restore track0 file=c:\temp\track0.bin
The default file name is track0.bin in the current directory. This file is used when no file name is specified.
Otherwise track 0 is restored from the specified file <filename>.
Comment:
The above command is identical to the corresponding command of the GUI version. The file containing the track 0
can be restored to the boot disk 1 both by the command-line version and the GUI version of Boot-US.
5.5.5 Restore sectors
The command for restoring arbitrary sectors of a certain disk from a file is:
bootusc restore sector {chs=c/h/s | lba=x} [num=n] [drive=d] file=<filename>
c/h/s = cylinder / head / sector number
x = LBA number
n = total number of sectors (1..127)
d = disk d (0|1..127) or diskette (A|B)
Examples:
bootusc restore sector LBA=0 num=1 drive=A file=c:\temp\mbr.bin
bootusc restore sector CHS=0/0/1 drive=2 file=c:\temp\mbr.bin
It is necessary to specify the sector(s) to be restored in the CHS or LBA format. Additionally the file name must be
specified where the sector data are to be read from.
By default the command for restoring sectors refers only to a single sector on the first disk. If required the command
can be extended to multiple sectors by the option num. Additionally the option drive allows to access sectors on other
disks.
User Manual Boot-US 4.2.0
90 5 Command-line version

The file where the binary sector data are stored contains only the plain sector data. This file does not contain any
position information. Additionally to using Boot-US for restoring the file to disk any disk editor can be used as well.
5.5.6 Restore partition and boot sectors
The command for restoring all partition and boot sectors on all disks from a single file is:
bootusc restore partsec file=<filename>
Example:
bootusc restore partsec file=c:\temp\backup.sec
It is necessary to specify the file name where the sector data are to be read from. This file contains the binary sector
data together with disk positition information for each data block. Due to the additional sector data only Boot-US can
be used for restoring the file to disk.
Comment:
The above command is identical to the corresponding command of the GUI version. The file containing the partition
and boot sectors can be restored both by the command-line version and the GUI version of Boot-US.
User Manual Boot-US 4.2.0
5 Command-line version 91

5.6 Operations on partition level
The following commands can be applied to whole partitions:
Hide a partition•
Unhide partitions•
Activate a partition•
Deactivate partitions•
5.6.1 Hide partition
The command for hiding a partition is:
bootusc partition hide {label=<label> | partnr=n | lba=x}
[true] [drive=d] [batch]
d = disk d (0|1..127)
n = partition number (see report)
x = LBA number of partition (see report)
Examples:
bootusc partition hide drive=1 label=WIN_10 batch
bootusc partition hide drive=1 label="WIN 10"
bootusc partition hide partnr=4
bootusc partition hide true LBA=63
The specified partition on the disk d will be hidden. When true is specified the partition will be true hid. The partition
to be hidden must be identified either by the volume label <label>, the partition number or the LBA number x of the
partition begin. This information is displayed by the report function. When no drive is specified disk 1 is assumed.
When batch is specified no user intervention is necessary.
5.6.2 Unhide partitions
The command for unhiding partitions is:
bootusc partition unhide [drive=d] [batch]
d = disk d (0|1..127)
Examples:
bootusc partition unhide
bootusc partition unhide drive=2
The unhiding of partitions is carried out for all partitions on the first respectively on the specified disk d. This is the
only modification in the partition table of the MBR of the respective disk. The boot loader code in the MBR remains
unchanged completely. When no disk is specified the partitions on disk 1 are unhid. When batch is specified no user
intervention is necessary.
Starting with bootusc 1.5.0 true hidden partitions are also unhidden by this command. To unhide a true hidden
partition the boot sector of the respective partition must be reset to the previous state.
When you have activated the automatic hiding of C: partitions (or the individual hiding of partitions) during the
installation of the boot manager of Boot-US, on every boot process all primary (and logical) non-selected partitions
(or the specified partitions) will be hidden. This happens also when you have performed an installation of the boot
manager on a diskette. There are configurations where several partitions are involved in a successful boot process.
When one of these partitions is hidden, the boot process may fail. This boot problem can be easily solved by unhiding
User Manual Boot-US 4.2.0
92 5 Command-line version

all partitions.
5.6.3 Activate partition
The command for activating a partition is:
bootusc partition activate {label=<label> | partnr=n | lba=x}
[drive=d] [batch]
d = disk d (0|1..127)
n = partition number (see report)
x = LBA number of partition (see report)
Examples:
bootusc partition activate drive=1 label=WIN_10 batch
bootusc partition activate drive=1 label="WIN 10"
bootusc partition activate partnr=4
The specified primary partition on the disk d is activated. Only primary partitions can be activated. Partitions must be
activated individually, i.e. the respective partition must be specified either by the volume label <label>, the partition
number n or the LBA number x of the partition begin. All this information is displayed by the report function. When a
certain partition is activated all other primary partitions on the same disk are deactivated automatically. When no disk
is specified disk 1 is assumed. When batch is specified no user intervention is necessary.
5.6.4 Deactivate partitions
The command for deactivating all partition on a certain disk is:
bootusc partition deactivate [drive=d] [batch]
d = disk d (0|1..127)
Examples:
bootusc partition deactivate drive=1 batch
bootusc partition deactivate drive=2
This deactivates all partitions on the specified disk d. No partition remains active on this disk. When no disk is
specified disk 1 is assumed. When batch is specified no user intervention is necessary.
A configuration where no partition is active will cause problems when trying to boot without a boot manager, since
the MBR code expects to find exactly one active primary partition. If no active partition is found, the MBR code stops
the boot process and displays an error message.
This command was requested by a customer to avoid some problem with the assignment of drive letters. This
command might not be useful for other customers.
User Manual Boot-US 4.2.0
5 Command-line version 93

5.7 Operations for boot manager
The following commands are available for the administration of the boot manager:
Install boot manager•
Uninstall boot manager•
Show status about installed boot manager•
Update entry in boot manager•
Preselect other entry in boot manager•
Comment:
The commands listed above are compatible with the respective commands of the GUI version of the configuration
program. Updating the entries of an already installed boot manager is available only in the command-line version.
5.7.1 Install boot manager
The command for installing the boot manager is:
bootusc bootmanager install [file=<filename>] [batch]
Examples:
bootusc bootmanager install
bootusc bootmanager install file=c:\temp\bmgrus.ini batch
The configuration parameters of the boot manager are read from a separate configuration file specified by the
parameter file. The default configuration file is called bmgrus.ini residing in the same directory as the
command-line program bootusc.exe. When batch is specified no user intervention is necessary.
5.7.1.1 Contents of bmgrus.ini
The easiest way to create the configuration file bmgrus.ini is by the Boot-US (GUI). When you install the boot
manager the current boot manager configuration is saved in this file. You can use this file also for the command-line
version.
The configuration file bmgrus.ini contains a global section [GLOBAL], an optional section [GRAPHIC] and
separate sections [ENTRY_<nn>] (<nn> = 1...N) for every entry in the boot manager. Addionally a section
[COLORS] can be added.
General rules:
The sections must be specified in upper case. The keywords can be specified in any case. The symbol <nn> denotes an
integer, <xxx> denotes a string.
5.7.1.2 Keywords in section [GLOBAL]
Keyword Values Explanation
INSTALL_TARGET
PRIMARY |
PRIMARY_INACTIVE |
MBR |
DISKETTE |
IMAGE |
IMAGE_CDISO|
ESP_NVRAM|
FILE_UEFI
Install target of boot manager. Default is
PRIMARY_INACTIVE (BIOS mode) or
ESP_NVRAM (UEFI mode).
User Manual Boot-US 4.2.0
94 5 Command-line version

INSTALL_ESP_PARTNR <nn>
UEFI mode: partition number on the boot disk 1 of
the target ESP partition, on which the boot
manager is installed. 0 means the first available
ESP partition, 1...N means a specific partition.
STARTUP_DELAY <nn> Startup delay in sec. Default is 0 (sec).
AVAILABLE_TIME <nn> | UNLIMITED
Time available for selecting another partition.
Default is 30 (sec).
START_SIGNAL YES | NO
Signal when boot manager starts? Default is NO
(no start signal).
SELECT_LAST_BOOT YES | NO
Should a fixed partition or the last booted partition
be preselected? Default is NO (fixed partition is
preselected).
SELECTED_ENTRY <nn>
Defines which partition (1...N) is preselected.
Default is 1 (top partition is preselected).
INVISIBLE_START YES | NO
Invisible start of boot manager? Default is NO
(boot manager is visible).
INVISIBLE_HOTKEY <hotkey>
Hotkey for displaying invisible boot manager.
Mandatory if the boot manager is invisible.
Example: <ALT> + <B>
INVISIBLE_STARTTEXT <text>
Text (30 ch.) displayed while boot manager is
invisible. Default is "Booting".
INVISIBLE_PROGRESS YES | NO
Show progress while boot manager is invisible?
Default is YES (show progress).
SIMPLE_CFG_MENU YES | NO
Should only the simple commands in the
configuration menu be displayed? Default is NO
(show all commands). When YES is specified the
two commands "Unhide all partitions" and
"Uninstall boot manager" are not shown.
NUMLOCK YES | NO
Set NumLock to on or off in the boot manager.
Default is empty meaning that NumLock is not
changed.
CAPSLOCK YES | NO
Set CapsLock to on or off in the boot manager.
Default is empty meaning that CapsLock is not
changed.
USE_RTC_TIMER YES | NO
Use RTC clock in BIOS boot manager? Default is
NO (use BIOS timer with 18 ticks per sec.). This
option fixes problems with the BIOS timer in some
motherboards.
DISABLE_HIDE_TEXT YES | NO
Display hide state in the boot manager? Default is
NO (show hide state). When YES is specified no
hide state is displayed.
REDUCE_SIZE YES | NO
Reduce the display size of the boot manager?
Default is NO (default size). When YES is
specified the display size is reduced.
ENCRYPT_PASSWORDS YES | NO Specified whether all passwords specified in this
configuration file are encrypted or plain text.
User Manual Boot-US 4.2.0
5 Command-line version 95

Default is NO meaning passwords are plain text.
BOOTUS_PASSWORD <xxx>
Admin password of configuration program
Boot-US (encrypted or plain text). The specified
password is stored in the boot manager. It protects
the command line and GUI version of Boot-US.
Accepted only in licensed version. Default is
empty string.
BMGRUS_PASSWORD <xxx>
Admin password of boot manager (encrypted or
plain text). The specified password protects the
configuration menu of the boot manager (F10 key).
Accepted only in licensed version. Default is
empty string.
KEYBOARD_LAYOUT ENGLISH | GERMAN
Keyboard layout: english or german. The layout is
required only if special characters are used in
passwords. Default is ENGLISH.
HIDE_METHOD
NO_CHANGE |
PRI |
PRILOG |
SELECT |
PRI_TRUE |
PRILOG_TRUE |
SELECT_TRUE
Specifies the method for hiding partitions. Starting
with version 1.7.0 it is possible to specify an
individual hiding of partitions (keywords SELECT
or SELECT_TRUE). Default is NO_CHANGE.
PRI or PRI_TRUE will hide primary partitions
automatically. Logical partitions remain
unchanged. PRILOG and PRILOG_TRUE will
hide primary and logical partitions automatically.
Remark: The previous values AUTO (same as PRI)
and AUTO_TRUE (same as PRI_TRUE) are still
recognized.
RESERVED_LBA <nn>
BIOS mode: LBA sector in track 0 used by
third-party program. When the boot manager is
installed in the MBR (track 0) this sector will be
skipped, thus the boot manager and the third-part
program can both exist in the track 0. Default is 0
meaning that no sector will be skipped.
DISK_NUMBERS_ZERO_BASED YES | NO
Are the disk numbers 0- or 1-based? Default is NO
(disk numbers start with 1).
5.7.1.3 Keywords in section [GRAPHIC]
Keyword Values Explanation
GIF_Filename <name>
BIOS mode: Name of GIF file with background image. Default is
empty string (text mode).
BMP_Filename <name>
UEFI mode: Name of BMP file with background image. Default is
empty string (text mode).
Transparent_Main YES | NO Transparency of boot manager main menu. Default is YES..
BM_OffsetX <nn>
X position of boot manager display (0...48). Default is 24
(horizontally centered).
BM_OffsetY <nn>
Y position of boot manager display (0...23). Default is 11 (vertically
centered).
Input_Device
User Manual Boot-US 4.2.0
96 5 Command-line version

KBD_MOUSE |
KBD_TOUCH
UEFI mode: Activate mouse or touch screen support. Default is
input by keyboard only.
5.7.1.4 Keywords in section [ENTRY_<nn>]
Keyword Values Explanation
NAME <name> BIOS mode: Specifies the partition name (12 ch.). Default is empty string.
DESCRIPTION <descr> Specifies the partition description (33 or 48 ch.). Default is empty string.
BootOption <nnnn> UEFI mode: Specifies the boot option number (4 hex digits).
PASSWORD <xxx>
Password for partition (encrypted or plain text). Accepted only in licensed version.
Default is empty string.
DRIVE <xxx>
BIOS mode: Specifies the drive where the partition resides. Allowed values are (1...N)
or (0...N-1) or A. There is no default, the keyword is mandatory. The value A means
booting from diskette A:. The values 1...N mean disk 1...N if the disk numbers are
1-based. For 0-based disk numbers the allowed values are (0...N-1) and 0 then means
the first disk.
LABEL <xxx> BIOS mode:Identifies the partition by the volume label.
PARTNR <nn> BIOS mode: Identifies the partition by the partition number (see report).
LBA <nn> BIOS mode: Identifies the partition by its LBA start sector (0...N).
POSITION
<nn> MB
| GB
BIOS mode: Identifies the partition by its disk position. The specified position must lie
somewhere inside the partition.
PTABLE <nn>
BIOS mode: Identifies the partition by its partition table entry (0...3). Usage if the
keyword PTABLE is not recommended.
Note:
BIOS mode: Exactly one of the keywords LABEL, PARTNR, LBA, POSITION or PTABLE must be specified to
identify the partition to be booted.. When booting from diskette A: the five keywords LABEL, PARTNR, LBA,
POSITION and PTABLE are ignored.
The following keywords are used for individually hiding partitions. They are only allowed when HIDE_METHOD is
set to SELECT or SELECT_TRUE. The keywords for specifying the partition to hide are similar to the keywords
specifying the partitions to be booted. Only the prefix HIDEPART_<n>_ is added, where <n> is a number between 1
and N (see below).
Example:
To hide three partitions selectively you would specify the prefixes HIDEPART_1_, HIDEPART_2_ and
HIDEPART_3_.
Keyword Values Explanation
HIDEPART_<n>_DRIVE <xxx> Drive where the partition to hide resides.
HIDEPART_<n>_LABEL <xxx> Identifies the partition to hide by the volume label.
HIDEPART_<n>_PARTNR <nn> Identifies the partition to hide by the partition number (see report).
HIDEPART_<n>_LBA <nn> Identifies the partition to hide by its LBA start sector (0...N).
HIDEPART_<n>_POSITION <nn> MB | GB Identifies the partition to hide by its disk position.
User Manual Boot-US 4.2.0
5 Command-line version 97

5.7.1.5 Keywords in section [COLORS]
The section [COLORS] is usually not present. Boot-US then uses predefined colors from the respective color scheme
(see table below).
If you do not like the predefined colors you may specify your own color scheme. In this case you need to fill all
keywords of the section [COLORS] with the desired values. The values are rgb color values in hex notation (e.g.
000000 = black, FFFFFF = bright white, FF0000 = bright red).
Keyword Text mode Dark colors Light colors Explanation
Main_Text DCDCDC DCDCDC 303030 Text color in main window
Main_Key FCDC00 FCDC00 980000 Keyword color in main window
Sub_Text DCDCDC DCDCDC 2C3434 Text color in all sub-windows
Sub_Key FCDC00 FCDC00 A40000 Keyword color in all sub-windows
Main_Window 303C98 274AA8 EEEEEE Background color in main window
Help_Window 604430 505050 B8B8B8 Background color in help window
Error_Window E41400 882418 F87C1C Background color in error window
CFG_Window 005440 30485C A4D4F8 Background color in configuration window
Password_Window 005440 283080 98A8FC Background color in password window
Option_Window 303C98 283080 98A8FC Background color in option window
Background 000000 not present not present Background of text mode
Tip:
You can add an empty section [COLORS] to the file bmgrus.ini. When you install the boot manager the next time by
the Boot-US (GUI) all color values of this section will be filled. Once you have a complete section [COLORS]
changing some colors is easy.
5.7.2 Uninstall boot manager
The command for uninstalling the boot manager is:
bootusc bootmanager remove [batch]
Example:
bootusc bootmanager remove
With this command the boot manager is removed from the boot disk 1. The MBR code is replaced by the previous
MBR code. In case the boot manager is installed in a primary partition this partition is deleted. The former active
partition is re-activated. If necessary the first partition is set active. All hidden partitions on all disks are made visible.
When batch is specified no user intervention is necessary.
5.7.3 Show status about installed boot manager
The command for displaying status information about an installed boot manager is:
bootusc bootmanager status
Example:
bootusc bootmanager status
User Manual Boot-US 4.2.0
98 5 Command-line version

When the boot manager is not installed on the boot disk 1 the error code 4 is returned.
The status function does not require a license.
5.7.4 Update entry in boot manager
The following command can update the name and/or description of a certain entry (see status command) in an
installed boot manager. The available parameters depend on the boot mode (BIOS or UEFI):
Boot mode BIOS:
bootusc bootmanager update entry=n [name=<name>] [descr=<descr>] [partid=<id>] [batch]
Boot mode UEFI:
bootusc bootmanager update entry=n descr=<descr> [batch]
n = 1..N or 'selected' (N = total number of entries, see status)
id = XXh (XX = two digit hex number)
Examples:
bootusc bootmanager update entry=1 name="Win XP" descr="New installation"
bootusc bootmanager update entry=1 partid=07h
bootusc bootmanager update entry=selected partid=07h
By this command the name <name>, the description <descr> and/or the partition ID <id> of the entry n in an already
installed boot manager can be changed. All other data of the corresponding boot manager entry remain unchanged.
Alternatively to a specific entry the currently selected entry can be changed. When batch is specified no user
intervention is necessary.
User Manual Boot-US 4.2.0
5 Command-line version 99

5.7.5 Preselect other entry in boot manager
The command for changing the preselected entry (see status command) in an installed boot manager is:
bootusc bootmanager preselect entry=n [boot_once] [fixed] [batch]
n = 1..N (N = total number of entries, see status)
Examples:
bootusc bootmanager preselect entry=2
bootusc bootmanager preselect entry=3 boot_once
With this command the preselected entry in an already installed boot manager can be changed to the specified entry.
When boot_once is specified the specified entry is booted just one time, while the previously preselected entry is
preserved. When fixed is specified the preselected entry does not change even if another entry is booted. When
batch is specified no user intervention is necessary.
The preselect function does not require a license.
The function for a one-time change of the preselected entry is useful especially when remotely accessing the machine.
A typical usage pattern for maintenance purposes is to start a certain system just once and afterwards return to the
standard system. This one-time change of the booted system can be achieved now easily by the parameter boot_once.
User Manual Boot-US 4.2.0
100 5 Command-line version

5.8 Repair MBR
The following two commands (fixmbr und repair_mbr) write a standard boot loader to the MBR. The two
commands differ only in the selection of the target disk. The changes in the MBR are identical.
Starting with version 3.2.0 a new command fixmbr is provided. With this command the target disk can be specified
directly.
bootusc fixmbr drive=d [file=<filename>]
d = disk d (0|1..127)
Examples:
bootusc fixmbr drive=1
bootusc fixmbr drive=2 file=track0.bin
With the old command repair_mbr the configured boot disk 1 was used automatically as the target disk.
bootusc repair_mbr [file=<filename>]
Examples:
bootusc repair_mbr
bootusc repair_mbr file=track0.bin
Inserting a standard boot loader in the MBR is done typically in the following cases:
removing the boot manager from the MBR•
make an USB stick bootable•
The partition table remains essentially unchanged. The only modification of the partition table is that the first primary
partition is activated if none is active.
When no file name is specified a standard boot loader is written in the MBR. This standard boot loader searches the
partition table for an active partition and starts the boot sector of that partition. When a file is specified the boot loader
is extracted from this file and written to the MBR.
User Manual Boot-US 4.2.0
5 Command-line version 101

5.9 Fix GPT table
The command for repairing a corrupt GPT table of a certain disk is:
bootusc fixmbr drive=d
d = disk d (0|1..127)
Examples:
bootusc fixgpt drive=1
The primary and the backup GPT table are repaired if possible. Especially the checksums are calculated and repaired
if necessary. The backup GPT table is checked and recreated from the primary GPT table if necessary. The data of the
GPT partitions (type, position, size) and the position of the backup GPT table remain unchanged.
User Manual Boot-US 4.2.0
102 5 Command-line version

5.10 Set standard disk parameters
The command to set standard disk parameters into the MBR of a certain disk is:
bootusc set diskparam drive=d
d = disk d (0|1..127)
Example:
bootusc set diskparam drive=1
The end CHS values in the partition table of the respective disk are changed to standard values (63 sectors per track
and 240 to 255 heads).
Background:
Since Windows Vista partitions are often aligned on 1 MiB boundaries. In theses cases the partition table contains
unconventional CHS values. Some BIOSes determine the disk parameters dynamically from the contents of the
partition table. The unconventional CHS values then result in unconventional disk parameters.
To install the boot manager Boot-US into the MBR and the following sectors the track 0 has to be large enough. This
means the number of the sectors per track should contain the maximal allowed value 63. The command 'set diskparam'
allows to restore the standard disk parameters, and as a result the boot manager could be installed into the MBR.
User Manual Boot-US 4.2.0
5 Command-line version 103

5.11 Set disk signature
The command to set a new disk signature in the MBR of a certain disk is:
bootusc set disksig drive=d id=<disk_signature>
d = disk d (0|1..127)
Example:
bootusc set disksig drive=1 id=2F3400C7
This command replaces the disk signature of the specified disk by the new value <disk_signature>. The new disk
signature must consist of 8 hex digits.
Background:
The disk signature is written by Windows to the MBR of a new disk, see glossary. This value is stored also in the
Windows BCD in many places. When booting Windows the disk signature from the BCD is used to locate the
appropriate disk containing important boot files.
When cloning a disk the disk signature is also cloned. Sometimes the disk contains only data files and no system files
required for booting. In this case the disk signature can be changed to avoid duplicate disk signatures. When the disk
contains system or boot files changing the disk signature makes the disk unbootable. In such a case it is necessary to
rebuild the BCD using the new disk signature.
User Manual Boot-US 4.2.0
104 5 Command-line version

5.12 Report about partitions
A report about all partitions on all disks can be displayed by the following command:
bootusc report [file=<filename>]
Example:
bootusc report
bootusc report file=info.txt
By default the report is displayed in the console window. When you specify a file name the report is saved in this file.
The partitions are sorted according to their position on the disk. Primary and extended partitions have a partition
numbered from 1 to 4. Logical partitions have a partition number of 5 and higher.
The report function does not require a license. This function is by intention not protected by a license.
The following screenshot (fig. 16) shows an example for the output of the report function:
Fig. 16: Report about partitions
User Manual Boot-US 4.2.0
5 Command-line version 105

5.13 Encrypt passwords
The following command allows you to look up the encrypted form of a password:
bootusc encrypt_pw <passwd>
Examples:
bootusc encrypt_pw test
bootusc encrypt_pw "test 123"
The string <passwd> contains the plain text password. Valid characters in the plain text password are almost all
printable characters of the 7 bit ASCII character set. The command displays the password in encrypted form. The
opposite is not supported, i.e. there is no command provided which allows you to look up the plain text password from
an encrypted password.
This command is available only with a license.
User Manual Boot-US 4.2.0
106 5 Command-line version

5.14 Reboot the computer
The following command allows you to reboot the PC:
bootusc reboot [batch]
Example:
bootusc reboot
When batch is specified the user is not prompted for confirmation.
User Manual Boot-US 4.2.0
5 Command-line version 107

5.15 Exit codes of command-line program
The command-line program bootusc.exe returns the following exit codes:
0 = Command executed successfully
1 = Syntax error or invalid parameters specified (command was not executed)
2 = Command aborted by user
3 = Error during execution of command
4 = Boot manager is not installed (only for command 'bootmanager status')
User Manual Boot-US 4.2.0
108 5 Command-line version

6 Tips
Please read the following tips before you install the boot manager Boot-US! These recommendations will help you to
avoid potential trouble when setting up a multi-boot system.
General:
1. In which cases one might face problems ?
2. Recommendations for safe usage of Boot-US
3. Uninstalling the boot manager Boot-US
The remaining tips contains answers for frequently asked questions. Especially the Windows tips 1 and 2 explain how
multiple versions of Windows may be installed and booted by the boot manager of Boot-US.
Miscellaneous:
1. Basic questions about Boot-US
2. Unhiding partitions in the boot manager
3. Error messages on integrity checks
4. Double occupied sectors in track 0
Installation:
1. Limitations of different operating systems (BIOS)
2. Check independence and completeness
3. Install boot manager Boot-US in separate ESP partition (UEFI)
Windows:
1. Installing Windows several times on one disk (BIOS)
2. Installing Windows several times on one disk (UEFI)
3. Installing Windows several times on different disks (BIOS)
4. Installing Windows several times on different disks (UEFI)
4. Problems with fast startup
Linux:
1. Booting Linux by the boot manager of Boot-US
2. Linux partition is recognized by Boot-US as non-bootable
Copy partitions:
1. Fast backup of partitions
Archive (older tips):
1. Boot-US does not detect SCSI or IDE disks under NT
2. Support for Windows 2000/XP/2003/Vista/2008/7/8/10
3. True partition hiding for Windows 2000/XP/2003/Vista/2008/7/8/10
4. Copying (cloning) a Windows 2000/XP/2003 installation
5. Administrator rights under Vista and Windows 7/8/10
6. System reserved partition on Windows 7/8/10
6 Tips 109

6.1 In which cases one might face problems ?
The following problems affect mostly booting by BIOS. When booting by UEFI many of these problems do not
exists. Disk managers:
This case affects only booting by BIOS. When disk managers are installed on the first hard disk e.g., the OnTrack or
EZ-Drive disk manager, then an installation of the boot manager Boot-US to the MBR may cause problems.
Typically disk managers are used in older PCs which are without LBA support for accessing disks larger than 500
MiB. When the mainboard BIOS supports EIDE disks or offers LBA access disk managers are usually neither
required nor installed.
The incompatibility of a boot manager (when installed on the MBR) with disk managers has two reasons. Firstly,
both programs are installed potentially on the same sectors, i.e. on the MBR and the beginning of the track 0.
Secondly, when the boot manager Boot-US is installed on the MBR it becomes active before the disk manager. This
means the boot manager is not supported by the disk manager and therefore the boot manager can access the wrong
sectors of the disk.
When the boot manager is installed on a primary partition the above mentioned problems should not arise. Here the
MBR contains the necessary code to start the disk manager before the boot manager becomes active, and both
programs reside on different sectors.
ABIT RAID adapters:
The following warning does not apply to the case where the RAID adapter is used just as a fast IDE channel and no
true RAID functions are active. In this case there are no RAID configuration data which would have to be stored.
If RAID functions are used the corresponding RAID configuration data must not get destroyed, otherwise, you will
not be able to access the data on the RAID disks any more. It seems that the ABIT UDMA RAID adapter stores its
configuration data directly on user accessible sectors on the hard disk, i.e. on the track 0. This way of storing the
configuration data is extremely unsafe. The data can be easily overwritten, for example, when the boot manager
Boot-US is installed on the MBR, or when a disk manager is installed on the MBR. All restrictions and warnings
about disk managers also apply to the ABIT RAID adapater. For example, you must not install the boot manager of
Boot-US to the MBR when using an ABIT RAID adapater.
When the boot manager is installed on a primary partition problems should not arise.
Complicated configuration:
The following cases are classified as complicated configuration:
Disk number of boot partition has been changed (BIOS)•
Partitions are booted over several steps•
Partitions are not independent•
In such cases you should be careful when you install the boot manager Boot-US. The boot process differs from the
one for which Boot-US has been designed.
Whne booting by BIOS and the disk number of the boot partition is changed, for example if a new disk is inserted or
removed, it is necessary to take this change into account during the boot process. The boot manager Boot-US does
contain special support for changing the disk order during the boot process, see a "second" hard disk, nevertheless
problems are conceivable in special cases.
The other problematic case is when more than one partition is involved in the boot process. When the boot manager
is installed care must be taken that all partitions involved remain visible during the boot process. The respective
operating system probably will fail to start when one of the start partitions is hidden.
User Manual Boot-US 4.2.0
110 6 Tips

6.2 Recommendations for safe usage of Boot-US
Please pay attention to the following recommendations. They will help you to avoid problems when setting up a
multi-boot system. If you face a problem please try to find the cause of the problem and then take the appropriate
measures. Even if at first glance the whole system seems to be corrupt usually only a small part of the data are
changed. Often everything can be repaired easily with standard tools. A complete re-installation of the system is
definitely the very last option which is appropriate only in extreme cases.
Backup your data
The most important rule is to backup all important data on independent storage media. If something goes wrong
during the installation of another operating system or the boot manager and a new installation of the operating system
is necessary then you can restore your data, although this would require a considerable amount of time.
Any questions ?
If you have any question or something is not clear to you, please try to resolve your queries before you continue. The
chapter glossary explains the important terms which you will come across when setting up a multi-boot system.
Is the information displayed correctly ?
When Boot-US starts up it collects the information about all partitions on all hard disks and displays that on the initial
screen. Please check whether all partitions are displayed correctly and whether the disk parameters (number of
cylinders, heads, sectors and capacity) have been correctly determined. If there is something wrong or if there are any
error messages issued by Boot-US do not install other operating systems or the boot manager.
Save partition and boot sectors
Before you begin to experiment with the boot manager it is strongly recommended that you save the list of all
partition and boot sectors from all disks to an independent media, e.g. a USB stick. The created file contains all
sectors which might get modified by the boot manager installation and operation. These sectors can be saved and
restored both by the Windows program Boot-US and the command-line utility bootusc.exe.
Installation to removable media
It is strongly recommended to install the boot manager first to a removeable media (USB stick, CD/DVD, diskette)
and not on the hard disk. It is important that you choose the setting "Do not change partitions". With this setting no
partitions are changed. After the boot manager has been installed to the removeable media you can verify that no data
have been changed on the hard disk. Just restart your system and you will notice that everything works as before.
Afterwards you can try booting the configured entries by the boot manager residing on the removeable media.
Installation in primary partition
When the installation to a removeable media is successful one can think of installing the boot manager Boot-US to a
primary partition on the first hard disk. Please again use the setting "Do not change partitions" when you install
the boot manager Boot-US to a primary partition.
Installation in MBR
You should install the boot manager of Boot-US to the MBR only if this is necessary i.e. when you need the boot
manager partition for other purposes. The advantage of the installation in the MBR is that no additional partition is
occupied. The disadvantage is that for repairing problems more effort is required.
User Manual Boot-US 4.2.0
6 Tips 111

6.3 Uninstalling the boot manager Boot-US
The boot manager Boot-US can be uninstalled by any of the following three methods:
command Bootmanager / Remove... in the configuration program Boot-US (GUI)•
command bootusc bootmanager remove in the command-line version of the configuration program Boot-US•
command Uninstall boot manager directy in the boot manager•
All three methods are equivalent. The same operations are performed in all three cases. In short, the boot loader in the
MBR is restored, a potentially created partition for the boot manager is deleted and the former active partition is
reactivated. Additionally all hidden partitions are made visible.
Uninstalling a boot manager manually
Sometimes it might be necessary to uninstall a boot manager by standard tools, especially when the accompanying
uninstallation program is not available. As explained you should never face such a situation with the boot manager of
Boot-US. However with respect to other boot managers it might be useful to know how to remove them by standard
tools. The necessary steps depend mainly on the location where the boot manager is installed.
Boot manager in separate primary partition
This type of installation is very easy to remove with standard tools. It is sufficient to boot from a DOS diskette and
deactivate the boot manager partition with any partition manaer and activate another partition. Examples for this type
of installation are the OS/2 boot manager or the boot manager Boot-US when installed on a separate partition.
Boot manager in MBR
This type of installation can also be removed with standard tools. Again a DOS boot diskette with the standard FDISK
program is needed. By the command fdisk /mbr a standard boot loader code is written to the MBR. The purpose of
the standard boot loader code is to search the partition table for a partition marked as active and to boot that partition.
After that by a partition manager an appropriate partition has to be marked as active. Alternatively by issuing the
command bootusc repair_mbr an equivalent standard boot loader code can be written to the MBR. In the latter case
the first partition is activated automatically. An example for this type of installation is the boot manager of Boot-US
when installed on the MBR.
Boot manager in operating system
Here the boot manager is integrated into the operating system. Naturally there is no general rule for removing such a
boot manager. It might even be impossible to remove such a boot manager. The boot manager becomes active only
after the operating system has been started. It must be removed by the means offered by the corresponding operating
system. An example for this type of installation is the file "boot.ini" of Windows NT/2000/XP/2003. This boot
manager cannot be removed since it is necessary for starting Windows NT/2000/XP/2003.
Hidden partitions
When the boot manager is removed by the configuration program Boot-US then all hidden partitions will be made
visible during the uninstallation process. However if the boot manager is removed "manually" hidden partitions will
remain hidden. Usually the hex number 10h is added to the partition ID to hide a partition. This way of hiding a
partition is used, for example, by Boot-US and the OS/2 boot manager. In these cases the partitions can be made
visible simply by issuing the command bootusc unhide. Some boot managers also change the boot sector when
hiding partitions. Such partitions cannot be made visible by standard tools. The original program used for hiding the
partition must be employed for unhiding them.
During the test of a boot manager it might happen that partitions are hid -- -- intentionally or unintentionally.
Meanwhile this can be easily repaired directly in the boot manager, see Miscellaneous tip 2.
User Manual Boot-US 4.2.0
112 6 Tips

6.4 Basic questions about Boot-US
Does Boot-US work under a 64 bit Windows?
The answer is yes. The configuration program Boot-US exists as a WIN32 and a WIN64 version. Boot-US does not
work under the very old 16 bit Windows like Windows 3.x.
Explanation of version numbers
The first two digits of the version number of Boot-US represents the version of the accompanying boot manager. The
third digit counts the fix levels of a certain version. Each time when the data structure for storing the configured
partitions inside the boot manager is changed, a new version number is assigned to the boot manager. For example,
the version number 1.2.2 of Boot-US tells you that three versions -- 1.0, 1.1, 1.2 -- of the boot manager were created.
A higher version of Boot-US always understands (reads) all previous versions of the boot manager. When you
upgrade Boot-US it is therefore not required to uninstall the boot manager before.
What is a trace file?
A trace file contains a protocol of the important function calls. The trace output is built by the developer into the
program. The developer has specified the important function calls to be traced. The trace file is mainly a means for
problem determination. In case of problems one can see which function calls were executed on the client machine.
From the trace file the problem is either identified directly or at least one can obtain hints about the cause of the
problem. Inside Boot-US the trace output can be activated by the menu command Configuration / Settings....
How do I install the license?
The license for Boot-US is delivered in form of a license file bootus.lic. This license file must be copied
(unchanged!) into the installation directory of Boot-US. The file name must be bootus.lic. When Boot-US finds a
valid license file at start-up in the installation directory all features of Boot-US are enabled.
Inside Boot-US it can be easily verified whether a valid license is installed. Firstly, the window's title changes from
"Boot-US [non-licensed version]" to "Boot-US". Secondly, the menu command Help / About Boot-US... directly
shows the current number of licenses and the licensee.
User Manual Boot-US 4.2.0
6 Tips 113

6.5 Unhiding partitions in the boot manager
When the boot manager is tested and some partitions could not be booted any more, the typcial reason is that during
this test, some partitions have been hidden either intentionally or unintentionally.
Unhide partitions in the boot manager
Starting with version 1.2.1 of Boot-US these hidden partitions can be made visible very easily directly in the boot
manager Boot-US. Please press the F10 key in the boot manager. This opens a configuration menu where you can
execute the command Unhide partitions on all disks. This makes all hidden partitions on all disks visible and allows
access to all partitions as before.
Comment:
Starting with Boot-US 1.5.1 this command also makes true hidden partitions visible.
User Manual Boot-US 4.2.0
114 6 Tips

6.6 Error messages on integrity checks
When reading the list of all partitions from all disks an automatic integrity check of all partitions is carried out. As a
result of these checks the following warning or error messages could be displayed for individual partitions. Warnings
are marked as W<nnn> and error messages as E<nnn>:
E001: MBR of disk <xx> is invalid: signature 0xAA55 missing.
Either the disk is empty or the MBR is corrupt.
E003: partition sector (LBA=<xx>) invalid: signature 0xAA55 missing.
Either the partition sector is corrupt or the address of the partition sector is wrong.
E004: boot sector (LBA=<xx>) invalid: signature 0xAA55 missing.
Either the boot sector is corrupt or the address of the boot sector is wrong.
E005: MBR of disk <xx> contains more than one extended partition.
The extended partition was created with a partition manager which violates the established standards. You should use
a partition manager which sticks to the established standards.
E006: log. partition sector (LBA=<xx>) invalid: signature 0xAA55 missing.
Either the logical partition sector is corrupt or the address of the logical partition sector is wrong.
E007: log. partition sector (LBA=<xx>) invalid: found two partitions in partition sector.
The logical partition was created with a partition manager which violates the established standards. You should use a
partition manager which sticks to the established standards.
E008: log. partition sector (LBA=<xx>) invalid: found two extended partitions in partition sector.
The logical partition was created with a partition manager which violates the established standards. You should use a
partition manager which sticks to the established standards.
E009: log. partition not fully contained in extended partition.
The logical partition was created with a partition manager which violates the established standards. You should use a
partition manager which sticks to the established standards.
E010: boot sector is true hidden, but ID=<xx> represents unhidden partition.
The corresponding partition was unhid incompletely. This error can be solved easily by hiding or unhiding the
partition a second time.
E011: partitions overlap. There is a serious danger to lose data!!
Sooner or later this error will lead to data corruption. You must delete one of the two partitions to prevent the
partitions from overwriting each others data. The respective partitions were created by an erroneous partition manager.
You should use a partition manager which is working accurately.
E012: LBA values from partition table and effective values do not agree.
The computed LBA start position or the number of sectors of the partition do not agree with the values found in the
partition table. The partition was created with a partition manager which violates the established standards. You
should use a partition manager which sticks to the established standards.
E013: MBR of disk <xx> is invalid.
The field for active partitions contains invalid values. The MBR is corrupt or the disk does not contain a partition
table.
E014: primary GPT table of disk <xx> is invalid.
The primary GPT table is defect. You can try to repair it.
User Manual Boot-US 4.2.0
6 Tips 115

E015: backup GPT table of disk <xx> is invalid.
The primary GPT table seems ok, only the backup GPT table is defect. This problem should be repairable.
E016: boot sector is true hidden, but attribute <xx> represents unhidden GPT partition.
The corresponding partition was unhid incompletely. This error can be solved easily by hiding or unhiding the
partition a second time.
E017: CRC error in GPT table of disk <xx>.
The CRC checksums in the header of the GPT table are wrong. The other fields seem to be ok. This problem should
be repairable.
E018: GPT header of disk <xx> is empty.
The header of the primary GPT table is completely empty. You can try to create a GPT partition, this should result in
a valid header.
E019: GPT header of disk <xx> contains wrong signature.
The signature EFI PART in the header of the primary GPT table is wrong. It is unclear whether a GPT table should be
present or whether the GPT table is corrupt. You can try to repair it.
E020: End of log. partition overlaps (<xx> MB) with next log. partition sector.
Repair: Shrink the logical partition by the overlap amount. Usually shrinking by a few MB is sufficient to solve the
problem.
E021: log. partition sector (LBA=<xx>) invalid: first entry contains ext. partition.
The logical partition was created with a partition manager which violates the established standards. You should use a
partition manager which sticks to the established standards.
E022: log. partition sector (LBA=<xx>) invalid: second entry does not contain ext. partition.
The logical partition was created with a partition manager which violates the established standards. You should use a
partition manager which sticks to the established standards.
W001: NTFS format of partition is invalid.
The NTFS format of the partition seems to be corrupt.
W002: CHS values from partition table and effective values do not agree.
The alignment of partitions is relevant only for very old operating systems (e.g DOS). If you use current operating
systems you can ignore this warning.
W003: partition does not start and end on cylinder boundaries.
The alignment of partitions is relevant only for very old operating systems (e.g DOS). If you use current operating
systems you can ignore this warning.
W004: partition does not start on cylinder boundaries.
The alignment of partitions is relevant only for very old operating systems (e.g DOS). If you use current operating
systems you can ignore this warning.
W005: partition does not end on cylinder boundaries.
The alignment of partitions is relevant only for very old operating systems (e.g DOS). If you use current operating
systems you can ignore this warning.
W006: partition is not aligned on 1 MiB boundary.
The alignment of partitions is relevant only for very old operating systems (e.g DOS). If you use current operating
systems and no SSD you can ignore this warning. If you use a SSD then the alignment on 1 MiB boundaries is
recommended for performance reasons.
User Manual Boot-US 4.2.0
116 6 Tips

W007: true hiding uses outdated variant.
The partition was true hid with an old version of Boot-US. You need to upgrade to Boot-US 3.7.0 (or higher) for using
the new variant of true hiding a partition.
W008: disk signature exists multiple times.
Internal disks should have different non-empty disk signatures, see glossary. Removable disks sometimes have empty
disk signatures. This warning also occurs when an empty disk signature is present multiple times. In this case
disabling the warnings in the configuration settings will disable the appearance of this warning. Only when cloning a
disk such a collison should occur. In all other cases you should try to fix this collision.
The disk signature can be changed by the following command:
bootusc set disksig drive=d id=<disk_signature>
Attention: Changing the disk signature can affect the bootability of the operating systems installed on the affected
disk.
W009: disk unique GUID exists multiple times.
GPT disks should have unique disk GUIDs. Only when cloning a disk such a collison may occur. In all other cases
you should try to fix this collision.
W010: partition unique GUID exists multiple times.
Partitions on GPT disks should have unique partition GUIDs. Only when cloning a disk such a collison may occur. In
all other cases you should try to fix this collision.
User Manual Boot-US 4.2.0
6 Tips 117

6.7 Double occupied sectors in track 0
It can happen that third-party programs store data in indiviual sectors of track 0. Especially some Adobe programs
seem to store copy protection data in sectors of track 0. If the boot manager is installed in the MBR and the following
sectors of track 0 it can easily happen in this case that a sector is occupied by the third-party program as well as by the
boot manager.
Clearly such a double occupany will lead to problems, especially the boot manager will not start correctly any more.
Solution:
When installing the boot manager into the MBR it is now possible to specify a sector which is occupied by a
third-party program. This sector will then not be used by the boot manager.
The sector reserved for the third-party program is specified by the following parameter RESERVED_LBA in the file
bmgrus.ini (see chapter Contents of bmgrus.ini):
[GLOBAL]
RESERVED_LBA = <nn>
<nn> is the LBA sector number of the reserved sector.
Which sector has been modified?
The position of the double occupied sector can be determined as follow:
save track 0 immediately after boot manager has been installed in MBR•
save track 0 after the third-party program has written data to the track 0 (and corrupted the boot manager)•
compare the two backup files to see which sector has been changed•
User Manual Boot-US 4.2.0
118 6 Tips

6.8 Limitations of different operating systems (BIOS)
Preliminary remark: The following limits apply to a disk with 255 heads and 63 sectors per track when booting by
BIOS. If the actual disk parameters are smaller, the limits might need to be adapted appropriately. It is therefore
recommended to configure the disk with these disk parameters (255 heads and 63 sectors per track). A later
modification of the disk parameters is not possible without reinstalling all partitions!
DOS with FAT16:
The beginning of a bootable DOS partition must lie within the first 2 GB of a disk, to boot successfully that partition.
Windows 95/98 with FAT16/FAT32:
The beginning of a bootable Windows 95/98 partition must lie within the first 8 GB of a disk, to boot successfully that
partition.
Windows ME with FAT16/FAT32:
The 8 GB limit does not exist any more for Windows ME. A bootable Windows ME partition can be created
anywhere on the disk. If the partitions begins beyond the 8 GB limit, the BIOS must support the extended INT 13h to
boot successfully the partition.
Windows NT 4 with FAT16:
The beginning of a bootable Windows NT 4.0 partition with the file system FAT16 must lie within the first 2 GB of a
disk, to boot successfully that partition.
Windows NT 4 with NTFS:
The beginning of a bootable Windows NT 4.0 partition with the file system NTFS must lie within the first 4 GB of a
disk, to boot successfully that partition.
Windows 2000/XP/2003/Vista/2008/7/8/10:
The 8 GB limit does not exist any more for Windows 2000/XP/2003/Vista/2008/7/8/10. A bootable Windows
2000/XP/2003/Vista/2008/7/8/10 partition can be created anywhere on the disk. If the partition begins beyond the 8
GB limit, the BIOS must support the extended INT 13h to boot successfully the partition.
Linux:
The 8 GB limit does not exist any more for Linux starting with LILO 21.6. A bootable Linux partition can be created
anywhere on the disk. If the partitions begins beyond the 8 GB limit, the BIOS must support the extended INT 13h to
boot successfully the partition.
User Manual Boot-US 4.2.0
6 Tips 119

6.9 Check independence and completeness
The boot manager Boot-US allows you to boot and use multiple operating systems independently of each other. This
requires, however, that the operating systems have been installed independently and completely each into a separate
partition. When a new operating system is installed (see chapter Tips / section Windows) this is automatically the
case.
Frequently certain operating systems are already installed. Especially with Microsoft operating systems the standard
installation of a second, third,... operating system does not result in an independent and complete installation into a
single partition.
Test:
You must check whether an operating system installed in a primary partition can be booted independently from the
remaining operating systems respective partitions (without using an external boot manager). For this check please
follow the instructions below:
The partition to be checked has to reside on the first boot disk. If that is not the case, please interchange the
order of the boot disks in the BIOS. Alternatively you could temporarily detach the disks residing before the
one to be checked.
•
The primary partition to be checked has to be set active.•
All other primary and logical partitions on the same disk must be true hid.•
Restart the PC.•
The partition to be check should start up successfully without using any external boot manager.•
Recommendation: All partitions to be booted by the boot manager Boot-US should be checked whether they pass the
above test. Partitions with operating systems which pass this test are installed completely and independently. They can
be booted without problems by the boot manager Boot-US. Operating systems which do not pass this test and are to be
booted by Boot-US, have to be repaired first.
User Manual Boot-US 4.2.0
120 6 Tips

6.10 Installing boot manager Boot-US on separate ESP partition
(UEFI)
Starting with Boot-US 4.2.0, the target ESP partition for the installation of the boot manager can be selected directly.
This makes it easy to install the boot manager in a separate ESP partition.
A separate ESP partition can be created as follows:
Select the menu command "Partitions/Create..."•
Select a free space on a GPT disk.•
Create a new partition (in GPT style) with a size of approx. 250 MB.•
Select "FAT32" as the file system and "EFI System part." as the partition type. Format the partition and assign
it the volume name "BMGRUS", for example.
•
An empty FAT32 partition with the selected properties is created.•
When you subsequently install the boot manager Boot-US, you can select this partition as the target ESP
partition.
•
Comment: The ESP partition containing the boot manager Boot-US must always be visible. Only then can the UEFI
firmware start the boot manager Boot-US when the computer is started.
User Manual Boot-US 4.2.0
6 Tips 121

6.11 Installing Windows multiple times on one disk (BIOS)
Overview:
DOS, Windows 95/98/ME/NT/2000/XP/2003/Vista/2008/7/8/10 can be installed multiple times without any problems
onto different primary partitions on the first hard disk. In principle you have the choice between two setup strategies:
Don't hide already existing partitions•
Hide the already existing partitions before installing a new one•
The first strategy is the method used by Microsoft. In this case there is a central partition which is used for booting
the other partitions. It is obvious that all partitions are implicitly connected by this central partition. When this central
partition is deleted or changed all other primary partitions are affected, i.e. they might become unbootable.
Furthermore the central partition must always reside on the first hard disk.
The second strategy is the method recommended by the author of Boot-US. This type of installation requires a little
more effort and planning, but it has the advantage that all installed partitions are truly independent of each other. This
independence results simply from the fact that all already existing partitions are hidden when the next partition is
installed. Therefore this new installation appears exactly like the first installation. Due to the independence any
partition can later be modified or deleted without affecting the other partitions.
Remark: Please make sure that you know the installation limits of all involved operating systems.
Installation example:
Windows 10 is to be installed twice in two separate primary partitions on the first hard disk. Both partitions should be
booted by the boot manager of Boot-US. This can be achieved as follows:
Install Windows 10 on a single primary partition.•
For safety reasons install the boot manager Boot-US to diskette or CD with activated "automatic true hiding of
partitions". With this diskette or CD this first Windows partition can be booted even when it is true hidden.
•
True hide the Windows partition by means of Boot-US. The menu command Partitions / Details... opens a
dialog where single partitions can be true hid.
•
Create a second primary partition and set it active. This can be achieved by the configuration program
Boot-US (GUI) or any other partition manager.
•
Install the second copy of Windows in this second primary partition. The first Windows should not be running
when the second installation is started. The first Windows has been true hidden before and therefore it cannot
disturb the second installation.
•
Start the configuration program Boot-US (on the second Windows) and install the boot manager with
activated "automatic true hiding of partitions". Both Windows partitions can be included in the boot manager.
•
Restart the PC and select the desired partition.•
The selected partition will be made visible by the boot manager and the other one will be true hid.•
By the same procedure other combinations of DOS, Windows 95/98/ME/NT/2000/XP/2003/Vista/2008/7/8/10 can be
installed multiple times on the first disk.
Comment:
If Windows 2000 or higher is involved you must true hide all partitions, see Windows tip 5. If only DOS or Windows
95/98/ME or NT is involved then simple hiding of partitions is sufficient.
User Manual Boot-US 4.2.0
122 6 Tips

6.12 Installing Windows multiple times on one disk (UEFI)
Microsoft installation:
The Microsoft method for installing multiple Windows systems on one disk works as follows:
The first Windows installation creates an ESP partition and the Windows partition. The boot data are stored in
the ESP partition.
•
Further Windows installations create additional Windows partitions and store the boot data also in the ESP
partition.
•
After starting the computer you are promted to select the system to boot.•
Thus the Windows installations are not independent of each other, they are all connected by the common ESP
partition. Furthermore all Windows partitions with all files are always visible and accesible.
Independent installation:
The aim is to install multiple Windows systems completely independent of each other on one disk and boot them by
UEFI. Due to the independence any partition can later be modified or deleted without affecting the other partitions.
Installation example:
Windows 10 is to be installed twice on the first GPT disk. Both installations should be booted by the boot manager of
Boot-US. This can be achieved as follows:
Install Windows 10 on the first GPT disk. An ESP partition and Windows partitions will be created. Also a
boot option with the label "Windows Boot Manager" will be created in the UEFI NVRAM.
•
For safety reasons install the boot manager Boot-US to an USB stick in the so-called UEFI fallback mode and
add the entry "Windows Boot Manager". With this USB stick you can easily unhide all true hidden partitions.
•
Save the UEFI variables to a file (menu command UEFI / Save variables...) and store this file on the USB
stick.
•
True hide the ESP partition and the Windows partition by means of Boot-US. The menu command Partitions
/ Details... opens a dialog where single partitions can be true hid.
•
Restart the computer and install another Windows system. This installation will create a separate ESP
partition and separate Windows partitions. It will also create another boot option "Windows Boot Manager" in
the UEFI NVRAM, which points to the second ESP partition and can start the second Windows system.
•
Create an empty ESP partition, see Installing boot manager Boot-US on separate ESP partition (UEFI).•
The boot manager Boot-US is installed in the empty ESP partition. You should have two UEFI boot option
"Windows Boot Manager". Both boot options are added to the boot manager. The "individual true hding" of
partitons can be chosen.
•
Starting with Boot-US 4.2.0 the ESP partition and the associated Windows partition can both be true hid.•
On the next start the boot manager Boot-US appears and offers both Windows systems.•
When you boot one of the two Windows systems the corresponding Windows partition and the associated
ESP partition will be made visible by the boot manager. The other Windows partition and ESP partition will
be true hid. Only the ESP partitions containing the boot mananger Boot-US must always be visible.
•
Comment:
The important step of this procedure is to change the partition type of the hidden ESP partition. Only then Windows
will ignore the hidden ESP partition when performing a second installation. This requires Boot-US 4.1.0 (or higher).
User Manual Boot-US 4.2.0
6 Tips 123

6.13 Installing Windows multiple times on different disks (BIOS)
Remark 1: Please make sure that you know the installation limits of all involved operating systems.
Remark 2: The disk parameters "number of heads" and "sectors per track" must not change between
installation of an operating system and the later usage. The simplest solution is to configure in the BIOS all
disks to have 255 heads and 63 sectors per track.
To install DOS and Windows 95/98/ME/NT/2000/XP/2003/Vista/2008/7/8/10 multiple times on different disks the
following procedure should be employed:
DOS or Windows is installed on the first disk.•
A physical second disk must appear temporarily as the first disk. This can be achieved, for example, by
deactivating temporarily the physical first disk (detach the data cable).
•
On this physical second disk (now appearing as first disk) DOS or Windows can be installed without
problems.
•
The physical first disk is re-activated. Both disks are now available as before.•
Windows on the first disk is booted (without support of Boot-US).•
The configuration program Boot-US is started and the desired partitions on the first and second disk are
included in the boot manager. Again "automatic hiding of partitions" must be activated.
•
By the boot manager Boot-US all partitions on the first and second disk can be booted. The selected partition
will be made visible while the other non-selected primary partitions will be hid during the boot process.
•
Comment:
If Windows 2000/XP/2003/Vista/2008/7/8/10 is involved you must true hide all partitions, see Windows tip 5.
Comment:
Advanced users with complex boot setups should keep in mind that Boot-US automatically performs disk mapping
when a partition on the second (or higher) boot disk is selected for booting:
boot disk #2 is mapped as boot disk #1•
boot disk #1 is mapped as boot disk #2•
Due to the automatic disk mapping usually none of the files listed below need to be modified. Only in seldom
exceptional cases it might be necessary to modify some device IDs in files like:
Boot.ini in Windows•
a configuration file of a secondary bootloader•
etc.•
User Manual Boot-US 4.2.0
124 6 Tips

6.14 Installing Windows multiple times on different disks (UEFI)
To install Windows 10/11 multiple times on different disks the following procedure should be employed:
Windows is installed on the first disk.•
This disk is temporarily deactivated, for example by detaching the data cables. A second disk now appears as
the first disk.
•
On this physical second disk (now appearing as first disk) Windows can be installed without problems.•
The physical first disk is re-activated. Both disks are now available as before.•
Windows on the first disk is booted (without support of Boot-US).•
An empty ESP partition is created, see Installing boot manager Boot-US on separate ESP partition (UEFI).•
The configuration program Boot-US is started and the desired partitions on the first and second disk are
included in the boot manager. Here the "individual true hiding of partitions" can be activated. The empty ESP
partition is selected as installation target for the boot manager Boot-US.
•
Starting with Boot-US 4.2.0 the ESP partition and the associated Windows partition can both be true hid.•
On the next start the boot manager Boot-US appears and offers both Windows systems.•
By the boot manager Boot-US Windows on the first and second disk can be booted. When the true hiding is
used the corresponding Windows partition and the associated ESP partition will be made visible. The other
Windows partition and ESP partition will be true hid. Only the ESP partitions containing the boot mananger
Boot-US must always be visible.
•
Comment:
When installing Windows in UEFI mode a EFI System partition (ESP) is created containing the efi file
\efi\microsoft\boot\bootmgfw.efi. The actual Windows files lie in a separate partition. Windows (on disk 1 or
2) is booted by starting the corresponding efi file (on disk 1 or 2).
User Manual Boot-US 4.2.0
6 Tips 125

6.15 Problems with fast startup
Fast Startup:
The fast startup was introduced with Windows 8. It exists therefore also in Windows 10. The fast startup is enabled by
default. When Windows is shut down and the fast startup is enabled, the current state (Windows kernel, loaded
drivers, disk cache with opened files) is saved in the file C:\hiberfil.sys. When you start Windows the next time
this file is loaded directly into memory without executing the respective programs separately.
Problems:
The memory image in the file C:\hiberfil.sys must match the data stored on the disk. If you boot another system
the data stored on the disk might get changed.
If Windows does not notice that another system was booted in-between then data loss might occur easily.•
On the other hand if Windows detects that another system was booted in-between, then Windows runs
CHKDSK to make sure there are no inconsistencies on the disk.
•
Solution:
The above problems can be avoided by disabling the fast startup.
User Manual Boot-US 4.2.0
126 6 Tips

6.16 Booting Linux by the boot manager of Boot-US
Linux:
Linux can be installed on a primary or logical partition on any hard disk. Usually GRUB is additionally installed in the
MBR of the respective disk. Starting Linux is done by loading GRUB first, which in turn then starts Linux.
The installation of GRUB into the MBR of the respective disk overwrites other boot managers which may reside
already in the MBR. In order to not disturb other installations Linux should be installed on an empty disk and other
disks with other installation should be detached. This method has the least impact on other operating systems.
Boot manager Boot-US:
The boot manager Boot-US can start Linux from a primary or logical partition on the first or a higher boot disk.
Boot-US knows two ways for starting Linux:
by using GRUB installed in the MBR of the Linux disk•
by starting the boot sector of the Linux partition directly•
The first variant is implemented by the option "boot MBR with GRUB from disk x". The second variant requires to
install a Linux boot loader, e.g. GRUB, into the boot sector of the Linux partition. In both cases no further
configuration of GRUB is required. If Linux resides on a higher boot disk then the boot manager Boot-US passes the
correct boot disk number internally to GRUB. No change of GRUB is necessary.
Drive and partition names:
Linux uses the following drive and partition names:
the first SCSI or SSD disk is called /dev/sda•
the second SCSI or SSD disk is called /dev/sdb (etc.)•
the first IDE disk is called /dev/hda•
the second IDE disk is called /dev/hdb (etc.)•
The partitions on a drive are named by the drive name appended by a number. For example sda2 refers to the second
primary partition on the sda drive..
Installing GRUB to the boot sector:
During the installation of Linux usally a Linux boot loader (for example GRUB) is automatically installed into the
MBR. In order to install GRUB into the boot sector of a Linux partition the command grub-install can be used. As
already noted no special configuration of GRUB is necessary. You only need to specify the correct installation target
of GRUB. Supposed Linux is installed to sda2. Then GRUB must be installed also to sda2 for allowing Boot-US to
directly start the Linux partition.
Example:
grub-install /dev/sda2
If you erroneously specify the target sda then GRUB would be installed to the MBR of the sda drive.
User Manual Boot-US 4.2.0
6 Tips 127

6.17 Linux partition is recognized by Boot-US as non-bootable
Boot-US considers a Linux partition as non-bootable when the Linux partition does not have a valid boot sector.
Such a partition is indicated as non-bootable by Boot-US. Boot-US requires a valid boot sector to boot that partition
directly.
This problem of a missing boot sector can be easily repaired. It is only required to install the Linux boot loader, for
example GRUB, into this partition (for example sda2). In the previous Linux tip 1 you can find a short introduction
for installing GRUB.
Alternatively, if GRUB is installed in the MBR and is able to boot Linux, then you can also tell Boot-US to use the
option "boot MBR with GRUB from disk x" for starting Linux. In this case the boot manager Boot-US starts GRUB
which in turn starts Linux. The boot sector of the Linux partition can remain empty.
6.18 Fast backup of partitions
Remark: The fast backup of partitions and disks can protect against malicous programs. However, it is then necessary
to store the backups separately so that they cannot be destroyed by the malicious program.
Overview:
Starting with Boot-US version 4 a fast backup of single partitions or whole disks is possible. In particular the backup
of true hidden partitions is quick and easy with Boot-US. Boot-US recognizes the filesystem of
FAT16/FAT32/exFAT, NTFS and Ext2/3/4 partitions, and thus can skip unoccupied sectors in the backup. This
feature can speed up the backup enormously.
Example:
The following hardware is used:
Thinkpad X250 with CPU i5-5300U and 4 GB RAM•
Disk 1: SATA SSD, 500 GB, read and write speed approx. 470 MB/sec•
Disk 2: SATA SSD, 500 GB, read and write speed approx. 470 MB/sec•
An Ext4 partition of size 155 GB will be saved to a file. The file resides on disk 2 on a NTFS partition. This allows a
simultanouos access to both disks. The Ext4 partition is 8 percent full. In the backup only the occupied sectors are
taken into account, the data is saved compressed. The following screenshot shows the throughput just before close
before the end of the backup.
User Manual Boot-US 4.2.0
128 6 Tips

A physical throughput of 330 MB/sec can be seen. That's slightly less than the maximum speed of the two SSDs,
which is due to the frequent occurrence of short sequences of consecutively occupied sectors. However, the effective
throughput is 2900 MB/sec, which is almost 10 times faster. The reason is that the unoccupied sectors are skipped.
The displayed values are averaged over 5 seconds, which explains the small deviation from the simple formula
$progress/$elapsed_time.
With faster hardware, a correspondingly larger throughput would be expected.
User Manual Boot-US 4.2.0
6 Tips 129

6.19 Boot-US does not find SCSI or IDE disks under NT
Under Windows NT on a system with mixed disk types (EIDE and SCSI) it could happen that Boot-US detects only
one disk type (SCSI or EIDE). This is not a failure of Boot-US, but it is caused by Windows NT. You could verify
that NT has the same problem by starting the Disk Administrator of Windows NT. This program will also not detect
the same disk type. The problem of the "apparent missing" disks is caused by non-installed or non-started drivers for
the corresponding disk type. The following hints are intended to help you solving this problem.
Install (E)IDE drivers:
The driver atdisk.sys handles IDE disks while the driver atapi.sys handles EIDE disks. The instructions to install
or start the driver atdisk.sys for IDE disks (see also Microsoft Knowledge Base article Q133491) are as follows:
The driver atdisk.sys must reside in the directory %systemroot%\system32\drivers.•
In Control Panel / Devices set the start mode of the device ATDISK to "System". If you want that the newly
added drives appear first in the Disk Administrator set the start mode to "Boot".
Attention: changing the start mode could prevent NT from booting.
•
Start the device ATDISK.•
Start the Disk Administrator of NT and assign appropriate drive letters to the partitions of the (E)IDE and
SCSI disks. If you do not assign drive letters, Windows will choose them automatically at the next startup and
they might be different from the current drive letters.
•
Restart Windows NT.•
Install SCSI (and EIDE) drivers:
SCSI drivers are provided usually with the SCSI controller. The installation is straightforward:
Open Control Panel / SCSI Adapters and click on Drivers / Add....•
A dialog box opens. Select the appropriate model of the SCSI controller.•
Insert the installation CD or diskette in the appropriate drive.•
NT copies the necessary driver files from the CD or diskette.•
Remark: (E)IDE drivers can also be installed with this approach.
User Manual Boot-US 4.2.0
130 6 Tips

6.20 Support for Windows 2000/XP/2003/Vista/2008/7/8/10
Starting with version 1.2.4 Boot-US supports Windows 2000/XP/2003/Vista/2008/7/8/10. To install under Windows
2000/XP/2003/Vista/2008/7/8/10 the boot manager Boot-US you must use the version Boot-US 1.2.4 or higher. If
you install under Windows 2000/XP/2003/Vista/2008/7/8/10 the boot manager using Boot-US 1.2.3 (or earlier) you
may suffer serious data loss!
Technical background:
Microsoft has changed in Windows 2000/XP/2003/Vista/2008/7/8/10 the functions for accessing the hard disk. If the
disk is accessed by the old functions (of Boot-US 1.2.3), the access should be denied always and an error should be
returned. Unfortunately this error checking does not work reliably in Windows 2000/XP/2003/Vista/2008/7/8/10.
Under certain circumstances Windows 2000/XP/2003/Vista/2008/7/8/10 does allow the disk access with the "old"
functions calls. Write access with the old function calls seems to work, i.e. no error is returned. In reality, however,
incorrect data is written to the disk resulting in the mentioned data loss.
User Manual Boot-US 4.2.0
6 Tips 131

6.21 True partition hiding for Windows
2000/XP/2003/Vista/2008/7/8/10
All Windows versions from Windows 2000 and higher ignore the simple hiding of partitions, i.e. those partitions are
still visible to Windows. To hide a partition under Windows 2000/XP/2003/Vista/2008/7/8/10 the partition must be
true hid. When a partition is true hid the partition ID and the boot sector of the respective partition is modified. True
hiding a partition is available with Boot-US 1.5.0 (or higher).
Comment:
If Windows 2000 up to Windows 10 is involved and multiple independent installations of Windows are to be
performed, the present partitions must be true hid before the next installation is carried out. The true hidden partitions
are ignored by all versions of Windows.
Comment:
It is possible that Windows 2000/XP/2003/Vista/2008/7/8/10 considers a true hidden partition as unformatted. This
can be changed by removing the drive letter from a true hidden partition. This prevents that you accidentally format
such an "unformatted" partition thereby deleting all existing data on that partition. Drive letters are assigned or
removed within the Windows disk administrator (Computer Management / Storage / Disk Management).
User Manual Boot-US 4.2.0
132 6 Tips

6.22 Copying (cloning) a Windows 2000/XP/2003 installation
Copying or cloning a partition with Windows 2000/XP/2003 does not always lead to second independent Windows
installation. Especially when the image is installed on the same hard disk, the second Windows becomes dependent on
the original partition. On the other hand, copying the image to another disk seems to work better.
The reason for these problems is that all data are copied unchanged. Especially the absolute partition identifiers are
also duplicated. This means the image contains references to the original partition. When the image is booted,
Windows follows the references and tries to access the original partition and not the image. If the image resides on
another disk, it seems that Windows considers the references as invalid and accesses the image correctly.
These problems can be avoided by deleting the following registry key before creating the image:
HKEY_LOCAL_MACHINE\System\MountedDevices.
Using this measure the references to the original partition are missing in the image. When the original partition or the
image is started the next time Windows recognizes that this registry key is missing and reconstructs it from the
existing partitions.
This tip has been kindly provided by Christian Wittmer from Scorpio IT (http://www.scorpio-it.com). Thank you
very much.
Attention:
When trying the above tip it is strongly recommended to backup the registry before deleting the
registry key. When Windows has not been installed on C: severe problems have been reported after
deleting the registry key. In general you are using this tip at your own risk.
User Manual Boot-US 4.2.0
6 Tips 133

6.23 Administrator rights under Vista and Windows 7/8/10
Starting with Vista Microsoft has changed the user rights management. These changes also apply to Windows 7/8/10.
Even if a user is logged on as administrator programs started by this user are running without administrator rights by
default.
Programs may contain a manifest which requests administrator rights or the user may start the program by "run as
administrator". In both cases Windows shows the User Account Control to inform the user that the program requests
administrator rights. Only after the user has approved this request the program gets started with administrator rights.
Beginning with version 3.6.0 the program Boot-US (GUI) can be started directly by a double click. The program
contains now in the embedded manifest the request for administrator rights. Hence it is not necessary any more to start
the program by right clicking and selecting "run as administrator".
Also the command-line version of Boot-US requires administrator rights. This can be achieved most easily by starting
it from a command-line window having administrator rights. Another possibility is to start the program by the tool
"runas" under an administrative user.
User Manual Boot-US 4.2.0
134 6 Tips

6.24 System reserved partition on Windows 7/8/10
When you install Windows 7/8/10 on an empty disk then it is installed in two partitions: a small system reserved boot
partition of size 100 - 350 MiB and the actual Windows 7/8/10 partition. Windows 7/8/10 is booted by the system
reserved partition. This partition must be inserted into the boot manager. Additionally you need to make sure that both
partitions are simultaneously made visible or true hid. In other words: you need to use the individual true hiding of
partitions, hence you must specify yourself which partitions need to be true hid in each case. The system reserved boot
partition is used primarily for a BitLocker encryption. If you do not make use of BitLocker then it is easier to install
Windows 7/8/10 in a single partition.
When Windows 7/8/10 is installed in two partitions then the automatic true hiding cannot be used, since in this case
only one of the two Windows 7/8/10 partitions would be made visible while the other one would remain true hid. In
such a case booting does fail since the Windows 7/8/10 installation is not completely accessible.
To install Windows 7/8/10 in a single partition you can create the target partition and set it active before starting the
installation. The installation will then be carried out into the active partition. Other primary partitions on the same disk
should, as usually, be true hid before starting the new installation.
Also without that preparation of the disk it is possible to install Windows 7/8/10 in a single partition, for example see
the following link:
http://www.mydigitallife.info/hack-to-remove-100-mb-system-reserved-partition-when-installing-windows-7/comment-page-1/
The reference to this link was kindly provided by Jörg Staudte (www.musikcomputer.de).
User Manual Boot-US 4.2.0
6 Tips 135

User Manual Boot-US 4.2.0
136 6 Tips

7 Glossary
The following glossary explains the most important expressions which you will always come across in regard to boot
managers and partitions.
1. BIOS short overview
2. UEFI short overview
3. UEFI fallback boot mode
4. Purpose of boot manager
5. Partition / partition sector / boot sector
6. Format of partition sector
7. Master Boot Record (MBR) / track 0
8. Primary / extended / logical partition
9. GPT partition
10. Active partition
11. Hidden partition / true hidden partition
12. Bootable partition
13. Which partition IDs are recognized ?
14. LBA and CHS format, LBA mapping
15. INT 13h / extended INT 13h
16. SI and IEC units
17. USB drives
18. Disk signature
19. 4Kn disk
7 Glossary 137

7.1 BIOS short overview
The BIOS on x86 computers provides functions necessary for booting the machine. The BIOS functions are stored in
a chip, hence they are available immediately after switching on the machine.
The BIOS functions are implemented as calls of certain software interrupts. There are software interrupts for
accessing the keyboard, the screen and storage devices (disks, diskettes, cd/dvd).
Standard boot process from disk:
Booting from disk is performed as follows:
In the BIOS a certain order of the boot disks is specified.1.
The BIOS loads the first sector (MBR) of the boot disk 1 into memory and starts the MBR code residing in
the MBR.
2.
This MBR code searches the partition table for a partition entry marked as active.3.
The MBR code loads the boot sector of the active partition into memory and starts the boot sector code.4.
The boot sector code loads additional sectors from disk and starts them. This finally starts the operating
system.
5.
Standard boot process from diskette:
Booting from diskette is similar to booting from disk. The BIOS loads and starts the first sector of the diskette.
However on diskettes the first sector is already the boot sector, there is no partition table on diskettes. The operating
system is therefore started already in the first step.
Boot process from cd/dvd:
The boot process from cd/dvd is different in a some details from booting from disk. First of all the size of a cd/dvd
sector is 2048 bytes (while disk sectors have a size of 512 bytes), and secondly the boot data are stored in sector 17
(boot record) and not in the first sector of the cd/dvd. The boot record contains links to the boot catalog which
contains the images to start. The images can be diskette images or whole disk images.
User Manual Boot-US 4.2.0
138 7 Glossary

7.2 UEFI short overview
The UEFI firmware is the successor of the BIOS. Similar to the BIOS the UEFI firmware is stored in a chip and
therefore the UEFI firmware is available immediately after switching on the computer. UEFI is used since around
2010. Since around 2020 booting by UEFI has largely replaced booting by BIOS. Contrary to BIOS there exist
detailed specifications of the UEFI functions and interfaces.
CSM (Compatibility Support Module):
CSM is a component of UEFI which provides BIOS functions. By activating CSM an UEFI machine boots identically
to a BIOS machine.
EFI System Partition and efi files:
The EFI System partition (ESP) is a special partition on a GPT disk. The UEFI specification defines that the ESP is
formated as FAT32. The ESP contains efi files. Additionally it may contain other files (e.g. configuration data). The
UEFI firmware contains all required functions to load an efi file from FAT32 and start this file. Efi files are files
containing the boot loader code for starting an operating system.
When you install an operating system on an UEFI machine, the installation program creates GPT partitions incl. the
ESP and stores the appropriate efi file there. The actual operating system is stored on a separate GPT partition.
UEFI boot variables:
The UEFI variables are stored in the NVRAM. They can be read and written by the UEFI firmware and by operating
systems (Windows, Linux, ...). The following screenshot shows the UEFI variables relevant for booting:
User Manual Boot-US 4.2.0
7 Glossary 139

BootOrder
This variable contains the order of the boot options. The UEFI firmware first tries to boot the first entry (Boot0017). If
that fails it tries the second entry (Boot0013). These tries are continued until a working boot option is met.
Boot####
The individual boot options are stored as UEFI variables with the names Boot####. Here #### is a four digit hex
number beginning with 0000. The corresponding variable (e.g. Boot0017) contains a short description and the name of
an efi file together with an indication about the partition where this file lies.
User Manual Boot-US 4.2.0
140 7 Glossary

7.3 UEFI fallback boot mode
The UEFI specification defines a so called "fallback boot mode" which allows booting an efi file from disks or
removable disks (e.g. USB sticks) without a corresponding boot variable existing in NVRAM.
When the UEFI firmware is directed to boot from a disk it first searches for a EFI System partition (on GPT disks) or
a FAT32 partition (on MBR disks). Subsequently, if such a partition is found the firmware searches for a file
\efi
\boot
\bootx64.efi
(on x86-64 machines), and if found, starts this efi file.
Example: Installation of boot manager Boot-US to USB stick
Get an USB stick formatted with FAT32 in MBR style•
The USB stick may already contain directories and files•
Create a directory \efi\boot on the USB stick•
Install the boot manager Boot-US to a file, this creates the file bmgrus.efi•
Copy the file bmgrus.efi to the directory \efi\boot on the USB stick•
If you have specified a background image copy it to the same directory•
Rename the file bmgrus.efi on the USB stick to bootx64.efi•
Restart the computer and select the USB stick as boot medium•
The UEFI firmware starts the file bootx64.efi with the boot manager Boot-US•
User Manual Boot-US 4.2.0
7 Glossary 141

7.4 Purpose of boot manager
The purpose of a boot manager is to allow a user to boot different operating systems from the same PC (one at a time).
Many operating systems contain an integrated boot manager, for example "BCD" (boot configuration database) on
Windows or "GRUB" for Linux. The main disadvantage of these built-in boot managers is that they can be used only
after the corresponding operating system has been started. After that the actually desired operating system can be
booted. Therefore, in many cases, two boot processes are necessary to start the target operating system. Also the
configuration of these boot managers often requires detailed system knowledge.
On the contrary the boot manager Boot-US allows the selection of the configured operating systems directly after
starting the machine before any operating system is booted. Hence the boot manager Boot-US is faster and more
flexible than the built-in boot managers. Additionally it is very easy to configure the boot manager by the Windows
configuration program Boot-US.
User Manual Boot-US 4.2.0
142 7 Glossary

7.5 Partition / partition table and partition sectors / boot sector
Partition:
A partition is a set of adjoined sectors on a disk. Any sector of the disk belongs either to no partition or it belongs to a
specific partition, but it must not belong to more than one partition at the same time. In other words, partitions must
not overlap each other. Typically, different operating systems are installed on separate partitions. An operating system
can access all sectors of its partition, while access to sectors of other partitions is not possible sometimes.
There is the old convention that partitions should start and end on cylinder boundaries. No rule is without exception:
since the first sector of a hard disk (C/H/S=0/0/1) is always reserved for the MBR and one does not want to leave the
complete zeroth cylinder empty, the first partition does not begin on the next cylinder boundary (C/H/S=1/0/1) but
directly after the track 0 at C/H/S=0/1/1. Hence only the sectors of the track 0 are left empty (with the exception of the
first sector).
There is no compelling technical reason for this convention. All modern operating systems like Linux and Windows
do not have any problems when partitions do not start or end on cylinder boundaries. However very old operating
systems (e.g. DOS) expect that this convention is obeyed.
With the introduction of SSD drives the alignment on cylinder boundaries became obsolet. On SSDs drives data
blocks at certain addresses can be accessed faster than at other addresses. Therefore Microsoft introduced with
Windows Vista a new alignment schema. New partitions are now aligned on 1 MiB boundaries to allow the fastest
possible access. This alignment is meanwhile the new standard.
Partition table and partition sectors:
Every partition requires an accompanying entry in a partition table. This entry in the partition table describes this
partition, i.e. it contains the information about begin and end of the partition and the type of the partition. The partition
table itself is stored in one or more separate partition sectors. This applies to MBR as well as GPT partitions.
The partition table for all primary and extended partitions is stored in the MBR (in one sector). On the contrary, to
every logical drive belongs a separate partition sector, which describes on one hand the logical partition and on the
other hand contains the position of the partition sector for the next logical drive. The partition table for GPT partitions
is stored in the 33 sectors following the MBR. For details see format of partition sector.
Boot sector:
The boot sector is the sector at the beginning of a partition. In most cases the boot sector contains data about the file
system used for formating the partition. Additionally the boot sector may contain a small program.
When booting by BIOS then loading the boot sector into memory and starting this boot sector code will boot the
corresponding operating system from this MBR partition. The contents and the format of the boot sector code depends
on the operating system. A certain boot sector can therefore be used only for booting a particular operating system but
not for booting any other operating systems.
When booting by UEFI the boot sector code is not used.
User Manual Boot-US 4.2.0
7 Glossary 143

7.6 Format of MBR partition sector
MBR partition sector describe MBR partitions, i.e. they contains the information about the position, size and type of
the MBR partitions.
All MBR partition sectors have exactly the same format (see table below). It should be noted, however, that the boot
loader code is present only in the MBR partition sector. In the partition sectors for logical drives the boot loader code
is empty.
The boot loader code is relevant only when booting by UEFI.
---------------------------------------
MBR partition sector (length 512 bytes)
---------------------------------------
Offset Bytes Meaning
000h 446 boot loader code
1BEh 16 1. partition entry
1CEh 16 2. partition entry
1DEh 16 3. partition entry
1EEh 16 4. partition entry
1FEh 2 signature (55h AAh)
-------------------------------------
------------------------------------------------------
MBR partition entry (length 16 bytes)
------------------------------------------------------
Off. Bytes Meaning
00h 1 80h = active partition / 00h = not active
01h 1 begin of partition (head number)
02h 1 begin of partition (sector number) [*]
03h 1 begin of partition (cylinder number) [*]
04h 1 partition ID
05h 1 end of partition (head number)
06h 1 end of partition (sector number) [*]
07h 1 end of partition (cylinder number) [*]
08h 4 rel. sectors (# sec. to begin of partition)
0Ch 4 number of sectors in partition
-----------------------------------------------------
[*] Remark:
The byte for the sector number (offset 2 respectively 6) contains
the CHS sector number in the bits 0-5.
Hence in the CHS format the sector number occupies 6 bits.
The remaining two bits 6+7 belong to the CHS cylinder number,
they represent the high bits 8+9 of the CHS cylinder number.
The byte for the cylinder number (offset 3 respectively 7) contains
the low bits 0-7 of the CHS cylinder number.
Hence in the CHS format the cylinder number occupies 10 bits.
The byte at offset 0 specifies whether the partition is active or not. In the standard boot process (without boot
manager) the partition marked as active is booted automatically.
Obviously that there are two ways to specify the position of a partition. Namely the CHS format and the LBA format.
In the CHS format the position of a partition is specified by cylinder/head/sector numbers specifying begin and end of
the partition (24 bit each). In the LBA format the position of a partition is specified by specifying the relative sector
(begin of partition) and total number of sectors (32 bit each).
For disks up to a size of 8 GB the 24 bit of the CHS format are sufficient to specify all partitions.
User Manual Boot-US 4.2.0
144 7 Glossary

For larger disks these 24 bits are not any more sufficient. The 32 bit of the LBA format allows addressing of all disk
sectors up to a maximum disk size of 2048 GB (2 TB).
User Manual Boot-US 4.2.0
7 Glossary 145

7.7 Master Boot Record (MBR) / track 0
Master Boot Record (MBR):
The Master Boot Record (MBR) on x86-computers is the first sector of the hard disk. The MBR occupies exactly one
sector (512 bytes). After starting the computer the BIOS automatically loads the first sector of the boot drive (C: or
A:) and starts the code found on this sector. When the boot order is set to "C: , A:", then the BIOS tries to load the
MBR from the first hard disk. When booting from A: comes first, then the BIOS tries to load the first sector of a
diskette. When the sector has been read successfully (from C: or A:) it is executed. When the sector could not be read
(e.g. booting from A: without diskette in drive A:) the BIOS tries to boot from the next boot drive.
On diskettes there is no MBR. Rather the first sector of the diskette contains the boot sector if the diskette is bootable,
or a small program which asks the user to remove the diskette and press any key.
The MBR is a partition sector. All MBR partition sectors have the same format (see format of MBR partition sector),
which is independent of the operating system. The MBR also contains a small boot loader program and the partition
table. The partition table can contain up to four entries. Each entry describes a partition. The boot loader of the
standard MBR searches in the partition table of the first hard disk for a primary partition marked as active. If such a
partition is found, the boot sector of this partition is loaded and started. The boot sector finally loads the corresponding
operating system.
The boot loader program in the MBR will be executed only when booting by BIOS. When booting by UEFI it is
ignored.
Track 0:
The term "track" denotes a set of sectors all having the same head number and cylinder number. The "track 0" consists
of all sectors with head and cylinder number 0. The first sector in the track 0 is the MBR. Since the sector number is
restricted to the range 1 to 63, the track 0 contains at most 63 sectors. Usually the track 0 is empty (except for the
MBR), hence this space can be used store small programs. This has the advantage that no additional partition must be
created to store these data and furthermore there is no dependency on the file systems of existing partitions. The
problem is that there is no indicator whether the track 0 contains some data or not. Therefore it could happen that
other programs unintentionally overwrite the data stored in the track 0.
On GPT disks the GPT table begins immediately after the MBR. Hence for GPT disks there are no free sectors on the
track 0.
User Manual Boot-US 4.2.0
146 7 Glossary

7.8 Primary / extended / logical partition
The terms primary, extended and logical partition apply only to MBR disks. On GPT disks there are no such
partitions.
The partition table in the partition sector of the MBR can contain at most four entries. This could be either only
primary partitions (max. four) or exactly one extended partition and up to three primary partitions. This convention
allows, for example, that on a second hard disk only one extended partition is created.
Primary partition:
A primary partition is completely defined by its entry in the partition table. This entry contains the information about
the beginning and end of the partition, the type of the partition and the position of the accompanying boot sector.
Extended partition:
In the case of an extended partition the entry in the partition table of the MBR describes only the space reserved for
the extended partition. This space can be split in up to 24 logical partitions. Logical partitions can be created only
inside an extended partition. In simple words, the extended partition represents the space reserved for the logical
partitions. The partition entry in the MBR points to the partition sector of the first logical partition, which resides
directly at the beginning of the extended partition.
Logical partition:
A logical partition -- often also called a logical drive -- is a set of adjoining sectors inside an extended partition. In
many respects the logical partitions resemble primary partitions. However the boot loader in the standard MBR of
Microsoft does not support booting from logical partitions. With the help of a boot manager a logical partitions can be
easily booted, supposed the operating system allows itself to be installed on a logical partitions.
The size, position and type of logical partitions is stored in a chain of partition sectors inside the extended partition.
The partition table of a logical partition sector contains two entries. One entry describes the logical partition, the other
entry contains the position of the partition sector of the next logical partition. The entry in the partition table of the
MBR describes just the beginning of this chain. If the chain is broken, the following logical partitions will not be
accessible any more.
User Manual Boot-US 4.2.0
7 Glossary 147

User Manual Boot-US 4.2.0
148 7 Glossary

7.9 GPT disk / GPT partition
A GPT disk is a disk containing a GPT partition table.
The GPT table is stored in the 33 sectors immediately following the MBR (LBA 1 to 33). Additionally a backup of the
GPT table is stored at the end of the disk. To prevent an unintentional overwriting of GPT partitions by MBR partition
managers the whole disk space (except for the MBR) is marked as occupied by the so-called GPT protective partition.
Since the MBR table contains only 32 bit sector numbers the GPT protective partition is limited to a size of 2 TiB.
The following table summarizes the main differences between MBR and GPT partitions.
Parameter MBR GPT
Sector numbers 32 bit 64 bit
Max. disk size 2 TiB 8 x 10
12
TiB
Partition ID ID with 8 bit GUID with 128 bit
Partitions per disk 4 pri. 128
Checksum no yes
The GPT tables contain the following data:
------------------------------------------------------
GPT header (length 512 bytes)
------------------------------------------------------
Offset Bytes Meaning
00h 8 signature ("EFI PART")
08h 4 revision
0Ch 4 header size
10h 4 crc32 of header
14h 4 reserved
18h 8 LBA of current header
20h 8 LBA of backup header
28h 8 first LBA for partitions
30h 8 last LBA for partitions
38h 16 unique disk GUID
48h 8 partition entries start LBA
50h 4 number of partition entries
54h 4 size of a partition entry
58h 4 crc32 of partition entries
5Ch 420 reserved
-----------------------------------------------------
------------------------------------------------------
GPT partition entry (length 128 bytes)
------------------------------------------------------
Offset Bytes Meaning
00h 16 partition type GUID
10h 16 unique partition GUID
20h 8 first LBA of partition
28h 8 last LBA of partition
30h 8 attributes
38h 72 name of partition (36 unicode characters)
-----------------------------------------------------
User Manual Boot-US 4.2.0
7 Glossary 149

The GPT header contains the unique disk GUID and each GPT partition entry contains a unique partition GUID.
When you create a new GPT disk with GPT partitions these unique GUIDs will be different from already existing
ones. This means that the unique disk GUID can be used to unambiguously identify the GPT disk, and the unique
partition GUID can be used to unambiguously identify the GPT partition.
The drawing below shows the main elements of a GPT disk: MBR with reference to GPT protective partition, primary
and backup GPT table with references to GPT partitions.
User Manual Boot-US 4.2.0
150 7 Glossary

7.10 Active partition
The term active partition is relevant only for MBR partitions and booting by BIOS.
The active partition is the partition on the first hard disk which is automatically booted when no boot manager is
installed. The partition marked as active is set in the partition table of the MBR. Please note that there is only one
active partition allowed on each hard disk. If a boot manager is installed it is irrelevant which partition is marked as
active, since the partitions are selected and booted from the boot manager.
User Manual Boot-US 4.2.0
7 Glossary 151

7.11 Hidden partition / true hidden partition
Boot-US supports the hiding of partitions both for MBR and GPT partitions.
In general the idea of partition hididng is to prevent operating systems (e.g. Windows) from accessing certain
partitions. For example, if more than one primary C: partitions are present on a hard disk the assignment of drive
letters to these partitions might lead to problems. These problems can be avoided if all but one of these primary C:
partitions are hidden. It is then possible to boot only from the remaining non-hidden partition. The other C: partitions
are not visible, i.e. they are considered as unknown partitions. The drive letter C: is thus always automatically
assigned to the booted operating system.
7.11.1 MBR partitions
Simple hidden partition:
To (simple) hide MBR partitions the value 10h is added to the partition ID. And to make a partition visible only this
value 10h needs to be subtracted from the partition ID. The OS/2 boot manager uses the same scheme for hiding
partitions.
Both in the configuration program Boot-US and in the boot manager Boot-US only partitions which use drive letters
can be hidden. Hiding partitions therefore applies only to the following partition IDs: 01h, 04h, 06h, 07h, 0Bh, 0Ch
and 0Eh, (see list of recognized partition IDs). All other partitions (e.g. Linux with partition ID 83h) cannot be hid.
True hidden partition:
The simple method of hiding a partition described above does not work with Windows
2000/XP/2003/Vista/2008/7/8/10/11. This means, even if the partition ID is switched to hidden, the partition is
accessible under Windows 2000/XP/2003/Vista/2008/7/8/10/11. To true hide the partition the boot sector is
additionally changed. Hence true hiding a partition means to change both the partition ID and the boot sector. Then
the partition is not anymore recognized by Windows 2000/XP/2003/Vista/2008/7/8/10/11.
Comment 1:
Starting with Windows 10 version 1703 it is necessary to change the boot sector and the end sector of a NTFS
partition. Only then Windows does not recognize the file system of the respective partition any more. Boot-US 3.7.0
(and higher) contains this improved version of true hiding a partition.
Comment 2:
It is possible that Windows 2000/XP/2003/Vista/2008/7/8/10 considers a true hidden partition as unformatted. This
can be changed by removing the drive letter from a true hidden partition. This prevents that you accidentally format
such an "unformatted" partition thereby deleting all existing data on that partition. Drive letters are assigned or
removed within the Windows disk administrator (Computer Management / Storage / Disk Management).
7.11.2 GPT partitions
To (simple) hide a GPT partition the HIDDEN bit of the attribute value of the GPT partition is set. To unhide the
partition the HIDDEN bit is cleared. The GUID partition type remains unchanged. The CRC checksums in the GPT
table are recomputed and updated when an attribute value changes. Boot-US supports the hiding of GPT partitions
only for the type Microsoft basic data and the file systems FAT16, FAT32, exFAT and NTFS.
True hidden partition:
Starting with Boot-US 3.7.0 the MBR method for true hiding a partition can be applied also to GPT partitions of type
Microsoft basic data. Here again the boot sector and the end sector (if necessary) are changed which prevents
Windows from recognizing the file system of the true hidden partition. As a consequence the partition is not anymore
accessible by Windows. The change of the boot and end sector can be easily reverted which makes the partition
accessible again.
User Manual Boot-US 4.2.0
152 7 Glossary

7.12 Bootable partition
The term bootable partition is relevant only for MBR partitions and booting by BIOS.
Boot-US considers partitions as bootable if the boot sector contains a valid boot sector signature. Specifically the
last two bytes in the boot sector must be 55h AAh. When this signature is missing the corresponding partition is
considered non-bootable. By this simple check Boot-US decides whether a primary or logical partition is bootable.
Extended partitions are not bootable in general, since they represent only the frame for the logical partitions.
Unfortunately, the presence of this signature is not a safe indicator of a bootable partition. One could think that by
checking the whole boot sector one could decide whether a partition is bootable or not. It would "only" be necessary
to store a list of all boot sectors for all supported operating systems and compare the actual boot sector to that list.
However, this would mean a big effort and even then it would not allow a safe identification of bootable partitions.
Even if the boot sector is fully correct the boot process can fail in a later state, for example when a driver is missing or
does not fit to the hardware. Probably by now many user might have experienced this by themselves.
Therefore in practice the bootability of a partition can be verified only by experiment, i.e. by trying to boot the
partition. If it works the partition is bootable, otherwise not. Thus partitions which are classified as bootable by
Boot-US could also turn out as non-bootable in reality.
User Manual Boot-US 4.2.0
7 Glossary 153

7.13 Which partition IDs are recognized ?
The following two sections contain all MBR and GPT partitions recognized by Boot-US.
7.13.1 MBR partitions
The type of MBR partitions is determined by the partition ID (1 byte). This value is stored in the partition table.
Boot-US knows 80 partition IDs in total. The following table contains the list of these partition IDs with a short
description of the corresponding partition type. Please note that some partition IDs cannot be assigned uniquely to a
specific partition type. In other words several operating systems respective partitions use the same partition ID.
-------------------------------------------------
Partition ID Partition type
-------------------------------------------------
00h partition is free (empty)
01h FAT12
02h Xenix root
03h Xenix /usr
04h FAT16 < 32 MiB
05h extended partition
06h FAT16 > 32 MiB
07h NTFS, exFAT, HPFS
08h OS/2, AIX, Dell, QNX
09h AIX, Coherent, QNX
0Ah OS/2 boot manager
0Bh FAT32
0Ch FAT32 (LBA)
0Eh FAT16 (LBA)
0Fh extended partition (LBA)
10h OPUS
11h FAT12 (hidden)
12h Compaq config partition
14h FAT16 < 32 MiB (hidden)
15h extended partition (hidden)
16h FAT16 > 32 MiB (hidden)
17h NTFS, exFAT, HPFS (hidden)
18h AST
1Bh FAT32 (hidden)
1Ch FAT32 (LBA) (hidden)
1Eh FAT16 (LBA) (hidden)
1Fh extended partition (LBA) (hidden)
24h NEC DOS 3.x
27h Windows Recovery Env.
37h Windows Recovery Env. (hidden)
38h THEOS ver 3.2
39h THEOS ver 4
3Ah THEOS ver 4
3Bh THEOS ver 4 extended partition
3Ch Partition Magic recovery partition
40h Venix 80286
41h Personal RISC
42h SFS
44h GoBack partition
45h Boot-US boot manager
4Dh QNX 4.x
4Eh QNX 4.x 2nd part
4Fh QNX 4.x 3rd part
50h OnTrack DiskManager RO
51h OnTrack RW, Novell
52h CP/M, Microport
53h Disk Manager 6.0
54h Disk Manager 6.0
55h EZ-Drive
User Manual Boot-US 4.2.0
154 7 Glossary

56h GoldenBow
61h SpeedStor
63h Unix System V
64h Novell Netware 2.xx
65h Novell Netware 3.xx, 4.xx
67h Novell
68h Novell
69h Novell
70h DiscSecure MultiBoot
75h IBM PC/IX
80h Minix up to 1.4a
81h Minix from 1.4b, Linux (early ver.)
82h Linux swap
83h Linux native (usually ext3/ext4)
84h Hibernation partition
86h FAT16 volume set
87h NTFS volume set
A0h Phoenix Save-To-Disk
A1h Phoenix Save-To-Disk
A5h BSD
A6h OpenBSD
A9h NetBSD
AFh Apple HFS+
B6h Windows NT FAT16 mirror set (corrupt)
B7h Windows NT NTFS mirror set (corrupt)
BEh Solaris 8 boot partition
BFh New Solaris x86 partition
C6h Windows NT FAT16 volume set (corrupt)
C7h Windows NT NTFS volume set (corrupt)
DBh Concurrent DOS
EBh BeOS
ECh SkyOS
EEh GPT protective partition
EFh EFI system partition
FFh Bad Track Table
-------------------------------------------------
Some partitions are classified as hidden partition. The partition ID of the hidden partitions is different from their
visible counterpart only by the hex number 10h which is added on the partition ID of the visible partition.
7.13.2 GPT partitions
The type of GPT partitions is determined by the GUID (16 bytes). The GUID is stored in the GPT partition table. The
following table contains all GUIDs known by Boot-US. All GUIDs are documented officially. However due to their
length the GUID values are rather unpractical. Much more practical are the IDs with a length of two bytes only. These
short IDs were invented by Rod Smith (Linux project GPT fdisk). Boot-US uses the same short IDs for denoting the
GPT partition types. The short ID is not stored in the GPT partition table.
--------------------------------------------------------------------------
ID GUID Description
--------------------------------------------------------------------------
0700h EBD0A0A2-B9E5-4433-87C0-68B6B72699C7 Microsoft basic data
0C01h E3C9E316-0B5C-4DB8-817D-F92DF00215AE Microsoft reserved
2700h DE94BBA4-06D1-4D40-A16A-BFD50179D6AC Windows Recovery
4200h AF9B60A0-1431-4F62-BC68-3311714A69AD Windows LDM data
4201h 5808C8AA-7E8F-42E0-85D2-E1E90434CFB3 Windows LDM metadata
7501h 37AFFC90-EF7D-4E96-91C3-2D7AE055B174 IBM GPFS
7F00h FE3A2A5D-4F32-41A7-B725-ACCC3285A309 ChromeOS kernel
7F01h 3CB8E202-3B7E-47DD-8A3C-7FF2A13CFCEC ChromeOS root
7F02h 2E0A753D-9E48-43B0-8337-B15192CB1B5E ChromeOS reserved
8200h 0657FD6D-A4AB-43C4-84E5-0933C84B4F4F Linux swap
8300h 0FC63DAF-8483-4772-8E79-3D69D8477DE4 Linux data
User Manual Boot-US 4.2.0
7 Glossary 155

8301h 8DA63339-0007-60C0-C436-083AC8230908 Linux reserved
8E00h E6D6D379-F507-44C2-A23C-238F2A3DF928 Linux LVM
A500h 516E7CB4-6ECF-11D6-8FF8-00022D09712B FreeBSD disklabel
A501h 83BD6B9D-7F41-11DC-BE0B-001560B84F0F FreeBSD boot
A502h 516E7CB5-6ECF-11D6-8FF8-00022D09712B FreeBSD swap
A503h 516E7CB6-6ECF-11D6-8FF8-00022D09712B FreeBSD UFS
A504h 516E7CBA-6ECF-11D6-8FF8-00022D09712B FreeBSD ZFS
A505h 516E7CB8-6ECF-11D6-8FF8-00022D09712B FreeBSD Vinum/RAID
A580h 85D5E45A-237C-11E1-B4B3-E89A8F7FC3A7 Midnight BSD data
A581h 85D5E45E-237C-11E1-B4B3-E89A8F7FC3A7 Midnight BSD boot
A582h 85D5E45B-237C-11E1-B4B3-E89A8F7FC3A7 Midnight BSD swap
A583h 0394Ef8B-237E-11E1-B4B3-E89A8F7FC3A7 Midnight BSD UFS
A584h 85D5E45D-237C-11E1-B4B3-E89A8F7FC3A7 Midnight BSD ZFS
A585h 85D5E45C-237C-11E1-B4B3-E89A8F7FC3A7 Midnight BSD Vinum
A800h 55465300-0000-11AA-AA11-00306543ECAC Apple UFS
A901h 49F48D32-B10E-11DC-B99B-0019D1879648 NetBSD swap
A902h 49F48D5A-B10E-11DC-B99B-0019D1879648 NetBSD FFS
A903h 49F48D82-B10E-11DC-B99B-0019D1879648 NetBSD LFS
A904h 2DB519C4-B10F-11DC-B99B-0019D1879648 NetBSD concatenated
A905h 2DB519EC-B10F-11DC-B99B-0019D1879648 NetBSD encrypted
A906h 49F48DAA-B10E-11DC-B99B-0019D1879648 NetBSD RAID
AB00h 426F6F74-0000-11AA-AA11-00306543ECAC Apple boot
AF00h 48465300-0000-11AA-AA11-00306543ECAC Apple HFS/HFS(+)
AF01h 52414944-0000-11AA-AA11-00306543ECAC Apple RAID
AF02h 52414944-5F4F-11AA-AA11-00306543ECAC Apple RAID offline
AF03h 4C616265-6C00-11AA-AA11-00306543ECAC Apple label
AF04h 5265636F-7665-11AA-AA11-00306543ECAC AppleTV recovery
AF05h 53746F72-6167-11AA-AA11-00306543ECAC Apple Core
AF06h B6FA30DA-92D2-4A9A-96F1-871EC6486200 Apple SoftRAID Status
AF07h 2E313465-19B9-463F-8126-8A7993773801 Apple SoftRAID Scratch
AF08h FA709C7E-65B1-4593-BFD5-E71D61DE9B02 Apple SoftRAID Volume
AF09h BBBA6DF5-F46F-4A89-8F59-8765B2727503 Apple SoftRAID Cache
AF0Ah 7C3457EF-0000-11AA-AA11-00306543ECAC Apple APFS
BE00h 6A82CB45-1DD2-11B2-99A6-080020736631 Solaris boot
BF00h 6A85CF4D-1DD2-11B2-99A6-080020736631 Solaris root
BF01h 6A898CC3-1DD2-11B2-99A6-080020736631 Solaris /usr & Mac ZFS
BF02h 6A87C46F-1DD2-11B2-99A6-080020736631 Solaris swap
BF03h 6A8B642B-1DD2-11B2-99A6-080020736631 Solaris backup
BF04h 6A8EF2E9-1DD2-11B2-99A6-080020736631 Solaris /var
BF05h 6A90BA39-1DD2-11B2-99A6-080020736631 Solaris /home
BF06h 6A9283A5-1DD2-11B2-99A6-080020736631 Solaris alternate sector
BF07h 6A945A3B-1DD2-11B2-99A6-080020736631 Solaris Reserved 1
BF08h 6A9630D1-1DD2-11B2-99A6-080020736631 Solaris Reserved 2
BF09h 6A980767-1DD2-11B2-99A6-080020736631 Solaris Reserved 3
BF0Ah 6A96237F-1DD2-11B2-99A6-080020736631 Solaris Reserved 4
BF0Bh 6A8D2AC7-1DD2-11B2-99A6-080020736631 Solaris Reserved 5
C001h 75894C1E-3AEB-11D3-B7C1-7B03A0000000 HP-UX data
C002h E2A1E728-32E3-11D6-A682-7B03A0000000 HP-UX service
ED00h F4019732-066E-4E12-8273-346C5641494F Sony System
EF00h C12A7328-F81F-11D2-BA4B-00A0C93EC93B EFI System
EF01h 024DEE41-33E7-11D3-9D69-0008C781F39F MBR partition scheme
EF02h 21686148-6449-6E6F-744E-656564454649 BIOS boot partition
EF10h C12A7338-F81F-11D2-BA4B-00A0C93EC93B EFI System hidden
FB00h AA31E02A-400F-11DB-9590-000C2911D1B8 VMWare VMFS
FB01h 9198EFFC-31C0-11DB-8F78-000C2911D1B8 VMWare reserved
FB02h 9D275380-40AD-11DB-BF97-000C2911D1B8 VMWare crash protection
FD00h A19D880F-05FC-4D3B-A006-743F0F84911E Linux RAID
--------------------------------------------------------------------------
User Manual Boot-US 4.2.0
156 7 Glossary

7.14 LBA and CHS format, LBA mapping
LBA format:
LBA is the abbreviation for Logical Block Address. This simply means the sectors of a disk are sequentially
numbered starting with LBA number 0. Every sector is identified by its unambigious LBA number. The LBA format
is supported by BIOS (as of 1995) and by UEFI.
CHS format:
The CHS format is the initial BIOS schema for identifying a disk sector. The CHS format is not used by UEFI.
In the CHS format a sector is identified by its Cylinder/Head/Sector number. In the beginning these values meant the
physical location of the sector on the disk, later these values became only logical numbers. The (logical) number of
cylinders, heads and sectors per track can be determined by the func. 08h respectively 48h of the BIOS interrupt 13h.
The CHS format is supported by all the BIOS but it is limited to a disk size of 8 GB (see below).
The CHS format has the following restrictions:
cylinder number 0 - 1023 (10 Bit)
head number 0 - 254 (8 Bit)
sector number 1 - 63 (6 Bit)
Due to a problem in the DOS operating system a maximum head number 255 leads to a crash although the BIOS
would allow this number. Therefore a maximum head number 255 is not used in general.
Max. disk size:
For the CHS format in the partition table and for calling BIOS funtions there are in general only 24 bits available.
With 24 bits and a sector size of 512 bytes it is possible to address all sectors of a disk up to a maximum disk size of 8
GB. For the LBA addressing scheme there are 32 bits reserved in the partition table. At the same sector size of 512
bytes all sectors of a disk up to a maximum size of 2048 GB (2 TB) can be addressed. The extended INT 13h even
uses 64 bits for storing the LBA number. Due to its simpler concept and also the possibility to support larger disks the
LBA format is used internally by all modern operating systems for the direct disk access.
Conversion between CHS and LBA:
It is possible to covert the LBA format to CHS and vice versa. Conceptually both forms are equivalent. A sector
C/H/S in the CHS format has the following LBA number:
LBA = C x Num_Head x Num_Sec + H x Num_Sec + (S - 1)
Here Num_Sec means the (logical) number of sectors per track and Num_Head the (logical) number of heads. Only
these two (logical) geometry parameters of the disk are relevant for the conversion. The number of cylinders in
unimportant for the conversion.
LBA mapping:
The two conversion parameters Num_Head and Num_Sec are summarized as LBA mapping. The LBA mapping
determines the conversion between CHS and LBA numbers of a sector. These two parameters are obtained from the
function AH=08h of the standard BIOS interrupt 13h. Even if the extended interrupt 13h is supported, the LBA
mapping is obtained from the standard INT 13h. The disk parameters which are returned from the extended INT 13h
are useful only to compute the total disk size.
The total disk size is simply the product of the total number of sectors (number of cylinders x number of heads x
number of sectors/track) with 512 (the sector size).
User Manual Boot-US 4.2.0
7 Glossary 157

7.15 INT 13h / extended INT 13h
INT 13h:
The BIOS interrupt 13h provides functions for direct access of the disk. These functions are implemented by the
BIOS, i.e. these functions can be used without the need of any disk drivers. This is important especially for booting,
since at this moment no operating system and no hard disk drivers are loaded. Typically the INT 13h is used for
reading the boot sector from the disk. The INT 13h uses the CHS notation with a width of 24 bit to address a sector.
Therefore the INT 13h can access at most 8 GB of a disk. If the disk is larger, then in the best case the first 8 GB are
accessible by the INT 13h.
Extended INT 13h:
The extended INT 13h is the extension of the INT 13h. This extension has been specified around 1994 by IBM and
Microsoft. One difference (among others) of the extended INT 13h is that it uses LBA numbers with a width of 64 bit
for addressing disk sectors. Therefore the extended INT 13h supports disks up to a size of 8 billion TB. This limit
exceeds today's typical disk capacities (8 GB) by 12 orders of magnitude. Hence it should be possible to use the
extended INT 13h for "some" more years.
The INT 13h is not used by UEFI.
User Manual Boot-US 4.2.0
158 7 Glossary

7.16 SI and IEC units
SI units:
The standard SI units like KB, MB, GB and TB are powers of 1000.
Examples:
1 KB = 1000 Byte = 10
3
Byte
1 MB = 1000 KB = 10
6
Byte = 1 000 000 Byte
1 GB = 1000 MB = 10
9
Byte = 1 000 000 000 Byte
1 TB = 1000 GB = 10
12
Byte = 1 000 000 000 000 Byte
IEC units:
On the other hand the units KiB, MiB, GiB and TiB are specified as powers of 1024. These units were standardized by
IEC in 1999. Starting with Boot-US 3.0.1 these IEC units are used by default.
Examples:
1 KiB = 1024 Byte = 2
10
Byte
1 MiB = 1024 KiB = 2
20
Byte = 1 048 576 Byte
1 GiB = 1024 MiB = 2
30
Byte = 1 073 741 824 Byte
1 TiB = 1024 GiB = 2
40
Byte = 1 099 511 627 776 Byte
Since the number 1024 is close to the number 1000 it became customary to abbreviate 1024 as 1 KB although strictly
speaking both numbers are different. However the difference is only about 2 percent and thus in many cases
negligible. But the above table shows that the error becomes larger with increasing numbers. 1 TiB differs already by
about 10 percent from 1 TB, and such a difference is usually not negligible any more. It is therefore expected that in
the future more emphasis is put on using the correct units. If numbers are meant as powers of 1024 then one expects to
see the IEC units.
User Manual Boot-US 4.2.0
7 Glossary 159

7.17 USB drives
Windows classifies USB drives in two groups: USB disks and USB sticks. This classification is controlled by the
value of the "removable media bit" in the controller of the USB drive.
USB disks:
For USB disks the "removable media bit" in the controller of the USB drive contains the value 0. Windows treats such
drives like fixed disks. Especially it is possible to create multiple MBR partitions on USB disks and Windows will
show all partitions supposed their file system is recognized by Windows.
USB sticks:
However in most cases the "removable media bit" in the controller of the USB drive contains the value 1. Windows
considers such drives as USB removable drives, in short USB sticks. Windows can access on USB sticks only the first
MBR partition. It is possible to create additional MBR partitions on an USB stick. However, these additional
partitions are ignored by Windows, they never show up in the Windows explorer.
Set partition accessible:
Starting with Boot-US 3.5.0 you can select which partition on the USB stick should be accessible by Windows. The
selected partition is moved by Boot-US to the first position in the partition table. This partition remains accessible by
Windows until you set another partition on the USB stick as accessible. In Boot-US the accessible partition is marked
with the partition number 1.
This new function requires a 3.x.x license if the USB stick contains more than two partitions.
Linux:
Linux does not distinguish between USB disks and USB sticks. All partitions on USB disks and USB sticks are
accessible.
User Manual Boot-US 4.2.0
160 7 Glossary

7.18 Disk signature
The disk signature is an unsigned 32 bit number stored in the MBR at offset 1B8h (4 bytes in little endian format).
The disk signature is displayed always in the hex format and not in the decimal format. In the following screenshot the
disk signature is the hex value 64D6E9CD.
The disk signature is created by Windows as a random value when the disk is initialized. It is important to note that
each disk receives a different disk signature and that the disk signature does not change later. Hence the disk signature
can be used to unambiguously identify the respective disk.
Starting with Windows Vista the disk signature is used in the Boot Configuration Database (BCD) for identifying the
respective boot disk.
User Manual Boot-US 4.2.0
7 Glossary 161

7.19 4Kn disk
In 2010 hard disk manufacturers defined the Advanced Format (AF). AF disks have a larger internal (physical) sector
size of 4096 bytes (4K) instead of 512 bytes as previously. To ensure backward compatibility with existing operating
systems the access to many AF disks used a (logical) sector size of 512 bytes. Meanwhile AF disks exist which can be
accessed only with a sector size of 4096 bytes.
Consequently there are the following disk variants:
512n: the internal sector size is 512 bytes and the access occurs also with a sector size of 512 bytes•
512e: the internal sector size is 4096 bytes but the access occurs still with a sector size of 512 bytes•
4Kn: the internal sector size is 4096 bytes and the access occurs also with a sector size of 4096 bytes•
For application programs there is no difference between 512n and 512e disks. Both are accessed with 512 byte
sectors. The internal organisation of the data storage is not relevant for the application program. A differentiation is
helpful only for performance reasons to optimise the access strategy.
On the other hand 4Kn disks require support in the application program, since the program must use a different sector
size of 4096 bytes for accessing the disk. In Boot-US 4Kn disks are marked by the suffix (4Kn), see the following
screenshot.
User Manual Boot-US 4.2.0
162 7 Glossary


8.1 Boot-US short overview
Boot-US is a boot manager which allows the user an easy selection among all installed operating systems. Boot-US
does not change any data on the installed operating systems. Boot-US starts all systems by the means used also by the
respective system. Boot-US supports booting by BIOS and UEFI on x86 machines. The visual appearance and the
operation of Boot-US is largely independent of the boot variant BIOS/UEFI.
8.1.1 The package Boot-US
The package Boot-US consists of a universal boot manager (fig. 1) and the accompanying configuration program
for the boot manager.
Fig. 1: Boot manager Boot-US
The configuration program Boot-US (GUI) is a standard Windows program. It runs under Windows XP to Windows
11 as 32 bit or 64 bit version. It recognizes whether Windows is installed in BIOS or UEFI mode, and thus uses
automatically the appropriate variant of the boot manager.
User Manual Boot-US 4.2.0
164 8 Tech-Info

Fig. 2: Configuration program Boot-US (GUI)
As a result of the separation in two programs the boot manager itself can be a small and simple program. The boot
manager needs only handle the selection and booting of the desired operating system. The configuration program is
the more complex component and, among other things, it is used to configure and install the boot manager. However,
since the configuration program runs directly under Windows it offers the comfort of a graphical user interface. For
example there are wizards guiding the user through the boot manager configuration process and there is extensive
context sensitive online help.
User Manual Boot-US 4.2.0
8 Tech-Info 165

8.2 Installation and update
8.2.1 Installation process
The installation of the package Boot-US is a two step process:
Installation of configuration program Boot-US (GUI)•
Installation of boot manager•
You first install the configuration program. This is a standard Windows installation. Then you use the configuration
program to install a current version of the boot manager. You can use the configuration program also to access a
previous version of the boot manager. All configuration programs can read the data of all previous boot manager
versions.
Comment:
The installation of the configuration program does not change the boot behaviour of the machine. Only the installation
of the boot manager changes the boot behaviour.
Comment:
If you have multiple Windows installations on your machine you can install the configuration program on each
Windows installation. This allows you to access the boot manager from each Windows installation. The boot manager
itself is installed only in a single instance on the machine.
8.2.2 Installed files
The installation program bootus_xxx_eng_install*.exe contains the configuration program Boot-US (GUI) as a
Windows 32- or 64-bit program. This installation program runs under Windows XP to Windows 11. It installs the
package Boot-US (GUI) in the respective version on your PC. The following files are copied to the chosen installation
directory:
File name Meaning
bootus.exe
Configuration program Boot-US
german\bootus_chm.hlp
German HTML help for Boot-US
german\lizenz.txt
License information (german)
german\bestell.txt
Information for ordering Boot-US (german)
english\bootus_eng.dll
English resources for Boot-US
english\bootus_eng.chm
English HTML help for Boot-US
english\license.txt
License information (english)
english\order.txt
Information for ordering Boot-US (english)
images\*.gif + *.bmp
Sample background images
The command-line version of Boot-US is delivered in the file bootusc_xxx_eng_setup.zip. It contains the
following files:
File name Meaning
readme.txt
Instructions for using bootusc.exe<
bootusc.ini
Example INI file
bmgrus.ini
Example setup INI for boot manager
User Manual Boot-US 4.2.0
166 8 Tech-Info

dos32\bootusc.exe
DOS command-line program
win32\bootusc.exe
WIN32 command-line program
win64\bootusc.exe
WIN64 command-line program
8.2.3 Update
The recommended method for updating the configuration program and the boot manager is to install the new
version simply over the existing old version. All new versions of Boot-US can read the data of all old versions.
Installing on top of an existing version thus maintains all previous settings. It is not required to uninstall the old
version before an update.
The update of the boot manager to a new version is a two step process:
Update of configuration program Boot-US (GUI)•
Update of boot manager•
User Manual Boot-US 4.2.0
8 Tech-Info 167

8.3 Uninstallation
The two components of the package Boot-US, the configuration program and the boot manager, are uninstalled
separately. The uninstallation of one component does not change the installation status of the other component.
8.3.1 Uninstallation of configuration program
The configuration program is a standard Windows application. It is uninstalled like any other Windows program, by
the usual Windows means: Start Menu -> Settings -> Apps -> Boot-US -> Uninstall
8.3.2 Uninstallation of boot manager
There are two possibilities to uninstall the boot manager:
In the configuration program: menu command "Boot manager -> Remove..."•
In the boot manager: Press key F10 -> command "Uninstall boot manager"•
User Manual Boot-US 4.2.0
168 8 Tech-Info

8.4 Boot manager BIOS
8.4.1 Overview
When booting by BIOS the boot manager Boot-US consists of a small x86 assembler program. The boot manager
Boot-US will be installed either in the MBR of the boot disk 1 or a primary partition of the boot disk 1. Here the boot
disk 1 is the drive which is configured in the BIOS as the start drive.
Additionally the boot manager can be installed also on diskette or on CD/DVD. In this case when starting the machine
the corresponding drive must be selected as start drive in order to start the boot manager Boot-US.
8.4.2 Entries in boot manager
When installing the boot manager the following entries can be added to the boot manager:
bootabale partitions of disk 1,2, ...1.
booting from disk 1,2, ...2.
booting from diskette3.
In the case 1. the boot sector of the partition is started. This will start the operating system belonging to the respective
partition. This partition contains the boot system files, the actual operating system files could lie on the same or a
different partition.
In the case 2. the MBR of the respective disk is started. For Linux installations the MBR often contains the boot
manager GRUB. In this case Boot-US starts GRUB which then starts Linux.
In the case 3. the system installed on the diskette will be started.
8.4.3 Special functions of Boot-US
The boot manager Boot-US has the following special functions:
true hiding of partitions•
boot from disk 2 (and higher)•
password protection•
The true hiding of partitions allows a completely separated operation of multiple Windows installations on one
machine. When starting a certain Windows installation the boot manager Boot-US makes all partitions visible
belonging to the respective Windows installation, and at the same time, true hides all partitions belonging to the other
Windows installations.
Booting from disk 2 allows an easy installation of multiple Windows systems on a single machine. Each Windows
system will be installed on a spearate disk. Upon start by Boot-US the corresponding Windows system is started
directly from the respective disk without requiring to change the start order each time in the BIOS.
Passwords can be set for individual entries and for administrative commands of the boot manager.
User Manual Boot-US 4.2.0
8 Tech-Info 169

8.5 Boot manager UEFI
8.5.1 Overview
When booting by UEFI the boot manager Boot-US consists of an efi file, which is installed in the EFI System
partition (ESP) on the boot disk 1. Additionally a new Boot#### variable containing this efi file is created in the
NVRAM, and added to the first position of the BootOrder variable. Here the boot disk 1 is just a symbolic name for
the target disk of the boot manager installation.
Additionally the boot manager can be installed also as UEFI fallback boot mode on a FAT32 partition of a removable
disk (e.g. an USB stick). In this case when starting the machine the corresponding drive must be selected as start drive
in order to start the boot manager Boot-US.
8.5.2 Entries in boot manager
When installing the boot manager the following entries can be added to the boot manager:
Boot#### variable with efi file on disk 1,2, ...1.
Efi file in UEFI fallback boot mode on disk 1,2, ...2.
When installing an operating system usally a Boot#### variable with a corresponding efi file is created in the
NVRAM. In the case 1. the Boot#### variable is read by the boot manager Boot-US, and then the corresponding efi
file is started. This will start the operating system belonging to this Boot#### variable.
Additionally efi files can be present as so-called UEFI fallback boot modes. Here no corresponding entry in the
NVRAM exists. In order to start the efi file the user must direct the UEFI firmware to boot from the corresponding
drive. In the case 2. the boot manager Boot-US directly starts the specified efi file.
8.5.3 Special functions of Boot-US
The boot manager Boot-US has the following special functions:
true hiding of partitions•
direct start of efi files•
password protection•
The true hiding of partitions allows a completely separated operation of multiple Windows installations on one
machine. When starting a certain Windows installation the boot manager Boot-US makes all partitions visible
belonging to the respective Windows installation, and at the same time, true hides all partitions belonging to the other
Windows installations.
The direct start of efi files simplifies the usage of the UEFI fallback boot mode. It is not necessary to enter an UFFI
menu for selecting the device to be booted. You can simply select in the boot manager Boot-US the efi file to be
booted.
Passwords can be set for individual entries and for administrative commands of the boot manager.
User Manual Boot-US 4.2.0
170 8 Tech-Info

8.6 Partition numbers
Within the package Boot-US all partitions on a disk are assigned a partition number according to the following rule:
For MBR partitions the primary and extended partitions are assigned always a partition number between 1 and 4.
Logical partitions are assigned always a partition number of 5 and higher.
Within each of the two groups the partitions are ordered according to their position on the disk. For example a primary
(or extended) partition with the number 1 lies before a partition with the number 2. Similarly a logical partition with
the number 5 always lies before a log. partition with the number 6.
For GPT partitions the protective partition is assigned the partition number 0. The actual GPT partitions get a
partition number starting with 1. The numbers are based on the position on the disk. Higher numbers lie further back.
User Manual Boot-US 4.2.0
8 Tech-Info 171
