
Stratodesk NoTouch OS Quick Start
Guide V1.0
Stratodesk NoTouchOS Quick Start Guide v1.0

Introduction to Stratodesk
Stratodesk is redefining endpoint computing by delivering a single endpoint solution for VDI,
DaaS and IoT markets. Today’s enterprises are moving beyond traditional desktops towards
smart workplaces where the diverse network of endpoint devices will create interoperability
and compatibility issues without a single unified endpoint solution.
Stratodesk’s cutting edge Linux-based endpoint OS and management suite, NoTouch, is a
next generation, hardware-agnostic solution that enables companies to cost-effectively
manage their endpoints. Our solution works seamlessly across x86 and ARM based
hardware products (including Raspberry Pi) to provide a unified platform for your endpoints.
It also increases endpoint security, simplifies user experience and allows customers to
maximize the benefits of existing desktop hardware (Laptops, Thin Clients, PCs and ARM
devices) through PC Repurposing.
Stratodesk NoTouchOS Quick Start Guide v1.0

Table of Contents
▪ Install NoTouchOS
▪ PC’s & x86 Thin Clients
o Preparation
o Prepare USB Drive/Stick
o Live Boot
o Installation Procedure
▪ Raspberry Pi Devices
▪ Jetson Nano
▪ MSI Installation
o Warnings First
o Manual Installation
o Control the MSI Behaviour
o Mass Rollout with Group Policies (GPO)
o Troubleshooting
▪ Configuration Preload
o Readout Config of Well-Known Device
o Rename & Place on Boot Medium
o PXE Live Boot
o MSI File
o Use/Install
o Advanced Option
o Certificates
o Machine Certificates
Stratodesk NoTouchOS Quick Start Guide v1.0

Install NoTouch OS
Installation in NoTouchOS terminology means to physically write NoTouchOS on a system's
hard or flash drive, overwriting/wiping out Windows or any other operating system that was
there. If you just want to run NoTouchOS for a quick test or side-by-side with the existing
OS, do not install, use Live Boot - just run from the boot medium that you created, "live"
mode is the default.
NoTouchOS works on both PCs/Thin Clients/Laptops/Tablets with x86 (Intel/AMD/VIA/etc)
processors and the ARM-base Raspberry Pi devices.
PC’s & x86 Thin Clients
Installing NoTouchOS is very easy. Most people choose to use a USB pen drive or
PXE/network boot. Alternatively, one can burn a bootable CD-ROM from the ISO file that is
included in the NoTouch OS download "All-In-One" package. Download this "All-In-One"
package first. Another option is to install over a running Windows using MSI Installation.
You might not have to "install" NoTouch OS. It runs well in "live" mode from USB, PXE or
CD-ROM for a test, side-by-side with your existing OS. Installing is done when you
actually want to wipe out Windows or whatever has been there before.
Preparation
Note: For installing with MSI packages, please see here: MSI Installation This section
describes how to install with your own boot medium.
Preparing for installation is easy:
1. Set up your boot medium, such as
● Prepare USB Drive/Stick, or
● Burn the NoTouch ISO on a CD-ROM, or
● Set up PXE Network Boot
2. Let the target machine boot from your boot medium (this may require entering the
machine's BIOS and changing boot options)
3. Immediately after boot, at the boot menu, type in "install" to avoid Live Boot and
instead go into the text-based installer (a module called GENESIS internally)
Stratodesk NoTouchOS Quick Start Guide v1.0

Prepare USB Drive/Stick
Whether you want to live boot or Install NoTouchOS from a USB drive, be it a USB thumb
drive/USB stick/etc or anything else, this is what you need to do.
To create the bootable USB drive such as a USB pen drive or "USB stick" you'll need the
following:
▪ USB flash drive, which fits your size requirements (e.g. 2GB), in FAT/FAT32 format
▪ The Stratodesk NoTouch OS All-In-One package (ZIP file). Download it from the
Stratodesk web site.
The actual installation is easy. Please follow the instructions that match your computer
operating system below.
Windows users might be fine with just extracting the ZIP file with "Extract All..." and then
double clicking on PrepareUSBdrive.cmd and following the instructions. A longer
explanation is given below.
You can download the installation package from our support portal, or you can submit your
name and email address for a free trail on our website. Then you will receive a download
link for a ZIP-file which contains the necessary tools and files. Download this package and
use the Extract All ... function to extract it.
Stratodesk NoTouchOS Quick Start Guide v1.0

This will create a new folder with the extracted files. Now it is time to prepare your USB pen
drive (USB-stick) or basically any bootable USB storage medium to boot NoTouch OS. Make
sure that your USB drive is formatted with FAT/FAT32 File System. With the USB stick
attached to your computer open the new folder and run the command PrepareUSBdrive by
double-clicking on it.
When you are asked if you want to allow the program to make changes to your computer
select Yes.
Stratodesk NoTouchOS Quick Start Guide v1.0

This will start a tool named UNetbootin to create a bootable USB stick. All the settings
should be prefilled but make sure the correct USB stick is selected in case you have more
than one attached. Then just hit Start and the bootable USB stick will be created.
When the tool has finished select Exit. Now the USB stick is ready to use.
Stratodesk NoTouchOS Quick Start Guide v1.0

Procedure on Computers running Mac OS
While Stratodesk does not officially support installation on Mac, we are happy to see that
this is easily doable.
1. Download and extract the All-In-One ZIP package to a temporary folder. Download
and install the free UNetbootin software package (Mac version)
from http://unetbootin.github.io/
2. Run UNetbootin to flash the NoTouch OS ISO file - you'll find that in the folder you
extracted the All-In-One package into - to the USB drive. Follow UNetbootin's
directions and make sure you pick the right ISO and the right USB device.
Procedure on Computers running Linux
While Stratodesk does not officially support installation on Linux, we are happy to see that
this is easily doable.
1. Download and extract the All-In-One ZIP package to a temporary folder. Download
and install the free UNetbootin software package (Linux version)
from http://unetbootin.github.io/ - Installing software on Linux is depending on your
distribution. Please follow the instructions in UNetbootin's manual and your Linux
distribution's manual.
2. Run UNetbootin to flash the NoTouch OS ISO file - you'll find that in the folder you
extracted the All-In-One package into - to the USB drive. Follow UNetbootin's
directions and make sure you pick the right ISO and the right USB device
Troubleshooting
Make sure you set your target machine's boot order to boot from USB first. Usually this is
done in the system BIOS, which is usually accessed by hitting the Del or F2 keys immediately
after turning on the machine. Refer to your hardware or BIOS vendor's specific instructions.
In some rare cases a system still might not boot from USB. Try these steps to solve this
problem:
▪ Try to choose a different BIOS boot option such as USB-HDD or even USB-ZIP
Stratodesk NoTouchOS Quick Start Guide v1.0

▪ Use a different USB drive. The vast majority of USB sticks are fine but there are some
out in the wild that refuse to be bootable; especially on older Thin Client hardware.
Did the USB pen drive have enough space? Did you clean the trash can / recycle bin so that
deleted files were really deleted?
Did you use an earlier NoTouch version before on this drive? If so, did you really delete it
before reapplying the procedure?
Should you still not be able to get it running, why not try a different USB drive? Especially
these USB sticks/pen drives are now available in masses in every office as they are
frequently used as swag/advertising items so it should not be difficult to find another one.
Live Boot
"Live Boot" refers to the concept of running NoTouch on a PC or laptop or similar device
without writing it to a system's disk, thus without "installing" it onto a specific machine.
NoTouch can be live-booted from USB, CD-ROM and network (PXE).
Live booting is easy:
1. Set up your boot medium, such as
● Prepare USB Drive/Stick, or
● Burn the NoTouch ISO on a CD-ROM, or
● Set up PXE Network Boot, e.g. by using the Stratodesk Virtual Appliance
2. Let the target machine boot from your boot medium (this may require entering the
machine's BIOS and changing boot options)
Note: It is possible to customize and pre-load your own configuration - please see
here: Configuration Preload
Raspberry Pi: "Live Boot" is not available for Raspberry Pi based systems.
Installation Procedure
Make sure you type in "install" or select it with your cursor keys, depending on the menu
that appears; Do this immediately when the boot menu appears, after the BIOS runs its
start-up checks (if you miss that moment, the system will boot to live mode). A text-based
installer, sometimes referred to by its internal codename GENESIS, appears.
Note: Install means overwriting whatever is there on the hard or flash drive. There is no
uninstall. Only install it when you are absolutely sure you want to repurpose this PC into a
Thin Client.
Stratodesk NoTouchOS Quick Start Guide v1.0

This opens the Stratodesk GENESIS Main Menu. You only have to pick the
appropriate Install NoTouch OS option and hit ENTER to start the installation.
You will be asked for a system serial number. The system will try to read the device
identification or serial number from the system's DMI-BIOS. On most brandname PCs this
will correspond to the asset tag sticker, and that is the intended purpose: To match devices
to their asset tags. In case the system cannot read a number from DMI-BIOS, please copy
the asset tag or your inventory id number. For test purposes you can also enter a dummy
S/N. The number you enter can later be used in NoTouch Center to identify the device.
Stratodesk NoTouchOS Quick Start Guide v1.0

Then the final question if you really want to install the NoTouch OS on the local drive will
pop up. Think again! Is there anything of value on the drive? Installing NoTouch will wipe
your hard drive. Are you sure?
If you are sure, select OK and hit ENTER.
Actually, there is a second option given, "OK+Wipe". This would securely erase the full disk,
a process which can take several hours. Do NOT use this on Thin Clients - this feature is
intended for PCs with real hard drives only.
Stratodesk NoTouchOS Quick Start Guide v1.0
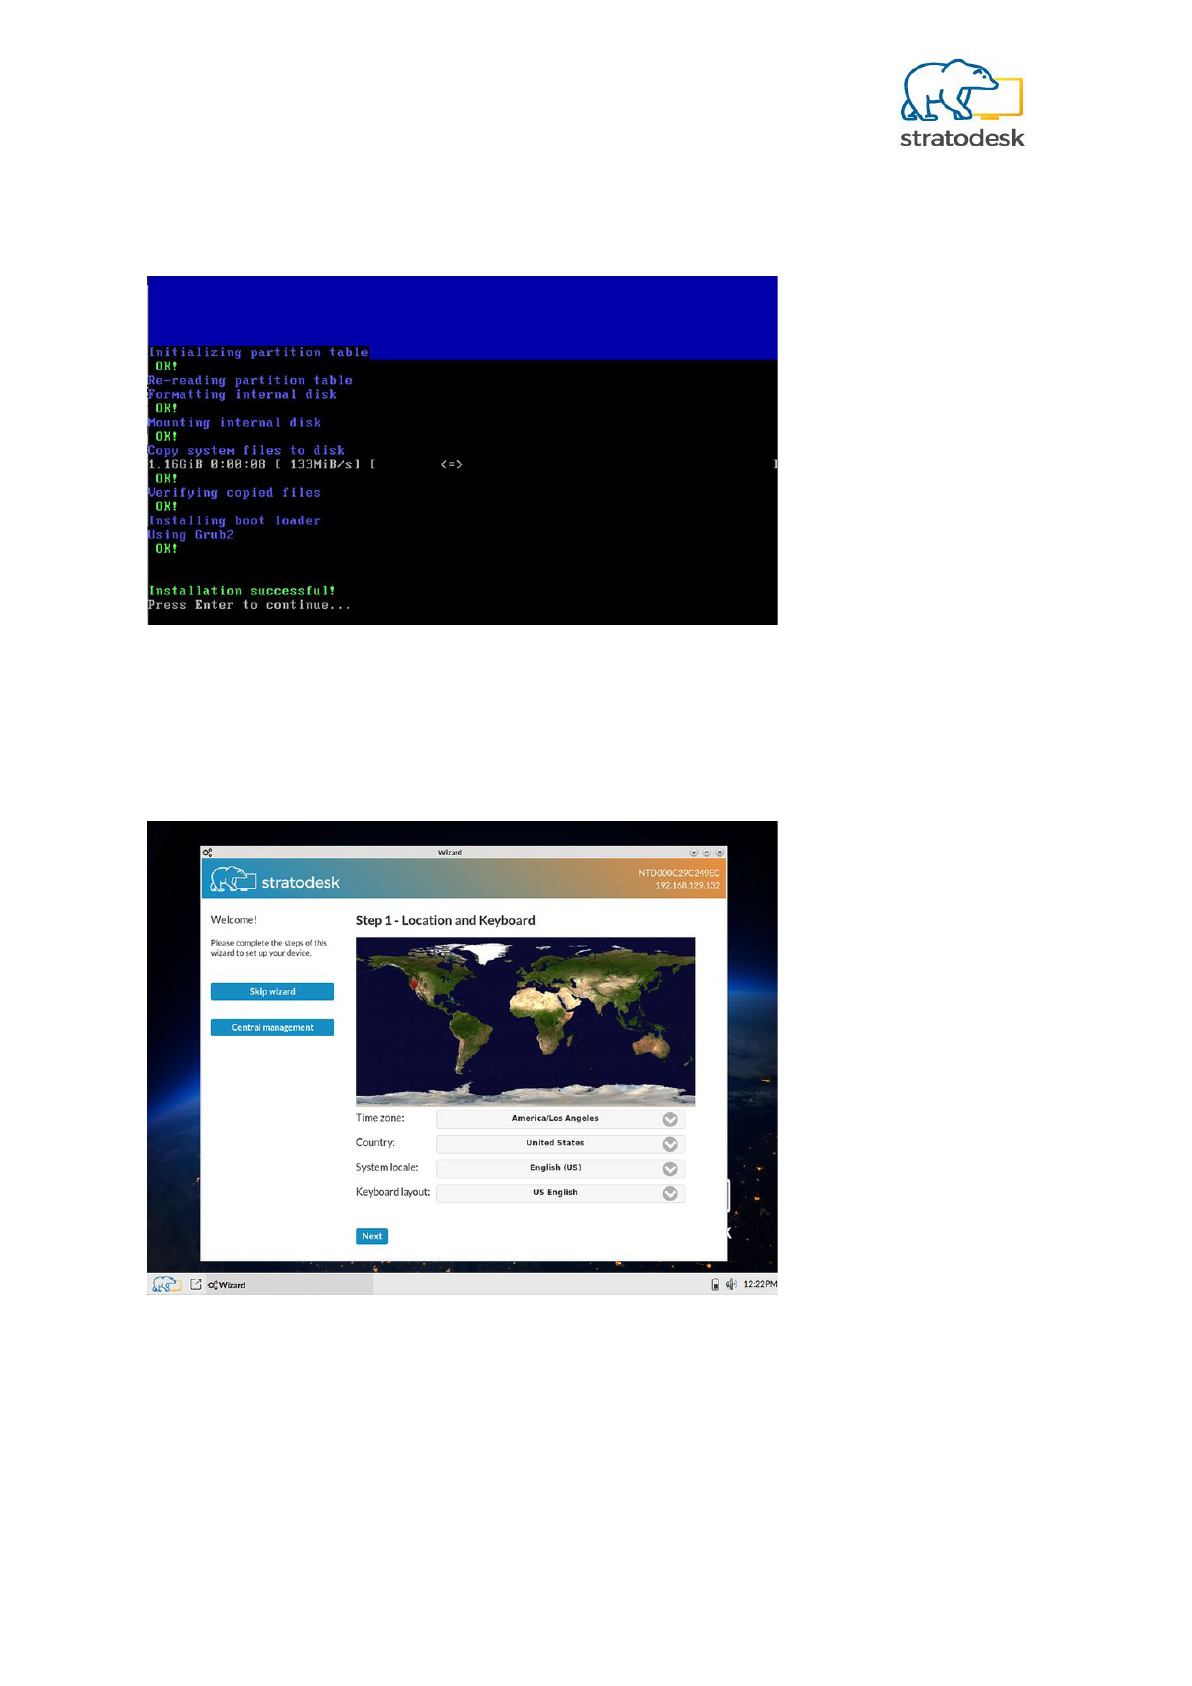
You will get the message that the installation finished successfully and will be asked to
press ENTER.
This will return you to the GENESIS Main Menu where you move the selection down
to Reboot and press ENTER. The client will reboot and start up with NoTouch OS.
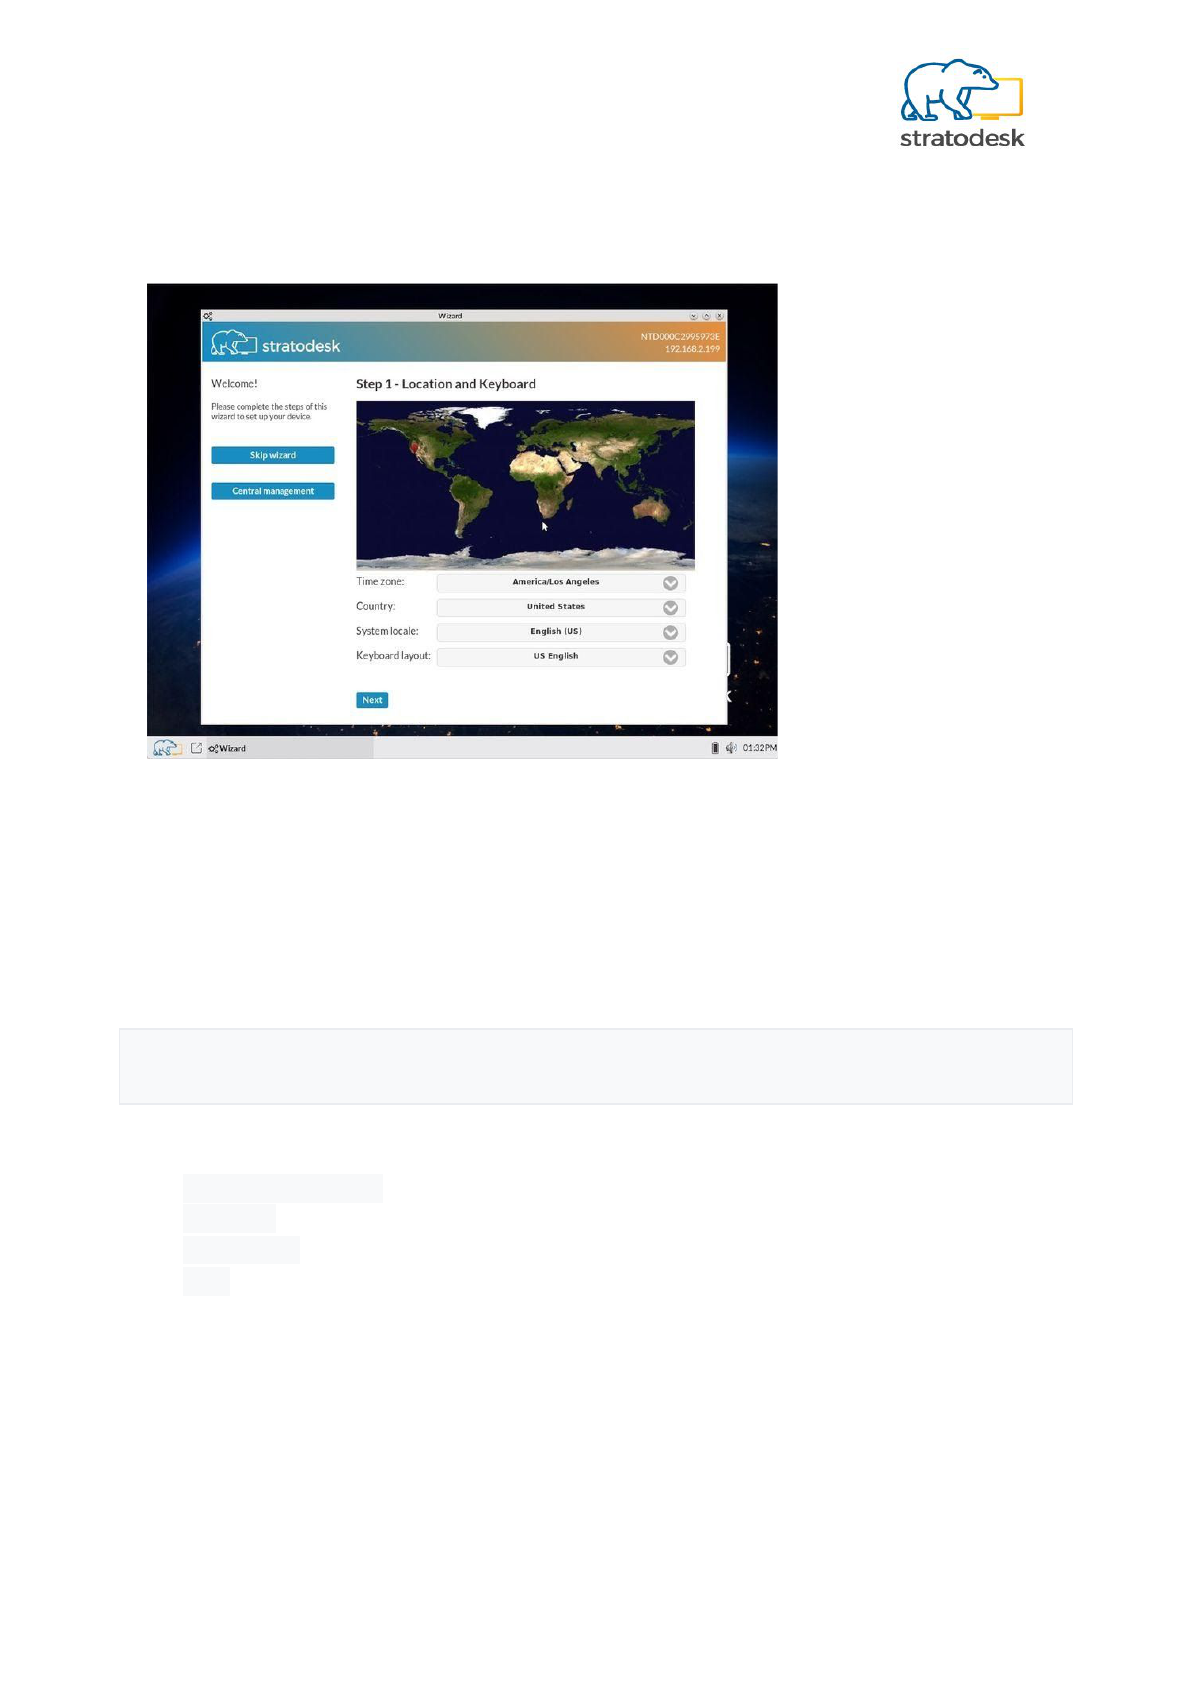
Now you are finished and after the reboot you will see the NoTouch OS Configuration Wizard.
Stratodesk NoTouchOS Quick Start Guide v1.0

Raspberry Pi Devices
Generic Raspberry Pis are easily converted to running NoTouch by reflashing the SD card.
1. Take the SD card from the Raspberry and insert it into your PC or Mac via an SD card
reader
2. Unzip the NoTouch ZIP file. Double-check if you have an ZIP file with "-armhf-" in the
file name.
3. On Windows, execute FlashSDcard.cmd.
Note for Mac or Linux users: Yes, you can flash the SD card on Mac or Linux too. Find out
which device node represents the SD card reader - e.g. on Mac use Disk Utility. Then use the
dd shell command as root, such as
dd if=lnx-2.40.1864-EEs-k404-armhf-160604.bin of=/dev/disk2 bs=16m
Jetson Nano
The Jetson Nano is easily converted to running NoTouch by reflashing the SD card.
1. Take the SD card and insert it into your PC or Mac via an SD card reader
2. Unzip the NoTouch JETSON ZIP file. Double-check if you have an ZIP file with
"-JETSON-" in the file name.
3. On Windows, execute FlashSDcard.cmd.
Note for Mac or Linux users: Yes, you can flash the SD card on Mac or Linux too. Find out
which device node represents the SD card reader - e.g. on Mac use Disk Utility. Then use the
dd shell command as root, such as
dd if=lnx-2.40.5633-JETSON-k409-arm64-190804.bin of=/dev/disk2 bs=16m
Stratodesk NoTouchOS Quick Start Guide v1.0

MSI Installation
NoTouchOS can be installed directly from inside Windows with an MSI package. The big
advantage is that you can roll MSI packages out without any third-party tools without any
user interaction on the individual systems.
This installation procedure supports at least Windows XP, Vista, 7, 8 and 8.1.
Please note: This will overwrite Windows. It is supposed to be the "last" thing you ever do
on the old Windows. You can actually use the MSI file to also run NoTouch side-by-side with
Windows by creating the C:\wininstall_config.txt file, see below for more information. But
beware, the default is to repurpose.
Warnings First
This package is intended to make an unattended mass rollout possible, i.e. repurposing a
large number of PCs without user interaction. It looks and feels like a regular Windows MSI
package, the only difference is that there is no uninstall - it will reformat the hard drive,
overwrite Windows and install NoTouchOS.
Please do not store these packages on (semi)public shares - one of your co-workers could be
tempted to try it and then destroy his work machine. Test the package on a dedicated test
machine, do the rollout on the machines intended to be converted, and then delete the
dangerous MSI packages.
Manual Installation
Firstly, copy the msi file to the target operating system.
Stratodesk NoTouchOS Quick Start Guide v1.0

Double-click it or right-click and select "Install"
At this point, the system will ask a few questions. The idea here is to make sure people
know what they are doing. In a real mass-rollout you will have the config file rolled out and
these questions will not be asked (see below). The system will do some magic - no further
interaction necessary. After some time, it will request a reboot.
Stratodesk NoTouchOS Quick Start Guide v1.0
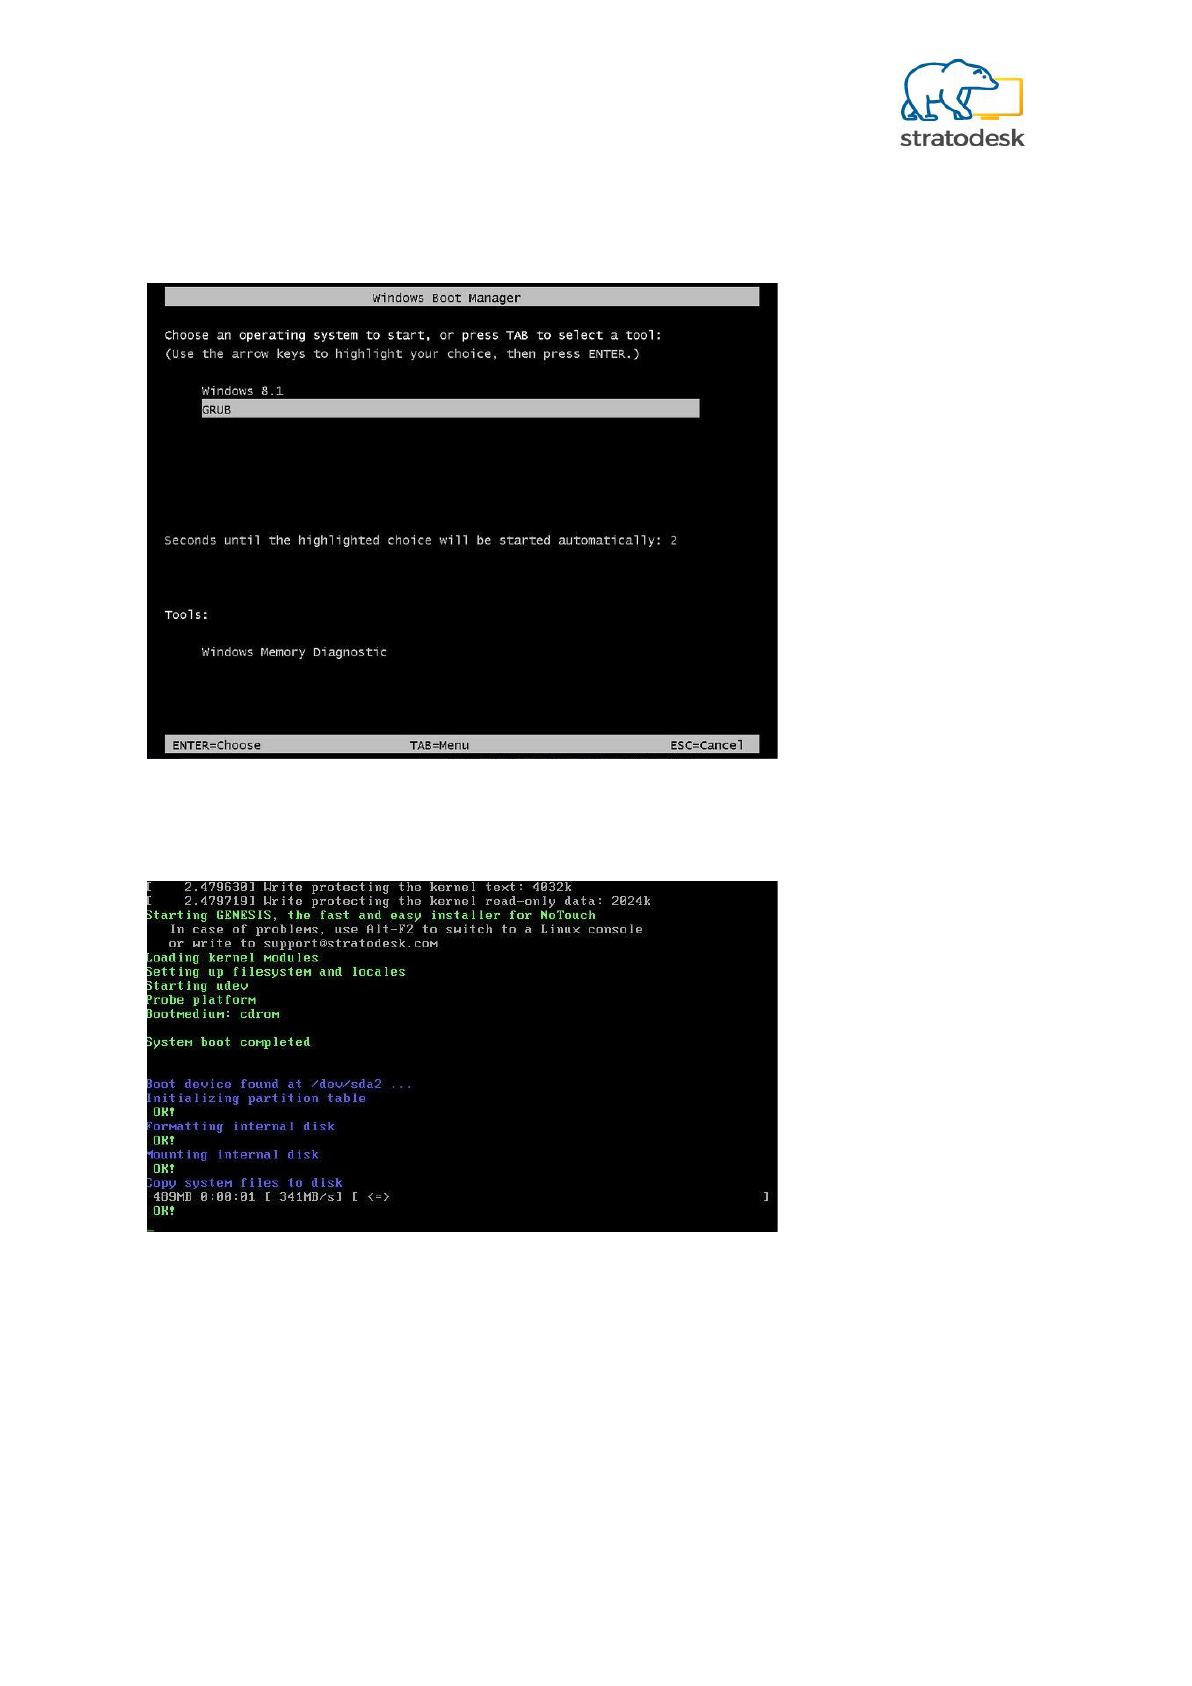
On the reboot, if you are fast enough, you will notice that the boot loader is now different.
Again, no interaction necessary, just let the system do what it is supposed to do:
Then the regular text-based NoTouchOS GENESIS installer will come up, run through all of its
steps without any user interaction and reboot again.
Stratodesk NoTouchOS Quick Start Guide v1.0
Congratulations. Your PC has been upgraded to a NoTouchOS VDI endpoint.
Control the MSI Behaviour
You can control the behaviour of the MSI file, for instance tell it to create a dual-boot
installation instead of overwriting Windows.
For this, create a text file on the target PC with this name before installing the MSI (we
assume you will at the end of the day have this being created automatically on many many
machines):
C:\wininstall_config.txt
The content of this file should be as follows:
● mode=dual|replace (choose "dual" for dual boot)
● kparams= (kernel parameters if needed, optional)
● notdefault (don't setup NoTouch to be the default boot entry, optional)
● auto (for unattended "replace" installations, optional)
Please test the installation first on a single test device before rolling it out to all devices.
Mass Rollout with Group Policies (GPO)
There are many tools available that support easy rollout of MSI packages. However, there is
no need for any 3rd-party software, you can do this right with plain Windows.
Stratodesk NoTouchOS Quick Start Guide v1.0

Let's assume you have the MSI package downloaded and put on a file share where "Domain
Computers" have read permission (Use "Share with"/"Specific people").
The user account you are using to install the file must have full administrative access
(emphasis on "full" - we mean it!)
1. First, create the configuration text file (see below) and roll it out with regular GPO
means!
2. Make sure you have the "tcmgr" DNS host name or alias configured and that it
points to NoTouch Center.
3. Open "Group Policy Management" from "Administrative Tools" in the Start Menu.
4. Click your way through "Domains", your domain and search for "Group Policy
Objects".
5. Do a right-click on the "Group Policy Objects" folder, click "New", and assign a name.
6. Edit your new policy - In the right pane on the bottom, there is a box that say’s
"Security Filtering". Remove the "Authenticated Users" entry. Add either the group
"Domain Computers" for all machines or specific computer names, depending on
where you'd like the software to be deployed.
7. Go back up to the domain folder (in the navigation pane) and right click it. Click "Link
an existing GPO". Click your new GPO's name and click OK.
8. Now go back to the GPO under "Group Policy Objects" folder, and right click it. Click
on "Edit". A new window will open.
9. Navigate to "Computer Configuration" / "Policies" / "Software Settings" / "Software
installations". Right click inside the empty pane on the right and go to "New" /
"Software Package".
10. A new window pops up - navigate to the share that you created earlier
(\\MYSERVERNAME\FOLDERNAME), not the physical folder on the server
(C:\SOMETHING\FOLDERNAME) and select your MSI.
11. Click the "Assigned" bubble and then click on OK.
12. Now close all of your windows on the server and reboot all of your workstations.
They will install the NoTouch MSI before the computer allows a user to logon (that
means, the computer will have a "Please wait..." banner for some time.
Note: It may take two or three restarts for the server to update the GPO on the
workstations.
After that, you'll find all machines in NoTouch Center ready to be configured. If you have set
up ‘Auto Assign’ they will get their configuration automatically, if not, add them to the
groups where you want them, and they will be configured by NoTouch Center.
Troubleshooting
In case the system does not start into Linux afterwards, most likely you did not have the
correct permissions. Remember, you need full administrative permissions otherwise you
won't be able to modify the boot loader configuration! If the system starts into Linux but
then cannot boot properly most likely you have the wrong kernel version. Please try a
different kernel version image.
Stratodesk NoTouchOS Quick Start Guide v1.0

Configuration Preload
When installing NoTouch on a device, it will create a factory-default configuration. The
typical workflow is that the client would get its configuration from the management server
immediately afterwards. There are cases however, where this is not possible, for example
when a specific Wireless LAN or Network Authentication configuration is needed to access
the network. An easy method exists how to automatically preload a configuration to a
freshly-repurposed device with the standard USB/CDROM installation (for PXE see below):
1. Configure a sample device to the point you'd like to distribute
2. Fetch the configuration from this device
3. Place the file in the root folder of the USB medium or CD-ROM
On top of that, it is possible to add custom, machine-specific certificates.
Read out the configuration from a well configured device
Connect with your browser on your PC/workstation/laptop to the well-configured - the
"template" device - and log in with your admin password. Even though it resembles the local
configuration, some additional menu items are available:
● Choose "Download configuration"
● A file named HOSTNAME.cfg will be downloaded (instead of "HOSTNAME", the file
name will be the actual system's DNS host name)
This file contains the full "configuration", meaning configuration parameters, but also
certificates, custom templates, etc. It also contains static IP address configuration if you do
not use DHCP.
Rename and place it on the boot medium
The easiest thing is to just rename the file to config.cfg and place it on the USB medium
(root folder). Note: Please spell config.cfg all-lowercase, this is case-sensitive.
If, and only if you use a CD-ROM to repurpose devices, you need to create a custom ISO
image. You may use third party tools provided they keep the boot capability of the ISO
image, or you use the builtin method on Windows systems:
1. Inside the extracted NoTouch ZIP, create a folder named "localcd", and a subfolder
"images"
2. Copy the config.cfg file into the "images" folder, and rename it to live.cfg
3. Execute CustomizeISO.cmd
Stratodesk NoTouchOS Quick Start Guide v1.0

PXE Live Boot
In a PXE live boot setup, you need to:
1. Get the configuration from one machine as described above
2. Copy config.cfg into the Stratodesk Virtual Appliance using scp or by connecting to
the notouch file share
3. Make sure it resides in the /opt/clientconf/config directory (or the config subfolder
of the notouch file share)
Note: This method cannot be used for installation via PXE.
MSI File
If you deploy or boot via our MSI Installation, configuration preload could not be simpler.
Simply roll out your config.cfg file and place it into the C:\ directory.
In other words, the MSI file looks - on the target machine, when executed - for a file
named C:\config.cfg. If it is present, it is used, if not, default configuration will apply.
Note: Of course, the MSI file should be rolled out after the config.cfg. However, whatever
mechanism you use (Group Policies, Altiris, ...), if you can roll out an MSI, you can also roll
out the config.cfg.
Use/Install
No extra actions have to be taken. Just Install or Live Boot as usual. (Note: You need at least
NoTouch version 2.36.13 to use configuration preload with Live Boot)
With the file present, it will be used automatically. During the textual installation, you will
see a one-line text message informing you that the installer is applying the configuration to
the system which is not present otherwise.
Advanced Options
Modifying the configuration manually
The config.cfg file is actually a gzip-compressed tar file (tar.gz), a very common archive
format in the Linux/Unix/Mac OS X world. You can open the archive and modify its internals.
However, that can lead to producing unusable configuration, effectively meaning you could
repurpose hundreds of devices with a totally useless configuration. So beware!
Per-machine configuration
If a file named MACADDRESS.cfg exists on the boot medium (meaning the MAC address of
the local machine), it will be preferred over config.cfg. That means, you can prepare your
USB stick to automatically repurpose different devices with different configuration.
Stratodesk NoTouchOS Quick Start Guide v1.0

Important: Type MAC addresses in a no-colon/no-dash format. So do not write
00:00:0C:12:A3:BC, nor 00-00-0C-12-A3-BC, but rather 00000C12A3BC.cfg. Only the latter is
supported!
Side note: It may seem desirable to add more options such as host names, IP addresses etc.
However, that would defy the purpose. When using this method is mostly to pre-distribute a
configuration that allows to access the network. If you have networking from the beginning,
there is not really a point in preloading the configuration since you could use the
management center anyway.
Parameters only preload
The config.cfg contains ALL configuration. You may extract the file config.dat manually and
just place this file on the boot medium. You can even create per-machine config.dat's
named as MACADDR.dat similar to how described above.
Certificates
The methods described above allow to preconfigure newly repurposed devices with
"configuration archives" that may already contain certificates. It is very handy to add
certificates that every machine has to use to already beforehand in the configuration
archive, so you do not have to worry about distributing them. Please see the main article
- Certificates - first to understand about how NoTouch works with certificates.
In some case, you may have to distribute machine-specific certificates, however, such as
when using WPA2 or IEEE802.1X client certificates. Fortunately, NoTouch has a mechanism
for that as well.
When installing/repurposing, the NoTouch installer looks if the boot medium contains a
folder named certificates. In this folder, it expects to see subfolders with the names of MAC
addresses, again in a no-dash/no-colon style. All files inside the folder matching the current
system's MAC address will be copied to the local certificate store, possibly overwriting
existing files.
Machine Certificate Best Practice
We suggest naming machine-specific certificates simply as "machine.crt" or similar. The
reason is that you save the effort of entering a different filename into the configuration
parameters (such as for WPASupplicant) on each machine. It is so easy, to configure one
template machine, and then create a folder hierarchy where each machine has a folder
named after the MAC address with a generic filename in there.
Stratodesk NoTouchOS Quick Start Guide v1.0
