Version 2016.2 2017-02-12
Revision 1 Page 1
How to use Quelea
License agreements ................................................................................................................................. 5
1. Short introduction to Quelea .......................................................................................................... 6
1.1. Layout....................................................................................................................................... 7
1.1.1. Schedule and Database ................................................................................................... 7
1.1.2. Preview ............................................................................................................................ 9
1.1.3. Live ................................................................................................................................. 10
1.2. Setting up a projector ............................................................................................................ 14
1.2.1. Selecting output ............................................................................................................ 14
1.2.2. Using Test Patterns to adjust projector settings ........................................................... 15
1.3. Adding songs to your database .............................................................................................. 16
1.3.1. Creating a new song ...................................................................................................... 16
1.3.2. Importing songs from another software ....................................................................... 18
1.4. Adding items to Order of Service ........................................................................................... 21
1.4.1. Adding a song ................................................................................................................ 21
1.4.2. Adding a Bible passage .................................................................................................. 22
1.4.3. Adding an image ............................................................................................................ 24
1.4.4. Adding multimedia ........................................................................................................ 25
1.4.5. Adding a presentation ................................................................................................... 26
1.4.6. Organizing a schedule .................................................................................................... 26
1.5. Themes ................................................................................................................................... 26
1.6. Showing something live ......................................................................................................... 26
1.7. Ready to go ............................................................................................................................ 27
2. Additional features ........................................................................................................................ 28
2.1. Themes ................................................................................................................................... 28
2.1.1. Set a global theme ......................................................................................................... 28
2.1.2. Set an individual theme ................................................................................................. 28
2.1.3. Setting up a theme ........................................................................................................ 29
2.2. Logo ........................................................................................................................................ 39
2.3. Spelling check ......................................................................................................................... 40
2.4. Translations ............................................................................................................................ 41
2.4.1. Add a translation ........................................................................................................... 41
2.4.2. Show a translation ......................................................................................................... 43
Version 2016.2 2017-02-12
Revision 1 Page 2
2.5. Mobile Lyrics .......................................................................................................................... 45
2.5.1. Activating Mobile Lyrics................................................................................................. 45
2.5.2. Using Mobile Lyrics ........................................................................................................ 47
2.6. Mobile Remote ...................................................................................................................... 48
2.6.1. Activating Mobile Remote ............................................................................................. 48
2.6.2. Using Mobile Remote .................................................................................................... 50
2.7. Notices ................................................................................................................................... 51
2.8. Stage View .............................................................................................................................. 53
2.8.1. Setting up Stage View .................................................................................................... 53
2.9. Bible search ............................................................................................................................ 55
2.10. Bible Browser ......................................................................................................................... 56
2.11. Saving and sharing schedules ................................................................................................ 57
2.12. Exporting or printing a song ................................................................................................... 59
2.13. Recording ............................................................................................................................... 59
2.14. Timer ...................................................................................................................................... 60
2.15. Section titles ........................................................................................................................... 61
2.16. Displaying a PDF ..................................................................................................................... 62
2.17. Displaying a website .............................................................................................................. 63
2.17.1. Usage ............................................................................................................................. 63
2.17.2. Limitations ..................................................................................................................... 64
2.18. Displaying an image group ..................................................................................................... 65
2.19. Planning Center Online .......................................................................................................... 65
2.20. Live Text ................................................................................................................................. 66
3. Setting up Quelea for your needs ................................................................................................. 67
3.1. General ................................................................................................................................... 67
User Options .................................................................................................................................. 67
3.1.1. Interface language ......................................................................................................... 67
3.1.2. Check for update on startup.......................................................................................... 67
3.1.3. Warn if only one monitor is connected ......................................................................... 67
3.1.4. Only preview one line per song section ........................................................................ 67
3.1.5. Autoplay videos in live panel ......................................................................................... 67
3.1.6. Advance schedule on live display .................................................................................. 67
3.1.7. Overflow current song into next song ........................................................................... 67
3.1.8. Preview item on image change ..................................................................................... 67
Version 2016.2 2017-02-12
Revision 1 Page 3
3.1.9. Show Video Library Tab (requires restart) .................................................................... 67
3.1.10. Attempt to auto-translate songs ................................................................................... 68
3.1.11. Copy song to schedule by default ................................................................................. 68
3.1.12. Clear item from live view on removal from schedule ................................................... 68
3.1.13. Embed media in schedule file........................................................................................ 68
3.1.14. Show small song information ........................................................................................ 68
3.1.15. Show small bible passage information .......................................................................... 68
3.1.16. Thumbnail size ............................................................................................................... 68
Text Options .................................................................................................................................. 69
3.1.17. Capitalise on each line ................................................................................................... 69
3.1.18. Use uniform font size .................................................................................................... 69
3.1.19. Maximum font size ........................................................................................................ 69
3.1.20. Additional line spacing .................................................................................................. 69
3.1.21. Maximum characters per line........................................................................................ 69
3.2. Display .................................................................................................................................... 70
3.3. Stage View .............................................................................................................................. 70
3.4. Notices ................................................................................................................................... 71
3.5. Presentations ......................................................................................................................... 71
3.5.1. Use OpenOffice for presentations ................................................................................. 71
3.5.2. OpenOffice path ............................................................................................................ 71
3.5.3. Use PowerPoint for presentations ................................................................................ 71
3.5.4. PowerPoint path ............................................................................................................ 71
3.6. Bible ....................................................................................................................................... 72
3.6.1. Default Bible and add a Bible ........................................................................................ 72
3.6.2. Layout of Bible passages ............................................................................................... 72
3.7. Server Settings ....................................................................................................................... 72
3.8. Recordings .............................................................................................................................. 73
3.8.1. Path for recordings ........................................................................................................ 73
3.8.2. Automatically convert recordings to MP3 files (requires VLC) ..................................... 73
3.9. Import/Export ........................................................................................................................ 73
3.10. Advanced settings .................................................................................................................. 74
3.10.1. VLCARG .......................................................................................................................... 74
3.10.2. Fade in/out adjustments ............................................................................................... 76
3.10.3. Margins ......................................................................................................................... 76
Version 2016.2 2017-02-12
Revision 1 Page 4
3.10.4. Automatically extend projection window to a recently plugged in device ................... 76
4. Shortcuts and other things that are good to know ....................................................................... 77
5. Troubleshooting ............................................................................................................................ 79
6. FAQ (Frequently Asked Questions) ............................................................................................... 81

Version 2016.2 2017-02-12
Revision 1 Page 5
License agreements
The software
Quelea is free software: you can redistribute it and/or modify it under the terms of the GNU General
Public License version 3 (or later). You can find more information about this license here:
http://www.gnu.org/licenses/quick-guide-gplv3.html. As such, you are welcome to share the
software with anyone, modify it to suit your needs and free to share the changes that you make.
Quelea's source code is freely available to view online, and we will never, ever charge money for use
of this software.
The manual
This manual is licensed under the CC-BY-SA 4.0 license (Read more here:
http://creativecommons.org/licenses/by-sa/4.0/). This means that you can copy and redistribute this
material in any way you like, including adapting, translating or building upon the material as long as
you attribute the work to Arvid Nyström and the Quelea-Projection project (http://quelea.org/) and
release the produced work under the same license.
We are always looking for translators for this document and the software.

Version 2016.2 2017-02-12
Revision 1 Page 6
1. Short introduction to Quelea
Quelea is a competent cross platform church software developed to bring the best features from
similar software, spiced with unique features, to every church for free. The founders have developed
this software entirely on their spare time and the software is completely open source, which means
that anybody that knows how to program in Java could adjust the software for themselves or help
developing Quelea for everybody.
In the first chapter we will first get acquainted with the software and then walk through the basic
features. You will notice that Quelea is very intuitive and that there are instructions embedded to the
software to make it easy for anyone to use it. If you have any questions, do not hesitate to ask them
in the official Quelea discussion forum: https://groups.google.com/forum/#!forum/quelea-discuss

Version 2016.2 2017-02-12
Revision 1 Page 7
1.1. Layout
One might say Quelea is divided into three sections: Schedule and Database, Preview and Live.
1.1.1. Schedule and Database
Below you see the Order of Service and the Database, where all your songs will be stored and can be
organised for different occasion. The first time you start Quelea you will need to add songs to the
database (see 1.3). Once you have added songs to the database you can start organizing them in the
Order of Service (see 1.4), or a Schedule as it also is called.

Version 2016.2 2017-02-12
Revision 1 Page 8
Below is an example of songs in a database and an Order of Service (Schedule):

Version 2016.2 2017-02-12
Revision 1 Page 9
1.1.2. Preview
The preview allows you to see what your items will look like before you show them live. You can
preview different slides by clicking the different text sections or by using your keyboard’s up and
down arrow keys. When you are ready to show the item live, just click the “Go live” button.

Version 2016.2 2017-02-12
Revision 1 Page 10
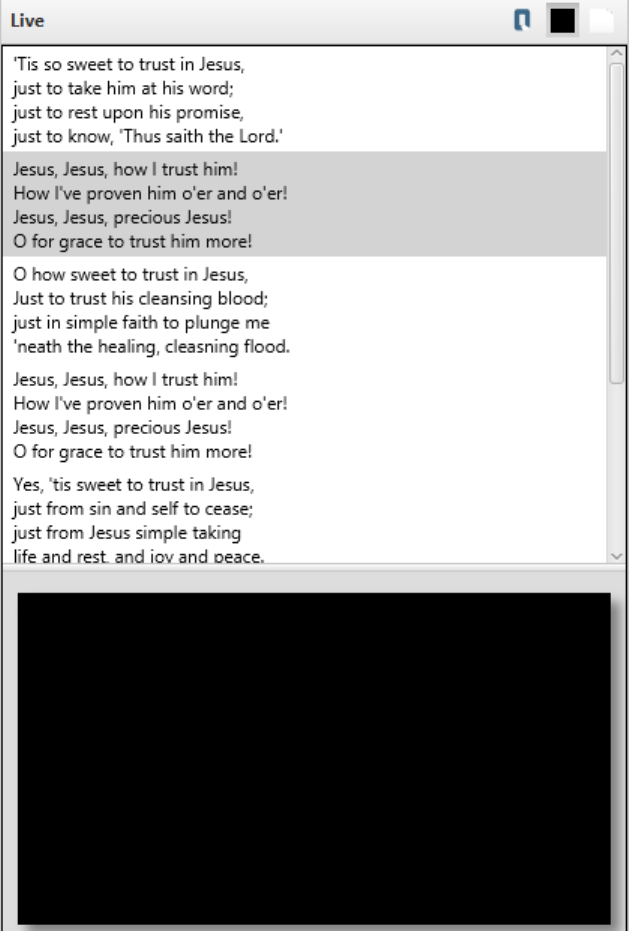
1.1.3. Live
In the live section you can switch between the slides by clicking the different text sections, by using
your keyboard’s up and down arrow keys, the Page Up and the Page Down keys or by using section
shortcuts (see 4. Shortcuts and other things that are good to know). If you are not ready to show the
text live just yet, you have three options to hide the text: Logo button, Black Screen or Clear screen.

Version 2016.2 2017-02-12
Revision 1 Page 12
1.1.3.2. Black Screen
If you select the Black Screen button, the projector output will be completely black, not displaying
any changes of slide or item until you deselect the button.

Version 2016.2 2017-02-12
Revision 1 Page 13
1.1.3.3. Clear screen
If you select the Clear Screen button, any text will disappear and the background image/video/colour
you have pre-assigned will be the only thing visible on the output (see 2.1. Themes). Any changes of
slide or item will not appear until you deselect the button.

Version 2016.2 2017-02-12
Revision 1 Page 14
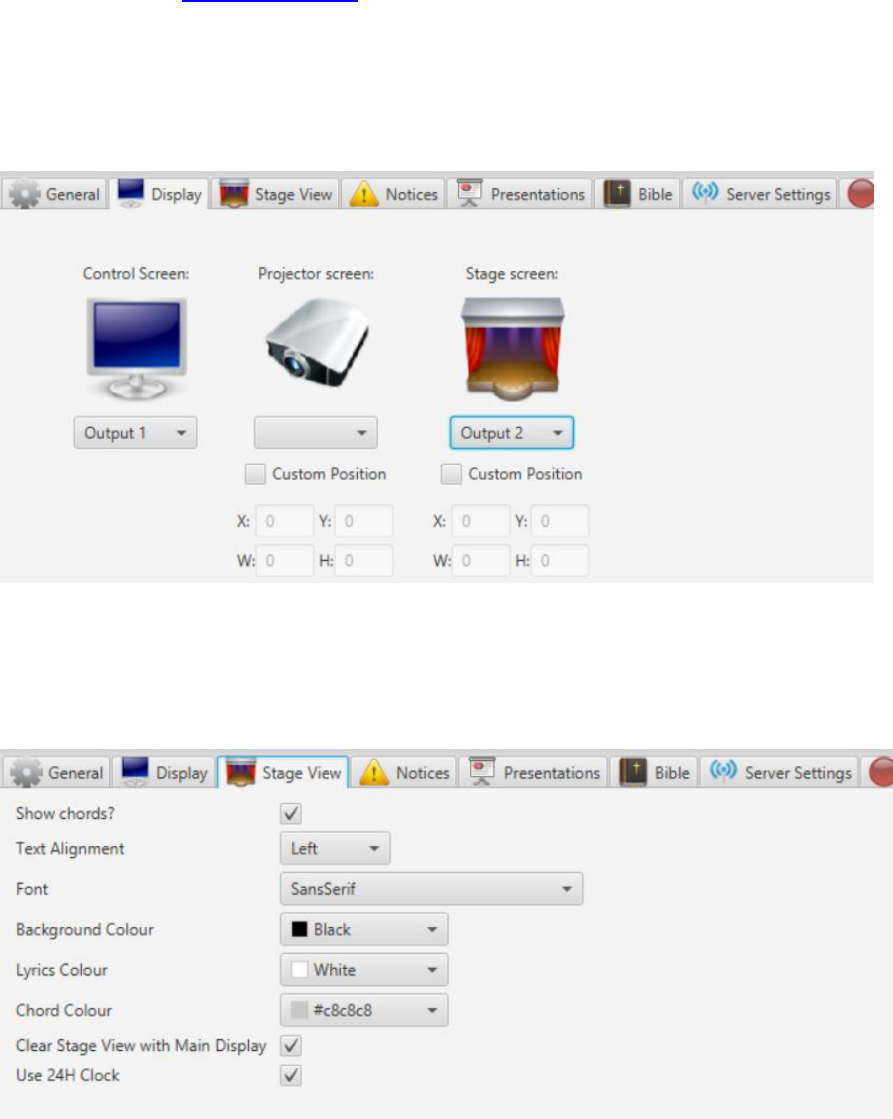
1.2. Setting up a projector
1.2.1. Selecting output
For Quelea to know where you would like to display the output, you must set up what screens you
use. To access the settings, go to Tools and Options or press keyboard shortcut Ctrl+T (⌘+T on Mac).
Select the tab Display. For most users, the appropriate setting would be to change Projector screen
to Output 2 and press OK. (If the black projector screen now would appear on your computer, try
changing the output again.) Note you might not see a second output if the screen is cloned unto you
projector rather than extended (see 5. Troubleshooting). If you are an advanced user and want an
automatization of these steps, you could check out 3.10. Advanced settings.

Version 2016.2 2017-02-12
Revision 1 Page 15
1.2.2. Using Test Patterns to adjust projector settings
If you manually need to adjust the output colours, size or other visual settings on your projector you
might want to use Test Patterns: images created to simplify the adjustments. To find out how you
adjust your projector you must consult your product manual. To find the images, go to Tools and Test
Patterns. When you select an image, it will appear on your projector output that you set up in the
previous step (1.2.1).

Version 2016.2 2017-02-12
Revision 1 Page 16
1.3. Adding songs to your database
1.3.1. Creating a new song
The first time you run Quelea, your song database will be empty. A message will be visible, showing
you where to click to add a new song to the database.
Version 2016.2 2017-02-12
Revision 1 Page 17
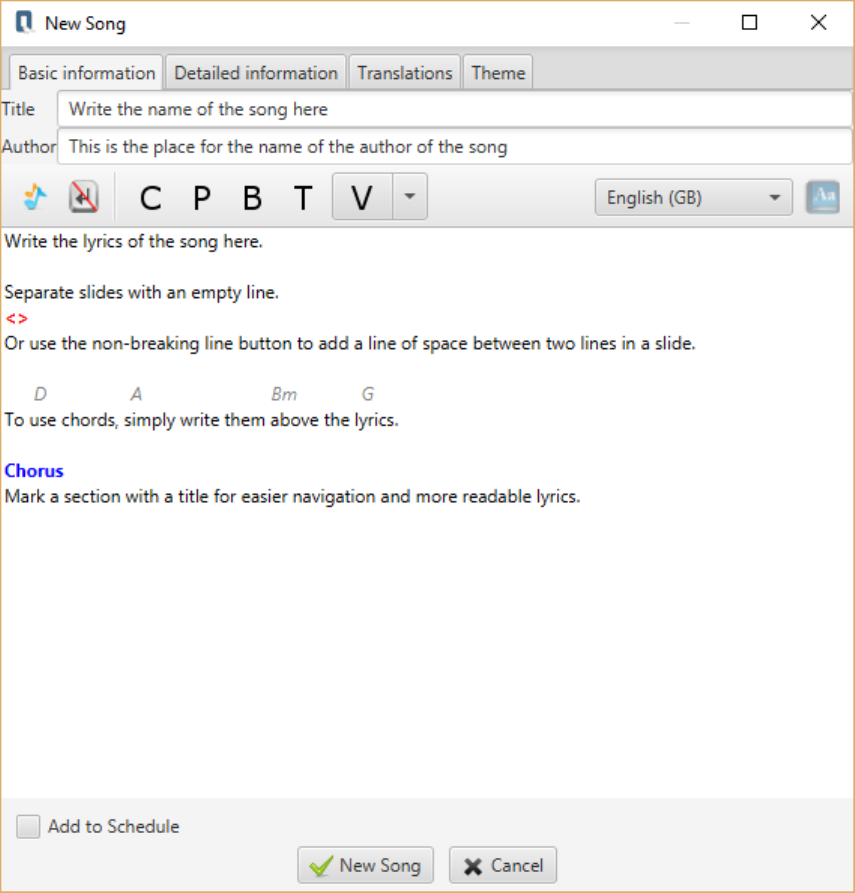
After clicking the button you will see the following dialog where you can add the name of the song
and the author, along with the lyrics. You might also add chords that you later can use with Stage
View (see 2.8). It is also possible to transpose the chords by clicking the button with the two notes. If
you assign labels to the sections, by using the buttons with a letter on them or by writing, you will
later be able to use keyboard navigation to navigate through the song (see 2.15. Section titles).
After you have added the lyrics, you might also want to add more information about the song, like
CCLI number, Copyright or Year. You could also add a translation to a song or a separate theme for
this song. For detailed information on how to do that see section 2. Additional features or follow the
instructions under the dedicated tabs (Detailed information, Translations, Theme).

Version 2016.2 2017-02-12
Revision 1 Page 18
1.3.2. Importing songs from another software
If you are migrating from another projection software, you might already have a database of songs
that you would like to use. Instead of manually adding the songs one by one, you can use the Quelea
import function. Quelea supports the import of databases from many of the most common software
among churches, such as EasyWorship, OpenLP, EasySlides and many others. Simply click on
Database, select Import and click on the source of the database you wish to import.
For this example we will use an EasySlides XML file, but the steps are similar when you import from
another source. The only major exception is importing through Planning Center Online, so for further
instructions on how to use that feature, check 2.19. Planning Center Online.

Version 2016.2 2017-02-12
Revision 1 Page 19
If you already have songs in your database and want to make sure Quelea will not import the songs
you already have got, select “Check duplicates”. Otherwise, or after that, click on the text “Click to
select file” and browse to the location of the database file.
After you have selected the file, the file path will appear. When you select “Import” Quelea will start
to read the file to see what songs are stored within the file.

Version 2016.2 2017-02-12
Revision 1 Page 20
After a while a new dialog will appear, asking you to choose which songs to import. If you want to
import all, just select “Check/Uncheck all” and click on “Add”.
Once Quelea has finished importing the songs they will appear in your database and you are now
able to add songs to a schedule (see 1.4) and showing them live (see 1.6).

Version 2016.2 2017-02-12
Revision 1 Page 21
1.4. Adding items to Order of Service
The Order of Service, or Schedule, is a way for you to organize multiple items for a certain occasion,
e.g. a service. You can add songs, Bible passages, images, presentations, timers and videos (from a
file on your computer, from YouTube or from a DVD) and then place them in the order you would like
to have them.
1.4.1. Adding a song
To add a song to your schedule, start by finding the desired song in your database. You could either
search by title, phrase or author. You could also scroll through the database to find the desired song.
Once you have found it, you have three ways to add it to your Order of Service: by dragging the song
and dropping it in the Order of Service, by pressing enter on your keyboard or right-clicking and
selecting “Add to schedule”. If you want to make sure that the version that you have in your
database will remain untouched even if you edit the lyrics during the service, select “Copy to
schedule” instead or enable the setting Copy song to schedule by default (3.1.11).

Version 2016.2 2017-02-12
Revision 1 Page 22
1.4.2. Adding a Bible passage
To add a Bible passage to your schedule, you start by selecting the Bible tab. There, your default
Bible (see 3.6.1) will be selected, but you are free to select whichever translation you prefer. (If your
preferred translation is not in Quelea by default, read about how you can add Bible translations at
3.6.1.Default Bible and add a Bible.)
Next, you select your desired book by scrolling through them (left image) or by writing the first
letters of the book (right image). Note that the letters you write will not be visible but will be
remembered as you continue typing.

Version 2016.2 2017-02-12
Revision 1 Page 23
After that, you write the desired chapter and verse, separated with a colon (:). If you wish to add
multiple verses, just separate the first and the last verse number with a hyphen (-). Not writing a
second number after the hyphen before adding the passage to your schedule will automatically add
the remaining verses of the chapter to the passage. If you want to add multiple passages from the
book at once, just separate the full passage path with a comma (,) or a semi-colon (;), e.g. 3:16-
17;3:21.
You can also click the verses to extend/shorten the selected passage. If you click before or after the
selection, the passage is extended to/from that verse. If you click a verse in the selection, that will
become the first verse of the passage.
Once you have found the desired passage, press enter or click “Add to Schedule”. (If you later decide
you would like to change the Bible version of the passage, just right-click and select “Switch
Version”.)
Version 2016.2 2017-02-12
Revision 1 Page 24
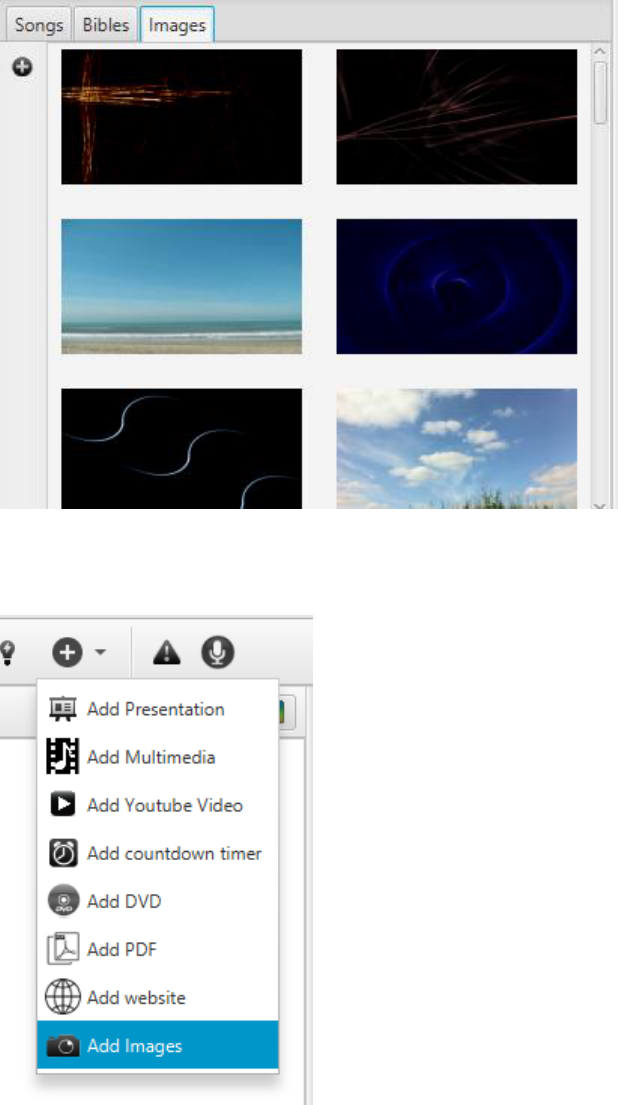
1.4.3. Adding an image
To add an image to your schedule, you double-click on one of the images found in the Images tab or
drag and drop it in your schedule. If you wish to add your own images, just click the Plus button on
your left and browse to the desired image.
Alternatively, you could also add images by using the option in the add menu. This option is
explained in detail in the section 2.18. Displaying an image group.

Version 2016.2 2017-02-12
Revision 1 Page 25
1.4.4. Adding multimedia
If you want to add multimedia to your schedule you have three options: 1) add a video or music file
stored on your local computer, 2) add a YouTube video, or 3) add a DVD video. All three are found as
options under the plus button in the top of the screen. Simply select your option and browse to the
location of the video file/DVD or enter the YouTube URL of the desired video. If you have activated
the Video Library Tab (see 3.1.9), you can also add a video from that tab in a similar way to how you
add images (1.4.3).
Once you have entered a YouTube URL, a preview image of the video will appear after a while along
with the title of the clip. If nothing appears, check your Internet connection and make sure you have
not misspelled the URL. In case you still cannot play a YouTube video, check the section 5.
Troubleshooting for further instructions.

Version 2016.2 2017-02-12
Revision 1 Page 26
1.4.5. Adding a presentation
To add a presentation you hover the mouse over the add button, click the option “Add Presentation”
and browse to the desired presentation stored on your local computer. To set up Quelea to use
OpenOffice Impress or Microsoft PowerPoint for further features, see 3.1.3.
1.4.6. Organizing a schedule
You can use the small buttons to the left of the schedule to move an item up or down (arrow
buttons) in the schedule or to remove one (X button).
1.5. Themes
How to set up themes will be covered in 2.1, but it might be good for you to know that you can use
themes to set up font, colours, image or video background, text alignments or other non-standard
settings. You find the themes located in the upper right corner of the Order of Service section; a
colourful button.
1.6. Showing something live
Now you should have a Schedule ready to use. Select the item you want to display in the Order of
Service and either press space bar on your keyboard or click “Go Live” in the Preview section. There
you navigate through the slides by clicking the different text sections or by using your keyboard’s up
and down arrow keys. You can also use the Page Up and the Page Down keys, which often is used by
presentation remotes. Note, however, that this will not work if the database panel is selected.
Version 2016.2 2017-02-12
Revision 1 Page 27
1.7. Ready to go
This was a short introduction to get you started with Quelea. You now know the basic features that
you need to know to be able to use it, but if you wish to extend your knowledge in how Quelea can
be used and how you can adjust the settings to your needs, you will find more under 2. Additional
features, 3. Setting up Quelea for your needs and 4. Shortcuts and other things that are good to
know.

Version 2016.2 2017-02-12
Revision 1 Page 28
2. Additional features
Quelea has a lot of features that might be useful for many users. Some of these features are unique
to Quelea, others are found in similar software too. New features are regularly added based on user
requests. If you discover a feature you miss or have a suggestion on how to improve Quelea, see the
FAQ (Frequently Asked Questions) (6.) for ways to let the developers know what you think.
2.1. Themes
In Quelea you can assign a certain layout to an entire schedule or individual layouts for each item. By
default, the layout will be: black background and white text that is aligned to the centre of the screen
for songs and to the left for Bible passages. For different reasons you might want to change this, e.g.
to make it more visually pleasing or for readability reasons. If you have trouble finding a layout that
works for anyone (for instance, some churches have found that dyslectic persons might sometimes
be helped by different colours that others might prefer), you might want to take a look at the Mobile
Lyrics feature (2.5), where each reader can assign their own colours.
2.1.1. Set a global theme
A global theme applies to all text-based items in your schedule, apart from timers and presentations.
Start by clicking the colourful button in the upper right corner of the Order of Service section. You
will see the following.
You will find two example themes along with the default theme. You can edit (pencil button) or
delete (red x button) the two example themes if you wish, but the default theme is non-editable for
you to always have a good standard option to revert to. To select a theme, you simply click one of
them and all items (songs or Bible passages) in your schedule will use that layout. If you would like to
add your own theme, click the New Theme button in the left corner. Since setting up a theme always
is done in the same way, regardless if it is a global theme or an individual theme, we will look into it
further after finding where to set up an individual theme (2.1.3 Setting up a theme).
2.1.2. Set an individual theme
To set up an individual theme you can click the colourful button appearing to the right of the item
when hovering it. You can also reach it when editing the item by right-clicking it and select “Edit
Song” and then selecting the tab “Theme”. The second method can be done with an item in the
schedule (both with songs or Bible passages) or with a song in the song database. One thing to notice
here is that the individual theme will override the default theme, but any other global theme (added
by you or there by default) will override the individual settings you have made. (This is being
discussed at the moment and will probably be an optional feature in the future.)

Version 2016.2 2017-02-12
Revision 1 Page 29
2.1.3. Setting up a theme
The only difference between setting up a global theme and an individual theme is the first line
“Theme Name” which is needed to be able to save a global theme, other than that, the instructions
are the same. As you will see, you can change Font appearance, Background and Text position.

Version 2016.2 2017-02-12
Revision 1 Page 30
2.1.3.1. Font appearance
By default, there will only be six fonts available to you and “Noto Sans” will be the suggested font to
use.
If you would like to add more fonts to choose between, you click the ellipsis (...) next to the drop-
down menu.

Version 2016.2 2017-02-12
Revision 1 Page 31
That will open up a new window where you can drag and drop any font that you want to add from
the left to the right, and any font you would like to remove from the right to the left.

Version 2016.2 2017-02-12
Revision 1 Page 32
Once you have selected the preferred font, you can select the font appearance: if you want the text
to be bold, italic, alignment to the left, centre or right, and the font colour.

Version 2016.2 2017-02-12
Revision 1 Page 33
2.1.3.2. More font options – Translation appearance and Shadow settings
By pressing the ellipsis button (...) next to “Font” you find settings for the translated lyrics (see 2.4).
You set it up in a similar way to the previous font settings (2.1.3.1).
You can also set up whether or not you want to use shadows and the appearance of them. You can
activate or deactivate shadow, set shadow colour, shadow offset, shadow radius and shadow spread.
All changes to the shadow settings will be previewed on the canvas, so you are immediately able to
see the result.

Version 2016.2 2017-02-12
Revision 1 Page 34
2.1.3.3. Background
In Quelea, you can set the background to be a Colour background, an Image background or a Video
background.
2.1.3.3.1. Colour background
If you choose a background colour you are advised to choose a colour that is a good contrast to the
font colour. If you would choose two similar colours, a warning will appear, telling you that it might
be hard to read.

Version 2016.2 2017-02-12
Revision 1 Page 35
2.1.3.3.2. Image background
If you choose an image, you will have to browse to the desired image by clicking the button next to
the blank box. By default, the file browser opens the Quelea image folder. If you would like to add
your own image, just browse to the folder in which it is stored, although you are advised to first read
the image guidelines stored in the “img” folder in the Quelea main folder (IMAGE GUIDELINES.txt).

Version 2016.2 2017-02-12
Revision 1 Page 36
2.1.3.3.3. Video background
If you would like to use video backgrounds, you will need VLC media player installed on your
computer. (Visit http://www.videolan.org/vlc/ to download, just make sure you download the 32-bit
version.) Similar to using an image as the background, you will need to browse to the desired video
and the file browser will open the Quelea video folder first. (Note that you also can use live video as
background, but that it requires advanced user settings; see 3.10.1.1. Using VLCARG to set up live
video background).

Version 2016.2 2017-02-12
Revision 1 Page 37
If you want it to, Quelea can stretch the video to fit the screen. You can also adjust the hue, if you
would like different colours to your background video. Of course, this option is best to use only with
abstract videos. (If you need even more video settings, look into the advanced settings available
through VLCARG mentioned earlier.)

Version 2016.2 2017-02-12
Revision 1 Page 38
2.1.3.4. Text position
If you hover over the canvas, where the sample text is displayed, nine boxes will appear. By selecting
one of them, you can set the text position best suited for your projection environment.

Version 2016.2 2017-02-12
Revision 1 Page 39
2.2. Logo
The first time you click the logo button, you will see instructions on how to add your own logo to
display in Quelea. If you have already followed the instructions once, next time you click it, you will
instead access the logo you have assigned. However, a tooltip is always available if you hover the
mouse over the button if you would like a reminder on how to change the logo. However, setting or
changing the logo is simple: all you need to do is to right-click the logo button and you will be able to
browse to the desired image. This image can later be used as an alternative to fade into, rather than
fading to background image/colour/video or a blank screen.

Version 2016.2 2017-02-12
Revision 1 Page 40
2.3. Spelling check
If you misspell a word, Quelea will automatically find it as long as you have selected the right
language for the song. If a spelling error is found, a yellow triangle will appear in the upper right
corner, telling you that there is at least on error in the lyrics. By clicking the “Aa” button that looks
like a book, or by hitting F7 on your keyboard, you can access the spell checker.
Here you can change the misspelled word to one of the suggestions by selecting the desired
suggestion and then clicking “Correct”, make the spell checker ignore the word for this song by
clicking “Ignore”, add the word to the dictionary by clicking “Add” or manually correct it by clicking
“Cancel”. Once you have clicked Ignore, Add or Correct, the spelling checker will automatically find
any other spelling errors for you.

Version 2016.2 2017-02-12
Revision 1 Page 41
2.4. Translations
Since Quelea 2014 Exodus, it is possible to use translations of songs. You can store many translations
to a song but at the moment only display one at the time.
2.4.1. Add a translation
To add a translation, you need to edit a song (by right-clicking a song and selecting “Edit song”). One
of the tabs in that window is called “Translations”.
.
On the left side you see the default translation: the lyrics added in the tab Basic information. On the
right side you see the space where the translations will be added. To add a translation to a song,
press the star button in the upper right corner.

Version 2016.2 2017-02-12
Revision 1 Page 42
First, you are asked to enter the name of the language to which you would like to add a translation. If
this is spelled correctly and the setting “Attempt to auto-translate songs” is checked (see 3.1.10), an
automatic translation will be added to your song that you later can edit. (There are no guarantees
that the automatic translation will be entirely accurate, so you are advised to always check the
translation first before using it live).
In this example, the song is automatically translated to Spanish. As Spanish speakers will see, this
would need to be edited. To edit, simply select the text and write.

Version 2016.2 2017-02-12
Revision 1 Page 43
Any further added translations will be added as new tabs next to the first one.
2.4.2. Show a translation
To show a translation, you need to add a song with at least one translation to the schedule, then
right-click it and select “Choose translations”.

Version 2016.2 2017-02-12
Revision 1 Page 44
Then you will be prompted with a dialog that allows you to select the translation you would like to
display. It is only possible to display one translation (apart from the default lyrics) at the time.
In the schedule, you can see that a translation to the song has been selected by the text within the
parenthesis.
When you display the song live (1.6), every other line will be the translated version. By default, the
translation will be smaller and italic, but the font appearance can be changed within the theme
settings (2.1.3.2). With Mobile Lyrics (2.5) each user can select to view its own language.

Version 2016.2 2017-02-12
Revision 1 Page 45
2.5. Mobile Lyrics
Mobile Lyrics is one of those features that make Quelea rather unique. It that allows you to view
what is being displayed live via any web browser, as long as it is connected to the same network as
Quelea. This can be used either as a complement to a projector or instead of one. Mobile Lyrics also
allows each unit to set up individual layouts, making it easier for each reader to use their preferred
colour settings. Also, note that there is an Android application called Quelea Mobile Lyrics in the
Google Play Store with some additional features to the browser version.
2.5.1. Activating Mobile Lyrics
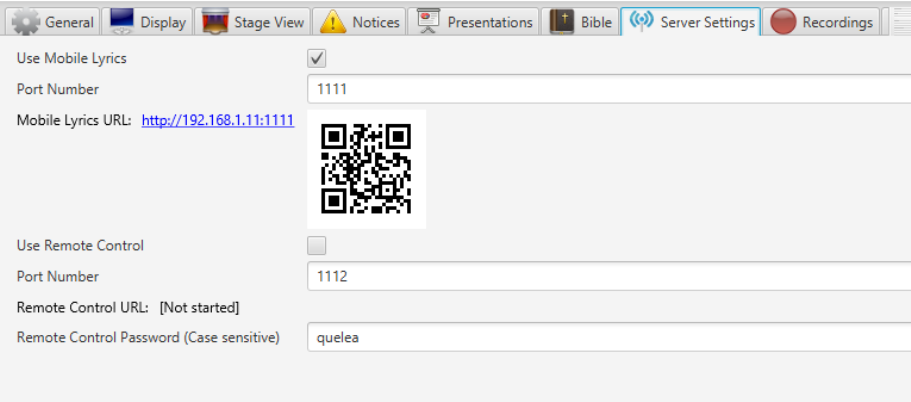
In Options, under the tab Server Settings, you find the option to activate Mobile Lyrics server. Note
that you will need to be connected to a network for this feature to work.
After you have activated the server, you will need to restart Quelea for the changes to take effect.
Once you have restarted Quelea a URL to the Quelea server will appear. The URL consist of the
specific address that your computer has in the network (usually automatically distributed by a
router) and a port number that specifies what the web browser should connect to when it contacts
your computer – in other words: the Quelea Mobile Lyrics server. This port number can be changed if
something other than Quelea already would use the suggested port, but for most cases it is best to
use the pre-defined value.
Version 2016.2 2017-02-12
Revision 1 Page 46
Simply visit the URL generated by Quelea from any device with web browsing capabilities (as long as
it is connected to the same network). This means that any smartphone, tablet, laptop or other
portable devices that is connected to the same network can access the lyrics you have in the live
section in Quelea. If you have an Android device, you can also download the application Quelea
Mobile Lyrics and use it to view the output. If your device has a QR-scanner you could simply scan the
generated QR code instead. This code can be saved as an image, e.g. for you to print or to display
with Quelea.

Version 2016.2 2017-02-12
Revision 1 Page 47
2.5.2. Using Mobile Lyrics
When you visit the webpage, this is what you will see:
The lyrics will be adjusted to fit any screen and still be as large as possible. In the upper right corner
you will see a cog wheel, where the user can set up their personal preference in colours. Simply click
the colour code you see, and a tool will drop down to help you find the desired colour.
It is also possible to show chords added to a song (1.3.1) which allows Mobile Lyrics to be used as a
stage screen. If you have a stored translation to a song (2.4) you could also select to view that instead
of the default lyrics. Mobile Lyrics could also be used as a way to give live interpretation or write
instant messages to users that’s not visible on the projection with Live Text (see 2.20).

Version 2016.2 2017-02-12
Revision 1 Page 48
2.6. Mobile Remote
Mobile Remote allows you, via a web browser, to control Quelea on any device connected to the
same network as Quelea. This means that Quelea could be operated e.g. from stage, even if the
computer with Quelea is located elsewhere. This is achieved either through a web browser or one of
the Android applications Quelea Mobile Remote or Quelea Stage Mode available in the Google Play
Store.
2.6.1. Activating Mobile Remote
In Options, under the tab Server Settings, you find the option to activate Mobile Remote server. Note
that you will need to be connected to a network for this feature to work. You should also choose a
password. Note that it is case sensitive, which means that “Quelea” is not the same as “quelea”.
After you have activated the server, you will need to restart Quelea for the changes to take effect.
Once you have restarted Quelea, a URL to the Quelea server will appear. The URL consist of the
specific address your computer has in the network (usually automatically distributed by a router) and
a port number that specifies what the web browser should connect to when it contacts your
computer – in other words: the Quelea Mobile Remote server. This port number can be changed if
something other than Quelea already would use the suggested port, but for most cases it is best to
use the pre-defined value.

Version 2016.2 2017-02-12
Revision 1 Page 49
Now the remote control feature is activated, and all you need to do is visit the URL generated by
Quelea from any unit with web browsing capabilities (as long as it is connected to the same network)
to be able to use it. This means that you could use any smart phone, tablet, laptop or other portable
devices that is connected to the same network as a remote control. If you have an Android device,
you can also download the applications Quelea Mobile Remote or Quelea Stage Mode to control the
software.

Version 2016.2 2017-02-12
Revision 1 Page 50
2.6.2. Using Mobile Remote
When you visit the webpage you will (after you have logged in) see buttons for fading into a logo, to
black and the theme background, buttons for changing slides and items, information about the
current item, the lyrics and a logout button.
When you display a song live, the lyrics will also appear at the Mobile Remote webpage. There you
can use it similarly to how you would in the live section of Quelea; you can click the lyric sections to
change slides. You cannot use the keyboard’s arrow keys, but instead you can use the dedicated
buttons on the webpage to change slides.

Version 2016.2 2017-02-12
Revision 1 Page 51
2.7. Notices
Notices is a feature to quickly display messages above other items. You find where to add new ones
by clicking the triangular alert button.
The notices window is rather basic: New Notice, to add a new one; Edit Notice, to edit one that
already is being displayed; and Remove Notice, to remove a notice that is being displayed.
When you want to add a notice, this is what you will see. First you need to write the notice (the
message that you want to display). Secondly you need to decide whether you should display it a
certain amount of times or if it should stay active until you delete it (“Infinite?”). Lastly you can set
up the font and colour of the notice. (For further notice settings, see 3.4. Notices)

Version 2016.2 2017-02-12
Revision 1 Page 52
Once you click “Add notice” a red bar will appear at the bottom of your projection (regardless of item
showing) with the notice scrolling from right to left (in this example, the Mobile Lyrics URL).
Version 2016.2 2017-02-12
Revision 1 Page 53
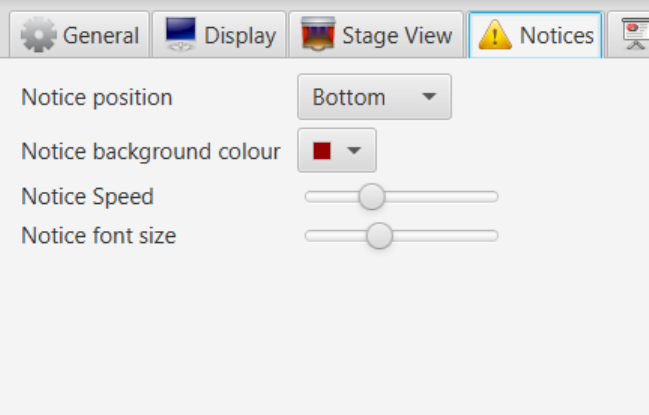
2.8. Stage View
If your computer supports several displays and you have the possibility to have a monitor on stage,
the Stage View feature can allow you to display additional information to that screen, apart from
what currently is being displayed on the main projection. Currently there are two features available
by default for the Stage View: clock and chords. The main idea behind the stage view is that it can be
used for worship leaders, hence the chord feature. With that idea in mind, Stage View is meant to be
less “cluttered” and therefore presentations, notices and videos will not be visible on the Stage View.
To be able to control Quelea from a stage screen and for some additional features, check out the
Android application Quelea Stage Mode in the Google Play Store.
2.8.1. Setting up Stage View
First, enter Options that you find under Tools. Go to the tab Display and activate the Stage screen.
Preferably, you would have three outputs, one for each screen, but that depends on your graphics
card. If you have three outputs, you need to try them to find which screen you want to use for what.
Secondly, go to the tab Stage View. Here you can set up whether or not to use chords, how the text
will align, font and colours for background, lyrics and chords. Clock is not an optional feature,
although you can change if you want a 24 hour clock or not. You can also select whether or not the
Stage View should be cleared when the Main Display is cleared.

Version 2016.2 2017-02-12
Revision 1 Page 54
This is an example of what the stage monitor will display if no settings are changed.

Version 2016.2 2017-02-12
Revision 1 Page 55
2.9. Bible search
In case you do not know where the Bible passage you want to use is, you can use the Bible searcher.
You find it under Tools and “Search bibles...”
Here you can search all translations or a single translation by choosing in the drop-down menu. By
default, all Bible translations will be used in the search. While you type, Quelea automatically
searches through the bibles. You need to write at least four characters for Quelea to start searching
and in the upper right corner you will see the number of results found.

Version 2016.2 2017-02-12
Revision 1 Page 56
By clicking a translation, the book that contains the results will appear. In this example, we start by
clicking the America Standard Version translation and then it shows the books that contain search
results (which is only one here). Clicking a book name shows all chapters containing a search result
and clicking a chapter shows all verses containing a search result. If only one translation is selected
instead of “All”, the first step will automatically skipped and the name of the books will be the base
of the tree menu.
Clicking a verse will display the chapter for you to read. If you wish to add your search result to your
schedule, click the “Add to Schedule” button and the entire chapter will be added. If you only want to
add that verse, you have to do it manually (see 1.4.2)
2.10. Bible Browser
The Bible Browser lets you easily browse through entire bible books. You find it under Tools and
“View bibles...”

Version 2016.2 2017-02-12
Revision 1 Page 57
Select the desired translation and book and start reading.
2.11. Saving and sharing schedules
Quelea can save a schedule for later use, help you print one or email one to a friend. To save a
schedule that you have created (1.4), click “File” and “Save Schedule” or “Save Schedule as...” If you
have opened an existing file, the latter will always let you save changes to a new schedule whereas
the first will save the changes to the same file as when it was created. The first time you click any of
them however, they will both let you create a file that contains your schedule. Quelea saves all
information to the file, so even if your database would be deleted or you would send it to another
user, everything will still be accessible. If you do not want to embed media resources (to reduce the
file size), see 3.1.13.

Version 2016.2 2017-02-12
Revision 1 Page 58
Printing a schedule allows you to print the order of service, not the lyrics of a song or the text of a
Bible passage. The same goes for exporting a schedule to a PDF.
If you would like to export all songs (with lyrics) to PDF files, you click “Schedule” and “Export songs
to PDF”. The songs will then be exported as a compressed Zip file that you first will have to
decompress if you want to reach the PDF files.
To email a schedule via Quelea, you click “Schedule” and “Email Schedule”. That opens a new email
in your system’s default email software. If you wish to use another email client, you will have to
attach the file manually.
This is what the email contains. The subject will be “Quelea schedule”.

Version 2016.2 2017-02-12
Revision 1 Page 59
2.12. Exporting or printing a song
In Quelea you can print an individual song or export one to a PDF. Right-click the desired song in the
database (not in the schedule) and then select either “Export to PDF” or “Print song”. Quelea will
then ask you if you also want to export/print the chords and translation(s) if there is/are any.
2.13. Recording
A new feature since Quelea 2016.0 is recording ability. This can for instance be used to record
sermons or entire services. To use the recording feature, you first need to set up the recording
location. Start by going to Options, the Recordings tab and click Browse, next to “Path for
recordings”. Browse to the folder where you would want the recordings to be stored.
To start a recording, just click the recording button with a microphone at the top of the screen.
The recording button will then be pushed down and the elapsed time and a textbox containing the
default name will appear.
If you want to change the name of the recording, just edit the text to whatever you want to call it.
Simply press the button again to stop recording. The recording will automatically be stored in the
recordings path and if you have enabled VLC converting (see 3.8.2), your file will automatically be
stored as a MP3 and the default WAV file will be deleted.

Version 2016.2 2017-02-12
Revision 1 Page 60
2.14. Timer
If you want a countdown timer to display, for instance with minutes until the service will start, you
can select “Add countdown timer” under the add menu at the top of Quelea.
You will then be prompted with a dialog where you can set up your new timer.
Start by writing the duration of the timer. Write the amount of minutes followed by a colon (:) and
then the amount of seconds, e.g. 5:00. If you would like to add a message that should be visible along
with the timer, you can write it in the Additional Text box, as long as you remember to write a hash
symbol (#) where you would like the timer to be visible. An example is “Service begins in #”, where
the hash automatically will be replaced with your timer. You could also set up a separate theme for
the timer (see 2.1.3 Setting up a theme). Lastly, a timer can then be saved and later be accessed
through the Timer tab.
The timer will then resemble a video, which you can play, pause and stop if you want to. When you
click “Go live”, the timer will automatically start.

Version 2016.2 2017-02-12
Revision 1 Page 61
2.15. Section titles
In all songs you can add a title to each section of the lyrics. Just click the buttons to insert a title or
write the title above the section and it will turn blue if it is recognized as a title. The available titles at
the moment are:
Chorus
Verse (optionally followed by a number)
Pre-chorus
Bridge
Tag
Interlude
Ending
The tags will then be visible in the preview and live panel and you can quickly jump to a section by
using the first letter of each title or the corresponding number of the verse that you want to display,
i.e. ‘C’ for chorus and ‘2’ for the second verse.

Version 2016.2 2017-02-12
Revision 1 Page 62
2.16. Displaying a PDF
In Quelea, you can import a PDF file and display it in a similar way as a presentation. You could for
instance export your presentation to PDF to make sure nothing changes in the layout, instead of
relying on the (sometimes inexact) library that Quelea uses to create preview images.
Just click the option “Add PDF” in the add menu with a plus sign or in the Schedule menu. You can
then browse to the PDF file you want to add to your schedule and it will automatically be imported
into it.
When you show the PDF live, you could either click the images to select which one to show or let
Quelea loop through the images automatically by clicking the loop button and setting an amount of
seconds that should elapse between each slide change.

Version 2016.2 2017-02-12
Revision 1 Page 63
2.17. Displaying a website
2.17.1. Usage
Another feature that makes Quelea rather unique is the ability to project a website. Just select
“Add website” in either the add menu (plus sign) or in the Schedule menu.
Then you need to add the URL to the website you want to display.
When you click OK, the website will be added to your schedule and start loading in the background. If
you preview the item, you should see the web page loaded along with a few extra buttons.

Version 2016.2 2017-02-12
Revision 1 Page 64
You could then navigate to any subpage you might want to show or enter a new URL in the text box.
When you are ready to show it live, click “Go live”.
Click directly on the preview image to pass a click onto the website and use the buttons to go
back/forward, refresh, go to a new URL or zoom in/out.
2.17.2. Limitations
This section is further information about the feature, explaining why it might not always work the
way you expect it to.
You might notice is that the preview image does not look the same way as it did before.
Basically this is due to limitations in Java where you only can have one instance of the
website, meaning that the website is moved from inside of the Quelea main window to the
projection area. As long as it is not live (in preview or hidden with either of the buttons), the
website is in the Quelea main window and as long as you show it live, it is actually only in the
projection (and what you see in the main window is a screenshot of it). Given that your
projection area probably is larger than the small area it has in the main window, it might
affect the layout of the website when it is moved.
You might also notice that the preview image might not be updated smoothly in Quelea and
that is intentionally set to a slower refresh rate to not overload slower computers. Note that
the potential lag you might experience is only visible for you, not the people watching the
projection.
Note, if you use scaling in Windows the mouse clicks on the preview image will not be
accurate.
Lastly, we must mention that the web browser that exists in Java (which this is built on) is
relatively old, which means that some websites will not be possible to display. For instance,
you cannot show anything built with Flash, e.g. like older YouTube videos use. This is not
something we can do anything about, other than hope that a future Java update will contain
an updated browser.

Version 2016.2 2017-02-12
Revision 1 Page 65
2.18. Displaying an image group
Sometimes you might want to display a group of images rather than one at the time and to do that
you simply select “Add Images” in the add menu (plus sign) or under the Schedule menu. You can
then browse to the images you want to add. Select multiple images with the selection marker you
get if you click the background and drag the mouse or by holding ctrl and selecting multiple items.
Once you have added them to the schedule, you can use the image group exactly the same way as a
PDF file (see 2.16).
2.19. Planning Center Online
If you have an account at Planning Center Online, you can import your data from their server into
Quelea. First, make sure you have setup a download path for additional files (see 3.9). Then, sign in
to Planning Center Online by going to Database -> Import -> Planning Center Online, or by pressing
the keyboard shortcut ctrl + alt + p.
Once you have logged in, you can select what you want to import.

Version 2016.2 2017-02-12
Revision 1 Page 66
2.20. Live Text
Live Text is a feature to use with Mobile Lyrics (2.5) to send text to the users while you write. This
could for instance be used for texted interpretation, to summarize a sermon for someone with
trouble hearing or as a way to send messages to the worship team if they are the only ones using it.
Start by making sure that the Mobile Lyrics server is activated (2.5.1) and then select Live Text under
Tools, or use the keyboard shortcut ctrl + shift + L.
The Live Text window will then appear and there you also find instructions on how to use the
feature. For each space or punctuation character, the text written so far will be sent to the Mobile
Lyrics users automatically. If the users are using the Android app, it is possible to combine this with
the automatic translation feature through Bing. Below you can see how the text above will appear
for the users.

Version 2016.2 2017-02-12
Revision 1 Page 67
3. Setting up Quelea for your needs
In this chapter we will walk through the settings in Quelea, to see what they mean and how you can
use them. You access the settings through Tools and Options (or Ctrl/⌘ + T).
3.1. General
User Options
3.1.1. Interface language
Allows you to select the interface language of Quelea. At this moment, Quelea is available in
fourteen languages: English, German, Czech, Swedish, Hungarian, Norwegian, Dutch, Lithuanian,
Portuguese, Slovenian, Spanish, Swahili, Bulgarian and French. More translations are greatly
appreciated, so if you know another language that you would like to translate to, read more here: 6.
FAQ (Frequently Asked Questions)
3.1.2. Check for update on startup
Does what it says: checks if there is any later release of Quelea if you are connected to the internet.
However, this does not apply to so called nightly builds (see question in 6. FAQ (Frequently Asked
Questions)).
3.1.3. Warn if only one monitor is connected
Gives you a warning each time you start Quelea without a second screen for output. If you only mean
to use Quelea to set up a schedule or only will use the Mobile Lyrics you might want to deactivate
this, otherwise this is a good feature that will let you know if your projector has been unplugged or
has a glitch.
3.1.4. Only preview one line per song section
With long Bible passages or songs with many verses, you might want to prefer to only preview the
first line of each slide to easier see all the remaining slides.
3.1.5. Autoplay videos in live panel
Will automatically play the video when you click “Go live”.
3.1.6. Advance schedule on live display
Will make Quelea preview the next item in the schedule automatically when you click “Go live”.
3.1.7. Overflow current song into next song
Use Page Down key to continue to the next item at the end of the current item.
3.1.8. Preview item on image change
If an image is dragged and dropped on an item in the schedule that isn’t already previewed, this will
make Quelea automatically preview the changed item. (This does not apply when individual themes
are edited any other way.)
3.1.9. Show Video Library Tab (requires restart)
The Video Library Tab will appear next to the tabs for songs, bibles, images and timers. You can then
add videos to your schedule the same way you add an image (see 1.4.3). This option is known to
make the start-up time longer on some system.
Version 2016.2 2017-02-12
Revision 1 Page 68
3.1.10. Attempt to auto-translate songs
If you are connected to the internet, this will attempt to automatically translate a song to the
language you enter (2.4.1). Remember that an automatic translation seldom is perfect, and this is
suggested to be used only as a way to get the basic understanding of the song if you have parts of
the congregation that do not understand the language of the song. Of course, if someone that
understands both languages could translate instead, that is always preferable.
3.1.11. Copy song to schedule by default
Some users prefer to keep an original version of a song in the database and then edit a copy of that
song for each use. This option means that all song that are added to the schedule are temporary
copies that will not be stored back to the database. It means that any edits you make to a song in the
schedule when this option is activated only will be stored in that schedule, whereas any edits you
make to a song in the database also will stored in the database.
3.1.12. Clear item from live view on removal from schedule
This deletes an item that is currently live if it is removed from schedule. If not checked, the song will
remain live until it is replaced with another item.
3.1.13. Embed media in schedule file
Makes the media available even if the schedule is sent to another computer or the original file is
deleted. This option is good if you want to make sure everything is available the next time the
schedule is opened, but in case you have large files in your schedule this can make it hard (or even
impossible) to email it to another user.
3.1.14. Show small song information
Displays the name of the song in the lower/upper right or left corner. Change the percentage of the
screen that it can take up if you feel that the text is too small.
3.1.15. Show small bible passage information
Displays the book, chapter and verse(s) of the passage in the lower/upper right or left corner. Change
the percentage of the screen that it can take up if you feel that the text is too small.
3.1.16. Thumbnail size
If you feel that the thumbnail size of the preview slides for presentations, PDF files or images is too
small, you can change it here.

Version 2016.2 2017-02-12
Revision 1 Page 69
Text Options
3.1.17. Capitalise on each line
Depending on grammatical rules or aesthetic preference you might or might not want to use this.
The first letter of each new line will be capitalised if checked, otherwise the capitalisations entered
when adding a song will be the only ones used.
3.1.18. Use uniform font size
Quelea is built to wrap the lyrics of each slide to fit the screen as best as possible. This option allows
you to choose whether or not this should be done per slide or per item. Per slide means that some
slides might use a larger font size than others within the same song, and per item means that the
font size of some slides will be smaller than they could be but the font size will not differ from slide
to slide.
3.1.19. Maximum font size
Since Quelea automatically wraps the text to fit the screen it might sometimes use a very large font
size, especially if the lyrics are short. With this option, you can set an upper limit for the font size.
3.1.20. Additional line spacing
This allows you to set an additional distance between lines in the lyrics.
3.1.21. Maximum characters per line
Set the maximum number of characters per line. Smaller number equals a slimmer line of lyrics,
higher means wider line of lyrics (until entire screen is filled). Depending on where the line breaks are
made in the lyrics, the proper number can change the lyrics to a smaller or bigger font size.

Version 2016.2 2017-02-12
Revision 1 Page 70
3.2. Display
We have already covered most of the settings here in previous chapters (1.2.1 and 2.8.1), so this part
will only cover the remaining: Custom Position. In case your computer is not connected to another
screen but you still would like to preview the output, you could imitate a separate screen by creating
a custom position screen. This will create a black box on your control screen as big as you want it and
everything you show live will appear there. You could, potentially, also use it to adjust the size of the
output on a separate screen as a last resort if no other settings work (on the monitor/projector or in
your operating system), but you would then have to set it up manually.
The X and Y position allows you to determine where the custom position screen will be located. X: 0
and Y: 0 means that it will be in the top left corner. X will move the screen horizontally and Y
vertically. W adjusts the width and H the height. All numbers are in pixels. One thing to consider
could be to preserve the aspect ratio of the screen that you later will use, though this will not be
discussed in detail here. For this example, the widescreen format 16:9 will be used.
As you can see, the screen will be located 50 pixels from the left side of the screen and 25 pixels
down from the top of the screen, and be 640 pixels wide and 360 pixels in height. This is of course
just an example, so feel free to put in any values if you want to use it.
3.3. Stage View
The settings here have already been discussed in 2.8.1.
Version 2016.2 2017-02-12
Revision 1 Page 71
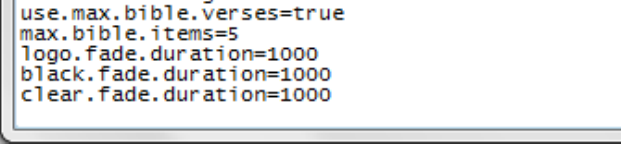
3.4. Notices
This tab lets you choose your own settings for the notices. You can change the placement on the
screen, background colour, the notice speed and the font size. Below you see the standard settings. If
you wish to change the speed of the notices, sliding the knob to the right means faster and left
slower. For font size, right means bigger and left means smaller. The changes will be saved once you
click OK and will be applied to the next notice you add (i.e. any notices already being displayed when
you change the settings will not be affected).
3.5. Presentations
3.5.1. Use OpenOffice for presentations
Requires a separate installation of OpenOffice (due to changes in the software, LibreOffice no longer
works) and allows you to get additional features for presentations, such as animations/transitions
and enfolded items. Note that this relies on OpenOffice own controls (a separate window).
3.5.2. OpenOffice path
Locate the installation path of OpenOffice.
3.5.3. Use PowerPoint for presentations
Requires a separate installation of PowerPoint and allows you to get additional features for
presentations, such as animations/transitions and enfolded items. Note that this to some extent
relies on PowerPoint’s own controls (a separate window) and is handled a bit differently depending
on if your computer is a PC or a Mac.
3.5.4. PowerPoint path
Locate the installation path of PowerPoint. Usually that is C:\Program Files\Microsoft
Office\Office15\POWERPNT.EXE where the number 15 might have to be swapped for version
number you might have.

Version 2016.2 2017-02-12
Revision 1 Page 72
3.6. Bible
The Bible tab lets you select a default Bible, add a Bible, select whether or not verse numbers should
be displayed in Bible passages and adjust the layout of a Bible passage.
3.6.1. Default Bible and add a Bible
To set a default Bible, simply click the drop-down menu and select one of the installed bibles. This
will later be the default option when you add a new Bible passage (you might need to restart Quelea
for the changes to take effect).
If you want to add a Bible, click the “Add bible...” button. This allows you to browse to a downloaded
Bible of type XML or XMM. If you wish to download a Bible, you find XMM bibles in 20 languages
here: http://www.opensong.org/pages/downloads.html and XML bibles in 57 languages here:
http://sourceforge.net/projects/zefania-sharp/files/Bibles/
Of course, after you have added a Bible, it can also be used as the default Bible.
3.6.2. Layout of Bible passages
Your first option is whether or not you want the verse numbers to be visible or not. By default this is
activated and small numbers will be visible in the beginning of each verse, both in the regular output
and the Mobile Lyrics.
Keep verses whole across slides will allow you to determine whether the text should be divided into
slides after a certain amount of words (to maintain as high font size as possible) or at the end of a
verse after a certain amount of words (to ensure that you will not have to change slide in the middle
of a verse).
The last option overrides the above and allows you to determine how many verses you would like to
display per slide. A higher number usually means smaller font size, since more text needs to be fitted
into the screen.
3.7. Server Settings
The server settings have already been discussed in 2.5. Mobile Lyrics and 2.6. Mobile Remote.
Version 2016.2 2017-02-12
Revision 1 Page 73
3.8. Recordings
3.8.1. Path for recordings
Set the path where you want audio recordings to be stored.
3.8.2. Automatically convert recordings to MP3 files (requires VLC)
Will automatically start converting a recording to a MP3 file once it is done and delete the original
recording file. If you are not in need of any manual modification of the recording once it is done, the
MP3 file will be much smaller in size and better for distribution. If, however, you want to edit the file
in a separate software, for instance to adjust sound levels or delete silence, the default WAV format
is better. Note that WAV files will be significantly larger. If VLC is not found, this option will be
disabled.
3.9. Import/Export
Here you can set the folder you want to use when you download data from Planning Center Online
(see 2.19).

Version 2016.2 2017-02-12
Revision 1 Page 74
3.10. Advanced settings
Quelea holds a few additional settings that on one hand require a bit more work from the user to set
up, but on the other hand allows you to fine-tune Quelea for your needs.
3.10.1. VLCARG
VLCARG is a feature that lets you pass argument to VLC, which means that you can basically adjust
the video any way you want. It also means that you could use live video in Quelea, even as a
background video if you would like, which is what we will cover here. For more options, read more
about it in the VLC wiki section, and feel free to discuss it at the Quelea forum.
3.10.1.1. Using VLCARG to set up live video background
The easiest way is probably to fire up VLC, go to media, and then click on "Open capture device". You
will see something like this:
You can then select whatever you want - for this example we will use the web camera connected to
the computer and set the maximum size to 640x480. Once you are done, hit the "Show more
options" checkbox in the bottom left:

Version 2016.2 2017-02-12
Revision 1 Page 75
You will see two text fields at the bottom, "MRL" and "Edit Options". Take note of these values. (You
may also want to hit "Play" right away to make sure these options work - if they don't work in VLC
directly they won't work in Quelea!)
Next, create a blank text document and open it in notepad (or Notepad++, or your favourite plain
text editor, but not MS Word or the like!). Paste the contents of the MRL field into the first line of the
text file, and paste the contents of the "Edit Options" field into the second line.
Save the file, quit notepad and then change the ".txt" extension to ".vlcarg". Quelea should then pick
it up as a video file, and pass on the MRL and options you specified to VLC directly. This means you
can add the file you just created as a video background (see 2.1.3.3.3. Video background). Note that
Version 2016.2 2017-02-12
Revision 1 Page 76
Quelea will save a copy of the file you created in the Quelea video folder, which means you will need
to edit the copied version, not the original that you created, if you need to change the settings.
3.10.2. Fade in/out adjustments
Hidden in the Quelea settings file, you will find an option to edit the fade in/out duration in
milliseconds. So if you are not pleased with the standard duration, start by going to your user folder
(in Windows it’s usually C:\Users\ [username]\). There you have to open the folder named “.quelea”
(the dot implies that the folder is hidden in Linux and OS X, and I won’t cover how you un-hide it or
access it anyway here, so feel free to search the internet for it – there are a lot of tutorials there).
Once you have opened the folder, locate the file called “quelea.properties”. Open this file in a plain
text editor, such as Notepad (i.e. not MS Word), and look for these three lines (add them if they are
not there): “logo.fade.duration=1000”, “black.fade.duration=1000” and “clear.fade.duration=1000”.
As you can see Quelea uses one second by default, but you can change the number to any time you
would like Quelea to use when it fades in to logo, black or clear. A higher number means slower fade
(e.g. 2500 = 2.5 seconds) and a lower number means faster (e.g. 500 = 0.5 seconds).
3.10.3. Margins
Hidden in the Quelea settings file, you will find an option to edit the margins that Quelea uses when
it is projecting. Follow the steps above to locate the file “quelea.properties” and open it. Add the
following lines and adjust the number to the percentage of the screen you want to use (0.9
corresponds to 90%).
lyric.width.bound=0.9
lyric.height.bound=0.9
3.10.4. Automatically extend projection window to a recently plugged in device
Another setting you can change by editing “quelea.properties” is if you want the projection screen to
be automatically extended when you plug in a projector. If you know for sure that you will not use
Stage View (see 2.8), this might be a good option in case you have a cable with a glitch or be worried
that it might be disconnected in the middle of a service. Without this option, you always need to set
up the screen output manually (see 1.2.1).
To enable this feature, add the following line to the properties file.
use.auto.extend=true
Version 2016.2 2017-02-12
Revision 1 Page 77
4. Shortcuts and other things that are good to know
This chapter will cover parts that are not covered by the previous chapters.
Keyboard shortcuts:
Space
Moves the selected item to live
Return
Adds an item from database to schedule
Delete
Removes an item from schedule
Shift + Left click
Quickly edit text in a slide
Ctrl + Left click
Preview an item in database without adding it to schedule
F5
Fade into/out of logo
F6
Fade into/out of black
F7
Hide/display lyrics and show background or enter spell check inside
of song editor
F8
Hide the projection window(s)
Ctrl + N
New schedule
Ctrl + O
Open schedule
Ctrl + S
Save schedule
Ctrl + P
Print schedule
Ctrl + M
Manage notices
Ctrl + Shift + N
New song
Ctrl + T
Open options
Arrow keys
Move between sections, slides and items
Page Up/Down
Move between slides (does not work if the database panel is
selected)
+
Add the next verse to a Bible passage that is live
1-9
Jump to a slide number or a verse number (if you have added
section titles)
C, B, P, T
Jump to a section title (chorus, bridge, pre-chorus, tag) if you have
added it to the song
Ctrl/Shift
A pencil will appear if you can edit a slide and a small dialog will
appear if you click, allowing you to change only that slide
Ctrl + Shift + L
Open Live Text
Ctrl + Alt + P
Open Planning Center Online import

Version 2016.2 2017-02-12
Revision 1 Page 78
Good to know:
There are tooltips available to the buttons that do not have self-explanatory text in them by
hovering over them.
You can preview a song without adding it to the schedule by dragging and dropping it to the
black preview box.
You can drag and drop an image to an item to set it as an individual theme.
Adding a hyphen (-) after a Bible verse adds the rest of that chapter.
You can change the Bible translation by right clicking a passage.
There are nightly releases available with experimental features (see 6. FAQ (Frequently
Asked Questions))
The aim is that a new stable release of Quelea will be available each six months.
There are many planed features for future releases. To see some of them, see 6. FAQ
(Frequently Asked Questions).
The discussion group is available for all your questions, bug reporting and opinions about
Quelea. https://groups.google.com/forum/#!forum/quelea-discuss/ If you want to suggest a
new feature, go to https://quelea.org/feedback/

Version 2016.2 2017-02-12
Revision 1 Page 79
5. Troubleshooting
If you cannot find the answer to the problem you are looking for here, search for your issue in the
discussion group: https://groups.google.com/forum/#!forum/quelea-discuss. If you cannot find any
information about your issues there already, feel free to ask a new question.
The video background flickers as it repeats
That is unfortunately pretty unavoidable; it has to do with the way VLC repeats videos. On a relatively
fast system it is pretty unnoticeable, but aside from that, the only way to really work round it is to
create a large video file that essentially loops it "manually" several times.
My animations/transitions in a presentation do not appear
Try to use the native PowerPoint or OpenOffice support instead (see 3.5). The built-in presentation
feature converts your presentation to a set of images and will therefore not preserve any transitions
or any other effects you might have added. There is no flawless solution yet due to technical
difficulties, so use the solution you feel best suits your needs or use a separate software for you
presentation needs.
The font size is too small
The font size is automatically calculated based on how much text there is per section. Try to split the
text into more sections by adding a blank line/set a maximum amount of verses per slide for a Bible
passage (3.6.2), change the maximum font size (3.1.19) to a higher value, lower the maximum
amount of characters per line (3.1.21) or uncheck the uniform font size (3.1.18) and see if anything
helps you.
VLC is not found even though it is installed
It is probably because your VLC version is incompatible with Quelea. You cannot use a 64-bit version
of VLC with Quelea, since it uses 32-bit Java. That means that you might have to manually select the
32-bit version of VLC when you download it. A 64-bit installer of Quelea is planned for future releases
but at the moment you need to use the 32-bit version of VLC even if you have a 64-bit system. To
check if this is the case for Windows users, an easy way is to look in your Program Files folder. If this
is the issue you will most likely also find a folder called Program Files (x86) that contains your 32-bit
installations. If you look in the two Program Files folder, Quelea should in that case be installed in
one of them and VLC in the other. If that is the case, download and install the 32-bit version of VLC.
I cannot select Output 2 although the projector is connected
First of all, check that you see anything from the computer on the projector. With Quelea you have
to use what usually is called Extended Desktop, which means that the desktop becomes wider,
stretching from your computer and onto your projector, allowing you to drag a window past the edge
of one screen an onto the next. If you see the same things on both screens, the screen is cloned and
not extended. In that case, that is probably the problem and you need to change the graphics
settings of your computer for that (often there is a keyboard shortcut for this, accessible with help of
the fn button, or windows key + p). If you do not see anything on your projector, it is probably that
the computer is set to only use the local screen and you change that setting the same way as above.
I cannot play a YouTube video
This is most likely due to video encryption that seems to be added to more and more YouTube videos
today. If you are a Windows or Linux user, you could check if you are able to play the video stream
Version 2016.2 2017-02-12
Revision 1 Page 80
directly in VLC since that is what is used by Quelea. In case VLC cannot play it either, there is not
much we can do about it. If you can play it in VLC but not in Quelea, you should send a message to
the developers at the discussion forum so that they might be able to identify where the problem lies.
A possible work-around would be to use one of the many services that offers you to download
YouTube videos and then add it to the schedule as a regular video. Due to these common issues,
YouTube support will be removed by default in Quelea 2017.0.
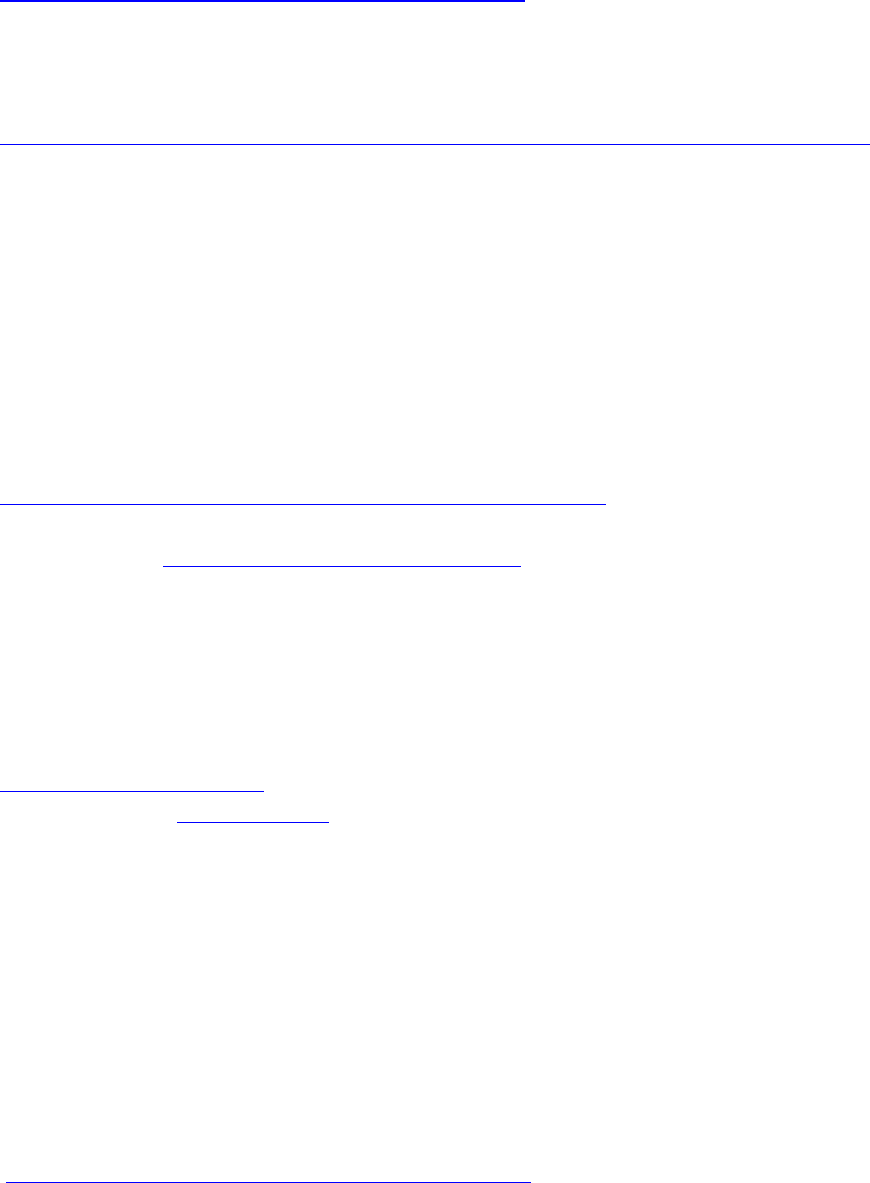
Version 2016.2 2017-02-12
Revision 1 Page 81
6. FAQ (Frequently Asked Questions)
If you have a question that is not answered below, search for your question here:
https://groups.google.com/forum/#!forum/quelea-discuss. If you cannot find any information about
your question there already, feel free to ask a new question.
Can I translate Quelea to [...]?
Yes, that would be terrific! Download this file:
https://sourceforge.net/p/quelea/source/ci/default/tree/Quelea/languages/gb.lang?format=raw
and open it in a notepad or word processor and translate everything after the equals sign (=), i.e. to
the right, and leave anything before it, i.e. to the left. If you see special character combinations like
“\n”, “%” or “$1”, make sure to let them also be a part of the translation. If you have any questions
regarding the translation, feel free to ask them in the Quelea forum.
What is a nightly release?
A nightly release is a version that is not yet beta tested – in other words: the latest release although
potentially buggy. This might contain experimental features and could potentially be less stable, but
apart from occasional bugs, most of the times they work as well as a stable release. However, you
are not advised to use a nightly release in a live setting where no issues can be tolerated. If you
would like to try the latest nightly release, download it here:
https://quelea.org/nightly/job/Quelea/ws/Quelea/dist/standalone/
To be able to use the nightly release, you must make sure that Java (JRE) is installed. You can
download it here: http://java.com/en/download/index.jsp
When will the next stable release be available?
Quelea aims to release a stable version each six months.
Will you add this feature?
There are many planned features on the to-do list, but feel free to let the developers know what
features you miss, since features are added by popular demand. Visit the page
https://quelea.org/feedback/ to see planned features and vote for the features you want to see or
discuss them in the discussion forum. Some of the planed features includes:
- Theme improvements
- Initial install wizard
- Show first line of next slide on stage view
- Transition between slides
- LibreOffice support
How do I report a bug/error?
Start by reproducing the error and then close Quelea. This will update the debug log. Secondly,
locate the debug log. Go to Help and About, there you will find a link to the debug log. If you click it,
the debug log will open in your default text editor. Save a copy of the file somewhere you know
where it is so that you easily can attach it later on. Next, go to the discussion group
(https://groups.google.com/forum/#!forum/quelea-discuss) and see if anyone else already has
reported the same thing. Lastly, if you cannot find a thread containing your question, start a new
question, describe the problem and attach the debug log.

Version 2016.2 2017-02-12
Revision 1 Page 82
If I donate money, will Quelea be developed faster?
I am afraid that the development of Quelea rather is determined by time than by money. Quelea is
developed by a few persons in their spare time and that amount of time unfortunately cannot be
changed by donations.
Where can I find free resources for Quelea?
If you visit http://quelea.org/resources/ you will find a few links to some free resources. If you need
lyrics, check out the Kingsway importer.
