
GarageBand
User Guide
for iPad

2GarageBand User Guide for iPad
Contents
Get started 5
Get started 5
Play Touch Instruments 7
Play the Keyboard 7
Use the Sampler 13
Play the Drums 16
Play the Smart Drums 18
Create drum patterns with the Beat Sequencer 20
Play the Amp 23
Record sounds with the Audio Recorder 27
Play the Strings 30
Play the Bass 32
Play the Guitar 34
Play the Pipa 36
Play the Erhu 37
Play the Guzheng 39
Play the Koto 41
Use Drummer 43
Use the track controls 45
Use effect plug-ins with Touch Instruments 47
Save custom sounds 49
Add custom chords 50
Use a Bluetooth MIDI device with Touch Instruments 50
Set the control knob orientation 51
Use MPE controllers 51
Record Touch Instruments 52
Record Touch Instruments 52

3GarageBand User Guide for iPad
Use the control bar and the track headers 56
Use the control bar 56
Use the track headers 57
Build a GarageBand song 60
Build a song in Tracks view 60
Create and save songs 61
Play and navigate songs 63
Change song settings 64
Use the Note Pad 67
Add Apple Loops 68
Import audio and MIDI files 70
Import a song from the Music app 72
Edit regions 73
Edit notes in regions 76
Change region settings 78
Automate volume changes 79
Merge tracks 81
Extend a song with song sections 82
Use Live Loops 85
Live Loops overview 85
Work in the Live Loops grid 86
Play cells in the grid 87
Edit cells 87
Choose a Touch Instrument 89
Record to a cell 90
Add Apple Loops and audio files 90
Add playing cells to a column 91
Record a Live Loops performance 91
Remix a song 92
Remix a song 92
Download additional sounds and loops 94
Download additional sounds and loops 94
Jam with other GarageBand users 98
Jam with other GarageBand users 98

4GarageBand User Guide for iPad
Use other music apps with GarageBand 101
Use other music apps with GarageBand 101
Use iCloud with GarageBand 104
Use iCloud with GarageBand 104
Use Schoolwork with GarageBand 106
Use Schoolwork with GarageBand 106
Share GarageBand songs 108
Share songs 108
Mirror GarageBand to an Apple TV 114
Mirror GarageBand to an Apple TV 114
Use VoiceOver with GarageBand 115
Intro 115
Use VoiceOver to play and record Touch Instruments 116
Navigate in tracks view with VoiceOver 117
Use VoiceOver to arrange and edit regions 119
Use VoiceOver to edit notes in regions 120
Use VoiceOver with automation 122
Use VoiceOver with plug-ins 123
Use keyboard shortcuts 125
Use keyboard shortcuts 125
Copyright 127

5GarageBand User Guide for iPad
Get started
Get started with GarageBand for iPad
The first time you open GarageBand, you see the Sound browser, where you can choose a
Touch Instrument to play. There are Touch Instruments for keyboard, guitar, bass, drums,
strings, and more, designed to help you make music easily.
When you tap Live Loops above the Sound browser, you see the Template browser, where
you can choose a template or empty grid for Live Loops. You can use Live Loops to play,
edit, and arrange musical ideas in real time like a DJ or electronic music producer.
In the Sound browser you can also open the Sound Library, where you can download
additional Touch Instruments, sounds, and loops.
Choose a Touch Instrument
• In the Sound browser, swipe left or right to view the instruments, and tap the one you
want to play. Tap More Sounds to see additional sounds for that instrument.
The Touch Instrument opens. To choose another instrument, tap the Browser button
on the left side of the control bar to return to the Sound browser, then tap a different
instrument. You can also touch and hold the Browser button, and choose another
instrument from the list.
6GarageBand User Guide for iPad
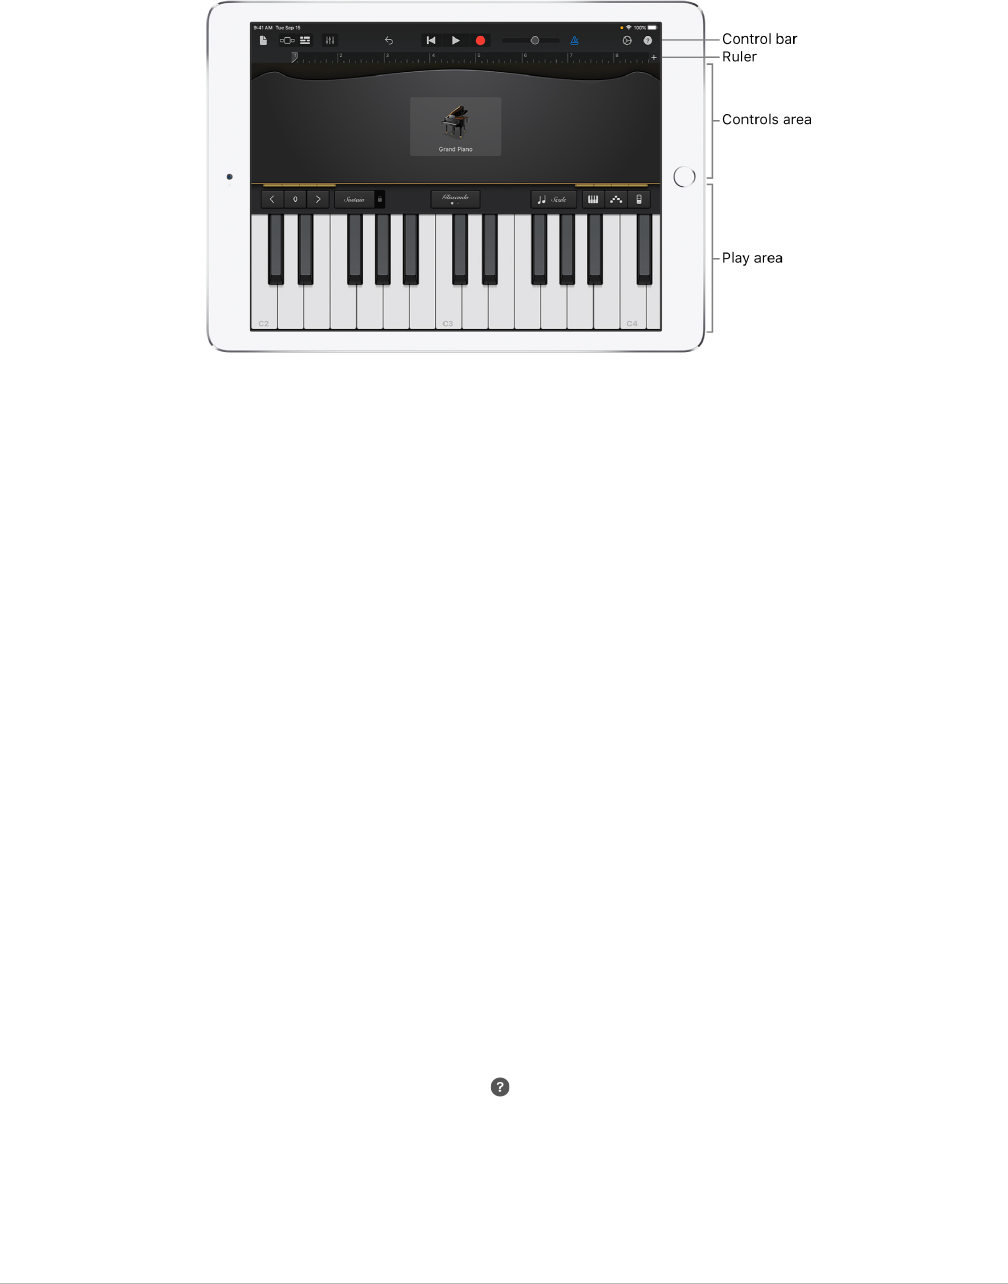
Each Touch Instrument has a play area and a controls area. You play melodies, chords, and
sounds by touching the keys, strings, or other elements in the play area, and change the
sound of the instrument using the knobs, buttons, and other controls in the controls area.
At the top of the screen is the control bar, featuring navigation, playback, and volume
controls. Below the control bar is a ruler that shows musical time in bars and beats. The
playhead moves across the ruler to show what part of the song is currently playing.
After the Touch Instrument opens, you can start playing. The following sections give
specific information about each type of Touch Instrument:
• Play the Keyboard
• Use the Sampler
• Play the Drums
• Play the Smart Drums
• Create drum patterns with the Beat Sequencer
• Play the Amp
• Record sounds with the Audio Recorder
• Play the Strings
• Play the Bass
• Play the Guitar
• Play the Pipa
• Play the Erhu
• Play the Guzheng
• Play the Koto
• Use Drummer
You can also tap the Info button in the upper-right corner to show the coaching tips
overlays, which contain helpful information about the current instrument or Tracks view.
You can play the instrument and use all its controls while the coaching tips are visible. Tap
the Info button again to hide the coaching tips.

7GarageBand User Guide for iPad
Play Touch Instruments
Play the Keyboard in GarageBand for iPad
Using the Keyboard Touch Instrument, you can play different keyboards, including grand
piano, electric piano, organ, clavinet, and synthesizer, by tapping the keys.
You can choose a keyboard sound, move higher or lower on the keyboard, hold notes, and
change the keyboard layout and size. Some keyboards include controls for pitch bend,
modulation, velocity, and other sound parameters. Alchemy synth sounds have an extended
set of controls that you can use to customize the sound.
You can now use the chord strips (previously available on the Smart Keyboard) with all
keyboard sounds to play chords, bass notes, and comping patterns.
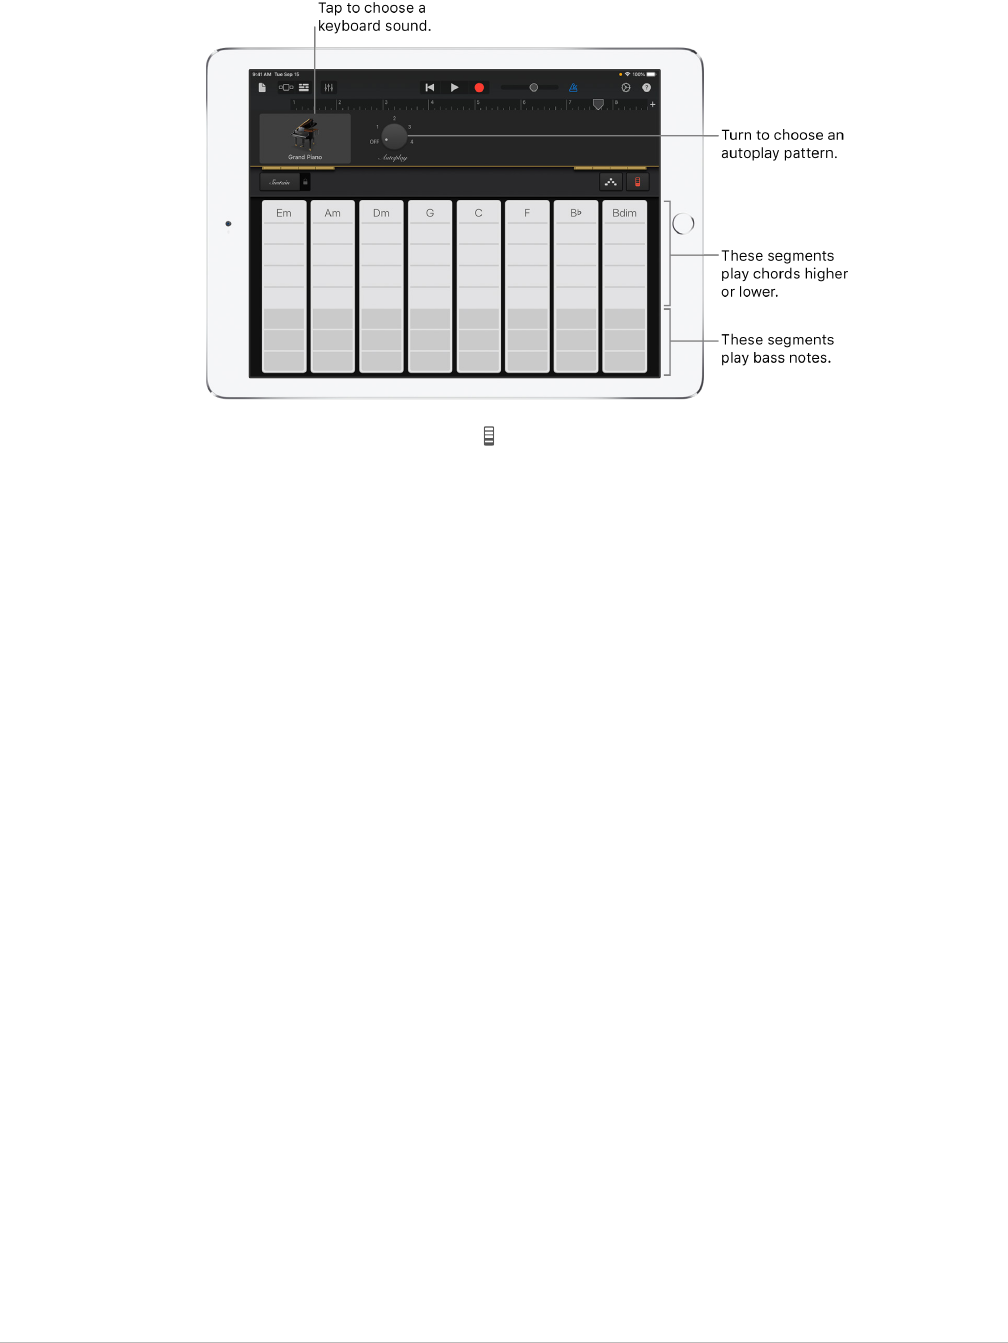
Choose a keyboard sound
• Tap the name of the sound near the top of the screen, then tap the sound you want to
play. You can also swipe left or right to change to the previous or next sound. To view
keyboard sounds in a different category, tap one of the category names.
Play higher or lower on the keyboard
• To move the keyboard by octaves, tap the Octave Down or Octave Up button.
To return to the keyboard’s middle range, tap the Reset button between the octave
buttons. The number on the button shows the current octave transposition.

8GarageBand User Guide for iPad
Hold notes longer
• Touch and hold the Sustain control as you play. You can also drag the Sustain control to
the right to lock it on.
Organ sounds have a Rotation switch instead of a Sustain control.
Change the keyboard layout and size
• Tap the Keyboard Options button , then do either of the following:
• Change the keyboard layout: Tap the single- or double-row keyboard.
• Change the keyboard size: Tap the small, medium, or large-size keyboard.
Bend notes and modulate the sound
Some keyboard sounds, including synthesizers and clavs, have pitch bend (Pitch) and
modulation (Mod) wheels in the controls area. You can use these to bend notes or change
the character of the sound as you play the keyboard.
• Drag the Pitch wheel up or down to bend the pitch of notes as you play.
• Drag the Mod wheel up or down to change the sound of the keyboard. Modulation can
add vibrato, resonance, or other changes to the sound.
Adjust the touch sensitivity of the keys
Increasing the touch sensitivity makes notes sound louder or softer depending on how hard
you tap the keys.
1. Tap the Keyboard Options button
, and turn on Velocity.
2. Pinch the two ends of the Velocity bar apart to increase the sensitivity range, or pinch
them together to decrease the range.
3. Drag the Velocity bar up or down to move the sensitivity range. This is particularly
useful after pinching the ends closer together to limit sensitivity to a narrow range.

9GarageBand User Guide for iPad
Play the keyboard by swiping left or right
You can control the keyboard in different ways by swiping left or right across the keys. By
default, swiping horizontally plays notes on the keyboard smoothly. You can change the
swiping behavior using the Glissando button.
• To move higher or lower on the keyboard by swiping across the keys, tap the button
until it says Scroll.
• To return to the default behavior, tap the button until it says Glissando.
• Some instruments, particularly synthesizers, have a third setting. For these instruments,
to slide smoothly between notes (called portamento), tap the button until it says Pitch.
Adjust the sound
Some keyboard sounds, including electric piano, synthesizer, and organ, include knobs or
other controls you can use to change the sound while you play. When available, the knobs
are labeled with the sound parameters they control. When you record the Keyboard, any
movements to the controls are also recorded.
• Turn the knobs while you play the keyboard, and listen to how the sound changes.
Adjust Alchemy synth sounds
Alchemy synth sounds include additional parameter knobs, the Transform Pad, and XY
pads. You can view the other Alchemy synth controls by swiping the controls area left
or right.
The Transform Pad has eight sections (called snapshots) that represent a group of
settings for the sound of the instrument. You can adjust the sound by tapping a snapshot
or dragging the rectangular framing box between the snapshots. When the framing box is
over one snapshot, you hear the sound of that snapshot. When the framing box partially
covers multiple snapshots, the sound of those snapshots is transformed to create a new
sound. The amount that each covered snapshot contributes to the sound is determined by
how much of the framing box covers the snapshot.

10GarageBand User Guide for iPad
Do one of the following:
• Play using a single snapshot: Tap a snapshot to place the framing box over it.
• Transform the sound between multiple snapshots: Drag the framing box so that it
partially covers the snapshots.
• Transform the sound using Gyro control: Tap the Gyro Control button above the
keyboard and tilt your iPad to move the framing box.
• Transform the sound using the XY pads:Swipe the controls area left or right to view the
XY pads, then drag the pucks on the two XY pads. Moving a puck changes the X and Y
axis values on its pad.
Adjust organ sounds
Organ keyboard sounds include drawbars on the left side of the controls area. Drawbars
let you quickly change the sound of the organ by adjusting the relative volume of different
harmonics or stops. The drawbars are arranged left to right from lower to higher stops;
dragging a drawbar down increases the volume of its harmonic, while dragging it up
decreases the volume of its harmonic.
You can also control the speed of the rotating speaker effect using the Rotation switch.
• Make the speaker rotate faster or slower: Drag the Rotation switch right or left.
Adjust the sound with Face Control
If your iPad supports facial recognition, you can add vibrato, resonance, or other changes
to some keyboard sounds by moving your mouth while you play.
1. Hold your iPad 10–20 inches (25–50 cm) away from your face and tap the Face Control
button .
The first time you use Face Control, GarageBand asks for permission to access the
camera on your iPad.
2. As you play, open and close your mouth to change the sound.
3. To turn Face Control off, tap the Face Control button again.
When playing Alchemy synth sounds, you cannot use Gyro Control and Face Control at the
same time.
Note:GarageBand uses ARKit face tracking features to translate your facial expressions
into instrument effect controls. Your face information is processed on device, and only
music is captured during your performance.
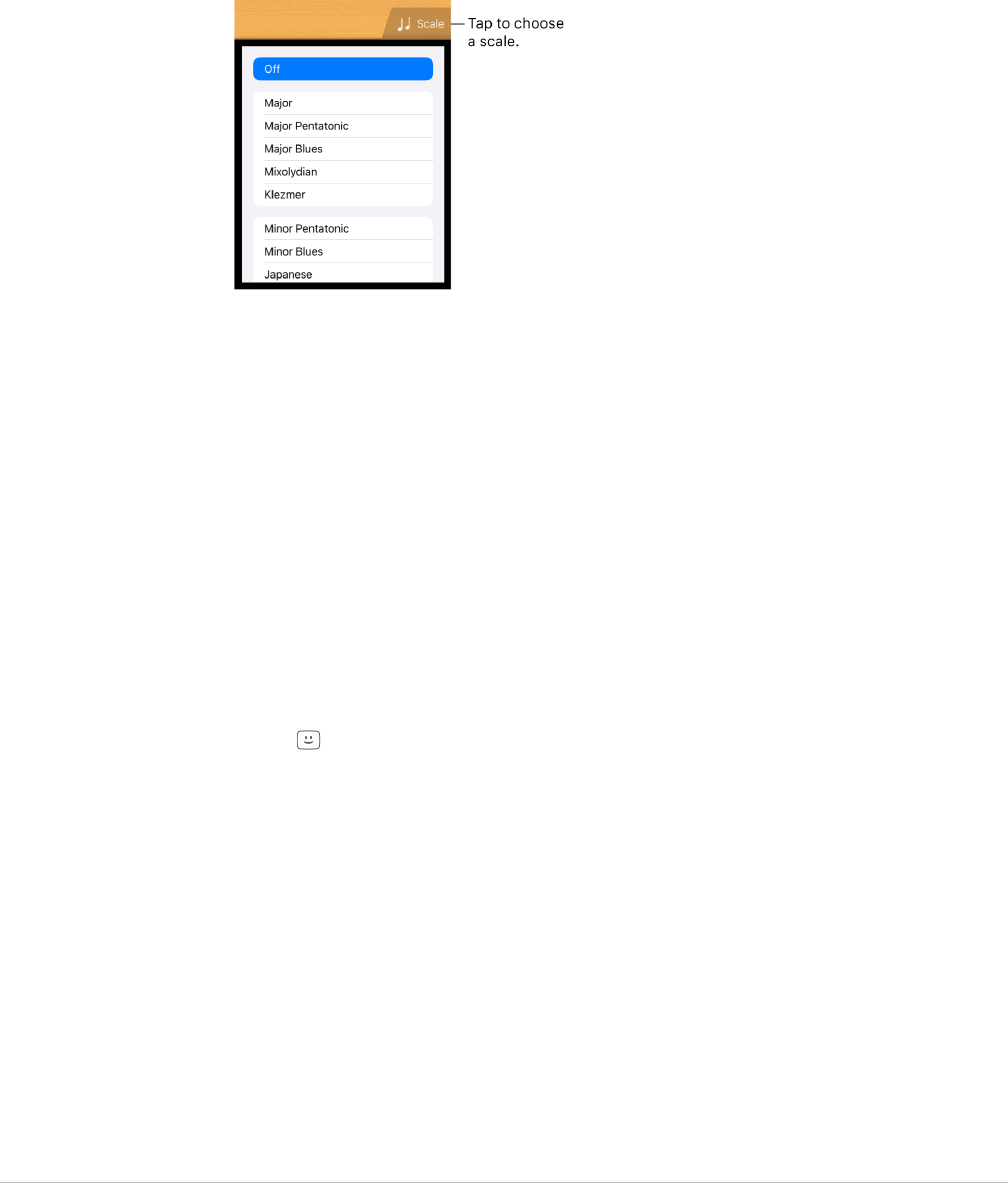
Play the keyboard using a particular scale
• Tap the Scale button , then tap the scale you want to play.
After you choose a scale, the keyboard changes to show note bars rather than keys. Tap
the bars to play the notes of the scale.

11GarageBand User Guide for iPad
View note labels on the keyboard
You can view note labels for every key on the keyboard.
1. Close GarageBand.
2. Open the Settings app, scroll down, then tap GarageBand.
3. Tap Keyboard Note Labels.
Play arpeggios automatically
The Keyboard Touch Instrument includes an arpeggiator. When you turn on the arpeggiator,
chords you play on the keyboard are arpeggiated, or played one note at a time rather than
simultaneously.
Note:The arpeggiator is not available for Alchemy synth sounds listed under Arpeggiated.
• Tap the Arpeggiator button , then tap the Run switch.
When you turn on the Arpeggiator, other controls appear below the Run switch, letting
you set the order, rate, and octave range of arpeggiated notes.
• Tap Note Order, then choose the direction of arpeggiated notes.
• Tap Note Rate, then choose a note value for arpeggiated notes, based on the tempo
of the song.
• Tap the Octave Range up or down arrow to set how many octaves the arpeggio
covers.
When the Arpeggiator is turned on, the Sustain control becomes a Latch control. If you
touch and hold or lock the Latch control, the current arpeggio keeps playing. Tapping a
different key transposes the current arpeggio to start on the tapped note.
12GarageBand User Guide for iPad
Play the keyboard using chord strips
• Tap the Chord Strips button to view the chord strips.
Play chords or bass notes with chord strips
• Play chords higher or lower: Tap one of the five upper segments of a chord strip.
• Play a bass note or sets of bass notes: Tap one of the three lower segments of a chord
strip.
• Play chords and bass notes together: Tap an upper segment and a lower segment at the
same time.
You can add your own custom chords to play.
Play comping patterns
1. Turn the Autoplay knob to one of the numbered positions.
2. Tap a segment of one of the chord strips.
• The upper segments (showing the chord names) play chords and bass notes
together.
• The middle segments play chords only. Tapping with two or three fingers plays
variations of the pattern.
• The lower segments play bass notes only.
3. Tap the segment again to stop playing the pattern.
Chord strips for monophonic keyboard sounds are not divided into segments. Turn the
Autoplay knob to select a pattern that plays when you tap the chord strips. Tapping a
different chord strip plays the same pattern with the notes of that chord.

13GarageBand User Guide for iPad
Save your own custom sounds
1. Modify an existing keyboard sound by adjusting the keyboard controls.
2. Tap the name of the keyboard sound near the top of the screen, then tap Save.
3. Type a name for your custom sound, then tap Done.
The first time you save a custom sound, a new Custom category appears. You can
rename or delete the sound by tapping Edit, then tapping the icon (to rename the
sound) or the red circle (to delete the sound).
Use the Sampler in GarageBand for iPad
You can record (or sample) a sound using a microphone, or add an audio file, and then
play it back like a melody on the Sampler keyboard. You can save samples to use in other
GarageBand songs, and edit them in several ways.
Open the Sampler
• Tap the Browser button , swipe to the Keyboard, then tap the Sampler button.
Record a sample
1. Tap the Record button to the right of the Sampler.
2. Play, sing, or make sound into the built-in microphone or a connected microphone.
3. When you finish, tap the Stop button to stop recording.
Adjust the microphone input level
When you make sound, the Input Level meter shows that the Sampler is receiving an
input signal from your microphone. If your audio device supports software level control or
monitoring, the Input Settings button is available in the Sampler window.
1. Tap the Input Settings button , then drag the Input Level slider left or right to set the
input level.
The Input Level slider is available if your input source supports software level control.
2. To set the level automatically, tap the Automatic switch next to the Input Level slider.
3. If your audio device has multiple inputs, tap Channel, then choose the input channel.

14GarageBand User Guide for iPad
Turn on monitoring for an external microphone
When an external microphone or other audio device (such as a headset or an audio
interface) is connected to your iPad, a Monitor switch appears in the Input Settings. When
monitoring is on, the sound picked up by your microphone is sent to your headphones or
audio interface.
1. Tap the Input Settings button .
2. Tap the Monitor switch to turn monitoring on. Tap the switch again to turn monitoring
off.
Play the sample
• Tap notes on the Sampler keyboard.
The sound plays higher or lower as you play higher or lower on the keyboard. You can
play multiple keys to create “chords” with the sound.
The Sampler also includes controls that let you change the keyboard range, hold notes,
change the keyboard layout and size, bend notes and add modulation, adjust touch
sensitivity, arpeggiate chords, or play using a particular scale. These controls are the
same as the controls for the Keyboard Touch Instrument.
Choose a different sample to play or edit
1. Tap the name of the current sample above the waveform display, tap This Song or
Library, then tap the name of the sample you want to play.
2. When you finish, tap Done.
Add an audio file to the Sampler
You can add Apple Loops, audio files, and audio regions to the sampler.
• In Tracks view:
• Drag a blue region from an Audio Recorder or Amp track to the Sampler track.
• Drag an Apple Loop or audio file from the Loop Browser to the Sampler track.
• In the Sampler:
• Tap the name of the current sample above the waveform display, tap Import, then
locate the audio file you want to import.
• Tap the Import button .
The file is added to the Sampler.
• When you finish, tap Done.

15GarageBand User Guide for iPad
Edit the sample
• Do any of the following:
• Trim the beginning or end of the sample: Drag the blue handles on the left or right
edge of the waveform. You can touch and hold either handle to zoom in for more
precise editing.
• Play the sample backward: Tap Reverse.
• Loop the sample so it plays repeatedly: Tap Loop. Drag the yellow left and right Loop
handles to change which part of the sample loops.
• Edit the volume of the sample over time: Tap Details, then drag the Shape points on
the curve.
If you edit the volume by dragging the Shape points, the volume edits are saved with
the sample.
• Adjust the pitch of the sample: Tap Details, then turn the Coarse Tune knob (for big
adjustments) or the Fine Tune knob (for small adjustments).
When you record a new sample, GarageBand detects the pitch of the recording and
matches it to the closest musical note. If you change the pitch settings, tap Detect
Pitch to return them to their original values.
• Undo your edits and start over: Tap Revert.

16GarageBand User Guide for iPad
Save a sample to the Library
You can save your samples so you can use them in other songs.
1. Tap the name of the current sample above the waveform display, tap This Song, then
tap the sample you want to save.
2. Tap Save to Library.
3. Enter a new name for the sample, then tap Done.
The sample is added to the Library.
4. When you finish, tap Done.
Rename the sample
1. In the Sample Library, tap the sample to select it, tap Edit, then tap the sample again.
2. Type a new name, then tap Done.
Play the Drums in GarageBand for iPad
Using the Drums Touch Instrument, you can play a drum kit simply by tapping the onscreen
drums. You can choose either an acoustic or electronic drum kit.

17GarageBand User Guide for iPad
Choose a drum kit
• Tap the name of the drum kit at the top of the screen, then tap the drum kit you want to
play. You can also swipe left or right to change to the previous or next drum kit.
Acoustic drum kits show a realistic-looking set of drums, and electronic drum kits show
a grid of drum pads.
You can access an acoustic or electronic drum kit directly from the browser by tapping
Acoustic Drums or Electronic Drums.
Play the drums in the drum kit
• Tap the onscreen drums (for electronic kits, drum pads).
Some drums, such as the hi-hat and snare drum, make different sounds when you tap
different parts of them. To see which sounds they make, tap the Info button
to show
the coaching tips.
Some drums also respond to other gestures.
Touching and holding a drum with two (or more) fingers plays a repeating pattern. By
changing the distance between your fingers, you can make the repeats faster or slower.
Moving a finger up or down makes the repeats play louder or softer.
Record a drum groove
1. Tap the Record button in the control bar.
2. Tap the drums in the drum kit.
You can record one or more drums at a time. When the playhead starts over from the
beginning of the section, you can record another part and it will be merged with the
existing parts. You can turn off merging in the Track controls.
3. When you finish, tap the Play button in the control bar to stop recording. Tap Play
again to hear the drum groove.
Play the crash cymbal and bass drum together
By default, when you tap the crash cymbal on the acoustic drums kit, the bass drum
plays together with the cymbal. You can set whether tapping the crash cymbal plays both
sounds, or only the cymbal.
1. Tap the Track Controls button in the control bar, tap Track Settings, then tap Recording.
2. Tap the “Bass Drum with Cymbal” switch to turn it on or off.

18GarageBand User Guide for iPad
Adjust the touch sensitivity of the drums
You can set the touch sensitivity for the drums to one of four levels. Increasing the touch
sensitivity makes hits sound louder or softer depending on how hard you tap the drums. If
you turn touch sensitivity off, all notes sound the same regardless of how hard you tap the
drums.
1. Tap the Track Controls button in the control bar, tap Track Settings, then tap
Velocity Sensitivity.
2. Tap the sensitivity level you want to use for the drums.
Save your own custom drum sounds
1. Modify an existing drum sound by adjusting the control knobs (for electronic drum kits
only).
2. Tap the name of the drum kit at the top of the screen, then tap Save.
3. Type a name for your custom sound, then tap Done.
The first time you save a custom sound, a new Custom category appears, with an icon
for your sound. You can rename or delete the sound by tapping Edit, then tapping the
icon (to rename the sound) or the red circle (to delete the sound).
Play the Smart Drums in GarageBand for iPad
You can quickly create drum grooves with Smart Drums. Simply drag drums into the grid
and position them to set the complexity and intensity of each drum part. After you record
a drum groove, you can make changes and preview the changes before re-recording the
drum groove.

19GarageBand User Guide for iPad
Open the Smart Drums
• Tap the Browser button , swipe to the Drums, then tap the Smart Drums button.
Choose a drum kit for Smart Drums
• Tap the drum kit icon in the upper-left corner, then tap the drum kit you want to play.
You can also swipe left or right to change to the previous or next drum kit.
Preview drums in the drum kit
• Tap a drum to the right of the grid.
Add drums to the grid
• Drag a drum into the grid.
The farther right you place the drum in the grid, the more complex its part; the higher
you place it, the louder it plays. You can reposition drums in the grid until you like the
part each one plays.
To stop playback, tap the Power button to turn it off. To clear the grid, tap Reset.
Create a drum groove automatically
• Tap the Dice button to the left of the grid.
You can tap the Dice button multiple times to try out different grooves.
Record a drum groove
After you have created a drum groove, you can record it to use in the song.
1. Tap the Record button in the control bar.
2. If you drag drums into the grid, change their position, or drag them out of the grid, your
changes are recorded as part of the drum groove.
3. When you finish, tap the Play button in the control bar to stop recording.
Edit the drum groove after you record
After you record a drum groove, the grid shows what has been recorded at the current
playhead position. For example, if you recorded a snare drum starting at bar 5, moving the
playhead to bar 5 (or later) shows the snare in the grid.
• You can edit the recorded drum groove and try out your changes without altering
the recording. Playback starts when you add or move drums in the grid so you can
hear your edits. To stop playback, tap the Power button to turn it off. To keep your
changes, record the groove again.

20GarageBand User Guide for iPad
Use the Beat Sequencer in GarageBand for iPad
You can create repeating drum patterns with the Beat Sequencer by tapping squares or
steps in a grid. Each grid row controls a different drum sound (kit piece), and each column
represents a beat in the pattern. When the Beat Sequencer is on (running), each lit step
plays its corresponding sound. You can choose different drum sounds and patterns, and
adjust velocity and other settings to customize the pattern.
Open the Beat Sequencer
• Tap the Browser button , swipe to Drums, then tap the Beat Sequencer button.
Choose a drum pattern for the Beat Sequencer
The Beat Sequencer comes with many drum patterns that you can change and save.
• Tap the Patterns button under the Beat Sequencer, then tap a pattern shown in the
list.
Choose a drum kit for the Beat Sequencer
• Tap the drum kit name in the lower-left corner, then tap the drum kit you want to play.
You can also swipe left or right to change to the previous or next drum kit.
Start or stop the Beat Sequencer
• Play the Beat Sequencer by itself: Tap the Start/Stop button in the Beat Sequencer.
• Play the Beat Sequencer along with recorded tracks: Tap the Play button in the
control bar.
Turn steps on or off
• Tap the Step On/Off button under the grid and then do any of the following:
• Tap a step to turn it on or off.
• Drag across the grid in any direction to turn multiple steps on or off.
• Tap a row header to open the Row Settings, then tap Randomize Step On/Off to turn
on random steps for that row.

21GarageBand User Guide for iPad
Change the volume of steps
You can change the volume and attack of steps by adjusting their velocity.
• Tap the Velocity button under the grid, then do any of the following:
• Drag up or down on a step to raise or lower the velocity.
• Touch and hold a step to see an expanded view, then drag up or down.
• Drag left or right to change the velocity for multiple steps.
• Tap a row header to open the Row Settings, then tap Randomize Velocity to create
random values for that row.
Repeat notes in a step
You can set the note to repeat in each step to create effects like snare rolls and
double hits.
• Tap the Note Repeat button under the grid, then do any of the following:
• Drag up or down on a step to raise or lower the number of repeats.
• Touch and hold a step to see an expanded view, then drag up or down.
• Drag left or right to change the number of repeats for multiple steps.
• Tap a row header to open the Row Settings, then tap Randomize Note Repeat to
create random values for that row.
Add variations to your drum patterns
Using the Chance value, you can add variations to your drum patterns so they sound a bit
different each time they repeat. The Chance value of a step determines the probability of
whether or not a step is played when lit.
• Tap the Chance button under the grid, then do any of the following:
• Drag up or down on a step to raise or lower the probability.
• Touch and hold a step to see an expanded view, then drag up or down.
• Drag left or right to change the probability for multiple steps.
• Tap a row header to open the Row Settings, then tap Randomize Chance to create
random values for that row.
Change the number of steps in a row
• Tap the Loop Start/End button under the grid, then do either of the following:
• Drag the handle on the left or right edge of the loop to change its start or end point.
• Tap a row header to open the Row Settings, then tap Randomize Loop Start/End to
create random start and end points for that row.
Change the kit piece for a row
You can change which kit piece a row plays.
1. Tap the row header to open the Row Settings, then tap Kit Piece.
2. Tap the play button in the list to preview the kit piece.
3. Tap the name of the kit piece to select it for that row.
4. When you finish, tap the row header to close the Row Settings.

22GarageBand User Guide for iPad
Create a drum pattern automatically
• Tap the Dice button at the bottom of the grid.
You can tap the Dice button multiple times to try out different drum patterns.
Save your own custom drum patterns
1. Modify an existing drum pattern or create your own.
2. Tap the Patterns button under the Beat Sequencer, then tap Save.
3. Type a name for your custom drum pattern, then tap Done.
The first time you save a custom drum pattern, a new Custom category appears, with an
icon for your drum pattern. You can rename or delete the drum pattern by tapping Edit,
then tapping the icon (to rename the sound) or the red circle (to delete the sound).
Change the length of the drum pattern
• Tap the Inspector button , tap Length, then tap the number of steps for the drum
pattern.
View different sections of the drum pattern
If your drum pattern is longer than 16 steps, an overview of each section appears above
the grid.
• Tap the section at the top of the grid to select which one you want to view and edit.
Change the swing value of the drum pattern
• Tap the Inspector button , tap swing, then choose a swing value from the list.
Add or delete a row
• Add a row: Drag the row header up, tap the Add Row button , then tap a kit piece for
the row.
• Delete a row: Tap the icon for the row you want to delete, then tap Delete.
Mute or solo a row
• Drag the row header to the right and do one of the following:
• Mute the row: Tap the Mute button .
• Solo the row: Tap the Solo button .
Change the playback mode
The playback mode determines the order in which steps are played. You can change the
playback mode for the whole drum pattern or for each row.
• For the whole drum pattern: Tap the Inspector button , tap Playback Mode, then
choose a playback mode from the list. Tap the Inspector button when you are done.
• For a row: Tap the row header for the row you want to change, tap Playback Mode, then
choose a playback mode from the list. Tap the row header when you are done.

23GarageBand User Guide for iPad
By changing the playback mode, you can create interesting and dynamic rhythms. You can
choose from four modes:
• Forward: The pattern plays from left to right, to the end of the loop, and then repeats.
• Reverse: The pattern plays from right to left, to the end of the loop, and then repeats.
• Ping pong: The pattern plays back and forth, first from left to right, then from right to
left.
• Random: The steps in the pattern are played randomly.
Reset the Beat Sequencer
• Tap the Inspector button , tap Reset Pattern, then tap Reset.
Record a drum pattern
After you create a drum pattern, you can record it to use in the song.
1. Tap the Record button in the control bar.
2. If you turn steps in the grid on or off, or change their settings, your changes are
recorded as part of the pattern.
3. When you finish, tap the Play button in the control bar to stop recording.
After you record your pattern, it appears as a region in Tracks view.
Play the Amp in GarageBand for iPad
You can connect an electric guitar or electric bass and play it using a variety of highly
realistic amp sounds that combine a guitar or bass amp with one or more stompbox
effects. You can adjust the amp controls, add stompbox effects to customize your sound,
and visually tune your instrument.

24GarageBand User Guide for iPad
Choose a guitar or bass sound
• Tap the name at the top of the screen, then tap the sound you want to use. You can also
swipe left or right to change to the previous or next sound.
To switch between guitar and bass sounds, tap Guitar or Bass. To view sounds in a
different category, tap one of the category names.
Change the amp
• Swipe the amp left or right.
Adjust the input level
When you play your guitar or bass, a circle next to the Input Settings button lights green
to show that GarageBand is receiving input from your instrument. If the circle turns red,
lower the volume on your instrument to prevent distortion.
1. Tap the Input Settings button, then drag the Input Level slider left or right to set the
level.
The Input Level slider is available if your input source supports software level control.
2. To set the level automatically, tap the Automatic switch next to the Input Level slider.
3. If the input device supports left and right channels, tap Left or Right to select the input
channel.
Adjust the amp controls
• Touch and turn the knobs to adjust the amp controls.
Reduce unwanted noise
You can use a noise gate to reduce low-level input noise when you record. A noise gate
cuts off the sound when it falls below a certain minimum level.
1. Tap the Input Settings button , then turn Noise Gate on.
2. Drag the Noise Gate slider until the noise stops or decreases to an acceptable level.
Turn on monitoring for an external device
When an electric instrument or audio interface is connected to your iPad, a Monitor switch
appears below the Noise Gate controls.
1. Tap the Input Settings button .
2. Tap the Monitor switch to turn monitoring on. Tap the switch again to turn monitoring
off.

25GarageBand User Guide for iPad
Add, replace, or remove a stompbox effect
You can add up to four stompboxes, and change the order of stompboxes by dragging
them left or right.
1. Tap the Stompbox button in the upper-right corner to show the stompboxes.
2. To add a stompbox, tap an empty stompbox slot, then select a stompbox.
3. To replace a stompbox, tap the stompbox you want to replace, then select a new
stompbox.
4. To remove a stompbox, drag it down toward the bottom of the screen.
5. Tap the Amp button in the upper-right corner to return to the amp controls.
Turn a stompbox on or off
1. Tap the Stompbox button in the upper-right corner.
2. Tap the round On/Off button on the stompbox. If the small round LED (usually red) on
the stompbox is lit, the stompbox is turned on.
3. Tap the Amp button in the upper-right corner to return to the amp controls.
Adjust the stompbox controls
1. Tap the Stompbox button in the upper-right corner.
2. Drag or tap the knobs and switches to adjust the controls.
Use the wah pedal with Face Control
If your iPad supports facial recognition, you can move the pedal on the Modern Wah
stompbox by moving your mouth while you play. When you record, any pedal movements
you make with Face Control are also recorded.
1. Tap an empty stompbox slot, then select Modern Wah from the list.
2. Hold your iPad 10–20 inches (25–50 cm) away from your face, then tap the Face Control
button .
The first time you use Face Control, GarageBand asks for permission to access the
camera on your iPad.

26GarageBand User Guide for iPad
3. As you play, open and close your mouth to move the wah pedal up and down.
You can tap the Amp button and adjust the amp controls while continuing to use
Face Control.
4. To turn Face Control off, tap the Face Control button again.
Note:GarageBand uses ARKit face tracking features to translate your facial expressions
into instrument effect controls. Your face information is processed on device, and only
music is captured during your performance.
Tune your guitar or bass
1. Tap the Tuner button in the upper-left corner.
2. Play an open string you want to tune, watching the tuner.
The red horizontal lines show whether the string is too low (flat) or too high (sharp).
When the string is in tune, the note name in the center turns blue.
3. Tap the Tuner button again to close the tuner.
Save your own custom sounds
1. Modify an existing amp sound by changing the amp, adjusting the amp controls, adding
or removing stompboxes, or adjusting the stompbox controls.
2. Tap the name at the top of the screen, then tap Save.
3. Type a name for your custom sound, then tap Done.
The first time you save a custom sound, a new Custom category appears, with an icon
for your sound. You can rename or delete the sound by tapping Edit, then tapping the
icon (to rename the sound) or the red circle (to delete the sound).

27GarageBand User Guide for iPad
Turn crosstalk protection on or off
When your guitar or bass is connected to the headphone port and monitoring is turned on,
you may experience unwanted feedback due to crosstalk. GarageBand includes crosstalk
protection to help protect against feedback caused by crosstalk. Crosstalk protection is
especially useful when using high gain settings on a guitar or bass amp, or when using an
overdrive or boost stompbox together with a high-gain amp such as the Modern Stack. In such
cases, feedback caused by crosstalk can result in sudden, unpleasantly high output levels.
Crosstalk protection can change the sound of the instrument while monitoring is on, but
the sound returns to normal when monitoring is turned off or another track is selected.
You can turn off crosstalk protection to hear how it changes the sound; however, it is
recommended that you decrease the volume of your iPad to a low level before doing so.
1. Close GarageBand.
2. Open the Settings app, choose GarageBand, then turn Crosstalk Protection on or off.
Use the Audio Recorder in GarageBand for iPad
Using the Audio Recorder, you can record your voice, an instrument, or any other sound
using the microphone on your iPad, and play it back in GarageBand. You can also record
sounds using an external microphone connected to your iPad.
The Audio Recorder has two sets of controls you can use to change the sound. Fun view
lets you quickly change the sound of your recording, while Studio view gives you more
options to enhance your recording.
You can quickly create a new audio recording from the Home screen or the My Songs browser.
Tip:If you want to record a sound longer than the current section, change the section
length in the song section controls.

28GarageBand User Guide for iPad
Switch between Fun and Studio view
• Tap the Fun or Studio button at the top of the Audio Recorder.
Record a sound
1. Tap the Record button in the control bar.
Recording starts at the current position of the playhead. The ruler shows the area being
recorded in red.
2. Play, sing, or make sound into the microphone.
3. When you are finish, tap the Play button in the control bar to stop recording. Tap the
Play button again to hear your recording.
Adjust the microphone input level
The In level slider on the left shows the input level from the microphone or input source. If
your iPad or input source supports input level control, the slider is active and you can drag
it up or down to adjust the input level. If the level turns red, drag the slider down (or record
the part again more softly) to prevent distortion.
1. Drag the In level slider up or down to set the input level.
2. If the input device supports left and right channels, tap Channel button under the In
level slider, tap Input 1 or Input 2 to select the input channel, or tap Stereo to record in
stereo.
Set the input level automatically
When an external microphone or other audio device (such as a headset or an audio
interface) is connected to your iPad, the input level can be set automatically.
• Tap the Input Settings button , then tap the Automatic switch.

29GarageBand User Guide for iPad
Reduce unwanted noise
You can use a noise gate to reduce low-level input noise when you record. A noise gate
cuts off the sound when it falls below a certain minimum level.
1. Tap the Input Settings button , then turn Noise Gate on.
2. Drag the Noise Gate slider until the noise stops or decreases to an acceptable level.
Turn on monitoring for an external microphone
When an external microphone or other audio device (such as a headset or an audio
interface) is connected to your iPad, the Monitor button under the Out level slider becomes
active.
• Tap the Monitor button to turn monitoring on. Tap the button again to turn monitoring off.
Change the sound using a preset
The Audio Recorder includes presets that appear after you record a sound. Each preset
adds an interesting character to the recorded sound.
1. Do one of the following:
• In Fun view, tap or turn the dial to select one of the presets.
• In Studio view, tap the icon in the middle of the screen and choose a preset from the
list.
2. Turn the knobs to change the sound of the preset.
You can try out different presets by tapping them and turning the knobs.
Set the key and scale for Extreme Tuning
The Extreme Tuning preset is a popular vocal effect that changes the pitch of your
recording based on your song’s key and scale settings.
• Tap the Settings button , tap Key Signature, then tap a new key or a different scale
(major or minor).
If the actual key or scale of your song differs from the key or scale setting, the effect might
be less pronounced, or might change the pitch of individual notes in undesirable ways.

30GarageBand User Guide for iPad
Play the Strings in GarageBand for iPad
Using the Strings, you can choose different string sounds, and play one or several strings
at once. You can play notes, chords, and rhythm patterns, and play either legato, bowed,
or pizzicato.
Choose a string sound
• Tap the name of the sound in the upper-left corner of the screen, then tap a new string
sound you want to play.
Play different string instruments
• When you open the Strings in Chords view, all string instruments are active. Tap the
instrument or instruments you want to turn off. Tap them again to turn them back on.
Play chords
1. Tap the Chords/Notes switch on the right to switch to Chords view.
2. Do any of the following:
• Play a chord with bowing: Touch and hold a segment of a chord strip, then swipe up
and down. Swiping faster or slower plays the chord louder or softer.
• Play a chord staccato (arco): Quickly swipe a segment of a chord strip.
• Play a chord pizzicato: Tap a segment of a chord strip.
When playing pizzicato, the chord plays when you lift your finger.
You can add your own custom chords to play.

31GarageBand User Guide for iPad
Play a rhythm pattern
1. Turn the Autoplay knob to one of the numbered positions.
2. Tap a chord strip. Tapping a different chord strip plays the same pattern with the notes
of that chord, and tapping with two or three fingers plays variations of the pattern.
3. Tap the chord strip again to stop the pattern playing.
Play individual notes
In Notes view, you can play individual notes on a single string instrument.
1. Tap the Chords/Notes switch on the right to switch to Notes view.
2. Tap the instrument you want to play.
3. Do any of the following:
• Play notes legato: Touch and hold a string.
• Play notes short legato: Tap a string.
• Play notes with bowing: Touch and hold the Articulation button on the left, then
swipe a string up and down.
• Play notes pizzicato: Touch and hold the Articulation button on the left, then tap a
string to play notes pizzicato.
When playing pizzicato, notes play when you lift your finger.
• Lock the Articulation button: Double-tap the Articulation button. Double-tap it again
to unlock it.

32GarageBand User Guide for iPad
4. To play notes of a particular scale, tap the Scale button , then tap the scale you want
to play.
The fingerboard changes to show note bars. Play the notes of the scale as described in
Step 3.
Play the Bass in GarageBand for iPad
Using the Bass, you can play notes and bass lines. You can choose from different acoustic
and electric bass sounds.
Choose the sound of the Bass
• Tap the bass icon in the upper-left corner, then tap the sound you want to play. You can
also swipe left or right to change to the previous or next sound.

33GarageBand User Guide for iPad
Play notes of a chord
• Tap the strings on the fretboard in one of the chord strips. Each string plays a different
note of the chord.
You can add your own custom chords to play.
Play a bass line
1. Turn the Autoplay knob to one of the numbered positions.
2. Tap a chord strip. Tapping a different chord strip plays the same pattern with the notes
of that chord, and tapping with two or three fingers plays variations of the bass line.
3. Tap the chord strip again to stop the pattern.
Play individual notes
1. Tap the Chords/Notes switch on the right to switch to Notes view.
2. Tap the strings on the fretboard at the fret for the note you want to play. You can also
bend strings vertically to bend the pitch of a note.
3. To play notes of a particular scale, tap the Scale button, then tap the scale you want to
play.
The fretboard changes to show note bars rather than frets. Tap the bars to play the
notes of the scale.

34GarageBand User Guide for iPad
Play the Guitar in GarageBand for iPad
Using the Guitar, you can play notes, chords, and strumming patterns. You can choose
from acoustic or electric guitar sounds, and turn on stompbox effects to customize
the sound.
Choose the sound of the Guitar
• Tap the guitar icon in the upper-left corner, then tap the sound you want to play. You
can also swipe left or right to change to the previous or next sound.
Play chords
1. Tap the Chords/Notes switch on the right to switch to Chords view.
2. Do any of the following:
• Strum a chord: Swipe across the strings in one of the chord strips. You can also tap
strings to play individual notes of a chord.
• Play the full chord: Tap the top of a chord strip.
• Mute the strings: Touch and hold the fretboard to the left or right of the chord strips
as you play.
You can add your own custom chords to play.
Play a strumming pattern
1. Turn the Autoplay knob to one of the numbered positions.
2. Tap a chord strip. Tapping a different chord strip plays the same pattern with the notes
of that chord, while tapping with two or three fingers plays variations of the pattern.
3. Tap the chord strip again to stop the pattern playing.
35GarageBand User Guide for iPad
Play individual notes
1. Tap the Chords/Notes switch on the right to switch to Notes view.
2. Tap the strings on the fretboard to play notes. You can also bend strings vertically to
bend the pitch of a note up.
3. To play notes of a particular scale, tap the Scale button, then tap the scale you want to
play.
The fretboard changes to show note bars. Tap the bars to play the notes of the scale.
Turn stompbox effects on or off
When you choose an electric guitar sound, stompbox effects appear above the Guitar
fretboard. You can turn on the effects to change the sound.
• Tap the round On/Off button in the lower part of a stompbox. A red light indicates that
the stompbox is on.
Play the Retro Wah guitar with Face Control
If your iPad supports facial recognition, you can move the wah pedal on the Retro Wah
guitar by moving your mouth while you play. When you record, any pedal movements you
make with Face Control are also recorded.
1. Tap the guitar icon in the upper-left corner, then tap Retro Wah.
2. Hold your iPad 10–20 inches (25–50 cm) away from your face, then tap the Face Control
button .
The first time you use Face Control, GarageBand asks for permission to access the
camera on your iPad.
3. As you play, open and close your mouth to move the wah pedal up and down.
4. To turn Face Control off, tap the Face Control button again.
Note:GarageBand uses ARKit face tracking features to translate your facial expressions
into instrument effect controls. Your face information is processed on device, and only
music is captured during your performance.

36GarageBand User Guide for iPad
Play the Pipa in GarageBand for iPad
The pipa is a lute used in Chinese classical music. It has four strings (tuned A-D-E-A from
low to high) and is played with finger picks. Plucking the strings is called pi outward and pa
inward. You can press down on the strings to add vibrato, and you can also bend and strum
strings while playing. An important technique called Lunzhi involves rapidly plucking the
string with different fingers while fretting a note.
Open the Pipa
• Tap the Browser button , swipe to World, then tap the Pipa button.
Play chords
1. Tap the Chords/Notes button to switch to Chords view.
2. To play a chord, swipe up or down on one of the chord strips. You can also tap strings
to play individual notes of a chord.
You can add your own custom chords to play.
Play a pattern
1. Tap the Chords/Notes button to switch to Chords view.
2. Drag the Autoplay slider to one of the numbered positions.
3. Tap a chord strip. Tapping a different chord strip plays the same pattern with the notes
of that chord.
4. To stop the pattern playing, tap the chord strip again.
37GarageBand User Guide for iPad
Play individual notes
1. Tap the Chords/Notes button to switch to Notes view.
2. Do any of the following:
• Play notes: Tap the strings on the fretboard. You can also bend a string vertically to
bend the pitch of a note up.
• Strum notes: Swipe vertically on the area to the right of the strings.
• Play notes of a particular scale: Tap the Scale button , then tap the scale you want
to play.
Add Lunzhi tremolo
You can add Lunzhi tremolo while playing either notes or chords.
• Touch and hold the Lunzhi slider as you play. You can control the speed of the tremolo
by moving your finger left or right.
Play the Erhu in GarageBand for iPad
The erhu is a traditional Chinese instrument with a short body and a long neck. The strings
are tuned in fifths. The bow is never lifted from the strings, but passes between them,
producing a continuous, voice-like sound. Playing styles include glissando, grace notes,
trills, vibrato, and a characteristic horse effect, which uses upper glissando harmonics and
deep vibrato.

38GarageBand User Guide for iPad
Open the Erhu
• Tap the Browser button , swipe to World, then tap the Erhu button.
Use the chord strips
1. Tap the Chords/Notes button to switch to Chords view.
2. To play glissando, swipe a chord strip up and down. You can also tap to play individual
notes.
You can add your own custom chords to play.
Play a pattern
1. Tap the Chords/Notes button to switch to Chords view.
2. Drag the Autoplay slider to one of the numbered positions.
3. Tap a chord strip. Tapping a different chord strip plays the same pattern with the notes
of that chord.
4. Tap the chord strip again to stop the pattern playing.
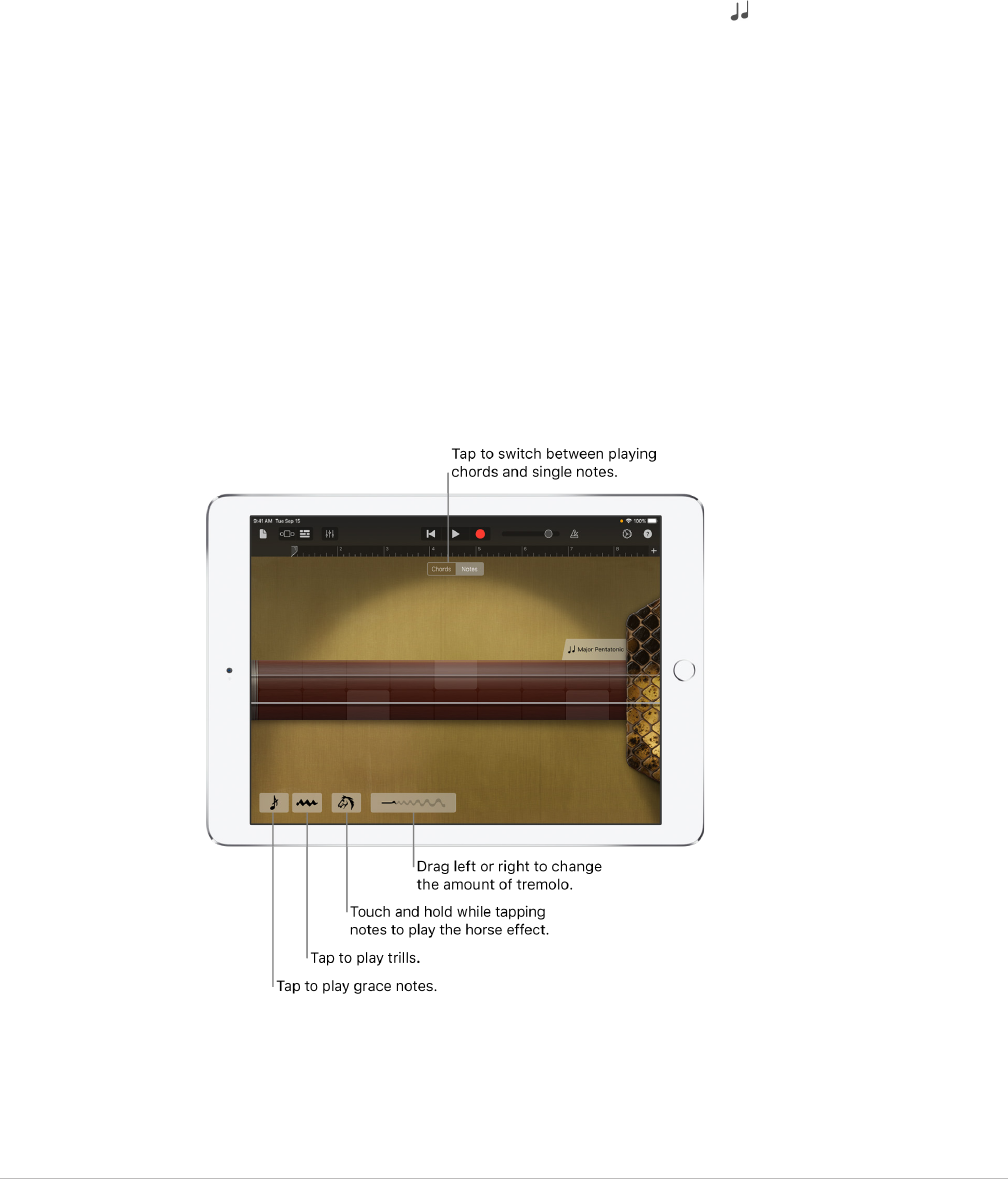
Play individual notes
1. Tap the Chords/Notes button to switch to Notes view.
2. Do any of the following:
• Play notes: Tap the strings on the fingerboard. Move your finger horizontally to
glissando between notes. Move your finger vertically to play notes louder or softer.
• Add a grace note: Touch and hold the Grace Note button as you play.
• Play trills: Touch and hold the Trill button as you play. You can control the speed
of the trill by moving your finger away from or towards the button.
• Use the horse effect: Touch and hold the Horse Effect button as you play.
• Play notes of a particular scale: Tap the Scale button , then tap the scale you want
to play.
Add vibrato
• Drag the Vibrato slider to the right. You can also control the amount of vibrato by tilting
your iPad.

39GarageBand User Guide for iPad
Play the Guzheng in GarageBand for iPad
The guzheng is a traditional Chinese zither-like instrument with 21 strings mounted over
bridges on a long hollow resonant body. The strings are tuned to a major pentatonic scale.
The guzheng is played by picking or plucking the strings with the right hand, and pushing
or pulling the strings with the left hand to change the pitch and create vibrato. The Yaozhi
tremolo technique involves rapidly picking a string inward and outward repeatedly.
Open the Guzheng
• Tap the Browser button , swipe to World, then tap the Guzheng button.
Use the chord strips
1. Tap the Chords/Notes button to switch to Chords view.
2. To play glissando, swipe a chord strip up and down. You can also tap to play individual
notes.
You can add your own custom chords to play.
Play a pattern
1. Tap the Chords/Notes button to switch to Chords view.
2. Drag the Autoplay slider to one of the numbered positions.
3. Tap a chord strip. Tapping a different chord strip plays the same pattern with the notes
of that chord.
4. Tap the chord strip again to stop the pattern playing.

40GarageBand User Guide for iPad
Play individual notes
1. Tap the Chords/Notes button to switch to Notes view.
2. Do any of the following:
• Play notes: Tap the strings.
• Bend notes: While tapping a string, drag left or right to lower or raise the pitch. Drag
back and forth to create vibrato.
• Strum: Swipe strings up or down.
• Mute strings: Play notes by tapping or swiping the strings, then tap the Guzheng in
the area to the left of the strings.
• Play harmonics: Touch and hold the Guzheng in the area to the left of the strings,
then play notes by tapping or swiping the strings.
• Play notes of a particular scale: Tap the Scale button , then tap the scale you want
to play.
Play more precisely
You can use the zoom boxes to show a larger set of strings and to change between a
picking or plucking sound.
• Tap the Zoom buttons
at the upper-left and right, and do either of the following:
• Play with a picking sound: Tap the strings in the right zoom box.
• Play with a plucking sound: Tap the strings in the left zoom box.
In each zoom box, the left strip shows the lower-pitched strings, the right strip shows the
higher-pitched strings.
Add Yaozhi tremolo
• Touch and hold the Yaozhi slider as you play. You can control the speed of the tremolo
by moving your finger left or right.

41GarageBand User Guide for iPad
Play the Koto in GarageBand for iPad
The koto is a traditional Japanese zither-like instrument with 13 strings mounted over
bridges on a long hollow resonant body. The strings are tuned to a minor pentatonic scale
called Hira Choshi. The koto is played by picking or plucking the strings with the right hand,
and pushing or pulling the strings with the left hand to change the pitch and create vibrato.
Open the Koto
• Tap the Browser button , swipe to World, then tap the Koto button.
Use the chord strips
1. Tap the Chords/Notes button to switch to Chords view.
2. To play glissando, swipe a chord strip up and down. You can also tap to play individual
notes.
You can add your own custom chords to play.
Play a pattern
1. Tap the Chords/Notes button to switch to Chords view.
2. Drag the Autoplay slider to one of the numbered positions.
3. Tap a chord strip. Tapping a different chord strip plays the same pattern with the notes
of that chord.
4. Tap the chord strip again to stop the pattern playing.

42GarageBand User Guide for iPad
Play individual notes
1. Tap the Chords/Notes button to switch to Notes view.
2. Do any of the following:
• Play with a picking sound: Tap the right side of a string.
• Bend notes: While tapping a string, drag left or right to lower or raise the pitch. Drag
you finger back and forth to create vibrato.
• Strum: Swipe strings up or down.
• Mute strings: Play notes by tapping or swiping the strings, then tap the Koto to the
left of the strings.
• Play harmonics: Touch and hold the Koto to the left of the strings, then play notes by
tapping or swiping the strings.
• Play notes of a particular scale: Tap the Scale button , then tap the scale you want
to play.
Play more precisely
You can use the zoom boxes to show a larger set of strings and to change between a
picking or plucking sound.
• Tap the Zoom buttons at the upper-left and right, and do either of the following:
• Play with a picking sound: Tap the strings in the right zoom box.
• Play with a plucking sound: Tap the strings in the left zoom box.
In each zoom box, the left strip shows the lower-pitched strings, the right strip shows the
higher-pitched strings.
Add tremolo
• Touch and hold the tremolo slider as you play. You can control the speed of the tremolo
by moving your finger left or right.
43GarageBand User Guide for iPad
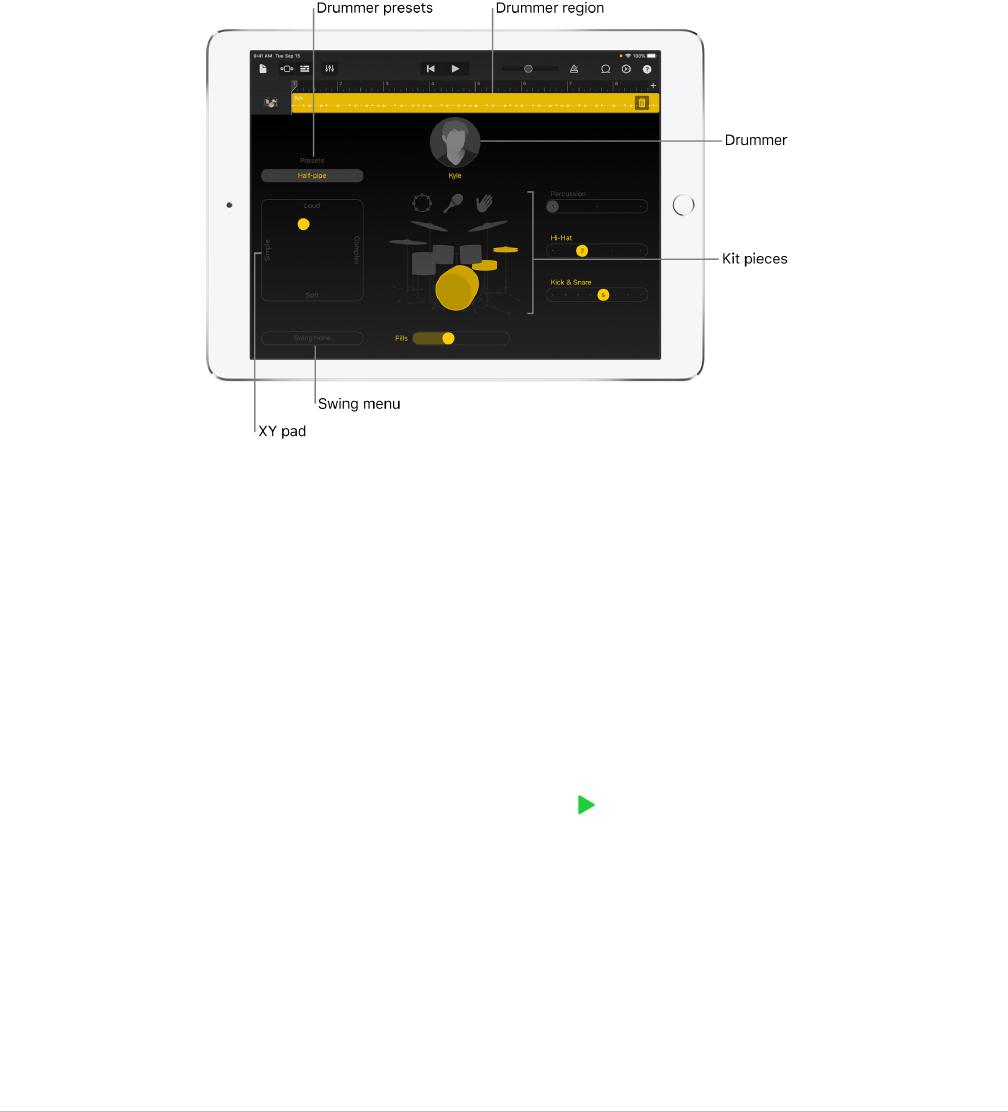
Use Drummer in GarageBand for iPad
You can add a virtual drummer to your song that plays realistic drum grooves. You can
choose drummers from different genres, each with its own acoustic, electronic, or
percussion drum kit. A GarageBand song can have up to two Drummer tracks.
You can change the drummer’s playing style by choosing different presets, and adjust
drum patterns using the Drummer controls—which include an XY pad for adjusting the
drummer’s performance, and controls for choosing different performance variations and fill
settings. You can also have the Drummer follow the rhythm of another track.
If your song contains multiple Drummer regions, the changes you make using the Drummer
controls affect only the currently selected Drummer region.
Choose a drummer
• Tap the drummer name, tap the style of drum kit you want to use (Acoustic, Electronic,
or Percussion), then tap the drummer you want to play.
All Drummer regions in a track use the same drummer.
Choose a drummer preset
• Tap the current drummer preset above the XY pad, scroll vertically through the preset
list, then tap a preset.
To hear the preset, tap the Play button in the control bar.
Adjust the loudness and complexity of the selected region
In the XY pad, do any of the following:
• Make the region louder or softer: Drag the yellow puck up or down.
• Make the region simpler or more complex: Drag the yellow puck left or right.

44GarageBand User Guide for iPad
Mute or unmute a drum kit piece
• Mute a drum kit piece: Tap a yellow (unmuted) kit piece.
• Unmute a drum kit piece: Tap a gray (muted) kit piece.
Choose a different pattern for a drum kit piece
Each style of drum kit —acoustic, electronic, or percussion— has different groups of drum
kit pieces. The slider to the right of each group controls the pattern for that particular
group.
• Tap a drum kit piece, then drag the slider for that piece left or right.
Change the swing value of the selected region
• Tap the Swing button, then choose a swing value from the pop-up menu.
Adjust the amount of fills
• Drag the Fills slider right to increase the number of fills, or drag it left to decrease the
number of fills.
Have a Drummer region follow the rhythm of another track
You can have the kick and snare portions of an acoustic or electronic Drummer region
follow the rhythmic groove of another track. Each Drummer region can follow a different
track.
1. Select a Drummer region.
2. Swipe the Follow switch right to turn it on.
3. Tap the Follow Track pop-up menu that appears under Kick & Snare (Kick, Snare &
Claps on electronic drum kits), then choose a track from the list.
Edit the selected Drummer region
• Tap the selected region, then tap one of the editing commands.
For information about the region editing commands, see Edit regions.
Replace the selected Drummer region
1. Delete the selected Drummer region: Tap the Trash icon on the right side of the region.
On an iPad Pro, double-tap the region, then tap Delete.
2. Create a new Drummer region: Tap an empty part of a Drummer track, then tap Create.

45GarageBand User Guide for iPad
Use the track controls in GarageBand for iPad
Each Touch Instrument has a set of track controls that lets you adjust its volume level, pan
(stereo) position, and effect levels. You can also solo the instrument to hear it by itself,
quantize or transpose the recordings on the instrument’s track, and change the master
effects. You can save track control settings and use them on another track or in another
project. A Touch Instrument’s track controls are available both when playing the instrument
and when the track is selected in Tracks view.
Open the track controls
• Tap the Track Controls button in the control bar.
Mute or solo the track
• Mute or unmute the track: Tap the Mute button .
• Solo or unsolo the track: Tap the Solo button .
Adjust the track’s volume and pan position
Do either of the following:
• Drag the Track Volume slider left or right.
• Drag the Track Pan slider left or right.
You can also automate track volume changes. When using volume automation, the Track
Volume slider cannot be adjusted.
Adjust the track’s compression
A compressor smoothes the difference between the loudest and softest parts of a track,
and can help the track stand out or sound more “punchy.”
• Drag the Compressor slider left or right.
Adjust the track’s treble and bass levels
Do either of the following:
• Drag the Treble slider left or right.
• Drag the Bass slider left or right.
Quantize regions in the track
You can correct the timing of recordings in a track to a certain note value (called
quantization). After you turn on quantization for a track, any new recordings or loops you
add to the track are also quantized.
1. Tap Track Settings, then tap Quantization.
Quantization values appear in three categories: Straight, Triplet, and Swing.
2. Tap one of the categories, then choose the note value you want to quantize the regions to.
Quantization applies to all regions in the track for the current song section, but you can
choose different quantization values for the same track for different song sections. If you
move or copy a region to a different section with a different quantization value, the value
appears as Multiple. For more information about song sections and quantization, see
Extend a song with song sections.

46GarageBand User Guide for iPad
Transpose regions in the track
You can change the pitch of (or transpose) recordings or loops in a track up or down by
semitones or octaves. After you turn on transposition for a track, any new recordings or
loops you add to the track are also transposed.
Regions recorded with the Guitar, Bass, or Strings instruments cannot be transposed.
1. Tap Track Settings, then tap Transposition.
2. To transpose by octaves, tap the Octaves up or down arrow, or swipe vertically to
transpose by multiple octaves.
3. To transpose by semitones, tap the Semitones up or down arrow, or swipe vertically to
transpose by multiple semitones.
Transposition applies to all regions in the track for the current song section, but you can
choose different transposition values for the same track for different song sections. If you
move or copy a region to a different section with a different transposition value, the value
appears as Multiple. For more information about song sections and transposition, see
Extend a song with song sections.
Merge recordings in a track
You can merge recordings made with Touch Instruments to create more complex parts.
When you turn on merging, you can record a part, and, when the playhead starts over from
the beginning of the section, record another part. The parts are merged into a single region.
The Merge Recordings switch is available when a track that supports merging is
selected. By default, merging is on for the Drums, and off for the other supported Touch
Instruments. Using Merge Recordings, you can also record notes for an instrument, then
record changes to knobs and other controls separately and have the two merged.
• Turn merging on or off: Tap Track Settings, tap Recording, then tap the Merge
Recordings switch.
Take Recording and Merge Recordings cannot both be activated at the same time. For
more information about take recording, see Record multiple takes.
Change the master effects
Each song has a set of master effects, including master echo (delay) and master reverb.
You can choose the master effects for the song, then use the Echo Level and Reverb Level
sliders to control how much of the master effects is added to each instrument in the song.
1. Tap Master Effects.
2. Do one of the following:
• Tap Echo, then choose a new master echo preset from the list.
• Tap Reverb, then choose a new master reverb preset from the list.
3. To return the master effects to their original settings, tap one or both of the effects,
then tap Default.
Adjust the track’s master effect levels
Do either of the following:
• Drag the Echo Level slider left or right.
• Drag the Reverb Level slider left or right.

47GarageBand User Guide for iPad
Use effect plug-ins in GarageBand for iPad
Effect plug-ins are used to shape and enhance the sound of your music in a variety of
ways. Many familiar sounds in popular music are created using effects. Effects include
reverb, compressors, and delays. You can use multiple plug-ins on each individual track
and change the order in which they affect the sound.
Effect types
GarageBand includes a variety of effect plug-ins that you can use on the tracks in your songs:
• Bitcrusher: A bitcrusher creates distortion by reducing the sampling rate and bit depth of
the signal. The result is a lo-fi digital sound similar to old video games or drum machines.
• Compressor: A compressor adjusts the volume of the sound to smooth out sudden level
changes. Compressors can add punch and definition to a track making it stand out from
the rest of the mix.
• Delay: Delay effect repeats a sound like an echo. It can add a subtle sense of space to a
sound, or create the impression that a voice or an instrument is in a large room or cavern.
• Distortion: Distortion and overdrive effects change the tone of the original sound,
making it sound “dirty” or “fuzzy.”
• EQ: EQ (short for equalization) lets you change the level of selected frequencies in a
sound. You can use EQ to make both subtle and dramatic changes to your songs.
• Modulation: Modulation effects, such as chorus, flanger, and phaser, repeat the sound
along with the original, but they shift or modulate the repeated sound during playback.
The result is often a shimmery or swirly effect on voices and instruments.
• Reverb: Reverb simulates the natural reflections of a sound in a surrounding space. It
can add definition and presence to voices and instruments, add ambience to a sound, or
simulate different rooms and other acoustic environments.
• Tremolo: Tremolo raises and lowers the volume of a sound at regular intervals, creating
a wobble effect.
• Vocal Transformer: The Vocal Transformer changes the pitch and tone of your voice.
View plug-ins for a track
You can view track plug-ins either when playing an instrument or when the track for the
instrument is selected in Tracks view.
• Tap the Track Controls button in the control bar, then tap Plug-ins & EQ.
Add a plug-in
1. Tap the Track Controls button in the control bar, tap Plug-ins & EQ, then tap Edit.
2. Tap the Add Plug-in button on one of the empty plug-in slots or tap the name of the
plug-in you want to replace.
3. Tap a plug-in in the list.
You cannot replace the Compressor and Visual-EQ plug-ins. If you want to turn them
off, see Turn a plug-in on or off.
Change the order of plug-ins
1. Tap the Track Controls button in the control bar, tap Plug-ins & EQ, then tap Edit.
2. Touch the handle to the right of the plug-in and drag it up or down to the position you
want, then let go.

48GarageBand User Guide for iPad
Turn a plug-in on or off
1. Tap the Track Controls button the control bar, then tap Plug-ins & EQ.
2. Tap the plug-in’s On/Off button to turn it on or off.
Change plug-in settings
1. Tap the Track Controls button, tap Plug-ins & EQ, then tap the name of the plug-in.
2. Drag the sliders to change the settings.
You can change the settings while playing an instrument to hear how the sound changes
in real time.
3. When you finish, tap the name of the plug-in to close the settings.
Use the Visual EQ
You can use the Visual EQ plug-in to optimize the sound of your tracks and songs by
adjusting the level of three ranges, or bands, of frequencies: bass, mid, and treble.
1. Tap the Track Controls button in the control bar, tap Plug-ins & EQ, then tap Visual EQ.
2. Do any of the following:
• Adjust an EQ band: Tap the colored puck for an EQ band to activate it, then drag
up or down to raise or lower the level for that band. Drag left or right to change the
frequency for that band.
Double-tap the puck to move it to its original position.
• Raise or lower the overall gain: Drag the Gain slider on the right up or down.
• Use the Analyzer: Click the Analyzer button, then play an instrument or a region on
the selected track.
While playing an instrument or a region, the frequency curve for the track appears in
the EQ display, showing which frequencies are louder or softer. You can adjust the
EQ bands while you watch the frequency curve.
Click the Analyzer button again to turn it off.
3. Tap Done when you finish.

49GarageBand User Guide for iPad
Remove a plug-in
1. Tap the Track Controls button in the control bar, tap Plug-ins & EQ, then tap Edit.
2. Tap the Remove Plug-in button , then tap the Delete button.
Note:You cannot remove the Compressor and Visual-EQ plug-ins.
3. Tap Done when you finish.
Enable Apple-designed Audio Unit Extensions
There are several Audio Unit Extensions included in iPadOS that you can use in your
GarageBand song.
1. Close GarageBand.
2. Open the Settings app, scroll down in the sidebar, then tap GarageBand.
3. Tap to turn on Enable Apple-designed Audio Unit Extensions.
The plug-ins appear in the Audio Unit Extensions list when you add a plug-in to a track.
Save custom sounds in GarageBand for iPad
You can save, rename, and delete your own custom sounds for each Touch Instrument and
use them on another track or in another song. Changes saved include settings for Touch
Instruments, master effects, plug-ins, and EQ.
1. Tap the Track Controls button in the control bar, then tap the name of the sound
above the track controls.
2. Tap Save, type a name for your custom sound, tap the Return button to dismiss the
keyboard, then tap Done in the upper-right corner.
The first time you save a custom sound, a new Custom category appears in the sidebar
at the bottom of the list of sounds. To rename or delete the sound, tap Edit, then tap
the icon (to rename) or the Delete button (to delete).
A dot to the left of the name indicates that the settings were modified from the last saved
version. Some Touch Instruments also let you save sounds in the same window that opens
when you choose a different sound.

50GarageBand User Guide for iPad
Add custom chords to GarageBand for iPad
You can add your own custom chords to a song. Custom chords can include extensions
(added notes) and alternate bass notes. When you add a custom chord, it is available to all
instruments played with chord strips in the current song.
Add a custom chord
1. Tap the Settings button in the control bar, then tap Edit Chords.
2. Tap the chord strip you want to use for the custom chord.
3. Swipe the Chord wheels to set the chord root and chord quality, and to add an
extension (added note). Swipe the Bass wheel if you want to add an alternate bass note.
4. When you finish, tap Done to return to the song.
Use a Bluetooth MIDI device with GarageBand for
iPad
You can connect a compatible Bluetooth® MIDI device to your iPad, and use it to play and
control Touch Instruments in GarageBand.
1. Tap the Settings button in the control bar.
2. Tap Advanced, then tap Bluetooth MIDI Devices.
3. Tap the name of the device you want to connect, then tap the Connect switch on.
4. To stop using the device, tap the Connect switch off.

51GarageBand User Guide for iPad
Set the control knob orientation in GarageBand for
iPad
You can set whether Touch Instrument control knobs respond to linear gestures, circular
gestures, or both. By default, the orientation is set to Automatic, which lets control knobs
respond to both linear and circular gestures.
Set the orientation for control knobs
1. Close GarageBand.
2. Open the Settings app, choose GarageBand, then tap Knob Gestures.
3. Choose the orientation you want to use (Automatic, Linear, or Circular).
Use MPE controllers with GarageBand for iPad
You can use GarageBand with controllers that support MIDI Polyphonic Expression (MPE).
MPE assigns each note to its own MIDI channel so that information about pitch, timbre, and
expression controls are applied to notes individually.
Turn on support for MPE controllers
1. Close GarageBand.
2. Open the Settings app, scroll down, then tap GarageBand.
3. Tap the Support MPE Controllers switch.

52GarageBand User Guide for iPad
Record Touch Instruments
Record Touch Instruments in GarageBand for iPad
You can record your Touch Instrument performances to play and use in a GarageBand
song. When you record a Touch Instrument, your recording appears in a region in the
instrument’s track in Tracks view. You can edit and arrange your recordings in Tracks view.
You can also record other music apps on your iPad, including both instruments and effects,
to GarageBand using Inter-App Audio.
If you have purchased and installed Audiobus on your iPad, you can record from other
music apps on your iPad to GarageBand using Audiobus. You can record from Audiobus
to an Audio Recorder, Amp, or Sampler track. You can record from Audiobus to an Audio
Recorder, Amp, or Sampler track.
When connecting apps in Audiobus, GarageBand can be used only as an output, not as an
input or an effect.
Record a Touch Instrument
1. Tap the Record button in the control bar.
Recording starts at the current position of the playhead. The ruler shows the area being
recorded in red.

53GarageBand User Guide for iPad
2. Play the Touch Instrument (or, for the Audio Recorder or Amp, sing or play).
The notes you play, as well as any changes to knobs, sliders, or other controls, are
recorded.
3. When you finish, tap the Play button in the control bar.
The new recording appears as a region in the ruler.
If you are recording to the Audio Recorder, Sampler, or Amp using a device with stereo
inputs, you can tap the Input Settings button , then choose whether to record the left or
right side of the stereo signal. If you are using an audio interface with multiple channels,
you can choose the input channel. For the Audio Recorder, you can also record the full
stereo signal.
When you tap Record, the current Touch Instrument starts recording at the location of the
playhead. Previous recordings (which appear as blue or green areas in the ruler) in the
same track are replaced by the new recording. If you don’t want to record over an existing
part, move the playhead to another area before you start recording.
When you record the Drums Touch Instrument, new recordings are merged with existing
regions on the track. You can turn off merging using the track controls.
Record multiple Touch Instruments at the same time
You can record more than one Touch Instrument at the same time. With a multichannel
audio interface connected to your iPad, you can record several Audio Recorder or Amp
Touch Instruments together with one other Touch Instrument. Without an audio interface,
you can record one Audio Recorder or Amp Touch Instrument together with one other
Touch Instrument.
1. To turn on multitrack recording, tap the Settings button in the control bar, tap
Advanced, then tap the Multitrack Recording switch.
2. Tap the Tracks button in the control bar.
3. Drag a track icon to the right to show the track headers.
4. Tap the circular Record Enable button in the header of each track you want to record.
5. For each Audio Recorder or Amp you want to record, tap the track’s header, tap Input,
then choose the input channel.
6. When you are ready, tap the Record button in the control bar to start recording.
7. When you finish, tap the Play button in the control bar.
Use the metronome for recording or playback
GarageBand has a metronome to help you play and record in time. The metronome includes
a count-in that plays before recording starts, to help you get ready. When the visual
count-in is turned on, the metronome displays the beat of the count-in. You can turn the
metronome on or off anytime while you are working.
• Turn the metronome on or off: In the control bar, tap the Metronome button .
In the song settings, you can turn the count-in on or off, change the sound of the
metronome, or make the metronome silent.

54GarageBand User Guide for iPad
Quickly edit a Touch Instrument recording
After you record a Touch Instrument, you can quickly edit the recorded region. You can
move, trim, cut, copy, paste, delete, loop, or split the region in the Touch Instrument
without switching to Tracks view.
1. Swipe down on the ruler below the control bar.
The play area of the Touch Instrument moves down, showing the recorded region. The
play area dims to indicate that you can’t play the instrument while the region is visible.
2. Tap the region to select it.
You can move or trim the selected region following the steps in Edit regions.
3. Tap the selected region again to show editing options.
You can cut, copy, paste, delete, loop, or split the region following the steps in Edit regions.
4. You can quickly switch between different Touch Instruments by dragging the instrument
icon in the track’s header up or down. You can also move to adjacent song sections by
swiping the track left or right.
5. To hide the region and return to the Touch Instrument, drag the instrument’s play area
(below the region) back up.

55GarageBand User Guide for iPad
Record multiple takes
You can record multiple versions, or takes in quick succession, and then choose and edit
the one you like best. When multi-take recording is turned on, a new take is created each
time the playhead starts over from the beginning of the song section.
1. If the length of the song section you want to record to is set to Automatic, tap the
Automatic switch to turn it off.
2. Tap the track containing the instrument you want to record.
3. Tap the Track Controls button , tap Track Settings, tap Recording, then tap the Multi-
Take Recording button.
4. Tap the Record button in the control bar to start recording.
Each time the playhead starts over from the beginning of the section, a new take is
created.
5. When you are done recording, double-tap the new region, tap Takes, then choose the
take you want to hear from the list.
6. To delete takes, do either of the following:
• Delete individual takes: Tap Edit and delete the takes you don’t want to keep.
• Delete all but the currently selected take: Tap the take you want to keep, then tap
Delete Unused Takes.
Prevent a recording from being interrupted
While you are recording a Touch Instrument, it is possible that audio events from other
applications on your iPad can interrupt the recording. Take the following steps to minimize
the possibility of interruption from competing audio events:
• Open the Settings app, and ensure that Airplane Mode is turned on.
• Make sure there are no alarms scheduled for the time you plan to record in the Calendar
app or any other app (including third-party apps).
• Do not connect or disconnect headphones or other external devices during recording.
• Do not connect or disconnect the iPad from your computer while recording.
• Do not connect the iPad to (or disconnect it from) a power outlet while recording.
Record from another music app using Audiobus
1. In GarageBand, choose an Audio Recorder, Amp, or Sampler Touch Instrument.
2. Open the Audiobus app, and add GarageBand as the output.
3. Open the app you have added as the input in Audiobus.
4. In the Audiobus connection panel, tap GarageBand to show its remote controls, then tap
the Record button.
5. Play, sing, or create sound using the input app.
6. When you finish, tap the Play button in the remote controls section of the Audiobus
connection panel, or tap the Record button again.
The recording appears as a blue region on the track for the Audio Recorder or Amp
Touch Instrument, or as a new sample in the Sampler Touch Instrument.

56GarageBand User Guide for iPad
Use the control bar and the track headers
Use the control bar in GarageBand for iPad
The control bar is located at the top of the screen. It includes controls that let you navigate
to different parts of GarageBand; control playback, recording, and volume; and open the
Loop Browser, Tracks view, and song settings.
The navigation buttons on the left include:
• The My Songs button saves the current song and opens the My Songs browser, where
you can create and save songs, and share songs.
• The Browser button opens the Sound browser, where you can choose a Touch
Instrument or open the Live Loops grid.
Touch and hold the Browser button to choose a different Touch Instrument.
• The Tracks button lets you switch from the Live Loops grid or the current Touch
Instrument to Tracks view. Touch and hold the button while using a Touch Instrument to
switch to another Touch Instrument in the song. The Tracks button is available after you
make the first Touch Instrument recording in Tracks view.
• The Instrument button opens the Touch Instrument for the currently selected
track. It’s to the right of the Browser button in Tracks view, and resembles the Touch
Instrument of the currently selected track.
• The Live Loops button lets you switch between Tracks view and the Live Loops grid.
The Live Loops button only appears if a Live Loops grid has been created for the song.
• The Track Controls button opens the Track Controls for the currently selected track.
• The FX button shows or hides the Remix FX controls.
• The Undo button appears after you record a Touch Instrument or make changes in
Tracks view. Tap it to undo your previous edits.
The controls for playing the song (called transport controls) in the center include:
• The Go to Beginning button moves the playhead to the beginning of the song. While
the song is playing, the Go to Beginning button changes to a Stop button.
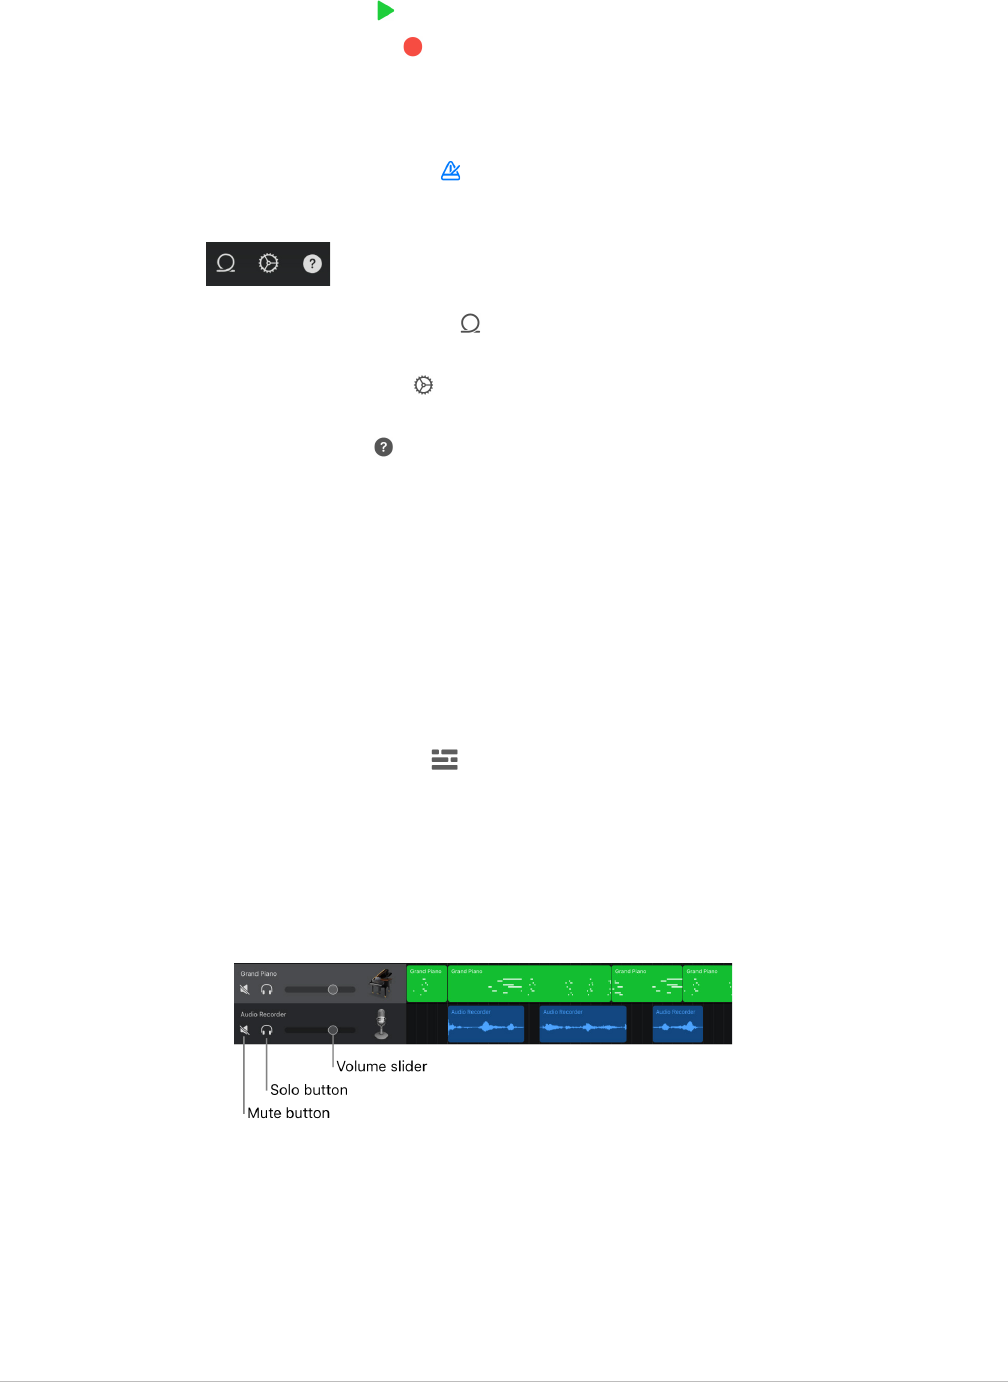
57GarageBand User Guide for iPad
• The Play button starts the song playing, or stops it if it's currently playing.
• The Record button starts recording. To stop recording and stop the playhead, tap the
Play button.
• The Master Volume slider lets you change the overall volume of the song. The Master
Volume slider is also controlled by the iPad’s hardware volume buttons.
• The Metronome button starts and stops the metronome click.
The buttons on the right include:
• The Loop Browser button opens the Loop Browser, where you can find and preview
loops to add to your song. The Loop Browser button is available only in Tracks view.
• The Settings button lets you view and edit song settings, including metronome,
tempo, and key signature settings.
• The Info button displays coaching tips for the current Touch Instrument or Tracks
view.
Use the track headers in GarageBand for iPad
Each Touch Instrument has a track that holds the recordings (called regions) you make with
that instrument. In Tracks view, each track has an icon, a name, and controls that let you
adjust its volume, and silence (mute) or solo the track. You can also reorder, rename, and
delete tracks in Tracks view.
Open Tracks view
• Tap the Tracks button
in the upper-left part of the control bar.
The Tracks button is available after you make the first Touch Instrument recording in a
song.
Show the track headers
• Drag a track icon to the right. The track headers extend to show the controls for each
track, including Mute and Solo buttons and a Volume slider.
• You can hide the track headers by dragging the track icon back to its original position.
Adjust the track volume
• Raise or lower the volume: Drag the Volume slider right or left.
• Reset the volume to a neutral setting (0 dB): Double-tap the Volume slider.

58GarageBand User Guide for iPad
Mute or solo a track
• Mute the track: Tap the Mute button in a track header.
• Solo the track: Tap the Solo button in a track header.
Tap the Mute or Solo button again to unmute or unsolo the track. You can mute or solo
more than one track at a time.
Enable tracks for recording
When Multitrack Recording is turned on, you can record multiple tracks at the same time.
• Tap the Record Enable button in the header of each track you want to record.
Turn on input monitoring
When Multitrack Recording is turned on, you can turn on input monitoring for Audio
Recorder and Amp Touch Instruments to hear them as you play.
• Tap the Input Monitoring button in the header of each Audio Recorder or Amp track
you want to record.
Change the order of tracks
1. Touch and hold the icon of a track you want to reorder.
The track lifts up slightly to indicate that it can be moved.
2. Drag the lifted track up or down to reorder it.
Add a track
• Tap the Add Track button below the track headers.
If the currently selected track is not empty, you can add a track and choose the Touch
Instrument for the track by touching and holding the Instruments button in the control bar.
Change the Touch Instrument for a track
• If the currently selected track is empty, touch and hold the Browser button in the
control bar to choose a different Touch Instrument for the track.
Duplicate a track
1. Tap the header of a track you want to duplicate to select the track, then tap it again.
2. Tap Duplicate.
An empty, duplicate track with the same Touch Instrument and track settings appears
below the original one.
If the song already has the maximum number of tracks, you cannot add or duplicate a
track.

59GarageBand User Guide for iPad
Rename a track
1. Tap the header of a track you want to rename, then tap Rename.
2. Type a new name for the track.
3. When you finish, tap Return.
Delete a track
1. Tap the header of a track you want to delete to select the track, then tap it again.
2. Tap Delete.
Change the icon for a track
1. Tap the header of the track with the icon you want to change, then tap Icons.
2. Choose an icon from the list.
3. When you finish, tap anywhere outside of the list.
In addition to the controls in the track header, you can control other aspects of the track,
including pan position, quantization or transposition of regions in the track, and effects
levels, using the track controls.
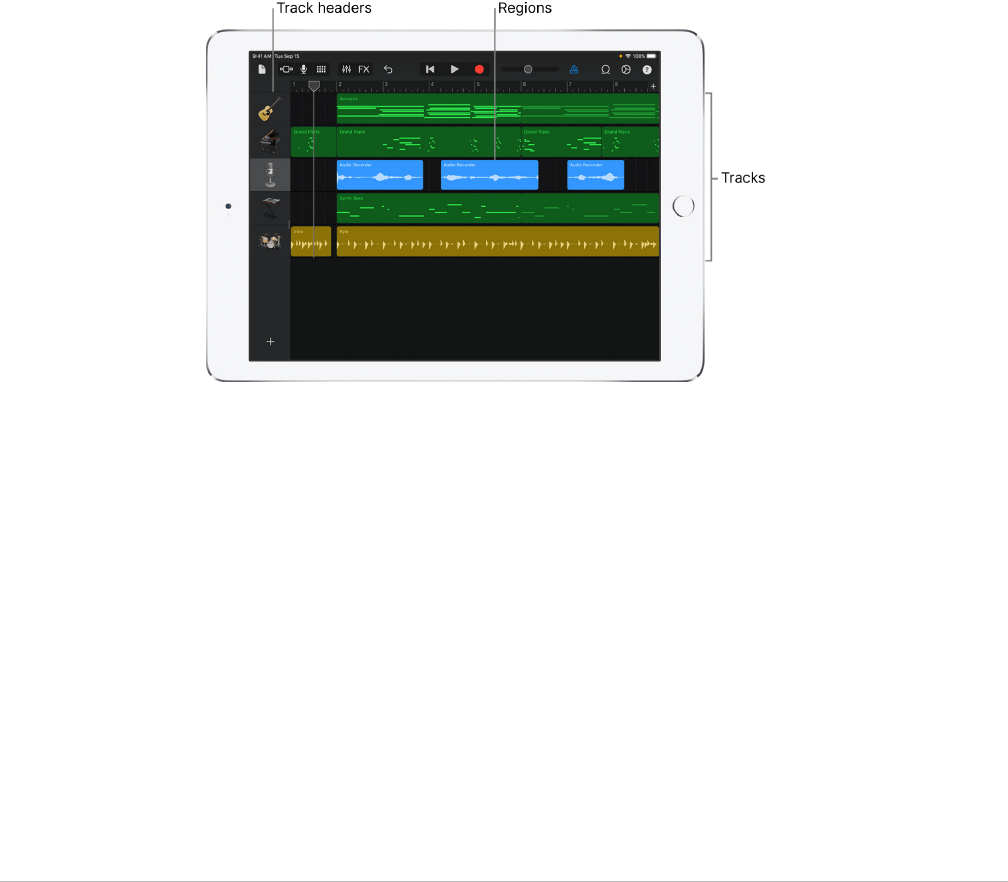
60GarageBand User Guide for iPad
Build a GarageBand song
Build a song in GarageBand for iPad
You build a song in GarageBand by recording Touch Instruments and arranging your
recordings in Tracks view. You can also add Apple Loops (prerecorded drum beats, bass
lines, and other background parts) from the Loop Browser. A GarageBand song can have up
to 32 tracks and be up to 2000 bars long.
Tracks view is organized into horizontal rows called tracks. Each track contains the
recordings of one Touch Instrument, which appear as rectangular regions. To the left of
each track is a header with an icon for that track’s Touch Instrument. You can add, reorder,
duplicate, and delete tracks, and control the sound of a track in several ways. You can also
edit regions in a variety of ways to build your song arrangement.
At the top of the screen is a ruler that shows bars and beats. The left edge of each region
aligns with the bar or beat on the ruler to show where it starts playing. The playhead is
a vertical line that moves across the ruler as the song plays, showing the part currently
playing. You can move the playhead to hear a different part of the song.
Each song has a tempo, key, and time signature that last for the entire song. You can
change these song settings, turn the count-in on or off, and change the metronome sound.

61GarageBand User Guide for iPad
The following sections give more information about specific tasks for building a song in
GarageBand:
• Create and save songs
• Play and navigate songs
• Change song settings
• Add Apple Loops
• Import audio and MIDI files
• Import a song from the Music app
• Edit regions
• Edit notes in regions
• Change region settings
• Automate volume changes
• Merge tracks
• Extend a song with song sections
Create and save songs in GarageBand for iPad
When you first open GarageBand, a new, empty song is created automatically. You can
create new songs to record and arrange your music in. In the My Songs browser you can
duplicate, name, save, and delete songs. You can also create folders, and add or remove
songs from folders.
Open the My Songs browser
• Tap the My Songs button
in the control bar.
The default view shows songs in their current location on your iPad. Tap Recents in the
sidebar to show songs you last worked on.
Create a new song
• In the My Songs browser, tap the Add Song button at the top-right of the screen.
The Sound browser opens, where you can choose a Touch Instrument to use in the
song.
Create a new song for recording audio
You can quickly create a new song optimized for audio recordings from the Home screen or
the My Songs browser.
• Do either of the following:
• On the Home screen: Touch and hold the GarageBand app icon until the menu
appears, then tap Create New Audio Recording.
• In the My Songs browser: Tap the New Audio Recording button near the upper-
right corner of the screen.
A new song is created and the Audio Recorder opens. The Time Ruler is turned on and the
section length is set to Automatic.

62GarageBand User Guide for iPad
Open a different song
• In the My Songs browser, swipe until you see the song you want to open, then tap the
song. To see the songs in a folder, tap the folder.
Save the current song
• You save the current song by opening the My Songs browser. Tap the My Songs
button
in the control bar.
To continue working on the song, tap it again in the
My Songs browser.
Create a song folder
1. Tap the New Folder button .
If you don’t see the New Folder button, touch and hold an empty area in the My Songs
browser and drag down.
2. Use the keyboard to type a name for the folder, then tap Done.
Move songs
• Move one song into a folder: Touch and hold a song, then drag it onto the folder.
• Move multiple songs:
• Tap Select at the top-right of the screen, then tap the songs you want to move.
• Tap Move at the bottom of the screen.
• Tap to the location of the Folder where you want to save your songs, then tap Move
at the top-right of the screen.
When you move songs to iCloud Drive, a copy of the song is uploaded to iCloud Drive.
Rename a song or folder
1. In the My Songs browser, touch and hold a song or folder, then tap Rename.
A keyboard appears, and the name appears in the name field with an insertion point.
2. Do one of the following:
• Tap the X on the right side of the name field to delete the existing name.
• Drag the insertion point to the left of the place where you want to start typing.
3. Use the keyboard to type a new name, then tap Done.
Sort items in the My Songs browser
You can sort songs and folders in the My Songs browser by name, date, size, or tags. By
default, items are sorted by name.
1. Touch and hold an empty area in the My Songs browser and drag down.
2. Tap the Name, Date, Size, or Tags button.
Duplicate a song
1. In the My Songs browser, tap Select, then tap the song you want to duplicate.
2. Tap Duplicate.

63GarageBand User Guide for iPad
Delete a song
• In the My Songs browser, do one of the following:
• Tap Select, tap the song or songs you want to delete, then tap Delete.
• Touch and hold the song you want to delete to open an option menu, then Tap
Delete.
Play and navigate songs in GarageBand for iPad
Tracks view shows a representation of musical time moving from left to right. Each Touch
Instrument has a track where its recordings appear as colored regions. The playhead
moves across the ruler as the song plays, showing the part currently playing. You can
move the playhead to hear a different part of the song. You can also zoom and scroll in
Tracks view.
Open Tracks view
• Tap the Tracks button
in the upper-left part of the control bar.
The Tracks button is available after you make the first Touch Instrument recording in a
song.
Play the current song
• Tap the Play button in the control bar.
Go to the beginning of the song
• Tap the Go to Beginning button in the control bar. If the song is playing, it starts over
from the beginning.
Move the playhead
• Drag the playhead to the point on the ruler where you want to start playback. If the
song is playing, it continues from the new location.
Start playback from any position
• Double-tap the position on the ruler where you want to start playback. The playhead
moves to that position and playback starts.
Scroll Tracks view
• Swipe left or right across an empty part of the screen to move forward or back to a
different part of the song.
Zoom Tracks view horizontally
• Pinch open to zoom in, or closed to zoom out.

64GarageBand User Guide for iPad
Continue playing after you close GarageBand
1. Tap the Settings button in the control bar.
2. Tap Advanced.
3. Tap Run in Background.
4. To improve performance when running GarageBand in the background with other music
apps, turn on Use with Music Apps.
When Run in Background is turned on, GarageBand continues playing after you close it, or
when you open another app from the app switcher. If recording is active when you close
GarageBand, you can continue recording. A red bar at the top of the display indicates that
GarageBand is still playing and recording in the background.
If a Touch Instrument is open when you close GarageBand, you can continue playing
it. If an Audio Recorder, Amp, or Sampler Touch Instrument is open when you close
GarageBand, you can continue recording or playing it.
When “Use with Music Apps” is turned on, you may notice a delay when playing some
Touch Instruments.
Change song settings in GarageBand for iPad
Every GarageBand song has settings for the metronome and count-in, as well as the song
tempo (speed), key, and time signature, which you can change at any time. You can also
add an automatic fade-out.
Open the song settings
• Tap the Settings button in the control bar.
Change the metronome settings
GarageBand has a metronome to help you play and record in time. The metronome includes
a count-in that plays before recording starts, to help you get ready. When the visual count-
in is turned on, the metronome displays the beat of the count-in. In the song settings, you
can turn the count-in on or off, and change the sound of the metronome.
1. Open the song settings, then tap Metronome and Count-in.
2. To turn the count-in on or off, tap the Count In switch. When the count-in is on, you can
turn the visual count-in on or off by tapping the Visual Count-in switch.
3. To change the sound for the metronome, choose a new metronome sound from the list.
4. To change the volume of the metronome, drag the Metronome Level slider left or right.

65GarageBand User Guide for iPad
Change the tempo of a song
Each song has a tempo (speed) that lasts for the entire song. You can change the tempo
when either a Touch Instrument or Tracks view is open.
1. Open the song settings, then tap Tempo to show the tempo controls.
2. Do one of the following:
• Set the tempo: Tap the tempo bar repeatedly.
• Change the tempo incrementally: Tap the up or down arrow next to the tempo
number. You can swipe vertically to change it in larger steps.
When you change the tempo of a song, recordings from Touch Instruments (except the
Audio Recorder and Amp) change to match the new tempo. Apple Loops also change to
match the new tempo.
Change the time signature of a song
Each song has a time signature that lasts for the entire song. You can change the time
signature in any Touch Instrument or in Tracks view.
• Open the song settings, tap Time Signature, then tap a new time signature.
When you change the time signature of a song, existing recordings and loops in the song
do not change.

66GarageBand User Guide for iPad
Change the key of a song
Each song has a key that lasts for the entire song. You can change the key in any Touch
Instrument or in Tracks view.
• Open the song settings, tap Key Signature, then tap a new key. You can also select a
different scale (major or minor).
When you change the key of a song, recordings from Touch Instruments (except the Audio
Recorder and Amp) change to match the new key. Apple Loops also change to match the
new key.
Turn off Follow Song Key for recordings and loops
By default, when you change the key of a song, the recordings and loops in the song
change to match the new key (except Audio Recorder and Amp recordings). You can turn
off this setting if you want to try out different keys without changing the recordings and
loops in the song.
• Open the song settings, tap Key Signature, then turn Follow Song Key off.
Tap Follow Song Key again to turn it on.
Show Time Ruler
You can change the ruler to show minutes and seconds (absolute time) instead of bars and
beats. This can be useful if you want to record audio for a certain length of time, or for an
interview or podcast. When the Time Ruler is on, snapping regions and notes to bars and
beats is disabled.
• Open the song settings, then turn Time Ruler on.
Add a fade-out
You can add an automatic fade-out to the end of a song. When you turn on Fade Out, the
last ten seconds of the song fade to silence. If you extend the last section by adding or
moving regions, the fade-out adjusts to the new end of the song. You hear the fade-out
when you play or share the song, but not while recording.
1. Open the song settings.
2. Turn Fade Out on.
Tap Fade Out again to turn off the automatic fade-out.

67GarageBand User Guide for iPad
Use 24-bit audio
When 24-bit audio is turned on, GarageBand records, mixes, and exports audio in 24-bit
resolution. 24-bit audio uses more storage space, but provides higher resolution for audio
editing.
1. Open the song settings, then tap Advanced.
2. Turn 24-bit Audio Resolution on.
Send tempo information to music apps and MIDI devices
You can use MIDI clock to sync other music apps or MIDI devices to the tempo used in
GarageBand when playing or recording.
1. Open the song settings, then tap Advanced.
2. Turn Send MIDI Clock on.
When you use Live Loops, MIDI clock is only sent when recording or playing back a Live
Loops performance.
Use the Note Pad in GarageBand for iPad
You can create, view, and edit notes for a song with the Note Pad. Each song can contain
one set of notes.
• Tap the Settings button in the control bar, then tap Note Pad.
To start typing, tap inside the text area.

68GarageBand User Guide for iPad
Add Apple Loops in GarageBand for iPad
GarageBand includes a set of Apple Loops you can use to easily add drum beats, bass
lines, rhythm parts, and other sounds to a song. Loops contain musical patterns that can
be seamlessly repeated over and over. You can extend a loop to fill any amount of time.
When you change the tempo or key of a song, Apple Loops also change to match the new
tempo or key.
You can quickly find loops in the Loop Browser and preview them to find the ones you want
to use in your song. You can specify loops as favorites and use them as a starting point for
many of your songs. Audio loops are blue, Touch Instrument loops are green, and Drummer
loops are yellow.
You can download sounds packs containing more Apple Loops in the Sound Library.
Open the Loop Browser
• Tap the Loop Browser button in the control bar. The Loop Browser button is available
only in Tracks view.
Find loops using keywords
• Search by instrument: Tap Instruments, then tap an instrument in the grid.
• Search by genre: Tap Genres, then choose a genre from the list.
• Search by descriptor: Tap Descriptors, then choose one or more descriptors from the
list. Descriptors are listed in contrasting pairs.
The results list shows loops that match your search criteria.
You can narrow search results by using instruments, genres, and descriptors together. The
results show only those loops that match all the selected keywords.

69GarageBand User Guide for iPad
Specify and access your favorite loops
1. To specify a loop as a favorite, tap the Favorite button for the loop in the list of
search results.
2. To access your favorite loops, tap the Favorites button near the upper-right of the
Loop Browser.
Search for loops by name
1. Tap the search field in the upper-right corner of the Loop Browser.
2. Type the name you want to search for, then tap Search on the keyboard.
Matching loops appear in the results list.
Find loops using filters
1. Tap Filter by, then do any of the following:
• Tap Sound Pack, then select one or more sound packs.
• Tap Type, then select Audio Loops, MIDI Loops, or Drummer Loops.
• Tap Scale, then tap a scale mode.
2. Tap Apple Loops in the upper-left corner to view the filtered results in the Loop Browser.
To return to the Loop Browser, tap Reset Filter.
Add a loop to the song
• Drag a loop from the results list to an empty part of the Tracks view screen. Align the left
edge of the loop with the bar or beat (on the ruler) where you want it to start playing.
The loop extends to the end of the current song section, or to the beginning of the next
region in the track.

70GarageBand User Guide for iPad
You can also drag:
• Audio loops to an Audio Recorder or Amp track
• Drummer loops to a Drummer track with the same drummer
• Touch Instrument loops to a track that uses the same Touch Instrument
The loop replaces any existing regions in the same part of the track.
Preview a loop
• Tap the loop in the results list.
Tap the loop again to stop the preview, or tap a different loop.
Reset the Loop Browser keywords
• Tap Reset Keywords.
Any keyword selections are cleared. You can now select a new keyword.
Import audio and MIDI files into GarageBand for
iPad
You can import audio and MIDI files from your computer and use them in your GarageBand
song. You can add:
• Audio files to an existing Audio Recorder or Amp track
• MIDI files to an existing Keyboard or Drums track
• Audio or MIDI files to new tracks
• Audio or MIDI files to your song from iCloud Drive or your iPad using the Files app
You can import AIFF, WAV, Apple Loops, AAC, and MP3 audio files. When you import an
audio file, it’s converted to a 44.1 kHz sample rate, 16-bit depth format if the original
format is different. With the exception of Apple Loops, imported audio files don’t follow
tempo changes you make in GarageBand.
When you import a multitrack MIDI file, GarageBand creates a new Keyboard track for each
track in the MIDI file. The total number of resulting tracks cannot exceed 32 tracks. You
cannot add multitrack MIDI files to cells in Live Loops.
Import audio and MIDI files from your Mac
1. Connect your iPad to your Mac using a USB or USB-C cable.
Your connected iPad appears in a Finder window sidebar under Locations.
2. On your Mac, select the icon for your iPad, then click Files.
GarageBand appears in the list of apps.
3. Drag the audio or MIDI files you want to import from another Finder window (or from
your Mac desktop) to GarageBand in the list.
4. In GarageBand on your iPad, set the length of the song section to Automatic to import
the entire audio or MIDI file; otherwise, only the portion of the file that fits the current
song section is imported.
After importing the audio or MIDI file, you can make the song section longer, then resize
the region so more of it plays.

71GarageBand User Guide for iPad
5. Tap the Tracks button to open Tracks view, then tap the Loop Browser button in
the control bar.
A message appears asking if you want to move the audio or MIDI files to the
GarageBand File Transfer folder.
6. Tap Move Files.
The files are moved to the GarageBand File Transfer folder and are now visible in the
Files tab of the Loop Browser.
7. To preview an audio file, tap it in the list. You can control the preview volume with the
slider at the bottom of the list.
8. Drag an audio or MIDI file from the list to Tracks view. Align the left edge of the file with
the bar or beat (on the ruler) where you want it to start playing.
A new region created from the audio or MIDI file is trimmed to the end of the current
song section, unless the current song section is set to Automatic. You can make the
song section longer or slow down the tempo, then resize the region so that more of
it plays.
Import audio and MIDI files with the Files app
1. Set the length of the song section to Automatic to import the entire audio or MIDI file;
otherwise, only the portion of the file that fits the current song section is imported.
After importing the file, you can make the song section longer, then resize the region so
that more of it plays.
2. Tap the Tracks button to open Tracks view, tap the Loop Browser button in the
control bar, then tap Files.
3. Tap “Browse items from the Files app,” then locate and tap an audio or MIDI file to
import it.
4. To preview an audio file, tap it in the list. You can control the preview volume with the
slider at the bottom of the list.
5. Drag an audio or MIDI file from the list to Tracks view. Align the left edge of the file with
the bar or beat (on the ruler) where you want it to start playing.
A new region created from the audio or MIDI file is trimmed to the end of the current
song section, unless the current song section is set to Automatic. You can make the
song section longer or slow down the tempo, then resize the region so that more of it
plays.
Import audio and MIDI files using Slide Over
1. Set the length of the song section to Automatic to import the entire audio or MIDI file;
otherwise, only the portion of the file that fits the current song section is imported.
After importing the file, you can make the song section longer, then resize the region so
that more of it plays.
2. Swipe up twice from the bottom edge of the screen.
The Dock appears.
3. In the Dock, touch and hold the Files app, drag it towards the upper-right corner of the
screen, then let go.
A Slide Over window opens.

72GarageBand User Guide for iPad
4. Locate the audio or MIDI file you want to import. If the file is in iCloud Drive, tap the
Download button to download it before importing.
5. Touch and hold the file, then drag it from the Slide Over window to Tracks view. Align
the left edge of the file with the bar or beat (on the ruler) where you want it to start
playing.
A new region created from the audio or MIDI file is trimmed to the end of the current
song section, unless the current song section is set to Automatic. You can make the
song section longer or slow down the tempo, then resize the region so that more of it
plays.
Import a song from the Music app into GarageBand
for iPad
You can import songs from the Music app on your iPad into Tracks view. You can import a
song to an existing Audio Recorder or Amp track, or have GarageBand create a new Audio
Recorder track for the song.
Songs imported from the Music app do not follow tempo changes you make in GarageBand.
Note:You can only import unprotected songs stored locally on your iPad.
Import a song from the Music app
1. To import the entire song, set the length of the song section to Automatic; otherwise,
only the portion of the song that fits the current song section is imported.
2. To get a list of tracks, tap the Tracks button .
3. Tap the Loop Browser button in the control bar, then tap Music.
4. You can search for songs by name, or browse by album, artist, genre, or playlist.
5. To preview a song, tap it in the list. You can control the preview volume with the slider
at the bottom of the list.
6. Drag a song from the list to Tracks view. Align the left edge of the song with the bar or
beat on the ruler where you want it to start playing.
After importing the song, you can make the song section longer, then resize the imported
region so that more of the song plays.

73GarageBand User Guide for iPad
Edit regions in GarageBand for iPad
Regions are the building blocks of a GarageBand song. When you record a Touch
Instrument, use the Drummer, or add Apple Loops to a song, a region appears in the
instrument’s track in Tracks view. There are three types of regions:
• Regions from Audio Recorder and Amp recordings and from imported audio files are
blue.
• Regions from other Touch Instruments are green.
• Regions from Drummer are yellow.
Blue regions show the audio waveform inside the region. For green regions, the sound is
generated in real time by GarageBand; notes appear as rectangles inside these regions.
Yellow regions show a simplified waveform representing the Drummer's performance.
If you change the tempo or key of a song, the green Touch Instrument regions, yellow
Drummer regions, and blue regions from Apple Loops all change to match the new tempo
or key. Blue regions from Audio Recorder and Amp recordings and from imported audio
files don’t change to match the tempo or key.
You can select regions and edit them in a variety of ways.
Select regions
• Select a single region: Tap the region in Tracks view.
• Select multiple regions: Do one of the following:
• Touch and hold a region. As you continue holding the region, tap other regions you
want to select.
• Touch and hold an empty area in the Tracks area, then drag around multiple regions
to select them.
• Select all regions in a track: Tap the track header.
• Select all regions in the current song section: Tap an empty area, then tap Select All.
When you tap a region, a frame appears around it. When selecting multiple regions, the
frame appears around the last selected region. If you do not see the frame, try zooming
until the left and right edges of the region are easily visible.
To edit a multiple selection after you have lifted your fingers, tap a region in the selection,
then tap unselected regions to add them to the selection, or tap selected regions to
remove them from the selection.

74GarageBand User Guide for iPad
Move a region
• Move a region forward or back in time: Drag the region left or right. Align the left edge
of the region with the bar or beat on the ruler where you want it to start playing.
• Move a region to another track with the same Touch Instrument: Drag the region up or
down. You can also drag regions between Keyboard and Sampler tracks, and between
Audio Recorder and Amp tracks. Smart Drums regions cannot be dragged to another
Smart Drums track.
If you move a region so that it overlaps another region, the overlapped part of the
“covered” region is deleted.
Trim a region
• Tap the region, then drag the left or right edge of the frame. To zoom in for more
precise editing, touch and hold either edge.
If the region is currently looped, tap it again, then tap Trim before dragging the left or
right edge.
If multiple regions are selected, all of the selected regions are trimmed by the same
amount.
You can shorten blue regions on either their left or right edge, but you cannot lengthen
them beyond their original length. You can shorten or lengthen green regions on
either edge.
Loop a region
1. Tap the region to select it.
2. Tap the region again, then tap Loop.
The region loops until the end of the song section, or until the beginning of the next
region in the same track. You can change how long it loops by dragging the right edge
of the region.
Split a region
1. Tap the region to select it.
2. Tap the region again, then tap Split.
3. Drag the Split marker (with the scissors icon) left or right to the point where you want to
split the region.
4. Drag the Split marker down.
To cancel the split, tap anywhere outside the region before dragging the Split marker
down.
5. To make multiple splits, move the Split marker to different parts of a region and drag it
down in each part.

75GarageBand User Guide for iPad
Join multiple regions
1. Make sure the regions are in the same track, with no other regions between them.
2. Touch and hold the first region, then tap the other region or regions while holding the
first one.
The regions change color to show they are selected, and a frame appears around the
last selected region.
3. Tap one of the selected regions, then tap Join.
Note:You cannot join blue regions. When you join yellow regions, the settings of the first
region are given to the resulting joined region.
Cut, copy, or delete a region
1. Tap the region to select it.
2. Tap the region again, then tap Cut, Copy, or Delete.
When you cut a region, the region is placed on the clipboard so you can paste it in a
different location.
Paste a region
You can paste a region you have copied, or paste an audio file from an app that supports
copying audio to the clipboard. GarageBand supports 44.1 kHz sample rate, 16-bit depth
uncompressed audio files.
You can paste copied regions to another track with the same Touch Instrument. You can
also paste regions between Keyboard and Sampler tracks, and between Audio Recorder
and Amp tracks. Smart Drums regions cannot be pasted to another Smart Drums track.
Audio files copied from another app can be pasted to Audio Recorder or Amp tracks.
1. Move the playhead to the point where you want the region to start.
2. Tap the header of the track where you want to paste the region to select the track.
3. Tap the track where you want to paste the region, then tap Paste.
You can also tap an empty area of Tracks view, then tap Paste. In this case the region is
pasted into the currently selected track.
Rename a region
1. Tap the region you want to rename to select it, then tap it again.
2. Tap Rename.
3. Type a new name for the region, then tap Done.
Turn off Snap to Grid
GarageBand includes a Snap to Grid feature that helps align regions in the Tracks area with
measures, beats, and beat divisions in the ruler. You can turn Snap to Grid off in order to
edit regions free of the grid–for example, to align a beat in an audio region with a precise
point in time not corresponding to any beat division.
If you are editing notes in a region, you can also turn off Snap to Grid to edit notes free of
the grid.

76GarageBand User Guide for iPad
1. Pinch to zoom in to the maximum level, then lift your fingers.
2. Pinch to zoom in again.
The text “Snap to Grid off” appears at the top of the Tracks area, indicating that Snap
to Grid is off.
To turn Snap to Grid back on, pinch to zoom out.
Undo and redo your edits
You can undo and redo edits to regions and other operations such as recording and
changing the sound.
• Undo: Tap the Undo button in the control bar.
• Redo: After undoing an edit, touch and hold the Undo button, than tap Redo.
Edit notes in regions in GarageBand for iPad
You can edit notes in green Touch Instrument regions. The editor is like a close-up version
of Tracks view, showing the notes in the region as rectangular bars. When you open the
editor, you can change the pitch, length (duration), and velocity of individual notes. For
some instruments, you can also change the articulation of notes, or the instrument that
plays the note. Notes in blue regions cannot be edited.
You can also turn off Snap to Grid to edit notes free of the grid. To learn how to turn off
Snap to Grid, see Edit regions.
Open the editor
Do one of the following:
• Double-tap a region, then tap Edit.
• Swipe up or down in a region with two fingers.
The editor opens. You can swipe left or right to move back or forward in the editor,
swipe up or down to view higher or lower notes, and pinch to zoom in or out.
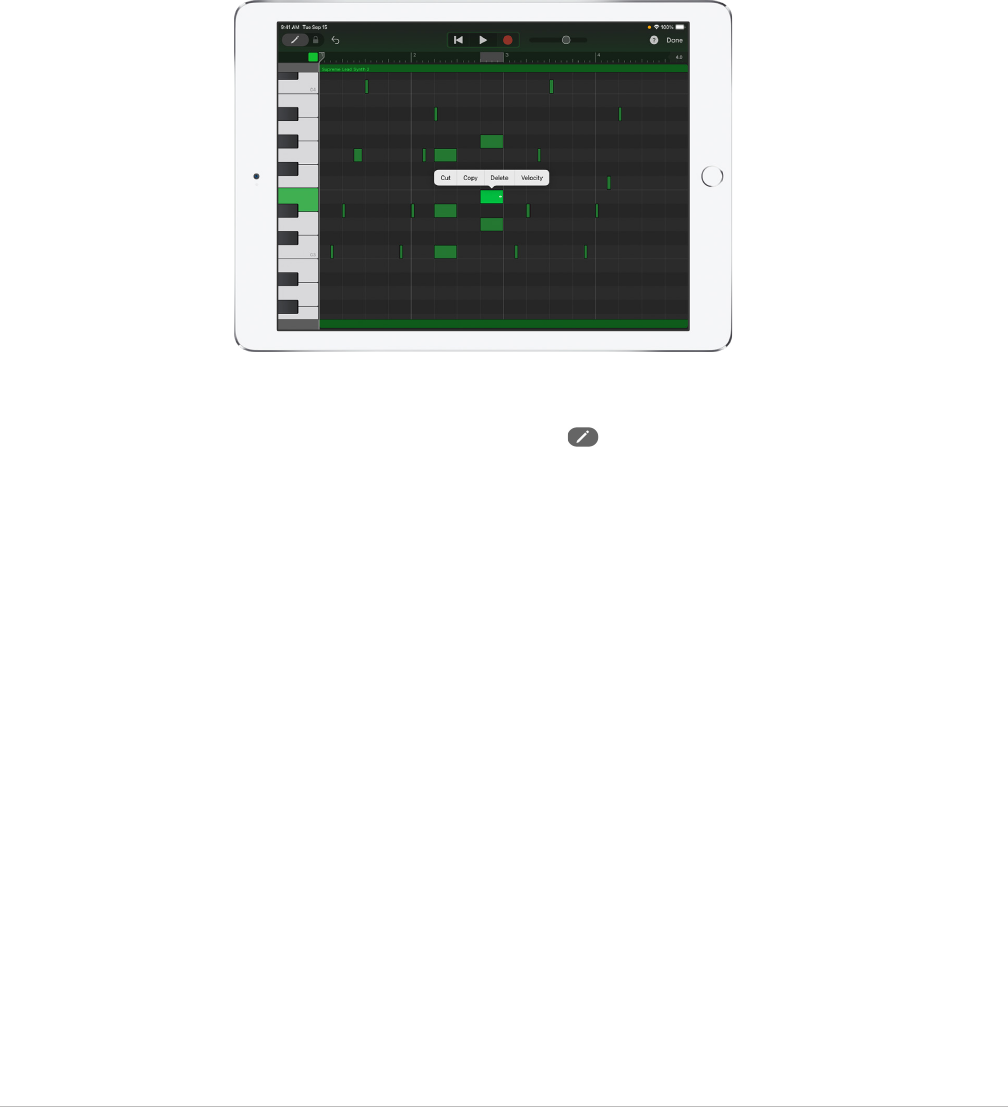
77GarageBand User Guide for iPad
Select notes in the editor
Do any of the following:
• Tap a single note to select it.
• Touch and hold a note, then tap other notes to select them.
• Touch and hold an empty part of the editor, then drag around multiple notes to select
them.
• Touch and hold a note bar on the left edge of the editor to select all notes of a certain
pitch.
Add notes
• Touch and hold the Add Notes button on the left side of the control bar, then tap in
the editor. You can also drag the Add Notes button right to lock it.
Move notes in time
• Select one or more notes, then drag the selected notes left or right.
Change the pitch of notes
• Select one or more notes, then drag the selected notes up or down.
For Drums tracks, moving notes up or down changes the drum sound for the notes.
Change the length of notes
• Select one or more notes, then drag the double-arrow handle of the last selected note.
Change the dynamics of notes
1. Select one or more notes, then tap the last selected note.
2. Tap Velocity.
3. Drag the slider left or right.

78GarageBand User Guide for iPad
Change the articulation of notes
1. Select one or more notes, then tap the last selected note.
2. Tap More, then tap Articulation.
Articulation is available only for the Strings Touch Instrument.
3. Tap the articulation you want the notes to use.
Change the instrument that plays selected notes
1. Select one or more notes, then tap the last selected note.
2. Tap More, then tap Instrument.
Instrument is available only for the Strings Touch Instrument.
3. Tap the instrument you want to play the notes.
Copy notes
1. Select one or more notes, then tap the last selected note.
2. Tap Copy.
3. Move the playhead to the point where you want to paste the notes.
4. Tap an empty area of Tracks view, then tap Paste.
Delete notes
1. Select one or more notes, then tap the last selected note.
2. Tap Delete.
When the Add Notes button is held down, or is locked on, you can delete notes simply
by tapping them.
Close the editor and return to Tracks view
• Tap Done in the upper-right corner of the control bar.
Change region settings in GarageBand for iPad
Each region in the Tracks area includes settings. Different region types may have some
different settings.
You can view and change the settings for a region in the Tracks area.
View and change region settings
1. Double-tap the region, then choose Settings from the Edit menu.
2. Change one or more of the region settings:
• Gain: Drag the Gain slider left or right to adjust the cell’s volume (blue regions only).
• Velocity: Drag the Velocity slider left or right to adjust the cell volume (green and
yellow regions only).
• Looping: Swipe the Looping switch right to turn on looping for the cell.
• Follow Tempo & Pitch: Tap to have the region follow the song tempo and key (blue
regions only).

79GarageBand User Guide for iPad
• Octaves: Tap the – and + buttons to raise or lower the pitch (green regions only).
• Semitones: Tap the – and + buttons to raise or lower the pitch (green regions only).
• Speed: Drag the Speed slider left to right to change the speed (tempo) of the cell.
• Reverse: Swipe the Reverse switch right to have the cell play in reverse.
• Reset All: To reset all cell settings, tap Reset All.
3. When you finish, tap Done.
Automate volume changes in GarageBand for iPad
You can automate volume changes over time using automation curves. When you show track
automation, each track’s automation curve shows the volume level over time. You can create
volume changes by adding automation points, and dragging them to different values.
Open the automation editor
• Tap a track header, then tap Automation.
The tracks expand vertically and a volume automation curve appears over each track.
Add automation points
• Touch and hold the Edit Automation button on the left side of the control bar, tap a
track automation curve, then drag vertically to adjust the value of the automation point.
You can also drag the Edit Automation button right to lock it.
Select automation points
• Tap an automation point to select it.
• To select multiple automation points, do one of the following:
• Touch and hold an automation point, then tap others to add them to the selection.
• Tap the automation curve between two automation points to select both of them.
• Touch and hold an empty part of the track, then drag around automation points to
select them.

80GarageBand User Guide for iPad
Move automation points
• Drag one or more automation points left or right.
Cut and paste automation points
You can cut and paste automation points to a different position on the same track, or to
another track.
1. Select one or more automation points, tap one of them, then tap Cut.
2. Position the playhead at the point where you want to paste the first cut automation
point.
3. Tap the track where you want to paste the cut automation points, then tap Paste.
Copy and paste automation points
You can copy and paste automation points to a different position on the same track, or to
another track.
1. Select one or more automation points, tap one of them, then tap Copy.
2. Position the playhead at the point where you want to paste the first copied automation
point.
3. Tap the track where you want to paste the copied automation points, then tap Paste.
Delete automation points
• Touch and hold the Edit Automation button (or lock it), then tap an automation point to
delete it.
To delete multiple automation points, select the automation points, tap one of them,
then tap Delete.
Turn off automation for a track
You can turn off (or bypass) automation for a track so that the track sounds without the
automation.
• Tap the Bypass button in the lower-right corner of the track header. Tap the Bypass
button again to turn on automation for the track again.
If the Bypass button is yellow, automation is on. If the Bypass button is white,
automation is turned off. While automation for a track is turned off, you cannot edit
automation points.
Close the automation editor
• Tap Done in the upper-right corner of the control bar.
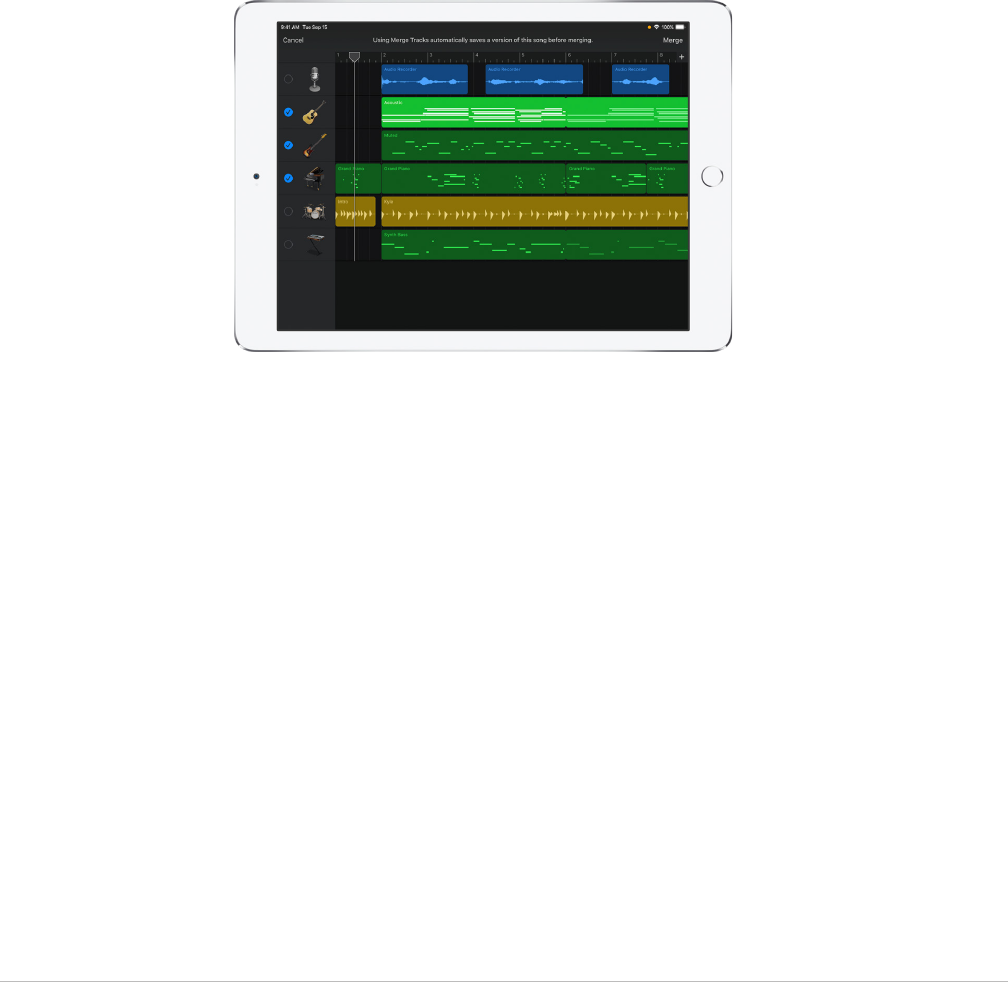
81GarageBand User Guide for iPad
Merge tracks in GarageBand for iPad
You can merge (or bounce) any number of unmuted tracks in a song. This can be useful
if you reach the maximum number of tracks for a song, but want to add more Touch
Instruments.
When you merge tracks, the tracks are replaced with a single track containing a stereo
audio file in a new copy of the song. The original song is available in the My Songs browser,
so you can edit the original tracks.
Merge tracks
1. Tap a track header to select it, tap the track header again, then tap Merge.
2. In the track header area, tap the circles for the additional tracks you want to merge.
3. Tap Merge in the upper-right corner.
A new copy of the song is created, with the merged tracks replaced by a single Audio
Recorder track. The original song remains available in the My Songs browser.
You can also merge one or more tracks with the FX track. Any effects recorded to the FX
track are added to the new Audio Recorder track, and the FX track is turned off (so the
effects are audible only on the new track). For information about using the FX track, see
Remix a song.

82GarageBand User Guide for iPad
Add song sections in GarageBand for iPad
Many songs are organized in sections such as intro, verse, and chorus. Each section is
usually eight bars long, or a multiple of eight. When you create a GarageBand song, it
contains one repeating section. You can add more sections, set the length of a section, and
play back a single section or all sections.
When you tap the Song Section button, Tracks view changes to show all existing sections
in the song, and the ruler shows the letter of each section at the beginning of that section.
Open the song section controls
• Tap the Song Section button on the right edge of the ruler.
Add a song section
1. Open the song section controls, then tap Add.
The new, empty section is added after the last section.
2. Tap anywhere in Tracks view to close the song section controls.
Add a copy of a section
1. Open the song section controls, choose the section you want to copy, then tap
Duplicate.
The copy is added after the last section.
2. Tap anywhere in Tracks view to close the song section controls.
Set a section to automatically fit the length of your recording
When you record a Touch Instrument, the section length determines how long the
recording is. However, you can set the section to automatically fit the length of your
recording. This is useful when you record something of an undetermined length (such as
an improvised performance or spoken word), or when you import audio or MIDI files into
your song.
1. Open the song section controls.
2. Tap the Inspector button next to the section name. If you have more than one
section, tap the Inspector button next to the last section.
3. Tap the Automatic switch to turn it on.
4. Tap anywhere in Tracks view to close the song section controls.
Change the length of a section
1. Open the song section controls.
2. Tap the Inspector button next to the section name.
3. If the section is set to Automatic, tap the Automatic switch to turn it off.

83GarageBand User Guide for iPad
4. Tap the up or down arrow next to Manual to lengthen or shorten the section
incrementally by bars. You can swipe vertically to change it in larger increments.
5. Tap anywhere in Tracks view to close the song section controls.
When you shorten a section, any regions extending past the end of the section are
shortened. When you lengthen a section, all regions that extend from the beginning to the
end of the section now loop to the new end of the section. A section can be any number of
bars, and the overall song can be up to 2000 bars long.
Play a different section
1. Open the song section controls, then choose the section you want to play. To play all
sections in the song, choose All Sections.
Tracks view changes to show the section, and the ruler shows the bar numbers for the
section.
In Tracks view, you can also switch between adjacent song sections by swiping left or
right until the next section is visible.
If you set different quantization or transposition values for a track in different sections,
the quantization or transposition value for that track appears as Multiple when you
choose All Sections.
2. Tap anywhere in Tracks view to close the song section controls.
3. To play the current section or sections, tap the Play button in the control bar.
Change the order of sections
1. Open the song section controls, then tap Edit.
2. Drag a section up or down in the list by the handle on its right edge.
3. When you finish, tap Done.
4. Tap anywhere in Tracks view to close the song section controls.
Extend a region across multiple sections
1. Open the song section controls, then tap All Sections.
2. Tap anywhere in Tracks view to close the song section controls.
3. Move, resize, or loop the region to extend across multiple sections. You can also record
a new region across multiple sections.

84GarageBand User Guide for iPad
Delete a section
1. Open the song section controls, then tap Edit.
2. Tap the red circle to the left of the section you want to delete.
If the song has only one section, the section cannot be deleted.
3. Tap anywhere in Tracks view to close the song section controls.
Set the first section of new songs to match the length of your recording
By default, the first section of a new song is 8 bars long. You can set the length of the first
section of new songs to Automatic, in which case it matches the length of your recording.
1. On the Home screen, tap Settings.
2. In the Settings app, scroll down, then tap GarageBand.
3. Tap the Automatic Recording Length switch.

85GarageBand User Guide for iPad
Use Live Loops
GarageBand for iPad Live Loops overview
Live Loops is designed to make it easy to create music like a DJ or electronic music
producer. With Live Loops, you can play, edit, and arrange musical ideas in real time. Each
musical phrase or loop exists in a cell in the Live Loops grid. Working in the grid, you can
start and stop playback of cells freely, while keeping everything in sync.
When you tap Live Loops in the Sound browser, the Template browser appears in place
of the Sound browser. You can choose a Live Loops template which includes a set of
instruments and prerecorded cells, or choose an empty grid. You can record your own
ideas, and add loops or audio files to the grid. You can also add regions from Tracks view
to the grid, use Remix FX, and record a Live Loops performance to Tracks view.
Choose a Live Loops template
1. In the Sound browser, tap Live Loops.
2. In the Template browser, swipe left or right to view additional templates.
3. Tap a template.
Switch to a different template
1. In the Live Loops grid, tap the Browser button .
2. In the Template browser, tap a different template.

86GarageBand User Guide for iPad
Work in the Live Loops grid in GarageBand for iPad
The Live Loops grid is where you record, play, and edit your musical ideas. The grid
consists of cells, which can be empty or filled. Cells can contain Touch Instrument
recordings, loops, or audio files. You can start and stop individual cells freely, or start
multiple selected cells in sync.
In the grid, cells are arranged in rows and columns. Each row uses the same Touch
Instrument, similar to a track in Tracks view, and only one cell in a row can play at a time.
Cells in a column can have different lengths (durations). You can play back cells in a
column individually, or start playback for all cells in the column simultaneously, using the
trigger at the bottom of the column.
Playing cells and other actions in the grid follow the current Time Snap setting. Time Snap
ensures that your changes start at musically meaningful points in time (beats or bars), so
they are in sync with other cells. You can set the Time Snap value and change it while you
are working in the grid.
Set the Time Snap value for the grid
• Tap the Time Snap value located in the upper-right corner of the grid, then choose a
Time Snap value from the pop-up menu. You can tap the Time Snap value and swipe to
choose a value in one motion.
Turn off Time Snap
• Choose Off as the Time Snap value.
Zoom the grid in or out
Do one of the following:
• Pinch the row headers.
• Pinch the column triggers.
When cell editing is turned on, you can pinch directly on the grid to zoom in or out.
Scroll the grid
• Show any hidden tracks: Swipe the row headers vertically.
• Show a different part of the grid: Swipe the column triggers horizontally.
When cell editing is turned on, you can touch and hold a cell, then swipe horizontally or
vertically to show a different part of the grid.

87GarageBand User Guide for iPad
Play Live Loops cells in GarageBand for iPad
You can start and stop playback of cells in the grid individually, start cells in a column
simultaneously, and start playback of selected cells simultaneously regardless of their
position in the grid.
Select cells
• Tap a cell to select it.
When cell editing is turned on, you can select multiple cells for editing. You can select and
edit multiple cells in the same row, but only one cell in a row can play at a time.
Play cells
• Start or stop playback: Tap a cell.
• Start playback of all selected cells: Tap a selected cell.
• Start all the cells in the column: Tap the trigger below a column.
Stop playback
• Stop playback of a cell: Tap a playing cell or tap an empty cell in the same row as the
one playing.
• Stop playback of all selected cells: Tap a selected cell to stop playback of all selected
cells.
• Stop playback of all cells in the grid: Tap the trigger below an empty column.
Edit cells in GarageBand for iPad
You can edit cells in the Live Loops grid in a variety of ways. You can cut, copy, and paste
cells, move cells, delete cells, and change cell settings. When you turn on cell editing, you
cannot start or stop playback of cells (but you can edit cells that are already playing).
You can also copy regions in Tracks view and paste them in the grid, in a row using the
same instrument as the track they were copied from.

88GarageBand User Guide for iPad
Turn on cell editing
• Tap the Edit Cells button in the lower-left corner of the Live Loops grid.
To turn off cell editing, tap the Edit Cells button again.
Cut a cell
• Double-tap the cell, then choose Cut from the Edit menu.
Copy a cell
• Double-tap the cell, then choose Copy from the Edit menu.
Paste a cell
• Double-tap a cell, then choose Paste from the Edit menu.
You can paste a cell in another row using the same Touch Instrument as the row it was
copied from. You can also paste a cell from a row using the Audio Recorder or Amp to
another row using either of these instruments, and paste a cell from a row using the
Keyboard or Sampler to another row using either of these instruments. The cell takes the
sound of the Touch Instrument in the row you you paste it to.
Move a cell
• Touch and hold a cell, then drag it to an empty cell in the grid.
If you drag it to a cell that is not empty, the contents of the starting cell and the
destination cell are swapped.
You can move a cell to another row using the same Touch Instrument as the row it was
moved from. You can also move a cell from a row using the Audio Recorder or Amp to
another row using either of these instruments, and move a cell from a row using the
Keyboard or Sampler to another row using either of these instruments. The cell takes the
sound of the Touch Instrument in the row you you move it to.
Delete a cell
• Double-tap the cell, then choose Delete from the Edit menu.
Edit cell contents
• Double-tap the cell, then choose Edit from the Edit menu.
You can edit the cell contents, similar to editing regions. For green cells, you can also edit
notes in the cell, similar to editing notes in a region.
Change cell settings
1. Double-tap the cell, then choose Settings from the Edit menu.
2. Change one or more of the cell settings:
• Gain: Drag the Gain slider left or right to adjust the cell’s volume (blue and yellow
cells only).
• Velocity: Drag the Velocity slider left or right to adjust the cell volume (green cells
only).
• Time Snap: Choose the Time Snap value for the cell.
• Play Mode: Choose the play mode for the cell.

89GarageBand User Guide for iPad
• Looping: Tap the Looping switch to turn on looping for the cell.
• Follow Tempo & Pitch: Tap to have the cell follow the song tempo and key (blue cells
only).
• Octaves: Tap the – and + buttons to raise or lower the pitch (green cells only).
• Semitones: Tap the – and + buttons to raise or lower the pitch.
• Speed: Drag the Speed slider left to right to change the speed (tempo) of the cell.
• Reverse: Tap the Reverse switch to have the cell play in reverse.
• Reset All: To reset all cell settings, tap Reset All.
3. When you finish, tap Done.
While the Cell Settings menu is visible, you can tap the selected cell to start or stop
playback, in order to hear your changes. You can also tap other cells and edit their
settings.
Edit a column trigger
• Tap a column trigger , then tap one of the editing commands.
Show a row in the Tracks view
• In the Live Loops grid, double-tap a row header, then tap Show in Tracks view.
Show a track in the Live Loops grid
• In Tracks view, double-tap a track header, then tap Show in Grid.
Play a Touch Instrument in Live Loops in
GarageBand for iPad
You can choose the Touch Instrument for an empty row in the grid. Any cells you record
use the Touch Instrument for that row. If you choose an Audio Recorder or Amp Touch
Instrument, you can also add loops to empty cells in the grid.
If you choose Drummer as the Touch Instrument for an empty row, a yellow Drummer
region is added to the first cell in the row, using the current Drummer settings.
Choose a Touch Instrument for an empty grid row
1. To create a new, empty row at the bottom of the grid, tap the Add Row button below
the track headers.
2. Tap a cell in an empty row, then tap Instruments.
The Sound browser opens.
3. Tap the Touch Instrument you want to use.
4. To return to the Live Loops grid, tap the Live Loops button in the control bar.

90GarageBand User Guide for iPad
Record to a cell in GarageBand for iPad
You can record to a cell, using the Touch Instrument for the row in which the cell is located.
When you record to a cell, other cells playing when recording starts continue playing, but
any tracks playing in Tracks view stop playing. The ruler shows the units of time for the
cell, not for a song section.
If the cell is already filled, the new recording replaces the existing one. For the Keyboard,
Drums, Sampler, Guitar, and Bass, you can merge new recordings with existing ones by
turning on Merge Recordings in the track controls.
Note:You can’t record to a Drummer cell.
Record to a cell in the grid
1. Do one of the following:
• Tap the cell, then tap Record from the shortcut menu.
• Double-tap the cell.
The Touch Instrument for the cell’s row opens. If the cell is in an empty row, the last-
used Touch Instrument opens, and becomes the Touch Instrument for the cell’s row. If
no cell has been used, double-tapping shows the Edit menu.
2. To start recording, tap the Record button in the control bar.
3. Play the Touch Instrument.
The notes you play, and any changes to knobs, sliders, and other controls, are recorded.
4. To finish recording, tap the Record button again.
5. Tap the Live Loops button to return to the Live Loops grid.
Use Apple Loops and audio files with Live Loops in
GarageBand for iPad
In addition to recording, you can add Apple Loops and audio files to cells in an Audio
Recorder or Amp row of the grid, or to an empty row. If your song has an empty grid, and
has regions in Tracks view, you can import all of the regions from Tracks view to the Live
Loops grid.
Add an Apple Loop to a cell in an Audio Recorder or Amp row
1. Tap an empty cell, then tap Loops.
The Loop Browser opens.
2. Do one of the following:
• Tap Download button for the loop you want to add.
• Drag a loop from the Loop Browser to the empty cell.
If the loop features a different instrument that the one originally used by the row, the icon
for the row changes to a speaker icon.

91GarageBand User Guide for iPad
Add an Apple Loop to a new, empty row
1. Tap the Add Row button below the track headers, then tap Loops.
The Loop Browser opens.
2. Do one of the following:
• Tap the Download button for the loop you want to add.
• Drag a loop from the Loop Browser to the empty cell.
Add an audio file to a cell in an Audio Recorder or Amp row
1. Tap an empty cell, then tap Loops.
The Loop Browser opens.
2. In the Loop Browser, tap Audio Files.
3. Select the audio file you want to add.
4. Do one of the following:
• Tap Download button for the audio file you want to add.
• Drag an audio file from the Loop Browser to the empty cell.
Add playing cells to a column in GarageBand for
iPad
When cells from different columns are playing, you can add the playing cells to a single
column. If you add playing cells to an empty column, the cells in the corresponding rows
are added to the column. If you add playing cells to a column that already contains cells,
the playing cells replace any existing cells in the corresponding rows.
Add playing cells to a single column
1. Tap the Edit Cells button in the lower-left corner of the Live Loops grid.
2. Tap the column trigger for the column you want to add the playing cells to.
3. Tap Merge Playing Cells.
Record a Live Loops performance in GarageBand
for iPad
You can record a Live Loops performance to Tracks view. When you start recording, any
cells currently playing are recorded to the corresponding track in Tracks view, from the
beginning of the current song section. If you start cells playing while recording, they are
recorded from the beat (time position) when they start playing. Any changes you perform
to cell settings, such as adjusting the speed, pitch, or direction of cells, are also recorded.
Record a performance to Tracks view
1. Tap the Record button in the control bar.
2. Start the performance by tapping cells or triggers to start playback. Cell playback is
recorded to the track in Tracks view that corresponds to the row of the cell.
3. To stop recording, tap the Stop button in the control bar.
4. To view and play your performance, tap the Tracks button in the control bar.
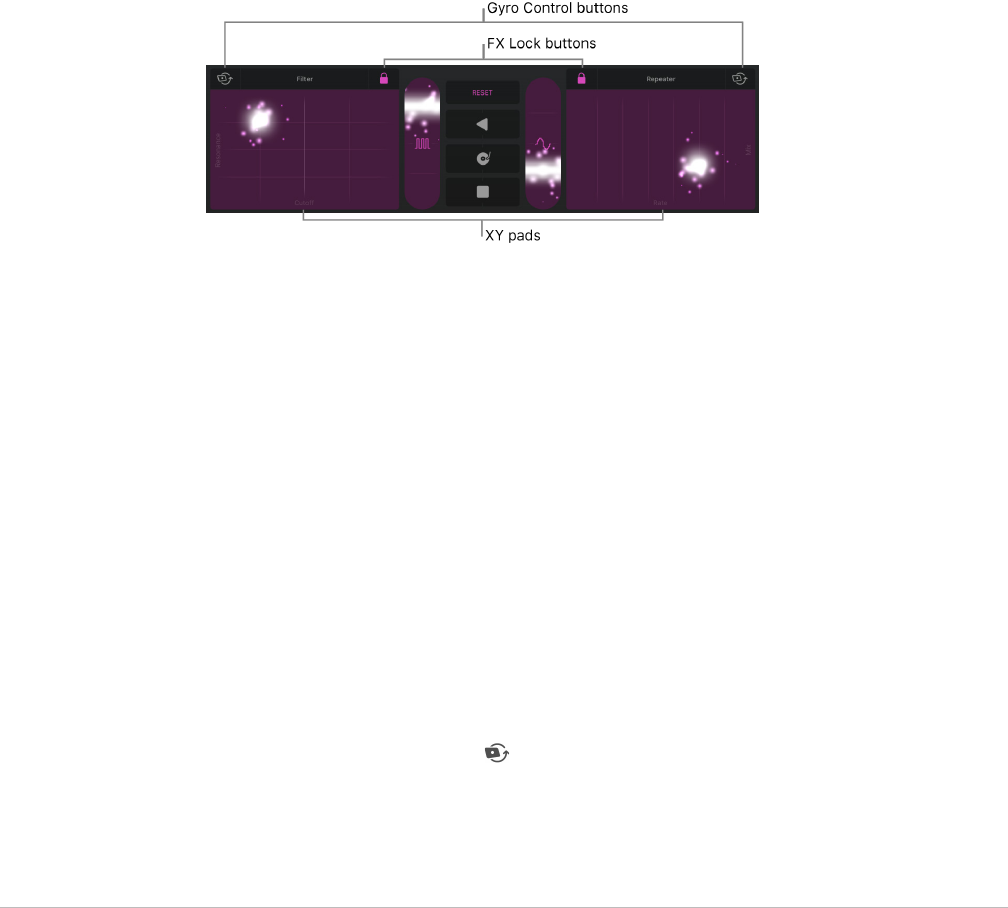
92GarageBand User Guide for iPad
Remix a song
Remix a song with GarageBand for iPad
You can remix a GarageBand song in real time, in either the Tracks area or the Live Loops
grid. Using the Remix FX, you can scratch mix the song like a DJ using a turntable, play the
song in reverse, stop or downsample the song, and use a variety of remix effects.
Remix FX includes a set of buttons and XY pads which you can use to control various
effects. The three central buttons are: Reverse, Scratch, and Tape Stop. The two vertical
sliders are: Gater and Downsampler. The selectable effects for the XY pads include Filter,
Wobble, Orbit, Repeater, Reverb, and Delay effects.
You can also control the XY pads with the motion sensors on your iPad using Gyro Control,
and lock an effect using FX Lock, so it continues to sound after you lift your finger.
After you record a remix, you can edit the Remix FX region like other regions in Tracks view.
If you cut or shorten the FX Remix region made with a locked effect, that effect shuts off
at the end of the region, and starts again at the start of the next region when you play the
remix.
Open the Remix FX controls
• In the control bar, tap the FX button.
To close the Remix FX, tap the FX button again.
Turn on Gyro Control
• Tap the Gyro Control button above the XY pad.

93GarageBand User Guide for iPad
Lock an effect
• Tap the FX Lock button above one of the XY pads.
To unlock the effect, tap the Reset button, or double-tap the FX button.
Record a remix
1. For each XY pad, tap the effect to use for that pad.
2. Tap the Record button.
3. As the song plays, use the Remix FX buttons, XY pads, and other controls.
A purple region with your changes appears in the FX track at the bottom of the Tracks
area.
4. When you finish, tap the Play button to stop recording.
Bypass Remix FX when you play a song
1. In Tracks view, drag a track header right to show the track controls.
2. In the FX track, tap the On/Off button to bypass the Remix FX.
To hear the Remix FX again, tap the On/Off button again.
You can also merge one or more tracks with the FX track. Any effects recorded to the FX
track are added to the new Audio Recorder track, and the FX track is turned off (so the
effects are audible only on the new track).

94GarageBand User Guide for iPad
Download additional sounds and loops
Download additional sounds and loops for
GarageBand on iPad
After you install GarageBand, three types of additional content (collectively called content
packs) are available to download in the Sound Library: sound packs, Producer packs, and
Remix sessions. Sound packs contain sounds, loops, and other kinds of content you can
use to build songs. Producer packs contain content similar to sound packs, created by well
known producers and artists. Remix sessions contain Live Loops grids with original tracks
from popular songs. Producer packs and Remix sessions are available for download in the
Producers and Artists section of the Sound Library.
Each content pack in the Sound Library has an icon and a name, and shows a brief
description and preview button when you tap it. The descriptions for Producer packs and
Remix sessions also contain a short video.
Notifications on your iPad and numbered badges in GarageBand indicate that new or
updated content packs are available in the Sound Library.

95GarageBand User Guide for iPad
Sound packs
Sound packs can contain different types of content, including the following:
• Apple Loops
• Sounds for the Keyboard and Alchemy synth
• Drum kits for Drums and Beat Sequencer
• Live Loops grids
• Drummers
• New Touch Instruments
• Guitar and Bass effects
Some sound packs may also be required in order to perform certain tasks, such as opening
a GarageBand song created on another device. If so, a message appears asking if you want
to download the required sound pack.
Producer packs and Remix sessions
The Producers and Artists section of the Sound Library contains Producer packs and Remix
sessions.
• Producer packs are sound packs created by well known producers and artists. You can
use the sounds from Producer packs in your songs to create, arrange, and mix your own
music.
• Remix Sessions contain original tracks from popular songs arranged in a Live Loops
grid that you can rearrange and remix to create your own version. Remix sessions are
created by the artist, together with Today At Apple and Apple Music. Remix sessions
downloads are available for a limited time.
Note:Remix sessions are provided to GarageBand users for personal and non-
commercial purposes only and may not be used or distributed outside of the
GarageBand app without the explicit prior written consent of the copyright holders.
Producer packs and Remix sessions include a short video in their description that contains
information or guidance from the producer or artist.

96GarageBand User Guide for iPad
Open the Sound Library
Do one of the following:
• Tap the Browser button , swipe left or right, then tap Sound Library.
• Tap a numbered badge in the Sound browser, Template browser, Loop Browser, or
anywhere you can choose instrument sounds.
Download Sound Library content
1. In the Sound Library, tap the content pack you want to download.
Swipe horizontally or tap See All to view more content packs for each section.
Sound packs and Producer packs that are required in order to open an existing song
have a badge with an exclamation point.
2. Do any of the following:
• Tap the Preview button to hear a sample.
• Tap the Play button in the upper-left corner of Producer packs and Remix sessions
to watch a video.
• In Producer packs and Remix sessions, tap the Apple Music or the Apple TV+
buttons for any additional content by the artist or producer.
• Tap Get to download.
Downloaded Remix sessions are saved to your iPad in the My Songs browser.
Delete a sound pack or Producer pack
1. In the Sound Library, tap the sound pack or Producer pack you want to delete, then tap
Delete.
2. Tap Delete to confirm the deletion.

97GarageBand User Guide for iPad
Delete a Remix session
You can delete Remix sessions as you would any GarageBand song in the Files app or the
My Songs browser.
• In the Files app or the My Songs browser, navigate to the Remix session you want to
delete and do either of the following:
• Tap Select, tap the Remix session, then tap Delete.
• Touch and hold the Remix session to open the option menu, then Tap Delete.
Manage Sound Library content
You can manage content packs to free up storage space on your iPad. The total amount of
space used for all installed Sound Library content is shown at the top of the list. The size
of each pack is shown in the list.
1. Open the Sound Library and tap Manage Packs in the upper-left corner.
2. Do either of the following:
• Delete a content pack: Tap Edit at the upper-right, tap the Delete button next to
the content pack you want to delete, then tap Delete. Alternatively, you can swipe
left on the content pack, then tap Delete.
• Download a content pack: Tap Get next to the content pack you want to download.
Manage notifications
You can change the settings for notifications you receive when new Sound Library content
is available. You can turn notifications on or off, choose how and where you want the
notifications to appear, choose how you want the notifications grouped, and more.
1. Close GarageBand, then open the Settings app.
2. Tap Notifications, scroll down, then tap GarageBand under Notification Style.
3. Change the various settings for GarageBand notifications.

98GarageBand User Guide for iPad
Jam with other GarageBand users
Jam with other users in GarageBand for iPad
You can make music with other GarageBand users sharing a Wi-Fi connection. The
bandleader creates a jam session, then up to three band members can join the jam session.
Playback and recording are synchronized between all devices, so everyone can play
and record together as a band. The leader can keep exclusive control of playback and
recording, or allow all members to share control.
When members join a jam session, the song settings on their devices are matched to the
current jam session song settings. Jam session song settings include the tempo, key, and
time signature; the number and length of song sections; any master effects used; any
custom chords; a fade-out; or a count-in. Only the leader can change the jam session song
settings.
After members record tracks to add to the jam session, the leader collects all unmuted
tracks from the members' devices. Playback and recording stop while the recordings are
collected.
If any device cannot start playback because it is optimizing performance, all other devices
remain stopped until the optimizing device is ready. If anyone in the band opens the Sound
browser during playback or recording, the song stops playing but the jam session is still
active.
Jam Sessions work with Touch Instruments and Tracks view, but not with the Live
Loops grid.
Open the Jam Session controls
1. Tap the Settings button in the control bar.
2. Tap Jam Session.
Create a jam session
• In the Jam Session controls, tap Create Session.

99GarageBand User Guide for iPad
Share control of playback and recording
By default, the bandleader controls playback and recording for the jam session. When
Bandleader Control is on, the transport controls appear dimmed on members’ devices.
• Turn the Bandleader Control switch off.
When the leader turns off Bandleader Control, band members can share control of
playback. When a band member taps Record, recording starts on their device, and
playback starts on all other devices. While the song is playing, band members can tap
Record to “punch in” or tap Play to “punch out” on their device.
Join a jam session
When the Jam Session controls are visible on the leader’s device, other nearby devices can
join the jam session by using Wi-Fi.
• In the Jam Session controls, under Join Session, tap the session you want to join.
The leader sends the jam session song settings to the open song on the member’s
device. If the member’s song has a different time signature, a different number of song
sections, or song sections with a different length than the leader’s, a new, empty song
is created.
Collect band member recordings
The bandleader can collect recordings from all the band members, either automatically
or manually. When the leader collects recordings, the unmuted tracks (including soloed
tracks) from each member’s song are added to the leader’s song. While the leader collects
recordings, playback and recording stop, and all GarageBand controls are paused.
By default, recordings are collected automatically after each recording when Bandleader
Control is on. The Auto-Collect Recordings setting is available only when Bandleader
Control is on. The leader can also turn off auto-collection and collect recordings manually.
1. Open the Jam Session controls.
2. Do one of the following:
• Turn off Auto-Collect Recordings.
• Turn off Bandleader Control.
3. Tap Collect Recordings.
If the number of tracks exceeds the maximum number (eight), the leader can delete tracks,
or ask members to mute or delete tracks, then collect recordings again.
The collected tracks are muted in the leader’s song. If the leader starts a new recording
or manually collects tracks again, all collected tracks are deleted and replaced by new
collected tracks. However, if the leader unmutes or edits a collected track, it is not
deleted. If the leader copies a collected track, the copy is not deleted. If the leader turns
Auto-Collect Recordings on or off after collecting recordings, the collected tracks are not
deleted the next time recording starts.
After collecting recordings, the leader can make changes to the song, and then email the
finished song to the members as an audio file.

100GarageBand User Guide for iPad
Leave a jam session
A band member can leave the jam session at any time.
• In the Jam Session controls, tap Leave Session.
If members leave a jam session, either by tapping Leave Session, opening the My Songs
browser, or because of a network problem, they can rejoin the session by following the
same steps they used to join the session originally. When a member leaves a session,
everyone in the session receives a message that the member has left. Other members can
keep jamming.
Stop a jam session
The leader can stop a jam session at any time. All members receive a message that the
session has stopped.
• In the Jam Session controls, tap Stop Session.
If the leader opens the My Songs browser during a jam session, the session stops.

101GarageBand User Guide for iPad
Use other music apps with GarageBand
Use other music apps with GarageBand for iPad
If you have Audio Unit Extensions or Inter-App Audio apps installed on your iPad, you can
use them with GarageBand as instruments or effects.
You can buy Audio Unit Extensions or Inter-App Audio apps on the App Store or from third-
party vendors.
Add an Audio Unit instrument
You can add Audio Unit instruments to your song and then play and record them as Touch
Instruments, similar to the Keyboard. You can save, rename, and delete custom sounds for
an Audio Unit instrument in the same way you do with sounds for a Touch Instrument.
1. In the Sound browser, swipe left or right until you see External, then tap Audio Unit
Extensions.
2. Tap the instrument you want to add.
3. Tap Presets to load, save, and edit sounds.
If the Audio Unit instrument has its own preset sounds, the name of the sound appears
instead of Preset.
Some Audio Unit instruments have their own custom view. If so, the custom view appears
when you open the instrument. You can switch between the custom view and the standard
view by tapping the Controls View button . If your iPad supports facial recognition, you
can control the mod wheel of an Audio Unit instrument with Face Control.

102GarageBand User Guide for iPad
Add an Audio Unit effect
You can use Audio Unit effects to change the sound of instruments, similar to plug-ins in
the track controls.
1. Tap the Track Controls button in the control bar, tap Plug-ins & EQ, then tap Edit.
2. Tap the Add Plug-in button on one of the empty plug-in slots or tap the name of the
plug-in you want to replace.
3. Tap Audio Unit Extensions.
4. Tap an Audio Unit effect in the list.
The Audio Unit effect is added to the list of plug-ins.
5. Tap the Audio Unit effect in the list to view its settings.
6. Tap Presets at the lower-left of the plug-in window to save, rename, and delete your
own custom presets.
If the Audio Unit effect has its own presets, its name appears instead of Preset.
Add an Inter-App Audio instrument
You can record the sound output of an Inter-App Audio instrument to an Audio Recorder,
Amp, or Sampler track in your song.
Do one of the following:
• In the Sound browser, tap External, tap Inter-App Audio, tap Instrument, then tap an
app.
• In an Audio Recorder, Amp, or Sampler Touch Instrument, tap the InputSettings
button , tap Inter-App Audio, then choose an app from the Instrument submenu.

103GarageBand User Guide for iPad
Add an Inter-App Audio effect
You can use an Inter-App Audio effect to modify the sound of an Audio Recorder, Amp, or
Sampler Touch Instrument when you record it in GarageBand.
Do one of the following:
• In the Sound browser, tap External, tap Inter-App Audio, tap Effect, then tap an app.
• In an Audio Recorder, Amp, or Sampler Touch Instrument, tap the InputSettingsbutton
, tap Inter-App Audio, then choose an app from the Effect submenu.
Record a performance with an Inter-App Audio instrument
Some Inter-App Audio instrument apps provide support for controlling GarageBand. If the
app supports such controls, you can play your GarageBand song, and record to it, from
within the instrument app.
For instrument apps that do not provide support for controlling GarageBand, start
recording in GarageBand, then switch to the instrument app to play your performance.
Before you start recording, you may want to set the song section length to Automatic, so
the recording is not cut off before you finish the performance.
1. In GarageBand, tap the Record button to start recording.
2. Open the Inter-App Audio instrument app from the app switcher.
3. In the Inter-App Audio instrument app, play your performance.
4. When you finish playing, open GarageBand again from the app switcher.
5. In GarageBand, tap the Stop button to stop recording.
You can record from other music apps to GarageBand using the Audiobus app if it is
installed on your iPad.

104GarageBand User Guide for iPad
Use iCloud with GarageBand
Use iCloud with GarageBand for iPad
You can upload your GarageBand songs to iCloud Drive and access them from another app
or other devices. You can open your songs directly from iCloud Drive in the sidebar in the
My Songs browser, or download them to your iPad.
When you close a song or close GarageBand, the song is updated with your latest changes
in iCloud. If changes made on multiple devices are out of sync, a copy of the song with the
newest changes is saved to the same location as the original in iCloud Drive.
Before you can use iCloud Drive with GarageBand, you must set up iCloud in the Settings
app on your iPad. More information is available online at the iCloud Support website.
Turn on iCloud for GarageBand
You turn on iCloud for GarageBand in the Settings app on your iPad.
1. Close GarageBand.
2. On the Home screen, tap Settings, then tap your name at the top of Settings.
3. Tap iCloud, then tap the switch next to GarageBand in the list of iCloud apps.
You might have to scroll down to see the GarageBand icon.
Upload a song to iCloud Drive
1. In the My Songs browser, tap Select, tap the song you want to upload, then tap Move in
the quick actions menu.
2. Locate where you want to save your song on iCloud Drive, then tap Copy.
Copy a song in iCloud Drive to your iPad
1. In the My Songs browser, tap iCloud Drive in the sidebar and locate the song you want
to copy.
2. Tap Select, tap the song you want to upload, then tap Move in the quick actions menu.
3. Locate where you want to save your song on your iPad and tap Copy.

105GarageBand User Guide for iPad
Open a song in iCloud Drive
Songs available to download from iCloud Drive appear with an iCloud download badge .
• In the My Songs browser, tap iCloud Drive in the sidebar, then locate and tap the
GarageBand song you want to open.
The song is downloaded. If there is a newer version in iCloud, the newer version is
downloaded to your iPad. If the version on your iPad is newer, that version is uploaded
to iCloud.
Create a song in iCloud Drive
1. In the My Songs browser, tap iCloud Drive in the sidebar, locate and tap the GarageBand
for iOS folder, then do one of the following:
• Tap the Add Song button at the top-right of the screen.
• Tap Create Document in the My Songs browser.
The Sound browser opens, where you can choose a Touch Instrument to use in the
song. When you close the song, the latest changes are saved to the original location in
iCloud Drive.
Delete a song in iCloud Drive
When you delete a song in iCloud Drive, the song is deleted on all your devices.
1. In the My Songs browser, tap iCloud Drive in the sidebar, then locate the song you want
to delete.
2. Tap Select, tap the song you want to delete, then tap Delete.
If you turn off iCloud for GarageBand, your songs stored in iCloud Drive will be deleted
from your iPad, but will remain stored in iCloud Drive.If you want to turn off iCloud and
keep your songs on your iPad, you need to duplicate the songs you want to keep before
you turn off iCloud.

106GarageBand User Guide for iPad
Use Schoolwork with GarageBand
Use Schoolwork with GarageBand for iPad
With the Schoolwork app, teachers can add GarageBand activities to handouts and assign
them to their students. A project can also be attached to a handout and shared between
teacher and students via iCloud Drive.
To use GarageBand with Schoolwork, the Schoolwork app must be installed on your iPad,
and you must sign in with the Managed Apple ID for your school or class. If you need help
with your Managed Apple ID account, contact your teacher (teachers should contact their
school administrator).
Add an activity to a handout
Teachers can add a GarageBand activity to a new handout, and then post the handout to
their students or save it as a draft in the Schoolwork app.
1. In the Schoolwork app, create a new handout.
2. On the handout, tap Add Activity, tap Apps, then tap GarageBand.
3. Choose one of the available activities from the shortcut menu:
• Audio Recording: Create an audio recording using the Audio Recorder Touch
Instrument.
• Create New Live Loops Song: Choose a Live Loops template in the Template browser
to create a new song.
• Create New Tracks Song: Choose a Touch Instrument in the Sound browser to create
a new song.
4. Fill in the title, due date, and other information for the handout, tap the Inspector button
to choose a share option for the attached song, then tap Post to send the handout.
When a student completes an activity, it shows as Done on the handout, and shows the
time taken to complete it.

107GarageBand User Guide for iPad
Share a GarageBand song to a handout
Teachers can share a GarageBand song to Schoolwork and attach it to a new handout, then
post the handout to their students. Students can share a song to an existing handout for
their class.
1. In the My Songs browser, tap Select, tap a song, then tap Share.
2. Do one of the following:
• To share the song as an editable GarageBand project: tap Project.
• To share the song as an audio file: tap Song.
3. Tap Share with Schoolwork.
For teachers: A New Handout window opens with the GarageBand song attached. The
teacher can assign the handout to a class or to individual students.
For students: A list of available handouts appears.
4. Do one of the following:
• For teachers: Fill in the title, due date, and other information for the handout, tap the
Inspector button to choose a share option for the attached song, then tap Post to
send the handout.
• For students: Tap a handout to attach the song, then tap Submit.
For complete information about using the Schoolwork app, open Schoolwork Help from
within the app.

108GarageBand User Guide for iPad
Share GarageBand songs
Share songs with GarageBand for iPad
You can share a song as a GarageBand project or as an audio file. You can share
GarageBand songs to a Mac or to another app on your iPad. You can also send a song in an
email, share it to nearby devices using AirDrop, or use it as a ringtone. If you have set up
iCloud, you can also use iCloud to share songs between devices.
You can import a GarageBand song created on another iPad or iPhone. Because
GarageBand for Mac offers features and functionality not found in GarageBand for iPad,
you can’t import a GarageBand for Mac song to GarageBand for iPad.
In Logic Pro and GarageBand for Mac, you can share a special GarageBand for iPad-
compatible version of your project to iCloud.You can add, edit, and arrange new tracks in
GarageBand for iPad. When you reopen the project in Logic Pro or GarageBand for Mac,
the new tracks are added to the original project.
Share a song to a Mac
1. In the My Songs browser, tap the Select button, tap the song you want to share, then
tap Share.
2. Do one of the following:
• To save the song as an editable GarageBand project: Tap Project.
• To save the song as an audio file: Tap Song.
You can add the artist, composer, and title information, choose the audio quality, and
add an image for the audio file.
3. Tap Share, tap Save to Files, locate and tap the GarageBand folder, then tap Add.
4. Connect your iPad to your Mac.
Your connected iPad appears in a Finder window sidebar under Locations.
5. On your Mac, select the icon for your iPad, click Files, then click GarageBand in the
Apps list.
6. Drag the song from the GarageBand list to the Finder.
You can open a GarageBand project in GarageBand on your Mac, or play the audio file
in the Music app on your computer. You can’t open a GarageBand project on a Windows
computer.

109GarageBand User Guide for iPad
Share songs to a Mac using the GarageBand File Transfer folder
GarageBand uses the GarageBand File Transfer folder to store audio files that you can
import into GarageBand or use with other music apps. You can copy the GarageBand File
Transfer folder to your Mac to create a backup or to use the contents with other apps.
1. In the My Songs browser, tap the Select button, tap the song you want to share, tap
Share, then tap Song.
You can add the artist, composer, and title information, choose the audio quality, and
add an image for the audio file.
2. Tap Share, tap Save to Files, locate and tap the GarageBand File Transfer folder, then
tap Save.
A stereo audio file is saved to the GarageBand File Transfer folder.
3. Connect your iPad to your Mac.
Your connected iPad appears in a Finder window sidebar under Locations.
4. On your Mac, select the icon for your iPad, click Files, then click the disclosure arrow
for GarageBand in the Apps list.
The GarageBand File Transfer folder appears.
5. Drag the GarageBand File Transfer folder to the Finder.
6. To save any changes made on your Mac to your device, drag the GarageBand Transfer
folder from your Mac back to the GarageBand area in the Finder window.
Send a song in an email
1. In the My Songs browser, tap the Select button, tap the song you want to share, tap
Share, then tap Song.
You can add the artist, composer, and title information, choose the audio quality, and
add an image for the audio file.
2. Tap Share, then tap Mail.
A new email is created with the song as an attachment.
3. In the email, tap the To, Cc/Bcc, and Subject fields to edit the recipients and the subject
of the email.
4. Tap the body of the email to edit the message text.
5. When the email is ready, tap Send.
You can’t send the email until you add at least one recipient.

110GarageBand User Guide for iPad
Send a song using Messages
1. In the My Songs browser, tap the Select button, tap the song you want to share, tap
Share, then do one of the following:
• Send a stereo audio file: Tap Song, then tap Share.
After you tap Song, you can add the artist, composer, and title information. You can
also choose the audio quality and an image for the audio file.
• Send a GarageBand project: Tap Project.
2. Tap Messages.
3. Choose a recipient for the message. You can also add message text.
4. When the message is ready, tap the Send button .
You can’t send the message until you add at least one recipient.
Send a GarageBand song to the Clips app
You can add your GarageBand song to videos you create with the Clips app, available from
the App Store.
1. In the My Songs browser, tap the Select button, tap the song you want to share, tap
Share, then tap Song.
You can add the artist, composer, and title information. You can also choose the audio
quality and an image for the audio file.
2. Tap Share, then tap Clips.
The Clips app opens and shows a list of projects.
3. Tap the project you want to add the song to.
If the video project in Clips doesn’t contain imported audio, the song is added to the
project. If the project already contains imported audio, you can choose to replace it by
tapping Replace.
Important:Replacing imported audio can’t be undone.
4. Tap Done.
Open a song in another app on your iPad
You can open a GarageBand song in iMovie or another app on your iPad. The app must be
compatible with the “Open in” feature.
1. In the My Songs browser, tap the Select button, tap the song you want to share, tap
Share, then do one of the following:
• Send a stereo audio file: Tap Song, then tap Share.
After you tap Song, you can add the artist, composer, and title information. You can
also choose the audio quality and an image for the audio file.
• Send a GarageBand project: Tap Project.
2. Tap “Open in.”
A list shows apps that can open the song. If there are no compatible apps on your iPad,
the list is empty.
3. Tap the icon of the app you want to open the song in.

111GarageBand User Guide for iPad
Import a GarageBand for iPad song
Using a Mac, you can import a GarageBand song that was created on another iPad or
iPhone. Because GarageBand for Mac offers additional features and functionality not
found in GarageBand for iPad, you can’t import a GarageBand for Mac song to GarageBand
for iPad.
1. Connect your iPad to your Mac.
Your connected device appears as an icon in a Finder window sidebar under Locations.
2. Select the icon for your iPad, click Files, then select GarageBand in the Apps list.
3. Drag a song to the GarageBand files list.
After you import a song, you can open it in the My Songs browser.
Share a song to nearby devices using AirDrop
You can share songs to other devices using AirDrop. AirDrop is available for devices
featuring a Lightning connector.
Before sharing a song using AirDrop, you must turn AirDrop on in Control Center. You
can also choose whether to share with all devices using AirDrop, or only those in your
Contacts.
1. In the My Songs browser, tap the Select button, tap the song you want to share, tap
Share, then do one of the following:
• Send a stereo audio file: Tap Song, then tap Share.
After you tap Song, you can add the artist, composer, and title information. You can
also choose the audio quality and an image for the audio file.
• Send a GarageBand project: Tap Project.
2. Tap the device you want to share with.
To return to the My Songs browser without sharing the song, tap Cancel.
A notification appears on the device it is shared with. After the song is downloaded to the
device, it opens in GarageBand (if GarageBand is the only compatible app) or presents a
list of compatible music apps.
Collaborate with other users using iCloud Drive
You can invite people to collaborate with you on songs stored in iCloud Drive. When you
or one of the other users close a song you are collaborating on or close GarageBand,
the song is updated with the latest changes in iCloud Drive. If changes made on multiple
devices are out of sync, a copy of the song with the new changes is saved to the same
location as the original in iCloud Drive.
1. Ensure that you are signed in to iCloud on all devices you want to share with.
2. In the My Songs browser, tap iCloud Drive in the sidebar, and locate the song you want
to share.
3. Tap the Select button, tap the song you want to share, tap Share, tap Project, then tap
Add People.

112GarageBand User Guide for iPad
4. Tap Share Options to change access and permissions settings.
5. Do one of the following:
• Tap Message to share a link to your song using Messages.
• Tap Mail to send a link to your song in an email.
• Tap Copy Link to copy the link to your song to the clipboard.
If “Only people you invite” is selected in Share Options, a window appears where you
can add people that can access the song. When you are done, tap Copy Link.
Share a GarageBand song using a sharing extension
1. In the My Songs browser, tap the Select button, tap the song you want to share, tap
Share, then do one of the following:
• Send a stereo audio file: Tap Song, then tap Share.
After you tap Song, you can add the artist, composer, and title information. You can
also choose the audio quality and an image for the audio file.
• Send a GarageBand project: Tap Project.
2. Tap the icon for the social network or service.
3. Follow the instructions in the dialog for your social network or service.
Before you can share GarageBand songs using a sharing extension, you must install one or
more apps that include a sharing extension.
Share a GarageBand song as a ringtone or text tone
1. In the My Songs browser, tap the Select button, tap the song you want to share, tap
Share, then tap Ringtone.
The Export Ringtone panel opens, showing the name for the ringtone. By default, the
ringtone uses the same name as the song.
The maximum length for exported ringtones is 30 seconds. If the exported ringtone
exceeds the maximum length, a dialog appears. Tap Continue to have GarageBand
shorten the ringtone automatically, or tap Cancel to return to the song so you can
shorten it.
2. To rename the ringtone, tap the name and type a new name.
3. Tap Export.
4. In the Ringtone Export Successful panel, do one of the following:
• Return to the My Songs browser: Tap OK.
• Choose a use for the ringtone: Tap “Use sound as,” then do one of the following:
• Use the ringtone as your standard ringtone, replacing the existing ringtone: Tap
Standard Ringtone.
• Use the ringtone as your standard text tone, replacing the existing text tone: Tap
Standard Text Tone.
• See a list of your contacts: Tap “Assign to contact,” then tap the contact you want
to use the ringtone with.
• Return to the My Songs browser without assigning the ringtone: Tap Done.

113GarageBand User Guide for iPad
Manage exported GarageBand ringtones
1. In the My Songs browser, tap the Select button, tap the song you want to share, tap
Share, then tap Ringtone.
The Export Ringtone panel opens.
2. Tap Your Ringtones.
A window opens showing all previously exported ringtones.
3. To delete a ringtone:
Tap Edit, tap the Delete button , then tap Delete for any ringtone you want to delete.
4. When you finish, tap Done.
To return to the Export Ringtone panel without deleting ringtones (or if there are no
existing ringtones), tap Export Ringtone.
Send a GarageBand song to YouTube or Facebook via iMovie
1. In the My Songs browser, tap the Select button, tap the song you want to share, tap
Share, then tap Song.
After you tap Song, you can add the artist, composer, and title information. You can also
choose the audio quality of the file, and choose an image for the audio file.
2. Tap Share, then tap Copy to iMovie.
3. Add your idea to a new iMovie project, then share the resulting movie to YouTube or
Facebook.
If iMovie is not installed on your iPad, download it from the App Store.

114GarageBand User Guide for iPad
Mirror GarageBand to an Apple TV
Mirror GarageBand for iPad to an Apple TV
You can mirror the GarageBand app along with its audio output via Screen Mirroring to an
Apple TV.
Mirror GarageBand to an Apple TV
1. Make sure your iPad and the Apple TV are connected to the same Wi-Fi network.
2. Open Control Center, tap the Screen Mirroring button , then tap Apple TV.
The GarageBand window appears on both the iPad and the Apple TV. Audio output is
streamed to the Apple TV only.

115GarageBand User Guide for iPad
Use VoiceOver with GarageBand
Intro to VoiceOver with GarageBand for iPad
VoiceOver is an advanced screen reader that lets you use your iPad without seeing the
screen. After you turn on VoiceOver in the Settings app, you can use VoiceOver gestures
and rotor actions to navigate within GarageBand, choose and play Touch Instruments, edit
your performance, and arrange your songs.
To learn more about VoiceOver, see Turn on and practice VoiceOver, Learn VoiceOver
gestures, and Control VoiceOver using the rotor in the iPad User Guide.
The following topics provide information about using VoiceOver to perform specific tasks
within different areas of GarageBand:
• Use VoiceOver to play and record Touch Instruments
• Navigate in tracks view with VoiceOver
• Use VoiceOver to arrange and edit regions
• Use VoiceOver to edit notes in regions
• Use VoiceOver with automation
• Use VoiceOver with plug-ins

116GarageBand User Guide for iPad
Use VoiceOver to play and record Touch
Instruments in GarageBand for iPad
In GarageBand for iPad, you can use VoiceOver gestures to choose a Touch Instrument in
the Sound browser, start and stop playback and recording, and adjust the value of knobs
and sliders. And when you turn on the Direct Touch accessibility feature, you can also play
a Touch Instrument.
To learn more about recording Touch Instruments, see Record Touch Instruments in
GarageBand for iPad.
Choose a Touch Instrument in the Sound browser
When you first open GarageBand for iPad or create a new song, the Sound browser opens.
In the Sound browser, you can choose a Touch Instrument to play in your song.
1. In the Sound browser, swipe right repeatedly until you hear the name of a Touch
Instrument button (for example, “Keyboard button”).
2. Do any of the following:
• Navigate to another instrument: Swipe right or left with three fingers.
• Navigate through quick options for that instrument: Swipe right or left.
• Open a list of additional sounds for that instrument: Swipe right until you hear “More
Sounds.”
3. Double tap to select the instrument you want to play.
The Touch Instrument opens.
Turn on Direct Touch
When the Direct Touch accessibility feature is on, you can play a Touch Instrument like the
Keyboard or Drums in real time, just as you would when VoiceOver is off. Even when Direct
Touch is on, you can still use VoiceOver gestures to interact with the nonplayable areas of
the Touch Instrument, as well as the control bar and ruler. You can also use Direct Touch to
control the Pitch and Mod wheels on some Keyboard Touch Instruments.
1. Do one of the following:
• Choose a Touch Instrument from the Sound browser.
• In Tracks view, navigate to the Instrument button in the control bar, then double-tap.
The Touch Instrument opens.
2. Navigate until you hear the name of the Touch Instrument.
If Direct Touch is off, the name of the Touch Instrument is followed by “Use the rotor to
enable Direct Touch for this app.”
3. Turn the VoiceOver rotor to Direct Touch, then swipe up or down until you hear “Direct
Touch on for GarageBand.”

117GarageBand User Guide for iPad
Adjust knobs and sliders
Most Touch Instruments have controls like knobs and sliders to change parameter values.
You can adjust these controls using VoiceOver gestures. When you navigate to such a
control, VoiceOver announces that it’s adjustable.
1. Navigate to the knob or slider you want to adjust.
2. Do any of the following:
• Change the parameter value: Swipe up or down.
• Change the parameter value in smaller increments: Double-tap and hold until you
hear three rising tones, then drag left or right.
VoiceOver announces the new value each time it changes.
Start and stop playback or recording
You can use a VoiceOver gesture to start and stop playback or recording, depending if a
Touch Instrument or Tracks view is active.
Do one of the following:
• When a Touch Instrument is active: Double-tap with two fingers to start or stop recording
• When Tracks view is active: Double-tap with two fingers to start or stop playback
Navigate in Tracks view with VoiceOver in
GarageBand for iPad
In GarageBand for iPad, you can use standard VoiceOver gestures to navigate through the
interface. When you navigate to a track, the track icon is the first selected item in a track,
followed by any regions on the track. If the track headers are open, the Mute and Solo
buttons are selected next, followed by the Volume slider, and then the regions. When you
navigate past the last region on a track, the VoiceOver cursor moves to the track icon of
the next track.
You can use additional gestures to zoom in and out, move the playhead, scroll tracks left to
right, jump to the previous or next tracks, open track headers, and change the order of tracks.
To learn more about navigating songs, see Play and navigate songs in GarageBand for iPad.
Get ruler position announcements
• When you navigate to items that have a ruler position like regions, notes, or the
playhead, VoiceOver announces the full ruler position.
• When you move an item forward or backward in time, VoiceOver announces only the
part of the time position that changes.
For example, if you navigate to the playhead at the beginning of the second bar, VoiceOver
announces its position as “Bar 2, Beat 1.” If you move the playhead to the second beat of
the same bar, only the beat is changed and VoiceOver announces “Beat 2.” As you move
the playhead further in time, VoiceOver announces each following beat. When the playhead
reaches the next bar, VoiceOver announces “Bar 3, Beat 1.”
When you move an item while zoomed in, VoiceOver also announces smaller time divisions
like ticks and divisions.

118GarageBand User Guide for iPad
Zoom a region
• Navigate to any region, turn the VoiceOver rotor to Zoom, then swipe down to zoom in
or swipe up to zoom out.
Scroll tracks to the left or right
When you zoom in on a region, you can scroll tracks to the left or right.
• Navigate to any item in a zoomed track, then use three fingers to swipe left or right.
The visible range of the ruler is announced as you scroll.
Move the playhead
Do any of the following:
• Navigate to the playhead, double-tap and hold until you hear three rising tones, then
drag left or right to move the playhead to any position.
• Navigate to the playhead, then swipe up or down to move the playhead in one-bar
increments.
• Navigate to a track icon or region, turn the VoiceOver rotor to Playhead, then swipe up
or down to move the playhead in one-bar increments.
Each time you move the playhead, VoiceOver announces the new position.
Select the next or previous track
• Navigate to a track icon or a region, turn the VoiceOver rotor to Tracks, then swipe up
or down.
Open or close track headers
When track headers are open, you can select and adjust the volume, mute, and solo
controls for a track. Do one of the following:
• Navigate to a track icon, turn the VoiceOver rotor to Toggle Track Headers, then swipe
up or down.
• Navigate to the Track Headers button, then double-tap.
If the track headers are open, you can close them by navigating to a Solo button, Mute
button, or Volume slider in the track header, then turning the VoiceOver rotor to Toggle
Track Headers.
Change the order of tracks
1. Navigate to the track icon of the track you want to move.
2. Double-tap and hold until you hear three rising tones.
3. Drag vertically to move the track up or down.
When you drag the track, VoiceOver announces the new position in relation to the other
tracks.

119GarageBand User Guide for iPad
Use VoiceOver to arrange and edit regions in
GarageBand for iPad
You can use several VoiceOver gestures to arrange and edit regions in GarageBand for
iPad. You can use the Actions rotor option to access most editing functions and additional
region settings.
To learn more about editing regions, Edit regions in GarageBand for iPad.
Select a region
• Navigate to the region you want to select, turn the VoiceOver rotor to Actions, swipe up
or down until you hear “Activate,” then double-tap.
Select multiple regions
1. Navigate to the additional region you want to select.
2. Turn the VoiceOver rotor to Actions, swipe up or down until you hear “Add to or Remove
from Multiselection,” then double-tap.
Deselect a selected region
1. Navigate to the region you want to deselect.
2. Turn the VoiceOver rotor to Actions, swipe up or down until you hear “Add to or Remove
from Multiselection,” then double-tap.
Trim a region
1. Navigate to the region you want to trim, then select it.
2. Swipe right until you hear “Left Resize Handle” or “Right Resize Handle” to select the
left or right resize handle.
3. Swipe up or down to move the resize handle to the right or left by one beat.
4. To move the resize handle in smaller increments, double-tap and hold until you hear
three rising tones, then drag up or down.
Split a region
1. Navigate to the region you want to split, turn the VoiceOver rotor to Actions, swipe up
or down until you hear “Split,” then double-tap.
The VoiceOver cursor moves to the Split marker that appears on the region.
2. To move the Split marker to where you want to split the region, do one of the following:
• Move the Split marker right or left to the nearest beat: Swipe up or down.
• Move the Split marker in smaller increments: Double-tap and hold until you hear
three rising tones, then drag left or right.
3. Double-tap to split the region at the Split marker.
After you split a region, the VoiceOver cursor remains on the Split marker. If you want to
make additional splits, move the Split marker to a new location and repeat step 3.

120GarageBand User Guide for iPad
Move a region
1. Navigate to the region you want to move, then double-tap to select it.
2. Swipe right until you hear “Move Region Handle.”
3. To move the Region, do one of the following:
• Move the region right or left to the nearest beat: Swipe up or down.
• Move the region in smaller increments: Double-tap and hold until you hear three
rising tones, then drag left or right.
Access additional region settings
You can access additional region settings using the Actions rotor option. These settings
include Gain, Speed, Looping, Reverse, and so on, depending on what kind of region is
selected.
1. Navigate to a region, then double-tap to select it.
2. Turn the VoiceOver rotor to Actions, swipe up or down until you hear “Settings,” then
double-tap.
A window opens containing a list of additional region settings.
3. Swipe horizontally to navigate through the settings.
4. To adjust a selected setting, do one of the following:
• Adjust a slider: Swipe up or down.
• Turn a switch on or off: Double-tap.
• Open a menu: Double-tap.
• Choose a menu item: Double-tap.
5. When you’re finished making changes, navigate to Done, then double-tap.
Use VoiceOver to edit notes in regions in
GarageBand for iPad
In GarageBand for iPad, you can use VoiceOver gestures to edit notes in regions recorded
with Touch Instruments.
To learn more about editing notes, see Edit notes in regions.
Open the Editor
• Navigate to a MIDI region, turn the VoiceOver rotor to Actions, swipe up or down until
you hear “Edit,” then double-tap.
Select notes
• Navigate to a MIDI note in the Editor, then double-tap.
Select multiple notes
1. Navigate to the additional note you want to select.
2. Turn the VoiceOver rotor to Actions, swipe up or down until you hear “Add or Remove
from Multiselection,” then double-tap.

121GarageBand User Guide for iPad
Deselect a selected note
1. Navigate to the note you want to deselect.
2. Turn the VoiceOver rotor to Actions, swipe up or down until you hear “Add to or Remove
from Multiselection,” then double-tap.
Move notes
1. Navigate to the note you want to move, then double-tap and hold until you hear three
rising tones.
2. Do any of the following:
• Drag horizontally to move the note to the previous or next beat.
• Drag vertically to change the pitch.
If you’re editing the notes for a drum kit, dragging vertically changes the kit piece.
Copy and paste notes
1. Select one or more notes.
2. Turn the VoiceOver rotor to Actions, swipe up or down until you hear “Copy,” then
double-tap.
3. Move the playhead to the point where you want to paste the notes.
4. Turn the VoiceOver rotor to Actions, swipe up or down until you hear “Paste,” then
double-tap.
Delete notes
1. Select one or more notes.
2. Turn the VoiceOver rotor to Actions, swipe up or down until you hear “Delete,” then
double-tap.
Change the length of a note
1. Select one or more notes.
2. Turn the VoiceOver rotor to Actions, swipe up or down until you hear “Update Length
via Gesture,” then double-tap.
3. Double-tap and hold until you hear three rising tones, then drag horizontally to change
the length of the note.
4. Double-tap again when you are done.
Change note velocity
1. Select one or more notes.
2. Turn the VoiceOver rotor to Actions, swipe up or down until you hear “Velocity,” then
double-tap.
3. Swipe up or down to increase or decrease the velocity.
4. Double-tap and hold until you hear three rising tones, then drag horizontally to change
the velocity.
5. When you finish, move two fingers back and forth three times quickly, making a “z.”
Close the editor
• Navigate to the Done button, then double-tap.

122GarageBand User Guide for iPad
Use VoiceOver with automation in GarageBand for
iPad
In GarageBand for iPad, you can use VoiceOver gestures to create and edit volume
automation points for each track.
To learn more about using automation in your song, see Automate volume changes in
GarageBand for iPad.
Open automation
• Navigate to a track icon, turn the VoiceOver rotor to Actions, swipe up or down until you
hear “Automation,” then double-tap.
Activate automation lane
• After you open automation, swipe horizontally until you hear the track name and number
followed by “Automation Points,” then double-tap.
The automation lane is activated and the VoiceOver cursor moves to an automation
point at the beginning of the first bar.
Create automation points
After you activate the automation lane, do one of the following:
• Create an automation point at the next beat: Turn the VoiceOver rotor to Actions, swipe
up or down until you hear “Create New Automation on the Next Beat,” then double-tap.
• Create an automation point between existing automation points: Swipe left or right to
select the automation point to the left of where you want the new automation point to
appear. Turn the VoiceOver rotor to Actions, swipe up or down until you hear “Create
New Automation Point Between This and the Next Point,” then double-tap.
Select automation points
• After you create automation points, navigate to an automation point, then double-tap.
To select multiple automation points, navigate to each point you want to add to the
selection, then double-tap. To deselect an automation point, navigate to it, then
double-tap again.
Move automation points
• Select one or more automation points, double-tap and hold until you hear three rising
tones, then drag horizontally or vertically.
Delete automation points
• Select one or more automation points, turn the VoiceOver rotor to Actions, swipe up or
down until you hear “Delete,” then double-tap.
Close automation
• Navigate to the Done button, then double-tap.

123GarageBand User Guide for iPad
Use VoiceOver with plug-ins in GarageBand for
iPad
You can use VoiceOver gestures in GarageBand for iPad to add plug-ins and Audio Unit
Extensions to tracks, access parameters for Audio Unit Extensions, and use the Visual EQ
plug-in.
To learn more about using plug-ins in your song, see Use effect plug-ins with Touch
Instruments.
Add a plug-in to the selected track
1. Navigate to the Track Controls button in the control bar, then double-tap.
2. Navigate to the Plug-Ins & EQ button, then double-tap.
The list of plug-ins for the selected track opens, and the Bypass button of the first
plug-in is selected.
3. Swipe left until you hear “Edit button” then double-tap.
The plug-in list expands to Edit mode, where you can add, delete, and rearrange plug-
ins. Items in the list labeled “None” are empty slots where you can add a plug-in.
4. Swipe right until you hear “None,” then double-tap.
A list opens containing plug-ins that you can add to the selected track.
5. Navigate past the GarageBand Effects heading to the list of plug-ins, then double-tap
the plug-in you want to add.
The plug-in is added to the selected track and GarageBand exits Edit mode.
6. Navigate to the plug-in you want to edit, then double-tap to access its settings.
Add an Audio Unit Extension to the selected track
If you’ve enabled Apple-designed Audio Unit Extensions in the Settings app or installed
Audio Unit Extensions from other manufacturers on your iPad, you can add them to the list
of plug-ins on the selected track.
1. Navigate to the Track Controls button in the control bar, then double-tap.
2. Navigate to the Plug-Ins & EQ button, then double-tap.
The list of plug-ins for the selected track opens, and the Bypass button of the first
plug-in is selected.
3. Swipe left until you hear “Edit,” then double-tap.
The plug-in list expands to Edit mode, where you can add, delete, and rearrange plug-
ins. Items in the list labeled “None” are empty slots where you can add a plug-in.
4. Swipe right until you hear “None,” then double-tap.
A list opens and the Effects button is selected.
5. Swipe once to the right to select the Audio Unit Extensions button, then double-tap

124GarageBand User Guide for iPad
6. Navigate past the Audio Unit Extensions heading to the list of Audio Unit Extensions,
then double-tap the Audio Unit Extension you want to add.
The Audio Unit Extension is added to the list of plug-ins the selected track, and
GarageBand exits Edit mode.
7. Navigate to the plug-in you want to edit, then double-tap to access its settings.
Edit Audio Unit Extensions
If the interface of an Audio Unit Extension is difficult to navigate to and edit with VoiceOver
gestures, you can turn on Edit view to improve access to the parameter controls.
1. After you Add an Audio Unit Extension to the selected track, open the Plug-ins & EQ list.
See steps 1 and 2 of Add a plug-in to the selected track.
2. In the Plug-ins & EQ list, navigate to the name of the Audio Unit Extension you want to
edit, then double-tap.
The interface for the Audio Unit Extension opens.
3. Navigate to the Edit button, then double-tap.
Accessible controls for each parameter are available.
4. Navigate to a control, then swipe up or down to adjust it. To adjust in smaller
increments, double-tap and hold until you hear three rising tones, then drag up or
down.
5. To close the plug-in, navigate until you hear “Done,” then double-tap.
Open and edit the Visual EQ
1. Open the Plug-ins & EQ list.
See steps 1 and 2 of Add a plug-in to the selected track above.
2. In the Plug-ins & EQ list, navigate to the Visual EQ, then double-tap.
The interface for the Visual EQ opens and the Bass puck is selected.
3. Navigate to any of the frequency pucks and do any of the following:
• Swipe up or down to raise or lower the gain of the frequency band.
• Double-tap and hold until you hear three rising tones, then drag vertically to raise or
lower the gain, or drag horizontally to raise or lower the frequency.
4. To close the Visual EQ, navigate until you hear “Done,” then double-tap.

125GarageBand User Guide for iPad
Use keyboard shortcuts
Use keyboard shortcuts with GarageBand for iPad
If you have an external keyboard connected to your iPad, you can use keyboard shortcuts
in Tracks view to play, navigate, and edit your GarageBand song.
Action Shortcut
Start or stop playback Space bar
Go to the beginning Return
Move forward Period (.)
Move back Comma (,)
Create a new track Option-Command-N
Duplicate the selected track Command-D
Delete the selected track Command-Delete
Select previous track Up Arrow
Select next track Down Arrow
Solo the selected track S
Mute the selected track M
Undo Command-Z
Redo Shift-Command-Z
Select all regions or cells Command-A
Delete the selected regions Delete
Select the previous region on the selected track Left Arrow
Select the next region on the selected track Right Arrow
Add previous region to selection Shift-Left Arrow
Add next region to selection Shift-Right Arrow
Split selected region or event at the playhead Command-T
Join selected regions or notes Command-J

126GarageBand User Guide for iPad
Action Shortcut
Cut Command-X
Copy Command-C
Paste Command-V
Loop the selected region L
Start recording R
Turn the metronome on/off K
Turn count-in on/off Shift-K
Show/Hide Remix FX Option-R
Show/Hide Automation A
Open Loop Browser O
Instrument Browser - Previous Instrument Left Arrow
Instrument Browser - Next Instrument Right Arrow
Show/Hide coaching tips H
Show Help Option-H

127GarageBand User Guide for iPad
Apple Inc.
Copyright © 2023 Apple Inc. All rights reserved.
Use of the “keyboard” Apple logo (Option-Shift-K) for commercial purposes without the prior written consent of
Apple may constitute trademark infringement and unfair competition in violation of federal and state laws.
Apple, the Apple logo, 3D Touch, AirDrop, Apple Music, Apple TV, ARKit, Finder, GarageBand, iMovie, iPad,
iPad Air, iPad Pro, iPhone, Lightning, Logic, Logic Pro, Mac, Safari, Smart Strings, and Touch Instruments are
trademarks of Apple Inc., registered in the U.S. and other countries.
App Store, iCloud, and iCloud Drive are service marks of Apple Inc., registered in the U.S. and other countries.
Apple
One Apple Park Way
Cupertino, CA 95014
apple.com
IOS is a trademark or registered trademark of Cisco in the U.S. and other countries and is used under license.
Other company and product names mentioned herein are trademarks of their respective companies. Mention
of third-party products is for informational purposes only and constitutes neither an endorsement nor a
recommendation. Apple assumes no responsibility with regard to the performance or use of these products.
Every effort has been made to ensure that the information in this manual is accurate. Apple is not responsible for
printing or clerical errors.
Some apps are not available in all areas. App availability is subject to change.
028-00753
