
Document Scanning
January 2020

1
Document Scanning and 2D Barcode
Table of Contents
Document Scanning and 2D Barcodes ................................................................................................. 2
Sample 2D Barcodes ........................................................................................................................... 2
2D barcode on a hardcopy: .............................................................................................................. 2
Scanning Hardcopies ........................................................................................................................... 4
Reconciling Unprocessed Images ........................................................................................................ 8
Viewing Hardcopy / Rx Image from F12 Screen ................................................................................. 14
Scanning MedsCheck Reports ............................................................................................................. 1
Reconciling Unprocessed Images ........................................................................................................ 5
Viewing Scanned Images Linked to a Patient ..................................................................................... 11

2
Document Scanning and 2D Barcode
Document Scanning and 2D Barcodes
This document outlines the process for scanning documents such as hard copies, medication reviews,
and other documents that pertain to the patient record. Many documents in Kroll version 10 include 2D
barcodes that, when scanned, inform the system of which patient or prescription the document pertains
to.
Sample 2D Barcodes
The following section includes sample hardcopies with scannable 2D barcodes. The 2D barcodes on
hardcopies appear in the top right corner and the 2D barcodes on MedsCheck Annual reviews in the
bottom right corner.
2D barcode on a hardcopy:

3
Document Scanning and 2D Barcode
2D barcode on a MedsCheck Annual review (note that barcodes are included on all pages):
4
Document Scanning and 2D Barcode
Scanning Hardcopies
This section outlines the process for scanning a hardcopy. It explains how to process successfully
scanned hardcopies as well as how to process hard copies that must be manually reconciled.
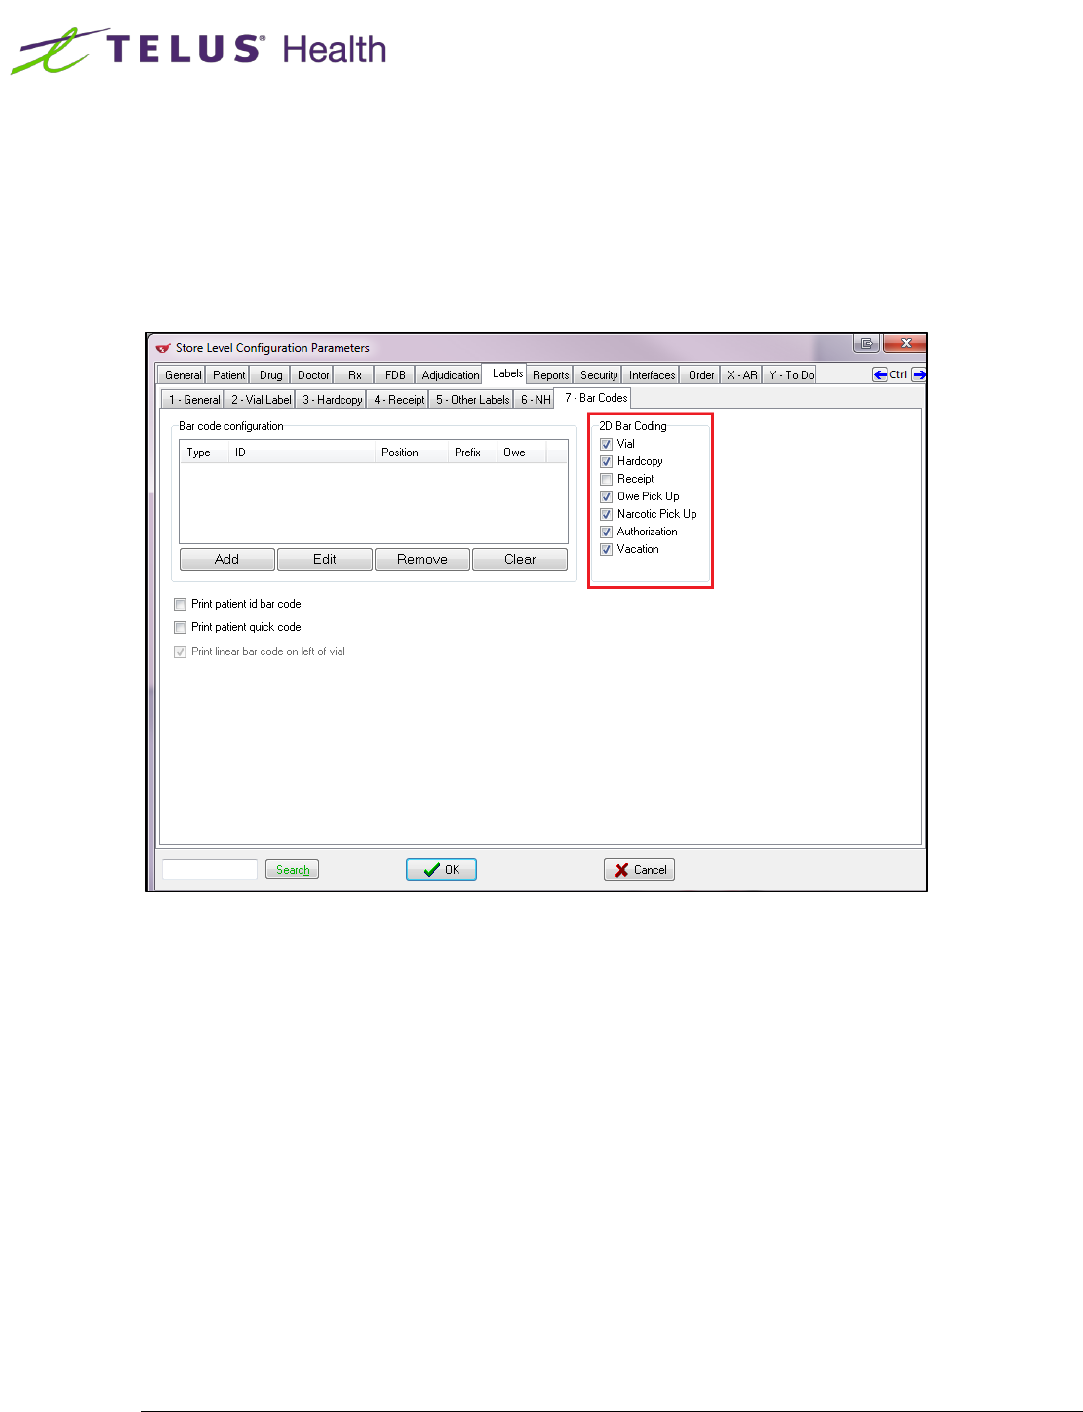
1. From the Start screen, select File > Configuration > Store > Labels > Barcodes and ensure all
2D Bar Coding items except Receipt is checked.
2. Fill Rxs throughout the day, saving the hardcopies and ensuring each have been signed by a
pharmacist.
5
Document Scanning and 2D Barcode
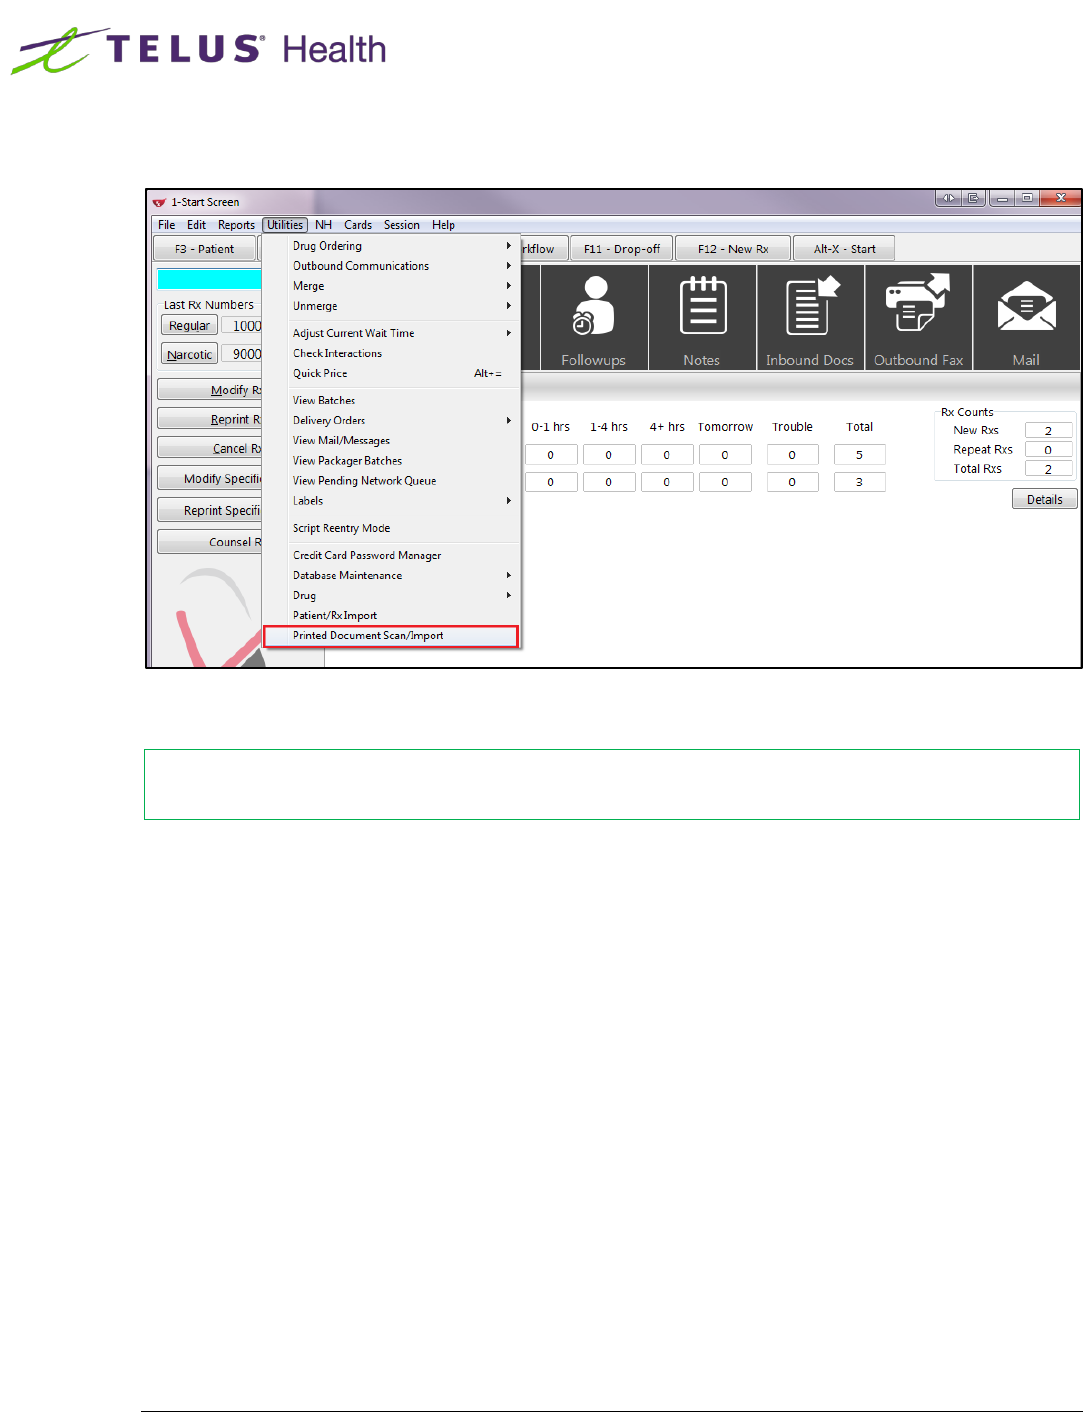
3. When you are ready to begin scanning the hardcopies, select Utilities > Printed Document
Scan/Import.
4. The Import Scanned Documents window will appear.
NOTE: You can scan multiple hardcopies at once if you have the Fujitsu fi-6130 scanner. All other
scanners will only allow you to scan 1 page at a time.

6
Document Scanning and 2D Barcode
5. Place the hardcopies face down on the scanner hopper. Check Scan both sides of paper box if
you are scanning any hard copies with information on both sides (only if your scanner supports
dual side scanning). Click Start Scanning.
6. When scanning is complete, the number that appears next to To Process indicates the number
of Rxs that were scanned successfully. The number that appears next to To Reconcile indicates
the number of Rxs that were not scanned successfully, and will need to be manually reconciled.
7. Click Process and Reconcile.

7
Document Scanning and 2D Barcode
8. The Document Scan Reconciliation window will open. Items in the To Process list appear in
the Documents to be created section, and items in the To Reconcile list appear in the
Unprocessed Images section.
9. If all Rxs were scanned successfully and appear in the Documents to be created section, click
the Process Pending Documents button. Click Cancel to close the window.
The scanning process is now complete.

8
Document Scanning and 2D Barcode
Reconciling Unprocessed Images
This section outlines the process for reconciling unprocessed images.
1. From the Document Scan Reconciliation window, highlight scanned hardcopy in the
Unprocessed Images list and click Create New Document.

9
Document Scanning and 2D Barcode
2. Select Script Image from the Document Type dropdown menu and Hardcopy from the Image
Type dropdown menu. Enter the Rx number in the Rx Number field and click Lookup.

10
Document Scanning and 2D Barcode
3. The Rx Num, Date, Patient, Drug, and Doctor fields will auto-populate, and the unprocessed
image Type will be set to Script Image. Highlight the line item and click Save and Proceed to
Next.

11
Document Scanning and 2D Barcode
4. The hardcopy will appear in the Documents to be created list.

12
Document Scanning and 2D Barcode
5. If you wish to add the image to a current document, click Add this image to the current
document. This will result in the current document having 2 pages.

13
Document Scanning and 2D Barcode
6. Complete the above steps for all other items in the Unprocessed Images list. When you are
finished, click Process Pending Documents. Click Cancel to close the window.
The scanning process is now complete.
14
Document Scanning and 2D Barcode
Viewing Hardcopy / Rx Image from F12 Screen
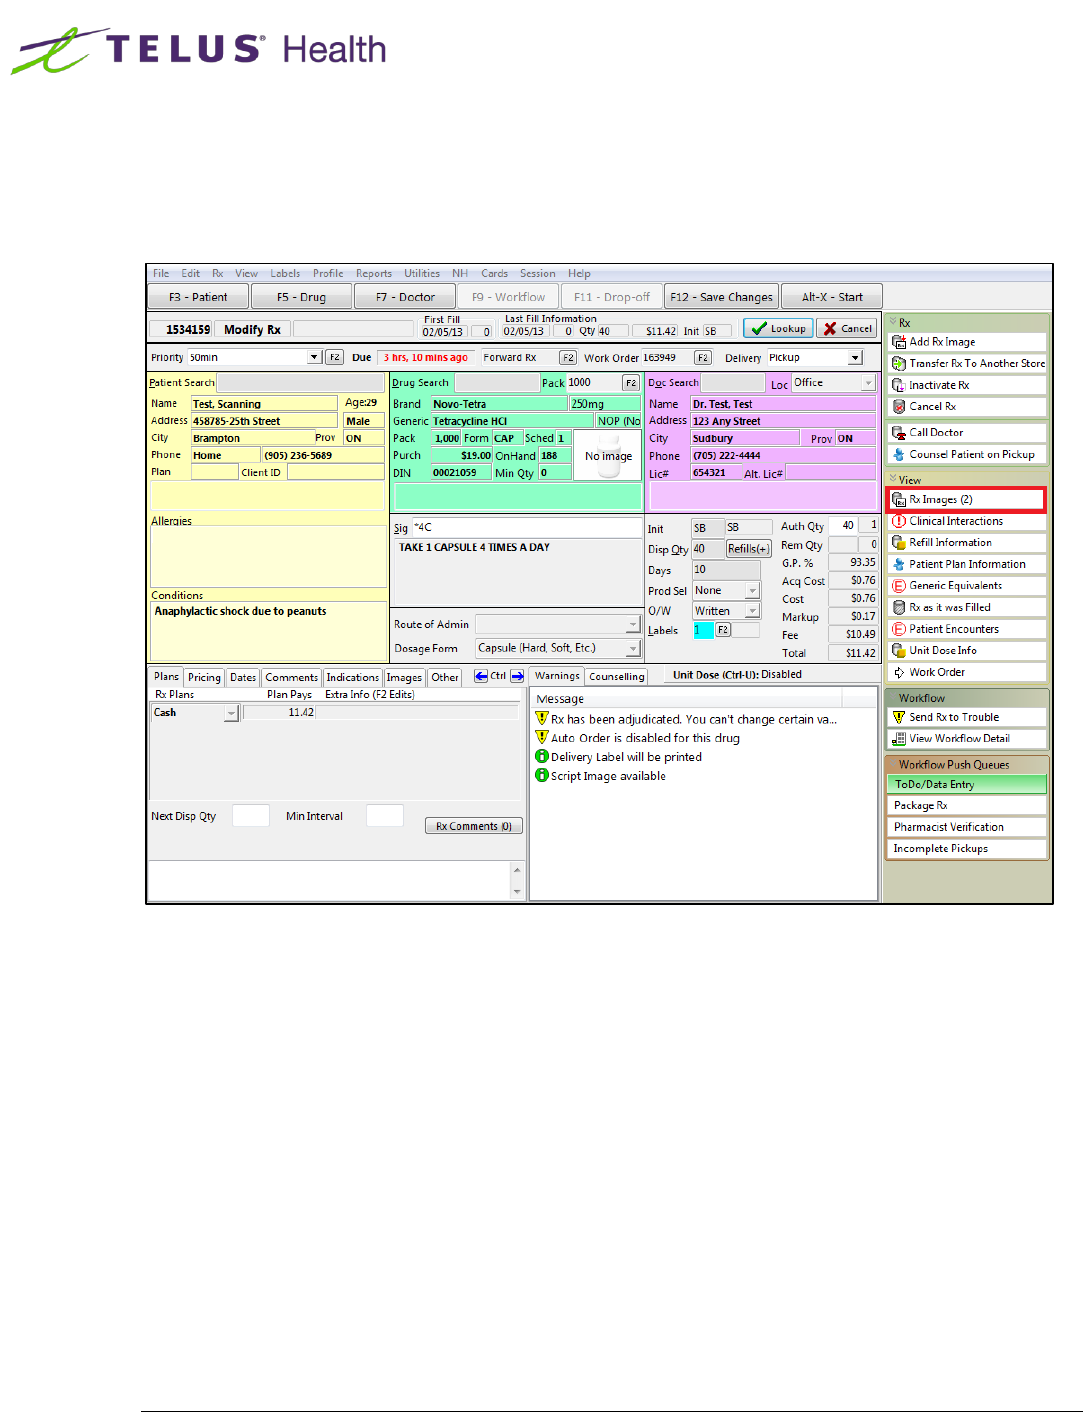
The scanned Hardcopy / Rx Image can be viewed from the main F12 screen.
1. From the main F12 screen, select Rx Images from the right side Rx panel.

15
Document Scanning and 2D Barcode
2. The Rx Images window appears. Select Script Image tab to view scanned image of the original
written prescription.
3. Click Print Script Image Report to print the selected Script Image if desired.

16
Document Scanning and 2D Barcode
4. Select Hardcopy tab to view the scanned hardcopy.

Mail Module 1
Scanning MedsCheck Reports
This section outlines the process for scanning MedsCheck Reports. It explains how to process successfully
scanned MedsCheck Reports as well as how to process MedsCheck Reports that must be manually reconciled.
1. When all the MedsCheck Reports for the day have been signed and you are ready to begin scanning,
select Utilities > Printed Document Scan/Import.
2. The Import Scanned Documents window will appear. Place the MedsCheck Reports face down on the
scanner hopper. Check Scan both sides of paper box if you are scanning any reports with information
on both sides (only if your scanner supports dual side scanning). Click Start Scanning.

Mail Module 2
3. When scanning is complete, the number that appears next to To Process indicates the number of
MedsCheck Reports that were scanned successfully. The number that appears next to To Reconcile
indicates the number of MedsCheck Reports that were not scanned successfully, and will need to be
manually reconciled.
4. Click Process and Reconcile.
The Document Scan Reconciliation window will open. Items in the To Process list appear in the Documents
to be created section, and items in the To Reconcile list appear in the Unprocessed Images section.

Mail Module 3

Mail Module 4
5. If all the MedsCheck Reports were scanned successfully and appear in the Documents to be created
section, click the Process Pending Documents button. Click Cancel to close the window.
The scanning process is now complete.

Mail Module 5
Reconciling Unprocessed Images
1. From the Document Scan Reconciliation window, highlight a MedsCheck Report in the Unprocessed
Images list and click Create New Document.

Mail Module 6
2. Select Patient Document from the Document Type dropdown menu, search for the Patient associated
with the MedsCheck Report by clicking the F3 and click Lookup.

Mail Module 7
3. The Patient Name, DOB, Address, City and Province fields will auto-populate, and the unprocessed
image Type will be set to Patient Document. Select Meds Check from the Report Type dropdown
menu and click Save and proceed to next.

Mail Module 8
4. The MedsCheck Report will appear in the Documents to be created list. If you wish to add the image to
the current document, click Add this image to the current document button.

Mail Module 9
5. The second image is added to the current document and the page number totals to two pages.

Mail Module 10
6. Complete the above steps for all other items in the Unprocessed Image list. When you are finished, click
Process Pending Documents. Click Cancel to close the window.
The Scanning process is now complete.

Mail Module 11
Viewing Scanned Images Linked to a Patient
The scanned image document can be viewed from the Patient Profile.
1. From the Patient Card, select Documents from the right side Patient panel.

Mail Module 12
2. The Patient Document List window will appear with all the documents associated to the selected patient.
Double click the document you want to view.

Mail Module 13
3. The Edit Patient Document window will appear. You enter comments in the Comments section if you
wish. To view the document, select Actions > Open.

Mail Module 14
The document will display:
4. Click Save to save the changes.
5. Click Cancel to close the window.
