
1
Version 6
User Guide

2
Contents
Introduction ..............................................................................................................................5
Key Features ...................................................................................................................................5
Box Contents .................................................................................................................................. 6
Getting Started ..............................................................................................................................6
Troubleshooting and Support ........................................................................................................7
Model Specific Features .................................................................................................................7
Semi-Weighted Keybed (Launchkey 88 only)..............................................................................7
Hardware Overview ........................................................................................................................8
Getting Connected ......................................................................................................................10
Connecting Launchkey with a Computer ..................................................................................10
Connecting Launchkey with External MIDI Enabled Instruments .............................................10
Working with Ableton Live .....................................................................................................11
Installation ....................................................................................................................................11
Setup ............................................................................................................................................11
Session Mode ............................................................................................................................... 13
Launching Clips ........................................................................................................................15
Launching Scenes .....................................................................................................................16
Stop, Solo, Mute ......................................................................................................................16
Record .......................................................................................................................................17
Capture MIDI .............................................................................................................................17
Quantise ....................................................................................................................................17
Click ...........................................................................................................................................17
Undo..........................................................................................................................................17
Arm/Select (Launchkey 49, 61 and 88 only) ..................................................................................... 18
Drum Mode - Playing and Recording Drums .....................................................................................18
Using Ableton Live’s Mixer ..........................................................................................................19
Pots ...........................................................................................................................................19
Faders (Launchkey 49, 61 and 88 only) ............................................................................................20
Device Mode - Navigating and Controlling Devices .........................................................................21
Device Select.............................................................................................................................22
Device Lock ...............................................................................................................................22
Transport Functions ......................................................................................................................23
3
Working with Cubase ............................................................................................................. 24
Setup ............................................................................................................................................24
Pot Modes and Fader Modes (49, 61, 88 key) .............................................................................25
Device mode .............................................................................................................................25
Volume mode ............................................................................................................................25
Pans Mode ................................................................................................................................25
Sends (Sends A and B) ..............................................................................................................25
Pad Mode ..................................................................................................................................... 26
Session Mode ............................................................................................................................ 26
Fader Buttons (Launchkey 49, 61 and 88 only) ............................................................................26
Select Mode ..............................................................................................................................26
Arm Mode .................................................................................................................................26
Transport Controls ........................................................................................................................27
Track ◄ ► Buttons ..................................................................................................................27
> Pad (Scene Launch) ................................................................................................................27
Standalone Features ...............................................................................................................28
Grid ..............................................................................................................................................28
Drum Mode ...............................................................................................................................28
Scale Chord Mode ....................................................................................................................28
User Chord Mode ......................................................................................................................30
Fixed Chord...............................................................................................................................31
Scale Mode ..................................................................................................................................33
Custom Modes .............................................................................................................................34
Pads ........................................................................................................................................... 34
Pots ...........................................................................................................................................35
Faders (Launchkey 49, 61 and 88 only) ............................................................................................35
Arpeggiator ..................................................................................................................................35
Arpeggiator Pot Controls ..........................................................................................................36
Arp Modes ................................................................................................................................37
Arp Rates .................................................................................................................................. 38
Arp Rhythms .............................................................................................................................39
Latch ......................................................................................................................................... 39
Arp Control Lock ......................................................................................................................40
Octave Buttons.............................................................................................................................40
Settings ........................................................................................................................................41
Pot Pickup ....................................................................................................................................41
Navigation Mode - ([...] Button) ..........................................................................................................42
Strum Mode .................................................................................................................................42
Arp Controls in Strum Mode .....................................................................................................43
4
Working with Other DAWs ....................................................................................................44
Logic ............................................................................................................................................. 44
Setup .........................................................................................................................................44
Session Mode ............................................................................................................................ 45
Pots ...........................................................................................................................................47
Faders (Launchkey 49, 61 and 88 only) ............................................................................................48
Arm/Select (Launchkey 49, 61 and 88 only) ..................................................................................... 48
Transport Functions ...................................................................................................................49
Navigation .................................................................................................................................49
Reason .......................................................................................................................................... 50
Setup .........................................................................................................................................50
Transport Control ......................................................................................................................50
Pots ...........................................................................................................................................51
Pads Session Mode ...................................................................................................................51
Navigation .................................................................................................................................51
Preset Browsing ......................................................................................................................... 51
Working with HUI (Pro Tools, Studio One etc.) ..................................................................................52
Setup ........................................................................................................................................52
Pro Tools .................................................................................................................................... 52
Studio One ............................................................................................................................... 52
Pad Session Mode .....................................................................................................................52
Navigation ................................................................................................................................52
Controlling the Mixer ................................................................................................................52
Faders and Fader Buttons (Launchkey 49, 61 and 88 only)............................................................53
The faders always control track volumes for the selected bank of tracks. ................................53
Transport Buttons ......................................................................................................................53
The transport buttons listed below will function as described when used with HUI. ................53
Physical Characteristics ...........................................................................................................54
Weight and Dimensions ...............................................................................................................54
Custom Modes and Components ...........................................................................................54
5
Introduction
Launchkey [MK3] is Novation’s intuitive and fully integrated MIDI keyboard controller for making tracks
in Ableton Live and Steinberg’s Cubase. Designed to give you everything you need to create and play
your music. Made for creators of all abilities, Launchkey gives you inspirational tools to expand your
musical vocabulary.
Launchkey gives you unrivalled access to Ableton Live’s functions, including Capture MIDI, track
arm, quantise, click and loop controls. Not using Ableton Live? No problem, Launchkey also has
full integration with Cubase, Logic and Reason, plus out of the box functionality with other DAWs
including Studio One and Pro Tools, via HUI.
Inspirational features include Scale, Chord and Strum modes and a powerful arpeggiator, which
together extend your musical capabilities and let you create in new ways. Scale Mode transposes keys
and pads played to notes in the scale selected; chord modes let you trigger complex chords with one
finger, while the arpeggiator gives your melodies movement.
Launchkey also works in standalone; the full-size five-pin MIDI output works with any MIDI-compatible
device. Use Novation Components to update firmware and configure Custom Modes. We recommend
updating the firmware right away so your Launchkey is up to date and fully featured.
Key Features
• Designed for Ableton Live: immediate
access to all the controls you need.
• Additional DAW support: Full integration
with Cubase, Logic and Reason, out of
the box functionality with Studio One,
Pro Tools and more via HUI.
• Produce and perform: 25, 37, 49, 61 or
88-note velocity sensitive keyboard and
16 velocity sensitive RGB backlit pads
• Shape your sound: tweak instruments and
effects to perfection using eight rotary
encoders - and 9 faders (Launchkey 49,
61 and 88 only)
• Automatically map scales to the keys:
never hit a wrong note
• Get creative: three chord modes allow
you to trigger chords with one finger,
the powerful arpeggiator gets melodies
moving
• Transport and mixer control: directly
operate playback, recording, pans, mutes
and sends
• Connect to your hardware: 5-pin MIDI Out
works with any MIDI-compatible device
• Control anything MIDI: create custom
mappings for any performance or studio
rig using Novation Components
• Make music immediately: Ableton Live
Lite, virtual instruments and effects
plugins and sample packs included

6
Box Contents
• Launchkey 25, 37, 49, 61 or 88
• USB Type-A to B cable (1.5 meters)
• Safety Instructions
Getting Started
The ‘Easy Start Tool’ provides a step-by-step guide to setting up your Launchkey. This online tool
guides you through the process of registering your Launchkey and accessing the software bundle.
When connecting Launchkey to your computer, it will appear as a Mass Storage Device (MSD), like a
USB drive. Open the drive and open ‘Click Here to Get Started.url’. This will open the Easy Start tool
in your web browser.
Alternatively, visit our website to register your Launchkey and access the software bundle.

7
Troubleshooting and Support
For help getting started with your Launchkey, please visit:
novationmusic.com/get-started
If you have any questions or need any help at any time with your Launchkey, please visit our Help
Centre.
Here you can also contact our support team:
support.novationmusic.com
Model Specific Features
There are 25, 37, 49, 61 and 88 key versions of Launchkey. The differences between the devices are
outlined below and model specific features are noted throughout this guide.
Model Launchkey 25 Launchkey 37 Launchkey 49 Launchkey 61 Launchkey 88
Velocity Sensitive keys 25 37 49 61 88
Faders - - 9 9 9
Fader/Track Buttons - - 9 9 9
Arm/Select Button - -
Semi-Weighted
Keybed
- - - -
Semi-Weighted Keybed (Launchkey 88 only)
The Launchkey 88 model features a semi-weighted keyboard for a piano-like feel. All 88 keys are
velocity sensitive with four velocity curves to suit your playing– See “Settings” on page 41.
8
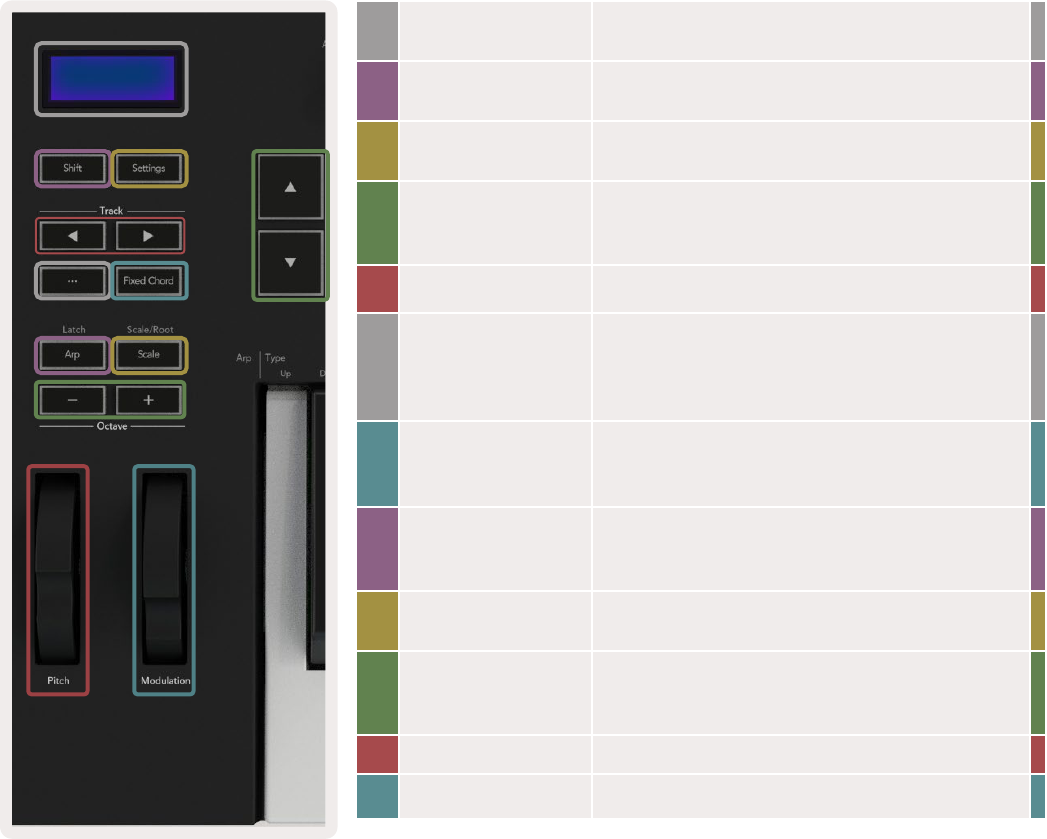
Hardware Overview
1 LCD Display Shows the device status, parameter values,
and lets you navigate through menus.
2 Shift Button Enables access to secondary Shift functions
which are shown in grey text on the hardware.
3 Settings Button Opens the settings menu on the screen. See
“Settings” on page 41 for a reference table
4 ▲▼ Buttons Navigates up and down through rows of pads.
Used for clips and drum racks in Live, chords,
and more.
5 Track ◄ ►Buttons Navigates through tracks in your DAW.
6 … Button
(Navigation Mode)
Pressing the ‘...’ button will put the Launchkey
into Navigation Mode useful for browsing
samples and presets. See “Navigation Mode -
([...] Button)” on page 42.
7 Fixed Chord
Button
Stores a chord that can be played with oe
finger anywhere on the keyboard. See “Fixed
Chord” on page 31.
8 Arp Button Turns on and off Launchkey’s inbuilt
arpeggiator. Long press also locks the pot and
pad Arp controls to on.
9 Scale Button Turns on and off Launchkey’s Scale Mode. See
“Scale Mode” on page 33.
10 Octave - +
Buttons
Transposes the keyboard up or down eight
octaves (C-2 to C5). Pressing both buttons sets
the transposition amount back to 0.
11 Pitch Wheel Bends the pitch of the note being played.
12 Modulation Wheel Modulates software/hardware parameters.
1
2 3
4
5
6
8
11
10
7
9
12

9
19 Faders (Launchkey 49,
61 and 88 only)
Control various parameters using eight available modes: Device, Volume, Send
A, Send B and four Custom Modes. The 9th fader controls Master volume in your
DAW (excluding HUI).
20 Fader Buttons (49,
61 and 88 key models
only)
Control various parameters using eight available modes: Device, Volume, Send A,
Send B and four Custom Modes.
21 Arm/Select Button (49,
61 and 88 Key Models
Only)
Changes the functionality of the Fader Buttons in your DAW to let you select and
record arm tracks.
13 Pots Controls various parameters using eight available modes: Device, Volume, Pan, Sends
and four Custom Modes. The first five pots also control Arp parameters as secondary
functions.
14 Pads Trigger clips and play drum racks in Ableton Live using Session and Drum Modes. Send
custom MIDI messages using four available Custom Modes. Trigger chords in Scale Chord
and User Chord Modes.
15 Device Select Selects the device you want to control in Ableton Live using the pads.
16 Device Lock Locks the currently selected device controls to the pots in Ableton Live, even when you
navigate to a different track.
17 > Button
(Scene Launch)
Launches full rows of clips in Ableton Live.
18 Stop/Solo/
Mute Button
Turns the bottom row of pads into track stop, solo or mute buttons.
13
14
15
16
17
18
19
20 21

10
22 Capture
MIDI
Capture any recently played MIDI notes in your
DAW (supported by Live, Cubase and Logic).
23 Quantise Triggers the quantise function in Live, Cubase and
Logic, to snap notes to the grid.
24 Click Toggles Logic, Cubase and Live’s metronome on and off.
25 Undo Triggers Logic, Cubase and Live’s undo function.
26 Play, Record, Stop, Loop Controls the transport in your DAW.
22
26
23 24 25
Getting Connected
Connecting Launchkey with a Computer
Your Launchkey is USB bus-powered, it’s powered when you connect it to your computer with a USB
cable. When connecting Launchkey for the first time, visit Components to make sure you have the
latest firmware. This will make sure you have all the latest features enabled.
Power and MIDI via USB
USB Cable
Note: When connecting Launchkey to a Mac you may see the Keyboard Setup Assistant. This is
because Launchkey functions as a computer keyboard device in Navigate Mode. Please close the
Keyboard Setup Assistant.
Connecting Launchkey with External MIDI Enabled Instruments
If you want to use the 5-pin DIN socket for MIDI output on your Launchkey without a computer, you
can power the unit with a standard USB power supply (5V DC, minimum 500mA).
MIDI Device/Sound
Module
USB
Power
MIDI Cable

11
Working with Ableton Live
We’ve designed your Launchkey to work seamlessly with Ableton Live, with deep integration through
powerful production and performance controls out of the box. In addition, you can modify your
Launchkey to suit your needs with Custom Modes. Launchkey’s functionality with Ableton Live is
detailed below.
Installation
If you already own Ableton Live, open the program and plug in your Launchkey. If you don’t yet own
Ableton Live, register your Launchkey at novationmusic.com/register to download and install your
included copy of Ableton Live Lite. If you have never used Ableton Live before, we recommend visiting
our Easy Start Tool (see ‘Getting Started’). There you’ll find videos covering installation, the software’s
basic features, and how to get started making music with your Launchkey.
Setup
With Ableton Live installed, plug your Launchkey into your Mac or PC’s USB port. When you open Live
your Launchkey will be automatically detected and enter Session Mode.
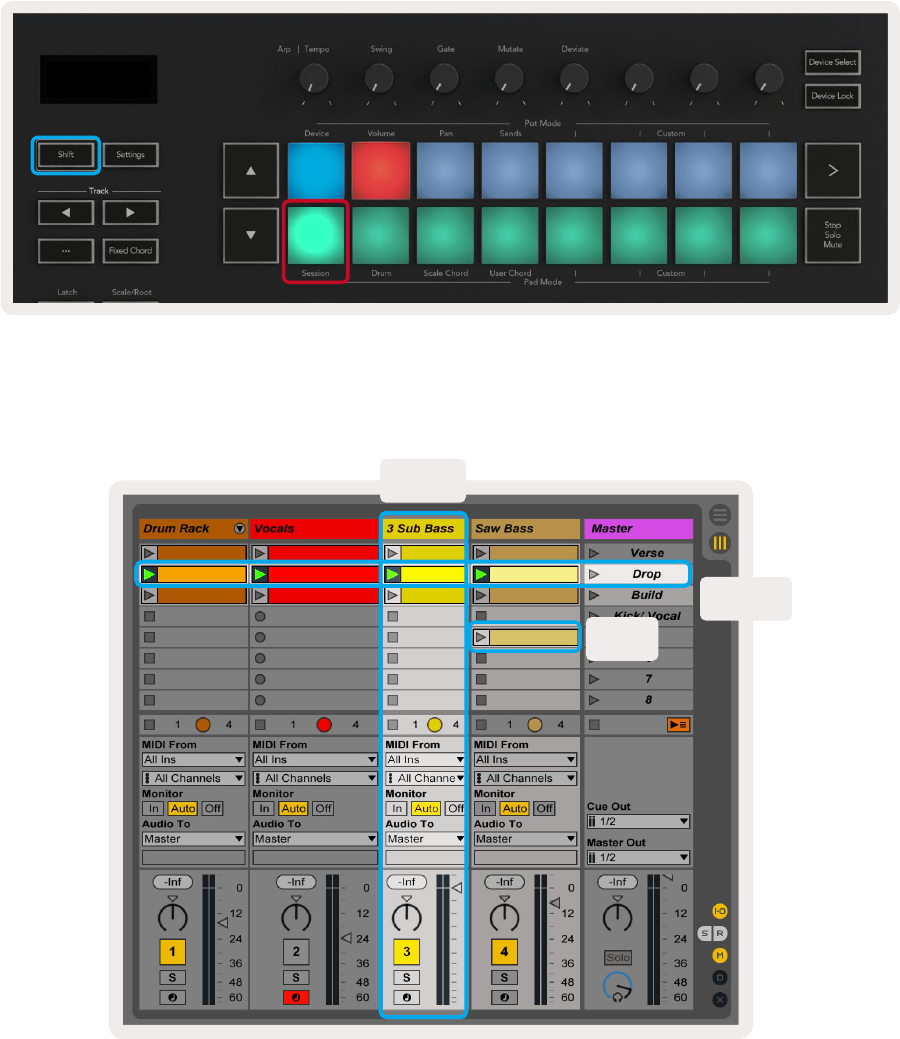
Press Shift on your Launchkey and your pad lights will look like the image below. The top row of pads
(blue) select behaviour or “Mode” of the Pots above, while the lower row of pads (green) select the
behaviour or mode of the pads. A red pad shows this mode (Volume) is assigned to the faders (49, 61
and 88 key models only).

12
If your pads do not match the image above you’ll need to set up Ableton Live’s Control Surface
Preferences. To do this, find the ‘Link Tempo MIDI’ Preferences menu in Ableton Live:
Windows: Options > Preferences > Link Tempo MIDI
Mac: Live > Preferences > Link Tempo MIDI
This window varies in different Ableton Live versions. The MIDI setup stays the same.
In the Link Tempo MIDI tab you need to copy the settings shown above. Select Launchkey MK3 from
the Control Surface menu. Under Input and Output select:
Input - ‘Launchkey MK3 [...] (LKMK3 DAW OUT)’ on Mac or MIDIIN2 (LKMK3 MIDI) on Windows
Output - ‘Launchkey MK3 [...] (LKMK3 DAW IN)’ on Mac or MIDIOUT2 (LKMK3 MIDI) on Windows.
Match the Track, Sync and Remote settings in the screenshot above. MPE is not used for the
Launchkey.
If you’re having trouble getting your Launchkey working with Ableton Live, please visit our Easy Start
Tool for video explanations.
13
Session Mode
Session mode controls Ableton Live’s Session View. To access Session mode on your Launchkey hold
Shift and press the “Session” pad (bottom left pad). The Session pad will brighten:
Session View is a grid that consists of clips, tracks and scenes (shown below).
Scene
Clip
Track

14
Launchkey’s Session mode provides an 8x2 grid of the clips in your Session View. Example of
Launchkey’s pads in Session mode:
Scenes are rows of clips. Launching a scene will launch all clips in that row. This means you can
arrange clips into horizontal groups (across tracks) to form a song structure, launching scene after
scene to progress through a song.
Again, to access Session mode on your Launchkey by hold Shift and press the Session pad (the bottom
left pad).
In Session mode, the pads represent the grid of clips found inside the coloured rectangle in Ableton
Live’s Session View. The image below shows the rectangle (orange) extending from the left-most track
to the Master track:
Clips are typically loops that contain MIDI
notes or audio.
Tracks represent virtual instruments or audio
tracks. MIDI clips placed on instrument tracks
will play back on the instrument assigned to
that track.

15
Any changes you make to clip position or colour within Ableton Live are shown in the Session mode of
Launchkey. Unlit pads show empty clip slots.
You can navigate around Session View by pressing the ▲▼and the track ◄ ► buttons.
You can move the currently selected grid of clips (inside Ableton Live’s coloured rectangle) up or
down. The ▲ button moves the grid of clips up one row. The ▼ button moves the grid of clips down
one row.
The track ◄ ► buttons will select the adjacent left or right track. This will automatically arm the track
to receive MIDI.
Launching Clips
Pressing pads will launch clips in the corresponding location in your Session View. Pads will pulse
green to show a clip is playing. Pressing the pad again will relaunch the clip, and pressing an empty
pad below/above stops playback on that track.
How fast clips stop or relaunch is set by Ableton Live’s Global Quantization Menu at the top of the Live
screen. By default, this is set to one bar, but can go as fast as 1/32 notes, or as slow as 8 bars. It can
also be set to ‘None’ so clips change immediately.

16
Launching Scenes
Pressing the Scene Launch button (>) launches scenes in Ableton Live. This means all the clips in the
top row of the pad grid will start together.
Stop, Solo, Mute
In Session mode, you can use the Stop, Solo, Mute pad to change the functionality of the bottom
eight pads so they no longer launch clips.
The Stop, Solo, Mute pad toggles between four different states which affect tracks in different ways:
Stop (Red) – Press a pad in the bottom row to stop any clip on the corresponding track. The red pads
dim if tracks are not playing.
Solo (Blue) - Press a pad in the bottom row to solo corresponding tracks, you’ll only hear tracks with
Solo on. The pads dim if tracks are not soloed (i.e. they are silent). Soloed tracks glow bright blue.
17
Mute (Yellow) – Press a pad in the bottom row to Mute corresponding tracks. The pads dim for muted
tracks, leaving pads for unmuted tracks at their original brightness and colour.
Clips (Multi-colour) – the fourth press (after toggling through Stop, Solo and Mute) changes the
function of bottom pads to the default Session mode, where the bottom row of pads will again
represent clips.
Record
Pressing this button triggers Session Record while in Session Mode. This will allow you to record what
you’re playing to new clips as well as overdub existing clips.
Capture MIDI
Pressing this button triggers the Capture MIDI function. It retrospectively captures recently played
MIDI notes in the record-armed track. If you are not recording, but you play something that sounds
great, you can use Capture MIDI to send it straight into a clip.
Quantise
This button quantises MIDI notes in the currently active clip on the currently selected track. This snaps
the MIDI notes to the grid, helping to keep them in time with the beat.
Click
Turns Ableton’s metronome on/off.
Undo
Triggers the undo function.

18
Arm/Select (Launchkey 49, 61 and 88 only)
The “Arm/Select” button (highlighted in red below) sets the functionality of the eight “Fader Buttons’’
(highlighted below in blue) to either arm tracks, enabling recording; or to select a track. While set to
Arm the buttons light up red to show a track armed for recording and dim red when not. Unlit buttons
show no track is associated with the fader.
When set to Select the colour of the buttons will match the tracks in Live. Pushing a Fader Button
(highlighted blue) will select that track.
Drum Mode - Playing and Recording Drums
To enter Drum Mode hold the Shift button and press the Drum pad (2nd from the bottom left).
Drum mode transforms your Launchkey’s pads into velocity-sensitive drum pads.
If a Drum Rack is loaded onto the selected Live track, and your Launchkey is in Drum mode, the
pads light up the colour of the track. When played the pads will light up green. These pads will play
whatever Drum Rack pads are visible on your computer screen. Pressing the ▲▼ buttons scrolls up/
down through a Drum Rack’s bank of 128 pads, each press moves up or down the rack in banks of 16.

19
When using Ableton’s Drum Racks, Drum mode will – apart from triggering sounds – select the
associated Drum Rack pad within a Drum Rack. This means on release, the last played Drum Rack pad
lights up white and Ableton Live shows the selected Drum Rack pad on the screen.
Using Ableton Live’s Mixer
The eight Pots and eight Faders (49, 61 and 88 key models only) provide hands on control over
Ableton Live’s mixer. You can control the Volume, Pan, Send A and Send B levels of the tracks in your
project.
Pots
The eight pots provide hands-on, rotary control over Ableton Live’s mixer components. To prevent
any sudden jumps in control when you start turning the pots we have implemented a “Pot Pickup”
function.The pots will only start controlling the parameter once it has been moved to the position
shown in Live. For example if a parameter is set to 0 in Live you will need to turn the pot all the way to
the leftmost limit for it to be picked up (this can be turned off in Live’s preferences).
When your Launchkey is connected to Live, the pots automatically enter Device Mode, to assign the
pots to Live’s Mixer (Volume, Pan, Sends) hold the Shift button and press the labelled pads in the
upper row.
Volume - This mode allows you to control Track volumes using the pots. To select this mode, hold the
Shift button and press the Volume pad.

20
Pan Mode - This mode allows you to control Track Pan values using the pots. To select this mode,
hold the Shift button and press the Pan pad.
Sends Mode - This Mode allows you to control Track Sends values using the pots. To select this mode,
hold the Shift button and press the Sends pad. On the first press the pots control to Send A, on the
second press they control Send B.
Note: a mode cannot be assigned to both the pots and the faders at the same time. If a mode is
already mapped to the Faders, the pad will appear red while Shift is held, pressing a pad whilst in this
state will not assign the Pots to that mode.
Faders (Launchkey 49, 61 and 88 only)
The nine faders provide, linear control over a range of Ableton Live’s mixer parameters. To select one
of these modes hold the Shift button (highlighted in red below) and press the respective Fader button
(highlighted in blue below).
When your Launchkey is connected to Live, the faders default to Volume Mode. In this mode the first
eight faders control Ableton Track Volumes. The ninth Fader always controls the Master Volume no
matter what mode you select. The faders can also be set to control the Send A, Send B levels.
Note: you can’t assign a mode to both the pots and faders at the same time. If a mode is already
mapped to the pots, then the respective Fader button will appear red while Shift is held, pressing a
Fader button whilst in this state will not assign the faders to that mode.

21
Device Mode - Navigating and Controlling Devices
Device mode allows you to control an Ableton “Device” (Ableton or 3rd-party instruments and effects)
on a Live track. When your Launchkey is connected to Live, the pots will automatically sync to the first
device within the current Live track.
You can also assign faders to control devices (49, 61 and 88 key models only). To do this ensure the
pots are not already assigned to Device mode (you can’t assign a mode to both pots and faders at the
same time) hold the Shift button and press the first Fader button. To re-assign control over devices to
the Pots hold the Shift button and press the first pad in the top row.
If the Track contains an Effect or Instrument Rack the assigned faders or pots sync to the first rack’s
eight Macro Controls. The image below shows an Instrument Rack preset called ‘Percussion 1’. In
this example your Launchkey’s eight pots control a variety of important parameters including sample
volumes, stretch and start times as well as the Dry/Wet values of Delay and Reverb effects.
If the Track does not contain a Rack then Device Mode will sync to a selection of eight parameters of
the first device. To navigate between devices on a track containing multiple see ‘Device Select/Lock’.

22
Device Select
The “Device Select” button allows you to navigate through devices on a track. Press and hold this
button to access this function. The drum pads and ▲▼ arrow buttons will light up purple.
The▲▼ arrow buttons can be used to navigate through the devices. The ▲ button going left and
▼ button moving to the right. The pads allow you to choose which page of controls the area is
controlling. The screen displays which device is selected and the parameter being controlled.
Device Lock
The “Device Lock” button keeps the currently selected device and control bank locked to the controls
even if you change the selected track. The button is lit when this feature is active.
To turn device lock off press the Device Lock button again. Selecting a new device whilst the Device
Lock button is on will lock the control to the newly selected device.

23
Transport Functions
The buttons shown below provide key functionality for performing and recording with Ableton Live.
Play - Pressing this button starts playback.
Stop - Pressing this button stops playback.
Record - Pressing this button triggers Session Record while in Session Mode. This will allow you to
record what you’re playing to new clips as well as overdub existing clips.
Loop - Triggers Ableton’s Loop Switch

24
Working with Cubase
Setup
Cubase 12+ comes with the Launchkey [MK3] script preinstalled. You need Cubase 12+ for the
Launchkey to work. Cubase automatically detects your Launchkey [MK3]. The Launchkey defaults to
the following modes:
• Pad Mode – Session Mode.
• Pots – Volume (Launchkey 25/37) or Pan (Launchkey 49/61/88).
• Faders (Launchkey 49/61/88) – Volume
For quick access to the modes and information for the Launchkey you have connected click on:
Studio > Studio Setup... > MIDI Remote > Open MIDI Remote in Lower Zone.
You will see the following, where you can see what each control on the Launchkey is mapped to.

25
Pot Modes and Fader Modes (49, 61, 88 key)
Above the top row of pads are the Pot modes. Hold Shift and press the pad for the mode you want to use.
You can reassign the faders on Launchkey 49, 61 and 88 holding Shift and pressing the fader buttons.
When you move a pot or fader the screen momentarily displays the parameter and its current value. You
can assign these modes to either pots or faders at any given time, but both cannot have the same mode.
Device mode
Device mode links the pots or faders to control Cubase’s ‘Track Quick Controls’. To assign the faders to
Cubase’s Track Quick Controls, hold Shift and press the Device button below fader one.
Volume mode
Volume mode links the Launchkey’s pots or faders to control the volumes for the track bank you select.
Pans Mode
Pans Mode links the Launchkey’s pots to the pans for the bank of tracks you select. You cannot assign
Faders to Cubase’s Pan controls.
Sends (Sends A and B)
Pressing the Sends pad once sets the pots to control the first bank of sends (Sends A) for the bank of
tracks you select. Pressing the Sends pad when you’re already in Sends mode toggles the pots between
Sends A and Sends B in Cubase.
Hold Shift and press the Sends A or Sends B button beneath faders three or four to assign either Sends
bank to the faders.

26
Pad Mode
Session Mode
Session mode allows you to control Select, Record Arm, Solo and Mute. Session Mode has two pages:
1. Page 1 is for Select (top row) and Arm controls (bottom row).
2. Page 2 is for Mute (top row) and Solo (bottom row).
You can move between pages using the Stop/Solo/Mute pad. The arrow buttons light to show which page
you can move, and the screen momentarily shows the pad mode.
On page 1 the pads show the current bank of eight tracks lit the track colours and the arm controls lit red.
If the bank has less than eight tracks, unavailable controls won’t light. The selected track is brightly lit, and
unselected tracks are dimly lit. For Arm Controls, armed tracks light bright red.
On Page 2 the top row controls Mute and the bottom row controls Solo. If the function is active, the pad is
brightly lit. These pad colours match Cubase for Solo (red) and Mute (yellow).
Fader Buttons (Launchkey 49, 61 and 88 only)
The “Arm/Select” button toggles the Fader Buttons between the Arm and Select modes:
Unlit fader Buttons show no track is associated with that fader channel.
Select Mode
In Select mode, the button LEDs match the Cubase track colour and are dimly lit. Pressing a Fader Button
selects the track in the current bank. The button LED for the track you select turns a brighter shade of the
track colour. You can select one track at a time.
Arm Mode
In Arm mode, the button LEDs light dim red. Pressing a Fader Button arms the track in the current bank
and turns the button LED bright red. You can arm multiple tracks at once.

27
Transport Controls
The table below shows how the transport controls on your Launchkey map to the transport and editing
controls in Cubase.
Control Action
Play Starts playback
Stop Stops playback
Record Toggles Cubase’s Record Button.
Loop Toggles Cubase’s Loop function.
Capture MIDI Triggers Cubase’s Retrospective MIDI Record
function.
Quantise Triggers Cubase’s Quantise function.
Click Toggles Cubase’s metronome on/off.
Undo Triggers Cubase’s Undo function.
Shift + Undo Hold Shift and press Undo to trigger Cubase’s
Redo function
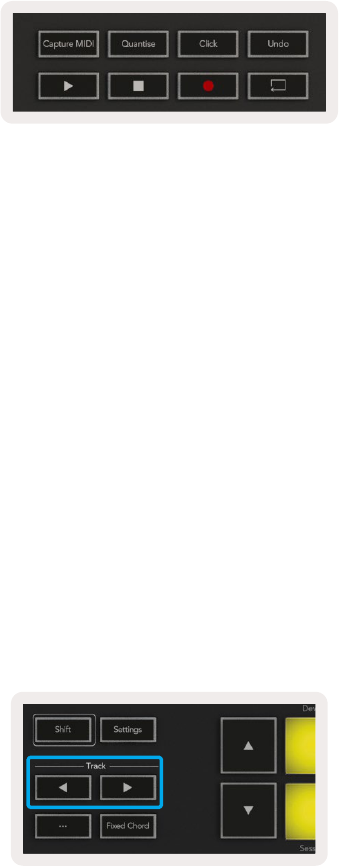
Track ◄ ► Buttons
Press the Track ◄ ► buttons (pads, pots & faders) to bank the pad, pot, and fader controls by eight
tracks. This doesn’t select a new track until you press a pad on the top row. Holding Shift and pressing the
Track buttons banks the current selection by one track.
> Pad (Scene Launch)
This pad doesn’t do anything in Cubase.

28
Standalone Features
Grid
The Grid is made up of the 2x8 velocity sensitive pads. The standalone functions of the pads appear in
grey text around the grid and their uses are detailed below.
Drum Mode
Hold Shift and press the Drum Mode pad (second from bottom left) to enter Drum Mode. Whilst in this
mode the velocity sensitive pads output MIDI notes from C1 to D#2 and will be lit blue.
Chord Modes
Scale Chord Mode
Scale Chord Mode provides you with banks of predefined chords. To access these banks press the
Scale Chord pad while holding the Shift button. Each row of pads will now contain a bank of chords.
The root key is C minor by default, to change this see Scale Mode.

29
The first and last pad of each row light up more brightly than the middle pads to show root chord
position. To navigate between pages of chords use the ▲▼ navigation buttons.
On the first page the top row of pads are lit blue and contain triads, the bottom row of pads contains
7ths and is lit a darker blue. Pressing the ▼ button will reveal a row of 9ths, with the pads lit up in
purple, below this are 6/9ths and the pads will light up in pink.
When you press a pad it lights up green and returns to its original colour when released.
To change the octave of the chords hold Shift and press the ▲▼ buttons, these provide access to a
range of -3 to +3 octaves.

30
User Chord Mode
In User Chord Mode you can assign up to six-note chords to each pad. Your Launchkey saves these
chords to its internal memory and are accessible between power cycles. Any assignments you make
are still available even after you turn Launchkey off and on again.
To enter User Chord Mode hold the Shift button and press the User Chord pad (bottom row, fourth
from the left).
To assign a chord to a pad press and hold the pad and press the notes you want to assign from the
keyboard. You can assign up to six notes to each pad. You can input notes with individual key pushes,
meaning you do not need to hold down all the notes at once so long as the pad is being held.
When you assign a chord to a pad it lights up blue. When you press a pad it plays the chord and lights
up green. If no chord is assigned the pad will not be lit.
To delete a chord assignment from a pad hold the stop/solo/mute button, the pads with assigned
chords will turn red. Press a red pad to delete the assigned chord, once deleted the pad will no longer
be lit.
31
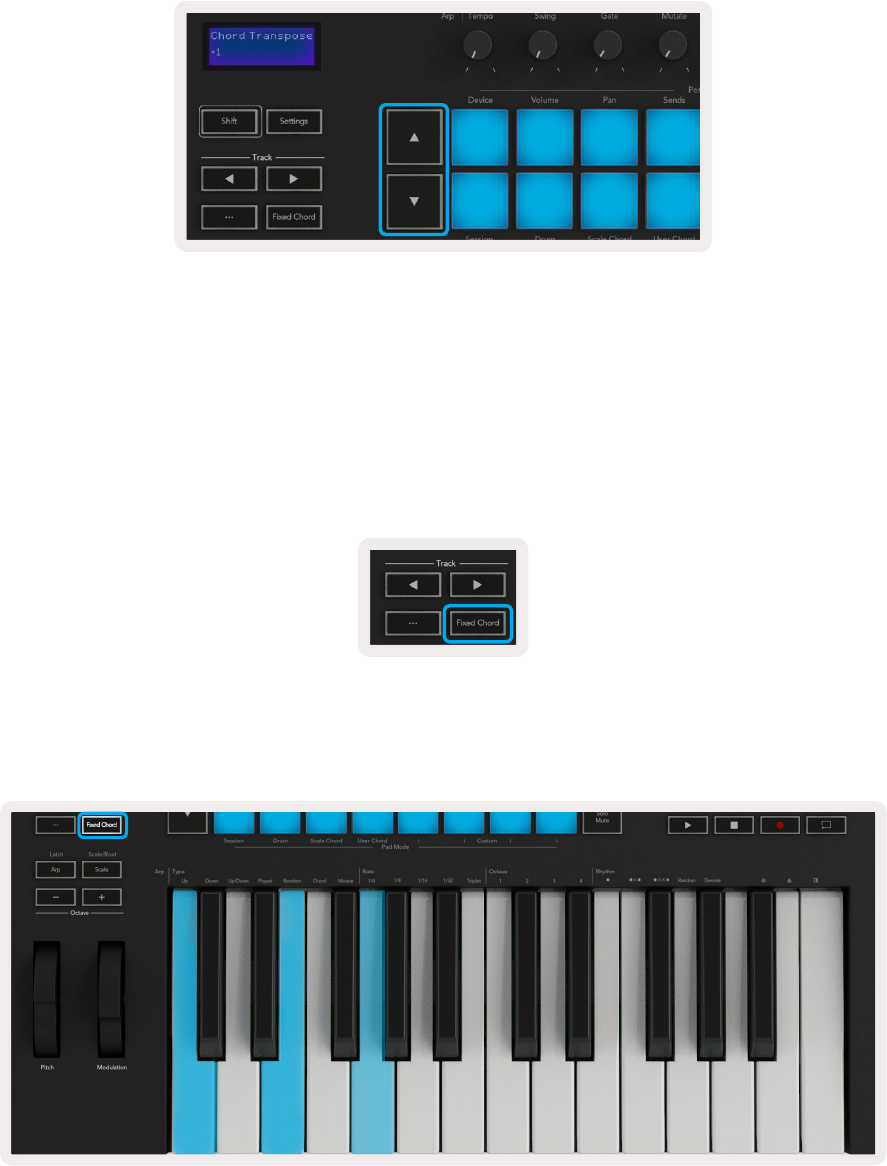
You can use the ▲▼ buttons to transpose the chord bank in semitones between -12 and +12, any
changes show on the screen.
Fixed Chord
Fixed Chord lets you play a chord shape and then transpose it by pressing other keys.
To set a chord press and hold the Fixed Chord button. Then, while still holding the button, press and
release the keys you wish to be part of your chord. The chord is now stored.
The Launchkey considers the first note you input into the chord as the ‘root note’, even if you add
notes lower than the first one, like in the example below:
Press and hold the Fixed Chord button, then press and release C, then E, and finally G (a C Major
chord). The unit stores this as the ‘fixed chord’. Release the Fixed Chord button.

32
Major chords will now sound on whatever key you press. For example, you can now press F to hear an
F Major chord (shown below), or Ab to hear an Ab Major chord, etc.

33
Scale Mode
In Scale mode, you can set the entire keyboard, or the pads in instrument mode, to only play notes in
a scale you select. Press the “Scale” button to activate this mode, the button lights showing the mode
is active.
The screen displays a message to show the active scale (C minor by default).
To change the scale, you need to access Scale Settings. Hold the Shift button and press the Scale
button. The Scale button flashes to show you are in scale settings.
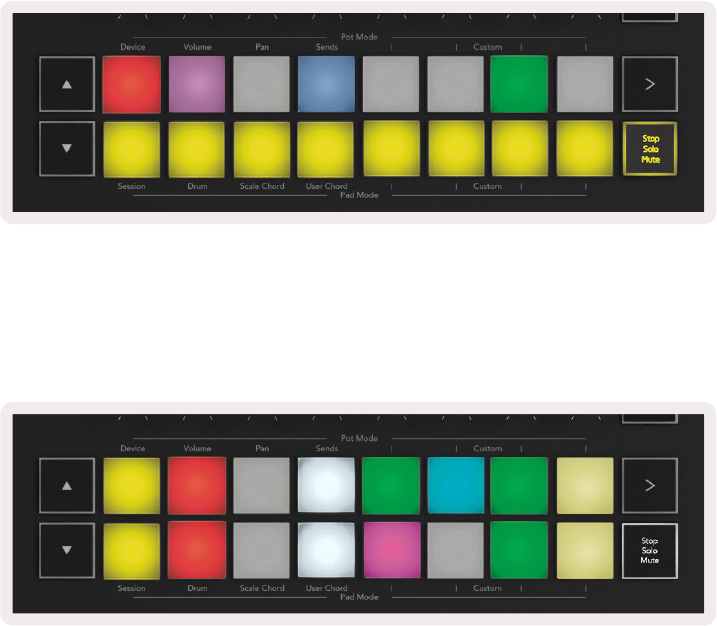
To change the root note, press the corresponding key (all the black keys represent sharps #). The pads
change the Scale type. In scale setting mode, they look like this:
The bottom row of pads light so you can select a scale, the screen shows the selected scale. From left
to right the pads select the following scales:
1. Minor
2. Major
3. Dorian
4. Mixolydian
5. Phrygian
6. Harmonic Minor
7. Minor Pentatonic
8. Major Pentatonic.
To exit scales setting mode press the Scale button or any function button. The settings mode also
times out after ten seconds of inactivity, with the keyboard returning to its previous state.

34
Custom Modes
Using novation Components, you can configure the Launchkey’s knobs, pads and faders (49, 61 and
88 key models only) to send custom messages. We refer to these custom message configurations as
Custom Modes. To access the custom modes press Shift and the Custom Mode Pads/Fader buttons.
Note that in standalone operation, Device, Volume, Pan, Sends and Session modes are not available.
To access Components, visit components.novationmusic.com using a Web MIDI-enabled browser
(we recommend Google Chrome, Edge or Opera). Alternatively, download the standalone version of
Components from your Novation Account page.
Pads
Launchkey has four pad Custom Modes. To access these Custom Modes hold Shift and then press any
of the four Pad Mode Custom buttons. Pads can send MIDI notes, Program Changes messages and CC
messages using Components.
Your Launchkey comes with four default custom pad modes. From left to right the default pad modes
offer the following functionality:
• Minor Scale: Each pad is a note in the C minor scale across 2 octaves.
• Alt Drums: An alternative to the Drum Mode layout of notes for drum playing.
• CC switches: A section of CC switches for MIDI mapping with a row of momentary and a row of
toggle.
• Programs 0-15: First 16 programs changes for selecting your presets.

35
Pots
Launchkey has four pot Custom Modes. To access these Custom Modes hold Shift and then press any
of the four Pot Mode Custom buttons. Pots can send custom CC numbers using Components.
Faders (Launchkey 49, 61 and 88 only)
Launchkey has four fader Custom Modes. To access these Custom Modes hold Shift and then press any
of the four Fader Mode Custom buttons. Faders can send custom CC numbers using Components.
Arpeggiator
Pressing the Arp button on the left of Launchkey enables the Arpeggiator which takes your chords and
creates an arpeggio – i.e. it plays each note of the chord one after another. The Arpeggiator will run as
long as keys are held, at the rhythmic value specified by the Arp Rate.
Launchkey’s Arp is a great way to come up with interesting melodies and progressions with ease.

36
Arpeggiator Pot Controls
When you hold the Shift button the pots can transform your arpeggios.
Tempo – This pot speeds up or slows down your arpeggio relative to the Arp Rate. Using Launchkey
as a standalone controller, this tempo ranges from 60 BPM to 187 BPM. However, when synced with
Ableton Live, this pot will have no effect.
Swing – This pot sets the amount every other note is delayed, resulting in a swung rhythm. To change
the Arpeggiator’s Swing, hold the Arp button, and turn the pot labelled Swing. By default (centre
position), swing will be set to 0% (meaning no swing), with extremes of 80% (very swung) and -80%
(negative swing). Negative swing means every other note is rushed, instead of delayed.
Gate – Adjusting this pot creates longer or shorter MIDI notes, resulting in either a more ‘staccato’
arpeggio, or a more fluid, ‘legato’ one. This pot goes from 0% to 200% of the space between notes.
For notes have swing applied, both notes retain the same gate length.
Mutate – After you select Mutate as the Arp Mode, hold the Shift button and turn this pot to add
variation to your arpeggio. A new ‘mutation’ occurs with each turn of the pot. When you stop turning
the pot notes are set and will repeat indefinitely.
Deviate – After selecting Deviate as your Arp Rhythm, turn this pot to make rhythmic variations. With
every turn of this pot, you’ll create a different pattern of rests.
Note: the pots will also control arp functions with Arp Control Lock active.

37
Arp Modes
After turning on the Arp you’ll be in one of seven Arpeggiator types, each resulting in arpeggios of
different note orders. To change the Arp Type, press and hold the Shift button, and then press the key
corresponding to your desired mode.
Up – Notes play in ascending order (i.e. rising in pitch). As you add notes, the number of notes in the
sequence grows but stay in ascending order. For example, you may start by holding down a first note -
E3 - then add two more notes - C3 and G3. The resulting arpeggio will be C3, E3 and G3.
Down – This Mode is similar to Up Mode, but notes play in descending order (e.g. G3, E3, C3).
Up/Down – This arpeggio Mode starts by playing notes in ascending order. Then, after reaching the
highest note, the notes descend towards the lowest note, which plays once before the arpeggio rises
again and stops before reaching the lowest note. This means when the pattern repeats, the lowest
note only plays once.
Played – Notes are repeated in the order you pleayed them.
Random – In this Mode, the order of the chord notes is randomised indefinitely.
Chord – All notes play back on every rhythmic step (see Arp Rate). This makes playing fast chords
easier.
Mutate – This mode creates its own notes and adds them to the arpeggio by turning the pot under
the label ‘Mutation’. Turn this pot to alter your arpeggio in unexpected ways. The pot itself goes from
‘gentle’ (left) to ‘crazy’ (right) – i.e. 25% left will add subtle variation to your arpeggio, while 99% right
will give you very unexpected results. When you’re happy with what you hear, stop turning the pot.
The notes will repeat indefinitely.

38
Arp Rates
These options specify the speed of the arpeggiated notes. Since each note plays immediately after the
end of the previous one, a shorter rate (eg. 1/32) plays an arpeggio faster than longer one (e.g. 1/4).
Rate options are common musical note values: quarter (1⁄4), eighth (1/8), sixteenth (1/16) and thirty-
second (1/32) notes. To change the Arp Rate, press and hold the Arp button, and then press the key
below 1/4, 1/8, 1/16, or 1/32.
Additionally, you can toggle triplet rhythms on/off for each of the above musical values by pressing
the key below ‘Triplet’. This turns your arpeggio notes into quarter, eighth, sixteenth and thirty-second
note triplets.
Arp Octaves
These four keys specify how many octaves your arpeggio spans. To change, hold the Arp button, and
then press the key below 1, 2, 3 or 4. Choosing an octave higher than 1 will repeat the arpeggio at
higher octaves. For example, an arpeggio that was C3, E3, and G3 at 1 octave will become C3, E3, G3,
C4, E4, and G4 when set to 2 octaves.

39
Arp Rhythms
Arp Rhythms add musical rests (silent steps) to your arpeggio’s pattern, allowing for greater variations
in your arpeggios. Hold Arp then press one of the following keys:
Dots - These three options are rhythmic patterns.
• O – The normal Arpeggiator setting, this places a note on every division of the selected Arp rate.
• OXO (note - rest - note) – This rhythm adds a rest between every pair of notes.
• OXXO (note - rest - rest - note) – This pattern adds two rests between every pair of notes.
Random - This option creates random rests for random lengths. Each step has a 50% chance of being
either a note or a rest. If it is a rest, the note isn’t skipped but shifts to the next step.
Deviate - This is the most unique Arp Rhythm, and makes many variations of notes. It uses the Deviate
rotary pot, where every turn creates a different rest pattern.
Latch
Latch lets you use the Arpeggiator without holding down keys. Any notes you press and release
concurrently will form a new arpeggio pattern which the arpeggiator ‘latches’ onto. The arpeggiator
then continues to play as if you never released the keys. When you press a new key, the previous
arpeggio erases and a new one forms.
To turn on Latch, press and hold the Shift button, and then press the Arp button.

40
Arp Control Lock
Long pressing the Arp button turns on Arp Control Lock. When Arp Control Lock mode is on, the Arp
controls on the pots and pads are accessible directly without requiring a Shift press. This is useful for when
you want to play the arp using one hand.
When Arp Control Lock is on, the screen updates to show you and the Arp button LED pulses. Press the
Arp button again to turn off Arp Control Lock.
The symbols are reserved for functionality coming to the Launchkey in the future (See “Strum Mode” on
page 42). Keep an eye out for upcoming Firmware updates that unlock further functionality.
Octave Buttons
Pressing the Octave buttons will increment and decrement the keyboard octave by 1. The available
octaves range from C-2 to C8. Shift pressing the Octave buttons will transpose the keyboard by up or
down by one semitone.
To reset the keyboard octave to 0 press the Octave +/- buttons at the same time. To reset the keyboard
transposition to 0, hold Shift and press the Octave +/- buttons at the same time.

41
Settings
Pressing the Settings button brings up the settings menu on the screen. You can scroll through the list of
settings using the scene ▲▼ buttons. To adjust the values of the settings, either use the pads or the track
◄ ► buttons. The available settings are shown below.
Setting Description Value Range Default
Keys MIDI Channel Sets the MIDI channel for the Keys 1 -16 1
Chords MIDI
Channel
Sets the MIDI channel for the Scale Chord and
User Chord
1 -16 2
Drums MIDI Channel Sets the MIDI channel for the Drum Mode 1 -16 10
Velocity Curve (Keys) Select a velocity curve for the keys Soft /Normal /Hard
/Off
Normal
Velocity Curve (Pads) Select a velocity curve for the pads Soft /Normal /Hard
/Off
Normal
Pad Aftertouch Set the Aftertouch type Off /Channel /Poly Poly
Pad AT Threshold Set the threshold in which the aftertouch kicks in Low /Medium /High Normal
Pot Pick-up Turn pot pickup on/off Off /On Off
MIDI Clock Out Turn MIDI clock out on/off Off /On On
Brightness Adjust the brightness of the pads and the screen 1-16 9
Vegas Mode* Turns on/off Vegas Mode* Off /On On
*Vegas Mode is the light show that is shown on the pads and fader buttons after a period of inactivity.
Pot Pickup
You can turn on Pot Pickup from the settings menu. With Pot Pickup on, your Launchkey saves the states
of the various pages for the Pots and Faders. The control will only output MIDI when the control has been
moved to the position of the saved state. This is to prevent any sudden jumps in the control value.
If you move a control but it is not ‘picked up’ the screen displays the saved value until it has been moved
to the pick up point.

42
Navigation Mode - ([...] Button)
Pressing the ‘...’ button will put the Launchkey into a navigation mode useful for browsing samples and
presets. You will see the pads light up as shown below. The four blue pads form a left, right, up and down
keypad which replicates the cursor control keys on your computer keyboard. The green pad replicates
the enter/return key on your computer keyboard. You can use the pads to browse and select presets and
samples in your DAW or a software plugin as well as any other function of a keyboard’s cursor keys and
enter button.
Strum Mode
Strum mode is a feature of the arpeggiator controls. Strum mode is inspired by playing stringed
instruments such as guitar, harp and also the popular “Omnichord” style control. It uses the modulation
wheel for a controlled, performable strum of your arpeggio. You can think of Strum mode as the
Modulation wheel being virtual strings you can strum.
To enter Strum mode, while in the Arp Controls page, press the sixth pad on the top. This pad toggles
Strum mode on or off. When on, the pad is lit green, when off, the pad is dimly lit red. You can also access
Strum mode by holding the [Shift] button and pressing the key labelled [Ø] on the keyboard.
Once Strum mode is on, hold notes on the keyboard and use the Modulation wheel to play the virtual
strings on your chords. In Strum mode you can still access much of the arpeggiator’s behaviour, the only
exception to this is the Rhythm page which will become inactive while Strum mode is engaged.
43
Arp Controls in Strum Mode
Mode – This lets you set the direction or order of notes on the modulation wheel.
Up – raising the Mod Wheel will play the notes in an ascending order.
Down – raising the Mod Wheel will play the notes in a descending order.
Up/Down – raising the Mod Wheel will play the notes in an ascending then descending order.
Played – raising the Mod Wheel plays the notes in the order they were played into the arpeggiator.
Random – raising the Mod Wheel will play the notes in a random order.
Chord – raising the Mod Wheel will play full chords and apply up to four inversions on the chord shape.
Mutate – raising the Mod Wheel will follow the Arp’s Mutate rotary control setting.
Rate – This will let you increase the duration or “ring out” time of the strum’s individual notes. ¼ will give
the longest note duration with 1/32 giving the shortest duration.
You can add further fine control of the note’s duration with the “Gate” rotary control.
Octave – You can add extra octaves to the Strum mode, in effect giving a much wider range of notes or
virtual strings accessible from the Mod Wheel.
Mod Wheel – When set to one octave the Mod Wheel places the virtual strings within a range of one
octave. When set higher, the amount of virtual strings will increase and the range of notes will also
increase within the Mod Wheel area.
Latch – This lets you latch on the arpeggiator in the normal way so notes on the keyboard do not need to
be held down.
Note: When the Arp latch is on, in Strum mode, you will not hear any notes played on the keyboard until
you use the Mod Wheel to strum through the arpeggio.

44
Working with Other DAWs
Launchkey can act as a general-purpose MIDI controller for Logic, Reason as well as a range of other
DAWs using HUI (human user interface). In addition to the Note On/Note Off messages sent from the
keys, each of the pots, faders and pads transmit a MIDI message you can customise using Novation
Components. This allows you to configure your device to use these messages as you wish.
Logic
Your Launchkey can serve as a controller for many tasks in Logic Pro X. The behaviour described in
the Standalone Features section remains the same in Logic Pro X. In addition, you can modify your
Launchkey to suit your needs with Custom Modes. The functionality of the Launchkey dedicated to
Logic Pro X is detailed below.
Setup
To set up Launchkey with for use with Logic Pro X you will need to download the necessary drivers, to
do this follow the following steps:
• Follow the link to the Novation Customer Portal on novationmusic.com
• Register Launchkey [MK3]
• Go to My Hardware > Launchkey [MK3] > Downloads/Drivers
• Download and run the Logic Script Installer
With Logic Pro X and the script installed, plug your Launchkey into your Mac’s USB port. When you
open Logic your Launchkey will be automatically detected. Now if you hold the Shift button on the
Launchkey the pads will look similar to this:

45
If this does not happen you will need to manually choose your Launchkey as a ‘Control Surface’ via the
following path:
Logic Pro X > Control Surfaces > Setup.
Once in the Setup window, choose ‘Install’ from the ‘New’ menu. This, in turn, will open the ‘Install’
window. Scroll to the Novation Launchkey and click ‘Add’.
Session Mode
To access session mode, hold Shift and press the Session Mode pad as shown below. This mode allows
you to enable record or mute and solo Logic tracks.

46
Record/Mute mode - the top row of pads toggles the record arm on the relevant track and will be lit
red, the bottom row toggles the track mute and will be lit yellow. The tracks represented by the pads
include any sends tracks, the top row of pads will not be lit for sends (busses).
Pressing a red pad will arm that track for recording and it will glow a brighter red. When you mute a track
the corresponding pad becomes brighter.
Record/Solo mode - As above, the top row of pads toggles the record arm on the relevant track, the
bottom row of pads will be lit blue and toggles the track solo. When soloed the pad will become a
brighter blue.
You can toggle between the two Record/Solo modes by pressing Stop/Solo/Mute button. Please note
when using Launchkey with Logic Pro X the Stop/Solo/Mute button will only toggle between Solo and
Mute modes, there is no Stop mode. The Stop transport button stops playback.

47
Pots
Device Mode - Links the pots to the parameters, or “smart controls” of the device on the selected track.
For instrument tracks, this is the parameter array of the instrument. To assign the pots to Device Mode
press the Device Pad (upper left) with the Shift button held. Now, when you move a pot, the changed
device parameter and its current value is displayed on the screen for a moment.
The image below shows a track containing a ‘Classic Electric Piano’. In this example your Launchkey’s
eight pots control a variety of important parameters including Bell Volume, Treble, Drive etc.
Volume Mode - Links the pots to the volume control of a project’s tracks, including send tracks (busses).
When you move a pot, the changed device parameter and its current value is displayed on the screen for
a moment.
Pan Mode - Links pots to control the pans for the relevant tracks, including send (busses). When you move
a pot, the changed device parameter and its current value is displayed on the screen for a moment.
Sends Mode - Links the pots to control the sends. When you move a pot, the changed device parameter
and its current value is displayed on the screen for a moment.
Note (49, 61 and 88 key models only): a mode cannot be assigned to both the pots and the faders at the
same time. If a mode is already mapped to the pots, then the respective Fader Button will appear red
while Shift is held, pressing a Fader Button whilst in this state will not assign the faders to that mode.
48
Faders (Launchkey 49, 61 and 88 only)
• Device Mode - Links the faders to the parameters, or “smart controls” of the device on the selected
track (see navigation). For instrument tracks, this is the parameter array of the instrument. To assign
the faders to Device Mode press the Device Fader button (left most) with the Shift button held. Now,
when you move a fader, the changed device parameter and its current value is displayed on the
screen for a moment.
• Volume Mode - Links the faders to the volume control of a project’s tracks, including sends (Bus
tracks). When you move a fader, the changed device parameter and its current value is displayed on
the screen for a moment.
• Sends Modes - Links the faders to control the sends. When you move a fader, the changed device
parameter and its current value is displayed on the screen for a moment.
Note: a mode cannot be assigned to both the pots and the faders at the same time. If a mode is already
mapped to the pots, then the respective Fader Button will appear red while Shift is held, pressing a Fader
Button whilst in this state will not assign the faders to that mode.
Arm/Select (Launchkey 49, 61 and 88 only)
The ‘Arm/Select’ button sets the functionality of the eight ‘Track Buttons’ to either arm tracks, enabling
recording; or to select a track. While set to Arm the buttons light up red when a track is armed for
recording and dim red when not. Unlit buttons show no track is associated with the fader.
When set to Select the buttons will be lit white, with selected tracks being bright and unselected tracks
dim. Pushing a fader button will select that track.
49
Transport Functions
The buttons shown below provide key functionality for performing and recording with Logic Pro X.
• Capture MIDI - pressing this will trigger the “Capture as Recording” function in Logic.
• Click - toggles the metronome click.
• Undo - pressing this will trigger the undo function.
• Record - pressing this will trigger the record function.
• Play and Stop - these buttons control playback of the track.
• Loop - toggles the transport loop (“Cycle Mode”).
Navigation
The ◄ and ►track buttons allow you to navigate between which track is selected. When in Session
Mode the pad for the selected track will be lit a brighter red than the non-selected tracks and the
smart controls change with the selected track in Device Mode.

50
Reason
Your Launchkey can serve as a controller for many tasks in Propellerhead Reason. The behaviour
described in the Standalone Features section remains the same in Reason. In addition, you can modify
your Launchkey to suit your needs with Custom Modes. The functionality of the Launchkey dedicated
to Reason is detailed below.
Setup
To set up Launchkey for use with Reason you will need to download the necessary script, to do this
follow the following steps:
• Follow the link to the Novation Customer Portal on novationmusic.com.
• Register Launchkey [MK3].
• Go to My Hardware > Launchkey [MK3] > Downloads/Drivers.
• Download and run the Reason Script Installer.
With Reason and the script installed, plug your Launchkey into your Mac or PC’s USB port. Launchkey
will be automatically detected and the Keyboards and Control Surfaces window will appear, if it
does not you can open it by going to Reason > Preferences > Control surfaces. Make sure “Use with
Reason” is checked for the Novation Launchkey MK3 device. Close the window. Now if you hold the
Shift button on the Launchkey the pads will look like this:
Transport Control
• Quantise - Toggles quantise On/Off, quantising incoming MIDI
• Click - toggles the metronome click
• Undo - pressing this will trigger the undo function
• Play and Stop - pressing these buttons will initiate playback of the track
• Record - pressing this will trigger the record function
• Loop - toggles the transport loop (“cycle mode”)

51
Pots
With a Reason instrument selected, the Launchkey’s eight pots automatically control useful parameters.
Which parameters the pots control varies by instrument. With the Kong Drum Designer, for example, the
Launchkey’s pots (from left to right) map to Pitch, Decay, Bus FX, Aux 1, Aux 2, Tone, Pan and Level.
Pads Session Mode
With a Reason instrument selected and the pads set to Session Mode (hold Shift and press the Session
pad), the Launchkey’s 16 pads automatically control useful device settings. For the Grain Sample
Manipulator, for example, the pads (from left to right) map to Effects On, Phaser On, Distortion On, EQ
On, Delay On, Reverb On, Compression On, Key Mode setting (toggles between Poly, Retrig, Legato),
Porta (toggles between Off, On and Auto), Motion, Grain Type Select, Oscillator On/Off, Sample to Filter
and Osc to Filter.
Navigation
The ◄ and ► arrow buttons allow you to navigate between tracks, pressing the ◄ button will select the
track above and the ► button will select the track below. Doing so automatically arms the newly-selected
Reason track.
Preset Browsing
Press the ▲ and ▼ buttons to scroll through presets on Reason instruments.
52
Working with HUI (Pro Tools, Studio One etc.)
‘HUI’ (Human User Interface Protocol) allows the Launchkey to act like a Mackie HUI device and therefore
work with DAWs with HUI support. DAWs that support HUI include Steinberg Cubase, Avid Pro Tools,
PreSonus Studio One among others. The behaviour described in the Standalone Features sections remains
applicable for HUI-supported DAWs. The following pages will describe the functionality when Launchkey
acts as a control surface via HUI.
Setup
Pro Tools
To set up Launchkey in Pro Tools, navigate to ‘Setup’ > ‘Peripherals’. From there select the ‘MIDI
controllers’ tab, set ‘Type’ to HUI, ‘Receive From’ to ‘Launchkey MK3 (#) LKMK3 DAW Out’, ‘Send To’ to
‘Launchkey MK3 (#) LKMK3 DAW In’ and ‘# Ch’s’ to 8.
Studio One
To set up the Launchkey in Studio one, navigate to ‘Preferences’ > ‘External Devices’ and click ‘Add..’.
Then, choose ‘Mackie HUI’ from the list, set ‘Receive From’ to ‘Launchkey MK3 (#) LKMK3 DAW Out’ and
‘Send To’ to ‘Launchkey MK3 (#) LKMK3 DAW In’.
Pad Session Mode
To enter Session Mode, hold Shift and press the Session pad (bottom left), the Launchkey’s 16 pads now
mute and solo tracks. The upper row will be lit blue and the bottom row will be lit yellow. The pads will be
lit dimly if solo or mute is not active and brightly when active.
Navigation
The◄ and ► track buttons move between selected tracks. To bank through eight tracks at a time hold the
Shift button and press the ◄ or ► track button.
Controlling the Mixer
The pots and faders (49, 61 and 88 key models only) can provide mixer control over the bank of tracks.
Hold Shift, then press either the Volume, Pan or Sends pan or Fader buttons to control track volume,
panning and Send A/B with your Launchkey’s eight pots or faders. Pressing the Sends pad (with shift held)
multiple times toggles between Send A and B.
53
Faders and Fader Buttons (Launchkey 49, 61 and 88 only)
The faders always control track volumes for the selected bank of tracks.
The Arm/Select button toggles between arming tracks (default) and selecting tracks. When in select mode
the Fader buttons are lit dim white and in arm mode red. When a track is selected and active, the Fader
button will be lit brightly.
Transport Buttons
The transport buttons listed below will function as described when used with HUI.
• Play - Pressing this button will initiate playback of the track.
• Stop - Pressing this button will stop playback of the track.
• Undo - pressing this will trigger the undo function.
• Rec - pressing this will trigger the record arm function.
• Loop - toggles the transport loop (“cycle mode”).

54
Physical Characteristics
Weight and Dimensions
Model Weight Height Width Depth
Launchkey 25 1.8kg (3.97lbs) 77mm (3.03”)
(62mm excluding pots)
463mm (18.23“) 258mm (10.16”)
Launchkey 37 2.7kg (5.95lbs) 77mm (3.03”)
(62mm excluding pots)
555mm (21.85“) 258mm (10.16”)
Launchkey 49 3.1kg (6.84lbs) 77mm (3.03”)
(62mm excluding pots)
789mm (31.06“) 258mm (10.16”)
Launchkey 61 3.5kg (7.72lbs) 77mm (3.03”)
(62mm excluding pots)
952mm (37.48“) 258mm (10.16”)
Launchkey 88 8.3kg (18.08lbs) 87mm (3.43”)
(72mm excluding pots)
1270mm (50.00”) 258mm (10.16”)
Custom Modes and Components
Custom modes allow you to create unique MIDI templates for each control area. You can create and send
these templates to the Launchkey from Novation Components. In addition you can use Components to
update the firmware or calibrate the Launchkey’s Pitch and Modulation wheels.

55
Trade Marks
The Novation trade mark is owned by Focusrite Audio Engineering Ltd. All other brand, product and
company names and any other registered names or trade marks mentioned in this manual belong to
their respective owners.
Disclaimer
Novation has taken all possible steps to ensure the information given here is both correct and
complete. In no event can Novation accept any liability or responsibility for any loss or damage to the
owner of the equipment, any third party, or any equipment which may result from use of this manual or
the equipment which it describes. The information provided in this document may be modified at any
time without prior warning. Specifications and appearance may differ from those listed and shown.
Copyright and Legal Notices
Novation is a registered trade mark of Focusrite Audio Engineering Limited. Launchkey MK3 is a
trademark of Focusrite Audio Engineering PLC.
2022 © Focusrite Audio Engineering Limited. All rights reserved.
Novation
A division of Focusrite Audio Engineering Ltd.
Windsor House, Turnpike Road
Cressex Business Park , High Wycombe
Buckinghamshire , HP12 3FX
United Kingdom
Tel: +44 1494 462246
Fax: +44 1494 459920
email: [email protected]
Web: novationmusic.com
Caution:
The normal operation of this product may be affected by a strong electrostatic discharge (ESD).
If this happens, reset the unit by removing and then replugging the USB cable. Normal operation
will return.
