
September 24, 2021
D
D
i
i
s
s
c
c
o
o
v
v
e
e
r
r
y
y
User Guide
Version R95
English

Copyright Agreement
The purchase and use of all Software and Services is subject to the Agreement as defined in Kaseya’s
“Click-Accept” EULATOS as updated from time to time by Kaseya at
http://www.kaseya.com/legal.aspx. If Customer does not agree with the Agreement, please do not
install, use or purchase any Software and Services from Kaseya as continued use of the Software or
Services indicates Customer’s acceptance of the Agreement.”
©2019 Kaseya. All rights reserved. | www.kaseya.com
i
Contents
Discovery Overview
1
Contents
Discovery Overview ..................................................................................................................................... i
Discovery Module Minimum Requirements ............................................................................................. iii
Summary ..................................................................................................................................................... iii
Discovered Devices ............................................................................................................................. v
Topology Map .................................................................................................................................... vii
Standard SNMP Monitoring ....................................................................................................... xi
Networks.................................................................................................................................................... xiii
Getting Started with Network Discovery ........................................................................................ xiii
View Assets ............................................................................................................................... xiv
Scanning Networks with SNMP Enabled ................................................................................ xiv
Scanning Networks with vPro Enabled ................................................................................... xv
By Network ........................................................................................................................................ xvi
Edit Network ............................................................................................................................. xvii
Scan Schedules Dialog ............................................................................................................. xx
Importing Networks ................................................................................................................... xx
Network Probe tab .................................................................................................................... xxi
Scan Schedules tab ................................................................................................................. xxii
Agent Deployment tab ............................................................................................................. xxii
Alerting Profiles tab ................................................................................................................ xxiii
Asset Promotion tab ............................................................................................................... xxiii
Scan Results ........................................................................................................................... xxiv
By Agent .......................................................................................................................................... xxvi
Domains................................................................................................................................................. xxviii
Getting Started with Domain Watch ........................................................................................... xxviii
Managing a Synchronized Security Model ........................................................................... xxix
Managing Multiple Domains .................................................................................................. xxix
Managing Remote Portal Access .......................................................................................... xxix
Configuration ................................................................................................................................... xxx
Configuration Prerequisites ................................................................................................... xxx
Configuring Probe Deployment ............................................................................................. xxxi
Configuring Agent Deployment ............................................................................................ xxxii
Configuring OU/Container Policies ...................................................................................... xxxii
Configuring Contact Policies .............................................................................................. xxxiii
Configuring Computer Policies ........................................................................................... xxxiv
Configuring Group Policies ................................................................................................. xxxiv
Configuring User Policies ..................................................................................................... xxxv
Configuring Alerting Profiles ............................................................................................... xxxvi
Applying Changes ................................................................................................................ xxxvi
Reviewing Domain Watch Results ..................................................................................... xxxvii
Discovery Overview
2
Configuring Activation ........................................................................................................ xxxvii
Configuring Full Synchronization ..................................................................................... xxxviii
Domain Watch ............................................................................................................................. xxxviii
Probe Deployment ................................................................................................................ xxxix
Agent Deployment ..................................................................................................................... xli
Policies ...................................................................................................................................... xlii
OU/Containers ................................................................................................................... xlii
Computers ........................................................................................................................ xliv
Groups ............................................................................................................................... xlv
Users ................................................................................................................................ xlvii
Alerting Profiles ....................................................................................................................... xlix
Schedule and Status ..................................................................................................................... l
Computers ............................................................................................................................................ li
Contacts ............................................................................................................................................. liii
Users & Portal Access ....................................................................................................................... lv
More Information ............................................................................................................................... lix
Setting Discovery Policies for Computers .............................................................................. lix
Setting Discovery Policies for Contacts.................................................................................. lix
Setting Discovery Policies for Users ........................................................................................ lx
Licensing ..................................................................................................................................... lx
The Directory Services Feature Set .......................................................................................... lx
How Agents are Installed Using Discovery ............................................................................. lxi
How Machine ID Accounts are Created in Discovery ........................................................... lxii
How Machine Moves in Domains are Reflected in Discovery .............................................. lxii
Enabling Remote Portal Access in Discovery ...................................................................... lxiii
Enabling/Disabling Domain Users Accounts or Resetting Domain User Passwords ...... lxiv
Making Changes to Discovery Managed User Logons ........................................................ lxiv
Supported Domain Logon Formats ........................................................................................ lxv
Synchronization ....................................................................................................................... lxvi
Activation / Deactivation ........................................................................................................ lxvii
Uninstalling the Probe and Detaching the Org .................................................................... lxvii
Probe Alerts and Domain Alerts ............................................................................................ lxvii
Removing a Domain from Discovery Management ............................................................ lxviii
Uninstalling Discovery .......................................................................................................... lxviii
Domain Watch Default Settings ........................................................................................... lxviii
Administration ......................................................................................................................................... lxix
Settings ............................................................................................................................................. lxix
Audit Log ........................................................................................................................................... lxx
Glossary ..................................................................................................................................................... 71
Index ........................................................................................................................................................... 75

i
Discovery Overview
Discovery discovers computers and devices on individual networks or entire domains.
Lan Watch
Discover Network Devices and Deploy Agents
Deploy an agent - To discover devices on a network, deploy at least one Agent to computer on that
network.
Select a Network - Under Lan Watch, a list of discoverable networks is presented based on
Agents that are deployed. Choose a network from the list manually create a new network.
Edit the Lan Watch Settings - Associate the network with an organization.
Select a probe machine.
Tailor the IP Scan Range
Enable the SNMP Discovery
Enable Vpro Discovery
Enable Alerting
Configure Asset Tracking
Set Agent Deployment Policies - Set policies to automatically deploy agents discovered computers.
Select an agent deployment package and credentials.
Run LAN watch, Deploy Agent, View Results - Run a scan now or schedule it on recurring basis. View
the summary page to monitor scan progress. View a list of all discovered devices and drill in see
details each devices. If deployment policies are set the LAN watch scan will deploy agents
discovered devices.
Select a Network - Under Lan Watch, a list of discoverable networks is presented based on Agents
that are deployed. Choose a network from the list or manually create a new network.
Domain Watch
Discover and Sync Active Directory Domains
Deploy an Agent - To work with an active directory domain deploy at least one Agent to a computer
on that domain. The system will automatically detect the name of the domain for each agent.
Select a Domain - Under Domain Watch, a list of domains is presented based on the agents that are
deployed. Choose a domain from list.
Deploy and Activate a Domain Probe - Deploy a probe to a domain computer.Supply domain
credentials and activate the probe to discover domain computers, users and contacts.
Set Agent Deployment Policies -Set a policy to automatically deploy agents to domain computers.
Agents can be deployed.
Set Computer Policy - Set policies to create machine accounts that correspond to domain
computers, and specify which computers are eligible for the end user portal.
Set Contact Policy - Set policies to create staff records that correspond to domain contacts. Staff
records can be referenced on tickets and elsewhere.
Set User &Portal Policy - Set policies to create users and staff records that correspond to domain
users. Users can be allowed to login to the VSA using their domain credentials, or they can be
granted access to the end user portal.
Apply Policies - Click the ‘Apply’ button to sync users, contacts, and computers. Agents are
deployed to domain computers during this process. While the Domain Watch probe is active, new

ii Contents
ii
users , contacts and computers can be automatically detected as they are added to the domain in
the future (configurable by the policy).
Set Alerts - While the probe is activated, Domain Watch detects changes in AD domain and can
send notifications when AD objects are added, changed or deleted. These notifications can be
configured for computers, users, contacts groups, containers, OUs, and domains.
Schedule Periodic Re-Sync - A re-sync can be used to detect any domain changes that may have
occurred during period when the Domain Watch probe was deactivated or disconnected.
Schedule a periodic resync to ensure that no domain changes are missed.
User and Portals Access (Domain)
Review users, review and assign portal access, reset passwords, enable/disable accounts .
View User Accounts and Staff Records - View the domain user accounts and see which accounts
have been configured for VSA login (these users can login the VSA using their domain
credentials).Leverage the grid filters to quickly find specific users.
Review and Assign Portal Access - View the domain users that can access the end user portal .Portal
access can be assigned automatically by policy, or manually on a user-by -user basis.
Reset Passwords- Passwords can be reset for any domain user directly from VSA console (No need
to remote control to the domain server.
Enable & Disable User Accounts - Domain user accounts can be enabled and disabled directly from
the VSA console (no need to remote control to the domain server). Disabling an account prevent
the user from logging in to the domain and also the VSA.
Network Discovery
Discovers computers and devices on individual networks.
Deploys agents to discovered machines.
Identifies SNMP-enabled devices that can be monitored using the Monitor > Assign SNMP page.
Identifies vPro-enabled machines that can be managed using the vPro module.
Integrates with Network Monitor. Agent-less devices can be monitored by Network Monitor.
Enables a device to be "promoted" to a managed asset (page xiv). An Audit > View Assets page
provides a consolidated view of all computers and devices managed by the VSA, regardless of
the method of discovery.
Generates alerts for first-time discovery of new device names and new IP addresses.
Domain Discovery
Automatically discovers AD domains that can be synced with the VSA.
Deploys agents to discovered domain machines.
Automatically creates a VSA security hierarchy modeled after an existing domain hierarchy.
Automatically keeps the VSA synchronized with all domain changes.
Automatically creates VSA users and staff member records in the VSA based on the creation of
users and contacts in the domains.
Auto-populates domain user and contact information in Service Desk tickets.
Resets a domain password or enable/disables a domain user from the VSA.
Uses the industry standard LDAP protocol to safely and securely communicate with Active
Directory domains.
Note: See Discovery Module Requirements (page iii).
Functions
Description
Overview
Displays the workflow of discovering computers and devices
by network and by domain.

iii
By Agent (page xxvi)
Discovers devices on the same network as a selected
"probe" machine.
By Network (page xvi)
Discovers computers and devices by network.
Discovered Devices
(page v)
Displays discovered computers and devices in table format.
Discovered Devices -
Tile View
Displays discovered computers and devices in tile format.
Domain Watch (page
xxxviii)
Configures the integration of Discovery with Active Directory
domains.
Computers (page li)
Manages machine ID accounts created, based on applied
Discovery computer policies, for all domains monitored by
Discovery probes.
Contacts (page liii)
Manages staff records created, based on applied Discovery
contact policies, for all domains monitored by Discovery
probes.
Users & Portal Users
(page lv)
Manages VSA users and Portal Access candidates created,
based on applied Discovery group policies, for all domains
monitored by Discovery probes.
Settings (page lxix)
Sets options and default values that apply to the entire
Discovery module.
Audit Log (page lxx)
Displays a log of Discovery module activities.
Discovery Module Minimum Requirements
Kaseya Server
The Discovery R95 module requires VSA R95.
Directory Services
Directory Services 1.2 is a feature set that can be licensed and enabled separately. The feature
set provides advanced functionality in the Discovery module.
Network Probe
Microsoft Windows Server 2012, 2012 R2, 2016, 2019 (64-bit versions only)
Microsoft Windows 8, 8.1, 10 (64-bit versions only)
Domain Probe
Microsoft Windows Server 2012, 2012 R2, 2016, 2019
Microsoft Windows 8, 8.1, 10
Summary
Discovery Overview ..................................................................................................................................... i
Discovery Module Minimum Requirements ............................................................................................. iii
Summary ..................................................................................................................................................... iii
Discovered Devices ............................................................................................................................. v
Topology Map .................................................................................................................................... vii
Standard SNMP Monitoring ....................................................................................................... xi
Networks.................................................................................................................................................... xiii

iv Contents
iv
Getting Started with Network Discovery ........................................................................................ xiii
View Assets ............................................................................................................................... xiv
Scanning Networks with SNMP Enabled ................................................................................ xiv
Scanning Networks with vPro Enabled ................................................................................... xv
By Network ........................................................................................................................................ xvi
Edit Network ............................................................................................................................. xvii
Scan Schedules Dialog ............................................................................................................. xx
Importing Networks ................................................................................................................... xx
Network Probe tab .................................................................................................................... xxi
Scan Schedules tab ................................................................................................................. xxii
Agent Deployment tab ............................................................................................................. xxii
Alerting Profiles tab ................................................................................................................ xxiii
Asset Promotion tab ............................................................................................................... xxiii
Scan Results ........................................................................................................................... xxiv
By Agent .......................................................................................................................................... xxvi
Domains................................................................................................................................................. xxviii
Getting Started with Domain Watch ........................................................................................... xxviii
Managing a Synchronized Security Model ........................................................................... xxix
Managing Multiple Domains .................................................................................................. xxix
Managing Remote Portal Access .......................................................................................... xxix
Configuration ................................................................................................................................... xxx
Configuration Prerequisites ................................................................................................... xxx
Configuring Probe Deployment ............................................................................................. xxxi
Configuring Agent Deployment ............................................................................................ xxxii
Configuring OU/Container Policies ...................................................................................... xxxii
Configuring Contact Policies .............................................................................................. xxxiii
Configuring Computer Policies ........................................................................................... xxxiv
Configuring Group Policies ................................................................................................. xxxiv
Configuring User Policies ..................................................................................................... xxxv
Configuring Alerting Profiles ............................................................................................... xxxvi
Applying Changes ................................................................................................................ xxxvi
Reviewing Domain Watch Results ..................................................................................... xxxvii
Configuring Activation ........................................................................................................ xxxvii
Configuring Full Synchronization ..................................................................................... xxxviii
Domain Watch ............................................................................................................................. xxxviii
Probe Deployment ................................................................................................................ xxxix
Agent Deployment ..................................................................................................................... xli
Policies ...................................................................................................................................... xlii
Alerting Profiles ....................................................................................................................... xlix
Schedule and Status ..................................................................................................................... l
Computers ............................................................................................................................................ li
Contacts ............................................................................................................................................. liii
Users & Portal Access ....................................................................................................................... lv
More Information ............................................................................................................................... lix
Setting Discovery Policies for Computers .............................................................................. lix

v
Setting Discovery Policies for Contacts.................................................................................. lix
Setting Discovery Policies for Users ........................................................................................ lx
Licensing ..................................................................................................................................... lx
The Directory Services Feature Set .......................................................................................... lx
How Agents are Installed Using Discovery ............................................................................. lxi
How Machine ID Accounts are Created in Discovery ........................................................... lxii
How Machine Moves in Domains are Reflected in Discovery .............................................. lxii
Enabling Remote Portal Access in Discovery ...................................................................... lxiii
Enabling/Disabling Domain Users Accounts or Resetting Domain User Passwords ...... lxiv
Making Changes to Discovery Managed User Logons ........................................................ lxiv
Supported Domain Logon Formats ........................................................................................ lxv
Synchronization ....................................................................................................................... lxvi
Activation / Deactivation ........................................................................................................ lxvii
Uninstalling the Probe and Detaching the Org .................................................................... lxvii
Probe Alerts and Domain Alerts ............................................................................................ lxvii
Removing a Domain from Discovery Management ............................................................ lxviii
Uninstalling Discovery .......................................................................................................... lxviii
Domain Watch Default Settings ........................................................................................... lxviii
Administration ......................................................................................................................................... lxix
Settings ............................................................................................................................................. lxix
Audit Log ........................................................................................................................................... lxx
Glossary ..................................................................................................................................................... 71
Index ........................................................................................................................................................... 75
In This Section
Discovered Devices v
Topology Map vii
Discovered Devices
Discovery > Networks > Discovered Devices
The Discovered Devices page shows computers and devices discovered using By Agent (page xxvi) and
By Network (page xvi). Use this page to install agents on discovered computers and mobile devices.
You can also make discovered devices a managed asset, even if they cannot be installed with an
agent. The scan results shown on this page is cumulative from all probe machines. A record is not
removed unless you delete it.
Results are shown in table format. This table supports selectable columns, column sorting, column
filtering and flexible columns widths (http://help.kaseya.com/webhelp/EN/VSA/9050000/index.asp#6875.htm).
Actions
View - Displays a popup window of information collected about a selected device. Different views,
based on the type of probe used to collect the information, can be selected using the Probe Type
drop-down list:
NMAP Probe - The standard method of discovering a device on a network, using the
Discovery module.

vi Contents
vi
Machine Audit - The audit performed on a machine installed with an agent.
vPro - The inventory of hardware attributes returned by a vPro audit. A vPro machine must
be enabled, and a scan must include a vPro credential to return vPro hardware attributes
from a machine. See the Edit Network (page xvii) and the vPro tab for more information.
Merge View - Merges all methods of data collection into one consolidated view. The default
view.
Deploy Agent - Installs an agent on a selected discovered machine. See agent deployment
prerequisites (page xxii).
Deploy Agent by Address - Deploys agents to IP4 addresses that have not been discovered.
Agent From - An agent machine on the same network used to deploy the agent.
OS Type - Deploying to Windows, Mac or Linux.
Address - An IP4 address. Delimit multiple IP addresses with commas.
Username / Password - An administrator-level username and password. For domain
credentials use the username format.
Delete - Deletes the row of a discovered device or machine. For example, a mobile device may be
"found" on a network during a scan, but only reside there temporarily. It will continue to be listed
on the Discovered Devices pages until the row is deleted.
Ignore - Prevents a discovered device or machine from being included in subsequent scans. You
can remove the ignore status by deleting the row. The next time the network is scanned it will be
re-discovered as a new device.
Merge - Merge two or more selected rows that reference the same device or machine. Some
devices and machines have multiple IP addresses. Click Merge to display a dialog. Select the row
you want to keep, then click Merge within the dialog to complete the merge and remove the
duplicate rows.
Rename Device - Renames a discovered computer or device within the VSA.
Make Asset - Manually designates a device without an agent as a managed asset. All computers
and mobile devices with agents installed on them are necessarily managed assets. A device not
capable of supporting an agent, such as a router or a printer, may require monitoring and
therefore be designated a managed asset. All managed devices and computers display on the
View Assets page.
Change Type - Changes a device or computer to another device type. This may be required to
deploy an agent successfully to a computer that was mis-typed.
Table Columns
(Eligible to Deploy Agent) - If checked, this device can install an agent.
(Device Status)
- Only displays if an agent is installed. Hover over this icon to display the Quick View
(http://help.kaseya.com/webhelp/EN/VSA/9050000/index.asp#33842.htm) window. Click to launch Live
Connect (http://help.kaseya.com/webhelp/EN/VSA/9050000/index.asp#33845.htm).
/ - If enabled, this non-agent device has been promoted to an asset (page xxiii).
Device Name - A unique device or machine ID / group ID / organization ID name for a device or
machine in the VSA.
Discovered Name - The name of the device or computer assigned by its own operating system or
hardware.
IP Address - The IP address of the discovered device or machine.
MAC Address - The MAC address of the discovered device or machine.
Device Type - The type of device or machine.
Last Seen - The last time this device or machine was detected by a network scan (page xvi).
Network - The network that discovered this device.

vii
Note: The phrase Unscanned Network displays in this field for machines that are already "known" to
the VSA because they have an agent installed on them, but have not yet been "discovered" as part
of a network scan.
NMAP Scan Results - Click the icon in this column to display NMAP scan data for this device.
Primary Probe - The primary probe that last detected this device or machine.
Probe Type - The type of probe used to detect this device.
OS - The operating system of discovered device or machine.
OS Accuracy - The probable accuracy of identifying the operating system correctly.
Manufacturer - The manufacturer of the device.
SNMP Active - If checked, the device has SNMP functionality, though it may not be enabled.
Computer Agent - If checked, an agent is already installed on this machine.
Mobile Agent - If checked, this device is a mobile device.
Asset - If checked, this device is already being managed and displays on the View Assets page.
Ignore - If checked, do not continue to scan this device.
Deploy Attempt - The date/time an agent deployment was attempted.
Deploy Status - The status of the agent deployment. Review error messages using this column.
See agent deployment prerequisites (page xxii).
vPro Machine - If checked, the machine is a vPro-enabled machine. See the Edit Network (page
xvii) for more information about vPro-enabled machines.
Topology Map
Discovery > Networks > Topology Map
The Topology Map is an interactive map that displays information about networks, devices within a
network, types of devices, device status and how they are connected. All connections between devices
are determined by data collected using the SNMP protocol.

viii Contents
viii
To enable the ability to interact with the topology map, navigate to Discovery > Networks > by Network,
and create (or edit) a network using the steps below:
1. Provide a name for the network.
2. Select the agent machine to use for scanning with this network.
3. Specify the range of IP addresses to be included in the network scan.
4. Assign an organization to a network.
5. SNMP tab - enable SNMP and provide SNMP community string to establish connectivity on the
map. Note: for topology to be properly created, SNMP must be enabled for all network devices
(and printers) and a common SNMP community string must be used for all SNMP-enabled
devices.
6. (Optional) Select Asset Status Check and specify Asset Status Check Interval in order to check
automatically if the asset is online or offline.
7. (Optional) AD tab – put credentials in order to connect to your active directory. Note: providing
Active Directory credentials will enhance the accuracy of the network topology visualization.
8. Make sure that all necessary fields are filled and click Save.
9. In order to see the topology map of the network, preform a scan of the network. If you are creating
a new network, click Save & Scan, or select network from grid on By Network page and click Scan
Now. It will take some time for VSA to gather information about all the devices within the network,
and the topology map will be displayed in Topology Map tab as a result of the network scan.
Note: If you have networks, that were set up before, please, check their settings (related to steps 1-9
documented above) and re-run a scan to enable the Topology Map.
Topology Map View
Topology map has two variants of view: cluster and tree. You can switch from one to the other
view clicking on Cluster View/Tree View button in the bottom right.

ix
In the bottom of the map there is time and date of last network scan.
Devices displayed on the map are equivalent to those that are displayed in Discovery > Networks
> Discovered Devices tab.
There may be 2 hubs displayed on the topology map. One hub contains the current network
devices and the second, historical data. Once discovered, a device will always be displayed even
if it is not found during the next scans.
Relationships between devices and their connection gateway/access points will be shown on
networks where SNMP is enabled
http://help.kaseya.com/WebHelp/EN/KDIS/9050000/#11052.htm with valid community string.
Otherwise devices will be connected to a "hub" node for each network.
Cluster View
Tree View
Collapse All/Expand All- collapse or expand topology map nodes using this button in the bottom
right.
Zoom In/Zoom Out - change the size of the topology map using these buttons on the right.
Collapse one unit and hide devices.
Expand one unit and show devices.
Alarm Summary badge - alarm counts on agent and non-agent devices that currently have
open alarms. Clicking on it, user is redirected to Alarm Summary
http://help.kaseya.com/webhelp/EN/vsa/9050000/#41666.htm page, filtered specifically for
the selected node.
Filter
Use filters on the top of the topology map to highlight specific nodes and for quick navigation on the
map.
Filters:
Network - The displayed topology is in the context of an individual network scan.
Machine Group - Select or enter machine group ID, and map will display devices which have the
selected machine group ID.
Name - Enter or select the name of the device to show it on the map.
Type - Select or enter device type that you want to highlight on the map.
IP Address - Select or enter the IP address. Map will display those units, that have this IP address.
MAC Address - Select or enter the MAC address of device that you want to display on the map.

x Contents
x
Device Status
Statuses of the devices are marked as circles of different colors around units. Devices have the
following statuses:
Status
Definition
Device is online, can be an asset or an agent.
Device is offline.
Status is unknown and the device is neither an asset nor an agent.
Device Details
To view details about a specific device, click on the unit circle. The information about the device will be
displayed in Quick View window.
Device Quick View window - Shows information about the device, that is not an asset and not an
agent.
Asset Quick View window - Shows information about the asset.
Scan Results - Displays the latest scan results for a network.
View Credentials - View credentials of this asset.
Check Status - Manually check status of the asset.
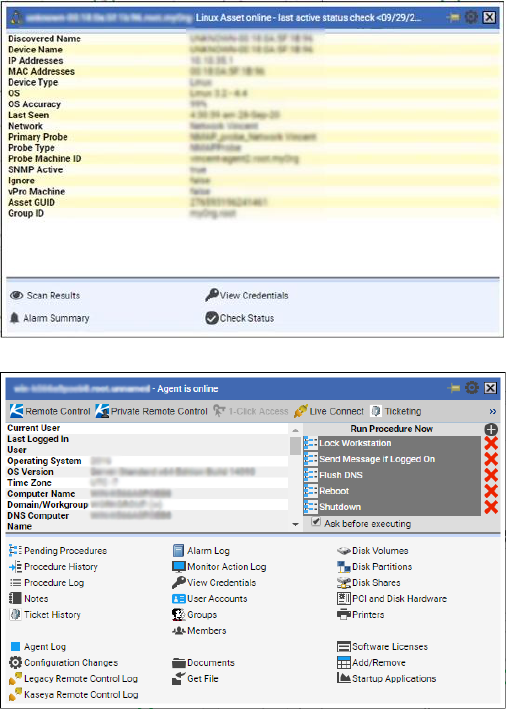
xi
Alarm Summary - Redirects to the Alarm Summary
http://help.kaseya.com/webhelp/EN/vsa/9050000/#41666.htm page, filtered specifically
for the selected asset.
Agent Quick View window - Shows agent Quick View with information about the agent.
Standard SNMP Monitoring
Discovery > Networks > By Network > New or Edit
Discovery > Networks > Topology Map > Enable Monitoring
Standard SNMP Monitoring provides an ability to deploy simple SNMP monitoring to network
infrastructure (non-agent capable assets) and printers.
To deploy simple SNMP monitoring for the new or existing Network:
1. Navigate to Discovery > Networks > By Network > New or Edit > SNMP tab;
2. Check the Enable SNMP checkbox;
3. Check the Enable Standard Monitoring checkbox;
4. Check ATSE action:
Create Alarm - If checked, creates an alarm.

xii Contents
xii
Create Ticket - If checked, creates a ticket.
Email Recipients - If checked, notifies email recipients specified in Email Addresses.
5. Click Save.
6. If you are creating a new network, click Save & Scan. Once the scan is finished it will
automatically enable all SNMP-enabled devices for the selected Network.
Note: For the existing network, changes will take place at the time of the next scan and only will be
applied to newly discovered devices.
To deploy simple SNMP monitoring for an individual device within the discovered Network
with SNMP devices:
1. Navigate to Discovery > Networks > Topology Map;
2. Right-click on SNMP node, select Enable Monitoring/Edit Monitoring;
3. Check ATSE action:
Create Alarm - If checked, creates an alarm.
Create Ticket - If checked, creates a ticket.
Email Recipients - If checked, notifies email recipients specified in Email Addresses.

xiii
4. Click Save.
5. Right-click on the SNMP node, then click Disable Monitoring to disable monitoring on this SNMP
device.
Networks
In This Section
Getting Started with Network Discovery xiii
By Network xvi
By Agent xxvi
Getting Started with Network Discovery
The By Network and By Agent pages discovers all computers and devices on networks that have an IP
address. Any agent machine can be selected as the "probe" machine for its own network. Discovered
devices can be workstations and servers without agents, SNMP devices and vPro-enabled machines.
Discovered devices display on the following pages:
Discovered Devices (page v)
Discovered Devices - Tile View
Scanning Networks by Agent
This is the fastest way to scan a new network.
1. On the By Agent page, select a machine ID. Both Windows and Apple agent machines can serve
as a probe agent.
2. Click the Scan Now button to scan a network immediately.
Optionally click the Schedule Scan to schedule a scan and enter additional options. For
Schedule Scan, leave the network scan range blank. It will be populated automatically, based
on the subnet defined for the probe agent machine.
3. Enter a network name if the selected agent hasn't scanned a network before.
4. Click the Scan button to start the scan.
View discovered devices on the Discovered Devices page.
Visit the By Network page to edit networks before you scan again.
Scanning Networks by Network
1. On the By Network page select New or Edit. Enter a new network or change the name of an existing
network.
2. If an agent has not already been selected for the network, select an agent. Both Windows and
Apple agent machines can serve as a probe agent.
3. Leave the network scan range blank. It will be populated automatically, based on the subnet
defined for the probe agent machine.
4. Optionally search for SNMP devices and vPro enabled machines by configuring these tabs.
5. Select Save —instead of Save & Scan—so you can configure additional settings.
Optionally deploy agents to discovered computers by policy, using the Agent Deployment
Policy tab in the lower panel.
Optionally create alerts for newly discovered types of computers and devices, using the Alert
Profiles tab in the lower panel.

xiv Contents
xiv
Optionally set asset policies for discovered computers and devices, using the Asset
Promotion page.
6. Run a scan immediately using the Scan Now button or schedule a scan on a recurring basis using
the Schedule Scan button.
View discovered devices on the Discovered Devices page.
Deploy Agents
The Discovered Devices page shows computers and devices discovered using By Agent (page xxvi) and
By Network (page xvi). Use this page to install agents on discovered computers and mobile devices.
You can also make discovered devices a managed asset, even if they cannot be installed with an
agent. The scan results shown on this page is cumulative from all probe machines. A record is not
removed unless you delete it.
View Assets
The Audit > View Assets page is populated by Discovery scans of networks and domains.The View
Assets (http://help.kaseya.com/webhelp/EN/VSA/9050000/index.asp#10649.htm) page provides a consolidated
view of all "assets" managed by the VSA. Types of assets include:
Agent managed machines and mobile devices - Computers and mobile devices that have an agent
installed on them are always considered managed assets and display on this page for as long as
the agent is installed on them.
Devices promoted to an asset - When an agent cannot be installed on a discovered device, the
device can still be "promoted" to a managed asset and display on this page. For example, a router
or printer may still require monitoring, even if an agent cannot be installed on the machine. There
are many different types of non-agent device types that can be managed by the VSA: routers,
switchers, printers, firewalls, etc. The Make Asset button on the Discovery > Discovered Devices
(page v) page enables you to "promote" a device to an asset. When you do the device begins
displaying on this page. You can "demote" a asset using the Demote Asset to Device on this page.
When you do, the asset is removed from this page.
All managed assets are assigned a machine group and organization. Scoping rules
(http://help.kaseya.com/webhelp/EN/VSA/9050000/index.asp#4578.htm) and view filtering
(http://help.kaseya.com/webhelp/EN/VSA/9050000/index.asp#214.htm) features within the VSA depend on this
assignment.
Multiple credentials can be defined for each asset. For agent assets, one of the credentials can be
designated an agent credential and optionally used by Policy Management as an agent
credential.
Service Desk tickets can be optionally associated with assets listed on this page.
Scanning Networks with SNMP Enabled
By Network or By Agent in the Discovery module uses an existing VSA agent (page 71) on a managed
machine to periodically scan the local area network for any and all new devices connected to that
network since the last time a network scan ran.
The discovery machine issues SNMP requests to the SNMP devices it discovers on that same
network. So you must run a network scan with SNMP-enabled to have access to SNMP-enabled
devices using the VSA.

xv
To include SNMP devices in the a network scan:
1. Select a machine ID on the same network as the SNMP devices you want to discover.
2. Check the Enable SNMP checkbox.
3. Enter a community name in the Read Community Name and Confirm fields.
A community name is a credential for gaining access to an SNMP-enabled device. The default
"read" community name is typically public, in all lower case, but each device may be configured
differently. You may have to identify or reset the community name on the device directly if you're
not sure what community name to use.
4. Click the Save & Scan button at the bottom of the Edit Network dialog. This will start the scan
immediately.
5. Review discovered SNMP-enabled devices using the Monitor > Assign SNMP page.
Scanning Networks with vPro Enabled
The Audit > View Assets > vPro tab displays hardware information about vPro-enabled machines
discovered by enabling a vPro scan using the Edit Network (page xvii) dialog, then scanning the
network. This information is only available if a machine's vPro credential is specified when scanning a
network.
Types of hardware information returned by the vPro machine include:
Agent check-in status, if the vPro machine has an agent installed
Computer Information
Motherboard Asset Information
BIOS Information
Processor Information
RAM Information
Hard Drive Information
Note: The vPro module provides vPro management features
(http://help.kaseya.com/webhelp/EN/VPRO/9050000/index.asp#10070.htm).

xvi Contents
xvi
By Network
Discovery > Networks > By Network
The By Network and By Agent pages discovers all computers and devices on networks that have an IP
address. Any agent machine can be selected as the "probe" machine for its own network. Discovered
devices can be workstations and servers without agents, SNMP devices and vPro-enabled machines.
Discovered devices display on the following pages:
Discovered Devices (page v)
Discovered Devices - Tile View
Scanning Networks by Network
1. On the By Network page select New or Edit. Enter a new network or change the name of an existing
network.
2. If an agent has not already been selected for the network, select an agent. Both Windows and
Apple agent machines can serve as a probe agent.
3. Leave the network scan range blank. It will be populated automatically, based on the subnet
defined for the probe agent machine.
4. Optionally search for SNMP devices and vPro enabled machines by configuring these tabs.
5. Select Save —instead of Save & Scan—so you can configure additional settings.
Optionally deploy agents to discovered computers by policy, using the Agent Deployment
Policy tab in the lower panel.
Optionally create alerts for newly discovered types of computers and devices, using the Alert
Profiles tab in the lower panel.
Optionally set asset policies for discovered computers and devices, using the Asset
Promotion page.
6. Run a scan immediately using the Scan Now button or schedule a scan on a recurring basis using
the Schedule Scan button.
View discovered devices on the Discovered Devices page.
Filtering Networks and Probe Agents
Networks are associated with organizations. If your scope and filtering enable you to see a org,
you will see that network in the upper panel.
Agents are assigned to a machine group. If your scope and filtering enable you to see a probe
agent assigned to a network you will see that probe agent in the lower panel.
If you can see a network but cannot see its probe agent, the probe agent will be identified with an
****** to indicate it exists but is currently hidden from view.
Actions
New - Manually adds a new network. Displays the same properties as the Edit Network (page xvii).
After selecting a probe agent, if you leave the network scan range blank it will be populated
automatically, based on the subnet defined for the probe agent machine.
Note: You can also create new networks by importing them using the System > Import Center. See
Importing Networks (page xx).
Edit - Displays the Edit Network (page xvii) dialog. Sets the scan options used by Scan Now and
Scan Schedule.
Delete - Deletes a network. Use this option to remove a network that no longer has any managed
agents.
Schedule Scan - Displays the Scan Schedules Dialog (page xx). Schedules a scan, on a recurring
basis, for a selected network.

xvii
Scan Now - Runs a scan immediately on a selected network using the scan options defined by the
Edit Dialog.
Harvest Networks - Displays a list of suggested networks you can scan immediately, based on
already installed agents on those networks. Select a network, then enter a Name, Org, Probe and IP
Scan Range for the new network. The network scan record is saved without starting the scan, so
you can edit it before you start the scan.
Refresh - Refreshes the page.
Upper Panel Tables Columns
Scan Results - - Click this icon to display the results of the latest scan and the accumulated
results of all previous scans (page xxiv).
Monitored by KNM - If checked, enables integration with Network Monitor for this network.
Network Name - A friendly name used to identify a network with the VSA.
Gateway - The connection gateway IP address.
Scan Range - The range of IP addresses included in a scan.
Subnet Mask - Determines the number of IP addresses in a subnet.
Org ID - The unique identifier of an organization (page 73) in the VSA.
Org Name - A friendly name used to identify an organization within the VSA.
Status - The status of a scan. A scan progresses through the following statuses. These statuses
are displayed in Pending Procedures
(http://help.kaseya.com/webhelp/EN/VSA/9050000/index.asp#33845.htm) and Procedure History. If the scan
does not fail, the status returns to Ready To Scan once a scan is completed.
Ready To Scan
Installing
Performing Deep Scan
Failed
Scan Progress - Displays a progress bar for a deep scan.
Next Scan - The date/time a scan is next scheduled.
Last Scan - The date/time a scan last ran.
Scanned Devices - A count of the devices discovered on this network.
Assets - A count of the number of devices marked as managed View Assets.
Agents - The number of machines and devices installed with agents on the network.
Alerts Active - If checked, alerts are active on this network.
Network Prefix - The number of bits used to specify the network portion of an IP address.
Max Addr Count - The maximum number of IP addresses specified by a network.
Lower Panel Tabs
Network Probe tab (page xxi)
Scan Schedules tab (page xxii)
Agent Deployment tab (page xxii)
Alerting Profiles tab (page xxiii)
Asset Promotion tab (page xxiii)
Edit Network
Discovery > Networks > By Network (page xvi) > New or Edit
The Edit dialog sets scan options used by Scan Now. These same settings serve as the default settings
displayed by the Scan Schedules dialog.

xviii Contents
xviii
General tab
Network Name - A friendly name used to identify a network with the VSA.
Probe - The agent machine to use for scanning with this network. Windows and Apple agent
machines can serve as probe machines.
IP Range - Specifies the range of IP addresses included in a scan. By default, the entire scan range
configured for a network is specified. Example: 192.168.32-35.0-255. Multiple IP ranges
separated by commas are supported. Example: 192.168.32-35.0-255, 10.10.14-15.0-255.
Note: You can also specify a
cross-subnet scan
. This means your probe agent uses a different router
than the router used by devices specified in the IP range. Because the probe agent is scanning
beyond its own router, the ARP method of scanning is not used and MAC addresses and host names
cannot be included in the returned data. Discovered IP addresses with no MAC address resolution
will be included in the Quick Scan results but will not be added to the system as Discovered Devices
or Assets. After performing an initial cross-subnet scan, you can deploy an agent to a discovered
machine on the cross-subnet. Then use that new agent machine as a probe agent to scan its own
subnet. This will provide the missing MAC and host name data.
IP Exclusions - Specifies a range of IP addresses to excluded from the scan. Multiple IP ranges
separated by commas are supported. Example: 192.168.32-35.0-255, 10.10.14-15.0-255 By
default, this field is blank.
Organization - Assign an organization to a network. Once organizations are assigned to all your
networks, the network table can be sorted and filtered by organization. This assignment has no
effect on the organization assigned discovered devices when they are promoted to an an asset
(page xxiii).
Alerts Active - If checked, alerts configured on the Alerting Profiles tab (page xxiii) are active. If
blank, alerts are not generated for discovered devices on this network.
Monitor Network - If checked, enables integration with Network Monitor for this network.
Store contact information for a selected network using the following fields.
Primary Phone
Primary Fax
Primary Email
Country
Street
City
State
Zip
SNMP tab
After Discovery has performed an SNMP-enabled scan using a valid community name, you can:
Identify, sort and filter SNMP capable devices on the Discovered Devices (page v) page using the
SNMP Active column.
Begin monitoring SNMP-enabled devices by assigning SNMP sets using Monitor > Assign
SNMP (http://help.kaseya.com/webhelp/EN/VSA/9050000/index.asp#2190.htm).
Options
Enable SNMP - If checked, scan for SNMP devices within the specified Scan IP Range.
Read Community Name / Confirm Community String - A network scan can only identify SNMP devices
that share the same SNMP Community Read value as the managed machine performing a
network scan. Community names are case sensitive. Typically the default read community name
value is public, but may be reset by an administrator to Public, PUBLIC, etc.

xix
Enable Standard Monitoring – If checked, enable monitoring for SNMP devices within the network.
ATSE action:
Create Alarm - If checked, creates an alarm.
Create Ticket - If checked, creates a ticket.
Email Recipients - If checked, notifies email recipients specified in Email Addresses.
vPro tab
After Discovery has performed a vPro-enabled scan using a valid vPro credential on a network, you
can:
Identify, sort and filter vPro-enabled devices on the Discovered Devices (page v) page using the
vPro Machine column.
Display hardware attributes for vPro-enabled machines using the View button on the Discovered
Devices (page v) page.
Display hardware attributes for vPro-enabled machines classified as assets using the vPro tab on
the Assets page.
List vPro machines on the Desktop Management > vPro > vPro Management
(http://help.kaseya.com/webhelp/EN/VPRO/9050000/index.asp#10070.htm) page if the Show Discovered Assets
checkbox is checked. On this same page these agentless vPro machines can be powered on—on
demand or by schedule—and powered off on demand.
A machine does not need to be a vPro machine to discover vPro machines using Discovery.
Note: vPro configuration is a prerequisite to using this feature. Refer to the latest Intel documentation
for information on how to configure vPro. At the time of this writing, the following link leads to the Intel
documentation: http://communities.intel.com/community/openportit/vproexpert
(http://communities.intel.com/community/openportit/vproexpert).
Options
Enable vPro - Windows only. If checked, vPro scanning is enabled for this network.
Username / Password / Confirm Password - Enter the appropriate vPro credentials to return hardware
asset details about vPro machines discovered during the scan. Typically the same credentials are
defined for all vPro machines on the same network.
VMware tab
After Discovery has performed a scan using valid VMware credentials, you can:
Display a topology for the related assets of the discovered VMware environment in Discovery >
Networks > Topology Map.
Options
New - Adds a new record, click by row to add/edit:
Name/Password - Enter the appropriate credentials.
Host name or IP address - Enter the appropriate Host name or IP Address for the VMWare
server to provide discovery and return details about the VMWare environment discovered
during the scan.
Delete – Deletes a selected record.
WMI (Hyper-V) tab
After Discovery has performed a scan using valid WMI (Hyper-V) credentials, you can:
Display a topology for the related assets of the discovered WMI (Hyper-V) environment in
Discovery > Networks > Topology Map.

xx Contents
xx
Options
New - Adds new record, click by row to add/edit:
Name/Password - Enter the appropriate credentials for the WMI (Hyper-V) server to provide
discovery and return details about the WMI (Hyper-V) environment discovered during the
scan.
Delete – Deletes a selected record.
Scan Schedules Dialog
Discovery > Networks > By Network (page xvi) > Scan Schedules
The Scan Schedules dialog schedules a scan, on a recurring basis, for a selected network.
Note: See how to set SNMP and vPro parameters in Edit Network (page xvii).
Scan Schedule tab
Recurrence - Schedule a scan periodically. Each type of recurrence—Daily, Weekly,
Monthly—displays additional options appropriate for that type of recurrence. Periodic scheduling
includes setting start and end dates for the recurrence.
Skip if offline - If checked and the machine is offline, skip and run the next scheduled period and
time. If blank and the machine is offline, run the task as soon as the machine is online again.
Applies only to recurring schedules, a 'Once' schedule always executes the next time the agent is
online.
Power up if offline - Windows only. If checked, powers up the machine if offline. Requires
Wake-On-network or vPro and another managed system on the same network.
Scan Parameters
IP Range - By default, the entire scan range configured for a network is specified. Example:
192.168.32-35.0-255. Multiple IP ranges separated by commas are supported. Example:
192.168.32-35.0-255, 10.10.14-15.0-255.
Note: You can also specify a
cross-subnet scan
. This means your probe agent uses a different router
than the router used by devices specified in the IP range. Because the probe agent is scanning
beyond its own router, the ARP method of scanning is not used and MAC addresses and host names
cannot be included in the returned data. After performing an initial cross-subnet scan, you can
deploy an agent to a discovered machine on the cross-subnet. Then use that new agent machine as a
probe agent to scan its own subnet. This will provide the missing MAC and host name data.
IP Exclusion Range - Specifies a range of IP addresses to excluded from the scan. Multiple IP
ranges separated by commas are supported. Example: 192.168.32-35.0-255, 10.10.14-15.0-255
By default, this field is blank.
Email Addresses - Assigns the email address used for Discovery alerts. This assignment overrides
the default setting on the Alerting Profiles tab (page xxiii), but only for this one scheduled scan.
Importing Networks
You can create networks by importing an XML file using the System > Import Center
(http://help.kaseya.com/webhelp/EN/VSA/9050000/index.asp#6963.htm) page. You cannot export network records.
The format for the XML is shown below:

xxi
<?xml version="1.0" encoding="utf-8"?>
<networks>
<!-- <Network> Info =
"0=networkName,1=IpScanRange,2=IpExclusionRange,3=AlertsActive(Y),,,,,,,,,12=enab
leSNMP(Y),13=commString,14=confirmCommString,15=enableVpro(Y),16=vproUserName,17=
vProPassword,18=vProPasswordConfirm/>"
Use Y for checkboxes. Do not enter values in empty commas shown above.-->
<Network
Info="OhioStar,10.100.23.20-80,10.100.23.40-50,Y,,,,,,,,,Y,public,public,Y,asmith
,xyz9999!,xyz9999!" />
<Network Info="JaguarIT,10.20.20.20-80,10.20.20.30-60,,,,,,,,,,,,,,,, " />
<Network Info="PayServAcct,10.50.20.20-80,10.50.20.50-60,,,,,,,,,,,,,,,, " />
</networks>
Network Probe tab
Discovery > Networks > By Network > Network Probe tab
The Network Probe tab displays properties of the agent used to scan a selected network.
Probe Agent - These icons indicate the agent check-in status of each managed machine. Hovering
the cursor over a check-in icon displays the agent Quick View window.
Online but waiting for first audit to complete
Agent online
Agent online and user currently logged on.
Agent online and user currently logged on, but user not active for 10 minutes
Agent is currently offline
Agent has never checked in
Agent is online but remote control has been disabled
The agent has been suspended
An agent icon adorned with a red clock badge is a temporary agent.
Machine.Group ID - A unique machine ID / group ID / organization ID (page 72) name for a machine
in the VSA.
Status - The status of a scan. A scan progresses through the following statuses. These statuses
are displayed in Pending Procedures
(http://help.kaseya.com/webhelp/EN/VSA/9050000/index.asp#33845.htm) and Procedure History. If the scan
does not fail, the status returns to Ready To Scan once a scan is completed.
Ready To Scan
Installing
Performing Deep Scan
Failed
Last Scan - The date/time a scan last ran.
Domain/Workgroup - The workgroup or domain the computer belongs to.
DNS Name - The fully qualified domain name used to identify a computer or device on the network.
Gateway - The connection gateway IP address.
OS - Operating system type the machine is running.
IP Address - IP address assigned to the machine, in version 4 format.
Last Checkin - The last time this computer's agent checked-in to the VSA.

xxii Contents
xxii
Scan Schedules tab
Discovery > Networks > By Network > Scan Schedules tab
The Scan Schedules tab maintains recurring scan schedules for a selected network.
Actions
Edit - Adds or edits a selected scan schedule (page xx) for a selected network.
Delete - Deletes a selected scan schedule.
Table Columns
Type - The recurring time period: Daily, Weekly, Monthly.
Next Scan - The date/time a scan is next scheduled.
Scan Range - The range of IP addresses to include in a scan.
Exclude Range - The range of IP addresses to exclude from the scan.
Alert Email - If not blank, the email address used for Discovery alerts for this one scheduled scan.
If blank, the default setting on the Alerting Profiles tab (page xxiii) is used.
Agent Deployment tab
Discovery > Networks > By Network > Agent Deployment tab
The Agent Deployment Policies tab of the By Network page sets policies for the deployment of agents on
computers discovered on a selected network. For each type of operating system—for Windows, Mac
and Linux—set the following:
Automatically install agents for <OS type> machines - Check to enable.
Default Package - For each type of OS, select an OS appropriate agent install package.
Designated Deployer Agent - An agent machine on the same network used to deploy the agent.
User Name / Password / Confirm Password - Enter an administrator credential that allows remote
installation of an agent.
The policies you set also serve as defaults when deploying an agent manually using:
Discovered Devices (page v)
Discovered Devices - Tile View
Scan Results (page xxiv)
Matching OS Type Requirement
Since each type of OS can only deploy agents to target machines matching its own OS type, you must
manually install at least one agent of each OS type—Windows, Mac and Linux—on a network to
deploy agents automatically from then on to all three types of operating system.
Administrator Credential
The logon credential specified must have administrator rights on the remote selected machine.
If the target machine is on a domain, the administrator credential must use the format
domain\administrator or administrator@domain.
If the target machine is not on a domain, then the administrator credential may require the format
localhost\administrator or <hostname>\administrator or
<workgroup>\administrator.
If the target machine is a Linux machine, the root username alone—without a hostname or
domain—must be used.
Troubleshooting

xxiii
See Install Issues and Failures for a general agent install issues and failures.
See the Kaseya knowledge base (https://helpdesk.kaseya.com/entries/34435416) for troubleshooting
issues and failures specific to deploying agents using Discovery.
Alerting Profiles tab
Discovery > Networks > By Network > Alerting Profiles tab
The Alerting Profiles tab of the By Network page sets Discovery alert policies for a selected network and
device type: computer, mobile, network and firewall.
If enabled, an alert is only generated for a new device name or a new IP address the first time any
scan discovers it.
The Alerts Active checkbox in the Edit dialog enable and disables the Discovery alerts configured
on this tab for a selected network.
Actions
Configure - Edits probe and network alert profile settings displayed on this tab.
Profile
Network - The name of the network being configured.
Device Type - The type of device alerts are being set for: for example, computer, mobile, network,
firewall.
New Device - If a new device is discovered for the selected type of device:
Alarm - If checked, create an alarm.
Ticket - If checked, create a ticket.
Email - If checked, notify email recipients specified in Email Addresses.
Agent - Runs a selected agent procedure on the specified agent machine. If the discovered
device is a computer, leave blank to run the agent procedure on the discovered computer.
Procedure - Specify the agent procedure to be run.
New Device IP - If the IP address associated with an existing MAC address changes:
Alarm - If checked, create an alarm.
Ticket - If checked, create a ticket.
Email - If checked, notify email recipients specified in Email Addresses.
Email addresses - Specify one or more email addresses, delimited by a comma.
Asset Promotion tab
Discovery > Networks > By Network > Asset Promotion tab
The Asset Promotion tab of the By Network page configures the automatic promotion of devices to assets
when the devices are discovered.
When an agent cannot be installed on a discovered device, the device can be "promoted" to a
managed asset. For example, a router or printer may still require monitoring, even if an agent
cannot be installed on the machine.
All managed assets must be assigned a machine group and organization. Scoping rules
(http://help.kaseya.com/webhelp/EN/VSA/9050000/index.asp#4578.htm) and view filtering
(http://help.kaseya.com/webhelp/EN/VSA/9050000/index.asp#214.htm) features within the VSA depend on
this assignment.
A discovered device can be manually promoted or demoted on the Discovered Devices (page v)
page or Discovered Devices - Tile View page by toggling the / icon.

xxiv Contents
xxiv
Settings
Promote 'unknown' devices to assets - When scanning does not return a host name for a discovered
device, Discovery assigns the device a display name starting with the string 'unknown' on the
Discovered Devices (page v) page. If this option is checked, 'unknown' devices are promoted to
assets. Applies to the entire network across all device types. If not checked, discovered devices
identified as 'unknown' are not promoted to assets.
Automatic Asset Promotion Rule - Specifies which discovered devices—those that cannot be
installed with an agent—should be automatically promoted to a managed asset.
All
None
IP Address Range
Default Group - Selects the organization and machine group to assign to discovered devices
promoted to a managed asset.
Selected Group - Selects a fixed organization and machine group.
Use Probe - Uses the organization and machine group of the probe machine. This is the
default.
Default Root - Uses the default machine group of the organzation associated with this
network.
Scan Results
Discovery > Networks > By Network > icon
Discovery > Networks > By Agent > icon
The Scan Results window displays the latest scan results for a network. The same window is displayed
by clicking the icon on two different pages.
Click the icon for a network the By Network (page xvi) page.
Click the icon for an agent machine on the By Agent (page xxvi) page.
Note: There may be a delay displaying this page if a network scan is in process.
The Scan Results window has multiple tabs.
Summary tab - Displays counts for each type of device found. Can also deploy agents.
Deep Scan tab - Displays a tile view of each device found.
Quick Scan tab - Displays an NMAP scan report.
Actions
Deploy Agents - Deploys an agent to all computers without an agent found in the lower panel. See
agent deployment prerequisites (page xxii).
Deploy Agent by Address - Deploys agents to IP4 addresses that have not been discovered.
Agent From - An agent machine on the same network used to deploy the agent.
OS Type - Deploying to Windows, Mac or Linux.
Address - An IP4 address. Delimit multiple IP addresses with commas.
Username / Password - An administrator-level username and password. For domain
credentials use the domain\username format.
Summary tab
(Upper Panel)

xxv
The upper panel of this tab shows counts for the latest scan on a network.
All Devices Found - The total number of devices found by the scan.
Classified - The total number of devices that have been classified.
Unmanaged Computers - The total number of discovered computers that are not assets.
The IP addresses used by this network are listed in the upper right corner.
(Lower Panel)
The lower panel of this tab shows counts for each type of device found by all scans on a network.
Clicking the count for any type of device displays all the members of that count on the Devices tab in tile
format. See
Computers - by operating system
Mobile - by device type
Network - by device type
Printer
Unclassified
Virtual Server - by virtual server type
(Probe Information)
Network Name - A friendly name used to identify a network with the VSA.
Probe IP - IP address of the probe machine.
Subnet Mask - Subnet mask of the probe machine.
Default Gateway - Default gateway for the probe machine.
DNS Server - DNS server for the probe machine.
Wins Server - WINS server for the probe machine.
Deep Scan tab
Each tile on this tab displays a summary of information about a device. A tile can include the following
icons:
- Click to display NMAP scan data.
- Only displays if an agent is installed. Hover over this icon to display the Quick View
(http://help.kaseya.com/webhelp/EN/VSA/9050000/index.asp#33842.htm) window. Click to launch Live Connect
(http://help.kaseya.com/webhelp/EN/VSA/9050000/index.asp#33845.htm).
- Only displays if an agent is installed. The number of alarms created for this device or computer.
Click to display the Alarm Summary (http://help.kaseya.com/webhelp/EN/VSA/9050000/index.asp#4112.htm)
page for this device.
- Only displays if an agent is assigned a monitor set or if a SNMP device is assigned an SNMP
set. Click to display the Machine Status dashlet
(http://help.kaseya.com/webhelp/EN/VSA/9050000/index.asp#2803.htm) or Device Status dashlet
(http://help.kaseya.com/webhelp/EN/VSA/9050000/index.asp#2817.htm).
- Hovering over a tile displays a pencil icon. You can edit the name of a discovered machine or
device.
Device Filter Settings
Device - Filters the display of devices by device ID. Enter the beginning of a string to find all device
IDs that match that string. Include an asterisk at the beginning of a string to find all devices that
match that string anywhere in the device ID. For example, entering the string *ABC matches all
device IDs that include ABC anywhere in their device ID.
Type - Filters the display by the type of device:
Computer

xxvi Contents
xxvi
Mobile
Network
Power
Printer
Unclassified
Virtual Server
Machine Group - The organization and machine group of a machine.
Reset - Clears the device filter.
(Page Selector) - When more rows of data are selected than can be displayed on a single page,
click the and buttons to display the previous and next page.
(Rows Per Page) - Select the number of rows displayed per page.
Sort By - Sorts the display of data by:
Name
IP Address
Device Type
Assets - If checked, displays View Assets.
unManaged - If checked, displays devices without an agent.
If both Assets and unManaged are blank, only agent tiles are displayed.
if both Assets and unManaged are checked, all discovered devices are displayed.
If Assets is blank and unManaged is checked, then only non-assets are displayed.
If Assets is checked and unManaged is blank, then only assets are displayed.
By Agent
Discovery > Networks > By Agent
The By Agent page discovers devices on the same network as a selected probe machine. These
devices can be workstations and servers without agents, SNMP devices and vPro machines.
Discovered devices display on the following pages:
Discovered Devices (page v)
Discovered Devices - Tile View
Scanning Networks by Agent
This is the fastest way to scan a new network.
1. On the By Agent page, select a machine ID. Both Windows and Apple agent machines can serve
as a probe agent.
2. Click the Scan Now button to scan a network immediately.
Optionally click the Schedule Scan to schedule a scan and enter additional options. For
Schedule Scan, leave the network scan range blank. It will be populated automatically, based
on the subnet defined for the probe agent machine.
3. Enter a network name if the selected agent hasn't scanned a network before.
4. Click the Scan button to start the scan.
View discovered devices on the Discovered Devices page.
Visit the By Network page to edit networks before you scan again.

xxvii
Actions
Schedule Scan - Displays the Scan Schedules Dialog (page xx). Schedules a scan, on a recurring
basis, for a selected network. You must enter a unique name for a new network, if the selected
agent is not already serving as a a probe agent.
Scan Now - Runs a scan immediately on the network the selected agent machine belongs to, using
the scan options defined by the Edit Network (page xvii) of the By Network page. You must enter a
unique name for a new network, if the selected agent is not already serving as a a probe agent.
Cancel Scan - Cancel a scan on the network the selected agent machine belongs to.
Refresh - Refreshes the page.
Tables Columns
(Check-in Status) - These icons indicate the agent check-in status of each managed machine.
Hovering the cursor over a check-in icon displays the agent Quick View window.
Online but waiting for first audit to complete
Agent online
Agent online and user currently logged on.
Agent online and user currently logged on, but user not active for 10 minutes
Agent is currently offline
Agent has never checked in
Agent is online but remote control has been disabled
The agent has been suspended
An agent icon adorned with a red clock badge is a temporary agent.
- Click this icon to display the results of the latest scan and the accumulated results of all
previous scans (page xxiv).
Machine.Group ID - A unique machine ID / group ID / organization ID (page 72) name for a machine
in the VSA.
IP Address - The IP address of the probe machine.
OS - Operating system type the machine is running.
MAC Address - The MAC address of the probe machine.
Default Gateway - The default gateway of the probe machine.
Network - The network this agent is assigned to as a probe agent.
Scan Status - The status of a scan. A scan progresses through the following statuses. These
statuses are displayed in Pending Procedures
(http://help.kaseya.com/webhelp/EN/VSA/9050000/index.asp#33845.htm) and Procedure History. If the scan
does not fail, the status returns to Ready To Scan once a scan is completed.
Ready To Scan
Installing
Performing Deep Scan
Failed
Scan Range - The range of IP addresses scanned by the selected machine ID when a network scan
runs.
Next Scan - The date/time a scan is next scheduled.
Last Scan - The date/time a scan last ran.
SNMP Active - If checked, the device has SNMP functionality, though it may not be enabled.

xxviii Contents
xxviii
Domains
In This Section
Getting Started with Domain Watch xxviii
Configuration xxx
Domain Watch xxxviii
Computers li
Contacts liii
Users & Portal Access lv
More Information lix
Getting Started with Domain Watch
Discovery on the Kaseya Server (1) uses a probe agent on a domain computer (2) to communicate
with an Active Directory (AD) domain (3). Once connected, the probe "harvests" domain data (4) back
to the Kaseya Server.
Agents are deployed to domain machines using a group policy object (GPO) to download the
agent install package (5).
VSA users can use their domain credential to logon to the VSA (6).
Portal Access users can use their domain credentials to logon remotely to their machines (7).
The application protocol used to communicate with the domain server is Lightweight Directory
Access Protocol (LDAP).
See OU/Container (page 73) for more information about "organizational units".

xxix
Managing a Synchronized Security Model
One of the benefits of synchronizing the VSA with the domain is that the domain hierarchy of folders
and items—domains, organizational units/containers, computers, groups, users, and contacts—is
automatically "harvested" to create and maintain a similar security model in the VSA—organizations,
machine groups, machines, users, scopes, roles, and staff. Service providers are freed from having to
enter the same data a second time in the VSA. For example, user data, such as email, phone and other
contact information need only be updated in the domain to update corresponding fields in the VSA.
The security model created in the VSA by Discovery integration with the Active Directory domain
results in the following mapping of objects.
Managing Multiple Domains
Discovery provides consolidated access throughout the VSA to Discovery managed domain
computers, users and contacts, regardless of whether these domains have a "trust" relationship
between them. For example, Discovery can provide a consolidated view of the domains of both a
primary company and a subsidiary company.
Each Discovery managed domain is associated with a unique organization within the VSA.
A scope matching the name of the organization is created. If you like, you can add multiple
organizations to the same scope. This enables a VSA user to use a single scope to have visibility
of all machine groups in multiple organizations.
The machine ID / group ID filter enables you to filter the display of machines—by machine
property, machine group or organization.
Managing Remote Portal Access
Discovery sets policies that enable users to use their domain credentials to logon remotely to their
machines using Portal Access. Remote access using Portal Access can be inside or outside of the
company's firewall. For example, a Portal Access user might want to access their office computer from
home.

xxx Contents
xxx
Note: Portal Access in R95 only works using Live Connect (Classic). Even if the Use new Live Connect when
clicking the Live Connect button in Quickview option is set to Yes in System > Default Settings, Live Connect
(Classic) will still be used when logging into the VSA using Portal Access credentials.
Configuration
The following topics provide a step-by-step procedure for configuring the Discovery > Domain Watch
(page xxxviii) page.
In This Section
Configuration Prerequisites xxx
Configuring Probe Deployment xxxi
Configuring Agent Deployment xxxii
Configuring OU/Container Policies xxxii
Configuring Contact Policies xxxiii
Configuring Computer Policies xxxiv
Configuring Group Policies xxxiv
Configuring User Policies xxxv
Configuring Alerting Profiles xxxvi
Applying Changes xxxvi
Reviewing Domain Watch Results xxxvii
Configuring Activation xxxvii
Configuring Full Synchronization xxxviii
Configuration Prerequisites
1. Identify the domain administrator credentials for the Active Directory domain you intend to
integrate with the VSA. Discovery requires a domain credential authorized to perform the
following types of updates:
Create a GPO for the purpose of storing Kaseya install packages
Reset a password
Enable or disable a user account
Must have administrator level permissions to the assigned probe machine (either locally
through the built-in Administrators group OR as a Domain Admin)

xxxi
Note: A domain administrator credential provides the necessary authorization.
2. Create a new organization for your domain using the System > Orgs/Groups/Depts/Staff >
Manage page.
3. Install a VSA agent on a machine that is a member of the Active Directory domain you intend to
integrate with the VSA.
4. Verify you can see your domain in the upper panel of the Domain Watch (page xxxviii) page.
At least one domain machine with an agent on it displays in the lower panel.
Notice that the Org Id and Org Name for the domain network is currently blank.
Configuring Probe Deployment
Note: No tabs display unless a domain row in the upper panel is selected. At least one agent must be
installed on a domain computer to see its domain row displayed in the upper panel.
1. Click the Discovery > Domains > Domain Watch > Probe Deployment (page xxxix) tab.
2. Select the row of the Domain Name in the upper panel you want to configure.
The Probe Status displays Un-installed.
Domain machines with Kaseya agents installed on them display in the lower panel.
Initially you may only see a single domain computer with a Kaseya agent installed on it
displayed in the lower pane. As agents are automatically installed on other domain
computers using Discovery policies, these domain computers will all be displayed in the
lower pane.
3. Select one of the machines in the lower panel.
Click the enabled Install button in the lower panel.
4. The first thing the Install dialog asks you to enter is a credential. Discovery requires a domain
credential authorized to perform the following types of updates:
Create a GPO for the purpose of storing Kaseya install packages
Reset a password
Enable or disable a user account
Must have administrator level permissions to the assigned probe machine (either locally
through the built-in Administrators group OR as a Domain Admin)
Note: A domain administrator credential provides the necessary authorization.
5. Click the Verify and Set Credentials button.
If the credential is valid, the dialog displays a second Install button.
6. Optionally filter the scan performed by the probe machine using the Filter String. Useful for large
domains. Use distinguished name notation. For example, CN=Users,DC=myDomain,DC=com
Note: Semicolon can be used to separate multiple OUs, for example:
CN=OU1,DC=myDomain,DC=com;CN=OU2,DC=myDomain,DC=com.
7. The Install dialog asks you to specify a unique VSA organization for each domain integrated with
Discovery.
When agents are installed on machines for this domain, the machine ID accounts created in
the VSA become members of this organization.
When user records or staff records are created in the VSA for this domain, they are
associated with the organization you select.

xxxii Contents
xxxii
After the install, the association with the organization cannot be changed without
Uninstalling the Probe and Detaching the Org (page lxvii). This prevents creating duplicate
users, staff and computer records in multiple organizations.
8. Click the Install button in the dialog. The dialog closes.
Discovery probe components are installed on the agent machine.
After the install, the probe agent automatically begins "harvesting" a preview of all folders and
items in the domain concerning the OU/container hierarchy, computers, contacts, groups
and users. No detailed information is requested. The preview populates the Policies tabs with
this summary data.
The Probe Status displays Previewing while harvesting the data. This can take several
minutes. Use the Refresh button to update the page. Refreshing of the page is not done
automatically.
When the preview is complete, the Probe Status icon displays Installed.
Notice that the Org Id and Org Name for the domain network is now shows the organization
you selected.
Configuring Agent Deployment
1. Click the Discovery > Domains > Domain Watch > Agent Deployment (page xli) tab.
2. Click the Edit button. Set the following:
Automatically install Agents when computer is discovered - Leave this checkbox blank if you have just
activated the probe for the first time. Wait until policies are applied, then return to this tab and check
this checkbox. When policies are applied, agents are automatically installed on computers
that are members of those policies. The computers may need to be rebooted to complete the
installation of Kaseya agents.
Allow Agents to be installed on Directory Server - Leave this checkbox blank. If checked, agents
will also be installed on the system hosting the Active Directory domain.
Default Package - Select a Windows-based agent install package to use with the selected
domain.
Note: Domain Watch does not support installing agents on Linux or Apple machines. Agents must
be installed on domain Linux machines and domain Apple machines outside of Domain Watch. See
How Agents are Installed Using Discovery (page lxi).
3. Click the Save button to close this dialog.
Configuring OU/Container Policies
1. Click the Discovery > Domains > Domain Watch > Policies > OU/Containers (page xlii).
Use this tab to specify which domain machines you want to install a Kaseya agent on.
Each OU/container (page 73) in this tab is identified by its canonical name. A canonical name
provides the complete hierarchy of OUs/containers used to locate folders and items—such
as computers, contacts or groups—in a domain, similar in format to the full path name of a
file in a disk directory.
Additional columns show counts for the computers and contacts selected and available in
each OU/container.
2. Select an OU/container that shows a count for one or more computers.
Note: Sort this tab by clicking the Sort Descending option in the Total Computers column heading. This
ensures any OU/containers with computer counts greater than zero are listed first.
3. Select the Computers Policy button.

xxxiii
The dialog box lists all the available computers of the OU/container you can include (page
71) in selected policies.
Entering a checkbox next to a computer in this dialog means you want to install an agent on
that domain computer.
Optionally checking the Include new Computers checkbox means you want to include new
computers added to this OU/container. They will be assigned the same Discovery policy
you have previously configured for selected computers in this OU/container.
Optionally checking the Automatically assign portal access to portal candidates means you also
want to designate these computers as portal candidate machines (page lxiii).
Select the Machine Group to assign machine ID accounts created by this policy.
Select a fixed account, or
Use Directory Default - Administrators can automatically map the VSA machine
groups used to organize domain computers inside the VSA using the OU hierarchy
that already exists in Active Directory. This occurs when a OU policy or a computer
policy selects the Use Directory Default value. When this occurs, the domain
machine is assigned to the machine group that matches its current OU location. If an
Active Directory administrator renames the OU or moves the computer to a different
OU location, the machine group is changed in the VSA to match it. Tracking moves
fully requires policies be set in both the source and target OUs. Parent machine groups
are created as necessary, to match the OU hierarchy. Alternatively, a computer can be
assigned a policy that assigns it to a fixed machine group.
4. Check one or more computers in the list and click Save.
The dialog closes and the count in the Selected Computers column is updated with the number
of machines included in the computer policy you just set.
The Computers/Contacts Status displays Modified.
Do not Apply Changes yet.
Configuring Contact Policies
1. Click the Discovery > Domains > Domain Watch > OU/Containers (page xlii).
Use this tab to specify which domain contacts you want to create a staff record for in the
VSA. A domain contact contains contact information similar to information defined for a user,
but a contact has no domain logon privileges.
2. Select a OU/container that shows a count for one or more contacts.
Note: Sort this tab by clicking the Sort Descending option in the Total Contacts column heading. This
ensures any OU/containers with contact counts greater than zero are listed first.
3. Select the Contacts Policy button.
The dialog box lists all the available contacts of the OU/container you can include (page 71)
in selected policies.
Entering a checkbox next to a contact in this dialog means you want to create a VSA staff
record for that domain contact.
Optionally checking the Include new Contacts checkbox means you want to include new
contacts added to this OU/container. VSA staff records will be created for these new
contacts as they are discovered.
4. Check one or more contacts in the list and click Save.
The dialog closes and the count in the Selected Contacts column is updated with the number of
contacts included in the contact policy you just set.
The Computers/Contacts Status displays Modified.
Do not Apply Changes yet.

xxxiv Contents
xxxiv
Configuring Computer Policies
1. Click the Discovery > Domains > Domain Watch > Policies > Computers (page xliv).
Sets the machine group assignment policy for each domain computer individually.
This tab has precedence over policies set on the OU/Containers tab.
2. Select the Computers Policy button.
Set the computer policy for the selected machine to Include or Do Not Include.
Select the Machine Group to assign machine ID accounts created by this policy.
Select a fixed account, or
Use Default
3. Click Save.
The Policy Status displays Modified.
Do not Apply Changes yet.
Configuring Group Policies
Note: In Active Directory, users included in policies must have a first name, last name,
username,.password and email address.
1. Click the Discovery > Domains > Domain Watch > Policies > Groups (page xlv) tab.
Discovery user policies enables domain logons to be used by the VSA in two ways:
VSA user logons - These logons are used by VSA administrators.
Portal Access logons - These logons are used by machine users who want to access
their own machines remotely.
User groups are called "security groups" or simply "groups" in an Active Directory domain.
Each group in this tab is identified by its canonical name.
An additional column shows a count for the number of users in each group.
2. Select a group that shows a count for one or more users.
The same member can be a member of multiple groups in an Active Directory domain.
Note: Sort this tab by clicking the Sort Descending option in the Total Users column heading. This
ensures any groups with user counts greater than zero that don't yet have policies assigned
are listed near the top of the tab.
3. Select the Configure Group Policy button.
The Group Policy dialog displays, listing the Member Users in this group.
4. Select a Member Group Policy.
Each user group in Discovery can be assigned one of three different VSA logon policies.
These policies are applied to all users belonging to the group.
Do Not Include Users - Do nothing with the domain users listed in this user group.
Create Staff Members - Creates a staff member record. These users can be
assigned Portal Access to a machine manually.
Create Staff and make Auto Portal Candidates - Designates domain users in this
user group for Auto Portal Access assignment. See Making Portal Access
Candidates (page lxiii) for details.
Create VSA Users - Creates VSA user logons for domain users listed in this user
group.

xxxv
Since each domain user can belong to multiple domain user groups, a domain user is
assigned the highest ranking VSA logon policy assigned to any user group the domain user is a
member of. Logon policies are ranked from highest to lowest in this order:
Create VSA Users
Create Staff and make Auto Portal Candidates
Create Staff Members
Do Not Include Users
5. If Create VSA Users is selected:
Role Lookup - Select the role these users will use.
Scope Lookup - Select the scope these users will use.
If a scope with the same name as the organization does not already exist, a
displays to the right of the Scope Lookup drop-down list of the User Policy dialog.
Clicking the icon enables you to create a new scope that has the same name as the
organization associated with the domain. Once the scope is created the no longer
displays to the right of the Scope Lookup drop-down list and text at the top of the dialog
indicates the default scope already exists.
If the same user is assigned to multiple groups, and different roles and scopes are
assigned to each group, then when the user logs on to the VSA, these roles and
scopes will be available in the roles/scope selector in the upper-right corner of the VSA
window.
Roles/scope assignments using the Groups tab and Users tab can be modified and
reapplied multiple times. Successive changes will cause roles and scopes to
accumulate, rather than be replaced. Discovery never removes records in the VSA.
You can assign a VSA user to a scope outside of the organization associated with the
domain network. This enables a VSA user to use a single scope to have visibility of all
machine groups in multiple organizations. You must ensure the scope selected
provides access to each domain organization.
6. Select a Department to assign staff records created by this policy.
Select a fixed department, or
Use Directory Default - Administrators can automatically map the departments used to
organize staff records inside the VSA using the OU hierarchy that already exists in Active
Directory. This occurs when a Group or User policy selects the Use Directory Default value.
When this occurs, a staff record created by policy is assigned to the department that
matches its current OU location. If an Active Directory administrator renames the OU or
moves the user to a different OU location, the staff record is changed in the VSA to match it.
Tracking moves fully requires policies be set in both the source and target OUs. Parent
departments are created as necessary, to match the OU hierarchy. Alternatively, a staff
record can be assigned a policy that assigns it to a fixed department.
7. Click Save to close this dialog.
The dialog closes and the policy you selected displays in the Users Policy column.
The Policy Status displays Modified.
Do not Apply Changes yet.
Configuring User Policies
1. Click the Discovery > Domains > Domain Watch > Policies > Users (page xlv) tab.
Sets user policy for each user individually.
This tab has precedence over policies set on the Group tab.
2. Select a user.
3. Select the Configure Users Policy button.

xxxvi Contents
xxxvi
The Users Policy dialog displays.
4. Select a Member User Policy.
5. If Create VSA Users is selected:
Role Lookup - Select the role these users will use.
Scope Lookup - Select the scope these users will use.
6. Select a Department to assign staff records created by this policy.
Select a fixed department, or
Use Directory Default
7. Click Save to close this dialog.
The dialog closes and the policy you selected displays in the Users Policy column.
The Policy Status displays Modified.
Do not Apply Changes yet.
Configuring Alerting Profiles
1. Click the Discovery > Domains > Domain Watch > Alerting Profiles (page xlix) tab.
2. Enable all probe alerts.
This notifies you of any interruptions in the connection between the probe agent and Active
Directory.
3. Enable selected domain alerts.
If agents are deployed automatically using the Automatically install Agents when computer is
discovered checkbox in Agent Deployment (page xli), you do not need to be notified about the
discovery of new computers. If agents are not installed automatically, you do need to be
notified about newly discovered computers.
Enable alarms and email notification for the creation, change or deletion of various domain
objects in Active Directory. Each domain object belonging to an alert category--computer,
contact, container, domain, group, organization unit, user—must be assigned to a
Discovery policy, otherwise alerts for this object will not be triggered. Alerts are only
triggered after being detected by the next full or incremental sync.
Note: For more information about alerts see: Probe Alerts and Domain Alerts (page lxvii)
Applying Changes
You can apply changes to policies at any time. Typically you wait to apply changes until you have
completed your configuration changes on all policy tabs.
Note: You should not enable Activation (page xxxvii) or Full Synchronization (page xxxviii) until you are
satisfied with your initial policy configuration.
1. Navigate to any of the following policy tabs. It doesn't matter which tab you use. Changes are
applied to all policy tabs that have been modified.
OU/Containers
Computers
Groups
Users.
2. Click Apply Changes.
An "on demand" incremental synchronization is started. This is the same incremental
synchronization performed by Activation, which recurs on a fixed time period.

xxxvii
Domain Watch harvests detailed data for the Active Directory objects you set to "included" in
the policies you configured.
Harvesting is complete when the Policy Status for all policies says Applied.
Reviewing Domain Watch Results
1. Review Domain Watch data on these three pages. These pages display all Active Directory
objects discovered by "included" policies in Domain Watch.
Computers (page li) - Machine account templates are listed on this page.
New machine groups may have been created for these new machine accounts,
depending on the policy.
Any machine account template can be installed with an agent.
Some machines may be designated "auto portal candidate" machines.
Contacts (page liii) - Active Directory contacts are listed on this page. These are for
reference purposes only.
Users & Portal Access (page lv) - There are three types of domain users listed on this page,
depending on the policy specified.
VSA Users - These domain users can logon to the VSA using their domain credentials.
You can see them listed in the System > User Security > Users page. A new
domain-specific scope may have been generated for one or more VSA users,
depending on the policy. Check the System > User Security > Scopes page.
Auto Portal - These domain users are designated "auto portal" users. Whenever a "auto
portal" user is the last one to log out of an "auto portal candidate" domain machine,
Portal Access for that machine is automatically assigned to the user. Portal Access
allows a user to remote desktop into the machine. Any domain user can be manually
assigned Portal Access to a domain machine using this page, provided the domain
user was the last one logged out of the domain machine. Portal Access assignments
display on both this page and the Computers page. You can also see Portal Access
assignments on the Agent > Portal Access page.
Note: Portal Access in R95 only works using Live Connect (Classic). Even if the Use new Live
Connect when clicking the Live Connect button in Quickview option is set to Yes in System >
Default Settings, Live Connect (Classic) will still be used when logging into the VSA using
Portal Access credentials.
Staff - Displays domain user information, for reference purposes only. New staff
records, and in most cases new departments, are generated for all domain users and
contacts discovered by Domain Watch. These are located on the System >
Orgs/Groups/Depts/Staff > Manage page.
2. Review Domain Watch records in these additional VSA locations.
Alarms based on domain alerts are listed on the Monitor > Alarm Summary page and Agent
> Agent Logs > Alarm Log tab.
Tickets based on domain alerts display in either the Ticketing module or Service Desk
module.
Create and run reports based on Discovery > Active Directory report parts in Info Center.
Configuring Activation
After the probe is installed and the initial preview has completed, you should set as many as policies as
you can without activating your network domain. Instead click Apply Changes to perform an "on demand"
incremental synchronization. This is the same event performed by activation on a recurring fixed time
period basis. Continue performing "on demand" incremental synchronization until you are satisfied with

xxxviii Contents
xxxviii
the results of your initial configuration. Then click Activation to perform incremental synchronization
automatically. The default recurring time period is 60 minutes.
1. Select the Agent Deployment tab for your selected domain network on the Domain Watch page.
2. Select the agent probe row in the lower panel.
3. Click the Activate button in the lower panel. The Activate Probe dialog opens.
You can enter a different credential for the probe than the one entered for the install.
Typically the same credential is used.
Set a incremental synchronization interval (page lxvi) for synchronization of data between
the domain and Discovery The default is 60 minutes.
Click the Activate button to close this dialog and activate the probe. This should only take a
minute or two. Use the Refresh button to update the page. Refreshing of the page is not done
automatically.
The Probe Status displays Activated.
Configuring Full Synchronization
The Discovery probe accumulates domain changes in real time. If the connection between the
Discovery probe and a domain is lost for a period of time, the probe has no way to recover those
changes. To ensure domain changes are not lost forever, set probe alerts (page lxvii) and schedule a
recurring full synchronization (page lxvi), for example, once a week. If a probe alert is triggered,
consider running a full synchronization immediately. You should also run a full synchronization if the
probe was temporarily deactivated and reactivated.
1. Click the Discovery > Domains > Domain Watch > Schedule and Status (page l) tab.
2. Enable full synchronization on a weekly basis.
Domain Watch
Discovery > Domains > Domain Watch
The Domain Watch page configures the integration of Discovery with Active Directory domains.
Configuration features include:
Installing Discovery probes that monitor a domain.
Activating and scheduling the synchronization of data between Discovery and the domain.
Applying Discovery policies for:
The deployment of agents.
The creation of VSA users, Portal Access users and staff records.
Setting Discovery alerts.
Displaying the status of the Discovery configuration.
Information about a domain selected in the upper panel of the Domain Watch page is organized into the
following tabs in the lower panel. Configure a selected domain in the tab order presented, from left to
right.
1. Probe Deployment (page xxxix)
2. Agent Deploy Policy (page xli)
3. OU/Containers (page xlii)
4. User Policies (page xlv)
5. Alert Policies (page xlix)
6. Schedule and Status (page l)

xxxix
Upper Panel
Actions
Refresh - Refreshes the entire page.
Column Headings
Domain Name - The name of the Active Directory domain.
Domain Guid - The unique identifier in the VSA for this domain.
Org ID - The unique identifier of an organization (page 73) in the VSA.
Org Name - A friendly name used to identify an organization within the VSA.
Probe Status
- Un-installed - A probe is not installed for this domain.
- Processing - The probe executing a user request.
- Installed - The probe is installed and harvesting has been completed.
- Activated - The probe is monitoring the domain. Discovery policies are not modified.
- Activated - The probe is monitoring the domain. Discovery policies are modified but
have not yet been applied.
- Activated - The probe is monitoring the domain. Discovery policies are modified and
applied.
- Activated - The probe is monitoring the domain. Discovery policies have been modified
but not yet been applied for at least three synchronization intervals. The Discovery
administrator may have forgotten to apply the modified policies.
- Attention or Offline - The probe has encountered a problem that may require user
attention. Because the probe's attention status may self-correct, the attention status does
not necessarily correspond to a warning alert or error alert. If offline, the domain machine is
unavailable.
Note: Discovery pages are not auto-refreshed. Click the Refresh button to ensure the latest
Probe Status displays.
Computers/Contacts / User Policies Status - The policies of both tabs can be in one of 3 states.
- Original - Discovery policies have not yet been configured.
- Modified - Discovery policies have been configured but not yet applied. After clicking
the Apply Changes button, this icon remains unchanged until the harvest has been completed.
- Applied - Discovery policies have been applied.
Last Probe Agent Check-in - The latest date/time the probe agent checked in.
Last Probe Response - The last response returned by the probe agent.
Last Status Message - The last status message returned by the probe agent.
Probe Deployment
Discovery > Domains > Domain Watch > Probe Deployment tab
The Probe Deployment tab configures the probe agent for a selected domain. All domain computers with
a Kaseya agent installed on them display in the lower panel.
Discovery communicates with an Active Directory domain using a probe agent. The probe uses the
industry standard LDAP protocol to safely and securely communicate with the domain. Each probe
agent must be a member of the domain it monitors. Probe deployment installs the extra functionality an
agent requires to act as a probe.
Initially you may only see a single domain computer with a Kaseya agent installed on it displayed in the
lower pane. As agents are automatically installed on other domain computers using Discovery
policies, these domain computers will all be displayed in the lower pane.

xl Contents
xl
For more information see:
Configuring Probe Deployment (page xxxi).
Lower Panel
Header Fields
Probe Status
- Un-installed - A probe is not installed for this domain.
- Processing - The probe executing a user request.
- Installed - The probe is installed and harvesting has been completed.
- Activated - The probe is monitoring the domain. Discovery policies are not modified.
- Activated - The probe is monitoring the domain. Discovery policies are modified but
have not yet been applied.
- Activated - The probe is monitoring the domain. Discovery policies are modified and
applied.
- Activated - The probe is monitoring the domain. Discovery policies have been modified
but not yet been applied for at least three synchronization intervals. The Discovery
administrator may have forgotten to apply the modified policies.
- Attention or Offline - The probe has encountered a problem that may require user
attention. Because the probe's attention status may self-correct, the attention status does
not necessarily correspond to a warning alert or error alert. If offline, the domain machine is
unavailable.
Note: Discovery pages are not auto-refreshed. Click the Refresh button to ensure the latest Probe
Status displays.
Domain Name - The name of the Active Directory domain.
Administrator User Name - The administrator name of the credential used to log into the Active
Directory domain.
Actions
Install - Installs the probe. After the install, the association with the organization cannot be
changed without uninstalling the probe and detaching the probe. This prevents creating duplicate
users, staff and computer records in multiple organizations.
Domain Name - The probe machine is a member of this domain.
Administrator User Name - The probe machine uses this administrator username to access the
domain controller.
Administrator Password / Confirm Password - The administrator password.
Note: Discovery passwords cannot contain quotation marks (").
Filter String - Filters the scan performed by the probe machine. Useful for large domains. Use
distinguished name notation. For example, CN=Users,DC=myDomain,DC=com
VSA Organization - The VSA organization associated with the selected domain.
Uninstall - Uninstalls the probe.
Note: Before uninstalling the Discovery module from the VSA be sure to deactivate and detach the
organization, then uninstall the probe agent.
Activate - Enables incremental discovery and synchronization of domain controller data. Activating
a probe on a domain computer deactivates any other probe on that same domain, without loss of
data.

xli
Note: Activation is not required to run full sync on the Domain Watch > Schedule and Status (page l)
tab.
Deactivate - Disables incremental synchronization updates from the domain. If reactivation occurs
later, a "changes gap" may exist in the data collected by the probe, requiring the scheduling of a
full synchronization to correct.
Uninstall and Detach Org - Uninstalls the probe and detaches the organization. This may be
necessary if the wrong organization was selected for the domain initially. See Uninstalling the
Probe and Detaching the Org (page lxvii) for issues to consider before uninstalling a probe.
Column Headings
Domain Name - The name of the Active Directory domain.
Machine.Group ID - The machine ID.groupID.orgID of the machine in the VSA.
DNS Computer Name - The fully qualified domain name of the computer.
Computer Name - The local host name of the computer.
Agent Guid - A unique identifier for a machine ID.group ID account and its corresponding agent.
IP Address - The IP address of the computer.
Domain GUID - The unique GUID identifying this domain in Discovery.
Host Type - Domain Server or Domain Member.
Status - The probe status of the machine.
Last Agent Check-in - The last time the agent for this machine is checked in.
Organization - The VSA organization (page 73) this computer is a member of.
Agent Deployment
Discovery > Domains > Domain Watch > Agent Deployment tab
The Agent Deployment tab sets agent deployment policies for a selected domain.
For more information see:
Configuring Agent Deployment (page xxxii).
Header Fields
Probe Status
- Un-installed - A probe is not installed for this domain.
- Processing - The probe executing a user request.
- Installed - The probe is installed and harvesting has been completed.
- Activated - The probe is monitoring the domain. Discovery policies are not modified.
- Activated - The probe is monitoring the domain. Discovery policies are modified but
have not yet been applied.
- Activated - The probe is monitoring the domain. Discovery policies are modified and
applied.
- Activated - The probe is monitoring the domain. Discovery policies have been modified
but not yet been applied for at least three synchronization intervals. The Discovery
administrator may have forgotten to apply the modified policies.
- Attention or Offline - The probe has encountered a problem that may require user
attention. Because the probe's attention status may self-correct, the attention status does
not necessarily correspond to a warning alert or error alert. If offline, the domain machine is
unavailable.
Note: Discovery pages are not auto-refreshed. Click the Refresh button to ensure the latest
Probe Status displays.

xlii Contents
xlii
Actions
Edit - Edit agent deployment policies.
Automatically install Agents when computer is discovered - Check this checkbox. When policies
are applied, agents are automatically installed on computers that are members of those
policies. The computers must be rebooted to complete the installation of the Kaseya agents.
Note: Kaseya recommends leaving this checkbox
blank
until all Policies (page xlii) are configured
for a domain for the first time.
Allow Agents to be installed on Directory Server - Leave this checkbox blank. If checked, agents
will also be installed on the system hosting the Active Directory domain.
Default Package - Select a Windows agent install package to use with the selected domain.
Note: Domain Watch does not support installing agents on Linux or Apple machines. Agents must
be installed on domain Linux machines and domain Apple machines outside of Domain Watch. See
How Agents are Installed Using Discovery (page lxi).
Policies
Discovery > Domains > Domain Watch > Policies tab
In This Section
OU/Containers xlii
Computers xliv
Groups xlv
Users xlvii
OU/Containers
Discovery > Domains > Domain Watch > Policies > OU/Containers tab
The OU/Containers tab sets Discovery policies by domain OU or container for both computers and
contacts.
Related topics:
Configuring OU/Container Policies (page xxxii)
Configuring Contact Policies (page xxxiii)
Setting Discovery Policies for Contacts (page lix)
Setting Policies by Individual Computer
You can set policies by individual computer using the Computers (page xliv) tab. Policies set by
computer have precedence over policies set by OU/Container.
Included and Excluded
Once a probe is installed, Discovery is configured by setting selected domain folders and items to
included or excluded. Discovery policies provide IT automation—such as installing agents or creating
users—only for included folders and items. Discovery only harvests detailed information for included
folders and items, minimizing the amount of data required to maintain synchronization with the domain.
Header Fields
Policy Status
- Original - Discovery policies have not yet been configured.
- Modified - Discovery policies have been configured but not yet applied. After clicking
the Apply Changes button, this icon remains unchanged until the harvest has been completed.

xliii
- Applied - Discovery policies have been applied.
Last Full Sync - Date/time of last full synchronization for this domain.
Last Incremental Sync - Date/time of last incremental synchronization of all outstanding changes for
this domain. Clicking Apply Changes after modifying policies on any Policies (page xlii) tab performs
an "on demand" incremental synchronization. Activation performs a recurring incremental
synchronization.
Actions
Computers Policy - Sets the Discovery computer policy for included computers in an OU/container.
Include new Computers - If checked, the policy assigned this OU/container is applied to newly
discovered computers.
Automatically assign portal access to portal candidates - If checked, these computers are
automatically assigned to be portal access candidate (page lxiii) machines.
Computer Machine Group Override - Administrators can automatically map the VSA machine
groups used to organize domain computers inside the VSA using the OU hierarchy that
already exists in Active Directory. This occurs when a OU policy or a computer policy selects
the Use Directory Default value. When this occurs, the domain machine is assigned to
the machine group that matches its current OU location. If an Active Directory administrator
renames the OU or moves the computer to a different OU location, the machine group is
changed in the VSA to match it. Tracking moves fully requires policies be set in both the
source and target OUs. Parent machine groups are created as necessary, to match the OU
hierarchy. Alternatively, a computer can be assigned a policy that assigns it to a fixed
machine group. This policy can be overridden by Computers (page xliv) policy.
Contacts Policy - Sets the Discovery contact policy for included contacts in an OU/container.
Include new Contacts - If checked, the policy assigned this OU/container is applied to newly
discovered contacts.
Apply Changes - Applies Discovery policy changes pending on all Policies tabs.
Column Headings
Type
- Domain
- Container
- Organizational Unit
Container/Org Unit - The canonical name of a container or organizational unit in the Active Directory
domain. A A canonical name provides the complete hierarchy of OUs/containers used to locate
folders and items—such as computers, contacts or groups—in a domain, similar in format to the
full path name of a file in a disk directory.
Include New Computers - If checked, the policy assigned this OU/container is applied to newly
discovered computers.
Selected Computers - Represents the number of machines that have are included in this
OU/container. Initially this number is zero.
Total Computers - Represents the total number of machines that are members of this OU/container.
Machine Group Override - Specifies the machine group to assign when an agent is installed. Use
Directory Default specifies the default machine group for the organization associated with the
domain using the Probe Deployment (page xxxix) tab.
Auto Portal Computers - If checked, these computers are automatically assigned to be portal
access candidate (page lxiii) machines.
Incl New Contacts - If checked, the policy assigned this OU/container is applied to newly
discovered contacts.
Selected Contacts - The number of contacts that are included in this OU/container. Initially this
number is zero.

xliv Contents
xliv
Total Contacts - The total number of contacts that are members of this OU/container.
Computers
Discovery > Domains > Domain Watch > Policies > Computers tab
The Computers tab sets the machine group of a domain machine by individual computer. The policy
overrides the policy set for the computer using the OU/Containers (page xlii) tab.
For more information see:
Configuring Computer Policies (page xxxiv)
Setting Discovery Policies for Computers (page lix)
Included and Excluded
Once a probe is installed, Discovery is configured by setting selected domain folders and items to
included or excluded. Discovery policies provide IT automation—such as installing agents or creating
users—only for included folders and items. Discovery only harvests detailed information for included
folders and items, minimizing the amount of data required to maintain synchronization with the domain.
Header Fields
Policy Status
- Original - Discovery policies have not yet been configured.
- Modified - Discovery policies have been configured but not yet applied. After clicking
the Apply Changes button, this icon remains unchanged until the harvest has been completed.
- Applied - Discovery policies have been applied.
Last Full Sync - Date/time of last full synchronization for this domain.
Last Incremental Sync - Date/time of last incremental synchronization of all outstanding changes for
this domain. Clicking Apply Changes after modifying policies on any Policies (page xlii) tab performs
an "on demand" incremental synchronization. Activation performs a recurring incremental
synchronization.
Actions
Configure Computer Policy - Sets the Discovery computer policy for included computers in an
OU/container.
Computer Policy - Include or Do Not Include
Computer Machine Group Override - Administrators can automatically map the VSA machine
groups used to organize domain computers inside the VSA using the OU hierarchy that
already exists in Active Directory. This occurs when a OU policy or a computer policy selects
the Use Directory Default value. When this occurs, the domain machine is assigned to
the machine group that matches its current OU location. If an Active Directory administrator
renames the OU or moves the computer to a different OU location, the machine group is
changed in the VSA to match it. Tracking moves fully requires policies be set in both the
source and target OUs. Parent machine groups are created as necessary, to match the OU
hierarchy. Alternatively, a computer can be assigned a policy that assigns it to a fixed
machine group. This policy has precedence over OU/Containers (page xlii) policy.
Apply Changes - Applies Discovery policy changes pending on all Policies tabs.
Column Headings
Type
- Domain
- Container
- Organizational Unit

xlv
Container/Org Unit - The canonical name of a container or organizational unit in the Active Directory
domain. A A canonical name provides the complete hierarchy of OUs/containers used to locate
folders and items—such as computers, contacts or groups—in a domain, similar in format to the
full path name of a file in a disk directory.
Computer Name - The canonical name of the computer in an Active Directory domain.
Included - If checked, this machine can be installed with an agent using Discovery.
Machine Group Override - Specifies the machine group to assign when an agent is installed. Use
Default specifies the default machine group for the organization associated with the domain
using the Probe Deployment (page xxxix) tab.
Groups
Discovery > Domains > Domain Watch > Policies > Groups tab
Note: In Active Directory, users must have a first name, last name, username,.password and email
address.
The Groups tab sets Discovery policies by (user) groups for a selected domain.
For more information see:
Configuring Group Policies (page xxxiv)
Managing Remote Portal Access (page xxix)
Enabling Portal Access in Discovery (page lxiii)
Enabling/Disabling Domain Users Accounts or Resetting Domain User Passwords (page
lxiv)
Making Changes to Discovery Managed User Logons (page lxiv)
Supported Domain Logon Formats (page lxv)
Setting Policies by Individual User
You can set policies by individual user using the Users (page xlvii) tab.
Included and Excluded
Once a probe is installed, Discovery is configured by setting selected domain folders and items to
included or excluded. Discovery policies provide IT automation—such as installing agents or creating
users—only for included folders and items. Discovery only harvests detailed information for included
folders and items, minimizing the amount of data required to maintain synchronization with the domain.
Header Fields
Policy Status
- Original - Discovery policies have not yet been configured.
- Modified - Discovery policies have been configured but not yet applied. After clicking
the Apply Changes button, this icon remains unchanged until the harvest has been completed.
- Applied - Discovery policies have been applied.
Last Full Sync - Date/time of last full synchronization for this domain.
Last Incremental Sync - Date/time of last incremental synchronization of all outstanding changes for
this domain. Clicking Apply Changes after modifying policies on any Policies (page xlii) tab performs
an "on demand" incremental synchronization. Activation performs a recurring incremental
synchronization.
Actions
Configure Group Policy - Includes selected users as either VSA users or Portal Access candidates.
When this dialog opens, the Member User Policy drop-down list provides the following options:

xlvi Contents
xlvi
Do Not Include Users - Do not create VSA user logons or Portal Access logons for domain
users listed in this user group.
Create Staff Members - Creates a staff member record. These users can be assigned
Portal Access to a machine manually.
Note:
The user can only be manually assigned the
Portal Access
user of a machine—using the
Users & Portal Users (page lv)
page—if the user was the last user logged on to that machine.
The list of eligible machines are listed in the Last Logged-onto Machines field in the lower panel
of this same page.
Create Staff and make Auto Portal Candidates - Designates domain users in this user
group as Portal Access candidates. See Making Portal Access Candidates (page lxiii) for
details.
Create VSA Users - Creates VSA user logons for domain users listed in this user group. You
must select a role and scope.
If a scope with the same name as the organization does not already exist, a
displays to the right of the Scope Lookup drop-down list of the User Policy dialog.
Clicking the icon enables you to create a new scope that has the same name as the
organization associated with the domain. Once the scope is created the no longer
displays to the right of the Scope Lookup drop-down list and text at the top of the dialog
indicates the default scope already exists.
If the same user is assigned to multiple groups, and different roles and scopes are
assigned to each group, then when the user logs on to the VSA, these roles and
scopes will be available in the roles/scope selector in the upper-right corner of the VSA
window.
Roles/scope assignments using the Groups tab and Users tab can be modified and
reapplied multiple times. Successive changes will cause roles and scopes to
accumulate, rather than be replaced. Discovery never removes records in the VSA.
You can assign a VSA user to a scope outside of the organization associated with the
domain network. This enables a VSA user to use a single scope to have visibility of all
machine groups in multiple organizations. You must ensure the scope selected provides
access to each domain organization.
You can assign a VSA user to a scope outside of the organization associated with the
domain network. This enables a VSA user to use a single scope to have visibility of all
machine groups in multiple organizations. You must ensure the scope selected provides
access to each domain organization.
User Department Override - Administrators can automatically map the departments used to
organize staff records inside the VSA using the OU hierarchy that already exists in Active
Directory. This occurs when a Group or User policy selects the Use Directory Default value.
When this occurs, a staff record created by policy is assigned to the department that
matches its current OU location. If an Active Directory administrator renames the OU or
moves the user to a different OU location, the staff record is changed in the VSA to match it.
Tracking moves fully requires policies be set in both the source and target OUs. Parent
departments are created as necessary, to match the OU hierarchy. Alternatively, a staff
record can be assigned a policy that assigns it to a fixed department. This policy can be
overridden by Users (page xlvii) policy.
Apply Changes - Applies Discovery policy changes pending on all Policies tabs.
Column Headings
Type - - Group

xlvii
Group Name - A canonical name provides the complete hierarchy of OUs/containers used to locate
folders and items—such as computers, contacts or groups—in a domain, similar in format to the
full path name of a file in a disk directory.
Users Policy
Do Not Include Users - Do not create VSA user logons or Portal Access logons for domain
users listed in this user group.
Create Staff Members - Creates a staff member record.
Create Staff and make Auto Portal Candidates - Designates domain users in this user
group as Portal Access candidates. See Making Portal Access Candidates (page lxiii) for
details.
Create VSA Users - Creates VSA user logons for domain users listed in this user group.
Total Users - The total number of users in this group.
Role Policy - The VSA role to assign to newly created VSA users if Users Policy is Create VSA
Users.
Scope Policy - The VSA scope to assign to newly created VSA users if Users Policy is Create
VSA Users.
Dept Override - Specifies the department to assign a newly created user. Use Directory Default
specifies the default department for the organization associated with the domain using the Probe
Deployment (page xxxix) tab.
Users
Discovery > Domains > Domain Watch > Policies > Users tab
The Users tab sets Discovery policies by individual user.
Note: In Active Directory, users must have a first name, last name, username,.password and email
address.
Related topics:
Setting Discovery Policies for Users (page lx)
Configuring User Policies (page xxxv)
Setting Policies by (User) Group
You can set policies for users by (user) group using the Groups (page xlv) tab.
Included and Excluded
Once a probe is installed, Discovery is configured by setting selected domain folders and items to
included or excluded. Discovery policies provide IT automation—such as installing agents or creating
users—only for included folders and items. Discovery only harvests detailed information for included
folders and items, minimizing the amount of data required to maintain synchronization with the domain.
Header Fields
Policy Status
- Original - Discovery policies have not yet been configured.
- Modified - Discovery policies have been configured but not yet applied. After clicking
the Apply Changes button, this icon remains unchanged until the harvest has been completed.
- Applied - Discovery policies have been applied.
Last Full Sync - Date/time of last full synchronization for this domain.
Last Incremental Sync - Date/time of last incremental synchronization of all outstanding changes for
this domain. Clicking Apply Changes after modifying policies on any Policies (page xlii) tab performs

xlviii Contents
xlviii
an "on demand" incremental synchronization. Activation performs a recurring incremental
synchronization.
Actions
Configure Users Policy - Includes the selected user as either a VSA user or Portal Access
candidate. When this dialog opens, the Member User Policy drop-down list provides the following
options:
Do Not Include Users - Do not create a VSA user logon or Portal Access logon for this
domain user.
Create Staff Members - Creates a staff member record. This user can be assigned Portal
Access to a machine manually.
Note:
The user can only be manually assigned the
Portal Access
user of a machine—using the
Users & Portal Users (page lv)
page—if the user was the last user logged on to that machine.
The list of eligible machines are listed in the Last Logged-onto Machines field in the lower panel
of this same page.
Create Staff and make Auto Portal Candidates - Designates a domain user in this user
group as a Portal Access candidate. See Making Portal Access Candidates (page lxiii) for
details.
Create VSA Users - Creates a VSA user logon for the selected domain user.
Role Lookup
Scope Lookup
User Department Override - Administrators can automatically map the departments used to
organize staff records inside the VSA using the OU hierarchy that already exists in Active
Directory. This occurs when a Group or User policy selects the Use Directory Default value.
When this occurs, a staff record created by policy is assigned to the department that
matches its current OU location. If an Active Directory administrator renames the OU or
moves the user to a different OU location, the staff record is changed in the VSA to match it.
Tracking moves fully requires policies be set in both the source and target OUs. Parent
departments are created as necessary, to match the OU hierarchy. Alternatively, a staff
record can be assigned a policy that assigns it to a fixed department. This policy has
precedence over Groups (page xlv) policy.
Apply Changes - Applies Discovery policies changes for both the Policies > Computers tab and the
User Policies tab.
Column Headings
User Name - A canonical name provides the complete hierarchy of OUs/containers used to locate
folders and items—such as computers, contacts or groups—in a domain, similar in format to the
full path name of a file in a disk directory.
Policy
Do Not Include Users - Do not create a VSA user logon or Portal Access logon for this
domain user.
Create Staff Members - Creates a staff member record.
Create Staff and make Auto Portal Candidates - Designates this domain user a Portal
Access candidate. See Making Portal Access Candidates (page lxiii) for details.
Create VSA Users - Creates a VSA user logon for this domain user.
Groups Member Of - The groups this user is a member of.
Role Policy - The VSA role to assign the newly created VSA user if Policy is Create VSA
Users.
Scope Policy - The VSA scope to assign the newly created VSA user if Policy is Create VSA
Users.

xlix
Dept Override - Specifies the department to assign a newly created user. Use Directory Default
specifies the default department for the organization associated with the domain using the Probe
Deployment (page xxxix) tab.
Alerting Profiles
Discovery > Domains > Domain Watch > Alert Policies tab
The Alerting Profiles tab sets Discovery alert policies for a selected domain.
For more information see:
Probe Alerts and Domain Alerts (page lxvii)
Configuring Alert Policies (page xxxvi)
Actions
Configure - Edits probe and domain alert policy settings displayed on this tab.
Probe Alerts Policy
Displays enabled/disabled probe alert policy settings.
Alarm on Warning
Alarm on Failure
Ticket on Warning
Ticket on Failure
Email on Warning
Email on Failure
Email Addresses (for warning)
Email Addresses (for failure)
Domain Alerts Policy
Displays enabled/disabled domain alert policy settings. Each domain object belonging to an alert
category--computer, contact, container, domain, group, organization unit, user—must be assigned to
a Discovery policy, otherwise alerts for this object will not be triggered. Alerts are only triggered after
being detected by the next full or incremental sync.
Type / Object Type
- Computer
- Contact
- Container
- Domain
- Group
- Organizational Unit
- User
Alarm on create
Alarm on change
Alarm on delete
Ticket on create
Ticket on change
Ticket on delete
Email on create
Email on change
Email on delete

l Contents
l
Email Addresses
Schedule and Status
Discovery > Domains > Domain Watch > Schedule and Status tab
The Schedule and Status tab schedules full synchronizations for a selected domain. It also displays the
status of incremental synchronizations and full synchronizations. The Discovery probe accumulates
domain changes in real time. If the connection between the Discovery probe and a domain is lost for a
period of time, the probe has no way to recover those changes. To ensure domain changes are not lost
forever, set probe alerts (page lxvii) and schedule a recurring full synchronization (page lxvi), for
example, once a week. If a probe alert is triggered, consider running a full synchronization
immediately. You should also run a full synchronization if the probe was temporarily deactivated and
reactivated.
For more information see:
Synchronization (page lxvi)
Actions
Schedule Full Synchronization - Schedules a full synchronization once or periodically. Each type of
recurrence—Once, Minutes, Hourly, Daily, Weekly, Monthly, Yearly—displays additional options
appropriate for that type of recurrence. Periodic scheduling includes setting start and end dates
for the recurrence. Options include:
Distribution Window - Reschedules the task to a randomly selected time no later than the
number of periods specified, to spread network traffic and server loading. For example, if the
scheduled time for a task is 3:00 AM, and the distribution window is 1 hour, then the task
schedule will be changed to run at a random time between 3:00 AM and 4:00 AM. Distribution
Window must be greater than or equal to the Recurrence Interval.
Skip if offline - If checked and the machine is offline, skip and run the next scheduled period
and time. If blank and the machine is offline, run the task as soon as the machine is online
again. Applies only to recurring schedules, a 'Once' schedule always executes the next time
the agent is online.
Power up if offline - Windows only. If checked, powers up the machine if offline. Requires
Wake-On-network or vPro and another managed system on the same network.
Exclude the following time range - Applies only to the distribution window. If checked, specifies a
time range to exclude the scheduling of a task within the distribution window. Specifying a
time range outside of the distribution window is ignored by the scheduler.
Cancel Full Synchronization - Cancels the full synchronization schedule.
Header Fields
Probe Status
- Un-installed - A probe is not installed for this domain.
- Processing - The probe executing a user request.
- Installed - The probe is installed and harvesting has been completed.
- Activated - The probe is monitoring the domain. Discovery policies are not modified.
- Activated - The probe is monitoring the domain. Discovery policies are modified but
have not yet been applied.
- Activated - The probe is monitoring the domain. Discovery policies are modified and
applied.
- Activated - The probe is monitoring the domain. Discovery policies have been modified
but not yet been applied for at least three synchronization intervals. The Discovery
administrator may have forgotten to apply the modified policies.
- Attention or Offline - The probe has encountered a problem that may require user
attention. Because the probe's attention status may self-correct, the attention status does

li
not necessarily correspond to a warning alert or error alert. If offline, the domain machine is
unavailable.
Note: Discovery pages are not auto-refreshed. Click the Refresh button to ensure the latest
Probe Status displays.
Computers/Contacts Status and User Policies Status
- Original - Discovery policies have not yet been configured.
- Modified - Discovery policies have been configured but not yet applied. After clicking
the Apply Changes button, this icon remains unchanged until the harvest has been completed.
- Applied - Discovery policies have been applied.
General Information
Domain Name - The name of the Active Directory domain.
Incr. Sync. Interval (mins) - The incremental synchronization interval for this domain. The
synchronization interval is set when a probe is activated using the Probe Deployment (page xxxix)
tab.
Administrator User Name - The administrator name of the credential used to log into the Active
Directory domain.
Synchronization History
Recent Agent Check-in - The most recent check-in of any agent on the domain.
Active Agent Check-in - Date/time the probe agent of this domain last checked in.
Last Probe Request - Date/time a synchronization request was last sent to the probe of this domain.
Last Script Exec. - Date/time a script was last executed for this domain.
Last Full Preview - Date/time a preview synchronization was last executed for this domain. A
preview is only performed when a probe is installed.
Last Full Sync - Date/time of last full synchronization for this domain.
Last Incremental Sync - Date/time of last incremental synchronization of all outstanding changes for
this domain. Clicking Apply Changes after modifying policies on any Policies (page xlii) tab performs
an "on demand" incremental synchronization. Activation performs a recurring incremental
synchronization.
Last Script Status - Status of last Discovery script executed for this domain. For example,
Then/Else Success or Then/Else failure in step N.
Scheduled Synchronization
Full Synchronization Period - The scheduled pattern for full synchronization for this domain. May be
once or recurring.
Next Full Synchronization - The next scheduled full synchronization for this domain.
Computers
Discovery > Domains > Computers
The Computers page lists machine ID / group ID / organization ID (page 72) accounts created using
applied Discovery computer policies, for all domains monitored by Discovery probes.
Newly created machine ID accounts initially display as "empty" machine ID template
accounts—identified with a check-in icon—meaning there is no corresponding agent for this
machine ID account.
Changes made to included (page 71) computers update their corresponding VSA machine ID accounts
at the next synchronization.
For more information see:

lii Contents
lii
How Agents are Installed Using Discovery (page lxi)
How Machine ID Accounts are Created in Discovery (page lxii)
How Machine Moves in Domains are Reflected in Discovery (page lxii)
Upper Panel
Actions
Deploy Agent - If an agent has not yet been deployed for a created machine ID account, you can
manually deploy the agent using this page.
Synchronize Machines - If an agent already exists on a managed machine in a different machine
group, then Discovery creates an "empty" machine ID template (page 72) account—identified
with a check-in icon—and no agent ever checks in. The new machine ID template account
displays a machine.ID / group ID / organization ID (page 72) based on the computer's canonical
name in the Active Directory domain. You can merge these duplicate accounts. The existing,
active agent account adopts the name of the new machine ID template account, then the new
machine ID template account is deleted. No data is lost by the merge and the machine ID account
now matches its location in the domain hierarchy.
Refresh - Refreshes the page.
Column Headings
Machine.Group ID - A unique machine ID / group ID / organization ID (page 72) name for a machine
in the VSA.
Domain - The name of the Active Directory domain.
Duplicate Exists - If checked, a duplicate VSA machine ID account exists for this domain computer.
Duplicate Machine.Group ID - The name of a duplicate machine.group ID for this same machine.
Agent Deployed - If checked, an agent has been deployed on this computer.
Install Package - The agent install package selected for this computer's domain. The agent install
package for a domain is specified using the Agent Deployment (page xli) page.
OS - The operating system of the computer.
Auto Portal - A domain user is automatically assigned to be the Portal Access (page lxiii) user of
domain machine if Auto Portal is enabled for both the domain user and domain computer.
Canonical Name - A canonical name provides the complete hierarchy of OUs/containers used to
locate folders and items—such as computers, contacts or groups—in a domain, similar in format
to the full path name of a file in a disk directory.
Agent Deploy Date - The date/time an agent deployment was attempted.
Deploy Status - The status of the agent deployment. Review error messages using this column.
Lower Panel
The lower panel displays detailed information about a row selected in the upper panel.
VSA Agent Settings
Machine ID - A unique machine ID / group ID / organization ID (page 72) name for a machine in the
VSA.
Agent Deployment Package - The agent install package selected for this computer's domain.
Status
Operating System - The operating system of the computer.
Last Reboot - The last date/time the computer was rebooted.
Created in AD - The date/time the computer was added to the Active Directory domain.

liii
Last Modified in AD - The date/time the computer record in the Active Directory domain was last
modified.
Last Logged-on User ID - The user ID of the last logon to the computer.
Last Logged-on User Name - The user name of the last logon to the computer.
Directory Server Details
Describes detailed information about the computer in the domain.
Computer Name - The name of the computer.
Domain Name - The name of the Active Directory domain.
Canonical Name - A canonical name provides the complete hierarchy of OUs/containers used to
locate folders and items—such as computers, contacts or groups—in a domain, similar in format
to the full path name of a file in a disk directory.
Distinguished Name - A distinguished name provides the same information as a canonical name,
formatted as a series of attributes, sequenced in reverse order from the canonical name. CN =
Common name or container. OU = Organization unit. DC = Domain component.
DNS Host Name - The fully qualified domain name of the computer.
DC Type - Domain Server or Domain Member.
Site - The name of a geographical location, comprising one or more subnets. A local area network.
Description - A one line description of the computer.
Location - The site/subnet of the computer. Used to locate nearby printers and other resources.
Primary Group - A user or computer is associated with a primary group for POSIX compliance, based
on UNIX. For Active Directory domain computers, the default primary group is Domain
Computers.
Contacts
Discovery > Domains > Contacts
The Contacts page lists staff records created using applied Discovery contact policies, for all domains
monitored by Discovery probes.
Changes made to included (page 71) domain contacts update their corresponding VSA staff records at
the next synchronization.
Upper Panel
Actions
Refresh - Refreshes the page.
Column Headings
Contact - The canonical name for the domain contact. A A canonical name provides the complete
hierarchy of OUs/containers used to locate folders and items—such as computers, contacts or
groups—in a domain, similar in format to the full path name of a file in a disk directory.
Staff - The full name of the staff record created in the VSA.
VSA Org - The VSA organization of the staff record.
VSA Dept - The VSA department of the staff record.
Email - The email of the staff record.
Telephone No - The phone number of the staff record.
Mobile - The mobile phone number of the staff record.

liv Contents
liv
Lower Panel
The lower panel displays detailed information harvested from the domain about a contact selected in
the upper panel.
General
First Name - The first name of the contact.
Last Name - The last name of the contact.
Display Name - The full name of the contact.
Description - A description of the contact.
Office - The contact's office location.
Telephone Number - The primary phone number of the contact.
Email - The email of the contact.
Address
The address of the contact.
Street
P.O. Box
City
State/Province
Zip/Postal Code
Country/Region
Telephones
The phones numbers and notes for the contact.
Home
Pager
Mobile
Fax
IP Phone
Notes
Account
Common Name - The common name of the contact.
Canonical Name - The canonical name of the contact. A canonical name provides the complete
hierarchy of OUs/containers used to locate folders and items—such as computers, contacts or
groups—in a domain, similar in format to the full path name of a file in a disk directory.
Domain Name - The name of the Active Directory domain.
Distinguished Name - A distinguished name provides the same information as a canonical name,
formatted as a series of attributes, sequenced in reverse order from the canonical name. CN =
Common name or container. OU = Organization unit. DC = Domain component.
Description - A description of the contact.
Created in AD - The date/time the contact record was created in the Active Directory domain.
Last Modified in AD - The date/time the contact record was last modified in the Active Directory
domain.
Organization
Job Title - The job title of the contact.
Department - The department the contact is a member of.

lv
Company - The company the contact is a member of.
Manager - The manager of this contact.
Direct Reports - The users or contacts that report to this contact.
Users & Portal Access
Discovery > Domains > Users & Portal Access
Note: Portal Access in R95 only works using Live Connect (Classic). Even if the Use new Live Connect when
clicking the Live Connect button in Quickview option is set to Yes in System > Default Settings, Live Connect
(Classic) will still be used when logging into the VSA using Portal Access credentials.
The Users & Portal Access lists VSA users and Portal Access candidates created using applied
Discovery group policies, for all domains monitored by Discovery probes.
Changes made included (page 71) domain (user) groups update their corresponding VSA user and
Portal Access candidate records at the next synchronization.
For more information see:
Setting Discovery Policies for Users (page lx)
Enabling Portal Access in Discovery (page lxiii)
Enabling/Disabling Domain Users Accounts or Resetting Domain User Password (page lxiv)
Making Changes to Discovery Managed User Logons (page lxiv)
Supported Domain Logon Formats (page lxv)
Upper Panel
Actions
Disable Account - Disables a domain user account immediately. Affects VSA logons and Portal
Access logons using the same domain logon.
Enable Account - Enables a domain user account immediately. Affects VSA logons and Portal
Access logons using the same domain logon.
Reset Password - Resets a domain user password. The effect takes effect at the next logon. Affects
VSA logons and Portal Access logons using the same domain logon. Options include:
Unlock Account - If checked, unlocks a domain user's locked account.
Force Password Change - If checked, forces the domain user to change the reset password the
next time the user logs on to the domain.
Assign Portal User - Manually assigns Portal Access to a domain computer to a domain user. A user
must be the last user logged on to that machine. The list of eligible machines are listed in the Last
Logged-onto Machines field in the lower panel of this same page.
Remove Portal Users - Manually removes Portal Access to a domain computer from a domain user.
Refresh - Refreshes the page.
Column Headings
Domain Name - The name of the Active Directory domain.
Domain User - The fully qualified domain name of the user.
User Name - The domain user name.
User Logon Name - The VSA logon name, if this is also a VSA user logon.
Enabled - If checked, the user is enabled in the domain.
VSA Org - The VSA organization (page 73) this user is a member of.

lvi Contents
lvi
VSA Dept - The VSA department this user is a member of.
Supervisor - The VSA supervisor for this staff member.
Expires - The date this account expires.
VSA - If checked, the VSA user can logon to the VSA using his or her domain credential.
Portal - If checked, this domain user is assigned the Portal Access user of the domain machine
listed in the Portal Assignment column. Unchecked, the user is not assigned to any domain
computer as the Portal Access user.
Auto Portal - A domain user is automatically assigned to be the Portal Access (page lxiii) user of a
domain machine if Auto Portal is enabled for both the domain user and domain computer.
Portal Assignment
None (will be assigned upon login to an 'Auto Portal' computer) - Auto Portal
is enabled for this user.
None (assign using the 'Assign Portal User' button) - Auto Portal is not enabled
for this user, but can be manually assigned to be the Portal Access user of a machine.
Note:
The user can only be manually assigned the
Portal Access
user of a machine—using the
Users & Portal Users (page lv)
page—if the user was the last user logged on to that machine.
The list of eligible machines are listed in the Last Logged-onto Machines field in the lower panel
of this same page.
<machineID> - The domain computer currently assigned to the domain user with Portal
Access to that machine.
VSA User - The user is a VSA user and cannot be assigned as a Portal Access user of a
machine.
Email - The email of the domain user.
Phone - The phone of the domain user.
City - The city of the domain user.
Country - The country of the domain user.
User Policy - The policy assigned to the user.
Lower Panel - User Details tab
General
First Name - The first name of the user.
Last Name - The last name of the user.
Display Name - The full name of the user.
Office - The user's office location.
Telephone Number - The primary phone number of the user.
Email - The email of the user.
View All Tickets - If checked, the VSA user associated with this staff member can view all Service
Desk tickets in his or her scope as well as tickets associated with this specific staff member
record. If blank, this VSA user can only view Service Desk tickets associated with this specific
staff member record.
Approve All Timesheets - If checked, this staff member can approve any timesheet. This ensures all
timesheets can be approved in a timely manner, if other approvers are temporarily unavailable.
Timesheet Approval Pattern - Specifies the approval pattern required to approve this staff member's
timesheets. Approval patterns determine whether the staff member's supervisor, or the
supervisor's supervisor, or both, are required to approve the staff member's timesheet.
VSA Logon - If Yes, the VSA user can logon to the VSA using his or her domain credential.
VSA Roles - The VSA roles assigned to the VSA user.
VSA Scopes - The VSA scopes assigned to the VSA user.

lvii
Address
The address of the user.
Street
P.O. Box
City
State/Province
Zip/Postal Code
Country/Region
Telephones
The phones numbers and notes for the user.
Home
Pager
Mobile
Fax
IP Phone
Notes
Last Logged-onto Machines
Last Logged-on to (Machines) - The domain computer the domain user last logged on to. Portal
Access to a domain machine can only be assigned to the last machine a domain user has logged
on to.
Account
User Logon Name - The domain user's logon name.
Account Expires - The expiration date for the domain account.
Common Name - The common name of the user in the domain.
Canonical Name - The canonical name of the user. A canonical name provides the complete
hierarchy of OUs/containers used to locate folders and items—such as computers, contacts or
groups—in a domain, similar in format to the full path name of a file in a disk directory.
Domain Name - The name of the Active Directory domain.
Distinguished Name - A distinguished name provides the same information as a canonical name,
formatted as a series of attributes, sequenced in reverse order from the canonical name. CN =
Common name or container. OU = Organization unit. DC = Domain component.
Last Password Change - The last date the password changed.
Last Logon - The date/time the user last logged on.
Last Logoff - The date/time the user last logged off.
Created in AD - The date/time the user record was created in the Active Directory domain.
Last Modified in AD - The date/time the user record was last modified in the Active Directory
domain.
Organization
Title - The job title of the user.
Domain Department - The department the user is a member of.
VSA Department - The department the VSA staff record is a member of.
Domain Company - The company the user is a member of.
Supervisor - The user or contact this user reports to. Called the Manager in domain and
Supervisor in VSA.

lviii Contents
lviii
VSA Org Id - The VSA identifier of the organization (page 73).
VSA Org Name - The VSA friendly name of the organization.
Description - A description of the domain user account.
Direct Reports - The domain contacts or domain users that report to this domain user.
Lower Panel - Portal Access tab
Additional details display in the Portal Access tab if the user is a Portal Access candidate (page lxiii).
VSA Portal Settings
These settings are the same as those shown on the Agent > Portal Access
(http://help.kaseya.com/webhelp/EN/VSA/9050000/index.asp#438.htm) page.
Portal Access Enabled - If Yes, the domain user is currently assigned a Portal Access remote logon
to a VSA managed machine.
User ID - The Portal Access user ID.
Contact Name - The name for the Portal Access user.
Contact Email - The email for the Portal Access user.
Contact Phone - The phone for the Portal Access user.
Note: The Change Profile tab of Portal Access is automatically populated with the
name
,
email
and
phone number
of the currently logged in Portal Access candidate. The submitter fields of new
Service Desk tickets are populated with the contact information stored in the Change Profile tab.
This means Portal Access users don't have re-enter the same contact information, each time they
create a new Service Desk ticket.
Language Preference - The Portal Users language preference.
Machine Role - The machine role (http://help.kaseya.com/webhelp/EN/VSA/9050000/index.asp#4827.htm)
assigned to the Portal Access machine.
Show Notes as Tooltip - If checked, Agent > Edit Profile
(http://help.kaseya.com/webhelp/EN/VSA/9050000/index.asp#256.htm) notes are included as part of the
tooltip that displays whenever the cursor hovers over a machine ID's check-in status icon.
Auto Assign Tickets from inbound emails - If Yes, auto assign a ticket to this machine ID if the
Ticketing email reader receives an email from the same email address as the Contact Email.
Applies when new emails come into the ticketing email reader that do not map into any of the
email mappings.
Note: if multiple machine IDs have the same contact email, then only one machine ID can have this
checkbox checked.
Portal Assignment - The machine the Portal Access user is assigned to.
Last Logged-on to Machine - The date/time the Portal Access user last logged onto the machine.
VSA Machine Administrator
Admin Email - The email address providing administrator support for this managed machine. Set
using the Agent > Edit Profile (http://help.kaseya.com/webhelp/EN/VSA/9050000/index.asp#256.htm) page.
Computer Manager from Directory Server
Manager - The domain user this domain user reports to. Called the Manager in an Active Directory
domain and Supervisor in the VSA.
Office - The user's office location.
The user's address:
Street

lix
City
State/Province
Country/Region
Telephone No. - The user's phone number.
Fax No. - The user's fax number.
More Information
In This Section
Setting Discovery Policies for Computers lix
Setting Discovery Policies for Contacts lix
Setting Discovery Policies for Users lx
Licensing lx
The Directory Services Feature Set lx
How Agents are Installed Using Discovery lxi
How Machine ID Accounts are Created in Discovery lxii
How Machine Moves in Domains are Reflected in Discovery lxii
Enabling Remote Portal Access in Discovery lxiii
Enabling/Disabling Domain Users Accounts or Resetting Domain User Passwords lxiv
Making Changes to Discovery Managed User Logons lxiv
Supported Domain Logon Formats lxv
Synchronization lxvi
Activation / Deactivation lxvii
Uninstalling the Probe and Detaching the Org lxvii
Probe Alerts and Domain Alerts lxvii
Removing a Domain from Discovery Management lxviii
Uninstalling Discovery lxviii
Domain Watch Default Settings lxviii
Setting Discovery Policies for Computers
The following Discovery computer policies can be set by OU/container or by individual computer.
Setting a policy by computer has precedence over setting a policy by OU/container.
Automatic deployment of agents on newly discovered machines.
Manual deployment of agents on selected machines.
Agent deployment on the system hosting the Active Directory domain.
Designating all machines or selected machines as portal candidates (page lxiii).
Automatic assignment of domain machines to machine groups based on the OU hierarchy in
Active Directory. Alternatively you can assign domain machines to a fixed machine group.
Discovery computer policies are set using the Domains > Domain Watch > Policies > OU/Containers
(page xlii) tab or Computers (page xliv) tab.
Setting Discovery Policies for Contacts
The following Discovery contact policies can be set for each OU/container in the domain.
Automatic creation of VSA staff records for all newly discovered domain contacts.
Manual creation of VSA staff records for all selected domain contacts in an OU/container.
Creating a staff record using a Discovery policy also creates a hierarchy of departments that reflects
the OU/container hierarchy in the domain.

lx Contents
lx
Discovery contact policies are set using the Domains > Domain Watch > Policies > OU/Containers
(page xlii) tab.
Setting Discovery Policies for Users
Discovery can create VSA users and Portal Access users based on domain users. This means IT
administrators can provide their users the same credential for these applications and manage
authentication and authorization from a single location, using the Active Directory domain.
The following Discovery user policies can be set by (user) group or set by individual user.
1. Do Not Include Users - Do not create VSA user logons or Portal Access logons for domain
users listed in this user group.
2. Create Staff Members - Creates a staff member record. These users can be assigned Portal
Access to a machine manually.
3. Create Staff and make Auto Portal Candidates - Designates domain users in this user group
as Portal Access candidates. See Making Portal Access Candidates (page lxiii) for details.
4. Create VSA Users - Creates VSA user logons for domain users listed in this group. Automatic
assignment of VSA users to departments can be based on the OU hierarchy in Active Directory.
Alternatively you can assign domain machines to a fixed machine group.
Discovery user policies are set using the Domains > Domain Watch > Policies > Groups (page xlv) tab
or Users (page xlvii) tab.
Licensing
Discovery domains are licensed separately from agent licenses. Discovery domain license counts
display on the Licenses tab of the System > License Manager
(http://help.kaseya.com/webhelp/EN/VSA/9050000/index.asp#2924.htm) page.
A Discovery managed domain is a domain attached to an organization. A domain is attached to an
organization when activated using the Domains > Domain Watch > Probe Deployment (page xxxix) tab.
A managed domain can be in one of following licensing states:
Unlicensed - Discovery is installed and visible in the VSA but zero domains are licensed.
Licensed - A sufficient number of licenses exist for the domains being managed.
Exceeded - Another domain cannot be installed, because the maximum number of domains has
been installed.
Expired - Discovery has been disabled because licensing for the entire module has expired.
The Directory Services Feature Set
Directory Services 1.2 is a feature set (page 71), licensed separately, that provides advanced
functionality in the Discovery module.
Domain Policies
Domain policies can be can specified for multiple machines and users by:
OU/Container
Groups
Incremental Synchronization
Activation/Deactivation
Provides incremental discovery and synchronization of domain controller data. Without
Directory Services 1.2 only full discovery and synchronization is supported. Activation
and Deactivation buttons display on the Domain Watch > Probe Deployment page,
enabling and disabling incremental discovery and synchronization.
Auto Portal Access
Auto creates portal access to a machine, based on the person last logged on to the
machine.

lxi
Contacts
Discovers and synchronizes domain contacts and VSA staff records. A domain contact
contains information similar to a domain user, but a contact has no domain logon
privileges. Directory Services 1.2 enables you to set policies that create VSA staff
member records for newly discovered contacts in a domain and to keep the two
records synchronized with each other. Creating a staff record using a Directory
Services policy also creates a hierarchy of departments that reflects the OU/container
hierarchy in the domain.
Users
Enables and disables domain logons from the Directory Services module.
Resets the domain passwords.
Unlocks domain accounts.
Alerts
Provides alerts for new or changed computers, contacts, OU/containers, domains,
groups, organizations, or users.
How Agents are Installed Using Discovery
All agents installed on domain machines using Discovery are installed using a single agent install
package specified for each domain.
Since different types of machines may require different agent settings, Kaseya recommends specifying
a "generic" agent install package for Discovery agent installs. Change the agent settings after the
install, as appropriate, for each type of machine. Agent settings can be changed manually using Policy
Management or Agent > Copy Settings.
Domain Discovery uses two methods for installing agents.
Method 1 - Agent Installs Using Kconnect
Applies to both network installs and domain installs.
This method is successful most of the time and installs the agent immediately without requiring a reboot of the
machine. It is the same technology used by By Network (page xvi) to remotely install an agent. The agent
install package is downloaded from the Kaseya Server to the agent probe computer. The agent probe
computer runs a Kaseya utility called Kconnect.exe. The agent probe machine uses its Active
Directory domain credential to transfer the file to the target computer and install the agent.
Method 2 - Agent Installs using a GPO Script
Applies only to domain installs. Both method 1 and method 2 are initiated at the same time for a domain
install. If an install using one method has already succeeded, any subsequent attempt to install an
agent is canceled.
This method does not occur until the target computer is rebooted. A single copy of the agent install package
for each domain is stored on the system hosting the Active Directory domain. A Group Policy Object
(GPO) is created for the domain in Active Directory. When an agent is deployed using Discovery the
GPO is assigned to that domain machine in Active Directory. If an agent is not already installed on the
domain machine, the GPO triggers an agent install the next time the domain machine is rebooted. If the
agent is deleted from the domain machine, the GPO method of installing the agent ensures that the
agent is re-installed.
Updating the Install Package on the Domain Controller
The copy of the agent install package on the system hosting the Active Directory domain is not
automatically updated when the agent install package is changed. For this release, to update the agent
install package manually:
1. In Active Directory, locate the Features > Group Policy Management > <forest> > Domains
<domain> > Group Policy Objects folder.
2. Right-click the ADAgentDeployGPO group policy object and select the Edit... option to open the Group
Policy Management Editor dialog.
3. Locate the Computer Configuration > Policies > Windows Settings > Scripts folder.

lxii Contents
lxii
4. Right-click the Startup script and select the Properties option to open up the Startup Properties dialog.
5. Select the InstallAgent.vbs script and click the Show Files... button to display a Windows explorer
window.
6. A KcsSetup<number>.exe file displays in the selected file folder with a unique number added to
the end of the filename. For example: KcsSetup35475311.exe.
7. Rename the old KcsSetup<number>.exe file and replace it with your updated KcsSetup.exe.
Note: Ensure you rename the KcsSetup.exe file to the exact KcsSetup<number>.exe filename that
was used before, including the unique number that was previously used.
New installs of the agent using the GPO method will now install using the agent settings in the new
agent install package.
Note: When installing an agent to a Windows XP domain machine using the GPO method, installs may fail if
the Security Center domain policy is disabled
(https://technet.microsoft.com/en-us/library/cc725578(WS.10).aspx).
How Machine ID Accounts are Created in Discovery
The creation and grouping of machine ID accounts (page 72) using Discovery depends on how
machines are organized in the domain and whether the machine ID accounts already exist in the VSA.
A single organization is specified for each domain in Discovery. The organization selected
determines the organization assigned to newly created machine ID accounts when installed using
Discovery.
The appropriate hierarchy of machine groups for a new machine ID account are created, if the
machine group hierarchy doesn't already exist, matching the machine's location in the OU
hierarchy in the domain.
Newly created machine ID accounts initially display as "empty" machine ID template
accounts—identified with a check-in icon—meaning there is no corresponding agent for this
machine ID account.
If no agent exists on the domain machine, then a new agent is installed after a reboot of the
computer using the newly created machine ID account.
If an agent already exists on a managed machine in a different machine group, then Discovery
creates an "empty" machine ID template (page 72) account—identified with a check-in
icon—and no agent ever checks in. The new machine ID template account displays a
machine.ID / group ID / organization ID (page 72) based on the computer's canonical name in
the Active Directory domain. You can merge these duplicate accounts. The existing, active agent
account adopts the name of the new machine ID template account, then the new machine ID
template account is deleted. No data is lost by the merge and the machine ID account now
matches its location in the domain hierarchy.
Select a Duplicate Exists row in the Discovery > Computers (page li) page then click the Synchronize
Machines button.
Warning: Use the Synchronize Machines method to merge duplicates rather than merging accounts
using Agent > Manage Agents (http://help.kaseya.com/webhelp/EN/VSA/9050000/index.asp#250.htm) >
Rename.
How Machine Moves in Domains are Reflected in Discovery
When a machine is moved to a new OU in the domain, the effect it has in Discovery depends on the
policies selected using the Discovery > Domains > Domain Watch > Policies > OU/Containers (page
xlii) or Computers (page xliv). Discovery monitoring of a member machine in the domain depends on

lxiii
whether its policy is set to "included" in both the source OU location and the target OU location.
OU/Containers and Computers policies must also be set to Use Default Directory in the target
directory.
Assuming the Include New Computers checkbox is checked in the target location:
From Included to Included - The machine ID account hierarchy is changed to match the new location
in the domain hierarchy.
From Included to Excluded - The machine ID account hierarchy is not changed. The VSA must move
the machine ID manually using Agent > Manage Agents > Change Group.
From Excluded to Included - A new "empty" machine ID account hierarchy is created, matching the
new location in the domain hierarchy. The VSA user can choose to merge the old machine ID
account with the newly created machine ID account using the Domains > Computers >
Synchronize Machines button.
From Excluded to Excluded - No change is made in the VSA.
Enabling Remote Portal Access in Discovery
Portal Access enables the end-user of a managed machine to remotely logon to that machine. Only
one end-user of a machine can have Portal Access to that machine at a time. The end-user must have
previously logged onto the machine locally at least once. Discovery supports both manual and
automatic Portal Access assignment. For more information see:
Managing Remote Portal Access (page xxix)
Note: Portal Access in R95 only works using Live Connect (Classic). Even if the Use new Live Connect when
clicking the Live Connect button in Quickview option is set to Yes in System > Default Settings, Live Connect
(Classic) will still be used when logging into the VSA using Portal Access credentials.
Automatic Portal Access Assignment
When a domain user logs on to a domain machine, both the domain machine and the domain user
must be designated as Discovery portal candidates to enable the user to be automatically assigned as
the Portal Access (http://help.kaseya.com/webhelp/EN/VSA/9050000/index.asp#438.htm) user of that machine.
Manual Portal Access Assignment
Discovery can also manually assign and remove Portal Access for domain users, regardless of
whether the domain user or domain computer is a portal candidate or not.
Note: A domain user can be either a VSA user or a Portal Access user but not both. Once a VSA user logon
has been created for a domain user, that user is no longer eligible to be a Portal Access user of any
machine.
Portal Access Using Discovery
Discovery managed Portal Access provides the following unique behavior not available outside of
Discovery.
When a portal candidate user logs on to a portal candidate machine—and that portal candidate
machine is not already assigned a Portal Access user—he or she is automatically assigned the
Portal Access user of that machine.
The Change Profile tab of Portal Access is automatically populated with the name, email and phone
number of the currently logged in Portal Access candidate. The submitter fields of new Service
Desk tickets are populated with the contact information stored in the Change Profile tab. This
means Portal Access users don't have re-enter the same contact information, each time they
create a new Service Desk ticket.

lxiv Contents
lxiv
Note: Regardless of the submitter information recorded in a ticket, the current Portal Access user
sees all tickets related to that machine.
If connection to the Active Directory server is lost, preventing domain authentication, users can
still use their Portal Access logon to logon remotely to the Portal Access machine they were last
assigned.
All machines can be designated portal candidates using the Automatically assign portal access to
portal candidates checkbox in the Computers Policy dialog on the OU/Containers (page xlii) tab.
Any domain user who is not already a VSA user—whether a portal candidate or not—can be
manually assigned the Portal Access user of a domain computer, using the Assign Portal User
button on the Computers (page li) page.
Note:
The user can only be manually assigned the
Portal Access
user of a machine—using the
Users &
Portal Users (page lv)
page—if the user was the last user logged on to that machine.
The list of
eligible machines are listed in the Last Logged-onto Machines field in the lower panel of this same page.
Any domain user—whether a portal candidate or not—can be manually removed as the Portal
Access user of any domain computer at any time, using the Remove Portal User button on the
Computers (page li) page.
Enabling/Disabling Domain Users Accounts or Resetting
Domain User Passwords
When the Discovery > Users and Portal Access page is used to enable or disable a domain user
account or reset a domain user's password, synchronization occurs immediately for only that domain
user record. Detailed domain data is harvested for only that domain user.
A disabled domain user will no longer be able to logon using the domain credential, nor be able to
logon to the VSA using their domain credential.
Password changes take effect the next time the domain user logs on, to both the domain and to
the VSA using their domain credential.
Note: Enabling/disabling domain user accounts or resetting domain user passwords
in Active Directory
will
not update the VSA until a read time synchronization occurs.
Note: Do not make changes to the password of a Discovery managed user or enable/disable that user
using the System > Users (http://help.kaseya.com/webhelp/EN/VSA/9050000/index.asp#4576.htm) page or System
> Change Logon page. These changes
only occur in the VSA
and only have a temporary effect on that user.
Eventually synchronization will reset the user's VSA password and enable/disable the VSA user as
specified in Active Directory.
Note: Active Directory passwords used to authenticate to VSA must conform to the VSA password
requirements described described in System > Server Management > Logon Policy
http://help.kaseya.com/webhelp/EN/VSA/9050000/#522.htm.
Making Changes to Discovery Managed User Logons
You may wish to make changes to created VSA user logon or Portal Access candidates after applying
Discovery policies. You should be aware that:
The VSA users and Portal Access users created by Discovery are never removed automatically
by Discovery.
The agents installed by Discovery are never uninstalled by Discovery.
The deletion of VSA users and Portal Access users and the uninstalling of agents must always be
made manually, outside of Discovery.

lxv
Note: An domain user can only be associated with
either
a VSA user logon
or
a Portal Access logon,
but not
both at the same time.
Removing VSA User Logon Access Only
Delete the VSA user logon only.
Removing Portal User Access Only
Use the Remove Portal Users button on the User and Portal Access page.
Promote a Portal Access Candidate to a VSA User
Use the Remove Portal Users button on the User and Portal Access page.
Modify Discovery policies so that at least one group the domain user belong to is set to Create
VSA User. The <VSA user will be created when the Discovery user policy is applied.
Demote a VSA User to a Portal Access User
Delete the VSA user logon only.
Modify Discovery policies so that at least one group the domain user belong to is set to Create
Staff and make Auto Portal Candidate and no groups the domain user belongs to are set to
Create VSA user. The Portal Access candidate will be created when the Discovery user policy
is applied.
Supported Domain Logon Formats
The following domain logon formats are supported using Discovery, for both VSA users and Portal
Access users.
Format
Field
Full DNS
Domain Name
Logons*
Pre-Windows
2000 Domain
Name Logons**
Domain Back Slash
Username
ITservices.acme.co
m\william
ITservices\william
Password
********
********
Domain
Domain Forward Slash
Username
ITservices.acme.co
m/william
ITservices/william
Password
********
********
Domain
Separate Domain
Username
william
william
Password
********
********
Domain
ITservices.acme.co
m
ITservices
Email Style Domain
Username
william@ITservices
.acme.com
william@ITservices
Password
********
Domain

lxvi Contents
lxvi
* The Full DNS domain name is also known as the User Principal Name (UPN) suffix.
** The Pre-Windows 2000 domain name is also known as the NetBIOS Domain Name.
Synchronization
Synchronization refers to the updating of Discovery with data harvested from an Active Directory
domain. The following Discovery events trigger synchronization between Discovery and a domain.
Previews
Incremental Synchronization (Apply Changes or Activation)
Full Synchronization
Enabling/Disabling Domain Users Accounts or Resetting Domain User Password (page lxiv).
Previews
When the Discovery probe is installed, the first task the probe performs is a preview. A preview
updates Discovery with:
Summary domain data for all folders and items.
Since this is the first time data is "harvested" from a domain, only summary domain data is required.
Folders are domain objects that contain other objects. This can refer to organizational units or
containers, and groups, meaning groups of users.
Items can refer to computers, users and contacts.
Incremental Synchronization (Apply Changes or Activation)
An incremental synchronization compares Domain Watch policies against any changes the probe
agent has detected on monitored OUs, computers, security groups and users in Active Directory and
synchronizes the two systems. Only monitored Active Directory records are compared.
After the probe is installed and the initial preview has completed, you should set as many as policies as
you can without activating your network domain. Instead click Apply Changes to perform an "on demand"
incremental synchronization. This is the same event performed by activation on a recurring fixed time
period basis. Continue performing "on demand" incremental synchronization until you are satisfied with
the results of your initial configuration. Then click Activation to perform incremental synchronization
automatically. The default recurring time period is 60 minutes.
User added, moved or deleted
Computer added, moved or deleted
User or contact changes such as name, address, phone number, email address
Reorganization of the domain OU hierarchy
Full Synchronization
The Discovery probe accumulates domain changes in real time. If the connection between the
Discovery probe and a domain is lost for a period of time, the probe has no way to recover those
changes. To ensure domain changes are not lost forever, set probe alerts (page lxvii) and schedule a
recurring full synchronization (page lxvi), for example, once a week. If a probe alert is triggered,
consider running a full synchronization immediately. You should also run a full synchronization if the
probe was temporarily deactivated and reactivated.
A full synchronization provides Discovery with a complete update of domain data, including:
Summary domain data for all folders and items, whether "included" or "excluded"
Detailed domain data for all "included" folders and "included" items.
Enabling/Disabling Domain Users Accounts or Resetting Domain User Password.
A few important domain changes are uploaded by the probe immediately. These include:
Password changes

lxvii
Enabling / disabling a user account
Activation / Deactivation
Activation and Deactivation buttons display on the Domain Watch > Probe Deployment tab.
Activation - Enables incremental discovery and synchronization of domain controller data on a
fixed time period. Activating a probe on a domain computer deactivates any other probe on that
same domain, without loss of data.
Clicking Apply Changes after modifying policies on any Policies (page xlii) tab performs an "on
demand" incremental synchronization. Activation performs a recurring incremental
synchronization.
Activation is not required to run full sync on the Domain Watch > Schedule and Status (page
l) tab.
Deactivation - Disables incremental synchronization updates from the domain. If reactivation
occurs later, a "changes gap" may exist in the data collected by the probe, requiring the
scheduling of a full synchronization to correct.
Uninstalling the Probe and Detaching the Org
You associate an organization with a domain when a probe is installed. After the install, the association
with the organization cannot be changed without uninstalling the probe and detaching the probe. This
prevents creating duplicate users, staff and computer records in multiple organizations.
Uninstalling and detaching the org clears all records for that domain in the Computers (page li),
Contacts (page liii) and Users & Portal Users (page lv) pages, because these records are no longer
known to be members of the domain by way of the org association. The actual VSA records are not
deleted.
Probe Alerts and Domain Alerts
Probe Alerts
Probe warnings alerts and failure alerts provides alerts and email notifications for any issues
concerning the probe's communication with the Active Directory server. Probe alerts can include:
The Active Directory server goes offline.
The domain credential used by Discovery is no longer valid.
The probe cannot communicate with the domain controller.
Warning: The Discovery probe accumulates domain
changes
in real time. If the connection between the
Discovery probe and a domain is lost for a period of time, the probe has no way to recover those changes.
To ensure domain changes are not lost forever, set probe alerts (page lxvii) and schedule a recurring
full
synchronization (page lxvi), for example, once a week.
If a probe alert is triggered, consider running a full
synchronization immediately. You should also run a full synchronization if the probe was temporarily
deactivated and reactivated.
Domain Alerts
Domain alerts provides alarm, ticket and email notifications for create, change and deletes of selected
types of objects in the domain. Types of domain objects include:
Computer
Contact
Container
Domain
Group

lxviii Contents
lxviii
Organizational Unit
User
Each domain object belonging to an alert category--computer, contact, container, domain, group,
organization unit, user—must be assigned to a Discovery policy, otherwise alerts for this object will
not be triggered. Alerts are only triggered after being detected by the next full or incremental sync.
Removing a Domain from Discovery Management
If you wish to remove a domain from Discovery management, consider deleting the following types of
domain generated records from the VSA:
Optionally delete any domain-generated machine ID template records using Agent > Delete
(http://help.kaseya.com/webhelp/EN/VSA/9050000/index.asp#541.htm). These are typically identified as
belonging to the organization associated with the domain in Discovery.
Optionally delete domain-generated VSA users using System > Users
(http://help.kaseya.com/webhelp/EN/VSA/9050000/index.asp#4576.htm). Each domain-generated VSA
username is prefixed with the name of the domain, using the following format: domain/username.
Optionally delete domain-generated Portal Access user logons using the Agent > Portal Access
(Classic) (http://help.kaseya.com/webhelp/EN/VSA/9050000/index.asp#438.htm) page.
Optionally delete the organization associated with the domain using System >
Orgs/Groups/Depts/Staff > Manage (http://help.kaseya.com/webhelp/EN/VSA/9050000/index.asp#4017.htm).
An organization cannot be deleted if machine ID accounts are members of that organization.
For machine ID accounts you want to keep, use Agent > Change Group
(http://help.kaseya.com/webhelp/EN/VSA/9050000/index.asp#545.htm) to move machine ID accounts to
a machine group in another organization.
For machine ID accounts you don't want to keep, use Agent > Delete
(http://help.kaseya.com/webhelp/EN/VSA/9050000/index.asp#541.htm) to uninstall the agents and
delete the machine ID accounts.
If you elect to keep the organization associated with the domain, optionally delete the staff
records created for domain contacts in the organization, using the System >
Orgs/Groups/Depts/Staff > Manage > Staff
(http://help.kaseya.com/webhelp/EN/VSA/9050000/index.asp#7018.htm) tab.
It is possible a dedicated scope was created using the Discovery > Domain > User Policies (page
xlv) tab. This dedicated scope is initially assigned the same name as the organization associated
with the domain. Optionally delete this dedicated scope.
Uninstalling Discovery
Note: Before uninstalling the Discovery module, review Removing a Domain from Discovery Management
(page lxviii).
1. Deactivate and detach the organization
2. Uninstall the probe from the agent.
3. Uninstall the Discovery module from the Kaseya Server.
Domain Watch Default Settings
The following options on the System > Default Settings page apply to Domain Watch.
Discovery - Domain Watch policies "Include new Computers/Contacts" include moved objects - If a policy is
applied to an OU/Container that has "Include New Computers" or Include new Contacts"
checked, and:
This option is Y, then the policy is applied to computers or contacts moved into the
OU/Container.

lxix
This option is N, then the policy is not applied to computers or contacts moved into the
OU/Container.
Discovery - Staff record "View All Tickets" enabled - If checked, the View All Tickets checkbox is
checked when the staff member record is created.
Discovery - Staff record Department name assignment scheme
Assign based on Active Directory OU Name - A department is created for the new staff
record based on the OU/Container name.
Assign based on Active Directory Department property - A department is created for
the new staff record based on the department name specified for the user in Active
Directory.
Discovery - Staff record Staff name assignment scheme
Assign based on Active Directory Display name. If empty, use First name plus
Last name
Assign based on Active Directory User logon name
Assign based on Active Directory First name plus Last name
Use domain short name in the construction of user passwords - If legacy AD logons were created using
the View AD Users page in VSA 6.2 or earlier and these legacy AD logons continue to be used, then
set to Yes. This enables user passwords for existing legacy AD logons to continue to be
recognized. Whenever a password for an existing AD logon is reset, a newer hashing algorithm is
used, based on fully qualified domain names. If legacy AD logons using the View AD Users page
were never implemented prior to 6.3, then set this option to No.
Administration
In This Section
Settings lxix
Audit Log lxx
Settings
Discovery > Administration > Settings
The Settings page sets options and default values for the entire Discovery module.
Discovery Settings
Ignore networks that begin with 192.168... - If checked, private networks starting with 192.168 are not
scanned.
Ignore networks that begin with 172... - If checked, private networks starting with 172 are not scanned.
Ignore networks that begin with 10... - If checked, private networks starting with 10 are not scanned.
Ignore networks that have a subnet mask of 255.255.255.255 - If checked, single node networks are not
scanned, because only one device can exist on the network and that must belong to the agent
machine performing the scan.
Alert Defaults
Sets the default values— checked or unchecked—for the Alerting Profiles tab (page xxiii).
Alarm on new device
Ticket on new device

lxx Contents
lxx
Email on new device
Alarm on IP change
Ticket on IP change
Email on IP change
Actions
Edit - Edits settings.
Audit Log
Discovery > Administration > Audit Log
The Audit Log page displays a log of Discovery module activity by:
Event ID
Event Date
Admin
Event Name
Message
If information has changed or been removed unexpectedly, check this page to determine what events
and administrators may have been involved.
This table supports selectable columns, column sorting, column filtering and flexible columns
widths (http://help.kaseya.com/webhelp/EN/VSA/9050000/index.asp#6875.htm).

Glossary
71
Glossary
Agents
The VSA manages machines by installing a software client called an agent on a managed machine.
The agent is a system service that does not require the user to be logged on for the agent to function
and does not require a reboot for the agent to be installed. The agent is configurable and can be totally
invisible to the user. The sole purpose of the agent is to carry out the tasks requested by the VSA user.
Once installed:
An agent icon—for example the agent icon—displays in the system tray of the managed
machine. Agent icons can be custom images or removed altogether.
Each installed agent is assigned a unique VSA machine ID / group ID / organization ID (page 72).
Machine IDs can be created automatically at agent install time or individually prior to agent
installation.
Each installed agent uses up one of the available agent licenses purchased by the service
provider.
Agents are typically installed using packages created using Agent > Deploy Agents inside the
VSA.
Multiple agents can be installed on the same machine, each pointing to a different server.
A check-in icon displays next to each machine ID in the VSA, displaying the overall status of the
managed machine. For example, the check-in icon indicates an agent is online and the user is
currently logged on.
Clicking a check-in icon displays a single machine interface for the managed machine called Live
Connect. Live Connect provides instant access to comprehensive data and tools you need to work
on that one machine.
Hovering the cursor over a check-in icon displays an agent Quick View window immediately. You
can view agent properties, quick launch selected agent procedures, or launch Live Connect from
the agent Quick View window.
Contact
A domain contact contains contact information similar to information defined for a user, but a contact
has no domain logon privileges.
Distinguished Name
A distinguished name provides the same information as a canonical name, formatted as a series of
attributes, sequenced in reverse order from the canonical name. CN = Common name or container.
OU = Organization unit. DC = Domain component.
Duplicate Exists
If an agent already exists on a managed machine in a different machine group, then Discovery
creates an "empty" machine ID template (page 72) account—identified with a check-in icon—and
no agent ever checks in. The new machine ID template account displays a machine.ID / group ID /
organization ID (page 72) based on the computer's canonical name in the Active Directory domain. You
can merge these duplicate accounts. The existing, active agent account adopts the name of the new
machine ID template account, then the new machine ID template account is deleted. No data is lost by
the merge and the machine ID account now matches its location in the domain hierarchy.
Feature Set
A feature set provides advanced, specialized functionality that is typically hidden in the basic module.
The basic module must be installed and the feature licensed separately to display feature set options.

Glossary
72
Included / Excluded domain Folders and Items
Once a probe is installed, Discovery is configured by setting selected domain folders and items to
included or excluded. Discovery policies provide IT automation—such as installing agents or creating
users—only for included folders and items. Discovery only harvests detailed information for included
folders and items, minimizing the amount of data required to maintain synchronization with the domain.
Incremental Synchronization
Clicking Apply Changes after modifying policies on any Policies (page xlii) tab performs an "on
demand" incremental synchronization. Activation performs a recurring incremental
synchronization.
Machine Group
Machines are always defined by machine group and machine groups are always defined by
organization. You can define multi-level hierarchies of machine groups by identifying a parent machine
group for a machine group. You can also move a machine group and all of its associated machines to
a different parent machine group within the same organization.
Machine ID / Group ID / Organization ID
Each agent (page 71) installed on a managed machine is assigned a unique machine ID / group ID /
organization ID. All machine IDs belong to a machine group ID and optionally a subgroup ID. All machine
group IDs belong to an organization ID. An organization typically represents a single customer
account. If an organization is small, it may have only one machine group containing all the machine IDs
in that organization. A larger organization may have many machine groups and subgroups, usually
organized by location or network. For example, the full identifier for an agent installed on a managed
machine could be defined as jsmith.sales.chicago.acme. In this case sales is a subgroup ID
within the chicago group ID within the organization ID called acme. In some places in the VSA, this
hierarchy is displayed in reverse order. Each organization ID has a single default machine group ID
called root. Group IDs and subgroup IDs are created using the System > Orgs/Group/Depts/Staff >
Manage > Machine Groups page.
Machine ID Template
A machine ID template is a machine ID record without an agent. Since an agent never checks into a
machine ID template account, it is not counted against your total license count. You can create as
many machine ID templates as you want without additional cost. When an agent install package is
created, the package's settings are typically copied from a selected machine ID template. Machine ID
templates are usually created and configured for certain types of machine. Machine type examples
include desktops, Autocad, QuickBooks, small business servers, Exchange servers, SQL Servers, etc.
A corresponding install package can be created based on each machine ID template you define.
Create machine ID templates using Agent > Create.
Import a machine ID template using Agent > Import/Export.
Base an agent install package on a machine ID template using Agent > Manage Packages.
Copy selected settings from machine ID templates to existing machine ID accounts using Agent >
Copy Settings.
Identify the total number of machine ID template accounts in your VSA using System > Statistics.
Configure settings for the machine ID template using the standard VSA functions, just as you
would a machine ID account with an agent.
Separate machine ID templates are recommended for Windows, Apple and Linux machines.
Alternatively you can create a package that selects the appropriate OS automatically and copy
settings from a template that includes an agent procedure that uses OS specific steps.
Machine IDs vs. Agents
When discussing agents it is helpful to distinguish between the machine ID / group ID / organization
ID (page 72) and the agent (page 71). The machine ID / group ID / organization ID is the account name for
a managed machine in the VSA database. The agent is the client software installed on the managed
Glossary
73
machine. A one-to-one relationship exists between the agent on a managed machine and its account
name on the VSA. Tasks assigned to a machine ID by VSA users direct the agent's actions on the
managed machine.
Machine Roles
The Machine Roles page creates and deletes machine roles. The user access window displays when a
machine user double-clicks the agent icon in the system tray of their managed machine.
Within the Machine Roles page you can select:
Members - Assign or remove machines for a machine role.
Access Rights - Select the access rights for a machine role. Access rights determine the functions
a machine user can access.
Role Types - Assign or remove role types for a machine role. Currently there is only one machine
role type provided and no access rights are restricted.
Managed Machine
A monitored machine with an installed agent (page 71) and active machine ID / group ID (page 72)
account on the Kaseya Server. Each managed machine uses up one agent license.
Org
The VSA supports three different kinds of business relationships:
Organizations - Supports machine groups and manages machines using agents.
Customers - Supports the billing of customers using Service Billing.
Vendors - Supports the procurement of materials using Service Billing.
The Org table is a support table shared by organizations, customers and vendors. Each record in the
Org table is identified by a unique orgID. The Org table contains basic information you'd generally
need to maintain about any kind of business relationship: mailing address, primary phone number,
duns number, yearly revenue, etc. Because the Org table is shared, you can easily convert:
A customer into an organization or vendor.
A vendor into an organization or customer.
An organization into a customer or vendor.
Note: myOrg is the organization of the service provider using the VSA.
OU/Container
An organizational unit (OU) is a container object within Active Directory. An OU/container is used to
organize users, groups, computers, and other organizational units. An organizational unit cannot
contain objects from other domains. A container is a "built-in" organizational unit.
Portal Access (Classic)
Note: Portal Access in R95 only works using Live Connect (Classic). Even if the Use new Live Connect when
clicking the Live Connect button in Quickview option is set to Yes in System > Default Settings, Live Connect
(Classic) will still be used when logging into the VSA using Portal Access credentials.
Portal Access (Classic) is a Live Connect (Classic) session initiated by the machine user. The machine
user displays the Portal Access page by clicking the agent icon on the system tray of a managed
machine. Portal Access contains machine user options such as changing the user's contact information,
creating or tracking trouble tickets, chatting with VSA users or remote controlling their own machine
from another machine. Portal Access logons are defined using Agent > Portal Access. The function list
the user sees during a Portal Access session is determined by the System > Machine Roles page. You
can customize Portal Access sessions using the System > Customize > Live Connect page.

Glossary
74
Probe Agent
Discovery communicates with an Active Directory domain using a probe agent. The probe uses the
industry standard LDAP protocol to safely and securely communicate with the domain. Each probe
agent must be a member of the domain it monitors. Probe deployment installs the extra functionality an
agent requires to act as a probe.
Use Directory Default - Computer
Administrators can automatically map the VSA machine groups used to organize domain computers
inside the VSA using the OU hierarchy that already exists in Active Directory. This occurs when a OU
policy or a computer policy selects the Use Directory Default value. When this occurs, the domain
machine is assigned to the machine group that matches its current OU location. If an Active Directory
administrator renames the OU or moves the computer to a different OU location, the machine group is
changed in the VSA to match it. Tracking moves fully requires policies be set in both the source and
target OUs. Parent machine groups are created as necessary, to match the OU hierarchy.
Alternatively, a computer can be assigned a policy that assigns it to a fixed machine group.
Use Directory Default - Users
Administrators can automatically map the departments used to organize staff records inside
the VSA using the OU hierarchy that already exists in Active Directory. This occurs when a
Group or User policy selects the Use Directory Default value. When this occurs, a staff
record created by policy is assigned to the department that matches its current OU location.
If an Active Directory administrator renames the OU or moves the user to a different OU
location, the staff record is changed in the VSA to match it. Tracking moves fully requires
policies be set in both the source and target OUs. Parent departments are created as
necessary, to match the OU hierarchy. Alternatively, a staff record can be assigned a policy
that assigns it to a fixed department.

Index
75
Index
A
Activation / Deactivation • lxvii
Administration • lxix
Agent Deployment • xli
Agent Deployment tab • xxii
Agents • 71
Alerting Profiles • xlix
Alerting Profiles tab • xxiii
Applying Changes • xxxvi
Asset Promotion tab • xxiii
Audit Log • lxx
B
By Agent • xxvi
By Network • xvi
C
Computers • xliv, li
Configuration • xxx
Configuration Prerequisites • xxx
Configuring Activation • xxxvii
Configuring Agent Deployment • xxxii
Configuring Alerting Profiles • xxxvi
Configuring Computer Policies • xxxiv
Configuring Contact Policies • xxxiii
Configuring Full Synchronization • xxxviii
Configuring Group Policies • xxxiv
Configuring OU/Container Policies • xxxii
Configuring Probe Deployment • xxxi
Configuring User Policies • xxxv
Contact • 71
Contacts • liii
D
Discovered Devices • v
Discovery Module Minimum Requirements • iii
Discovery Overview • i
Distinguished Name • 71
Domain Watch • xxxviii
Domain Watch Default Settings • lxviii
Domains • xxviii
Duplicate Exists • 71
E
Edit Network • xvii
Enabling Remote Portal Access in Discovery • lxiii
Enabling/Disabling Domain Users Accounts or
Resetting Domain User Passwords • lxiv
F
Feature Set • 71
G
Getting Started with Domain Watch • xxviii
Getting Started with Network Discovery • xiii
Groups • xlv
H
How Agents are Installed Using Discovery • lxi
How Machine ID Accounts are Created in Discovery •
lxii
How Machine Moves in Domains are Reflected in
Discovery • lxii
I
Importing Networks • xx
Included / Excluded domain Folders and Items • 72
Incremental Synchronization • 72
L
Licensing • lx
M
Machine Group • 72
Machine ID / Group ID / Organization ID • 72
Machine ID Template • 72
Machine IDs vs. Agents • 72
Machine Roles • 73
Making Changes to Discovery Managed User Logons •
lxiv
Managed Machine • 73
Managing a Synchronized Security Model • xxix
Managing Multiple Domains • xxix
Managing Remote Portal Access • xxix
More Information • lix
N
Network Probe tab • xxi
Networks • xiii
O
Org • 73
OU/Container • 73
OU/Containers • xlii
P
Policies • xlii
Portal Access (Classic) • 73
Probe Agent • 74
Probe Alerts and Domain Alerts • lxvii
Probe Deployment • xxxix
R
Removing a Domain from Discovery Management •
lxviii
Reviewing Domain Watch Results • xxxvii
S
Scan Results • xxiv
Scan Schedules Dialog • xx
Scan Schedules tab • xxii
Scanning Networks with SNMP Enabled • xiv
Index
76
Scanning Networks with vPro Enabled • xv
Schedule and Status • l
Setting Discovery Policies for Computers • lix
Setting Discovery Policies for Contacts • lix
Setting Discovery Policies for Users • lx
Settings • lxix
Standard SNMP Monitoring • xi
Summary • iii
Supported Domain Logon Formats • lxv
Synchronization • lxvi
T
The Directory Services Feature Set • lx
Topology Map • vii
U
Uninstalling Discovery • lxviii
Uninstalling the Probe and Detaching the Org • lxvii
Use Directory Default - Computer • 74
Use Directory Default - Users • 74
Users • xlvii
Users & Portal Access • lv
V
View Assets • xiv
