
Privileged Remote Access 24.2
Admin Guide
©2003-2024 BeyondTrust Corporation. All Rights Reserved. Other trademarks identified on this page are owned by their respective owners. BeyondTrust is not a chartered bank or trust company, or
depository institution. It is not authorized to accept deposits or trust accounts and is not licensed or regulated by any state or federal banking authority.
TC:7/8/2024

Table of Contents
BeyondTrust Privileged Remote Access Admin Interface 5
Log in to the PRA Administrative Interface 6
Search /login Administrative Interface 8
User Menu 9
Status 10
Information: View Privileged Remote Access Site Status and Software Details 10
Users: View Logged In Users and Send Messages 11
What's New: See Privileged Remote Access Software Release Details 12
Consoles & Downloads: Launch the Web Access Console and Download the Desktop
Access Console 13
Consoles & Downloads: Download Drivers 14
My Account: Email Settings and Extended Availability Mode 16
My Account: Change Password Settings and add Passwordless Authenticators 16
Configuration 19
Options: Manage Connection Options, Record Sessions, Speed Up Sessions 19
Teams: Group Users into Teams 22
Custom Fields: Create, Edit, Delete Custom API Fields 24
Jump 25
Jump Clients: Manage Settings and Install Jump Clients for Endpoint Access 25
Jump Groups: Configure Which Users Can Access Which Jump Items 31
Jump Policies: Set schedules, notifications, and approvals for Jump Items 33
Jump Item Roles: Create Permission Sets for Jump Items 37
Jumpoint: Set Up Unattended Access to a Network 39
Jump items: mass import Jump shortcuts and manage Jump item settings 42
Endpoint automation: run scripts on multiple endpoints without sessions 51
Manage vault accounts 53
Add account 54
Rotate 54
Search shared accounts 54
Check out and check in a shared account 54
Ellipsis menu for shared accounts 54
SALES: www.beyondtrust.com/contact
SUPPORT: www.beyondtrust.com/support
DOCUMENTATION: www.beyondtrust.com/docs
2
©2003-2024 BeyondTrust Corporation. All Rights Reserved. Other trademarks identified on this page are owned by their respective owners. BeyondTrust is not a chartered bank or trust company, or
depository institution. It is not authorized to accept deposits or trust accounts and is not licensed or regulated by any state or federal banking authority.
TC: 7/8/2024
PRIVILEGED REMOTE ACCESS 24.2
ADMIN GUIDE
This page needed for table of
contents. Do not delete.

Search personal accounts 55
View password for personal account 55
Edit personal account 55
Account Groups: Add and Manage Account Groups 55
Account Policies: Add and Manage Account Policies 58
Endpoints: View and Manage Discovered Systems 60
Services: View and Manage Discovered Services 61
Domains: Add and Manage Domains 61
Discovery: Discover Accounts, Endpoints, and Services in a Domain 63
Options: Configure Global Default Account Policy Settings and Password Length for
Account Rotation 67
Access console 69
Access console settings: manage default access console settings 69
Custom Links: Add URL Shortcuts to the Access Console 72
Canned Scripts: Create Scripts for Screen Sharing or Command Shell Sessions 73
Special Actions: Create Custom Special Actions 75
Users and Security 77
Users: Add Account Permissions for a User or Admin 77
User Accounts for Password Reset: Allow Users to Set Passwords 88
Access Invite: Create Profiles to Invite External Users to Sessions 89
Security Providers: Enable LDAP, RADIUS, Kerberos, SCIM, and SAML2 Logins 90
Vendor Groups 106
Session Policies: Set Session Permission and Prompting Rules 109
Group Policies: Apply User Permissions to Groups of Users 115
Kerberos Keytab: Manage the Kerberos Keytab 129
Reports 130
Access: Report on Session Activity 130
Vault: Report on Vault Account and User Activity 132
Vendors: Report on Vendor Accounts and User Activity 133
Jump Item: Report on Jump Item Activity 134
Syslog: Download Report Containing All Syslog Files on the Appliance 135
Compliance: Make Privileged Remote Access Data Anonymous to Meet Compliance
Standards 136
Languages: Manage Installed Languages 138
SALES: www.beyondtrust.com/contact
SUPPORT: www.beyondtrust.com/support
DOCUMENTATION: www.beyondtrust.com/docs
3
©2003-2024 BeyondTrust Corporation. All Rights Reserved. Other trademarks identified on this page are owned by their respective owners. BeyondTrust is not a chartered bank or trust company, or
depository institution. It is not authorized to accept deposits or trust accounts and is not licensed or regulated by any state or federal banking authority.
TC: 7/8/2024
PRIVILEGED REMOTE ACCESS 24.2
ADMIN GUIDE
This page needed for table of
contents. Do not delete.

Languages: Manage Installed Languages 138
Management 140
Software: Download a Backup, Upgrade Software 140
Security: Manage Security Settings 142
Site Configuration: Set HTTP Ports, Enable Prerequisite Login Agreement 149
Email configuration: configure the software to send emails 150
Outbound Events: Set Events to Trigger Messages 156
Cluster: Configure Atlas Cluster Technology for Load Balancing 159
Failover: Set Up a Backup B Series Appliance for Failover 162
API Configuration: Enable the XML API and Configure Custom Fields 165
Support: Contact BeyondTrust Technical Support 167
Ports and Firewalls 169
Disclaimers, Licensing Restrictions and Tech Support 170
SALES: www.beyondtrust.com/contact
SUPPORT: www.beyondtrust.com/support
DOCUMENTATION: www.beyondtrust.com/docs
4
©2003-2024 BeyondTrust Corporation. All Rights Reserved. Other trademarks identified on this page are owned by their respective owners. BeyondTrust is not a chartered bank or trust company, or
depository institution. It is not authorized to accept deposits or trust accounts and is not licensed or regulated by any state or federal banking authority.
TC: 7/8/2024
PRIVILEGED REMOTE ACCESS 24.2
ADMIN GUIDE
This page needed for table of
contents. Do not delete.

BeyondTrust Privileged Remote Access Admin Interface
This guide offers a detailed overview of /login and is designed to help you administer BeyondTrust users and your BeyondTrust software.
The BeyondTrust Appliance B Series serves as the central point of administration and management for your BeyondTrust software and
enables you to log in from anywhere that has internet access in order to download the access console.
Use this guide only after an administrator has performed the initial setup and configuration of the B Series Appliance as detailed in the
BeyondTrust Appliance B Series Hardware Installation Guide at www.beyondtrust.com/docs/privileged-remote-access/getting-
started/deployment/hardware-sra/. Once BeyondTrust is properly installed, you can begin accessing your endpoints immediately. Should
you need any assistance, please contact BeyondTrust Technical Support at www.beyondtrust.com/support.
SALES: www.beyondtrust.com/contact
SUPPORT: www.beyondtrust.com/support
DOCUMENTATION: www.beyondtrust.com/docs
5
©2003-2024 BeyondTrust Corporation. All Rights Reserved. Other trademarks identified on this page are owned by their respective owners. BeyondTrust is not a chartered bank or trust company, or
depository institution. It is not authorized to accept deposits or trust accounts and is not licensed or regulated by any state or federal banking authority.
TC: 7/8/2024
PRIVILEGED REMOTE ACCESS 24.2
ADMIN GUIDE

Log in to the PRA Administrative Interface
Login
The user administrative interface enables administrators to create user accounts and configure software settings. Log in to the user
administrative interface by going to your B Series Appliance's URL followed by /login.
Although your B Series Appliance's URL can be any registered DNS, it is most likely a subdomain of your company's primary domain, for
example, access.example.com/login.
Default Username: admin
Default Password: password
Note: For security purposes, the administrative username and password used for the /appliance interface are distinct from
those used for the /login interface and must be managed separately.
If two-factor authentication is enabled for your account, enter the code from the authenticator app.
Note: If more than one language is enabled for your site, select the language you want to use from the dropdown menu.
You can also change the language of your choice after you login to the admin site.
For more information, please see Log into the PRA Access Console at https://www.beyondtrust.com/docs/privileged-remote-
access/getting-started/access-console/login-to-the-access-console.htm.
Use Passwordless Login
FIDO2-certified authenticators can be used to securely log in to the desktop access console, privileged web access console, and the /login
administrative interface without entering your password. You can register up to 10 authenticators.
If passwordless login has been enabled, Authenticate Using may default to Passwordless FIDO2, or it can be selected. The exact
process for passwordless login depends on the type of device and manufacturer.
You can enable passwordless login and set the default authentication after logging into the /login administrative interface, by navigating to
Management > Security, and then registering passwordless authenticators at My Account > Security. Administrators can view and
manage passwordless login registration and usage at Users & Security > Users > Passwordless Authenticators
Note: Passwordless login for the desktop access console on macOS or Linux systems is supported only for roaming
authenticators (such as the YubiKey hardware security keys). Platform or integrated authenticators (such as Face ID and
fingerprint scanners) are not supported for the desktop access console login when using macOS or Linux systems.
Use Integrated Browser Authentication
If Kerberos has been properly configured for single sign-on, you can click the link to use integrated browser authentication, allowing you to
enter directly into the web interface without requiring you to enter your credentials.
SALES: www.beyondtrust.com/contact
SUPPORT: www.beyondtrust.com/support
DOCUMENTATION: www.beyondtrust.com/docs
6
©2003-2024 BeyondTrust Corporation. All Rights Reserved. Other trademarks identified on this page are owned by their respective owners. BeyondTrust is not a chartered bank or trust company, or
depository institution. It is not authorized to accept deposits or trust accounts and is not licensed or regulated by any state or federal banking authority.
TC: 7/8/2024
PRIVILEGED REMOTE ACCESS 24.2
ADMIN GUIDE

Forgot your password?
If password reset has been enabled from the /login > Management > Security page and the SMTP server has been set up for your site,
this link is visible. To reset your password, click the link, enter and confirm your email address, and then click Send. If there is more than
one user sharing the same email address, you are required to confirm your username. You will receive an email with a link that takes you
back to the login page. On the login screen, enter and confirm your new password, and then click Change Password.
Login Agreement
Administrators may restrict access to the login screen by enabling a prerequisite login agreement that must be confirmed before the login
screen is displayed. The login agreement can be enabled and customized from the /login > Management > Site Configuration page.
SALES: www.beyondtrust.com/contact
SUPPORT: www.beyondtrust.com/support
DOCUMENTATION: www.beyondtrust.com/docs
7
©2003-2024 BeyondTrust Corporation. All Rights Reserved. Other trademarks identified on this page are owned by their respective owners. BeyondTrust is not a chartered bank or trust company, or
depository institution. It is not authorized to accept deposits or trust accounts and is not licensed or regulated by any state or federal banking authority.
TC: 7/8/2024
PRIVILEGED REMOTE ACCESS 24.2
ADMIN GUIDE

Search /login Administrative Interface
From every page within Privileged Remote Access /login, you can search for settings and features within the administrative interface using
the search bar in the top-right corner. This feature searches for static text, including titles and labels, within the entirety of /login. Search
results are listed in a dropdown, grouped by page. You can click any of the items in the listed search results to be taken directly to the page
within /login. Titles and labels specific to your search are highlighted on the page.
Note:
l
Search results include only areas within /login where you have permissions.
l
User-entered items are not searched.
l
Search supports all languages supported by /login — all languages are searched and indexed.
SALES: www.beyondtrust.com/contact
SUPPORT: www.beyondtrust.com/support
DOCUMENTATION: www.beyondtrust.com/docs
8
©2003-2024 BeyondTrust Corporation. All Rights Reserved. Other trademarks identified on this page are owned by their respective owners. BeyondTrust is not a chartered bank or trust company, or
depository institution. It is not authorized to accept deposits or trust accounts and is not licensed or regulated by any state or federal banking authority.
TC: 7/8/2024
PRIVILEGED REMOTE ACCESS 24.2
ADMIN GUIDE

User Menu
The user dropdown menu, located in the upper-right corner of the screen, offers access to a few key features from anywhere on the admin
site. Click the user icon to view the logged-in user name and email address, and available links and options.
Log Out: Click to log out of the /login administrative interface. This does not log you out of any consoles. Those must be logged out
separately.
Change Email Settings: This is a link to My Account > Profile.
Change Password: This is a link to My Account > Security.
Launch Privileged Web Access Console: This gives you convenient access to the web console from anywhere in /login.
Download Access Console: This gives you a quick link to download the access console.
Enable Extended Availability: Click to enable this feature in the access console. Once enabled, this option switches to Disable, and can
be clicked again to disable this feature. Extended Availability Mode allows you to receive email invitations from other users requesting to
share a session when you are not logged into the console.
Language: Displays the current language. If more than one language is enabled for your site, select the language you want to use from
the dropdown menu. This language is also applied to the privileged web access console.
Color Scheme: Select your preferred color scheme for the /login administrative interface. You can switch between Light and Dark
modes, or System, which uses whatever mode is selected for your system.
For more information on these features, please see the following:
l
"Change Your Email Settings" on page 16
l
"Change Your Password" on page 16
SALES: www.beyondtrust.com/contact
SUPPORT: www.beyondtrust.com/support
DOCUMENTATION: www.beyondtrust.com/docs
9
©2003-2024 BeyondTrust Corporation. All Rights Reserved. Other trademarks identified on this page are owned by their respective owners. BeyondTrust is not a chartered bank or trust company, or
depository institution. It is not authorized to accept deposits or trust accounts and is not licensed or regulated by any state or federal banking authority.
TC: 7/8/2024
PRIVILEGED REMOTE ACCESS 24.2
ADMIN GUIDE

Status
Information: View Privileged Remote Access Site Status and Software Details
Status INFORMATION
Site Status
The main page of the BeyondTrust Privileged Remote Access /login interface gives an overview of your B Series Appliance statistics.
When contacting BeyondTrust Technical Support for software updates or troubleshooting purposes, you may be asked to email a
screenshot of this page.
Restart Privileged Remote Access Software
You can restart the BeyondTrust software remotely. Restart your software only if instructed to do so by BeyondTrust Technical Support.
Time Zone
An administrator can select the appropriate time zone from a dropdown, setting the correct date and time of the B Series Appliance for the
selected region.
Total Active Jump Clients Allowed
Review the total number of active Jump Clients that are allowed on your system. If you need more Jump Clients, contact BeyondTrust
Technical Support.
Maximum Concurrent Users
Review the maximum number of concurrent users that are allowed on your system. If you need more users, contact BeyondTrust
Technical Support.
Endpoint Licenses
View the number of endpoint licenses available on your BeyondTrust Appliance B Series. If you need more licenses, contact BeyondTrust
Sales.
Endpoints Configured
View the number of endpoints currently configured on your system.
SALES: www.beyondtrust.com/contact
SUPPORT: www.beyondtrust.com/support
DOCUMENTATION: www.beyondtrust.com/docs
10
©2003-2024 BeyondTrust Corporation. All Rights Reserved. Other trademarks identified on this page are owned by their respective owners. BeyondTrust is not a chartered bank or trust company, or
depository institution. It is not authorized to accept deposits or trust accounts and is not licensed or regulated by any state or federal banking authority.
TC: 7/8/2024
PRIVILEGED REMOTE ACCESS 24.2
ADMIN GUIDE

Download License Usage Report
Download a ZIP file containing detailed information (English only) on your BeyondTrust license usage. This file contains a list of all Jump
Items (not counting uninstalled Jump Clients), daily counts for Jump Item operations and license usage, and a summary for the B Series
Appliance and its endpoint license usage and churn.
Client Software
This is the hostname to which BeyondTrust client software connects. If the hostname attempted by the client software needs to change,
notify BeyondTrust Technical Support of the needed changes so that Support can prepare a software update.
Connected Clients
View the number and type of BeyondTrust software clients that are connected to your B Series Appliance.
For more information about the BeyondTrust Appliance B Series, please see B Series Appliance Overview at
https://www.beyondtrust.com/docs/privileged-remote-access/getting-started/deployment/index.htm.
ECM Clients
View the number of BeyondTrust Endpoint Credential Managers (ECM) that are connected to your B Series Appliance. Also, view
information about the location and connection time for each ECM, as well as the group it belongs to.
Note: To ensure optimal up-time, administrators can install up to three ECMs on different Windows machines to communicate
with the same credential store. A list of the ECMs connected to the appliance site can be found at /login > Status >
Information > ECM Clients.
Note: When ECMs are connected in a high availability configuration, the BeyondTrust Appliance B Seriesroutes requests to
the ECM in the ECM Group that has been connected to the appliance the longest.
For more information, please see Log Into Endpoints Using Credential Injection at
https://www.beyondtrust.com/docs/privileged-remote-access/getting-started/access-console/web-access/credential-
injection.htm.
Users: View Logged In Users and Send Messages
Status USERS
SALES: www.beyondtrust.com/contact
SUPPORT: www.beyondtrust.com/support
DOCUMENTATION: www.beyondtrust.com/docs
11
©2003-2024 BeyondTrust Corporation. All Rights Reserved. Other trademarks identified on this page are owned by their respective owners. BeyondTrust is not a chartered bank or trust company, or
depository institution. It is not authorized to accept deposits or trust accounts and is not licensed or regulated by any state or federal banking authority.
TC: 7/8/2024
PRIVILEGED REMOTE ACCESS 24.2
ADMIN GUIDE

Logged In Users
View a list of users logged into the access console, along with their login time and whether they are running any sessions.
Terminate
You can terminate a user's connection to the access console.
Send Message to Users
Send a message to all logged-in users via a pop-up window in the access console.
Extended Availability Users
View users who have extended availability mode enabled.
Disable
You may disable a user's extended availability.
What's New: See Privileged Remote Access Software Release Details
Status WHAT'S NEW
What's New
Easily review BeyondTrust features and capabilities newly available with each release. Learning about new features as they become
available can help you make the most of your BeyondTrust deployment.
The first time you log into the administrative interface after a BeyondTrust software upgrade, the What's New page will receive focus,
alerting you that new features are available on your site. You must be an administrator to view this tab.
The information shown on the What's New page is also available to users in the access console from the Help > About menu.
For more information, please see BeyondTrust Privileged Remote Access Update Documentation at
https://www.beyondtrust.com/docs/privileged-remote-access/updates/index.htm.
SALES: www.beyondtrust.com/contact
SUPPORT: www.beyondtrust.com/support
DOCUMENTATION: www.beyondtrust.com/docs
12
©2003-2024 BeyondTrust Corporation. All Rights Reserved. Other trademarks identified on this page are owned by their respective owners. BeyondTrust is not a chartered bank or trust company, or
depository institution. It is not authorized to accept deposits or trust accounts and is not licensed or regulated by any state or federal banking authority.
TC: 7/8/2024
PRIVILEGED REMOTE ACCESS 24.2
ADMIN GUIDE

Consoles & Downloads: Launch the Web Access Console and
Download the Desktop Access Console
Consoles & Downloads ACCESS CONSOLE
BeyondTrust Privileged Web Access Console
Launch the privileged web access console, a web-based access console. Access remote systems from your browser without having to
download and install the full access console.
BeyondTrust Access Console
Choose Platform
Choose the operating system on which you wish to install this software. This dropdown defaults to the appropriate installer detected for
your operating system.
For more information, please see Privileged Web Access Console Guide at https://www.beyondtrust.com/docs/privileged-
remote-access/getting-started/access-console/web-access/index.htm.
Download BeyondTrust Access Console
Download the BeyondTrust access console installer.
For system administrators who need to deploy the console installer to a large number of systems, the Microsoft Installer can be used with
your systems management tool of choice. In your command prompt, when composing the command to install the console using an MSI,
change to the directory where the MSI was downloaded and enter the command included on the My Account page.
You can include optional parameters for your MSI installation.
l
INSTALLDIR= accepts any valid directory path where you want the console to install.
l
RUNATSTARTUP= accepts 0 (default) or 1. If you enter 1, the console runs each time the computer starts up.
l
ALLUSERS= accepts "" (default) or 1. If you enter 1, the console installs for all users on the computer; otherwise, it installs only
for the current user.
l
SHOULDAUTOUPDATE=1 If you install for only the current user, you can choose to have the console automatically update each
time the site is upgraded by entering a value of 1; a value of 0 (default) does not auto-update, and the console must be manually
reinstalled when the site is upgraded. If you install the console for all users, it does not auto-update.
l
/quiet or /q runs the installer without displaying any windows, spinners, error, or other visible alerts.
SALES: www.beyondtrust.com/contact
SUPPORT: www.beyondtrust.com/support
DOCUMENTATION: www.beyondtrust.com/docs
13
©2003-2024 BeyondTrust Corporation. All Rights Reserved. Other trademarks identified on this page are owned by their respective owners. BeyondTrust is not a chartered bank or trust company, or
depository institution. It is not authorized to accept deposits or trust accounts and is not licensed or regulated by any state or federal banking authority.
TC: 7/8/2024
PRIVILEGED REMOTE ACCESS 24.2
ADMIN GUIDE

Consoles & Downloads: Download Drivers
Consoles & Downloads DRIVERS
Remote Desktop Agent
Download Remote Desktop Agent Installer
Click to download. Install the Remote Desktop Agent on 64-bit Windows servers with Remote Desktop Services to launch and inject
credentials in administrator-defined applications.
Virtual Smart Card
A virtual smart card allows you to authenticate to a remote system using a smart card on your local system.
To attempt virtual smart card authentication, the BeyondTrust user must have the BeyondTrust virtual smart card driver installed. The
computer being accessed must be running in elevated mode. It must also either have the BeyondTrust endpoint virtual smart card driver
installed or be accessed by the Jump To functionality of the access console.
Note: This feature is not supported for ARM-based Windows systems.
For more details and requirements, please see the Smart Cards for Remote Authentication at
https://www.beyondtrust.com/docs/privileged-remote-access/how-to/smart-card/index.htm.
Choose Windows Architecture
Select the appropriate virtual smart card installer for the BeyondTrust user system or the endpoint system.
Download Virtual Smart Card Installer
Click to download the virtual smart card installer selected above.
Access Console Network Tunneling Service
Note: Network Tunnel Jump is an advanced feature and disabled by default. This feature can be activated, at no additional
cost, by contacting your BeyondTrust representative.
Protocol Tunnel Jump shortcuts, including Network Tunnel Jump, are enabled only if their Jumpoint is configured for the
Protocol Tunnel Jump method on the /login > Jump > Jumpoint page.
SALES: www.beyondtrust.com/contact
SUPPORT: www.beyondtrust.com/support
DOCUMENTATION: www.beyondtrust.com/docs
14
©2003-2024 BeyondTrust Corporation. All Rights Reserved. Other trademarks identified on this page are owned by their respective owners. BeyondTrust is not a chartered bank or trust company, or
depository institution. It is not authorized to accept deposits or trust accounts and is not licensed or regulated by any state or federal banking authority.
TC: 7/8/2024
PRIVILEGED REMOTE ACCESS 24.2
ADMIN GUIDE

If a Privileged Remote Access user needs access to an endpoint through an IP Network Tunnel, then the Access Console Network
Tunneling Service must be installed on the user system. The Access Console Network Tunneling Service requires 64-bit Windows
Environments. This feature can be installed manually or via a software deployment tool. Once installed, it creates a service: BeyondTrust
Privileged Remote Access Network Tunnel Endpoint service.
Click Download Access Console Network Tunneling Service Installer if required.
For more information, including other requirements for Network Tunnels, see Network Tunnel Jump.
SALES: www.beyondtrust.com/contact
SUPPORT: www.beyondtrust.com/support
DOCUMENTATION: www.beyondtrust.com/docs
15
©2003-2024 BeyondTrust Corporation. All Rights Reserved. Other trademarks identified on this page are owned by their respective owners. BeyondTrust is not a chartered bank or trust company, or
depository institution. It is not authorized to accept deposits or trust accounts and is not licensed or regulated by any state or federal banking authority.
TC: 7/8/2024
PRIVILEGED REMOTE ACCESS 24.2
ADMIN GUIDE
My Account: Email Settings and Extended Availability Mode
My Account PROFILE
Change Your Email Settings
Email Address
Set the email address to where email notifications are sent, such as password resets or extended availability mode alerts.
Preferred Email Language
Displays the current language. If more than one language is enabled for your site, select the language you want to use from the dropdown
menu.
Password
Enter the password for your /login account, not your email password. The password is required to confirm your identity before changing
your email settings.
Note: To change your password, please see "Change Your Password" on page 16.
Extended Availability Mode
Enable or Disable
Enable or disable Extended Availability Mode by clicking the Enable/Disable button. Extended Availability Mode allows you to receive
email invitations from other users requesting to share a session when you are not logged into the console.
My Account: Change Password Settings and add Passwordless Authenticators
My Account SECURITY
Change Your Password
BeyondTrust recommends changing your password regularly.
SALES: www.beyondtrust.com/contact
SUPPORT: www.beyondtrust.com/support
DOCUMENTATION: www.beyondtrust.com/docs
16
©2003-2024 BeyondTrust Corporation. All Rights Reserved. Other trademarks identified on this page are owned by their respective owners. BeyondTrust is not a chartered bank or trust company, or
depository institution. It is not authorized to accept deposits or trust accounts and is not licensed or regulated by any state or federal banking authority.
TC: 7/8/2024
PRIVILEGED REMOTE ACCESS 24.2
ADMIN GUIDE

Username, Current Password, New Password
Verify that you are logged into the account for which you want to change the password, and then enter your current password. Create and
confirm a new password for your account. The password may be set to whatever you choose, as long as the string complies with the
defined policy set on the /login > Management > Security page.
Passwordless Authenticators
This feature is available only if enabled under Management > Security. The default authentication method is also selected here. Either
authentication method can be selected when logging in.
FIDO2-certified authenticators can be used to securely log in to the desktop access console (Windows only), privileged web access
console, and /login without entering your password. You can register up to 10 authenticators.
Only FIDO2-certified hardware authenticators that perform user verification – biometrics or PIN – are allowed.
There are two types of authenticators:
Roaming
Roaming authenticators, or cross-platform security keys like YubiKeys, are FIDO2-certified external devices that use biometrics or a PIN
for user verification. They can be used instead of your password when logging into the desktop access console (Windows only), privileged
web access console, and /login on any machine and supported operating system that allows the use of external FIDO2 authenticators.
Platform
Platform authenticators such as Windows Hello or macOS Touch ID are integrated, FIDO2-certified biometric authenticators. These
authenticators are tied to the machine where you registered the authenticator. They can be used instead of your password when logging
into the desktop access console (Windows only), privileged web access console, and /login. On macOS and Linux, platform
authenticators can only be used in the browser they were registered in. Incognito or private browsing windows cannot be used for
authentication.
Register and Manage Authenticators
The screen shows all registered authenticators, with their name, type, registration date and time, and last usage date and time. Registered
authenticators can be edited or deleted by selecting them and clicking the appropriate icon.
To register a new authenticator, click Register.
Select Roaming or Platform, depending on your requirements.
Enter an Authenticator Name. Choose a name to help you identify this authenticator when viewing all registered authenticators in a list.
Enter your BeyondTrust Privileged Remote Access Account Password. This is the password used to log in with Username & Password
authentication, not the authenticator's PIN or passcode. It is used to confirm your identity before allowing a new authenticator to be
registered to your account. It is not associated with the authenticator in any way.
Click Continue.
The remaining steps for registering your authenticator depend on the type, the manufacturer, the browser, and the OS.
SALES: www.beyondtrust.com/contact
SUPPORT: www.beyondtrust.com/support
DOCUMENTATION: www.beyondtrust.com/docs
17
©2003-2024 BeyondTrust Corporation. All Rights Reserved. Other trademarks identified on this page are owned by their respective owners. BeyondTrust is not a chartered bank or trust company, or
depository institution. It is not authorized to accept deposits or trust accounts and is not licensed or regulated by any state or federal banking authority.
TC: 7/8/2024
PRIVILEGED REMOTE ACCESS 24.2
ADMIN GUIDE

Tip: The browser or OS can timeout the authentication if there are delays responding to prompts.
Set up authenticators (for example, YubiKey or Windows Hello) within the OS before registering the authenticator. It is
important to follow the manufacturer's directions. For example, YubiKey Bio requires a PIN at setup, even for fingerprint
authentication.
Windows Hello can be set up using a PIN and a fingerprint. If this is done, either method can be used, regardless of how it is
registered.
Registering an authenticator might fail if the browser and OS combination does not support passwordless authentication. For
example, Firefox 110 does not support passwordless authentication for Linux and macOS. A warning message is usually
generated in these cases.
Note: Authenticators usually record failed authentication attempts, and may lock. They must be reset following the
manufacturer's instructions. A failed authentication at the authentication device does not count as a failed login to the
BeyondTrust site, as the incorrect information is not submitted to the site.
Two Factor Authentication
Activate Two Factor Authentication
Activate two-factor authentication (2FA) to increase the level of security for users accessing /login and the BeyondTrust access console.
Click Activate Two Factor Authentication and scan the displayed QR code using an authenticator app, such as Google Authenticator.
Alternatively, you can manually enter the alphanumeric code displayed below the QR code into your authenticator app.
The app automatically registers the account and begins providing you with codes. Enter your password and the code generated by the
authenticator app, and then click Activate. Please note that each code is valid for 60 seconds, after which time a new code is generated.
Once you log in, you have the option to switch to a different authenticator app or disable 2FA.
Note: If 2FA was deployed by your administrator, you do not have the option to disable it.
SALES: www.beyondtrust.com/contact
SUPPORT: www.beyondtrust.com/support
DOCUMENTATION: www.beyondtrust.com/docs
18
©2003-2024 BeyondTrust Corporation. All Rights Reserved. Other trademarks identified on this page are owned by their respective owners. BeyondTrust is not a chartered bank or trust company, or
depository institution. It is not authorized to accept deposits or trust accounts and is not licensed or regulated by any state or federal banking authority.
TC: 7/8/2024
PRIVILEGED REMOTE ACCESS 24.2
ADMIN GUIDE

Configuration
Options: Manage Connection Options, Record Sessions, Speed Up Sessions
Configuration OPTIONS
Session Options
Require Closed Sessions on Logout or Quit
If you check Require Closed Sessions on Logout or Quit, users will be unable to log out of the console if they currently have any
session tabs open.
Connection Options
Reconnect Timeout
Determine how long a disconnected endpoint client should attempt to reconnect.
Restrict physical access to the endpoint if the endpoint loses its connection or if all of the users in
session are disconnected
If the session connection is lost, the remote system's mouse and keyboard input can be temporarily disabled, resuming either when the
connection is restored or when the session is terminated.
Access Session Logging Options
Enable Screen Sharing Recording
Choose if screen sharing sessions should be automatically recorded as videos.
Screen Sharing Recording Resolution
Set the resolution at which to view session recording playback.
Note: All recordings are saved in raw format; the resolution size affects playback only.
SALES: www.beyondtrust.com/contact
SUPPORT: www.beyondtrust.com/support
DOCUMENTATION: www.beyondtrust.com/docs
19
©2003-2024 BeyondTrust Corporation. All Rights Reserved. Other trademarks identified on this page are owned by their respective owners. BeyondTrust is not a chartered bank or trust company, or
depository institution. It is not authorized to accept deposits or trust accounts and is not licensed or regulated by any state or federal banking authority.
TC: 7/8/2024
PRIVILEGED REMOTE ACCESS 24.2
ADMIN GUIDE

Enable User Recording for Protocol Tunnel Jump
Choose if Protocol Tunnel Jump sessions should be automatically recorded as videos. Because Protocol Tunnel Jumps require the use of
a third-party application of choice, the user's entire desktop is captured, including all monitors.
User Recording Resolution
Set the resolution at which to view session recording playback.
Note: All recordings are saved in raw format; the resolution size affects playback only.
Require User's Consent Before Recording Starts
Choose if users should receive a prompt telling them that their desktop will be recorded when beginning a Protocol Tunnel Jump session.
Please note that if the user does not consent, Protocol Tunnel Jump session will not continue.
Enable Command Shell Recording
Choose if command shell sessions should be automatically recorded as videos. Enabling command shell recordings also enables
command shell sessions to be available as text transcripts.
Command Shell Recording Resolution
Set the resolution at which to view session recording playback.
Note: All recordings are saved in raw format; the resolution size affects playback only.
IMPORTANT!
The recording settings enabled on this page can be overridden by a Jump Policy that has Disable Session Recordings selected.
This affects screen sharing, protocol tunnel Jump recording, and command shell recordings.
Enable Automatic Logging of System Information
Choose if system information should be automatically pulled from the remote system at the beginning of the session, to be available later
in the session report details.
Enable Session Forensics
Choose if you want the added capability to search across all sessions based on session events, which include chat messages, file
transfer, registry editor events, and session foreground window changed events. This feature is enabled by default.
SALES: www.beyondtrust.com/contact
SUPPORT: www.beyondtrust.com/support
DOCUMENTATION: www.beyondtrust.com/docs
20
©2003-2024 BeyondTrust Corporation. All Rights Reserved. Other trademarks identified on this page are owned by their respective owners. BeyondTrust is not a chartered bank or trust company, or
depository institution. It is not authorized to accept deposits or trust accounts and is not licensed or regulated by any state or federal banking authority.
TC: 7/8/2024
PRIVILEGED REMOTE ACCESS 24.2
ADMIN GUIDE

Note: If Command Shell is enabled, Session Forensics allows you to do an in-depth search of shell recordings. When you
search for a key term and a match is made in a stored shell recording, the video will automatically be queued to that point in
time in the recording. No command output or passwords are recorded.
Peer to Peer Options
Enabling peer-to-peer connections for access sessions enhances the performance of screen sharing, file transfer, and command shell
tools. Additional firewall configuration might be required to successfully establish peer-to-peer connections.
Disabled
This is the default setting. Disables Peer to Peer connections. To enable this feature, you must choose a server to negotiate the session.
When screen sharing, file transfer, or command shell is detected, the peer-to-peer connection is attempted. If successful, this creates a
direct connection between the user and the client systems, while still sending a second data stream to the B Series Appliance for auditing
purposes. If for any reason a peer-to-peer connection cannot be established, the session traffic defaults to the B Series Appliance-
mediated connection.
Use BeyondTrust Hosted Peer to Peer Server
BeyondTrust clients attempt to reach a peer-to-peer connection through the server hosted by BeyondTrust. This requires that your
BeyondTrust clients can make outbound UDP 3478 connection requests to stun.bt3ng.com. This setting is expected to work in most
situations.
Use B Series Appliance as Peer to Peer Server
If your organization requires specific security settings for traffic, you can use the B Series Appliance as a peer-to-peer server. This
requires that your B Series Appliance be able to accept inbound UDP 3478 connection requests by your BeyondTrust clients. Further
firewall settings are required.
For more information, please see BeyondTrust Appliance B Series Administration: Restrict Accounts, Networks, and Ports,
Enable a STUN Server, Set Up Syslog, Enable Login Agreement, Reset Admin Account at
https://www.beyondtrust.com/docs/privileged-remote-access/getting-started/deployment/web/security-appliance-
administration.htm.
Access Portal Logo
Administrators may upload a custom logo image to be displayed on public-facing web pages. This allows external users to verify they are
on your organization's web site, as well as enhancing the access portal with your organization's branding.
The logo image is displayed on the following public-facing web pages:
l
Access invite download page (the page shown after clicking a link in an access invite email)
l
Public recording URLs (view and download)
l
Extended availability responses (the page shown after clicking a link in an extended availability invitation email)
l
Jump approval authorizations (the page shown after clicking a link in a Jump approval email)
SALES: www.beyondtrust.com/contact
SUPPORT: www.beyondtrust.com/support
DOCUMENTATION: www.beyondtrust.com/docs
21
©2003-2024 BeyondTrust Corporation. All Rights Reserved. Other trademarks identified on this page are owned by their respective owners. BeyondTrust is not a chartered bank or trust company, or
depository institution. It is not authorized to accept deposits or trust accounts and is not licensed or regulated by any state or federal banking authority.
TC: 7/8/2024
PRIVILEGED REMOTE ACCESS 24.2
ADMIN GUIDE

Note: Uploaded logo image files may be in any standard image format. The logical image size maximum is 250 pixels wide
and 64 pixels high. However, BeyondTrust supports high density displays which allows for a maximum physical size of 500
pixels wide and 128 pixels high.
Teams: Group Users into Teams
Configuration TEAMS
Manage Teams
Grouping users into teams aids efficiency by assigning leadership within groups of users. In the access console, each team appears as a
separate queue for sessions.
Add New Team, Edit, Delete
Create a new team, modify an existing team, or remove an existing team. Deleting a team does not delete those user accounts, only the
team with which they are associated.
Add or Edit Team
Team Name
Create a unique name to help identify this team.
Code Name
Set a code name for integration purposes. If you do not set a code name, PRA creates one automatically.
Comments
Add comments to help identify the purpose of this object.
Group Policies
Note any group policies which assign members to this team. Click the link to go to the Group Policies page to verify or assign policy
members.
Team Members
Search for users to add to this team. You can set each member's role as a Team Member, Team Lead, or Team Manager. These roles
play a significant part in the Dashboard feature of the access console.
SALES: www.beyondtrust.com/contact
SUPPORT: www.beyondtrust.com/support
DOCUMENTATION: www.beyondtrust.com/docs
22
©2003-2024 BeyondTrust Corporation. All Rights Reserved. Other trademarks identified on this page are owned by their respective owners. BeyondTrust is not a chartered bank or trust company, or
depository institution. It is not authorized to accept deposits or trust accounts and is not licensed or regulated by any state or federal banking authority.
TC: 7/8/2024
PRIVILEGED REMOTE ACCESS 24.2
ADMIN GUIDE

In the table below, view existing team members. You can filter the view by entering a user's name in the filter box. You can also edit a
member's role or delete a member from the team.
To add a group of users to a team, go to Users & Security > Group Policies and assign that group to one or more teams in a given role.
Note: You may be unable to edit or delete some team members. This occurs when a user is added via group policy.
You can click the group policy link to modify the policy as a whole. Any changes made to the group policy apply to all members
of that group policy.
You can also add the individual to the team, overriding their settings as defined elsewhere.
Dashboard Settings
Within a team, a user can administrate only others with roles lower than their own. Note, however, that roles apply strictly on a team-by-
team basis, so a user may be able to administrate another user in one team but not be able to administer that same user in another team.
Monitoring Team Members from Dashboard
If enabled, a team lead or manager can monitor team members from the dashboard. Choose to Disable the ability to monitor, or choose
Only Access Console to allow a team lead or manager to monitor a team member's access console. Monitoring affects team leads and
managers for all teams on the site.
Enable Session Join and Take Over in Dashboard
If this option is checked, a team lead can join or take over a team member's sessions. Similarly, a team manager can administrate both
team members and team leads. The team lead must have start session access to the Jump Item that was used to create the session,
unless the option below is also checked.
Allow Team Managers/Leads to use "Transfer", "Take Over" and "Join Session" for sessions that are started
from Jump Items to which they do not have "Start Session" access.
If this option is checked, a team lead can join or take over a team member's sessions, even if the team lead does not have start session
access to the Jump Item that was used to create the session.
Team Chat History
Enable Replay of Team Chat History
If this option is checked, chat messages to everyone in the Team Chat area of the access console persist between access console logins.
This prevents loss of chat history if the connection is lost. This does not affect chat within a session, or private chats.
Hours of Team Chat History to Replay
By default, 8 hours of history is retained. This can be changed from a minimum of 1 to a maximum of 24, using the + and - icons or entering
the desired value. The time is set in one hour increments. Click Save after changing the time.
SALES: www.beyondtrust.com/contact
SUPPORT: www.beyondtrust.com/support
DOCUMENTATION: www.beyondtrust.com/docs
23
©2003-2024 BeyondTrust Corporation. All Rights Reserved. Other trademarks identified on this page are owned by their respective owners. BeyondTrust is not a chartered bank or trust company, or
depository institution. It is not authorized to accept deposits or trust accounts and is not licensed or regulated by any state or federal banking authority.
TC: 7/8/2024
PRIVILEGED REMOTE ACCESS 24.2
ADMIN GUIDE

Note: A maximum of 1000 chat messages is replayed. This limit applies regardless of the number of hours selected.
Custom Fields: Create, Edit, Delete Custom API Fields
Configuration CUSTOM FIELDS
Create custom API fields to gather information about your customer, enabling you to more deeply integrate BeyondTrust with your existing
programs. Custom fields must be used in combination with the BeyondTrust API. Create a new field, modify an existing field, or remove an
existing field.
Add or Edit Custom API Field
Display Name
Create a unique name to help identify this custom field. This name is displayed in the access console as part of the session details.
Code Name
Set a code name for integration purposes. If you do not set a code name, PRA creates one automatically.
Show in Access Console
If you check Show in Access Console, this field and its values will be visible wherever custom session details are displayed in the
access console.
SALES: www.beyondtrust.com/contact
SUPPORT: www.beyondtrust.com/support
DOCUMENTATION: www.beyondtrust.com/docs
24
©2003-2024 BeyondTrust Corporation. All Rights Reserved. Other trademarks identified on this page are owned by their respective owners. BeyondTrust is not a chartered bank or trust company, or
depository institution. It is not authorized to accept deposits or trust accounts and is not licensed or regulated by any state or federal banking authority.
TC: 7/8/2024
PRIVILEGED REMOTE ACCESS 24.2
ADMIN GUIDE

Jump
Jump Clients: Manage Settings and Install Jump Clients for Endpoint Access
Jump JUMP CLIENTS
Jump Client Installer List
This list shows all previously installed active Jump Client installers. Administrators and privileged users can view, download, delete, or
extend Jump Client installers.
A warning message appears at the top of the list: Installing more than one Jump Client on the same system is being phased out in a future
release. In the Access Console you may use the copy action on a Jump Client to apply different policies to the same endpoint. Click
Dismiss to remove the warning message.
Generic Jump Client Installer Download
The generic installer allows you to create Jump Client and Jumpoint installers that are not tied to a specific Jump Client or Jumpoint.
Generic installers can be used for automated or ephemeral deployments on VM images, and do not require authenticating and
downloading the Jump Client or Jumpoint-specific installer once deployed.
To use the generic Jump Client installer, select your desired platform, and click Download. When prompted, copy the Jump Client-
specific key to complete the installation.
Jump Client Mass Deployment Wizard
To access the Jump Client Mass Deployment Wizard, click Add at the top of the Jump Client Installer List.
The Mass Deployment Wizard enables administrators and privileged users to deploy Jump Clients to one or more remote computers for
later unattended access.
For more information, please see Privileged Remote Access Jump Client Guide: Unattended Access to Systems in Any
Network at https://www.beyondtrust.com/docs/privileged-remote-access/how-to/jump-clients/index.htm.
Jump Group
From the Jump Group dropdown, select whether to pin the Jump Client to your personal list of Jump Items or to a Jump Group shared by
other users. Pinning to your personal list of Jump Items means that only you can access this remote computer through this Jump Client.
Pinning to a shared Jump Group makes this Jump Client available to all members of that Jump Group.
Name
Add a name for the Jump Client.
SALES: www.beyondtrust.com/contact
SUPPORT: www.beyondtrust.com/support
DOCUMENTATION: www.beyondtrust.com/docs
25
©2003-2024 BeyondTrust Corporation. All Rights Reserved. Other trademarks identified on this page are owned by their respective owners. BeyondTrust is not a chartered bank or trust company, or
depository institution. It is not authorized to accept deposits or trust accounts and is not licensed or regulated by any state or federal banking authority.
TC: 7/8/2024
PRIVILEGED REMOTE ACCESS 24.2
ADMIN GUIDE

Some Mass Deployment Wizard settings allow override, enabling you to use the command line to set parameters that are specific to your
deployment, prior to installation.
Jump Policy
You may apply a Jump Policy to this Jump Client. Jump Policies are configured on the Jump > Jump Policies page and determine the
times during which a user can access this Jump Client. A Jump Policy can also send a notification when it is accessed or can require
approval to be accessed. If no Jump Policy is applied, this Jump Client can be accessed without restriction.
Jumpoint Proxy
If you have one or more Jumpoints set up as proxies, you can select a Jumpoint to proxy these Jump Client connections. That way, if
these Jump Clients are installed on computers without native internet connections, they can use the Jumpoint to connect back to your B
Series Appliance. The Jump Clients must be installed on the same network as the Jumpoint selected to proxy the connections.
Attempt an Elevated Install if the Client Supports It
If Attempt an Elevated Install if the Client Supports It is selected, the installer attempts to run with administrative rights, installing the
Jump Client as a system service. If the elevated installation attempt is unsuccessful or if this option is deselected, the installer runs with
user rights, installing the Jump Client as an application. This option applies only to Windows and Mac operating systems.
Note: A Jump Client pinned in user mode is available only when that user is logged in. In contrast, a Jump Client pinned in
service mode, with elevated rights, allows that system to always be available, regardless of which user is logged in.
This Installer Is Valid For
The installer remains usable only as long as specified by the This Installer is Valid For dropdown. Be sure to leave adequate time for
installation. If someone should attempt to run the Jump Client installer after this time, installation fails, and a new Jump Client installer
must be created. Additionally, if the installer is run within the allotted time but the Jump Client is unable to connect to the B Series
Appliance within that time, the Jump Client uninstalls, and a new installer must be deployed. The validity time can be set for anywhere
from 10 minutes to 1 year. This time does NOT affect how long the Jump Client remains active.
Once a Jump Client has been installed, it remains online and active until it is uninstalled from the local system either by a user from the
Jump interface or by an uninstall script. It can also be uninstalled, or extended, from the Jump Client Installer List. A user cannot remove a
Jump Client unless the user is given appropriate permissions by their admin from the /login interface.
Comments
Add Comments, which can be helpful in searching for and identifying remote computers. Note that all Jump Clients deployed via this
installer have the same comments set initially, unless you check Allow Override During Installation and use the available parameters to
modify the installer for individual installations.
Session Policy
You may choose a session policy to assign to this Jump Client. Session policies are configured on the Users & Security > Session
Policies page. A session policy assigned to this Jump Client has the highest priority when setting session permissions.
SALES: www.beyondtrust.com/contact
SUPPORT: www.beyondtrust.com/support
DOCUMENTATION: www.beyondtrust.com/docs
26
©2003-2024 BeyondTrust Corporation. All Rights Reserved. Other trademarks identified on this page are owned by their respective owners. BeyondTrust is not a chartered bank or trust company, or
depository institution. It is not authorized to accept deposits or trust accounts and is not licensed or regulated by any state or federal banking authority.
TC: 7/8/2024
PRIVILEGED REMOTE ACCESS 24.2
ADMIN GUIDE
For more information, please see at Session Policies: Set Session Permission and Prompting Rules at
https://www.beyondtrust.com/docs/privileged-remote-access/getting-started/admin/session-policies.htm.
Maximum Offline Minutes Before Deletion
You can set the Maximum Offline Minutes Before Deletion of a Jump Client from the system. This setting overrides the global setting, if
specified.
Prompt for Elevation Credentials if Needed
If Prompt for Elevation Credentials if Needed is selected, the installer prompts the user to enter administrative credentials if the system
requires that these credentials be independently provided; otherwise, it installs the Jump Client with user rights. This applies only if an
elevated install is being attempted.
Tag
Adding a Tag helps to organize your Jump Clients into categories within the access console.
Allow Override During Installation
Some Mass Deployment Wizard settings allow override, enabling you to use the command line to set parameters that are specific to your
deployment, prior to installation.
Mass Deploy Help
For system administrators who need to push out the Jump Client installer to a large number of systems, the Windows, Mac, or Linux
executable or the Windows MSI can be used with your systems management tool of choice. You can include a valid custom install
directory path where you want the Jump Client to install.
Note: It is common for receive an error message during the install, regarding a layout or appearance issue. This can be
disregarded.
Duplicate installations of Jump Clients or large numbers of installations can lead to installation failures or degraded
performance. Please see Review Best Practices for Jump Client Mass Deployment.
You can also override certain installation parameters specific to your needs. When you mark specific installation options for override
during installation, you can use the following optional parameters to modify the Jump Client installer for individual installations. Note that if
a parameter is passed on the command line but not marked for override in the /login administrative interface, the installation fails. If the
installation fails, view the operating system event log for installation errors.
Command Line Parameter Value Description
--install-dir <directory_path>
Specifies a new writable directory under which to
install the Jump Client. This is supported only on
Windows and Linux. When defining a custom install
directory, ensure that the directory you are creating
does not already exist and is in a location that can be
SALES: www.beyondtrust.com/contact
SUPPORT: www.beyondtrust.com/support
DOCUMENTATION: www.beyondtrust.com/docs
27
©2003-2024 BeyondTrust Corporation. All Rights Reserved. Other trademarks identified on this page are owned by their respective owners. BeyondTrust is not a chartered bank or trust company, or
depository institution. It is not authorized to accept deposits or trust accounts and is not licensed or regulated by any state or federal banking authority.
TC: 7/8/2024
PRIVILEGED REMOTE ACCESS 24.2
ADMIN GUIDE

written to.
--jc-name <name...>
If override is allowed, this command line parameter
sets the Jump Client's name.
--jc-jump-group
user:<username>jumpgroup:<jumpgroup-
code-name>
If override is allowed, this command line parameter
overrides the Jump Group specified in the Mass
Deployment Wizard.
--jc-session-policy <session-policy-code-name>
If override is allowed, this command line parameter
sets the Jump Client's session policy that controls the
permission policy during an access session.
--jc-jump-policy <jump-policy-code-name>
If override is allowed, this command line parameter
sets the Jump Policy that controls how users are
allowed to Jump to the Jump Client.
--jc-max-offline-minutes <minutes>
The maximum number of minutes a Jump Client can
be offline before it is deleted from the system. This
setting overrides the global setting if specified.
--jc-ephemeral
Sets the maximum number of minutes a Jump Client
will be offline before it is deleted from the system to 5
minutes. This is a convenience option that specifies
the Jump Client as being ephemeral and is functionally
equivalent to specifying --jc-max-offline-minutes 5
--jc-tag <tag-name>
If override is allowed, this command line parameter
sets the Jump Client's tag.
--jc-comments <comments ... >
If override is allowed, this command line parameter
sets the Jump Client's comments.
--silent
If included, the installer shows no windows, spinners,
errors, or other visible alerts.
Note: When deploying an MSI installer on Windows using an msiexec command, the above parameters can be specified by:
1. Removing leading dashes (--)
2. Converting remaining dashes to underscores (_)
3. Assigning a value using an equal sign (=)
MSI Example:
msiexec /i bomgar-pec-win32.msi KEY_INFO=w0dc3056g7ff8d1j68ee6wi6dhwzfefggyezh7c40jc90
jc_jump_group=jumpgroup:server_support jc_tag=servers
When deploying an EXE installer, the above parameters can be specified by:
l
Adding dashes
l
Adding a space between the parameter and the value
EXE Example:
SALES: www.beyondtrust.com/contact
SUPPORT: www.beyondtrust.com/support
DOCUMENTATION: www.beyondtrust.com/docs
28
©2003-2024 BeyondTrust Corporation. All Rights Reserved. Other trademarks identified on this page are owned by their respective owners. BeyondTrust is not a chartered bank or trust company, or
depository institution. It is not authorized to accept deposits or trust accounts and is not licensed or regulated by any state or federal banking authority.
TC: 7/8/2024
PRIVILEGED REMOTE ACCESS 24.2
ADMIN GUIDE

bomgar-pec-[unique id].exe --jc-jump-group jumpgroup:servers --jc-tag servers
Other rules to consider:
l
installdir has a dash in the EXE version but no dashes in the MSI version.
l
/quiet is used for the MSI version in place of --silent in the EXE version.
Jump Client Statistics
An administrator can choose which statistics to view for all Jump Clients on a site-wide basis. These statistics are displayed in the access
console and include CPU, console user, disk usage, a thumbnail of the remote screen, and uptime.
Upgrade
Maximum bandwidth of concurrent Jump Client upgrades
You can regulate the bandwidth used during upgrades by setting Maximum bandwidth of concurrent Jump Client upgrades.
Maximum number of concurrent Jump Client upgrades
Also set the maximum number of Jump Clients to upgrade at the same time. Note that if you have a large number of Jump Clients
deployed, you may need to limit this number to regulate the amount of bandwidth consumed.
Note: This setting does not affect access console upgrades.
Automatic Jump Client Upgrades
Use the radio buttons below to control automatic Jump Client upgrades. You can:
l
Permanently disable Jump Client upgrades.
l
Temporarily enable Jump Client upgrades for the current upgrade cycle.
l
Permanently enable Jump Client upgrades.
Note: In order to manually update Jump Clients in the privileged web access console, you must first disable Automatic Jump
Client Upgrades.
SALES: www.beyondtrust.com/contact
SUPPORT: www.beyondtrust.com/support
DOCUMENTATION: www.beyondtrust.com/docs
29
©2003-2024 BeyondTrust Corporation. All Rights Reserved. Other trademarks identified on this page are owned by their respective owners. BeyondTrust is not a chartered bank or trust company, or
depository institution. It is not authorized to accept deposits or trust accounts and is not licensed or regulated by any state or federal banking authority.
TC: 7/8/2024
PRIVILEGED REMOTE ACCESS 24.2
ADMIN GUIDE
Maintenance
Number of days before Jump Clients that have not connected are automatically deleted
If a Jump Client goes offline and does not reconnect to the B Series Appliance for the number of days specified by the Number of days
before Jump Clients that have not connected are automatically deleted setting, it is automatically uninstalled from the target
computer and is removed from the Jump interface of the access console.
Note: This setting is shared with the Jump Client during normal operation so that even if it cannot communicate with the site, it
uninstalls itself at the configured time. If this setting is changed after the Jump Client loses connection with the B Series
Appliance, it uninstalls itself at the previously configured time.
Number of days before Jump Clients that have not connected are considered lost
If a Jump Client goes offline and does not reconnect to the B Series Appliance for the number of days specified by the Number of days
before Jump Clients that have not connected are automatically deleted setting, it is labeled as lost in the access console. No
specific action is taken on the Jump Client at this time. It is labeled as lost only for identification purposes, so that an administrator can
diagnose the reason for the lost connection and take action to correct the situation.
Note: To allow you to identify lost Jump Clients before they are automatically deleted, this field should be set to a smaller
number than the deletion field above.
Uninstalled Jump Client Behavior
Uninstalled Jump Client Behavior determines how a Jump Client deleted by an end user is handled by the access console. Depending
on dropdown option selected, the deleted item can either be marked as uninstalled and kept in the list or actually be removed from the
Jump Items list in the access console. If the Jump Client cannot contact the B Series Appliance at the time it is uninstalled, the affected
item remains in its offline state.
Miscellaneous
Allow Representative to attempt to wake up Jump Clients
Allow users to attempt to wake up Jump Clients provides a way to wake up a selected Jump Client by broadcasting Wake-on-LAN
(WOL) packets through another Jump Client on the same network. Once a WOL is attempted, the option becomes unavailable for 30
seconds before a subsequent attempt can be made. WOL must be enabled on the target computer and its network for this function to
work. The default gateway information of the Jump Client is used to determine if other Jump Clients reside on the same network. When
sending a WOL packet, the user has an advanced option to provide a password for WOL environments that require a secure WOL
password.
Note: You can set Jump Clients to allow or disallow simultaneous Jumps from the Jump > Jump Items > Jump Settings
section. If allowed, multiple users can gain access to the same Jump Client without an invitation to join an active session by
another user. If disallowed, only one user can Jump to a Jump Client at a time. Only an invitation by the user who originated
the session can allow for a second user to access the session.
SALES: www.beyondtrust.com/contact
SUPPORT: www.beyondtrust.com/support
DOCUMENTATION: www.beyondtrust.com/docs
30
©2003-2024 BeyondTrust Corporation. All Rights Reserved. Other trademarks identified on this page are owned by their respective owners. BeyondTrust is not a chartered bank or trust company, or
depository institution. It is not authorized to accept deposits or trust accounts and is not licensed or regulated by any state or federal banking authority.
TC: 7/8/2024
PRIVILEGED REMOTE ACCESS 24.2
ADMIN GUIDE

For more information, please see Manage Jump Client Settings at https://www.beyondtrust.com/docs/privileged-remote-
access/how-to/jump-clients/settings.htm.
Use screen state to detect Customer Presence
When enabled, a customer will be considered present only if a user is logged in, the system is not locked, and a screen saver is not
running. When disabled, a customer will be considered present if a user is logged in, regardless of the screen state. Customer Presence
affects the session policy used for sessions started from a Jump Client.
Global connection rate for Jump Clients
The global connection rate setting is used by disconnected Jump Clients as a clue to know how aggressively to try to reconnect.
Jump Groups: Configure Which Users Can Access Which Jump Items
Jump JUMP GROUPS
Jump Groups
A Jump Group is a way to organize Jump Items, granting members varying levels of access to those items. Users are assigned to Jump
Groups either from this page or from the Users & Security > Group Policies page.
Add New Jump Group, Edit, Delete
Create a new group, modify an existing group, or remove an existing group.
Search Jump Groups
To quickly find an existing group in the list of Jump Groups, enter the name, part of the name, or a term from the comments. The list filters
all groups with a name or comment containing the entered search term. The list remains filtered until the search term is removed, even if
the user goes to other pages or logs out. To remove the search term, click the X to the right of the search box.
Add or Edit Group
Name
Create a unique name to help identify this group. This name helps when adding Jump Items to a group as well as when determining which
users and group policies are members of a Jump Group.
Code Name
Set a code name for integration purposes. If you do not set a code name, PRA creates one automatically.
SALES: www.beyondtrust.com/contact
SUPPORT: www.beyondtrust.com/support
DOCUMENTATION: www.beyondtrust.com/docs
31
©2003-2024 BeyondTrust Corporation. All Rights Reserved. Other trademarks identified on this page are owned by their respective owners. BeyondTrust is not a chartered bank or trust company, or
depository institution. It is not authorized to accept deposits or trust accounts and is not licensed or regulated by any state or federal banking authority.
TC: 7/8/2024
PRIVILEGED REMOTE ACCESS 24.2
ADMIN GUIDE

ECM Group
Select which ECM group to associate with the Jump Group. The dropdown menu shows ECM groups have been created on the site. If
there are no custom ECM Groups, only Default is available as an option. Credential requests originating from Jump Items in a Personal
Jump Group are routed to the Default ECM group.
Note: This feature is only present if enabled when your site is built. If it is not present, please contact your site administrator.
Note: While the ECM Groups must exist to be associated with a Jump Group, they still need to be associated with an API
Account in order for routing to occur. For more information, please see "API Configuration: Enable the XML API and Configure
Custom Fields" on page 165.
Comments
Add a brief description to summarize the purpose of this Jump Group.
Group Policies
This displays a listing of the group policies which assign users to this Jump Group.
Allowed Users
Search for users to add to this Jump Group. You can set each user's Jump Item Role to set their permissions specific to Jump Items in
this Jump Group, or you can use the user's default Jump Item Roles as set on the Users & Security > Group Policies or Users &
Security > Users page. A Jump Item Role is a predefined set of permissions regarding Jump Item management and usage.
You can also apply a Jump Policy to each user to manage their access to the Jump Items in this Jump Group. Selecting Set on Jump
Items instead uses the Jump Policy applied to the Jump Item itself. Jump Policies are configured on the Jump > Jump Policies page and
determine the times during which a user can access this Jump Item. A Jump Policy can also send a notification when it is accessed or can
require approval to be accessed. If neither the user nor the Jump Item has a Jump Policy applied, this Jump Item can be accessed without
restriction.
Existing Jump Group users are shown in a table. You can filter the list of users by entering a username in the Filter box. You can also edit
a user's settings or delete the user from the Jump Group.
To add groups of users to a Jump Group, go to Users & Security > Group Policies and assign that group to one or more Jump Groups.
Note: Edit and delete functionality may be disabled for some users. This occurs either when a user is added via group policy
or when a user's system Jump Item Role is set to anything other than No Access.
You can click the group policy link to modify the policy as a whole. Any changes made to the group policy apply to all members
of that group policy.
You can click the user link to modify the user's system Jump Item role. Any changes to the user's system Jump Item role apply
to all other Jump Groups in which the user is an unassigned member.
You also can add the individual to the group, overriding their settings as defined elsewhere.
SALES: www.beyondtrust.com/contact
SUPPORT: www.beyondtrust.com/support
DOCUMENTATION: www.beyondtrust.com/docs
32
©2003-2024 BeyondTrust Corporation. All Rights Reserved. Other trademarks identified on this page are owned by their respective owners. BeyondTrust is not a chartered bank or trust company, or
depository institution. It is not authorized to accept deposits or trust accounts and is not licensed or regulated by any state or federal banking authority.
TC: 7/8/2024
PRIVILEGED REMOTE ACCESS 24.2
ADMIN GUIDE
For more information, please see Use Jump Groups to Configure Which Users Can Access Which Jump Items at
https://www.beyondtrust.com/docs/privileged-remote-access/how-to/jumpoint/jump-groups.htm.
Jump Policies: Set schedules, notifications, and approvals for Jump Items
Jump JUMP POLICIES
Jump Policies
Jump Policies are used to control when certain Jump Items can be accessed by implementing schedules, sending email notifications
when a Jump Item is accessed, or requiring approval or user entry of a ticket system ID before a Jump Item may be accessed.
Add new Jump Policy, edit, delete
Create a new policy, modify an existing policy, or remove an existing policy.
Add or edit a policy
Display Name
Create a unique name to help identify this policy. This name should help users identify this policy when assigning it to Jump Items.
Code Name
Set a code name for integration purposes. If you do not set a code name, PRA creates one automatically.
Description
Add a brief description to summarize the purpose of this policy.
Jump schedule
Enabled
Set a schedule to define when Jump Items under this policy can be accessed. Set the time zone you want to use for this schedule, and
then add one or more schedule entries. For each entry, set the start day and time and the end day and time.
If, for instance, the time is set to start at 8 am and end at 5 pm, a user can start a session using this Jump Item at any time during this
window but may continue to work past the set end time. Attempting to re-access this Jump Item after 5 pm, however, results in a
notification indicating that the schedule does not permit a session to start. If necessary, the user may choose to override the schedule
restriction and start the session anyway.
SALES: www.beyondtrust.com/contact
SUPPORT: www.beyondtrust.com/support
DOCUMENTATION: www.beyondtrust.com/docs
33
©2003-2024 BeyondTrust Corporation. All Rights Reserved. Other trademarks identified on this page are owned by their respective owners. BeyondTrust is not a chartered bank or trust company, or
depository institution. It is not authorized to accept deposits or trust accounts and is not licensed or regulated by any state or federal banking authority.
TC: 7/8/2024
PRIVILEGED REMOTE ACCESS 24.2
ADMIN GUIDE

Force session to end when schedule does not permit access
If stricter access control is required, check Force session to end. This forces the session to disconnect at the scheduled end time. In this
case, the user receives recurring notifications beginning 15 minutes prior to being disconnected.
Jump notification
Notify recipients when a session starts
If this option is checked, a notification email is sent to the designated recipients whenever a session is started with any Jump Item that
uses this Jump Policy. When a user attempts to start a session with a Jump Item that uses this policy, a prompt states that a notification
email will be sent and asks if the user would like to start the session anyway.
Notify recipients when a session ends
If this option is checked, a notification email is sent to the designated recipients whenever a session ends for any Jump Item that uses this
Jump Policy. When a user attempts to start a session with a Jump Item that uses this policy, a prompt states that a notification email will be
sent at the end of the session and asks if the user would like to start the session anyway.
Email Address(es)
Enter one or more email addresses to which emails should be sent. Separate addresses with a space.This feature requires a valid SMTP
configuration for your B Series Appliance, set up on the /login > Management > Email Configuration page.
Display Name
Enter a name for the approver. This name appears on the prompt the user receives prior to a session with a Jump Item that uses this
policy.
Locale
If more than one language is enabled on this site, set the language in which to send emails.
Jump approval
Require a ticket ID before a session starts
If this option is checked, the user must enter a valid ticket ID before an access session can begin. When a user attempts to access an
endpoint with this Jump Policy applied, the user must enter a ticket ID from your existing ITSM or ticket ID approval process before access
is granted. Configure the ITSM or ticket system integration from the Jump Policies :: Ticket Systemsection.
Require approval before a session starts
If this option is checked, an approval email is sent to the designated recipients whenever a session is attempted with any Jump Item that
uses this Jump Policy. When a user attempts to start a session with a Jump Item that uses this policy, a dialog prompts the user to enter a
SALES: www.beyondtrust.com/contact
SUPPORT: www.beyondtrust.com/support
DOCUMENTATION: www.beyondtrust.com/docs
34
©2003-2024 BeyondTrust Corporation. All Rights Reserved. Other trademarks identified on this page are owned by their respective owners. BeyondTrust is not a chartered bank or trust company, or
depository institution. It is not authorized to accept deposits or trust accounts and is not licensed or regulated by any state or federal banking authority.
TC: 7/8/2024
PRIVILEGED REMOTE ACCESS 24.2
ADMIN GUIDE

request reason and the time and duration for the request.
Maximum Access Duration
Set the maximum length of time for which a user can request access to a Jump Item that uses this policy. The user can request a shorter
length of access but no longer than that set here.
Access Approval Applies To
When approval has been granted to a Jump Item, that Jump Item becomes available either to any user who can see and request access to
that Jump Item or only to the user who requested access.
Jump Approvers
Enter an email address or user name, or a team name so that anyone on that team can approve the jump. Separate multiple entries with a
space.This feature requires a valid SMTP configuration for your B Series Appliance, set up on the /login > Management > Email
Configuration page.
Display Name
Enter a name for the approver. This name appears on the prompt the user receives prior to a session with a Jump Item that uses this
policy.
Locale
If more than one language is enabled on this site, set the language in which to send emails.
Disable recordings
Disable Recordings
If this option is checked, sessions started with this Jump Policy will not be recorded, even if recordings are enabled on the Configuration
> Options page. This affects screen sharing, user recordings for protocol tunnel Jump, and command shell recordings.
Email notification template
Subject
Customize the subject of this email. Click the link below the Body field to view the macros that can used to customize the text in your
emails for your purposes.
Body
Customize the body of this email. Click the link below the Body field to view the macros that can used to customize the text in your emails
for your purposes.
SALES: www.beyondtrust.com/contact
SUPPORT: www.beyondtrust.com/support
DOCUMENTATION: www.beyondtrust.com/docs
35
©2003-2024 BeyondTrust Corporation. All Rights Reserved. Other trademarks identified on this page are owned by their respective owners. BeyondTrust is not a chartered bank or trust company, or
depository institution. It is not authorized to accept deposits or trust accounts and is not licensed or regulated by any state or federal banking authority.
TC: 7/8/2024
PRIVILEGED REMOTE ACCESS 24.2
ADMIN GUIDE

Email approval template
Subject
Customize the subject of this email. Click the link below the Body field to view the macros that can used to customize the text in your
emails for your purposes.
Body
Customize the body of this email. Click the link below the Body field to view the macros that can used to customize the text in your emails
for your purposes.
Ticket system
Ticket System URL
In Ticket System URL, enter the URL for your external ticket system. The B Series Appliance sends an outbound request to your external
ticketing system. The URL must be formatted for either HTTP or HTTPS. If an HTTPS URL is entered, the site certificate must be verified
for a valid connection. If a Jump Policy requiring a ticket ID exists, a ticket system URL must be entered or you will receive a warning
message.
Upload a certificate for HTTPS connections
Click Choose a certificate to upload the certificate for the HTTPS ticket system connection to the B Series Appliance. If your certificate is
uploaded, the B Series Appliance uses it when it contacts the external system. If you do not upload a certificate and the Ignore SSL
certificate errors box below this setting is checked, the B Series Appliance optionally falls back to use the built-in certificate store when
sending the request.
User Prompt
In User Prompt, enter the dialog text you want access console users to see when they are requested to enter the ticket ID required for
access.
Treat the Ticket ID as sensitive information
If this box is checked, the ticket ID is considered sensitive information and asterisks are shown instead of text. You must use an HTTPS
Ticket System URL. If an address with HTTP is entered, an error message appears to remind you HTTPS is required.
When this feature is enabled you cannot bypass issues with SSL certificates by checking the Ignore SSL certificate errors box. This
means you must have a valid SSL certificate in place. If you try to check the Ignore SSL certificate errors box, a message appears
stating that you cannot ignore SSL certificate errors.
When the Ticket ID is sensitive, the following rules apply:
l
Both the desktop and the web access consoles show asterisks instead of text.
l
The ticket is not logged anywhere by the access console or on the B Series Appliance.
SALES: www.beyondtrust.com/contact
SUPPORT: www.beyondtrust.com/support
DOCUMENTATION: www.beyondtrust.com/docs
36
©2003-2024 BeyondTrust Corporation. All Rights Reserved. Other trademarks identified on this page are owned by their respective owners. BeyondTrust is not a chartered bank or trust company, or
depository institution. It is not authorized to accept deposits or trust accounts and is not licensed or regulated by any state or federal banking authority.
TC: 7/8/2024
PRIVILEGED REMOTE ACCESS 24.2
ADMIN GUIDE

For more information, please see Create Jump Policies to Control Access to Jump Items at
https://www.beyondtrust.com/docs/privileged-remote-access/how-to/jumpoint/policies.htm.
Ignore SSL certificate errors
If checked, the B Series Appliance does not include the certificate validation information when it is contacting the external ticket system.
Leave this box unchecked if you are uploading a certificate for secure HTTPS connection.
Two factor authentication
Two Factor Authentication Challenge
For additional security, the Jump Policy can require an end-user to confirm their identity using a multi-factor authentication challenge
before starting or elevating a session. If desired, check Must complete a two factor authentication challenge before starting or
elevating a session.
Jump Item Roles: Create Permission Sets for Jump Items
Jump JUMP ITEM ROLES
Jump Item Roles
A Jump Item Role is a predefined set of permissions regarding Jump Item management and usage. Jump Item Roles are applied to users
either from the Jump > Jump Groups page or from the Users & Security > Group Policies page.
If more than one role is assigned to a user, then the most specific role for a user is always used. The order of specificity for Jump Item
Roles, from most specific to least specific, is:
l
The role assigned to the relationship between a user and a Jump Group on the Jump > Jump Groups page.
l
The role assigned to the relationship between a user and a Jump Group on the Users & Security > Group Policies page.
l
The Jump Item Roles configured for a user on the Users & Security > Users page or the Users & Security > Group Policies
page.
Note: A new Jump Item Role called Auditor is automatically created on new site installations. On existing installations it has
to be created. This role only has a single View Reports permission enabled, giving admins the option to grant a user just the
permission to run Jump Item reports, without the need to grant any other permission.
Add New Jump Item Role, Edit, Delete
Create a new role, modify an existing role, or remove an existing role.
SALES: www.beyondtrust.com/contact
SUPPORT: www.beyondtrust.com/support
DOCUMENTATION: www.beyondtrust.com/docs
37
©2003-2024 BeyondTrust Corporation. All Rights Reserved. Other trademarks identified on this page are owned by their respective owners. BeyondTrust is not a chartered bank or trust company, or
depository institution. It is not authorized to accept deposits or trust accounts and is not licensed or regulated by any state or federal banking authority.
TC: 7/8/2024
PRIVILEGED REMOTE ACCESS 24.2
ADMIN GUIDE

Add or Edit a Jump Item Role
Name
Create a unique name to help identify this role. This name helps when linking a Jump Item Role with a user or group of users in a Jump
Group.
Description
Add a brief description to summarize the purpose of this role.
Permissions
Jump Group or Personal Jump Items
Create and deploy new Jump Items
Enables the user to create Jump Items and install them on remote systems.
Move and Copy Jump Items
Enables the user to move or copy Jump Items from one Jump Group into another. This permission must be enabled on both Jump Groups.
Copied Jump Items can be edited.
For more information on how to copy Jump Items, please see Jump Interface: Use Jump Items to Access Remote Systems at
https://www.beyondtrust.com/docs/privileged-remote-access/getting-started/access-console/jump-interface.htm.
Remove existing Jump Items
Enables the user to delete Jump Items.
View Reports
Enables the user to view reports. This applies to the Jump Group to which the user is added with this role.
Jump Item
Start Sessions
Enables the user to Jump to remote systems.
SALES: www.beyondtrust.com/contact
SUPPORT: www.beyondtrust.com/support
DOCUMENTATION: www.beyondtrust.com/docs
38
©2003-2024 BeyondTrust Corporation. All Rights Reserved. Other trademarks identified on this page are owned by their respective owners. BeyondTrust is not a chartered bank or trust company, or
depository institution. It is not authorized to accept deposits or trust accounts and is not licensed or regulated by any state or federal banking authority.
TC: 7/8/2024
PRIVILEGED REMOTE ACCESS 24.2
ADMIN GUIDE

Edit Tag
Enables the user to edit a Jump Item's tag field.
Edit Comments
Enables the user to edit a Jump Item's comments field.
Edit Jump Policy
Enables the user to set which if any Jump Policy is applied to a Jump Item.
Edit Session Policy
Enables the user to set which if any session policy a Jump Item should use. Changing the session policy may affect the permissions
allowed in the session.
Edit Connectivity and Authentication
Enables the user to modify a Jump Item's connection and authentication information. This includes such fields as hostname, Jumpoint,
port, and username, among others.
Edit Behavior and Experience
Enables the user to modify the behavior of Jump Items. This includes such fields as connection type, display size, and terminal type,
among others.
For more information, please see Use Jump Item Roles to Configure Permission Sets for Jump Items at
https://www.beyondtrust.com/docs/privileged-remote-access/how-to/jumpoint/jump-item-roles.htm.
Jumpoint: Set Up Unattended Access to a Network
Jump JUMPOINT
Jumpoint Management
BeyondTrust's Jump Technology enables a user to access computers on a remote network without having to pre-install software on every
machine. Simply install a single Jumpoint agent at any network location to gain unattended access to every PC within that network.
Add New Jumpoint, Edit, Delete
Create a new Jumpoint, modify an existing Jumpoint, or remove an existing Jumpoint.
SALES: www.beyondtrust.com/contact
SUPPORT: www.beyondtrust.com/support
DOCUMENTATION: www.beyondtrust.com/docs
39
©2003-2024 BeyondTrust Corporation. All Rights Reserved. Other trademarks identified on this page are owned by their respective owners. BeyondTrust is not a chartered bank or trust company, or
depository institution. It is not authorized to accept deposits or trust accounts and is not licensed or regulated by any state or federal banking authority.
TC: 7/8/2024
PRIVILEGED REMOTE ACCESS 24.2
ADMIN GUIDE

Redeploy
Uninstall an existing Jumpoint and download an installer to replace the existing Jumpoint with a new one. Jump shortcuts associated with
the existing Jumpoint will use the new Jumpoint once it is installed.
Note: When an existing Jumpoint is replaced, its configuration is not saved. The new Jumpoint must be reconfigured.
Add or Edit Jumpoint
Name
Create a unique name to help identify this Jumpoint. This name should help users locate this Jumpoint when they need to start a session
with a computer on the same network.
Code Name
Set a code name for integration purposes. If you do not set a code name, PRA creates one automatically.
External Jump Item Network ID
On the Security page Access Console settings, when Jumpoint for External Jump Item Sessions is set to Automatically Selected
by External Jump Item Network ID, this value is matched against the Network ID property for external Jump Items returned by the
Endpoint Credential Manager to determine which Jumpoint handles a session.
Note: Network ID is equivalent to the Workgroup attribute on managed systems in Password Safe.
Comments
Add a brief description to summarize the purpose of this Jumpoint. This is helpful when managing Jumpoints.
Disabled
If checked, this Jumpoint is unavailable to make Jump connections.
Clustered
If checked, you will be able to add multiple, redundant nodes of the same Jumpoint on different host systems. This ensures that as long as
at least one node remains online, the Jumpoint will be available.
Enable Shell Jump Method
If you want users to be able to connect to SSH-enabled and Telnet-enabled network devices through this Jumpoint, check the Enable
Shell Jump Method option. Command filtering can be configured to prevent accidental use of commands that can be harmful to endpoint
SALES: www.beyondtrust.com/contact
SUPPORT: www.beyondtrust.com/support
DOCUMENTATION: www.beyondtrust.com/docs
40
©2003-2024 BeyondTrust Corporation. All Rights Reserved. Other trademarks identified on this page are owned by their respective owners. BeyondTrust is not a chartered bank or trust company, or
depository institution. It is not authorized to accept deposits or trust accounts and is not licensed or regulated by any state or federal banking authority.
TC: 7/8/2024
PRIVILEGED REMOTE ACCESS 24.2
ADMIN GUIDE

systems.
For more information on command filtering, please see Use Shell Jump to Access a Remote Network Device at
www.beyondtrust.com/docs/privileged-remote-access/getting-started/access-console/shell-jump.htm.
Enable Protocol Tunnel Jump Method
If the Enable Protocol Tunnel Jump Method option is checked, users may make connections from their systems to remote endpoints
through these types of Jumpoint.
When Enable Protocol Tunnel Jump Method is checked, there is an option to enter Managed IP Addresses for Protocol Tunnel
Jump. You can enter multiple IP address ranges. This allows using the Network Tunnel feature on networks without DHCP.
For more information, see Protocol Tunnel Jump Shortcuts and Network Tunnel Jump Shortcuts.
RDP Service Account
Select the vault account to be used by the Jumpoint to run a user-initiated client on the RDP server. This allows you to collect additional
event information from an RDP session started with this Jumpoint. This account in used only if the Remote RDP Jump Item is configured
to enable the Session Forensics functionality.
Note: The RDP Service Account setting must not use a local admin account, and must use a domain admin account with
privileges on the endpoint including access to remotely connect to the endpoint's C$ share, remotely create and start services
on the endpoint machine, and access remote file systems.
For more information, see Use RDP to Access a Remote Windows Endpoint in the Privileged Remote Access Jumpoint Guide.
Group Policies
This displays a listing of the group policies which allow users access to this Jumpoint.
Allowed Users
New Member Name
Search for users to add to this Jumpoint. Users must be added to the Jumpoint in order to create Jump Items using that Jumpoint or to
initiate ad hoc sessions through that Jumpoint. Users are not required to be added to the Jumpoint to start a session with a pre-existing
Jump Item using that Jumpoint, so long as they have access granted through Jump Group membership.
In the table below, view existing Jumpoint users. You can filter the view by entering a string in the Filter by Name text box. You can also
delete the user from the Jumpoint.
To add a group of users to a Jumpoint, go to Users & Security > Group Policies and assign that group to one or more Jumpoints.
SALES: www.beyondtrust.com/contact
SUPPORT: www.beyondtrust.com/support
DOCUMENTATION: www.beyondtrust.com/docs
41
©2003-2024 BeyondTrust Corporation. All Rights Reserved. Other trademarks identified on this page are owned by their respective owners. BeyondTrust is not a chartered bank or trust company, or
depository institution. It is not authorized to accept deposits or trust accounts and is not licensed or regulated by any state or federal banking authority.
TC: 7/8/2024
PRIVILEGED REMOTE ACCESS 24.2
ADMIN GUIDE

Note: You may see some users whose Delete options are disabled. This occurs when a user is added via group policy.
You can click the group policy link to modify the policy as a whole. Any changes made to the group policy apply to all members
of that group policy.
You also can add the individual to the Jumpoint, overriding their settings as defined elsewhere.
For more information about Jumpoint configuration, please see Configure and Install a PRA Jumpoint at
https://www.beyondtrust.com/docs/privileged-remote-access/how-to/jumpoint/installation-windows.htm.
Jump items: mass import Jump shortcuts and manage Jump item settings
Jump JUMP ITEMS
Jump shortcuts mass import wizard
Through a Jumpoint, Jump shortcuts can be created to:
l
Start a standard access session.
l
Start a Remote Desktop Protocol session with Windows or Linux systems.
l
Jump to a web site on a remote browser.
l
Shell Jump to an SSH-enabled or Telnet-enabled network device.
l
Connect to a VNC server.
l
Make a TCP connection through a Protocol Tunnel Jump.
Note: Linux Jumpoints can only be used for RDP, SSH/Telnet, Protocol Tunneling, Web Jump, and VNC sessions, allowing
for credential injection from user or Vault, as well as RemoteApp functionality and Shell Jump filtering. Clustered Jumpoints
can only add new nodes of the same OS. You cannot mix Windows and Linux nodes.
When creating a large number of Jump shortcuts, it may be easier to import them via a spreadsheet than to add them one by one in the
access console.
For more information, please see Use a Jump Shortcut to Jump to a Remote System at
https://www.beyondtrust.com/docs/privileged-remote-access/how-to/jumpoint/jump-shortcuts.htm.
Download template
From the dropdown in the Jump Shortcuts Mass Import Wizard section of the /login interface, select the type of Jump Item you wish to
add, and then click Download Template. Using the text in the CSV template as column headers, add the information for each Jump
shortcut you wish to import. If any required fields are missing, import fails. Optional fields can be filled in or left blank.
SALES: www.beyondtrust.com/contact
SUPPORT: www.beyondtrust.com/support
DOCUMENTATION: www.beyondtrust.com/docs
42
©2003-2024 BeyondTrust Corporation. All Rights Reserved. Other trademarks identified on this page are owned by their respective owners. BeyondTrust is not a chartered bank or trust company, or
depository institution. It is not authorized to accept deposits or trust accounts and is not licensed or regulated by any state or federal banking authority.
TC: 7/8/2024
PRIVILEGED REMOTE ACCESS 24.2
ADMIN GUIDE

Import Jump shortcuts
Once you have completed filling out the template, use Import Jump Shortcuts to upload the CSV file containing the Jump Item
information. The maximum file size allowed to be uploaded at one time is 5 MB. Only one type of Jump Item can be included in each CSV
file.The CSV file should use the format described in the tables below.
Local Jump shortcut
Field Description
Hostname
The hostname of the endpoint to be accessed by this Jump Item. This string has a maximum of 128
characters.
Name
The name of the endpoint to be accessed by this Jump Item. This name identifies the item in the session
tabs. This string has a maximum of 128 characters.
Jump Group
The code name of the Jump Group with which this Jump Item should be associated.
Note: When using the import method, a Jump Item cannot be associated with a personal list of
Jump Items.
Tag (optional)
You can organize your Jump Items into categories by adding a tag. This string has a maximum of 1024
characters.
Comments (optional) You can add comments to your Jump Items. This string has a maximum of 1024 characters.
Jump Policy (optional) The code name of a Jump Policy. You can specify a Jump Policy to manage access to this Jump Item.
Session Policy (optional)
The code name of a session policy. You can specify a session policy to manage the permissions available
on this Jump Item.
Endpoint Agreement
Policy (optional)
The value accept automatically accepts the endpoint agreement if it times out and allows the session the
start. The value reject automatically rejects the endpoint agreement and stops the session from starting.
The value no_prompt does not show an endpoint agreement even if the feature is configured. This field
has no effect if the global endpoint agreement is not enabled.
For more information about the global setting, please see Jump Items: Mass Import Jump Shortcuts and Manage Jump Item
Settings at https://www.beyondtrust.com/docs/privileged-remote-access/getting-started/admin/jump-items.htm.
Remote Jump shortcut
Field Description
Hostname
The hostname of the endpoint to be accessed by this Jump Item. This string has a maximum of 128
characters.
Jumpoint The code name of the Jumpoint through which the endpoint is accessed.
SALES: www.beyondtrust.com/contact
SUPPORT: www.beyondtrust.com/support
DOCUMENTATION: www.beyondtrust.com/docs
43
©2003-2024 BeyondTrust Corporation. All Rights Reserved. Other trademarks identified on this page are owned by their respective owners. BeyondTrust is not a chartered bank or trust company, or
depository institution. It is not authorized to accept deposits or trust accounts and is not licensed or regulated by any state or federal banking authority.
TC: 7/8/2024
PRIVILEGED REMOTE ACCESS 24.2
ADMIN GUIDE

Field Description
Name
The name of the endpoint to be accessed by this Jump Item. This name identifies the item in the session
tabs. This string has a maximum of 128 characters.
Jump Group
The code name of the Jump Group with which this Jump Item should be associated.
Note: When using the import method, a Jump Item cannot be associated with a personal list of
Jump Items.
Tag (optional)
You can organize your Jump Items into categories by adding a tag. This string has a maximum of 1024
characters.
Comments (optional) You can add comments to your Jump Items. This string has a maximum of 1024 characters.
Jump Policy (optional) The code name of a Jump Policy. You can specify a Jump Policy to manage access to this Jump Item.
Session Policy (optional)
The code name of a session policy. You can specify a session policy to manage the permissions available
on this Jump Item.
Endpoint Agreement
Policy (optional)
The value accept automatically accepts the endpoint agreement if it times out and allows the session the
start. The value reject automatically rejects the endpoint agreement and stops the session from starting.
The value no_prompt does not show an endpoint agreement even if the feature is configured. This field
has no effect if the global endpoint agreement is not enabled.
For more information about the global setting, please see Jump Items: Mass Import Jump Shortcuts and Manage Jump Item
Settings at https://www.beyondtrust.com/docs/privileged-remote-access/getting-started/admin/jump-items.htm.
Remote VNC Jump shortcut
Field Description
Hostname
The hostname of the endpoint to be accessed by this Jump Item. This string has a maximum of 128
characters.
Jumpoint The code name of the Jumpoint through which the endpoint is accessed.
Port (optional) A valid port number from 100 to 65535. Defaults to 5900.
Name
The name of the endpoint to be accessed by this Jump Item. This name identifies the item in the session
tabs. This string has a maximum of 128 characters.
Jump Group
The code name of the Jump Group with which this Jump Item should be associated.
Note: When using the import method, a Jump Item cannot be associated with a personal list of
Jump Items.
Tag (optional)
You can organize your Jump Items into categories by adding a tag. This string has a maximum of 1024
characters.
SALES: www.beyondtrust.com/contact
SUPPORT: www.beyondtrust.com/support
DOCUMENTATION: www.beyondtrust.com/docs
44
©2003-2024 BeyondTrust Corporation. All Rights Reserved. Other trademarks identified on this page are owned by their respective owners. BeyondTrust is not a chartered bank or trust company, or
depository institution. It is not authorized to accept deposits or trust accounts and is not licensed or regulated by any state or federal banking authority.
TC: 7/8/2024
PRIVILEGED REMOTE ACCESS 24.2
ADMIN GUIDE

Field Description
Comments (optional) You can add comments to your Jump Items. This string has a maximum of 1024 characters.
Jump Policy (optional) The code name of a Jump Policy. You can specify a Jump Policy to manage access to this Jump Item.
Session Policy (optional)
The code name of a session policy. You can specify a session policy to manage the permissions available
on this Jump Item.
Remote RDP Jump shortcut
Field Description
Hostname
The hostname of the endpoint to be accessed by this Jump Item. This string has a maximum of 128
characters.
Jumpoint The code name of the Jumpoint through which the endpoint is accessed.
Username (optional) The username to sign in as.
Domain (optional) The domain the endpoint is on.
Quality (optional)
The quality at which to view the remote system. Can be low (2-bit gray scale for the lowest bandwidth
consumption), best_perf (default - 8-bit color for fast performance), perf_and_qual (16-bit for medium
quality image and performance), best_qual (32-bit for the highest image resolution), or video_opt (VP9
codec for more fluid video). This cannot be changed during the remote desktop protocol (RDP) session.
Console Session
1: Starts a console session.
0: Starts a new session (default).
Ignore Untrusted
Certificate (optional)
1: Ignores certificate warnings.
0: Shows a warning if the server's certificate cannot be verified.
SecureApp Type
The SecureApp launch method. Can be "none", "remote_app" (to use RDP's built-in RemoteApp
functionality), "remote_desktop_agent" (to use BeyondTrust's Remote Desktop Agent), or "remote_
desktop_agent_credentials" (to use BeyondTrust's Remote Desktop Agent with Credential Injection). If
"remote_desktop_agent" or "remote_desktop_agent_credentials" are chosen then the BeyondTrust
Remote Desktop Agent must be installed on the remote system.>
RemoteApp Name The RemoteApp program name. This string has a maximum of 520 characters.
RemoteApp Parameters
A space-separated list of parameters to pass to the RemoteApp. Parameters with spaces can be quoted
using double-quotes. This string has a maximum of 16000 characters.
Remote Executable
Parameters
A space-separated list of parameters to pass to the remote executable that will be launched using the
BeyondTrust Remote Desktop Agent. Parameters with spaces can be quoted using double-quotes. This
can only be used if the SecureApp Type uses the BeyondTrust Remote Desktop Agent.
Target System
The name of the target system being accessed by the remote application. This value is used to limit the list
of injected credentials to only those that are valid on the target system. This value can only be used if the
SALES: www.beyondtrust.com/contact
SUPPORT: www.beyondtrust.com/support
DOCUMENTATION: www.beyondtrust.com/docs
45
©2003-2024 BeyondTrust Corporation. All Rights Reserved. Other trademarks identified on this page are owned by their respective owners. BeyondTrust is not a chartered bank or trust company, or
depository institution. It is not authorized to accept deposits or trust accounts and is not licensed or regulated by any state or federal banking authority.
TC: 7/8/2024
PRIVILEGED REMOTE ACCESS 24.2
ADMIN GUIDE

Field Description
SecureApp Type uses the BeyondTrust Remote Desktop Agent with Credential injection.
Credential Type
The type of credentials that will be injected into the remote executable. This value will depend on the
password vault from which credentials are retrieved. This value can only be used if the SecureApp Type
uses the BeyondTrust Remote Desktop Agent with Credential injection.
Name
The name of the endpoint to be accessed by this Jump Item. This name identifies the item in the session
tabs. This string has a maximum of 128 characters.
Jump Group
The code name of the Jump Group with which this Jump Item should be associated.
Note: When using the import method, a Jump Item cannot be associated with a personal list of
Jump Items.
Tag (optional)
You can organize your Jump Items into categories by adding a tag. This string has a maximum of 1024
characters.
Comments (optional) You can add comments to your Jump Items. This string has a maximum of 1024 characters.
Jump Policy (optional) The code name of a Jump Policy. You can specify a Jump Policy to manage access to this Jump Item.
Session Policy (optional)
The code name of a session policy. You can specify a session policy to manage the permissions available
on this Jump Item.
Shell Jump shortcut
Field Description
Hostname
The hostname of the endpoint to be accessed by this Jump Item. This string has a maximum of 128
characters.
Jumpoint The code name of the Jumpoint through which the endpoint is accessed.
Username (optional) The username to sign in as.
Protocol Can be either ssh or telnet.
Port (optional) A valid port number from 1 to 65535. Defaults to 22 if the protocol is ssh or 23 if the protocol is telnet.
Terminal Type (optional) Can be either xterm (default) or VT100.
Keep-Alive (optional)
The number of seconds between each packet sent to keep an idle session from ending. Can be any number
from 0 to 300. 0 disables keep-alive (default).
Name
The name of the endpoint to be accessed by this Jump Item. This name identifies the item in the session
tabs. This string has a maximum of 128 characters.
Jump Group
The code name of the Jump Group with which this Jump Item should be associated.
Note: When using the import method, a Jump Item cannot be associated with a personal list of
SALES: www.beyondtrust.com/contact
SUPPORT: www.beyondtrust.com/support
DOCUMENTATION: www.beyondtrust.com/docs
46
©2003-2024 BeyondTrust Corporation. All Rights Reserved. Other trademarks identified on this page are owned by their respective owners. BeyondTrust is not a chartered bank or trust company, or
depository institution. It is not authorized to accept deposits or trust accounts and is not licensed or regulated by any state or federal banking authority.
TC: 7/8/2024
PRIVILEGED REMOTE ACCESS 24.2
ADMIN GUIDE

Field Description
Jump Items.
Tag (optional)
You can organize your Jump Items into categories by adding a tag. This string has a maximum of 1024
characters.
Comments (optional) You can add comments to your Jump Items. This string has a maximum of 1024 characters.
Jump Policy (optional) The code name of a Jump Policy. You can specify a Jump Policy to manage access to this Jump Item.
Session Policy (optional)
The code name of a session policy. You can specify a session policy to manage the permissions available
on this Jump Item.
Protocol Tunnel Jump shortcut
Field Description
Tunnel Type The type of tunnel: TCP, SQL Server, Kuberbnetes Cluster, or Network (if enabled).
Hostname
The hostname of the endpoint to be accessed by this Jump Item. This string has a maximum of 128
characters.
Jumpoint The code name of the Jumpoint through which the endpoint is accessed.
TCP Tunnels (for TCP
Tunnel)
The list of one or more tunnel definitions. A tunnel definition is a mapping of a TCP port on the local user's
system to a TCP port on the remote endpoint. Any connection made to the local port causes a connection to
be made to the remote port, allowing data to be tunnelled between local and remote systems. Multiple
mappings should be separated by a semicolon.
Example: auto->22;3306->3306
In the example above, a randomly assigned local port maps to remote port 22, and local port 3306 maps to
remote port 3306.
Username and
Database (for SQL
Server Tunnel)
The username and database. Authentication is supported using Windows authentication and SQL login.
URL and CA Certificates
(for Kubenetes Cluster
Tunnel)
The base URL for the Kubernetes cluster. The maximum length is 256 characters.
For the certificates, a PEM-formatted certificate or chain of certificates used to validate the cluster URL. The
maximum length is 12,288 characters.
Filter Rules (for Network
Tunnel)
l
The IP address can be a list of addresses separated by commas, or a range of addresses separate
by a dash. You cannot enter a list and a range. CIDR notation can be used. Only IPv4 is supported.
l
Protocol is optional.
l
Tip: For information on protocols, see IANA Protocol Numbers.
SALES: www.beyondtrust.com/contact
SUPPORT: www.beyondtrust.com/support
DOCUMENTATION: www.beyondtrust.com/docs
47
©2003-2024 BeyondTrust Corporation. All Rights Reserved. Other trademarks identified on this page are owned by their respective owners. BeyondTrust is not a chartered bank or trust company, or
depository institution. It is not authorized to accept deposits or trust accounts and is not licensed or regulated by any state or federal banking authority.
TC: 7/8/2024
PRIVILEGED REMOTE ACCESS 24.2
ADMIN GUIDE

Field Description
l
Port is optional, and may not be applicable, depending on the protocol. The port can be a list of
ports, or a range, but not both.
Local Address (optional)
The address from which the connection should be made. This can be any address within the 127.x.x.x
subrange. The default address is 127.0.0.1.
Name
The name of the endpoint to be accessed by this Jump Item. This name identifies the item in the session
tabs. This string has a maximum of 128 characters.
Jump Group
The code name of the Jump Group with which this Jump Item should be associated.
Note: When using the import method, a Jump Item cannot be associated with a personal list of
Jump Items.
Tag (optional)
You can organize your Jump Items into categories by adding a tag. This string has a maximum of 1024
characters.
Comments (optional) You can add comments to your Jump Items. This string has a maximum of 1024 characters.
Jump Policy (optional) The code name of a Jump Policy. You can specify a Jump Policy to manage access to this Jump Item.
Session Policy (optional)
The code name of a session policy. You can specify a session policy to manage the permissions available
on this Jump Item.
Web Jump shortcut
Field Description
Name
The name of the endpoint to be accessed by this Jump Item. This name identifies the item in the session
tabs. This string has a maximum of 128 characters.
Jumpoint The code name of the Jumpoint through which the endpoint is accessed.
Jump Group
The code name of the Jump Group with which this Jump Item should be associated.
Note: When using the import method, a Jump Item cannot be associated with a personal list of
Jump Items.
Tag (optional)
You can organize your Jump Items into categories by adding a tag. This string has a maximum of 1024
characters.
Comments (optional) You can add comments to your Jump Items. This string has a maximum of 1024 characters.
Jump Policy (optional) The code name of a Jump Policy. You can specify a Jump Policy to manage access to this Jump Item.
Session Policy (optional)
The code name of a session policy. You can specify a session policy to manage the permissions available
on this Jump Item.
URL The URL of the web site. The URL must begin with either http or https.
SALES: www.beyondtrust.com/contact
SUPPORT: www.beyondtrust.com/support
DOCUMENTATION: www.beyondtrust.com/docs
48
©2003-2024 BeyondTrust Corporation. All Rights Reserved. Other trademarks identified on this page are owned by their respective owners. BeyondTrust is not a chartered bank or trust company, or
depository institution. It is not authorized to accept deposits or trust accounts and is not licensed or regulated by any state or federal banking authority.
TC: 7/8/2024
PRIVILEGED REMOTE ACCESS 24.2
ADMIN GUIDE
Field Description
Verify Certificate
(optional)
1: The site certificate is validated before the session starts; if issues are found, the session will not start.
0: The site certificate is not validated.
Username Format
passthru: Pass the username through directly from the credential provider. username_only: If the username
is in UPN (Username@Domain) or DLLN (DOMAIN\Username) format then the domain is removed. Only
the username is injected.
Username Field Hint
A CSS style query selector that identifies the username field to help with the initial credential injection. If this
value is provided and a matching element is not found, then the credential injection will fail.
Password Field Hint
A CSS style query selector that identifies the password field to help with the initial credential injection. If this
value is provided and a matching element is not found, then the credential injection will fail.
Submit Button Hint
A CSS style query selector that identifies the submit button to help with the initial credential injection. If this
value is provided and a matching element is not found, then the credential injection will fail.
Auth Timeout
The length of time the web jump client should wait for authentication to succeed before timing out. Valid
values are 1, 2, 3, 5, 10, 15, 30
For more information, please see Use a Jump Shortcut to Jump to a Remote System at
https://www.beyondtrust.com/docs/privileged-remote-access/how-to/jumpoint/jump-shortcuts.htm.
Endpoint user agreement
Enable Endpoint User Consent Configuration for Applicable Jump Items
Enable a dropdown in the access console which allows endpoint user agreement options to be configured for individual Jump Items.
Title
Customize the title of the agreement.The end-user sees this in the title bar of the prompt.You can localize this text for any languages you
have enabled. To revert to the default text, delete the text from the field and then save the blank field.
Text
Provide the text for the agreement. You can localize this text for any languages you have enabled. To revert to the default text, delete the
text from the field and then save the blank field.
Acceptance Timeout
If the user does not accept the agreement within the set Acceptance Timeout, the agreement is either accepted or rejected as
determined by the Jump Item properties.
SALES: www.beyondtrust.com/contact
SUPPORT: www.beyondtrust.com/support
DOCUMENTATION: www.beyondtrust.com/docs
49
©2003-2024 BeyondTrust Corporation. All Rights Reserved. Other trademarks identified on this page are owned by their respective owners. BeyondTrust is not a chartered bank or trust company, or
depository institution. It is not authorized to accept deposits or trust accounts and is not licensed or regulated by any state or federal banking authority.
TC: 7/8/2024
PRIVILEGED REMOTE ACCESS 24.2
ADMIN GUIDE

Automatic Behavior
Choose Auto Accept or Auto Reject. The Auto Accept option automatically accepts the endpoint agreement if it times out and allows
the session to start. The Auto Reject option automatically rejects the endpoint agreement and stops the session from starting.
Jump Item settings
Simultaneous Jumps
For Jump Client, Local Jump, Remote Jump, Remote VNC, and Shell Jump
Set this option to Join Existing Session to provide a way for multiple users to gain access to the same Jump Item without an invitation to
join an active session by another user. The first user to access the Jump Item maintains ownership of the session. Users in a shared Jump
session see each other and can chat.
If Join Existing Session is selected, there is an option to apply the setting to copies of Jump Clients.
l
If checked, a user can join a session that was started from another copy of a Jump Client in a different Group. Session permissions
are based on the original Jump Client that started the session.
l
If not checked, a user cannot join a session that was started from another copy of a Jump Client, unless it is the same Jump Group.
Set this option to Disallow Jump to ensure only one user can Jump to a Jump Item at a time. Only an invitation by the user who originated
the session can allow for a second user to access the session.
This setting applies to the following Jump Item types: Jump Client, Local Jump, Remote Jump, Remote VNC, and Shell Jump.
For Remote RDP
Set this option to Start New Session to provide a way for multiple users to gain access to the same Jump Item without an invitation to join
an active session by another user. For Remote RDP, multiple users may gain access to a Jump Item, but each starts an independent
session.
Set this option to Disallow Jump to ensure only one user at a time can Jump to a Jump Item. Only an invitation by the user who originated
the session can allow for a second user to access the session.
This setting applies to Remote RDP Jump Item types only.
External tools
Allow Users to Open Remote RDP Jump Shortcuts with an External Tool
When enabled, you can use your own RDP tool for Remote RDP Jump shortcuts.
Allow Users to Open Shell Jump Shortcut with an External Tool
When enabled, you can use your own tool to open Shell Jump shortcuts.
SALES: www.beyondtrust.com/contact
SUPPORT: www.beyondtrust.com/support
DOCUMENTATION: www.beyondtrust.com/docs
50
©2003-2024 BeyondTrust Corporation. All Rights Reserved. Other trademarks identified on this page are owned by their respective owners. BeyondTrust is not a chartered bank or trust company, or
depository institution. It is not authorized to accept deposits or trust accounts and is not licensed or regulated by any state or federal banking authority.
TC: 7/8/2024
PRIVILEGED REMOTE ACCESS 24.2
ADMIN GUIDE

These features must be enabled, per user, in the access console. For more information, please see Change Settings and
Preferences in the Access Console at https://www.beyondtrust.com/docs/privileged-remote-access/getting-started/access-
console/settings.htm.
Shell Jump filtering
Recognized Shell Prompts
Enter regular expressions, one per line, that will match against the command shell prompts found on your endpoint systems. A regular
expression should only attempt to match the final line of a multi-line prompt.
Shell Prompt Matching Validation
Enter an existing endpoint's shell prompt, and the output will indicate whether it matches any regular expression in the list. This
functionality will let you test your regular expressions without starting a session.
Endpoint automation: run scripts on multiple endpoints without sessions
Jump ENDPOINT AUTOMATION
With endpoint automation, you can remotely execute scripts across any number of endpoints at the same time, without starting any
sessions.
Note: The endpoint automation feature is only available to service mode Jump Clients with an active connection on Mac,
Windows, or Desktop Linux.
Jobs tab
The jobs tab lets your create a job, and shows a list of previously created jobs. The list can be searched and refreshed, and the list can be
modified by selecting visible columns, using the icon at the right edge above the top row.
For more information about a job, click the vertical ellipsis at the right end of the row for that job, then click Details. This view also shows
the results of a job. For more details about the results, click the eye icon at the right end of the results row. The results includes any exit
codes or error messages, and the last lines of the output log file, which may be useful for diagnosing errors. There is a link to the full output
log file. These files are stored for no more than 90 days.
The vertical ellipsis at the right end of the row for a job also has options to duplicate or rerun the job, and cancel the job if is it pending.
Create a job
You can create job with a script, or you can create a script template first and then use it to create jobs.
1. Click Create job.
2. Enter a name for the job.
SALES: www.beyondtrust.com/contact
SUPPORT: www.beyondtrust.com/support
DOCUMENTATION: www.beyondtrust.com/docs
51
©2003-2024 BeyondTrust Corporation. All Rights Reserved. Other trademarks identified on this page are owned by their respective owners. BeyondTrust is not a chartered bank or trust company, or
depository institution. It is not authorized to accept deposits or trust accounts and is not licensed or regulated by any state or federal banking authority.
TC: 7/8/2024
PRIVILEGED REMOTE ACCESS 24.2
ADMIN GUIDE

3. Select the starting date and time. To run a job immediately, select the current date and time.
4. Enter any notes if you would like to record more information about this job.
5. Select an existing script template, or complete the following:
l
Select the operating system. Scripts are usually specific to operating systems.
l
Complete the run script command.
l
Enter the script.
6. Now select your endpoint or endpoints, using the search and filter options. For more information about each option, click the i icon
beside it.
7. From the list of search results, you can select specific Jump Clients to add to the job, or select all search results. You can modify
the search criteria to find and add additional Jump Clients. You can also select and clear Jump Clients from the job.
8. The list of Jump Clients selected for the job appears at the bottom of the screen.
9. Once the list of Jump Clients for the job is complete, click Run job.
10. You can immediately view the job in the list of jobs.
Script Templates tab
The script templates tab lets you create a script, and shows a list of previously created script templates. The list can be searched and the
list can be modified by selecting visible columns, using the icon at the right edge above the top row. Scripts can also be edited or deleted.
Scripts are selected for jobs when creating a job.
Create Script Template
1. Click Create Script Template
2. Enter a name and description for the script.
3. Select the operating system. Scripts are usually specific to operating systems.
4. Complete the run script command.
5. Enter the script.
6. Save the script template.
7. You can immediately view the script template in the list of templates, and select it when creating a job.
SALES: www.beyondtrust.com/contact
SUPPORT: www.beyondtrust.com/support
DOCUMENTATION: www.beyondtrust.com/docs
52
©2003-2024 BeyondTrust Corporation. All Rights Reserved. Other trademarks identified on this page are owned by their respective owners. BeyondTrust is not a chartered bank or trust company, or
depository institution. It is not authorized to accept deposits or trust accounts and is not licensed or regulated by any state or federal banking authority.
TC: 7/8/2024
PRIVILEGED REMOTE ACCESS 24.2
ADMIN GUIDE

Manage vault accounts
Vault ACCOUNTS
View and manage information about all discovered and manually added accounts.
Note: Vault can import, rotate, and manage up to 60,000 accounts.
Available information for shared accounts includes:
l
Type: The type of account, specifically, whether it is a domain or a local account, or a generic password account.
l
Name: The name of the account.
l
Username: The username associated with the account.
l
Group: The name of the account group to which the account belongs.
l
Endpoint: The endpoint with which the account is associated.
l
Account Policy: The account policy the Vault account is using.
l
Description: Short description about the account.
l
Last Checkout: The last time the account was checked out.
l
Password Age: The age of the password.
l
Status: This column displays when at least one of the accounts has a warning, error, or checked-out status to indicate. Accounts
managed by Entra ID are identified in the Status column, as well as an alert if there is no service principal for the account.
Accounts used to run a Windows service are indicated as Service Account in the Status column. Multiple statuses for an account
are stacked and displayed in different colors. You can mouse-over a specific status to view more details about it.
Note: The Status column is auto-hidden when none of the accounts have a status currently set.
Tip: You can filter the list of shared accounts displayed using the filters for Group and Password Age. Click the Select
visible columns button above the grid to customize the columns displayed in the grid.
Based on this information, you can perform various actions, including credential check out, check in, and credential rotation.
Available information for personal accounts includes:
l
Type: The type of account, specifically, whether it is a domain or a local account, or a generic password account.
l
Name: The name of the account.
l
Owner: The name of the person who created and owns the account.
l
Description: Short description about the account.
l
Password Age: The age of the password.
Tip: You can filter the list of personal accounts displayed by Owner and Password Age.
SALES: www.beyondtrust.com/contact
SUPPORT: www.beyondtrust.com/support
DOCUMENTATION: www.beyondtrust.com/docs
53
©2003-2024 BeyondTrust Corporation. All Rights Reserved. Other trademarks identified on this page are owned by their respective owners. BeyondTrust is not a chartered bank or trust company, or
depository institution. It is not authorized to accept deposits or trust accounts and is not licensed or regulated by any state or federal banking authority.
TC: 7/8/2024
PRIVILEGED REMOTE ACCESS 24.2
ADMIN GUIDE

Add account
See Add and edit Vault accounts.
Rotate
Select one or more discovered (non-generic) accounts, click Rotate, and then click Start Rotation.
Note:
l
Service accounts running in a failover cluster environment cannot be rotated. The error "Failover Cluster detected.
Unable to change the run-as password for the service <service_name>" appears when a rotation attempt is made and
Rotation Failed is indicated in the Status column for the service.
l
Services using a Microsoft Graph account as the Run As account cannot be rotated.
l
Services that have dependent services cannot be rotated, due to the risk of services within the service chain not
restarting successfully.
For more information, please see Rotate Privileged Credentials Using BeyondTrust Vault at
https://www.beyondtrust.com/docs/privileged-remote-access/how-to/vault/rotation.htm.
Search shared accounts
Search for a specific shared account or a group of accounts based on Name, Endpoint Name, and Description.
Check out and check in a shared account
Click Check Out to view and use a shared credential. When selected, the Account Password prompt appears, displaying the credential
for 60 seconds to allow you to copy the password. Once the prompt is closed, the Check In option becomes available. When finished
using the account, click Check In to check the password back into the system.
For more information, please see Check Out Credentials from the PRA /login Interface at
https://www.beyondtrust.com/docs/privileged-remote-access/how-to/vault/check-out.htm.
Ellipsis menu for shared accounts
Click the ellipsis (...) to view more actions, such as Rotate Password, Edit, and Delete. When Rotate Password is selected, the system
automatically rotates or changes the password. When Edit is selected, you can modify the account's information. See Add and edit Vault
accounts for details on editing accounts. The Delete option removes the account from the Accounts list.
Note:
l
Service accounts running in a failover cluster environment cannot be rotated. The error "Failover Cluster detected.
Unable to change the run-as password for the service <service_name>" appears when a rotation attempt is made and
SALES: www.beyondtrust.com/contact
SUPPORT: www.beyondtrust.com/support
DOCUMENTATION: www.beyondtrust.com/docs
54
©2003-2024 BeyondTrust Corporation. All Rights Reserved. Other trademarks identified on this page are owned by their respective owners. BeyondTrust is not a chartered bank or trust company, or
depository institution. It is not authorized to accept deposits or trust accounts and is not licensed or regulated by any state or federal banking authority.
TC: 7/8/2024
PRIVILEGED REMOTE ACCESS 24.2
ADMIN GUIDE

Rotation Failed is indicated in the Status column for the service.
l
Services using a Microsoft Graph account as the Run As account cannot be rotated.
l
Services that have dependent services cannot be rotated, due to the risk of services within the service chain not
restarting successfully.
For more information, please see Rotate Privileged Credentials Using BeyondTrust Vault at
https://www.beyondtrust.com/docs/privileged-remote-access/how-to/vault/rotation.htm.
Search personal accounts
Search for a specific personal account or a group of accounts based on Name and Description.
View password for personal account
Click View Password to view and use a personal credential. When selected, the Account Password prompt appears, displaying the
credential for 60 seconds to allow you to copy the password.
Edit personal account
Click Edit Account to modify the account's information, specifically Name, Description, Username, and Password.
Account Groups: Add and Manage Account Groups
Vault ACCOUNT GROUPS
Shared Vault accounts can be added to an account group to allow Vault admins to grant users access to multiple shared Vault accounts
more efficiently. Account groups can also be used to associate a group of shared Vault accounts to a group policy.
Note: A shared Vault account can belong to only one group at a time and personal Vault accounts cannot be added to an
account group.
Account Groups
Add, view, and manage account groups.
Add Account Group
Click Add to add an account group, add Vault accounts to the group, and grant users access to the group of shared Vault accounts.
SALES: www.beyondtrust.com/contact
SUPPORT: www.beyondtrust.com/support
DOCUMENTATION: www.beyondtrust.com/docs
55
©2003-2024 BeyondTrust Corporation. All Rights Reserved. Other trademarks identified on this page are owned by their respective owners. BeyondTrust is not a chartered bank or trust company, or
depository institution. It is not authorized to accept deposits or trust accounts and is not licensed or regulated by any state or federal banking authority.
TC: 7/8/2024
PRIVILEGED REMOTE ACCESS 24.2
ADMIN GUIDE

Search Account Groups
Search for a specific account groups based on Name or Description.
Add Account Group
The Add Account Group option allows you to add account groups for the purpose of granting users access to multiple Vault accounts at
once.
Name
Enter a name for the account group.
Description
Enter a brief and memorable description of the account group.
Account Policy
Select a specific policy for the account group or leave Account Policy set to the default value of Inherit Policy Settings, in which case
the accounts in this account group inherit the policy settings set for the global default account policy on the Vault > Options page.
Group Policies
If the account group was added to any group policies, they are listed here, along with their Vault account roles.
Accounts
Source Account Group
Filter the list of accounts available to add to the group by selecting a group from the Source Account Group list.
Search Selected Account Group
Filter the list of accounts available to add to the group by searching for an account group. You can search by Name, Endpoint, and
Description.
Accounts in Group "Default Group"
List of Vault accounts available to add to the account group.
Add
Select accounts from the list of available groups, and then click Add to add them to the Accounts in This Group list.
SALES: www.beyondtrust.com/contact
SUPPORT: www.beyondtrust.com/support
DOCUMENTATION: www.beyondtrust.com/docs
56
©2003-2024 BeyondTrust Corporation. All Rights Reserved. Other trademarks identified on this page are owned by their respective owners. BeyondTrust is not a chartered bank or trust company, or
depository institution. It is not authorized to accept deposits or trust accounts and is not licensed or regulated by any state or federal banking authority.
TC: 7/8/2024
PRIVILEGED REMOTE ACCESS 24.2
ADMIN GUIDE

Remove
Select accounts from the list of Accounts in This Group, and then click Remove to remove them from the account group.
Search This Account Group
Filter the list of Accounts in This Group by searching for an account group by Name, Endpoint, and Description.
Accounts in This Group
List of Vault accounts that exist in this account group.
Allowed Users
New User Name
Select users who are allowed to access this account.
New Member Role
Select the Vault account role for the new user, and then click Add. Users can be assigned one of two roles:
l
Inject: (default value) Users with this role can use this account in Privileged Remote Access sessions.
l
Inject and Checkout: Users with this role can use this account in Privileged Remote Access sessions and can check out the
account on /login. The Checkout permission has no affect on generic SSH accounts.
Note: The Vault Account Role is visible in the list of users added to the Vault account.
Jump Item Associations
Select the type of Jump Item Associations for the account group. The Jump Item Associations setting determines which Jump Items
the accounts in this account group are associated with, so that only the accounts relevant to the target machine are available in the access
console during credential injection attempts. Select one of the following associations methods:
l
Any Jump Items: Accounts in this group can be injected into any Jump Item session in which the accounts are applicable.
l
No Jump Items: Accounts in this group cannot be injected into any Jump Item session.
l
Jump Items Matching Criteria: Accounts in this group can be injected only into Jump Item sessions that match the criteria you
define, in which the accounts are applicable.
o
You can define a direct association between applicable accounts in this account group and specific Jump Items by
selecting the Jump Items from the list, and then clicking Add Jump Item.
o
You can further define the association between applicable accounts in this account group and Jump Items by specifying
matching criteria based on the following Jump Item attributes. If configured, accounts in this account group are available
for injection for any Jump Items that match the specified attribute criteria in addition to any specific Jump Items you added
as matching criteria.
SALES: www.beyondtrust.com/contact
SUPPORT: www.beyondtrust.com/support
DOCUMENTATION: www.beyondtrust.com/docs
57
©2003-2024 BeyondTrust Corporation. All Rights Reserved. Other trademarks identified on this page are owned by their respective owners. BeyondTrust is not a chartered bank or trust company, or
depository institution. It is not authorized to accept deposits or trust accounts and is not licensed or regulated by any state or federal banking authority.
TC: 7/8/2024
PRIVILEGED REMOTE ACCESS 24.2
ADMIN GUIDE

n
Shared Jump Groups: Select a Jump Group from the list.
n
Name: This filter is matched against the value that appears in the Name column of the Jump Item in the access
console.
n
Hostname / IP: This filter is matched against the value that appears in the Hostname / IP column of the Jump Item
in the access console.
n
Tag: This filter is matched against the value that appears in the Tag column of the Jump Item in the access
console.
n
Comments: This filter is matched against the value that appears in the Comments column of the Jump Item in the
access console.
Tip: Click the i icon for each option and attribute to view more specific information about it.
Note: Local accounts are available for injection within the endpoints on which they were discovered.
Account Policies: Add and Manage Account Policies
Vault ACCOUNT POLICIES
Vault account policies provide a method to define account settings related to password rotation and credential checkout and apply those
settings to multiple accounts at once.
Multiple account policies that apply to a single Vault account are applied in the following order, from top to bottom:
l
The account policy associated with the Vault account
l
The account policy associated with the Vault's account group
l
The global default account policy settings
If multiple account policies define a setting, then the value from the first applied policy is used.
Account Policies
Add, view, and manage account policies.
Add Account Policy
Click Add to add an account policy.
Copy Account Policy
Click Copy to copy an existing account policy.
SALES: www.beyondtrust.com/contact
SUPPORT: www.beyondtrust.com/support
DOCUMENTATION: www.beyondtrust.com/docs
58
©2003-2024 BeyondTrust Corporation. All Rights Reserved. Other trademarks identified on this page are owned by their respective owners. BeyondTrust is not a chartered bank or trust company, or
depository institution. It is not authorized to accept deposits or trust accounts and is not licensed or regulated by any state or federal banking authority.
TC: 7/8/2024
PRIVILEGED REMOTE ACCESS 24.2
ADMIN GUIDE

Edit Account Policy
Click Edit to modify an existing account policy.
Add Account Policy
Add a new account policy.
Display Name
Enter a name for the account policy.
Code Name
Set a code name for integration purposes. If you do not set a code name, Privileged Remote Access creates one automatically.
Description
Enter a brief and memorable description of the account policy.
Permissions
Automatic Password Management
Scheduled Password Rotation Rules
l
Select Allow to schedule passwords for Vault accounts to automatically rotate when the password reaches a specified maximum
age.
l
Select Deny to disable scheduled password rotation for Vault accounts.
Maximum Password Age
If scheduled password rotation is enabled, specify the maximum number of days a password can be in place for Vault accounts before it is
automatically rotated.
Account Settings
Automatically Rotate Credentials after Check In Rules
l
Select Allow to automatically rotate passwords after a credential is checked in.
l
Select Deny to disable the automatic rotation of passwords after a credential is checked in.
SALES: www.beyondtrust.com/contact
SUPPORT: www.beyondtrust.com/support
DOCUMENTATION: www.beyondtrust.com/docs
59
©2003-2024 BeyondTrust Corporation. All Rights Reserved. Other trademarks identified on this page are owned by their respective owners. BeyondTrust is not a chartered bank or trust company, or
depository institution. It is not authorized to accept deposits or trust accounts and is not licensed or regulated by any state or federal banking authority.
TC: 7/8/2024
PRIVILEGED REMOTE ACCESS 24.2
ADMIN GUIDE

Allow Simultaneous Checkout Rules
l
Select Allow to enable the ability for Vault credentials to be checked out simultaneously.
l
Select Deny to disable the ability for Vault credentials to be checked out simultaneously.
Note: If a setting in an account policy is not defined, it inherits the settings from the global default account policy, configured
from the Vault > Options page in /login.
Endpoints: View and Manage Discovered Systems
Vault ENDPOINTS
Endpoints
View information about all discovered endpoints, such as the name, hostname, operating system, domain, and distinguished name of the
system, as well as information about the accounts and Jump Items associated with those systems.
Search Endpoints
Search for a specific endpoint or a group of endpoints based on Name, Hostname, Description, or Domain Name.
Select Visible Columns
Click the Select Visible Columns button (columns icon) above the Endpoints grid and select the columns to display in the grid.
Accounts
View the number of accounts associated with each endpoint. Click the Accounts link to view the accounts associated with the system.
Jump Items
View the number of Jump Items associated with each endpoint. Click the Jump Items link to view the Jump Items associated with the
system.
You can add new or existing RDP Jump shortcuts. While viewing Jump Items, click Add and select Add Remote RDP Jump Shortcut
or Associate Existing RDP Jump Shortcuts.
Services
View the number of Windows services associated with each endpoint. Click the Services link to view the services associated with the
system.
SALES: www.beyondtrust.com/contact
SUPPORT: www.beyondtrust.com/support
DOCUMENTATION: www.beyondtrust.com/docs
60
©2003-2024 BeyondTrust Corporation. All Rights Reserved. Other trademarks identified on this page are owned by their respective owners. BeyondTrust is not a chartered bank or trust company, or
depository institution. It is not authorized to accept deposits or trust accounts and is not licensed or regulated by any state or federal banking authority.
TC: 7/8/2024
PRIVILEGED REMOTE ACCESS 24.2
ADMIN GUIDE
Edit
Modify the endpoint's information, specifically Name, Description, and Hostname.
Note: If Windows services were discovered and imported into the Vault, any service used by the endpoint is listed and the
user account that runs the service is indicated.
Delete
Delete the endpoint from the Endpoints list.
Services: View and Manage Discovered Services
Vault SERVICES
Services
View the list of services found during discovery along with their associated endpoints and accounts, as well as the last status for each
service. You also have the option to restart the service upon rotation of the service account.
Search Account Groups
Search for specific services or a group of services based on Short Name, Description, Endpoint (Hostname) or Username.
Restart
Check the Restart box for the service to have the service restarted when the account running the service is rotated.
Delete
Delete the service from the Services list.
Domains: Add and Manage Domains
Vault DOMAINS
Add, view, and manage information about your domains.
SALES: www.beyondtrust.com/contact
SUPPORT: www.beyondtrust.com/support
DOCUMENTATION: www.beyondtrust.com/docs
61
©2003-2024 BeyondTrust Corporation. All Rights Reserved. Other trademarks identified on this page are owned by their respective owners. BeyondTrust is not a chartered bank or trust company, or
depository institution. It is not authorized to accept deposits or trust accounts and is not licensed or regulated by any state or federal banking authority.
TC: 7/8/2024
PRIVILEGED REMOTE ACCESS 24.2
ADMIN GUIDE

Domains
Add Domain
Click Add to manually add a new domain to the Domains list.
Domain Name
View the name of the domain.
Jumpoint
View the Jumpoint used to discover accounts and endpoints on the domain.
Management Account
View the management account associated with the Jumpoint and domain.
Discover
Click Discover to initiate the Jumpoint to scan and discover endpoints and accounts on the domain.
Edit
Click Edit to modify domain information.
Delete
Click Delete to delete this domain from the Domains list.
Add or Edit Domain
DNS Name
Enter the DNS Name of the domain.
Jumpoint
Choose an existing Jumpoint located in the environment where you wish to discover accounts.
Management Account
Select the management account needed to initiate a discovery job for this domain. Choose to use a new account, which requires a
Username, Password, and Password Confirmation. Or choose to use an existing account discovered from a previous job or added
SALES: www.beyondtrust.com/contact
SUPPORT: www.beyondtrust.com/support
DOCUMENTATION: www.beyondtrust.com/docs
62
©2003-2024 BeyondTrust Corporation. All Rights Reserved. Other trademarks identified on this page are owned by their respective owners. BeyondTrust is not a chartered bank or trust company, or
depository institution. It is not authorized to accept deposits or trust accounts and is not licensed or regulated by any state or federal banking authority.
TC: 7/8/2024
PRIVILEGED REMOTE ACCESS 24.2
ADMIN GUIDE

manually in the Accounts section.
Scheduled Domain Discovery
Enable and configure domain discovery to run on a set schedule.
Enable Scheduled Discovery
Check the box to enable the Discovery Schedule options.
Discovery Schedule
Select the days of the week and the time for the discovery job to run.
Discovery Scope
Select the objects you wish Vault to discover:
l
Domain Accounts
l
Endpoints
l
Local Accounts
l
Services
You can enter a Search Path, or leave it blank to search all OUs and containers. You can also use an LDAP Query to narrow the scope of
user accounts and endpoints searched.
Discovery: Discover Accounts, Endpoints, and Services in a Domain
Vault DISCOVERY
BeyondTrust Vault is an on-appliance credential store, enabling discovery of and access to privileged credentials. You can manually add
privileged credentials, or you can use the built-in discovery tool to scan and import Active Directory and local accounts into BeyondTrust
Vault.
For more information, please see BeyondTrust Vault Technical Whitepaper at https://www.beyondtrust.com/docs/privileged-
remote-access/how-to/vault/index.htm.
Discovery: Windows Domain
With the BeyondTrust Vault add-on, you can discover Active Directory accounts, local accounts, Windows service accounts, and
endpoints. Jumpoints are used to scan endpoints and discover the accounts associated with those endpoints.
Click New Discovery Job to initiate a discovery. The options are:
SALES: www.beyondtrust.com/contact
SUPPORT: www.beyondtrust.com/support
DOCUMENTATION: www.beyondtrust.com/docs
63
©2003-2024 BeyondTrust Corporation. All Rights Reserved. Other trademarks identified on this page are owned by their respective owners. BeyondTrust is not a chartered bank or trust company, or
depository institution. It is not authorized to accept deposits or trust accounts and is not licensed or regulated by any state or federal banking authority.
TC: 7/8/2024
PRIVILEGED REMOTE ACCESS 24.2
ADMIN GUIDE

l
Windows Domain: Discover endpoints, domain accounts, and local accounts accessible from a Jumpoint on a Windows domain.
l
Local Windows Accounts on Jump Clients: Discover local Windows accounts on machines where an active, service mode
Jump Client is currently online.
Note: The Local Windows Accounts on Jump Clients option only displays if you have the Jump Clients permission
located in Users & Security > Users > Access Permissions > Jump Technology. If you have any issues, contact your site
administrator.
Click Continue to start the discovery process.
If you selected Windows Domain, follow the steps in the Add Domain section. If you selected Local Windows Accounts on Jump
Clients, follow the steps in the Discovery: Jump Client Search Criteria.
For more information on Jumpoints, please see the BeyondTrust Privileged Remote Access Jumpoint Guide at
https://www.beyondtrust.com/docs/privileged-remote-access/how-to/jumpoint/index.htm.
Add Domain
DNS Name of the Domain
Enter the DNS name for your environment.
Jumpoint
Choose an existing Jumpoint located in the environment where you wish to discover accounts.
Management Account
Select the management account needed to initiate the discovery job. Choose to use a new account, which requires a Username,
Password, and Password Confirmation to be entered. Or, choose to use an existing account discovered from a previous job or added
manually in the Accounts section.
Username
Enter a valid username to use for discovery (username@domain).
Password
Enter a valid a password to user for discovery.
Confirm Password
Re-enter the password to confirm.
SALES: www.beyondtrust.com/contact
SUPPORT: www.beyondtrust.com/support
DOCUMENTATION: www.beyondtrust.com/docs
64
©2003-2024 BeyondTrust Corporation. All Rights Reserved. Other trademarks identified on this page are owned by their respective owners. BeyondTrust is not a chartered bank or trust company, or
depository institution. It is not authorized to accept deposits or trust accounts and is not licensed or regulated by any state or federal banking authority.
TC: 7/8/2024
PRIVILEGED REMOTE ACCESS 24.2
ADMIN GUIDE

Note: You can define which parts of a domain to run a Discovery/Import job. Once you select the required fields for a
Discovery Job, you can refine the search by specifying which OU’s to target or entering LDAP queries.
Discovery Scope
Select the objects you wish Vault to discover:
l
Domain Accounts
l
Endpoints
l
Local Accounts
l
Services
You can enter a Search Path, or leave it blank to search all OUs and containers. You can also use an LDAP Query to narrow the scope of
user accounts and endpoints searched.
Discovery: Jump Client Search Criteria
Enter one or more search criteria to find active Jump Clients you'd like to use to discover local Windows accounts. All text field searches
are partial and case-insensitive. Jump Clients that match all the search criteria will be displayed on the next page for you to select before
discovery begins.
Note: The following types of Jump Clients cannot be used for local account discovery and will not be included in the search
results:
l
Jump Clients that are currently offline or disabled
l
Jump Clients that are not running as an elevated service
l
Jump Clients that are installed in a domain controller
Jump Groups
Administrators can search for Jump Clients via their Jump Groups and their attributes. If the user is not a member of any Jump Group, the
Jump Groups selection section is grayed out and either a tool tip or note is shown indicating that user must be a member of at least one
Jump Group to proceed with the Jump Client discovery process. This is similar to how domain discovery works when a user is not a
member of a Jumpoint during discovery or not a member of a Jump Group when importing an endpoint.
You can search All of Your shared Jump Groups or Specific Jump Groups.
Jump Client Attributes
You can select one or more shared Jump Groups. Private Jump Groups are not supported.
One or more Jump Client attributes can be entered. If more than one search criteria is entered, only Jump Clients matching all criteria are
used for discovery.
The following attributes can be used as search criteria:
l
Name: The Jump Client's name as it appears in the Name column in the access console.
l
Hostname: The Jump Client's hostname as it appears in the Hostname/IP column of the access console.
SALES: www.beyondtrust.com/contact
SUPPORT: www.beyondtrust.com/support
DOCUMENTATION: www.beyondtrust.com/docs
65
©2003-2024 BeyondTrust Corporation. All Rights Reserved. Other trademarks identified on this page are owned by their respective owners. BeyondTrust is not a chartered bank or trust company, or
depository institution. It is not authorized to accept deposits or trust accounts and is not licensed or regulated by any state or federal banking authority.
TC: 7/8/2024
PRIVILEGED REMOTE ACCESS 24.2
ADMIN GUIDE

l
FQDN: The Jump Client's fully qualified domain name, as it appears under the FQDN label of the Jump Client details pane in the
access console.
l
Tag: The Jump Client's tag as it appears in the Tag column of the Representative Console.
l
Public/Private IP: The Jump Client's public and private IP addresses, as they appear under the Public IP label of the Jump Client
details pane in the access console. Jump Clients whose IP address starts with the given search value will match.
Click Continue to initiate the discovery.
Discovery: Select Jump Clients
This screen displays the Jump Clients that will be used in discovery. Select one or more and click Start Discovery.
Discovery Results
The results display a list of discovered Endpoints and Local Accounts. Select one or more and click Import Select.
Import Discovered Items
A list of the selections you made displays.
Account Group
Select from which account group you want to import, then click Start Import. A warning display indicating this process cannot be stopped
once it has started. Click Yes to proceed, or No to abort.
Importing
A message displays indicating the import was completed successfully. A list of Endpoints and Local Accounts displays.
Accounts
Search Shared/Personal Accounts
If you get an extensive list of accounts discovered, use the Search field to search accounts by Name, Endpoint, or Description (by
Name and Description only for personal accounts).
Toggle between Shared and Personal accounts. Select one or more accounts. Click ... to Rotate Password, Edit or Delete the account.
You can also click Rotate at the top of the page to rotate the password for the select accounts.
Discovery Jobs
View discovery jobs that are in progress for a specific domain, or review the results of successful and failed discovery jobs.
SALES: www.beyondtrust.com/contact
SUPPORT: www.beyondtrust.com/support
DOCUMENTATION: www.beyondtrust.com/docs
66
©2003-2024 BeyondTrust Corporation. All Rights Reserved. Other trademarks identified on this page are owned by their respective owners. BeyondTrust is not a chartered bank or trust company, or
depository institution. It is not authorized to accept deposits or trust accounts and is not licensed or regulated by any state or federal banking authority.
TC: 7/8/2024
PRIVILEGED REMOTE ACCESS 24.2
ADMIN GUIDE

View Results
Click View Results for a discovery job to view the Discovery Results, which includes discovered endpoints, local accounts, domain
accounts, and services found in the domain.
You can filter the list of items based on their attributes using the filter box above the grid. For each tab, click the i next to the filter box to see
which attributes can be searched.
Select which endpoints, accounts, and services to import and store in your BeyondTrust Vault instance. For each list item you wish to
import, check the box beside it and click Import Selected.
For more information, please see Discover Domains, Endpoints, and Privileged Accounts Using BeyondTrust Vault at
https://www.beyondtrust.com/docs/privileged-remote-access/how-to/vault/discovery.htm.
Options: Configure Global Default Account Policy Settings and Password Length
for Account Rotation
Vault OPTIONS
Global Options
Configure the settings for the global default account policy.
The global default account policy must define an option for each setting. If an account does not have a setting defined using a specific
policy, it inherits the policy from the account group. If the account group does not have a setting defined using a specific policy, it inherits
the policy from the global default account policy.
Automatic Password Management
Scheduled Password Rotation Rules
l
Select Allow to schedule passwords for Vault accounts to automatically rotate when the password reaches a specified maximum
age.
l
Select Deny to disable scheduled password rotation for Vault accounts.
Maximum Password Age
If scheduled password rotation is enabled, specify the maximum number of days a password can be in place for Vault accounts before it is
automatically rotated.
SALES: www.beyondtrust.com/contact
SUPPORT: www.beyondtrust.com/support
DOCUMENTATION: www.beyondtrust.com/docs
67
©2003-2024 BeyondTrust Corporation. All Rights Reserved. Other trademarks identified on this page are owned by their respective owners. BeyondTrust is not a chartered bank or trust company, or
depository institution. It is not authorized to accept deposits or trust accounts and is not licensed or regulated by any state or federal banking authority.
TC: 7/8/2024
PRIVILEGED REMOTE ACCESS 24.2
ADMIN GUIDE

Account Settings
Automatically Rotate Credentials after Check In Rules
l
Select Allow to automatically rotate passwords after a credential is checked in.
l
Select Deny to disable the automatic rotation of passwords after a credential is checked in.
Allow Simultaneous Checkout Rules
l
Select Allow to enable the ability for Vault credentials to be checked out simultaneously.
l
Select Deny to disable the ability for Vault credentials to be checked out simultaneously.
Generated Passwords for Account Rotation
Define the length of passwords generated during account rotation for domain and local accounts. You may set a minimum length of 20
characters and a maximum length of 256 characters.
Note: Password lengths do not apply to SSH and personal accounts.
Password Length
Set the minimum and maximum number of characters allowed for the password generated during manual, automatic, and scheduled
password rotation for accounts that are rotated through Windows API (non-Entra ID accounts).
Password Length of Entra ID Accounts
Set the minimum and maximum number of characters allowed for the password generated during password rotation of Entra ID Domain
Services accounts through MS Graph API.
SALES: www.beyondtrust.com/contact
SUPPORT: www.beyondtrust.com/support
DOCUMENTATION: www.beyondtrust.com/docs
68
©2003-2024 BeyondTrust Corporation. All Rights Reserved. Other trademarks identified on this page are owned by their respective owners. BeyondTrust is not a chartered bank or trust company, or
depository institution. It is not authorized to accept deposits or trust accounts and is not licensed or regulated by any state or federal banking authority.
TC: 7/8/2024
PRIVILEGED REMOTE ACCESS 24.2
ADMIN GUIDE
Access console
Access console settings: manage default access console settings
Access Console ACCESS CONSOLE SETTINGS
Manage Access Console settings
You can configure the default access console settings for your entire user base, applying a consistent access console user experience
and increasing team efficiency. You can force settings, allow settings to be overridden by the user, or leave settings unmanaged. If you
select Unmanaged, the BeyondTrust default setting will be displayed alongside for your consideration.
Each Enable or Disable setting provides an administrative checkbox option to become a forced setting. Forced settings take effect on the
user's next login and do not allow configuration in the console. A forced setting cannot be overridden unless an administrator deselects the
Forced checkbox option for that setting in the /login administrative interface.
For details on how a user may configure settings in the access console to their preference, please see Change Settings and
Preferences in the Access Console at https://www.beyondtrust.com/docs/privileged-remote-access/getting-started/access-
console/settings.htm.
Choose the settings you want to be the default for your users, and click the Save button at the top of the page.
Note that saved settings take effect only upon login to the console. Even if you save and apply the changes by clicking the Apply Now
button at the bottom of the page, detailed later, the user will not use the new settings until login.
If, for instance, you wish to set up default settings for new users but leave existing users' settings unchanged, save your managed settings
but do not apply them. This will make it so all new access console logins will begin with your managed default settings. Existing users will
have forced settings applied upon next login, but all other settings will remain unchanged.
Global settings
Enable spell checking
From the Global Settings section, you can choose to enable or disable spell check for chat. Currently, spell check is available for US
English only.
Configurable session side bar
Choose if you want the session menu icon to display, if the sidebar can be detached, and if the widgets on the session sidebar can be
rearranged and resized.
SALES: www.beyondtrust.com/contact
SUPPORT: www.beyondtrust.com/support
DOCUMENTATION: www.beyondtrust.com/docs
69
©2003-2024 BeyondTrust Corporation. All Rights Reserved. Other trademarks identified on this page are owned by their respective owners. BeyondTrust is not a chartered bank or trust company, or
depository institution. It is not authorized to accept deposits or trust accounts and is not licensed or regulated by any state or federal banking authority.
TC: 7/8/2024
PRIVILEGED REMOTE ACCESS 24.2
ADMIN GUIDE

Alerts - chat alerts
Audible alerts - Play a sound when a chat message is received
Choose if a sound should be played when the user receives a chat message. If unmanaged or if enabled and not forced, the user may
designate a custom sound in WAV format no larger than 1MB.
Visual alerts - Flash the application icon when a chat message is received
Choose if the application icon should flash when the user receives a chat message.
Show status messages in team chat windows
Choose if the team chat should include status messages, such as users logging in and out, or only chats sent between team members.
Pop-up Notifications
Team Chat
Choose if a user should receive a pop-up notification for chat messages received in a team chat.
Access Sessions
Choose if a user should receive a pop-up notification for chat messages received in a access session
Alerts - queue alerts
Audible alerts - Play a sound when a session enters any queue
Choose if a sound should be played when a session enters any of a user's queues.
Pop-up Notifications
Pop-up notifications appear independent of the access console and on top of other windows. If the pop-up notification is enabled and not
forced or left unmanaged, the user will be able to choose how they receive pop-up notifications.
Personal Queue - Shared Sessions
Choose if a user should receive a pop-up notification for shared sessions in this queue.
Team Chat - Shared Sessions
Choose if a user should receive a pop-up notification for shared sessions in this queue.
SALES: www.beyondtrust.com/contact
SUPPORT: www.beyondtrust.com/support
DOCUMENTATION: www.beyondtrust.com/docs
70
©2003-2024 BeyondTrust Corporation. All Rights Reserved. Other trademarks identified on this page are owned by their respective owners. BeyondTrust is not a chartered bank or trust company, or
depository institution. It is not authorized to accept deposits or trust accounts and is not licensed or regulated by any state or federal banking authority.
TC: 7/8/2024
PRIVILEGED REMOTE ACCESS 24.2
ADMIN GUIDE

Pop-up Behavior - Location and Duration
Set the default location and duration for pop-up notifications.
Access Sessions
Automatically request screen sharing
Choose if you want your users' sessions to begin with screen sharing.
Automatically detach
Choose if you want to open sessions as tabs in the access console or to automatically detach sessions into new windows.
Default Quality
Set the default quality for screen sharing sessions.
Default Scaling
Set the default size for screen sharing sessions.
Automatically enter full screen mode when screen sharing starts
When screen sharing starts, the user can automatically enter full screen mode.
Automatically restrict endpoint visibility when screen sharing starts
When screen sharing starts, the remote system can automatically have its display, mouse, and keyboard input restricted, providing a
privacy screen.
Command Shell
Number of lines of available command history
You can set the number of lines to save in the command shell history. The default value is 500 lines.
Additional external tools
You can define specific external tools that your end-users can use to connect to endpoints. This allows them to work with the tools and
applications that they're most familiar with, while taking advantage of the access and security of Privileged Remote Access.
Check Managed to add and use session external tools.
Click Add to make a new external tool in the access console.
SALES: www.beyondtrust.com/contact
SUPPORT: www.beyondtrust.com/support
DOCUMENTATION: www.beyondtrust.com/docs
71
©2003-2024 BeyondTrust Corporation. All Rights Reserved. Other trademarks identified on this page are owned by their respective owners. BeyondTrust is not a chartered bank or trust company, or
depository institution. It is not authorized to accept deposits or trust accounts and is not licensed or regulated by any state or federal banking authority.
TC: 7/8/2024
PRIVILEGED REMOTE ACCESS 24.2
ADMIN GUIDE

For each new tool, complete the following information:
l
Enter your desired Name for the tool. This is the name of the tool that appears to the end-user in the dropdown list for the Open
Client button, when starting a session.
l
Select a Platform. This is the Platform that the tool runs on. The options are Linux, macOS, and Windows.
l
Select a Tunnel Type. The options are MSSQL, RDP, and SSH.
l
Enter the Command. Click the i icon for example of commands that can be used.
l
Enter the Arguments. Click the i icon for example of commands that can be used. Enter one argument per line. Parameters
normally inside quotation marks are considered a single argument.
Select any external tool in the list to view and edit its information.
Save
Click Save, in the upper left, to save the profile settings you have configured. A message appears confirming settings saved or updated.
Users who download the access console after you save a new profile receive the new settings as the default settings.
Apply Access Console settings
Apply Now
To push the default settings to your users, click Apply Now. The page displays a confirmation message, Settings profile was
successfully applied.
Users receive an alert dialog for confirmation when they first log in to the access console after you apply the settings. The dialog warns
them that their settings have changed and prompts them with the option to acknowledge the dialog or to open their access console
settings window and review the changes.
Custom Links: Add URL Shortcuts to the Access Console
Access Console CUSTOM LINKS
Custom Links
Create links to sites your users can access during sessions. Examples could be a link to a searchable knowledge base, giving users a
chance to look for a solution to an issue on the endpoint system, or a customer relationship management (CRM) system.
Links created here become available through the Links button on the access console.
Add Custom Link, Edit, Delete
Add a new link, modify an existing link, or remove an existing link.
SALES: www.beyondtrust.com/contact
SUPPORT: www.beyondtrust.com/support
DOCUMENTATION: www.beyondtrust.com/docs
72
©2003-2024 BeyondTrust Corporation. All Rights Reserved. Other trademarks identified on this page are owned by their respective owners. BeyondTrust is not a chartered bank or trust company, or
depository institution. It is not authorized to accept deposits or trust accounts and is not licensed or regulated by any state or federal banking authority.
TC: 7/8/2024
PRIVILEGED REMOTE ACCESS 24.2
ADMIN GUIDE

Add or Edit a Custom Link
Name
Create a unique name to help identify this link.
URL
Add the URL to which this custom link should direct. Click the link below the Body field to view the macros that can used to customize the
text in your emails for your purposes.
For more information, please see Access Session Overview and Tools at https://www.beyondtrust.com/docs/privileged-
remote-access/getting-started/access-console/session-overview.htm.
Canned Scripts: Create Scripts for Screen Sharing or Command Shell Sessions
Access Console CANNED SCRIPTS
Canned Scripts
Create custom scripts to be used in screen sharing and command shell sessions. The script will be displayed in the screen sharing or
command shell interface as it is being executed. Executing a script in the screen sharing interface displays the running script on the
remote screen.
For more information, please see Access Session Overview and Tools at https://www.beyondtrust.com/docs/privileged-
remote-access/getting-started/access-console/session-overview.htm.
For more information, please see Open the Command Shell on the Remote Endpoint Using the Access Console at
https://www.beyondtrust.com/docs/privileged-remote-access/getting-started/access-console/command-shell.htm.
Team Availability and Categories Filters
Filter your view by selecting a team or category from the dropdown lists.
Add New Canned Script, Edit, Delete
Create a new script, modify an existing script, or remove an existing script.
SALES: www.beyondtrust.com/contact
SUPPORT: www.beyondtrust.com/support
DOCUMENTATION: www.beyondtrust.com/docs
73
©2003-2024 BeyondTrust Corporation. All Rights Reserved. Other trademarks identified on this page are owned by their respective owners. BeyondTrust is not a chartered bank or trust company, or
depository institution. It is not authorized to accept deposits or trust accounts and is not licensed or regulated by any state or federal banking authority.
TC: 7/8/2024
PRIVILEGED REMOTE ACCESS 24.2
ADMIN GUIDE

Add or Edit Canned Script
Script Name
Create a unique name to help identify this script. This name should help users locate the script they wish to run.
Description
Add a brief description to summarize the purpose of this script. This description is displayed on the prompt to confirm that the user wants
to run the selected script.
Command Sequence
Write the command sequence. Scripts must be written in command line format, similar to writing a batch file or shell script. Note that only
the last line of the script may be interactive; you cannot prompt for input in the middle of the script.
Within the script, reference an associated resource file using "%RESOURCE_FILE%", making sure to include the quotation marks.
Please note that the command sequence is case sensitive.
You can access the resource file's temporary directory using %RESOURCE_DIR%. When you run a script with an associated resource
file, that file will be temporarily uploaded to the customer's computer.
Team Availability
Select which teams should be able to use this item.
Categories
Select the category under which this item should be listed.
Resource File
You may select a resource file to be associated with this script.
Categories
Add Category, Delete
Create a new category or remove an existing category.
Resources
Choose and Upload Resource
Add any resource files you want to access from within your scripts. You may upload up to 100 MB to your resource file directory.
SALES: www.beyondtrust.com/contact
SUPPORT: www.beyondtrust.com/support
DOCUMENTATION: www.beyondtrust.com/docs
74
©2003-2024 BeyondTrust Corporation. All Rights Reserved. Other trademarks identified on this page are owned by their respective owners. BeyondTrust is not a chartered bank or trust company, or
depository institution. It is not authorized to accept deposits or trust accounts and is not licensed or regulated by any state or federal banking authority.
TC: 7/8/2024
PRIVILEGED REMOTE ACCESS 24.2
ADMIN GUIDE

If you upload a resource file with the same name as an existing resource file, there is a prompt to confirm replacing the file.
l
If you click YES, the updated resource file is uploaded and used for all applicable canned scripts.
l
If you click NO, the file is not uploaded.
Delete
Remove an existing resource file.
Special Actions: Create Custom Special Actions
Access Console SPECIAL ACTIONS
Special Actions
Create special actions to speed your processes. Special actions can be created for Windows, Mac, and Linux systems.
Add New Special Action, Edit, Delete
Create a new special action, modify an existing special action, or remove an existing special action.
Add or Edit Special Action
Action Name
Create a unique name to help identify this action. During a session, a user can see this name on the special actions dropdown.
Command
In the Command field, enter the full path of the application you wish to run. Do not use quotation marks; they will be added as necessary.
Windows systems may make use of the macros provided. If the command cannot be located on the remote system, then this custom
special action will not appear in the user's list of special actions.
Arguments
If the provided command will accept command line arguments, you may enter those arguments next. Arguments may use quotation marks
if necessary, and arguments for Windows systems may use the provided macros.
For help with Windows arguments, search for "command line switches" on docs.microsoft.com.
SALES: www.beyondtrust.com/contact
SUPPORT: www.beyondtrust.com/support
DOCUMENTATION: www.beyondtrust.com/docs
75
©2003-2024 BeyondTrust Corporation. All Rights Reserved. Other trademarks identified on this page are owned by their respective owners. BeyondTrust is not a chartered bank or trust company, or
depository institution. It is not authorized to accept deposits or trust accounts and is not licensed or regulated by any state or federal banking authority.
TC: 7/8/2024
PRIVILEGED REMOTE ACCESS 24.2
ADMIN GUIDE

Confirm
If you check the Confirm box, users will be prompted to confirm they want to run this special action before it will execute. Otherwise,
selecting the special action from the menu during a session will cause that special action to run immediately.
Special Actions Settings
Show Built-In Special Actions
If you want to enable the default special actions provided by BeyondTrust, check Show Built-In Special Actions. Otherwise, to enable
only your custom special actions, deselect this option.
Note: The Windows Security (Ctrl-Alt-Del) special action cannot be disabled.
SALES: www.beyondtrust.com/contact
SUPPORT: www.beyondtrust.com/support
DOCUMENTATION: www.beyondtrust.com/docs
76
©2003-2024 BeyondTrust Corporation. All Rights Reserved. Other trademarks identified on this page are owned by their respective owners. BeyondTrust is not a chartered bank or trust company, or
depository institution. It is not authorized to accept deposits or trust accounts and is not licensed or regulated by any state or federal banking authority.
TC: 7/8/2024
PRIVILEGED REMOTE ACCESS 24.2
ADMIN GUIDE

Users and Security
Users: Add Account Permissions for a User or Admin
Users &Security USERS
User Accounts
View information about all users who have access to your B Series Appliance, including local users and those who have access through
security provider integration.
Add User, Edit, Delete
Create a new account, modify an existing account, or remove an existing account. You cannot delete your own account.
Search Users
Search for a specific user account based on username, display name, or email address.
Security Provider
Select a security provider type from the dropdown to filter the list of users by security provider.
Synchronize
Synchronize the users and groups associated with an external security provider. Synchronization occurs automatically once a day.
Clicking this button forces a manual synchronization.
Reset Failed Login Attempts and Unlock Account
If a user has one or more failed login attempts, click the Reset button for their user account to reset the number back to zero.
If a user becomes locked due to too many failed consecutive login attempts, click the Unlock Account button for their user account to
reset the number back to zero and unlock their account.
Add or Edit User
Username
Unique identifier used to log in.
SALES: www.beyondtrust.com/contact
SUPPORT: www.beyondtrust.com/support
DOCUMENTATION: www.beyondtrust.com/docs
77
©2003-2024 BeyondTrust Corporation. All Rights Reserved. Other trademarks identified on this page are owned by their respective owners. BeyondTrust is not a chartered bank or trust company, or
depository institution. It is not authorized to accept deposits or trust accounts and is not licensed or regulated by any state or federal banking authority.
TC: 7/8/2024
PRIVILEGED REMOTE ACCESS 24.2
ADMIN GUIDE

Display Name
User's name as shown in team chats, in reports, etc.
Email Address
Set the email address to where email notifications are sent, such as password resets or extended availability mode alerts.
Password
Password used with the username to log in. The password may be set to whatever you choose, as long as the string complies with the
defined policy set on the /login > Management > Security page.
Email Password Reset Link to User
When checked, admins can send a password reset link to a user.
Must Reset Password at Next Login
If this option is selected, then the user must reset their password at next login.
Password Never Expires
Check this box to set the user's password to never expire.
Password Expiration Date
Set a date for the password to expire.
Memberships
Group Policy Memberships
Listing of the group policies to which the user belongs.
This section allows you to search or select from a dropdown of Available Group Policies, and Add the policy to the user. Policies
selected for the user display in a list which can be filtered.
The user can be removed from one or more group policies by selecting the policy or policies and clicking Remove. The default policy
cannot be selected.
Unsaved changes to the list are identified as Addition or Removal. Changes can be undone by selecting the policy or policies and
clicking Undo.
If the user is a member of multiple group policies, the priority of the policies can be modified by selecting one or more policies and clicking
Priority, at the upper right of the list.
Group policies selected for a user can be edited by clicking the name of the policy in the list.
SALES: www.beyondtrust.com/contact
SUPPORT: www.beyondtrust.com/support
DOCUMENTATION: www.beyondtrust.com/docs
78
©2003-2024 BeyondTrust Corporation. All Rights Reserved. Other trademarks identified on this page are owned by their respective owners. BeyondTrust is not a chartered bank or trust company, or
depository institution. It is not authorized to accept deposits or trust accounts and is not licensed or regulated by any state or federal banking authority.
TC: 7/8/2024
PRIVILEGED REMOTE ACCESS 24.2
ADMIN GUIDE

Note: Other memberships do not display while a new user is being created. Once the new user has been saved, the other
memberships appear, listing any to which the user may have been added, with links for updating these memberships and for
reviewing or editing details about the memberships.
Team Memberships
Listing of the teams to which the user belongs.
Jumpoint Memberships
Listing of the Jumpoints which the user can access.
Jump Group Memberships
Listing of the Jump Groups to which the user belongs.
Vault Account Group Memberships
Listing of the Vault Account Groups to which the user belongs.
Account Settings
Two Factor Authentication
Two factor authentication (2FA) uses an authenticator app to provide a time-based, one time code to login to the administrative interface,
as well as the access console. If Required is selected , the user will be prompted to enroll and begin using 2FA at the next login. If
Optional is selected, the user will have the option to use 2FA, but itis not required. Click Remove Current Authenticator App if you
want a user to stop login in with a specific authenticator.
Account Never Expires
When checked, the account never expires. When not checked, an account expiration date must be set.
Account Expiration Date
Causes the account to expire after a set date.
Account Disabled
Allows you to disable the account so the user cannot log in. Disabling does NOT delete the account.
Comments
Add comments to help identify the purpose of this object.
SALES: www.beyondtrust.com/contact
SUPPORT: www.beyondtrust.com/support
DOCUMENTATION: www.beyondtrust.com/docs
79
©2003-2024 BeyondTrust Corporation. All Rights Reserved. Other trademarks identified on this page are owned by their respective owners. BeyondTrust is not a chartered bank or trust company, or
depository institution. It is not authorized to accept deposits or trust accounts and is not licensed or regulated by any state or federal banking authority.
TC: 7/8/2024
PRIVILEGED REMOTE ACCESS 24.2
ADMIN GUIDE

Passwordless Authenticators
Listing of the passwordless authenticators registered for this user. Admins can view the name, type, registration timestamp, and last used
timestamp. Admins can remove one or more authenticators from this list.
General Permissions
Administration
Administrative Privileges
Grants the user full administrative rights.
Allowed to Administer Vault
Enables the user access to the Vault.
Password Setting
Enables the user to set passwords and unlock accounts for non-administrative local users.
Jumpoint Editing
Enables the user to create or edit Jumpoints. This option does not affect the user's ability to access remote computers via Jumpoint, which
is configured per Jumpoint or group policy.
Team Editing
Enables the user to create or edit teams.
Jump Group Editing
Enables the user to create or edit Jump Groups.
Canned Script Editing
Enables the user to create or edit canned scripts for use in screen sharing or command shell sessions.
Custom Link Editing
Enables the user to create or edit custom links.
SALES: www.beyondtrust.com/contact
SUPPORT: www.beyondtrust.com/support
DOCUMENTATION: www.beyondtrust.com/docs
80
©2003-2024 BeyondTrust Corporation. All Rights Reserved. Other trademarks identified on this page are owned by their respective owners. BeyondTrust is not a chartered bank or trust company, or
depository institution. It is not authorized to accept deposits or trust accounts and is not licensed or regulated by any state or federal banking authority.
TC: 7/8/2024
PRIVILEGED REMOTE ACCESS 24.2
ADMIN GUIDE

Allowed to View Access Session Reports
Enables the user to run reports on access session activity, viewing only sessions for which they were the primary session owner, only
sessions for endpoints belonging to a Jump Group of which the user is a member, or all sessions.
Allowed to View Access Session Recordings
Enables the user to view video recordings of screen sharing sessions and command shell sessions.
Allowed to View Vault Reports
Enables the user to view his or her own vault events or all Vault events.
Allowed to View Syslog Reports
Enables the user to download a ZIP file containing all syslog files available on the appliance. Admins are automatically permissioned to
access this report. Non-admin users must request access to view this report.
Access Permissions
Access
Allowed to access endpoints
Enables the user to use the access console in order to run sessions. If endpoint access is enabled, options pertaining to endpoint access
will also be available.
Session Management
Allowed to share sessions with teams which they do not belong to
Enables the user to invite a less limited set of user to share sessions, not only their team members. Combined with the extended
availability permission, this permission expands session sharing capabilities.
For more information, please see Control the Remote Endpoint with Screen Sharing at
https://www.beyondtrust.com/docs/privileged-remote-access/getting-started/access-console/screen-sharing.htm.
Allowed to invite external users
Enables the user to invite third-party users to participate in a session, one time only.
SALES: www.beyondtrust.com/contact
SUPPORT: www.beyondtrust.com/support
DOCUMENTATION: www.beyondtrust.com/docs
81
©2003-2024 BeyondTrust Corporation. All Rights Reserved. Other trademarks identified on this page are owned by their respective owners. BeyondTrust is not a chartered bank or trust company, or
depository institution. It is not authorized to accept deposits or trust accounts and is not licensed or regulated by any state or federal banking authority.
TC: 7/8/2024
PRIVILEGED REMOTE ACCESS 24.2
ADMIN GUIDE
For more information, please see Invite External Users to Join an Access Session at
https://www.beyondtrust.com/docs/privileged-remote-access/getting-started/access-console/access-invite.htm.
Allowed to enable extended availability mode
Enables the user to receive email invitations from other users requesting to share a session even when they are not logged into the access
console.
For more information, please see Use Extended Availability to Stay Accessible When Not Logged In at
https://www.beyondtrust.com/docs/remote-support/getting-started/rep-console/extended-availability.htm.
Allowed to edit the external key
Enables the user to modify the external key from the session info pane of a session within the access console.
For more information, please see Access Session Overview and Tools at https://www.beyondtrust.com/docs/privileged-
remote-access/getting-started/access-console/session-overview.htm.
User to User Screen Sharing
For more information, please see Share your Screen with Another User at https://www.beyondtrust.com/docs/privileged-
remote-access/getting-started/access-console/user-screensharing.htm.
Allowed to show screen to other users
Enables the user to share their screen with another user without the receiving user having to join a session. This option is available even if
the user is not in a session.
Allowed to give control when showing screen to other users
Enables the user sharing their screen to give keyboard and mouse control to the user viewing their screen.
Jump Technology
Allowed Jump Item Methods
Enables the user to Jump to computers using Jump Clients, Local Jump on the local network, Remote Jump via a Jumpoint,
Remote VNC via a Jumpoint, Remote RDP via a Jumpoint, Web Jump via a Jumpoint, Shell Jump via a Jumpoint, and Protocol
Tunnel Jump via a Jumpoint.
SALES: www.beyondtrust.com/contact
SUPPORT: www.beyondtrust.com/support
DOCUMENTATION: www.beyondtrust.com/docs
82
©2003-2024 BeyondTrust Corporation. All Rights Reserved. Other trademarks identified on this page are owned by their respective owners. BeyondTrust is not a chartered bank or trust company, or
depository institution. It is not authorized to accept deposits or trust accounts and is not licensed or regulated by any state or federal banking authority.
TC: 7/8/2024
PRIVILEGED REMOTE ACCESS 24.2
ADMIN GUIDE

Jump Item Roles
A Jump Item Role is a predefined set of permissions regarding Jump Item management and usage. For each option, click Show to open
the Jump Item Role in a new tab.
The Default role is used only when Use User's Default is set for that user in a Jump Group.
The Personal role applies only to Jump Items pinned to the user's personal list of Jump Items.
The Teams role applies to Jump Items pinned to the personal list of Jump Items of a team member of a lower role. For example, a team
manager can view team leads' and team members' personal Jump Items, and a team lead can view team members' personal Jump Items.
The System role applies to all other Jump Items in the system. For most users, this should be set to No Access. If set to any other option,
the user is added to Jump Groups to which they would not normally be assigned, and in the access console, they can see non-team
members' personal lists of Jump Items.
Note: A new Jump Item Role called Auditor is automatically created on new site installations. On existing installations it has
to be created. This role only has a single View Reports permission enabled, giving admins the option to grant a user just the
permission to run Jump Item reports, without the need to grant any other permission.
For more information, please see Use Jump Item Roles to Configure Permission Sets for Jump Items at
https://www.beyondtrust.com/docs/privileged-remote-access/how-to/jumpoint/jump-item-roles.htm.
Session Permissions
Set the prompting and permission rules that should apply to this user's sessions. Choose an existing session policy or define custom
permissions for this user. If Not Defined, the global default policy will be used. These permissions may be overridden by a higher policy.
Description
View the description of a pre-defined session permission policy.
Screen Sharing
Screen Sharing Rules
Select the representative's and remote user's access to the remote system:
l
If Not Defined, this option is set by the next lower priority policy. This setting may be overridden by a higher priority policy.
l
Deny disables screen sharing.
l
View Only allows the representative to view the screen.
l
View and Control allows the representative to view and take action on the system. If this is selected, endpoint restrictions can be
set to avoid interference by the remote user:
o
None does not set any restrictions on the remote system.
SALES: www.beyondtrust.com/contact
SUPPORT: www.beyondtrust.com/support
DOCUMENTATION: www.beyondtrust.com/docs
83
©2003-2024 BeyondTrust Corporation. All Rights Reserved. Other trademarks identified on this page are owned by their respective owners. BeyondTrust is not a chartered bank or trust company, or
depository institution. It is not authorized to accept deposits or trust accounts and is not licensed or regulated by any state or federal banking authority.
TC: 7/8/2024
PRIVILEGED REMOTE ACCESS 24.2
ADMIN GUIDE

o
Display, Mouse, and Keyboard disables these inputs. If this is selected, a check box is available to Automatically
request a privacy screen on session start. Privacy screen is applicable only for sessions started from a Jump Client, a
Remote Jump item, or a Local Jump item. We recommend using privacy screen for unattended sessions. The remote
system must support privacy screen.
For more information, please see Control the Remote Endpoint with Screen Sharing at
https://www.beyondtrust.com/docs/privileged-remote-access/getting-started/access-console/screen-sharing.htm.
Clipboard Synchronization Direction
Select how clipboard content flows between users and endpoints. The options are:
l
Not allowed: The user is not allowed to use the clipboard, no clipboard icons display in the access console, and cut and paste
commands do not work.
l
Allowed from Rep to Customer: The user can push clipboard content to the endpoint but cannot paste from the endpoint's
clipboard. Only the Send clipboard icon displays in the access console.
l
Allowed in Both Directions: Clipboard content can flow both ways. Both Push and Get clipboard icons display in the access
console.
For more information about the Clipboard Synchronization Mode, please see "Security: Manage Security Settings" on page
142.
Application Sharing Restrictions
Limit access to specified applications on the remote system with either Allow only the listed executables or Deny only the listed
executables. You may also choose to allow or deny desktop access.
Note: This feature applies only to Windows operating systems.
Add New Executables
If application sharing restrictions are enforced, an Add New Executables button appears. Clicking this button opens a dialog that allows
you to specify executables to deny or allow, as appropriate to your objectives.
After you have added executables, one or two tables display the file names or hashes you have selected for restriction. An editable
comment field allows administrative notes.
Enter file names or SHA-256 hashes, one per line
When restricting executables, manually enter the executable file names or hashes you wish to allow or deny. Click on Add Executable(s)
when you are finished to add the chosen files to your configuration.
You may enter up to 25 files per dialog. If you need to add more, click Add Executable(s) and then reopen the dialog.
SALES: www.beyondtrust.com/contact
SUPPORT: www.beyondtrust.com/support
DOCUMENTATION: www.beyondtrust.com/docs
84
©2003-2024 BeyondTrust Corporation. All Rights Reserved. Other trademarks identified on this page are owned by their respective owners. BeyondTrust is not a chartered bank or trust company, or
depository institution. It is not authorized to accept deposits or trust accounts and is not licensed or regulated by any state or federal banking authority.
TC: 7/8/2024
PRIVILEGED REMOTE ACCESS 24.2
ADMIN GUIDE
Browse for one or more files
When restricting executables, select this option to browse your system and choose executable files to automatically derive their names or
hashes. If you select files from your local platform and system in this manner, use caution to ensure that the files are indeed executable
files. No browser level verification is performed.
Choose either Use file name or Use file hash to have the browser derive the executable file names or hashes automatically. Click Add
Executable(s) when you are finished to add the chosen files to your configuration.
You may enter up to 25 files per dialog. If you need to add more, click Add Executable(s) and then reopen the dialog.
Note: This option is available only in modern browsers, not in legacy browsers.
Allowed Endpoint Restrictions
Set if the user can suspend the remote system's mouse and keyboard input. The user may also prevent the remote desktop from being
displayed.
For more information, please see Control the Remote Endpoint with Screen Sharing at
https://www.beyondtrust.com/docs/privileged-remote-access/getting-started/access-console/screen-sharing.htm.
Annotations
Annotation Rules
Enables the user to use annotation tools to draw on the remote system's screen. If Not Defined, this option is set by the next lower priority
policy. This setting may be overridden by a higher priority policy.
For more information, please see Use Annotations to Draw on the Remote Screen of the Endpoint at
https://www.beyondtrust.com/docs/privileged-remote-access/getting-started/access-console/annotations.htm.
File Transfer
File Transfer Rules
Enables the user to upload files to the remote system, download files from the remote system, or both. If Not Defined, this option is set by
the next lower priority policy. This setting may be overridden by a higher priority policy.
Accessible paths on the endpoint's filesystem
Allow the user to transfer files to or from any directories on the remote system or only specified directories.
SALES: www.beyondtrust.com/contact
SUPPORT: www.beyondtrust.com/support
DOCUMENTATION: www.beyondtrust.com/docs
85
©2003-2024 BeyondTrust Corporation. All Rights Reserved. Other trademarks identified on this page are owned by their respective owners. BeyondTrust is not a chartered bank or trust company, or
depository institution. It is not authorized to accept deposits or trust accounts and is not licensed or regulated by any state or federal banking authority.
TC: 7/8/2024
PRIVILEGED REMOTE ACCESS 24.2
ADMIN GUIDE

Accessible paths on user's filesystem
Allow the user to transfer files to or from any directories on their local system or only specified directories.
For more information, please see File Transfer to and from the Remote System Endpoint at
https://www.beyondtrust.com/docs/privileged-remote-access/getting-started/access-console/file-transfer.htm.
Command Shell
Command Shell Rules
Enables the user to issue commands on the remote computer through a virtual command line interface. If Not Defined, this option is set
by the next lower priority policy. This setting may be overridden by a higher priority policy.
Note: Command shell access cannot be restricted for Shell Jump sessions.
Configure command filtering to prevent accidental use of commands that can be harmful to endpoint systems.
For more information on command filtering, please see Use Shell Jump to Access a Remote Network Device at
www.beyondtrust.com/docs/privileged-remote-access/getting-started/access-console/shell-jump.htm.
For more information, please see Open the Command Shell on the Remote Endpoint Using the Access Console at
https://www.beyondtrust.com/docs/privileged-remote-access/getting-started/access-console/command-shell.htm.
System Information
System Information Rules
Enables the user to see system information about the remote computer. If Not Defined, this option is set by the next lower priority policy.
This setting may be overridden by a higher priority policy.
Allowed to use system information actions
Enables the user to interact with processes and programs on the remote system without requiring screen sharing. Kill processes; start,
stop, pause, resume, and restart services; and uninstall programs.
For more information, please see View System Information on the Remote Endpoint at
https://www.beyondtrust.com/docs/privileged-remote-access/getting-started/access-console/system-info.htm.
SALES: www.beyondtrust.com/contact
SUPPORT: www.beyondtrust.com/support
DOCUMENTATION: www.beyondtrust.com/docs
86
©2003-2024 BeyondTrust Corporation. All Rights Reserved. Other trademarks identified on this page are owned by their respective owners. BeyondTrust is not a chartered bank or trust company, or
depository institution. It is not authorized to accept deposits or trust accounts and is not licensed or regulated by any state or federal banking authority.
TC: 7/8/2024
PRIVILEGED REMOTE ACCESS 24.2
ADMIN GUIDE

Registry Access
Registry Access Rules
Enables the user to interact with the registry on a remote Windows system without requiring screen sharing. View, add, delete and edit
keys, search and import/export keys.
For more information, please see Access the Remote Registry Editor on the Remote Endpoint at
https://www.beyondtrust.com/docs/privileged-remote-access/getting-started/access-console/registry-editor.htm.
Canned Scripts
Canned Script Rules
Enables the user to run canned scripts that have been created for their teams. If Not Defined, this option is set by the next lower priority
policy. This setting may be overridden by a higher priority policy.
For more information, please see Open the Command Shell on the Remote Endpoint Using the Access Console at
https://www.beyondtrust.com/docs/privileged-remote-access/getting-started/access-console/command-shell.htm.
Session Termination Behavior
If unable to reconnect within the time you set by Reconnect Timeout, choose what action to take. To prevent an end-user from accessing
unauthorized privileges after an elevated session, set the client to automatically log the end user out of the remote Windows computer at
session end, to lock the remote computer, or to do nothing. These rules do not apply to browser sharing sessions.
Allow users to override this setting per session
You can allow a user to override the session termination setting from the Summary tab in the console during a session.
Availability Settings
Login Schedule
Restrict user login to the following schedule
Set a schedule to define when users can log into the access console. Set the time zone you want to use for this schedule, and then add
one or more schedule entries. For each entry, set the start day and time and the end day and time.
If, for instance, the time is set to start at 8 am and end at 5 pm, a user can log in at any time during this window but may continue to work
past the set end time. They will not, however, be allowed to log back in after 5 pm.
SALES: www.beyondtrust.com/contact
SUPPORT: www.beyondtrust.com/support
DOCUMENTATION: www.beyondtrust.com/docs
87
©2003-2024 BeyondTrust Corporation. All Rights Reserved. Other trademarks identified on this page are owned by their respective owners. BeyondTrust is not a chartered bank or trust company, or
depository institution. It is not authorized to accept deposits or trust accounts and is not licensed or regulated by any state or federal banking authority.
TC: 7/8/2024
PRIVILEGED REMOTE ACCESS 24.2
ADMIN GUIDE

Force logout when the schedule does not permit login
If stricter access control is required, check this option. This forces the user to log out at the scheduled end time. In this case, the user
receives recurring notifications beginning 15 minutes prior to being disconnected. When the user is logged out, any owned sessions will
follow the session fallback rules.
User Account Report
Export detailed information about your users for auditing purposes. Gather detailed information for all users, users from a specific security
provider, or just local users. Information collected includes data displayed under the "show details" button, plus group policy and team
memberships and permissions, and passwordless authentication registration and last usage.
User Accounts for Password Reset: Allow Users to Set Passwords
Users &Security USERS
User Accounts
Administrators can delegate, via user permission, the task of resetting local users' passwords and locked user accounts to privileged
users, without also granting full administrator permissions. Local users may continue to reset their own passwords.
Note: Administrators with the Allowed to Set Passwords permission will see no difference in the user interface.
When a privileged non-administrative user navigates to the Users & Security > Users page in the administrative /login interface, they will
see a limited-view User Accounts screen containing Change Password buttons for non-administrative users. The privileged user will
not be able to edit or delete user accounts. Privileged users are not allowed to reset administrator passwords, nor the passwords of
security provider users.
Search Users
Search for a specific user account based on username, display name, or email address.
Reset Failed Login Attempts and Unlock Account
If a user has one or more failed login attempts, click the Reset button for their user account to reset the number back to zero.
If a user becomes locked due to too many failed consecutive login attempts, click the Unlock Account button for their user account to
reset the number back to zero and unlock their account.
Change Password
Change the password for a non-administrative user.
SALES: www.beyondtrust.com/contact
SUPPORT: www.beyondtrust.com/support
DOCUMENTATION: www.beyondtrust.com/docs
88
©2003-2024 BeyondTrust Corporation. All Rights Reserved. Other trademarks identified on this page are owned by their respective owners. BeyondTrust is not a chartered bank or trust company, or
depository institution. It is not authorized to accept deposits or trust accounts and is not licensed or regulated by any state or federal banking authority.
TC: 7/8/2024
PRIVILEGED REMOTE ACCESS 24.2
ADMIN GUIDE

Change Password
Username
Unique identifier used to log in.This field is not editable.
Display Names
User's name as shown in team chats, in reports, etc.This field is not editable.
Email Address
The email address to which email notifications are sent, such as password resets or extended availability mode alerts. This field is not
editable.
Comments
Comments about the account. This field is not editable.
Password
The new password to assign to this user account. The password may be set to whatever you choose, as long as the string complies with
the defined policy set on the /login > Management > Security page.
Email Password Reset Link to User
Send an email to the user containing a link to reset the password for their account. This feature requires a valid SMTP configuration for
your B Series Appliance, set up on the /login > Management > Email Configuration page.
Must Reset Password at Next Login
If this option is selected, then the user must reset their password at next login.
Access Invite: Create Profiles to Invite External Users to Sessions
Users &Security ACCESS INVITE
Access Invitation Email
With access invite, a privileged user can invite an external user to join a session one time only. When the user makes the invitation, they
will select a security profile to determine what level of privileges the external user should be granted. Access invite security profiles are
configured as session policies on the Users & Security > Session Policies page and must be enabled for access invite use.
SALES: www.beyondtrust.com/contact
SUPPORT: www.beyondtrust.com/support
DOCUMENTATION: www.beyondtrust.com/docs
89
©2003-2024 BeyondTrust Corporation. All Rights Reserved. Other trademarks identified on this page are owned by their respective owners. BeyondTrust is not a chartered bank or trust company, or
depository institution. It is not authorized to accept deposits or trust accounts and is not licensed or regulated by any state or federal banking authority.
TC: 7/8/2024
PRIVILEGED REMOTE ACCESS 24.2
ADMIN GUIDE
The invitation email is sent to external users when you invite them to join a session.
Subject
Customize the subject of this email. Click the link below the Body field to view the macros that can used to customize the text in your
emails for your purposes.
Body
Customize the body of this email. Click the link below the Body field to view the macros that can used to customize the text in your emails
for your purposes.
For more information, please see Invite External Users to Join an Access Session at
https://www.beyondtrust.com/docs/privileged-remote-access/getting-started/access-console/access-invite.htm.
Security Providers: Enable LDAP, RADIUS, Kerberos, SCIM, and SAML2 Logins
Users &Security SECURITY PROVIDERS
Security Providers
You can configure your BeyondTrust Appliance B Series to authenticate users against existing LDAP, RADIUS, SCIM, SAML2, or
Kerberos servers, as well as to assign privileges based on the preexisting hierarchy and group settings already specified in your servers.
Kerberos enables single sign-on, while RSA and other two factor authentication mechanisms via RADIUS provide an additional level of
security.
Add Provider
From the Add dropdown, select LDAP, RADIUS, Kerberos, SCIM, or SAML2 to add a new security provider configuration.
Change Order
Click this button to drag and drop security providers to set their priority. You can drag and drop servers within a cluster; clusters can be
dragged and dropped as a whole. Click Save Order for prioritization changes to take effect.
Disable
Disable this security provider connection. This is useful for scheduled maintenance, when you want a server to be offline but not deleted.
SALES: www.beyondtrust.com/contact
SUPPORT: www.beyondtrust.com/support
DOCUMENTATION: www.beyondtrust.com/docs
90
©2003-2024 BeyondTrust Corporation. All Rights Reserved. Other trademarks identified on this page are owned by their respective owners. BeyondTrust is not a chartered bank or trust company, or
depository institution. It is not authorized to accept deposits or trust accounts and is not licensed or regulated by any state or federal banking authority.
TC: 7/8/2024
PRIVILEGED REMOTE ACCESS 24.2
ADMIN GUIDE

Sync
Synchronize the users and groups associated with an external security provider. Synchronization occurs automatically once a day.
Clicking this button forces a manual synchronization.
View Log
View the status history for a security provider connection.
Duplicate Node
Create a copy of an existing clustered security provider configuration. This will be added as a new node in the same cluster.
Upgrade to a Cluster
Upgrade a security provider to a security provider cluster. To add more security providers to this cluster copy an existing node.
Copy
Create a copy of an existing security provider configuration. This will be added as a top-level security provider and not as part of a cluster.
Edit, Delete
Modify an exiting object or remove an existing object.
Note: If you edit the local security provider and select a default policy that does not have administrator permissions, a warning
message appears. Ensure other users have administrator permissions before proceeding.
Edit Security Provider - LDAP
Name
Create a unique name to help identify this provider.
Enabled
If checked, your B Series Appliance searches this security provider when a user attempts to log in. If unchecked, this provider is not
searched.
User Authentication
Choose if this provider should be used for user authentication. If deselected, options specific to user authentication are disabled.
SALES: www.beyondtrust.com/contact
SUPPORT: www.beyondtrust.com/support
DOCUMENTATION: www.beyondtrust.com/docs
91
©2003-2024 BeyondTrust Corporation. All Rights Reserved. Other trademarks identified on this page are owned by their respective owners. BeyondTrust is not a chartered bank or trust company, or
depository institution. It is not authorized to accept deposits or trust accounts and is not licensed or regulated by any state or federal banking authority.
TC: 7/8/2024
PRIVILEGED REMOTE ACCESS 24.2
ADMIN GUIDE

User Provision
By default, user provisioning occurs on this provider. If you have a SCIM provider set up, you can choose to provision users through that
provider instead. If this provider is not used for user authentication, then Do not provision users is selected.
Note: This setting cannot be modified after this security provider is first saved.
Keep user information synchronized with the LDAP server
Checking this option keeps a user's display name set to the name designated on the security provider rather than allowing the display
name to be modified in BeyondTrust.
Authorization Settings
Synchronization: Enable LDAP object cache
If checked, LDAP objects visible to the B Series Appliance are cached and synchronized nightly, or manually, if desired. When using this
option, fewer connections are made to the LDAP server for administrative purposes thereby potentially increasing speed and efficiency.
If unchecked, changes to the LDAP server are immediately available without the need to synchronize. However, when you make changes
on user policies through the administrative interface, several short-lived LDAP connections may occur as necessary.
For providers that have previously had the synchronization setting enabled, disabling or unchecking the synchronization option will cause
all cached records that are currently not in use to be deleted.
Lookup Groups
Choose to use this security provider only for user authentication, only for group lookups, or for both. If the User Authentication option
above is not checked, then Lookup groups using this provider is selected. The option to look up groups using a different provider is
available only if another provider capable of group lookup has already been created.
Default Group Policy (Visible Only if User Authentication is Allowed)
Each user who authenticates against an external server must be a member of at least one group policy in order to authenticate to your B
Series Appliance, logging into either the /login interface or the access console. You can select a default group policy to apply to all users
allowed to authenticate against the configured server.
If a default policy is defined, any allowed user who authenticates against this server might have access at the level of this default policy.
Therefore, we recommend you set the default to a policy with minimum privileges to prevent users from gaining permissions you do not
wish them to have.
Note: If a user is in a default group policy and is then specifically added to another group policy, the settings for the specific
policy always take precedence over the settings for the default, even if the specific policy is a lower priority than the default,
and even if the default policy's settings are set to disallow override.
SALES: www.beyondtrust.com/contact
SUPPORT: www.beyondtrust.com/support
DOCUMENTATION: www.beyondtrust.com/docs
92
©2003-2024 BeyondTrust Corporation. All Rights Reserved. Other trademarks identified on this page are owned by their respective owners. BeyondTrust is not a chartered bank or trust company, or
depository institution. It is not authorized to accept deposits or trust accounts and is not licensed or regulated by any state or federal banking authority.
TC: 7/8/2024
PRIVILEGED REMOTE ACCESS 24.2
ADMIN GUIDE

Connection Settings
Hostname
Enter the hostname of the server that houses your external directory store.
Note: If you will be using LDAPS or LDAP with TLS, the hostname must match the hostname used in your LDAP server's
public SSL certificate's subject name or the DNS component of its alternate subject name.
Port
Specify the port for your LDAP server. This is typically port 389 for LDAP or port 636 for LDAPS. BeyondTrust also supports global catalog
over port 3268 for LDAP or 3269 for LDAPS.
Encryption
Select the type of encryption to use when communicating with the LDAP server. For security purposes, LDAPS or LDAP with TLS is
recommended.
Note: Regular LDAP sends and receives data in clear text from the LDAP server, potentially exposing sensitive user account
information to packet sniffing. Both LDAPS and LDAP with TLS encrypt user data as it is transferred, making these methods
recommended over regular LDAP. LDAP with TLS uses the StartTLS function to initiate a connection over clear text LDAP but
then elevates this to an encrypted connection. LDAPS initiates the connection over an encrypted connection without sending
any data in clear text whatsoever.
If you select LDAPS or LDAP with TLS, you must upload the Root SSL Certificate used by your LDAP server. This is necessary to ensure
the validity of the server and the security of the data. The Root Certificate must be in PEM format.
Note: If the LDAP server's public SSL certificate's subject name, or the DNS component of its alternate subject name, does
not match the value in the Hostname field, the provider will be treated as unreachable. You can, however, use a wildcard
certificate to certify multiple subdomains of the same site. For example, a certificate for *.example.com would certify both
access.example.com and remote.example.com.
Bind Credentials
Specify a username and password with which your B Series Appliance can bind to and search the LDAP directory store.
If your server supports anonymous binds, you may choose to bind without specifying a username and password. Anonymous binding is
considered insecure and is disabled by default on most LDAP servers.
Username
Enter a username for the bind credentials.
SALES: www.beyondtrust.com/contact
SUPPORT: www.beyondtrust.com/support
DOCUMENTATION: www.beyondtrust.com/docs
93
©2003-2024 BeyondTrust Corporation. All Rights Reserved. Other trademarks identified on this page are owned by their respective owners. BeyondTrust is not a chartered bank or trust company, or
depository institution. It is not authorized to accept deposits or trust accounts and is not licensed or regulated by any state or federal banking authority.
TC: 7/8/2024
PRIVILEGED REMOTE ACCESS 24.2
ADMIN GUIDE

Password and Confirm Password
Enter and confirm a password for the bind credentials.
Connection Method
If you are using an external directory store in the same LAN as your B Series Appliance, the two systems may be able to communicate
directly, in which case you can leave the option Proxy from appliance through the Connection Agent unchecked and move on.
If the two systems are unable to communicate directly, such as if your external directory server is behind a firewall, you must use a
connection agent. Downloading the Win32 connection agent enables your directory server and your B Series Appliance to communicate
via an SSL-encrypted, outbound connection, with no firewall configuration. The connection agent can be downloaded to either the
directory server or a separate server on the same network as your directory server (recommended).
In the case above, check Proxy from appliance through the Connection Agent. Create a Connection Agent Password for use in the
connection agent installation process. Then click Download Connection Agent, run the installer, and follow the installation wizard.
During installation, you will be prompted to enter the security provider name and the connection agent password you created above.
Note: BeyondTrust Cloud customers must run the connection agent in order to use an external directory store.
Directory Type
To aid in configuring the network connection between your B Series Appliance and your security provider, you can select a directory type
as a template. This pre-populates the configuration fields below with standard data but must be modified to match your security provider's
specific configuration. Active Directory LDAP is the most common server type, though you can configure BeyondTrust to communicate
with most types of security providers.
Cluster Settings (Visible Only for Clusters)
Member Selection Algorithm
Select the method to search the nodes in this cluster.
Top-to-bottom first attempts the server with the highest priority in the cluster. If that server is unavailable or the account is not found, the
next highest priority server is attempted. The search moves down through the list of clustered servers until either the account is found or it
is determined that the account does not exist on any of the specified and available servers.
Round-robin is designed to balance the load between multiple servers. The algorithm chooses at random which server to attempt first. If
that server is unavailable or the account is not found, another random server is attempted. The search continues at random through the
remaining servers in the cluster until either the account is found or it is determined that the account does not exist on any of the specified
and available servers.
Retry Delay
Set how long to wait after a cluster member becomes unavailable before trying that cluster member again.
SALES: www.beyondtrust.com/contact
SUPPORT: www.beyondtrust.com/support
DOCUMENTATION: www.beyondtrust.com/docs
94
©2003-2024 BeyondTrust Corporation. All Rights Reserved. Other trademarks identified on this page are owned by their respective owners. BeyondTrust is not a chartered bank or trust company, or
depository institution. It is not authorized to accept deposits or trust accounts and is not licensed or regulated by any state or federal banking authority.
TC: 7/8/2024
PRIVILEGED REMOTE ACCESS 24.2
ADMIN GUIDE

User Schema Settings
Override Cluster Values (Visible Only for Cluster Nodes)
If this option is unchecked, this cluster node will use the same schema settings as the cluster. If unchecked, you may modify the schema
settings below.
Search Base DN
Determine the level in your directory hierarchy, specified by a distinguished name, at which the B Series Appliance should begin searching
for users. Depending on the size of your directory store and the users who require BeyondTrust accounts, you may improve performance
by designating the specific organizational unit within your directory store that requires access. If you are not sure or if users span multiple
organizational units, you may want to specify the root distinguished name of your directory store.
User Query
Specify the query information that the B Series Appliance should use to locate an LDAP user when the user attempts to log in. The User
Query field accepts a standard LDAP query (RFC 2254 – String Representation of LDAP Search Filters). You can modify the query string
to customize how your users log in and what methods of usernames are accepted. To specify the value within the string that should act as
the username, replace that value with *.
Browse Query
The browse query affects how results are displayed when browsing via group policies. This filters results so that only certain results
display in the member selection dropdown when adding members to a group policy.
Object Classes
Specify valid object classes for a user within your directory store. Only users who posses one or more of these object classes will be
permitted to authenticate. These object classes are also used with the attribute names below to indicate to your B Series Appliance the
schema the LDAP server uses to identify users. You can enter multiple object classes, one per line.
Attribute Names
Specify which fields should be used for a user's unique ID, display name, and email address.
Unique ID
This field requests a unique identifier for the object. While the distinguished name can serve as this ID, a user's distinguished name may
change frequently over the life of the user, such as with a name or location change or with the renaming of the LDAP store. Therefore,
most LDAP servers incorporate some field that is unique per object and does not change for the lifetime of the user. If you do use the
distinguished name as the unique ID and a user's distinguished name changes, that user will be seen as a new user, and any changes
made specifically to the individual's BeyondTrust user account will not be carried over to the new user. If your LDAP server does not
incorporate a unique identifier, use a field that is least likely to have an identical entry for another user.
SALES: www.beyondtrust.com/contact
SUPPORT: www.beyondtrust.com/support
DOCUMENTATION: www.beyondtrust.com/docs
95
©2003-2024 BeyondTrust Corporation. All Rights Reserved. Other trademarks identified on this page are owned by their respective owners. BeyondTrust is not a chartered bank or trust company, or
depository institution. It is not authorized to accept deposits or trust accounts and is not licensed or regulated by any state or federal banking authority.
TC: 7/8/2024
PRIVILEGED REMOTE ACCESS 24.2
ADMIN GUIDE

E-mail
This determines which field should be used as the user's email address.
Display Name
This determines which field should be used as the user's display name.
Group Schema Settings (Visible Only if Performing Group Lookups)
Directory Type
To aid in configuring the network connection between your B Series Appliance and your security provider, you can select a directory type
as a template. This pre-populates the configuration fields below with standard data but must be modified to match your security provider's
specific configuration. Active Directory LDAP is the most common server type, though you can configure BeyondTrust to communicate
with most types of security providers.
Search Base DN
Determine the level in your directory hierarchy, specified by a distinguished name, at which the B Series Appliance should begin searching
for groups. Depending on the size of your directory store and the groups that require access to the B Series Appliance, you may improve
performance by designating the specific organizational unit within your directory store that requires access. If you are not sure or if groups
span multiple organizational units, you may want to specify the root distinguished name of your directory store.
Browse Query
The browse query affects how results are displayed when browsing via group policies. This filters results so that only certain results
display in the member selection dropdown when adding members to a group policy.
Object Classes
Specify valid object classes for a group within your directory store. Only groups that possess one or more of these object classes will be
returned. These object classes are also used with the attribute names below to indicate to your B Series Appliance the schema the LDAP
server uses to identify groups. You can enter multiple group object classes, one per line.
Attribute Names
Specify which fields should be used for a group's unique ID and display name.
Unique ID
This field requests a unique identifier for the object. While the distinguished name can serve as this ID, a group's distinguished name may
change frequently over the life of a group, such as with a location change or with the renaming of the LDAP store. Therefore, most LDAP
servers incorporate some field that is unique per object and does not change for the lifetime of the group. If you do use the distinguished
SALES: www.beyondtrust.com/contact
SUPPORT: www.beyondtrust.com/support
DOCUMENTATION: www.beyondtrust.com/docs
96
©2003-2024 BeyondTrust Corporation. All Rights Reserved. Other trademarks identified on this page are owned by their respective owners. BeyondTrust is not a chartered bank or trust company, or
depository institution. It is not authorized to accept deposits or trust accounts and is not licensed or regulated by any state or federal banking authority.
TC: 7/8/2024
PRIVILEGED REMOTE ACCESS 24.2
ADMIN GUIDE

name as the unique ID and a group's distinguished name changes, that group will be seen as a new group, and any group policies defined
for that group will not be carried over to the new group. If your LDAP server does not incorporate a unique identifier, use a field that is least
likely to have an identical entry for another group.
Display Name
This value determines which field should be used as the group's display name.
User to Group Relationships
This field requests a query to determine which users belong to which groups or, conversely, which groups contain which users.
Perform recursive search for groups
You can choose to perform a recursive search for groups. This will run a query for a user, then queries for all of the groups to which that
user belongs, then queries for all groups to which those groups belong, and so forth, until all possible groups associated with that user
have been found.
Running a recursive search can have a significant impact on performance, as the server will continue to issue queries until it has found
information about all groups. If it takes too long, the user may be unable to log in.
A non-recursive search will issue only one query per user. If your LDAP server has a special field containing all of the groups to which the
user belongs, recursive search is unnecessary. Recursive search is also unnecessary if your directory design does not handle group
members of groups.
Test Settings
Username and Password
Enter a username and password for an account that exists on the server you are testing. This account must match the criteria for login
specified in the configuration above.
Try to obtain user attributes and group memberships if the credentials are accepted
If this option is checked, your successful credential test will also attempt to check user attributes and group lookup. Note that for these
features to be successfully tested, they must be supported and configured in your security provider.
Start Test
If your server is properly configured and you have entered a valid test username and password, you will receive a success message.
Otherwise, you will see an error message and a log that will help in debugging the problem.
Edit Security Provider - RADIUS
Name
Create a unique name to help identify this provider.
SALES: www.beyondtrust.com/contact
SUPPORT: www.beyondtrust.com/support
DOCUMENTATION: www.beyondtrust.com/docs
97
©2003-2024 BeyondTrust Corporation. All Rights Reserved. Other trademarks identified on this page are owned by their respective owners. BeyondTrust is not a chartered bank or trust company, or
depository institution. It is not authorized to accept deposits or trust accounts and is not licensed or regulated by any state or federal banking authority.
TC: 7/8/2024
PRIVILEGED REMOTE ACCESS 24.2
ADMIN GUIDE

Enabled
If checked, your B Series Appliance searches this security provider when a user attempts to log in. If unchecked, this provider is not
searched.
Keep display name synchronized with remote system
Checking this option keeps a user's display name set to the name designated on the security provider rather than allowing the display
name to be modified in BeyondTrust.
Authorization Settings
Only allow the following users
You can choose to allow access only to specified users on your RADIUS server. Enter each username separated by a line break. Once
entered, these users will be available from the Add Policy Member dialog when editing group policies on the /login > Users & Security
> Group Policies page.
If you leave this field blank, all users who authenticate against your RADIUS server will be allowed; if you allow all, you must also specify a
default group policy.
LDAP Group Lookup
If you want users on this security provider to be associated with their groups on a separate LDAP server, choose one or more LDAP group
servers to use for group lookup.
Default Group Policy
Each user who authenticates against an external server must be a member of at least one group policy in order to authenticate to your B
Series Appliance, logging into either the /login interface or the access console. You can select a default group policy to apply to all users
allowed to authenticate against the configured server.
If a default policy is defined, any allowed user who authenticates against this server might have access at the level of this default policy.
Therefore, we recommend you set the default to a policy with minimum privileges to prevent users from gaining permissions you do not
wish them to have.
Note: If a user is in a default group policy and is then specifically added to another group policy, the settings for the specific
policy always take precedence over the settings for the default, even if the specific policy is a lower priority than the default,
and even if the default policy's settings are set to disallow override.
Connection Settings
Hostname
Enter the hostname of the server that houses your external directory store.
SALES: www.beyondtrust.com/contact
SUPPORT: www.beyondtrust.com/support
DOCUMENTATION: www.beyondtrust.com/docs
98
©2003-2024 BeyondTrust Corporation. All Rights Reserved. Other trademarks identified on this page are owned by their respective owners. BeyondTrust is not a chartered bank or trust company, or
depository institution. It is not authorized to accept deposits or trust accounts and is not licensed or regulated by any state or federal banking authority.
TC: 7/8/2024
PRIVILEGED REMOTE ACCESS 24.2
ADMIN GUIDE

Port
Specify the authentication port for your RADIUS server. This is typically port 1812.
Timeout (seconds)
Set the length of time to wait for a response from the server. Note that if the response is Response-Accept or Response-Challenge,
then RADIUS will wait the entire time specified here before authenticating the account. Therefore, it is encouraged to keep this value as
low as reasonably possible given your network settings. An ideal value is 3-5 seconds, with the maximum value at three minutes.
Connection Method
If you are using an external directory store in the same LAN as your B Series Appliance, the two systems may be able to communicate
directly, in which case you can leave the option Proxy from appliance through the Connection Agent unchecked and move on.
If the two systems are unable to communicate directly, such as if your external directory server is behind a firewall, you must use a
connection agent. Downloading the Win32 connection agent enables your directory server and your B Series Appliance to communicate
via an SSL-encrypted, outbound connection, with no firewall configuration. The connection agent can be downloaded to either the
directory server or a separate server on the same network as your directory server (recommended).
In the case above, check Proxy from appliance through the Connection Agent. Create a Connection Agent Password for use in the
connection agent installation process. Then click Download Connection Agent, run the installer, and follow the installation wizard.
During installation, you will be prompted to enter the security provider name and the connection agent password you created above.
Shared Secret
Provide a new shared secret so that your B Series Appliance and your RADIUS server can communicate.
Cluster Settings (Visible Only for Clusters)
Member Selection Algorithm
Select the method to search the nodes in this cluster.
Top-to-bottom first attempts the server with the highest priority in the cluster. If that server is unavailable or the account is not found, the
next highest priority server is attempted. The search moves down through the list of clustered servers until either the account is found or it
is determined that the account does not exist on any of the specified and available servers.
Round-robin is designed to balance the load between multiple servers. The algorithm chooses at random which server to attempt first. If
that server is unavailable or the account is not found, another random server is attempted. The search continues at random through the
remaining servers in the cluster until either the account is found or it is determined that the account does not exist on any of the specified
and available servers.
Retry Delay
Set how long to wait after a cluster member becomes unavailable before trying that cluster member again.
SALES: www.beyondtrust.com/contact
SUPPORT: www.beyondtrust.com/support
DOCUMENTATION: www.beyondtrust.com/docs
99
©2003-2024 BeyondTrust Corporation. All Rights Reserved. Other trademarks identified on this page are owned by their respective owners. BeyondTrust is not a chartered bank or trust company, or
depository institution. It is not authorized to accept deposits or trust accounts and is not licensed or regulated by any state or federal banking authority.
TC: 7/8/2024
PRIVILEGED REMOTE ACCESS 24.2
ADMIN GUIDE

Test Settings
Username and Password
Enter a username and password for an account that exists on the server you are testing. This account must match the criteria for login
specified in the configuration above.
Try to obtain user attributes and group memberships if the credentials are accepted
If this option is checked, your successful credential test will also attempt to check user attributes and group lookup. Note that for these
features to be successfully tested, they must be supported and configured in your security provider.
Start Test
If your server is properly configured and you have entered a valid test username and password, you will receive a success message.
Otherwise, you will see an error message and a log that will help in debugging the problem.
Edit Security Provider - Kerberos
Name
Create a unique name to help identify this provider.
Enabled
If checked, your B Series Appliance searches this security provider when a user attempts to log in. If unchecked, this provider is not
searched.
Keep display name synchronized with remote system
Checking this option keeps a user's display name set to the name designated on the security provider rather than allowing the display
name to be modified in BeyondTrust.
Strip realm from principal names
Select this option to remove the REALM portion from the User Principal Name when constructing the BeyondTrust username.
Authorization Settings
User Handling Mode
Select which users can authenticate to your B Series Appliance. Allow all users allows anyone who currently authenticates via your
KDC. Allow only user principals specified in the list allows only user principles explicitly designated. Allow only user principals
that match the regex allows only users principals who match a Perl-compatible regular expression (PCRE).
SALES: www.beyondtrust.com/contact
SUPPORT: www.beyondtrust.com/support
DOCUMENTATION: www.beyondtrust.com/docs
100
©2003-2024 BeyondTrust Corporation. All Rights Reserved. Other trademarks identified on this page are owned by their respective owners. BeyondTrust is not a chartered bank or trust company, or
depository institution. It is not authorized to accept deposits or trust accounts and is not licensed or regulated by any state or federal banking authority.
TC: 7/8/2024
PRIVILEGED REMOTE ACCESS 24.2
ADMIN GUIDE

SPN Handling Mode: Allow only SPNs specified in the list
If unchecked, all configured Service Principal Names (SPNs) for this security provider are allowed. If checked, select specific SPNs from a
list of currently configured SPNs.
If you want users on this security provider to be associated with their groups on a separate LDAP server, choose one or more LDAP group
servers to use for group lookup.
Default Group Policy
Each user who authenticates against an external server must be a member of at least one group policy in order to authenticate to your B
Series Appliance, logging into either the /login interface or the access console. You can select a default group policy to apply to all users
allowed to authenticate against the configured server.
If a default policy is defined, any allowed user who authenticates against this server might have access at the level of this default policy.
Therefore, we recommend you set the default to a policy with minimum privileges to prevent users from gaining permissions you do not
wish them to have.
Note: If a user is in a default group policy and is then specifically added to another group policy, the settings for the specific
policy always take precedence over the settings for the default, even if the specific policy is a lower priority than the default,
and even if the default policy's settings are set to disallow override.
Edit Security Provider - SAML2
Name
Enter a unique name to identify the provider.
Enabled
If checked, your B Series Appliance searches this security provider when a user attempts to log in. If unchecked, this provider is not
searched.
User Provision
By default, user provisioning occurs on this provider. If you have a SCIM provider set up, you can choose to provision users through that
provider instead.
Note: This setting cannot be modified after this security provider is first saved.
Associated Email Domains
This setting only applies if you have more than one active SAML provider and is ignored otherwise.
SALES: www.beyondtrust.com/contact
SUPPORT: www.beyondtrust.com/support
DOCUMENTATION: www.beyondtrust.com/docs
101
©2003-2024 BeyondTrust Corporation. All Rights Reserved. Other trademarks identified on this page are owned by their respective owners. BeyondTrust is not a chartered bank or trust company, or
depository institution. It is not authorized to accept deposits or trust accounts and is not licensed or regulated by any state or federal banking authority.
TC: 7/8/2024
PRIVILEGED REMOTE ACCESS 24.2
ADMIN GUIDE

Add any email domains that should be associated with this SAML provider, one per line. When authenticating, users are asked to enter
their email. The domain of their email is matched against this list, and they are redirected to the appropriate identity provider for
authentication.
If multiple SAML providers are configured and the user's email does not match any of the associated domain on any provider, then they
are not allowed to authenticate.
Identity provider settings
Identity Provider Metadata
The metadata file contains all the information needed for the initial setup of your SAML provider and must be downloaded from your
identity provider. Save the XML file, and then click Choose File to select and upload the selected file.
Note: The fields for Entity ID, Single Sign-On Service URL, and Certificate are automatically populated from the identity
provider's metadata file. If you cannot get a metadata file from your provider, this information can be entered manually.
Entity ID
This is the unique identifier for the identity provider you are using.
Single Sign-On Service URL
This is the URL where you are automatically redirected to log in to BeyondTrust Privileged Remote Access using SAML.
SSO URL Protocol Binding
This determines whether an HTTP POST occurs or whether the user is redirected to the sign-on URL. Choose HTTP redirect if not
specified by the provider.
If request signing is enabled (under Service Provider settings), protocol binding is limited to redirect only.
Server Certificate
This certificate is used to verify the signature of the assertion sent from the identity provider. Click +UPLOAD to open a file browse
window, navigate to the certificate, and click Open.
Service provider settings
Service Provider Metadata
Download the BeyondTrust metadata, which you then need to upload to your identity provider.
Entity ID
This is your BeyondTrust URL. It uniquely identifies your site to the identity provider.
SALES: www.beyondtrust.com/contact
SUPPORT: www.beyondtrust.com/support
DOCUMENTATION: www.beyondtrust.com/docs
102
©2003-2024 BeyondTrust Corporation. All Rights Reserved. Other trademarks identified on this page are owned by their respective owners. BeyondTrust is not a chartered bank or trust company, or
depository institution. It is not authorized to accept deposits or trust accounts and is not licensed or regulated by any state or federal banking authority.
TC: 7/8/2024
PRIVILEGED REMOTE ACCESS 24.2
ADMIN GUIDE

Private Key
If necessary, you can decrypt messages sent by the identity provider, if they support and require encryption. Click CHOOSE FILE to
upload the private key necessary to decrypt the messages sent from the identity provider.
Signed AuthnRequest
Check to enable request signing. If enabled, SSO URL protocol binding is limited to redirect only. The SSO URL protocol binding field is
updated automatically, if necessary.
A private key and signing certificate is required for request signing.
User attribute settings (Visible Only if This Provider is Used for User Provisioning)
User SAML Attributes
These attributes are used to provision users within BeyondTrust. The default values match BeyondTrust-certified applications with various
identity providers. If you are creating your own SAML connector, you may need to modify the attributes to match what is being sent by your
identity provider.
Authorization settings (Visible Only if This Provider is Used for User Provisioning)
Lookup Groups Using This Provider
Enabling this feature allows faster provisioning by automatically looking up groups for this user, using Group Lookup Attribute Name
and Delimiter. We recommend enabling this feature. If not used, SAML users must be manually assigned to group policies after their first
successful authentication.
Group Lookup Attribute Name
Enter the name of the SAML attribute that contains the names of groups to which users should belong. If the attribute value contains
multiple group names, then specify the Delimiter used to separate their names.
If left blank, SAML users must be manually assigned to group policies after their first successful authentication.
Group Lookup Delimiter
If the Delimiter is left blank, then the attribute value may contain multiple XML nodes with each one containing a different name.
Available Groups
This is an optional list of SAML groups always available to be manually assigned to group policies. If left blank, a given SAML group is
made available only after the first successful authentication of a user member of such group. Please enter one group name per line.
SALES: www.beyondtrust.com/contact
SUPPORT: www.beyondtrust.com/support
DOCUMENTATION: www.beyondtrust.com/docs
103
©2003-2024 BeyondTrust Corporation. All Rights Reserved. Other trademarks identified on this page are owned by their respective owners. BeyondTrust is not a chartered bank or trust company, or
depository institution. It is not authorized to accept deposits or trust accounts and is not licensed or regulated by any state or federal banking authority.
TC: 7/8/2024
PRIVILEGED REMOTE ACCESS 24.2
ADMIN GUIDE

Default Group Policy
Each user who authenticates against an external server must be a member of at least one group policy in order to authenticate to your B
Series Appliance, logging into either the /login interface or the access console. You can select a default group policy to apply to all users
allowed to authenticate against the configured server.
If a default policy is defined, any allowed user who authenticates against this server might have access at the level of this default policy.
Therefore, we recommend you set the default to a policy with minimum privileges to prevent users from gaining permissions you do not
wish them to have.
Note: If a user is in a default group policy and is then specifically added to another group policy, the settings for the specific
policy always take precedence over the settings for the default, even if the specific policy is a lower priority than the default,
and even if the default policy's settings are set to disallow override.
Test settings
You can test the SAML configuration from this page. The provider must be saved before it can be tested. Click Save at upper left area of
the screen, then scroll down and click Test. The configuration is tested against the identity provider, and a test results page shows the
SAML response and a formatted version of the assertion XML. The responses can be copied to other tools if further review is required.
For more information, please see SAML for Single Sign-On Authentication at https://www.beyondtrust.com/docs/privileged-
remote-access/how-to/integrations/security-providers/saml/index.htm.
Edit Security Provider - SCIM
Note: For SCIM to function, the SCIM API must be enabled on an API account, and the API must be configured on your SCIM
provider. API accounts are managed at /login > Management > API Configuration. At this time, only one SCIM provider can
be created. Once a SCIM provider has been created, the SCIM option is no longer available from the Create Provider
dropdown. SCIM user provisioning utilizes SCIM 2.0 Users and Group objects. For more information about the SCIM 2.0
standard, please see https://scim.cloud/.
Note: Privileged Remote Access now supports SCIM APIs for groups of users. Once you have configured a SCIM provider in
/login and configured users and groups in your SCIM solution, PRA reflects the same groups as what is present in your SCIM
solution, allowing you to select group polices by SCIM group.
Name
Create a unique name to help identify this provider.
Enabled
If checked, your B Series Appliance searches this security provider when a user attempts to log in. If unchecked, this provider is not
searched.
SALES: www.beyondtrust.com/contact
SUPPORT: www.beyondtrust.com/support
DOCUMENTATION: www.beyondtrust.com/docs
104
©2003-2024 BeyondTrust Corporation. All Rights Reserved. Other trademarks identified on this page are owned by their respective owners. BeyondTrust is not a chartered bank or trust company, or
depository institution. It is not authorized to accept deposits or trust accounts and is not licensed or regulated by any state or federal banking authority.
TC: 7/8/2024
PRIVILEGED REMOTE ACCESS 24.2
ADMIN GUIDE

SCIM User Query ID
From the dropdown, select the unique ID that SCIM should use for user queries.
SCIM Group Query ID
From the dropdown, select the unique ID that SCIM should use for group queries.
User Provision Settings
User Attribute
These attributes are used to provision users within BeyondTrust. The default values match BeyondTrust-certified applications with various
identity providers.
Authorization Settings
Unique ID
Enter the SCIM attribute to use as the user's unique ID within BeyondTrust.
Default Group Policy
Each user who authenticates against an external server must be a member of at least one group policy in order to authenticate to your B
Series Appliance, logging into either the /login interface or the access console. You can select a default group policy to apply to all users
allowed to authenticate against the configured server.
If a default policy is defined, any allowed user who authenticates against this server might have access at the level of this default policy.
Therefore, we recommend you set the default to a policy with minimum privileges to prevent users from gaining permissions you do not
wish them to have.
Note: If a user is in a default group policy and is then specifically added to another group policy, the settings for the specific
policy always take precedence over the settings for the default, even if the specific policy is a lower priority than the default,
and even if the default policy's settings are set to disallow override.
Attribute Name
Enter the name of the SCIM attribute that identifies users uniquely.
The groups provisioned with SCIM are always uniquely identified case-insensitively through their name for Group Lookup purposes.
SALES: www.beyondtrust.com/contact
SUPPORT: www.beyondtrust.com/support
DOCUMENTATION: www.beyondtrust.com/docs
105
©2003-2024 BeyondTrust Corporation. All Rights Reserved. Other trademarks identified on this page are owned by their respective owners. BeyondTrust is not a chartered bank or trust company, or
depository institution. It is not authorized to accept deposits or trust accounts and is not licensed or regulated by any state or federal banking authority.
TC: 7/8/2024
PRIVILEGED REMOTE ACCESS 24.2
ADMIN GUIDE

Vendor Groups
Users &Security VENDORS
Create vendor groups to allow third-party users controlled access to systems. This may be needed to provide support, maintenance, or
any other task that requires access to the system. You can configure up to 150 vendor groups.
Add New Vendor Group
Name
Enter a name for this vendor group.
Authorization Settings
Group Policy
The selected group policy defines the permissions, memberships, and other settings to all users authenticating with this vendor. These
settings cannot be changed on a per-user basis. Select a policy from those available, or go to Users and Security > Group Policies to
create a new one.
Note: Group policies that grant administrative permissions are not available for vendors.
Account Expires After
Set the number of days after which the account is deactivated.
Note: The vendor account is deactivated according to this setting, regardless of the options selected for the selected group
policy Account Expiration.
PRA User
Click to select an admin or a user from the list. The selected user can manage vendor users in this group and some self-registration
settings. This user receives all configured admin notifications for this vendor group and should have a valid email address.
Note: Any PRA user can be assigned by a PRA administrator to take over the management of that vendor group after it has
been created. The PRA user does not have permission/rights to change security settings specific to the vendor–rather, the
PRA user is the designated approver, receiver of notifications, and has visibility and edit privileged regarding the vendor users
themselves.
SALES: www.beyondtrust.com/contact
SUPPORT: www.beyondtrust.com/support
DOCUMENTATION: www.beyondtrust.com/docs
106
©2003-2024 BeyondTrust Corporation. All Rights Reserved. Other trademarks identified on this page are owned by their respective owners. BeyondTrust is not a chartered bank or trust company, or
depository institution. It is not authorized to accept deposits or trust accounts and is not licensed or regulated by any state or federal banking authority.
TC: 7/8/2024
PRIVILEGED REMOTE ACCESS 24.2
ADMIN GUIDE

Notify the PRA User When a User is Added to This Vendor Group
If this box is checked, an email is sent to the PRA admin or user in charge of the group each time a new user is added. You can require
PRA approval for new members. If approval is required, a message displays next to the new member's name in the group member's list,
indicating that the user Needs Approval.
Notify the PRA User When a User has Expired in This Vendor Group
If this box is checked, the admin or user in charge of the group users receives an email whenever a user has expired, as well as a link to
reactivate the user, if so desired.
Require PRA User Approval to Activate Users in This Vendor Group
If this box is checked, a PRA admin or user in charge of the group must approve new members.
Require PRA User Approval to Extend or Reactivate Users in This Vendor Group
If this box is checked, a PRA admin or user in charge of the group must approve extension or reactivation of users in this vendor group.
Email PRA User if Users Are Awaiting Action After
If this box is checked, the PRA admin or user in charge of the group receives an email notification if users are awaiting action after a
selected time period. The default is one day, but time periods from one hour to one week are available in the dropdown list below the
check box.
Network Restrictions
Network Address Allow List
Enter network address prefixes, one per line, in the formats shown in the examples. Netmasks are optional, and they can be given in either
dotted-decimal or integer bitmask format. Entries that omit a netmask are assumed to be single IP addresses.
Users Requiring Action
Users requiring an action from the admin or user in charge of the vendor group are listed here. Under Action Required you find the issue
requiring attention. The listed issues are Disabled, Expired, Failed Login, Locked, Needs Approval, and Pending.
Users
Click Add to add members to an existing group. You can use the search box to search for listed users under Last Authenticated As,
Display Name, and Email Address. You can select which column categories with user information to display from the settings icon on
the right. The options are Last Authenticated As, Display Name, Email Address, Last Authentication Date, Administrator, and
Expiration Date.
SALES: www.beyondtrust.com/contact
SUPPORT: www.beyondtrust.com/support
DOCUMENTATION: www.beyondtrust.com/docs
107
©2003-2024 BeyondTrust Corporation. All Rights Reserved. Other trademarks identified on this page are owned by their respective owners. BeyondTrust is not a chartered bank or trust company, or
depository institution. It is not authorized to accept deposits or trust accounts and is not licensed or regulated by any state or federal banking authority.
TC: 7/8/2024
PRIVILEGED REMOTE ACCESS 24.2
ADMIN GUIDE

Vendor Portal Settings
You can customize the vendor self-registration portal users see when they register. Changes are not applied until after the vendor group is
saved.
Enable Vendor Portal
Check the box to enable the vendor portal. This feature can only be turned on after selecting a group policy under Authorization
Settings.
Upload Logo
Click to upload a logo. This can be your logo, or the vendor's logo, depending on your needs and preferences. For best results use an
image that is 128x128 pixels. You can apply two accent colors and one background color:
l
Accent Color 1: Controls the section header background color, border color, and dark text color.
l
Accent Color 2: Controls the link color, button background color, and the language globe color.
Click Revert to Default if you do not want to keep the changes you made.
Portal Instructions
Enter the text to be displayed to users when they register in the self-registration portal.
Email Subject
This is the email subject that users see when they receive their confirmation email, after they have registered through the self-registration
portal.
Email Body
Enter the text for the confirmation email sent to users after they submit the registration form.
Vendor Portal URL
Enter the URL for the users' registration site.
Email Domain Allow List
You can restrict email addresses to the domains listed here when users register through the portal. Enter one email domain per line.
Commas and spaces are prohibited. If not provided, there are no restrictions on allowed email addresses.
Configurable Slug
Enter the URL slug for your site.
When done click Preview Vendor Portal to see how the portal will look.
SALES: www.beyondtrust.com/contact
SUPPORT: www.beyondtrust.com/support
DOCUMENTATION: www.beyondtrust.com/docs
108
©2003-2024 BeyondTrust Corporation. All Rights Reserved. Other trademarks identified on this page are owned by their respective owners. BeyondTrust is not a chartered bank or trust company, or
depository institution. It is not authorized to accept deposits or trust accounts and is not licensed or regulated by any state or federal banking authority.
TC: 7/8/2024
PRIVILEGED REMOTE ACCESS 24.2
ADMIN GUIDE

Add Vendor Administrator
Vendor Administrators
After clicking Save on the newly created vendor group, you are notified that
all vendor groups must have one user assigned as vendor administrator.
You can either click Proceed to assign a vendor administrator or add the
admin user later from the Vendors page.
Note: Vendor admins cannot add other vendor admins.
Add User
When adding a vendor admin, ensure the Vendor Group Administrator
box is checked.
Session Policies: Set Session Permission and Prompting Rules
Users &Security SESSION POLICIES
Session Policies
With session policies, you can customize session security permissions to fit specific scenarios. Session policies can be applied to users
and all Jump Items.
The Session Policies section lists available policies. Click the arrow by a policy name to quickly see where that policy is being used; its
availability for users, access invites, and Jump Clients; and the tools configured.
SALES: www.beyondtrust.com/contact
SUPPORT: www.beyondtrust.com/support
DOCUMENTATION: www.beyondtrust.com/docs
109
©2003-2024 BeyondTrust Corporation. All Rights Reserved. Other trademarks identified on this page are owned by their respective owners. BeyondTrust is not a chartered bank or trust company, or
depository institution. It is not authorized to accept deposits or trust accounts and is not licensed or regulated by any state or federal banking authority.
TC: 7/8/2024
PRIVILEGED REMOTE ACCESS 24.2
ADMIN GUIDE

Add, Edit, or Delete Session Policy
Create a new policy, modify an existing policy, or remove an existing policy.
Copy
To expedite the creation of similar policies, click Copy to create a new policy with identical settings. You can then edit this new policy to
meet your specific requirements.
Add or Edit Session Policy
Display Name
Create a unique name to help identify this policy. This name helps when assigning a session policy to users and Jump Clients.
Code Name
Set a code name for integration purposes. If you do not set a code name, PRA creates one automatically.
Description
Add a brief description to summarize the purpose of this policy. The description is seen when applying a policy to user accounts, group
policies, and access invites.
Availability
Users
Choose if this policy should be available to assign to users (user accounts and group policies).
Access Invite
Choose if this policy should be available for users to select when inviting an external user to join a session.
Jump Items
Choose if this policy should be available to assign to Jump Items.
Dependents
If this session policy is already in use, you will see the number of users and Jump Clients using this policy.
SALES: www.beyondtrust.com/contact
SUPPORT: www.beyondtrust.com/support
DOCUMENTATION: www.beyondtrust.com/docs
110
©2003-2024 BeyondTrust Corporation. All Rights Reserved. Other trademarks identified on this page are owned by their respective owners. BeyondTrust is not a chartered bank or trust company, or
depository institution. It is not authorized to accept deposits or trust accounts and is not licensed or regulated by any state or federal banking authority.
TC: 7/8/2024
PRIVILEGED REMOTE ACCESS 24.2
ADMIN GUIDE

Permissions
For all of the permissions that follow, you can choose to enable or disable the permission, or you can choose to set it to Not Defined.
Session policies are applied to a session in a hierarchical manner, with Jump Clients taking the highest priority, then users, and then the
global default. If multiple policies apply to a session, then the policy with the highest priority will take precedence over the others. If, for
example, the policy applied to a Jump Client defines a permission, then no other policies may change that permission for the session. To
make a permission available for a lower policy to define, leave that permission set to Not Defined.
Set which tools should be enabled or disabled with this policy.
Allow Elevated Access to Tools and Special Actions on the Endpoint
If enabled, access to elevated functionality is provided in the access console for this session without needing the explicit rights of a logged-
in user on the remote endpoint.
If disabled, this setting restricts users from gaining full access to the file transfer and command shell functions when they jump to an
elevated Jump Item but do not have elevated rights. To do this, special actions and power control actions are hidden and not available. It
also restricts File Transfer, Command Shell, and Registry Access when there is no user present in the session. This setting applies
where allowed by the endpoint's platform.
Screen Sharing
Screen Sharing Rules
Select the representative's and remote user's access to the remote system:
l
If Not Defined, this option is set by the next lower priority policy. This setting may be overridden by a higher priority policy.
l
Deny disables screen sharing.
l
View Only allows the representative to view the screen.
l
View and Control allows the representative to view and take action on the system. If this is selected, endpoint restrictions can be
set to avoid interference by the remote user:
o
None does not set any restrictions on the remote system.
o
Display, Mouse, and Keyboard disables these inputs. If this is selected, a check box is available to Automatically
request a privacy screen on session start. Privacy screen is applicable only for sessions started from a Jump Client, a
Remote Jump item, or a Local Jump item. We recommend using privacy screen for unattended sessions. The remote
system must support privacy screen.
Allowed Endpoint Restrictions
Set if the user can suspend the remote system's mouse and keyboard input. The user may also prevent the remote desktop from being
displayed.
Clipboard Synchronization Direction
Select how clipboard content flows between users and endpoints. The options are:
l
Not allowed: The user is not allowed to use the clipboard, no clipboard icons display in the access console, and cut and paste
commands do not work.
SALES: www.beyondtrust.com/contact
SUPPORT: www.beyondtrust.com/support
DOCUMENTATION: www.beyondtrust.com/docs
111
©2003-2024 BeyondTrust Corporation. All Rights Reserved. Other trademarks identified on this page are owned by their respective owners. BeyondTrust is not a chartered bank or trust company, or
depository institution. It is not authorized to accept deposits or trust accounts and is not licensed or regulated by any state or federal banking authority.
TC: 7/8/2024
PRIVILEGED REMOTE ACCESS 24.2
ADMIN GUIDE

l
Allowed from Rep to Customer: The user can push clipboard content to the endpoint but cannot paste from the endpoint's
clipboard. Only the Send clipboard icon displays in the access console.
l
Allowed in Both Directions: Clipboard content can flow both ways. Both Push and Get clipboard icons display in the access
console.
For more information about the Clipboard Synchronization Mode, please see "Security: Manage Security Settings" on page
142.
Application Sharing Restrictions
Limit access to specified applications on the remote system with either Allow only the listed executables or Deny only the listed
executables. You may also choose to allow or deny desktop access.
Note: This feature applies only to Windows operating systems.
Add New Executables
If application sharing restrictions are enforced, an Add New Executables button appears. Clicking this button opens a dialog that allows
you to specify executables to deny or allow, as appropriate to your objectives.
After you have added executables, one or two tables display the file names or hashes you have selected for restriction. An editable
comment field allows administrative notes.
Enter file names or SHA-256 hashes, one per line
When restricting executables, manually enter the executable file names or hashes you wish to allow or deny. Click on Add Executable(s)
when you are finished to add the chosen files to your configuration.
You may enter up to 25 files per dialog. If you need to add more, click Add Executable(s) and then reopen the dialog.
Browse for one or more files
When restricting executables, select this option to browse your system and choose executable files to automatically derive their names or
hashes. If you select files from your local platform and system in this manner, use caution to ensure that the files are indeed executable
files. No browser level verification is performed.
Choose either Use file name or Use file hash to have the browser derive the executable file names or hashes automatically. Click Add
Executable(s) when you are finished to add the chosen files to your configuration.
You may enter up to 25 files per dialog. If you need to add more, click Add Executable(s) and then reopen the dialog.
Note: This option is available only in modern browsers, not in legacy browsers.
SALES: www.beyondtrust.com/contact
SUPPORT: www.beyondtrust.com/support
DOCUMENTATION: www.beyondtrust.com/docs
112
©2003-2024 BeyondTrust Corporation. All Rights Reserved. Other trademarks identified on this page are owned by their respective owners. BeyondTrust is not a chartered bank or trust company, or
depository institution. It is not authorized to accept deposits or trust accounts and is not licensed or regulated by any state or federal banking authority.
TC: 7/8/2024
PRIVILEGED REMOTE ACCESS 24.2
ADMIN GUIDE

Allowed to log in using credentials from an Endpoint Credential Manager
Enable connection of a user to your Endpoint Credential Manager to use credentials from your existing password stores or vaults.
Use of the Endpoint Credential Manager requires a separate services agreement with BeyondTrust. Once a services agreement is in
place, you may download the required middleware from the BeyondTrust Support Portal.
Note: Prior to 15.2, this feature is available only in sessions started from an elevated Jump Client on Windows®. Starting with
15.2, you also may use an Endpoint Credential Manager in Remote Jump sessions, Microsoft® Remote Desktop Protocol
sessions, VNC sessions, and Shell Jump sessions. You may also use this feature with the Run As special action in a screen
sharing session on a Windows® system.
Annotations
Annotation Rules
Enables the user to use annotation tools to draw on the remote system's screen. If Not Defined, this option is set by the next lower priority
policy. This setting may be overridden by a higher priority policy.
File Transfer
File Transfer Rules
Enables the user to upload files to the remote system, download files from the remote system, or both. If Not Defined, this option is set by
the next lower priority policy. This setting may be overridden by a higher priority policy.
Accessible paths on the endpoint's filesystem
Allow the user to transfer files to or from any directories on the remote system or only specified directories.
Accessible paths on user's filesystem
Allow the user to transfer files to or from any directories on their local system or only specified directories.
Command Shell
Command Shell Rules
Enables the user to issue commands on the remote computer through a virtual command line interface. If Not Defined, this option is set
by the next lower priority policy. This setting may be overridden by a higher priority policy.
Note: Command shell access cannot be restricted for Shell Jump sessions.
Configure command filtering to prevent accidental use of commands that can be harmful to endpoint systems.
SALES: www.beyondtrust.com/contact
SUPPORT: www.beyondtrust.com/support
DOCUMENTATION: www.beyondtrust.com/docs
113
©2003-2024 BeyondTrust Corporation. All Rights Reserved. Other trademarks identified on this page are owned by their respective owners. BeyondTrust is not a chartered bank or trust company, or
depository institution. It is not authorized to accept deposits or trust accounts and is not licensed or regulated by any state or federal banking authority.
TC: 7/8/2024
PRIVILEGED REMOTE ACCESS 24.2
ADMIN GUIDE

For more information on command filtering, please see Use Shell Jump to Access a Remote Network Device at
www.beyondtrust.com/docs/privileged-remote-access/getting-started/access-console/shell-jump.htm.
System Information
System Information Rules
Enables the user to see system information about the remote computer. If Not Defined, this option is set by the next lower priority policy.
This setting may be overridden by a higher priority policy.
Allowed to use system information actions
Enables the user to interact with processes and programs on the remote system without requiring screen sharing. Kill processes; start,
stop, pause, resume, and restart services; and uninstall programs.
Registry Access
Registry Access Rules
Enables the user to interact with the registry on a remote Windows system without requiring screen sharing. View, add, delete and edit
keys, search and import/export keys.
Canned Scripts
Canned Script Rules
Enables the user to run canned scripts that have been created for their teams. If Not Defined, this option is set by the next lower priority
policy. This setting may be overridden by a higher priority policy.
Session Termination Behavior
If unable to reconnect within the time you set by Reconnect Timeout, choose what action to take. To prevent an end-user from accessing
unauthorized privileges after an elevated session, set the client to automatically log the end user out of the remote Windows computer at
session end, to lock the remote computer, or to do nothing. These rules do not apply to browser sharing sessions.
Allow users to override this setting per session
You can allow a user to override the session termination setting from the Summary tab in the console during a session.
Export Policy
You can export a session policy from one site and import those permissions into a policy on another site. Edit the policy you wish to export
and scroll to the bottom of the page. Click Export Policy and save the file.
SALES: www.beyondtrust.com/contact
SUPPORT: www.beyondtrust.com/support
DOCUMENTATION: www.beyondtrust.com/docs
114
©2003-2024 BeyondTrust Corporation. All Rights Reserved. Other trademarks identified on this page are owned by their respective owners. BeyondTrust is not a chartered bank or trust company, or
depository institution. It is not authorized to accept deposits or trust accounts and is not licensed or regulated by any state or federal banking authority.
TC: 7/8/2024
PRIVILEGED REMOTE ACCESS 24.2
ADMIN GUIDE

Import Policy
You may import those policy settings to any other BeyondTrust site that supports session policy import. Create a new session policy and
scroll to the bottom of the page. Browse to the policy file and then click Import Policy. Once the policy file is uploaded, the page will
refresh, allowing you to make modifications. Click Save Policy to make the policy available.
Save
Click Save to make this policy available.
Session Policy Simulator
Because layering policies can be complex, you can use the Session Policy Simulator to determine what the outcome will be.
Additionally, you could use the simulator to troubleshoot why a permission is not available when you expected it to be.
User
Start by selecting the user performing the session. This dropdown includes both user accounts and access invite policies.
Session Start Method
Select the session start method.
Jump Client / Jump Shortcut
Search for a Jump Client or Jump Shortcut by name, comments, Jump Group, or tag.
Simulate
Click Simulate. In the area below, the permissions configurable by session policy are displayed in read-only mode. You can see which
permissions are allowed or denied as a result of the stacked policies, as well as which policy set each permission.
Group Policies: Apply User Permissions to Groups of Users
Users &Security GROUP POLICIES
Group Policies
The Group Policies page enables you to set up groups of users who will share common privileges.
Add New Policy, Edit, Delete
Create a new policy, modify an existing policy, or remove an existing policy.
SALES: www.beyondtrust.com/contact
SUPPORT: www.beyondtrust.com/support
DOCUMENTATION: www.beyondtrust.com/docs
115
©2003-2024 BeyondTrust Corporation. All Rights Reserved. Other trademarks identified on this page are owned by their respective owners. BeyondTrust is not a chartered bank or trust company, or
depository institution. It is not authorized to accept deposits or trust accounts and is not licensed or regulated by any state or federal banking authority.
TC: 7/8/2024
PRIVILEGED REMOTE ACCESS 24.2
ADMIN GUIDE

Note: If you edit the group policy that is the default for the local provider, or has local administrator users, and remove
administrator permissions, a warning message appears. Ensure other users have administrator permissions before
proceeding.
Change Order
Click the Change Order button to drag and drop group policies to set their priority. Click Save Order for prioritization changes to take
effect. When multiple policies apply to a given user, the permissions take effect by starting at the top of the Group Policies list, and then
moving down the list. If a permission conflicts with a permission applied by a group policy higher in the list, then the lower permission will
overwrite the higher, unless the higher was set as Final. In short, group policies that appear lower in the list have a higher functional
priority than those that are higher.
Search Group Policies
To quickly find an existing policy in the list of Group Policies, enter the name, or part of the name. The list filters to all policies with a name
containing the entered search term. The list remains filtered until the search term is removed, even if the user goes to other pages or logs
out. To remove the search term, click the X to the right of the search box.
If you click the Change Order button after searching the list, all group policies appear. You can drag and drop group policies to set their
priority. When you click Save Order, the changes take effect and the list returns to policies with a name containing the entered search
term.
Expand All / Collapse All
To assist with searching and navigating the group policies, click the Expand All link above the grid to expand the details of all listed group
policies. Click Collapse All to return to the unexpanded list of group polices.
Copy
To expedite the creation of similar policies, click Copy to create a new policy with identical settings. You can then edit this new policy to
meet your specific requirements.
Add or Edit Policy
Policy Name
Create a unique name to help identify this policy.
Available Members and Policy Members
To assign members, select a member from the Available Members list and click Add to move it to the Policy Members box. Use the
Search box to find existing members.
You can select users from your local system, or select users or entire groups from configured security providers. To add users or groups
from an external directory store such as LDAP, RADIUS, or Kerberos, you must first configure the connection on the /login > Users &
Security > Security Providers page. If an attempt to add a user from a configured security provider is invalid, the synchronization log
error message appears here as well as in the log.
SALES: www.beyondtrust.com/contact
SUPPORT: www.beyondtrust.com/support
DOCUMENTATION: www.beyondtrust.com/docs
116
©2003-2024 BeyondTrust Corporation. All Rights Reserved. Other trademarks identified on this page are owned by their respective owners. BeyondTrust is not a chartered bank or trust company, or
depository institution. It is not authorized to accept deposits or trust accounts and is not licensed or regulated by any state or federal banking authority.
TC: 7/8/2024
PRIVILEGED REMOTE ACCESS 24.2
ADMIN GUIDE

Account Settings
Which account settings should this Group Policy control?
For each setting, select whether it should be defined in this policy or left available for configuration for individual users. If it is defined, you
will be unable to modify that privilege for an individual user from their user account page.
If you have a policy that defines a permission and you do not want any policy to be able to replace that permission, then you must select
that the permission cannot be overridden, and the policy must be a higher priority than other policies that additionally define that setting.
Two Factor Authentication
Two-factor authentication (2FA) uses an authenticator app to provide a time-based, one-time code to log into the administrative interface,
as well as the access console. If Required is selected, the user will be prompted to enroll and begin using 2FA at the next login. If
Optional is selected, the user has the option to use 2FA, but it is not required.
Account Expiration
When checked, the account never expires. When not checked, an account expiration date must be set.
Account Disabled
Allows you to disable the account so the user cannot log in. Disabling does NOT delete the account.
Comments
Add comments to help identify the purpose of this object.
General Permissions
Which general settings should this Group Policy control?
For each setting, select whether it should be defined in this policy or left available for configuration for individual users. If it is defined, you
will be unable to modify that privilege for an individual user from their user account page.
If you have a policy that defines a permission and you do not want any policy to be able to replace that permission, then you must select
that the permission cannot be overridden, and the policy must be a higher priority than other policies that additionally define that setting.
Administration
Administrative Privileges
Grants the user full administrative rights.
SALES: www.beyondtrust.com/contact
SUPPORT: www.beyondtrust.com/support
DOCUMENTATION: www.beyondtrust.com/docs
117
©2003-2024 BeyondTrust Corporation. All Rights Reserved. Other trademarks identified on this page are owned by their respective owners. BeyondTrust is not a chartered bank or trust company, or
depository institution. It is not authorized to accept deposits or trust accounts and is not licensed or regulated by any state or federal banking authority.
TC: 7/8/2024
PRIVILEGED REMOTE ACCESS 24.2
ADMIN GUIDE

Vault Administrative Privileges
Enables the user access to the Vault.
Password Setting
Enables the user to set passwords and unlock accounts for non-administrative local users.
Jumpoint Editing
Enables the user to create or edit Jumpoints. This option does not affect the user's ability to access remote computers via Jumpoint, which
is configured per Jumpoint or group policy.
Team Editing
Enables the user to create or edit teams.
Jump Group Editing
Enables the user to create or edit Jump Groups.
Canned Script Editing
Enables the user to create or edit canned scripts for use in screen sharing or command shell sessions.
Custom Link Editing
Enables the user to create or edit custom links.
Reporting
Session and Team Report Access
Enables the user to view access session reports. Depending on the option selected, users can view their sessions, their jump group
sessions, or all sessions.
Allowed to View Access Session Reports
Enables the user to run reports on access session activity, viewing only sessions for which they were the primary session owner, only
sessions for endpoints belonging to a Jump Group of which the user is a member, or all sessions.
Allowed to View Access Session Recordings
Enables the user to view video recordings of screen sharing sessions and command shell sessions.
SALES: www.beyondtrust.com/contact
SUPPORT: www.beyondtrust.com/support
DOCUMENTATION: www.beyondtrust.com/docs
118
©2003-2024 BeyondTrust Corporation. All Rights Reserved. Other trademarks identified on this page are owned by their respective owners. BeyondTrust is not a chartered bank or trust company, or
depository institution. It is not authorized to accept deposits or trust accounts and is not licensed or regulated by any state or federal banking authority.
TC: 7/8/2024
PRIVILEGED REMOTE ACCESS 24.2
ADMIN GUIDE

Vault Report Access
Enables the user to view Vault reports. Depending on the option selected, users can view their sessions, or all sessions.
Allowed to View Vault Reports
Enables the user view his or her own vault events or all Vault events.
Allowed to View Syslog Reports
Enables the user to download a ZIP file containing all syslog files available on the appliance. Admins are automatically permissioned to
access this report. Non-admin users must request access to view this report.
Access Permissions
Allowed to Access Endpoints
Enables the user to use the access console in order to run sessions. If endpoint access is enabled, options pertaining to endpoint access
will also be available.
Session Management
Allowed to share sessions with teams which they do not belong to
Enables the user to invite a less limited set of user to share sessions, not only their team members. Combined with the extended
availability permission, this permission expands session sharing capabilities.
Allowed to invite external users
Enables the user to invite third-party users to participate in a session, one time only.
Allowed to enable extended availability mode
Enables the user to receive email invitations from other users requesting to share a session even when they are not logged into the access
console.
Allowed to edit the external key
Enables the user to modify the external key from the session info pane of a session within the access console.
SALES: www.beyondtrust.com/contact
SUPPORT: www.beyondtrust.com/support
DOCUMENTATION: www.beyondtrust.com/docs
119
©2003-2024 BeyondTrust Corporation. All Rights Reserved. Other trademarks identified on this page are owned by their respective owners. BeyondTrust is not a chartered bank or trust company, or
depository institution. It is not authorized to accept deposits or trust accounts and is not licensed or regulated by any state or federal banking authority.
TC: 7/8/2024
PRIVILEGED REMOTE ACCESS 24.2
ADMIN GUIDE

User to User Screen Sharing
Allowed to show screen to other users
Enables the user to share their screen with another user without the receiving user having to join a session. This option is available even if
the user is not in a session.
Allowed to give control when showing screen to other users
Enables the user sharing their screen to give keyboard and mouse control to the user viewing their screen.
Jump Technology
Allowed Jump Item Methods
Enables the user to Jump to computers using Jump Clients, Local Jump on the local network, Remote Jump via a Jumpoint,
Remote VNC via a Jumpoint, Remote RDP via a Jumpoint, Web Jump via a Jumpoint, Shell Jump via a Jumpoint, and Protocol
Tunnel Jump via a Jumpoint.
Jump Item Roles
A Jump Item Role is a predefined set of permissions regarding Jump Item management and usage. For each option, click Show to open
the Jump Item Role in a new tab.
The Default role is used only when Use User's Default is set for that user in a Jump Group.
The Personal role applies only to Jump Items pinned to the user's personal list of Jump Items.
The Teams role applies to Jump Items pinned to the personal list of Jump Items of a team member of a lower role. For example, a team
manager can view team leads' and team members' personal Jump Items, and a team lead can view team members' personal Jump Items.
The System role applies to all other Jump Items in the system. For most users, this should be set to No Access. If set to any other option,
the user is added to Jump Groups to which they would not normally be assigned, and in the access console, they can see non-team
members' personal lists of Jump Items.
Session Permissions
Set the prompting and permission rules that should apply to this user's sessions. Choose an existing session policy or define custom
permissions for this user. If Not Defined, the global default policy will be used. These permissions may be overridden by a higher policy.
Description
View the description of a pre-defined session permission policy.
SALES: www.beyondtrust.com/contact
SUPPORT: www.beyondtrust.com/support
DOCUMENTATION: www.beyondtrust.com/docs
120
©2003-2024 BeyondTrust Corporation. All Rights Reserved. Other trademarks identified on this page are owned by their respective owners. BeyondTrust is not a chartered bank or trust company, or
depository institution. It is not authorized to accept deposits or trust accounts and is not licensed or regulated by any state or federal banking authority.
TC: 7/8/2024
PRIVILEGED REMOTE ACCESS 24.2
ADMIN GUIDE

Screen Sharing
Screen Sharing Rules
Select the representative's and remote user's access to the remote system:
l
If Not Defined, this option is set by the next lower priority policy. This setting may be overridden by a higher priority policy.
l
Deny disables screen sharing.
l
View Only allows the representative to view the screen.
l
View and Control allows the representative to view and take action on the system. If this is selected, endpoint restrictions can be
set to avoid interference by the remote user:
o
None does not set any restrictions on the remote system.
o
Display, Mouse, and Keyboard disables these inputs. If this is selected, a check box is available to Automatically
request a privacy screen on session start. Privacy screen is applicable only for sessions started from a Jump Client, a
Remote Jump item, or a Local Jump item. We recommend using privacy screen for unattended sessions. The remote
system must support privacy screen.
For more information, please see Control the Remote Endpoint with Screen Sharing at
https://www.beyondtrust.com/docs/privileged-remote-access/getting-started/access-console/screen-sharing.htm.
Clipboard Synchronization Direction
Select how clipboard content flows between users and endpoints. The options are:
l
Not allowed: The user is not allowed to use the clipboard, no clipboard icons display in the access console, and cut and paste
commands do not work.
l
Allowed from Rep to Customer: The user can push clipboard content to the endpoint but cannot paste from the endpoint's
clipboard. Only the Send clipboard icon displays in the access console.
l
Allowed in Both Directions: Clipboard content can flow both ways. Both Push and Get clipboard icons display in the access
console.
For more information about the Clipboard Synchronization Mode, please see "Security: Manage Security Settings" on page
142.
Application Sharing Restrictions
Limit access to specified applications on the remote system with either Allow only the listed executables or Deny only the listed
executables. You may also choose to allow or deny desktop access.
Note: This feature applies only to Windows operating systems.
SALES: www.beyondtrust.com/contact
SUPPORT: www.beyondtrust.com/support
DOCUMENTATION: www.beyondtrust.com/docs
121
©2003-2024 BeyondTrust Corporation. All Rights Reserved. Other trademarks identified on this page are owned by their respective owners. BeyondTrust is not a chartered bank or trust company, or
depository institution. It is not authorized to accept deposits or trust accounts and is not licensed or regulated by any state or federal banking authority.
TC: 7/8/2024
PRIVILEGED REMOTE ACCESS 24.2
ADMIN GUIDE

Add New Executables
If application sharing restrictions are enforced, an Add New Executables button appears. Clicking this button opens a dialog that allows
you to specify executables to deny or allow, as appropriate to your objectives.
After you have added executables, one or two tables display the file names or hashes you have selected for restriction. An editable
comment field allows administrative notes.
Enter file names or SHA-256 hashes, one per line
When restricting executables, manually enter the executable file names or hashes you wish to allow or deny. Click on Add Executable(s)
when you are finished to add the chosen files to your configuration.
You may enter up to 25 files per dialog. If you need to add more, click Add Executable(s) and then reopen the dialog.
Browse for one or more files
When restricting executables, select this option to browse your system and choose executable files to automatically derive their names or
hashes. If you select files from your local platform and system in this manner, use caution to ensure that the files are indeed executable
files. No browser level verification is performed.
Choose either Use file name or Use file hash to have the browser derive the executable file names or hashes automatically. Click Add
Executable(s) when you are finished to add the chosen files to your configuration.
You may enter up to 25 files per dialog. If you need to add more, click Add Executable(s) and then reopen the dialog.
Note: This option is available only in modern browsers, not in legacy browsers.
Allowed Endpoint Restrictions
Set if the user can suspend the remote system's mouse and keyboard input. The user may also prevent the remote desktop from being
displayed.
For more information, please see Control the Remote Endpoint with Screen Sharing at
https://www.beyondtrust.com/docs/privileged-remote-access/getting-started/access-console/screen-sharing.htm.
Annotations
Annotation Rules
Enables the user to use annotation tools to draw on the remote system's screen. If Not Defined, this option is set by the next lower priority
policy. This setting may be overridden by a higher priority policy.
For more information, please see Use Annotations to Draw on the Remote Screen of the Endpoint at
https://www.beyondtrust.com/docs/privileged-remote-access/getting-started/access-console/annotations.htm.
SALES: www.beyondtrust.com/contact
SUPPORT: www.beyondtrust.com/support
DOCUMENTATION: www.beyondtrust.com/docs
122
©2003-2024 BeyondTrust Corporation. All Rights Reserved. Other trademarks identified on this page are owned by their respective owners. BeyondTrust is not a chartered bank or trust company, or
depository institution. It is not authorized to accept deposits or trust accounts and is not licensed or regulated by any state or federal banking authority.
TC: 7/8/2024
PRIVILEGED REMOTE ACCESS 24.2
ADMIN GUIDE

File Transfer
File Transfer Rules
Enables the user to upload files to the remote system, download files from the remote system, or both. If Not Defined, this option is set by
the next lower priority policy. This setting may be overridden by a higher priority policy.
Accessible paths on the endpoint's filesystem
Allow the user to transfer files to or from any directories on the remote system or only specified directories.
Accessible paths on user's filesystem
Allow the user to transfer files to or from any directories on their local system or only specified directories.
For more information, please see File Transfer to and from the Remote System Endpoint at
https://www.beyondtrust.com/docs/privileged-remote-access/getting-started/access-console/file-transfer.htm.
Command Shell
Command Shell Rules
Enables the user to issue commands on the remote computer through a virtual command line interface. If Not Defined, this option is set
by the next lower priority policy. This setting may be overridden by a higher priority policy.
Note: Command shell access cannot be restricted for Shell Jump sessions.
Configure command filtering to prevent accidental use of commands that can be harmful to endpoint systems.
For more information on command filtering, please see Use Shell Jump to Access a Remote Network Device at
www.beyondtrust.com/docs/privileged-remote-access/getting-started/access-console/shell-jump.htm.
For more information, please see Open the Command Shell on the Remote Endpoint Using the Access Console at
https://www.beyondtrust.com/docs/privileged-remote-access/getting-started/access-console/command-shell.htm.
System Information
System Information Rules
Enables the user to see system information about the remote computer. If Not Defined, this option is set by the next lower priority policy.
This setting may be overridden by a higher priority policy.
SALES: www.beyondtrust.com/contact
SUPPORT: www.beyondtrust.com/support
DOCUMENTATION: www.beyondtrust.com/docs
123
©2003-2024 BeyondTrust Corporation. All Rights Reserved. Other trademarks identified on this page are owned by their respective owners. BeyondTrust is not a chartered bank or trust company, or
depository institution. It is not authorized to accept deposits or trust accounts and is not licensed or regulated by any state or federal banking authority.
TC: 7/8/2024
PRIVILEGED REMOTE ACCESS 24.2
ADMIN GUIDE

Allowed to use system information actions
Enables the user to interact with processes and programs on the remote system without requiring screen sharing. Kill processes; start,
stop, pause, resume, and restart services; and uninstall programs.
For more information, please see View System Information on the Remote Endpoint at
https://www.beyondtrust.com/docs/privileged-remote-access/getting-started/access-console/system-info.htm.
Registry Access
Registry Access Rules
Enables the user to interact with the registry on a remote Windows system without requiring screen sharing. View, add, delete and edit
keys, search and import/export keys.
For more information, please see Access the Remote Registry Editor on the Remote Endpoint at
https://www.beyondtrust.com/docs/privileged-remote-access/getting-started/access-console/registry-editor.htm.
Canned Scripts
Canned Script Rules
Enables the user to run canned scripts that have been created for their teams. If Not Defined, this option is set by the next lower priority
policy. This setting may be overridden by a higher priority policy.
For more information, please see Open the Command Shell on the Remote Endpoint Using the Access Console at
https://www.beyondtrust.com/docs/privileged-remote-access/getting-started/access-console/command-shell.htm.
Session Termination Behavior
If unable to reconnect within the time you set by Reconnect Timeout, choose what action to take. To prevent an end-user from accessing
unauthorized privileges after an elevated session, set the client to automatically log the end user out of the remote Windows computer at
session end, to lock the remote computer, or to do nothing. These rules do not apply to browser sharing sessions.
Allow users to override this setting per session
You can allow a user to override the session termination setting from the Summary tab in the console during a session.
SALES: www.beyondtrust.com/contact
SUPPORT: www.beyondtrust.com/support
DOCUMENTATION: www.beyondtrust.com/docs
124
©2003-2024 BeyondTrust Corporation. All Rights Reserved. Other trademarks identified on this page are owned by their respective owners. BeyondTrust is not a chartered bank or trust company, or
depository institution. It is not authorized to accept deposits or trust accounts and is not licensed or regulated by any state or federal banking authority.
TC: 7/8/2024
PRIVILEGED REMOTE ACCESS 24.2
ADMIN GUIDE

Availability Settings
Login Schedule
Restrict user login to the following schedule
Set a schedule to define when users can log into the access console. Set the time zone you want to use for this schedule, and then add
one or more schedule entries. For each entry, set the start day and time and the end day and time.
If, for instance, the time is set to start at 8 am and end at 5 pm, a user can log in at any time during this window but may continue to work
past the set end time. They will not, however, be allowed to log back in after 5 pm.
Force logout when the schedule does not permit login
If stricter access control is required, check this option. This forces the user to log out at the scheduled end time. In this case, the user
receives recurring notifications beginning 15 minutes prior to being disconnected. When the user is logged out, any owned sessions will
follow the session fallback rules.
Memberships
Add Team Membership
Search for teams to which members of this group policy should belong. You can set the role as Team Member, Team Lead, or Team
Manager. These roles play a significant part in the Dashboard feature of the access console. Click Add.
Added teams are shown in a table. You can edit the role of members in a team or delete the team from the list.
Remove Team Membership
Search for teams from which members of this group policy should be removed, and then click Add. Removed teams are shown in a table.
You can delete a team from the list.
Add Jumpoint Membership
Search for Jumpoints which members of this group policy should be allowed to access, and then click Add. Added Jumpoints are shown in
a table. You can delete a Jumpoint from the list.
Remove Jumpoint Membership
Search for Jumpoints from which members of this group policy should not be removed, and then click Add. Removed Jumpoints are
shown in a table. You can delete a Jumpoint from the list.
Add Jump Group Memberships
Search for Jump Groups to which members of this group policy should belong. You can set each user's Jump Item Role to set their
permissions specific to Jump Items in this Jump Group, or you can use the user's default Jump Item Roles set in this group policy or on the
SALES: www.beyondtrust.com/contact
SUPPORT: www.beyondtrust.com/support
DOCUMENTATION: www.beyondtrust.com/docs
125
©2003-2024 BeyondTrust Corporation. All Rights Reserved. Other trademarks identified on this page are owned by their respective owners. BeyondTrust is not a chartered bank or trust company, or
depository institution. It is not authorized to accept deposits or trust accounts and is not licensed or regulated by any state or federal banking authority.
TC: 7/8/2024
PRIVILEGED REMOTE ACCESS 24.2
ADMIN GUIDE

Users & Security > Users page. A Jump Item Role is a predefined set of permissions regarding Jump Item management and usage.
For more information, please see Use Jump Item Roles to Configure Permission Sets for Jump Items at
https://www.beyondtrust.com/docs/privileged-remote-access/how-to/jumpoint/jump-item-roles.htm.
You can also apply a Jump Policy to manage user access to the Jump Items in this Jump Group. Selecting Set on Jump Items instead
uses the Jump Policy applied to the Jump Item itself. Jump Policies are configured on the Jump > Jump Policies page and determine the
times during which a user can access this Jump Item. A Jump Policy can also send a notification when it is accessed or can require
approval to be accessed. If neither the user nor the Jump Item has a Jump Policy applied, this Jump Item can be accessed without
restriction.
For more information, please see Create Jump Policies to Control Access to Jump Items at
https://www.beyondtrust.com/docs/privileged-remote-access/how-to/jumpoint/policies.htm.
Added Jump Groups are shown in a table. You can edit a Jump Group's settings or delete the Jump Group from the list.
Remove Jump Group Memberships
Search for Jump Groups from which members of this group policy should be removed, and then click Add. Removed Jump Groups are
shown in a table. You can delete a Jump Group from the list.
Add Vault Account Memberships
Search for an account, select the Vault Account Role, and then click Add to grant members of the policy access to the selected vault
account. Users may have memberships added by other group policies. View Vault > Accounts to see all members within each account.
Users may be assigned one of two roles for using the vault account:
l
Inject: (default value) Users with this role can use this account in Privileged Remote Access sessions.
l
Inject and Checkout: Users with this role can use this account in Privileged Remote Access sessions and can check out the
account on /login. The Checkout permission has no affect on generic SSH accounts.
Note: Enable the Add Vault Account Memberships permission to assign a Vault Account Role to a vault account in a
group policy. The Vault Account Role is visible in the list of accounts added to the group policy.
Add Vault Account Group Memberships
Search for an account group, select the Vault Account Role, and then click Add to grant members of the policy access to the group of
vault accounts. Users may have memberships added by other group policies. View Vault > Account Groups to see all members within
each group. Users may be assigned one of two roles for using the group of vault accounts:
l
Inject: (default value) Users with this role can use this account in Privileged Remote Access sessions.
l
Inject and Checkout: Users with this role can use this account in Privileged Remote Access sessions and can check out the
account on /login. The Checkout permission has no affect on generic SSH accounts.
SALES: www.beyondtrust.com/contact
SUPPORT: www.beyondtrust.com/support
DOCUMENTATION: www.beyondtrust.com/docs
126
©2003-2024 BeyondTrust Corporation. All Rights Reserved. Other trademarks identified on this page are owned by their respective owners. BeyondTrust is not a chartered bank or trust company, or
depository institution. It is not authorized to accept deposits or trust accounts and is not licensed or regulated by any state or federal banking authority.
TC: 7/8/2024
PRIVILEGED REMOTE ACCESS 24.2
ADMIN GUIDE
Note: Enable the Add Vault Account Group permission to assign a Vault Account Role to a group of vault accounts in a
group policy. The Vault Account Role is visible in the list of account groups added to the group policy.
Save
Click Save to put the policy into effect.
Export Policy
You can export a group policy from one site and import those permissions into a policy on another site. Edit the policy you wish to export
and scroll to the bottom of the page. Click Export Policy and save the file.
Note: When exporting a group policy, only the policy name, account settings, and permissions are exported. Policy members,
team memberships, and Jumpoint memberships are not included in the export.
Import Policy
You may import exported group policy settings to any other BeyondTrust site that supports group policy import. Create a new group policy
or edit an existing policy whose permissions you wish to overwrite, and then scroll to the Import Policy section at the bottom of the page.
Click Select Policy File, locate the policy file, and then click Open. Once the policy file is uploaded, the page will refresh, allowing you to
make modifications; click Save to put the group policy into effect.
Note: Importing a policy file to an existing group policy will overwrite any previously defined permissions, with the exception of
policy members, team memberships, and Jumpoint memberships.
Sample Policy Matrix
The diagram below is an example of how multiple policies can work together.
SALES: www.beyondtrust.com/contact
SUPPORT: www.beyondtrust.com/support
DOCUMENTATION: www.beyondtrust.com/docs
127
©2003-2024 BeyondTrust Corporation. All Rights Reserved. Other trademarks identified on this page are owned by their respective owners. BeyondTrust is not a chartered bank or trust company, or
depository institution. It is not authorized to accept deposits or trust accounts and is not licensed or regulated by any state or federal banking authority.
TC: 7/8/2024
PRIVILEGED REMOTE ACCESS 24.2
ADMIN GUIDE
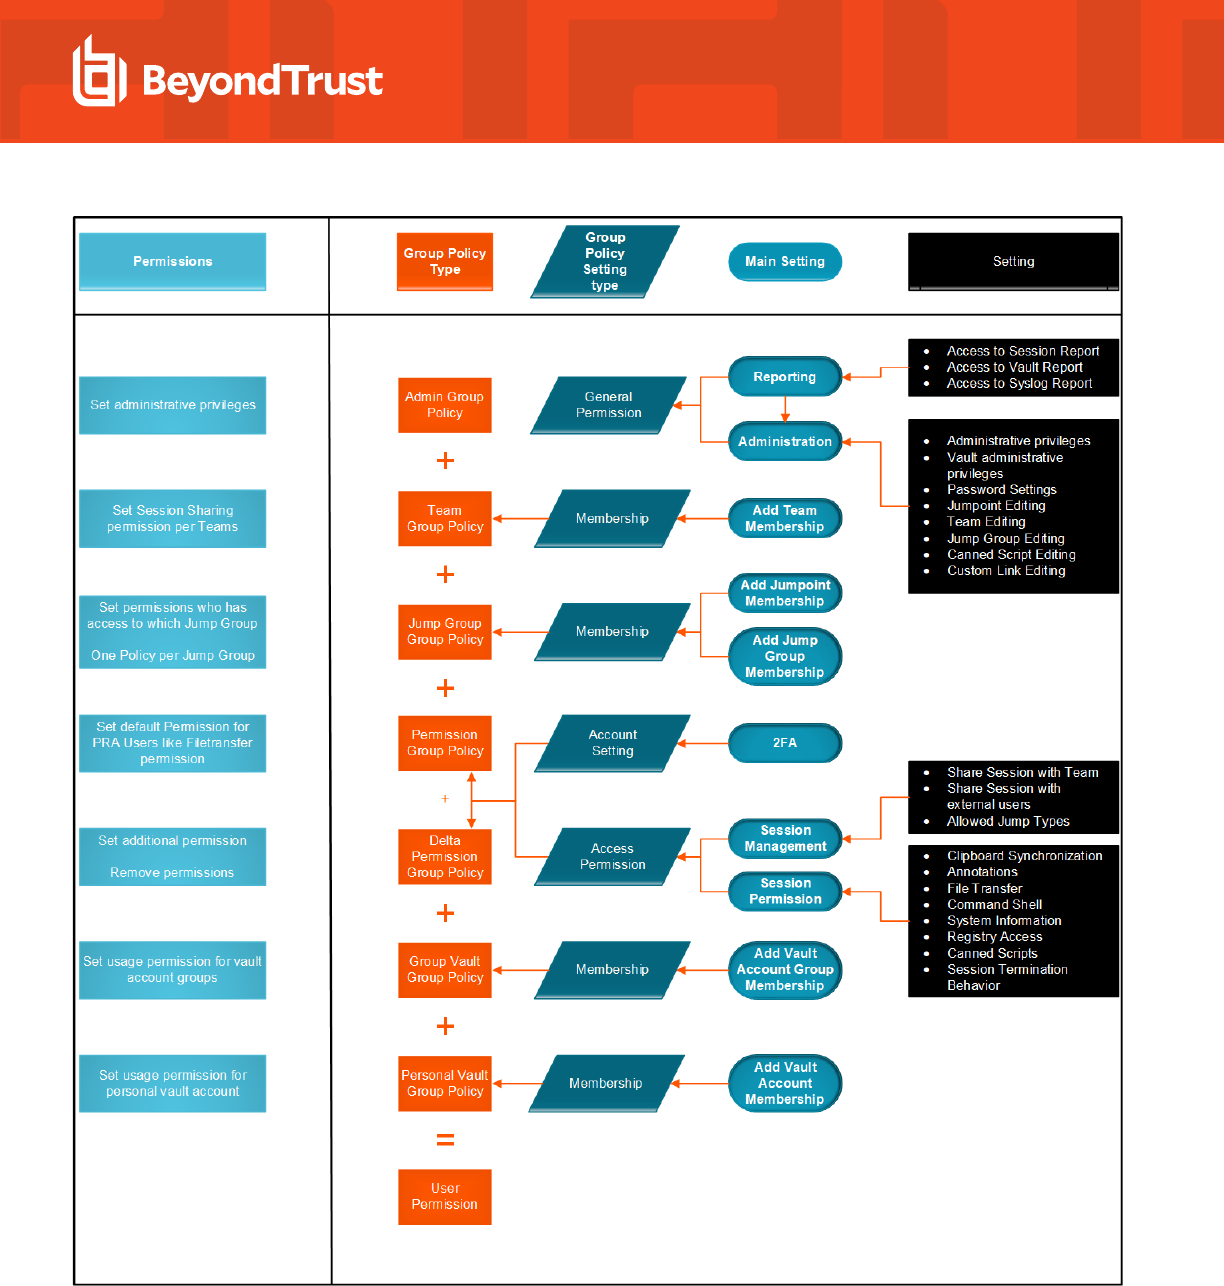
SALES: www.beyondtrust.com/contact
SUPPORT: www.beyondtrust.com/support
DOCUMENTATION: www.beyondtrust.com/docs
128
©2003-2024 BeyondTrust Corporation. All Rights Reserved. Other trademarks identified on this page are owned by their respective owners. BeyondTrust is not a chartered bank or trust company, or
depository institution. It is not authorized to accept deposits or trust accounts and is not licensed or regulated by any state or federal banking authority.
TC: 7/8/2024
PRIVILEGED REMOTE ACCESS 24.2
ADMIN GUIDE

Kerberos Keytab: Manage the Kerberos Keytab
Users &Security KERBEROS KEYTAB
Kerberos Keytab Management
BeyondTrust supports single sign-on functionality using the Kerberos authentication protocol. This enables users to authenticate to the B
Series Appliance without having to enter their credentials. Kerberos authentication applies both to the /login web interface and to the
access console.
To integrate Kerberos with your B Series Appliance, you must have a Kerberos implementation either currently deployed or in the process
of being deployed. Specific requirements are as follows:
l
You must have a working Key Distribution Center (KDC) in place.
l
Clocks must be synchronized across all clients, the KDC, and the B Series Appliance. Using a Network Time Protocol server
(NTP) is an easy way to ensure this.
l
You must have a Service Principal Name (SPN) created on the KDC for your B Series Appliance.
Configured Principles
The Configured Principals section lists all of the available SPNs for each uploaded keytab.
Once you have available SPNs, you can configure a Kerberos security provider from the Security Providers page and define which user
principals may authenticate to the B Series Appliance via Kerberos.
Import Keytab
UploadChoose File
Export the keytab for the SPN from your KDC and upload it to the B Series Appliance via the Import Keytab section of this page.
SALES: www.beyondtrust.com/contact
SUPPORT: www.beyondtrust.com/support
DOCUMENTATION: www.beyondtrust.com/docs
129
©2003-2024 BeyondTrust Corporation. All Rights Reserved. Other trademarks identified on this page are owned by their respective owners. BeyondTrust is not a chartered bank or trust company, or
depository institution. It is not authorized to accept deposits or trust accounts and is not licensed or regulated by any state or federal banking authority.
TC: 7/8/2024
PRIVILEGED REMOTE ACCESS 24.2
ADMIN GUIDE

Reports
Access: Report on Session Activity
Reports ACCESS
Access Reports
Administrators and privileged users can generate broad, comprehensive reports and also apply specific filtering to customize reported
information based on clear-cut needs.
Report Type
Generate activity reports according to three separate report types: Session, Summary, and Session Forensics (if enabled).
Session Report
View all access sessions that match the criteria you specify in report filters. Session reports include basic session information along with
links to session details, chat transcripts, and video recordings of screen sharing, Protocol Tunnel Jumps, and command shells.
Session reports detail a record of the full chat transcript, the number of files transferred (and details on failed file transfers), and specific
actions that took place during the session. Windows events that present obvious visual changes within a session are captured as events in
the session details. This primarily includes changes to the foreground window, with the executable name and its window title.
Specific command information relevant to Run As commands, including credentials, is also provided, but this reporting can be disabled in
"Security: Manage Security Settings" on page 142.
Other session information includes the session duration, local and remote IP addresses, and remote system information (if enabled).
Reports can be viewed online or downloaded to your local system.
If session recording is enabled, view a video playback of individual sessions, including captions of who was in control of the mouse and
keyboard at any given point during the session. If Protocol Tunnel Jump recording is enabled, view video recordings of the user's entire
desktop. If command prompt recording is enabled, view recordings and/or text transcripts of all command shells run during the session. All
recordings are stored on the B Series Appliance in raw format and are converted to compressed format when viewed or downloaded.
Summary Report
Summary reports provide an overview of session activity over time, categorized by user. Statistics include the total number of sessions
run, the average number of sessions per weekday, and the average duration of sessions.
Session Forensics Report
Access sessions forensics reports allow you to search for session events across all access sessions, as well as find sessions containing
the given text or phrase provided in the filter. This searches chat messages, command shell commands, file transfers, file system
modifications, registry modifications, and foreground window titles.
SALES: www.beyondtrust.com/contact
SUPPORT: www.beyondtrust.com/support
DOCUMENTATION: www.beyondtrust.com/docs
130
©2003-2024 BeyondTrust Corporation. All Rights Reserved. Other trademarks identified on this page are owned by their respective owners. BeyondTrust is not a chartered bank or trust company, or
depository institution. It is not authorized to accept deposits or trust accounts and is not licensed or regulated by any state or federal banking authority.
TC: 7/8/2024
PRIVILEGED REMOTE ACCESS 24.2
ADMIN GUIDE

Filters
Apply filtering options as needed to derive more customized reports from the basic report types. Enable one or more filters as you wish,
but only sessions that match all filters selected will be shown.
Session ID or Sequence Number
This unique identifier requires that you specify the ID (LSID) or sequence number for the single session you seek. This is often helpful if
you have an external ticketing system or CRM integration. You cannot combine this filter with others.
Date Range
Select a start date for which to pull reporting data. Then select either the number of days for which to pull your report or an end date.
Endpoint
Filter sessions by computer name, public IP, or private IP.
Jump Group
Filter sessions by Jump Items belonging to a certain Jump Group. If selected, the following options are available:
l
Find all sessions started from Jump Items belonging to a specific Jump Group.
l
Find all sessions started from personal Jump Items for a specific user.
l
Find all sessions in your personal Jump Group.
User
Select a user from the Search for a user box to filter sessions where a specific user participated. Check Match only if the selected user
is the primary user for the session to find sessions only where the user was the primary user.
Vendor Group
Find all sessions in which any users of a vendor group participated. A search box allows you to search for a specific vendor group.
External Key
Filter to report sessions that used the same specific external key.
Include only completed sessions
Filter to include only sessions that have been completed. This excludes sessions that are still running.
SALES: www.beyondtrust.com/contact
SUPPORT: www.beyondtrust.com/support
DOCUMENTATION: www.beyondtrust.com/docs
131
©2003-2024 BeyondTrust Corporation. All Rights Reserved. Other trademarks identified on this page are owned by their respective owners. BeyondTrust is not a chartered bank or trust company, or
depository institution. It is not authorized to accept deposits or trust accounts and is not licensed or regulated by any state or federal banking authority.
TC: 7/8/2024
PRIVILEGED REMOTE ACCESS 24.2
ADMIN GUIDE

Team Activity Report
Date Range
Select a start date for which to pull reporting data. Then select either the number of days for which to pull your report or an end date.
Filters
Select either Team or User to view all activity that matches the provided criteria. Team and User activity reports include information about
users as they log in or out of the access console, chat messages sent between team members, user-to-user screen sharing actions as
logged in chat, and files shared and downloaded.
Note: All items listed within Privileged Remote Access reports are ordered from newest to oldest, with the exception of
session forensics reports.
Vault: Report on Vault Account and User Activity
Reports VAULT
Vault Account Activity Report
Date Range
Select a start date for which to pull reporting data. Then select either the number of days for which to pull your report or an end date.
Account
To see all events involving a specific BeyondTrust Vault stored account, type in the account name, or select the account from the dynamic
pop-up list.
Performed By
To see all events involving a specific privileged user, API account, or the System, type in the account name, or select the account name
from the dynamic pop-up list.
Include Windows Services Events
Check the Include Windows services events option to include events related to service account rotation.
SALES: www.beyondtrust.com/contact
SUPPORT: www.beyondtrust.com/support
DOCUMENTATION: www.beyondtrust.com/docs
132
©2003-2024 BeyondTrust Corporation. All Rights Reserved. Other trademarks identified on this page are owned by their respective owners. BeyondTrust is not a chartered bank or trust company, or
depository institution. It is not authorized to accept deposits or trust accounts and is not licensed or regulated by any state or federal banking authority.
TC: 7/8/2024
PRIVILEGED REMOTE ACCESS 24.2
ADMIN GUIDE

For more information, please see BeyondTrust Vault Technical Whitepaper at https://www.beyondtrust.com/docs/privileged-
remote-access/how-to/vault/index.htm.
Note: If a user has been anonymized in an effort to follow compliance standards, the Vault Account Activity report might
display pseudonyms for user data or may indicate that information has been deleted. To learn more about data anonymization
and deletion for compliance efforts, please see Compliance: Anonymize Data to Meet Compliance Standards at
https://www.beyondtrust.com/docs/privileged-remote-access/getting-started/admin/reports-compliance.htm.
Vault Account Activity Report Results
Because users can be granted separate access to use and check out accounts, the Vault Account Activity Report distinguishes
between the two. This allows administrators to tell the difference between a user who is able to view the account's password and a user
who is only able to inject credentials in a session.
In the Vault Account Activity Report Results, the Data column shows information associated with the event. The Credentials
Checked Out event contains a Details link in the Data column when credentials are checked out while in a session. This link redirects to
the Support Session Detail Report in which the credentials were used.
Note: If the credentials are checked out from /login, then no Details link is present in the Data column.
The Data Service column appears in the reporting results when the Include Windows services events option is enabled. Any errors
that occur with service account rotation events are shown in this column.
Vendors: Report on Vendor Accounts and User Activity
Reports VENDORS
Vendor Account Activity Report
Date Range
Select a start date for which to pull reporting data. Then select either the number of days for which to pull your report or an end date.
Vendor Group
Find all events involving a specific vendor. Reports include Timestamp, Vendor Group, Event Type, Performed By, and associated
Data. Event Types cover Vendor Group or Vendor User Requested/Created/Deleted/Denied.
SALES: www.beyondtrust.com/contact
SUPPORT: www.beyondtrust.com/support
DOCUMENTATION: www.beyondtrust.com/docs
133
©2003-2024 BeyondTrust Corporation. All Rights Reserved. Other trademarks identified on this page are owned by their respective owners. BeyondTrust is not a chartered bank or trust company, or
depository institution. It is not authorized to accept deposits or trust accounts and is not licensed or regulated by any state or federal banking authority.
TC: 7/8/2024
PRIVILEGED REMOTE ACCESS 24.2
ADMIN GUIDE

Jump Item: Report on Jump Item Activity
Reports JUMP ITEM
Administrators and privileged users can generate broad, comprehensive reports and also apply specific filtering to customize reported
information based on clear-cut needs. All Jump Item events are logged. By default, logs are saved for 90 days, although this limit can be
modified in Days to Keep Jump Item Logging Information in Management > Security > Miscellaneous.
Note: Make sure the View Reports permission is enabled in Jump > Jump Item Roles > Permissions. This option is
enabled by default for all built-in administrators (the first admin account created on new site installs).
Note: A new Jump Item Role called Auditor is automatically created on new site installations. On existing installations it has
to be created. This role only has a single View Reports permission enabled, giving admins the option to grant a user just the
permission to run Jump Item reports, without the need to grant any other permission.
Users can view the following events related to Jump Items on Jump Groups (Personal or Shared):
l
Jump Item Created
l
Jump Item Deleted
l
Jump Item Copied From
l
Jump Item Copied To
l
Jump Item Moved From
l
Jump Item Moved To
l
Jump Item Session Started
The following information is included as part of the event:
l
The time at which the event occurred.
l
If the event was initiated by a user, the user's identifying information is associated to that event. This could be a user, API account,
or system information. The data in this column is shown as a hyperlink for User and API Account generated events. When
clicked, it links to that User or API Account edit page, assuming that the user or API account has appropriate permission to view
the report.
l
The event type.
l
Jump Item Type, which is one of the supported Jump Item types, for example, Jump Client, Remote Jump, Remote RDP, etc.
l
Name of the Jump Item. The data in this column is shown as a hyperlink. When clicked, the reporting view changes to show the
events belonging to only that specific Jump Item. The title of the page also changes to All Jump Item Events for: <Jump Item
Name>.
l
Name of the Jump Group. This is the source Jump Group for Jump Item Copied From and Jump Item Moved From events, and
destination Jump Group for Jump Item Copied To andJump Item Moved To events.
l
Any additional data that is specific to the logged event. This field can be used to store the destination Jump Group for the events
related to Jump Items Copy and Move.
Reporting data is included in backups.
SALES: www.beyondtrust.com/contact
SUPPORT: www.beyondtrust.com/support
DOCUMENTATION: www.beyondtrust.com/docs
134
©2003-2024 BeyondTrust Corporation. All Rights Reserved. Other trademarks identified on this page are owned by their respective owners. BeyondTrust is not a chartered bank or trust company, or
depository institution. It is not authorized to accept deposits or trust accounts and is not licensed or regulated by any state or federal banking authority.
TC: 7/8/2024
PRIVILEGED REMOTE ACCESS 24.2
ADMIN GUIDE

For more information, please see "Days to Keep Jump Item Logging Information" on page 146.
Filters
You can find Jump Item events that match the following filters. You may use multiple filters, but only Jump Item events matching all the
filters you enable are retrieved.
Date Range
Select a start date for which to pull reporting data. Then select either the number of days for which to pull your report or an end date.
Jump Group
Filter sessions by Jump Items belonging to a certain Jump Group. If selected, the following options are available:
l
Find all sessions started from Jump Items belonging to a specific Jump Group.
l
Find all sessions started from personal Jump Items for a specific user.
l
Find all sessions in your personal Jump Group.
Jump Item
Click on the search field to find all events involving a specific Jump Item.
Performed by
Click on the search field to find all events involving a specific user, API account, or the system.
Click Show Report when done.
Syslog: Download Report Containing All Syslog Files on the Appliance
Reports SYSLOG
Syslog Report
Download Syslog Files
Click the Download Syslog Files button to download a ZIP file containing all syslog files available on the Appliance
SALES: www.beyondtrust.com/contact
SUPPORT: www.beyondtrust.com/support
DOCUMENTATION: www.beyondtrust.com/docs
135
©2003-2024 BeyondTrust Corporation. All Rights Reserved. Other trademarks identified on this page are owned by their respective owners. BeyondTrust is not a chartered bank or trust company, or
depository institution. It is not authorized to accept deposits or trust accounts and is not licensed or regulated by any state or federal banking authority.
TC: 7/8/2024
PRIVILEGED REMOTE ACCESS 24.2
ADMIN GUIDE
Compliance: Make Privileged Remote Access Data Anonymous to Meet
Compliance Standards
Reports COMPLIANCE
IMPORTANT!
By default, the Compliance tab is disabled. If your organization wishes to have this functionality, please contact BeyondTrust
Support at www.beyondtrust.com/docs/index.htm#support.
User Anonymization
Information about users as well as the actions performed during access sessions can be made anonymous to meet privacy regulations
and compliance standards.
To make data anonymous, type the username, display name, or email address and then select the user from the list. Click Search
Representative Activity. If data is found, the system returns a list of the information found for the user, along with a randomly-generated,
proposed replacement term for the information. The proposed term is click-able, allowing the Edit Replacement prompt to appear. Within
the prompt, the data can be made anonymous by entering in a preferred replacement term for the data. When finished, click Edit
Replacement Term in All History to replace the term in the section.
The list updates with the new replacement term and displays "All access sessions and team activity events for this user will be marked as
anonymized at: (date and time)." After reviewing the replacement terms and time stamp, click Delete User and Anonymize to begin the
anonymizing process for the entire software. Before stating the anonymization process, you are required to enter your display name.
IMPORTANT!
All session recordings are deleted as part of the anonymization request.
Endpoint Anonymization
Information about endpoints being accessed as well as the actions performed during access sessions can be made anonymous to meet
privacy regulations and compliance standards.
To make data anonymous, enter the endpoint's name, hostname, or IP address into the field. Select the Partial match checkbox if partial
matches should be listed. Then click Search Customer Activity. If data is found, the system returns a list of the information found for the
endpoint along with a randomly-generated, proposed replacement term for the information. The proposed term is clickable, allowing the
Edit Replacement prompt to appear. Within the prompt, the data can be made anonymous by entering in a preferred replacement term
for the data. When finished, click Edit Replacement Term in All History to replace the term in the section.
The list updates with the new replacement term and displays "The selected access sessions will be marked as anonymized at: (date and
time)." After reviewing the replacement terms and time stamp, click Anonymize Selected Sessions to kick-start the anonymizing
process for the entire software. Before stating the anonymization process, you are required to enter your display name.
You can also choose to Add Custom. This allows you to enter and to search for customized information, such as account numbers.
SALES: www.beyondtrust.com/contact
SUPPORT: www.beyondtrust.com/support
DOCUMENTATION: www.beyondtrust.com/docs
136
©2003-2024 BeyondTrust Corporation. All Rights Reserved. Other trademarks identified on this page are owned by their respective owners. BeyondTrust is not a chartered bank or trust company, or
depository institution. It is not authorized to accept deposits or trust accounts and is not licensed or regulated by any state or federal banking authority.
TC: 7/8/2024
PRIVILEGED REMOTE ACCESS 24.2
ADMIN GUIDE

IMPORTANT!
All session recordings are deleted as part of the anonymization request.
Status
Review information about anonymization jobs, including the found and replacement terms, the type of data being anonymized, and the
status of the job.
The job status is automatically refreshed every 15 seconds, and the status for completed requests remains available for 24 hours.
Note: This status information is also available in session reports.
Note: For environments where failover or Atlas is configured, the anonymization of data is not complete until synchronization
across all nodes or backup B Series Appliances has occurred.
SALES: www.beyondtrust.com/contact
SUPPORT: www.beyondtrust.com/support
DOCUMENTATION: www.beyondtrust.com/docs
137
©2003-2024 BeyondTrust Corporation. All Rights Reserved. Other trademarks identified on this page are owned by their respective owners. BeyondTrust is not a chartered bank or trust company, or
depository institution. It is not authorized to accept deposits or trust accounts and is not licensed or regulated by any state or federal banking authority.
TC: 7/8/2024
PRIVILEGED REMOTE ACCESS 24.2
ADMIN GUIDE

Languages: Manage Installed Languages
Localization LANGUAGES
Languages
Privileged Remote Access supports English, Spanish, Dutch, French, German, Italian, Japanese, Russian, Polish, Simplified Chinese,
and Traditional Chinese. Privileged Remote Access supports international character sets.
Note: Because of translation scheduling, language packs trail slightly behind the English release of any new software version.
Also note that for some features localization is limited to 1-byte characters. The use of 2-byte characters (certain language
packs) may change expected behavior of some features. The BeyondTrust Jumpoint Configuration interface is not available in
translation at this time.
Enabled
If more than one language package is installed, check the box for each language you want to enable. Checking the option makes that
language available from the dropdown in the administrative interface and the access console.
Default Language
If more than one language package is installed, select a language to be displayed by default. Click Update Languages to save changes.
Installing Language Packs
Language packs must be installed and enabled by the BeyondTrust admin. BeyondTrust Support can build language packs into software
updates when requested to do so by customers. Before requesting language packs, check to make sure that they are not already installed
and that the active release version supports them. To check for languages and get the necessary update(s), follow these steps:
1. Log in to the BeyondTrust /login web interface as an admin user.
2. Navigate to the Localization tab and check for the necessary languages.
3. If the languages are listed, check the box for the ones you want to install.
4. If the languages are not listed, contact Support to have a new update built for them.
5. Install any necessary updates and test to see if the desired language(s) appear in BeyondTrust.
Representatives can select the necessary language at the login screen. Admins and reps can select their languages from the dropdown
menu in /login and /appliance.
Languages: Manage Installed Languages
Localization LANGUAGES
SALES: www.beyondtrust.com/contact
SUPPORT: www.beyondtrust.com/support
DOCUMENTATION: www.beyondtrust.com/docs
138
©2003-2024 BeyondTrust Corporation. All Rights Reserved. Other trademarks identified on this page are owned by their respective owners. BeyondTrust is not a chartered bank or trust company, or
depository institution. It is not authorized to accept deposits or trust accounts and is not licensed or regulated by any state or federal banking authority.
TC: 7/8/2024
PRIVILEGED REMOTE ACCESS 24.2
ADMIN GUIDE

Languages
Privileged Remote Access supports English, Spanish, Dutch, French, German, Italian, Japanese, Russian, Polish, Simplified Chinese,
and Traditional Chinese. Privileged Remote Access supports international character sets.
Note: Because of translation scheduling, language packs trail slightly behind the English release of any new software version.
Also note that for some features localization is limited to 1-byte characters. The use of 2-byte characters (certain language
packs) may change expected behavior of some features. The BeyondTrust Jumpoint Configuration interface is not available in
translation at this time.
Enabled
If more than one language package is installed, check the box for each language you want to enable. Checking the option makes that
language available from the dropdown in the administrative interface and the access console.
Default Language
If more than one language package is installed, select a language to be displayed by default. Click Update Languages to save changes.
Installing Language Packs
Language packs must be installed and enabled by the BeyondTrust admin. BeyondTrust Support can build language packs into software
updates when requested to do so by customers. Before requesting language packs, check to make sure that they are not already installed
and that the active release version supports them. To check for languages and get the necessary update(s), follow these steps:
1. Log in to the BeyondTrust /login web interface as an admin user.
2. Navigate to the Localization tab and check for the necessary languages.
3. If the languages are listed, check the box for the ones you want to install.
4. If the languages are not listed, contact Support to have a new update built for them.
5. Install any necessary updates and test to see if the desired language(s) appear in BeyondTrust.
Representatives can select the necessary language at the login screen. Admins and reps can select their languages from the dropdown
menu in /login and /appliance.
SALES: www.beyondtrust.com/contact
SUPPORT: www.beyondtrust.com/support
DOCUMENTATION: www.beyondtrust.com/docs
139
©2003-2024 BeyondTrust Corporation. All Rights Reserved. Other trademarks identified on this page are owned by their respective owners. BeyondTrust is not a chartered bank or trust company, or
depository institution. It is not authorized to accept deposits or trust accounts and is not licensed or regulated by any state or federal banking authority.
TC: 7/8/2024
PRIVILEGED REMOTE ACCESS 24.2
ADMIN GUIDE

Management
Software: Download a Backup, Upgrade Software
Management SOFTWARE
Backup Settings
It is an important disaster recovery best practice to save a backup copy of your software settings regularly. BeyondTrust recommends
backing up your B Series Appliance configuration each time you change its settings. In the event of a hardware failure, a backup file
speeds time-to-recovery and, if necessary, allow BeyondTrust to provide you access to temporary hosted services while retaining the
settings from your most recent backup.
Backup Password
To password protect your software backup file, create a password. If you do choose to set a password, you cannot revert to the backup
without providing the password.
Include Logged History Reporting Data
If this option is checked, your backup file includes session logs. If unchecked, session reporting data is excluded from the backup.
Download Backup
Save a secure copy of your software configuration. Save this file in a secure location.
Backup Vault Encryption Key
The Vault encryption key is used to encrypt and decrypt all the Vault credentials stored on the B Series Appliance. If you are ever required
to restore configuration data from a backup onto a new B Series Appliance, you must also restore the Vault encryption key from a backup
to be able to use the encrypted Vault credentials contained in the configuration backup.
Restore Settings
Configuration and Vault Encryption Key Backup File
Should you need to revert to a backup, browse to the latest backup file that you saved.
Configuration and Vault Encryption Key Backup Password
If you created a password for your backup file, enter it here.
SALES: www.beyondtrust.com/contact
SUPPORT: www.beyondtrust.com/support
DOCUMENTATION: www.beyondtrust.com/docs
140
©2003-2024 BeyondTrust Corporation. All Rights Reserved. Other trademarks identified on this page are owned by their respective owners. BeyondTrust is not a chartered bank or trust company, or
depository institution. It is not authorized to accept deposits or trust accounts and is not licensed or regulated by any state or federal banking authority.
TC: 7/8/2024
PRIVILEGED REMOTE ACCESS 24.2
ADMIN GUIDE

Upload Backup
Upload the backup file to your B Series Appliance and restore your site's settings to those saved on the backup.
For more information, please see Back Up Procedures at https://www.beyondtrust.com/docs/privileged-remote-access/how-
to/disaster-recovery/back-up-procedures.htm.
Upload Update
Select a software update file to manually upload new software packages from BeyondTrust. You must confirm that you wish to upload the
software package. The Uploaded Update section displays additional information to verify your uploaded package. Click Install if you
wish to complete the installation process, or Delete Update if you wish to clear the update staging area. If your update package only
contains additional licenses, you can install the update without restarting the B Series Appliance. After confirmation that you wish to install,
the page displays a progress bar to notify you of the overall installation progress. Updates made here automatically update all sites and
licenses on your B Series Appliance.
Note: Your B Series Appliance administrator can also use the Check for Updates feature of the B Series Appliance interface
to automatically search for and install new software packages.
Site Migration
Site migration allows you to migrate configuration settings and data from another BeyondTrust Privileged Remote Access site. For
example, migration can be used to move from an on-premises installation to a cloud installation. Migration uses an API account to
automatically download and restore a backup.
Preparation for Migration
Before migrating the data, please observe these prerequisites and conditions:
l
The API account needs read-only or higher access to the command API, and access to the backup and Vault encryption key APIs.
l
The administrator needs access to the local admin account to log in, in case security providers do not reconnect properly after the
migration.
l
If the source site version is earlier than 21.2, the Vault encryption key must be migrated manually.
l
Recordings are not included as part of migration. To retain access to existing recordings, keep the source online with a different
host name or use the integration client to back up the recordings before migration.
l
After the data has been migrated, additional steps are required to make the new instance fully functional. These steps are listed on
the Site Migration panel, and are summarized below:
o
Create a new DNS entry for the host name to access the old site.
o
Add the new host name to the old site public portal.
o
Confirm access to the old site.
o
Allow time for DNS entries to propagate across networks.
o
Click the Restart Software button on the old site to upgrade clients to use the new site.
SALES: www.beyondtrust.com/contact
SUPPORT: www.beyondtrust.com/support
DOCUMENTATION: www.beyondtrust.com/docs
141
©2003-2024 BeyondTrust Corporation. All Rights Reserved. Other trademarks identified on this page are owned by their respective owners. BeyondTrust is not a chartered bank or trust company, or
depository institution. It is not authorized to accept deposits or trust accounts and is not licensed or regulated by any state or federal banking authority.
TC: 7/8/2024
PRIVILEGED REMOTE ACCESS 24.2
ADMIN GUIDE

Data Migration
1. Enter the following information about the source site to start a migration:
l
Hostname
l
OAuth Client ID
l
OAuth Client Secret
2. Once the information is entered, click Verify Connection.
l
A pop-up notification verifies the connection and that the site version is supported.
l
Reset can be clicked at any time before starting the migration, if changes are required.
3. If applicable, click +Choose Certificate to select the SSL Certificate for a self-signed SSL certificate.
Note: Certificates must be in PEM, DER, or CRT format.
Tip: An option to Automatically begin site migration is available once the connection is verified. Check this option to
bypass some of the steps and notifications that follow. If checked, click Retrieve Backup and respond to the notifications to
complete the migration.
4. Review displayed information, and if correct, click Retrieve Backup. If not correct, click Reset.
5. Pop-up confirmation messages appear for the backup file and, if applicable for your version, the Vault encryption key. The file
names display on the panel, as well as a Migrate Site button.
6. Click Migrate Site.
7. A pop-up notification warns that a local account is required, and a second pop-up warns that the migration overwrites data on the
current site. Then a Migration in Process message displays.
8. When the migration completes, click Yes in the pop-up notification to reset the site. Log in again to view the migrated data.
9. Complete the post-migration steps listed on the Site Migration panel.
Security: Manage Security Settings
Management SECURITY
Authentication
Default Authentication Method
The default authentication method is Username & Password. If passwordless authentication is enabled, Passwordless FIDO2 can be
selected as the default authentication method. If passwordless authentication is enabled, either authentication method can be selected
when logging in.
SALES: www.beyondtrust.com/contact
SUPPORT: www.beyondtrust.com/support
DOCUMENTATION: www.beyondtrust.com/docs
142
©2003-2024 BeyondTrust Corporation. All Rights Reserved. Other trademarks identified on this page are owned by their respective owners. BeyondTrust is not a chartered bank or trust company, or
depository institution. It is not authorized to accept deposits or trust accounts and is not licensed or regulated by any state or federal banking authority.
TC: 7/8/2024
PRIVILEGED REMOTE ACCESS 24.2
ADMIN GUIDE

Enable Passwordless FIDO2 Authentication
This feature allows users from the local security provider or vendor users to register and log in with FIDO2-certified authenticators rather
than a password. FIDO2 authenticator devices must support CTAP2 and be able to perform user verification using biometrics or a PIN.
This feature is enabled by default. Uncheck to disable the feature. If unchecked:
l
The Passwordless Authenticators section of My Account > Security is hidden.
l
The Passwordless FIDO2 option is not available at the login dropdowns.
l
Users are unable to log in using previously registered authenticators.
Unchecking this feature does not remove previously registered authentications. If it is necessary to remove those, they must be deleted
before the feature is disabled.
Users with registered passwordless authentication can continue to log in using their username and password. This can be useful if they
need to log in using a device that does not support passwordless authentication.
This feature cannot be limited to specific users or user groups.
For more information, and to register authenticators, please see "Passwordless Authenticators" on page 17.
Account Lockout After
Set the number of times an incorrect password can be entered before the account is locked out.
Account Lockout Duration
Set how long a locked-out user must wait before being allowed to reattempt login. Alternatively, require an admin to unlock the account.
Allow local users to skip 2FA when logging in with passwordless FIDO2
When this setting is enabled, if a local user has set up both Two Factor Authentication and Passwordless FIDO2 Authentication, and the
user logs in using passwordless FIDO2, the user is not prompted to enter a second factor code from their authenticator app. The user is
still prompted for a second factor code if they log in using a password.
Passwords
Minimum Password Length
Set rules for local user accounts regarding the length of passwords.
Require Complex Passwords
Set rules for local user accounts regarding the complexity of passwords.
SALES: www.beyondtrust.com/contact
SUPPORT: www.beyondtrust.com/support
DOCUMENTATION: www.beyondtrust.com/docs
143
©2003-2024 BeyondTrust Corporation. All Rights Reserved. Other trademarks identified on this page are owned by their respective owners. BeyondTrust is not a chartered bank or trust company, or
depository institution. It is not authorized to accept deposits or trust accounts and is not licensed or regulated by any state or federal banking authority.
TC: 7/8/2024
PRIVILEGED REMOTE ACCESS 24.2
ADMIN GUIDE

Default Password Expiration
Set rules for local user accounts regarding how often passwords expire.
Enable Password Reset
Allow users with configured email addresses to reset passwords. The link provided in password reset emails are valid until one of the
following events occurs:
l
24 hours has elapsed.
l
The link is clicked, and the password is successfully reset.
l
The system sends another link to the email address.
Access Console
Terminate Session If Account Is In Use
If a user tries to log into the access console with an account already in use, a checked Terminate Session box disconnects the previous
connection in order to allow the new login.
Enable Saved Logins
Allow or disallow the access console to remember a user's credentials.
Log Out Idle User After
Set the length of time after which an inactive user is logged out of the access console to free the license for another user.
Enable Warning and Logout Notification on Idle Timeout
Set this option to show a notification to an idle user 30 seconds before a logout is set to occur. The user will also receive another
notification when the logout has occurred.
Remove User from Session After Inactivity
This option effectively pushes a user out of a session after the period of inactivity you select. This helps BeyondTrust customers meet
compliance initiatives with inactivity requirements. The user is notified 1 minute prior to removal and may reset the timeout.
A user is considered active in a session if any files are being transferred, whether through the file transfer tab or the chat interface, or if
they click the mouse or press a key in the session tab. Mouse movement by itself does not count as activity. As soon as activity stops, the
inactivity timer begins.
Allow Mobile Access Console and Privileged Web Access Console to Connect
Give users the option of accessing remote systems through the BeyondTrust access console app for iOS and Android, as well as through
the privileged web access console, a browser-based access console.
SALES: www.beyondtrust.com/contact
SUPPORT: www.beyondtrust.com/support
DOCUMENTATION: www.beyondtrust.com/docs
144
©2003-2024 BeyondTrust Corporation. All Rights Reserved. Other trademarks identified on this page are owned by their respective owners. BeyondTrust is not a chartered bank or trust company, or
depository institution. It is not authorized to accept deposits or trust accounts and is not licensed or regulated by any state or federal banking authority.
TC: 7/8/2024
PRIVILEGED REMOTE ACCESS 24.2
ADMIN GUIDE

Allow the Access Console CLI tool
Check this option to allow users to use the Access Console Command Line Interface (CLI) tool.
Clipboard Synchronization Mode
Clipboard Synchronization Mode determines how users are allowed to synchronize clipboards within a screen sharing session. The
available settings are as follows:
l
Automatic: The endpoint and user's clipboards are automatically synchronized when one or the other changes.
l
Manual: The user has to click one of the clipboard icons on the access console to either send content to or pull content from the
endpoint's clipboard
You MUST restart the software on the status page for this setting to take effect.
Admins can prevent users from accessing the clipboard, can allow users to send data to the endpoint, or can allow users to have access in
both directions (send and receive data). These settings control which clipboard icons the user sees in the access console when Manual
mode is selected, as well as how the synchronization flows in Automatic mode.
Granular control of access to the clipboard can be set for session policies and group policies, as well as granted to specific users. Please
see the links below for each particular case:
l
Users: Add User Permissions for a User or Admin: Users and Security > Users > Add > Session Permissions > Screen
Sharing
l
Session Policies: Set Session Permission and Prompting Rules: Users and Security > Session Policies > Add >
Permission > Screen Sharing
l
Group Policies: Apply User Permissions to Groups of Users: Users and Security > Group Policies > Add > Session
Permissions [defined]
Note: You must restart the software on the Status page for this setting to take effect.
Allow Search for External Jump Items
This enables Jump item searching in Password Safe, when Privileged Remote Access (PRA) has a Password Safe integration and a fully
configured Endpoint Credential Manager (ECM).
Note: You must restart the software for this setting to take effect. When enabling or disabling this setting, you are prompted to
restart now or restart later from the Status page in /login.
Jumpoint for External Jump Item Sessions
This field is available only when the Allow Search for External Jump Items option is checked. All sessions started from external Jump
items are performed through the Jumpoint selected here, or in the case where multiple Jumpoints are deployed on endpoints across
segmented networks, the Jumpoint used may be selected automatically by matching against an External Jump Item's Network ID. A
Jumpoint must be positioned on the network to have connectivity to potentially any of the External Jump Items returned by the ECM.
Select the Jumpoint to use for external Jump Item sessions from the dropdown list of available Jumpoints, or leave the default selection of
Automatically Selected by External Jump Item Network ID to allow PRA to determine which Jumpoint handles the session.
SALES: www.beyondtrust.com/contact
SUPPORT: www.beyondtrust.com/support
DOCUMENTATION: www.beyondtrust.com/docs
145
©2003-2024 BeyondTrust Corporation. All Rights Reserved. Other trademarks identified on this page are owned by their respective owners. BeyondTrust is not a chartered bank or trust company, or
depository institution. It is not authorized to accept deposits or trust accounts and is not licensed or regulated by any state or federal banking authority.
TC: 7/8/2024
PRIVILEGED REMOTE ACCESS 24.2
ADMIN GUIDE

The External Jump Item Network ID is an attribute you must set on the Jumpoint from Jump > Jumpoint in /login. It is equivalent to the
Workgroup attribute on managed systems in Password Safe. Its value is matched against the Network ID property for external Jump
Items returned by the ECM to determine the Jumpoint to handle a session.
External Jump Item Group Name
This field is available only when the Allow Search for External Jump Items option is checked. Optionally, enter a name for the external
Jump Group, or leave the default option of External Jump Items. This name displays as the Jump Group name when viewing Jump Items
in the access console or the web access console. Click Save if you have modified the default group name.
Log "Run As" Special Action Commands in Session Reports
Uncheck this option to stop logging and reporting all Run As commands. Since the entire command is logged, any credentials passed as a
command parameter are logged.
Miscellaneous
Days to Keep Logging Information
In Days to Keep Logging Information, you can set how long logging information should be stored on the B Series Appliance. This
information includes the session reporting data and recordings. The maximum duration for which session reporting data and recordings
can be retained on a B Series Appliance is 90 days. This is the default value in a new installation. It is possible that session recordings for
some sessions within the retention time frame are not available. This could be caused by disk space constraints or the Days to Keep
Logging Information setting.
The B Series Appliance runs a maintenance script every day that ensures disk usage does not exceed 90%. Should this be exceeded, the
script begins deleting session recordings based on a formula until the disk usage is less than 90%. If the Days to Keep Logging
Information setting was recently changed, the new setting may take up to 24 hours to go into effect.
If data or recordings must be retained beyond the configured limit, BeyondTrust recommends using the Reporting API
(www.beyondtrust.com/docs/privileged-remote-access/how-to/integrations/api/reporting).
Inter-appliance Communication Pre-shared Key
Enter a password in the Inter-appliance Communication Pre-shared Key field to establish a trusted relationship between two B Series
Appliances. Matching keys are required for two or more B Series Appliances to be configured for features such as failover or clustering.
The key must contain at least 6 characters and contain at least one uppercase letter, one lowercase letter, one number, and one special
character.
Days to Keep Jump Item Logging Information
Choose how long Jump Item reporting data will be accessible from the appliance. Because data is purged only once a day, it may actually
be accessible for up to 24 hours beyond what is selected here.
SALES: www.beyondtrust.com/contact
SUPPORT: www.beyondtrust.com/support
DOCUMENTATION: www.beyondtrust.com/docs
146
©2003-2024 BeyondTrust Corporation. All Rights Reserved. Other trademarks identified on this page are owned by their respective owners. BeyondTrust is not a chartered bank or trust company, or
depository institution. It is not authorized to accept deposits or trust accounts and is not licensed or regulated by any state or federal banking authority.
TC: 7/8/2024
PRIVILEGED REMOTE ACCESS 24.2
ADMIN GUIDE

Network Restrictions
Determine which IP networks should be able to access /login, /api, and the BeyondTrust access console on your B Series Appliance. If
you enable network restrictions, you can also enforce the networks on which access consoles may be used.
Admin Interface (/login) and API Interface (/api)
l
Always apply network restrictions: when selected, you have the option of creating either an Allow list containing only allowed
networks, or a Deny list containing networks that are denied access. When this option is selected, you can determine which
restrictions, if any, should apply to the desktop, mobile, and web access consoles.
l
Never apply network restrictions: when selected, no restrictions are applied and no other options are available to apply
restrictions to the desktop, mobile, and web console.
Desktop and Mobile Access Console
l
Always apply network restrictions: when selected, it inherits the network restrictions entered for the Admin interface.
l
Never apply network restrictions: when selected, no restrictions are applied to the desktop and mobile consoles, but you have
the option to apply restrictions to the web access console.
l
Only apply network restrictions for user's first authentication: this applies restrictions selected above, but only when the
user first logs in.
Web Console (/console)
l
Always apply network restrictions: when selected, the web access console inherits the restrictions entered for the admin
interface.
l
Never apply network restrictions: when selected, no restrictions are applied to the web access console, even if restrictions are
in effect for the other access console methods.
For more information, please see Privileged Web Access Console Guide at https://www.beyondtrust.com/docs/privileged-
remote-access/getting-started/access-console/web-access/index.htm.
Port Restrictions for Administrative Web Interface
Set the ports through which your /login interface can be accessed.
Proxy Configuration
Configure a proxy server to control the dataflow for information sent from the B Series Appliance. This applies to outbound events and API
calls.
Proxy Protocol
Configure HTTP or HTTPS proxy types for outbound connectivity from the B Series Appliance.
SALES: www.beyondtrust.com/contact
SUPPORT: www.beyondtrust.com/support
DOCUMENTATION: www.beyondtrust.com/docs
147
©2003-2024 BeyondTrust Corporation. All Rights Reserved. Other trademarks identified on this page are owned by their respective owners. BeyondTrust is not a chartered bank or trust company, or
depository institution. It is not authorized to accept deposits or trust accounts and is not licensed or regulated by any state or federal banking authority.
TC: 7/8/2024
PRIVILEGED REMOTE ACCESS 24.2
ADMIN GUIDE

Enable Proxy Configuration
Check the box to enable the outbound proxy settings.
Proxy Host
Enter the IP address or hostname of your proxy server.
Proxy Port
Enter the port your proxy server uses. The default port is 1080.
Proxy Username and Password
If your proxy server requires authentication, enter a username and password.
Test
Click Test to ensure configuration settings are entered correctly. The current test result is displayed in the Last Test Result area. Error
messages indicate where configuration settings must be corrected.
ICAP Configuration
You can configure file transfers to pass through the Secure Remote Access Appliance and be scanned by an Internet Content Adaptation
Protocol (ICAP) server. If the ICAP server indicates that a file is malicious, it is not sent to the destination.
IMPORTANT!
File transfers cannot be sent to an ICAP server in the following scenarios: Protocol Tunnel Jump-based file transfers, clipboard file
transfers within RDP sessions, and external tool file transfers within RDP or Shell Jump sessions. Even with ICAP enabled, these
transfers are not scanned.
Note: Enabling ICAP or changing the ICAP URL requires restarting the appliance to ensure clients are reconnected and
properly configured. In an Atlas environment, a sync is required.
Using ICAP reduces the performance of file transfers due to the added steps and scanning. If the ICAP server is down, file
transfers fail.
Improper ICAP configuration prevents Jumpoints from working correctly.
ICAP Settings
Enter the ICAP Server URL. This is supplied by your ICAP server vendor. The default port is 1344. If you are using another port, it must
be entered with the URL, in this format: icap://example.com:0000 or icaps://example.com:0000.
SALES: www.beyondtrust.com/contact
SUPPORT: www.beyondtrust.com/support
DOCUMENTATION: www.beyondtrust.com/docs
148
©2003-2024 BeyondTrust Corporation. All Rights Reserved. Other trademarks identified on this page are owned by their respective owners. BeyondTrust is not a chartered bank or trust company, or
depository institution. It is not authorized to accept deposits or trust accounts and is not licensed or regulated by any state or federal banking authority.
TC: 7/8/2024
PRIVILEGED REMOTE ACCESS 24.2
ADMIN GUIDE

If the protocol is icaps://, check Use a CA Certificate. Then click Choose a Certificate and upload the certificate.
Note: If you use a self-signed ICAPS certificate and you do not provide a CA certificate that can validate it, all session file
transfers will fail.
Expired or invalid certificates cause session file transfers to fail, regardless of whether a CA certificate is provided.
Save the ICAP settings before testing.
Test ICAP Connection
After entering and saving the ICAP settings, click TEST WITH A FILE and select a file to upload. There are three possible results:
l
A connection error. An error header and ICAP logs display (if available).
l
A malicious file is detected. A warning header and response details display. The exact nature of the malicious content does not
display.
l
No problems are detected. The response details display.
Site Configuration: Set HTTP Ports, Enable Prerequisite Login Agreement
Management SITE CONFIGURATION
HTTP
Site Addresses
Set one or more DNS addresses that resolve to your B Series Appliance.
Portal Redirect
By default, the option Redirect to /login is selected. Users who enter the portal address are automatically redirected to the administrative
/login interface. You can select Redirect to the Privileged Web Access Console or No Redirect to change this.
HTTP Port and HTTPS Port
Experienced network technicians operating in non-standard network environments can change the ports through which BeyondTrust
traffics. These port settings should be adjusted only in the case where ports other than the standard 80 and 443 are used for web access.
SALES: www.beyondtrust.com/contact
SUPPORT: www.beyondtrust.com/support
DOCUMENTATION: www.beyondtrust.com/docs
149
©2003-2024 BeyondTrust Corporation. All Rights Reserved. Other trademarks identified on this page are owned by their respective owners. BeyondTrust is not a chartered bank or trust company, or
depository institution. It is not authorized to accept deposits or trust accounts and is not licensed or regulated by any state or federal banking authority.
TC: 7/8/2024
PRIVILEGED REMOTE ACCESS 24.2
ADMIN GUIDE
Prerequisite Login Agreement
Enable Login Agreement for the administrative interface/Access Console
You can enable a login agreement that users must accept before accessing either the /login administrative interface, the access
console,or both. The configurable agreement allows you to specify restrictions and internal policy rules before users are allowed to log in.
Agreement Title
Customize the title of the agreement.
Agreement Text
Provide the text for the login agreement.
Email configuration: configure the software to send emails
Management EMAIL CONFIGURATION
Email address
Note: If a B Series Appliance is designated as a backup B Series Appliance or a traffic node, the email configuration for that B
Series Appliance will be overwritten with the email configuration defined on the primary B Series Appliance.
From Address
Set the email address from which automatic messages from your B Series Appliance will be sent.
SMTP relay server
Configure your B Series Appliance to work with your SMTP relay server in order to send automatic email notifications of certain events.
SMTP Relay Server
Enter the hostname or IP address of your SMTP relay server.
SMTP Port
Set the SMTP port to contact this server on.
SALES: www.beyondtrust.com/contact
SUPPORT: www.beyondtrust.com/support
DOCUMENTATION: www.beyondtrust.com/docs
150
©2003-2024 BeyondTrust Corporation. All Rights Reserved. Other trademarks identified on this page are owned by their respective owners. BeyondTrust is not a chartered bank or trust company, or
depository institution. It is not authorized to accept deposits or trust accounts and is not licensed or regulated by any state or federal banking authority.
TC: 7/8/2024
PRIVILEGED REMOTE ACCESS 24.2
ADMIN GUIDE

SMTP Encryption
If your SMTP server supports TLS encryption, choose TLS or STARTTLS. Otherwise, select None.
SMTP Authentication Type
To use a form of authentication with this server, select either Username and Password or OAuth2. Otherwise, select None.
Username and Password
Enter a username and password to configure this form of authentication.
OAuth2
For more information, please see the following:
l
"Configure OAuth2 for Entra ID" on page 152
l
"Configure OAuth2 for Google" on page 153
Admin contact
Default Admin Contact Email Addresses
Enter one or more email addresses to which emails should be sent. Separate addresses with a space.
Send Daily Communication Notice
You can have the B Series Appliance send a daily notification to ensure that alert communication is working correctly.
In addition to the test email and daily communication notices that can be configured above, emails are sent for the following events:
l
During any failover operation, the product version on the primary node does not match the product version on the backup node.
l
During a failover status check, any of the following problems are detected.
o
The current B Series Appliance is the primary node and a shared IP address is configured in /login, but its network
interface is not enabled.
o
A shared IP address is configured in /login but is not listed as an IP address in /appliance.
o
The backup node could not contact the primary node, and it also could not contact any of the test IP addresses configured
on the Management > Failover page.
o
The backup node could not contact any of the test IP addresses configured on the Management > Failover page.
o
The backup node's backup operations are disabled on the Management > Failover page.
o
The backup node unexpectedly failed to perform a probe of itself, indicating that it is malfunctioning.
o
The backup node failed to contact the primary node using the primary node's hostname.
o
Automatic failover is disabled, and the backup node failed to probe the primary node.
SALES: www.beyondtrust.com/contact
SUPPORT: www.beyondtrust.com/support
DOCUMENTATION: www.beyondtrust.com/docs
151
©2003-2024 BeyondTrust Corporation. All Rights Reserved. Other trademarks identified on this page are owned by their respective owners. BeyondTrust is not a chartered bank or trust company, or
depository institution. It is not authorized to accept deposits or trust accounts and is not licensed or regulated by any state or federal banking authority.
TC: 7/8/2024
PRIVILEGED REMOTE ACCESS 24.2
ADMIN GUIDE

o
Automatic failover is enabled, and the backup node failed to probe the primary node. The backup node will automatically
become the primary node if the primary node remains unresponsive.
o
Automatic failover is enabled, and the backup node is automatically becoming the primary node because the primary node
was down for too long.
o
The primary node failed to perform a data sync with the backup node sometime in the past 24 hours.
Send a test email when the settings are saved
If you wish to receive an immediate test email to verify that your SMTP settings are accurately configured, check this option before
clicking the Save button.
Configure OAuth2 for Entra ID
Note: Before starting configuration on Entra ID, an Azure/Office 365 Administrator must enable Authenticated SMTP for each
account on Exchange online. To do this, go to Office 365 Admin Portal (admin.microsoft.com) > Active Users > Mail >
Manage Email apps and check Authenticated SMTP.
Configure Entra ID
1. Log into your Azure console (portal.azure.com), navigate to Entra ID, and follow instructions there for registering a new
application.
2. The redirect URI is https://{URL OF YOUR APPLIANCE}/login/smtp-verification.
3. Note the following, as they are required later:
l
Application (client) ID
l
Authorization endpoint
l
Token endpoint
l
Client secret
Provide credentials to the SMTP relay server
1. Within the Privileged Remote Access admin interface, navigate to Management > Email Configuration.
2. Under SMTP Authentication Type, select OAuth2, and enter the following information:
l
Email: The email address for the SMTP relay.
l
SMTP OAuth Provider ID: The application ID noted earlier.
l
SMTP OAuth Client Secret: The client secret noted earlier.
l
SMTP OAuth Scopes: Enter https://outlook.office.com/SMTP.Send offline_access.
l
SMTP OAuth Authentication Endpoint: The authorization endpoint noted earlier.
l
SMTP OAuth Token Endpoint: The token endpoint noted earlier.
3. Click Save.
4. Now you can verify and connect the provider account. Click Verify Oauth2 Provider.
SALES: www.beyondtrust.com/contact
SUPPORT: www.beyondtrust.com/support
DOCUMENTATION: www.beyondtrust.com/docs
152
©2003-2024 BeyondTrust Corporation. All Rights Reserved. Other trademarks identified on this page are owned by their respective owners. BeyondTrust is not a chartered bank or trust company, or
depository institution. It is not authorized to accept deposits or trust accounts and is not licensed or regulated by any state or federal banking authority.
TC: 7/8/2024
PRIVILEGED REMOTE ACCESS 24.2
ADMIN GUIDE

Note: Ensure you are logged into the provider portal as the email address for the SMTP relay, entered above, in the same
browser session. You may need to log out of your personal or admin account.
Configure OAuth2 for Google
Configure Google Cloud
1. Log in to your Google Cloud Platform console (Google Dev
Console) (console.cloud.google.com). Use the correct Gmail
account, as only the owner of the project is able to work with the
project. If you do not already have a paid account, you might choose
to purchase an account by clicking Activate in the top banner.
BeyondTrust cannot provide assistance with purchasing an
account. Click Learn More in the top banner for information regarding the limitations of free accounts.
2. Click CREATE PROJECT. You can also use an existing project.
3. Accept the default Project Name, or enter a new name.
4. Accept the default Location, or select a folder from those available
for your organization.
5. Click CREATE.
6. The APIs and services page appears. Click Library in the left
menu.
7. Search or browse for the Gmail API in the library, and click it.
SALES: www.beyondtrust.com/contact
SUPPORT: www.beyondtrust.com/support
DOCUMENTATION: www.beyondtrust.com/docs
153
©2003-2024 BeyondTrust Corporation. All Rights Reserved. Other trademarks identified on this page are owned by their respective owners. BeyondTrust is not a chartered bank or trust company, or
depository institution. It is not authorized to accept deposits or trust accounts and is not licensed or regulated by any state or federal banking authority.
TC: 7/8/2024
PRIVILEGED REMOTE ACCESS 24.2
ADMIN GUIDE
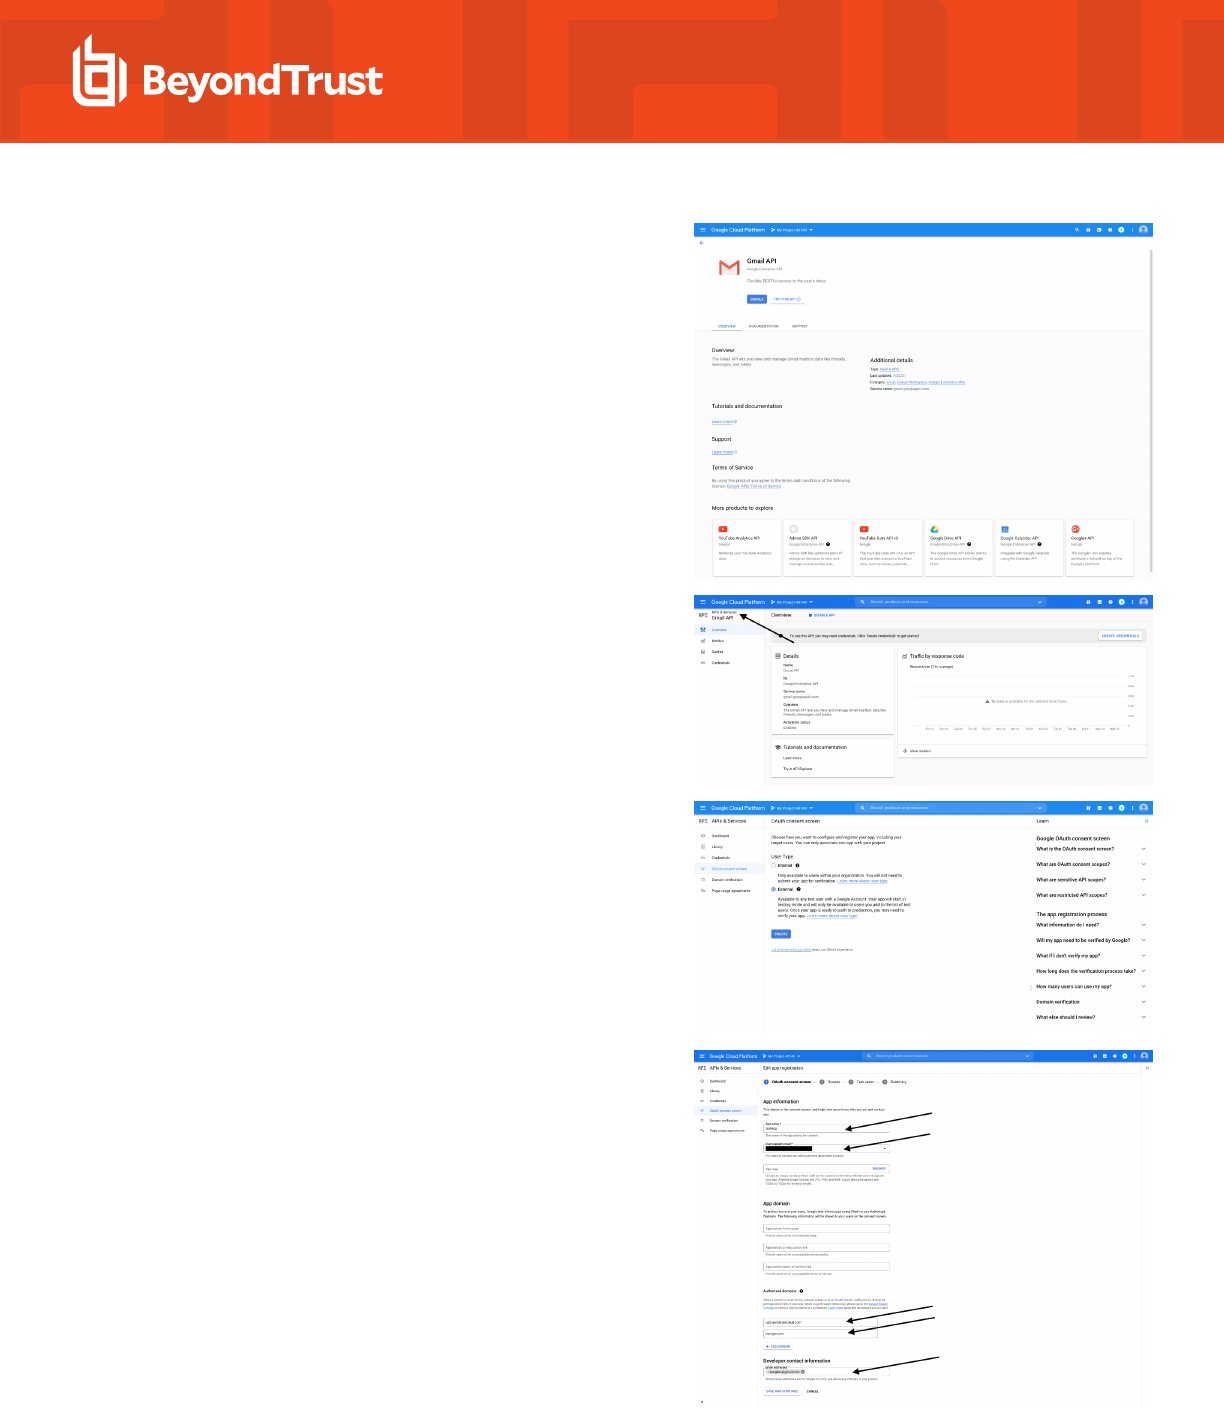
8. The Gmail API appears on its own page. Click ENABLE.
9. The Gmail API Overview page appears. Click APIs & services in
the upper left.
10. The APIs and services page appears again. Click OAuth consent
screen in the left menu.
11. Select the User Type. Internal allows only users from within the
organization, but requires a Google Workspace account.
12. Click CREATE.
13. Enter the App name.
14. Enter a User support email address. This may default to the
address you are using to create the project.
15. Enter a logo for the app, if desired. The App domain section is also
optional.
16. Add the Authorized domains. For BeyondTrust test appliances,
these are:
l
qabeyondtrustcloud.com
l
bomgar.com
17. Enter the Developer contact information. This is the email
address you are using to create the project.
18. Click SAVE AND CONTINUE.
SALES: www.beyondtrust.com/contact
SUPPORT: www.beyondtrust.com/support
DOCUMENTATION: www.beyondtrust.com/docs
154
©2003-2024 BeyondTrust Corporation. All Rights Reserved. Other trademarks identified on this page are owned by their respective owners. BeyondTrust is not a chartered bank or trust company, or
depository institution. It is not authorized to accept deposits or trust accounts and is not licensed or regulated by any state or federal banking authority.
TC: 7/8/2024
PRIVILEGED REMOTE ACCESS 24.2
ADMIN GUIDE

19. Under the Scopes tab, click ADD OR REMOVE SCOPES. This
opens the Update selected scopes window.
20. Locate and check the scope https://mail.google.com/ for the
Gmail API.
Note: The API does not appear if it has not been enabled.
21. Click UPDATE. The Update selected scopes window closes.
22. Click SAVE AND CONTINUE.
23. Under the Test users tab, click ADD USERS. This opens the Add
Users window. Add the users that have access to the application
and click ADD. Note the limits on test user access and related
restrictions.
24. Click SAVE AND CONTINUE.
25. Review the Summary, and make any necessary changes or
corrections.
26. Click BACK TO DASHBOARD.
27. Click Credentials in the left menu.
28. Click CREATE CREDENTIALS in the top banner and select OAuth
client ID.
29. On the create credentials page, select Web application for the
Application type. Additional fields appear when this is selected.
30. Enter a name for the application.
31. Scroll down to Authorised redirect URIs and click ADD URI.
32. Enter the Authorization Redirect URI in the form of https://{URL
OF YOUR APPLIANCE}/login/smtp-verification.
33. Click CREATE.
SALES: www.beyondtrust.com/contact
SUPPORT: www.beyondtrust.com/support
DOCUMENTATION: www.beyondtrust.com/docs
155
©2003-2024 BeyondTrust Corporation. All Rights Reserved. Other trademarks identified on this page are owned by their respective owners. BeyondTrust is not a chartered bank or trust company, or
depository institution. It is not authorized to accept deposits or trust accounts and is not licensed or regulated by any state or federal banking authority.
TC: 7/8/2024
PRIVILEGED REMOTE ACCESS 24.2
ADMIN GUIDE

34. A window confirms creation of the OAuth client, and shows the
Client ID and Client Secret. Click to download a JSON file. The file
contains information that is needed in the next steps.
35. Click OK to return to the APIs and services page.
Provide credentials to the SMTP relay server
1. Within the Privileged Remote Access admin interface, navigate to Management > Email Configuration.
2. Under SMTP Authentication Type, select OAuth2, and enter the following information:
l
Email: The email address for the SMTP relay.
l
SMTP OAuth Provider ID: The client_id from the JSON file generated during the Google configuration.
l
SMTP OAuth Client Secret: The client_secret from the JSON file generated during the Google configuration.
l
SMTP OAuth Scopes: Enter https://mail.google.com/.
l
SMTP OAuth Authentication Endpoint: The auth_uri from the JSON file generated during the Google configuration.
l
SMTP OAuth Token Endpoint: The token_uri from the JSON file generated during the Google configuration.
3. Click Save.
4. Now you can verify and connect the provider account. Click Verify Oauth2 Provider.
Note: Ensure you are logged into the provider portal as the email address for the SMTP relay, entered above, in the same
browser session. You may need to log out of your personal or admin account.
Outbound Events: Set Events to Trigger Messages
Management OUTBOUND EVENTS
SALES: www.beyondtrust.com/contact
SUPPORT: www.beyondtrust.com/support
DOCUMENTATION: www.beyondtrust.com/docs
156
©2003-2024 BeyondTrust Corporation. All Rights Reserved. Other trademarks identified on this page are owned by their respective owners. BeyondTrust is not a chartered bank or trust company, or
depository institution. It is not authorized to accept deposits or trust accounts and is not licensed or regulated by any state or federal banking authority.
TC: 7/8/2024
PRIVILEGED REMOTE ACCESS 24.2
ADMIN GUIDE

HTTP Recipients
You can configure your BeyondTrust Appliance B Series to send messages to an HTTP server or to an email address when different
events are triggered.
The variables sent by the B Series Appliance arrive as an HTTP POST method and can be accessed by calling the method used to
retrieve POST data in your coding language. If the server does not respond with an HTTP 200 to indicate success, the B Series Appliance
will re-queue the current event and retry it later.
Add New HTTP Recipient, Edit, Delete
Create a new recipient, modify an existing recipient, or remove an existing recipient.
Add or Edit HTTP Recipient
Name
Create a unique name to help identify this outbound event.
URL
Enter the destination URL for this outbound event handler.
Note: BeyondTrust Cloud customers must use of URLs beginning with HTTPS; only port 443 is supported.
Enabled
Check Enabled to enable the event handler. Uncheck Enabled to quickly stop the messages for the event handler you set up, as in the
event of planned integration testing.
Use a CA Certificate
When operating over an HTTPS connection, you must upload the certificate authority's root certificate advertised by the outbound event
server.
Send Custom Fields
When enabled, all custom fields configured on the Custom Fields page will be included in the outbound event.
Events to Send
Choose which events should trigger messages to be sent.
SALES: www.beyondtrust.com/contact
SUPPORT: www.beyondtrust.com/support
DOCUMENTATION: www.beyondtrust.com/docs
157
©2003-2024 BeyondTrust Corporation. All Rights Reserved. Other trademarks identified on this page are owned by their respective owners. BeyondTrust is not a chartered bank or trust company, or
depository institution. It is not authorized to accept deposits or trust accounts and is not licensed or regulated by any state or federal banking authority.
TC: 7/8/2024
PRIVILEGED REMOTE ACCESS 24.2
ADMIN GUIDE

Retry Interval
Set how often to retry a failed attempt.
Retry Duration
If an event continues to retry and fail, set how long it should continue to retry before being dropped.
Email Contact
Enter one or more email addresses to which notification should be sent if an error should occur.
Send Email Alert After
Set how long after an error the email should be sent; if the problem is resolved before this time is reached and the event succeeds, no
error notification will be sent.
Resend Email Alerts
Set how often error emails should be sent if a failed status should continue.
Email Recipients
Add New Email Recipient, Edit, Delete
Create a new recipient, modify an existing recipient, or remove an existing recipient.
Current Status
Displays a brief status message from the SMTP relay server. As long as the B Series Appliance is able to send messages to the relay
server, the status will show OK. Otherwise, review your SMTP relay server settings.
Retry Duration
If an event continues to retry and fail, set how long it should continue to retry before being dropped.
Add Email Recipient
Before you set up your B Series Appliance to send event messages to an email address, verify that your B Series Appliance is configured
to work with your SMTP relay server. Go to the Management > Email Configuration page to verify settings.
SALES: www.beyondtrust.com/contact
SUPPORT: www.beyondtrust.com/support
DOCUMENTATION: www.beyondtrust.com/docs
158
©2003-2024 BeyondTrust Corporation. All Rights Reserved. Other trademarks identified on this page are owned by their respective owners. BeyondTrust is not a chartered bank or trust company, or
depository institution. It is not authorized to accept deposits or trust accounts and is not licensed or regulated by any state or federal banking authority.
TC: 7/8/2024
PRIVILEGED REMOTE ACCESS 24.2
ADMIN GUIDE

Enabled
Check Enabled to enable the event handler. Uncheck Enabled to quickly stop the messages for the event handler you set up, as in the
event of planned integration testing.
Name
Create a unique name to help identify this outbound event.
Email Address
Enter the email address to receive notice of the selected events. You can configure up to ten email addresses, separated by commas.
Require External Key
If this option is checked, emails will be sent only for sessions which have an external key at the time the event occurs.
Events to Send
Choose which events should trigger messages to be sent.
Subject
Customize the subject of this email. Click the link below the Body field to view the macros that can used to customize the text in your
emails for your purposes.
Body
Customize the body of this email. Click the link below the Body field to view the macros that can used to customize the text in your emails
for your purposes.
Cluster: Configure Atlas Cluster Technology for Load Balancing
Management CLUSTER
Status
Large-scale geographic deployments benefit from BeyondTrust Atlas Cluster technology, establishing a single BeyondTrust site across
multiple B Series Appliances, which are termed nodes in a cluster. The primary B Series Appliance/primary node is the site of most
administration tasks. The traffic node is a B Series Appliance that participates in effectively routing your support traffic.
On the primary node, you will configure both the primary itself and the traffic nodes.
SALES: www.beyondtrust.com/contact
SUPPORT: www.beyondtrust.com/support
DOCUMENTATION: www.beyondtrust.com/docs
159
©2003-2024 BeyondTrust Corporation. All Rights Reserved. Other trademarks identified on this page are owned by their respective owners. BeyondTrust is not a chartered bank or trust company, or
depository institution. It is not authorized to accept deposits or trust accounts and is not licensed or regulated by any state or federal banking authority.
TC: 7/8/2024
PRIVILEGED REMOTE ACCESS 24.2
ADMIN GUIDE

Find more information about Atlas in the BeyondTrust Atlas Technology Guide at
https://www.beyondtrust.com/docs/privileged-remote-access/how-to/atlas/index.htm.
Current Status
Confirms the role of the site instance from which you accessed the page.
Sync Now
Synchronize the clustered B Series Appliances.
Disband Cluster
Disband the cluster, effectively removing each B Series Appliance from its role in the cluster.
Status History
Show or hide the log of clustered B Series Appliance messages.
Traffic Nodes
Method for Choosing Traffic Nodes
This selector is used to define how a traffic node is chosen for a user or endpoint client connection. The available methods for defining the
connection are Random, A Record Lookup, SRV Record Lookup, IP Anycast, and Timezone Offset. Your choice of connection
method is highly dependent upon your network infrastructure, among other complex considerations.
Add New Traffic Node, Edit Node, Remove Node
Create a new node, modify an existing node, or remove an existing node.
Accepting New Client Connections
Be sure this is checked; otherwise, clients will not be able to use the traffic node.
Add Traffic Node
Accepting New Client Connections
Be sure this is checked; otherwise, clients will not be able to use the traffic node.
SALES: www.beyondtrust.com/contact
SUPPORT: www.beyondtrust.com/support
DOCUMENTATION: www.beyondtrust.com/docs
160
©2003-2024 BeyondTrust Corporation. All Rights Reserved. Other trademarks identified on this page are owned by their respective owners. BeyondTrust is not a chartered bank or trust company, or
depository institution. It is not authorized to accept deposits or trust accounts and is not licensed or regulated by any state or federal banking authority.
TC: 7/8/2024
PRIVILEGED REMOTE ACCESS 24.2
ADMIN GUIDE

Name
Create a unique name to help identify this node.
Timezone Offset
Used only if Method for Choosing Traffic Nodes is set to Timezone Offset. This process involves detecting the time zone setting of the
host machine and using that setting to match the appropriate traffic node that has the closest time zone offset. The time zone offset is
derived from the customer time zone setting relative to Coordinated Universal Time (UTC).
Public Address
Enter the hostname you set up in DNS for this node, and enter the port over which clients will communicate with the node.
Internal Address
This can be the same as the public address. Advanced configurations can optionally set this to a different hostname for inter-appliance
communication.
Network Address Prefixes
You may leave this blank.
For advanced configurations, enter network address prefixes, one per line, in the form of ip.add.re.ss[/netmask]. Netmask is optional
and can be given in either dotted-decimal format or as an integer bitmask. If netmask is omitted, as single IP address is assumed.
When this field is populated, the primary node attempts to assign a client to this traffic node if the client's IP address matches one of the
network address prefixes. If the client's IP address matches more than one traffic node's network address prefixes, the client is assigned
to the traffic node with the longest matching prefix. If the matching prefixes are of equal length, one of the matching traffic nodes is chosen
at random. If a client's IP address does not match any network address prefixes, the client is assigned using the method configured.
Primary Node Configuration
Primary node
Name
Create a unique name to help identify this node.
Public Address
Enter the hostname you set up in DNS for this node, and enter the port over which clients will communicate with the node.
SALES: www.beyondtrust.com/contact
SUPPORT: www.beyondtrust.com/support
DOCUMENTATION: www.beyondtrust.com/docs
161
©2003-2024 BeyondTrust Corporation. All Rights Reserved. Other trademarks identified on this page are owned by their respective owners. BeyondTrust is not a chartered bank or trust company, or
depository institution. It is not authorized to accept deposits or trust accounts and is not licensed or regulated by any state or federal banking authority.
TC: 7/8/2024
PRIVILEGED REMOTE ACCESS 24.2
ADMIN GUIDE

Internal Address
This can be the same as the public address. Advanced configurations can optionally set this to a different hostname for inter-appliance
communication.
Maximum Client Fallback to Primary
Allows the number of clients you set to fall back to using the primary for traffic control if necessary.
Failover: Set Up a Backup B Series Appliance for Failover
Management FAILOVER
Note: This feature is available only to customers who own an on-premises B Series Appliance. BeyondTrust Cloud customers
do not have access to this feature.
For more information, please see Privileged Remote Access Failover Configuration at
https://www.beyondtrust.com/docs/privileged-remote-access/how-to/failover/index.htm.
Configuration
New Backup Site Connection Details
Host Name or IP Address
Enter the host name or IP address of the B Series Appliance you wish to use as the backup in a failover relationship.
Port
Enter the TLS port allowing this primary B Series Appliance to connect to the backup B Series Appliance.
Reverse Connection Details To This Primary Site
Host Name or IP Address
Enter the host name or IP address of this B Series Appliance, which you wish to use as the primary in a failover relationship.
SALES: www.beyondtrust.com/contact
SUPPORT: www.beyondtrust.com/support
DOCUMENTATION: www.beyondtrust.com/docs
162
©2003-2024 BeyondTrust Corporation. All Rights Reserved. Other trademarks identified on this page are owned by their respective owners. BeyondTrust is not a chartered bank or trust company, or
depository institution. It is not authorized to accept deposits or trust accounts and is not licensed or regulated by any state or federal banking authority.
TC: 7/8/2024
PRIVILEGED REMOTE ACCESS 24.2
ADMIN GUIDE

Port
Enter the TLS port allowing the backup B Series Appliance to connect to this primary B Series Appliance.
Status
This host's status
View the host name of this site, along with its status of primary site instance or backup site instance.
Peer host's status
View the host name of this site, along with its status of primary site instance or backup site instance. Also view the date and time of the last
status check.
Status History
Expand or collapse a table of status events that have occurred.
Primary or Backup Site Instance Status
Text confirms that you are either on the primary or backup site instance for your host site.
Sync Now
Manually force a data sync from the primary B Series Appliance to the backup B Series Appliance.
Become Backup/Primary
Switch roles with the peer B Series Appliance, essentially forcing a failover for planned maintenance or a known failover event.
Check this box to pull a data-sync from the site instance at example.com while becoming the backup/primary.
If you want to synchronize data from the peer B Series Appliance prior to swapping roles, select this checkbox. If this option is selected, all
users on the existing primary B Series Appliance will be disconnected during the data sync, and no other operations will be available until
the swap is complete.
Check this box to become a backup even if the peer site instance at example.com cannot be contacted.
On the primary site instance, you have the option to become the backup even if the peer B Series Appliance cannot be contacted. If this
option is unchecked, failover will be canceled if both B Series Appliances cannot be kept in sync in terms of their failover roles (one
primary and one backup).
For example, if you know the current backup B Series Appliance is online but cannot be reached by the primary due to a network
connection issue, you may wish to check this option to make the primary the backup before the network connection is restored. In this
example, you would also need to access the current backup and make it the primary.
SALES: www.beyondtrust.com/contact
SUPPORT: www.beyondtrust.com/support
DOCUMENTATION: www.beyondtrust.com/docs
163
©2003-2024 BeyondTrust Corporation. All Rights Reserved. Other trademarks identified on this page are owned by their respective owners. BeyondTrust is not a chartered bank or trust company, or
depository institution. It is not authorized to accept deposits or trust accounts and is not licensed or regulated by any state or federal banking authority.
TC: 7/8/2024
PRIVILEGED REMOTE ACCESS 24.2
ADMIN GUIDE

Break Failover Relationships
Break the failover relationship, removing each B Series Appliance from its role as primary or backup.
Primary or Backup Site Instance Configuration
Shared IPs
Control the shared IP address the site instance uses in the event of a failover by selecting the checkbox for the failover IP address. If you
change the relationship between the sites, the checked IP addresses will disable when a primary site becomes a backup, and will enable
when a backup becomes a primary site. You should manually mirror the setting on the peer site, as the setting is not shared.
Backup Settings
The settings you configure here will be enabled only when the site instance you are configuring is in a backup role.
When on the primary site instance, select Backup Settings > to expand or collapse the page displaying the configuration fields.
Enable Backup Operations
Enable or disable site backups.
Automatic Data-Sync Interval
You can control the timing details of the automatic data-sync interval.
Data-Sync Bandwidth Limit
Set bandwidth parameters for data-sync.
Enable Automatic Failover
Quickly enable or disable automatic failover.
Primary Site Instance Timeout
Set how long the primary site must be unreachable before failing over.
Network Connectivity Test IPs
Enter IP addresses for the backup site to check to determine whether the backup's inability to reach the primary is because the primary is
offline or the backup has lost its network connection.
SALES: www.beyondtrust.com/contact
SUPPORT: www.beyondtrust.com/support
DOCUMENTATION: www.beyondtrust.com/docs
164
©2003-2024 BeyondTrust Corporation. All Rights Reserved. Other trademarks identified on this page are owned by their respective owners. BeyondTrust is not a chartered bank or trust company, or
depository institution. It is not authorized to accept deposits or trust accounts and is not licensed or regulated by any state or federal banking authority.
TC: 7/8/2024
PRIVILEGED REMOTE ACCESS 24.2
ADMIN GUIDE

API Configuration: Enable the XML API and Configure Custom Fields
Management APICONFIGURATION
API Configuration
Enable XML API
Choose to enable the BeyondTrust XML API, allowing you to run reports and issue commands such as starting or transferring sessions
from external applications, as well as to automatically back up your software configuration.
CLI Client Download
The Command Line Interface (CLI) tool can be downloaded to make it easier to use and configure APIs and automation scripts, and
integrate them with your BeyondTrust Privileged Remote Access installation. The CLI tool is available for Windows (x64), macOS, and
Linux (x64) platforms. Select the appropriate platform and click Download BTAPI CLI Client.
The download is a compressed executable file. Extract the file, and save or link it from an executable area (in your PATH).
l
For Windows systems: Open the file in a terminal such as Windows Command Prompt or Windows PowerShell.
l
For macOS systems: Run the file in the terminal.
The Help information, including options, commands, and variable instructions, display when the program opens.
For more information on creating APIs with CLI, please see Use Cases examples in the BeyondTrust Privileged Remote
Access API Guide at https://www.beyondtrust.com/docs/privileged-remote-access/how-to/integrations/api/use-cases.htm.
API Accounts
An API account stores all of the authentication and authorization settings for the API client. At least one API account is required to use the
API, either in conjunction with the Integration Client, with a third-party app, or with your own in-house developed software.
Add an API Account, Edit, Delete
Create a new account, modify an existing account, or remove an existing account.
Add or Edit an API Account
Enabled
If checked, this account is allowed to authenticate to the API. When an account is disabled, all OAuth tokens associated with the account
are immediately disabled.
SALES: www.beyondtrust.com/contact
SUPPORT: www.beyondtrust.com/support
DOCUMENTATION: www.beyondtrust.com/docs
165
©2003-2024 BeyondTrust Corporation. All Rights Reserved. Other trademarks identified on this page are owned by their respective owners. BeyondTrust is not a chartered bank or trust company, or
depository institution. It is not authorized to accept deposits or trust accounts and is not licensed or regulated by any state or federal banking authority.
TC: 7/8/2024
PRIVILEGED REMOTE ACCESS 24.2
ADMIN GUIDE
Name
Create a unique name to help identify this account.
Comments
Add comments to help identify the purpose of this object.
OAuth Client ID
The OAuth client ID is a unique ID generated by the B Series Appliance. It cannot be modified. The client ID is considered public
information and, therefore, can be shared without compromising the security of the integration.
OAuth Client Secret
The OAuth client secret is generated by the B Series Appliance using a cryptographically secure pseudo-random number generator.
Note: The client secret cannot be modified, but it can be regenerated on the Edit page. Regenerating a client secret and then
saving the account immediately invalidates any OAuth tokens associated with the account. Any API calls using those tokens
cannot access the API.
Note: The OAuth client ID and client secret are used to create OAuth tokens, necessary for authenticating to the API.
For more information, please see the API Guide at www.beyondtrust.com/docs/privileged-remote-access/how-
to/integrations/api/index.htm.
Permissions
Select the areas of the API this account is allowed to use.
For the Command API, choose to deny access, to allow read-only access, or to allow full access.
For the Reporting API, check the allowed permissions:
l
Allow Access to Access Session Reports and Recordings
l
Allow Access to License Usage Reports
l
Allow Access to Vault Account Activity Reports
l
Allow Access to Syslog Reports
For the Backup API, check to Allow Access and to Allow Vault Encryption Key Access.
The Configuration API allows for the management and configuration of common tasks in /login, which can be automated and work with
your orchestration processes. Check to Allow Access and, if access is allowed, check if this API can Manage Vault Accounts.
Check to allow access to the Endpoint Credential Manager API.
SALES: www.beyondtrust.com/contact
SUPPORT: www.beyondtrust.com/support
DOCUMENTATION: www.beyondtrust.com/docs
166
©2003-2024 BeyondTrust Corporation. All Rights Reserved. Other trademarks identified on this page are owned by their respective owners. BeyondTrust is not a chartered bank or trust company, or
depository institution. It is not authorized to accept deposits or trust accounts and is not licensed or regulated by any state or federal banking authority.
TC: 7/8/2024
PRIVILEGED REMOTE ACCESS 24.2
ADMIN GUIDE

If ECM groups are enabled on the site, select which ECM group to use. ECMs that are not associated with a group come under Default.
The SCIM API allows the option to provision users from a different security provider. If you allow access to the SCIM API, the option Allow
long-lived bearer token becomes available. Allowing long-lived tokens is not recommended unless it is required by your SCIM client, as
these bearer tokens never expire. Because all other API permissions require tokens with a one-hour expiry, enabling long-lived tokens for
SCIM disables all other API permissions.
For more information, please see Vault Account Configuration APIs at www.beyondtrust.com/docs/privileged-remote-
access/how-to/integrations/api/configuration-api.htm.
Network Restrictions
List network address prefixes from which this account can authenticate.
Note: API accounts are not restricted by the network prefixes configured on the /login > Management > Security page. They
are restricted only by the network prefixes configured for the API account.
ECM Groups
Note: This feature is only present if enabled when your site is built. If it is not present, please contact your site administrator.
The ECM Groups feature provides support for multiple disconnected credential providers. It allows a single PRA deployment to integrate
with multiple external credential providers like Password Safe or Privileged Identity. These can be located at various remote locations
through multiple ECM instances.
New ECM Group Name
Create a unique name to help identify this ECM group. You can configure up to fifty ECM groups.
Support: Contact BeyondTrust Technical Support
Management SUPPORT
BeyondTrust Support Contact Information
The support page provides contact information should you need to contact a BeyondTrust Technical Support representative.
Advanced Technical Support from BeyondTrust
In the event that a BeyondTrust Technical Support representative should need access to your B Series Appliance, they will provide you
with support, access, and override codes to enter on this page to create a B Series Appliance-initiated, fully encrypted support tunnel back
SALES: www.beyondtrust.com/contact
SUPPORT: www.beyondtrust.com/support
DOCUMENTATION: www.beyondtrust.com/docs
167
©2003-2024 BeyondTrust Corporation. All Rights Reserved. Other trademarks identified on this page are owned by their respective owners. BeyondTrust is not a chartered bank or trust company, or
depository institution. It is not authorized to accept deposits or trust accounts and is not licensed or regulated by any state or federal banking authority.
TC: 7/8/2024
PRIVILEGED REMOTE ACCESS 24.2
ADMIN GUIDE

to BeyondTrust for quick resolution of complex issues.
SALES: www.beyondtrust.com/contact
SUPPORT: www.beyondtrust.com/support
DOCUMENTATION: www.beyondtrust.com/docs
168
©2003-2024 BeyondTrust Corporation. All Rights Reserved. Other trademarks identified on this page are owned by their respective owners. BeyondTrust is not a chartered bank or trust company, or
depository institution. It is not authorized to accept deposits or trust accounts and is not licensed or regulated by any state or federal banking authority.
TC: 7/8/2024
PRIVILEGED REMOTE ACCESS 24.2
ADMIN GUIDE
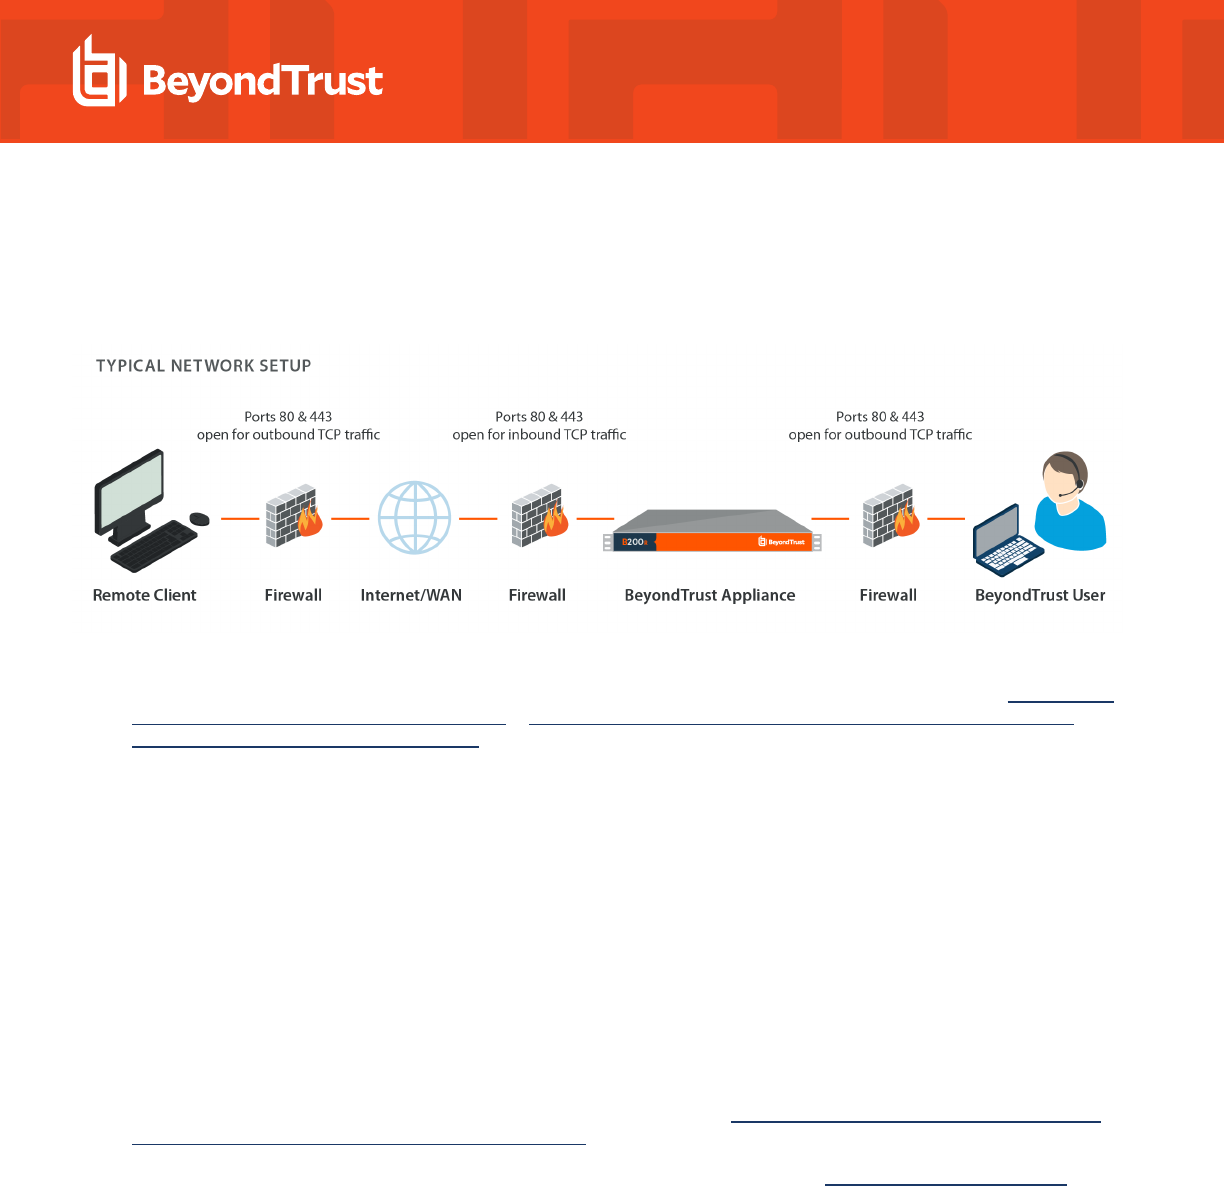
Ports and Firewalls
BeyondTrust solutions are designed to work transparently through firewalls, enabling a connection with any computer with internet
connectivity, anywhere in the world. However, with certain highly secured networks, some configuration may be necessary.
l
Ports 80 and 443 must be open for outbound TCP traffic on the remote system's and local user's firewalls. More ports may be
available depending on your build. The diagram shows a typical network setup; more details can be found in the BeyondTrust
Appliance B Series Hardware Installation Guide at https://www.beyondtrust.com/docs/privileged-remote-access/getting-
started/deployment/hardware-sra/index.htm.
l
Internet security software such as software firewalls must not block BeyondTrust executable files from downloading. Some
examples of software firewalls include McAfee Security, Norton Security, and Zone Alarm. If you do have a software firewall, you
may experience some connection issues. To avoid such issues, configure your firewall settings to allow the following executables,
wherein {uid} is a unique identifier consisting of letter and numbers:
o
bomgar-scc-{uid}.exe
o
bomgar-scc.exe
o
bomgar-pac-{uid}.exe
o
bomgar-pac.exe
o
bomgar-pec-{uid}.exe
o
bomgar-pec.exe
For assistance with your firewall configuration, please contact the manufacturer of your firewall software.
l
Example firewall rules based on B Series Appliance location can be found at www.beyondtrust.com/docs/privileged-remote-
access/getting-started/deployment/dmz/firewall-rules.htm.
If you should still have difficulty making a connection, contact BeyondTrust Technical Support at www.beyondtrust.com/support.
SALES: www.beyondtrust.com/contact
SUPPORT: www.beyondtrust.com/support
DOCUMENTATION: www.beyondtrust.com/docs
169
©2003-2024 BeyondTrust Corporation. All Rights Reserved. Other trademarks identified on this page are owned by their respective owners. BeyondTrust is not a chartered bank or trust company, or
depository institution. It is not authorized to accept deposits or trust accounts and is not licensed or regulated by any state or federal banking authority.
TC: 7/8/2024
PRIVILEGED REMOTE ACCESS 24.2
ADMIN GUIDE

Disclaimers, Licensing Restrictions and Tech Support
Disclaimers
This document is provided for information purposes only. BeyondTrust Corporation may change the contents hereof without notice. This
document is not warranted to be error-free, nor subject to any other warranties or conditions, whether expressed orally or implied in law,
including implied warranties and conditions of merchantability or fitness for a particular purpose. BeyondTrust Corporation specifically
disclaims any liability with respect to this document and no contractual obligations are formed either directly or indirectly by this document.
The technologies, functionality, services, and processes described herein are subject to change without notice.
All Rights Reserved. Other trademarks identified on this page are owned by their respective owners. BeyondTrust is not a chartered bank
or trust company, or depository institution. It is not authorized to accept deposits or trust accounts and is not licensed or regulated by any
state or federal banking authority.
Licensing Restrictions
One BeyondTrust Privileged Remote Access license enables one support representative at a time to troubleshoot an unlimited number of
remote computers, whether attended or unattended. Although multiple accounts may exist on the same license, two or more licenses (one
per concurrent support representative) are required to enable multiple support representatives to troubleshoot simultaneously.
One BeyondTrust Privileged Remote Access license enables access to one endpoint system. Although this license may be transferred
from one system to another if access is no longer required to the first system, two or more licenses (one per endpoint) are required to
enable access to multiple endpoints simultaneously.
Tech Support
At BeyondTrust, we are committed to offering the highest quality service by ensuring that our customers have everything they need to
operate with maximum productivity. Should you need any assistance, please log into the Customer Portal at
https://beyondtrustcorp.service-now.com/csm to chat with Support.
Technical support is provided with annual purchase of our maintenance plan.
SALES: www.beyondtrust.com/contact
SUPPORT: www.beyondtrust.com/support
DOCUMENTATION: www.beyondtrust.com/docs
170
©2003-2024 BeyondTrust Corporation. All Rights Reserved. Other trademarks identified on this page are owned by their respective owners. BeyondTrust is not a chartered bank or trust company, or
depository institution. It is not authorized to accept deposits or trust accounts and is not licensed or regulated by any state or federal banking authority.
TC: 7/8/2024
PRIVILEGED REMOTE ACCESS 24.2
ADMIN GUIDE
