Adaptive Planning:
Basic Navigation in Sheets
Quick Reference Guide
July-2022 Basic Navigation in Sheets Page | 1
Overview
This Quick Reference Guide (QRG) is designed to walk users through basic navigation in Adaptive Planning
Sheets.
This QRG assumes that you already have access to Workday Adaptive Planning and can log
in. If you don’t have access yet, email A[email protected]
to request access. Include
the Cost Center(s) that you need to budget for.
Table of Contents
Overview ....................................................................................................................................................... 1
Table of Contents ......................................................................................................................................... 1
Getting Started in Sheets ............................................................................................................................ 1
General Navigation ...................................................................................................................................... 2
Modifying Columns ...................................................................................................................................... 4
Modifying Rows ............................................................................................................................................ 6
Getting Started in Sheets
On the Adaptive Home screen:
1. Log in.
2. Select the Workday Icon.
The primary point of navigation is the Workday icon. Selecting this icon will drop down a menu of
options. Menu items with a right-facing arrow have more choices for you to select.
3. Open your desired Sheet.
Sheets are the interface where users will view, enter, and update plan data.
There are two ways to access sheets: 1) Clicking on the word “Sheets” will open a new page with a
list of Sheets; 2) Clicking on the right-facing arrow will provide you with a list of Sheets without
opening a new page.

Adaptive Planning:
Basic Navigation in Sheets
Quick Reference Guide
July-2022 Basic Navigation in Sheets Page | 2
To open a sheet in a new tab, right click on the Sheet name and select “open in a new tab.”
This is helpful if you want to have multiple sheets or reports open at the same time.
General Navigation
Once sheet is open:
1. Navigate the following sheet attributes to view information or input budget data:
a) Budget Version
Ensure you have the correct version selected. Select the Working Budget to input data.
Other versions are locked for editing but are available for reference. If you would like to review
other versions, you can select the drop-down arrow and choose from the available versions.
b) Levels
Ensure you are viewing the Sheet at the correct level by selecting the drop-down arrow and
selecting the appropriate level from the list, if not already displayed. Cost Center Hierarchies
and Cost Centers that you have access to will be listed. If you are entering data, ensure you are
at the Cost Center level (indicated by CC####) not the Cost Center Hierarchy Level (CCH####).
If you do not see the level(s) you should have access to, email [email protected].

Adaptive Planning:
Basic Navigation in Sheets
Quick Reference Guide
July-2022 Basic Navigation in Sheets Page | 3
c) Input Fields
The Input Fields are where you enter your Budget. The fields may vary depending on which
sheet you are in; however, the following things remain constant:
• Columns with green checkmarks in the header are required fields.
• Columns with white backgrounds provide the space for users to enter data with specific
data entry requirements – freeform or dropdown selections.
• Co
lumns with grey backgrounds are auto-populated based on the associated data
entered on a row – these are not editable by the user.
d) Toolbar
The toolbar has several tools to help you enter, remove, filter, and save data. You can always
hover over the icon in Adaptive to recall what each feature does, but the orientation below
provides some additional detail.
1.
Formula Assistant: If a cell uses a formula, clicking this button will provide the
correct
formula syntax.
2.
Save: Saves entries, formatting adjustments, and applied filters. Un-saved sheets
will always populate an error message before closing that allows a user to save their
work.
Note:
If the save button appears greyed out, this means that your input
sheet does not have any unsaved changes.
Note:
Any changes made to a field in an input sheet will always appear in
BLUE
until
they are save
d.
2.
Download: Gives users the options to download or view a printable version.
3.
Add/delete row: add a blank row to a modeled sheet. New rows always populate at
the bottom of the sheet.
Delete row should only be used to delete true errors or
extra rows.
4.
Reset to default view: removes all filters (in both the “display options” and the “filter
bar”) and resets sheet to original view.

Adaptive Planning:
Basic Navigation in Sheets
Quick Reference Guide
July-2022 Basic Navigation in Sheets Page | 4
Note: Reset to default view will also reset any unsaved changes, so be sure
to
remember to save!
5.
Display options: provides access to column-specific filtering.
6.
Refresh: refreshes sheet data (like “refresh” in Internet browser).
Note:
Refresh can function as an “undo” button if you have unsaved data
(displays in blue text). However, using refresh will undo ALL your work since
your last save point.
7.
Filter bar: allows dynamic filtering across entire sheet.
Note:
The filter bar is NOT column specific. It uses a “contains” operator
and will return results from multiple columns.
Example:
award LC00018 can be found in the “award” column as well as
the “notes” column. Adaptive will return results from both columns when
using the filter bar.
Modifying Columns
Adaptive’s input sheet design is static for all users. It
does not
allow for columns to be
moved or deleted based on individual user preferences. However, users can resize the
columns to their liking.
To Resize Columns:
1. Hover cursor over the middle of the two column headers.
Resizing columns in Adaptive is similar to Excel.
2. Click and drag to resize.
Drag to the left to contract a column and to the right to expand it.
3. Save, if desired.
Once column widths are how you would like to see them, select the save icon on the toolbar.

Adaptive Planning:
Basic Navigation in Sheets
Quick Reference Guide
July-2022 Basic Navigation in Sheets Page | 5
To modify display of time span columns:
The time span columns may sometimes break out into month (even after they were once
collapsed. Follow the instructions below to modify the column display options.
1. Select the Display Options icon on the toolbar.
2. Select the parameters you want displayed.
Selecting the Display Options icon brings up the following window:
Ensure check marks are selected for the parameters you want to display and are not checked on
those you do not want to display. For instance, if you only want to see Fiscal Year, then deselect
those in Month and Quarter and check the boxes in Year.
3. Select OK.
4. Save your Sheet
Select the Save icon on the toolbar.
To copy/paste from one column to another:
1. Using your mouse, click and drag to highlight cell(s) with the data you want to copy.
2. On your keyboard, hold Ctrl and C (copy shortcut) to copy the highlighted cell(s).

Adaptive Planning:
Basic Navigation in Sheets
Quick Reference Guide
July-2022 Basic Navigation in Sheets Page | 6
3. In the column you are copying to, ensure that you select a cell that lines up with the first cell
highlighted/copied, cold down Ctrl and V (paste shortcut). The data should copy over and be lined
up with the original cells.
4. Save your sheet to save these changes.
Modifying Rows
To edit row data:
1. Edit data within each cell that you want to modify, then save your sheet.
Data entry fields with grey backgrounds will auto-populate based on entries in other fields.
2. Adjust amounts in FY fields, if desired.
The data entry field for FY amounts has an additional option to adjust amounts.
a) Select one cell or highlight multiple cells, then right-click and select Adjust.
b) Adjust as desired. For example, you might want to increase the amount by a certain
percent.
c) Select OK.
To add new rows:
1. Select the Add Row icon on the tool bar (or right click mouse anywhere in Sheet and select Add
Row).
2. Enter data into row cells to complete the row. Until you save the sheet, newly entered data will
appear blue.
3. Save Sheet.
Select the Save icon on the toolbar.
Any time you add a new row, it will add the new row at the bottom of the Sheet. There is no
way to add a row in the middle of the sheet, but users can filter their sheet to be able to
view similar rows.
Adaptive Planning:
Basic Navigation in Sheets
Quick Reference Guide
July-2022 Basic Navigation in Sheets Page | 7
If you add a row while a filter is applied, it may seem to disappear when you save the sheet.
Remember to remove any filters to see the full set of data.
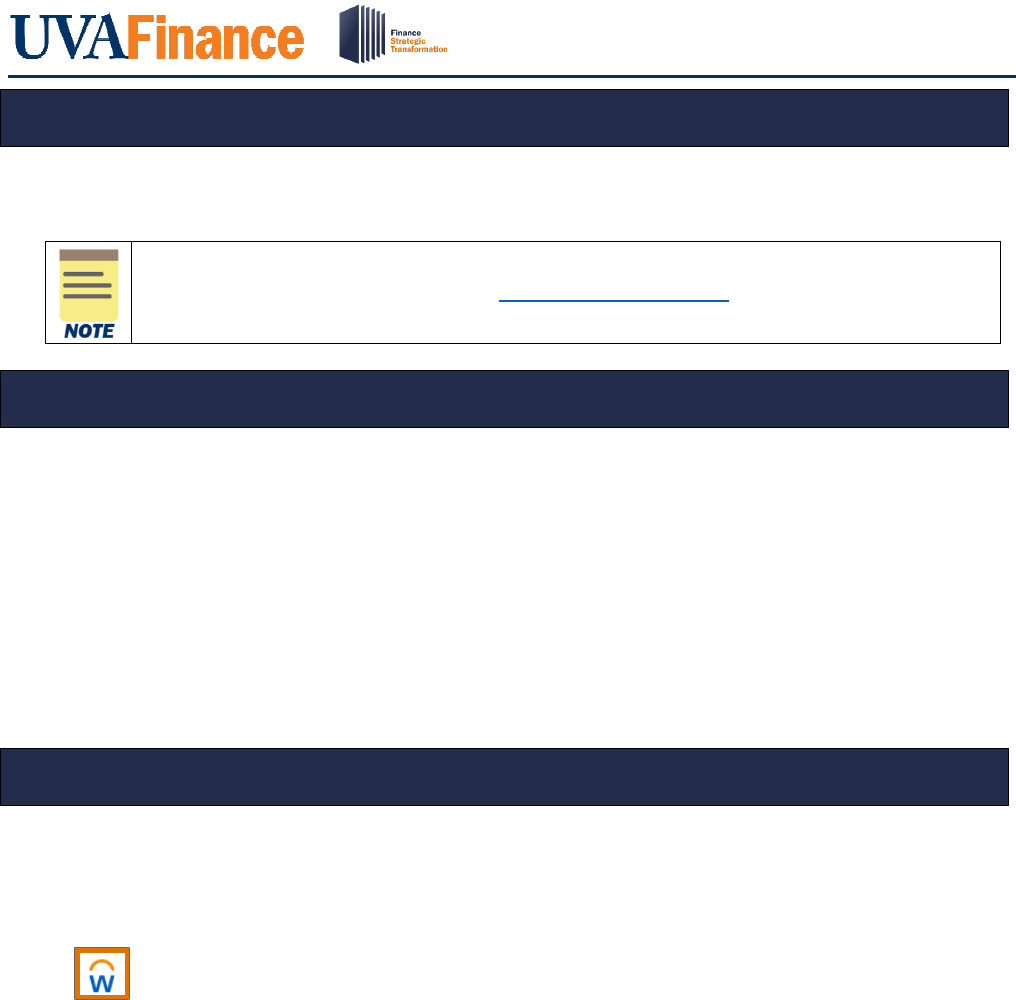
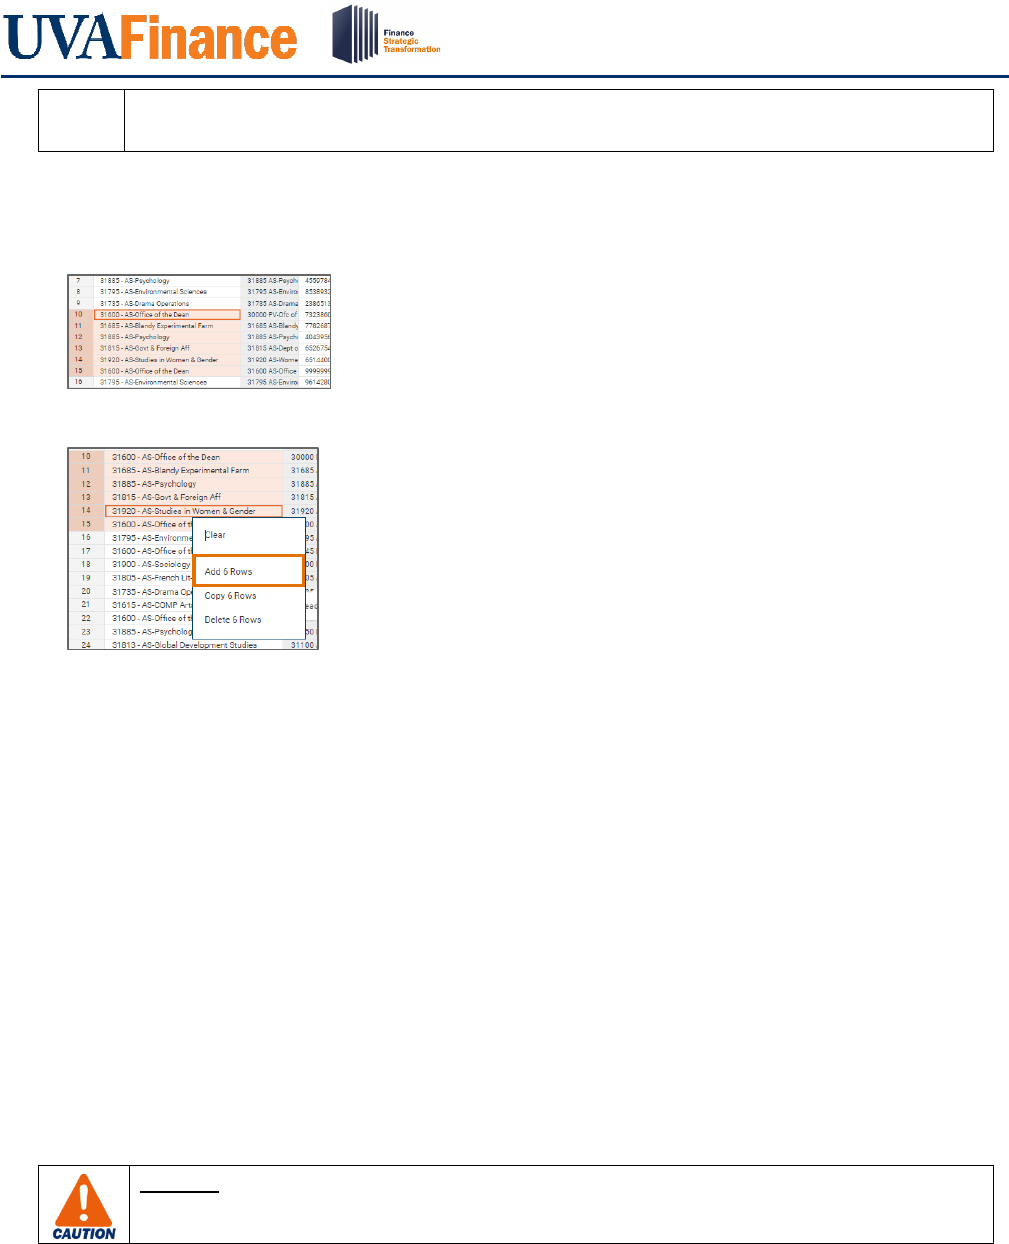
To add multiple rows:
1. Highlight multiple rows within the sheet
Click inside any column and drag down until you have selected the number of rows that you want.
2. Right Click and select Add x Rows (the new rows will appear at the bottom of the input sheet).
4. Enter data into row cells to complete the row. Until you save the sheet, newly entered data will
appear blue.
5. Save Sheet.
Select the Save icon on the toolbar.
To copy existing rows:
1. Right Click anywhere on the row you want to copy, then select Copy Row. To copy multiple rows,
click and drag down to select the rows you want to copy, then Right Click and select
Copy x Rows.
2. The copied row(s) will show up at the bottom of the sheet. Edit any cells that you want to change.
Until you save the Sheet, newly entered data will appear blue.
3. Save Sheet.
Select the Save icon on the toolbar.
To delete rows:
Only use Delete Row if you are correcting an error, such as a row added/duplicated in error
or an extra row.

Adaptive Planning:
Basic Navigation in Sheets
Quick Reference Guide
July-2022 Basic Navigation in Sheets Page | 8
Otherwise, zero out the FY amount fields where the row item no longer applies or duplicate
the line and modify other cells. This captures the change(s) while still maintaining a record
of previous years.
1. Select the row you want to delete.
To Select an entire row (as opposed to individual cells), click in the Row # cell.
2. Select the Delete Row icon on the toolbar (or Right Click on the highlighted row(s) and select
Delete Row(s)).
3. Confirm you wish to delete the row(s).
When prompted, select Delete. Otherwise, select Cancel.
