Configuring Development Environment
| Contents | 2
Contents
Introduction................................................................................................. 3
System Requirements.................................................................................. 4
Acumatica Framework or Acumatica ERP.....................................................6
Installing Acumatica Framework..................................................................7
Deploying a New Acumatica Framework-based Application from the Template.......................... 8
Installing the Visual Studio Templates.............................................................................. 15
Preparing the Solution in Visual Studio............................................................................. 16

| Introduction | 3
Introduction
This document describes how to set up development environment to start developing with Acumatica
Framework. The document guides you through creation of a new application from the application
template, installation of the Visual Studio templates, and preparation of the solution in Visual Studio.
The document also describes the differences between Acumatica Framework and Acumatica ERP.

| System Requirements | 4
System Requirements
Acumatica Framework includes server software and a database, each of which has its own
requirements.
Server Hardware and Software
Acumatica Framework can be installed on a computer running one of the following operating systems:
• Microsoft Windows Server 2012, any edition for the x64 (64-bit) platform, with or without any
service pack
• Microsoft Windows Server 2008, any edition for the x64 (64-bit) platform, with or without any
service pack
• Microsoft Windows Server 2008 R2, any edition for the x64 (64-bit) platform, with or without any
service pack
• Microsoft Windows Vista, any edition for the x64 (64-bit) platform, with or without any service
pack
You can install Acumatica Framework only in a Microsoft Windows Vista system running Internet
Information Services (IIS) 7.0, 7.5, or 8.0.
• Microsoft Windows 7, any edition for the x64 (64-bit) platform, with or without any service pack
You can install Acumatica Framework only in a Microsoft Windows 7 system running IIS 7.0, 7.5, or
8.0.
• Microsoft Windows 8, any edition for the x64 (64-bit) platform
You can install Acumatica Framework only in a Microsoft Windows 8 system running IIS 7.0, 7.5, or
8.0.
The following hardware requirements apply:
• 4 GB RAM
• 1 GB available hard disk space plus 200 MB for each additional Acumatica Framework instance
Database Hardware and Software
The Acumatica Framework database can be hosted by:
• Microsoft SQL Server 2005, any edition for the x64 (64-bit) platform, with or without any service
pack
• Microsoft SQL Server 2008, any edition for the x64 (64-bit) platform, with or without any service
pack
• Microsoft SQL Server 2008 R2, any edition for the x64 (64-bit) platform, with or without any
service pack
• Microsoft SQL Server 2012, any edition for the x64 (64-bit) platform, with or without any service
pack
• MySQL Community Edition Server for x64 (64-bit) platform, versions 5.6.12 - 5.6.15
GA release of MySQL Community Edition Server 5.6, revision 10 or newer is expected to work
properly
| System Requirements | 5
The following hardware requirements apply:
• 4 GB RAM
• 1 GB available hard disk space plus 200 MB for each additional instance of Acumatica Framework
Code Authoring Environments
To create stand-alone applications with Acumatica Framework or develop customizations and add-on
solutions on top of Acumatica ERP, you need one of the following integrated development environments
(IDEs):
• Microsoft Visual Studio 2010 with the Visual Web Developer feature, with or without any service
pack
• Microsoft Visual Web Developer 2010 Express, with or without any service pack
• Microsoft Visual Studio 2012 with Microsoft Web Developer Tools, with or without any service pack
• Microsoft Visual Studio Express 2012 for Web, with or without any service pack
Other Software
Before you install the Acumatica Framework software, make sure that the following software is installed
and enabled:
• Microsoft .NET Framework 4.0
• Microsoft IIS 7.0, 7.5, or 8.0, depending on the underlying operating system (see the minimum
options below)
• Microsoft Windows Installer 3.1
• Critical system patches and updates for Microsoft products
Configuration of IIS Features
Before you install the Acumatica ERP server software, make sure that the following IIS features are
turned on:
• Web Management Tools > IIS Management Console
• World Wide Web Services > Application Development Features > .NET Extensibility
• World Wide Web Services > Application Development Features > ASP.NET
• World Wide Web Services > Application Development Features > ISAPI Extensions
• World Wide Web Services > Application Development Features > ISAPI Filters
• Common HTTP Features > Default Document
• Common HTTP Features > Static Content
• Security > Request Filtering

| Acumatica Framework or Acumatica ERP | 6
Acumatica Framework or Acumatica ERP
There are two different packages, Acumatica Framework and Acumatica ERP. Acumatica Framework
represents the plaform without business modules, while Acumatica ERP includes the platform and the
Acumatica ERP application based on the platform. Hence, you use Acumatica Framework to create
stand-alone applications, and you use Acumatica ERP to develop customizations of the Acumatica ERP
application or add-on solutions on top of Acumatica ERP.
You can use Acumatica Framework to install an application template. The template includes the system
database, the default website with no business application modules, and the Visual Studio solution with
an empty C# Class Library project for your application.
You can use Acumatica ERP only to deploy a new instance of the Acumatica ERP application.
Both the Acumatica Framework and Acumatica ERP packages include a straightforward installer.
Once you install the package, you can use Acumatica Framework Configuration Wizard (or Acumatica
ERP Configuration Wizard) to deploy an application template (or new instance of the Acumatica ERP
application).

| Installing Acumatica Framework | 7
Installing Acumatica Framework
To start developing applications with Acumatica Framework, you should do the following:
1. Install Acumatica Framework.
2. Deploy a new application instance from the template. For details, see Deploying a New
Acumatica Framework-based Application from the Template
3. Install the Visual Studio templates. For details, see Installing the Visual Studio Templates
4. Prepare the solution in Visual Studio. For details, see Preparing the Solution in Visual Studio

| Installing Acumatica Framework | 8
Deploying a New Acumatica Framework-based Application
from the Template
You can deploy a new application instance by using the Acumatica Framework Configuration Wizard.
This topic shows how to deploy a new application from the template on the example of the application
you create to complete the training courses. After you complete all steps of the wizard, a new web
application that contains only the system pages will be deployed on Internet Information Services (IIS).
Creating a New Application from the Template
To deploy an application template, do the following:
1. Start the Acumatica Framework Configuration Wizard, which is located by default under All
Programs > Acumatica on the Windows Start menu.
2. On the Welcome screen, select Deploy New Application Instance for Training Course, as
shown in the following screenshot.
Figure: Deploy an application instance for the training course
You can deploy an application template without demo database tables by selecting the Deploy
New Instance of Acumatica Application Template menu. In this case, the deployment steps
are similar to the ones described below.
3. On the Database Server Connection screen (shown below), select the SQL server (1) where
you want to create the new database for the application. Specify the authentication method and
the user's credentials (2). Click Next.

| Installing Acumatica Framework | 9
Figure: Select the database server and authentication login to create the database
4. On the Database Configuration screen (see below), select Create a new database and
specify the database name. Click Next.
If you later need to modify the database connection string, you can find it in the
<connectionStrings> element in the Web.config file, located in the Site folder of the solution.
Figure: Create new database
5. On the Database Connection screen, specify the authentication method that IIS will use to
connect to the database server for working with your application, as shown in the following
screenshot. Click Next.

| Installing Acumatica Framework | 10
Figure: Select the database connection login for the application
6. On the Instance Configuration screen (shown below), select T100 Introduction to Acumatica
Framework and set the ASP.NET application parameters, as described below.
a. In the Instance Name box, specify the site name (1).
b. Specify the Local Path of the Instance where the solution will be created.
c. Specify the solution name (2) and select Introduction to Acumatica Framework from the
drop-down list (3).
d. Specify the user account on IIS that will be used by the Acumatica Framework
Configuration Wizard (4) to deploy the application; leave Default (anonymous user)
selected (as shown below). Click Next.
Figure: Specify instance configuration
For this training exercise, we recommend that you use the Default account. A specific account
may be needed in production, for security and specific access policy reasons.
7. On the Web Site Configuration screen (shown below), select Default Web Site as the available
site (1) and ASP.NET v4.0 Classic as the application pool (2). Select the Create Virtual
Directory check box (3). We recommend that you leave the virtual directory name the same as
the instance name. Click Next.
If you have an ASP.NET version of higher than 4.0, select the Classic version of the application
pool.

| Installing Acumatica Framework | 11
If you later need to change the virtual directory name, you can do this from the Application
Maintenance screen of the Acumatica Framework Configuration Wizard.
Figure: Specify site configuration
8. On the last screen, review the resulting configuration. Click Back to return to a previous
screen of the wizard if you need to modify a parameter, or click Finish if the configuration is
appropriate.
When you click Finish, the wizard creates the database, deploys the template website to IIS, and
creates the Visual Studio solution with an empty project, as you have specified in the template
configuration.
Browsing the Deployed Application
After the template application is deployed on IIS, you can open it in the web browser. You can also find
out the application URL in the Acumatica Framework Configuration Wizard.
To find out the URL of the application, do the following:
1. Launch the Acumatica Framework Configuration Wizard, and click Perform Application
Maintenance on the Welcome screen. The Application Maintenance screen appears, which
presents the list of web applications created and deployed by using the wizard.
2. From the list, select the deployed application and note the URL column, which contains the
application URL, http://localhost:80/Intro/Main.aspx, by default, as the screenshot below shows.

| Installing Acumatica Framework | 12
Figure: Find the application URL
3. Click Launch to open the application.
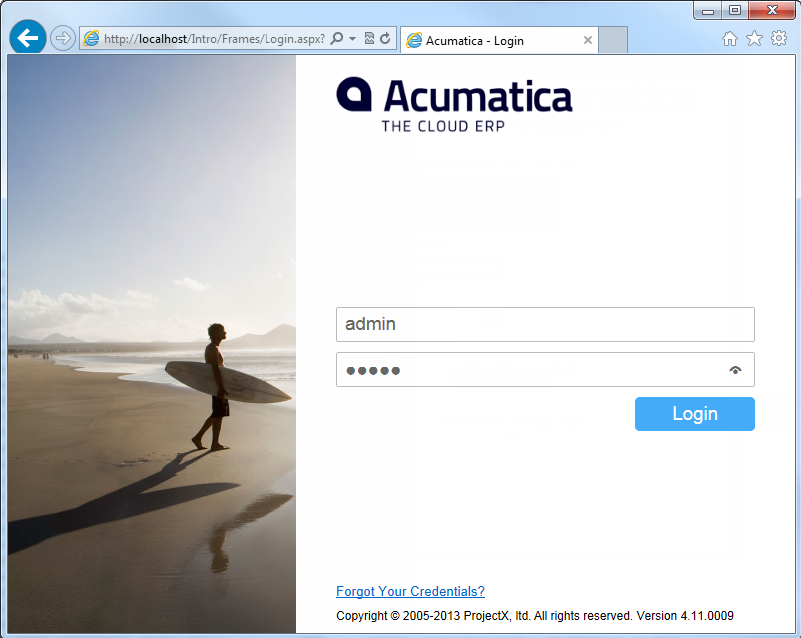
4. For the first login, specify the Username as admin and the Password as setup, and click Log
in. (See the screenshot below.)
The default administrator user account of each newly installed application instance has this
username and password combination. You will be prompted to change the password on the first
logon. We recommend that you use a simple password during training (at least three characters
are required, such as 123). However, for security reasons, you should use only strong passwords in
production.
| Installing Acumatica Framework | 13
Figure: Log in to the site for the first time
Now that you have logged in, you can see the default pages of the Acumatica Framework template
application. The application contains system pages, including pages for configuring the site map
and managing user access rights. The template also includes the documentation about Acumatica
Framework, which you can find in Help > Acumatica Framework (see below). Later in the course,
you will add a new main menu item for the RapidByte application pages.

| Installing Acumatica Framework | 14
Figure: View the template application content

| Installing Acumatica Framework | 15
Installing the Visual Studio Templates
To add pages and graphs to the application project, you use the special Acumatica Framework
templates for Visual Studio. To install the templates, do the following:
1. Start the Acumatica Framework Configuration Wizard, and click Deploy Acumatica Framework
Tools on the Welcome screen of the wizard, as shown in the following screenshot.
Figure: Install Acumatica Framework tools
2. On the next screen, confirm the installation by clicking Finish.
When you click Finish, the wizard installs the Acumatica Framework templates in Visual Studio,
including the PXGraph class and ASP.NET page templates. You have to install the templates before you
start the development of the application in Visual Studio.

| Installing Acumatica Framework | 16
Preparing the Solution in Visual Studio
The solution of an Acumatica Framework-based application consists of two parts: the application project
(or multiple application projects) and the website folder. This topic shows how to locate and organize
the solution that is created for the application once you configure it in the Acumatica Framework
Configuration Wizard.
Finding the Solution
You can use the Acumatica Framework Configuration Wizard as follows to locate the solution in the file
system:
1. Go to the Application Maintenance screen of the Acumatica Framework Configuration Wizard.
2. Find your instance in the list and see the Site Path column for it. The Visual Studio solution file
is located in the folder where Site\ is, so the solution path is C:\Program Files (x86)\Acumatica
Framework\RapidByte\RB.sln, as shown in the screenshot below.
Figure: Find the solution path
Preparing the Solution
To prepare the solution structure for development, open the solution in Visual Studio and do the
following:
1. Create the following new folder in the Site\Pages folder (see item 1 in the screenshot below):
• RapidByte
The existing SM folder contains system pages of the website; do not modify this folder or the
files in it.
2. Create the following new folders in the RB application project:
• RapidByte
• RapidByte > DAC
The DAC folder is required for Data Access Class Generator, which will create data access classes
in this folder.
RapidByte is the name of the Acumatica Framework-based application which you will create in the
training courses. There may be several folders on the same level as RapidByte and SM representing
other business modules of your application.
3. Set the Site folder as the startup project of the solution (right-click the folder and select Set as
StartUp Project).

| Installing Acumatica Framework | 17
With this option, you can debug the application on the ASP.NET Development Server by clicking
Start Debugging in Visual Studio.
We recommend to clear the Build check box for the Site project in the solution properties. By
clearing this option, you can build only the application project (and skip the building of the site
directories) when you build the solution. Building of the site may take significant amount of time
and is not required when you work on the application project.
As a result, you should have the solution structure as the screenshot below shows. Now you can go to
the last part of the lesson and see how the application menu is configured in the site map.
Figure: Confirm the Visual Studio solution structure
Now the solution is ready for application development.
