
Editing Panopto Recordings
After creating recordings in Panopto, you may want to go back and edit them. The
Panopto editor is available online and requires no special software to download or install.
Contents
Editing Panopto Recordings .................................................................................... 1
Contents ........................................................................................................... 1
Video Tutorials ................................................................................................... 2
Open the Panopto Editor ..................................................................................... 2
Video Editor Overview......................................................................................... 3
Change the Video Title ........................................................................................ 5
Delete Secondary Stream.................................................................................... 5
Change the Preview Image of a Video ................................................................... 7
Trim a Video ...................................................................................................... 8
Add a Table of Contents to a Video ..................................................................... 10
Allow Viewers to Download Slide Presentation...................................................... 11
Add a Clip to Splice Multiple Videos Together ....................................................... 12
Add and Edit Slides in the Editor ........................................................................ 15
Embed a Web Page into a Video ......................................................................... 18
Embed a YouTube Video into a Panopto Video...................................................... 20
Use the Focus Tool in the Editor ......................................................................... 23
Updated: 5 / 23/2024 Pag e 1 | 23

Upload / Create v
..
Panopto
Panopto
. ~
COLOR.ADO MESA
UNIVERSITY
DISTANCE EDUCATION
Ex
isting Activiti
es
v
~
Bulk Edit
Panopto
·
■
Personal
Sandbox·
eprickett [assignments] > Sample Capture Vi
deo
Search,
..
Q.
Details
Captions
Discussion
Video Tutorials
• Learn About the Video Editor
• Change the Preview Image of a Video
• Trim a Video in the Editor
• Add a Table of Contents
• Add a Clip to Splice Multiple Sessions Together
• Add and Edit Slides in the Editor
• Embed a YouTube Video into a Panopto Video
• Use the Focus Tool in the Editor
Open the Panopto Editor
1. After logging in to D2L and selecting the correct course, select the module that
contains the link for Panopto Recordings. Click the Panopto link.
2. Find the recording to which you wish to add captions and click on it.
3. In the top toolbar, click the Edit (pencil icon).
2 | Pag e

0
Panopto-
■
Videos
for
Editing > Are
You
Ready
for
a
Dog?
►
~ ... '
. ~
COLOR.ADO
MESA
UNIVERSITY
DISTANCE EDUCATION
0 1h
EJ
Help~
Are You Ready
for a Dog?
,.
-1:
•1
1111
1)
m 1 • .::JI
--
<
~
+
••·
&!a
Preview cuts during pl.lyb3(k
Captions
Slides
Qu
in~
Cuts
s1,eams
Me
You
Ready
for a Dog?
Ooyouhavethetime?
0:21
0:48
Bathing and Grooming 1:
17
[11\
,1
bt
)I
tent~
er,1,y
Captions
Shde
s
Are
You
Ready
for a
Dog
l
Quiue
s
Puppy Training
Cuts
Do
you have the time?
Stream s
Bathing and Grooming
•
Do
you
have
the
space?
S1
~•ctin;
a D09
Boo
or
Crate
Do
you
have
the
money?
Vaccinations
Any
Questions?
Enter a table
of
contents
entry
TT
~a
c-::>
I'
l'-0!'
0:00
0:21
0:48
1:17
2:01
2:07
2:
56
3:04
3:20
Video Editor Overview
The video editor includes the following features:
1. Video Title: This is where you can change your video name at any time by clicking
the title.
2. Primary Video Stream if one was recorded.
3. The Content area allows you to add text labels, quizzes, captions, YouTube videos,
website links, and more. You can also use this section to edit various contents
attributes such as start/end times.
3 | Pag e

. ~
COLOR.ADO MESA
UNIVERSITY
DISTANCE EDUCATION
0
11
ffi
He
lp -
4. Secondary Video: This is where you will see your secondary video stream.
5. Undo/redo: Use these to discard your most recent change(s).
6. Apply: If you're happy with the edits you've made, use Apply to make your changes
go live.
7. Revert: Your work will always be saved even if you decide not to publish. If you
don't like the changes you've made, you can Revert to start over.
8. Expand: Use this to expand the timeline view to take up the entire width of the
window.
9. Cut and Pointer tool: Use this to trim out sections from the beginning/end, middle
or from individual streams. You can make trims by dragging your mouse, while
clicking in the timeline allows you to seek around the video timeline. Since the editor
is non-destructive, you can also use it to add sections back in.
10. Plus icon: Clicking this icon will allow you to add items directly to your timeline,
such as streams, clips, quizzes, YouTube videos, and web pages.
11. Set thumbnail: The image set will be used to represent your video in lists,
sharing and more. You can use an image from your primary or secondary stream as
the thumbnail or upload your own image.
12. Timeline: This is where you will edit your video. The 'Lanes' represent Primary
Videos (P), Secondary Videos (S), Slides (SL) or Audio (P). If you have Primary and
Secondary videos, Primary videos will be displayed in the upper left.
4 | Pag e

. ~
COLOR.ADO MESA
UNIVERSITY
DISTANCE EDUCATION
PanoptO"
■
Person
al
S
an
dbox - eprickett > Updated Integration
Sam
pl
[El
Excavation Sites
Overview
Share
Outputs
Quiz Results
Streams
Clips
Search
Captions
Manage
[B
test 1
Overview
Share
Outputs
Se
ss
ion
In
formation
Name
Folder
Prev
iew
im
age
Excavation Sites
m!!l
Ancient Technology
Ed
it
Sess
ion Information
Name
Lecture #4
~ an
ce
l
Edit
-
Revert
I)
,h
tt) Help •
Change the Video Title
1. If you want to change the title of a video from the Editor, go to the top bar of the
editor and click on the video title.
2. If you want to change the title of a video from your list of recordings, hover over the
recording and click Settings (gear icon).
3. In the Overview section, you can change the name of your video by clicking on Edit
next to the Name.
4. Enter the new title and click Save.
Delete Secondary Stream
If you have recorded your computer screen by accident, you can delete it from your
recording so that only the primary source (camera) displays in the video.
1. Hover over the video you want to edit and click the Edit (pencil icon).
2. Click Streams from the left-hand menu.
5 | Pag e

. ~
COLOR.ADO MESA
UNIVERSITY
DISTANCE EDUCATION
Panopto-
■
My
Folder > record
sc
ree n by accident
Detai
ls
0 Add Stream
Contents
Captions
P
rimary
Slides • Camera
0
:0
0 - 0:05
Qu
i
zzes
Se
c
ondary
Cuts
_[I}
,00-0
:0
4
□
Screen
~·
Ed
it
i
I
HI
I Revert
Cl~
•
---
_,.._
.......
•
---
•
--
.
......
_
....
•
---
■
--..-.
o
-"'
ia
--
.....
...
..
_ ~
......
. _ ----
Primary
and
Secondary
Stream
0
3. Under the Secondary stream (Screen), click the three dots and then Delete.
4. Apply your changes using the Apply button in the top-right corner when you're
finished.
5. The recording will now display the Primary stream only.
6 | Pag e

&a
+
'"""'
- ~
COLOR.ADO MESA
UNIVERSITY
DISTANCE EDUCATION
.
_______
,,
.............
-.
------··
·-------
.
,_
....
.._
.
.._
___
·--
'
___
..
,
....
-,
............
.._
..
_,
..
_.
___
_
•
-----
..
---------··----
.
.,.,-
...
,
__
..__
---~
__
.,.,
_
___
,,
__
..,_.,._,
'
·--------
...
---
..
--
..
·-··
________________
,.,,....
__
_
,,..,.
__
..
....
,_
-~-~,
...
_.,
____
.
.
~.--
..
______
.,.,
___
_
,
_,._
.........
".Pl
ID "
I
Change the Preview Image of a Video
The preview image is the thumbnail that represents your video in the video library. You
can change the preview image of your video in the Panopto editor.
1. You can set the preview image using an image from your video. Open the video in the
editor and find the place in the video that has the preview image you would like in
either the primary or secondary viewer window.
2. Then click on the three dots next to the plus sign in the editor and select one of the
following options:
a. Set primary as preview image-Use an image from your primary video
stream, which is typically a video of the presenter.
b. Set secondary as preview image-Use an image from your secondary video
stream. This is typically what you are presenting and is located on the right side
of the screen.
c. Upload custom preview image-Upload an image file from your computer to
use.
3. If you do not select your own preview image, Panopto will automatically select one
for you in this order:
a. The image will be the first slide (if there is a slide stream).
b. The image will be chosen from .5 seconds into the first secondary video.
c. The image will be chosen from .5 seconds into the primary video.
7 | Pag e

S1
►
~
<
&3
+
I
o:oo
Pl
- ~
COLOR.ADO MESA
UNIVERSITY
DISTANCE EDUCATION
■
Preview cuts during playback
030
I
•
~,.-,,.h,,.;j,
I 1-
30
,
drag over the
section
to
be
cut.
--:::.::;_~
-
·--
.
Cit
0:00 I -3:31
◄
>)
■
Prev
iew
cu
t s du ring playback
10:30
l&I
00
I
1x
•••
Speed
Pre
view
0,.
12:00
Trim a Video
1. Open the Panopto video editor and select the Cut tool.
2. Position the cursor over the point you would like to start the edit, a dark gray edit
handle will appear. Click and drag the edit handle to trim the video. Let go at the
point you want the cut to finish. This will remove the grey highlighted area from the
video.
3. Move your cursor over each point you would like to cut and add a new handle at each
edit point.
4. You can use the magnifying glass on the right to zoom in on the timeline so you can
see the audio or video file in more detail to make more accurate cuts.
8 | Pag e

Contents
•
Session
Captions
•
Session
Slides
Quizzes
•
Session
. ~
COLOR.ADO MESA
UNIVERSITY
DISTANCE EDUCATION
0
:1
3 - 0:
27
0:42 - 1 :
10
.
1
:27
- 1
:46
.
.
m Preview cuts during p layback
0:00
I
P1
S1
~
0:00 I
I 0:3~ I
;ore
'r'ou
Reod~·
foro
Dagi
~
+
··•
~
Preview
cuts
during
playback
R>ver
I)
oh
~
-i
i>
m
,.
IICIIII
,_,
..
Q.
5. The Cuts tab is also in the editor on the left. This area shows every cut that has been
made and puts it into a list. You can edit the cuts here as well as on the timeline. If
you click on the three dots next to a cut, you can adjust the start and end time based
on minutes and seconds if you need to make a very fine edit.
6. The grey highlighted areas will not be shown to viewers. Editing in Panopto is non-
destructive, so you can add this content back in later if you need to.
7. Select Apply when you are done making your changes.
9 | Pag e

Details
Capt ions
Au
dm
Descriptions
Slides
Q\Jiues
c..i,
Streams
Contents
Captions
Slides
Quizzes
Cuts
St reams
'Q
Th
is
vi
d~
ha,
no
Sm
art Chapt~,...
Strategic Managemen t
ChapterObJectiv
es
What is Your Desti
ny
?
Functions of Management
Functions of Management
Addo
title
Know t he Organization!
Strategic Planning
Addo
title
Strategic Planning
Key
Points
Adda
title
Enteratableofcontentsentry
c-,
7:
21
8:
22
9:
00
Add
a description
S1
SL
. ~
COLOR.ADO MESA
UNIVERSITY
DISTANCE EDUCATION
---
1
~ 1
Su
bm
i
tt
i
ng
t ravel ex
pe
nse re po
rt
s 0
:0
6
LI
a
c-::i
Add a Table of Contents to a Video
In the Panopto viewer, the table of contents (TOC) provides an easy method to navigate
the recording. The TOC is automatically generated if a session is recorded with a
PowerPoint, but can be added manually, or edited to provide the viewer with more
information.
1. To add a new TOC entry, click the Contents tab from the left-hand side of the Editor
screen.
2. Select the Cut/Pointer tool from the top left of the edit timeline.
3. Click in the timeline to move the red line to the exact spot you want to insert a TOC
entry.
4. Type in the outlined box on the Contents tab to enter an event at that time. Hit
Enter on your keyboard to save the event.
10 | Pag e

Captions
Audio
Descriptions
Slides
Quizzes
Cuts
Streams
□
Title
.~
COLOR.ADO MESA
UNIVERSITY
DISTANCE EDUCATION
~
This vi
deo
has n
o,
Sm
.a
rt
Ch
.a
p
tie
rs
•
•
•
•
•
nm
Add a title
St
ra
teg ic Manage
,
..
Edit
Cha
pt,er Obj ec
tiv
es
■
De
lete
Wh
at is You r Destiny?
Fu
nct
ions of
Ma
nagement
Revert O
■
II
ffi
Excavation Sites
2 years
ago
0:00
0:02
0:24
0:
55
1:28
I O Sett ings I< Share
,•
Ed
it ,11 Stats I De
le
te
...
5. To edit or delete a pre-existing TOC entry, move the cursor over the entry you wish
to change, click on the three dots next to it then click on Edit or Delete.
6. Apply your changes using the Apply button in the top-right corner when you're
finished.
Allow Viewers to Download Slide Presentation
If a video is recorded with slides, or a PowerPoint is uploaded with the recording in the
editor, the slides can be made available to Viewers for download.
1. Hover over the recording and click Settings.
2. In the Settings window, select Streams from the left-hand navigation.
11 | Pag e

[El
Strateg ic
Mg
mt
Overview
Share
Outputs
Quiz
Results
References
Search
Captions
Aud io
Descriptions
Manage
Log
Streams
Name and
Id
[
DV
]
e955f345 -583d -4e
42
-ad9c-a
f860
111616d
[
SCR
EE
N]
6e74c
f69
-9d3H d25-ae3b-a
f8601
1
16
16d
Pr
esen
tation Documents
Filename
PD
F Docu ment s
No
PDF
documents
.
I Ch
oose
File I No
fil
e chos e n
Search this recording
D iscussion
Notes
Bookmarks
Attachments
I
:!:
I Pres.e ntat i
on
A
.p
ptx
:!:
Pr
ese
nt ati
on
B.pptx
. ~
COLOR.ADO MESA
UNIVERSITY
DISTANCE EDUCATION
Date created Captions Start Duration Creator
1/
10
/2023 4:
35
:26 PM Yes 00:00 09:
59
1/10/2023 4:
35
:26 PM
No
00:00 09:
59
Creator Processed? Download
x
De
lete
Yes
0Allow
Upload
PDF
Q.
X
3. In the Presentation Documents section, under the Download column, select
Allow next to the presentation you wish to make available for download.
4. Viewers may download the presentation(s) by navigating to the Attachments tab in
the left-hand navigation of the viewer. From this tab, they can select the download
button next to the title of the presentation they would like to download.
Add a Clip to Splice Multiple Videos Together
You can splice multiple videos together by using the Add a clip option in the editor. You
cannot add a clip of a video that already contains a clip. So, if you are trying to add a
video as a clip, and it already has a clip in it, it will not appear in the list of options in the
Insert Clip window.
Note: If you want to make edits to a clip, which is part of a spliced video, go to the
original clip and make edits there. After you publish the original video, the edits will be
reflected by default in the spliced video. If the original video clip is deleted, it will be
removed from any videos it was spliced into.
12 | Pag e

►
~
c;
C>.
16
(
~
+ D Preview cuts du
ri
ng playback
0:00
-
...
- ~
COLOR.ADO MESA
UNIVERSITY
DISTANCE EDUCATION
Pl
.-
.- -- - -
.
•
r
0 Add a stream
~1~
Add a
cl
ip
ti
Add a quiz
D Add a
You
Tube video
►
C-:::>
Add a webpage
< m
Add
a
cl
ip
A cli p
is
another co
mplet
e
se
ssi
on inserted i
nto
this
se
ssi
on's timeline.
My F
ol
der
Cancel
• Search under
"My
Folder"
Learning
about
Corporate Culture Lesson 1
5/30/2019
Submitting Expense Reports
5 0 2019
Our
Travel Policy
5/3012019
, .
,,
X
l
,.
r
1. Open the video where you want to add another video in the editor. Click in the
timeline to move the red line to the exact spot you want to add a clip.
2. Click on the Plus icon to the right of the scissors then choose Add a clip.
3. Select a video from one of your folders to insert into your video. Then click Insert.
13 | Pag e

Cap
tions
Slides
Quizzes
Cuts
Streams
Add a
description
.~
COLOR.ADO MESA
UNIVERSITY
DISTANCE EDUCATION
►
-+I+-
Submitting
Expense
Reports 0:09 -
0:29
.-----
~
~
Edit
i
De
lete
Ed
it Session Reference
X
Name
Length
Order
Start
time
Wednesday, May
16,
2018 at
9:54:11
AM
1:20
0
@ 0:00:00.00
0 at the beginning
at the end
- Cancel
Re
v
ert
0
■
II
@
4. Under Contents you will see the new session. Click the three dots to Edit when the
clip will appear in the session.
5. When editing the clip, you can choose a specific Start time in your recording to
insert this video, or just choose at the beginning or at the end. You can also choose
the Order if you have multiple clips added at the same time in the video.
6. Apply your changes using the Apply button in the top-right corner when you're
finished.
14 | Pag e

Cuts
Str
ea
ms
Contents
Captions
Slides
Quizzes
Cuts
.~
COLOR.ADO MESA
UNIVERSITY
DISTANCE EDUCATION
■
Edit > Best Practices
for
Online Video
(£)Adda
presentation l
• Best
Practices
for Onlin e Video.pptx
8 ~t Practic
~
for
On
lin e Video
+
•Ar11i:r•l7
...........
Fl'P
l
Ti
ps
fOf
being
on
camera
0 Add a presen
tat
io
n
(!'
Co
n
cu
r_Traini
ng_AP
Websi te.pptx
Process ing
,,,_
'"f:
0:00
0:
44
Add
new
sl
i
des
Preview
existing
sl
i
des
< m +
•••
r;
Preview cuts during playback
--
Add and Edit Slides in the Editor
1. In the editor, click on the Slides option in the left navigation menu.
2. If you have slides already in your Panopto video, a thumbnail image of each slide will
appear along with the time that it appears inside your video. If you'd like to add
slides to your video, click Add a presentation above and select your slide deck from
your computer.
3. To add a presentation, locate and select the PowerPoint you wish to add to your
video. Panopto will upload all slides in the presentation and allow you to preview
them once processed.
4. To add a slide to the video, click in the timeline to move the red line to the exact spot
you want to add the slide.
15 | Pag e

Cuts
St
reams
f1,-,,...,,
11M11
1f
..cae,
1
W.AM'lllllltn.."'11,._.,._.u11,
.~
COLOR.ADO MESA
UNIVERSITY
DISTANCE EDUCATION
0:02
0 Add a pr
esen
tat ion
Bea
tles;
Early
History
,
Sk
i
Hle
•
Guit
ar
+
Singing
,
~
M.t1ilc
•
nHde-d
a.
dru
rnm,er
~rid
biss
1>1
, H, m.c
chJingc,d
to
the
Si~
r
8c-atlc::i;
I 960: Th,
k~l!!i
•
R.tftrtrKt
to
~HoOr't.Cnt~u
□
"St.i"f'IOlll'tff('
-lff
·
-slul
1
nm
1 :15
~•
Edit
j Delete
5. Select the Plus icon next to the slide to add it. Repeat this step to add additional
slides.
6. A new stream appears within the timeline and your slides will now appear in the video
stream.
7. To edit where a slide appears, select the three dots next to the slide and then select
Edit.
16 | Pag e

.~
COLOR.ADO MESA
UNIVERSITY
DISTANCE EDUCATION
Edit
Table
of
Contents entry
X
Title
Time
Preview image
Sea
rch
keywords
Link
Captions
Slides
Quizzes
Cuts
St
reams
Expense Reportin
gP
resentation Overvi
ew
lo:
oo
:
o,
.63
h-.._..--.
Presentation Overview
lM'lfflSullffliltil",CME•PfflW~
~
bpenH
~I
ActnowleciplC
Auponsibllity
f~~h:r.;t"ptlom~T~ltt:mt.i~
Moff
ltikwm~lion
Expense Reporting
Presentation Overview When Su
bmitt
ing An Expense
Report
.6nn.-r,tiinn
Cvnonc-o
Donn..+C'
https
://
links ate useful for
1ncorporat1n9
quizzes into your video or
for
JUSt
pointing to a helpful web page. When
you
add a
llnk:
to your video. the
video
will
pause at
this
posJt1on
and v.ewers will
see
the hnked web
page.
Cancel
Add
a
description
Ex
pense
Re
p
ort
i ngP resentation Overview 0:02
~~
Ed
it
Enter a
table
of
contents
entry
j Delete
TT
LI
a
c-:::,
Re
v
ert
0
8. On the Edit Table of Contents entry page, you can manually type in the time you
want the slide to appear. When completed, click Save.
9. To remove a PowerPoint slide from the video, select the three dots next to the slide,
and then select Delete. Note: The slide won't be permanently deleted, so you can
add the slide back into the video later if needed.
10. Apply your changes using the Apply button in the top-right corner when you're
finished.
17 | Pag e

►
~
Gt
C>.
16
(
~
+
LI
Preview cuts
dur
ing playback
0:00
I
o,30
Pl
0 Add a stre
am
□
Add a clip
m Add a quiz
D Add a
Y:o
uTube
vi
deo
C-::>
Add a webpage
.~
COLOR.ADO MESA
UNIVERSITY
DISTANCE EDUCATION
11,00
.
--
--
+ • • •
fJ
P
re
view cuts du
Embed a Web Page into a Video
Adding links to Panopto sessions allows you to include extra teaching materials within a
video. Links may be embedded at any point in the video. When the video reaches the
time associated with the URL, the player will pause and display the contents of the
embedded web page directly within the Panopto player. When the user is finished with
the link, they may resume the player by clicking the Play button.
NOTE: Not all web addresses (URLs) will work. You will not be able to see a website that
does not allow the site content to be displayed in iframes. Additionally, an embedded
website will not display when viewing the session as a podcast or embedded video.
1. Open the video in the Panopto editor and click on the timeline to move the red line to
the exact spot you want to embed the webpage.
2. Click on the plus icon above the timeline and select Add a webpage.
18 | Pag e

- ~
COLOR.ADO MESA
UNIVERSITY
DISTANCE EDUCATION
Ed
it Table
of
Contents entry
Title
Time
Preview image
Stream
Search
keywords
Link
0:00:20.00
Preview image will be generated later
Camera
(p
rima
ry)
Camera (primary)
Scr
ee
n (secondary)
https:
//
Links
are useful for incorporating quizzes into your video or for
just
pointing
to
a helpful web page. When you add a link to your
video. the video will pause at this position and viewers will
see
the
linked web page.
- Cancel
1
111
1 Reve
rt
0
X
3. In the pop-up window, you can give the link a title, specify a more exact time, which
stream you want this to appear in (Camera or Screen), some keywords for searching,
and enter the link itself. Once the information is entered, click Save.
4. Apply your changes using the Apply button in the top-right corner when you're
finished.
5. The web page will now appear in the stream in which you chose.
19 | Pag e

d
PcWlOfJl:O
'
■
My
Folder
>
Recording
App
l
iances
Captions
DiKIZ5i.ion
Notes
Sene-caAppl,ance
►
~
<
~
+
0:00
Pl
c;
0:
16
a
Preview cuts
dur
ing playback
►
I
o,30
.-
. ~
COLOR.ADO MESA
UNIVERSITY
DISTANCE EDUCATION
I
mo
.-
*****
I)
< ;
,h
Help
•
Sign
out
6. If an error message or blank page appears after you embed a webpage, then the
webpage publisher does not allow the site content to be displayed in an iframe. This
is not controlled by Panopto. As a workaround, enter the link as the title of a table of
contents entry. Users will be able to click the link in the table of contents and open
the webpage in a new window.
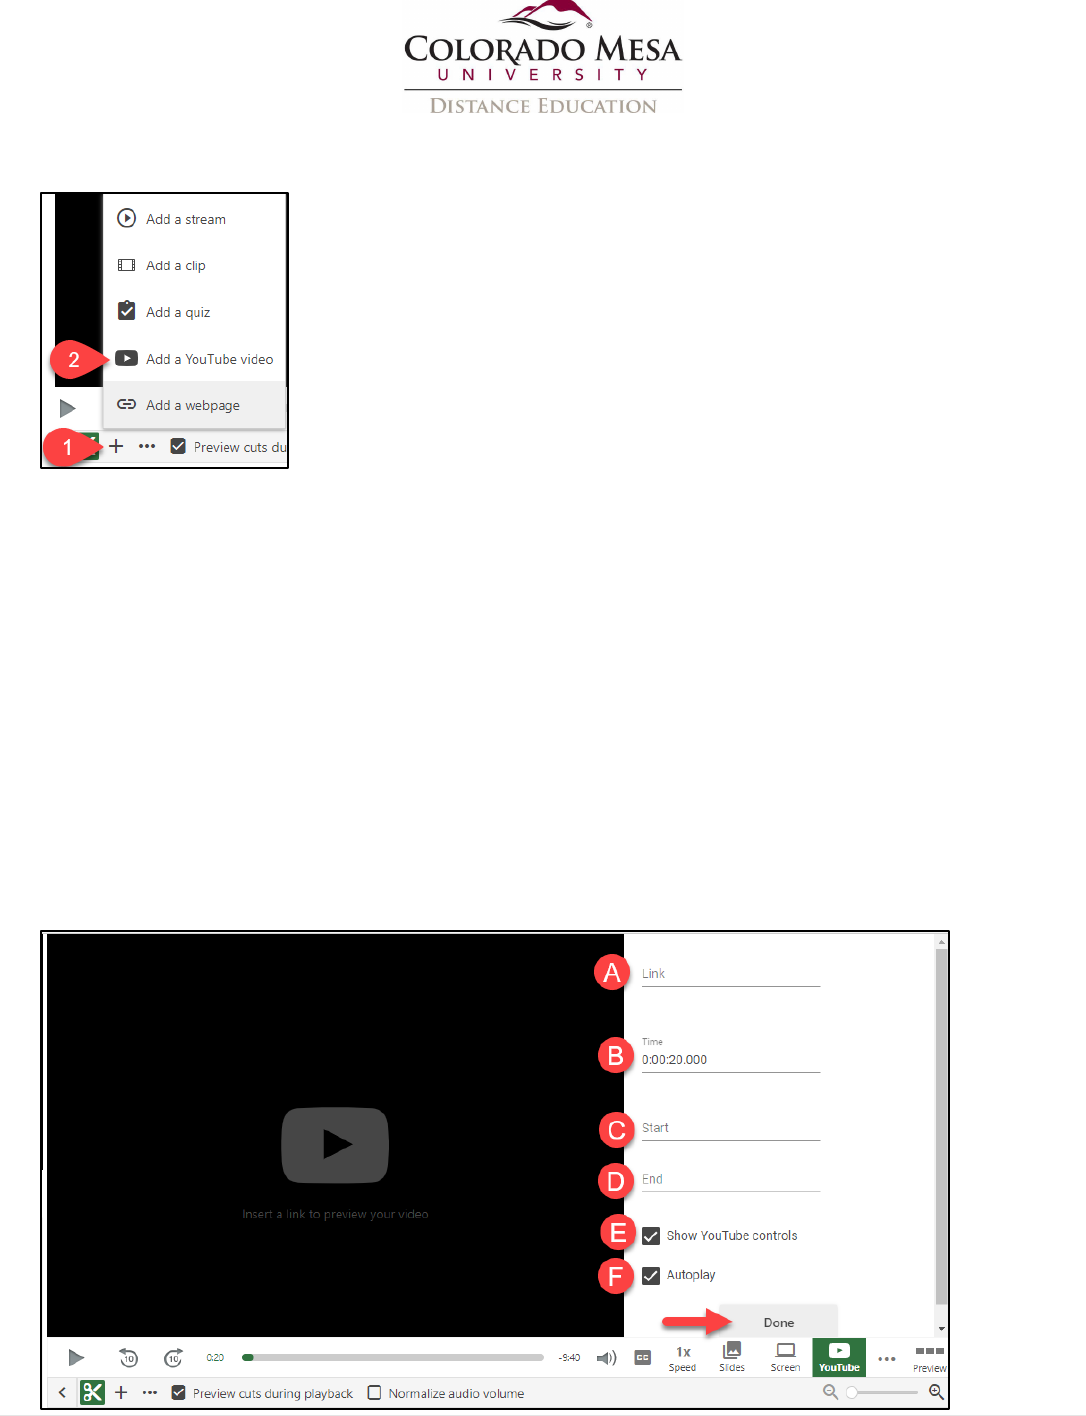
Embed a YouTube Video into a Panopto Video
You can embed a YouTube video or a portion of a YouTube video into your Panopto
recording from the editor. Note: Embedded YouTube videos will not play when using the
embedded viewer (e.g. in D2L) they must be played within the Panopto player/website.
7. Open the video in the Panopto editor and click on the timeline to move the red line to
the exact spot you want to embed the YouTube video.
20 | Pag e
0 Add a stream
□
Add a clip
fl Add a qu iz
D Add a
You
Tube video
C-:::>
Add a webpage
+
•••
L!
Pre
view cuts du
- ~
COLOR.ADO MESA
UNIVERSITY
DISTANCE EDUCATION
Link
Time
0:00:20.000
start
End
LI
Show
YouTube
controls
LI
Autop
l
ay
Done
1x
I!'
□
Speed S
li
des
Sc
r
een
+
...
m Preview
cuts
duri
ng
playback D Normalize aud io
vo
lu
me
g
0,.
•••
Prev
iew
8. Click on the plus icon above the timeline and select Add a YouTube video.
9. On the new screen enter the information related to the YouTube video you want to
embed:
a. Link - Paste in the link to the video that you would find in the address bar of
your browser for the video.
b. Time - This is the time in your session in which the YouTube video will start
c. Start (Optional) - This field allows you to designate where in the YouTube video
you want it to begin playing.
d. End (Optional) - This field allows you to designate where in the YouTube video
you want it to stop playing
e. Show YouTube Controls (Checkbox) - If checked, the controls for the
YouTube video will appear when you hover over the video.
f. Autoplay (Checkbox) - If checked, when the Panopto session reaches the
YouTube video the video will play automatically. In unchecked, the session
pauses and waits for the viewer to begin watching the video.
21 | Pag e

Captions
Slides
Quizzing
More
..
.
Add
a description
a
YouTu
be
video
Enter a table
of
contents entry
TT
LI
a
c-::>
. ~
COLOR.ADO MESA
UNIVERSITY
DISTANCE EDUCATION
0:17
Revert
0
ffi
10. Click Done to embed the YouTube video. This will insert a new Table of Contents
entry at the location where you currently are in the timeline.
11. Apply your changes using the Apply button in the top-right corner when you're
finished.
12. When the Panopto video is played it will pause itself at the time the YouTube link
was added. The YouTube video will appear in the secondary window to play.
22 | Pag e

<
. ~
COLOR.ADO
MESA
UNIVERSITY
DISTANCE EDUCATION
+
•••
fJ
Preview cuts during playback
<
&3
~
•
~
+ •••
L!.
Preview
cuts
during
playback
000
I I
I I I
1°~
0
•
I I I I I I I
1°~.
I I I I ' I I 1°~. I I I ' I I I
1°
~ I • I I I I I I
1°,
I I I
P1
Focus areas
S1
S2
I
DW
I
Re
v
ert
O
■
II
@
Use the Focus Tool in the Editor
The focus tool is used to switch between multiple video sources so viewers don’t have
to. The focus tool will be accessible in the editor when you have multiple primary or
secondary video sources. However, the tool will not appear when you only have one
primary and one secondary source, or if you have two secondary sources, but one of
them is slides.
6. When you have two or more primary or two or more secondary streams, you will see
the Focus tool appear to the right of the cut icon. Select the focus tool.
7. Click and drag over the area of video that you want viewers to focus on. This will trim
out the other primary or secondary sources. The trimmed sections will be grayed out
in the editor.
8. If you have two secondary streams, you can use the focus tool to go back and forth
when editing the streams.
9. Apply your changes using the Apply button in the top-right corner when you're
finished.
23 | Pag e
