MySQL Connector/ODBC Developer Guide

Abstract
This manual describes how to install and configure MySQL Connector/ODBC, the driver that enables ODBC
applications to communicate with MySQL servers, and how to use it to develop database applications.
The latest MySQL Connector/ODBC version is recommended for use with MySQL Server version 8.0 and higher.
For notes detailing the changes in each release of Connector/ODBC, see MySQL Connector/ODBC Release Notes.
For legal information, see the Legal Notices.
For help with using MySQL, please visit the MySQL Forums, where you can discuss your issues with other MySQL
users.
Licensing information. This product may include third-party software, used under license. If you are using
a Commercial release of MySQL Connector/ODBC, see the MySQL Connector/ODBC 9.0 Commercial License
Information User Manual or MySQL Connector/ODBC 8.0 Commercial License Information User Manual for licensing
information, including licensing information relating to third-party software that may be included in this Commercial
release. If you are using a Community release of MySQL Connector/ODBC, see the MySQL Connector/ODBC 9.0
Community License Information User Manual or MySQL Connector/ODBC 8.0 Community License Information User
Manual for licensing information, including licensing information relating to third-party software that may be included in
this Community release.
Document generated on: 2024-08-12 (revision: 79297)

Table of Contents
Preface and Legal Notices .................................................................................................................. v
1 Introduction to MySQL Connector/ODBC .......................................................................................... 1
2 Connector/ODBC Versions .............................................................................................................. 3
3 General Information About ODBC and Connector/ODBC ................................................................... 5
3.1 Connector/ODBC Architecture ............................................................................................... 5
3.2 ODBC Driver Managers ........................................................................................................ 7
4 Connector/ODBC Installation ........................................................................................................... 9
4.1 Installing Connector/ODBC on Windows .............................................................................. 10
4.1.1 Installing the Windows Connector/ODBC Driver Using the Zipped DLL Package .......... 11
4.1.2 Installing the Windows Connector/ODBC Debug Packages ........................................ 12
4.2 Installing Connector/ODBC on Unix-like Systems ................................................................. 13
4.2.1 Installing Connector/ODBC Using the MySQL Yum Repository ................................... 13
4.2.2 Installing Connector/ODBC from a Binary Tarball Distribution ..................................... 13
4.2.3 Installing Connector/ODBC from a DEB Distribution ................................................... 14
4.2.4 Installing Connector/ODBC from an RPM Distribution ................................................ 15
4.3 Installing Connector/ODBC on macOS ................................................................................ 15
4.4 Building Connector/ODBC from a Source Distribution on Windows ........................................ 16
4.5 Building Connector/ODBC from a Source Distribution on Unix ............................................... 18
4.6 Building Connector/ODBC from a Source Distribution on macOS .......................................... 20
4.7 Installing Connector/ODBC from the Development Source Tree ............................................ 20
5 Configuring Connector/ODBC ........................................................................................................ 23
5.1 Overview of Connector/ODBC Data Source Names .............................................................. 23
5.2 Connector/ODBC Connection Parameters ............................................................................ 24
5.3 Configuring a Connector/ODBC DSN on Windows ............................................................... 34
5.3.1 Configuring a Connector/ODBC DSN on Windows with the ODBC Data Source
Administrator GUI ............................................................................................................. 34
5.3.2 Configuring a Connector/ODBC DSN on Windows, Using the Command Line .............. 38
5.3.3 Troubleshooting ODBC Connection Problems ........................................................... 38
5.4 Configuring a Connector/ODBC DSN on macOS .................................................................. 39
5.5 Configuring a Connector/ODBC DSN on Unix ...................................................................... 42
5.6 Connecting Without a Predefined DSN ................................................................................ 42
5.7 ODBC Connection Pooling .................................................................................................. 43
5.8 OpenTelemetry Tracing Support .......................................................................................... 43
5.9 Authentication Options ........................................................................................................ 44
5.10 Getting an ODBC Trace File ............................................................................................. 45
5.10.1 Enabling ODBC Tracing on Windows ...................................................................... 45
5.10.2 Enabling ODBC Tracing on macOS ........................................................................ 46
5.10.3 Enabling ODBC Tracing on Unix ............................................................................ 47
5.10.4 Enabling a Connector/ODBC Log ........................................................................... 47
6 Connector/ODBC Examples ........................................................................................................... 49
6.1 Basic Connector/ODBC Application Steps ............................................................................ 49
6.2 Step-by-step Guide to Connecting to a MySQL Database through Connector/ODBC ............... 50
6.3 Connector/ODBC and Third-Party ODBC Tools .................................................................... 51
6.4 Using Connector/ODBC with Microsoft Access ..................................................................... 52
6.4.1 Exporting Access Data to MySQL ............................................................................. 52
6.4.2 Importing MySQL Data to Access ............................................................................. 55
6.4.3 Using Microsoft Access as a Front-end to MySQL ..................................................... 57
6.5 Using Connector/ODBC with Microsoft Word or Excel .......................................................... 63
6.6 Using Connector/ODBC with Crystal Reports ....................................................................... 65
6.7 Connector/ODBC Programming ........................................................................................... 71
6.7.1 Using Connector/ODBC with Visual Basic Using ADO, DAO and RDO ........................ 71
iii

MySQL Connector/ODBC Developer Guide
6.7.2 Using Connector/ODBC with .NET ............................................................................ 75
7 Connector/ODBC Reference .......................................................................................................... 81
7.1 Connector/ODBC API Reference ......................................................................................... 81
7.2 Connector/ODBC Data Types ............................................................................................. 85
7.3 Connector/ODBC Error Codes ............................................................................................ 86
8 Connector/ODBC Notes and Tips ................................................................................................... 89
8.1 Connector/ODBC General Functionality ............................................................................... 89
8.1.1 Obtaining Auto-Increment Values .............................................................................. 89
8.1.2 Dynamic Cursor Support .......................................................................................... 90
8.1.3 Configuring Catalog and Schema Support ................................................................. 90
8.1.4 Connector/ODBC Performance ................................................................................. 90
8.1.5 Setting ODBC Query Timeout in Windows ................................................................ 91
8.2 Connector/ODBC Application-Specific Tips .......................................................................... 91
8.2.1 Using Connector/ODBC with Microsoft Applications ................................................... 91
8.2.2 Using Connector/ODBC with Borland Applications ..................................................... 94
8.2.3 Using Connector/ODBC with ColdFusion ................................................................... 95
8.2.4 Using Connector/ODBC with OpenOffice.org ............................................................. 95
8.2.5 Using Connector/ODBC with Pervasive Software DataJunction .................................. 95
8.2.6 Using Connector/ODBC with SunSystems Vision ....................................................... 96
8.3 Connector/ODBC and the Application Both Use OpenSSL .................................................... 96
8.4 Connector/ODBC Errors and Resolutions (FAQ) .................................................................. 96
9 Connector/ODBC Support ............................................................................................................ 103
9.1 Connector/ODBC Community Support ............................................................................... 103
9.2 How to Report Connector/ODBC Problems or Bugs ........................................................... 103
9.3 Connector/ODBC Version History ...................................................................................... 104
iv

Preface and Legal Notices
This manual describes how to install, configure, and develop database applications using MySQL
Connector/ODBC, the driver that allows ODBC applications to communicate with MySQL servers.
Legal Notices
Copyright © 2005, 2024, Oracle and/or its affiliates.
License Restrictions
This software and related documentation are provided under a license agreement containing restrictions
on use and disclosure and are protected by intellectual property laws. Except as expressly permitted
in your license agreement or allowed by law, you may not use, copy, reproduce, translate, broadcast,
modify, license, transmit, distribute, exhibit, perform, publish, or display any part, in any form, or by any
means. Reverse engineering, disassembly, or decompilation of this software, unless required by law for
interoperability, is prohibited.
Warranty Disclaimer
The information contained herein is subject to change without notice and is not warranted to be error-free.
If you find any errors, please report them to us in writing.
Restricted Rights Notice
If this is software, software documentation, data (as defined in the Federal Acquisition Regulation), or
related documentation that is delivered to the U.S. Government or anyone licensing it on behalf of the U.S.
Government, then the following notice is applicable:
U.S. GOVERNMENT END USERS: Oracle programs (including any operating system, integrated
software, any programs embedded, installed, or activated on delivered hardware, and modifications
of such programs) and Oracle computer documentation or other Oracle data delivered to or accessed
by U.S. Government end users are "commercial computer software," "commercial computer software
documentation," or "limited rights data" pursuant to the applicable Federal Acquisition Regulation and
agency-specific supplemental regulations. As such, the use, reproduction, duplication, release, display,
disclosure, modification, preparation of derivative works, and/or adaptation of i) Oracle programs (including
any operating system, integrated software, any programs embedded, installed, or activated on delivered
hardware, and modifications of such programs), ii) Oracle computer documentation and/or iii) other Oracle
data, is subject to the rights and limitations specified in the license contained in the applicable contract.
The terms governing the U.S. Government's use of Oracle cloud services are defined by the applicable
contract for such services. No other rights are granted to the U.S. Government.
Hazardous Applications Notice
This software or hardware is developed for general use in a variety of information management
applications. It is not developed or intended for use in any inherently dangerous applications, including
applications that may create a risk of personal injury. If you use this software or hardware in dangerous
applications, then you shall be responsible to take all appropriate fail-safe, backup, redundancy, and other
measures to ensure its safe use. Oracle Corporation and its affiliates disclaim any liability for any damages
caused by use of this software or hardware in dangerous applications.
Trademark Notice
Oracle, Java, MySQL, and NetSuite are registered trademarks of Oracle and/or its affiliates. Other names
may be trademarks of their respective owners.
v

Documentation Accessibility
Intel and Intel Inside are trademarks or registered trademarks of Intel Corporation. All SPARC trademarks
are used under license and are trademarks or registered trademarks of SPARC International, Inc. AMD,
Epyc, and the AMD logo are trademarks or registered trademarks of Advanced Micro Devices. UNIX is a
registered trademark of The Open Group.
Third-Party Content, Products, and Services Disclaimer
This software or hardware and documentation may provide access to or information about content,
products, and services from third parties. Oracle Corporation and its affiliates are not responsible for and
expressly disclaim all warranties of any kind with respect to third-party content, products, and services
unless otherwise set forth in an applicable agreement between you and Oracle. Oracle Corporation and its
affiliates will not be responsible for any loss, costs, or damages incurred due to your access to or use of
third-party content, products, or services, except as set forth in an applicable agreement between you and
Oracle.
Use of This Documentation
This documentation is NOT distributed under a GPL license. Use of this documentation is subject to the
following terms:
You may create a printed copy of this documentation solely for your own personal use. Conversion to other
formats is allowed as long as the actual content is not altered or edited in any way. You shall not publish
or distribute this documentation in any form or on any media, except if you distribute the documentation in
a manner similar to how Oracle disseminates it (that is, electronically for download on a Web site with the
software) or on a CD-ROM or similar medium, provided however that the documentation is disseminated
together with the software on the same medium. Any other use, such as any dissemination of printed
copies or use of this documentation, in whole or in part, in another publication, requires the prior written
consent from an authorized representative of Oracle. Oracle and/or its affiliates reserve any and all rights
to this documentation not expressly granted above.
Documentation Accessibility
For information about Oracle's commitment to accessibility, visit the Oracle Accessibility Program website
at
http://www.oracle.com/pls/topic/lookup?ctx=acc&id=docacc.
Access to Oracle Support for Accessibility
Oracle customers that have purchased support have access to electronic support through My Oracle
Support. For information, visit
http://www.oracle.com/pls/topic/lookup?ctx=acc&id=info or visit http://www.oracle.com/pls/topic/
lookup?ctx=acc&id=trs if you are hearing impaired.
vi

Chapter 1 Introduction to MySQL Connector/ODBC
The MySQL Connector/ODBC is the name for the family of MySQL ODBC drivers (previously called
MyODBC drivers) that provide access to a MySQL database using the industry standard Open Database
Connectivity (ODBC) API. This reference covers Connector/ODBC 9.0, which includes the functionality of
the Unicode driver and the ANSI driver.
MySQL Connector/ODBC provides both driver-manager based and native interfaces to the MySQL
database, with full support for MySQL functionality, including stored procedures, transactions and full
Unicode compliance.
For more information on the ODBC API standard and how to use it, refer to http://support.microsoft.com/
kb/110093.
The application development section of the ODBC API reference assumes a good working knowledge of
C, general DBMS, and a familiarity with MySQL. For more information about MySQL functionality and its
syntax, refer to https://dev.mysql.com/doc/.
Typically, you need to install Connector/ODBC only on Windows machines. For Unix and macOS, you
can use the native MySQL network or named pipes to communicate with your MySQL database. You may
need Connector/ODBC for Unix or macOS if you have an application that requires an ODBC interface to
communicate with the database. Applications that require ODBC to communicate with MySQL include
ColdFusion, Microsoft Office, and Filemaker Pro.
For notes detailing the changes in each release of Connector/ODBC, see MySQL Connector/ODBC
Release Notes.
Key Connector/ODBC topics include:
• Installing Connector/ODBC: Chapter 4, Connector/ODBC Installation.
• The configuration options: Section 5.2, “Connector/ODBC Connection Parameters”.
• An example that connects to a MySQL database from a Windows host: Section 6.2, “Step-by-step Guide
to Connecting to a MySQL Database through Connector/ODBC”.
• An example that uses Microsoft Access as an interface to a MySQL database: Section 6.4, “Using
Connector/ODBC with Microsoft Access”.
• General tips and notes, including how to obtain the last auto-increment ID: Section 8.1, “Connector/
ODBC General Functionality”.
• Application-specific usage tips and notes: Section 8.2, “Connector/ODBC Application-Specific Tips”.
• A FAQ (Frequently Asked Questions) list: Section 8.4, “Connector/ODBC Errors and Resolutions (FAQ)”.
• Additional Connector/ODBC support options: Chapter 9, Connector/ODBC Support.
1

2

Chapter 2 Connector/ODBC Versions
The latest version of Connector/ODBC supports all active MySQL Server versions, which today includes
MySQL Server 8.0 and higher. As an example, use Connector/ODBC 9.0.0 with MySQL Server 8.0, 8.4,
and 9.0.
Information about each Connector/ODBC version; for release notes, see the Connector/ODBC release
notes.
Information about major changes per Connector/ODBC series is described at Section 9.3, “Connector/
ODBC Version History”.
3

4

Chapter 3 General Information About ODBC and Connector/
ODBC
Table of Contents
3.1 Connector/ODBC Architecture ....................................................................................................... 5
3.2 ODBC Driver Managers ................................................................................................................ 7
ODBC (Open Database Connectivity) provides a way for client programs to access a wide range of
databases or data sources. ODBC is a standardized API that enables connections to SQL database
servers. It was developed according to the specifications of the SQL Access Group and defines a set of
function calls, error codes, and data types that can be used to develop database-independent applications.
ODBC usually is used when database independence or simultaneous access to different data sources is
required.
For more information about ODBC, refer to http://support.microsoft.com/kb/110093.
Open Database Connectivity (ODBC) is a widely accepted application-programming interface (API) for
database access. It is based on the Call-Level Interface (CLI) specifications from X/Open and ISO/IEC for
database APIs and uses Structured Query Language (SQL) as its database access language.
A survey of ODBC functions supported by Connector/ODBC is given at Section 7.1, “Connector/ODBC API
Reference”. For general information about ODBC, see http://support.microsoft.com/kb/110093.
3.1 Connector/ODBC Architecture
The Connector/ODBC architecture is based on five components, as shown in the following diagram:
Figure 3.1 Connector/ODBC Architecture Components
• Application:
5

Connector/ODBC Architecture
The Application uses the ODBC API to access the data from the MySQL server. The ODBC API in turn
communicates with the Driver Manager. The Application communicates with the Driver Manager using
the standard ODBC calls. The Application does not care where the data is stored, how it is stored, or
even how the system is configured to access the data. It needs to know only the Data Source Name
(DSN).
A number of tasks are common to all applications, no matter how they use ODBC. These tasks are:
• Selecting the MySQL server and connecting to it.
• Submitting SQL statements for execution.
• Retrieving results (if any).
• Processing errors.
• Committing or rolling back the transaction enclosing the SQL statement.
• Disconnecting from the MySQL server.
Because most data access work is done with SQL, the primary tasks for applications that use ODBC are
submitting SQL statements and retrieving any results generated by those statements.
• Driver manager:
The Driver Manager is a library that manages communication between application and driver or drivers.
It performs the following tasks:
• Resolves Data Source Names (DSN). The DSN is a configuration string that identifies a given
database driver, database, database host and optionally authentication information that enables an
ODBC application to connect to a database using a standardized reference.
Because the database connectivity information is identified by the DSN, any ODBC-compliant
application can connect to the data source using the same DSN reference. This eliminates the need to
separately configure each application that needs access to a given database; instead you instruct the
application to use a pre-configured DSN.
• Loading and unloading of the driver required to access a specific database as defined within the
DSN. For example, if you have configured a DSN that connects to a MySQL database then the driver
manager will load the Connector/ODBC driver to enable the ODBC API to communicate with the
MySQL host.
• Processes ODBC function calls or passes them to the driver for processing.
• Connector/ODBC Driver:
The Connector/ODBC driver is a library that implements the functions supported by the ODBC API. It
processes ODBC function calls, submits SQL requests to MySQL server, and returns results back to
the application. If necessary, the driver modifies an application's request so that the request conforms to
syntax supported by MySQL.
• DSN Configuration:
The ODBC configuration file stores the driver and database information required to connect to the
server. It is used by the Driver Manager to determine which driver to be loaded according to the
6

ODBC Driver Managers
definition in the DSN. The driver uses this to read connection parameters based on the DSN specified.
For more information, Chapter 5, Configuring Connector/ODBC.
• MySQL Server:
The MySQL database where the information is stored. The database is used as the source of the data
(during queries) and the destination for data (during inserts and updates).
3.2 ODBC Driver Managers
An ODBC Driver Manager is a library that manages communication between the ODBC-aware application
and any drivers. Its main functionality includes:
• Resolving Data Source Names (DSN).
• Driver loading and unloading.
• Processing ODBC function calls or passing them to the driver.
Most ODBC Driver Manager implementations also include an administration application that makes the
configuration of DSN and drivers easier. Examples and information on ODBC Driver Managers for different
operating systems are listed below:
• Windows: Microsoft Windows ODBC Driver Manager (odbc32.dll). It is included in the Windows
operating system. See http://support.microsoft.com/kb/110093 for more information.
• macOS: ODBC Administrator is a GUI application for macOS. It provides a simplified configuration
mechanism for the iODBC Driver Manager. You can configure DSN and driver information either through
ODBC Administrator or through the iODBC configuration files. This also means that you can test ODBC
Administrator configurations using the iodbctest command. See http://support.apple.com/kb/DL895
for more information.
• Unix:
• unixODBC Driver Manager for Unix (libodbc.so). See http://www.unixodbc.org, for more
information.
• iODBC Driver Manager for Unix (libiodbc.so). See http://www.iodbc.org, for more information.
7

8

Chapter 4 Connector/ODBC Installation
Table of Contents
4.1 Installing Connector/ODBC on Windows ...................................................................................... 10
4.1.1 Installing the Windows Connector/ODBC Driver Using the Zipped DLL Package .................. 11
4.1.2 Installing the Windows Connector/ODBC Debug Packages ................................................ 12
4.2 Installing Connector/ODBC on Unix-like Systems ......................................................................... 13
4.2.1 Installing Connector/ODBC Using the MySQL Yum Repository ........................................... 13
4.2.2 Installing Connector/ODBC from a Binary Tarball Distribution ............................................. 13
4.2.3 Installing Connector/ODBC from a DEB Distribution ........................................................... 14
4.2.4 Installing Connector/ODBC from an RPM Distribution ........................................................ 15
4.3 Installing Connector/ODBC on macOS ........................................................................................ 15
4.4 Building Connector/ODBC from a Source Distribution on Windows ................................................ 16
4.5 Building Connector/ODBC from a Source Distribution on Unix ...................................................... 18
4.6 Building Connector/ODBC from a Source Distribution on macOS .................................................. 20
4.7 Installing Connector/ODBC from the Development Source Tree .................................................... 20
This section explains where to download Connector/ODBC, and how to run the installer, copy the files
manually, or build from source.
Where to Get Connector/ODBC
You can get a copy of the latest version of Connector/ODBC binaries and sources from our website at
https://dev.mysql.com/downloads//connector/odbc/.
Choosing Binary or Source Installation Method
You can install the Connector/ODBC drivers using two different methods:
• The binary installation is the easiest and most straightforward method of installation. You receive all
the necessary libraries and other files pre-built, with an installer program or batch script to perform all
necessary copying and configuration.
• The source installation method is intended for platforms where a binary installation package is not
available, or in situations where you want to customize or modify the installation process or Connector/
ODBC drivers before installation.
If a binary distribution is not available for a particular platform, and you build the driver from the original
source code.
Connector/ODBC binary distributions include an INFO_BIN file that describes the environment and
configuration options used to build the distribution. If you installed Connector/ODBC from a binary
distribution and experience build-related issues on a platform, it may help to check the settings that were
used to build the distribution on that platform. Binary and source distributions include an INFO_SRC file that
provides information about the product version and the source repository from which the distribution was
produced. This information was added in Connector/ODBC 8.0.14.
Supported Platforms
Connector/ODBC can be used on all major platforms supported by MySQL according to https://
www.mysql.com/en/support/supportedplatforms/database.html. This includes Windows, most Unix-like
operation systems, and macOS.
9

Choosing Unicode or ANSI Driver
Note
On all non-Windows platforms except macOS, the driver is built against unixODBC
and is expecting a 2-byte SQLWCHAR, not 4 bytes as iODBC is using. For this
reason, the binaries are only compatible with unixODBC; recompile the driver
against iODBC to use them together. For further information, see Section 3.2,
“ODBC Driver Managers”.
For further instructions, consult the documentation corresponding to the platform where you are installing
and whether you are running a binary installer or building from source:
Platform Binary Installer Build from Source
Windows Installation Instructions Build Instructions
Unix/Linux Installation Instructions Build Instructions
macOS Installation Instructions
Choosing Unicode or ANSI Driver
Connector/ODBC offers the flexibility to handle data using any character set through its Unicode-enabled
driver, or the maximum raw speed for a more limited range of character sets through its ANSI driver. Both
kinds of drivers are provided in the same download package, and are both installed onto your systems
by the installation program or script that comes with the download package. Users who install Connector/
ODBC and register it to the ODBC manager manually can choose to install and register either one or both
of the drivers; the different drivers are identified by a w (for “wide characters”) for the Unicode driver and a
for the ANSI driver at the end of the library names. For example, myodbc9w.dll versus myodbc9a.dll,
or libmyodbc9w.so versus libmyodbc9a.so.
Note
Related: The previously described file names contain an "9", such as
myodbc9a.dll, which means they are for Connector/ODBC 9.x. File names with a
"5", such as myodbc5a.dll, are for Connector/ODBC 5.x.
Prerequisites
The ODBC driver is linked against the MySQL Server client library, so it inherits its dependencies for its
shared libraries. For example, the MySQL Server client library depends on C++ runtime libraries.
4.1 Installing Connector/ODBC on Windows
Before installing the Connector/ODBC drivers on Windows:
• Make sure your Microsoft Data Access Components (MDAC) are up to date. You can obtain the latest
version from the Microsoft Data Access and Storage website.
• Make sure the Visual C++ Redistributable for Visual Studio is installed.
• Connector/ODBC 8.0.14 or higher: VC++ Runtime 2015 or VC++ Runtime 2017
• Connector/ODBC 8.0.11 to 8.0.13: VC++ Runtime 2015
• Connector/ODBC 5.3: VC++ Runtime 2013
Use the version of the package that matches the system type of your Connector/ODBC driver: use the
64-bit version (marked by “x64” in the package's title and filename) if you are running a 64-bit driver, and
10

Installing the Windows Connector/ODBC Driver Using the Zipped DLL Package
use the 32-bit version (marked by “x86” in the package's title and filename) if you are running a 32-bit
driver.
• OpenSSL is a required dependency. The MSI package bundles OpenSSL libraries used by Connector/
ODBC while the Zip Archive does not and requires that you install OpenSSL on the system.
There are different distribution types to use when installing for Windows. The software that is installed is
identical in each case, only the installation method is different.
• MSI: The Windows MSI Installer Package wizard installs Connector/ODBC. Download it from https://
dev.mysql.com/downloads/connector/odbc/. Configure ODBC connections using Chapter 5, Configuring
Connector/ODBC after the installation.
• Zip Archive: Contains DLL files that must be manually installed. See Section 4.1.1, “Installing the
Windows Connector/ODBC Driver Using the Zipped DLL Package” for additional details.
• Connector/ODBC 8.0 and below: MySQL Installer: The general MySQL Installer application for
Windows can install, upgrade, configure, and manage most MySQL 8.0 products, including Connector/
ODBC 8.0 and its prerequisites. Download it from http://dev.mysql.com/downloads/windows/installer/
and see the MySQL Installer documentation for additional details. This is not a Connector/ODBC specific
installer.
4.1.1 Installing the Windows Connector/ODBC Driver Using the Zipped DLL
Package
If you have downloaded the zipped DLL package:
1. Unzip the installation files to the location you want it installed.
2. Run the included batch file to perform an installation from the current directory and registers the ODBC
driver.
3. Alternatively to the batch file, install the individual files required for Connector/ODBC operation
manually.
4. Optionally install debug related files that are bundled in a different Zip file.
To install using the batch file:
1. Unzip the Connector/ODBC zipped Connector/ODBC package to the desired installation directory. For
example, to C:\Program Files\MySQL\Connector ODBC 9.0\.
Note
Multiple Zip files are available: 32-bit and 64-bit, and (as of 8.0.31) a separate
Debug Zip file that includes PDB files and unit tests.
2. Open a command prompt (with Admin privileges) and change the location to that directory.
3. Run Install.bat to register the Connector/ODBC driver with the Windows ODBC manager for both
the ANSI and Unicode versions. Output is similar to:
cd C:\Program Files\MySQL\Connector ODBC 9.0\
Install.bat
Registering Unicode driver
Checking if "MySQL ODBC 9.0 Unicode Driver" is not already registered
11

Installing the Windows Connector/ODBC Debug Packages
Registering "MySQL ODBC 9.0 Unicode Driver"
Success: Usage count is 1
Registering ANSI driver
Checking if "MySQL ODBC 9.0 ANSI Driver" is not already registered
Registering "MySQL ODBC 9.0 ANSI Driver"
Success: Usage count is 1
Note
Install.bat assumes the default naming scheme but optionally accepts a
custom name as the first parameter. For example, "Install.bat Fun" yields "Fun
Unicode" and "Fun ANSI" as the driver names.
Optionally use myodbc-installer.exe to list the registered drivers, for example:
cd C:\Program Files\MySQL\Connector ODBC 9.0\bin
myodbc-installer -d -l
SQL Server
MySQL ODBC 9.0 Unicode Driver
MySQL ODBC 9.0 ANSI Driver
Note
Changing or adding a new DSN (data source name) may be accomplished using
either the GUI, or from the command-line using myodbc-installer.exe.
Using Install.bat is optional, directly using myodbc-installer.exe is an alternative option to
register drivers. For example:
# For Unicode-enabled driver:
myodbc-installer -a -d -n "MySQL ODBC 9.0 Unicode Driver" -t "DRIVER=myodbc9w.dll;SETUP=myodbc9S.dll"
# For ANSI driver:
myodbc-installer -a -d -n "MySQL ODBC 9.0 ANSI Driver" -t "DRIVER=myodbc9a.dll;SETUP=myodbc9S.dll"
4.1.2 Installing the Windows Connector/ODBC Debug Packages
The associated Debug files are bundled in its own Zip file, including two lib/ directories:
• lib/: PDB files to use with regular builds; they are built in RelWithDebInfo mode.
• Debug/lib/: Debug builds built in Debug mode; includes driver, PDB files, and unit tests in test/
subdirectory.
Note
The separate debug Zip file was added in v8.0.31.
Add Debug Functionality to Regular Build
Download the debug zip and copy its lib/ contents to your driver installation directory; this adds the PDB
files generated in the RelWithDebInfo build.
Note
Regular builds are built with RelWithDebInfo so not all debugging information is
available. For example, some variables might be optimized out.
12

Installing Connector/ODBC on Unix-like Systems
Replace Regular Build with Debug Build
Manually copy Debug/lib/ files from the Zip package into the driver installation directory to replace the
DLL and PDB files inside. No new driver registration is required.
Install an Independent Debug Build
This requires copying the plugin/ directory and dependency libraries (lib*.dll) from the regular
driver build, and optionally copying additional authentication plugins (fido2.dll, libsasl.dll, and
saslSCRAM.dll) depending on the plugins you use.
Register with the myodbc-installer command line tool from the regular driver bin/ sub-directory.
4.2 Installing Connector/ODBC on Unix-like Systems
There are three methods available for installing Connector/ODBC on a Unix-like system from a binary
distribution. For most Unix environments, you will use the tarball distribution. For Linux systems, RPM
distributions are available, through the MySQL Yum repository (for some platforms) or direct download.
Prerequisites
• unixODBC 2.2.12 or later
• OpenSSL
• C++ runtime libraries (libstdc++)
Note
Connector/ODBC provides generic Linux packages for Intel architecture (both
32 and 64 bits). As of Connector/ODBC 8.0.32, generic Linux packages for ARM
architecture (64 bit) are also available.
4.2.1 Installing Connector/ODBC Using the MySQL Yum Repository
The MySQL Yum repository for Oracle Linux, Red Hat Enterprise Linux, CentOS, and Fedora provides
Connector/ODBC RPM packages using the MySQL Yum repository. You must have the MySQL Yum
repository on your system's repository list (see Adding the MySQL Yum Repository for details). Make sure
your Yum repository setup is up-to-date by running:
$> su root
$> yum update mysql-community-release
You can then install Connector/ODBC by the following command:
$> yum install mysql-connector-odbc
See Installing Additional MySQL Products and Components with Yum for more details.
4.2.2 Installing Connector/ODBC from a Binary Tarball Distribution
To install the driver from a tarball distribution (.tar.gz file), download the latest version of the driver for
your operating system and follow these steps, substituting the appropriate file and directory names based
on the package you download (some of the steps below might require superuser privileges):
1. Extract the archive:
13

Installing Connector/ODBC from a DEB Distribution
$> gunzip mysql-connector-odbc-9.0.0-i686-pc-linux.tar.gz
$> tar xvf mysql-connector-odbc-9.0.0-i686-pc-linux.tar
2. The extra directory contains two subdirectories, lib and bin. Copy their contents to the proper
locations on your system (we use /usr/local/bin and /usr/local/lib in this example; replace
them with the destinations of your choice):
$> cp bin/* /usr/local/bin
$> cp lib/* /usr/local/lib
The last command copies both the Connector/ODBC ANSI and the Unicode drivers from lib into /
usr/local/lib; if you do not need both, you can just copy the one you want. See Choosing Unicode
or ANSI Driver for details.
3. Finally, register the driver version of your choice (the ANSI version, the Unicode version, or both) with
your system's ODBC manager (for example, iODBC or unixodbc) using the myodbc-installer tool
that was included in the package under the bin subdirectory (and is now under the /usr/local/bin
directory, if the last step was followed); for example, this registers the Unicode driver with the ODBC
manager:
// Registers the Unicode driver:
$> myodbc-installer -a -d -n "MySQL ODBC 9.0 Unicode Driver" -t "Driver=/usr/local/lib/libmyodbc9w.so"
// Registers the ANSI driver
$> myodbc-installer -a -d -n "MySQL ODBC 9.0 ANSI Driver" -t "Driver=/usr/local/lib/libmyodbc9a.so"
4. Verify that the driver is installed and registered using the ODBC manager, or the myodbc-installer
utility:
$> myodbc-installer -d -l
Next, see Section 5.5, “Configuring a Connector/ODBC DSN on Unix” on how to configure a DSN for
Connector/ODBC.
4.2.3 Installing Connector/ODBC from a DEB Distribution
Connector/ODBC Debian packages (.deb files) are available (as of v8.0.20) for Debian or Debian-like Linux
systems from the Connector/ODBC downloads page. The two package types are:
• mysql-connector-odbc: This driver package installs MySQL ODBC driver libraries and the installer
tool. It installs these files:
${LibDir}/odbc/libmyodbc9a.so
${LibDir}/odbc/libmyodbc9w.so
${BinDir}/myodbc-installer
${DocDir}/mysql-connector-odbc/*
Prerequisites: it depends on the unixODBC libraries (libodbc, libodbcinst).
It installs and registers both the Unicode (MySQL ODBC 9.0 Unicode Driver) and ANSI (MySQL ODBC
9.0 ANSI Driver) drivers.
This driver package does not conflict with the official Debian package libmyodbc. It is possible to install/
uninstall/use both packages independently.
• mysql-connector-odbc-setup: This setup package provides the GUI configuration widget library. It
installs these files:
${LibDir}/odbc/libmyodbc9S.so
14

Installing Connector/ODBC from an RPM Distribution
${DocDir}/mysql-connector-odbc-setup/*
The installation process registers the setup library for ODBC drivers with the ODBC manager.
The ${LibDir}, ${BinDir}, ${DocDir} locations used above should be the standard locations where DEB
packages install libraries/executables/documentation. The library location contains architecture component,
and here are example locations:
/usr/lib/x86_64-linux-gnu/odbc/libmyodbc9a.so
/usr/lib/x86_64-linux-gnu/odbc/libmyodbc9w.so
/usr/lib/x86_64-linux-gnu/odbc/libmyodbc9S.so
/usr/bin/myodbc-installer
/usr/share/doc/mysql-connector-odbc/*
/usr/share/doc/mysql-connector-odbc-setup/*
4.2.4 Installing Connector/ODBC from an RPM Distribution
To install or upgrade Connector/ODBC from an RPM distribution on Linux, simply download the RPM
distribution of the latest version of Connector/ODBC and follow the instructions below. Use su root to
become root, then install the RPM file.
If you are installing for the first time:
$> su root
$> rpm -ivh mysql-connector-odbc-9.0.0.i686.rpm
If the driver exists, upgrade it like this:
$> su root
$> rpm -Uvh mysql-connector-odbc-9.0.0.i686.rpm
If there is any dependency error for MySQL client library, libmysqlclient, simply ignore it by supplying
the --nodeps option, and then make sure the MySQL client shared library is in the path or set through
LD_LIBRARY_PATH.
This installs the driver libraries and related documents to /usr/local/lib and /usr/share/doc/
MyODBC, respectively. See Section 5.5, “Configuring a Connector/ODBC DSN on Unix” for the post-
installation configuration steps.
To uninstall the driver, become root and execute an rpm command:
$> su root
$> rpm -e mysql-connector-odbc
4.3 Installing Connector/ODBC on macOS
macOS is based on the FreeBSD operating system, and you can normally use the MySQL network port
for connecting to MySQL servers on other hosts. Installing the Connector/ODBC driver lets you connect
to MySQL databases on any platform through the ODBC interface. If your application requires an ODBC
interface, install the Connector/ODBC driver.
On macOS, the ODBC Administrator, based on the iODBC manager, provides easy administration of
ODBC drivers and configuration, allowing the updates of the underlying iODBC configuration files through
a GUI tool. The tool is included in macOS v10.5 and earlier; users of later versions of macOS need
to download it from http://www.iodbc.org/dataspace/doc/iodbc/wiki/iodbcWiki/Downloads and install it
manually.
15

Prerequisites
Prerequisites
• iODBC
• OpenSSL is a required dependency. The macOS installation binaries bundle OpenSSL, while the
compressed tar archives do not and require that you install OpenSSL on your system before the
installation process.
• C++ runtime libraries (libc++)
There are two ways to install Connector/ODBC on macOS. You can use either the package provided in
a compressed tar archive that you manually install, or use a compressed disk image (.dmg) file, which
includes an installer.
To install using the compressed tar archive (some of the steps below might require superuser privileges):
1. Download the compressed tar archive.
2. Extract the archive:
$> tar xvzf mysql-connector-odbc-x.y.z-macos10.z-x86-(32|64)bit.tar.gz
3. The directory created contains two subdirectories, lib and bin. Copy these to a suitable location such
as /usr/local:
$> cp bin/* /usr/local/bin
$> cp lib/* /usr/local/lib
4. Finally, register the driver with iODBC using the myodbc-installer tool that was included in the
package:
$> myodbc-installer -a -d -n "MySQL ODBC 9.0 Driver" -t "Driver=/usr/local/lib/libmyodbc9w.so"
To install using the a compressed disk image (.dmg) file:
Important
iODBC 3.52.12 or later must be installed on the macOS system before you
can install Connector/ODBC using a compressed disk image. See Section 4.3,
“Installing Connector/ODBC on macOS” [15].
1. Download the disk image.
2. Double click the disk image to open it. You see the Connector/ODBC installer inside.
3. Double click the Connector/ODBC installer, and you will be guided through the rest of the installation
process. You need superuser privileges to finish the installation.
To verify the installed drivers, either use the ODBC Administrator application or the myodbc-installer
utility:
$> myodbc-installer -d -l
4.4 Building Connector/ODBC from a Source Distribution on
Windows
You only need to build Connector/ODBC from source on Windows to modify the source or installation
location. If you are unsure whether to install from source, please use the binary installation detailed in
Section 4.1, “Installing Connector/ODBC on Windows”.
16

Build Steps
Building Connector/ODBC from source on Windows requires a number of different tools and packages:
• MDAC, Microsoft Data Access SDK from https://www.microsoft.com/en-in/download/details.aspx?
id=21995.
• A suitable C++ compiler, such as Microsoft Visual C++ or the C++ compiler included with Microsoft
Visual Studio 2015 or later. Compiling Connector/ODBC 5.3 can use VS 2013.
• CMake.
• The MySQL client library and include files from MySQL 8.0 or higher for Connector/ODBC 9.0, or
MySQL 5.7 for Connector/ODBC 5.3. This is required because Connector/ODBC uses calls and
structures that do not exist in older versions of the library. To get the client library and include files, visit
https://dev.mysql.com/downloads/.
Build Steps
Set the environment variables for the Visual Studio toolchain. Visual Studio includes a batch file to set
these for you, and installs a Start menu shortcut that opens a command prompt with these variables set.
Set MYSQL_DIR to the MySQL server installation path, while using the short-style file names. For example:
C:\> set MYSQL_DIR=C:\PROGRA~1\MySQL\MYSQLS~1.0
Build Connector/ODBC using the cmake command-line tool by executing the following from the source root
directory (in a command prompt window):
C:\> cmake -G "Visual Studio 12 2013"
This produces a project file that you can open with Visual Studio, or build from the command line with
either of the following commands:
C:\> devenv.com MySQL_Connector_ODBC.sln /build Release
While building Connector/ODBC from source, dynamic linking with the MySQL client library is selected by
default—that is, the MYSQLCLIENT_STATIC_LINKING cmake option is FALSE by default (however, the
binary distributions of Connector/ODBC from Oracle are linked statically to the client library). If you want to
link statically to the MySQL client library, set the MYSQLCLIENT_STATIC_LINKING option to TRUE, and
use the MYSQLCLIENT_LIB_NAME option to supply the client library's name for static linking:
C:\> cmake -G "Visual Studio 12 2013" -DMYSQLCLIENT_STATIC_LINKING:BOOL=TRUE \
DMYSQLCLIENT_LIB_NAME=client_lib_name_with_extension
Also use the MYSQLCLIENT_LIB_NAME option to link dynamically to a MySQL client library other than
libmysql.dll. cmake looks for the client library under the location specified by the MYSQL_LIB_DIR
option; if the option is not specified, cmake looks under the default locations inside the folder specified by
the MYSQL_DIR option.
Since Connector/ODBC 8.0.11, use BUNDLE_DEPENDENCIES to install external library runtime
dependencies, such as OpenSSL, together with the connector. For dependencies inherited from the
MySQL client library, this only works if these dependencies are bundled with the client library itself.
INFO_SRC: this file provides information about the product version and the source repository from which
the distribution was produced. Was added in Connector/ODBC 8.0.14.
Optionally link Connector/ODBC statically (equivalent to the /MT compiler option in Visual Studio) or
dynamically (equivalent to the /MD compiler option in Visual Studio) to the Visual C++ runtime. The default
17

Building Connector/ODBC from a Source Distribution on Unix
option is to link dynamically; if you want to link statically, set the option STATIC_MSVCRT:BOOL=TRUE, that
is:
C:\> cmake -G "Visual Studio 12 2013" -DSTATIC_MSVCRT:BOOL=TRUE
The STATIC_MSVCRT option and the MYSQLCLIENT_STATIC_LINKING option are independent of each
other; that is, you can link Connector/ODBC dynamically to the Visual C++ runtime while linking statically to
the MySQL client library, and vice versa. However, if you link Connector/ODBC dynamically to the Visual C
++ runtime, you also need to link to a MySQL client library that is itself linked dynamically to the Visual C+
+ runtime; and similarly, linking Connector/ODBC statically to the Visual C++ runtime requires linking to a
MySQL client library that is itself linked statically to the Visual C++ runtime.
To compile a debug build, set the cmake build type so that the correct versions of the MySQL client
libraries are used; also, because the MySQL C client library built by Oracle is not built with the debug
options, when linking to it while building Connector/ODBC in debug mode, use the WITH_NODEFAULTLIB
option to tell cmake to ignore the default non-debug C++ runtime:
C:\> cmake -G "Visual Studio 14 2015" -DWITH_DEBUG=1 -DWITH_NODEFAULTLIB=libcmt
Create the debug build then with this command:
C:\> devenv.com MySQL_Connector_ODBC.sln /build Debug
Upon completion, the executables are in the bin/ and lib/ subdirectories.
See Section 4.1.1, “Installing the Windows Connector/ODBC Driver Using the Zipped DLL Package” on
how to complete the installation by copying the binary files to the right locations and registering Connector/
ODBC with the ODBC manager.
4.5 Building Connector/ODBC from a Source Distribution on Unix
You need the following tools to build MySQL from source on Unix:
• A working ANSI C++ compiler. GCC 4.2.1 or later, Sun Studio 12.1 or later, and many current vendor-
supplied compilers are known to work.
• CMake.
• MySQL client libraries and include files. To get the client libraries and include files, visit https://
dev.mysql.com/downloads/.
• A compatible ODBC manager must be installed. Connector/ODBC is known to work with the iODBC and
unixODBC managers. See Section 3.2, “ODBC Driver Managers” for more information.
• If you are using a character set that is not compiled into the MySQL client library, install the MySQL
character definitions from the charsets directory into SHAREDIR (by default, /usr/local/mysql/
share/mysql/charsets). These should be in place if you have installed the MySQL server on the
same machine. See Character Sets, Collations, Unicode for more information on character set support.
Once you have all the required files, unpack the source files to a separate directory, then run cmake with
the following command:
$> cmake -G "Unix Makefiles"
Typical cmake Parameters and Options
You might need to help cmake find the MySQL headers and libraries by setting the environment variables
MYSQL_INCLUDE_DIR, MYSQL_LIB_DIR, and MYSQL_DIR to the appropriate locations; for example:
18

Build Steps for Unix
$> export MYSQL_INCLUDE_DIR=/usr/local/mysql/include
$> export MYSQL_LIB_DIR=/usr/local/mysql/lib
$> export MYSQL_DIR=/usr/local/mysql
When you run cmake, you might add options to the command line. Here are some examples:
• -DODBC_INCLUDES=dir_name: Use when the ODBC include directory is not found within the system
$PATH.
• -DODBC_LIB_DIR=dir_name: Use when the ODBC library directory is not found within the system
$PATH.
• -DWITH_UNIXODBC=1: Enables unixODBC support. iODBC is the default ODBC library used when
building Connector/ODBC from source on Linux platforms. Alternatively, unixODBC may be used by
setting this option to “1”.
• -DMYSQLCLIENT_STATIC_LINKING=boolean: Link statically to the MySQL client
library. Dynamic linking with the MySQL client library is selected by default—that is, the
MYSQLCLIENT_STATIC_LINKING cmake option is FALSE by default (however, the binary
distributions of Connector/ODBC from Oracle are linked statically to the client library). If you want to
link statically to the MySQL client library, set the option to TRUE. See also the description for the -
DMYSQLCLIENT_LIB_NAME=client_lib_name_with_extension option.
• -DBUNDLE_DEPENDENCIES=boolean: Enable to install external library runtime dependencies, such as
OpenSSL, together with the connector. For dependencies inherited from the MySQL client library, this
only works if these dependencies are bundled with the client library itself. Option added in v8.0.11.
• -DMYSQLCLIENT_LIB_NAME=client_lib_name_with_extension: Location of the MySQL client
library. See the description for MYSQLCLIENT_STATIC_LINKING. To link statically to the MySQL client
library, use this option to supply the client library's name for static linking. Also use this option If you
want to link dynamically to a MySQL client library other than libmysqlclient.so. cmake looks for the
client library under the location specified by the environment variable MYSQL_LIB_DIR; if the variable
is not specified, cmake looks under the default locations inside the folder specified by the environment
variable MYSQL_DIR.
• -DMYSQL_CONFIG_EXECUTABLE=/path/to/mysql_config: Specifies location of the utility
mysql_config, which is used to fetch values of the variables MYSQL_INCLUDE_DIR, MYSQL_LIB_DIR,
MYSQL_LINK_FLAGS, and MYSQL_CXXFLAGS. Values fetched by mysql_config are overridden by values
provided directly to cmake as parameters.
• -DMYSQL_EXTRA_LIBRARIES=dependencies: When linking the MySQL client library
statically (-DMYSQLCLIENT_STATIC_LINKING=ON) and when setting MYSQL_LIB_DIR and
MYSQL_INCLUDE_DIR (so that the mysql_config is not used to detect settings), use this to define a
list of dependencies required by the client library.
• -DMYSQL_LINK_FLAGS=MySQL link flags
• -DMYSQL_CXXFLAGS=MySQL C++ linkage flags
• -DMYSQL_CXX_LINKAGE=1: Enables C++ linkage to MySQL client library. By default,
MYSQL_CXX_LINKAGE is enabled for MySQL 5.6.4 or later. For MySQL 5.6.3 and earlier, this option
must be set explicitly to 1.
Build Steps for Unix
To build the driver libraries, execute make:
19

Installing Driver Libraries
$> make
If any errors occur, correct them and continue with the build process. If you are not able to finish the build,
see Section 9.1, “Connector/ODBC Community Support”.
Installing Driver Libraries
To install the driver libraries, execute the following command:
$> make install
For more information on build process, refer to the BUILD file that comes with the source distribution.
Testing Connector/ODBC on Unix
Some tests for Connector/ODBC are provided in the distribution with the libraries that you built. To run the
tests:
1. Make sure you have an odbc.ini file in place, by which you can configure your DSN entries. A
sample odbc.ini file is generated by the build process under the test folder. Set the environment
variable ODBCINI to the location of your odbc.ini file.
2. Set up a test DSN in your odbc.ini file (see Section 5.5, “Configuring a Connector/ODBC DSN on
Unix” for details ). A sample DSN entry, which you can use for your tests, can be found in the sample
odbc.ini file.
3. Set the environment variable TEST_DSN to the name of your test DSN.
4. Set the environment variable TEST_UID and perhaps also TEST_PASSWORD to the user name
and password for the tests, if needed. By default, the tests use “root” as the user and do not enter
a password; if you want the tests to use another user name or password, set TEST_UID and
TEST_PASSWORD accordingly.
5. Make sure that your MySQL server is running.
6. Run the following command:
$> make test
4.6 Building Connector/ODBC from a Source Distribution on macOS
To build Connector/ODBC from source on macOS, follow the same instructions given for Section 4.5,
“Building Connector/ODBC from a Source Distribution on Unix”. Notice that iODBC is the default ODBC
library used when building Connector/ODBC on macOS from source. Alternatively, unixODBC may be
used by setting the option -DWITH_UNIXODBC=1.
4.7 Installing Connector/ODBC from the Development Source Tree
Caution
This section is only for users who are interested in helping us test our new code. To
just get MySQL Connector/ODBC up and running on your system, use a standard
release distribution.
The Connector/ODBC code repository uses Git. To check out the latest source code, visit GitHub: https://
github.com/mysql/mysql-connector-odbc To clone the Git repository to your machine, use this command
20

Installing Connector/ODBC from the Development Source Tree
$> git clone https://github.com/mysql/mysql-connector-odbc.git
You should now have a copy of the entire Connector/ODBC source tree in the directory mysql-
connector-odbc. To build and then install the driver libraries from this source tree on Unix or Linux, use
the same steps outlined in Section 4.5, “Building Connector/ODBC from a Source Distribution on Unix”.
On Windows, make use of Windows Makefiles WIN-Makefile and WIN-Makefile_debug in building
the driver. For more information, see Section 4.4, “Building Connector/ODBC from a Source Distribution on
Windows”.
After the initial checkout operation to get the source tree, run git pull periodically to update your source
according to the latest version.
21

22

Chapter 5 Configuring Connector/ODBC
Table of Contents
5.1 Overview of Connector/ODBC Data Source Names ...................................................................... 23
5.2 Connector/ODBC Connection Parameters .................................................................................... 24
5.3 Configuring a Connector/ODBC DSN on Windows ....................................................................... 34
5.3.1 Configuring a Connector/ODBC DSN on Windows with the ODBC Data Source
Administrator GUI ..................................................................................................................... 34
5.3.2 Configuring a Connector/ODBC DSN on Windows, Using the Command Line ...................... 38
5.3.3 Troubleshooting ODBC Connection Problems ................................................................... 38
5.4 Configuring a Connector/ODBC DSN on macOS .......................................................................... 39
5.5 Configuring a Connector/ODBC DSN on Unix .............................................................................. 42
5.6 Connecting Without a Predefined DSN ........................................................................................ 42
5.7 ODBC Connection Pooling .......................................................................................................... 43
5.8 OpenTelemetry Tracing Support .................................................................................................. 43
5.9 Authentication Options ................................................................................................................ 44
5.10 Getting an ODBC Trace File ..................................................................................................... 45
5.10.1 Enabling ODBC Tracing on Windows .............................................................................. 45
5.10.2 Enabling ODBC Tracing on macOS ................................................................................ 46
5.10.3 Enabling ODBC Tracing on Unix .................................................................................... 47
5.10.4 Enabling a Connector/ODBC Log ................................................................................... 47
Before you connect to a MySQL database using the Connector/ODBC driver, you configure an ODBC Data
Source Name (DSN). The DSN associates the various configuration parameters required to communicate
with a database to a specific name. You use the DSN in an application to communicate with the database,
rather than specifying individual parameters within the application itself. DSN information can be user-
specific, system-specific, or provided in a special file. ODBC data source names are configured in different
ways, depending on your platform and ODBC driver.
5.1 Overview of Connector/ODBC Data Source Names
A Data Source Name associates the configuration parameters for communicating with a specific database.
Generally, a DSN consists of the following parameters:
• Name
• Host Name
• Database Name
• Login
• Password
In addition, different ODBC drivers, including Connector/ODBC, may accept additional driver-specific
options and parameters.
There are three types of DSN:
• A System DSN is a global DSN definition that is available to any user and application on a particular
system. A System DSN can normally only be configured by a systems administrator, or by a user who
has specific permissions that let them create System DSNs.
23

Connector/ODBC Connection Parameters
• A User DSN is specific to an individual user, and can be used to store database connectivity information
that the user regularly uses.
• A File DSN uses a simple file to define the DSN configuration. File DSNs can be shared between users
and machines and are therefore more practical when installing or deploying DSN information as part of
an application across many machines.
DSN information is stored in different locations depending on your platform and environment.
5.2 Connector/ODBC Connection Parameters
You can specify the parameters in the following tables for Connector/ODBC when configuring a DSN:
• Table 5.1, “Connector/ODBC DSN Configuration Options”
• Table 5.3, “Connector/ODBC Option Parameters”
Users on Windows can use the ODBC Data Source Administrator to set these parameters; see
Section 5.3, “Configuring a Connector/ODBC DSN on Windows” on how to do that, and see Table 5.1,
“Connector/ODBC DSN Configuration Options” for information on the options and the fields and check
boxes they corrrespond to on the graphical user interface of the ODBC Data Source Administrator.
On Unix and macOS, use the parameter name and value as the keyword/value pair in the DSN
configuration. Alternatively, you can set these parameters within the InConnectionString argument in
the SQLDriverConnect() call.
Table 5.1 Connector/ODBC DSN Configuration Options
Parameter GUI Option Default Value Comment
user User ODBC The user name used to connect to MySQL.
uid User ODBC Synonymous with user. Added in 3.51.16.
server TCP/IP Server localhost The host name of the MySQL server. Can define multiple hosts if MULTI_HOST
is enabled.
database Database - The default database.
option - 0 Options that specify how Connector/ODBC works. See Table 5.3, “Connector/
ODBC Option Parameters” and Table 5.4, “Recommended Connector/ODBC
Option Values for Different Configurations”.
port Port 3306 The TCP/IP port to use if server is not localhost.
initstmt Initial Statement - Initial statement. A statement to execute when connecting to MySQL. In
version 3.51 the parameter is called stmt. The driver supports the initial
statement being executed only at the time of the initial connection.
password Password - The password for the user account on server. pwd is an alias.
password1,
password2,
password3
Password - For Multi-Factor Authentication (MFA); password1 is an alias for password.
There'as also the pwd1, pwd2, and pwd3 aliases. These were added in 8.0.28.
socket - - The Unix socket file or Windows named pipe to connect to; only define socket
if server is set to localhost
ssl-ca SSL Certificate - Alias of SSLCA as an eventual replacement; added in v8.0.29.
SSLCA SSL Certificate - The path to a file with a list of trust SSL CAs.
An ssl-ca alias was added in 8.0.29, which is preferred over SSLCA.
24

Connector/ODBC Connection Parameters
Parameter GUI Option Default Value Comment
ssl-
capath
SSL CA Path - Alias of SSLCAPATH as an eventual replacement; added in v8.0.29.
SSLCAPATHSSL CA Path - The path to a directory that contains trusted SSL CA certificates in PEM
format.
An ssl-capath alias was added in 8.0.29, which is preferred over
SSLCAPATH.
ssl-cert SSL Certificate - Alias of SSLCERT as an eventual replacement; added in v8.0.29.
SSLCERT SSL Certificate - The name of the SSL certificate file to use for establishing a secure
connection.
An ssl-cert alias was added in 8.0.29, which is preferred over SSLCERT.
ssl-
cipher
SSL Cipher - Alias of SSLCIPHER as an eventual replacement; added in v8.0.29.
SSLCIPHERSSL Cipher - The list of permissible ciphers for SSL encryption. The cipher list has the same
format as the openssl ciphers command.
An ssl-cipher alias was added in 8.0.29, which is preferred over
SSLCIPHER.
ssl-key SSL Key - Alias of SSLKEY as an eventual replacement; added in v8.0.29.
SSLKEY SSL Key - The name of the SSL key file to use for establishing a secure connection.
An ssl-key alias was added in 8.0.29, which is preferred over SSLKEY.
ssl-crl The path name of
the file containing
certificate revocation
lists in PEM format.
- Added in 8.0.31
ssl-
crlpath
The path of the
directory that contains
certificate revocation
list files in PEM format.
- Added in 8.0.31
rsakey RSA Public Key - The full-path name of the PEM file that contains the RSA public key for using
the SHA256 authentication plugin of MySQL. Added in 5.3.4.
sslverifyVerify SSL 0 If set to 1, the SSL certificate will be verified when used with the MySQL
connection. If not set, then the default behavior is to ignore SSL certificate
verification.
Note
The option is deprecated since Connector/ODBC 5.3.7.
It is preferable to use the SSLMODE option parameter
instead.
authentication-
kerberos-
mode
Kerberos
implementation
SSPI Acceptable values are "SSPI" (default) or "GSSAPI". For functionality details,
see Kerberos Pluggable Authentication. The SSPI option is only supported by
Windows, whereas GSSAPI is supported by both Windows and other operating
systems. Added in Connector/ODBC 8.0.32.
25

Connector/ODBC Connection Parameters
Parameter GUI Option Default Value Comment
OPENTELEMETRYOpenTelemetry
implementation
PREFERRED Acceptable values are PREFERRED (default) or DISABLED. For functionality
details, see Section 5.8, “OpenTelemetry Tracing Support”. Added in
Connector/ODBC 8.1.0.
MULTI_HOSTWhether to enable
multiple host
functionality
0 Enable new connections to try multiple hosts until a successful connection is
established. A list of hosts is defined with SERVER in the connection string.
For example, SERVER=address1[:port1],address2[:port2];MULTI_HOST=1 --
option added in 8.0.19.
ENABLE_DNS_SRVWhether to use DNS
+SRV usage in the
DSN
0 If set to 1, enables DNS+SRV usage in the DSN; the host
is passed for SRV lookup without a port and with a full
lookup name. Example usage: DRIVER={MySQL ODBC 9.0
Driver};SERVER=_mysql._tcp.foo.abc.com;ENABLE_DNS_SRV=1;USER=user;PWD=passwd;
-- option added in Connector/ODBC 8.0.19.
charset Character Set - The character set to use for the connection. Added in 3.51.17. Note: executing
SET NAMES is not allowed as of 5.1. This option is deprecated for the
Unicode driver as of 9.0.0.
readtimeout- - The timeout in seconds for attempts to read from the server. Each attempt
uses this timeout value and there are retries if necessary, so the total
effective timeout value is three times the option value. You can set the
value so that a lost connection can be detected earlier than the TCP/IP
Close_Wait_Timeout value of 10 minutes. This option works only for TCP/
IP connections, and only for Windows prior to MySQL 5.1.12. Corresponds to
the MYSQL_OPT_READ_TIMEOUT option of the MySQL Client Library. Added in
3.51.27.
writetimeout- - The timeout in seconds for attempts to write to the server. Each attempt uses
this timeout value and there are net_retry_count retries if necessary, so
the total effective timeout value is net_retry_count times the option value.
This option works only for TCP/IP connections, and only for Windows prior to
MySQL 5.1.12. Corresponds to the MYSQL_OPT_WRITE_TIMEOUT option of
the MySQL Client Library. Added in 3.51.27.
interactiveInteractive Client 0 If set to 1, the CLIENT_INTERACTIVE connection option of mysql-real-
connect() is enabled. Added in 5.1.7.
OCI_CONFIG_FILEOracle Clound
Infastructure
configuration file path
~/.oci/config on
Linux and macOS,
and %HOMEDRIVE%
%HOMEPATH%\.oci
\config on Windows.
Used by the authentication_oci_client plugin for the Oracle Cloud Infrastructure
(OCI) to support ephemeral key pairs and security tokens. The default profile
is DEFAULT and can be configured using OCI_CONFIG_PROFILE. Option
added in Connector/ODBC 8.0.27.
OCI_CONFIG_PROFILEOracle Clound
Infastructure
configuration profile
name
DEFAULT Defaults to DEFAULT, optionally specify a specific profile as defined in
OCI_CONFIG_FILE. Option added in Connector/ODBC 8.0.33.
prefetch Prefetch from server by
_ rows at a time
0 When set to a non-zero value N, causes all queries in the connection to return
N rows at a time rather than the entire result set. Useful for queries against
very large tables where it is not practical to retrieve the whole result set at
once. You can scroll through the result set, N records at a time.
This option works only with forward-only cursors. It does not work when the
option parameter MULTI_STATEMENTS is set. It can be used in combination
with the option parameter NO_CACHE. Its behavior in ADO applications is
undefined: the prefetching might or might not occur. Added in 5.1.11.
26

Connector/ODBC Connection Parameters
Parameter GUI Option Default Value Comment
no_ssps - 0 In Connector/ODBC 5.2 and after, by default, server-side prepared statements
are used. When this option is set to a non-zero value, prepared statements
are emulated on the client side, which is the same behavior as in 5.1 and 3.51.
Added in 5.2.0.
can_handle_exp_pwdCan Handle Expired
Password
0 Indicates that the application can deal with an expired password, which
is signalled by an SQL state of 08004 (“Server rejected the connection”)
and a native error code ER_MUST_CHANGE_PASSWORD_LOGIN (1862).
The connection is “sandboxed”, and can do nothing other than issue a SET
PASSWORD statement. To establish a connection in this case, your application
must either use the initstmt connection option to set a new password at the
start, or issue a SET PASSWORD statement immediately after connecting. Once
the expired password is reset, the restrictions on the connection are lifted. See
ALTER USER Statement for details about password expiration for MySQL
server accounts. Added in 5.2.4.
ENABLE_CLEARTEXT_PLUGINEnable Cleartext
Authentication
0 Set to 1 to enable cleartext authentication. Added in 5.1.13 and 5.2.5.
ENABLE_LOCAL_INFILEEnable LOAD DATA
operations
0 A connection string, DSN, and GUI option. Set ENABLE_LOCAL_INFILE=1
to enable LOAD DATA operations. This toggles the
MYSQL_OPT_LOCAL_INFILE mysql_options() option. The connection string
overrides the DSN value if both are set. Added in 5.3.12 and 8.0.14.
LOAD_DATA_LOCAL_DIRRestrict LOAD DATA
operations
A connection string, DSN, and GUI option. Set LOAD_DATA_LOCAL_DIR
to a specific directory, such as LOAD_DATA_LOCAL_DIR=/
tmp, to restrict uploading files to a specific path. This sets the
MYSQL_OPT_LOAD_DATA_LOCAL_DIR mysql_options() option. The
connection string overrides the DSN value if both are set. This option has no
effect if ENABLE_LOCAL_INFILE=1. Added in 8.0.22.
GET_SERVER_PUBLIC_KEYGet Server Public Key 0 When connecting to accounts that use caching_sha2_password
authentication over non-secure connection (TLS disabled), Connector/ODBC
requests the RSA public key required to perform the authentication from
the server. The option is ignored if the authentication mechanism used for
the connection is different from caching_sha2_password. This option
corresponds to the MYSQL_OPT_GET_SERVER_PUBLIC_KEY option for the
mysql_options() C API function. The value is a boolean.
The option is added in Connector/ODBC versions 8.0.11 and 5.3.11. It requires
Connector/ODBC built using OpenSSL-based MySQL client library. If MySQL
client library used by Connector/ODBC was built with YaSSL, as is the case for
GPL distributions of Connector/ODBC 5.3, the option does not function and is
ignored
NO_TLS_1_0Disable TLS 1.0 0 This option was removed in v8.0.28. It disallowed the use of TLS 1.0 for
connection encryption. All versions of TLS are allowed by default, and this
option exluded version 1.0 from being used. Added in 5.3.7. TLS 1.0 support
was deprecated in v8.0.26 before removal in v8.0.28.
NO_TLS_1_1Disable TLS 1.1 0 This option was removed in v8.0.28. It disallowed the use of TLS 1.1 for
connection encryption. All versions of TLS are allowed by default, and this
option exluded version 1.1 from being used. Added in 5.3.7. TLS 1.1 support
was deprecated in v8.0.26 before removal in v8.0.28.
27

Connector/ODBC Connection Parameters
Parameter GUI Option Default Value Comment
NO_TLS_1_2Disable TLS 1.2 0 Disallows the use of TLS 1.2 for connection encryption. All versions of TLS are
allowed by default, and this option exludes version 1.2 from being used. Added
in 5.3.7.
NO_TLS_1_3Disable TLS 1.3 0 Disallows the use of TLS 1.3 for connection encryption. All versions of TLS are
allowed by default, and this option exludes version 1.3 from being used. Added
in 8.0.26.
tls-
versions
Define the allowed TLS
protocol versions
TLSv1.2,TLSv1.3 (set
by libmysqlclient)
Accepts TLSv1.2 and/or TLSv1.3; while other values generate an error. It
has no effect if ssl-mode=DISABLED, and overrides (disables) the related
NO_TLS_X_Y connection options such as NO_TLS_1_2. Added in 8.0.30.
SSL_ENFORCEEnforce SSL 0 Enforce the requirement to use SSL for connections to server. See Table 5.2,
“Combined Effects of SSL_ENFORCE and DISABLE_SSL_DEFAULT ”.
Added in 5.3.6.
Note
This option is deprecated since Connector/ODBC
5.3.7 and removed in 8.0.13. It is preferable to use the
SSLMODE option parameter instead.
DISABLE_SSL_DEFAULTDisable default SSL 0 Disable the default requirement to use SSL for connections to server.
When set to “0” [default], Connector/ODBC tries to connect with SSL
first, and falls back to unencrypted connection if it is not possible to
establish an SSL connection. When set to “1,” Connection with SSL is not
attempted, and unencrypted connection is used, unless SSL_ENFORCE is
also set to “1.” See Table 5.2, “Combined Effects of SSL_ENFORCE and
DISABLE_SSL_DEFAULT ”. Added in 5.3.6.
Note
The option is deprecated since Connector/ODBC
5.3.7 and removed in 8.0.13. Use the SSLMODE option
parameter instead.
ssl-mode SSL Mode - Alias of SSLMODE as an eventual replacement; added in v8.0.29.
SSLMODE SSL Mode - Sets the SSL mode of the server connection. The option can be set to any
of the following values: DISABLED, PREFERRED, REQUIRED, VERIFY_CA,
or VERIFY_IDENTITY. See description for the --ssl-mode option in the
MySQL 8.0 Reference Manual for the meaning of each of the option values.
An ssl-mode alias was added in 8.0.29, which is preferred over SSLMODE.
If SSLMODE is not explicitly set, use of the SSLCA or SSLCAPTH option implies
SSLMODE=VERIFY_CA.
Added in 5.3.7. This option overrides the deprecatedsslverify and
SSL_ENFORCE options.
Note
The SSL configuration parameters can also be automatically loaded from a my.ini
or my.cnf file. See Using Option Files.
28

Connector/ODBC Connection Parameters
Table 5.2 Combined Effects of SSL_ENFORCE and DISABLE_SSL_DEFAULT
DISABLE_SSL_DEFAULT =
0
DISABLE_SSL_DEFAULT =
1
SSL_ENFORCE = 0 (Default) Connection with
SSL is attempted first; if
not possible, fall back to
unencrypted connection.
Connection with SSL is not
attempted; use unencrypted
connection.
SSL_ENFORCE = 1 Connect with SSL; throw an
error if an SSL connection
cannot be established.
Connect with SSL; throw an
error if an SSL connection
cannot be established.
DISABLE_SSL_DEFAULT=1 is
overridden.
The behavior of Connector/ODBC can be also modified by using special option parameters listed in
Table 5.3, “Connector/ODBC Option Parameters”, specified in the connection string or through the GUI
dialog box. All of the connection parameters also have their own numeric constant values, which can
be added up as a combined value for the option parameter for specifying those options. However, the
numerical option value in the connection string can only enable, but not disable parameters enabled on
the DSN, which can only be overridden by specifying the option parameters using their text names in the
connection string.
Note
While the combined numerical value for the option parameter can be easily
constructed by addition of the options' constant values, decomposing the value to
verify if particular options are enabled can be difficult. We recommend using the
options' parameter names instead in the connection string, because they are self-
explanatory.
Table 5.3 Connector/ODBC Option Parameters
Parameter Name GUI Option Constant Value Description
FOUND_ROWS Return matched rows instead
of affected rows
2 The client cannot handle when MySQL returns
the true value of affected rows. If this flag is set,
MySQL returns “found rows” instead. You must
have MySQL 3.21.14 or newer for this to work.
BIG_PACKETS Allow big result set 8 Do not set any packet limit for results and bind
parameters. Without this option, parameter
binding will be truncated to 255 characters.
NO_PROMPT Don't prompt when connecting 16 Do not prompt for questions even if driver would
like to prompt.
DYNAMIC_CURSOR Enable Dynamic Cursors 32 Enable or disable the dynamic cursor support.
NO_SCHEMA Disables support for ODBC
schemas
64 Ignore use of database schema name in
catalog.schema.table.column. See
also the related NO_CATALOG option. This
option was removed in Connector/ODBC
8.0.13 but served no function before then,
and was reintroduced in Connector/ODBC
8.0.26. This option is enabled by default as of
Connector/ODBC 8.0.27. For usage details, see
Section 8.1.3, “Configuring Catalog and Schema
Support”
29

Connector/ODBC Connection Parameters
Parameter Name GUI Option Constant Value Description
NO_DEFAULT_CURSOR Disable driver-provided cursor
support
128 Force use of ODBC manager cursors
(experimental).
NO_LOCALE Don't use setlocale() 256 Disable the use of extended fetch (experimental).
PAD_SPACE Pad CHAR to full length with
space
512 Pad CHAR columns to full column length.
FULL_COLUMN_NAMES Include table name in
SQLDescribeCol()
1024 SQLDescribeCol() returns fully-qualified
column names.
COMPRESSED_PROTO Use compression 2048 Use the compressed client/server protocol.
IGNORE_SPACE Ignore space after function
names
4096 Tell server to ignore space after function name
and before “(” (needed by PowerBuilder). This
makes all function names keywords.
NAMED_PIPE Named Pipe 8192 Connect with named pipes to a mysqld server
running on NT.
NO_BIGINT Treat BIGINT columns as INT
columns
16384 Change BIGINT columns to INT columns (some
applications cannot handle BIGINT).
NO_CATALOG Disable catalog support 32768 Forces results from the catalog functions, such as
SQLTables, to always return NULL and the driver
to report that catalogs are not supported. See
also the related NO_SCHEMA option. For usage
details, see Section 8.1.3, “Configuring Catalog
and Schema Support”
USE_MYCNF Read options from my.cnf 65536 Read parameters from the [client] and
[odbc] groups from my.cnf.
SAFE Enable safe options 131072 Add some extra safety checks.
NO_TRANSACTIONS Disable transaction support 262144 Disable transactions.
LOG_QUERY Log queries to %TEMP%
\myodbc.sql
524288 Enable query logging to c:\myodbc.sql(/tmp/
myodbc.sql) file. (Enabled only in debug mode.)
NO_CACHE Don't cache results of forward-
only cursors
1048576 Do not cache the results locally in
the driver, instead read from server
(mysql_use_result()). This works only for
forward-only cursors. This option is very important
in dealing with large tables when you do not want
the driver to cache the entire result set.
FORWARD_CURSOR Force use of forward-only
cursors
2097152 Force the use of Forward-only cursor type. In
cases of applications setting the default static/
dynamic cursor type and one wants the driver to
use noncache result sets, this option ensures the
forward-only cursor behavior.
AUTO_RECONNECT Enable automatic reconnect 4194304 Enables auto-reconnection functionality. Do not
use this option with transactions, since an auto-
reconnection during a incomplete transaction
may cause corruption. An auto-reconnected
connection will not inherit the same settings and
environment as the original connection. MySQL
Server deprecated this functionality in 8.0.34/8.1.0
and removed it in 8.3.0. This connection option
30

Connector/ODBC Connection Parameters
Parameter Name GUI Option Constant Value Description
was removed from Connector/ODBC 8.3.0 and
setting it returns SQL_SUCCESS_WITH_INFO
with an HY000 error stating that it's no longer
supported.
AUTO_IS_NULL Enable SQL_AUTO_IS_NULL 8388608 When AUTO_IS_NULL is set, the driver does not
change the default value of sql_auto_is_null,
leaving it at 1, so you get the MySQL default, not
the SQL standard behavior.
When AUTO_IS_NULL is not set, the
driver changes the default value of
SQL_AUTO_IS_NULL to 0 after connecting, so
you get the SQL standard, not the MySQL default
behavior.
Thus, omitting the flag disables the compatibility
option and forces SQL standard behavior.
See IS NULL. Added in 3.51.13.
ZERO_DATE_TO_MIN Return SQL_NULL_DATA for
zero date
16777216 Translates zero dates (XXXX-00-00) into the
minimum date values supported by ODBC,
XXXX-01-01. This resolves an issue where
some statements will not work because the date
returned and the minimum ODBC date value are
incompatible. Added in 3.51.17.
MIN_DATE_TO_ZERO Bind minimal date as zero date 33554432 Translates the minimum ODBC date value
(XXXX-01-01) to the zero date format supported
by MySQL (XXXX-00-00). This resolves an issue
where some statements will not work because the
date returned and the minimum ODBC date value
are incompatible. Added in 3.51.17.
NO_DATE_OVERFLOW Ignore data overflow error 0 Continue with the query execution rather then
return error if the time portion is missing. The
server will ignore the time component and the
result is the same as if they were zeros. Added in
5.3.8.
MULTI_STATEMENTS Allow multiple statements 67108864 Enables support for batched statements. As of
8.0.24, preparing a query with multiple statements
raises an error. The direct execution of parameter-
less statements prepared using the SQLPrepare()
function is not supported. Multiple statements can
only be executed through the SQLExecDirec()
ODBC function.
COLUMN_SIZE_S32 Limit column size to signed 32-
bit range
134217728 Limits the column size to a signed 32-bit value
to prevent problems with larger column sizes in
applications that do not support them. This option
is automatically enabled when working with ADO
applications. Added in 3.51.22.
31

Connector/ODBC Connection Parameters
Parameter Name GUI Option Constant Value Description
NO_BINARY_RESULT Always handle binary function
results as character data
268435456 When set, this option disables charset 63 for
columns with an empty org_table. Added in
3.51.26.
DFLT_BIGINT_BIND_STR Bind BIGINT parameters as
strings
536870912 Causes BIGINT parameters to be bound as
strings. Microsoft Access treats BIGINT as a
string on linked tables. The value is read correctly,
but bound as a string. This option is used
automatically if the driver is used by Microsoft
Access. Added in 5.1.3.
NO_I_S Don't use
INFORMATION_SCHEMA for
metadata
1073741824 Tells catalog functions not to use
INFORMATION_SCHEMA, but rather use legacy
algorithms. The trade-off here is usually speed for
information quality. Added in 5.1.7, deprecated in
8.0.26, and removed (and now ignored) in 8.0.31.
CB_FIDO_GLOBAL Registers a global
callback function for the
authentication_webauthn
connection
20480 User-defined constant (see Connector/
ODBC WebAuthn and FIDO Information);
the last registered global callback is reused
in connections not defining a callback. Only
use with connections that use the MySQL
ODBC driver; using with other connections
might lead to undefined behavior. Example
usage: SQLSetConnectAttr(hdbc,
CB_FIDO_GLOBAL, &my_user_callback,
SQL_IS_POINTER);. Support added in 8.2.0.
CB_FIDO_CONNECTION Registers a per-connection
callback function for the
authentication_webauthn
connection
20481 User-defined constant (see Connector/ODBC
WebAuthn and FIDO Information); the callback
is registered for a single connection. Only use
with connections that use the MySQL ODBC
driver; using with other connections might lead to
undefined behavior. Support added in 8.2.0.
Table 5.4, “Recommended Connector/ODBC Option Values for Different Configurations” shows some
recommended parameter settings and their corresponding option values for various configurations:
Table 5.4 Recommended Connector/ODBC Option Values for Different Configurations
ConfigurationParameter
Settings
Option
Value
Microsoft
Access,
Visual
Basic
FOUND_ROWS=1;2
Microsoft
Access
(with
improved
DELETE
queries)
FOUND_ROWS=1;DYNAMIC_CURSOR=1;34
32

Connector/ODBC Connection Parameters
ConfigurationParameter
Settings
Option
Value
Microsoft
SQL
Server
COLUMN_SIZE_S32=1;134217728
Large
tables
with
too
many
rows
COMPRESSED_PROTO=1;2048
Sybase
PowerBuilder
IGNORE_SPACE=1;FLAG_SAFE=1;135168
Query
log
generation
(Debug
mode)
LOG_QUERY=1;524288
Large
tables
with
no-
cache
results
NO_CACHE=1;FORWARD_CURSOR=1;3145728
Applications
that
run
full-
table
"SELECT
*
FROM ...
"
query,
but
read
only
a
small
number
(N)
of
rows
from
the
result
PREFETCH=NNot
Applicable
33

Configuring a Connector/ODBC DSN on Windows
5.3 Configuring a Connector/ODBC DSN on Windows
To add or configure a Connector/ODBC 5.x or 8.x DSN on Windows, use either the ODBC Data Source
Administrator GUI, or the command-line tool myodbc-installer.exe that comes with Connector/
ODBC.
5.3.1 Configuring a Connector/ODBC DSN on Windows with the ODBC Data
Source Administrator GUI
The ODBC Data Source Administrator on Windows lets you create DSNs, check driver installation,
and configure ODBC functions such as tracing (used for debugging) and connection pooling. The following
are steps for creating and configuring a DSN with the ODBC Data Source Administrator:
1. Open the ODBC Data Source Administrator.
Different editions and versions of Windows store the ODBC Data Source Administrator in
different locations. For instructions on opening the ODBC Data Source Administrator, see
the documentation for you Windows version; these instructions from Microsoft cover some popuar
Windows platforms. You should see a window similar to the following when you open the ODBC Data
Source Administrator:
Figure 5.1 ODBC Data Source Administrator Dialog
2. To create a System DSN (which will be available to all users), select the System DSN tab. To create a
User DSN, which will be available only to the current user, click the Add... button to open the "Create
New Data Source" dialog.
3. From the "Create New Data Source" dialog, select the MySQL ODBC 5.x ANSI or Unicode Driver, then
click Finish to open its connection parameters dialog.
34

Configuring a Connector/ODBC DSN on Windows with the ODBC Data Source Administrator GUI
Figure 5.2 Create New Data Source Dialog: Choosing a MySQL ODBC Driver
35

Configuring a Connector/ODBC DSN on Windows with the ODBC Data Source Administrator GUI
4. You now need to configure the specific fields for the DSN you are creating through the Connection
Parameters dialog.
Figure 5.3 Data Source Configuration Connection Parameters Dialog
In the Data Source Name box, enter the name of the data source to access. It can be any valid name
that you choose.
Tip
To identify whether a DSN was created using the 32-bit or the 64-bit
driver, include the driver being used within the DSN identifier. This will
help you to identify the right DSN to use with applications such as Excel
that are only compatible with the 32-bit driver. For example, you might
add Using32bitCODBC to the DSN identifier for the 32-bit interface and
Using64bitCODBC for those using the 64-bit Connector/ODBC driver.
5. In the Description box, enter some text to help identify the connection.
6. In the Server field, enter the name of the MySQL server host to access. By default, it is localhost.
7. In the User field, enter the user name to use for this connection.
8. In the Password field, enter the corresponding password for this connection.
9. The Database pop-up should be automatically populated with the list of databases that the user has
permissions to access.
10. To communicate over a different TCP/IP port than the default (3306), change the value of the Port.
11. Click OK to save the DSN.
36

Configuring a Connector/ODBC DSN on Windows with the ODBC Data Source Administrator GUI
To verify the connection using the parameters you have entered, click the Test button. If the connection
can be made successfully, you will be notified with a Connection Successful dialog; otherwise, you
will be notified with a Connection Failed dialog.
You can configure a number of options for a specific DSN by clicking the Details button.
Figure 5.4 Connector/ODBC Connect Options Dialog
Toggling the Details button opens (or closes) an additional tabbed display where you set additional options
that include the following:
• Connections, Metadata, and Cursors/Results enable you to select the additional flags for the DSN
connection. For more information on these flags, see Section 5.2, “Connector/ODBC Connection
Parameters”.
37

Configuring a Connector/ODBC DSN on Windows, Using the Command Line
Note
For the Unicode version of Connector/ODBC, due to its native Unicode
support, you do not need to specify the initial character set to be used with
your connection. However, for the ANSI version, if you want to use a multibyte
character set such as UTF-16 or UTF-32 initially, specify it in Character Set box;
however, that is not necessary for using UTF-8 or UTF-8-MB4 initially, because
they do not contain \0 bytes in any characters, and therefore the ANSI driver will
not truncate the strings by accident when finding \0 bytes.
• Debug lets you turn on ODBC debugging to record the queries you execute through the DSN to the
myodbc.sql file. For more information, see Section 5.10, “Getting an ODBC Trace File”.
• SSL configures the additional options required for using the Secure Sockets Layer (SSL) when
communicating with MySQL server.
Figure 5.5 Connector/ODBC Connect Options Dialog: SSL Options
You must also enable and configure SSL on the MySQL server with suitable certificates to communicate
using it using SSL.
5.3.2 Configuring a Connector/ODBC DSN on Windows, Using the Command
Line
Use myodbc-installer.exe when configuring Connector/ODBC from the command-line.
Execute myodbc-installer.exe without arguments to view a list of available options.
5.3.3 Troubleshooting ODBC Connection Problems
This section answers Connector/ODBC connection-related questions.
• While configuring a Connector/ODBC DSN, a Could Not Load Translator or Setup
Library error occurs
For more information, refer to MS KnowledgeBase Article(Q260558). Also, make sure you have the
latest valid ctl3d32.dll in your system directory.
• The Connector/ODBC .dll (Windows) and .so (Linux) file names depend on several factors:
38

Configuring a Connector/ODBC DSN on macOS
Connector/ODBC Version: A digit in the file name indicates the major Connector/ODBC version
number. For example, a file named myodbc9w.dll is for Connector/ODBC 9.x whereas myodbc5w.dll is
for Connector/ODBC 5.x.
Driver Type: The Unicode driver adds the letter "w" to file names to indicate that wide characters are
supported. For example, myodbc9w.dll is for the Unicode driver. The ANSI driver adds the letter "a"
instead of a "w", like myodbc9a.dll.
GUI Setup module: The GUI setup module files add the letter "S" to file names.
• Enabling Debug Mode: typically debug mode is not enabled as it decreases performance. The driver
must be compiled with debug mode enabled.
5.4 Configuring a Connector/ODBC DSN on macOS
To configure a DSN on macOS, you can either use the command-line utility (myodbc-installer), edit
the odbc.ini file within the Library/ODBC directory of the user, or use the ODBC Administrator GUI.
Note
The ODBC Administrator is included in OS X v10.5 and earlier; users of later
versions of OS X and macOS need to download and install it manually.
To create a DSN using the myodbc-installer utility, you only need to specify the DSN type and the
DSN connection string. For example:
$> myodbc-installer -a -s -t"DSN=mydb;DRIVER=MySQL ODBC 9.0 Driver;SERVER=mysql;USER=username;PASSWORD=pass"
To use ODBC Administrator:
Warning
• For correct operation of ODBC Administrator, ensure that the /Library/
ODBC/odbc.ini file used to set up ODBC connectivity and DSNs are writable
by the admin group. If this file is not writable by this group, then the ODBC
Administrator may fail, or may appear to work but not generate the correct entry.
• There are known issues with the macOS ODBC Administrator and Connector/
ODBC that may prevent you from creating a DSN using this method. In that case,
use the command line or edit the odbc.ini file directly. Existing DSNs or those
that you created using the myodbc-installer tool can still be checked and
edited using ODBC Administrator.
1. Open the ODBC Administrator from the Utilities folder in the Applications folder.
39
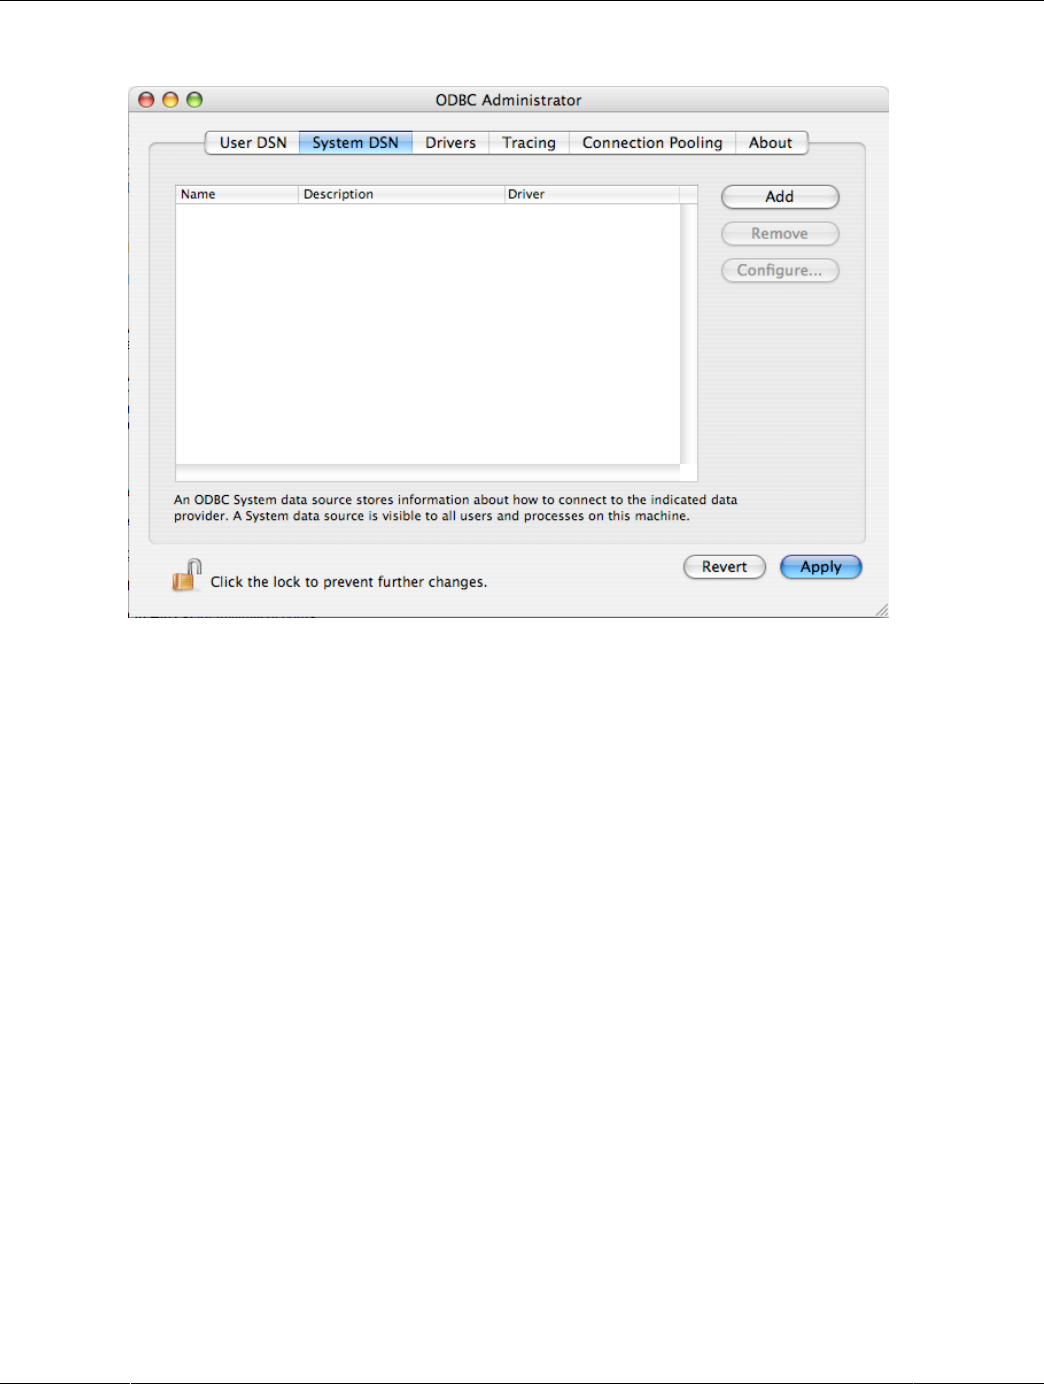
Configuring a Connector/ODBC DSN on macOS
Figure 5.6 ODBC Administrator Dialog
2. From the ODBC Administrator dialog, choose either the User DSN or System DSN tab and click
Add.
3. Select the Connector/ODBC driver and click OK.
40

Configuring a Connector/ODBC DSN on macOS
4. You will be presented with the Data Source Name (DSN) dialog. Enter the Data Source Name and
an optional Description for the DSN.
Figure 5.7 ODBC Administrator Data Source Name Dialog
5. Click Add to add a new keyword/value pair to the panel. Configure at least four pairs to specify the
server, username, password and database connection parameters. See Section 5.2, “Connector/
ODBC Connection Parameters”.
6. Click OK to add the DSN to the list of configured data source names.
A completed DSN configuration may look like this:
Figure 5.8 ODBC Administrator Sample DSN Dialog
You can configure other ODBC options in your DSN by adding further keyword/value pairs and setting the
corresponding values. See Section 5.2, “Connector/ODBC Connection Parameters”.
41

Configuring a Connector/ODBC DSN on Unix
5.5 Configuring a Connector/ODBC DSN on Unix
On Unix, you configure DSN entries directly in the odbc.ini file. Here is a typical odbc.ini file that
configures myodbc9w (Unicode) and myodbc9a (ANSI) as DSN names for Connector/ODBC 9.0:
;
; odbc.ini configuration for Connector/ODBC 9.0 driver
;
[ODBC Data Sources]
myodbc9w = MyODBC 9.0 UNICODE Driver DSN
myodbc9a = MyODBC 9.0 ANSI Driver DSN
[myodbc9w]
Driver = /usr/local/lib/libmyodbc9w.so
Description = Connector/ODBC 9.0 UNICODE Driver DSN
SERVER = localhost
PORT =
USER = root
Password =
Database = test
OPTION = 3
SOCKET =
[myodbc9a]
Driver = /usr/local/lib/libmyodbc9a.so
Description = Connector/ODBC 9.0 ANSI Driver DSN
SERVER = localhost
PORT =
USER = root
Password =
Database = test
OPTION = 3
SOCKET =
Refer to the Section 5.2, “Connector/ODBC Connection Parameters”, for the list of connection parameters
that can be supplied.
Note
If you are using unixODBC, you can use the following tools to set up the DSN:
• ODBCConfig GUI tool (HOWTO: ODBCConfig)
• odbcinst
In some cases when using unixODBC, you might get this error:
Data source name not found and no default driver specified
If this happens, make sure the ODBCINI and ODBCSYSINI environment variables are pointing to the right
odbc.ini file. For example, if your odbc.ini file is located in /usr/local/etc, set the environment
variables like this:
export ODBCINI=/usr/local/etc/odbc.ini
export ODBCSYSINI=/usr/local/etc
5.6 Connecting Without a Predefined DSN
You can connect to the MySQL server using SQLDriverConnect, by specifying the DRIVER name field.
Here are the connection strings for Connector/ODBC using DSN-less connections:
42

For Connector/ODBC 9.0:
For Connector/ODBC 9.0:
ConnectionString = "DRIVER={MySQL ODBC 9.0 Unicode Driver};\
SERVER=localhost;\
DATABASE=test;\
USER=venu;\
PASSWORD=venu;\
FOUND_ROWS=1;"
Substitute “MySQL ODBC 9.0 Driver” with the name by which you have registered your Connector/ODBC
driver with the ODBC driver manager, if it is different. If your programming language converts backslash
followed by whitespace to a space, it is preferable to specify the connection string as a single long string,
or to use a concatenation of multiple strings that does not add spaces in between. For example:
ConnectionString = "DRIVER={MySQL ODBC 9.0 Unicode Driver};"
"SERVER=localhost;"
"DATABASE=test;"
"USER=venu;"
"PASSWORD=venu;"
"FOUND_ROWS=1;"
Note. On macOS, you might need to specify the full path to the Connector/ODBC driver library.
Refer to Section 5.2, “Connector/ODBC Connection Parameters” for the list of connection parameters that
can be supplied.
5.7 ODBC Connection Pooling
Connection pooling enables the ODBC driver to re-use existing connections to a given database from a
pool of connections, instead of opening a new connection each time the database is accessed. By enabling
connection pooling you can improve the overall performance of your application by lowering the time taken
to open a connection to a database in the connection pool.
For more information about connection pooling: http://support.microsoft.com/default.aspx?scid=kb;EN-
US;q169470.
5.8 OpenTelemetry Tracing Support
For applications on Linux systems that use OpenTelemetry (OTel) instrumentation, the connector
adds query and connection spans to the trace generated by application code and forwards the current
OpenTelemetry context to the server. OpenTelemetry tracing was introduced in the Connector/ODBC 8.1.0
release.
Note
OTel context forwarding works only with MySQL Enterprise Edition, a commercial
product. To learn more about commercial products, see https://www.mysql.com/
products/.
Enabling and Disabling Tracing
By default, the connector forwards the context only when an instrumented application installs the required
OpenTelemetry SDK libraries and configures the trace exporter to send trace data to some destination. If
the application code does not use instrumentation, then the legacy connector does not use it either.
Connector/ODBC supports a connection property option, OPENTELEMETRY, which has these values:
43

Limitation
• PREFERRED: Default. Use instrumentation in the connection if the required OpenTelemetry
instrumentation is available. Otherwise, permit the connection to operate without any OpenTelemetry
instrumentation.
• DISABLED: The connector does not create OpenTelemetry spans or forward the OpenTelemetry context
to the server.
Setting to boolean false behaves the same as DISABLED.
When you build code that links to Connector/ODBC and uses OTel instrumentation, the additional spans
generated by the connector appear in the traces generated by your code. Spans generated by the
connector are sent to the same destination (trace exporter) where other spans generated by the user code
are sent as configured by user code. It is not possible to send spans generated by the connector to any
other destination.
This implementation is distinct from the implementation provided through the MySQL client library (or the
related telemetry_client client-side plugin).
Limitation
OTel instrumentation in the ODBC driver only functions if the application is built with the -rdynamic
compiler option so that symbols defined in user code are externally visible. Without this, the OTel context
is not forwarded to the server (as the driver has no way of getting the current OTel context) and the spans
generated by the ODBC driver will be not sent to the destination specified in the application (they will be
discarded).
5.9 Authentication Options
Connector/ODBC supports different authentication methods, including:
• Standard authentication using a MySQL username and password, such as caching_sha2_password.
• The Kerberos authentication protocol for passwordless authentication. For more information about
Kerberos authentication, see Kerberos Pluggable Authentication.
Support added in Connector/ODBC 8.0.26 for Linux clients, and 8.0.27 for Windows clients.
• Multi-Factor Authentication (MFA) by utilizing the PASSWORD1 (alias of PASSWORD), PASSWORD2, and
PASSWORD3 connection options. In addition there are PWD1, PWD2, and PWD3 aliases.
Support added in Connector/ODBC 8.0.28.
• FIDO-based authentication is supported and Connector/ODBC supports the FIDO-based WebAuthn
Pluggable Authentication plugin. See the general WebAuthn Pluggable Authentication documentation for
installation requirements and implementation details.
Note
Support for the authentication_webauthn plugin was added in Connector/ODBC
8.2.0. Support for the authentication_fido plugin was added in 8.0.29, deprecated
in 8.2.0, and removed in 8.4.0.
A callback usage example:
// SQL_DRIVER_CONNECT_ATTR_BASE is not defined in all driver managers.
44

Getting an ODBC Trace File
// Therefore use a custom constant until it becomes a standard.
#define MYSQL_DRIVER_CONNECT_ATTR_BASE 0x00004000
// Custom constants used for callback
#define CB_FIDO_GLOBAL MYSQL_DRIVER_CONNECT_ATTR_BASE + 0x00001000
#define CB_FIDO_CONNECTION MYSQL_DRIVER_CONNECT_ATTR_BASE + 0x00001001
// Usage example
// Callback function inside code:
void user_callback(const char* msg)
{
// Do something ...
}
SQLHENV henv = nullptr;
SQLAllocHandle(SQL_HANDLE_ENV, nullptr, &henv);
// Set the ODBC version to 3.80 otherwise the custom constants don't work
SQLSetEnvAttr(henv, SQL_ATTR_ODBC_VERSION,
(SQLPOINTER)SQL_OV_ODBC3_80, 0);
SQLHDBC hdbc = nullptr;
SQLAllocHandle(SQL_HANDLE_DBC, henv, &hdbc);
// CB_FIDO_X is either CB_FIDO_GLOBAL or CB_FIDO_CONNECTION
SQLSetConnectAttr(hdbc, CB_FIDO_X, &user_callback, SQL_IS_POINTER);
SQLDriverConnect(hdbc, hwnd, conn_str, ....);
5.10 Getting an ODBC Trace File
If you encounter difficulties or problems with Connector/ODBC, start by making a log file from the ODBC
Manager and Connector/ODBC. This is called tracing, and is enabled through the ODBC Manager. The
procedure for this differs for Windows, macOS and Unix.
5.10.1 Enabling ODBC Tracing on Windows
To enable the trace option on Windows:
1. The Tracing tab of the ODBC Data Source Administrator dialog box lets you configure the way ODBC
function calls are traced.
45
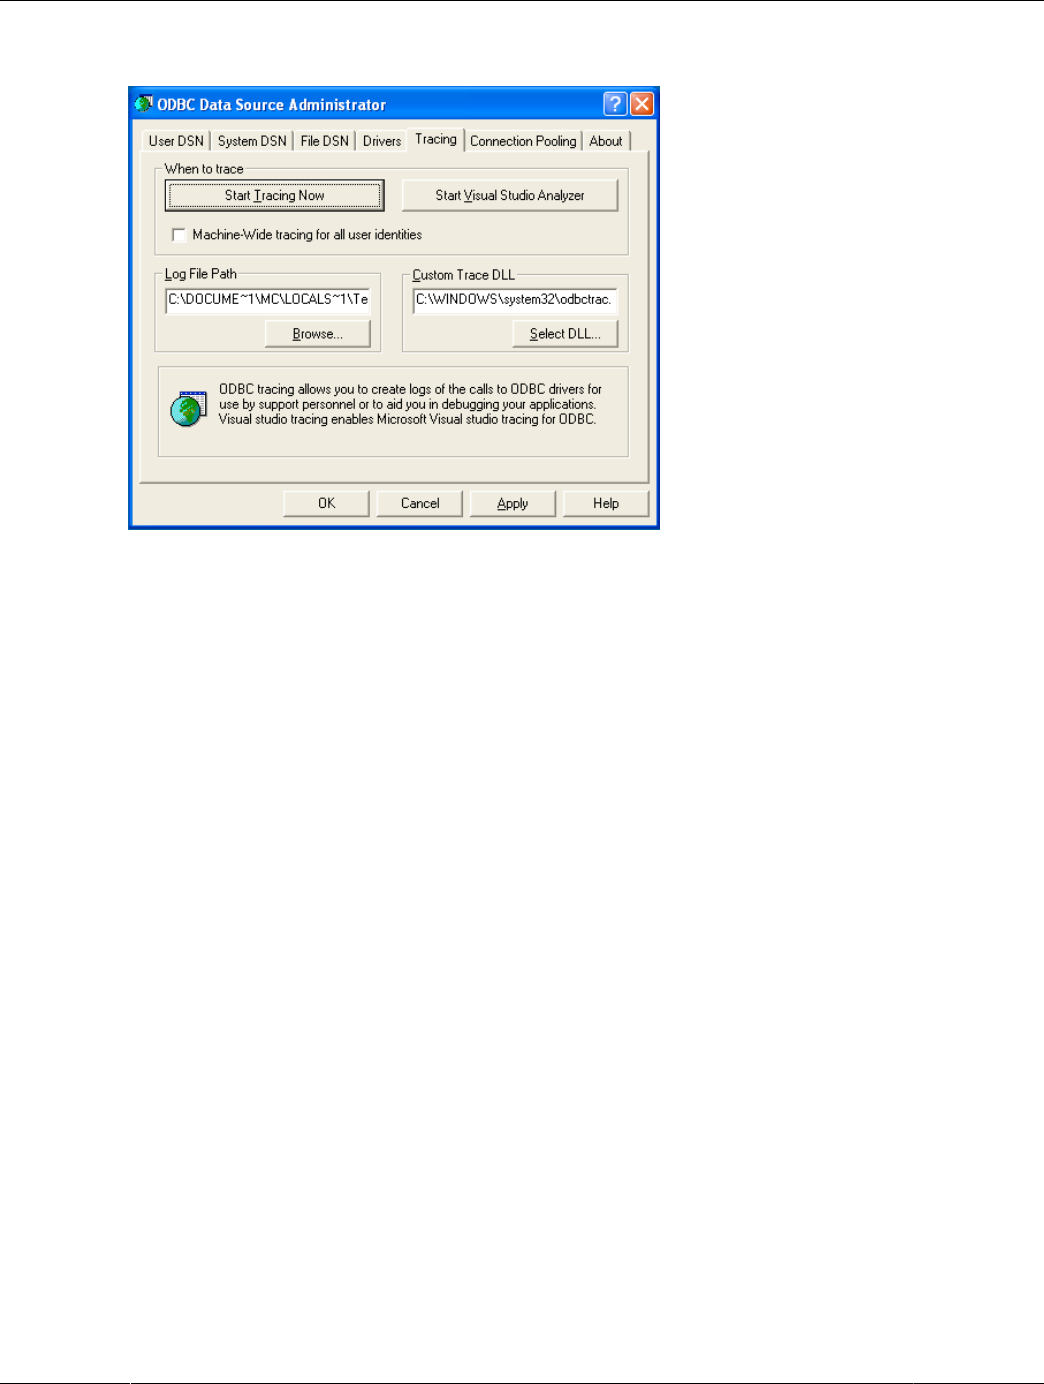
Enabling ODBC Tracing on macOS
Figure 5.9 ODBC Data Source Administrator Tracing Dialog
2. When you activate tracing from the Tracing tab, the Driver Manager logs all ODBC function calls
for all subsequently run applications.
3. ODBC function calls from applications running before tracing is activated are not logged. ODBC
function calls are recorded in a log file you specify.
4. Tracing ceases only after you click Stop Tracing Now. Remember that while tracing is on, the log
file continues to increase in size and that tracing affects the performance of all your ODBC applications.
5.10.2 Enabling ODBC Tracing on macOS
To enable the trace option on macOS, use the Tracing tab within ODBC Administrator .
1. Open the ODBC Administrator.
2. Select the Tracing tab.
46

Enabling ODBC Tracing on Unix
Figure 5.10 ODBC Administrator Tracing Dialog
3. Select the Enable Tracing check box.
4. Enter the location to save the Tracing log. To append information to an existing log file, click the
Choose... button.
5.10.3 Enabling ODBC Tracing on Unix
To enable the trace option on OS X 10.2 (or earlier) or Unix, add the trace option to the ODBC
configuration:
1. On Unix, explicitly set the Trace option in the ODBC.INI file.
Set the tracing ON or OFF by using TraceFile and Trace parameters in odbc.ini as shown below:
TraceFile = /tmp/odbc.trace
Trace = 1
TraceFile specifies the name and full path of the trace file and Trace is set to ON or OFF. You can
also use 1 or YES for ON and 0 or NO for OFF. If you are using ODBCConfig from unixODBC, then
follow the instructions for tracing unixODBC calls at HOWTO-ODBCConfig.
5.10.4 Enabling a Connector/ODBC Log
To generate a Connector/ODBC log, do the following:
1. Within Windows, enable the Trace Connector/ODBC option flag in the Connector/ODBC connect/
configure screen. The log is written to file C:\myodbc.log. If the trace option is not remembered
when you are going back to the above screen, it means that you are not using the myodbcd.dll
driver, see Section 5.3.3, “Troubleshooting ODBC Connection Problems”.
47

Enabling a Connector/ODBC Log
On macOS, Unix, or if you are using a DSN-less connection, either supply OPTION=4 in the connection
string, or set the corresponding keyword/value pair in the DSN.
2. Start your application and try to get it to fail. Then check the Connector/ODBC trace file to find out what
could be wrong.
If you need help determining what is wrong, see Section 9.1, “Connector/ODBC Community Support”.
48

Chapter 6 Connector/ODBC Examples
Table of Contents
6.1 Basic Connector/ODBC Application Steps .................................................................................... 49
6.2 Step-by-step Guide to Connecting to a MySQL Database through Connector/ODBC ....................... 50
6.3 Connector/ODBC and Third-Party ODBC Tools ............................................................................ 51
6.4 Using Connector/ODBC with Microsoft Access ............................................................................. 52
6.4.1 Exporting Access Data to MySQL ..................................................................................... 52
6.4.2 Importing MySQL Data to Access ..................................................................................... 55
6.4.3 Using Microsoft Access as a Front-end to MySQL ............................................................. 57
6.5 Using Connector/ODBC with Microsoft Word or Excel .................................................................. 63
6.6 Using Connector/ODBC with Crystal Reports ............................................................................... 65
6.7 Connector/ODBC Programming ................................................................................................... 71
6.7.1 Using Connector/ODBC with Visual Basic Using ADO, DAO and RDO ................................ 71
6.7.2 Using Connector/ODBC with .NET .................................................................................... 75
Once you have configured a DSN to provide access to a database, how you access and use that
connection is dependent on the application or programming language. As ODBC is a standardized
interface, any application or language that supports ODBC can use the DSN and connect to the configured
database.
6.1 Basic Connector/ODBC Application Steps
Interacting with a MySQL server from an applications using the Connector/ODBC typically involves the
following operations:
• Configure the Connector/ODBC DSN.
• Connect to MySQL server.
This might include: allocate environment handle, set ODBC version, allocate connection handle, connect
to MySQL Server, and set optional connection attributes.
• Initialization statements.
This might include: allocate statement handle and set optional statement attributes.
• Execute SQL statements.
This might include: prepare the SQL statement and execute the SQL statement, or execute it directly
without prepare.
• Retrieve results, depending on the statement type.
For SELECT / SHOW / Catalog API the results might include: get number of columns, get column
information, fetch rows, and get the data to buffers. For Delete / Update / Insert the results might include
the number of rows affected.
• Perform transactions; perform commit or rollback.
• Disconnect from the server.
This might include: disconnect the connection and free the connection and environment handles.
49

Step-by-step Guide to Connecting to a MySQL Database through Connector/ODBC
Most applications use some variation of these steps. The basic application steps are also shown in the
following diagram:
Figure 6.1 Connector/ODBC Programming Flowchart
6.2 Step-by-step Guide to Connecting to a MySQL Database through
Connector/ODBC
A typical situation where you would install Connector/ODBC is to access a database on a Linux or Unix
host from a Windows machine.
As an example of the process required to set up access between two machines, the steps below take you
through the basic steps. These instructions assume that you connect to system ALPHA from system BETA
with a user name and password of myuser and mypassword.
On system ALPHA (the MySQL server) follow these steps:
50

Connector/ODBC and Third-Party ODBC Tools
1. Start the MySQL server.
2. Use GRANT to set up an account with a user name of myuser that can connect from system BETA
using a password of myuser to the database test:
GRANT ALL ON test.* to 'myuser'@'BETA' IDENTIFIED BY 'mypassword';
For more information about MySQL privileges, refer to Access Control and Account Management.
On system BETA (the Connector/ODBC client), follow these steps:
1. Configure a Connector/ODBC DSN using parameters that match the server, database and
authentication information that you have just configured on system ALPHA.
Parameter Value Comment
DSN remote_test A name to identify the connection.
SERVER ALPHA The address of the remote server.
DATABASE test The name of the default database.
USER myuser The user name configured for access to this database.
PASSWORD mypassword The password for myuser.
2. Using an ODBC-capable application, such as Microsoft Office, connect to the MySQL server using the
DSN you have just created. If the connection fails, use tracing to examine the connection process. See
Section 5.10, “Getting an ODBC Trace File”, for more information.
6.3 Connector/ODBC and Third-Party ODBC Tools
Once you have configured your Connector/ODBC DSN, you can access your MySQL database through
any application that supports the ODBC interface, including programming languages and third-party
applications. This section contains guides and help on using Connector/ODBC with various ODBC-
compatible tools and applications, including Microsoft Word, Microsoft Excel and Adobe/Macromedia
ColdFusion.
Connector/ODBC has been tested with the following applications:
Publisher Application Notes
Adobe ColdFusion Formerly Macromedia ColdFusion
Borland C++ Builder
Builder 4
Delphi
Business Objects Crystal Reports
Claris Filemaker Pro
Corel Paradox
Computer Associates Visual Objects
Also known as CAVO
AllFusion ERwin Data
Modeler
Gupta Team Developer
Previously known as Centura Team Developer;
Gupta SQL/Windows
Gensym G2-ODBC Bridge
51

Using Connector/ODBC with Microsoft Access
Publisher Application Notes
Inline iHTML
Lotus Notes
Versions 4.5 and 4.6
Microsoft Access
Excel
Visio Enterprise
Visual C++
Visual Basic
ODBC.NET Using C#, Visual Basic, C++
FoxPro
Visual Interdev
OpenOffice.org OpenOffice.org
Perl DBD::ODBC
Pervasive Software DataJunction
Sambar Technologies Sambar Server
SPSS SPSS
SoftVelocity Clarion
SQLExpress SQLExpress for Xbase++
Sun StarOffice
SunSystems Vision
Sybase PowerBuilder
PowerDesigner
theKompany.com Data Architect
6.4 Using Connector/ODBC with Microsoft Access
You can use a MySQL database with Microsoft Access using Connector/ODBC. The MySQL database
can be used as an import source, an export source, or as a linked table for direct use within an Access
application, so you can use Access as the front-end interface to a MySQL database.
6.4.1 Exporting Access Data to MySQL
Important
Make sure that the information that you are exporting to the MySQL table is valid for
the corresponding MySQL data types. Values that are valid within Access but are
outside of the supported ranges of the MySQL data types may trigger an “overflow”
error during the export.
To export a table of data from an Access database to MySQL, follow these instructions:
1. With an Access database opened, the navigation plane on the right should display, among other things,
all the tables in the database that are available for export (if that is not the case, adjust the navigation
plane's display settings). Right click on the table you want to export, and in the menu that appears,
choose Export , ODBC Database.
52
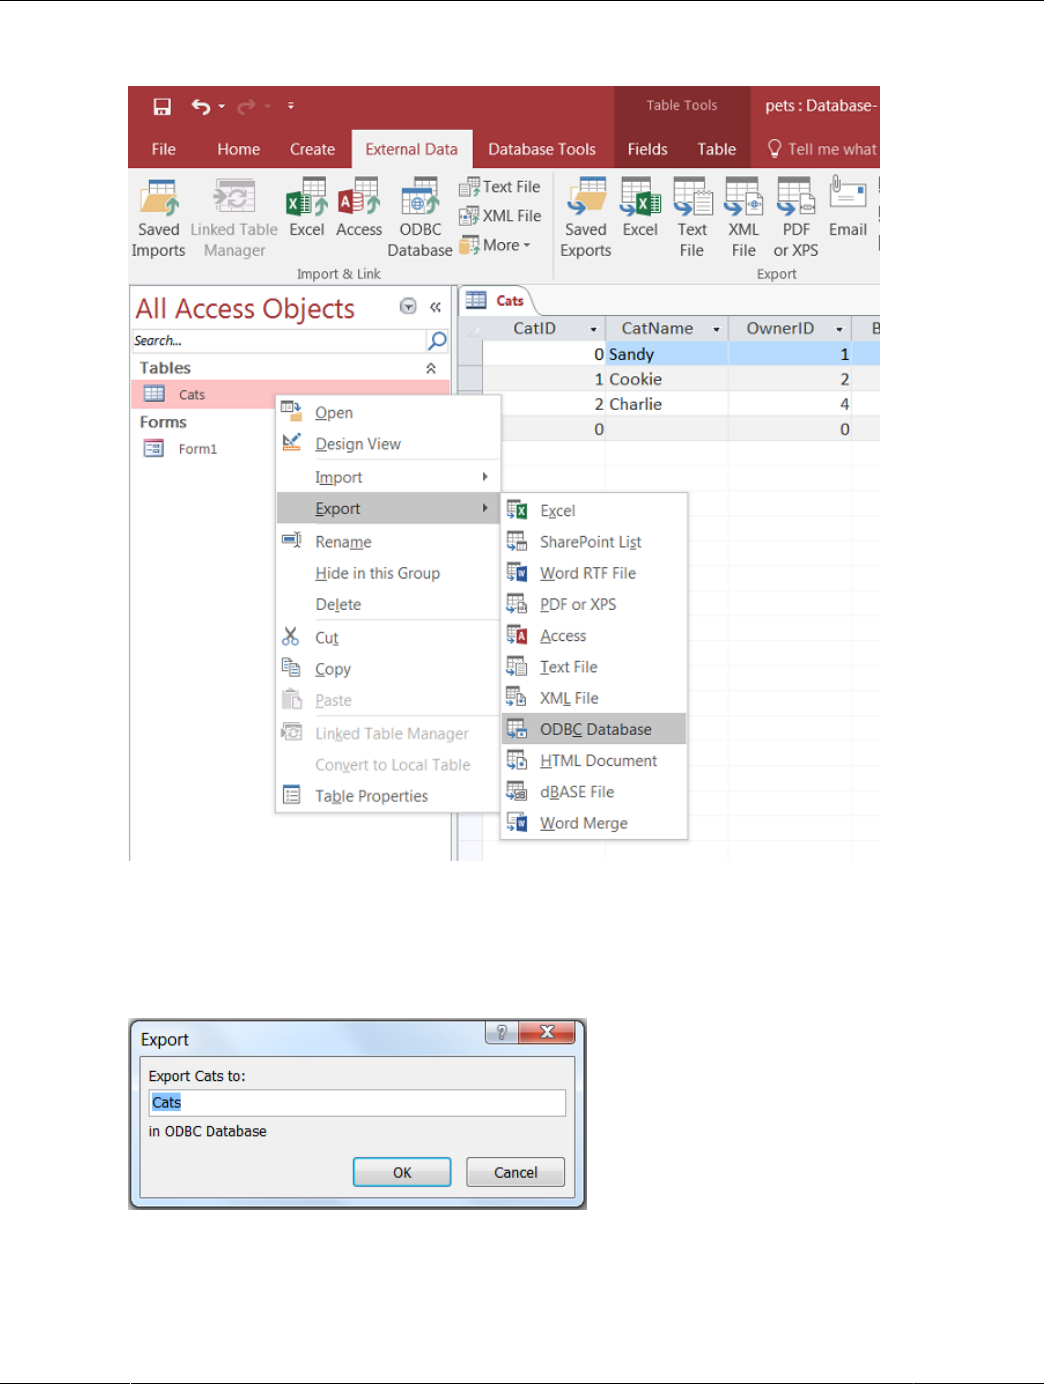
Exporting Access Data to MySQL
Figure 6.2 Access: Export ODBC Database Menu Selected
2. The Export dialog box appears. Enter the desired name for the table after its import into the MySQL
server, and click OK.
Figure 6.3 Entering Name For Table To Be Exported
3. The Select Data Source dialog box appears; it lists the defined data sources for any ODBC drivers
installed on your computer. Click either the File Data Source or Machine Data Source tab, and then
double-click the Connector/ODBC DSN to which you want to export your table. To define a new DSN
53

Exporting Access Data to MySQL
for Connector/ODBC instead, click New and follow the instructions in Section 5.3, “Configuring a
Connector/ODBC DSN on Windows”; double click the new DSN after it has been created.
Figure 6.4 Selecting An ODBC Database
If the ODBC data source that you selected requires you to log in, enter your login ID and password
(additional information might also be required), and then click OK.
4. A dialog box appears with a success message if the export is successful. In the dialog box, you can
choose to save the export steps for easy repetitions in the future.
Figure 6.5 Save Export Success Message
Note
If you see the following error message instead when you try to export to the
Connector/ODBC DSN, it means you did not choose the Database to connect to
when you defined or logged in to the DSN. Reconfigure the DSN and specify the
54

Importing MySQL Data to Access
Database to connect to (see Section 5.3, “Configuring a Connector/ODBC DSN
on Windows” for details), or choose a Database when you log in to the DSN .
Figure 6.6 Error Message Dialog: Database Not Selected
6.4.2 Importing MySQL Data to Access
To import tables from MySQL to Access, follow these instructions:
1. Open the Access database into which that you want to import MySQL data.
2. On the External Data tab, choose ODBC Database.
Figure 6.7 External Data: ODBC Database
3. In the Get External Data dialog box that appears, choose Import the source data into a new
table in the current database and click OK.
55

Importing MySQL Data to Access
Figure 6.8 Get External Data: ODBC Database
4. The Select Data Source dialog box appears. It lists the defined data sources for any ODBC drivers
installed on your computer. Click either the File Data Source or Machine Data Source tab, and then
double-click the Connector/ODBC DSN from which you want to import your table. To define a new
DSN for Connector/ODBC instead, click New and follow the instructions in Section 5.3, “Configuring a
Connector/ODBC DSN on Windows”; double click the new DSN after it has been created.
Figure 6.9 Select Data Source Dialog: Selecting an ODBC Database
If the ODBC data source that you selected requires you to log in, enter your login ID and password
(additional information might also be required), and then click OK.
56

Using Microsoft Access as a Front-end to MySQL
5. Microsoft Access connects to the MySQL server and displays the list of tables (objects) that you can
import. Select the tables you want to import from this Import Objects dialog (or click Select All), and
then click OK.
Figure 6.10 Import Objects Dialog: Selecting Tables To Import
Notes
• If no tables show up for you to select, it might be because you did not
choose the Database to connect to when you defined or logged in to the
DSN. Reconfigure the DSN and specify the Database to connect to (see
Section 5.3, “Configuring a Connector/ODBC DSN on Windows” for details),
or choose a Database when you log in to the DSN .
• If your Access database already has a table with the same name as the one
you are importing, Access will append a number to the name of the imported
table.
6. A dialog box appears with a success message if the import is successful. In the dialog box, you can
choose to save the import steps for easy repetitions in the future.
Figure 6.11 Get External Data: Save Import Steps Dialog
6.4.3 Using Microsoft Access as a Front-end to MySQL
You can use Microsoft Access as a front end to MySQL by linking tables within your Microsoft Access
database to tables that exist within your MySQL database. When a query is requested on a table within
Access, ODBC is used to execute the queries on the MySQL database.
To create a linked table:
57

Using Microsoft Access as a Front-end to MySQL
1. Open the Access database that you want to link to MySQL.
2. On the External Data tab, choose ODBC Database.
Figure 6.12 External Data: ODBC Database
3. In the Get External Data dialog box that appears, choose Link to the data source by creating a
linked table and click OK.
Figure 6.13 Get External Data: Link To ODBC Database Option Chosen
4. The Select Data Source dialog box appears; it lists the defined data sources for any ODBC drivers
installed on your computer. Click either the File Data Source or Machine Data Source tab, and
then double-click the Connector/ODBC DSN you want to link your table to. To define a new DSN
58

Using Microsoft Access as a Front-end to MySQL
for Connector/ODBC instead, click New and follow the instructions in Section 5.3, “Configuring a
Connector/ODBC DSN on Windows”; double click the new DSN after it has been created.
Figure 6.14 Selecting An ODBC Database
If the ODBC data source that you selected requires you to log in, enter your login ID and password
(additional information might also be required), and then click OK.
59
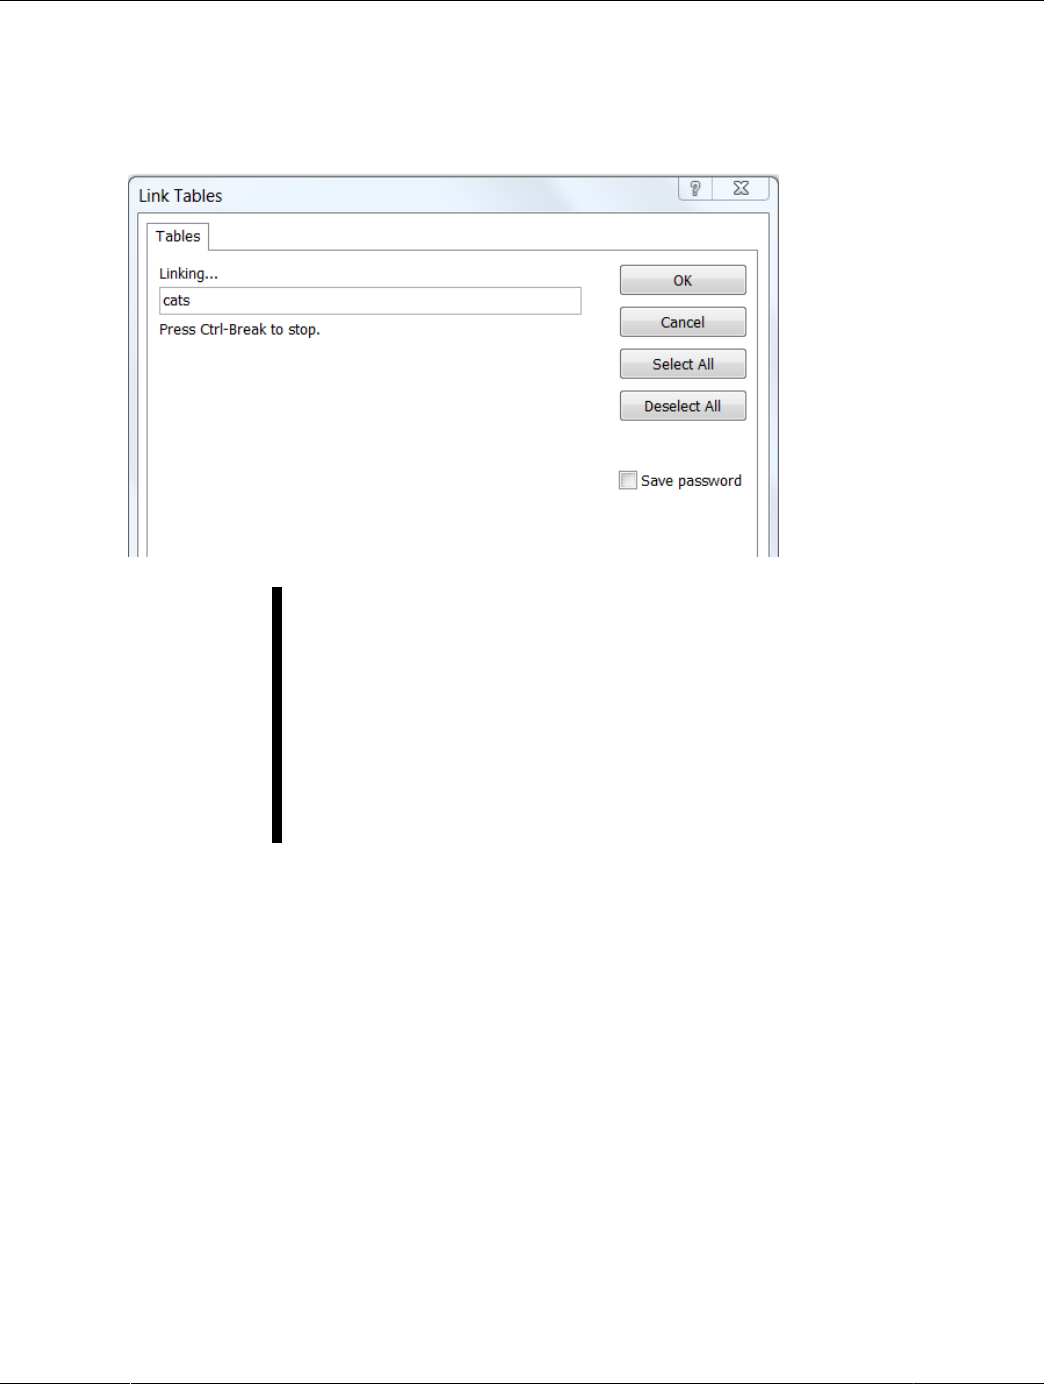
Using Microsoft Access as a Front-end to MySQL
5. Microsoft Access connects to the MySQL server and displays the list of tables that you can link to.
Choose the tables you want to link to (or click Select All), and then click OK.
Figure 6.15 Link Tables Dialog: Selecting Tables to Link
Notes
• If no tables show up for you to select, it might be because you did not
choose the Database to connect to when you defined or logged in to the
DSN. Reconfigure the DSN and specify the Database to connect to (see
Section 5.3, “Configuring a Connector/ODBC DSN on Windows” for details),
or choose a Database when you log in to the DSN.
• If your database on Access already has a table with the same name as the
one you are linking to, Access will append a number to the name of the new
linked table.
60

Using Microsoft Access as a Front-end to MySQL
6. If Microsoft Access is unable to determine the unique record identifier for a table automatically, it will
ask you to choose a column (or a combination of columns) to be used to uniquely identify each row
from the source table. Select the column[s] to use and click OK.
Figure 6.16 Linking Microsoft Access Tables To MySQL Tables, Choosing Unique Record
Identifier
Once the process has been completed, you can build interfaces and queries to the linked tables just as you
would for any Access database.
Use the following procedure to view links or to refresh them when the structures of the linked tables have
changed.
To view or refresh links:
1. Open the database that contains links to MySQL tables.
2. On the External Data tab, choose Linked Table Manager.
61

Using Microsoft Access as a Front-end to MySQL
Figure 6.17 External Data: Linked Table Manager
3. The Linked Table Manager appears. Select the check box for the tables whose links you want to
refresh. Click OK to refresh the links.
Figure 6.18 External Data: Linked Table Manager Dialog
If the ODBC data source requires you to log in, enter your login ID and password (additional information
might also be required), and then click OK.
Microsoft Access confirms a successful refresh or, if the tables are not found, returns an error message, in
which case you should update the links with the steps below.
To change the path for a set of linked tables (for pictures of the GUI dialog boxes involved, see the
instructions above for linking tables and refreshing links) :
1. Open the database that contains the linked tables.
62

Using Connector/ODBC with Microsoft Word or Excel
2. On the External Data tab, choose Linked Table Manager.
3. In the Linked Table Manager that appears, select the Always Prompt For A New Location check
box.
4. Select the check box for the tables whose links you want to change, and then click OK.
5. The Select Data Source dialog box appears. Select the new DSN and database with it.
6.5 Using Connector/ODBC with Microsoft Word or Excel
You can use Microsoft Word and Microsoft Excel to access information from a MySQL database using
Connector/ODBC. Within Microsoft Word, this facility is most useful when importing data for mailmerge,
or for tables and data to be included in reports. Within Microsoft Excel, you can execute queries on your
MySQL server and import the data directly into an Excel Worksheet, presenting the data as a series of
rows and columns.
With both applications, data is accessed and imported into the application using Microsoft Query, which
lets you execute a query though an ODBC source. You use Microsoft Query to build the SQL statement to
be executed, selecting the tables, fields, selection criteria and sort order. For example, to insert information
from a table in the World test database into an Excel spreadsheet, using the DSN samples shown in
Chapter 5, Configuring Connector/ODBC:
1. Create a new Worksheet.
2. From the Data menu, choose Import External Data, and then select New Database Query.
3. Microsoft Query will start. First, you need to choose the data source, by selecting an existing Data
Source Name.
Figure 6.19 Microsoft Query Wizard: Choose Data Source Dialog
4. Within the Query Wizard, choose the columns to import. The list of tables available to the user
configured through the DSN is shown on the left, the columns that will be added to your query are
shown on the right. The columns you choose are equivalent to those in the first section of a SELECT
query. Click Next to continue.
63

Using Connector/ODBC with Microsoft Word or Excel
Figure 6.20 Microsoft Query Wizard: Choose Columns
5. You can filter rows from the query (the equivalent of a WHERE clause) using the Filter Data dialog.
Click Next to continue.
Figure 6.21 Microsoft Query Wizard: Filter Data
64
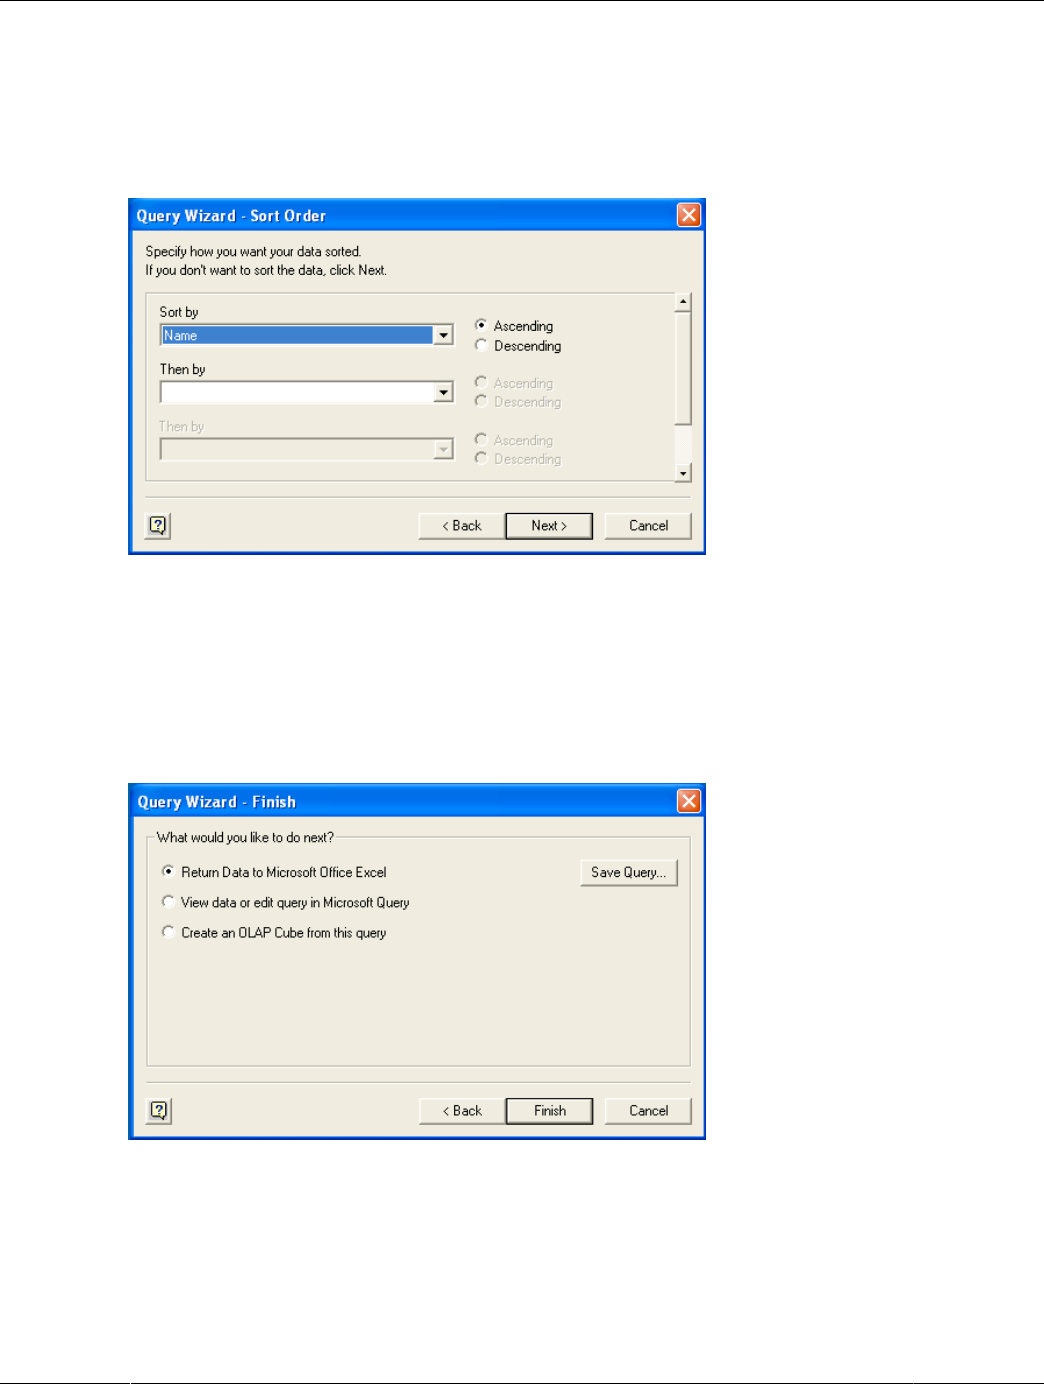
Using Connector/ODBC with Crystal Reports
6. Select an (optional) sort order for the data. This is equivalent to using a ORDER BY clause in your SQL
query. You can select up to three fields for sorting the information returned by the query. Click Next to
continue.
Figure 6.22 Microsoft Query Wizard: Sort Order
7. Select the destination for your query. You can select to return the data Microsoft Excel, where you
can choose a worksheet and cell where the data will be inserted; you can continue to view the query
and results within Microsoft Query, where you can edit the SQL query and further filter and sort the
information returned; or you can create an OLAP Cube from the query, which can then be used directly
within Microsoft Excel. Click Finish.
Figure 6.23 Microsoft Query Wizard: Selecting A Destination
The same process can be used to import data into a Word document, where the data will be inserted as a
table. This can be used for mail merge purposes (where the field data is read from a Word table), or where
you want to include data and reports within a report or other document.
6.6 Using Connector/ODBC with Crystal Reports
Crystal Reports can use an ODBC DSN to connect to a database from which you to extract data and
information for reporting purposes.
65

Using Connector/ODBC with Crystal Reports
Note
There is a known issue with certain versions of Crystal Reports where the
application is unable to open and browse tables and fields through an ODBC
connection. Before using Crystal Reports with MySQL, please ensure that you have
update to the latest version, including any outstanding service packs and hotfixes.
For more information on this issue, see the Business) Objects Knowledgebase for
more information.
For example, to create a simple crosstab report within Crystal Reports XI, follow these steps:
1. Create a DSN using the Data Sources (ODBC) tool. You can either specify a complete database,
including user name and password, or you can build a basic DSN and use Crystal Reports to set the
user name and password.
For the purposes of this example, a DSN that provides a connection to an instance of the MySQL
Sakila sample database has been created.
2. Open Crystal Reports and create a new project, or an open an existing reporting project into which you
want to insert data from your MySQL data source.
3. Start the Cross-Tab Report Wizard, either by clicking the option on the Start Page. Expand the Create
New Connection folder, then expand the ODBC (RDO) folder to obtain a list of ODBC data sources.
You will be asked to select a data source.
Figure 6.24 Cross-Tab Report Creation Wizard
4. When you first expand the ODBC (RDO) folder you will be presented the Data Source Selection
screen. From here you can select either a pre-configured DSN, open a file-based DSN or enter and
manual connection string. For this example, the pre-configured Sakila DSN will be used.
66

Using Connector/ODBC with Crystal Reports
If the DSN contains a user name/password combination, or you want to use different authentication
credentials, click Next to enter the user name and password that you want to use. Otherwise, click
Finish to continue the data source selection wizard.
Figure 6.25 ODBC (RDO) Data Source Selection Wizard
5. You will be returned the Cross-Tab Report Creation Wizard. You now need to select the database and
tables that you want to include in your report. For our example, we will expand the selected Sakila
67

Using Connector/ODBC with Crystal Reports
database. Click the city table and use the > button to add the table to the report. Then repeat the
action with the country table. Alternatively you can select multiple tables and add them to the report.
Finally, you can select the parent Sakila resource and add of the tables to the report.
Once you have selected the tables you want to include, click Next to continue.
Figure 6.26 Cross-Tab Report Creation Wizard with Example ODBC (RDO) Data
6. Crystal Reports will now read the table definitions and automatically identify the links between the
tables. The identification of links between tables enables Crystal Reports to automatically lookup and
summarize information based on all the tables in the database according to your query. If Crystal
68

Using Connector/ODBC with Crystal Reports
Reports is unable to perform the linking itself, you can manually create the links between fields in the
tables you have selected.
Click Next to continue the process.
Figure 6.27 Cross-Tab Report Creation Wizard: Table Links
7. You can now select the columns and rows that to include within the Cross-Tab report. Drag and drop or
use the > buttons to add fields to each area of the report. In the example shown, we will report on cities,
69

Using Connector/ODBC with Crystal Reports
organized by country, incorporating a count of the number of cities within each country. If you want to
browse the data, select a field and click the Browse Data... button.
Click Next to create a graph of the results. Since we are not creating a graph from this data, click
Finish to generate the report.
Figure 6.28 Cross-Tab Report Creation Wizard: Cross-Tab Selection Dialog
70

Connector/ODBC Programming
8. The finished report will be shown, a sample of the output from the Sakila sample database is shown
below.
Figure 6.29 Cross-Tab Report Creation Wizard: Final Report
Once the ODBC connection has been opened within Crystal Reports, you can browse and add any fields
within the available tables into your reports.
6.7 Connector/ODBC Programming
With a suitable ODBC Manager and the Connector/ODBC driver installed, any programming language or
environment that can support ODBC can connect to a MySQL database through Connector/ODBC.
This includes, but is not limited to, Microsoft support languages (including Visual Basic, C# and interfaces
such as ODBC.NET), Perl (through the DBI module, and the DBD::ODBC driver).
6.7.1 Using Connector/ODBC with Visual Basic Using ADO, DAO and RDO
This section contains simple examples of the use of Connector/ODBC with ADO, DAO and RDO.
6.7.1.1 ADO: rs.addNew, rs.delete, and rs.update
The following ADO (ActiveX Data Objects) example creates a table my_ado and demonstrates the use of
rs.addNew, rs.delete, and rs.update.
Private Sub myodbc_ado_Click()
Dim conn As ADODB.Connection
Dim rs As ADODB.Recordset
Dim fld As ADODB.Field
Dim sql As String
71

Using Connector/ODBC with Visual Basic Using ADO, DAO and RDO
'connect to MySQL server using Connector/ODBC
Set conn = New ADODB.Connection
conn.ConnectionString = "DRIVER={MySQL ODBC 9.0 Unicode Driver};"_
& "SERVER=localhost;"_
& " DATABASE=test;"_
& "UID=venu;PWD=venu; FOUND_ROWS=1"
conn.Open
'create table
conn.Execute "DROP TABLE IF EXISTS my_ado"
conn.Execute "CREATE TABLE my_ado(id int not null primary key, name varchar(20)," _
& "txt text, dt date, tm time, ts timestamp)"
'direct insert
conn.Execute "INSERT INTO my_ado(id,name,txt) values(1,100,'venu')"
conn.Execute "INSERT INTO my_ado(id,name,txt) values(2,200,'MySQL')"
conn.Execute "INSERT INTO my_ado(id,name,txt) values(3,300,'Delete')"
Set rs = New ADODB.Recordset
rs.CursorLocation = adUseServer
'fetch the initial table ..
rs.Open "SELECT * FROM my_ado", conn
Debug.Print rs.RecordCount
rs.MoveFirst
Debug.Print String(50, "-") & "Initial my_ado Result Set " & String(50, "-")
For Each fld In rs.Fields
Debug.Print fld.Name,
Next
Debug.Print
Do Until rs.EOF
For Each fld In rs.Fields
Debug.Print fld.Value,
Next
rs.MoveNext
Debug.Print
Loop
rs.Close
'rs insert
rs.Open "select * from my_ado", conn, adOpenDynamic, adLockOptimistic
rs.AddNew
rs!ID = 8
rs!Name = "Mandy"
rs!txt = "Insert row"
rs.Update
rs.Close
'rs update
rs.Open "SELECT * FROM my_ado"
rs!Name = "update"
rs!txt = "updated-row"
rs.Update
rs.Close
'rs update second time..
rs.Open "SELECT * FROM my_ado"
rs!Name = "update"
rs!txt = "updated-second-time"
rs.Update
rs.Close
'rs delete
rs.Open "SELECT * FROM my_ado"
72

Using Connector/ODBC with Visual Basic Using ADO, DAO and RDO
rs.MoveNext
rs.MoveNext
rs.Delete
rs.Close
'fetch the updated table ..
rs.Open "SELECT * FROM my_ado", conn
Debug.Print rs.RecordCount
rs.MoveFirst
Debug.Print String(50, "-") & "Updated my_ado Result Set " & String(50, "-")
For Each fld In rs.Fields
Debug.Print fld.Name,
Next
Debug.Print
Do Until rs.EOF
For Each fld In rs.Fields
Debug.Print fld.Value,
Next
rs.MoveNext
Debug.Print
Loop
rs.Close
conn.Close
End Sub
6.7.1.2 DAO: rs.addNew, rs.update, and Scrolling
The following DAO (Data Access Objects) example creates a table my_dao and demonstrates the use of
rs.addNew, rs.update, and result set scrolling.
Private Sub myodbc_dao_Click()
Dim ws As Workspace
Dim conn As Connection
Dim queryDef As queryDef
Dim str As String
'connect to MySQL using MySQL ODBC 9.0 Unicode Driver
Set ws = DBEngine.CreateWorkspace("", "venu", "venu", dbUseODBC)
str = "odbc;DRIVER={MySQL ODBC 9.0 Unicode Driver};"_
& "SERVER=localhost;"_
& " DATABASE=test;"_
& "UID=venu;PWD=venu; FOUND_ROWS=1"
Set conn = ws.OpenConnection("test", dbDriverNoPrompt, False, str)
'Create table my_dao
Set queryDef = conn.CreateQueryDef("", "drop table if exists my_dao")
queryDef.Execute
Set queryDef = conn.CreateQueryDef("", "create table my_dao(Id INT AUTO_INCREMENT PRIMARY KEY, " _
& "Ts TIMESTAMP(14) NOT NULL, Name varchar(20), Id2 INT)")
queryDef.Execute
'Insert new records using rs.addNew
Set rs = conn.OpenRecordset("my_dao")
Dim i As Integer
For i = 10 To 15
rs.AddNew
rs!Name = "insert record" & i
rs!Id2 = i
rs.Update
Next i
rs.Close
73

Using Connector/ODBC with Visual Basic Using ADO, DAO and RDO
'rs update..
Set rs = conn.OpenRecordset("my_dao")
rs.Edit
rs!Name = "updated-string"
rs.Update
rs.Close
'fetch the table back...
Set rs = conn.OpenRecordset("my_dao", dbOpenDynamic)
str = "Results:"
rs.MoveFirst
While Not rs.EOF
str = " " & rs!Id & " , " & rs!Name & ", " & rs!Ts & ", " & rs!Id2
Debug.Print "DATA:" & str
rs.MoveNext
Wend
'rs Scrolling
rs.MoveFirst
str = " FIRST ROW: " & rs!Id & " , " & rs!Name & ", " & rs!Ts & ", " & rs!Id2
Debug.Print str
rs.MoveLast
str = " LAST ROW: " & rs!Id & " , " & rs!Name & ", " & rs!Ts & ", " & rs!Id2
Debug.Print str
rs.MovePrevious
str = " LAST-1 ROW: " & rs!Id & " , " & rs!Name & ", " & rs!Ts & ", " & rs!Id2
Debug.Print str
'free all resources
rs.Close
queryDef.Close
conn.Close
ws.Close
End Sub
6.7.1.3 RDO: rs.addNew and rs.update
The following RDO (Remote Data Objects) example creates a table my_rdo and demonstrates the use of
rs.addNew and rs.update.
Dim rs As rdoResultset
Dim cn As New rdoConnection
Dim cl As rdoColumn
Dim SQL As String
'cn.Connect = "DSN=test;"
cn.Connect = "DRIVER={MySQL ODBC 9.0 Unicode Driver};"_
& "SERVER=localhost;"_
& " DATABASE=test;"_
& "UID=venu;PWD=venu; FOUND_ROWS=1"
cn.CursorDriver = rdUseOdbc
cn.EstablishConnection rdDriverPrompt
'drop table my_rdo
SQL = "drop table if exists my_rdo"
cn.Execute SQL, rdExecDirect
'create table my_rdo
SQL = "create table my_rdo(id int, name varchar(20))"
cn.Execute SQL, rdExecDirect
74

Using Connector/ODBC with .NET
'insert - direct
SQL = "insert into my_rdo values (100,'venu')"
cn.Execute SQL, rdExecDirect
SQL = "insert into my_rdo values (200,'MySQL')"
cn.Execute SQL, rdExecDirect
'rs insert
SQL = "select * from my_rdo"
Set rs = cn.OpenResultset(SQL, rdOpenStatic, rdConcurRowVer, rdExecDirect)
rs.AddNew
rs!id = 300
rs!Name = "Insert1"
rs.Update
rs.Close
'rs insert
SQL = "select * from my_rdo"
Set rs = cn.OpenResultset(SQL, rdOpenStatic, rdConcurRowVer, rdExecDirect)
rs.AddNew
rs!id = 400
rs!Name = "Insert 2"
rs.Update
rs.Close
'rs update
SQL = "select * from my_rdo"
Set rs = cn.OpenResultset(SQL, rdOpenStatic, rdConcurRowVer, rdExecDirect)
rs.Edit
rs!id = 999
rs!Name = "updated"
rs.Update
rs.Close
'fetch back...
SQL = "select * from my_rdo"
Set rs = cn.OpenResultset(SQL, rdOpenStatic, rdConcurRowVer, rdExecDirect)
Do Until rs.EOF
For Each cl In rs.rdoColumns
Debug.Print cl.Value,
Next
rs.MoveNext
Debug.Print
Loop
Debug.Print "Row count="; rs.RowCount
'close
rs.Close
cn.Close
End Sub
6.7.2 Using Connector/ODBC with .NET
This section contains simple examples that demonstrate the use of Connector/ODBC drivers with
ODBC.NET.
6.7.2.1 Using Connector/ODBC with ODBC.NET and C# (C sharp)
The following sample creates a table my_odbc_net and demonstrates its use in C#.
/**
* @sample : mycon.cs
* @purpose : Demo sample for ODBC.NET using Connector/ODBC
*
**/
75

Using Connector/ODBC with .NET
/* build command
*
* csc /t:exe
* /out:mycon.exe mycon.cs
* /r:System.Data.Odbc.dll
*/
using Console = System.Console;
using System.Data.Odbc;
namespace myodbc3
{
class mycon
{
static void Main(string[] args)
{
try
{
//Connection string for Connector/ODBC 9.0
string MyConString = "DRIVER={MySQL ODBC 9.0 Unicode Driver};" +
"SERVER=localhost;" +
"DATABASE=test;" +
"UID=venu;" +
"PASSWORD=venu;" +
"FOUND_ROWS=1";
//Connect to MySQL using Connector/ODBC
OdbcConnection MyConnection = new OdbcConnection(MyConString);
MyConnection.Open();
Console.WriteLine("\n !!! success, connected successfully !!!\n");
//Display connection information
Console.WriteLine("Connection Information:");
Console.WriteLine("\tConnection String:" +
MyConnection.ConnectionString);
Console.WriteLine("\tConnection Timeout:" +
MyConnection.ConnectionTimeout);
Console.WriteLine("\tDatabase:" +
MyConnection.Database);
Console.WriteLine("\tDataSource:" +
MyConnection.DataSource);
Console.WriteLine("\tDriver:" +
MyConnection.Driver);
Console.WriteLine("\tServerVersion:" +
MyConnection.ServerVersion);
//Create a sample table
OdbcCommand MyCommand =
new OdbcCommand("DROP TABLE IF EXISTS my_odbc_net",
MyConnection);
MyCommand.ExecuteNonQuery();
MyCommand.CommandText =
"CREATE TABLE my_odbc_net(id int, name varchar(20), idb bigint)";
MyCommand.ExecuteNonQuery();
//Insert
MyCommand.CommandText =
"INSERT INTO my_odbc_net VALUES(10,'venu', 300)";
Console.WriteLine("INSERT, Total rows affected:" +
MyCommand.ExecuteNonQuery());;
//Insert
MyCommand.CommandText =
"INSERT INTO my_odbc_net VALUES(20,'mysql',400)";
Console.WriteLine("INSERT, Total rows affected:" +
76

Using Connector/ODBC with .NET
MyCommand.ExecuteNonQuery());
//Insert
MyCommand.CommandText =
"INSERT INTO my_odbc_net VALUES(20,'mysql',500)";
Console.WriteLine("INSERT, Total rows affected:" +
MyCommand.ExecuteNonQuery());
//Update
MyCommand.CommandText =
"UPDATE my_odbc_net SET id=999 WHERE id=20";
Console.WriteLine("Update, Total rows affected:" +
MyCommand.ExecuteNonQuery());
//COUNT(*)
MyCommand.CommandText =
"SELECT COUNT(*) as TRows FROM my_odbc_net";
Console.WriteLine("Total Rows:" +
MyCommand.ExecuteScalar());
//Fetch
MyCommand.CommandText = "SELECT * FROM my_odbc_net";
OdbcDataReader MyDataReader;
MyDataReader = MyCommand.ExecuteReader();
while (MyDataReader.Read())
{
Console.WriteLine("Data:" + MyDataReader.GetInt32(0) + " " +
MyDataReader.GetString(1) + " " +
MyDataReader.GetInt64(2));
}
//Close all resources
MyDataReader.Close();
MyConnection.Close();
}
catch (OdbcException MyOdbcException) //Catch any ODBC exception ..
{
for (int i=0; i < MyOdbcException.Errors.Count; i++)
{
Console.Write("ERROR #" + i + "\n" +
"Message: " +
MyOdbcException.Errors[i].Message + "\n" +
"Native: " +
MyOdbcException.Errors[i].NativeError.ToString() + "\n" +
"Source: " +
MyOdbcException.Errors[i].Source + "\n" +
"SQL: " +
MyOdbcException.Errors[i].SQLState + "\n");
}
}
}
}
}
6.7.2.2 Using Connector/ODBC with ODBC.NET and Visual Basic
The following sample creates a table my_vb_net and demonstrates the use in VB.
' @sample : myvb.vb
' @purpose : Demo sample for ODBC.NET using Connector/ODBC
'
'
' build command
'
' vbc /target:exe
' /out:myvb.exe
77

Using Connector/ODBC with .NET
' /r:System.Data.Odbc.dll
' /r:System.dll
' /r:System.Data.dll
'
Imports System.Data.Odbc
Imports System
Module myvb
Sub Main()
Try
Dim MyConString As String = "DRIVER={MySQL ODBC 9.0 Unicode Driver};" & _
"SERVER=localhost;" & _
"DATABASE=test;" & _
"UID=venu;" & _
"PASSWORD=venu;" & _
"FOUND_ROWS=1;"
'Connection
Dim MyConnection As New OdbcConnection(MyConString)
MyConnection.Open()
Console.WriteLine("Connection State::" & MyConnection.State.ToString)
'Drop
Console.WriteLine("Dropping table")
Dim MyCommand As New OdbcCommand()
MyCommand.Connection = MyConnection
MyCommand.CommandText = "DROP TABLE IF EXISTS my_vb_net"
MyCommand.ExecuteNonQuery()
'Create
Console.WriteLine("Creating....")
MyCommand.CommandText = "CREATE TABLE my_vb_net(id int, name varchar(30))"
MyCommand.ExecuteNonQuery()
'Insert
MyCommand.CommandText = "INSERT INTO my_vb_net VALUES(10,'venu')"
Console.WriteLine("INSERT, Total rows affected:" & _
MyCommand.ExecuteNonQuery())
'Insert
MyCommand.CommandText = "INSERT INTO my_vb_net VALUES(20,'mysql')"
Console.WriteLine("INSERT, Total rows affected:" & _
MyCommand.ExecuteNonQuery())
'Insert
MyCommand.CommandText = "INSERT INTO my_vb_net VALUES(20,'mysql')"
Console.WriteLine("INSERT, Total rows affected:" & _
MyCommand.ExecuteNonQuery())
'Insert
MyCommand.CommandText = "INSERT INTO my_vb_net(id) VALUES(30)"
Console.WriteLine("INSERT, Total rows affected:" & _
MyCommand.ExecuteNonQuery())
'Update
MyCommand.CommandText = "UPDATE my_vb_net SET id=999 WHERE id=20"
Console.WriteLine("Update, Total rows affected:" & _
MyCommand.ExecuteNonQuery())
'COUNT(*)
MyCommand.CommandText = "SELECT COUNT(*) as TRows FROM my_vb_net"
Console.WriteLine("Total Rows:" & MyCommand.ExecuteScalar())
'Select
Console.WriteLine("Select * FROM my_vb_net")
78

Using Connector/ODBC with .NET
MyCommand.CommandText = "SELECT * FROM my_vb_net"
Dim MyDataReader As OdbcDataReader
MyDataReader = MyCommand.ExecuteReader
While MyDataReader.Read
If MyDataReader("name") Is DBNull.Value Then
Console.WriteLine("id = " & _
CStr(MyDataReader("id")) & " name = " & _
"NULL")
Else
Console.WriteLine("id = " & _
CStr(MyDataReader("id")) & " name = " & _
CStr(MyDataReader("name")))
End If
End While
'Catch ODBC Exception
Catch MyOdbcException As OdbcException
Dim i As Integer
Console.WriteLine(MyOdbcException.ToString)
'Catch program exception
Catch MyException As Exception
Console.WriteLine(MyException.ToString)
End Try
End Sub
79

80

Chapter 7 Connector/ODBC Reference
Table of Contents
7.1 Connector/ODBC API Reference ................................................................................................. 81
7.2 Connector/ODBC Data Types ..................................................................................................... 85
7.3 Connector/ODBC Error Codes .................................................................................................... 86
This section provides reference material for the Connector/ODBC API, showing supported functions and
methods, supported MySQL column types and the corresponding native type in Connector/ODBC, and the
error codes returned by Connector/ODBC when a fault occurs.
7.1 Connector/ODBC API Reference
This section summarizes ODBC routines, categorized by functionality.
For the complete ODBC API reference, please refer to the ODBC Programmer's Reference at http://
msdn.microsoft.com/en-us/library/ms714177.aspx.
An application can call SQLGetInfo function to obtain conformance information about Connector/
ODBC. To obtain information about support for a specific function in the driver, an application can call
SQLGetFunctions.
Note
For backward compatibility, the Connector/ODBC driver supports all deprecated
functions.
The following tables list Connector/ODBC API calls grouped by task:
Table 7.1 ODBC API Calls for Connecting to a Data Source
Function Name Connector/
ODBC
Supports?
Standard Purpose
SQLAllocHandle Yes ISO 92 Obtains an environment, connection, statement, or
descriptor handle.
SQLConnect Yes ISO 92 Connects to a specific driver by data source name,
user ID, and password.
SQLDriverConnect Yes ODBC Connects to a specific driver by connection string or
requests that the Driver Manager and driver display
connection dialog boxes for the user.
SQLAllocEnv Yes Deprecated Obtains an environment handle allocated from
driver.
SQLAllocConnect Yes Deprecated Obtains a connection handle
Table 7.2 ODBC API Calls for Obtaining Information about a Driver and Data Source
Function Name Connector/
ODBC
Supports?
Standard Purpose
SQLDataSources No ISO 92 Returns the list of available data sources, handled
by the Driver Manager
81

Connector/ODBC API Reference
Function Name Connector/
ODBC
Supports?
Standard Purpose
SQLDrivers No ODBC Returns the list of installed drivers and their
attributes, handles by Driver Manager
SQLGetInfo Yes ISO 92 Returns information about a specific driver and data
source.
SQLGetFunctions Yes ISO 92 Returns supported driver functions.
SQLGetTypeInfo Yes ISO 92 Returns information about supported data types.
Table 7.3 ODBC API Calls for Setting and Retrieving Driver Attributes
Function Name Connector/
ODBC
Supports?
Standard Purpose
SQLSetConnectAttr Yes ISO 92 Sets a connection attribute.
SQLGetConnectAttr Yes ISO 92 Returns the value of a connection attribute.
SQLSetConnectOption Yes Deprecated Sets a connection option
SQLGetConnectOption Yes Deprecated Returns the value of a connection option
SQLSetEnvAttr Yes ISO 92 Sets an environment attribute.
SQLGetEnvAttr Yes ISO 92 Returns the value of an environment attribute.
SQLSetStmtAttr Yes ISO 92 Sets a statement attribute.
SQLGetStmtAttr Yes ISO 92 Returns the value of a statement attribute.
SQLSetStmtOption Yes Deprecated Sets a statement option
SQLGetStmtOption Yes Deprecated Returns the value of a statement option
Table 7.4 ODBC API Calls for Preparing SQL Requests
Function Name Connector/
ODBC
Supports?
Standard Purpose
SQLAllocStmt Yes Deprecated Allocates a statement handle
SQLPrepare Yes ISO 92 Prepares an SQL statement for later execution.
SQLBindParameter Yes ODBC Assigns storage for a parameter in an SQL
statement. Connector/ODBC 5.2 adds
support for “out” and “inout” parameters,
through the SQL_PARAM_OUTPUT or
SQL_PARAM_INPUT_OUTPUT type specifiers.
(“Out” and “inout” parameters are not supported for
LONGTEXT and LONGBLOB columns.)
SQLGetCursorName Yes ISO 92 Returns the cursor name associated with a
statement handle.
SQLSetCursorName Yes ISO 92 Specifies a cursor name.
SQLSetScrollOptions Yes ODBC Sets options that control cursor behavior.
82

Connector/ODBC API Reference
Table 7.5 ODBC API Calls for Submitting Requests
Function Name Connector/
ODBC
Supports?
Standard Purpose
SQLExecute Yes ISO 92 Executes a prepared statement.
SQLExecDirect Yes ISO 92 Executes a statement
SQLNativeSql Yes ODBC Returns the text of an SQL statement as translated
by the driver.
SQLDescribeParam No ODBC Returns the description for a specific parameter in a
statement. Not supported by Connector/ODBC—the
returned results should not be trusted.
SQLNumParams Yes ISO 92 Returns the number of parameters in a statement.
SQLParamData Yes ISO 92 Used in conjunction with SQLPutData to supply
parameter data at execution time. (Useful for long
data values.)
SQLPutData Yes ISO 92 Sends part or all of a data value for a parameter.
(Useful for long data values.)
Table 7.6 ODBC API Calls for Retrieving Results and Information about Results
Function Name Connector/
ODBC
Supports?
Standard Purpose
SQLRowCount Yes ISO 92 Returns the number of rows affected by an insert,
update, or delete request.
SQLNumResultCols Yes ISO 92 Returns the number of columns in the result set.
SQLDescribeCol Yes ISO 92 Describes a column in the result set.
SQLColAttribute Yes ISO 92 Describes attributes of a column in the result set.
SQLColAttributes Yes Deprecated Describes attributes of a column in the result set.
SQLFetch Yes ISO 92 Returns multiple result rows.
SQLFetchScroll Yes ISO 92 Returns scrollable result rows.
SQLExtendedFetch Yes Deprecated Returns scrollable result rows.
SQLSetPos Yes ODBC Positions a cursor within a fetched block of data and
enables an application to refresh data in the rowset
or to update or delete data in the result set.
SQLBulkOperations Yes ODBC Performs bulk insertions and bulk bookmark
operations, including update, delete, and fetch by
bookmark.
Table 7.7 ODBC API Calls for Retrieving Error or Diagnostic Information
Function Name Connector/
ODBC
Supports?
Standard Purpose
SQLError Yes Deprecated Returns additional error or status information
SQLGetDiagField Yes ISO 92 Returns additional diagnostic information (a single
field of the diagnostic data structure).
83

Connector/ODBC API Reference
Function Name Connector/
ODBC
Supports?
Standard Purpose
SQLGetDiagRec Yes ISO 92 Returns additional diagnostic information (multiple
fields of the diagnostic data structure).
Table 7.8 ODBC API Calls for Obtaining Information about the Data Source's System Tables
(Catalog Functions) Item
Function Name Connector/
ODBC
Supports?
Standard Purpose
SQLColumnPrivileges Yes ODBC Returns a list of columns and associated privileges
for one or more tables.
SQLColumns Yes X/Open Returns the list of column names in specified tables.
SQLForeignKeys Yes ODBC Returns a list of column names that make up foreign
keys, if they exist for a specified table.
SQLPrimaryKeys Yes ODBC Returns the list of column names that make up the
primary key for a table.
SQLSpecialColumns Yes X/Open Returns information about the optimal set of
columns that uniquely identifies a row in a specified
table, or the columns that are automatically
updated when any value in the row is updated by a
transaction.
SQLStatistics Yes ISO 92 Returns statistics about a single table and the list of
indexes associated with the table.
SQLTablePrivileges Yes ODBC Returns a list of tables and the privileges associated
with each table.
SQLTables Yes X/Open Returns the list of table names stored in a specific
data source.
Table 7.9 ODBC API Calls for Performing Transactions
Function Name Connector/
ODBC
Supports?
Standard Purpose
SQLTransact Yes Deprecated Commits or rolls back a transaction
SQLEndTran Yes ISO 92 Commits or rolls back a transaction.
Table 7.10 ODBC API Calls for Terminating a Statement
Function Name Connector/
ODBC
Supports?
Standard Purpose
SQLFreeStmt Yes ISO 92 Ends statement processing, discards pending
results, and, optionally, frees all resources
associated with the statement handle.
SQLCloseCursor Yes ISO 92 Closes a cursor that has been opened on a
statement handle.
84

Connector/ODBC Data Types
Function Name Connector/
ODBC
Supports?
Standard Purpose
SQLCancel Yes ISO 92 Cancels an SQL statement.
Table 7.11 ODBC API Calls for Terminating a Connection
Function Name Connector/
ODBC
Supports?
Standard Purpose
SQLDisconnect Yes ISO 92 Closes the connection.
SQLFreeHandle Yes ISO 92 Releases an environment, connection, statement, or
descriptor handle.
SQLFreeConnect Yes Deprecated Releases connection handle.
SQLFreeEnv Yes Deprecated Releases an environment handle.
7.2 Connector/ODBC Data Types
The following table illustrates how Connector/ODBC maps the server data types to default SQL and C data
types.
Table 7.12 How Connector/ODBC Maps MySQL Data Types to SQL and C Data Types
Native Value SQL Type C Type
bigint unsigned SQL_BIGINT SQL_C_UBIGINT
bigint SQL_BIGINT SQL_C_SBIGINT
bit SQL_BIT SQL_C_BIT
bit SQL_CHAR SQL_C_CHAR
blob SQL_LONGVARBINARY SQL_C_BINARY
bool SQL_CHAR SQL_C_CHAR
char SQL_CHAR SQL_C_CHAR
date SQL_DATE SQL_C_DATE
datetime SQL_TIMESTAMP SQL_C_TIMESTAMP
decimal SQL_DECIMAL SQL_C_CHAR
double precision SQL_DOUBLE SQL_C_DOUBLE
double SQL_FLOAT SQL_C_DOUBLE
enum SQL_VARCHAR SQL_C_CHAR
float SQL_REAL SQL_C_FLOAT
int unsigned SQL_INTEGER SQL_C_ULONG
int SQL_INTEGER SQL_C_SLONG
integer unsigned SQL_INTEGER SQL_C_ULONG
integer SQL_INTEGER SQL_C_SLONG
long varbinary SQL_LONGVARBINARY SQL_C_BINARY
long varchar SQL_LONGVARCHAR SQL_C_CHAR
85

Connector/ODBC Error Codes
Native Value SQL Type C Type
longblob SQL_LONGVARBINARY SQL_C_BINARY
longtext SQL_LONGVARCHAR SQL_C_CHAR
mediumblob SQL_LONGVARBINARY SQL_C_BINARY
mediumint unsigned SQL_INTEGER SQL_C_ULONG
mediumint SQL_INTEGER SQL_C_SLONG
mediumtext SQL_LONGVARCHAR SQL_C_CHAR
numeric SQL_NUMERIC SQL_C_CHAR
real SQL_FLOAT SQL_C_DOUBLE
set SQL_VARCHAR SQL_C_CHAR
smallint unsigned SQL_SMALLINT SQL_C_USHORT
smallint SQL_SMALLINT SQL_C_SSHORT
text SQL_LONGVARCHAR SQL_C_CHAR
time SQL_TIME SQL_C_TIME
timestamp SQL_TIMESTAMP SQL_C_TIMESTAMP
tinyblob SQL_LONGVARBINARY SQL_C_BINARY
tinyint unsigned SQL_TINYINT SQL_C_UTINYINT
tinyint SQL_TINYINT SQL_C_STINYINT
tinytext SQL_LONGVARCHAR SQL_C_CHAR
varchar SQL_VARCHAR SQL_C_CHAR
year SQL_SMALLINT SQL_C_SHORT
7.3 Connector/ODBC Error Codes
The following tables lists the error codes returned by Connector/ODBC apart from the server errors.
Table 7.13 Special Error Codes Returned by Connector/ODBC
Native
Code
SQLSTATE 2 SQLSTATE 3 Error Message
500 01000 01000 General warning
501 01004 01004 String data, right truncated
502 01S02 01S02 Option value changed
503 01S03 01S03 No rows updated/deleted
504 01S04 01S04 More than one row updated/deleted
505 01S06 01S06 Attempt to fetch before the result set returned the first row
set
506 07001 07002 SQLBindParameter not used for all parameters
507 07005 07005 Prepared statement not a cursor-specification
508 07009 07009 Invalid descriptor index
509 08002 08002 Connection name in use
510 08003 08003 Connection does not exist
86

Connector/ODBC Error Codes
Native
Code
SQLSTATE 2 SQLSTATE 3 Error Message
511 24000 24000 Invalid cursor state
512 25000 25000 Invalid transaction state
513 25S01 25S01 Transaction state unknown
514 34000 34000 Invalid cursor name
515 S1000 HY000 General driver defined error
516 S1001 HY001 Memory allocation error
517 S1002 HY002 Invalid column number
518 S1003 HY003 Invalid application buffer type
519 S1004 HY004 Invalid SQL data type
520 S1009 HY009 Invalid use of null pointer
521 S1010 HY010 Function sequence error
522 S1011 HY011 Attribute can not be set now
523 S1012 HY012 Invalid transaction operation code
524 S1013 HY013 Memory management error
525 S1015 HY015 No cursor name available
526 S1024 HY024 Invalid attribute value
527 S1090 HY090 Invalid string or buffer length
528 S1091 HY091 Invalid descriptor field identifier
529 S1092 HY092 Invalid attribute/option identifier
530 S1093 HY093 Invalid parameter number
531 S1095 HY095 Function type out of range
532 S1106 HY106 Fetch type out of range
533 S1117 HY117 Row value out of range
534 S1109 HY109 Invalid cursor position
535 S1C00 HYC00 Optional feature not implemented
0 21S01 21S01 Column count does not match value count
0 23000 23000 Integrity constraint violation
0 42000 42000 Syntax error or access violation
0 42S02 42S02 Base table or view not found
0 42S12 42S12 Index not found
0 42S21 42S21 Column already exists
0 42S22 42S22 Column not found
0 08S01 08S01 Communication link failure
87

88

Chapter 8 Connector/ODBC Notes and Tips
Table of Contents
8.1 Connector/ODBC General Functionality ....................................................................................... 89
8.1.1 Obtaining Auto-Increment Values ...................................................................................... 89
8.1.2 Dynamic Cursor Support .................................................................................................. 90
8.1.3 Configuring Catalog and Schema Support ......................................................................... 90
8.1.4 Connector/ODBC Performance ......................................................................................... 90
8.1.5 Setting ODBC Query Timeout in Windows ........................................................................ 91
8.2 Connector/ODBC Application-Specific Tips .................................................................................. 91
8.2.1 Using Connector/ODBC with Microsoft Applications ........................................................... 91
8.2.2 Using Connector/ODBC with Borland Applications ............................................................. 94
8.2.3 Using Connector/ODBC with ColdFusion .......................................................................... 95
8.2.4 Using Connector/ODBC with OpenOffice.org ..................................................................... 95
8.2.5 Using Connector/ODBC with Pervasive Software DataJunction .......................................... 95
8.2.6 Using Connector/ODBC with SunSystems Vision ............................................................... 96
8.3 Connector/ODBC and the Application Both Use OpenSSL ............................................................ 96
8.4 Connector/ODBC Errors and Resolutions (FAQ) .......................................................................... 96
Here are some common notes and tips for using Connector/ODBC within different environments,
applications and tools. The notes provided here are based on the experiences of Connector/ODBC
developers and users.
8.1 Connector/ODBC General Functionality
This section provides help with common queries and areas of functionality in MySQL and how to use them
with Connector/ODBC.
8.1.1 Obtaining Auto-Increment Values
Obtaining the value of column that uses AUTO_INCREMENT after an INSERT statement can be achieved in
a number of different ways. To obtain the value immediately after an INSERT, use a SELECT query with the
LAST_INSERT_ID() function.
For example, using Connector/ODBC you would execute two separate statements, the INSERT statement
and the SELECT query to obtain the auto-increment value.
INSERT INTO tbl (auto,text) VALUES(NULL,'text');
SELECT LAST_INSERT_ID();
If you do not require the value within your application, but do require the value as part of another INSERT,
the entire process can be handled by executing the following statements:
INSERT INTO tbl (auto,text) VALUES(NULL,'text');
INSERT INTO tbl2 (id,text) VALUES(LAST_INSERT_ID(),'text');
Certain ODBC applications (including Delphi and Access) may have trouble obtaining the auto-increment
value using the previous examples. In this case, try the following statement as an alternative:
SELECT * FROM tbl WHERE auto IS NULL;
89

Dynamic Cursor Support
This alternative method requires that sql_auto_is_null variable is not set to 0. See Server System
Variables.
See also Obtaining the Unique ID for the Last Inserted Row.
8.1.2 Dynamic Cursor Support
Support for the dynamic cursor is provided in Connector/ODBC 3.51, but dynamic cursors are not
enabled by default. You can enable this function within Windows by selecting the Enable Dynamic
Cursor check box within the ODBC Data Source Administrator.
On other platforms, you can enable the dynamic cursor by adding 32 to the OPTION value when creating
the DSN.
8.1.3 Configuring Catalog and Schema Support
Many relational databases reference CATALOG and SCHEMA in ways that do not directly correspond to
what MySQL refers to as a database. It is neither a CATALOG nor a SCHEMA. Generally, catalogs are
collections of schemas, so the fully qualified name would look like catalog.schema.table.column.
Historically with MySQL ODBC Driver, CATALOG and DATABASE were two names used for the same
thing. At the same time SCHEMA was often used as a synonym for a MySQL Database. This would
suggest that CATALOG equals a SCHEMA, which is incorrect, but in the MySQL Server context they
would be the same thing.
In ODBC both schemas and catalogs can be used when referring to database objects such as tables. The
expectation on how to interpret these schema and catalog notions differs between developers, which is
why both the NO_CATALOG and NO_SCHEMA options exist: to cover all these expectations and allow
one to disable interpreting ODBC function parameters as CATALOG or SCHEMA explicitly.
The Connector/ODBC driver does not allow using catalog and schema functionality at the same time
because it would cause unsupported naming. However, some software such as MS SQL Server might
try do so through the linked server objects. This is why Connector/ODBC 8.0.26 added a NO_SCHEMA
option to MySQL ODBC Driver to report schemas as not supported, which is already done for catalogs
with the NO_CATALOG option. Using NO_SCHEMA causes the driver to report schema operations
unsupported through SQLGetInfo() call. As a result the client software will not attempt to access tables as
catalog.schema.table, but instead as catalog.table.
Table 8.1 Connector/ODBC NO_CATALOG and NO_SCHEMA combinations
NO_CATALOGNO_SCHEMADescription and notes
true true Driver does not support catalogs nor schemas.
false true Catalogs are supported and interpreted as MySQL database names, specifying
schema triggers an error.
true false Schemas are supported and interpreted as MySQL database names, specifying
catalog triggers an error.
false false Both catalogs and schemas are supported but it is an error if both are specified
at the same time. If only catalog or only schema is specified, it is interpreted as a
MySQL database name.
8.1.4 Connector/ODBC Performance
The Connector/ODBC driver has been optimized to provide very fast performance. If you experience
problems with the performance of Connector/ODBC, or notice a large amount of disk activity for simple
queries, there are a number of aspects to check:
90

Setting ODBC Query Timeout in Windows
• Ensure that ODBC Tracing is not enabled. With tracing enabled, a lot of information is recorded in
the tracing file by the ODBC Manager. You can check, and disable, tracing within Windows using the
Tracing panel of the ODBC Data Source Administrator. Within macOS, check the Tracing panel of
ODBC Administrator. See Section 5.10, “Getting an ODBC Trace File”.
• Make sure you are using the standard version of the driver, and not the debug version. The debug
version includes additional checks and reporting measures.
• Disable the Connector/ODBC driver trace and query logs. These options are enabled for each DSN,
so make sure to examine only the DSN that you are using in your application. Within Windows, you
can disable the Connector/ODBC and query logs by modifying the DSN configuration. Within macOS
and Unix, ensure that the driver trace (option value 4) and query logging (option value 524288) are not
enabled.
8.1.5 Setting ODBC Query Timeout in Windows
For more information on how to set the query timeout on Microsoft Windows when executing queries
through an ODBC connection, read the Microsoft knowledgebase document at https://docs.microsoft.com/
en-us/office/client-developer/access/desktop-database-reference/database-querytimeout-property-dao.
8.2 Connector/ODBC Application-Specific Tips
Most programs should work with Connector/ODBC, but for each of those listed here, there are specific
notes and tips to improve or enhance the way you work with Connector/ODBC and these applications.
With all applications, ensure that you are using the latest Connector/ODBC drivers, ODBC Manager and
any supporting libraries and interfaces used by your application. For example, on Windows, using the
latest version of Microsoft Data Access Components (MDAC) will improve the compatibility with ODBC in
general, and with the Connector/ODBC driver.
8.2.1 Using Connector/ODBC with Microsoft Applications
The majority of Microsoft applications have been tested with Connector/ODBC, including Microsoft Office,
Microsoft Access and the various programming languages supported within ASP and Microsoft Visual
Studio.
8.2.1.1 Microsoft Access
To improve the integration between Microsoft Access and MySQL through Connector/ODBC:
• For all versions of Access, enable the Connector/ODBC Return matching rows option. For Access
2.0, also enable the Simulate ODBC 1.0 option.
• Include a TIMESTAMP column in all tables that you want to be able to update. For maximum portability,
do not use a length specification in the column declaration (which is unsupported within MySQL in
versions earlier than 4.1).
• Include a primary key in each MySQL table you want to use with Access. If not, new or updated rows
may show up as #DELETED#.
• Use only DOUBLE float fields. Access fails when comparing with single-precision floats. The symptom
usually is that new or updated rows may show up as #DELETED# or that you cannot find or update rows.
• If you are using Connector/ODBC to link to a table that has a BIGINT column, the results are displayed
as #DELETED#. The work around solution is:
91

Using Connector/ODBC with Microsoft Applications
• Have one more dummy column with TIMESTAMP as the data type.
• Select the Change BIGINT columns to INT option in the connection dialog in ODBC DSN
Administrator.
• Delete the table link from Access and re-create it.
Old records may still display as #DELETED#, but newly added/updated records are displayed properly.
• If you still get the error Another user has changed your data after adding a TIMESTAMP
column, the following trick may help you:
Do not use a table data sheet view. Instead, create a form with the fields you want, and use that form
data sheet view. Set the DefaultValue property for the TIMESTAMP column to NOW(). Consider hiding
the TIMESTAMP column from view so your users are not confused.
• In some cases, Access may generate SQL statements that MySQL cannot understand. You can fix this
by selecting "Query|SQLSpecific|Pass-Through" from the Access menu.
• On Windows NT, Access reports BLOB columns as OLE OBJECTS. If you want to have MEMO columns
instead, change BLOB columns to TEXT with ALTER TABLE.
• Access cannot always handle the MySQL DATE column properly. If you have a problem with these,
change the columns to DATETIME.
• If you have in Access a column defined as BYTE, Access tries to export this as TINYINT instead of
TINYINT UNSIGNED. This gives you problems if you have values larger than 127 in the column.
• If you have very large (long) tables in Access, it might take a very long time to open them. Or you might
run low on virtual memory and eventually get an ODBC Query Failed error and the table cannot open.
To deal with this, select the following options:
• Return Matching Rows (2)
• Allow BIG Results (8).
These add up to a value of 10 (OPTION=10).
Some external articles and tips that may be useful when using Access, ODBC and Connector/ODBC:
• Read How to Trap ODBC Login Error Messages in Access
• Optimizing Access ODBC Applications
• Optimizing for Client/Server Performance
• Tips for Converting Applications to Using ODBCDirect
• Tips for Optimizing Queries on Attached SQL Tables
8.2.1.2 Microsoft Excel and Column Types
If you have problems importing data into Microsoft Excel, particularly numeric, date, and time values, this
is probably because of a bug in Excel, where the column type of the source data is used to determine the
data type when that data is inserted into a cell within the worksheet. The result is that Excel incorrectly
identifies the content and this affects both the display format and the data when it is used within
calculations.
92

Using Connector/ODBC with Microsoft Applications
To address this issue, use the CONCAT() function in your queries. The use of CONCAT() forces Excel
to treat the value as a string, which Excel will then parse and usually correctly identify the embedded
information.
However, even with this option, some data may be incorrectly formatted, even though the source data
remains unchanged. Use the Format Cells option within Excel to change the format of the displayed
information.
8.2.1.3 Microsoft Visual Basic
To be able to update a table, you must define a primary key for the table.
Visual Basic with ADO cannot handle big integers. This means that some queries like SHOW
PROCESSLIST do not work properly. The fix is to use OPTION=16384 in the ODBC connect string or to
select the Change BIGINT columns to INT option in the Connector/ODBC connect screen. You may
also want to select the Return matching rows option.
8.2.1.4 Microsoft Visual InterDev
If you have a BIGINT in your result, you may get the error [Microsoft][ODBC Driver Manager]
Driver does not support this parameter. Try selecting the Change BIGINT columns to
INT option in the Connector/ODBC connect screen.
8.2.1.5 Visual Objects
Select the Don't optimize column widths option.
8.2.1.6 Microsoft ADO
When you are coding with the ADO API and Connector/ODBC, you need to pay attention to some
default properties that aren't supported by the MySQL server. For example, using the CursorLocation
Property as adUseServer returns a result of −1 for the RecordCount Property. To have the right
value, you need to set this property to adUseClient, as shown in the VB code here:
Dim myconn As New ADODB.Connection
Dim myrs As New Recordset
Dim mySQL As String
Dim myrows As Long
myconn.Open "DSN=MyODBCsample"
mySQL = "SELECT * from user"
myrs.Source = mySQL
Set myrs.ActiveConnection = myconn
myrs.CursorLocation = adUseClient
myrs.Open
myrows = myrs.RecordCount
myrs.Close
myconn.Close
Another workaround is to use a SELECT COUNT(*) statement for a similar query to get the correct row
count.
To find the number of rows affected by a specific SQL statement in ADO, use the RecordsAffected
property in the ADO execute method. For more information on the usage of execute method, refer to http://
msdn.microsoft.com/library/default.asp?url=/library/en-us/ado270/htm/mdmthcnnexecute.asp.
For information, see ActiveX Data Objects(ADO) Frequently Asked Questions.
93

Using Connector/ODBC with Borland Applications
8.2.1.7 Using Connector/ODBC with Active Server Pages (ASP)
Select the Return matching rows option in the DSN.
For more information about how to access MySQL through ASP using Connector/ODBC, refer to the
following articles:
• Using MyODBC To Access Your MySQL Database Via ASP
• ASP and MySQL at DWAM.NT
A Frequently Asked Questions list for ASP can be found at http://support.microsoft.com/default.aspx?scid=/
Support/ActiveServer/faq/data/adofaq.asp.
8.2.1.8 Using Connector/ODBC with Visual Basic (ADO, DAO and RDO) and ASP
Some articles that may help with Visual Basic and ASP:
8.2.2 Using Connector/ODBC with Borland Applications
With all Borland applications where the Borland Database Engine (BDE) is used, follow these steps to
improve compatibility:
• Update to BDE 3.2 or newer.
• Enable the Don't optimize column widths option in the DSN.
• Enabled the Return matching rows option in the DSN.
8.2.2.1 Using Connector/ODBC with Borland Builder 4
When you start a query, you can use the Active property or the Open method.
The Active property starts by automatically issuing a SELECT * FROM ... query. That may affect
performance for large tables.
8.2.2.2 Using Connector/ODBC with Delphi
Also, here is some potentially useful Delphi code that sets up both an ODBC entry and a BDE entry for
Connector/ODBC. The BDE entry requires a BDE Alias Editor that is free at a Delphi Super Page near you.
(Thanks to Bryan Brunton <[email protected]> for this):
fReg:= TRegistry.Create;
fReg.OpenKey('\Software\ODBC\ODBC.INI\DocumentsFab', True);
fReg.WriteString('Database', 'Documents');
fReg.WriteString('Description', ' ');
fReg.WriteString('Driver', 'C:\WINNT\System32\myodbc.dll');
fReg.WriteString('Flag', '1');
fReg.WriteString('Password', '');
fReg.WriteString('Port', ' ');
fReg.WriteString('Server', 'xmark');
fReg.WriteString('User', 'winuser');
fReg.OpenKey('\Software\ODBC\ODBC.INI\ODBC Data Sources', True);
fReg.WriteString('DocumentsFab', 'MySQL');
94

Using Connector/ODBC with ColdFusion
fReg.CloseKey;
fReg.Free;
Memo1.Lines.Add('DATABASE NAME=');
Memo1.Lines.Add('USER NAME=');
Memo1.Lines.Add('ODBC DSN=DocumentsFab');
Memo1.Lines.Add('OPEN MODE=READ/WRITE');
Memo1.Lines.Add('BATCH COUNT=200');
Memo1.Lines.Add('LANGDRIVER=');
Memo1.Lines.Add('MAX ROWS=-1');
Memo1.Lines.Add('SCHEMA CACHE DIR=');
Memo1.Lines.Add('SCHEMA CACHE SIZE=8');
Memo1.Lines.Add('SCHEMA CACHE TIME=-1');
Memo1.Lines.Add('SQLPASSTHRU MODE=SHARED AUTOCOMMIT');
Memo1.Lines.Add('SQLQRYMODE=');
Memo1.Lines.Add('ENABLE SCHEMA CACHE=FALSE');
Memo1.Lines.Add('ENABLE BCD=FALSE');
Memo1.Lines.Add('ROWSET SIZE=20');
Memo1.Lines.Add('BLOBS TO CACHE=64');
Memo1.Lines.Add('BLOB SIZE=32');
AliasEditor.Add('DocumentsFab','MySQL',Memo1.Lines);
8.2.2.3 Using Connector/ODBC with C++ Builder
Tested with BDE 3.0. The only known problem is that when the table schema changes, query fields are
not updated. BDE, however, does not seem to recognize primary keys, only the index named PRIMARY,
although this has not been a problem.
8.2.3 Using Connector/ODBC with ColdFusion
The following information is taken from the ColdFusion documentation:
Use the following information to configure ColdFusion Server for Linux to use the unixODBC driver with
Connector/ODBC for MySQL data sources. You can download Connector/ODBC at https://dev.mysql.com/
downloads/Connector/ODBC/.
ColdFusion version 4.5.1 lets you use the ColdFusion Administrator to add the MySQL data source.
However, the driver is not included with ColdFusion version 4.5.1. Before the MySQL driver appears in the
ODBC data sources drop-down list, build and copy the Connector/ODBC driver to /opt/coldfusion/
lib/libmyodbc.so.
The Contrib directory contains the program mydsn-xxx.zip which lets you build and remove the DSN
registry file for the Connector/ODBC driver on ColdFusion applications.
For more information and guides on using ColdFusion and Connector/ODBC, see the following external
sites:
• Troubleshooting Data Sources and Database Connectivity for Unix Platforms.
8.2.4 Using Connector/ODBC with OpenOffice.org
Open Office (http://www.openoffice.org) How-to: MySQL + OpenOffice. How-to: OpenOffice + MyODBC +
unixODBC.
8.2.5 Using Connector/ODBC with Pervasive Software DataJunction
You have to change it to output VARCHAR rather than ENUM, as it exports the latter in a manner that causes
MySQL problems.
95

Using Connector/ODBC with SunSystems Vision
8.2.6 Using Connector/ODBC with SunSystems Vision
Select the Return matching rows option.
8.3 Connector/ODBC and the Application Both Use OpenSSL
If Connector/ODBC is connecting securely with the MySQL server and the application using the connection
makes calls itself to an OpenSSL library, the application might then fail, as two copies of the OpenSSL
library will then be in use.
Note
Connector/ODBC 8.0 and higher link to OpenSSL dynamically while earlier
Connector/ODBC versions link to OpenSSL statically. This solves problems related
to using two OpenSSL copies from the same application.
Note
The TLSv1.0 and TLSv1.1 connection protocols were deprecated in Connector/
ODBC 8.0.26 and removed in version 8.0.28.
Note
See also the tls-versions connection option.
To prevent the issue, in your application, do not allow OpenSSL initialization in one thread and the
opening of an Connector/ODBC connection in another thread (which also initializes openSSL) to happen
simultaneously. For example, use a mutex to ensure synchronization between SQLDriverConnect() or
SQLConnect() calls and openSSL initialization. In addition to that, implement the following if possible:
• Use a build of Connector/ODBC that links (statically or dynamically) to a version of the
libmysqlclient library that is in turn dynamically linked to the same OpenSSL library that the
application calls.
• When creating a build of Connector/ODBC that links (statically or dynamically) to a version of the
libmysqlclient library that is in turn statically linked to an OpenSSL library, do NOT export OpenSSL
symbols in your build. That prevents incorrect resolution of application symbols; however, that does not
prevent other issues that come with running two copies of OpenSSL code within a single application.
8.4 Connector/ODBC Errors and Resolutions (FAQ)
The following section details some common errors and their suggested fix or alternative solution. If you
are still experiencing problems, use the Connector/ODBC mailing list; see Section 9.1, “Connector/ODBC
Community Support”.
Many problems can be resolved by upgrading your Connector/ODBC drivers to the latest available release.
On Windows, make sure that you have the latest versions of the Microsoft Data Access Components
(MDAC) installed.
64-Bit Windows and ODBC Data Source Administrator
I have installed Connector/ODBC on Windows XP x64 Edition or Windows Server 2003 R2 x64. The
installation completed successfully, but the Connector/ODBC driver does not appear in ODBC Data
Source Administrator.
96

Error 10061 (Cannot connect to server)
This is not a bug, but is related to the way Windows x64 editions operate with the ODBC driver. On
Windows x64 editions, the Connector/ODBC driver is installed in the %SystemRoot%\SysWOW64
folder. However, the default ODBC Data Source Administrator that is available through the
Administrative Tools or Control Panel in Windows x64 Editions is located in the %SystemRoot%
\system32 folder, and only searches this folder for ODBC drivers.
On Windows x64 editions, use the ODBC administration tool located at %SystemRoot%
\SysWOW64\odbcad32.exe, this will correctly locate the installed Connector/ODBC drivers and enable
you to create a Connector/ODBC DSN.
This issue was originally reported as Bug #20301.
Error 10061 (Cannot connect to server)
When connecting or using the Test button in ODBC Data Source Administrator I get error 10061
(Cannot connect to server)
This error can be raised by a number of different issues, including server problems, network problems, and
firewall and port blocking problems. For more information, see Can't connect to [local] MySQL server.
"Transactions are not enabled" Error
The following error is reported when using transactions: Transactions are not enabled
This error indicates that you are trying to use transactions with a MySQL table that does not support
transactions. Transactions are supported within MySQL when using the InnoDB database engine, which
is the default storage engine in MySQL 5.5 and higher. In versions of MySQL before MySQL 5.1, you may
also use the BDB engine.
Check the following before continuing:
• Verify that your MySQL server supports a transactional database engine. Use SHOW ENGINES to obtain
a list of the available engine types.
• Verify that the tables you are updating use a transactional database engine.
• Ensure that you have not enabled the disable transactions option in your DSN.
#DELETED# Records Reported by Access
Access reports records as #DELETED# when inserting or updating records in linked tables.
If the inserted or updated records are shown as #DELETED# in Access, then:
• If you are using Access 2000, get and install the newest (version 2.6 or higher) Microsoft MDAC
(Microsoft Data Access Components) from https://www.microsoft.com/en-in/download/
details.aspx?id=21995. This fixes a bug in Access that when you export data to MySQL, the table and
column names aren't specified.
Also, get and apply the Microsoft Jet 4.0 Service Pack 5 (SP5), which can be found at http://
support.microsoft.com/default.aspx?scid=kb;EN-US;q239114. This fixes some cases where columns are
marked as #DELETED# in Access.
• For all versions of Access, enable the Connector/ODBC Return matching rows option. For Access
2.0, also enable the Simulate ODBC 1.0 option.
97

Write Conflicts or Row Location Errors
• Include a TIMESTAMP in all tables that you want to be able to update.
• Include a primary key in the table. If not, new or updated rows may show up as #DELETED#.
• Use only DOUBLE float fields. Access fails when comparing with single-precision floats. The symptom
usually is that new or updated rows may show up as #DELETED# or that you cannot find or update rows.
• If you are using Connector/ODBC to link to a table that has a BIGINT column, the results are displayed
as #DELETED. The work around solution is:
• Have one more dummy column with TIMESTAMP as the data type.
• Select the Change BIGINT columns to INT option in the connection dialog in ODBC DSN
Administrator.
• Delete the table link from Access and re-create it.
Old records still display as #DELETED#, but newly added/updated records are displayed properly.
Write Conflicts or Row Location Errors
How do I handle Write Conflicts or Row Location errors?
If you see the following errors, select the Return Matching Rows option in the DSN configuration
dialog, or specify OPTION=2, as the connection parameter:
Write Conflict. Another user has changed your data.
Row cannot be located for updating. Some values may have been changed
since it was last read.
Importing from Access 97
Exporting data from Access 97 to MySQL reports a Syntax Error.
This error is specific to Access 97 and versions of Connector/ODBC earlier than 3.51.02. Update to the
latest version of the Connector/ODBC driver to resolve this problem.
Importing from Microsoft DTS
Exporting data from Microsoft DTS to MySQL reports a Syntax Error.
This error occurs only with MySQL tables using the TEXT or VARCHAR data types. You can fix this error by
upgrading your Connector/ODBC driver to version 3.51.02 or higher.
SQL_NO_DATA Exception from ODBC.NET
Using ODBC.NET with Connector/ODBC, while fetching empty string (0 length), it starts giving the
SQL_NO_DATA exception.
You can get the patch that addresses this problem from http://support.microsoft.com/default.aspx?
scid=kb;EN-US;q319243.
Error with SELECT COUNT(*)
Using SELECT COUNT(*) FROM tbl_name within Visual Basic and ASP returns an error.
98

Multiple-Step Operation Error
This error occurs because the COUNT(*) expression is returning a BIGINT, and ADO cannot make sense
of a number this big. Select the Change BIGINT columns to INT option (option value 16384).
Multiple-Step Operation Error
Using the AppendChunk() or GetChunk() ADO methods, the Multiple-step operation
generated errors. Check each status value error is returned.
The GetChunk() and AppendChunk() methods from ADO do not work as expected when the cursor
location is specified as adUseServer. On the other hand, you can overcome this error by using
adUseClient.
A simple example can be found from http://www.dwam.net/iishelp/ado/docs/adomth02_4.htm
Modified Record Error
Access returns Another user had modified the record that you have modified while
editing records on a Linked Table.
In most cases, this can be solved by doing one of the following things:
• Add a primary key for the table if one doesn't exist.
• Add a timestamp column if one doesn't exist.
• Only use double-precision float fields. Some programs may fail when they compare single-precision
floats.
If these strategies do not help, start by making a log file from the ODBC manager (the log you get when
requesting logs from ODBCADMIN) and a Connector/ODBC log to help you figure out why things go
wrong. For instructions, see Section 5.10, “Getting an ODBC Trace File”.
Direct Application Linking Under Unix or Linux
When linking an application directly to the Connector/ODBC library under Unix or Linux, the application
crashes.
Connector/ODBC under Unix or Linux is not compatible with direct application linking. To connect to an
ODBC source, use a driver manager, such as iODBC or unixODBC.
Microsoft Office and DATE or TIMESTAMP Columns
Applications in the Microsoft Office suite cannot update tables that have DATE or TIMESTAMP columns.
This is a known issue with Connector/ODBC. Ensure that the field has a default value (rather than NULL)
and that the default value is nonzero (that is, something other than 0000-00-00 00:00:00).
INFORMATION_SCHEMA Database
When connecting Connector/ODBC 5.x to a MySQL 4.x server, the error 1044 Access denied for
user 'xxx'@'%' to database 'information_schema' is returned.
Connector/ODBC 5.x is designed to work with MySQL 5.0 or later, taking advantage of the
INFORMATION_SCHEMA database to determine data definition information. Support for MySQL 4.1 is
planned for the final release.
99

S1T00 Error
S1T00 Error
When calling SQLTables, the error S1T00 is returned, but I cannot find this in the list of error numbers for
Connector/ODBC.
The S1T00 error indicates that a general timeout has occurred within the ODBC system and is not a
MySQL error. Typically it indicates that the connection you are using is stale, the server is too busy to
accept your request or that the server has gone away.
"Table does not exist" Error in Access 2000
When linking to tables in Access 2000 and generating links to tables programmatically, rather than through
the table designer interface, you may get errors about tables not existing.
There is a known issue with a specific version of the msjet40.dll that exhibits this issue. The version
affected is 4.0.9025.0. Reverting to an older version will enable you to create the links. If you have recently
updated your version, check your WINDOWS directory for the older version of the file and copy it to the
drivers directory.
Batched Statements
When I try to use batched statements, the execution of the batched statements fails.
Batched statement support was added in 3.51.18. Support for batched statements is not enabled by
default. Enable option FLAG_MULTI_STATEMENTS, value 67108864, or select the Allow multiple
statements flag within a GUI configuration. Batched statements using prepared statements is not
supported in MySQL.
Packet Errors with ADODB and Excel
When connecting to a MySQL server using ADODB and Excel, occasionally the application fails to
communicate with the server and the error Got an error reading communication packets
appears in the error log.
This error may be related to Keyboard Logger 1.1 from PanteraSoft.com, which is known to interfere with
the network communication between MySQL Connector/ODBC and MySQL.
Outer Join Error
When using some applications to access a MySQL server using Connector/ODBC and outer joins, an error
is reported regarding the Outer Join Escape Sequence.
This is a known issue with MySQL Connector/ODBC which is not correctly parsing the "Outer Join Escape
Sequence", as per the specs at Microsoft ODBC Specs. Currently, Connector/ODBC will return a value >
0 when asked for SQL_OJ_CAPABILITIES even though no parsing takes place in the driver to handle the
outer join escape sequence.
Hebrew/CJK Characters
I can correctly store extended characters in the database (Hebrew/CJK) using Connector/ODBC 5.1, but
when I retrieve the data, the text is not formatted correctly and I get garbled characters.
When using ASP and UTF8 characters, add the following to your ASP files to ensure that the data returned
is correctly encoded:
100

Duplicate Entry in Installed Programs List
Response.CodePage = 65001
Response.CharSet = "utf-8"
Duplicate Entry in Installed Programs List
I have a duplicate MySQL Connector/ODBC entry within my Installed Programs list, but I cannot delete
one of them.
This problem can occur when you upgrade an existing Connector/ODBC installation, rather than removing
and then installing the updated version.
Warning
To fix the problem, use any working uninstallers to remove existing installations;
then may have to edit the contents of the registry. Make sure you have a backup of
your registry information before attempting any editing of the registry contents.
Values Truncated to 255 Characters
When submitting queries with parameter binding using UPDATE, my field values are being truncated to 255
characters.
Ensure that the FLAG_BIG_PACKETS option is set for your connection. This removes the 255 character
limitation on bound parameters.
Disabling Data-At-Execution
Is it possible to disable data-at-execution using a flag?
If you do not want to use data-at-execution, remove the corresponding calls. For example:
SQLLEN ylen = SQL_LEN_DATA_AT_EXEC(10);
SQLBindCol(hstmt,2,SQL_C_BINARY, buf, 10, &ylen);
Would become:
SQLBindCol(hstmt,2,SQL_C_BINARY, buf, 10, NULL);
This example also replaced &ylen with NULL in the call to SQLBindCol().
For further information, refer to the MSDN documentation for SQLBindCol().
NULLABLE Attribute for AUTO_INCREMENT Columns
When you call SQLColumns() for a table column that is AUTO_INCREMENT, the NULLABLE column of the
result set is always SQL_NULLABLE (1).
This is because MySQL reports the DEFAULT value for such a column as NULL. It means, if you insert a
NULL value into the column, you will get the next integer value for the table's auto_increment counter.
101

102

Chapter 9 Connector/ODBC Support
Table of Contents
9.1 Connector/ODBC Community Support ....................................................................................... 103
9.2 How to Report Connector/ODBC Problems or Bugs ................................................................... 103
9.3 Connector/ODBC Version History .............................................................................................. 104
There are many different places where you can get support for using Connector/ODBC. Always try the
Connector/ODBC Mailing List or Connector/ODBC Forum. See Section 9.1, “Connector/ODBC Community
Support”, for help before reporting a specific bug or issue to MySQL.
9.1 Connector/ODBC Community Support
Community support from experienced users is also available through the ODBC Forum. You may also find
help from other users in the other MySQL Forums, located at http://forums.mysql.com.
9.2 How to Report Connector/ODBC Problems or Bugs
If you encounter difficulties or problems with Connector/ODBC, start by making a log file from the ODBC
Manager (the log you get when requesting logs from ODBC ADMIN) and Connector/ODBC. The procedure
for doing this is described in Section 5.10, “Getting an ODBC Trace File”.
Check the Connector/ODBC trace file to find out what could be wrong. Determine what statements were
issued by searching for the string >mysql_real_query in the myodbc.log file.
Also, try issuing the statements from the mysql client program or from admndemo. This helps you
determine whether the error is in Connector/ODBC or MySQL.
Ideally, include the following information with your bug report:
• Operating system and version
• Connector/ODBC version
• ODBC Driver Manager type and version
• MySQL server version
• ODBC trace from Driver Manager
• Connector/ODBC log file from Connector/ODBC driver
• Simple reproducible sample
The more information you supply, the more likely it is that we can fix the problem.
If you are unable to find out what is wrong, the last option is to create an archive in tar or zip format that
contains a Connector/ODBC trace file, the ODBC log file, and a README file that explains the problem.
Initiate a bug report for our bugs database at http://bugs.mysql.com/, then click the Files tab in the bug
report for instructions on uploading the archive to the bugs database. Only MySQL engineers have access
to the files you upload, and we are very discreet with the data.
103

Connector/ODBC Version History
If you can create a program that also demonstrates the problem, please include it in the archive as well.
If the program works with another SQL server, include an ODBC log file where you perform exactly the
same SQL statements so that we can compare the results between the two systems.
Remember that the more information you can supply to us, the more likely it is that we can fix the problem.
9.3 Connector/ODBC Version History
This section highlights substantial changes per major Connector/ODBC release series, especially useful
when updating legacy code. The connector release model changed after version 8.0, and now releases
one version. The latest Connector/ODBC version supports all active MySQL Server versions.
Information about each Connector/ODBC version; for release notes, see the Connector/ODBC release
notes.
• Connector/ODBC 8.x: 8.1.0 is the first GA release version that supersedes the 8.0 series. MySQL
connector releases use the latest Innovation release number. For example, when MySQL Server
released versions 5.7.43, 8.0.34, and 8.1.0, this connector released connector version (8.1.0) that
connects to all three MySQL Server versions.
This is the first series without 32-bit support, which ended for all MySQL products.
• Connector/ODBC 8.0: added MySQL Server 8.0 support, including caching_sha2_password and the
related GET_SERVER_PUBLIC_KEY connection attribute.
Note
As of 8.0.35, 32-bit Connector/ODBC builds exist for Windows. The 8.0 series no
longer includes new functionality but it does contain bug fixes. You're encouraged
to use the latest Connector/ODBC version and not the 8.0 series if you do not
need 32-bit builds.
• Connector/ODBC 5.3: functions with MySQL Server versions between 4.1 and 5.7. It does not
work with 4.0 or earlier releases, and does not support all MySQL 8 features. It conforms to the
ODBC 3.8 specification and contains key ODBC 3.8 features including self-identification as a ODBC
3.8 driver, streaming of output parameters (supported for binary types only), and support of the
SQL_ATTR_RESET_CONNECTION connection attribute (for the Unicode driver only). Connector/ODBC
5.3 also introduces a GTK+-based setup library, providing GUI DSN setup dialog on some Unix-based
systems. The library is currently included in the Oracle Linux 6 and Debian 6 binary packages. Other
new features in the 5.3 series include file DSN and bookmark support.
Connector/ODBC 5.3.11 added caching_sha2_password support by adding the
GET_SERVER_PUBLIC_KEY connection attribute.
• Connector/ODBC 5.2: upgrades the ANSI driver of Connector/ODBC 3.51 to the 5.x code base. It also
includes new features, such as enabling server-side prepared statements by default. At installation
time, you can choose the Unicode driver for the broadest compatibility with data sources using various
character sets, or the ANSI driver for optimal performance with a more limited range of character sets. It
works with MySQL versions 4.1 to 5.7.
• Connector/ODBC 5.1: is a partial rewrite of the of the 3.51 code base, and is designed to work with
MySQL versions 4.1 to 5.7.
Connector/ODBC 5.1: also includes the following changes and improvements over the 3.51 release:
• Improved support on Windows 64-bit platforms.
104

Connector/ODBC Version History
• Full Unicode support at the driver level. This includes support for the SQL_WCHAR data type, and
support for Unicode login, password and DSN configurations. For more information, see Microsoft
Knowledgebase Article #716246.
• Support for the SQL_NUMERIC_STRUCT data type, which provides easier access to the precise
definition of numeric values. For more information, see Microsoft Knowledgebase Article #714556
• Native Windows setup library. This replaces the Qt library based interface for configuring DSN
information within the ODBC Data Sources application.
• Support for the ODBC descriptor, which improves the handling and metadata of columns and
parameter data. For more information, see Microsoft Knowledgebase Article #716339.
• Connector/ODBC 3.51, also known as the MySQL ODBC 3.51 driver, is a 32-bit ODBC driver.
Connector/ODBC 3.51 has support for ODBC 3.5x specification level 1 (complete core API + level 2
features) to continue to provide all functionality of ODBC for accessing MySQL.
The manual for versions of Connector/ODBC older than 5.3 can be located in the corresponding binary or
source distribution.
Note
Versions of Connector/ODBC earlier than the 3.51 revision were not fully compliant
with the ODBC specification.
Note
From this section onward, the primary focus of this guide is the Connector/ODBC
5.3 driver.
Note
Version numbers for MySQL products are formatted as X.X.X. However, Windows
tools (Control Panel, properties display) may show the version numbers as
XX.XX.XX. For example, the official MySQL formatted version number 5.0.9 may
be displayed by Windows tools as 5.00.09. The two versions are the same; only the
number display formats are different.
105

106
