TABLE OF CONTENTS
HOW TO MAKE ACCESSIBLE WORD DOCUMENTS ................................................................ 2
Providing headings for your document is KEY .......................................................................... 2
How to add headers to your document .................................................................................. 2
How to have the headers match your current document theme ............................................ 2
How to spot check if your heading levels are set up in a logical order .................................. 3
How to Bold and Italicize in a document so it is screen reader friendly..................................... 3
Avoid underlining ................................................................................................................... 4
Font type matters for students who have limited vision ............................................................. 4
Color Contrast is also important for students who have limited vision ...................................... 4
Adding hyperlinks in a Word document ..................................................................................... 5
How to add a hyperlink in a Word document (or e-mail) ........................................................ 5
Adding alternative text to pictures ............................................................................................. 6
How to add alt text to a picture .............................................................................................. 6
A few pro tips to be aware of when making alt text ............................................................... 7
Using columns when laying out your page ................................................................................ 8
How you provide spacing in a document is important ............................................................. 10
Avoid hitting enter to add blank spaces to your document .................................................. 10
An easy way to add spacing ................................................................................................ 11
How to make accessible lists in Word ..................................................................................... 11
How to make an accessible multilevel list ............................................................................ 12
Using Tables in Word .............................................................................................................. 13
Adding a table in Word ........................................................................................................ 13
Example of accessible table vs a not accessible table ........................................................ 14
How to insert a data table from Excel into Word .................................................................. 15
Running the accessibility checker ........................................................................................... 15
Saving to PDF: Not all saving methods are created equally ................................................... 17
Bonus Tips .............................................................................................................................. 17
Can use templates if do not wish to build an accessible document from scratch ................ 17
Converting a Word document to PDF .................................................................................. 18
2
HOW TO MAKE ACCESSIBLE WORD DOCUMENTS
Microsoft Word tends to be the easiest platform for screen reader technology to navigate
through. By using the below steps, you can make any of your Word documents accessible for
students who use screen reading technology.
PROVIDING HEADINGS FOR YOUR DOCUMENT IS KEY
Headers are the structural markup to provide hierarchy of information within a document and
allows screen reader users to skim a document efficiently. Think of headers like a table of
contents for your document.
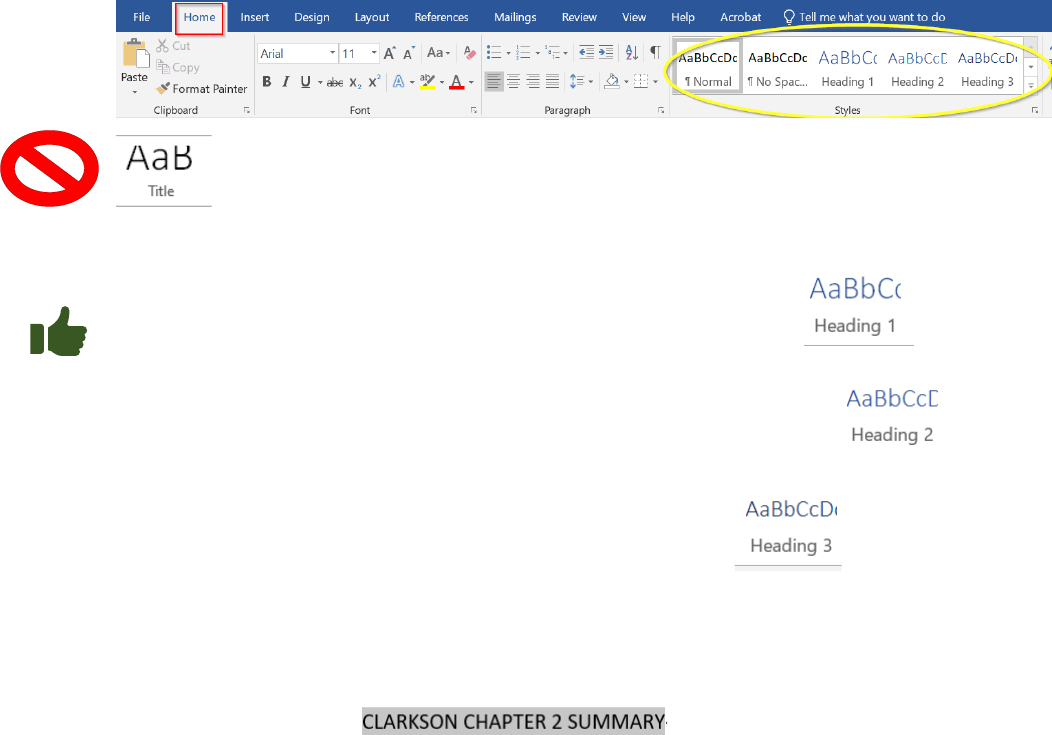
HOW TO ADD HEADERS TO YOUR DOCUMENT
Headers can be found under the Home TabStyles. Headings are added by either clicking on
the heading you want before you start typing that line, or by highlighting the section heading and
then clicking on the respective header style.
Important note: Screen readers CANNOT read the Title Heading
listing in the styles list.
So, instead use Heading 1 for the title of your document.
Then use Heading 2 for the start of the document sections.
If there is an additional subsections use Heading 3
HOW TO HAVE THE HEADERS MATCH YOUR CURRENT DOCUMENT THEME
:
1. In the document, select the section of text that you want the header to match- Such as
this example title-
2. Right click on the header level you want for the text and choose Update Header To
Match section

3
HOW TO SPOT CHECK IF YOUR HEADING LEVELS ARE SET UP IN A LOGICAL ORDER
Once you have added headers to your document, you can verify that they are laid out the way
you would like them by clicking on the View Tab and clicking on Navigation Pane. This will
show you how your document is currently laid out based off the header levels you gave to
different parts of your document.
HOW TO BOLD AND ITALICIZE IN A DOCUMENT SO IT IS SCREEN READER FRIENDLY
Screen reader technology cannot identify if a word is bolded or italicized.
However, there is a simple trick that you can use to bold or italicize a word, while still making it
accessible to a screen reader. Highlight the word you want to bold or italicize. Then in the
Styles toolbar, choose the corresponding heading setting:

4
AVOID UNDERLINING
Underlined text indicates a hyperlink to assistive technologies like a screen reader. Reserve
underlining only for navigation hyperlinks.
FONT TYPE MATTERS FOR STUDENTS WHO HAVE LIMITED VISION
Not all font types are treated equally. In fact, sans serif font styles are recommended because
they are easier for individuals with low or limited vision to read.
Font types that are recommended include Arial, Calibri, Verdana, and Tahoma.
Font types that are not recommended include Times New Roman, Georgia, and Bookman
Old Style.
COLOR CONTRAST IS ALSO IMPORTANT FOR STUDENTS WHO HAVE LIMITED VISION
Sufficient contrast should be kept in mind during document creation to help make sure the
information is viewable for individuals who have limited vision. A Color Contrast Analyzer
can be
used to help determine accessibility. With that said, fixing it using the accessibility checker
would likely be an easier option (see Helpful tip on next page).
Make sure that the contrast between foreground and background colors is at least 4.5:1.
(Black text on a white background has a very strong ratio at 21:1)
Helpful tip: If you are not sure if a text/background has challenging color contrast, run the
accessibility checker on your document. If color contrast is an issue you will see a
warning that says “hard to read contrast” and can easily fix it within the checker. (The
word or phrase that has challenging contrast will show in the checker for this example it
is the word “important.”)
If the new color you choose meets contrast requirements the error will disappear.

5
Color contrast cannot really be fixed once it is converted to a PDF Format. So make
sure to make changes before converting it to PDF.
ADDING HYPERLINKS IN A WORD DOCUMENT
In order to make a web address accessible to a screen reader, do not simply copy and paste a
web address into a document. (Doing so will result in the technology to read each letter of the
hyperlink individually.)
Instead, rename the hyperlink, to help indicate where the hyperlink will redirect the person to
when once they click on it. Pro Tip: Do not simply say “Click Here.” Remember to make sure
the name of the hyperlink will help the student know where the hyperlink will direct them to.
HOW TO ADD A HYPERLINK IN A WORD DOCUMENT (OR E-MAIL)
Highlight the part of the sentence that you want to turn into a hyperlink, right-click, and choose
the Link option:

6
Once the hyperlink is in place, when you hover over it with your mouse you will see this
message:
ADDING ALTERNATIVE TEXT TO PICTURES
Alterative text (commonly referred to as “alt text”) can be read by screen readers, and helps
people who are blind or who have low vision understand what images and other objects are in a
document. Without alt text an image on a page will simply read as “image.”
HOW TO ADD ALT TEXT TO A PICTURE
1. Right-click on the image that you would like to add alt text for and click on Edit Alt
Text

7
2. Type in an image description. You want to keep your description as short and concise as
possible. The image description should have the essential information that you want a
student to be aware of, such as the example below:
A FEW PRO TIPS TO BE AWARE OF WHEN MAKING ALT TEXT
1. NEVER use the generate a description box to come up with an alt text for you. The
descriptions that Word comes up with automatically are in no way going to accurately
represent your image.
2. If you have an image that is simply decorative and does not have any essential
information within it, then mark it as decorative. This will cause the screen reader
technology to skip/ignore the image when navigating though the document.

8
USING COLUMNS WHEN LAYING OUT YOUR PAGE
There may be times that you want to show text side-by-side. If that is the case, use the columns
option under the layout tab to insure proper reading order. (Do not use tabs or spaces to
attempt to format your information into columns because it will not read correctly with the screen
reading technology.)
Example: Let’s pretend you want to put the following information into two columns.
1. Select the information you want to switch into columns from the above example (Tip: if
you want to do it for the whole document, no need to select specific information--move
on to step 2):

9
2. Go to the Layout Tab and choose Columns and choose the number of columns that
you want (for more options click on More Columns)
3. This will automatically change the format to a two-column format:
Pro Tip: As you will notice in this example, “Center for Experiential Education” is at the bottom
of the first column, but we want it at the top of the second column. To make this change, put
your curser in front of the word “Center.” Then in the Layout Tab click Breaks and then click on
Columns.

10
This action will move our desired text to the next column
HOW YOU PROVIDE SPACING IN A DOCUMENT IS IMPORTANT
When it comes to screen reading technology, not all spacing is treated equally.
AVOID HITTING ENTER TO ADD BLANK SPACES TO YOUR DOCUMENT
Important: You want to avoid hitting the enter key a bunch of times to give spaces between
sections, because for every empty line space the screen reading technology is going to read it
as “blank.” Instead use page breaks to start on a new page or start a new section. This is found
under the Layout Tab and then Breaks (see picture that follows).

11
AN EASY WAY TO ADD SPACING
One of the easiest ways to add spacing or new lines to a document is to hold down the SHIFT
key while you hit the Enter key. This is known as a soft return. It will allow you to add new
lines to a document, while also avoiding adding in “blank spaces” that would cause an
accessibility error.
HOW TO MAKE ACCESSIBLE LISTS IN WORD
Lists can help provide structure to a document and makes the reading more efficient.
Don’t:
Use dashes, asterisks, etcetera, to make lists. Do not use the multilevel list option built into
Word because there are accessibility issues currently with that feature.
Do:
Use the bullets feature or numbering feature under the Home tab and Paragraph setting to
create lists:

12
HOW TO MAKE AN ACCESSIBLE MULTILEVEL LIST
1. Highlight the complete part that you want to make a multilevel list:
2. Under the Home Tab Click on the Numbering icon:
3. This will temporarily number each line:
4. Next, select the part that you would like to indent (in this example, lines number 2 and 3)
and under the Home tab select paragraph indent:

13
5. This will cause the selected lines to get indented while also upholding the integrity of the
list for screen reader technology. Pro Tip: Hitting the Tab Key is a shortcut way to also
properly indent the selected info.
Pro Tip: What if there is an area that I want on a new line, but I do not want it listed as a
new number of sub indent? First, place your curser in front of the word you want to put on a
new line. Then hold down the shift key as you hit enter. This should result in a new line while
holding the integrity of the list.
U
SING TABLES IN WORD
You only want to use tables for tabular data. Do not use tables to set up the overall layout of
the page. Why? You may have materials in an order in your table that is obvious to a sighted
reader, but is not a screen reader. Instead, if you are trying to accomplish page layout, use the
column format option that was discussed earlier in this handout.
ADDING A TABLE IN WORD
1. Click the Insert Tab.
2. Click the Insert Table icon.
3. Select the number of rows & columns desired by moving your cursor down & right.
Helpful Note: You do not need to add alt text to a table. Just make sure all your rows and
column have either a title or data in it. You also do not want to leave any data cells blank.
14
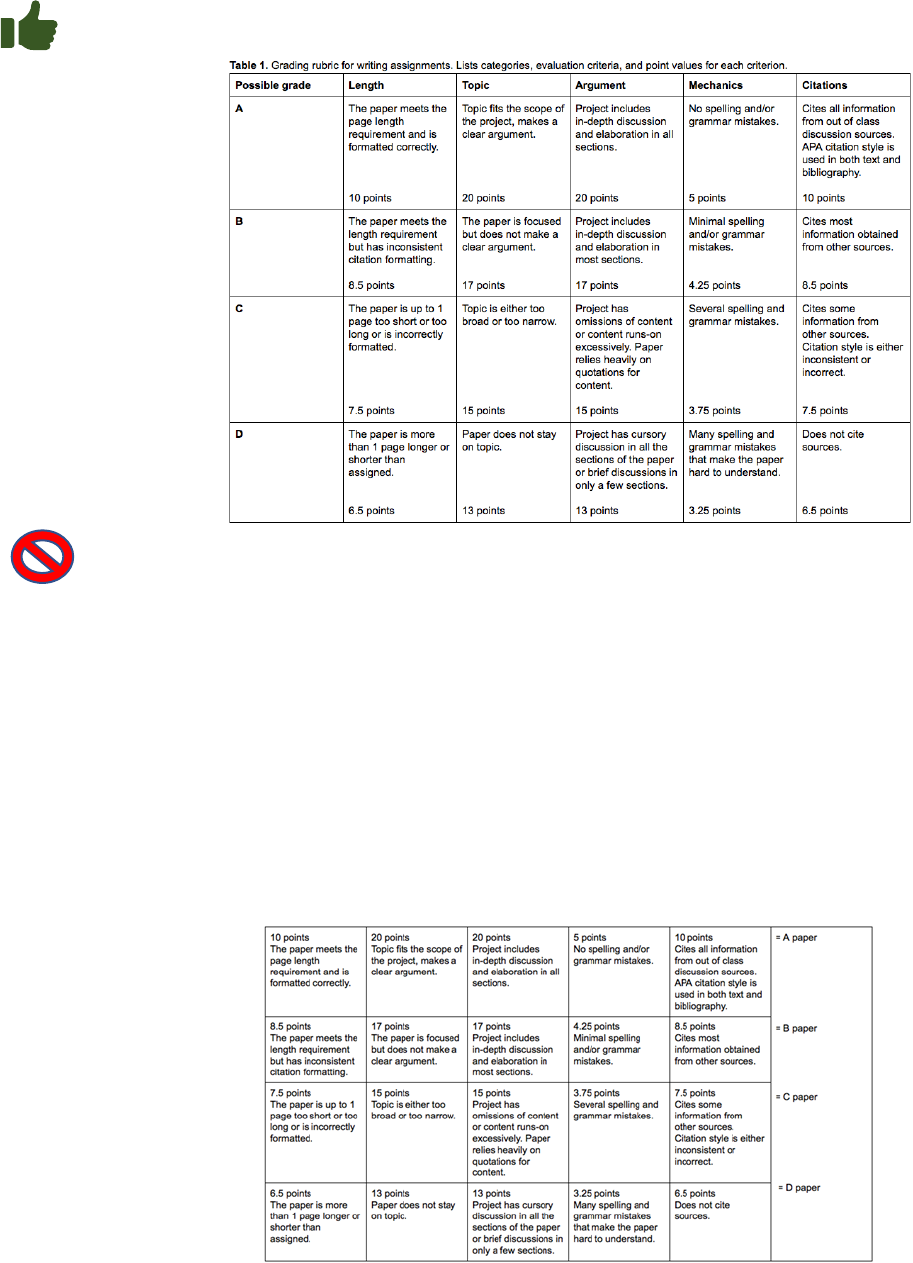
EXAMPLE OF ACCESSIBLE TABLE VS A NOT ACCESSIBLE TABLE
Accessible
Not accessible
The below table contains the exact same core content as the previous example of a well-made
table, but the following changes make it inaccessible:
• This table does not include a caption that informs readers about the what this content is.
• This table is also missing the row and column headings that helped readers identify what
each cell in the table means.
• The last column is a single merged cell that identifies the criteria that needs to be met to
receive a certain letter grade. While this column certainly contains helpful information, it
would be very confusing to a screen reader user because all of the information is
contained in one large cell.
(Tables should not contain merged cells as they are difficult to navigate with screen
readers.)

15
HOW TO INSERT A DATA TABLE FROM EXCEL INTO WORD
1. In Excel, find the information you want and copy the cells that you want to paste over
into Word.
2. On the Home Tab choose Paste.
3. Choose either Use Destination Styles or Use Destination Theme only (all other
options will cause accessibility challenges)
RUNNING THE ACCESSIBILITY CHECKER
In some versions of Word, you find the checker by clicking on the File tab in the upper left
corner, then Check for Issues, then Check Accessibility. Many versions of Word have the
Check Accessibility icon under the Review tab. The location of the accessibility checker can
vary on your version of Word.
Pro tip: While there is an accessibility checker feature in the online version of Office 365, that
version will not allow you to fix as many issues as the desktop version. So, try to run the
accessibility checker via your desktop whenever possible.
Important Note: Sometimes when you run the accessibility checker you will get an error stating
that the checker cannot be run. If that happens, resave a second copy of the document.
Example, if the title of the document was xx click save as and resave as xx2. Open up that
second document (xx2) and click the accessibility checker icon. The accessibility checker
should now work.

16
Once you have found, and run the Accessibility Checker, a pane will open on the right side of
your screen with the Inspection Results. You have to learn how to read the results and repair
any errors identified therein - you will see what Microsoft has identified as an Error, Warning, or
Tip.
• Error: Content that makes the document difficult or impossible to read and understand
for people with disabilities.
• Warning: Content that in most (but not all) cases makes the document difficult to
understand for people with disabilities.
• Tip: Content that people with disabilities can understand but that could be presented in a
different way to improve the user’s experience.
Repairing the identified issues becomes easier with patience and practice. If you get stuck, the
Accessibility Checker provides tips directly within the results for each identified issue on Why
Fix it and How to Fix it.
Helpful Note: If you get a warning that says “Object not in line with text” you can disregard
that warning. That warning does not need to be fixed.

17
SAVING TO PDF: NOT ALL SAVING METHODS ARE CREATED EQUALLY
Note: Whenever possible, it is best to give a student who uses screen reader technology a
Word version of a document because that tends to be most accessible for them to navigate
through.
When/if you would like to save your Word document to a PDF there is one specific way that you
want to do it to help insure that as many of the accessibility features convert over as possible.
(Note: Converting a document to PDF will cause a couple of accessibility errors that would need
to be addressed.)
Under the File Tab, choose Save as Adobe PDF
Do NOT do a Print to PDF
BONUS TIPS
CAN USE TEMPLATES IF DO NOT WISH TO BUILD AN ACCESSIBLE DOCUMENT FROM SCRATCH
Accessible templates can be found under the File tab by clicking New and typing in accessible
templates
Pro Tip: A full list of all of the accessible office templates offered by Microsoft 365 can be found
online.
18
CONVERTING A WORD DOCUMENT TO PDF
Whenever possible, it is best to give a student who uses screen reader technology a Word
version of a document because that tends to be most accessible for them to navigate through.
With that said, keep in mind if you convert a Word document to PDF, even a fully accessible
version of Word will have a couple errors when it is converted to PDF; including the need to
assign a title once it is in PDF and verifying the reading order. See the handout “How to Make
Accessible PDF’s” for more information.
www.normandale.edu/_files/documents/osd/HowtoMakeAccessibleWordDocuments.pdf Updated 6/28/24
