
1 Confidential
RADIFLOW ISID THREAT DETECTION SYSTEM
INTEGRATION
WITH CISCO ISE
CONFIGURATION GUIDE
This controlled document is the property of Radiflow Ltd.
THIS DOCUMENT CONTAINS PROPRIETARY INFORMATION.
ANY DUPLICATION, REPRODUCTION OR TRANSMISSION TO
UNAUTHORIZED PARTIES WITHOUT PRIOR PERMISSION OF RADIFLOW
IS STRICTLY PROHIBITED.

2 Confidential
Contents
Executive Summary ..............................................................................................................................................3
Introduction .........................................................................................................................................................3
Solution Overview ................................................................................................................................................4
Use Cases ..............................................................................................................................................................5
OT policy creation and enforcement based on Radiflow iSID Device Information ..........................................5
Policy Defined Segmentation ...........................................................................................................................5
Threat containment and prevention using ANC ..............................................................................................6
Authentication configuration ...............................................................................................................................7
Obtaining Your Cisco ISE Certificate .................................................................................................................7
Certificate Options ...........................................................................................................................................8
Activate PxGrid in Cisco ISE ........................................................................................................................... 10
Activate ERS in Cisco ISE ................................................................................................................................ 11
Activate ANC (Adaptive Network Control) .................................................................................................... 13
Configure iSID and Connect to Cisco ISE ........................................................................................................... 14
ISE Instance creation ..................................................................................................................................... 14
Configuration ISID asset attributes in Cisco ISE ................................................................................................ 18
ISID asset information updates in Cisco ISE ...................................................................................................... 22
Manual update .............................................................................................................................................. 22
Asset info synchronization example ............................................................................................................. 23
Changes in asset attributes in ISID and ISE update ....................................................................................... 26
ISID – ANC integration ....................................................................................................................................... 28
Troubleshooting ................................................................................................................................................ 35

3 Confidential
Executive Summary
This document describes this integrated solution, which offers the ability to leverage Cisco ISE’s platform
with the Radiflow iSID provided comprehensive asset inventory of the devices in the industrial network,
including detailed asset information (such as device type, software/firmware version, etc).
In addition to that, that integration will allow enforce threat containment and prevention via integration
with Adaptive Network Control (ANC) component while anomaly traffic or cyber threat will be detected by
ISID.
iSID data in conjunction with the Cisco ISE platform enables creation and enforcement of a range of access
policies to manage network security in flexible and dynamic way specifically in OT environments.
Introduction
Radiflow iSID can be integrated with Cisco Identity Services Engine (ISE) in order to enrich the security
enforcement capabilities of the network with contextual data from the OT operations.
Cisco ISE allows customers to provide highly secure network access to users and devices. It helps to gain
visibility into what is happening in network, such as who is connected, which applications are installed and
running, and much more. That visibility enables to enforce various security and access policies across the
network.
iSID’s Deep Packet Inspection engine is able to identify industrial assets on running industrial processes
without the need for active discovery which would carry the risk of interrupting operations. iSID is able to
supply this OT contextual data to Cisco ISE using the pxGrid API. ISE can use this OT asset information to
apply Adaptive Network Control (ANC) policies which can be used to orchestrate appropriate levels of
network access and security controls on a per device basis. The data shared by iSID can be propagated to
other pxGrid integrated products in order to further enhance capabilities.
iSID-ISE integrated solution allows extended OT asset visibility and OT environment specific threats
detection to manage and enforce customer-defined access policies in operational environments.
This guide is intended for ISID’s users which required to integrate with Cisco ISE infrastructure.

4 Confidential
Solution Overview
iSID - Cisco ISE integration combines the following capabilities and functionality to powerful OT network
detection and policy enforcement solution:
- OT Asset information, communication patterns and network anomalies gathered and detected by ISID,
- ISID detection of sensitive OT management commands,
- ISE policy engine that allows network engineers to set up policies according to specific cyber security
policy,
- Authorization and authentication capabilities to control access to the network per device,
- Utilization of Cisco pxGrid framework for ISE integration,
- ISE Adaptive Network Control capabilities to enforce quarantine policy for rogue endpoint,
- More.
All these were integrated together to allow secure and resilient functionality of operational networks along
with quick and timely response to potential cyber threats.
The Integration was tested on following ISID and ISE versions:
ISE – v 2.4 and higher, pxGrid – 2.0
ISID – v6.2.2.10 and above

5 Confidential
Use Cases
OT policy creation and enforcement based on Radiflow iSID Device Information
ISE receives enriched data about the OT device, and will process it according to the profiles and policies
which have been configured. The following use cases and their associated benefits are available:
a. Enrich data in ISE with OT specific insights available with iSID's DPI engine. This will enable better
administration and decision making within ISE by providing additional context.
b. b. Categorise devices by their type/function within the OT environment, and apply a default access
policy based on this data. This can also be configured based on the detected IEC 62443 zone of the
device. This will ensure that devices are quickly provisioned with an appropriate basic level of access
to and protection on the network, and also allows appropriate/desired segmentation between the IT
and OT networks.
Policy Defined Segmentation
Devices can also be manually categorised by business process. Applying access policies to specific business
processes can enable automatic micro-segmentation use cases. It can also be used to split networks into areas
of separate administrative responsibility, ensuring engineers have access only to devices they are authorised
to configure, and simplifying secure remote access to vendor networks.

6 Confidential
Threat containment and prevention using ANC
Devices can be "quarantined" based on alerts or anomalies detected by iSID. While it's extremely unlikely to
be desirable for a production OT asset to be quarantined from network access, OT security engineer or OT
network administrator can activated ANC capability within ISID and apply a relevant quarantine policy to
increase OT security by restricting devices which were involved in security violation alert without interrupting
active OT processes – which is useful in cases of disabling remote access to the device, or preventing new
connections to and from the device and more.

7 Confidential
Authentication configuration
In order to configure iSID-ISE communication, there is a need to configure both ISE and iSID. The following
steps should be performed to work with Cisco ISE and iSID in integrated way.
Obtaining Your Cisco ISE Certificate
iSID-ISE integration requires a valid Cisco ISE certificate for each server in order to perform the integration.
Each server has its own unique corresponding certificate. Hence, the certificates cannot be shared or
exchanged between servers.
1. Create a certificate for your application instance by downloading one from Cisco ISE as described in the
Cisco Reference Manuals
a. Deploying Certificates with Cisco pxGrid - Using an external Certificate Authority (CA) with Cisco
ISE 2.x
b. Internal Certificate Authority (CA) to Deploy Certificates to Cisco Platform Exchange Grid
(pxGrid) Clients
2. Save certificate in your file system for current and subsequent iSID–ISE integration sessions.
3. When prompted for the Cisco ISE certificate - browse to the certificate saved in your system.

8 Confidential
Certificate Options
There are two types of credentials for obtaining/applying a Cisco ISE certificate:
- Certificate-based connection – Used for an external Certificate Authority (CA)
- Password-based connection – Used for a local certificate
The password-based authentication will be used unless the certificate-based parameters are applied.
If you are using password-based authentication, select the checkbox to ‘Allow Password Based Account
Creation’ in Administration > pxGrid Services> Settings.
As described in CISCO manual how to deploy certificate to pxGrid clients, fill out the following in
Administration > pxGrid Services > Client Management >Certificates:
1. In the ‘I want to field’:
Enter ‘Generate a single certificate (without a certificate signing request)’
2. In the Common Name (CN) field:
Enter your fully qualified domain name for iSID server.
3. For the Subject Alternative Name (SAN):
Enter the iSID DNS and/or IP Address.
o The download format is Privacy Enhanced Electronic Mail (PEM)
o If you provide an optional Certificate Password, make sure to confirm it

9 Confidential
4. ISE creates the password based on the above input.

10 Confidential
Activate PxGrid in Cisco ISE
1. Select Administration > System > Deployment and edit the ISE node to enable pxGrid under both the
General Settings tab and the Profiling Configuration tab.

11 Confidential
2. Verify that the ISE pxGrid node has subscribed to the endpoint asset topic:
Select Administration > pxGrid Services > Web Clients.
Activate ERS in Cisco ISE
The External RESTful Services (ERS) APIs are based on HTTPS protocol and REST methodology and uses port
9060. ERS is designed to allow external clients to perform CRUD (Create, Read, Update, Delete) operations
on Cisco ISE resources. ERS is based on the HTTP protocol and REST methodology. The External RESTful
Services APIs support basic authentication. The authentication credentials are encrypted and are part of the
request header. The Cisco ISE administrator must assign special privileges to a user to perform operations
using the External RESTful Services APIs.
To perform operations using the External RESTful Services APIs (except for the Guest API), the users must be
assigned to ‘External RESTful Services Admin Group’ and must be authenticated against the credentials
stored in the Cisco ISE internal database (internal admin users)
Once the above is configured, the user will have full access to all ERS APIs (GET, POST, DELETE, PUT). This
user can Create, Read, Update, and Delete ERS API requests. Hence, information relevant to additional
attributes on Radiflow iSID, can be updated on Cisco ISE
Please refer to Cisco Identity Services Engine API Reference Guide, Release 3.0 – Setting UP guide in
order to
- Enable ERS (port 9060)
- Creating ERS Admin
- Setting up ERS for Sponsor Access
1. Select Administration > System > ERS Settings and select the ‘Enable ERS for Read/Write’ in the ‘ERS for
Primary Node’.

12 Confidential
Note: Based on Cisco ISE guide, for field implementation, ‘ers admin’ needs to be defined with relevant
permissions, as well as ‘Setting up ERS for Sponsor Access’. Please refer to the mentioned above guide for
detailed ERS definition instructions.

13 Confidential
Activate ANC (Adaptive Network Control)
Adaptive Network Control (ANC) is a service that runs on the Administration node. This service monitors
and controls network access of endpoints. ANC allows you to reset the network access status of an endpoint
to quarantine, unquarantine, or shut down a port. These define the degree of authorization for the
endpoints in the network.
You can quarantine or unquarantine endpoints, or shut down the network access server (NAS) ports to
which endpoints are connected, by using their endpoint IP addresses or MAC addresses. You can perform
quarantine and unquarantine operations on the same endpoint multiple times, provided they are not
performed simultaneously. If you discover a hostile endpoint on your network, you can shut down the
endpoint’s access.
ANC is disabled by default. ANC gets enabled only when pxGrid is enabled, and it remains enabled until you
manually disable the service in the Admin portal. You must have Super Admin and Policy Admin role
privileges to enable ANC in Cisco ISE. Detailed information regarding the ANC configuration can be found in:
Cisco-ISE-admin-guide

14 Confidential
Configure iSID and Connect to Cisco ISE
On iSID side, needs to define and configure instance/s.
Before configuration of the ISE integration in iSID:
1. DNS for the ISE should be defined,
2. Certifications should be generated/provided by ISE, as explained above: Obtaining Your Cisco ISE
Certificate
ISE Instance creation
Navigate to Configuration -> Third Party Integration, and press on the ‘+’ icon
Select the ‘Cisco ISE’ from the drop-down list:

15 Confidential
When the following Cisco ISE configuration appears, fill the relevant info (as in an example below):
- ISE DNS name
- iSID DNS name
- Server certificate // this is a *.pem file
- Client Certificate // this is *.pem file
- Client Key // this is *.key file
- Client password // used password when connecting to ISE
Upon completed, press the ‘Continue’ button in the lower right corner of the dialog to implement your
choices.
At the next step, ‘ERS Instance’, which is relevant for additional attributes, please provide the credential
for the ERS. Then press the ‘Continue’

16 Confidential
At the ‘ISE Policy Configuration’ step:
- Check/uncheck the ‘Primary’ checkbox based on the configured ISE desired (see below two
examples).
- In the case ANC integration is required for quarantine policies, make sure this checkbox is marked.
Confirm the Instance creation by pressing the ‘Apply’ button.
If needed, repeat the instance creation also for backup Cisco ISE instance.
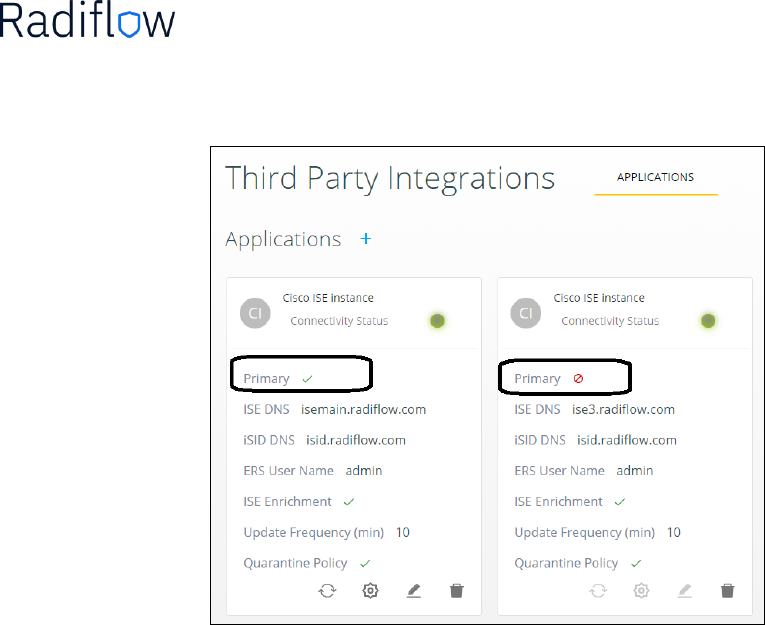
17 Confidential
By the end of the instance creation, similar to the following example should be presented in iSID:

18 Confidential
Configuration ISID asset attributes in Cisco ISE
At this point, iSID uses pxGrid to send OT Asset attributes to Cisco ISE to be used for asset classification and
policies. In order to use these attributes in ISE, they should be defined as custom attributes.
The following attributes are sent:
ISE Properties
Meaning
Attribute Name
assetName
Name
Asset_Name
assetId
Unique ID
Asset_ID
assetIpAddress
IP address
Asset_IP
assetMacAddress
MAC address (can be array)
Asset_MAC
assetVendor
Vendor Name
Asset_Vendor_Name
assetProductId
Manufacturer Model
Asset_Model_ID**
assetSerialNumber
Manufacturer Serial Number
Asset_Serial_Number
assetDeviceType
Device Type (PLC, HMI, EWS, etc)
Asset_type
assetSwRevision
Software version
Asset_SW_rev**
assetHwRevision
Hardware version
Asset_HW_rev**
assetProtocol
Protocols used by device
Asset_Protocol_List
assetModelName
Manufacturer Model Name
Asset_Model_Name**
assetOsName
Operating system
Asset_OS**
assetZone
62443 Zone device belongs (DMZ,
Basic, Control, etc)
Asset_Zone
Future
Risk/
exploitability score
Asset_Risk
Future
High, Medium, Low
Asset_criticality
Future
List of CVE’s relevant to device
Asset_CVEs
Future
If device involved in unapproved
alerts (T/F)
Asset_alerts
** = Supported based on protocol

19 Confidential
Use the following steps to define custom attributes.
1. Go to Administration > Identity Management > Settings > Endpoint
Custom Attributes and with the plus sign + define the custom attributes

20 Confidential
2. Enable the Custom Attributes for enforcement by selecting:
Administration > System > Settings > Profiling:
Check the checkbox for ‘Enable Custom Attribute for Profiling
Enforcement’.

21 Confidential
3. Check the custom attribute list at the assets attribute:

22 Confidential
ISID asset information updates in Cisco ISE
Manual update
Based on the above example, iSID is about to update the active ISE server every 10 minutes. If user would
like to interrupt and force update during this time, navigate to the Configuration -> Third Party Integrations,
select the desired Instance and press the ‘Sync Access Data’.
The result will be reflected in both iSID and active ISE as following.

23 Confidential
Asset info synchronization example
Below is an example for manual synchronization of the assets.
iSID indication: 2 new assets were discovered
User press the sync’ option:
Blue balloon appears at the right bottom side of the screen, confirming the action:
Upon successful synchronization, a confirmation will be presented (green balloon):
24 Confidential
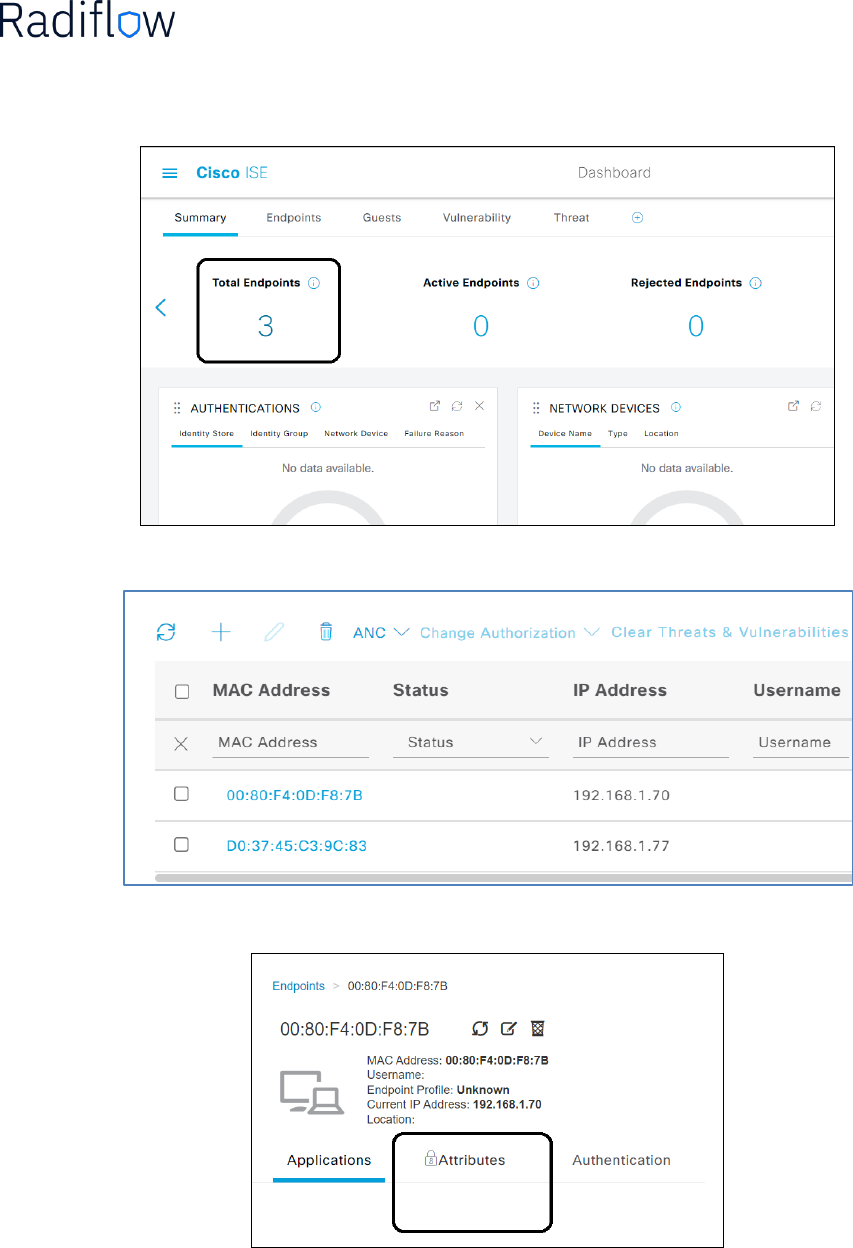
When login to the active ISE via the GUI – check the list of endpoints:
Then scroll down on the opened page and confirm seeing the assets:
Select one of the assets, and at the opened page scroll up to the ‘Attribute’:
25 Confidential
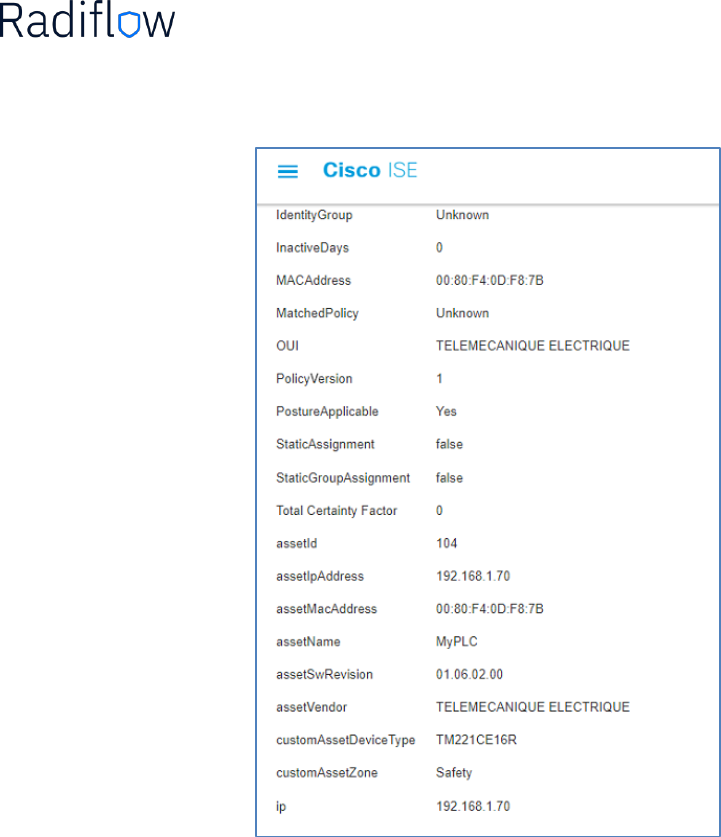
Then scroll down to see the relevant attribute details:
26 Confidential
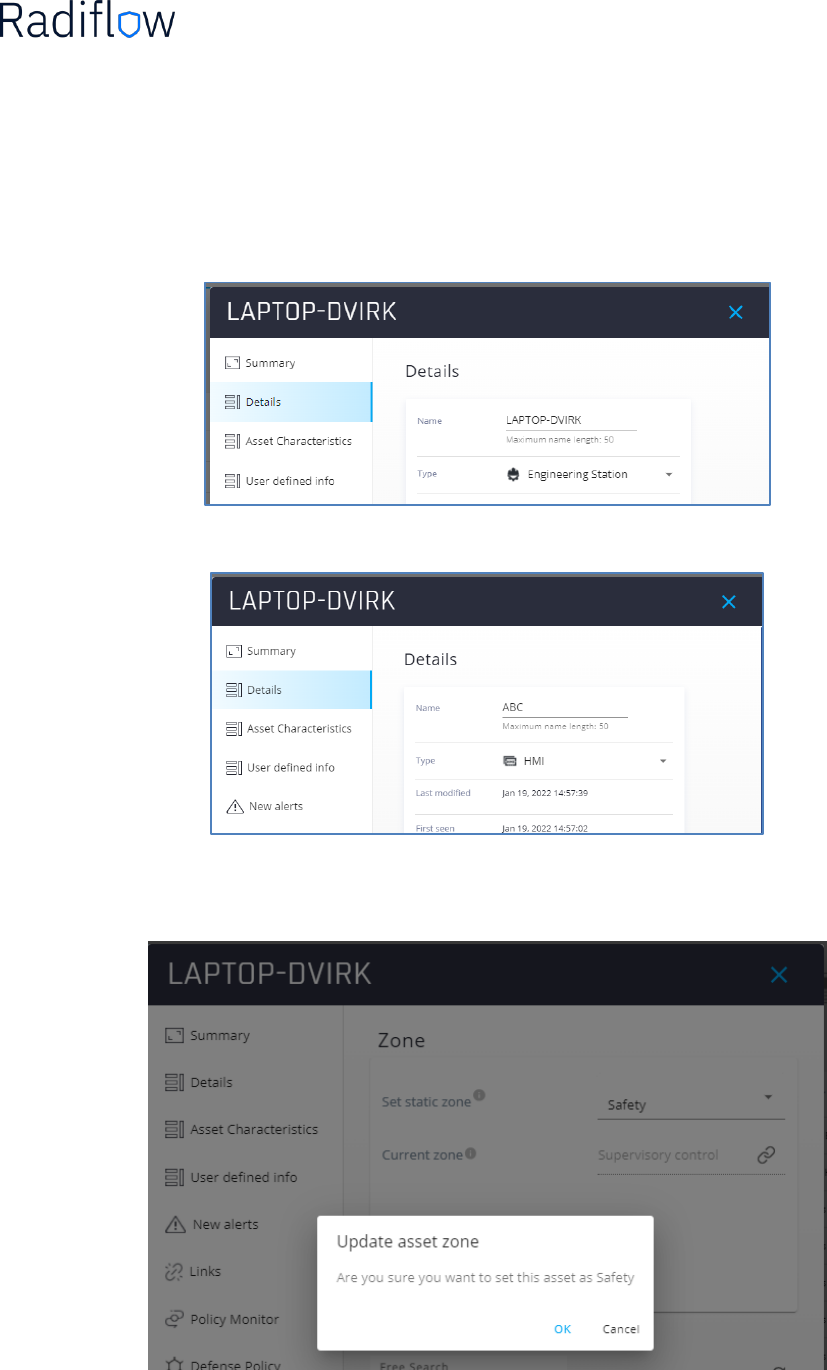
Changes in asset attributes in ISID and ISE update
It is possible to get updates or make changes in iSID, such as: name, type, zone, etc.. an that information will
be reflected in ISE once synchronized. For example, changing the asset ‘LAPTOP-DVIRK’ to ‘ABC’, and
changing the zone from ‘basic’ to ‘safety’
Before changing the name:
After changing the asset name:
Before and after updating the zone:

27 Confidential
Before and after the sync’ the info will be reflected in Cisco ISE:

28 Confidential
ISID – ANC integration
Assuming alert is detected in iSID. If iSID operator has “administrator” or “cyber analyst” role, and he
decides that the asset/s involved in this alert should be included in the quarantine list of Cisco ISE, there is a
possibility to update Cisco ISE quarantine list with the asset/s details (MAC/s address).
For example, a CVE alert has been detected in iSID. Analyst marks this alert and press the ‘Add devices to
Quarantine via Cisco ANC’ icon:
Analyst needs to confirm the ‘adding to quarantine’ action:
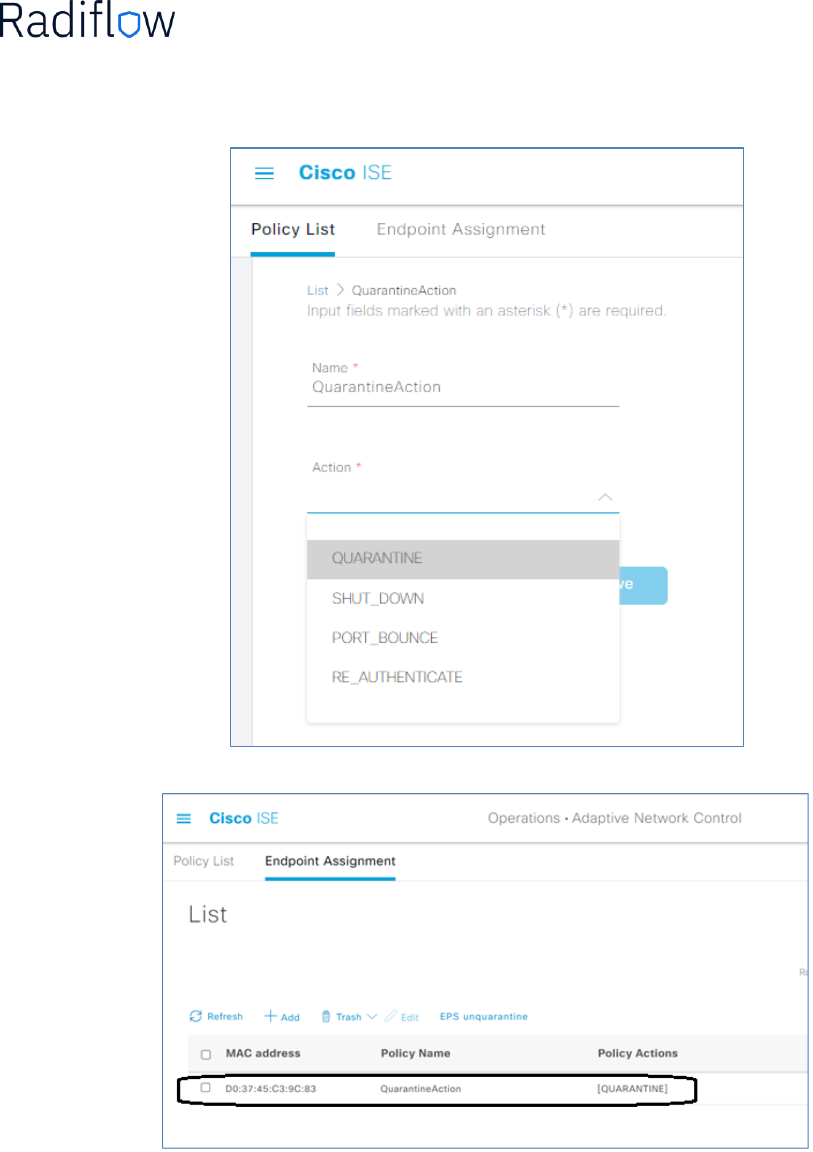
This information will be presented in Cisco ISE under Adaptive Network Control > Endpoint Assignment:
29 Confidential
At this point it is up to the network administrator to decide which rule (policy-set) should be enforced.
For that, user needs to set a policy with ANC action, then bind this policy to the ‘Policy-set’ and then define
which action will be taken on assets that match this policy.

30 Confidential
To define a policy, navigate to ‘Adaptive Network Control > Policy List’. Press the ‘Add’ button and provide
the policy name (‘QuarantineAction’ in our case) and Action (‘Quarantine’ in our case). Then press ‘save’
In order to bind this policy to the Policy-Sets, navigate to Policy > Policy Sets, and press on the ‘>’ icon:

31 Confidential
From the alternative selection, expand the ‘Authorized Policy – Local Exceptions’
Then press on the ‘+’ icon as presented below:
A new Policy will be added. Click on the policy text, and change its name to a logical name. then press on the
‘+’ icon to define the rule of this policy:

32 Confidential
At this point a condition page will be opened.
Search for a session with Attribute name ANCPolicy
It is possible to search a session by either typing ‘ANC’ in the Attribute, or, choose ‘session’ from the
Dictionary list:
Using the Attribute > ‘ANC’ search:
Using ‘Dictionary’ dropdown list to select the ‘session’. And then select the ‘ANCPolicy’:

33 Confidential
As a result of the above, the ANCPolicy will be presented. Select the desired policy from the :
When the desired condition was selected, save the choice by pressing the ‘Use’ button.

34 Confidential
As a result, a new condition will be added the policy.
Press on the ‘+’ icon to select the desired action that will be performed once the policy takes action. For
example, ’Limited_ACL_rule’:
Then save the action:

35 Confidential
Troubleshooting
Issue
Proposed steps for solution
ISID - Failure to connect to ISE
If you cannot connect, try to
Check your cables
Check ping connectivity toward ISE or backup ISE
Check network firewall and connectivity
Connect into another Cisco ISE node.
Turn Cisco ISE off and on
Authentication to ISE fails
Confirm the issue is not relevant to connectivity by sending pings. If there
is no ping reply, it means that Cisco ISE or its network is down.
Check if credentials and certifications has been changed at either iSID or
ISE.
Turn Cisco ISE on and off again.
If there is no change, contact Cisco ISE support.
No asset information is passing
from ISID to ISE
If iSID information fails to be reflected in Cisco ISE,
Check if DNS details have been changed
Check if certificate or credentials have been changed.
Check ping connectivity from iSID machine to Cisco ISE
Try to update manually and check if data arrives to ISE machine.
If there is no change, contact Radiflow Support.
Passing MAC details using ANC
fails
ANC is דupported by enabling the PxGrid, if MAC details are not being
presented,
Check ping connectivity from iSID machine to Cisco ISE
Check if PxGrid is enabled.
If there is no change, contact Radiflow Support.
For further ISE troubleshooting please refer to Monitoring and Troubleshooting Service in Cisco ISE guide
