
Red Hat 3scale API Management 2.7
Admin Portal Guide
Manage aspects related to Red Hat 3scale API Management.
Last Updated: 2022-11-29


Red Hat 3scale API Management 2.7 Admin Portal Guide
Manage aspects related to Red Hat 3scale API Management.

Legal Notice
Copyright © 2022 Red Hat, Inc.
The text of and illustrations in this document are licensed by Red Hat under a Creative Commons
Attribution–Share Alike 3.0 Unported license ("CC-BY-SA"). An explanation of CC-BY-SA is
available at
http://creativecommons.org/licenses/by-sa/3.0/
. In accordance with CC-BY-SA, if you distribute this document or an adaptation of it, you must
provide the URL for the original version.
Red Hat, as the licensor of this document, waives the right to enforce, and agrees not to assert,
Section 4d of CC-BY-SA to the fullest extent permitted by applicable law.
Red Hat, Red Hat Enterprise Linux, the Shadowman logo, the Red Hat logo, JBoss, OpenShift,
Fedora, the Infinity logo, and RHCE are trademarks of Red Hat, Inc., registered in the United States
and other countries.
Linux ® is the registered trademark of Linus Torvalds in the United States and other countries.
Java ® is a registered trademark of Oracle and/or its affiliates.
XFS ® is a trademark of Silicon Graphics International Corp. or its subsidiaries in the United States
and/or other countries.
MySQL ® is a registered trademark of MySQL AB in the United States, the European Union and
other countries.
Node.js ® is an official trademark of Joyent. Red Hat is not formally related to or endorsed by the
official Joyent Node.js open source or commercial project.
The OpenStack ® Word Mark and OpenStack logo are either registered trademarks/service marks
or trademarks/service marks of the OpenStack Foundation, in the United States and other
countries and are used with the OpenStack Foundation's permission. We are not affiliated with,
endorsed or sponsored by the OpenStack Foundation, or the OpenStack community.
All other trademarks are the property of their respective owners.
Abstract
This guide provides the information to manage Red Hat 3scale API Management.

. . . . . . . . . . . . . . . . . . . . . . . . . . . . . . . . . . . . . . . . . . . . . . . . . . . . . . . . . . . . . . . . . . . . . . . . . . . . . . . . . . . . . . . . . . . . . . . . . . . . . . . . . . . . . . . . . . . . . . . . . . . . . . . . . . . . . . . . . . . . . . . . . . . . . . . . . . . . . . . . . . . . . . . . . . . . . . . . . . . . . . . . . . . . . . . . . . . . . . . . . . . . . . . . . . . . . . . . . . . . . . . . . . . . . . . . . . . . . . . . . . . . . . . . . . . . . . . . . . . . . . . . . . . . . . . . . . . . . . . .
. . . . . . . . . . . . . . . . . . . . . . . . . . . . . . . . . . . . . . . . . . . . . . . . . . . . . . . . . . . . . . . . . . . . . . . . . . . . . . . . . . . . . . . . . . . . . . . . . . . . . . . . . . . . . . . . . . . . . . . . . . . . . . . . . . . . . . . . . . . . . . . . . . . . . . . . . . . . . . . . . . . . . . . . . . . . . . . . . . . . . . . . . . . . . . . . . . . . . . . . . . . . . . . . . . . . . . . . . . . . . . . . . . . . . . . . . . . . . . . . . . . . . . . . . . . . . . . . . . . . . . . . . . . . . . . . . . . . . . . .
. . . . . . . . . . . . . . . . . . . . . . . . . . . . . . . . . . . . . . . . . . . . . . . . . . . . . . . . . . . . . . . . . . . . . . . . . . . . . . . . . . . . . . . . . . . . . . . . . . . . . . . . . . . . . . . . . . . . . . . . . . . . . . . . . . . . . . . . . . . . . . . . . . . . . . . . . . . . . . . . . . . . . . . . . . . . . . . . . . . . . . . . . . . . . . . . . . . . . . . . . . . . . . . . . . . . . . . . . . . . . . . . . . . . . . . . . . . . . . . . . . . . . . . . . . . . . . . . . . . . . . . . . . . . . . . . . . . . . . . .
. . . . . . . . . . . . . . . . . . . . . . . . . . . . . . . . . . . . . . . . . . . . . . . . . . . . . . . . . . . . . . . . . . . . . . . . . . . . . . . . . . . . . . . . . . . . . . . . . . . . . . . . . . . . . . . . . . . . . . . . . . . . . . . . . . . . . . . . . . . . . . . . . . . . . . . . . . . . . . . . . . . . . . . . . . . . . . . . . . . . . . . . . . . . . . . . . . . . . . . . . . . . . . . . . . . . . . . . . . . . . . . . . . . . . . . . . . . . . . . . . . . . . . . . . . . . . . . . . . . . . . . . . . . . . . . . . . . . . . . .
. . . . . . . . . . . . . . . . . . . . . . . . . . . . . . . . . . . . . . . . . . . . . . . . . . . . . . . . . . . . . . . . . . . . . . . . . . . . . . . . . . . . . . . . . . . . . . . . . . . . . . . . . . . . . . . . . . . . . . . . . . . . . . . . . . . . . . . . . . . . . . . . . . . . . . . . . . . . . . . . . . . . . . . . . . . . . . . . . . . . . . . . . . . . . . . . . . . . . . . . . . . . . . . . . . . . . . . . . . . . . . . . . . . . . . . . . . . . . . . . . . . . . . . . . . . . . . . . . . . . . . . . . . . . . . . . . . . . . . . .
. . . . . . . . . . . . . . . . . . . . . . . . . . . . . . . . . . . . . . . . . . . . . . . . . . . . . . . . . . . . . . . . . . . . . . . . . . . . . . . . . . . . . . . . . . . . . . . . . . . . . . . . . . . . . . . . . . . . . . . . . . . . . . . . . . . . . . . . . . . . . . . . . . . . . . . . . . . . . . . . . . . . . . . . . . . . . . . . . . . . . . . . . . . . . . . . . . . . . . . . . . . . . . . . . . . . . . . . . . . . . . . . . . . . . . . . . . . . . . . . . . . . . . . . . . . . . . . . . . . . . . . . . . . . . . . . . . . . . . . .
. . . . . . . . . . . . . . . . . . . . . . . . . . . . . . . . . . . . . . . . . . . . . . . . . . . . . . . . . . . . . . . . . . . . . . . . . . . . . . . . . . . . . . . . . . . . . . . . . . . . . . . . . . . . . . . . . . . . . . . . . . . . . . . . . . . . . . . . . . . . . . . . . . . . . . . . . . . . . . . . . . . . . . . . . . . . . . . . . . . . . . . . . . . . . . . . . . . . . . . . . . . . . . . . . . . . . . . . . . . . . . . . . . . . . . . . . . . . . . . . . . . . . . . . . . . . . . . . . . . . . . . . . . . . . . . . . . . . . . . .
. . . . . . . . . . . . . . . . . . . . . . . . . . . . . . . . . . . . . . . . . . . . . . . . . . . . . . . . . . . . . . . . . . . . . . . . . . . . . . . . . . . . . . . . . . . . . . . . . . . . . . . . . . . . . . . . . . . . . . . . . . . . . . . . . . . . . . . . . . . . . . . . . . . . . . . . . . . . . . . . . . . . . . . . . . . . . . . . . . . . . . . . . . . . . . . . . . . . . . . . . . . . . . . . . . . . . . . . . . . . . . . . . . . . . . . . . . . . . . . . . . . . . . . . . . . . . . . . . . . . . . . . . . . . . . . . . . . . . . . .
. . . . . . . . . . . . . . . . . . . . . . . . . . . . . . . . . . . . . . . . . . . . . . . . . . . . . . . . . . . . . . . . . . . . . . . . . . . . . . . . . . . . . . . . . . . . . . . . . . . . . . . . . . . . . . . . . . . . . . . . . . . . . . . . . . . . . . . . . . . . . . . . . . . . . . . . . . . . . . . . . . . . . . . . . . . . . . . . . . . . . . . . . . . . . . . . . . . . . . . . . . . . . . . . . . . . . . . . . . . . . . . . . . . . . . . . . . . . . . . . . . . . . . . . . . . . . . . . . . . . . . . . . . . . . . . . . . . . . . . .
. . . . . . . . . . . . . . . . . . . . . . . . . . . . . . . . . . . . . . . . . . . . . . . . . . . . . . . . . . . . . . . . . . . . . . . . . . . . . . . . . . . . . . . . . . . . . . . . . . . . . . . . . . . . . . . . . . . . . . . . . . . . . . . . . . . . . . . . . . . . . . . . . . . . . . . . . . . . . . . . . . . . . . . . . . . . . . . . . . . . . . . . . . . . . . . . . . . . . . . . . . . . . . . . . . . . . . . . . . . . . . . . . . . . . . . . . . . . . . . . . . . . . . . . . . . . . . . . . . . . . . . . . . . . . . . . . . . . . . . .
Table of Contents
PREFACE
PART I. ACCOUNT SETTINGS
CHAPTER 1. ACCOUNT CONFIGURATION
1.1. ADD YOUR COMPANY INFORMATION
1.2. SELECT YOUR PREFERRED TIME ZONE
CHAPTER 2. RED HAT SINGLE SIGN ON FOR THE 3SCALE ADMIN PORTAL
2.1. ENABLE RH-SSO OR AUTH0 MEMBER AUTHENTICATION
2.1.1. RH-SSO prerequisites
2.1.2. Auth0 prerequisites
2.1.3. Enable RH-SSO
2.2. USING RH-SSO WITH 3SCALE
2.3. REDIRECTING A 3SCALE LOGIN TO A RH-SSO OPTION
2.3.1. Prerequisites
2.3.2. Required steps
CHAPTER 3. INVITING USERS AND MANAGING RIGHTS
3.1. NAVIGATE TO USER ADMINISTRATION
3.2. SEND AN INVITATION
3.3. ACCEPT THE INVITATION
3.4. GIVE NEW USERS RIGHTS
CHAPTER 4. NOTIFICATIONS
4.1. TYPES OF NOTIFICATIONS
4.2. VISIBILITY
4.3. SUBSCRIBING TO NOTIFICATIONS BY EMAIL
4.4. WEB NOTIFICATIONS
CHAPTER 5. PERSONAL SETTINGS
CHAPTER 6. TOKENS
6.1. ACCESS TOKENS
6.2. CREATING ACCESS TOKENS
6.3. USING ACCESS TOKENS
6.3.1. Service tokens
PART II. MULTITENANCY
CHAPTER 7. MULTITENANCY
7.1. MASTER ADMIN PORTAL
7.1.1. Accessing the Master Admin Portal
7.1.2. Adding an account through the Master Admin Portal
7.1.3. Creating a single gateway with the Master Admin Portal
7.2. MANAGING ACCOUNTS
7.2.1. Managing accounts through the Master Admin Portal
7.2.1.1. Additional information
7.2.2. Managing accounts through API calls
7.3. UNDERSTANDING MULTITENANCY SUBDOMAINS
7.4. DELETING TENANT ACCOUNTS
7.4.1. Deleting an account via the Admin Portal
7.4.2. Deleting a tenant via the console
7.5. RESUMING TENANT ACCOUNTS
7
8
9
9
9
10
10
10
10
10
11
11
11
11
13
13
13
13
13
15
15
15
15
15
17
18
18
18
18
19
20
21
21
21
21
22
22
22
22
23
23
24
24
25
25
Table of Contents
1

. . . . . . . . . . . . . . . . . . . . . . . . . . . . . . . . . . . . . . . . . . . . . . . . . . . . . . . . . . . . . . . . . . . . . . . . . . . . . . . . . . . . . . . . . . . . . . . . . . . . . . . . . . . . . . . . . . . . . . . . . . . . . . . . . . . . . . . . . . . . . . . . . . . . . . . . . . . . . . . . . . . . . . . . . . . . . . . . . . . . . . . . . . . . . . . . . . . . . . . . . . . . . . . . . . . . . . . . . . . . . . . . . . . . . . . . . . . . . . . . . . . . . . . . . . . . . . . . . . . . . . . . . . . . . . . . . . . . . . . .
. . . . . . . . . . . . . . . . . . . . . . . . . . . . . . . . . . . . . . . . . . . . . . . . . . . . . . . . . . . . . . . . . . . . . . . . . . . . . . . . . . . . . . . . . . . . . . . . . . . . . . . . . . . . . . . . . . . . . . . . . . . . . . . . . . . . . . . . . . . . . . . . . . . . . . . . . . . . . . . . . . . . . . . . . . . . . . . . . . . . . . . . . . . . . . . . . . . . . . . . . . . . . . . . . . . . . . . . . . . . . . . . . . . . . . . . . . . . . . . . . . . . . . . . . . . . . . . . . . . . . . . . . . . . . . . . . . . . . . . .
. . . . . . . . . . . . . . . . . . . . . . . . . . . . . . . . . . . . . . . . . . . . . . . . . . . . . . . . . . . . . . . . . . . . . . . . . . . . . . . . . . . . . . . . . . . . . . . . . . . . . . . . . . . . . . . . . . . . . . . . . . . . . . . . . . . . . . . . . . . . . . . . . . . . . . . . . . . . . . . . . . . . . . . . . . . . . . . . . . . . . . . . . . . . . . . . . . . . . . . . . . . . . . . . . . . . . . . . . . . . . . . . . . . . . . . . . . . . . . . . . . . . . . . . . . . . . . . . . . . . . . . . . . . . . . . . . . . . . . . .
. . . . . . . . . . . . . . . . . . . . . . . . . . . . . . . . . . . . . . . . . . . . . . . . . . . . . . . . . . . . . . . . . . . . . . . . . . . . . . . . . . . . . . . . . . . . . . . . . . . . . . . . . . . . . . . . . . . . . . . . . . . . . . . . . . . . . . . . . . . . . . . . . . . . . . . . . . . . . . . . . . . . . . . . . . . . . . . . . . . . . . . . . . . . . . . . . . . . . . . . . . . . . . . . . . . . . . . . . . . . . . . . . . . . . . . . . . . . . . . . . . . . . . . . . . . . . . . . . . . . . . . . . . . . . . . . . . . . . . . .
. . . . . . . . . . . . . . . . . . . . . . . . . . . . . . . . . . . . . . . . . . . . . . . . . . . . . . . . . . . . . . . . . . . . . . . . . . . . . . . . . . . . . . . . . . . . . . . . . . . . . . . . . . . . . . . . . . . . . . . . . . . . . . . . . . . . . . . . . . . . . . . . . . . . . . . . . . . . . . . . . . . . . . . . . . . . . . . . . . . . . . . . . . . . . . . . . . . . . . . . . . . . . . . . . . . . . . . . . . . . . . . . . . . . . . . . . . . . . . . . . . . . . . . . . . . . . . . . . . . . . . . . . . . . . . . . . . . . . . . .
. . . . . . . . . . . . . . . . . . . . . . . . . . . . . . . . . . . . . . . . . . . . . . . . . . . . . . . . . . . . . . . . . . . . . . . . . . . . . . . . . . . . . . . . . . . . . . . . . . . . . . . . . . . . . . . . . . . . . . . . . . . . . . . . . . . . . . . . . . . . . . . . . . . . . . . . . . . . . . . . . . . . . . . . . . . . . . . . . . . . . . . . . . . . . . . . . . . . . . . . . . . . . . . . . . . . . . . . . . . . . . . . . . . . . . . . . . . . . . . . . . . . . . . . . . . . . . . . . . . . . . . . . . . . . . . . . . . . . . . .
. . . . . . . . . . . . . . . . . . . . . . . . . . . . . . . . . . . . . . . . . . . . . . . . . . . . . . . . . . . . . . . . . . . . . . . . . . . . . . . . . . . . . . . . . . . . . . . . . . . . . . . . . . . . . . . . . . . . . . . . . . . . . . . . . . . . . . . . . . . . . . . . . . . . . . . . . . . . . . . . . . . . . . . . . . . . . . . . . . . . . . . . . . . . . . . . . . . . . . . . . . . . . . . . . . . . . . . . . . . . . . . . . . . . . . . . . . . . . . . . . . . . . . . . . . . . . . . . . . . . . . . . . . . . . . . . . . . . . . . .
. . . . . . . . . . . . . . . . . . . . . . . . . . . . . . . . . . . . . . . . . . . . . . . . . . . . . . . . . . . . . . . . . . . . . . . . . . . . . . . . . . . . . . . . . . . . . . . . . . . . . . . . . . . . . . . . . . . . . . . . . . . . . . . . . . . . . . . . . . . . . . . . . . . . . . . . . . . . . . . . . . . . . . . . . . . . . . . . . . . . . . . . . . . . . . . . . . . . . . . . . . . . . . . . . . . . . . . . . . . . . . . . . . . . . . . . . . . . . . . . . . . . . . . . . . . . . . . . . . . . . . . . . . . . . . . . . . . . . . . .
. . . . . . . . . . . . . . . . . . . . . . . . . . . . . . . . . . . . . . . . . . . . . . . . . . . . . . . . . . . . . . . . . . . . . . . . . . . . . . . . . . . . . . . . . . . . . . . . . . . . . . . . . . . . . . . . . . . . . . . . . . . . . . . . . . . . . . . . . . . . . . . . . . . . . . . . . . . . . . . . . . . . . . . . . . . . . . . . . . . . . . . . . . . . . . . . . . . . . . . . . . . . . . . . . . . . . . . . . . . . . . . . . . . . . . . . . . . . . . . . . . . . . . . . . . . . . . . . . . . . . . . . . . . . . . . . . . . . . . . .
. . . . . . . . . . . . . . . . . . . . . . . . . . . . . . . . . . . . . . . . . . . . . . . . . . . . . . . . . . . . . . . . . . . . . . . . . . . . . . . . . . . . . . . . . . . . . . . . . . . . . . . . . . . . . . . . . . . . . . . . . . . . . . . . . . . . . . . . . . . . . . . . . . . . . . . . . . . . . . . . . . . . . . . . . . . . . . . . . . . . . . . . . . . . . . . . . . . . . . . . . . . . . . . . . . . . . . . . . . . . . . . . . . . . . . . . . . . . . . . . . . . . . . . . . . . . . . . . . . . . . . . . . . . . . . . . . . . . . . . .
PART III. SERVICE DISCOVERY
CHAPTER 8. SERVICE DISCOVERY
8.1. ABOUT SERVICE DISCOVERY
8.1.1. Criteria for a discoverable service
8.2. CONFIGURING SERVICE DISCOVERY
8.2.1. Configuring with an OAuth server
8.2.1.1. Using OpenShift OAuth server
8.2.1.2. Using RH-SSO server (Keycloak)
8.2.2. Configuring without an OAuth server
8.3. DISCOVERING SERVICES
8.4. AUTHORIZING 3SCALE ACCESS TO AN OPENSHIFT PROJECT
8.5. UPDATING SERVICES
PART IV. ACCESS CONTROL
CHAPTER 9. DEFINING YOUR API (METHODS AND METRICS)
9.1. ADDING METHODS AND METRICS
9.2. IMPORTING YOUR METHODS AND METRICS AUTOMATICALLY
CHAPTER 10. APPLICATION PLANS
10.1. HOW TO CREATE AN APPLICATION PLAN
10.2. SETTING UP A DEFAULT APPLICATION PLAN
CHAPTER 11. MAPPING RULES
CHAPTER 12. PROVISIONING PAID PLANS
12.1. DECIDING YOUR PRICING MODEL
12.2. CONFIGURING AN APPLICATION PLAN WITH YOUR PRICING RULES
12.3. CREATING FURTHER PRICING TIERS
12.4. PROVISIONING THE PAID PLANS
12.5. ADDITIONAL REFERENCES
CHAPTER 13. PROVISIONING RATE LIMITS
13.1. CONFIGURING THE APPLICATION PLAN
13.2. SETTING THE RATE LIMITS
13.3. PUTTING THE NEW RATE LIMITS INTO ACTION
13.4. MORE INFORMATION
PART V. BILLING
CHAPTER 14. CONFIGURING BILLING SETTINGS
14.1. BILLING MODES (CHARGING & GATEWAY)
14.2. CHARGING ENABLED (CHARGING & GATEWAY)
14.3. CURRENCY (CHARGING & GATEWAY)
14.4. INVOICE FOOTNOTE (CHARGING & GATEWAY)
14.5. TEXT TO SHOW IF VAT/SALES TAX IS 0% (CHARGING & GATEWAY)
14.6. BILLING PERIODS FOR INVOICE IDS (CHARGING & GATEWAY)
14.7. CREDIT CARD POLICIES
14.8. CREDIT CARD GATEWAYS
14.8.1. Stripe integration (recommended)
14.8.1.1. Prerequisites
14.8.1.2. Getting your API keys from Stripe
14.8.1.3. Configuring settings in 3scale
14.8.2. Braintree integration
14.8.2.1. Getting your API keys from Braintree
27
28
28
28
29
29
30
31
32
32
33
34
35
36
36
37
38
38
38
39
40
40
40
41
41
41
42
42
42
42
42
43
44
44
44
44
44
44
44
45
45
45
46
46
46
49
49
Red Hat 3scale API Management 2.7 Admin Portal Guide
2

. . . . . . . . . . . . . . . . . . . . . . . . . . . . . . . . . . . . . . . . . . . . . . . . . . . . . . . . . . . . . . . . . . . . . . . . . . . . . . . . . . . . . . . . . . . . . . . . . . . . . . . . . . . . . . . . . . . . . . . . . . . . . . . . . . . . . . . . . . . . . . . . . . . . . . . . . . . . . . . . . . . . . . . . . . . . . . . . . . . . . . . . . . . . . . . . . . . . . . . . . . . . . . . . . . . . . . . . . . . . . . . . . . . . . . . . . . . . . . . . . . . . . . . . . . . . . . . . . . . . . . . . . . . . . . . . . . . . . . . .
. . . . . . . . . . . . . . . . . . . . . . . . . . . . . . . . . . . . . . . . . . . . . . . . . . . . . . . . . . . . . . . . . . . . . . . . . . . . . . . . . . . . . . . . . . . . . . . . . . . . . . . . . . . . . . . . . . . . . . . . . . . . . . . . . . . . . . . . . . . . . . . . . . . . . . . . . . . . . . . . . . . . . . . . . . . . . . . . . . . . . . . . . . . . . . . . . . . . . . . . . . . . . . . . . . . . . . . . . . . . . . . . . . . . . . . . . . . . . . . . . . . . . . . . . . . . . . . . . . . . . . . . . . . . . . . . . . . . . . . .
. . . . . . . . . . . . . . . . . . . . . . . . . . . . . . . . . . . . . . . . . . . . . . . . . . . . . . . . . . . . . . . . . . . . . . . . . . . . . . . . . . . . . . . . . . . . . . . . . . . . . . . . . . . . . . . . . . . . . . . . . . . . . . . . . . . . . . . . . . . . . . . . . . . . . . . . . . . . . . . . . . . . . . . . . . . . . . . . . . . . . . . . . . . . . . . . . . . . . . . . . . . . . . . . . . . . . . . . . . . . . . . . . . . . . . . . . . . . . . . . . . . . . . . . . . . . . . . . . . . . . . . . . . . . . . . . . . . . . . . .
. . . . . . . . . . . . . . . . . . . . . . . . . . . . . . . . . . . . . . . . . . . . . . . . . . . . . . . . . . . . . . . . . . . . . . . . . . . . . . . . . . . . . . . . . . . . . . . . . . . . . . . . . . . . . . . . . . . . . . . . . . . . . . . . . . . . . . . . . . . . . . . . . . . . . . . . . . . . . . . . . . . . . . . . . . . . . . . . . . . . . . . . . . . . . . . . . . . . . . . . . . . . . . . . . . . . . . . . . . . . . . . . . . . . . . . . . . . . . . . . . . . . . . . . . . . . . . . . . . . . . . . . . . . . . . . . . . . . . . . .
. . . . . . . . . . . . . . . . . . . . . . . . . . . . . . . . . . . . . . . . . . . . . . . . . . . . . . . . . . . . . . . . . . . . . . . . . . . . . . . . . . . . . . . . . . . . . . . . . . . . . . . . . . . . . . . . . . . . . . . . . . . . . . . . . . . . . . . . . . . . . . . . . . . . . . . . . . . . . . . . . . . . . . . . . . . . . . . . . . . . . . . . . . . . . . . . . . . . . . . . . . . . . . . . . . . . . . . . . . . . . . . . . . . . . . . . . . . . . . . . . . . . . . . . . . . . . . . . . . . . . . . . . . . . . . . . . . . . . . . .
. . . . . . . . . . . . . . . . . . . . . . . . . . . . . . . . . . . . . . . . . . . . . . . . . . . . . . . . . . . . . . . . . . . . . . . . . . . . . . . . . . . . . . . . . . . . . . . . . . . . . . . . . . . . . . . . . . . . . . . . . . . . . . . . . . . . . . . . . . . . . . . . . . . . . . . . . . . . . . . . . . . . . . . . . . . . . . . . . . . . . . . . . . . . . . . . . . . . . . . . . . . . . . . . . . . . . . . . . . . . . . . . . . . . . . . . . . . . . . . . . . . . . . . . . . . . . . . . . . . . . . . . . . . . . . . . . . . . . . . .
. . . . . . . . . . . . . . . . . . . . . . . . . . . . . . . . . . . . . . . . . . . . . . . . . . . . . . . . . . . . . . . . . . . . . . . . . . . . . . . . . . . . . . . . . . . . . . . . . . . . . . . . . . . . . . . . . . . . . . . . . . . . . . . . . . . . . . . . . . . . . . . . . . . . . . . . . . . . . . . . . . . . . . . . . . . . . . . . . . . . . . . . . . . . . . . . . . . . . . . . . . . . . . . . . . . . . . . . . . . . . . . . . . . . . . . . . . . . . . . . . . . . . . . . . . . . . . . . . . . . . . . . . . . . . . . . . . . . . . . .
. . . . . . . . . . . . . . . . . . . . . . . . . . . . . . . . . . . . . . . . . . . . . . . . . . . . . . . . . . . . . . . . . . . . . . . . . . . . . . . . . . . . . . . . . . . . . . . . . . . . . . . . . . . . . . . . . . . . . . . . . . . . . . . . . . . . . . . . . . . . . . . . . . . . . . . . . . . . . . . . . . . . . . . . . . . . . . . . . . . . . . . . . . . . . . . . . . . . . . . . . . . . . . . . . . . . . . . . . . . . . . . . . . . . . . . . . . . . . . . . . . . . . . . . . . . . . . . . . . . . . . . . . . . . . . . . . . . . . . . .
14.8.2.2. Configuring settings in 3scale
14.8.2.2.1. Troubleshooting
CHAPTER 15. PRICING
15.1. PRICING RULES
15.2. SETTING PRICING RULES
15.3. UPDATE EXISTING PRICING RULES
CHAPTER 16. BILLING
16.1. LISTING INVOICES
16.2. INVOICE VIEW
16.2.1. Invoice details
16.2.2. Editing invoices
16.3. INVOICE STATES
16.4. AUTOMATED BILLING PROCESS
16.4.1. On the first day of each month
16.4.2. Every day
16.4.3. Automatic and manual invoices
16.4.4. Mid-month upgrades
16.4.4.1. Prepaid billing
16.4.4.2. Postpaid billing
16.5. ENABLE/DISABLE BILLING/CHARGING PER ACCOUNT
16.6. PLANS WITH A TRIAL PERIOD
16.7. VAT RATE/SALES TAX
16.7.1. Configure VAT rate field
16.7.2. Configure VAT code field
16.7.3. Set VAT values for an account
16.7.4. Invoices with VAT
16.8. DEVELOPER PORTAL VIEW
16.9. CREDIT CARD FLOW
16.9.1. Sign up for a paid plan
16.9.2. Upgrade from a free to a paid plan
16.10. "BILLING ADDRESS" FIELD
CHAPTER 17. EMAIL NOTIFICATIONS
17.1. PROVIDER NOTIFICATIONS
17.2. DEVELOPER EMAILS
17.2.1. Billing email address
CHAPTER 18. BILLING API
PART VI. MANAGING DEVELOPER ACCOUNTS
CHAPTER 19. ADDING DEVELOPERS
19.1. CREATE A NEW DEVELOPER ACCOUNT
19.2. SET UP APPLICATIONS
19.3. NOTIFY THE DEVELOPER
CHAPTER 20. APPROVING DEVELOPERS
20.1. APPROVE FROM EMAIL NOTIFICATION
20.2. ACCOUNT APPROVAL
20.3. SERVICE APPROVAL
20.4. APPLICATION APPROVAL
CHAPTER 21. CHANGING PLANS FOR AN APP
51
53
54
54
54
55
56
56
56
56
57
57
57
57
58
58
59
59
60
60
61
61
62
62
62
62
63
63
63
64
64
66
66
66
66
68
69
70
70
70
70
71
71
71
71
72
74
Table of Contents
3

. . . . . . . . . . . . . . . . . . . . . . . . . . . . . . . . . . . . . . . . . . . . . . . . . . . . . . . . . . . . . . . . . . . . . . . . . . . . . . . . . . . . . . . . . . . . . . . . . . . . . . . . . . . . . . . . . . . . . . . . . . . . . . . . . . . . . . . . . . . . . . . . . . . . . . . . . . . . . . . . . . . . . . . . . . . . . . . . . . . . . . . . . . . . . . . . . . . . . . . . . . . . . . . . . . . . . . . . . . . . . . . . . . . . . . . . . . . . . . . . . . . . . . . . . . . . . . . . . . . . . . . . . . . . . . . . . . . . . . . .
. . . . . . . . . . . . . . . . . . . . . . . . . . . . . . . . . . . . . . . . . . . . . . . . . . . . . . . . . . . . . . . . . . . . . . . . . . . . . . . . . . . . . . . . . . . . . . . . . . . . . . . . . . . . . . . . . . . . . . . . . . . . . . . . . . . . . . . . . . . . . . . . . . . . . . . . . . . . . . . . . . . . . . . . . . . . . . . . . . . . . . . . . . . . . . . . . . . . . . . . . . . . . . . . . . . . . . . . . . . . . . . . . . . . . . . . . . . . . . . . . . . . . . . . . . . . . . . . . . . . . . . . . . . . . . . . . . . . . . . .
. . . . . . . . . . . . . . . . . . . . . . . . . . . . . . . . . . . . . . . . . . . . . . . . . . . . . . . . . . . . . . . . . . . . . . . . . . . . . . . . . . . . . . . . . . . . . . . . . . . . . . . . . . . . . . . . . . . . . . . . . . . . . . . . . . . . . . . . . . . . . . . . . . . . . . . . . . . . . . . . . . . . . . . . . . . . . . . . . . . . . . . . . . . . . . . . . . . . . . . . . . . . . . . . . . . . . . . . . . . . . . . . . . . . . . . . . . . . . . . . . . . . . . . . . . . . . . . . . . . . . . . . . . . . . . . . . . . . . . . .
. . . . . . . . . . . . . . . . . . . . . . . . . . . . . . . . . . . . . . . . . . . . . . . . . . . . . . . . . . . . . . . . . . . . . . . . . . . . . . . . . . . . . . . . . . . . . . . . . . . . . . . . . . . . . . . . . . . . . . . . . . . . . . . . . . . . . . . . . . . . . . . . . . . . . . . . . . . . . . . . . . . . . . . . . . . . . . . . . . . . . . . . . . . . . . . . . . . . . . . . . . . . . . . . . . . . . . . . . . . . . . . . . . . . . . . . . . . . . . . . . . . . . . . . . . . . . . . . . . . . . . . . . . . . . . . . . . . . . . . .
. . . . . . . . . . . . . . . . . . . . . . . . . . . . . . . . . . . . . . . . . . . . . . . . . . . . . . . . . . . . . . . . . . . . . . . . . . . . . . . . . . . . . . . . . . . . . . . . . . . . . . . . . . . . . . . . . . . . . . . . . . . . . . . . . . . . . . . . . . . . . . . . . . . . . . . . . . . . . . . . . . . . . . . . . . . . . . . . . . . . . . . . . . . . . . . . . . . . . . . . . . . . . . . . . . . . . . . . . . . . . . . . . . . . . . . . . . . . . . . . . . . . . . . . . . . . . . . . . . . . . . . . . . . . . . . . . . . . . . . .
. . . . . . . . . . . . . . . . . . . . . . . . . . . . . . . . . . . . . . . . . . . . . . . . . . . . . . . . . . . . . . . . . . . . . . . . . . . . . . . . . . . . . . . . . . . . . . . . . . . . . . . . . . . . . . . . . . . . . . . . . . . . . . . . . . . . . . . . . . . . . . . . . . . . . . . . . . . . . . . . . . . . . . . . . . . . . . . . . . . . . . . . . . . . . . . . . . . . . . . . . . . . . . . . . . . . . . . . . . . . . . . . . . . . . . . . . . . . . . . . . . . . . . . . . . . . . . . . . . . . . . . . . . . . . . . . . . . . . . . .
. . . . . . . . . . . . . . . . . . . . . . . . . . . . . . . . . . . . . . . . . . . . . . . . . . . . . . . . . . . . . . . . . . . . . . . . . . . . . . . . . . . . . . . . . . . . . . . . . . . . . . . . . . . . . . . . . . . . . . . . . . . . . . . . . . . . . . . . . . . . . . . . . . . . . . . . . . . . . . . . . . . . . . . . . . . . . . . . . . . . . . . . . . . . . . . . . . . . . . . . . . . . . . . . . . . . . . . . . . . . . . . . . . . . . . . . . . . . . . . . . . . . . . . . . . . . . . . . . . . . . . . . . . . . . . . . . . . . . . . .
. . . . . . . . . . . . . . . . . . . . . . . . . . . . . . . . . . . . . . . . . . . . . . . . . . . . . . . . . . . . . . . . . . . . . . . . . . . . . . . . . . . . . . . . . . . . . . . . . . . . . . . . . . . . . . . . . . . . . . . . . . . . . . . . . . . . . . . . . . . . . . . . . . . . . . . . . . . . . . . . . . . . . . . . . . . . . . . . . . . . . . . . . . . . . . . . . . . . . . . . . . . . . . . . . . . . . . . . . . . . . . . . . . . . . . . . . . . . . . . . . . . . . . . . . . . . . . . . . . . . . . . . . . . . . . . . . . . . . . . .
. . . . . . . . . . . . . . . . . . . . . . . . . . . . . . . . . . . . . . . . . . . . . . . . . . . . . . . . . . . . . . . . . . . . . . . . . . . . . . . . . . . . . . . . . . . . . . . . . . . . . . . . . . . . . . . . . . . . . . . . . . . . . . . . . . . . . . . . . . . . . . . . . . . . . . . . . . . . . . . . . . . . . . . . . . . . . . . . . . . . . . . . . . . . . . . . . . . . . . . . . . . . . . . . . . . . . . . . . . . . . . . . . . . . . . . . . . . . . . . . . . . . . . . . . . . . . . . . . . . . . . . . . . . . . . . . . . . . . . . .
. . . . . . . . . . . . . . . . . . . . . . . . . . . . . . . . . . . . . . . . . . . . . . . . . . . . . . . . . . . . . . . . . . . . . . . . . . . . . . . . . . . . . . . . . . . . . . . . . . . . . . . . . . . . . . . . . . . . . . . . . . . . . . . . . . . . . . . . . . . . . . . . . . . . . . . . . . . . . . . . . . . . . . . . . . . . . . . . . . . . . . . . . . . . . . . . . . . . . . . . . . . . . . . . . . . . . . . . . . . . . . . . . . . . . . . . . . . . . . . . . . . . . . . . . . . . . . . . . . . . . . . . . . . . . . . . . . . . . . . .
. . . . . . . . . . . . . . . . . . . . . . . . . . . . . . . . . . . . . . . . . . . . . . . . . . . . . . . . . . . . . . . . . . . . . . . . . . . . . . . . . . . . . . . . . . . . . . . . . . . . . . . . . . . . . . . . . . . . . . . . . . . . . . . . . . . . . . . . . . . . . . . . . . . . . . . . . . . . . . . . . . . . . . . . . . . . . . . . . . . . . . . . . . . . . . . . . . . . . . . . . . . . . . . . . . . . . . . . . . . . . . . . . . . . . . . . . . . . . . . . . . . . . . . . . . . . . . . . . . . . . . . . . . . . . . . . . . . . . . . .
. . . . . . . . . . . . . . . . . . . . . . . . . . . . . . . . . . . . . . . . . . . . . . . . . . . . . . . . . . . . . . . . . . . . . . . . . . . . . . . . . . . . . . . . . . . . . . . . . . . . . . . . . . . . . . . . . . . . . . . . . . . . . . . . . . . . . . . . . . . . . . . . . . . . . . . . . . . . . . . . . . . . . . . . . . . . . . . . . . . . . . . . . . . . . . . . . . . . . . . . . . . . . . . . . . . . . . . . . . . . . . . . . . . . . . . . . . . . . . . . . . . . . . . . . . . . . . . . . . . . . . . . . . . . . . . . . . . . . . . .
21.1. CHANGE ACCOUNT PLANS
21.2. CHANGE SERVICE PLANS
21.3. CHANGE APPLICATION PLANS
21.3.1. More information
CHAPTER 22. CONTACTING DEVELOPERS
22.1. LOCATE THE RELEVANT APPLICATION AND ACCOUNT IN THE SYSTEM
22.2. SEND INTERNAL MESSAGES TO DEVELOPERS
22.3. CONTACT BY OTHER MEANS
CHAPTER 23. CUSTOMIZE PLANS
23.1. CHOOSE THE ACCOUNT
23.2. SELECT THE APPLICATION
23.3. CUSTOMIZE THE APPLICATION PLAN
23.3.1. More information
CHAPTER 24. ENABLE SIGNUP
CHAPTER 25. FINDING APPLICATIONS
25.1. GET THE INFORMATION YOU NEED
25.2. SEARCH FOR THE APPLICATION
25.3. ACCESS APPLICATION INFORMATION
CHAPTER 26. INVITING DEVELOPERS
CHAPTER 27. UNSUBSCRIBING DEVELOPERS FROM A SERVICE
27.1. UNSUBSCRIBING A SINGLE DEVELOPER FROM SERVICES
27.2. UNSUBSCRIBING MULTIPLE DEVELOPERS FROM SERVICES
CHAPTER 28. SUSPENDING APPLICATIONS
28.1. FIND THE APPLICATION
28.2. DISABLE THE APPLICATION
28.3. CONTACT THE DEVELOPER
CHAPTER 29. DELETING APPLICATIONS
CHAPTER 30. DELETING AN API
PART VII. ANALYTICS
CHAPTER 31. API ANALYTICS
31.1. PREREQUISITES
31.2. DETERMINING THE METRICS AND METHODS TO TRACK
31.3. CREATING YOUR METRICS AND METHODS
31.4. SETTING UP REPORTS
31.5. CHECKING THAT TRAFFIC IS REPORTED CORRECTLY
31.6. TROUBLESHOOTING
31.7. CONTROLLING WHO SEES THE ANALYTICS
31.8. ACCESSING ANALYTICS DATA BY API AND EMAIL REPORTS
CHAPTER 32. EXTENDING ANALYTICS
32.1. REASONS FOR CUSTOMIZED SCRIPTS
32.2. A REAL-WORLD EXAMPLE
32.3. EXAMPLE: CUSTOMER REQUIREMENTS
32.4. HANDS-ON IMPLEMENTATION
32.4.1. Winning recipe
32.4.2. Step-by-step guide
74
74
75
76
77
77
77
78
79
79
79
79
80
81
82
82
82
82
84
85
85
85
86
86
86
86
88
89
90
91
91
91
91
91
92
93
93
93
95
95
95
95
96
96
96
Red Hat 3scale API Management 2.7 Admin Portal Guide
4

. . . . . . . . . . . . . . . . . . . . . . . . . . . . . . . . . . . . . . . . . . . . . . . . . . . . . . . . . . . . . . . . . . . . . . . . . . . . . . . . . . . . . . . . . . . . . . . . . . . . . . . . . . . . . . . . . . . . . . . . . . . . . . . . . . . . . . . . . . . . . . . . . . . . . . . . . . . . . . . . . . . . . . . . . . . . . . . . . . . . . . . . . . . . . . . . . . . . . . . . . . . . . . . . . . . . . . . . . . . . . . . . . . . . . . . . . . . . . . . . . . . . . . . . . . . . . . . . . . . . . . . . . . . . . . . . . . . . . . . .
. . . . . . . . . . . . . . . . . . . . . . . . . . . . . . . . . . . . . . . . . . . . . . . . . . . . . . . . . . . . . . . . . . . . . . . . . . . . . . . . . . . . . . . . . . . . . . . . . . . . . . . . . . . . . . . . . . . . . . . . . . . . . . . . . . . . . . . . . . . . . . . . . . . . . . . . . . . . . . . . . . . . . . . . . . . . . . . . . . . . . . . . . . . . . . . . . . . . . . . . . . . . . . . . . . . . . . . . . . . . . . . . . . . . . . . . . . . . . . . . . . . . . . . . . . . . . . . . . . . . . . . . . . . . . . . . . . . . . . . .
32.5. CONCLUSIONS
CHAPTER 33. OUT-OF-THE-BOX ANALYTICS
CHAPTER 34. RESPONSE CODE TRACKING
98
99
101
Table of Contents
5

Red Hat 3scale API Management 2.7 Admin Portal Guide
6

PREFACE
This guide will help you to use the available functions in the Admin Portal to manage your 3scale
installation.
PREFACE
7

PART I. ACCOUNT SETTINGS
Red Hat 3scale API Management 2.7 Admin Portal Guide
8
CHAPTER 1. ACCOUNT CONFIGURATION
After creating your account, update basic information about your company. Set your location and add
your contact information.
NOTE
The account view is only visible to administrators, not to members.
1.1. ADD YOUR COMPANY INFORMATION
Once you have created your new account, add you company information with these steps:
1. Click the gear icon located in the right of the top navigation bar. You will see the Overview
window.
2. Next to the Account Details heading, click the Edit link.
3. Fill in the information for your account.
The address you specify here has two goals:
If you are on a paid plan, we use this address for billing purposes.
If you use the billing and payment modules, this address is also what your user will see on your
invoices.
1.2. SELECT YOUR PREFERRED TIME ZONE
On the same page you can also select the time zone you will use on all system displays. This setting
affects analytics graphs. However, billing cycle calculations are made according to UTC time.
CHAPTER 1. ACCOUNT CONFIGURATION
9

CHAPTER 2. RED HAT SINGLE SIGN ON FOR THE 3SCALE
ADMIN PORTAL
This guide provides information about how to configure and use Red Hat Single Sign-On (RH-SSO) with
the Red Hat 3scale API Management Admin Portal.
2.1. ENABLE RH-SSO OR AUTH0 MEMBER AUTHENTICATION
3scale supports single sign on (SS0) authentication for your members and admins.
The 3scale Admin Portal supports the following SSO providers, each which support a number of identity
brokering and member federation options:
Red Hat SSO (RH-SSO)
Auth0
NOTE
You can enable multiple SSO member authentication types
Only users that have been added to RH-SSO or Auth0 will be able to access your 3scale Admin Portal
through SSO. If you want to further restrict the access by either roles or user groups you should refer to
the corresponding step by step tutorials on the RH-SSO or Auth0 support portals.
Once you have established SSO through your chosen provider, you must configure it and enable it on
the 3scale Admin Portal.
2.1.1. RH-SSO prerequisites
An RH-SSO instance and realm configured as described under the Developer Portal
authentication section of the documentation.
2.1.2. Auth0 prerequisites
An Auth0 Subscription and account
2.1.3. Enable RH-SSO
As an administrator, perform the following steps in the 3scale Admin Portal to enable RH-SSO or Auth0:
1. Ensure your preferred SSO provider, highlighted in the prerequisites, has been properly
configured
2. Navigate to SSO Integrations in the Account Settings:
Click the gear icon in the upper right corner of the page
Navigate to Account Settings (gear icon) > Users > SSO Integrations, and click New SSO
Integration.
3. Select your SSO provider from the dropdown list
4. Enter the required information, provided when you configured your SSO:
Client
Red Hat 3scale API Management 2.7 Admin Portal Guide
10

Client
Client Secret
Realm or Site
5. Click Create Authentication Provider
NOTE
If, during testing, you encounter a callback URL mismatch, add the callback URL shown in
the error message to your Auth0 allowed callback URLs.
2.2. USING RH-SSO WITH 3SCALE
Once you have configured SSO, members can sign on using the account credentials in connected
Identity Providers (IdPs).
Follow these steps to log in to the 3scale Admin Portal using SSO:
1. Navigate to your 3scale login page:
https://<organization>-admin.3scale.net/p/login
2. Authorize 3scale with your IdP
3. If necessary, complete sign up by entering any needed information
Once you successfully sign up, you will have a member account under the API provider organization, and
you will be automatically logged in.
2.3. REDIRECTING A 3SCALE LOGIN TO A RH-SSO OPTION
This section describes the redirection to an Identity Provider (IdP) login window via RH-SSO. As a 3scale
API Management administrator, complete these steps to have your 3scale account accessible through
an optional single sign-on (SSO) login page.
2.3.1. Prerequisites
3scale 2.7
An RH-SSO instance and realm configured as described under the Configuring RH-SSO section
of the Developer Portal documentation.
NOTE
Before you can integrate RH-SSO with 3scale, you must have a working RH-SSO
instance. Refer to the RH-SSO documentation for installation instructions: Installing RH-
SSO 7.2.
2.3.2. Required steps
1. Access and follow the instructions for setting up RH-SSO under the Red Hat Single Sign-On
for the 3scale Admin Portal section of the 3scale documentation.
CHAPTER 2. RED HAT SINGLE SIGN ON FOR THE 3SCALE ADMIN PORTAL
11

2. Provide your RH-SSO administrator with your 3scale URL that will form the basis for a redirect
within RH-SSO for your secure logon. Use the following URL format:
https://<organization>-admin.3scale.net/auth/<system_name>/bounce
3. <system_name> can be fetched via the SSO Integration detail page of the Admin Portal:
https://<organization>.3scale.net/p/admin/account/authentication_providers/<ID>
Note: <ID> identifies the RH-SSO integration.
4. You will see the following SSO integration details obtained in the previous step.
The Callback URL
https://<organization>.3scale.net/auth/keycloak_0123456aaaaa/callback
Where keycloak_0123456aaaaa is the system name and is used in the bounce URL.
5. Navigate to the new URL address of RH-SSO, and securely log in to your 3scale account.
Red Hat 3scale API Management 2.7 Admin Portal Guide
12

CHAPTER 3. INVITING USERS AND MANAGING RIGHTS
NOTE
The invite feature is only available for Pro and Enterprise customers.
In order to share the workload of administering your APIs, you may wish to invite team members from
your organization to access the 3scale Admin Portal. The instructions below describe how to give access
rights to the 3scale Admin Portal, to one or more team members.
With users, we refer to the members of your team. The 3scale Admin Portal has two types of users:
Admins: Which have full access to all areas and services, and can invite other members (if your
plan allows it).
Members: Which have limited access to areas of the product (e.g. Analytics, Developer Portal)
and, if you are an enterprise customer, also to services.
If you create a new 3scale user from a Single Sign-On (SSO) integration, this user has the member role
by default, regardless of the SSO token content. 3scale does not map its roles to SSO roles.
3.1. NAVIGATE TO USER ADMINISTRATION
To see the list of users of your 3scale installation, follow these steps in the Admin Portal page:
1. In the navigation bar, click the gear icon located in the upper right of the window.
2. Navigate to Users > Listing from the left side menu.
3.2. SEND AN INVITATION
From the list of users, you can invite a new team member. To send the invitation:
1. Click on the Invite user link, located on the upper-right side above the list.
2. Enter the email address of the person you want to invite and click Send.
3. As a confirmation of the sending, on the upper-right corner of the window you will see a
message: Invitation was successfully sent..
An invitation email will be sent to the address you entered. If the email does not arrive, make sure it was
not marked as spam in the recipient’s email account.
Additionally, you can find the list and status of sent invitations in Users > Invitations.
3.3. ACCEPT THE INVITATION
Your new administrator or member must click the link in the invitation email and complete the form to
complete the process. Once the form is submitted, their account will be activated.
3.4. GIVE NEW USERS RIGHTS
There are two main type of rights you can give to members of your team:
CHAPTER 3. INVITING USERS AND MANAGING RIGHTS
13

By area: Such as analytics, billing, or developer administration.
By service: Choose which services to give access to members amongst all of your services.
Note: This feature is only available for enterprise customers.
To give a new user rights, edit the new user by selecting them from the user menu and clicking on Edit.
You have the following user roles:
Changing their rights to Admin will give them full access to control the Admin Portal.
Changing their rights to Member will give you the option of choosing which areas and services
the team member has access to.
As Member, select an area to list all the available services related to said area.
Giving access to certain areas of the Admin Portal will give members access only to the equivalent API:
Developer accounts — Applications: Gives access to the Account management API
Analytics: Gives access to the Analytics API
Billing: Gives access to the Billing API
Red Hat 3scale API Management 2.7 Admin Portal Guide
14

CHAPTER 4. NOTIFICATIONS
Notifications originate from interactions with the Red Hat 3scale API Management user interface and
the 3scale API. Developers can trigger notifcations to administrators and other members and to 3scale.
You will only receive API notifications for APIs you have access to.
4.1. TYPES OF NOTIFICATIONS
There are different types of notifications:
Accounts
Billing
Applications
Service subscriptions
Usage alerts
4.2. VISIBILITY
Admin users have access to all notifications.
Member users have access only to notifications of the areas they have been given access to. For
example, a member will only have access to notifications related to billing if they have access to the
billing section.
For enterprise accounts, member users will only have access to notifications regarding activity of the
services they have been granted access to.
4.3. SUBSCRIBING TO NOTIFICATIONS BY EMAIL
Subscriptions are personal and can only be modified by the person receiving those notifications. To edit
your subscriptions:
1. Navigate to Account Settings (gear icon in the navigation bar) > Personal > Notification
Preferences.
2. Select the notifications you would like to receive.
3. Click Update Notification Preferences.
4.4. WEB NOTIFICATIONS
In addition to email notifications, you can find information about the last activities in your Dashboard:
CHAPTER 4. NOTIFICATIONS
15

Red Hat 3scale API Management 2.7 Admin Portal Guide
16

CHAPTER 5. PERSONAL SETTINGS
In Personal settings you can edit your preferences as a team member. If you are an admin, you will also
be able to edit the account preferences. For that, check out the account configuration tutorial.
To edit your personal settings:
1. Click on the gear icon in the navigation bar.
2. On the left panel, navigate to Personal. There are 3 types of settings you can edit from here:
Personal Details: Name, email, password, etc.
Tokens: Create access tokens to authenticate against the 3scale APIs – Billing, Account
Management, and Analytics – and try them out using our ActiveDocs (interactive
documentation). Learn more about 3scale tokens.
Notification Preferences: Select which notifications you’d like to receive. Note: If you are
an enterprise customer, and if you are a member, these are filtered by area and service. This
means you will only be able to subscribe to notifications regarding areas and services you
have been given access to. More on notification preferences here.
CHAPTER 5. PERSONAL SETTINGS
17

CHAPTER 6. TOKENS
This tutorial contains information about 3scale tokens: what are they, how they work, and how to create
them.
3scale has two types of tokens: Access tokens (created by the user) and Service tokens (automatically
created when you create a new service in 3scale).
6.1. ACCESS TOKENS
Access tokens allow API provider admins and members to authenticate against the 3scale APIs – Billing,
Account management, and Analytics – and try them out using our ActiveDocs (interactive
documentation).
An access token may provide either read and write access, or read only.
An important thing to take into account is how access tokens work, which is according to the member’s
rights. Admins can create tokens to authenticate against all three 3scale APIs. Members will be limited
by their permissions to access the different parts of the Admin Portal. For example, if a member does
not have access to the Billing area, they will not be able to create a token to authenticate against the
Billing API.
6.2. CREATING ACCESS TOKENS
Access tokens can be created on the tokens page. To create tokens, follow these steps:
1. Click on the gear icon in the navigation bar.
2. Navigate to Personal > Tokens.
3. Click Add Access Token.
4. Specify a name, select one or more scopes, and choose the permission for the token.
5. To save the new token, click Create Access token.
Note that if you are a member, you might not see all the APIs – just the ones you have been given access
to by the admin of your account.
You can create as many access tokens as you need. For security reasons, the tokens will not be stored
on 3scale. When you create a new token, you will be alerted to save the token so you can then use it to
make requests to the 3scale API.
If you lose a token, we recommend that you delete it – which will disable it and render it invalid – then
create a new one.
6.3. USING ACCESS TOKENS
When using your access token to make calls to the 3scale APIs the results will be filtered by the services
you have access to.
For example, when deploying APIcast self-managed, you’ll need an access token so your APIcast API
gateway can pull the configuration of the service using the Account Management API.
The way it works is if your organization has set up three services on 3scale, and as a member, you have
Red Hat 3scale API Management 2.7 Admin Portal Guide
18

access to Service 1, but not 2 and 3, and you also have access to the Account Management API, when
you create a token and make a request to the Account Management API you will only get the
applications which are using Service 1.
Following the same example, if you have access to the Account Management API, but access to zero
services, when making a call, you’ll get "access denied" error.
6.3.1. Service tokens
Service tokens are used to authenticate against 3scale Service Management API. Service tokens are
generated automatically when a new service is created in 3scale, and are unique per service. They are
shared among the users of the 3scale account.
You can find the service tokens for the services that the user has access to in the Admin Portal’s
Dashboard: Account Settings (gear icon) > Personal > Tokens.
CHAPTER 6. TOKENS
19

PART II. MULTITENANCY
Red Hat 3scale API Management 2.7 Admin Portal Guide
20

CHAPTER 7. MULTITENANCY
Red Hat 3scale API Management allows multiple independent instances of 3scale accounts to exist on a
single on-premises deployment. Accounts operate independently from one another, and cannot share
information among themselves.
7.1. MASTER ADMIN PORTAL
A master administrator monitors and manages the Red Hat 3scale API Management accounts through
the Master Admin Portal and API endpoints. Similar to the standard Admin Portal, the Master Admin
Portal contains information about all accounts in a deployment and allows for administration of accounts
and users through a unique account page.
For details on account administrator operations, refer to the Account settings guide.
7.1.1. Accessing the Master Admin Portal
To access the Master Admin Portal, you need to use the credentials and URL specifically defined for the
Master Admin Portal during the on-premises installation process.
The Master Admin Portal URL consists of the MASTER_NAME (master by default in the template) and
the WILDCARD_DOMAIN:
<MASTER_NAME>.<WILDCARD_DOMAIN>
You can identify the Master Admin Portal by the Master flag.
7.1.2. Adding an account through the Master Admin Portal
To add an account through the Master Admin Portal, follow these steps:
1. Log in to the Master Admin Portal.
2. Navigate to Accounts.
3. Click Create.
4. Indicate the required information for the user:
a. Username
b. Email
c. Password
d. Password confirmation
5. Indicate the required information for the organization:
a. Organization/Group Name
CHAPTER 7. MULTITENANCY
21
6. Click Create.
After these steps, Red Hat 3scale creates an account subdomain for your account based on the
Organization/Group Name field. Additionally, you can see a page containing the details of the account
you created.
7.1.3. Creating a single gateway with the Master Admin Portal
With the Master Admin Portal, you can create a single gateway for all tenants by configuring the
THREESCALE_PORTAL_ENDPOINT environment variable. This is similar to the Hosted APIcast in the
Hosted 3scale (SaaS), where the default apicast-staging and apicast-production gateways deployed
with the OpenShift template are configured in this way.
To create a single gateway with the Master Admin Portal, follow these steps:
1. Fetch the value of ACCESS_TOKEN out of the system-master-apicast secret in your 3scale
project. Alternatively, you can create new access tokens in the Master Admin Portal.
2. Use the following command when you deploy APIcast:
THREESCALE_PORTAL_ENDPOINT="https://<ACCESS_TOKEN>@<public url to master
admin portal>/master/api/proxy/configs"
The end of the url looks like /master/api/proxy/configs, this is because master holds the
configs in a different endpoint compared to the default /admin/api/services.json.
7.2. MANAGING ACCOUNTS
You can manage accounts through the Master Admin Portal or through API calls.
7.2.1. Managing accounts through the Master Admin Portal
To manage the accounts through the Master Admin Portal, you need to do the following:
1. Log in to the Master Admin Portal.
2. Navigate to the Accounts page.
3. Select the group or organization you want to manage.
On the Accounts page from a Master Admin Portal, you can perform administrative actions, such as
impersonating an admin tenant account or suspend a tenant account. You can also manage the
following account attributes:
Applications
Users
Invitations
Group Memberships
Organization/Group Name
7.2.1.1. Additional information
Red Hat 3scale API Management 2.7 Admin Portal Guide
22

For more information about tenant accounts, see the 3scale Glossary.
7.2.2. Managing accounts through API calls
You can manage accounts through the Master Admin API calls. For information on these calls, refer to
the Master API section, by clicking the question mark (?) icon located in the upper-right corner of the
Master Admin Portal, and then choosing 3scale API Docs.
7.3. UNDERSTANDING MULTITENANCY SUBDOMAINS
As a result of multiple accounts existing under the same OpenShift cluster domain, individual account
names prepend the OpenShift cluster domain name as subdomains. For example, the route for an
account named user on a cluster with a domain of example.com appears as:
user.example.com
A standard multitenant deployment will include:
A master admin user
A master admin portal route, defined by the MASTER_NAME parameter:
<MASTER_NAME>.<WILDCARD_DOMAIN>
An account admin user
An account admin portal route, defined by the TENANT_NAME parameter:
<TENANT_NAME>-admin.<WILDCARD_DOMAIN>
A developer portal route for the account:
<TENANT_NAME>.<WILDCARD_DOMAIN>
Routes for the production and staging built-in APIcast gateway:
<API_NAME>-<TENANT_NAME>-apicast-staging.<WILDCARD_DOMAIN>
<API_NAME>-<TENANT_NAME>-apicast-production.<WILDCARD_DOMAIN>
This example illustrates the output users and routes of a standard multitenant deployment of
3scale:
CHAPTER 7. MULTITENANCY
23

----
--> Deploying template "3scale-project/3scale-api-management" for "amp.yml" to project
project
3scale API Management
---------
3scale API Management main system
Login on https://user-admin.3scale-project.example.com as admin/xXxXyz123
...
* With parameters:
* ADMIN_PASSWORD=xXxXyz123 # generated
* ADMIN_USERNAME=admin
* TENANT_NAME=user
...
* MASTER_NAME=master
* MASTER_USER=master
* MASTER_PASSWORD=xXxXyz123 # generated
...
--> Success
Access your application via route 'user-admin.3scale-project.example.com'
Access your application via route 'master-admin.3scale-project.example.com'
Access your application via route 'backend-user.3scale-project.example.com'
Access your application via route 'user.3scale-project.example.com'
Access your application via route 'api-user-apicast-staging.3scale-project.example.com'
Access your application via route 'api-user-apicast-production.3scale-project.example.com'
Access your application via route 'apicast-wildcard.3scale-project.example.com'
...
----
Additional accounts added by the master admin will be be assigned a subdomain based on their names.
7.4. DELETING TENANT ACCOUNTS
7.4.1. Deleting an account via the Admin Portal
With this procedure, accounts are scheduled for deletion and will be deleted after 15 days. During the
time it is scheduled for deletion:
Users cannot log in to the account.
The account can not be edited; but the master can resume the account to the approved status.
Additionally, the domains of the tenant (admin domain and developer portal) are not available, similar to
a real deletion.
Prerequisites:
Log in to your master admin account .
Procedure
1. To see the list of accounts, navigate to Accounts.
Red Hat 3scale API Management 2.7 Admin Portal Guide
24

2. Click the account you want to delete.
3. Click Edit, next to the account’s name.
4. In the accounts details page, click the Delete icon.
5. Confirm the deletion.
7.4.2. Deleting a tenant via the console
If you want to delete the account with an immediate effect, you can do so via the console:
1. Open the console with these commands:
oc rsh -c system-master "$(oc get pods --selector deploymentconfig=system-app -o name)"
bundle exec rails console
2. Delete immediately with these lines:
tenant = Account.find(PROVIDER_ID)
tenant.schedule_for_deletion!
DeleteAccountHierarchyWorker.perform_later(tenant)
This is how each line works:
Line 1: finds the account and saves it in the variable tenant.
Line 2: schedules the account for deletion. This is only necessary if you have not scheduled
the deletion through the Admin Portal.
Line 3: deletes the tenant in a background process only if you have scheduled the account
for deletion or it is suspended. Deletion will not proceed if the account is in approved status.
7.5. RESUMING TENANT ACCOUNTS
Resuming a tenant account implies restoring an account scheduled for deletion. You can resume a
tenant account up to 15 days after you have scheduled it for deletion.
After resuming an account:
All previous apps exist.
All historical stats remain.
All tokens that should be valid are valid again.
Apps start authorizing again.
Prerequisites:
Log in to your master admin account.
Procedure
1. To see the list of accounts, navigate to Accounts.
CHAPTER 7. MULTITENANCY
25

2. Click the account you want to resume.
3. Under the account details, click Resume.
4. Click Ok to confirm you want to resume the account.
Red Hat 3scale API Management 2.7 Admin Portal Guide
26

PART III. SERVICE DISCOVERY
PART III. SERVICE DISCOVERY
27

CHAPTER 8. SERVICE DISCOVERY
With Red Hat 3scale API Management’s Service Discovery feature, you can import services from
OpenShift.
8.1. ABOUT SERVICE DISCOVERY
Using Service Discovery, you can scan for discoverable API services that are running in the same
OpenShift cluster and automatically import the associated API definitions into 3scale.
You can also update the API integration and the Open API Specification at any time and then
resynchronize them with the cluster.
Service Discovery offers the following features:
Uses the cluster API to query for services that are properly annotated for discovery.
Configures 3scale to access the service using an internal endpoint inside the cluster.
Imports Open API Specification (Swagger) up to version 2.0 as 3scale ActiveDocs.
Supports OpenShift and Red Hat Single Sign-On (RH SSO) authorization flows.
Works with Red Hat Fuse, starting with Fuse version 7.2.
When you import a discoverable service, it keeps its namespace.
For 3scale on premise installations, the 3scale API provider may have its own namespace and
services. Discovered services can co-exist with 3scale existing and native services.
Fuse discoverable services are deployed to the Fuse production namespace.
8.1.1. Criteria for a discoverable service
An API service must meet the following criteria in order for 3scale Service Discovery to find it:
The API specification’s Content-Type header must be one of the following values:
application/swagger+json
application/vnd.oai.openapi+json
application/json
The OpenShift Service Object YAML definition includes the following metadata:
The discovery.3scale.net label: (required) Set to "true". 3scale uses this label when it
executes the selector definition to find all services that need discovery.
The following annotations:
discovery.3scale.net/discovery-version: (optional) The version of the 3scale discovery
process.
discovery.3scale.net/scheme: (required) The scheme part of the URL where the service is
hosted. Possible values are "http" or "https".
Red Hat 3scale API Management 2.7 Admin Portal Guide
28

discovery.3scale.net/port: (required) The port number of the service within the cluster.
discovery.3scale.net/path: (optional) The relative base path of the URL where the service
is hosted. You can omit this annotation when the path is at root, "/".
discovery.3scale.net/description-path: The path to the OpenAPI service description
document for the service.
For example:
metadata:
annotations:
discovery.3scale.net/scheme: "https"
discovery.3scale.net/port: '8081'
discovery.3scale.net/path: "/api"
discovery.3scale.net/description-path: "/api/openapi/json"
labels:
discovery.3scale.net: "true"
name: i-task-api
namespace: fuse
NOTE
If you are an OpenShift user with administration privileges, you can view the API service’s
YAML file in the OpenShift Console:
1. Select Applications> Services.
2. Select the service, for example i-task-api, to open its Details page.
3. Select Actions> Edit YAML to open the YAML file.
4. When you have finished viewing it, select Cancel.
8.2. CONFIGURING SERVICE DISCOVERY
As a 3scale administrator, you can configure Service Discovery with or without an OAuth server.
Prerequisites
You must deploy 3scale 2.7 to an OpenShift cluster (version 3.11 or later).
To deploy 3scale to OpenShift, you need to use 3scale-amp-openshift-templates.
3scale users that want to use Service Discovery 3scale must have access to the OpenShift
cluster.
8.2.1. Configuring with an OAuth server
If you configure 3scale Service Discovery with an Open Authorization (OAuth) server, this is what
happens when a user signs in to 3scale:
The user is redirected to the OAuth Server.
If the user is not already logged in to the OAuth Server, the user is prompted to log in.
CHAPTER 8. SERVICE DISCOVERY
29

If it is the first time that the user implements 3scale Service Discovery with SSO, the OAuth
server prompts for authorization to perform the relevant actions.
The user is redirected back to 3scale.
To configure Service Discovery with an OAuth server, you have the following options:
1. Section 8.2.1.1, “Using OpenShift OAuth server”
2. Section 8.2.1.2, “Using RH-SSO server (Keycloak)”
8.2.1.1. Using OpenShift OAuth server
As a 3scale system administrator, you can allow users to individually authenticate and authorize 3scale to
discover APIs by using OpenShift built-in OAuth server.
1. Create an OpenShift OAuth client for 3scale. For more details about OpenShift authentication,
see OAuth Clients.
$ oc project default
$ cat <<-EOF | oc create -f -
kind: OAuthClient
apiVersion: v1
metadata:
name: 3scale
secret: "<choose-a-client-secret>"
redirectURIs:
- "<3scale-master-domain-route>"
grantMethod: prompt
EOF
2. Open the 3scale Service Discovery settings file:
$ oc project <3scale-project>
$ oc edit configmap system
3. Configure the following settings:
service_discovery.yml:
production:
enabled: true
authentication_method: oauth
oauth_server_type: builtin
client_id: '3scale'
client_secret: '<choose-a-client-secret>'
4. Ensure that users have proper permissions to view cluster projects containing discoverable
services.
To give an administrator user, represented by <user>, the view permission for the <namespace>
project containing a service to be discovered, use this command:
oc adm policy add-role-to-user view <user> -n <namespace>
5. After modifying configmap, you need to redeploy the system-app and system-sidekiq pods
Red Hat 3scale API Management 2.7 Admin Portal Guide
30
5. After modifying configmap, you need to redeploy the system-app and system-sidekiq pods
to apply the changes.
6. Check the status of the rollout to ensure it has finished:
oc rollout status dc/system-app
oc rollout status dc/system-sidekiq
Additional note
By default, OpenShift OAuth session tokens expire after 24 hours, as indicated in OpenShift Token
Options.
8.2.1.2. Using RH-SSO server (Keycloak)
As a system administrator, you can allow users to individually authenticate and authorize 3scale to
discover services using Red Hat Single Sign-On for OpenShift . For an example about configuring
OpenShift to use the RH-SSO deployment as the authorization gateway for OpenShift, you can refer to
this workflow.
1. Create an OAuth client for 3scale in Red Hat OAuth server (Keycloak).
NOTE
In the client configuration, verify that the username maps to
preferred_username, so that OpenShift can link accounts.
2. Edit 3scale Service Discovery settings.
$ oc project <3scale-project>
$ oc edit configmap system
3. Verify that these settings are configured.
service_discovery.yml:
production:
enabled: true
authentication_method: oauth
oauth_server_type: rh_sso
client_id: '3scale'
client_secret: '<choose-a-client-secret>'
4. Make sure users have proper permissions to view cluster projects containing discoverable
services.
For example, to give <user> view permission for the <namespace> project, use this command:
oc adm policy add-role-to-user view <user> -n <namespace>
5. After modifying configmap, you need to redeploy the system-app and system-sidekiq pods
to apply the changes.
oc rollout latest dc/system-app
oc rollout latest dc/system-sidekiq
CHAPTER 8. SERVICE DISCOVERY
31

Additional note:
Token lifespan: By default, session tokens expire after one minute, as indicated in Keycloak -
Session and Token Timeouts. However, it is recommended to set the timeout to an acceptable
value of one day.
8.2.2. Configuring without an OAuth server
To configure the 3scale Service Discovery without an OAuth server, you can use 3scale Single Service
Account to authenticate to OpenShift API service. 3scale Single Service Account provides a seamless
authentication to the cluster for the Service Discovery without an authorization layer at the user level.
All 3scale tenant administration users have the same access level to the cluster while discovering API
services through 3scale.
Procedure
1. Verify that the 3scale project is the current project.
$ oc project <3scale-project>
2. Open the 3scale Service Discovery settings in an editor.
$ oc edit configmap system
3. Verify that the following settings are configured.
service_discovery.yml:
production:
enabled: <%= cluster_token_file_exists = File.exists?(cluster_token_file_path =
'/var/run/secrets/kubernetes.io/serviceaccount/token') %>
bearer_token: "<%= File.read(cluster_token_file_path) if cluster_token_file_exists %>"
authentication_method: service_account
4. Provide the 3scale deployment amp service account with the relevant permissions to view
projects containing discoverable services by following one of these options:
Grant the 3scale deployment amp service account with view cluster level permission.
oc adm policy add-cluster-role-to-user view system:serviceaccount:<3scale-project>:amp
Apply a more restrictive policy as described in OpenShift - Service Accounts.
8.3. DISCOVERING SERVICES
You can discover a new API service corresponding to an OpenAPI Specification (OAS, also known as
Swagger specification), if applicable; which is discovered from the cluster, for management with 3scale.
Prerequisites
The OpenShift administrator has configured Service Discovery for the OpenShift cluster. For
example, for Fuse Online APIs, the OpenShift administrator must set the Fuse Online service’s
CONTROLLERS_EXPOSE_VIA3SCALE environment variable to true.
The 3scale administrator has configured the 3scale deployment for Service Discovery as
Red Hat 3scale API Management 2.7 Admin Portal Guide
32

The 3scale administrator has configured the 3scale deployment for Service Discovery as
described in Section 8.1, “About Service Discovery”.
You know the API’s service name and its namespace (OpenShift project).
The 3scale administrator has granted your 3scale user or service account (depending on the
configured authentication mode) the necessary privileges to view the API service and its
namespace. For more details, you can see Section 8.4, “Authorizing 3scale access to an
OpenShift project”.
The API service is deployed on the same OpenShift cluster where 3scale is installed.
The API has the correct annotations that enable Service Discovery, as described in Section 8.1,
“About Service Discovery”.
Procedure
1. Log in to the 3scale Administration Portal.
2. From the Admin Portal’s Dashboard, click New API.
3. Choose Import from OpenShift.
If the OAuth token is not valid, the OpenShift project administrator should authorize access
to the 3scale user.
4. In the Namespace field, specify or select the OpenShift project that contains the API, for
example fuse.
5. In the Name field, type or select the name of an OpenShift service within that namespace, for
example i-task-api.
6. Click Create Service.
7. Wait for the new API service to be asynchronously imported into 3scale. A message appears in
the upper right section of the Admin Portal: The service will be imported shortly. You will
receive a notification when it is done.
Next steps
See the Red Hat 3scale API Management documentation for information about managing the API.
8.4. AUTHORIZING 3SCALE ACCESS TO AN OPENSHIFT PROJECT
As an OpenShift project administrator, you can authorize a 3scale user to access a namespace when the
OAuth token is not valid.
Prerequisites
You need to have the credentials as an OpenShift project administrator.
The OpenShift administrator has configured Service Discovery for the OpenShift cluster. For
example, for Fuse Online APIs, the OpenShift administrator must set the Fuse Online service’s
CONTROLLERS_EXPOSE_VIA3SCALE environment variable to true.
The 3scale administrator has configured the 3scale deployment for Service Discovery as
described in Section 8.1, “About Service Discovery”.
CHAPTER 8. SERVICE DISCOVERY
33

You know the API service name and its namespace of the OpenShift project.
The API service is deployed on the same OpenShift cluster where 3scale is installed.
The API has the correct annotations that enable Service Discovery, as described in Section 8.1,
“About Service Discovery”.
Procedure
1. Click the Authenticate to enable this option link.
2. Log in to OpenShift using the namespace administrator credentials.
3. Authorize access to the 3scale user, by clicking Allow selected permissions.
Next steps
See the Red Hat 3scale API Management documentation for information about managing the API.
8.5. UPDATING SERVICES
You can update (refresh) an existing API service in 3scale with the current definitions for the service in
the cluster.
Prerequisite
The service was previously imported/discovered from the cluster.
Procedure
1. Log in to 3scale Administration Portal.
2. Navigate to the Overview page of the API service.
3. Click the Refresh link, next to Source: OpenSource.
4. Wait for the new API service to be asynchronously imported into 3scale.
Red Hat 3scale API Management 2.7 Admin Portal Guide
34

PART IV. ACCESS CONTROL
PART IV. ACCESS CONTROL
35

CHAPTER 9. DEFINING YOUR API (METHODS AND METRICS)
You can define your API by adding methods and metrics at both the API product and backend levels. An
API product is a bundle of one or more API backends. At the product level, methods and metrics enable
you to set limits and pricing rules for any of the product’s application plans. At the backend level,
methods and metrics can be used to set the limits and pricing rules of the application plan of any
product that bundles the backend.
Metrics are suitable to track the usage of your API, both at product and backend levels. Hits is the built-
in metric that exists in each API and is used to track the hits made to your API. You can achieve finer
granularity for the API usage tracking by defining Methods under the Hits metric. Reporting traffic to a
method automatically increases counters for the method and for the Hits metric. You can define
separate methods for each endpoint of your API backend, or a combination of endpoint and HTTP
method. See the Mapping rules section to learn how to map the endpoints of your API to the methods
defined here.
For measuring usage of your API apart from hits, you can define a new Metric and report the usage in
different units. A unit should be quantifiable and apply a meaning for your business goals such as
megabytes, CPU time, the number of elements returned by the API, and so on. All metrics other than
hits, such as CPU time or mb, are not included by default on 3scale and must be reported using an
endpoint periodically called by an external service configured by the user.
Methods and metrics are also the scaffolding to package your API: each application plan enables you to
define different usage limits and pricing rules for each method and metric. See the API analytics section
to learn more about the usage reported to metrics and methods.
Additional resources
For more details on API products and backends, see Getting started with 3scale.
9.1. ADDING METHODS AND METRICS
To add a new method to a product or backend, follow these steps:
1. Navigate to [Your_product_name] > Integration > Methods & Metrics or
[Your_backend_name] > Methods & Metrics.
2. Click on the New method link, placed on the right above the list of methods.
3. Specify the parameters:
Friendly name is a short description of the method, it is shown in different sections of the
3scale Admin Portal. This name must be unique for the product.
System name is the name of the method which will be used to report the usage through the
3scale Service Management API. It also must be unique, and it should only contain
alphanumeric characters, underscore _, hyphen - and forward slash / without spaces. Other
than that, you are free to decide what the system name will look like, it can be exactly the
same as the endpoint (/status), or for example can include the method and the path
(GET_/status).
The Description field can be used for a more detailed description of the method, it is
optional.
Red Hat 3scale API Management 2.7 Admin Portal Guide
36
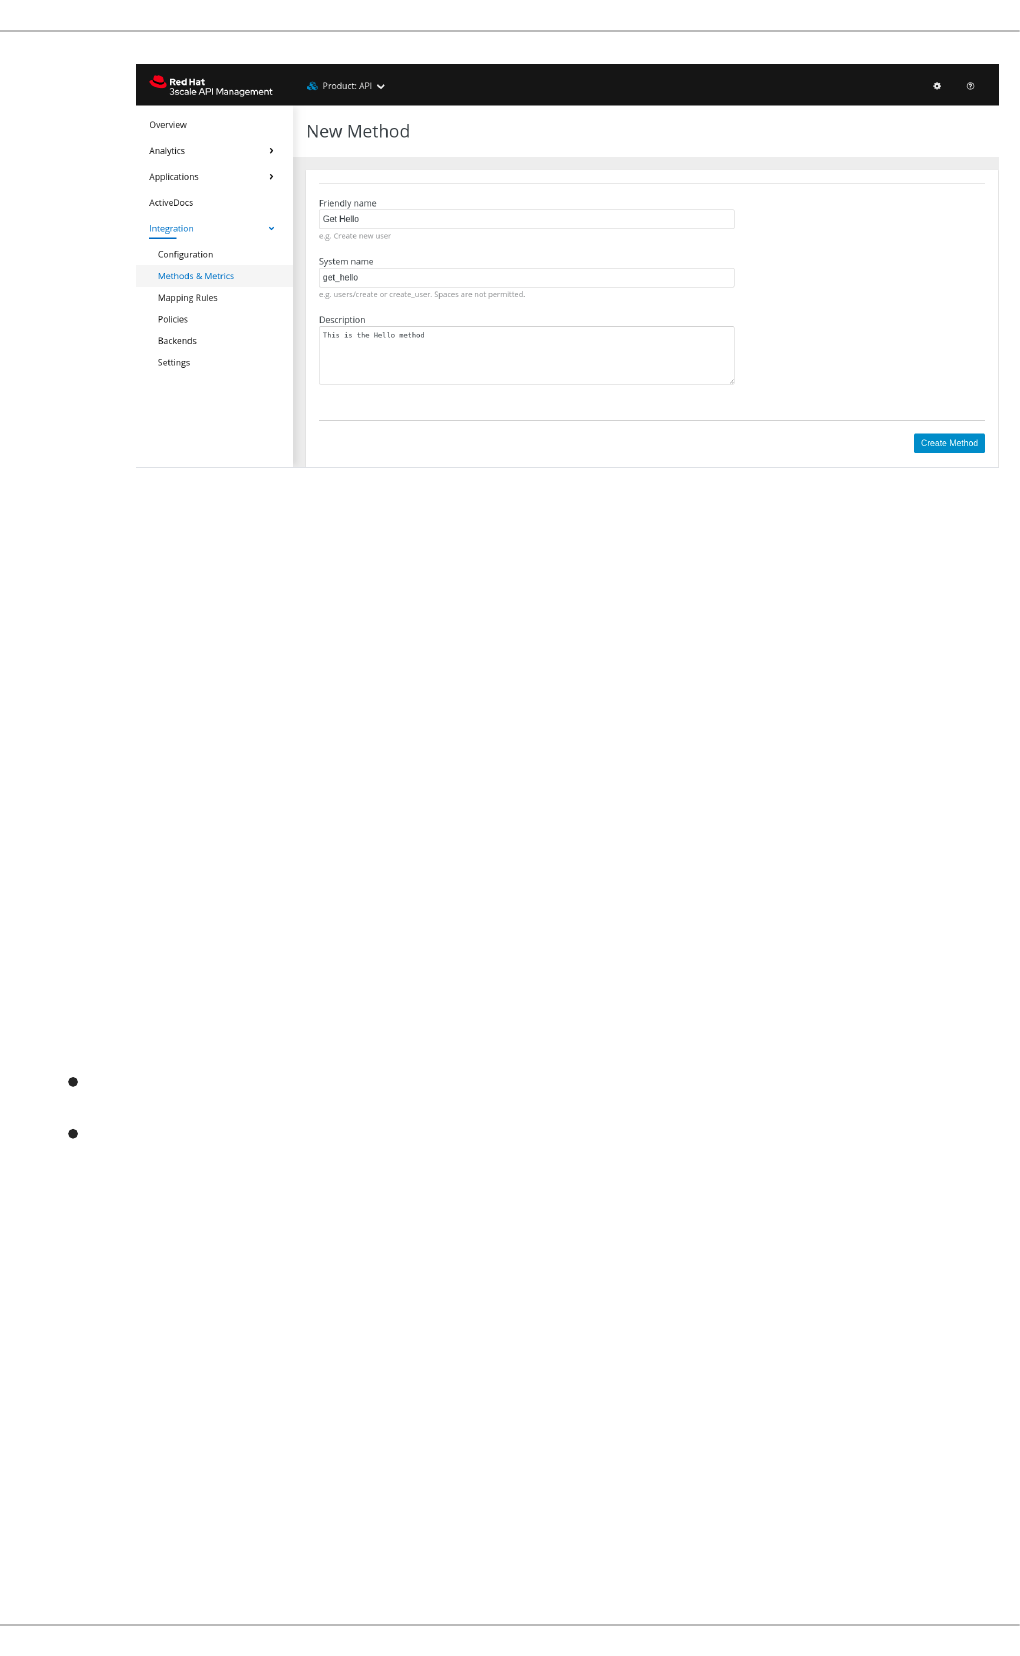
4. Finally, click Create Method.
You can later change the definition of the method. Just click on the method name (in the column
Method), update the fields and click on Update Method.
Be very careful with changing the system name of the methods and metrics or deleting them. These
changes can break your already deployed 3scale integration if there are mapping rules pointing to the
previous system name of the method.
For creating a new metric, click on New metric and provide the required parameters. When specifying
the unit, use a singular noun (e.g. "hit"), as it will be pluralized automatically in the Analytics charts.
These new methods and metrics will be available in all of your current and future plans. You can now edit
limits and pricing rules for them on each plan by going to [Your_product_name] > Applications >
Application Plans > [plan_you_want_to_edit].
9.2. IMPORTING YOUR METHODS AND METRICS AUTOMATICALLY
If your API has a lot of endpoints, we offer two additional ways of automatically creating your methods
and metrics on 3scale:
Importing via Swagger spec
Importing via RAML spec
CHAPTER 9. DEFINING YOUR API (METHODS AND METRICS)
37

CHAPTER 10. APPLICATION PLANS
Application Plans define the different sets of access rights you might want to allow for consumers of
your API. These can determine anything from rate limits, which methods or resources are accessible and
which features are enabled.
10.1. HOW TO CREATE AN APPLICATION PLAN
By default, when your 3scale account is created, you are given two plans: Basic and Unlimited. You can
keep and edit these or create your own. You can create as many plans as you need.
To create a new application plan, follow these steps:
1. Navigate to [Your_product_name] > Applications > Application Plans.
2. Click the Create Application Plan button.
3. On the Create Application Plan page, enter a name and a system name (system names must
be unique) for your new plan.
4. If you want to require applications to get approval before they can access your API, select the
Applications require approval? check box.
Once you have created a plan, you can provision rate limits and set up paid plans.
10.2. SETTING UP A DEFAULT APPLICATION PLAN
After you have created all your plans, you can select a default plan for when people sign up to register
their applications.
To select a default application plan:
1. Navigate to [Your_product_name] > Applications > Application Plans.
2. From the drop-down list under Default Plan, select a plan.
If you do not indicate a default application plan, when a new user signs up to get access to your API, they
will not be created an application by default. In other words, the user will not be able to get access to
your API.
Red Hat 3scale API Management 2.7 Admin Portal Guide
38

CHAPTER 11. MAPPING RULES
After defining your API by adding methods and metrics, you can map your API endpoints or paths to the
methods you have defined in the Mapping Rules page. To do so:
1. Navigate to [Your_product_name] > Integration > Mapping Rules.
2. Click the Add Mapping Rule link.
3. Select an HTTP method, a pattern, a metric (or method), and its increment.
4. Click the Create Mapping Rule button.
5. To verify your mapping rules, navigate to [Your_product_name] > Integration > Methods &
Metrics. Each method and metric should have a check mark in the Mapped column.
CHAPTER 11. MAPPING RULES
39

CHAPTER 12. PROVISIONING PAID PLANS
One of the most popular ways to monetize an API, either products or backends, is by defining
subscription fees based on usage. This section focuses on how to use application plans to provision
pricing tiers, and how to set up a paid plan. It is also possible to apply pricing rules at the account, as well
as at the product and backend levels.
These topics are covered in following sections in this chapter.
12.1. DECIDING YOUR PRICING MODEL
The first decision to make is how to differentiate between the tiers in your pricing model. The tiers can
be driven by volume or usage, API functionality, access to other resources, or a combination of them:
Volume / Usage. The most common way to differentiate between tiers is based on volume
because volume usually has a strong correlation to value to the customer as well as cost to
serve. You can apply a global hit count for calls on the product or a more granular measurement
at the method level. Volume drivers are applied at the level of the global hits metric, or for
individual methods under hits. Multiple pricing rules can be applied to any metric. Note that the
hits calculation is cumulated over a one-month billing cycle.
Functionality. You can enable or disable access to parts of your product depending on the tier.
This is a good approach to distinguish between standard and premium levels.
Resources. You can also create tiers based on access to any other resources that provide value
to the customer or drive costs in your infrastructure – for example, gigabytes of bandwidth
consumed, number of users, or transaction values. Resource drivers are similar to volume drivers
but are applied on custom metrics.
Once you have decided on your pricing drivers, you must decide whether the tiers will be based on a flat
rate subscription, a variable rate, or a one-off upfront charge. All three of the pricing drivers above are
compatible with the one off, or monthly flat rate subscriptions. If you decide your pricing will be based on
volume of hits or resource consumption, there will of course be a variable element to your pricing.
12.2. CONFIGURING AN APPLICATION PLAN WITH YOUR PRICING
RULES
You can either create a new application plan or edit an existing one. When creating a new application
plan, you can enter any upfront charges or flat rate subscriptions.
Red Hat 3scale API Management 2.7 Admin Portal Guide
40

In the edit application view, you can enter or modify the upfront charges and subscriptions.
Next, set up the pricing drivers you selected in Section 12.1, “Deciding your pricing model” :
1. Navigate to [Your_product_name] > Overview > Applications > Application Plans
2. Click on an application plan name.
3. Go to Metrics, Methods, Limits & Pricing Rules. Here, pricing can be defined at the level of
total hits, the granularity of methods, or for any custom metric.
If some of them already exist as metrics, you can edit the item.
Once you are finished setting up your pricing rules, click Update Application plan.
12.3. CREATING FURTHER PRICING TIERS
You can define an API paid plan with a single application plan. Usually this would be the case if all your
pricing rules are defined by volume or resource drivers. However if you want to offer separate plans for
different segments of your developer community, add more application plans.
The easiest way to do this is to copy the first application plan from the application plan overview page.
This way, it will be pre-populated with all the existing metrics and pricing rules. The more care you take
to create a full plan the first time, the more time you will save with the plan copy feature.
12.4. PROVISIONING THE PAID PLANS
In order to provision the plans, your developers must create new applications and select one of the new
paid plans. You can also do this on their behalf from the admin console. For any existing applications, it is
also possible to change from an existing plan to one of the new paid plans.
12.5. ADDITIONAL REFERENCES
In conjunction with flat-rate pricing plans it is common to differentiate between tiers using rate limits.
This is explained in provision rate limits
CHAPTER 12. PROVISIONING PAID PLANS
41

CHAPTER 13. PROVISIONING RATE LIMITS
Rate limits allow you to throttle access to your API resources, products and backends. You can configure
different limits for separate developer segments through the use of application plans.
Once you have rate limits in place, these limits will control the responses a developer receives when they
make authorization request calls to the 3scale back end.
13.1. CONFIGURING THE APPLICATION PLAN
If you do not have an application plan defined yet, create one first. Otherwise, select the plan you want to
set rate limits for and click edit.
For more details about creating application plans, see Application plans.
13.2. SETTING THE RATE LIMITS
To set the rate limits:
1. Navigate to [Your_product_name] > Overview > Applications > Application plan.
2. Click on the name of the application plan you want to configure.
3. Scroll down to Metrics, Methods, Limits and Pricing Rules.
4. Click on Limits.
5. Configure the limits on the product or the backend level.
6. When you are finished setting the limits you require, save your changes by clicking Update
Application plan.
13.3. PUTTING THE NEW RATE LIMITS INTO ACTION
Now that you have your rate limits defined, the following will happen:
If you have alerts configured, the new limits will be used to decide when notifications are sent.
When you exceed the number of calls to the 3scale back end, the limits are considered and you
will see the relevant error message. For more details about APIcast error messages, see
Configuring error messages.
Once your rate limits are operational, you will see the users who are reaching the limits on your
dashboard, making it quick and easy to check for potential plan upgrade candidates. For more
information about soft and hard limits, refer to the Getting Started guide in Configure your API access
policies with application plans for the Advanced path.
13.4. MORE INFORMATION
Besides setting rate limits, you can also set variable pricing rules for the same metrics – see provision
paid plans
Red Hat 3scale API Management 2.7 Admin Portal Guide
42

PART V. BILLING
PART V. BILLING
43

CHAPTER 14. CONFIGURING BILLING SETTINGS
This document describes how the Billing feature works in 3scale.
Billing settings are divided into Charging & Gateway and Credit Card Policies, both can be found in
Audience > Billing in the Admin Portal.
14.1. BILLING MODES (CHARGING & GATEWAY)
Billing in 3scale is based on the calendar month, and can be Prepaid and *Postpaid.
In the Prepaid mode, all fixed fees and setup fees are billed at the beginning of the month or at
the beginning of any prorated billing period. Variable costs are always calculated and billed at
the beginning of the following month.
In Postpaid mode, all fixed fees as well as variable costs are billed at the beginning of the
following month.
For more details see Automated billing process .
14.2. CHARGING ENABLED (CHARGING & GATEWAY)
This setting enables credit card transactions. When this setting is on, all due invoices will be charged
using the selected payment gateway. If you leave this setting off, billing will take place and invoices will
be issued, but no real payment transaction will take place.
14.3. CURRENCY (CHARGING & GATEWAY)
Select the currency in which billing and the credit card transactions will be made. Please make sure that
the selected currency is supported by your payment gateway. This setting is global and applies to all
invoices and transactions; it is not possible to set different currencies for different developer accounts.
14.4. INVOICE FOOTNOTE (CHARGING & GATEWAY)
The text introduced in the Invoice footnote field will appear at the bottom of every PDF invoice. You can
use this field to provide additional information about the charging and billing policy for your customers.
If the text of the footnote is changed, it doesn’t automatically apply to the invoices, for which the PDF
has already been generated. However, it is possible to apply the change by regenerating the PDF of the
invoices.
14.5. TEXT TO SHOW IF VAT/SALES TAX IS 0% (CHARGING &
GATEWAY)
This field is used to add a text message to the PDF invoice, in case VAT / Sales Tax is 0% for the billed
account. This line will only appear if the VAT / Sales Tax is set to 0 explicitly, otherwise it will not be
shown. This text will also appear on the Invoice page in the Admin Portal.
See more about this setting in VAT / Sales Tax section
14.6. BILLING PERIODS FOR INVOICE IDS (CHARGING & GATEWAY)
Red Hat 3scale API Management 2.7 Admin Portal Guide
44

Invoices in 3scale have two types of IDs:
Actual ID
which uniquely identifies the invoice in the database. This is a numeric ID, which appears in the
invoice URL (i.e. https://<dashboard_domain>/buyers/accounts/<acount_id>/invoices/<invoice_id>)
and is used as the invoice ID in the Billing API.
Friendly ID
which appears on the invoice, is a user-friendly identifier. It should be unique per 3scale account,
although it is technically possible to have duplicated friendly ID. In case duplicate ID is identified by
the system, it will show a warning: This invoice id is already in use and should probably be changed . If
the friendly ID displays as fix for more than 24 hours, contact support.
This setting defines the format of the Friendly ID of the invoice:
monthly (default)
YYYY-MM-XXXXXXXX, i.e. the ID includes the year, the month and the number of the invoice.
Example: 2018-02-00000013
yearly
YYYY-XXXXXXXX, i.e. it only includes the year and the number. Example: 2018-00000001
The only effect of changing the Billing periods for invoice ids from monthly to yearly is changing the
friendly ID format; this does not modify the billing cycle period. Only monthly billing is supported by
3scale API Management. Changing the format of the invoice IDs to yearly can be used, if there is such a
requirement from your accounting department.
If you need to charge the customers yearly, billing should be handled manually – you can create a new
invoice and add a line item with the yearly cost. If you prefer to use yearly charging, you may also want to
set your application plans to be free, to make sure the invoices are not generated and/or charged
automatically each month.
14.7. CREDIT CARD POLICIES
Here you can configure the path to the following pages:
Legal Terms page
Privacy page
Refund page
14.8. CREDIT CARD GATEWAYS
3scale integrates with the following payment gateways for credit card transactions:
Braintree
Stripe
14.8.1. Stripe integration (recommended)
After completing these steps you will have configured Stripe as a payment gateway for your account.
This will allow your developers to enter their credit card details, and you can automatically charge them
through Stripe for access to your API, according to the calculated invoices.
CHAPTER 14. CONFIGURING BILLING SETTINGS
45

If you enable credit card charging for your paid API, then one key step is to setup your payment gateway.
There are a number of alternative payment gateways which you can use with your 3scale account. Here
we cover the steps for Stripe.
14.8.1.1. Prerequisites
Before you start these steps, you will need to open an account with Stripe.
14.8.1.2. Getting your API keys from Stripe
Log in to your Stripe account, and get your API keys at https://dashboard.stripe.com/account/apikeys.
You will need two keys: a "secret" one, and a "publishable" one. Use the "test" set when you’re doing
tests and the "live" ones when you are ready to start charging.
14.8.1.3. Configuring settings in 3scale
You need to tell 3scale to start using these API keys. To do this, log in to your 3scale Admin Portal. and
go to Audience > Billing > Charging & Gateway.
Red Hat 3scale API Management 2.7 Admin Portal Guide
46

If the Charging Enabled flag is not active, enable it and click Save.
You should see a drop-down called Gateway near the bottom of the page. Change it to Stripe.
CHAPTER 14. CONFIGURING BILLING SETTINGS
47

The form below the drop-down should change to show two fields. Insert your Stripe API keys and click
Save.
You might see a couple of alerts when you change your payment gateway. This is expected. Read them
and accept them if they appear.
The payment gateway is now set up, but your users might not be able to use it yet since the it’s not
configured in the CMS. Go to Developer portal, and click on the template called Payment Gateway /
Show on the left navigation pane.
Red Hat 3scale API Management 2.7 Admin Portal Guide
48

If it’s not there already, add the following code before {% when "braintree_blue" %}:
Finally click Save and Publish. Your users should now be able to pay you using the Stripe gateway.
NOTE
In order to map your data from Stripe with your data on 3scale, you can use the Stripe
field called metadata.3scale_account_reference which is composed of 3scale-
[PROVIDER_ID]-[DEVELOPER_ACCOUNT_ID]
14.8.2. Braintree integration
These are the steps to set up the Braintree gateway in order to to charge for use of your API.
14.8.2.1. Getting your API keys from Braintree
{% when "stripe" %}
<p><a href="{{ current_account.edit_stripe_billing_address_url }}">Edit billing address</a></p>
{% if current_account.has_billing_address? %}
{% stripe_form "Edit Credit Card Details" %}
{% else %}
<p>After entering billing address, the option to enter credit card will be enabled.</p>
{% endif %}
CHAPTER 14. CONFIGURING BILLING SETTINGS
49
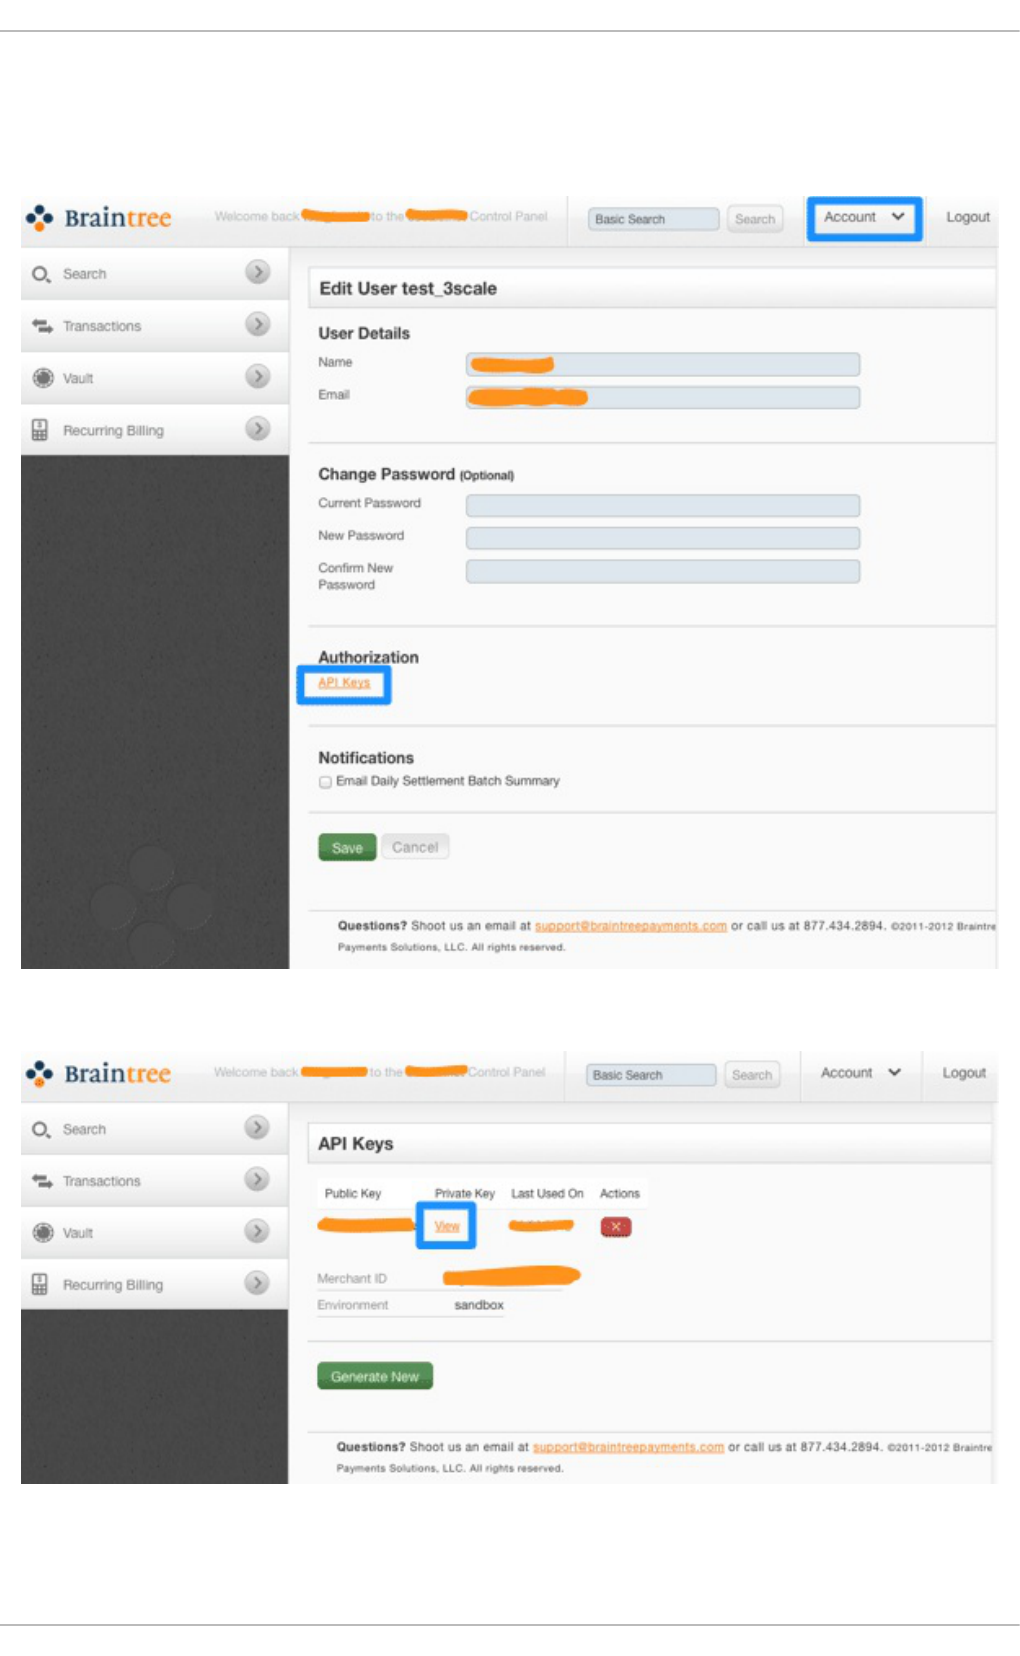
You’ll need to open an account with Braintree. You need a Gateway and Merchant account plus Vault. As
an optional extra, you can choose to allow American Express cards as a payment method.
To begin, log in to your Braintree account. Then find your API keys in the Account > MyUser area:
The API keys page still hides the private key, so select the option to view it:
Finally you have the Public Key, Private Key, and Merchant ID that you’ll need for the 3scale billing
settings:
Red Hat 3scale API Management 2.7 Admin Portal Guide
50

14.8.2.2. Configuring settings in 3scale
You need to tell 3scale to start using these API keys. To do this, log in to your 3scale Admin Portal and
go to Audience > Billing > Charging & Gateway.
Ensure that the currency type specified on the billing page matches the currency type used in your
Braintree merchant account.
CHAPTER 14. CONFIGURING BILLING SETTINGS
51
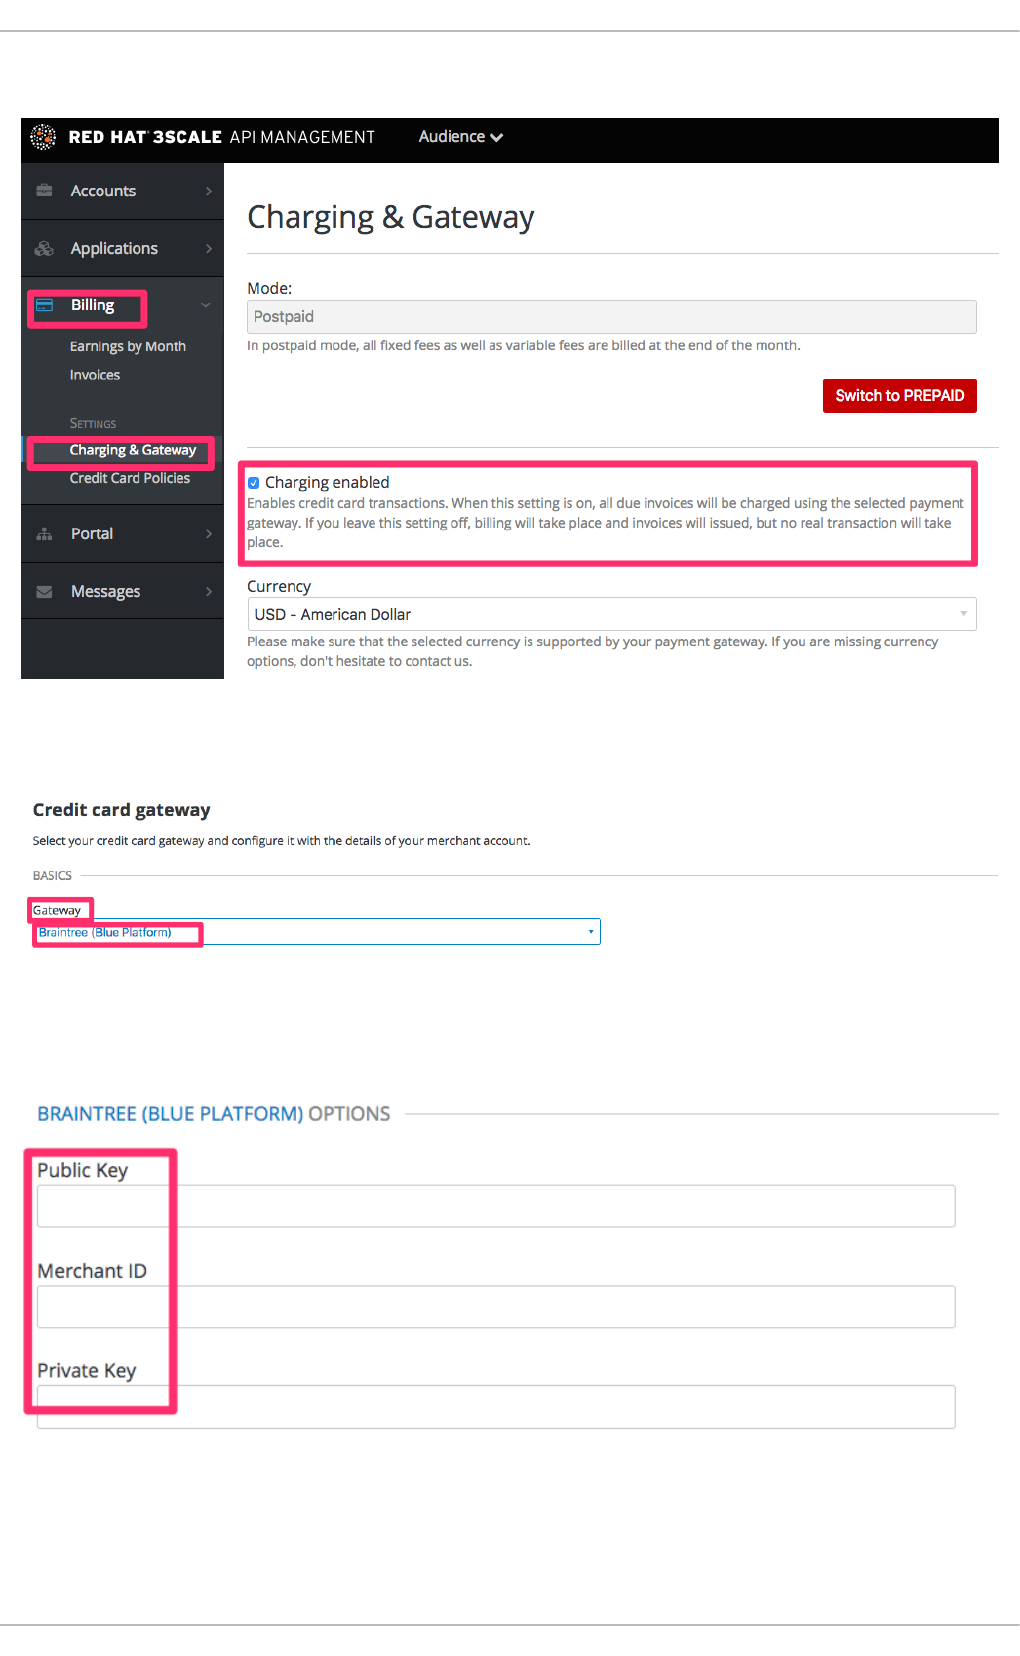
If the Charging Enabled flag is not active, enable it and click Save.
You should see a drop-down called Gateway near the bottom of the page. Change it to Braintree (Blue
Platform).
The form below the drop-down should change to show two fields. Insert your Braintree keys and click
Save.
You might see a couple of alerts when you change your payment gateway. This is expected. Read and
accept them if they appear.
Red Hat 3scale API Management 2.7 Admin Portal Guide
52

Your users should now be able to pay you using the Braintree gateway.
NOTE
In order to map your data from Braintree with your data on 3scale, you can use the
Braintree field called customer.id which is composed of 3scale-[PROVIDER_ID]-
[DEVELOPER_ACCOUNT_ID]
14.8.2.2.1. Troubleshooting
In case your account is in the sandbox mode and you encounter any problems, you will have to change it
to production.
CHAPTER 14. CONFIGURING BILLING SETTINGS
53

CHAPTER 15. PRICING
This section describes different ways you can charge your developers for using your API.
Setup fee
is a one-time charge applied upon subscription to the service, it is not charged when switching to
another plan. It appear in the invoice/credit card only on the first month of a subscription. Can be
configured on application plans, service plans, and account plans.
Cost per month
is a recurring cost charged monthly. It is prorated if the subscription occurred in the middle of the
month. Sometimes it it referred to as "fixed fee". Can be configured on application plans, service
plans, and account plans.
Variable costs
are the costs derived from the pricing rules applied to each method/metric configured in the
application plan. They are based on the usage of your API and therefore cannot be known in advance,
only when the billing period has concluded. Only available on application plans.
Example
If you have a plan with monthly cost of $10, but want to charge your developer a $5 setup fee. The
initial charge would be for $15, while all subsequent charges would be for $10.
15.1. PRICING RULES
Pricing rules define the cost of each API request. Multiple pricing rules on the same metric divide up the
ranges of when a pricing rule applies. Pricing rules are based on calendar month, and the counter is reset
at 00:00 UTC of the 1st day of each month.
Example 1
Until 100 calls per month (from 1 to 100) each API call can be charged at $0.04, and starting from the
call 101 (from 101 to infinity) the calls are charged at $0.10.
Example 2
The first 1000 calls are not charged (cost $0), because they are included in the plan which has a
monthly fixed cost. Starting from call 1001, each call is charged at $0.50.
Example 3
Calls from 1 to 100 are charged at $0.30, 100 to 500 – at $0.40, and 500 and further – at $0.50.
NOTE
Pricing rules are defined for metrics and methods. The actual API requests are mapped to
these metrics and methods through the Mapping Rules.
15.2. SETTING PRICING RULES
1. Go to [Your_API_service] > Applications > Application Plans.
Red Hat 3scale API Management 2.7 Admin Portal Guide
54

2. Select an existing application plan or create a new one.
3. In the section Metrics, Methods, Limits & Pricing Rules click Pricing (x) to open the pricing
section.
4. Click new pricing rule.
5. Set the values From, To and Cost per Unit and click Create pricing rule.
Repeat the last two steps to create all the necessary pricing rules ranges.
Leave the To field empty to set the rule to "to infinity".
The maximum number of decimals is set to 4 for the cost of metric, if a number is added with more
decimals, the value is rounded to a number with 4 decimal places.
15.3. UPDATE EXISTING PRICING RULES
1. Click on edit.
2. Make the necessary adjustments to the From, To and Cost per Unit fields.
3. Click Update pricing rule.
CHAPTER 15. PRICING
55

CHAPTER 16. BILLING
The billing process creates invoices under the developer account, if it is subscribed to any paid services.
The invoices are charged using the configured payment gateway.
16.1. LISTING INVOICES
In the Audience > Billing > Earning by month section you can find an overview of your due and received
payments, calculated as the sum of all invoices issued that month, depending on their state:
Total
all invoices excluding cancelled
In process
Open, Finalized and Pending invoices
Overdue
Failed and Unpaid invoices
Paid
Paid invoices
By clicking on a specific month you can list all invoices for that month.
You can also see the list of invoices by going to Audience > Billing > Invoices, where you can find
invoices by their ID (friendly ID), the account name, and also filter by month and state.
The invoices of a specific developer account can also be found under X Invoices in the breadcrumbs of
the account details page at Audience > Accounts > Listing > [selected account], where X is the number
of invoices the account has.
16.2. INVOICE VIEW
If you click on the invoice friendly ID from the invoices list, you will see the details of the invoice.
16.2.1. Invoice details
The title includes the month and year of the invoice, and also shows whether the invoice was created
manually or by automated billing process, e.g. Invoice for February 2018 (manually created).
The Details block below shows the friendly ID of the invoice, invoice state, dates when the invoice was
finalized and issued, and when it is due and paid on. If the PDF has already been generated, the link to
download the PDF will be also shown.
The Issued by and Issued to blocks shows the name and the address of the API provider and the
developer account accordingly.
Below a block with line items will be shown, including calculations of the VAT/Sales Tax, total cost, and if
the text in "Text to show if VAT/Sales Tax is 0%" was configured, it will also be shown here.
In the Transactions block of the invoice you can see the list of all credit card transactions attempts,
including the status of the transaction, its timestamp, reference number, message provided by the
payment gateway and the amount. You can find the transactions in your payment gateway administrator
console using the reference number.
Red Hat 3scale API Management 2.7 Admin Portal Guide
56

16.2.2. Editing invoices
If the invoice is in Open or Finalized state, you can edit some details of the invoice.
By clicking on the Edit link at the top right corner of the invoice view, you can change the friendly ID and
the billing period.
You can also add and delete invoice line items (except calculated costs – total, VAT/sales tax, total with
VAT/sales tax). To add a new line item, click on Add, and fill in Name, Quantity (does not affect the
cost), Description and Cost.
The links at the bottom of the invoice view can trigger actions on the invoice – different actions are
available depending on the current state of the invoice, e.g. Generate PDF, Issue invoice Cancel invoice,
Regenerate PDF, Charge, Mark as paid etc. These actions (except PDF-related) will change the state of
the invoice.
16.3. INVOICE STATES
The invoice can be in one of the following states:
Open
the invoice is created, but the automated calculations has not yet been finalized.
Finalized
the invoice has all the current billing period charges added to it.
Pending
the invoice has been issued to the developers and is awaiting payment.
Unpaid
the invoice has been charged unsuccessfully, but pending automatic retry.
Paid
the invoice has been charged successfully.
Failed
the invoice has been charged unsuccessfully, and automatic retry will not be attempted anymore.
Cancelled
has been cancelled by an admin.
16.4. AUTOMATED BILLING PROCESS
In 3scale, the billing process runs daily. It generates invoices, changing their states according to the
billing flow, and performs charges using the configured payment gateway.
The billing flow is a bit different for Prepaid and Postpaid mode, and as billing in 3scale is based on
calendar month, there are special events that happen on the first day of the month.
16.4.1. On the first day of each month
Postpaid
Bill variable cost for the previous month: The cost is included as a line item to the open invoice.
Finalize open invoices for the previous month
CHAPTER 16. BILLING
57

Bill fixed cost for the current month: Create a new invoice for the current month in Open state.
Prepaid
Bill fixed cost (current month)
Bill variable cost (previous month)
Notifications are sent to the API admins about the invoices finalized in the beginning of the month, so
they can review the invoices and make necessary adjustments.
All actions that are performed every day also happen on the first day of the month in addition to the
ones described above.
16.4.2. Every day
Bill expired trials and new contracts that have not yet been billed: Invoices in Open state for the
current month are created.
Prepaid only: Finalize all open invoices: Status changes to Finalized.
Issue invoices: Status changes to Pending.
The invoices are generally issued 2-3 days after they were finalized. The "Issued On" date of
the invoice is set to current date, and the "Due On" date (when the invoice will be charged)
is set to the Issued On + 2 days.
When the invoice is issued to the developers, they receive an email notification, and can see
the issued invoice in the Developer Portal.
Charge invoices
The invoices in Unpaid and Pending states are charged, if the Due On date is today or
earlier.
If the payment failed, the invoice state is changed to Unpaid. Charging will be retried again
in 3 days. After 3 unsuccessful retries, the invoice state is changed to Failed, and charging is
not retried anymore.
Notify about expired credit cards
The developer accounts whose credit cards are going to expire soon are sent email
notifications.
16.4.3. Automatic and manual invoices
The invoices that are generated by the automated billing process have an (automatically created) label
in the invoice header. For example: Invoice for January 2019 (automatically created) .
The invoices that are generated manually are marked with (manually created) on the invoice details
page.
The automated billing process may use existing invoices in open state for the current month to create
additional line items, but only for automatically created invoices. The invoices created manually will not
be updated by the automated billing process.
Red Hat 3scale API Management 2.7 Admin Portal Guide
58

16.4.4. Mid-month upgrades
If an application (or account/service subscription) is upgraded in the middle of the month, the monthly
cost is prorated according to the number of days left in the month. The limits configured on the
application plan are not prorated.
If the application is upgraded from a free to a paid plan, the next time billing runs a new invoice will be
generated including the prorated monthly cost.
When the application is upgraded from a paid plan to a more expensive paid plan, the behavior depends
on several factors:
The mode of Billing: Prepaid or Postpaid
When the plan change is made
16.4.4.1. Prepaid billing
1. If the application plan is changed on the same billing day (a billing day starts at 8am UTC) as
is it was created, and so it has never been invoiced before, the fixed costs for the old plan are
included to the invoice, and are discounted with a 'Refund' line item. The fixed costs for the new
plan are also added to the invoice.
Example: A customer signed up for the Plan A (200$) on the first day of the month, and
upgraded to the Plan B (300$) on the same day. One invoice will be generated in this case, and
it will contain the following line items:
Description Cost
Fixed fee ('Plan A') 200
Refund ('Plan A') -200
Application upgrade ('Plan A' to 'Plan B') 300
Total 300
Note that if the customer signed up on another day of the month, the cost of and refund of 200
would be prorated.
2. If the application plan is changed after the invoice was already issued for this application:
In case of an upgrade, the developer will be issued two invoices: one for the initial charge,
and another one for the upgrade.
Example: A customer signed up for the Plan A (200$) on the first day of the month, and
then upgraded to the Plan B (300$) in the middle of the month. The following invoices will
be generated:
Description Cost
Fixed fee ('Plan A') 200
CHAPTER 16. BILLING
59

Total 200
Description Cost
Description Cost
Refund ('Plan A') -100
Application upgrade ('Plan A' to 'Plan B') 150
Total 50
In the second invoice, the refunded cost (100$) and the new cost (150$) are prorated, as
the upgrade is made in the middle of the billing period.
Refunding on application downgrade (change to a plan with a lower cost) is not supported
at the moment.
16.4.4.2. Postpaid billing
In Postpaid billing mode a single invoice will be issued, and it will include the Refund and Application
upgrade line items.
IMPORTANT: This behavior was introduced on April 20th, 2018 with the following changes:
A bug was fixed where the initial charge (for the initial application plan) was not included in the
invoice when the application was upgraded on the same day as created.
Previously only one line item was added on application upgrade, including the difference
between the cost of the new and the old plan. For example, in the scenario 2 described in
Prepaid billing section above (application upgrades from Plan A – 200$, to Plan B – 300$), the
second generated invoice would be:
Description Cost
Application upgrade ('Plan A' to 'Plan B') 50
Total 50
where 50$ is the difference between the prorated costs of the new and old plan for the rest of the
month (150$ - 100$).
After April 20th, 2018, the calculations are reflected more clearly in the invoice (including refund and
charge separately), while the total cost remains the same as before.
16.5. ENABLE/DISABLE BILLING/CHARGING PER ACCOUNT
Automated billing process generates invoices for all developer accounts subscribed to paid services.
Red Hat 3scale API Management 2.7 Admin Portal Guide
60

Automated billing process generates invoices for all developer accounts subscribed to paid services.
Charging can be enabled or disabled globally. For more details about charging, see Configuring billing
settings.
You can also enable or disable both billing and charging per developer account. To perform these
actions, navigate to Audience > Accounts > Listing and click the developer account under Group/Org.
that you want to change, then click the corresponding button (Enable / Disable):
Monthly billing is enabled/disabled
Monthly charging is enabled/disabled
If charging is disabled, and billing is enabled, the developer will be issued invoices, but will not be
charged. This is useful in case you handle charging separately (e.g. with wire transfer).
If both are disabled, the developer will not be issued or charged.
If billing is disabled, and charging is enabled, the developer will not be issued any new invoices, but all the
outstanding ones (Pending and Failed) will still be charged.
Here in the Billing Status block you can also see whether the credit card details are configured on the
account. In case credit card details are configured, the month and the year of card expiration is shown.
The presence of the credit card details may affect the Developer Portal flow on sign up and plan change
(see more in Section 16.9, “Credit card flow” ).
16.6. PLANS WITH A TRIAL PERIOD
A trial period (in days) can be set for paid plans to delay the charging for the specified amount of days.
You can see the trial period status for the application in the application listing ([Your_product_name] >
Applications > Listing) in the State column as "live – trial expires in N days" , and in the application
details page in the Trial days left field.
During the trial period the application can use all the features and usage limits defined by the plan
without restrictions.
Once the trial period is set, it is not possible to cancel or extend it. Upgrading to another plan will not
reset the trial days counter.
10 days before the trial period expires, an email notification is sent to the developer account notifying
about the upcoming trial expiration. The template of this email can be configured in Audience >
Messages > Email Templates: "Application trial period expired for buyer" for the application plans, and
"Service trial period expired for buyer" for service plans with trial period. The developer should either
remain on the current plan, or switch to another plan, or contact the API provider if they decide to
cancel the subscription.
Once the trial period is over, the next time automated billing runs (see Section 16.4, “Automated billing
process”) the developer will be charged according to the costs set for the plan that the application or
service are currently on. Note that the application will not be blocked or suspended after the trial period
expires, and will continue to work.
While a trial period technically can be set for free plans, it is not recommended as the feature loses its
usefulness.
16.7. VAT RATE/SALES TAX
Value-Added Tax (VAT) is a tax that is applied on goods and services sold within European Union. In
CHAPTER 16. BILLING
61

Value-Added Tax (VAT) is a tax that is applied on goods and services sold within European Union. In
other countries there is a similar tax, for example, Sales tax. API providers who charge their customers
for using their API service often need to charge the tax as well and reflect it in the invoices to comply
with the existing regulations.
3scale billing can automatically include VAT in the invoices, when configured.
16.7.1. Configure VAT rate field
VAT rate is the number (in percentage) that will be applied to the total cost in the invoice. To configure
VAT rate, follow these steps in the Admin Portal, from the Dashboard:
1. Go to Audience > Accounts > Fields Definitions.
2. Click Create in the Account section.
3. Select vat_rate in the [new field] drop-down list.
4. Set a value for Label.
5. Configure the checkboxes to indicate whether the field should be Required, Read only or
Hidden for the developers.
NOTE: the "Choices" field only accepts strings, so this field cannot be used.
6. Click Create.
16.7.2. Configure VAT code field
VAT code is the VAT identification number. To configure the VAT code follow these steps in the Admin
Portal, from the Dashboard:
1. Go to Audience > Accounts > Fields Definitions.
2. Click Create in the Account section.
3. Select vat_code in the [new field] drop-down list.
4. Set a value for Label.
5. Configure the checkboxes to indicate whether the field should be Required, Read only or
Hidden for the developers.
6. Click Create.
16.7.3. Set VAT values for an account
Once VAT code and VAT rate fields are added, you can set the corresponding values under the
developer account Edit form. Depending on the selected checkboxes in the fields definitions the fields
can also be visible and/or editable by the developers in the Developer Portal.
VAT code can be any string.
VAT rate must be a number. Either integer or decimal numbers are accepted (e.g.: 21, 23.5 etc.) and they
represent the percentage of the cost that will be included as VAT.
16.7.4. Invoices with VAT
Red Hat 3scale API Management 2.7 Admin Portal Guide
62

When an invoice is generated for a developer account that has a non-zero VAT rate configured, the
invoices will include the following line items:
<VAT rate> will be replaced with the Label set for the VAT rate field, and <VAT rate value> is the value
configured for the account the invoice is issued for.
The VAT code will be included in the PDF version of the invoice with the label, specified in as the Label in
the VAT code field definition. The value will correspond to the value set in the developer account details.
The fields vat_rate and vat_code can also be read and written by the 3scale Account Management API.
16.8. DEVELOPER PORTAL VIEW
The developers can manage their Credit Card information and see their invoices in the Developer
Portal.
The Finance switch in Audience > Developer Portal > Feature Visibility has to be in Visible state for the
developers to see the billing-related elements in the Developer Portal.
A logged-in user can update the credit card details at Settings > Credit Card Details. Depending on the
payment gateway configured the form may be different, and the user may need to enter the billing
address first.
NOTE
Credit card details are not stored in the 3scale database. These details are managed by
the payment gateway. Only the last 4 digits of the credit card number, the expiration date
and the reference provided by the payment gateway are stored in the 3scale database.
A developer can only have one credit card card on the Developer Portal.
Credit card details cannot be deleted from the Developer Portal. The user of the developer account
who wants to delete his credit card details would need to request the API provider to delete the credit
card details from the system.
To see the invoices, the user can go to Settings > Invoices, and from there they can either show the
details for each invoice, or download the invoice PDF.
16.9. CREDIT CARD FLOW
16.9.1. Sign up for a paid plan
When a developer signs up for a paid plan, they are requested to enter the credit card details before
they are allowed to see the application credentials. Once the developer logs in to the Developer Portal
for the first time, they will be redirected to the Credit Card Details page. Trying to access any other
developer account page will result in a redirection to the Credit Card Details page again.
You can use Liquid tags to hide all of the menu items, except the Credit Card Details tab, by
customizing the corresponding Developer Portal templates.
The current_account Liquid drop exposes the method requires_credit_card_now? which returns true
_Total cost (without <VAT rate>)_ +
_<VAT rate> Amount_ +
_Total cost (<VAT rate> <VAT rate value>% included)_
CHAPTER 16. BILLING
63

The current_account Liquid drop exposes the method requires_credit_card_now? which returns true
if the credit card details are missing, but are required (only if Billing is configured in the Admin Portal),
and false otherwise.
You can hide any menu items and other user interface elements in the submenu and users_menu
partials by wrapping them with the following condition:
16.9.2. Upgrade from a free to a paid plan
For plan changes of the existing applications there are multiple options that can be configured, including
changing the plan directly by the developer or requesting a plan change. In case the application is
upgraded from a free to a paid plan, it is important to ensure that the developer enters the credit card
details before being able to upgrade. This can be configured in [Your_product_name] > Integration >
Settings, Application Plan Changing section by the following setting:
Change plan directly if developer has credit card, otherwise:
- Only request a plan change
- Request Credit Card entry for paid plans
Select the first option if you want to only allow the developer to request the change, and perform the
upgrade manually after the credit card details are entered.
Select the second option if you want the developer to be notified that credit card details need to be
entered before upgrading to a paid plan. In the plan selector widget the developer will see a message
"You cannot change plan until you enter your Credit Card details" pointing to the credit card details
form.
16.10. "BILLING ADDRESS" FIELD
When the developer enters the billing address on the Credit Card Details in the Developer Portal, this
address is stored separately from the "legal" account address.
By default the legal address appears in the Invoices in the Issued to field. However, in case the
developer does not have the legal address configured, but only the billing address, the latter will be used
on the invoices. The organization name is considered part of the address in this case.
By default the billing address is not visible in the Admin Portal or through the product API; however you
can add it as follows:
1. Go to Audience > Accounts > Fields Definitions.
2. Under the Account block click Create.
3. Select 'billing_address' from the drop-down list, add the label, check the Read only checkbox
and click Create.
Now the <billing_address> field appears in the XML model for Accounts in the Account Management
API and Webhooks. The corresponding billing address will be visible as read-only in the Account and the
Account edit pages of the Admin Portal.
Billing address can be changed by the developer in the Developer Portal, in the Credit Card Details
{% unless current_account.requires_credit_card_now? %}
...
{% endunless %}
Red Hat 3scale API Management 2.7 Admin Portal Guide
64

section. The admin cannot change the billing address in the Admin Portal, but it is possible to do so with
the Account Edit endpoint of the Account Management API using the following fields (as "additional
fields"):
billing_address_name
billing_address_address1
billing_address_address2
billing_address_country
billing_address_city
billing_address_state
billing_address_zip
billing_address_phone
CHAPTER 16. BILLING
65

CHAPTER 17. EMAIL NOTIFICATIONS
Different events related to billing trigger email notifications for API providers and developers.
17.1. PROVIDER NOTIFICATIONS
The users of the 3scale account (admins and members with Billing permission) can subscribe to or
unsubscribe from the notifications related to billing at Account Settings (gear icon on the top-right) >
Personal > Notification Preferences, under Billing section:
Action required: review invoices
Sent a few days before end of billing cycle so you can review invoices before they are being sent to
customers.
Customer downgraded
Sent when a customer changes to a plan with a lower monthly fixed price.
Expiring credit card
Sent when a customer’s credit card is about to expire.
Payment error (retry)
Sent when payment fails, resulting in an unpaid invoice and a retry.
Payment error (final)
Sent when the final retry of a payment fails, resulting in a failed invoice.
Note: All admin users of the 3scale account will receive notifications regarding billing, if they are
subscribed to them.
17.2. DEVELOPER EMAILS
The email notifications sent to the developer accounts can be configured at Audience > Messages >
Email Templates. The following emails are available:
Credit card expired notification for buyer
Sent when the credit card is due to expire soon.
Invoice charged successfully for buyer
Sent when the invoice has been successfully charged.
Invoice charge failure for buyer with retry
Sent when the invoice charge has failed, and the invoice is in Unpaid state, which means that the
charging will be retried again.
Invoice charge failure for buyer without retry
Invoice charge has failed for the 3rd time, the invoice has passed to Failed state and will not be
retried again.
Upcoming invoice charge for buyer
Sent when the invoice is issued for the developer.
All admin users of the developer account will receive the above notifications.
17.2.1. Billing email address
You can configure an email address that your customers can contact for resolving any issues with billing
Red Hat 3scale API Management 2.7 Admin Portal Guide
66

You can configure an email address that your customers can contact for resolving any issues with billing
(e.g. billing@example.com), in Audience > Messages > Support Emails in the Finance support email
field.
The email templates reference the email address with the Liquid drop {{
provider.finance_support_email }}.
CHAPTER 17. EMAIL NOTIFICATIONS
67

CHAPTER 18. BILLING API
The Billing API provides a way to automate common billing processes.
All the endpoints of the Billing API can be found in the Admin Portal under Documentation (?) > 3scale
API Docs > Billing API.
The Billing API requires a valid access token which meets the following requirements:
it should belong to either an admin user of the provider account, or a member user with "Billing"
permissions
it should include "Billing API" scope
Note that when an invoice ID is required as a parameter, it refers to the invoice ID, and not the Friendly
invoice ID.
The XML response of the API endpoints is mostly self-explanatory, and the fields of the Invoice
represent the same information as in the web and PDF representation.
Some notable fields of the response:
creation_type: can have the following values: 'manual' for invoices created manually or
'background' for invoices created by the 3scale automated billing process
provider: the details of the API provider (the admin account), corresponds to the Issued by
section of the invoice.
buyer: the details of the developer account, corresponds to the Issued to section of the invoice.
The XML representation of the invoice also includes the list of Line Items under the line-items field.
For some line items (typically the ones created automatically) apart from the expected name,
description, quantity and cost (price), you can see the following:
type: the type of the line item, can have the following values:
LineItem::PlanCost – for line items for fixed plan costs
LineItem::VariableCost – for line items for variable costs
metric_id: for variable costs line items – the ID of the metric that the cost is associated with
contract_id: the ID of the service or application that the cost is associated with
Red Hat 3scale API Management 2.7 Admin Portal Guide
68

PART VI. MANAGING DEVELOPER ACCOUNTS
PART VI. MANAGING DEVELOPER ACCOUNTS
69

CHAPTER 19. ADDING DEVELOPERS
These are the steps to add a new developer account for access to your API.
If you have configured the workflow to invite developers manually, this covers how to add new
developers.
19.1. CREATE A NEW DEVELOPER ACCOUNT
1. Follow Accounts link from the Audience section on the Admin Portal.
2. Click Create.
As an admin, you can skip even some of the required fields. If you want to invite users to the account
securely, you can also skip the password fields. However the email on this main admin account must be
unique among all users.
19.2. SET UP APPLICATIONS
If you want to pre-configure app keys for the account, you can also add an application on behalf of the
developer. Otherwise, leave this as one of the initial steps for the developer to take.
19.3. NOTIFY THE DEVELOPER
You can either send an email invitation to the developer manually or follow the steps to use the invite
developer feature.
Red Hat 3scale API Management 2.7 Admin Portal Guide
70

CHAPTER 20. APPROVING DEVELOPERS
This section shows how to make approvals for any step in the signup workflow.
Once you’ve implemented the signup workflow with manual approval steps, you have a few options. The
approval process is slightly different depending on the trigger and what is being approved. If you receive
an email notification, follow the instructions in the following section. Otherwise, it depends on whether
you want to approve an account, a service, or an application.
20.1. APPROVE FROM EMAIL NOTIFICATION
If you (as admin) receive an email notification that one of your developers has an item pending approval,
you can copy/paste the URL for the item into your browser, and it will take you directly to the page to
make the approval.
20.2. ACCOUNT APPROVAL
To search for specific accounts or filter all accounts that are in a “pending” (for approval) state, navigate
to Audience > Accounts > Listing. To show only the pending accounts, select "Pending" in the
dropdown list State and click Search.
You can make individual approvals directly on each row, or select several rows at a time and perform a
bulk approval.
20.3. SERVICE APPROVAL
To search for specific subscriptions to a service or filter all subscriptions that are in a “pending” (for
approval) state, navigate to Audience > Accounts > Subscriptions.
To view Subscriptions, enable Service Plans in Audience > Accounts > Usage Rules.
You can select one subscription or several at a time and perform a bulk approval.
CHAPTER 20. APPROVING DEVELOPERS
71

20.4. APPLICATION APPROVAL
To search for applications or filter all applications that are in a “pending” (for approval) state:
1. Navigate to Audience > Applications > Listing.
2. Select "pending" in the dropdown list State and click Search.
You can select one application or several at a time and perform a bulk approval.
You can also start from the details page for a developer account, select which application you wish to
approve from there, and make the approval on the application details page.
Red Hat 3scale API Management 2.7 Admin Portal Guide
72

CHAPTER 20. APPROVING DEVELOPERS
73

CHAPTER 21. CHANGING PLANS FOR AN APP
After this section you will be able to change plans for accounts, services or applications.
As admin you may change plans for a developer at any time, or in response to a plan change request that
the developer initiates.
NOTE
The change plans step is slightly different depending on what type of plans are being
changed.
21.1. CHANGE ACCOUNT PLANS
To search or filter specific accounts, navigate to Audience > Accounts > Listing.
You can select one or more rows at a time, and change the plans.
21.2. CHANGE SERVICE PLANS
To search or filter specific subscriptions to a service, navigate to Audience > Accounts > Subscriptions.
You can only view subscriptions if you have enabled Service Plans in the Settings page.
You can select one or several subscriptions at a time, and change the plans.
Red Hat 3scale API Management 2.7 Admin Portal Guide
74

21.3. CHANGE APPLICATION PLANS
To search or filter specific applications, navigate to Audience > Applications > Listing.
You can select one or several applications at a time, and change plans.
Another scenario is to start from the details page for a developer Account. From there you select the
application for which you wish to change plan. On the application details page, you can change the plan.
CHAPTER 21. CHANGING PLANS FOR AN APP
75

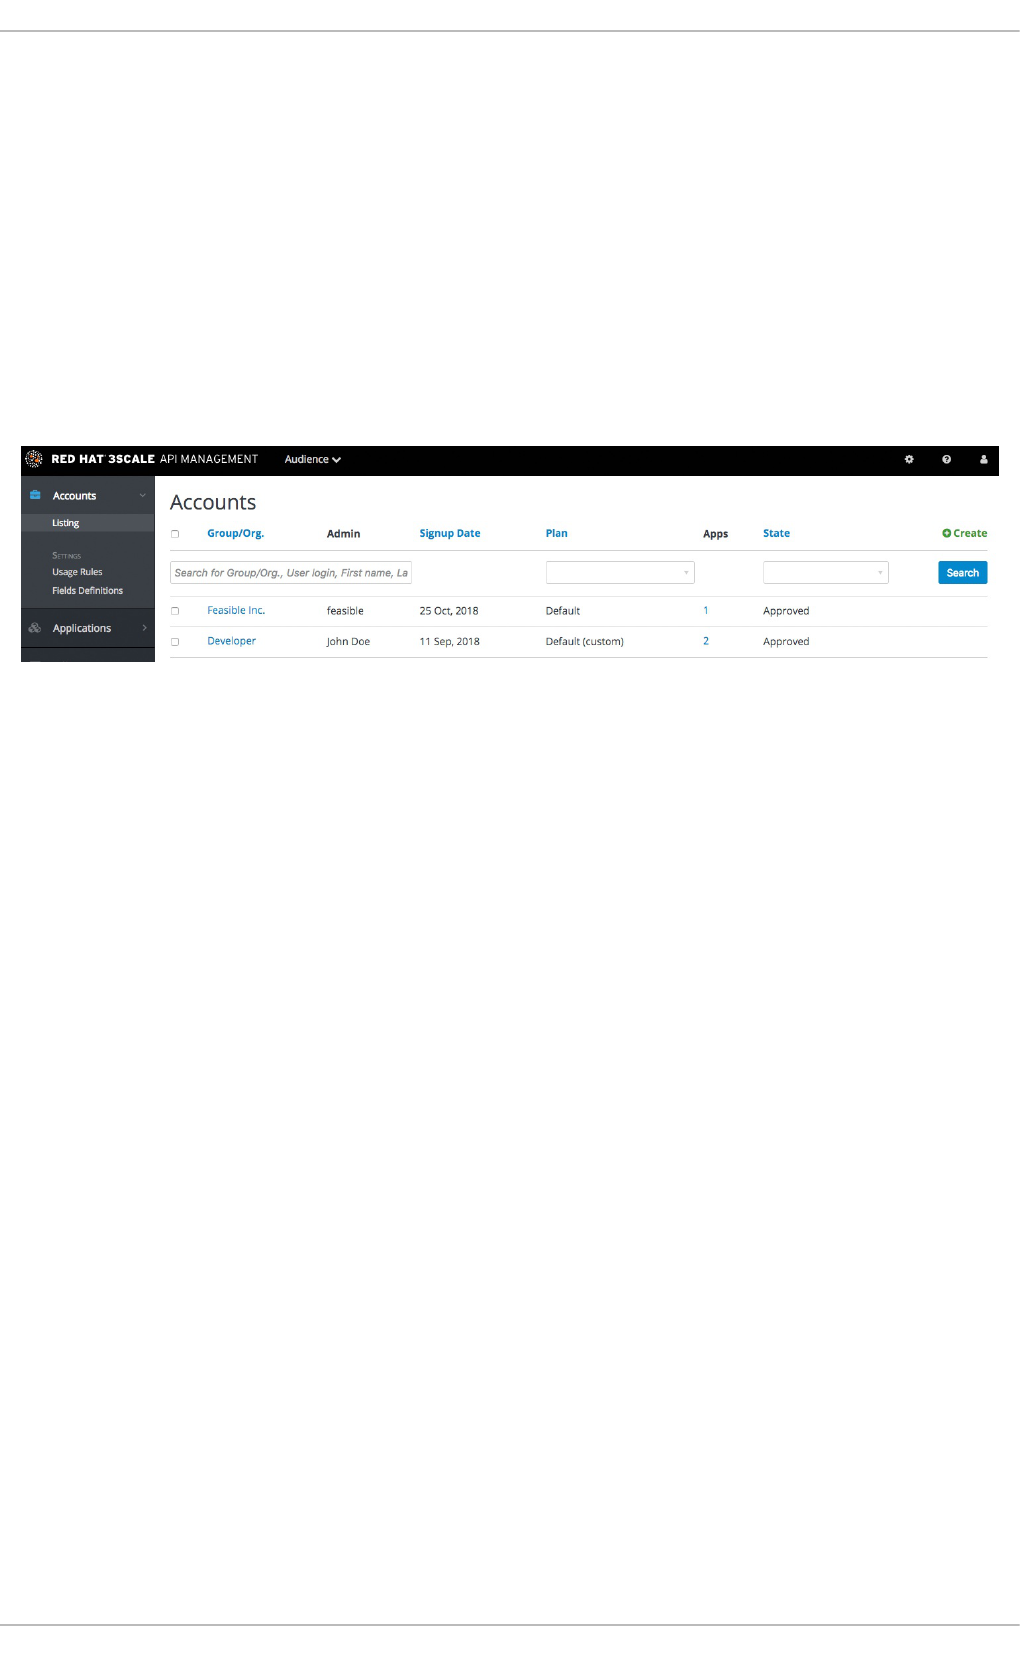
CHAPTER 22. CONTACTING DEVELOPERS
This guide explains how to find out which developer account manages a particular application and then
communicate with them – both through 3scale and externally.
During API operations, you may urgently need to contact developers who are using your API.
22.1. LOCATE THE RELEVANT APPLICATION AND ACCOUNT IN THE
SYSTEM
If you already know the account and developer who manages the application in question, navigate to
their account from the Accounts page in Audience > Accounts > Listing, as shown below.
If you only have the application ID or API key, you can use the search box on the Accounts page in
Audience > Accounts > Listing to find the relevant account. More information on locating applications
is available here.
22.2. SEND INTERNAL MESSAGES TO DEVELOPERS
Once you are in the account profile page as shown below, click the message icon.
CHAPTER 22. CONTACTING DEVELOPERS
77

The message created here will be sent both to the account system dashboard, where all developers on
the account will see it, and by email to the people on the developer account who have admin status
within the account.
22.3. CONTACT BY OTHER MEANS
If it’s an emergency and email is unlikely to be fast enough for your purposes, you can also use the
contact information submitted by the developer at time of signup, which is available:
On the company account page (general contact information but may include a phone number)
Developer/user specific information on the users’ own file
Note that you can make contact phone numbers a required field upon signup.
Red Hat 3scale API Management 2.7 Admin Portal Guide
78
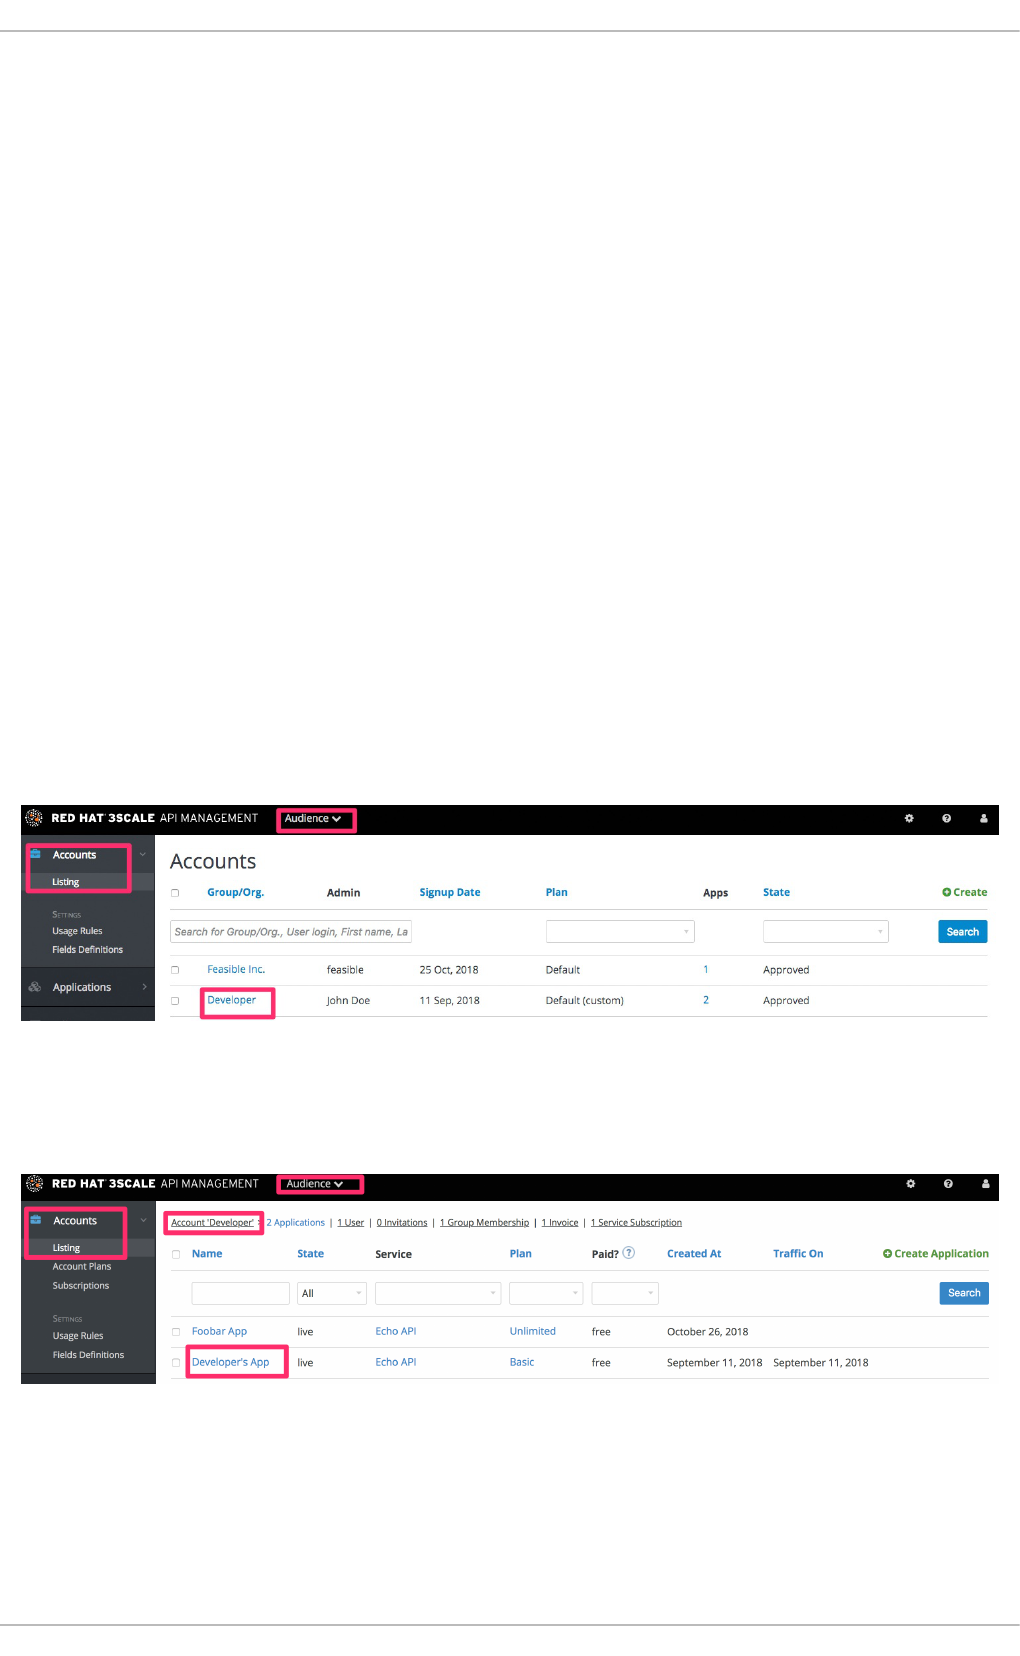
CHAPTER 23. CUSTOMIZE PLANS
When you have completed this section you will have customized an application plan for a specific
developer.
Application plans are a good way to apply standard policies for different segments of your developer
community. However, you always have the flexibility to customize the standard plans for any individual
developer with unique requirements.
Once a plan is customized, you lose the link to the original plan. If you make changes to the original plan,
the custom plan does not inherit any of those changes. So you should use this customization feature
sparingly, before you become overwhelmed with too many custom plans which you cannot manage
effectively.
A developer wants to increase their current limits without upgrading to the next pricing tier as the
current billing period is already under way. A customization could be a good way to handle this situation
by enabling the increase in limits and charging only the variable costs incurred. This would also help
encourage an upgrade for the following billing month.
23.1. CHOOSE THE ACCOUNT
To view the details page for the developer Account you are interested in:
1. Navigate to Audience > Accounts > Listing
2. Choose the Developer account
23.2. SELECT THE APPLICATION
Select the application whose plan you wish to customize.
23.3. CUSTOMIZE THE APPLICATION PLAN
Select the option to “customize”. This provides the page where all the plan elements can be customized
for the application owned by this account.
CHAPTER 23. CUSTOMIZE PLANS
79

23.3.1. More information
Before you take the step to customize plans, always consider first if you are not better off with a new
standard plan (which can be hidden from display in the Developer Portal). Then you would just change to
the standard plan and so gain the benefit of reuse if this applies to more than one of your developer
partners.
Red Hat 3scale API Management 2.7 Admin Portal Guide
80

CHAPTER 24. ENABLE SIGNUP
Configure developer signup by implementing self-service or manual mode.
You can configure the workflow for developers to be self-service or by manual invite only. Self-service
signups are done by developers through the Developer Portal, while manual invites are handled by your
admins through the Admin Portal.
By default, developers are enabled to sign up by themselves. If you enable developer self-service, you
can require admin approval before the developer account can be activated.
To do so, navigate to Audience > Accounts > Settings > Usage Rules.
CHAPTER 24. ENABLE SIGNUP
81

CHAPTER 25. FINDING APPLICATIONS
By the end of this guide, you’ll be able to quickly locate an application in the Admin Portal based on
either its name, an API key, or an application identifier.
During API operations, you may need to be able to find information on an application that is accessing
your API quickly – either for support purposes, to change configuration, or potentially because the
application is misbehaving and needs to be disabled.
25.1. GET THE INFORMATION YOU NEED
To find an application, you need the name of the account it belongs to or the application’s name. If you
do not have this information, you can verify the access logs. To perform the search, navigate to
Applications (Audience > Applications > Listing).
If you search by identifier for an authentication type, you need the following information:
For API key-only authentication patterns: the API key
For app ID and app key authentication patterns: the app identifier (search by app key is not
supported)
For OpenID Connect authentication patterns: the client_id (search on the secret is not
supported)
25.2. SEARCH FOR THE APPLICATION
To search a given application, navigate to Applications page (Audience > Applications > Listing), and
use the search box as shown in the image below.
25.3. ACCESS APPLICATION INFORMATION
Once the results are returned, click on the application you would like to access and you will be taken to
that application’s homepage, which includes information such as that shown in the image below.
Red Hat 3scale API Management 2.7 Admin Portal Guide
82

CHAPTER 25. FINDING APPLICATIONS
83

CHAPTER 26. INVITING DEVELOPERS
After completing these steps, you will have added a new developer user to a developer account.
When you create a developer account manually, you can invite developer users to that account through
the Admin Portal:
1. Navigate to Audience > Accounts > Listing.
2. Choose the account in question.
3. Select "Invitations" and then click Invite user.
Red Hat 3scale API Management 2.7 Admin Portal Guide
84

CHAPTER 27. UNSUBSCRIBING DEVELOPERS FROM A
SERVICE
As an admin, you can unsubscribe developers from a service. You may need to do this for one specific
developer, or for multiple developers, in the event of a service deprecation.
27.1. UNSUBSCRIBING A SINGLE DEVELOPER FROM SERVICES
Unsubscribe a single developer from a service they are subscribed to through the Admin Portal:
1. In the Admin Portal’s Dashboard, navigate to Audience > Accounts > Listing > [select an
account] > Service Subscriptions.
2. Select Unsubscribe for the service that you want to remove the developer from.
27.2. UNSUBSCRIBING MULTIPLE DEVELOPERS FROM SERVICES
Perform a bulk action to unsubscribe multiple developers from a deprecated or deleted service:
NOTE
This method only applies to services that have been deleted or suspended. You cannot
perform a bulk unsubscription action on active services.
1. In the Dashboard, navigate to: Audience > Accounts > Subscriptions.
2. Do bulk state change.
3. Using the service dropdown menu, identify the service from which you want to unsubscribe
developers.
4. Using the checkboxes on the left, select the developers you want to unsubscribe.
5. Select Change State > Suspend to suspend the selected developer subscriptions.
Remember that service plans need to be enabled.
CHAPTER 27. UNSUBSCRIBING DEVELOPERS FROM A SERVICE
85

CHAPTER 28. SUSPENDING APPLICATIONS
This guide explains how to disable all keys and access tokens for an application.
If an application is misusing your API and affecting other traffic, you may need to quickly suspend its
operations before contacting the developer involved to ask them to amend their code or configuration.
28.1. FIND THE APPLICATION
You can find the application from the Accounts or Applications tabs or by searching as described here.
28.2. DISABLE THE APPLICATION
Once you have located the application and see the application summary page, click on the suspend icon
next to the ‘State’ value. This action will immediately disable the application from the API and suspend
all keys from working. Calls with these application keys will be rejected by the control system.
The application can be unsuspended using the same button once the problematic behavior has been
rectified.
NOTE
If you use caching in your agents, suspension may not be immediate but require a short
timeout.
28.3. CONTACT THE DEVELOPER
How you contact the developer of the application will depend on your workflow and policy. On the same
page, you can click on the account name, which will take you to the account view where you can identify
the key administrator of the account that owns the application. You can contact them either by email or
by clicking on the send message button as shown, which will generate a dashboard message for the user.
Red Hat 3scale API Management 2.7 Admin Portal Guide
86

CHAPTER 28. SUSPENDING APPLICATIONS
87

CHAPTER 29. DELETING APPLICATIONS
To delete an application via the Admin Portal, you need to follow these steps:
Option 1: Delete an application from the list of all applications for [Your_API_name].
1. In the Dashboard, click [Your_API_name].
2. Click the Overview tab.
3. From the left panel on the Overview page, click Applications.
4. Choose Listing.
5. Click on an application.
6. You will see a page containing details of the application. Click Edit.
7. To delete the application, click Delete.
8. You will see a confirmation message. Click Ok to confirm the deletion.
Option 2: Delete an application based on a specific application plan.
1. In the Admin Portal, click Dashboard.
2. Choose API.
3. Under Published Application Plans, choose an application.
4. Click on an application.
5. You will see a page containing details of the application. Click Edit.
6. To delete the application, click Delete.
7. You will see a confirmation message. Click Ok to confirm the deletion.
Alternatively, you can also delete an application via 3scale API Docs, with the operation called
Application Delete.
Red Hat 3scale API Management 2.7 Admin Portal Guide
88

CHAPTER 30. DELETING AN API
You can delete an API by deleting its service. Deleting a service removes the API’s applications,
application plans, metrics, pricing rules, features, service plans, and subscriptions.
To delete an API:
1. Navigate to [Your_product_name] > Overview > Edit.
2. In the Service deletion section, click the link to delete the service.
CHAPTER 30. DELETING AN API
89

PART VII. ANALYTICS
Red Hat 3scale API Management 2.7 Admin Portal Guide
90

CHAPTER 31. API ANALYTICS
This guide is designed to help you tune your API analytics to track the items you need to know about and
to see top applications and trends over time.
Knowing how your API is used is a crucial step for managing traffic, provisioning for peaks, and
identifying top users so you can help them achieve greater success with your API.
31.1. PREREQUISITES
Complete the instructions of the Getting Started section before using this guide.
The guide assumes that you are using one of the existing 3scale code plugins to perform an integration.
You can follow a similar flow with other integration methods. Check the Operating APIcast chapter of
the documentation to learn more about the available integration options.
31.2. DETERMINING THE METRICS AND METHODS TO TRACK
3scale acts as an infinitely scalable data repository for your API product statistics, and you can track
almost any metric for your API product. For example:
Hits/transactions: calls to the API product. Hits are included by default as metrics on all APIs.
Hits can be overall calls to the API product or broken out into individual methods on the API
product.
Data transfer: quantity of MB/GB of data uploaded and downloaded via the API product
CPU hours: compute time (or some other internal resource) associated with calls to the API
product
Results returned: count of the number of records or data objects being returned
Disk storage: total disk storage in use by an account
You can track more metrics that are relevant to your API product. 3scale can track an arbitrary number
of metrics and methods, as long as it is a countable quantity that can be incremented over time.
31.3. CREATING YOUR METRICS AND METHODS
After you choose your metrics, register them in the Admin Portal. Navigate to [Your_product_name] >
Integration > Methods & Metrics.
You can add metrics and methods to your API. Specify a Friendly name and a System name, which are
used later in your plugin configuration. For more details about creating methods and metrics, see
defining your API on 3scale.
31.4. SETTING UP REPORTS
Once you have configured the 3scale system with the names of the metrics to track, it is time to tweak
your plugin setup to report the right metrics. The precise manner of doing this depends on the plugin or
integration method in use. By default, the plugins report the hits (API transactions) metric only.
Generally speaking, you need to follow these steps.
1. The application should pass the appropriate metric/method names to the plugin as determined
CHAPTER 31. API ANALYTICS
91

1. The application should pass the appropriate metric/method names to the plugin as determined
by the incoming API call. The metric/method value and the increment required is an argument
of authorize and/or report methods the plugin exposes.
2. You can also report the traffic using the 3scale Service Management API. You can find
information about different endpoints in the 3scale APIs ActiveDocs section. 3scale ActiveDocs
are available in your Admin Portal under the Documentation → 3scale API Docs section.
When you report traffic for a specific API method, use the method system name in the metric
argument. This automatically increments the counter both for the method reported and the hits metric.
31.5. CHECKING THAT TRAFFIC IS REPORTED CORRECTLY
Once the API and 3scale connection is established, you can send traffic to the API and watch it register
on the API Analytics dashboard. You need an existing developer account and an application with API
credentials to be able to perform the steps in this section. Follow these steps to create a developer
account and get an application with API credentials.
1. Open the Getting Started guide.
2. Navigate to Audience > Applications > Listing to see the list of existing applications.
3. Select an application by clicking on its name.
4. Find the API credentials for the selected application. The credentials depend on the selected
authentication type and can be a user key (API key), an application ID and application keys, or a
client ID and client secret. For more information about the available authentication modes, see
the authentication patterns article.
Figure 31.1. API credentials
5. Use these keys to make calls to your API in the usual way. For example, from the command line
Red Hat 3scale API Management 2.7 Admin Portal Guide
92

using cURL or from the browser for API endpoints using the GET method. The precise calls to
make depend on the structure of the methods on your API product. Traffic from these calls
appear in the Analytics section for your API product.
31.6. TROUBLESHOOTING
If traffic does not display on the usage charts in the Analytics section, perform the following checks.
Are authorize/report calls responding correctly?
All plugins call the 3scale Service Management API, which has predetermined response codes.
Authorize calls for valid keys should return responses with HTTP code 200. Report calls should
respond with code 202.
Are there errors in the integration error console?
The log of integration errors detected by 3scale can be found in [your_product_name] >
Analytics > Integration Errors.
Are the correct metric and method names being used?
The most common reason for failure is that the method and metric names passed in report calls
do not correspond to those created in the API settings of your Admin Portal. Check that you are
using the correct system names for each metric/method.
31.7. CONTROLLING WHO SEES THE ANALYTICS
By default, the usage statistics are visible to the API provider through the Admin Portal and to the
developers who created applications through the Developer Portal. (Each developer can see only the
usage statistics for their own applications.) You have the ability to hide the analytics views from the
Developer Portal. See the Creating the Developer Portal section to learn more about customizing the
Developer Portal.
31.8. ACCESSING ANALYTICS DATA BY API AND EMAIL REPORTS
Besides the usage graphs in the Analytics section, there are other methods to obtain the analytics data
of your API product.
Analytics API
You can use the 3scale Analytics API. It is a flexible way to extract all the analytics data for your
API product in either XML or JSON format.
Daily and weekly traffic reports (SaaS only)
These reports provide the aggregated data about your traffic, including information about new
subscribers to your API product and top applications. To enable these reports in the Account
Settings (gear icon) > Personal > Notification Preferences of your Admin Portal, find the
Daily report and Weekly report check boxes. If enabled, these reports are emailed to the admin
user of your 3scale account.
CSV export (SaaS only)
There is a download CSV link on each analytics view page, and you can download the usage
statistics in .csv format.
CHAPTER 31. API ANALYTICS
93

Red Hat 3scale API Management 2.7 Admin Portal Guide
94

CHAPTER 32. EXTENDING ANALYTICS
This article shows how to create scripts that extend the current capabilities of the built-in Red Hat
3scale API Management analytics.
By using the Account Management and Analytics API on Enterprise accounts only, you can create scripts
that get the custom information that you need in the format that you prefer. This article describes a
particular use case, but the same approach can be used to get whatever data you need out of 3scale.
32.1. REASONS FOR CUSTOMIZED SCRIPTS
3scale continuously improves the features available on your API Dashboard. However, you may be
ahead of our development plans and have a very specific need that is not yet supported.
To satisfy the needs for API management, 3scale always gives you the tools to access all your data.
However, customized scripts have some costs – it takes some resources to write the scripts – but the
cost is not too high, as we will show in this article. More importantly, DIY gives you total flexibility and
control to implement any use case you can think of.
32.2. A REAL-WORLD EXAMPLE
Recently a customer came to us with a very specific need that could not be solved with 3scale in a
streamlined way.
They were onboarding thousands of new developers per week. They were able to survive such success
thanks to the 3scale API Management Platform. Onboarding so many developers would be a daunting
task – luckily 3scale provides automates necessities such as key provisioning, sign-up workflows, and
email communication. So far so good.
There was, however, something that was not possible to do with 3scale, which was quite important for
them. Since they are onboarding so many people, they needed a straight-forward way to classify the new
developers based on their engagement with their API so that their operations and marketing teams
could interact with the new developers more effectively.
Such a feature, at least at the required level of detail, is not yet available in 3scale built-in analytics tools.
However since all the data is already available, it can be extracted using the 3scale Account and
Analytics API.
32.3. EXAMPLE: CUSTOMER REQUIREMENTS
They would like to know how many new developers have signed up for the free evaluation plan in the last
10 days, split up different ways.
First, they wanted to know how many developers signed up but did not use their API. What they wanted
to do with this information is out of scope for this article, but it is clearly valuable information that would
help adoption of your API.
Second, they wanted to split the developers that had used their API into two groups:
Developers that used it for a period of time – say the first half of the 10 days – and then stopped
using the API. These developers tried it out, but became inactive.
Developers that have been using the API consistently. For those, who would like to know the
percentage growth or decline.
CHAPTER 32. EXTENDING ANALYTICS
95
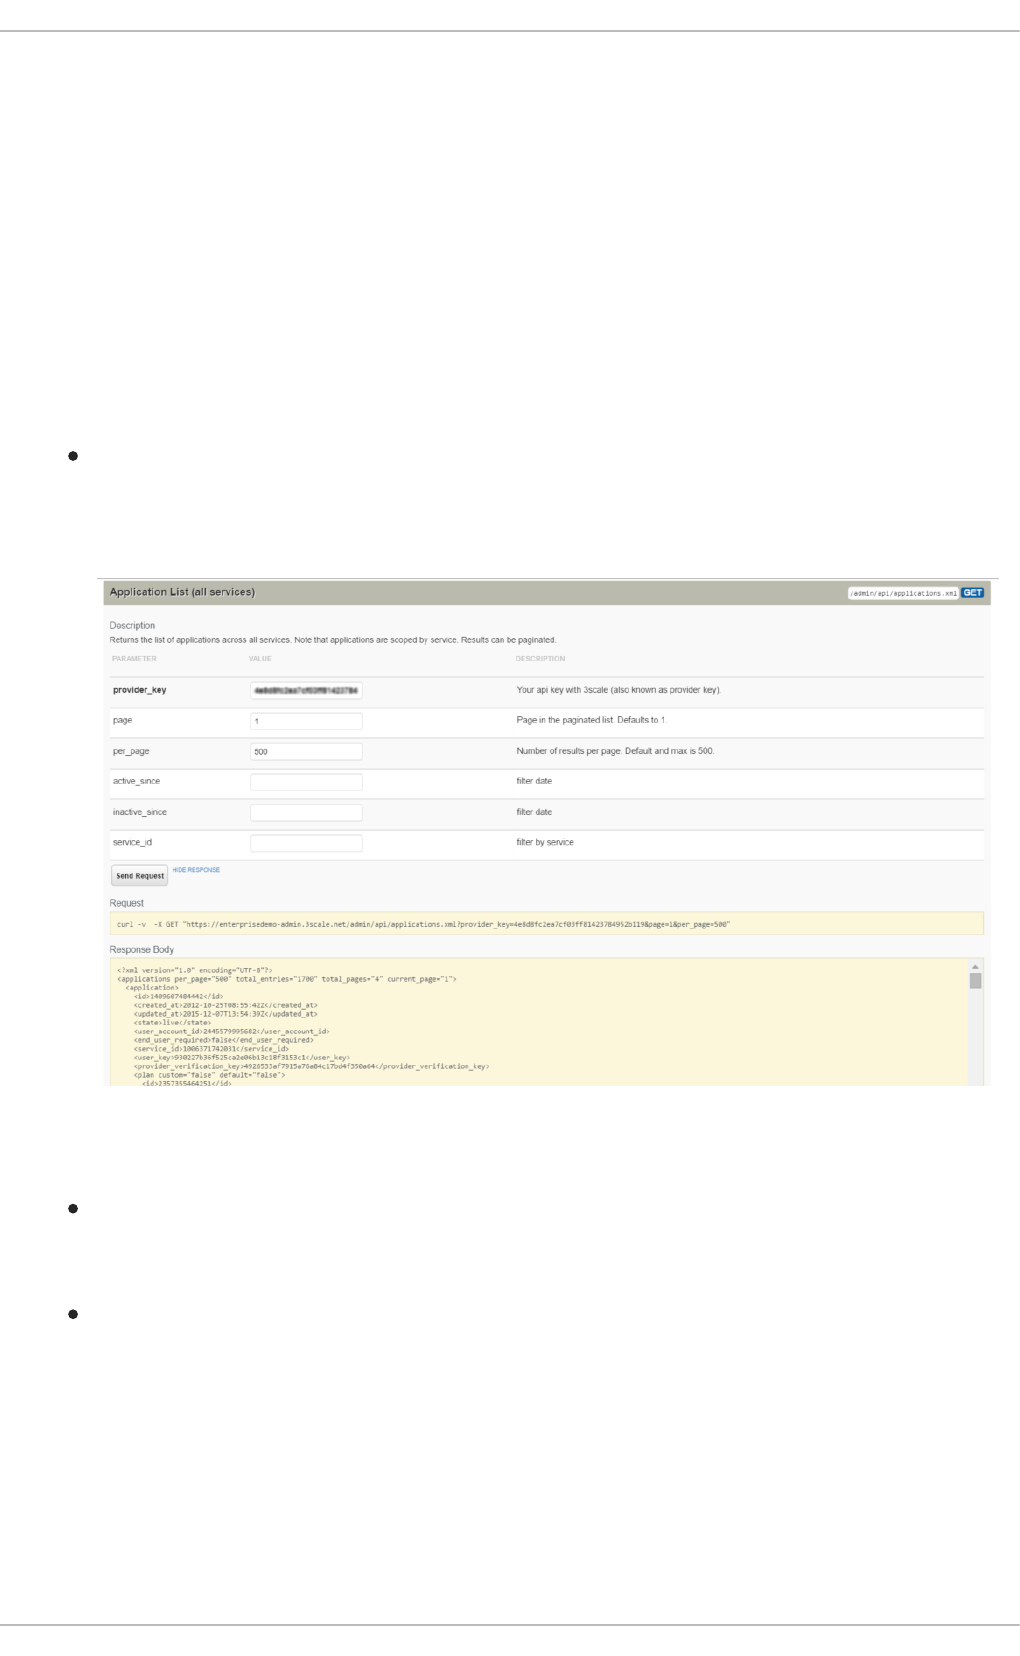
This information is available on 3scale built-in analytics. The problem is that there is no view to show it
aggregated, which makes the whole experience quite cumbersome.
A typical answer to this problem would be this classification will be part of the upcoming analytics revamp .
But that does not solve the problem if you need it now. We at 3scale want to give you the tools to do
everything you need to do without depending on our release schedule.
32.4. HANDS-ON IMPLEMENTATION
32.4.1. Winning recipe
This recipe usually gives better results in achieving custom work.
Tinker a bit with ActiveDocs. 3scale ActiveDocs, available in your Admin Portal, under the
Account Settings > Integrate > 3scale API Docs. 3scale has all of its APIs available as
ActiveDocs so that you can try them out from your browser. This allows you to find the request
that best serves your needs, get the request (curl-like) and get a grasp of the response. See an
example:
This is the ActiveDocs for the API request to fetch all applications that will be used on the script to
extend the analytics.
Once you have done the research with the ActiveDocs, put down the request on your scripting
language of choice, for example Ruby. Thanks to the request and responses provided by
ActiveDocs, it has never been easier to explore what the API does.
Repeat until you have a script that does exactly what you need. For the example of the
extended analytics, the script is available as a gist . You can try it out in your account.
As pedestrian as it sounds, this is the easiest way to proceed. The ActiveDocs let you quickly get a grasp
of what the API is able to do. Then, it is just a matter of finding which 3 or 4 requests are needed for the
task you want to do and putting a script together.
32.4.2. Step-by-step guide
These were the steps taken to achieve the custom analytics that this customer wanted:
Red Hat 3scale API Management 2.7 Admin Portal Guide
96

Retrieve the full list of applications. This operation requires pagination.
Filter the applications that do not meet the criteria, i.e. the plan must be "evaluation" and they
have to be newer than 10 days.
Then for each application that meets the criteria, get its usage, meaning how many hits the
application has had in the last 10 days.
def api_call_applications_list(domain, provider_key)
done = false
res = Array.new
page = 1
while !done
url = "https://#{domain}/admin/api/applications.xml?provider_key=#{provider_key}&page=#
{page}&per_page=100"
page += 1
response = RestClient.get url
raise Exception.new("Wrong response code (#{response.code}) in request #{url}") if
response.code!=200
document = Nokogiri::XML(response.to_str) done =
document.xpath("applications/@current_page").text ==
document.xpath("applications/@total_pages").text
document.xpath("//application").each do |item|
app = Hash.new
app["created_at"] = DateTime.parse(item.xpath("created_at").text)
app["plan_name"] = item.xpath("plan/name").text
app["service_id"] = item.xpath("plan/service_id").text
app["account_id"] = item.xpath("user_account_id").text
app["id"] = item.xpath("id").text
res << app
end
end
return res
end
def filter_applications(domain, provider_key, plan_name, num_of_days)
res = api_call_applications_list(domain, provider_key)
res.each do |item|
res.delete(item) if item["plan_name"] != plan_name
res.delete(item) if item["created_at"] > (DateTime.now - num_of_days)
end
return res
end
def api_call_application_usage(domain, provider_key, application_id, metric, from, to, granularity)
url = "https://#{domain}/stats/applications/#{application_id}/usage.xml?provider_key=#
{provider_key}&metric_name=#{metric}&since=#{from}&until=#{to}&granularity=#{granularity}"
response = RestClient.get url
raise Exception.new("Wrong response code (#{response.code}) in request #{url}") if
response.code!=200
document = Nokogiri::XML(response.to_str)
return document.xpath("//usage/data/values").text.split(",")
end
CHAPTER 32. EXTENDING ANALYTICS
97

Finally, you must cross-reference the applications to the accounts because the information of
the developers is stored in the account object.
Now you need to put everything together. Get the full script as a gist and you are done. You have a
script that gets the information that was not yet available on 3scale built-in analytics.
32.5. CONCLUSIONS
3scale is very DIY-friendly. We believe that anyone should be able to extend the current capabilities of
any service that they have contracted. As much as we would like to think that we can cover all the bases,
we will always be a bit behind in certain aspects, whether because it is a super special need or simply
because we are busy building other features. Whatever the case, we want to avoid blocking you when
something is not possible right away. We give you full access to your data and a complete API toolset to
work with it.
If you have scripts that you want to share with us and the rest of 3scale users, please send them. We
would be happy to collect and publish them.
def api_call_account_read(domain, provider_key, account_id)
url = "https://#{domain}/admin/api/accounts/#{account_id}.xml?provider_key=#{provider_key}"
response = RestClient.get url
raise Exception.new("Wrong response code (#{response.code}) in request #{url}") if
response.code!=200
document = Nokogiri::XML(response.to_str)
account = Hash.new
account["email"] = document.xpath("//users/user/email").text
account["name"] = document.xpath("//users/user/first_name").text + " " +
document.xpath("//users/user/last_name").text
return account
end
Red Hat 3scale API Management 2.7 Admin Portal Guide
98

CHAPTER 33. OUT-OF-THE-BOX ANALYTICS
By the end of this tutorial, you will be able to find visual information on an application’s traffic.
Each application using an API has a traffic trace in the 3scale system, which can be viewed from the
Admin Portal as well as recovered by an API.
To view traffic analytics for an application:
1. Navigate to the application for which you want to view analytics.
You can find the application from Audience > Accounts > Listing or Audience > Applications >
Listing, or by searching as described in the finding applications tutorial.
2. Review the application’s overview page.
After you have located the application, you will see an overview page with information about the
application as shown in the following image:
The items labeled in the image correspond to the following information:
1. The name of the application given by the developer.
2. Meta data captured for the application. You will learn how to set which data to capture in
the advanced section.
3. The status of the application – is it live or suspended?
4. The current API identifiers, keys, and certificates that the application has. This view varies
depending on what authentication method was used to integrate the API into 3scale.
5. A summary of traffic statistics for the application.
6. Information on which application plan the application is on and which rate limits apply.
3. Click the Analytics link above the application name.
CHAPTER 33. OUT-OF-THE-BOX ANALYTICS
99

The usage charts are displayed for the application. Controlling the metrics, methods, and time
range allows you to check different types of data about the application.
Red Hat 3scale API Management 2.7 Admin Portal Guide
100

CHAPTER 34. RESPONSE CODE TRACKING
This tutorial shows how to set up and use the response codes log in the 3scale system.
Tracking response codes from your API is a great way to see how your clients are using it and to see in
real time whether everything is fine with your servers.
To enable response code tracking feature, set the APICAST_RESPONSE_CODES environment
variable to 1 or true when starting APIcast gateway using Docker or OpenShift deployment.
When enabled, APIcast gateway captures the HTTP status code of API responses returned by the
upstream service for authorized calls, and sends them to the Service Management API (in authrep call).
Example:
https://su1.3scale.net/transactions/authrep.xml?service_token={SERVICE_TOKEN}&service_id=
{SERVICE_ID}&user_key={USER_KEY}&usage%5Bhits%5D=1&log%5Bcode%5D=200"
In this example,log[code]=200 is sent, which means that the API responded with a 200 status code.
To verify the integration, you must call your API with valid 3scale credentials, and then verify that the call
was correctly reported on the Analytics > Usage page.
NOTE
Response Code Tracking is not intended to be an accurate count of all responses.
The value of this view is to provide a visual representation of the trend over a
period of time.
Response Code Tracking and 3scale Auth Caching mode: None is not a
supported combination.
CHAPTER 34. RESPONSE CODE TRACKING
101

If everything is going well so far, go to the Analytics >Response codes page. You should be able to see
a graph with your latest traffic divided by colors, depending if the response was 2xx, 4xx, or 5xx.
The graph tool gives you the ability to view the history of response codes. You can also check the
response code statistics for different periods of time and different levels of granularity. Simply click on
the time selection bar and define the time period and granularity that will fit your needs.
Red Hat 3scale API Management 2.7 Admin Portal Guide
102
