
ASSEMBLY INSTRUCTIONS
ITEM#: A208064301
SKU#8105 80389
PEMBROKE FIRE PIT
DINING TABLE
Need help? We are here for you! 1(866)578-6569 24/7 • Toll Free
Production number: 2023100
480
PEMBROKE COLLECTION

For Outdoor Use Only.
Installation and service must be performed by a
qualified installer, service agency, or the gas
supplier.
If you smell gas:
1. Shut off gas to the appliance.
2. Extinguish any open flame.
3. If odor continues, leave the area immediately
4. After le aving the area, call your gas supplier or fire
department.
Failure to follow these instructions could result in fire or
explosion, which could cause property damage, personal
injury, or death.
Leave this manual with the
appliance.
Retain this manual for future
reference.
WARNING: If the information in this manual is not
followed exactly, a fire or explosion may result causing
property damage, personal injury, or loss of life.
Do not store or use gasoline, or other flammable vapors and liquids, in the vicinity of this or
any other appliance.
An LP - cylinder not connected for use shall not be stored in the vicinity of this or any other
appliance.
This appliance can produce carbon monoxide which has no odor.
Using it in an enclosed space can kill you.
Never use this appliance in an enclosed space such as a camper, tent,
car or home.
This appliance complies with “ANSI Z21.97-2017/CSA 2.41-2017, Outdoor Decorative Gas Appliances.
2/20
Prophane cylinder required (not included)
1AA 1.5V battery required (not included)
CAUTION

General information
Specification
Important safety information and precaution
Expanded view
Parts list
Installation
Location
Set up
Gas connection
Operation
Leak check
Ignite lighting
Storage and Maintenance
Trouble shooting
Limited warranty
- - - - - - - - - - - - - - - - - - - - - - - - - - - - - -
- - - - - - - - - - - - - - - - - - - - - - - - - - - - - - - - - - - - - - - - - - - - - 3
- - - - - - - - - - - - - - - - - - - - - - - - - - - - - - - - - - - - - - - - - - - - - - - - - - - - - - - - - - - - - - - - - - - - - - - - - - - - - - - - - 4
- - - - - - - - - - - - - - - - - - - - - - - - - - - - - - - - - - - - - - - - - - - - - - - - - - - - - 4-5
- - - - - - - - - - - - - - - - - - - - - - - - - - - - - - - - - - - - - - - - - - - - - - - - - - - - - - - - - - - - - - - - - - - - - - - - - - - - - - - 6
- - - - - - - - - - - - - - - - - - - - - - - - - - - - - - - - - - - - - - - - - - - - - - - - - - - - - - - - - - - - - - - - - - - - - - - - - - - - - - - - - - - - - 7
- - - - - - - - - - - - - - - - - - - - - - - - - - - - - - - - - - - - - - - - - - - - - - - - - - - - - - - - - - - - - - - - - - - - - - - - - - - - - - - - - - - 9
- - - - - - - - - - - - - - - - - - - - - - - - - - - - - - - - - - - - - - - - - - - - - - - - - - - - - - - - - - - - - - - - - - - - - - - - - - - - - - - - - - - - 16
- - - - - - - - - - - - - - - - - - - - - - - - - - - - - - - - - - - - - - - - - - - - - - - - - - - - - - - - - - - - - - - - - - - - - - - - - - - - - - - - - - - - - - 16
- - - - - - - - - - - - - - - - - - - - - - - - - - - - - - - - - - - - - - - - - - - - - - - - - - - - - - - - - - - - - - - - - - - - - - - - - - - - - - 16
- - - - - - - - - - - - - - - - - - - - - - - - - - - - - - - - - - - - - - - - - - - - - - - - - - - - - - - - - - - - - - - - - - - - - - - - - - - - - - - - - - 17
- - - - - - - - - - - - - - - - - - - - - - - - - - - - - - - - - - - - - - - - - - - - - - - - - - - - - - - - - - - - - - - - - - - - - - - - - - - - - - - - - - 17
- - - - - - - - - - - - - - - - - - - - - - - - - - - - - - - - - - - - - - - - - - - - - - - - - - - - - - - - - - - - - - - - - - - - - - - - - - - - - - - 17
- - - - - - - - - - - - - - - - - - - - - - - - - - - - - - - - - - - - - - - - - - - - - - - - - - - - - - - - - - - - - - - - - - - - - 18
- - - - - - - - - - - - - - - - - - - - - - - - - - - - - - - - - - - - - - - - - - - - - - - - - - - - - - - - - - - - - - - - - - - - - - - - - - - - - 19
- - - - - - - - - - - - - - - - - - - - - - - - - - - - - - - - - - - - - - - - - - - - - - - - - - - - - - - - - - - - - - - - - - - - - - - - - - - - - 19
Failure to position the parts in accordance with these diagrams or use only parts specifically approved with this appliance
may result in property damage or personal injury.
This product can expose you to Carbon Monoxide, which is known to the State of California to cause birth defects or
other reproductive harm. For more information go to www.P65Warnings.ca.gov
Please take time to read these instructions thoroughly and follow each step carefully for
safe and easy operation. Keep this manual to
consumer for installer and consumer future
reference/use.
We would like to hear from you with any comments or suggestions. In the continental U.S.,
you can call Sunjoy Toll Free number: 1-866-578-6569 at any time.
You can also send us an email to [email protected]
3/20
TABLE OF CONTENTS
GENERAL INFORMATION
WARNINGS:

• The installation must conform with local codes, or in the absences of local codes with the National
Fuel Gas Code, ANSI Z223.1/NFPA54; International Fuel Gas Code, Natural Gas and Propane
Installation Code, CSA B149.1; or Propane Storage and Handling Code, B149.2, as applicable.
• The LP gas supply cylinder to be used must be:
1- Constructed and marked in accordance with the U.S. Department of Transportation (D.O.T.)
Specifications for LP-Gas Cylinders, or the Standard for Cylinders, Spheres and Tubes for
transportation of Dangerous Goods and Commission, CAN/CSA-B339 as applicable;
2- Provided with a listed overfilling prevention device;
3- Provided with a cylinder connection device compatible with the connection for the appliance.
• Always place the appliance on a firm and level surface.
• Solid fuels shall not be burned in this gas appliance. When using decorative Lava Rocks, use only
Lava Rocks (INCLUDED).
• The appliance shall be used only outdoors in a well-ventilated space and shall not be used in a
building, garage or any other enclosed area.
• When in use, keep the appliance area clear and at least 40 in / 101.6 cm side, back and top
clearance from combustible materials, gasoline and other flammable liquid and vapors. Do not use
the appliance under overhead combustible surfaces. Certain items or materials, when stored under
the appliance or nearby, will be subjected to radiant heat and could be damaged.
PEMBROKE FIRE PIT DINING TABLE
A208064301
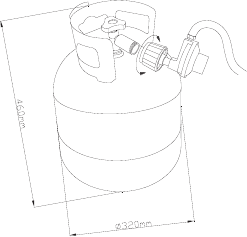
38,000 BTU/HR
Propane - LP
20 lb. LP - Gas cylinder
11 Inches W.C.
1.9mm
Max. 250 PSI Min. 25 PSI
4/20
IMPROTANT SAFETY INFORMATION AND PRECAUTION
• Open the door and inspect the hose assembly and burner prior to each use. If there is evidence of
excessive abrasion or wear or if the hose or burner is damaged, it must be replaced by appropriate
part from the manufacturer.
• Inspect the gas connections of the appliance prior to each use. Do not to operate the unit if there is a
gas leak. Have the appliance inspected annually by a qualified service person.
• The pressure regulator and hose assembly provided with the appliance must be used. The replacement
part must be the same as the part specified by manufacturer.
• The assembly of LP-gas and leak checking please refer to the “Gas connection” on page 16 and
“leak Test” on page 17.
• Children and adults should be alerted to the hazards of high surface temperatures and should stay
away to avoid burns or prevent clothing ignition.
• Young children and pets should be carefully supervised when they are in the area of the appliance.
• Any guard or other protective device removed for servicing the appliance must be replaced prior to
operation.
• Clothing or other flammable materials should not be hung from the appliance or placed on or near the
appliance.
• Do not use the appliance if any part has been under water. Immediately call a qualified technician to
inspect the appliance and to replace any part of the control system and any gas control which has
been under water.
• LP-gas supply cylinder to be used must be constructed and marked in accordance with the
specifications for LP-gas cylinders of the U.S. Department of Transportation (DOT).
• The cylinder supplies system must be arranged for vapor withdrawal and the cylinder must include a
collar to protect the cylinder valve.
• Use only 20 lb / 9 kg LP-Gas cylinders.
• Do not burn wood or any other materials in this appliance.
• The appliance must be isolated from the gas supply piping system by closing
its individual manual shutoff valve during any pressure testing of the gas supply
piping system at test pressure equal to or less than 1/2psi (3.5kPa).
• Properly place the hose out of pathways where people may trip over it or in areas where there may be
subject to accidental damage.
• The burner must be replaced prior to the appliance being put into operation if it is evident that the
burner is damaged. The replacement burner must be the same as the part specified by manufacturer.
• The cleaning of the appliance including the burner, please refer to “Storage and Maintenance” on
page 18.
5/20

6/20
EXPANDED VIEW
F
G
J
K

7/20
PARTS LIST
Label Part Number Description Qty Part Image
A
P00310013401 Lid 1
B
P00310010302
Mesh screen
1
C
P00210055301 Table top 1
D
P00410019401 Door 1
E
P00400038201 Rear door 1
F
P00380057001
Side panel 2
G
P00670007101 Cylinder rack 1
P002500130 Fire bowl 1
P006600048
Lava rock
3KG
J
K

If you want to replace the parts listed, please contact Customer Service Center: 1(866) 578-6569.
8/20
Label Part Number Description Qty Add Part Image
H1
H010010003 Bolt M6*15
H050030001
Flat washer
M6
H090010017
24
24
1
3
3
0Wrench M6
H2
HW
HARDWARE PACK

9/20
Fit Side panel (F) with Rear door (E),
assemble with Bolt (H1) and Flat washer
(H2), then assemble with Wrench (HW).
2 places in total.
STEP 1
2x
2x
1x
1x

10/20
Fit Side pane
l (F) with Rear door (E),
assemble with Bolt (H1) and Flat
washer (H2), then assemble with
Wrench (HW). 2 places in total.
STEP 2
2x
2x
1x

11/20
Fit Cylinder rack (G) with Side
panel (F), assemble with Bolt (H1)
and Flat washer (H2), then
assemble with Wrench (HW). 4
places in total.
STEP 3
4x
4x
1x
F
E
F
G
G
G
12/20
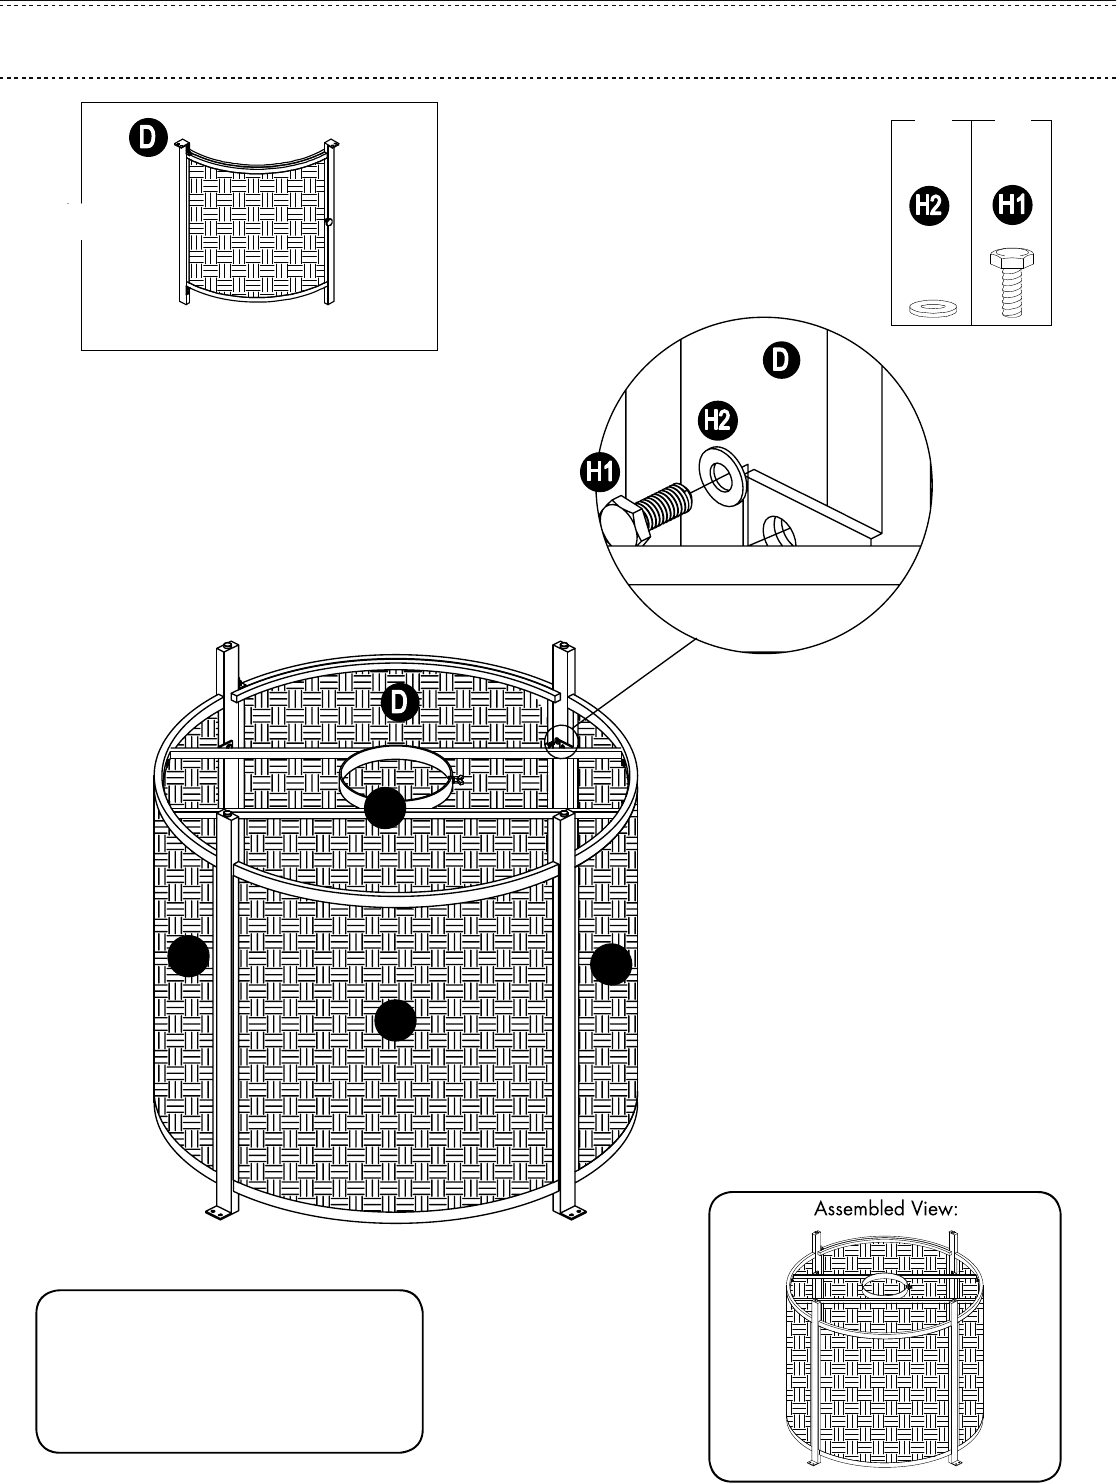
Fit Door (D) with Side panel (F),
assemble with Bolt (H1) and Flat
washer (H2), then assemble with
Wrench (HW). 4 places in total.
STEP 4
4x 4x
1x
E
F
F
G

13/20
Fit Table top (C) with Fire bowl (J),
assemble with Bolt (H1) and Flat
washer (H2), then assemble with
Wrench (HW). 4 places in total.
STEP 5
4x
4x
1x
1x
J
J
J

14/20
Put the assembled (D/E/F) to the
assembled Table top (C) with Bolt (H1)
and Flat washer (H2), and tighten all
Bolts with Wrench (HW). Please note
that the control knob should face the
door.
STEP 6
8x
8x
1 AA 1.5V battery required
(not included)refer to page
16 -SETUP.

15/20
Pour the Lava rock (K) into the Fire
bowl (J), close the Mesh screen (B),
and finally close the Lid (A).
STEP 7
1x
1x
1x
K
K
J
F
Your Gas appliance must be installed on a flat, stable surface, away from any combustible materials or
construction.
Your Gas appliance comes assembled, ready for a Gas connection.
1 - Remove the appliance from container box and place it on any level, outdoor, non-combustible
surface.
NOTE: Do not place this appliance on grass or dirt area. This may prevent proper safety venting.
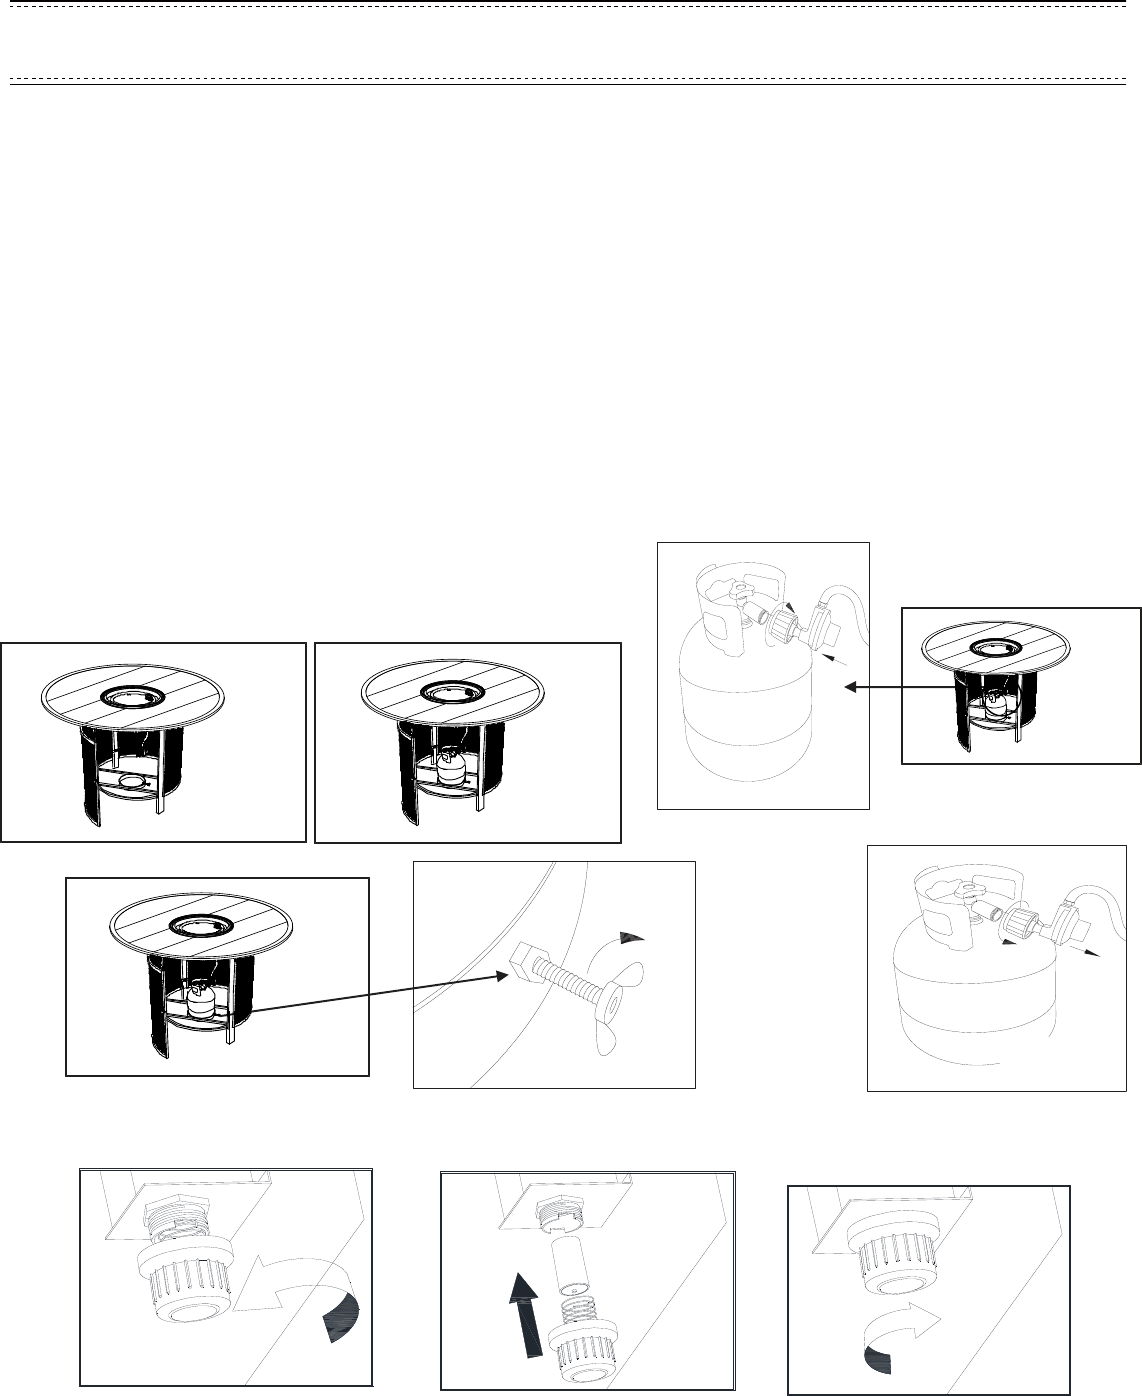
2 - Open the gas door and put the cylinder inside.
1 - Open the door and control valve outside. See Fig 4.
2 - Put the cylinder into the cylinder rack. See Fig 5.
3 - Connect the regulator and the cylinder as per Fig.6. Make sure there is no leakage or damage
(please refer to “Leak Test” on page 15 and the damage checking on page 4).
4 - Turn the butterfly nut on the cylinder frame, so that the nut is held against the bottom of the cylinder,
to make sure the cylinder can be fixed. See Fig 7.
5 - Disconnect the regulator and the cylinder as per Fig.8
LOCATION
Fig.8
Fig.4
Fig.5
Fig.7
Fig.6
Fig.6
6 -
Unscrew the battery box as shown in Fig 1.Insert the negative electrode side of the battery into the
bottom of battery box as shown in Fig 2. Then screw the battery box as shown in Fig 3.
Fig 1
Fig 2
Fig 3
Note: If the battery of the pulse electronic igniter runs out of power, please replace the new battery
as above.1AA 1.5V Battery required (not included)
16/20

17/20
s
1 - Make sure the control knob is in the “OFF” position.
2 - Make sure the gas cylinder is correctly and securely connected to the pressure regulator, without
over tightening.
3 - Turn on the gas cylinder valve. Apply 50% soap and 50% water solution to the gas hose and
connections between the control knob and gas cylinder.
4 - If something is leaking, you will see bubbles form. In case of leaks, turn off the gas supply, undo the
leaking connection, re-connect it and try again. If the leak persists, consult Customer Service
Center for assistance (1(866) 578-6569).
5 - If the connection does not leak, continue to the next step.
1- Put 1AA 1.5V battery into the ignition
2 - Push in and turn control knob to LOW.
3 - If the burner is not lit, turn the knob back to "OFF" .
Wait 5 minutes and repeat step 1.
4 - If burner is lit,Continue to depress control knob for
1-2 minutes until the thermocouple is hot.
5 - Release control knob and the burner should stay lit.
6 - Turn control knob to desired heat setting,LOW-HIGH.
7 - Turn control knob to OFF to shutdown. Turn off gas supply at
cylinder.Allow a 5-minutes complete shut off period before
relighting the appliance.
OPERATION:

18/20
While in use, the burner flame should be mainly blue in appearance with a small amount of yellow.
The flame can be identified by the following figure.
7 - Press in and turn the control valve knob clockwise to OFF to shut down fireplace. Close the gas
cylinder valve when the fireplace is not in use.
( Do not kink flexible gas hose. If it is kinke
d, a gas leak could occur.)
To obtain the best performance from your fireplace, you must perform the following storage and
maintenance activities on a regular basis:
• Allow at least 35 minutes for the fireplace to cool down after use, before disconnecting and removing
the gas cylinder.
• Store the gas cylinder in a dry, well-ventilated and
sheltered area protected from inclement weather
and dust, out of the reach of children, and not in a building, garage or any other closed area.
• The fireplace may be stored indoors only if the cylinder is disconnected and removed.
• Keep the fireplace area clear and free from combustible materials, gasoline and other flammable
vapors and liquids.
• Installation and repair should be done by a qualified service person. The fireplace should be
inspected before use and at least annually by a qualified service person. More frequent cleaning
may be required as necessary. It is imperative that the control compartment, burner, and
circulating air passageways of the fireplace be kept clean.
• If you disassemble the burner when cleaning the fireplace, please
reassemble it according to the picture on the right to make sure the burner
induction tunnel is on and exactly cover the orifice base. It is imperative that
the control compartment, burner, and circulating air passageways of the
fireplace be kept clean. It is recommended not to disassemble the burner.
• Permanent installation and repair should be done by a qualified service
person. The fireplace should be inspected annually by a qualified service person.
STORAGE AND MAINTENANCE:

19/20
Gas odor Gas leak See “If you smell gas:” on front
cover of manual
Check all gas connections
Delayed ignition Low gas pressure
Clogged or dirty
burner
ports Blocked orifice
Spent battery
Check gas supply pressure
Clean burner ports-see manual
section
Check orifice opening
Change new battery
Incorrect burner flame Incorrect gas supply or
pressure Blocked
orifice
Clogged or dirty burner
ports
Check gas supply pressure
Check and clean orifice opening
Clean burner ports
If you want to replace the parts listed, please contact SUNJOY Customer Service Center (1(866)
578-6569).
Subject to the conditions set out below, this product is warranted to the original purchaser to be free from
defects in workmanship and materials for one (1) year from the date of purchase.
• Satisfactory proof of the purchase date must be furnished at the time of notification of the defect for
any claim under the warranty to be enforceable.
• This warranty covers all parts found defective in workmanship and/or materials during the warranty
period and can be repaired or replaced at the discretion of the manufacturer at no cost to the original
purchaser.
• This warranty will be void if the product has not been assembled, installed or operated according to
the instructions, or subjected to abuse, improperly treated, neglected, rusted by exposure to the
elements, misused and/or if any repairs, maintenance, or service has been done by an unauthorized
person.
• Returns must be properly packaged and returned to the dealer from whom the product was acquired.
• The manufacturer, distributor and retailer will not be liable for any incidental or consequential loss or
damage arising from the installation or operation of the product and/or the failure of any part for any
reason.
• There are no other express or implied warranties, except for those stipulated herein. This warranty
gives specific rights and the original purchaser may have additional rights and remedies in law.
• This warranty does not cover commercial use.
Made in China
TROUBLE SHOOTING:

20/20
Please be advised that this fire pit table uses natural lava rock that may crackle or pop when
it is used. The lava rock has been pre-heat treated, however the lava rock may pop or burst causing small
pieces of hot lava rock to fly out of the fire pit area unless covered with the wire mesh screen. You have
been provided a wire mesh screen which should be placed over the burner and lava rock area at all
times to prevent lava rock from flying out of the contained area. When in use, please make sure that the
wire mesh screen is maintained in place covering the lava rock and burner area at all times.
As a precaution, please follow these instructions when in use of the fire pit table:
1 - Follow the product's instruction manual.
2 - Set up the fire pit table in a safe distance away from any combustible materials.
3 - Use the protective wire mesh screen over your lava rock and burner area when in use!
4 - Lava Rock is a natural stone subject to moisture, therefore while burning your LP you may hear
crackling due to moisture in the lava rock. Do not be alarmed this is a natural occurrence!
5 - It is strongly recommended that you cover the fire pit table when not in use with the metal cover plate.
If left uncovered, moisture may be present and can cause the lava rock to pop again but will subside
after it burns for 30 minutes. (Use the protective wire mesh screen over your lava rock and burner)
Label
Part Number Description Qty Part Image
B
P00310010302
Mesh screen 1
PARTS LIST
