
4-H POSTER
HINTS
Tips for Making 4-H Posters with Impact!
Compiled by:
Barbara Bowman, Extension Educator
Purdue Cooperative Extension - Brown County
Revised: June 2013
Katie Zuber, Extension Educator
Purdue Cooperative Extension - Monroe County
4-H Poster Rules
All 4-H poster exhibits (unless otherwise specified in project manual) must be 22” x 28” in size, displayed
horizontally, and backed with a solid 22” x 28” foamcore backing.
• Plywood, masonite, or similar materials MAY NOT be used for poster backing (unless otherwise specified in
project manual—i.e., small engines).
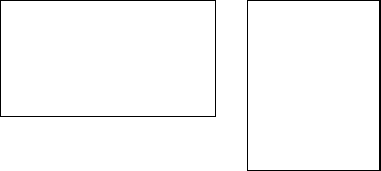
• Poster must be displayed horizontally. Vertical posters will be dropped one place.
All poster exhibits may be made on any color of poster board or suitable material (i.e., fabric, wrapping paper,
etc.), and then be securely attached and mounted on the foamcore backing.
It is best to use rubber cement to attach the poster board to the foamcore backing, as then the
foamcore backing can usually be used again.
Attaching the poster board or other material to the foamcore backing BEFORE you put anything
else (pictures, labels, etc.) on the poster works best. If you do this, make sure you let it dry for a
couple of days or the cement will retain moisture and ruin the poster.
The foamcore backing itself can be used as the poster.
The Extension Office has the correct size of foamcore backing, available for $2.25 each.
All poster exhibits should be covered with a clear plastic, acetate, or transparent covering to protect your
exhibit and make it more attractive.
Plastic sleeves available from the Extension Office
Heat shrink plastic available at craft, hardware, and discount stores. Lay a sheet of plastic
(approximately 28” x 34”) on a hard surface. Place your poster (including foamcore backing)
facedown and tape the plastic to the backside of the exhibit). The final thickness should be
about ¼ to ½ inch.
Do NOT use Saran Wrap!
The Extension Office has plastic sleeves, available for $1.00 each. The sleeves are the correct size to fit
your poster board and seal at the one end.
Every poster (except Minis) must have Velcro dots secured to the back of the poster.
Use at least 8 circles per poster, placing dots in from the edge of the exhibit (outside the plastic
sleeve) about 8 inches.
Have the dots attached BEFORE bringing the exhibit to the fair. It takes about 12 hours to cure.
The Extension Office has Velcro dots available for $0.25.
Each poster must have a label. The label should be placed in the lower right-hand corner of your poster.
This is the information that is required (unless instructed differently in the project manual).
Name; County; 4-H Club; Project; Division
Correct Way
Wrong
Way
Planning Your Poster
• Read the project manual
• Read your county project requirements in the Fair Book
• Decide on a subject to express ONE THOUGHT OR IDEA
• Look at the WHO – WHAT – WHY – HOW
WHO is audience you wish to reach?
WHAT is the subject matter you wish to present?
WHY – the purpose of the poster.
HOW to express your message.
Only when you have clearly defined the answer to WHO, WHAT, and WHY can you proceed to HOW!
• Select a TITLE. The title you choose would:
Identify the exhibit (tell content)
Short (limit it to 4-5 words)
Simple (use short, simple words)
Attract attention
Personal – “Your Food Dollars”
Action – “Make Your Own Belt”
Question – “How Well Are You Fed?”
Catchy – “Freeze Food for Fresh Flavor”
• Plan an ARRANGEMENT to:
Attract and interest the viewer
Provide good balance – formal or informal
Be simple, neat, clear, interesting, and in good taste
• Influence the VIEWER’S EYE by:
Direction the objects or figures face. The eye should lead in and around the display not out of it.
Keeping heavy materials from coming too close to top, bottom, or sides of the poster.
Sequence of information. The eye moves from one object to the next in logical order.
Pull of directional line. Attention is directed to specific objects in the display. Use devices to pull
groups together (lines overlapping, color repeats, etc.).
Amount and arrangement of contrasting areas. A pattern of lights and darks
leads the eye in a given direction.
Effective 4-H Posters
Your poster needs: STOPPING POWER
APPEARANCE
• Simple - not too much information on one poster
• Can be read at a glance
Specific main idea
Brief wording, short and to the point
• Title is short, simple, and catchy
• Title may suggest a theme (refer to project manual for required themes)
• Arrangement is well-designed
• Framing or border is done within the 22” x 28” poster dimensions
Your poster should be: INTERESTING
ATTRACTS INTEREST
• Attracts attention immediately
• Contrast-- unusual lines, shapes, and textures (color & design)
• Good use of color (in background, objects, & lettering)
• Display is attractive and shows creativity
Your poster should be: CONVINCING
HOLDS INTEREST
• Idea expressed well
• Conveys a message
• Tells the message accurately and completely
• Message--expresses only one idea in each poster
But you have to remember the: MECHANICS
WORKMANSHIP
• Soft pencil (no. 2) can be used to make guide line marks which are easily erased (art gum eraser)
• Items must be securely attached or mounted to poster board or background material
• Lettering
Use a guide line or ruler for consistency and neatness
Lettering should not be crowded onto poster
Use plain, bold lettering and lines
Lower case letters are more easily read than capitals
Horizontal letters are easier to read and design than vertical letters
Be sure your lettering is large enough to be seen
Do not mix colors in a message. Keep letters all one color.
Various types of lettering can be used. Gummed letters, cutout letters, pressure-sensitive
transfer letters; as well as letters in felt, paper, cardboard, plastic, metal, or wood are
available at bookstores and office supply stores.
Your local bookstore or office supply store should carry lettering aids such as rubber stamps
and lettering stencils.

• Color
Use neutral or soft colors for backgrounds (grays, greens, and blues in pastel shades are excellent
background colors)
Color of lettering should contrast with background
Limit to two or three colors--usually it is best to select one lettering color to go with your overall
background color. A third color may be used in small amounts for accent and attention.
Use bright, intense colors for the smaller areas and if possible for the center of interest. Red is a
good accent color.
Color combinations ranked in order for legibility:
1.
Black on yellow
5.
Black on white
9.
White on black
2.
Green on white
6.
Yellow on black
10.
Red on yellow
3.
Blue on white
7.
White on red
11.
Green on red
4.
White on blue
8.
White on orange
12.
Red on green
Here is a list of color combinations which may help you to select colors for your poster. Some of the
combinations may seem unusual but you will find they will work magic to attract and hold attention.
Accent
(least amount)
Props
(happy medium)
Background
(largest amount)
Green Chartreuse Light yellow
Violet Lilac Light Gray
Red Pink or black Light Gray
Blue Light blue Light gray
Blue and gray Light blue White
Violet and white Medium gray Pink
Red Ivory Light yellow
Blue Light blue Chartreuse
Green Beige Light gray
Black and white Light gray Chartreuse
Black and white Medium blue Light gray
Blue Deep Pink Light blue
Black Orchid Pink
Black Light green Light yellow
Black Medium blue Light gray
Blue and silver Cream White

DO! DO! DO!
• Do keep it organized
• Do use correct spelling!
• Do use only one idea
• Do use devices to pull groups together (lines overlapping, color repeats, etc.)
• Do keep heavy materials from coming too close to top, bottom, or sides of the poster
• Do make lines (the viewer’s eye) carry to main center of interest, not out of the poster
• Do make cuts evenly, paste cleanly, measure for centers and parallels
DON’T! DON’T! DON’T!
• Don’t use staples, tacks, or tape
Tape is acceptable in a few areas (i.e., attaching leaves to poster)
• Don’t use fluorescent poster board
• Don’t create a poster with all words or all pictures
• Don’t use complicated designs or naturalistic drawings
• Don’t use several small centers of interest
• Don’t use fine, threadlike writing or very small lettering
• Don’t forget the need for good balance and proportion
Need ideas?
• Look at advertisements, billboards, theater signs, travel posters, and magazines

POSTER PREPARATION WITH VELCRO
All posters need to be 22’ x 28’ and must be displayed horizontally.
All posters need to be covered with plastic. Several methods of covering are popular.
The most popular is a plastic sleeve made to fit. These sleeves are available at the
Extension Office. Other methods include: Heat shrink type plastic, available at craft and
hardware stores or plastic purchased at craft/sewing store. You may also have framing
shops cover your poster for a fee.
All posters must use foamcore board as the backing product. You may not use
plywood, or masonite or similar materials for poster backing. Remember if you
purchase foamcore board from some other source it may not be the correct size! You
may use the foamcore as the poster or you can have a poster board attached to it.
Velcro must be attached to the back of posters before display. It takes several hours to
cure (at least 12 hours). Please secure your velcro to the back of your poster before
you bring it to the fair.
We suggest you use at least 8 circles of Velcro per poster. Placement should be in from
the edges of the poster about 8 inches.
All posters must have a label in the front lower right corner. It should include: Name,
County, 4-H Club, Project, Division.
Please refer to Poster General Rules in the 4-H Fair Book for more information!
X X X
X X
X X X
28”
22”
