
AWS SDK for JavaScript
Developer Guide for SDK v2

AWS SDK for JavaScript Developer Guide for SDK v2
AWS SDK for JavaScript: Developer Guide for SDK v2
Copyright © 2018 Amazon Web Services, Inc. and/or its affiliates. All rights reserved.
Amazon's trademarks and trade dress may not be used in connection with any product or service that is not Amazon's, in any manner
that is likely to cause confusion among customers, or in any manner that disparages or discredits Amazon. All other trademarks not
owned by Amazon are the property of their respective owners, who may or may not be affiliated with, connected to, or sponsored by
Amazon.

AWS SDK for JavaScript Developer Guide for SDK v2
Table of Contents
What Is the AWS SDK for JavaScript? ................................................................................................... 1
Using the SDK with Node.js ......................................................................................................... 1
Using the SDK with AWS Cloud9 .................................................................................................. 1
Using the SDK with AWS Amplify ................................................................................................. 1
Using the SDK with Web Browsers ............................................................................................... 2
Common Use Cases ............................................................................................................ 2
Getting Started .................................................................................................................................. 3
Getting Started in a Browser Script .............................................................................................. 3
The Scenario ..................................................................................................................... 3
Step 1: Create an Amazon Cognito Identity Pool .................................................................... 4
Step 2: Add a Policy to the Created IAM Role ........................................................................ 4
Step 3: Create the HTML Page ............................................................................................. 5
Step 4: Write the Browser Script .......................................................................................... 5
Step 5: Run the Sample ...................................................................................................... 5
Full Sample ....................................................................................................................... 7
Possible Enhancements ....................................................................................................... 8
Getting Started in Node.js ........................................................................................................... 8
The Scenario ..................................................................................................................... 8
Prerequisite Tasks ............................................................................................................... 8
Step 1: Configure Your Credentials ....................................................................................... 9
Step 2: Create the Package JSON for the Project .................................................................... 9
Step 3: Install the SDK and Dependencies ............................................................................. 9
Step 4: Write the Node.js Code .......................................................................................... 10
Step 5: Run the Sample .................................................................................................... 10
Using AWS Cloud9 with the SDK for JavaScript .................................................................................... 11
Step 1: Set up Your AWS Account to Use AWS Cloud9 ................................................................... 11
Step 2: Set up Your AWS Cloud9 Development Environment .......................................................... 11
Step 3: Set up the SDK for JavaScript ......................................................................................... 12
To set up the SDK for JavaScript for Node.js ........................................................................ 12
To set up the SDK for JavaScript in the browser ................................................................... 12
Step 4: Download Example Code ................................................................................................ 12
Step 5: Run and Debug Example Code ........................................................................................ 13
Setting Up the SDK for JavaScript ...................................................................................................... 14
Prerequisites ............................................................................................................................ 14
Setting Up an AWS Node.js Environment ............................................................................. 14
Web Browsers Supported .................................................................................................. 14
Installing the SDK .................................................................................................................... 15
Installing Using Bower ...................................................................................................... 16
Loading the SDK ...................................................................................................................... 16
Upgrading From Version 1 ......................................................................................................... 17
Automatic Conversion of Base64 and Timestamp Types on Input/Output ................................. 17
Moved response.data.RequestId to response.requestId .......................................................... 17
Exposed Wrapper Elements ............................................................................................... 18
Dropped Client Properties ................................................................................................. 19
Configuring the SDK for JavaScript ..................................................................................................... 20
Using the Global Configuration Object ........................................................................................ 20
Setting Global Configuration ............................................................................................. 20
Setting Configuration Per Service ....................................................................................... 21
Immutable Configuration Data ........................................................................................... 22
Setting the AWS Region ............................................................................................................ 22
In a Client Class Constructor .............................................................................................. 22
Using the Global Configuration Object ................................................................................ 22
Using an Environment Variable .......................................................................................... 22
Using a Shared Config File ................................................................................................ 22
iii

AWS SDK for JavaScript Developer Guide for SDK v2
Order of Precedence for Setting the Region ......................................................................... 23
Specifying Custom Endpoints ..................................................................................................... 23
Endpoint String Format ..................................................................................................... 23
Endpoints for the ap-northeast-3 Region ............................................................................ 23
Endpoints for MediaConvert .............................................................................................. 24
Getting Your Credentials ........................................................................................................... 24
Setting Credentials ................................................................................................................... 25
Best Practices for Credentials ............................................................................................. 25
Setting Credentials in Node.js ............................................................................................ 25
Setting Credentials in a Web Browser ................................................................................. 28
Locking API Versions ................................................................................................................. 34
Node.js Considerations .............................................................................................................. 35
Using Built-In Node.js Modules ........................................................................................... 35
Using NPM Packages ........................................................................................................ 35
Configuring maxSockets in Node.js ..................................................................................... 36
Configuring Proxies for Node.js .......................................................................................... 36
Registering Certificate Bundles in Node.js ............................................................................ 37
Browser Script Considerations .................................................................................................... 37
Building the SDK for Browsers ........................................................................................... 37
Cross-Origin Resource Sharing (CORS) ................................................................................. 40
Bundling with Webpack ............................................................................................................ 42
Installing Webpack ........................................................................................................... 42
Configuring Webpack ........................................................................................................ 43
Running Webpack ............................................................................................................ 43
Using the Webpack Bundle ................................................................................................ 44
Importing Individual Services ............................................................................................. 44
Bundling for Node.js ......................................................................................................... 45
Working with Services ....................................................................................................................... 47
Creating and Calling Service Objects ........................................................................................... 47
Requiring Individual Services ............................................................................................. 48
Creating Service Objects ................................................................................................... 49
Locking the API Version of a Service Object ......................................................................... 49
Specifying Service Object Parameters ................................................................................. 49
Logging AWS SDK for JavaScript Calls ........................................................................................ 50
Using a Third-Party Logger ................................................................................................ 50
Calling Services Asychronously ................................................................................................... 51
Managing Asychronous Calls .............................................................................................. 51
Using a Callback Function ................................................................................................. 52
Using a Request Object Event Listener ................................................................................ 53
Using Promises ................................................................................................................ 57
Requests With a Node.js Stream Object .............................................................................. 58
Using the Response Object ........................................................................................................ 59
Accessing Data Returned in the Response Object .................................................................. 59
Paging Through Returned Data .......................................................................................... 60
Accessing Error Information from a Response Object ............................................................ 60
Accessing the Originating Request Object ............................................................................ 60
Working with JSON .................................................................................................................. 60
JSON as Service Object Parameters .................................................................................... 61
Returning Data as JSON .................................................................................................... 62
SDK for JavaScript Code Examples ..................................................................................................... 63
Amazon CloudWatch Examples .................................................................................................. 63
Creating Alarms in Amazon CloudWatch .............................................................................. 64
Using Alarm Actions in Amazon CloudWatch ........................................................................ 67
Getting Metrics from Amazon CloudWatch .......................................................................... 69
Sending Events to Amazon CloudWatch Events .................................................................... 72
Using Subscription Filters in Amazon CloudWatch Logs ......................................................... 75
Amazon DynamoDB Examples .................................................................................................... 79
iv

AWS SDK for JavaScript Developer Guide for SDK v2
Creating and Using Tables in DynamoDB ............................................................................. 79
Reading and Writing A Single Item in DynamoDB ................................................................. 83
Reading and Writing Items in Batch in DynamoDB ................................................................ 86
Querying and Scanning a DynamoDB Table ......................................................................... 88
Using the DynamoDB Document Client ............................................................................... 91
Amazon EC2 Examples .............................................................................................................. 95
Creating an Amazon EC2 Instance ...................................................................................... 96
Managing Amazon EC2 Instances ....................................................................................... 98
Working with Amazon EC2 Key Pairs ................................................................................. 102
Using Regions and Availability Zones with Amazon EC2 ....................................................... 105
Working with Security Groups in Amazon EC2 .................................................................... 106
Using Elastic IP Addresses in Amazon EC2 ......................................................................... 110
MediaConvert Examples .......................................................................................................... 113
Getting Your Account-Specific Endpoint ............................................................................ 113
Creating and Managing Jobs ............................................................................................ 115
Using Job Templates ....................................................................................................... 120
Amazon S3 Glacier Examples ................................................................................................... 126
Creating an Glacier Vault ................................................................................................. 127
Uploading an Archive to Glacier ....................................................................................... 127
Doing a Multipart Upload to Glacier ................................................................................. 128
AWS IAM Examples ................................................................................................................. 129
Managing IAM Users ....................................................................................................... 130
Working with IAM Policies ............................................................................................... 134
Managing IAM Access Keys .............................................................................................. 138
Working with IAM Server Certificates ................................................................................ 142
Managing IAM Account Aliases ......................................................................................... 145
Amazon Kinesis Example ......................................................................................................... 147
Capturing Web Page Scroll Progress with Amazon Kinesis .................................................... 148
AWS Lambda Examples ........................................................................................................... 152
Using Lambda in Web Pages ............................................................................................ 153
Invoking a Lambda Function in the Browser ....................................................................... 153
Writing a Lambda Function in Node.js ............................................................................... 157
Amazon S3 Examples .............................................................................................................. 161
Uploading Photos to Amazon S3 from a Browser ................................................................ 161
Creating and Using Amazon S3 Buckets ............................................................................ 171
Configuring Amazon S3 Buckets ....................................................................................... 175
Managing Amazon S3 Bucket Access Permissions ................................................................ 177
Working with Amazon S3 Bucket Policies ........................................................................... 179
Using an Amazon S3 Bucket as a Static Web Host .............................................................. 182
Amazon SES Examples ............................................................................................................ 185
Managing Identities ........................................................................................................ 185
Working with Email Templates ......................................................................................... 189
Sending Email Using Amazon SES .................................................................................... 193
Using IP Address Filters ................................................................................................... 197
Using Receipt Rules ........................................................................................................ 200
Amazon SNS Examples ............................................................................................................ 204
Managing Topics ............................................................................................................. 204
Publishing Messages to a Topic ........................................................................................ 208
Managing Subscriptions ................................................................................................... 209
Sending SMS Messages ................................................................................................... 213
Amazon SQS Examples ............................................................................................................ 218
Using Queues in Amazon SQS .......................................................................................... 218
Sending and Receiving Messages in Amazon SQS ............................................................... 221
Managing Visibility Timeout in Amazon SQS ...................................................................... 224
Enabling Long Polling in Amazon SQS .............................................................................. 226
Using Dead Letter Queues in Amazon SQS ........................................................................ 229
Tutorials ........................................................................................................................................ 231
v

AWS SDK for JavaScript Developer Guide for SDK v2
Tutorial: Setting Up Node.js on an Amazon EC2 Instance ............................................................. 231
Prerequisites .................................................................................................................. 231
Procedure ...................................................................................................................... 231
Creating an Amazon Machine Image ................................................................................. 232
Related Resources ........................................................................................................... 232
Tutorial: Creating and Using Lambda Functions .......................................................................... 232
The Scenario .................................................................................................................. 232
Prerequisites .................................................................................................................. 233
Tutorial Steps ................................................................................................................. 233
Create an Amazon S3 Bucket Configured as a Static Website ................................................ 234
Prepare the Browser Script .............................................................................................. 236
Create a Lambda Execution Role in IAM ............................................................................ 237
Create and Populate a DynamoDB Table ........................................................................... 239
Prepare and Create the Lambda Function .......................................................................... 243
Run the Lambda Function ............................................................................................... 246
API Reference and Changelog .......................................................................................................... 249
SDK Changelog on GitHub ....................................................................................................... 249
Additional Resources ....................................................................................................................... 250
JavaScript SDK Forum ............................................................................................................. 250
JavaScript SDK and Developer Guide on GitHub ......................................................................... 250
JavaScript SDK on Gitter ......................................................................................................... 250
Document History .......................................................................................................................... 251
Document History .................................................................................................................. 251
Earlier Updates ....................................................................................................................... 252
vi
AWS SDK for JavaScript Developer Guide for SDK v2
Using the SDK with Node.js
What Is the AWS SDK for JavaScript?
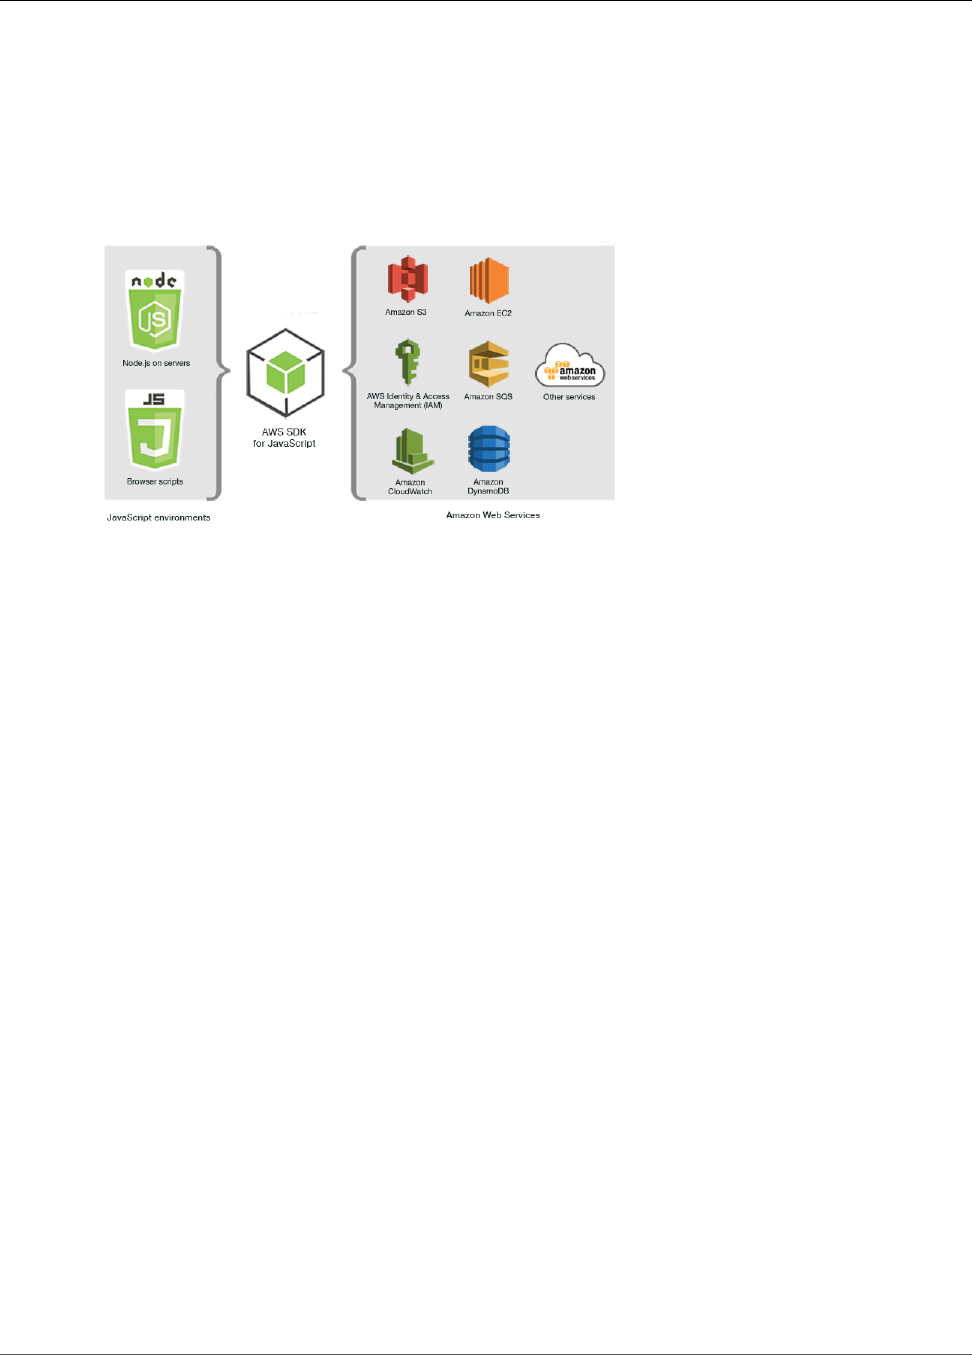
The AWS SDK for JavaScript provides a JavaScript API for AWS services you can use to build applications
for Node.js or the browser. The JavaScript API lets developers build libraries or applications that make
use of AWS services.
Not all services are immediately available in the SDK. To find out which services are currently supported
by the AWS SDK for JavaScript, see https://github.com/aws/aws-sdk-js/blob/master/SERVICES.md. For
information about the SDK for JavaScript on GitHub, see Additional Resources (p. 250).
Using the SDK with Node.js
Node.js is a cross-platform runtime for running server-side JavaScript applications. You can set up
Node.js on an Amazon EC2 instance to run on a server. You can also use Node.js to write on-demand AWS
Lambda functions.
Using the SDK for JavaScript for Node.js differs from using it for JavaScript in a web browser in the way
you load the SDK and in how you obtain the credentials needed to access specific web services. When use
of particular APIs differs between Node.js and the browser, those differences will be called out.
Using the SDK with AWS Cloud9
You can also develop Node.js applications using the SDK for JavaScript in the AWS Cloud9 IDE. For a
sample of how to use AWS Cloud9 for Node.js development, see Node.js Sample for AWS Cloud9 in the
AWS Cloud9 User Guide. For more information on using AWS Cloud9 with the SDK for JavaScript, see
Using AWS Cloud9 with the AWS SDK for JavaScript (p. 11).
Using the SDK with AWS Amplify
For browser-based web, mobile and hybrid apps, you can also use the AWS Amplify Library on GitHub,
which extends the SDK for JavaScript, providing a declarative interface.
Note
Frameworks such as AWS Amplify may not offer the same browser support as the SDK for
JavaScript. Check the frameworks documentation for details.
1

AWS SDK for JavaScript Developer Guide for SDK v2
Using the SDK with Web Browsers
Using the SDK with Web Browsers
All major web browsers support execution of JavaScript. JavaScript code running in a web browser is
often called client-side JavaScript.
Using the SDK for JavaScript in a web browser differs from using it for Node.js in the way you load the
SDK and in how you obtain the credentials needed to access specific web services. When use of particular
APIs differs between Node.js and the browser, those differences will be called out.
For a list of browsers supported by the AWS SDK for JavaScript, see Web Browsers Supported (p. 14).
Common Use Cases
Using the SDK for JavaScript in browser scripts makes it possible to realize a number of compelling
use cases. Here are several ideas for things you can build in a browser application using the SDK for
JavaScript to access different web services.
• Building a custom console to AWS services in which you access and combine features across regions
and services to best meet your organizational or project needs.
• Using Amazon Cognito Identity to enable authenticated user access to your browser applications and
websites, including use of third-party authentication from Facebook and others.
• Using Amazon Kinesis to process click streams or other marketing data in real time.
• Using Amazon DynamoDB for serverless data persistence such as individual user preferences for
visitors of your website or application users.
• Using AWS Lambda to encapsulate proprietary logic that you can invoke from browser scripts without
downloading and revealing your intellectual property to users.
2

AWS SDK for JavaScript Developer Guide for SDK v2
Getting Started in a Browser Script
Getting Started with the AWS SDK
for JavaScript
The AWS SDK for JavaScript provides access to web services in either browser scripts or Node.js. This
section has two getting started exercises that show you how to work with the SDK for JavaScript in each
of these JavaScript environments.
You can also develop Node.js applications using the SDK for JavaScript in the AWS Cloud9 IDE. For a
sample of how to use AWS Cloud9 for Node.js development, see Node.js Sample for AWS Cloud9 in the
AWS Cloud9 User Guide.
Topics
• Getting Started in a Browser Script (p. 3)
• Getting Started in Node.js (p. 8)
Getting Started in a Browser Script
This browser script example shows you:
• How to access AWS services from a browser script using Amazon Cognito Identity.
• How to turn text into synthesized speech using Amazon Polly.
• How to use a presigner object to create a presigned URL.
The Scenario
Amazon Polly is a cloud service that converts text into lifelike speech. You can use Amazon Polly to
develop applications that increase engagement and accessibility. Amazon Polly supports multiple
languages and includes a variety of lifelike voices. For more information about Amazon Polly, see the
Amazon Polly Developer Guide.
The example shows how to set up and run a simple browser script that takes text you enter, sends that
text to Amazon Polly, and then returns the URL of the synthesized audio of the text for you to play. The
browser script uses Amazon Cognito Identity to provide credentials needed to access AWS services. You
will see the basic patterns for loading and using the SDK for JavaScript in browser scripts.
Note
Playback of the synthesized speech in this example depends on running in a browser that
supports HTML 5 audio.
3

AWS SDK for JavaScript Developer Guide for SDK v2
Step 1: Create an Amazon Cognito Identity Pool
The browser script uses the SDK for JavaScript to synthesize text by using these APIs:
• AWS.CognitoIdentityCredentials constructor
• AWS.Polly.Presigner constructor
• getSynthesizeSpeechUrl
Step 1: Create an Amazon Cognito Identity Pool
In this exercise, you create and use an Amazon Cognito identity pool to provide unauthenticated access
to your browser script for the Amazon Polly service. Creating an identity pool also creates two IAM roles,
one to support users authenticated by an identity provider and the other to support unauthenticated
guest users.
In this exercise, we will only work with the unauthenticated user role to keep the task focused. You can
integrate support for an identity provider and authenticated users later.
To create an Amazon Cognito identity pool
1. Sign in to the AWS Management Console and open the Amazon Cognito console at https://
console.aws.amazon.com/cognito/.
2. Choose Manage Identity Pools on the console opening page.
3. On the next page, choose Create new identity pool.
4. In the Getting started wizard, type a name for your identity pool in Identity pool name.
5. Choose Enable access to unauthenticated identities.
6. Choose Create Pool.
7. On the next page, choose View Details to see the names of the two IAM roles created for your
identity pool. Make a note of the name of the role for unauthenticated identities. You need this
name to add the required policy for Amazon Polly.
8. Choose Allow.
9. On the Sample code page, copy or write down the identity pool ID displayed in red. You need this
value for your browser script.
After you create your Amazon Cognito identity pool, you're ready to add permissions for Amazon Polly
that are needed by your browser script.
Step 2: Add a Policy to the Created IAM Role
To enable browser script access to Amazon Polly for speech synthesis, use the unauthenticated IAM role
created for your Amazon Cognito identity pool. This requires you to add an IAM policy to the role. For
more information on IAM roles, see Creating a Role to Delegate Permissions to an AWS Service in the IAM
User Guide.
4

AWS SDK for JavaScript Developer Guide for SDK v2
Step 3: Create the HTML Page
To add an Amazon Polly policy to the IAM role associated with unauthenticated users
1. Sign in to the AWS Management Console and open the IAM console at https://
console.aws.amazon.com/iam/.
2. In the navigation panel on the left of the page, choose Roles.
3. In the list of IAM roles, choose the unauthenticated identities role previously created by Amazon
Cognito.
4. In the Summary page for this role, choose Attach policies.
5. In the Attach Permissions page for this role, find and then choose AmazonPollyFullAccess.
6. Choose Attach policy.
After you create your Amazon Cognito identity pool and add permissions for Amazon Polly to your IAM
role for unauthenticated users, you are ready to build the webpage and browser script.
Step 3: Create the HTML Page
The sample app consists of a single HTML page that contains the user interface and browser script.
Create an HTML document and copy the following contents into it. The page includes an <audio>
element to play the synthesized speech, and a <p> element to display messages.
For more information on the <audio> element, see The Embed Audio element on the Mozilla Developer
website.
<!DOCTYPE html>
<html>
<head>
<meta charset="UTF-8">
<title>AWS SDK for JavaScript - Browser Getting Started Application</title>
</head>
<body>
<div id="textToSynth">
<input autofocus size="23" type="text" id="textEntry" value="It's very good to meet
you."/>
<button class="btn default" onClick="speakText()">Synthesize</button><p
id="result">Enter text above then click Synthesize</p>
</div>
<audio id="audioPlayback" controls>
<source id="audioSource" type="audio/mp3" src="">
<p id="result">result</p>
</audio>
</body>
</html>
Save the HTML file, naming it polly.html. After you have created the user interface for the application,
you're ready to add the browser script code that runs the application.
Step 4: Write the Browser Script
The first thing to do in creating the browser script is to add the SDK for JavaScript by adding this line
after the <audio> element in the page.
<script src="https://sdk.amazonaws.com/js/aws-sdk-2.283.1.min.js"></script>
Then add a new script element after the SDK entry in which you'll add the browser script. Set the AWS
Region and credentials for the SDK. Next, create a function named speakText() that will be invoked as
an event handler by the button.
5

AWS SDK for JavaScript Developer Guide for SDK v2
Step 5: Run the Sample
To synthesize speech with Amazon Polly, you must first create the parameters JSON needed, which
includes the sound format of the output, sampling rate, the ID of the voice to use, and the text to play
back. Set the Text: attribute to empty text initially, so that you can retrieve the value of the <input>
element in the webpage and assign that value into the JSON.
// Initialize the Amazon Cognito credentials provider
AWS.config.region = 'REGION';
AWS.config.credentials = new AWS.CognitoIdentityCredentials({IdentityPoolId:
'IDENTITY_POOL_ID'});
// Function invoked by button click
function speakText() {
// Create synthesizeSpeech params JSON
var speechParams = {
OutputFormat: "mp3",
SampleRate: "16000",
Text: "",
TextType: "text",
VoiceId: "Matthew"
};
speechParams.Text = document.getElementById("textEntry").value;
Amazon Polly returns synthesized speech as an audio stream. The easiest way to play that audio in a
browser is to have Amazon Polly make the audio available at a presigned URL you can then set as the
src property of the <audio> element in the webpage.
Create a new AWS.Polly service object. Then create an AWS.Polly.Presigner object you'll
use to create a presigned URL at which the synthesized speech audio can be retrieved. You must
pass the speech parameters JSON you just defined and the AWS.Polly service object to the
AWS.Polly.Presigner constructor.
Then call the getSynthesizeSpeechUrl method of the presigner object, passing the speech
parameters JSON. If successful, this method returns the URL of the synthesized speech, which you then
assign to the <audio> element for playback.
// Create the Polly service object and presigner object
var polly = new AWS.Polly({apiVersion: '2016-06-10'});
var signer = new AWS.Polly.Presigner(speechParams, polly)
// Create presigned URL of synthesized speech file
signer.getSynthesizeSpeechUrl(speechParams, function(error, url) {
if (error) {
document.getElementById('result').innerHTML = error;
} else {
audioSource.src = url;
document.getElementById('result').innerHTML = "Speech ready to play.";
}
});
}
Step 5: Run the Sample
To run the sample app, load polly.html into a web browser. This is what the browser presentation
should resemble.
6

AWS SDK for JavaScript Developer Guide for SDK v2
Full Sample
Enter a phrase you want turned to speech in the input box, then choose Synthesize. When the audio is
ready to play, a message appears. Use the audio player controls to hear the synthesized speech.
Full Sample
Here is the full HTML page with the browser script. It's also available here on GitHub.
<!DOCTYPE html>
<html>
<head>
<meta charset="UTF-8">
<title>AWS SDK for JavaScript - Browser Getting Started Application</title>
</head>
<body>
<div id="textToSynth">
<input autofocus size="23" type="text" id="textEntry" value="It's very good to meet
you."/>
<button class="btn default" onClick="speakText()">Synthesize</button><p
id="result">Enter text above then click Synthesize</p>
</div>
<audio id="audioPlayback" controls>
<source id="audioSource" type="audio/mp3" src="">
<p id="result">result</p>
</audio>
<script src="https://sdk.amazonaws.com/js/aws-sdk-2.283.1.min.js"></script>
<script>
// Initialize the Amazon Cognito credentials provider
AWS.config.region = 'REGION';
AWS.config.credentials = new AWS.CognitoIdentityCredentials({IdentityPoolId:
'IDENTITY_POOL_ID'});
// Function invoked by button click
function speakText() {
// Create synthesizeSpeech params JSON
var speechParams = {
OutputFormat: "mp3",
SampleRate: "16000",
Text: "",
TextType: "text",
VoiceId: "Matthew"
};
speechParams.Text = document.getElementById("textEntry").value;
// Create the Polly service object and presigner object
var polly = new AWS.Polly({apiVersion: '2016-06-10'});
var signer = new AWS.Polly.Presigner(speechParams, polly)
// Create presigned URL of synthesized speech file
signer.getSynthesizeSpeechUrl(speechParams, function(error, url) {
if (error) {
document.getElementById('result').innerHTML = error;
} else {
audioSource.src = url;
document.getElementById('result').innerHTML = "Speech ready to play.";
}
});
}
</script>
</body>
</html>
7

AWS SDK for JavaScript Developer Guide for SDK v2
Possible Enhancements
Possible Enhancements
Here are variations on this application you can use to further explore using the SDK for JavaScript in a
browser script.
• Experiment with other sound output formats.
• Add the option to select any of the various voices provided by Amazon Polly.
• Integrate an identity provider like Facebook or Amazon to use with the authenticated IAM role.
Getting Started in Node.js
This Node.js code example shows:
• How to create the package.json manifest for your project.
• How to install and include the modules that your project uses.
• How to create an Amazon Simple Storage Service (Amazon S3) service object from the AWS.S3 client
class.
• How to create an Amazon S3 bucket and upload an object to that bucket.
The Scenario
The example shows how to set up and run a simple Node.js module that creates an Amazon S3 bucket,
then adds a text object to it.
Because bucket names in Amazon S3 must be globally unique, this example includes a third-party
Node.js module that generates a unique ID value that you can incorporate into the bucket name. This
additional module is named uuid.
Prerequisite Tasks
To set up and run this example, you must first complete these tasks:
• Create a working directory for developing your Node.js module. Name this directory awsnodesample.
• Install Node.js. For more information, see the Node.js website. You can find downloads of the current
and LTS versions of Node.js for a variety of operating systems at https://nodejs.org/en/download/
current/.
Contents
• Step 1: Configure Your Credentials (p. 9)
• Step 2: Create the Package JSON for the Project (p. 9)
• Step 3: Install the SDK and Dependencies (p. 9)
• Step 4: Write the Node.js Code (p. 10)
• Step 5: Run the Sample (p. 10)
8

AWS SDK for JavaScript Developer Guide for SDK v2
Step 1: Configure Your Credentials
Step 1: Configure Your Credentials
You need to provide credentials to AWS so that only your account and its resources are accessed
by the SDK. For more information about obtaining your account credentials, see Getting Your
Credentials (p. 24).
To hold this information, we recommend you create a shared credentials file. To learn how, see Loading
Credentials in Node.js from the Shared Credentials File (p. 26). Your credentials file should resemble
the following example.
[default]
aws_access_key_id = YOUR_ACCESS_KEY_ID
aws_secret_access_key = YOUR_SECRET_ACCESS_KEY
Step 2: Create the Package JSON for the Project
After you create the awsnodesample project directory, you create and add a package.json file for
holding the metadata for your Node.js project. For details about using package.json in a Node.js
project, see What is the file package.json? on the docs.nodejitsu.com site.
In the project directory, create a new file named package.json. Then add this JSON to the file.
{
"dependencies": {},
"name": "awsnodesample",
"description": "A simple Node.js application showing usage of the AWS SDK for Node.js.",
"version": "1.0.1",
"main": "sample.js",
"devDependencies": {},
"scripts": {
"test": "echo \"Error: no test specified\" && exit 1"
},
"author": "NAME",
"license": "ISC"
}
Save the file. As you install the modules you need, the dependencies portion of the file will be
completed. You can find the final JSON file here on GitHub.
Step 3: Install the SDK and Dependencies
You install the SDK for JavaScript package using npm (the Node.js package manager).
From the awsnodesample directory in the package, type the following at the command line.
npm install aws-sdk
This command installs the SDK for JavaScript in your project, and updates package.json to list the SDK
as a project dependency.
Next, install the uuid module to the project by typing the following at the command line, which installs
the module and updates package.json. For more information about uuid, see the module's page at
https://www.npmjs.com/package/uuid.
npm install uuid
9

AWS SDK for JavaScript Developer Guide for SDK v2
Step 4: Write the Node.js Code
These packages and their associated code are installed in the node_modules subdirectory of your
project.
For more information on installing Node.js packages, see How to Install Local Packages and How
to Create Node.js Modules at the npm (Node.js package manager) website. For information about
downloading and installing the AWS SDK for JavaScript, see Installing the SDK for JavaScript (p. 15).
Step 4: Write the Node.js Code
Create a new file named sample.js to contain the example code. Begin by adding the require
function calls to include the SDK for JavaScript and uuid modules, so they are available for you to use.
Build a unique bucket name that's used to create an Amazon S3 bucket by appending a unique ID value
to a recognizable prefix, in this case 'node-sdk-sample-'. You generate the unique ID by calling the
uuid module. Then create a name for the Key parameter used to upload an object to the bucket.
Create a promise object to call the createBucket method of the AWS.S3 service object. On a
successful response, create the parameters needed to upload text to the newly created bucket. Using
another promise, call the putObject method to upload the text object to the bucket.
// Load the SDK and UUID
var AWS = require('aws-sdk');
var uuid = require('uuid');
// Create unique bucket name
var bucketName = 'node-sdk-sample-' + uuid.v4();
// Create name for uploaded object key
var keyName = 'hello_world.txt';
// Create a promise on S3 service object
var bucketPromise = new AWS.S3({apiVersion: '2006-03-01'}).createBucket({Bucket:
bucketName}).promise();
// Handle promise fulfilled/rejected states
bucketPromise.then(
function(data) {
// Create params for putObject call
var objectParams = {Bucket: bucketName, Key: keyName, Body: 'Hello World!'};
// Create object upload promise
var uploadPromise = new AWS.S3({apiVersion:
'2006-03-01'}).putObject(objectParams).promise();
uploadPromise.then(
function(data) {
console.log("Successfully uploaded data to " + bucketName + "/" + keyName);
});
}).catch(
function(err) {
console.error(err, err.stack);
});
This sample code can be found here on GitHub.
Step 5: Run the Sample
Type the following command to run the sample.
node sample.js
If the upload is successful, you'll see a confirmation message at the command line. You can also find the
bucket and the uploaded text object in the Amazon S3 console.
10

AWS SDK for JavaScript Developer Guide for SDK v2
Step 1: Set up Your AWS Account to Use AWS Cloud9
Using AWS Cloud9 with the AWS
SDK for JavaScript
You can use AWS Cloud9 with the AWS SDK for JavaScript to write and run your JavaScript in the
browser code —as well as write, run, and debug your Node.js code—using just a browser. AWS Cloud9
includes tools such as a code editor and terminal, plus a debugger for Node.js code. Because the AWS
Cloud9 IDE is cloud based, you can work on your projects from your office, home, or anywhere using
an internet-connected machine. For general information about AWS Cloud9, see the AWS Cloud9 User
Guide.
Follow these stps to set up AWS Cloud9 with the SDK for JavaScript:
Contents
• Step 1: Set up Your AWS Account to Use AWS Cloud9 (p. 11)
• Step 2: Set up Your AWS Cloud9 Development Environment (p. 11)
• Step 3: Set up the SDK for JavaScript (p. 12)
• To set up the SDK for JavaScript for Node.js (p. 12)
• To set up the SDK for JavaScript in the browser (p. 12)
• Step 4: Download Example Code (p. 12)
• Step 5: Run and Debug Example Code (p. 13)
Step 1: Set up Your AWS Account to Use AWS
Cloud9
Start to use AWS Cloud9 by signing in to the AWS Cloud9 console as an AWS Identity and Access
Management (IAM) entity (for example, an IAM user) who has access permissions for AWS Cloud9 in your
AWS account.
To set up an IAM entity in your AWS account to access AWS Cloud9, and to sign in to the AWS Cloud9
console, see Team Setup for AWS Cloud9 in the AWS Cloud9 User Guide.
Step 2: Set up Your AWS Cloud9 Development
Environment
After you sign in to the AWS Cloud9 console, use the console to create an AWS Cloud9 development
environment. After you create the environment, AWS Cloud9 opens the IDE for that environment.
See Creating an Environment in AWS Cloud9 in the AWS Cloud9 User Guide for details.
Note
As you create your environment in the console for the first time, we recommend that you choose
the option to Create a new instance for environment (EC2). This option tells AWS Cloud9 to
11

AWS SDK for JavaScript Developer Guide for SDK v2
Step 3: Set up the SDK for JavaScript
create an environment, launch an Amazon EC2 instance, and then connect the new instance to
the new environment. This is the fastest way to begin using AWS Cloud9.
Step 3: Set up the SDK for JavaScript
After AWS Cloud9 opens the IDE for your development environment, follow one or both of the following
procedures to use the IDE to set up the SDK for JavaScript in your environment.
To set up the SDK for JavaScript for Node.js
1. If the terminal isn't already open in the IDE, open it. To do this, on the menu bar in the IDE, choose
Window, New Terminal.
2. Run the following command to use npm to install the SDK for JavaScript.
npm install aws-sdk
If the IDE can't find npm, run the following commands, one at a time in the following order,
to install npm. (These commands assume you chose the option to Create a new instance for
environment (EC2), earlier in this topic.)
curl -o- https://raw.githubusercontent.com/creationix/nvm/v0.33.0/install.sh | bash #
Download and install Node Version Manager (nvm).
. ~/.bashrc #
Activate nvm.
nvm install node #
Use nvm to install npm (and Node.js at the same time).
To set up the SDK for JavaScript in the browser
You don't have to install the SDK for JavaScript to use it in browser scripts. You can load the hosted SDK
for JavaScript package directly from AWS with a script in your HTML pages.
You can download minified and non-minified distributable versions of the current SDK for JavaScript
from GitHub at https://github.com/aws/aws-sdk-js/tree/master/dist.
Step 4: Download Example Code
Use the terminal you opened in the previous step to download example code for the SDK for JavaScript
into the AWS Cloud9 development environment. (If the terminal isn't already open in the IDE, open it by
choosing Window, New Terminal on the menu bar in the IDE.)
To download the example code, run the following command. This command downloads a copy of all of
the code examples used in the official AWS SDK documentation into your environment's root directory.
git clone https://github.com/awsdocs/aws-doc-sdk-examples.git
To find code examples for the SDK for JavaScript, use the Environment window to open the
ENVIRONMENT_NAME\aws-doc-sdk-examples\javascript\example_code, where
ENVIRONMENT_NAME is the name of your AWS Cloud9 development environment.
To learn how to work with these and other code examples, see SDK for JavaScript Code Examples.
12


AWS SDK for JavaScript Developer Guide for SDK v2
Prerequisites
Setting Up the SDK for JavaScript
The topics in this section explain how to install the SDK for JavaScript for use in web browsers and with
Node.js. It also shows how to load the SDK so you can access the web services supported by the SDK.
Topics
• Prerequisites (p. 14)
• Installing the SDK for JavaScript (p. 15)
• Loading the SDK for JavaScript (p. 16)
• Upgrading the SDK for JavaScript from Version 1 (p. 17)
Prerequisites
Before you use the AWS SDK for JavaScript, determine whether your code needs to run in Node.js or web
browsers. After that, do the following:
• For Node.js, install Node.js on your servers if it is not already installed.
• For web browsers, identify the browser versions you need to support.
Topics
• Setting Up an AWS Node.js Environment (p. 14)
• Web Browsers Supported (p. 14)
Setting Up an AWS Node.js Environment
To set up an AWS Node.js environment in which you can run your application, use any of the following
methods:
• Choose an Amazon Machine Image (AMI) with Node.js pre-installed and create an Amazon EC2
instance using that AMI. When creating your Amazon EC2 instance, choose your AMI from the AWS
Marketplace. Search the AWS Marketplace for Node.js and choose an AMI option that includes a
version of Node.js (32-bit or 64-bit) pre-installed.
• Create an Amazon EC2 instance and install Node.js on it. For more information about how to
install Node.js on an Amazon Linux instance, see Tutorial: Setting Up Node.js on an Amazon EC2
Instance (p. 231).
• Create a serverless environment using AWS Lambda to run Node.js as a Lambda function. For more
information about using Node.js within a Lambda function, see Programming Model (Node.js) in the
AWS Lambda Developer Guide.
• Deploy your Node.js application to AWS Elastic Beanstalk. For more information on using Node.js
with Elastic Beanstalk, see Deploying Node.js Applications to AWS Elastic Beanstalk in the AWS Elastic
Beanstalk Developer Guide.
• Create a Node.js application server using AWS OpsWorks. For more information on using Node.js with
AWS OpsWorks, see Creating Your First Node.js Stack in the AWS OpsWorks User Guide.
Web Browsers Supported
The SDK for JavaScript supports all modern web browsers, including these minimum versions:
14

AWS SDK for JavaScript Developer Guide for SDK v2
Installing the SDK
Browser Version
Google Chrome 28.0+
Mozilla Firefox 26.0+
Opera 17.0+
Microsoft Edge 25.10+
Windows Internet Explorer 10+
Apple Safari 5+
Android Browser 4.3+
Note
Frameworks such as AWS Amplify may not offer the same browser support as the SDK for
JavaScript. Check the frameworks documentation for details.
Installing the SDK for JavaScript
Whether and how you install the AWS SDK for JavaScript depends whether the code executes in Node.js
modules or browser scripts.
Not all services are immediately available in the SDK. To find out which services are currently supported
by the AWS SDK for JavaScript, see https://github.com/aws/aws-sdk-js/blob/master/SERVICES.md
Node
The preferred way to install the AWS SDK for JavaScript for Node.js is to use npm, the Node.js
package manager. To do so, type this at the command line.
npm install aws-sdk
In the event you see this error message:
npm WARN deprecated [email protected]: Use uuid module instead
Type these commands at the command line:
npm uninstall --save node-uuid
npm install --save uuid
Browser
You don't have to install the SDK to use it in browser scripts. You can load the hosted SDK package
directly from Amazon Web Services with a script in your HTML pages. The hosted SDK package
supports the subset of AWS services that enforce cross-origin resource sharing (CORS). For more
information, see Loading the SDK for JavaScript (p. 16).
You can create a custom build of the SDK in which you select the specific web services and versions
that you want to use. You then download your custom SDK package for local development and host
15

AWS SDK for JavaScript Developer Guide for SDK v2
Installing Using Bower
it for your application to use. For more information about creating a custom build of the SDK, see
Building the SDK for Browsers (p. 37).
You can download minified and non-minified distributable versions of the current AWS SDK for
JavaScript from GitHub at:
https://github.com/aws/aws-sdk-js/tree/master/dist
Installing Using Bower
Bower is a package manager for the web. After you install Bower, you can use it to install the SDK. To
install the SDK using Bower, type the following into a terminal window:
bower install aws-sdk-js
Loading the SDK for JavaScript
How you load the SDK for JavaScript depends on whether you are loading it to run in a web browser or in
Node.js.
Not all services are immediately available in the SDK. To find out which services are currently supported
by the AWS SDK for JavaScript, see https://github.com/aws/aws-sdk-js/blob/master/SERVICES.md
Node.js
After you install the SDK, you can load the AWS package in your node application using require.
var AWS = require('aws-sdk');
React Native
To use the SDK in a React Native project, first install the SDK using npm:
npm install aws-sdk
In your application, to reference the React Native compatible version of the SDK with the following
code
var AWS = require('aws-sdk/dist/aws-sdk-react-native');
Browser
The quickest way to get started with the SDK is to load the hosted SDK package directly from
Amazon Web Services. To do this, add the following script tag to your HTML pages:
<script src="https://sdk.amazonaws.com/js/aws-sdk-2.283.1.min.js"></script>
After the SDK loads in your page, the SDK is available from the global variable AWS (or
window.AWS).
If you bundle your code and module dependencies using browserify, you load the SDK using
require, just as you do in Node.js.
16

AWS SDK for JavaScript Developer Guide for SDK v2
Upgrading From Version 1
Upgrading the SDK for JavaScript from Version 1
The following notes help you upgrade the SDK for JavaScript from version 1 to version 2.
Automatic Conversion of Base64 and Timestamp
Types on Input/Output
The SDK now automatically encodes and decodes base64-encoded values, as well as timestamp values,
on the user's behalf. This change affects any operation where base64 or timestamp values were sent by a
request or returned in a response that allows for base64-encoded values.
User code that previously converted base64 is no longer required. Values encoded as base64 are now
returned as buffer objects from server responses and can also be passed as buffer input. For example, the
following version 1 SQS.sendMessage parameters:
var params = {
MessageBody: 'Some Message',
MessageAttributes: {
attrName: {
DataType: 'Binary',
BinaryValue: new Buffer('example text').toString('base64')
}
}
};
Can be rewritten as follows.
var params = {
MessageBody: 'Some Message',
MessageAttributes: {
attrName: {
DataType: 'Binary',
BinaryValue: 'example text'
}
}
};
Here is how the message is read.
sqs.receiveMessage(params, function(err, data) {
// buf is <Buffer 65 78 61 6d 70 6c 65 20 74 65 78 74>
var buf = data.Messages[0].MessageAttributes.attrName.BinaryValue;
console.log(buf.toString()); // "example text"
});
Moved response.data.RequestId to
response.requestId
The SDK now stores request IDs for all services in a consistent place on the response object, rather
than inside the response.data property. This improves consistency across services that expose request
IDs in different ways. This is also a breaking change that renames the response.data.RequestId
property to response.requestId (this.requestId inside a callback function).
In your code, change the following:
17

AWS SDK for JavaScript Developer Guide for SDK v2
Exposed Wrapper Elements
svc.operation(params, function (err, data) {
console.log('Request ID:', data.RequestId);
});
To the following:
svc.operation(params, function () {
console.log('Request ID:', this.requestId);
});
Exposed Wrapper Elements
If you use AWS.ElastiCache, AWS.RDS, or AWS.Redshift, you must access the response through the
top-level output property in the response for some operations.
For example, the RDS.describeEngineDefaultParameters method used to return the following.
{ Parameters: [ ... ] }
It now returns the following.
{ EngineDefaults: { Parameters: [ ... ] } }
The list of affected operations for each service are shown in the following table.
Client Class Operations
AWS.ElastiCache authorizeCacheSecurityGroupIngress,
createCacheCluster,
createCacheParameterGroup,
createCacheSecurityGroup,
createCacheSubnetGroup,
createReplicationGroup,
deleteCacheCluster,
deleteReplicationGroup,
describeEngineDefaultParameters,
modifyCacheCluster,
modifyCacheSubnetGroup,
modifyReplicationGroup,
purchaseReservedCacheNodesOffering,
rebootCacheCluster,
revokeCacheSecurityGroupIngress
AWS.RDS addSourceIdentifierToSubscription,
authorizeDBSecurityGroupIngress,
copyDBSnapshot, createDBInstance,
createDBInstanceReadReplica,
createDBParameterGroup,
createDBSecurityGroup,
createDBSnapshot, createDBSubnetGroup,
createEventSubscription,
createOptionGroup,
deleteDBInstance, deleteDBSnapshot,
deleteEventSubscription,
18

AWS SDK for JavaScript Developer Guide for SDK v2
Dropped Client Properties
Client Class Operations
describeEngineDefaultParameters,
modifyDBInstance, modifyDBSubnetGroup,
modifyEventSubscription,
modifyOptionGroup, promoteReadReplica,
purchaseReservedDBInstancesOffering,
rebootDBInstance,
removeSourceIdentifierFromSubscription,
restoreDBInstanceFromDBSnapshot,
restoreDBInstanceToPointInTime,
revokeDBSecurityGroupIngress
AWS.Redshift authorizeClusterSecurityGroupIngress,
authorizeSnapshotAccess,
copyClusterSnapshot, createCluster,
createClusterParameterGroup,
createClusterSecurityGroup,
createClusterSnapshot,
createClusterSubnetGroup,
createEventSubscription,
createHsmClientCertificate,
createHsmConfiguration,
deleteCluster, deleteClusterSnapshot,
describeDefaultClusterParameters,
disableSnapshotCopy,
enableSnapshotCopy, modifyCluster,
modifyClusterSubnetGroup,
modifyEventSubscription,
modifySnapshotCopyRetentionPeriod,
purchaseReservedNodeOffering,
rebootCluster,
restoreFromClusterSnapshot,
revokeClusterSecurityGroupIngress,
revokeSnapshotAccess,
rotateEncryptionKey
Dropped Client Properties
The .Client and .client properties have been removed from service objects. If you use the .Client
property on a service class or a .client property on a service object instance, remove these properties
from your code.
The following code used with version 1 of the SDK for JavaScript:
var sts = new AWS.STS.Client();
// or
var sts = new AWS.STS();
sts.client.operation(...);
Should be changed to the following code.
var sts = new AWS.STS();
sts.operation(...)
19

AWS SDK for JavaScript Developer Guide for SDK v2
Using the Global Configuration Object
Configuring the SDK for JavaScript
Before you use the SDK for JavaScript to invoke web services using the API, you must configure the SDK.
At a minimum, you must configure these settings:
• The region in which you will request services.
• The credentials that authorize your access to SDK resources.
In addition to these settings, you may also have to configure permissions for your AWS resources. For
example, you can limit access to an Amazon S3 bucket or restrict an Amazon DynamoDB table for read-
only access.
The topics in this section describe various ways to configure the SDK for JavaScript for Node.js and
JavaScript running in a web browser.
Topics
• Using the Global Configuration Object (p. 20)
• Setting the AWS Region (p. 22)
• Specifying Custom Endpoints (p. 23)
• Getting Your Credentials (p. 24)
• Setting Credentials (p. 25)
• Locking API Versions (p. 34)
• Node.js Considerations (p. 35)
• Browser Script Considerations (p. 37)
• Bundling Applications with Webpack (p. 42)
Using the Global Configuration Object
There are two ways to configure the SDK:
• Set the global configuration using AWS.Config.
• Pass extra configuration information to a service object.
Setting global configuration with AWS.Config is often easier to get started, but service-level
configuration can provide more control over individual services. The global configuration specified by
AWS.Config provides default settings for service objects that you create subsequently, simplifying their
configuration. However, you can update the configuration of individual service objects when your needs
vary from the global configuration.
Setting Global Configuration
After you load the SDK, use the global variable, AWS, to access the SDK. You use this global access
variable with the JavaScript API to interact with individual services. The SDK includes a global
configuration object, AWS.Config, that you use to specify the SDK configuration settings required by
your application.
Set your SDK configuration using AWS.Config by setting its properties according to your application
needs. The following table summarizes AWS.Config properties commonly used to set the configuration
of the SDK.
20

AWS SDK for JavaScript Developer Guide for SDK v2
Setting Configuration Per Service
Configuration Options Description
credentials Required. Specifies the credentials used to
determine access to services and resources.
region Required. Specifies the region in which requests
for services are made.
maxRetries Optional. Specifies the maximum number of times
a given request is retried.
logger Optional. Specifies a logger object to which
debugging information is written.
update Optional. Updates the current configuration with
new values.
For more information about the configuration object, see Class: AWS.Config in the API Reference.
Global Configuration Examples
You must set the region and the credentials in AWS.Config. You can set these properties as part of the
AWS.Config constructor, as shown in the following browser script example:
var myCredentials = new
AWS.CognitoIdentityCredentials({IdentityPoolId:'IDENTITY_POOL_ID'});
var myConfig = new AWS.Config({
credentials: myCredentials, region: 'us-west-2'
});
You can also set these properties after creating AWS.Config using the update method, as shown in the
following example that updates the region:
myConfig = new AWS.Config();
myConfig.update({region: 'us-east-1'});
Setting Configuration Per Service
Each service that you use in the SDK for JavaScript is accessed through a service object that is part of
the API for that service. For example, to access the Amazon S3 service you create the Amazon S3 service
object. You can specify configuration settings that are specific to a service as part of the constructor for
that service object. When you set configuration values on a service object, the constructor takes all of the
configuration values used by AWS.Config, including credentials.
For example, if you need to access Amazon EC2 objects in multiple regions, create an EC2 service object
for each region and then set the region configuration of each service object accordingly.
var ec2_regionA = new AWS.EC2({region: 'ap-southeast-2', maxRetries: 15, apiVersion:
'2014-10-01'});
var ec2_regionB = new AWS.EC2({region: 'us-east-1', maxRetries: 15, apiVersion:
'2014-10-01'});
You can also set configuration values specific to a service when configuring the SDK with AWS.Config.
The global configuration object supports many service-specific configuration options. For more
21

AWS SDK for JavaScript Developer Guide for SDK v2
Immutable Configuration Data
information about service-specific configuration, see Class: AWS.Config in the AWS SDK for JavaScript
API Reference.
Immutable Configuration Data
Global configuration changes apply to requests for all newly created service objects. Newly created
service objects are configured with the current global configuration data first and then any local
configuration options. Updates you make to the global AWS.config object don't apply to previously
created service objects.
Existing service objects must be manually updated with new configuration data or you must create and
use a new service object that has the new configuration data. The following example creates a new
Amazon S3 service object with new configuration data:
s3 = new AWS.S3(s3.config);
Setting the AWS Region
A region is a named set of AWS resources in the same geographical area. An example of a region is us-
east-1, which is the US East (N. Virginia) Region. You specify a region when configuring the SDK for
JavaScript so that the SDK accesses the resources in that region. Some services are available only in
specific regions.
The SDK for JavaScript doesn't select a region by default. However, you can set the region using an
environment variable, a shared config file, or the global configuration object.
In a Client Class Constructor
When you instantiate a service object, you can specify the region for that resource as part of the client
class constructor, as shown here.
var s3 = new AWS.S3({apiVersion: '2006-03-01', region: 'us-west-2'});
Using the Global Configuration Object
To set the region in your JavaScript code, update the AWS.Config global configuration object as shown
here.
AWS.config.update({region: 'us-east-1'});
For more information about current regions and available services in each region, see AWS Regions and
Endpoints in the AWS General Reference.
Using an Environment Variable
You can set the region using the AWS_REGION environment variable. If you define this variable, the SDK
for JavaScript reads it and uses it.
Using a Shared Config File
Much like the shared credentials file lets you store credentials for use by the SDK, you can keep your
region and other configuration settings in a shared file named config that is used by SDKs. If the
22

AWS SDK for JavaScript Developer Guide for SDK v2
Order of Precedence for Setting the Region
AWS_SDK_LOAD_CONFIG environment variable has been set to a truthy value, the SDK for JavaScript
automatically searches for a config file when it loads. Where you save the config file depends on your
operating system:
• Linux, macOS, or Unix users: ~/.aws/config
• Windows users: C:\Users\USER_NAME\.aws\config
If you don't already have a shared config file, you can create one in the designated directory. In the
following example, the config file sets both the region and the output format.
[default]
region=us-west-2
output=json
For more information about using shared config and credentials files, see Loading Credentials in Node.js
from the Shared Credentials File (p. 26) or Configuration and Credential Files in the AWS Command
Line Interface User Guide.
Order of Precedence for Setting the Region
The order of precedence for region setting is as follows:
• If a region is passed to a client class constructor, that region is used. If not, then...
• If a region is set on the global configuration object, that region is used. If not, then...
• If the AWS_REGION environment variable is a truthy value, that region is used. If not, then...
• If the AMAZON_REGION environment variable is a truthy value, that region is used. If not, then...
• If the AWS_SDK_LOAD_CONFIG environment variable is set to a truthy value and the shared credentials
file (~/.aws/credentials or the path indicated by AWS_SHARED_CREDENTIALS_FILE) contains a
region for the configured profile, that region is used. If not, then...
• If the AWS_SDK_LOAD_CONFIG environment variable is set to a truthy value and the config file
(~/.aws/config or the path indicated by AWS_CONFIG_FILE) contains a region for the configured
profile, that region is used.
Specifying Custom Endpoints
Calls to API methods in the SDK for JavaScript are made to service endpoint URIs. By default, these
endpoints are built from the region you have configured for your code. However, there are situations in
which you need to specify a custom endpoint for your API calls.
Endpoint String Format
Endpoint values should be a string in the format:
https://{service}.{region}.amazonaws.com
Endpoints for the ap-northeast-3 Region
The ap-northeast-3 region in Japan is not returned by region enumeration APIs, such as
EC2.describeRegions. To define endpoints for this region, follow the format described previously. So
the Amazon EC2 endpoint for this region would be
ec2.ap-northeast-3.amazonaws.com
23

AWS SDK for JavaScript Developer Guide for SDK v2
Endpoints for MediaConvert
Endpoints for MediaConvert
You need to create a custom endpoint to use with MediaConvert. Each customer account is assigned
its own endpoint, which you must use. Here is an example of how to use a custom endpoint with
MediaConvert.
// Create MediaConvert service object using custom endpoint
var mcClient = new AWS.MediaConvert({endpoint: 'https://abcd1234.mediaconvert.us-
west-1.amazonaws.com'});
var getJobParams = {Id: 'job_ID'};
mcClient.getJob(getJobParams, function(err, data)) {
if (err) console.log(err, err.stack); // an error occurred
else console.log(data); // successful response
};
To get your account API endpoint, see MediaConvert.describeEndpoints in the API Reference.
Make sure you specify the same region in your code as the region in the custom endpoint URI. A
mismatch between the region setting and the custom endpoint URI can cause API calls to fail.
For more information on MediaConvert, see the AWS.MediaConvert class in the API Reference or the
AWS Elemental MediaConvert User Guide.
Getting Your Credentials
When you create an AWS account, your account is provided with root credentials. Those credentials
consist of two access keys:
• Access key ID
• Secret access key
For more information on your access keys, see Understanding and Getting Your Security Credentials in
the AWS General Reference.
To get the access key ID and secret access key for an IAM user
Access keys consist of an access key ID and secret access key, which are used to sign programmatic
requests that you make to AWS. If you don't have access keys, you can create them from the AWS
Management Console. We recommend that you use IAM access keys instead of AWS account root user
access keys. IAM lets you securely control access to AWS services and resources in your AWS account.
The only time that you can view or download the secret access keys is when you create the keys. You
cannot recover them later. However, you can create new access keys at any time. You must also have
permissions to perform the required IAM actions. For more information, see Permissions Required to
Access IAM Resources in the IAM User Guide.
1. Open the IAM console.
2. In the navigation pane of the console, choose Users.
3. Choose your IAM user name (not the check box).
4. Choose the Security credentials tab and then choose Create access key.
5. To see the new access key, choose Show. Your credentials will look something like this:
• Access key ID: AKIAIOSFODNN7EXAMPLE
24

AWS SDK for JavaScript Developer Guide for SDK v2
Setting Credentials
• Secret access key: wJalrXUtnFEMI/K7MDENG/bPxRfiCYEXAMPLEKEY
6. To download the key pair, choose Download .csv file. Store the keys in a secure location.
Keep the keys confidential in order to protect your AWS account, and never email them. Do not
share them outside your organization, even if an inquiry appears to come from AWS or Amazon.com.
No one who legitimately represents Amazon will ever ask you for your secret key.
Related topics
• What Is IAM? in the IAM User Guide
• AWS Security Credentials in AWS General Reference
Setting Credentials
AWS uses credentials to identify who is calling services and whether access to the requested resources
is allowed. In AWS, these credentials are typically the access key ID and the secret access key that were
created along with your account.
Whether running in a web browser or in a Node.js server, your JavaScript code must obtain valid
credentials before it can access services through the API. Credentials can be set globally on the
configuration object, using AWS.Config, or per service, by passing credentials directly to a service
object.
There are several ways to set credentials that differ between Node.js and JavaScript in web browsers. The
topics in this section describe how to set credentials in Node.js or web browsers. In each case, the options
are presented in recommended order.
Best Practices for Credentials
Properly setting credentials ensures that your application or browser script can access the services
and resources needed while minimizing exposure to security issues that may impact mission critical
applications or compromise sensitive data.
An important principle to apply when setting credentials is to always grant the least privilege required
for your task. It's more secure to provide minimal permissions on your resources and add further
permissions as needed, rather than provide permissions that exceed the least privilege and, as a result,
be required to fix security issues you might discover later. For example, unless you have a need to read
and write individual resources, such as objects in an Amazon S3 bucket or a DynamoDB table, set those
permissions to read only.
For more information on granting the least privilege, see Best Practices in the IAM User Guide.
Warning
While it is possible to do so, we recommend you not hard code credentials inside an application
or browser script. Hard coding credentials poses a risk of exposing your access key ID and secret
access key.
For more information about how to manage your access keys, see Best Practices for Managing AWS
Access Keys in the AWS General Reference.
Setting Credentials in Node.js
There are several ways in Node.js to supply your credentials to the SDK. Some of these are more secure
and others afford greater convenience while developing an application. When obtaining credentials in
Node.js, be careful about relying on more than one source such as an environment variable and a JSON
25

AWS SDK for JavaScript Developer Guide for SDK v2
Setting Credentials in Node.js
file you load. You can change the permissions under which your code runs without realizing the change
has happened.
Here are the ways you can supply your credentials in order of recommendation:
1. Loaded from AWS Identity and Access Management (IAM) roles for Amazon EC2 (if running on Amazon
EC2)
2. Loaded from the shared credentials file (~/.aws/credentials)
3. Loaded from environment variables
4. Loaded from a JSON file on disk
Warning
While it is possible to do so, we do not recommend hard-coding your AWS credentials in your
application. Hard-coding credentials poses a risk of exposing your access key ID and secret
access key.
The topics in this section describe how to load credentials into Node.js.
Topics
• Loading Credentials in Node.js from IAM Roles for EC2 (p. 26)
• Loading Credentials for a Node.js Lambda Function (p. 26)
• Loading Credentials in Node.js from the Shared Credentials File (p. 26)
• Loading Credentials in Node.js from Environment Variables (p. 27)
• Loading Credentials in Node.js from a JSON File (p. 27)
Loading Credentials in Node.js from IAM Roles for EC2
If you run your Node.js application on an Amazon EC2 instance, you can leverage IAM roles for Amazon
EC2 to automatically provide credentials to the instance. If you configure your instance to use IAM roles,
the SDK automatically selects the IAM credentials for your application, eliminating the need to manually
provide credentials.
For more information on adding IAM roles to an Amazon EC2 instance, see IAM Roles for Amazon EC2.
Loading Credentials for a Node.js Lambda Function
When you create an AWS Lambda function, you must create a special IAM role that has permission to
execute the function. This role is called the execution role. When you set up a Lambda function, you must
specify the IAM role you created as the corresponding execution role.
The execution role provides the Lambda function with the credentials it needs to run and to invoke other
web services. As a result, you do not need to provide credentials to the Node.js code you write within a
Lambda function.
For more information about creating a Lambda execution role, see Manage Permissions: Using an IAM
Role (Execution Role) in the AWS Lambda Developer Guide.
Loading Credentials in Node.js from the Shared Credentials File
You can keep your AWS credentials data in a shared file used by SDKs and the command line interface.
The SDK for JavaScript automatically searches the shared credentials file for credentials when loading.
Where you keep the shared credentials file depends on your operating system:
• Linux, Unix, and macOS users: ~/.aws/credentials
• Windows users: C:\Users\USER_NAME\.aws\credentials
26
AWS SDK for JavaScript Developer Guide for SDK v2
Setting Credentials in Node.js
If you do not already have a shared credentials file, you can create one in the designated
directory. Add the following text to the credentials file, replacing <YOUR_ACCESS_KEY_ID> and
<YOUR_SECRET_ACCESS_KEY> values:
[default]
aws_access_key_id = <YOUR_ACCESS_KEY_ID>
aws_secret_access_key = <YOUR_SECRET_ACCESS_KEY>
The [default] section heading specifies a default profile and associated values for credentials. You can
create additional profiles in the same shared configuration file, each with its own credential information.
The following example shows a configuration file with the default profile and two additional profiles:
[default] ; default profile
aws_access_key_id = <DEFAULT_ACCESS_KEY_ID>
aws_secret_access_key = <DEFAULT_SECRET_ACCESS_KEY>
[personal-account] ; personal account profile
aws_access_key_id = <PERSONAL_ACCESS_KEY_ID>
aws_secret_access_key = <PERSONAL_SECRET_ACCESS_KEY>
[work-account] ; work account profile
aws_access_key_id = <WORK_ACCESS_KEY_ID>
aws_secret_access_key = <WORK_SECRET_ACCESS_KEY>
By default, the SDK checks the AWS_PROFILE environment variable to determine which profile to
use. If the AWS_PROFILE variable is not set in your environment, the SDK uses the credentials for
the [default] profile. To use one of the additional profiles, change the value of the AWS_PROFILE
environment variable. In the previous example, to use the credentials from the work account, set
AWS_PROFILE=work-account.
After setting the environment variable, to run a script.js file that uses the SDK, type the following at
the command line:
$ AWS_PROFILE=work-account node script.js
You can also explicitly select the profile used by the SDK, either by setting process.env.AWS_PROFILE
before loading the SDK, or by selecting the credential provider as shown in the following example:
var credentials = new AWS.SharedIniFileCredentials({profile: 'work-account'});
AWS.config.credentials = credentials;
Loading Credentials in Node.js from Environment Variables
The SDK automatically detects AWS credentials set as variables in your environment and uses them for
SDK requests, eliminating the need to manage credentials in your application. The environment variables
that you set to provide your credentials are:
• AWS_ACCESS_KEY_ID
• AWS_SECRET_ACCESS_KEY
• AWS_SESSION_TOKEN (optional)
Loading Credentials in Node.js from a JSON File
You can load configuration and credentials from a JSON document on disk using
AWS.config.loadFromPath. The path specified is relative to the current working directory of your
process. For example, to load credentials from a 'config.json' file with the following content:
27

AWS SDK for JavaScript Developer Guide for SDK v2
Setting Credentials in a Web Browser
{ "accessKeyId": <YOUR_ACCESS_KEY_ID>, "secretAccessKey": <YOUR_SECRET_ACCESS_KEY>,
"region": "us-east-1" }
Use the following command:
AWS.config.loadFromPath('./config.json');
Note
Loading configuration data from a JSON document resets all existing configuration data. Add
additional configuration data after using this technique. Loading credentials from a JSON
document is not supported in browser scripts.
Setting Credentials in a Web Browser
There are several ways to supply your credentials to the SDK from browser scripts. Some of these are
more secure and others afford greater convenience while developing a script. Here are the ways you can
supply your credentials in order of recommendation:
1. Using Amazon Cognito Identity to authenticate users and supply credentials
2. Using web federated identity
3. Hard coded in the script
Warning
We do not recommend hard coding your AWS credentials in your scripts. Hard coding credentials
poses a risk of exposing your access key ID and secret access key.
Topics
• Using Amazon Cognito Identity to Authenticate Users (p. 28)
• Using Web Federated Identity to Authenticate Users (p. 30)
• Web Federated Identity Examples (p. 32)
Using Amazon Cognito Identity to Authenticate Users
The recommended way to obtain AWS credentials for your browser scripts is to use the Amazon
Cognito Identity credentials object, AWS.CognitoIdentityCredentials. Amazon Cognito enables
authentication of users through third-party identity providers.
To use Amazon Cognito Identity, you must first create an identity pool in the Amazon Cognito console.
An identity pool represents the group of identities that your application provides to your users. The
identities given to users uniquely identify each user account. Amazon Cognito identities are not
credentials. They are exchanged for credentials using web identity federation support in AWS Security
Token Service (AWS STS).
Amazon Cognito helps you manage the abstraction of identities across multiple identity providers with
the AWS.CognitoIdentityCredentials object. The identity that is loaded is then exchanged for
credentials in AWS STS.
Configuring the Amazon Cognito Identity Credentials Object
If you have not yet created one, create an identity pool to use with your browser scripts in the Amazon
Cognito console before you configure AWS.CognitoIdentityCredentials. Create and associate both
authenticated and unauthenticated IAM roles for your identity pool.
28

AWS SDK for JavaScript Developer Guide for SDK v2
Setting Credentials in a Web Browser
Unauthenticated users do not have their identity verified, making this role appropriate for guest users
of your app or in cases when it doesn't matter if users have their identities verified. Authenticated users
log in to your application through a third-party identity provider that verifies their identities. Make
sure you scope the permissions of resources appropriately so you don't grant access to them from
unauthenticated users.
After you configure an identity pool with identity providers attached, you can use
AWS.CognitoIdentityCredentials to authenticate users. To configure your application credentials
to use AWS.CognitoIdentityCredentials, set the credentials property of either AWS.Config or
a per-service configuration. The following example uses AWS.Config:
AWS.config.credentials = new AWS.CognitoIdentityCredentials({
IdentityPoolId: 'us-east-1:1699ebc0-7900-4099-b910-2df94f52a030',
Logins: { // optional tokens, used for authenticated login
'graph.facebook.com': 'FBTOKEN',
'www.amazon.com': 'AMAZONTOKEN',
'accounts.google.com': 'GOOGLETOKEN'
}
});
The optional Logins property is a map of identity provider names to the identity tokens for those
providers. How you get the token from your identity provider depends on the provider you use. For
example, if Facebook is one of your identity providers, you might use the FB.login function from the
Facebook SDK to get an identity provider token:
FB.login(function (response) {
if (response.authResponse) { // logged in
AWS.config.credentials = new AWS.CognitoIdentityCredentials({
IdentityPoolId: 'us-east-1:1699ebc0-7900-4099-b910-2df94f52a030',
Logins: {
'graph.facebook.com': response.authResponse.accessToken
}
});
s3 = new AWS.S3; // we can now create our service object
console.log('You are now logged in.');
} else {
console.log('There was a problem logging you in.');
}
});
Switching Unauthenticated Users to Authenticated Users
Amazon Cognito supports both authenticated and unauthenticated users. Unauthenticated users receive
access to your resources even if they aren't logged in with any of your identity providers. This degree of
access is useful to display content to users prior to logging in. Each unauthenticated user has a unique
identity in Amazon Cognito even though they have not been individually logged in and authenticated.
Initially Unauthenticated User
Users typically start with the unauthenticated role, for which you set the credentials property of your
configuration object without a Logins property. In this case, your default configuration might look like
the following:
// set the default config object
var creds = new AWS.CognitoIdentityCredentials({
IdentityPoolId: 'us-east-1:1699ebc0-7900-4099-b910-2df94f52a030'
});
AWS.config.credentials = creds;
29

AWS SDK for JavaScript Developer Guide for SDK v2
Setting Credentials in a Web Browser
Switch to Authenticated User
When an unauthenticated user logs in to an identity provider and you have a token, you can switch the
user from unauthenticated to authenticated by calling a custom function that updates the credentials
object and adds the Logins token:
// Called when an identity provider has a token for a logged in user
function userLoggedIn(providerName, token) {
creds.params.Logins = creds.params.Logins || {};
creds.params.Logins[providerName] = token;
// Expire credentials to refresh them on the next request
creds.expired = true;
}
You can also Create CognitoIdentityCredentials object. If you do, you must reset the credentials
properties of existing service objects you created. Service objects read from the global configuration only
on object initialization.
For more information about the CognitoIdentityCredentials object, see
AWS.CognitoIdentityCredentials in the AWS SDK for JavaScript API Reference.
Using Web Federated Identity to Authenticate Users
You can directly configure individual identity providers to access AWS resources using web identity
federation. AWS currently supports authenticating users using web identity federation through several
identity providers:
• Login with Amazon
• Facebook Login
• Google Sign-in
You must first register your application with the providers that your application supports. Next, create an
IAM role and set up permissions for it. The IAM role you create is then used to grant the permissions you
configured for it through the respective identity provider. For example, you can set up a role that allows
users who logged in through Facebook to have read access to a specific Amazon S3 bucket you control.
After you have both an IAM role with configured privileges and an application registered with your
chosen identity providers, you can set up the SDK to get credentials for the IAM role using helper code,
as follows:
AWS.config.credentials = new AWS.WebIdentityCredentials({
RoleArn: 'arn:aws:iam::<AWS_ACCOUNT_ID>/:role/<WEB_IDENTITY_ROLE_NAME>',
ProviderId: 'graph.facebook.com|www.amazon.com', // this is null for Google
WebIdentityToken: ACCESS_TOKEN
});
The value in the ProviderId parameter depends on the specified identity provider. The value in the
WebIdentityToken parameter is the access token retrieved from a successful login with the identity
provider. For more information on how to configure and retrieve access tokens for each identity provider,
see the documentation for the identity provider.
Step 1: Registering with Identity Providers
To begin, register an application with the identity providers you choose to support. You will be asked to
provide information that identifies your application and possibly its author. This ensures that the identity
providers know who is receiving their user information. In each case, the identity provider will issue an
application ID that you use to configure user roles.
30

AWS SDK for JavaScript Developer Guide for SDK v2
Setting Credentials in a Web Browser
Step 2: Creating an IAM Role for an Identity Provider
After you obtain the application ID from an identity provider, go to the IAM console at https://
console.aws.amazon.com/iam/ to create a new IAM role.
To create an IAM role for an identity provider
1. Go to the Roles section of the console and then choose Create New Role.
2. Type a name for the new role that helps you keep track of its use, such as facebookIdentity, and
then choose Next Step.
3. In Select Role Type, choose Role for Identity Provider Access.
4. For Grant access to web identity providers, choose Select.
5. From the Identity Provider list, choose the identity provider that you want to use for this IAM role.
6. Type the application ID provided by the identity provider in Application ID and then choose Next
Step.
7. Configure permissions for the resources you want to expose, allowing access to specific operations
on specific resources. For more information about IAM permissions, see Overview of AWS IAM
Permissions in the IAM User Guide. Review and, if needed, customize the role's trust relationship, and
then choose Next Step.
8. Attach additional policies you need and then choose Next Step. For more information about IAM
policies, see Overview of IAM Policies in the IAM User Guide.
9. Review the new role and then choose Create Role.
You can provide other constraints to the role, such as scoping it to specific user IDs. If the role grants
write permissions to your resources, make sure you correctly scope the role to users with the correct
privileges, otherwise any user with an Amazon, Facebook, or Google identity will be able to modify
resources in your application.
For more information on using web identity federation in IAM, see About Web Identity Federation in the
IAM User Guide.
Step 3: Obtaining a Provider Access Token After Login
Set up the login action for your application by using the identity provider's SDK. You can download
and install a JavaScript SDK from the identity provider that enables user login, using either OAuth or
OpenID. For information on how to download and set up the SDK code in your application, see the SDK
documentation for your identity provider:
• Login with Amazon
• Facebook Login
• Google Sign-in
31

AWS SDK for JavaScript Developer Guide for SDK v2
Setting Credentials in a Web Browser
Step 4: Obtaining Temporary Credentials
After your application, roles, and resource permissions are configured, add the code to your application
to obtain temporary credentials. These credentials are provided through the AWS Security Token Service
using web identity federation. Users log in to the identity provider, which returns an access token. Set up
the AWS.WebIdentityCredentials object using the ARN for the IAM role you created for this identity
provider:
AWS.config.credentials = new AWS.WebIdentityCredentials({
RoleArn: 'arn:aws:iam::<AWS_ACCOUNT_ID>:role/<WEB_IDENTITY_ROLE_NAME>',
ProviderId: 'graph.facebook.com|www.amazon.com', // Omit this for Google
WebIdentityToken: ACCESS_TOKEN // Access token from identity provider
});
Service objects that are created subsequently will have the proper credentials. Objects created before
setting the AWS.config.credentials property won't have the current credentials.
You can also create AWS.WebIdentityCredentials before retrieving the access token. This allows you
to create service objects that depend on credentials before loading the access token. To do this, create
the credentials object without the WebIdentityToken parameter:
AWS.config.credentials = new AWS.WebIdentityCredentials({
RoleArn: 'arn:aws:iam::<AWS_ACCOUNT_ID>:role/<WEB_IDENTITY_ROLE_NAME>',
ProviderId: 'graph.facebook.com|www.amazon.com' // Omit this for Google
});
// Create a service object
var s3 = new AWS.S3;
Then set WebIdentityToken in the callback from the identity provider SDK that contains the access
token:
AWS.config.credentials.params.WebIdentityToken = accessToken;
Web Federated Identity Examples
Here are a few examples of using web federated identity to obtain credentials in browser JavaScript.
These examples must be run from an http:// or https:// host scheme to ensure the identity provider can
redirect to your application.
Login with Amazon Example
The following code shows how to use Login with Amazon as an identity provider.
<a href="#" id="login">
<img border="0" alt="Login with Amazon"
src="https://images-na.ssl-images-amazon.com/images/G/01/lwa/btnLWA_gold_156x32.png"
width="156" height="32" />
</a>
<div id="amazon-root"></div>
<script type="text/javascript">
var s3 = null;
var clientId = 'amzn1.application-oa2-client.1234567890abcdef'; // client ID
var roleArn = 'arn:aws:iam::<AWS_ACCOUNT_ID>:role/<WEB_IDENTITY_ROLE_NAME>';
window.onAmazonLoginReady = function() {
amazon.Login.setClientId(clientId); // set client ID
32

AWS SDK for JavaScript Developer Guide for SDK v2
Setting Credentials in a Web Browser
document.getElementById('login').onclick = function() {
amazon.Login.authorize({scope: 'profile'}, function(response) {
if (!response.error) { // logged in
AWS.config.credentials = new AWS.WebIdentityCredentials({
RoleArn: roleArn,
ProviderId: 'www.amazon.com',
WebIdentityToken: response.access_token
});
s3 = new AWS.S3();
console.log('You are now logged in.');
} else {
console.log('There was a problem logging you in.');
}
});
};
};
(function(d) {
var a = d.createElement('script'); a.type = 'text/javascript';
a.async = true; a.id = 'amazon-login-sdk';
a.src = 'https://api-cdn.amazon.com/sdk/login1.js';
d.getElementById('amazon-root').appendChild(a);
})(document);
</script>
Facebook Login Example
The following code shows how to use Facebook Login as an identity provider:
<button id="login">Login</button>
<div id="fb-root"></div>
<script type="text/javascript">
var s3 = null;
var appId = '1234567890'; // Facebook app ID
var roleArn = 'arn:aws:iam::<AWS_ACCOUNT_ID>:role/<WEB_IDENTITY_ROLE_NAME>';
window.fbAsyncInit = function() {
// init the FB JS SDK
FB.init({appId: appId});
document.getElementById('login').onclick = function() {
FB.login(function (response) {
if (response.authResponse) { // logged in
AWS.config.credentials = new AWS.WebIdentityCredentials({
RoleArn: roleArn,
ProviderId: 'graph.facebook.com',
WebIdentityToken: response.authResponse.accessToken
});
s3 = new AWS.S3;
console.log('You are now logged in.');
} else {
console.log('There was a problem logging you in.');
}
});
};
};
// Load the FB JS SDK asynchronously
(function(d, s, id){
var js, fjs = d.getElementsByTagName(s)[0];
33

AWS SDK for JavaScript Developer Guide for SDK v2
Locking API Versions
if (d.getElementById(id)) {return;}
js = d.createElement(s); js.id = id;
js.src = "//connect.facebook.net/en_US/all.js";
fjs.parentNode.insertBefore(js, fjs);
}(document, 'script', 'facebook-jssdk'));
</script>
Google+ Sign-in Example
The following code shows how to use Google+ Sign-in as an identity provider. The access token used for
web identity federation from Google is stored in response.id_token instead of access_token like
other identity providers.
<span
id="login"
class="g-signin"
data-height="short"
data-callback="loginToGoogle"
data-cookiepolicy="single_host_origin"
data-requestvisibleactions="http://schemas.google.com/AddActivity"
data-scope="https://www.googleapis.com/auth/plus.login">
</span>
<script type="text/javascript">
var s3 = null;
var clientID = '1234567890.apps.googleusercontent.com'; // Google client ID
var roleArn = 'arn:aws:iam::<AWS_ACCOUNT_ID>:role/<WEB_IDENTITY_ROLE_NAME>';
document.getElementById('login').setAttribute('data-clientid', clientID);
function loginToGoogle(response) {
if (!response.error) {
AWS.config.credentials = new AWS.WebIdentityCredentials({
RoleArn: roleArn, WebIdentityToken: response.id_token
});
s3 = new AWS.S3();
console.log('You are now logged in.');
} else {
console.log('There was a problem logging you in.');
}
}
(function() {
var po = document.createElement('script'); po.type = 'text/javascript'; po.async =
true;
po.src = 'https://apis.google.com/js/client:plusone.js';
var s = document.getElementsByTagName('script')[0]; s.parentNode.insertBefore(po, s);
})();
</script>
Locking API Versions
AWS services have API version numbers to keep track of API compatibility. API versions in AWS services
are identified by a YYYY-mm-dd formatted date string. For example, the current API version for Amazon
S3 is 2006-03-01.
We recommend locking the API version for a service if you rely on it in production code. This can isolate
your applications from service changes resulting from updates to the SDK. If you don't specify an API
version when creating service objects, the SDK uses the latest API version by default. This could cause
your application to reference an updated API with changes that negatively impact your application.
34

AWS SDK for JavaScript Developer Guide for SDK v2
Node.js Considerations
To lock the API version that you use for a service, pass the apiVersion parameter when constructing
the service object. In the following example, a newly created AWS.DynamoDB service object is locked to
the 2011-12-05 API version:
var dynamodb = new AWS.DynamoDB({apiVersion: '2011-12-05'});
You can globally configure a set of service API versions by specifying the apiVersions parameter in
AWS.Config. For example, to set specific versions of the DynamoDB and Amazon EC2 APIs along with
the current Amazon Redshift API, set apiVersions as follows:
AWS.config.apiVersions = {
dynamodb: '2011-12-05',
ec2: '2013-02-01',
redshift: 'latest'
};
Node.js Considerations
Although Node.js code is JavaScript, using the AWS SDK for JavaScript in Node.js can differ from using
the SDK in browser scripts. Some API methods work in Node.js but not in browser scripts, as well as the
other way around. And successfully using some APIs depends on your familiarity with common Node.js
coding patterns, such as importing and using other Node.js modules like the File System (fs)
module.
Using Built-In Node.js Modules
Node.js provides a collection of built-in modules you can use without installing them. To use these
modules, create an object with the require method to specify the module name. For example, to
include the built-in HTTP module, use the following.
var http = require('http');
Invoke methods of the module as if they are methods of that object. For example, here is code that reads
an HTML file.
// include File System module
var fs = require('fs');
// Invoke readFile method
fs.readFile('index.html', function(err, data) {
if (err) {
throw err;
} else {
// Successful file read
}
});
For a complete list of all built-in modules that Node.js provides, see Node.js v6.11.1 Documentation on
the Node.js website.
Using NPM Packages
In addition to the built-in modules, you can also include and incorporate third-party code from npm,
the Node.js package manager. This is a repository of open source Node.js packages and a command-line
interface for installing those packages. For more information about npm and a list of currently available
35

AWS SDK for JavaScript Developer Guide for SDK v2
Configuring maxSockets in Node.js
packages, see https://www.npmjs.com. You can also learn about additional Node.js packages you can use
here on GitHub.
One example of an npm package you can use with the AWS SDK for JavaScript is browserify. For
details, see Building the SDK as a Dependency with Browserify (p. 39). Another example is webpack.
For details, see Bundling Applications with Webpack (p. 42).
Configuring maxSockets in Node.js
In Node.js, you can set the maximum number of connections per origin. If maxSockets is set, the low-
level HTTP client queues requests and assigns them to sockets as they become available.
This lets you set an upper bound on the number of concurrent requests to a given origin at a time.
Lowering this value can reduce the number of throttling or timeout errors received. However, it can also
increase memory usage because requests are queued until a socket becomes available.
The following example shows how to set maxSockets for all service objects you create. This example
allows up to 25 concurrent connections to each service endpoint.
var AWS = require('aws-sdk');
var https = require('https');
var agent = new https.Agent({
maxSockets: 25
});
AWS.config.update({
httpOptions:{
agent: agent
}
});
The same can be done per service.
var AWS = require('aws-sdk');
var https = require('https');
var agent = new https.Agent({
maxSockets: 25
});
var dynamodb = new AWS.DynamoDB({
apiVersion: '2012-08-10'
httpOptions:{
agent: agent
}
});
When using the default of https, the SDK takes the maxSockets value from the globalAgent. If the
maxSockets value is not defined or is Infinity, the SDK assumes a maxSockets value of 50.
For more information about setting maxSockets in Node.js, see the Node.js online documentation.
Configuring Proxies for Node.js
If you can't directly connect to the internet, the SDK for JavaScript supports use of HTTP or HTTPS
proxies through a third-party HTTP agent, such as proxy-agent. To install proxy-agent, type the
following at the command line.
npm install proxy-agent --save
36

AWS SDK for JavaScript Developer Guide for SDK v2
Registering Certificate Bundles in Node.js
If you decide to use a different proxy, first follow the installation and configuration instructions for
that proxy. To use this or another third-party proxy in your application, you must set the httpOptions
property of AWS.Config to specify the proxy you choose. This example shows proxy-agent
var proxy = require('proxy-agent');
AWS.config.update({
httpOptions: { agent: proxy('http://internal.proxy.com') }
});
For more information about other proxy libraries, see npm, the Node.js package manager.
Registering Certificate Bundles in Node.js
The default trust stores for Node.js include the certificates needed to access AWS services. In some cases,
it might be preferable to include only a specific set of certificates.
In this example, a specific certificate on disk is used to create an https.Agent that rejects connections
unless the designated certificate is provided. The newly created https.Agent is then used to update
the SDK configuration.
var fs = require('fs');
var https = require('https');
var fs = require('fs');
var certs = [
fs.readFileSync('/path/to/cert.pem')
];
AWS.config.update({
httpOptions: {
agent: new https.Agent({
rejectUnauthorized: true,
ca: certs
})
}
});
Browser Script Considerations
The following topics describe special considerations for using the AWS SDK for JavaScript in browser
scripts.
Topics
• Building the SDK for Browsers (p. 37)
• Cross-Origin Resource Sharing (CORS) (p. 40)
Building the SDK for Browsers
The SDK for JavaScript is provided as a JavaScript file with support included for a default set of services.
This file is typically loaded into browser scripts using a <script> tag that references the hosted SDK
package. However, you may need support for services other than the default set or otherwise need to
customize the SDK.
If you work with the SDK outside of an environment that enforces CORS in your browser and if you want
access to all services provided by the SDK for JavaScript, you can build a custom copy of the SDK locally
37

AWS SDK for JavaScript Developer Guide for SDK v2
Building the SDK for Browsers
by cloning the repository and running the same build tools that build the default hosted version of the
SDK. The following sections describe the steps to build the SDK with extra services and API versions.
Topics
• Using the SDK Builder to Build the SDK for JavaScript (p. 38)
• Using the CLI to Build the SDK for JavaScript (p. 38)
• Building Specific Services and API Versions (p. 39)
• Building the SDK as a Dependency with Browserify (p. 39)
Using the SDK Builder to Build the SDK for JavaScript
The easiest way to create your own build of the AWS SDK for JavaScript is to use the SDK builder web
application at https://sdk.amazonaws.com/builder/js. Use the SDK builder to specify services, and their
API versions, to include in your build.
Choose Select all services or choose Select default services as a starting point from which you can
add or remove services. Choose Development for more readable code or choose Minified to create a
minified build to deploy. After you choose the services and versions to include, choose Build to build and
download your custom SDK.
Using the CLI to Build the SDK for JavaScript
To build the SDK for JavaScript using the AWS CLI, you first need to clone the Git repository that
contains the SDK source. You must have Git and Node.js installed on your computer.
First, clone the repository from GitHub and change directory into the directory:
git clone git://github.com/aws/aws-sdk-js
cd aws-sdk-js
After you clone the repository, download the dependency modules for both the SDK and build tool:
npm install
You can now build a packaged version of the SDK.
Building from the Command Line
The builder tool is in dist-tools/browser-builder.js. Run this script by typing:
node dist-tools/browser-builder.js > aws-sdk.js
This command builds the aws-sdk.js file. This file is uncompressed. By default this package includes only
the standard set of services.
38

AWS SDK for JavaScript Developer Guide for SDK v2
Building the SDK for Browsers
Minifying Build Output
To reduce the amount of data on the network, JavaScript files can be compressed through a process
called minification. Minification strips comments, unnecessary spaces, and other characters that aid
in human readability but that do not impact execution of the code. The builder tool can produce
uncompressed or minified output. To minify your build output, set the MINIFY environment variable:
MINIFY=1 node dist-tools/browser-builder.js > aws-sdk.js
Building Specific Services and API Versions
You can select which services to build into the SDK. To select services, specify the service names,
delimited by commas, as parameters. For example, to build only Amazon S3 and Amazon EC2, use the
following command:
node dist-tools/browser-builder.js s3,ec2 > aws-sdk-s3-ec2.js
You can also select specific API versions of the services build by adding the version name after the
service name. For example, to build both API versions of Amazon DynamoDB, use the following
command:
node dist-tools/browser-builder.js dynamodb-2011-12-05,dynamodb-2012-08-10
Service identifiers and API versions are available in the service-specific configuration files at https://
github.com/aws/aws-sdk-js/tree/master/apis.
Building All Services
You can build all services and API versions by including the all parameter:
node dist-tools/browser-builder.js all > aws-sdk-full.js
Building Specific Services
To customize the selected set of services included in the build, pass the AWS_SERVICES environment
variable to the Browserify command that contains the list of services you want. The following example
builds the Amazon EC2, Amazon S3, and DynamoDB services.
$ AWS_SERVICES=ec2,s3,dynamodb browserify index.js > browser-app.js
Building the SDK as a Dependency with Browserify
Node.js has a module-based mechanism for including code and functionality from third-party
developers. This modular approach is not natively supported by JavaScript running in web browsers.
However, with a tool called Browserify, you can use the Node.js module approach and use modules
written for Node.js in the browser. Browserify builds the module dependencies for a browser script into a
single, self-contained JavaScript file that you can use in the browser.
You can build the SDK as a library dependency for any browser script by using Browserify. For example,
the following Node.js code requires the SDK:
var AWS = require('aws-sdk');
var s3 = new AWS.S3();
s3.listBuckets(function(err, data) { console.log(err, data); });
39

AWS SDK for JavaScript Developer Guide for SDK v2
Cross-Origin Resource Sharing (CORS)
This example code can be compiled into a browser-compatible version using Browserify:
$ browserify index.js > browser-app.js
The application, including its SDK dependencies, is then made available in the browser through
browser-app.js.
For more information about Browserify, see the Browserify website.
Cross-Origin Resource Sharing (CORS)
Cross-origin resource sharing, or CORS, is a security feature of modern web browsers. It enables web
browsers to negotiate which domains can make requests of external websites or services. CORS is an
important consideration when developing browser applications with the AWS SDK for JavaScript because
most requests to resources are sent to an external domain, such as the endpoint for a web service. If your
JavaScript environment enforces CORS security, you must configure CORS with the service.
CORS determines whether to allow sharing of resources in a cross-origin request based on:
• The specific domain that makes the request
• The type of HTTP request being made (GET, PUT, POST, DELETE and so on)
How CORS Works
In the simplest case, your browser script makes a GET request for a resource from a server in another
domain. Depending on the CORS configuration of that server, if the request is from a domain that's
authorized to submit GET requests, the cross-origin server responds by returning the requested resource.
If either the requesting domain or the type of HTTP request is not authorized, the request is denied.
However, CORS makes it possible to preflight the request before actually submitting it. In this case,
a preflight request is made in which the OPTIONS access request operation is sent. If the cross-origin
server's CORS configuration grants access to the requesting domain, the server sends back a preflight
response that lists all the HTTP request types that the requesting domain can make on the requested
resource.
Is CORS Configuration Required
Amazon S3 buckets require CORS configuration before you can perform operations on them. In some
JavaScript environments CORS may not be enforced and therefore configuring CORS is unnecessary.
40

AWS SDK for JavaScript Developer Guide for SDK v2
Cross-Origin Resource Sharing (CORS)
For example, if you host your application from an Amazon S3 bucket and access resources from
*.s3.amazonaws.com or some other specific endpoint, your requests won't access an external domain.
Therefore, this configuration doesn't require CORS. In this case, CORS is still used for services other than
Amazon S3.
Configuring CORS for an Amazon S3 Bucket
You can configure an Amazon S3 bucket to use CORS in the Amazon S3 console.
1. In the Amazon S3 console, choose the bucket you want to configure.
2. In the pop-up-dialog, choose Permissions
3. In the Permission tab, choose CORS Configuration.
4. Type your CORS configuration in the CORS Configuration Editor and then choose Save.
A CORS configuration is an XML file that contains a series of rules within a <CORSRule>. A configuration
can have up to 100 rules. A rule is defined by one of the following tags:
• <AllowedOrigin>, which specifies domain origins that you allow to make cross-domain requests.
• <AllowedMethod>, which specifies a type of request you allow (GET, PUT, POST, DELETE, HEAD) in
cross-domain requests.
• <AllowedHeader>, which specifies the headers allowed in a preflight request.
For sample configurations, see How Do I Configure CORS on My Bucket? in the Amazon Simple Storage
Service Developer Guide.
CORS Configuration Example
The following CORS configuration sample allows a user to view, add, remove, or update objects
inside of a bucket from the domain example.org, though it is recommended that you scope the
<AllowedOrigin> to the domain of your website. You can specify "*" to allow any origin.
<?xml version="1.0" encoding="UTF-8"?>
<CORSConfiguration xmlns="http://s3.amazonaws.com/doc/2006-03-01/">
<CORSRule>
<AllowedOrigin>https://example.org</AllowedOrigin>
<AllowedMethod>HEAD</AllowedMethod>
<AllowedMethod>GET</AllowedMethod>
41

AWS SDK for JavaScript Developer Guide for SDK v2
Bundling with Webpack
<AllowedMethod>PUT</AllowedMethod>
<AllowedMethod>POST</AllowedMethod>
<AllowedMethod>DELETE</AllowedMethod>
<AllowedHeader>*</AllowedHeader>
<ExposeHeader>ETag</ExposeHeader>
<ExposeHeader>x-amz-meta-custom-header</ExposeHeader>
</CORSRule>
</CORSConfiguration>
This configuration does not authorize the user to perform actions on the bucket. It enables the browser's
security model to allow a request to Amazon S3. Permissions must be configured through bucket
permissions or IAM role permissions.
You can use ExposeHeader to let the SDK read response headers returned from Amazon S3. For
example, if you want to read the ETag header from a PUT or multipart upload, you need to include the
ExposeHeader tag in your configuration, as shown in the previous example. The SDK can only access
headers that are exposed through CORS configuration. If you set metadata on the object, values are
returned as headers with the prefix x-amz-meta-, such as x-amz-meta-my-custom-header, and
must also be exposed in the same way.
Bundling Applications with Webpack
Web applications in browser scripts or Node.js use of code modules creates dependencies. These code
modules can have dependencies of their own, resulting in a collection of interconnected modules that
your application requires to function. To manage dependencies, you can use a module bundler like
webpack.
The webpack module bundler parses your application code, searching for import or require
statements, to create bundles that contain all the assets your application needs so that the assets can
be easily served through a webpage. The SDK for JavaScript can be included in webpack as one of the
dependencies to include in the output bundle.
For more information about webpack, see the webpack module bundler on GitHub.
Installing Webpack
To install the webpack module bundler, you must first have npm, the Node.js package manager, installed.
Type the following command to install the webpack CLI and JavaScript module.
42

AWS SDK for JavaScript Developer Guide for SDK v2
Configuring Webpack
npm install webpack
You may also need to install a webpack plugin that allows it to load JSON files. Type the following
command to install the JSON loader plugin.
npm install json-loader
Configuring Webpack
By default, webpack searches for a JavaScript file named webpack.config.js in your project's root
directory. This file specifies your configuration options. Here is an example of a webpack.config.js
configuration file.
// Import path for resolving file paths
var path = require('path');
module.exports = {
// Specify the entry point for our app.
entry: [
path.join(__dirname, 'browser.js')
],
// Specify the output file containing our bundled code
output: {
path: __dirname,
filename: 'bundle.js'
},
module: {
/**
* Tell webpack how to load 'json' files.
* When webpack encounters a 'require()' statement
* where a 'json' file is being imported, it will use
* the json-loader.
*/
loaders: [
{
test: /\.json$/,
loaders: ['json']
}
]
}
}
In this example, browser.js is specified as the entry point. The entry point is the file webpack uses
to begin searching for imported modules. The file name of the output is specified as bundle.js. This
output file will contain all the JavaScript the application needs to run. If the code specified in the entry
point imports or requires other modules, such as the SDK for JavaScript, that code is bundled without
needing to specify it in the configuration.
The configuration in the json-loader plugin that was installed earlier specifies to webpack how to
import JSON files. By default, webpack only supports JavaScript but uses loaders to add support for
importing other file types. Because the SDK for JavaScript makes extensive use of JSON files, webpack
throws an error when generating the bundle if json-loader isn't included.
Running Webpack
To build an application to use webpack, add the following to the scripts object in your package.json
file.
"build": "webpack"
43

AWS SDK for JavaScript Developer Guide for SDK v2
Using the Webpack Bundle
Here is an example package.json that demonstrates adding webpack.
{
"name": "aws-webpack",
"version": "1.0.0",
"description": "",
"main": "index.js",
"scripts": {
"test": "echo \"Error: no test specified\" && exit 1",
"build": "webpack"
},
"author": "",
"license": "ISC",
"dependencies": {
"aws-sdk": "^2.6.1"
},
"devDependencies": {
"json-loader": "^0.5.4",
"webpack": "^1.13.2"
}
}
To build your application, type the following command.
npm run build
The webpack module bundler then generates the JavaScript file you specified in your project's root
directory.
Using the Webpack Bundle
To use the bundle in a browser script, you can incorporate the bundle using a <script> tag as shown in
the following example.
<!DOCTYPE html>
<html>
<head>
<title>AWS SDK with webpack</title>
</head>
<body>
<div id="list"></div>
<script src="bundle.js"></script>
</body>
</html>
Importing Individual Services
One of the benefits of webpack is that it parses the dependencies in your code and bundles only the
code your application needs. If you are using the SDK for JavaScript, bundling only the parts of the SDK
actually used by your application can reduce the size of the webpack output considerably.
Consider the following example of the code used to create an Amazon S3 service object.
// Import the AWS SDK
var AWS = require('aws-sdk');
// Set credentials and region
// This can also be done directly on the service client
44

AWS SDK for JavaScript Developer Guide for SDK v2
Bundling for Node.js
AWS.config.update({region: 'us-west-1', credentials: {YOUR_CREDENTIALS}});
var s3 = new AWS.S3({apiVersion: '2006-03-01'});
The require() function specifies the entire SDK. A webpack bundle generated with this code would
include the full SDK but the full SDK is not required when only the Amazon S3 client class is used. The
size of the bundle would be substantially smaller if only the portion of the SDK you require for the
Amazon S3 service was included. Even setting the configuration doesn't require the full SDK because you
can set the configuration data on the Amazon S3 service object.
Here is what the same code looks like when it includes only the Amazon S3 portion of the SDK.
// Import the Amazon S3 service client
var S3 = require('aws-sdk/clients/s3');
// Set credentials and region
var s3 = new S3({
apiVersion: '2006-03-01',
region: 'us-west-1',
credentials: {YOUR_CREDENTIALS}
});
Bundling for Node.js
You can use webpack to generate bundles that run in Node.js by specifying it as a target in the
configuration.
target: "node"
This is useful when running a Node.js application in an environment where disk space is limited. Here is
an example webpack.config.js configuration with Node.js specified as the output target.
// Import path for resolving file paths
var path = require('path');
module.exports = {
// Specify the entry point for our app
entry: [
path.join(__dirname, 'node.js')
],
// Specify the output file containing our bundled code
output: {
path: __dirname,
filename: 'bundle.js'
},
// Let webpack know to generate a Node.js bundle
target: "node",
module: {
/**
* Tell webpack how to load JSON files.
* When webpack encounters a 'require()' statement
* where a JSON file is being imported, it will use
* the json-loader
*/
loaders: [
{
test: /\.json$/,
loaders: ['json']
}
]
}
45

AWS SDK for JavaScript Developer Guide for SDK v2
Bundling for Node.js
}
46

AWS SDK for JavaScript Developer Guide for SDK v2
Creating and Calling Service Objects
Working with Services in the SDK for
JavaScript
The AWS SDK for JavaScript provides access to services that it supports through a collection of client
classes. From these client classes, you create service interface objects, commonly called service objects.
Each supported AWS service has one or more client classes that offer low-level APIs for using service
features and resources. For example, Amazon DynamoDB APIs are available through the AWS.DynamoDB
class.
The services exposed through the SDK for JavaScript follow the request-response pattern to exchange
messages with calling applications. In this pattern, the code invoking a service submits an HTTP/HTTPS
request to an endpoint for the service. The request contains parameters needed to successfully invoke
the specific feature being called. The service that is invoked generates a response that is sent back to
the requestor. The response contains data if the operation was successful or error information if the
operation was unsuccessful.
Invoking an AWS service includes the full request and response lifecycle of an operation on a
service object, including any retries that are attempted. A request is encapsulated in the SDK by the
AWS.Request object. The response is encapsulated in the SDK by the AWS.Response object, which is
provided to the requestor through one of several techniques, such as a callback function or a JavaScript
promise.
Topics
• Creating and Calling Service Objects (p. 47)
• Logging AWS SDK for JavaScript Calls (p. 50)
• Calling Services Asychronously (p. 51)
• Using the Response Object (p. 59)
• Working with JSON (p. 60)
Creating and Calling Service Objects
The JavaScript API supports most available AWS services. Each service class in the JavaScript API
provides access to every API call in its service. For more information on service classes, operations, and
parameters in the JavaScript API, see the API reference.
47

AWS SDK for JavaScript Developer Guide for SDK v2
Requiring Individual Services
When using the SDK in Node.js, you add the SDK package to your application using require, which
provides support for all current services.
var AWS = require('aws-sdk');
When using the SDK with browser JavaScript, you load the SDK package to your browser scripts using
the AWS-hosted SDK package. To load the SDK package, add the following script tag.
<script src="https://sdk.amazonaws.com/js/aws-sdk-2.283.1.min.js"></script>
The default hosted SDK package provides support for a subset of the available AWS services. For a
list of the default services in the hosted SDK package for the browser, see Supported Services in the
API Reference. You can use the SDK with other services if CORS security checking is disabled. In this
case, you can build a custom version of the SDK to include the additional services you require. For more
information on building a custom version of the SDK, see Building the SDK for Browsers (p. 37).
Requiring Individual Services
Requiring the SDK for JavaScript as shown previously includes the entire SDK into your code. Alternately,
you can choose to require only the individual services used by your code. Consider the following code
used to create an Amazon S3 service object.
// Import the AWS SDK
var AWS = require('aws-sdk');
// Set credentials and region
// This can also be done directly on the service client
AWS.config.update({region: 'us-west-1', credentials: {YOUR_CREDENTIALS}});
var s3 = new AWS.S3({apiVersion: '2006-03-01'});
In the previous example, the require function specifies the entire SDK. The amount of code to
transport over the network as well as the memory overhead of your code would be substantially
smaller if only the portion of the SDK you require for the Amazon S3 service was included. To require an
individual service, call the require function as shown, including the service constructor in all lower case.
require('aws-sdk/clients/SERVICE');
Here is what the code to create the previous Amazon S3 service object looks like when it includes only
the Amazon S3 portion of the SDK.
// Import the Amazon S3 service client
var S3 = require('aws-sdk/clients/s3');
// Set credentials and region
var s3 = new S3({
apiVersion: '2006-03-01',
region: 'us-west-1',
credentials: {YOUR_CREDENTIALS}
});
You can still access the global AWS namespace without every service attached to it.
require('aws-sdk/global');
48

AWS SDK for JavaScript Developer Guide for SDK v2
Creating Service Objects
This is a useful technique when applying the same configuration across multiple individual services,
for example to provide the same credentials to all services. Requiring individual services should reduce
loading time and memory consumption in Node.js. When done along with a bundling tool such as
Browserify or webpack, requiring individual services results in the SDK being a fraction of the full size.
This helps with memory or disk-space constrained environments such as an IoT device or in a Lambda
function.
Creating Service Objects
To access service features through the JavaScript API, you first create a service object through which
you access a set of features provided by the underlying client class. Generally there is one client class
provided for each service; however, some services divide access to their features among multiple client
classes.
To use a feature, you must create an instance of the class that provides access to that feature. The
following example shows creating a service object for DynamoDB from the AWS.DynamoDB client class.
var dynamodb = new AWS.DynamoDB({apiVersion: '2012-08-10'});
By default, a service object is configured with the global settings also used to configure the SDK.
However, you can configure a service object with runtime configuration data that is specific to that
service object. Service-specific configuration data is applied after applying the global configuration
settings.
In the following example, an Amazon EC2 service object is created with configuration for a specific
region but otherwise uses the global configuration.
var ec2 = new AWS.EC2({region: 'us-west-2', apiVersion: '2014-10-01'});
In addition to supporting service-specific configuration applied to an individual service object, you can
also apply service-specific configuration to all newly created service objects of a given class. For example,
to configure all service objects created from the Amazon EC2 class to use the US West (Oregon) (us-
west-2) Region, add the following to the AWS.config global configuration object.
AWS.config.ec2 = {region: 'us-west-2', apiVersion: '2016-04-01'};
Locking the API Version of a Service Object
You can lock a service object to a specific API version of a service by specifying the apiVersion option
when creating the object. In the following example, a DynamoDB service object is created that is locked
to a specific API version.
var dynamodb = new AWS.DynamoDB({apiVersion: '2011-12-05'});
For more information about locking the API version of a service object, see Locking API Versions (p. 34).
Specifying Service Object Parameters
When calling a method of a service object, pass parameters in JSON as required by the API. For example,
in Amazon S3, to get an object for a specified bucket and key, pass the following parameters to
the getObject method. For more information about passing JSON parameters, see Working with
JSON (p. 60).
49

AWS SDK for JavaScript Developer Guide for SDK v2
Logging AWS SDK for JavaScript Calls
s3.getObject({Bucket: 'bucketName', Key: 'keyName'});
For more information about Amazon S3 parameters, see Class: AWS.S3 in the API reference.
In addition, you can bind values to individual parameters when creating a service object using the
params parameter. The value of the params parameter of service objects is a map that specifies one or
more of the parameter values defined by the service object. The following example shows the Bucket
parameter of an Amazon S3 service object being bound to a bucket named myBucket.
var s3bucket = new AWS.S3({params: {Bucket: 'myBucket'}, apiVersion: '2006-03-01' });
By binding the service object to a bucket, the s3bucket service object treats the myBucket parameter
value as a default value that no longer needs to be specified for subsequent operations. Any bound
parameter values are ignored when using the object for operations where the parameter value isn't
applicable. You can override this bound parameter when making calls on the service object by specifying
a new value.
var s3bucket = new AWS.S3({ params: {Bucket: 'myBucket'}, apiVersion: '2006-03-01' });
s3bucket.getObject({Key: 'keyName'});
// ...
s3bucket.getObject({Bucket: 'myOtherBucket', Key: 'keyOtherName'});
Details about available parameters for each method are found in the API reference.
Logging AWS SDK for JavaScript Calls
The AWS SDK for JavaScript is instrumented with a built-in logger so you can log API calls you make with
the SDK for JavaScript.
To turn on the logger and print log entries in the console, add the following statement to your code.
AWS.config.logger = console;
Here is an example of the log output.
[AWS s3 200 0.185s 0 retries] createMultipartUpload({ Bucket: 'js-sdk-test-bucket', Key:
'issues_1704' })
Using a Third-Party Logger
You can also use a third-party logger, provided it has log() or write() operations to write to a log file
or server. You must install and set up your custom logger as instructed before you can use it with the
SDK for JavaScript.
One such logger you can use in either browser scripts or in Node.js is logplease. In Node.js, you can
configure logplease to write log entries to a log file. You can also use it with webpack.
When using a third-party logger, set all options before assigning the logger to AWS.Config.logger.
For example, the following specifies an external log file and sets the log level for logplease
// Require logplease
50

AWS SDK for JavaScript Developer Guide for SDK v2
Calling Services Asychronously
Const myLogger = require(‘logplease’);
// Set external log file option
myLogger.setLogFile(‘debug.log’);
// Set log level
myLogger.setLogLevel(‘DEBUG’);
// Assign logger to SDK
AWS.Config.logger = myLogger;
For more information about logplease, see the logplease Simple JavaScript Logger on GitHub.
Calling Services Asychronously
All requests made through the SDK are asynchronous. This is important to keep in mind when writing
browser scripts. JavaScript running in a web browser typically has just a single execution thread. After
making an asynchronous call to an AWS service, the browser script continues running and in the process
can try to execute code that depends on that asynchronous result before it returns.
Making asynchronous calls to an AWS service includes managing those calls so your code doesn't try to
use data before the data is available. The topics in this section explain the need to manage asynchronous
calls and detail different techniques you can use to manage them.
Topics
• Managing Asychronous Calls (p. 51)
• Using an Anonymous Callback Function (p. 52)
• Using a Request Object Event Listener (p. 53)
• Using JavaScript Promises (p. 57)
• Requests With a Node.js Stream Object (p. 58)
Managing Asychronous Calls
For example, the home page of an e-commerce website lets returning customers sign in. Part of
the benefit for customers who sign in is that, after signing in, the site then customizes itself to their
particular preferences. To make this happen:
1. The customer must log in and be validated with their user name and password.
2. The customer's preferences are requested from a customer database.
3. The database provides the customer's preferences that are used to customize the site before the page
loads.
If these tasks execute synchronously, then each must finish before the next can start. The web page
would be unable to finish loading until the customer preferences return from the database. However,
after the database query is sent to the server, receipt of the customer data can be delayed or even fail
due to network bottlenecks, exceptionally high database traffic, or a poor mobile device connection.
To keep the website from freezing under those conditions, call the database asychronously. After the
database call executes, sending your asynchronous request, your code continues to execute as expected.
If you don't properly manage the response of an asynchronous call, your code can attempt to use
information it expects back from the database when that data isn't available yet.
51

AWS SDK for JavaScript Developer Guide for SDK v2
Using a Callback Function
Using an Anonymous Callback Function
Each service object method that creates an AWS.Request object can accept an anonymous callback
function as the last parameter. The signature of this callback function is:
function(error, data) {
// callback handling code
}
This callback function executes when either a successful response or error data returns. If the method
call succeeds, the contents of the response are available to the callback function in the data parameter.
If the call doesn't succeed, the details about the failure are provided in the error parameter.
Typically the code inside the callback function tests for an error, which it processes if one is returned. If
an error is not returned, the code then retrieves the data in the response from the data parameter. The
basic form of the callback function looks like this example.
function(error, data) {
if (error) {
// error handling code
console.log(error);
} else {
// data handling code
console.log(data);
}
}
In the previous example, the details of either the error or the returned data are logged to the console.
Here is an example that shows a callback function passed as part of calling a method on a service object.
new AWS.EC2({apiVersion: '2014-10-01'}).describeInstances(function(error, data) {
if (error) {
console.log(error); // an error occurred
} else {
console.log(data); // request succeeded
}
});
52

AWS SDK for JavaScript Developer Guide for SDK v2
Using a Request Object Event Listener
Accessing the Request and Response Objects
Within the callback function, the JavaScript keyword this refers to the underlying AWS.Response
object for most services. In the following example, the httpResponse property of an AWS.Response
object is used within a callback function to log the raw response data and headers to help with
debugging.
new AWS.EC2({apiVersion: '2014-10-01'}).describeInstances(function(error, data) {
if (error) {
console.log(error); // an error occurred
// Using this keyword to access AWS.Response object and properties
console.log("Response data and headers: " + JSON.stringify(this.httpResponse));
} else {
console.log(data); // request succeeded
}
});
In addition, because the AWS.Response object has a Request property that contains the AWS.Request
that was sent by the original method call, you can also access the details of the request that was made.
Using a Request Object Event Listener
If you do not create and pass an anonymous callback function as a parameter when you call a service
object method, the method call generates an AWS.Request object that must be manually sent using its
send method.
To process the response, you must create an event listener for the AWS.Request object to register a
callback function for the method call. The following example shows how to create the AWS.Request
object for calling a service object method and the event listener for the successful return.
// create the AWS.Request object
var request = new AWS.EC2({apiVersion: '2014-10-01'}).describeInstances();
// register a callback event handler
request.on('success', function(response) {
// log the successful data response
console.log(response.data);
});
// send the request
request.send();
After the send method on the AWS.Request object is called, the event handler executes when the
service object receives an AWS.Response object.
For more information about the AWS.Request object, see Class: AWS.Request in the API Reference. For
more information about the AWS.Response object, see Using the Response Object (p. 59) or Class:
AWS.Response in the API Reference.
Chaining Multiple Callbacks
You can register multiple callbacks on any request object. Multiple callbacks can be registered for
different events or the same event. Also, you can chain callbacks as shown in the following example.
request.
on('success', function(response) {
console.log("Success!");
}).
53

AWS SDK for JavaScript Developer Guide for SDK v2
Using a Request Object Event Listener
on('error', function(response) {
console.log("Error!");
}).
on('complete', function() {
console.log("Always!");
}).
send();
Request Object Completion Events
The AWS.Request object raises these completion events based on the response of each service
operation method:
• success
• error
• complete
You can register a callback function in response to any of these events. For a complete list of all request
object events, see Class: AWS.Request in the API Reference.
The success Event
The success event is raised upon a successful response received from the service object. Here is how
you register a callback function for this event.
request.on('success', function(response) {
// event handler code
});
The response provides a data property that contains the serialized response data from the service. For
example, the following call to the listBuckets method of the Amazon S3 service object
s3.listBuckets.on('success', function(response) {
console.log(response.data);
}).send();
returns the response and then prints the following data property contents to the console.
{ Owner: { ID: '...', DisplayName: '...' },
Buckets:
[ { Name: 'someBucketName', CreationDate: someCreationDate },
{ Name: 'otherBucketName', CreationDate: otherCreationDate } ],
RequestId: '...' }
The error Event
The error event is raised upon an error response received from the service object. Here is how you
register a callback function for this event.
request.on('error', function(error, response) {
// event handling code
});
When the error event is raised, the value of the response's data property is null and the error
property contains the error data. The associated error object is passed as the first parameter to the
registered callback function. For example, the following code:
54

AWS SDK for JavaScript Developer Guide for SDK v2
Using a Request Object Event Listener
s3.config.credentials.accessKeyId = 'invalid';
s3.listBuckets().on('error', function(error, response) {
console.log(error);
}).send();
returns the error and then prints the following error data to the console.
{ code: 'Forbidden', message: null }
The complete Event
The complete event is raised when a service object call has finished, regardless of whether the call
results in success or error. Here is how you register a callback function for this event.
request.on('complete', function(response) {
// event handler code
});
Use the complete event callback to handle any request cleanup that must execute regardless of
success or error. If you use response data inside a callback for the complete event, first check the
response.data or response.error properties before attempting to access either one, as shown in
the following example.
request.on('complete', function(response) {
if (response.error) {
// an error occurred, handle it
} else {
// we can use response.data here
}
}).send();
Request Object HTTP Events
The AWS.Request object raises these HTTP events based on the response of each service operation
method:
• httpHeaders
• httpData
• httpUploadProgress
• httpDownloadProgress
• httpError
• httpDone
You can register a callback function in response to any of these events. For a complete list of all request
object events, see Class: AWS.Request in the API Reference.
The httpHeaders Event
The httpHeaders event is raised when headers are sent by the remote server. Here is how you register a
callback function for this event.
request.on('httpHeaders', function(statusCode, headers, response) {
// event handling code
55

AWS SDK for JavaScript Developer Guide for SDK v2
Using a Request Object Event Listener
});
The statusCode parameter to the callback function is the HTTP status code. The headers parameter
contains the response headers.
The httpData Event
The httpData event is raised to stream response data packets from the service. Here is how you register
a callback function for this event.
request.on('httpData', function(chunk, response) {
// event handling code
});
This event is typically used to receive large responses in chunks when loading the entire response into
memory is not practical. This event has an additional chunk parameter that contains a portion of the
actual data from the server.
If you register a callback for the httpData event, the data property of the response contains the entire
serialized output for the request. You must remove the default httpData listener if you don't have the
extra parsing and memory overhead for the built-in handlers.
The httpUploadProgress and httpDownloadProgress Events
The httpUploadProgress event is raised when the HTTP request has uploaded more data. Similarly,
the httpDownloadProgress event is raised when the HTTP request has downloaded more data. Here is
how you register a callback function for these events.
request.on('httpUploadProgress', function(progress, response) {
// event handling code
})
.on('httpDownloadProgress', function(progress, response) {
// event handling code
});
The progress parameter to the callback function contains an object with the loaded and total bytes of
the request.
The httpError Event
The httpError event is raised when the HTTP request fails. Here is how you register a callback function
for this event.
request.on('httpError', function(error, response) {
// event handling code
});
The error parameter to the callback function contains the error that was thrown.
The httpDone Event
The httpDone event is raised when the server finishes sending data. Here is how you register a callback
function for this event.
request.on('httpDone', function(response) {
// event handling code
56

AWS SDK for JavaScript Developer Guide for SDK v2
Using Promises
});
Using JavaScript Promises
The AWS.Request.promise method provides a way to call a service operation and manage
asynchronous flow instead of using callbacks. In Node.js and browser scripts, an AWS.Request object is
returned when a service operation is called without a callback function. You can call the request's send
method to make the service call.
However, AWS.Request.promise immediately starts the service call and returns a promise that is
either fulfilled with the response data property or rejected with the response error property.
var request = new AWS.EC2({apiVersion: '2014-10-01'}).describeInstances();
// create the promise object
var promise = request.promise();
// handle promise's fulfilled/rejected states
promise.then(
function(data) {
/* process the data */
},
function(error) {
/* handle the error */
}
);
The next example returns a promise that's fulfilled with a data object, or rejected with an error object.
Using promises, a single callback isn't responsible for detecting errors. Instead, the correct callback is
called based on the success or failure of a request.
var s3 = new AWS.S3({apiVersion: '2006-03-01', region: 'us-west-2'});
var params = {
Bucket: 'bucket',
Key: 'example2.txt',
Body: 'Uploaded text using the promise-based method!'
};
var putObjectPromise = s3.putObject(params).promise();
putObjectPromise.then(function(data) {
console.log('Success');
}).catch(function(err) {
console.log(err);
});
Coordinating Multiple Promises
In some situations, your code must make multiple asynchronous calls that require action only when they
have all returned successfully. If you manage those individual asynchronous method calls with promises,
you can create an additional promise that uses the all method. This method fulfills this umbrella
promise if and when the array of promises that you pass into the method are fulfilled. The callback
function is passed an array of the values of the promises passed to the all method.
In the following example, an AWS Lambda function must make three asynchronous calls to Amazon
DynamoDB but can only complete after the promises for each call are fulfilled.
Promise.all([firstPromise, secondPromise, thirdPromise]).then(function(values) {
console.log("Value 0 is " + values[0].toString);
57

AWS SDK for JavaScript Developer Guide for SDK v2
Requests With a Node.js Stream Object
console.log("Value 1 is " + values[1].toString);
console.log("Value 2 is " + values[2].toString);
// return the result to the caller of the Lambda function
callback(null, values);
});
Browser and Node.js Support for Promises
Support for native JavaScript promises (ECMAScript 2015) depends on the JavaScript engine and version
in which your code executes. To help determine the support for JavaScript promises in each environment
where your code needs to run, see the ECMAScript Compatability Table on GitHub.
Using Other Promise Implementations
In addition to the native promise implementation in ECMAScript 2015, you can also use third-party
promise libraries, including:
• bluebird
• RSVP
• Q
These optional promise libraries can be useful if you need your code to run in environments that don't
support the native promise implementation in ECMAScript 5 and ECMAScript 2015.
To use a third-party promise library, set a promises dependency on the SDK by calling the
setPromisesDependency method of the global configuration object. In browser scripts, make sure
to load the third-party promise library before loading the SDK. In the following example, the SDK is
configured to use the implementation in the bluebird promise library.
AWS.config.setPromisesDependency(require('bluebird'));
To return to using the native promise implementation of the JavaScript engine, call
setPromisesDependency again, passing a null instead of a library name.
Requests With a Node.js Stream Object
You can create a request that streams the returned data directly to a Node.js Stream object by calling
the createReadStream method on the request. Calling createReadStream returns the raw HTTP
stream managed by the request. The raw data stream can then be piped into any Node.js Stream object.
This technique is useful for service calls that return raw data in their payload, such as calling getObject
on an Amazon S3 service object to stream data directly into a file, as shown in this example.
var s3 = new AWS.S3({apiVersion: '2006-03-01'});
var params = {Bucket: 'myBucket', Key: 'myImageFile.jpg'};
var file = require('fs').createWriteStream('/path/to/file.jpg');
s3.getObject(params).createReadStream().pipe(file);
When you stream data from a request using createReadStream, only the raw HTTP data is returned.
The SDK does not post-process the data.
Because Node.js is unable to rewind most streams, if the request initially succeeds, then retry logic
is disabled for the rest of the response. In the event of a socket failure while streaming, the SDK
58

AWS SDK for JavaScript Developer Guide for SDK v2
Using the Response Object
won't attempt to retry or send more data to the stream. Your application logic needs to identify such
streaming failures and handle them.
Using the Response Object
After a service object method has been called, it returns an AWS.Response object by passing it to your
callback function. You access the contents of the response through the properties of the AWS.Response
object. There are two properties of the AWS.Response object you use to access the contents of the
response:
• data property
• error property
When using the standard callback mechanism, these two properties are provided as parameters on the
anonymous callback function as shown in the following example.
function(error, data) {
if (error) {
// error handling code
console.log(error);
} else {
// data handling code
console.log(data);
}
}
Accessing Data Returned in the Response Object
The data property of the AWS.Response object contains the serialized data returned by the service
request. When the request is successful, the data property contains an object that contains a map to the
data returned. The data property can be null if an error occurs.
Here is an example of calling the getItem method of a DynamoDB table to retrieve the file name of an
image file to use as part of a game.
// Initialize parameters needed to call DynamoDB
var slotParams = {
Key : {'slotPosition' : {N: '0'}},
TableName : 'slotWheels',
ProjectionExpression: 'imageFile'
};
// prepare request object for call to DynamoDB
var request = new AWS.DynamoDB({region: 'us-west-2', apiVersion:
'2012-08-10'}).getItem(slotParams);
// log the name of the image file to load in the slot machine
request.on('success', function(response) {
// logs a value like "cherries.jpg" returned from DynamoDB
console.log(response.data.Item.imageFile.S);
});
// submit DynamoDB request
request.send();
For this example, the DynamoDB table is a lookup of images that show the results of a slot machine pull
as specified by the parameters in slotParams.
59

AWS SDK for JavaScript Developer Guide for SDK v2
Paging Through Returned Data
Upon a successful call of the getItem method, the data property of the AWS.Response object
contains an Item object returned by DynamoDB. The returned data is accessed according to the request's
ProjectionExpression parameter, which in this case means the imageFile member of the Item
object. Because the imageFile member holds a string value, you access the file name of the image itself
through the value of the S child member of imageFile.
Paging Through Returned Data
Sometimes the contents of the data property returned by a service request span multiple pages. You
can access the next page of data by calling the response.nextPage method. This method sends a new
request. The response from the request can be captured either with a callback or with success and error
listeners.
You can check to see if the data returned by a service request has additional pages of data by calling
the response.hasNextPage method. This method returns a boolean to indicate whether calling
response.nextPage returns additional data.
s3.listObjects({Bucket: 'bucket'}).on('success', function handlePage(response) {
// do something with response.data
if (response.hasNextPage()) {
response.nextPage().on('success', handlePage).send();
}
}).send();
Accessing Error Information from a Response Object
The error property of the AWS.Response object contains the available error data in the event of a
service error or transfer error. The error returned takes the following form.
{ code: 'SHORT_UNIQUE_ERROR_CODE', message: 'a descriptive error message' }
In the case of an error, the value of the data property is null. If you handle events that can be in a
failure state, always check whether the error property was set before attempting to access the value of
the data property.
Accessing the Originating Request Object
The request property provides access to the originating AWS.Request object. It can be useful to refer
to the original AWS.Request object to access the original parameters it sent. In the following example,
the request property is used to access the Key parameter of the original service request.
s3.getObject({Bucket: 'bucket', Key: 'key'}).on('success', function(response) {
console.log("Key was", response.request.params.Key);
}).send();
Working with JSON
JSON is a format for data exchange that is both human and machine-readable. While the name JSON
is an acronym for JavaScript Object Notation, the format of JSON is independent of any programming
language.
The SDK for JavaScript uses JSON to send data to service objects when making requests and receives
data from service objects as JSON. For more information about JSON, see json.org.
60

AWS SDK for JavaScript Developer Guide for SDK v2
JSON as Service Object Parameters
JSON represents data in two ways:
• An object, which is an unordered collection of name-value pairs. An object is defined within left ({)
and right (}) braces. Each name-value pair begins with the name, followed by a colon, followed by the
value. Name-value pairs are comma separated.
• An array, which is an ordered collection of values. An array is defined within left ([) and right (])
brackets. Items in the array are comma separated.
Here is an example of a JSON object that contains an array of objects in which the objects represent
cards in a card game. Each card is defined by two name-value pairs, one that specifies a unique value to
identify that card and another that specifies a URL that points to the corresponding card image.
var cards = [{"CardID":"defaultname", "Image":"defaulturl"},
{"CardID":"defaultname", "Image":"defaulturl"},
{"CardID":"defaultname", "Image":"defaulturl"},
{"CardID":"defaultname", "Image":"defaulturl"},
{"CardID":"defaultname", "Image":"defaulturl"}];
JSON as Service Object Parameters
Here is an example of simple JSON used to define the parameters of a call to a Lambda service object.
var pullParams = {
FunctionName : 'slotPull',
InvocationType : 'RequestResponse',
LogType : 'None'
};
The pullParams object is defined by three name-value pairs, separated by commas within the left and
right braces. When providing parameters to a service object method call, the names are determined by
the parameter names for the service object method you plan to call. When invoking a Lambda function,
FunctionName, InvocationType, and LogType are the parameters used to call the invoke method
on a Lambda service object.
When passing parameters to a service object method call, provide the JSON object to the method call, as
shown in the following example of invoking a Lambda function.
lambda = new AWS.Lambda({region: 'us-west-2', apiVersion: '2015-03-31'});
// create JSON object for service call parameters
var pullParams = {
FunctionName : 'slotPull',
InvocationType : 'RequestResponse',
LogType : 'None'
};
// invoke Lambda function, passing JSON object
lambda.invoke(pullParams, function(err, data) {
if (err) {
console.log(err);
61

AWS SDK for JavaScript Developer Guide for SDK v2
Returning Data as JSON
} else {
console.log(data);
}
});
Returning Data as JSON
JSON provides a standard way to pass data between parts of an application that need to send several
values at the same time. The methods of client classes in the API commonly return JSON in the data
parameter passed to their callback functions. For example, here is a call to the getBucketCors method
of the Amazon S3 client class.
// call S3 to retrieve CORS configuration for selected bucket
s3.getBucketCors(bucketParams, function(err, data) {
if (err) {
console.log(err);
} else if (data) {
console.log(JSON.stringify(data));
}
});
The value of data is a JSON object, in this example JSON that describes the current CORS configuration
for a specified Amazon S3 bucket.
{
"CORSRules": [
{
"AllowedHeaders":["*"],
"AllowedMethods":["POST","GET","PUT","DELETE","HEAD"],
"AllowedOrigins":["*"],
"ExposeHeaders":[],
"MaxAgeSeconds":3000
}
]
}
62

AWS SDK for JavaScript Developer Guide for SDK v2
Amazon CloudWatch Examples
SDK for JavaScript Code Examples
The topics in this section contain examples of how to use the AWS SDK for JavaScript with the APIs of
various services to carry out common tasks.
You can find the sample code for these examples in addition to others in the AWS documentation sample
repository on GitHub.
Topics
• Amazon CloudWatch Examples (p. 63)
• Amazon DynamoDB Examples (p. 79)
• Amazon EC2 Examples (p. 95)
• AWS Elemental MediaConvert Examples (p. 113)
• Amazon S3 Glacier Examples (p. 126)
• AWS IAM Examples (p. 129)
• Amazon Kinesis Example (p. 147)
• AWS Lambda Examples (p. 152)
• Amazon S3 Examples (p. 161)
• Amazon Simple Email Service Examples (p. 185)
• Amazon Simple Notification Service Examples (p. 204)
• Amazon SQS Examples (p. 218)
Amazon CloudWatch Examples
Amazon CloudWatch (CloudWatch) is a web service that monitors your Amazon Web Services (AWS)
resources and applications you run on AWS in real time. You can use CloudWatch to collect and track
metrics, which are variables you can measure for your resources and applications. CloudWatch alarms
send notifications or automatically make changes to the resources you are monitoring based on rules
that you define.
The JavaScript API for CloudWatch is exposed through the AWS.CloudWatch,
AWS.CloudWatchEvents, and AWS.CloudWatchLogs client classes. For more information about using
the CloudWatch client classes, see Class: AWS.CloudWatch, Class: AWS.CloudWatchEvents, and Class:
AWS.CloudWatchLogs in the API reference.
Topics
63

AWS SDK for JavaScript Developer Guide for SDK v2
Creating Alarms in Amazon CloudWatch
• Creating Alarms in Amazon CloudWatch (p. 64)
• Using Alarm Actions in Amazon CloudWatch (p. 67)
• Getting Metrics from Amazon CloudWatch (p. 69)
• Sending Events to Amazon CloudWatch Events (p. 72)
• Using Subscription Filters in Amazon CloudWatch Logs (p. 75)
Creating Alarms in Amazon CloudWatch
This Node.js code example shows:
• How to retrieve basic information about your CloudWatch alarms.
• How to create and delete a CloudWatch alarm.
The Scenario
An alarm watches a single metric over a time period you specify, and performs one or more actions
based on the value of the metric relative to a given threshold over a number of time periods.
In this example, a series of Node.js modules are used to create alarms in CloudWatch. The Node.js
modules use the SDK for JavaScript to create alarms using these methods of the AWS.CloudWatch
client class:
• describeAlarms
• putMetricAlarm
• deleteAlarms
For more information about CloudWatch alarms, see Creating Amazon CloudWatch Alarms in the
Amazon CloudWatch User Guide.
Prerequisite Tasks
To set up and run this example, you must first complete these tasks:
• Install Node.js. For more information about installing Node.js, see the Node.js website.
• Create a shared configurations file with your user credentials. For more information about providing a
shared credentials file, see Loading Credentials in Node.js from the Shared Credentials File (p. 26).
Configuring the SDK
Configure the SDK for JavaScript by creating a global configuration object then setting the region for
your code. In this example, the region is set to us-west-2.
// Load the SDK for JavaScript
64

AWS SDK for JavaScript Developer Guide for SDK v2
Creating Alarms in Amazon CloudWatch
var AWS = require('aws-sdk');
// Set the region
AWS.config.update({region: 'us-west-2'});
Describing Alarms
Create a Node.js module with the file name cw_describealarms.js. Be sure to configure the SDK
as previously shown. To access CloudWatch, create an AWS.CloudWatch service object. Create a JSON
object to hold the parameters for retrieving alarm descriptions, limiting the alarms returned to those
with a state of INSUFFICIENT_DATA. Then call the describeAlarms method of the AWS.CloudWatch
service object.
// Load the AWS SDK for Node.js
var AWS = require('aws-sdk');
// Set region
AWS.config.update({region: 'REGION'});
// Create CloudWatch service object
var cw = new AWS.CloudWatch({apiVersion: '2010-08-01'});
cw.describeAlarms({StateValue: 'INSUFFICIENT_DATA'}, function(err, data) {
if (err) {
console.log("Error", err);
} else {
// List the names of all current alarms in the console
data.MetricAlarms.forEach(function (item, index, array) {
console.log(item.AlarmName);
});
}
});
To run the example, type the following at the command line.
node cw_describealarms.js
This sample code can be found here on GitHub.
Creating an Alarm for a CloudWatch Metric
Create a Node.js module with the file name cw_putmetricalarm.js. Be sure to configure the SDK
as previously shown. To access CloudWatch, create an AWS.CloudWatch service object. Create a JSON
object for the parameters needed to create an alarm based on a metric, in this case the CPU utilization
of an Amazon EC2 instance. The remaining parameters are set so the alarm triggers when the metric
exceeds a threshold of 70 percent. Then call the describeAlarms method of the AWS.CloudWatch
service object.
// Load the AWS SDK for Node.js
var AWS = require('aws-sdk');
// Set region
AWS.config.update({region: 'REGION'});
// Create CloudWatch service object
var cw = new AWS.CloudWatch({apiVersion: '2010-08-01'});
var params = {
AlarmName: 'Web_Server_CPU_Utilization',
ComparisonOperator: 'GreaterThanThreshold',
65

AWS SDK for JavaScript Developer Guide for SDK v2
Creating Alarms in Amazon CloudWatch
EvaluationPeriods: 1,
MetricName: 'CPUUtilization',
Namespace: 'AWS/EC2',
Period: 60,
Statistic: 'Average',
Threshold: 70.0,
ActionsEnabled: false,
AlarmDescription: 'Alarm when server CPU exceeds 70%',
Dimensions: [
{
Name: 'InstanceId',
Value: 'INSTANCE_ID'
},
],
Unit: 'Seconds'
};
cw.putMetricAlarm(params, function(err, data) {
if (err) {
console.log("Error", err);
} else {
console.log("Success", data);
}
});
To run the example, type the following at the command line.
node cw_putmetricalarm.js
This sample code can be found here on GitHub.
Deleting an Alarm
Create a Node.js module with the file name cw_deletealarms.js. Be sure to configure the SDK as
previously shown. To access CloudWatch, create an AWS.CloudWatch service object. Create a JSON
object to hold the names of the alarms you want to delete. Then call the deleteAlarms method of the
AWS.CloudWatch service object.
// Load the AWS SDK for Node.js
var AWS = require('aws-sdk');
// Set region
AWS.config.update({region: 'REGION'});
// Create CloudWatch service object
var cw = new AWS.CloudWatch({apiVersion: '2010-08-01'});
cw.deleteAlarms({AlarmNames: ['Web_Server_CPU_Utilization']}, function(err, data) {
if (err) {
console.log("Error", err);
} else {
console.log("Success", data);
}
});
To run the example, type the following at the command line.
node cw_deletealarms.js
This sample code can be found here on GitHub.
66

AWS SDK for JavaScript Developer Guide for SDK v2
Using Alarm Actions in Amazon CloudWatch
Using Alarm Actions in Amazon CloudWatch
This Node.js code example shows:
• How to change the state of your Amazon EC2 instances automatically based on a CloudWatch alarm.
The Scenario
Using alarm actions, you can create alarms that automatically stop, terminate, reboot, or recover your
Amazon EC2 instances. You can use the stop or terminate actions when you no longer need an instance
to be running. You can use the reboot and recover actions to automatically reboot those instances.
In this example, a series of Node.js modules are used to define an alarm action in CloudWatch that
triggers the reboot of an Amazon EC2 instance. The Node.js modules use the SDK for JavaScript to
manage Amazon EC2 instances using these methods of the CloudWatch client class:
• enableAlarmActions
• disableAlarmActions
For more information about CloudWatch alarm actions, see Create Alarms to Stop, Terminate, Reboot, or
Recover an Instance in the Amazon CloudWatch User Guide.
Prerequisite Tasks
To set up and run this example, you must first complete these tasks:
• Install Node.js. For more information about installing Node.js, see the Node.js website.
• Create a shared configurations file with your user credentials. For more information about providing a
shared credentials file, see Loading Credentials in Node.js from the Shared Credentials File (p. 26).
• Create an IAM role whose policy grants permission to describe, reboot, stop, or terminate an Amazon
EC2 instance. For more information about creating an IAM role, see Creating a Role to Delegate
Permissions to an AWS Service in the IAM User Guide.
Use the following role policy when creating the IAM role.
{
"Version": "2012-10-17",
"Statement": [
{
"Effect": "Allow",
"Action": [
"cloudwatch:Describe*",
"ec2:Describe*",
"ec2:RebootInstances",
"ec2:StopInstances*",
"ec2:TerminateInstances"
],
"Resource": [
"*"
67

AWS SDK for JavaScript Developer Guide for SDK v2
Using Alarm Actions in Amazon CloudWatch
]
}
]
}
Configuring the SDK
Configure the SDK for JavaScript by creating a global configuration object then setting the region for
your code. In this example, the region is set to us-west-2.
// Load the SDK for JavaScript
var AWS = require('aws-sdk');
// Set the region
AWS.config.update({region: 'us-west-2'});
Creating and Enabling Actions on an Alarm
Create a Node.js module with the file name cw_enablealarmactions.js. Be sure to configure the
SDK as previously shown. To access CloudWatch, create an AWS.CloudWatch service object.
Create a JSON object to hold the parameters for creating an alarm, specifying ActionsEnabled as
true and an array of ARNs for the actions the alarm will trigger. Call the putMetricAlarm method
of the AWS.CloudWatch service object, which creates the alarm if it does not exist or updates it if the
alarm does exist.
In the callback function for the putMetricAlarm, upon successful completion create a JSON object
containing the name of the CloudWatch alarm. Call the enableAlarmActions method to enable the
alarm action.
// Load the AWS SDK for Node.js
var AWS = require('aws-sdk');
// Set the region
AWS.config.update({region: 'REGION'});
// Create CloudWatch service object
var cw = new AWS.CloudWatch({apiVersion: '2010-08-01'});
var params = {
AlarmName: 'Web_Server_CPU_Utilization',
ComparisonOperator: 'GreaterThanThreshold',
EvaluationPeriods: 1,
MetricName: 'CPUUtilization',
Namespace: 'AWS/EC2',
Period: 60,
Statistic: 'Average',
Threshold: 70.0,
ActionsEnabled: true,
AlarmActions: ['arn:aws:swf:us-west-2:{CUSTOMER_ACCOUNT}:action/actions/
AWS_EC2.InstanceId.Reboot/1.0'], /* This is a workflow */
AlarmDescription: 'Alarm when server CPU exceeds 70%',
Dimensions: [
{
Name: 'InstanceId',
Value: 'INSTANCE_ID'
},
],
Unit: 'Seconds'
};
cw.putMetricAlarm(params, function(err, data) {
if (err) {
68

AWS SDK for JavaScript Developer Guide for SDK v2
Getting Metrics from Amazon CloudWatch
console.log("Error", err);
} else {
console.log("Alarm action added", data);
var paramsEnableAlarmAction = {
AlarmNames: [paramsUpdateAlarm.AlarmName]
};
cw.enableAlarmActions(paramsEnableAlarmAction, function(err, data) {
if (err) {
console.log("Error", err);
} else {
console.log("Alarm action enabled", data);
}
});
}
});
To run the example, type the following at the command line.
node cw_enablealarmactions.js
This sample code can be found here on GitHub.
Disabling Actions on an Alarm
Create a Node.js module with the file name cw_disablealarmactions.js. Be sure to configure the
SDK as previously shown. To access CloudWatch, create an AWS.CloudWatch service object. Create a
JSON object containing the name of the CloudWatch alarm. Call the disableAlarmActions method to
disable the actions for this alarm.
// Load the AWS SDK for Node.js
var AWS = require('aws-sdk');
// Set the region
AWS.config.update({region: 'REGION'});
// Create CloudWatch service object
var cw = new AWS.CloudWatch({apiVersion: '2010-08-01'});
cw.disableAlarmActions({AlarmNames: ['Web_Server_CPU_Utilization']}, function(err, data) {
if (err) {
console.log("Error", err);
} else {
console.log("Success", data);
}
});
To run the example, type the following at the command line.
node cw_disablealarmactions.js
This sample code can be found here on GitHub.
Getting Metrics from Amazon CloudWatch
69

AWS SDK for JavaScript Developer Guide for SDK v2
Getting Metrics from Amazon CloudWatch
This Node.js code example shows:
• How to retrieve a list of published CloudWatch metrics.
• How to publish data points to CloudWatch metrics.
The Scenario
Metrics are data about the performance of your systems. You can enable detailed monitoring of some
resources, such as your Amazon EC2 instances, or your own application metrics.
In this example, a series of Node.js modules are used to get metrics from CloudWatch. In this example, a
series of Node.js modules are used to send events to Amazon CloudWatch Events. The Node.js modules
use the SDK for JavaScript to get metrics from CloudWatch using these methods of the CloudWatch
client class:
• listMetrics
• putMetricData
For more information about CloudWatch metrics, see Using Amazon CloudWatch Metrics in the Amazon
CloudWatch User Guide.
Prerequisite Tasks
To set up and run this example, you must first complete these tasks:
• Install Node.js. For more information about installing Node.js, see the Node.js website.
• Create a shared configurations file with your user credentials. For more information about providing a
shared credentials file, see Loading Credentials in Node.js from the Shared Credentials File (p. 26).
Configuring the SDK
Configure the SDK for JavaScript by creating a global configuration object then setting the region for
your code. In this example, the region is set to us-west-2.
// Load the SDK for JavaScript
var AWS = require('aws-sdk');
// Set the region
AWS.config.update({region: 'us-west-2'});
Listing Metrics
Create a Node.js module with the file name cw_listmetrics.js. Be sure to configure the SDK as
previously shown. To access CloudWatch, create an AWS.CloudWatch service object. Create a JSON
object containing the parameters needed to list metrics within the AWS/Logs namespace. Call the
listMetrics method to list the IncomingLogEvents metric.
// Load the AWS SDK for Node.js
var AWS = require('aws-sdk');
// Set the region
AWS.config.update({region: 'REGION'});
// Create CloudWatch service object
var cw = new AWS.CloudWatch({apiVersion: '2010-08-01'});
var params = {
70

AWS SDK for JavaScript Developer Guide for SDK v2
Getting Metrics from Amazon CloudWatch
Dimensions: [
{
Name: 'LogGroupName',
},
],
MetricName: 'IncomingLogEvents',
Namespace: 'AWS/Logs'
};
cw.listMetrics(params, function(err, data) {
if (err) {
console.log("Error", err);
} else {
console.log("Metrics", JSON.stringify(data.Metrics));
}
});
To run the example, type the following at the command line.
node cw_listmetrics.js
This sample code can be found here on GitHub.
Submitting Custom Metrics
Create a Node.js module with the file name cw_putmetricdata.js. Be sure to configure the SDK as
previously shown. To access CloudWatch, create an AWS.CloudWatch service object. Create a JSON
object containing the parameters needed to submit a data point for the PAGES_VISITED custom metric.
Call the putMetricData method.
// Load the AWS SDK for Node.js
var AWS = require('aws-sdk');
// Set the region
AWS.config.update({region: 'REGION'});
// Create CloudWatch service object
var cw = new AWS.CloudWatch({apiVersion: '2010-08-01'});
// Create parameters JSON for putMetricData
var params = {
MetricData: [
{
MetricName: 'PAGES_VISITED',
Dimensions: [
{
Name: 'UNIQUE_PAGES',
Value: 'URLS'
},
],
Unit: 'None',
Value: 1.0
},
],
Namespace: 'SITE/TRAFFIC'
};
cw.putMetricData(params, function(err, data) {
if (err) {
console.log("Error", err);
} else {
console.log("Success", data);
}
71

AWS SDK for JavaScript Developer Guide for SDK v2
Sending Events to Amazon CloudWatch Events
});
To run the example, type the following at the command line.
node cw_putmetricdata.js
This sample code can be found here on GitHub.
Sending Events to Amazon CloudWatch Events
This Node.js code example shows:
• How to create and update a rule used to trigger an event.
• How to define one or more targets to respond to an event.
• How to send events that are matched to targets for handling.
The Scenario
CloudWatch Events delivers a near real-time stream of system events that describe changes in Amazon
Web Services (AWS) resources to any of various targets. Using simple rules, you can match events and
route them to one or more target functions or streams.
In this example, a series of Node.js modules are used to send events to CloudWatch Events. The
Node.js modules use the SDK for JavaScript to manage instances using these methods of the
CloudWatchEvents client class:
• putRule
• putTargets
• putEvents
For more information about CloudWatch Events, see Adding Events with PutEvents in the Amazon
CloudWatch Events User Guide.
Prerequisite Tasks
To set up and run this example, you must first complete these tasks:
• Install Node.js. For more information about installing Node.js, see the Node.js website.
• Create a shared configurations file with your user credentials. For more information about providing a
shared credentials file, see Loading Credentials in Node.js from the Shared Credentials File (p. 26).
• Create a Lambda function using the hello-world blueprint to serve as the target for events. To learn
how, see Step 1: Create an AWS Lambda function in the Amazon CloudWatch Events User Guide.
• Create an IAM role whose policy grants permission to CloudWatch Events and that includes
events.amazonaws.com as a trusted entity. For more information about creating an IAM role, see
Creating a Role to Delegate Permissions to an AWS Service in the IAM User Guide.
Use the following role policy when creating the IAM role.
72

AWS SDK for JavaScript Developer Guide for SDK v2
Sending Events to Amazon CloudWatch Events
{
"Version": "2012-10-17",
"Statement": [
{
"Sid": "CloudWatchEventsFullAccess",
"Effect": "Allow",
"Action": "events:*",
"Resource": "*"
},
{
"Sid": "IAMPassRoleForCloudWatchEvents",
"Effect": "Allow",
"Action": "iam:PassRole",
"Resource": "arn:aws:iam::*:role/AWS_Events_Invoke_Targets"
}
]
}
Use the following trust relationship when creating the IAM role.
{
"Version": "2012-10-17",
"Statement": [
{
"Effect": "Allow",
"Principal": {
"Service": "events.amazonaws.com"
},
"Action": "sts:AssumeRole"
}
]
}
Configuring the SDK
Configure the SDK for JavaScript by creating a global configuration object then setting the region for
your code. In this example, the region is set to us-west-2.
// Load the SDK for JavaScript
var AWS = require('aws-sdk');
// Set the region
AWS.config.update({region: 'us-west-2'});
Creating a Scheduled Rule
Create a Node.js module with the file name cwe_putrule.js. Be sure to configure the SDK as
previously shown. To access CloudWatch Events, create an AWS.CloudWatchEvents service object.
Create a JSON object containing the parameters needed to specify the new scheduled rule, which include
the following:
• A name for the rule
• The ARN of the IAM role you created previously
• An expression to schedule triggering of the rule every five minutes
Call the putRule method to create the rule. The callback returns the ARN of the new or updated rule.
// Load the AWS SDK for Node.js
73

AWS SDK for JavaScript Developer Guide for SDK v2
Sending Events to Amazon CloudWatch Events
var AWS = require('aws-sdk');
// Set the region
AWS.config.update({region: 'REGION'});
// Create CloudWatchEvents service object
var cwevents = new AWS.CloudWatchEvents({apiVersion: '2015-10-07'});
var params = {
Name: 'DEMO_EVENT',
RoleArn: 'IAM_ROLE_ARN',
ScheduleExpression: 'rate(5 minutes)',
State: 'ENABLED'
};
cwevents.putRule(params, function(err, data) {
if (err) {
console.log("Error", err);
} else {
console.log("Success", data.RuleArn);
}
});
To run the example, type the following at the command line.
node cwe_putrule.js
This sample code can be found here on GitHub.
Adding a Lambda Function Target
Create a Node.js module with the file name cwe_puttargets.js. Be sure to configure the SDK as
previously shown. To access CloudWatch Events, create an AWS.CloudWatchEvents service object.
Create a JSON object containing the parameters needed to specify the rule to which you want to attach
the target, including the ARN of the Lambda function you created. Call the putTargets method of the
AWS.CloudWatchEvents service object.
// Load the AWS SDK for Node.js
var AWS = require('aws-sdk');
// Set the region
AWS.config.update({region: 'REGION'});
// Create CloudWatchEvents service object
var cwevents = new AWS.CloudWatchEvents({apiVersion: '2015-10-07'});
var params = {
Rule: 'DEMO_EVENT',
Targets: [
{
Arn: 'LAMBDA_FUNCTION_ARN',
Id: 'myCloudWatchEventsTarget',
}
]
};
cwevents.putTargets(params, function(err, data) {
if (err) {
console.log("Error", err);
} else {
console.log("Success", data);
}
});
74

AWS SDK for JavaScript Developer Guide for SDK v2
Using Subscription Filters in Amazon CloudWatch Logs
To run the example, type the following at the command line.
node cwe_puttargets.js
This sample code can be found here on GitHub.
Sending Events
Create a Node.js module with the file name cwe_putevents.js. Be sure to configure the SDK as
previously shown. To access CloudWatch Events, create an AWS.CloudWatchEvents service object.
Create a JSON object containing the parameters needed to send events. For each event, include the
source of the event, the ARNs of any resources affected by the event, and details for the event. Call the
putEvents method of the AWS.CloudWatchEvents service object.
// Load the AWS SDK for Node.js
var AWS = require('aws-sdk');
// Set the region
AWS.config.update({region: 'REGION'});
// Create CloudWatchEvents service object
var cwevents = new AWS.CloudWatchEvents({apiVersion: '2015-10-07'});
var params = {
Entries: [
{
Detail: '{ \"key1\": \"value1\", \"key2\": \"value2\" }',
DetailType: 'appRequestSubmitted',
Resources: [
'RESOURCE_ARN',
],
Source: 'com.company.myapp'
}
]
};
cwevents.putEvents(params, function(err, data) {
if (err) {
console.log("Error", err);
} else {
console.log("Success", data.Entries);
}
});
To run the example, type the following at the command line.
node cwe_putevents.js
This sample code can be found here on GitHub.
Using Subscription Filters in Amazon CloudWatch
Logs
75

AWS SDK for JavaScript Developer Guide for SDK v2
Using Subscription Filters in Amazon CloudWatch Logs
This Node.js code example shows:
• How to create and delete filters for log events in CloudWatch Logs.
The Scenario
Subscriptions provide access to a real-time feed of log events from CloudWatch Logs and deliver that
feed to other services, such as an Amazon Kinesis stream or AWS Lambda, for custom processing,
analysis, or loading to other systems. A subscription filter defines the pattern to use for filtering which
log events are delivered to your AWS resource.
In this example, a series of Node.js modules are used to list, create, and delete a subscription filter in
CloudWatch Logs. The destination for the log events is a Lambda function. The Node.js modules use the
SDK for JavaScript to manage subscription filters using these methods of the CloudWatchLogs client
class:
• putSubscriptionFilters
• describeSubscriptionFilters
• deleteSubscriptionFilter
For more information about CloudWatch Logs subscriptions, see Real-time Processing of Log Data with
Subscriptions in the Amazon CloudWatch Logs User Guide.
Prerequisite Tasks
To set up and run this example, you must first complete these tasks:
• Install Node.js. For more information about installing Node.js, see the Node.js website.
• Create a shared configurations file with your user credentials. For more information about providing a
shared credentials file, see Loading Credentials in Node.js from the Shared Credentials File (p. 26).
• Create a Lambda function as the destination for log events. You will need to use the ARN of this
function. For more information about setting up a Lambda function, see Subscription Filters with AWS
Lambda in the Amazon CloudWatch Logs User Guide.
• Create an IAM role whose policy grants permission to invoke the Lambda function you created and
grants full access to CloudWatch Logs or apply the following policy to the execution role you create
for the Lambda function. For more information about creating an IAM role, see Creating a Role to
Delegate Permissions to an AWS Service in the IAM User Guide.
Use the following role policy when creating the IAM role.
{
"Version": "2012-10-17",
"Statement": [
{
"Effect": "Allow",
"Action": [
"logs:CreateLogGroup",
"logs:CrateLogStream",
"logs:PutLogEvents"
],
"Resource": "arn:aws:logs:*:*:*"
},
{
"Effect": "Allow",
"Action": [
"lambda:InvokeFunction"
76

AWS SDK for JavaScript Developer Guide for SDK v2
Using Subscription Filters in Amazon CloudWatch Logs
],
"Resource": [
"*"
]
}
]
}
Configuring the SDK
Configure the SDK for JavaScript by creating a global configuration object then setting the region for
your code. In this example, the region is set to us-west-2.
// Load the SDK for JavaScript
var AWS = require('aws-sdk');
// Set the region
AWS.config.update({region: 'us-west-2'});
Describing Existing Subscription Filters
Create a Node.js module with the file name cwl_describesubscriptionfilters.js. Be sure to
configure the SDK as previously shown. To access CloudWatch Logs, create an AWS.CloudWatchLogs
service object. Create a JSON object containing the parameters needed to describe your existing filters,
including the name of the log group and the maximum number of filters you want described. Call the
describeSubscriptionFilters method.
// Load the AWS SDK for Node.js
var AWS = require('aws-sdk');
// Set the region
AWS.config.update({region: 'REGION'});
// Create the CloudWatchLogs service object
var cwl = new AWS.CloudWatchLogs({apiVersion: '2014-03-28'});
var params = {
logGroupName: 'GROUP_NAME',
limit: 5
};
cwl.describeSubscriptionFilters(params, function(err, data) {
if (err) {
console.log("Error", err);
} else {
console.log("Success", data.subscriptionFilters);
}
});
To run the example, type the following at the command line.
node cwl_describesubscriptionfilters.js
This sample code can be found here on GitHub.
Creating a Subscription Filter
Create a Node.js module with the file name cwl_putsubscriptionfilter.js. Be sure to configure
the SDK as previously shown. To access CloudWatch Logs, create an AWS.CloudWatchLogs service
77

AWS SDK for JavaScript Developer Guide for SDK v2
Using Subscription Filters in Amazon CloudWatch Logs
object. Create a JSON object containing the parameters needed to create a filter, including the ARN of
the destination Lambda function, the name of the filter, the string pattern for filtering, and the name of
the log group. Call the putSubscriptionFilters method.
// Load the AWS SDK for Node.js
var AWS = require('aws-sdk');
// Set the region
AWS.config.update({region: 'REGION'});
// Create the CloudWatchLogs service object
var cwl = new AWS.CloudWatchLogs({apiVersion: '2014-03-28'});
var params = {
destinationArn: 'LAMBDA_FUNCTION_ARN',
filterName: 'FILTER_NAME',
filterPattern: 'ERROR',
logGroupName: 'LOG_GROUP',
};
cwl.putSubscriptionFilter(params, function(err, data) {
if (err) {
console.log("Error", err);
} else {
console.log("Success", data);
}
});
To run the example, type the following at the command line.
node cwl_putsubscriptionfilter.js
This sample code can be found here on GitHub.
Deleting a Subscription Filter
Create a Node.js module with the file name cwl_deletesubscriptionfilters.js. Be sure to
configure the SDK as previously shown. To access CloudWatch Logs, create an AWS.CloudWatchLogs
service object. Create a JSON object containing the parameters needed to delete a filter, including the
names of the filter and the log group. Call the deleteSubscriptionFilters method.
// Load the AWS SDK for Node.js
var AWS = require('aws-sdk');
// Set the region
AWS.config.update({region: 'REGION'});
// Create the CloudWatchLogs service object
var cwl = new AWS.CloudWatchLogs({apiVersion: '2014-03-28'});
var params = {
filterName: 'FILTER',
logGroupName: 'LOG_GROUP'
};
cwl.deleteSubscriptionFilter(params, function(err, data) {
if (err) {
console.log("Error", err);
} else {
console.log("Success", data);
}
});
78

AWS SDK for JavaScript Developer Guide for SDK v2
Amazon DynamoDB Examples
To run the example, type the following at the command line.
node cwl_deletesubscriptionfilter.js
This sample code can be found here on GitHub.
Amazon DynamoDB Examples
Amazon DynamoDB is a fully managed NoSQL cloud database that supports both document and key-
value store models. You create schemaless tables for data without the need to provision or maintain
dedicated database servers.
The JavaScript API for DynamoDB is exposed through the AWS.DynamoDB, AWS.DynamoDBStreams,
and AWS.DynamoDB.DocumentClient client classes. For more information about using the
DynamoDB client classes, see Class: AWS.DynamoDB, Class: AWS.DynamoDBStreams, and Class:
AWS.DynamoDB.DocumentClient in the API reference.
Topics
• Creating and Using Tables in DynamoDB (p. 79)
• Reading and Writing A Single Item in DynamoDB (p. 83)
• Reading and Writing Items in Batch in DynamoDB (p. 86)
• Querying and Scanning a DynamoDB Table (p. 88)
• Using the DynamoDB Document Client (p. 91)
Creating and Using Tables in DynamoDB
This Node.js code example shows:
• How to create and manage tables used to store and retrieve data from DynamoDB.
The Scenario
Similar to other database systems, DynamoDB stores data in tables. A DynamoDB table is a collection of
data that's organized into items that are analogous to rows. To store or access data in DynamoDB, you
create and work with tables.
79

AWS SDK for JavaScript Developer Guide for SDK v2
Creating and Using Tables in DynamoDB
In this example, you use a series of Node.js modules to perform basic operations with a DynamoDB table.
The code uses the SDK for JavaScript to create and work with tables by using these methods of the
AWS.DynamoDB client class:
• createTable
• listTables
• describeTable
• deleteTable
Prerequisite Tasks
To set up and run this example, first complete these tasks:
• Install Node.js. For more information, see the Node.js website.
• Create a shared configurations file with your user credentials. For more information about providing a
shared credentials file, see Loading Credentials in Node.js from the Shared Credentials File (p. 26).
Configuring the SDK
Configure the SDK for JavaScript by creating a global configuration object then setting the region for
your code. In this example, the region is set to us-west-2.
// Load the SDK for JavaScript
var AWS = require('aws-sdk');
// Set the region
AWS.config.update({region: 'us-west-2'});
Creating a Table
Create a Node.js module with the file name ddb_createtable.js. Be sure to configure the SDK as
previously shown. To access DynamoDB, create an AWS.DynamoDB service object. Create a JSON object
containing the parameters needed to create a table, which in this example includes the name and data
type for each attribute, the key schema, the name of the table, and the units of throughput to provision.
Call the createTable method of the DynamoDB service object.
// Load the AWS SDK for Node.js
var AWS = require('aws-sdk');
// Set the region
AWS.config.update({region: 'REGION'});
// Create the DynamoDB service object
ddb = new AWS.DynamoDB({apiVersion: '2012-10-08'});
var params = {
AttributeDefinitions: [
{
AttributeName: 'CUSTOMER_ID',
AttributeType: 'N'
},
{
AttributeName: 'CUSTOMER_NAME',
AttributeType: 'S'
}
],
KeySchema: [
{
80

AWS SDK for JavaScript Developer Guide for SDK v2
Creating and Using Tables in DynamoDB
AttributeName: 'CUSTOMER_ID',
KeyType: 'HASH'
},
{
AttributeName: 'CUSTOMER_NAME',
KeyType: 'RANGE'
}
],
ProvisionedThroughput: {
ReadCapacityUnits: 1,
WriteCapacityUnits: 1
},
TableName: 'CUSTOMER_LIST',
StreamSpecification: {
StreamEnabled: false
}
};
// Call DynamoDB to create the table
ddb.createTable(params, function(err, data) {
if (err) {
console.log("Error", err);
} else {
console.log("Success", data);
}
});
To run the example, type the following at the command line.
node ddb_createtable.js
This sample code can be found here on GitHub.
Listing Your Tables
Create a Node.js module with the file name ddb_listtables.js. Be sure to configure the SDK as
previously shown. To access DynamoDB, create an AWS.DynamoDB service object. Create a JSON object
containing the parameters needed to list your tables, which in this example limits the number of tables
listed to 10. Call the listTables method of the DynamoDB service object.
// Load the AWS SDK for Node.js
var AWS = require('aws-sdk');
// Set the region
AWS.config.update({region: 'REGION'});
// Create the DynamoDB service object
ddb = new AWS.DynamoDB({apiVersion: '2012-10-08'});
// Call DynamoDB to retrieve the list of tables
ddb.listTables({Limit: 10}, function(err, data) {
if (err) {
console.log("Error", err.code);
} else {
console.log("Table names are ", data.TableNames);
}
});
To run the example, type the following at the command line.
node ddb_listtables.js
81

AWS SDK for JavaScript Developer Guide for SDK v2
Creating and Using Tables in DynamoDB
This sample code can be found here on GitHub.
Describing a Table
Create a Node.js module with the file name ddb_describetable.js. Be sure to configure the SDK
as previously shown. To access DynamoDB, create an AWS.DynamoDB service object. Create a JSON
object containing the parameters needed to describe a table, which in this example includes the name of
the table provided as a command-line parameter. Call the describeTable method of the DynamoDB
service object.
// Load the AWS SDK for Node.js
var AWS = require('aws-sdk');
// Set the region
AWS.config.update({region: 'REGION'});
// Create the DynamoDB service object
ddb = new AWS.DynamoDB({apiVersion: '2012-10-08'});
var params = {
TableName: process.argv[2]
};
// Call DynamoDB to retrieve the selected table descriptions
ddb.describeTable(params, function(err, data) {
if (err) {
console.log("Error", err);
} else {
console.log("Success", data.Table.KeySchema);
}
});
To run the example, type the following at the command line.
node ddb_describetable.js TABLE_NAME
This sample code can be found here on GitHub.
Deleting a Table
Create a Node.js module with the file name ddb_deletetable.js. Be sure to configure the SDK as
previously shown. To access DynamoDB, create an AWS.DynamoDB service object. Create a JSON object
containing the parameters needed to describe a table, which in this example includes the name of the
table provided as a command-line parameter. Call the deleteTable method of the DynamoDB service
object.
// Load the AWS SDK for Node.js
var AWS = require('aws-sdk');
// Set the region
AWS.config.update({region: 'REGION'});
// Create the DynamoDB service object
ddb = new AWS.DynamoDB({apiVersion: '2012-10-08'});
var params = {
TableName: process.argv[2]
};
// Call DynamoDB to delete the specified table
ddb.deleteTable(params, function(err, data) {
if (err && err.code === 'ResourceNotFoundException') {
82

AWS SDK for JavaScript Developer Guide for SDK v2
Reading and Writing A Single Item in DynamoDB
console.log("Error: Table not found");
} else if (err && err.code === 'ResourceInUseException') {
console.log("Error: Table in use");
} else {
console.log("Success", data);
}
});
To run the example, type the following at the command line.
node ddb_deletetable.js TABLE_NAME
This sample code can be found here on GitHub.
Reading and Writing A Single Item in DynamoDB
This Node.js code example shows:
• How to add an item in a DynamoDB table.
• How to retrieve, an item in a DynamoDB table.
• How to delete an item in a DynamoDB table.
The Scenario
In this example, you use a series of Node.js modules to read and write one item in a DynamoDB table by
using these methods of the AWS.DynamoDB client class:
• putItem
• getItem
• deleteItem
Prerequisite Tasks
To set up and run this example, first complete these tasks:
• Install Node.js. For more information, see the Node.js website.
• Create a shared configurations file with your user credentials. For more information about providing a
shared credentials file, see Loading Credentials in Node.js from the Shared Credentials File (p. 26).
• Create a DynamoDB table whose items you can access. For more information about creating a
DynamoDB table, see Creating and Using Tables in DynamoDB (p. 79).
Configuring the SDK
Configure the SDK for JavaScript by creating a global configuration object then setting the region for
your code. In this example, the region is set to us-west-2.
83

AWS SDK for JavaScript Developer Guide for SDK v2
Reading and Writing A Single Item in DynamoDB
// Load the SDK for JavaScript
var AWS = require('aws-sdk');
// Set the region
AWS.config.update({region: 'us-west-2'});
Writing an Item
Create a Node.js module with the file name ddb_putitem.js. Be sure to configure the SDK as
previously shown. To access DynamoDB, create an AWS.DynamoDB service object. Create a JSON object
containing the parameters needed to add an item, which in this example includes the name of the table
and a map that defines the attributes to set and the values for each attribute. Call the putItem method
of the DynamoDB service object.
// Load the AWS SDK for Node.js
var AWS = require('aws-sdk');
// Set the region
AWS.config.update({region: 'REGION'});
// Create the DynamoDB service object
ddb = new AWS.DynamoDB({apiVersion: '2012-10-08'});
var params = {
TableName: 'TABLE',
Item: {
'CUSTOMER_ID' : {N: '001'},
'CUSTOMER_NAME' : {S: 'Richard Roe'},
}
};
// Call DynamoDB to add the item to the table
ddb.putItem(params, function(err, data) {
if (err) {
console.log("Error", err);
} else {
console.log("Success", data);
}
});
To run the example, type the following at the command line.
node ddb_putitem.js
This sample code can be found here on GitHub.
Getting an Item
Create a Node.js module with the file name ddb_getitem.js. Be sure to configure the SDK as
previously shown. To access DynamoDB, create an AWS.DynamoDB service object. To identify the item to
get, you must provide the value of the primary key for that item in the table. By default, the getItem
method returns all the attribute values defined for the item. To get only a subset of all possible attribute
values, specify a projection expression.
Create a JSON object containing the parameters needed to get an item, which in this example includes
the name of the table, the name and value of the key for the item you're getting, and a projection
expression that identifies the item attribute you want to retrieve. Call the getItem method of the
DynamoDB service object.
// Load the AWS SDK for Node.js
84

AWS SDK for JavaScript Developer Guide for SDK v2
Reading and Writing A Single Item in DynamoDB
var AWS = require('aws-sdk');
// Set the region
AWS.config.update({region: 'REGION'});
// Create the DynamoDB service object
ddb = new AWS.DynamoDB({apiVersion: '2012-10-08'});
var params = {
TableName: 'TABLE',
Key: {
'KEY_NAME' : {N: '001'},
},
ProjectionExpression: 'ATTRIBUTE_NAME'
};
// Call DynamoDB to read the item from the table
ddb.getItem(params, function(err, data) {
if (err) {
console.log("Error", err);
} else {
console.log("Success", data.Item);
}
});
To run the example, type the following at the command line.
node ddb_getitem.js
This sample code can be found here on GitHub.
Deleting an Item
Create a Node.js module with the file name ddb_deleteitem.js. Be sure to configure the SDK as
previously shown. To access DynamoDB, create an AWS.DynamoDB service object. Create a JSON object
containing the parameters needed to add an item, which in this example includes the name of the table
and both the key name and value for the item you're deleting. Call the deleteItem method of the
DynamoDB service object.
// Load the AWS SDK for Node.js
var AWS = require('aws-sdk');
// Set the region
AWS.config.update({region: 'REGION'});
// Create the DynamoDB service object
ddb = new AWS.DynamoDB({apiVersion: '2012-10-08'});
var params = {
TableName: 'TABLE',
Key: {
'KEY_NAME' : {S: 'VALUE'},
}
};
// Call DynamoDB to delete the item from the table
ddb.deleteItem(params, function(err, data) {
if (err) {
console.log("Error", err);
} else {
console.log("Success", data);
}
});
85
AWS SDK for JavaScript Developer Guide for SDK v2
Reading and Writing Items in Batch in DynamoDB
To run the example, type the following at the command line.
node ddb_deleteitem.js
This sample code can be found here on GitHub.
Reading and Writing Items in Batch in DynamoDB
This Node.js code example shows:
• How to read and write batches of items in a DynamoDB table.
The Scenario
In this example, you use a series of Node.js modules to put a batch of items in a DynamoDB table as
well as read a batch of items. The code uses the SDK for JavaScript to perform batch read and write
operations using these methods of the DynamoDB client class:
• batchGetItem
• batchWriteItem
Prerequisite Tasks
To set up and run this example, first complete these tasks:
• Install Node.js. For more information, see the Node.js website.
• Create a shared configurations file with your user credentials. For more information about providing a
shared credentials file, see Loading Credentials in Node.js from the Shared Credentials File (p. 26).
• Create a DynamoDB table whose items you can access. For more information about creating a
DynamoDB table, see Creating and Using Tables in DynamoDB (p. 79).
Configuring the SDK
Configure the SDK for JavaScript by creating a global configuration object then setting the region for
your code. In this example, the region is set to us-west-2.
// Load the SDK for JavaScript
var AWS = require('aws-sdk');
// Set the region
AWS.config.update({region: 'us-west-2'});
Reading Items in Batch
Create a Node.js module with the file name ddb_batchgetitem.js. Be sure to configure the SDK as
previously shown. To access DynamoDB, create an AWS.DynamoDB service object. Create a JSON object
86

AWS SDK for JavaScript Developer Guide for SDK v2
Reading and Writing Items in Batch in DynamoDB
containing the parameters needed to get a batch of items, which in this example includes the name
of one or more tables from which to read, the values of keys to read in each table, and the projection
expression that specifies the attributes to return. Call the batchGetItem method of the DynamoDB
service object.
// Load the AWS SDK for Node.js
var AWS = require('aws-sdk');
// Set the region
AWS.config.update({region: 'REGION'});
// Create DynamoDB service object
var ddb = new AWS.DynamoDB({apiVersion: '2012-08-10'});
var params = {
RequestItems: {
'TABLE_NAME': {
Keys: [
{'KEY_NAME': {N: 'KEY_VALUE_1'}},
{'KEY_NAME': {N: 'KEY_VALUE_2'}},
{'KEY_NAME': {N: 'KEY_VALUE_3'}}
],
ProjectionExpression: 'KEY_NAME, ATTRIBUTE'
}
}
};
ddb.batchGetItem(params, function(err, data) {
if (err) {
console.log("Error", err);
} else {
data.Responses.TABLE_NAME.forEach(function(element, index, array) {
console.log(element);
});
}
});
To run the example, type the following at the command line.
node ddb_batchgetitem.js
This sample code can be found here on GitHub.
Writing Items in Batch
Create a Node.js module with the file name ddb_batchwriteitem.js. Be sure to configure the SDK as
previously shown. To access DynamoDB, create an AWS.DynamoDB service object. Create a JSON object
containing the parameters needed to get a batch of items, which in this example includes the table into
which you want to write items, the key(s) you want to write for each item, and the attributes along with
their values. Call the batchWriteItem method of the DynamoDB service object.
// Load the AWS SDK for Node.js
var AWS = require('aws-sdk');
// Set the region
AWS.config.update({region: 'REGION'});
// Create DynamoDB service object
var ddb = new AWS.DynamoDB({apiVersion: '2012-08-10'});
var params = {
RequestItems: {
"TABLE_NAME": [
87

AWS SDK for JavaScript Developer Guide for SDK v2
Querying and Scanning a DynamoDB Table
{
PutRequest: {
Item: {
"KEY": { "N": "KEY_VALUE" },
"ATTRIBUTE_1": { "S": "ATTRIBUTE_1_VALUE" },
"ATTRIBUTE_2": { "N": "ATTRIBUTE_2_VALUE" }
}
}
},
{
PutRequest: {
Item: {
"KEY": { "N": "KEY_VALUE" },
"ATTRIBUTE_1": { "S": "ATTRIBUTE_1_VALUE" },
"ATTRIBUTE_2": { "N": "ATTRIBUTE_2_VALUE" }
}
}
}
]
}
};
ddb.batchWriteItem(params, function(err, data) {
if (err) {
console.log("Error", err);
} else {
console.log("Success", data);
}
});
To run the example, type the following at the command line.
node ddb_batchwriteitem.js
This sample code can be found here on GitHub.
Querying and Scanning a DynamoDB Table
This Node.js code example shows:
• How to query and scan a DynamoDB table for items.
The Scenario
Querying finds items in a table or a secondary index using only primary key attribute values. You must
provide a partition key name and a value for which to search. You can also provide a sort key name and
value, and use a comparison operator to refine the search results. Scanning finds items by checking every
item in the specified table.
In this example, you use a series of Node.js modules to identify one or more items you want to retrieve
from a DynamoDB table. The code uses the SDK for JavaScript to query and scan tables using these
methods of the DynamoDB client class:
88

AWS SDK for JavaScript Developer Guide for SDK v2
Querying and Scanning a DynamoDB Table
• query
• scan
Prerequisite Tasks
To set up and run this example, first complete these tasks:
• Install Node.js. For more information, see the Node.js website.
• Create a shared configurations file with your user credentials. For more information about providing a
shared credentials file, see Loading Credentials in Node.js from the Shared Credentials File (p. 26).
• Create a DynamoDB table whose items you can access. For more information about creating a
DynamoDB table, see Creating and Using Tables in DynamoDB (p. 79).
Configuring the SDK
Configure the SDK for JavaScript by creating a global configuration object then setting the region for
your code. In this example, the region is set to us-west-2.
// Load the SDK for JavaScript
var AWS = require('aws-sdk');
// Set the region
AWS.config.update({region: 'us-west-2'});
Querying a Table
This example queries a table that contains episode information about a video series, returning the
episode titles and subtitles of second season episodes past episode 9 that contain a specified phrase in
their subtitle.
Create a Node.js module with the file name ddb_query.js. Be sure to configure the SDK as previously
shown. To access DynamoDB, create an AWS.DynamoDB service object. Create a JSON object containing
the parameters needed to query the table, which in this example includes the table name, the
ExpressionAttributeValues needed by the query, a KeyConditionExpression that uses those
values to define which items the query returns, and the names of attribute values to return for each
item. Call the query method of the DynamoDB service object.
// Load the AWS SDK for Node.js
var AWS = require('aws-sdk');
// Set the region
AWS.config.update({region: 'REGION'});
// Create DynamoDB service object
var ddb = new AWS.DynamoDB({apiVersion: '2012-08-10'});
var params = {
ExpressionAttributeValues: {
':s': {N: '2'},
':e' : {N: '09'},
':topic' : {S: 'PHRASE'}
},
KeyConditionExpression: 'Season = :s and Episode > :e',
ProjectionExpression: 'Title, Subtitle',
FilterExpression: 'contains (Subtitle, :topic)',
TableName: 'EPISODES_TABLE'
};
89

AWS SDK for JavaScript Developer Guide for SDK v2
Querying and Scanning a DynamoDB Table
ddb.query(params, function(err, data) {
if (err) {
console.log("Error", err);
} else {
data.Items.forEach(function(element, index, array) {
console.log(element.Title.S + " (" + element.Subtitle.S + ")");
});
}
});
To run the example, type the following at the command line.
node ddb_query.js
This sample code can be found here on GitHub.
Scanning a Table
Create a Node.js module with the file name ddb_scan.js. Be sure to configure the SDK as previously
shown. To access DynamoDB, create an AWS.DynamoDB service object. Create a JSON object containing
the parameters needed to scan the table for items, which in this example includes the name of the table,
the list of attribute values to return for each matching item, and an expression to filter the result set to
find items containing a specified phrase. Call the scan method of the DynamoDB service object.
// Load the AWS SDK for Node.js
var AWS = require('aws-sdk');
// Set the region
AWS.config.update({region: 'REGION'});
// Create DynamoDB service object
var ddb = new AWS.DynamoDB({apiVersion: '2012-08-10'});
var params = {
ExpressionAttributeValues: {
":topic": {
S: "PHRASE"
}
},
FilterExpression: "contains (Subtitle, :topic)",
ProjectionExpression: "Title, Subtitle",
TableName: "EPISODES_TABLE"
};
ddb.scan(params, function(err, data) {
if (err) {
console.log("Error", err);
} else {
data.Items.forEach(function(element, index, array) {
console.log(element.Title.S + " (" + element.Subtitle.S + ")");
});
}
});
To run the example, type the following at the command line.
node ddb_scan.js
This sample code can be found here on GitHub.
90

AWS SDK for JavaScript Developer Guide for SDK v2
Using the DynamoDB Document Client
Using the DynamoDB Document Client
This Node.js code example shows:
• How to access a DynamoDB table using the document client.
The Scenario
The DynamoDB document client simplifies working with items by abstracting the notion of attribute
values. This abstraction annotates native JavaScript types supplied as input parameters, as well as
converts annotated response data to native JavaScript types.
For more information on the DynamoDB Document Client class, see AWS.DynamoDB.DocumentClient in
the API Reference. For more information on programming with Amazon DynamoDB, see Programming
with DynamoDB in the Amazon DynamoDB Developer Guide.
In this example, you use a series of Node.js modules to perform basic operations on a DynamoDB table
using the document client. The code uses the SDK for JavaScript to query and scan tables using these
methods of the DynamoDB Document Client class:
• get
• put
• update
• query
• delete
Prerequisite Tasks
To set up and run this example, first complete these tasks:
• Install Node.js. For more information, see the Node.js website.
• Create a shared configurations file with your user credentials. For more information about providing a
shared credentials file, see Loading Credentials in Node.js from the Shared Credentials File (p. 26).
• Create a DynamoDB table whose items you can access. For more information about creating a
DynamoDB table using the SDK for JavaScript, see Creating and Using Tables in DynamoDB (p. 79).
You can also use the DynamoDB console to create a table.
Configuring the SDK
Configure the SDK for JavaScript by creating a global configuration object then setting the region for
your code. In this example, the region is set to us-west-2.
// Load the SDK for JavaScript
var AWS = require('aws-sdk');
// Set the region
91

AWS SDK for JavaScript Developer Guide for SDK v2
Using the DynamoDB Document Client
AWS.config.update({region: 'us-west-2'});
Getting an Item from a Table
Create a Node.js module with the file name ddbdoc_get.js. Be sure to configure the SDK as previously
shown. To access DynamoDB, create an AWS.DynamoDB.DocumentClient object. Create a JSON object
containing the parameters needed get an item from the table, which in this example includes the name
of the table, the name of the hash key in that table, and the value of the hash key for the item you want
to get. Call the get method of the DynamoDB document client.
// Load the AWS SDK for Node.js
var AWS = require('aws-sdk');
// Set the region
AWS.config.update({region: 'REGION'});
// Create DynamoDB document client
var docClient = new AWS.DynamoDB.DocumentClient({apiVersion: '2012-08-10'});
var params = {
TableName: 'EPISODES_TABLE',
Key: {'KEY_NAME': VALUE}
};
docClient.get(params, function(err, data) {
if (err) {
console.log("Error", err);
} else {
console.log("Success", data.Item);
}
});
To run the example, type the following at the command line.
node ddbdoc_get.js
This sample code can be found here on GitHub.
Putting an Item in a Table
Create a Node.js module with the file name ddbdoc_put.js. Be sure to configure the SDK as previously
shown. To access DynamoDB, create an AWS.DynamoDB.DocumentClient object. Create a JSON object
containing the parameters needed to write an item to the table, which in this example includes the name
of the table and a description of the item to add or update that includes the hashkey and value as well
as names and values for attributes to set on the item. Call the put method of the DynamoDB document
client.
// Load the AWS SDK for Node.js
var AWS = require('aws-sdk');
// Set the region
AWS.config.update({region: 'REGION'});
// Create DynamoDB document client
var docClient = new AWS.DynamoDB.DocumentClient({apiVersion: '2012-08-10'});
var params = {
TableName: 'TABLE',
Item: {
'HASHKEY': VALUE,
92

AWS SDK for JavaScript Developer Guide for SDK v2
Using the DynamoDB Document Client
'ATTRIBUTE_1': 'STRING_VALUE',
'ATTRIBUTE_2': VALUE_2
}
};
docClient.put(params, function(err, data) {
if (err) {
console.log("Error", err);
} else {
console.log("Success", data);
}
});
To run the example, type the following at the command line.
node ddbdoc_put.js
This sample code can be found here on GitHub.
Updating an Item in a Table
Create a Node.js module with the file name ddbdoc_update.js. Be sure to configure the
SDK as previously shown. To access DynamoDB, create an AWS.DynamoDB.DocumentClient
object. Create a JSON object containing the parameters needed to write an item to the table,
which in this example includes the name of the table, the key of the item to update, a set of
UpdateExpressions that define the attributes of the item to update with tokens you assign values
to in the ExpressionAttributeValues parameters. Call the update method of the DynamoDB
document client.
// Load the AWS SDK for Node.js
var AWS = require('aws-sdk');
// Set the region
AWS.config.update({region: 'REGION'});
// Create DynamoDB document client
var docClient = new AWS.DynamoDB.DocumentClient({apiVersion: '2012-08-10'});
// Create variables to hold numeric key values
var season = SEASON_NUMBER;
var episode = EPISODES_NUMBER;
var params = {
TableName: 'EPISODES_TABLE',
Key: {
'Season' : season,
'Episode' : episode
},
UpdateExpression: 'set Title = :t, Subtitle = :s',
ExpressionAttributeValues: {
':t' : 'NEW_TITLE',
':s' : 'NEW_SUBTITLE'
}
};
docClient.update(params, function(err, data) {
if (err) {
console.log("Error", err);
} else {
console.log("Success", data);
}
});
93

AWS SDK for JavaScript Developer Guide for SDK v2
Using the DynamoDB Document Client
To run the example, type the following at the command line.
node ddbdoc_update.js
This sample code can be found here on GitHub.
Querying a Table
This example queries a table that contains episode information about a video series, returning the
episode titles and subtitles of second season episodes past episode 9 that contain a specified phrase in
their subtitle.
Create a Node.js module with the file name ddbdoc_query.js. Be sure to configure the SDK as
previously shown. To access DynamoDB, create an AWS.DynamoDB.DocumentClient object.
Create a JSON object containing the parameters needed to query the table, which in this example
includes the table name, the ExpressionAttributeValues needed by the query, and a
KeyConditionExpression that uses those values to define which items the query returns. Call the
query method of the DynamoDB document client.
// Load the AWS SDK for Node.js
var AWS = require('aws-sdk');
// Set the region
AWS.config.update({region: 'REGION'});
// Create DynamoDB document client
var docClient = new AWS.DynamoDB.DocumentClient({apiVersion: '2012-08-10'});
var params = {
ExpressionAttributeValues: {
':s': 2,
':e': 9,
':topic': 'PHRASE'
},
KeyConditionExpression: 'Season = :s and Episode > :e',
FilterExpression: 'contains (Subtitle, :topic)',
TableName: 'EPISODES_TABLE'
};
docClient.query(params, function(err, data) {
if (err) {
console.log("Error", err);
} else {
console.log("Success", data.Items);
}
});
To run the example, type the following at the command line.
node ddbdoc_query.js
This sample code can be found here on GitHub.
Deleting an Item from a Table
Create a Node.js module with the file name ddbdoc_delete.js. Be sure to configure the SDK as
previously shown. To access DynamoDB, create an AWS.DynamoDB.DocumentClient object. Create
a JSON object containing the parameters needed to delete an item in the table, which in this example
94

AWS SDK for JavaScript Developer Guide for SDK v2
Amazon EC2 Examples
includes the name of the table as well as a the name and value of the hashkey of the item you want to
delete. Call the delete method of the DynamoDB document client.
// Load the AWS SDK for Node.js
var AWS = require('aws-sdk');
// Set the region
AWS.config.update({region: 'REGION'});
// Create DynamoDB document client
var docClient = new AWS.DynamoDB.DocumentClient({apiVersion: '2012-08-10'});
var params = {
Key: {
'HASH_KEY': VALUE
},
TableName: 'TABLE'
};
docClient.delete(params, function(err, data) {
if (err) {
console.log("Error", err);
} else {
console.log("Success", data);
}
});
To run the example, type the following at the command line.
node ddbdoc_delete.js
This sample code can be found here on GitHub.
Amazon EC2 Examples
Amazon Elastic Compute Cloud (Amazon EC2) is a web service that provides virtual server hosting in the
cloud. It is designed to make web-scale cloud computing easier for developers by providing resizeable
compute capacity.
The JavaScript API for Amazon EC2 is exposed through the AWS.EC2 client class. For more information
about using the Amazon EC2 client class, see Class: AWS.EC2 in the API reference.
Topics
• Creating an Amazon EC2 Instance (p. 96)
• Managing Amazon EC2 Instances (p. 98)
• Working with Amazon EC2 Key Pairs (p. 102)
• Using Regions and Availability Zones with Amazon EC2 (p. 105)
• Working with Security Groups in Amazon EC2 (p. 106)
95

AWS SDK for JavaScript Developer Guide for SDK v2
Creating an Amazon EC2 Instance
• Using Elastic IP Addresses in Amazon EC2 (p. 110)
Creating an Amazon EC2 Instance
This Node.js code example shows:
• How to create an Amazon EC2 instance from a public Amazon Machine Image (AMI).
• How to create and assign tags to the new Amazon EC2 instance.
The Scenario
In this example, you use a Node.js module to create an Amazon EC2 instance and assign both a key
pair and tags to it. The code uses the SDK for JavaScript to create and tag an instance by using these
methods of the Amazon EC2 client class:
• runInstances
• createTags
Prerequisite Tasks
To set up and run this example, first complete these tasks.
• Install Node.js. For more information, see the Node.js website.
• Create a shared configurations file with your user credentials. For more information about providing a
shared credentials file, see Loading Credentials in Node.js from the Shared Credentials File (p. 26).
• Create a key pair. For details, see Working with Amazon EC2 Key Pairs (p. 102). You use the name of
the key pair in this example.
Configuring the SDK
Configure the SDK for JavaScript by creating a global configuration object then setting the region for
your code.
// Load the SDK for JavaScript
var AWS = require('aws-sdk');
// Set the region
AWS.config.update({region: 'us-west-2'});
Creating and Tagging an Instance
Create a Node.js module with the file name ec2_createinstances.js. Be sure to configure the SDK
as previously shown.
Create an object to pass the parameters for the runInstances method of the AWS.EC2 client class,
including the name of the key pair to assign and the ID of the AMI to run. To call the runInstances
96

AWS SDK for JavaScript Developer Guide for SDK v2
Creating an Amazon EC2 Instance
method, create a promise for invoking an Amazon EC2 service object, passing the parameters. Then
handle the response in the promise callback.
The code next adds a Name tag to a new instance, which the Amazon EC2 console recognizes and displays
in the Name field of the instance list. You can add up to 50 tags to an instance, all of which can be added
in a single call to the createTags method.
// Load the AWS SDK for Node.js
var AWS = require('aws-sdk');
// Load credentials and set region from JSON file
AWS.config.loadFromPath('./config.json');
// Create EC2 service object
var ec2 = new AWS.EC2({apiVersion: '2016-11-15'});
// AMI is amzn-ami-2011.09.1.x86_64-ebs
var instanceParams = {
ImageId: 'AMI_ID',
InstanceType: 't1.micro',
KeyName: 'KEY_PAIR_NAME',
MinCount: 1,
MaxCount: 1
};
// Create a promise on an EC2 service object
var instancePromise = new AWS.EC2({apiVersion:
'2016-11-15'}).runInstances(instanceParams).promise();
// Handle promise's fulfilled/rejected states
instancePromise.then(
function(data) {
console.log(data);
var instanceId = data.Instances[0].InstanceId;
console.log("Created instance", instanceId);
// Add tags to the instance
tagParams = {Resources: [instanceId], Tags: [
{
Key: 'Name',
Value: 'SDK Sample'
}
]};
// Create a promise on an EC2 service object
var tagPromise = new AWS.EC2({apiVersion:
'2016-11-15'}).createTags(tagParams).promise();
// Handle promise's fulfilled/rejected states
tagPromise.then(
function(data) {
console.log("Instance tagged");
}).catch(
function(err) {
console.error(err, err.stack);
});
}).catch(
function(err) {
console.error(err, err.stack);
});
To run the example, type the following at the command line.
node ec2_createinstances.js
This sample code can be found here on GitHub.
97

AWS SDK for JavaScript Developer Guide for SDK v2
Managing Amazon EC2 Instances
Managing Amazon EC2 Instances
This Node.js code example shows:
• How to retrieve basic information about your Amazon EC2 instances.
• How to start and stop detailed monitoring of an Amazon EC2 instance.
• How to start and stop an Amazon EC2 instance.
• How to reboot an Amazon EC2 instance.
The Scenario
In this example, you use a series of Node.js modules to perform several basic instance management
operations. The Node.js modules use the SDK for JavaScript to manage instances by using these Amazon
EC2 client class methods:
• describeInstances
• monitorInstances
• unmonitorInstances
• startInstances
• stopInstances
• rebootInstances
For more information about the lifecycle of Amazon EC2 instances, see Instance Lifecycle in the Amazon
EC2 User Guide for Linux Instances.
Prerequisite Tasks
To set up and run this example, first complete these tasks:
• Install Node.js. For more information about installing Node.js, see the Node.js website.
• Create a shared configurations file with your user credentials. For more information about providing a
shared credentials file, see Loading Credentials in Node.js from the Shared Credentials File (p. 26).
• Create an Amazon EC2 instance. For more information about creating Amazon EC2 instances, see
Amazon EC2 Instances in the Amazon EC2 User Guide for Linux Instances or Amazon EC2 Instances in
the Amazon EC2 User Guide for Windows Instances.
Configuring the SDK
Configure the SDK for JavaScript by creating a global configuration object then setting the region for
your code. In this example, the region is set to us-west-2.
// Load the SDK for JavaScript
var AWS = require('aws-sdk');
// Set the region
98

AWS SDK for JavaScript Developer Guide for SDK v2
Managing Amazon EC2 Instances
AWS.config.update({region: 'us-west-2'});
Describing Your Instances
Create a Node.js module with the file name ec2_describeinstances.js. Be sure to configure
the SDK as previously shown. To access Amazon EC2, create an AWS.EC2 service object. Call the
describeInstances method of the Amazon EC2 service object to retrieve a detailed description of
your instances.
// Load the AWS SDK for Node.js
var AWS = require('aws-sdk');
// Set the region
AWS.config.update({region: 'REGION'});
// Create EC2 service object
ec2 = new AWS.EC2({apiVersion: '2016-11-15'});
// Call EC2 to retrieve the policy for selected bucket
ec2.describeInstances(params, function(err, data) {
if (err) {
console.log("Error", err.stack);
} else {
console.log("Success", JSON.stringify(data));
}
});
To run the example, type the following at the command line.
node ec2_describeinstances.js
This sample code can be found here on GitHub.
Managing Instance Monitoring
Create a Node.js module with the file name ec2_monitorinstances.js. Be sure to configure the SDK
as previously shown. To access Amazon EC2, create an AWS.EC2 service object. Add the instance IDs of
the instances for which you want to control monitoring.
Based on the value of a command-line argument (ON or OFF), call either the monitorInstances
method of the Amazon EC2 service object to begin detailed monitoring of the specified instances or call
the unmonitorInstances method. Use the DryRun parameter to test whether you have permission to
change instance monitoring before you attempt to change the monitoring of these instances.
// Load the AWS SDK for Node.js
var AWS = require('aws-sdk');
// Set the region
AWS.config.update({region: 'REGION'});
// Create EC2 service object
ec2 = new AWS.EC2({apiVersion: '2016-11-15'});
var params = {
InstanceIds: ['INSTANCE_ID'],
DryRun: true
};
if (process.argv[2].toUpperCase() === "ON") {
// call EC2 to start monitoring the selected instances
99

AWS SDK for JavaScript Developer Guide for SDK v2
Managing Amazon EC2 Instances
ec2.monitorInstances(params, function(err, data) {
if (err && err.code === 'DryRunOperation') {
params.DryRun = false;
ec2.monitorInstances(params, function(err, data) {
if (err) {
console.log("Error", err);
} else if (data) {
console.log("Success", data.InstanceMonitorings);
}
});
} else {
console.log("You don't have permission to change instance monitoring.");
}
});
} else if (process.argv[2].toUpperCase() === "OFF") {
// call EC2 to stop monitoring the selected instances
ec2.unmonitorInstances(params, function(err, data) {
if (err && err.code === 'DryRunOperation') {
params.DryRun = false;
ec2.unmonitorInstances(params, function(err, data) {
if (err) {
console.log("Error", err);
} else if (data) {
console.log("Success", data.InstanceMonitorings);
}
});
} else {
console.log("You don't have permission to change instance monitoring.");
}
});
}
To run the example, type the following at the command line, specifying ON to begin detailed monitoring
or OFF to discontinue monitoring.
node ec2_monitorinstances.js ON
This sample code can be found here on GitHub.
Starting and Stopping Instances
Create a Node.js module with the file name ec2_startstopinstances.js. Be sure to configure the
SDK as previously shown. To access Amazon EC2, create an AWS.EC2 service object. Add the instance IDs
of the instances you want to start or stop.
Based on the value of a command-line argument (START or STOP), call either the startInstances
method of the Amazon EC2 service object to start the specified instances, or the stopInstances
method to stop them. Use the DryRun parameter to test whether you have permission before actually
attempting to start or stop the selected instances.
// Load the AWS SDK for Node.js
var AWS = require('aws-sdk');
// Set the region
AWS.config.update({region: 'REGION'});
// Create EC2 service object
ec2 = new AWS.EC2({apiVersion: '2016-11-15'});
var params = {
InstanceIds: [process.argv[3]],
DryRun: true
100

AWS SDK for JavaScript Developer Guide for SDK v2
Managing Amazon EC2 Instances
};
if (process.argv[2].toUpperCase() === "START") {
// call EC2 to start the selected instances
ec2.startInstances(params, function(err, data) {
if (err && err.code === 'DryRunOperation') {
params.DryRun = false;
ec2.startInstances(params, function(err, data) {
if (err) {
console.log("Error", err);
} else if (data) {
console.log("Success", data.StartingInstances);
}
});
} else {
console.log("You don't have permission to start instances.");
}
});
} else if (process.argv[2].toUpperCase() === "STOP") {
// call EC2 to stop the selected instances
ec2.stopInstances(params, function(err, data) {
if (err && err.code === 'DryRunOperation') {
params.DryRun = false;
ec2.stopInstances(params, function(err, data) {
if (err) {
console.log("Error", err);
} else if (data) {
console.log("Success", data.StoppingInstances);
}
});
} else {
console.log("You don't have permission to stop instances");
}
});
}
To run the example, type the following at the command line specifying START to start the instances or
STOP to stop them.
node ec2_startstopinstances.js START INSTANCE_ID
This sample code can be found here on GitHub.
Rebooting Instances
Create a Node.js module with the file name ec2_rebootinstances.js. Be sure to configure the SDK
as previously shown. To access Amazon EC2, create an Amazon EC2 service object. Add the instance IDs
of the instances you want to reboot. Call the rebootInstances method of the AWS.EC2 service object
to reboot the specified instances. Use the DryRun parameter to test whether you have permission to
reboot these instances before actually attempting to reboot them.
// Load the AWS SDK for Node.js
var AWS = require('aws-sdk');
// Set the region
AWS.config.update({region: 'REGION'});
// Create EC2 service object
ec2 = new AWS.EC2({apiVersion: '2016-11-15'});
var params = {
InstanceIds: ['INSTANCE_ID'],
DryRun: true
101

AWS SDK for JavaScript Developer Guide for SDK v2
Working with Amazon EC2 Key Pairs
};
// call EC2 to reboot instances
ec2.rebootInstances(params, function(err, data) {
if (err && err.code === 'DryRunOperation') {
params.DryRun = false;
ec2.rebootInstances(params, function(err, data) {
if (err) {
console.log("Error", err);
} else if (data) {
console.log("Success", data);
}
});
} else {
console.log("You don't have permission to reboot instances.");
}
});
To run the example, type the following at the command line.
node ec2_rebootinstances.js
This sample code can be found here on GitHub.
Working with Amazon EC2 Key Pairs
This Node.js code example shows:
• How to retrieve information about your key pairs.
• How to create a key pair to access an Amazon EC2 instance.
• How to delete an existing key pair.
The Scenario
Amazon EC2 uses public–key cryptography to encrypt and decrypt login information. Public–key
cryptography uses a public key to encrypt data, then the recipient uses the private key to decrypt the
data. The public and private keys are known as a key pair.
In this example, you use a series of Node.js modules to perform several Amazon EC2 key pair
management operations. The Node.js modules use the SDK for JavaScript to manage instances by using
these methods of the Amazon EC2 client class:
• createKeyPair
• deleteKeyPair
• describeKeyPairs
For more information about the Amazon EC2 key pairs, see Amazon EC2 Key Pairs in the Amazon EC2
User Guide for Linux Instances or Amazon EC2 Key Pairs and Windows Instances in the Amazon EC2 User
Guide for Windows Instances.
102

AWS SDK for JavaScript Developer Guide for SDK v2
Working with Amazon EC2 Key Pairs
Prerequisite Tasks
To set up and run this example, first complete these tasks:
• Install Node.js. For more information about installing Node.js, see the Node.js website.
• Create a shared configurations file with your user credentials. For more information about providing a
shared credentials file, see Loading Credentials in Node.js from the Shared Credentials File (p. 26).
Configuring the SDK
Configure the SDK for JavaScript by creating a global configuration object then setting the region for
your code. In this example, the region is set to us-west-2.
// Load the SDK for JavaScript
var AWS = require('aws-sdk');
// Set the region
AWS.config.update({region: 'us-west-2'});
Describing Your Key Pairs
Create a Node.js module with the file name ec2_describekeypairs.js. Be sure to configure the SDK
as previously shown. To access Amazon EC2, create an AWS.EC2 service object. Create an empty JSON
object to hold the parameters needed by the describeKeyPairs method to return descriptions for
all your key pairs. You can also provide an array of names of key pairs in the KeyName portion of the
parameters to the describeKeyPairs method.
// Load the AWS SDK for Node.js
var AWS = require('aws-sdk');
// Set the region
AWS.config.update({region: 'REGION'});
// Create EC2 service object
var ec2 = new AWS.EC2({apiVersion: '2016-11-15'});
// Retrieve key pair descriptions; no params needed
ec2.describeKeyPairs(function(err, data) {
if (err) {
console.log("Error", err);
} else {
console.log("Success", JSON.stringify(data.KeyPairs));
}
});
To run the example, type the following at the command line.
node ec2_describekeypairs.js
This sample code can be found here on GitHub.
Creating a Key Pair
Each key pair requires a name. Amazon EC2 associates the public key with the name that you specify
as the key name. Create a Node.js module with the file name ec2_createkeypair.js. Be sure to
configure the SDK as previously shown. To access Amazon EC2, create an AWS.EC2 service object. Create
the JSON parameters to specify the name of the key pair, then pass them to call the createKeyPair
method.
103

AWS SDK for JavaScript Developer Guide for SDK v2
Working with Amazon EC2 Key Pairs
// Load the AWS SDK for Node.js
var AWS = require('aws-sdk');
// Set the region
AWS.config.update({region: 'REGION'});
// Create EC2 service object
var ec2 = new AWS.EC2({apiVersion: '2016-11-15'});
var params = {
KeyName: 'KEY_PAIR_NAME'
};
// Create the key pair
ec2.createKeyPair(params, function(err, data) {
if (err) {
console.log("Error", err);
} else {
console.log(JSON.stringify(data));
}
});
To run the example, type the following at the command line.
node ec2_createkeypair.js
This sample code can be found here on GitHub.
Deleting a Key Pair
Create a Node.js module with the file name ec2_deletekeypair.js. Be sure to configure the SDK as
previously shown. To access Amazon EC2, create an AWS.EC2 service object. Create the JSON parameters
to specify the name of the key pair you want to delete. Then call the deleteKeyPair method.
// Load the AWS SDK for Node.js
var AWS = require('aws-sdk');
// Set the region
AWS.config.update({region: 'REGION'});
// Create EC2 service object
var ec2 = new AWS.EC2({apiVersion: '2016-11-15'});
var params = {
KeyName: 'KEY_PAIR_NAME'
};
// Delete the key pair
ec2.deleteKeyPair(params, function(err, data) {
if (err) {
console.log("Error", err);
} else {
console.log("Key Pair Deleted");
}
});
To run the example, type the following at the command line.
node ec2_deletekeypair.js
This sample code can be found here on GitHub.
104

AWS SDK for JavaScript Developer Guide for SDK v2
Using Regions and Availability Zones with Amazon EC2
Using Regions and Availability Zones with Amazon
EC2
This Node.js code example shows:
• How to retrieve descriptions for regions and Availability Zones.
The Scenario
Amazon EC2 is hosted in multiple locations worldwide. These locations are composed of regions and
Availability Zones. Each region is a separate geographic area. Each region has multiple, isolated locations
known as Availability Zones. Amazon EC2 provides the ability to place instances and data in multiple
locations.
In this example, you use a series of Node.js modules to retrieve details about regions and Availability
Zones. The Node.js modules use the SDK for JavaScript to manage instances by using the following
methods of the Amazon EC2 client class:
• describeAvailabilityZones
• describeRegions
For more information about regions and Availability Zones, see Regions and Availability Zones in the
Amazon EC2 User Guide for Linux Instances or Regions and Availability Zones in the Amazon EC2 User
Guide for Windows Instances.
Prerequisite Tasks
To set up and run this example, you must first complete these tasks:
• Install Node.js. For more information about installing Node.js, see the Node.js website.
• Create a shared configurations file with your user credentials. For more information about providing a
shared credentials file, see Loading Credentials in Node.js from the Shared Credentials File (p. 26).
Configuring the SDK
Configure the SDK for JavaScript by creating a global configuration object then setting the region for
your code. In this example, the region is set to us-west-2.
// Load the SDK for JavaScript
var AWS = require('aws-sdk');
// Set the region
AWS.config.update({region: 'us-west-2'});
Describing Regions and Availability Zones
Create a Node.js module with the file name ec2_describeregionsandzones.js. Be sure to configure
the SDK as previously shown. To access Amazon EC2, create an AWS.EC2 service object. Create an
105

AWS SDK for JavaScript Developer Guide for SDK v2
Working with Security Groups in Amazon EC2
empty JSON object to pass as parameters, which returns all available descriptions. Then call the
describeRegions and describeAvailabilityZones methods.
// Load the AWS SDK for Node.js
var AWS = require('aws-sdk');
// Set the region
AWS.config.update({region: 'REGION'});
// Create EC2 service object
var ec2 = new AWS.EC2({apiVersion: '2016-11-15'});
var params = {};
// Retrieves all regions/endpoints that work with EC2
ec2.describeRegions(params, function(err, data) {
if (err) {
console.log("Error", err);
} else {
console.log("Regions: ", data.Regions);
}
});
// Retrieves availability zones only for region of the ec2 service object
ec2.describeAvailabilityZones(params, function(err, data) {
if (err) {
console.log("Error", err);
} else {
console.log("Availability Zones: ", data.AvailabilityZones);
}
});
To run the example, type the following at the command line.
node ec2_describeregionsandzones.js
This sample code can be found here on GitHub.
Working with Security Groups in Amazon EC2
This Node.js code example shows:
• How to retrieve information about your security groups.
• How to create a security group to access an Amazon EC2 instance.
• How to delete an existing security group.
The Scenario
An Amazon EC2 security group acts as a virtual firewall that controls the traffic for one or more
instances. You add rules to each security group to allow traffic to or from its associated instances. You
can modify the rules for a security group at any time; the new rules are automatically applied to all
instances that are associated with the security group.
106

AWS SDK for JavaScript Developer Guide for SDK v2
Working with Security Groups in Amazon EC2
In this example, you use a series of Node.js modules to perform several Amazon EC2 operations involving
security groups. The Node.js modules use the SDK for JavaScript to manage instances by using the
following methods of the Amazon EC2 client class:
• describeSecurityGroups
• authorizeSecurityGroupIngress
• createSecurityGroup
• describeVpcs
• deleteSecurityGroup
For more information about the Amazon EC2 security groups, see Amazon EC2 Amazon Security Groups
for Linux Instances in the Amazon EC2 User Guide for Linux Instances or Amazon EC2 Security Groups for
Windows Instances in the Amazon EC2 User Guide for Windows Instances.
Prerequisite Tasks
To set up and run this example, first complete these tasks:
• Install Node.js. For more information about installing Node.js, see the Node.js website.
• Create a shared configurations file with your user credentials. For more information about providing a
shared credentials file, see Loading Credentials in Node.js from the Shared Credentials File (p. 26).
Configuring the SDK
Configure the SDK for JavaScript by creating a global configuration object then setting the region for
your code. In this example, the region is set to us-west-2.
// Load the SDK for JavaScript
var AWS = require('aws-sdk');
// Set the region
AWS.config.update({region: 'us-west-2'});
Describing Your Security Groups
Create a Node.js module with the file name ec2_describesecuritygroups.js. Be sure to configure
the SDK as previously shown. To access Amazon EC2, create an AWS.EC2 service object. Create a JSON
object to pass as parameters, including the group IDs for the security groups you want to describe. Then
call the describeSecurityGroups method of the Amazon EC2 service object.
// Load the AWS SDK for Node.js
var AWS = require('aws-sdk');
// Set the region
AWS.config.update({region: 'REGION'});
// Create EC2 service object
var ec2 = new AWS.EC2({apiVersion: '2016-11-15'});
var params = {
GroupIds: ['SECURITY_GROUP_ID']
};
// Retrieve security group descriptions
ec2.describeSecurityGroups(params, function(err, data) {
if (err) {
107

AWS SDK for JavaScript Developer Guide for SDK v2
Working with Security Groups in Amazon EC2
console.log("Error", err);
} else {
console.log("Success", JSON.stringify(data.SecurityGroups));
}
});
To run the example, type the following at the command line.
node ec2_describesecuritygroups.js
This sample code can be found here on GitHub.
Creating a Security Group and Rules
Create a Node.js module with the file name ec2_createsecuritygroup.js. Be sure to configure the
SDK as previously shown. To access Amazon EC2, create an AWS.EC2 service object. Create a JSON object
for the parameters that specify the name of the security group, a description, and the ID for the VPC.
Pass the parameters to the createSecurityGroup method.
After you successfully create the security group, you can define rules for allowing inbound traffic. Create
a JSON object for parameters that specify the IP protocol and inbound ports on which the Amazon EC2
instance will receive traffic. Pass the parameters to the authorizeSecurityGroupIngress method.
// Load the AWS SDK for Node.js
var AWS = require('aws-sdk');
// Load credentials and set region from JSON file
AWS.config.loadFromPath('./config.json');
// Create EC2 service object
var ec2 = new AWS.EC2({apiVersion: '2016-11-15'});
// Variable to hold a ID of a VPC
var vpc = null;
// Retrieve the ID of a VPC
ec2.describeVpcs(function(err, data) {
if (err) {
console.log("Cannot retrieve a VPC", err);
} else {
vpc = data.Vpcs[0].VpcId;
var paramsSecurityGroup = {
Description: 'DESCRIPTION',
GroupName: 'SECURITY_GROUP_NAME',
VpcId: vpc
};
// Create the instance
ec2.createSecurityGroup(paramsSecurityGroup, function(err, data) {
if (err) {
console.log("Error", err);
} else {
var SecurityGroupId = data.GroupId;
console.log("Success", SecurityGroupId);
var paramsIngress = {
GroupName: 'SECURITY_GROUP_NAME',
IpPermissions:[
{
IpProtocol: "tcp",
FromPort: 80,
ToPort: 80,
IpRanges: [{"CidrIp":"0.0.0.0/0"}]
},
108

AWS SDK for JavaScript Developer Guide for SDK v2
Working with Security Groups in Amazon EC2
{
IpProtocol: "tcp",
FromPort: 22,
ToPort: 22,
IpRanges: [{"CidrIp":"0.0.0.0/0"}]
}
]
};
ec2.authorizeSecurityGroupIngress(paramsIngress, function(err, data) {
if (err) {
console.log("Error", err);
} else {
console.log("Ingress Successfully Set", data);
}
});
}
});
}
});
To run the example, type the following at the command line.
node ec2_createsecuritygroup.js
This sample code can be found here on GitHub.
Deleting a Security Group
Create a Node.js module with the file name ec2_deletesecuritygroup.js. Be sure to configure the
SDK as previously shown. To access Amazon EC2, create an AWS.EC2 service object. Create the JSON
parameters to specify the name of the security group to delete. Then call the deleteSecurityGroup
method.
// Load the AWS SDK for Node.js
var AWS = require('aws-sdk');
// Set the region
AWS.config.update({region: 'REGION'});
// Create EC2 service object
var ec2 = new AWS.EC2({apiVersion: '2016-11-15'});
var params = {
GroupId: 'SECURITY_GROUP_ID'
};
// Delete the security group
ec2.deleteSecurityGroup(params, function(err, data) {
if (err) {
console.log("Error", err);
} else {
console.log("Security Group Deleted");
}
});
To run the example, type the following at the command line.
node ec2_deletesecuritygroup.js
This sample code can be found here on GitHub.
109

AWS SDK for JavaScript Developer Guide for SDK v2
Using Elastic IP Addresses in Amazon EC2
Using Elastic IP Addresses in Amazon EC2
This Node.js code example shows:
• How to retrieve descriptions of your Elastic IP addresses.
• How to allocate and release an Elastic IP address.
• How to associate an Elastic IP address with an Amazon EC2 instance.
The Scenario
An Elastic IP address is a static IP address designed for dynamic cloud computing. An Elastic IP address is
associated with your AWS account. It is a public IP address, which is reachable from the Internet. If your
instance does not have a public IP address, you can associate an Elastic IP address with your instance to
enable communication with the Internet.
In this example, you use a series of Node.js modules to perform several Amazon EC2 operations involving
Elastic IP addresses. The Node.js modules use the SDK for JavaScript to manage Elastic IP addresses by
using these methods of the Amazon EC2 client class:
• describeAddresses
• allocateAddress
• associateAddress
• releaseAddress
For more information about Elastic IP addresses in Amazon EC2, see Elastic IP Addresses in the Amazon
EC2 User Guide for Linux Instances or Elastic IP Addresses in the Amazon EC2 User Guide for Windows
Instances.
Prerequisite Tasks
To set up and run this example, first complete these tasks:
• Install Node.js. For more information about installing Node.js, see the Node.js website.
• Create a shared configurations file with your user credentials. For more information about providing a
shared credentials file, see Loading Credentials in Node.js from the Shared Credentials File (p. 26).
• Create an Amazon EC2 instance. For more information about creating Amazon EC2 instances, see
Amazon EC2 Instances in the Amazon EC2 User Guide for Linux Instances or Amazon EC2 Instances in
the Amazon EC2 User Guide for Windows Instances.
Configuring the SDK
Configure the SDK for JavaScript by creating a global configuration object then setting the region for
your code. In this example, the region is set to us-west-2.
// Load the SDK for JavaScript
110

AWS SDK for JavaScript Developer Guide for SDK v2
Using Elastic IP Addresses in Amazon EC2
var AWS = require('aws-sdk');
// Set the region
AWS.config.update({region: 'us-west-2'});
Describing Elastic IP Addresses
Create a Node.js module with the file name ec2_describeaddresses.js. Be sure to configure the
SDK as previously shown. To access Amazon EC2, create an AWS.EC2 service object. Create a JSON object
to pass as parameters, filtering the addresses returned by those in your VPC. To retrieve descriptions of
all your Elastic IP addresses, omit a filter from the parameters JSON. Then call the describeAddresses
method of the Amazon EC2 service object.
// Load the AWS SDK for Node.js
var AWS = require('aws-sdk');
// Set the region
AWS.config.update({region: 'REGION'});
// Create EC2 service object
var ec2 = new AWS.EC2({apiVersion: '2016-11-15'});
var params = {
Filters: [
{Name: 'domain', Values: ['vpc']}
]
};
// Retrieve Elastic IP address descriptions
ec2.describeAddresses(params, function(err, data) {
if (err) {
console.log("Error", err);
} else {
console.log("Success", JSON.stringify(data.Addresses));
}
});
To run the example, type the following at the command line.
node ec2_describeaddresses.js
This sample code can be found here on GitHub.
Allocating and Associating an Elastic IP Address with an Amazon
EC2 Instance
Create a Node.js module with the file name ec2_allocateaddress.js. Be sure to configure the SDK
as previously shown. To access Amazon EC2, create an AWS.EC2 service object. Create a JSON object for
the parameters used to allocate an Elastic IP address, which in this case specifies the Domain is a VPC.
Call the allocateAddress method of the Amazon EC2 service object.
Upon success, the data parameter to the callback function has an AllocationId property that
identifies the allocated Elastic IP address.
Create a JSON object for the parameters used to associate an Elastic IP address to an Amazon EC2
instance, including the AllocationId from the newly allocated address and the InstanceId of the
Amazon EC2 instance. Then call the associateAddresses method of the Amazon EC2 service object.
// Load the AWS SDK for Node.js
111

AWS SDK for JavaScript Developer Guide for SDK v2
Using Elastic IP Addresses in Amazon EC2
var AWS = require('aws-sdk');
// Set the region
AWS.config.update({region: 'REGION'});
// Create EC2 service object
var ec2 = new AWS.EC2({apiVersion: '2016-11-15'});
var paramsAllocateAddress = {
Domain: 'vpc'
};
// Allocate the Elastic IP address
ec2.allocateAddress(paramsAllocateAddress, function(err, data) {
if (err) {
console.log("Address Not Allocated", err);
} else {
console.log("Address allocated:", data.AllocationId);
var paramsAssociateAddress = {
AllocationId: data.AllocationId,
InstanceId: 'INSTANCE_ID'
};
// Associate the new Elastic IP address with an EC2 instance
ec2.associateAddress(paramsAssociateAddress, function(err, data) {
if (err) {
console.log("Address Not Associated", err);
} else {
console.log("Address associated:", data.AssociationId);
}
});
}
});
To run the example, type the following at the command line.
node ec2_allocateaddress.js
This sample code can be found here on GitHub.
Releasing an Elastic IP Address
Create a Node.js module with the file name ec2_releaseaddress.js. Be sure to configure the SDK
as previously shown. To access Amazon EC2, create an AWS.EC2 service object. Create a JSON object for
the parameters used to release an Elastic IP address, which in this case specifies the AllocationId for
the Elastic IP address. Releasing an Elastic IP address also disassociates it from any Amazon EC2 instance.
Call the releaseAddress method of the Amazon EC2 service object.
// Load the AWS SDK for Node.js
var AWS = require('aws-sdk');
// Set the region
AWS.config.update({region: 'REGION'});
// Create EC2 service object
var ec2 = new AWS.EC2({apiVersion: '2016-11-15'});
var paramsReleaseAddress = {
AllocationId: 'ALLOCATION_ID'
};
// Disassociate the Elastic IP address from EC2 instance
ec2.releaseAddress(paramsReleaseAddress, function(err, data) {
if (err) {
112
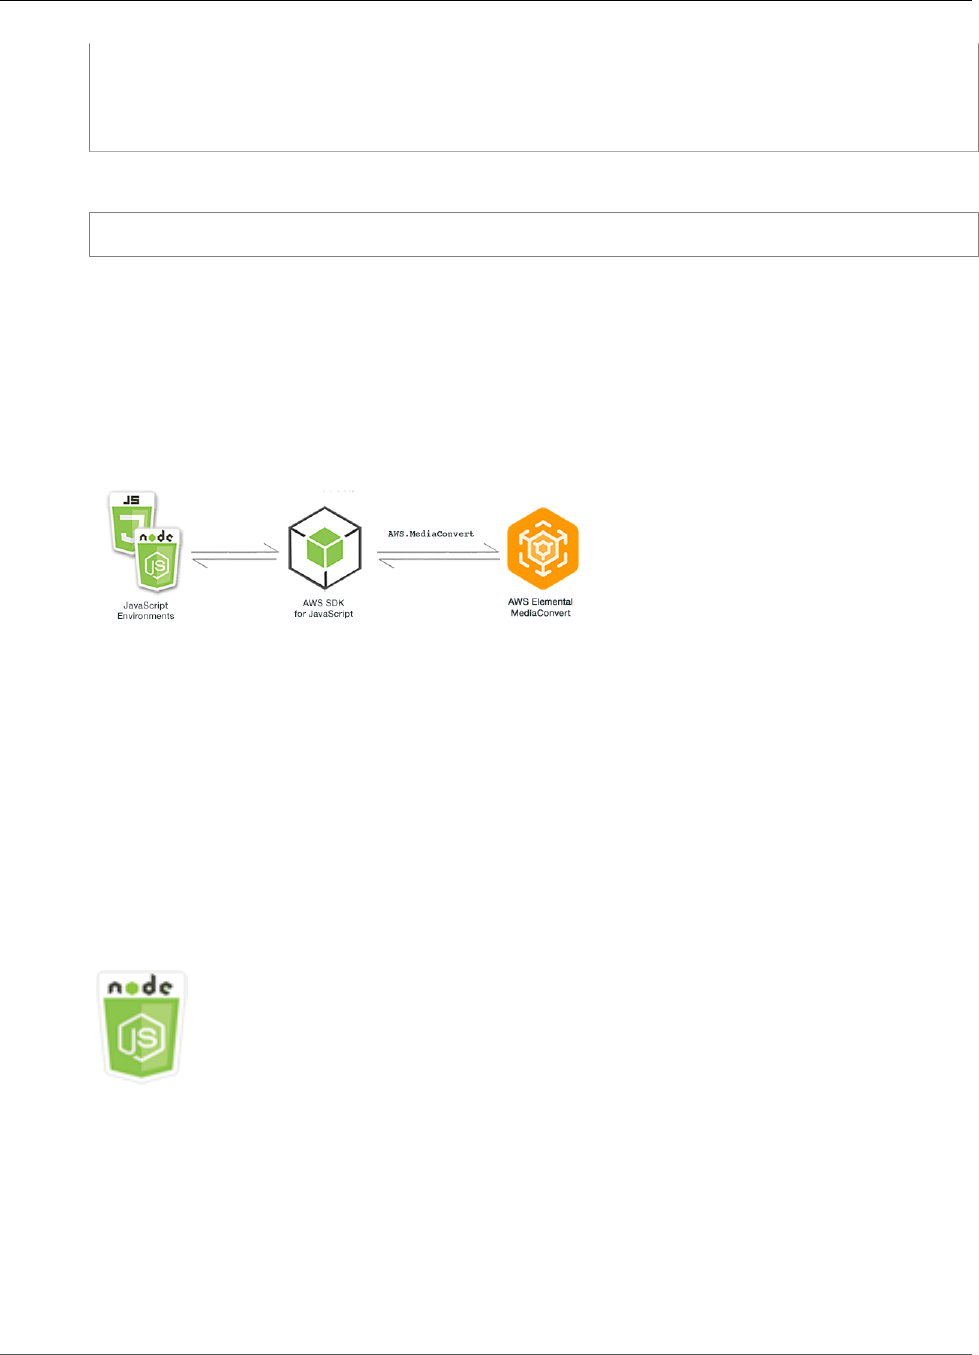
AWS SDK for JavaScript Developer Guide for SDK v2
MediaConvert Examples
console.log("Error", err);
} else {
console.log("Address released");
}
});
To run the example, type the following at the command line.
node ec2_releaseaddress.js
This sample code can be found here on GitHub.
AWS Elemental MediaConvert Examples
AWS Elemental MediaConvert is a file-based video transcoding service with broadcast-grade features.
You can use it to create assets for broadcast and for video-on-demand (VOD) delivery across the internet.
For more information, see the AWS Elemental MediaConvert User Guide.
The JavaScript API for MediaConvert is exposed through the AWS.MediaConvert client class. For more
information, see Class: AWS.MediaConvert in the API reference.
Topics
• Getting Your Account-Specific Endpoint for MediaConvert (p. 113)
• Creating and Managing Transcoding Jobs in MediaConvert (p. 115)
• Using Job Templates in MediaConvert (p. 120)
Getting Your Account-Specific Endpoint for
MediaConvert
This Node.js code example shows:
• How to retrieve your account-specific endpoint from MediaConvert.
The Scenario
In this example, you use a Node.js module to call MediaConvert and retrieve your account-specific
endpoint. You can retrieve your endpoint URL from the service default endpoint and so do not yet need
113

AWS SDK for JavaScript Developer Guide for SDK v2
Getting Your Account-Specific Endpoint
your acccount-specific endpoint. The code uses the SDK for JavaScript to retrieve this endpoint by using
this method of the MediaConvert client class:
• describeEndpoints
Prerequisite Tasks
To set up and run this example, first complete these tasks:
• Install Node.js. For more information, see the Node.js website.
• Create a shared configurations file with your user credentials. For more information about providing a
shared credentials file, see Loading Credentials in Node.js from the Shared Credentials File (p. 26).
• Create an IAM role that gives MediaConvert access to your input files and the Amazon S3 buckets
where your output files are stored. For details, see Set Up IAM Permissions in the AWS Elemental
MediaConvert User Guide.
Configuring the SDK
Configure the SDK for JavaScript by creating a global configuration object, and then setting the region
for your code. In this example, the region is set to us-west-2.
// Load the SDK for JavaScript
var AWS = require('aws-sdk');
// Set the region
AWS.config.update({region: 'us-west-2'});
Getting Your Endpoint URL
Create a Node.js module with the file name emc_getendpoint.js. Be sure to configure the SDK as
previously shown.
Create an object to pass the empty request parameters for the describeEndpoints method of the
AWS.MediaConvert client class. To call the describeEndpoints method, create a promise for invoking
an MediaConvert service object, passing the parameters. Handle the response in the promise callback.
// Load the AWS SDK for Node.js
var AWS = require('aws-sdk');
// Set the region
AWS.config.update({region: 'us-west-2'});
// Create empty request parameters
var params = {
MaxResults: 0,
};
// Create a promise on a MediaConvert object
var endpointPromise = new AWS.MediaConvert({apiVersion:
'2017-08-29'}).describeEndpoints(params).promise();
endpointPromise.then(
function(data) {
console.log("Your MediaConvert endpoint is ", data.Endpoints);
},
function(err) {
console.log("Error", err);
}
114

AWS SDK for JavaScript Developer Guide for SDK v2
Creating and Managing Jobs
);
To run the example, type the following at the command line.
node emc_getendpoint.js
This sample code can be found here on GitHub.
Creating and Managing Transcoding Jobs in
MediaConvert
This Node.js code example shows:
• How to specify the account-specific endpoint to use with MediaConvert.
• How to create transcoding jobs in MediaConvert.
• How to cancel a transcoding job.
• How to retrieve the JSON for a completed transcoding job.
• How to retrieve a JSON array for up to 20 of the most recently created jobs.
The Scenario
In this example, you use a Node.js module to call MediaConvert to create and manage transcoding jobs.
The code uses the SDK for JavaScript to do this by using these methods of the MediaConvert client class:
• createJob
• cancelJob
• getJob
• listJobs
Prerequisite Tasks
To set up and run this example, first complete these tasks:
• Install Node.js. For more information, see the Node.js website.
• Create a shared configurations file with your user credentials. For more information about providing a
shared credentials file, see Loading Credentials in Node.js from the Shared Credentials File (p. 26).
• Create and configure Amazon S3 buckets that provide storage for job input files and output files. For
details, see Create Storage for Files in the AWS Elemental MediaConvert User Guide.
• Upload the input video to the Amazon S3 bucket you provisioned for input storage. For a list of
supported input video codecs and containers, see Supported Input Codecs and Containers in the AWS
Elemental MediaConvert User Guide.
• Create an IAM role that gives MediaConvert access to your input files and the Amazon S3 buckets
where your output files are stored. For details, see Set Up IAM Permissions in the AWS Elemental
MediaConvert User Guide.
115

AWS SDK for JavaScript Developer Guide for SDK v2
Creating and Managing Jobs
Configuring the SDK
Configure the SDK for JavaScript by creating a global configuration object, and then setting the region
for your code. In this example, the region is set to us-west-2. Because MediaConvert uses custom
endpoints for each account, you must also configure the AWS.MediaConvert client class to use your
account-specific endpoint. To do this, set the endpoint parameter on AWS.config.mediaconvert.
// Load the SDK for JavaScript
var AWS = require('aws-sdk');
// Set the region
AWS.config.update({region: 'us-west-2'});
// Set the custom endpoint for your acccount
AWS.config.mediaconvert({endpoint: 'ACCOUNT_ENDPOINT'});
Defining a Simple Transcoding Job
Create a Node.js module with the file name emc_createjob.js. Be sure to configure the SDK as
previously shown. Create the JSON that defines the transcode job parameters.
These parameters are quite detailed. You can use the AWS Elemental MediaConvert console to generate
the JSON job parameters by choosing your job settings in the console, and then choosing Show job
JSON at the bottom of the Job section. This example shows the JSON for a simple job.
var params = {
"Queue": "JOB_QUEUE_ARN",
"UserMetadata": {
"Customer": "Amazon"
},
"Role": "IAM_ROLE_ARN",
"Settings": {
"OutputGroups": [
{
"Name": "File Group",
"OutputGroupSettings": {
"Type": "FILE_GROUP_SETTINGS",
"FileGroupSettings": {
"Destination": "s3://OUTPUT_BUCKET_NAME/"
}
},
"Outputs": [
{
"VideoDescription": {
"ScalingBehavior": "DEFAULT",
"TimecodeInsertion": "DISABLED",
"AntiAlias": "ENABLED",
"Sharpness": 50,
"CodecSettings": {
"Codec": "H_264",
"H264Settings": {
"InterlaceMode": "PROGRESSIVE",
"NumberReferenceFrames": 3,
"Syntax": "DEFAULT",
"Softness": 0,
"GopClosedCadence": 1,
"GopSize": 90,
"Slices": 1,
"GopBReference": "DISABLED",
"SlowPal": "DISABLED",
"SpatialAdaptiveQuantization": "ENABLED",
"TemporalAdaptiveQuantization": "ENABLED",
"FlickerAdaptiveQuantization": "DISABLED",
116

AWS SDK for JavaScript Developer Guide for SDK v2
Creating and Managing Jobs
"EntropyEncoding": "CABAC",
"Bitrate": 5000000,
"FramerateControl": "SPECIFIED",
"RateControlMode": "CBR",
"CodecProfile": "MAIN",
"Telecine": "NONE",
"MinIInterval": 0,
"AdaptiveQuantization": "HIGH",
"CodecLevel": "AUTO",
"FieldEncoding": "PAFF",
"SceneChangeDetect": "ENABLED",
"QualityTuningLevel": "SINGLE_PASS",
"FramerateConversionAlgorithm": "DUPLICATE_DROP",
"UnregisteredSeiTimecode": "DISABLED",
"GopSizeUnits": "FRAMES",
"ParControl": "SPECIFIED",
"NumberBFramesBetweenReferenceFrames": 2,
"RepeatPps": "DISABLED",
"FramerateNumerator": 30,
"FramerateDenominator": 1,
"ParNumerator": 1,
"ParDenominator": 1
}
},
"AfdSignaling": "NONE",
"DropFrameTimecode": "ENABLED",
"RespondToAfd": "NONE",
"ColorMetadata": "INSERT"
},
"AudioDescriptions": [
{
"AudioTypeControl": "FOLLOW_INPUT",
"CodecSettings": {
"Codec": "AAC",
"AacSettings": {
"AudioDescriptionBroadcasterMix": "NORMAL",
"RateControlMode": "CBR",
"CodecProfile": "LC",
"CodingMode": "CODING_MODE_2_0",
"RawFormat": "NONE",
"SampleRate": 48000,
"Specification": "MPEG4",
"Bitrate": 64000
}
},
"LanguageCodeControl": "FOLLOW_INPUT",
"AudioSourceName": "Audio Selector 1"
}
],
"ContainerSettings": {
"Container": "MP4",
"Mp4Settings": {
"CslgAtom": "INCLUDE",
"FreeSpaceBox": "EXCLUDE",
"MoovPlacement": "PROGRESSIVE_DOWNLOAD"
}
},
"NameModifier": "_1"
}
]
}
],
"AdAvailOffset": 0,
"Inputs": [
{
"AudioSelectors": {
117

AWS SDK for JavaScript Developer Guide for SDK v2
Creating and Managing Jobs
"Audio Selector 1": {
"Offset": 0,
"DefaultSelection": "NOT_DEFAULT",
"ProgramSelection": 1,
"SelectorType": "TRACK",
"Tracks": [
1
]
}
},
"VideoSelector": {
"ColorSpace": "FOLLOW"
},
"FilterEnable": "AUTO",
"PsiControl": "USE_PSI",
"FilterStrength": 0,
"DeblockFilter": "DISABLED",
"DenoiseFilter": "DISABLED",
"TimecodeSource": "EMBEDDED",
"FileInput": "s3://INPUT_BUCKET_AND_FILE_NAME"
}
],
"TimecodeConfig": {
"Source": "EMBEDDED"
}
}
};
Creating a Transcoding Job
After creating the job parameters JSON, call the createJob method by creating a promise for invoking
an AWS.MediaConvert service object, passing the parameters. Then handle the response in the promise
callback. The ID of the job created is returned in the response data.
// Create a promise on a MediaConvert object
var endpointPromise = new AWS.MediaConvert({apiVersion:
'2017-08-29'}).createJob(params).promise();
// Handle promise's fulfilled/rejected status
endpointPromise.then(
function(data) {
console.log("Job created! ", data);
},
function(err) {
console.log("Error", err);
}
);
To run the example, type the following at the command line.
node emc_createjob.js
This sample code can be found here on GitHub.
Canceling a Transcoding Job
You can cancel jobs only while they are still in the queue. You can’t cancel jobs that have already started
transcoding.
Create a Node.js module with the file name emc_canceljob.js. Be sure to configure the SDK as
previously shown. Create the JSON that includes the ID of the job to cancel. Then call the cancelJob
118

AWS SDK for JavaScript Developer Guide for SDK v2
Creating and Managing Jobs
method by creating a promise for invoking an AWS.MediaConvert service object, passing the
parameters. Handle the response in the promise callback.
// Load the AWS SDK for Node.js
var AWS = require('aws-sdk');
// Set the region
AWS.config.update({region: 'us-west-2'});
// Set MediaConvert to customer endpoint
AWS.config.mediaconvert = {endpoint : 'ACCOUNT_ENDPOINT'};
var params = {
Id: 'JOB_ID' /* required */
};
// Create a promise on a MediaConvert object
var endpointPromise = new AWS.MediaConvert({apiVersion:
'2017-08-29'}).cancelJob(params).promise();
// Handle promise's fulfilled/rejected status
endpointPromise.then(
function(data) {
console.log("Job " + params.Id + " is canceled", );
},
function(err) {
console.log("Error", err);
}
);
To run the example, type the following at the command line.
node ec2_canceljob.js
This sample code can be found here on GitHub.
Listing Recent Transcoding Jobs
Create a Node.js module with the file name emc_listjobs.js. Be sure to configure the SDK as
previously shown.
Create the parameters JSON, including values to specify whether to sort the list in ASCENDING, or
DESCENDING order, the ARN of the job queue to check, and the status of jobs to include. Then call the
listJobs method by creating a promise for invoking an AWS.MediaConvert service object, passing
the parameters. Handle the response in the promise callback.
// Load the AWS SDK for Node.js
var AWS = require('aws-sdk');
// Set the region
AWS.config.update({region: 'us-west-2'});
// Set the customer endpoint
AWS.config.mediaconvert = {endpoint : 'ACCOUNT_ENDPOINT'};
var params = {
MaxResults: 10,
Order: 'ASCENDING',
Queue: 'QUEUE_ARN',
Status: 'SUBMITTED'
};
119

AWS SDK for JavaScript Developer Guide for SDK v2
Using Job Templates
// Create a promise on a MediaConvert object
var endpointPromise = new AWS.MediaConvert({apiVersion:
'2017-08-29'}).listJobs(params).promise();
// Handle promise's fulfilled/rejected status
endpointPromise.then(
function(data) {
console.log("Jobs: ", data);
},
function(err) {
console.log("Error", err);
}
);
To run the example, type the following at the command line.
node emc_listjobs.js
This sample code can be found here on GitHub.
Using Job Templates in MediaConvert
This Node.js code example shows:
• How to create MediaConvert job templates.
• How to use a job template to create a transcoding job.
• How to list all your job templates.
• How to delete job templates.
The Scenario
The JSON required to create a transcoding job in MediaConvert is detailed, containing a large number
of settings. You can greatly simplify job creation by saving known-good settings in a job template that
you can use to create subsequent jobs. In this example, you use a Node.js module to call MediaConvert
to create, use, and manage job templates. The code uses the SDK for JavaScript to do this by using these
methods of the MediaConvert client class:
• createJobTemplate
• createJob
• deleteJobTemplate
• listJobTemplates
Prerequisite Tasks
To set up and run this example, first complete these tasks:
• Install Node.js. For more information, see the Node.js website.
120

AWS SDK for JavaScript Developer Guide for SDK v2
Using Job Templates
• Create a shared configurations file with your user credentials. For more information about providing a
shared credentials file, see Loading Credentials in Node.js from the Shared Credentials File (p. 26).
• Create an IAM role that gives MediaConvert access to your input files and the Amazon S3 buckets
where your output files are stored. For details, see Set Up IAM Permissions in the AWS Elemental
MediaConvert User Guide.
Configuring the SDK
Configure the SDK for JavaScript by creating a global configuration object, and then setting the region
for your code. In this example, the region is set to us-west-2. Because MediaConvert uses custom
endpoints for each account, you must also configure the AWS.MediaConvert client class to use your
account-specific endpoint. To do this, set the endpoint parameter on AWS.config.mediaconvert.
// Load the SDK for JavaScript
var AWS = require('aws-sdk');
// Set the region
AWS.config.update({region: 'us-west-2'});
// Set the custom endpoint for your acccount
AWS.config.mediaconvert({endpoint: 'ACCOUNT_ENDPOINT'});
Creating a Job Template
Create a Node.js module with the file name emc_create_jobtemplate.js. Be sure to configure the
SDK as previously shown.
Specify the parameters JSON for template creation. You can use most of the JSON parameters from
a previous successful job to specify the Settings values in the template. This example uses the job
settings from Creating and Managing Transcoding Jobs in MediaConvert (p. 115).
Call the createJobTemplate method by creating a promise for invoking an AWS.MediaConvert
service object, passing the parameters. Then handle the response in the promise callback.
// Load the AWS SDK for Node.js
var AWS = require('aws-sdk');
// Set the region
AWS.config.update({region: 'us-west-2'});
// Set the custom endpoint for your acccount
AWS.config.mediaconvert({endpoint: 'ACCOUNT_ENDPOINT'});
var params = {
Category: 'YouTube Jobs',
Description: 'Final production transcode',
Name: 'DemoTemplate',
Queue: 'JOB_QUEUE_ARN',
"Settings": {
"OutputGroups": [
{
"Name": "File Group",
"OutputGroupSettings": {
"Type": "FILE_GROUP_SETTINGS",
"FileGroupSettings": {
"Destination": "s3://BUCKET_NAME/"
}
},
"Outputs": [
{
"VideoDescription": {
"ScalingBehavior": "DEFAULT",
121

AWS SDK for JavaScript Developer Guide for SDK v2
Using Job Templates
"TimecodeInsertion": "DISABLED",
"AntiAlias": "ENABLED",
"Sharpness": 50,
"CodecSettings": {
"Codec": "H_264",
"H264Settings": {
"InterlaceMode": "PROGRESSIVE",
"NumberReferenceFrames": 3,
"Syntax": "DEFAULT",
"Softness": 0,
"GopClosedCadence": 1,
"GopSize": 90,
"Slices": 1,
"GopBReference": "DISABLED",
"SlowPal": "DISABLED",
"SpatialAdaptiveQuantization": "ENABLED",
"TemporalAdaptiveQuantization": "ENABLED",
"FlickerAdaptiveQuantization": "DISABLED",
"EntropyEncoding": "CABAC",
"Bitrate": 5000000,
"FramerateControl": "SPECIFIED",
"RateControlMode": "CBR",
"CodecProfile": "MAIN",
"Telecine": "NONE",
"MinIInterval": 0,
"AdaptiveQuantization": "HIGH",
"CodecLevel": "AUTO",
"FieldEncoding": "PAFF",
"SceneChangeDetect": "ENABLED",
"QualityTuningLevel": "SINGLE_PASS",
"FramerateConversionAlgorithm": "DUPLICATE_DROP",
"UnregisteredSeiTimecode": "DISABLED",
"GopSizeUnits": "FRAMES",
"ParControl": "SPECIFIED",
"NumberBFramesBetweenReferenceFrames": 2,
"RepeatPps": "DISABLED",
"FramerateNumerator": 30,
"FramerateDenominator": 1,
"ParNumerator": 1,
"ParDenominator": 1
}
},
"AfdSignaling": "NONE",
"DropFrameTimecode": "ENABLED",
"RespondToAfd": "NONE",
"ColorMetadata": "INSERT"
},
"AudioDescriptions": [
{
"AudioTypeControl": "FOLLOW_INPUT",
"CodecSettings": {
"Codec": "AAC",
"AacSettings": {
"AudioDescriptionBroadcasterMix": "NORMAL",
"RateControlMode": "CBR",
"CodecProfile": "LC",
"CodingMode": "CODING_MODE_2_0",
"RawFormat": "NONE",
"SampleRate": 48000,
"Specification": "MPEG4",
"Bitrate": 64000
}
},
"LanguageCodeControl": "FOLLOW_INPUT",
"AudioSourceName": "Audio Selector 1"
}
122

AWS SDK for JavaScript Developer Guide for SDK v2
Using Job Templates
],
"ContainerSettings": {
"Container": "MP4",
"Mp4Settings": {
"CslgAtom": "INCLUDE",
"FreeSpaceBox": "EXCLUDE",
"MoovPlacement": "PROGRESSIVE_DOWNLOAD"
}
},
"NameModifier": "_1"
}
]
}
],
"AdAvailOffset": 0,
"Inputs": [
{
"AudioSelectors": {
"Audio Selector 1": {
"Offset": 0,
"DefaultSelection": "NOT_DEFAULT",
"ProgramSelection": 1,
"SelectorType": "TRACK",
"Tracks": [
1
]
}
},
"VideoSelector": {
"ColorSpace": "FOLLOW"
},
"FilterEnable": "AUTO",
"PsiControl": "USE_PSI",
"FilterStrength": 0,
"DeblockFilter": "DISABLED",
"DenoiseFilter": "DISABLED",
"TimecodeSource": "EMBEDDED",
}
],
"TimecodeConfig": {
"Source": "EMBEDDED"
}
}
};
// Create a promise on a MediaConvert object
var templatePromise = new AWS.MediaConvert({apiVersion:
'2017-08-29'}).createJobTemplate(params).promise();
// Handle promise's fulfilled/rejected status
templatePromise.then(
function(data) {
console.log("Success!", data);
},
function(err) {
console.log("Error", err);
}
);
To run the example, type the following at the command line.
node emc_create_jobtemplate.js
This sample code can be found here on GitHub.
123

AWS SDK for JavaScript Developer Guide for SDK v2
Using Job Templates
Creating a Transcoding Job from a Job Template
Create a Node.js module with the file name emc_template_createjob.js. Be sure to configure the
SDK as previously shown.
Create the job creation parameters JSON, including the name of the job template to use, and the
Settings to use that are specific to the job you're creating. Then call the createJobs method by
creating a promise for invoking an AWS.MediaConvert service object, passing the parameters. Handle
the response in the promise callback.
// Load the AWS SDK for Node.js
var AWS = require('aws-sdk');
// Set the region
AWS.config.update({region: 'us-west-2'});
// Set the custom endpoint for your acccount
AWS.config.mediaconvert({endpoint: 'ACCOUNT_ENDPOINT'});
var params = {
"Queue": "QUEUE_ARN",
"JobTemplate": "TEMPLATE_NAME",
"Role": "ROLE_ARN",
"Settings": {
"Inputs": [
{
"AudioSelectors": {
"Audio Selector 1": {
"Offset": 0,
"DefaultSelection": "NOT_DEFAULT",
"ProgramSelection": 1,
"SelectorType": "TRACK",
"Tracks": [
1
]
}
},
"VideoSelector": {
"ColorSpace": "FOLLOW"
},
"FilterEnable": "AUTO",
"PsiControl": "USE_PSI",
"FilterStrength": 0,
"DeblockFilter": "DISABLED",
"DenoiseFilter": "DISABLED",
"TimecodeSource": "EMBEDDED",
"FileInput": "s3://BUCKET_NAME/FILE_NAME"
}
]
}
};
// Create a promise on a MediaConvert object
var templateJobPromise = new AWS.MediaConvert({apiVersion:
'2017-08-29'}).createJob(params).promise();
// Handle promise's fulfilled/rejected status
templateJobPromise.then(
function(data) {
console.log("Success! ", data);
},
function(err) {
console.log("Error", err);
}
);
124

AWS SDK for JavaScript Developer Guide for SDK v2
Using Job Templates
To run the example, type the following at the command line.
node emc_template_createjob.js
This sample code can be found here on GitHub.
Listing Your Job Templates
Create a Node.js module with the file name emc_listtemplates.js. Be sure to configure the SDK as
previously shown.
Create an object to pass the request parameters for the listTemplates method of the
AWS.MediaConvert client class. Include values to determine what templates to list (NAME, CREATION
DATE, SYSTEM), how many to list, and their sort order. To call the listTemplates method, create a
promise for invoking an MediaConvert service object, passing the parameters. Then handle the response
in the promise callback.
// Load the AWS SDK for Node.js
var AWS = require('aws-sdk');
// Set the region
AWS.config.update({region: 'us-west-2'});
// Set the customer endpoint
AWS.config.mediaconvert = {endpoint : 'ACCOUNT_ENDPOINT'};
var params = {
ListBy: 'NAME',
MaxResults: 10,
Order: 'ASCENDING',
};
// Create a promise on a MediaConvert object
var listTemplatesPromise = new AWS.MediaConvert({apiVersion:
'2017-08-29'}).listJobTemplates(params).promise();
// Handle promise's fulfilled/rejected status
listTemplatesPromise.then(
function(data) {
console.log("Success ", data);
},
function(err) {
console.log("Error", err);
}
);
To run the example, type the following at the command line.
node emc_listtemplates.js
This sample code can be found here on GitHub.
Deleting a Job Template
Create a Node.js module with the file name emc_deletetemplate.js. Be sure to configure the SDK as
previously shown.
Create an object to pass the name of the job template you want to delete as parameters
for the deleteJobTemplate method of the AWS.MediaConvert client class. To call the
125

AWS SDK for JavaScript Developer Guide for SDK v2
Amazon S3 Glacier Examples
deleteJobTemplate method, create a promise for invoking an MediaConvert service object, passing
the parameters. Handle the response in the promise callback.
// Load the AWS SDK for Node.js
var AWS = require('aws-sdk');
// Set the region
AWS.config.update({region: 'us-west-2'});
// Set the customer endpoint
AWS.config.mediaconvert = {endpoint : 'ACCOUNT_ENDPOINT'};
var params = {
Name: 'TEMPLATE_NAME'
};
// Create a promise on a MediaConvert object
var deleteTemplatePromise = new AWS.MediaConvert({apiVersion:
'2017-08-29'}).deleteJobTemplate(params).promise();
// Handle promise's fulfilled/rejected status
deleteTemplatePromise.then(
function(data) {
console.log("Success ", data);
},
function(err) {
console.log("Error", err);
}
);
To run the example, type the following at the command line.
node emc_deletetemplate.js
This sample code can be found here on GitHub.
Amazon S3 Glacier Examples
Amazon S3 Glacier is a secure cloud storage service for data archiving and long-term backup. The service
is optimized for infrequently accessed data where a retrieval time of several hours is suitable.
The JavaScript API for Amazon S3 Glacier is exposed through the AWS.Glacier client class. For more
information about using the Glacier client class, see Class: AWS.Glacier in the API reference.
Topics
• Creating an Glacier Vault (p. 127)
• Uploading an Archive to Glacier (p. 127)
• Doing a Multipart Upload to Glacier (p. 128)
126

AWS SDK for JavaScript Developer Guide for SDK v2
Creating an Glacier Vault
Creating an Glacier Vault
This Node.js code example shows:
• How to create a vault using the createVault method of the Glacier service object.
Prerequisite Tasks
To set up and run this example, you must first complete these tasks:
• Install Node.js. For more information about installing Node.js, see the Node.js website.
• Create a shared configurations file with your user credentials. For more information about providing a
shared credentials file, see Loading Credentials in Node.js from the Shared Credentials File (p. 26).
Configuring the SDK
Configure the SDK for JavaScript by creating a global configuration object then setting the region for
your code. In this example, the region is set to us-west-2.
// Load the SDK for JavaScript
var AWS = require('aws-sdk');
// Set the region
AWS.config.update({region: 'us-west-2'});
Create the Vault
// Load the SDK for JavaScript
var AWS = require('aws-sdk');
// Set the region
AWS.config.update({region: 'us-west-2'});
var glacier = new AWS.Glacier({apiVersion: '2012-06-01'});
glacier.createVault({vaultName: 'YOUR_VAULT_NAME'}, function(err) {
if (!err) console.log("Created vault!")
});
Uploading an Archive to Glacier
This Node.js code example shows:
127

AWS SDK for JavaScript Developer Guide for SDK v2
Doing a Multipart Upload to Glacier
• How to upload an archive to Glacier using the uploadArchive method of the Glacier service object.
The following example uploads a single Buffer object as an entire archive using the uploadArchive
method of the Glacier service object.
The example assumes you've already created a vault named YOUR_VAULT_NAME. The SDK automatically
computes the tree hash checksum for the data uploaded, though you can override it by passing your own
checksum parameter:
Prerequisite Tasks
To set up and run this example, you must first complete these tasks:
• Install Node.js. For more information about installing Node.js, see the Node.js website.
• Create a shared configurations file with your user credentials. For more information about providing a
shared credentials file, see Loading Credentials in Node.js from the Shared Credentials File (p. 26).
Configuring the SDK
Configure the SDK for JavaScript by creating a global configuration object then setting the region for
your code. In this example, the region is set to us-west-2.
// Load the SDK for JavaScript
var AWS = require('aws-sdk');
// Set the region
AWS.config.update({region: 'us-west-2'});
Upload the Archive
// Load the SDK for JavaScript
var AWS = require('aws-sdk');
// Set the region
AWS.config.update({region: 'us-west-2'});
var glacier = new AWS.Glacier({apiVersion: '2012-06-01'}),
buffer = new Buffer(2.5 * 1024 * 1024); // 2.5MB buffer
var params = {vaultName: 'YOUR_VAULT_NAME', body: buffer};
glacier.uploadArchive(params, function(err, data) {
if (err) console.log("Error uploading archive!", err);
else console.log("Archive ID", data.archiveId);
});
Doing a Multipart Upload to Glacier
The following example creates a multipart upload out of 1 megabyte chunks of a Buffer object using
the initiateMultipartUpload method of the Glacier service object.
The example assumes you have already created a vault named YOUR_VAULT_NAME. A complete SHA-256
tree hash is manually computed using the computeChecksums method.
var glacier = new AWS.Glacier({apiVersion: '2012-06-01'}),
vaultName = 'YOUR_VAULT_NAME',
buffer = new Buffer(2.5 * 1024 * 1024), // 2.5MB buffer
128

AWS SDK for JavaScript Developer Guide for SDK v2
AWS IAM Examples
partSize = 1024 * 1024, // 1MB chunks,
numPartsLeft = Math.ceil(buffer.length / partSize),
startTime = new Date(),
params = {vaultName: vaultName, partSize: partSize.toString()};
// Compute the complete SHA-256 tree hash so we can pass it
// to completeMultipartUpload request at the end
var treeHash = glacier.computeChecksums(buffer).treeHash;
// Initiate the multipart upload
console.log('Initiating upload to', vaultName);
glacier.initiateMultipartUpload(params, function (mpErr, multipart) {
if (mpErr) { console.log('Error!', mpErr.stack); return; }
console.log("Got upload ID", multipart.uploadId);
// Grab each partSize chunk and upload it as a part
for (var i = 0; i < buffer.length; i += partSize) {
var end = Math.min(i + partSize, buffer.length),
partParams = {
vaultName: vaultName,
uploadId: multipart.uploadId,
range: 'bytes ' + i + '-' + (end-1) + '/*',
body: buffer.slice(i, end)
};
// Send a single part
console.log('Uploading part', i, '=', partParams.range);
glacier.uploadMultipartPart(partParams, function(multiErr, mData) {
if (multiErr) return;
console.log("Completed part", this.request.params.range);
if (--numPartsLeft > 0) return; // complete only when all parts uploaded
var doneParams = {
vaultName: vaultName,
uploadId: multipart.uploadId,
archiveSize: buffer.length.toString(),
checksum: treeHash // the computed tree hash
};
console.log("Completing upload...");
glacier.completeMultipartUpload(doneParams, function(err, data) {
if (err) {
console.log("An error occurred while uploading the archive");
console.log(err);
} else {
var delta = (new Date() - startTime) / 1000;
console.log('Completed upload in', delta, 'seconds');
console.log('Archive ID:', data.archiveId);
console.log('Checksum: ', data.checksum);
}
});
});
}
});
AWS IAM Examples
AWS Identity and Access Management (IAM) is a web service that enables Amazon Web Services (AWS)
customers to manage users and user permissions in AWS. The service is targeted at organizations with
multiple users or systems in the cloud that use AWS products. With IAM, you can centrally manage users,
security credentials such as access keys, and permissions that control which AWS resources users can
access.
129

AWS SDK for JavaScript Developer Guide for SDK v2
Managing IAM Users
The JavaScript API for IAM is exposed through the AWS.IAM client class. For more information about
using the IAM client class, see Class: AWS.IAM in the API reference.
Topics
• Managing IAM Users (p. 130)
• Working with IAM Policies (p. 134)
• Managing IAM Access Keys (p. 138)
• Working with IAM Server Certificates (p. 142)
• Managing IAM Account Aliases (p. 145)
Managing IAM Users
This Node.js code example shows:
• How to retrieve a list of IAM users.
• How to create and delete users.
• How to update a user name.
The Scenario
In this example, a series of Node.js modules are used to create and manage users in IAM. The Node.js
modules use the SDK for JavaScript to create, delete, and update users using these methods of the
AWS.IAM client class:
• createUser
• listUsers
• updateUser
• getUser
• deleteUser
For more information about IAM users, see IAM Users in the IAM User Guide.
Prerequisite Tasks
To set up and run this example, you must first complete these tasks:
130

AWS SDK for JavaScript Developer Guide for SDK v2
Managing IAM Users
• Install Node.js. For more information about installing Node.js, see the Node.js website.
• Create a shared configurations file with your user credentials. For more information about providing a
shared credentials file, see Loading Credentials in Node.js from the Shared Credentials File (p. 26).
Configuring the SDK
Configure the SDK for JavaScript by creating a global configuration object then setting the region for
your code. In this example, the region is set to us-west-2.
// Load the SDK for JavaScript
var AWS = require('aws-sdk');
// Set the region
AWS.config.update({region: 'us-west-2'});
Creating a User
Create a Node.js module with the file name iam_createuser.js. Be sure to configure the SDK as
previously shown. To access IAM, create an AWS.IAM service object. Create a JSON object containing the
parameters needed, which consists of the user name you want to use for the new user as a command-
line parameter.
Call the getUser method of the AWS.IAM service object to see if the user name already exists. If the
user name does not currently exist, call the createUser method to create it. If the name already exists,
write a message to that effect to the console.
// Load the AWS SDK for Node.js
var AWS = require('aws-sdk');
// Set the region
AWS.config.update({region: 'REGION'});
// Create the IAM service object
var iam = new AWS.IAM({apiVersion: '2010-05-08'});
var params = {
UserName: process.argv[2]
};
iam.getUser(params, function(err, data) {
if (err && err.code === 'NoSuchEntity') {
iam.createUser(params, function(err, data) {
if (err) {
throw err;
} else {
console.log("Success", data);
}
});
} else {
console.log("User " + process.argv[2] + " already exists", data.User.UserId);
}
});
To run the example, type the following at the command line.
node iam_createuser.js USER_NAME
This sample code can be found here on GitHub.
131

AWS SDK for JavaScript Developer Guide for SDK v2
Managing IAM Users
Listing Users in Your Account
Create a Node.js module with the file name iam_listusers.js. Be sure to configure the SDK as
previously shown. To access IAM, create an AWS.IAM service object. Create a JSON object containing the
parameters needed to list your users, limiting the number returned by setting the MaxItems parameter
to 10. Call the listUsers method of the AWS.IAM service object. Write the first user's name and
creation date to the console.
// Load the AWS SDK for Node.js
var AWS = require('aws-sdk');
// Set the region
AWS.config.update({region: 'REGION'});
// Create the IAM service object
var iam = new AWS.IAM({apiVersion: '2010-05-08'});
var params = {
MaxItems: 10
};
iam.listUsers(params, function(err, data) {
if (err) {
throw err;
} else {
var users = data.Users || [];
users.forEach(function(user) {
console.log("User " + user.UserName + " created", user.CreateDate);
});
}
});
To run the example, type the following at the command line.
node iam_listusers.js
This sample code can be found here on GitHub.
Updating a User's Name
Create a Node.js module with the file name iam_updateuser.js. Be sure to configure the SDK as
previously shown. To access IAM, create an AWS.IAM service object. Create a JSON object containing the
parameters needed to list your users, specifying both the current and new user names as command-line
parameters. Call the updateUser method of the AWS.IAM service object.
// Load the AWS SDK for Node.js
var AWS = require('aws-sdk');
// Set the region
AWS.config.update({region: 'REGION'});
// Create the IAM service object
var iam = new AWS.IAM({apiVersion: '2010-05-08'});
var params = {
UserName: process.argv[2],
NewUserName: process.argv[3]
};
iam.updateUser(params, function(err, data) {
if (err) {
132

AWS SDK for JavaScript Developer Guide for SDK v2
Managing IAM Users
throw err;
} else {
console.log("Success", data);
}
});
To run the example, type the following at the command line, specifying the user's current name followed
by the new user name.
node iam_updateuser.js ORIGINAL_USERNAME NEW_USERNAME
This sample code can be found here on GitHub.
Deleting a User
Create a Node.js module with the file name iam_deleteuser.js. Be sure to configure the SDK as
previously shown. To access IAM, create an AWS.IAM service object. Create a JSON object containing the
parameters needed, which consists of the user name you want to delete as a command-line parameter.
Call the getUser method of the AWS.IAM service object to see if the user name already exists. If the
user name does not currently exist, write a message to that effect to the console. If the user exists, call
the deleteUser method to delete it.
// Load the AWS SDK for Node.js
var AWS = require('aws-sdk');
// Set the region
AWS.config.update({region: 'REGION'});
// Create the IAM service object
var iam = new AWS.IAM({apiVersion: '2010-05-08'});
var params = {
UserName: process.argv[2]
};
iam.getUser(params, function(err, data) {
if (err && err.code === 'NoSuchEntity') {
console.error("User " + process.argv[2] + " does not exist.");
throw err;
} else {
iam.deleteUser(params, function(err, data) {
if (err) {
throw err;
} else {
console.log("User " + process.argv[2] + " deleted.");
}
});
}
});
To run the example, type the following at the command line.
node iam_deleteuser.js USER_NAME
This sample code can be found here on GitHub.
133

AWS SDK for JavaScript Developer Guide for SDK v2
Working with IAM Policies
Working with IAM Policies
This Node.js code example shows:
• How to create and delete IAM policies.
• How to attach and detach IAM policies from roles.
The Scenario
You grant permissions to a user by creating a policy, which is a document that lists the actions that a user
can perform and the resources those actions can affect. Any actions or resources that are not explicitly
allowed are denied by default. Policies can be created and attached to users, groups of users, roles
assumed by users, and resources.
In this example, a series of Node.js modules are used to manage policies in IAM. The Node.js modules use
the SDK for JavaScript to create and delete policies as well as attaching and detaching role policies using
these methods of the AWS.IAM client class:
• createPolicy
• getPolicy
• listAttachedRolePolicies
• attachRolePolicy
• detachRolePolicy
For more information about IAM users, see Overview of Access Management: Permissions and Policies in
the IAM User Guide.
Prerequisite Tasks
To set up and run this example, you must first complete these tasks:
• Install Node.js. For more information about installing Node.js, see the Node.js website.
• Create a shared configurations file with your user credentials. For more information about providing a
shared credentials file, see Loading Credentials in Node.js from the Shared Credentials File (p. 26).
• Create an IAM role to which you can attach policies. For more information about creating roles, see
Creating IAM Roles in the IAM User Guide.
Configuring the SDK
Configure the SDK for JavaScript by creating a global configuration object then setting the region for
your code. In this example, the region is set to us-west-2.
// Load the SDK for JavaScript
var AWS = require('aws-sdk');
134

AWS SDK for JavaScript Developer Guide for SDK v2
Working with IAM Policies
// Set the region
AWS.config.update({region: 'us-west-2'});
Creating an IAM Policy
Create a Node.js module with the file name iam_createpolicy.js. Be sure to configure the SDK
as previously shown. To access IAM, create an AWS.IAM service object. Create two JSON objects, one
containing the policy document you want to create and the other containing the parameters needed
to create the policy, which includes the policy JSON and the name you want to give the policy. Be sure
to stringify the policy JSON object in the parameters. Call the createPolicy method of the AWS.IAM
service object.
// Load the AWS SDK for Node.js
var AWS = require('aws-sdk');
// Set the region
AWS.config.update({region: 'REGION'});
// Create the IAM service object
var iam = new AWS.IAM({apiVersion: '2010-05-08'});
var myManagedPolicy = {
"Version": "2012-10-17",
"Statement": [
{
"Effect": "Allow",
"Action": "logs:CreateLogGroup",
"Resource": "RESOURCE_ARN"
},
{
"Effect": "Allow",
"Action": [
"dynamodb:DeleteItem",
"dynamodb:GetItem",
"dynamodb:PutItem",
"dynamodb:Scan",
"dynamodb:UpdateItem"
],
"Resource": "RESOURCE_ARN"
}
]
};
var params = {
PolicyDocument: JSON.stringify(myManagedPolicy),
PolicyName: 'myDynamoDBPolicy',
};
iam.createPolicy(params, function(err, data) {
if (err) {
throw err;
} else {
console.log("New Policy: ", data);
}
});
To run the example, type the following at the command line.
node iam_createpolicy.js
This sample code can be found here on GitHub.
135

AWS SDK for JavaScript Developer Guide for SDK v2
Working with IAM Policies
Getting an IAM Policy
Create a Node.js module with the file name iam_getpolicy.js. Be sure to configure the SDK as
previously shown. To access IAM, create an AWS.IAM service object. Create a JSON object containing the
parameters needed retrieve a policy, which is the ARN of the policy you want to get. Call the getPolicy
method of the AWS.IAM service object. Write the policy description to the console.
// Load the AWS SDK for Node.js
var AWS = require('aws-sdk');
// Set the region
AWS.config.update({region: 'REGION'});
// Create the IAM service object
var iam = new AWS.IAM({apiVersion: '2010-05-08'});
var params = {
PolicyArn: 'arn:aws:iam::aws:policy/AWSLambdaExecute'
};
iam.getPolicy(params, function(err, data) {
if (err) {
throw err;
} else {
console.log(params.PolicyArn + ' - ' + data.Policy.Description);
}
});
To run the example, type the following at the command line.
node iam_getpolicy.js
This sample code can be found here on GitHub.
Attaching a Managed Role Policy
Create a Node.js module with the file name iam_attachrolepolicy.js. Be sure to configure the
SDK as previously shown. To access IAM, create an AWS.IAM service object. Create a JSON object
containing the parameters needed to get a list of managed IAM policies attached to a role, which
consists of the name of the role. Provide the role name as a command-line parameter. Call the
listAttachedRolePolicies method of the AWS.IAM service object, which returns an array of
managed policies to the callback function.
Check the array members to see if the policy you want to attach to the role is already attached. If the
policy is not attached, call the attachRolePolicy method to attach it.
// Load the AWS SDK for Node.js
var AWS = require('aws-sdk');
// Set the region
AWS.config.update({region: 'REGION'});
// Create the IAM service object
var iam = new AWS.IAM({apiVersion: '2010-05-08'});
var paramsRoleList = {
RoleName: process.argv[2]
};
var policyName = 'AmazonDynamoDBFullAccess';
136

AWS SDK for JavaScript Developer Guide for SDK v2
Working with IAM Policies
var policyArn = 'arn:aws:iam::aws:policy/AmazonDynamoDBFullAccess';
iam.listAttachedRolePolicies(paramsRoleList).eachPage(function(err, data) {
if (err) {
throw err;
}
if (data && data.AttachedPolicies) {
data.AttachedPolicies.forEach(function(rolePolicy) {
if (rolePolicy.PolicyName === policyName) {
console.log(policyName + ' is already attached to this role.');
process.exit();
}
});
} else {
// there are no more results when data is null
var params = {
PolicyArn: policyArn,
RoleName: process.argv[2]
};
iam.attachRolePolicy(params, function(err, data) {
if (err) {
console.error('Unable to attach policy to role.');
throw err;
} else {
console.log('Role attached successfully.');
}
});
}
});
To run the example, type the following at the command line.
node iam_attachrolepolicy.js IAM_ROLE_NAME
Detaching a Managed Role Policy
Create a Node.js module with the file name iam_detachrolepolicy.js. Be sure to configure the
SDK as previously shown. To access IAM, create an AWS.IAM service object. Create a JSON object
containing the parameters needed to get a list of managed IAM policies attached to a role, which
consists of the name of the role. Provide the role name as a command-line parameter. Call the
listAttachedRolePolicies method of the AWS.IAM service object, which returns an array of
managed policies in the callback function.
Check the array members to see if the policy you want to detach from the role is attached. If the policy is
attached, call the detachRolePolicy method to detach it.
// Load the AWS SDK for Node.js
var AWS = require('aws-sdk');
// Set region
AWS.config.update({region: 'REGION'});
// Create the IAM service object
var iam = new AWS.IAM({apiVersion: '2010-05-08'});
var paramsRoleList = {
RoleName: process.argv[2]
};
var policyName = 'AmazonDynamoDBFullAccess';
var policyArn = 'arn:aws:iam::aws:policy/AmazonDynamoDBFullAccess';
137
AWS SDK for JavaScript Developer Guide for SDK v2
Managing IAM Access Keys
iam.listAttachedRolePolicies(paramsRoleList).eachPage(function(err, data, done) {
if (err) {
throw err;
}
var foundPolicy = false;
if (data && data.AttachedPolicies) {
data.AttachedPolicies.forEach(function(rolePolicy) {
if (rolePolicy.PolicyName !== policyName) {
return;
}
foundPolicy = true;
var params = {
PolicyArn: policyArn,
RoleName: process.argv[2]
};
iam.detachRolePolicy(params, function(err, data) {
if (err) {
console.error('Unable to detach policy from role.');
throw err;
} else {
console.log('Policy detached from role successfully.');
process.exit();
}
});
});
if (!foundPolicy) {
done();
}
} else {
console.log('Policy was not attached to the role.');
}
});
To run the example, type the following at the command line.
node iam_detachrolepolicy.js IAM_ROLE_NAME
Managing IAM Access Keys
This Node.js code example shows:
• How to manage the access keys of your users.
The Scenario
Users need their own access keys to make programmatic calls to AWS from the SDK for JavaScript. To fill
this need, you can create, modify, view, or rotate access keys (access key IDs and secret access keys) for
IAM users. By default, when you create an access key, its status is Active, which means the user can use
the access key for API calls.
In this example, a series of Node.js modules are used manage access keys in IAM. The Node.js modules
use the SDK for JavaScript to manage IAM access keys using these methods of the AWS.IAM client class:
138

AWS SDK for JavaScript Developer Guide for SDK v2
Managing IAM Access Keys
• createAccessKey
• listAccessKeys
• getAccessKeyLastUsed
• updateAccessKey
• deleteAccessKey
For more information about IAM access keys, see Access Keys in the IAM User Guide.
Prerequisite Tasks
To set up and run this example, you must first complete these tasks:
• Install Node.js. For more information about installing Node.js, see the Node.js website.
• Create a shared configurations file with your user credentials. For more information about providing a
shared credentials file, see Loading Credentials in Node.js from the Shared Credentials File (p. 26).
Configuring the SDK
Configure the SDK for JavaScript by creating a global configuration object then setting the region for
your code. In this example, the region is set to us-west-2.
// Load the SDK for JavaScript
var AWS = require('aws-sdk');
// Set the region
AWS.config.update({region: 'us-west-2'});
Creating Access Keys for a User
Create a Node.js module with the file name iam_createaccesskeys.js. Be sure to configure the
SDK as previously shown. To access IAM, create an AWS.IAM service object. Create a JSON object
containing the parameters needed to create new access keys, which includes IAM user's name. Call the
createAccessKey method of the AWS.IAM service object.
// Load the AWS SDK for Node.js
var AWS = require('aws-sdk');
// Set region
AWS.config.update({region: 'REGION'});
// Create the IAM service object
var iam = new AWS.IAM({apiVersion: '2010-05-08'});
iam.createAccessKey({UserName: 'IAM_USER_NAME'}, function(err, data) {
if (err) {
throw err;
} else {
console.log("Success", data.AccessKey);
}
});
To run the example, type the following at the command line. Be sure to pipe the returned data to a text
file in order not to lose the secret key, which can only be provided once.
node iam_createaccesskeys.js > newuserkeys.txt
139

AWS SDK for JavaScript Developer Guide for SDK v2
Managing IAM Access Keys
This sample code can be found here on GitHub.
Listing a User's Access Keys
Create a Node.js module with the file name iam_listaccesskeys.js. Be sure to configure the SDK
as previously shown. To access IAM, create an AWS.IAM service object. Create a JSON object containing
the parameters needed to retrieve the user's access keys, which includes IAM user's name and optionally
the maximum number of access key pairs you want listed. Call the listAccessKeys method of the
AWS.IAM service object.
// Load the AWS SDK for Node.js
var AWS = require('aws-sdk');
// Set the region
AWS.config.update({region: 'REGION'});
// Create the IAM service object
var iam = new AWS.IAM({apiVersion: '2010-05-08'});
var params = {
MaxItems: 5,
UserName: 'IAM_USER_NAME'
};
iam.listAccessKeys(params, function(err, data) {
if (err) {
throw err;
} else {
console.log("Success", data);
}
});
To run the example, type the following at the command line.
node iam_listaccesskeys.js
This sample code can be found here on GitHub.
Getting the Last Use for Access Keys
Create a Node.js module with the file name iam_accesskeylastused.js. Be sure to configure
the SDK as previously shown. To access IAM, create an AWS.IAM service object. Create a JSON object
containing the parameters needed to create new access keys, which is the access key ID for which you
want the last use information. Call the getAccessKeyLastUsed method of the AWS.IAM service object.
// Load the AWS SDK for Node.js
var AWS = require('aws-sdk');
// Set the region
AWS.config.update({region: 'REGION'});
// Create the IAM service object
var iam = new AWS.IAM({apiVersion: '2010-05-08'});
iam.getAccessKeyLastUsed({AccessKeyId: 'ACCESS_KEY_ID'}, function(err, data) {
if (err) {
throw err;
} else {
console.log("Last Access Key used: " + data.AccessKeyLastUsed);
}
});
140

AWS SDK for JavaScript Developer Guide for SDK v2
Managing IAM Access Keys
To run the example, type the following at the command line.
node iam_accesskeylastused.js
This sample code can be found here on GitHub.
Updating Access Key Status
Create a Node.js module with the file name iam_updateaccesskey.js. Be sure to configure the SDK
as previously shown. To access IAM, create an AWS.IAM service object. Create a JSON object containing
the parameters needed to update the status of an access keys, which includes the access key ID and the
updated status. The status can be Active or Inactive. Call the updateAccessKey method of the
AWS.IAM service object.
// Load the AWS SDK for Node.js
var AWS = require('aws-sdk');
// Set the region
AWS.config.update({region: 'REGION'});
// Create the IAM service object
var iam = new AWS.IAM({apiVersion: '2010-05-08'});
var params = {
AccessKeyId: 'ACCESS_KEY_ID',
Status: 'Active',
UserName: 'USER_NAME'
};
iam.updateAccessKey(params, function(err, data) {
if (err) {
throw err;
} else {
console.log('Access Key updated.');
}
});
To run the example, type the following at the command line.
node iam_updateaccesskey.js
This sample code can be found here on GitHub.
Deleting Access Keys
Create a Node.js module with the file name iam_deleteaccesskey.js. Be sure to configure the SDK
as previously shown. To access IAM, create an AWS.IAM service object. Create a JSON object containing
the parameters needed to delete access keys, which includes the access key ID and the name of the user.
Call the deleteAccessKey method of the AWS.IAM service object.
// Load the AWS SDK for Node.js
var AWS = require('aws-sdk');
// Set the region
AWS.config.update({region: 'REGION'});
// Create the IAM service object
var iam = new AWS.IAM({apiVersion: '2010-05-08'});
var params = {
141

AWS SDK for JavaScript Developer Guide for SDK v2
Working with IAM Server Certificates
AccessKeyId: 'ACCESS_KEY_ID',
UserName: 'USER_NAME'
};
iam.deleteAccessKey(params, function(err, data) {
if (err) {
throw err);
} else {
console.log("Success", data);
}
});
To run the example, type the following at the command line.
node iam_deleteaccesskey.js
This sample code can be found here on GitHub.
Working with IAM Server Certificates
This Node.js code example shows:
• How to carry out basic tasks in managing server certificates for HTTPS connections.
The Scenario
To enable HTTPS connections to your website or application on AWS, you need an SSL/TLS server
certificate. To use a certificate that you obtained from an external provider with your website or
application on AWS, you must upload the certificate to IAM or import it into AWS Certificate Manager.
In this example, a series of Node.js modules are used to handle server certificates in IAM. The Node.js
modules use the SDK for JavaScript to manage server certificates using these methods of the AWS.IAM
client class:
• listServerCertificates
• getServerCertificate
• updateServerCertificate
• deleteServerCertificate
For more information about server certificates, see Working with Server Certificates in the IAM User
Guide.
Prerequisite Tasks
To set up and run this example, you must first complete these tasks:
• Install Node.js. For more information about installing Node.js, see the Node.js website.
142

AWS SDK for JavaScript Developer Guide for SDK v2
Working with IAM Server Certificates
• Create a shared configurations file with your user credentials. For more information about providing a
shared credentials file, see Loading Credentials in Node.js from the Shared Credentials File (p. 26).
Configuring the SDK
Configure the SDK for JavaScript by creating a global configuration object then setting the region for
your code. In this example, the region is set to us-west-2.
// Load the SDK for JavaScript
var AWS = require('aws-sdk');
// Set the region
AWS.config.update({region: 'us-west-2'});
Listing Your Server Certificates
Create a Node.js module with the file name iam_listservercerts.js. Be sure to configure
the SDK as previously shown. To access IAM, create an AWS.IAM service object. Call the
listServerCertificates method of the AWS.IAM service object.
// Load the AWS SDK for Node.js
var AWS = require('aws-sdk');
// Set the region
AWS.config.update({region: 'REGION'});
// Create the IAM service object
var iam = new AWS.IAM({apiVersion: '2010-05-08'});
iam.listServerCertificates().eachPage(function(err, data) {
if (err) {
throw err;
}
if (data && data.ServerCertificateMetadataList) {
data.ServerCertificateMetadataList.forEach(function(metadata) {
console.log(metadata);
});
}
});
To run the example, type the following at the command line.
node iam_listservercerts.js
This sample code can be found here on GitHub.
Getting a Server Certificate
Create a Node.js module with the file name iam_getservercert.js. Be sure to configure the SDK as
previously shown. To access IAM, create an AWS.IAM service object. Create a JSON object containing the
parameters needed get a certificate, which consists of the name of the server certificate you want. Call
the getServerCertificates method of the AWS.IAM service object.
// Load the AWS SDK for Node.js
var AWS = require('aws-sdk');
// Set the region
AWS.config.update({region: 'REGION'});
143

AWS SDK for JavaScript Developer Guide for SDK v2
Working with IAM Server Certificates
// Create the IAM service object
var iam = new AWS.IAM({apiVersion: '2010-05-08'});
iam.getServerCertificate({ServerCertificateName: 'CERTIFICATE_NAME'}, function(err, data) {
if (err) {
throw err;
} else {
console.log('Server Certificate:');
console.log(data);
}
});
To run the example, type the following at the command line.
node iam_getservercert.js
This sample code can be found here on GitHub.
Updating a Server Certificate
Create a Node.js module with the file name iam_updateservercert.js. Be sure to configure the
SDK as previously shown. To access IAM, create an AWS.IAM service object. Create a JSON object
containing the parameters needed to update a certificate, which consists of the name of the existing
server certificate as well as the name of the new certificate. Call the updateServerCertificate
method of the AWS.IAM service object.
// Load the AWS SDK for Node.js
var AWS = require('aws-sdk');
// Set the region
AWS.config.update({region: 'REGION'});
// Create the IAM service object
var iam = new AWS.IAM({apiVersion: '2010-05-08'});
var params = {
ServerCertificateName: 'CERTIFICATE_NAME',
NewServerCertificateName: 'NEW_CERTIFICATE_NAME'
};
iam.updateServerCertificate(params, function(err, data) {
if (err) {
throw err;
} else {
console.log('Server Certificate updated.');
}
});
To run the example, type the following at the command line.
node iam_updateservercert.js
This sample code can be found here on GitHub.
Deleting a Server Certificate
Create a Node.js module with the file name iam_deleteservercert.js. Be sure to configure the SDK
as previously shown. To access IAM, create an AWS.IAM service object. Create a JSON object containing
144
AWS SDK for JavaScript Developer Guide for SDK v2
Managing IAM Account Aliases
the parameters needed to delete a server certificate, which consists of the name of the certificate you
want to delete. Call the deleteServerCertificates method of the AWS.IAM service object.
// Load the AWS SDK for Node.js
var AWS = require('aws-sdk');
// Set the region
AWS.config.update({region: 'REGION'});
// Create the IAM service object
var iam = new AWS.IAM({apiVersion: '2010-05-08'});
iam.deleteServerCertificate({ServerCertificateName: 'CERTIFICATE_NAME'}, function(err,
data) {
if (err) {
throw err;
} else {
console.log('Server Certificate deleted.');
}
});
To run the example, type the following at the command line.
node iam_deleteservercert.js
This sample code can be found here on GitHub.
Managing IAM Account Aliases
This Node.js code example shows:
• How to manage aliases for your AWS account ID.
The Scenario
If you want the URL for your sign-in page to contain your company name or other friendly identifier
instead of your AWS account ID, you can create an alias for your AWS account ID. If you create an AWS
account alias, your sign-in page URL changes to incorporate the alias.
In this example, a series of Node.js modules are used to create and manage IAM account aliases. The
Node.js modules use the SDK for JavaScript to manage alises using these methods of the AWS.IAM client
class:
• createAccountAlias
• listAccountAliases
• deleteAccountAlias
For more information about IAM account aliases, see Your AWS Account ID and Its Alias in the IAM User
Guide.
145

AWS SDK for JavaScript Developer Guide for SDK v2
Managing IAM Account Aliases
Prerequisite Tasks
To set up and run this example, you must first complete these tasks:
• Install Node.js. For more information about installing Node.js, see the Node.js website.
• Create a shared configurations file with your user credentials. For more information about providing a
shared credentials file, see Loading Credentials in Node.js from the Shared Credentials File (p. 26).
Configuring the SDK
Configure the SDK for JavaScript by creating a global configuration object then setting the region for
your code. In this example, the region is set to us-west-2.
// Load the SDK for JavaScript
var AWS = require('aws-sdk');
// Set the region
AWS.config.update({region: 'us-west-2'});
Creating an Account Alias
Create a Node.js module with the file name iam_createaccountalias.js. Be sure to configure
the SDK as previously shown. To access IAM, create an AWS.IAM service object. Create a JSON object
containing the parameters needed to create an account alias, which includes the alias you want to create.
Call the createAccountAlias method of the AWS.IAM service object.
// Load the AWS SDK for Node.js
var AWS = require('aws-sdk');
// Set the region
AWS.config.update({region: 'REGION'});
// Create the IAM service object
var iam = new AWS.IAM({apiVersion: '2010-05-08'});
iam.createAccountAlias({AccountAlias: process.argv[2]}, function(err, data) {
if (err) {
throw err;
} else {
console.log('Account alias ' + process.argv[2] + ' created.');
}
});
To run the example, type the following at the command line.
node iam_createaccountalias.js ALIAS
This sample code can be found here on GitHub.
Listing Account Alises
Create a Node.js module with the file name iam_listaccountalises.js. Be sure to configure
the SDK as previously shown. To access IAM, create an AWS.IAM service object. Create a JSON object
containing the parameters needed to list account alises, which includes the maximum number of items
to return. Call the listAccountAlises method of the AWS.IAM service object.
// Load the AWS SDK for Node.js
146

AWS SDK for JavaScript Developer Guide for SDK v2
Amazon Kinesis Example
var AWS = require('aws-sdk');
// Set the region
AWS.config.update({region: 'REGION'});
// Create the IAM service object
var iam = new AWS.IAM({apiVersion: '2010-05-08'});
iam.listAccountAliases({MaxItems: 10}, function(err, data) {
if (err) {
throw err;
} else {
console.log('Aliases: ' + data.AccountAliases.join(', '));
}
});
To run the example, type the following at the command line.
node iam_listaccountalises.js
This sample code can be found here on GitHub.
Deleting an Account Alias
Create a Node.js module with the file name iam_deleteaccountalias.js. Be sure to configure
the SDK as previously shown. To access IAM, create an AWS.IAM service object. Create a JSON object
containing the parameters needed to delete an account alias, which includes the alias you want deleted.
Call the deleteAccountAlias method of the AWS.IAM service object.
// Load the AWS SDK for Node.js
var AWS = require('aws-sdk');
// Set the region
AWS.config.update({region: 'REGION'});
// Create the IAM service object
var iam = new AWS.IAM({apiVersion: '2010-05-08'});
iam.deleteAccountAlias({AccountAlias: process.argv[2]}, function(err, data) {
if (err) {
throw err;
} else {
console.log('Account alias ' + process.argv[2] + ' deleted.');
}
});
To run the example, type the following at the command line.
node iam_deleteaccountalias.js ALIAS
This sample code can be found here on GitHub.
Amazon Kinesis Example
Amazon Kinesis is a platform for streaming data on AWS, offering powerful services to load and analyze
streaming data, and also providing the ability for you to build custom streaming data applications for
specialized needs.
147

AWS SDK for JavaScript Developer Guide for SDK v2
Capturing Web Page Scroll Progress with Amazon Kinesis
The JavaScript API for Kinesis is exposed through the AWS.Kinesis client class. For more information
about using the Kinesis client class, see Class: AWS.Kinesis in the API reference.
Topics
• Capturing Web Page Scroll Progress with Amazon Kinesis (p. 148)
Capturing Web Page Scroll Progress with Amazon
Kinesis
This browser script example shows:
• How to capture scroll progress in a web page with Amazon Kinesis as an example of streaming page
usage metrics for later analysis.
The Scenario
In this example, a simple HTML page simulates the content of a blog page. As the reader scrolls the
simulated blog post, the browser script uses the SDK for JavaScript to record the scroll distance down
the page and send that data to Kinesis using the putRecords method of the Kinesis client class. The
streaming data captured by Amazon Kinesis Data Streams can then be processed by Amazon EC2
instances and stored in any of several data stores including Amazon DynamoDB and Amazon Redshift.
Prerequisite Tasks
To set up and run this example, you must first complete these tasks:
• Create an Kinesis stream. You need to include the stream's resource ARN in the browser script. For
more information about creating Amazon Kinesis Data Streams, see Managing Kinesis Streams in the
Amazon Kinesis Data Streams Developer Guide.
148

AWS SDK for JavaScript Developer Guide for SDK v2
Capturing Web Page Scroll Progress with Amazon Kinesis
• Create an Amazon Cognito identity pool with access enabled for unauthenticated identities. You
need to include the identity pool ID in the code to obtain credentials for the browser script. For more
information about Amazon Cognito identity pools, see Identity Pools in the Amazon Cognito Developer
Guide.
• Create an IAM role whose policy grants permission to submit data to an Kinesis stream. For more
information about creating an IAM role, see Creating a Role to Delegate Permissions to an AWS Service
in the IAM User Guide.
Use the following role policy when creating the IAM role.
{
"Version": "2012-10-17",
"Statement": [
{
"Effect": "Allow",
"Action": [
"mobileanalytics:PutEvents",
"cognito-sync:*"
],
"Resource": [
"*"
]
},
{
"Effect": "Allow",
"Action": [
"kinesis:Put*"
],
"Resource": [
"STREAM_RESOURCE_ARN"
]
}
]
}
The Blog Page
The HTML for the blog page consists mainly of a series of paragraphs contained within a <div> element.
The scrollable height of this <div> is used to help calculate how far a reader has scrolled through the
content as they read. The HTML also contains a pair of <script> elements. One of these elements adds
the SDK for JavaScript to the page and the other adds the browser script that captures scroll progress on
the page and reports it to Kinesis.
<!DOCTYPE html>
<html>
<head>
<title>AWS SDK for JavaScript - Amazon Kinesis Application</title>
</head>
<body>
<div id="BlogContent" style="width: 60%; height: 800px; overflow: auto;margin:
auto; text-align: center;">
<div>
<p>
Lorem ipsum dolor sit amet, consectetur adipiscing elit. Vestibulum
vitae nulla eget nisl bibendum feugiat. Fusce rhoncus felis at ultricies luctus. Vivamus
fermentum cursus sem at interdum. Proin vel lobortis nulla. Aenean rutrum odio in tellus
semper rhoncus. Nam eu felis ac augue dapibus laoreet vel in erat. Vivamus vitae mollis
turpis. Integer sagittis dictum odio. Duis nec sapien diam. In imperdiet sem nec ante
laoreet, vehicula facilisis sem placerat. Duis ut metus egestas, ullamcorper neque et,
accumsan quam. Class aptent taciti sociosqu ad litora torquent per conubia nostra, per
inceptos himenaeos.
149

AWS SDK for JavaScript Developer Guide for SDK v2
Capturing Web Page Scroll Progress with Amazon Kinesis
</p>
<!-- Additional paragraphs in the blog page appear here -->
</div>
</div>
<script src="https://sdk.amazonaws.com/js/aws-sdk-2.283.1.min.js"></script>
<script src="kinesis-example.js"></script>
</body>
</html>
Configuring the SDK
Obtain the credentials needed to configure the SDK by calling the CognitoIdentityCredentials
method, providing the Amazon Cognito identity pool ID. Upon success, create the Kinesis service object
in the callback function.
// Configure Credentials to use Cognito
AWS.config.credentials = new AWS.CognitoIdentityCredentials({
IdentityPoolId: 'IDENTITY_POOL_ID'
});
AWS.config.region = 'us-west-2';
// We're going to partition Amazon Kinesis records based on an identity.
// We need to get credentials first, then attach our event listeners.
AWS.config.credentials.get(function(err) {
// attach event listener
if (err) {
alert('Error retrieving credentials.');
console.error(err);
return;
}
// create kinesis service object
var kinesis = new AWS.Kinesis({
apiVersion: '2013-12-02'
});
Creating Scroll Records
Scroll progress is calculated using the scrollHeight and scrollTop properties of the <div>
containing the content of the blog post. Each scroll record is created in an event listener function for the
scroll event and then added to an array of records for periodic submission to Kinesis.
var blogContent = document.getElementById('BlogContent');
// Get Scrollable height
var scrollableHeight = blogContent.clientHeight;
var recordData = [];
var TID = null;
blogContent.addEventListener('scroll', function(event) {
clearTimeout(TID);
// Prevent creating a record while a user is actively scrolling
TID = setTimeout(function() {
// calculate percentage
var scrollableElement = event.target;
var scrollHeight = scrollableElement.scrollHeight;
var scrollTop = scrollableElement.scrollTop;
var scrollTopPercentage = Math.round((scrollTop / scrollHeight) * 100);
var scrollBottomPercentage = Math.round(((scrollTop + scrollableHeight) /
scrollHeight) * 100);
150

AWS SDK for JavaScript Developer Guide for SDK v2
Capturing Web Page Scroll Progress with Amazon Kinesis
// Create the Amazon Kinesis record
var record = {
Data: JSON.stringify({
blog: window.location.href,
scrollTopPercentage: scrollTopPercentage,
scrollBottomPercentage: scrollBottomPercentage,
time: new Date()
}),
PartitionKey: 'partition-' + AWS.config.credentials.identityId
};
recordData.push(record);
}, 100);
});
Submitting Records to Kinesis
Once each second, if there are records in the array, those pending records are sent to Kinesis.
// upload data to Amazon Kinesis every second if data exists
setInterval(function() {
if (!recordData.length) {
return;
}
// upload data to Amazon Kinesis
kinesis.putRecords({
Records: recordData,
StreamName: 'NAME_OF_STREAM'
}, function(err, data) {
if (err) {
console.error(err);
}
});
// clear record data
recordData = [];
}, 1000);
});
Capturing Web Page Scroll Progress Code
Here is the browser script code for the Kinesis capturing web page scroll progress example.
// Configure Credentials to use Cognito
AWS.config.credentials = new AWS.CognitoIdentityCredentials({
IdentityPoolId: 'IDENTITY_POOL_ID'
});
AWS.config.region = 'REGION';
// We're going to partition kinesis records based on an identity.
// We need to get credentials first, then attach our event listeners.
AWS.config.credentials.get(function(err) {
// attach event listener
if (err) {
alert('Error retrieving credentials.');
console.error(err);
return;
}
// create kinesis client once
var kinesis = new AWS.Kinesis({
apiVersion: '2013-12-02'
});
151

AWS SDK for JavaScript Developer Guide for SDK v2
AWS Lambda Examples
var blogContent = document.getElementById('BlogContent');
// Get Scrollable height
var scrollableHeight = blogContent.clientHeight;
var recordData = [];
var TID = null;
blogContent.addEventListener('scroll', function(event) {
clearTimeout(TID);
// Prevent creating a record while a user is actively scrolling
TID = setTimeout(function() {
// calculate percentage
var scrollableElement = event.target;
var scrollHeight = scrollableElement.scrollHeight;
var scrollTop = scrollableElement.scrollTop;
var scrollTopPercentage = Math.round((scrollTop / scrollHeight) * 100);
var scrollBottomPercentage = Math.round(((scrollTop + scrollableHeight) /
scrollHeight) * 100);
// Create the kinesis record
var record = {
Data: JSON.stringify({
blog: window.location.href,
scrollTopPercentage: scrollTopPercentage,
scrollBottomPercentage: scrollBottomPercentage,
time: new Date()
}),
PartitionKey: 'partition-' + AWS.config.credentials.identityId
};
recordData.push(record);
}, 100);
});
// upload data to kinesis every second if data exists
setInterval(function() {
if (!recordData.length) {
return;
}
// upload data to kinesis
kinesis.putRecords({
Records: recordData,
StreamName: 'blog_stats'
}, function(err, data) {
if (err) {
console.error(err);
}
});
// clear record data
recordData = [];
}, 1000);
});
AWS Lambda Examples
AWS Lambda is a service that provides on-demand compute capacity that runs in response to events
without the need to provision or maintain a server. With Lambda, you code computing tasks as Lambda
functions, which can be called as needed across the Internet. You can write Lambda functions using
Node.js.
152

AWS SDK for JavaScript Developer Guide for SDK v2
Using Lambda in Web Pages
For more information about Node.js programming in Lambda, see Programming Model (Node.js) in the
AWS Lambda Developer Guide.
Using Lambda in Web Pages
The JavaScript API for Lambda is exposed through the AWS.Lambda client class. For more information
about using the Lambda client class, see Class: AWS.Lambda in the API reference. Create an instance of
the AWS.Lambda class to give your browser script a service object that can invoke a Lambda function.
Create the JSON parameters you must pass to the AWS.Lambda.invoke method, which calls the
Lambda function.
Any data returned by the Lambda function is returned in the callback mechanism you use. See Calling
Services Asychronously (p. 51) for details about different ways to set up a callback mechanism.
Topics
• Invoking a Lambda Function in a Browser Script (p. 153)
• Writing a Lambda Function in Node.js (p. 157)
Invoking a Lambda Function in a Browser Script
This browser script example shows you:
• How to create a Lambda service object used to invoke a Lambda function.
• How to access data values from JSON returned by the Lambda function.
The Scenario
In this example, a simulated slot machine browser-based game invokes a Lambda function that
generates the random results of each slot pull, returning those results as the file names of images used
to display the result. The images are stored in an Amazon S3 bucket that is configured to function as a
static web host for the HTML, CSS, and other assets needed to present the application experience.
153

AWS SDK for JavaScript Developer Guide for SDK v2
Invoking a Lambda Function in the Browser
Prerequisite Tasks
To set up and run this example, you must first complete these tasks:
• Download the .zip archive that contains the assets needed for this app from here on GitHub.
• In the Amazon S3 console, create an Amazon S3 bucket configured to serve as a static web host.
Upload the HTML page, CSS file, and application graphics to the bucket.
• In the Amazon Cognito console, create an Amazon Cognito identity pool with access enabled for
unauthenticated identities. You need to include the identity pool ID in the code to obtain credentials
for the browser script.
• In the IAM console, create an IAM role whose policy grants permission to invoke a Lambda function.
• Create the Lambda function called by the browser script that returns the result of each game spin.
Configuring the SDK
Here is the portion of the browser script that configures the SDK for JavaScript, using Amazon Cognito to
obtain credentials.
AWS.config.update({region: 'REGION'});
AWS.config.credentials = new
AWS.CognitoIdentityCredentials({IdentityPoolId: 'IDENTITY_POOL_ID'});
Creating the Lambda Service Object
After configuring the SDK, this portion of the browser script creates a new Lambda service object, setting
the region and API version. After creating the service object, the code creates a JSON object for passing
the parameters that are needed to invoke a Lambda function with the service object. The code then
creates a variable to hold the data returned by the Lambda function.
var lambda = new AWS.Lambda({region: REGION, apiVersion: '2015-03-31'});
// create JSON object for parameters for invoking Lambda function
var pullParams = {
FunctionName : 'slotPull',
InvocationType : 'RequestResponse',
LogType : 'None'
};
// create variable to hold data returned by the Lambda function
154

AWS SDK for JavaScript Developer Guide for SDK v2
Invoking a Lambda Function in the Browser
var pullResults;
Invoking the Lambda Function
Later in the browser script, when the app is ready to request a random slot machine pull, the code calls
the invoke method on the Lambda service object, passing the JSON object that holds the parameters
that are needed to invoke the slotPull Lambda function.
lambda.invoke(pullParams, function(error, data) {
if (error) {
prompt(error);
} else {
pullResults = JSON.parse(data.Payload);
}
});
Accessing the Returned Data
In the preceding code example, the call to the Lambda function uses an anonymous function as
the callback in which the response is received. That response is automatically provided as the data
parameter to the callback function. That parameter passes the data property of the AWS.Response
object received by the SDK.
The data property contains the serialized data received from the Lambda function. In this example, the
Lambda function returns the results of each spin in the game as JSON.
{
isWinner: false,
leftWheelImage : {S : 'cherry.png'},
midWheelImage : {S : 'puppy.png'},
rightWheelImage : {S : 'robot.png'}
}
To access the individual values contained within the data parameter, the following code turns the
serialized data back into a JSON object by passing data.Payload to the JSON.parse function and
then assigning the result to a variable.
pullResults = JSON.parse(data.Payload);
After that, you can access individual data values in the JSON object by using pullResults.
// check results to see if this spin is a winner
if (pullResults.isWinner) {
prompt("Winner!");
}
Invoking a Lambda Function Code
Here is the complete HTML and browser script for the slot machine example.
<!doctype html>
<html>
<head>
<meta charset="UTF-8">
<title>Emoji Slots</title>
<link href="emojislots.css" rel="stylesheet" type="text/css">
155

AWS SDK for JavaScript Developer Guide for SDK v2
Invoking a Lambda Function in the Browser
<script src="https://sdk.amazonaws.com/js/aws-sdk-2.283.1.min.js"></script>
<script src="http://ajax.googleapis.com/ajax/libs/jquery/1.11.2/jquery.min.js"></script>
<script type="text/javascript">
// Configure AWS SDK for JavaScript
AWS.config.update({region: 'REGION'});
AWS.config.credentials = new AWS.CognitoIdentityCredentials({IdentityPoolId:
'IDENTITY_POOL_ID'});
var pullReturned = null;
var slotResults;
var isSpinning = false;
// Prepare to call Lambda function
var lambda = new AWS.Lambda({region: 'REGION', apiVersion: '2015-03-31'});
var pullParams = {
FunctionName : 'slotPull',
InvocationType : 'RequestResponse',
LogType : 'None'
};
function pullHandle() {
if (isSpinning == false) {
// Show the handle pulled down
slot_handle.src = "lever-dn.png";
}
}
function initiatePull() {
// Show the handle flipping back up
slot_handle.src = "lever-up.png";
// Set all three wheels "spinning"
slot_L.src = "slotpullanimation.gif";
slot_M.src = "slotpullanimation.gif";
slot_R.src = "slotpullanimation.gif";
// Set app status to spinning
isSpinning = true;
// Call the Lambda function to collect the spin results
lambda.invoke(pullParams, function(err, data) {
if (err) {
prompt(err);
} else {
pullResults = JSON.parse(data.Payload);
displayPull();
}
});
}
function displayPull() {
isSpinning = false;
if (pullResults.isWinner) {
winner_light.visibility = visible;
}
$("#slot_L").delay(4000).attr("src", pullResults.leftWheelImage.file.S);
$("#slot_M").delay(6500).attr("src", pullResults.midWheelImage.file.S);
$("#slot_R").delay(9000).attr("src", pullResults.rightWheelImage.file.S);
}
</script>
</head>
<body>
<div id="appframe">
<img id="slot_L" src="puppy.png" height="199" width="80" alt="slot wheel 1"/>
<img id="slot_M" src="puppy.png" height="199" width="80" alt="slot wheel 2"/>
<img id="slot_R" src="puppy.png" height="199" width="80" alt="slot wheel 3"/>
<img id="winner_light" src="winner.png" height="48" width="247" alt="winner indicator"/>
156
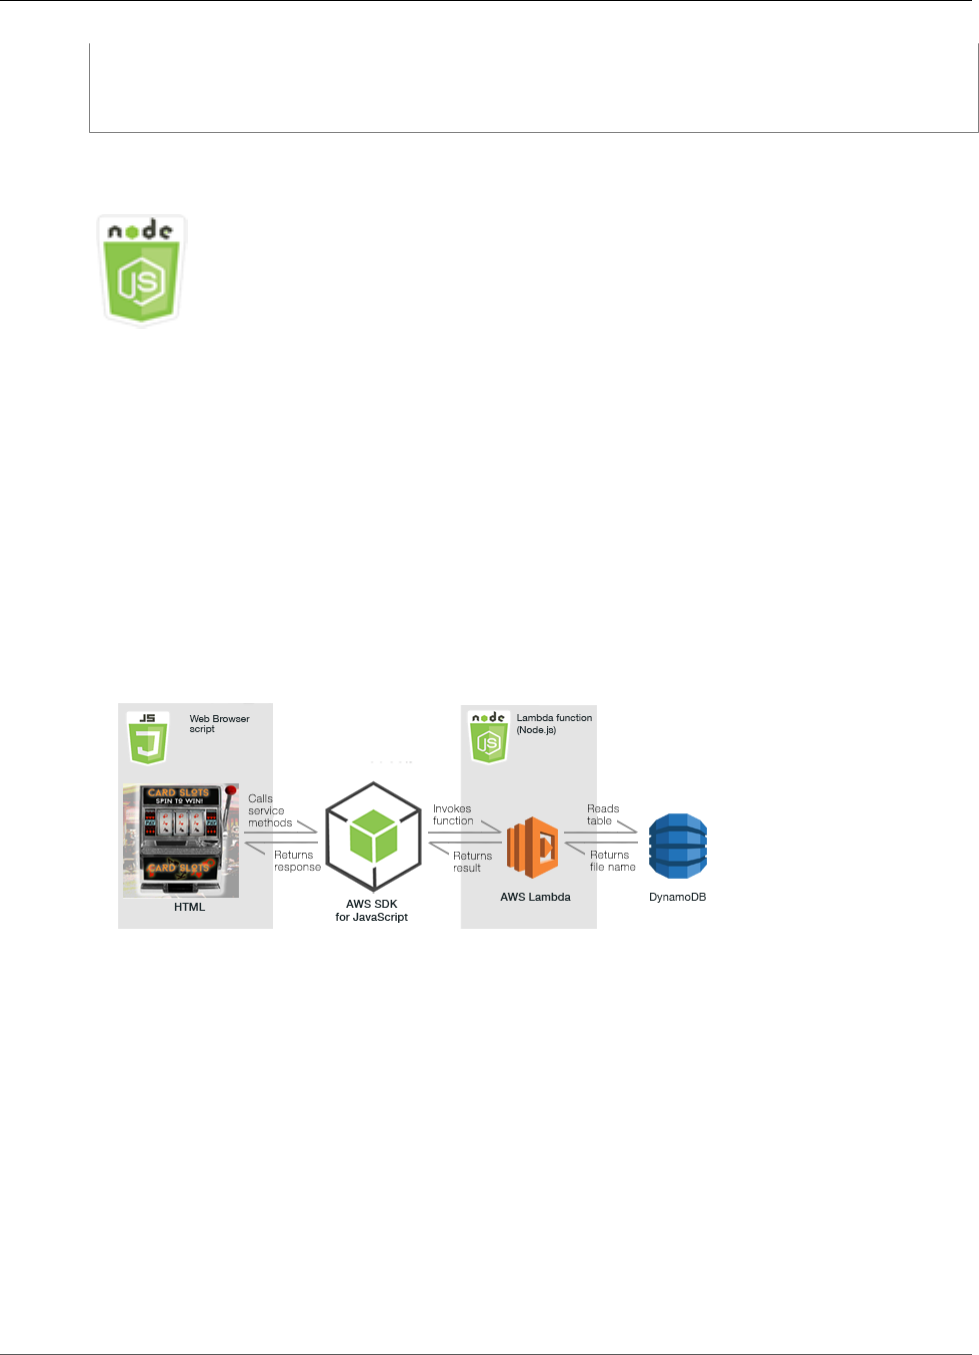
AWS SDK for JavaScript Developer Guide for SDK v2
Writing a Lambda Function in Node.js
</div>
</body>
</html>
Writing a Lambda Function in Node.js
This Node.js code example shows:
• How to prepare an object representation of data that the function returns to the browser.
• How to create a service object used to access a DynamoDB table that stores the data values retrieved
and returned by the Lambda function.
• How to return the requested data to the calling application as a JSON payload.
The Scenario
In this example, a Lambda function supports a browser-hosted slot machine game. For the purposes of
this example, we treat the JavaScript code running in the browser as a closed box. When a player pulls
the slot machine lever, the browser code invokes the Lambda function to generate the random results of
each spin. While this task is pretty simple, it illustrates one of the benefits of a Lambda function, which is
that you can keep proprietary code hidden and separate from JavaScript code running in the browser.
The Lambda function, which uses Node.js 4.3, requests a randomly generated result for a browser-based
slot machine game. Each time the function is invoked, a random number from 0 through 9, inclusive,
is generated and used as the key to look up an image file from a DynamoDB table. The three random
results are compared to each other and if all three match, the spin is flagged as a winner. The results of
the spin are saved into a JSON object and returned to the browser script.
The asynchronous requests to DynamoDB use separate calls to the getItem method of the DynamoDB
service object instead of making a single call to the getBatchItem method. The reason these are
separate calls is because each of the three random results needed for each spin of the game can
produce the same result. In fact, a winner is defined by all three results being identical. However the
getBatchItem method returns an error if you request the same key from the table more than once in
the same call.
Because it's necessary to make three separate asynchronous requests to DynamoDB, the Lambda
function can only return its results after receiving the response from all three method calls.
157

AWS SDK for JavaScript Developer Guide for SDK v2
Writing a Lambda Function in Node.js
Prerequisite Tasks
To set up and run this example, you must first complete these tasks:
• Create an HTML page with browser script accessed in an Amazon S3 bucket acting as a static web host.
The browser script invokes the Lambda function.
• Create a DynamoDB table with a single row containing ten columns, each containing the file name of a
different graphic stored in the Amazon S3 bucket used by the browser portion of the game.
• Create an IAM execution role for the Lambda function..
Use the following role policy when creating the IAM role.
{
"Version": "2012-10-17",
"Statement": [
{
"Effect": "Allow",
"Action": [
"logs:CreateLogGroup",
"logs:CreateLogStream",
"logs:PutLogEvents"
],
"Resource": "arn:aws:logs:*:*:*"
},
{
"Effect": "Allow",
"Action": [
"lambda:InvokeFunction"
],
"Resource": "arn:aws:lambda:*:*:*"
},
{
"Effect": "Allow",
"Action": [
"dynamodb:GetItem"
],
"Resource": "arn:aws:dynamodb:*:*:*"
}
]
}
Configuring the SDK
Here is the portion of the Lambda function that configures the SDK. The credentials are not provided in
the code because they are supplied to a Lambda function through the required IAM execution role.
var AWS = require('aws-sdk');
AWS.config.update({region: 'us-west-2'});
Preparing JSON Objects
This Lambda function creates two different JSON objects. The first of these JSON objects packages the
data sent as the response of the Lambda function after it has successfully completed. The second JSON
object holds the parameters needed to call the getItem method of the DynamoDB service object. The
name-value pairs of this JSON are determined by the parameters of getItem.
// define JSON used to format Lambda function response
var slotResults = {
158

AWS SDK for JavaScript Developer Guide for SDK v2
Writing a Lambda Function in Node.js
'isWinner' : false,
'leftWheelImage' : {'file' : {S: ''}},
'middleWheelImage' : {'file' : {S: ''}},
'rightWheelImage' : {'file' : {S: ''}}
};
// define JSON for making getItem calls to the slotWheels DynamoDB table
var thisPullParams = {
Key : {'slotPosition' : {N: ''}},
TableName: 'slotWheels',
ProjectionExpression: 'imageFile'
};
Calling DynamoDB
Each of the three calls to the getItem method of the DynamoDB service object is made and each
response is managed using its own Promise object. All three of these Promise objects are identical
except for the name used to keep track of which result is used for which result in the game.
The code generates a random number in the range 0 to 9, inclusive, and then assigns the number to
the Key value in the JSON that is used to call DynamoDB. It then calls the getItem method on the
DynamoDB service object, passing in the JSON with the completed set of parameters.
The Lambda function reads the imageFile column value returned by DynamoDB and concatenates
that file name to a constant, forming the URL for an Amazon S3 bucket where the image files and the
browser portion of the app are hosted. The callback then resolves the Promise object, passing the URL.
// create DynamoDB service object
var request = new AWS.DynamoDB({region: 'us-west-2', apiVersion: '2012-08-10'});
// set a random number 0-9 for the slot position
thisPullParams.Key.slotPosition.N = Math.floor(Math.random()*10).toString();
// call DynamoDB to retrieve the image to use for the Left slot result
var myLeftPromise = request.getItem(thisPullParams).promise().then(function(data) {return
URL_BASE + data.Item.imageFile.S});
// set a random number 0-9 for the slot position
thisPullParams.Key.slotPosition.N = Math.floor(Math.random()*10).toString();
// call DynamoDB to retrieve the image to use for the Middle slot result
var myMiddlePromise = request.getItem(thisPullParams).promise().then(function(data) {return
URL_BASE + data.Item.imageFile.S});
// set a random number 0-9 for the slot position
thisPullParams.Key.slotPosition.N = Math.floor(Math.random()*10).toString();
// call DynamoDB to retrieve the image to use for the Right slot result
var myRightPromise = request.getItem(thisPullParams).promise().then(function(data) {return
URL_BASE + data.Item.imageFile.S});
Gathering and Sending the Response
The Lambda function can't send its response until all three of the asynchronous calls to DynamoDB
have completed and returned their values. To track the resolution of all three Promise objects used
to call DynamoDB, another Promise object is used. The callback of this Promise object is invoked by
Promise.all, which takes an array of Promise objects as its parameters. So this Promise resolves
only if all of the Promise objects in the array resolve. The callback receives an array holding the return
values of resolved Promise objects as its parameter.
The URL values returned by the Promise objects in the array are then assigned into the JSON created to
send back the response of the Lambda function. These three values are compared to determine if they
are all identical. If they are all identical, the fourth value in the returned JSON is set to true.
159

AWS SDK for JavaScript Developer Guide for SDK v2
Writing a Lambda Function in Node.js
After all four values in the returned JSON have been set, the JSON is passed to callback, which returns
the results to the browser script and terminates the Lambda function.
Promise.all([myLeftPromise, myMiddlePromise, myRightPromise]).then(function(values) {
// assign resolved promise values to returned JSON
slotResults.leftWheelImage.file.S = values[0];
slotResults.middleWheelImage.file.S = values[1];
slotResults.rightWheelImage.file.S = values[2];
// if all three values are identical, the spin is a winner
if ((values[0] === values[1]) && (values[0] === values[2])) {
slotResults.isWinner = true;
}
// return the JSON result to the caller of the Lambda function
callback(null, slotResults);
});
Writing a Lambda Function Code
Here is the Node.js code for the Lambda function example.
// Configuring the AWS SDK
var AWS = require('aws-sdk');
AWS.config.update({region: 'REGION'});
exports.handler = (event, context, callback) => {
const URL_BASE = "S3_BUCKET_URL";
// Define the object that will hold the data values returned
var slotResults = {
'isWinner' : false,
'leftWheelImage' : {'file' : {S: ''}},
'middleWheelImage' : {'file' : {S: ''}},
'rightWheelImage' : {'file' : {S: ''}}
};
// define parameters JSON for retrieving slot pull data from the database
var thisPullParams = {
Key : {'slotPosition' : {N: ''}},
TableName: 'slotWheels',
ProjectionExpression: 'imageFile'
};
// create DynamoDB service object
var request = new AWS.DynamoDB({region: 'REGION', apiVersion: '2012-08-10'});
// set a random number 0-9 for the slot position
thisPullParams.Key.slotPosition.N = Math.floor(Math.random()*10).toString();
// call DynamoDB to retrieve the image to use for the Left slot result
var myLeftPromise = request.getItem(thisPullParams).promise().then(function(data) {return
URL_BASE + data.Item.imageFile.S});
// set a random number 0-9 for the slot position
thisPullParams.Key.slotPosition.N = Math.floor(Math.random()*10).toString();
// call DynamoDB to retrieve the image to use for the Left slot result
var myMiddlePromise = request.getItem(thisPullParams).promise().then(function(data) {return
URL_BASE + data.Item.imageFile.S});
// set a random number 0-9 for the slot position
thisPullParams.Key.slotPosition.N = Math.floor(Math.random()*10).toString();
// call DynamoDB to retrieve the image to use for the Left slot result
var myRightPromise = request.getItem(thisPullParams).promise().then(function(data) {return
URL_BASE + data.Item.imageFile.S});
160

AWS SDK for JavaScript Developer Guide for SDK v2
Amazon S3 Examples
Promise.all([myLeftPromise, myMiddlePromise, myRightPromise]).then(function(values) {
slotResults.leftWheelImage.file.S = values[0];
slotResults.middleWheelImage.file.S = values[1];
slotResults.rightWheelImage.file.S = values[2];
// if all three values are identical, the spin is a winner
if ((values[0] === values[1]) && (values[0] === values[2])) {
slotResults.isWinner = true;
}
// return the JSON result to the caller of the Lambda function
callback(null, slotResults);
});
};
Amazon S3 Examples
Amazon Simple Storage Service (Amazon S3) is a web service that provides highly scalable cloud storage.
Amazon S3 provides easy to use object storage, with a simple web service interface to store and retrieve
any amount of data from anywhere on the web.
The JavaScript API for Amazon S3 is exposed through the AWS.S3 client class. For more information
about using the Amazon S3 client class, see Class: AWS.S3 in the API reference.
Topics
• Uploading Photos to Amazon S3 from a Browser (p. 161)
• Creating and Using Amazon S3 Buckets (p. 171)
• Configuring Amazon S3 Buckets (p. 175)
• Managing Amazon S3 Bucket Access Permissions (p. 177)
• Working with Amazon S3 Bucket Policies (p. 179)
• Using an Amazon S3 Bucket as a Static Web Host (p. 182)
Uploading Photos to Amazon S3 from a Browser
This browser script code example shows:
• How to upload photos into albums stored in an Amazon S3 bucket.
161

AWS SDK for JavaScript Developer Guide for SDK v2
Uploading Photos to Amazon S3 from a Browser
The Scenario
In this example, a simple HTML page provides a browser-based application for creating photo albums
in an Amazon S3 bucket into which you can upload photos. The application lets you delete photos and
albums that you add.
The browser script uses the SDK for JavaScript to interact with an Amazon S3 bucket. Use the following
methods of the Amazon S3 client class to enable the photo album application:
• listObjects
• headObject
• putObject
• upload
• deleteObject
• deleteObjects
Prerequisite Tasks
To set up and run this example, you must first complete these tasks:
• In the Amazon S3 console, create an Amazon S3 bucket that you will use to store the photos in
the album. For more information about creating a bucket in the console, see Creating a Bucket in
the Amazon Simple Storage Service Console User Guide. Make sure you have both Read and Write
permissions on Objects.
• In the Amazon Cognito console, create an Amazon Cognito identity pool using Federated Identities
with access enabled for unauthenticated users in the same region as the Amazon S3 bucket. You
need to include the identity pool ID in the code to obtain credentials for the browser script. For
more information about Amazon Cognito Federated Identities, see Amazon Cognito Identity: Using
Federated Identites in the Amazon Cognito Developer Guide.
• In the IAM console, find the IAM created by Amazon Cognito for unauthenticated users. Add the
following policy to grant read and write permissions to an Amazon S3 bucket. For more information
about creating an IAM role, see Creating a Role to Delegate Permissions to an AWS Service in the IAM
User Guide.
Use this role policy for the the IAM role created by Amazon Cognito for unauthenticated users.
{
"Version": "2012-10-17",
"Statement": [
{
"Effect": "Allow",
"Action": [
"s3:*"
],
"Resource": [
"arn:aws:s3:::BUCKET_NAME/*"
162

AWS SDK for JavaScript Developer Guide for SDK v2
Uploading Photos to Amazon S3 from a Browser
]
}
]
}
Configuring CORS
Before the browser script can access the Amazon S3 bucket, you must first set up its CORS configuration
as follows.
<?xml version="1.0" encoding="UTF-8"?>
<CORSConfiguration xmlns="http://s3.amazonaws.com/doc/2006-03-01/">
<CORSRule>
<AllowedOrigin>*</AllowedOrigin>
<AllowedMethod>POST</AllowedMethod>
<AllowedMethod>GET</AllowedMethod>
<AllowedMethod>PUT</AllowedMethod>
<AllowedMethod>DELETE</AllowedMethod>
<AllowedMethod>HEAD</AllowedMethod>
<AllowedHeader>*</AllowedHeader>
</CORSRule>
</CORSConfiguration>
The Web Page
The HTML for the photo upload application consists of a <div> element within which the browser script
creates the upload user interface. The first <script> element adds the SDK to the browser script. The
second <script> element adds the external JavaScript file that holds the browser script code.
<!DOCTYPE html>
<html>
<head>
<script src="https://sdk.amazonaws.com/js/aws-sdk-2.283.1.min.js"></script>
<script src="./app.js"></script>
<script>
function getHtml(template) {
return template.join('\n');
}
listAlbums();
</script>
</head>
<body>
<h1>My Photo Albums App</h1>
<div id="app"></div>
</body>
</html>
Configuring the SDK
Obtain the credentials needed to configure the SDK by calling the CognitoIdentityCredentials
method, providing the Amazon Cognito identity pool ID. Next, create an AWS.S3 service object.
var albumBucketName = 'BUCKET_NAME';
var bucketRegion = 'REGION';
var IdentityPoolId = 'IDENTITY_POOL_ID';
AWS.config.update({
region: bucketRegion,
163

AWS SDK for JavaScript Developer Guide for SDK v2
Uploading Photos to Amazon S3 from a Browser
credentials: new AWS.CognitoIdentityCredentials({
IdentityPoolId: IdentityPoolId
})
});
var s3 = new AWS.S3({
apiVersion: '2006-03-01',
params: {Bucket: albumBucketName}
});
Nearly all of the rest of the code in this example is organized into a series of functions that gather and
present information about the albums in the bucket, upload and display photos uploaded into albums,
and delete photos and albums. Those functions are:
• listAlbums
• createAlbum
• viewAlbum
• addPhoto
• deleteAlbum
• deletePhoto
Listing Albums in the Bucket
The application creates albums in the Amazon S3 bucket as objects whose keys begin with a forward
slash character, indicating the object functions as a folder. To list all the existing albums in the bucket,
the application's listAlbums function calls the listObjects method of the AWS.S3 service object
while using commonPrefix so the call returns only objects used as albums.
The rest of the function takes the list of albums from the Amazon S3 bucket and generates the HTML
needed to display the album list in the web page. It also enables deleting and opening individual albums.
function listAlbums() {
s3.listObjects({Delimiter: '/'}, function(err, data) {
if (err) {
return alert('There was an error listing your albums: ' + err.message);
} else {
var albums = data.CommonPrefixes.map(function(commonPrefix) {
var prefix = commonPrefix.Prefix;
var albumName = decodeURIComponent(prefix.replace('/', ''));
return getHtml([
'<li>',
'<span onclick="deleteAlbum(\'' + albumName + '\')">X</span>',
'<span onclick="viewAlbum(\'' + albumName + '\')">',
albumName,
'</span>',
'</li>'
]);
});
var message = albums.length ?
getHtml([
'<p>Click on an album name to view it.</p>',
'<p>Click on the X to delete the album.</p>'
]) :
'<p>You do not have any albums. Please Create album.';
var htmlTemplate = [
'<h2>Albums</h2>',
message,
'<ul>',
getHtml(albums),
164

AWS SDK for JavaScript Developer Guide for SDK v2
Uploading Photos to Amazon S3 from a Browser
'</ul>',
'<button onclick="createAlbum(prompt(\'Enter Album Name:\'))">',
'Create New Album',
'</button>'
]
document.getElementById('app').innerHTML = getHtml(htmlTemplate);
}
});
}
Creating an Album in the Bucket
To create an album in the Amazon S3 bucket, the application's createAlbum function first validates
the name given for the new album to ensure it contains suitable characters. The function then forms
an Amazon S3 object key, passing it to the headObject method of the Amazon S3 service object. This
method returns the metadata for the specified key, so if it returns data, then an object with that key
already exists.
If the album doesn't already exist, the function calls the putObject method of the AWS.S3 service
object to create the album. It then calls the viewAlbum function to display the new empty album.
function createAlbum(albumName) {
albumName = albumName.trim();
if (!albumName) {
return alert('Album names must contain at least one non-space character.');
}
if (albumName.indexOf('/') !== -1) {
return alert('Album names cannot contain slashes.');
}
var albumKey = encodeURIComponent(albumName) + '/';
s3.headObject({Key: albumKey}, function(err, data) {
if (!err) {
return alert('Album already exists.');
}
if (err.code !== 'NotFound') {
return alert('There was an error creating your album: ' + err.message);
}
s3.putObject({Key: albumKey}, function(err, data) {
if (err) {
return alert('There was an error creating your album: ' + err.message);
}
alert('Successfully created album.');
viewAlbum(albumName);
});
});
}
Viewing an Album
To display the contents of an album in the Amazon S3 bucket, the application's viewAlbum function
takes an album name and creates the Amazon S3 key for that album. The function then calls the
listObjects method of the AWS.S3 service object to obtain a list of all the objects (photos) in the
album.
The rest of the function takes the list of objects (photos) from the album and generates the HTML
needed to display the photos in the web page. It also enables deleting individual photos and navigating
back to the album list.
function viewAlbum(albumName) {
var albumPhotosKey = encodeURIComponent(albumName) + '/';
165

AWS SDK for JavaScript Developer Guide for SDK v2
Uploading Photos to Amazon S3 from a Browser
s3.listObjects({Prefix: albumPhotosKey}, function(err, data) {
if (err) {
return alert('There was an error viewing your album: ' + err.message);
}
// `this` references the AWS.Response instance that represents the response
var href = this.request.httpRequest.endpoint.href;
var bucketUrl = href + albumBucketName + '/';
var photos = data.Contents.map(function(photo) {
var photoKey = photo.Key;
var photoUrl = bucketUrl + encodeURIComponent(photoKey);
return getHtml([
'<span>',
'<div>',
'<img style="width:128px;height:128px;" src="' + photoUrl + '"/>',
'</div>',
'<div>',
'<span onclick="deletePhoto(\'' + albumName + "','" + photoKey + '\')">',
'X',
'</span>',
'<span>',
photoKey.replace(albumPhotosKey, ''),
'</span>',
'</div>',
'</span>',
]);
});
var message = photos.length ?
'<p>Click on the X to delete the photo</p>' :
'<p>You do not have any photos in this album. Please add photos.</p>';
var htmlTemplate = [
'<h2>',
'Album: ' + albumName,
'</h2>',
message,
'<div>',
getHtml(photos),
'</div>',
'<input id="photoupload" type="file" accept="image/*">',
'<button id="addphoto" onclick="addPhoto(\'' + albumName +'\')">',
'Add Photo',
'</button>',
'<button onclick="listAlbums()">',
'Back To Albums',
'</button>',
]
document.getElementById('app').innerHTML = getHtml(htmlTemplate);
});
}
Adding Photos to an Album
To upload a photo to an album in the Amazon S3 bucket, the application's addPhoto function uses a file
picker element in the web page to identify a file to upload. It then forms a key for the photo to upload
from the current album name and the file name.
The function calls the upload method of the Amazon S3 service object to upload the photo. The ACL
parameter is set to public-read so the application can fetch the photos in an album for display by
their URL in the bucket. After uploading the photo, the function redisplays the album so the uploaded
photo appears.
function addPhoto(albumName) {
var files = document.getElementById('photoupload').files;
166

AWS SDK for JavaScript Developer Guide for SDK v2
Uploading Photos to Amazon S3 from a Browser
if (!files.length) {
return alert('Please choose a file to upload first.');
}
var file = files[0];
var fileName = file.name;
var albumPhotosKey = encodeURIComponent(albumName) + '//';
var photoKey = albumPhotosKey + fileName;
s3.upload({
Key: photoKey,
Body: file,
ACL: 'public-read'
}, function(err, data) {
if (err) {
return alert('There was an error uploading your photo: ', err.message);
}
alert('Successfully uploaded photo.');
viewAlbum(albumName);
});
}
Deleting a Photo
To delete a photo from an album in the Amazon S3 bucket, the application's deletePhoto function calls
the deleteObject method of the Amazon S3 service object. This deletes the photo specified by the
photoKey value passed to the function.
function deletePhoto(albumName, photoKey) {
s3.deleteObject({Key: photoKey}, function(err, data) {
if (err) {
return alert('There was an error deleting your photo: ', err.message);
}
alert('Successfully deleted photo.');
viewAlbum(albumName);
});
}
Deleting an Album
To delete an album in the Amazon S3 bucket, the application's deleteAlbum function calls the
deleteObjects method of the Amazon S3 service object.
function deleteAlbum(albumName) {
var albumKey = encodeURIComponent(albumName) + '/';
s3.listObjects({Prefix: albumKey}, function(err, data) {
if (err) {
return alert('There was an error deleting your album: ', err.message);
}
var objects = data.Contents.map(function(object) {
return {Key: object.Key};
});
s3.deleteObjects({
Delete: {Objects: objects, Quiet: true}
}, function(err, data) {
if (err) {
return alert('There was an error deleting your album: ', err.message);
}
alert('Successfully deleted album.');
listAlbums();
});
});
167

AWS SDK for JavaScript Developer Guide for SDK v2
Uploading Photos to Amazon S3 from a Browser
}
Uploading Photos to Amazon S3 Code
Here is the browser script code for the Amazon S3 photo album example.
var albumBucketName = 'BUCKET_NAME';
var bucketRegion = 'REGION';
var IdentityPoolId = 'IDENTITY_POOL_ID';
AWS.config.update({
region: bucketRegion,
credentials: new AWS.CognitoIdentityCredentials({
IdentityPoolId: IdentityPoolId
})
});
var s3 = new AWS.S3({
apiVersion: '2006-03-01',
params: {Bucket: albumBucketName}
});
function listAlbums() {
s3.listObjects({Delimiter: '/'}, function(err, data) {
if (err) {
return alert('There was an error listing your albums: ' + err.message);
} else {
var albums = data.CommonPrefixes.map(function(commonPrefix) {
var prefix = commonPrefix.Prefix;
var albumName = decodeURIComponent(prefix.replace('/', ''));
return getHtml([
'<li>',
'<span onclick="deleteAlbum(\'' + albumName + '\')">X</span>',
'<span onclick="viewAlbum(\'' + albumName + '\')">',
albumName,
'</span>',
'</li>'
]);
});
var message = albums.length ?
getHtml([
'<p>Click on an album name to view it.</p>',
'<p>Click on the X to delete the album.</p>'
]) :
'<p>You do not have any albums. Please Create album.';
var htmlTemplate = [
'<h2>Albums</h2>',
message,
'<ul>',
getHtml(albums),
'</ul>',
'<button onclick="createAlbum(prompt(\'Enter Album Name:\'))">',
'Create New Album',
'</button>'
]
document.getElementById('app').innerHTML = getHtml(htmlTemplate);
}
});
}
function createAlbum(albumName) {
albumName = albumName.trim();
if (!albumName) {
return alert('Album names must contain at least one non-space character.');
168

AWS SDK for JavaScript Developer Guide for SDK v2
Uploading Photos to Amazon S3 from a Browser
}
if (albumName.indexOf('/') !== -1) {
return alert('Album names cannot contain slashes.');
}
var albumKey = encodeURIComponent(albumName) + '/';
s3.headObject({Key: albumKey}, function(err, data) {
if (!err) {
return alert('Album already exists.');
}
if (err.code !== 'NotFound') {
return alert('There was an error creating your album: ' + err.message);
}
s3.putObject({Key: albumKey}, function(err, data) {
if (err) {
return alert('There was an error creating your album: ' + err.message);
}
alert('Successfully created album.');
viewAlbum(albumName);
});
});
}
function viewAlbum(albumName) {
var albumPhotosKey = encodeURIComponent(albumName) + '//';
s3.listObjects({Prefix: albumPhotosKey}, function(err, data) {
if (err) {
return alert('There was an error viewing your album: ' + err.message);
}
// `this` references the AWS.Response instance that represents the response
var href = this.request.httpRequest.endpoint.href;
var bucketUrl = href + albumBucketName + '/';
var photos = data.Contents.map(function(photo) {
var photoKey = photo.Key;
var photoUrl = bucketUrl + encodeURIComponent(photoKey);
return getHtml([
'<span>',
'<div>',
'<img style="width:128px;height:128px;" src="' + photoUrl + '"/>',
'</div>',
'<div>',
'<span onclick="deletePhoto(\'' + albumName + "','" + photoKey + '\')">',
'X',
'</span>',
'<span>',
photoKey.replace(albumPhotosKey, ''),
'</span>',
'</div>',
'<span>',
]);
});
var message = photos.length ?
'<p>Click on the X to delete the photo</p>' :
'<p>You do not have any photos in this album. Please add photos.</p>';
var htmlTemplate = [
'<h2>',
'Album: ' + albumName,
'</h2>',
message,
'<div>',
getHtml(photos),
'</div>',
'<input id="photoupload" type="file" accept="image/*">',
'<button id="addphoto" onclick="addPhoto(\'' + albumName +'\')">',
'Add Photo',
'</button>',
169

AWS SDK for JavaScript Developer Guide for SDK v2
Uploading Photos to Amazon S3 from a Browser
'<button onclick="listAlbums()">',
'Back To Albums',
'</button>',
]
document.getElementById('app').innerHTML = getHtml(htmlTemplate);
});
}
function addPhoto(albumName) {
var files = document.getElementById('photoupload').files;
if (!files.length) {
return alert('Please choose a file to upload first.');
}
var file = files[0];
var fileName = file.name;
var albumPhotosKey = encodeURIComponent(albumName) + '//';
var photoKey = albumPhotosKey + fileName;
s3.upload({
Key: photoKey,
Body: file,
ACL: 'public-read'
}, function(err, data) {
if (err) {
return alert('There was an error uploading your photo: ', err.message);
}
alert('Successfully uploaded photo.');
viewAlbum(albumName);
});
}
function deletePhoto(albumName, photoKey) {
s3.deleteObject({Key: photoKey}, function(err, data) {
if (err) {
return alert('There was an error deleting your photo: ', err.message);
}
alert('Successfully deleted photo.');
viewAlbum(albumName);
});
}
function deleteAlbum(albumName) {
var albumKey = encodeURIComponent(albumName) + '/';
s3.listObjects({Prefix: albumKey}, function(err, data) {
if (err) {
return alert('There was an error deleting your album: ', err.message);
}
var objects = data.Contents.map(function(object) {
return {Key: object.Key};
});
s3.deleteObjects({
Delete: {Objects: objects, Quiet: true}
}, function(err, data) {
if (err) {
return alert('There was an error deleting your album: ', err.message);
}
alert('Successfully deleted album.');
listAlbums();
});
});
}
170

AWS SDK for JavaScript Developer Guide for SDK v2
Creating and Using Amazon S3 Buckets
Creating and Using Amazon S3 Buckets
This Node.js code example shows:
• How to obtain and display a list of Amazon S3 buckets in your account.
• How to create an Amazon S3 bucket.
• How to upload an object to a specified bucket.
The Scenario
In this example, a series of Node.js modules are used to obtain a list of existing Amazon S3 buckets,
create a bucket, and upload a file to a specified bucket. These Node.js modules use the SDK for
JavaScript to get information from and upload files to an Amazon S3 bucket using these methods of the
Amazon S3 client class:
• listBuckets
• createBucket
• listObjects
• upload
• deleteBucket
Prerequisite Tasks
To set up and run this example, you must first complete these tasks:
• Install Node.js. For more information about installing Node.js, see the Node.js website.
• Create a shared configurations file with your user credentials. For more information about providing a
shared credentials file, see Loading Credentials in Node.js from the Shared Credentials File (p. 26).
Configuring the SDK
Configure the SDK for JavaScript by creating a global configuration object then setting the region for
your code. In this example, the region is set to us-west-2.
// Load the SDK for JavaScript
var AWS = require('aws-sdk');
// Set the region
AWS.config.update({region: 'us-west-2'});
Displaying a List of Amazon S3 Buckets
Create a Node.js module with the file name s3_listbuckets.js. Make sure to configure the SDK
as previously shown. To access Amazon Simple Storage Service, create an AWS.S3 service object. Call
the listBuckets method of the Amazon S3 service object to retrieve a list of your buckets. The data
parameter of the callback function has a Buckets property containing an array of maps to represent the
buckets. Display the bucket list by logging it to the console.
171

AWS SDK for JavaScript Developer Guide for SDK v2
Creating and Using Amazon S3 Buckets
// Load the SDK for JavaScript
var AWS = require('aws-sdk');
// Set the region
AWS.config.update({region: 'REGION'});
// Create S3 service object
s3 = new AWS.S3({apiVersion: '2006-03-01'});
// Call S3 to list current buckets
s3.listBuckets(function(err, data) {
if (err) {
console.log("Error", err);
} else {
console.log("Bucket List", data.Buckets);
}
});
To run the example, type the following at the command line.
node s3_listbuckets.js
This sample code can be found here on GitHub.
Creating an Amazon S3 Bucket
Create a Node.js module with the file name s3_createbucket.js. Make sure to configure the SDK
as previously shown. Create an AWS.S3 service object. The module will take a single command-line
argument to specify a name for the new bucket.
Add a variable to hold the parameters used to call the createBucket method of the Amazon S3 service
object, including the name for the newly created bucket. The callback function logs the new bucket's
location to the console after Amazon S3 successfully creates it.
// Load the SDK for JavaScript
var AWS = require('aws-sdk');
// Set the region
AWS.config.update({region: 'REGION'});
// Create the parameters for calling createBucket
var bucketParams = {
Bucket : process.argv[2]
};
// Create S3 service object
s3 = new AWS.S3({apiVersion: '2006-03-01'});
// Call S3 to create the bucket
s3.createBucket(bucketParams, function(err, data) {
if (err) {
console.log("Error", err);
} else {
console.log("Success", data.Location);
}
});
To run the example, type the following at the command line.
node s3_createbucket.js BUCKET_NAME
172

AWS SDK for JavaScript Developer Guide for SDK v2
Creating and Using Amazon S3 Buckets
This sample code can be found here on GitHub.
Uploading a File to an Amazon S3 Bucket
Create a Node.js module with the file name s3_upload.js. Make sure to configure the SDK as
previously shown. Create an AWS.S3 service object. The module will take two command-line arguments,
the first one to specify the destination bucket and the second to specify the file to upload.
Create a variable with the parameters needed to call the upload method of the Amazon S3 service
object. Provide the name of the target bucket in the Bucket parameter. The Key parameter is set to the
name of the selected file, which you can obtain using the Node.js path module. The Body parameter
is set to the contents of the file, which you can obtain using createReadStream from the Node.js fs
module.
// Load the AWS SDK for Node.js
var AWS = require('aws-sdk');
// Set the region
AWS.config.update({region: 'REGION'});
// Create S3 service object
s3 = new AWS.S3({apiVersion: '2006-03-01'});
// call S3 to retrieve upload file to specified bucket
var uploadParams = {Bucket: process.argv[2], Key: '', Body: ''};
var file = process.argv[3];
var fs = require('fs');
var fileStream = fs.createReadStream(file);
fileStream.on('error', function(err) {
console.log('File Error', err);
});
uploadParams.Body = fileStream;
var path = require('path');
uploadParams.Key = path.basename(file);
// call S3 to retrieve upload file to specified bucket
s3.upload (uploadParams, function (err, data) {
if (err) {
console.log("Error", err);
} if (data) {
console.log("Upload Success", data.Location);
}
});
To run the example, type the following at the command line.
node s3_upload.js BUCKET_NAME FILE_NAME
This sample code can be found here on GitHub.
Listing Objects in an Amazon S3 Bucket
Create a Node.js module with the file names3_listobjects.js. Make sure to configure the SDK as
previously shown. Create an AWS.S3 service object.
Add a variable to hold the parameters used to call the listObjects method of the Amazon S3 service
object, including the name of the bucket to read. The callback function logs a list of objects (files) or a
failure message.
173

AWS SDK for JavaScript Developer Guide for SDK v2
Creating and Using Amazon S3 Buckets
// Load the SDK for JavaScript
var AWS = require('aws-sdk');
// Set the region
AWS.config.update({region: 'REGION'});
// Create the parameters for calling createBucket
var bucketParams = {
Bucket : BUCKET_NAME
};
// Call S3 to create the bucket
s3.listObjects(bucketParams, function(err, data) {
if (err) {
console.log("Error", err);
} else {
console.log("Success", data);
}
});
To run the example, type the following at the command line.
node s3_listobjects.js
This sample code can be found here on GitHub.
Deleting an Amazon S3 Bucket
Create a Node.js module with the file name s3_deletebucket.js. Make sure to configure the SDK as
previously shown. Create an AWS.S3 service object.
Add a variable to hold the parameters used to call the createBucket method of the Amazon S3 service
object, including the name of the bucket to delete. The bucket must be empty in order to delete it. The
callback function logs a success or failure message.
// Load the SDK for JavaScript
var AWS = require('aws-sdk');
// Set the region
AWS.config.update({region: 'REGION'});
// Create the parameters for calling createBucket
var bucketParams = {
Bucket : BUCKET_NAME
};
// Call S3 to create the bucket
s3.deleteBucket(bucketParams, function(err, data) {
if (err) {
console.log("Error", err);
} else {
console.log("Success", data);
}
});
To run the example, type the following at the command line.
node s3_deletebucket.js
This sample code can be found here on GitHub.
174

AWS SDK for JavaScript Developer Guide for SDK v2
Configuring Amazon S3 Buckets
Configuring Amazon S3 Buckets
This Node.js code example shows:
• How to configure the cross-origin resource sharing (CORS) permissions for a bucket.
The Scenario
In this example, a series of Node.js modules are used to list your Amazon S3 buckets and to configure
CORS and bucket logging. The Node.js modules use the SDK for JavaScript to configure a selected
Amazon S3 bucket using these methods of the Amazon S3 client class:
• getBucketCors
• putBucketCors
For more information about using CORS configuration with an Amazon S3 bucket, see Cross-Origin
Resource Sharing (CORS) in the Amazon Simple Storage Service Developer Guide.
Prerequisite Tasks
To set up and run this example, you must first complete these tasks:
• Install Node.js. For more information about installing Node.js, see the Node.js website.
• Create a shared configurations file with your user credentials. For more information about providing a
shared credentials file, see Loading Credentials in Node.js from the Shared Credentials File (p. 26).
Configuring the SDK
Configure the SDK for JavaScript by creating a global configuration object then setting the region for
your code. In this example, the region is set to us-west-2.
// Load the SDK for JavaScript
var AWS = require('aws-sdk');
// Set the region
AWS.config.update({region: 'us-west-2'});
Retrieving a Bucket CORS Configuration
Create a Node.js module with the file name s3_getcors.js. The module will take a single command-
line argument to specify the bucket whose CORS configuration you want. Make sure to configure the SDK
as previously shown. Create an AWS.S3 service object.
The only parameter you need to pass is the name of the selected bucket when calling the
getBucketCors method. If the bucket currently has a CORS configuration, that configuration is
returned by Amazon S3 as the CORSRules property of the data parameter passed to the callback
function.
175

AWS SDK for JavaScript Developer Guide for SDK v2
Configuring Amazon S3 Buckets
If the selected bucket has no CORS configuration, that information is returned to the callback function in
the error parameter.
// Load the AWS SDK for Node.js
var AWS = require('aws-sdk');
// Set the region
AWS.config.update({region: 'REGION'});
// Create S3 service object
s3 = new AWS.S3({apiVersion: '2006-03-01'});
// set the parameters for S3.getBucketCors
var bucketParams = {Bucket: process.argv[2]};
// call S3 to retrieve CORS configuration for selected bucket
s3.getBucketCors(bucketParams, function(err, data) {
if (err) {
console.log(err);
} else if (data) {
console.log(JSON.stringify(data.CORSRules));
}
});
To run the example, type the following at the command line.
node s3_getcors.js BUCKET_NAME
This sample code can be found here on GitHub.
Setting a Bucket CORS Configuration
Create a Node.js module with the file name s3_setcors.js. The module takes multiple command-line
arguments, the first of which specifies the bucket whose CORS configuration you want to set. Additional
arguments enumerate the HTTP methods (POST, GET, PUT, PATCH, DELETE, POST) you want to allow for
the bucket. Configure the SDK as previously shown.
Create an AWS.S3 service object. Next create a JSON object to hold the values for the CORS
configuration as required by the putBucketCors method of the AWS.S3 service object. Specify
"Authorization" for the AllowedHeaders value and "*" for the AllowedOrigins value. Set the
value of AllowedMethods as empty array initially.
Specify the allowed methods as command line parameters to the Node.js module, adding each of
the methods that match one of the parameters. Add the resulting CORS configuration to the array of
configurations contained in the CORSRules parameter. Specify the bucket you want to configure for
CORS in the Bucket parameter.
// Load the AWS SDK for Node.js
var AWS = require('aws-sdk');
// Set the region
AWS.config.update({region: 'REGION'});
// Create S3 service object
s3 = new AWS.S3({apiVersion: '2006-03-01'});
// Create initial parameters JSON for putBucketCors
var thisConfig = {
AllowedHeaders:["Authorization"],
AllowedMethods:[],
AllowedOrigins:["*"],
176

AWS SDK for JavaScript Developer Guide for SDK v2
Managing Amazon S3 Bucket Access Permissions
ExposeHeaders:[],
MaxAgeSeconds:3000
};
// Create array of allowed methods parameter based on command line parameters
var allowedMethods = [];
process.argv.forEach(function (val, index, array) {
if (val.toUpperCase() === "POST") {allowedMethods.push("POST")};
if (val.toUpperCase() === "GET") {allowedMethods.push("GET")};
if (val.toUpperCase() === "PUT") {allowedMethods.push("PUT")};
if (val.toUpperCase() === "PATCH") {allowedMethods.push("PATCH")};
if (val.toUpperCase() === "DELETE") {allowedMethods.push("DELETE")};
if (val.toUpperCase() === "HEAD") {allowedMethods.push("HEAD")};
});
// create CORS params
thisConfig.AllowedMethods = allowedMethods;
var corsRules = new Array(thisConfig);
var corsParams = {Bucket: process.argv[2], CORSConfiguration: {CORSRules: corsRules}};
// set the new CORS configuration on the selected bucket
s3.putBucketCors(corsParams, function(err, data) {
if (err) {
// display error message
console.log("Error", err);
} else {
// update the displayed CORS config for the selected bucket
console.log("Success", data);
}
});
To run the example, type the following at the command line including one or more HTTP methods as
shown.
node s3_setcors.js BUCKET_NAME get put
This sample code can be found here on GitHub.
Managing Amazon S3 Bucket Access Permissions
This Node.js code example shows:
• How to retrieve or set the access control list for an Amazon S3 bucket.
The Scenario
In this example, a Node.js module is used to display the bucket access control list (ACL) for a selected
bucket and apply changes to the ACL for a selected bucket. The Node.js module uses the SDK for
JavaScript to manage Amazon S3 bucket access permissions using these methods of the Amazon S3
client class:
• getBucketAcl
177

AWS SDK for JavaScript Developer Guide for SDK v2
Managing Amazon S3 Bucket Access Permissions
• putBucketAcl
For more information about access control lists for Amazon S3 buckets, see Managing Access with ACLs
in the Amazon Simple Storage Service Developer Guide.
Prerequisite Tasks
To set up and run this example, you must first complete these tasks:
• Install Node.js. For more information about installing Node.js, see the Node.js website.
• Create a shared configurations file with your user credentials. For more information about providing a
shared credentials file, see Loading Credentials in Node.js from the Shared Credentials File (p. 26).
Configuring the SDK
Configure the SDK for JavaScript by creating a global configuration object then setting the region for
your code. In this example, the region is set to us-west-2.
// Load the SDK for JavaScript
var AWS = require('aws-sdk');
// Set the region
AWS.config.update({region: 'us-west-2'});
Retrieving the Current Bucket Access Control List
Create a Node.js module with the file name s3_getbucketacl.js. The module will take a single
command-line argument to specify the bucket whose ACL configuration you want. Make sure to
configure the SDK as previously shown.
Create an AWS.S3 service object. The only parameter you need to pass is the name of the selected
bucket when calling the getBucketAcl method. The current access control list configuration is returned
by Amazon S3 in the data parameter passed to the callback function.
// Load the AWS SDK for Node.js
var AWS = require('aws-sdk');
// Set the region
AWS.config.update({region: 'REGION'});
// Create S3 service object
s3 = new AWS.S3({apiVersion: '2006-03-01'});
var bucketParams = {Bucket: process.argv[2]};
// call S3 to retrieve policy for selected bucket
s3.getBucketAcl(bucketParams, function(err, data) {
if (err) {
console.log("Error", err);
} else if (data) {
console.log("Success", data.Grants);
}
});
To run the example, type the following at the command line.
node s3_getbucketacl.js BUCKET_NAME
This sample code can be found here on GitHub.
178

AWS SDK for JavaScript Developer Guide for SDK v2
Working with Amazon S3 Bucket Policies
Working with Amazon S3 Bucket Policies
This Node.js code example shows:
• How to retrieve the bucket policy of an Amazon S3 bucket.
• How to add or update the bucket policy of an Amazon S3 bucket.
• How to delete the bucket policy of an Amazon S3 bucket.
The Scenario
In this example, a series of Node.js modules are used to retrieve, set, or delete a bucket policy on an
Amazon S3 bucket. The Node.js modules use the SDK for JavaScript to configure policy for a selected
Amazon S3 bucket using these methods of the Amazon S3 client class:
• getBucketPolicy
• putBucketPolicy
• deleteBucketPolicy
For more information about bucket policies for Amazon S3 buckets, see Using Bucket Policies and User
Policies in the Amazon Simple Storage Service Developer Guide.
Prerequisite Tasks
To set up and run this example, you must first complete these tasks:
• Install Node.js. For more information about installing Node.js, see the Node.js website.
• Create a shared configurations file with your user credentials. For more information about providing a
shared credentials file, see Loading Credentials in Node.js from the Shared Credentials File (p. 26).
Configuring the SDK
Configure the SDK for JavaScript by creating a global configuration object then setting the region for
your code. In this example, the region is set to us-west-2.
// Load the SDK for JavaScript
var AWS = require('aws-sdk');
// Set the region
AWS.config.update({region: 'us-west-2'});
Retrieving the Current Bucket Policy
Create a Node.js module with the file name s3_getbucketpolicy.js. The module takes a single
command-line argument that specifies the bucket whose policy you want. Make sure to configure the
SDK as previously shown.
179

AWS SDK for JavaScript Developer Guide for SDK v2
Working with Amazon S3 Bucket Policies
Create an AWS.S3 service object. The only parameter you need to pass is the name of the selected
bucket when calling the getBucketPolicy method. If the bucket currently has a policy, that policy is
returned by Amazon S3 in the data parameter passed to the callback function.
If the selected bucket has no policy, that information is returned to the callback function in the error
parameter.
// Load the AWS SDK for Node.js
var AWS = require('aws-sdk');
// Set the region
AWS.config.update({region: 'REGION'});
// Create S3 service object
s3 = new AWS.S3({apiVersion: '2006-03-01'});
var bucketParams = {Bucket: process.argv[2]};
// call S3 to retrieve policy for selected bucket
s3.getBucketPolicy(bucketParams, function(err, data) {
if (err) {
console.log("Error", err);
} else if (data) {
console.log("Success", data.Policy);
}
});
To run the example, type the following at the command line.
node s3_getbucketpolicy.js BUCKET_NAME
This sample code can be found here on GitHub.
Setting a Simple Bucket Policy
Create a Node.js module with the file name s3_setbucketpolicy.js. The module takes a single
command-line argument that specifies the bucket whose policy you want to apply. Configure the SDK as
previously shown.
Create an AWS.S3 service object. Bucket policies are specified in JSON. First, create a JSON object that
contains all of the values to specify the policy except for the Resource value that identifies the bucket.
Format the Resource string required by the policy, incorporating the name of the selected bucket.
Insert that string into the JSON object. Prepare the parameters for the putBucketPolicy method,
including the name of the bucket and the JSON policy converted to a string value.
// Load the AWS SDK for Node.js
var AWS = require('aws-sdk');
// Set the region
AWS.config.update({region: 'REGION'});
// Create S3 service object
s3 = new AWS.S3({apiVersion: '2006-03-01'});
var readOnlyAnonUserPolicy = {
Version: "2012-10-17",
Statement: [
{
Sid: "AddPerm",
Effect: "Allow",
Principal: "*",
Action: [
180

AWS SDK for JavaScript Developer Guide for SDK v2
Working with Amazon S3 Bucket Policies
"s3:GetObject"
],
Resource: [
""
]
}
]
};
// create selected bucket resource string for bucket policy
var bucketResource = "arn:aws:s3:::" + process.argv[2] + "/*";
readOnlyAnonUserPolicy.Statement[0].Resource[0] = bucketResource;
// convert policy JSON into string and assign into params
var bucketPolicyParams = {Bucket: process.argv[2], Policy:
JSON.stringify(readOnlyAnonUserPolicy)};
// set the new policy on the selected bucket
s3.putBucketPolicy(bucketPolicyParams, function(err, data) {
if (err) {
// display error message
console.log("Error", err);
} else {
console.log("Success", data);
}
});
To run the example, type the following at the command line.
node s3_setbucketpolicy.js BUCKET_NAME
This sample code can be found here on GitHub.
Deleting a Bucket Policy
Create a Node.js module with the file name s3_deletebucketpolicy.js. The module takes a single
command-line argument that specifies the bucket whose policy you want to delete. Configure the SDK as
previously shown.
Create an AWS.S3 service object. The only parameter you need to pass when calling the
deleteBucketPolicy method is the name of the selected bucket.
// Load the AWS SDK for Node.js
var AWS = require('aws-sdk');
// Set the region
AWS.config.update({region: 'REGION'});
// Create S3 service object
s3 = new AWS.S3({apiVersion: '2006-03-01'});
var bucketParams = {Bucket: process.argv[2]};
// call S3 to delete policy for selected bucket
s3.deleteBucketPolicy(bucketParams, function(error, data) {
if (error) {
console.log("Error", err);
} else if (data) {
console.log("Success", data);
}
});
To run the example, type the following at the command line.
181

AWS SDK for JavaScript Developer Guide for SDK v2
Using an Amazon S3 Bucket as a Static Web Host
node s3_deletebucketpolicy.js BUCKET_NAME
This sample code can be found here on GitHub.
Using an Amazon S3 Bucket as a Static Web Host
This Node.js code example shows:
• How to set up an Amazon S3 bucket as a static web host.
The Scenario
In this example, a series of Node.js modules are used to configure any of your buckets to act as a static
web host. The Node.js modules use the SDK for JavaScript to configure a selected Amazon S3 bucket
using these methods of the Amazon S3 client class:
• getBucketWebsite
• putBucketWebsite
• deleteBucketWebsite
For more information about using an Amazon S3 bucket as a static web host, see Hosting a Static
Website on Amazon S3 in the Amazon Simple Storage Service Developer Guide.
Prerequisite Tasks
To set up and run this example, you must first complete these tasks:
• Install Node.js. For more information about installing Node.js, see the Node.js website.
• Create a shared configurations file with your user credentials. For more information about providing a
shared credentials file, see Loading Credentials in Node.js from the Shared Credentials File (p. 26).
Configuring the SDK
Configure the SDK for JavaScript by creating a global configuration object then setting the region for
your code. In this example, the region is set to us-west-2.
// Load the SDK for JavaScript
var AWS = require('aws-sdk');
// Set the region
AWS.config.update({region: 'us-west-2'});
Retrieving the Current Bucket Website Configuration
Create a Node.js module with the file name s3_getbucketwebsite.js. The module takes a single
command-line argument that specifies the bucket whose website configuration you want. Configure the
SDK as previously shown.
182

AWS SDK for JavaScript Developer Guide for SDK v2
Using an Amazon S3 Bucket as a Static Web Host
Create an AWS.S3 service object. Create a function that retrieves the current bucket website
configuration for the bucket selected in the bucket list. The only parameter you need to pass is the name
of the selected bucket when calling the getBucketWebsite method. If the bucket currently has a
website configuration, that configuration is returned by Amazon S3 in the data parameter passed to the
callback function.
If the selected bucket has no website configuration, that information is returned to the callback function
in the err parameter.
// Load the AWS SDK for Node.js
var AWS = require('aws-sdk');
// Set the region
AWS.config.update({region: 'REGION'});
// Create S3 service object
s3 = new AWS.S3({apiVersion: '2006-03-01'});
var bucketParams = {Bucket: process.argv[2]};
// call S3 to retrieve policy for selected bucket
s3.getBucketWebsite(bucketParams, function(err, data) {
if (err) {
console.log("Error", err);
} else if (data) {
console.log("Success", data);
}
});
To run the example, type the following at the command line.
node s3_getbucketwebsite.js BUCKET_NAME
This sample code can be found here on GitHub.
Setting a Bucket Website Configuration
Create a Node.js module with the file name s3_setbucketwebsite.js. Make sure to configure the
SDK as previously shown. Create an AWS.S3 service object.
Create a function that applies a bucket website configuration. The configuration allows the selected
bucket to serve as a static web host. Website configurations are specified in JSON. First, create a JSON
object that contains all the values to specify the website configuration, except for the Key value that
identifies the error document, and the Suffix value that identifies the index document.
Insert the values of the text input elements into the JSON object. Prepare the parameters for the
putBucketWebsite method, including the name of the bucket and the JSON website configuration.
// Load the AWS SDK for Node.js
var AWS = require('aws-sdk');
// Set the region
AWS.config.update({region: 'REGION'});
// Create S3 service object
s3 = new AWS.S3({apiVersion: '2006-03-01'});
// Create JSON for setBucketWebsite parameters
var staticHostParams = {
Bucket: '',
WebsiteConfiguration: {
ErrorDocument: {
183

AWS SDK for JavaScript Developer Guide for SDK v2
Using an Amazon S3 Bucket as a Static Web Host
Key: ''
},
IndexDocument: {
Suffix: ''
},
}
};
// Insert specified bucket name index and error documents into params JSON
// from command line arguments
staticHostParams.Bucket = process.argv[2];
staticHostParams.WebsiteConfiguration.IndexDocument.Suffix = process.argv[3];
staticHostParams.WebsiteConfiguration.ErrorDocument.Key = process.argv[4];
// set the new policy on the selected bucket
s3.putBucketWebsite(staticHostParams, function(err, data) {
if (err) {
// display error message
console.log("Error", err);
} else {
// update the displayed policy for the selected bucket
console.log("Success", data);
}
});
To run the example, type the following at the command line.
node s3_setbucketwebsite.js BUCKET_NAME INDEX_PAGE ERROR_PAGE
This sample code can be found here on GitHub.
Deleting a Bucket Website Configuration
Create a Node.js module with the file name s3_deletebucketwebsite.js. Make sure to configure the
SDK as previously shown. Create an AWS.S3 service object.
Create a function that deletes the website configuration for the selected bucket. The only parameter you
need to pass when calling the deleteBucketWebsite method is the name of the selected bucket.
// Load the AWS SDK for Node.js
var AWS = require('aws-sdk');
// Set the region
AWS.config.update({region: 'REGION'});
// Create S3 service object
s3 = new AWS.S3({apiVersion: '2006-03-01'});
var bucketParams = {Bucket: process.argv[2]};
// call S3 to delete policy for selected bucket
s3.deleteBucketWebsite(bucketParams, function(err, data) {
if (err) {
console.log("Error", err);
} else if (data) {
console.log("Success", data);
}
});
To run the example, type the following at the command line.
node s3_deletebucketwebsite.js BUCKET_NAME
184

AWS SDK for JavaScript Developer Guide for SDK v2
Amazon SES Examples
This sample code can be found here on GitHub.
Amazon Simple Email Service Examples
Amazon Simple Email Service (Amazon SES) is a cloud-based email sending service designed to help
digital marketers and application developers send marketing, notification, and transactional emails. It
is a reliable, cost-effective service for businesses of all sizes that use email to keep in contact with their
customers.
The JavaScript API for Amazon SES is exposed through the AWS.SES client class. For more information
about using the Amazon SES client class, see Class: AWS.SES in the API reference.
Topics
• Managing Amazon SES Identities (p. 185)
• Working with Email Templates in Amazon SES (p. 189)
• Sending Email Using Amazon SES (p. 193)
• Using IP Address Filters for Email Receipt in Amazon SES (p. 197)
• Using Receipt Rules in Amazon SES (p. 200)
Managing Amazon SES Identities
This Node.js code example shows:
• How to verify email addresses and domains used with Amazon SES.
• How to assign IAM policy to your Amazon SES identities.
• How to list all Amazon SES identities for your AWS account.
• How to delete identities used with Amazon SES.
An Amazon SES identity is an email address or domain that Amazon SES uses to send email. Amazon SES
requires you to verify your email identities, confirming that you own them and preventing others from
using them.
For details on how to verify email addresses and domains in Amazon SES, see Verifying Email Addresses
and Domains in Amazon SES in the Amazon Simple Email Service Developer Guide. For information
about sending authorization in Amazon SES, see Overview of Amazon SES Sending Authorization .
185

AWS SDK for JavaScript Developer Guide for SDK v2
Managing Identities
The Scenario
In this example, you use a series of Node.js modules to verify and manage Amazon SES identities. The
Node.js modules use the SDK for JavaScript to verify email addresses and domains, using these methods
of the AWS.SES client class:
• listIdentities
• deleteIdentity
• verifyEmailIdentity
• verifyDomainIdentity
Prerequisite Tasks
To set up and run this example, you must first complete these tasks:
• Install Node.js. For more information about installing Node.js, see the Node.js website.
• Create a shared configurations file with your user credentials. For more information about providing a
credentials JSON file, see Loading Credentials in Node.js from the Shared Credentials File (p. 26).
Configuring the SDK
Configure the SDK for JavaScript by creating a global configuration object then setting the region for
your code. In this example, the region is set to us-west-2.
// Load the SDK for JavaScript
var AWS = require('aws-sdk');
// Set the region
AWS.config.update({region: 'us-west-2'});
Listing Your Identities
In this example, use a Node.js module to list email addresses and domains to use with Amazon SES.
Create a Node.js module with the file name ses_listidentities.js. Configure the SDK as previously
shown.
Create an object to pass the IdentityType and other parameters for the listIdentities method
of the AWS.SES client class. To call the listIdentities method, create a promise for invoking an
Amazon SES service object, passing the parameters object.
Then handle the response in the promise callback. The data returned by the promise contains an array
of domain identities as specified by the IdentityType parameter.
// Load the AWS SDK for Node.js
var AWS = require('aws-sdk');
// Set region
AWS.config.update({region: 'REGION'});
// Create listIdentities params
var params = {
IdentityType: "Domain",
MaxItems: 10
};
186

AWS SDK for JavaScript Developer Guide for SDK v2
Managing Identities
// Create the promise and SES service object
var listIDsPromise = new AWS.SES({apiVersion:
'2010-12-01'}).listIdentities(params).promise();
// Handle promise's fulfilled/rejected states
listIDsPromise.then(
function(data) {
console.log(data.Identities);
}).catch(
function(err) {
console.error(err, err.stack);
});
To run the example, type the following at the command line.
node ses_listidentities.js
This sample code can be found here on GitHub.
Verifying an Email Address Identity
In this example, use a Node.js module to verify email senders to use with Amazon SES. Create a Node.js
module with the file name ses_verifyemailidentity.js. Configure the SDK as previously shown. To
access Amazon SES, create an AWS.SES service object.
Create an object to pass the EmailAddress parameter for the verifyEmailIdentity method of the
AWS.SES client class. To call the verifyEmailIdentity method, create a promise for invoking an
Amazon SES service object, passing the parameters. Then handle the response in the promise callback.
// Load the AWS SDK for Node.js
var AWS = require('aws-sdk');
// Set region
AWS.config.update({region: 'REGION'});
// Create promise and SES service object
var verifyEmailPromise = new AWS.SES({apiVersion:
'2010-12-01'}).verifyEmailIdentity({EmailAddress: "[email protected]"}).promise();
// Handle promise's fulfilled/rejected states
verifyEmailPromise.then(
function(data) {
console.log("Email verification initiated");
}).catch(
function(err) {
console.error(err, err.stack);
});
To run the example, type the following at the command line. The domain is added to Amazon SES to be
verified.
node ses_verifyemailidentity.js
This sample code can be found here on GitHub.
Verifying a Domain Identity
In this example, use a Node.js module to verify email domains to use with Amazon SES. Create a Node.js
module with the file name ses_verifydomainidentity.js. Configure the SDK as previously shown.
187

AWS SDK for JavaScript Developer Guide for SDK v2
Managing Identities
Create an object to pass the Domain parameter for the verifyDomainIdentity method of the
AWS.SES client class. To call the verifyDomainIdentity method, create a promise for invoking an
Amazon SES service object, passing the parameters object. Then handle the response in the promise
callback.
// Load the AWS SDK for Node.js
var AWS = require('aws-sdk');
// Set region
AWS.config.update({region: 'REGION'});
// Create the promise and SES service object
var verifyDomainPromise = new AWS.SES({apiVersion:
'2010-12-01'}).verifyDomainIdentity({Domain: "DOMAIN_NAME"}).promise();
// Handle promise's fulfilled/rejected states
verifyDomainPromise.then(
function(data) {
console.log("Verification Token: " + data.VerificationToken);
}).catch(
function(err) {
console.error(err, err.stack);
});
To run the example, type the following at the command line. The domain is added to Amazon SES to be
verified.
node ses_verifydomainidentity.js
This sample code can be found here on GitHub.
Deleting Identities
In this example, use a Node.js module to delete email addresses or domains used with Amazon SES.
Create a Node.js module with the file name ses_deleteidentity.js. Configure the SDK as previously
shown.
Create an object to pass the Identity parameter for the deleteIdentity method of the AWS.SES
client class. To call the deleteIdentity method, create a request for invoking an Amazon SES service
object, passing the parameters. Then handle the response in the promise callback..
// Load the AWS SDK for Node.js
var AWS = require('aws-sdk');
// Set region
AWS.config.update({region: 'REGION'});
// Create the promise and SES service object
var deletePromise = new AWS.SES({apiVersion:
'2010-12-01'}).deleteIdentity({Identity: "DOMAIN_NAME"}).promise();
// Handle promise's fulfilled/rejected states
deletePromise.then(
function(data) {
console.log("Identity Deleted");
}).catch(
function(err) {
console.error(err, err.stack);
});
To run the example, type the following at the command line.
188

AWS SDK for JavaScript Developer Guide for SDK v2
Working with Email Templates
node ses_deleteidentity.js
This sample code can be found here on GitHub.
Working with Email Templates in Amazon SES
This Node.js code example shows:
• Get a list of all of your email templates.
• Retrieve and update email templates.
• Create and delete email templates.
Amazon SES lets you send personalized email messages using email templates. For details on how to
create and use email templates in Amazon Simple Email Service, see Sending Personalized Email Using
the Amazon SES API in the Amazon Simple Email Service Developer Guide.
The Scenario
In this example, you use a series of Node.js modules to work with email templates. The Node.js modules
use the SDK for JavaScript to create and use email templates using these methods of the AWS.SES client
class:
• listTemplates
• createTemplate
• getTemplate
• deleteTemplate
• updateTemplate
Prerequisite Tasks
To set up and run this example, you must first complete these tasks:
• Install Node.js. For more information about installing Node.js, see the Node.js website.
• Create a shared configurations file with your user credentials. For more information about creating a
credentials file, see Loading Credentials in Node.js from the Shared Credentials File (p. 26).
Configuring the SDK
Configure the SDK for JavaScript by creating a global configuration object then setting the region for
your code. In this example, the region is set to us-west-2.
// Load the SDK for JavaScript
var AWS = require('aws-sdk');
// Set the region
AWS.config.update({region: 'us-west-2'});
189

AWS SDK for JavaScript Developer Guide for SDK v2
Working with Email Templates
Listing Your Email Templates
In this example, use a Node.js module to create an email template to use with Amazon SES. Create a
Node.js module with the file name ses_listtemplates.js. Configure the SDK as previously shown.
Create an object to pass the parameters for the listTemplates method of the AWS.SES client class. To
call the listTemplates method, create a promise for invoking an Amazon SES service object, passing
the parameters. Then handle the response in the promise callback.
// Load the AWS SDK for Node.js
var AWS = require('aws-sdk');
// Set the region
AWS.config.update({region: 'REGION'});
// Create the promise and SES service object
var templatePromise = new AWS.SES({apiVersion:
'2010-12-01'}).listTemplates({MaxItems: ITEMS_COUNT}).promise();
// Handle promise's fulfilled/rejected states
templatePromise.then(
function(data) {
console.log(data);
}).catch(
function(err) {
console.error(err, err.stack);
});
To run the example, type the following at the command line. Amazon SES returns the list of templates.
node ses_listtemplates.js
This sample code can be found here on GitHub.
Getting an Email Template
In this example, use a Node.js module to get an email template to use with Amazon SES. Create a Node.js
module with the file name ses_gettemplate.js. Configure the SDK as previously shown.
Create an object to pass the TemplateName parameter for the getTemplate method of the AWS.SES
client class. To call the getTemplate method, create a promise for invoking an Amazon SES service
object, passing the parameters. Then handle the response in the promise callback.
// Load the AWS SDK for Node.js
var AWS = require('aws-sdk');
// Set the region
AWS.config.update({region: 'REGION'});
// Create the promise and SES service object
var templatePromise = new AWS.SES({apiVersion: '2010-12-01'}).getTemplate({TemplateName:
'TEMPLATE_NAME'}).promise();
// Handle promise's fulfilled/rejected states
templatePromise.then(
function(data) {
console.log(data.SubjectPart);
}).catch(
function(err) {
console.error(err, err.stack);
});
190

AWS SDK for JavaScript Developer Guide for SDK v2
Working with Email Templates
To run the example, type the following at the command line. Amazon SES returns the template details.
node ses_gettemplate.js
This sample code can be found here on GitHub.
Creating an Email Template
In this example, use a Node.js module to create an email template to use with Amazon SES. Create a
Node.js module with the file name ses_createtemplate.js. Configure the SDK as previously shown.
Create an object to pass the parameters for the createTemplate method of the AWS.SES client class,
including TemplateName, HtmlPart, SubjectPart, and TextPart. To call the createTemplate
method, create a promise for invoking an Amazon SES service object, passing the parameters. Then
handle the response in the promise callback.
// Load the AWS SDK for Node.js
var AWS = require('aws-sdk');
// Set the region
AWS.config.update({region: 'REGION'});
// Create createTemplate params
var params = {
Template: {
TemplateName: 'TEMPLATE_NAME', /* required */
HtmlPart: 'HTML_CONTENT',
SubjectPart: 'SUBJECT_LINE',
TextPart: 'TEXT_CONTENT'
}
};
// Create the promise and SES service object
var templatePromise = new AWS.SES({apiVersion:
'2010-12-01'}).createTemplate(params).promise();
// Handle promise's fulfilled/rejected states
templatePromise.then(
function(data) {
console.log(data);
}).switch(
function(err) {
console.error(err, err.stack);
});
To run the example, type the following at the command line. The template is added to Amazon SES.
node ses_createtemplate.js
This sample code can be found here on GitHub.
Updating an Email Template
In this example, use a Node.js module to create an email template to use with Amazon SES. Create a
Node.js module with the file name ses_updatetemplate.js. Configure the SDK as previously shown.
Create an object to pass the Template parameter values you want to update in the template, with the
required TemplateName parameter passed to the updateTemplate method of the AWS.SES client
class. To call the updateTemplate method, create a promise for invoking an Amazon SES service object,
passing the parameters. Then handle the response in the promise callback.
191

AWS SDK for JavaScript Developer Guide for SDK v2
Working with Email Templates
// Load the AWS SDK for Node.js
var AWS = require('aws-sdk');
// Set the region
AWS.config.update({region: 'REGION'});
// Create updateTemplate parameters
var params = {
Template: {
TemplateName: 'TEMPLATE_NAME', /* required */
HtmlPart: 'HTML_CONTENT',
SubjectPart: 'SUBJECT_LINE',
TextPart: 'TEXT_CONTENT'
}
};
// Create the promise and SES service object
var templatePromise = new AWS.SES({apiVersion:
'2010-12-01'}).updateTemplate(params).promise();
// Handle promise's fulfilled/rejected states
templatePromise.then(
function(data) {
console.log("Template Updated");
}).switch(
function(err) {
console.error(err, err.stack);
});
To run the example, type the following at the command line. Amazon SES returns the template details.
node ses_updatetemplate.js
This sample code can be found here on GitHub.
Deleting an Email Template
In this example, use a Node.js module to create an email template to use with Amazon SES. Create a
Node.js module with the file name ses_deletetemplate.js. Configure the SDK as previously shown.
Create an object to pass the requiredTemplateName parameter to the deleteTemplate method of the
AWS.SES client class. To call the deleteTemplate method, create a promise for invoking an Amazon
SES service object, passing the parameters. Then handle the response in the promise callback.
// Load the AWS SDK for Node.js
var AWS = require('aws-sdk');
// Set the region
AWS.config.update({region: 'REGION'});
// Create the promise and SES service object
var templatePromise = new AWS.SES({apiVersion: '2010-12-01'}).deleteTemplate({TemplateName:
'TEMPLATE_NAME'}).promise();
// Handle promise's fulfilled/rejected states
templatePromise.then(
function(data) {
console.log("Template Deleted");
}).catch(
function(err) {
console.error(err, err.stack);
});
192

AWS SDK for JavaScript Developer Guide for SDK v2
Sending Email Using Amazon SES
To run the example, type the following at the command line. Amazon SES returns the template details.
node ses_deletetemplate.js
This sample code can be found here on GitHub.
Sending Email Using Amazon SES
This Node.js code example shows:
• Send a text or HTML email.
• Send emails based on an email template.
• Send bulk emails based on an email template.
The Amazon SES API provides two different ways for you to send an email, depending on how much
control you want over the composition of the email message: formatted and raw. For details, see Sending
Formatted Email Using the Amazon SES API and Sending Raw Email Using the Amazon SES API.
The Scenario
In this example, you use a series of Node.js modules to send email in a variety of ways. The Node.js
modules use the SDK for JavaScript to create and use email templates using these methods of the
AWS.SES client class:
• sendEmail
• sendTemplatedEmail
• sendBulkTemplatedEmail
Prerequisite Tasks
• Install Node.js. For more information about installing Node.js, see the Node.js website.
• Create a shared configurations file with your user credentials. For more information about providing a
credentials JSON file, see Loading Credentials in Node.js from the Shared Credentials File (p. 26).
Configuring the SDK
Configure the SDK for JavaScript by creating a global configuration object, setting the region, and
providing credentials for your code. In this example, the credentials are provided using the JSON file you
created.
// Load the SDK for JavaScript
var AWS = require('aws-sdk');
// Set the region
AWS.config.update({region: 'us-west-2'});
193

AWS SDK for JavaScript Developer Guide for SDK v2
Sending Email Using Amazon SES
Email Message Sending Requirements
Amazon SES composes an email message and immediately queues it for sending. To send email using
the SES.sendEmail method, your message must meet the following requirements:
• You must send the message from a verified email address or domain. If you attempt to send
email using a non-verified address or domain, the operation results in an "Email address not
verified" error.
• If your account is still in the Amazon SES sandbox, you can only send to verified addresses or domains,
or to email addresses associated with the Amazon SES Mailbox Simulator. For more information, see
Verifying Email Addresses and Domains in the Amazon Simple Email Service Developer Guide.
• The total size of the message, including attachments, must be smaller than 10 MB.
• The message must include at least one recipient email address. The recipient address can be a To:
address, a CC: address, or a BCC: address. If a recipient email address is invalid (that is, it is not in the
format UserName@[SubDomain.]Domain.TopLevelDomain), the entire message is rejected, even if
the message contains other recipients that are valid.
• The message cannot include more than 50 recipients, across the To:, CC: and BCC: fields. If you need
to send an email message to a larger audience, you can divide your recipient list into groups of 50 or
fewer, and then call the sendEmail method several times to send the message to each group.
Sending an Email
In this example, use a Node.js module to send email with Amazon SES. Create a Node.js module with the
file name ses_sendemail.js. Configure the SDK as previously shown.
Create an object to pass the parameter values that define the email to be sent, including sender and
receiver addresses, subject, email body in plain text and HTML formats, to the sendEmail method of
the AWS.SES client class. To call the sendEmail method, create a promise for invoking an Amazon SES
service object, passing the parameters. Then handle the response in the promise callback.
// Load the AWS SDK for Node.js
var AWS = require('aws-sdk');
// Set the region
AWS.config.update({region: 'REGION'});
// Create sendEmail params
var params = {
Destination: { /* required */
CcAddresses: [
'EMAIL_ADDRESS',
/* more items */
],
ToAddresses: [
'EMAIL_ADDRESS',
/* more items */
]
},
Message: { /* required */
Body: { /* required */
Html: {
Charset: "UTF-8",
Data: "HTML_FORMAT_BODY"
},
Text: {
Charset: "UTF-8",
Data: "TEXT_FORMAT_BODY"
}
},
194

AWS SDK for JavaScript Developer Guide for SDK v2
Sending Email Using Amazon SES
Subject: {
Charset: 'UTF-8',
Data: 'Test email'
}
},
Source: 'SENDER_EMAIL_ADDRESS', /* required */
ReplyToAddresses: [
'EMAIL_ADDRESS',
/* more items */
],
};
// Create the promise and SES service object
var sendPromise = new AWS.SES({apiVersion: '2010-12-01'}).sendEmail(params).promise();
// Handle promise's fulfilled/rejected states
sendPromise.then(
function(data) {
console.log(data.MessageId);
}).catch(
function(err) {
console.error(err, err.stack);
});
To run the example, type the following at the command line. The email is queued for sending by Amazon
SES.
node ses_sendemail.js
This sample code can be found here on GitHub.
Sending an Email Using a Template
In this example, use a Node.js module to send email with Amazon SES. Create a Node.js module with the
file name ses_sendtemplatedemail.js. Configure the SDK as previously shown.
Create an object to pass the parameter values that define the email to be sent, including sender and
receiver addresses, subject, email body in plain text and HTML formats, to the sendTemplatedEmail
method of the AWS.SES client class. To call the sendTemplatedEmail method, create a promise for
invoking an Amazon SES service object, passing the parameters. Then handle the response in the
promise callback.
// Load the AWS SDK for Node.js
var AWS = require('aws-sdk');
// Set the region
AWS.config.update({region: 'REGION'});
// Create sendTemplatedEmail params
var params = {
Destination: { /* required */
CcAddresses: [
'EMAIL_ADDRESS',
/* more CC email addresses */
],
ToAddresses: [
'EMAIL_ADDRESS',
/* more To email addresses */
]
},
Source: 'EMAIL_ADDRESS', /* required */
Template: 'TEMPLATE_NAME', /* required */
TemplateData: '{ \"REPLACEMENT_TAG_NAME\":\"REPLACEMENT_VALUE\" }', /* required */
195

AWS SDK for JavaScript Developer Guide for SDK v2
Sending Email Using Amazon SES
ReplyToAddresses: [
'EMAIL_ADDRESS',
],
};
// Create the promise and SES service object
var sendPromise = new AWS.SES({apiVersion:
'2010-12-01'}).sendTemplatedEmail(params).promise();
// Handle promise's fulfilled/rejected states
sendPromise.then(
function(data) {
console.log(data);
}).catch(
function(err) {
console.error(err, err.stack);
});
To run the example, type the following at the command line. The email is queued for sending by Amazon
SES.
node ses_sendtemplatedemail.js
This sample code can be found here on GitHub.
Sending Bulk Email Using a Template
In this example, use a Node.js module to send email with Amazon SES. Create a Node.js module with the
file name ses_sendbulktemplatedemail.js. Configure the SDK as previously shown.
Create an object to pass the parameter values that define the email to be sent, including
sender and receiver addresses, subject, email body in plain text and HTML formats,
to the sendBulkTemplatedEmail method of the AWS.SES client class. To call the
sendBulkTemplatedEmail method, create a promise for invoking an Amazon SES service object,
passing the parameters. Then handle the response in the promise callback.
// Load the AWS SDK for Node.js
var AWS = require('aws-sdk');
// Set the region
AWS.config.update({region: 'REGION'});
// Create sendBulkTemplatedEmail params
var params = {
Destinations: [ /* required */
{
Destination: { /* required */
CcAddresses: [
'EMAIL_ADDRESS',
/* more items */
],
ToAddresses: [
'EMAIL_ADDRESS',
'EMAIL_ADDRESS',
/* more items */
]
},
ReplacementTemplateData: '{ \"REPLACEMENT_TAG_NAME\":\"REPLACEMENT_VALUE\" }'
},
],
Source: 'EMAIL_ADDRESS', /* required */
Template: 'TEMPLATE_NAME', /* required */
196

AWS SDK for JavaScript Developer Guide for SDK v2
Using IP Address Filters
DefaultTemplateData: '{ \"REPLACEMENT_TAG_NAME\":\"REPLACEMENT_VALUE\" }',
ReplyToAddresses: [
'EMAIL_ADDRESS',
]
};
// Create the promise and SES service object
var sendPromise = new AWS.SES({apiVersion:
'2010-12-01'}).sendBulkTemplatedEmail(params).promise();
// Handle promise's fulfilled/rejected states
sendPromise.then(
function(data) {
console.log(data);
}).catch(
function(err) {
console.log(err, err.stack);
});
To run the example, type the following at the command line. The email is queued for sending by Amazon
SES.
node ses_sendbulktemplatedemail.js
This sample code can be found here on GitHub.
Using IP Address Filters for Email Receipt in Amazon
SES
This Node.js code example shows:
• Create IP address filters to accept or reject mail that originates from an IP address or range of IP
addresses.
• List your current IP address filters.
• Delete an IP address filter.
In Amazon SES, a filter is a data structure that consists of a name, an IP address range, and whether to
allow or block mail from it. IP addresses you want to block or allow are specified as a single IP address
or a range of IP addresses in Classless Inter-Domain Routing (CIDR) notation. For details on how Amazon
SES receives email, see Amazon SES Email-Receiving Concepts in the Amazon Simple Email Service
Developer Guide.
The Scenario
In this example, a series of Node.js modules are used to send email in a variety of ways. The Node.js
modules use the SDK for JavaScript to create and use email templates using these methods of the
AWS.SES client class:
• createReceiptFilter
197

AWS SDK for JavaScript Developer Guide for SDK v2
Using IP Address Filters
• listReceiptFilters
• deleteReceiptFilter
Prerequisite Tasks
To set up and run this example, you must first complete these tasks:
• Install Node.js. For more information about installing Node.js, see the Node.js website.
• Create a shared configurations file with your user credentials. For more information about providing a
shared credentials file, see Loading Credentials in Node.js from the Shared Credentials File (p. 26).
Configuring the SDK
Configure the SDK for JavaScript by creating a global configuration object then setting the region for
your code. In this example, the region is set to us-west-2.
// Load the SDK for JavaScript
var AWS = require('aws-sdk');
// Set the region
AWS.config.update({region: 'us-west-2'});
Creating an IP Address Filter
In this example, use a Node.js module to send email with Amazon SES. Create a Node.js module with the
file name ses_createreceiptfilter.js. Configure the SDK as previously shown.
Create an object to pass the parameter values that define the IP filter, including the filter name, an IP
address or range of addresses to filter, and whether to allow or block email traffic from the filtered
addresses. To call the createReceiptFilter method, create a promise for invoking an Amazon SES
service object, passing the parameters. Then handle the response in the promise callback.
// Load the AWS SDK for Node.js
var AWS = require('aws-sdk');
// Set the region
AWS.config.update({region: 'REGION'});
// Create createReceiptFilter params
var params = {
Filter: {
IpFilter: {
Cidr: "IP_ADDRESS_OR_RANGE",
Policy: "Allow" | "Block"
},
Name: "NAME"
}
};
// Create the promise and SES service object
var sendPromise = new AWS.SES({apiVersion:
'2010-12-01'}).createReceiptFilter(params).promise();
// Handle promise's fulfilled/rejected states
sendPromise.then(
function(data) {
console.log(data);
}).catch(
function(err) {
198

AWS SDK for JavaScript Developer Guide for SDK v2
Using IP Address Filters
console.error(err, err.stack);
});
To run the example, type the following at the command line. The filter is created in Amazon SES.
node ses_createreceiptfilter.js
This sample code can be found here on GitHub.
Listing Your IP Address Filters
In this example, use a Node.js module to send email with Amazon SES. Create a Node.js module with the
file name ses_listreceiptfilters.js. Configure the SDK as previously shown.
Create an empty parameters object. To call the listReceiptFilters method, create a promise for
invoking an Amazon SES service object, passing the parameters. Then handle the response in the
promise callback.
// Load the AWS SDK for Node.js
var AWS = require('aws-sdk');
// Set the region
AWS.config.update({region: 'us-west-2'});
// Create the promise and SES service object
var sendPromise = new AWS.SES({apiVersion: '2010-12-01'}).listReceiptFilters({}).promise();
// Handle promise's fulfilled/rejected states
sendPromise.then(
function(data) {
console.log(data.Filters);
}).catch(
function(err) {
console.error(err, err.stack);
});
To run the example, type the following at the command line. Amazon SES returns the filter list.
node ses_listreceiptfilters.js
This sample code can be found here on GitHub.
Deleting an IP Address Filter
In this example, use a Node.js module to send email with Amazon SES. Create a Node.js module with the
file name ses_deletereceiptfilter.js. Configure the SDK as previously shown.
Create an object to pass the name of the IP filter to delete. To call the deleteReceiptFilter method,
create a promise for invoking an Amazon SES service object, passing the parameters. Then handle the
response in the promise callback.
// Load the AWS SDK for Node.js
var AWS = require('aws-sdk');
// Set the region
AWS.config.update({region: 'REGION'});
// Create the promise and SES service object
var sendPromise = new AWS.SES({apiVersion: '2010-12-01'}).deleteReceiptFilter({FilterName:
"NAME"}).promise();
199

AWS SDK for JavaScript Developer Guide for SDK v2
Using Receipt Rules
// Handle promise's fulfilled/rejected states
sendPromise.then(
function(data) {
console.log("IP Filter deleted");
}).catch(
function(err) {
console.error(err, err.stack);
});
To run the example, type the following at the command line. The filter is deleted from Amazon SES.
node ses_deletereceiptfilter.js
This sample code can be found here on GitHub.
Using Receipt Rules in Amazon SES
This Node.js code example shows:
• Create and delete receipt rules.
• Organize receipt rules into receipt rule sets.
Receipt rules in Amazon SES specify what to do with email received for email addresses or domains you
own. A receipt rule contains a condition and an ordered list of actions. If the recipient of an incoming
email matches a recipient specified in the conditions for the receipt rule, Amazon SES performs the
actions that the receipt rule specifies.
To use Amazon SES as your email receiver, you must have at least one active receipt rule set. A receipt
rule set is an ordered collection of receipt rules that specify what Amazon SES should do with mail it
receives across your verified domains. For more information, see Creating Receipt Rules for Amazon SES
Email Receiving and Creating a Receipt Rule Set for Amazon SES Email Receiving in the Amazon Simple
Email Service Developer Guide.
The Scenario
In this example, a series of Node.js modules are used to send email in a variety of ways. The Node.js
modules use the SDK for JavaScript to create and use email templates using these methods of the
AWS.SES client class:
• createReceiptRule
• deleteReceiptRule
• createReceiptRuleSet
• deleteReceiptRuleSet
Prerequisite Tasks
To set up and run this example, you must first complete these tasks:
200

AWS SDK for JavaScript Developer Guide for SDK v2
Using Receipt Rules
• Install Node.js. For more information about installing Node.js, see the Node.js website.
• Create a shared configurations file with your user credentials. For more information about providing a
credentials JSON file, see Loading Credentials in Node.js from the Shared Credentials File (p. 26).
Configuring the SDK
Configure the SDK for JavaScript by creating a global configuration object then setting the region for
your code. In this example, the region is set to us-west-2.
// Load the SDK for JavaScript
var AWS = require('aws-sdk');
// Set the region
AWS.config.update({region: 'us-west-2'});
Creating an Amazon S3 Receipt Rule
Each receipt rule for Amazon SES contains an ordered list of actions. This example creates a receipt rule
with an Amazon S3 action, which delivers the mail message to an Amazon S3 bucket. For details on
receipt rule actions, see Action Options in the Amazon Simple Email Service Developer Guide.
For Amazon SES to write email to an Amazon S3 bucket, create a bucket policy that gives PutObject
permission to Amazon SES. For information about creating this bucket policy, see Give Amazon SES
Permission to Write to Your Amazon S3 Bucket in the Amazon Simple Email Service Developer Guide.
In this example, use a Node.js module to create a receipt rule in Amazon SES to save received messages
in an Amazon S3 bucket. Create a Node.js module with the file name ses_createreceiptrule.js.
Configure the SDK as previously shown.
Create a parameters object to pass the values needed to create for the receipt rule set. To call the
createReceiptRuleSet method, create a promise for invoking an Amazon SES service object, passing
the parameters. Then handle the response in the promise callback.
// Load the AWS SDK for Node.js
var AWS = require('aws-sdk');
// Set the region
AWS.config.update({region: 'REGION'});
// Create createReceiptRule params
var params = {
Rule: {
Actions: [
{
S3Action: {
BucketName: "S3_BUCKET_NAME/*",
ObjectKeyPrefix: "email"
}
}
],
Recipients: [
'DOMAIN | EMAIL_ADDRESS',
/* more items */
],
Enabled: true | false,
Name: "RULE_NAME",
ScanEnabled: true | false,
TlsPolicy: "Optional"
},
RuleSetName: "RULE_SET_NAME"
201

AWS SDK for JavaScript Developer Guide for SDK v2
Using Receipt Rules
};
// Create the promise and SES service object
var newRulePromise = new AWS.SES({apiVersion:
'2010-12-01'}).createReceiptRule(params).promise();
// Handle promise's fulfilled/rejected states
newRulePromise.then(
function(data) {
console.log("Rule created");
}).catch(
function(err) {
console.error(err, err.stack);
});
To run the example, type the following at the command line. Amazon SES creates the receipt rule.
node ses_createreceiptrule.js
This sample code can be found here on GitHub.
Deleting a Receipt Rule
In this example, use a Node.js module to send email with Amazon SES. Create a Node.js module with the
file name ses_deletereceiptrule.js. Configure the SDK as previously shown.
Create a parameters object to pass the name for the receipt rule to delete. To call the
deleteReceiptRule method, create a promise for invoking an Amazon SES service object, passing the
parameters. Then handle the response in the promise callback.
// Load the AWS SDK for Node.js
var AWS = require('aws-sdk');
// Set the region
AWS.config.update({region: 'REGION'});
// Create deleteReceiptRule params
var params = {
RuleName: 'RULE_NAME', /* required */
RuleSetName: 'RULE_SET_NAME' /* required */
};
// Create the promise and SES service object
var newRulePromise = new AWS.SES({apiVersion:
'2010-12-01'}).deleteReceiptRule(params).promise();
// Handle promise's fulfilled/rejected states
newRulePromise.then(
function(data) {
console.log("Receipt Rule Deleted");
}).catch(
function(err) {
console.error(err, err.stack);
});
To run the example, type the following at the command line. Amazon SES creates the receipt rule set list.
node ses_deletereceiptrule.js
This sample code can be found here on GitHub.
202

AWS SDK for JavaScript Developer Guide for SDK v2
Using Receipt Rules
Creating a Receipt Rule Set
In this example, use a Node.js module to send email with Amazon SES. Create a Node.js module with the
file name ses_createreceiptruleset.js. Configure the SDK as previously shown.
Create a parameters object to pass the name for the new receipt rule set. To call the
createReceiptRuleSet method, create a promise for invoking an Amazon SES service object, passing
the parameters. Then handle the response in the promise callback.
// Load the AWS SDK for Node.js
var AWS = require('aws-sdk');
// Set the region
AWS.config.update({region: 'REGION'});
// Create the promise and SES service object
var newRulePromise = new AWS.SES({apiVersion:
'2010-12-01'}).createReceiptRuleSet({RuleSetName: "NAME"}).promise();
// Handle promise's fulfilled/rejected states
newRulePromise.then(
function(data) {
console.log(data);
}).catch
function(err) {
console.error(err, err.stack);
});
To run the example, type the following at the command line. Amazon SES creates the receipt rule set list.
node ses_createreceiptruleset.js
This sample code can be found here on GitHub.
Deleting a Receipt Rule Set
In this example, use a Node.js module to send email with Amazon SES. Create a Node.js module with the
file name ses_deletereceiptruleset.js. Configure the SDK as previously shown.
Create an object to pass the name for the receipt rule set to delete. To call the deleeReceiptRuleSet
method, create a promise for invoking an Amazon SES service object, passing the parameters. Then
handle the response in the promise callback.
// Load the AWS SDK for Node.js
var AWS = require('aws-sdk');
// Set the region
AWS.config.update({region: 'REGION'});
// Create the promise and SES service object
var newRulePromise = new AWS.SES({apiVersion:
'2010-12-01'}).deleeReceiptRuleSet({RuleSetName: "NAME"}).promise();
// Handle promise's fulfilled/rejected states
newRulePromise.then(
function(data) {
console.log(data);
}).catch(
function(err) {
console.error(err, err.stack);
});
203

AWS SDK for JavaScript Developer Guide for SDK v2
Amazon SNS Examples
To run the example, type the following at the command line. Amazon SES creates the receipt rule set list.
node ses_deletereceiptruleset.js
This sample code can be found here on GitHub.
Amazon Simple Notification Service Examples
Amazon Simple Notification Service (Amazon SNS) is a web service that coordinates and manages the
delivery or sending of messages to subscribing endpoints or clients.
In Amazon SNS, there are two types of clients—publishers and subscribers—also referred to as producers
and consumers.
Publishers communicate asynchronously with subscribers by producing and sending a message to
a topic, which is a logical access point and communication channel. Subscribers (web servers, email
addresses, Amazon SQS queues, Lambda functions) consume or receive the message or notification
over one of the supported protocols (Amazon SQS, HTTP/S, email, SMS, AWS Lambda) when they are
subscribed to the topic.
The JavaScript API for Amazon SNS is exposed through the AWS.SNS client class. For more information,
see Class: AWS.SNS in the API reference.
Topics
• Managing Topics in Amazon SNS (p. 204)
• Publishing Messages in Amazon SNS (p. 208)
• Managing Subscriptions in Amazon SNS (p. 209)
• Sending SMS Messages with Amazon SNS (p. 213)
Managing Topics in Amazon SNS
This Node.js code example shows:
• How to create topics in Amazon SNS to which you can publish notifications.
• How to delete topics created in Amazon SNS.
• How to get a list of available topics.
204

AWS SDK for JavaScript Developer Guide for SDK v2
Managing Topics
• How to get and set topic attributes.
The Scenario
In this example, you use a series of Node.js modules to create, list, and delete Amazon SNS topics, and
to handle topic attributes. The Node.js modules use the SDK for JavaScript to manage topics using these
methods of the AWS.SNS client class:
• createTopic
• listTopics
• deleteTopic
• getTopicAttributes
• setTopicAttributes
Prerequisite Tasks
To set up and run this example, you must first complete these tasks:
• Install Node.js. For more information about installing Node.js, see the Node.js website.
• Create a shared configurations file with your user credentials. For more information about providing a
credentials JSON file, see Loading Credentials in Node.js from the Shared Credentials File (p. 26).
Creating a Topic
In this example, use a Node.js module to create an Amazon SNS topic. Create a Node.js module with the
file name sns_createtopic.js. Configure the SDK as previously shown.
Create an object to pass the Name for the new topic to the createTopic method of the AWS.SNS client
class. To call the createTopic method, create a promise for invoking an Amazon SNS service object,
passing the parameters object. Then handle the response in the promise callback. The data returned
by the promise contains the ARN of the topic.
// Load the AWS SDK for Node.js
var AWS = require('aws-sdk');
// Set region
AWS.config.update({region: 'REGION'});
// Create promise and SNS service object
var createTopicPromise = new AWS.SNS({apiVersion: '2010-03-31'}).createTopic({Name:
"TOPIC_NAME"}).promise();
// Handle promise's fulfilled/rejected states
createTopicPromise.then(
function(data) {
console.log("Topic ARN is " + data.TopicArn);
}).catch(
function(err) {
console.error(err, err.stack);
});
To run the example, type the following at the command line.
node sns_createtopic.js
205

AWS SDK for JavaScript Developer Guide for SDK v2
Managing Topics
This sample code can be found here on GitHub.
Listing Your Topics
In this example, use a Node.js module to list all Amazon SNS topics. Create a Node.js module with the file
name sns_listtopics.js. Configure the SDK as previously shown.
Create an empty object to pass to the listTopics method of the AWS.SNS client class. To call
the listTopics method, create a promise for invoking an Amazon SNS service object, passing the
parameters object. Then handle the response in the promise callback. The data returned by the
promise contains an array of your topic ARNs.
// Load the AWS SDK for Node.js
var AWS = require('aws-sdk');
// Set region
AWS.config.update({region: 'REGION'});
// Create promise and SNS service object
var listTopicsPromise = new AWS.SNS({apiVersion: '2010-03-31'}).listTopics({}).promise();
// Handle promise's fulfilled/rejected states
listTopicsPromise.then(
function(data) {
console.log(data.Topics);
}).catch(
function(err) {
console.error(err, err.stack);
});
To run the example, type the following at the command line.
node sns_listtopics.js
This sample code can be found here on GitHub.
Deleting a Topic
In this example, use a Node.js module to delete an Amazon SNS topic. Create a Node.js module with the
file name sns_deletetopic.js. Configure the SDK as previously shown.
Create an object containing the TopicArn of the topic to delete to pass to the deleteTopic method
of the AWS.SNS client class. To call the deleteTopic method, create a promise for invoking an Amazon
SNS service object, passing the parameters object. Then handle the response in the promise callback.
// Load the AWS SDK for Node.js
var AWS = require('aws-sdk');
// Set region
AWS.config.update({region: 'REGION'});
// Create promise and SNS service object
var deleteTopicPromise = new AWS.SNS({apiVersion: '2010-03-31'}).deleteTopic({TopicArn:
'TOPIC_ARN'}).promise();
// Handle promise's fulfilled/rejected states
deleteTopicPromise.then(
function(data) {
console.log("Topic Deleted");
}).catch(
206

AWS SDK for JavaScript Developer Guide for SDK v2
Managing Topics
function(err) {
console.error(err, err.stack);
});
To run the example, type the following at the command line.
node sns_deletetopic.js
This sample code can be found here on GitHub.
Getting Topic Attributes
In this example, use a Node.js module to retrieve attributes of an Amazon SNS topic. Create a Node.js
module with the file name sns_gettopicattributes.js. Configure the SDK as previously shown.
Create an object containing the TopicArn of a topic to delete to pass to the getTopicAttributes
method of the AWS.SNS client class. To call the getTopicAttributes method, create a promise for
invoking an Amazon SNS service object, passing the parameters object. Then handle the response in
the promise callback.
// Load the AWS SDK for Node.js
var AWS = require('aws-sdk');
// Set region
AWS.config.update({region: 'REGION'});
// Create promise and SNS service object
var getTopicAttribsPromise = new AWS.SNS({apiVersion:
'2010-03-31'}).getTopicAttributes({TopicArn: 'TOPIC_ARN'}).promise();
// Handle promise's fulfilled/rejected states
getTopicAttribsPromise.then(
function(data) {
console.log(data);
}).catch(
function(err) {
console.error(err, err.stack);
});
To run the example, type the following at the command line.
node sns_gettopicattributes.js
This sample code can be found here on GitHub.
Setting Topic Attributes
In this example, use a Node.js module to set the mutable attributes of an Amazon SNS topic. Create a
Node.js module with the file name sns_settopicattributes.js. Configure the SDK as previously
shown.
Create an object containing the parameters for the attribute update, including the TopicArn of
the topic whose attributes you want to set, the name of the attribute to set, and the new value
for that attribute. You can set only the Policy, DisplayName, and DeliveryPolicy attributes.
Pass the parameters to the setTopicAttributes method of the AWS.SNS client class. To call the
setTopicAttributes method, create a promise for invoking an Amazon SNS service object, passing
the parameters object. Then handle the response in the promise callback.
207

AWS SDK for JavaScript Developer Guide for SDK v2
Publishing Messages to a Topic
// Load the AWS SDK for Node.js
var AWS = require('aws-sdk');
// Set region
AWS.config.update({region: 'REGION'});
// Create setTopicAttributes parameters
var params = {
AttributeName: 'ATTRIBUTE_NAME', /* required */
TopicArn: 'TOPIC_ARN', /* required */
AttributeValue: 'NEW_ATTRIBUTE_VALUE'
};
// Create promise and SNS service object
var setTopicAttribsPromise = new AWS.SNS({apiVersion:
'2010-03-31'}).setTopicAttributes(params).promise();
// Handle promise's fulfilled/rejected states
setTopicAttribsPromise.then(
function(data) {
console.log(data);
}).catch(
function(err) {
console.error(err, err.stack);
});
To run the example, type the following at the command line.
node sns_settopicattributes.js
This sample code can be found here on GitHub.
Publishing Messages in Amazon SNS
This Node.js code example shows:
• How to publish messages to an Amazon SNS topic.
The Scenario
In this example, you use a series of Node.js modules to publish messages from Amazon SNS to topic
endpoints, emails, or phone numbers. The Node.js modules use the SDK for JavaScript to send messages
using this method of the AWS.SNS client class:
• publish
Prerequisite Tasks
To set up and run this example, you must first complete these tasks:
• Install Node.js. For more information about installing Node.js, see the Node.js website.
208

AWS SDK for JavaScript Developer Guide for SDK v2
Managing Subscriptions
• Create a shared configurations file with your user credentials. For more information about providing a
credentials JSON file, see Loading Credentials in Node.js from the Shared Credentials File (p. 26).
Publishing a Message to an SNS Topic
In this example, use a Node.js module to publish a message to an Amazon SNS topic. Create a Node.js
module with the file name sns_publishtotopic.js. Configure the SDK as previously shown.
Create an object containing the parameters for publishing a message, including the message text and
the ARN of the SNS topic. For details on available SMS attributes, see SetSMSAttributes in the Amazon
Simple Notification Service API Reference of the SNS topic.
Pass the parameters to the publish method of the AWS.SNS client class. Create a promise for invoking
an Amazon SNS service object, passing the parameters object. Then handle the response in the promise
callback.
// Load the AWS SDK for Node.js
var AWS = require('aws-sdk');
// Set region
AWS.config.update({region: 'REGION'});
// Create publish parameters
var params = {
Message: 'MESSAGE_TEXT', /* required */
TopicArn: 'TOPIC_ARN'
};
// Create promise and SNS service object
var publishTextPromise = new AWS.SNS({apiVersion: '2010-03-31'}).publish(params).promise();
// Handle promise's fulfilled/rejected states
publishTextPromise.then(
function(data) {
console.log(`Message ${params.Message} send sent to the topic ${params.TopicArn}`);
console.log("MessageID is " + data.MessageId);
}).catch(
function(err) {
console.error(err, err.stack);
});
To run the example, type the following at the command line.
node sns_publishtotopic.js
This sample code can be found here on GitHub.
Managing Subscriptions in Amazon SNS
This Node.js code example shows:
• How to list all subscriptions to an Amazon SNS topic.
209

AWS SDK for JavaScript Developer Guide for SDK v2
Managing Subscriptions
• How to subscribe an email address, an application endpoint, or an AWS Lambda function to an
Amazon SNS topic.
• How to unsubscribe from Amazon SNS topics.
The Scenario
In this example, you use a series of Node.js modules to publish notification messages to Amazon SNS
topics. The Node.js modules use the SDK for JavaScript to manage topics using these methods of the
AWS.SNS client class:
• subscribe
• confirmSubscription
• listSubscriptionsByTopic
• unsubscribe
Prerequisite Tasks
To set up and run this example, you must first complete these tasks:
• Install Node.js. For more information about installing Node.js, see the Node.js website.
• Create a shared configurations file with your user credentials. For more information about providing a
credentials JSON file, see Loading Credentials in Node.js from the Shared Credentials File (p. 26).
Listing Subscriptions to a Topic
In this example, use a Node.js module to list all subscriptions to an Amazon SNS topic. Create a Node.js
module with the file name sns_listsubscriptions.js. Configure the SDK as previously shown.
Create an object containing the TopicArn parameter for the topic whose subscriptions you want to
list. Pass the parameters to the listSubscriptionsByTopic method of the AWS.SNS client class. To
call the listSubscriptionsByTopic method, create a promise for invoking an Amazon SNS service
object, passing the parameters object. Then handle the response in the promise callback.
/// Load the AWS SDK for Node.js
var AWS = require('aws-sdk');
// Set region
AWS.config.update({region: 'REGION'});
// Create promise and SNS service object
var subslistPromise = new AWS.SNS({apiVersion:
'2010-03-31'}).listSubscriptionsByTopic({TopicArn : TOPIC_ARN}).promise();
// Handle promise's fulfilled/rejected states
subslistPromise.then(
function(data) {
console.log(data);
}).catch(
function(err) {
console.error(err, err.stack);
}
);
To run the example, type the following at the command line.
node sns_listsubscriptions.js
210

AWS SDK for JavaScript Developer Guide for SDK v2
Managing Subscriptions
This sample code can be found here on GitHub.
Subscribing an Email Address to a Topic
In this example, use a Node.js module to subscribe an email address so that it receives SMTP
email messages from an Amazon SNS topic. Create a Node.js module with the file name
sns_subscribeemail.js. Configure the SDK as previously shown.
Create an object containing the Protocol parameter to specify the email protocol, the TopicArn
for the topic to subscribe to, and an email address as the message Endpoint. Pass the parameters to
the subscribe method of the AWS.SNS client class. You can use the subscribe method to subscribe
several different endpoints to an Amazon SNS topic, depending on the values used for parameters
passed, as other examples in this topic will show.
To call the subscribe method, create a promise for invoking an Amazon SNS service object, passing the
parameters object. Then handle the response in the promise callback.
// Load the AWS SDK for Node.js
var AWS = require('aws-sdk');
// Set region
AWS.config.update({region: 'REGION'});
// Create subscribe/email parameters
var params = {
Protocol: 'EMAIL', /* required */
TopicArn: 'TOPIC_ARN', /* required */
Endpoint: 'EMAIL_ADDRESS'
};
// Create promise and SNS service object
var subscribePromise = new AWS.SNS({apiVersion: '2010-03-31'}).subscribe(params).promise();
// Handle promise's fulfilled/rejected states
subscribePromise.then(
function(data) {
console.log("Subscription ARN is " + data.SubscriptionArn);
}).catch(
function(err) {
console.error(err, err.stack);
});
To run the example, type the following at the command line.
node sns_subscribeemail.js
This sample code can be found here on GitHub.
Subscribing an Application Endpoint to a Topic
In this example, use a Node.js module to subscribe a mobile application endpoint so it
receives notifications from an Amazon SNS topic. Create a Node.js module with the file name
sns_subscribeapp.js. Configure the SDK as previously shown.
Create an object containing the Protocol parameter to specify the application protocol, the
TopicArn for the topic to subscribe to, and the ARN of a mobile application endpoint for the Endpoint
parameter. Pass the parameters to the subscribe method of the AWS.SNS client class.
To call the subscribe method, create a promise for invoking an Amazon SNS service object, passing the
parameters object. Then handle the response in the promise callback.
211

AWS SDK for JavaScript Developer Guide for SDK v2
Managing Subscriptions
// Load the AWS SDK for Node.js
var AWS = require('aws-sdk');
// Set region
AWS.config.update({region: 'REGION'});
// Create subscribe/email parameters
var params = {
Protocol: 'application', /* required */
TopicArn: 'TOPIC_ARN', /* required */
Endpoint: 'MOBILE_ENDPOINT_ARN'
};
// Create promise and SNS service object
var subscribePromise = new AWS.SNS({apiVersion: '2010-03-31'}).subscribe(params).promise();
// Handle promise's fulfilled/rejected states
subscribePromise.then(
function(data) {
console.log("Subscription ARN is " + data.SubscriptionArn);
}).catch(
function(err) {
console.error(err, err.stack);
});
To run the example, type the following at the command line.
node sns_subscribeapp.js
This sample code can be found here on GitHub.
Subscribing a Lambda Function to a Topic
In this example, use a Node.js module to subscribe an AWS Lambda function so it receives notifications
from an Amazon SNS topic. Create a Node.js module with the file name sns_subscribelambda.js.
Configure the SDK as previously shown.
Create an object containing the Protocol parameter, specifying the lambda protocol, the TopicArn
for the topic to subscribe to, and the ARN of an AWS Lambda function as the Endpoint parameter. Pass
the parameters to the subscribe method of the AWS.SNS client class.
To call the subscribe method, create a promise for invoking an Amazon SNS service object, passing the
parameters object. Then handle the response in the promise callback.
// Load the AWS SDK for Node.js
var AWS = require('aws-sdk');
// Set region
AWS.config.update({region: 'REGION'});
// Create subscribe/email parameters
var params = {
Protocol: 'lambda', /* required */
TopicArn: 'TOPIC_ARN', /* required */
Endpoint: 'LAMBDA_FUNCTION_ARN'
};
// Create promise and SNS service object
var subscribePromise = new AWS.SNS({apiVersion: '2010-03-31'}).subscribe(params).promise();
// Handle promise's fulfilled/rejected states
subscribePromise.then(
function(data) {
212
AWS SDK for JavaScript Developer Guide for SDK v2
Sending SMS Messages
console.log("Subscription ARN is " + data.SubscriptionArn);
}).catch(
function(err) {
console.error(err, err.stack);
});
To run the example, type the following at the command line.
node sns_subscribelambda.js
This sample code can be found here on GitHub.
Unsubscribing from a Topic
In this example, use a Node.js module to unsubscribe an Amazon SNS topic subscription. Create a Node.js
module with the file name sns_unsubscribe.js. Configure the SDK as previously shown.
Create an object containing the SubscriptionArn parameter, specifying the ARN of the subscription to
unsubscribe. Pass the parameters to the unsubscribe method of the AWS.SNS client class.
To call the unsubscribe method, create a promise for invoking an Amazon SNS service object, passing
the parameters object. Then handle the response in the promise callback.
// Load the AWS SDK for Node.js
var AWS = require('aws-sdk');
// Set region
AWS.config.update({region: 'REGION'});
// Create promise and SNS service object
var subscribePromise = new AWS.SNS({apiVersion:
'2010-03-31'}).subscribe({SubscriptionArn : TOPIC_SUBSCRIPTION_ARN}).promise();
// Handle promise's fulfilled/rejected states
subscribePromise.then(
function(data) {
console.log(data);
}).catch(
function(err) {
console.error(err, err.stack);
});
To run the example, type the following at the command line.
node sns_unsubscribe.js
This sample code can be found here on GitHub.
Sending SMS Messages with Amazon SNS
This Node.js code example shows:
• How to get and set SMS messaging preferences for Amazon SNS.
213

AWS SDK for JavaScript Developer Guide for SDK v2
Sending SMS Messages
• How to check a phone number to see if it has opted out of receiving SMS messages.
• How to get a list of phone numbers that have opted out of receiving SMS messages.
• How to send an SMS message.
The Scenario
You can use Amazon SNS to send text messages, or SMS messages, to SMS-enabled devices. You can
send a message directly to a phone number, or you can send a message to multiple phone numbers at
once by subscribing those phone numbers to a topic and sending your message to the topic.
In this example, you use a series of Node.js modules to publish SMS text messages from Amazon SNS to
SMS-enabled devices. The Node.js modules use the SDK for JavaScript to publish SMS messages using
these methods of the AWS.SNS client class:
• getSMSAttributes
• setSMSAttributes
• checkIfPhoneNumberIsOptedOut
• listPhoneNumbersOptedOut
• publish
Prerequisite Tasks
To set up and run this example, you must first complete these tasks:
• Install Node.js. For more information about installing Node.js, see the Node.js website.
• Create a shared configurations file with your user credentials. For more information about providing a
credentials JSON file, see Loading Credentials in Node.js from the Shared Credentials File (p. 26).
Getting SMS Attributes
Use Amazon SNS to specify preferences for SMS messaging, such as how your deliveries are optimized
(for cost or for reliable delivery), your monthly spending limit, how message deliveries are logged,
and whether to subscribe to daily SMS usage reports. These preferences are retrieved and set as SMS
attributes for Amazon SNS.
In this example, use a Node.js module to get the current SMS attributes in Amazon SNS. Create a Node.js
module with the file name sns_getsmstype.js. Configure the SDK as previously shown. Create an
object containing the parameters for getting SMS attributes, including the names of the individual
attributes to get. For details on available SMS attributes, see SetSMSAttributes in the Amazon Simple
Notification Service API Reference.
This example gets the DefaultSMSType attribute, which controls whether SMS messages are sent
as Promotional, which optimizes message delivery to incur the lowest cost, or as Transactional,
which optimizes message delivery to achieve the highest reliability. Pass the parameters to the
setTopicAttributes method of the AWS.SNS client class. To call the getSMSAttributes method,
create a promise for invoking an Amazon SNS service object, passing the parameters object. Then handle
the response in the promise callback.
// Load the AWS SDK for Node.js
var AWS = require('aws-sdk');
// Set region
AWS.config.update({region: 'REGION'});
// Create SMS Attribute parameter you want to get
214

AWS SDK for JavaScript Developer Guide for SDK v2
Sending SMS Messages
var params = {
attributes: [
'DefaultSMSType',
'ATTRIBUTE_NAME'
/* more items */
]
};
// Create promise and SNS service object
var getSMSTypePromise = new AWS.SNS({apiVersion:
'2010-03-31'}).getSMSAttributes(params).promise();
// Handle promise's fulfilled/rejected states
getSMSTypePromise.then(
function(data) {
console.log(data);
}).catch(
function(err) {
console.error(err, err.stack);
});
To run the example, type the following at the command line.
node sns_getsmstype.js
This sample code can be found here on GitHub.
Setting SMS Attributes
In this example, use a Node.js module to get the current SMS attributes in Amazon SNS. Create a
Node.js module with the file name sns_setsmstype.js. Configure the SDK as previously shown.
Create an object containing the parameters for setting SMS attributes, including the names of the
individual attributes to set and the values to set for each. For details on available SMS attributes, see
SetSMSAttributes in the Amazon Simple Notification Service API Reference.
This example sets the DefaultSMSType attribute to Transactional, which optimizes message
delivery to achieve the highest reliability. Pass the parameters to the setTopicAttributes method
of the AWS.SNS client class. To call the getSMSAttributes method, create a promise for invoking an
Amazon SNS service object, passing the parameters object. Then handle the response in the promise
callback.
// Load the AWS SDK for Node.js
var AWS = require('aws-sdk');
// Set region
AWS.config.update({region: 'REGION'});
// Create SMS Attribute parameters
var params = {
attributes: { /* required */
'DefaultSMSType': 'Transactional', /* highest reliability */
}
};
// Create promise and SNS service object
var setSMSTypePromise = new AWS.SNS({apiVersion:
'2010-03-31'}).setSMSAttributes(params).promise();
// Handle promise's fulfilled/rejected states
setSMSTypePromise.then(
function(data) {
console.log(data);
}).catch(
215

AWS SDK for JavaScript Developer Guide for SDK v2
Sending SMS Messages
function(err) {
console.error(err, err.stack);
});
To run the example, type the following at the command line.
node sns_setsmstype.js
This sample code can be found here on GitHub.
Checking If a Phone Number Has Opted Out
In this example, use a Node.js module to check a phone number to see if it has opted out from receiving
SMS messages. Create a Node.js module with the file name sns_checkphoneoptout.js. Configure the
SDK as previously shown. Create an object containing the phone number to check as a parameter.
This example sets the PhoneNumber parameter to specify the phone number to check. Pass the
object to the checkIfPhoneNumberIsOptedOut method of the AWS.SNS client class. To call the
checkIfPhoneNumberIsOptedOut method, create a promise for invoking an Amazon SNS service
object, passing the parameters object. Then handle the response in the promise callback.
// Load the AWS SDK for Node.js
var AWS = require('aws-sdk');
// Set region
AWS.config.update({region: 'REGION'});
// Create promise and SNS service object
var phonenumPromise = new AWS.SNS({apiVersion:
'2010-03-31'}).checkIfPhoneNumberIsOptedOut({phoneNumber: 'PHONE_NUMBER'}).promise();
// Handle promise's fulfilled/rejected states
phonenumPromise.then(
function(data) {
console.log("Phone Opt Out is " + data.isOptedOut);
}).catch(
function(err) {
console.error(err, err.stack);
});
To run the example, type the following at the command line.
node sns_checkphoneoptout.js
This sample code can be found here on GitHub.
Listing Opted-Out Phone Numbers
In this example, use a Node.js module to get a list of phone numbers that have opted out from receiving
SMS messages. Create a Node.js module with the file name sns_listnumbersoptedout.js. Configure
the SDK as previously shown. Create an empty object as a parameter.
Pass the object to the listPhoneNumbersOptedOut method of the AWS.SNS client class. To call the
listPhoneNumbersOptedOut method, create a promise for invoking an Amazon SNS service object,
passing the parameters object. Then handle the response in the promise callback.
// Load the AWS SDK for Node.js
var AWS = require('aws-sdk');
// Set region
AWS.config.update({region: 'REGION'});
216

AWS SDK for JavaScript Developer Guide for SDK v2
Sending SMS Messages
// Create promise and SNS service object
var phonelistPromise = new AWS.SNS({apiVersion:
'2010-03-31'}).listPhoneNumbersOptedOut({}).promise();
// Handle promise's fulfilled/rejected states
phonelistPromise.then(
function(data) {
console.log(data);
}).catch(
function(err) {
console.error(err, err.stack);
}
);
To run the example, type the following at the command line.
node sns_listnumbersoptedout.js
This sample code can be found here on GitHub.
Publishing an SMS Message
In this example, use a Node.js module to send an SMS message to a phone number. Create a Node.js
module with the file name sns_publishsms.js. Configure the SDK as previously shown. Create an
object containing the Message and PhoneNumber parameters.
When you send an SMS message, specify the phone number using the E.164 format. E.164 is a standard
for the phone number structure used for international telecommunication. Phone numbers that follow
this format can have a maximum of 15 digits, and they are prefixed with the plus character (+) and the
country code. For example, a US phone number in E.164 format would appear as +1001XXX5550100.
This example sets the PhoneNumber parameter to specify the phone number to send the message. Pass
the object to the publish method of the AWS.SNS client class. To call the publish method, create a
promise for invoking an Amazon SNS service object, passing the parameters object. Then handle the
response in the promise callback.
// Load the AWS SDK for Node.js
var AWS = require('aws-sdk');
// Set region
AWS.config.update({region: 'REGION'});
// Create publish parameters
var params = {
Message: 'TEXT_MESSAGE', /* required */
PhoneNumber: 'E.164_PHONE_NUMBER',
};
// Create promise and SNS service object
var publishTextPromise = new AWS.SNS({apiVersion: '2010-03-31'}).publish(params).promise();
// Handle promise's fulfilled/rejected states
publishTextPromise.then(
function(data) {
console.log("MessageID is " + data.MessageId);
}).catch(
function(err) {
console.error(err, err.stack);
});
To run the example, type the following at the command line.
217

AWS SDK for JavaScript Developer Guide for SDK v2
Amazon SQS Examples
node sns_publishsms.js
This sample code can be found here on GitHub.
Amazon SQS Examples
Amazon Simple Queue Service (SQS) is a fast, reliable, scalable, fully managed message queuing service.
Amazon SQS lets you decouple the components of a cloud application. Amazon SQS includes standard
queues with high throughput and at-least-once processing, and FIFO queues that provide FIFO (first-in,
first-out) delivery and exactly-once processing.
The JavaScript API for Amazon SQS is exposed through the AWS.SQS client class. For more information
about using the CloudWatch client class, see Class: AWS.SQS in the API reference.
Topics
• Using Queues in Amazon SQS (p. 218)
• Sending and Receiving Messages in Amazon SQS (p. 221)
• Managing Visibility Timeout in Amazon SQS (p. 224)
• Enabling Long Polling in Amazon SQS (p. 226)
• Using Dead Letter Queues in Amazon SQS (p. 229)
Using Queues in Amazon SQS
This Node.js code example shows:
• How to get a list of all of your message queues
• How to obtain the URL for a particular queue
• How to create and delete queues
The Scenario
In this example, a series of Node.js modules are used to work with queues. The Node.js modules use the
SDK for JavaScript to use queues using these methods of the AWS.SQS client class:
• listQueues
218

AWS SDK for JavaScript Developer Guide for SDK v2
Using Queues in Amazon SQS
• createQueue
• getQueueUrl
• deleteQueue
For more information about Amazon SQS messages, see How Queues Work in the Amazon Simple Queue
Service Developer Guide.
Prerequisite Tasks
To set up and run this example, you must first complete these tasks:
• Install Node.js. For more information about installing Node.js, see the Node.js website.
• Create a shared configurations file with your user credentials. For more information about providing a
shared credentials file, see Loading Credentials in Node.js from the Shared Credentials File (p. 26).
Configuring the SDK
Configure the SDK for JavaScript by creating a global configuration object then setting the region for
your code. In this example, the region is set to us-west-2.
// Load the SDK for JavaScript
var AWS = require('aws-sdk');
// Set the region
AWS.config.update({region: 'us-west-2'});
Listing Your Queues
Create a Node.js module with the file name sqs_listqueues.js. Be sure to configure the SDK as
previously shown. To access Amazon SQS, create an AWS.SQS service object. Create a JSON object
containing the parameters needed to list your queues, which by default is an empty object. Call the
listQueues method to retrieve the list of queues. The callback returns the URLs of all queues.
// Load the AWS SDK for Node.js
var AWS = require('aws-sdk');
// Set the region
AWS.config.update({region: 'REGION'});
// Create an SQS service object
var sqs = new AWS.SQS({apiVersion: '2012-11-05'});
var params = {};
sqs.listQueues(params, function(err, data) {
if (err) {
console.log("Error", err);
} else {
console.log("Success", data.QueueUrls);
}
});
To run the example, type the following at the command line.
node sqs_listqueues.js
This sample code can be found here on GitHub.
219

AWS SDK for JavaScript Developer Guide for SDK v2
Using Queues in Amazon SQS
Creating a Queue
Create a Node.js module with the file name sqs_createqueue.js. Be sure to configure the SDK as
previously shown. To access Amazon SQS, create an AWS.SQS service object. Create a JSON object
containing the parameters needed to list your queues, which must include the name for the queue
created. The parameters can also contain attributes for the queue, such as the number of seconds for
which message delivery is delayed or the number of seconds to retain a received message. Call the
createQueue method. The callback returns the URL of the created queue.
// Load the AWS SDK for Node.js
var AWS = require('aws-sdk');
// Set the region
AWS.config.update({region: 'REGION'});
// Create an SQS service object
var sqs = new AWS.SQS({apiVersion: '2012-11-05'});
var params = {
QueueName: 'SQS_QUEUE_NAME',
Attributes: {
'DelaySeconds': '60',
'MessageRetentionPeriod': '86400'
}
};
sqs.createQueue(params, function(err, data) {
if (err) {
console.log("Error", err);
} else {
console.log("Success", data.QueueUrl);
}
});
To run the example, type the following at the command line.
node sqs_createqueue.js
This sample code can be found here on GitHub.
Getting the URL for a Queue
Create a Node.js module with the file name sqs_getqueueurl.js. Be sure to configure the SDK as
previously shown. To access Amazon SQS, create an AWS.SQS service object. Create a JSON object
containing the parameters needed to list your queues, which must include the name of the queue whose
URL you want. Call the getQueueUrl method. The callback returns the URL of the specified queue.
// Load the AWS SDK for Node.js
var AWS = require('aws-sdk');
// Set the region
AWS.config.update({region: 'REGION'});
// Create an SQS service object
var sqs = new AWS.SQS({apiVersion: '2012-11-05'});
var params = {
QueueName: 'SQS_QUEUE_NAME'
};
sqs.getQueueUrl(params, function(err, data) {
if (err) {
220

AWS SDK for JavaScript Developer Guide for SDK v2
Sending and Receiving Messages in Amazon SQS
console.log("Error", err);
} else {
console.log("Success", data.QueueUrl);
}
});
To run the example, type the following at the command line.
node sqs_getqueueurl.js
This sample code can be found here on GitHub.
Deleting a Queue
Create a Node.js module with the file name sqs_deletequeue.js. Be sure to configure the SDK as
previously shown. To access Amazon SQS, create an AWS.SQS service object. Create a JSON object
containing the parameters needed to delete a queue, which consists of the URL of the queue you want to
delete. Call the deleteQueue method.
// Load the AWS SDK for Node.js
var AWS = require('aws-sdk');
// Set the region
AWS.config.update({region: 'REGION'});
// Create an SQS service object
var sqs = new AWS.SQS({apiVersion: '2012-11-05'});
var params = {
QueueUrl: 'SQS_QUEUE_URL'
};
sqs.deleteQueue(params, function(err, data) {
if (err) {
console.log("Error", err);
} else {
console.log("Success", data);
}
});
To run the example, type the following at the command line.
node sqs_deletequeue.js
This sample code can be found here on GitHub.
Sending and Receiving Messages in Amazon SQS
This Node.js code example shows:
• How to send messages in a queue.
• How to receive messages in a queue.
• How to delete messages in a queue.
221

AWS SDK for JavaScript Developer Guide for SDK v2
Sending and Receiving Messages in Amazon SQS
The Scenario
In this example, a series of Node.js modules are used to send and receive messages. The Node.js modules
use the SDK for JavaScript to send and receive messages by using these methods of the AWS.SQS client
class:
• sendMessage
• receiveMessage
• deleteMessage
For more information about Amazon SQS messages, see Sending a Message to an Amazon SQS Queue
and Receiving and Deleting a Message from an Amazon SQS Queue in the Amazon Simple Queue Service
Developer Guide.
Prerequisite Tasks
To set up and run this example, you must first complete these tasks:
• Install Node.js. For more information about installing Node.js, see the Node.js website.
• Create a shared configurations file with your user credentials. For more information about providing a
shared credentials file, see Loading Credentials in Node.js from the Shared Credentials File (p. 26).
• Create an Amazon SQS queue. For an example of creating a queue, see Using Queues in Amazon
SQS (p. 218).
Configuring the SDK
Configure the SDK for JavaScript by creating a global configuration object then setting the region for
your code. In this example, the region is set to us-west-2.
// Load the SDK for JavaScript
var AWS = require('aws-sdk');
// Set the region
AWS.config.update({region: 'us-west-2'});
Sending a Message to a Queue
Create a Node.js module with the file name sqs_sendmessage.js. Be sure to configure the SDK as
previously shown. To access Amazon SQS, create an AWS.SQS service object. Create a JSON object
containing the parameters needed for your message, including the URL of the queue to which you want
to send this message. In this example, the message provides details about a book on a list of fiction best
sellers including the title, author, and number of weeks on the list.
Call the sendMessage method. The callback returns the unique ID of the message.
// Load the AWS SDK for Node.js
var AWS = require('aws-sdk');
// Set the region
AWS.config.update({region: 'REGION'});
// Create an SQS service object
var sqs = new AWS.SQS({apiVersion: '2012-11-05'});
var params = {
DelaySeconds: 10,
MessageAttributes: {
222

AWS SDK for JavaScript Developer Guide for SDK v2
Sending and Receiving Messages in Amazon SQS
"Title": {
DataType: "String",
StringValue: "The Whistler"
},
"Author": {
DataType: "String",
StringValue: "John Grisham"
},
"WeeksOn": {
DataType: "Number",
StringValue: "6"
}
},
MessageBody: "Information about current NY Times fiction bestseller for week of
12/11/2016.",
QueueUrl: "SQS_QUEUE_URL"
};
sqs.sendMessage(params, function(err, data) {
if (err) {
console.log("Error", err);
} else {
console.log("Success", data.MessageId);
}
});
To run the example, type the following at the command line.
node sqs_sendmessage.js
This sample code can be found here on GitHub.
Receiving and Deleting Messages from a Queue
Create a Node.js module with the file name sqs_receivemessage.js. Be sure to configure the SDK
as previously shown. To access Amazon SQS, create an AWS.SQS service object. Create a JSON object
containing the parameters needed for your message, including the URL of the queue from which you
want to receive messages. In this example, the parameters specify receipt of all message attributes, as
well as receipt of no more than 10 messages.
Call the receiveMessage method. The callback returns an array of Message objects from which
you can retrieve ReceiptHandle for each message that you use to later delete that message. Create
another JSON object containing the parameters needed to delete the message, which are the URL of
the queue and the ReceiptHandle value. Call the deleteMessage method to delete the message you
received.
// Load the AWS SDK for Node.js
var AWS = require('aws-sdk');
// Set the region
AWS.config.update({region: 'REGION'});
// Create an SQS service object
var sqs = new AWS.SQS({apiVersion: '2012-11-05'});
var queueURL = "SQS_QUEUE_URL";
var params = {
AttributeNames: [
"SentTimestamp"
],
MaxNumberOfMessages: 1,
223
AWS SDK for JavaScript Developer Guide for SDK v2
Managing Visibility Timeout in Amazon SQS
MessageAttributeNames: [
"All"
],
QueueUrl: queueURL,
VisibilityTimeout: 20,
WaitTimeSeconds: 0
};
sqs.receiveMessage(params, function(err, data) {
if (err) {
console.log("Receive Error", err);
} else if (data.Messages) {
var deleteParams = {
QueueUrl: queueURL,
ReceiptHandle: data.Messages[0].ReceiptHandle
};
sqs.deleteMessage(deleteParams, function(err, data) {
if (err) {
console.log("Delete Error", err);
} else {
console.log("Message Deleted", data);
}
});
}
});
To run the example, type the following at the command line.
node sqs_receivemessage.js
This sample code can be found here on GitHub.
Managing Visibility Timeout in Amazon SQS
This Node.js code example shows:
• How to specify the time interval during which messages received by a queue are not visible.
The Scenario
In this example, a Node.js module is used to manage visibility timeout. The Node.js module uses the SDK
for JavaScript to manage visibility timeout by using this method of the AWS.SQS client class:
• changeMessageVisibility
For more information about Amazon SQS visibility timeout, see Visibility Timeout in the Amazon Simple
Queue Service Developer Guide.
Prerequisite Tasks
To set up and run this example, you must first complete these tasks:
224

AWS SDK for JavaScript Developer Guide for SDK v2
Managing Visibility Timeout in Amazon SQS
• Install Node.js. For more information about installing Node.js, see the Node.js website.
• Create a shared configurations file with your user credentials. For more information about providing a
shared credentials file, see Loading Credentials in Node.js from the Shared Credentials File (p. 26).
• Create an Amazon SQS queue. For an example of creating a queue, see Using Queues in Amazon
SQS (p. 218).
• Send a message to the queue. For an example of sending a message to a queue, see Sending and
Receiving Messages in Amazon SQS (p. 221).
Configuring the SDK
Configure the SDK for JavaScript by creating a global configuration object then setting the region for
your code. In this example, the region is set to us-west-2.
// Load the SDK for JavaScript
var AWS = require('aws-sdk');
// Set the region
AWS.config.update({region: 'us-west-2'});
Changing the Visibility Timeout
Create a Node.js module with the file name sqs_changingvisibility.js. Be sure to configure the
SDK as previously shown. To access Amazon Simple Queue Service, create an AWS.SQS service object.
Receive the message from the queue.
Upon receipt of the message from the queue, create a JSON object containing the parameters
needed for setting the timeout, including the URL of the queue containing the message, the
ReceiptHandle returned when the message was received, and the new timeout in seconds. Call the
changeMessageVisibility method.
// Load the AWS SDK for Node.js
var AWS = require('aws-sdk');
// Set the region
AWS.config.update({region: 'REGION'});
// Create the SQS service object
var sqs = new AWS.SQS({apiVersion: '2012-11-05'});
var queueURL = "SQS_QUEUE_URL";
var params = {
AttributeNames: [
"SentTimestamp"
],
MaxNumberOfMessages: 1,
MessageAttributeNames: [
"All"
],
QueueUrl: queueURL
};
sqs.receiveMessage(params, function(err, data) {
if (err) {
console.log("Receive Error", err);
} else {
var visibilityParams = {
QueueUrl: queueURL,
ReceiptHandle: data.Messages[0].ReceiptHandle,
VisibilityTimeout: 20 // 20 seconds timeout
};
225

AWS SDK for JavaScript Developer Guide for SDK v2
Enabling Long Polling in Amazon SQS
sqs.changeMessageVisibility(visibilityParams, function(err, data) {
if (err) {
console.log("Delete Error", err);
} else {
console.log("Timeout Changed", data);
}
});
}
});
To run the example, type the following at the command line.
node sqs_changingvisibility.js
This sample code can be found here on GitHub.
Enabling Long Polling in Amazon SQS
This Node.js code example shows:
• How to enable long polling for a newly created queue
• How to enable long polling for an existing queue
• How to enable long polling upon receipt of a message
The Scenario
Long polling reduces the number of empty responses by allowing Amazon SQS to wait a specified time
for a message to become available in the queue before sending a response. Also, long polling eliminates
false empty responses by querying all of the servers instead of a sampling of servers. To enable long
polling, you must specify a non-zero wait time for received messages. You can do this by setting the
ReceiveMessageWaitTimeSeconds parameter of a queue or by setting the WaitTimeSeconds
parameter on a message when it is received.
In this example, a series of Node.js modules are used to enable long polling. The Node.js modules use the
SDK for JavaScript to enable long polling using these methods of the AWS.SQS client class:
• setQueueAttributes
• receiveMessage
• createQueue
For more information about Amazon SQS long polling, see Long Polling in the Amazon Simple Queue
Service Developer Guide.
Prerequisite Tasks
To set up and run this example, you must first complete these tasks:
• Install Node.js. For more information about installing Node.js, see the Node.js website.
226

AWS SDK for JavaScript Developer Guide for SDK v2
Enabling Long Polling in Amazon SQS
• Create a shared configurations file with your user credentials. For more information about providing a
shared credentials file, see Loading Credentials in Node.js from the Shared Credentials File (p. 26).
Configuring the SDK
Configure the SDK for JavaScript by creating a global configuration object then setting the region for
your code. In this example, the region is set to us-west-2.
// Load the SDK for JavaScript
var AWS = require('aws-sdk');
// Set the region
AWS.config.update({region: 'us-west-2'});
Enabling Long Polling When Creating a Queue
Create a Node.js module with the file name sqs_longpolling_createqueue.js. Be sure to configure
the SDK as previously shown. To access Amazon SQS, create an AWS.SQS service object. Create a
JSON object containing the parameters needed to create a queue, including a non-zero value for the
ReceiveMessageWaitTimeSeconds parameter. Call the createQueue method. Long polling is then
enabled for the queue.
// Load the AWS SDK for Node.js
var AWS = require('aws-sdk');
// Set the region
AWS.config.update({region: 'REGION'});
// Create the SQS service object
var sqs = new AWS.SQS({apiVersion: '2012-11-05'});
var params = {
QueueName: 'SQS_QUEUE_NAME',
Attributes: {
'ReceiveMessageWaitTimeSeconds': '20',
}
};
sqs.createQueue(params, function(err, data) {
if (err) {
console.log("Error", err);
} else {
console.log("Success", data.QueueUrl);
}
});
To run the example, type the following at the command line.
node sqs_longpolling_createqueue.js
This sample code can be found here on GitHub.
Enabling Long Polling on an Existing Queue
Create a Node.js module with the file name sqs_longpolling_existingqueue.js. Be sure to
configure the SDK as previously shown. To access Amazon Simple Queue Service, create an AWS.SQS
service object. Create a JSON object containing the parameters needed to set the attributes of queue,
including a non-zero value for the ReceiveMessageWaitTimeSeconds parameter and the URL of the
queue. Call the setQueueAttributes method. Long polling is then enabled for the queue.
227

AWS SDK for JavaScript Developer Guide for SDK v2
Enabling Long Polling in Amazon SQS
// Load the AWS SDK for Node.js
var AWS = require('aws-sdk');
// Set the region
AWS.config.update({region: 'REGION'});
// Create the SQS service object
var sqs = new AWS.SQS({apiVersion: '2012-11-05'});
var params = {
Attributes: {
"ReceiveMessageWaitTimeSeconds": "20",
},
QueueUrl: "SQS_QUEUE_URL"
};
sqs.setQueueAttributes(params, function(err, data) {
if (err) {
console.log("Error", err);
} else {
console.log("Success", data);
}
});
To run the example, type the following at the command line.
node sqs_longpolling_existingqueue.js
This sample code can be found here on GitHub.
Enabling Long Polling on Message Receipt
Create a Node.js module with the file name sqs_longpolling_receivemessage.js. Be sure
to configure the SDK as previously shown. To access Amazon Simple Queue Service, create an
AWS.SQS service object. Create a JSON object containing the parameters needed to receive messages,
including a non-zero value for the WaitTimeSeconds parameter and the URL of the queue. Call the
receiveMessage method.
// Load the AWS SDK for Node.js
var AWS = require('aws-sdk');
// Set the region
AWS.config.update({region: 'REGION'});
// Create the SQS service object
var sqs = new AWS.SQS({apiVersion: '2012-11-05'});
var queueURL = "SQS_QUEUE_URL";
var params = {
AttributeNames: [
"SentTimestamp"
],
MaxNumberOfMessages: 1,
MessageAttributeNames: [
"All"
],
QueueUrl: queueURL,
WaitTimeSeconds: 20
};
sqs.receiveMessage(params, function(err, data) {
if (err) {
228

AWS SDK for JavaScript Developer Guide for SDK v2
Using Dead Letter Queues in Amazon SQS
console.log("Error", err);
} else {
console.log("Success", data);
}
});
To run the example, type the following at the command line.
node sqs_longpolling_receivemessage.js
This sample code can be found here on GitHub.
Using Dead Letter Queues in Amazon SQS
This Node.js code example shows:
• How to use a queue to receive and hold messages from other queues that the queues can't process.
The Scenario
A dead letter queue is one that other (source) queues can target for messages that can't be processed
successfully. You can set aside and isolate these messages in the dead letter queue to determine why
their processing did not succeed. You must individually configure each source queue that sends messages
to a dead letter queue. Multiple queues can target a single dead letter queue.
In this example, a Node.js module is used to route messages to a dead letter queue. The Node.js module
uses the SDK for JavaScript to use dead letter queues using this method of the AWS.SQS client class:
• setQueueAttributes
For more information about Amazon SQS dead letter queues, see Using Amazon SQS Dead Letter
Queues in the Amazon Simple Queue Service Developer Guide.
Prerequisite Tasks
To set up and run this example, you must first complete these tasks:
• Install Node.js. For more information about installing Node.js, see the Node.js website.
• Create a shared configurations file with your user credentials. For more information about providing a
shared credentials file, see Loading Credentials in Node.js from the Shared Credentials File (p. 26).
• Create an Amazon SQS queue to serve as a dead letter queue. For an example of creating a queue, see
Using Queues in Amazon SQS (p. 218).
Configuring the SDK
Configure the SDK for JavaScript by creating a global configuration object then setting the region for
your code. In this example, the region is set to us-west-2.
229

AWS SDK for JavaScript Developer Guide for SDK v2
Using Dead Letter Queues in Amazon SQS
// Load the SDK for JavaScript
var AWS = require('aws-sdk');
// Set the region
AWS.config.update({region: 'us-west-2'});
Configuring Source Queues
After you create a queue to act as a dead letter queue, you must configure the other queues that route
unprocessed messages to the dead letter queue. To do this, specify a redrive policy that identifies the
queue to use as a dead letter queue and the maximum number of receives by individual messages before
they are routed to the dead letter queue.
Create a Node.js module with the file name sqs_deadletterqueue.js. Be sure to configure the SDK
as previously shown. To access Amazon SQS, create an AWS.SQS service object. Create a JSON object
containing the parameters needed to update queue attributes, including the RedrivePolicy parameter
that specifies both the ARN of the dead letter queue, as well as the value of maxReceiveCount. Also
specify the URL source queue you want to configure. Call the setQueueAttributes method.
// Load the AWS SDK for Node.js
var AWS = require('aws-sdk');
// Set the region
AWS.config.update({region: 'REGION'});
// Create the SQS service object
var sqs = new AWS.SQS({apiVersion: '2012-11-05'});
var params = {
Attributes: {
"RedrivePolicy": "{\"deadLetterTargetArn\":\"DEAD_LETTER_QUEUE_ARN\",\"maxReceiveCount\":
\"10\"}",
},
QueueUrl: "SOURCE_QUEUE_URL"
};
sqs.setQueueAttributes(params, function(err, data) {
if (err) {
console.log("Error", err);
} else {
console.log("Success", data);
}
});
To run the example, type the following at the command line.
node sqs_deadletterqueue.js
This sample code can be found here on GitHub.
230

AWS SDK for JavaScript Developer Guide for SDK v2
Tutorial: Setting Up Node.js on an Amazon EC2 Instance
Tutorials
The following tutorials show you how to perform different tasks related to using the AWS SDK for
JavaScript.
Topics
• Tutorial: Setting Up Node.js on an Amazon EC2 Instance (p. 231)
• Tutorial: Creating and Using Lambda Functions (p. 232)
Tutorial: Setting Up Node.js on an Amazon EC2
Instance
A common scenario for using Node.js with the SDK for JavaScript is to set up and run a Node.js web
application on an Amazon Elastic Compute Cloud (Amazon EC2) instance. In this tutorial, you will create
a Linux instance, connect to it using SSH, and then install Node.js to run on that instance.
Prerequisites
This tutorial assumes that you have already launched a Linux instance with a public DNS name that is
reachable from the Internet and to which you are able to connect using SSH. For more information, see
Step 1: Launch an Instance in the Amazon EC2 User Guide for Linux Instances.
You must also have configured your security group to allow SSH (port 22), HTTP (port 80), and HTTPS
(port 443) connections. For more information about these prerequisites, see Setting Up with Amazon
EC2 in the Amazon EC2 User Guide for Linux Instances.
Procedure
The following procedure helps you install Node.js on an Amazon Linux instance. You can use this server
to host a Node.js web application.
To set up Node.js on your Linux instance
1. Connect to your Linux instance as ec2-user using SSH.
2. Install node version manager (nvm) by typing the following at the command line.
curl -o- https://raw.githubusercontent.com/creationix/nvm/v0.32.0/install.sh | bash
We will use nvm to install Node.js because nvm can install multiple versions of Node.js and allow you
to switch between them.
3. Activate nvm by typing the following at the command line.
. ~/.nvm/nvm.sh
231

AWS SDK for JavaScript Developer Guide for SDK v2
Creating an Amazon Machine Image
4. Use nvm to install the version of Node.js you intend to use by typing the following at the command
line.
nvm install 4.4.5
Installing Node.js also installs the Node Package Manager (npm) so you can install additional
modules as needed.
5. Test that Node.js is installed and running correctly by typing the following at the command line.
node -e "console.log('Running Node.js ' + process.version)"
This should display the following message that confirms the installed version of Node.js running.
Running Node.js v4.4.5
Creating an Amazon Machine Image
After you install Node.js on an Amazon EC2 instance, you can create an Amazon Machine Image (AMI)
from that instance. Creating an AMI makes it easy to provision multiple Amazon EC2 instances with the
same Node.js installation. For more information about creating an AMI from an existing instance, see
Creating an Amazon EBS-Backed Linux AMI in the Amazon EC2 User Guide for Linux Instances.
Related Resources
For more information about the commands and software used in this topic, see the following web pages:
• node version manager (nvm): see nvm repo on GitHub.
• node package manager (npm): see npm website.
Tutorial: Creating and Using Lambda Functions
In this tutorial, you learn how to:
• Create AWS Lambda functions in Node.js and call them from JavaScript running in a web browser.
• Call another service within a Lambda function and process the asynchronous responses before
forwarding those responses to the browser script.
• Use Node.js scripts to create the resources needed by the Lambda function.
The Scenario
In this example, a simulated browser-based slot machine game invokes a Lambda function that
generates the random results of each slot pull. Those results are returned as the file names of the images
that are used to display to the user. The images are stored in an Amazon S3 bucket that is configured
to function as a static web host for the HTML, CSS, and other assets used to present the application
experience.
This diagram illustrates most of the elements in this application and how they relate to one another.
Versions of this diagram will appear throughout the tutorial to show the focus of each task
232

AWS SDK for JavaScript Developer Guide for SDK v2
Prerequisites
Prerequisites
This tutorial assumes you have completed these tasks before you begin:
• Install Node.js on your computer to run various scripts that help set up the Amazon S3 bucket and
the Amazon DynamoDB table, and create and configure the Lambda function. The Lambda function
itself runs in the AWS Lambda Node.js environment. For information about installing Node.js, see
www.nodejs.org.
• Install the AWS SDK for JavaScript on your computer to run the setup scripts. For information on
installing the AWS SDK for JavaScript for Node.js, see Installing the SDK for JavaScript (p. 15).
• Download slotassets.zip from the code example archive on GitHub. This archive contains the
browser assets that are used by the application, the Node.js code that's used in the Lambda function,
and several setup scripts. In this tutorial, you modify the index.html file and upload all the browser
asset files to an Amazon S3 bucket you provision for this application. As part of creating the Lambda
function, you also modify the Node.js code in slotpull.js before uploading it to the Amazon S3
bucket.
After you meet the prerequisites, this tutorial should take about 30 minutes to complete.
Tutorial Steps
To create this application you'll need resources from multiple services that must be connected and
configured in both the code of the browser script and the Node.js code of the Lambda function. In some
cases, the tasks involved are described here, while other tasks require topics of their own to detail the
instructions. After you complete each of the steps in an additional topic, return to the steps here and
continue.
To construct the tutorial application and the Lambda function it uses
1. Create a working directory on your computer for this tutorial.
2. Copy slotassets.zip into your working directory.
3. Create a JSON file with your account credentials in your working directory. This file is used by the
setup scripts to authenticate their AWS requests. For details, see Loading Credentials in Node.js from
a JSON File (p. 27).
4. Create an Amazon S3 bucket configured as a static website (p. 234).
5. Prepare the browser script (p. 236). Save the edited copy of index.html for upload to Amazon
S3.
233

AWS SDK for JavaScript Developer Guide for SDK v2
Create an Amazon S3 Bucket
Configured as a Static Website
6. Open the slotassets.zip archive you downloaded from the code example archive on GitHub, and
copy the contents into your working directory.
7. Create a Lambda execution role in IAM (p. 237).
8. Create and populate an Amazon DynamoDB table (p. 239).
9. Prepare and create the Lambda function (p. 243).
10. Run the Lambda function. (p. 246)
Create an Amazon S3 Bucket Configured as a Static
Website
This topic is part of a larger tutorial about using the AWS SDK for JavaScript with AWS Lambda
functions. To start at the beginning of the tutorial, see Tutorial: Creating and Using Lambda
Functions (p. 232).
In this task, you will focus on creating and preparing the Amazon S3 bucket used by the application.
For this application, the first thing you need to create is an Amazon S3 bucket to store all the browser
assets. These include the HTML file, all graphics files, and the CSS file. The bucket is configured as a static
website so that it also serves the application from the bucket's URL.
The slotassets.zip archive file contains a Node.js script named s3-bucket-setup.js that creates
the Amazon S3 bucket and sets the website configuration.
To create and configure the Amazon S3 bucket that the tutorial application uses
1. Open the slotassets.zip archive file you downloaded from the code example archive on GitHub.
2. Copy the s3-bucket-setup.js script from the archive to the folder that contains your credentials
JSON file.
3. At the command line, type:
node s3-bucket-setup.js BUCKET_NAME
where BUCKET_NAME is the name for the bucket. The bucket name must be globally unique. When
successful, the script displays the URL of the new bucket. Make a note of this URL because you'll use
it later.
234

AWS SDK for JavaScript Developer Guide for SDK v2
Create an Amazon S3 Bucket
Configured as a Static Website
Setup Script
The setup script runs the following code. It takes the command-line argument that is passed in and uses
it to specify the bucket name and the parameter that makes the bucket publicly readable. It then sets up
the parameters used to enable the bucket to act as a static website host.
// Load the AWS SDK for Node.js
var AWS = require('aws-sdk');
// Load credentials and set region from JSON file
AWS.config.loadFromPath('./config.json');
// Create S3 service object
s3 = new AWS.S3({apiVersion: '2006-03-01'});
// Create params JSON for S3.createBucket
var bucketParams = {
Bucket : process.argv[2],
ACL : 'public-read'
};
// Create params JSON for S3.setBucketWebsite
var staticHostParams = {
Bucket: process.argv[2],
WebsiteConfiguration: {
ErrorDocument: {
Key: 'error.html'
},
IndexDocument: {
Suffix: 'index.html'
},
}
};
// Call S3 to create the bucket
s3.createBucket(bucketParams, function(err, data) {
if (err) {
console.log("Error", err);
} else {
console.log("Bucket URL is ", data.Location);
// Set the new policy on the newly created bucket
s3.putBucketWebsite(staticHostParams, function(err, data) {
if (err) {
// Display error message
console.log("Error", err);
} else {
// Update the displayed policy for the selected bucket
console.log("Success", data);
}
});
}
});
This script uses code from these AWS SDK for JavaScript code example topics:
• Creating and Using Amazon S3 Buckets (p. 171)
• Using an Amazon S3 Bucket as a Static Web Host (p. 182)
Next Step
Return to the full Tutorial Steps (p. 233).
235

AWS SDK for JavaScript Developer Guide for SDK v2
Prepare the Browser Script
Prepare the Browser Script
This topic is part of a larger tutorial about using the AWS SDK for JavaScript with AWS Lambda
functions. To start at the beginning of the tutorial, see Tutorial: Creating and Using Lambda
Functions (p. 232).
In this task, you will focus on creating an Amazon Cognito identity pool used to authenticate your
browser script code, and then editing the browser script accordingly.
Prepare an Amazon Cognito Identity Pool
The JavaScript code in the browser script needs authentication to access AWS services. Within webpages,
you typically use Amazon Cognito Identity to do this authentication. First, create an Amazon Cognito
identity pool.
To create and prepare an Amazon Cognito identity pool for the browser script
1. Open the Amazon Cognito console, choose Manage Federated Identities, and then choose Create
new identity pool.
2. Enter a name for your identity pool, choose enable access to unauthenticated identities, and then
choose Create Pool.
3. Choose View Details to display details on both the authenticated and unauthenticated IAM roles
created for this identity pool.
4. In the summary for the unauthenticated role, choose View Policy Document to display the current
role policy.
5. Choose Edit to change the role policy, and then choose Ok.
6. In the text box, edit the policy to insert this "lambda:InvokeFunction" action, so the full policy
becomes the following.
{
"Version": "2012-10-17",
"Statement": [
{
"Effect": "Allow",
"Action": [
"lambda:InvokeFunction",
"mobileanalytics:PutEvents",
"cognito-sync:*"
],
236

AWS SDK for JavaScript Developer Guide for SDK v2
Create a Lambda Execution Role in IAM
"Resource": [
"*"
]
}
]
}
7. Choose Allow.
8. Choose Sample code in the side menu. Make a note of the identity pool ID, shown in red text in the
console.
Edit the Browser Script
Next, update the browser script to include the Amazon Cognito identity pool ID created for this
application.
To prepare the browser script in the webpage
1. Open the slotassets.zip archive file that you downloaded from the code example archive on
GitHub.
2. Open index.html in a text editor.
3. Find this line of code in the browser script.
AWS.config.credentials = new AWS.CognitoIdentityCredentials({IdentityPoolId:
'IDENTITY_POOL_ID'});
4. Replace IDENTITY_POOL_ID with the identity pool ID you obtained previously.
5. Save index.html.
Next Step
Return to the full Tutorial Steps (p. 233).
Create a Lambda Execution Role in IAM
This topic is part of a larger tutorial about using the AWS SDK for JavaScript with AWS Lambda
functions. To start at the beginning of the tutorial, see Tutorial: Creating and Using Lambda
Functions (p. 232).
In this task, you will focus on creating IAM role used by the application to execute the Lambda function.
237

AWS SDK for JavaScript Developer Guide for SDK v2
Create a Lambda Execution Role in IAM
A Lambda function requires an execution role created in IAM that provides the function with the
necessary permissions to run. For more information about the Lambda execution role, see Manage
Permissions: Using an IAM Role (Execution Role) in the AWS Lambda Developer Guide.
To create the Lambda execution role in IAM
1. Open the slotassets.zip archive file that you downloaded from the code example archive on
GitHub.
2. Copy the lambda-role-setup.js script from the archive to the folder that contains your
credentials JSON file.
3. Open lambda-role-setup.js in a text editor.
4. Find this line of code.
RoleName: "ROLE"
Replace ROLE with another name.
5. Save your changes to lambda-role-setup.js, and then close the file.
6. At the command line, type the following.
node lambda-role-setup.js
7. Make a note of the ARN returned by the script. You need this value to create the Lambda function.
Setup Script Code
The following code is the setup script that creates the Lambda execution role. The setup script creates
the JSON that defines the trust relationship needed for a Lambda execution role. It also creates the JSON
parameters for attaching the AWSLambdaRole managed policy. Then it assigns the string version of the
JSON to the parameters for the createRole method of the IAM service object.
The createRole method automatically URL-encodes the JSON to create the execution role. When the
new role is successfully created, the script displays its ARN. Then the script calls the attachRolePolicy
method of the IAM service object to attach the managed policy. When the policy is successfully attached,
the script displays a confirmation message.
// Load the AWS SDK for Node.js
var AWS = require('aws-sdk');
// Load credentials and set region from JSON file
238

AWS SDK for JavaScript Developer Guide for SDK v2
Create and Populate a DynamoDB Table
AWS.config.loadFromPath('./config.json');
// Create the IAM service object
var iam = new AWS.IAM({apiVersion: '2010-05-08'});
var myPolicy = {
"Version": "2012-10-17",
"Statement": [
{
"Effect": "Allow",
"Principal": {
"Service": "lambda.amazonaws.com"
},
"Action": "sts:AssumeRole"
}
]
};
var createParams = {
AssumeRolePolicyDocument: JSON.stringify(myPolicy),
RoleName: "ROLE"
};
var policyParams = {
PolicyArn: "arn:aws:iam::policy/service-role/AWSLambdaRole",
RoleName: "ROLE"
};
iam.createRole(createParams, function(err, data) {
if (err) {
console.log(err, err.stack); // an error occurred
} else {
console.log("Role ARN is", data.Role.Arn); // successful response
iam.attachRolePolicy(policyParams , function(err, data) {
if (err) {
console.log(err, err.stack);
} else {
console.log("AWSLambdaRole Policy attached");
}
});
}
});
This script uses code from these AWS SDK for JavaScript code example topics:
• Writing a Lambda Function in Node.js (p. 157)
• Working with IAM Policies (p. 134)
Next Step
Return to the full Tutorial Steps (p. 233).
Create and Populate a DynamoDB Table
This topic is part of a larger tutorial about using the AWS SDK for JavaScript with Lambda functions. To
start at the beginning of the tutorial, see Tutorial: Creating and Using Lambda Functions (p. 232).
In this task, you will focus on creating and populating the DynamoDB table used by the application.
239

AWS SDK for JavaScript Developer Guide for SDK v2
Create and Populate a DynamoDB Table
The Lambda function generates three random numbers, then uses those numbers as keys to look up
file names stored in an Amazon DynamoDB table. In the slotassets.zip archive file are two Node.js
scripts named ddb-table-create.js and ddb_table-populate.js. Together these files create
the DynamoDB table and populate it with the names of the image files in the Amazon S3 bucket. The
Lambda function exclusively provides access to the table. Completing this portion of the application
requires you to do these things:
• Edit the Node.js code used to create the DynamoDB table.
• Run the setup script that creates the DynamoDB table.
• Run the setup script, which populates the DynamoDB table with data the application expects and
needs.
To edit the Node.js script that creates the DynamoDB table for the tutorial application
1. Open the slotassets.zip archive file you downloaded from the code example archive on GitHub.
2. Copy ddb-table-create.js and ddb-table-populate.js from the archive to the folder that
contains your credentials JSON file.
3. Open ddb-table-create.js in a text editor.
4. Find this line in the script.
TableName: "TABLE_NAME"
Edit the table name to one you choose. Make a note of the table name.
5. Save the edits, and then close the file.
To run the Node.js setup script that creates the DynamoDB table
• At the command line, type the following.
node ddb-table-create.js
Table Creation Script
The setup script ddb-table-create.js runs the following code. It creates the parameters that the
JSON needs to create the table. This includes setting the table name, defining the sort key for the table
(slotPosition), and defining the name of the attribute that contains the file name of one of the 16
240

AWS SDK for JavaScript Developer Guide for SDK v2
Create and Populate a DynamoDB Table
PNG images used to display a slot wheel result. It then calls the createTable method to create the
table.
// Load the AWS SDK for Node.js
var AWS = require('aws-sdk');
// Load credentials and set region from JSON file
AWS.config.loadFromPath('./config.json');
// Create DynamoDB service object
var ddb = new AWS.DynamoDB({apiVersion: '2012-08-10'});
var tableParams = {
AttributeDefinitions: [
{
AttributeName: 'slotPosition',
AttributeType: 'N'
},
{
AttributeName: 'imageFile',
AttributeType: 'S'
}
],
KeySchema: [
{
AttributeName: 'slotPosition',
KeyType: 'HASH'
},
{
AttributeName: 'imageFile',
KeyType: 'RANGE'
}
],
ProvisionedThroughput: {
ReadCapacityUnits: 1,
WriteCapacityUnits: 1
},
TableName: 'TABLE_NAME',
StreamSpecification: {
StreamEnabled: false
}
};
ddb.createTable(tableParams, function(err, data) {
if (err) {
console.log("Error", err);
} else {
console.log("Success", data);
}
});
This script uses code from these AWS SDK for JavaScript code example topics:
• Creating and Using Tables in DynamoDB (p. 79)
When the DynamoDB table exists, you must populate it with the items and data the application needs.
The slotassets.zip archive file contains a Node.js script named ddb_table-populate.js that
automates data population for the DynamoDB table you just created.
To run the Node.js setup script that populates the DynamoDB table with data
1. Open ddb_table-populate.js in a text editor.
241

AWS SDK for JavaScript Developer Guide for SDK v2
Create and Populate a DynamoDB Table
2. Find this line in the script.
var myTable = 'TABLE_NAME';
Change TABLE_NAME to the name of the table you created previously.
3. Save the edits, and then close the file.
4. At the command line, type the following.
node ddb_table-populate.js
Table Population Script
The setup script ddb_table-populate.js runs the following code. It creates the parameters that
the JSON needs to create each data item for the table. These include a unique numeric ID value for
slotPosition and the file name of one of the 16 PNG images of a slot wheel result for imageFile.
After setting the needed parameters for each possible result, the code repeatedly calls a function that
executes the putItem method to populate items in the table.
// Load the AWS SDK for Node.js
var AWS = require('aws-sdk');
// Load credentials and set region from JSON file
AWS.config.loadFromPath('./config.json');
// Create DynamoDB service object
var ddb = new AWS.DynamoDB({apiVersion: '2012-08-10'});
var myTable = 'TABLE_NAME';
// Add the four results for spades
var params = {
TableName: myTable,
Item: {'slotPosition' : {N: '0'}, 'imageFile' : {S: 'spad_a.png'}
}
};
post();
var params = {
TableName: myTable,
Item: {'slotPosition' : {N: '1'}, 'imageFile' : {S: 'spad_k.png'}
}
};
post();
var params = {
TableName: myTable,
Item: {'slotPosition' : {N: '2'}, 'imageFile' : {S: 'spad_q.png'}
}
};
post();
var params = {
TableName: myTable,
Item: {'slotPosition' : {N: '3'}, 'imageFile' : {S: 'spad_j.png'}
}
};
post();
// Add the four results for hearts
.
.
.
242

AWS SDK for JavaScript Developer Guide for SDK v2
Prepare and Create the Lambda Function
// Add the four results for diamonds
.
.
.
var params = {
TableName: myTable,
Item: {'slotPosition' : {N: '12'}, 'imageFile' : {S: 'club_a.png'}
}
};
post();
var params = {
TableName: myTable,
Item: {'slotPosition' : {N: '13'}, 'imageFile' : {S: 'club_k.png'}
}
};
post();
var params = {
TableName: myTable,
Item: {'slotPosition' : {N: '14'}, 'imageFile' : {S: 'club_q.png'}
}
};
post();
var params = {
TableName: myTable,
Item: {'slotPosition' : {N: '15'}, 'imageFile' : {S: 'club_j.png'}
}
};
post();
function post () {
ddb.putItem(params, function(err, data) {
if (err) {
console.log("Error", err);
} else {
console.log("Success", data);
}
});
}
This script uses code from this AWS SDK for JavaScript code example topic:
• Reading and Writing A Single Item in DynamoDB (p. 83)
Next Step
Return to the full Tutorial Steps (p. 233).
Prepare and Create the Lambda Function
This topic is part of a larger tutorial about using the AWS SDK for JavaScript with AWS Lambda
functions. To start at the beginning of the tutorial, see Tutorial: Creating and Using Lambda
Functions (p. 232).
In this task, you will focus on creating the Lambda function used by the application.
243

AWS SDK for JavaScript Developer Guide for SDK v2
Prepare and Create the Lambda Function
The Lambda function is invoked by the browser script every time the player of the game clicks and
releases the handle on the side of the machine. There are 16 possible results that can appear in each slot
position, chosen at random.
The Lambda function generates three random results, one for each slot wheel in the game. For each
result, the Lambda function calls the Amazon DynamoDB table to retrieve the file name of the result
graphic. Once all three results are determined and their matching graphic URLs are retrieved, the result
information is returned to the browser script for showing the result.
The Node.js code needed for the Lambda function is provided in the slotassets.zip archive file that
you downloaded from the code example archive on GitHub. You must edit this code to use it in your
Lambda function. Completing this portion of the application requires you to do these things:
• Edit the Node.js code used by the Lambda function.
• Compress the Node.js code into a .zip archive file that you then upload to the Amazon S3 bucket used
by the application.
• Edit the Node.js setup script for creating the Lambda function.
• Run the setup script, which creates the Lambda function from the .zip archive file in the Amazon S3
bucket.
To make the necessary edits in the Node.js code of the Lambda function
1. Open the slotassets.zip archive that you downloaded from the code sample archive on GitHub.
2. Copy slotpull.js to the folder that contains your credentials JSON file.
3. Open slotpull.js in a text editor.
4. Find this line of code in the browser script.
TableName: = "TABLE_NAME";
5. Replace TABLE_NAME with the name you used to create the DynamoDB table.
6. Save slotpull.js.
To prepare the Node.js code for creating the Lambda function
1. Compress slotpull.js into a .zip archive file for creating the Lambda function.
2. Upload slotpull.js.zip to the Amazon S3 bucket you created for this app.
244

AWS SDK for JavaScript Developer Guide for SDK v2
Prepare and Create the Lambda Function
Lambda Function Code
For details about the example code in the Lambda function, see Writing a Lambda Function in
Node.js (p. 157). The code creates a JSON object to package the result for the browser script in the
application. Next, it generates three random integer values that are used to look up items in the
DynamoDB table, and obtains file names of images in the Amazon S3 bucket. The result JSON is
populated and passed back to the Lambda function caller.
Creating the Lambda Function
You can provide the Node.js code for the Lambda function is in a file compressed into a .zip archive
file that you upload to an Amazon S3 bucket. The slotassets.zip archive file contains a Node.js
setup script named lambda-function-setup.js that you modify and then run to create the Lambda
function.
To edit the Node.js setup script for creating the Lambda function
1. Open the slotassets.zip archive file that you downloaded from the code example archive on
GitHub.
2. Copy lambda-function-setup.js to the folder that contains your credentials JSON file.
3. Open lambda-function-setup.js in a text editor.
4. Find this line in the script
S3Bucket: 'BUCKET_NAME',
Replace BUCKET_NAME with the name of the Amazon S3 bucket that contains the .zip archive file of
the Lambda function code.
5. Find this line in the script
S3Key: 'ZIP_FILE_NAME',
Replace ZIP_FILE_NAME with the name of the .zip archive file of the Lambda function code in the
Amazon S3 bucket.
6. Find this line in the script.
Role: 'ROLE_ARN',
Replace ROLE_ARN with the ARN of the execution role you just created.
7. Save your changes to lambda-function-setup.js and close the file.
To run the setup script and create the Lambda function from the .zip archive file in the
Amazon S3 bucket
• At the command line, type the following.
node lambda-function-setup.js
Creation Script Code
The following is the script that creates the Lambda function. The code assumes you uploaded the .zip
archive file of the Lambda function to the Amazon S3 bucket you created for the application.
245

AWS SDK for JavaScript Developer Guide for SDK v2
Run the Lambda Function
// Load the AWS SDK for Node.js
var AWS = require('aws-sdk');
// Load credentials and set region from JSON file
AWS.config.loadFromPath('./config.json');
// Create the IAM service object
var lambda = new AWS.Lambda({apiVersion: '2015-03-31'});
var params = {
Code: { /* required */
S3Bucket: ''BUCKET_NAME',
S3Key: 'ZIP_FILE_NAME'
},
FunctionName: 'slotTurn', /* required */
Handler: 'slotSpin.Slothandler', /* required */
Role: 'ROLE_ARN', /* required */
Runtime: 'nodejs8.10', /* required */
Description: 'Slot machine game results generator'
};
lambda.createFunction(params, function(err, data) {
if (err) console.log(err); // an error occurred
else console.log("success"); // successful response
});
This script uses example code from this AWS SDK for JavaScript topic:
• Writing a Lambda Function in Node.js (p. 157)
Next Step
Return to the full Tutorial Steps (p. 233).
Run the Lambda Function
This topic is part of a larger tutorial about using the AWS SDK for JavaScript with AWS Lambda
functions. To start at the beginning of the tutorial, see Tutorial: Creating and Using Lambda
Functions (p. 232).
After you finish creating and configuring the following required resources, you're ready to run the
application to execute the AWS Lambda function:
• Amazon S3 bucket
• Amazon Cognito identity pool
• IAM execution role
• Amazon DynamoDB table
• Lambda function
To run the browser application
1. Open a web browser.
2. Point the browser at the URL for the Amazon S3 bucket that hosts the application.
246

AWS SDK for JavaScript Developer Guide for SDK v2
Run the Lambda Function
3. Choose or touch the handle on the right side of the slot machine. The wheels begin to spin as the
browser script invokes the Lambda function to generate results for this turn.
4. Once the Lambda function returns the spin results to the browser script, the browser script sets the
game display to show the images that the Lambda function selected.
5. Choose or touch the handle again to start another spin.
247

AWS SDK for JavaScript Developer Guide for SDK v2
Run the Lambda Function
Tutorial Clean Up
Ensure that you don't incur ongoing charges for the resources and services used in this tutorial by doing
the following cleanup.
After you complete the application, delete these resources in their respective service consoles:
• The Lambda function in the AWS Lambda console at https://console.aws.amazon.com/lambda/.
• The DynamoDB table in the Amazon DynamoDB console at https://console.aws.amazon.com/
dynamodb/.
• The objects in the Amazon S3 bucket and the bucket itself in the Amazon S3 console at https://
console.aws.amazon.com/s3/.
• The Amazon Cognito identity pool in the Amazon Cognito console at https://
console.aws.amazon.com/cognito/.
• The Lambda execution role in the IAM console at https://console.aws.amazon.com/iam/.
248

AWS SDK for JavaScript Developer Guide for SDK v2
SDK Changelog on GitHub
JavaScript API Reference
The API Reference topics for version 2.283.1 of the SDK for JavaScript are found at
https://docs.aws.amazon.com/AWSJavaScriptSDK/latest/index.html.
SDK Changelog on GitHub
The changelog for releases from version 2.4.8 and later is found at
https://github.com/aws/aws-sdk-js/blob/master/CHANGELOG.md.
249

AWS SDK for JavaScript Developer Guide for SDK v2
JavaScript SDK Forum
Additional Resources
The following links provide additional resources you can use with the SDK for JavaScript.
JavaScript SDK Forum
You can find questions and discussions on matters of interest to users of the SDK for JavaScript in the
JavaScript SDK Forum.
JavaScript SDK and Developer Guide on GitHub
There are several repos on GitHub for the AWS SDK for JavaScript.
• The current SDK for JavaScript is available in the SDK repo.
• The SDK for JavaScript Developer Guide is available in markdown format in its own documentation
repo.
• The sample code included in this guide is available in the SDK sample code repo.
JavaScript SDK on Gitter
You can also find questions and discussions about the SDK for JavaScript in the JavaScript SDK
community on Gitter.
250

AWS SDK for JavaScript Developer Guide for SDK v2
Document History
Document History for AWS SDK for
JavaScript
• SDK version: v2.283.1
• Latest documentation update: July 20, 2018
Document History
The following table describes important changes in each release of the AWS SDK for JavaScript after May
2018. For notification about updates to this documentation, you can subscribe to an RSS feed.
update-history-change update-history-description update-history-date
New Lambda Tutorial Added a new tutorial that
builds the browser-based game
mentioned in code example
topics for AWS Lambda. The
tutorial includes a downloadable
zip archive containing the
graphic assets used by the game,
several Node.js scripts used to
create and configure the services
and resources used by the game,
and the Node.js code for the
AWS Lambda function that runs
the game. See Tutorial: Creating
and Using Lambda Functions for
the new content.
July 20, 2018
New Getting Started in a
Browser Script
Getting Started in a Browser
Script has been rewritten to
simplify the example and
to access the Amazon Polly
service to send text and return
synthesized speech you can
play in the browser. See Getting
Started in Browser Script for the
new content.
July 14, 2018
New Amazon SNS Code Samples Four new Node.js code samples
for working with Amazon SNS
have been added. See Amazon
SNS Examples for the sample
code.
June 29, 2018
New Getting Started in Node.js Getting Started in Node.js has
been rewritten to use updated
sample code and to provide
greater detail in how to create
the package.json file as well
June 4, 2018
251

AWS SDK for JavaScript Developer Guide for SDK v2
Earlier Updates
as the Node.js code itself. See
Getting Started in Node.js for
the new content.
Earlier Updates
The following table describes important changes in each release of the AWS SDK for JavaScript before
June 2018.
Change Description Date
New AWS Elemental
MediaConvert code samples
Three new Node.js code samples
for working with AWS Elemental
MediaConvert have been
added. See AWS Elemental
MediaConvert Examples (p. 113)
for the sample code.
May 21, 2018
New Edit on GitHub Button The header of every topic now
provides a button that takes
you to the markdown version
of same topic on GitHub so you
can provide edits to improve the
accuracy and completeness of
the guide.
February 21, 2018
New Topic on Custom Endpoints Information has been added on
the format and use of custom
endpoints for making API
calls. See Specifying Custom
Endpoints (p. 23).
February 20, 2018
SDK for JavaScript Developer
Guide on GitHub
The SDK for JavaScript
Developer Guide is available in
markdown format in its own
documentation repo. You can
post issues you would like the
guide to address or submit pull
requests to submit proposed
changes.
February 16, 2018
New Amazon DynamoDB code
sample
A new Node.js code sample for
updating a DynamoDB table
using the Document Client
has been added. See Using
the DynamoDB Document
Client (p. 91) for the sample
code.
February 14, 2018
New Topic on AWS Cloud9 A topic describing how to use
AWS Cloud9 to develop and
debug browser and Node.js code
has been added. See Using AWS
Cloud9 with the AWS SDK for
JavaScript (p. 11).
February 5, 2018
252

AWS SDK for JavaScript Developer Guide for SDK v2
Earlier Updates
Change Description Date
New Topic on SDK Logging A topic describing how to log
API calls made with the SDK
for JavaScript has been added,
including information about
using a third-party logger. See
Logging AWS SDK for JavaScript
Calls (p. 50).
February 5, 2018
Updated Topic on Region
Setting
The topic describing how to
set the region used with the
SDK has been updated and
expanded, including information
about the order of precedence
for setting the region. See
Setting the AWS Region (p. 22).
December 12, 2017
New Amazon SES Code
Examples
The section with SDK code
examples has been updated
to include five new examples
for working with Amazon SES.
For more information about
these code examples, see
Amazon Simple Email Service
Examples (p. 185).
November 9, 2017
Usability Improvements Based on recent usability
testing, a number of changes
have been made to improve
documentation usability.
• Code samples are more
clearly identified as targeted
either for browser or Node.js
execution.
• TOC links no longer jump
immediately to other web
content, including the API
Reference.
• Includes more linking in
Getting Started section to
details on obtaining AWS
credentials.
• Provides more information
about common Node.js
features needed to
use the SDK. For more
information, see Node.js
Considerations (p. 35).
August 9, 2017
253

AWS SDK for JavaScript Developer Guide for SDK v2
Earlier Updates
Change Description Date
New DynamoDB Code Examples The section with SDK code
examples has been updated
to re-write the two previous
examples as well as add three
brand new examples for
working with DynamoDB. For
more information about these
code examples, see Amazon
DynamoDB Examples (p. 79).
June 21, 2017
New IAM Code Examples The section with SDK code
examples has been updated
to include five new examples
for working with IAM. For
more information about these
code examples, see AWS IAM
Examples (p. 129).
December 23, 2016
New CloudWatch and Amazon
SQS Code Examples
The section with SDK code
examples has been updated
to include new examples for
working with CloudWatch
and with Amazon SQS. For
more information about
these code examples,
see Amazon CloudWatch
Examples (p. 63) and Amazon
SQS Examples (p. 218).
December 20, 2016
New Amazon EC2 Code
Examples
The section with SDK code
examples has been updated to
include five new examples for
working with Amazon EC2. For
more information about these
code examples, see Amazon EC2
Examples (p. 95).
December 15, 2016
List of supported browsers made
more visible
The list of browsers supported
by the SDK for JavaScript, which
was previously found in the
topic on Prerequisites, has been
given its own topic to make
it more visible in the table of
contents.
November 16, 2016
254

AWS SDK for JavaScript Developer Guide for SDK v2
Earlier Updates
Change Description Date
Initial publication of the new
Developer Guide
The previous Developer
Guide is now deprecated. The
new Developer Guide has
been reorganized to make
information easier to find.
When either Node.js or browser
JavaScript scenarios present
special considerations, those are
identified as appropriate. The
guide also provides additional
code examples that are better
organized to make them easier
and faster to find.
October 28, 2016
255
