
You must read the Usage and Safety Precautions before use.
Operation Manual
Handy Recorder
H8
© 2021 ZOOM CORPORATION
Copying or reprinting this manual in part or in whole without permission is prohibited.
Product names, registered trademarks and company names in this document are the property of their respective companies. All trademarks and registered
trademarks in this document are for identification purposes only and are not intended to infringe on the copyrights of their respective owners.
Proper display is not possible on grayscale devices.

Notes about this Operation Manual
You might need this manual in the future. Always keep it in a place where you can access it easily.
The contents of this document and the specications of the product could be changed without notice.
Items that appear on the touchscreen are shown with a gray background in this operation manual.(Example:
Lo Cut)
◎ Windows® is a trademark or registered trademark of Microsoft® Corporation.
◎ macOS and iPadOS are trademarks or registered trademarks of Apple Inc.
◎ The SD, SDHC and SDXC logos are trademarks.
◎ The Bluetooth® word mark and logo are registered trademarks of Bluetooth SIG, Inc. and these marks are
used under license by Zoom Corporation. Other trademarks and trade names are the property of their re-
spective companies.
◎ Other product names, registered trademarks and company names in this document are the property of
their respective companies.
• All trademarks and registered trademarks in this document are for identication purposes only and are
not intended to infringe on the copyrights of their respective owners.
• Recording from copyrighted sources, including CDs, records, tapes, live performances, video works and
broadcasts, without permission of the copyright holder for any purpose other than personal use is prohib-
ited by law. Zoom Corporation will not assume any responsibility related to infringements of copyrights.
◎ Google Spatial Audio HRIRs
Copyright 2016 Google Inc. All Rights Reserved.
This product includes HRTFs (Head Related Impulse Responses) developed by Google Inc.
Google Spatial Audio is released under Apache License 2.0.
http://www.apache.org/licenses/LICENSE-2.0
THESE HRTFs WERE MODIFIED BY ZOOM.
length: first 64 samples
filter: low shelf
2

Introduction
Thank you very much for purchasing the ZOOM H8 Handy Recorder.
The
H8 portable recorder can handle all kinds of recording with three apps (FIELD, MUSIC, PODCAST) that can be
selected according to the type of project, an extensive selection of input options, and a touchscreen that allows intui-
tive operation. We hope you will enjoy using it for a long time.
Main features of the H8
FIELD app
This eld recording app, which can record up to 12 tracks, is designed for capturing sound in the environment and for
the creation of movies and television shows, for example. In addition to a large meter display that makes checking
track levels easy, this app offers a low-cut lter, compressor, limiter, noise gate and other signal processing along with
a sound marker function that is useful for synchronizing camera video.
MUSIC app
This app enables multi-track recording of even large bands with up to 10 inputs (using an optional EXH-8). Level
meters and faders, which are crucial in music production, are located on the Home Screen. This recording app offers
signicant features, including equalization, compression and other dynamics signal processing on each channel as
well as punching in and out, which enables rerecording parts. Moreover, the included effects are equivalent to those in
ZOOM multi-effects processors. By connecting to Guitar Lab over USB, a massive library of amp/cabinet models and
effects can be accessed.
PODCAST app
This app turns the H8 into a portable podcast recorder. By tapping the four sound pads located on the Home Screen,
effect sounds and jingles can be played to add excitement to programs (and recorded on tracks 3/4 and the stereo
mix). In addition to the 13 preset sounds, any samples on the SD card can be assigned to the sound pads. Using the
function that enables simultaneous recording of stereo mix les, podcast les can be created using just the
H8.
Optional mic capsules
The H8 has a unique ZOOM mic capsule connector that allows mic capsules to be switched for different applications.
In addition to the included XYH-6 XY stereo mic, the MSH-6 MS mic and other existing optional capsules be used. Fur-
thermore, the
H8 also supports a new generation of capsules, including the XAH-8 mic that can be switched between
XY to AB patterns, the VRH-8 Ambisonic mic capable of recording 360º sound and the EXH-8 attachment with 4 XLR
jacks.
Extensive selection of input options
In addition to the mic capsule connector (MIC IN), the H8 has XLR jacks (Inputs 1–4) and TRS/XLR combo jacks (Inputs
A and B) built in. Inputs 1–4 support professional mixer output using the –20dB PAD function. In addition, Inputs A and
B support Hi-Z, enabling direct input of guitars and basses.
Remote operation using iOS/iPadOS devices
Using an optional wireless adapter (BTA-1) and the H8 Control iOS/iPadOS app enables operation of the H8 from a dis-
tance, eliminating concern about handling noise from direct operation of the unit.
Audio interface use with computers and iOS/iPadOS devices
Connected to a computer or iOS/iPadOS device by USB, the H8 can be used as an audio interface with up to 12 tracks
for music production in a DAW or for online meetings.
3

Terms used in this manual
Effect
A wide variety of effects can be applied to sounds, including distortion, chorus and reverb. By adjusting effect
parameters, you can create your own original sounds.
Patch memory
Patch memories store the effects used, their ON/OFF states and parameter setting values, allowing easy recall.
Effects are saved and recalled in units of patch memories. Up to three effects can be added to one patch
memory, and the H8 can store up to 50 patches.
Automatic saving
This function automatically saves changes to patch memories and effect settings.
Sound pad
Sound pads can be pressed to play the audio les that have been assigned to them. This is convenient for playing
interviews that have been recorded in advance, opening and closing music and jingles.
Project
The H8 manages recording and playback data in units called projects.
The audio les assigned to tracks and settings, including for panning, faders and marks, are saved in project les.
Up to 999 projects can be created on a single card.
4

Contents
Notes about this Operation Manual ……………………… 2
Introduction …………………………………………………………… 3
Terms used in this manual …………………………………… 4
H8
overview …………………………………………………………… 7
H8
apps ……………………………………………………………………… 7
Functions of parts …………………………………………………… 8
Mic capsule overview …………………………………………… 12
Touchscreen operation overview ………………………… 13
Making preparations …………………………………………… 16
Inserting SD cards ………………………………………………… 16
Supplying power …………………………………………………… 17
Turning the power on/off ……………………………………… 18
Preventing misoperation (HOLD function) ………… 18
Setting the display language
(rst time starting up) ………………………………………… 19
Setting the date and time
(rst time starting up) ………………………………………… 19
Connecting …………………………………………………………… 20
Connection examples …………………………………………… 20
Connecting/disconnecting the mic capsule ……… 21
Connecting mics, instruments, mixers
and other equipment ………………………………………… 23
Making input and output settings ……………………… 25
Making settings for input tracks ………………………… 25
Setting the headphone output level …………………… 42
Adjusting connected equipment levels
(playing test tones) …………………………………………… 43
Recording with the FIELD app ……………………………… 45
Display overview …………………………………………………… 45
Recording ………………………………………………………………… 47
Playing recordings ………………………………………………… 49
Recording automatically ……………………………………… 50
Capturing audio before recording starts
(pre-recording) …………………………………………………… 54
Enabling the sound marker function …………………… 56
Recording L/R tracks …………………………………………… 57
Recording with the MUSIC app …………………………… 59
Display overview …………………………………………………… 59
Creating new projects …………………………………………… 61
Opening existing projects ……………………………………… 63
Recording ………………………………………………………………… 65
Playing recordings ………………………………………………… 67
Using effects …………………………………………………………… 68
Using the metronome …………………………………………… 69
Assigning les to tracks………………………………………… 74
Recording additional les ……………………………………… 78
Mixing projects ……………………………………………………… 80
Recording with the PODCAST app ……………………… 83
Display overview …………………………………………………… 83
Recording ………………………………………………………………… 85
Playing recordings ………………………………………………… 86
Using sound pads ………………………………………………… 88
Making recording settings …………………………………… 91
Using effects ……………………………………………………… 95
Selecting tracks and patch memories
to use effects ……………………………………………………… 95
Adjusting effect parameters ……………………………… 100
Making patch memory settings ………………………… 101
Managing projects …………………………………………… 106
Folder and le structure ……………………………………… 106
Managing projects ……………………………………………… 107
Using as an audio interface ……………………………… 112
Connecting the
H8 with a computer
or iOS/iPadOS device ……………………………………… 112
Disconnecting from a computer
or iOS/iPadOS device ……………………………………… 114
Making audio interface settings ……………………… 115
Managing SD cards …………………………………………… 117
Checking SD card information …………………………… 117
Testing SD card performance …………………………… 118
Formatting SD cards …………………………………………… 121
Using as a card reader ……………………………………… 122
Connecting the
H8 with a computer ………………… 122
Disconnecting a computer from the H8 …………… 123
5
Using the tuner ………………………………………………… 124
Tuning guitars ……………………………………………………… 124
Changing the tuner type ……………………………………… 125
Setting the standard pitch of the tuner …………… 126
Using at tunings ………………………………………………… 128
Using Guitar Lab ……………………………………………… 130
Connecting Guitar Lab ………………………………………… 130
Disconnecting Guitar Lab …………………………………… 130
Setting the date and time ………………………………… 131
Setting the date and time …………………………………… 131
Setting the date format ……………………………………… 132
Setting the battery type …………………………………… 134
Setting how marks are added when
recording/playing ……………………………………………… 135
Making display settings …………………………………… 136
Setting the display brightness …………………………… 136
Setting the display backlight ……………………………… 137
Setting the Auto Power OFF function ……………… 139
Operating from an iOS/iPadOS device ……………… 141
Connecting an iOS/iPadOS device …………………… 141
Disconnecting from an iOS/iPadOS device ……… 143
Setting the language shown ……………………………… 144
Restoring default setting values ……………………… 145
Managing the rmware …………………………………… 146
Checking the rmware versions ………………………… 146
Updating the rmware ………………………………………… 146
Using optional mic capsules …………………………… 147
Using the XAH-8 …………………………………………………… 147
Using the EXH-8 …………………………………………………… 150
Using the VRH-8 …………………………………………………… 154
Appendix …………………………………………………………… 160
Troubleshooting …………………………………………………… 160
Specications …………………………………………………… 162
6

H8
overview
H8
apps
The H8 includes three apps that are tailored for different uses and can be launched from its Home Screen.
FIELD app
Use this for eld recording.
This can be used to record things that
can be heard in nature to realize unique
sounds for effects.
PODCAST app
This app is good for preparing audio
materials for podcasts as well as live
streaming.
Content can be made that is easy to
listen to casually on smartphones, com-
puters and other devices.
Home Screen
MUSIC app
Use this when making music.
Guitar can be recorded while
listening back to previously
recorded drum tracks, and
vocals can be rerecorded as
many times as necessary until
everyone is satised.
7

Functions of parts
█
Front
❷ Mic track button
❶ Mic input volume L/R
❸ PAD switch 1
❹ Input volume 1/3/A
❺ Hi-Z switch A
❸ PAD switches 3/4
❻ Touchscreen
❼ Mic capsule
❸ PAD switch 2
❽ Track buttons/indicators
1/2/3/4/A/B
❹ Input volume 2/4/B
❾ STOP/HOME button
PLAY/PAUSE button
REC button
❺ Hi-Z switch B
❶
Mic input volume L/R
Use to adjust the mic input volume.
❷
Mic track button
This turns the mic track on and off.
❸
PAD switches 1–4
These attenuate (reduce) the input signals of equipment connected to inputs 1–4 by 20 dB.
Set PAD switches to [–20dB] when connecting line level equipment.
❹
Input volume knobs 1/2/3/4/A/B
Use to adjust input volumes.
❺
Hi-Z switches A/B
Use to switch the impedances of inputs A/B.
Set Hi-Z switches to [Hi-Z] when connecting a guitar or bass guitar.
❻
Touchscreen
This shows various types of information and allows touch control of unit settings and other features.
❼
Mic capsule
This can be swapped for different applications.
8

❽
Track buttons/indicators 1/2/3/4/A/B
These turn input tracks on and off.
They also light red and green to show track status. They blink rapidly when input sound levels are high.
❾
STOP/HOME button
Press to stop project recording/playback and to open the Home Screen or the top screen of an app.
PLAY/PAUSE button
Press to start/pause playback of recorded projects.
REC button
Press to start recording.
█
Left side
█
Right side
Lock release
buttons
❶ Input 1
❷ Input A
❸ Input 3
❹ SD card slot
❺ MIC/LINE IN jack
(supports plug-in power)
❶ Input 2
❷ Input B
❸ Input 4
❶
Inputs 1/2
Connect mics and keyboards to these. These support XLR Plug connectors.
❷
Inputs A/B
Connect mics, keyboards and guitars to these. These support XLR and 1/4-inch phone (unbalanced) plugs.
❸
Inputs 3/4
Connect mics and keyboards to these. These support XLR Plug connectors.
❹
SD card slot
The
H8 supports cards that conform to SD, SDHC or SDXC specications.
❺
MIC/LINE IN input jack (supports plug-in power)
A connected mic can be used to record. Mics that require plug-in power can be used with this jack.
❻
Speaker
Sound is output here during project playback.
❻ Speaker
9

█ Bottom
❶ Power/HOLD switch ❷ REMOTE connector ❸ USB (Micro-B) port
❹ LINE OUT jack ❺ Strap attachment holes ❻ PHONE OUT jack
❶
Power/HOLD switch
Use this to turn the power ON/OFF and to disable button operation.
❷
REMOTE connector
Connect a BTA-1 or other dedicated wireless adapter here. This enables operation of the
H8 from an iOS/
iPadOS device using a dedicated controller app.
❸
USB (Micro-B) port
Connect this to a computer or iOS/iPadOS device to use the
H8 as an audio interface or card reader.
By using Guitar Lab on a computer, you can also manage patches and edit and add effects, for example.
A dedicated AC adapter (ZOOM AD-17) can also be connected here to use AC power.
❹
LINE OUT jack
This can output sound to a connected device.
❺
Strap attachment holes
Use these to attach a strap.
❻
PHONE OUT jack
This can output sound to headphones.
10

█
Back
❶ Mic connector cap attachment points
❷ Tripod mounting threads
❸ Battery compartment cover
❶
Mic connector cap attachment points
Use these when attaching a mic connector cap.
❷
Tripod mounting threads
Use these screw threads to attach a tripod (not included).
❸
Battery compartment cover
Remove when installing or removing batteries.
11

Mic capsule overview
RL RL
90° 120°
The H8 includes a mic capsule (XY mic).
The XY mic capsule has two crossing directional mics. By rotating the individual mics, the width of audio capture
can be switched from 90º to 120º.
Features:
Since these mics have large diaphragms, they can record a range of frequencies from low to high with good
stereo placement while capturing sounds in the center clearly.
Providing a three-dimensional sound with natural depth and width, this technique is ideal for recording when you
want to capture a specic sound source that is nearby or at a medium distance.
Use examples: solo performances, chamber music, live rehearsals, eld recording
NOTE
The XY mic has a MIC/LINE IN input jack that can be used to connect an external mic or line-level device. This
jack can also provide plug-in power to mics that use it. (
→
page 28)
12

Touchscreen operation overview
Tap, swipe and slide on the H8 touchscreen to make settings and select functions to adjust.
Home Screen
This appears on the touchscreen when the H8 power is turned on.
From the Home Screen, three recording applications, various settings screens and other functions can be
launched.
Swipe to
change
• Tap the icon to launch the FIELD app.
• Tap the icon to launch the MUSIC app.
• Tap the icon to launch the PODCAST app.
• Tap other icons to launch various settings screens, for example.
HINT
Press to return to the Home Screen.
13

Operations on various screens
Tap, slide and swipe to operate the touchscreen.
Slide
(move while touching)
Swipe
(ick nger left or right while touching)
Tap
(touch a selection item)
Character Input Screen overview
Cursor movement button
Cursor movement button
Text input box
Keyboard
14

Tap
[↑]
Tap [123]Tap [ABC]
NOTE
The following characters can be used in project names.
(space) ! # $ ' ( ) + , - 0 1 2 3 4 5 6 7 8 9 ; = @ A B C D E F G H I J K L M N O P Q R S T U V W X Y Z [ ] ^ _ ` a b c d e
f g h i j k l m n o p q r s t u v w x y z { } ~
15

Making preparations
Inserting SD cards
SD card slot on
lower left side
1.
Turn the power off and then open the SD card slot cover.
2.
Insert the SD card into the SD card slot.
To remove an SD card, push it further into the slot and then pull it out.
NOTE
• Always turn the power off before inserting or removing an SD card.
Inserting or removing a card while the power is on could result in data loss.
• When inserting an SD card, be sure to insert the correct end with the top side up as shown.
• If an SD card is not loaded, recording and playback are not possible.
• After purchasing a new SD card, always format it using the H8 to maximize performance.
(
→
“Formatting SD cards” on page 121)
16

Supplying power
Using batteries
Open while
pressing up
1.
Turn the power off and then remove the battery cover.
2.
Install the batteries.
3.
Replace the battery cover.
NOTE
• Use alkaline batteries, rechargeable NiMH batteries or lithium batteries.
• If the battery indicator becomes empty, turn the power off immediately and install new batteries.
• To enable accurate display of remaining battery charge, set the battery type using Home Screen > SYSTEM >
Battery. (
→
“Setting the battery type” on page 134)
Using an AC adapter
1.
Connect the cable of the dedicated ZOOM AD-17 AC adapter to the USB port.
2.
Plug the dedicated AC adapter into an outlet.
HINT
• A 5V mobile battery (commercially-available) can also be connected.
• When connected to a computer, power can be supplied by USB.
17

Turning the power on/off
Turning the power on
1.
Slide toward .
Turning the power off
1.
Keep sliding toward until the ZOOM logo appears.
NOTE
• If “No Card!” appears on the display, conrm that an SD card is inserted properly.
• If “Card Protected!” appears on the display, the SD card write-protection is enabled. Slide the lock switch on
the SD card to disable write-protection.
• If “Invalid SD Card!” appears on the display, the card is not formatted correctly. Format the card or use a differ-
ent card. (
→
“Formatting SD cards” on page 121)
Preventing misoperation (HOLD function)
In order to prevent misoperation, the HOLD function can be used to disable operation of the H8 buttons and
touchscreen.
1.
Slide to [HOLD].
█
Deactivating the hold function
Slide back to the middle.
18

Setting the display language (rst time starting up)
The rst time you turn the power on after purchase, set the touchscreen display language when the LANGUAGE
Screen opens.
1.
Tap the language you want to set.
HINT
The display language can be changed later using Home Screen > Language. (
→
“Setting the language shown”
on page 144)
Setting the date and time (rst time starting up)
When the Set Date/Time Screen opens after the LANGUAGE Screen, set the date and time.
1.
Swipe the date and time items to set them.
2.
Tap Enter.
HINT
The date and time setting can be changed later using Home Screen > SYSTEM > Date/Time > Set Date/Time.
(
→
“Setting the date and time” on page 131)
19

Connecting
Connection examples
Video recording (using the FIELD app to record audio)
Shotgun
mic
Lavalier mic
Receiver Receiver Ambient micAmbient mic
Band recording in a studio (using the MUSIC app to record audio)
Vocal mic
Drum mic
Electric bass
Keyboard
Electric guitar
20

Podcasting (using the PODCAST app to record audio)
Portable music player, etc.
Mics Mics
Headphones
Connecting/disconnecting the mic capsule
Connecting the mic capsule
1.
Remove the protective caps from the H8 and the mic capsule.
21

2.
While pressing the buttons on the sides of the mic, connect it to the main unit, inserting it completely.
Disconnecting the mic capsule
1.
While pressing the buttons on the sides of the mic, pull it out of the main unit.
NOTE
• Do not use too much force when disconnecting. Doing so could damage the mic or the main unit.
• Recording will stop if a mic capsule is removed during recording.
• Attach the protective caps when the mic capsule will not be connected for a long time.
22

Connecting mics, instruments, mixers and other equipment
The H8 can record up to 12 tracks at once. These include up to 4 tracks of input from a mic capsule, Inputs 1–4,
A and B, and a stereo mix of these with L/R tracks (2 tracks).
Mics can be connected to Inputs 1–4 and instruments can be connected to Inputs A and B, for example, and
recorded to corresponding input tracks 1–4, A and B.
Connecting mics
Input A
Input B
Input 1
Input 2
Input 3
Input 4
Connect dynamic and condenser mics with XLR plugs to Inputs 1–4, A and B. Phantom power (+24 V/+48 V) can
be supplied to condenser mics. (
→
page 30)
Connecting instruments
When directly connecting guitars and bass guitars, connect their mono plugs to Input A or B. When connecting
keyboards and other instruments with stereo outputs connect them to both input A and B.
When connecting a guitar or other device with high output impedance, set the corresponding Hi-Z switch (
) to
[Hi-Z].
23

Input A Input B
Hi-Z switches A/B
Connecting mixers and similar devices
Connect XLR cables from keyboards and mixers directly to Inputs 1–4.
For mixers and other devices with a rated output level of +4 dB, set the corresponding PAD switches (
) to
[–20dB].
Input 1
Input 2
Input 3
Input 4
PAD switches 3/4
PAD switches 1/2
HINT
When connecting an ordinary mic, set the PAD switch to [0dB].
24

Making input and output settings
Making settings for input tracks
Enabling tracks for recording
Select which tracks to record from MIC IN, 1–4 and A/B.
The MIC IN, 1–4 and A/B tracks correspond to the MIC IN, 1–4 and A/B inputs.
1.
Launch a recording app.
2.
Press the buttons for the tracks that you want to record.
The indicators for the selected track buttons will light red.
Track buttons/indicators 3/4
Track buttons/indicators A/B
Track buttons/indicators 1/2
Mic track button
HINT
While pressing a track button, pressing the adjacent button (1 and 2, 3 and 4, or A and B) will stereo link those
tracks, making a stereo track and creating stereo les on the SD card. Do the same thing to end a stereo link.
25

Setting recording (input) levels
Input levels can be adjusted for signals to be recorded.
1.
Turn the input volume knob ( ) for the selected track to adjust its input level.
Adjust so that the peak level stays around −12 dB.
Input volume 1/3/A
Input volume 2/4/B
Mic input volume L/R
HINT
• If the sound distorts even after lowering the input level, try changing mic positions and adjusting the output
levels of connected devices.
• Plug-in power can be provided to the MIC/LINE IN input jack on the mic capsule.
(
→
“Using plug-in power” on page 28)
• The Lo Cut function can be used when adjusting levels. (
→
page 33)
• The Comp/Limiter/Gate function can be used when adjusting levels. (
→
page 34)
26

Backup recording (FIELD and PODCAST apps only)
When using a mic capsule with up to two channels on the MIC IN, a backup recording le can be recorded 12 dB
lower than the set input level. This can be used to replace the regular recording le if its recording level was too
high, causing distortion, for example.
1.
Open the Track Setting Screen in the app.
Tap in the following order:
• FIELD app screen >
> select track
• PODCAST app screen >
> select track
2.
Tap Backup Rec, and set to On.
NOTE
• During backup recording, the Lo Cut and Comp/Limiter/Gate settings are not applied.
• To play a backup recording le, assign a le with “_BU” added to its name to a track. Then select and play it.
(
→
“Changing les assigned to tracks” on page 74)
27

Using plug-in power
Make the following setting when a mic that is compatible with plug-in power is connected to the mic capsule
MIC/LINE IN input jack.
1.
Open the Track Setting Screen in the app.
Tap in the following order:
• FIELD app screen >
> select track
• MUSIC app screen > select track >
• PODCAST app screen > > select track
2.
Tap Plugin Power and set to On.
NOTE
This setting can be set only when a mic capsule that supports plug-in power is connected.
28

Adjusting the side mic level
You can adjust the side mic level (stereo width) before recording for tracks that use a mid-side mic.
1.
Open the Track Setting Screen in the app.
Tap in the following order:
• FIELD app screen >
> select track
• MUSIC app screen > select track >
• PODCAST app screen > > select track
2.
Tap MS Side Mic Level.
3.
Slide up or down to adjust it.
HINT
• This can be set to Off, RAW or in a range from −24 to +6 dB.
• The more the side mic level is increased, the greater the stereo width becomes.
• The side mic level setting is also applied to backup recording when it is enabled.
NOTE
• When set to RAW, recording to the MIC IN tracks will occur without stereo encoding.
• Stereo encoding is conducted for L/R track recording and mixdown.
• The stereo width of audio in RAW format can be adjusted after recording by using ZOOM MS Decoder or other
plug-in software.
29
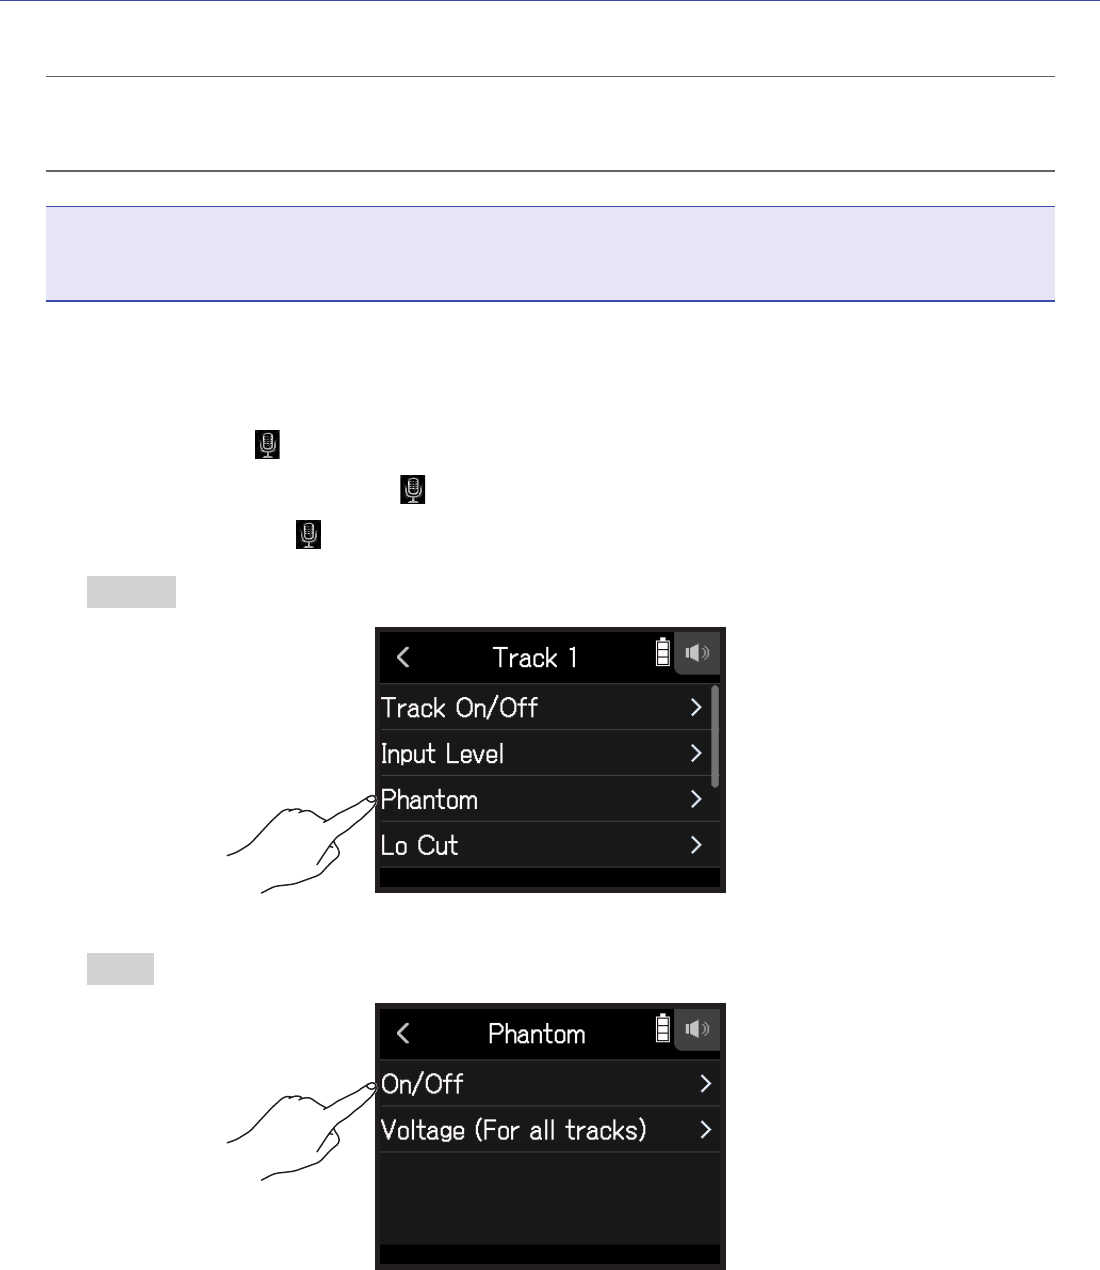
Setting phantom power
H8
inputs 1–4, A and B support phantom power. They can supply power at +24 V or +48 V.
HINT
Phantom power is a function that supplies power to devices that require an external power supply, including
some condenser mics. The standard power is +48V, but some devices can operate with lower voltages.
NOTE
Do not use this function with devices that are not compatible with phantom power. Doing so could damage the
device.
1.
Open the Track Setting Screen in the app.
Tap in the following order:
• FIELD app screen >
> select track
• MUSIC app screen > select track >
• PODCAST app screen > > select track
2.
Tap Phantom.
3.
Tap On/Off.
30

4.
Tap On.
31

Setting phantom power voltage
1.
Open the Track Setting Screen in the app.
Tap in the following order:
• FIELD app screen >
> select track
• MUSIC app screen > select track >
• PODCAST app screen > > select track
2.
Tap Phantom.
3.
Tap Voltage (For all tracks).
4.
Tap +24V or +48V.
HINT
• When using mics and other equipment that can operate with voltages less than +48 V, selecting the lower volt-
age can reduce the H8 power consumption.
• The phantom power setting is shared by all inputs.
32

Reducing noise (low-frequency cut)
The high pass lter can cut low frequencies to reduce the sound of wind, vocal pops and other noise.
1.
Open the Track Setting Screen in the app.
Tap in the following order:
• FIELD app screen >
> select track
• MUSIC app screen > select track >
• PODCAST app screen > > select track
2.
Tap Lo Cut.
3.
Slide up and down to set the desired cutoff frequency.
NOTE
This will not affect backup recording data.
HINT
This can be set to Off or 10–240 Hz.
33

Comp/Limiter/Gate
The volume can be adjusted suitably according to the input signal levels, making listening to them easier.
█
Compressor
This reduces level differences between loud and quiet sounds, making listening to them easier.
█
Limiter
This can prevent distortion by reducing input signals that have high levels.
█
Gate
This suppresses background noise when the input signal level is low.
Threshold
Level
Original
signal
Signal
after limiter
Attack
time
Release
time
Time
Parameter Explanation
Threshold This adjusts the threshold that triggers the effect.
Attack time
This adjusts the speed that the effect is triggered after the threshold
level is exceeded.
Release time
This adjusts how quickly the effect stops after the signal goes below
the threshold level.
34

█
Selecting the compressor, limiter or noise gate
1.
Open the Track Setting Screen in the app.
Tap in the following order:
• FIELD app screen >
> select track
• MUSIC app screen > select track >
• PODCAST app screen > > select track
2.
Tap Comp/Limiter/Gate.
3.
Tap Type.
4.
Tap Comp, Limiter or Noise Gate.
• Comp: This selects the compressor and sets the ratio to 4:1.
• Limiter: This selects the Limiter and sets the ratio to 20:1.
• Noise Gate: This selects the noise gate.
• Off: This disables the compressor, limiter and noise gate.
35

█
Setting the threshold
This sets the base level from which the limiter operates.
1.
Open the Track Setting Screen in the app.
Tap in the following order:
• FIELD app screen >
> select track
• MUSIC app screen > select track >
• PODCAST app screen > > select track
2.
Tap Comp/Limiter/Gate.
3.
Tap Threshold.
NOTE
Threshold cannot be set if Type is set to Off.
4.
Slide up and down to adjust.
36

HINT
• This can be set from −16 to −2 dBFS for the compressor and limiter.
• This can be set from −80 to −2 dBFS for the noise gate.
█
Setting the attack time
This sets the amount of time until compression starts after the input signal exceeds the threshold.
1.
Open the Track Setting Screen in the app.
Tap in the following order:
• FIELD app screen >
> select track
• MUSIC app screen > select track >
• PODCAST app screen > > select track
2.
Tap Comp/Limiter/Gate.
3.
Tap Attack Time.
NOTE
Attack Time cannot be set if Type is set to Off.
37

4.
Slide up and down to adjust the time.
HINT
This can be set from 1 to 4 ms.
█
Setting the release time
This sets the amount of time until compression stops after the input signal goes below the threshold.
1.
Open the Track Setting Screen in the app.
Tap in the following order:
• FIELD app screen >
> select track
• MUSIC app screen > select track >
• PODCAST app screen > > select track
2.
Tap Comp/Limiter/Gate.
38

3.
Tap Release Time.
NOTE
Release Time cannot be set if Type is set to Off.
4.
Slide up and down to adjust the time.
HINT
• Limiter operation is linked for tracks that have stereo link enabled. If the signal for either linked channel
reaches the threshold, the limiter will operate on both tracks.
Adjusting input signal monitoring balance using fader and pan settings
The level and panning of each input signal when monitoring can be adjusted.
1.
Open the Track Setting Screen in the app.
Tap in the following order:
• FIELD app screen >
> select track
• MUSIC app screen > select track >
• PODCAST app screen > > select track
39

2.
Tap Fader/Pan.
3.
Select Fader or Pan.
4.
Slide up and down to change their settings.
• Fader can be set to Mute or in a range of −48.0 dB – +10.0 dB (by 0.5 dB) to adjust the input signal level.
• Pan can be set to L100 – L1, Center, or R1 – R100 to adjust the left-right sound balance.
40

Enabling stereo linking
By enabling stereo tracks (stereo links), inputs can be handled as stereo sounds.
1.
Open the Track Setting Screen in the app.
Tap in the following order:
• FIELD app screen >
> select track
• MUSIC app screen > select track >
• PODCAST app screen > > select track
2.
Tap Stereo Link.
3.
Tap On.
HINT
While pressing a track button, pressing the adjacent button (1 and 2, 3 and 4, or A and B) will stereo link those
tracks, making a stereo track and creating stereo les on the SD card. Do the same thing to end a stereo link.
41
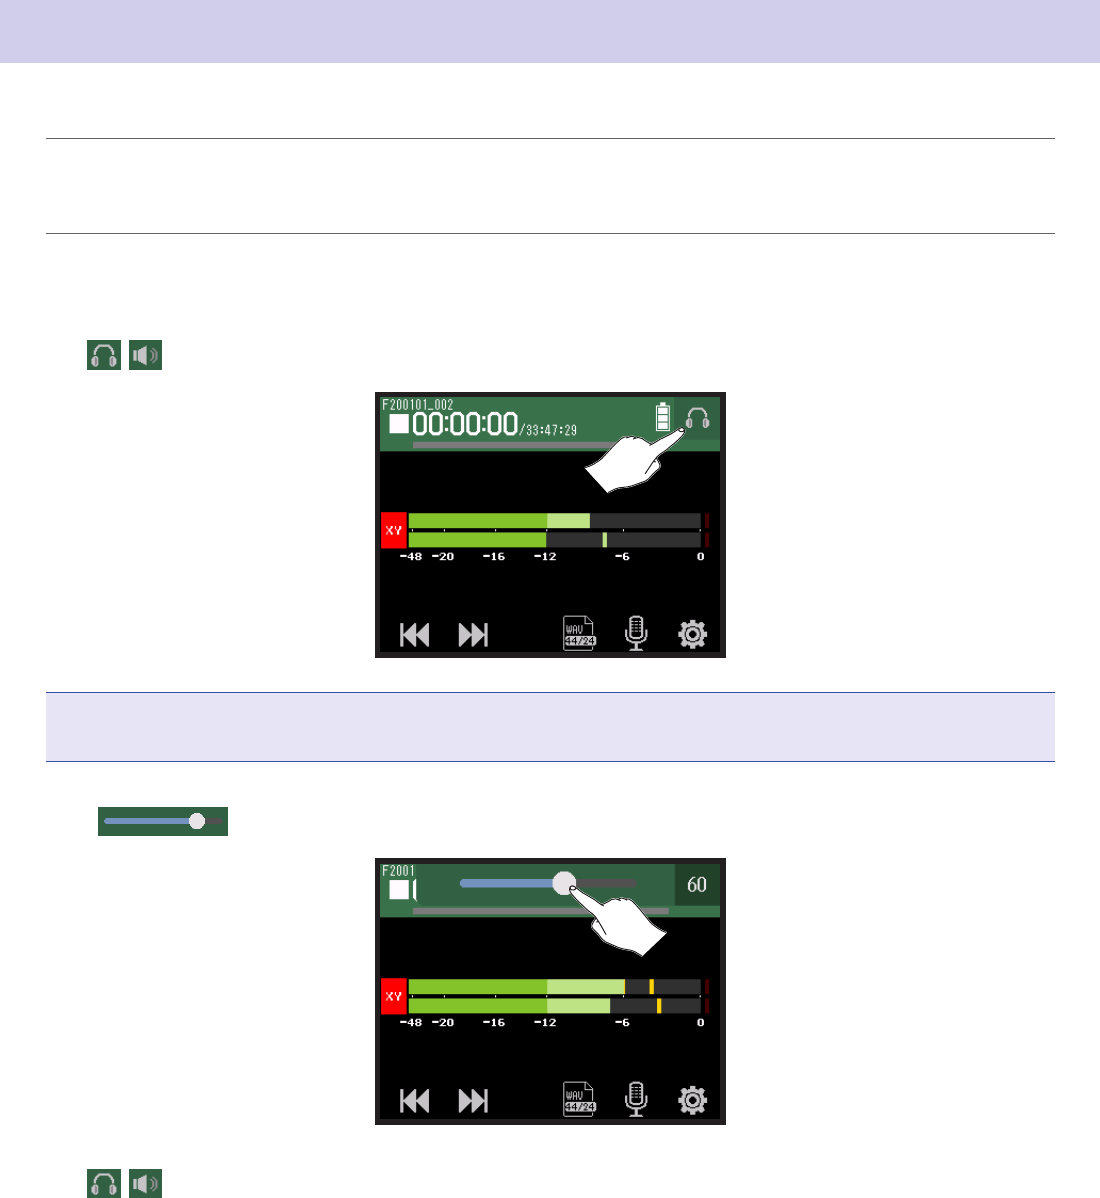
Setting the headphone output level
Use headphones, for example, to monitor input/playback sounds and adjust levels (volume).
HINT
• Monitoring with the speaker is possible during playback.
• If a cable is connected to the LINE OUT or PHONE OUT jack, sound will not be output from the H8 speaker.
1.
Connect headphones, for example, to the H8 PHONE OUT jack.
2.
Tap / at the top right of the screen.
NOTE
A speaker icon will appear when headphones are not connected.
3.
Slide to adjust the volume.
4.
Tap / at the top right of the screen.
42

Adjusting connected equipment levels (playing test tones)
The line output level can be adjusted.
Test tones can be played in order to adjust the level for a digital SLR camera or other device.
1.
Minimize the input volume of the other device.
2.
Use an audio cable to connect the external mic jack of the other device with the H8 LINE OUT jack.
3.
Tap LINE OUT LEVEL on the Home Screen.
4.
Tap Test Tone.
This starts output of the test tone.
43

5.
Slide up and down to adjust the output level.
While checking the audio level meter of the other device, adjust the audio signal level so that it never
exceeds −12 dB.
HINT
This can be set from −40 to 0 dB.
6.
Make small adjustments to the input volume of the other device.
While checking the audio level meter of the connected device, make adjustments to the input gain of that
device until the audio signal level is about −12 dB.
7.
Tap Test Tone.
This stops test tone output.
NOTE
• See the manual of the connected device for information about its operation.
• The test tone is output from both the LINE OUT and PHONE OUT jacks.
• Be careful with the volume if you are monitoring the sound with headphones, for example.
HINT
The test tone is a 1kHz sine wave at −12 dBFS.
44

FIELD
Recording with the FIELD app
Display overview
⓬ Track settings button
⓭ Recording format button
⓫ Settings button
❿ Clipping indicators
❾ Headphone/speaker
volume button
❽ Remaining battery charge
Empty Full
❼ Progress
bar
❻ Time
display
❺ REW/FF buttons
❹ Track numbers
❸ Level meters
❷ Status icon
❶ Recording/playback
project name
❶
Recording/playback project name
❷
Status icon
This shows the recording/playback status.
■
: Stopped
●
: Recording
: Recording/playback paused
▶
: Playing
❸
Level meters
❹
Track numbers
Red: Input enabled
Green: Playback track enabled
Gray: Input disabled
Adjacent track numbers are connected to show input link settings.
❺
REW/FF buttons
Use to select projects and to search backward and forward.
❻
Time display
00:00:00/
00:00:00
When recording
Left: Current elapsed recording time
Right: Remaining available recording time
When playing
Left: Current elapsed playback time
Right: Remaining playback time
45

FIELD
❼
Progress bar
This shows the current playback location.
Mark positions are shown above the progress bar.
Slide
▼
to change the playback position.
❽
Remaining battery charge
This shows the remaining battery charge. When the remaining battery charge becomes low, replace the bat-
teries (
→
“Using batteries” on page 17) or connect an AC adapter (
→
“Using an AC adapter” on page 17).
❾
Headphone/speaker volume button
Touch this to show the headphone/speaker volume slider. (
→
page 42)
❿
Clipping indicators
If a clipping indicator lights, adjust the input level (
→
“Setting recording (input) levels” on page 26) or set
the limiter (
→
“Comp/Limiter/Gate” on page 34).
⓫
Settings button
Press to access a list of projects on the SD card (
→
page 107) and to make automatic recording settings
(
→
page 50).
⓬
Track settings button
Press to make track settings, including Lo Cut and Phantom functions. (
→
page 27)
⓭
Recording format button
Use to set the recording format. (
→
page 47)
46

FIELD
Recording
Recording process
Recording follows the process shown below.
Prepare to
record
• Insert an SD card
• Use batteries or an AC adapter
• Connect the mic capsule
• Connect mics, instruments, mixers and other equipment
• Turn the power on
• Set the recording format
• Make input and output settings
Record
• Press to start recording and press to stop
• Marks can also be added
• Press
to pause
Play and check
• Press to start playback and to stop
• Cue to mark positions and to make project mixer settings, for example
Setting the recording format
Considering audio quality and le size, select the format.
1.
Tap .
47

FIELD
2.
Tap the recording format to set it.
The following formats can be set.
They are shown in order of audio quality (from low to high) and le size (from small to large).
Setting Explanation
MP3 128 kbps
The sampling frequency is 44.1 kHz.
The higher the bit rate is, the better the audio quality will be.
MP3 192 kbps
MP3 320 kbps
WAV 44.1 kHz/16 bit
The higher the sampling frequency (kHz) and bit rate (bit) are, the
better the audio quality will be.
WAV 44.1 kHz/24 bit
WAV 48 kHz/16 bit
WAV 48 kHz/24 bit
WAV 96 kHz/16 bit
WAV 96 kHz/24 bit
Recording
1.
Press on the FIELD app screen.
This starts recording.
2.
Press to pause.
NOTE
• When recording is paused, a mark is added at that point. Press
again to resume recording.
• A maximum of 99 marks can be added in a project.
HINT
Marks can be added without pausing. (
→
“Setting how marks are added when recording/playing” on page 135)
3.
Press to stop.
NOTE
If the le size exceeds 2 GB during recording, recording will continue in a new project with a number that is one
higher. No gap in sound will occur between the two projects when this happens.
48

FIELD
HINT
Files are automatically saved at regular intervals during recording. If the power is interrupted or another prob-
lem occurs during recording, an affected le can be restored to normal by playing the automatically saved le
with the H8.
Playing recordings
1.
Press .
Playback operations
Operation Touchscreen/button operation
Select playback project/move to mark
Tap
Search forward/backward
Press and hold
Slide left/right
Pause/resume playback
Press
Stop
Press
HINT
• Slide left/right
to change the playback position.
• During playback, press track buttons to switch between playing back (lit green) and muted (unlit).
• If the selected project is not valid, an “Invalid Project!” message will appear.
• If no playable project exists, a “No Project!" message will appear.
• During playback, press
to add marks that can be used for cueing. (
→
“Setting how marks are added when
recording/playing” on page 135)
49

FIELD
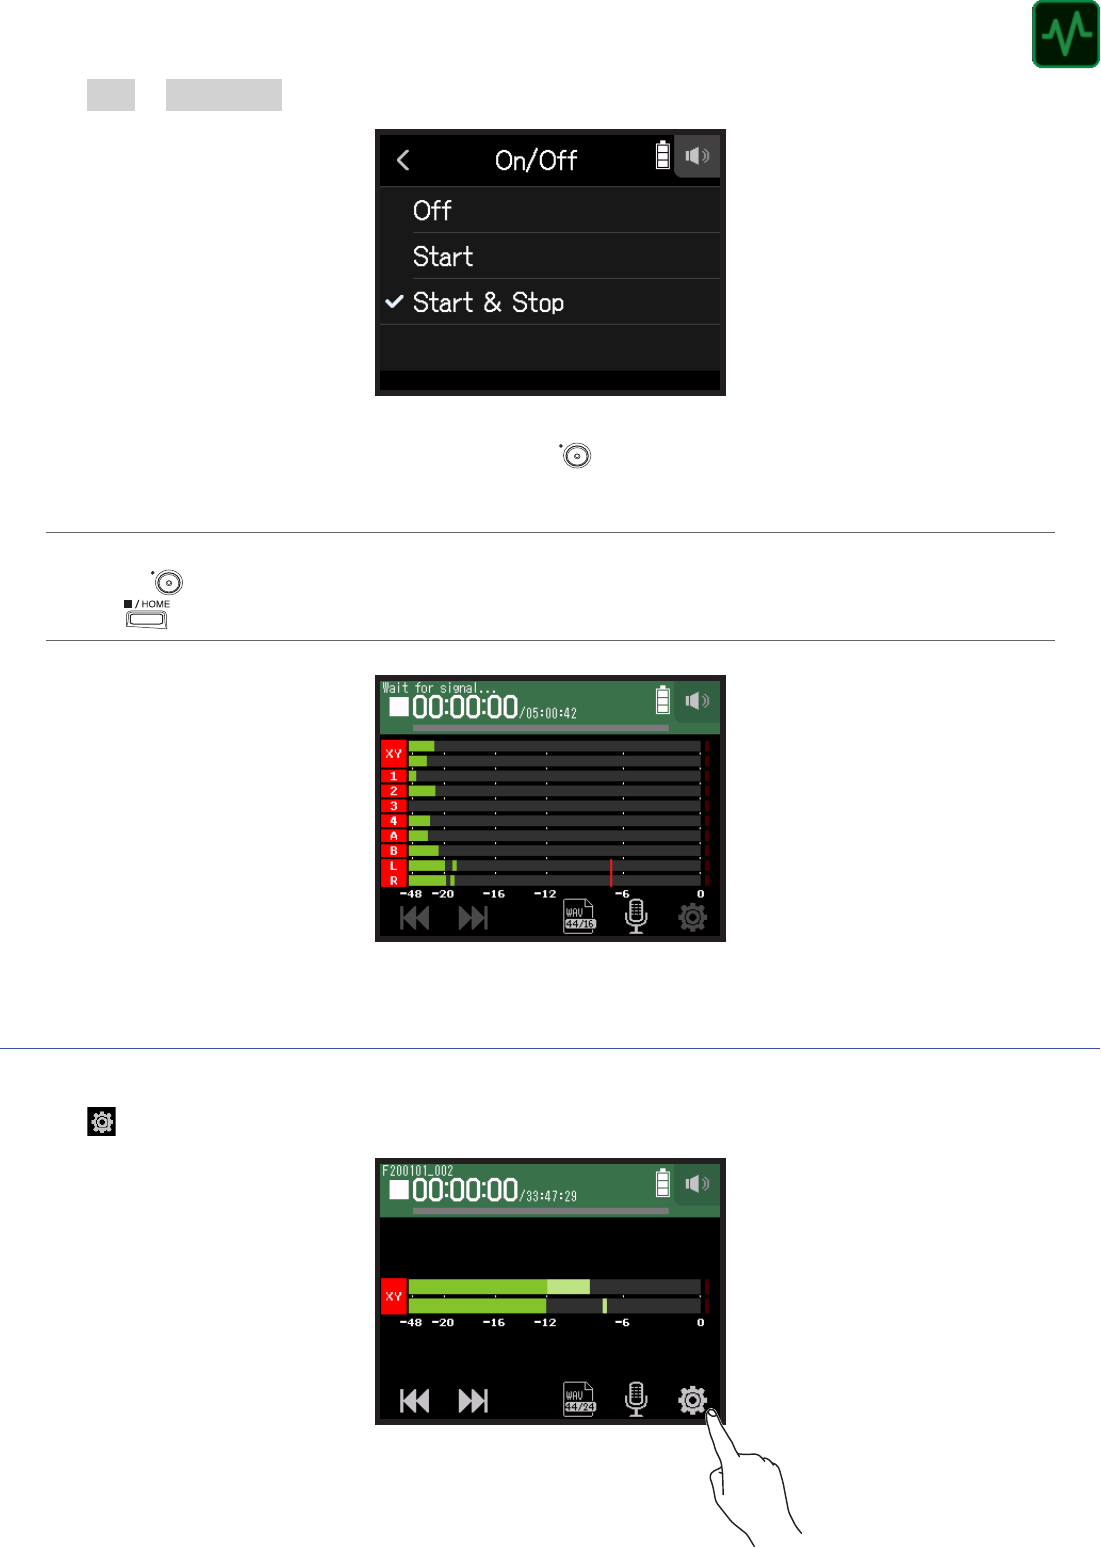
Recording automatically
Recording can be started and stopped automatically in response to the input level.
1.
Tap .
2.
Tap Auto Rec.
3.
Tap On/Off.
50
FIELD
4.
Tap Start or Start & Stop.
5.
Return to the top screen of the FIELD app, and press .
This will start automatic recording standby.
HINT
• Pressing
again will start recording immediately.
• Press
to end recording standby or stop recording.
Setting automatic recording start/stop levels
1.
Tap .
51

FIELD
2.
Tap Auto Rec.
3.
Tap Start & Stop Level.
4.
Slide Start Level and Stop Level left and right to set their levels.
• The red line shows the recording start level, and the blue line shows the recording stop level.
Recording will start automatically when the input level exceeds the set start level.
Recording will stop automatically when the input level becomes lower than the set stop level.
HINT
This can be set from −48 to 0 dBFS.
52

FIELD
Setting the automatic recording stop time
This sets the time until recording stops automatically after the input level becomes lower than the set stop level.
1.
Tap .
2.
Tap Auto Rec.
3.
Tap Auto Stop Time.
53

FIELD
4.
Slide up and down to set the level.
HINT
• This can be set from 0 to 5 seconds.
• After stopping recording automatically, automatic recording standby starts.
Capturing audio before recording starts (pre-recording)
The input signal is always buffered for a set amount of time, so it can be captured for up to 6 seconds before
is pushed (pre-recording). This is useful when
is pressed late, for example.
1.
Tap .
54

FIELD
2.
Tap Pre Rec.
3.
Tap On.
Recording format Maximum pre-recording time
MP3 128 kbps
6 seconds
MP3 192 kbps
MP3 320 kbps
WAV 44.1 kHz/16 bit
WAV 44.1 kHz/24 bit
WAV 48 kHz/16 bit
WAV 48 kHz/24 bit
WAV 96 kHz/16 bit
3 seconds
WAV 96 kHz/24 bit
55

FIELD
Enabling the sound marker function
Half-second tone signals (sound markers) can be output from the output jacks (PHONE OUT and LINE OUT)
when recording is started and stopped. Since sound markers are also written to recording les, when recording
audio for video with the H8, sending its output signal to the camera input can make synchronizing audio and
video easier.
1.
Tap .
2.
Tap Sound Marker.
3.
Tap On.
56

FIELD
NOTE
Be careful with the volume if you are monitoring the input sound with headphones, for example.
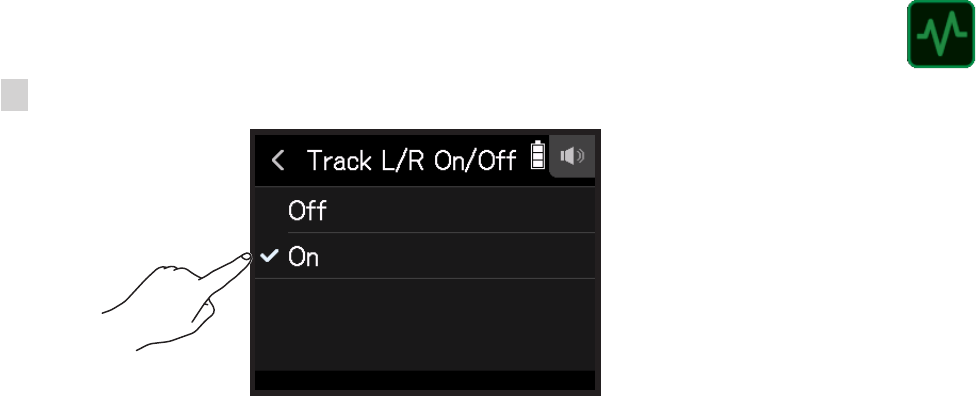
Recording L/R tracks
During recording, a stereo le can be created based on the mix from the internal mixer.
1.
Tap .
2.
Tap Track L/R On/Off.
57
FIELD
3.
Set it to On.
58

MUSIC
Recording with the MUSIC app
Display overview
❾ Remaining battery charge
Empty Full
❷ Status icon
❸ Clipping indicators
❹ Level meters
❺ Faders
❻ Track buttons
⓭ Low/Mid/High equalization
❼ Time
display
❽ Progress
bar
❿ Headphone/speaker
volume button
⓫ Track display
switching button
⓬ Settings button
⓮ Track Setting button
⓯ EFFECT settings button
⓰ Eect Send
⓱ Pan
Tap to change screens
❶ Recording/playback
project name
❶
Recording/playback project name
❷
Status icon
This shows the recording/playback status.
■
: Stopped
●
: Recording
: Recording/playback paused
▶
: Playing
❸
Clipping indicators
If a clipping indicator lights, adjust the input level (
→
“Setting recording (input) levels” on page 26) or set
the limiter (
→
“Comp/Limiter/Gate” on page 34).
❹
Level meters
❺
Faders
❻
Track buttons
Tap these to open track channel strip screens.
59

MUSIC
❼
Time display
00:00:00/
00:00:00
When recording
Left: Current elapsed recording time
Right: Remaining available recording time
When playing
Left: Current elapsed playback time
Right: Remaining playback time
❽
Progress bar
This shows the current playback location.
Slide
▼
to change the playback position.
❾
Remaining battery charge
This shows the remaining battery charge. When the remaining battery charge becomes low, replace the bat-
teries (
→
“Using batteries” on page 17) or connect an AC adapter (
→
“Using an AC adapter” on page 17).
❿
Headphone/speaker volume button
Touch this to show the headphone/speaker volume slider. (
→
page 42)
⓫
Track display switching button
This changes the tracks shown
⓬
Settings button
Press to access a list of projects on the SD card (
→
page 107) and to create new projects (
→
page 61).
⓭
Low/Mid/High equalization
These can be used to boost and cut the equalization of low, mid and high frequencies.
⓮
Track Setting button
Press to make track settings, including Lo Cut and Phantom functions. (
→
page 28)
⓯
EFFECT settings button
Insert effects can be used. (
→
“Using effects” on page 68)
⓰
Effect Send
Use this to adjust the level sent to the send effect.
⓱
Pan
Use this to adjust the left-right balance.
60

MUSIC
Creating new projects
The H8 manages recording and playback data in units called projects.
1.
Tap .
2.
Tap New Project.
3.
Tap Rec Format.
61

MUSIC
4.
Tap a format.
The following formats can be set.
Setting Explanation
WAV 44.1 kHz/16 bit
The higher the sampling frequency (kHz) and bit rate (bit) are, the
better the audio quality will be.
WAV 44.1 kHz/24 bit
WAV 48 kHz/16 bit
WAV 48 kHz/24 bit
NOTE
Effects can only be used when the recording format is 44.1 kHz/16 bit or 44.1 kHz/24 bit.
5.
Tap Create, and input the project name.
See "Character Input Screen overview" (
→
page 14) for how to input characters.
NOTE
The project created will be set as the recording/playback project.
62

MUSIC
Opening existing projects
1.
Tap .
2.
Tap Projects.
3.
Tap … for the project you want to open.
63

MUSIC
4.
Tap Select.
5.
Tap Execute.
64

MUSIC
Recording
Recording process
Recording follows the process shown below.
Prepare to
record
• Insert an SD card
• Use batteries or an AC adapter
• Connect the mic capsule
• Connect mics, instruments, mixers and other equipment
• Turn the power on
• Create a new project
• Make input and output settings
Record
• Press followed by to start recording and to stop recording
• Press
to pause
Play and check
• Press to start playback and to stop
• Project mixer settings can also be made, for example
Record
additional les
• Make punch in/out settings
• Press
followed by to start recording and to stop recording
65

MUSIC
Recording
1.
Press on the MUSIC app screen.
This will start recording standby.
2.
Press .
This starts recording.
3.
Press to pause.
4.
Press to stop.
NOTE
If the le size exceeds 2 GB during recording, recording will stop automatically.
HINT
Files are automatically saved at regular intervals during recording. If the power is interrupted or another prob-
lem occurs during recording, a le can be restored to normal by assigning the automatically saved le to a track
(
→
“Changing les assigned to tracks” on page 74).
66

MUSIC
Playing recordings
1.
Press .
Playback operations
Operation Touchscreen/button operation
Search forward/backward
Slide
left/right.
Pause/resume playback
Press
.
Stop
Press
.
HINT
• Slide the progress bar left/right to change the playback position.
• During playback, press track buttons to switch between playing back (lit green) and muted (unlit).
• If the selected project is not valid, an “Invalid Project!” message will appear.
67

MUSIC
Using effects
There are 76 types of effects that can be used.
1.
Tap the desired track button.
2.
Tap EFFECT.
This opens the Effect Screen.
Refer to “Using effects” (
→
page 95) for setting procedures and other details.
NOTE
Effects can only be used when the recording format is 44.1 kHz/16 bit or 44.1 kHz/24 bit.
68
MUSIC
Using the metronome
The H8 has a metronome with a precount function. Metronome settings are saved separately with each project.
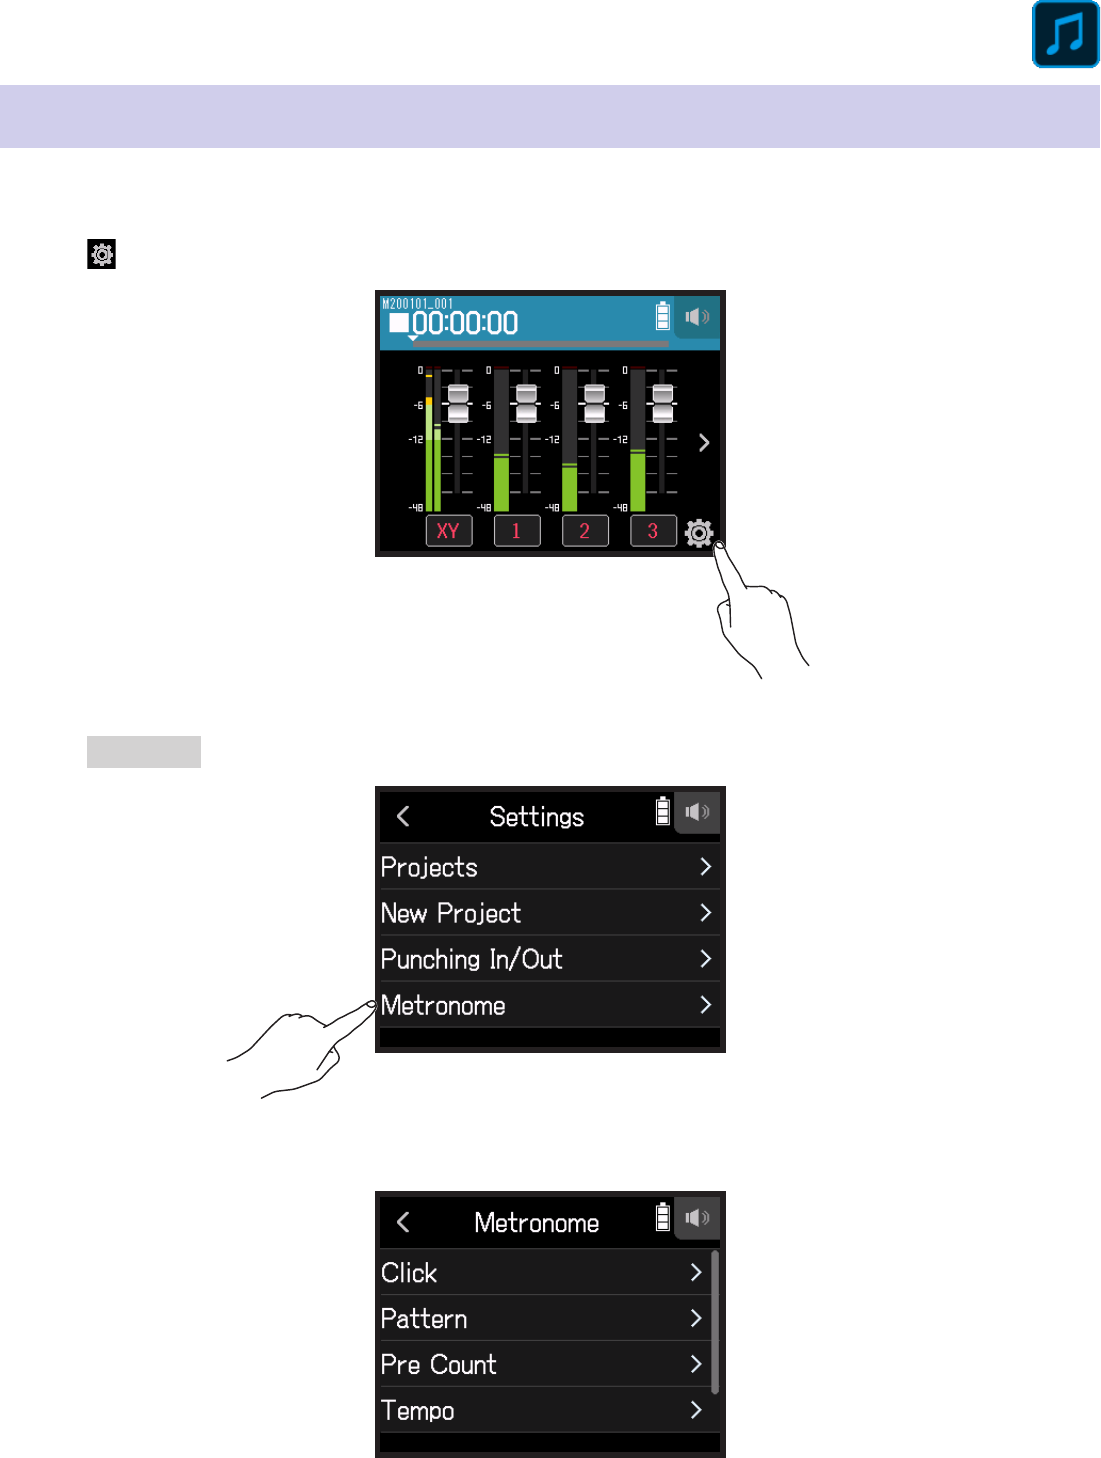
1.
Tap .
2.
Tap Metronome.
This opens the Metronome Settings Screen.
69

MUSIC
Setting when the metronome sounds
1.
Tap Click on the Metronome Settings Screen.
2.
Tap a condition to select it. (See the table below.)
Condition (setting) Explanation
Off The metronome does not make sound.
Rec And Play The metronome sounds during recording and playback.
Rec only The metronome sounds only during recording.
Play only The metronome sounds only during playback.
70

MUSIC
Selecting the metronome pattern
1.
Tap Pattern on the Metronome Settings Screen.
2.
Tap a pattern to select it.
HINT
This can be set to 0/4, 1/4, 2/4, 3/4, 4/4, 5/4, 6/4, 7/4, 8/4 or 6/8.
Setting the precount
A metronome count can be sounded before starting recording/playback.
1.
Tap Pre Count on the Metronome Settings Screen.
71

MUSIC
2.
Tap a setting to select it. (See the table below.)
Select a setting from below.
Setting Explanation
Off No precount will sound.
1–8
Before recording/playback, the precount will sound for the set
number of times (1–8).
Special
Before recording/playback, the precount will sound as shown below.
Setting the metronome tempo
1.
Tap Tempo on the Metronome Settings Screen.
72

MUSIC
2.
Slide up and down to set the desired tempo.
HINT
• This can be set from 40 to 250.
• The tempo set here will be shared by the effects.
Setting the metronome volume
1.
Tap Level on the Metronome Settings Screen.
2.
Slide up and down to set the desired volume.
HINT
This can be set from 0 to 10.
73

MUSIC
Assigning les to tracks
Recording data from tracks in other projects and recorded backup tracks can be freely assigned to tracks and
checked during playback.
Changing les assigned to tracks
1.
Tap the desired track button.
2.
Tap Track Setting.
3.
Tap File Assign.
74

MUSIC
4.
Tap Assign.
5.
Tap the le to assign.
6.
Tap Assign.
NOTE
When a le is assigned from another project, it will be copied into the currently selected project.
75

MUSIC
Removing le assignments from tracks
1.
Tap the button for the track to change.
2.
Tap Track Setting.
3.
Tap File Assign.
76

MUSIC
4.
Tap Clear.
5.
Tap Execute.
77

MUSIC
Recording additional les
When Punching In/Out is Off, new les are always recorded.
When Punching In/Out is On parts of already recorded tracks can be partially re-recorded.
1.
Tap .
2.
Tap Punching In/Out.
3.
Set it to Off or On.
Setting Explanation
Off Always record new les.
On Parts of already recorded tracks are rerecorded.
78

MUSIC
Recording new les
1.
Tap Punching In/Out and set to Off.
2.
Repeatedly press the track buttons for tracks to rerecord until they light red.
3.
Press .
This will start recording standby.
4.
Press .
This starts recording.
5.
Press to stop.
Rerecording parts of tracks
Punching in/out is a function that can be used to rerecord parts of already recorded tracks. "Punching in" is
switching track status from playback to recording. "Punching out" is switching track status from recording to
playback.
With the H8, punching in/out can be conducted manually.
1.
Tap Punching In/Out and set to On.
2.
Repeatedly press the track buttons for tracks to rerecord until they light red.
3.
Press to start playback.
4.
Press at the position where you want to start rerecording (punch in).
5.
Press at the end of recording (punch out).
NOTE
• Punching in/out can be done once each time playback is started.
• Since punching in/out overwrites part of the le, the previous data will be lost.
79

MUSIC
Mixing projects
Adjusting track levels
1.
Slide track faders up and down to adjust track levels.
HINT
This can be set from −∞ to +10 dB.
Adjusting other settings
1.
Tap the desired track button.
80

MUSIC
2.
Slide up and down to adjust them, and tap the buttons.
Parameter Explanation
EQ Low*
• This adjusts the boost/cut of low-frequency equalization.
• Type: shelving
• Gain range: −12 dB – +12 dB
• Frequency: 100 Hz
EQ Mid*
• This adjusts the boost/cut of mid-frequency equalization.
• Type: peaking
• Gain range: −12 dB – +12 dB
• Frequency: 2.5 kHz
EQ High*
• This adjusts the boost/cut of high-frequency equalization.
• Type: shelving
• Gain range: −12 dB – +12 dB
• Frequency: 10 kHz
Pan* Use this to adjust the left-right balance.
Send* Use this to adjust the level sent to the send effect.
Track Setting
Use to make input settings. (
→
“Making input and output settings”
on page 25)
EFFECT
Insert effects can be used. (
→
“Using effects” on page 95)
NOTE
*These parameters do not affect individual track recordings. They do affect les created during mixdown.
Other parameters do affect individual track recordings.
81
MUSIC
Mixing down tracks
Recorded projects can be mixed down to stereo les (WAV).
NOTE
Mixing down is not possible when Punching In/Out is On.
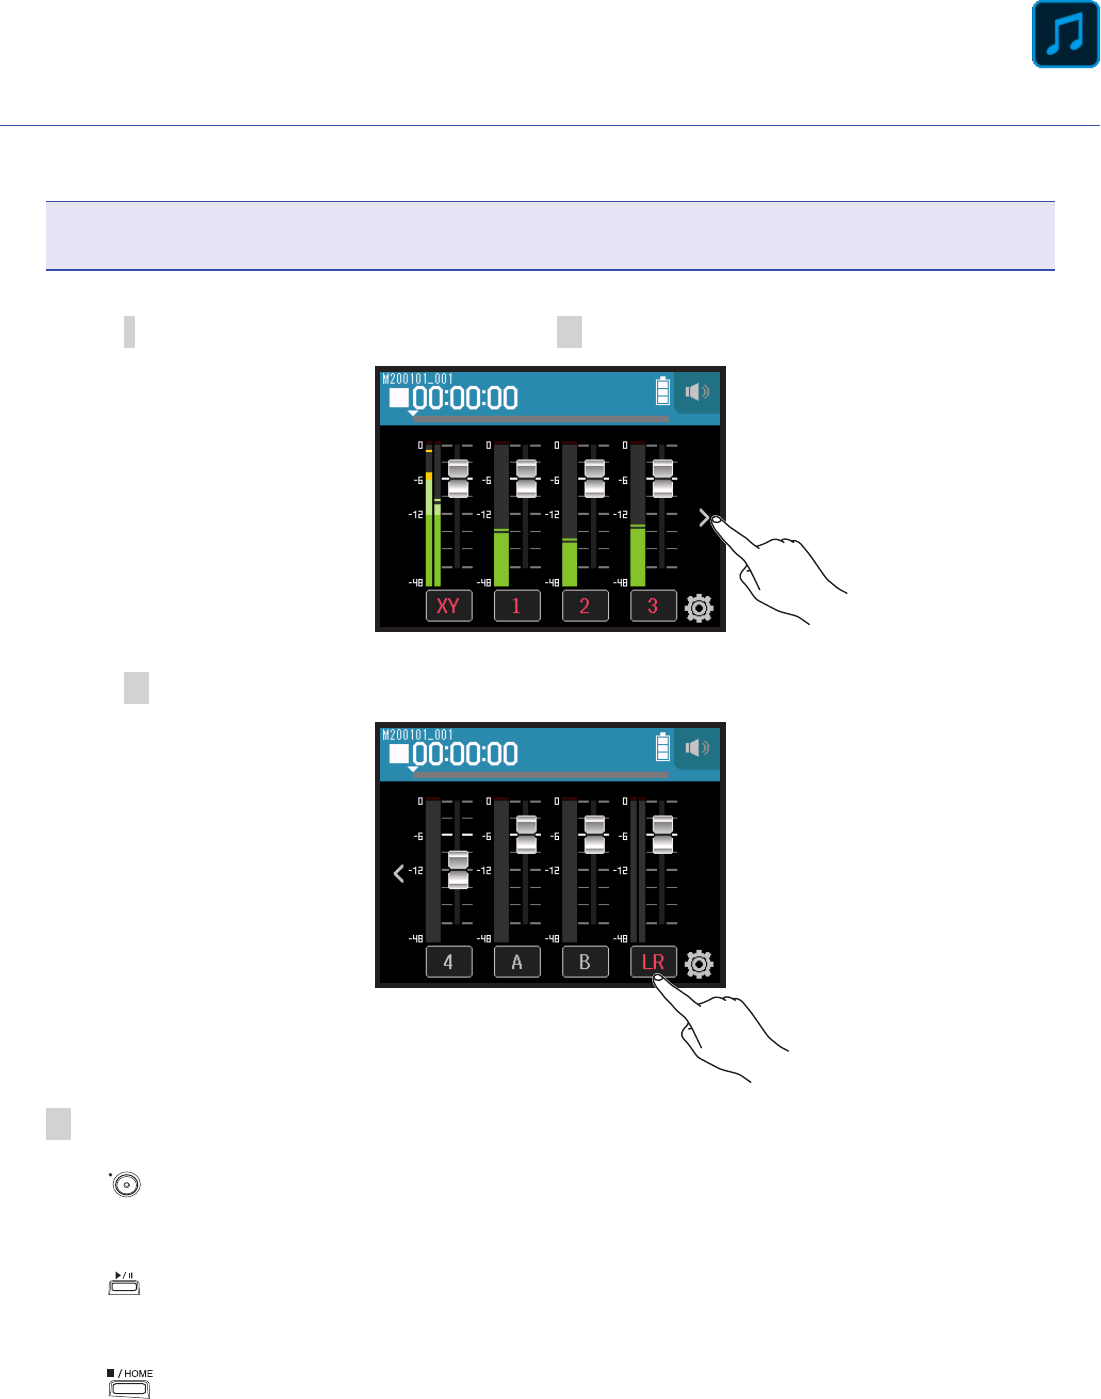
1.
Tap the > track display switching button to show the LR track.
2.
Tap the LR track button.
LR will become red.
3.
Press .
This will start recording standby.
4.
Press .
This starts recording.
5.
Press to stop.
82

PODCAST
Recording with the PODCAST app
Display overview
⓫ Track settings button
⓬ Settings button
❿ Level meters
❽ Clipping indicators
❾ Pad Level
❼ Headphone/speaker volume
button
❻ Remaining battery charge
Empty Full
❺ Progress
bar
❹ Time
display
❸ Sound pads
❷ Status icon
❶ Recording/playback
project name
❶
Recording/playback project name
❷
Status icon
This shows the recording/playback status.
■
: Stopped
●
: Recording
: Recording/playback paused
▶
: Playing
❸
Sound pads
Sounds assigned to each pad can be played.
❹
Time display
00:00:00/
00:00:00
When recording
Left: Current elapsed recording time
Right: Remaining available recording time
When playing
Left: Current elapsed playback time
Right: Remaining playback time
❺
Progress bar
This shows the current playback location.
Mark positions are shown above the progress bar.
Slide
▼
to change the playback position.
❻
Remaining battery charge
This shows the remaining battery charge. When the remaining battery charge becomes low, replace the bat-
teries (
→
“Using batteries” on page 17) or connect an AC adapter (
→
“Using an AC adapter” on page 17).
83

PODCAST
❼
Headphone/speaker volume button
Touch this to show the headphone/speaker volume slider. (
→
page 42)
❽
Clipping indicators
If a clipping indicator lights, adjust the input level (
→
“Setting recording (input) levels” on page 26) or set
the limiter (
→
“Comp/Limiter/Gate” on page 34).
❾
Pad level
Use this to adjust the sound pad level.
❿
Level meters
These are the level meters for the LR track.
When the LR track is on, LR becomes red.
⓫
Track settings button
Press to make track settings, including Lo Cut and Phantom functions. (
→
page 27)
⓬
Settings button
Press to access a list of projects on the SD card (
→
page 107) and to make recording format settings
(
→
page 91).
84

PODCAST
Recording
Recording process
Recording follows the process shown below.
Prepare to
record
• Insert an SD card
• Use batteries or an AC adapter
• Connect the mic capsule
• Connect mics, instruments, mixers and other equipment
• Turn the power on
• Set the recording format
• Make input and output settings
Record
• Press to start recording and press to stop recording
• Sound pads can also be recorded
• Marks can also be added
• Press
to pause
Play and check
• Press to start playback and to stop
• Cue to mark positions and to make project mixer settings, for example
Recording
1.
Press on the PODCAST app screen.
This starts recording.
NOTE
• When sound pads are used during recording, their sounds are mixed in stereo and recorded on tracks 3/4.
• In PODCAST mode, Inputs 3/4 cannot be used.
2.
Press to pause.
NOTE
• When recording is paused, a mark is added at that point. Press
again to resume recording.
• A maximum of 99 marks can be added in a project.
HINT
Marks can be added without pausing. (
→
“Setting how marks are added when recording/playing” on page 135)
85

PODCAST
3.
Press to stop.
NOTE
If the le size exceeds 2 GB during recording, recording will continue in a new project with a number that is one
higher. No gap in sound will occur between the two projects when this happens.
HINT
Files are automatically saved at regular intervals during recording. If the power is interrupted or another prob-
lem occurs during recording, a le can be restored to normal by assigning the automatically saved le to a track
(
→
“Changing les assigned to tracks” on page 74).
Playing recordings
1.
Press .
Playback operations
Operation Touchscreen/button operation
Select playback project/move to mark
Tap
/
Search forward/backward
Press and hold
/
Slide left/right.
Skip 15 seconds
Tap
/
Pause/resume playback
Press
Stop
Press
86

PODCAST
HINT
• Slide the progress bar left/right to change the playback position.
• During playback, press track buttons to switch between playing back (lit green) and muted (unlit).
• If the selected project is not valid, an “Invalid Project!” message will appear.
• If no playable project exists, a “No Project!" message will appear.
• During playback, press
to add marks that can be used for cueing. (
→
“Setting how marks are added when
recording/playing” on page 135)
2.
Press to return the top screen of the PODCAST app.
87

PODCAST
Using sound pads
Audio les (WAV format) can be assigned to the sound pads. Tap one to play the assigned le. These are useful,
for example, for playing effect sounds during podcasting and streaming as well as during live theater and music
performances.
NOTE
• When sound pads are used during recording, their sounds are mixed in stereo and recorded on tracks 3/4.
• In PODCAST mode, Inputs 3/4 cannot be used.
Playing sounds with sound pads
When shipped new from the factory, the H8 has 13 built-in sounds, and 4 are pre-assigned to sound pads.
1.
Tap a sound pad.
NOTE
When sound pads are played during recording, they will be recorded on tracks 3/4.
HINT
Slide the Pad Level knob up and down to adjust the overall level of the pads.
88
PODCAST
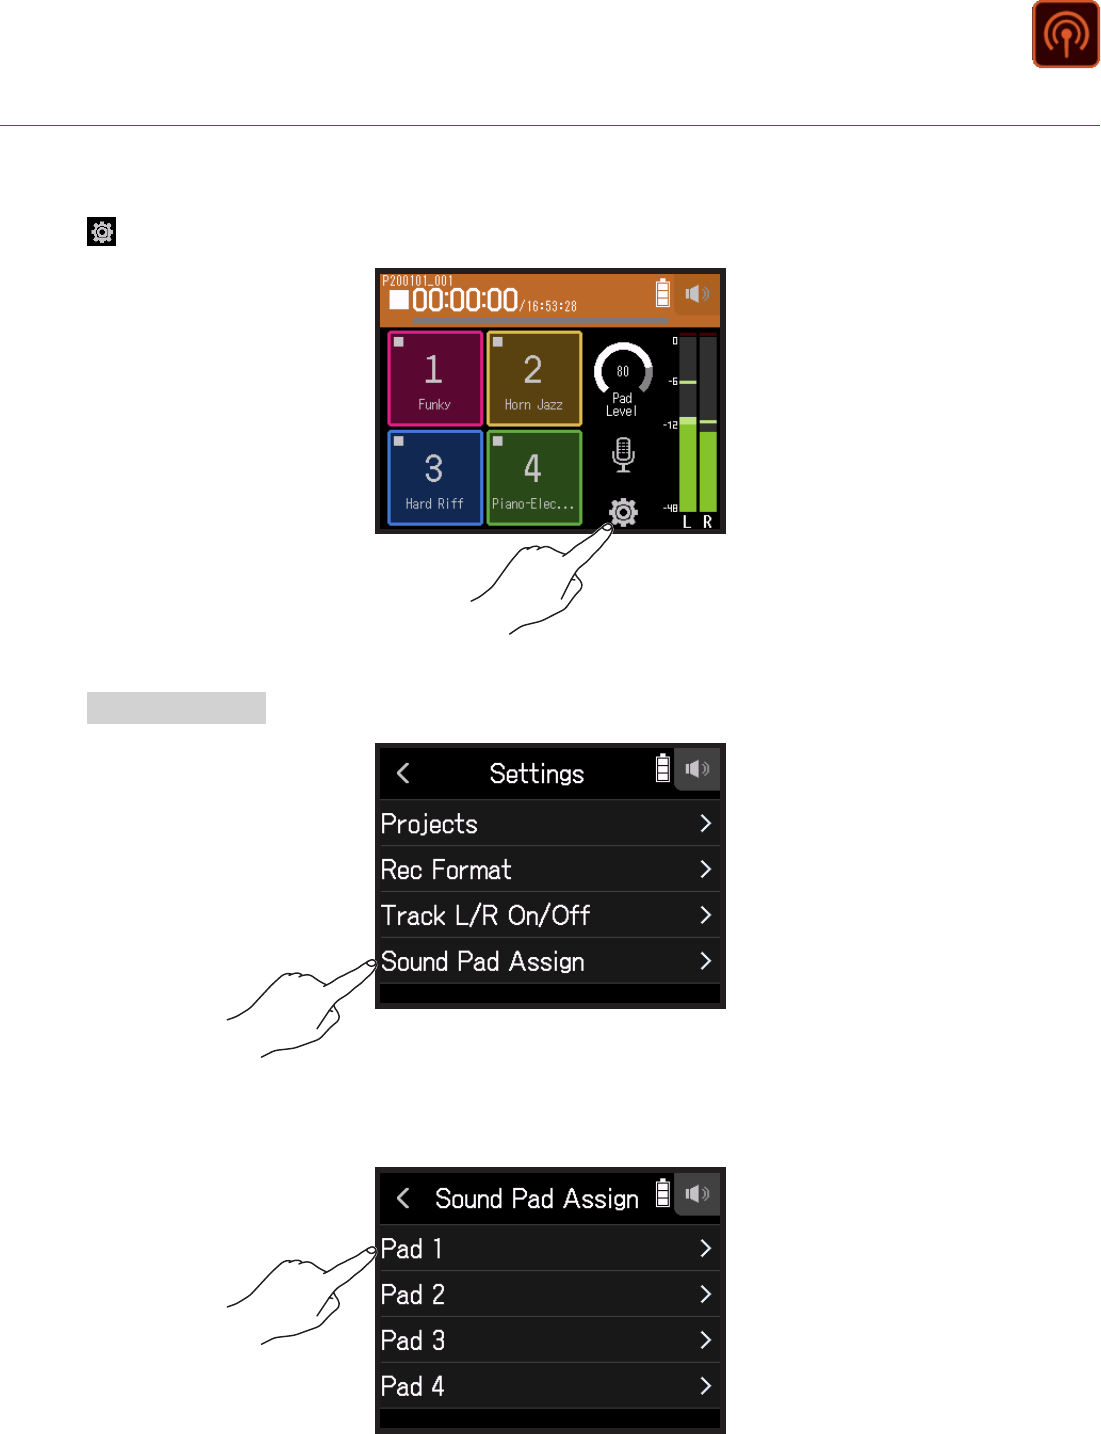
Assigning audio les to sound pads
Built-in sounds and audio les saved on an SD card can be assigned to sound pads.
1.
Tap .
2.
Tap Sound Pad Assign.
3.
Tap the number of the pad to be reassigned.
89

PODCAST
4.
Tap Preset or SD CARD.
5.
Tap the desired le.
6.
Tap Assign.
NOTE
• Use a computer to store audio les for sound pad assignment in the SOUND PAD folder on the card.
(
→
“Using as a card reader” on page 122)
• Sound pads support the following le types.
– File format: WAV
– Sampling rate: 44.1/48 kHz
– Bit rate: 16/24-bit
– Channels: Mono/stereo
• Files that are not inside the SOUND PAD folder will be copied to the SOUND PAD folder when they are
assigned.
90

PODCAST
Making recording settings
Setting the recording format
Considering audio quality and le size, select the format.
1.
Tap .
2.
Tap Rec Format.
3.
Set the recording format
91

PODCAST
The following formats can be set.
Setting Explanation
WAV 44.1 kHz/16 bit
The larger the number, the higher the sound quality,and the larger the
le size.
WAV 44.1 kHz/24 bit
WAV 48 kHz/16 bit
WAV 48 kHz/24 bit
MP3 128 kbps
MP3 192 kbps
MP3 320kbps
Recording L/R tracks
During recording, a stereo le can be created based on the mix from the internal mixer.
1.
Tap .
2.
Tap Track L/R On/Off.
92

PODCAST
3.
Tap On.
93

PODCAST
Using effects
There are 76 types of effects that can be used.
1.
Tap .
2.
Select a track.
3.
Tap Effect.
This opens the Effect Screen.
Refer to “Using effects” (
→
page 95) for setting procedures and other details.
NOTE
Effects can only be used when the recording format is 44.1 kHz/16 bit or 44.1 kHz/24 bit.
94

Using effects
These alter the sounds of instruments, voices and other sources. The included effects, which are equivalent to
those in ZOOM multi-effects processors, can be used with a variety of instruments. Using the free Guitar Lab
effect management application on a computer (Mac/Windows), you can add effects that are distributed online as
well as edit and back up patch memories, for example.
Selecting tracks and patch memories to use effects
Setting tracks to use effects from the MUSIC app screen
1.
Select a track.
2.
Tap EFFECT.
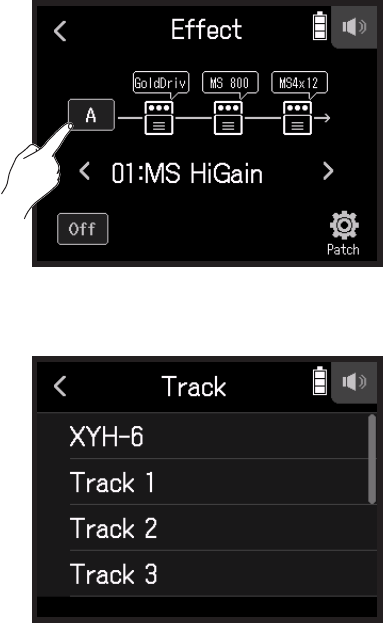
95

This opens the Effect Screen.
3.
Tap the input icon.
4.
Select the track to use the effect on.
96

Setting tracks to use effects from the PODCAST app screen
1.
Tap .
2.
Select a track.
3.
Tap Effect.
This opens the Effect Screen.
97
4.
Tap the input icon.
5.
Select the track to use the effect on.
98

Selecting patch memories and turning them on/off
1.
Tap < and > on the Effect Screen to select a patch memory.
2.
Tap On/Off.
99

Adjusting effect parameters
1.
Tap the effect to adjust on the Effect Screen.
2.
Adjust the effect.
• Tap On/Off to change its on/off setting.
• Tap Type to change the effect.
• Slide parameters up and down to adjust their settings.
NOTE
• If there are ve or more parameters, tap > to change the screen.
• Using the H8, you can combine three effects as you like. If the processing capability limit is exceeded, how-
ever, a "Process Overow. Change effect" warning will appear and effects will be bypassed. Change one of the
effects to end this condition.
• The parameters that can be adjusted depend on the effect.
100

Making patch memory settings
Saving patch memories
1.
Tap Patch on the Effect Screen.
2.
Tap Save.
3.
Tap the name of the save destination patch.
101

4.
Tap Execute.
NOTE
• Patch memories are not saved in projects.
• 50 patch memories can be saved as H8 settings.
Saving patch memories automatically
This setting can be made to automatically save patch memories when they are changed.
1.
Tap Patch on the Effect Screen.
2.
Tap Auto Save.
102

3.
Tap On.
Changing patch names
1.
Select the patch memory with the name you want to change on the Effect Screen.
2.
Tap Patch.
3.
Tap Patch Name.
103


3.
Slide up and down to change the level.
105
Managing projects
Folder and le structure
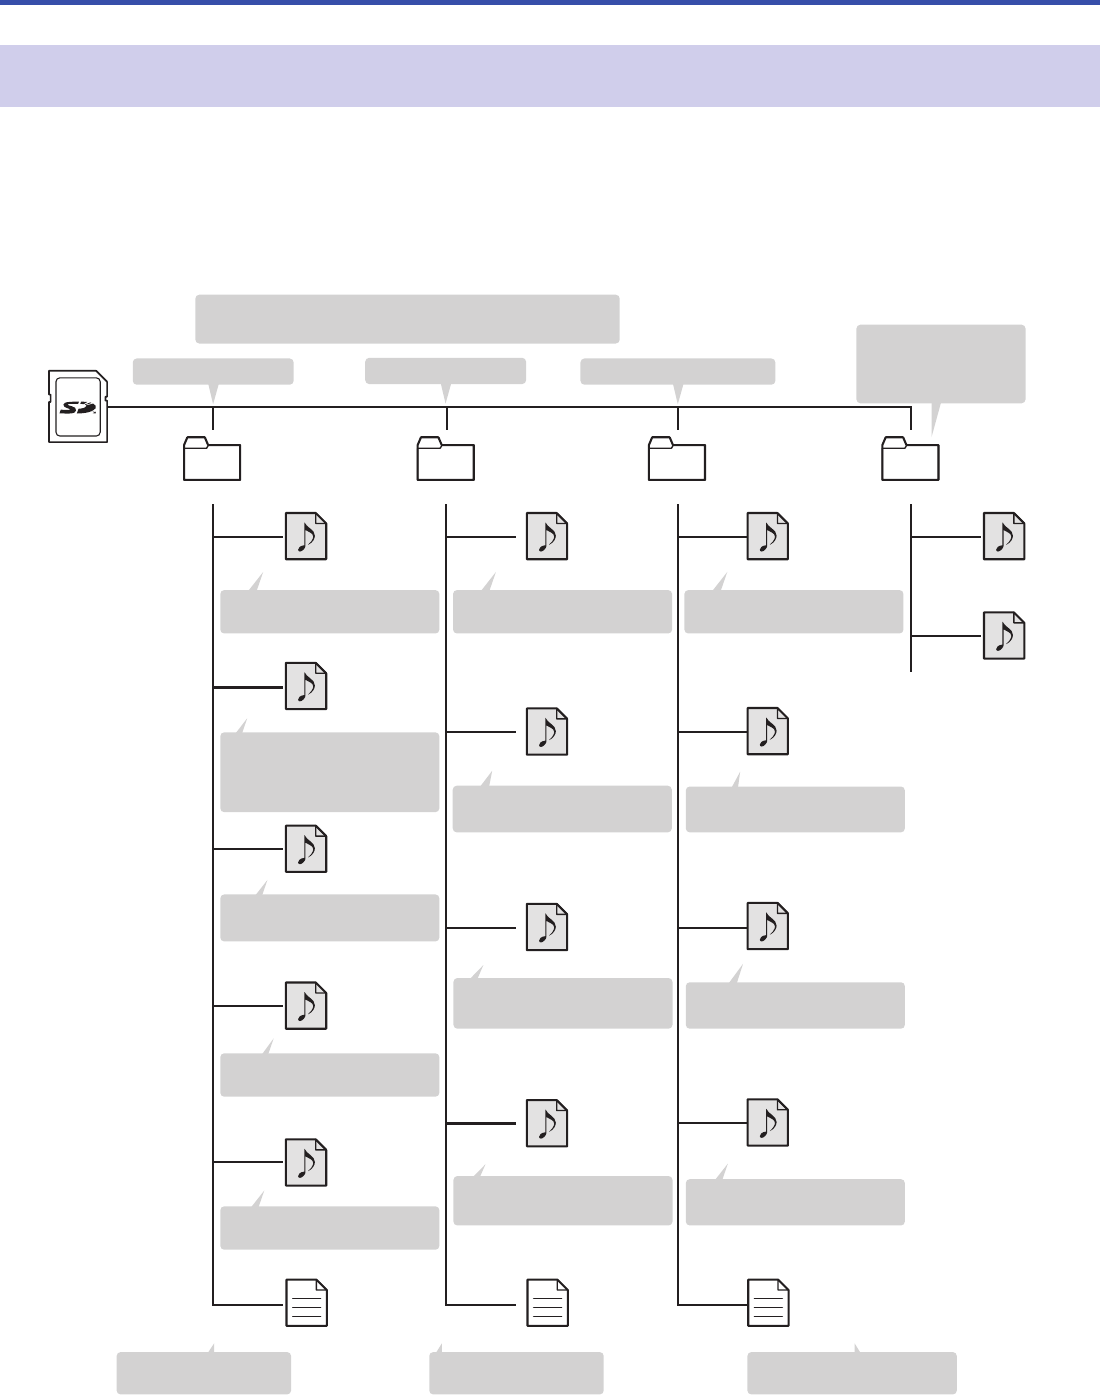
When recording with the H8, folders and les are created on SD cards in the following manner.
Projects that are created can be used with all three apps (FIELD, MUSIC and PODCAST). (Recording and playback
of 96kHz/16-bit and 96kHz/24-bit WAV les is only supported by the FIELD app.)
The H8 manages recording and playback data in units called projects.
• • • • •
Files assigned to
PODCAST app sound
pads are copied here.
Root
F200101_001
Mic12.wav
Mic12_BU.wav
Tr12.wav
TrA.wav
Tr1.wav
Tr1_01.wav
TrLR.wav
M200101_001 P200101_001 SOUNDPAD
• • • • • • • • • • • • •
F200101_001.h8prj
Tr1.wav
Tr2.wav
Tr34.wav
TrA.wav
P200101_001.h8prj
Mic12.wav
MIc12_01.wav
M200101_001.h8prj
opening.wav
bgm1.wav
Stereo file recording of
sound pad track
Stereo file recording of
signals from MIC IN
PODCAST app recording
MUSIC app recording
FIELD app recording
Project folders are created with names like “[date]_001”
and “[date]_002” . (The date format is YYMMDD.)
Stereo file backup recording
of signals from MIC IN at a
level 12 dB lower
Stereo file recording of
input 1 and 2 signals
Mono file recording
of input A signal
Stereo file recording of
built-in mixer L/R output
Project file
(FIELD app recording)
Project file
(MUSIC app recording)
Project file
(PODCAST app recording)
Mono file recording of
input A signal
Mono file recording of
input 2 signal
Mono file recording of
input 1 signal
2nd mono file recording of
input 1 signal
1st mono file recording of
input 1 signal
2nd stereo file recording of
signals from MIC IN
1st stereo file recording of
signals from MIC IN
106
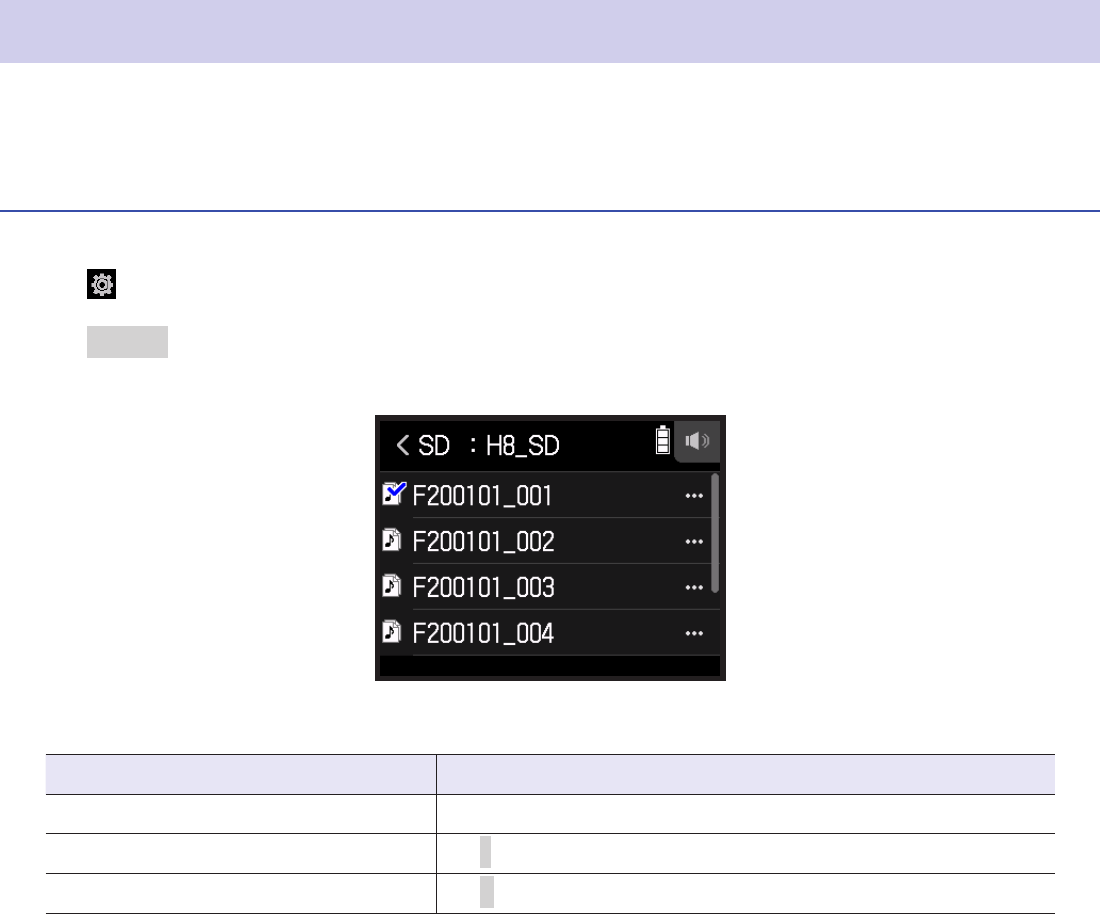
Managing projects
The contents of SD cards can be viewed and folders can be created. Recording/playback folders can also be set
and deleted and have their information checked, for example.
Project Operation Screen
1.
Tap on an app screen.
2.
Tap Projects.
The Project Operation Screen shows the folders and les on the SD card.
• The following operations are possible.
Action Operation
Move down a level Tap a folder
Move up a level
Tap <
Show options
Tap …
107

Selecting the project recording/playback folder
Select the folder that contains the project to be played and to use for recording projects, and return to the top
screen of the app.
1.
Tap … on the Project Operation Screen.
2.
Tap Select.
3.
Tap Execute.
NOTE
When a folder is selected, the rst project inside the selected folder will be set as the playback project.
108


Checking project information
1.
Tap … on the Project Operation Screen.
2.
Tap Information.
Item Explanation
Date/Time Date and time recorded
Format Recording format
Size Recording le size
Length Recording time
110

Deleting folders and projects
1.
Tap … on the Project Operation Screen.
2.
Tap Delete.
3.
Tap Execute.
111

Using as an audio interface
Signals input to the H8 can be input to a computer or iOS/iPadOS device. Moreover, signals played back on a
computer or iOS/iPadOS device can be output from the H8.
Connecting the H8 with a computer or iOS/iPadOS device
1.
Tap AUDIO INTERFACE on the Home Screen.
2.
Select the mode.
Mode Explanation
Stereo Mix (PC/Mac)
This is a 2-in/2-out connection mode for Mac/Windows that sends
all tracks as a stereo mix.
Stereo Mix (iPad)
This is a 2-in/2-out connection mode for iPadOS devices that sends
all tracks as a stereo mix.
Multi Track (PC/Mac)
This is a 12-in/2-out connection mode for Mac/Windows that sends
the signals of each track separately.
NOTE
A driver is necessary for use with Windows. Download the driver from the ZOOM website (zoomcorp.com).
112
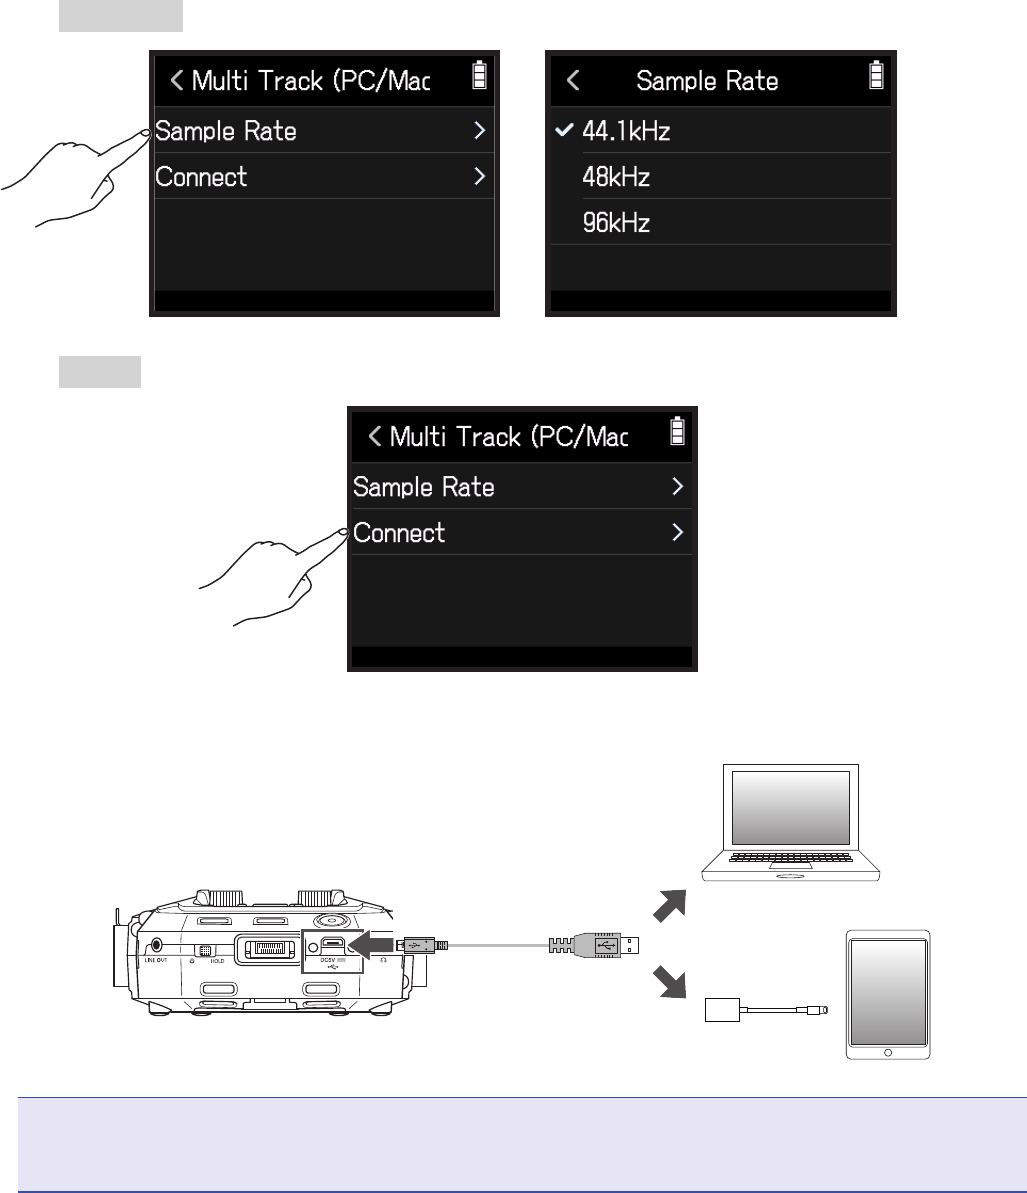
If a Stereo Mix has been selected, skip to step 5.
3.
Tap Sample Rate, and select a sample rate.
4.
Tap Connect.
5.
Use a USB cable to connect the H8 with a computer or iOS/iPadOS device.
USB Micro-B
port
NOTE
Use a Lightning to USB Camera Adapter (or Lightning to USB 3 Camera Adapter) to connect to an iOS/iPadOS
device with a lighting connector.
113

Disconnecting from a computer or iOS/iPadOS device
1.
Tap on the audio interface top screen.
2.
Tap Exit.
3.
Tap Execute.
4.
Disconnect the USB cable connecting the H8 with a computer or iOS/iPadOS device.
114

Making audio interface settings
The following two settings can be made when using the H8 as an audio interface.
Enabling direct monitoring
This directly outputs the sound being recorded through the H8 from the H8 before sending it to the computer or
iOS/iPadOS device. This enables monitoring without latency.
1.
After connecting a computer or iOS/iPadOS device, tap on the app screen.
2.
Tap Direct Monitor, and set it to On.
Setting loop back (Stereo Mix only)
This function mixes the playback sound from the computer or iOS/iPadOS device with the H8 input and sends
the mix back to the computer or iOS/iPadOS device (loop back).
This function can be used to add narration to music played back from the computer and to record the mix or
stream it on the computer, for example.
1.
After connecting a computer or iOS/iPadOS device, tap on the app screen.
2.
Tap Loopback, and set it to On.
115

Mixing inputs
The mix balance of the inputs can be adjusted. Input signals will be sent to the computer or iOS/iPadOS device
using the balance settings made here. When using a Stereo Mix setting, the mixed stereo signal will be sent.
See "Adjusting input signal monitoring balance using fader and pan settings" (
→
page 39) for how to mix
inputs.
116

Managing SD cards
Checking SD card information
The open space and size of SD cards can be checked.
1.
Tap SD CARD on the Home Screen.
2.
Tap Information.
117

Testing SD card performance
Purchased SD cards can be tested to conrm that they can be used with the H8.
A basic test can be done quickly, while a full test examines the entire SD card.
Conducting a quick test
1.
Tap SD CARD on the Home Screen.
2.
Tap Quick Test.
118
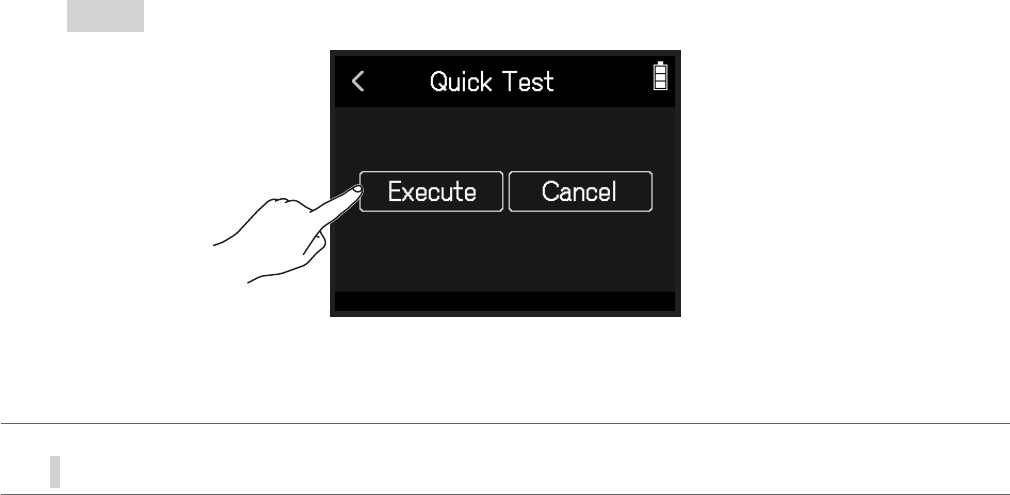
3.
Select Execute.
The card performance test will start and should take about 30 seconds. The result of the test will be shown
when it completes.
HINT
Tap < to cancel the test.
119

Conducting a full test
1.
Tap SD CARD on the Home Screen.
2.
Tap Full Test.
3.
Select Execute.
The card performance test will start. If the access rate MAX reaches 90%, the card will fail (NG).
HINT
Tap < to cancel the test.
NOTE
Even if a performance test result is "OK", there is no guarantee that writing errors will not occur. This informa-
tion is just to provide guidance.
120

Formatting SD cards
1.
Tap SD CARD on the Home Screen.
2.
Tap Format.
3.
Select Execute.
NOTE
• Before using SD cards that have just been purchased or that have been formatted on a computer, they must be
formatted by the H8.
• All data previously saved on the SD card will be deleted when it is formatted. Please use caution.
121

Using as a card reader
When connected to a computer, data on the SD card can be checked and copied.
Connecting the H8 with a computer
1.
Tap SD CARD READER on the Home Screen.
2.
Use a USB cable to connect the H8 and the computer.
122

Disconnecting a computer from the H8
1.
Conduct procedures on the computer to disconnect.
• Windows: Select
H8 from "Safely Remove Hardware".
• macOS: Drag the
H8 icon to the Trash and drop it.
NOTE
Always conduct computer ejection procedures before disconnecting the USB cable.
2.
Disconnect the USB cable connecting the H8 with the computer, and press .
3.
Tap Execute.
123

Using the tuner
Using the tuner function, you can tune guitars and other instruments.
Tuning guitars
1.
Tap TUNER on the Home Screen.
←
Low pitch – Correct pitch – High pitch
→
2.
Play the open string that you want to tune and adjust its pitch.
The pitch detuning with the nearest note name or string number will be shown.
124
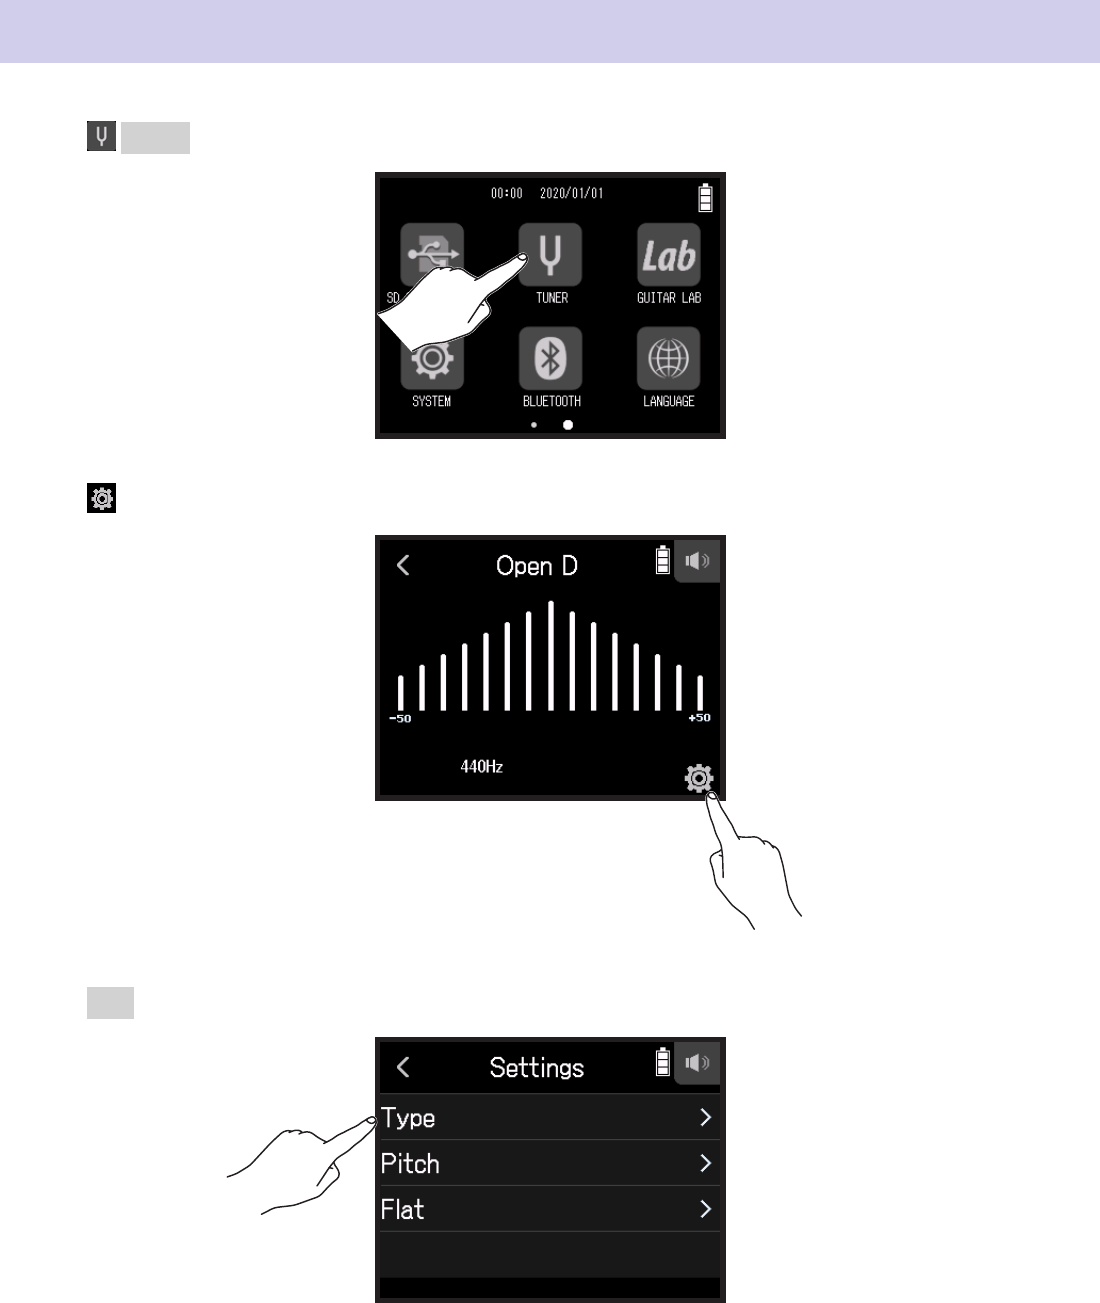
Changing the tuner type
1.
Tap TUNER on the Home Screen.
2.
Tap .
3.
Tap Type.
125

4.
Tap the guitar type to select it.
Available tuner type settings
Setting Explanation
String number/note
7 6 5 4 3 2 1
Chromatic
The name of the nearest note (in semitones) and the amount of
detuning are shown.
– – – – – – –
Guitar Standard guitar tuning with a 7th string B E A D G B E
Bass guitar Standard bass guitar tuning with a 5th string. – – B E A D G
Open A Open A tuning (open strings play A chord) – E A E A C# E
Open D Open D tuning (open strings play D chord) – D A D F# A D
Open E Open E tuning (open strings play E chord) – E B E G# B E
Open G Open G tuning (open strings play G chord) – D G D G B D
DADGAD Alternate tuning often used for tapping and other techniques – D A D G A D
Setting the standard pitch of the tuner
1.
Tap TUNER on the Home Screen.
126

2.
Tap .
3.
Tap Pitch.
4.
Slide up and down to set the standard pitch, and tap.
HINT
This can be set from 435 Hz to 445 Hz.
127
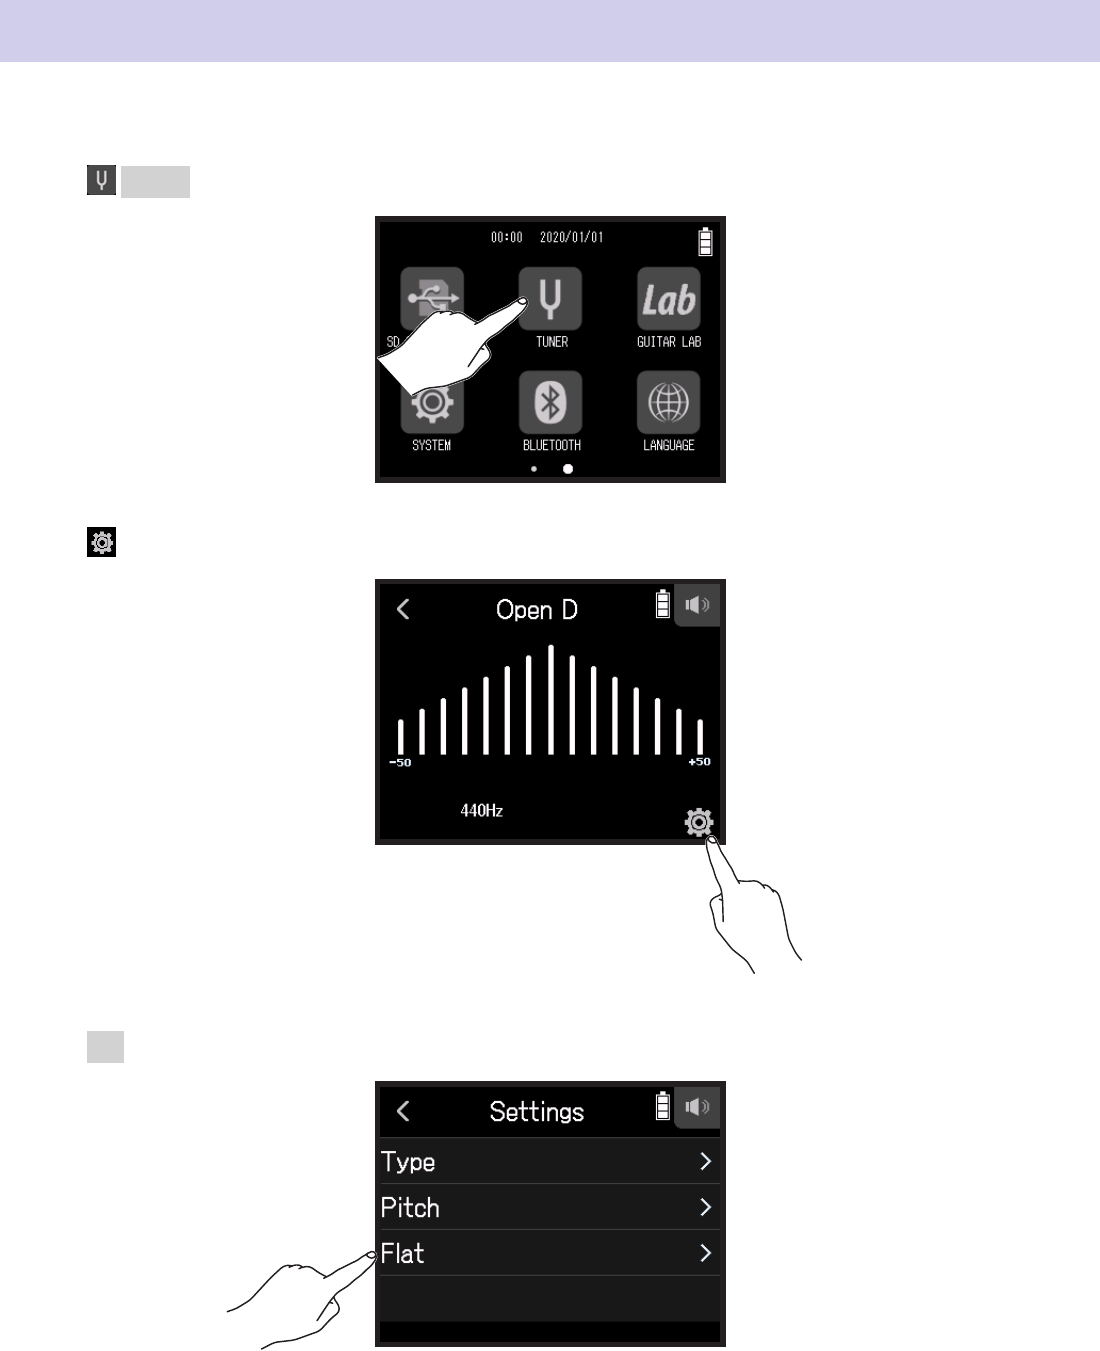
Using at tunings
All strings can be tuned down from standard tuning by 1–3 semitones.
1.
Tap TUNER on the Home Screen.
2.
Tap .
3.
Tap Flat.
128

4.
Tap a setting to select it.
HINT
This can be set from ×0 to ×3 (3 semitones lower).
NOTE
Flat tuning cannot be used when the tuner type is Chromatic.
129

Using Guitar Lab
Guitar Lab can be used on a computer (PC/Mac) to add effects that are distributed online as well as to edit and
back up patch memories, for example.
Connecting Guitar Lab
1.
Tap GUITAR LAB on the Home Screen.
2.
Use a USB cable to connect the H8 and the computer.
3.
Launch Guitar Lab on the Computer.
Disconnecting Guitar Lab
1.
Press .
2.
Tap Execute.
130

Setting the date and time
Setting the date and time
Set the date and time added to recording les.
1.
Tap SYSTEM on the Home Screen.
2.
Tap Date/Time.
3.
Tap Set Date/Time.
131

4.
Swipe the date and time items to set them.
Setting the date format
1.
Tap SYSTEM on the Home Screen.
2.
Tap Date/Time.
132

3.
Tap Date Format.
4.
Tap the date format to select it.
133

Setting the battery type
Set the type of battery used by the H8 to alkaline, Ni-MH or lithium so that the amount of remaining battery
charge can be accurately displayed.
1.
Tap SYSTEM on the Home Screen.
2.
Tap Battery.
3.
Tap a battery type to select it.
134

Setting how marks are added when recording/playing
You can set how marks are added when is pressed while recording or playing back a WAV format le.
1.
Tap SYSTEM on the Home Screen.
2.
Tap Play Key Option.
3.
Tap Recording or Playing.
4.
Tap a mark adding option to select it.
Mark adding method Explanation
Pause
Pressing
will pause without adding a mark.
Pause & Mark
Pressing
will pause and add a mark.
Mark
Pressing
will add a mark without pausing.
135

Making display settings
Setting the display brightness
1.
Tap SYSTEM on the Home Screen.
2.
Tap Power Saving.
3.
Tap LCD Brightness.
136

4.
Slide up and down to adjust the brightness.
HINT
This can be set from 5 to 100.
Setting the display backlight
1.
Tap SYSTEM on the Home Screen.
2.
Tap Power Saving.
137

3.
Tap LCD Backlight.
4.
Tap a setting to select it.
Setting Explanation
On The backlight always stays bright.
30 seconds
The backlight will dim after the set time has elapsed.
1 min
2 min
3 min
4 min
5 min
138

Setting the Auto Power OFF function
The power will automatically turn off if the H8 is unused for 10 hours.
If you want the power to stay on continuously until powered off, disable the Automatic Power Saving function.
1.
Tap SYSTEM on the Home Screen.
2.
Tap Power Saving.
3.
Tap Auto Power Off.
139

4.
Set it to Off.
NOTE
This function is only enabled when power is being supplied through the USB port.
140

Operating from an iOS/iPadOS device
Connecting an iOS/iPadOS device
The H8 can be operated from an iOS/iPadOS device by connecting a dedicated wireless adapter (e.g. BTA-1) and
using the dedicated H8 Control app.
NOTE
• The H8 Control app must be installed on the iOS/iPadOS device beforehand. The H8 Control app can be down-
loaded from the App Store.
• For app setting and operation procedures, see the manual for the H8 Control app.
1.
Remove the REMOTE connector cover and connect a BTA-1 or other dedicated wireless adapter.
2.
Tap BLUETOOTH on the Home Screen.
141

3.
Tap Execute.
4.
Launch the H8 Control app on the iOS/iPadOS device, and conduct connection procedures.
HINT
For app setting and operation procedures, see the manual for the H8 Control app.
142

Disconnecting from an iOS/iPadOS device
1.
Tap BLUETOOTH on the Home Screen.
2.
Tap Execute.
HINT
After disconnecting, tap BLUETOOTH on the Home Screen, and reconnect to the iOS/iPadOS device to use it
again for operation.
143
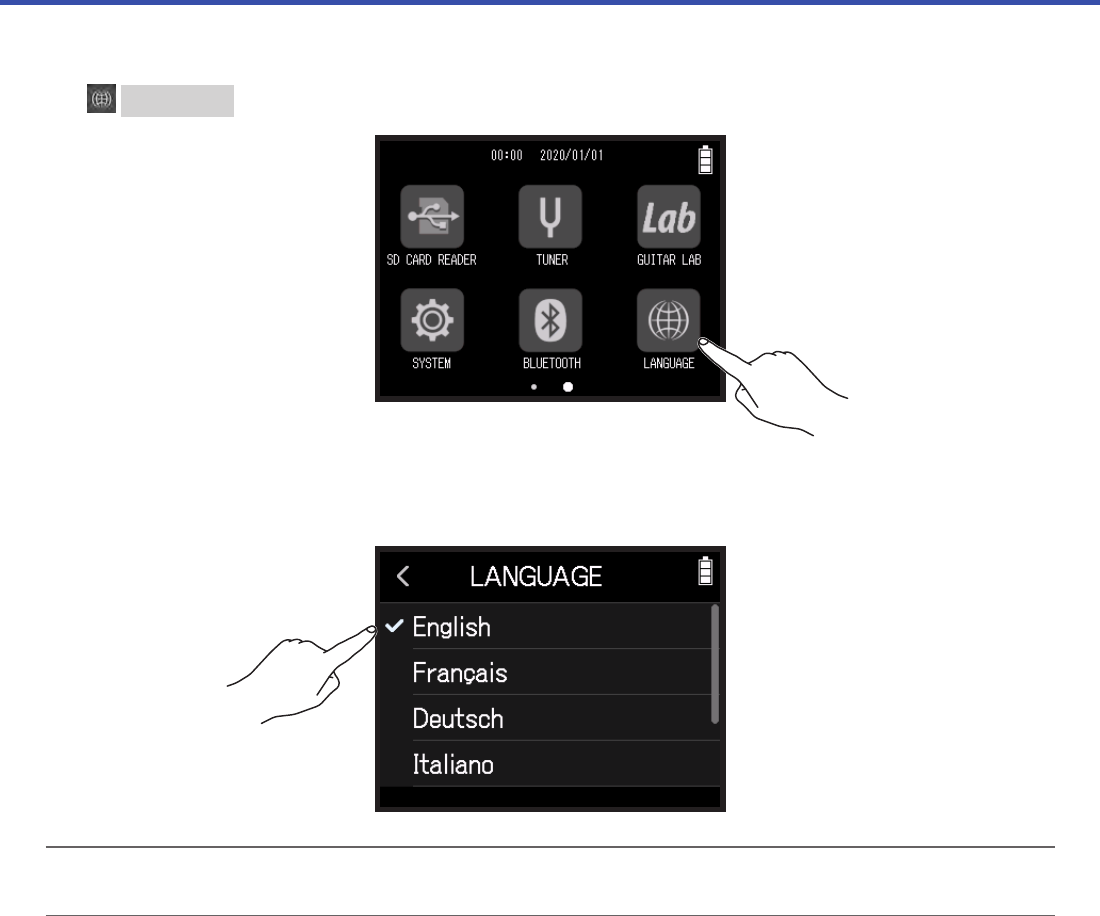
Setting the language shown
1.
Tap LANGUAGE on the Home Screen.
2.
Tap a language to select it.
HINT
The rst time the power is turned on after purchase, this screen opens automatically.
144

Restoring default setting values
The factory default settings can be restored.
1.
Tap SYSTEM on the Home Screen.
2.
Tap Factory Reset.
3.
Tap Execute.
The settings will be reset and the power will automatically turn off.
145

Managing the rmware
Checking the rmware versions
1.
Tap SYSTEM on the Home Screen.
2.
Tap Firmware Version.
Updating the rmware
The H8 rmware can be updated to the latest versions.
Files for the latest rmware updates can be downloaded from the ZOOM website (zoomcorp.com).
Follow the instructions in the “H8 Firmware Update Guide” on the H8 download page.
146

Using optional mic capsules
Using the XAH-8
Features and functions of parts
The XAH-8 is a mic capsule that enables convenient use of two different stereo formats (X-Y and A-B).
█
X-Y format
Record specic sound sources at near to medium distance with natural three-dimensional depth and width.
This is optimal for recording solo performances, chamber music, live rehearsals, eld recordings and similar situ-
ations.
Turn the mics inward until they lock
into place with a clicking sound.
█
A-B format
Record ambient sound along with specic sound sources for a wide stereo feel.
This is optimal for recording the reverb of a hall, as well as for meetings and similar situations.
Turn the mics outward until they lock
into place with a clicking sound.
█
Functions of parts
❶ X-Y/A-B mic
❷ Mic input volume
❶
X-Y/A-B mic
This stereo mic can be used for X-Y or A-B
recording.
The angle of audio capture can be changed by
rotating the individual mics.
❷
Mic input volume
This adjusts the mic input volume.
147

Appearance in each app
When the XAH-8 is attached, it appears in the apps as shown below.
█
FIELD app
X-Y format
A-B format
█
MUSIC app
X-Y format
A-B format
█
PODCAST app
The appearance does not
change because of the mic
capsule type.
148

Making track settings
1.
Open the Track Setting Screen in the app.
• On the FIELD app screen, touch
and select XAH-8.
• On the MUSIC app screen, select XY or AB and then
.
• On the PODCAST app screen, touch
and select XAH-8.
2.
Tap each item to set it.
The following items can be set.
Item Explanation/reference Apps that use
Track On/Off
This turns track recording on/off. This can also be set with the mic
track buttons on the unit.
→
“Enabling tracks for recording” on page 25
Backup Rec
→
“Backup recording (FIELD and PODCAST apps only)” on page 27
Lo Cut
→
“Reducing noise (low-frequency cut)” on page 33
Comp/Limiter/Gate
→
“Comp/Limiter/Gate” on page 34
Fader/Pan
→
“Adjusting input signal monitoring balance using fader and pan set-
tings” on page 39
File Assign
→
“Changing les assigned to tracks” on page 74
Effect
→
“Setting tracks to use effects from the PODCAST app screen” on
page 97
149

Using the EXH-8
Features and functions of parts
█
Features
• This capsule adds four channels of external XLR input.
• Signals can be input from dynamic/condenser mics, mixers and other equipment.
• Each input has a separate volume control, enabling quick and reliable level balancing at recording locations.
• −20dB pad switches enable professional equipment that uses +4dB line level to also be input without distortion.
• Phantom power can be supplied.
█
Connection example
Dynamic mic Dynamic mic
Condenser mic Mixer
When connecting condenser mics and other devices that require phantom power, use an external power supply.
Dedicated AC adapter
(ZOOM AD-17)
Micro-B
150

█
Functions of parts
Left side of capsule
Top of capsule
Right side of capsule
❺ Inputs 1/2/3/4 ❺ Inputs 1/2/3/4
❶ Power indicator
❷ Track buttons/
indicators 1/2/3/4
❸ Input volume knobs 1/2/3/4
❸ Input volume knobs 1/2/3/4
❹ PAD switches 1/2/3/4
❹ PAD switches 1/2/3/4
❶
Power indicator
This will light when an external power supply is connected, showing that phantom power can be used.
❷
Track buttons/indicators 1/2/3/4
These turn tracks on and off. Pressing track buttons will make their LEDs light red.
❸
Input volume knobs 1/2/3/4
These adjust input volumes.
❹
PAD switches 1/2/3/4
These attenuate the input signals of equipment connected to inputs 1–4 by 20 dB.
Set PAD switches to –20dB when connecting mixers, for example, that use +4 dBu as the standard output
level.
❺
Inputs 1/2/3/4
Connect mics and mixers to these.
151

Appearance in each app
When the EXH-8 is attached, it appears in the apps as shown below.
█
FIELD app
█
MUSIC app
█
PODCAST app
The appearance does not
change because of the mic
capsule type.
152

Making track settings
1.
Open the Track Setting Screen in the app.
• On the Field App Screen, touch
and select EXH-8 1–EXH-8 4.
• On the MUSIC app screen, select EX1–EX4 and then
.
• On the PODCAST app screen, touch
and select EXH-8 1–EXH-8 4.
2.
Tap each item to set it.
The following items can be set.
Item Explanation/reference Apps that use
Track On/Off
This turns track recording on/off. This can also be set with the
mic track buttons on the unit.
→
“Enabling tracks for recording” on page 25
Phantom
→
“Setting phantom power” on page 30
Lo Cut
→
“Reducing noise (low-frequency cut)” on page 33
Comp/Limiter/Gate
→
“Comp/Limiter/Gate” on page 34
Fader/Pan
→
“Adjusting input signal monitoring balance using fader and pan
settings” on page 39
Stereo Link
→
“Enabling stereo linking” on page 41
File Assign
→
“Changing les assigned to tracks” on page 74
Effect
→
“Setting tracks to use effects from the PODCAST app screen”
on page 97
153

Using the VRH-8
Features and functions of parts
█
Features
The VRH-8 is an Ambisonic mic that uses 4 capsules to enable 360º recording and capture vertical spread and
depth. The built-in position sensor enables recording with the correct mic position setting regardless of the mic
orientation.
█
Recording modes
Ambisonics A Ambisonics B
Audio files are recorded as is for the four directional
condenser mics.
FRD
(front right down)
BLD
(back left down)
BRU
(back right up)
FLU
(front left up)
Data in A format is processed and distributed to four
channels (W/X/Y/Z) to produce this audio data.
FuMa and AmbiX are two modes that have different
channel distribution methods.
Z
Z
Y
Y
Y
Y
XX
X
X
W
█
Functions of parts
❶ Ambisonic mic
❷ Mic input volume
❶
Ambisonic mic
This Ambisonic mic is comprised of four unidi-
rectional condenser mics. This mic can record
three-dimensional sound with natural depth
and width.
❷
Mic input volume
This adjusts the mic input volume.
154

Appearance in each app
When the VRH-8 is attached, it appears in the apps as shown below.
The orientation of the H8 is detected by the position sensor and shown on the top screen of each app. Follow the
instructions on the screen and adjust the angle of the H8.
█
FIELD app
█
MUSIC app
█
PODCAST app
The appearance does not
change because of the mic
capsule type.
155

Making track settings
1.
Open the Track Setting Screen in the app.
• On the Field App Screen, touch
and select VRH-8.
• On the MUSIC app screen, select WY or ZX and then
.
• On the PODCAST app screen, touch
and select VRH-8.
2.
Tap each item to set it.
The following items can be set.
Item Explanation/reference Apps that use
Track On/Off
This turns track recording on/off. This can also be set with the
mic track buttons on the unit.
→
“Enabling tracks for recording” on page 25
Ambisonics
→
“Making Ambisonics settings” on page 157
Lo Cut
→
“Reducing noise (low-frequency cut)” on page 33
Comp/Limiter/Gate
→
“Comp/Limiter/Gate” on page 34
Fader/Pan
→
“Adjusting input signal monitoring balance using fader and pan
settings” on page 39
File
→
“Changing les assigned to tracks” on page 74
NOTE
Effects and the Pan of Fader/Pan cannot be used.
156

Making Ambisonics settings
1.
Open the Track Setting Screen in the app.
• On the FIELD app screen, touch
. Then select VRH-8 and Ambisonics.
• On the MUSIC app screen, select WY or ZX. Then select
and Ambisonics.
• On the PODCAST app screen, touch
. Then select VRH-8 and Ambisonics.
2.
Tap each item to set it.
█
Format
This sets the le format used to record les.
Setting Explanation
FuMa Record as Ambisonic B FuMa format (4-channel).
AmbiX Record as Ambisonic B AmbiX format (4-channel).
Ambisonics A Record as Ambisonic A format (4-channel).
Stereo Record as an ordinary stereo (2-channel) le.
Binaural Record as a stereo (2-channel) le that has been converted to binaural.
NOTE
Binaural cannot be used when the recording format is 96k/16bit or 96k/24bit.
157

█
Mic position
Set the mic position used for recording. Whichever mic position is selected will record as though facing front.
Setting Explanation
Automatic When recording starts, the mic position will automatically be set to one of the four below.
Upright
Front
Upside Down Front
Endre Front
Endre Invert Front
NOTE
• If the Mic Position setting and the mic orientation during recording are not the same, recording les cannot be
made with the correct orientation and the front orientation will be off during playback.
• When the Mic Position setting is Auto, an animation will guide orientation of the mic so that it matches the
closest of the other four mic position settings.
• The Mic Position setting becomes xed when recording starts. The Mic Position setting will not change during
recording even if the mic orientation is changed.
HINT
To minimize reections, we recommend placing the VRH-8 as far from walls and the oor as possible when
recording.
158

█
Ambisonic Monitor
This sets the conversion format when outputting input signals from the PHONE OUT and LINE OUT jacks.
Setting Explanation
Stereo The input sound is converted to ordinary stereo for monitoring.
Binaural The input sound is converted to binaural for monitoring.
NOTE
Binaural cannot be used when the recording format is 96k/16bit or 96k/24bit.
159

Appendix
Troubleshooting
If you think that the H8 is operating strangely, check the following items rst.
Recording/playback trouble
█
There is no sound or output is very quiet
• Check the connections to the monitoring system and its volume setting.
• Conrm that the H8 volume is not too low. (
→
“Setting the headphone output level” on page 42)
█
Sound from connected equipment or inputs cannot be heard or is very quiet
• If you are using a mic capsule, conrm that it is oriented correctly.
• Check the input level setting. (
→
“Setting recording (input) levels” on page 26)
• If a CD player or other device is connected to an input jack, raise the output level of that device.
• Check the input signal monitoring settings. (
→
“Adjusting input signal monitoring balance using fader and pan
settings” on page 39)
• Check the phantom power and plug-in power settings. (
→
“Setting phantom power” on page 30, “Using
plug-in power” on page 28)
█
Recording is not possible
• Conrm that the track button indicators are lit red.
• Conrm that the SD card has open space. (
→
“Checking SD card information” on page 117)
• Conrm that an SD card is loaded properly in a card slot.
• If “Card Protected!” appears on the display, the SD card write-protection is enabled. Slide the lock switch on the
SD card to disable write-protection.
█
Recorded sound cannot be heard or is very quiet
• Conrm that the volume levels of the tracks are not too low. (
→
“Setting recording (input) levels” on page 26)
• Conrm that the track button indicators are lit green during playback.
160

Other trouble
█
Computer does not recognize it even though it is connected to a USB port
• Conrm that the operating system is compatible. (
→
zoomcorp.com)
• The operation mode must be set on the H8 to allow the computer to recognize the H8. (
→
“Using as an audio
interface” on page 112, “Using as a card reader” on page 122)
█
Battery operation time is short
Making the following settings could increase the battery operation time.
• Set the correct type of batteries being used. (
→
“Setting the battery type” on page 134)
• Turn unnecessary tracks off. (
→
“Enabling tracks for recording” on page 25)
• Set the phantom power voltage to 24 V. (
→
“Setting phantom power voltage” on page 32)
• Reduce the display brightness. (
→
“Setting the display brightness” on page 136)
• Set the display to dim when not used for some time. (
→
“Setting the display backlight” on page 137)
• Reduce the sampling rate used to record les. (
→
page 47, “Setting the recording format” on page 91)
• Due to their characteristics, using nickel metal hydride batteries (especially high-capacity ones) or lithium bat-
teries should enable longer use than alkaline batteries when power consumption is high.
161

Specications
Recording media Cards that support SD/SDHC/SDXC specications
XY mic (XYH-6) Mic type Directional
Sensitivity –41 dB, 1 kHz at 1 Pa
Input gain –∞ to 46.5 dB
Maximum sound pressure
input
136 dB SPL
MIC/LINE IN stereo mini
jack
Input gain: –∞ to 46.5 dB
Input impedance: 2 kΩ
Plug-in power: 2.5 V supported
Inputs MIC IN Backup input Set input gain –12 dB
INPUTS 1 – 4 Connectors XLR jack (pin 2 hot)
Input gain −30 – 55.5 dB (−20 dB with PAD)
Input impedance 2 kΩ or more
Maximum allowable input
level
+24.0 dBu (PAD ON)
Phantom power +24 V/+48 V (independent ON/OFF for INPUTS 1–4)
Equivalent input noise (EIN) –123.5 dBu or less (A-wt)
INPUTS A, B Connectors XLR/TRS combo jacks (XLR: 2 hot, TRS: TIP hot)
Input gain -30 to 55.5 dB
Input impedance 7 kΩ or higher (Hi-Z (TS) is 300 kΩ or higher)
Maximum allowable input
level
+4.0 dBu (Hi-Z (TS) is −2.0 dB)
Phantom power +24 V/+48 V (independent ON/OFF for INPUTS A and B)
Equivalent input noise (EIN) –123.5 dBu or less (A-wt)
Outputs Output jack LINE OUT (stereo mini jack) Rated output level: –10 dBu when output load impedance is 10 kΩ
or more
PHONE OUT (stereo mini
jack)
Maximum output level: 20 mW + 20 mW into 32 Ω load
Built-in speaker 400 mW/8 Ω mono speaker
Recording
formats
FIELD WAV setting
Supported formats 44.1/48/96 kHz, 16/24-bit, mono/stereo, BWF format
Maximum simultaneous
recording tracks
12 tracks (MIC IN, backup recording, 1-4, A, B, and LR)
MP3 setting
Supported formats 128, 192, 320 kbps
Maximum simultaneous
recording tracks
2 tracks
MUSIC WAV setting
Supported formats 44.1/48 kHz, 16/24-bit, mono/stereo, BWF format
Maximum simultaneous
recording tracks
8 tracks (MIC IN, 1-4, A, B)
PODCAST WAV setting
Supported formats 44.1/48 kHz, 16/24-bit, mono/stereo, BWF format
Maximum simultaneous
recording tracks
10 tracks (MIC IN, backup recording, 1, 2, A, B, and LR)
MP3 setting
Supported formats 128, 192, 320 kbps
Maximum simultaneous
recording tracks
2 tracks
Recording time With 32GB card
50:08:00 (44.1 kHz/16-bit WAV)
555:28:00 (128 kbps MP3)
162

Tuner Chromatic/Guitar/Bass/Open A/Open D/Open E/Open G/DADGAD
Display 2.4" (320×240) full-color touchscreen LCD
USB USB Micro-B
Mass storage class operation
USB2.0 High Speed
Guitar Lab connection function
USB1.1 Full Speed
Audio interface operation: multi track mode
(Note: Use with Windows requires a driver, but Macintosh does not)
USB2.0 High Speed
12in/2out, 44.1/48/96 kHz, 16/24-bit
Audio interface operation: stereo mode
USB2.0 Full Speed
2in/2out, 44.1/48 kHz, 24-bit
Note: Use as an iPad audio interface supported (stereo mode only)
Note: Use a USB cable that supports data transfer. USB bus power is supported.
REMOTE ZOOM BTA-1 or other dedicated wireless adapter
Estimated continuous operation time
using batteries (hours: minutes)
Using alkaline batteries
Using XY mic, 44.1 kHz/24-bit (stereo × 1): about 10:00
• The above values are approximate.
• Continuous battery operation times were determined using in-house testing methods.
They will vary greatly according to use conditions.
Power • 4 AA batteries (alkaline, NiMH or lithium)
• AC adapter (ZOOM AD-17): DC 5 V/1 A
• USB bus power
External dimensions
H8
: 116.4 mm (W) × 163.3 mm (D) × 48.6 mm (H)
XYH-6: 78.9 mm (W) × 60.2 mm (D) × 45.2 mm (H)
Weight
H8
: 354 g
XYH-6: 130 g
163

